Cambium / cnMaestro
Introduction
The Cambium Networks cnMaestro is a comprehensive, cloud-first network management system designed for Cambium's wired and wireless portfolio. It acts as a centralized controller, simplifying the deployment, monitoring, and troubleshooting of Cambium devices across various network types. The rXg provides a native API-based connector to the cnMaestro, though requiring the following features to available within the cnMaestro controller configuration
cnMaestro X Account: The API Client feature is generally available in cnMaestro X (the advanced version). If you are using cnMaestro Essentials, you need to upgrade to gain access to the API configuration scaffold.
Super Admin Privileges: You must have a Super Admin account in cnMaestro to access and configure API clients.
Access: API communication occurs over HTTPS. Ensure your client application can properly validate SSL/TLS certificates for your cnMaestro instance (whether cloud-hosted or on-premises).
The cnMaestro controller configuration process is outlined in the following sections.
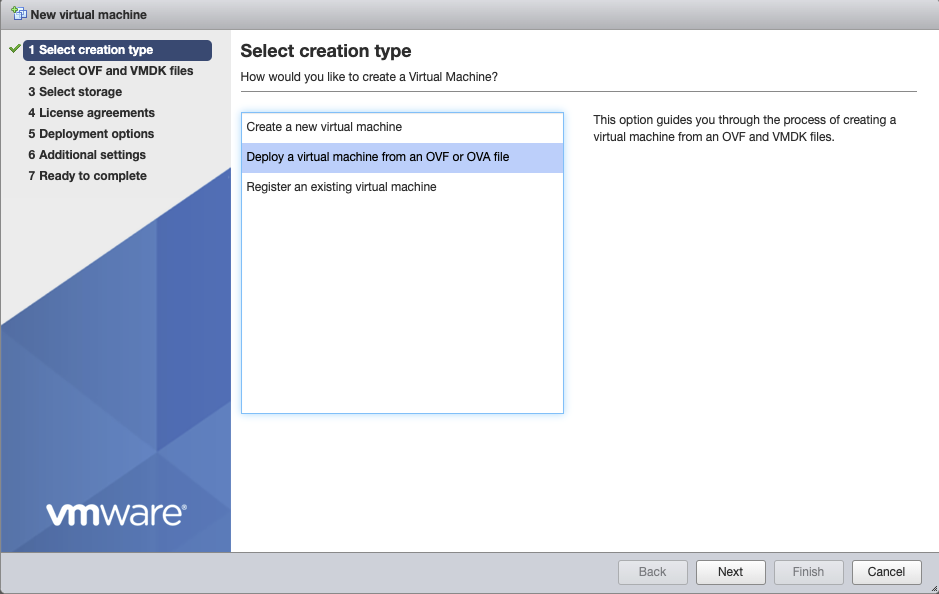
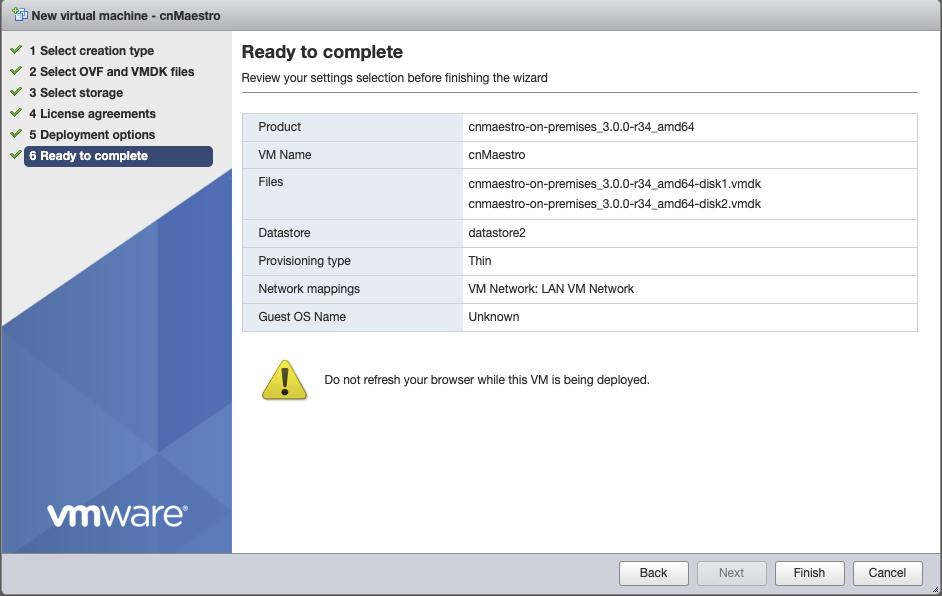
Deploy cnMaestro On-Premises in VMware
Navigate to ESXI host and create new virtual machine, select "Deply a virtual machine from an OVF or OVA file".
Give the vm a name, click on "Click to select files or drag/drop" and select the ova file, click next.

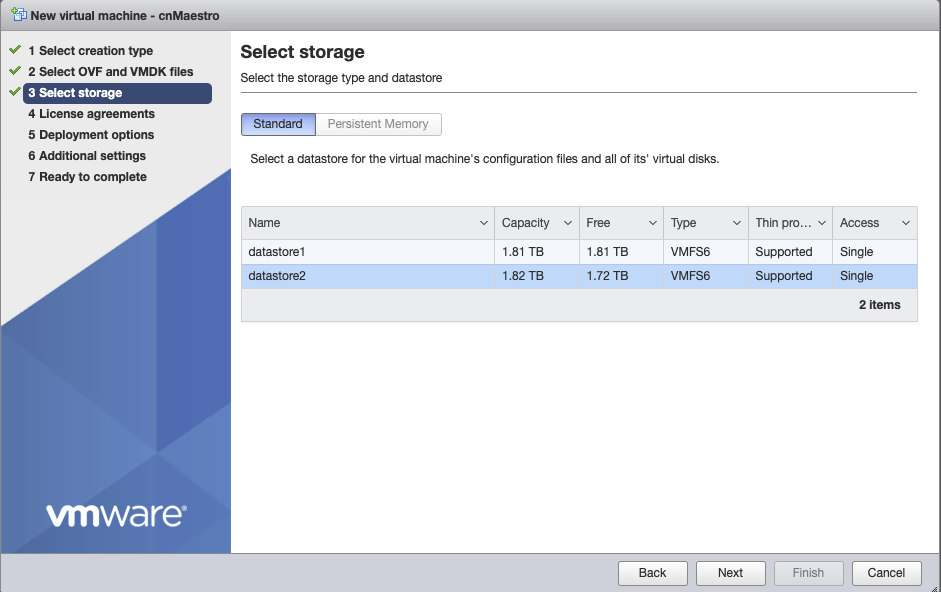
Select the storage where VM will be created, click next.
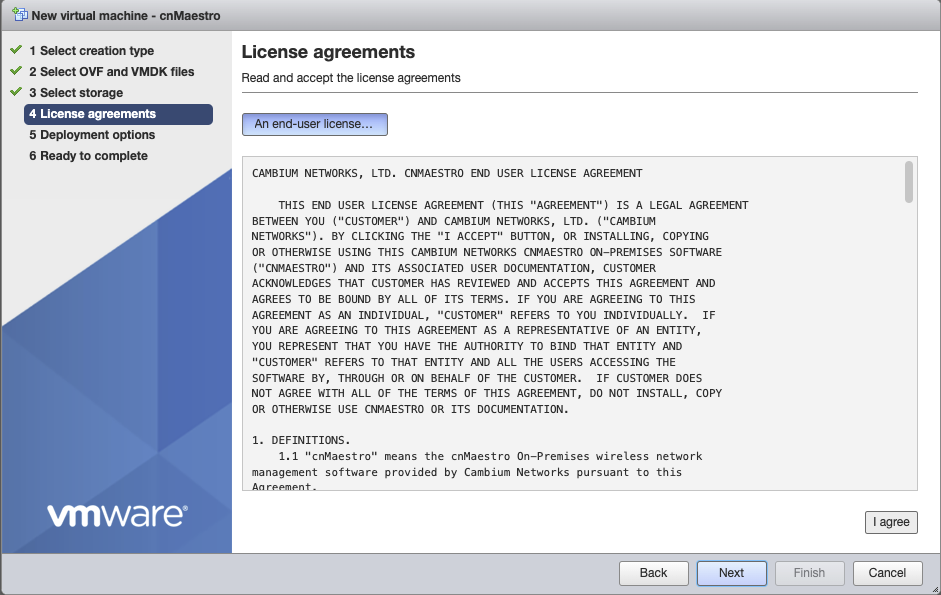
Agree to the License Agreements by clicking 'I Agree', and then click next.
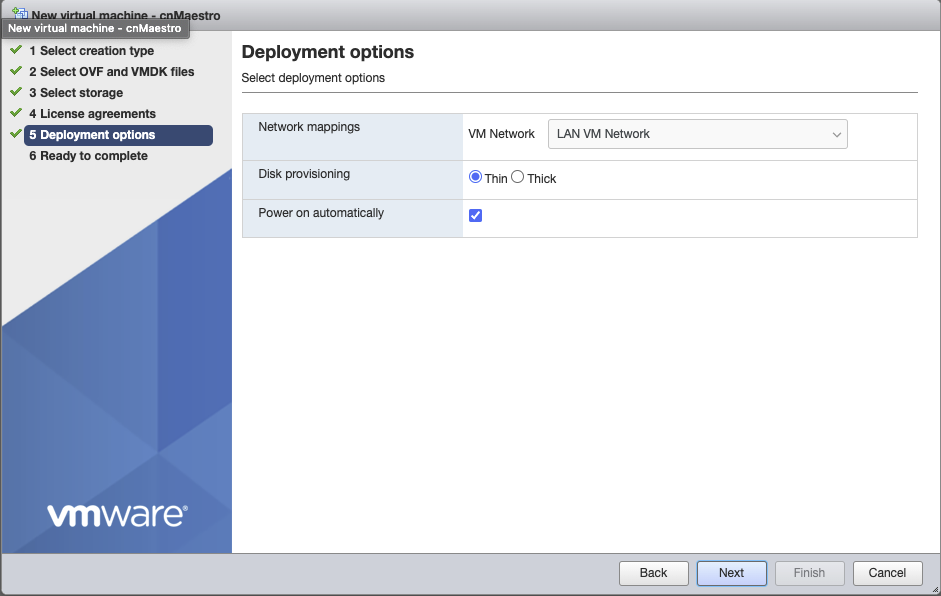
Select the appropriate Network mapping for your network, should be connect to the LAN of the rXg. Verify settings, click next.
Click Finish, and wait for the VM to be deployed.

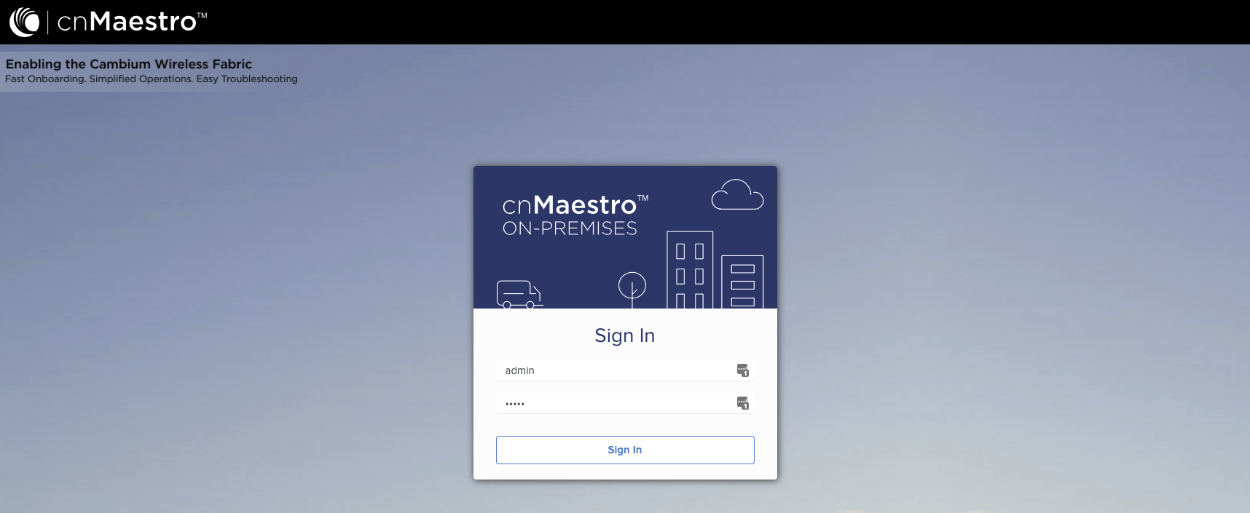
Configure cnMaestro
For On-Premises navigate to IP address of cnMaestro VM and login with admin/admin.
Set Country and Time Zone.

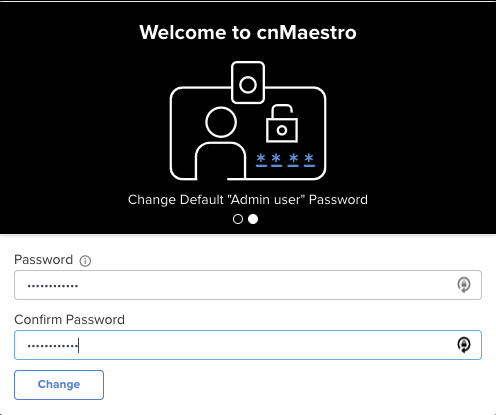
Change the Default "Admin user" Password, and re-authenticate.
API client ID and client secret
Steps to Generate API Credentials (Client ID and Client Secret), required to connect the rXg to the cnMaestro controller:
Log in to cnMaestro:
- Access your cnMaestro web interface (e.g., cloud.cambiumnetworks.com for cloud instances, or your specific URL for on-premises deployments).
- Authenticate with your Super Admin credentials.
Navigate to the API Client Section:
- In the cnMaestro web interface, locate and click on "Network Services".
- Within that section, find and select "API Client".

Add a New API Client:
- On the API Client page, click the button to "Add API client".

Provide Client Details:
- You will be prompted to enter information for your new API client. This typically includes:
- Application Name: A descriptive name for your API client (e.g., "My_Automation_Script," "Inventory_Sync_Tool").
- Description: An optional, brief explanation of the client's purpose.
- Expiration Time (Optional): Some cnMaestro versions allow you to set a validity period for the access tokens generated by this client (e.g., 3600 seconds for 1 hour, which is often the default).

Save the Configuration:
- After entering the required details, click "Save".
Retrieve Client ID and Client Secret:
- Upon successful saving, cnMaestro will generate credentials but not display the client secret. Proceed to download the credentials and store them in a safe location.
- If you lose the client_secret, you will typically need to revoke the existing API client and create a new one.

An example of access credentials created for the purpose of this tutorial is shown below.
{
  "application_name": "Test",
  "application_description": "Test",
  "client_id": "OBB8Xiq7RPo3cNpd",
  "client_secret": "JmraMgSQ0hp8N3irU5DTBhAQ2J2Yke"
}
Enable SNMP (On-Premises only)
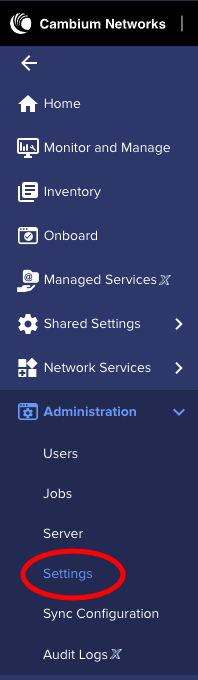
Note: This step should be skipped if not using On-Premises. First navigate to Administration.
Expand Optional Features and check the Enable SNMP box, click save.
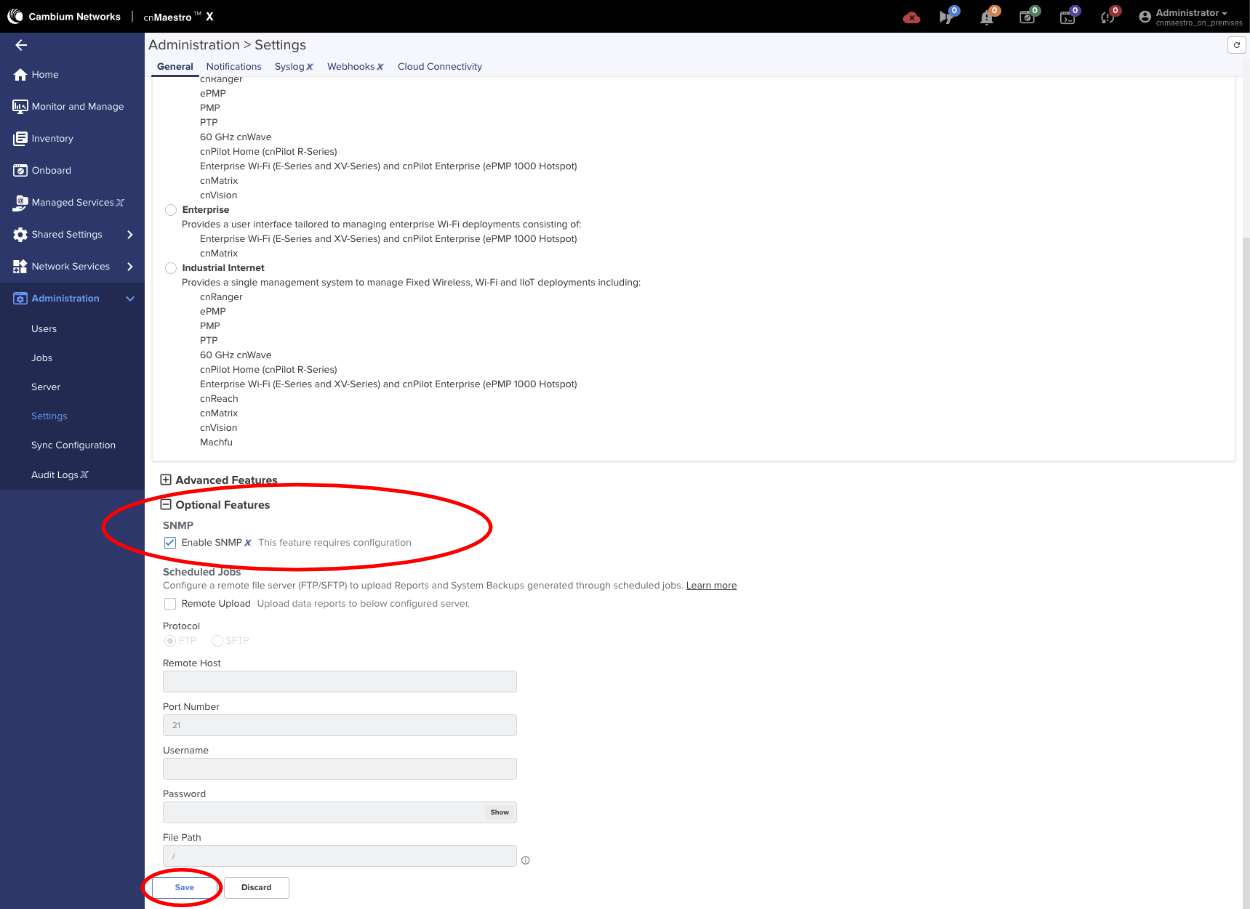
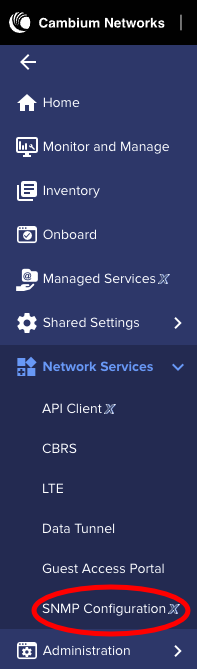
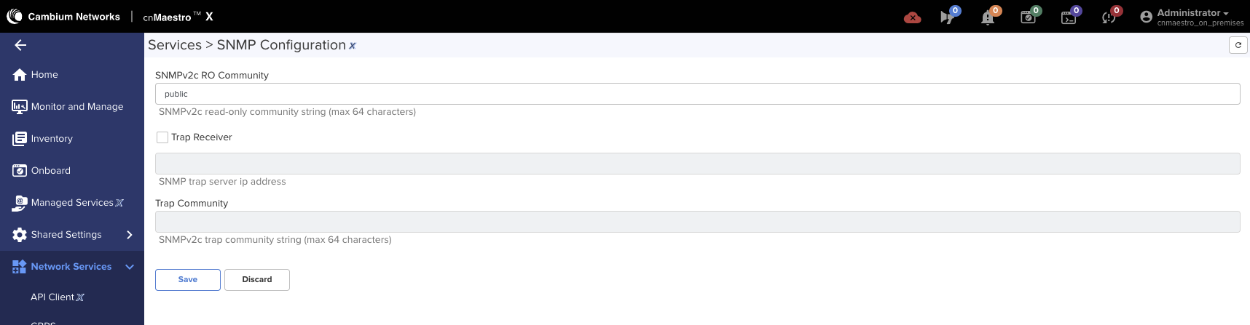
Set SNMPv2c RO Community name, by navigating to Network Services => SNMP Configuration.
Set the SNMPv2c RO Community string and click save.
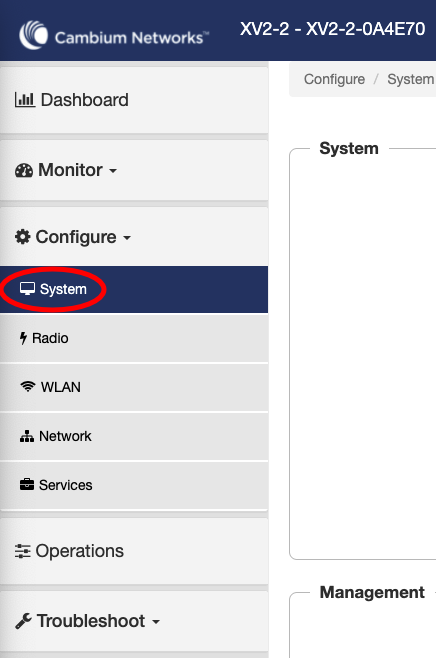
Point WAP to the controller
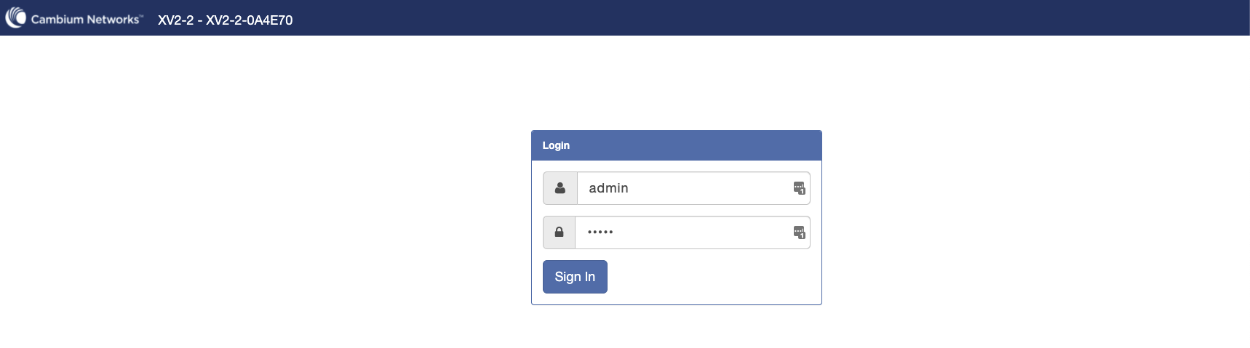
Access the WAP via its IP address and login using admin/admin.
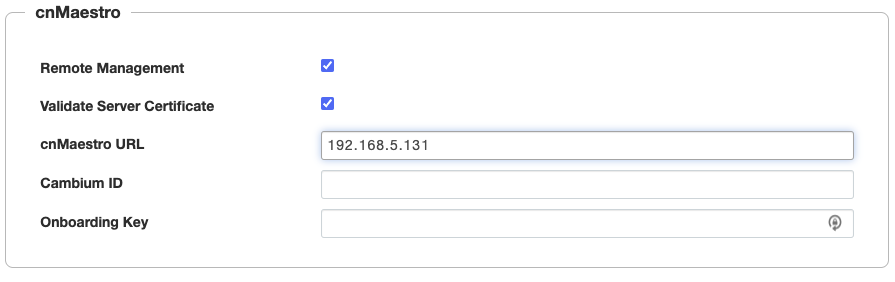
Select System from the menu and look for cnMaestro under Management. Enter the URL or IP address of the cnMaestro in the cnMaestro URL. Click Save.
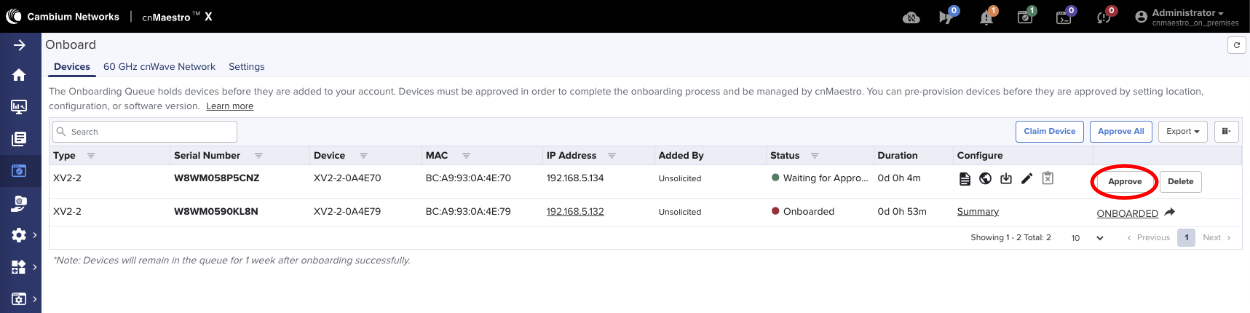
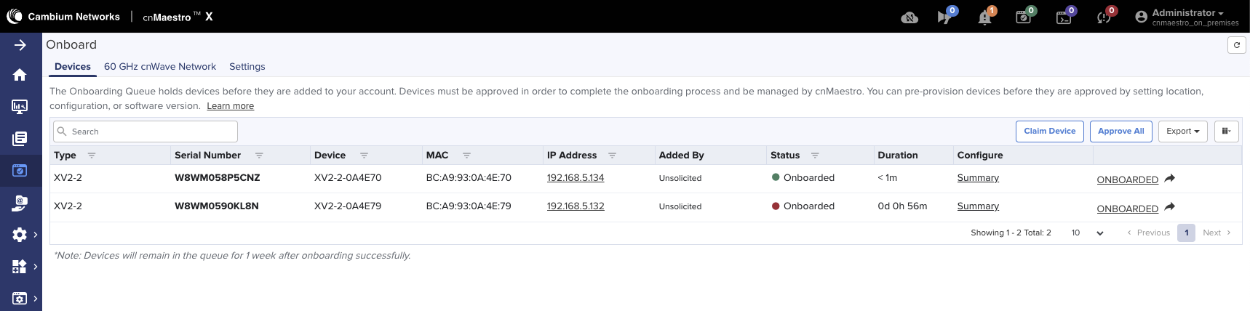
Next we need to claim the WAP, navigate to the cnMaestro Dashboard and click onboarding under Devices.

Approve the WAP by clicking the Approve button.
Next add the WAP to a Wi-Fi WAP Group. Click on Monitor and Manage and find the WAP under Networks, click on the 3 dots next to the WAP and select edit.
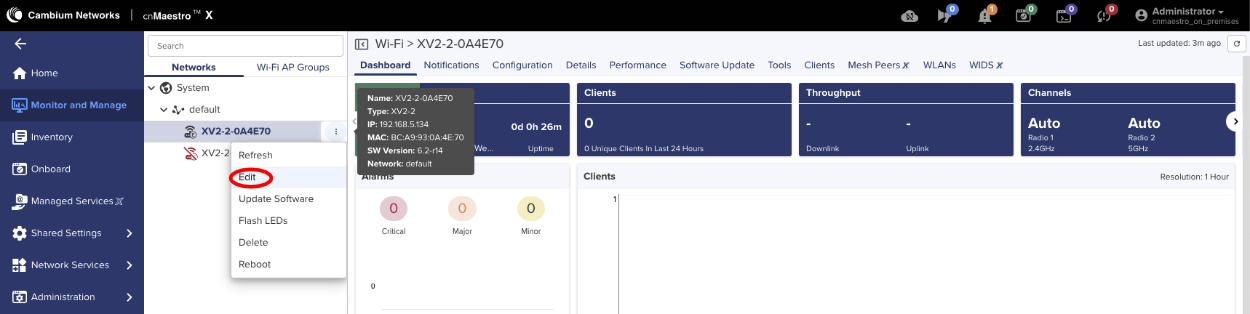
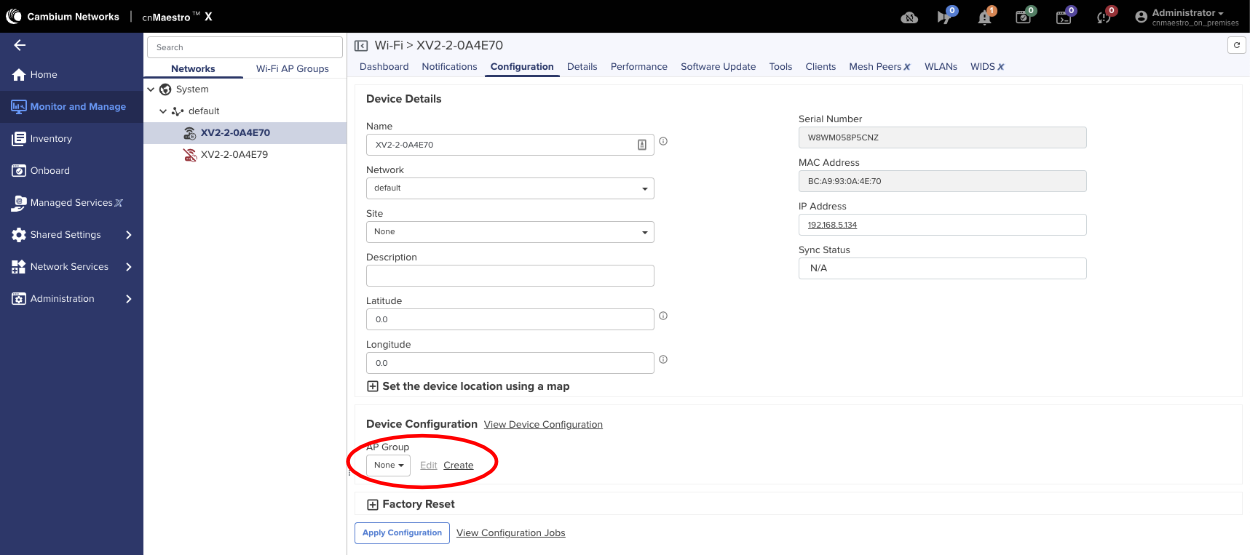
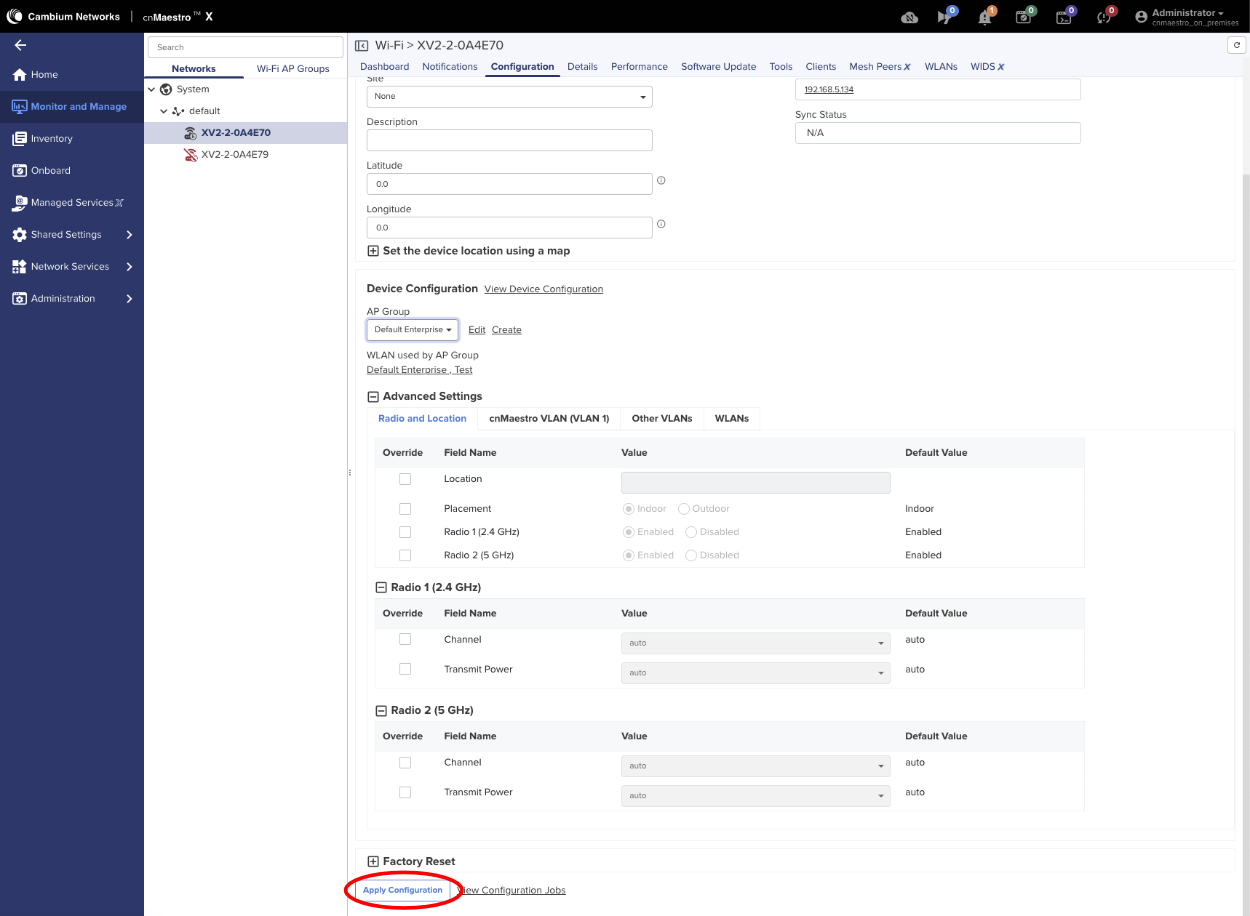
Under Device Configuration, change WAP group to Default Enterprise and Apply Configuration.
WLAN configuration
To create a new WLAN in cnMaestro, navigate to the Configuration > Wi-Fi Profiles section, then click the "Add New" button in the "WLANs" section.

You will need to input a name for the new WAP group and configure its settings, including the device type, country, and any associated WLANs.
- Access the WLANs page: In cnMaestro, navigate to the Configuration section and then to the "Wi-Fi Profiles" section.

Start the WLAN creation: Click the "Add New" button to create a new WLAN, and configure the following basic settings. Note that some of the properties, such as Description, are optional. All mandatory fields are marked with an asterisk (*).
- Type: Select the appropriate WLAN type (e.g., Enterprise Wi-Fi for Cambium WAPs).
- Name: Enter a descriptive name for your WAP group (e.g., "Office WAPs"). The Name may match the SSID.
- Scope: Select one of the available of the existing scopes (sometimes referred to as 'zones')
- SSID: The SSID of this WLAN (up to 32 characters).
- VLAN: Default VLAN assigned to clients on this WLAN (1-4094)
- Security: Set authentication and encryption type. When a non-open SSID is configured, a new Passphrase field is presented.
- Passphrase: Pre-shared security passphrase or key (must contain 8 to 63 ASCII or 64 Hexadecimal digits). Applicable to WPA2/WPA3 Security types.

- The remaining parameters may remain in their default state, e.g., the radio types (2.4 GHz, 5 GHz, 6 GHz) on which this WLAN should be supported, client isolation, roaming, etc. The advanced options are typically not configured in the majority of the deplyments.

The resulting view of a number of WLANs in the system is shown below

WAP Group configuration
To create a new WAP group in cnMaestro, navigate to the Configuration > Wi-Fi Profiles section, then click the "Add New" button in the "AP Groups" section.

You will need to input a name for the new WAP group and configure its settings, including the device type, country, and any associated WLANs.
- Access the AP Groups page: In cnMaestro, navigate to the Configuration section and then to the "Wi-Fi Profiles" section.
Start the WAP Group creation: Click the "Add New" button to create a new WAP group, and configure the following basic settings. Note that some of the properties, such as Location, Contact, Description, are optional. All mandatory fields are marked with an asterisk (*).
- Type: Select the appropriate device type (e.g., Enterprise Wi-Fi for Cambium WAPs).
- Name: Enter a descriptive name for your WAP group (e.g., "Office WAPs").
- Scope: Select one of the available of the existing scopes (sometimes referred to as 'zones')
- Auto Sync: Enable this option to automatically push configuration changes to WAPs within the group. This option is selected by default.
- Country: Select the country where the WAPs are located.
- Placement: Specify whether the WAPs are indoors or outdoors. Indoor placement is the default.

- WLANs: Add the WLANs you want to be broadcast by the WAPs in this group. An existing WLAN can be added using the 'Add VLAN' button, or a new one can be created using the 'Create WLAN' button.

Switch over to the "Management" section of the dialog and fill in the following mandatory information. The remaining configuration elements are optional and do not need to be filled in.
Admin Password: Configure password for authentication of GUI and CLI sessions (max 32 characters)
Time Zone: Select the time zone for the given WAP Group

- Save the configuration: Once you've configured the basic settings, save the new WAP group.
The resulting view of a number of Wi-Fi Profiles in the system is shown below

rXg-side Configuration Elements
All operations are performed in the 'Network::Wireless' scaffold, and specific sub-scaffolds.
Navigate to Network::Wireless.

Create a new WLAN Controller.

Create a new wireless controller using the 'Create New' button in the 'WLAN Controllers' scaffold and fill in the following information:
Name: field is an arbitrary string descriptor used only for administrative identification. Choose a name that reflects the purpose of the record. This field has no bearing on the configuration or settings determined by this scaffold.
Type: select the 'Cambium cnMaestro' controller type
Host: select the host portion of the URL used to access the cnMaestro controller, e.g., 'us-e1-s21-g2ynoku0yo.cloud.cambiumnetworks.com'. It is recommended to use the gateway address, rather than the explicit IP address, in case the public IP address changes over time.
Username: copy the 'client_id' value from the API access credentials created in the cnMaestro
New Password: copy the 'client_secret' value from the API access credentials created in the cnMaestro

- Managed Account / Network values are populated from the cnMaestro scaffold, whereby the first value shown below is the Managed Account, and the second one - the Network. These values will depend on your particular cnMaestro configuration, and organization of your accounts and networks.

NOTE: If you are using the Cambium Cloud, the Host field will be cloud.cambiumnetworks.com. The username and password fields are the same as a local instance documented above.
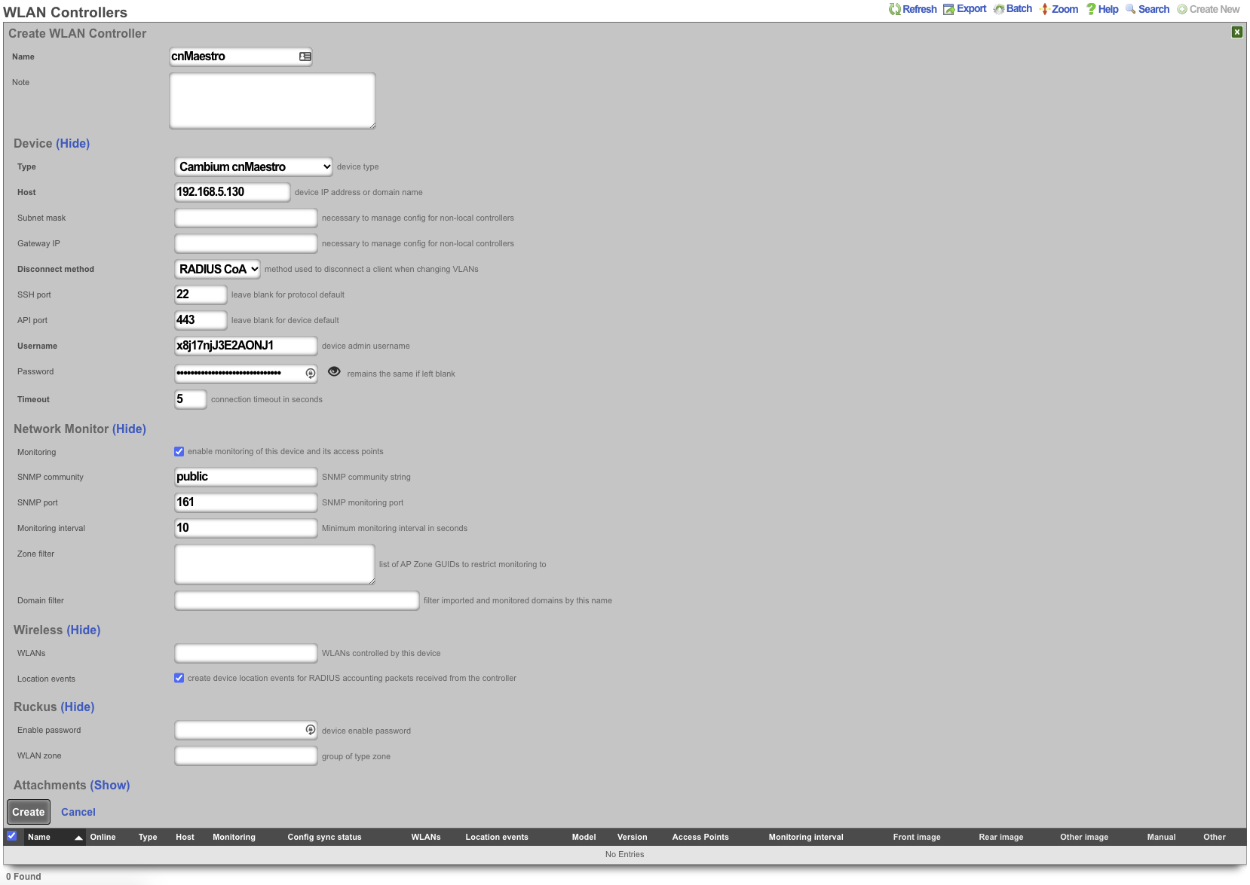
- Click the 'Create' button to complete the process.

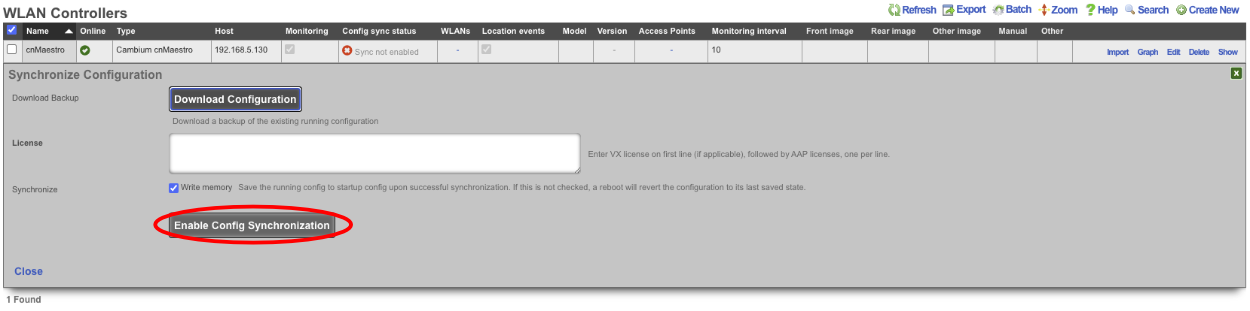
Once created, a new entry in the 'WLAN Controllers' is created, as shown below.

After a few seconds the Controller will appear online. Click on Sync not enabled.

Click on 'Enable Config Synchronization'.
The Controller is now managed by the rXg.
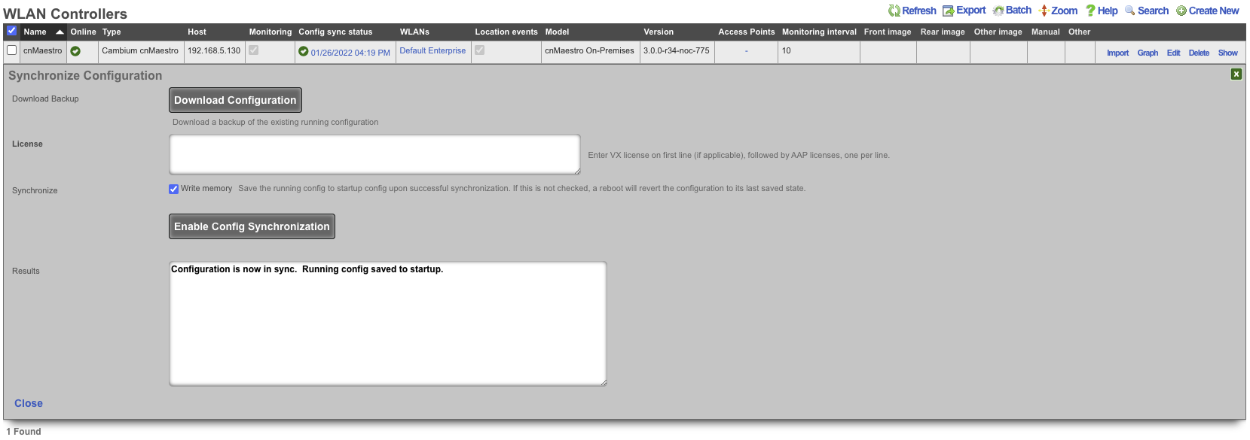
The setup process and API exchange between the rXg and the cnMaestro can take several minutes, depending on the complexity of the network structure created in the cnMaestro controller. Once the controller comes online, use the 'Import' button to import WAPs, associated WLANs, and zone configuration. The example below shows the following sceffolds with elements imported from cnMaestro: 'WLANs', 'Access Point Profiles', 'Access Point Zones', and 'Access Points'.


