Certificates
The Certificates view enables the operator to manipulate the cryptographic keys that are used in conjunction with rXg services that employ public key cryptography.
Cryptography in the form of transport layer security via SSL and IPsec protocols is present in several rXg services to ensure the privacy and integrity of the data being transferred. The RADIUS server, IPsec VPN concatenator, and of course, the web multiplexer that serves the captive portal and administrative console all require asymmetric cryptographic keypairs. The creation, import, and export of keypairs is accomplished by manipulating the Certificates scaffold.
The rXg web multiplexer and RADIUS server employ transport layer security (TLS) in the form of the SSL protocol. The VPN concatenator conforms to the IPsec protocol. Both TLS and the IPsec protocol suites incorporate signed certificates as part of their trust mechanisms. The Certificate Signing Requests scaffold enables the operator to generate trusted third-party certification requests. A trusted third-party signature is required for the certificate used by the web multiplexer to serve a captive portal in a production environment.
Third-party Signatures
Operation of an rXg served captive portal requires at least one administrator to have working knowledge of public-key cryptography and TLS/SSL. In particular, an administrator must be familiar with the process of obtaining a signed SSL certificate. This process must be repeated periodically since signed SSL certificates have a limited life time.
There are many references available on the Internet that provide detailed information about howpublic-key cryptographyworks as well as specific information about thetransport layer security protocol. Practical Cryptography (ISBN 0471223573) by Niels Ferguson and Bruce Schneier provides an excellent overview of this subject. Network Security with OpenSSL (ISBN 059600270X) provides detailed step-by-step instructions on the process of generating certificate signing requests as well as obtaining and installing third-party signed certificates.
To obtain and install a signed SSL certificate for an rXg:
- Choose a domain name for the rXg.
- Configure your DNS server to resolve the chosen domain to the WAN address of the rXg.
- Set the domain name in the Device Options scaffold.
- Click on the create new action on the Certificate scaffold. A drop-down dialog will appear.
- Enter a name for the new key chain. A good choice for the name of the new key chain is the domain name that you have chosen.
- Leave all other fields blank (except note if you have a note). The rXg will automatically generate a private key.
- Click the create button.
- Click on the create new action on the Certificate Signing Requests scaffold. A drop-down dialog will appear.
- Give the new CSR a name.
- Choose the certificate key chain that was created in the previous step.
- Completely fill out the form.
- Choose the appropriate option to generate a CSR for a trusted third-party to sign. Do not use the self-sign or local CA options as this will automatically create a certificate that is not automatically trusted by most browsers.
- Click the create button.
- A CSR will now be shown in the Certificate Signing Requests scaffold. Send the CSR to a trusted third-party signer to obtain a signed certificate to load into the rXg.
- Copy the CSR out of the list or show view of the certificate signing requests field into the clipboard.
- Contact a trusted third-party SSL certificate signer such asGo Daddy.
Paste the CSR from the clipboard into the appropriate form along with payment.
- If the signer gives a choice of formats, choose X509 PEM, Apache, mod_ssl, or OpenSSL, as the rXg SSL web multiplexer is compatible with all of the above formats.
- Contact your domain administrator to authorize certificate issuance by clicking on a URL in an email sent by the third-party signer.
- Open the signed certificate and intermediate certificate(s) using a text editor such as WordPad, TextEdit.app, or vi.
- Edit the key chain record in the Certificates scaffold. Copy and paste the certificates into the appropriate fields in the record.
- Enable the key chain by setting on the check box next to the active field and clicking the update button.
- Wait for the web server to restart. When the web server comes back up it will be using the signed certificate.
Local CA Signatures
The Certificate Signing Requests scaffold also enables the operator to sign certificates using the rXg integrated certificate authority. This feature is typically used in conjunction with the IPsec concatenator to issue client certificates for IPsec host-to-site connectivity with the rXg. The rXg integrated certificate authority may also be employed as a powerful revenue generation tool. Operators with wireless distribution and access networks that have open connectivity at locations with high transient traffic are particularly suited to using the integrated rXg local certificate authority as a revenue generation mechanism.
In a typical usage scenario, one or more usage plans are created with misc. items specifying an additional charge for a secure connection. The captive portal is then configured to create a new certificate linked to a local certificate authority when these plans are purchased. In addition, the portal creates a new certificate signing request that is set to automatically sign chain with the local certificate authority. The portal would then present the certificate for the local CA, as well as the private key and signed certificate from the newly created certificate. Thus, an operator can generate significant additional revenue without any intervention once the configuration of the rXg and portal is established.
To setup a local certificate authority and begin signing certificates , use the following procedure:
- Click on the create new action on the Certificate Authorities scaffold. A drop-down dialog will appear.
- Give the new CA a name. Use a name that reflects the purpose of the CA, for example "CA for VPN."
- Fill out the C, ST, L, O, OU, CN, and email fields appropriately. The information listed here should reflect your actual organization. The information in the fields is meant to allow the recipient of the certificate a method to contact the owner and confirm validity of the key.
- Click the create button. You now have a local CA that may be used to sign certificates.
- Click on the create new action on the Certificate Key Chains scaffold. A drop-down dialog will appear.
- Enter a name for the new key chain. A good choice for the name of the new key chain is the name of the device for which it will be issued (e.g., "VPN srv CKC", "VPN client CKC 1", etc.)
- Select the CA that we just created in the previous step, which is "CA for VPN" if you followed our example.
- The rXg automatically populates the server field.
- Leave the intermediate and certificate fields blank.
- Click the create button.
- Repeat the steps above. At least two key chains (one for the rXg and one for the client) are needed to support most applications such as the IPsec VPN.
- Click on the create new action on the Certificate Signing Requests scaffold. A drop-down dialog will appear.
- Give the new CSR a name.
- Choose from one of the certificate key chains that were created in the previous step ("VPN src CKC" and "VPN client CKC 1" if you followed our example).
- Completely fill out the form.
- Choose the appropriate option to generate a CSR and sign with linked local Certificate Authority. The CA that was generated in the first step and linked in the second step will be used to sign the certificate.
- Click the create button.
- Repeat the steps above. At least two key chains (one for the rXg and one for the client) are needed to support most applications such as the IPsec VPN.
- Export all of certificates that we have just created along with the private key for the client so that they may be loaded into the client software. Specifically, you need to copy and paste the following items into files that must be copied onto the client:
- The certificate field from "CA for VPN"
- The certificate field from "VPN src CKC"
- The certificate field from "VPN client CKC 1"
- The server field from "VPN client CKC 1"
The procedure for installation of certificates and private keys onto the client device is highly dependent upon the client device software. The vast majority of client software will have a certificate manager with specific keystores for CA certificates, regular certificates and private keys. For example:
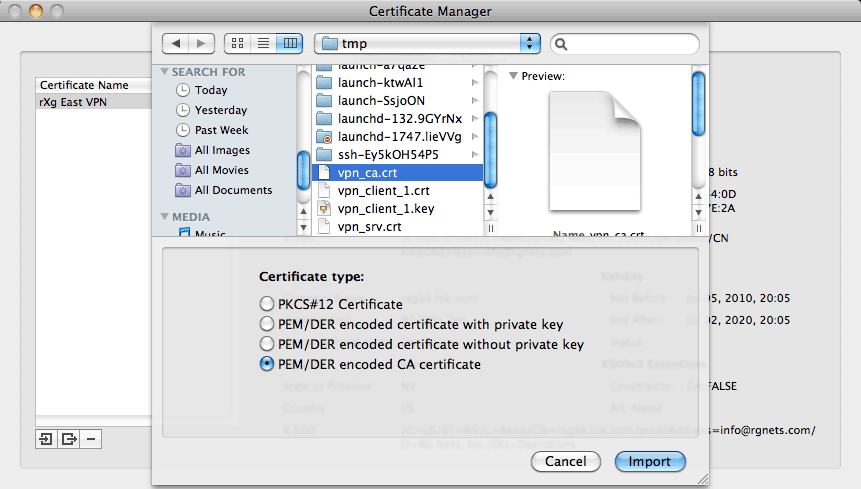
In the client software shown above, the operator must combine the contents of the certificate and server fields from "VPN client CKC 1" into a single file before importing with the "PEM/DER encoded certificate with private key" option. This may be accomplished by copying and pasting both sets of data into a text editor and saving the file. The "VPN srv CKC" certificate must be imported using the "PEM/DER encoded certificate without private key" option. The "VPN CA" certificate must be imported with the "PEM/DER encoded CA certificate" option.
The rXg integrated certificate authority may be used to support an unlimited number of clients. The same procedure as described above (omitting step #1) is used to create certificates and keys for additional clients. Once the certificate authority is set up, automating the creation of certificates for clients is very easy. For example:
ca = CertificateAuthority.find_by_name('VPN CA')

ckc = SslKeyChain.new
ckc.certificate_authority = ca
cc.save!

csr = CertificateSigningRequests.new
csr.SslKeyChain = ckc
csr.country = 'US'
csr.state = 'NV'
csr.locale = 'Reno'
csr.organization_name = 'RG Nets'
csr.common_name = 'vpn.rgnets.com'
csr.email_address = '[email protected]'
csr.sign_mode = 'ca'
csr.save!
If the code above were to be included in a customized portal, the country, state, locale, organization, etc., should be changed to reflect the operator. The certificates that the end-user would need to install may be presented in a portal view using the Ruby code shown below: Server Certificate <%= SslKeyChain.find_by_name('VPN srv CKC').certificate %> CA Certificate <%= ca.certificate %> Client Certificate <%= ckc.certificate %> Client Private Key <%= ckc.server_key %> Integrating and fully automating the generation of client certificates is a simple way to provide an IPsec VPN premium service offering. The IPsec VPN offering may be marketed as a wireless security mechanism, a remote access mechanism, or both at the same time. See the IPsec documentation for more details. 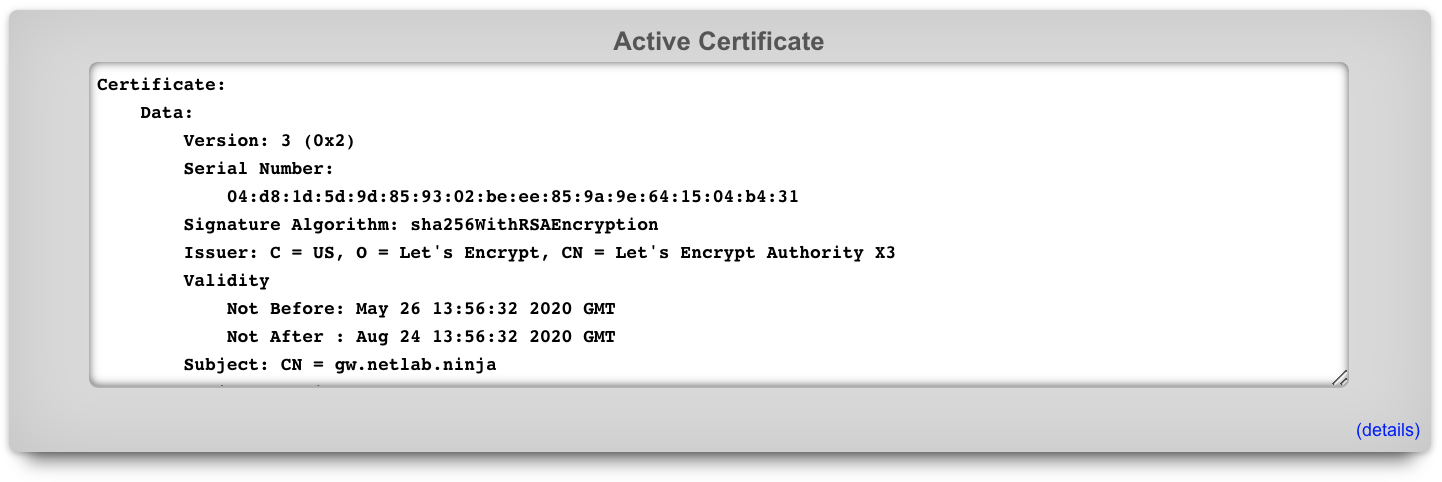
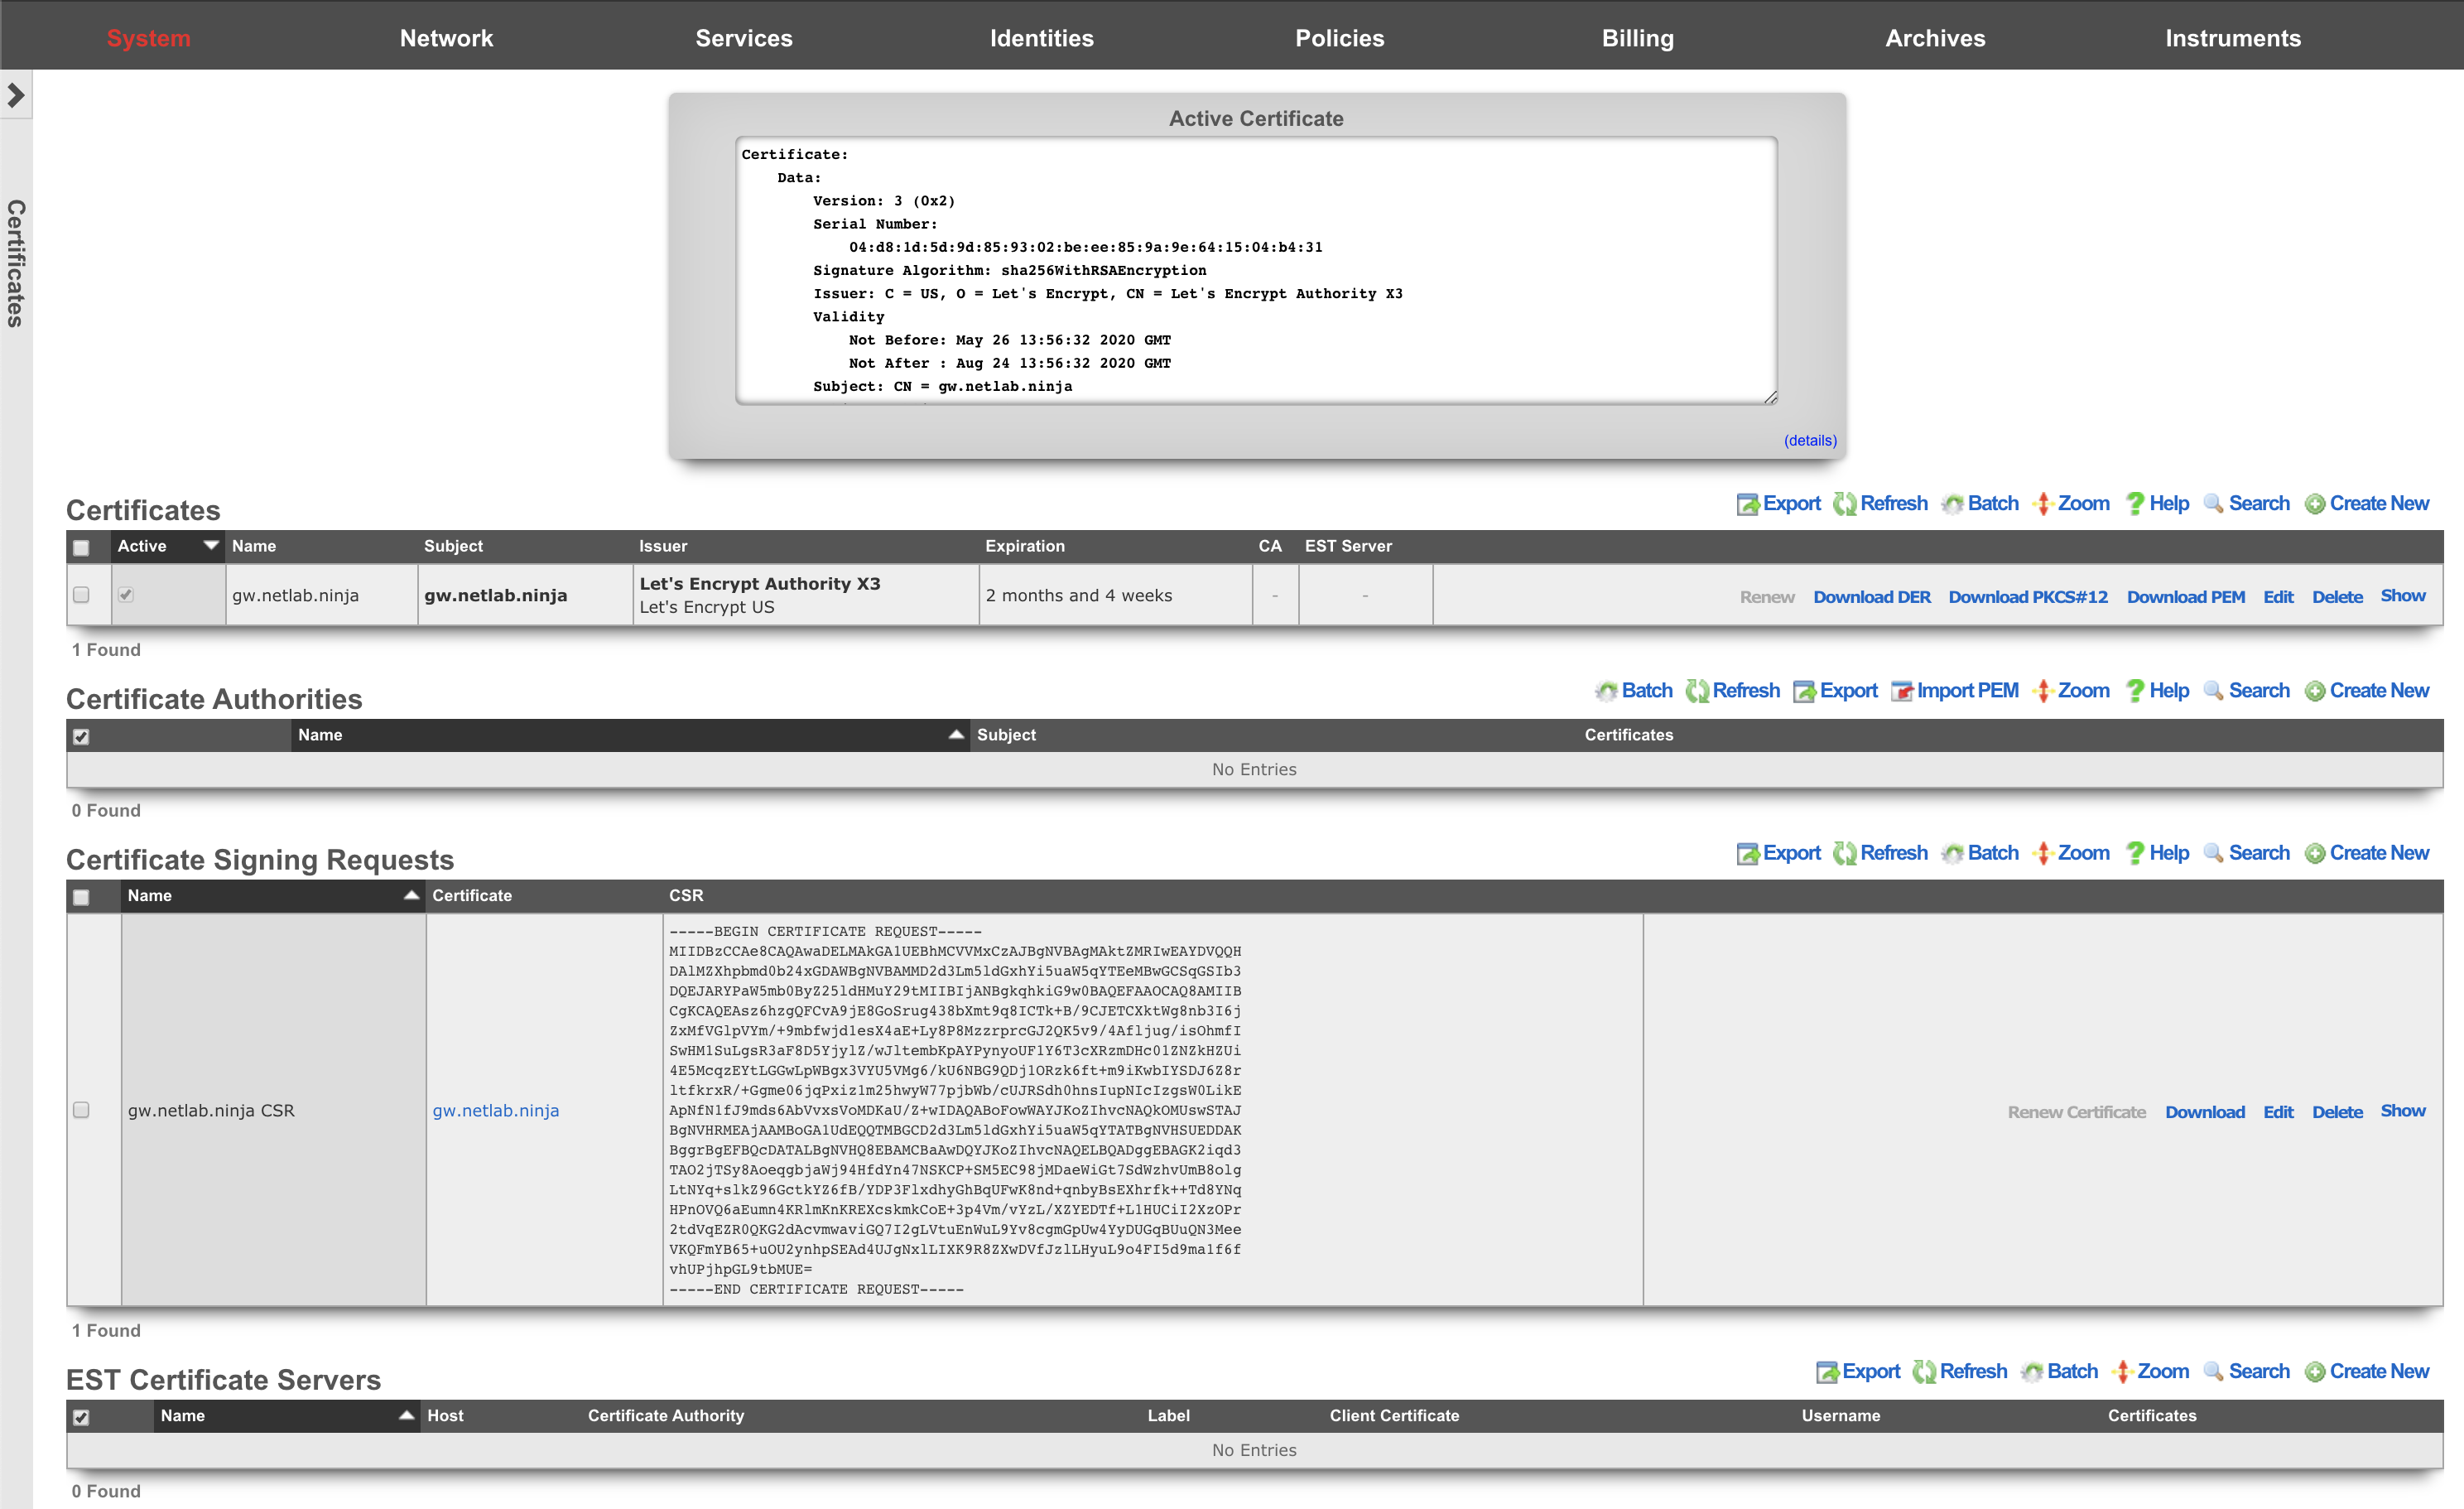
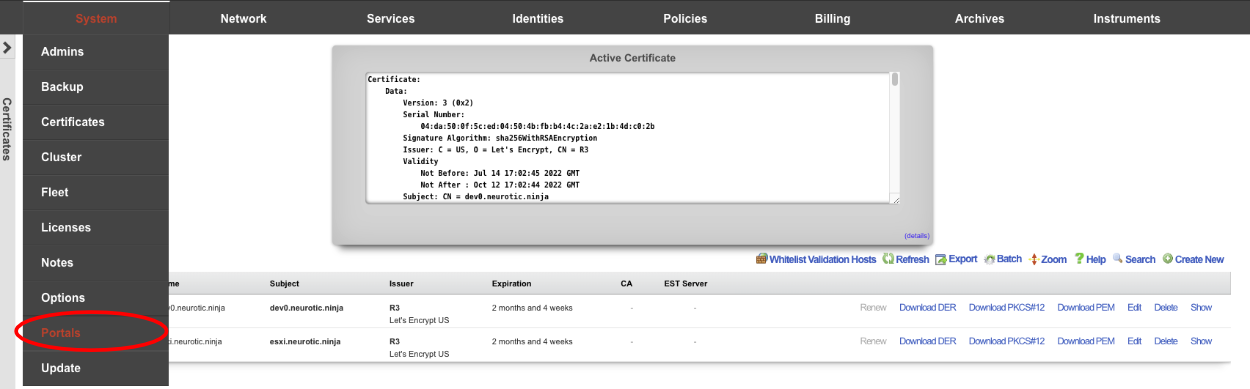
Active Certificate
The Active Certificate dialog at the top of the Certificate view presents a scrollable view port that contains the certificate currently in use. The details of the certificate are presented in text format. The certificate itself, in PEM format, can be found by scrolling to the bottom of the view port.

Certificates
The Certificate Key Chains scaffold enables the operator to manage the public and private keys used to ensure privacy and integrity of communication between the administrator and the operator.
The active field enables an option set. Exactly one option set may be active at any time. Enabling a particular option set will automatically disable another existing active option set.
If no keychain is set active, the rXg uses a self-signed keychain for bootstrap purposes. The bootstrap keychain is completely unsuitable for production environments. The captive portal will behave erratically when used with the self-signed bootstrap keychain. Replace the bootstrap keychain with one that has a certificate signed by a reputable trusted third-party signer immediately.
The name field is an arbitrary string descriptor used only for administrative identification. Choose a name that reflects the purpose of the record. This field has no bearing on the configuration or settings determined by this scaffold.
The server key algorithm dictates what algorithm is used for the private key of the certificate. When creating a certificate for the purpose of OpenRoaming RadSec, the key algorithm must be secp384r1
The certificate authority field associates this record with a local certificate authority. This field is optional and should be left blank if a trusted third-party will be used to sign this certificate. When this field is set, the linked certificate authority will be used to sign the certificate chain if a certificate signing request is created with a request for a local signature.
The server field contains the private key part of the keychain. In most cases a new keychain is created when the operator expects the rXg to generate the key. In this case, please leave this field blank when creating a new keychain to have the rXg automatically generate a private key. When installing a chain that was generated and/or signed elsewhere, this field must be populated with the server private key in PEM format.
The intermediate field contains the certificate(s) issued to the trusted third-party signer by a trusted root certificate authority. In most cases, this field must be populated with an intermediate certificate that can be downloaded from the website of the trusted third-party signer.
The certificate field contains the certificate issued to the domain administrator by the trusted third-party signer. This field must be populated with a signed certificate before the certificate chain may be made active. If the operator generates a CSR with a local certificate authority signature, this field will be populated with the signed certificate automatically.
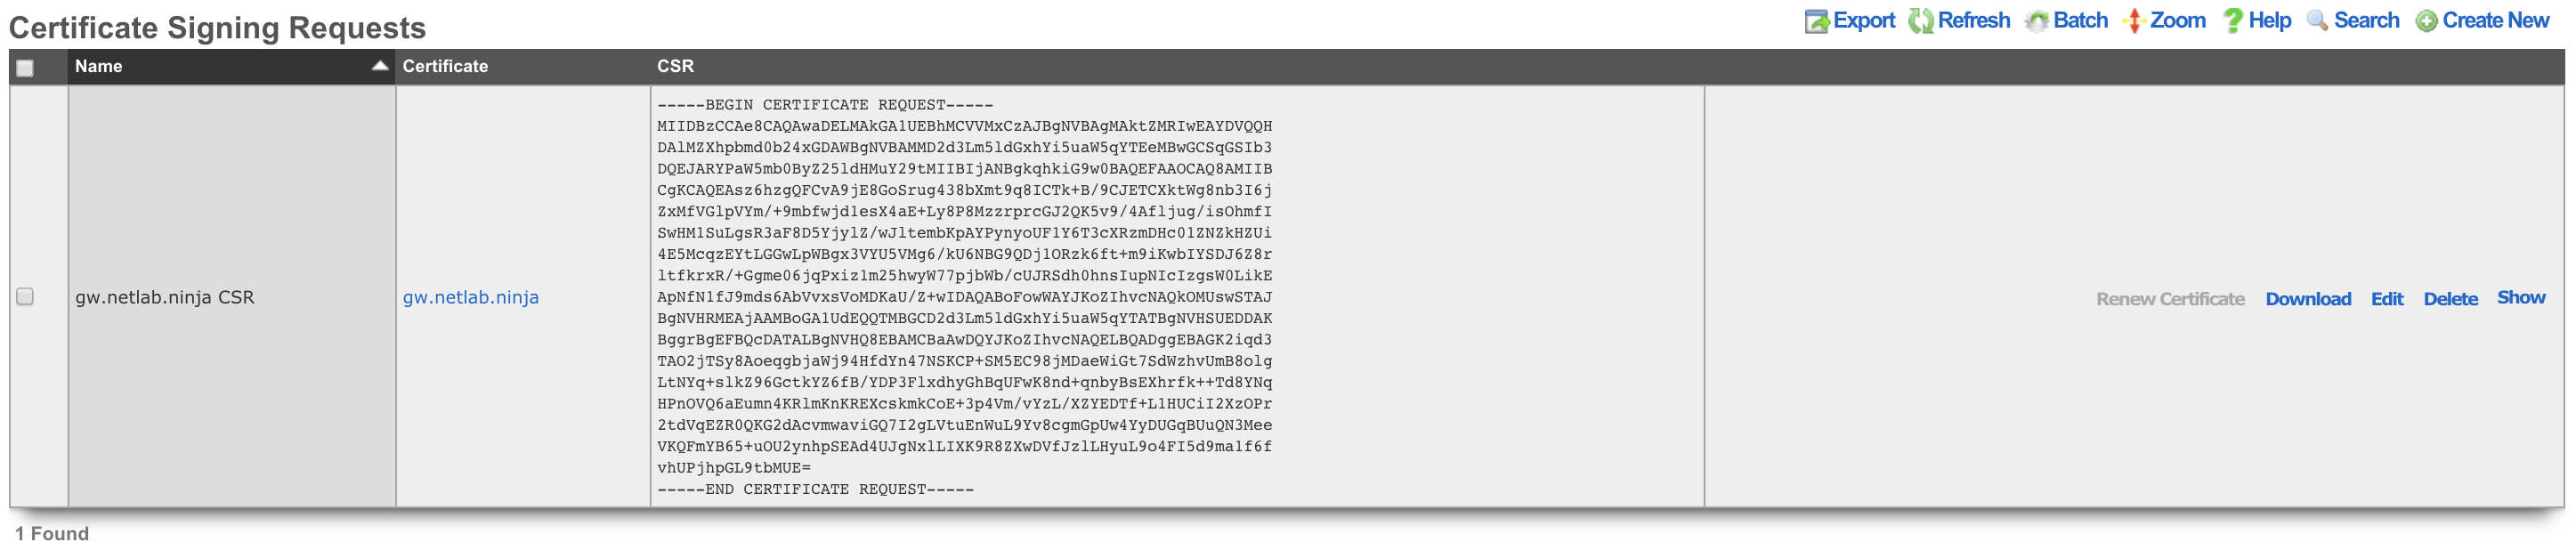
Certificate Signing Requests
The Certificate Signing Requests scaffold enables the administrator to generate X.509 public key signing requests for submission to trusted third-party signers.
The name field is an arbitrary string descriptor used only for administrative identification. Choose a name that reflects the purpose of the record. This field has no bearing on the configuration or settings determined by this scaffold.
The certificate field chooses a key pair for which to generate the certificate signing request.
The certificate identification fields are used to identify and describe the organization making the certificate signing request. It is extremely important to be very careful when entering the data in the following fields. If a trusted third-party signer is used to sign a certificate, it may choose to validate each of the fields with arbitrarily high precision. If a local CA is being created, the end-users who will load the CA cert may choose to verify the trustworthiness of the CA based on the data in these fields.
The country code field is the ISO 3166-1-alpha-2 country code of the requesting organization.
The state field is the state or province of the requesting organization.
The locality field is the city or town of the requesting organization.
The organization field is the company name of the requesting organization.
The organizational unit field is the section or division of the requesting organization.
The common name field is the fully qualified domain name of the rXg. This field must match what is set in the active device option.
The email address field is a contact email address for the requesting organization.
When creating a RadSec certificate for the purpose of WBA OpenRoaming, there are a few considerations that must be met:
- The certificate's Server key algorithm must be secp384r1
- The key usage must be set to client+server.
- The Organizational Unit (OU) must be set to WBA:WRIX End-Entity
- The UID should be set to the WBA member ID, e.g. MYCORP:US
- The Policy identifier must be 1.3.6.1.4.1.14122.1.1.7
The sign mode field specifies how the operator intends to execute the signing for the CSR that is to be generated. The operator may choose to simply generate the certificate without any local signing. This is the option that should be used when the certificate will be signed by a trusted third-party. The operator may also choose to sign with a local certificate authority. This option is only valid if the certificate chain is associated with a local certificate authority. Finally, the operator may choose to self-sign the CSR. This option is for testing and demonstration purposes only and should never be used in a production environment.
The certbot credential is a necessary association if, and only if, a sign mode has been selected that requires a certbot credential.
The note field is a place for the administrator to enter a comment. This field is purely informational and has no bearing on the configuration settings.

Certificate Authorities
The Certificate Authorities scaffold enables the operator to create and manage local CAs that are used to sign certificate chains. The certificates that are signed by local certificate authorities take part in a chain of trust that begins with the CA certificate.
The name field is an arbitrary string descriptor used only for administrative identification. Choose a name that reflects the purpose of the record. This field has no bearing on the configuration or settings determined by this scaffold.
The certificate identification fields are used to identify and describe the organization making the certificate signing request. It is extremely important to be very careful when entering the data in the following fields. If a trusted third-party signer is used to sign a certificate, it may choose to validate each of the fields with arbitrarily high precision. If a local CA is being created, the end-users who will load the CA cert may choose to verify the trustworthiness of the CA based on the data in these fields.
The country code field is the ISO 3166-1-alpha-2 country code of the requesting organization.
The state field is the state or province of the requesting organization.
The locality field is the city or town of the requesting organization.
The organization field is the company name of the requesting organization.
The organizational unit field is the section or division of the requesting organization.
The common name field is the fully qualified domain name of the rXg. This field must match what is set in the active device option.
The email address field is a contact email address for the requesting organization.
The days field specifies the number of days that a signature for a certificate will be valid for. An expired certificate must be resigned before it can be used.
The CA keypair are automatically generated when the operator creates a new record in this scaffold. The certificate and private key fields contain the two halves of the keychain and may be accessed via the show option once a record is created. The certificate is what needs to be distributed to clients that wish to verify the trustworthiness of certificates signed by this certificate authority. The private key should never be copied out of the rXg except for backup purposes or if the CA keychain is to be used on a third-party CA for signing certificates.
The note field is a place for the administrator to enter a comment. This field is purely informational and has no bearing on the configuration settings.
EST Certificate Servers
Enrollment over Secure Transport (EST) is a certificate management protocol for PKI clients needing to acquire client and associated CA certificates. The EST Certificate Servers scaffold enables the operator to create and manage EST servers that are used to retrieve signed certificate chains and CAs.
The name field is an arbitrary string descriptor used only for administrative identification. Choose a name that reflects the purpose of the record. This field has no bearing on the configuration or settings determined by this scaffold.
The host field specifies the FQDN or IP address of the EST server.
The port field specifies the remote TCP port the EST server is listening on for incoming connections.
The certificate authority allows the operator to select which imported CA will be used as the explicit trust anchor.
The label field is optional and denotes the EST partition to interact with.
The client certificate drop-down can be used to select a certificate used for authentication against the EST server.
The username and password fields can be used for basic authentication against an EST server.
Certbot Credentials
The Certificate Credentials scaffold enables the administrator to define api_key/email/provider records for 3rd party ACME-enabled, and API Key-enabled Certificate Authorities.
The name field is an arbitrary string descriptor used only for administrative identification. Choose a name that reflects the purpose of the record. This field has no bearing on the configuration or settings determined by this scaffold.
The Email field defines the username for the API Key.
The API Key field defines the API Key shared secret.
The Provider field defines which provider this credential is meant to be used with.
The note field is a place for the administrator to enter a comment. This field is purely informational and has no bearing on the configuration settings.
Let's Encrypt Examples
This example will show the creation process to setup and retrieve a certificate to be used for the FQDN using Let's Encrypt. NOTE: The use of Let's Encrypt requires the Let's Encrypt servers to reach out to the system via the FQDN to make sure the requester owns the domain, if an ACL is in place this can prevent Let's Encrypt from retrieving the required information. An ACL will also prevent the certificates from being automatically renewed.
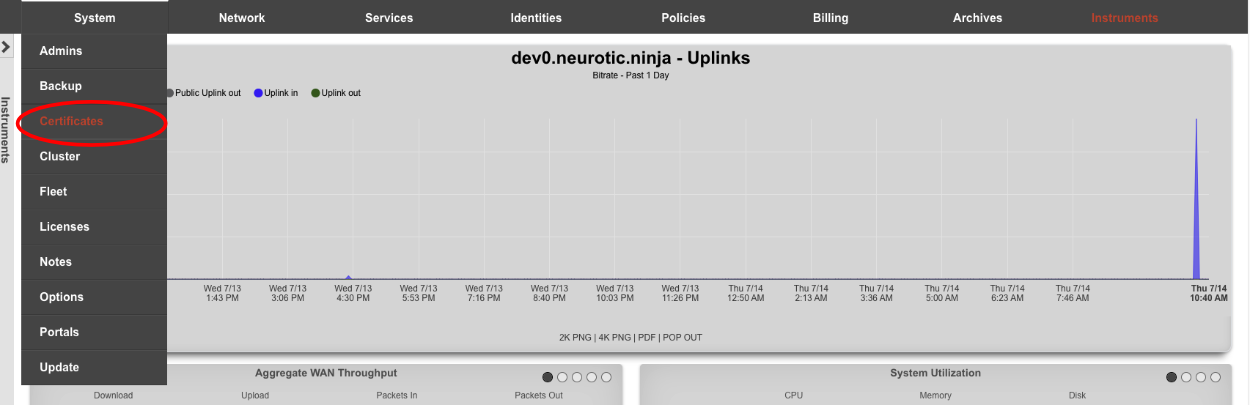
First navigate to Systems::Certificates.
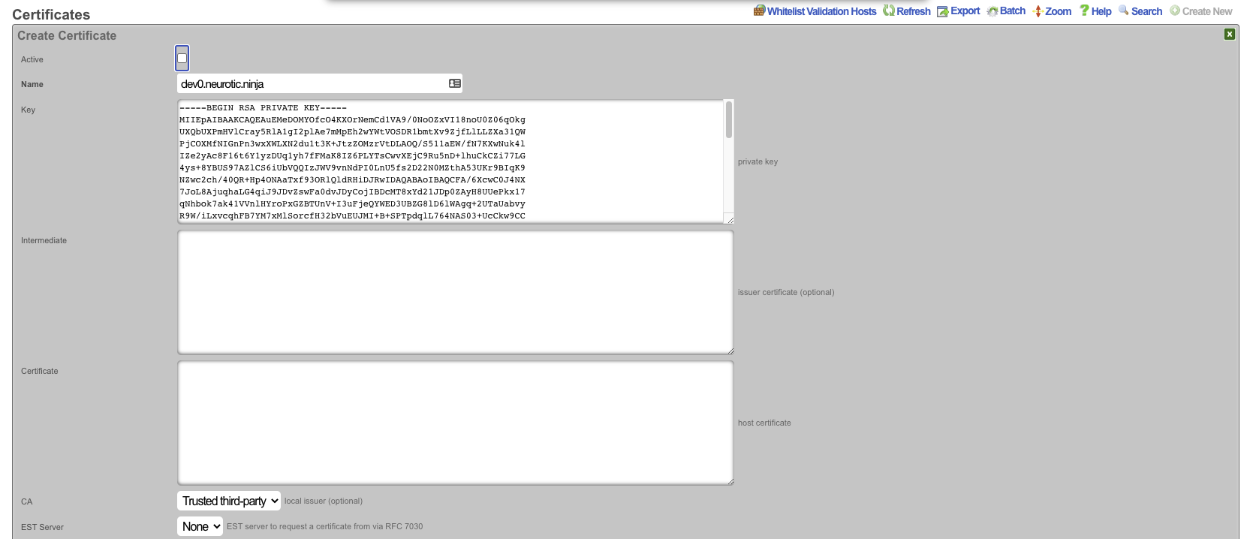
Create a new Certificate.

For Let's Encrypt the top section can be ignored (shown below).
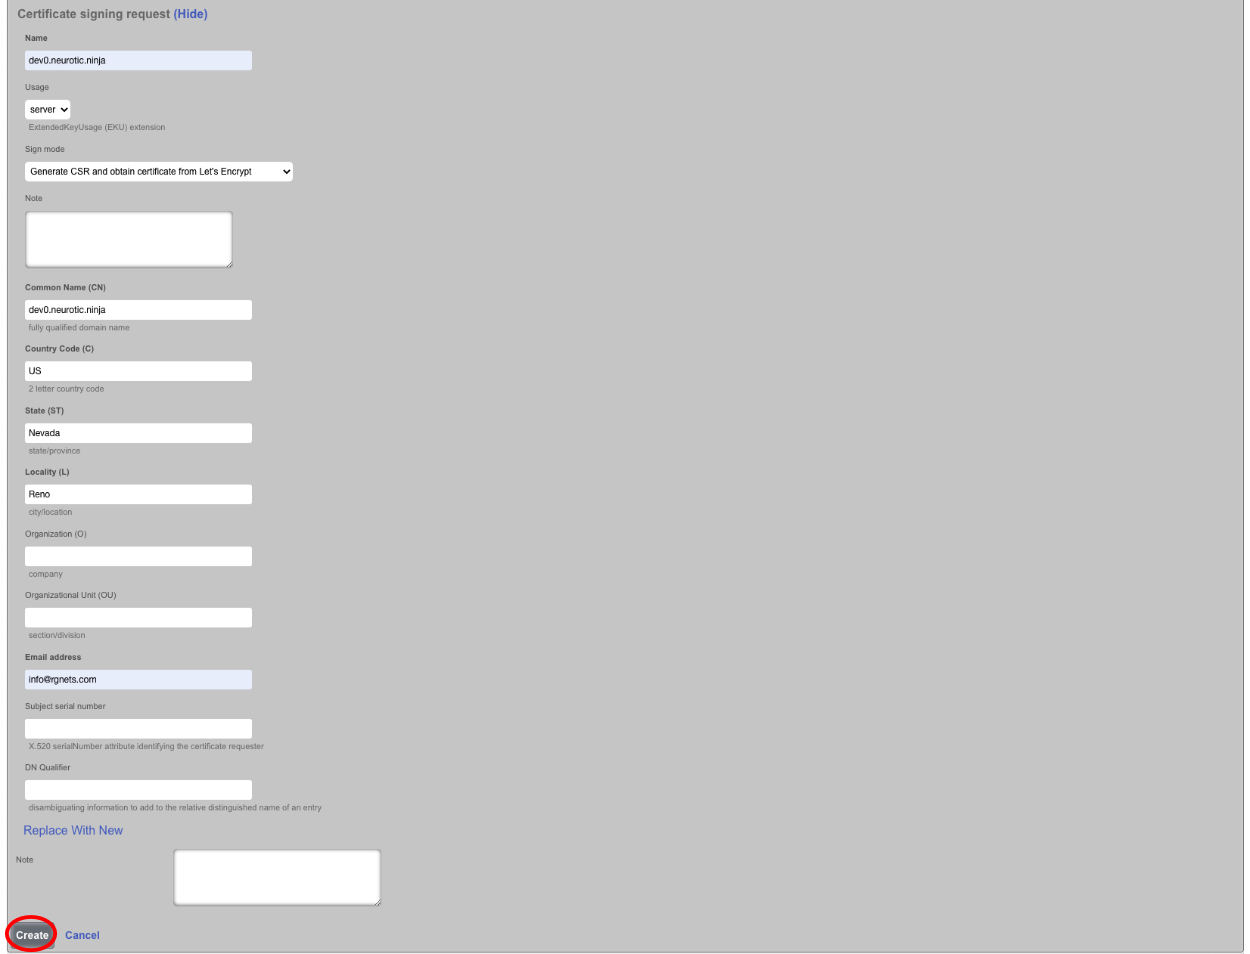
The Certificate signing request section needs to be completed. Give the record a name, this can be the FQDN but does not need to be. Leave the Usage field set to server. Change the Sign mode field to Generate CSR and obtain certificate from Let's Encrypt. Enter the FQDN into the Common Name (CN) field. Enter the 2 letter country code into the*Country Code (C)* field. Enter the state into the State (ST) field, this should be spelled out and not the 2 letter abbreviation. Enter the city into the Locality (L) field. The Orgainization (O) field is optional, along with the Organizational Unit (OU)field. Enter a valid email address into the Email address field, this should be an email specifcally for this and not a personal email address. Click Create , this will start the certificate retrieval process.

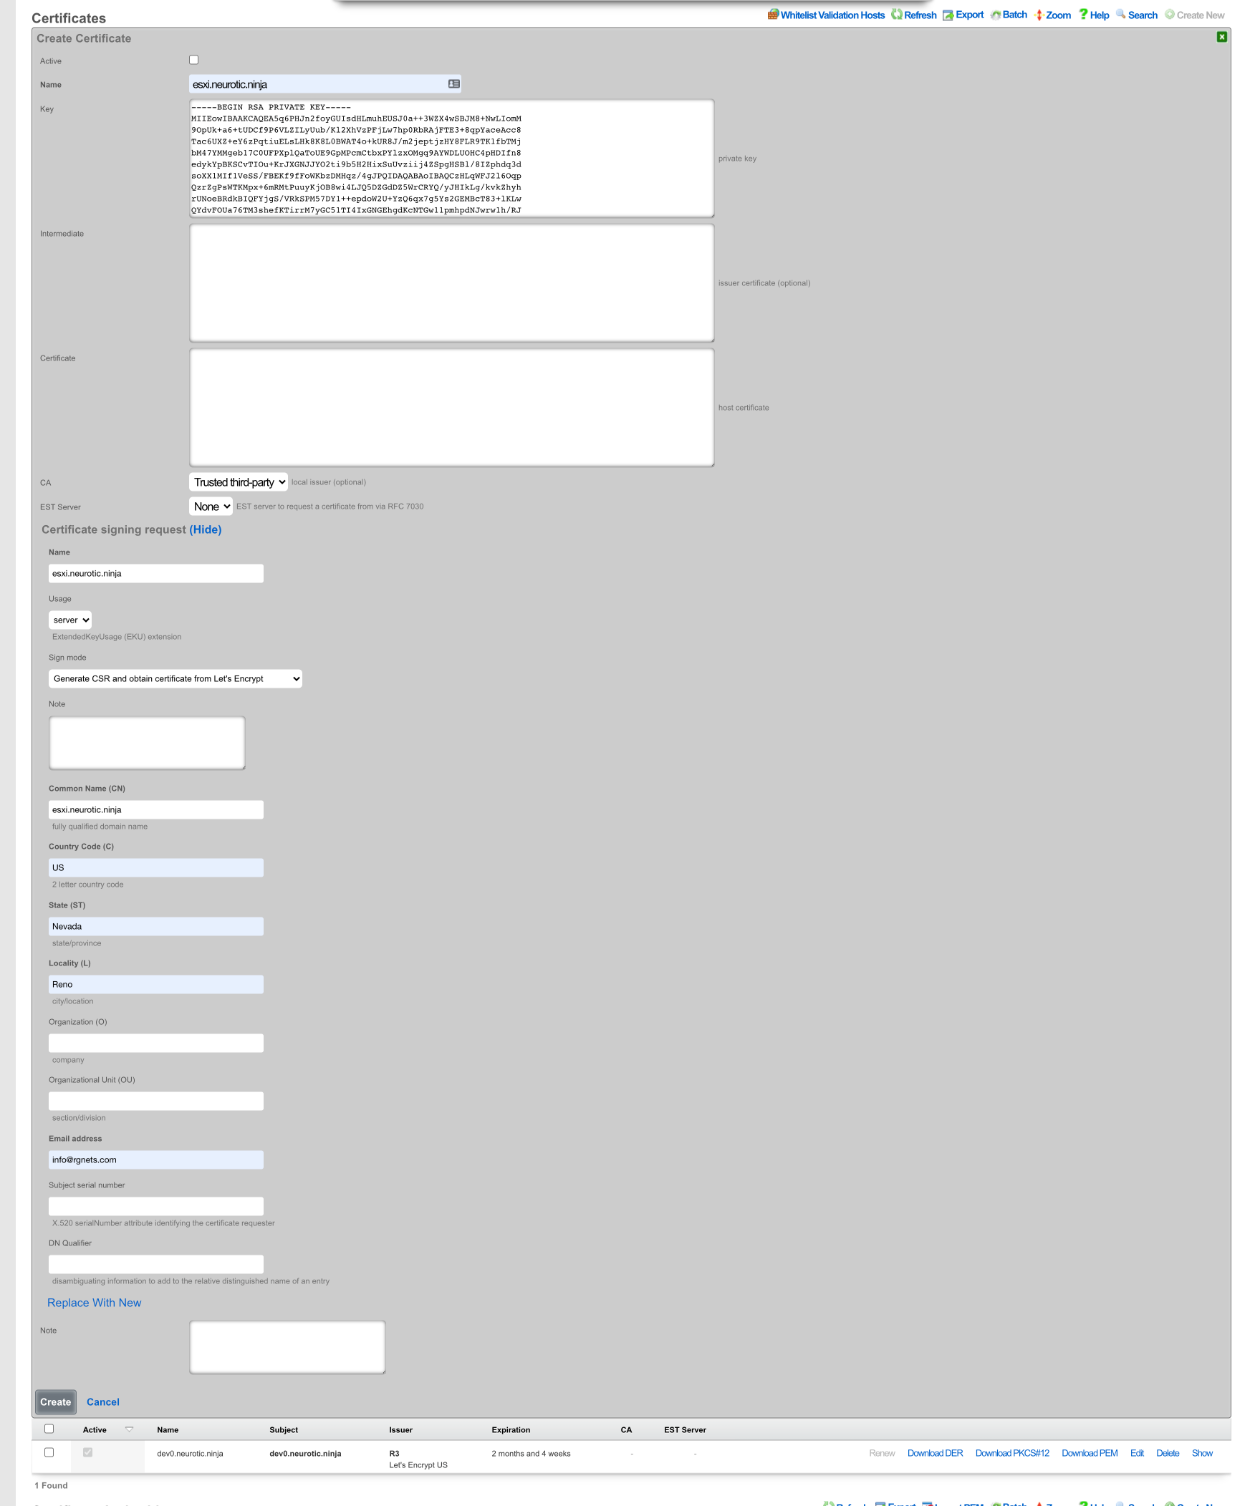
It will take a minute or two to retrieve the certificate, one retrieved it will display the following. If for some reason the certificate cannot be retrieved a health notice will be generated with information regarding why it failed, this is usually because the system cannot be reached, either because the FQDN does not resolve to the primary IP address of the system, or an ACL is in place.

The final step is to edit the record, check the active box and click Update. This makes the certificate active and now when you use the FQDN name to access the system it will be secure.

Let's Encrypt Certificates for Virtual HTTP Hosts
Generating a Let's Encrypt Certificate for use with HTTP Virtual Hosts follows the above example with the exception that the Active box is not checked after retrieving the certificate. The FQDN being used to access the HTTP Virtual Host must resolve to the primary IP address of the system.


Next the HTTP Virtual Host must be created by navigating to System::Portals.
Create a new HTTP Virtual Hosts.

Give the record a Name , this is arbitrary and does not affect how the HTTP Virtual Host performs. Enter the FQDN used in the certificate in the previous step in the Hostname for remote access. The Target server IP field is the private IP address of the device to be accessed via the FQDN. Enter the port the device is listening on in the Target listening port field. If the device is listening for HTTPS connections check the HTTPS box. Select the certificate created in the previous step in the Certificate field. Click Create.
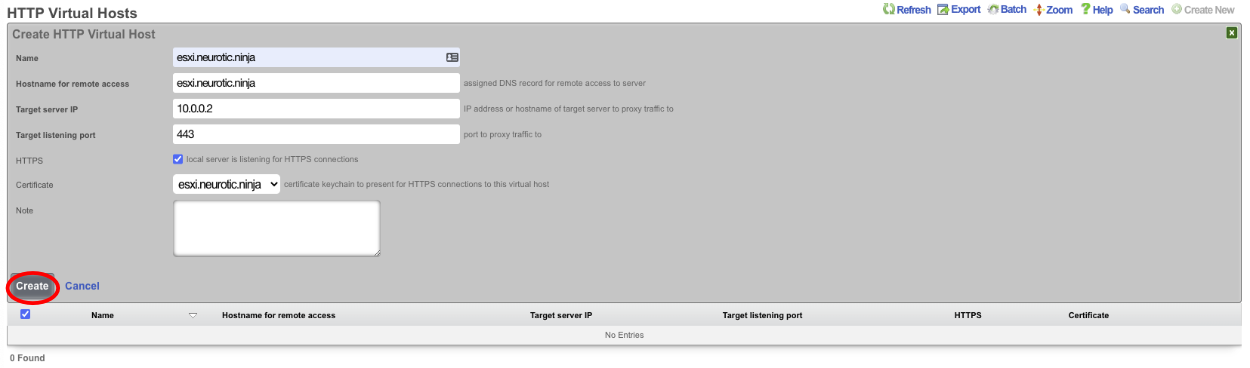

Now the device can be accessed via the FQDN we configured in the virtual host. This allows the operator to access devices behind the rXg over a secure connection even if the device itself is not HTTPS. To access the device enter https://esxi.neurotic.ninja into the browser.


