Overview
The revenue eXtraction gateway (rXg) is RG Nets' next-generation IP data and voice revenue generating network gateway, combining the latest technologies to maximize operator profitability and minimize cost. This operation manual describes how to use the features and functionality present on each corresponding view of the rXg administrative console.
This operation manual assumes that the rXg device has been properly installed by a certified technician or qualified engineer associated with an entity that has a current RG Nets operator support agreement. Before continuing to use this manual on a newly installed rXg, please review the rXg installation and initial configuration guide. You can always find the latest version of the rXg quick start guide in the FAQ section of the RG Nets customer portal. Once you have gone through the rXg installation process, you will have the URL and access credentials for the RG Nets customer portal.
Navigation and Organization
The primary mechanism used to navigate within the rXg administrative console is the menu at the top of each page. The menu is present at the top of all views of the console and allows quick access to all functionality.

Each of the buttons of the main menu represents a subsystem of the rXg. The primary link on each button leads to a dashboard of that subsystem. The menu text of the primary button becomes red to indicate which subsystem is currently being viewed.

Bringing the mouse pointer over a primary menu button and holding it there will reveal a sub-menu for each section. The links in the sub-menu bring up views to configure the various aspects of the subsystem. Once again, red indicates the subsystem that is currently being displayed.

A side panel menu can be accessed by clicking the arrow icon to the left of the screen. This side panel menu contains a history of the 4 most recently visited pages, as well as context-sensitive links to related configuration and informational pages.

Global Search
The Global Search feature provides a powerful way to quickly locate devices, accounts, and sessions across the entire rXg system. The search button is located in the top menu bar and accepts IP addresses, MAC addresses, account logins, and other identifiers.
When a search is performed, the rXg displays comprehensive information including:
- Device information (IP, MAC, hostname, vendor)
- Account details (login, name, group, plan, quota)
- Login sessions (online status, duration, browser/OS)
- Group membership and policy assignments
- Related scaffolds (DHCP leases, ARP entries, NAT assignments, etc.)
An example of a global search result for an active client device is shown below.

Fuzzy MAC Address Matching
The Global Search includes an automatic fuzzy MAC address matching feature. When an exact MAC address match is not found, the system will search for similar MAC addresses that differ only in the last hex digit. This is particularly useful for:
- Access Point CSID scenarios: Some access points use a BSSID (the MAC address broadcast to wireless clients) that differs slightly from the hardware MAC address stored in the rXg database. The last character may vary.
- Troubleshooting wireless clients: When searching for a client's MAC address that was observed over-the-air, fuzzy matching helps locate the corresponding device entry.
When fuzzy matching is used, a red FUZZY MATCH warning box appears in the search results to clearly indicate that the displayed results are for a similar, but not exact, MAC address match. Hovering over the question mark icon provides additional context about why fuzzy matching occurred.

Randomized MAC Detection
Modern wireless devices often use randomized MAC addresses when scanning for or joining networks to protect user privacy. The Global Search automatically detects these randomized addresses and displays a NOTICE warning when results are for a randomized MAC address. Randomized MAC addresses can make device tracking more challenging, as the same physical device may appear with different MAC addresses over time.
Data Display, Sorting and Searching
Operator manipulation of data in the rXg administrative console is accomplished through AJAX enabled scaffolds. Each view consists of one or more scaffolds for various data aspects that can be manipulated to configure the subsystem.

Scaffolds display pertinent properties directly in the list view. Each of the column headers may be clicked to sort the data. Clicking the same column header again toggles the sort between ascending and descending. For example, if the first field header is clicked on the Accounts scaffold, the records are sorted by login.

Clicking on the login field header again reverses the sort. The data is now presented as a descending list.

Similarly, clicking on the third field header twice changes the sort to be descending by time.

Scaffolds containing a large number of records are automatically paginated. Navigation through the pages is accomplished through a set of links on the lower right corner of the scaffold. If the scaffold does not contain enough records for pagination, the pagination controls will not be displayed.

The previous and next links move backward and forward through the pages of records. The numbers enable quick access to a specific page.
The search link displays a form that enables the list display to be limited to items that match the data entered into the search field.

This is extremely useful when looking for a particular record in a scaffold that has a large data-set. In the example below, entering "baker" into the search field reduces the dataset from 94 to 2.

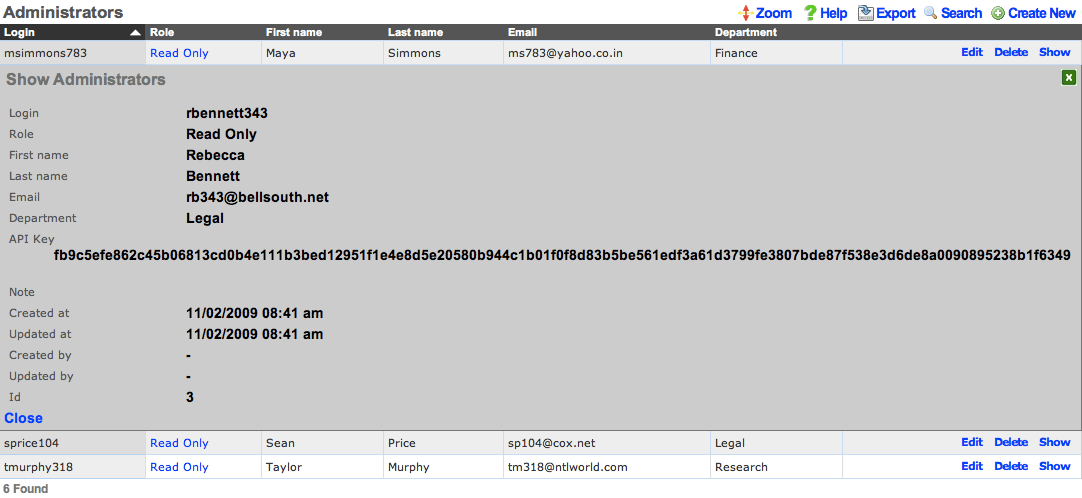
Clicking on the show link at the right of each record displays all of the detailed information available for that record.

Screen space limitations dictate that a reduced set of fields be present in the list view. Using the show link gives access to the other fields stored in the record. In addition to payload fields, meta-data fields such as the create and last update time, as well as the creator's administrative login and last updater may be seen in the detailed display.
Some scaffolds have additional per-record display capabilities. These can be accessed by using the additional links displayed at the right side of the list view. For example, several scaffolds can display per-record graphs.

To close a show, graph, help or other detailed display drop down, click on the white X in the red box at the top right of the detailed display area.
Data Entry and Export
The create new link found at the upper right is used to add data to the scaffold. Some scaffolds, such as those found in instruments , do not have a create new link because data cannot be directly added to the scaffold. When the create new link is clicked, a drop down appears with the fillable form elements available when creating a new record.

A new record is created immediately upon clicking the create button. If any errors are detected during the record creation, they are displayed inline in the form. The original data entered is preserved. Simply change the data to conform to the requirements and hit create to try to create the record again.

The export link allows the operator to download the data in the scaffold as a separated value text format. By clicking the export link, a drop down will appear that enables the configuration of the download. By default, the export mechanism will download all data in the scaffold with headers in a comma separated value (CSV) format.

Once downloaded, the data can be imported into a broad spectrum of software. For example, Microsoft Excel can import the data to create graphs and Crystal Reports can import the data for customized report generation.

System
The operator must configure and maintain several aspects of the rXg in order to properly deploy and operate an rXg powered revenue generating network. The rXg requires the operator to create an administrator , install an SSL certificate signed by a trusted third-party, and configure the appropriate time zone and time server options before an RGN may be brought into production. These prerequisites, as well as many other global configuration settings, are configured via the views of the System menu.
System Dashboard
The System dashboard presents an overview of options and configuration settings governing the global behavior of the rXg.

At the top of the system dashboard are graphs depicting CPU and Memory usage over the last 12 hours.

At the bottom left of the System dashboard is a dialog that presents currently utilized and maximum values for both transient and configuration license parameters.

Click on the details link to navigate to the License view of the administrative console to update the license key. Further information about the purpose and restriction of the parameters listed may be found on the manual page for the License view.
Click on the details link of either dialog to go to the options view of the administrative console where device and network options may be changed. Further information about the function of each option may be found on the manual page for the Options view.
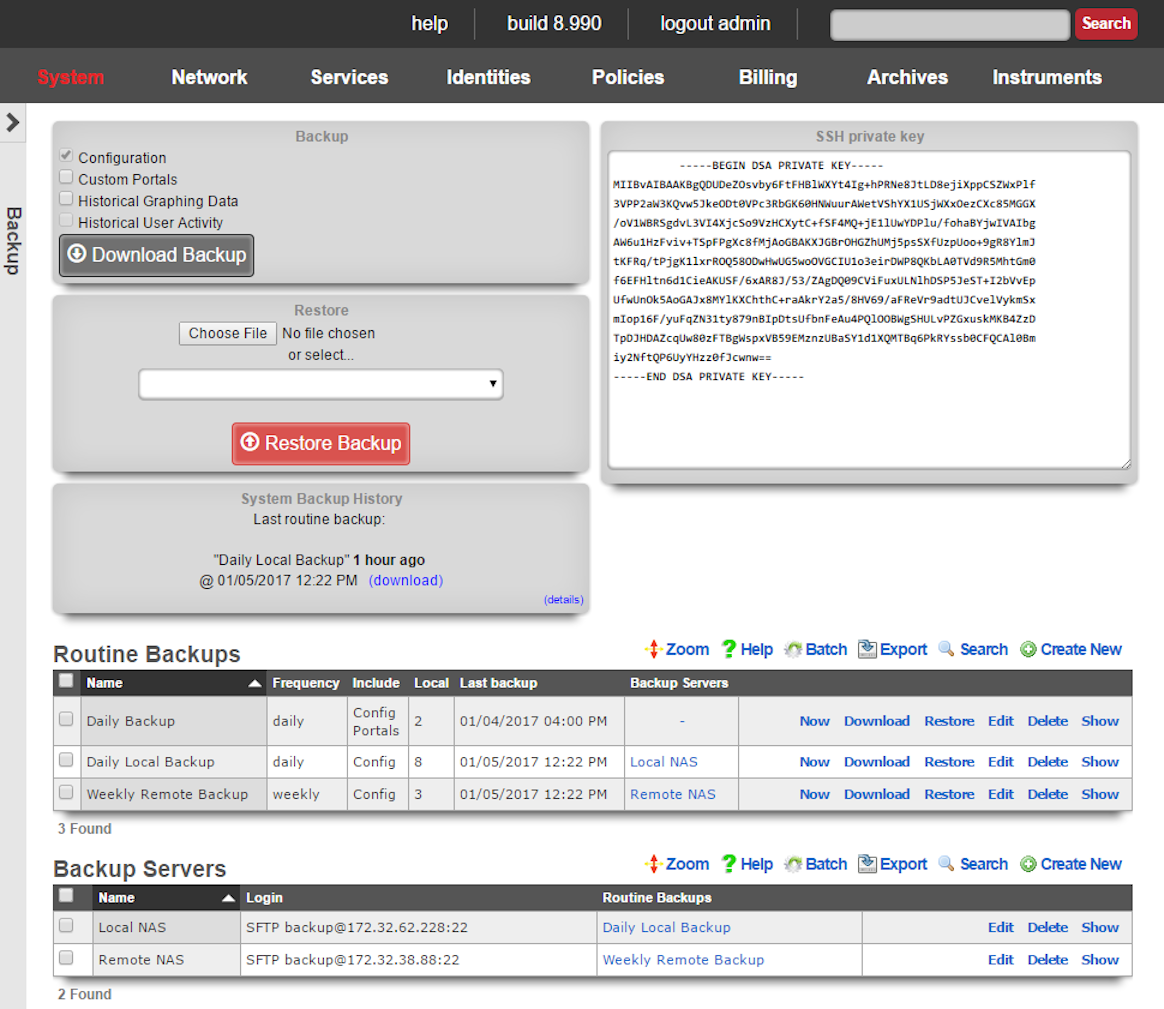
At the bottom center of the system dashboard is a dialog that allows the administrator to view the status of the routine backup mechanism, and download the most recent backup of the rXg.

To back up the configuration, simply click on the download link. When clicked, the button will start a download process, resulting in the web browser prompting a download destination for the configuration to the administrator's computer. Save the backup file in a secure location, as the file may contain sensitive information about the end-users of the network that the rXg manages.
At the bottom right of the system dashboard is a dialog that allows the administrator to reboot , shutdown , and reset the rXg.

To prevent accidental shutdown , reboot , or factory reset , a dialog box will pop-up when any of the buttons is pressed asking for a confirmation.
The reboot option will cause the rXg to power cycle. This is useful if the rXg is behaving erratically after an abnormal condition such as overflow of the persistent storage device.
The shutdown option performs a clean power down of the rXg. Using this option is extremely important before disconnecting the power cord to ensure integrity of data.
The factory reset option erases the configuration data stored on the rXg and brings it back to factory defaults. Extreme caution should be used as a factory reset is a destructive and irreversible process. Important data such as the license key and SSL certificate for the rXg should be backed up before executing a factory reset.
Admins
The rXg administrative console implements all five tenets of a trustworthy system. Three of the five tenets (authentication, authorization and non-repudiation) are controlled on this view.
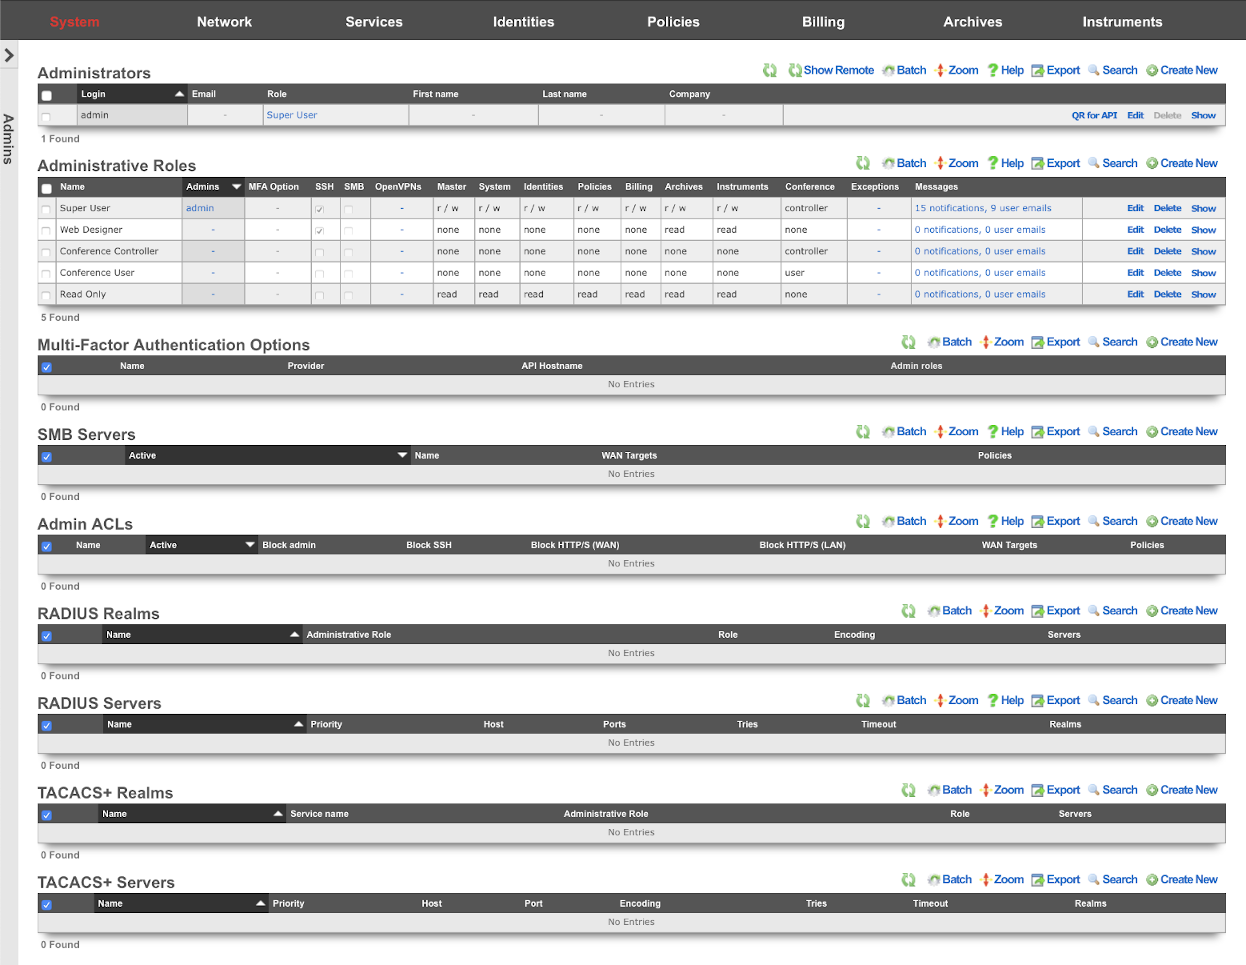
L3 authentication is enabled through the admin ACLs scaffold. By default, no active records are present in the Admin ACLs scaffold. In this default configuration, all devices may access the web administrative console. When an active Admin ACL record is present, the web administrative console may only be accessed by devices specified in the record.
L5-L7 authentication and non-repudiation are enabled through the Administrators scaffold. Each person that is involved with the administration of the rXg must have an independent record in the Administrators scaffold. Using strong login and password credentials enforces authentication. Enforcing administrative protocol to maintain distinct records for each administrator, prohibiting shared role accounts, and prohibiting revelation of credentials between administrators ensures non-repudiation.
Authorization is enabled through the Administrative Roles scaffold. Each administrator belongs to a role, and each role is granted a specific level of access to a subsystem of the rXg administrative console. As with any secure communication mechanism, adherence to proper protocol is of paramount concern to maintaining security. In order to ensure trust, there is no substitute or alternative to creating an individual administrative account for each administrator and using the Administrative Roles scaffold to apply an appropriate policy.
The remaining tenets of information security (confidentiality and integrity) are ensured by the use of SSL to protect communication between the administrator and the rXg. The configuration of the SSL subsystem is on a different view.
Access
The rXg web administrative console supports two access work flows: browser-based access and API-based access. Browser-based access is intended for human consumption and utilizes the login and password credentials configured when the administrator record is created. API-based access utilizes an rXg generated API key and is intended for computer consumption.
Browser-based Access for Human Consumption
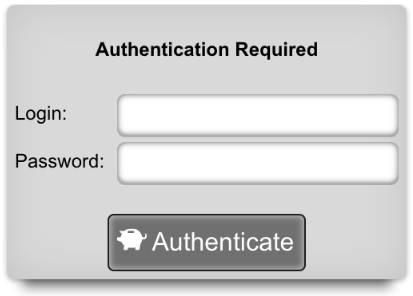
Browser-based access is initiated when the operator wishes to access the web administrative console through a web browser to configure and instrument the rXg. To accomplish this, the operator uses a web browser to open the location https://rxg.dns.entry/admin/. If admin ACLs are in place, the device running the web browser must be listed in order to gain access to the admin login page. Credentials (as defined in the Administrators scaffold) must be specified to continue.
Once credentials are supplied, the web browser is automatically redirected to the Instruments dashboard. The operator may then use the web browser to access the administrative console according to the access restrictions defined by the administrative role that is associated with the administrator.
API-based Access for Computer Consumption
The rXg also supports direct API access to the console web application via HTTP. When an administrator record is created, the API key field is automatically populated with a random string. The operator must pass the generated value of the API key field, as a CGI parameter named api_key, to the console web applications controllers and actions.
One common use for API-based access is to perform automated backups from a third-party server or workstation. For example, an administrative workstation or server could be configured to periodically run the following command:
curl -O http://rxg.dns.entry/admin/menu/download_backup?api_key=fb9c5e...f6349
API-based access enables the operator to integrate simply with a broad spectrum of possibilities through standard HTTP. Nearly any task that is accomplished via browser-based access with a human present may be automated via API-based access. Some simple tasks are executed by hitting specialized actions with an HTTP GET such as the backup example described above. Most other tasks are executed through the RESTful API.
It is highly recommended that operators create specific accounts for API-based access rather than sharing an account between a human operator and computer automation. This enables the operator to quickly and easily discern between automated and manual requests through the admin log as well as helps keep the system more secure.

Administrators
The Administrators scaffold enables creation, modification, and deletion of accounts for administrators of the rXg.
To ensure authentication and non-repudiation of operator actions, each rXg administrator must have their own individual account protected by a set of strong credentials. Shared accounts and role accounts must be avoided as they represent a breach in security protocol.
The login and password fields are the credentials that identify an individual administrator. No administrators should be aware of the credentials of any other administrator. When creating a new administrator, the password must be entered twice for confirmation.
The service account checkbox, if selected, creates an admin that is used only to generate an API key and does not allow the service account to have access to the admin GUI.
The email field is used as the destination email address for system-generated email notifications. The selection of email notifications that the administrator will receive is governed by the notifications chosen in the administrative role that the administrator is associated with.
The role field defines an authorization policy for this administrator. The permissions for the roles in the list are defined by the Administrative Roles scaffold.
The first name , last name , and department fields are informational fields. They are only used in the Administrators scaffold to identify the administrator.
The public SSH key field is an optional field that the administrator uses to specify the credentials for secure FTP (SFTP) and command-line secure shell (SSH) access to the rXg. To enable SFTP/SSH access to the rXg, the administrator must generate a key pair using an SSH client and place the public key into the field. The key must be at least 4096-bit RSA or stronger. In addition, the administrator must be in an administrative role that has SSH access enabled.
Password authentication through SSH is not supported. Numerous resources are available for those that are unfamiliar withSSH public key authentication. In addition, a good book that covers this subject is SSH, The Secure Shell: The Definitive Guide (ISBN 0596008953) by Daniel J. Barrett, Richard E. Silverman and Robert G. Byrnes.
The API Key is an automatically generated string that is populated when an administrator record is created. The API key may be used by the operator to script operations by supplying the value as a CGI parameter named api_key to the administrative console web application. The value is determined by the rXg and is not editable through the create and edit actions.
The note field is a place for the administrator to enter a comment. This field is purely informational and has no bearing on the configuration settings.

Administrative Roles
The Administrative Roles scaffold enables creation, modification and deletion of authorization policies that govern authenticated administrators within the rXg administrative console.
The name field is an arbitrary string descriptor used only for administrative identification. Choose a name that reflects the purpose of the record. This field has no bearing on the configuration or settings determined by this scaffold.
The note field is a place for the administrator to enter a comment. This field is purely informational and has no bearing on the configuration settings.
The SSH checkbox authorizes secure FTP (SFTP) and command-line secure shell (SSH) access to the rXg. Valid public SSH keys must be present in the accounts of administrators for which SFTP/SSH access is desired.
The SMB checkbox authorizes Samba access to the rXg. Must be accompanied by an active SMB Server which contains to the policy or WAN targets which will be accessing the SMB Server.
The API checkbox authorizes access to the rXg admin web interface when providing a member Admin's API Key as the api_key_query parameter or the _apikey HTTP header.
The MFA Option specifies a Multi-Factor Authentication configuration to use for members of this Admin Role. When enabled, Admins must perform MFA when logging into the Admin console. Multi-Factor Authentication is configured in the Multi-Factor Authentication scaffold on this dashboard.
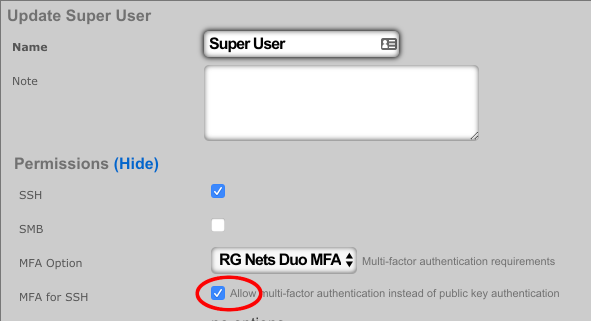
The MFA for SSH checkbox enables Multi-Factor Authentication for this role when logging in via SSH. Admins may perform public key authentication OR password + MFA authentication to access the SSH server. Fallback behavior in the event that the MFA provider is unreachable or has an invalid configuration is controlled within the associated Multi-Factor Authentication scaffold.
Each of the permission sets can be configured to be readwrite , readonly , or none. The readwrite setting allows full access. The readonly setting only allows administrators to view configuration for the section and disallows updates. The none setting does not allow any access to the section.
The master permission authorizes control over global hardware-specific configuration options. Licensing, SSL, configuration backup, and restore are governed by this permission.
The system permission authorizes control over core services and network configuration. Device options, IP addresses, routing, DNS, DHCP, and other configuration options that affect the rXg software as a whole are governed by this permission.
The identities permission authorizes control over configuration and options that affect the authentication of end-users. Management of end-user accounts, groups, definitions and applications are governed by this permission.
The policies permission authorizes control over configuration options that affect the end-user control and communication mechanisms. Configuration of the end-user experience via traffic shaping, HTML payload rewriting, content and packet filtering, etc. is governed by this permission.
The billing permission authorizes control over configuration options and log retrieval for the rXg accounting mechanisms. Management of access and usage plans, download quotas, recurring billing, and other accounting related activities are governed by this permission.
The instruments permission authorizes control over the viewing, manipulating, and downloading of real-time and archival data. Graphing, logs, and all other end-user cognizance mechanisms of the rXg are governed by this permission.
The various options in the notifications section determine which of the automatically generated emails the administrators who are a member of this administrative role receive. The rXg emails correspond to the custom messages configured via the email view of the Services menu.
The rXg emails are primarily used for event-driven notifications. For example, an administrative role for billing support personnel would want to receive failed transaction notifications. Similarly, an administrative role for network engineering would want to receive notifications for event triggers.
The Location Areas field is used to correlate this Admin Roles with that have APs with associated clients whose transactions will be discoverable for this Admin Role, so that Admins within this Admin Role may choose to approve those transactions.

Multi-Factor Authentication
The rXg supports verifying an administrator's identity by initiating Multi-Factor Authentication through a third-party provider. The Multi-Factor Authentication scaffold configures the rXg for multi-Factor Authentication.
The name field is an arbitrary string descriptor used only for administrative identification. Choose a name that reflects the purpose of the record. This field has no bearing on the configuration or settings determined by this scaffold.
The provider dropdown specifies the third-party MFA mechanism to be used for confirming administrator's identity.
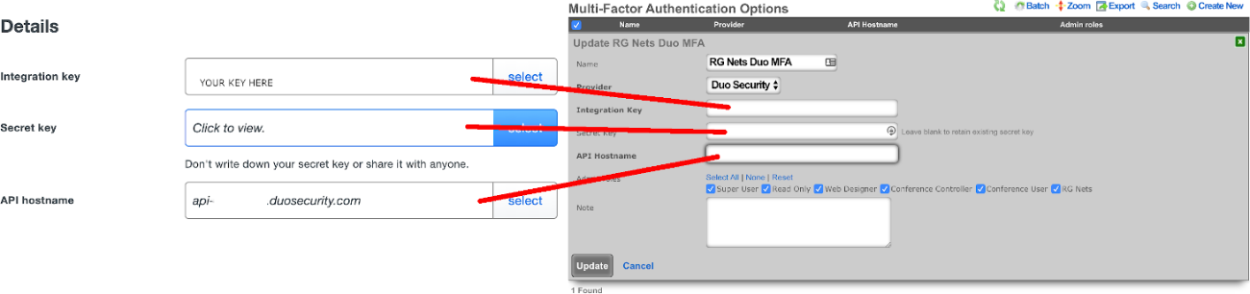
The integration key , secret key , and API hostname fields should be completed using information from an application created within the provider's control panel.
The fallback mode determines the behavior that should be used when primary login is initiated, but the provider's service is unreachable or misconfigured. Completing Multi-Factor Authentication from the Admin UI requires that the administrator's device have Internet access, and in the case of SSH access, requires that the rXg have Internet access. If the rXg does not have Internet access, the fallback mode will be used to determine the login behavior.
When configured to allow access , errors with the configuration file or connection to the Duo service will allow SSH login without Multi-Factor Authentication.
When configured to prevent access , errors with the configuration file or connection to the Duo service will deny SSH access. This option is more secure but may result in you being locked out of SSH access to the system, and should be used with caution.
The admin roles selection determines which roles will trigger Multi-Factor Authentication after completing primary authentication.
Multi-Factor Authentication may be enabled for SSH access by enabling the MFA for SSH checkbox when editing an individual admin role. When MFA is used with SSH, the administrator may continue using a public key, if configured, but will fall back to username and password authentication with a Multi-Factor Authentication prompt before completion.
Duo Multi-Factor Authentication
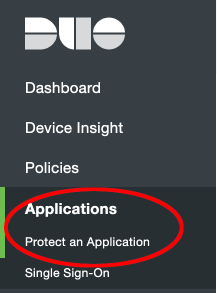
In order to set up Duo Multi-Factor Authentication with the rXg, you will need to login to your Duo account, or create a new account at https://duo.com/

Once you are logged into the admin panel (https://admin.duosecurity.com/), you will need create a new Application to protect, and retrieve your integration key, secret key, and API hostname to be entered into the corresponding fields in the rXg.
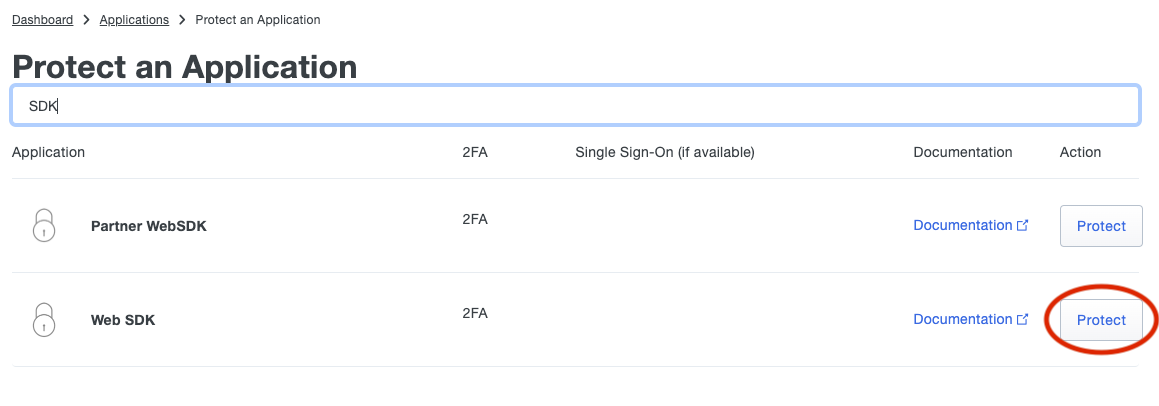
To do so, click on the applications link on the Duo Dashboard, and then on "Protect an Application".
Next, search for the term "SDK" and click the protect button for the web SDK Application.
Copy the fields in the application details to the appropriate fields in the rXg
Select the admin roles for which Multi-Factor Authentication should be enforced.
Multi-Factor Authentication may optionally be applied to SSH access. If MFA for SSH is enabled in the admin role, the admin may log into the rXg via SSH by providing a public key OR providing a valid username and password combination. When providing a username and password, a push notification will be sent to the mobile device, or the admin may register by visiting a generated URL (if the Duo application policy allows it).
To configure Duo for SSH navigate to System::Admins and edit the administrative role for which you would like to enable MFA for SSH.

Single Sign-On Strategies
The Single Sign-On scaffold enables use of a centralized identity management store for administrative accounts of the rXg.
The name field is an arbitrary string descriptor used only for administrative identification. Choose a name that reflects the purpose of the record. This field has no bearing on the configuration or settings determined by this scaffold.
The note field is a place for the administrator to enter a comment. This field is purely informational and has no bearing on the configuration settings.
The role attribute field tells the rXg what user attribute to observe for an admin role assignment. An attribute value received which matches the name of an admin role will apply that admin role to the user.
The admin role dropdown enables the operator to select a fallback admin role. If the role attribute value is blank, or cannot be interpreted, the fallback role is used.
The provider dropdown selects the type of SSO application
The ID and key fields are used to authenticate to a specific application.
The scope field overrides default permissions requested by the app. Entries in the scope field may require an app review.
The alternate redirect hostname enables the operator to override the redirect URL to utilize a different FQDN than is configured on the rXg. This requires a DNS record pointing to the node and should fall under an existing wildcard certificate.
The button text field allows the operator to override the default text displayed within the button on the administrative portal login screen.
The IdP metadata URL (Identity Provider) can be used to import the SSO URL and certificate fingerprint of the remote identity provider. If the IdP provides this URL, the rXg will try to import the remaining fields.
The IdP SSO URL is provided by the identity provider as the URL to redirect logon requests to.
The IdP SLO URL is optionally provided by the identity provider as a URL to redirect log-off requests to.
The IdP cert fingerprint enables the operator to provide a SHA1 fingerprint of the identity providers certificate, for validation. Leaving this field blank disables certificate validation.
The SP EntityID (Service Provider) field enables an operator to override the default EntityID of the rXg. The default value is the active FQDN defined under System::Options::Device Options.

SMB Servers
The SMB Servers scaffold configures the rXg integrated SMB file sharing server. The rXg exposes several aspects of the onboard filesystem as SMB shares including, but not limited to, the portals, logs, backups, and TFTP datastores.
The rXg SMB share is accessible via the UNC \ip.address.of.rxg\datastore. For example, if the rXg IP address is 192.168.5.1 and the operator desires to modify the captive portal, the appropriate UNC is \192.168.5.1\portals. Datastores are appropriately flagged as read-only or read-write depending on their nature. For example, logs and backups are read-only whereas the portals and TFTP datastores are writable. The following named shares are available: admin login - the admin's home directory; "backups" - routine backups (read only); "logs" - raw log files (read only); "portals" - custom portals (read/write); "tftp" - TFTP boot directory (read/write);
The active field enables an option set. Exactly one option set may be active at any time. Enabling a particular option set will automatically disable another existing active option set.
The name field is an arbitrary string descriptor used only for administrative identification. Choose a name that reflects the purpose of the record. This field has no bearing on the configuration or settings determined by this scaffold.
IP layer access control to the SMB file sharing mechanism is controlled by the policy and WAN target fields. LAN access to the SMB shares must be initiated from an IP address that is a member of a group listed in the policy linked to the SMB server. WAN access must be initiated from an IP address that is listed in a linked WAN target.
User layer access control is configured via the administrator accounts configured on the system. The operator must supply a valid administrator account login and password that is linked to an administrative role with SMB enabled in order to access the SMB file shares.

Admin ACLs
The Admin ACLs scaffold enables operators to configure L3 access restrictions to the web administrative console. Since L3 ACLs take effect before L5-L7 credentials may be presented, the Admin ACLs are typically used to restrict access to the web admin console to a set of known devices. This helps thwart dictionary attacks against the L5-L7 authentication mechanism of the web administrative console.
The active field enables an option set. Exactly one option set may be active at any time. Enabling a particular option set will automatically disable another existing active option set.
The name field is an arbitrary string descriptor used only for administrative identification. Choose a name that reflects the purpose of the record. This field has no bearing on the configuration or settings determined by this scaffold.
The WAN targets and policies fields specify which sets of hosts should be allowed access to the web administrative console. By default, all devices are allowed access to the web administrative console. When an active record in the web admin console ACLs exists, then access to the web administrative console is restricted on L3 to the specified hosts.
It is extremely important to be careful when creating a web admin console ACL. Incorrect data entry may disable administrative access and may be unrecoverable. Once an admin ACL is active, the operator must specifically list hosts to be granted access on the WAN by creating WAN targets and enabling the appropriate check boxes. Hosts on the LAN may be granted access by placing the hosts into a group and then linking them into a policy selected here.

RADIUS Realms
The name field is an arbitrary string descriptor used only for administrative identification. Choose a name that reflects the purpose of the record. This field has no bearing on the configuration or settings determined by this scaffold.
The read role from class field allows you to override the selected default Administrative Role.
The administrative role drop down box allows you to specify the default administrative role for admins tied to the Radius Realm. For example, if an admin logs in and the read role from class box is unchecked, all admins will be tied to the role specified here; if read role from class is checked but the role doesn't match, the role specified in administrative role will be applied.
The encoding drop down lets the operator specify between PAP , CHAP , and MSCHAP.
The servers field allows you to specify the Radius Realm Servers the realm(s) authenticates against.
Using the Request Attribute settings, the operator can specify which attributes will be sent to the Radius Server.
Send NAS-IP-Address attribute indicates the identifying IP Address of the NAS which is requesting authentication of the user. This can be set to use Uplink IP of the rXg, or it can be specified using the NAS-IP-Address field.
The operator can Send Called-Station-ID , this can be set to use the uplink MAC or the operator can specify using the Called-Station-Id field.
The operator can send a NAS-Identifier. If the use domain name box is checked it will send the active Device Option's domain name as NAS-Identifier , or the operator can manually set a static NAS-Identifier using the NAS-Identifier field.
The operator can send the NAS-Port. If Use client VLAN is checked, the VLAN tag of the client will be sent as NAS-Port, or 1 if untagged. The NAS-Port field will manually set static NAS-Port.
When Send NAS-Port-Type is checked, the operator can specify the type by using the NAS-Port-Type dropdown and selecting from the list.
When Send requesting node IP is checked, requesting node IP attribute can be selected from the drop-down box.
When Send requesting node MAC is checked, the requesting node MAC attribute will be sent and can be selected from the drop down box.

RADIUS Servers
The name field is an arbitrary string descriptor used only for administrative identification. Choose a name that reflects the purpose of the record. This field has no bearing on the configuration or settings determined by this scaffold.
The priority field dictates the order servers are tried, where highest is first.
The host field is the RADIUS service IP address or domain name.
The secret field is the RADIUS shared secret.
The port field is the RADIUS service port (Default 1812).
The accounting port field is the RADIUS Accounting service port (Default 1813).
The tries field is the number of failed tries before moving on to the next least priority server.
The timeout field is the number of seconds per try to wait for a response from the server.
The realms field lets the operator select which Realms will be tied to the RADIUS Server.

TACACS+ is a security application that provides centralized validation of users attempting to gain access to a router or network access server. TACACS+ services are maintained in a database on a TACACS+ daemon running, typically, on a UNIX or Windows NT workstation. You must have access to and must configure a TACACS+ server before the configured TACACS+ features on your network access server are available.
TACACS+ Realms
The name field is an arbitrary string descriptor used only for administrative identification. Choose a name that reflects the purpose of the record. This field has no bearing on the configuration or settings determined by this scaffold.
The service name field is used to specify the custom TACACS+ service name.
The role attribute field is used to specify the custom TACACS+ authorization attribute to map to an administravite role name.
The administravite role drop down box allows the operator to specify the fallback role when the server does not provide the name of an existing role.
The operator can specify the TACACS+ servers to use the TACACS+ Realm by selecting servers in the servers field.

TACACS+ Servers
The name field is an arbitrary string descriptor used only for administrative identification. Choose a name that reflects the purpose of the record. This field has no bearing on the configuration or settings determined by this scaffold.
The priority field dictates the order servers are tried, where highest is first.
The host field is the TACACS+ service IP address or domain name.
The port field is the TACACS+ service port (Default 49).
The encoding drop down lets the operator specify between PAP, CHAP, and MSCHAP.
The secret field is the TACACS+ shared secret.
The tries field is the number of failed tries before moving on to the next least priority server.
The timeout field is the number of seconds per try to wait for a response from the server.
The realms field lets the operator select which Realms will be tied to the TACACS+ Server.
Backup
The Backup view presents the dialogs and scaffolds associated with creating backups, automated push-based remote backups, and restoring backups of the rXg.
Backup is a critical aspect of network continuity. Proper backups enable the RGN operator to quickly and easily recover from a rXg hardware failure. In addition, the rXg backup and restore mechanism enables operators to quickly replicate a rXg configuration across a fleet of rXgs.
The rXg supports operator initiated on-demand backups as well as rXg initiated periodic scheduled backups. On-demand backups are initiated via a dialog presented on the Backup view. Periodic backups are configured via the Routine Backups and Backup Servers scaffolds.
On-demand and Pull Backup
The operator may initiate a backup at any time via a dialog present on the Backup view. Backups always include the configuration of the rXg. Backups may optionally include custom portals, graph databases, and/or historical data by selecting the appropriate checkbox.

The on-demand backup mechanism may also be used by an operator as part of a pull backup system. The most common use case for this is when an operator wishes to have a server periodically initiate a backup. For example, a UNIX server that has cron and curl might be configured with the following crontab:
30 4 * * * curl -O https://rxg.host/admin/menu/download_backup?api_key=a...123
30 5 * * * rm -f `ls -ot | head -10`
The value for the api_key parameter is obtained from the Admins view. It is highly recommended that the operator creates a specific account for the purpose of enabling pull-based backup on both the rXg and the backup server. There are two additional parameters that may also be present in the URL:portalsWhen set to 1, custom portals are included in the backuprrdsWhen set to 1, graph databases are included in the backupThe two parameters mirror the check box options that are present in the dialog box. The configuration of the rXg is always included in the backup. If the operator wishes to be explicit, the parameterconfig=1 may also be passed.
Scheduled and Push Backup
The rXg supports scheduled backups that are stored on the local persistent storage device, pushed to external servers, and other rXgs. Backup schedules are determined by routine backup records. External servers that will receive push-based backups are configured via backup server records.
Routine Backups
Entries in the Routine Backups scaffold configures the schedule according to which the rXg will perform automated system backups.
The name field is an arbitrary string descriptor used only for administrative identification. Choose a name that reflects the purpose of the record. This field has no bearing on the configuration or settings determined by this scaffold.
The frequency field specifies the execution frequency of the automatic backup defined by this record.
An rXg routine backup will be limited to the configuration of the system by default. Routine backups may optionally include additional data by selecting the appropriate check boxes:
- Configuration - The core system configuration (enabled by default)
- Billing Data - Stored payment methods and billing information
- Custom Portals - All custom portal files
- Graph Databases - Graph database (RRD) files for historical graphs
- Historical Data - Large tables containing detailed end-user data (e.g., connections, web proxy, RADIUS accounting)
- Software Packages - Attached software packages used for Fleet software upgrades
- Device Firmware - Attached device firmware for infrastructure devices
The number of backups to keep on the rXg configures the length of the FIFO storage queue. The rXg creates and stores new backups on the rXg persistent storage mechanism according to the schedule defined by this record. When the number of stored backups reaches the value specified in this field, the rXg deletes the oldest stored backup.
The backup servers field associates this routine backup record with a remote server to which the backup will be pushed. The specification of a backup server is optional. The default behavior when no backup server is specified is to store the backup file on the local persistent storage.
The note field is a place for the administrator to enter a comment. This field is purely informational and has no bearing on the configuration settings.
Backup Servers
Entries in the backup servers scaffold contain the configuration data needed to establish a file transfer to a remote server for the purpose of pushing a backup file created by a routine backup.
The name field is an arbitrary string descriptor used only for administrative identification. Choose a name that reflects the purpose of the record. This field has no bearing on the configuration or settings determined by this scaffold.
The protocol field specifies the application layer protocol that will be used to transport the file.
The host field specifies the DNS name or IP address of the server that will be the destination of the file transfer.
The username , password , and SSH private key fields contain the authentication credentials for the server specified in the host field. When the FTP protocol is selected, only the username and password fields are relevant. When the SFTP protocol is selected, the operator may choose to use either password or public-key based authentication. Public-key authentication is enabled by copying and pasting a key into the SSH private key field and entering the key passphrase into the password field.
The path field specifies the destination on the remote filesystem for the backup file that is being pushed. The location specified by the path field must exist or the routine backup will fail. If the path is left blank, the default path on the server will be used as the destination on for the backup file.
The port field specifies the TCP port that will be used when a connection is made by the rXg to the server specified by the host field. If the port is not specified, port 21 is used for FTP and 22 is used for SFTP.
The note field is a place for the administrator to enter a comment. This field is purely informational and has no bearing on the configuration settings.
Receiving Backups
A secondary warm spare rXg may be configured to receive push backups from a primary active rXg. This mechanism enables operators to rapidly recover from rXg hardware failures. If the primary active rXg hardware fails, the operator simply logs into the secondary warm spare rXg and initiates a restore. The secondary warm spare rXg will then immediately take over the operation of the primary active rXg. This mechanism is most often as a redundancy solution for rXg cluster controllers.
To configure an rXg to receive backups, create a backup server on the primary active rXg. Configure the following settings in the new backup server record:
ProtocolSFTPHostDNS entry of the secondary warm spare rXg.UsernamebackupSSH private keyThe SSH private key from the secondary warm spare (a 4096-bit RSA key or stronger is required).All other fields may be left as their default. The SSH private key for the secondary warm spare rXg may be found on a dialog in the Backup view. 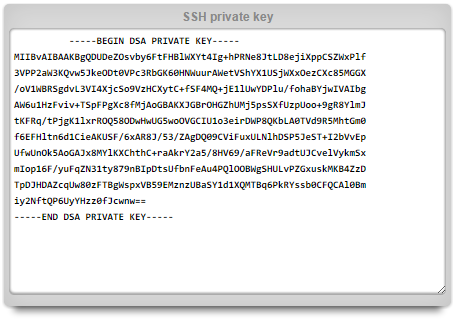
The backup server must be associated with a routine backup record that defines the transmission frequency of backups from the primary active rXg to the secondary warm spare rXg. Backups from the primary active rXg are displayed in the restore dialog of the secondary warm spare rXg.
Fleet Manager Backup Server
A Fleet Manager can act as a central backup server for the nodes it manages. When a fleet node is configured to push its backups to the manager, each routine backup is uploaded to the manager along with the backup's manifest. The manager records the backup against the originating node, verifies the archive's checksum, and applies the node's retention policy. Fleet-node backups are stored separately from the manager's own backups so that the manager's backups do not grow to include the archives of the entire fleet.
A node selects a manager as a backup destination by creating a backup server with the Fleet Manager protocol and choosing the target manager from the drop-down, then attaching that backup server to the routine backups whose archives should be pushed. Because the destination is an ordinary backup server, a node can send different routine backups to different managers (or to a mix of managers and conventional FTP, SFTP, and HTTPS servers). The upload happens at backup-completion time, on the same schedule as every other backup server, and is authenticated with the node's fleet key; no host, port, or credentials are required.
Because a single manager receives backups from the whole fleet, the upload is spread by a short random delay so that members do not all arrive at once, and the manager protects itself: it refuses an upload when accepting it would leave less than its configured free-storage reserve (the Backup Disk Reserve in the manager's own Fleet Node > Fleet Manager Backup Settings, default 30 GB) and softly limits how many uploads it accepts concurrently (the Backup Max Concurrent Uploads setting there, default 6), asking the node to retry later in both cases. While an upload is in progress the manager tracks its arriving bytes, and reclaims the slot only if no data is received for a configurable idle window (the Backup Upload Idle Timeout, default 10 minutes), so a stuck or abandoned upload frees its slot quickly while a healthy slow transfer keeps it. To keep these responses fast under load, the manager verifies each archive's checksum and enforces retention in the background after accepting the upload; an archive that fails its checksum is discarded.
A node sends backups to a manager simply by configuring the Fleet Manager backup server described above and attaching it to a routine backup; no separate permission needs to be enabled on the manager. The manager governs what it accepts and keeps through its disk reserve, its per-backup size limit, and its retention policy rather than a receive gate. A re-upload of a backup the manager already holds is kept as-is, so a duplicate or interrupted retry can never overwrite an accepted archive.
Retention of fleet-node backups is governed by fleet node backup policies. A policy keeps the most recent backups for each node on a grandfather-father-son schedule: a separate keep count for each schedule tier hourly, daily, weekly, and monthly plus a manual bucket for on-demand backups run from a routine backup's Now link. A scheduled backup's tier is the frequency of the routine backup that produced it, while an on-demand Now run is bucketed as manual so it does not evict a scheduled backup. Backups are pruned per node and per tier, so the frequent backups of one tier never crowd out the less frequent backups of another. A blank tier keeps every backup of that tier; zero keeps none.
A policy may further bound what is kept with a maximum age (in days) and a maximum total size (in gigabytes, per node); the oldest backups are pruned first when a bound is exceeded, and the most recent backup is always kept. A separate maximum backup size, entered as a number with a selectable MB or GB unit, is admission control rather than retention a single backup larger than this is refused at upload, and a health notice is raised for the node, instead of being stored and then pruned.
A policy may target any number of fleet nodes and any number of fleet groups, or it may be designated the fleet-wide default. Each node is governed by exactly one policy, chosen most-specific first: a policy targeting the node directly wins; otherwise a policy targeting one of the node's groups (or an ancestor group) applies; failing both, the single default policy applies. The Preview action on a policy shows, for each node it governs, how many backups of each tier would be kept.
Restoring a Fleet Node
A backup that the Fleet Manager holds for a node can be restored back onto that node directly from the Fleet Node Backups scaffold using the Restore to Node action. The Fleet Manager instructs the node to restore the selected backup; the node downloads the archive back from the manager, verifies its checksum, and restores it. The restore uses the same safeguards as a local restore, including the trial restore into a temporary database and the check that the node is not running an older software build than the backup.
Restore
An rXg may be restored with a backup that is uploaded by the operator or that is chosen from one or more that are stored on the local persistent storage. A dialog on the Backup view is presented to accomplish this task.
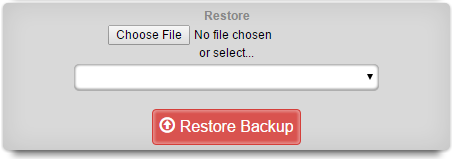
To restore a backup that has been previously created via a pull mechanism, use the file chooser dialog to select a rXg backup file that is accessible via the administrator's workstation. To restore a backup that has been previously created via a local routing backup or remotely pushed to the rXg, select a backup from the drop down.
If no local routine backups or remotely pushed backups are present on the rXg persistent storage, then the option to select a file stored on the rXg will not appear.
When restoring a backup, it is important to note that the rXg will maintain the license that is present on the rXg. Furthermore, when a backup is restored to a rXg that does not have the same Ethernet interfaces, the restore mechanism enables the operator to reconfigure the interfaces before the rXg comes online. This behavior enables operators to use a single rXg to build a configuration template that may be replicated across a fleet of rXgs.
Keep in mind that the flexibility of the backup and restore mechanism must be used in a reasonable manner. In general, the backup and restore mechanism is designed for similar machines. Restoring a secondary warm spare rXg that has fewer capabilities than a failed primary active rXg will likely result in disastrous consequences.
Restoring an Encrypted Backup
If Backup Encryption is enabled (configured in the Backup Encryption section of the Device Options scaffold), backups are encrypted to an operator-held public key and the private key is never stored on the rXg. The rXg therefore cannot decrypt a backup and refuses to restore an encrypted one: when an encrypted archive is uploaded to the restore dialog or supplied on the command line, the restore is rejected with a message indicating that the archive must be decrypted off-site first. Decrypt the archive on a machine that holds the private key and then restore the resulting plaintext archive. The Backup Encryption section of the System Options documentation describes how to generate keys, decrypt an archive, and restore the result.
Backup Integrity
Every backup archive that the rXg creates is accompanied by a manifest file, stored alongside the archive with a .manifest.json suffix. The manifest records a SHA-256 checksum of the archive along with the build, host, and contents of the backup.
When a backup is restored, the rXg recomputes the checksum of the archive and compares it against the value recorded in the manifest before extracting any data. A backup that has been truncated or altered in transit fails this comparison and the restore is aborted before the existing configuration is touched. Backups created before this mechanism was introduced do not have a manifest and are restored without an integrity check. The integrity of an encrypted backup is instead guaranteed by its authenticated encryption a tampered archive fails to decrypt so the checksum comparison does not apply to it.
Config Templates
Entries in the Config Templates scaffold provide the ability to configure the rXg with YAML configuration files.
The name field is an arbitrary string descriptor used only for administrative identification. Choose a name that reflects the purpose of the record. This field has no bearing on the configuration or settings determined by this scaffold.
You can either paste in your configuration template into the config field, or you can load one from either a local file with the upload file field or a remote file with the remote URL field. If the remote URL requires basic authentication, then use the username and password fields.
The apply template field applies the config template immediately after saving.
The recurring method field instructs the backend to regularly fetch the file at the remote URL and apply it on a schedule.
The note field is a place for the administrator to enter a comment. This field is purely informational and has no bearing on the configuration settings.
Config Template Deployment History
The Config Template Deployment History scaffold provides a comprehensive audit log of all config template applications. Every time a config template is appliedwhether in test mode or live modethe system creates a detailed record of what was attempted, what changed, and the outcome.
Viewing Deployment History
The deployment history scaffold displays a list of all template applications with the following information:
- Config Template Name - The name of the template that was applied
- Initiated At - When the template application was started
- Status - The outcome of the deployment (Success, Failure, Partial Failure, In Progress, or Pending)
- Deployment Type - Whether this was a local deployment or a fleet deployment
- Initiated By - The administrator who initiated the deployment. For fleet deployments received from a fleet manager, this shows the fleet manager hostname and the initiating admin (e.g., "[FLEET] fleet-manager.example.com (admin)")
- Mode - Whether the template was run in Test mode or Apply mode
- Total Changes - The number of records that were created, updated, or deleted
On fleet managers, additional columns show fleet node deployment statistics.
Viewing Deployment Details
Clicking Show on a deployment record displays comprehensive details including:
- Complete deployment metadata (timestamps, initiator, client IP)
- Change summary showing counts of created, updated, deleted, and failed records
- The raw template content (ERB source) that was applied
- The rendered template content (after ERB processing) for local deployments
- Template checksum for verification
For fleet deployments, the rendered template content is stored per-node rather than on the parent deployment record. This is because each fleet node renders the ERB template against its own database, which may produce different results. View individual node records to see each node's rendered template.
Viewing Individual Changes
Each deployment tracks the individual record changes that occurred. Click the Changes action link to view a detailed list of all changes made during that deployment. For each change, the system records:
- Action - The type of change (Create, Update, Delete, or Failed)
- Affected Model - The type of record that was changed (e.g., Policy, Account, Address)
- Record Label - A human-readable identifier for the affected record
- Before Attributes - The state of the record before the change (for updates and deletes)
- After Attributes - The state of the record after the change (for creates and updates)
- Attribute Changes - For updates, the specific fields that changed and their old/new values
Test Mode Deployments
When a config template is run in test mode, the deployment history still records what would have changed, even though the changes are rolled back. This allows operators to:
- Preview the effects of a template before applying it
- Verify that a template will make the expected changes
- Troubleshoot template issues without affecting production data
Test mode deployments are clearly marked with "Test" in the Mode column.
Fleet Deployments
On a fleet manager, when a config template is applied to fleet nodes, the deployment history tracks:
- The overall deployment status across all targeted nodes
- Individual node deployment status via the Nodes action link
- Success/failure counts for fleet-wide visibility
Click the Nodes action link to view detailed information for each fleet node, including:
- Status - Whether the deployment succeeded, failed, or is still in progress
- Response Time - How long the fleet node took to apply the template
- Changes Count - The number of records modified on that node
- Rendered Template - The template after ERB processing against the fleet node's database
Note on Fleet Node Compatibility: The deployment audit trail feature requires fleet nodes to be running a compatible software version. For fleet nodes running older software that does not support this feature:
- The Changes Count column will display "N/A"
- No individual change records will be available for that node
- The deployment will still succeed; only the audit trail data is unavailable
On fleet nodes that receive templates from a fleet manager, the Initiated By field shows the originating fleet manager and administrator, providing a complete audit trail across the fleet.
Data Retention
Deployment history records are automatically purged after 3 months by default to manage database storage. This includes:
- Config Template Deployment records
- Config Template Deployment Node records (for fleet deployments)
- Config Template Deployment Change records
The retention period can be adjusted in the Database Purgers scaffold under System > Maintenance.
Security and Immutability
Deployment history records are immutable audit logs:
- Records cannot be created, modified, or deleted through the administrative interface
- Critical fields (initiator, template content, timestamps) cannot be changed after creation
- The scaffold is read-only to preserve audit integrity
Example: Audit Trail Flow
Here is a typical audit trail scenario for tracking configuration changes:
Administrator applies template: Admin "jsmith" applies a config template named "Network Settings" that modifies DNS and DHCP settings.
Deployment record created: The system creates a deployment history record showing:
- Initiated by: jsmith
- Template: Network Settings
- Mode: Live
- Status: Success (or Partial Failure if some changes failed)
Individual changes recorded: Each modification is logged as a separate change record:
- Action:
update, Model:Option, Record: "DNS Server 1", showing before/after values - Action:
create, Model:DhcpOption, Record: "Domain Search List" - Action:
update, Model:Option, Record: "DNS Server 2", showing before/after values
- Action:
Viewing the audit trail: Navigate to System > Backup > Config Template Deployment History to see all deployments. Click Changes to view the detailed list of what was modified, including the exact attribute values before and after each change.
This audit trail enables administrators to: - Understand exactly what changed and when - Identify who made specific configuration changes - Roll back changes by referencing the "before" attribute values - Investigate issues by correlating deployment times with system behavior
Configuration Syntax
The top-level YAML object must be a key-value store (also called a hash, map, or dictionary) or an array of key-value stores. There are two types of top-level keys in the YAML configuration template: model/scaffold keys and smart keys.
Model keys (or scaffold keys ) are entries in the YAML template which create/modify entries in the database. These keys are based on the underlying ActiveRecord models, or scaffolds. You may use the PascalCase or snake_case version of the scaffolds (e.g., AdminRole, admin_role, or admin_roles); however, the PascalCase version ensures you don't conflict with a smart key. Fields are always written in snake_case.
For example, to add an administrator:
Admin:
- login: my_admin
  password: 'testPassword1!'
  password_confirmation: 'testPassword1!'
  admin_role: Super User
  ssh_keypairs:
  - name: my_admin authorized public key
    public_key: 'ssh-rsa AAAA...Q=='
    authorized: true
If you wanted to edit an existing record, ensure that the lookup field is defined first. For example, to set the time zone:
DeviceOption:
- name: Default
  time_zone: America/Chicago
Smart keys are snake_case entries in the YAML template which, in addition to creating entries in the database, perform some other operations. An example of this is the license_key. It is not enough to just create the entry; the backend also needs to process the key so the licensing limitations are removed. Otherwise, (for example) if later in the config template, the operator tries to set the Uplink to 1Gbps, the licensing limitations would not allow this until the backend processed the new license key. To set the license_key in a config template:
license_key: |
  abcdQabcduUzuo5IxtjuDabcdx6zVfEgnjl30Q4lDiabcdpCYmNrQa5x
  ...
  xKdOy1PabcdHydNCvs5CU5JLRabcdn0yHZIpv6FvDxFdmku7XiDEGuI=
Advanced Usage
Top-Level Data Structure
If your top-level data structure is a hash, then you cannot replicate keys, or they will overwrite one-another. So, to organize your config template to support duplicate keys, you need to use an array as your top-level data structure:
# configure management network
- Address:
  - name: mgmt
    cidr: 10.0.0.1/24
- Vlan:
  - name: mgmt
    interface: igb3
    tag: 4
    addresses: mgmt

# configure onboarding network
- Address:
  - name: onboarding
    cidr: 172.16.0.1/23
- Vlan:
  - name: onboarding
    interface: igb3
    tag: 5
    addresses: onboarding
Nested Associations
Rather than creating associated records in their own keys, you can also nest the associations, like so:
Address:
- name: mgmt # configure management network
  cidr: 10.0.0.1/24
  create_dhcp_pool: true
  vlan:
    name: mgmt
    interface: igb3
    tag: 4
- name: onboarding # configure onboarding network
  cidr: 172.16.0.1/23
  create_dhcp_pool: true
  vlan:
    name: onboarding
    interface: igb3
    tag: 5
Notice that this pattern is more concise and readable, and naturally groups associated records together, without having to convert your top-level data structure into an array.
Custom Lookups and Mutating Records
Normally, the first key/value pair under a model key will be used to lookup the record. For example, to edit an admin's role, you can do this:
Admin:
- login: someuser
  admin_role: Super User
However, suppose you wanted to edit a user's login. Then you should use the special _lookup field:
Admin:
- _lookup:
    login: sumusr
  login: someuser
Only Update Existing Records
Typically, when a config template is run, the rXg will look up an existing record and modify it, or attempt to create a new record if there is no existing record.
Sometimes you may wish to only update an existing record if it is found and never create a new record. To do this, you may use the special _updatefield:
AccountGroup:
- name: test
  priority: 5
  _update: true
- name: test2
  priority: 7
  _update: true
The template above would look for existing account groups with the name "test" and "test2" and update their priorities as needed. If the groups do not already exist, they will not be created, and the template will fail and be rolled back.
Delete Existing Records
A config template that contains an _delete key can be used to delete an existing record. See the following example:
Admin:
- login: testadmin
  _delete: true
The template above would look for an existing administrator account with the name "testadmin" and delete the administrator if it does exist.
Association Lookups
When defining a nested association, normally you can just provide a string with a "natural key", which usually refers to the name field on the associated record. There are exceptions for models which don't have aname field, such as the Admin model, and for those we try to use the most sensible field (login in the case of theAdmin model). However, you can also provide a full record definition, for which the normal rules apply (first key/value pair will be used for lookup), and you can even provide a nested custom _lookupfield. If the record doesn't exist, it will be created, assuming you provided all the required fields.
Supported Model/Scaffold Keys
We are not going to enumerate the model keys, since they map directly to scaffolds. You can refer to the rXg API documentation, or you can SSH into the rXg and run console to inspect the various models.
ActiveRecord models should generally be referenced using theirPascalCase name, to ensure you are not accidentally using a smart key. However, to accommodate flexibility, you may also use thesnake_case version of the model name in your config template.
Supported Smart Keys
license_key Configure the system with the provided license key. This key only takes a single string as an argument, but you do need to use YAML formatting to send multiple lines. For example:
license_key: |
  abcdQabcduUzuo5IxtjuDabcdx6gnjl30Q4lDiabcdpCYbK4VmNrQa5x
  ...
  xKdOy1PabcdHydNCvs5CU5JLRabcdn0yHZIpv6FvDxFdmku7XiDEGuI=
Use Config Template to Bootstrap New rXg Installation
A new rXg installation (before the first admin is created and the license is applied) can be bootstrapped and pre-configured using a configuration template delivered to the rXg in one of the two following ways:
- on a USB drive during the initial rXg boot, or
- via HTTP(S) download from a server advertised during the DHCP exchange.
The bootstrap process is executed after the installation of the rXg completes but before the first admin account is created and the license is added to the system.
The config template can be of arbitrary complexity and contain all the necessary baseline configuration elements, including local user accounts (administration, read-only, etc.), IP addressing, VLANs, IP groups, policies, etc., as long as the config template syntax is correct. It is also possible to include the license key in the bootstrap config template.
It is recommended that the bootstrap config template be vetted thoroughly before it is applied to any newly installed rXg systems to avoid misconfiguration and the need for additional cleanup.
Bootstrap via USB Drive
The USB bootstrap method allows you to pre-configure an rXg system by placing a configuration template file on a USB drive before the first boot.
USB Bootstrap Flow
                         USB BOOTSTRAP PROCESS


       Power On
         rXg


       rXg Boot
        Starts


       Scan USB            File Detection Criteria:
        Drives        Has .yml extension
              OR contains 'template' in filename


      Config File
        Found?


      YES        NO


 Parse YAML      Boot with
   Config        Default
    Settings
                  (First Admin
                  Setup Screen)

   Valid
   YAML?


 YES        NO


 Process Smart              Log Error
 Keys First                 Boot Default
 (license_key)


 Process Model
 Keys
 (Admin, Device
 Option, etc.)


   All Records
   Created OK?


   YES                  NO (partial)


 Bootstrap         Some records
 Complete          may have failed
                   (check logs)
 System boots
 with applied
 configuration

                     System boots
                     with partial
                     configuration
USB Drive Requirements
| Requirement | Details |
|---|---|
| Filesystem | FAT32, UFS, or ext2/ext3/ext4 |
| File location | Root directory of the USB drive |
| File naming | Must have .yml extension AND/OR contain the word template in the filename |
| Examples | config.yml, bootstrap-template.yml, my-template-config.yml |
Bootstrap Process
- Complete the rXg installation process
- Power down the rXg system
- Insert a USB drive containing your config template file
- Power on the rXg system
During boot, the rXg will: 1. Scan all attached USB drives for files matching the naming criteria 2. If multiple matching files are found, they are processed in alphabetical order 3. Apply each config template following standard config template rules 4. If critical errors occur, the bootstrap is aborted and the system boots with default settings
Minimal Bootstrap Example
A minimal bootstrap configuration typically includes:
# Apply license key (processed first)
license_key: |-
  <your license key here>

# Create administrator account
Admin:
- login: admin
  password: 'YourSecureP@ssword123!'
  password_confirmation: 'YourSecureP@ssword123!'
  admin_role: Super User
  email: [email protected]

# Configure system hostname
DeviceOption:
- name: Default
  active: true
  domain_name: rxg.example.com
  time_zone: America/Chicago
A complete minimal bootstrap example is available here: Minimal Bootstrap Example
Important Notes
- The
license_keyis a smart key that is processed before other configuration items - The
Super Useradmin role exists by default on fresh installations - Password must meet complexity requirements (minimum 8 characters, mixed case, numbers, and special characters)
- The
Defaultdevice option always exists and should be updated rather than created - Use
PascalCasemodel names (e.g.,DeviceOption,SslKeyChain) to avoid conflicts with smart keys
Bootstrap via HTTP(S) Download
The HTTP(S) download bootstrap process allows automatic provisioning of rXg systems using DHCP options to specify the location of a configuration template.
Requirements Summary
| Component | Requirement |
|---|---|
| DHCP Server | Must provide Option 66 (TFTP Server Name) and Option 67 (Bootfile Name) |
| Option 66 | HTTP or HTTPS URL of the server hosting the config template |
| Option 67 | Filename of the config template (e.g., config-template.yml) |
| HTTP(S) Server | Must be accessible from the rXg uplink network |
| Config Template | Valid YAML configuration file |
DHCP Bootstrap Flow
                       DHCP BOOTSTRAP PROCESS


  Power On
    rXg


  rXg Boot
   Starts


                        PHASE 1: Initial DHCP
                        (Standard DORA Process)


   rXg           DHCP Discover         DHCP
   Uplink        DHCP Offer          Server
   Interface     DHCP Request
                 DHCP ACK


        IP Address Acquired (e.g., 192.168.151.182)


                     PHASE 2: Bootstrap Options Request
                     (Periodic DHCP Request for Options 66 & 67)


     Request Options 66, 67
   rXg               DHCP
                                                Server

     Option 66: Server URL
                    Option 67: Filename


  Options
  Received?


 YES        NO


       Continue
       polling DHCP
       periodically


       Eventually boot
       with defaults
       (First Admin
       Setup Screen)


                      PHASE 3: Config Template Fetch


      HTTP(S) GET Request
   rXg              HTTP(S)
                 URL: {Option66}/{Option67}    Server

                   Serves:
      YAML Config Template      config.yml


   Download
  Successful?


 YES        NO


       Log Error
       Retry or boot
       with defaults


                      PHASE 4: Config Template Processing
                      (Same as USB Bootstrap)


 Parse YAML
 Config


 Process Smart
 Keys First
 (license_key)


 Process Model
 Keys
 (Admin, Device
 Option, etc.)


 Bootstrap
 Complete

 System boots
 with applied
 configuration
Dynamic Option 67: The filename in Option 67 can include dynamic parameters that the rXg will substitute with system values:
/config_template_fetch?rxg_iui=%iui%&rxg_ip=%ip%&rxg_mac=%base_mac%
This enables the HTTP(S) server to generate customized configurations based on the requesting rXg's identity.
How It Works
The HTTP(S) download bootstrap process involves specific DHCP server configuration and an HTTP(S) server on which the config template is stored.
The DHCP server provides an IP address to the rXg uplink interface during the boot process, following the standard DHCPv4 DORA process, as shown below, where the rXg acquires the uplink interface address. At this stage, the rXg does not request the DHCP bootstrap options. The example below shows the client rXg (rgxclient) be assigned the address of 192.168.151.182 from the DHCP server of 192.168.151.1. Only standard options are requested and provided.
19:02:00.139469 bc:24:11:02:b7:ae > ff:ff:ff:ff:ff:ff, ethertype IPv4 (0x0800), length 342: (tos 0x10, ttl 128, id 0, offset 0, flags [none], proto UDP (17), length 328)
    0.0.0.0.68 > 255.255.255.255.67: [udp sum ok] BOOTP/DHCP, Request from bc:24:11:02:b7:ae, length 300, xid 0x15500df4, Flags [none] (0x0000)
        Client-Ethernet-Address bc:24:11:02:b7:ae
        Vendor-rfc1048 Extensions
            Magic Cookie 0x63825363
            DHCP-Message (53), length 1: Discover
            Requested-IP (50), length 4: 192.168.151.104
            Client-ID (61), length 7: ether bc:24:11:02:b7:ae
            Hostname (12), length 9: "rxgclient"
            Parameter-Request (55), length 10:
            Subnet-Mask (1), BR (28), Time-Zone (2), Classless-Static-Route (121)
            Default-Gateway (3), Domain-Name (15), Domain-Name-Server (6), Hostname (12)
            Unknown (119), MTU (26)
            END (255), length 0
            PAD (0), length 0, occurs 18
19:02:00.139571 3c:fd:fe:bd:a2:63 > bc:24:11:02:b7:ae, ethertype IPv4 (0x0800), length 342: (tos 0x10, ttl 128, id 0, offset 0, flags [none], proto UDP (17), length 328)
    192.168.151.1.67 > 192.168.151.182.68: [udp sum ok] BOOTP/DHCP, Reply, length 300, xid 0x15500df4, Flags [none] (0x0000)
        Your-IP 192.168.151.182
        Client-Ethernet-Address bc:24:11:02:b7:ae
        Vendor-rfc1048 Extensions
            Magic Cookie 0x63825363
            DHCP-Message (53), length 1: Offer
            Server-ID (54), length 4: 192.168.151.1
            Lease-Time (51), length 4: 3440
            Subnet-Mask (1), length 4: 255.255.255.0
            BR (28), length 4: 192.168.151.255
            Default-Gateway (3), length 4: 192.168.151.1
            Domain-Name-Server (6), length 4: 192.168.151.1
            END (255), length 0
            PAD (0), length 0, occurs 20
19:02:02.269492 bc:24:11:02:b7:ae > ff:ff:ff:ff:ff:ff, ethertype IPv4 (0x0800), length 342: (tos 0x10, ttl 128, id 0, offset 0, flags [none], proto UDP (17), length 328)
    0.0.0.0.68 > 255.255.255.255.67: [udp sum ok] BOOTP/DHCP, Request from bc:24:11:02:b7:ae, length 300, xid 0x15500df4, Flags [none] (0x0000)
        Client-Ethernet-Address bc:24:11:02:b7:ae
        Vendor-rfc1048 Extensions
            Magic Cookie 0x63825363
            DHCP-Message (53), length 1: Request
            Server-ID (54), length 4: 192.168.151.1
            Requested-IP (50), length 4: 192.168.151.182
            Client-ID (61), length 7: ether bc:24:11:02:b7:ae
            Hostname (12), length 9: "rxgclient"
            Parameter-Request (55), length 10:
            Subnet-Mask (1), BR (28), Time-Zone (2), Classless-Static-Route (121)
            Default-Gateway (3), Domain-Name (15), Domain-Name-Server (6), Hostname (12)
            Unknown (119), MTU (26)
            END (255), length 0
            PAD (0), length 0, occurs 12
19:02:02.269596 3c:fd:fe:bd:a2:63 > bc:24:11:02:b7:ae, ethertype IPv4 (0x0800), length 342: (tos 0x10, ttl 128, id 0, offset 0, flags [none], proto UDP (17), length 328)
    192.168.151.1.67 > 192.168.151.182.68: [udp sum ok] BOOTP/DHCP, Reply, length 300, xid 0x15500df4, Flags [none] (0x0000)
        Your-IP 192.168.151.182
        Client-Ethernet-Address bc:24:11:02:b7:ae
        Vendor-rfc1048 Extensions
            Magic Cookie 0x63825363
            DHCP-Message (53), length 1: ACK
            Server-ID (54), length 4: 192.168.151.1
            Lease-Time (51), length 4: 3438
            Subnet-Mask (1), length 4: 255.255.255.0
            BR (28), length 4: 192.168.151.255
            Default-Gateway (3), length 4: 192.168.151.1
            Domain-Name-Server (6), length 4: 192.168.151.1
            END (255), length 0
            PAD (0), length 0, occurs 20
Once the DHCP DORA is completed, the rXg periodically sends a DHCP Request message requesting Option 66 (tftp-server-name) and Option 67 (bootfile-name), as shown below. The DHCP server provides the requested Option 66 (e.g., http://192.168.151.10) and Option 67 (e.g., "config-template-mdu.yml"). The only two supported transport protocols are HTTP and HTTPS.
19:15:52.002351 bc:24:11:02:b7:ae > ff:ff:ff:ff:ff:ff, ethertype IPv4 (0x0800), length 342: (tos 0x10, ttl 128, id 0, offset 0, flags [none], proto UDP (17), length 328)
    0.0.0.0.68 > 255.255.255.255.67: [udp sum ok] BOOTP/DHCP, Request from bc:24:11:02:b7:ae, length 300, xid 0x57663714, Flags [none] (0x0000)
          Client-Ethernet-Address bc:24:11:02:b7:ae
          Vendor-rfc1048 Extensions
            Magic Cookie 0x63825363
            DHCP-Message (53), length 1: Request
            Requested-IP (50), length 4: 192.168.151.182
            Hostname (12), length 9: "rxgclient"
            Parameter-Request (55), length 9:
              Subnet-Mask (1), BR (28), Time-Zone (2), Default-Gateway (3)
              Domain-Name (15), Domain-Name-Server (6), Hostname (12), BF (67)
              TFTP (66)
            Client-ID (61), length 7: ether bc:24:11:02:b7:ae
            END (255), length 0
            PAD (0), length 0, occurs 19
19:15:52.004756 3c:fd:fe:bd:a2:63 > bc:24:11:02:b7:ae, ethertype IPv4 (0x0800), length 370: (tos 0x10, ttl 128, id 0, offset 0, flags [none], proto UDP (17), length 356)
    192.168.151.1.67 > 192.168.151.182.68: [udp sum ok] BOOTP/DHCP, Reply, length 328, xid 0x57663714, Flags [none] (0x0000)
          Your-IP 192.168.151.182
          Client-Ethernet-Address bc:24:11:02:b7:ae
          Vendor-rfc1048 Extensions
            Magic Cookie 0x63825363
            DHCP-Message (53), length 1: ACK
            Server-ID (54), length 4: 192.168.151.1
            Lease-Time (51), length 4: 3600
            Subnet-Mask (1), length 4: 255.255.255.0
            BR (28), length 4: 192.168.151.255
            Default-Gateway (3), length 4: 192.168.151.1
            Domain-Name-Server (6), length 4: 192.168.151.1
            BF (67), length 23: "config-template-mdu.yml"
            TFTP (66), length 21: "http://192.168.151.10"
            END (255), length 0
Once the rXg is provided with the requested Option 66 and Option 67 values, the HTTP(S) GET request is transmitted to the indicated server hosting the indicated config template.
192.168.151.182 - - [19/Apr/2025:03:53:37 +0000] "GET /config-template-mdu.yml? HTTP/1.1" 200 12301 "-" "Ruby"
The following message is displayed on the console

DHCP Server Configuration
The DHCP server used to provide Option 66 and Option 67 may use any platform available to the operator. The following examples show the configuration of the necessary DHCP options using a standard rXg DHCP server and two of the predefined options. The Services::DHCP scaffolds are used in this example.
Create new DHCP option entries for Option 66 and Option 67 under the Services::DHCP::DHCP Options scaffold, as shown below and assign them respective names and values. In the example below, Option 66 is assigned the address of the HTTP server hosting the YML file (http://192.168.150.10), while Option 67 is assigned the file name (config-template-mdu.yml).
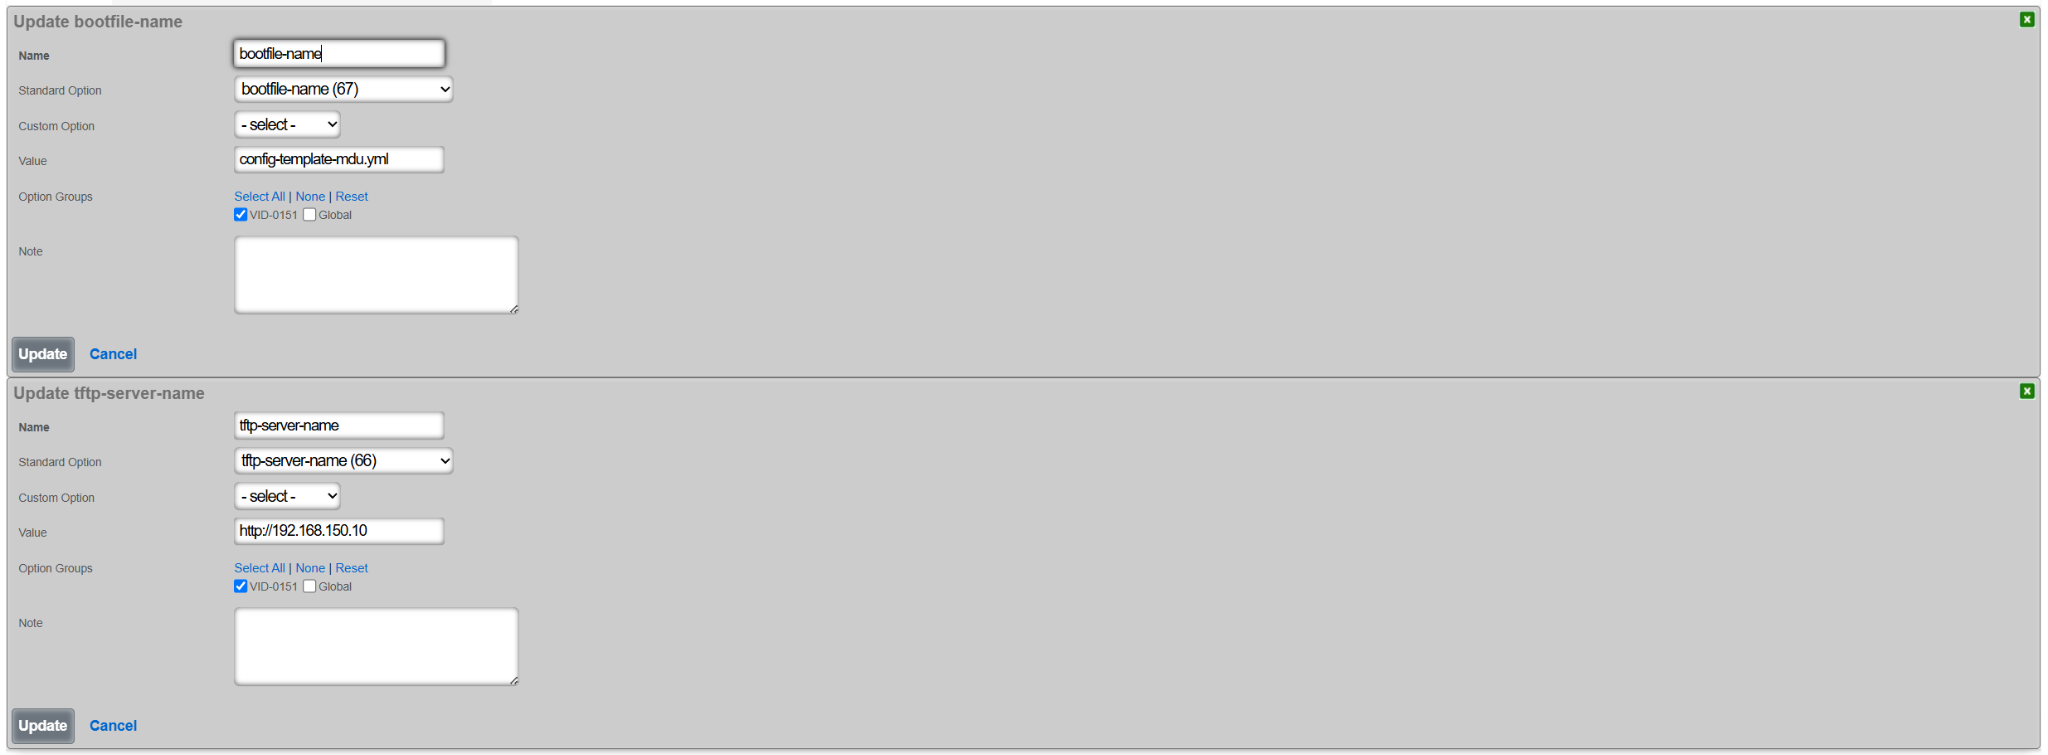
Next, create a new DHCP option group under the Services::DHCP::DHCP Option Groups scaffold, as shown below. This group will be tied back to the DHCP pool associated with the IP address group / VLAN on which the new rXg is being bootstrapped. Note that several global options were also selected, including:
- Global default-lease-time
- Global max-lease-time
- Global min-lease-time
- send the local gateway address as primary DNS server (recommended)
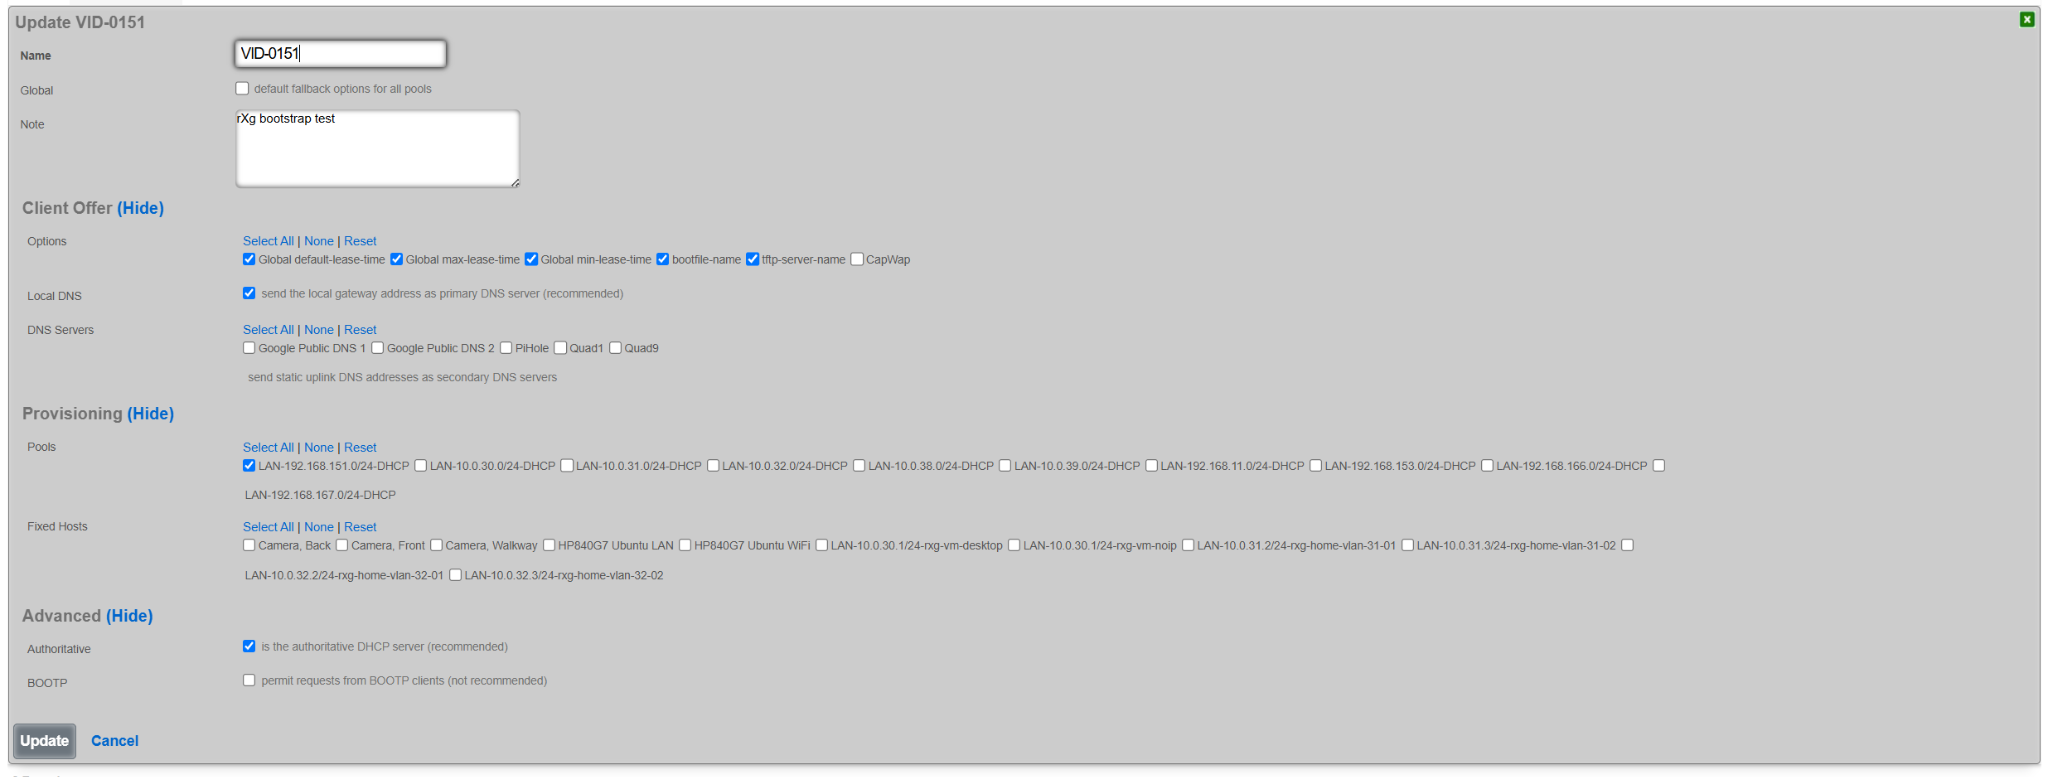
Once created, the DHCP pool for the target VLAN contains an entry associating it with the specific newly created options group (VID-0151 in this case).

Similar configuration can be also reproduced using any existing DHCP server, though details are outside of the scope of this document.
Dynamic Option 67
The value of Option 67 can be also defined using a more comprehensive set of parameters, by sending an HTTP(S) GET request to a specific page on the target HTTP(S) server (/config_template_fetch in the example below) with a number of parameters, comprising tuples of {param_name}=%{value}%, where the param_name depends on the internal implementation of the example config_template_fetch script, and the value is shown in the table below.
| {value} | Internal rXg variable | Meaning |
|---|---|---|
| iui | IUI | rXg sends its local IUI value |
| serial_number | SystemInfo.system_serial_number | rXg sends its serial number |
| version | RXG_BUILD | rXg sends its current build information (version) |
| hostname | DeviceOption.active.domain_name | rXg sends its domain name |
| ip | Uplink.primary_interface_stat_alias | rXg sends the local primary uplink interface IP address |
| base_mac | PhysicalInterface.base_mac | rXg sends the local primary uplink interface MAC address |
| timestamp | Time.now.to_i | rXg sends the current time when the request is being made |
The decision on which of the supported parameters to include in the rXg HTTP(S) GET request is implementation-dependent.
The resulting value of Option 67 requesting the bootstrapped rXg to send to the remote HTTP(S) server would look as follows for IUI and IP address values. This scring can be further extended by adding new parameters and their respective values.
/config_template_fetch?rxg_iui=%iui%&rxg_ip=%ip%
This mechanism allows the remote HTTP(S) server to provide a custom YML config template file in the function of the parameters filled in by the bootstrapped rXg node, including issuing the license (based on the IUI value), generating system certificates (based on hostname value), setting the WAN interface and system options (based on hostname and ip values), etc. The content and the operation of the HTTP(S) server in this respect is implementation-dependent and outside of the scope of responsibility of the rXg system.
Bootstrap Example
For the purposes of the demonstration of the bootstrapping process via DHCP message exchange, a new rXg system was installed and offered a MDU-like config template, enhanced with license information and the initial administration account.
Once the initialization process was completed, the UI displayed (provided that a valid license was installed within the template or already present in the Asset Manager), the Config Templates scaffold shows the config template downloaded during the rXg initialization process. The template is automatically applied to the rXg system, creating the necessary user accounts

The following example shows the state of the rXg system after the DHCP-driven bootstrap process is completed and the system is fully configured with the MDU-style setup, covering VLANs, IP addresses, policies, accounts, etc., as shown in the following screenshots.


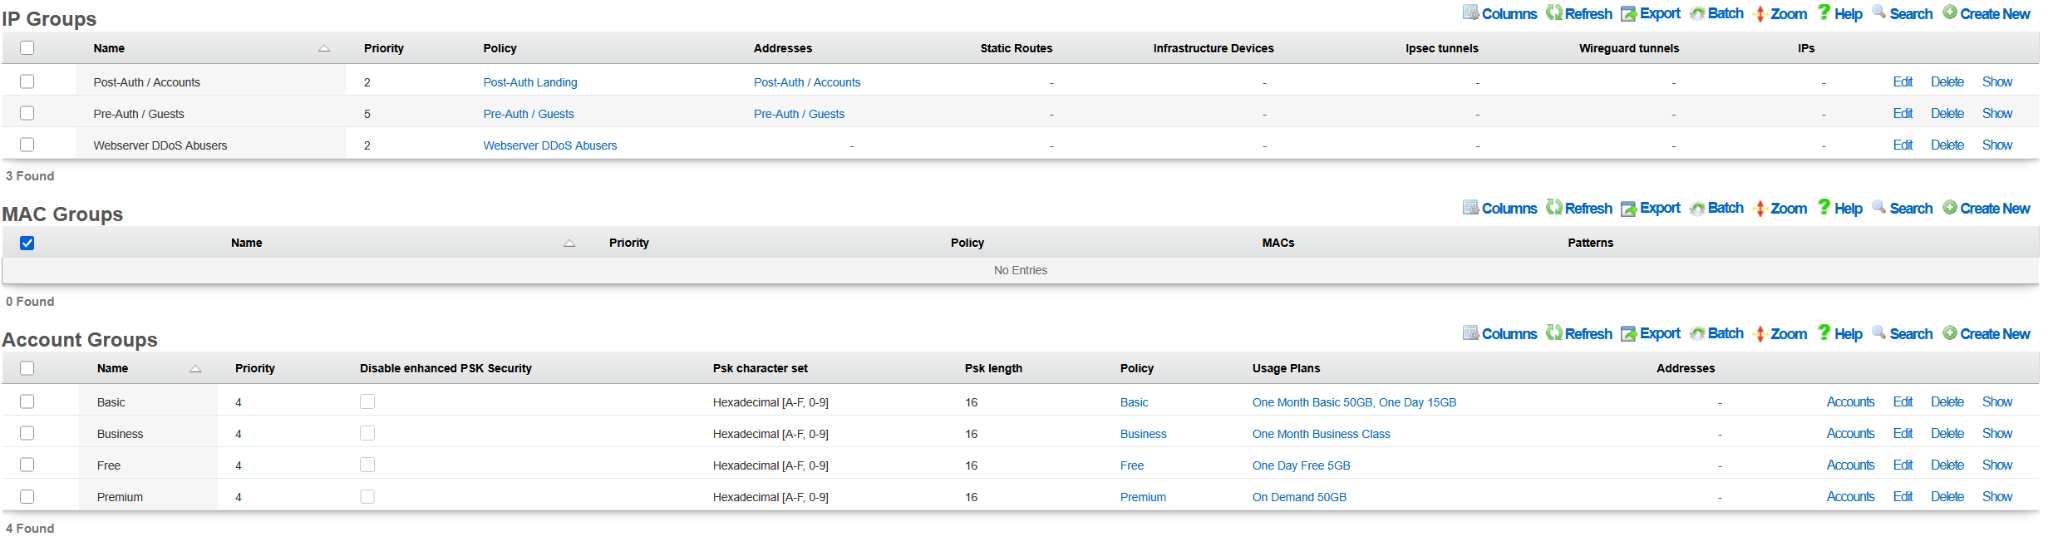
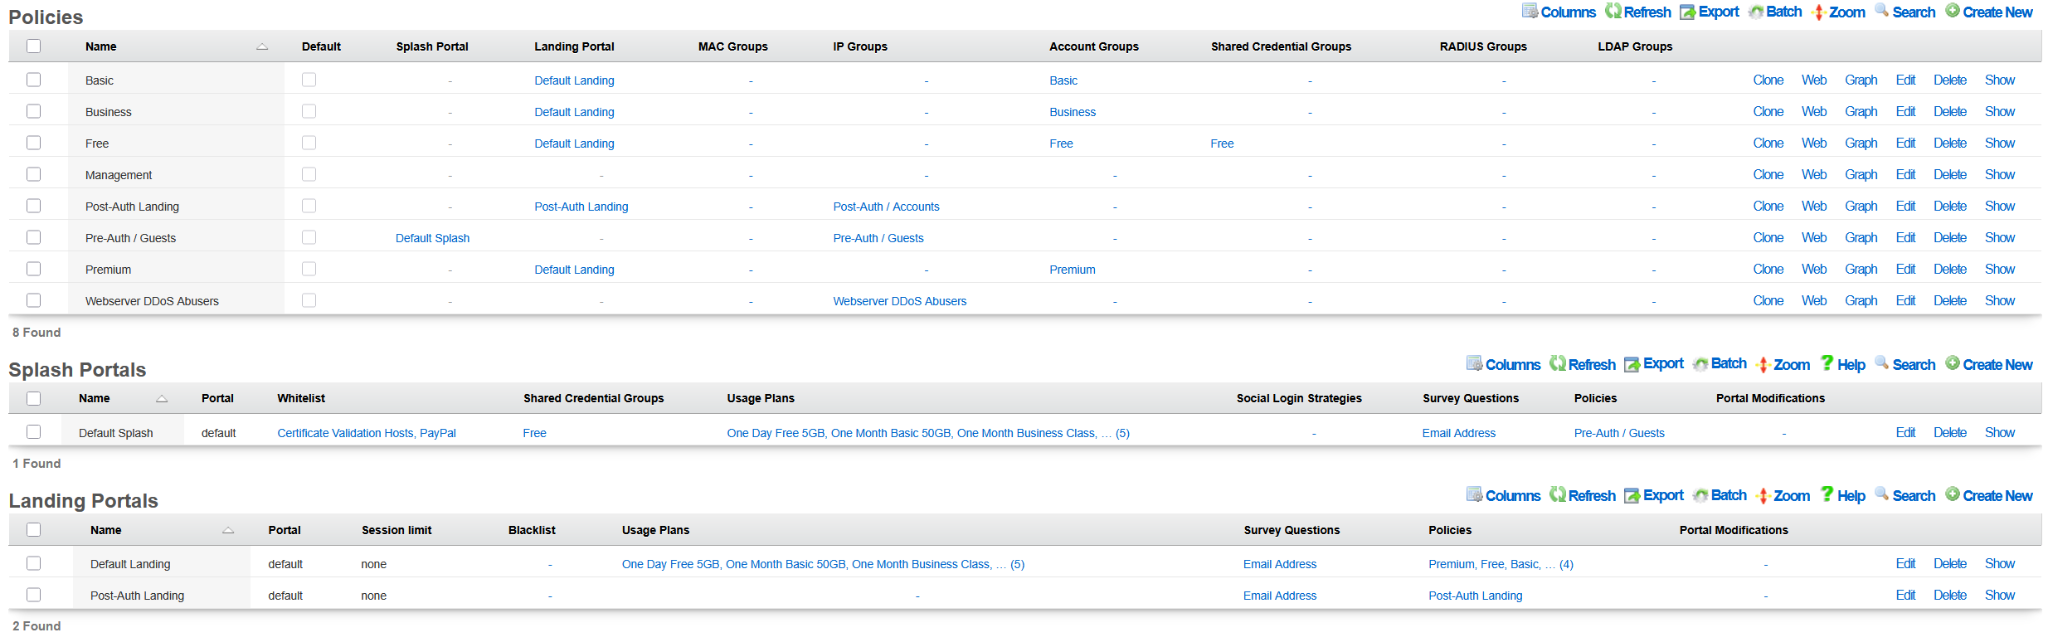


The example of the config template used for this sectio of the manual is available here: YML example
Bootstrap Troubleshooting
This section covers common issues encountered during the bootstrap process and how to diagnose them.
Checking Bootstrap Logs
Bootstrap operations are logged to the system log. To view bootstrap-related log entries:
- SSH into the rXg system (if an admin account exists) or access the console directly
Check the system logs:
shell
grep -i bootstrap /var/log/messages
grep -i "config template" /var/log/messages
For more detailed Rails application logs:
shell
tail -100 /space/rxg/console/log/production.log | grep -i template
Common Issues and Solutions
| Issue | Possible Cause | Solution |
|---|---|---|
| License applied but admin not created | Password doesn't meet complexity requirements | Ensure password has 8+ characters with uppercase, lowercase, numbers, and special characters |
| License applied but admin not created | Incorrect model or field name | Use Admin (not admins) and verify field names match the model |
| USB drive not detected | Unsupported filesystem | Format USB as FAT32, UFS, or ext2/ext3/ext4 |
| Config file not found | Incorrect filename | Ensure file has .yml extension or contains template in the name |
| Config file not found | File not in root directory | Place the YAML file in the root directory of the USB drive |
| SSL certificate not applied | Incorrect model name | Use SslKeyChain (PascalCase), not ssl_key_chains |
| Partial configuration applied | YAML syntax error | Validate YAML syntax before deployment using an online validator |
| DHCP bootstrap not working | Missing DHCP options | Verify Option 66 and Option 67 are configured on DHCP server |
Validating Your Config Template
Before deploying a bootstrap configuration, validate it using these methods:
YAML Syntax Validation: Use an online YAML validator or command-line tool:
shell
python3 -c "import yaml; yaml.safe_load(open('config.yml'))"
Test on Existing rXg: Apply the template in test mode on an existing rXg installation:
- Navigate to System > Backup > Config Templates
- Create a new template and paste your configuration
- Click Test to see what changes would be made without applying them
Check Model Names: Verify that all model names are correct by referencing the rXg API documentation
Password Complexity Requirements
Administrator passwords must meet these requirements: - Minimum 8 characters - Maximum 100 characters - Must include a mix of character types for sufficient complexity - The system calculates a "password strength" score that must meet minimum thresholds
Example of a compliant password: SecureP@ss123!
Default Records Available During Bootstrap
The following records exist by default on a fresh rXg installation and can be referenced in your bootstrap configuration:
| Model | Default Record | Notes |
|---|---|---|
| AdminRole | Super User |
Full administrative access |
| AdminRole | Read Only |
View-only access |
| AdminRole | Web Designer |
Limited access for portal customization |
| AdminRole | Conference Controller |
Conference management access |
| AdminRole | Conference User |
Conference participant access |
| DeviceOption | Default |
Update this record rather than creating a new one |
| Policy | Default |
Default network policy |
Field Name Reference for Common Models
When creating bootstrap configurations, use these field names:
Admin:
yaml
Admin:
- login: username          # Required, 3-32 chars, lowercase + digits
  password: 'password'     # Required for new accounts
  password_confirmation: 'password'  # Must match password
  admin_role: Super User   # References AdminRole by name
  email: [email protected]  # Optional
  first_name: John         # Optional
  last_name: Doe           # Optional
DeviceOption:
yaml
DeviceOption:
- name: Default            # Use "Default" to update existing
  active: true
  domain_name: rxg.example.com
  time_zone: America/Chicago
  smtp_address: localhost  # Optional
  ssh_port: 22             # Optional
SslKeyChain:
yaml
SslKeyChain:
- name: certificate-name
  active: true
  certificate: |           # PEM format
    -----BEGIN CERTIFICATE-----
    ...
    -----END CERTIFICATE-----
  server_key: |            # PEM format
    -----BEGIN PRIVATE KEY-----
    ...
    -----END PRIVATE KEY-----
  intermediate_certificate: |  # Optional, PEM format
    -----BEGIN CERTIFICATE-----
    ...
    -----END CERTIFICATE-----
Integrating with Ansible
Ansible is an automation engine that can automate configuration management, deployment, and many other IT needs. Ansible relies on OpenSSH, making it very lightweight and secure. Furthermore, Ansible does not require any remote agent for configuration management. By utilizing the rXg config template mechanism, Ansible can automate tasks across many installations.
Procedure
- Install Ansible on a host machine. See Installation Guide.
- Create Hosts file "/etc/ansible/hosts"
Populate hosts file (here I create a group called lab, and add my host to it).
  lab:
      hosts:
              lab.rgnets.net:
          production:
            hosts:
              production.rgnets.net:
Ad-Hoc Ping all hosts
  ndk@MBP ansible % ansible all -m ping
          [WARNING]: Platform freebsd on host production.rgnets.com is using the discovered Python interpreter at
          /usr/local/bin/python3.7, but future installation of another Python interpreter could change this. See
          https://docs.ansible.com/ansible/2.9/reference_appendices/interpreter_discovery.html for more information. **production.rgnets.com | SUCCESS =\> {**"ansible_facts": {
                  "discovered_interpreter_python": "/usr/local/bin/python3.7"
              },
              "changed": false,
              "ping": "pong"
          }
          [WARNING]: Platform freebsd on host lab.rgnets.com is using the discovered Python interpreter at
          /usr/local/bin/python3.7, but future installation of another Python interpreter could change this. See
          https://docs.ansible.com/ansible/2.9/reference_appendices/interpreter_discovery.html for more information. **lab.rgnets.com | SUCCESS =\> {**"ansible_facts": {
                  "discovered_interpreter_python": "/usr/local/bin/python3.7"
              },
              "changed": false,
              "ping": "pong"
          }
Ad-Hoc Ping all hosts in 'lab' group
  ndk@MBP ansible % ansible lab -m ping
          [WARNING]: Platform freebsd on host lab.rgnets.com is using the discovered Python interpreter at
          /usr/local/bin/python3.7, but future installation of another Python interpreter could change this. See
          https://docs.ansible.com/ansible/2.9/reference_appendices/interpreter_discovery.html for more information. **lab.rgnets.com | SUCCESS =\> {**"ansible_facts": {
                  "discovered_interpreter_python": "/usr/local/bin/python3.7"
              },
              "changed": false,
              "ping": "pong"
          }
Ad-Hoc copy a file to all hosts in 'lab' group
ansible lab -m copy -a "src=/etc/ansible/test.yaml dest=~/"Create an Ansible "Playbook". In Ansible, a playbook is a list of "plays". Plays are a collection of Ansible modules, or tasks to execute against one or more remote machines. In this example, we will utilize two "plays":
templatewhich is used to copy a file from our Ansible host to the desired rXg, andshellto execute a command on the rXg.Create a rXg config-template YAML. Example:
admins.yamlAdmin: - login: dgray first_name: Dorian last_name: Gray email: [email protected] crypted_password: "$2a$11$NRMhuglh/HgEvB3Um2skUe9Y/GP0jceg6hZRYDrbLufnO0Y2ZN4tO" admin_role: Super UserCreate an Ansible "Playbook" YAML. Example:
adminmgmt.yml--- - hosts: lab tasks: - name: Copy Admins YAML to host(s) template: src: /etc/ansible/admins.yaml dest: ~/admins.yaml - name: Apply the YAML as a config-Template shell: "/space/rxg/rxgd/bin/apply_template ~/admins.yaml" register: apply_template_output - debug: var: apply_template_outputExecute the Ansible Playbook:
  ndk@MBP ansible % ansible-playbook adminmgmt.yml

  PLAY [lab] ***************************************************************************************************************

  TASK [Gathering Facts] ***************************************************************************************************
  [WARNING]: Platform freebsd on host lab.rgnets.com is using the discovered Python interpreter at
  /usr/local/bin/python3.7, but future installation of another Python interpreter could change this. See
  https://docs.ansible.com/ansible/2.9/reference_appendices/interpreter_discovery.html for more information.
  ok: [lab.rgnets.com]

  TASK [Copy Admins YAML to host(s)] ***************************************************************************************
  ok: [lab.rgnets.com]

  TASK [Apply the YAML as a config-Template] *******************************************************************************
  changed: [lab.rgnets.com]

  TASK [debug] *************************************************************************************************************
  ok: [lab.rgnets.com] => {
      "apply_template_output": {
          "changed": true,
          "cmd": "/space/rxg/rxgd/bin/apply_template ~/admins.yaml",
          "delta": "0:00:07.626886",
          "end": "2020-04-01 12:04:32.647933",
          "failed": false,
          "rc": 0,
          "start": "2020-04-01 12:04:25.021047",
          "stderr": "/space/rxg/console/vendor/bundle/ruby/2.6/gems/activesupport-4.2.11.1/lib/active_support/core_ext/....
          "stderr_lines": [
              "/space/rxg/console/vendor/bundle/ruby/2.6/gems/activesupport-4.2.11.1/lib/active_support/core_ext/object....
              "Creating new ConfigTemplate with name Generated by ndk at Apr 1, 12:4 PM"
          ],
          "stdout": "INFO : Initiated Apr 1, 12:04 PM",
          "stdout_lines": [
              "INFO : Initiated Apr 1, 12:04 PM"
          ]
      }
  }

  PLAY RECAP ***************************************************************************************************************
  lab.rgnets.com : ok=4 changed=1 unreachable=0 failed=0 skipped=0 rescued=0 ignored=0
Certificates
The Certificates view enables the operator to manipulate the cryptographic keys that are used in conjunction with rXg services that employ public key cryptography.
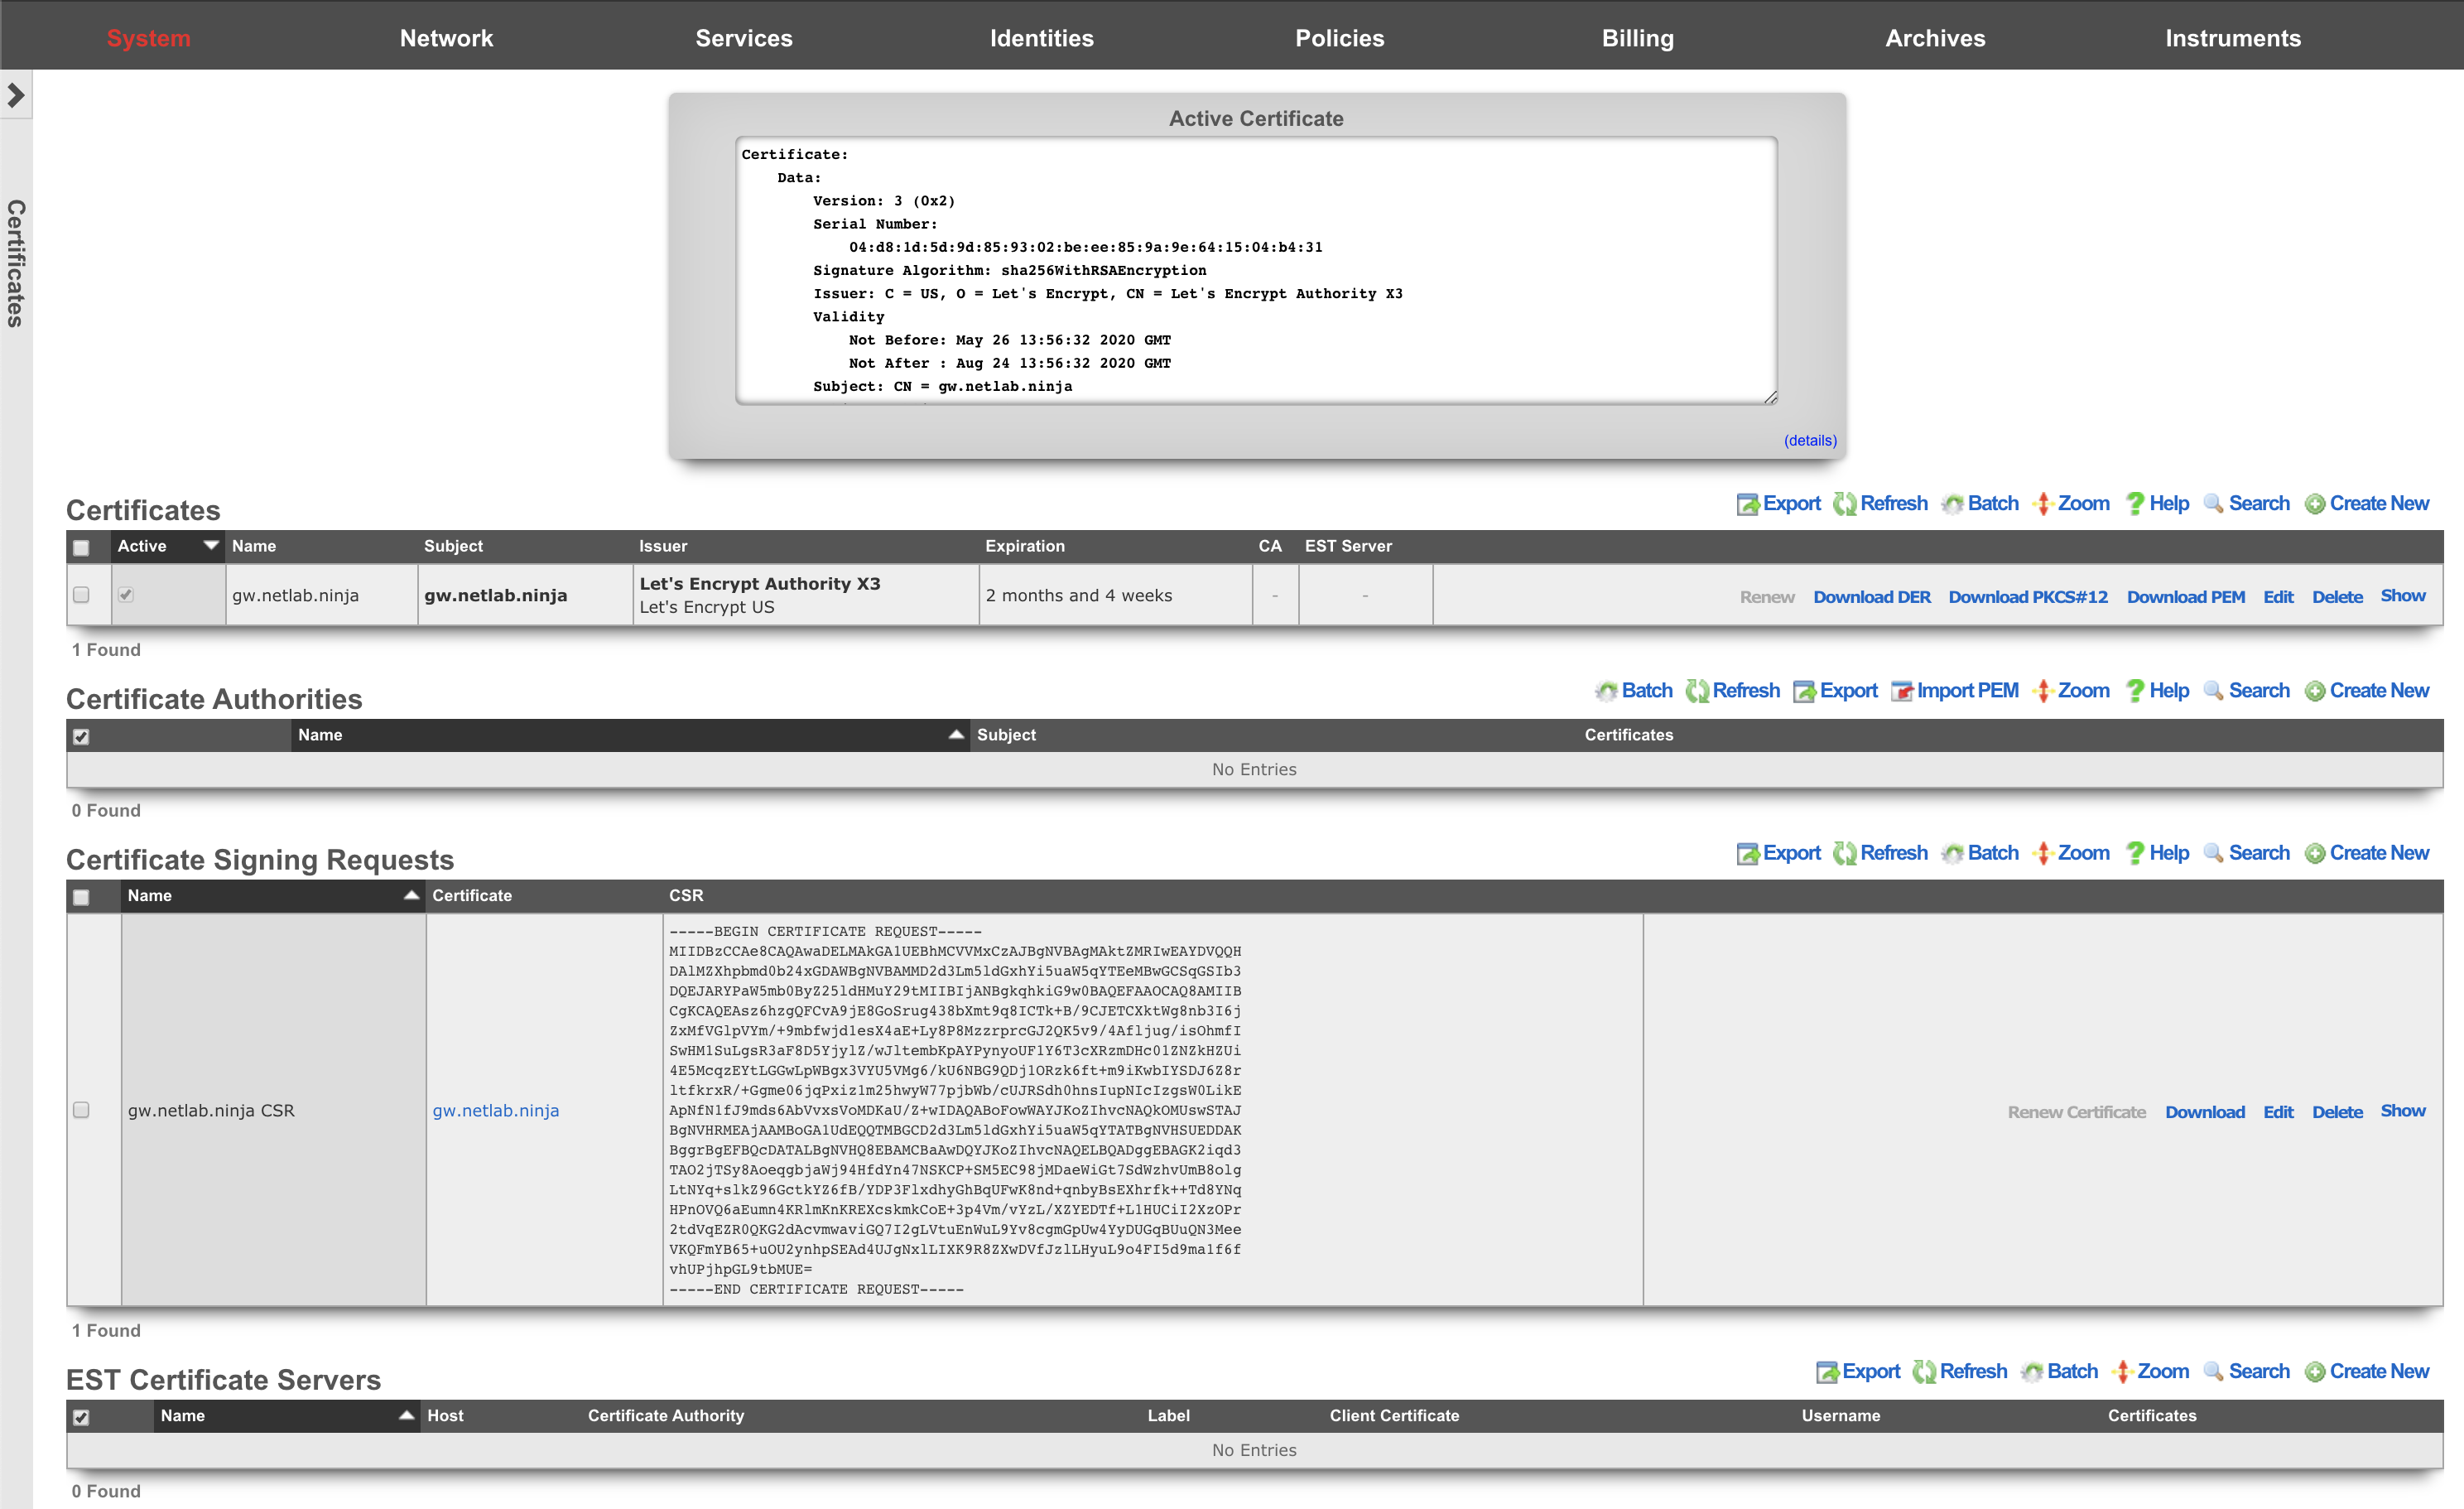
Cryptography in the form of transport layer security via SSL and IPsec protocols is present in several rXg services to ensure the privacy and integrity of the data being transferred. The RADIUS server, IPsec VPN concatenator, and of course, the web multiplexer that serves the captive portal and administrative console all require asymmetric cryptographic keypairs. The creation, import, and export of keypairs is accomplished by manipulating the Certificates scaffold.
The rXg web multiplexer and RADIUS server employ transport layer security (TLS) in the form of the SSL protocol. The VPN concatenator conforms to the IPsec protocol. Both TLS and the IPsec protocol suites incorporate signed certificates as part of their trust mechanisms. The Certificate Signing Requests scaffold enables the operator to generate trusted third-party certification requests. A trusted third-party signature is required for the certificate used by the web multiplexer to serve a captive portal in a production environment.
Third-party Signatures
Operation of an rXg served captive portal requires at least one administrator to have working knowledge of public-key cryptography and TLS/SSL. In particular, an administrator must be familiar with the process of obtaining a signed SSL certificate. This process must be repeated periodically since signed SSL certificates have a limited life time.
There are many references available on the Internet that provide detailed information about howpublic-key cryptographyworks as well as specific information about thetransport layer security protocol. Practical Cryptography (ISBN 0471223573) by Niels Ferguson and Bruce Schneier provides an excellent overview of this subject. Network Security with OpenSSL (ISBN 059600270X) provides detailed step-by-step instructions on the process of generating certificate signing requests as well as obtaining and installing third-party signed certificates.
To obtain and install a signed SSL certificate for an rXg:
- Choose a domain name for the rXg.
- Configure your DNS server to resolve the chosen domain to the WAN address of the rXg.
- Set the domain name in the Device Options scaffold.
- Click on the create new action on the Certificate scaffold. A drop-down dialog will appear.
- Enter a name for the new key chain. A good choice for the name of the new key chain is the domain name that you have chosen.
- Leave all other fields blank (except note if you have a note). The rXg will automatically generate a private key.
- Click the create button.
- Click on the create new action on the Certificate Signing Requests scaffold. A drop-down dialog will appear.
- Give the new CSR a name.
- Choose the certificate key chain that was created in the previous step.
- Completely fill out the form.
- Choose the appropriate option to generate a CSR for a trusted third-party to sign. Do not use the self-sign or local CA options as this will automatically create a certificate that is not automatically trusted by most browsers.
- Click the create button.
- A CSR will now be shown in the Certificate Signing Requests scaffold. Send the CSR to a trusted third-party signer to obtain a signed certificate to load into the rXg.
- Copy the CSR out of the list or show view of the certificate signing requests field into the clipboard.
- Contact a trusted third-party SSL certificate signer such asGo Daddy.
Paste the CSR from the clipboard into the appropriate form along with payment.
- If the signer gives a choice of formats, choose X509 PEM, Apache, mod_ssl, or OpenSSL, as the rXg SSL web multiplexer is compatible with all of the above formats.
- Contact your domain administrator to authorize certificate issuance by clicking on a URL in an email sent by the third-party signer.
- Open the signed certificate and intermediate certificate(s) using a text editor such as WordPad, TextEdit.app, or vi.
- Edit the key chain record in the Certificates scaffold. Copy and paste the certificates into the appropriate fields in the record.
- Enable the key chain by setting on the check box next to the active field and clicking the update button.
- Wait for the web server to restart. When the web server comes back up it will be using the signed certificate.
Local CA Signatures
The Certificate Signing Requests scaffold also enables the operator to sign certificates using the rXg integrated certificate authority. This feature is typically used in conjunction with the IPsec concatenator to issue client certificates for IPsec host-to-site connectivity with the rXg. The rXg integrated certificate authority may also be employed as a powerful revenue generation tool. Operators with wireless distribution and access networks that have open connectivity at locations with high transient traffic are particularly suited to using the integrated rXg local certificate authority as a revenue generation mechanism.
In a typical usage scenario, one or more usage plans are created with misc. items specifying an additional charge for a secure connection. The captive portal is then configured to create a new certificate linked to a local certificate authority when these plans are purchased. In addition, the portal creates a new certificate signing request that is set to automatically sign chain with the local certificate authority. The portal would then present the certificate for the local CA, as well as the private key and signed certificate from the newly created certificate. Thus, an operator can generate significant additional revenue without any intervention once the configuration of the rXg and portal is established.
To setup a local certificate authority and begin signing certificates , use the following procedure:
- Click on the create new action on the Certificate Authorities scaffold. A drop-down dialog will appear.
- Give the new CA a name. Use a name that reflects the purpose of the CA, for example "CA for VPN."
- Fill out the C, ST, L, O, OU, CN, and email fields appropriately. The information listed here should reflect your actual organization. The information in the fields is meant to allow the recipient of the certificate a method to contact the owner and confirm validity of the key.
- Click the create button. You now have a local CA that may be used to sign certificates.
- Click on the create new action on the Certificate Key Chains scaffold. A drop-down dialog will appear.
- Enter a name for the new key chain. A good choice for the name of the new key chain is the name of the device for which it will be issued (e.g., "VPN srv CKC", "VPN client CKC 1", etc.)
- Select the CA that we just created in the previous step, which is "CA for VPN" if you followed our example.
- The rXg automatically populates the server field.
- Leave the intermediate and certificate fields blank.
- Click the create button.
- Repeat the steps above. At least two key chains (one for the rXg and one for the client) are needed to support most applications such as the IPsec VPN.
- Click on the create new action on the Certificate Signing Requests scaffold. A drop-down dialog will appear.
- Give the new CSR a name.
- Choose from one of the certificate key chains that were created in the previous step ("VPN src CKC" and "VPN client CKC 1" if you followed our example).
- Completely fill out the form.
- Choose the appropriate option to generate a CSR and sign with linked local Certificate Authority. The CA that was generated in the first step and linked in the second step will be used to sign the certificate.
- Click the create button.
- Repeat the steps above. At least two key chains (one for the rXg and one for the client) are needed to support most applications such as the IPsec VPN.
- Export all of certificates that we have just created along with the private key for the client so that they may be loaded into the client software. Specifically, you need to copy and paste the following items into files that must be copied onto the client:
- The certificate field from "CA for VPN"
- The certificate field from "VPN src CKC"
- The certificate field from "VPN client CKC 1"
- The server field from "VPN client CKC 1"
The procedure for installation of certificates and private keys onto the client device is highly dependent upon the client device software. The vast majority of client software will have a certificate manager with specific keystores for CA certificates, regular certificates and private keys. For example:
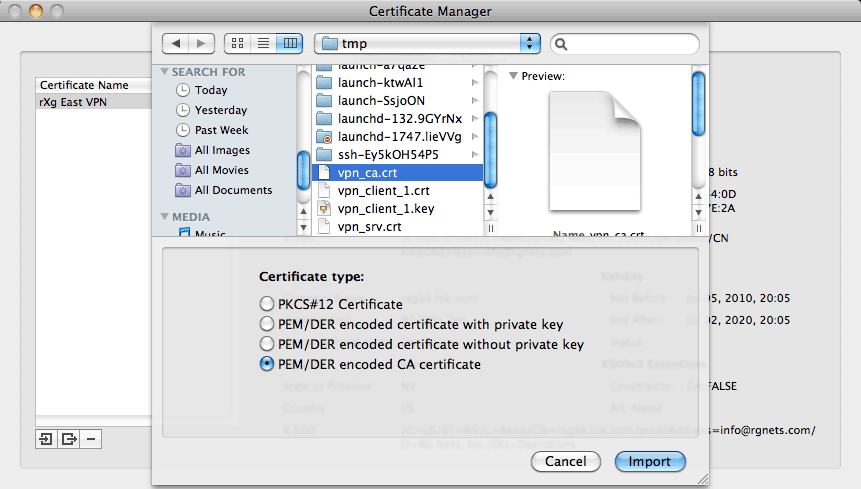
In the client software shown above, the operator must combine the contents of the certificate and server fields from "VPN client CKC 1" into a single file before importing with the "PEM/DER encoded certificate with private key" option. This may be accomplished by copying and pasting both sets of data into a text editor and saving the file. The "VPN srv CKC" certificate must be imported using the "PEM/DER encoded certificate without private key" option. The "VPN CA" certificate must be imported with the "PEM/DER encoded CA certificate" option.
The rXg integrated certificate authority may be used to support an unlimited number of clients. The same procedure as described above (omitting step #1) is used to create certificates and keys for additional clients. Once the certificate authority is set up, automating the creation of certificates for clients is very easy. For example:
ca = CertificateAuthority.find_by_name('VPN CA')

ckc = SslKeyChain.new
ckc.certificate_authority = ca
cc.save!

csr = CertificateSigningRequests.new
csr.SslKeyChain = ckc
csr.country = 'US'
csr.state = 'NV'
csr.locale = 'Reno'
csr.organization_name = 'RG Nets'
csr.common_name = 'vpn.rgnets.com'
csr.email_address = '[email protected]'
csr.sign_mode = 'ca'
csr.save!
If the code above were to be included in a customized portal, the country, state, locale, organization, etc., should be changed to reflect the operator. The certificates that the end-user would need to install may be presented in a portal view using the Ruby code shown below: Server Certificate <%= SslKeyChain.find_by_name('VPN srv CKC').certificate %> CA Certificate <%= ca.certificate %> Client Certificate <%= ckc.certificate %> Client Private Key <%= ckc.server_key %> Integrating and fully automating the generation of client certificates is a simple way to provide an IPsec VPN premium service offering. The IPsec VPN offering may be marketed as a wireless security mechanism, a remote access mechanism, or both at the same time. See the IPsec documentation for more details. 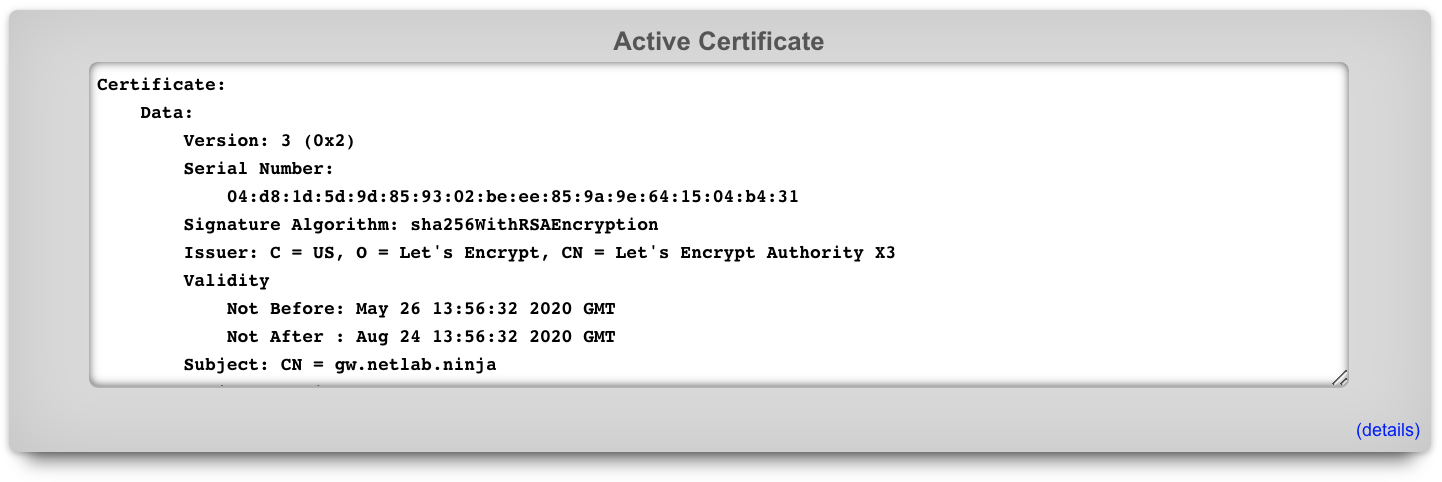
Active Certificate
The Active Certificate dialog at the top of the Certificate view presents a scrollable view port that contains the certificate currently in use. The details of the certificate are presented in text format. The certificate itself, in PEM format, can be found by scrolling to the bottom of the view port.

Certificates
The Certificate Key Chains scaffold enables the operator to manage the public and private keys used to ensure privacy and integrity of communication between the administrator and the operator.
The active field enables an option set. Exactly one option set may be active at any time. Enabling a particular option set will automatically disable another existing active option set.
If no keychain is set active, the rXg uses a self-signed keychain for bootstrap purposes. The bootstrap keychain is completely unsuitable for production environments. The captive portal will behave erratically when used with the self-signed bootstrap keychain. Replace the bootstrap keychain with one that has a certificate signed by a reputable trusted third-party signer immediately.
The name field is an arbitrary string descriptor used only for administrative identification. Choose a name that reflects the purpose of the record. This field has no bearing on the configuration or settings determined by this scaffold.
The server key algorithm dictates what algorithm is used for the private key of the certificate. When creating a certificate for the purpose of OpenRoaming RadSec, the key algorithm must be secp384r1
The certificate authority field associates this record with a local certificate authority. This field is optional and should be left blank if a trusted third-party will be used to sign this certificate. When this field is set, the linked certificate authority will be used to sign the certificate chain if a certificate signing request is created with a request for a local signature.
The server field contains the private key part of the keychain. In most cases a new keychain is created when the operator expects the rXg to generate the key. In this case, please leave this field blank when creating a new keychain to have the rXg automatically generate a private key. When installing a chain that was generated and/or signed elsewhere, this field must be populated with the server private key in PEM format.
The intermediate field contains the certificate(s) issued to the trusted third-party signer by a trusted root certificate authority. In most cases, this field must be populated with an intermediate certificate that can be downloaded from the website of the trusted third-party signer.
The certificate field contains the certificate issued to the domain administrator by the trusted third-party signer. This field must be populated with a signed certificate before the certificate chain may be made active. If the operator generates a CSR with a local certificate authority signature, this field will be populated with the signed certificate automatically.
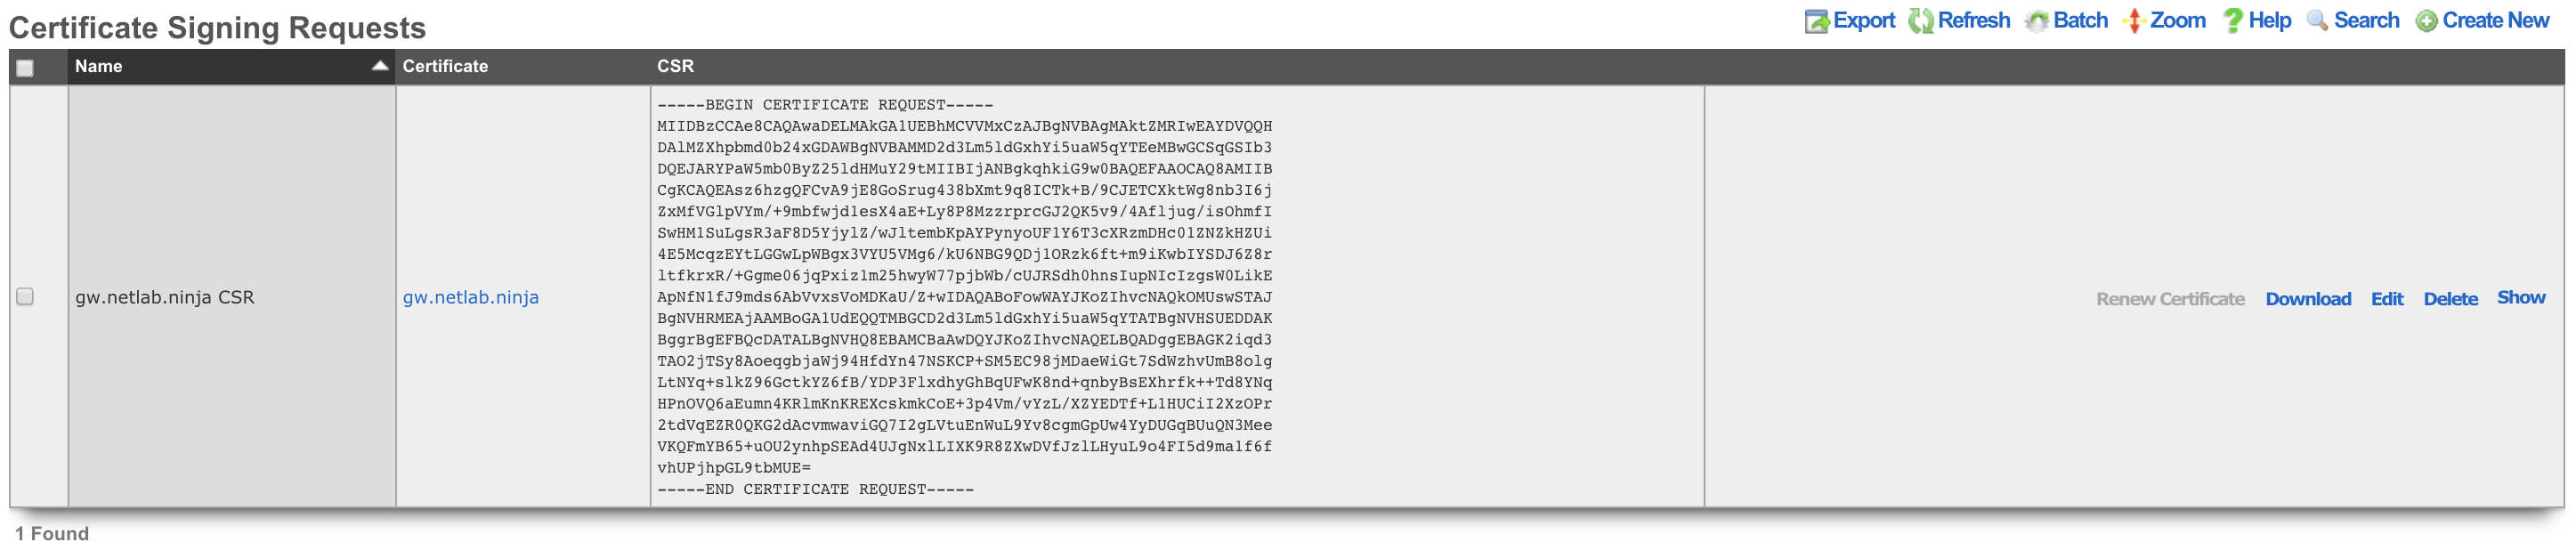
Certificate Signing Requests
The Certificate Signing Requests scaffold enables the administrator to generate X.509 public key signing requests for submission to trusted third-party signers.
The name field is an arbitrary string descriptor used only for administrative identification. Choose a name that reflects the purpose of the record. This field has no bearing on the configuration or settings determined by this scaffold.
The certificate field chooses a key pair for which to generate the certificate signing request.
The certificate identification fields are used to identify and describe the organization making the certificate signing request. It is extremely important to be very careful when entering the data in the following fields. If a trusted third-party signer is used to sign a certificate, it may choose to validate each of the fields with arbitrarily high precision. If a local CA is being created, the end-users who will load the CA cert may choose to verify the trustworthiness of the CA based on the data in these fields.
The country code field is the ISO 3166-1-alpha-2 country code of the requesting organization.
The state field is the state or province of the requesting organization.
The locality field is the city or town of the requesting organization.
The organization field is the company name of the requesting organization.
The organizational unit field is the section or division of the requesting organization.
The common name field is the fully qualified domain name of the rXg. This field must match what is set in the active device option.
The email address field is a contact email address for the requesting organization.
When creating a RadSec certificate for the purpose of WBA OpenRoaming, there are a few considerations that must be met:
- The certificate's Server key algorithm must be secp384r1
- The key usage must be set to client+server.
- The Organizational Unit (OU) must be set to WBA:WRIX End-Entity
- The UID should be set to the WBA member ID, e.g. MYCORP:US
- The Policy identifier must be 1.3.6.1.4.1.14122.1.1.7
The sign mode field specifies how the operator intends to execute the signing for the CSR that is to be generated. The operator may choose to simply generate the certificate without any local signing. This is the option that should be used when the certificate will be signed by a trusted third-party. The operator may also choose to sign with a local certificate authority. This option is only valid if the certificate chain is associated with a local certificate authority. Finally, the operator may choose to self-sign the CSR. This option is for testing and demonstration purposes only and should never be used in a production environment.
The certbot credential is a necessary association if, and only if, a sign mode has been selected that requires a certbot credential.
The note field is a place for the administrator to enter a comment. This field is purely informational and has no bearing on the configuration settings.

Certificate Authorities
The Certificate Authorities scaffold enables the operator to create and manage local CAs that are used to sign certificate chains. The certificates that are signed by local certificate authorities take part in a chain of trust that begins with the CA certificate.
The name field is an arbitrary string descriptor used only for administrative identification. Choose a name that reflects the purpose of the record. This field has no bearing on the configuration or settings determined by this scaffold.
The certificate identification fields are used to identify and describe the organization making the certificate signing request. It is extremely important to be very careful when entering the data in the following fields. If a trusted third-party signer is used to sign a certificate, it may choose to validate each of the fields with arbitrarily high precision. If a local CA is being created, the end-users who will load the CA cert may choose to verify the trustworthiness of the CA based on the data in these fields.
The country code field is the ISO 3166-1-alpha-2 country code of the requesting organization.
The state field is the state or province of the requesting organization.
The locality field is the city or town of the requesting organization.
The organization field is the company name of the requesting organization.
The organizational unit field is the section or division of the requesting organization.
The common name field is the fully qualified domain name of the rXg. This field must match what is set in the active device option.
The email address field is a contact email address for the requesting organization.
The days field specifies the number of days that a signature for a certificate will be valid for. An expired certificate must be resigned before it can be used.
The CA keypair are automatically generated when the operator creates a new record in this scaffold. The certificate and private key fields contain the two halves of the keychain and may be accessed via the show option once a record is created. The certificate is what needs to be distributed to clients that wish to verify the trustworthiness of certificates signed by this certificate authority. The private key should never be copied out of the rXg except for backup purposes or if the CA keychain is to be used on a third-party CA for signing certificates.
The note field is a place for the administrator to enter a comment. This field is purely informational and has no bearing on the configuration settings.
EST Certificate Servers
Enrollment over Secure Transport (EST) is a certificate management protocol for PKI clients needing to acquire client and associated CA certificates. The EST Certificate Servers scaffold enables the operator to create and manage EST servers that are used to retrieve signed certificate chains and CAs.
The name field is an arbitrary string descriptor used only for administrative identification. Choose a name that reflects the purpose of the record. This field has no bearing on the configuration or settings determined by this scaffold.
The host field specifies the FQDN or IP address of the EST server.
The port field specifies the remote TCP port the EST server is listening on for incoming connections.
The certificate authority allows the operator to select which imported CA will be used as the explicit trust anchor.
The label field is optional and denotes the EST partition to interact with.
The client certificate drop-down can be used to select a certificate used for authentication against the EST server.
The username and password fields can be used for basic authentication against an EST server.
Certbot Credentials
The Certificate Credentials scaffold enables the administrator to define api_key/email/provider records for 3rd party ACME-enabled, and API Key-enabled Certificate Authorities.
The name field is an arbitrary string descriptor used only for administrative identification. Choose a name that reflects the purpose of the record. This field has no bearing on the configuration or settings determined by this scaffold.
The Email field defines the username for the API Key.
The API Key field defines the API Key shared secret.
The Provider field defines which provider this credential is meant to be used with.
The note field is a place for the administrator to enter a comment. This field is purely informational and has no bearing on the configuration settings.
Let's Encrypt Examples
This example will show the creation process to setup and retrieve a certificate to be used for the FQDN using Let's Encrypt. NOTE: The use of Let's Encrypt requires the Let's Encrypt servers to reach out to the system via the FQDN to make sure the requester owns the domain, if an ACL is in place this can prevent Let's Encrypt from retrieving the required information. An ACL will also prevent the certificates from being automatically renewed.
First navigate to Systems::Certificates.
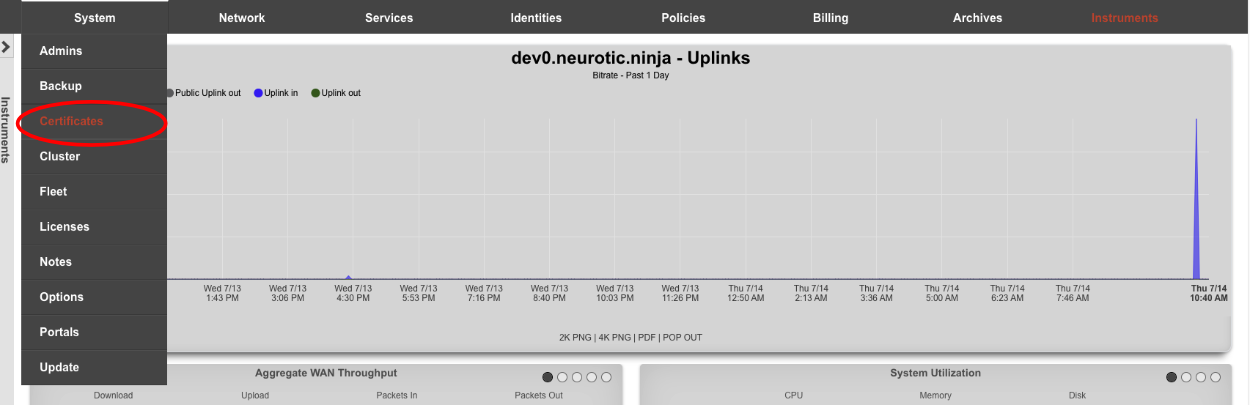
Create a new Certificate.

For Let's Encrypt the top section can be ignored (shown below).
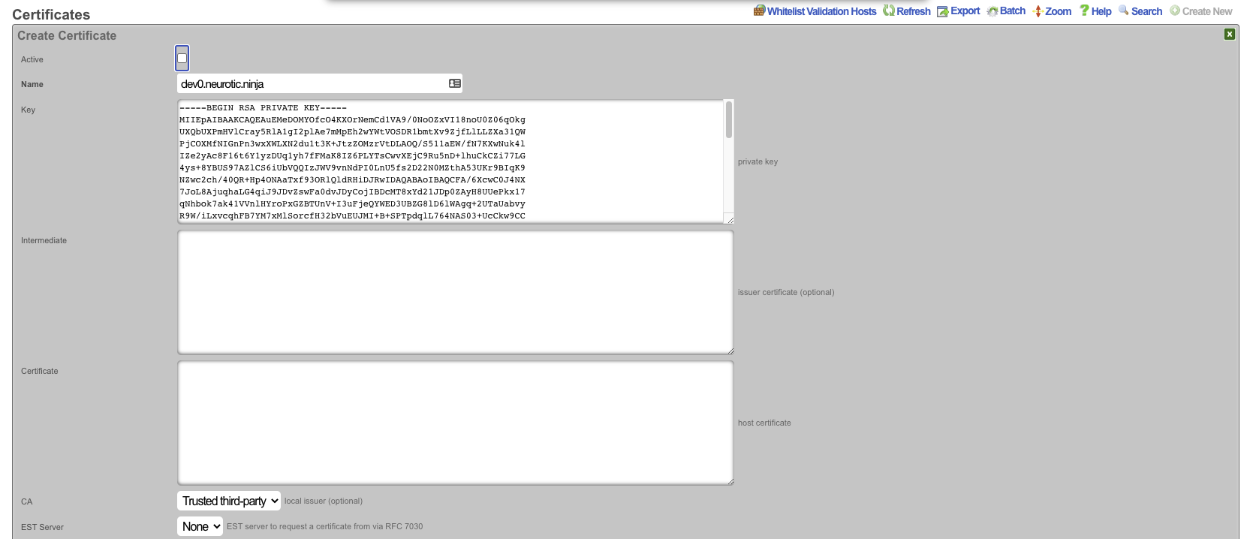
The Certificate signing request section needs to be completed. Give the record a name, this can be the FQDN but does not need to be. Leave the Usage field set to server. Change the Sign mode field to Generate CSR and obtain certificate from Let's Encrypt. Enter the FQDN into the Common Name (CN) field. Enter the 2 letter country code into the*Country Code (C)* field. Enter the state into the State (ST) field, this should be spelled out and not the 2 letter abbreviation. Enter the city into the Locality (L) field. The Orgainization (O) field is optional, along with the Organizational Unit (OU)field. Enter a valid email address into the Email address field, this should be an email specifcally for this and not a personal email address. Click Create , this will start the certificate retrieval process.
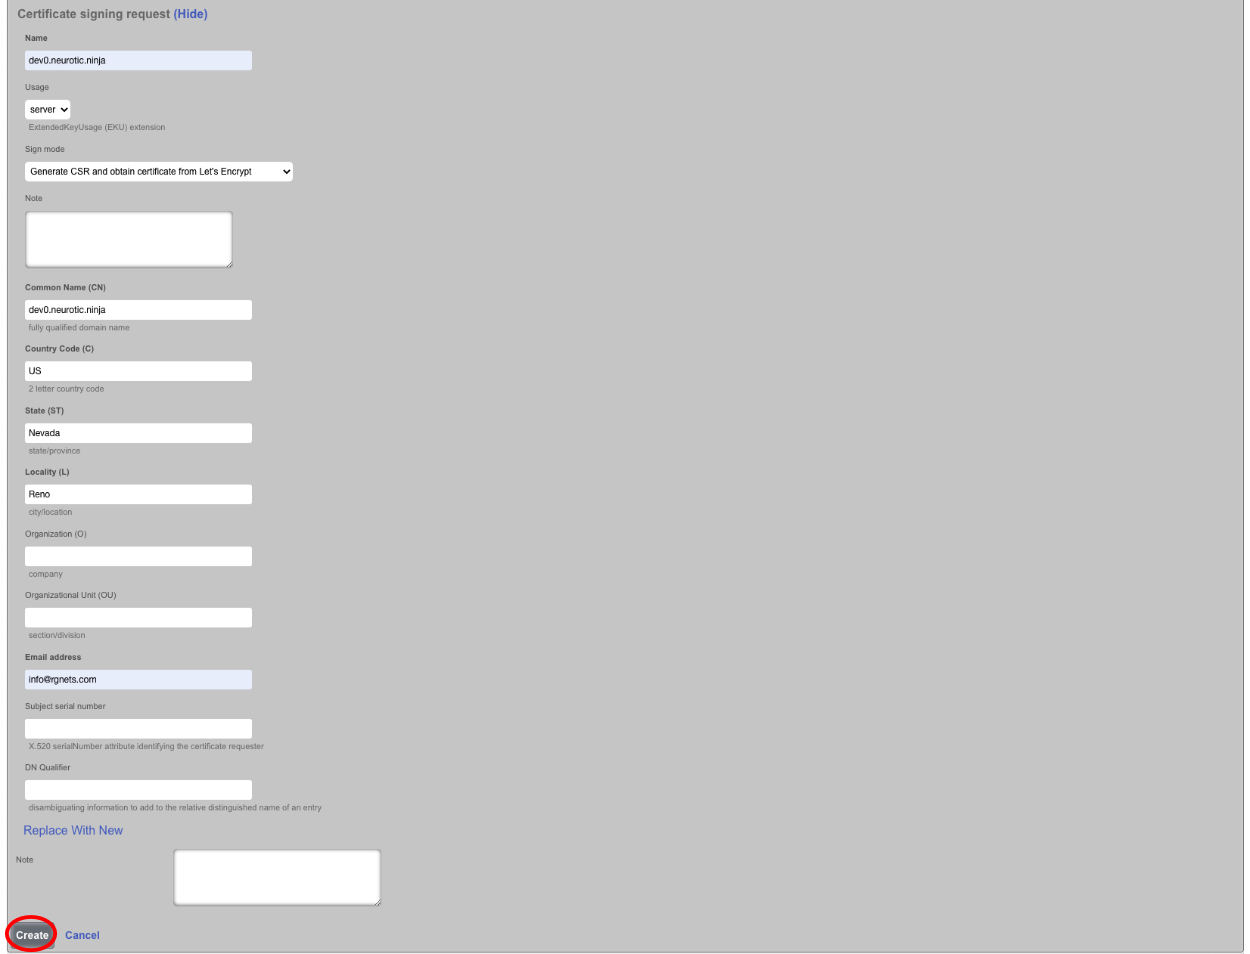

It will take a minute or two to retrieve the certificate, one retrieved it will display the following. If for some reason the certificate cannot be retrieved a health notice will be generated with information regarding why it failed, this is usually because the system cannot be reached, either because the FQDN does not resolve to the primary IP address of the system, or an ACL is in place.

The final step is to edit the record, check the active box and click Update. This makes the certificate active and now when you use the FQDN name to access the system it will be secure.

Let's Encrypt Certificates for Virtual HTTP Hosts
Generating a Let's Encrypt Certificate for use with HTTP Virtual Hosts follows the above example with the exception that the Active box is not checked after retrieving the certificate. The FQDN being used to access the HTTP Virtual Host must resolve to the primary IP address of the system.
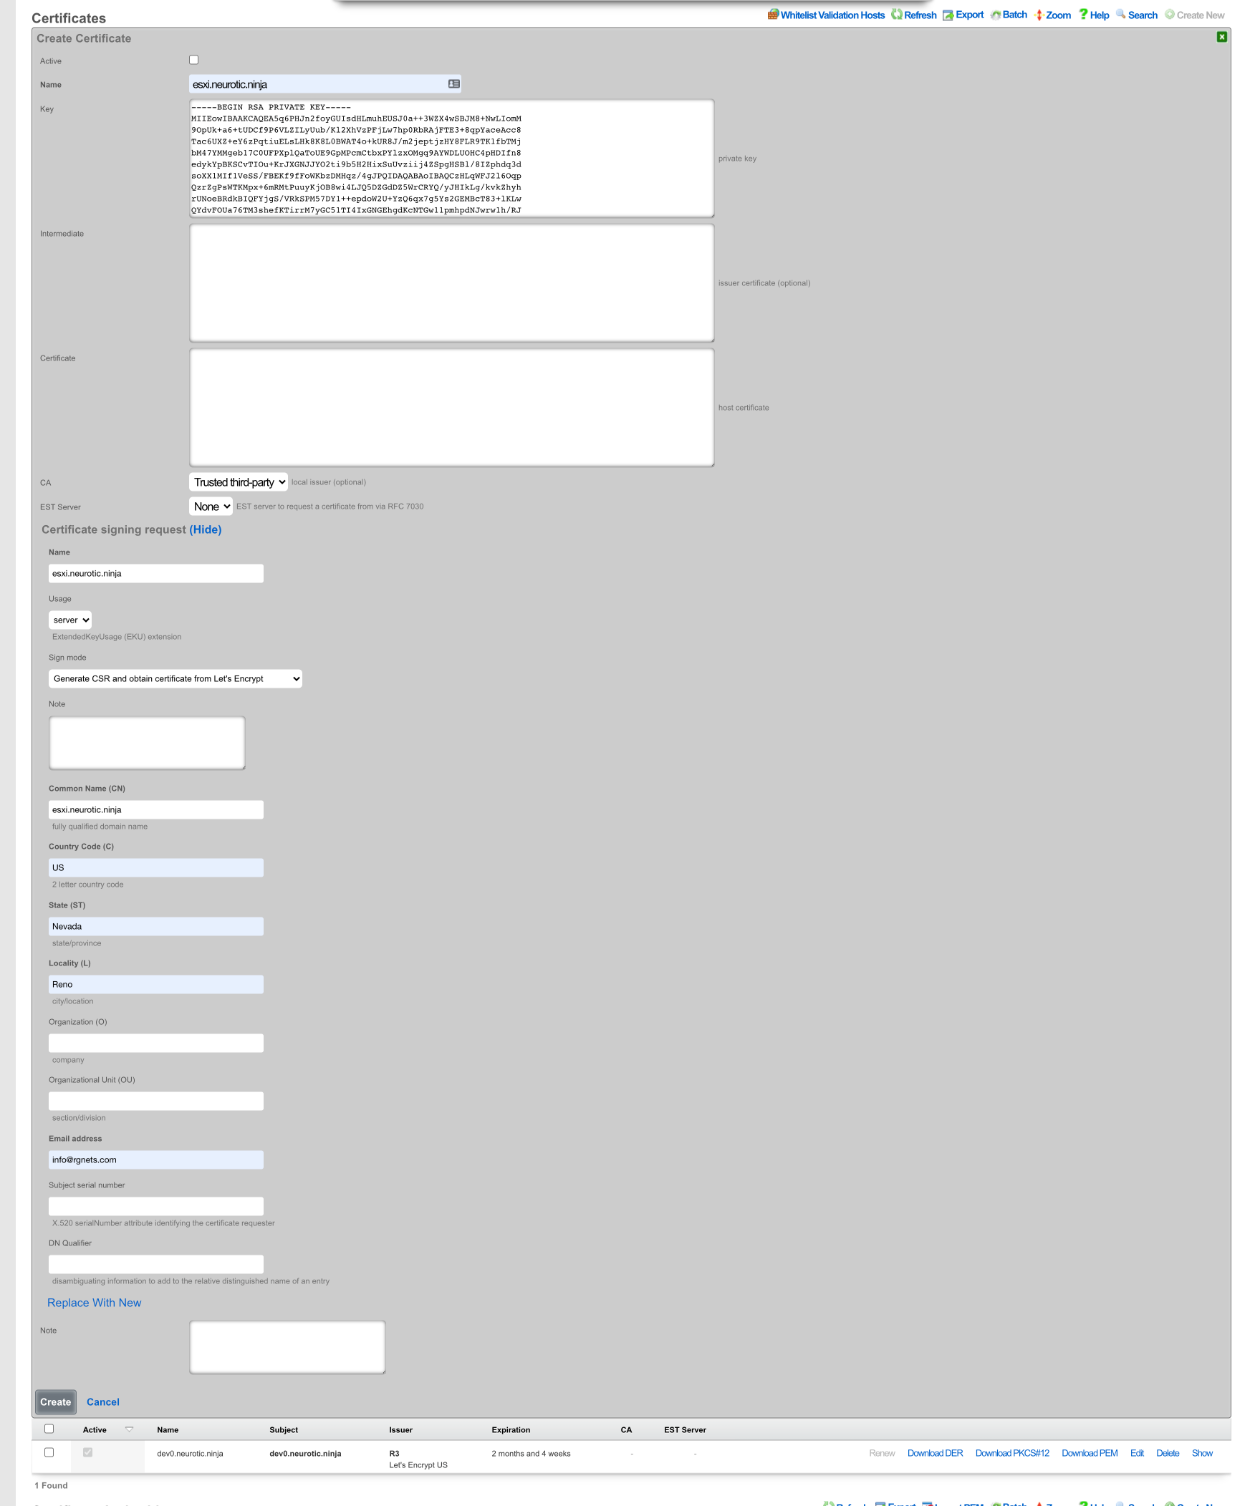


Next the HTTP Virtual Host must be created by navigating to System::Portals.
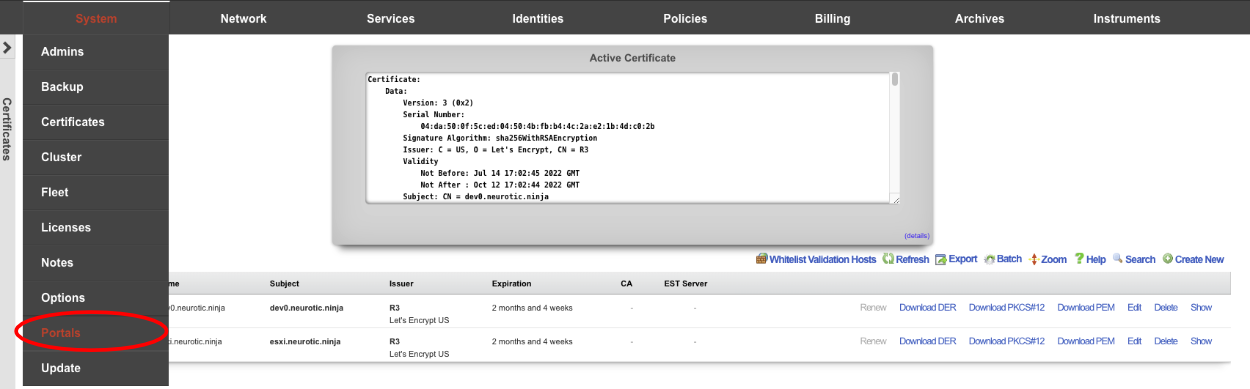
Create a new HTTP Virtual Hosts.

Give the record a Name , this is arbitrary and does not affect how the HTTP Virtual Host performs. Enter the FQDN used in the certificate in the previous step in the Hostname for remote access. The Target server IP field is the private IP address of the device to be accessed via the FQDN. Enter the port the device is listening on in the Target listening port field. If the device is listening for HTTPS connections check the HTTPS box. Select the certificate created in the previous step in the Certificate field. Click Create.
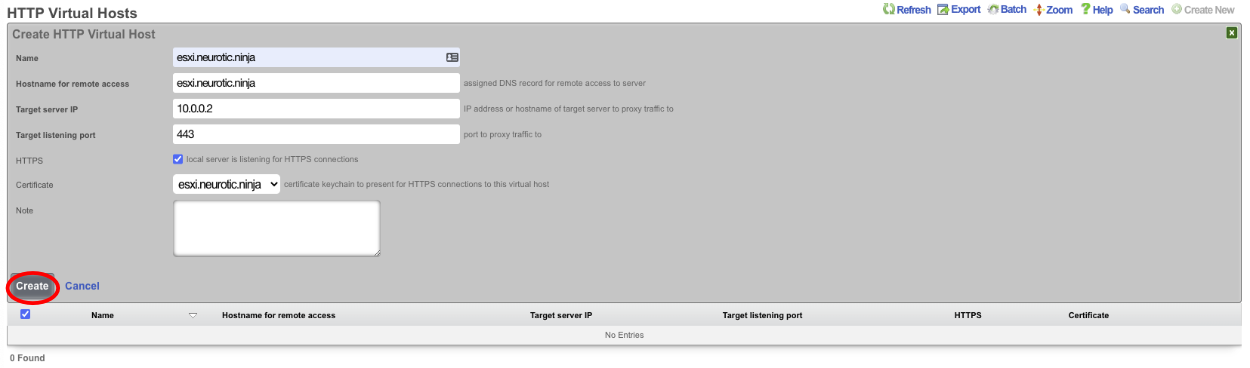

Now the device can be accessed via the FQDN we configured in the virtual host. This allows the operator to access devices behind the rXg over a secure connection even if the device itself is not HTTPS. To access the device enter https://esxi.neurotic.ninja into the browser.
Cluster
The rXg clustering solution simplifies and unifies the management of large scale rXg deployments.

An rXg cluster controller centralizes the configuration, instrumentation, and all operationally relevant persistent storage of a cluster of rXg devices. Synchronized, parallel, highly available, and cost-effective operation of an rXg cluster is easily achieved, enabling clear communication, authoritative control, and complete cognizance over a diverse RGN end-user population.
Load Balancing, Scaling and Failover
In a typical clustered rXg deployment, the distribution network is divided into parallel segments that are configured to be independent collision domains for the purposes of load balancing. Each rXg cluster node is then assigned one or more LAN segments to manage. A single, unified identity management and policy enforcement configuration is then applied to the entire cluster. This enables a cluster of rXg devices to support networks of virtually unlimited scale.

An rXg cluster automatically provides a failover configuration. In the event of a node failure, L2s and L3s of the failed node are automatically moved to operational nodes. End-users experience no downtime, and the process requires no operator intervention.

Topology
The approved cluster deployment topology is creating a private network solely for the purpose of cluster internal communications. It is highly recommended that the physical layer of the cluster internal communications network be gigabit Ethernet. Cluster nodes must use a native port to communicate directly with the controller (not a VLAN trunk port). The cluster intercommunication network (CIN) may be provisioned via a VLAN switch if and only if the cluster nodes are connected via untagged ports. In general, an Ethernet interface that is associated with an uplink on the node or controller should never be used for the CIN. In theory, the cluster may be connected over the public Internet, however this configuration is not officially supported.

The segmentation of the distribution LAN is usually accomplished via a VLAN switch. The segment assigned to the rXg cluster nodes is usually accomplished via VLAN trunk ports in order to ease management. There is no fundamental issue with using native ports to achieve the same goal, though naturally the management of the additional physical cabling may be more cumbersome.
Configuration
By default, the rXg stores its configuration database locally on the same hardware that executes the administrative console, portal web application, and enforcement engine. The rXg can be configured as part of a cluster using the Cluster Node Bootstrap scaffold of the Cluster view.

When operating as a node of a cluster , the rXg shares a remote database with all of its peers. By sharing a single database between all nodes, the operator uses a single, unified console to configure settings that are global to the cluster (e.g., end-user identity management, policy enforcement, etc.) as well as unique to the individual node (e.g., networking, SSL certificates, etc.). In addition, instrumentation and logging from all nodes in the cluster is centrally stored in the same shared database that resides on the cluster controller. This enables the operator to obtain complete cognizance over any end-user that is on any node of the cluster through the cluster controller administrative console.
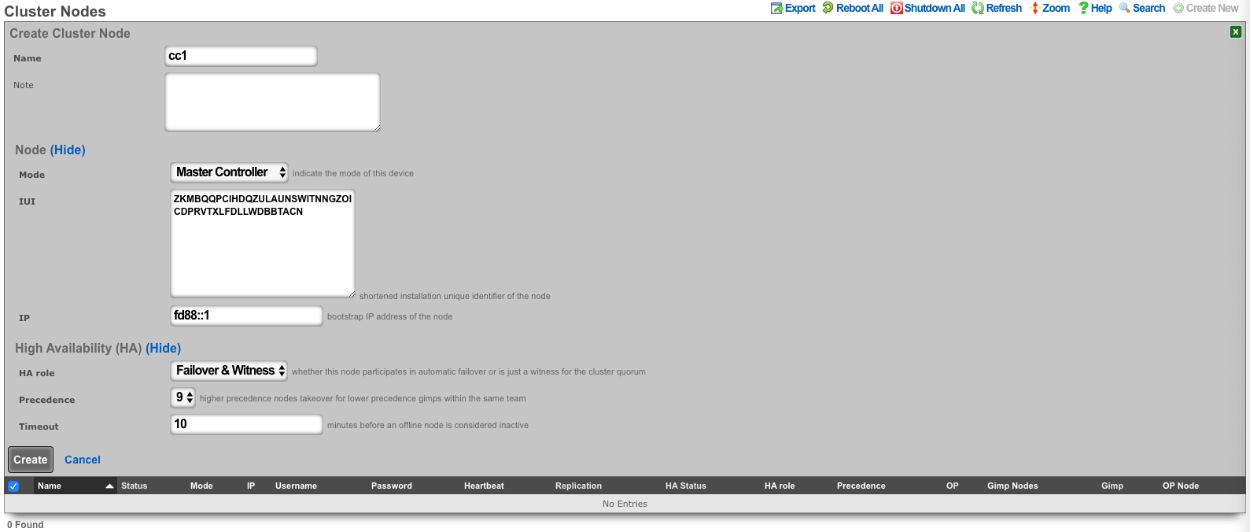
To enable an rXg as a cluster controller, the operator creates an entry in the Cluster Nodes scaffold. The first entry will always be for the master controller. Subsequent entries will be made for standby controllers and data nodes. The operator will need to provide the IUI, IP address, and HA Role for each subsequent system.
Each cluster should only contain one master controller entry which will contain the read-write copy of the database.
Standby controllers can be defined to receive read-only copies of the database and have the ability to promote to master controller in the event of a failure.
Data nodes contain no copy of the database and participate in the cluster by managing individual LAN segments.
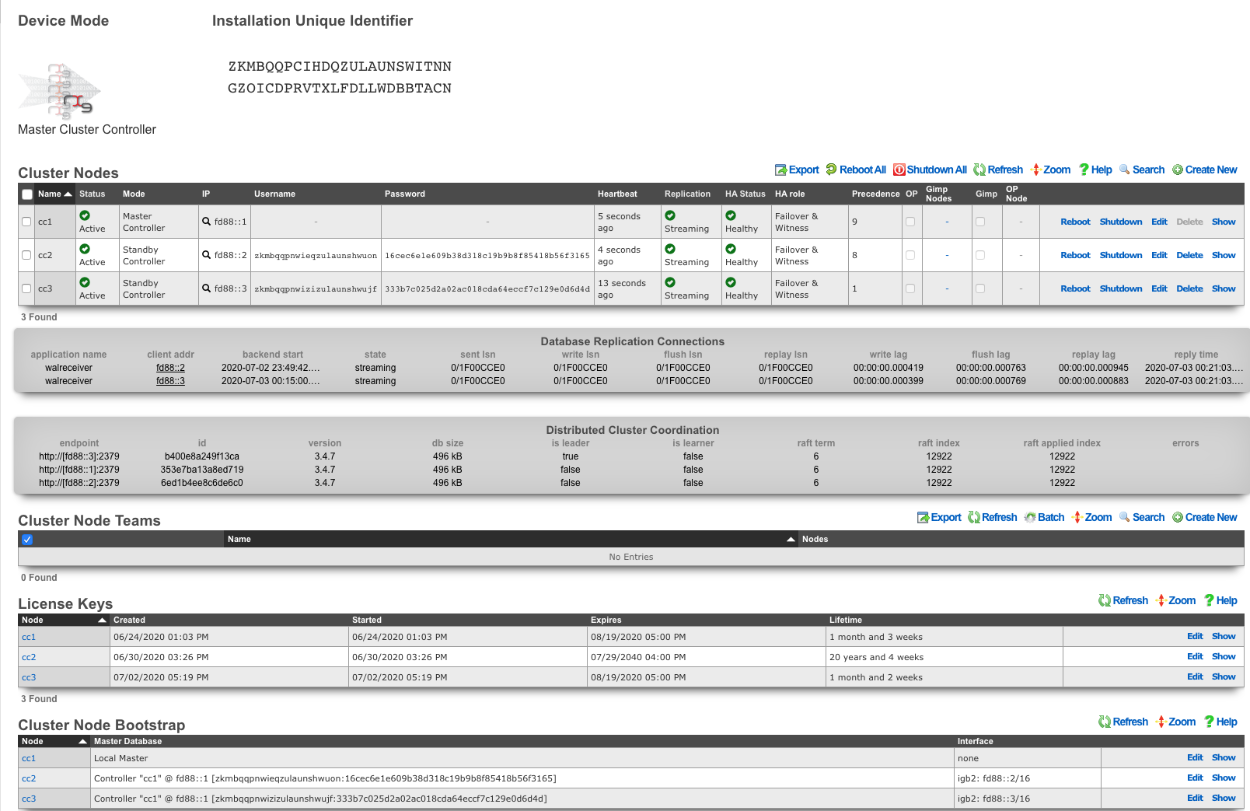
A cluster controller presents a Cluster Nodes scaffold on the Cluster view that configures the member nodes that are attached to the cluster controller. The operator must create a record for each and every cluster node that is to take part in a cluster managed by the cluster controller. Each record contains the credentials that authorize the cluster node to share the cluster controller database.
Deployment Procedure
A successful cluster deployment begins with a proper plan and documentation of the cluster topology. At very least, a network diagram must be created that has all relevant IP addresses labelled. Every cluster node must have at least three connections (LAN, WAN, CIN). The cluster controller must be connected to the CIN. The LAN and WAN connections are optional on the cluster controller , though recommended to ease remote and local access to the management console as well as enable ping targets for multiple uplink control.

- Install the rXg cluster controller(s), and all rXg cluster node hardware according to RG Nets guidelines.
- Power on the devices and connect to the administrative console of each device.
- Use the WAN IP address to connect to the administrative console as all units will have the same default LAN IP address at this time. If necessary, connect a serial terminal or VGA monitor to the rXg and hit CTRL-D to see what WAN IP address the rXg has acquired.
Create at least one administrator and install a valid license on the master controller.
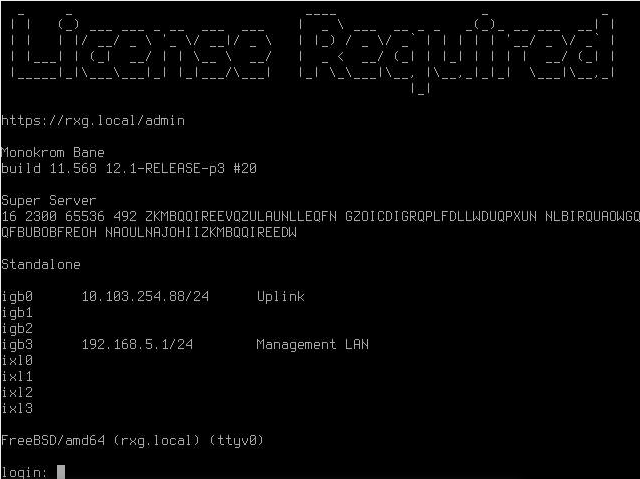
On the master controller , bring up the LAN view and create an Ethernet interface along with an associated network address. This will define the CIN and allow all nodes to communicate with one another once configured.
Bring up two web browsers side-by-side. In one browser, open the administrative console of the cluster controller and navigate to the cluster view. You should see the Cluster Nodes scaffold with a single entry (the cluster controller ). In the second browser, bring up the administrative console of a cluster node (still in default state) and you should see the Cluster Node Bootstrap scaffold. The master database should be currently set to local master.
Create a new Cluster Node scaffold entry on the master controller by copying the IUI of the second system and defining the IP Address. Use the dual browser setup to repeat the process outlined here for each node that will take part in this cluster.
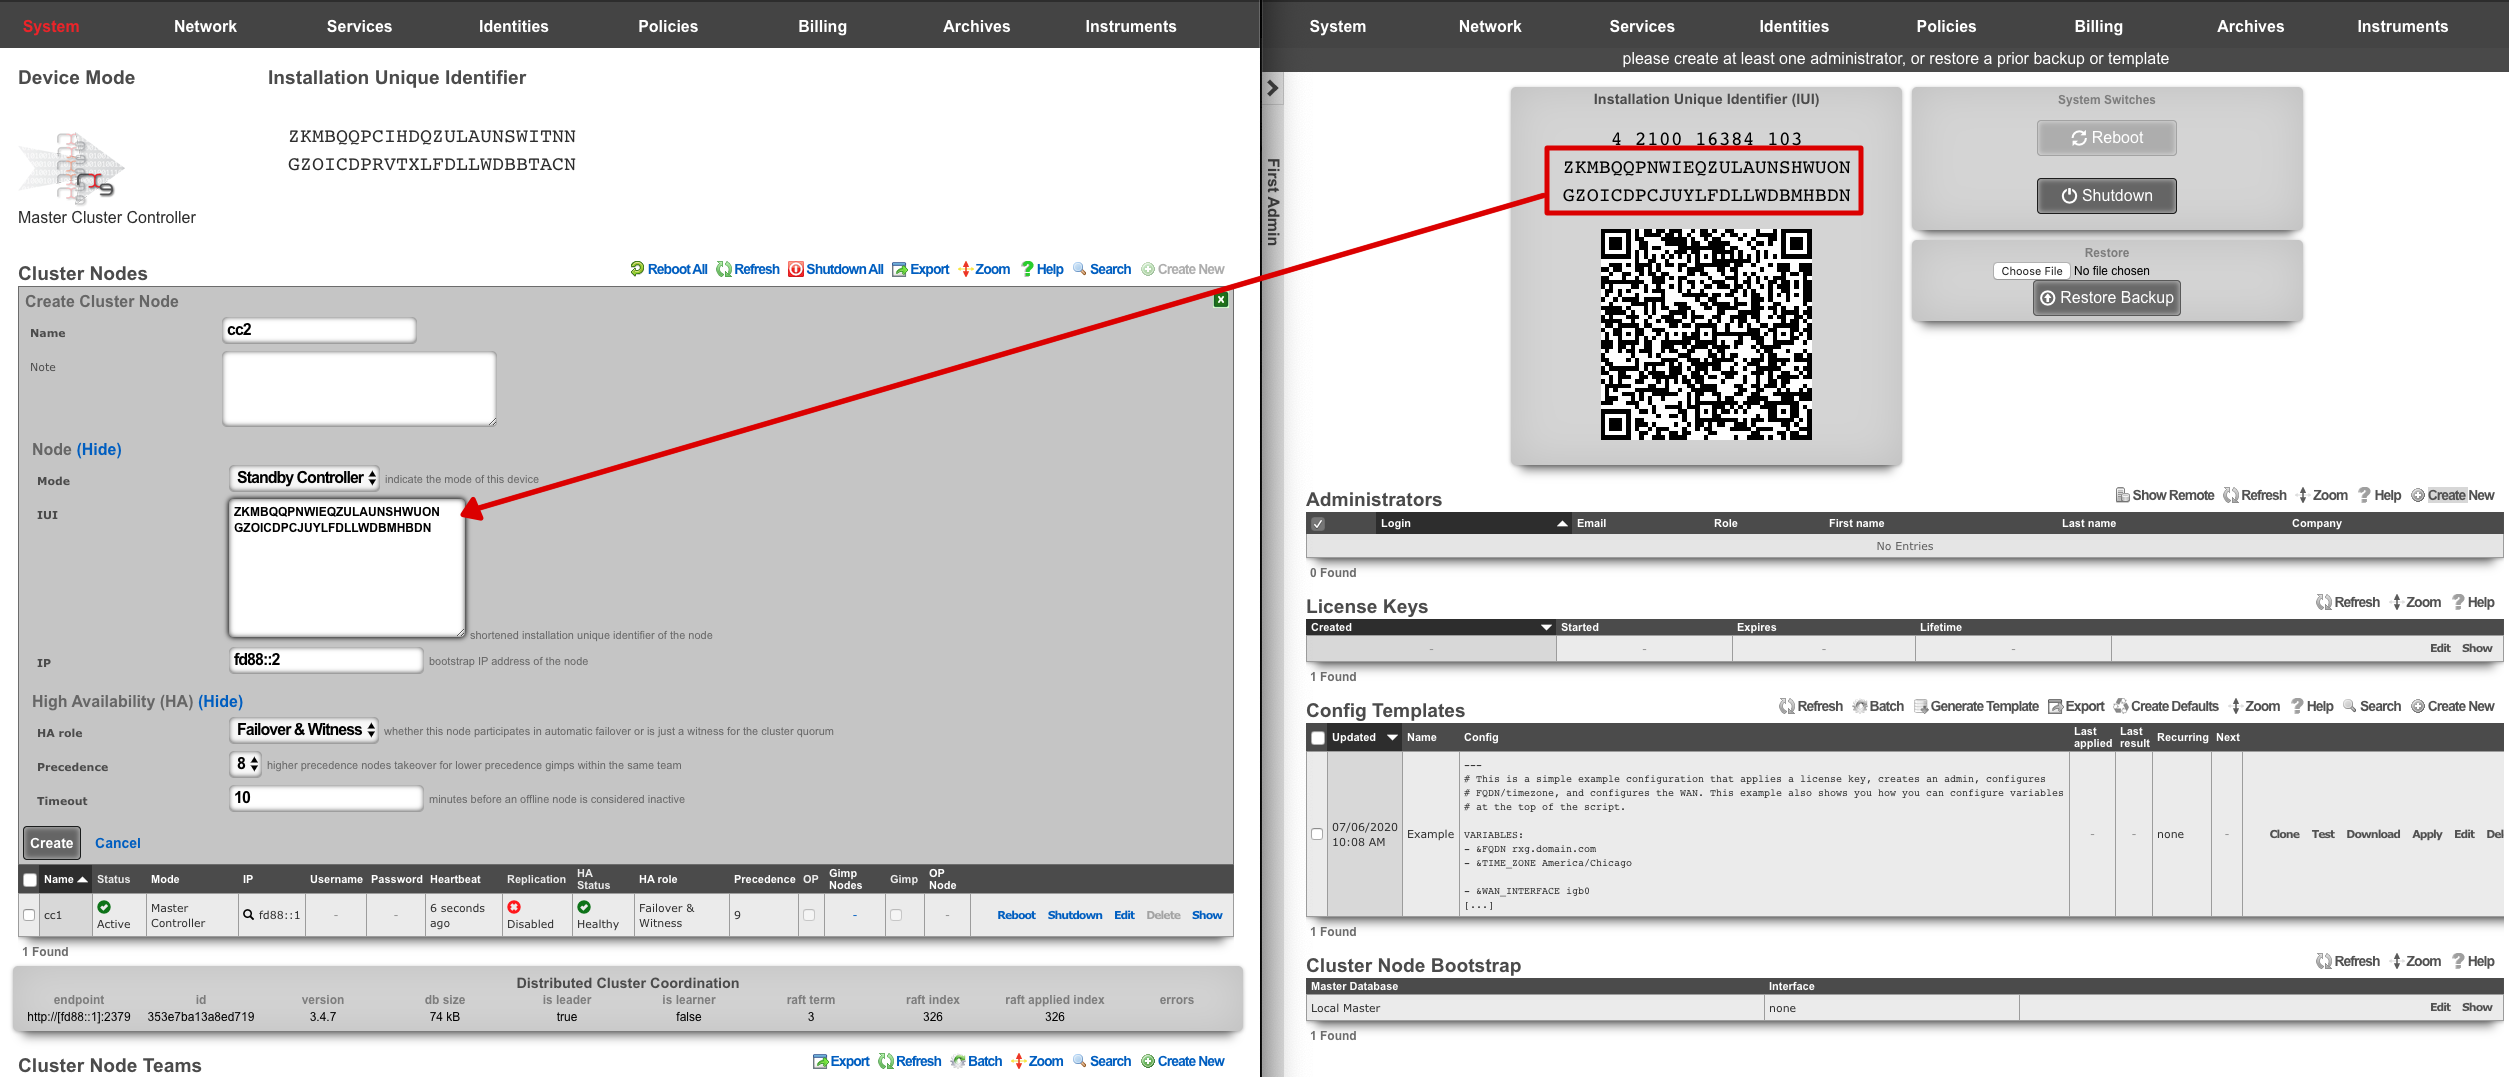
A new record in the Cluster Nodes scaffold must be created for every rXg device that will participate in this cluster.
- Copy the IUI from the browser displaying the cluster node console and paste it into the appropriate field displayed in the cluster node record creation form.
- Enter the CIN IP address that will be configured on this node into the IP field.
Choose the appropriate mode for the rXg device. Use the dual browser setup to repeat the process outlined here for each node that will take part in this cluster.
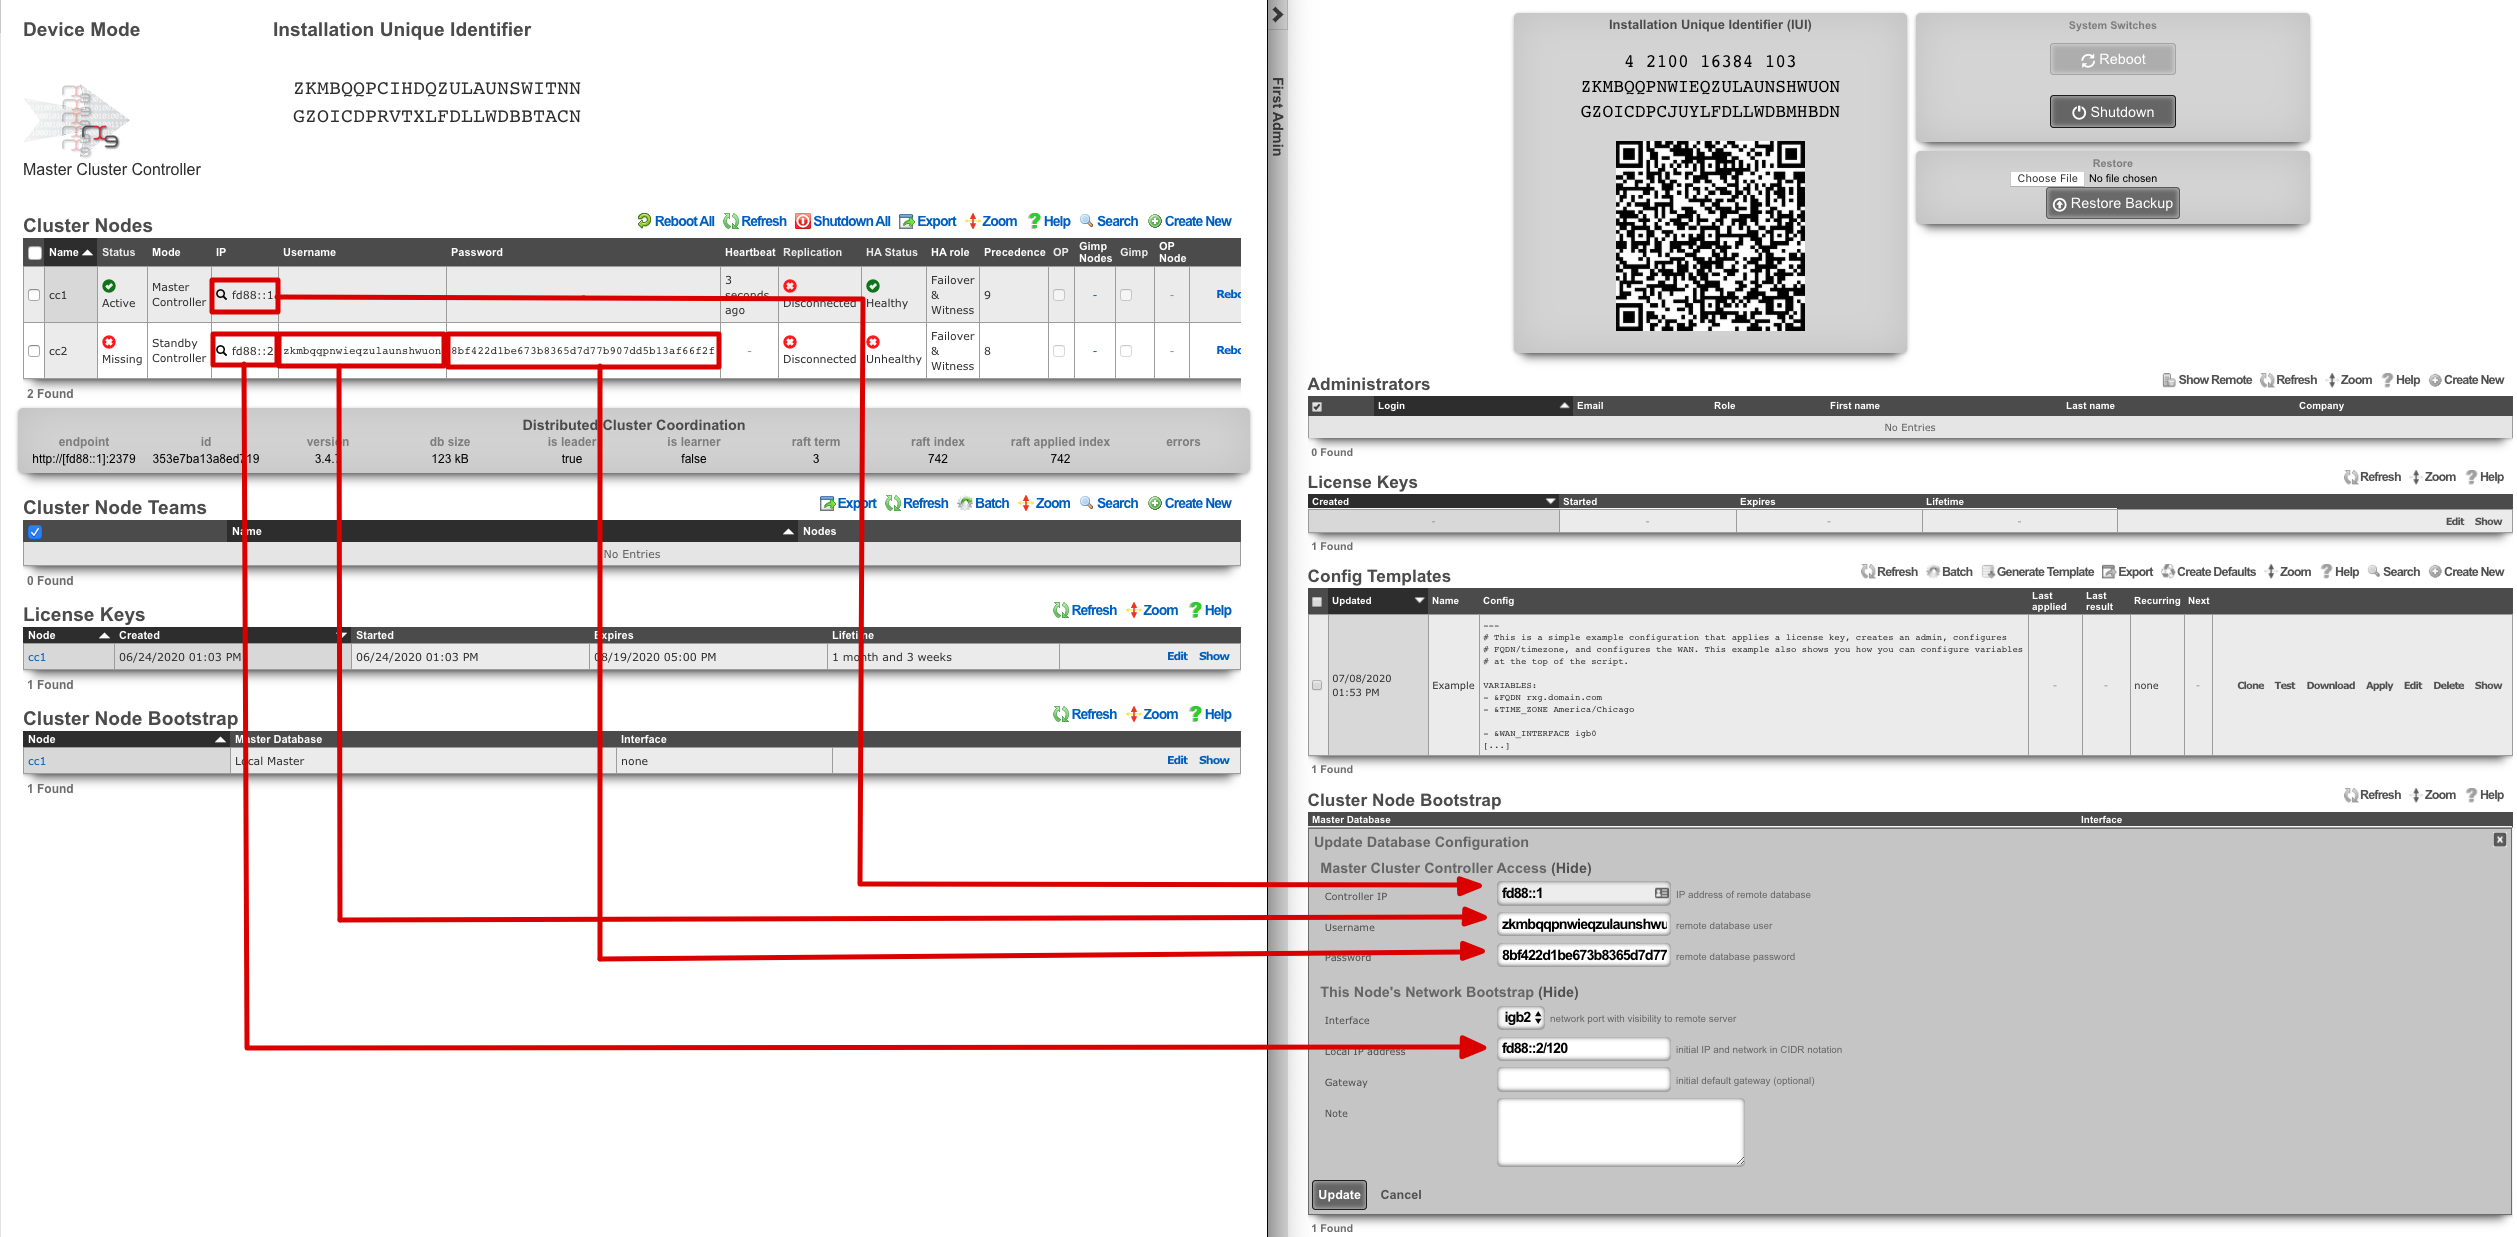
Click the edit link next to the record in the Cluster Node Bootstrap scaffold in the administrative console of the node. Enter the CIN IP address of the cluster controller in the Controller IP field. The settings for the username and password fields are displayed in the list view of the Cluster Nodes scaffold on the administrative console of the master controller. Copy and paste those values into the appropriate fields.
Choose the CIN port for the interface setting and enter the CIN IP address in CIDR notation for the cluster node into the local IP address fields. Click update to save the settings.
When the cluster node connects to the remote database on the cluster controller for the first time, a cluster node initialization process is automatically executed. First, the cluster controller incorporates the MAC addresses and media-types available to the cluster node into the set of all available Ethernet ports. Then, records for the CIN Ethernet interface and address are added to the cluster configuration and marked for application to the particular cluster node that is being initialized. In addition, a default device option for the new cluster node is created.
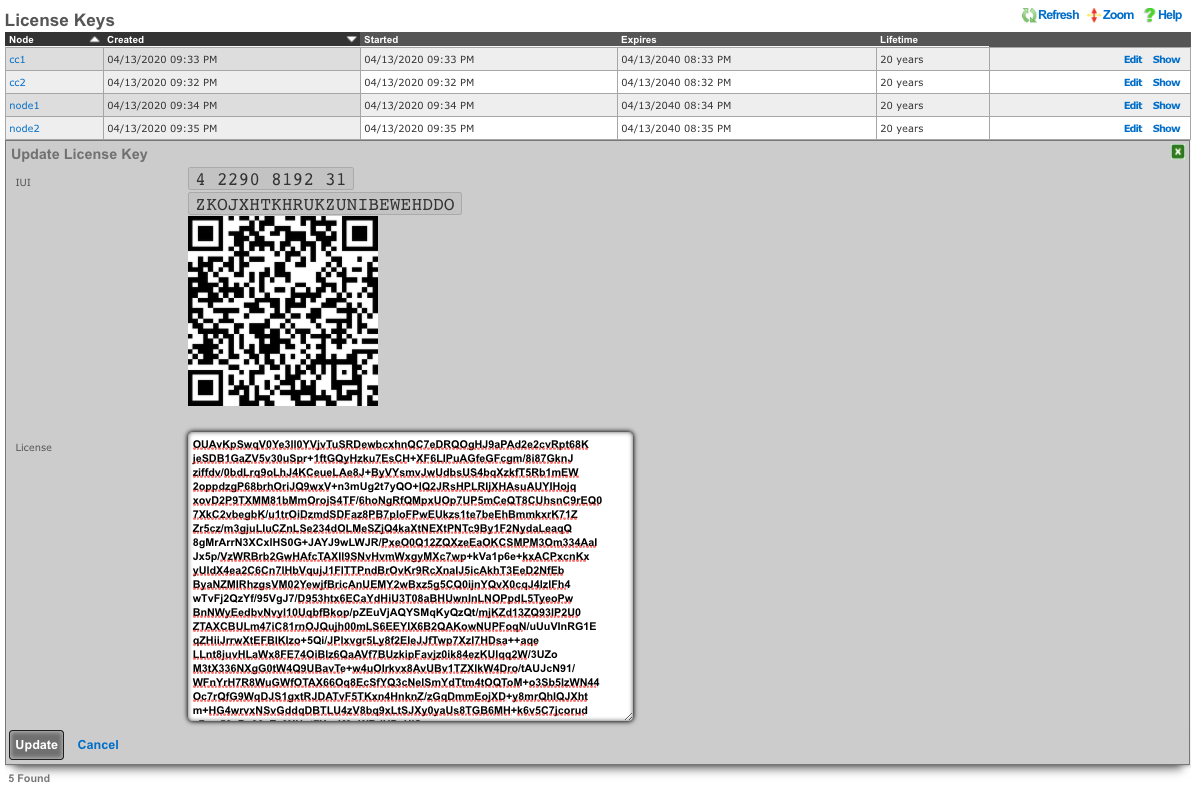
When all cluster nodes have been initialized, the deployment of the cluster is complete. The operator can input licensing for each node in the License Keys scaffold in the Cluster view. The cluster may now be configured with settings in a similar manner as a standalone rXg, by using the master controller administrative console.
Symmetric Cluster

In a symmetric cluster a node can operate as both the data plane and control plane. Because each node requires large, high endurance SSDs as well as enough CPU and RAM to operate as both the control plane and data plane, symmetric clustering is recommended for smaller deployments.
Asymmetric Cluster

An asymmetric cluster separates the control plane from the data plane. This enables the operator to scale requirements for nodes individually. Only nodes allocated as controllers need large high endurance SSDs, more CPU, and RAM. Data plane nodes require minimal SSD, CPU, and RAM to manage their individual LAN Segments.
All transit networking features are executed on the cluster nodes. The controller does not forward packets nor does it run any proxies for web experience manipulation. All billing, user management, and instrument collection features are executed on the cluster controller. Cluster nodes do not run recurring billing, system status, or traffic rate collection tasks.
Data Flow: Control Plane / Data Plane Communication
The following diagram illustrates the communication flows between cluster components during normal operation. The Master Controller (control plane) manages configuration and persistent storage, while Data Nodes (data plane) handle packet forwarding, DHCP, NAT, and policy enforcement for their assigned LAN segments. Standby Controllers maintain hot-standby database replicas for high availability.
Cluster Sync and Configuration Push
sequenceDiagram
    participant Op as Operator<br/>(Admin Console)
    participant MC as Master Controller<br/>(Control Plane)
    participant PG as PostgreSQL<br/>(Master DB)
    participant SC as Standby Controller<br/>(Hot Standby DB)
    participant DN as Data Node<br/>(Data Plane)

    Note over Op,DN: Configuration Change Flow

    Op->>MC: Save configuration change<br/>(e.g., create Policy, VLAN, Address)
    MC->>PG: Write to database<br/>(INSERT/UPDATE)
    PG-->>MC: Commit confirmed

    par WAL Streaming Replication
        PG->>SC: Stream WAL records<br/>(continuous async replication)
        SC-->>PG: Acknowledge LSN position
    and TriggerCallbacks to Data Nodes
        MC->>DN: TriggerCallback via CIN<br/>(notify config change)
        DN->>PG: Read updated config<br/>(SELECT over CIN)
        PG-->>DN: Return config records
        DN->>DN: Apply config locally<br/>(regenerate PF rules,<br/>update DHCP, NAT tables)
        DN-->>MC: Acknowledge sync complete
    end

    Note over Op,DN: Instrumentation Collection Flow

    loop Every collection interval
        DN->>DN: Collect local metrics<br/>(traffic rates, connection states,<br/>DHCP leases, NAT assignments)
        DN->>PG: Write instrumentation data<br/>(INSERT over CIN)
        PG-->>DN: Commit confirmed
    end

    Op->>MC: View Instruments dashboard
    MC->>PG: Query instrumentation tables
    PG-->>MC: Return aggregated metrics<br/>(collated across all nodes)
    MC-->>Op: Display cluster-wide instruments
Heartbeat Monitoring and HA Failover
sequenceDiagram
    participant MC as Master Controller
    participant SC as Standby Controller
    participant DN1 as Data Node 1
    participant DN2 as Data Node 2
    participant W as Witness<br/>(Quorum)

    Note over MC,W: Normal Operation - Heartbeat Exchange

    loop Heartbeat cycle
        MC->>DN1: Heartbeat ping via CIN
        DN1-->>MC: Heartbeat response<br/>(update heartbeat_at)
        MC->>DN2: Heartbeat ping via CIN
        DN2-->>MC: Heartbeat response<br/>(update heartbeat_at)
        MC->>SC: Heartbeat ping via CIN
        SC-->>MC: Heartbeat response
        MC->>W: Heartbeat ping via CIN
        W-->>MC: Heartbeat response
    end

    Note over MC,W: Data Node Failure Scenario

    MC->>DN1: Heartbeat ping via CIN
    DN1--xMC: No response (node failure)

    loop HA timeout period (default 300s)
        MC->>DN1: Retry heartbeat
        DN1--xMC: No response
    end

    MC->>MC: HA timeout exceeded<br/>for DN1
    MC->>DN2: Take over DN1 networking<br/>(L2s, L3s, VLANs, addresses)
    DN2->>DN2: Configure DN1 interfaces<br/>(bring up failover networking)
    DN2-->>MC: Networking takeover complete
    MC->>MC: Generate health notice<br/>(Cluster Node Status)

    Note over MC,W: Controller Failover Scenario

    MC--xSC: Master becomes unreachable

    loop Control Plane HA backoff (default 300s)
        SC->>MC: Attempt connection
        MC--xSC: No response
    end

    SC->>W: Request quorum vote
    W-->>SC: Quorum granted
    SC->>SC: Promote PostgreSQL<br/>(pg_ctl promote)
    SC->>SC: Assume Master Controller role
    SC->>DN1: Resume heartbeat monitoring
    SC->>DN2: Resume heartbeat monitoring
CIN Traffic Summary
All inter-node communication traverses the Cluster Interconnect Network (CIN), a dedicated gigabit Ethernet segment. CIN traffic passes through the policy enforcement engine unfettered (no packet filter states, no queuing). The following traffic types flow over the CIN:
| Traffic Type | Direction | Description |
|---|---|---|
| PostgreSQL WAL | Master Standby | Streaming replication of database write-ahead log records |
| Database queries | Nodes Master | Config reads and instrumentation writes from data nodes |
| TriggerCallbacks | Master Nodes | Notifications of configuration changes requiring local application |
| Heartbeat | Master All Nodes | Liveness monitoring for HA failover decisions |
| BNG Entry Sync | Nodes Master | MAC-to-VLAN tag mappings learned at the data plane |
| RADIUS Proxy | Nodes Master | Proxied RADIUS requests when enable_radius_proxy is set |
Implementation Details
The gateway setting in the Cluster Node Bootstrap scaffold of cluster nodes should not be configured unless absolutely necessary. Setting this implies that the cluster node will connect to the cluster controller via an uplink interface and is not officially supported.
All CIN traffic is passed through the rXg policy enforcement engine unfettered. No packet filter states are created and traffic is not queued. Ensure proper cluster operation by making sure that the CIN is properly deployed using high performance gigabit Ethernet equipment and high-quality cables.
A valid license must be present in the license view of the cluster controller for every node associated with the cluster.
Device and network configurations are associated with a particular node while almost every other kind of configuration is global. If a scaffold does not have a field that associates a node with the record, the record will apply globally to the entire cluster. When the scaffold has an active setting, only one record per cluster node may be made active. The records that are not active are shared by the cluster.
When configuring Ethernet interfaces , one port will be available for each physical port in the cluster. Since all networking configuration (e.g., addresses , uplinks , VLANs , binats and even all the DHCP server settings) are ultimately linked to an Ethernet interface , the port field determines which node the configuration applies to.
A single uplink control record may contain uplinks that span several nodes of the cluster. However, on each node, only the relevant uplinks are used to determine the weighted connection pools.
Ping targets may be configured as node-specific (associated with a cluster node record). Ping targets that are node-specific are pinged and status-updated by their associated node only.
Ping targets that have no cluster_node association are global to the cluster. Global ping targets are status-updated by only the cluster controller. However, global ping targets may and should be used to instrument the condition of multiple uplinks configured throughout devices in the cluster. In this case, all nodes having an uplink associated with the global ping targets ping the target through the respective uplink(s), but only the online state of the uplink record is changed, not the state of the global ping target itself, except by the controller. Creating a ping target with an uplink(s) association automatically clears any cluster node associated with it.
System graphs must be cluster node specific and represent data for only that node or the cluster controller.
Network graphs are global. Graphs of IPs , MACs , login sessions , bandwidth queues , and policies represent cluster-wide data. For example, traffic rate stats for the same IP that may somehow be behind two different nodes is accumulated at the controller and collated into a single database entry for that IP. Similarly, traffic rates statistics for a single bandwidth queue or policy are collected from all nodes, summed at the controller, and written to a single database entry. Cluster node specific items defined by the records that are directly or indirectly associated with an Ethernet interface record are stored in node specific records.
Cluster Node Bootstrap
The Cluster Node Bootstrap scaffold configures the mechanism by which this rXg will join a cluster.
The controller IP field specifies the IP address of the rXg cluster controller.
The username and password fields are the credentials assigned to this node by the cluster controller. Obtain the values for these fields by entering the IUI for this node into the Cluster Nodes scaffold of the Cluster view on the console of the cluster controller.
The interface field configures the Ethernet interface that will be used by this cluster node to communicate with the cluster controller. An Ethernet interface must be dedicated for the sole purpose of cluster communications.
The local bootstrap configuration options ( local IP address and gateway ) are used as the bootstrap configuration of the rXg when operated in cluster mode. This is needed to enable the cluster node to communicate with the cluster controller and retrieve the complete rXg configuration from the controller.

Cluster Nodes
Cluster nodes define the members of an rXg cluster.
The name field is an arbitrary string descriptor used only for administrative identification. Choose a name that reflects the purpose of the record. This field has no bearing on the configuration or settings determined by this scaffold.
The note field is a place for the administrator to enter a comment. This field is purely informational and has no bearing on the configuration settings.
The auto registration box enables automatic registration of cluster nodes. Allows for automatic cluster configuration.
The permit new nodes box allows new nodes that have never been a member of the cluster to join the cluster.
The auto approve new nodes box allows new nodes to be automatically approved without operator intervention.
The pending auto registration box, if checked, will mark the node as pending auto registration. When the node connects to the master controller for the first time it will automatically become a member of the cluster.
The mode dropdown indicates the type of node defined by this record. Only one node may be defined as the master controller for each cluster.
The IUI is the installation unique identifier for the node that is defined by this record. The installation unique identifier for an rXg may be found by visiting the license view of the system menu.
The IP is the IP address that will be used by the cluster node for communicating with the cluster controller. This will also be the bootstrap IP address that is configured in the Cluster Node Bootstrap scaffold of the Cluster view on the cluster node.
The priority field indicates the priority of an individual node. A higher precedence node takes over for lower precedence gimps (failed nodes) within the same team.
The DP (data plane) HA enabled field defines the HA behavior of this node in the cluster; if checked this node will take over networking for a failed node, if unchecked the node will not.
The control plane HA backoff (seconds) field specifies the amount of time a node will try to reach the controller before moving on to the next controller. Default value is 30 seconds.
The DP (data plane) HA timeout (seconds) field specifies the amount of time that must elapse before a node is considered offline, and another node will take over the networking configured on the failed node. Default value is 300 seconds.
The username and password fields are the credentials assigned to this node by the cluster controller. Enter these into the cluster view of the appropriate cluster node to enable access.
Example Cluster Setup: 2 CC's, 2 GW's
For this example, there will be 4 machines: 2 CC's and 2 GW's. For different cluster layouts there may be more CC's or GW's. The example below will provide details on adding each type. The first step will be to install the rXg software on all 4 machines. Once this is done, two browser windows should be opened: one for the primary CC, and the 2nd for all additional nodes (this includes any CC's or GW's that will be added).
Create a new administrator on the Master Controller , by clicking "Create New" on the Administrators scaffold. Each admin account should be unique for every operator.
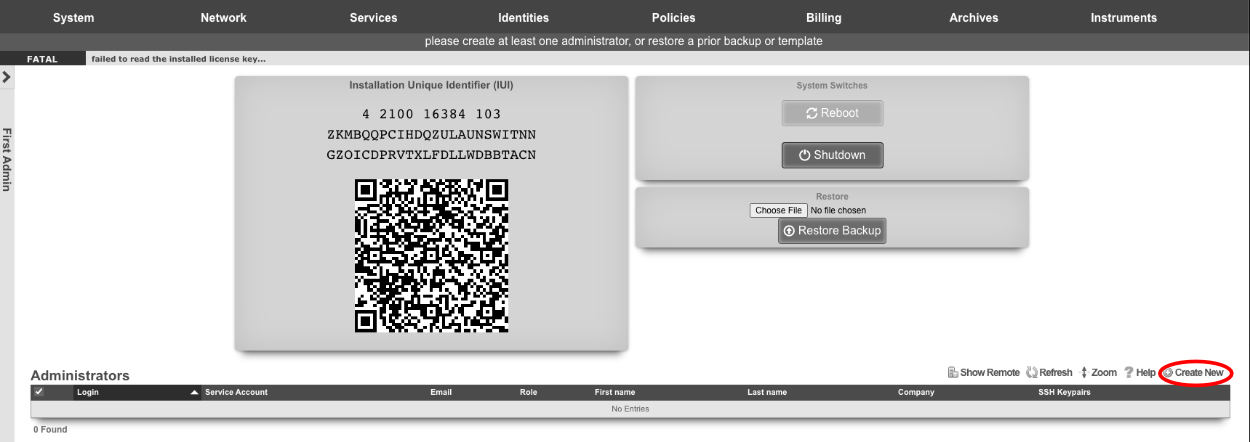
At a minimum a Login and Password are required. Click create.
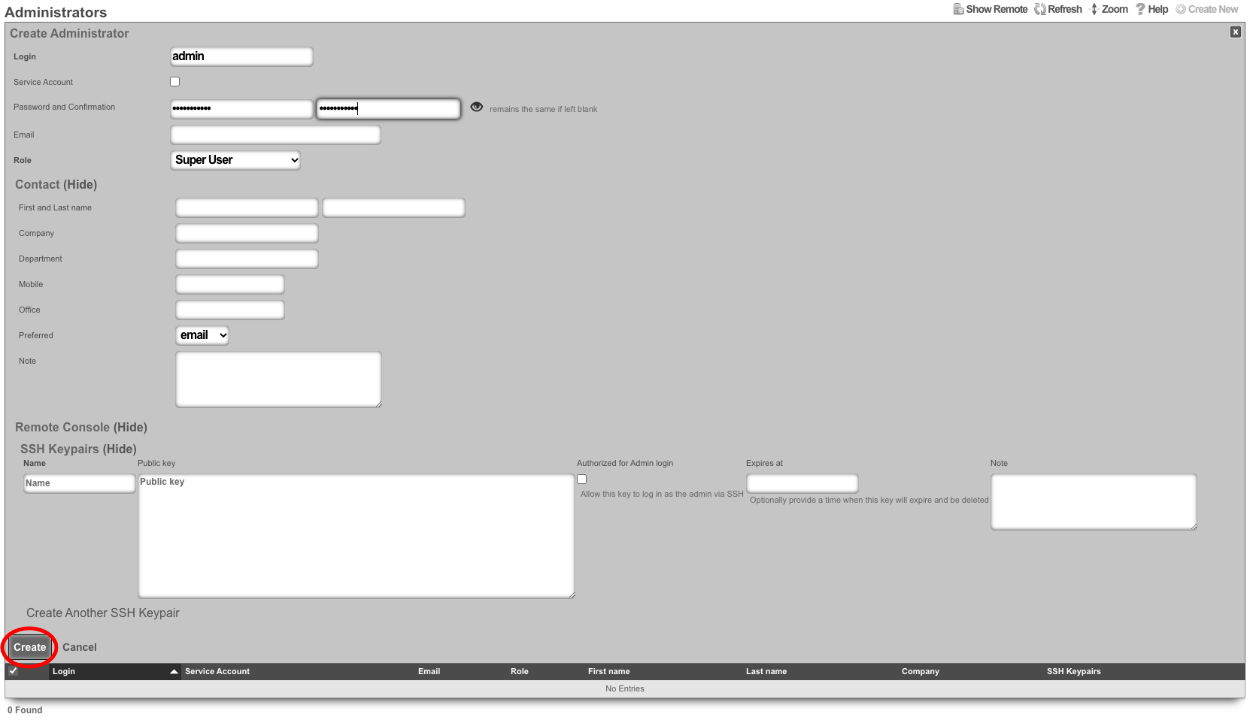
Next edit the License Keys scaffold.

Paste in the license key and click update. This will restart the webserver.
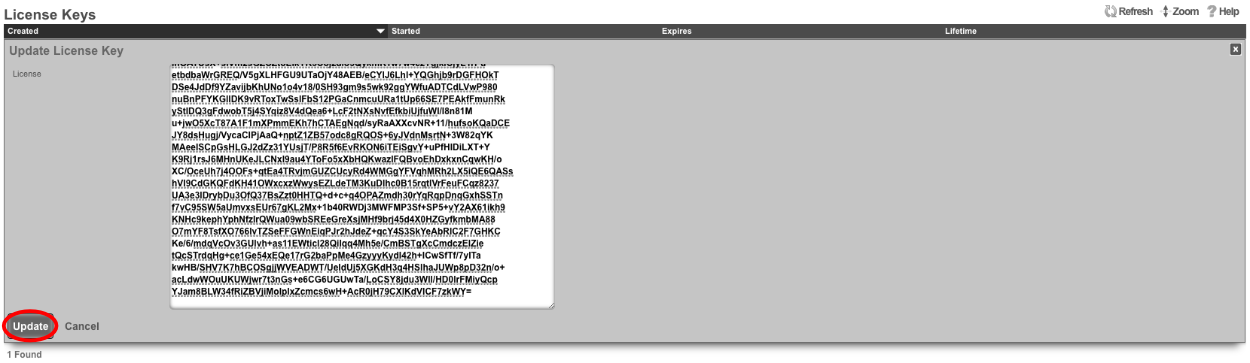
Next the CIN (Cluster Interconnect Network) will be created. Navigate to Network::LAN , and create a new network address.

Name: cc1 CIN Address. Set the interface , and specify the IP address in CIDR notation. Leave both autoincrement and span values at 1. Do not check create DHCP pool. Click create.
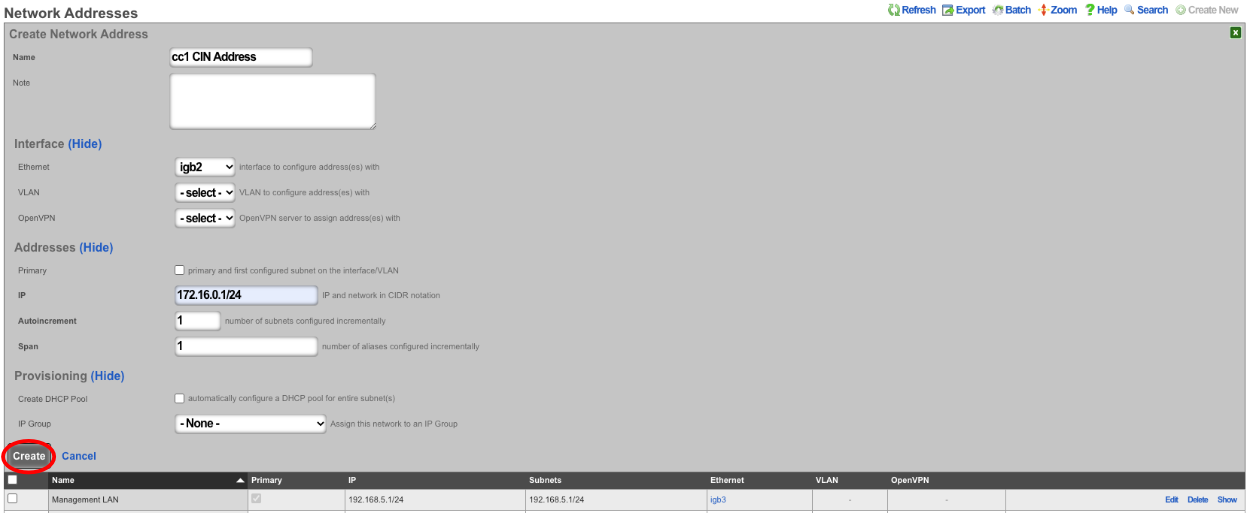
Turn rXg into Master Controller by navigating to System::Cluster. Create a new cluster node by clicking create new on the Cluster Node scaffold.

Uncheck DP (data plane) HA enabled this will ensure that the CC doesn't take over the networking for the other nodes before they are integrated into the cluster. Verify that the default information is correct and click create.
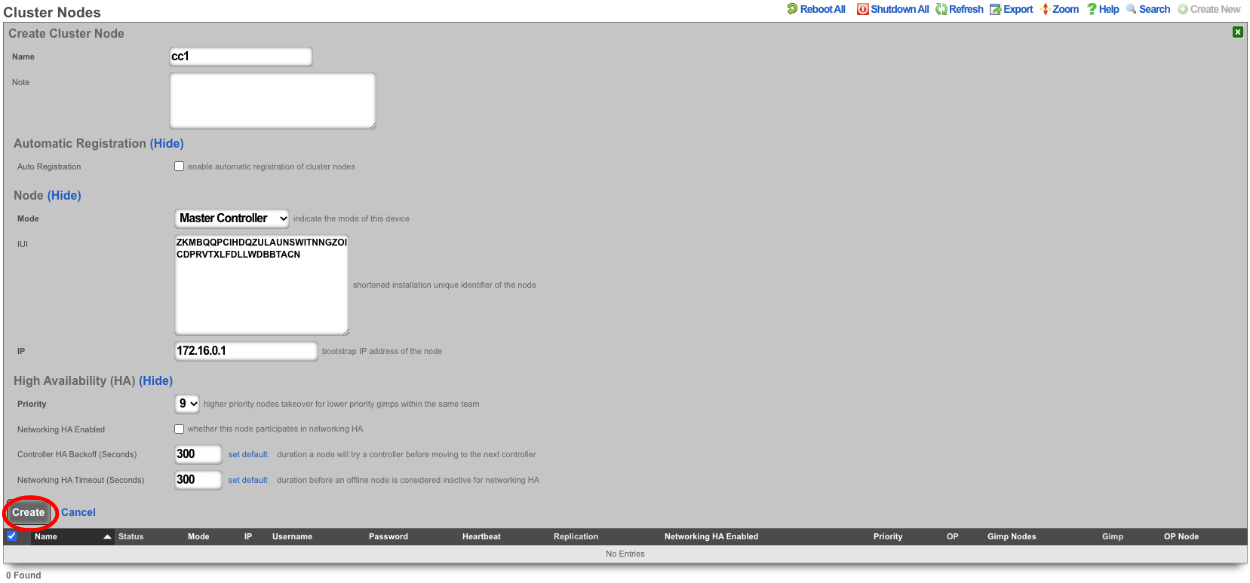
Create a new cluster node record for each CC and GW that will be added to the cluster. The easiest way to do this is to have 2 browser windows open, one with the Master Controller admin GUI loaded, and the other with the admin GUI with a tab for each CC and GW. Click create new on the Cluster Nodes scaffold.

Verify the name and mode is correct. Copy the IUI from the secondary controller into the IUI field on the Master Controller , verify that the mode , IP , and priority are configured as desired. Uncheck the DP (data plane) HA enabled box. Click create.
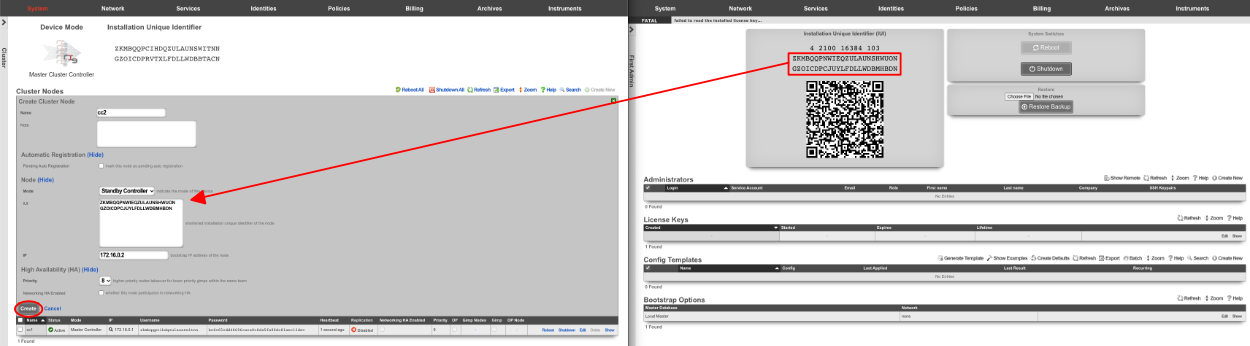
Next repeat for the 2 GW nodes. Click create new on the Cluster Nodes scaffold, copy the IUI from the first GW node into the IUI field. Verify that the mode , IP , and priority are configured as desired. Uncheck the DP (data plane) HA enabled box. Click create.
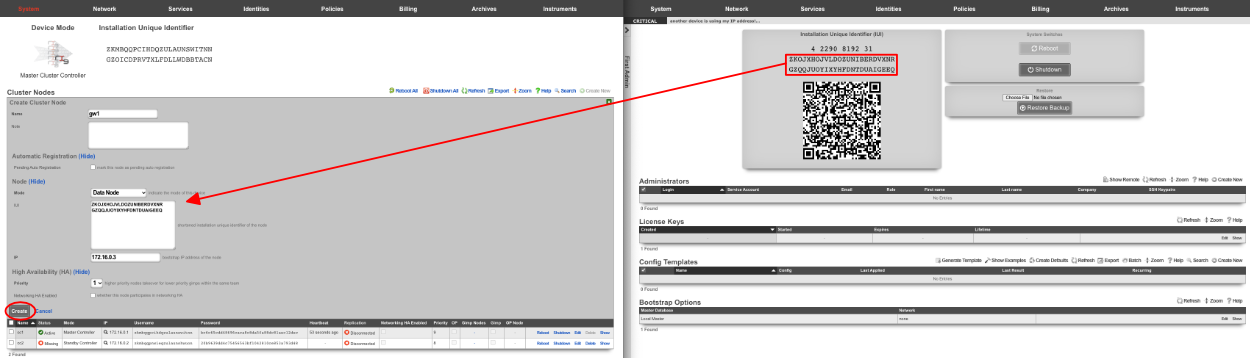
Repeat for GW 2. Verify that the mode , IP , and priority are configured as desired. Uncheck the DP (data plane) HA enabled box. Click create.
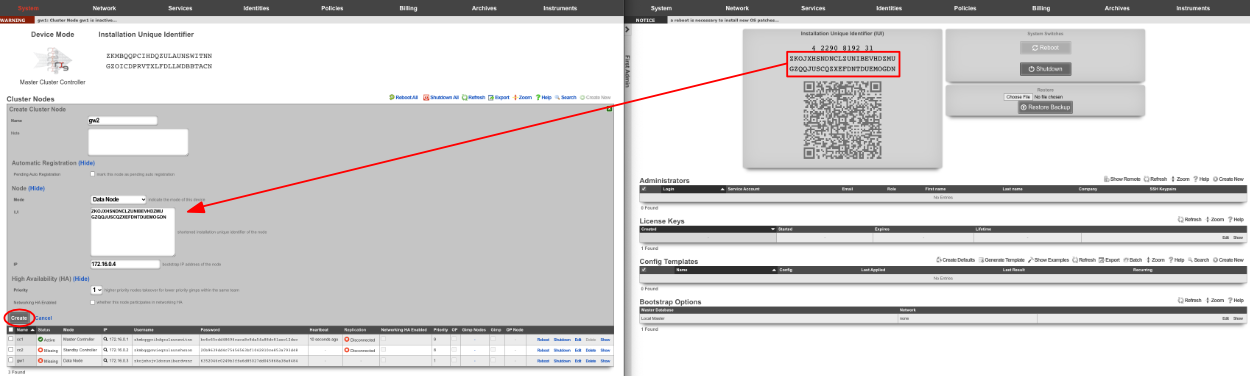
All the CC's and GW's now have cluster node records on the Master Controller.

Next, we will integrate the secondary CC and GW's into the cluster using the Cluster Node Bootstrap scaffold. On the secondary cc admin GUI in the second browser edit the cluster node bootstrap record.

Copy controller IP , username , password from the Master Controller's Cluster Nodes scaffold to the secondary controller. Set the interface , and the local IP address in CIDR notation. Click update.
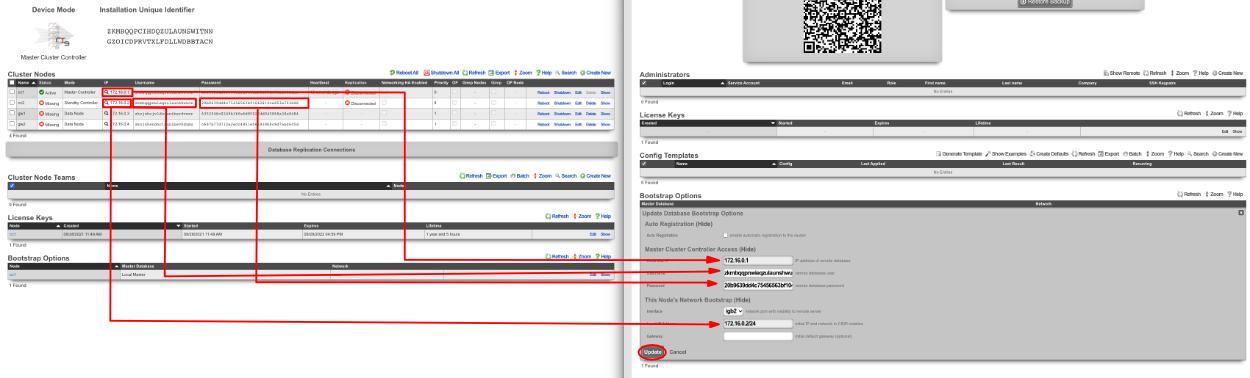
Repeat the process for GW 1 and GW 2 nodes.

Next add the license for each node. On the Master Controller edit the license key entry for cc2 paste the license in. Repeat for each node.

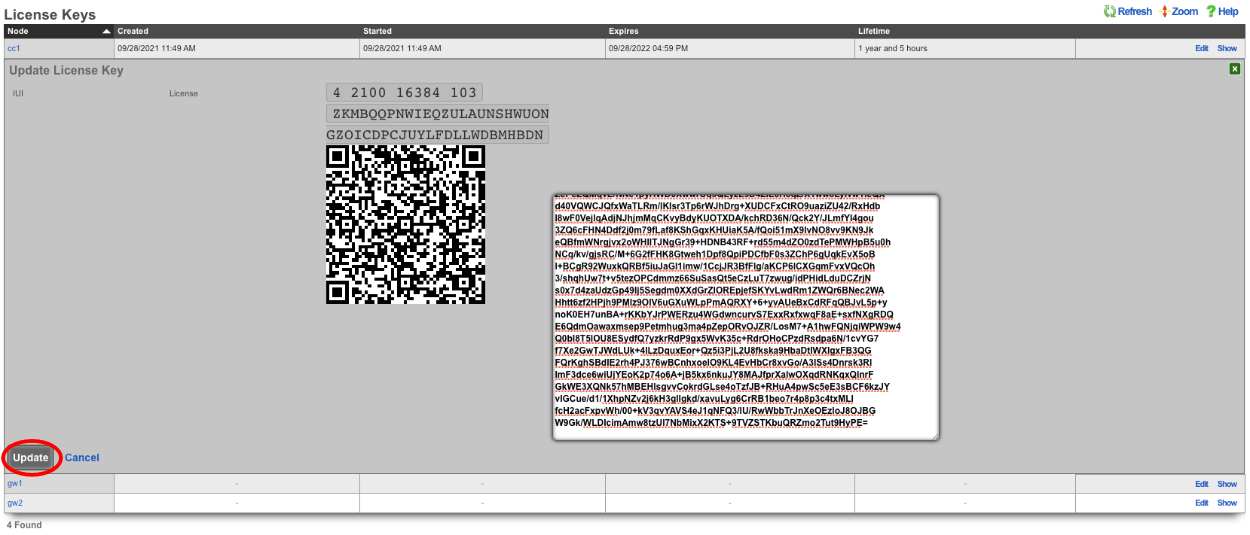
After the licenses have been installed on the remaining nodes the cluster configuration is complete. The operator will now use the Master Controller to continue configuring the system. The System::Cluster page will now show Replication and HA status as green.
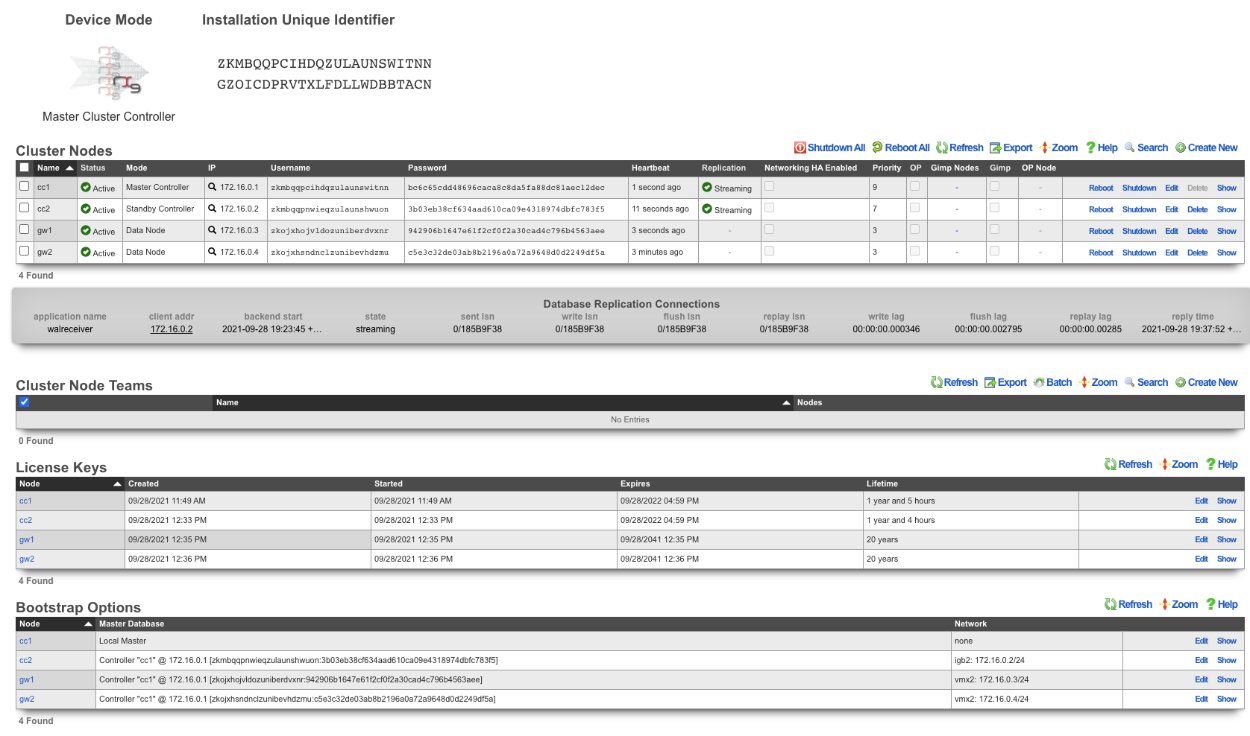
Example Cluster Setup: Using Autoconfiguration 2 CC's
For this example, we will use auto configuration to configure a cluster consisting of 2 CC's. Unlike the previous example, we will use the auto configuration option instead of manually creating the cluster. After installing the rXg software on each machine, open a separate browser tab for each machine in the cluster.
Create a new administrator on the Master Controller , by clicking "create new" on the Administrators scaffold. Each admin account should be unique for every operator.

At a minimum a login and password are required. Click create.
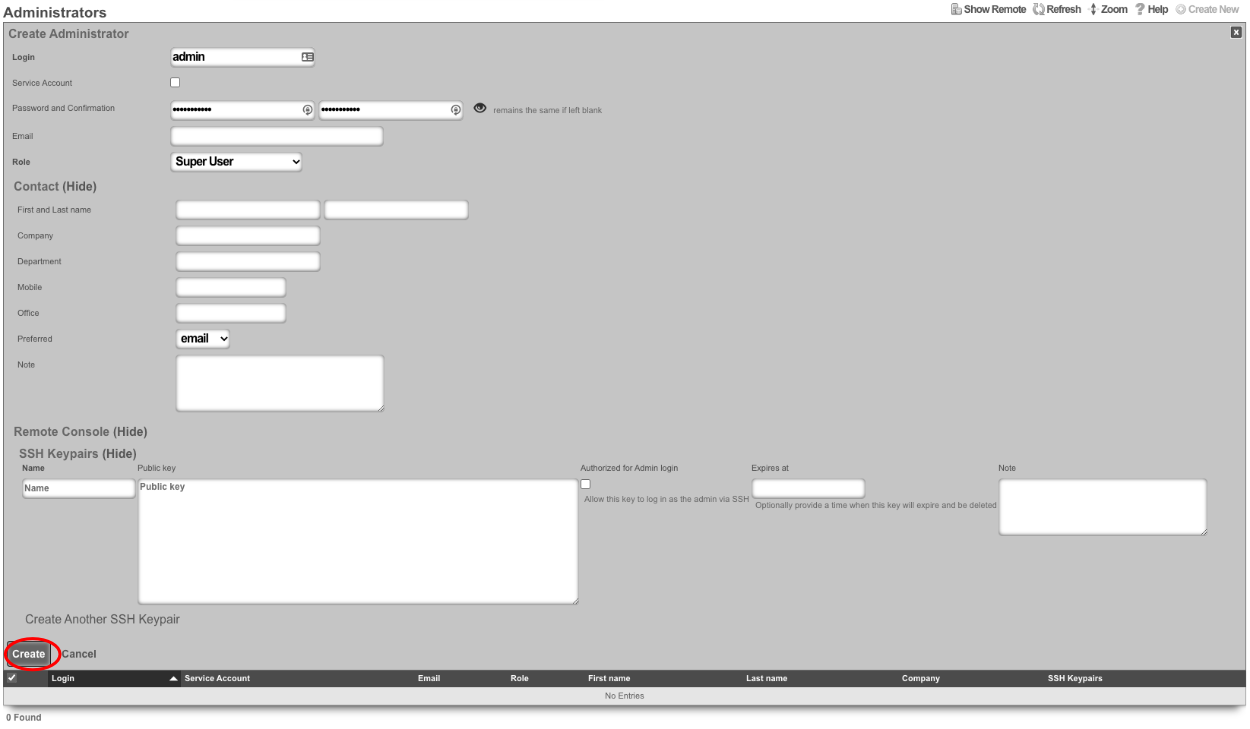
Next, edit the License Keys scaffold.

Paste in the license key and click update , this will restart the webserver. Note: if an asset exists in the licensing portal with the IUI of the node, the node will automatically retrieve its license.
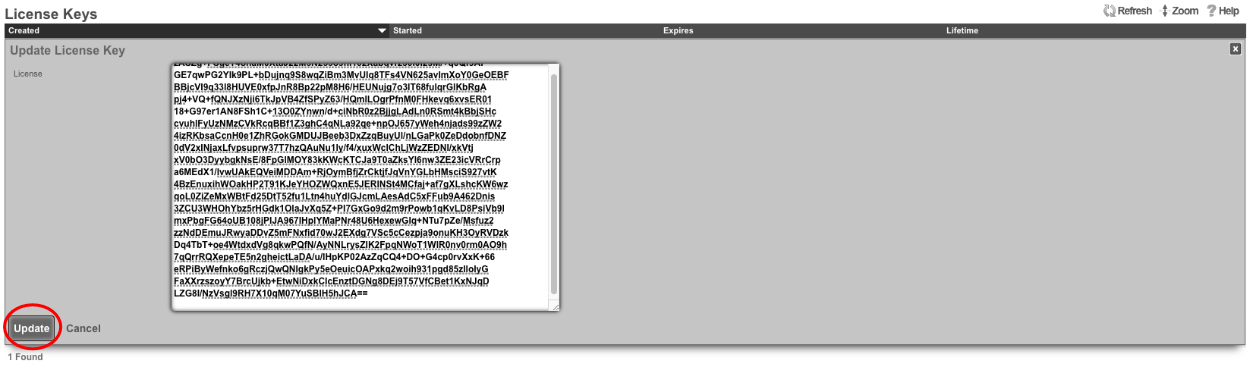
Next the CIN (Cluster Interconnect Network) will be created. Navigate to Network::LAN, and create a new network address.

Name : cc1 CIN Address. Set the interface , and specify the IP address in CIDR notation. Leave both autoincrement and span values at 1. Do not check create DHCP pool. Click create.
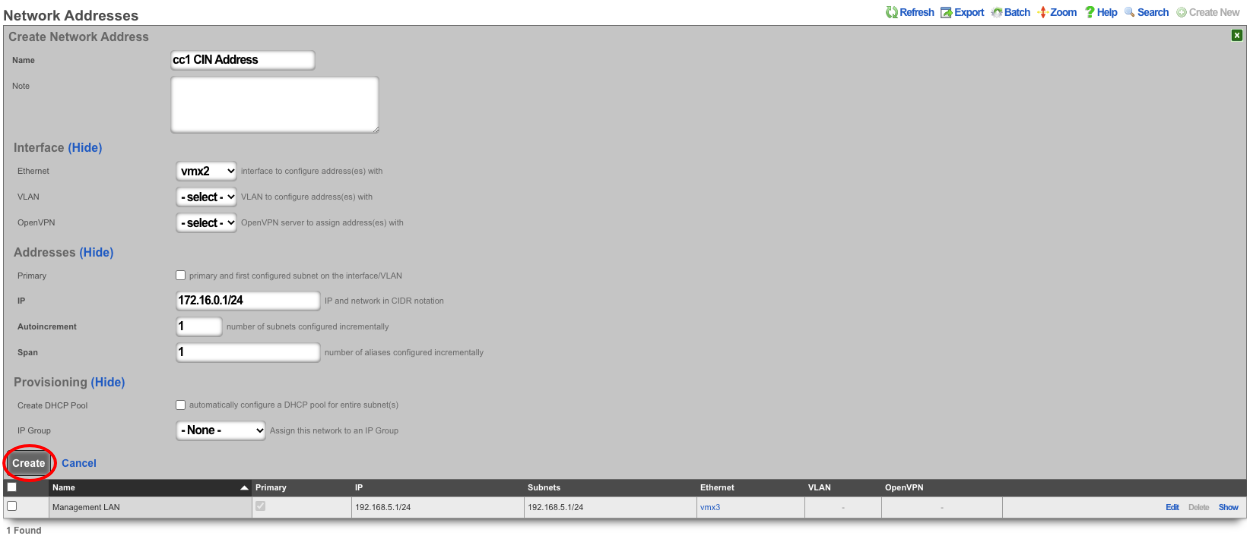
Turn the rXg into a Master Controller by navigating to System::Cluster. Create a new cluster node by clicking create new on the Cluster Node scaffold.

Verify that the default information is correct. Check the auto registration box, this will allow the automatic registration of cluster nodes. Once that is done, it will open up the permit new nodes option, check this as well. This will allow new nodes to join the cluster so they can auto-register.
Now the auto approve new nodes option will become available. Check this box. By checking this box, the operator of the rXg will not need to approve new nodes that join the cluster. Checking all the boxes makes it so new nodes will not only auto join the cluster but will also be approved without any intervention. If you wish to disallow the auto-approval process, then the opererator will need to approve each node before it will become part of the cluster.
For this example, we are checking all the options so that the process is as automatic as possible. Click create.
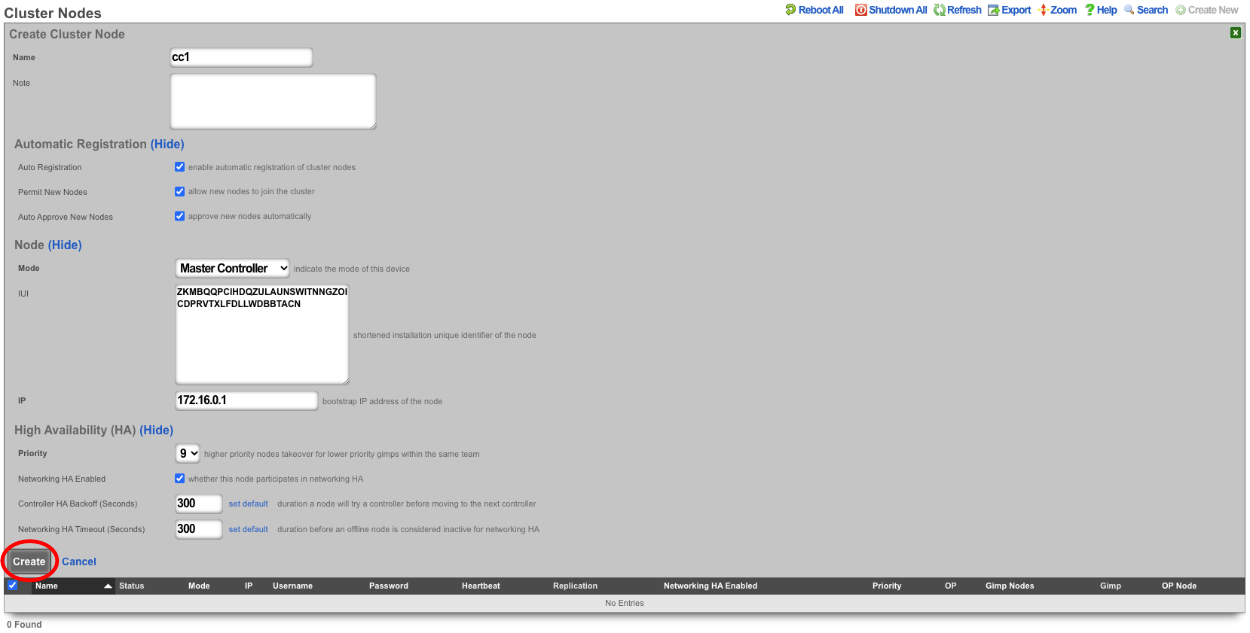
Now go to the tab that was opened with the secondary CC's admin GUI. Do not create an admin or apply a license at this time. Scroll down to the bottom of the page and edit the cluster node bootstrap record.

Under the Auto Registration section check the auto registration box, which will enable the node automatically register to the Master Controller. This will unlock the create CIN option and the join as new option. Create CIN will create the cluster interconnect network on the node using the data provided on the form. Check the create CIN box.
The join as new box should be checked if this node has never been a member of this cluster before (such as having a node fail and re-adding it to the cluster after repair - it would not be a new node in this case), check this box. This will allow the operator to select the join role for this node. In this case, it should be set to*standby controller (HA)*.
Enter the controller's IP address in the controller IP field. Set the interface that will be used to connect to the CIN network in the interface field. Set the CIN IP of this node in the local IP address field. The gateway field does not need to be set because the node belongs to the same network as the Master Controller. Click update.
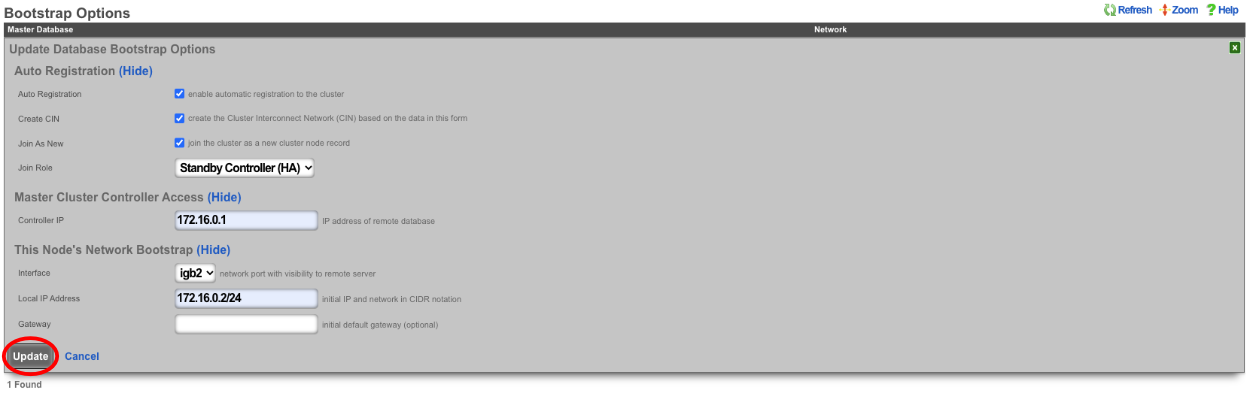
The cluster node bootstrap record will now show that it is awaiting auto-registration.

On the Master Controller navigate to System::Cluster. Both nodes should not be listed in the Cluster Nodes scaffold.

Note that their status may be unlicensed; the licenses can be added via the License Key scaffold below. Edit the record for CC2 and paste in the license. In this case, the nodes have pulled their licenses automatically.
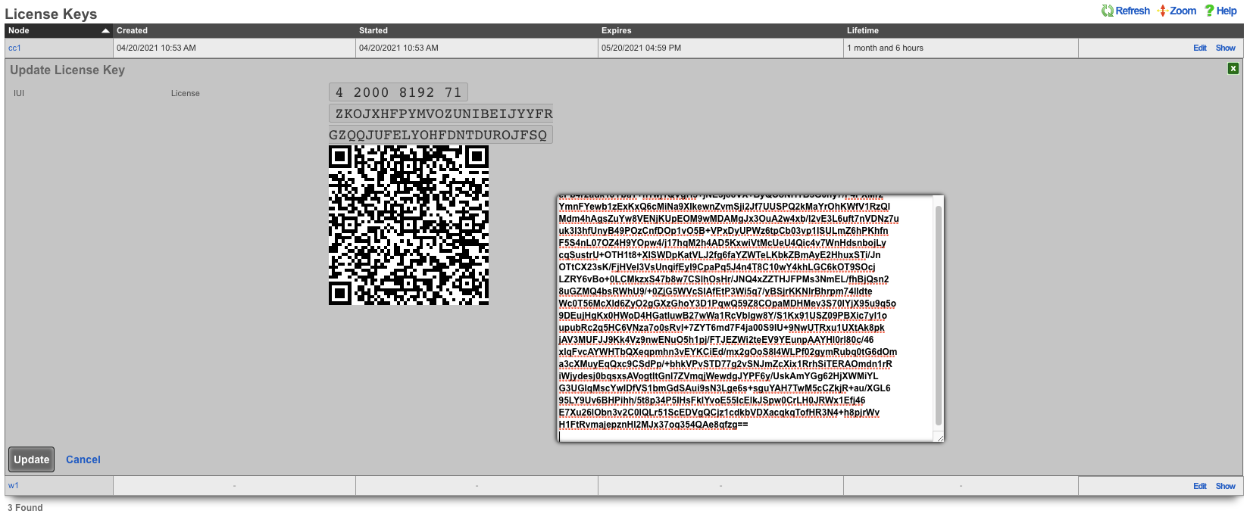
Now that the licenses have been added, it is a fully functional cluster that created itself without the operator needing to copy and paste information between the Master Controller and nodes.

How to change which Cluster Controller is the Master Controller
Turn off DP (data plane) HA on the nodes, leave the Master Controller for last.
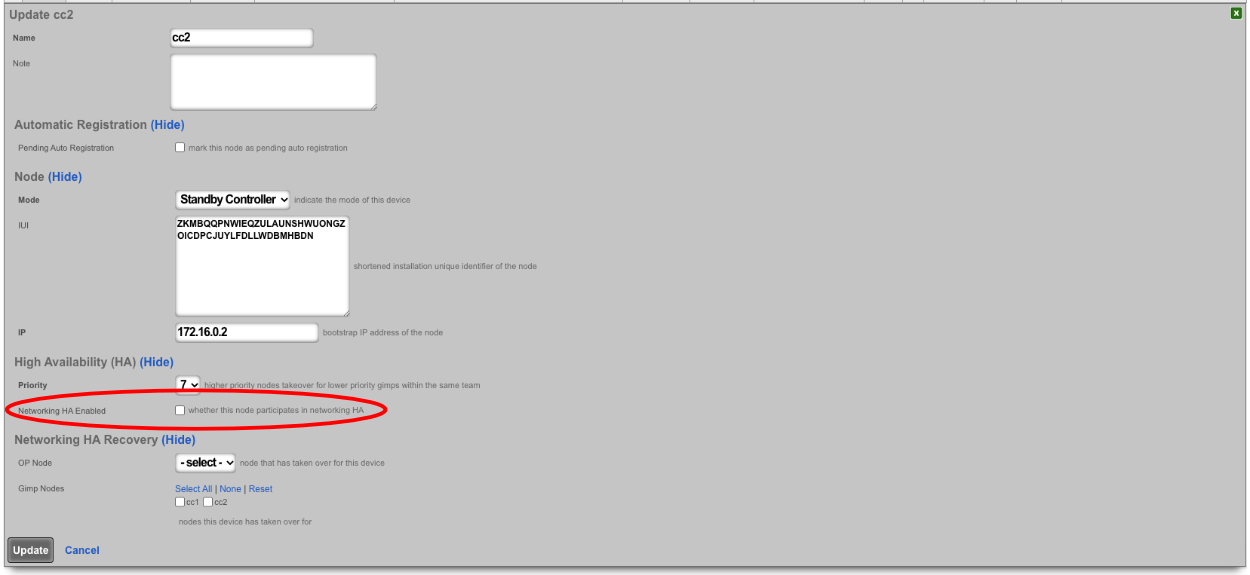
Make sure the priority of the standby you want to become the new master is higher than all other standby controllers. Typically, the standby controllers will be a priority of 7 by default. Set the standby that you want to be master to 9.

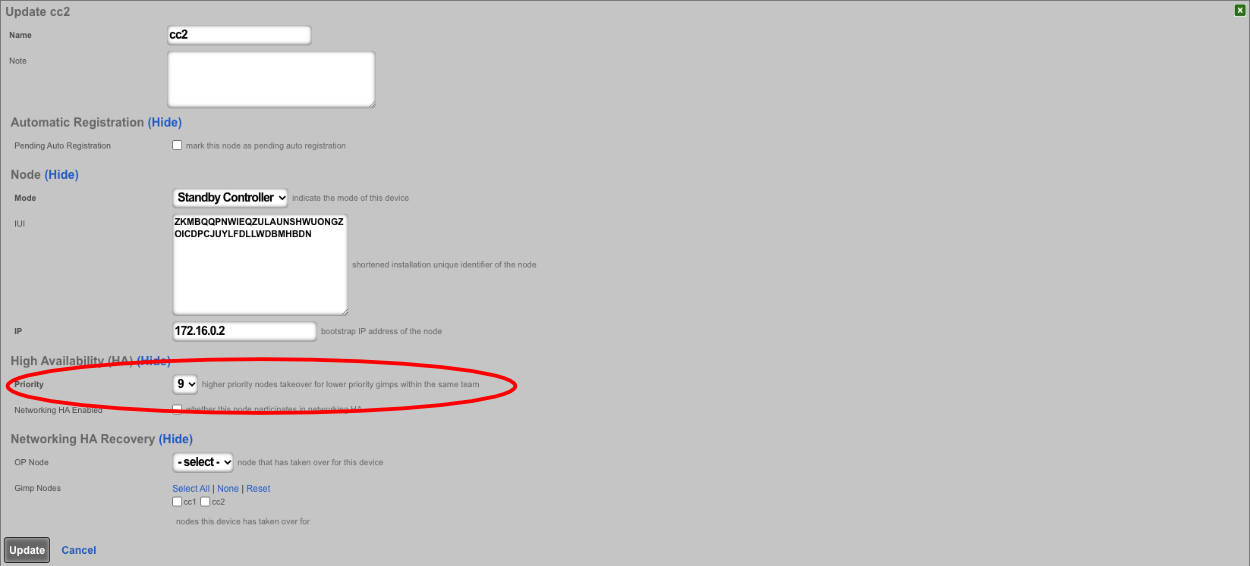

SSH into the current master. Stop rxgd and kill postgres (you will need to become root for this). Running ' kr' will stop rxgd and then running ' killall postgres' will stop postgres. Once this is done, the highest priority standby will take over as master. You can reduce the HA timeout to make this faster (default is 5 minutes).
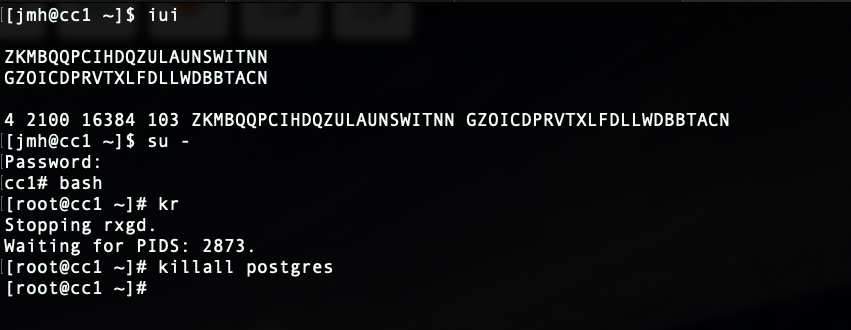
Open GUI on the new master. Edit the cluster node record for the current master node and set to standby.
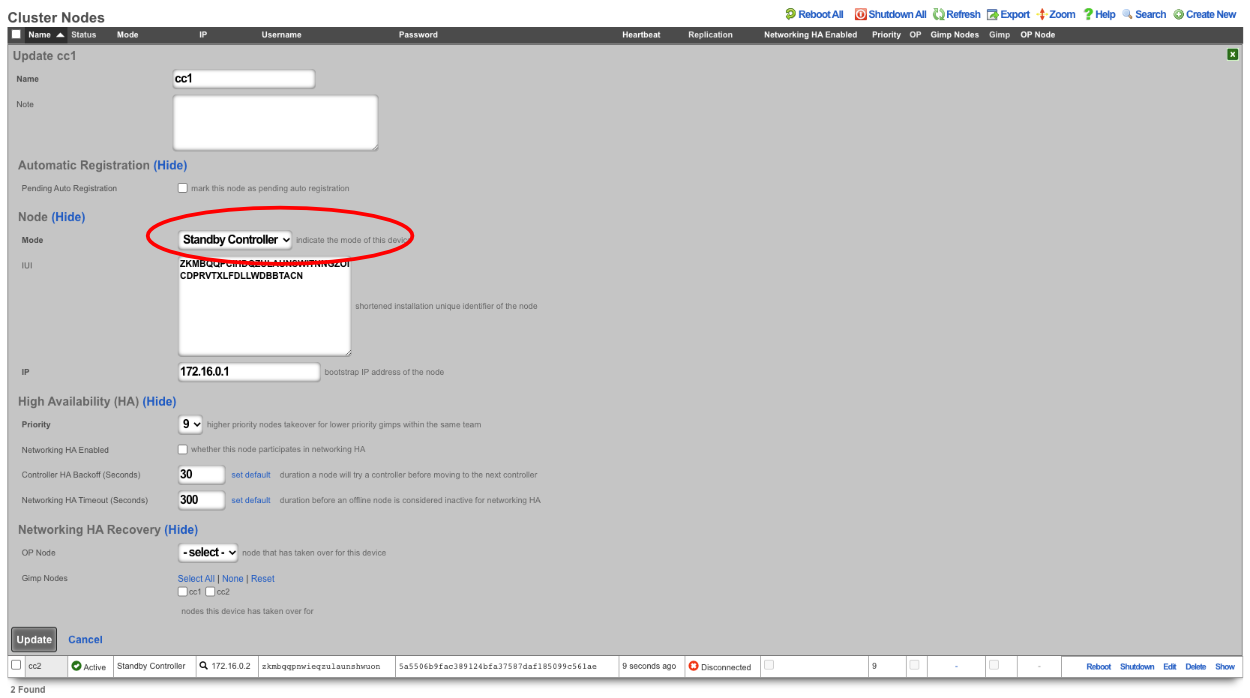
SSH into the node that will be the new master. Run ' console' to access the rails console. Find the BootstrapOption record for the NEW master and set the host , username , and password fields to nil. In this case, the record that will be edited is the last record, since there is only CC1 and CC 2. The record can be found by running ' BootstrapOption.last'.
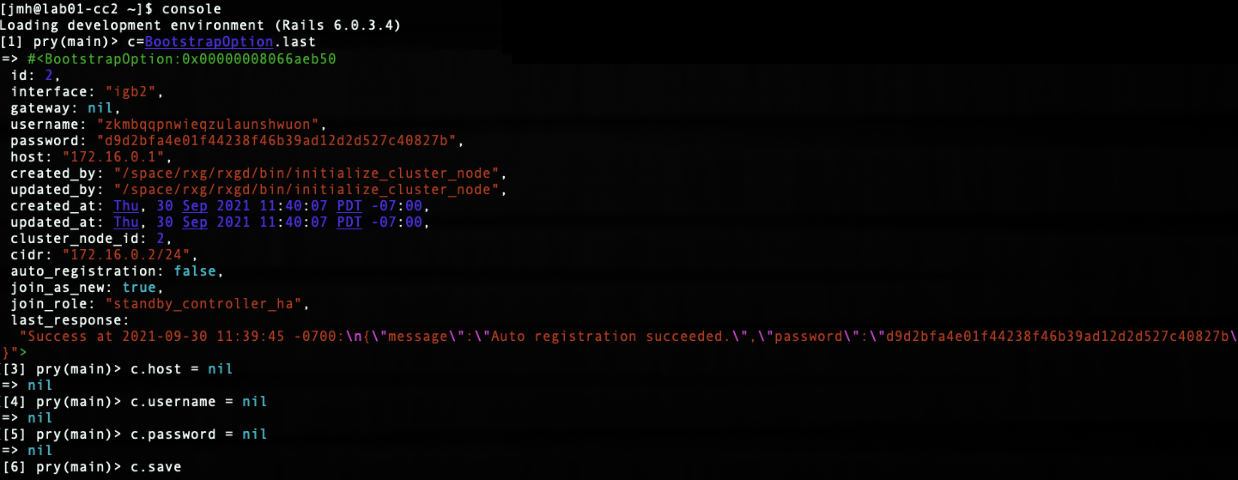
Edit cluster node record in GUI for new master and set to master.
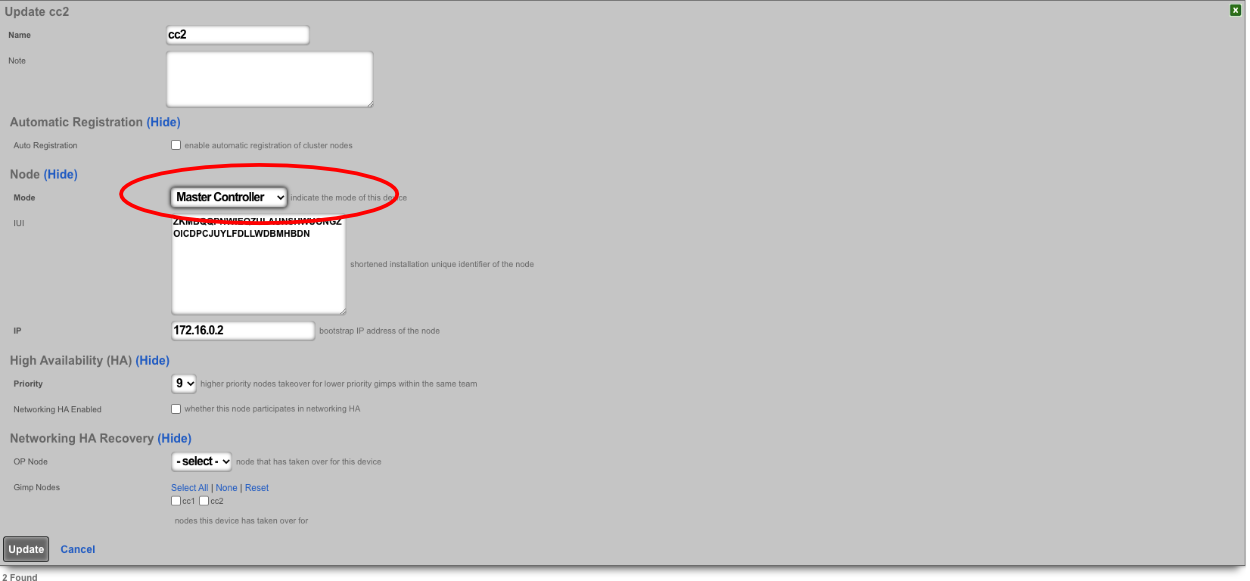
Edit the bootstrap option record in GUI for old master and set it as if it is a new node.
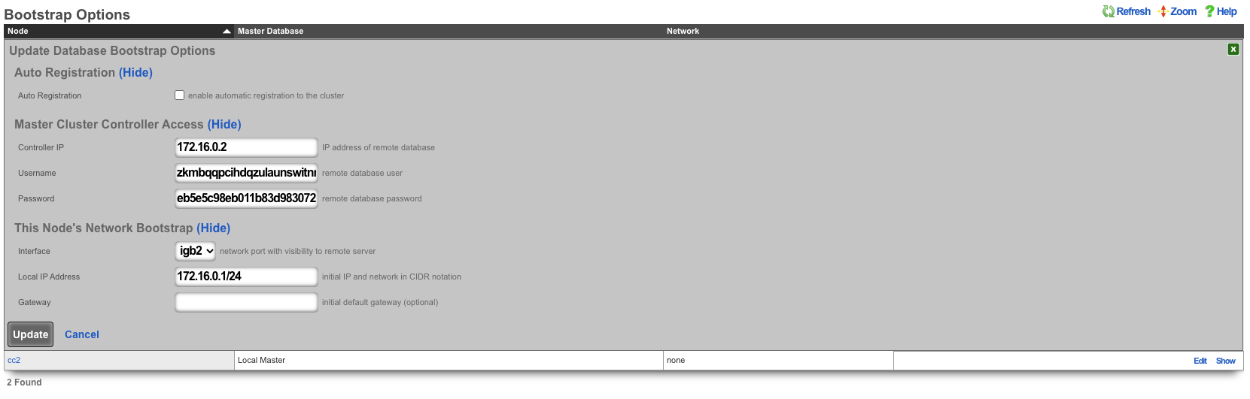
SSH to OLD master and edit the bootstrap.yml located at /space/rxg/bootstrap.yml. Change the order under _controllers so that the NEW master is on top of the list followed by any other standbys. Repeat for bootstrap_live.yml. After editing the 2 files on the OLD master run ' rr' to restart rxgd. If you changed the control plane HA timeout , be sure to set it back. Finally, edit the cluster node records and re-enable DP (data plane) HA , doing the master CC last.
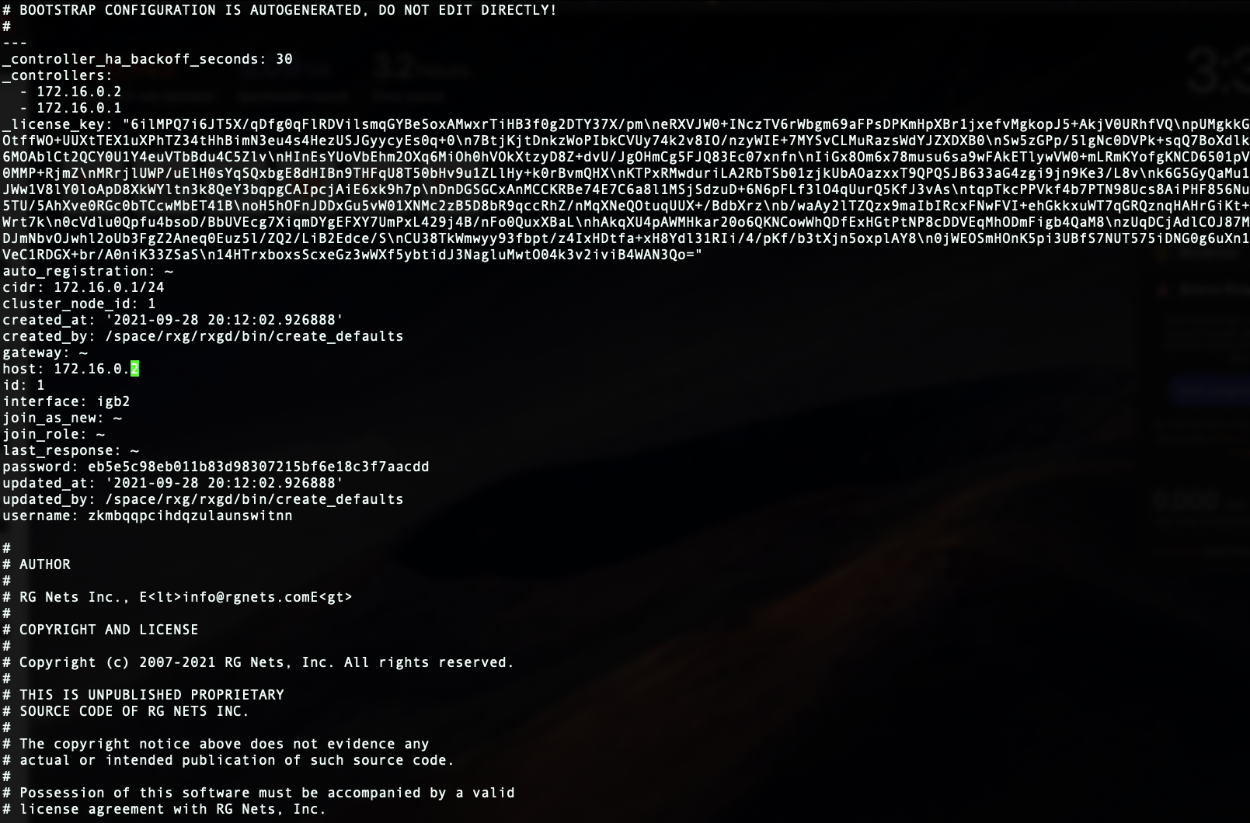

Note: Doing this will not copy over graphing information so it will be lost.
Node Integration After Failure
With HA 3.0 , the process to get a failed node back into the cluster is straight forward. For example, if a node loses a power supply, once it's replaced and the node is turned back on, the node will automatically join the cluster and take over networks configured on it (if another node took over for it).
If the node is replaced with new hardware, meaning the IUI has changed, the cluster node record for the downed node can be edited. Once the IUI is replaced with the new node's IUI , the username and password for the new node will be generated. These can then be entered into the bootstrap and the node will integrate into the cluster and replace the failed node.
Compliance
The Compliance view lets the operator detect and remediate configuration drift on this rXg or across a fleet. A compliance rule ties a known-good configuration source either a config template or a backend script to a schedule and a set of target nodes. Each time a rule runs, the rXg evaluates the rule against each target and records whether the node is compliant (matches the expected state) or non-compliant (has drifted).
Compliance rules work on any rXg. On a standalone rXg, a rule evaluates the local machine. On a fleet node, a rule created locally evaluates just that node on its own schedule. On a fleet manager, a rule can target remote fleet nodes and drive checks across the fleet from a single place.
Compliance Rules
The Compliance Rules scaffold is where rules are defined. Navigate to System::Compliance to open it.
The name field is a unique identifier for the rule. It appears in health notices, notification events, and the compliance dashboards. Choose a name that reflects what the rule enforces.
The config template field selects a config template whose test-mode run determines compliance. When the template reports zero changes, the node is compliant. Any created, updated, deleted, or failed action on test-mode apply counts as drift. Pick either a config template or a backend script not both.
The backend script field selects a backend script whose standard-output lines are parsed for compliance markers. Pick either a backend script or a config template not both. See Backend Script Compliance Syntax below.
The severity field selects the health-notice severity raised when the rule fails. Options are notice, warning, and critical. Severity does not affect how the check runs, only how failures are reported.
The enabled checkbox, when unchecked, causes the scheduler to skip this rule and the Check Now action to refuse to run. Disable rules to temporarily pause them without deleting the record.
The create health notice checkbox controls whether a failing check raises a health notice at the severity above. Regardless of this setting, a passing check always clears any existing notice for the rule+node pair so leaving notices off for noisy rules still lets pass/fail transitions clear stale alerts.
The check interval field controls how often the scheduler runs the rule. The compliance checks job fires every 30 minutes and skips any rule that has been checked within its interval. Intervals match the config template recurring options (hourly, daily, weekly, etc.).
The fleet nodes field (fleet manager only) selects specific fleet nodes to check. Leave empty to fall back to the config template's own node targeting (for config_template rules) or to self-check the manager (any rule).
The fleet groups field (fleet manager only) selects fleet groups to check. A node that belongs to a selected group is included. Combined with fleet nodes a node selected either way is checked once per evaluation.
The note field is a free-form description shown in the rule list. Use it to record the purpose of the rule, the customer or site context, or links to related documentation.
Check Now and Check All
The Check Now action on each rule forces an immediate evaluation, bypassing the check interval. Each remote node is enqueued as its own background job, so the action returns immediately with a queued message and the per-node results trickle into the Current Status dashboard as each job completes. Refresh the page to watch results land. The same flow applies whether the rule targets a single node or a hundred fan-out scales with the number of available DelayedJob workers rather than an in-process thread pool.
The Check All button at the top of the rule list (shown only when at least one enabled rule exists) fans out a Check Now to every enabled rule at once. It is guarded by a short cache-keyed cooldown so a double-click can't enqueue two sweeps, and the confirm dialog gates the deliberate action. Disabled rules are skipped to include a paused rule in a bulk sweep, enable it first.
A built-in rate limit (default 30 seconds between manual checks of the same rule, plus a per-admin window of 20 manual checks per 5 minutes across all rules) protects against accidental hammering. Scheduled checks via the compliance scheduler are not subject to this limit.
Operator Portal Dashboard
The admin scaffold at System::Compliance is the configuration surface where rules are defined and remediations are launched. The day-to-day operational view lives in the fleet operator portal under Compliance, at /admin/operator_portal/fleet/compliance_rules. That dashboard renders summary cards across the top (overall fleet status, node-by-node pass/fail breakdown, warnings), a sortable and filterable rule list with the per-rule pass/fail pill, and an expand row beneath each rule that drills into the per-node snapshots. The same actions (Check Now, Remediate, Hide/Show Details, Export to CSV) are available without having to leave the dashboard. Per-rule snapshots in the expand row also expose Remediate for individual non-compliant nodes and Remediate All Non-Compliant Nodes for batch remediation. The dashboard is themed for both dark and light operator-portal modes.
Config Template Compliance vs Backend Script Compliance
Config template rules are the preferred mechanism when you want to enforce a concrete configuration specific records existing with specific values. Test-mode execution tells you exactly what would change if the template were applied live, giving you a per-attribute view of drift in the Review & Remediate page. If the template produces zero changes, the node is compliant.
Backend script rules are the right tool when compliance is a computed property something that isn't expressible as records managed by a config template (for example, filesystem state, service status, or a composite rule that inspects multiple subsystems). Because scripts run arbitrary Ruby in the rXg's binding, they can check anything the admin API can see.
Backend Script Compliance Syntax
Backend script rules parse each line of the script's standard output for a prefix. Only prefixed lines count toward the result; other output is ignored.
| Prefix | Effect |
|---|---|
Pass: or OK: |
Counts as a passing test |
Error:, Failure:, or Fail: |
Counts as a failing test (makes the rule non-compliant) |
Warning: |
Informational does not affect compliance but is recorded |
A backend script is compliant when it emits no Error:, Failure:, or Fail: lines. An uncaught exception in the script also fails the check, with the exception text recorded as a failure. The script runs with fleet_node and node (an alias) bound to the rXg being checked, so scripts can query the node's own configuration.
Version Requirements for Remote Checks
When a rule targets a remote fleet node, the required node build depends on the rule type:
| Node Build | Config Template Rules | Backend Script Rules |
|---|---|---|
| >= 16.621 | Fully supported via the native compliance endpoint | Fully supported |
| 16.381 16.620 | Supported via a legacy fallback using the existing execute_config_template endpoint and the audit-trail read API slightly slower but produces the same detailed results |
Not supported; upgrade the node to build >= 16.621 to enable remote backend-script compliance |
| < 16.381 | Not supported; upgrade the node to build >= 16.381 to enable remote compliance | Not supported; upgrade the node to build >= 16.621 to enable remote backend-script compliance |
Nodes whose version limits a rule are indicated in the UI with a yellow (legacy) or red (unsupported) triangle icon next to the node name, with a tooltip explaining the limitation and the minimum version required. The Check Now flash also names any targeted nodes that can't be checked remotely due to their version.
When a check targets a node that cannot run the rule type at its current version, the compliance engine records the result with status set to unsupported rather than error. The Compliance Status dashboard renders these rows with a yellow info icon and the version-floor message inline, and they are excluded from the rule's compliant / non-compliant tally they sit in a separate N unsupported counter so a rule reading "5/5 nodes compliant 1 unsupported" makes clear that the unchecked node hasn't been factored into the pass/fail score. Unsupported results do not raise health notices and do not fire the compliance_check_failed notification event; the operator's only action is to upgrade the node.
The compliance engine itself is part of build 16.621, so creating a rule "locally on the node" is only an option once the node is on at least that build below 16.621 the node has no Compliance Rules scaffold at all, and remote checking (where available) is the only way to evaluate it. The workaround for unsupported nodes is to upgrade them.
Remediation
The Remediate action appears on a rule when at least one node is non-compliant and the rule uses a config template. Backend script rules are not remediable their output determines compliance but doesn't describe what change would fix it.
On a fleet manager with multiple non-compliant nodes, Remediate opens a batch review page that lists the non-compliant nodes, shows the changes each one would receive if the template were applied live, and lets the operator pick which nodes to remediate. Each node panel starts collapsed under the node name click the header to inspect that node's pending changes. On a standalone rXg or a single non-compliant node, Remediate opens a single-node review page.
Before applying the fix, the remediation flow compares the reviewed change set against the most recent compliance check result. If the template's output has drifted since the review because the manager or node configuration has changed in the meantime the remediation is blocked with a drift error and the operator is prompted to re-review.
Applying a remediation always enqueues the work as background jobs one per (rule node) and immediately redirects the operator to a status page that polls every few seconds. Each node's row updates as its job completes, so the operator can watch fleet-wide remediation progress without refreshing manually. After every node finishes, the compliance check service re-runs automatically to refresh the Current Status dashboard, so a successful remediation flips the rule's nodes from red to green within a sweep or two.
Results and History
Each rule evaluation produces a compliance check result row capturing the outcome, test counts, change summary, and any warnings or failures. The Check History nested link on a rule shows all historical results. The Current Status nested link shows the latest result per node use it for dashboard-style views.
The compliance node detail page, reached by clicking a node name in the compliance dashboard, shows every rule targeting that node with its latest result, test score, and any failures or warnings. If the node is version-limited, a banner at the top explains what's unavailable and how to work around it.
A background job (PurgeComplianceCheckResultsJob, runs daily) trims result history older than 90 days so the table doesn't grow unbounded. The job always preserves the results that the dashboard's current-status snapshots currently reference, so the dashboard stays accurate regardless of how far back the history has been trimmed.
For operator-tunable retention, a Database Purger named Compliance History is seeded automatically on first install (default 3 months). It covers both compliance_check_results (the per-evaluation history) and compliance_check_invocations (the node-side async-flow status table) keyed on each row's created_at. Edit it under System::Database Purgers to change retention, or disable purging entirely by setting age to zero. The hardcoded 90-day backstop above is independent keeping at least one of them in place is a good idea so the tables can't grow without bound if the configurable purger is misconfigured.
Notifications and Health Notices
When a rule has create health notice checked, a non-compliant result raises a health notice named compliance_<rule_id>_<node_name> at the rule's severity. A later passing result clears the notice, so the health-notice list is a live roll-up of currently-failing rules. Regardless of the create health notice setting, a failing check also fires the compliance_check_failed notification event wire it into email, Slack, or webhook notifications via the standard Notification Events scaffold. There is no paired "passed" event: passing results clear any prior notice but are not broadcast as notification events, since success of a routine check is rarely actionable.
Fleet
The Fleet view allows the operator to configure the rXg to be used as a fleet manager or to join a node to an existing fleet manager.

The Fleet Nodes scaffold allows the operator to turn the rXg into a fleet manager and to add nodes to be managed.
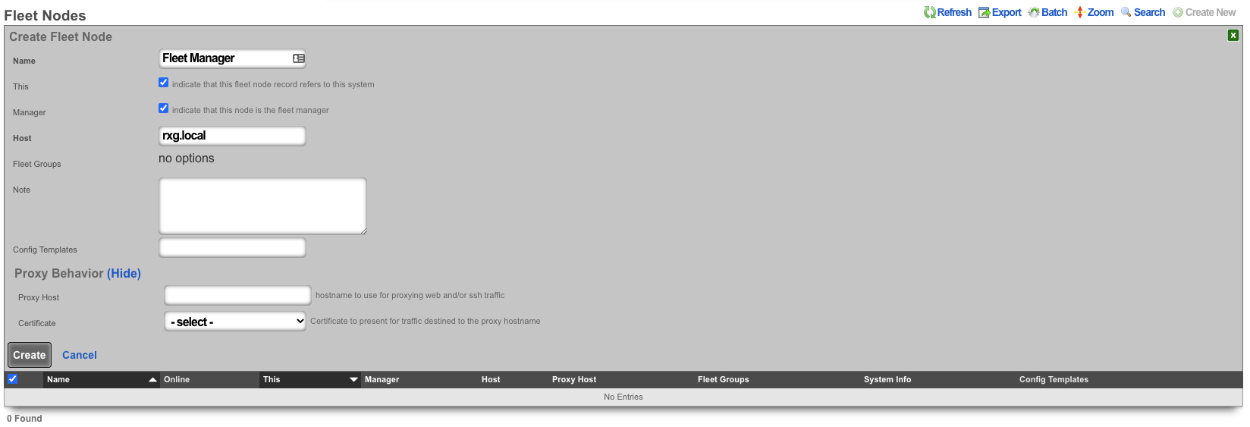
The name field is an arbitrary string descriptor used only for administrative identification. Choose a name that reflects the purpose of the record. This field has no bearing on the configuration or settings determined by this scaffold.
The this checkbox indicates that this fleet node record refers to this system.
The manager field, if checked, indicates that this node is the fleet manager.
The host field is used to enter the FQDN or IP address of the Node.
The key will contain the key to be used to authenticate with the fleet manager , or if on a fleet node, it will be a record of the key generated for the node by the fleet manager.
The ignore SSL cert errors field, if checked, will allow the fleet manager to ignore any certificate errors when communicating with the nodes. Note: this is not recommended.
The stat reporting interval field is the interval in seconds that the node will report its stats. When set on the fleet manager node, this value will set the default value, unless overridden on a node record. Default value is 10 seconds.
The fleet groups field allows the operator to set which fleet groups the node will belong to. It is possible for a node to belong to multiple groups.
The PMS properties field allows the operator to set which PMS properties the node belongs to (if configured).
The config templates field allows the operator to select which, if any, templates should be pushed to the node.
The software package field allows the operator to select an upgrade software package to push to the node.
The proxy hostname field is the hostname to use for proxying web and/or SSH traffic. When set on a fleet manager record, it enables cookie-based proxying via the operator portal. When set on a Fleet Node record, enables persistant anonymous Virtual Host behavior.
The certificate field sets the certificate to present for traffic destined to the proxy hostname.
The operator can use the Fleet Groups scaffold to create groups, which can then be used to control who can access those groups by specific admin or administrative roles.
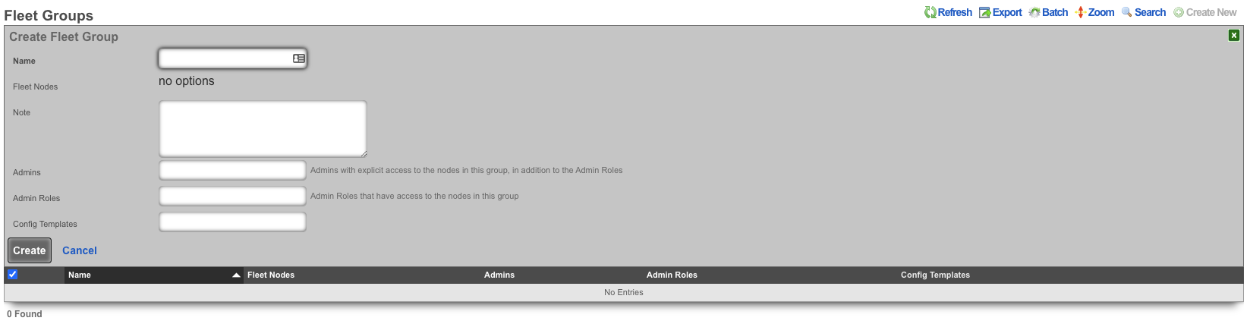
The name field is an arbitrary string descriptor used only for administrative identification. Choose a name that reflects the purpose of the record. This field has no bearing on the configuration or settings determined by this scaffold.
The fleet nodes field allows the operator to specify which nodes belong to the fleet group.
The note field is a place for the administrator to enter a comment. This field is purely informational and has no bearing on the configuration settings.
The admins field allows the operator to specify which admins will have explicit access to the nodes in this group, in addition to the admin roles.
The admin roles field allows the operator to select the admin roles that have access to the nodes in this group.
The config templates field allows the operator to push selected config templates to the nodes that are members of this group.
The Software Packages scaffold allows the operator to upload software packages that can then be pushed to fleet nodes for upgrades.

The name field is an arbitrary string descriptor used only for administrative identification. Choose a name that reflects the purpose of the record. This field has no bearing on the configuration or settings determined by this scaffold.
The file field allows the operator to upload an upgrade package to the fleet manager.
The remote URL field allows the operator to specify a URL to retrieve the package from (if not uploading via the file field).
The username field is used for HTTP authentication if required.
The password field is used for HTTP authentication if required.
The fleet nodes field allows the operator to specify which nodes the upgrade package should be pushed to. This is optional; the operator can use the Scheduled Upgrade scaffold to specify which nodes and when the upgrade should take place.
The Scheduled Upgrades scaffold allows the operator to schedule upgrades. Upgrades can be pushed out immediately or can be rolled out over several days, starting at a specific time of day.
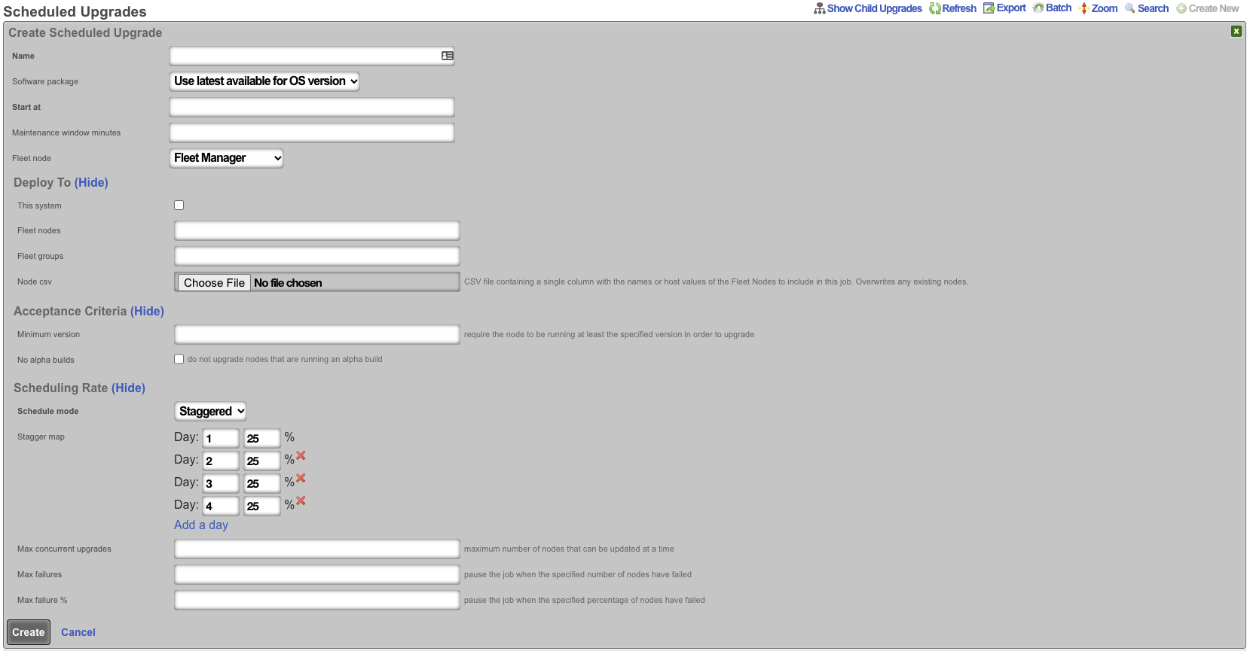
The name field is an arbitrary string descriptor used only for administrative identification. Choose a name that reflects the purpose of the record. This field has no bearing on the configuration or settings determined by this scaffold.
The software package field allows the operator to specify which upgrade package is scheduled for install. By default, it will be set to use latest available for OS version. The operator can also specify any software package that has been uploaded using the Software Packages scaffold.
The start at field allows the operator to specify on what day and at what time the upgrade will begin.
The fleet node field specifies the target node to upgrade. Use the fleet nodes or fleet groups fields to target multiple nodes at once.
The this system field specifies that the upgrade will also be pushed to the fleet manager.
The fleet nodes field allows the operator to select specific nodes that will be upgraded regardless of fleet group membership.
The fleet groups field allows the operator to select which fleet groups will be included in the upgrade. If a fleet group is selected, it will push the upgrade to all nodes that belong to that group.
The node CSV field allows the operator to upload a CSV file containing a single column with the names or host values of the fleet nodes to include in this job. This will overwrite any existing nodes that have been selected.
The minimum version field designates that the node must be running at least the specified version in order to upgrade.
If the no alpha builds box is checked, then nodes that are running an alpha build will not be upgraded.
The schedule mode field is by default set to immediate; if set to staggered , it allows the operator to set the number of days the upgrade will take place over and how many nodes should be upgraded per day. The number of days can be changed by deleting or adding a day.
The max concurrent upgrades field sets the maximum number of nodes that can be updated at a time.
The max failures field will pause the job when the specified number of nodes have failed.
The max failure % field will pause the job when the specified percentage of nodes have failed.
Fleet-Wide Compliance Checks
A fleet manager can audit configuration drift across its nodes via the Compliance view (System::Compliance). A compliance rule ties a known-good source a config template or a backend script to a schedule and a set of target nodes, then evaluates each node on that schedule. See the Compliance manual page for the full configuration reference. Remote checks have node-version requirements (config template rules require build >= 16.381, backend script rules require >= 16.621) older nodes show a warning icon on the dashboard with the minimum version they need.
Example Fleet Manager Setup
For initial fleet setup, navigate to https://FQDN/admin/menu/fleet.

Create a new fleet node. Name is arbitrary.
This box should be checked if the record being created is for the node being created.
Manager should be checked if the node being created will be the fleet manager node.
Host is the FQDN or IP address of the node.
Fleet groups should be selected to allow the node to be seen by specific groups.
Proxy host can be set if required for proxying web and/or SSH traffic. Select certificate to present for traffic destined to the proxy hostname. Click create.
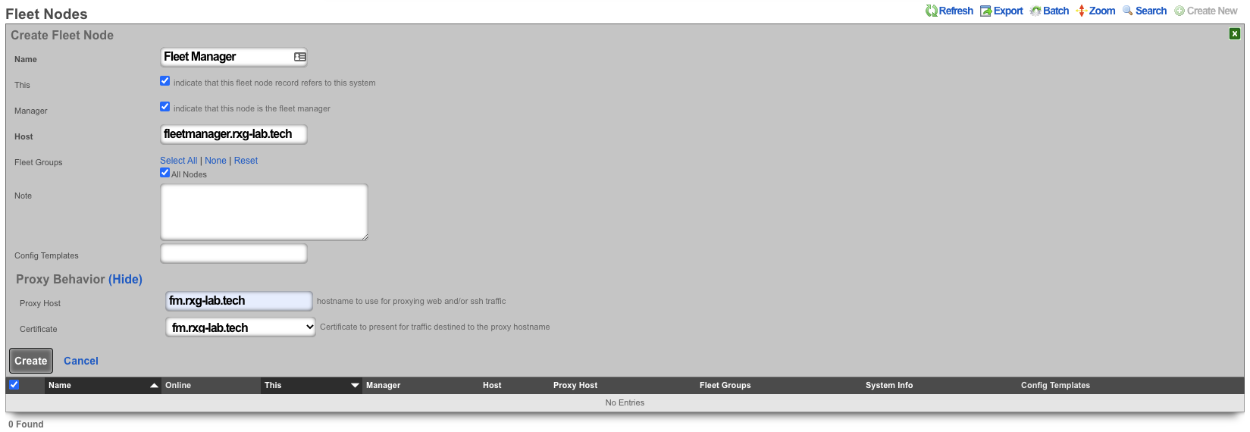
Fleet groups can be used to group nodes together. For example, nodes can be grouped by property owner. Name is arbitrary.
Fleet nodes is used to select the nodes that will belong to the group.
The admin field sets admins with explicit access to the nodes in this group. The admin roles field sets the admin roles that have access to the nodes in this group.

To add a node to the fleet manager navigate to System::Fleet on the fleet manager node.
Create a new fleet node record by clicking create new.

The name field is arbitrary. Leave both the this and manager boxes unchecked.
Enter the FQDN of the node in the HOST field. Select a group this node will belong to, if applicable. Copy the key in the key field. Click create.
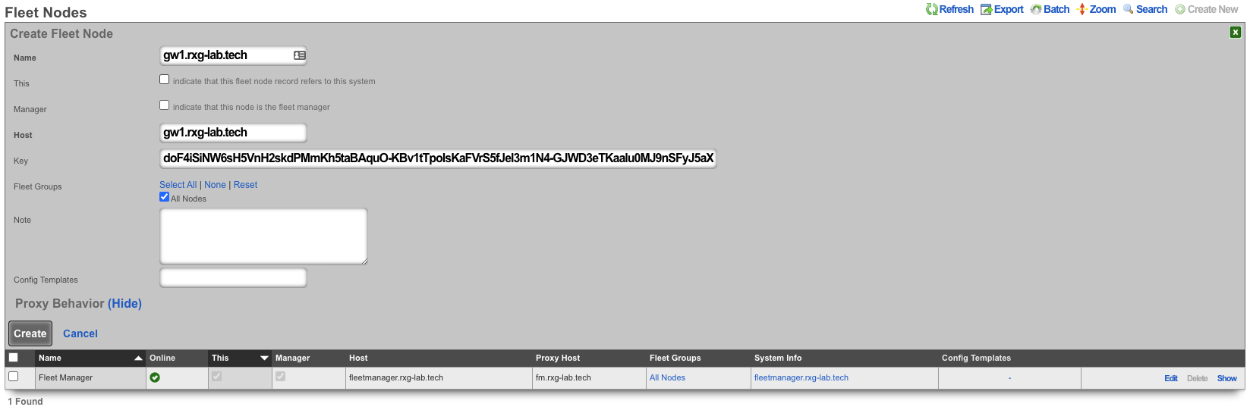
Navigate to https://FQDN/admin/menu/fleet on the node being added to the fleet manager. Enter the FQDN of the fleet manager into the fleet manager host field, and copy the key into this node's key field and click join.

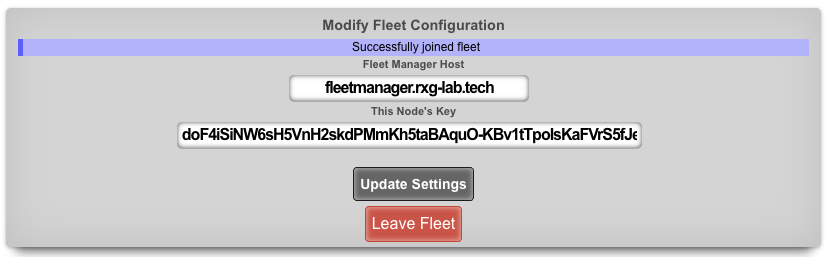

Example Fleet Templates
The operator can use the fleet manager to push config templates to the nodes connected to the fleet manager. This can be done on a per-node basis or to specific groups as defined by the fleet groups.
To push a config template to a node navigate to System::Backup on the fleet manager , and create a new config template.

In this example, a new usage plan will be pushed to nodes in the Lab02 group. The config template must be given a name.
The config to be pushed goes in the config field, or a .yml file containing the config can be added.
Lastly, we select Lab02 Group via the fleet group field. Optionally, the apply template box can be checked which will run the template after creation.
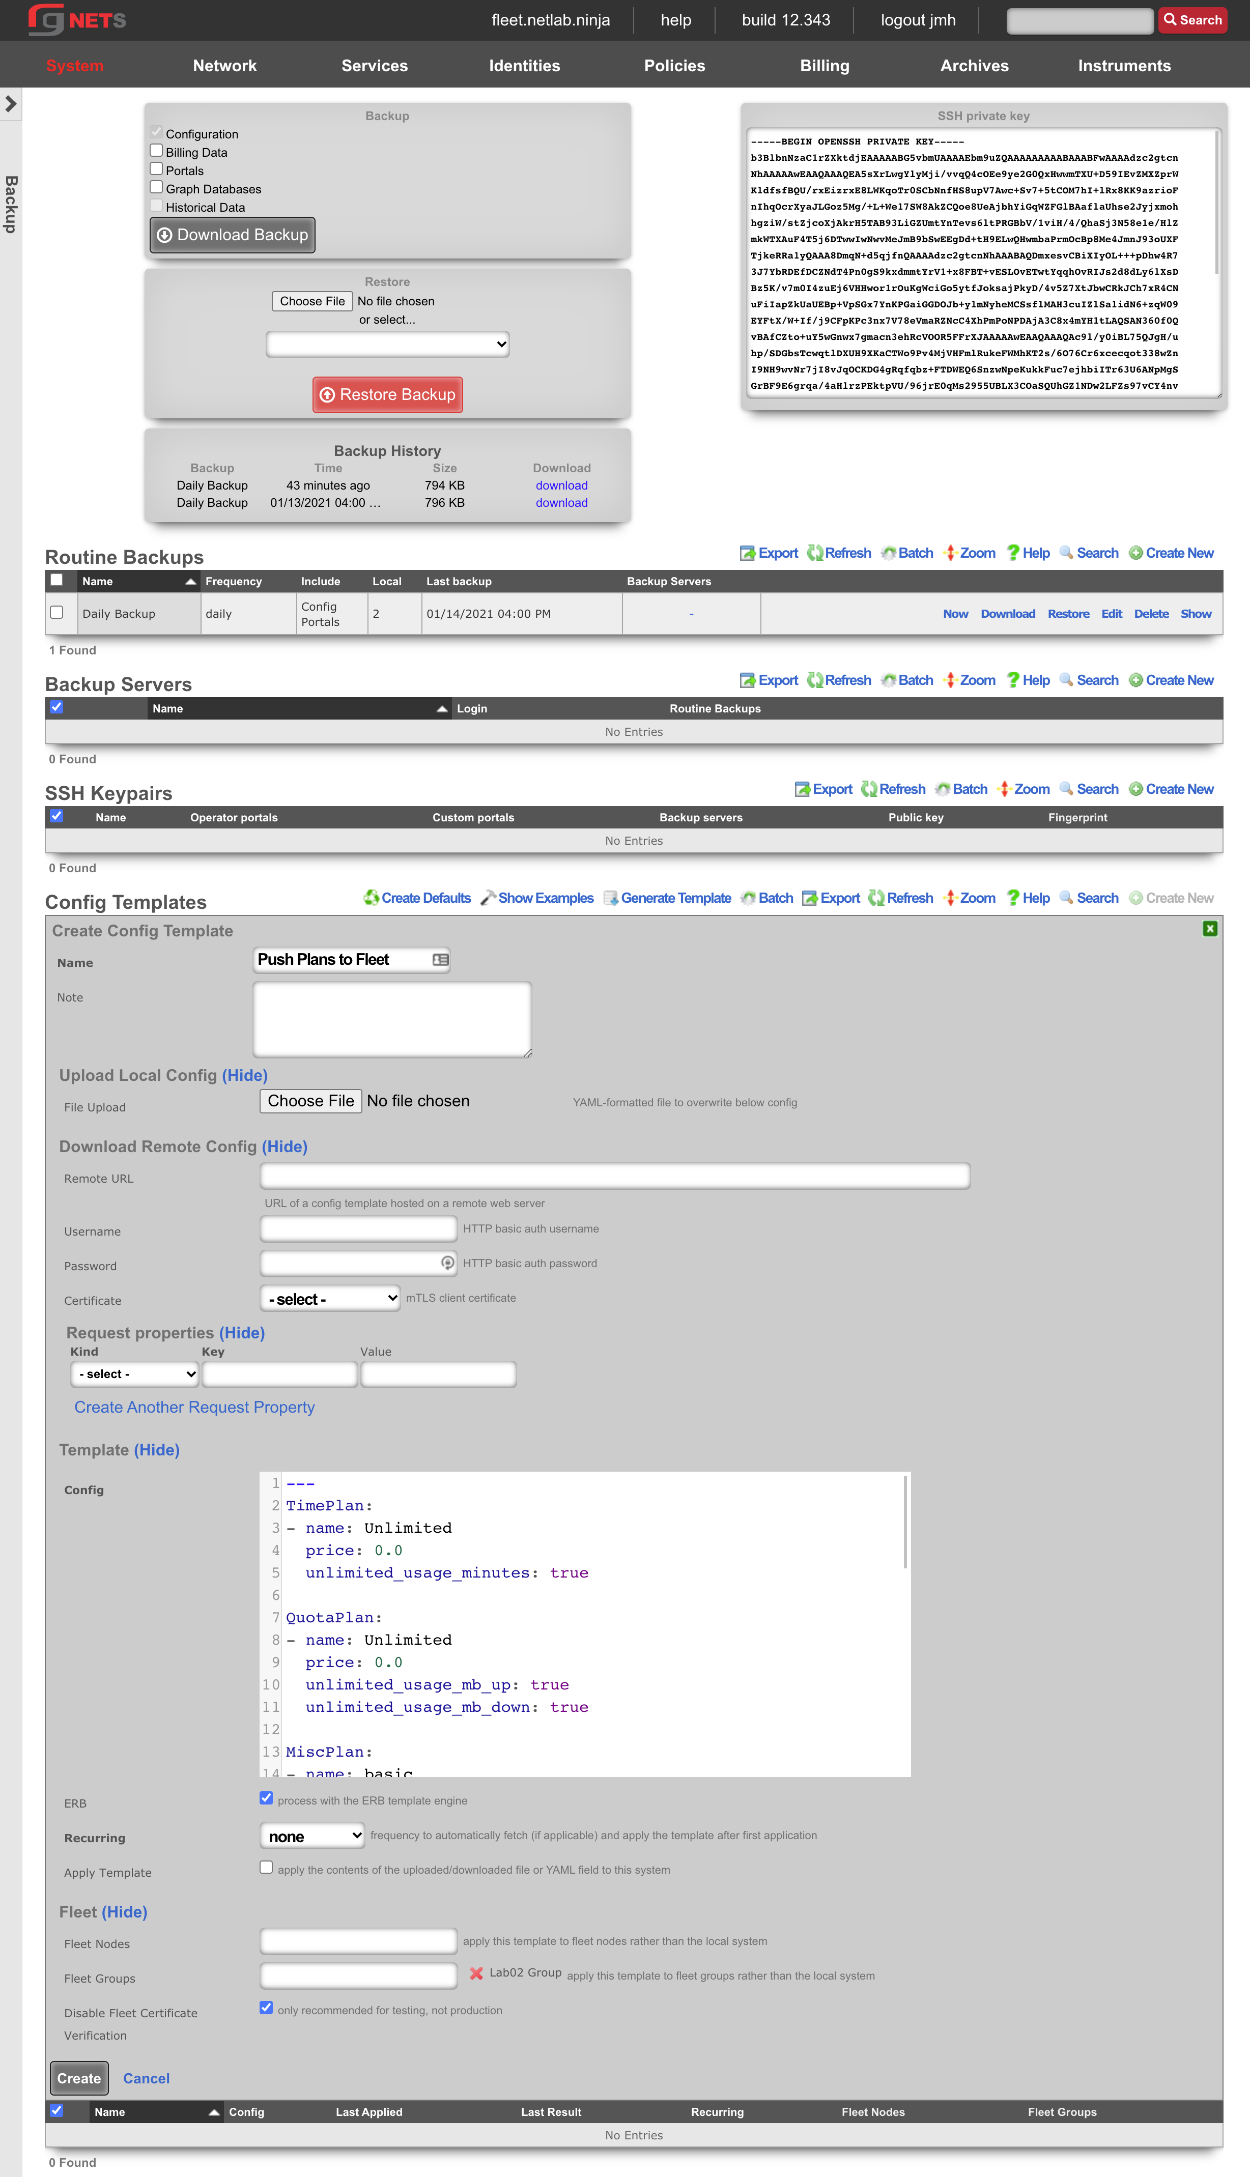
Below is an example showing that the config template was successfully applied to both fleet nodes in the group.

Below are two screenshots. The first is from Billing::Plans before the config template is applied, and the second shows the same scaffold after applying the config template.
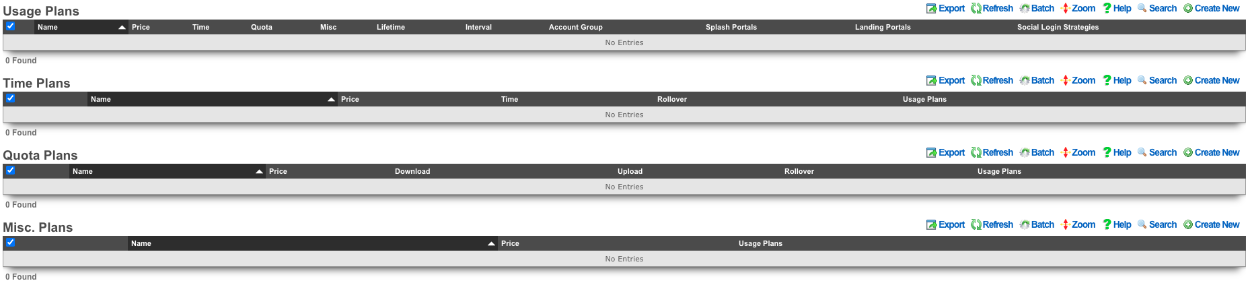
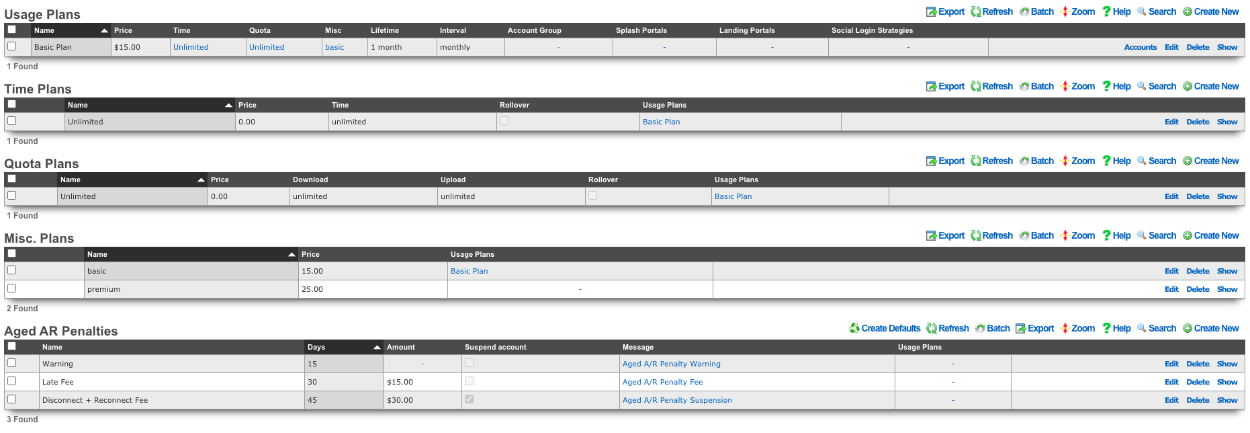
Example Fleet Templates #2 - Speedtests
In this example, a template will be used to push speedtest config to all the nodes that the fleet manager controls. Navigate to System::Backup on the fleet manager , and create a new config template.
A speedtest will be configured on all fleet nodes which will then run a speedtest every 8 hours.
The config template must be given a name.
The config to be pushed goes in the config field, or a .yml file containing the config can be added.
Lastly, we want to select all nodes. Optionally, the apply template checkbox can be checked, which will run the template after creation. Click create.
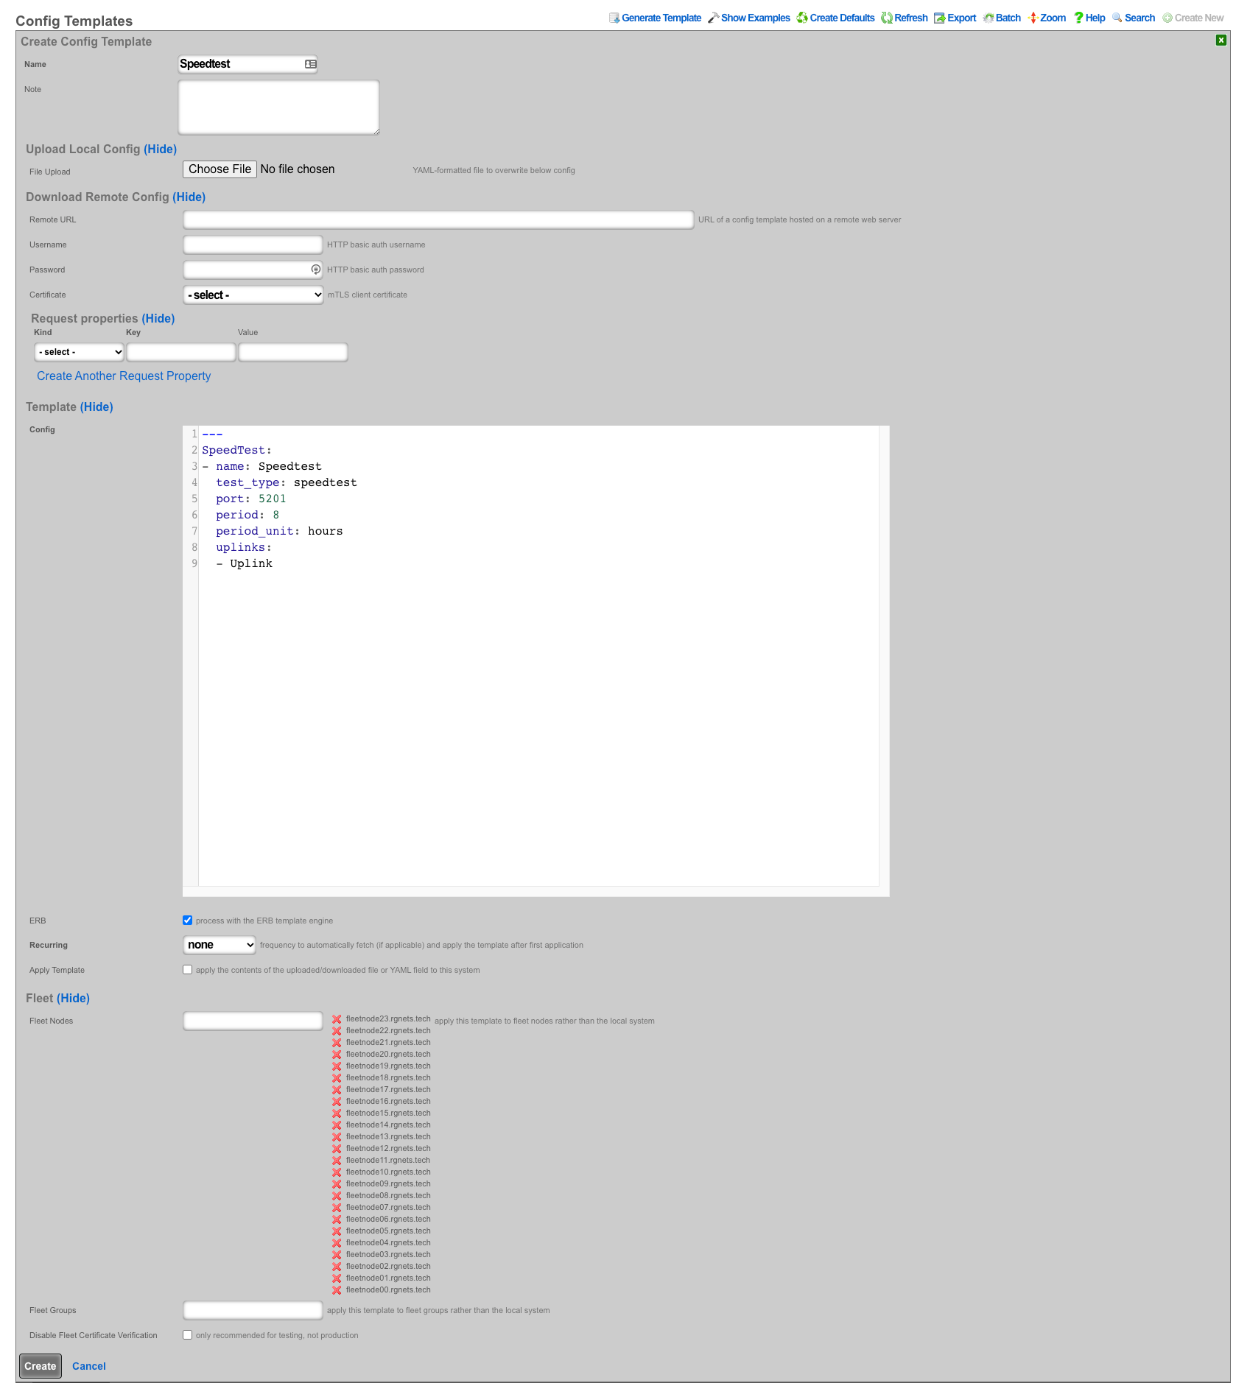
Below is an example showing that the config template was successfully applied to all fleet nodes controlled by the fleet manager.

Below is a screenshot of the configuration of the speedtest pushed to all nodes.
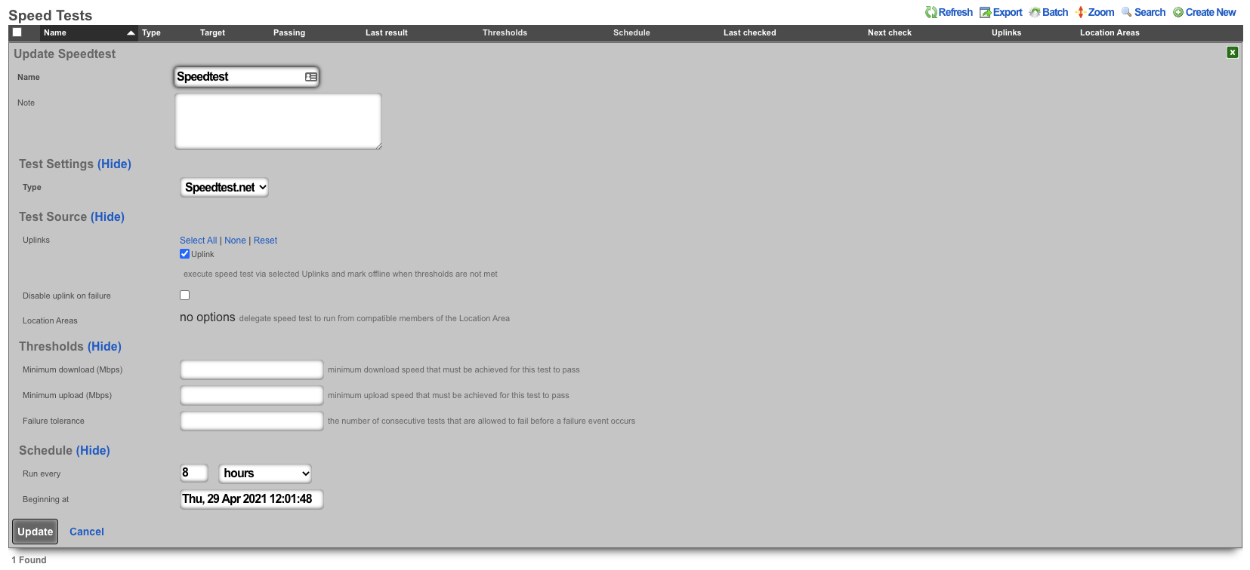
Example Fleet Proxy Setup
Fleet proxy allows the operator to access nodes behind the fleet manager that may not be otherwise accessible due to ACL's in place. To setup the proxy feature we first need to create a certificate.
Navigate to System::Certificates and create a new certificate. Note: the domain name you are using for the certificate should resolve to the primary IP address of the fleet manager node.

Give the certificate a name , then scroll down to the certificate signing request section. Give that a name as well, leave usage set to server, and set the sign mode to generate CSR. Obtain certificate from Let's Encrypt.
Fill out the common name , country code , state , locality , and email address fields with the appropriate information (the other fields are optional). Click create. After a minute or so the new certificate will be retrieved.
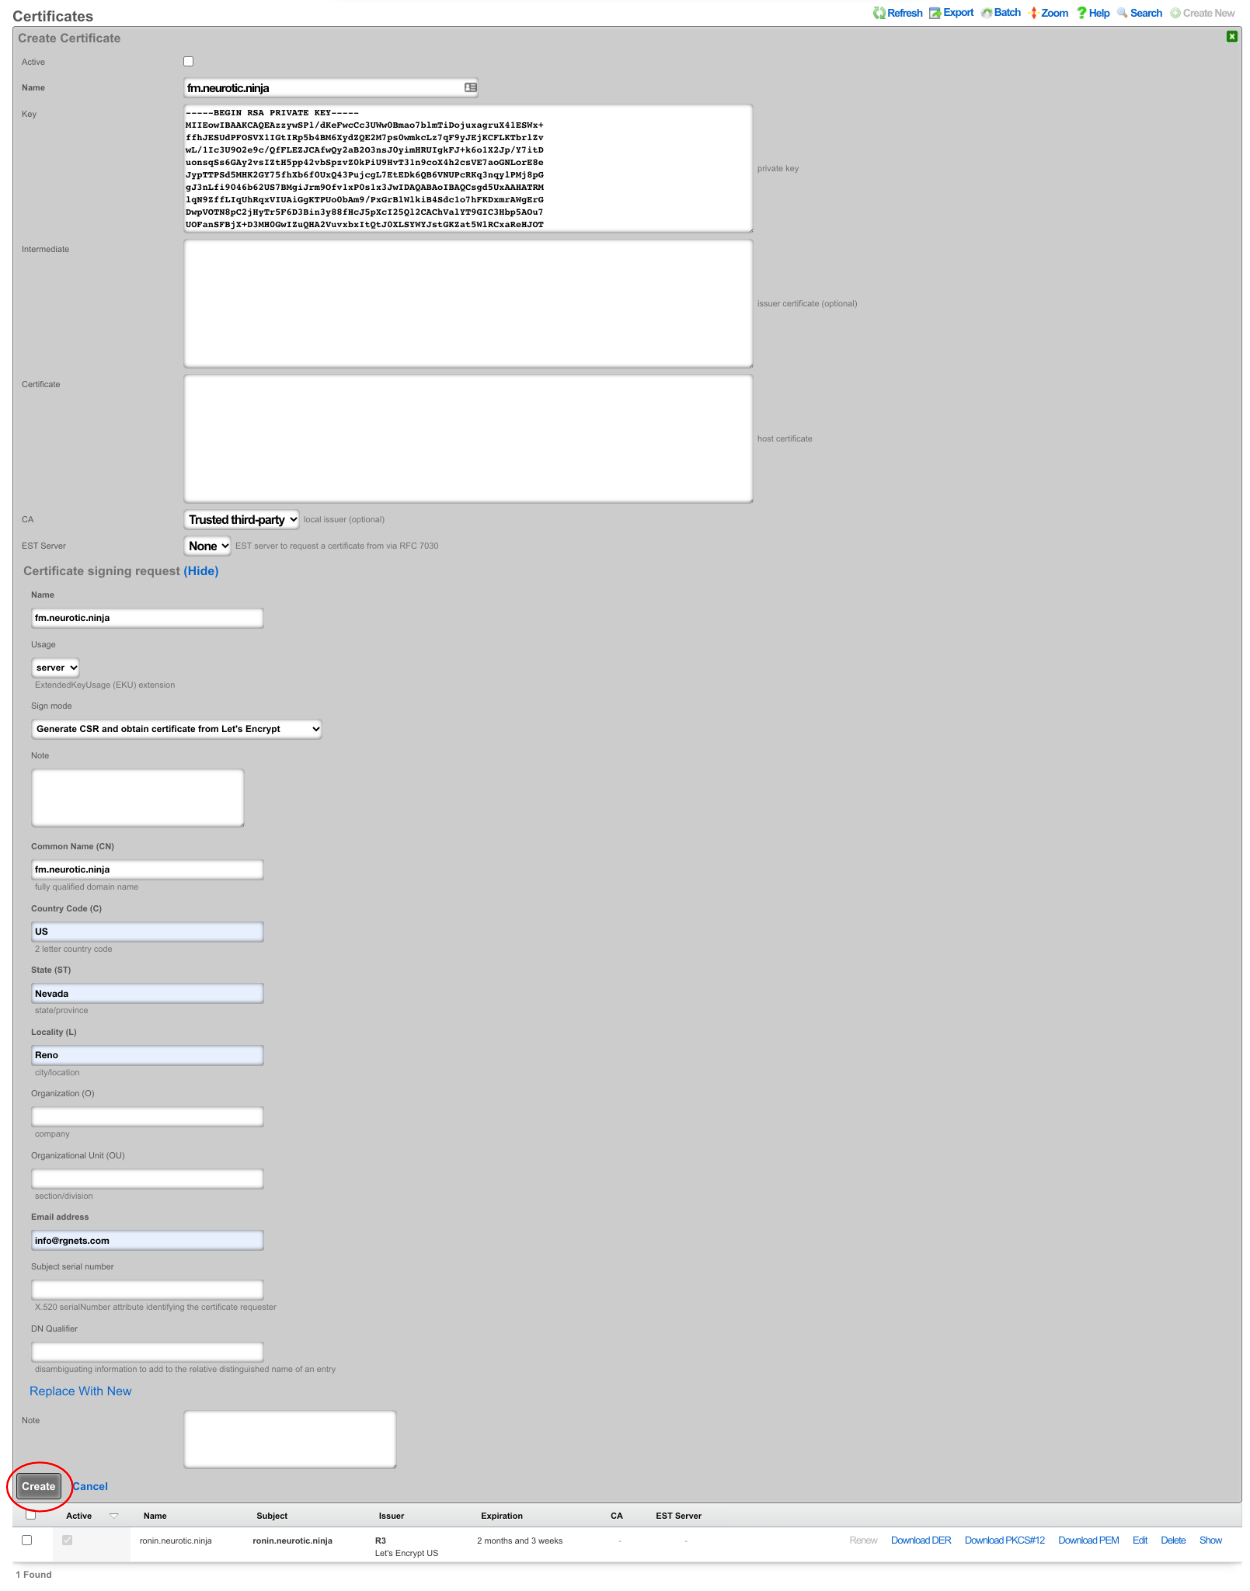

Now that the certificate is created, navigate to System::Fleet and edit the fleet node record for the fleet manager.

In the proxy behavior section, set the proxy hostname field to match the FQDN of the certificate created earlier. Select the certificate that matches the FQDN. Click update.
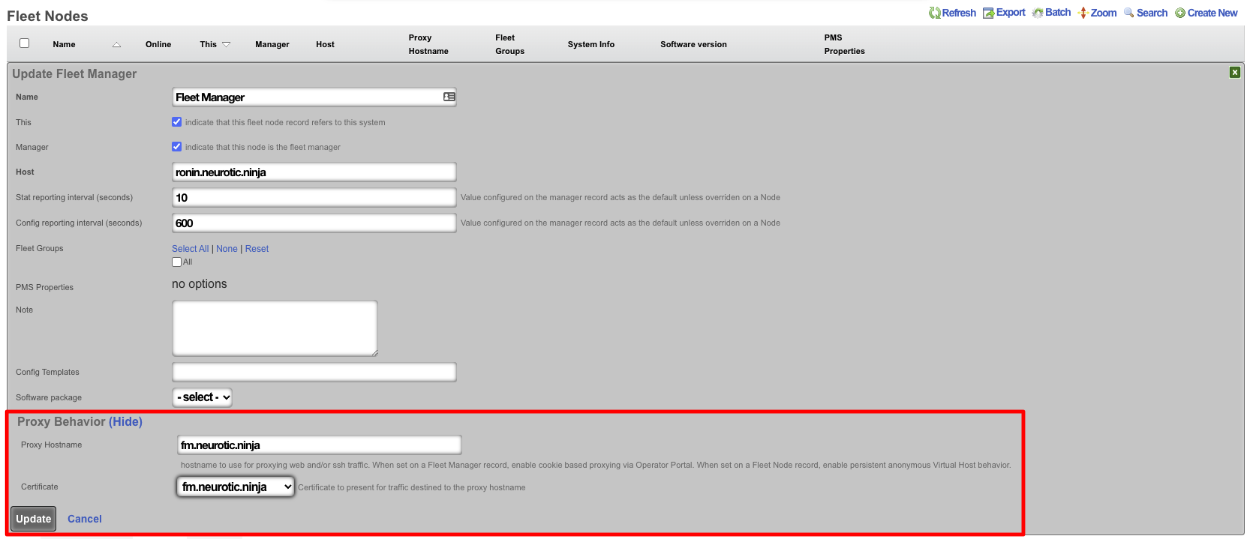

Navigate to the fleet operator portal and there will now be the option to proxy to each node, even nodes that would not be accessible, like the nodes in this example with private IP addresses on the WAN (which is not an officially supported deployment).
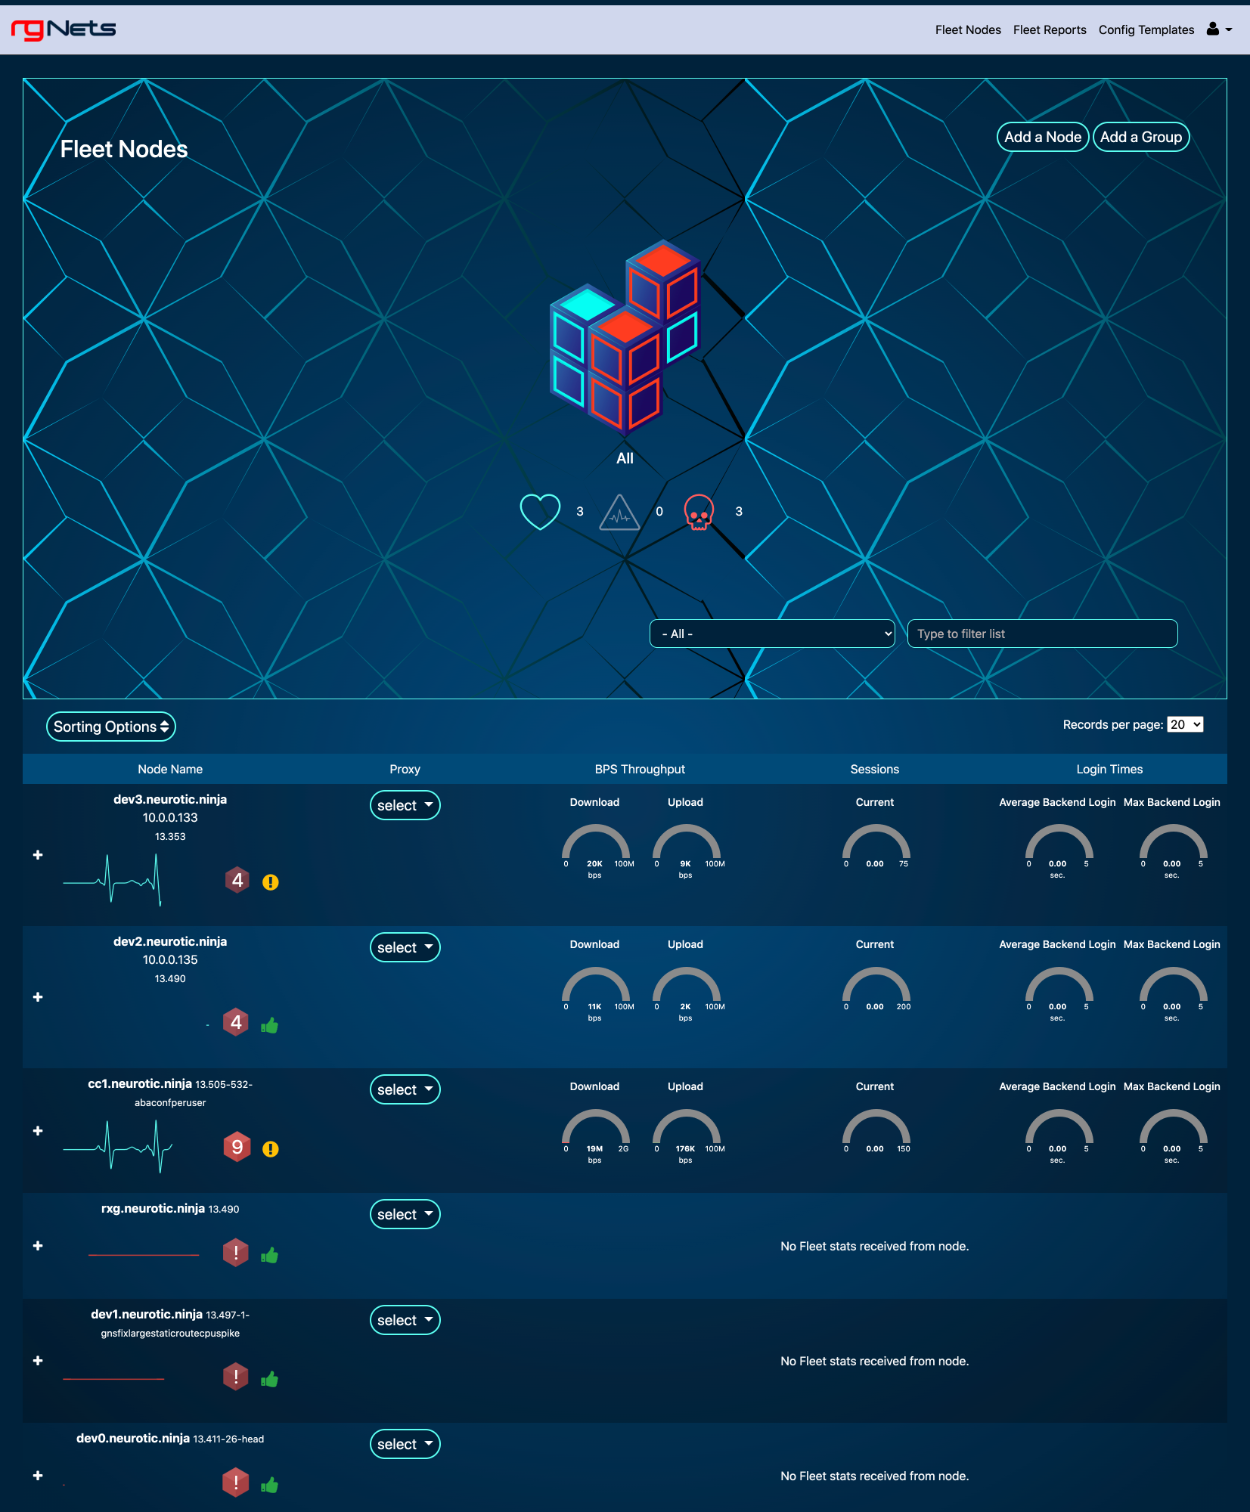
Now the fleet manager can be used as a proxy to either access the Admin UI or SSH. To access a node, click on the proxy drop-down for that node and select either admin UI or SSH.

Once the proxy is established the operator will have access to the admin UI of the fleet node , the proxy connection can be ended by clicking end proxy at the top of the admin UI.

Example Fleet Upgrade Setup
To setup a fleet upgrade the operator must first upload the software package that will be used for the upgrade. To upload the software package , navigate to System::Fleet and create a new software package.

Give the software package a name and choose the file, or enter the remote URL and username and password. For this example, the package will be uploaded directly. Once the file is chosen, click create.


Next, create a new scheduled upgrade.

Give the schedule a name. Select the software package uploaded in the previous step. Select a start at date/time.
Next, select the fleet node or fleet groups that should be included in the upgrade. For this example, the scheduling rate will be left at immediate since we are only pushing the upgrade to single node. Click create.
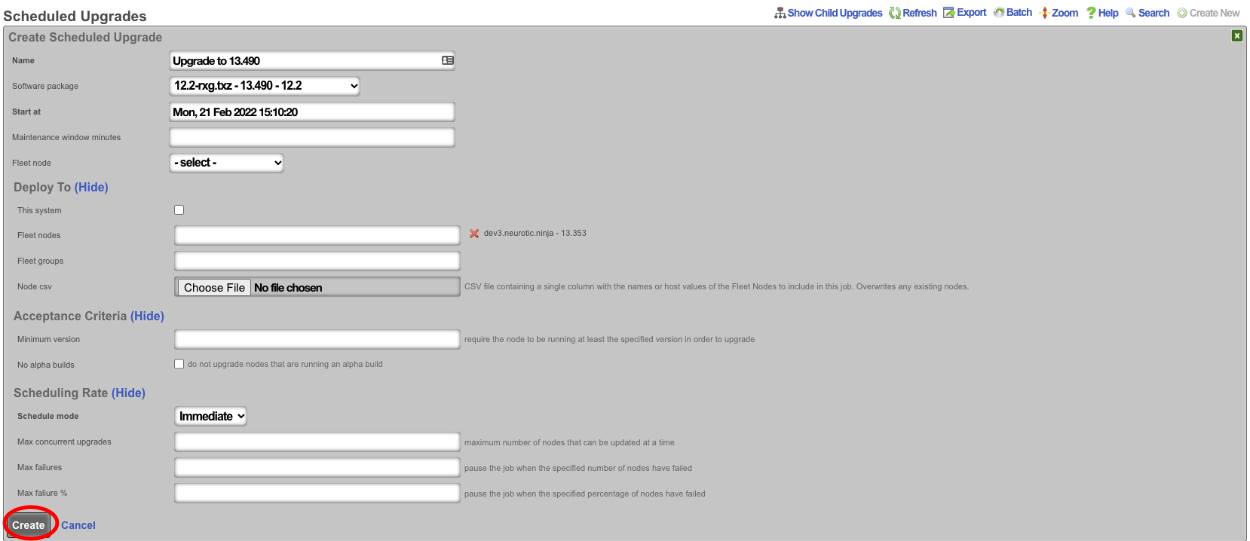
The operator can use the Scheduled Upgrades scaffold to view the status of the upgrade.
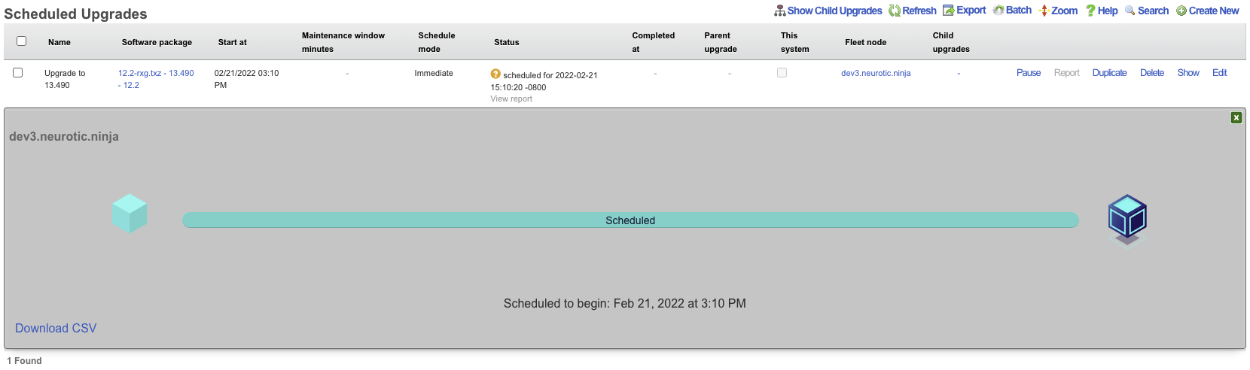
Licenses
The Licenses view presents all information and controls necessary to review, obtain, and install a license key for the current rXg.
Detailed View
The licensing summary dialog displays the permitted values of all aspects of the installed license key alongside current utilization.
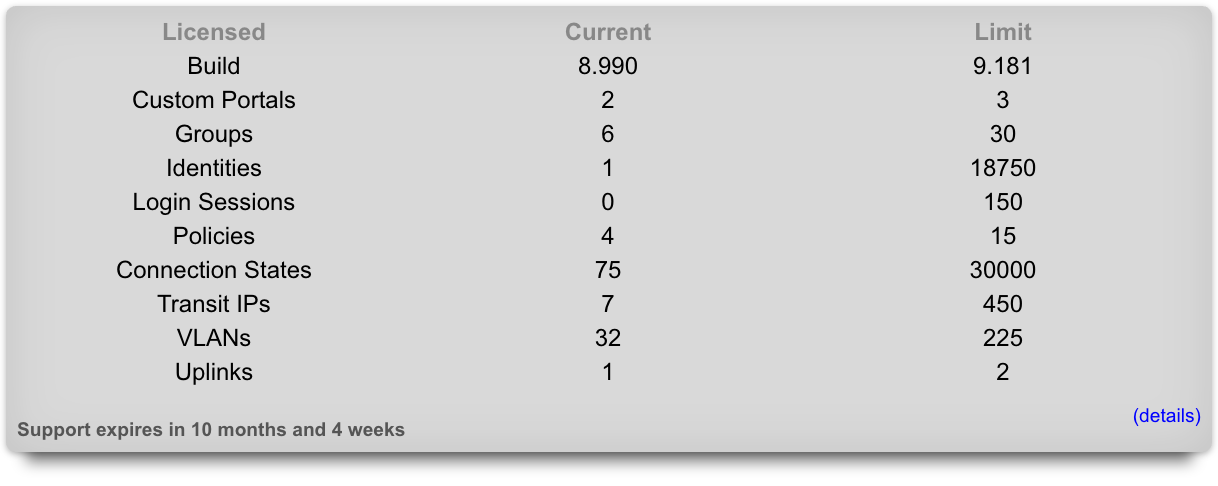
The accounts field describes the number of end-user accounts in the local database. This represents the total number of end-user accounts that are present in the persistent storage mechanism. The activity of the end-user accounts (or lack thereof) does not have any effect on this parameter.
The login session field describes the number of simultaneous end-users logged in via the captive portal. This includes end-users who have logged in via RADIUS , LDAP , tokens (including free access) as well as locally stored accounts.
The IP sessions field describes the number of simultaneous IP addresses that have traffic transiting the rXg. This parameter is fully inclusive of all sessions regardless of whether they originate from end-users who have logged into the portal or are authorized for access by other means (e.g., MAC groups that have portal disabled).
The MAC entries field describes the number of devices that are L2 connected to the rXg. This parameter is fully inclusive of all L2 devices regardless of whether they are generating traffic that transits the rXg.
The connection states field describes the total number of simultaneous TCP and UDP connections transiting the rXg. A state is a connection between an end-user on the LAN and a server on the WAN. For example, opening Microsoft Outlook to read email from a single email account will typically result in 2 states: one for downloading new emails and a second one to transmit unsent emails. Typical web surfing results in approximately 5 simultaneous states, most of which are TCP HTTP connections downloading web page assets such as images. Some programs such as peer-to-peer file sharing programs may create upwards of 50 or even 100 states. Malicious software such as worms attempting to spread through the Internet will often generate thousands of states.
The VLANs field describes the number of logical interfaces configured on the rXg. Each physical interface of the rXg can have many logical VLAN interfaces. This parameter represents the sum total of all logical VLAN interfaces on all physical interfaces present on this rXg.
The uplinks field describes the number of logical WAN uplinks configured on the rXg. This parameter enables rXg link control features. The rXg can aggregate, fail-over, diversify, and affine traffic among multiple uplinks when configured and licensed to do so.
The RADIUS realms field describes the number of RADIUS realms that are configured on the rXg. In a typical configuration, each realm represents a roaming partner or entity with whom the operator has an agreement to authenticate the partner's database of end-user accounts.
The RADIUS groups field describes the number of RADIUS groups that are configured on the rXg. Each RADIUS group is a pool of end-users who have been authorized by a server specified by one or more RADIUS realms.
The LDAP domains field describes the number of LDAP domains that are configured on the rXg. Each LDAP domain represents a separate administrative group of end-users that can be authenticated via the rXg captive portal via LDAP.
The LDAP groups field describes the number of LDAP groups that are configured on the rXg. Each LDAP group is a pool of end-users who have been authorized by a server specified by one or more LDAP domains.
The account groups field describes the number of account groups that are configured on the rXg. Account groups affect end-users who have logged in via the captive portal using credentials matching a locally stored account. Account groups are often employed to logically group end-users who have purchased different levels of service (e.g., standard versus premium). The rXg integrated billing system employs account groups as destinations for end-users when a purchase of a usage plan is made.
The IP groups field describes the number of IP groups that are configured on the rXg. IP groups are used to logically group operator specified CIDR blocks that should experience similar policy. In a typical deployment, IP groups are used to define the IP addresses that will experience forced browser redirect. Members of IP groups can be as small as a single IP address (/32) or as large as a class A (/8).
The MAC groups field describes the number of MAC groups that are configured on the rXg. MAC groups are used to logically group one or more MAC addresses for policy enforcement purposes. In a typical scenario, MAC groups are used for exceptions to policies enforced globally via IP groups or specifically via account groups. For example, a MAC group may contain the MAC addresses of the operator laptops to enable unfettered and priority access to network administrators.
Installation Unique Identifier
The installation unique identifier (IUI) is a string of characters that uniquely identifies a particular piece of rXg hardware.
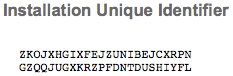
The IUI must be supplied with all license requests. License keys are generated for a particular IUI and will not install nor work with an rXg that does not present a matching IUI. The IUI is hardware dependent and cannot be changed by the administrator of the system.
License Keys Scaffold
The License Key scaffold interprets and presents the several dates present in the license key as well as the lifetime of the currently installed license.

In addition, the License scaffold enables the operator to view the current key as well as install a new license key.
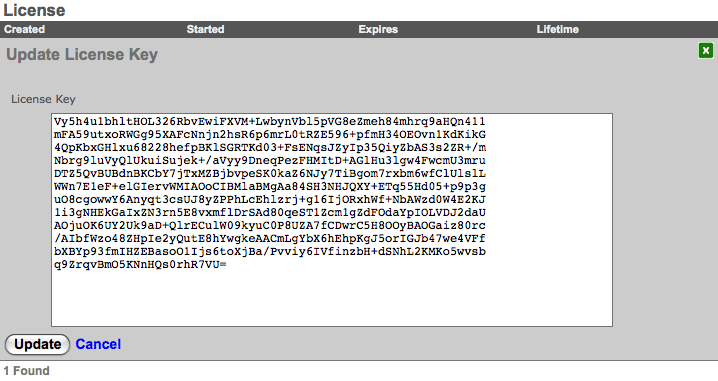
To install a new license key , click on the edit link and copy and paste the new key string into the text box provided. Be very careful and precise when copying and pasting. Leaving out a line or even a single character will result in the rXg rejecting the key.
Confirm that the rXg is connected to the WAN before installing a license for the first time. This is needed for time synchronization, which is a prerequisite to installing a license with temporal restrictions. Also, be sure to install the right license key as the keys are generated to match the IUI that is also presented on this view.
Options
The Options view enables the operator to configure global configuration options for the rXg.
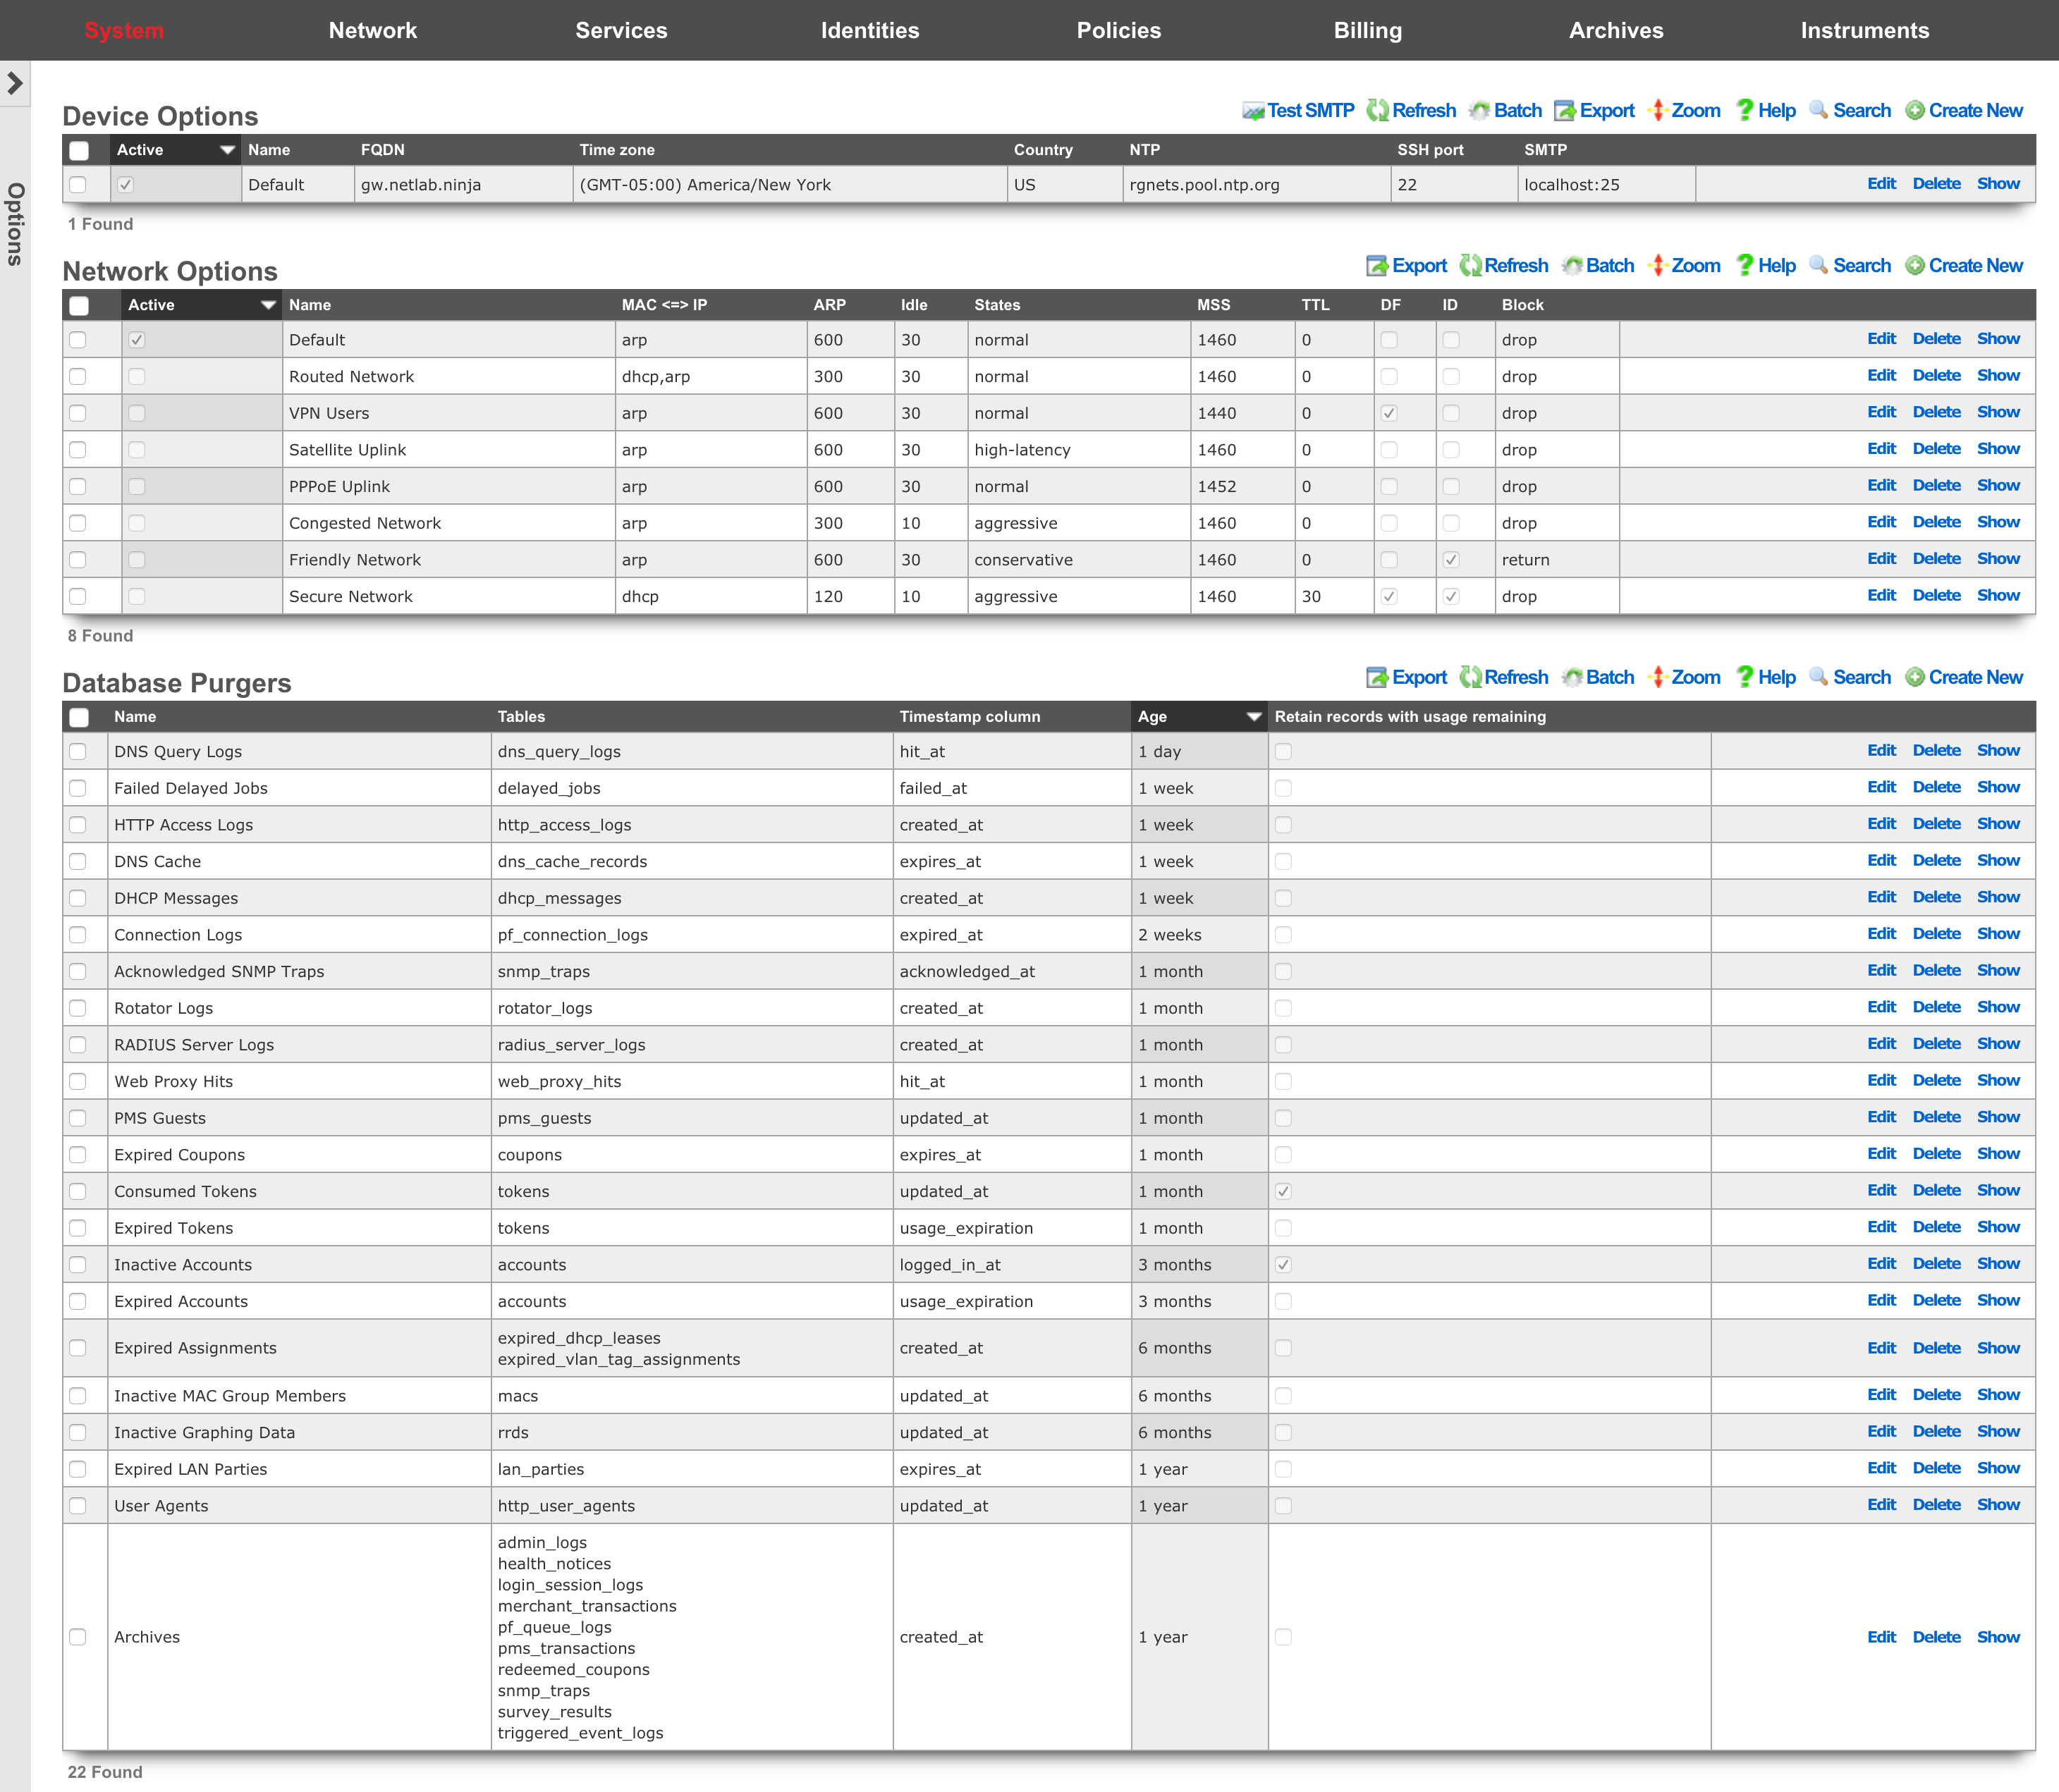
The Options scaffolds are designed to easily store and swap between profiles. For example, one set of device options can be stored for each node in an rXg cluster using the Device Options scaffold. This allows a single configuration database to be shared across a cluster. To give the rXg the identity of a particular node, simply mark the appropriate profile as being active. The Network Options scaffold comes pre-populated with a series of packet option profiles for different kinds of networks. If the complexion of the network changes, simply mark the appropriate profile active and the rXg will be reconfigured.

Device Options
The Device Options scaffold enables configuration of global settings governing various core services of the rXg.
The active field enables an option set. Exactly one option set may be active at any time. Enabling a particular option set will automatically disable another existing active option set.
The name field is an arbitrary string descriptor used only for administrative identification. Choose a name that reflects the purpose of the record. This field has no bearing on the configuration or settings determined by this scaffold.
The FQDN setting is the fully qualified domain name that is used to identify this rXg. This will be the domain name that users will be redirected to if using a local splash portal. Your upstream DNS servers and DNS glue records must be configured to resolve the specified DNS name into an IP address configured on the rXg.
The time zone setting configures the GMT offset for the rXg. It is critically important to make sure that this is set correctly to ensure proper billing functionality.
The NTP server field specifies the network time synchronization server. Change this to your internal network time servers for increased time synchronization reliability. If you do not have an internal network time server, choose from one of manypublic NTP servers or use the publicNTP pool.
The SMTP section is used to configure the outbound SMTP server. These settings are used for the email notification and mass email campaign subsystems.
The server address and server port settings enable configuration of an upstream proxy email server. By default, emails are queued to an email MTA locally on the rXg which then delivers directly to the recipients. Setting an SMTP server causes the rXg, to deliver all emails through the specified host.
The username and password fields are the credentials used for the email relay server specified by the server address and server password settings. Leave these fields blank if the email relay server does not require authentication credentials.
The log rotate hour field configures the hour during which the rXg rotates its system log files, restarts critical services, and performs nightly database maintenance. This should be set to the time of least end-user activity, likely in the middle of the night. A time of 4AM is not supported because it conflicts with the Daylight Savings Time (DST) shift.
The start limiting at field is the minimum amount of unauthenticated ssh connections necessary to begin dropping new connections at the percentage defined in the drop rate (%) field. Must be set if drop rate (%) is set. The drop rate (%) field is the rate which new unauthenticated ssh connections will be dropped once the start limiting at number of unauthenticated connections is reached. This will scale linearly up to 100% once the block all at number of connections is reached. Must be set if start limiting at is set. The block all at field is the maximum number of unauthenticated ssh sessions that will be allowed.
The login banner field allows configuration of a warning or notice message that is displayed in two places: on the admin login page before the authentication form, and to SSH users after successful authentication as part of the message of the day (MOTD). This is commonly used to display security policy compliance notices, legal warnings, or organizational information required by regulatory frameworks. The banner is limited to 4000 characters. Leaving this field blank disables the banner in both contexts.
Backup Encryption
By default, an rXg configuration backup is an unencrypted archive containing a complete dump of the configuration database. Anyone who obtains a copy of a backup file from the appliance, a backup server, or off-box storage can read every secret it contains. The Backup Encryption section of the Device Options scaffold protects against this by encrypting every backup with an operator-held public key.
Backup encryption uses asymmetric (public/private key) cryptography. The public key is stored on the rXg and used to encrypt each backup as it is written. The corresponding private key is held only by the operator and is never stored on the rXg. Because the appliance holds only the public half, a stolen backup file cannot be decrypted even by an attacker who has full access to the rXg only the holder of the private key can decrypt it. Encrypted backups are therefore decrypted off-site, on a machine that the operator controls, before they can be restored.
Settings
The enabled checkbox turns backup encryption on. While disabled, backups are written unencrypted.
Backups are encrypted with OpenSSL CMS (Cryptographic Message Syntax, RFC 5652) using X.509 certificates and AES-256-GCM authenticated encryption. Because openssl is present on every rXg and on virtually every workstation, nothing extra needs to be installed to encrypt or to decrypt, and a tampered archive fails to decrypt rather than restoring corrupt data.
The public keys field holds one or more public X.509 certificates that each backup is encrypted to. Paste one or more complete PEM certificate blocks, each delimited by -----BEGIN CERTIFICATE----- and -----END CERTIFICATE-----. More than one certificate may be configured for example an operator key plus a break-glass recovery key in which case any one of the corresponding private keys can decrypt the backup. Only public certificates belong in this field the rXg rejects any attempt to save private-key material here.
The required checkbox controls the failure behavior. When set (the default), a backup that cannot be encrypted for example because no valid certificate is configured or openssl is unavailable fails, rather than being written in the clear, and a health notice is raised. When cleared, the rXg falls back to writing an unencrypted backup if encryption cannot be performed. Leaving required enabled is strongly recommended.
Backup encryption settings are cluster-global: they are configured on the master controller and apply to every node in the cluster.
Generating a key pair
Generate the certificate and private key on a workstation that you control never on the rXg. Paste the certificate into the public keys field and store the private key securely off the appliance.
openssl req -x509 -newkey rsa:4096 -nodes \
  -keyout backup-key.pem -out backup-cert.pem \
  -days 3650 -subj "/CN=rXg Backup"
Paste the contents of backup-cert.pem (the certificate) into public keys; keep backup-key.pem (the private key) safe.
Protecting the private key with a passphrase
The key generated above has no passphrase, so the private-key file is usable on its own. For defense in depth so that a stolen private-key file is still useless without a secret only you know the private key may additionally be encrypted with a passphrase. This is optional; add it if you want a second factor guarding the key. You are prompted for the passphrase whenever you decrypt a backup, and losing the passphrase is equivalent to losing the key.
Generate the key without the -nodes option so OpenSSL encrypts it with a passphrase, or encrypt an existing key, then supply the passphrase at restore:
openssl pkey -in backup-key.pem -aes256 -out backup-key-enc.pem     # enter a passphrase
openssl cms -decrypt -inform DER -recip backup-cert.pem -inkey backup-key-enc.pem \
  -in backup.tgz -out restored.tgz
Restoring an encrypted backup
Because the rXg never holds the private key, it cannot decrypt a backup and refuses to restore an encrypted one. If an encrypted archive is selected for restore whether uploaded through the Backup view or supplied on the command line the restore is rejected with a message indicating that the backup must be decrypted off-site first.
To restore, decrypt the archive on a machine that holds the private key, producing a plaintext .tgz:
openssl cms -decrypt -inform DER -recip backup-cert.pem -inkey backup-key.pem \
  -in backup.tgz -out restored.tgz
Then restore the resulting restored.tgz normally either by uploading it in the restore dialog on the Backup view, or by running restore_rxg restored.tgz from the console. Integrity of an encrypted backup is guaranteed by the authenticated encryption itself: a tampered archive fails to decrypt, so a successfully decrypted archive is known to be intact.
Recommended: immediately after enabling or changing backup encryption, verify recovery end-to-end before relying on it take a backup, decrypt it off-site with your private key, and restore the decrypted archive. This confirms that the configured certificate actually corresponds to a private key you hold and can restore with, and catches a mistyped certificate or a missing passphrase while you still have unencrypted backups to fall back on.
Warning: if the private key is lost, backups encrypted to it cannot be recovered there is deliberately no recovery path. Store the private key securely, and consider configuring a second recovery certificate as a safeguard.
DKIM Domains
An entry in the DKIM Domains scaffold enables DKIM message signing of outbound email for the domain specified in the record. DKIM message signing is a technique that allows a sending mail server to prove that it is authorized to send email for that domain.
When enabling DKIM signing, a cryptographic keypair is generated, which will be used to sign the outgoing email. A DNS record must be defined in the public DNS records of the desired domain, which specifies the public key of the generated keypair.
The name field is an arbitrary string descriptor used only for administrative identification. Choose a name that reflects the purpose of the record. This field has no bearing on the configuration or settings determined by this scaffold.
The domain field specifies the domain for which DKIM signing should be enabled. By default, the rXg will use the FQDN of the system to send outbound emails, unless a different "from" address is specified in the Custom Message being sent. If a different domain is used in the Custom Message, then a DKIM Domain should be created for that domain in order to sign outbound email.
The selector field specifies the unique selector that identifies _this_system's public key, since there could potentially be many servers sending email for the same domain. The selector must be the same across all domains that are enabled for a single system. In a cluster, each node could use its own selector, although it is not a requirement. A different DNS TXT record will need to be created for each domain/selector combination.
After creating a DKIM Domain, refreshing the scaffold should show the DNS record name that must be created in the public DNS records, and a button allows the operator to copy the contents that should go into the data field of the DNS record. If the DNS record is not created, servers that receive email that has been signed by this server will not be able to validate the DKIM signature, and may reject the email.
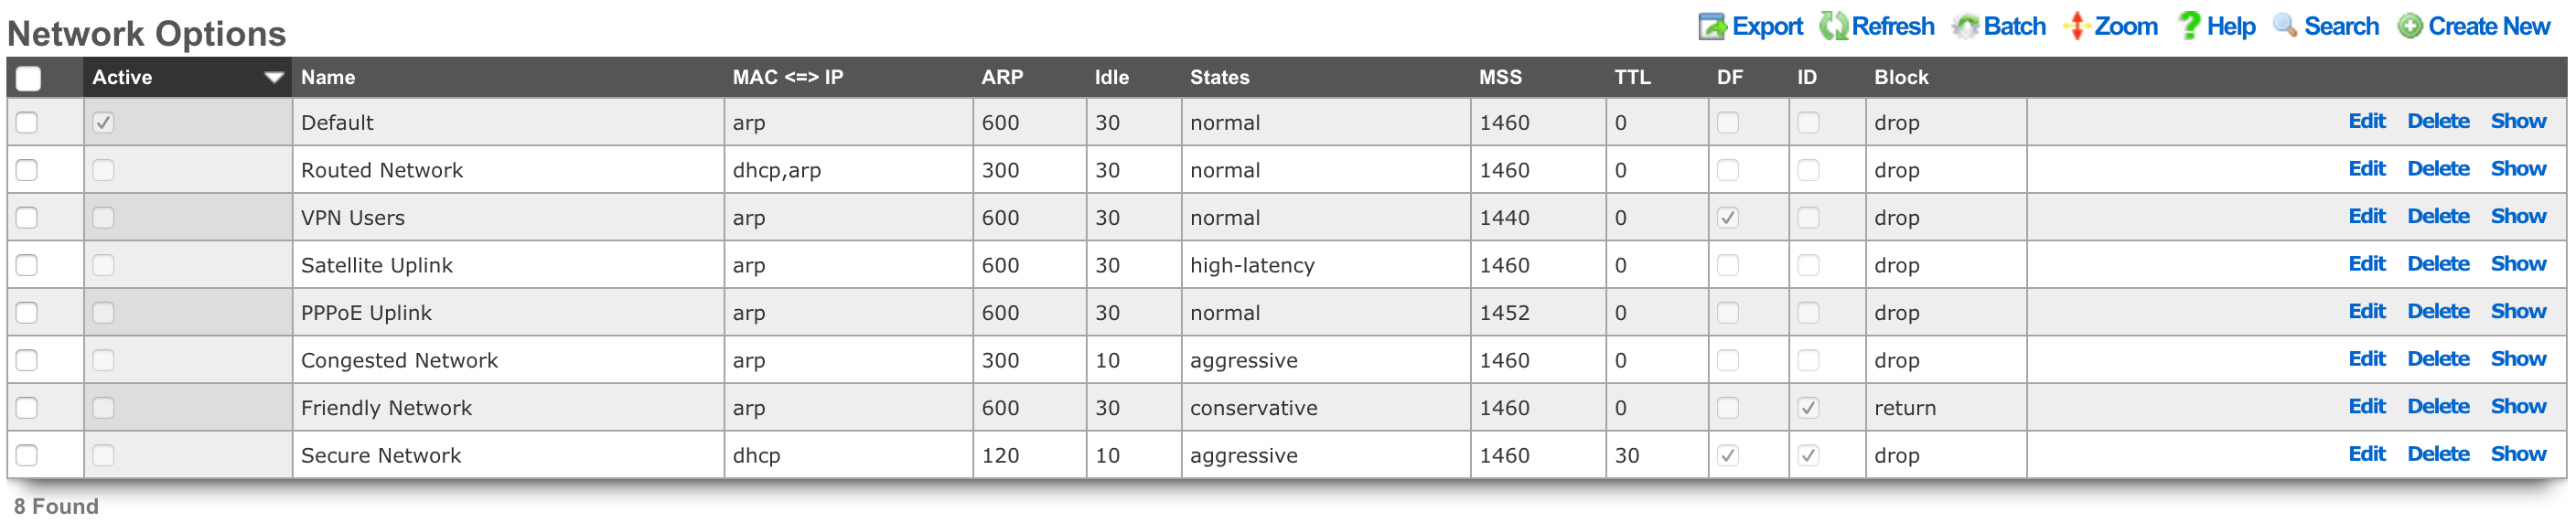
Network Options
The Network Options scaffold enables configuration of global settings that govern the rXg packet manipulation engine.
The active field enables an option set. Exactly one option set may be active at any time. Enabling a particular option set will automatically disable another existing active option set.
The name field is an arbitrary string descriptor used only for administrative identification. Choose a name that reflects the purpose of the record. This field has no bearing on the configuration or settings determined by this scaffold.
The state timeout field governs the expiration of UDP / TCP connection states. The normal setting is the default recommended selection for most applications. The high-latency setting increases the time before expiration occurs and is recommended for satellite uplinks. The aggressive setting reduces expiration timeouts and should be used for highly reliable uplinks, such as a leased-line (e.g., T-1) and situations where a large number of connections are constantly being created and destroyed. The conservative setting changes the expiration policy so that the system goes to great lengths to preserve states even when they are idle despite a much higher memory utilization.
The MAC <=> IP setting affects how the rXg translates a MAC address into an IP address , and vice versa. A value of dhcp,arp configures the rXg to utilize the DHCP leases table and ARP table cooperatively, where the MAC sent by an IP's DHCP client is favored over the MAC determined by the ARP protocol for a given IP address. The arp,dhcp value means the ARP table takes precedence over active DHCP leases. The dhcp and arp values configure the rXg to use only the DHCP leases table or ARP table. Appropriate configuration of this setting is critical for correct operation of numerous rXg features including automatic login.
Using the ARP table is the preferred method of determining the MAC to IP mapping on L2 connected networks. This is because the ARP table is most likely to have up to-the-second information and will also be able to map MAC addresses to statically assigned and misconfigured IP addresses. However, the ARP table will be unreliable in L2 connected networks that have intermediate devices that engage in ARP spoofing. Some wireless radios perform MAC spoofing when used in bridged, mesh or WDS mode. When working with such equipment, the DHCP leases table must be used to determine the MAC to IP mapping.
Using the DHCP lease table to discover MAC to IP mapping is required in L3 routed networks. This is because the rXg will see the MAC address of the next hop router rather than the MAC address of the end-user device for all IPs that are not L2 bridged. Furthermore, intermediate routers must be configured for DHCP relay and use the rXg as the DHCP server. The rXg is unable to use the DHCP leases table to create a MAC to IP mapping for devices that do not use the rXg as the DHCP server , for statically assigned addresses and for otherwise misconfigured IP addresses. The DHCP leases table is also most likely to contain out-of-date information compared to the near real-time ARP table. Thus, it is recommended that the DHCP lease table be used only when the ARP table cannot be used to acquire the correct IP to MAC mapping.
Using either the dhcp,arp and arp,dhcp settings is only recommended when deploying an rXg in a mixed L2 and L3 connected LAN environment. If a rXg deployed to manage a L3 routed fixed wireless broadband network and then is also used to manage a local hotzone that is L2 bridged, then it is necessary to use both the DHCP leases table and the ARP table in order to determine the MAC to IP address mapping. In most cases, it is best to prefer the ARP table over the DHCP lease table because the ARP table is most likely to have the most recent and hence the most correct mapping.
The dhcp,arp and arp,dhcp settings should only be used when absolutely necessary. Conflicts and/or confusion may occur when both the DHCP leases table and ARP table are both used to map MACs to IPs. For example: if the DHCP issues a lease to client A, then client A leaves the network, then at a later time, client B joins the network and acquires a lease for the same IP address, then client A returns to the network, there will be a conflict. The DHCP leases table will report the IP MAC mapping as client B whereas the ARP table may report the IP MAC mapping as client A. This issue is exasperated in situations where long DHCP leases are issued.
Correct IP to MAC mapping is prerequisite for proper operation of several critical rXg features including automatic login. Careful consideration of all available options as well as thorough examination of all available ARP and DHCP instrumentation is strongly advised when configuring this option.
The ARP timeout field dictates how long an ARP entry is held in the cache, in minutes, until it needs to be refreshed.
The maximum MSS setting enforces a maximum segment size on all packets transiting the rXg to be less than or equal to the specified number of bytes. Make sure that the MSS is set less than the MTU of any transit network, otherwise fragmentation will occur again. Typical values of MSS and MTU for Ethernet are 1460 and 1500 respectively. Reductions in MSS are necessary to support certain forms of IP-IP tunneling. Recommended values by tunnel type:
- GRE tunnels: MSS 1380 (4-byte GRE header + 20-byte outer IP header = 24 bytes minimum overhead; conservative to allow for optional GRE fields)
- IPsec VPN: MSS ~1400 (varies by cipher; ESP header adds 50-70+ bytes)
- GRE over IPsec: MSS ~1340 (combined GRE + IPsec overhead)
The minimum TTL setting modifies the minimum time-to-live on all packets transiting the rXg. The TTL is a value from 1 to 255 that is decremented each time a packet crosses a router. When the TTL reaches zero, the packet can no longer cross any routers (unless the router is capable of and has been specifically configured to ignore and rewrite the TTL). This modifier is useful for fine tuning performance of very large networks. Boosting the TTL helps in situations where packets are not reaching their targets. Reducing the TTL helps reduce looping of stray traffic. A minimum TTL set to zero disables the TTL normalization. Note that setting a minimum TTL prevents traceroute utilities from operating correctly.
The prioritize ACK setting will prioritize packets with a TOS of low delay and for TCP ACKs with no data payload.
The clear DF bit setting enables or disables the removal of the don't fragment (DF) bit in the IP flags field of packets transiting the rXg. IP fragmentation is a mechanism that enables packets to be broken into smaller pieces to pass through links with a smaller MTU than the original size. In particular, packets with DF unset can be fragmented along their way to their destination by other routers. Enable this option if the packets transiting the rXg (upstream or downstream) are too large for one of the transit routers to handle. The two most common uses of this option are to enable NFS traffic to pass over the WAN and to permit fragmenting of inbound WAN traffic to support IP-IP tunneling (e.g., IPsec VPN) between the end-user client and the rXg.
The randomize ID setting enables or disables the randomization of the data inside IP identification fields. Enabling this prevents fingerprinting of a network from the outside world. Outsiders on the WAN can use the sequential nature of the IP packet ID field to discover the topology of a network protected by NAT. It is recommended that this option be enabled whenever clear DF bit is enabled.
The block policy field defines the response to devices when packets are blocked. The drop setting will silently drop all blocked packets, whereas the return setting will send an ICMP unreachable packet for UDP requests, a TCP Reset for TCP requests, and will silently drop all others.
The Queueing Mode option affects the traffic shaping mechanism and the queues that are built for client devices. When queueing is disabled, no queues are built and ALTQ is disabled. When set to normal mode, a single queue tree is built and packet scheduling and throughput is limited to a single CPU core. When set to parallel mode, packet processing is parallelized across multiple queue trees allowing multiple CPU cores to increase throughput. The number of parallel trees is set by the Tx/Rx Queues option, which requires a reboot if changed. NOTE: use of parallel queueing can result in inaccurate throttling if traffic for a single client traverses more than one tree, since the queue discipline is distinct for each queue tree.
In order to reduce the frequency of firewall queue and ruleset reloads, a set of semi-static queues pools is created, and queues are assigned to clients as needed. The Default Leaf Queue Count field specifies how many queues should be generated for a given pool when there is no prior knowledge of the number of queues required by that pool. When the number of clients nears the size of the pool, the pool is expanded. When a client disappears from the network, its queue assignment can be reclaimed so the queue can be reused by another client without growing the queue pool, since system performance is impacted when there are many queues. The Queue Assignment Timeout option controls how long (in minutes) a queue assignment will be retained before being reclaimed for another client. A shorter timeout will keep queue pools smaller. Setting a value of 0 will disable queue assignment reclamation.
The note field is a place for the administrator to enter a comment. This field is purely informational and has no bearing on the configuration settings.
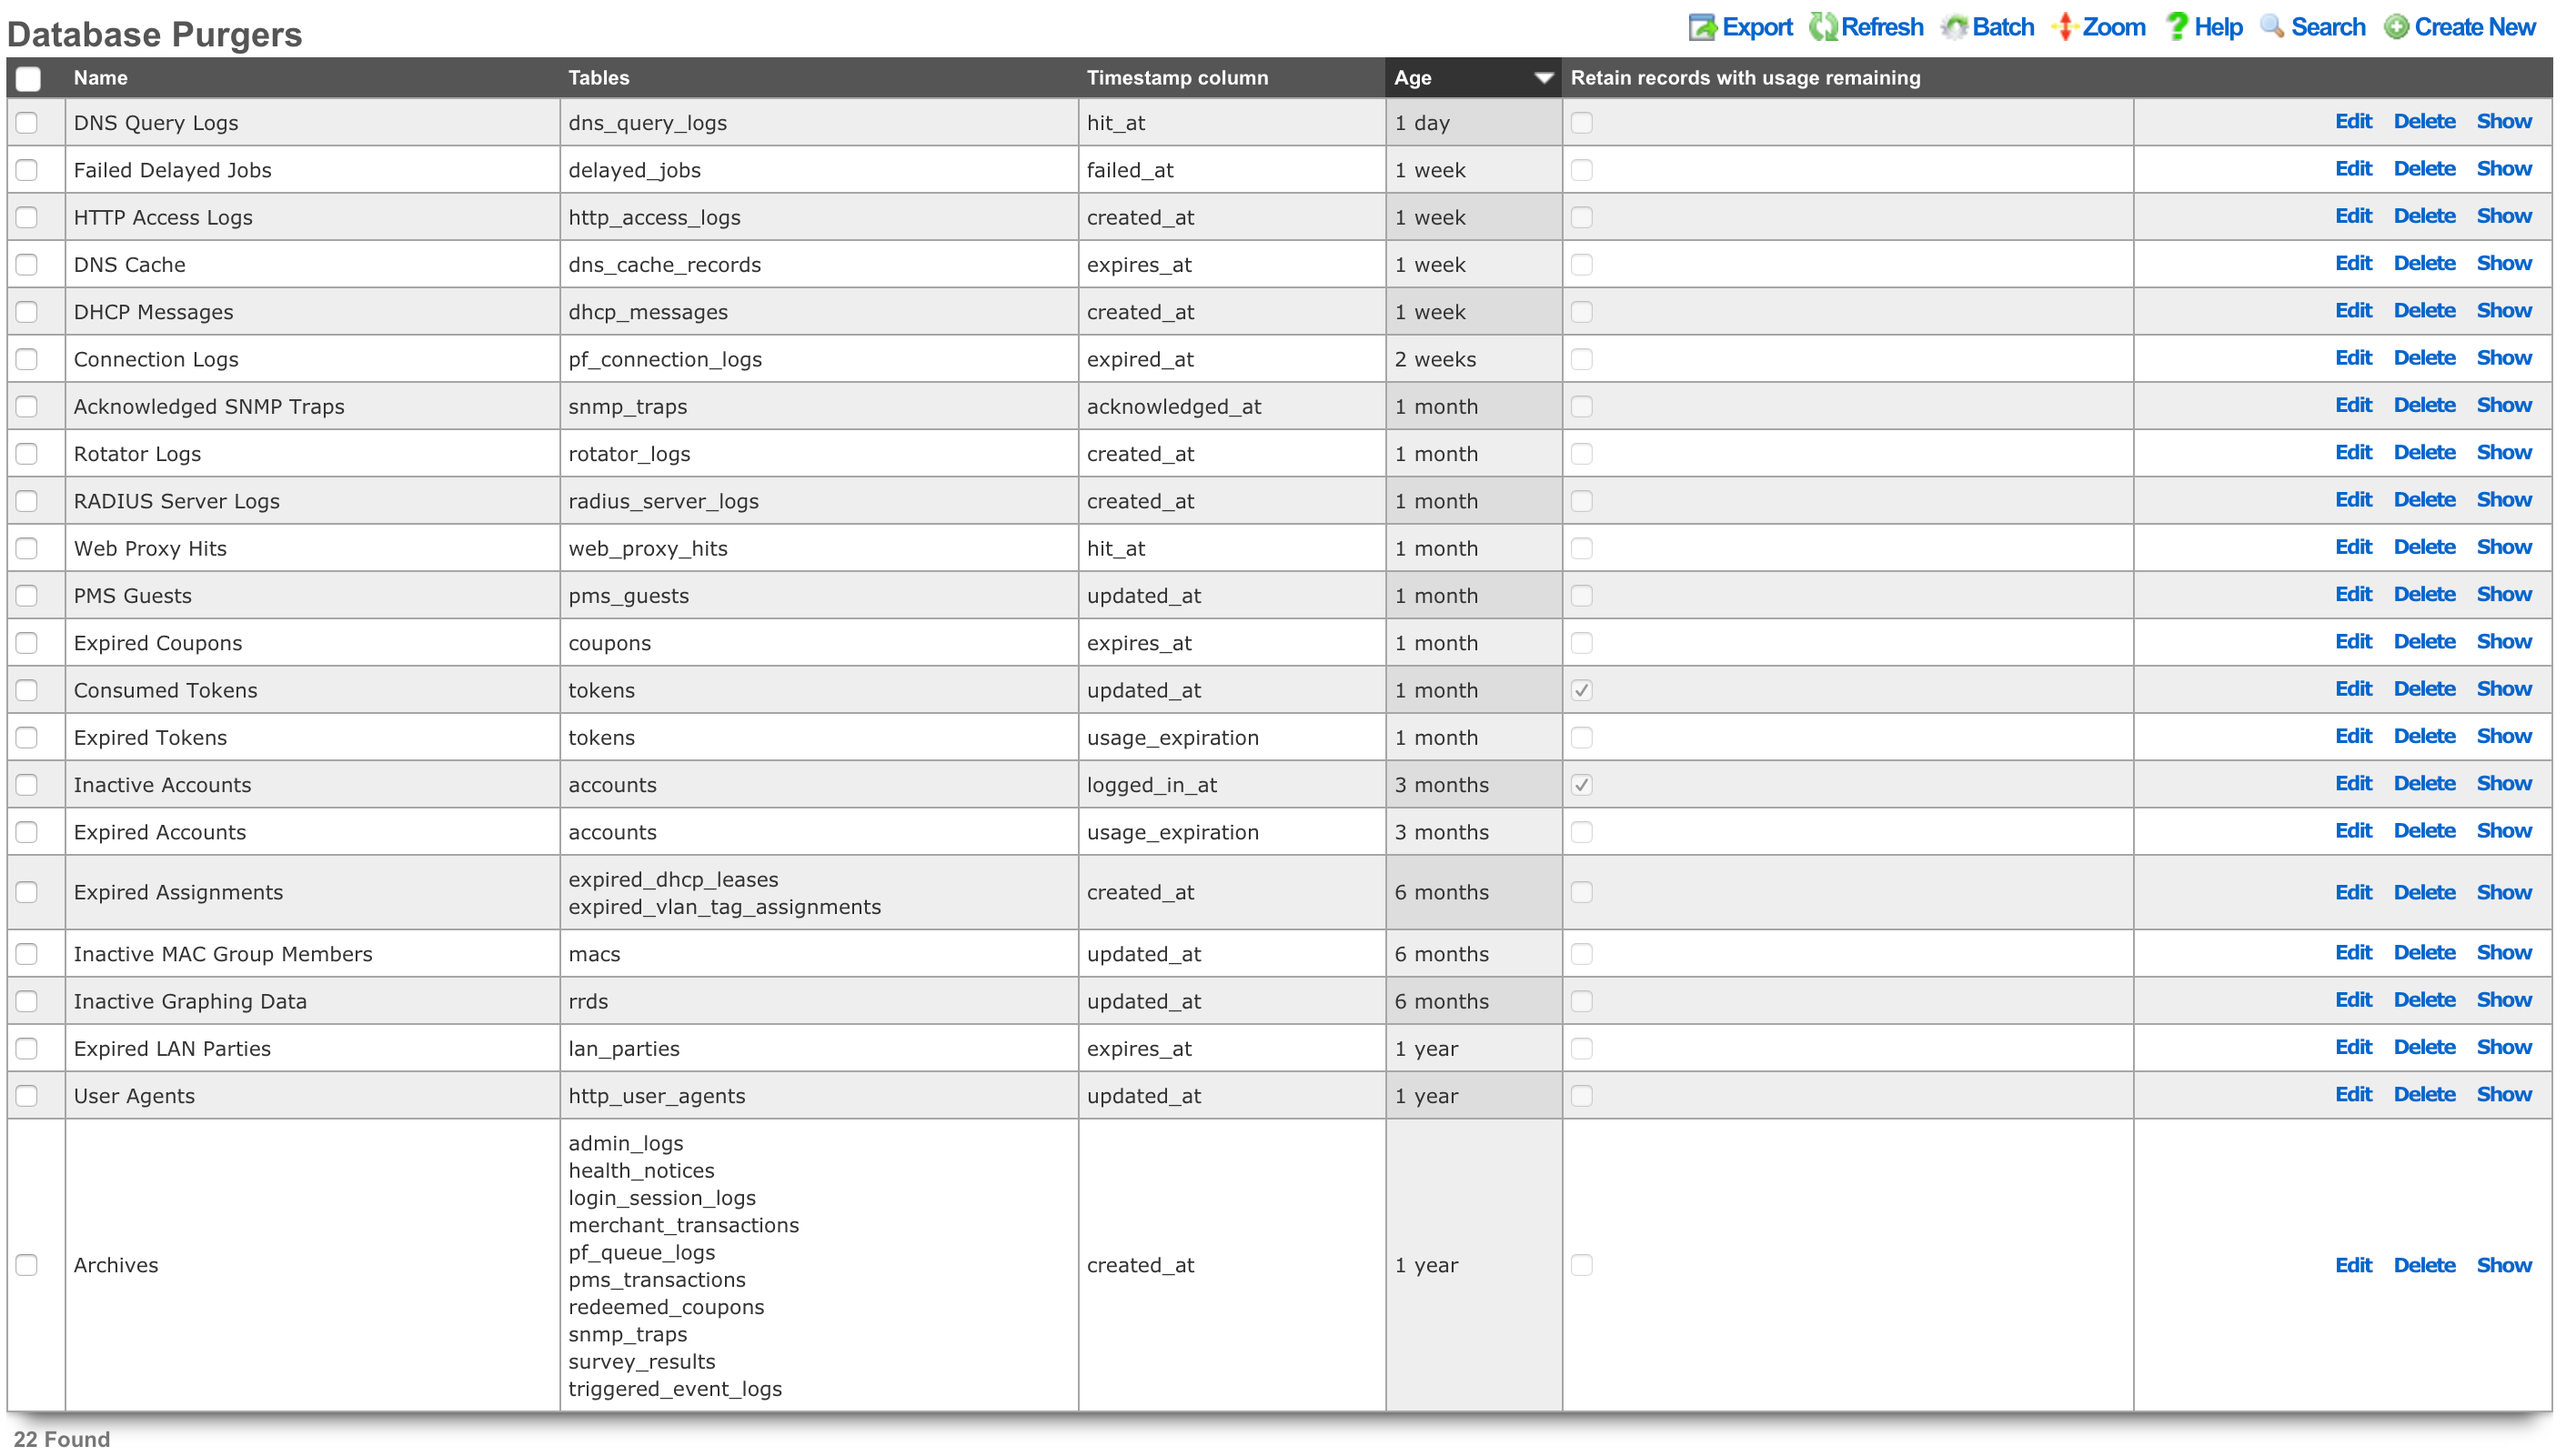
Database Purgers
Entries in the Database Purgers scaffold define rules by which database records are automatically deleted.
The name field is an arbitrary string descriptor used only for administrative identification. Choose a name that reflects the purpose of the record. This field has no bearing on the configuration or settings determined by this scaffold.
The tables field specifies which tables of the database will be affected by this record. Multiple database tables may be selected so that a single purging policy may be applied across several facets of the rXg configuration database.
The timestamp column field determines the database timestamp that will be used in the calculations to determine if a database record is to be purged.
created_at and updated_at Any table may be purged of records using the created_at and updated_at timestamp columns. expires_at Only useful when used in conjunction with coupons. usage_expiration Only useful when used in conjunction with tokens. logged_in_at Only useful when used in conjunction with accounts.
The age field specifies the length of time that must elapse between the current time and the stored value in the timestamp column in order for a record to be chosen for deletion.
The retain records with usage remaining checkbox prevents the deletion of account records that have a non-zero value in their usage (time) field. This checkbox has no effect when the selected table is anything other than account.
The note field is a place for the administrator to enter a comment. This field is purely informational and has no bearing on the configuration settings.
CALEA Options
The Communications Assistance for Law Enforcement Act (CALEA) is the cornerstone of lawful interception in the United States. It is a federal law specifically designed to ensure that, despite rapid advancements in telecommunications technology, law enforcement agencies can still conduct court-ordered electronic surveillance.
Requirements on Carriers and Manufacturers: CALEA places a legal obligation on:
- Telecommunications Carriers: This broadly includes traditional phone companies, mobile carriers, broadband internet access providers, and interconnected VoIP (Voice over IP) providers. They must ensure their networks have the technical capacity to perform lawful intercepts.
- Manufacturers of Telecommunications Equipment: Equipment used by these carriers must be designed with built-in lawful intercept capabilities.
Built-in Capabilities: The core of CALEA is that these capabilities must be designed into the network and equipment, rather than being added on an ad-hoc basis when a warrant is issued. This ensures that intercepts can be executed efficiently and without "undue burden" on the carrier.
Lawful intercept (LI) refers to the process by which a law enforcement agency (LEA), with appropriate legal authorization (typically a court order or warrant), obtains communications network data from a service provider. Under CALEA, this generally covers two main types of information:
Call-Identifying Information (CII) / Metadata (Trap and Trace / Pen Register):
- This is non-content information about a communication.
- Examples: Source and destination numbers (for calls), email addresses (for email, though CALEA's application to information services like webmail is debated), timestamps, duration of calls/sessions, IP addresses, and for mobile phones, cell tower location data.
- This is akin to what a "pen register" (for outgoing calls) or "trap and trace" (for incoming calls) device traditionally captured.
Content of Communications (Full Content / Wiretap / Title III):
- This includes the actual substance of the communication.
- Examples: Voice conversations, the body of text messages, email content, data from internet sessions (e.g., web Browse, chat messages, file transfers).
- This requires a higher legal standard (e.g., a Title III warrant in the U.S.), demonstrating probable cause that a crime is being committed.
The rXg supports LI via the System::Options::CALEA Options scaffold, providing the ability to define the traffic of interest (using the target client MAC address(es) as the trigger) and destination where the captured traffic is to be delivered.

The configuration process involves the following steps: * Name: the name assigned to the CALEA rule being created. This field is an arbitrary string descriptor used only for administrative identification. Choose a name that reflects the purpose of the record. This field has no bearing on the configuration or settings determined by this scaffold. * Active: this box is checked by default, indicating that the given CALEA rule will be activated once saved. It is possible to create rules and activate them afterwards as well, in which case this box should be unchecked. * Mirror mode: indicates the mirror mode the traffic of interest is subject to. Today, only one mirror mode is supported, in which all traffic of interest is replicated (not sampled) and transmitted to the destination IP address * Destination IP: the destination IP (IPv4 or IPv6) address of the CALEA collector * MACs: in this section, at least one MAC address is configured, describing the traffic of interest to be mirrored and delivered to the target CALEA collector. Enter MAC address of interest in the MAC field, along with an optional note. If more entries are needed, use the Create Another MAC button or the dropdown next to the Add Existing button which allows to select one of the previously defined MAC addresses.
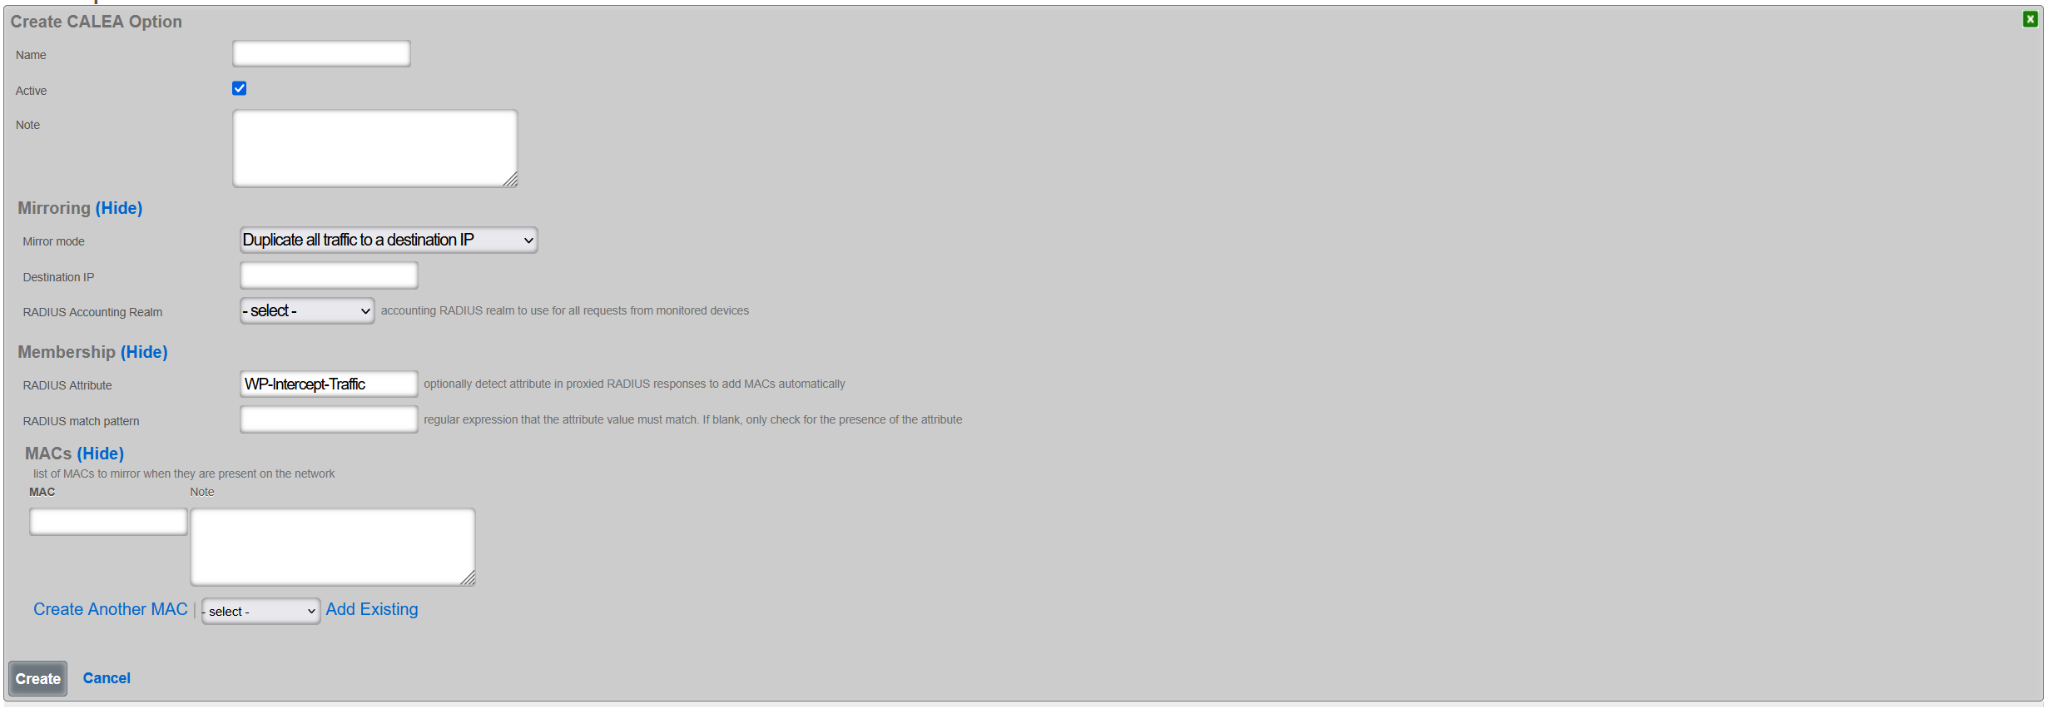
Once created, an example of a CALEA rule is as shown below, where traffic from two separate hosts is collected and transmitted to the CALEA collector at 192.168.150.4.
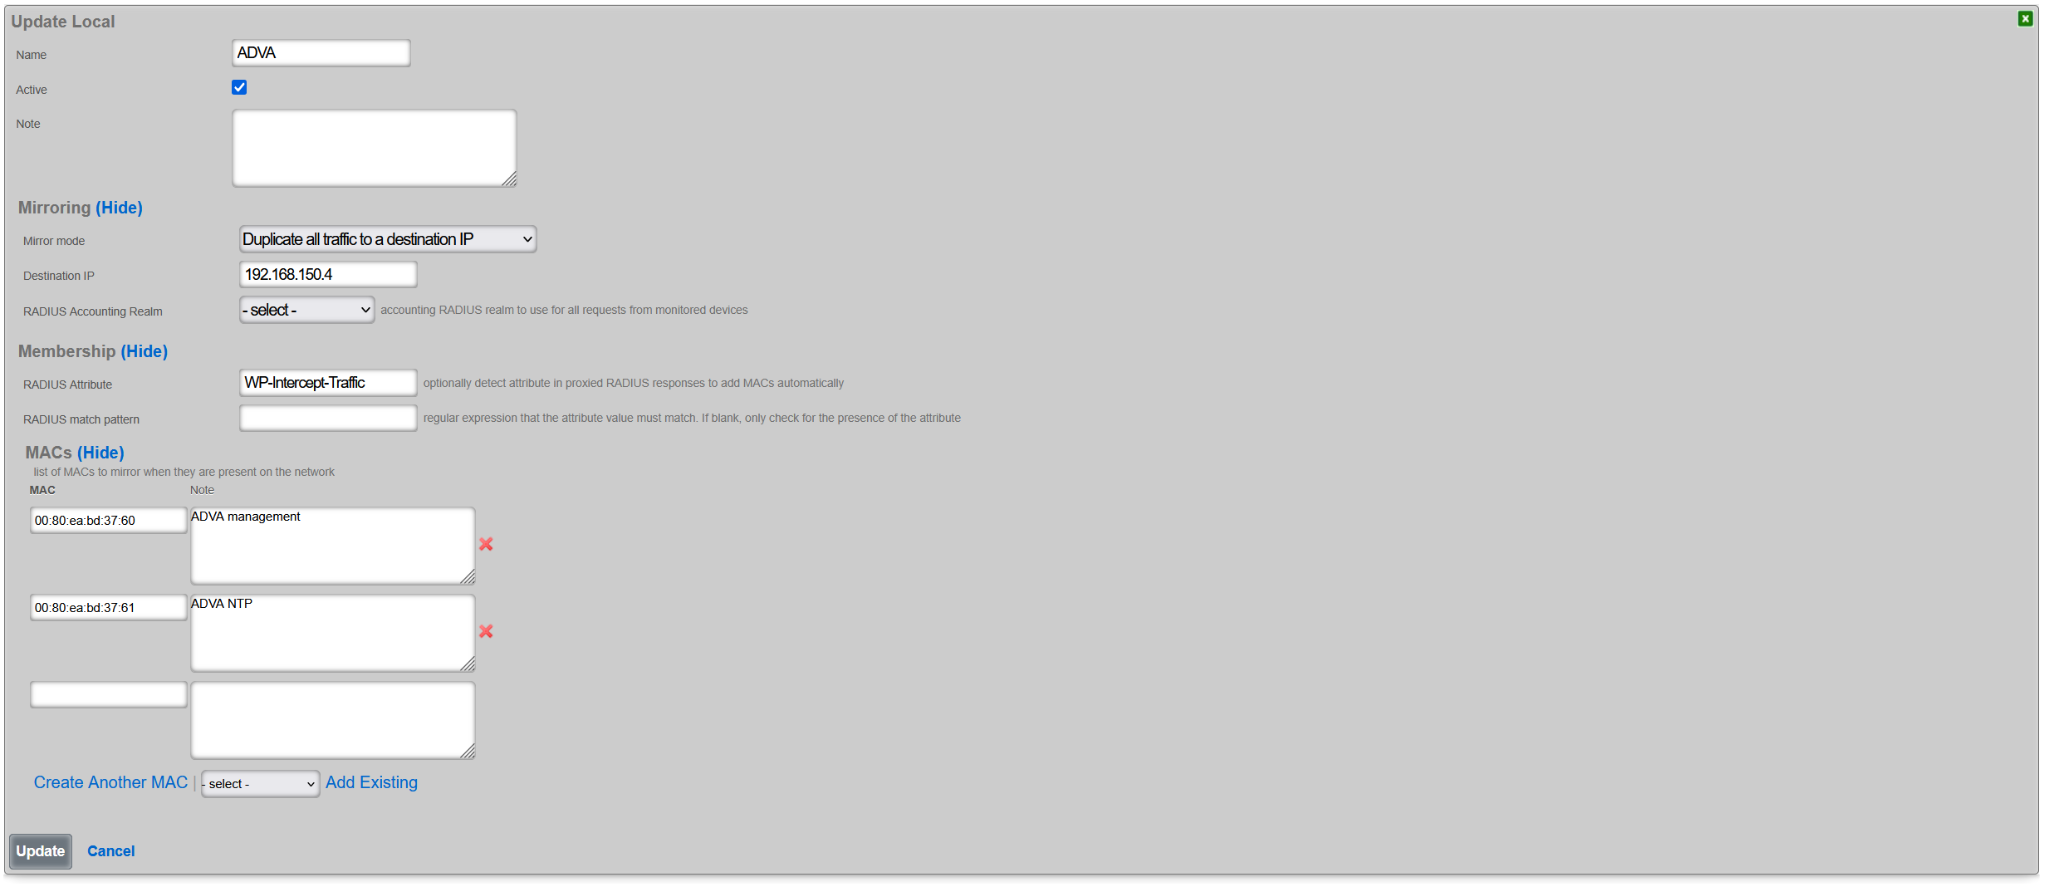
When and if the same traffic set needs to be delivered to multiple CALEA collectors, multiple CALEA rules with the same set of MAC addresses but different Destination IP addresses need to be created.
The given CALEA rule is active as long as the Active box remains checked. Note that at this time only one CALEA associated mirror rule can be active at a time.
NOTE: The IP address(es) associated with the monitored MAC address(es) must be in a non-Default policy. The association with the Default policy prevents the mirror traffic from being properly tagged for remote forwarding towards the configured collector.
Portals
The Portals view configures the rXg captive portal web application framework enabling self-provisioning and advertising communication for the end-users population.
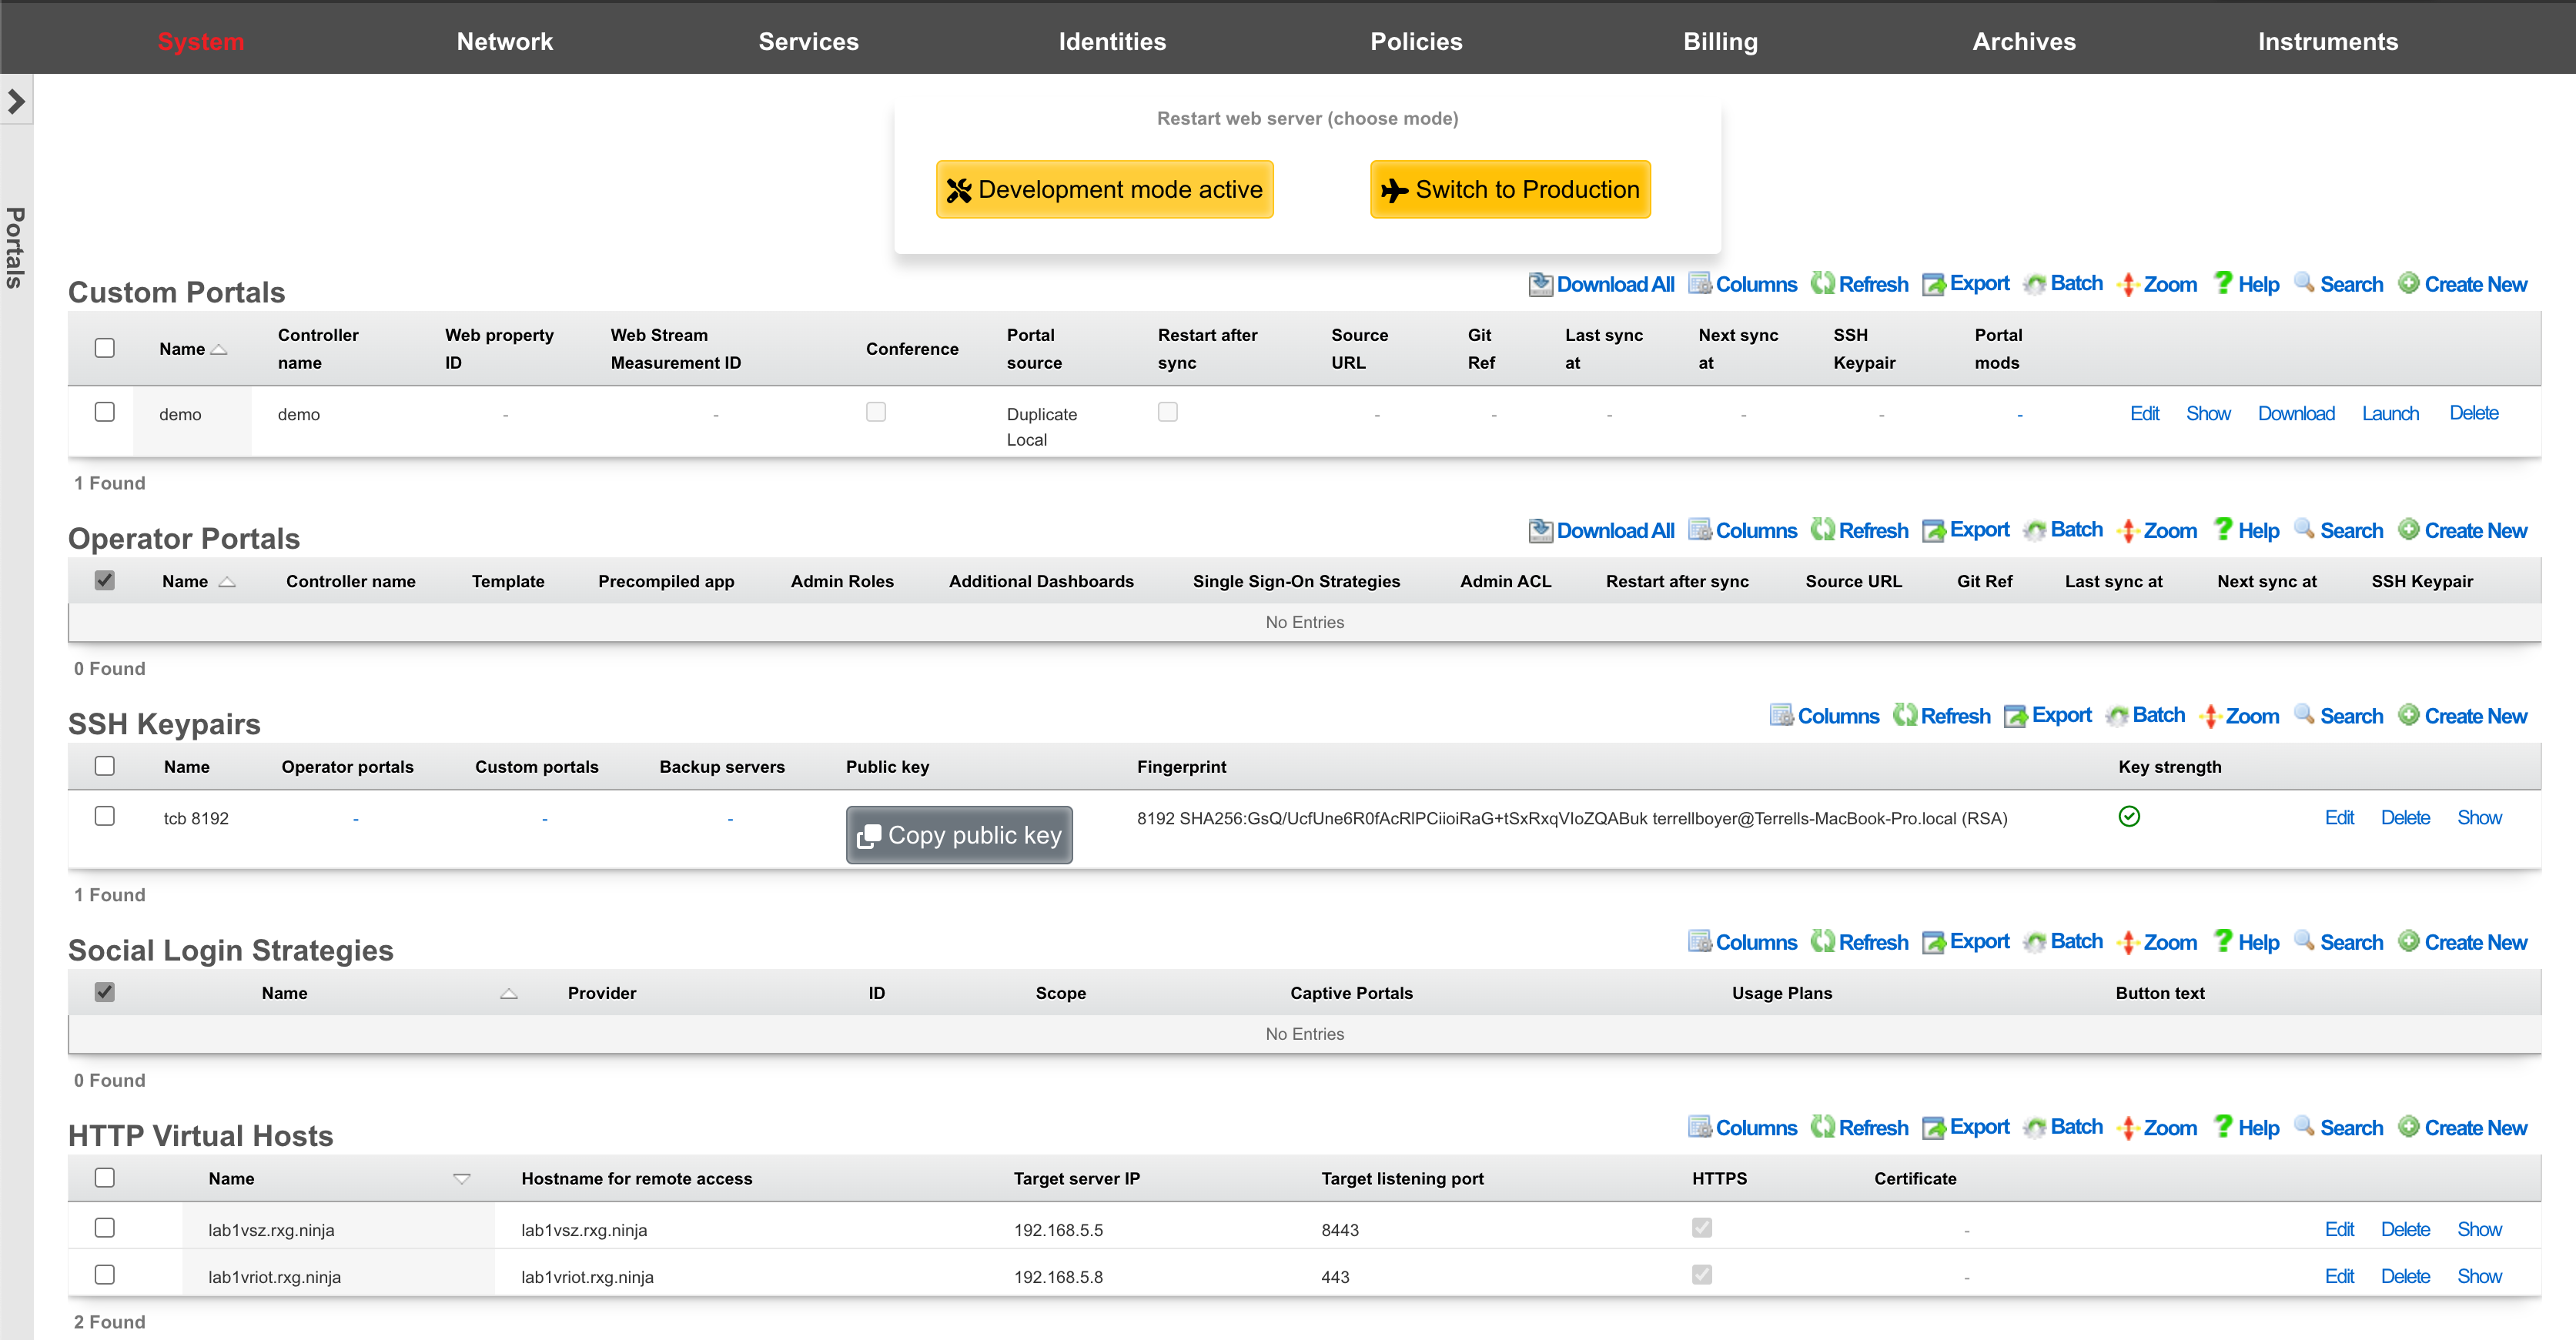
The primary purpose of the captive portal is to provide a destination for end-users after a forced browser redirect. The end-user population that experiences a forced browser redirect is controlled through the policies subsystem.
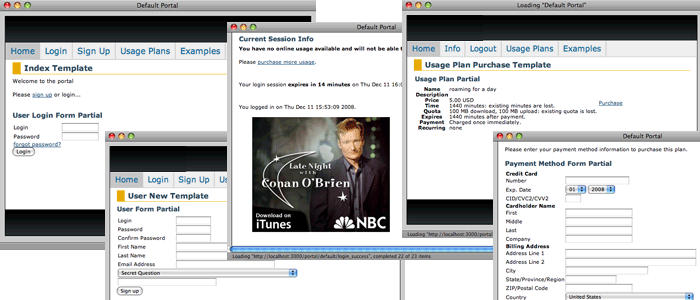
The rXg is prepackaged with a default captive portal containing several revenue-generating web applications. Prepackaged end-user self-provisioning modules include sign-up via account creation, payment via real-time credit card processing, usage plan selection, coupon code redemption, viewing and editing of current profile , and more. In addition, the default captive portal includes several modules that assist with the delivery of pre authentication , post authentication , HTML injected , and web session interstitial advertising.
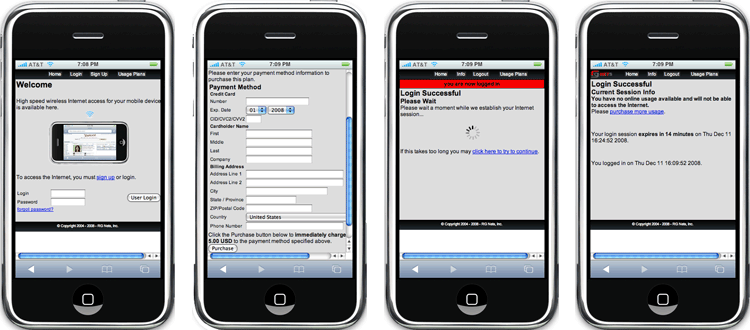
The captive portal infrastructure includes small format device detection and automatic routing of requests made by such devices to alternative layouts and stylesheets. This enables the portal to have unique and independent views for smart phones, PDAs, gaming devices, and other handheld devices.
While the default captive portal is fully functional, it is designed to be a basis for operators to create their own customized portal with operator specific art, identity, and even functionality. The process of customizing the captive portal begins with the creation of a new record in the Custom Portals scaffold on this view.

The rXg employs a caching mechanism to maximize performance of the captive portal web application server infrastructure. Use the restart web server dialog to bring the web application infrastructure into development mode in order to disable caching so that changes made to the custom portal files are immediately reflected in the pages being served. If pages are being loaded onto the rXg via SFTP, click the development button when the pages are finished being uploaded to dump the cache by restarting the web server. Restart the web server back into production mode when done making changes.
In order to customize a portal, the administrator must be enabled with SSH access via the Admins view. In addition, a working knowledge of how to use SSH, SFTP and Ruby on Railsare required. Some excellent books that cover these subjects are SSH, The Secure Shell: The Definitive Guide (ISBN 0596008953), Agile Web Development with Rails (ISBN 0977616630) and The Rails Way (ISBN 0321445619).

Custom Portals
An rXg can have multiple custom captive portals residing on it simultaneously. Each captive portal must have a record in the Custom Portals scaffold. Each captive portal may be assigned to serve a different subset of the end-user population. The mapping between portals and end-users is defined by the policies subsystem.
The name field is an arbitrary string used to identify the portal. This string is used for identification purposes only.
The controller name field is the string used to uniquely identify the portal within the Ruby on Rails web application infrastructure. If the controller name is left blank when a new custom portal is created, the rXg administrative console will automatically generate a reasonable default based on the name field.
The controller name becomes the suffix of the direct access URL. For example, if the controller name is abc the direct access URL is https://rxg.local/portal/abc. The controller name also determines the directory and file name structure that is used to store the custom portal on the filesystem of the rXg. It is very important be precise about the controller name when editing and uploading files to customize the portal.
The Google Analytics web property field stores a Google Analytics web property ID. The format of a Google Analytics web property ID is UA-xxxxxx-xx where the x's are numbers. The web property ID is listed next to the name of a configured profile in a Google Analytics account home page.
When the Google Analytics web property field is populated, the captive portal will automatically include a Google Analytics site tracking code. This allows the operator to easily integrate external, third-party verifiable portal traffic tracking for the purposes of revenue verification and advertising/impression count marketing.
It is the responsibility of the operator to create and maintain a Google Analytics account along with an appropriate profile for the desired web property. For most portals, it is recommended that the operator configure the portal post authentication landing page as a goal so that it is easy to see the ratio of potential end-users to end-users who commit to subscribe.
Operator Portals
The 'Operator Portals' scaffold lists all of the currently configured portals on the given system. Multiple portal types can be instantiated at any time, for example, a fleet manager portal, a front office manager (FOM), and others.

When creating a new Operator Portal, several fields needs to be filled in, as follows:
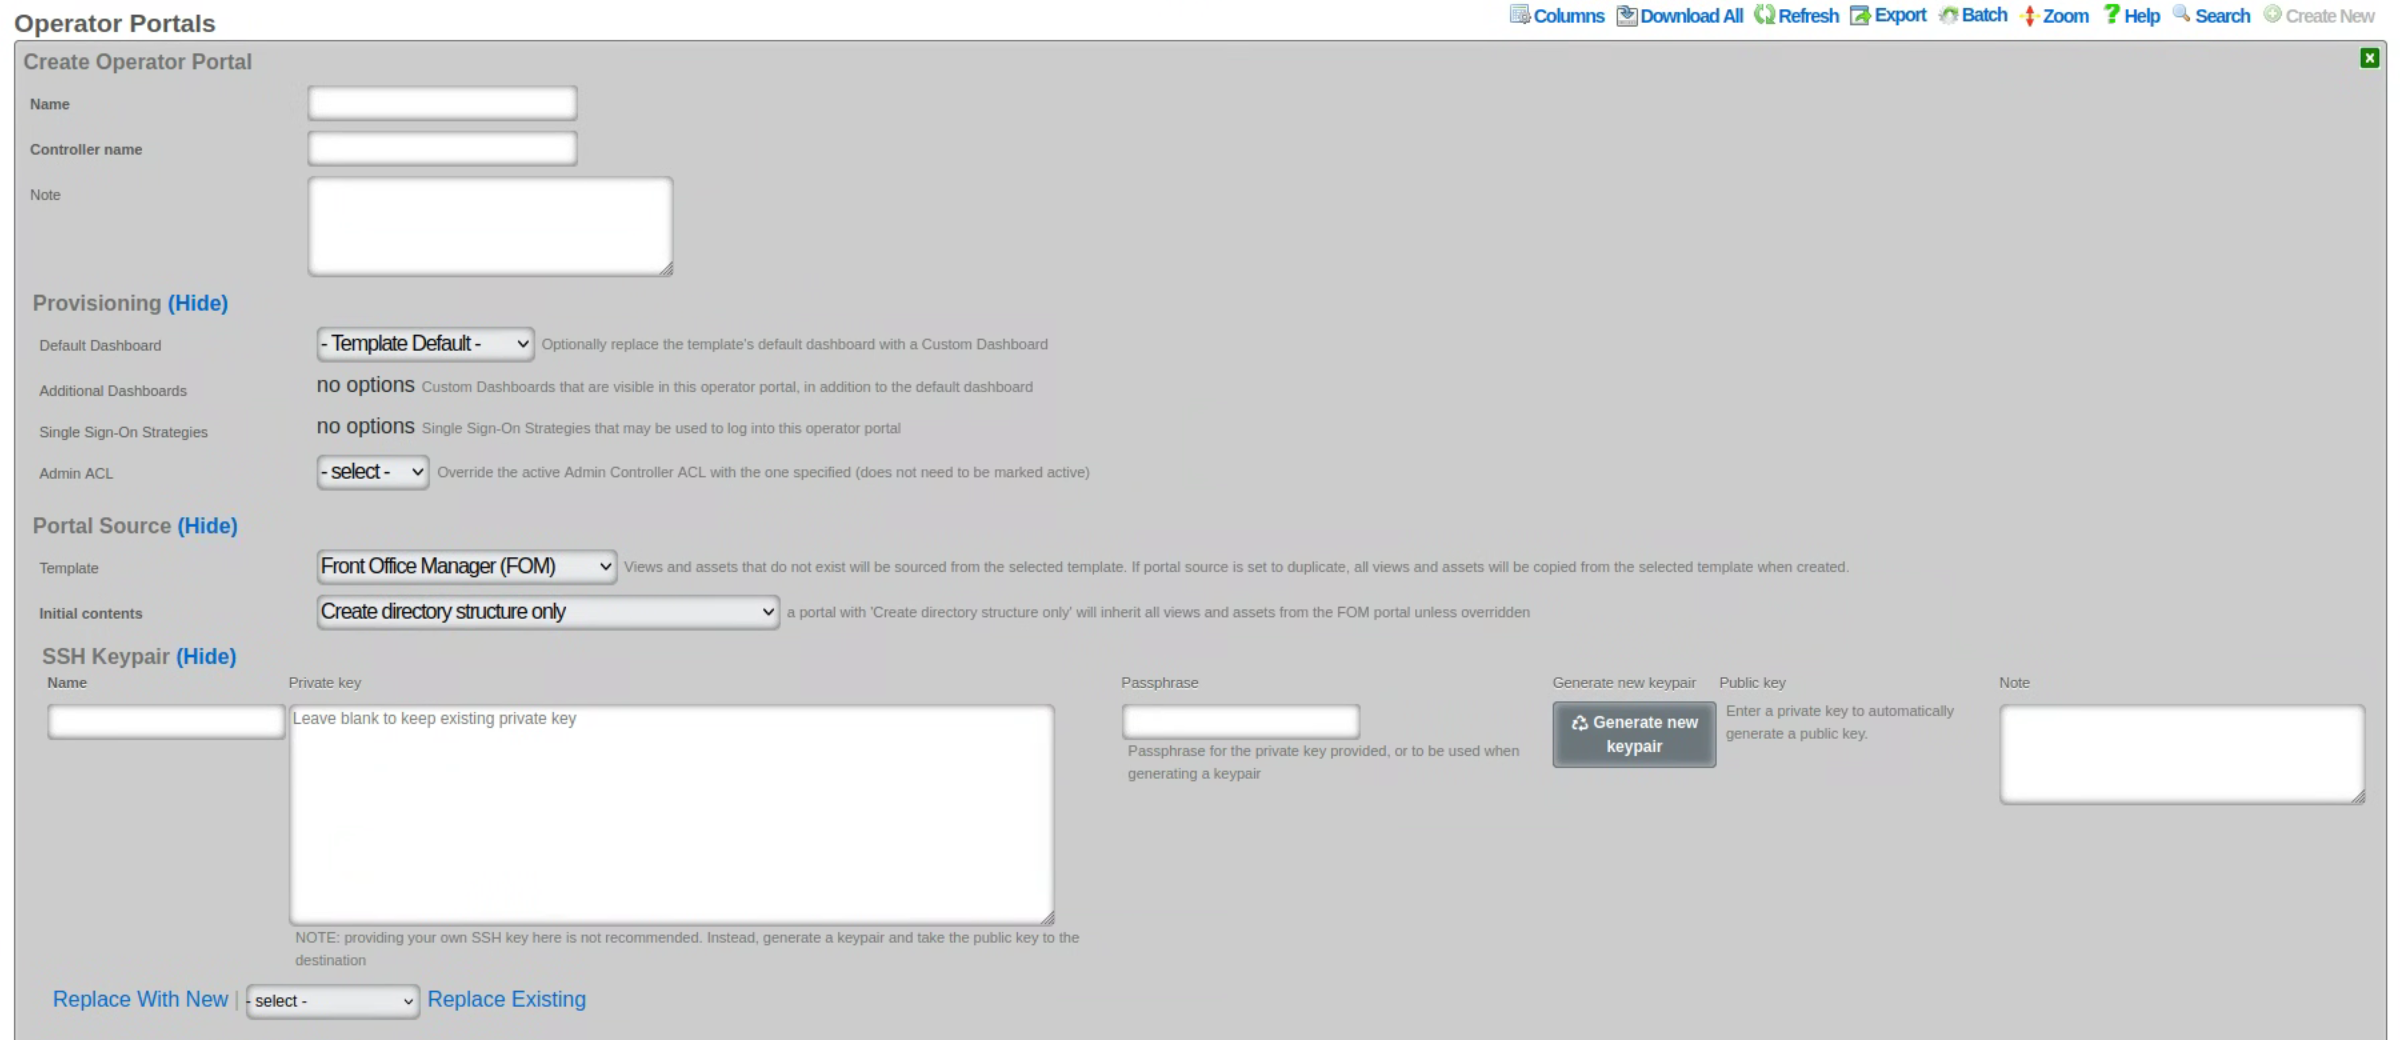
The name field is an arbitrary string descriptor used only for administrative identification. Choose a name that reflects the purpose of the record. This field has no bearing on the configuration or settings determined by this scaffold.
The controller name field sets the name of the controller and how you access the operator portal. For example, if the controller name is set to FOM, then the operator portal would be accessed by going to https://FQDN.OF.SYSTEM/FOM.
The default dashboard field allows the operator to specify which dashboard should be displayed when first logging in. By default, this is set to Template Default, but can be changed to any other custom dashboard that exists on the system.
The additional dashboards field allows the operator to select other custom dashboards that are visible in this operator portal, in addition to the default dashboard.
The single sign-on strategies field is used to select which, if any, single sign-on strategies that may be used to log into this operator portal.
The admin ACL field allows the operator to override the active admin controller ACL with the one specified here; the ACL selected here does not need to be marked as active.
The template field lets the operator choose which template this operator portal will be created from. Views and assets that do not exist will be sourced from the selected template. If portal source is set to duplicate, all views and assets will be copied from the selected template when created. Several options are pre-configured, including the Front Office Manager (FOM), Fleet Manager, Conference, IoT, Location Manager (covered in more detail in the following section), and a Precompiled Web App.
The initial contents field sets how the portal will be created. A portal with ' create directory structure only' selected will inherit all views and assets from the FOM portal unless overridden.
- If ' duplicate files from template or existing portal' is selected, then a new operator portal will be created and all files will be copied to the directory from the selected source, allowing the operator to edit any of the preexisting views.
- If ' Git' is selected then the source portal will be pulled from the Git repository. It is also possible to set a sync frequency when using Git so that any changes made to the repository can automatically be pulled to all systems. Checking ' restart after sync' will restart the webserver if there is change that was pulled and automatically restart the webserver so the changes will take effect.
- If ' Archive file via HTTP GET' is selected then the portal can be pulled from a remote site and sync frequency can be configured as well. It is also possible to use ' rsync' which provides the same sync options.
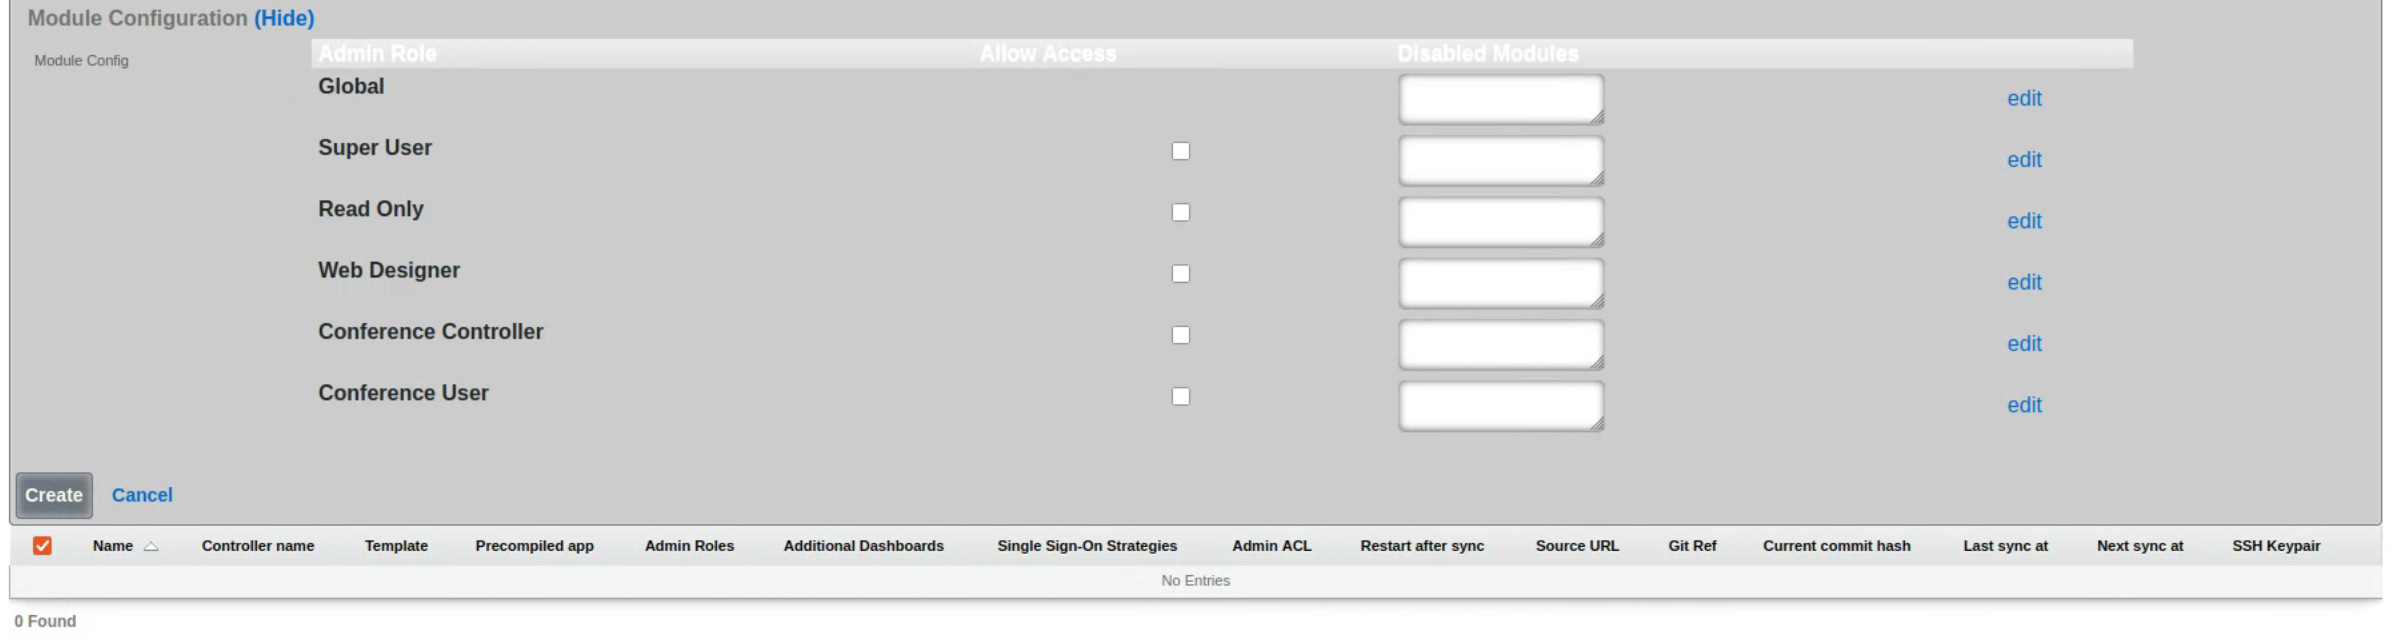
The module configuration section allows the operator to specify not only which admin roles have access to the operator portal but can also be used to disable specific modules contained within the operator portals. To select the specific admin roles able to access (interact with) the given Operator Portal, check the box in the 'Allow Access' column next to the selected Admin Role. The example below shows access granted to the in-build Super User accoutn only, effectively disallowing users in any other groups from vewing this portal.
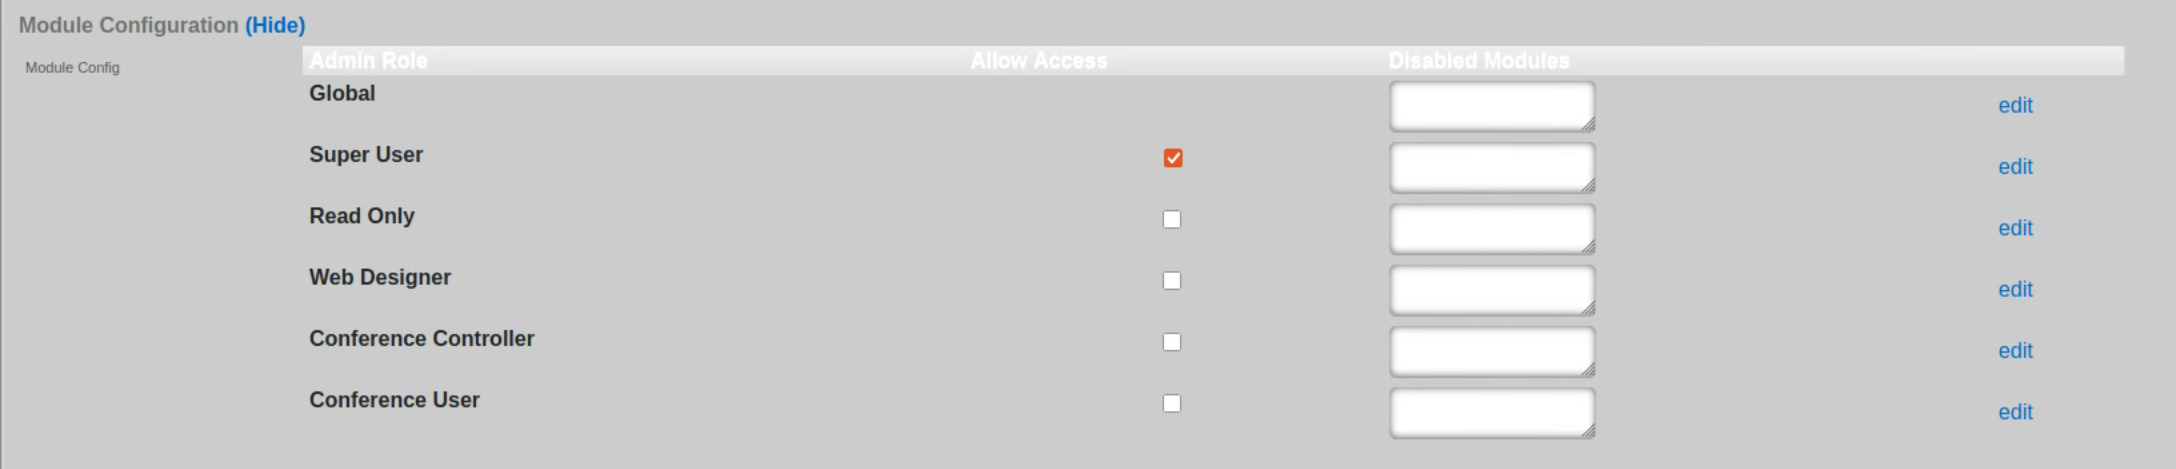
The visibility of specific modules within the given portal can be further controlled using the 'Disabled Modules' section. The example below is for a Fleet Manager type portal, showing settings disabling all proxy settings in the portal. The level of granularity and list of available control features depends on the portal type.
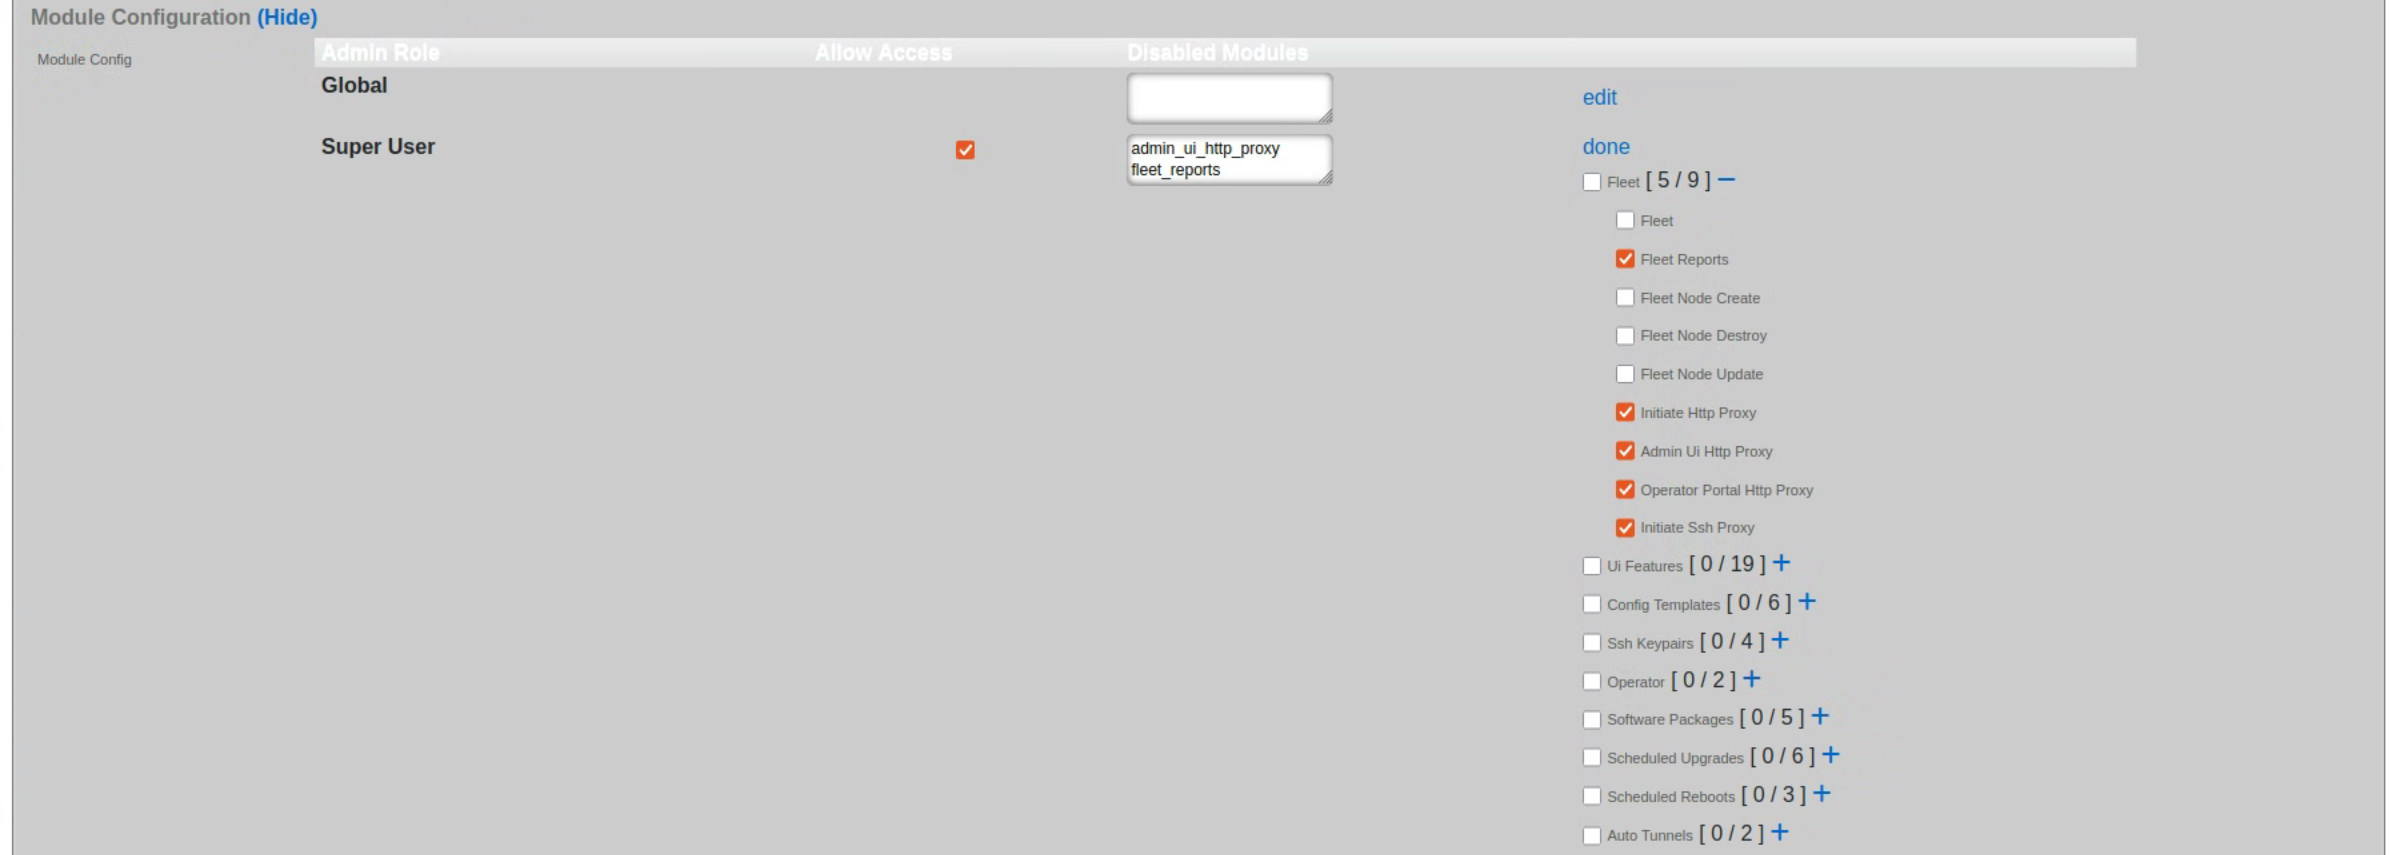
Fleet Manager
The Fleet Manager portal, as the name suggests, is used to manage a fleet of rXg systems deployed in different geographical locations, organized in arbitrary groups depending on the preferred operational scheme. The Fleet Manager portal is used to view status of different fleet groups and nodes, perform group actions on them (including scheduled software updates), generate reports, etc.
Fleet Nodes
The screen below shows a view of a small fleet with two nodes, one of which comprises a cluster of two nodes.
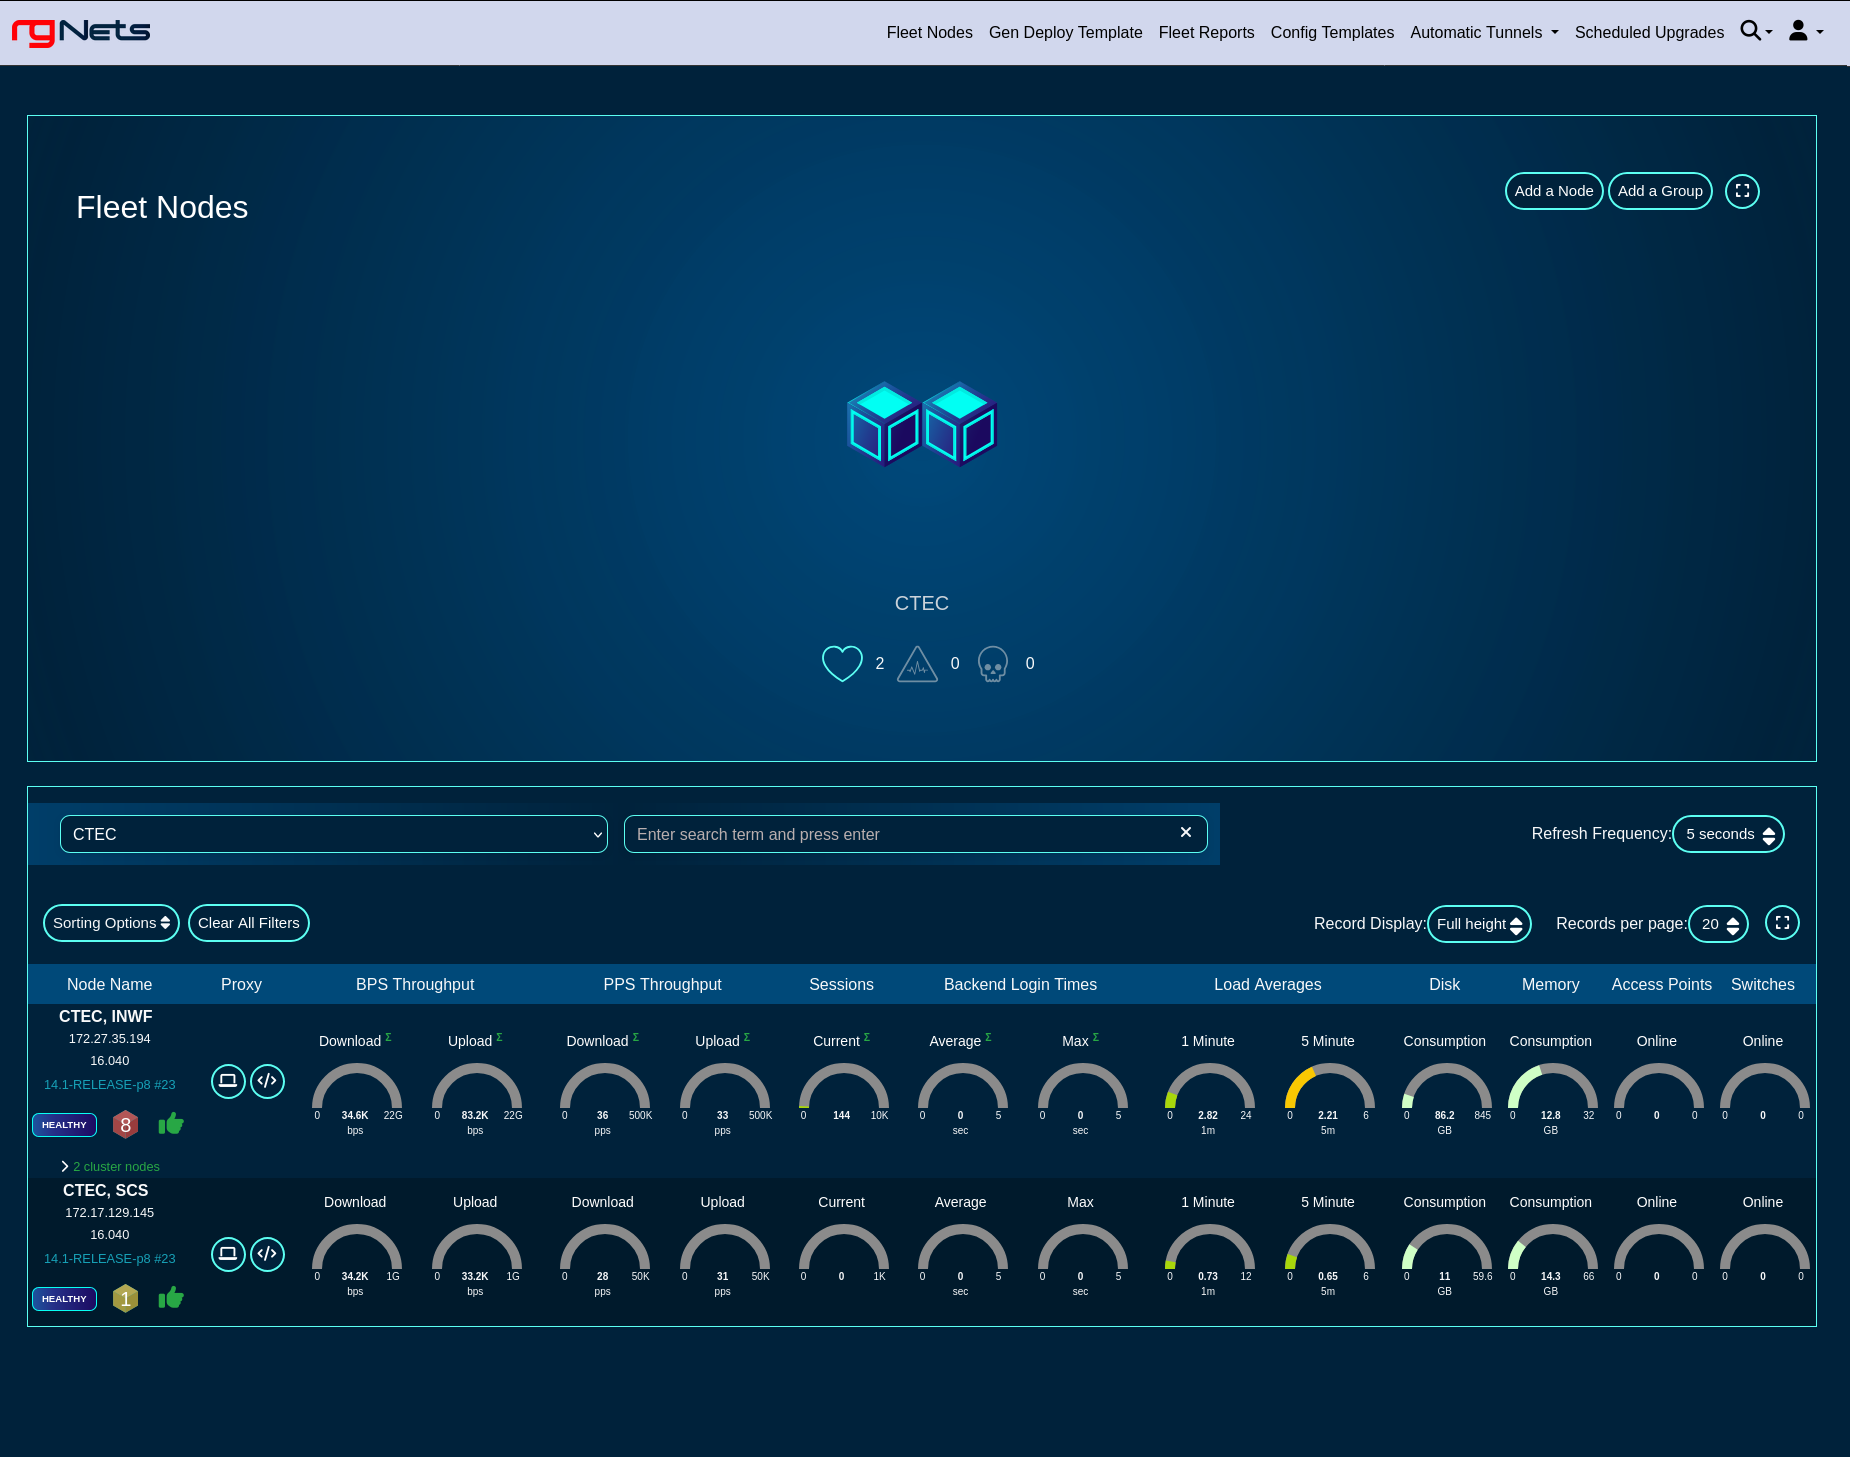
Health metrics for individual nodes can be displayed in a 'Full height', 'Compact', and 'Text' format, by toggling the 'Record Display' option, as shown in the following three screensots.
Full height view of the fleet
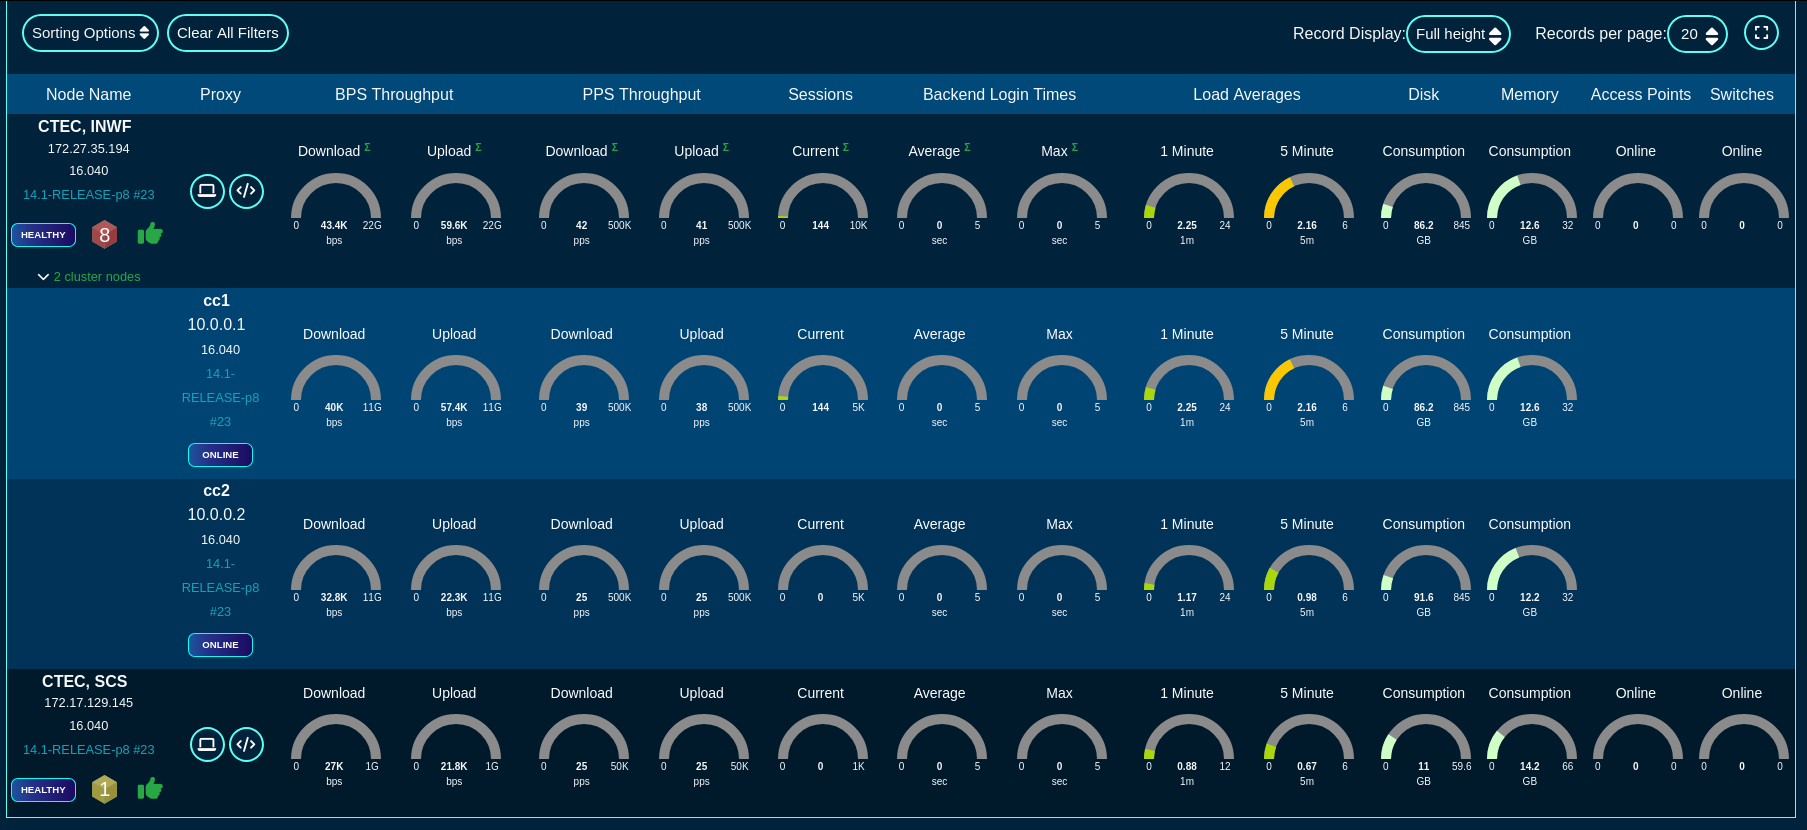
Compact view of the fleet
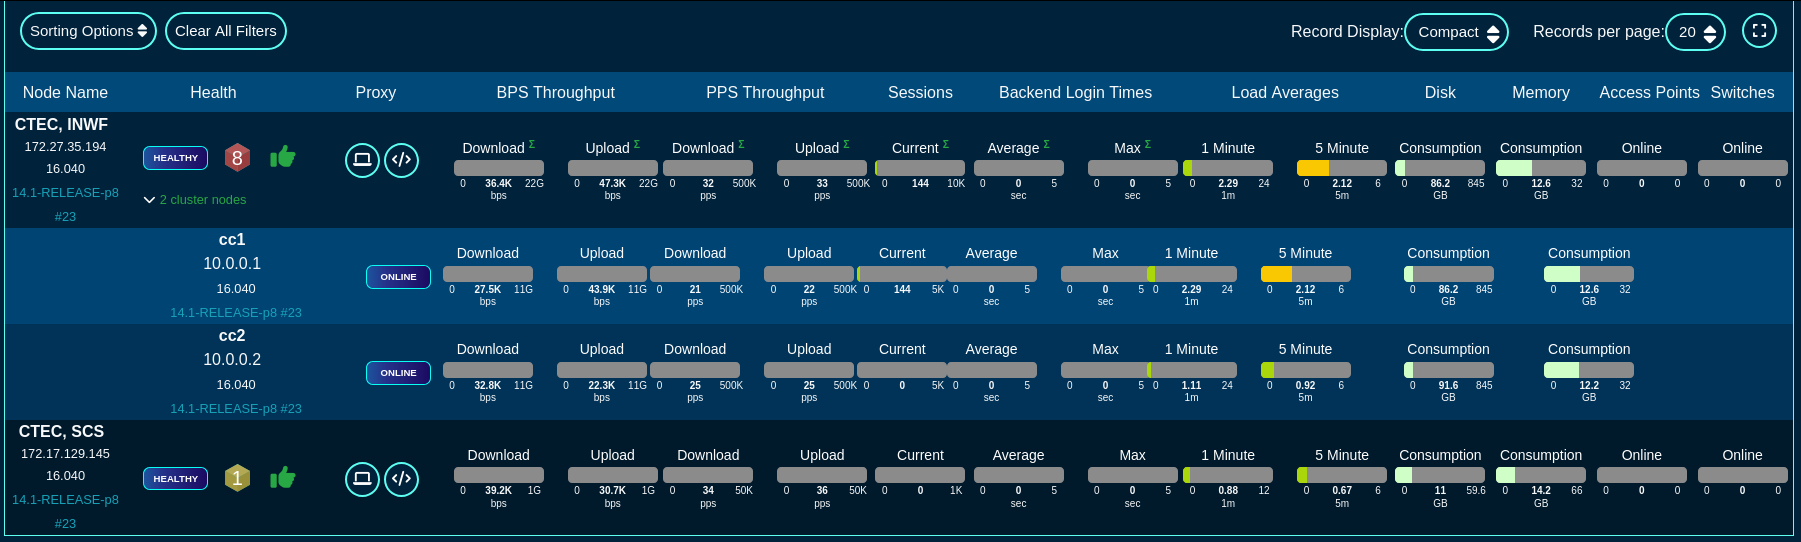
Text view of the fleet
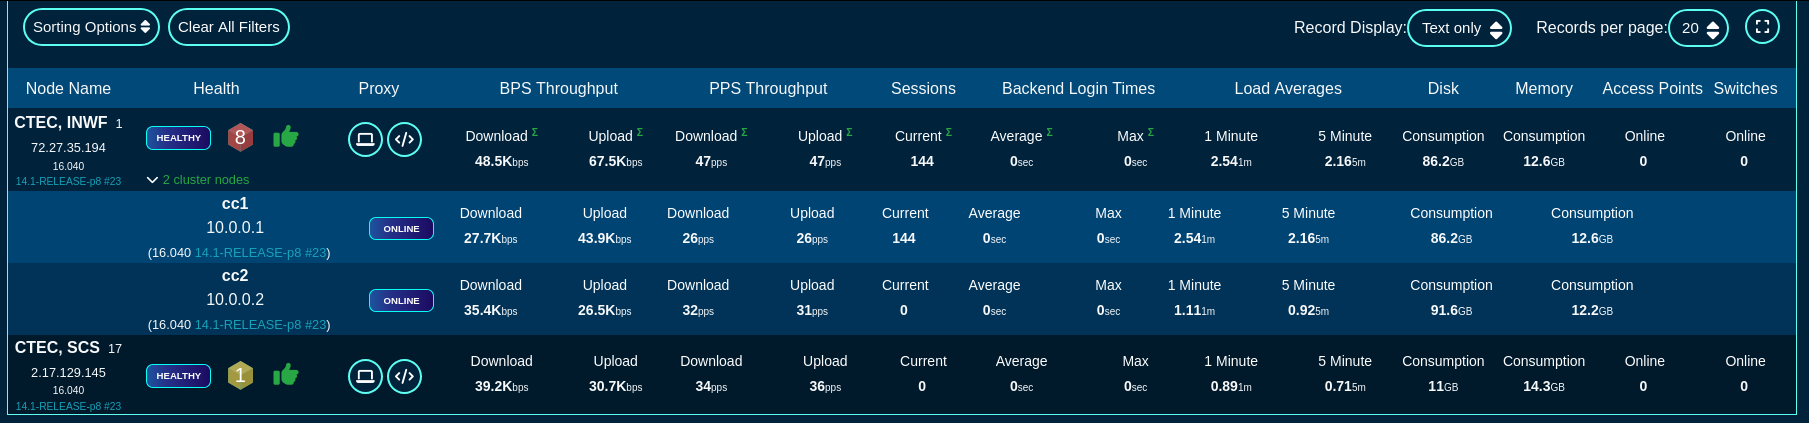
There are also sorting and filtering options, selection of the number of elements displayed per page, as well as the refresh frequency. In the large scale deployments of production Fleet Managers, the refresh time may need to be extended to 30 seconds or even longer, depending on the number of nodes reporting to the fleet manager.
The main screen provides an option to add a group using the 'Add a Group' button to create a new logical grouping of several nodes, as well as 'Add a Node' option to add a node to one of the node groups previously created in the system.
To add a new group, fill in the following fields in the respective dialog
The Name field is an arbitrary string descriptor used only for administrative identification. Choose a name that reflects the purpose of the record. This field has no bearing on the configuration or settings determined by this scaffold.
The Fleet Nodes allows the operator to assign some of the previously existing nodes to the newly created group. This field can be left empty, if the group does not contain any nodes at the time it is created.
The Note field is an arbitrary string note used to describe the given group. This field may be left empty.
The Admins and Admin Roles fields allow to restrict admin access to the given group to the selected admin accounts (when selected in the Admins field) or admin groups (when selected in the Admin Roles field). At least one of them needs to be populated, and by default, the Admin Roles field is populated with the gropup the accoutn creating the given group belongs to.
The Config Templates field may be optionally used to select which of the configuration templates configured in the system are accessible to the given group. This field may be left empty and individual templates can be added to the given group later on.

To add a new node, fill in the following fields in the respectibe dialog
The Name field is an arbitrary string descriptor used only for administrative identification. Choose a name that reflects the purpose of the record. This field has no bearing on the configuration or settings determined by this scaffold.
The Host field is filled with the FQDN (must be resolvable via the DNS used by the fleet manager) or the IP address (IPv4 or IPv6) of the fleet node.
The Key field is automatically generated by the dialog itself and will be used to link the new fleet node and connect it to the fleet manager. It may be customized, if needed, but it is recommended to leave it in its default value.
The Fleet Groups field allows to assign the newly created node to one of the existing groups.
The Ignore SSL cert errors field should not be checked in the production conditions to avoid on-boarding potentially insecure fleet nodes.
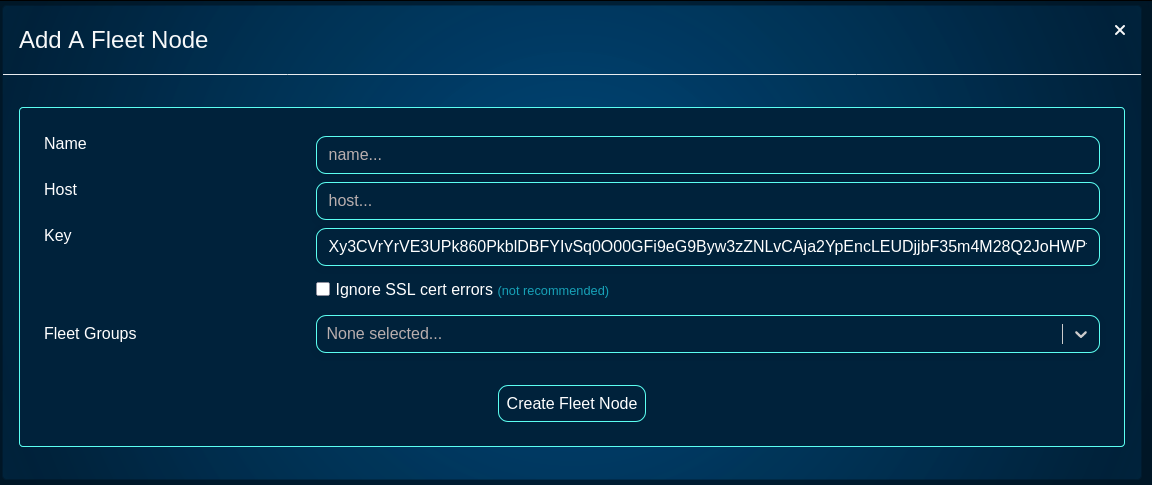
The Fleet Reports screen provides access to a variety of pre-configured reports, providing also an option to create custom ones, as needed. The name of individual report types are pretty self-explanatory and will not be examined in more detail here.
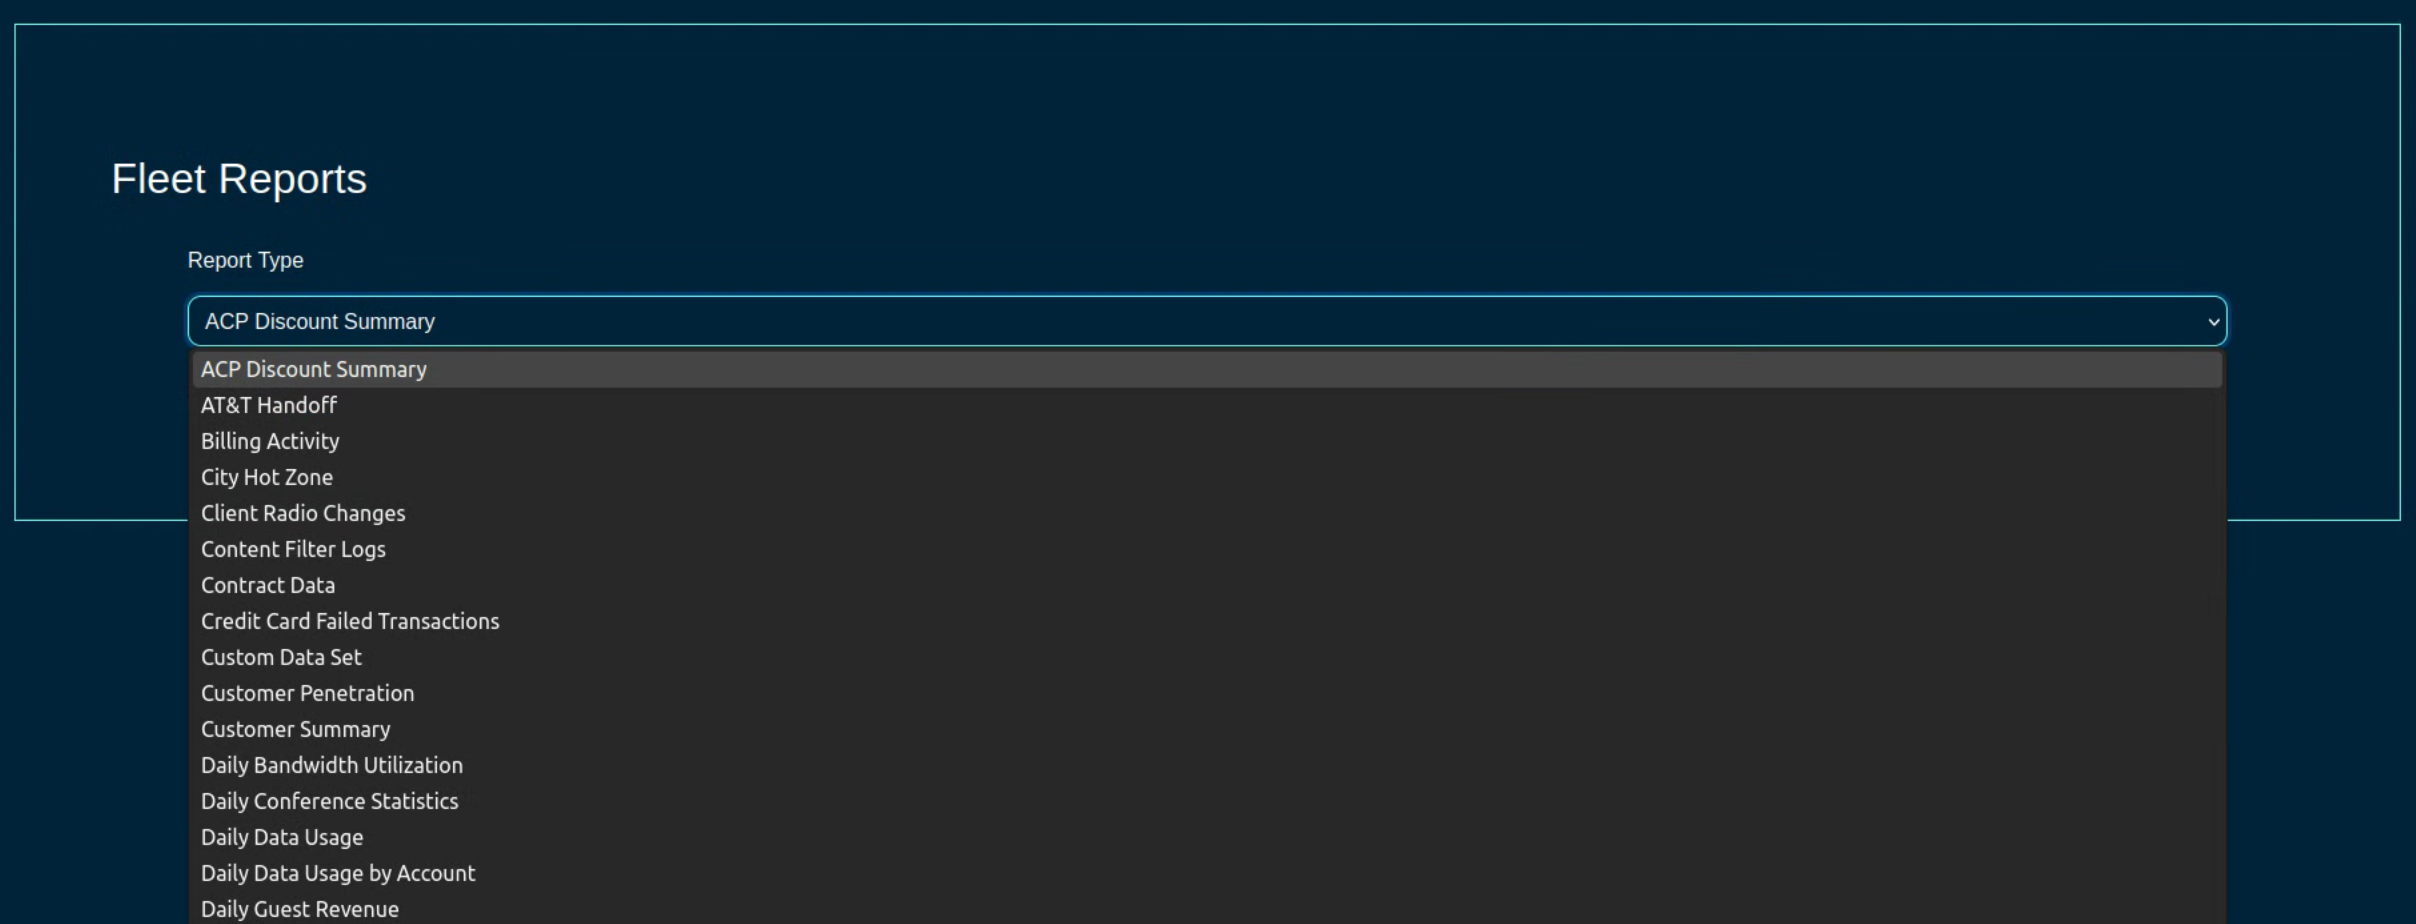
Config Templates
The Conifg Templates screen provides access to the configuration templates, allowing the operator to create a new configuration template, test it, and apply it to selected node(s) or group(s).
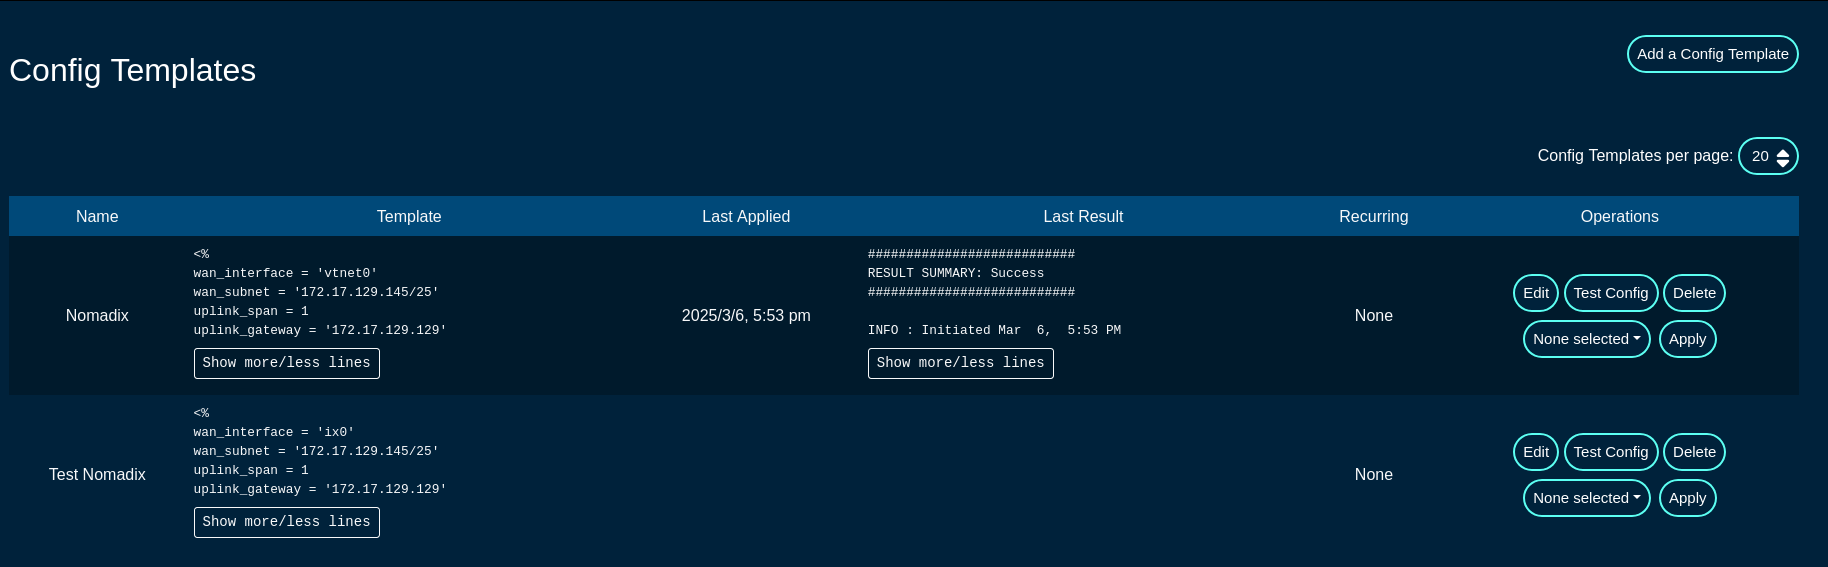
A config template can be edited using the 'Edit' button, deleted using the 'Delete' button, validated using the 'Test Config' button, and applied using the 'Apply' button to nodes selected under the 'None selected' drop down list.
Additionally, new configuration templates can be created using the 'Add a Config Template' button, with the following fields that need to be populated:
The Name field is an arbitrary string descriptor used only for administrative identification. Choose a name that reflects the purpose of the record. This field has no bearing on the configuration or settings determined by this scaffold.
The Note field is an arbitrary string note used to describe the given config template. This field may be left empty.
The File upload allows the operator to upload a YAML-formatted file to overwrite the content of the given config file.
The Remote URL,, Username, Password, and Certificate fields are used for a remote config download process, where the config template is donwloaded from a specific remote location.

The Request properties allows to custom HTTP Header or Query Parameter fields for the given config template. More than one field / entry is possible, by adding new lines using the 'Create Another Request Property' button
The Config field contains the YAML-formatted body of the config template, which may include also embedded Ruby code.
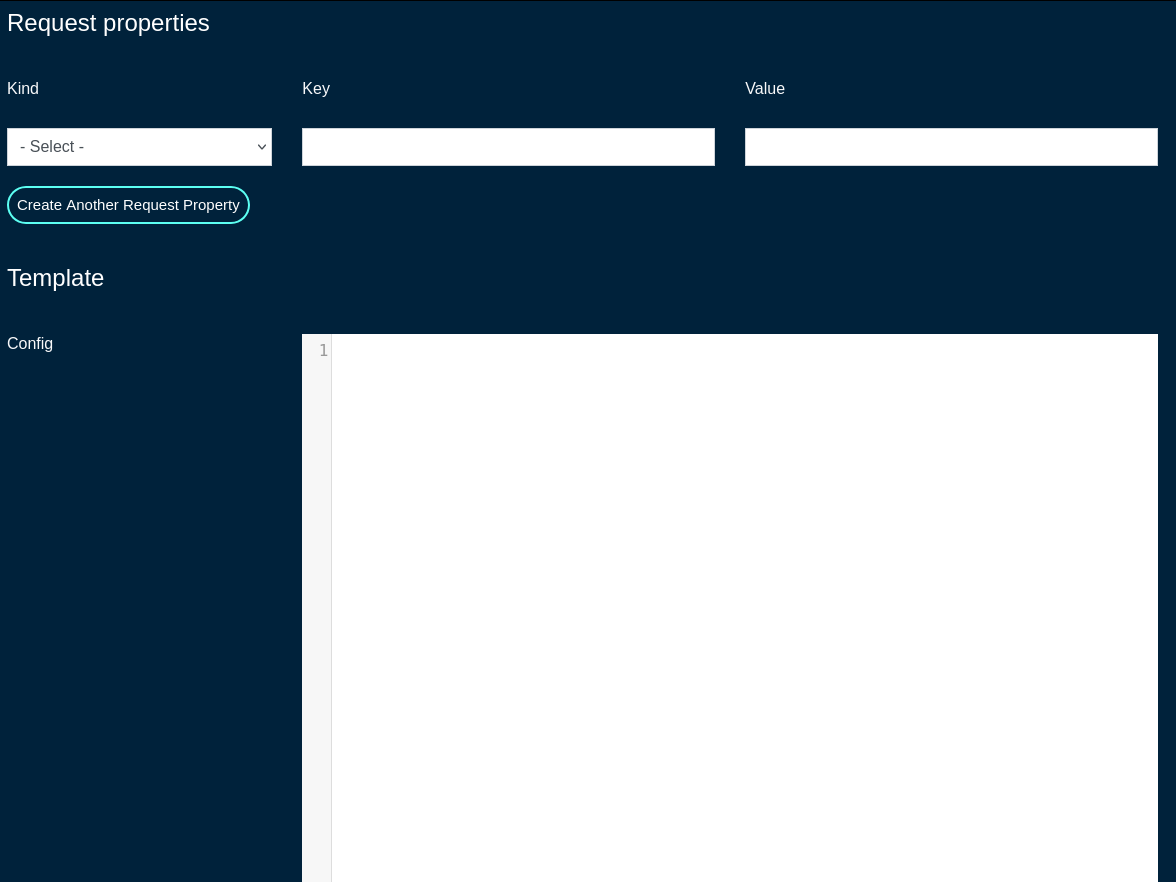
The ERB field should remain checked, which indicates that the given config template is to be processed with the ERB template engine.
The Recurring field allows the operator to set frequency to automatically fetch (if applicable) and apply the config template after first application. Various frequency options are pre-defined, including from hourly to annually, covering the majority of use cases commonly observed in production conditions.
The Fleet Nodes, Fleet Groups, and Excluded Nodes fields provide a flexible way to select which of the node(s) and/or groups to apply the given config template to.
The Retry Every and For fields specify the retry conditions for the given config template, should its application fail. Leave blank to disable retries when a template application fails. The configuration fields allow to specify the retry period in minutes / hours / days / weeks / months and the duration of the retry period (again, in minutes / hours / days / weeks / months).
The Disable Fleet Certificate Verification should not be selected for production conditions and it is only recommended for testing, not production. When checked, the fleet certificates are not being validated, which may lead to a potential of a rouge fleet node have the configuration template applied to.
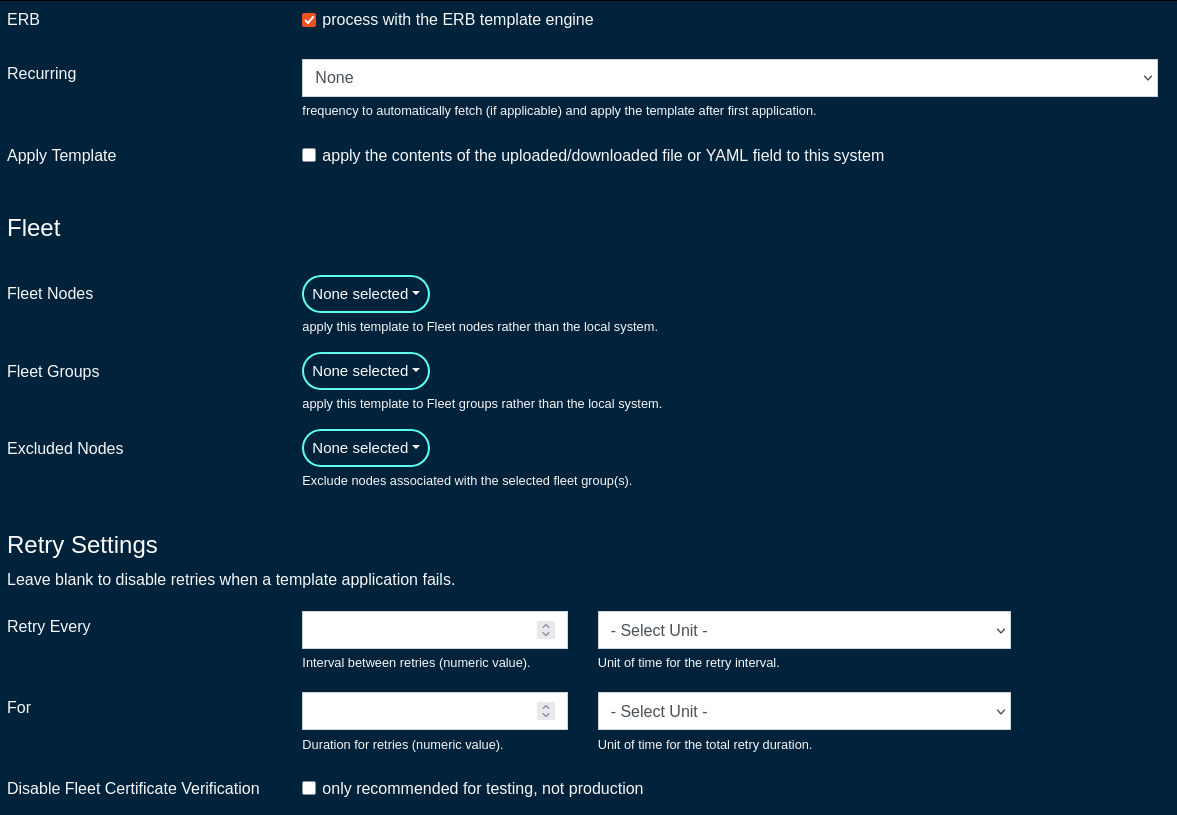
Automatic Tunnels
The Automatic Tunnels screens allows the operator to use a Tunnel Wizard or Tunnel Visualization for the fleet.
The Tunnel Wizard allows the operator to create instant Wireguard tunnels among the nodes of a fleet group, providing L2 connectivity between the selected nodes.
The wizard includes several steps , including
- STEP 1: select the topology (mesh or hub&spoke)
- MESH: Establish a tunnel from every node in the group to every other node in the group.
- HUB & SPOKE: Establish a tunnel from every node in the group to a common hub node.

- STEP 2: select the fleet group the connectivity is applicable to
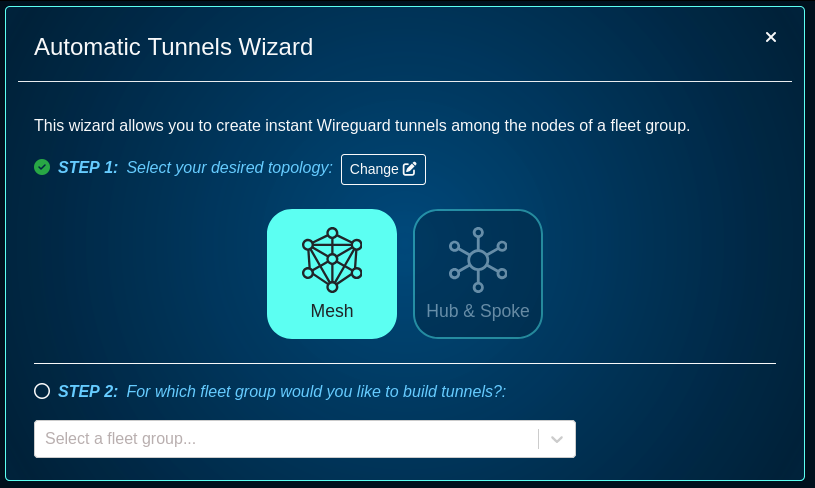
- STEP 3: provide the addresses to use for Wireguard interfaces (these caddresses can be private RFC1918 IPv4 address space)
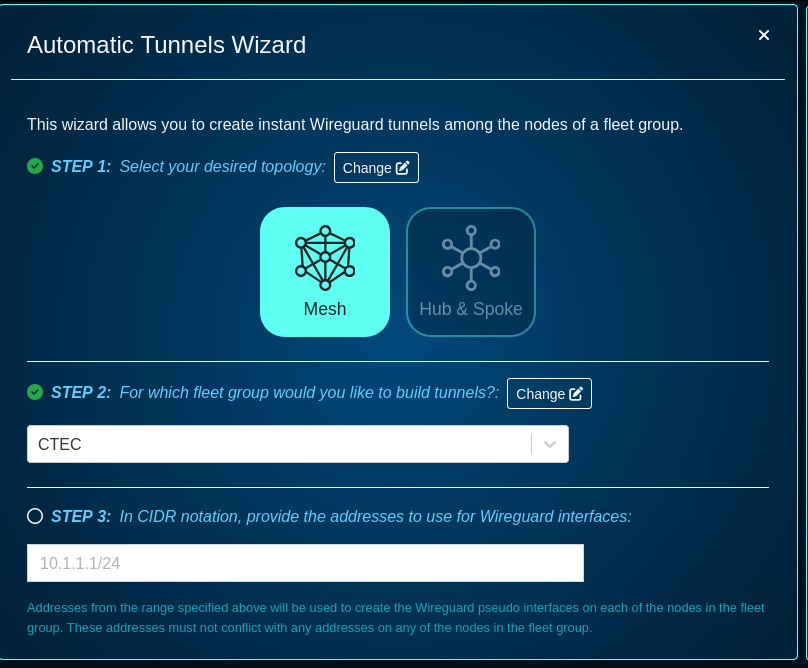
- STEP 4: specify a port, keep-alive time, addresses, or IP groups, if needede - this step is optional
- a default Wireguard Port is set to 51820, other port numbers can be used
- a keep alive period can be set to a custom value
- node addresses can be selected - select the addresses for each node that should be accessible via the created tunnels. By default, tunnels will use addresses marked "Wireguard eligible" from the admin UI's addresses scaffold.
- Select the IP Group for each node that should be associated with each of the created tunnels. By default, tunnels will share a new IP group called "WireGuard Default" that will be connected to the default policy.
- there is an option to check to automatically rerun the wizard and apply updates whenever there are changes to fleet nodes within the selected group.

The wizard requires the acknowledgment that running this wizard will make changes to the configuration of all fleet nodes in the selected group, potentially disrupting access to those systems. It is critical that before any Wireguard configuration is committed, backup of all running configurations is taken for all target nodes.
Scheduled Upgrades
The Scheduled Upgrades screen allows to create scheduled upgrades for selected node(s) / group(s).
For starters, go to the Software Packages, and click on the 'Create New' button and fill in the following fields:
The Name field is an arbitrary string descriptor used only for administrative identification. Choose a name that reflects the purpose of the record. This field has no bearing on the configuration or settings determined by this scaffold.
The File is where the new firmware file is selected and then uploaded.
The Remote URL,, Username, and Password fields are used for a remote software image download process.
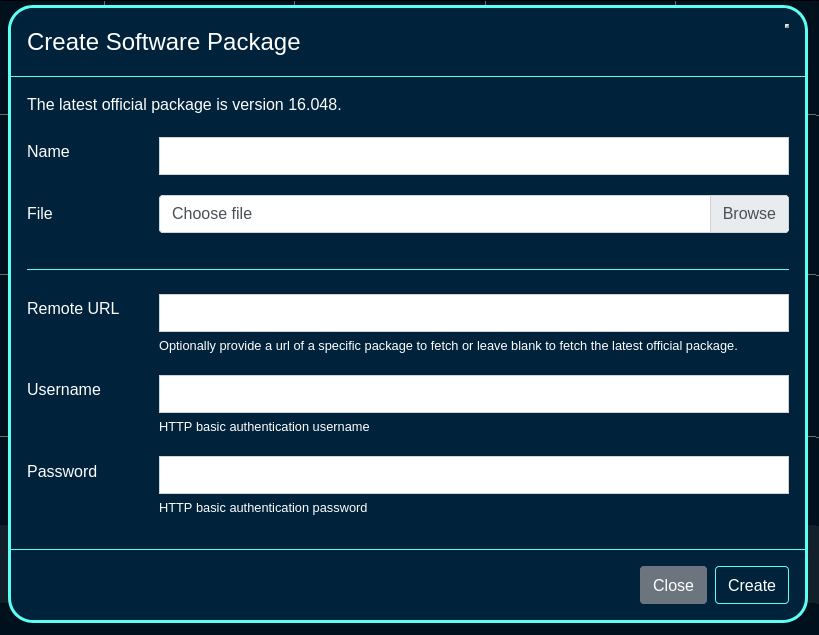
Once the software package(s) required for the fleet are created, a scheduled upgrade can be created, using the 'Create Scheduled Upgrade' button. The following fields are available:
The Name field is an arbitrary string descriptor used only for administrative identification. Choose a name that reflects the purpose of the record. This field has no bearing on the configuration or settings determined by this scaffold.
The Software Package is where one of the pre-defined software packages is selected.
The Start at and the Timezone fields are used to select the time when the upgrade process is scheduled to start.
The OS upgrade toggle allows the OS upgrade to take place.
The Minimum version and No alpha builds allow to set the minimum version of the code required (to make sure that the node is running at least the specified version in order to upgrade), and to control whether the node(s) are allowed to run alpha builds or not.
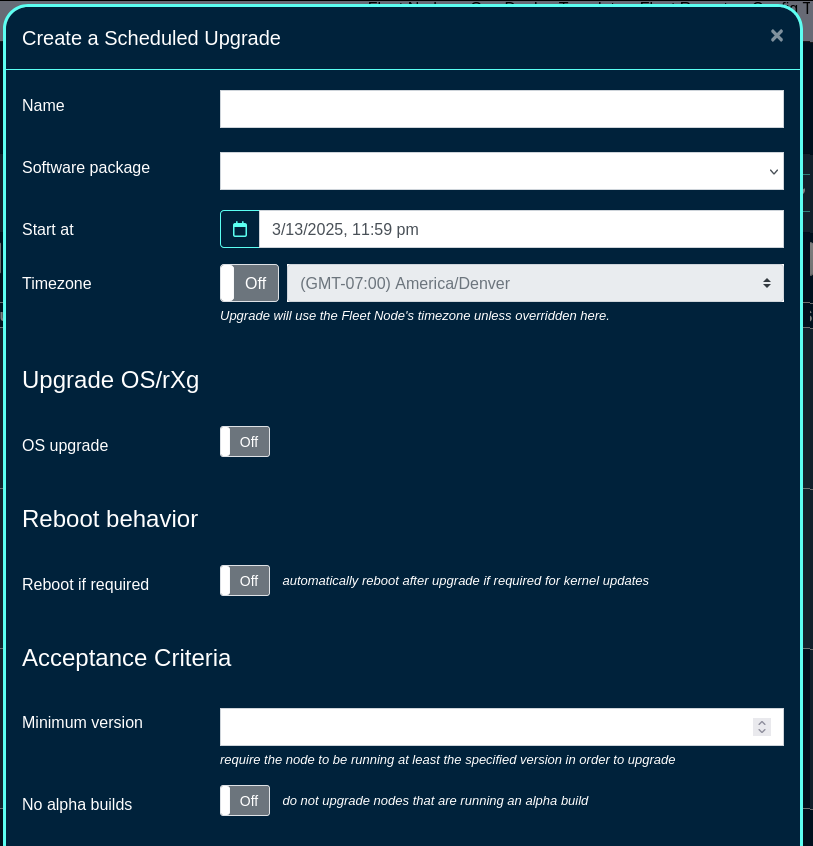
The Schedule mode allows to select when to execute the code upgrade, including the immediate or various types of staggered upgrades. In staggered upgrades, for example upgrades to a specific share of systems per day may be configured, to minimize distuprion to end customers.
The Fleet Nodes, Fleet Groups, and Node csv fields provide a flexible way to select which of the node(s) and/or groups to perform the upgrade on. The CSV file allows also to upload the names or host values for target node(s) to be upgrades.
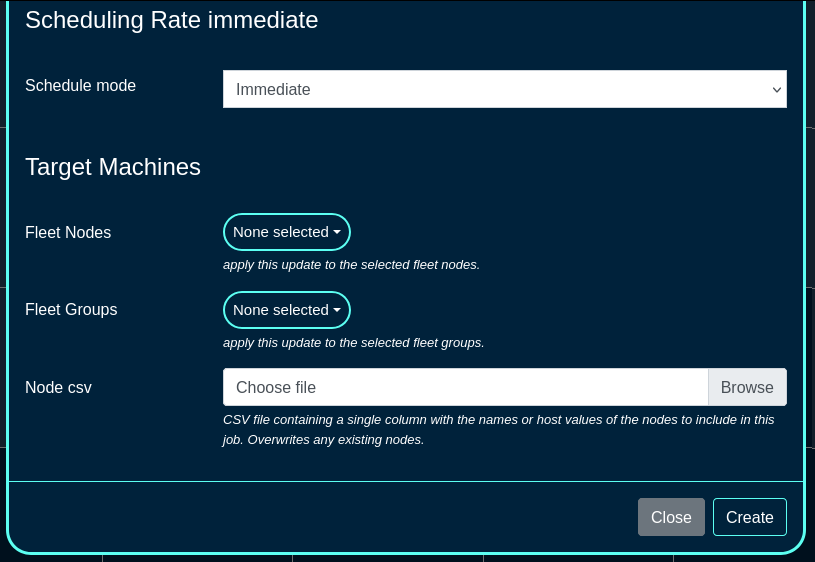
A Scheduled Reboot schedule can be also created using the 'Create Scheduled Reboot' button, including the following fields:
The Date and Timezone fields are used to select the date/time when the reboot process is scheduled to start.
The Fleet Nodes and Fleet Groups fields provide a flexible way to select which of the node(s) and/or groups to perform the reboot on.
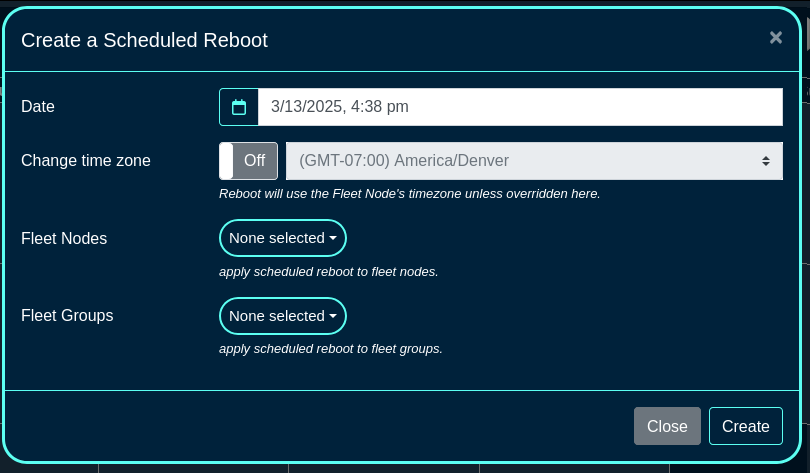
Once a scheduled reboot even is created, new information fields are displayed on the left side of the screen (specific nodes ot be rebooted and the scheduled time) as well as the calendar view is updated with the scheduled action.
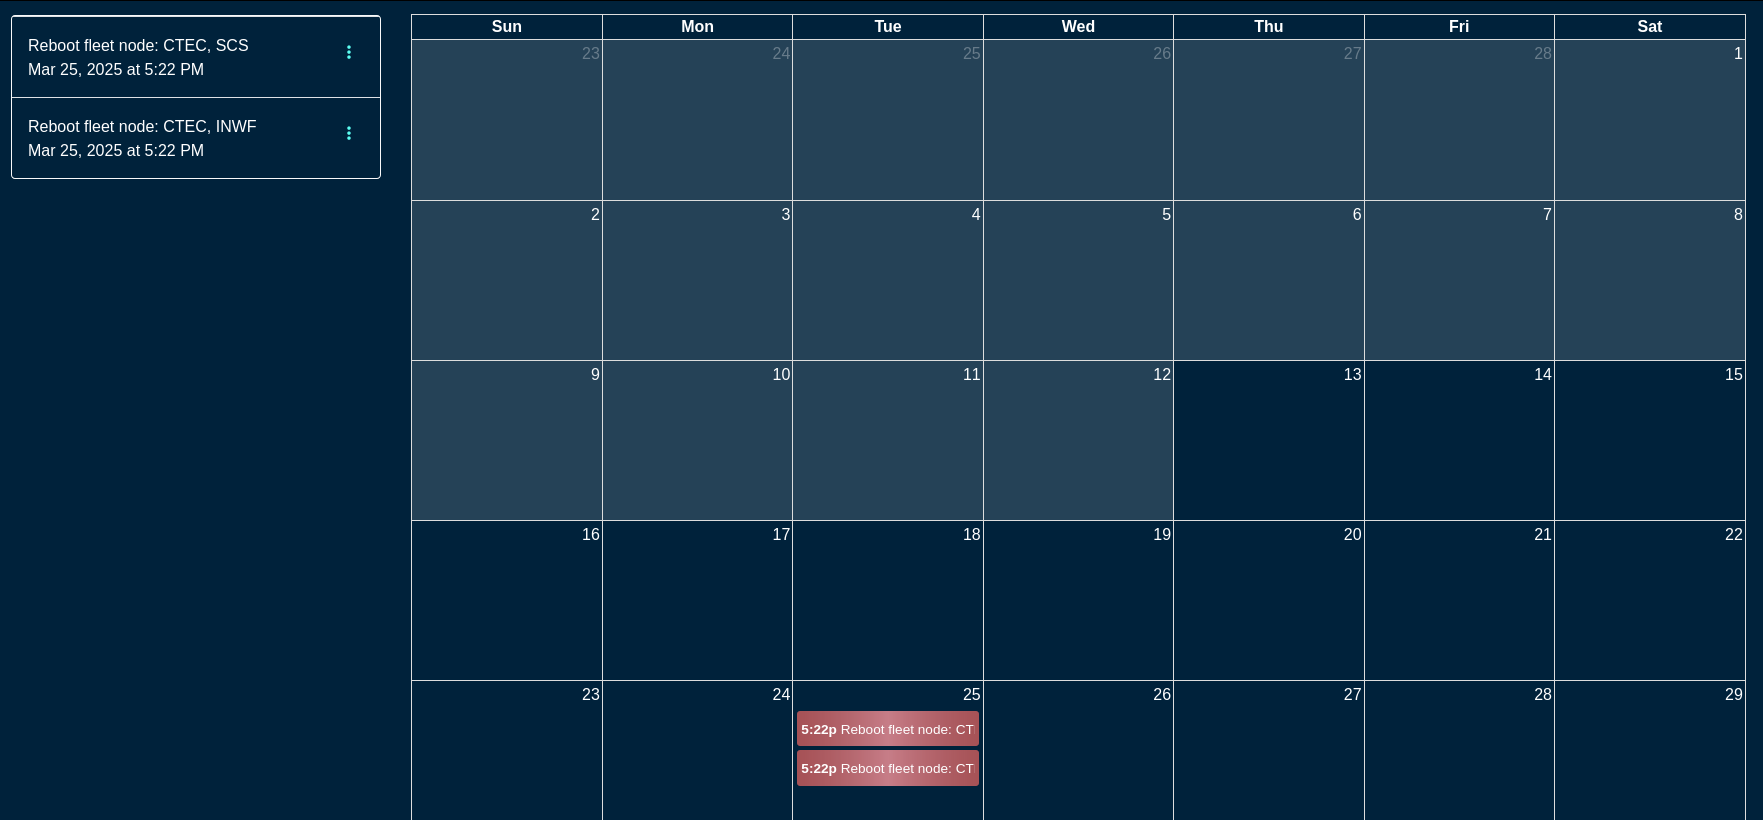
Scheduled events can be deleted / modified by clicking on the target event and changing the desired parameters. For example, to modify a scheduled reboot event, click on the specific calendar entry or select the event on the left, menu option (3 vertical dots), and select Edit. Modify the parameters of the event or delete the action, as needed.
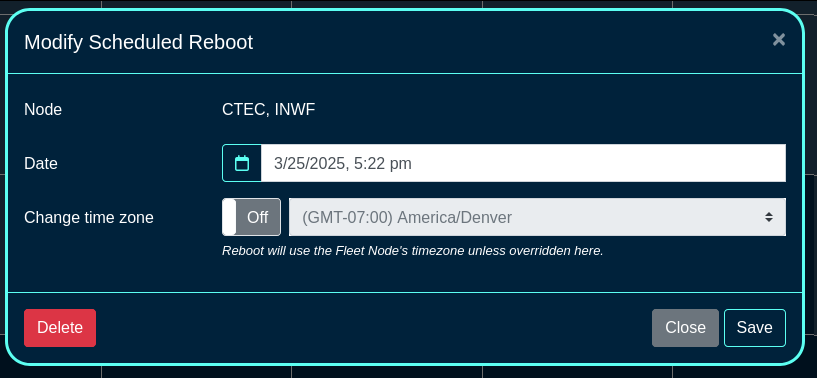
User Menu
The user menu on the right side of the screen permits the operator to change the password, access SSH key options (see the screen below), or log out from the portal.
The SSH key options include:
- a line entry for each existing SSH key, containing its name, authorization check box (if checked, the SSH key can be used to log into the shell on ths rXg system), a way to copy of the public key, fingerprint value (hash of the key and its size), an optional private key information, as well as an option to Edit or Delete the given key entry.
- there is an option to generate a new key pair (public and private) as well as add an existing SSH keygenerated offline using any of the methods available outside of rXg (Putty, SecurCRT, shell on Linux, Mac, etc.)
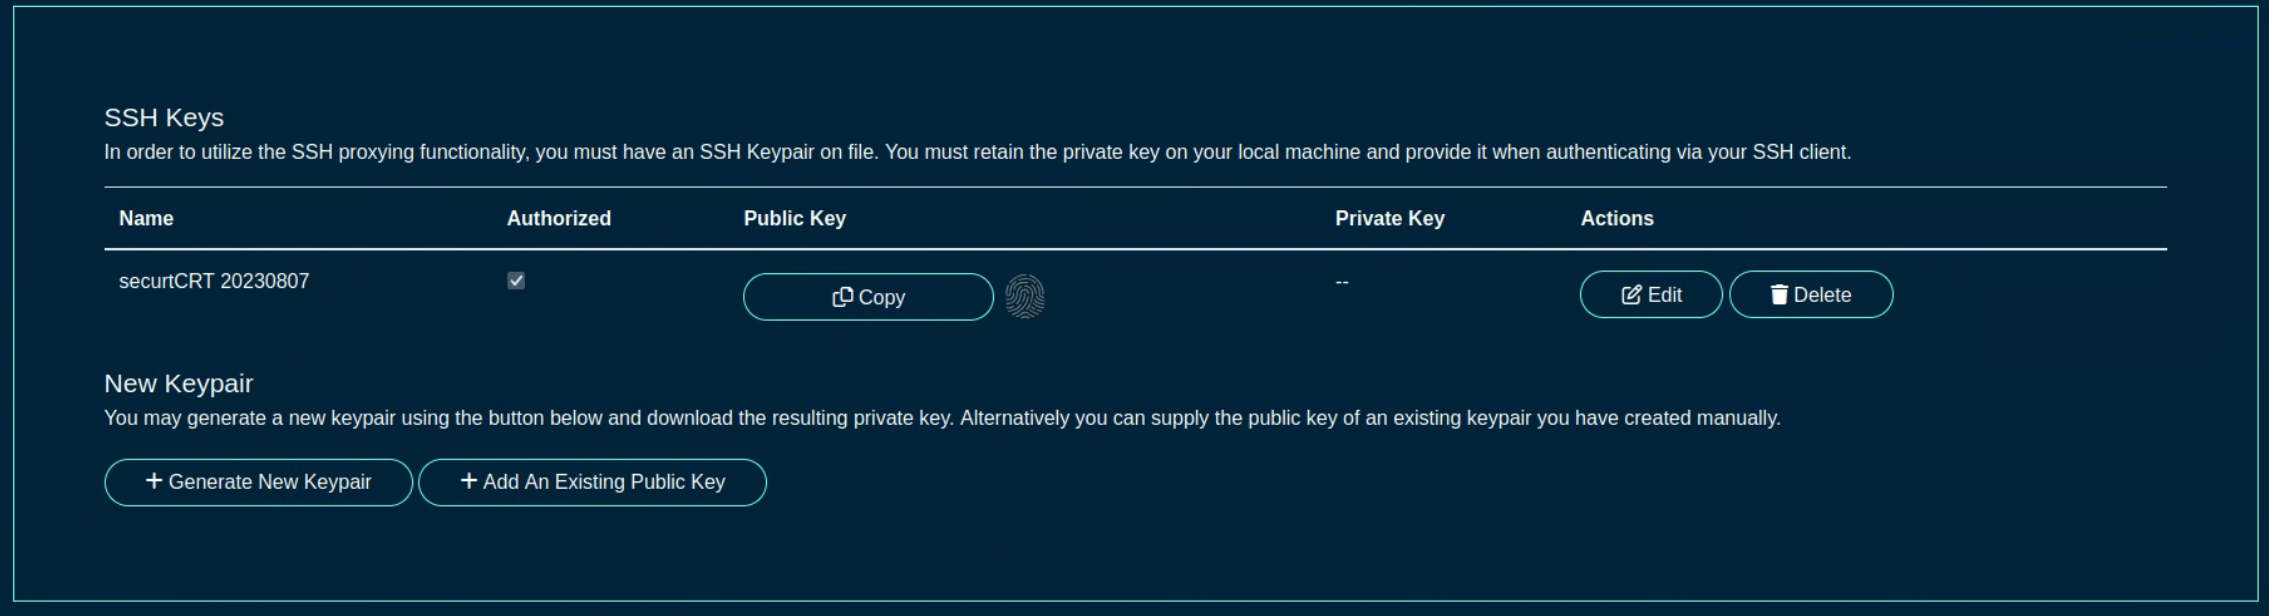
Location Manager
The Location Manager is a portal that is aimed at presenting network information in a spatially aware way.
One of its key functionalities is creating and placing POIs (Points of Interest).
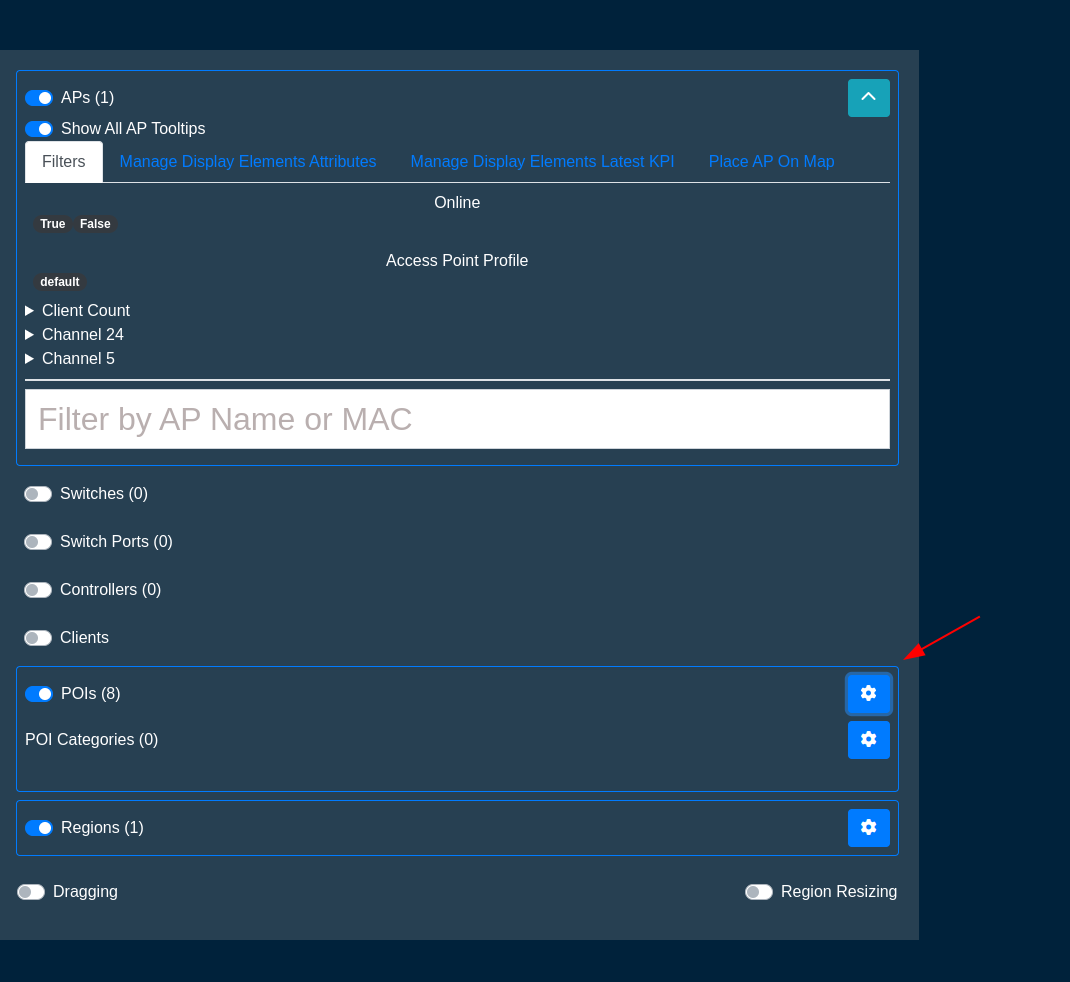
Click Here to Create a new POI.
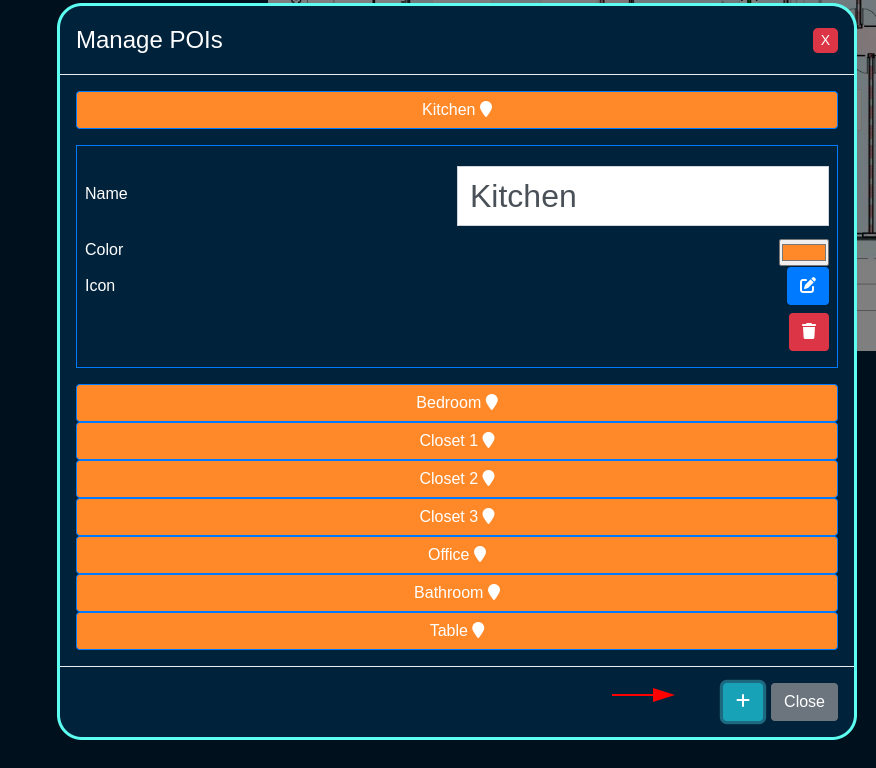
After you name it, click here to save it
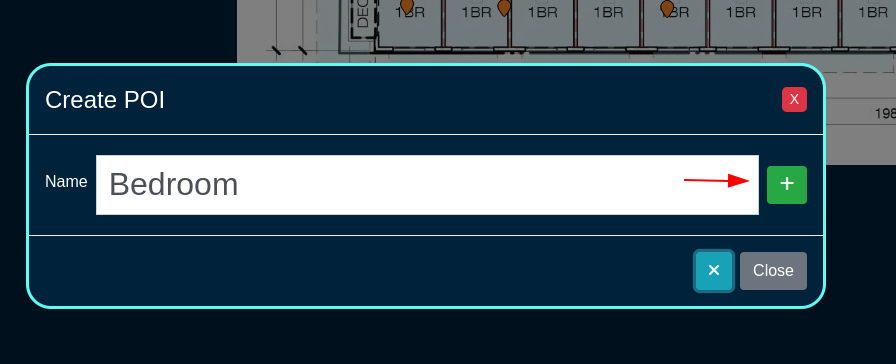
When you first create it, it will be placed in the center of the floorplan. Make sure dragging is turned on, then simply drag it to where it should be.
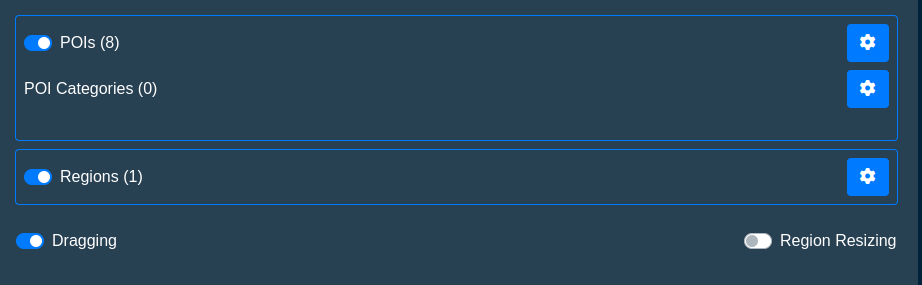
Omniauth Strategies
The Social Login Strategies scaffold enables creation, modification, and deletion of login strategies for supported Omniauth providers.
The name field identifies this login strategy in the system.
The provider name field determines which Oauth provider this strategy relates to. Select a supported provider from the list.
The app ID field defines the ID of the application that has been created with the provider chosen in the provider name field. For Facebook, this is the App ID , but for Twitter this is the API Key. This value should be obtained from the developer console of the associated provider.
The app secret field defines the app's secret value which authenticates the app. This value should be obtained from the developer console of the associated provider.
The captive portals selections define for which captive portals this strategy is enabled. This strategy will not be available unless it is associated with at least one captive portal.
The usage plans selections determine which usage plans are available for users who log in using this strategy. The plans selected here must also be associated with the end user's effective portal; however, users who have not logged in via this strategy won't be able to see these plans in the usage plan list. If there are no usage plans associated with this strategy, an account will be created for the user, who will then be redirected to the usage plan list view. If there is only one associated usage plan, and it is free, the plan will automatically be applied to the account.
The SAML section contains configuration options which pertain only to SAML login strategies. When utilizing a SAML strategy, the App ID and App Key are not necessary.
A SAML configuration requires at a minimum, an Identity Provider (IdP) SSO URL, and optionally, a IdP Cert Fingerprint to enable validation of the IdP's certificate. Both the SSO URL and Fingerprint may be determined automatically by providing a IdP metadata URL.
The Service Provider (SP) Entity ID is a unique identifier for the service provider, which will be entered into the IdP when adding the SP.
After creating the login strategy , the webserver will restart. Clicking the show link will provide the metadata URL that can be provided out-of-band to the Identity Provider in order to establish a login trust.
Users who log in with an Omniauth strategy only have access to usage plans that are associated with their strategy AND the current captive portal. Users who log in with a non-social account do not have access to the usage plans associated with the portal's Omniauth strategies.
The note field is a place for the administrator to enter a comment. This field is purely informational and has no bearing on the configuration settings.
A WAN target should be associated with the captive portal where the operator intends to use the strategy which allows the user to access the provider's site for the login process. Twitter, Facebook, and Google WAN targets are created automatically and should be selected when utilizing these providers.
For more information, see the Social Login manual entry.

Remote Access to Local Web Servers
The rXg web multiplexor may be configured to recognize operator specified name-based virtual hosts. This feature enables the operator to configure remote access to web servers that are on the LAN side of the rXg in a reasonable, maintainable and understandable manner. Name-based virtual hosts are most often used for remote access to the web management consoles of privately addressed LAN equipment without VPN. VPNs are the preferred mechanism for enabling remote access to LAN equipment. The next best thing is to use name-based virtual hosts through this feature.
The operator must configure DNS records for each and every name-based virtual host that is desired. The DNS records must resolve to the WAN IP of the rXg. Web requests to the DNS record will contain the HTTP headers that enable the rXg web multiplexor to send the request to the appropriate backend server on the LAN.
The rXg must be configured with either a wildcard SSL certificate or individual certificates per destination host. Each HTTP virtual host entry can be configured to use unique SSL Certificates and should match the configured DNS entry for that host. This is required because HTTP headers are read after the SSL handshake is complete.
The hostname for remote access field specifies the DNS record that has
been configured. For example, if the rXg is given the domain name
gw.somewhere.net it would be appropriate to use name-based virtual hosts such
as wc.gw.somewhere.net, ap003.gw.somewhere.net, sw18.gw.somewhere.net,
etc. The chosen domain does not need to be a subdomain of the rXg.
The local server IP field specifies the target IP address(es) of the back-end server(s) for the name-based Virtual Host that is configured by this record. Web traffic sent to the rXg using the hostname configured in this record will be proxied to this IP. Multiple IP addresses can be defined, separated by spaces or newlines. When multiple IPs are defined, requests are load-balanced to the IPs in the list according to the configured Load balancing method.
The available load balanding methods are as follows:
- Round-Robin: This is the default behavior. Traffic is distributed in a round robin fashion.
- Least Connections: The next request is assigned to the server with the least number of active connections.
- Source IP Hash: A hash-function is used to determine what server should be selected for the next request (based on the client's IP address). Subsequent requests from the same client should be send to the same backend server.
- Source IP:Port Hash: A hash function based on the client's IP and Port combination
- Request URI Hash: A hash function based on the full request URI.
- Random: Each request will be passed to a randomly selected server.
- Random + Least Connections: Two servers are chosen at random, and the one with the least number of active connections is used.
The WAN Targets association restricts access to this virtual host to only the hosts included in the WAN Target. All other source IPs will receive a 403 Forbidden response when attempting to access using this FQDN.

Custom Data Set
The name field will be used to call the data set in a portal so choose a name that reflects the purpose of the record.
The policies field allows the operator to restrict which policies have access to the custom data set.
The note field is a place for the administrator to enter a comment. This field is purely informational and has no bearing on the configuration settings.
The key field specifies which custom data keys belong to the custom data set. When creating a custom data set this field is required; however, a custom data keys does not need to belong to a custom data set to be used.

Custom Data Keys
The dataset field is used to tie a custom data key to custom data set. This is optional when creating a custom data key , but can be used to tie a collection of custom data keys into a single custom data set.
The note field is a place for the administrator to enter a comment. This field is purely informational and has no bearing on the configuration settings.
The name field will be used to call the data set in a portal, so choose a name that reflects the purpose of the record.
The value section allows the operator to set what value or values are contained within the custom data key.
The string field is used to store a string value.
The text field is similar to the string field but should be used for large blocks of text.
The Boolean field can be used as a true/false flag. It is false by default.
The decimal field is used to store decimal numbers.
The integer field is used to store whole numbers.
The date field is used to store a specific date.
The time field is used to store the time.
The date-time field is used to store both the date and time.

Attachments
The name field is an arbitrary string descriptor used only for administrative identification. Choose a name that reflects the purpose of the record. This field has no bearing on the configuration or settings determined by this scaffold.
The description field can be used to describe the purpose or a description of the content.
The note field is a place for the administrator to enter a comment. This field is purely informational and has no bearing on the configuration settings.
The custom portals field is used to select which customs portals the content will be available for use. Selecting a custom portal here will make the content available to any Captive or Landing portals based off of the Custom Portal selected.
The captive portals field is used to select which specific Splash portals the content will be available on.
The landing portals field is used to select which specific Splash portals the content will be available on.
The file field is used to select the file to upload and make available to the selected portals.
Simple Webpacker Example
Webpacker allows the operator to import pre-compiled JavaScript into a custom portal. In this example, a new custom portal will be created then add the necessary files. Navigate to System::Portals and create a new custom portal. Note: an existing portal if one already exists.

Give the portal a name, and specify the controller name. For this example, just the default portal will be used so no other information needs to be provided. Click create. Note: webserver will restart when a new portal is created.
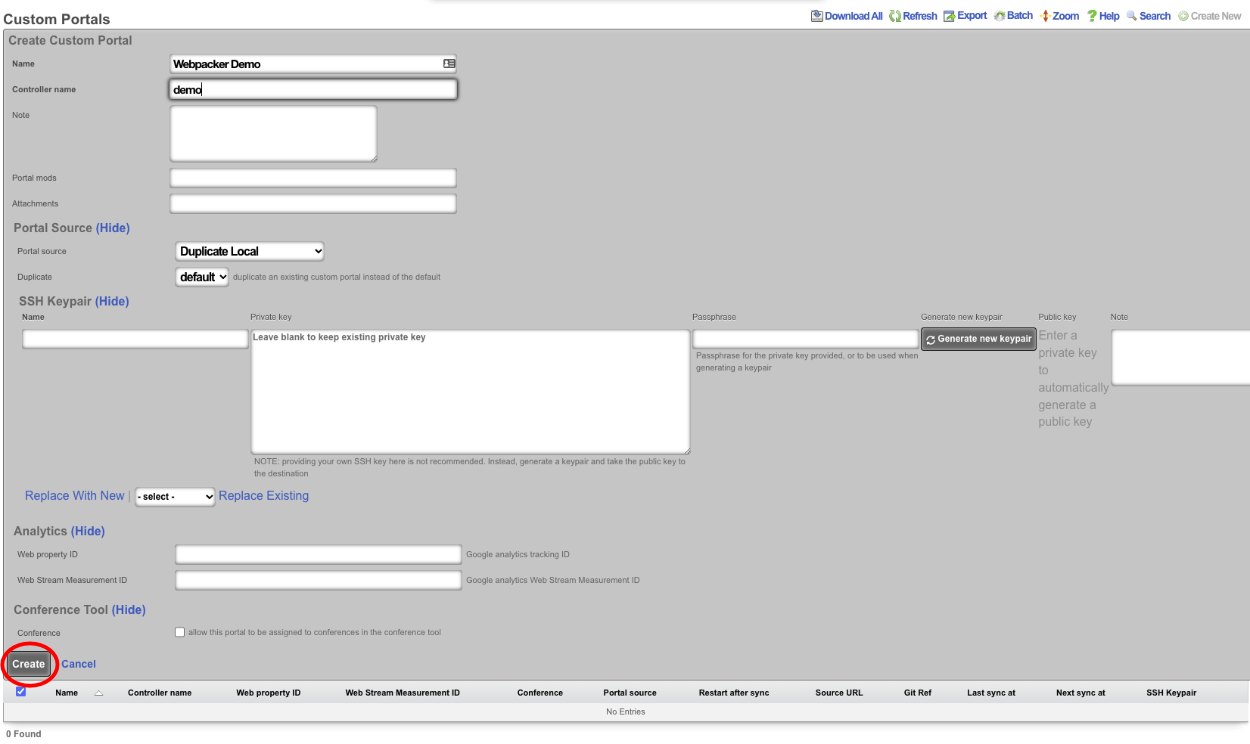
Once the portal has been created, access the portal files. This can be done via SSH or SMB ; see the Portal Customization section of the help manual for instructions on setting up access. In this example, SSH to the machine and become root.
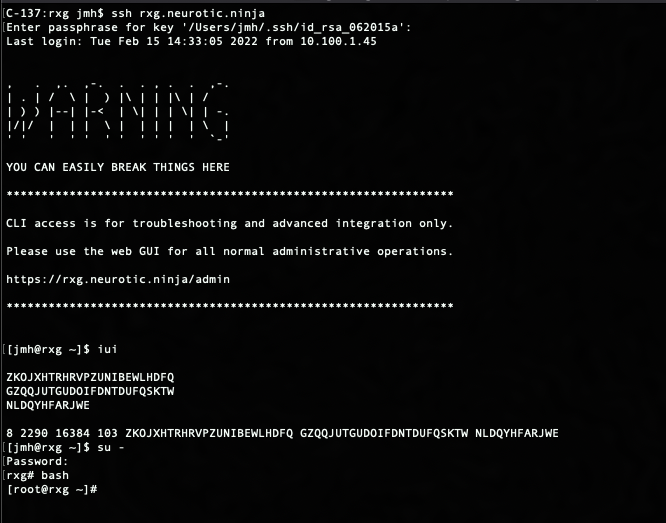
Now navigate to the portal directory cd /space/portals/demo. Note: portal path may be different if using a different portal or used a different controller name.

Next, create a src directory within the root portal directory. This will be where any desired js files imported using webpacker will be placed. To create directory, use the following command: mkdir src

Navigate to the src directory that was created with the following command: cd src
Next, create a hello.js file. This file will contain the following code:
let hello = "Hello, world!" console.log(hello)
Save the file and go back to the root portal directory cd ..

Edit the pack.js file and add the following line:
import "./src/hello.js"
This will import the JavaScript file created in the previous step. Once the line is added, save the file.

Now the portal JavaScript was added can be hit to and see in the developer tools console as the following:
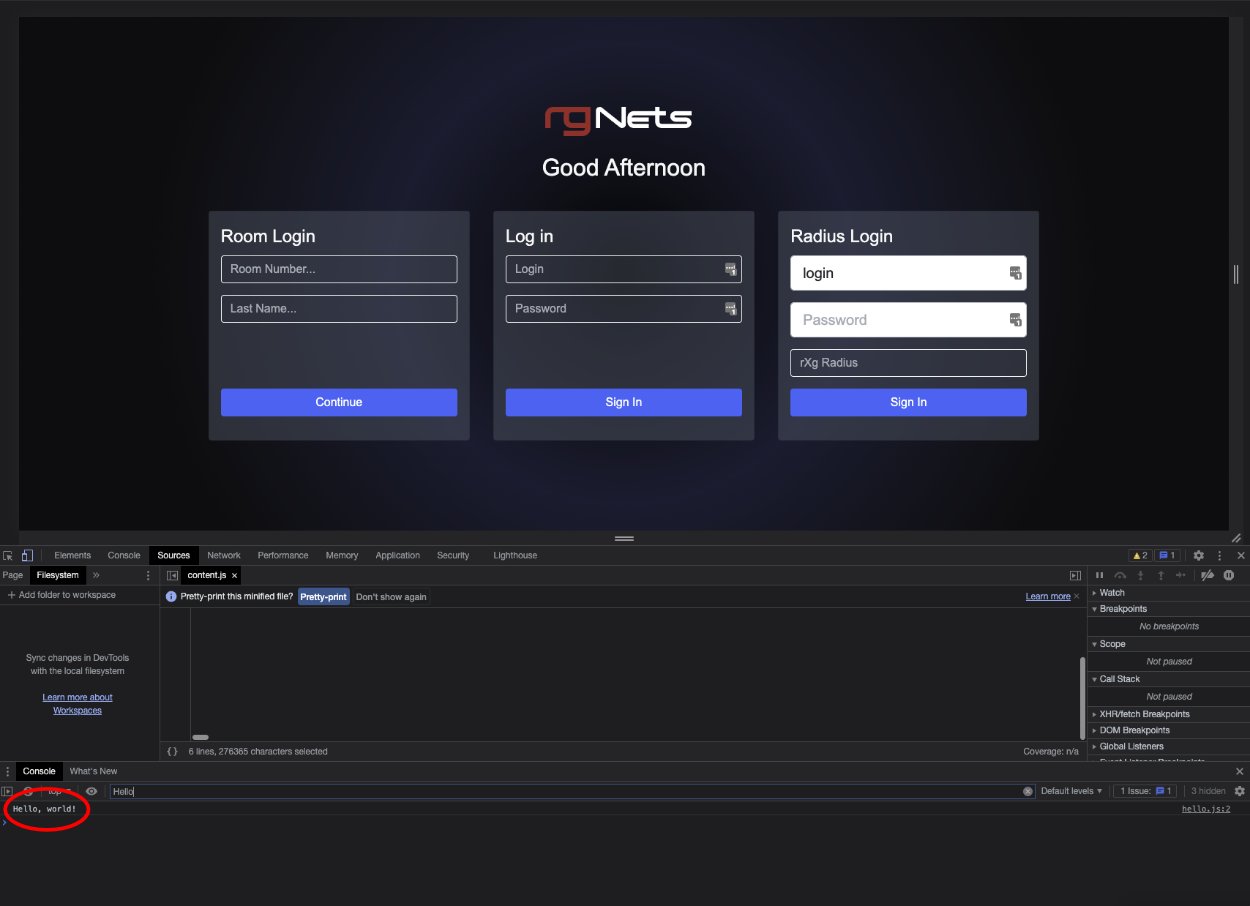
Update
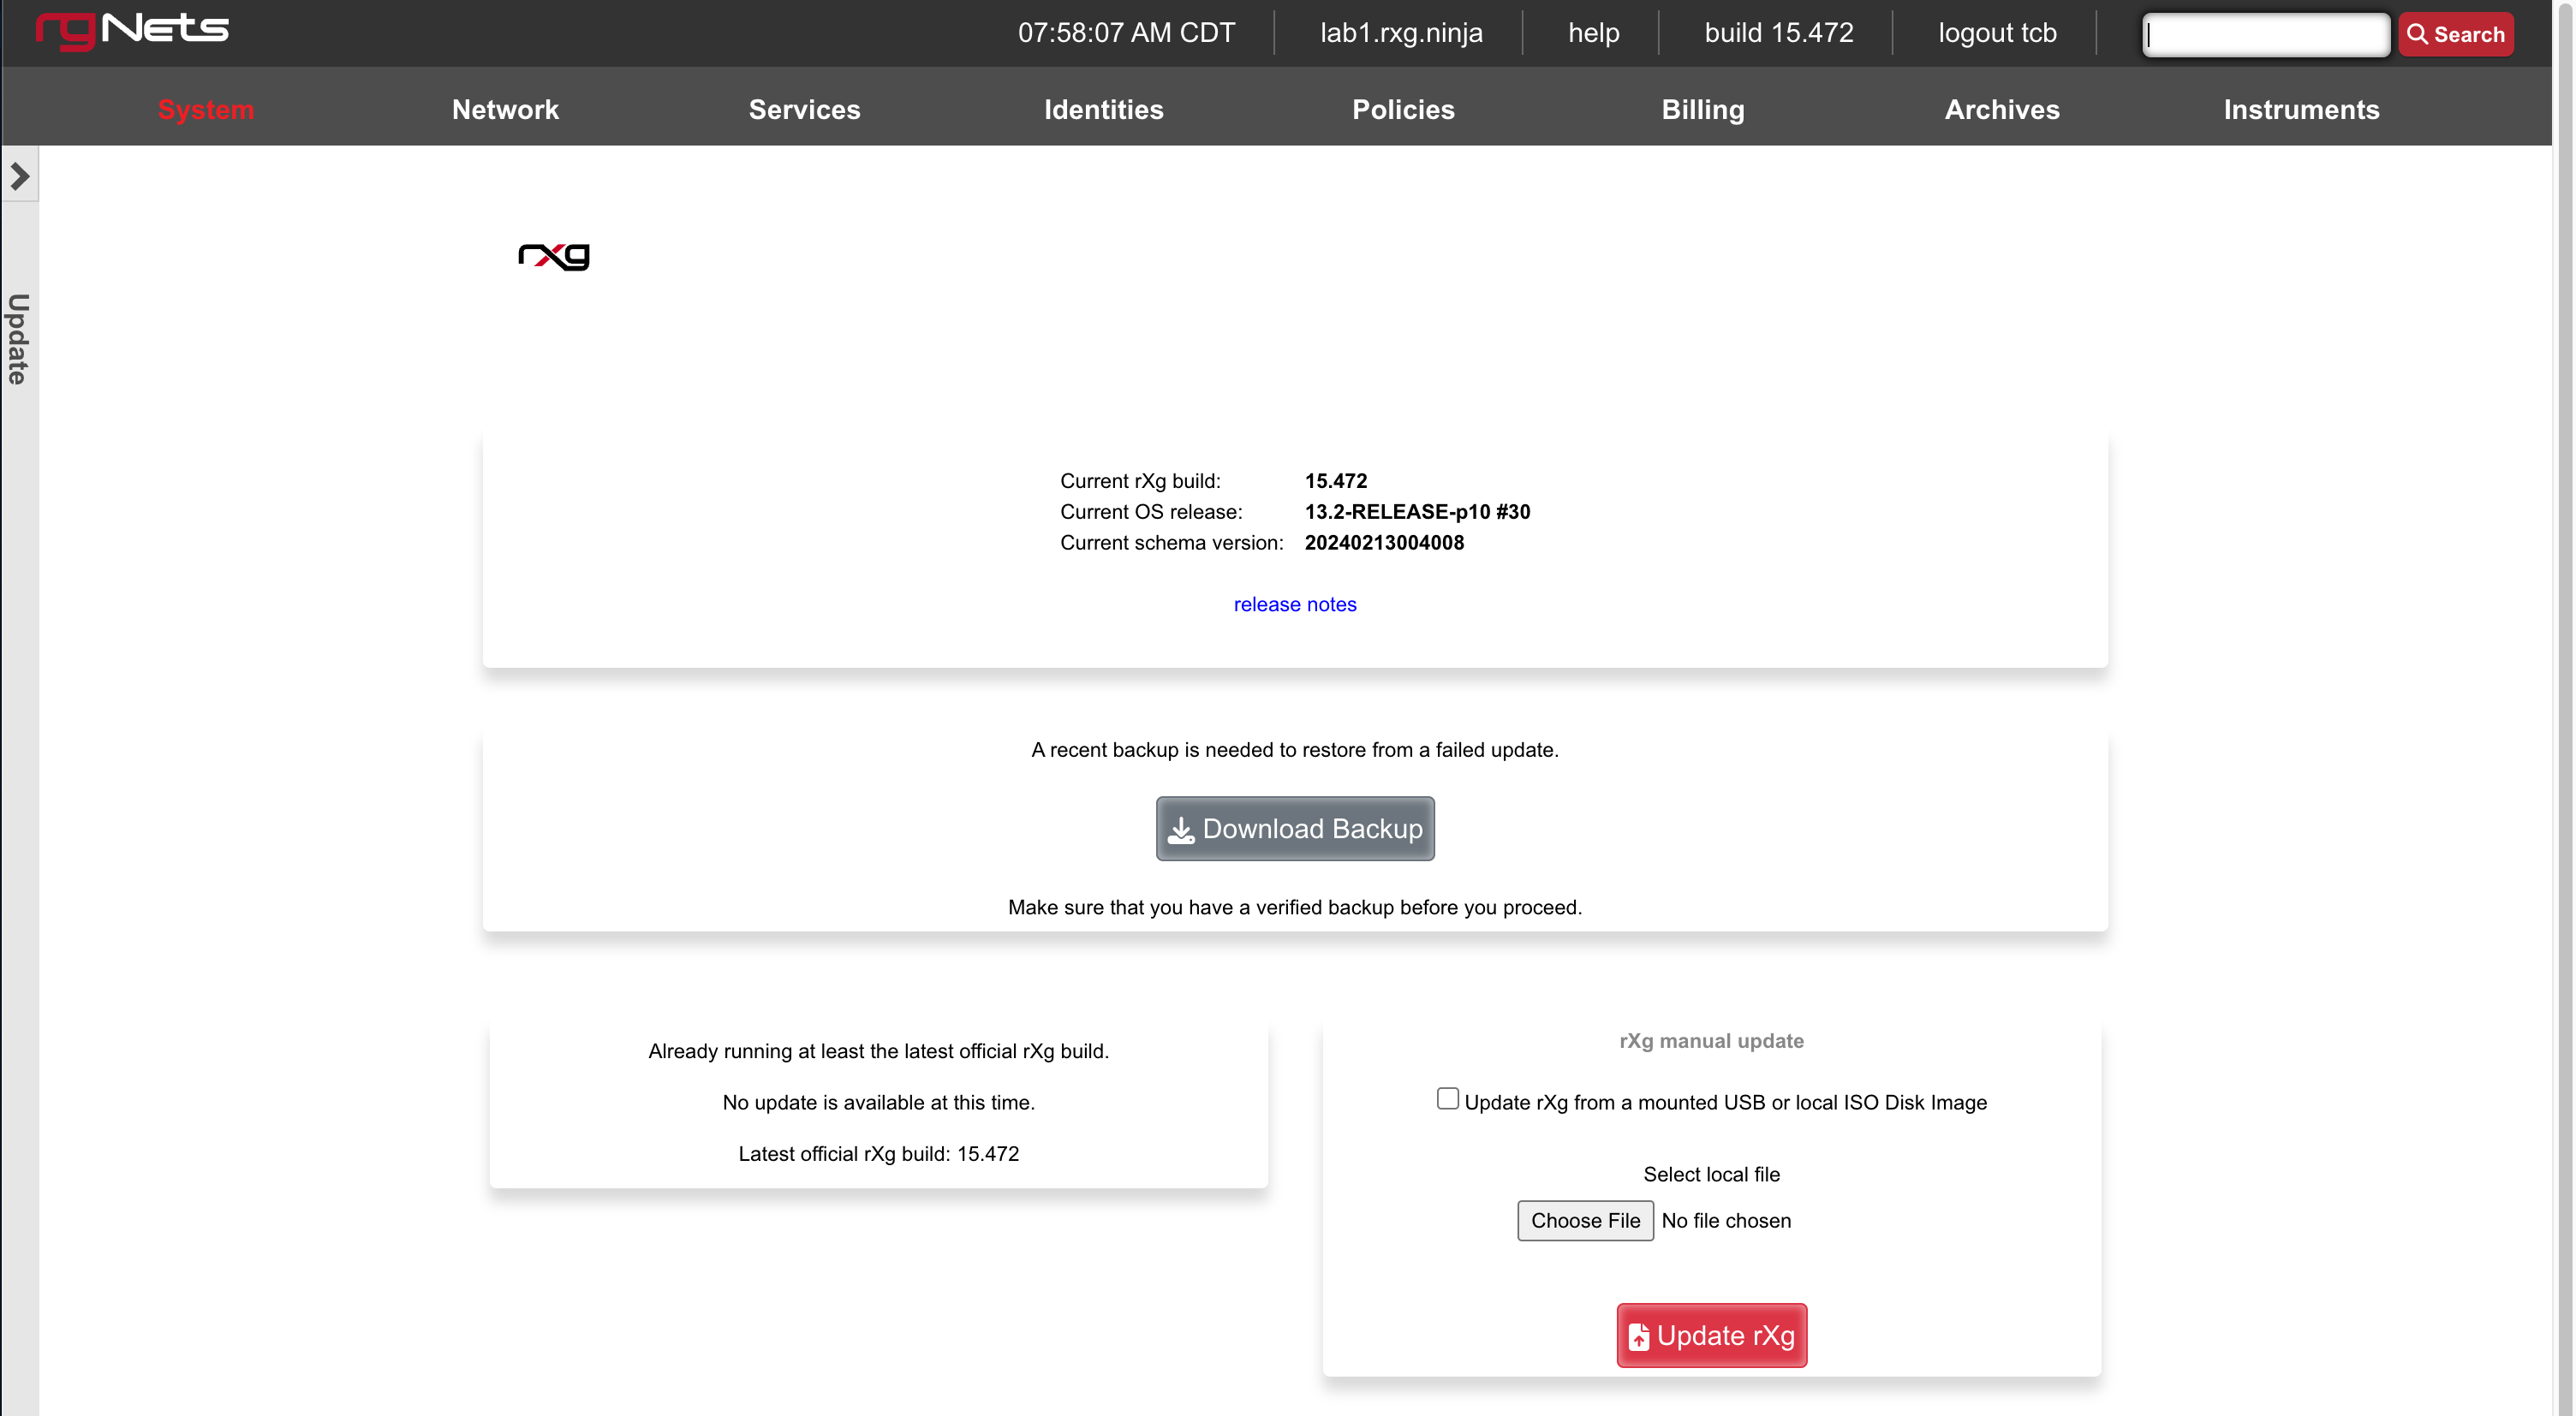
The Update view presents dialogs enabling the operator to change the version of the rXg software currently running. The operator may choose to automatically update or manually update the rXg.
It is imperative that the operator make a full backup of the rXg (including, but not limited to, the database configuration and the customized captive portals ) before initiating an update. If an update fails for any reason, it may be necessary to restore the rXg from backup.
The rXg automatic update process requires that the operator have a valid support contract with RG Nets. By supplying a valid support credential ( email and password ) assigned to the operator, the rXg will contact RG Nets servers, download the latest rXg software, and automatically perform the update.
The rXg manual update process requires that the operator have a version of the rXg software stored on their local filesystem. The latest versions of the rXg software are available on the rXg servers. Access to the rXg servers requires a valid support contract. The manual update process is useful for operators who have multiple rXgs deployed and wish to minimize the number of times that the rXg software package needs to be downloaded over the Internet.
The Update rXg from a mounted USB or local ISO Disk Image checkbox in this section allows you to use a bootable USB that is connected to the host as the source, OR an ISO file that is loaded into the disk images scaffold (currently only available when there is a virtualization host record defined or when manually loaded into the /space/disk_images directory). This dialog is intended for performing an rxg upgrade not an OS upgrade. The OS upgrade form becomes visible when the official FreeBSD version has changed.
When the box is unchecked, you can also upload an ISO file there to upgrade the rxg version.
Additional Resources
YouTube Playlist - Upgrading an rXg
Network
The rXg operates on the principle that it is the router between a distribution network which is connected to the end-user population and one or more uplinks where resources reside. Physical, data-link and network connectivity must be established in order for an rXg to deliver control, communication and cognizance over the end-user population. The network menu enables the operator to access the views of the administrative console to create and edit the IP addresses, routing tables, address translation configuration needed to establish L3 connectivity.
End-users must each be assigned an individual IP address so that the rXg can deliver the full spectrum enforcement and instrumentation capabilities. End-users may be assigned public or private IP addresses depending on the desired network topology. The operator may choose to utilize both both private and public addresses at the same time. The rXg may be configured to perform or network address translation on any private (or public for that matter) addresses on the LAN block.
The rXg supports nearly any IP topology imaginable. End-users may be either L2 or L3 connected to the rXg. All capabilities, including the forced browser redirection to a captive portal, are fully supported regardless of whether end-users are L2 connected or L3 connected. L2 connected end-users may be connected natively or via VLANs. L3 connected end-users transit routers that forward blocks configured statically or via dynamic routing protocols.
In the simplest case, the rXg is deployed as the router for a natively addressed LAN that is L2 bridged into the rXg such as the example shown above. The rXg may be configured to natively route public or private blocks and NAT may be enabled or disabled on each block.
In larger RGNs, the rXg is often configured to be the termination point of several VLANs that connect to end-users. In the example above, VLANs are used to segregate traffic between end-users who are originating traffic from two geospatially distinct properties on the same resort. The use of VLANs helps to maximize the performance of the network through traffic segregation.
Traffic segregation is a critical aspect of designing large scale RGNs. VLANs are the most common mechanism to accomplish this, but an alternative network topology is to use L3 segregation as depicted in the example shown above. To accomplish this, routers must be deployed on the LAN side of the rXg. End-users are then connected to blocks that are behind the routers. The rXg must be configured with static or dynamic routing so that the end-user traffic will pass appropriately.
Network Dashboard
The network dashboard presents an overview of the current status and configured settings for the WAN, LAN and routing subsystems of the rXg.

The left column presents a dialog containing the configuration and status information for each of the uplinks configured on the rXg.

Numerous details about the uplink are displayed in the dialog. The colored icon at the upper left of the dialog informs the administrator about the status of the uplink. A green light indicates that the uplink is online while a red one indicates that the uplink is offline. Real-time configuration information is presented in the dialog. For example, if the uplink is set to request network configuration via DHCP, the IP, subnet mask and gateway obtained from the DHCP server is presented.
The top of the middle column presents information about the physical and logical interfaces connected to the rXg.

Each interface that is physically connected and has a link is reported along with the MAC address and media type. The media type is read from the interface when the view is loaded making this an ideal place to determine the speed and duplex of an auto-negotiated link. Clicking on the dialog brings up a view with more detailed information.
The bottom of the middle column presents a snapshot of the routing table of the rXg.

The most utilized routes are presented here. Clicking on the scaffold brings up a view with more detailed information.
The right column presents a set of dialogs describing the LAN IP addresses configured on the rXg.

Use these dialogs to quickly review what IP addresses are configured into which interfaces.
WAN
The WAN view presents the scaffolds associated with configuring the wide area network interfaces.
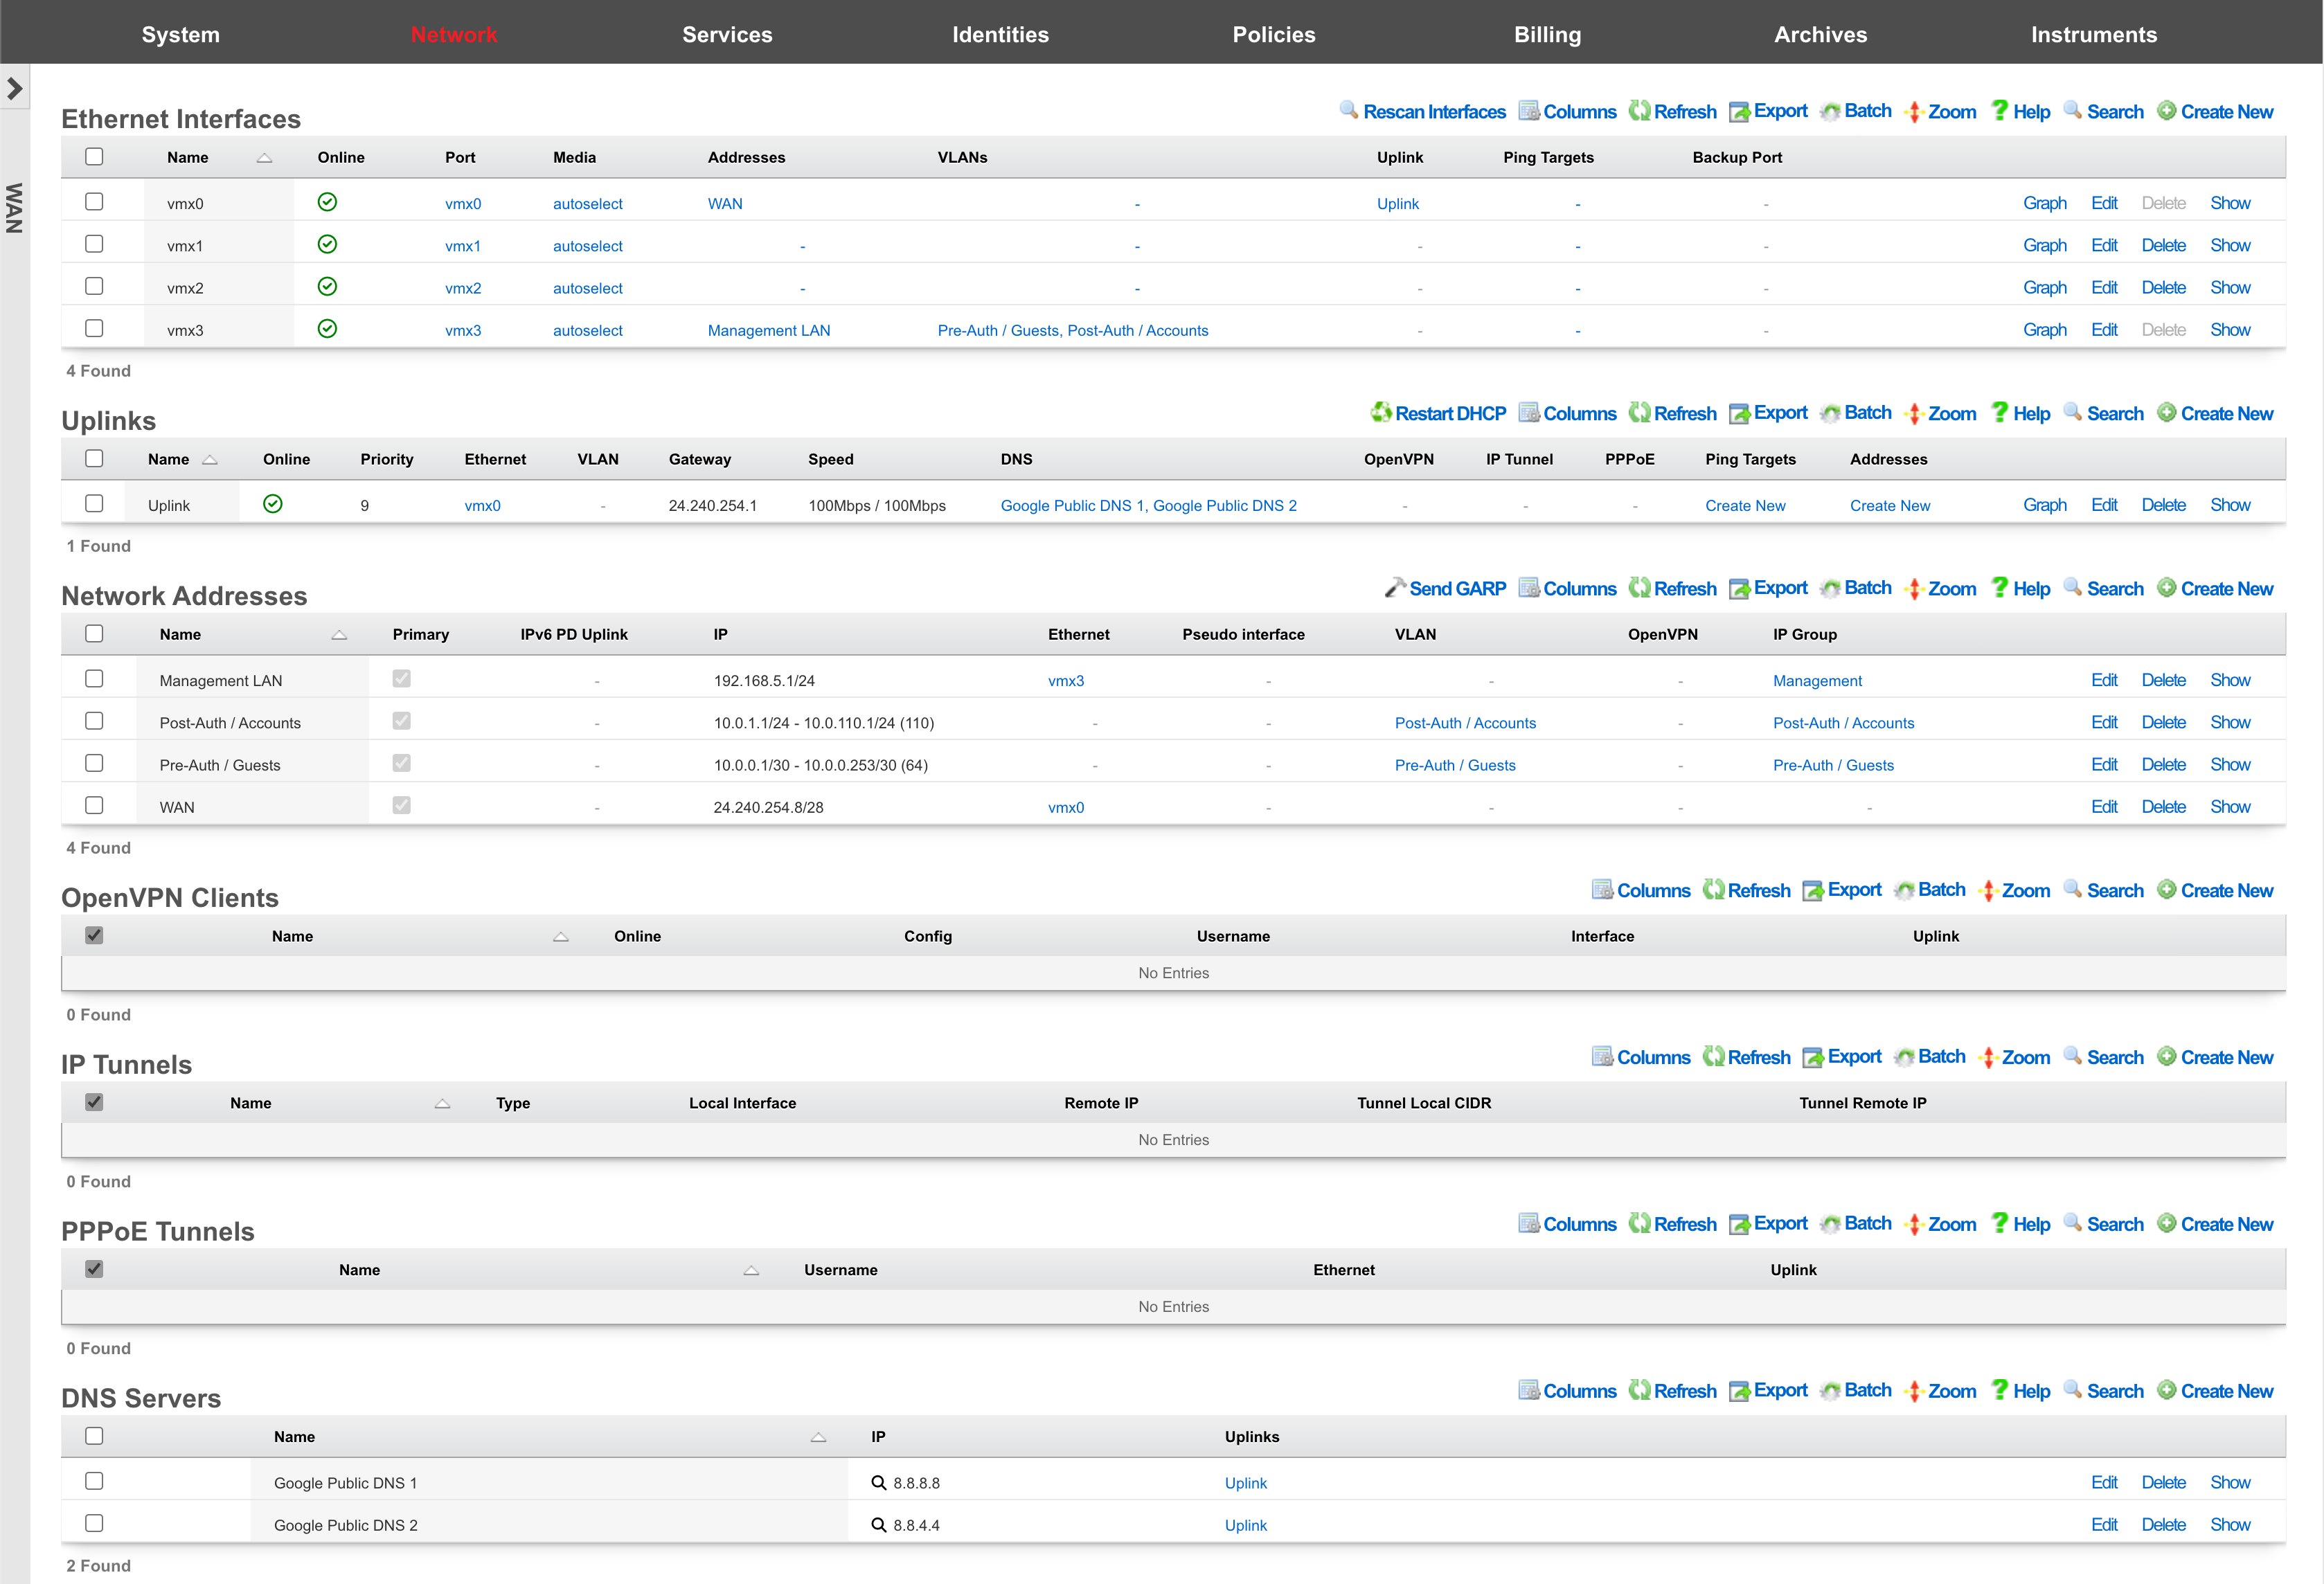
An rXg requires at least one properly configured entry in the uplinks scaffold in order to function. If more than one uplink is configured, the rXg can aggregate and failover WAN uplinks. In addition, the rXg can affine and diversity LAN traffic over the WAN uplinks.
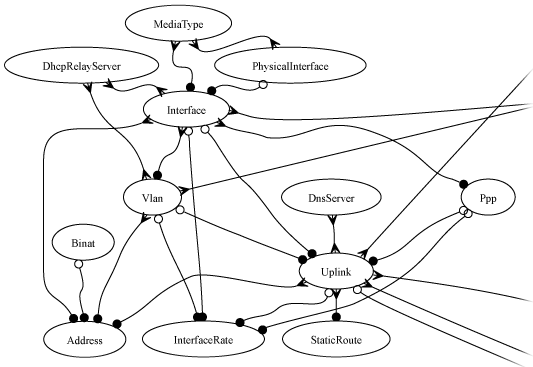
An uplink must be configured with a valid IP address and gateway to function. To use DHCP to obtain an IP address and gateway dynamically, simply check the DHCP checkbox in the uplink record. As an alternative, a static IP address may be manually specified by creating a record in the addresses scaffold and associating the record with an uplink. The gateway for a statically assigned IP block must be manually configured in the uplink record. If the upstream ISP requires PPPoE authentication, configure the ISP supplied credentials into a record of the PPPoE scaffold and associate the record with the uplink.

Ethernet Interfaces
An entry in the ethernet interfaces activates and configures a physical port on the rXg to take part in in networking connectivity.
In most cases, at least two ethernet interfaces must be configured (one for the WAN, one for the LAN). In multiple uplink scenarios, it is common to have one ethernet interface configured for each WAN uplink. It is also possible to use VLANs on a single ethernet interface to configure unlimited WAN and LAN interfaces.
The name field is an arbitrary string descriptor used only for administrative identification. Choose a name that reflects the purpose of the record. This field has no bearing on the configuration or settings determined by this scaffold.
The port field determines the physical ethernet port that this record will activate and configure.
The media field configures the speed and duplex of the Ethernet port. In most cases, the autoselect setting will automatically negotiate the fastest possible link. Autoselect should also be used if automatic crossover detection is required as most Ethernet hardware will disable automatic crossover if anything other than autoselect is specified as the media type.
If physical link cannot be established, first check the physical cable using an isolation test. If the cable is determined to not be the issue, try setting the ethernet interfaces on both sides of the cable to the same speed and duplex. Note that if a straight cable is connected between two nodes, that cable will need to be replaced with a crossover because automatic crossover detection will be disabled when a media type other than autoselect is specified. In addition, using a lower speed setting and avoiding full-duplex communication may be necessary when the cable is long or does not meet the standards needed for higher speed communication.
The MTU setting configures the maximum transmission unit (frame size) for this interface. By default, most ethernet interfaces support 1500 bytes. Large MTUs may be used in gigabit networks that support jumbo frames to obtain better throughput when transferring large files. Support for jumbo frames must be present throughout the infrastructure in order for larger MTUs to work properly.
The addresses , uplink , VLANs and PPPoE fields link an Ethernet interface to a configuration defined by the specified scaffold. These fields shown here are mainly presented for informational purposes. In most scenarios, an administrator will link the address, uplink, VLAN or PPPoE configuration to the Ethernet interface using the other scaffold.
The backup port field specifies an alternative ethernet interface to assign the addresses , uplink , VLANs and PPPoE configuration settings when this ethernet interface goes down. An ethernet interface is marked as down if it loses link or if all of the ping targets associated with it go offline. The VLANs and Network Addresses associated with an ethernet interface are moved to the backup port when the ethernet interface is marked as down. The backup port mechanism is designed to be used with generic L2 switching. Backup ports should not be used with any LAG/MLT/SMLT/LACP configuration on the connected switch.
The checksum offload , TCP segmentation offload and large receive offload settings offload the specified processing to the NIC hardware when possible. In some cases this may cause instability and in other cases there are performance benefits.

Uplinks
An entry in the uplinks scaffold declares a specified logical interface as a WAN uplink. At least one uplink must be configured for proper rXg operation. More than one uplink may be configured in multiple uplink control scenarios when the operator has obtained multiple WAN drains. When multiple uplinks are configured, the rXg can aggregate and failover between uplinks as well as diversify and affine LAN traffic amongst them.
The name field is an arbitrary string descriptor used only for administrative identification. Choose a name that reflects the purpose of the record. This field has no bearing on the configuration or settings determined by this scaffold.
The priority field determines the order of precedence during failover in a multiple uplink control scenario. When only one uplink is configured, this field has no effect as there is no uplink to failover to. When multiple uplinks are configured and connection aggregation is enabled, a failure of a link will cause another member of the pool to forward all traffic. If aggregation is not enabled, or all uplinks within a pool have failed, then the uplink with the highest priority amongst all of the remaining uplinks will be used to forward the traffic.
The interface , PPPoE and VLAN drop downs specifies the mechanism by which this uplink will forward traffic upstream. Only one option may be selected for each uplink.
The DHCP checkbox enables the DHCP client for this uplink. The network address, subnet mask and default gateway of this uplink are requested from the DHCP server. If a statically configured IP address is desired, leave this checkbox cleared, create a record in the addresses scaffold and associate it with this uplink.
The gateway IP specifies a statically assigned default gateway for this uplink. The default gateway must be within the IP block defined by the network address associated with this uplink. This field should remain blank if the DHCP checkbox is set.
The upload speed and download speed fields describe the throughput of the uplink. These values are used for traffic shaping calculations and should accurately reflect the actual capacity of the connection. The upload speed must be at least 2% of the download speed (for ACK queue accounting).
IPv6 Configuration
The DHCP6 checkbox enables the DHCPv6 client for this uplink. When enabled, the rXg will request an IPv6 address and optionally a delegated prefix from the upstream provider.
The gateway IPv6 field specifies a statically assigned IPv6 default gateway for this uplink. This field should remain blank if the DHCP6 checkbox is set.
The prefix delegation size field (visible when DHCP6 is enabled) specifies the size of the IPv6 prefix to request from the upstream provider, typically /48, /56, or /64 depending on ISP policy.
The send IPv6 prefix hint checkbox requests a specific prefix from the ISP during DHCPv6 negotiation. This is useful when the ISP supports prefix hints and the operator wishes to maintain a consistent IPv6 prefix.
Tunneled Uplink Options
For VPN-based uplinks, the following options are available (mutually exclusive with physical interfaces):
The OpenVPN client field associates this uplink with an OpenVPN tunnel configured under Network :: VPN :: OpenVPN Clients. Traffic using this uplink will exit through the VPN tunnel.
The tunnel interface field associates this uplink with an IP tunnel (GIF, GRE, etc.) configured under Network :: WAN :: IP Tunnels.
The PPPoE field associates this uplink with a PPPoE connection. When using PPPoE, do not associate the uplink directly with an Ethernet interface.
Health Monitoring
The ping targets field associates ping targets with this uplink for health monitoring. Each uplink should have at least two ping targets configured to enable proper failover detection. When all ping targets for an uplink fail, the uplink is marked offline and traffic is routed through remaining healthy uplinks.
The skip dataplane HA checkbox excludes this uplink from high-availability failover synchronization. This is useful for backup uplinks that should not trigger HA events.
Auto-Created Ping Targets
When creating an uplink with a static gateway, the rXg automatically creates ping targets for the gateway IP addresses:
[Uplink Name] Gateway- monitors the IPv4 gateway[Uplink Name] IPv6 Gateway- monitors the IPv6 gateway (if configured)
These auto-created targets help ensure basic gateway reachability is monitored.
Validation Rules
- At least one connection method is required (DHCP, static gateway, or tunnel)
- DHCP and static gateway are mutually exclusive (for each IP version)
- Upload bandwidth cannot exceed download bandwidth
- Upload must be at least 2% of download

Network Addresses
An entry in the network addresses scaffold defines an IP block that will be associated with an interface, uplink or VLAN.
The name field is an arbitrary string descriptor used only for administrative identification. Choose a name that reflects the purpose of the record. This field has no bearing on the configuration or settings determined by this scaffold.
The IP field specifies the IP address using CIDR notation that will be configured on the interface specified. If the address record will be used for configuring multiple addresses on the interface via the span field, the IP field configures the first (lowest) IP address of the range.
The span field specifies the range of IP addresses configured by this address record. The default value of 1 is assumed if this field is omitted. For LAN links, a span of 1 is typical. For WAN links, a span of greater than 1 automatically enables translation pooling in NAT scenarios. In addition, bidirectional network address translation (BiNAT) requires the WAN link to span one additional address for each BiNAT.

PPPoE Tunnels
An entry in the PPPoE tunnels scaffold enables the point-to-point protocol over Ethernetclient to connect with the specified credentials through an Ethernet interface for the purpose of configuring a valid uplink.
The username and password fields specify the credentials for the PPPoE client. The credentials are assigned by the upstream ISP.
The service name is an optional service selector. If the upstream ISP did not provide a specific value, leave this field blank.
The interface field associates this PPPoE tunnel with an Ethernet interface. It is highly recommended that an Ethernet interface associated with a PPPoE tunnel be used exclusively for this purpose. Avoid associating addresses, VLANs, and other entities with an Ethernet interface that is designated for a PPPoE tunnel.
The uplink field associates this PPPoE tunnel with an uplink. To use PPPoE, an uplink must be associated with a record in the PPPoE tunnels scaffold, which in turn, is associated with a Ethernet interface. Do not associate an uplink that has a PPPoE tunnel enabled with the Ethernet interface directly.

DNS Servers
An entry in the DNS servers scaffold specifies an upstream DNS server to use for DNS resolution.
It is highly recommended that at least one upstream DNS servers be configured for network resilience, else the built-in DNS server is used for resolution. Without DNS resolution, no networking services will operate.
Many ISPs will provide DNS server entries. These DNS servers should be configured into this scaffold. In a multiple uplink control scenario where multiple uplinks from a diverse set of ISPs are configured in parallel, the DNS servers for all of the upstream ISPs should be configured with the appropriate uplink setting selected. In this case, theGoogle Public DNS or OpenDNS servers may be used as backup DNS servers for all uplinks.
The IP field specifies the IP address of the DNS server that is to be used for DNS queries. In most cases, the upstream ISP will provide the IP addresses for the public DNS servers for a specific uplink. If no servers are provided, using the Google Public DNS orOpenDNS is a good alternative.
The uplinks field associates uplinks with the DNS server specified in this record. In many cases, the upstream ISP will have DNS servers that are restricted to their customers so it is important to make sure that the right IP is associated with the proper uplink.
Recommended Ping Targets
For reliable uplink health monitoring and failover, configure ping targets that are external to the ISP network, highly available, and respond to ICMP requests. Common choices include:
| Target | Provider | Notes |
|---|---|---|
| 8.8.8.8 | Google Public DNS | IPv4 |
| 8.8.4.4 | Google Public DNS | IPv4 |
| 1.1.1.1 | Cloudflare DNS | IPv4 |
| 1.0.0.1 | Cloudflare DNS | IPv4 |
| 9.9.9.9 | Quad9 DNS | IPv4 |
| 208.67.222.222 | OpenDNS | IPv4 |
| 2001:4860:4860::8888 | Google Public DNS | IPv6 |
| 2001:4860:4860::8844 | Google Public DNS | IPv6 |
| 2606:4700:4700::1111 | Cloudflare DNS | IPv6 |
| 2606:4700:4700::1001 | Cloudflare DNS | IPv6 |
Using external targets (rather than ISP infrastructure) enables detection of upstream connectivity issues, peering problems, and ISP outages that would not be detected by pinging the gateway alone.
Configure IPV6 to IPV4 Tunnel
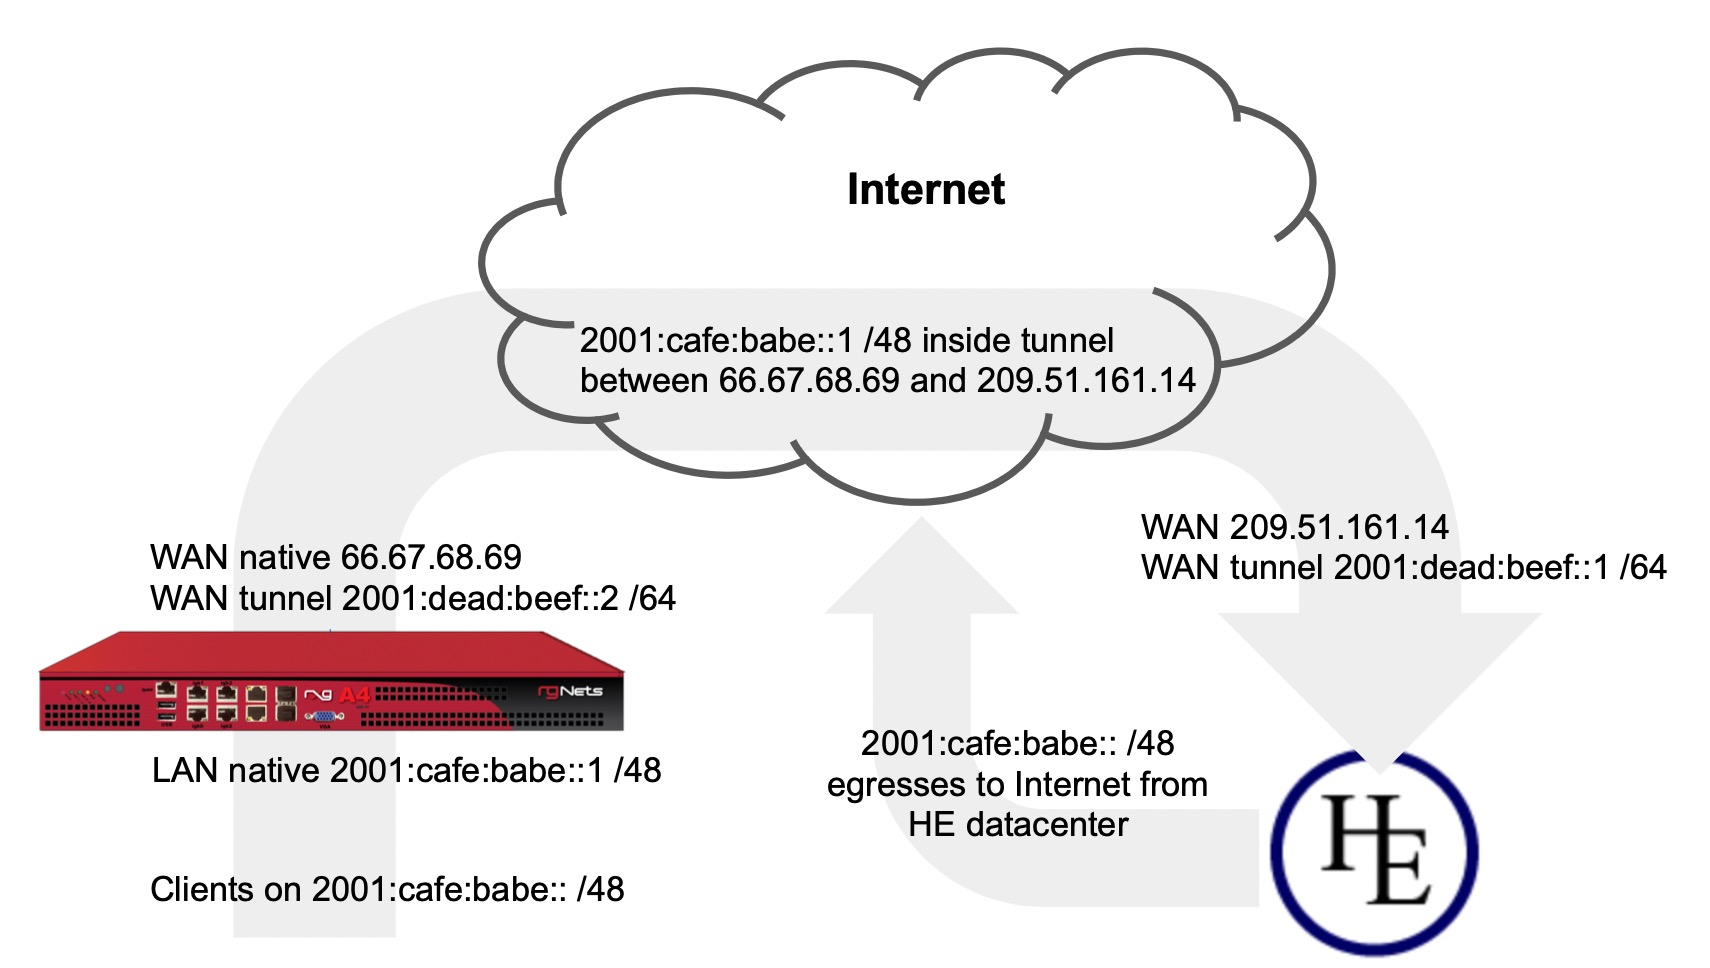
In this example we will configure the rXg with an IP tunnel that will allow us to access IPv6 addresses over an existing IPv4 connection. The IPv6 tunnel end point is provided by https://ipv6.he.net after passing a basic certification process. We will need to create an IP Tunnel, an Uplink, a Network Address, and lastly a DHCP pool. To begin navigate to Network::WAN.
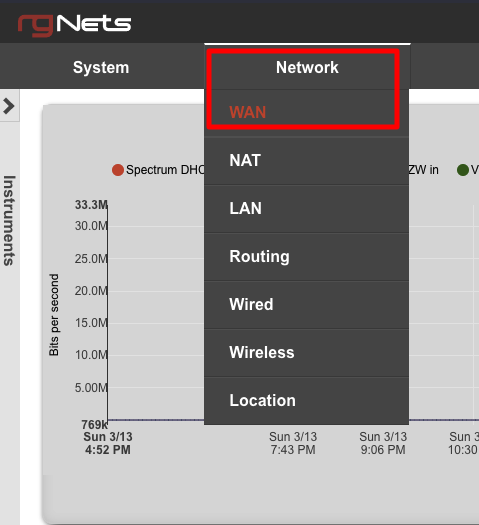
First we will create an IP Tunnel.

Give the IP Tunnel a name. The Type field should be set to GIF. Set the Local Interface field to the WAN interface. The Remote IP field is the Server IPv4 Address obtained from he.net. The Tunnel Local CIDR field is the Client IPv6 Address obtained from he.net. The Tunnel Remote IP is the Server IPv6 Address obtained from he.net. Click Create.
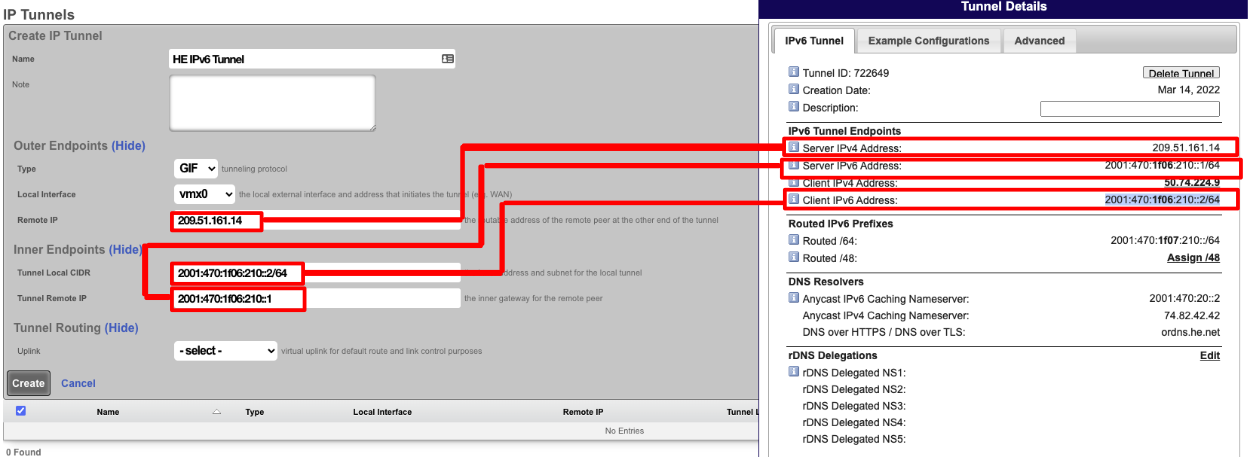
Next create a new Uplink, give the uplink a name, priority should be lower than your primary uplinks. Change the IP Tunnel field to the IP Tunnel created in the previous step. Click Create.
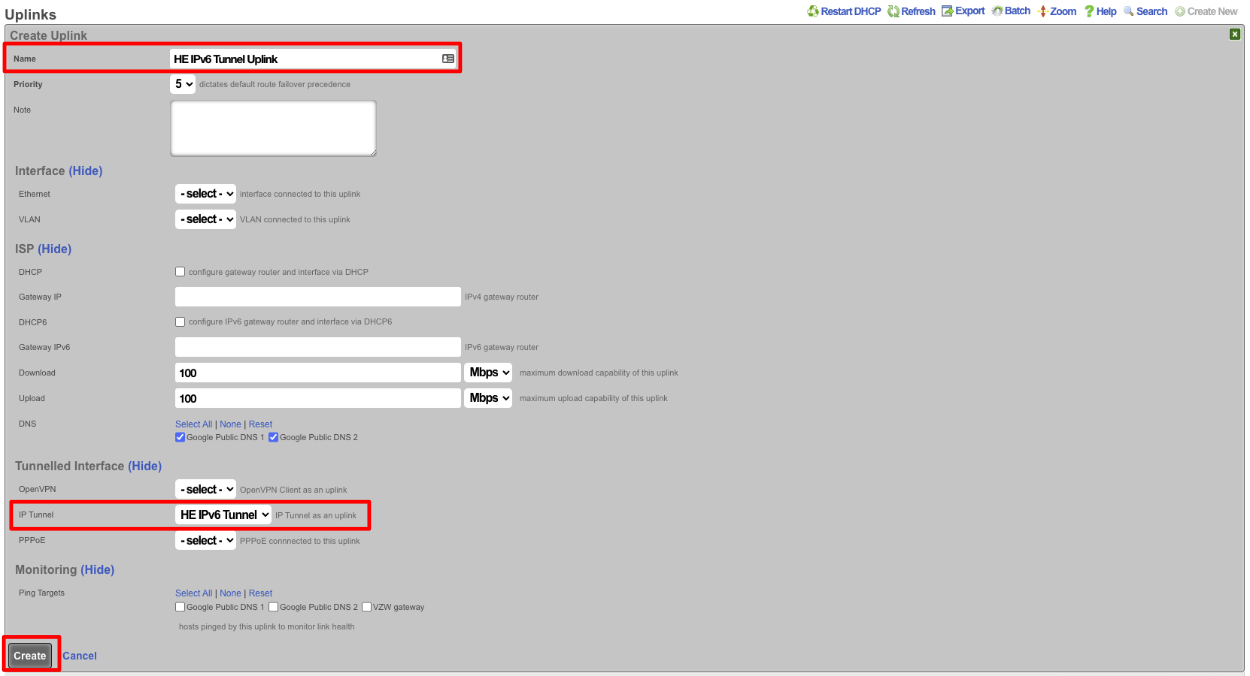
Next create a new Network address to create the LAN DHCP addresses that the system will hand out to IPv6 enabled clients. Give the Network addresses a name, select the ethernet interface the addresses will be configured on, and fill out the IP field with the information obtained from HE, in the Routed IPv6 Prefixes section. Note that the address given ends with :: which is invalid so append the IP you want to assign to the system usually 1. Checking the Create DHCP Pool box is optional, for this example setup it will not be checked and we will create the DHCP pool. Click Create.
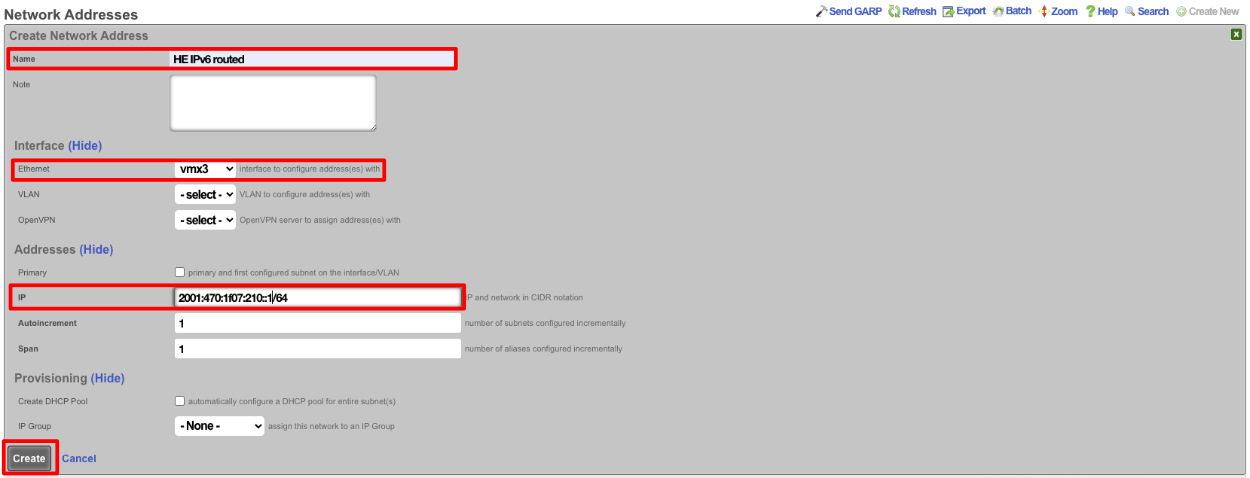
Next navigate to Services::DHCP and create a new DHCP pool. As long as the last address created was the address from the previous step it will auto fill the fields. It may be a good idea to reduce the scope of the pool by changing the end IP from 2001:470:1f07:210:ffff:ffff:ffff:ffff to 2001:470:1f07:210::ff. Click Create

Now if we SSH into the machine and run ifconfig gif0 we should see our intferface configured with the IPv4 Tunnel addresses as well as the IPv6 Address, and we should be able to ping an IPv6 addressing using ping6 like ping6 google.com.
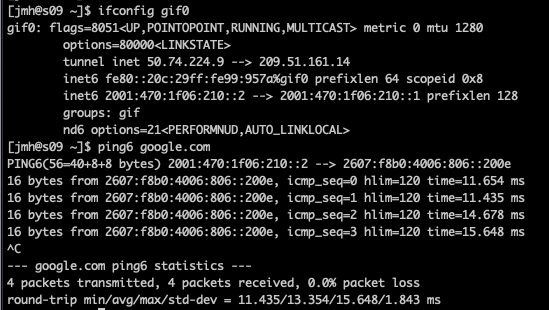
Multiple Uplink Configuration Scenarios
When multiple uplinks are configured, the rXg provides sophisticated traffic management across all available WAN connections. Understanding how the system selects uplinks is essential for proper configuration.
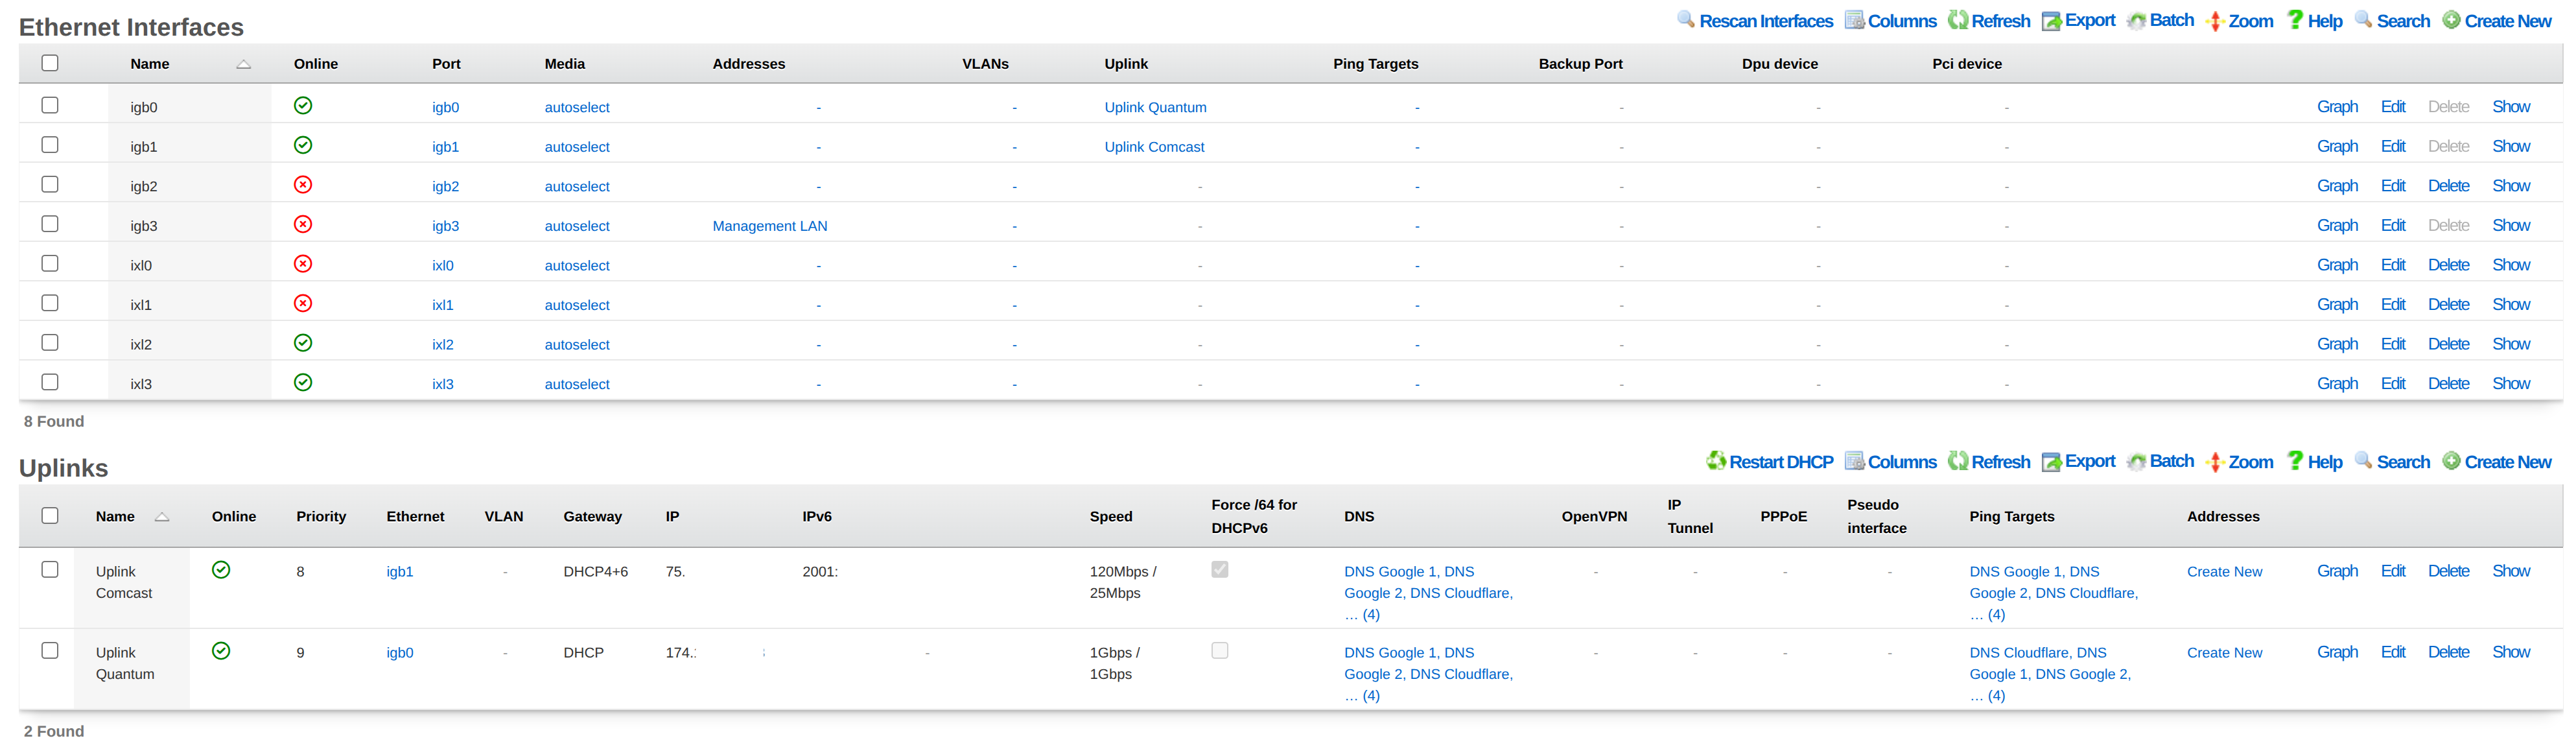
How Default Routing Works
When multiple uplinks are configured, the rXg selects the highest-priority online uplink as the default route. All traffic traverses this uplink unless:
- The uplink fails health checks (becomes offline)
- An Uplink Control policy directs traffic to a different uplink
- An Uplink Control rule specifies load balancing across multiple uplinks
The priority field (1-9, higher = more preferred) determines failover order. When the primary uplink fails, traffic automatically shifts to the next highest-priority online uplink. When the primary recovers, traffic returns to it.
Operating Modes
The rXg supports four primary multi-uplink operating modes:
| Mode | Description | Configuration Approach |
|---|---|---|
| Bandwidth Aggregation | Combine multiple uplinks for increased total bandwidth | Single Uplink Control with multiple uplinks, traffic distributed by weight |
| Uplink Failover | Primary uplink with automatic failover to backup | Two Uplink Control records (primary + backup with Backup flag) |
| Carrier Diversity | Multiple ISPs with health-based routing | Ping targets that traverse each ISP's network to external hosts |
| Application Affinity | Route specific traffic types through designated uplinks | Multiple Uplink Control records with Applications or WAN Targets filters |
These modes can be combined. For example, aggregating two fiber uplinks while maintaining a cellular backup with application affinity for VoIP.

The following scenarios demonstrate common configurations, providing more complex and mission oriented options.
Configure Two Uplinks with Failover
This walkthrough demonstrates configuring a primary and backup uplink with automatic failover.
Step 1: Configure the Primary Uplink
- Navigate to Network :: WAN :: Uplinks
- Click Create New
- Fill in the form:
| Field | Value | |-------|-------| | Name | Primary - Fiber | | Priority | 9 | | Interface | em0 (or your primary interface) | | DHCP | Checked | | Download Bandwidth | 1000 Mbps | | Upload Bandwidth | 1000 Mbps |
- Click Create
Step 2: Configure the Backup Uplink
- Click Create New again
- Fill in the form:
| Field | Value | |-------|-------| | Name | Backup - Cable | | Priority | 5 | | Interface | em1 (or your backup interface) | | DHCP | Checked | | Download Bandwidth | 100 Mbps | | Upload Bandwidth | 10 Mbps |
- Click Create
Step 3: Configure Ping Targets for Primary Uplink
- Navigate to Network :: WAN :: Ping Targets
- Click Create New
- Fill in the form:
| Field | Value | |-------|-------| | Name | Google DNS Primary | | Target | 8.8.8.8 | | Timeout | 3.0 | | Attempts | 6 | | RTT Tolerance | 100 | | Packet Loss Tolerance | 20 | | Uplinks | Primary - Fiber |
- Click Create
- Repeat to create a second ping target using 1.1.1.1 (Cloudflare DNS)
Step 4: Configure Ping Targets for Backup Uplink
Create two more ping targets for the backup uplink using different target IPs (e.g., 8.8.4.4 and 9.9.9.9) and associate them with the Backup - Cable uplink.
Step 5: Create Uplink Control Records
Navigate to Policies :: Uplink Control to create the primary and backup Uplink Control records. See the Uplink Control section for detailed configuration.
Verification
- Check Network :: WAN :: Uplinks - both should show Online status
- To test failover, disconnect the primary uplink and verify traffic continues via backup
- Reconnect primary and verify traffic returns to it
Configure Load Balancing Across Two Uplinks
This walkthrough demonstrates configuring two uplinks for load-balanced traffic distribution.
Step 1: Configure Both Uplinks
Follow the uplink creation steps from the failover scenario, but set both uplinks to the same priority (e.g., priority 9).
Step 2: Configure Ping Targets
Ensure each uplink has at least two ping targets configured.
Step 3: Adjust Weight Distribution
To customize traffic distribution based on bandwidth:
- Navigate to Policies :: Uplink Control
- Locate the Uplinks section (a separate scaffold on the same page)
- Edit each uplink to adjust its Weight value
Example for 75%/25% distribution: - Primary - Fiber: weight = 3 - Backup - Cable: weight = 1
Traffic calculation: 3/(3+1) = 75% through fiber, 1/(3+1) = 25% through cable.
Note: Weight is a global property of the uplink. Changing it affects all Uplink Controls that include it.
Step 4: Create Load-Balanced Uplink Control
Navigate to Policies :: Uplink Control and create a single Uplink Control record containing both uplinks. Traffic will be distributed according to weight ratios.
Configure VoIP Traffic Through Dedicated Uplink
This walkthrough demonstrates application-based routing for VoIP traffic.
Prerequisites
- Two configured uplinks with ping targets
- VoIP-related Applications defined in Services :: Application Control :: Applications
Configuration
- Navigate to Policies :: Uplink Control
- Create an Uplink Control record for VoIP:
| Field | Value | |-------|-------| | Name | VoIP Dedicated | | Uplinks | (select low-latency uplink) | | Applications | SIP, RTP (select VoIP apps) | | Policies | (select applicable policies) |
- Create a second Uplink Control record for default traffic:
| Field | Value | |-------|-------| | Name | Default Traffic | | Uplinks | (select remaining uplinks) | | Applications | (leave empty for all other traffic) | | Policies | (same policies) |
VoIP traffic will route through the dedicated low-latency uplink while all other traffic uses the default Uplink Control.
Configure Dual-Stack with Asymmetric IPv6 Support
This walkthrough demonstrates bandwidth aggregation for IPv4 across two uplinks where only one supports IPv6. This is common when one ISP provides IPv4-only service while another supports both IPv4 and IPv6.
Overview
| Uplink | IPv4 | IPv6 | Role |
|---|---|---|---|
| Quantum | Yes | No | IPv4 aggregation only |
| Comcast | Yes | Yes | IPv4 aggregation + exclusive IPv6 |
Goals: - IPv4 traffic load-balanced across both uplinks with failover protection - IPv6 traffic routed exclusively through the dual-stack uplink - Automatic failover if either uplink fails
Step 1: Configure the IPv4-Only Uplink
- Navigate to Network :: WAN :: Uplinks
- Click Create New
- Fill in the form:
| Field | Value | |-------|-------| | Name | Quantum - IPv4 Only | | Priority | 9 | | Interface | em0 | | DHCP | Checked | | DHCP6 | Unchecked | | Gateway IPv6 | (leave empty) | | Download Bandwidth | 500 Mbps | | Upload Bandwidth | 50 Mbps |
- Click Create
Do not configure any IPv6 settings on this uplink.
Step 2: Configure the Dual-Stack Uplink
- Click Create New
- Fill in the form:
| Field | Value | |-------|-------| | Name | Comcast - Dual Stack | | Priority | 9 | | Interface | em1 | | DHCP | Checked | | DHCP6 | Checked | | Prefix Delegation Size | 64 (or as provided by ISP) | | Download Bandwidth | 1000 Mbps | | Upload Bandwidth | 100 Mbps |
- Click Create
Enabling DHCP6 configures this uplink to receive an IPv6 address and prefix delegation. Since this is the only uplink with IPv6, all IPv6 traffic will automatically route through it.
Step 3: Configure Ping Targets
Create at least two ping targets for each uplink:
For Quantum (IPv4 only): - Target: 8.8.8.8 (Google DNS) - Target: 1.1.1.1 (Cloudflare DNS)
For Comcast (Dual Stack): - Target: 208.67.222.222 (OpenDNS) - IPv4 - Target: 9.9.9.9 (Quad9) - IPv4 - Target: 2001:4860:4860::8888 (Google IPv6) - optional - Target: 2606:4700:4700::1111 (Cloudflare IPv6) - optional
Step 4: Configure Weight Distribution
Adjust uplink weights based on available bandwidth:
- Navigate to Policies :: Uplink Control
- Locate the Uplinks section (a separate scaffold on the same page)
- Edit Quantum - IPv4 Only: set weight = 1 (for 500 Mbps)
- Edit Comcast - Dual Stack: set weight = 2 (for 1000 Mbps)
Traffic Distribution: - Quantum: 1/(1+2) = 33% of IPv4 traffic - Comcast: 2/(1+2) = 67% of IPv4 traffic - All IPv6 traffic: 100% through Comcast (only available path)
Step 5: Create IPv4 Load-Balanced Uplink Control
- Navigate to Policies :: Uplink Control
- Create an Uplink Control record containing both uplinks
IPv4 traffic is distributed across both uplinks according to weights. If one uplink fails, all IPv4 traffic automatically routes through the remaining uplink.
How IPv6 Routing Works
IPv6 routing requires no additional configuration:
- Automatic Path Selection: Since only Comcast has IPv6 configured, the rXg automatically routes all IPv6 traffic through that uplink
- No Uplink Control Needed for IPv6: IPv6 follows the only available default route
- Failover Behavior: If Comcast fails, IPv6 connectivity is lost (expected, as Quantum cannot carry IPv6)
Failover Behavior Summary
| Failure Scenario | IPv4 Behavior | IPv6 Behavior |
|---|---|---|
| Quantum offline | All traffic via Comcast | Unchanged (Comcast only) |
| Comcast offline | All traffic via Quantum | Unavailable |
| Both online | Load balanced by weight | Comcast only |
Configure VPN-Based Uplink
This walkthrough demonstrates configuring an OpenVPN tunnel as an uplink, allowing traffic to exit through a VPN provider or remote site.
Use Cases
- Privacy: Route traffic through a VPN provider
- Site-to-site: Connect branch offices through a central VPN
- Geo-restriction bypass: Access region-locked content
- Policy-based VPN: Route specific users or applications through VPN
Prerequisites
- OpenVPN server credentials (certificates, keys, or username/password)
- OpenVPN configuration file from the VPN provider
Step 1: Configure OpenVPN Client
- Navigate to Network :: VPN :: OpenVPN Clients
- Click Create New
- Fill in the form:
| Field | Value | |-------|-------| | Name | VPN Provider | | Remote | vpn.provider.com (or IP address) | | Port | 1194 (or provider-specified port) | | Protocol | UDP (or as specified by provider) | | Device Type | tun | | Certificate Authority | (upload or paste CA certificate) | | Client Certificate | (upload or paste client certificate) | | Client Key | (upload or paste client key) |
- Click Create
- Verify the connection establishes (check status shows connected)
Step 2: Create VPN Uplink
- Navigate to Network :: WAN :: Uplinks
- Click Create New
- Fill in the form:
| Field | Value | |-------|-------| | Name | VPN Uplink | | Priority | 5 (lower than primary uplinks) | | Interface | (leave empty) | | VLAN | (leave empty) | | OpenVPN Client | VPN Provider | | Download Bandwidth | (VPN provider's advertised speed) | | Upload Bandwidth | (VPN provider's advertised speed) |
- Click Create
Note: Leave the physical interface fields empty when using a VPN client. The uplink uses the tunnel interface created by OpenVPN.
Step 3: Configure Ping Targets
Create at least two ping targets for the VPN uplink:
| Field | Value |
|---|---|
| Name | Google DNS via VPN |
| Target | 8.8.8.8 |
| Uplinks | VPN Uplink |
| Field | Value |
|---|---|
| Name | Cloudflare via VPN |
| Target | 1.1.1.1 |
| Uplinks | VPN Uplink |
These targets are pinged through the VPN tunnel to verify end-to-end connectivity.
Step 4: Create Uplink Control
For all traffic through VPN:
- Navigate to Policies :: Uplink Control
- Create an Uplink Control record with the VPN Uplink
- Associate with desired policies
For specific traffic through VPN (e.g., only certain applications):
- Create an Uplink Control record for VPN traffic:
| Field | Value | |-------|-------| | Name | VPN Traffic | | Uplinks | VPN Uplink | | Applications | (select applications to route through VPN) | | Policies | (select applicable policies) |
- Create a second Uplink Control record for default traffic using physical uplinks
Verification
- Check Network :: WAN :: Uplinks - VPN Uplink should show Online
- From a device in the policy, verify external IP matches VPN provider's exit IP
- Test failover by disconnecting VPN and verifying traffic shifts to physical uplinks
Configure Bandwidth-Based Routing
This walkthrough demonstrates routing different user groups to different uplinks based on their service tier or usage patterns. Heavy users are directed to high-capacity uplinks while light users can use any available uplink.
Use Case
An operator has: - A 1 Gbps fiber uplink (expensive, high-capacity) - A 100 Mbps cable uplink (cheaper, limited capacity)
Premium users should always use the fiber uplink. Standard users can use either uplink with load balancing. This maximizes the value of the expensive fiber connection while providing adequate service to all users.
Step 1: Create User Groups
- Navigate to Identities :: Groups :: Account Groups
- Create groups for different service tiers:
| Group Name | Priority | Description | |------------|----------|-------------| | Premium Users | 7 | High-bandwidth subscribers | | Standard Users | 5 | Regular subscribers |
- Assign users to groups based on their subscription level (via usage plans, manual assignment, or LDAP/RADIUS attributes)
Step 2: Configure Uplinks
- Navigate to Network :: WAN :: Uplinks
- Ensure both uplinks are configured:
| Uplink | Priority | Weight | Bandwidth | |--------|----------|--------|-----------| | Fiber 1G | 9 | 1 | 1000 Mbps | | Cable 100M | 9 | 1 | 100 Mbps |
- Configure ping targets for both uplinks (at least 2 each)
Step 3: Create Policies
- Navigate to Policies :: Policies
- Create or edit policies for each user group:
| Policy Name | Associated Group | |-------------|------------------| | Premium Policy | Premium Users | | Standard Policy | Standard Users |
Step 4: Create Uplink Control Records
Navigate to Policies :: Uplink Control
Create Uplink Control for Premium users (fiber only):
| Field | Value | |-------|-------| | Name | Premium - Fiber Only | | Uplinks | Fiber 1G | | Policies | Premium Policy |
- Create Uplink Control for Standard users (load balanced):
| Field | Value | |-------|-------| | Name | Standard - Load Balanced | | Uplinks | Fiber 1G, Cable 100M | | Policies | Standard Policy |
Traffic Behavior
| User Type | Normal Operation | Fiber Fails | Cable Fails |
|---|---|---|---|
| Premium | 100% Fiber | Offline (no fallback) | 100% Fiber |
| Standard | Load balanced (weight ratio) | 100% Cable | 100% Fiber |
Optional: Add Backup for Premium Users
To provide failover for premium users when fiber fails:
- Create a backup Uplink Control:
| Field | Value | |-------|-------| | Name | Premium - Backup | | Uplinks | Cable 100M | | Backup | Checked | | Policies | Premium Policy |
Now premium users fail over to cable if fiber goes offline, rather than losing connectivity.
Advanced: Application-Based Tiers
Combine bandwidth-based routing with application affinity:
| Uplink Control | Uplinks | Applications | Policies | Effect |
|---|---|---|---|---|
| Premium VoIP | Fiber 1G | SIP, RTP | Premium Policy | VoIP always on fiber |
| Premium Default | Fiber 1G, Cable 100M | (none) | Premium Policy | Other traffic load balanced |
| Standard All | Cable 100M | (none) | Standard Policy | Standard users on cable only |
This reserves fiber capacity for premium users' VoIP while allowing their bulk traffic to use either uplink.
SSL/TLS Certificate Considerations
When configuring multiple uplinks with failover, SSL/TLS certificates require special attention. The rXg associates certificates with the configured fully qualified domain name (FQDN) in System :: Options, not with individual uplink IP addresses.
Potential Issues During Failover
IP Address Access Mismatch
When users access the rXg directly via IP address (not domain name) and failover changes the active uplink IP, browsers display certificate warnings. The certificate CN contains the FQDN, not IP addresses.
Solution: Always access rXg via its configured FQDN.
DNS Propagation Delay
During failover, DNS records may still point to the failed uplink's IP address until TTL expires or dynamic DNS updates propagate.
Solution: Configure short DNS TTLs (300 seconds or less) and use dynamic DNS or health-checked DNS providers.
Let's Encrypt Renewal Failures
ACME certificate renewal may fail if the primary uplink is offline during the scheduled renewal attempt and DNS still points to the failed uplink.
Solutions: - Use DNS-01 validation instead of HTTP-01 (works regardless of uplink state) - Configure DNS provider API credentials in Services :: Certificate Authorities :: Certbot Credentials - Monitor certificate expiration and renew manually if needed
Captive Portal Redirect Issues
During failover, captive portal redirects may temporarily fail certificate validation if DNS hasn't updated to the new uplink IP.
Solution: Ensure DNS resolves FQDN to active uplink IP with short TTLs.
Recommended Solutions
Use FQDN-Based Access (Recommended)
- Register a domain name for your rXg
- Configure the FQDN in System :: Options :: Domain Name
- Set up DNS with short TTLs (300 seconds or less)
- Use dynamic DNS or a health-check-based DNS provider
- Train users to access via FQDN, not IP address
Multi-IP SAN Certificate (Static IPs Only)
If both uplinks have static IP addresses, generate a certificate that includes both IPs as Subject Alternative Names:
- Include SANs for primary FQDN and both uplink IPs
- For self-signed certificates, include IP SANs during generation
- Note: Many public CAs do not support IP SANs
DNS-01 Validation for Let's Encrypt
- Navigate to Services :: Certificate Authorities :: Certbot Credentials
- Configure DNS provider API credentials
- Request certificates using DNS-01 validation
- Renewal works regardless of which uplink is active
Quick Reference: Certificate Checklist
| Item | Recommendation |
|---|---|
| Domain Name | Configure FQDN in System :: Options |
| DNS TTL | 300 seconds or less |
| DNS Failover | Use health-checked DNS or dynamic DNS |
| Certificate Type | Domain-validated (not IP-based) |
| Let's Encrypt | DNS-01 validation preferred |
| Monitoring | Alert on certificate expiration |
Troubleshooting
Uplink Shows Offline But Connection Works
Possible Causes: 1. Ping targets are unreachable through that uplink 2. RTT/jitter/packet loss exceeds tolerance thresholds 3. All ping targets are failing
Solutions:
1. Verify ping targets are reachable: ping -S [uplink-ip] [target]
2. Check ping target thresholds; increase tolerances if network latency is high
3. Add additional ping targets
Traffic Not Using Expected Uplink
Possible Causes: 1. Uplink is offline 2. Policy not associated with correct Uplink Control 3. Another Uplink Control with higher specificity matches first 4. Device not in expected group
Solutions: 1. Verify uplink online status in Network :: WAN :: Uplinks 2. Check policy's Uplink Control associations 3. Review Uplink Control WAN Targets and Applications filters 4. Verify device group membership in Identities
Failover Not Occurring
Possible Causes: 1. Fewer than 2 ping targets configured per uplink 2. Backup flag not set correctly on Uplink Control 3. Ping targets responding despite uplink issues (e.g., pinging gateway only)
Solutions: 1. Ensure each uplink has at least 2 ping targets 2. Verify backup Uplink Control has Backup checkbox enabled 3. Use external ping targets (not ISP infrastructure)
Load Balancing Uneven
Possible Causes: 1. Weight values not configured as intended 2. One uplink has lower capacity causing queuing 3. Session persistence keeping traffic on one uplink
Solutions: 1. Verify weight values on each uplink 2. Ensure bandwidth values accurately reflect uplink capacity 3. Note that per-session distribution may appear uneven with few active sessions
Certificate Errors After Failover
Possible Causes: 1. Accessing rXg via IP address instead of FQDN 2. DNS still resolving to failed uplink's IP 3. Certificate doesn't include backup uplink IP as SAN
Solutions: 1. Always access rXg via its configured FQDN 2. Reduce DNS TTL and verify dynamic DNS is updating 3. For static IPs, generate certificate with both uplink IPs as SANs 4. Temporarily accept browser warning for emergency access
Let's Encrypt Certificate Not Renewing
Possible Causes: 1. Primary uplink offline during renewal attempt 2. ACL blocking Let's Encrypt validation servers 3. DNS not resolving to active uplink 4. HTTP-01 challenge failing
Solutions: 1. Switch to DNS-01 validation (works regardless of uplink state) 2. Whitelist Let's Encrypt IP ranges in ACLs 3. Verify DNS configuration and TTL settings 4. Check Services :: Certificate Authorities :: SSL Key Chains for error details
IPv6 Not Working on Dual-Stack Uplink
Possible Causes: 1. DHCP6 not enabled on the uplink 2. ISP not providing IPv6 service 3. Prefix delegation not configured correctly
Solutions:
1. Verify DHCP6 is enabled on the uplink
2. Confirm ISP provides IPv6 service to your account
3. Check prefix delegation size matches ISP requirements
4. Test with: ping6 -S [uplink-ipv6-address] google.com
Quick Reference
Priority and Weight Defaults
| Setting | Default | Range | Meaning |
|---|---|---|---|
| Priority | Auto-assigned | 1-9 | Higher = preferred for failover |
| Weight | 1 | 1-9 | Higher = more traffic in aggregation |
Minimum Requirements for Failover
| Component | Minimum |
|---|---|
| Uplinks | 2 |
| Ping targets per uplink | 2 |
| Uplink Control records | 1 (or 2 if using backup flag) |
Health Check Intervals
The PingMonitor runs approximately every 37 seconds, checking all configured ping targets.
Bandwidth Constraints
| Constraint | Value |
|---|---|
| Minimum bandwidth | 128 Kbps |
| Upload minimum | 2% of download |
| Maximum | License-limited |
NAT
The NAT view presents the scaffolds that configure settings to modify the network address translation mechanisms of the rXg.
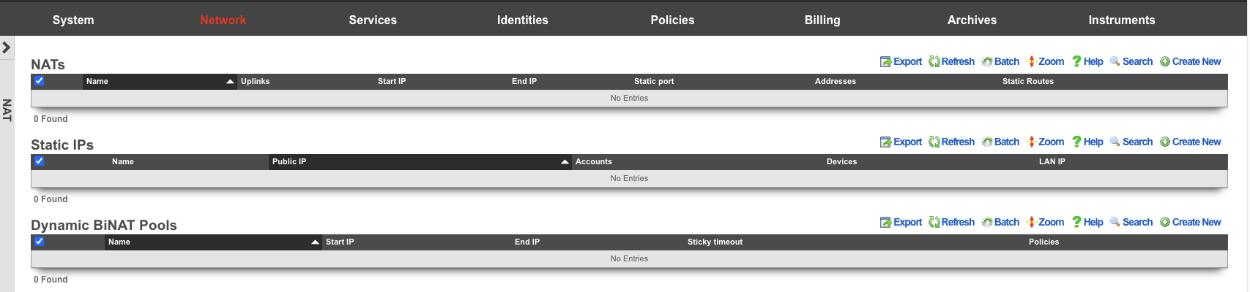 The NAT view with scaffolds for configuring network address translation
NAT
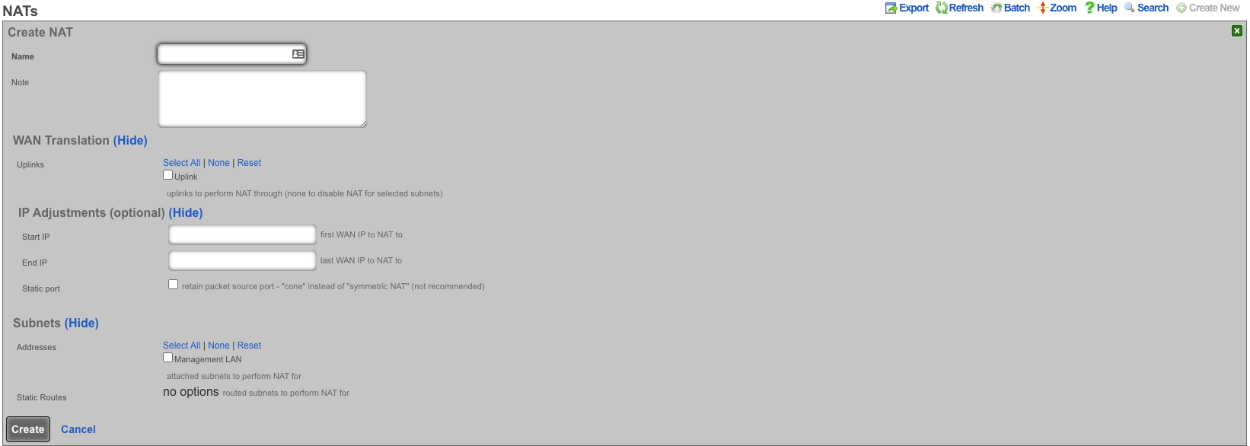 NAT scaffold displaying configured NAT rules
Entries in the NAT scaffold configure network address translation between LAN subnets and WAN addresses.
NAT Pool Fields
Note on Terminology: A "NAT pool" refers to a range of public IP addresses used for Port Address Translation (PAT), also known as NAT overload or many-to-one NAT. When Start IP and End IP are configured, multiple LAN devices share these public addresses by using different source ports for each connection.
The name field is an arbitrary string descriptor used only for administrative identification. Choose a name that reflects the purpose of the record. This field has no bearing on the configuration or settings determined by this scaffold.
The addresses and static routes field specify the source LAN subnets for which network address translation will be enabled by this record.
The uplinks field specifies the WAN address(es) that will be used as the source address for outbound traffic from the selected LAN subnets after NAT translation.
The Reverse NAT field specifies that traffic originating from the rXg itself (not LAN clients) will be NAT'd to the first IP of the selected Addresses. This option is primarily used when the upstream ISP assigns a private IP via DHCP but routes a block of public IPs to that private address. In this scenario, the public IP block is configured as a Network Address on the WAN interface, and Reverse NAT ensures outbound traffic from the rXg uses the first public IP from that routed block rather than the private DHCP-assigned uplink IP.
The Start IP field determines the first IP address of a range of WAN addresses that will be used as a NAT pool for Port Address Translation (PAT). When configured, outbound connections from selected LAN subnets will be translated to addresses within this pool, distributing the load across multiple public IPs. The IP must fall within a WAN address subnet associated with the selected uplink.
The End IP field specifies the last IP address in the range of WAN addresses that will be used for the NAT pool. Together with Start IP, this defines the pool of public addresses available for PAT. The IP must fall within the same WAN address subnet as the Start IP.
The Static Port field, when enabled, preserves the original source port when performing NAT translation. When enabled, if a client uses source port 5060, the translated connection will also use port 5060 (if available). This is often beneficial for: - SIP-based VoIP systems that expect consistent port mappings - Certain gaming consoles and peer-to-peer applications - Applications that embed port numbers in their protocol messages
When disabled (the default), the rXg may rewrite source ports as needed to avoid conflicts, which maximizes port utilization efficiency.
Validation Rules for NAT Pools: - Both Start IP and End IP must be valid IPv4 addresses within a configured WAN subnet - Start IP and End IP must belong to the same WAN address subnet - Start IP must be less than or equal to End IP - The IP range cannot overlap with other NAT pools of the same type - At least one uplink must be selected when specifying a Start IP / End IP range - Selected Addresses and Static Routes must be LAN subnets (not WAN) - Reverse NAT is mutually exclusive with Start IP/End IP, Static Port, and Static Routes fields
Best Practices: - Avoid overlapping IP ranges with Dynamic BiNAT pools to prevent unexpected behavior - Avoid including the uplink's gateway IP address in the NAT pool range - For clarity, consider selecting exactly one uplink per NAT pool when using Start IP / End IP ranges
The note field is a place for the administrator to enter a comment. This field is purely informational and has no bearing on the configuration settings.
If no records are present in the NAT scaffold, the rXg will automatically enable NAT from subnets that are configured with RFC 1918 specified private addresses.
NAT Monitoring
The rXg provides several instruments for monitoring NAT activity on the Instruments :: NAT Assignments view:
- NAT Assignments - View real-time NAT mappings showing which private IPs are translated to which public IPs
- NAT Pool Stats - Monitor utilization statistics across configured NAT pools
Example NAT Pool Deployment
This example demonstrates configuring a NAT pool using a /27 block of public IP addresses (30 usable IPs) for Port Address Translation (PAT). This configuration allows thousands of LAN devices to share the pool of public IPs.
Prerequisites
Before configuring a NAT pool, ensure you have:
- A configured Uplink with WAN connectivity
- A block of public IP addresses from your ISP (routed to your primary WAN IP or directly on the WAN segment)
- LAN subnets (Addresses) that need NAT translation
Step 1: Configure the WAN Address Block
Navigate to Network :: WAN :: Network Addresses and create a new Address for the NAT pool block.
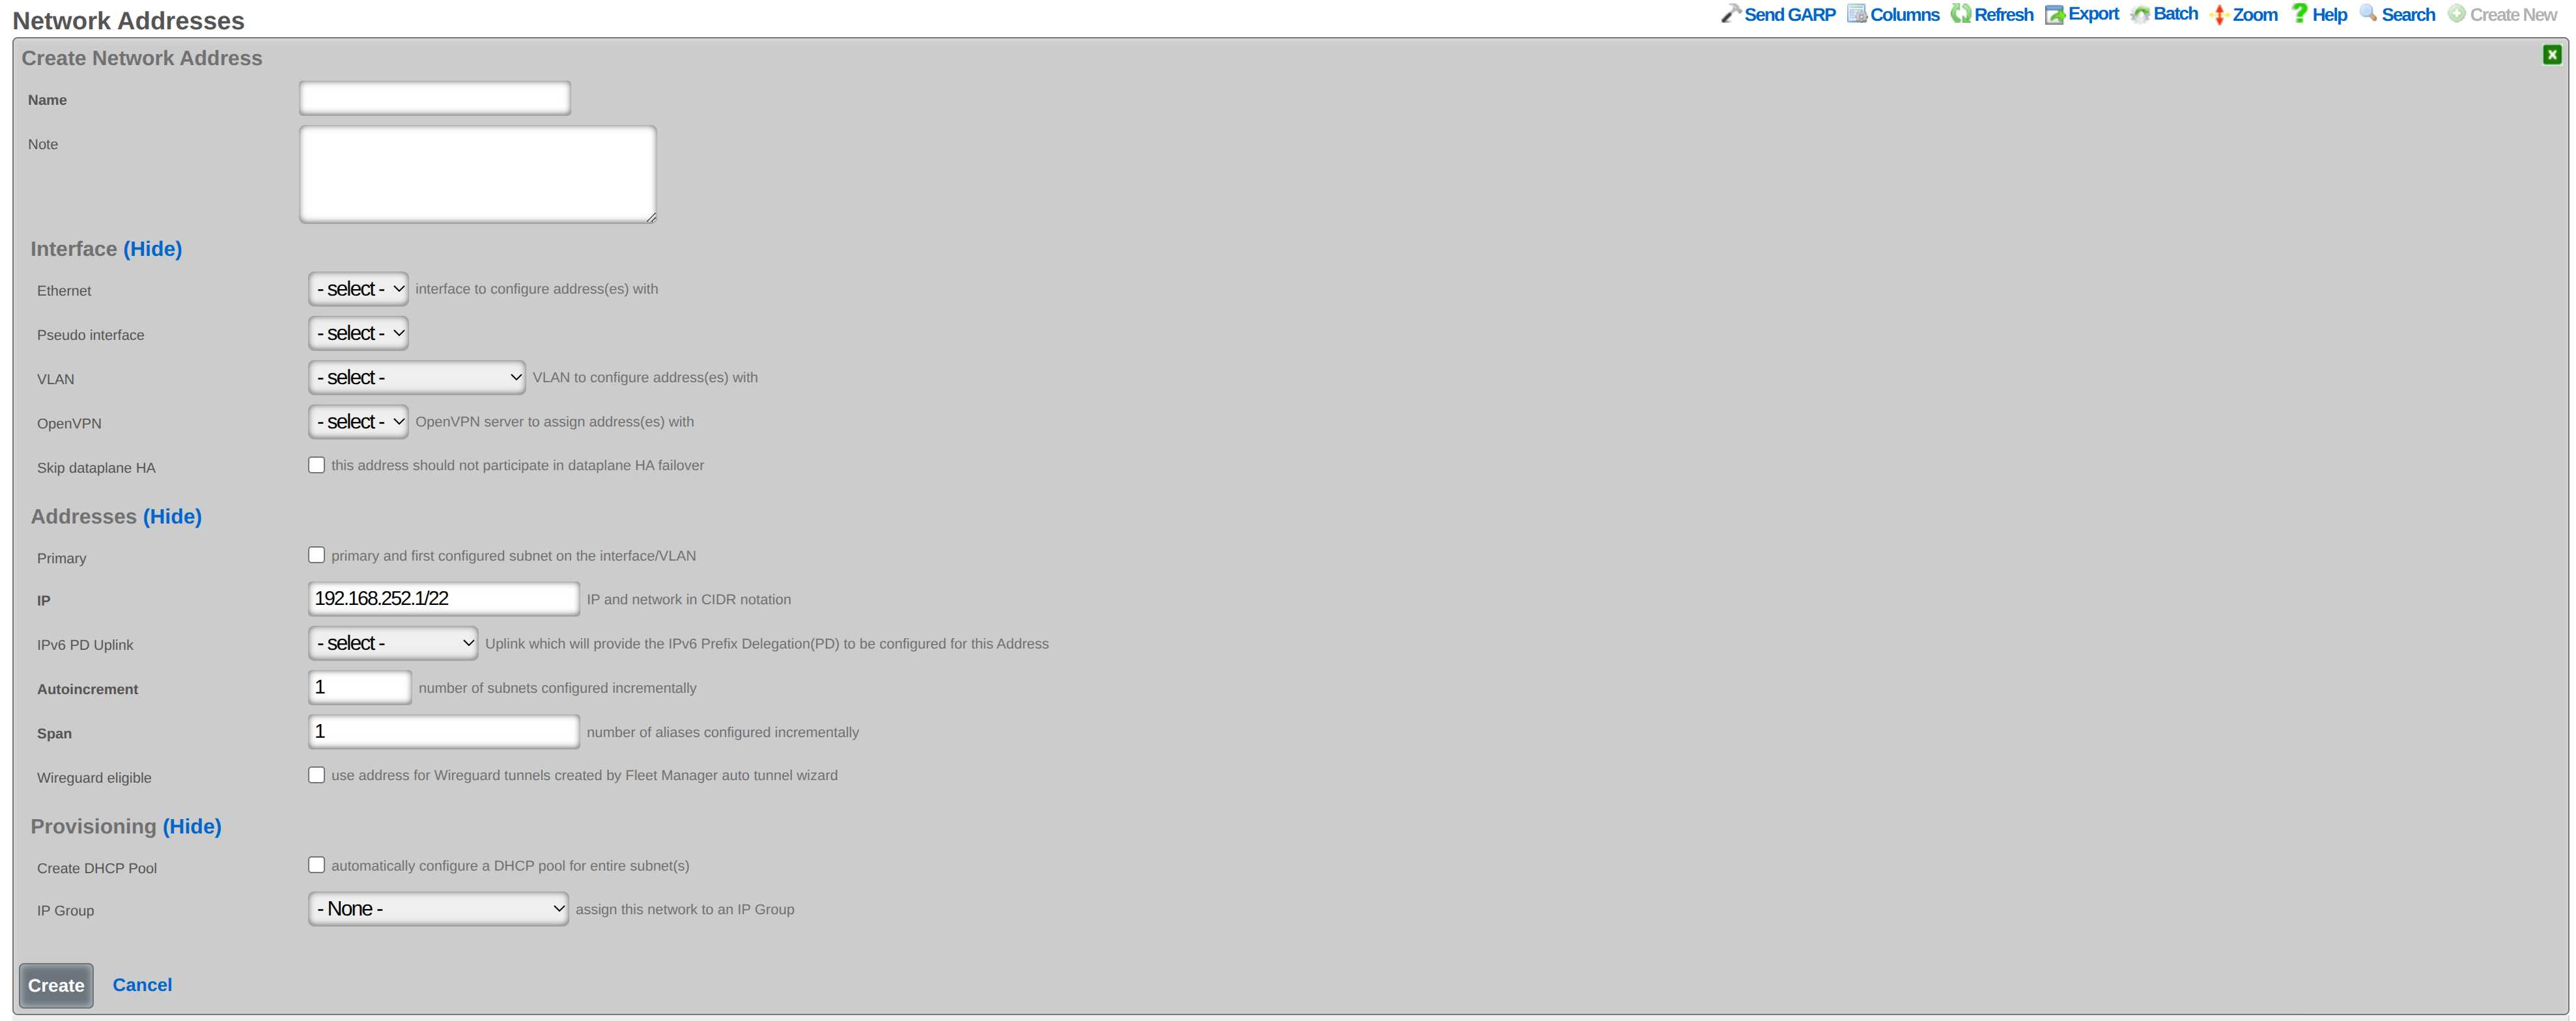 Creating a WAN Address for the NAT pool IP block
Configure the following:
- Name: A descriptive name (e.g., PRIMARY-NAT-WAN-IP-POOL)
- CIDR: The IP block in CIDR notation (e.g., 203.0.113.32/27)
- Interface: Select the same interface your Uplink uses
- Span: Set to the number of consecutive IPs from the block that should be consumed (e.g., 30 to consume an entire /27 block)
- Primary: Leave unchecked (the primary WAN IP is already configured)
The Address must be associated with a WAN interface (the same interface used by your Uplink) to be recognized as a valid WAN address for NAT pools. The Span determines how many consecutive IPs from the block are assigned to the rXg and available for the NAT pool.
Step 2: Create the NAT Pool Rule
Navigate to Network :: NAT and create a new NAT entry.
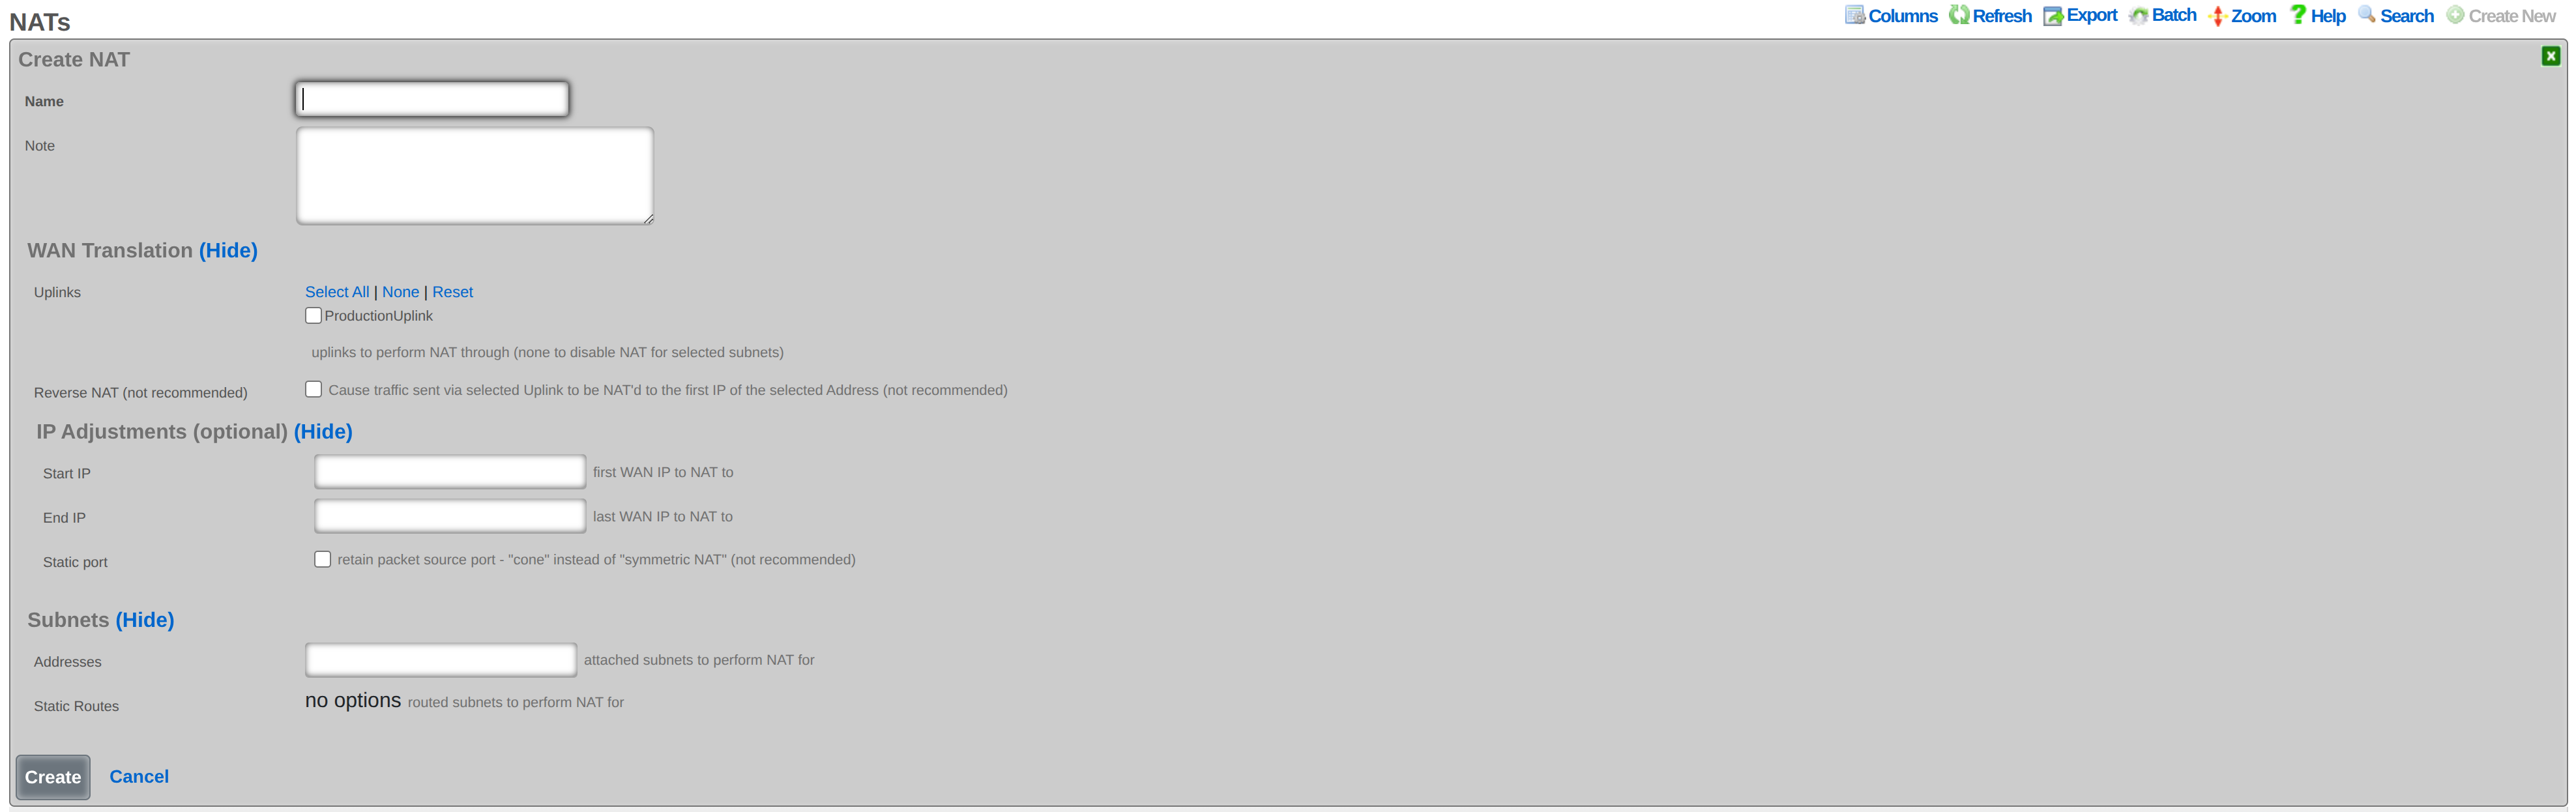 Creating a NAT pool rule with IP range and LAN subnet selection
Configure the following:
- Name: A descriptive name (e.g., Primary-NAT-Pool)
- Uplinks: Select the WAN uplink(s) to use for this NAT pool (at least one required)
- Start IP: The first usable IP in your range (e.g., 203.0.113.33)
- End IP: The last usable IP in your range (e.g., 203.0.113.62)
- Addresses: Select your LAN subnet(s) that should use this NAT pool
Important: When configuring Start IP and End IP, at least one Uplink must be selected. The IP range must fall within a WAN Address subnet associated with the selected Uplink's interface.
Step 3: Verify the Configuration
After creating the NAT pool:
- Navigate to Network :: NAT and confirm your NAT pool entry appears with the correct Start IP and End IP values
- Navigate to Instruments :: NAT Assignments to view real-time NAT mappings as LAN devices generate traffic
- Navigate to Instruments :: NAT Pool Stats to monitor pool utilization
Capacity Planning
With a /27 block (30 usable IPs) and standard PAT:
| Metric | Value | Notes |
|---|---|---|
| Public IPs | 30 | Usable IPs in a /27 (32 minus network and broadcast) |
| Ports per IP | 64,512 | Full port range (65,536) excluding reserved ports 0-1023 |
| Theoretical max connections | 1,935,360 | 30 IPs 64,512 ports |
| Practical device support | Thousands | Each device typically uses 100-500 ports |
Each LAN device typically uses 100-500 ports for normal browsing, so 30 IPs can support several thousand simultaneous users. Heavy users (streaming, gaming, many browser tabs) may use 1,000+ ports.
Splitting the Pool
If you need to reserve some IPs for other purposes (e.g., future BiNAT or Static IP assignments), configure a smaller range:
| Purpose | Range | Count |
|---|---|---|
| NAT Pool | 203.0.113.33 - 203.0.113.50 |
18 IPs |
| Reserved for BiNAT/Static | 203.0.113.51 - 203.0.113.62 |
12 IPs |
Multiple LAN Subnets
You can NAT multiple LAN subnets through the same pool by selecting multiple entries in the Addresses field. All selected subnets will share the NAT pool, with connections distributed across the available public IPs.
NAT Pool Troubleshooting
Error: "does not fall within any configured WAN subnets"
Cause: The Start IP or End IP is not within a WAN Address subnet associated with the selected Uplink's interface.
Solution:
1. Navigate to Network :: Addresses
2. Verify your NAT pool block (e.g., 203.0.113.32/27) exists
3. Ensure the Address is assigned to the same Interface used by your Uplink
4. If the Address doesn't exist, create it with the correct Interface association
Error: "conflicts with existing pool"
Cause: The IP range overlaps with another NAT pool or Dynamic BiNAT pool.
Solution: 1. Navigate to Network :: NAT and check other NAT entries for overlapping ranges 2. Check Dynamic BiNAT Pools for conflicts 3. Adjust ranges to eliminate overlap
Error: "Start and end IP must belong to the same subnet"
Cause: The Start IP and End IP are in different WAN Address subnets.
Solution:
1. Ensure both IPs are within the same WAN Address block
2. Verify the WAN Address is configured with the correct CIDR (e.g., /27 not a smaller subnet)
Error: "must contain one selection when specifying a start/end IP range"
Cause: No Uplink is selected.
Solution: 1. Select at least one Uplink in the Uplinks field 2. The Uplink must be associated with the interface where your WAN Address is configured
Error: "cannot include WAN subnets"
Cause: A WAN Address was selected in the Addresses field instead of a LAN Address.
Solution: 1. Only select LAN Addresses (private subnets) in the Addresses field 2. Remove any WAN-associated addresses from the selection
NAT Not Working (Traffic Not Translating)
Check the following: 1. ISP Routing: Your upstream router/ISP must route the NAT pool block to your rXg's primary WAN IP 2. LAN Subnet Selection: The LAN subnet selected in the NAT rule must match your actual LAN Address configuration 3. Firewall Rules: Verify no firewall rules are blocking outbound traffic 4. Uplink Status: Check that the Uplink is online at Network :: WAN :: Uplinks 5. NAT Assignments: Monitor Instruments :: NAT Assignments to see if translations are occurring
Routed IP Blocks (ISP Routes Block to Your WAN IP)
If your ISP provides the NAT pool block as a routed block (not directly on the WAN segment), the block must still be configured as a WAN Address:
- Navigate to Network :: Addresses
- Create a new Address with the routed block CIDR
- Associate it with the same Interface/VLAN as your Uplink
- The routed block will now appear as a valid WAN range for NAT pools
Note: Your ISP must route this block to your primary WAN IP for NAT to function correctly. Verify routing is configured upstream before troubleshooting the rXg configuration.
NAT Pool Exhaustion
Symptoms: Connection failures, slow new connections, or "connection reset" errors during peak usage.
Cause: All available source ports across the NAT pool IPs are in use.
Diagnosis: 1. Navigate to Instruments :: NAT Pool Stats 2. Check port utilization percentage for each pool IP 3. If utilization exceeds 80%, consider expanding the pool
Solutions: 1. Add more public IPs to the NAT pool (expand the Start IP/End IP range) 2. Reduce connection timeouts for idle NAT mappings 3. Identify port-heavy users via NAT Assignments and apply rate limiting 4. Split traffic across multiple NAT pools if available
See Also
- Network :: WAN - Configure uplinks and WAN addresses required for NAT pools
- Network :: LAN - Configure LAN address blocks and VLANs
- Instruments :: NAT Assignments - Monitor real-time NAT mappings and pool utilization
Static IPs
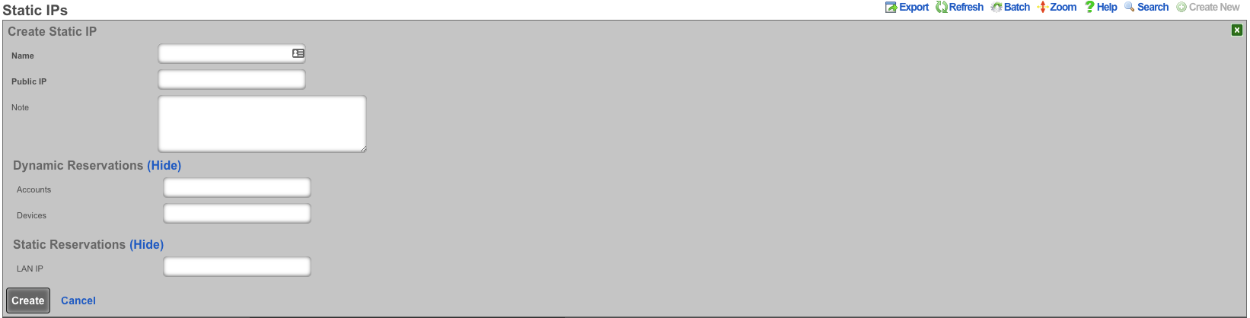 Static IPs scaffold for configuring one-to-one NAT mappings
An entry in the Static IPs scaffold creates a one-to-one mapping between an IP address within a span associated with an uplink and a private IP address on the LAN. This feature is typically used to give public access to a resource that is configured on a private IP address such as a web server.
The name field is an arbitrary string descriptor used only for administrative identification. Choose a name that reflects the purpose of the record. This field has no bearing on the configuration or settings determined by this scaffold.
The Source IP field determines the destination of the translation of traffic originating from the Public IP.
The Public IP field specifies the IP address within a span of addresses associated with an uplink that will be translated to the Source IP.
The note field is a place for the administrator to enter a comment. This field is purely informational and has no bearing on the configuration settings.
Dynamic BiNAT Pools
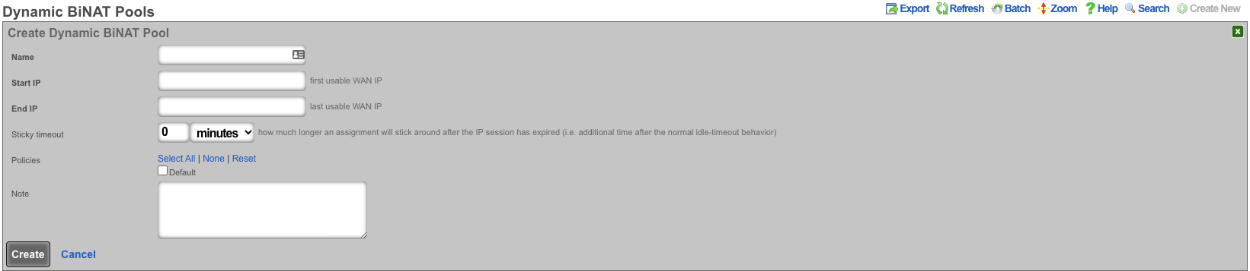 Dynamic BiNAT Pools scaffold for configuring dynamic dedicated IP assignments
An entry in the Dynamic BiNAT Pools scaffold specifies a range of IP addresses that may be dynamically assigned to devices whose account has a Max BiNATs value of 1 or greater, and whose policy is enabled for this Dynamic BiNAT Pool. This feature is typically used to give public access to a resource that is configured on a private IP address such as a web server or a gaming device which requires open incoming firewall ports for proper operation.
The end-user may subscribe to a usage plan which allows Dynamic BiNAT, and may enable BiNAT functionality for specific device(s) by accessing the manage devices page of the portal. The operator may also change the active BiNAT device(s) by editing the account's device list. Care must be given to ensure that the range of addresses configured here is large enough to accommodate the number of devices that are configured for Dynamic BiNAT.
The name field is an arbitrary string descriptor used only for administrative identification. Choose a name that reflects the purpose of the record. This field has no bearing on the configuration or settings determined by this scaffold.
The Start IP field determines the first IP address of the range of uplink addresses that will be used as the Dynamic BiNAT IP for eligible devices. The IP should fall within a span of addresses associated with an uplink that is associated with the device's link control.
The End IP field specifies the last IP address in the range of uplink addresses that will be used as the Dynamic BiNAT IP for eligible devices. The IP should fall within a span of addresses associated with an uplink that is associated with the device's link control.
The Policies field specifies policies that may utilize this BiNAT Pool. When an associated Policy contains Accounts, a number of IPs specified in the Max BiNATs field of the Account will be assigned to that Account. The end user will be able to configure up to that many DMZ devices through the manage devices page in the captive portal. When an associated Policy contains devices that do not belong to an account, such as from an IP group or MAC group, a BiNAT will be assigned to each device currently connected that belongs to the associated Policy. If no policies are associated with this BiNAT pool, the pool is effectively disabled, and the addresses will be available for regular NAT.
The note field is a place for the administrator to enter a comment. This field is purely informational and has no bearing on the configuration settings.
Data Flow: Subscriber Onboarding and NAT Assignment
The following diagrams illustrate the end-to-end flow of how a subscriber device connects to the network, obtains an IP address, authenticates, gets assigned a NAT translation, and gains Internet access.
Device Connection Through Internet Access
sequenceDiagram
    participant UE as Subscriber Device
    participant AP as Access Point
    participant DHCP as DHCP Server<br/>(rXg)
    participant PF as Packet Filter<br/>(Policy Engine)
    participant CP as Captive Portal
    participant DB as rXg Database
    participant NAT as NAT Engine
    participant WAN as Internet<br/>(via Uplink)

    Note over UE,WAN: Phase 1  Network Attachment (L2/L3)

    UE->>AP: Associate with SSID
    AP-->>UE: Association confirmed<br/>(on default or DVLAN)
    UE->>DHCP: DHCP DISCOVER
    DHCP->>DHCP: Select pool<br/>(by VLAN, class rules)
    DHCP-->>UE: DHCP OFFER (IP, gateway, DNS)
    UE->>DHCP: DHCP REQUEST
    DHCP-->>UE: DHCP ACK
    DHCP->>DB: Record DHCP lease<br/>(IP, MAC, AP, lease time)

    Note over UE,WAN: Phase 2  Pre-Authentication (Captive Portal)

    UE->>PF: HTTP request to any site
    PF->>PF: Check policy for device<br/>(no LoginSession yet)
    PF-->>UE: HTTP 302 redirect<br/>(to captive portal)
    UE->>CP: Load portal landing page
    CP-->>UE: Login form<br/>(credentials / OAuth / SMS)

    alt Account Login
        UE->>CP: Submit credentials<br/>(username + password)
        CP->>DB: Authenticate<br/>(local DB / RADIUS / LDAP)
        DB-->>CP: Auth success + policy
    else MAC Automatic Login
        CP->>DB: Lookup MAC address<br/>(match against known devices)
        DB-->>CP: Auto-login granted + policy
    else Shared Credential
        UE->>CP: Submit shared password
        CP->>DB: Validate against<br/>SharedCredentialGroup
        DB-->>CP: Auth success + policy
    end

    CP->>DB: Create LoginSession<br/>(account, IP, MAC, online=true,<br/>expires_at, policy)

    Note over UE,WAN: Phase 3  NAT Assignment & Internet Access

    DB->>NAT: Assign NAT IP<br/>(from uplink pool)
    NAT->>NAT: Select public IP<br/>(CGNAT shared pool<br/>or dedicated BiNAT IP)
    NAT->>DB: Create NatAssignment<br/>(source_ip  nat_ip, uplink)
    NAT->>PF: Install NAT rule<br/>(source_ip  nat_ip)

    PF->>PF: Apply policy<br/>(bandwidth queues, content filter)

    UE->>PF: HTTP request
    PF->>NAT: Translate source IP<br/>(private  public)
    NAT->>WAN: Forward to Internet
    WAN-->>NAT: Response
    NAT->>PF: Translate destination IP<br/>(public  private)
    PF->>UE: Deliver response<br/>(QoS shaped)
NAT Pool Selection Logic
flowchart TD
    A[Device authenticates<br/>LoginSession created] --> B{Account has<br/>dedicated IP<br/>entitlement?}

    B -->|Yes: max_dedicated_ips > 0| C{BiNAT Pool<br/>has available IPs?}
    B -->|No| G[Assign shared CGNAT IP<br/>from uplink NAT pool]

    C -->|Yes| D{Static dedicated<br/>IPs enabled?}
    C -->|No| G

    D -->|Yes| E[Assign static dedicated IP<br/>reserved for account lifetime]
    D -->|No| F[Assign dynamic dedicated IP<br/>from BiNAT pool]

    E --> H[Create NatAssignment<br/>is_binat=true, static=true]
    F --> H2[Create NatAssignment<br/>is_binat=true, static=false]
    G --> I[Create NatAssignment<br/>is_binat=false]

    H --> J[Device gets 1:1 NAT<br/>Full inbound connectivity<br/>UPnP port forwards available]
    H2 --> J
    I --> K[Device shares public IP<br/>with other subscribers<br/>Port-based NAT translation]

    style A fill:#e1f5fe
    style J fill:#c8e6c9
    style K fill:#fff9c4
Session Lifecycle and Accounting
sequenceDiagram
    participant UE as Subscriber Device
    participant RXG as rXg Gateway
    participant RAD as RADIUS Server<br/>(if RADIUS auth)
    participant DB as rXg Database

    Note over UE,DB: Active Session  Periodic Updates

    loop Every accounting interval
        RXG->>RXG: Collect traffic stats<br/>(bytes/pkts up/down per IP)
        RXG->>DB: Update LoginSession counters<br/>(bytes_up, bytes_down)

        opt RADIUS accounting enabled
            RXG->>RAD: Accounting Interim-Update<br/>(Acct-Session-Time,<br/>Acct-Input/Output-Octets)
        end
    end

    Note over UE,DB: Session Termination

    alt User logs out
        UE->>RXG: Explicit logout request
    else Session expires
        RXG->>RXG: expires_at reached
    else Admin disconnects
        DB->>RXG: Admin destroys LoginSession
    else Idle timeout
        RXG->>RXG: No traffic for idle period
    end

    RXG->>DB: Destroy LoginSession
    DB->>DB: Final usage debit to account
    DB->>DB: Create LoginSessionLog<br/>(historical record)
    DB->>DB: Release NatAssignment<br/>(if dynamic)
    DB->>DB: Destroy VlanTagAssignment<br/>(if DVLAN configured)

    opt RADIUS accounting enabled
        RXG->>RAD: Accounting Stop<br/>(Acct-Terminate-Cause,<br/>final byte/packet counts)
    end

    opt CoA / Disconnect to AP
        RXG->>UE: Disconnect-Request<br/>(force de-authentication)
    end
NAT Pool Sizing Recommendations
Proper sizing of NAT pools is critical for network performance and subscriber experience. The recommended ratio of public IP addresses to concurrent devices varies based on deployment type.
Terminology: Throughout this section, sizing ratios are expressed as concurrent devices per public IP. A "device" is any network-connected endpoint (phone, laptop, tablet, smart TV, gaming console, etc.). In MDU contexts, a "subscriber" typically has multiple devices; in hospitality contexts, a "guest room" may contain several guests each with multiple devices. Always size based on expected peak concurrent device count, not subscriber or room count.
MDU (Multi-Dwelling Units) and Large Enterprise Deployments
For MDU deployments such as apartments, condominiums, and student housing, the recommended configuration is 1:1 (one public IP address per living unit). This configuration is preferred when subscribers require unrestricted inbound connectivity and provides:
- Full public IP functionality for each subscriber
- Support for gaming, hosting, and applications requiring open ports
- Simplified troubleshooting and traffic attribution
- Non-repudiation of online activities, assisting in subpoena and DMCA enforcement
- Easier provisioning of static IP options to subscribers
When using Dynamic BiNAT pools for MDU deployments, ensure the pool contains at least as many addresses as the expected number of concurrent subscribers.
Hotel and Hospitality Deployments
For transient environments such as hotels, convention centers, and similar hospitality venues, a ratio of 50:1 to 150:1 (50 to 150 concurrent devices per public IP address) is typically appropriate. The optimal ratio depends on usage patterns and guest expectations. This higher sharing ratio is appropriate because:
- Guest stays are temporary and connections are transient
- Guest traffic typically consists of web browsing and streaming
- Fewer guests require dedicated public IP functionality
- Cost optimization is often a priority
Sizing considerations:
- Use 50:1 to 100:1 for venues with heavy usage (tech conferences, gaming events, business travelers)
- Use 100:1 to 150:1 for typical leisure hospitality with light browsing and streaming
- Remember that device density varies significantly; a guest room may have 4-8+ devices (phones, tablets, laptops, smart TVs, wearables). Size based on observed peak concurrent device counts, not room or guest account numbers
Warning: Higher sharing ratios increase the risk of port exhaustion during peak usage. Each public IP provides tens of thousands of usable ports (the exact number depends on your configured port range and NAT timeout settings). Modern applications and devices often maintain dozens of simultaneous connections, so always validate your chosen ratio against observed port utilization. Monitor the NAT Pool Stats for signs of port exhaustion.
IPv6 consideration: Deploying dual-stack IPv6 can significantly reduce IPv4 NAT pressure, as IPv6-capable devices and services will bypass the NAT pool entirely. This allows for higher IPv4 sharing ratios without risking port exhaustion.
CGNAT (Carrier Grade NAT) can be used for the general guest population, with a smaller BiNAT pool available for guests who require dedicated IP functionality.
General Guidelines
When sizing NAT pools, consider the following:
- Peak concurrent users: Size pools based on maximum expected simultaneous connections, not total subscriber count
- Service tier mix: Account for the percentage of subscribers on plans that include BiNAT access
- Growth margin: Include headroom for subscriber growth to avoid pool exhaustion
- Static vs. dynamic: Static BiNAT assignments permanently consume addresses; dynamic assignments can be shared when subscribers disconnect
Use the NAT Pool Stats in the Instruments::NAT Assignments view to monitor pool utilization and identify when expansion is needed.
Example BiNAT Deployments
Below are 3 BiNAT deployment examples.
Example 1: Dynamic BiNATs
In this example the operator has configured the rXg to have a block of public IP address that are used for CGNAT and another pool that users can dynamically be assigned a public IP address from that can be used as NAT for the account. This IP can be assigned to a specific device (DMZ), and can also be used for UPnP.
First a block of public IP address must be assigned to an interface.
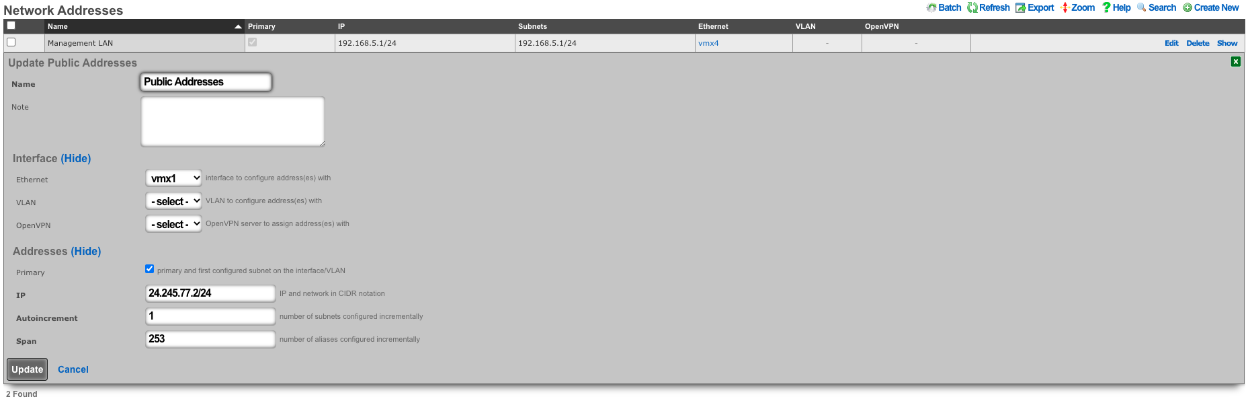 Public IP address block configured on the WAN interface
Next we need to configure a BiNAT pool by going to Network :: NAT, in this case half the public IP addresses will be used for BiNATs. The Operator can control which accounts/clients can be assigned a BiNAT by selecting the Policies that can use the pool. In this case only users in the Residents-Premium policy will be able to draw from the pool.
 BiNAT pool configured with half the public IPs for the Residents-Premium policy
Being in the Residents-Premium policy is not all that is required the account must also be set to allow the use of BiNAT IP address. This is controlled by the Usage Plan the user has purchased. This can be set by going to Billing :: Plans. Edit the appropriate Usage Plan and look at the Sessions section of the account. Here the Operator can set the number of Max dedicated IPs , in this example it is set to 1. UPnP has also been selected in this case.
 Usage Plan configuration with Max dedicated IPs and UPnP options
Now users who purchase the Residents-Premium plan will have a BiNAT assigned to their account that all the traffic from their devices will NAT through and their devices can create UPnP port forwards automatically.
Example 2: Static Dedicated BiNATs
In this example the rXg has been configured so that each account gets assigned a BiNAT that is static. First a block of public IP addresses must be configured.
Public IP address block configured on the WAN interface
Next the BiNAT pool must be configured to consume the entire block of public IP address, and the appropriate policies must be allowed access to the BiNAT pool. Network :: NAT.
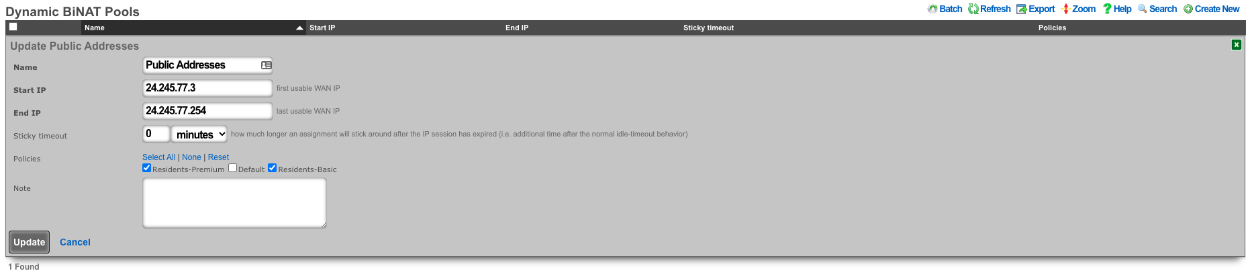 BiNAT pool consuming the full range of public IP addresses
The account must also be set to allow the use of BiNAT IP address. This is controlled by the Usage Plan the user has purchased. This can be set by going to Billing :: Plans. Edit the appropriate Usage Plan and look at the Sessions section of the account. Here the Operator can set the number of Max dedicated IPs , in this example it is set to 1. By checking the Static dedicated IPs box the NAT IP or IPs are reserved and remain static for the lifetime of the account. UPnP has also been selected in this case.
 Usage Plan configuration with Static dedicated IPs enabled for permanent IP assignment
In this example each account is assigned a BiNAT address when created, and the IP assigned will remain for the lifetime of the account. This is the equivalent of having a static public IP address.
Example 3: BroadBand On Demand
In this example the rXg has been configured so that each account selects the number of Dedicated IPs (BiNAT addresses) that will be assigned to the account at time of purchase. A block of Public IP address must be configured via Network :: WAN.
Public IP address block configured on the WAN interface
Next the BiNAT pool must be configured to determine which IP address can be used for dedicated IPs, and the appropriate policies must be allowed access to the BiNAT pool. Network :: NAT.
BiNAT pool consuming the full range of public IP addresses
The Usage Plans for this example must be configured to allow the user to pick the number of Dedicated IPs by using the Plan Addons scaffold via Billing :: Plans. Here two Plan Addons have been created allowing the user to purchase additional Dedicated IPs and allows them to make them static by purchasing the static IP option.
 Plan Addons scaffold with dedicated IP purchase options
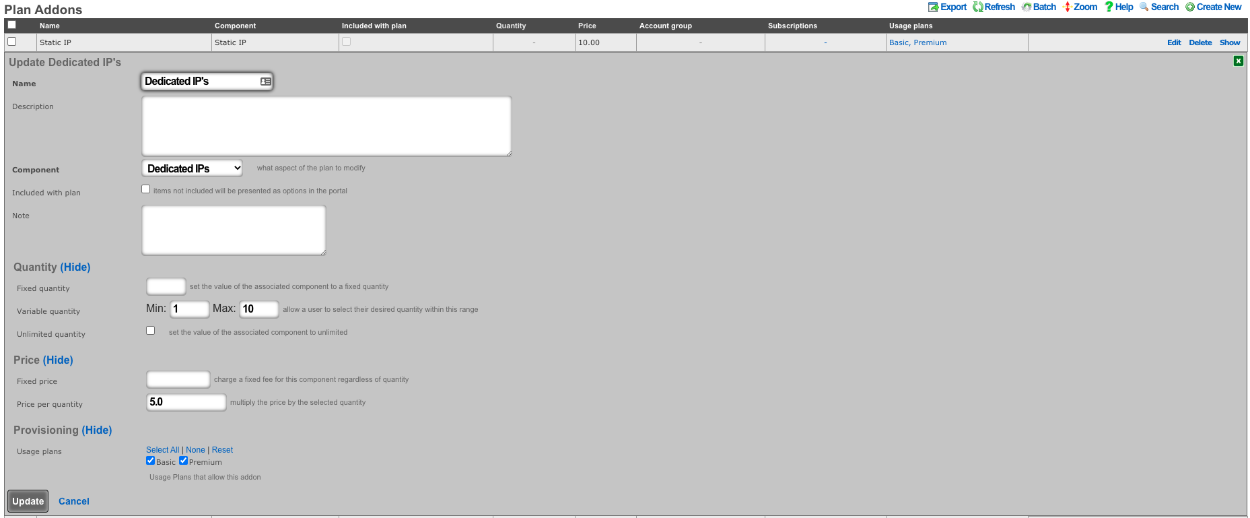 Plan Addon allowing users to purchase additional dedicated IPs
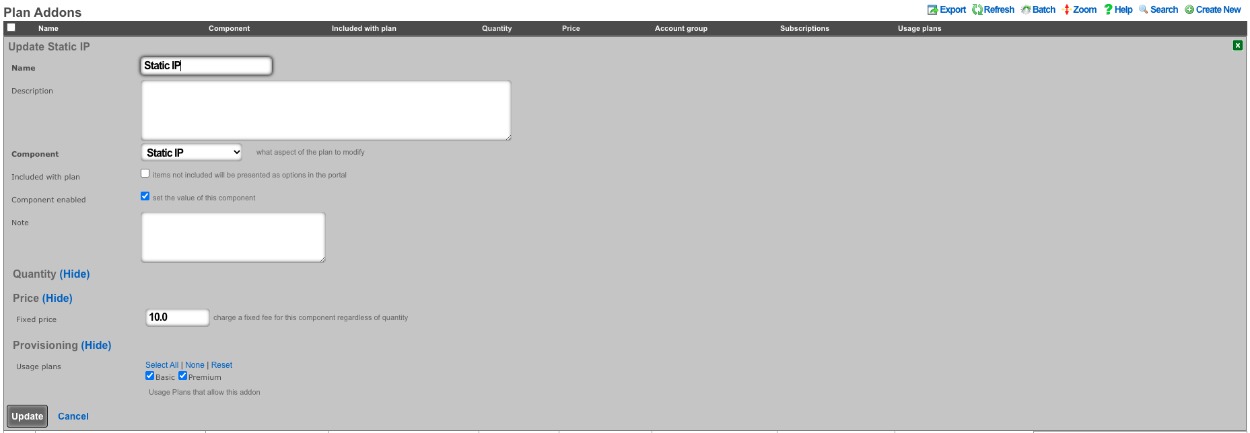 Plan Addon allowing users to make dedicated IPs static
The above configuration allows the user when purchasing a plan to select how many dedicated IPs they want and can purchase the ability to make them static as well.
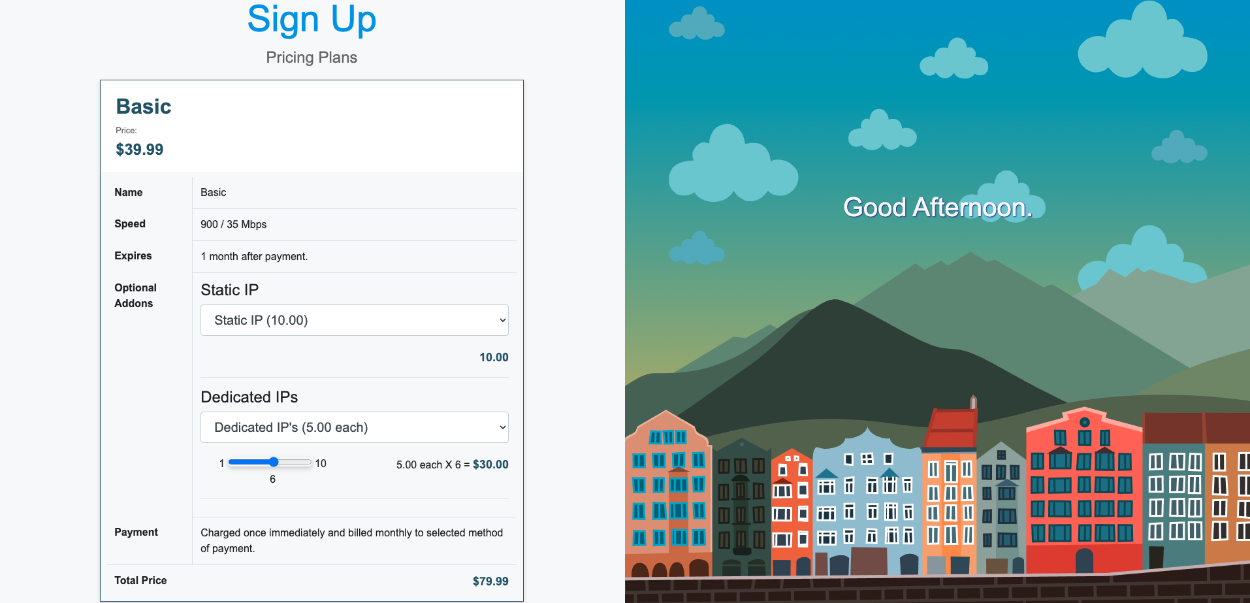 End-user portal showing dedicated IP and static IP addon options during plan purchase
Reverse NAT Example
Video Configuration Guide and Demonstration
In this example a NAT rule will be created for Reverse NAT. It will be assumed here that the ISP is handing out a private IP address and routing a static block of public IP addresses to the private IP address. Traffic that originates from the WAN IP address of the rXg will be NAT'ted to the first IP address of the public static block on the LAN. What this means is that if a client device were to go to whatismyipaddress it would report the first IP address of the static block on the LAN and not the WAN IP address. Inbound traffic from the Internet destined to the first IP address of the public static block on the LAN is now redirected to the WAN IP address of the rXg. This means that if the operator were to put in their browser the first Public IP address from the static LAN block, they would be getting to the WAN of the system.
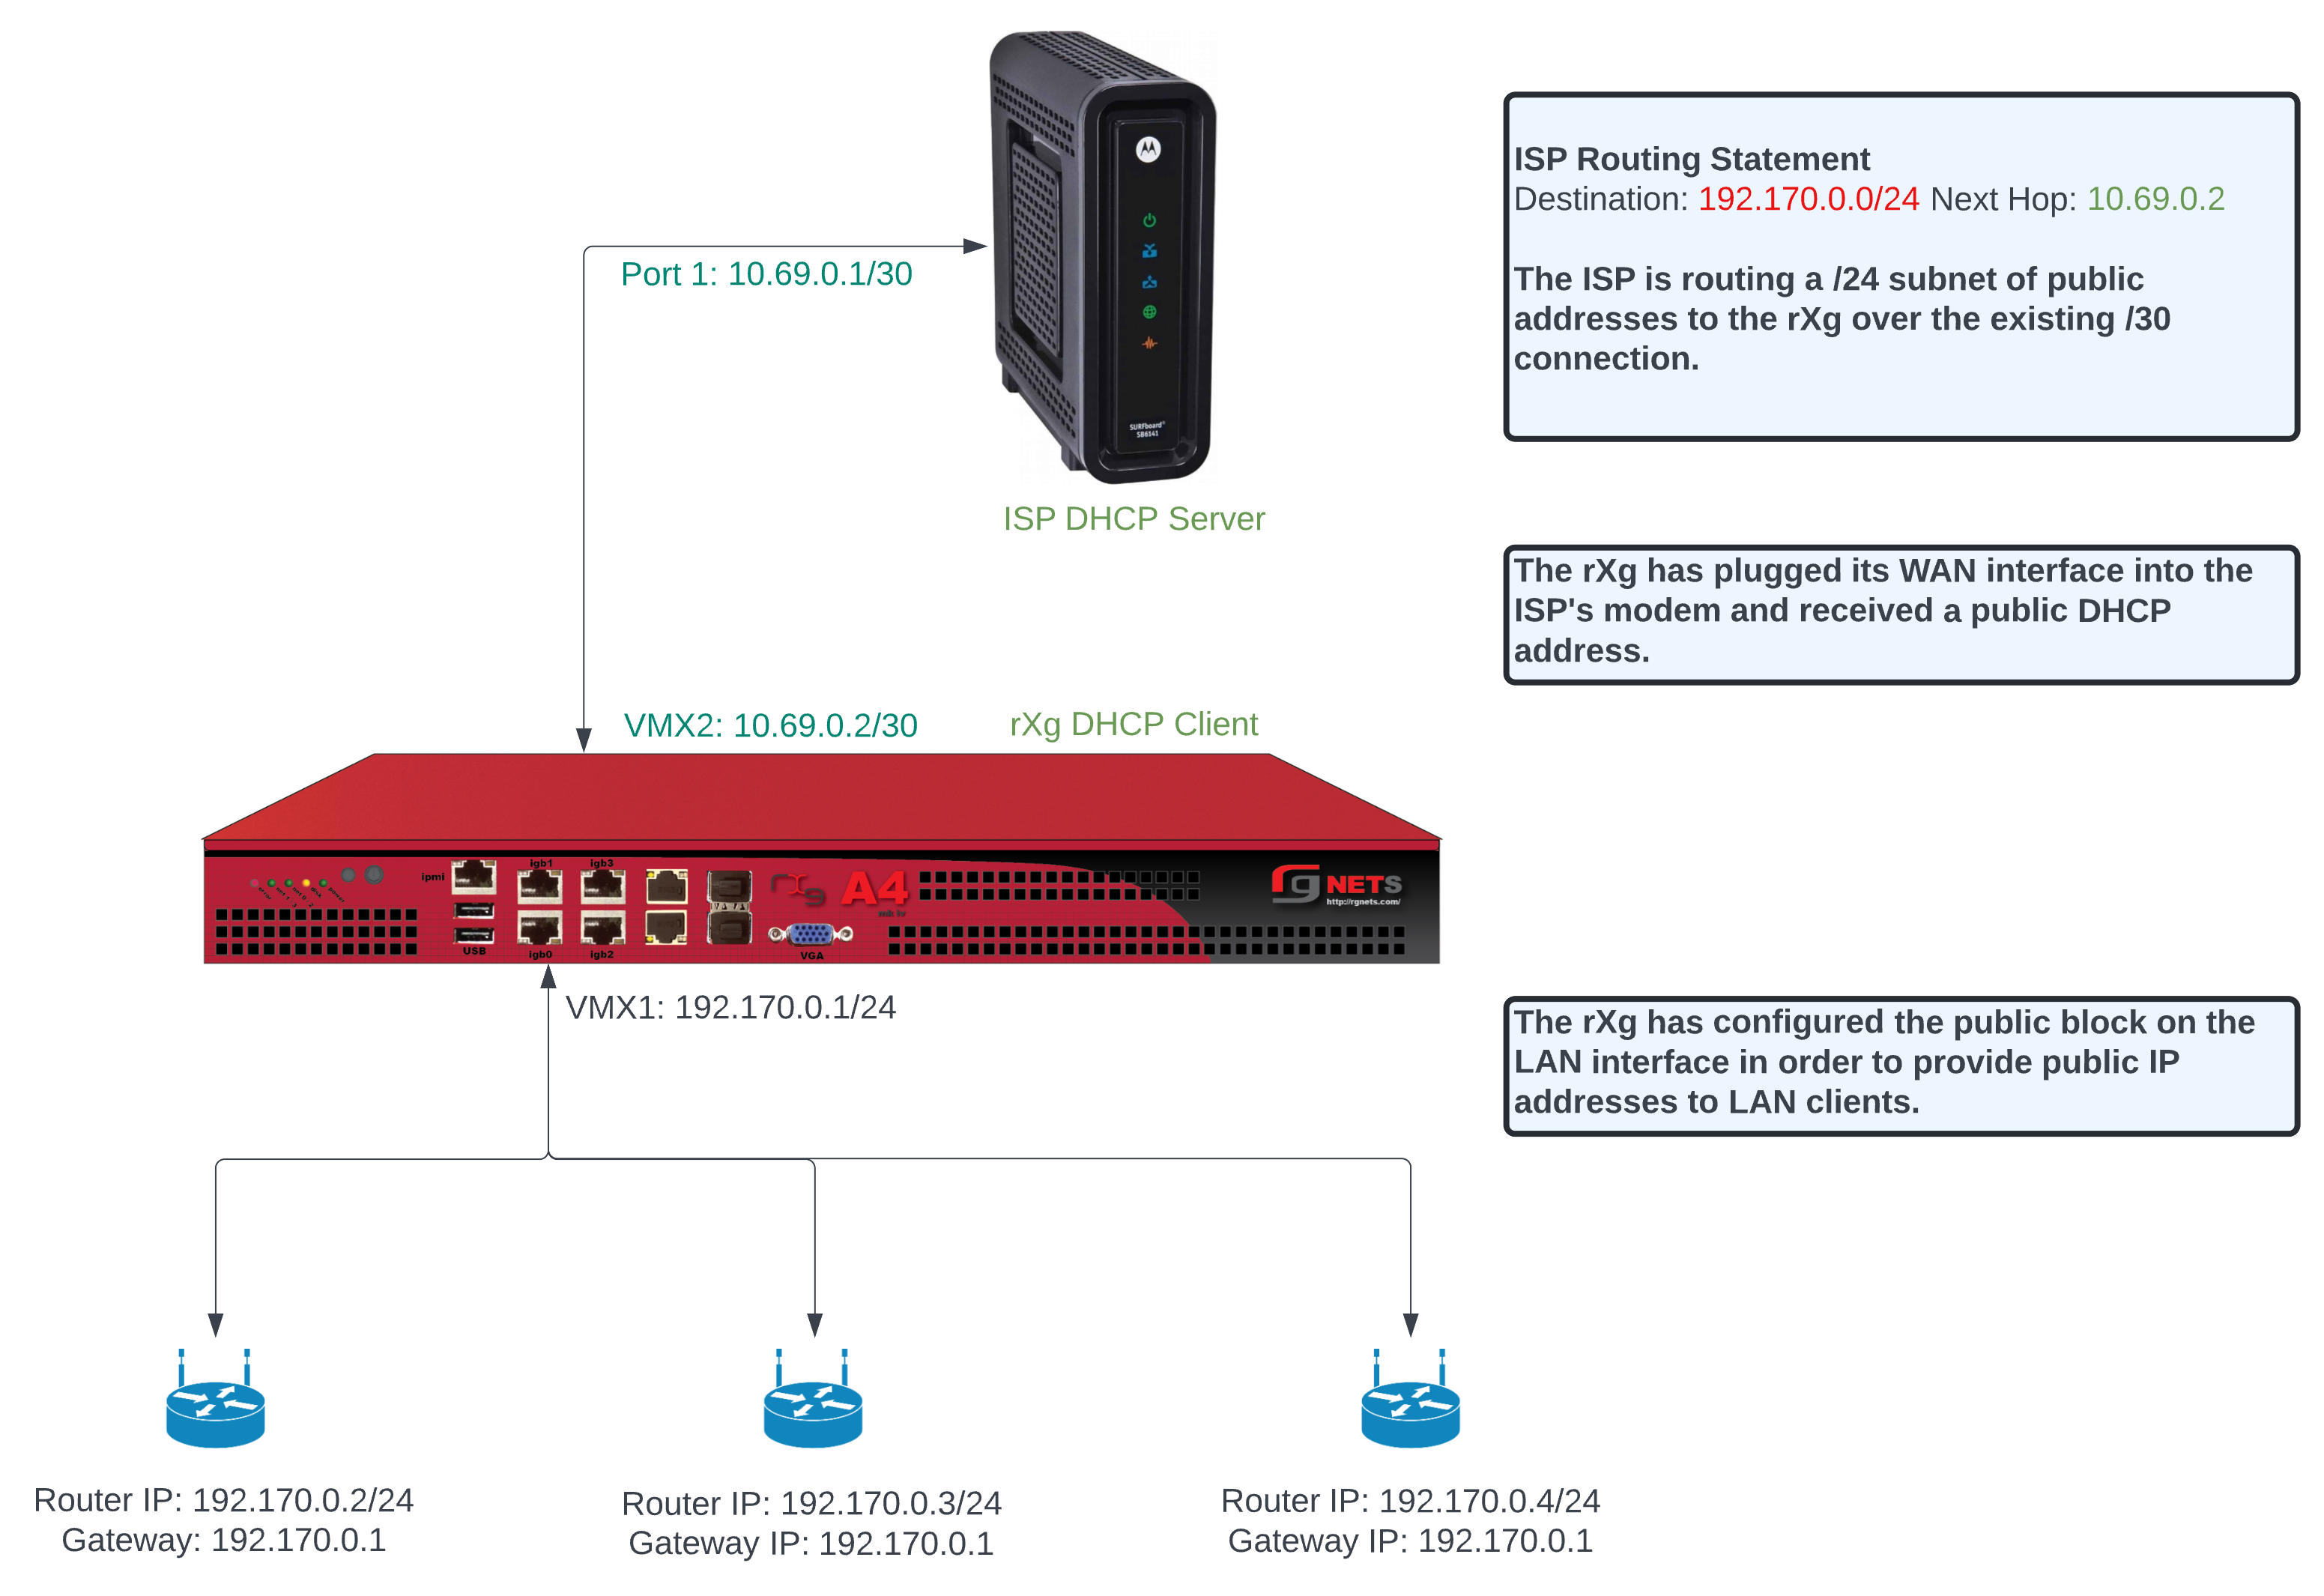 Reverse NAT concept diagram showing traffic translation between private WAN and public LAN addresses
To configure this there needs to be a WAN uplink that would usually be a static IP address however it could be DHCP that assigns a static IP, and there needs to be a block of static Public IP addresses routed to the uplink IP. Below is an example Uplink configuration that receives a WAN IP via DHCP.
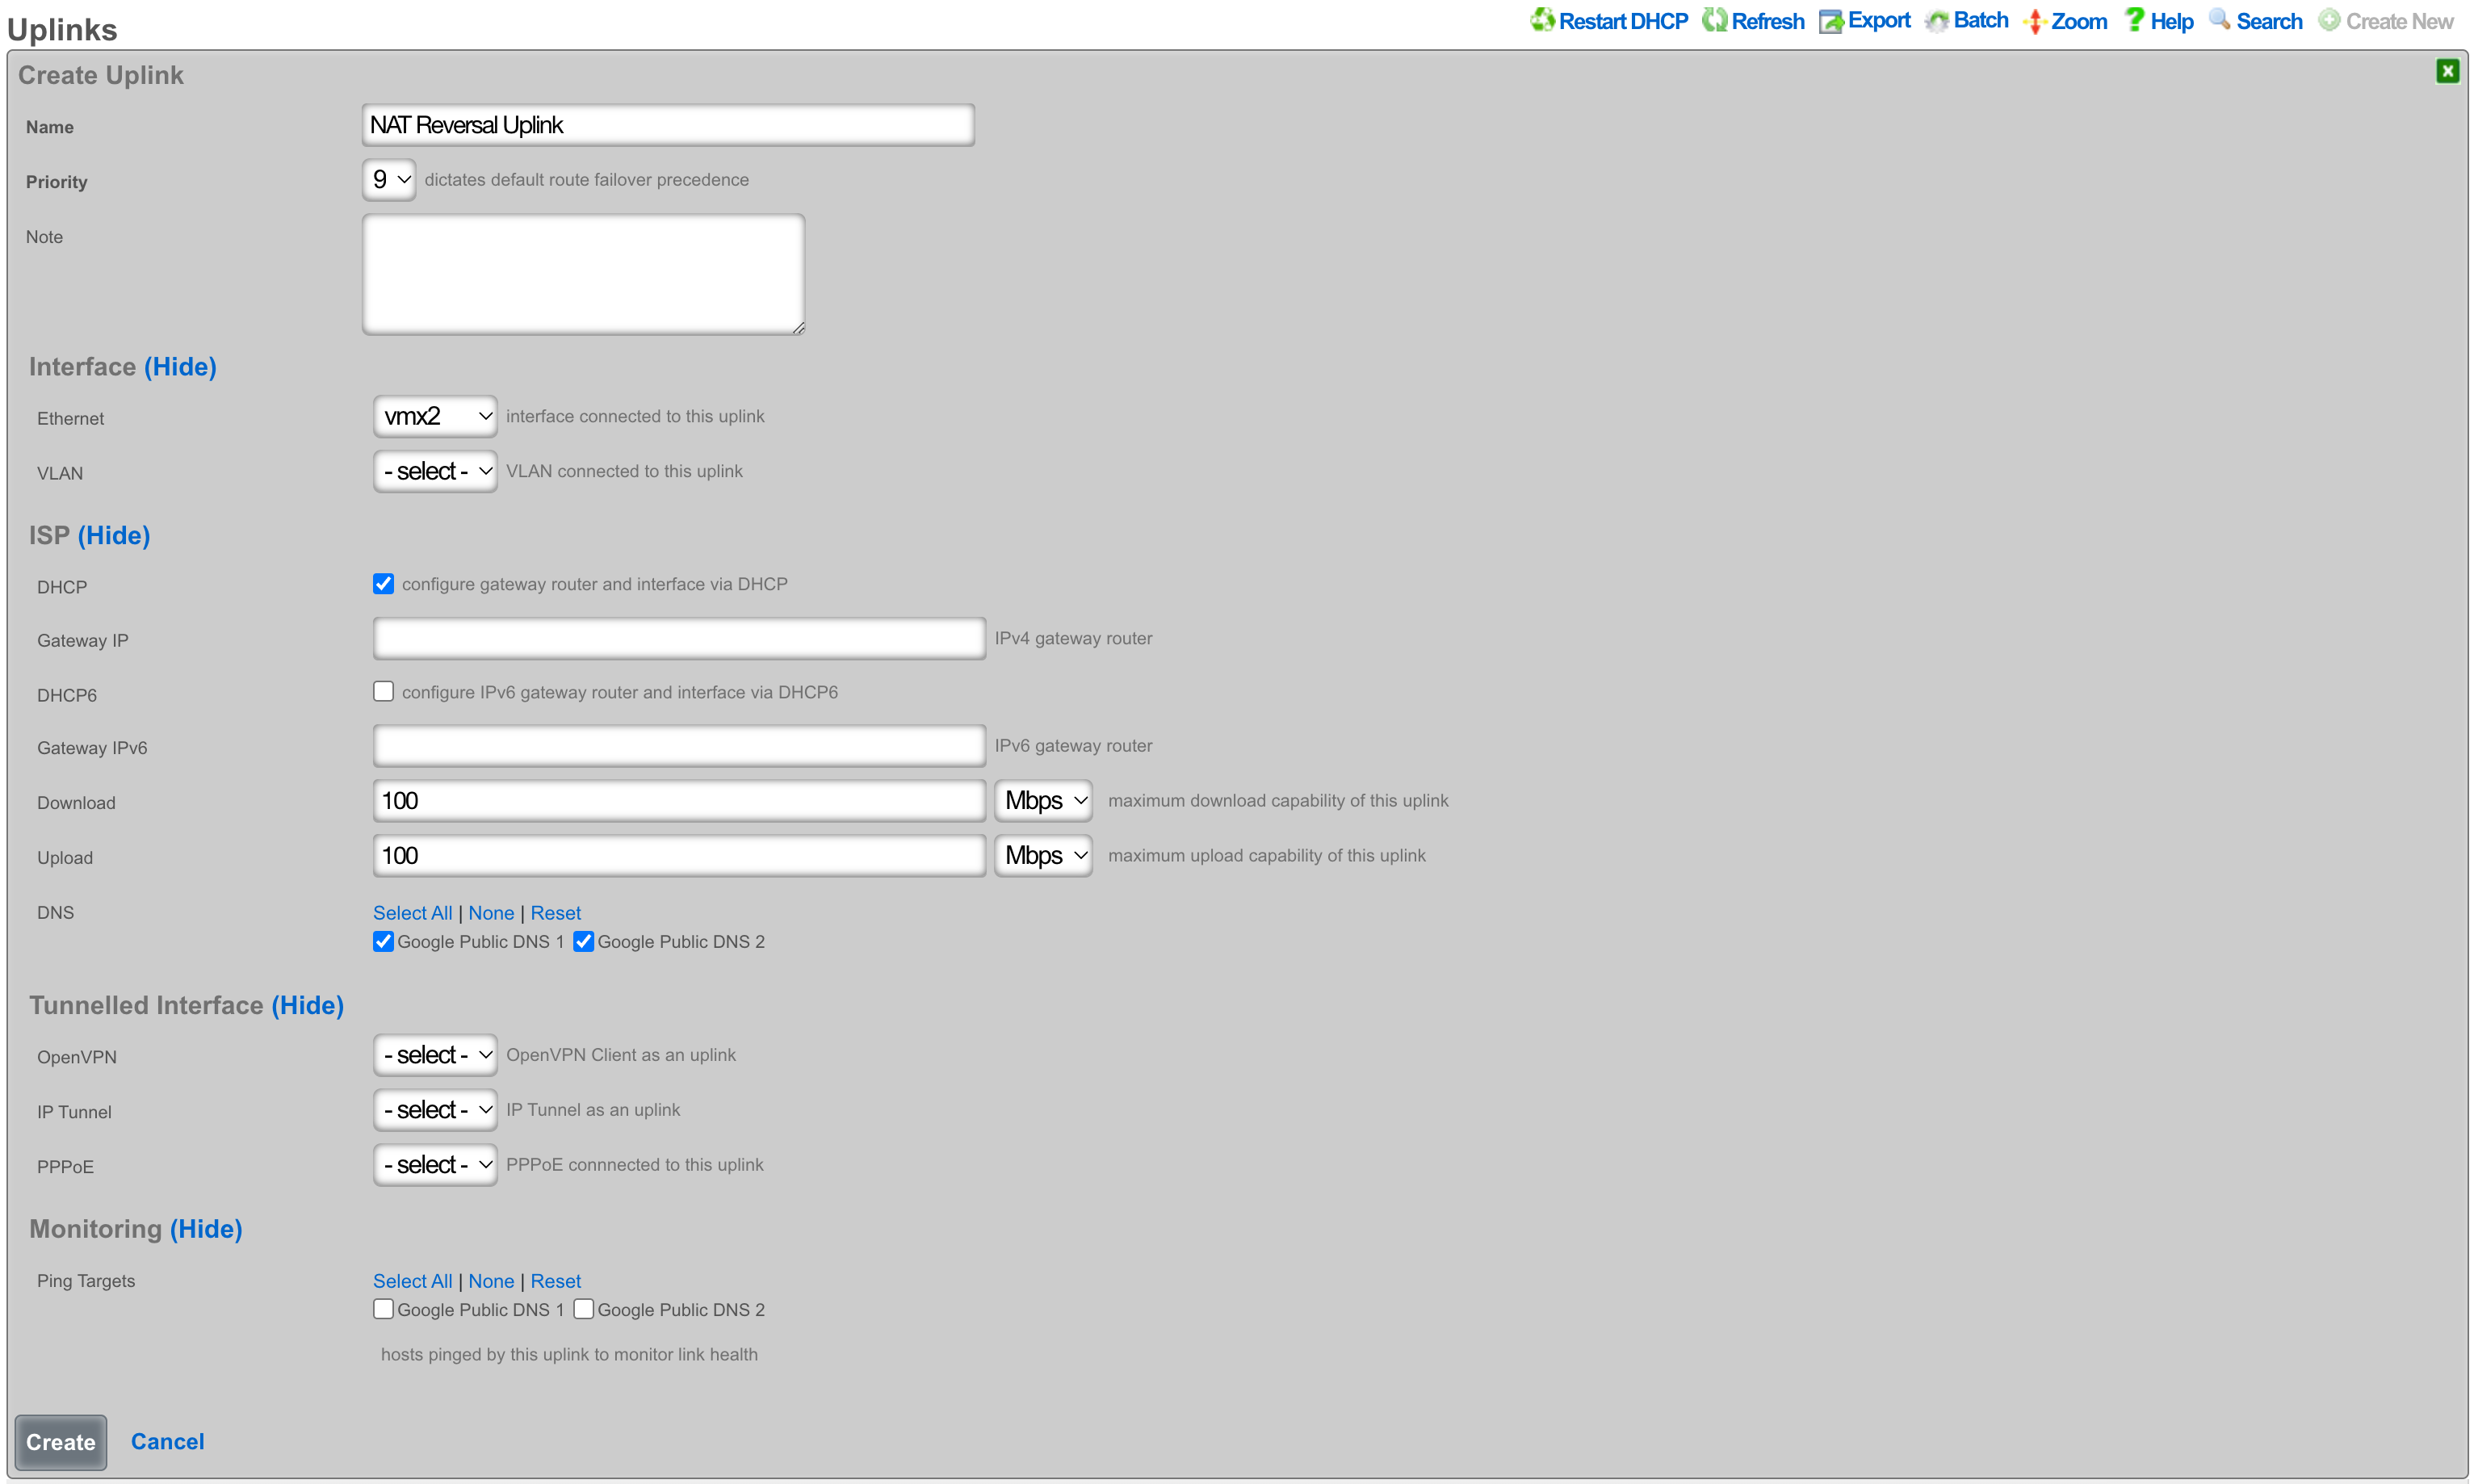 Uplink configuration receiving WAN IP address via DHCP
To configure this with an assigned static WAN IP address, create a new Uplink or edit an existing one. Select the interface. Make sure the DHCP box is unchecked, and enter the gateway IP address. Create or update the uplink.
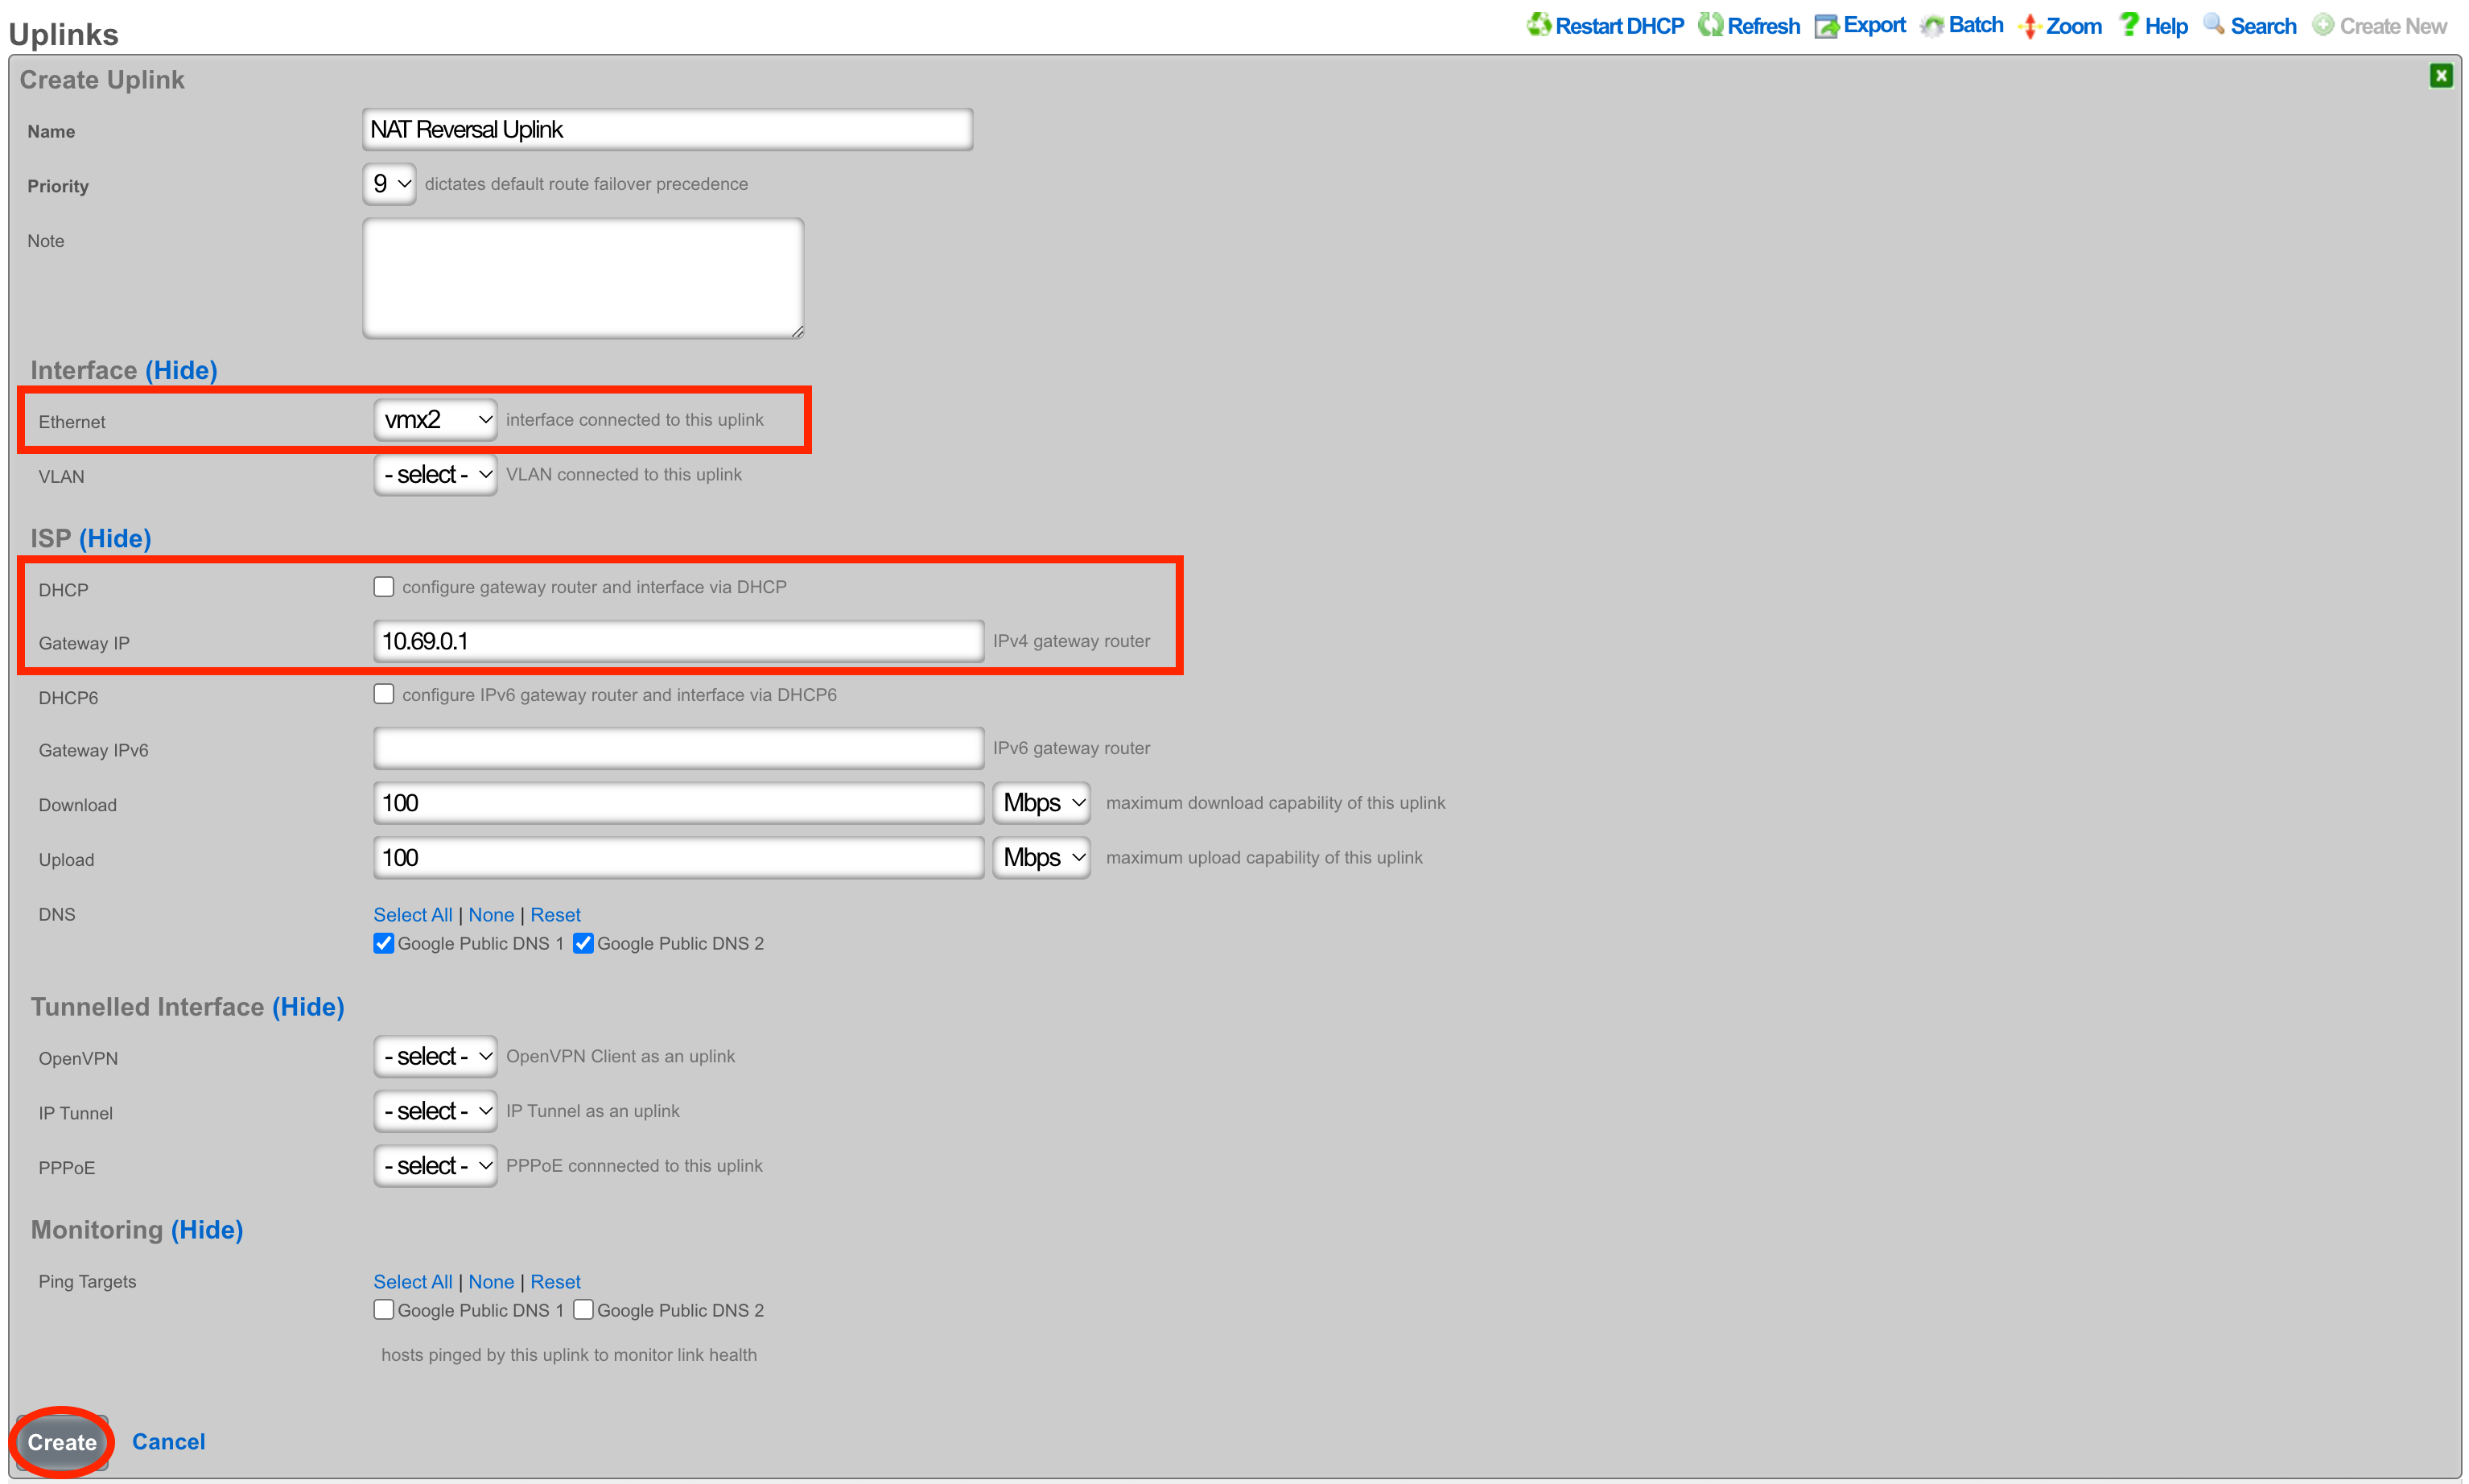 Uplink configuration with static WAN IP address and gateway
Next create a new Network Address and assign the IP address to the uplink. Give the Network Address a name, and select the interface, the interface should match the interface of the Uplink. Enter the address to be assigned to the uplink and click create.
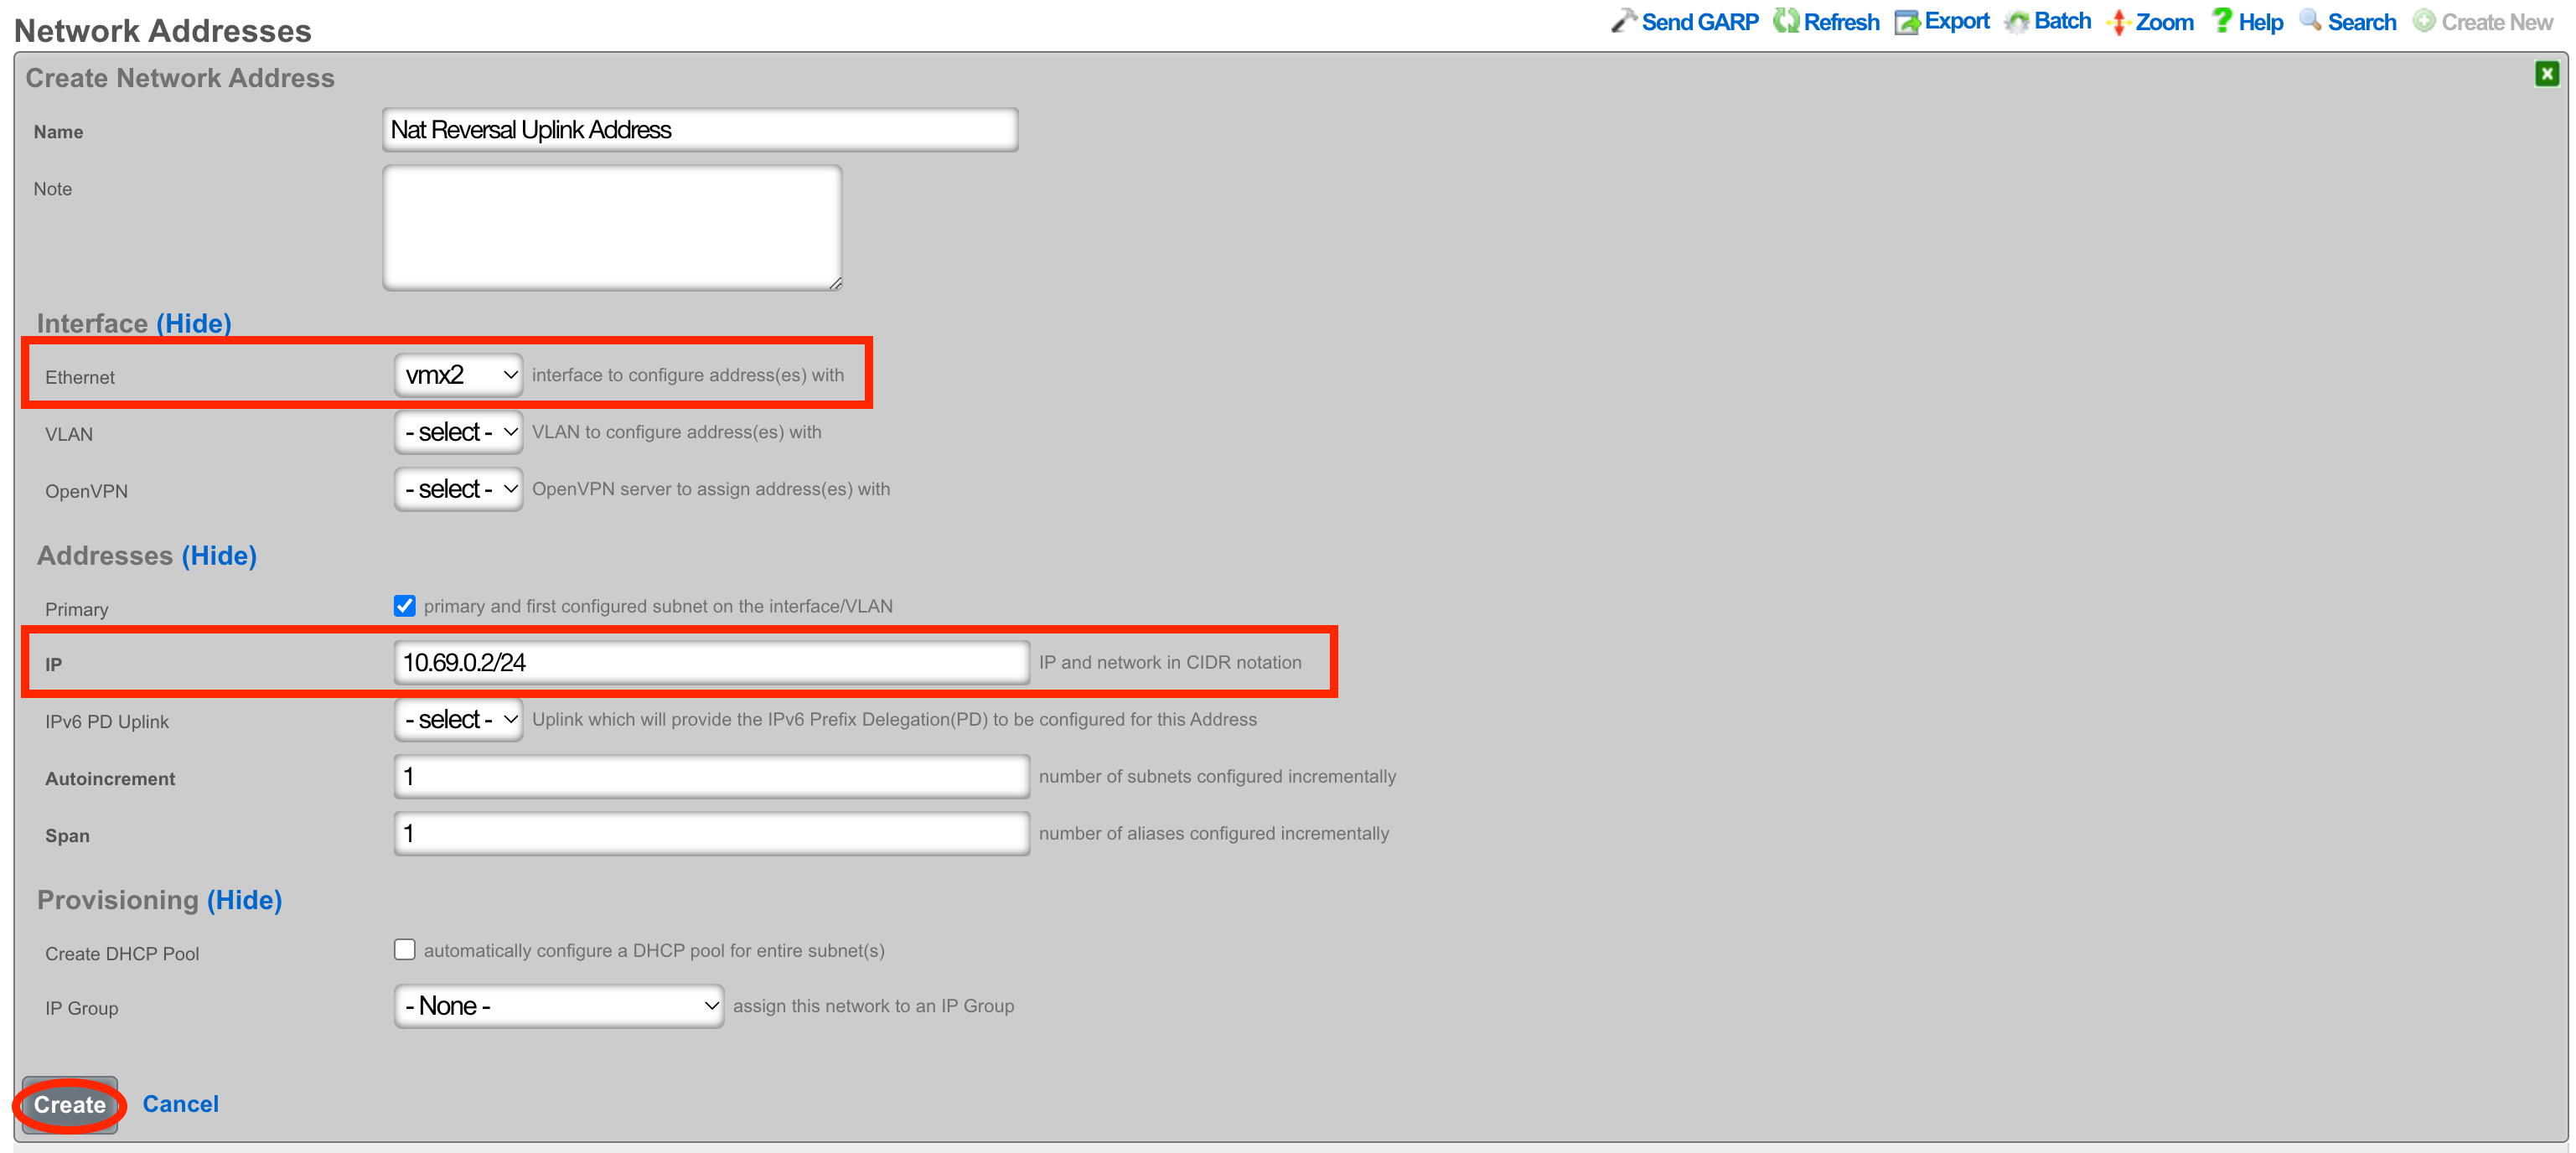 Network Address configuration assigning the WAN IP to the uplink interface
Next the Static Block of Public IP address will be created. Create a new Network Address. Give the record a name, select the interface that matches the uplink in this case it is vmx1. Enter the IP address in cidr notation. Only a single IP address is needed here however we can assign more to the system by adjusting the span if needed. Setting the span to 2 in this example would assign the .2 and .3 address to the system. Click Create.
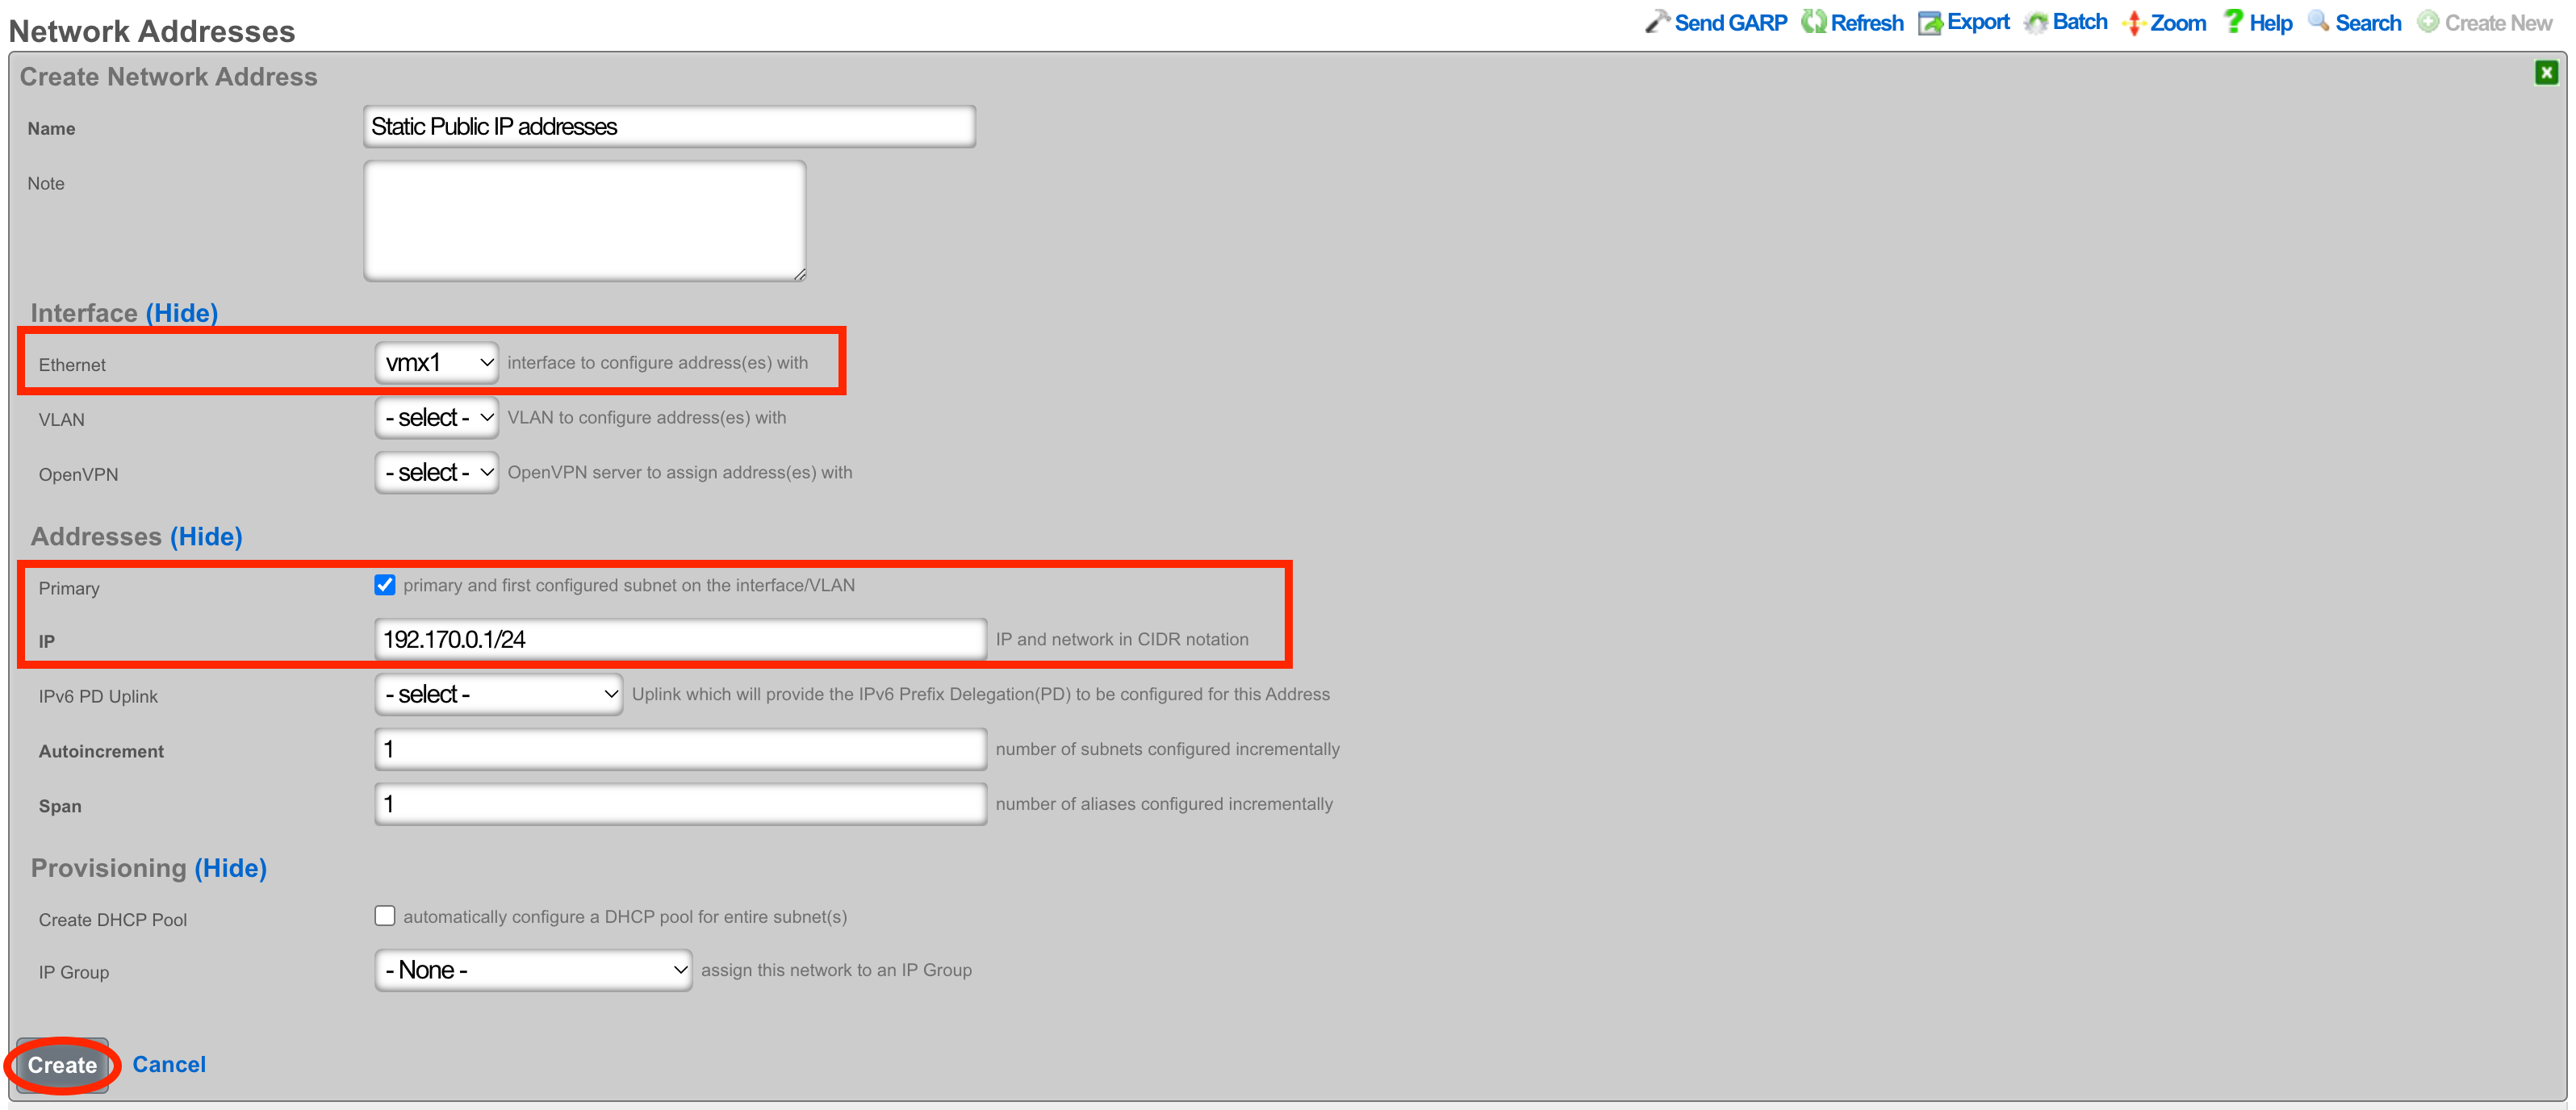 Network Address configuration for the static public IP block routed by the ISP
Next navigate to Network :: NAT and create a new NATs rule.
 NAT scaffold ready for creating a new Reverse NAT rule
Give the record a name, select the Uplink and check the Reverse NAT box. Next select the Network Address created in the previous step and click Create.
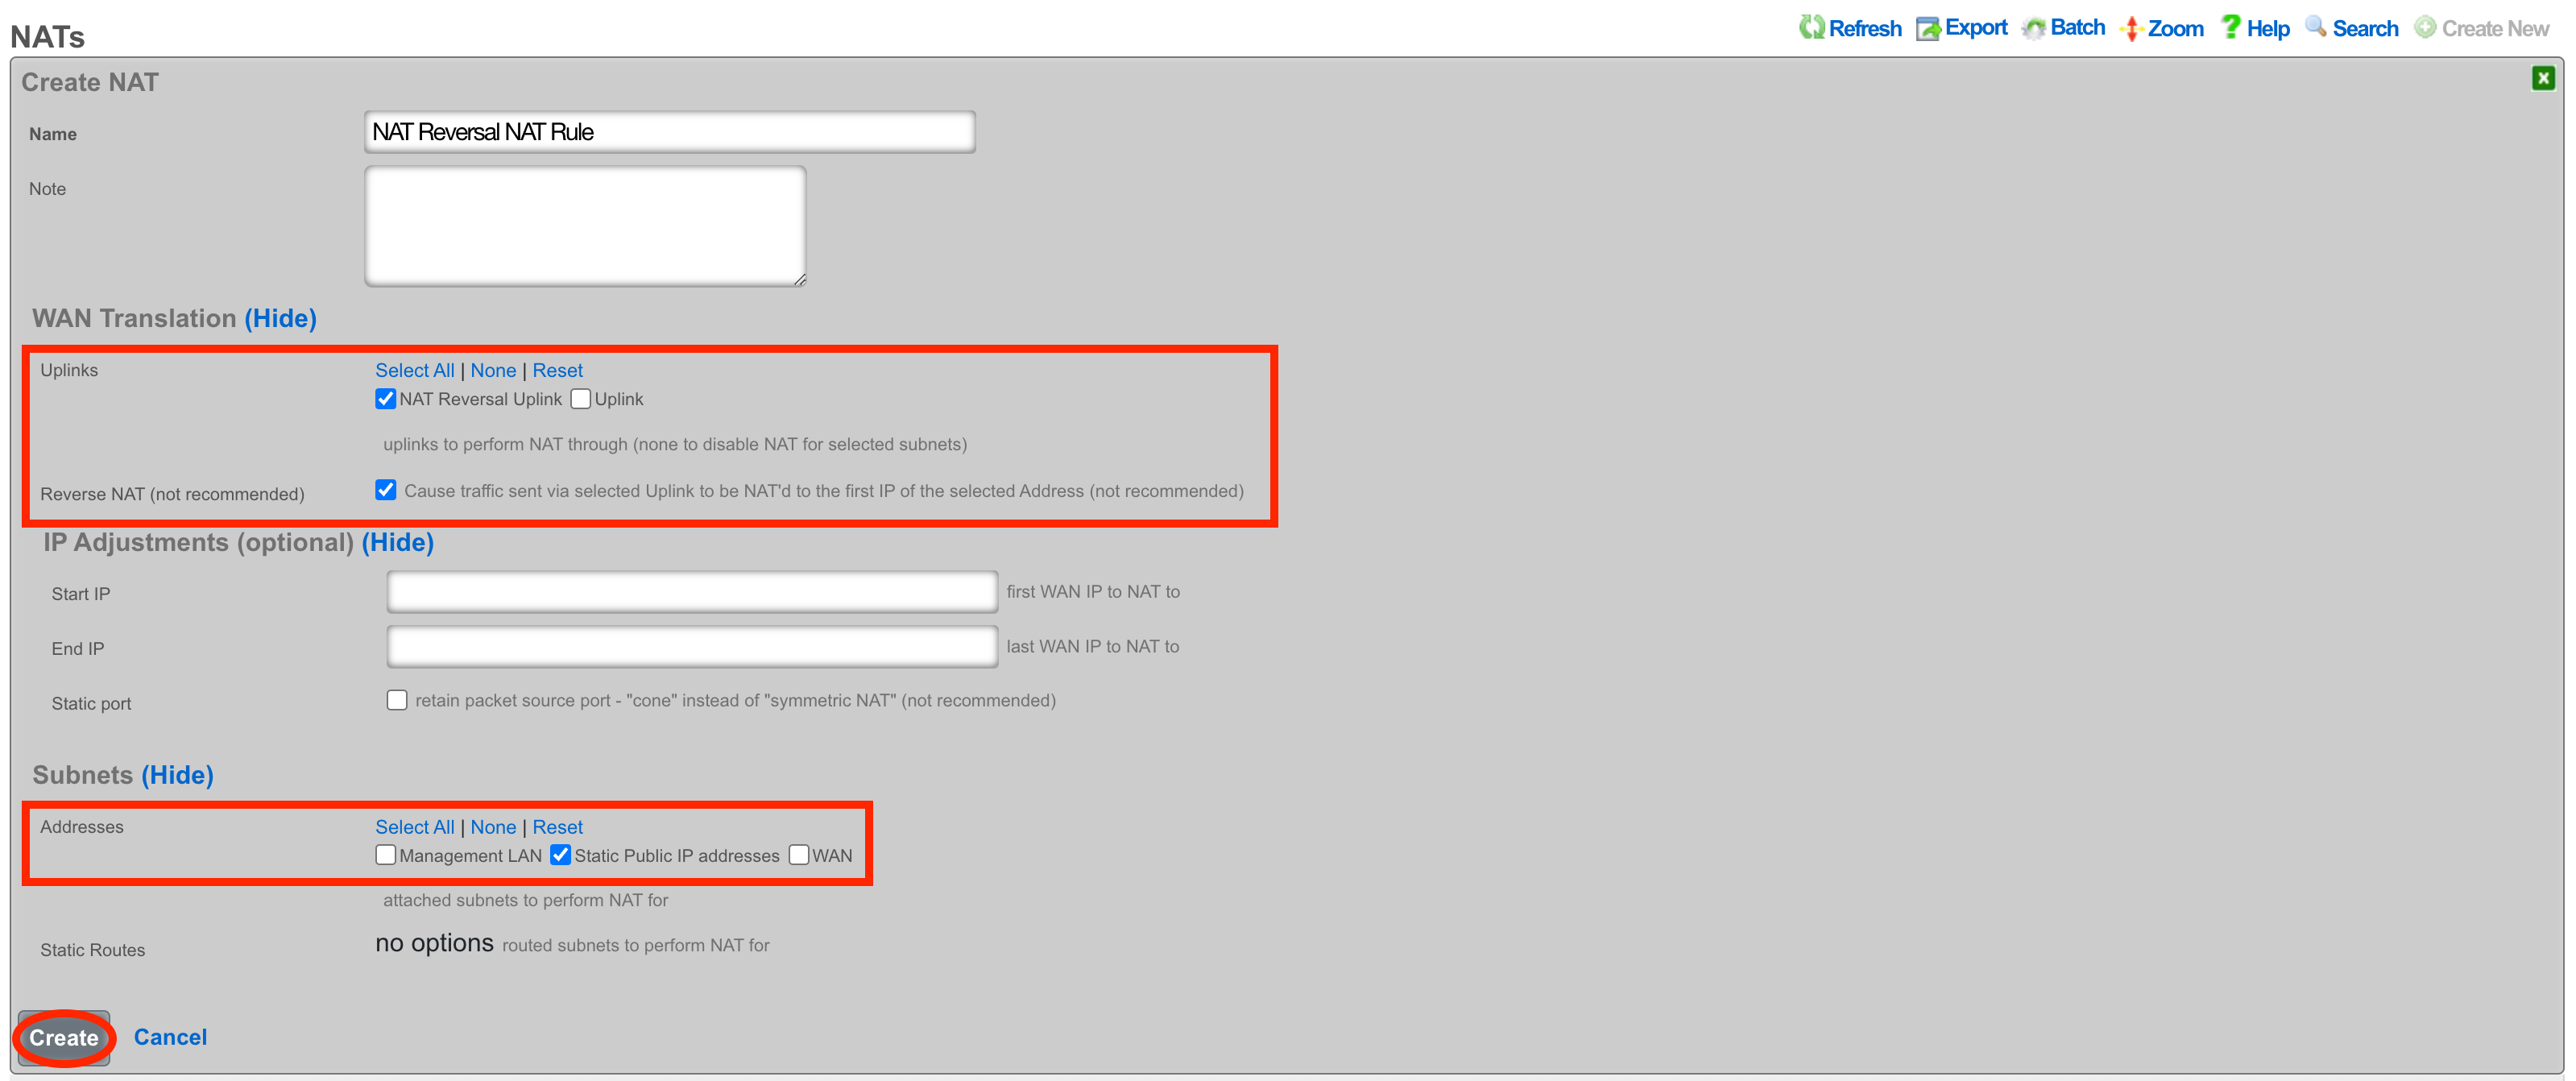 Reverse NAT rule configuration with uplink and public address block selected
With this configuration in place, a device on the LAN that goes to whatismyipaddress.com would report that its IP address was 203.0.113.1. A device going to https://203.0.113.1/admin would get the Admin GUI of the system, even though the uplinks IP is a private address.
LAN
The LAN view presents the scaffolds associated with configuring the local area network interfaces.
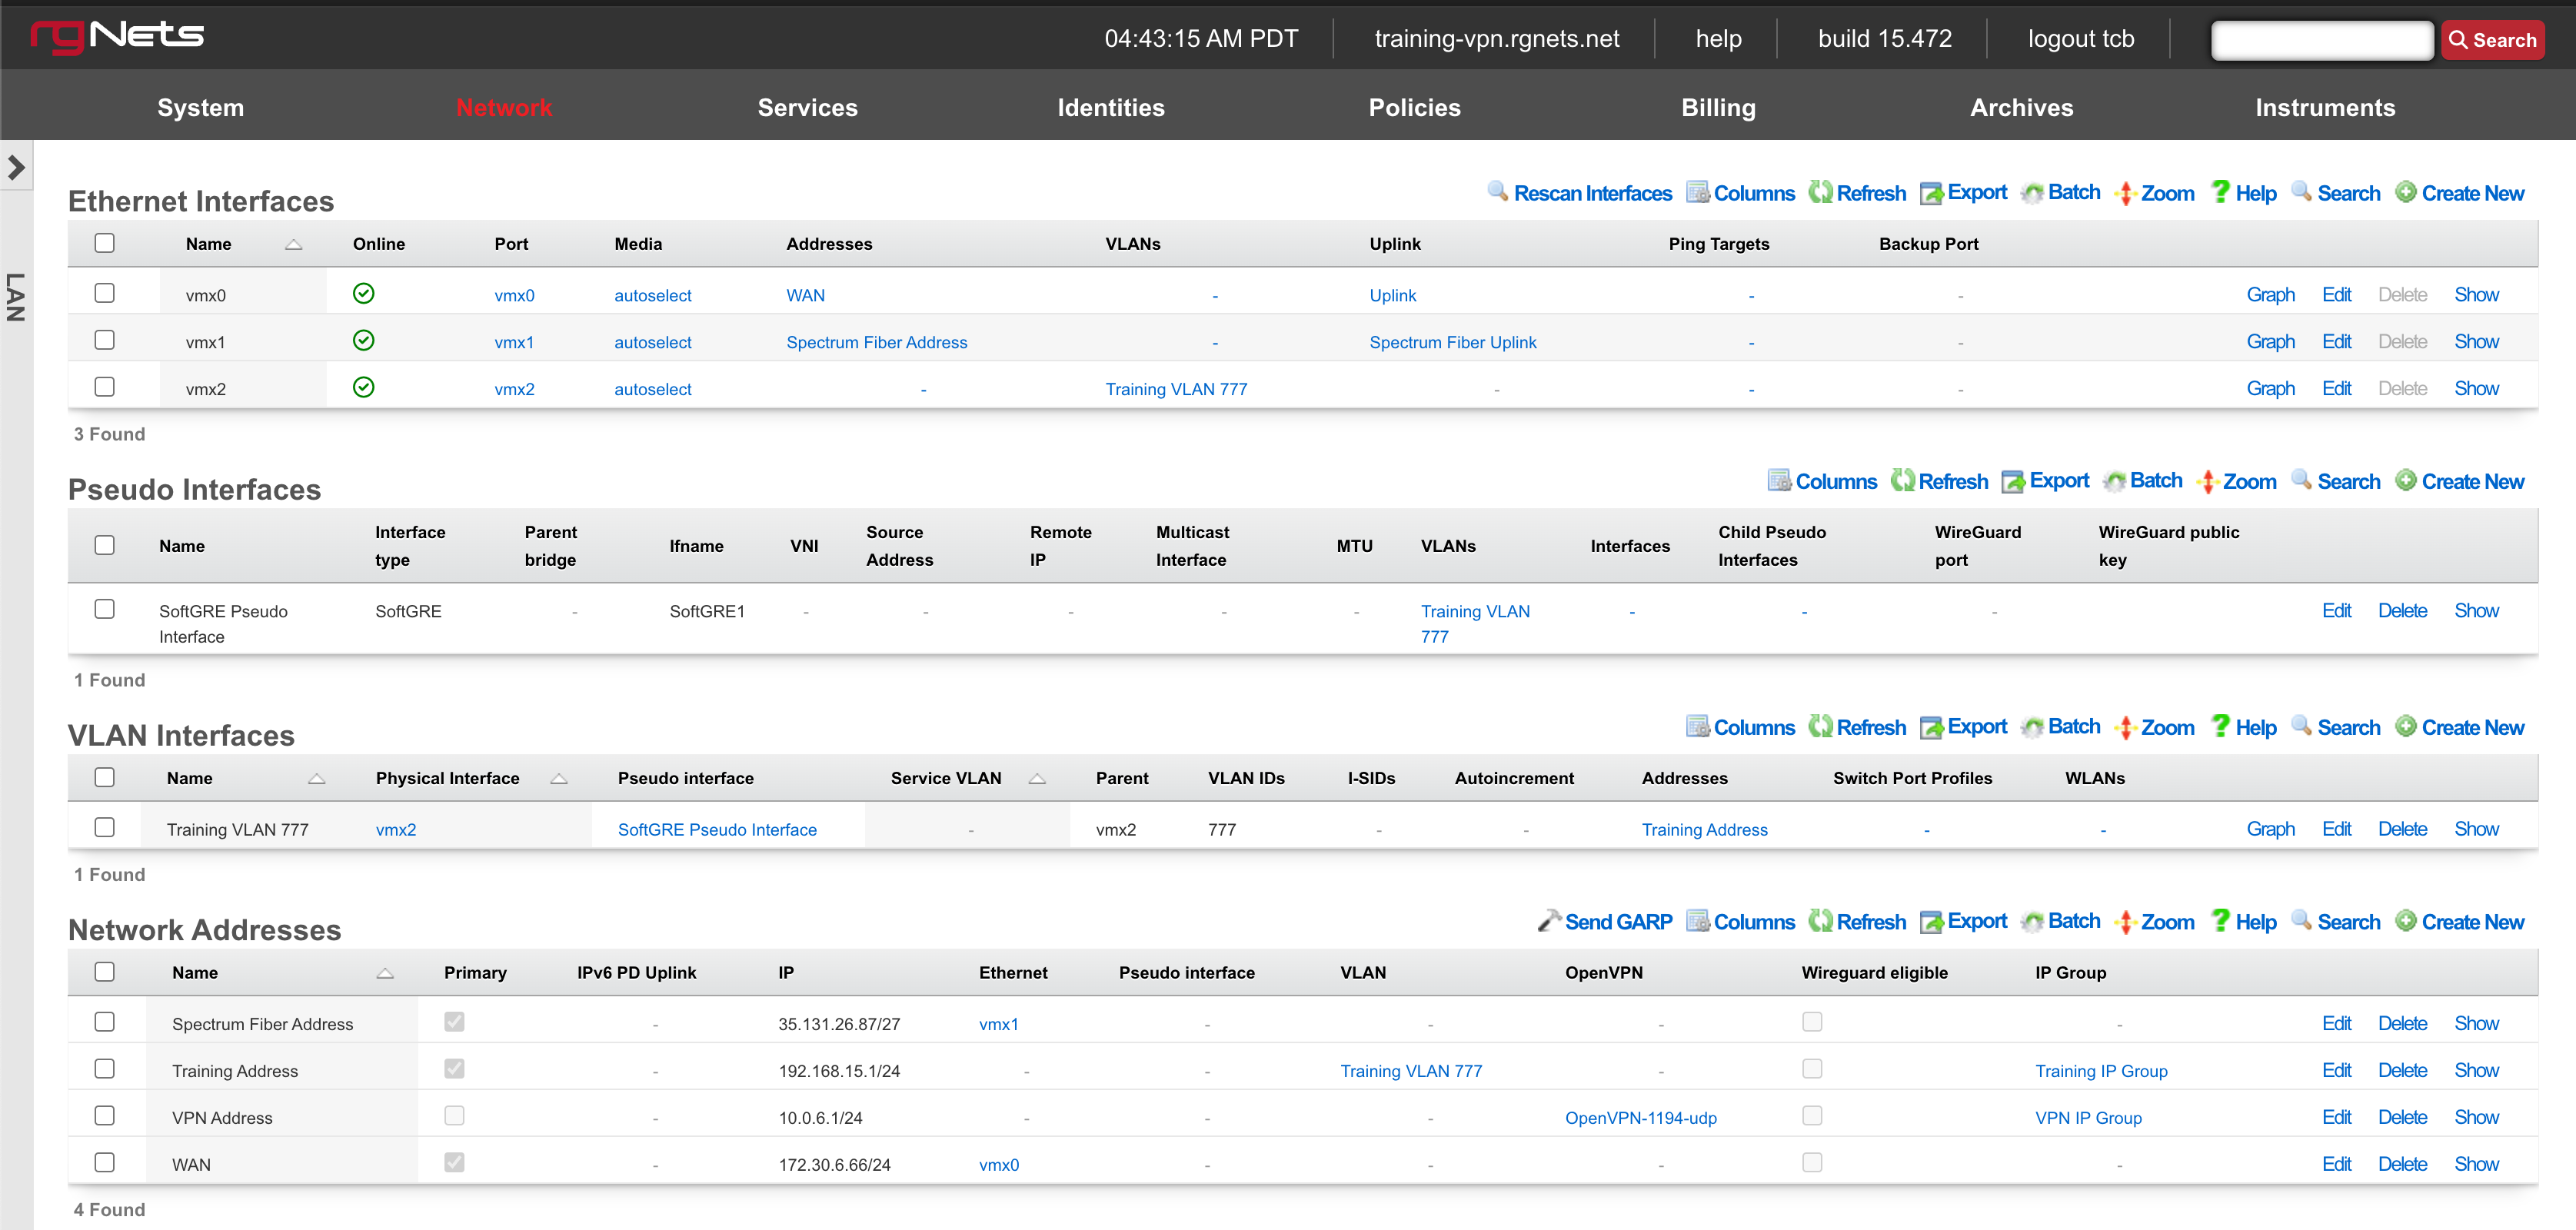
An rXg requires at least one properly configured LAN address in order to function. To configure an IP address on an interface, create a record in the addresses scaffold and associate it with an Ethernet interface record. If the LAN distribution network is connected via an 802.1Q VLAN trunk, create VLAN interfaces using the VLANs scaffold and then associate address records with the VLAN interfaces.
Ethernet Interfaces

An entry in the ethernet interfaces activates and configures a physical port on the rXg to take part in in networking connectivity.
In most cases, at least two ethernet interfaces must be configured (one for the WAN, one for the LAN). In multiple uplink scenarios, it is common to have one ethernet interface configured for each WAN uplink. It is also possible to use VLANs on a single ethernet interface to configure unlimited WAN and LAN interfaces.
The name field is an arbitrary string descriptor used only for administrative identification. Choose a name that reflects the purpose of the record. This field has no bearing on the configuration or settings determined by this scaffold.
The port field determines the physical ethernet port that this record will activate and configure.
The media field configures the speed and duplex of the Ethernet port. In most cases, the autoselect setting will automatically negotiate the fastest possible link. Autoselect should also be used if automatic crossover detection is required as most Ethernet hardware will disable automatic crossover if anything other than autoselect is specified as the media type.
If physical link cannot be established, first check the physical cable using an isolation test. If the cable is determined to not be the issue, try setting the ethernet interfaces on both sides of the cable to the same speed and duplex. Note that if a straight cable is connected between two nodes, that cable will need to be replaced with a crossover because automatic crossover detection will be disabled when a media type other than autoselect is specified. In addition, using a lower speed setting and avoiding full-duplex communication may be necessary when the cable is long or does not meet the standards needed for higher speed communication.
The MTU setting configures the maximum transmission unit (frame size) for this interface. By default, most ethernet interfaces support 1500 bytes. Large MTUs may be used in gigabit networks that support jumbo frames to obtain better throughput when transferring large files. Support for jumbo frames must be present throughout the infrastructure in order for larger MTUs to work properly.
The addresses , uplink , VLANs and PPPoE fields link an Ethernet interface to a configuration defined by the specified scaffold. These fields shown here are mainly presented for informational purposes. In most scenarios, an administrator will link the address, uplink, VLAN or PPPoE configuration to the Ethernet interface using the other scaffold.
The backup port field specifies an alternative ethernet interface to assign the addresses , uplink , VLANs and PPPoE configuration settings when this ethernet interface goes down. An ethernet interface is marked as down if it loses link or if all of the ping targets associated with it go offline. The VLANs and Network Addresses associated with an ethernet interface are moved to the backup port when the ethernet interface is marked as down. The backup port mechanism is designed to be used with generic L2 switching. Backup ports should not be used with any LAG/MLT/SMLT/LACP configuration on the connected switch.
The checksum offload , TCP segmentation offload and large receive offload settings offload the specified processing to the NIC hardware when possible. In some cases this may cause instability and in other cases there are performance benefits.
In this example, there is no redundancy as there is only one path between the rxg and all network switches. If the rxg loses connectivity with Switch A, Switch B, C, and D will also lose access.
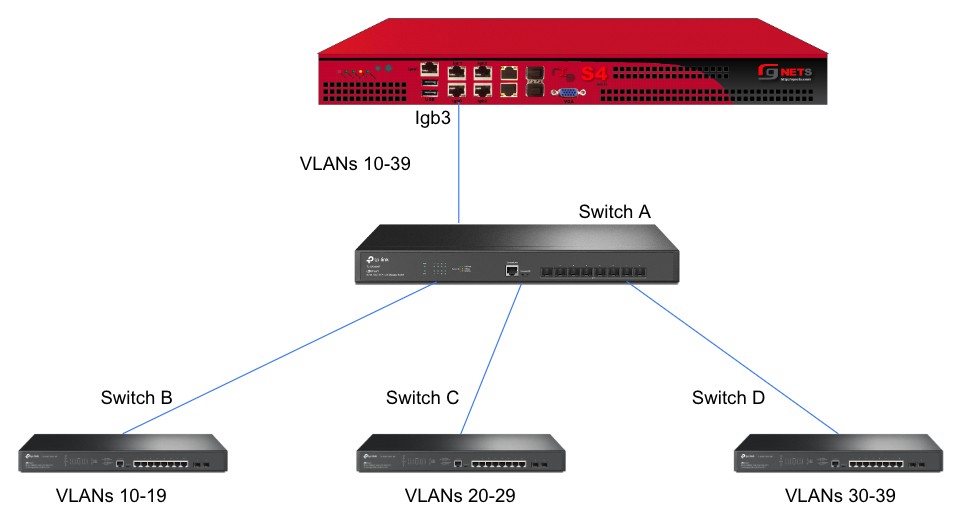
A slightly better version of the above configuration would be to add a Backup Port so that if the primary link to switch A becomes unusable, a secondary link can be utilized.
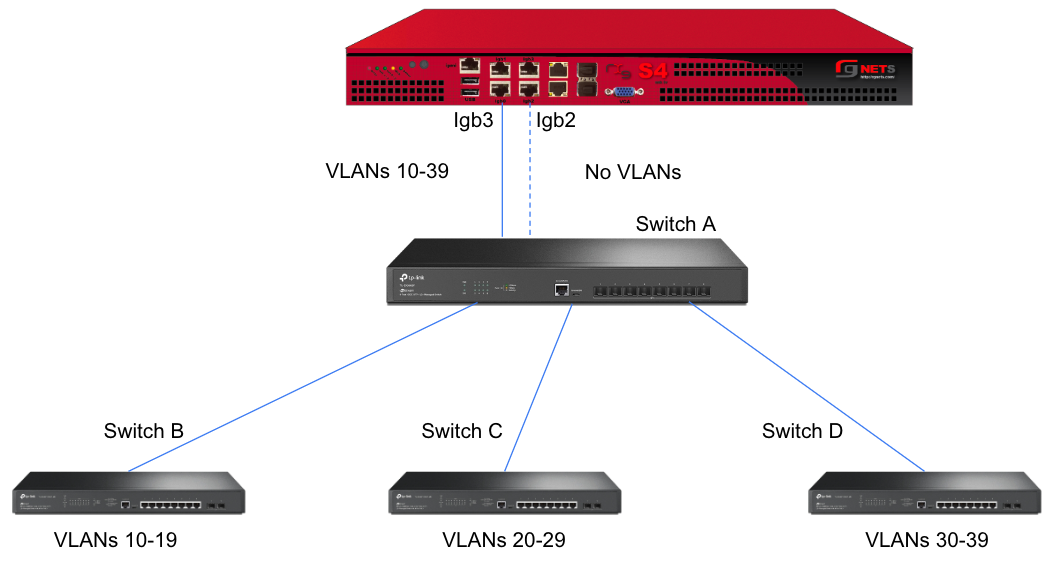
Edit the primary interface, select several Ping Targets , then select a Backup Port.
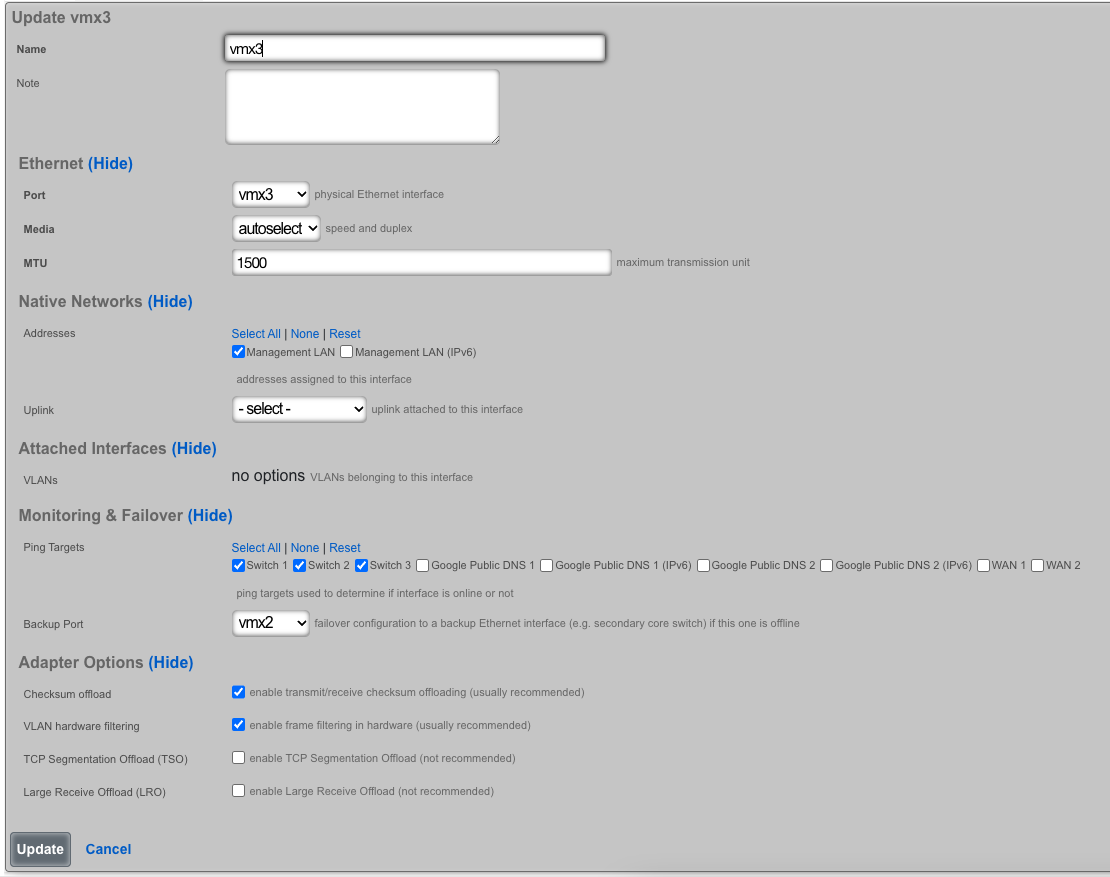
In this example, when Igb3 loses link or all Ping Targets fail to respond, the VLANs and Network Addresses associated with Igb3 are moved to the Backup Port Igb2. Igb3 is marked as down.
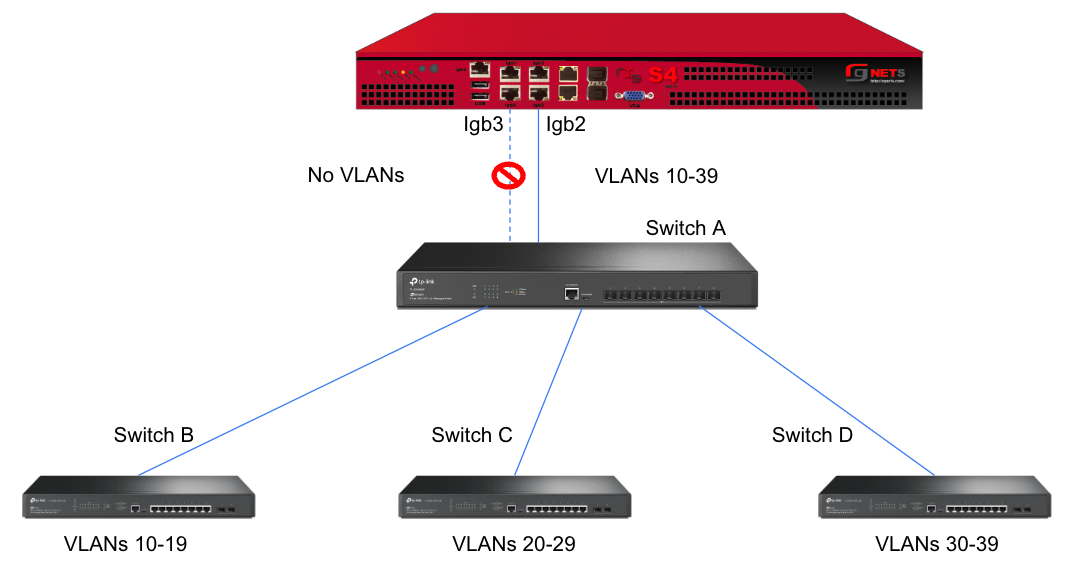
However, this still leaves Switch A as a single point of failure. Consider the below topology for a higher level of redundancy.
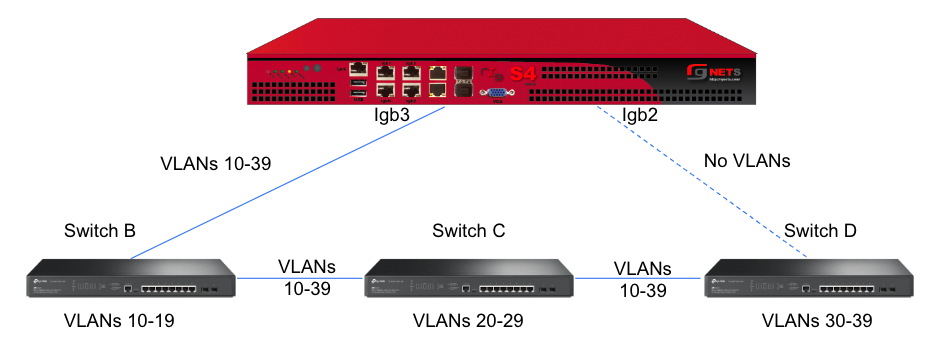
This feature is not dependent on proprietary protocols and as such will work with most any available switch.
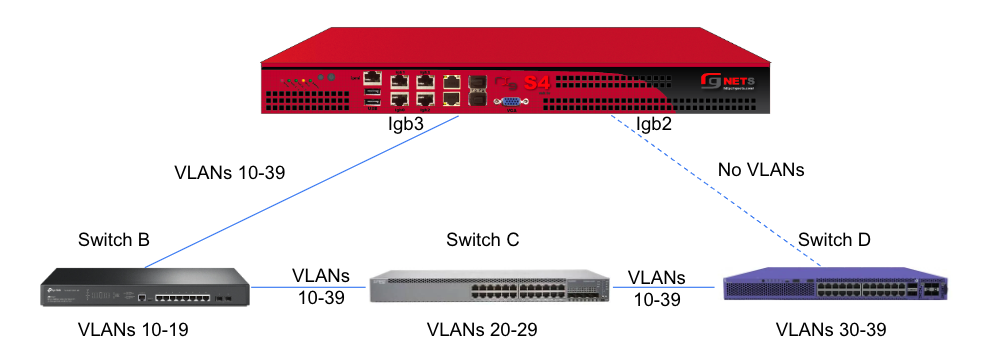
Sample Topology: Redundant Core Switches
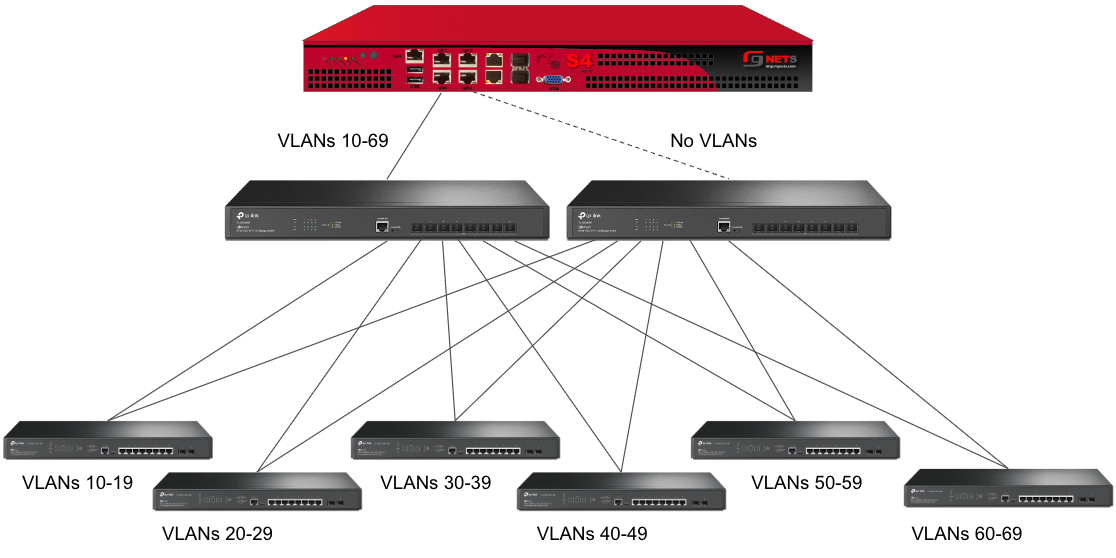
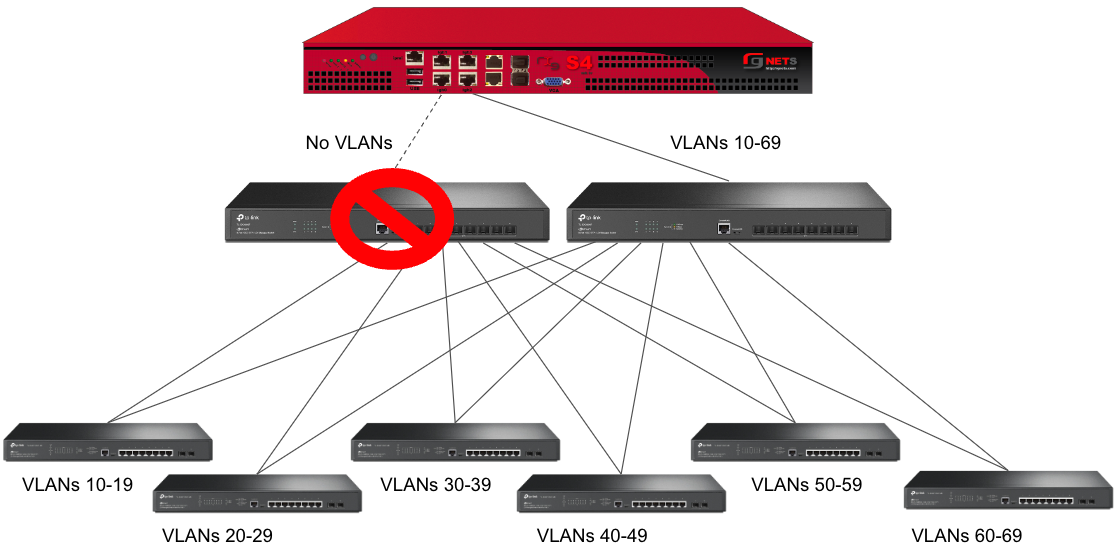
Sample Topology: Redundant Gateways and Core Switches
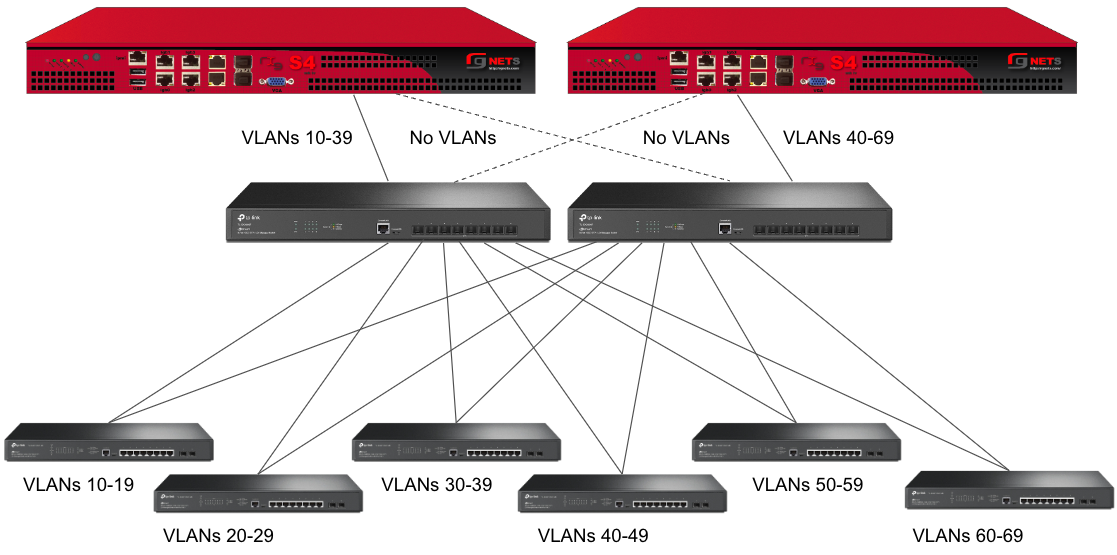
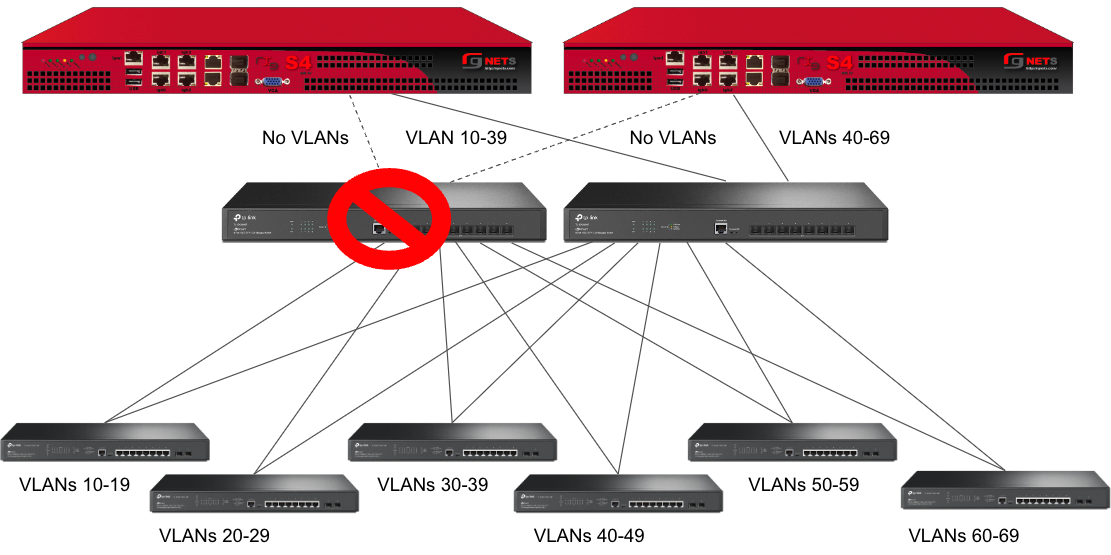
Pseudo Interfaces
Pseudo interfaces provide virtual network interface capabilities that extend beyond traditional physical interfaces. These software-defined interfaces enable advanced networking features including tunneling, aggregation, and virtualization. The rXg platform supports multiple pseudo interface types, each optimized for specific use cases and deployment scenarios.

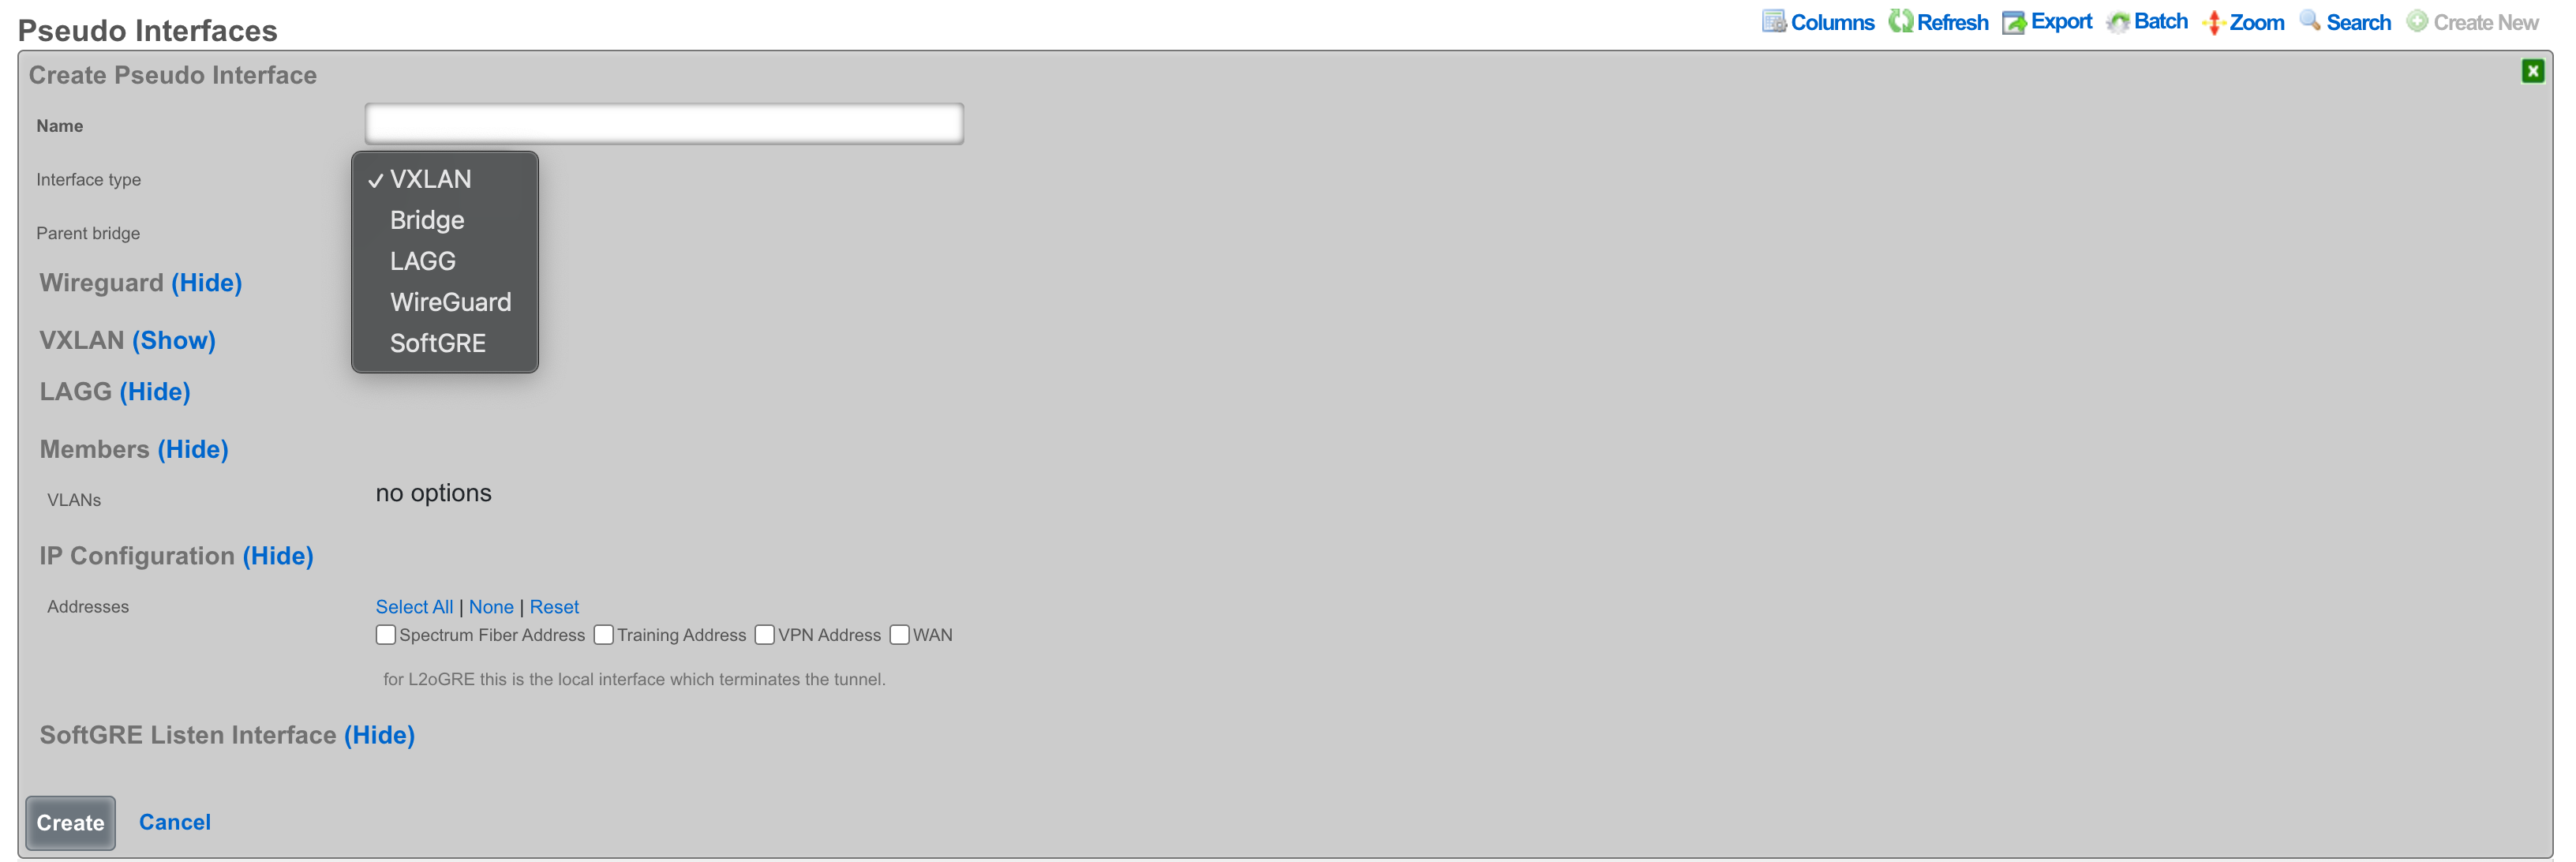
General Features and Capabilities
Parent/Child Pseudo Interface Relationships
The rXg platform supports sophisticated hierarchical relationships between pseudo interfaces, enabling operators to create complex network topologies that mirror real-world deployment scenarios. This capability allows a parent pseudo interface to contain and manage multiple child pseudo interfaces, establishing a tree-like structure that simplifies management and enhances scalability.
When configuring parent/child relationships, the parent interface acts as a container that aggregates the functionality of its children. This architecture proves particularly valuable in bridge configurations where multiple pseudo interfaces need to operate as a cohesive unit. The parent interface inherits certain properties from its children while maintaining its own distinct configuration parameters. Traffic flowing through child interfaces can be managed collectively at the parent level, enabling centralized policy application and traffic shaping.
The relationship between parent and child interfaces operates bidirectionally in terms of configuration inheritance. Changes to a parent interface can cascade to its children when appropriate, while the aggregate state of child interfaces influences the operational status of the parent. This hierarchical model supports multiple levels of nesting, though practical deployments typically utilize no more than two or three levels to maintain manageable complexity.
In this example, the parent bridge interface "DataCenter-BR1" aggregates traffic from three child pseudo interfaces. The VXLAN interfaces handle different tenant networks (VNI 100 and 200), while the WireGuard interface provides secure remote access. All traffic flows through the parent bridge, enabling unified policy application and monitoring.
This three-tier configuration demonstrates complex hierarchical relationships where the master bridge aggregates two building-level bridges, each containing floor-specific VLANs. Management traffic (VLAN 10) flows through all buildings while user traffic remains segmented by floor and building.
Hierarchical Interface Configurations
Hierarchical configurations extend beyond simple parent/child relationships to encompass complex multi-tier network architectures. These configurations enable operators to model sophisticated network designs where interfaces at different levels serve distinct purposes while maintaining coordinated operation.
In a typical hierarchical deployment, the top-level pseudo interface might represent a major network segment or service boundary. Second-tier interfaces could correspond to different service types or customer groups, while third-tier interfaces might represent individual customer connections or specific service instances. This structure mirrors common service provider architectures where aggregation occurs at multiple levels.
The hierarchical model provides several operational advantages. Configuration templates can be applied at higher levels and inherited by lower-level interfaces, reducing repetitive configuration tasks. Monitoring and troubleshooting benefit from the logical grouping, as operators can quickly identify issues at the appropriate level of the hierarchy. Performance optimization also improves, as the system can make intelligent decisions about resource allocation based on the hierarchical structure.
This service provider hierarchy demonstrates three service tiers beneath a core aggregation layer. Each service type receives dedicated resources and policies while sharing common infrastructure. Traffic isolation and quality of service policies apply at each hierarchical level.
This corporate hierarchy shows geographic and functional organization with dedicated cloud connectivity. Each regional hub aggregates local sites while maintaining global connectivity through the core bridge. Policies cascade from global to regional to site level, with local customization at each tier.
Autoincrement Modes for Pseudo Interfaces
Autoincrement functionality for pseudo interfaces streamlines the deployment of large-scale configurations by automatically generating sequential interface instances based on defined patterns. This feature proves invaluable when deploying numerous similar interfaces that differ only in specific parameters such as VLAN IDs or IP addresses.
The autoincrement system operates by defining a base configuration and specifying increment parameters that determine how subsequent interfaces differ from the base. When enabled, the system automatically creates the specified number of interfaces, applying the increment logic to generate unique configurations for each instance. This automation dramatically reduces configuration time and eliminates human errors that commonly occur during repetitive manual configuration tasks.
Autoincrement modes support various increment strategies depending on the interface type and deployment requirements. Sequential numbering represents the simplest approach, where each interface receives the next number in sequence. More sophisticated patterns include subnet-aligned increments that ensure each interface aligns with network boundaries, and ratio-based increments that create specific relationships between interface parameters. The system validates increment patterns to prevent conflicts and ensure that generated configurations remain valid within the broader network context.
Interface Statistics and RRD Monitoring
The rXg platform implements comprehensive statistics collection and monitoring for all pseudo interfaces through integration with RRD (Round Robin Database) systems. This monitoring infrastructure captures detailed performance metrics at regular intervals, storing them in an efficient circular buffer format that maintains both fine-grained recent data and aggregated historical trends.
Statistics collection occurs automatically for all configured pseudo interfaces without requiring additional configuration. The system captures fundamental metrics including bytes transmitted and received, packet counts, error rates, and drop statistics. For certain interface types, specialized metrics provide additional insight into interface-specific behavior. VPP interfaces, for instance, include hardware acceleration metrics that reveal DPU utilization and offload effectiveness.
The RRD storage system organizes collected data into multiple resolution tiers. High-resolution data captures metrics every few seconds for recent activity, providing detailed visibility into current performance. As data ages, the system automatically consolidates it into lower-resolution averages, maintaining long-term trends while managing storage efficiently. This tiered approach ensures that operators can examine both immediate performance issues and long-term capacity trends.
Graphical visualization of collected statistics enables intuitive performance analysis. The web interface generates real-time graphs showing traffic patterns, utilization trends, and error conditions. These visualizations support multiple time scales, from minutes to years, allowing operators to identify both transient issues and gradual changes. Comparative views enable side-by-side analysis of multiple interfaces, facilitating capacity planning and troubleshooting.
Network Graph Associations
Network graph associations provide a powerful mechanism for visualizing and managing the relationships between pseudo interfaces and other network elements. These associations create a comprehensive map of network topology that aids in understanding traffic flows, identifying dependencies, and planning network changes.
The network graph system automatically discovers relationships based on interface configurations and traffic patterns. Direct associations form when interfaces explicitly reference each other, such as VLAN membership or bridge participation. Indirect associations emerge from observed traffic flows and routing relationships. The system continuously updates these associations as the network evolves, maintaining an accurate representation of the current topology.
Graph associations support multiple view types optimized for different operational needs. Physical topology views show the actual connection paths between interfaces and devices. Logical topology views abstract away physical details to focus on service relationships and traffic flows. Service-oriented views group interfaces by their role in delivering specific services, making it easier to understand service dependencies and impact analysis.
The association data integrates with other management functions to provide context-aware operations. When examining an interface, operators can immediately see all associated interfaces and understand how changes might propagate through the network. During troubleshooting, the graph highlights affected paths and identifies potential bottlenecks. For capacity planning, the associations reveal traffic aggregation points and help predict the impact of growth.
Uplink Associations with Pseudo Interfaces
Pseudo interfaces can establish uplink associations that designate them as WAN-facing interfaces, enabling advanced routing and policy capabilities. These associations transform pseudo interfaces into full-featured uplink interfaces capable of managing internet connectivity, implementing NAT, and enforcing security policies.
When a pseudo interface becomes associated with an uplink configuration, it gains access to the complete set of uplink features. This includes participation in multi-WAN configurations where traffic load balances across multiple uplinks or fails over when primary connections experience issues. The pseudo interface can implement sophisticated NAT configurations, including both source NAT for outbound traffic and destination NAT for inbound services.
Quality of Service (QoS) and traffic shaping integrate seamlessly with uplink-associated pseudo interfaces. The system can apply bandwidth limits, implement priority queuing, and ensure fair bandwidth distribution across different traffic types. These capabilities prove particularly valuable for VPN-based uplinks where the pseudo interface represents a tunnel that requires specific performance guarantees.
The uplink association also enables advanced routing features including policy-based routing, where traffic routes are based on source addresses, protocols, or other packet characteristics. Dynamic routing protocols can operate over uplink-associated pseudo interfaces, enabling participation in BGP, OSPF, or other routing infrastructures. This flexibility allows pseudo interfaces to serve as full replacements for physical WAN interfaces in software-defined networking deployments.
VXLAN (Virtual Extensible LAN)
VXLAN, or Virtual Extensible LAN, is a network virtualization technology designed to address limitations of traditional VLANs (Virtual Local Area Networks) in large environments. VXLAN tunnels Layer 2 Ethernet traffic over a Layer 3 IP network by wrapping local area network data packets inside IP packets for transport across a larger IP network. VXLAN overcomes the limited number of VLANs supported by traditional methods. It uses a 24-bit identifier, allowing for millions of virtual networks compared to the roughly 4,000 of standard VLANs.
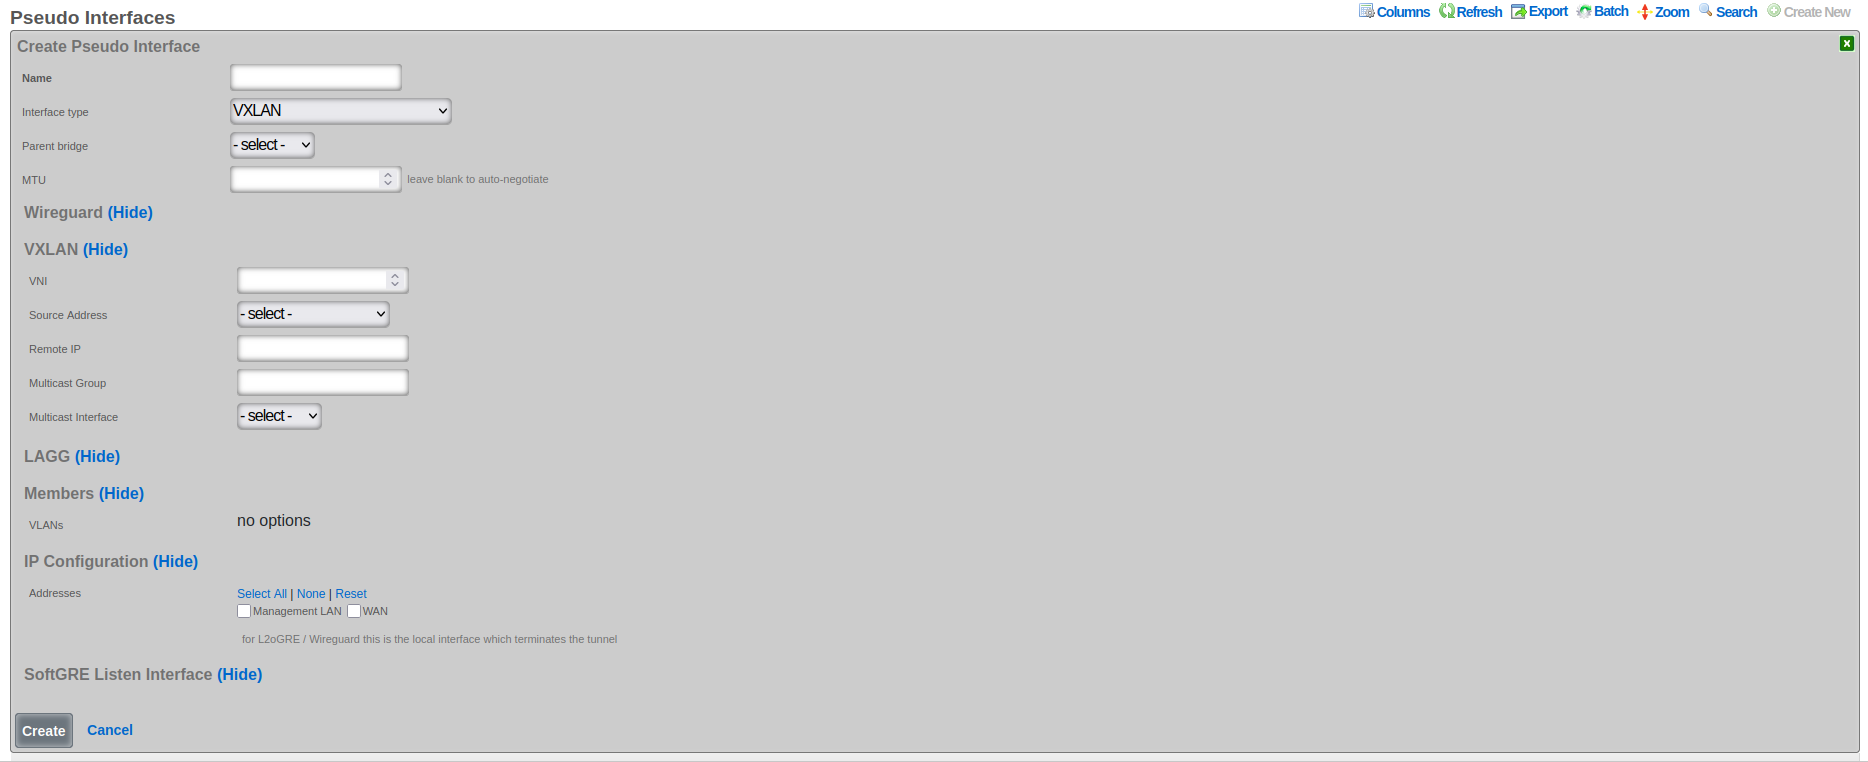
The following configuration steps provide guidance for configuring a VXLAN pseudo interface:
The Name field is an arbitrary string descriptor used only for administrative identification. Choose a name that reflects the purpose of the VXLAN segment, such as "Tenant-100-VXLAN" or "DataCenter-Overlay".
Set the Interface Type to VXLAN to enable VXLAN encapsulation and processing capabilities.
The Parent Bridge field enables hierarchical VXLAN configurations where this VXLAN becomes a child of a bridge.
Configure the MTU field to accommodate VXLAN encapsulation overhead. Subtract 50 bytes from the underlying network MTU (typically 1450 bytes for standard 1500-byte networks) to prevent fragmentation.
The VNI field (VXLAN Network Identifier) specifies the 24-bit value that uniquely identifies this VXLAN segment. This value must be coordinated across all VTEPs participating in the same overlay network. Valid range is 1 to 16,777,214.
The Source Address field specifies the source IP address used for VXLAN tunnel establishment. This address must be reachable from all remote VTEPs and should typically be assigned to a loopback or dedicated tunnel interface.
The Remote IP field contains comma-separated IP addresses of remote VTEPs when using unicast mode. Leave this field empty when using multicast group configuration.
The Multicast Group field specifies the multicast group address used for BUM (Broadcast, Unknown unicast, and Multicast) traffic distribution. Use addresses in the range 224.0.0.0 to 239.255.255.255, with organization-local scope (239.0.0.0/8) being preferred.
The VXLAN Device Interface field selects the underlying physical or logical interface through which VXLAN traffic transmits. This interface must support the required MTU size including VXLAN overhead.
Associate VLANs in the Members section to specify which VLAN traffic should be carried over this VXLAN tunnel. Only traffic from selected VLANs will be encapsulated and transmitted.
Assign Addresses in the IP Configuration section to enable IP communication over the VXLAN overlay. These addresses become available to devices connected through the VXLAN tunnel.
VXLAN Multicast Group Configuration
VXLAN multicast group configuration enables efficient distribution of broadcast, unknown unicast, and multicast (BUM) traffic across VXLAN segments. This approach leverages IP multicast infrastructure to eliminate the need for explicit peer configuration, simplifying deployment and improving scalability in large-scale VXLAN deployments.
When configuring a VXLAN interface with multicast support, operators specify a multicast group address that serves as the distribution tree root for BUM traffic. All VXLAN tunnel endpoints (VTEPs) participating in the same VXLAN segment join this multicast group, creating an automatic discovery mechanism that eliminates manual peer configuration. The multicast infrastructure handles group membership dynamically, automatically adjusting as VTEPs join or leave the network.
The multicast group address must fall within the designated multicast range (224.0.0.0 to 239.255.255.255) and should be chosen carefully to avoid conflicts with other multicast applications. Many organizations allocate specific multicast ranges for VXLAN use, ensuring systematic address assignment and preventing overlap. The Organization-Local Scope (239.0.0.0/8) often serves this purpose, as it provides adequate address space while remaining contained within the organization's network.
Multicast group configuration requires supporting infrastructure including multicast-enabled routers and switches throughout the underlay network. The Protocol Independent Multicast (PIM) protocol typically manages multicast routing, with PIM Sparse Mode (PIM-SM) being the most common deployment model. Operators must ensure that Rendezvous Points (RPs) are properly configured and that multicast routing tables correctly forward traffic between VTEPs.
VXLAN Remote IP vs Multicast Group Selection
The choice between unicast remote IP and multicast group configuration represents a fundamental architectural decision that affects scalability, complexity, and operational requirements. Each approach offers distinct advantages and trade-offs that operators must carefully consider based on their specific deployment requirements and infrastructure capabilities.
Unicast remote IP configuration provides explicit control over VXLAN tunnel endpoints by specifying exact peer addresses. This approach works in any IP network without requiring multicast support, making it suitable for deployments where multicast infrastructure is unavailable or undesirable. The explicit peer specification enhances security by limiting tunnel establishment to known endpoints and simplifies troubleshooting by creating clearly defined point-to-point relationships.
The unicast approach excels in small to medium deployments where the number of VTEPs remains manageable. Configuration remains straightforward, with each VTEP maintaining a list of peer addresses for tunnel establishment. This explicit configuration provides precise control over traffic flows and eliminates the complexity of multicast routing. However, scalability becomes challenging as the number of VTEPs grows, requiring full-mesh configuration that becomes increasingly difficult to manage.
Multicast group configuration offers superior scalability by eliminating the need for explicit peer configuration. VTEPs automatically discover peers through multicast group membership, enabling dynamic network growth without reconfiguration of existing nodes. This approach proves invaluable in large-scale deployments where hundreds or thousands of VTEPs must communicate. The automatic discovery mechanism also simplifies operations by eliminating manual configuration errors and reducing administrative overhead.
The selection between these approaches often depends on specific deployment constraints. Cloud environments frequently lack multicast support, making unicast configuration the only viable option. Enterprise data centers with modern infrastructure can leverage multicast for improved scalability. Hybrid approaches are also possible, where unicast handles known traffic flows while multicast manages BUM traffic distribution.
VXLAN MTU Configuration
Maximum Transmission Unit (MTU) configuration for VXLAN interfaces requires careful consideration of overhead introduced by encapsulation. VXLAN adds 50 bytes of overhead to each packet (8 bytes for VXLAN header, 8 bytes for UDP header, 20 bytes for IP header, and 14 bytes for Ethernet header), which must be accommodated within the underlay network MTU to prevent fragmentation and ensure optimal performance.
The overlay network MTU must be configured to account for VXLAN encapsulation overhead while ensuring that encapsulated packets do not exceed the underlay network's capabilities. In networks with standard 1500-byte MTU, the VXLAN interface MTU typically configures to 1450 bytes, leaving sufficient room for encapsulation headers. This conservative approach prevents fragmentation but may impact application performance that expects full 1500-byte payloads.
Jumbo frame support in the underlay network enables VXLAN interfaces to maintain standard 1500-byte MTU for overlay traffic. By configuring the underlay network with an MTU of 1550 bytes or larger, operators can accommodate VXLAN overhead without reducing the overlay MTU. Many modern data center networks support 9000-byte jumbo frames, providing ample headroom for various encapsulation types while maintaining standard MTUs for application traffic.
MTU configuration must remain consistent across all elements of the VXLAN infrastructure. This includes the VXLAN interfaces themselves, the underlying physical interfaces, and all intermediate network devices. Mismatched MTU configurations lead to silent packet drops that prove difficult to diagnose. The Path MTU Discovery (PMTUD) mechanism can help identify MTU constraints, but many networks disable ICMP messages required for PMTUD, necessitating careful manual configuration.
Bridge
The bridge interface allows two or more interfaces to have a connection between them at Layer 2. This essentially combines them into a single logical network segment, allowing devices connected to either interface to communicate directly with each other.
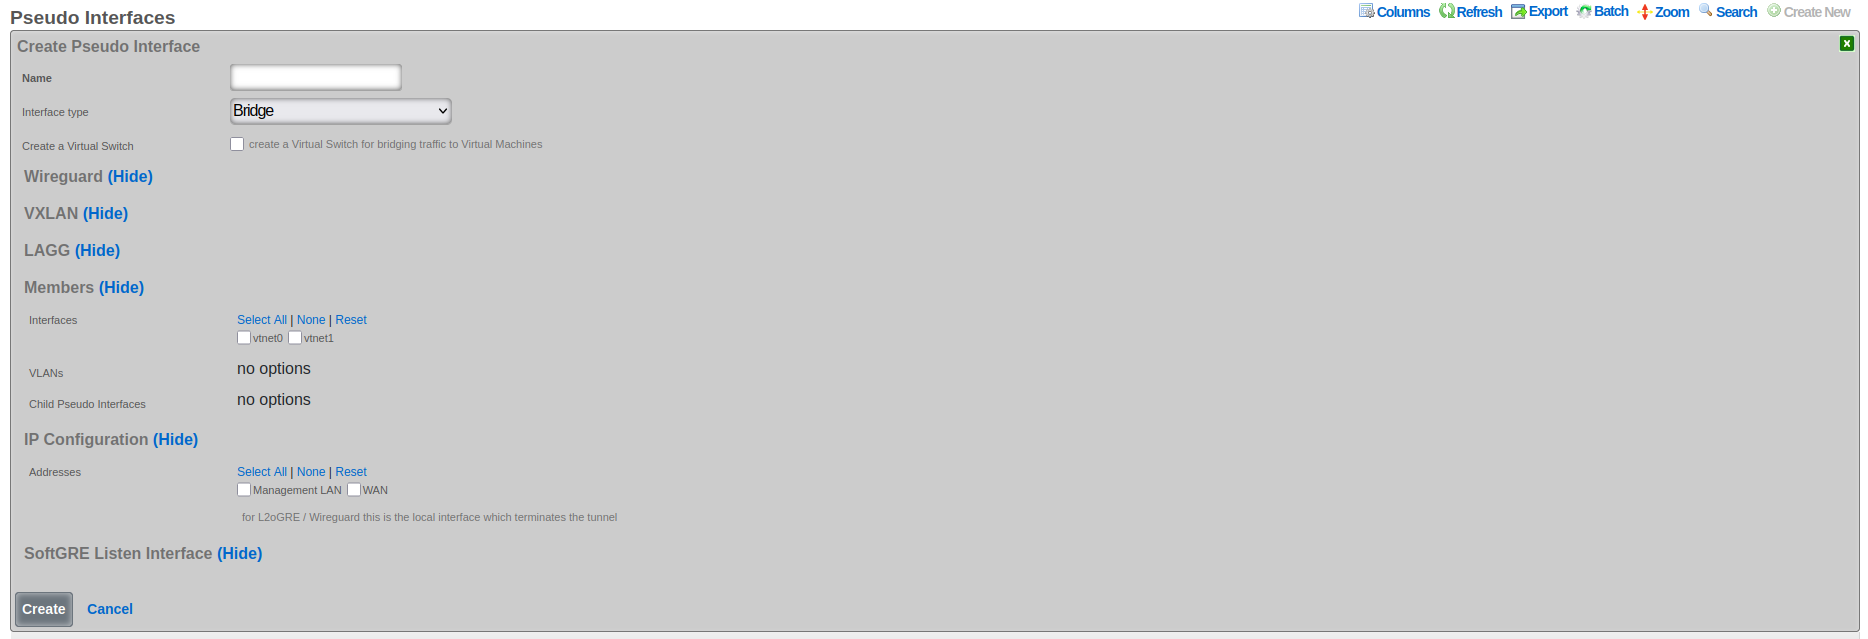
The following configuration steps provide guidance for configuring a Bridge pseudo interface:
- The Name field is an arbitrary string descriptor used only for administrative identification. Choose a descriptive name that indicates the bridge's purpose, such as "DataCenter-Core-Bridge" or "Campus-Aggregation".
- Set the Interface Type to Bridge to enable Layer 2 bridging capabilities across multiple interfaces.
- The Create Virtual Switch checkbox, when enabled, automatically provisions corresponding virtual switches in virtualization environments. This option appears only when virtualization hosts are configured and enables seamless integration between physical and virtual networks.
- In the Members section, select Child Pseudo Interfaces to specify which other pseudo interfaces (VXLAN, WireGuard, etc.) should be bridged together. Traffic flows freely between all selected child interfaces at Layer 2. Associate VLANs in the Members section to include specific VLAN interfaces in the bridge. Only selected VLAN traffic participates in the bridged network segment. Select Interfaces in the Members section to include physical ethernet interfaces in the bridge. This creates a direct Layer 2 connection between physical and virtual networks.
- Configure Addresses in the IP Configuration section to assign IP addresses to the bridge interface itself, enabling Layer 3 functionality such as routing and management access.
Bridge interfaces require careful consideration of MTU settings across all member interfaces. The system validates that all interfaces added to a bridge share the same MTU value to prevent frame size mismatches that could cause packet loss. When adding interfaces to an existing bridge, their MTU must match the bridge's configured MTU, ensuring consistent frame handling across the bridged segment.
The bridge implementation supports integration with virtual switch infrastructures when virtualization hosts are configured. This capability enables bridge interfaces to extend into virtualized environments, connecting physical and virtual networks seamlessly. The create virtual switch option automates the provisioning of corresponding virtual switches, simplifying deployment in virtualized infrastructures.
LAGG (Link Aggregation Group)
LAGG, which can also be referred to as LAG (Link Aggregation Group), stands for Link Aggregation. It's a networking technology that groups multiple physical network interfaces together into a single logical interface. This essentially combines the bandwidth and, in some cases, provides redundancy for network connections.
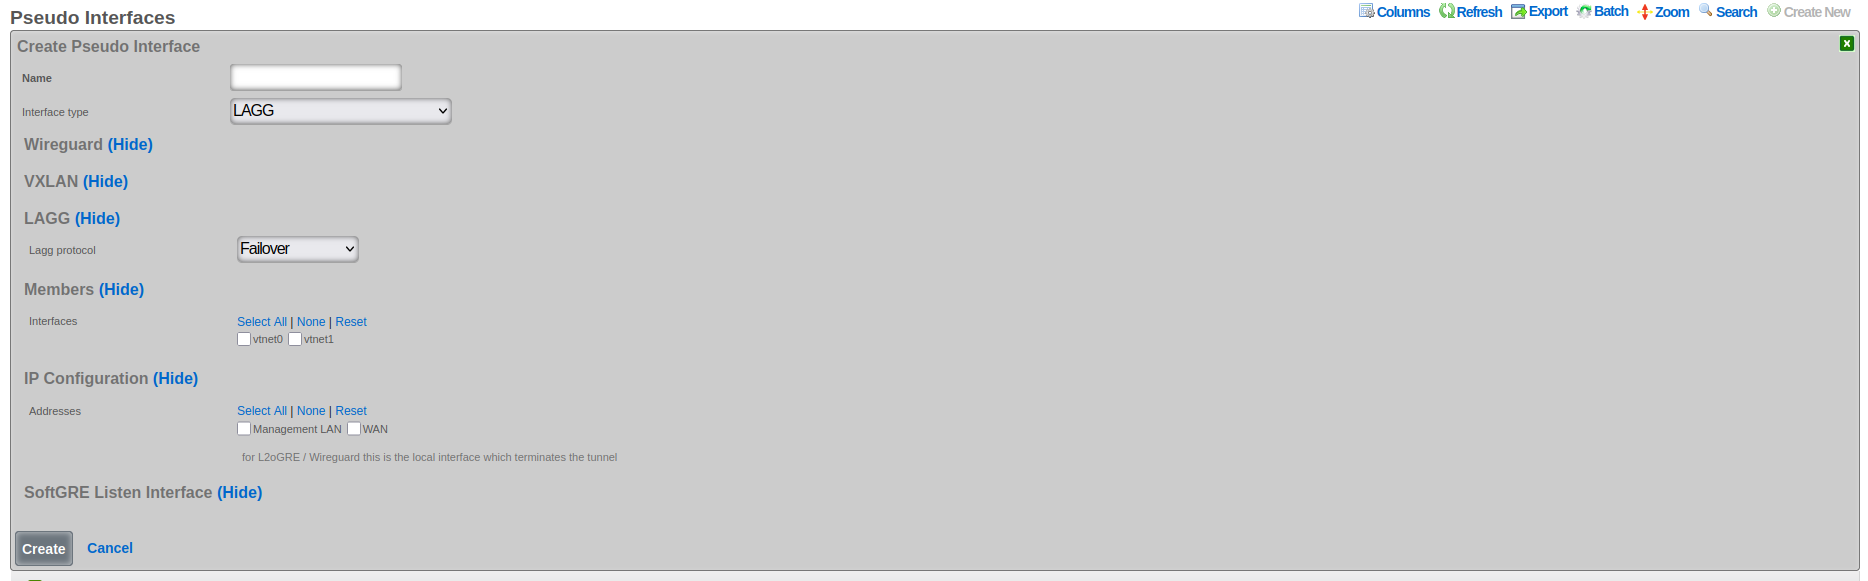
The following configuration steps provide guidance for configuring a LAGG pseudo interface:
The Name field is an arbitrary string descriptor used only for administrative identification. Choose a name that reflects the aggregation purpose, such as "Uplink-LAG" or "Server-Connection-AG".
Set the Interface Type to LAGG to enable link aggregation functionality.
The LAGG Protocol field determines the aggregation behavior and load distribution method:
- Failover: Designates one interface as primary with others as standby for redundancy
- Load Balance: Uses hash-based traffic distribution without requiring switch cooperation
- LACP: Implements IEEE 802.1AX for dynamic negotiation with compatible switches
- Round Robin: Distributes packets sequentially across all member interfaces
- Broadcast: Transmits each packet through all member interfaces simultaneously
In the Members section, select Interfaces to specify which physical or virtual Ethernet interfaces participate in the aggregation. All selected interfaces must have compatible speed and duplex settings.
Associate VLANs (if present in the given system) to enable tagged traffic across the aggregated link. VLAN configuration applies to the logical aggregated interface rather than individual member interfaces.
Configure Addresses in the IP configuration section to assign IP addresses to the aggregated interface. These addresses represent the logical interface and remain accessible even if individual member interfaces fail.
The rXg platform implements comprehensive LAGG support with multiple operational modes, each optimized for specific deployment requirements. The selection of LAGG protocol determines how traffic distributes across member interfaces and how the system responds to interface failures.
LAGG Failover Protocol Configuration
The failover protocol provides the simplest and most reliable form of link aggregation, designating one interface as primary and others as standby. This configuration ensures continuous connectivity by automatically switching to a standby interface when the primary fails, providing redundancy without the complexity of load distribution algorithms.
In failover mode, all traffic flows through the designated primary interface under normal conditions. The standby interfaces remain idle but continuously monitor their link status and maintain readiness for activation. When the primary interface fails, whether due to link loss, administrative action, or error threshold exceeded, the system immediately activates the highest-priority standby interface. This transition typically completes within milliseconds, minimizing service disruption.
The failover protocol supports multiple standby interfaces with configurable priority levels. Priority assignment determines the activation order when multiple standby interfaces are available. Higher priority interfaces activate first, with lower priority interfaces serving as additional backup options. This priority system enables sophisticated failover strategies where preferred paths activate in specific sequences based on performance characteristics or business requirements.
Configuration of failover protocol requires careful consideration of failure detection mechanisms. Link state monitoring provides the fastest detection for physical failures but cannot identify logical issues such as upstream connectivity problems. Advanced configurations can incorporate ping monitoring or BFD (Bidirectional Forwarding Detection) to verify end-to-end connectivity. These enhanced detection mechanisms ensure that failover occurs for both physical and logical failures, improving overall reliability.
LAGG LACP Setup and Requirements
Link Aggregation Control Protocol (LACP), defined in IEEE 802.1AX (formerly 802.3ad), provides dynamic negotiation and management of link aggregation groups. This protocol enables automatic configuration, continuous monitoring, and intelligent load distribution across multiple physical links, creating a robust and efficient aggregated interface.
LACP operates by exchanging control messages (LACPDUs) between participating devices to establish and maintain the aggregation. These messages carry information about system capabilities, port characteristics, and aggregation preferences. The protocol uses this information to automatically form aggregation groups, verify configuration consistency, and detect changes in the aggregation topology. This dynamic negotiation eliminates manual configuration errors and enables automatic adaptation to network changes.
The LACP configuration process begins with enabling the protocol on participating interfaces and configuring basic parameters. The system priority determines which device controls the aggregation when connected to another LACP-capable device. The port key identifies which ports can aggregate together, with ports sharing the same key eligible for aggregation. The aggregation mode, either active or passive, determines whether the port initiates LACP negotiation or waits for the peer to begin.
LACP requires compatible configuration on both ends of the aggregated link. The connected switch must support LACP and have matching configuration for successful aggregation. Key parameters that must align include the aggregation key, timeout values, and load distribution algorithm. Many switches default to passive LACP mode, requiring the rXg interface to operate in active mode to initiate negotiation. The timeout value, either short (1 second) or long (30 seconds), determines how quickly the system detects partner failures.
Load distribution in LACP aggregations uses hash-based algorithms to assign flows to specific member links. The hash calculation typically includes source and destination MAC addresses, IP addresses, and port numbers, ensuring that packets from the same flow follow the same path. This approach maintains packet ordering while distributing different flows across available links. The specific hash algorithm must be compatible between the rXg and connected switch for optimal distribution.
LAGG Load Balance, Round Robin, and Broadcast Modes
Beyond failover and LACP, LAGG interfaces support additional distribution modes that provide different traffic handling characteristics suited to specific deployment scenarios. These modes include load balance for hash-based distribution, round robin for sequential packet distribution, and broadcast for redundant transmission.
Load balance mode implements static hash-based distribution without the complexity of LACP negotiation. This mode proves valuable when connecting to devices that do not support LACP but can handle traffic from multiple source MAC addresses. The distribution algorithm uses a hash of packet headers to assign flows to specific member interfaces, maintaining packet order within flows while distributing load across available links. The hash calculation typically incorporates Layer 2, 3, and 4 headers, providing good distribution for diverse traffic patterns.
The load balance algorithm adapts to member interface changes by redistributing the hash space among remaining active interfaces. When an interface fails, its assigned flows redistribute to surviving interfaces. When an interface recovers, the algorithm gradually shifts flows to include the recovered interface, minimizing disruption to existing connections. This adaptive behavior provides both load distribution and redundancy without requiring protocol negotiation with connected devices.
Round robin mode provides the simplest distribution mechanism by sending each packet through the next available interface in sequence. This approach achieves near-perfect load distribution at the packet level, ensuring equal utilization of all member interfaces. However, round robin distribution can cause packet reordering when packets from the same flow traverse different paths with varying latencies. This reordering can significantly impact TCP performance and should be used only in controlled environments where reordering consequences are understood and acceptable.
Broadcast mode transmits every packet through all member interfaces simultaneously, creating redundant paths for critical traffic. This mode finds application in high-availability scenarios where packet loss must be minimized at the cost of increased bandwidth consumption. Industrial control systems and financial trading networks sometimes employ broadcast mode to ensure message delivery despite individual link failures. The receiving system must be capable of handling duplicate packets, either through explicit duplicate detection or by using protocols that naturally handle duplicates.
WireGuard
WireGuard is a modern, lightweight VPN protocol known for its simplicity, speed, and strong cryptography. It uses public key authentication and runs in the Linux/FreeBSD kernel for high performance, though it is also available on Windows, macOS, Android, and iOS. Configuration is minimal, often requiring just a few lines per peer. WireGuard establishes encrypted tunnels between devices, routing selected IP traffic securely. It is ideal for both personal VPNs and site-to-site secure networking.
The following configuration steps provide guidance for configuring a WireGuard pseudo interface:
The Name field is an arbitrary string descriptor used only for administrative identification. Choose a name that reflects the VPN's purpose, such as "Remote-Access-VPN" or "Site-to-Site-Tunnel".
Set the Interface Type to WireGuard to enable encrypted VPN tunnel capabilities.
The WG IP field specifies the IP address assigned to the WireGuard interface itself. This address becomes the tunnel endpoint and should be from a dedicated subnet used exclusively for WireGuard tunnels.
The WG Port field sets the UDP port number for WireGuard communication. The default port is 51820, but any available UDP port can be used. The system automatically selects unused ports when creating multiple WireGuard interfaces.
The WG Private Key field contains the cryptographic private key for this WireGuard interface. The system automatically generates secure keys when creating new interfaces. This key must be kept confidential and should be rotated periodically for security.
The WG Public Key field displays the corresponding public key derived from the private key. This public key is shared with peer devices to establish encrypted tunnels. The key updates automatically when the private key changes.
The Regenerate Keypair checkbox, when selected, generates new private and public keys for the interface. This action disconnects existing tunnels, requiring reconfiguration of all peer devices with the new public key.
Configure Network Addresses to assign additional IP ranges accessible through the WireGuard tunnel. These addresses enable routing to networks behind the WireGuard endpoint.
Associate the interface with IP Groups to apply policies, bandwidth limits, and access controls to WireGuard traffic. Different tunnels can be associated with different IP groups for granular policy enforcement.
There are at least three primary advantages of WireGuard compared to other VPN solutions:
Ease of use: WireGuard is designed to be simpler to set up and use compared to other VPN protocols like OpenVPN. This is achieved by having a lean codebase and focusing on essential functionalities.
High performance: WireGuard prioritizes speed. It uses modern cryptographic techniques and a streamlined approach to achieve faster connection speeds and lower latency compared to traditional VPN protocols.
Security: Despite its simplicity, WireGuard offers robust security. It utilizes state-of-the-art cryptography and keeps the attack surface minimal by design.
WireGuard Key Management
The rXg platform implements comprehensive key management for WireGuard interfaces, automating the generation and maintenance of cryptographic keys while providing flexibility for manual key configuration. Each WireGuard interface requires a unique private/public key pair that identifies the interface and enables secure tunnel establishment.
When creating a new WireGuard interface, the system automatically generates a cryptographically secure private key and derives the corresponding public key. This automatic generation uses the WireGuard toolset's native key generation functions, ensuring compatibility and security. The private key remains confidential and never leaves the rXg device, while the public key can be safely shared with peer devices for tunnel configuration.
The regenerate keypair functionality enables operators to rotate keys periodically or in response to security events. When triggered, the system generates a new key pair and updates the interface configuration. Existing tunnels using the old keys will disconnect and must be reconfigured with the new public key. This controlled key rotation maintains security while minimizing operational disruption.
Manual key configuration supports scenarios where specific keys must be used, such as when migrating from existing WireGuard deployments or integrating with external key management systems. Operators can provide a private key, and the system automatically derives and validates the corresponding public key. The system verifies key format and uniqueness to prevent configuration errors that could compromise security.
WireGuard Tunnel Configuration
WireGuard tunnels represent individual peer connections within a WireGuard interface. Each tunnel defines a remote peer that can communicate through the WireGuard interface, including the peer's public key, endpoint address, and allowed IP ranges. The rXg platform extends basic WireGuard tunnel functionality with advanced features for monitoring, policy enforcement, and traffic management.
Tunnel configuration begins with specifying the peer's public key, which uniquely identifies the remote endpoint and enables cryptographic verification. The endpoint address, consisting of an IP address and port number, tells the system where to send encrypted packets. For peers behind NAT or with dynamic addresses, the endpoint can be omitted, allowing the peer to initiate the connection.
The allowed IPs configuration defines which IP addresses can be routed through the tunnel. This setting serves dual purposes: it determines which traffic the local system sends through the tunnel and validates that received traffic originates from authorized addresses. The allowed IPs can range from specific host addresses (/32 for IPv4, /128 for IPv6) to entire networks, providing flexible routing control.
Persistent keepalive settings maintain tunnel connectivity through NAT devices and firewalls. When configured, the system sends periodic empty packets to keep NAT mappings active and ensure the tunnel remains reachable. The keepalive interval typically ranges from 25 to 60 seconds, balancing connectivity reliability with bandwidth consumption.
WireGuard IP Groups and Policies
The integration between WireGuard tunnels and IP groups enables sophisticated policy enforcement for VPN traffic. By associating tunnels with IP groups, operators can apply consistent security policies, bandwidth management, and access controls to VPN users, treating them identically to local network users.
IP group association occurs at the tunnel level, allowing different peers to receive different policy treatment even when connecting through the same WireGuard interface. This granular control enables multi-tenant VPN deployments where different user groups require distinct network access and service levels. The policy engine evaluates traffic from WireGuard tunnels using the same rules as local traffic, ensuring consistent security enforcement.
Bandwidth policies applied through IP groups enable fair resource allocation among VPN users. The system can enforce per-tunnel bandwidth limits, implement traffic shaping, and prioritize certain traffic types. These controls prevent individual VPN users from consuming excessive bandwidth while ensuring critical services receive adequate resources.
Access control policies restrict which network resources VPN users can access. By defining appropriate firewall rules within IP groups, operators can limit VPN users to specific servers, services, or network segments. Time-based policies enable different access levels during business hours versus off-hours, accommodating various usage patterns.
WireGuard Monitoring and Statistics
The rXg platform provides comprehensive monitoring capabilities for WireGuard interfaces and tunnels, enabling operators to track tunnel health, analyze traffic patterns, and troubleshoot connectivity issues. Real-time statistics and historical data provide insights into VPN usage and performance.
Handshake monitoring tracks the cryptographic handshake status for each tunnel. The last handshake timestamp indicates when the tunnel last successfully authenticated, helping identify inactive or problematic connections. Tunnels without recent handshakes may indicate configuration errors, network connectivity issues, or inactive peers.
Traffic statistics track bytes transmitted and received for each tunnel, providing visibility into bandwidth consumption and usage patterns. These counters enable capacity planning, usage-based billing, and identification of abnormal traffic patterns. The system maintains both current counters and historical data, enabling trend analysis and reporting.
Ping target integration enables active monitoring of tunnel connectivity. By configuring ping targets for WireGuard tunnels, the system continuously verifies end-to-end connectivity through the VPN. Failed ping targets can trigger alerts, initiate failover actions, or adjust routing decisions, ensuring reliable VPN connectivity.
SoftGRE
A SoftGRE tunnel is a type of tunneling protocol that uses Generic Routing Encapsulation (GRE, see RFC 2784) to transport Layer 2 Ethernet traffic over an IP network. In simpler terms, it encapsulates Ethernet data packets (overlay traffic) within GRE IP packets, allowing them to be sent across an IP network (underlay network) that would not otherwise support them.
The terms "overlay" and "underlay" describe the layers in a GRE tunnel setup. The underlay network refers to the physical or IP infrastructure that carries packetssuch as routers and links across the internet. The overlay network is the virtual network created by the GRE tunnel, allowing devices to communicate as if they're on the same local network, regardless of physical location. The GRE tunnel encapsulates overlay traffic within underlay packets, enabling features like layer 2 discovery across separate physical sites. This separation allows more flexible and scalable network designs while relying on the underlay for actual packet delivery.
The softGRE daemon supports both IPv4 and IPv6 underlay networks. The softGRE daemon supports both IPv4 and IPv6 overlay traffic. Any combination of underlay and overlay IP protocols is supported.
SoftGRE tunnels are particularly useful for extending Wi-Fi networks. Such L2 tunnels can be used to connect geographically separated Wi-Fi access points (APs) to a central rXg, creating a seamless network for users.
The following configuration steps provide an example of how to configure the rXg as an endpoint for a SoftGRE tunnel.

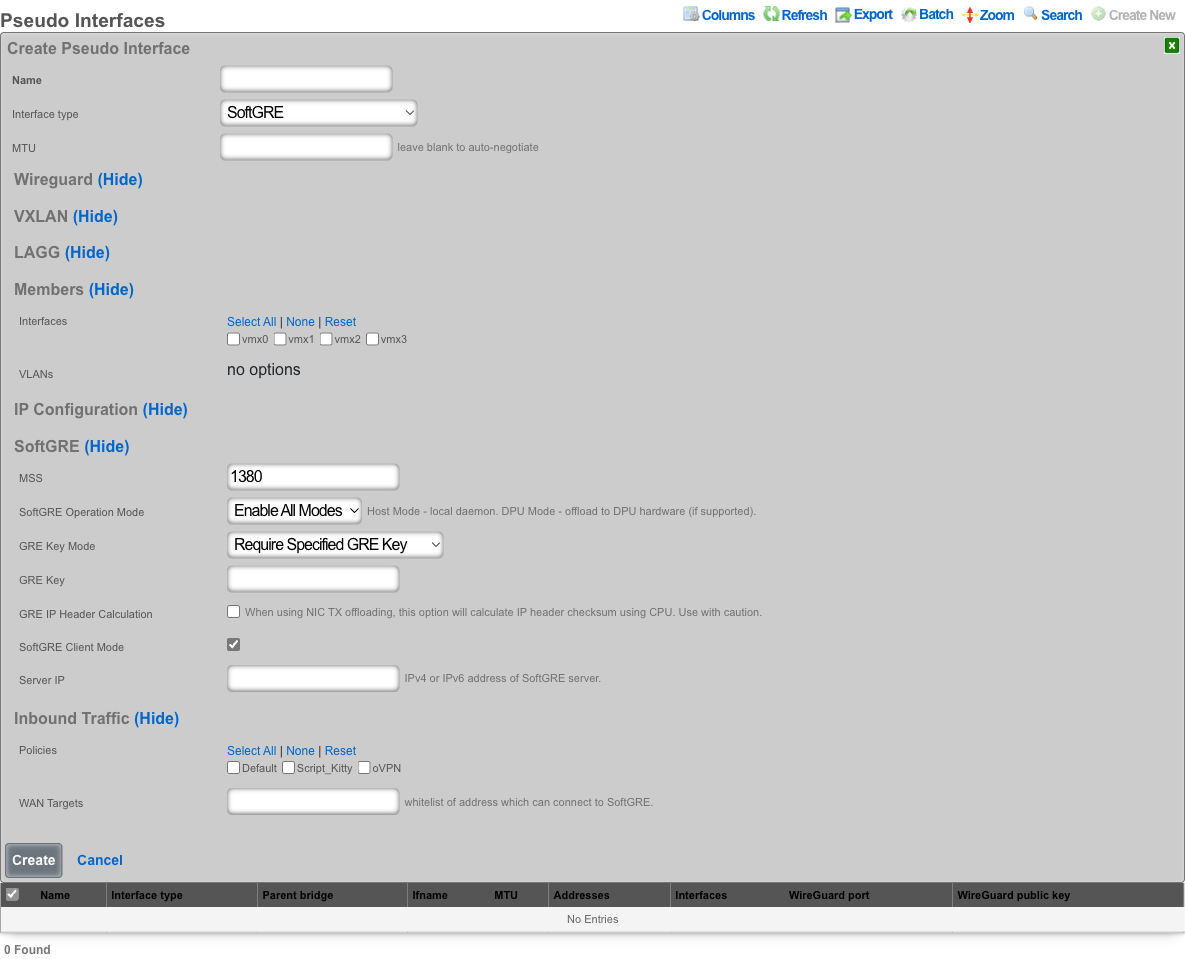
- The name field is an arbitrary string descriptor used only for administrative identification. Choose a name that reflects the purpose of the record. This field has no bearing on the configuration or settings determined by this scaffold.
- Set the Interface type to SoftGRE.
- The Members field indicates where tunneled traffic can egress. Interfaces can be used for untagged traffic and VLANs will be used for tagged traffic.
**NOTE* that the softGRE daemon monitors traffic on all LAN and WAN interfaces, including tagged and untagged interfaces, on the rXg platform and the selection of specific interfaces / VLANs in the Members section influences only the traffic egress, not the ingress.*
In the SoftGRE section, configure the tunnel behavior:
- MSS sets the Maximum Segment Size for TCP connections through the tunnel (default 1380).
- SoftGRE Operation Mode controls where the tunnel is processed: Enable All Modes runs on both host and DPU, Host Mode runs on the host CPU only, and DPU Mode offloads to DPU hardware (requires a compatible DPU device).
- GRE Key Mode, GRE IP Header Calculation, SoftGRE Client Mode, and Server IP are described in the advanced features sections below.
In the Inbound Traffic section you have an option to restrict where the incoming SoftGRE connections are accepted from. Policies are used to identify LAN side tunnels and WAN Targets are used to identify tunnels originating from the WAN. By default, all LAN and WAN interfaces are monitored by the softGRE daemon.
For vendor-specific configuration examples and additional SoftGRE configuration details, see the Miscellaneous SoftGRE Documentation.
SoftGRE Advanced Features
GRE Key Modes and Traffic Segregation
GRE key functionality provides critical traffic segregation and security capabilities for SoftGRE tunnels. The key field in the GRE header enables multiple logical tunnels to share the same source and destination IP addresses while maintaining traffic isolation. The rXg platform implements comprehensive key handling modes that accommodate various deployment scenarios and security requirements.
The Ignore GRE Keys mode treats all incoming traffic identically regardless of GRE key presence or value. This permissive approach simplifies configuration when traffic segregation is handled through other mechanisms such as VLAN tagging or IP addressing. This mode proves useful during migration scenarios where some endpoints include keys while others do not, allowing gradual transition without service disruption.
The Reject GRE Key Packets mode enforces strict security by dropping any packets that contain a GRE key. This configuration ensures that only keyless GRE packets enter the tunnel, preventing unauthorized traffic injection from endpoints that might attempt to use keys for bypassing security controls. Organizations requiring strict traffic validation often employ reject mode to ensure that all traffic follows expected patterns without unexpected key-based routing.
The Require Specified GRE Key mode mandates that all packets must contain a specific GRE key value for acceptance. This strict enforcement creates authenticated tunnels where only endpoints possessing the correct key can inject traffic. The key effectively serves as a shared secret, providing basic authentication without the overhead of cryptographic operations. Multiple tunnels can terminate on the same IP addresses by using different required keys, enabling efficient address utilization while maintaining complete traffic isolation.
VLAN-to-Key Mapping Modes
Advanced GRE key modes enable sophisticated mapping between VLAN IDs and GRE keys, automating traffic segregation in complex multi-tenant environments. These mapping modes eliminate manual key configuration by deriving key values from VLAN tags, ensuring consistent traffic isolation across the overlay network.
The Use GRE Key to Assign VLAN mode creates a direct correspondence between GRE keys and VLAN IDs, where the key value equals the VLAN ID. This straightforward mapping simplifies troubleshooting and ensures intuitive traffic flow visualization. When a packet arrives with VLAN tag 100, the system automatically applies GRE key 100 during encapsulation. Similarly, received packets with GRE key 100 map to VLAN 100 upon decapsulation. This bidirectional mapping maintains VLAN segregation across the GRE overlay without requiring explicit configuration for each VLAN.
The Prefer GRE Key over VLAN mode implements a flexible hierarchy where GRE keys take precedence when present, but VLAN-based mapping provides a fallback mechanism. If an incoming packet includes a GRE key, the system uses that key value for traffic handling. When no key is present, the system examines VLAN tags and applies corresponding mapping rules. This mode accommodates mixed environments where some traffic sources support GRE keys while others rely solely on VLAN tagging.
The Prefer VLAN over GRE Key mode reverses the precedence, prioritizing VLAN-based mapping while accepting GRE keys as an alternative. This configuration proves valuable when VLAN tags represent the primary segregation mechanism, but some traffic sources can only provide GRE keys. The system first attempts VLAN-based mapping, falling back to GRE key interpretation when no VLAN tag exists. This approach maintains consistency with VLAN-centric network designs while accommodating key-based traffic sources.
IP Header Calculation and Checksum Handling
The IP header calculation option addresses compatibility issues between GRE encapsulation and network interface checksum offloading. Modern network interfaces often defer checksum calculation to hardware, improving CPU efficiency. However, this optimization can create problems when packets undergo GRE encapsulation before hardware checksum calculation occurs.
When checksum offloading is enabled on the underlying interface, packets enter the GRE tunnel with zero-value checksums, expecting hardware to calculate the correct values during transmission. However, GRE encapsulation occurs in software before packets reach the hardware, resulting in encapsulated packets containing invalid inner checksums. The receiving endpoint cannot verify packet integrity, leading to drops or corruption.
The GRE IP Header Calculation option forces software-based checksum computation before GRE encapsulation, ensuring that encapsulated packets contain valid checksums regardless of hardware offloading configuration. This software calculation incurs additional CPU overhead but guarantees compatibility across diverse hardware configurations. The option proves essential when the underlying network includes interfaces with varying offload capabilities or when hardware offload behavior cannot be controlled.
Enabling IP header calculation involves performance trade-offs that operators must carefully consider. Software checksum calculation increases CPU utilization, potentially limiting tunnel throughput on systems with limited processing resources. However, the compatibility benefits often outweigh performance impacts, especially in heterogeneous environments where hardware capabilities vary. The system provides detailed statistics on checksum calculation overhead, enabling operators to assess the performance impact and make informed configuration decisions.
Client/Server Mode Operation
When enabled, the SoftGRE Client Mode transforms the SoftGRE interface from a passive tunnel endpoint into an active initiator that establishes connections to remote GRE servers. This operational mode proves invaluable for scenarios where the rXg device operates behind NAT or requires explicit connection establishment to traverse firewalls.
In client mode, the SoftGRE interface initiates tunnel establishment by sending keepalive packets to the configured server IP address. These keepalives serve multiple purposes including initial tunnel establishment, NAT traversal through regular traffic generation, and continuous liveness detection. The server endpoint learns the client's public IP address from received packets, automatically adapting to address changes that occur due to DHCP renewal or failover events.
The client mode configuration requires specification of the server IP address, which represents the remote endpoint's stable public address. This server must be reachable from the client's network and capable of accepting GRE traffic. The client automatically handles NAT traversal by ensuring that outbound packets create the necessary NAT mappings for return traffic. This automatic NAT handling eliminates complex manual configuration and enables deployment in diverse network environments.
Client mode includes intelligent reconnection logic that handles various failure scenarios. If the tunnel loses connectivity, the client automatically attempts reconnection using exponential backoff to prevent overwhelming the server. The system monitors tunnel statistics and adjusts keepalive intervals based on observed stability, reducing overhead on stable connections while maintaining quick detection of failures.
Server configuration in SoftGRE establishes the endpoint address for client-mode tunnels, creating a stable target for incoming connections. The server IP address must be publicly reachable and stable, as clients rely on this address for tunnel establishment. Static IP addresses work best, though dynamic DNS can accommodate scenarios where the server address occasionally changes. The server interface must be configured to accept incoming GRE traffic, which may require firewall adjustments to permit protocol 47 (GRE) from client networks.
MTU and MSS Configuration
Proper MTU and MSS configuration ensures optimal performance while preventing fragmentation in GRE tunnels. The encapsulation overhead introduced by GRE headers reduces the effective payload capacity, requiring careful calculation to maintain efficient packet transmission without triggering fragmentation.
The GRE encapsulation adds 24 bytes of overhead in the standard configuration, consisting of 4 bytes for the GRE header and 20 bytes for the outer IP header. When VLAN tags are present, each tag adds 4 additional bytes. The total overhead must be subtracted from the underlying network MTU to determine the maximum payload size that can traverse the tunnel without fragmentation. For example, with a standard 1500-byte network MTU and single VLAN tag on both inner and outer packets, the effective payload MTU becomes 1468 bytes (1500 - 24 - 4 - 4).
Maximum Segment Size (MSS) configuration for TCP connections requires additional consideration beyond basic MTU calculations. MSS represents the largest TCP payload that can be transmitted without fragmentation, which equals the MTU minus IP and TCP header overhead. For IPv4, this means subtracting an additional 40 bytes (20 for IP, 20 for TCP) from the tunnel MTU. The system can automatically adjust TCP MSS values through MSS clamping, ensuring that connections use appropriate segment sizes regardless of endpoint configuration.
The platform enforces MSS boundaries to prevent configuration errors that could impact performance or stability. The minimum MSS of 576 bytes ensures compatibility with all IP implementations, as this represents the minimum reassembly buffer size required by IPv4 specifications. The maximum MSS cannot exceed the calculated tunnel capacity based on underlying MTU and encapsulation overhead. These validations prevent misconfigurations that could lead to excessive fragmentation or packet loss.
WAN Targets and Policies Configuration
WAN targets and policies configuration controls which external networks can establish GRE tunnels to the rXg device, implementing security boundaries and traffic segregation. This configuration proves essential for deployments where tunnels originate from untrusted networks or where different tunnel sources require different handling.
WAN targets define specific external endpoints authorized to establish tunnels. Each target specifies an IP address or range from which GRE traffic will be accepted. This explicit allowlisting ensures that only known and authorized endpoints can inject traffic into the overlay network. Targets can be static addresses for fixed endpoints or dynamic ranges for scenarios where clients obtain addresses through DHCP. The system continuously validates incoming traffic against configured targets, dropping packets from unauthorized sources.
Policy associations provide sophisticated traffic handling based on tunnel source characteristics. Different policies can apply to tunnels from different WAN targets, enabling differentiated services, security controls, and routing decisions. For example, tunnels from branch offices might receive different QoS treatment than those from partner networks. Policies can enforce bandwidth limits, apply security filters, or direct traffic to specific network segments based on the tunnel source.
The combination of WAN targets and policies enables complex multi-tenant scenarios where a single rXg device serves multiple independent networks. Each tenant's tunnels terminate on the same physical interface but receive completely isolated treatment through policy separation. This approach maximizes hardware utilization while maintaining strict security boundaries between different traffic sources.
VPP (Vector Packet Processing) Interfaces
Introduction to VPP Interfaces
Vector Packet Processing represents a revolutionary approach to packet processing that achieves exceptional performance through batch processing and CPU cache optimization. VPP interfaces on the rXg platform leverage this technology to deliver line-rate packet processing capabilities that far exceed traditional kernel-based networking stacks. These interfaces provide hardware-accelerated networking functions while maintaining the flexibility and programmability required for modern network services.
The VPP architecture processes packets in vectors (batches) rather than individually, amortizing processing overhead across multiple packets and maximizing CPU cache utilization. This approach enables VPP interfaces to handle millions of packets per second on standard server hardware, with even higher performance when combined with specialized acceleration hardware. The processing pipeline remains fully programmable, allowing dynamic insertion of features such as ACLs, NAT, and tunnel termination without requiring kernel modifications.
VPP interfaces operate in a dedicated userspace environment, bypassing the kernel networking stack entirely. This design eliminates context switching overhead and provides deterministic performance characteristics essential for latency-sensitive applications. The interfaces maintain compatibility with standard networking protocols and management interfaces while delivering performance improvements of 10x or more compared to traditional approaches.
DPU Device Integration and Hardware Acceleration
Data Processing Units (DPUs) represent specialized processors designed specifically for network and storage workloads. The integration between VPP interfaces and DPU devices on the rXg platform creates a powerful hardware-accelerated networking solution that offloads complex packet processing tasks from the main CPU while maintaining full programmability and flexibility.
DPU integration occurs transparently when VPP interfaces detect compatible hardware. The system automatically identifies available DPU devices during initialization and establishes communication channels between the VPP framework and DPU processors. This integration includes firmware version verification, capability negotiation, and resource allocation to ensure optimal utilization of available hardware acceleration features.
The DPU handles computationally intensive operations that would otherwise consume significant CPU resources. These operations include cryptographic functions for VPN termination, pattern matching for deep packet inspection, and complex header manipulations for tunnel processing. By offloading these tasks to dedicated hardware, the main CPU remains available for control plane operations and application workloads, improving overall system performance and efficiency.
Hardware acceleration through DPU devices extends beyond simple offload capabilities. The DPU can implement complete network functions such as load balancing, firewall processing, and traffic shaping entirely in hardware. These hardware-implemented functions operate at line rate regardless of packet size or complexity, providing consistent and predictable performance. The tight integration between VPP and DPU ensures that hardware-accelerated functions seamlessly integrate with software-based features, creating a unified and flexible networking platform.
The management interface provides comprehensive visibility into DPU utilization and performance. Operators can monitor hardware resource consumption, track offload effectiveness, and identify potential bottlenecks. The system includes automatic failover capabilities that redirect processing to software paths if hardware resources become unavailable, ensuring continuous operation even during hardware maintenance or failure scenarios.
VPP interfaces are automatically created and managed by the system when DPU devices are detected and configured. The following steps describe how to identify and monitor VPP interfaces:
Automatic Interface Detection: VPP interfaces appear automatically in the pseudo interface list when compatible DPU hardware is detected. Interface names follow the pattern "dpu0", "dpu1", etc., corresponding to detected DPU devices.
Interface Status Monitoring: Check the Status field to verify that VPP interfaces are operational. Active interfaces show "UP" status, while inactive interfaces may indicate hardware issues or configuration problems.
Hardware Resource Monitoring: View the DPU Utilization metrics to track hardware acceleration effectiveness. High utilization may indicate the need for additional DPU resources or traffic optimization.
Performance Statistics: Monitor Packets Per Second and Bytes Transmitted/Received counters to assess VPP interface performance. These metrics help identify bottlenecks and validate hardware acceleration benefits.
Address Assignment: Network Addresses can be assigned to VPP interfaces for management and routing purposes, similar to other pseudo interfaces. These addresses enable direct communication with the VPP interface.
Policy Association: VPP interfaces support IP Group associations for applying security policies, bandwidth limits, and access controls to hardware-accelerated traffic.
Failover Monitoring: The system automatically monitors hardware health and redirects traffic to software processing if DPU devices become unavailable. Check the Failover Status to verify backup processing capability.
Automated Configuration Workflow
The DPU configuration workflow operates entirely automatically, requiring no manual intervention once compatible hardware is detected. This automation ensures optimal performance while eliminating configuration errors that could impact system stability. These interfaces cannot be manually created through the scaffold interface, as they require specific hardware resources and automatic configuration based on the DPU device capabilities. The system assigns unique interface names to VPP interfaces based on the associated DPU device, ensuring clear identification and management.
DPU Detection and Configuration Flow:

  1. Hardware Detection Phase
      PCIe bus enumeration
      DPU device identification
      Firmware version verification

  2. Resource Allocation
      Memory pool assignment
      CPU core affinity configuration
      Network queue mapping

  3. VPP Interface Creation
      Interface naming (dpu0, dpu1, etc.)
      Hardware offload capability negotiation
      Feature pipeline configuration

  4. Integration with rXg Framework
      Address assignment
      Policy association
      Monitoring infrastructure setup
Phase 1: Discovery and Enumeration During system initialization, the rXg platform scans the PCIe bus to identify connected DPU devices. The discovery process examines device IDs, vendor information, and capability registers to determine device type and supported features. Each discovered DPU undergoes firmware version verification to ensure compatibility with the current rXg release.
Phase 2: Resource Planning and Allocation The system analyzes available system resources and DPU capabilities to determine optimal resource allocation strategies. This includes memory pool sizing, interrupt vector assignment, and CPU core affinity optimization. The allocation process considers both performance requirements and system stability constraints.
Phase 3: VPP Framework Integration Compatible DPUs integrate directly with the VPP packet processing framework, creating high-performance data plane instances. The integration process establishes shared memory regions, configures interrupt handling, and initializes hardware acceleration features. Each DPU receives a unique interface identifier that enables management and monitoring through standard rXg interfaces.
Phase 4: Feature Enablement and Optimization The final configuration phase enables advanced features based on DPU capabilities and system requirements. This includes cryptographic acceleration, pattern matching engines, and quality of service mechanisms. The system performs automatic performance tuning based on observed traffic patterns and hardware characteristics.
Configuration Examples
Single DPU Deployment
System Configuration:

  Physical Server
   CPU: Intel Xeon (Management)
   Memory: 64GB System RAM
   DPU: BlueField-2 (25Gbps)
      Interface: dpu0
      Offload: Crypto, ACL, NAT
      Memory: 16GB dedicated
   Network: 2x25G + 1x1G management


Automatic Interface Creation:
 dpu0: Primary data plane interface
 dpu0_mgmt: Management interface
 dpu0_rep: Representor for host communication
Dual DPU High Availability
System Configuration:

  High-Performance Server
   CPU: Intel Xeon Gold (Management)
   Memory: 128GB System RAM
   DPU0: BlueField-3 (100Gbps)
      Interfaces: dpu0, dpu0_backup
      Role: Primary packet processing
   DPU1: BlueField-3 (100Gbps)
      Interfaces: dpu1, dpu1_backup
      Role: Standby/Load sharing
   Network: 4x100G + 2x10G management


Failover Configuration:
 Primary: dpu0 handles all traffic
 Standby: dpu1 monitors and ready for takeover
 Automatic failover in <100ms
 Stateful connection preservation
Monitoring and Management
DPU interfaces provide comprehensive monitoring capabilities that integrate seamlessly with the rXg management framework. Operators can monitor hardware utilization, offload effectiveness, and performance metrics through standard interfaces.
The system tracks key performance indicators including packet processing rates, hardware acceleration utilization, memory consumption, and error conditions. These metrics enable capacity planning, performance optimization, and proactive issue identification. Advanced monitoring features include per-flow statistics, latency measurements, and quality of service compliance tracking.
Administrative functions support firmware updates, configuration changes, and diagnostic operations. The system provides safe update mechanisms that maintain service continuity during maintenance operations. Configuration changes propagate automatically to affected DPU instances, ensuring consistent behavior across the entire system.
DPU Variants
The rXg platform supports multiple DPU variants, each optimized for specific networking workloads and performance requirements. The system automatically detects and configures supported DPU devices during initialization, creating appropriate VPP interfaces and establishing hardware acceleration paths.
BlueField-2 DPU Series
The NVIDIA BlueField-2 family represents high-performance DPUs designed for data center and cloud networking applications. These devices integrate ARM processors with advanced networking acceleration capabilities, supporting line-rate packet processing at 25/100/200 Gbps speeds. The BlueField-2 DPUs excel at cryptographic operations, deep packet inspection, and complex header processing tasks.
BlueField-3 DPU Series
The next-generation BlueField-3 DPUs provide enhanced performance and expanded feature sets compared to their predecessors. These devices support higher throughput rates, additional cryptographic algorithms, and improved programmability through enhanced SDK support. BlueField-3 DPUs integrate seamlessly with container orchestration platforms and provide hardware-accelerated service mesh functionality.
Intel Infrastructure Processing Unit (IPU)
Intel IPUs focus on infrastructure acceleration and workload isolation capabilities. These devices excel at providing consistent performance for network functions while maintaining strong security boundaries between different workloads. Intel IPUs support advanced traffic management features and provide hardware-accelerated load balancing capabilities. At this time the support for IPUs is at the R&D phase.
VLANs

The rXg defines a logical 802.1Q virtual LAN interface for each entry in the VLANs scaffold. A good reference for understanding VLANs and trunk ports is Network Warrior (ISBN 0596101511) by Gary Donahue.
Creating a VLAN implies that the Ethernet interface that is directly associated with it is a VLAN trunk port. The device connected to the Ethernet interface must be similarly configured to accept traffic for the VLAN ID specified in this record.
The Physical Interface drop down associates this VLAN logical interface with an Ethernet interface. A VLAN logical interface presents itself in the same manner as a Ethernet interface for network address configuration and policy management purposes. However, the VLAN must be associated with an Ethernet interface so that it knows what physical port to transmit and receive on.
The Service VLAN drop down associates this VLAN with a Q-in-Q parent VLAN interface. Note: if using Q-in-Q the operator should make sure that VLAN hardware filtering is disabled on the Ethernet Interface by navigating to Network::LAN editing the interface and confirm that the VLAN hardware filtering box is unchecked.
The name field is an arbitrary string descriptor used only for administrative identification. Choose a name that reflects the purpose of the record. This field has no bearing on the configuration or settings determined by this scaffold.
The VLAN ID is an integer value that is used in the VLAN identifier field of the frames transferred over the physical interface defined by this record. The field is 12-bits in the ethernet frame, making the range of values from 0 to 4096. The 0 value is reserved for native traffic and 1 is used for management by many bridges and switches. In addition, 4095 is reserved by most implementations.
The I-SIDs (Backbone Service Instance Identifier) can be used to identify any virtualized traffic across an 802.1ah encapsulated frame.
The Autoincrement drop down changes how VLANs are configured with regards to the number of subnets. none | single L2 | n tags=1 will result in a single VLAN being associated to a single subnet or subnets. per-subnet | auto-increment L2 w/L3 | n tags = subnets / ratio means the number of VLANs that will be configured is the number of Subnets divided by the ration. With a Ratio of 1 and tied to a Network Address that has 32 subnets, 32 VLANs will be configured. With a Ratio of 2 and a Network Address with 32 subnets, 16 VLANs will be configured (32 / 2 = 16).per-IP | auto-increment L2 over split L3 via BNG | n tags = (usable IPs / ratio)means if we have a Network Address configured with 32 usable IP addresses the number of VLANs that will be configured is the number of IP address divided by the ratio. Given a Network Address with 32 usable IP addresses and a Ratio of 1, 32 VLANs will be configured. If the Ratio is set to 2, 16 VLANs will be configured (32 / 2 = 16).
The Ratio field is the number of autoincrement subnets or usable IPs in each VLAN tag.
The MAC Override allows the operator to adjust the MAC address(es) assigned to each VLAN interface created based on this VLAN configuration. The MAC address assigned to each VLAN will be the MAC Override incremented for each VLAN interface created. The first VLAN interface created will use the value of MAC Override. For each additional VLAN created, the value will be incremented by 1. For example a MAC Override of ff:ff:fe:00:00:1a with a vlan tag of 10 will result in a MAC address of ff:ff:fe:00:00:1a being assigned to the vlan10 interface. When using autoincrement, vlan11 will be assigned ff:ff:fe:00:00:1b , vlan12 will be assigned ff:ff:fe:00:00:1c , etc.
The addresses field associates one or more network addresses with this VLAN logical interface. All interfaces, including logical VLAN interfaces, must have one or more network addresses associated with them in order for them to pass traffic.
The Switch Port Profiles field allows the operator to associate the VLAN(s) to a switch port profile that will automatically configured the VLAN(s) to the switch ports attached to the profile.
The WLANs field allows the operator to associate the VLAN(s) to a WLAN.
The Conference options field allows the operator to associate the VLAN(s) to a conference record so the VLAN(s) can be used when created a conference via the Conference Tool.

Network Addresses
An entry in the network addresses scaffold defines an IP block that will be associated with an interface, uplink or VLAN.
The name field is an arbitrary string descriptor used only for administrative identification. Choose a name that reflects the purpose of the record. This field has no bearing on the configuration or settings determined by this scaffold.
The IP field specifies the IP address using CIDR notation that will be configured on the interface specified. If the address record will be used for configuring multiple addresses on the interface via the span field, the IP field configures the first (lowest) IP address of the range.
The span field specifies the range of IP addresses configured by this address record. The default value of 1 is assumed if this field is omitted. For LAN links, a span of 1 is typical. For WAN links, a span of greater than 1 automatically enables translation pooling in NAT scenarios. In addition, bidirectional network address translation (BiNAT) requires the WAN link to span one additional address for each BiNAT.
Examples using Autoincrement
1. Autoincrement with 1:1 VLAN per subnet (MDU)
In this example the VLAN is configured per-subnet with a ratio of 1, this means that each subnet will have it's own VLAN tag. The number of VLANs used will be the number of subnets divied by the ratio. For this example there will be 128 /24 subnets tied to the VLAN which will result in 128 VLANs.
Create a new VLAN Interface , give it a name, select the Physical Interface the VLANs will be tied to. Set the VLAN IDs field to first VLAN to be used. Autoincrement is set to per-subnet , and Ratio is set to 1. If the Network Address is created already it can be selected, in this case it does not, click Create.
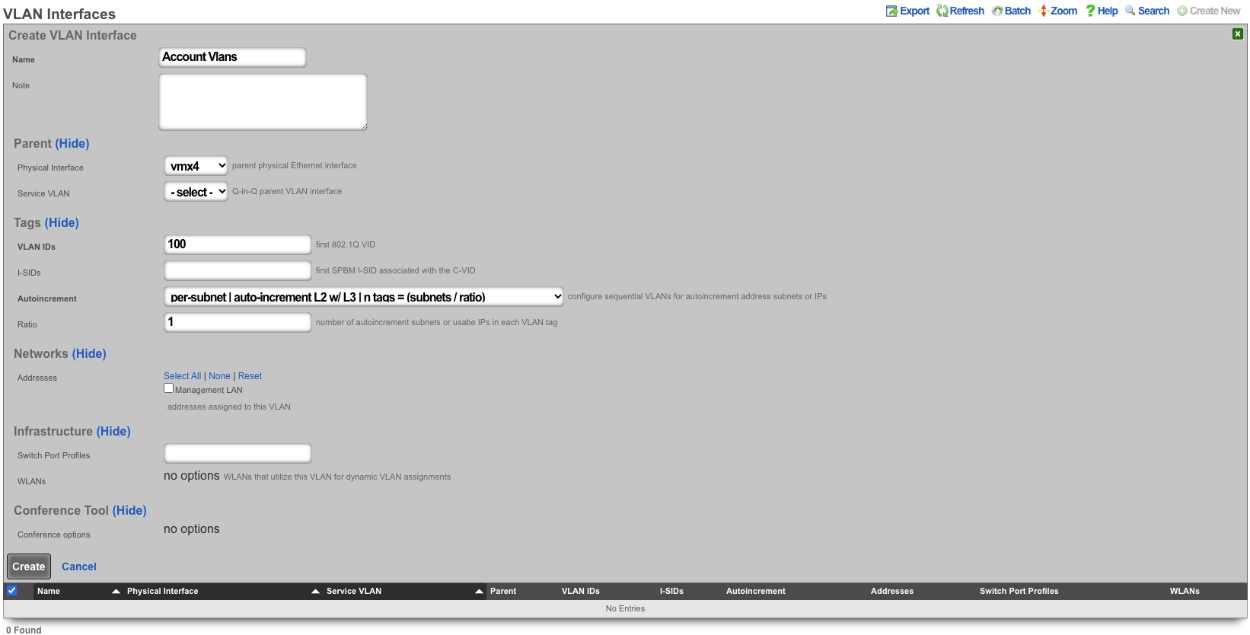

Next create a new Network Address , give it a name. Under the Interface section set the Ethernet field to select, and the VLAN field to the VLAN created in the previous step. Set the IP field to the desired starting network address using CIDR notation. Next set the Autoincrement field to the desired number of subnets to create, in this case it will be set to 128. Check the Create DHCP Pool box and then click Create.
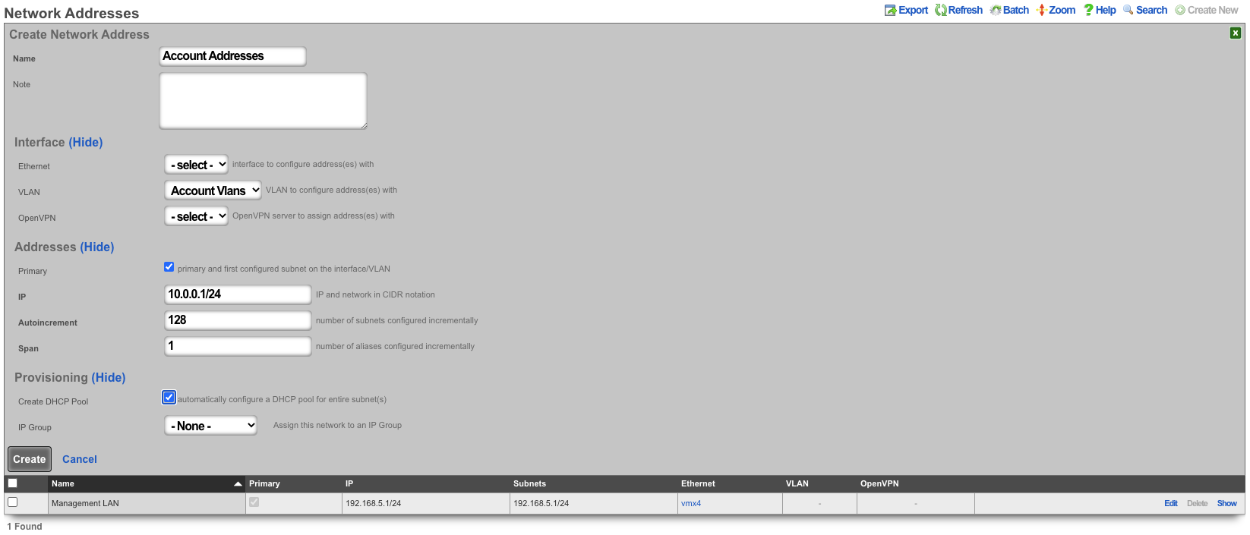
Now there are 128 /24 subnets that have been created (10.0.0.1/24-10.0.127.1/24), and 128 VLANs have been configured (100-227) tied sequentially to the subnets.

2. Autoincrement with more than 1 subnet per VLAN
In this example the configuration will put more than 1 subnet into each VLAN. The number of VLANs in this case will be the number of subnets divided by the ratio. In this example there are 64 /30 subnets and the ratio will be set to 4. In this configuration there will end up being 16 VLANs configured.
Create a new VLAN Interface , give it a name, select the Physical Interface the VLANs will be tied to. Set the VLAN ID's field to the first VLAN to be used. Autoincrement is set to per-subnet , and Ratio is set to 4. If the Network Address is created already it can be selected, in this case it does not, click Create.
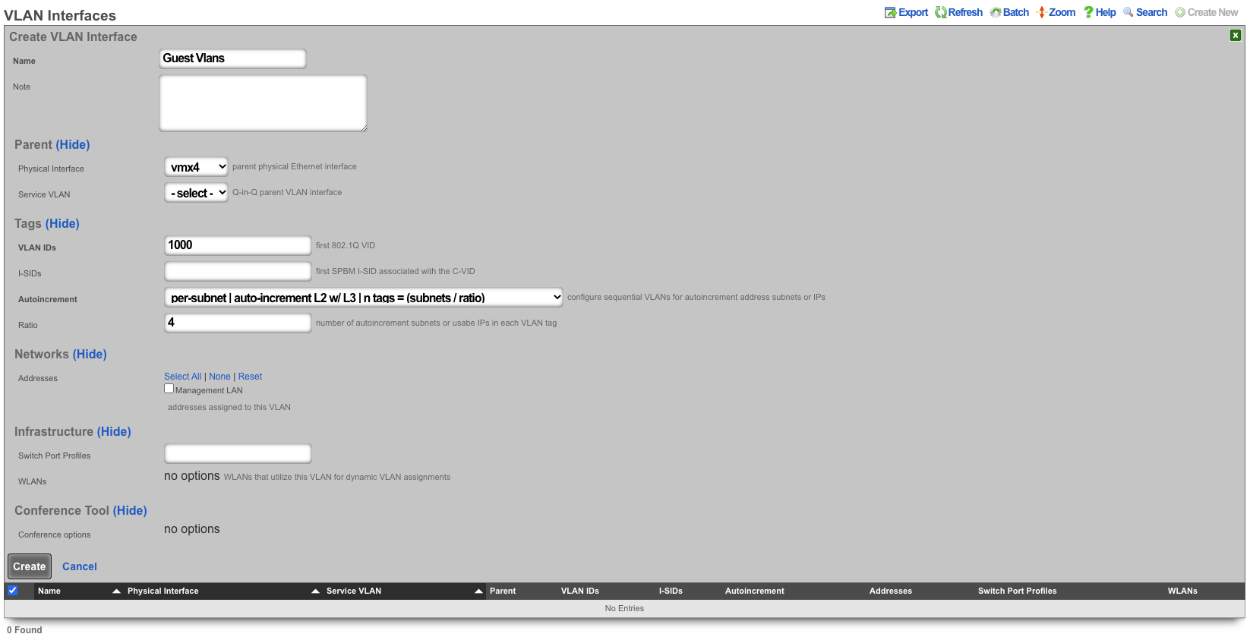

Next create a new Network Address , give it a name. Under the Interface section set the Ethernet field to select, and the VLAN field to the VLAN created in the previous step. Set the IP field to the desired starting network address using CIDR notation. Next set the Autoincrement field to the desired number of subnets to create, in this case it will be set to 64. Check the Create DHCP Pool box and then click Create
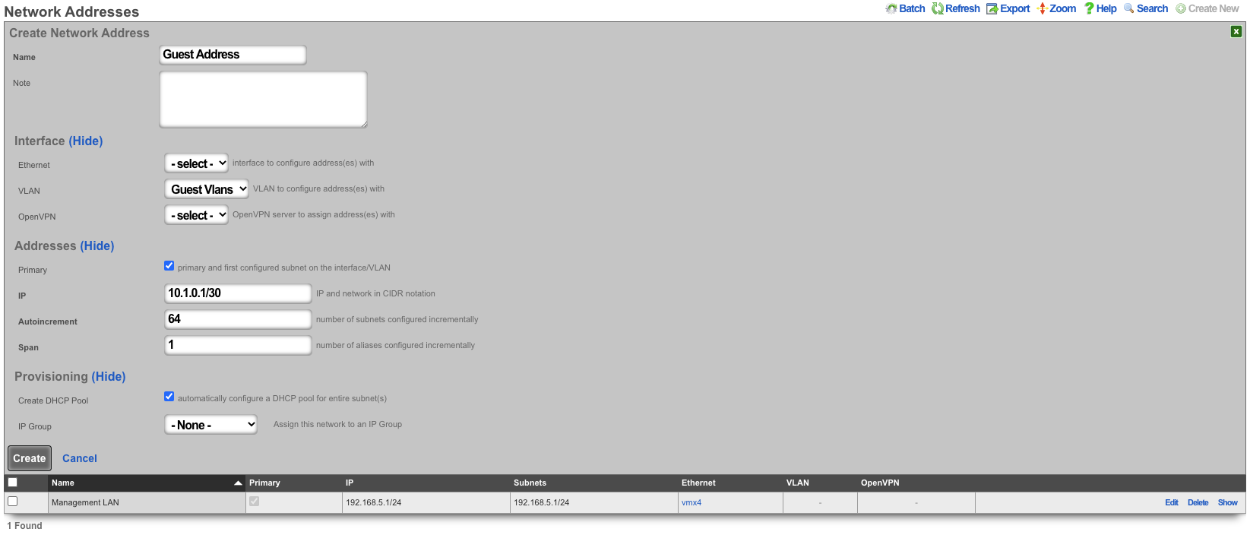
With this configuration there are 64 /30 subnets with 4 subnets per VLAN. 64(subnets) / 4(Ratio) gives us a total of 16 VLANs.

3. BNG with many VLANS inside a single subnet.
The autoincrement BNG feature enables a single subnet to be divided amongst a large number of VLANs. Autoincrement BNG maximizes public address space distribution efficiency. A public /24 CIDR block would typically need to be divided into 64 /30 CIDRs for distribution amongst subscribers. Each of the /30 CIDRs would then be assigned to a unique layer 2 microsegment. Thus a /24 CIDR block would typically support 64 subcscribers. This is an inefficient use of public IPv4 address space.
| Network | VLAN |
|---|---|
| 76.77.78.0/30 | VLAN 1000 |
| 76.77.78.4/30 | VLAN 1001 |
| 76.77.78.8/30 | VLAN 1002 |
| ⋮ | ⋮ |
| 76.77.78.248/30 | VLAN 1062 |
| 76.77.78.252/30 | VLAN 1063 |
The autoincrement BNG feature enables efficient distribution of public static IPv4 24 CIDR blocks. For example, a /24 CIDR block can support 253 subscribers where each subscriber is microsegmented onto their own unique layer two on the distribution infrastructure. It may help to think of this as autoincrementing VLAN assignment via /32s instead of /30s. The difference is that all of the /32s share a single gateway that is accessible from all VLANs. In reality the BNG autoincrement mechanism enables distribution of the addresses on a /24 subnet to ensure client compatibility. This enables efficient use of address space while enforcing true segmentation through a universally compatible standards-based approach.
| Network | VLAN |
|---|---|
| 76.77.78.2/24 | VLAN 1000 |
| 76.77.78.3/24 | VLAN 1001 |
| 76.77.78.4/24 | VLAN 1002 |
| ⋮ | ⋮ |
| 76.77.78.253/24 | VLAN 1251 |
| 76.77.78.254/24 | VLAN 1252 |
In the example below, autoincrement BNG microsegments each usable IP address in 76.77.78.0/24 onto a unique VLAN. VLAN 3002 on igb3 is configured with the first address of the CIDR 76.77.78.1/24 as if the entire CIDR were configured onto VLAN 3002. All of the usable IP addresses of CIDR 76.77.78.0/24 (76.77.67.2/24 to 76.77.78.254/24 inclusive) would normally share the same VLAN 3002. However with autoincrement BNG enabled, the usable IPs are spread across VLANs 3002 to 3254 inclusive.
Autoincrement BNG is unique in that it allows all client devices to share the same default gateway despite being microsegmented at layer 2. In this example, all client devices in VLANs 3002 to 3254 inclusive use 76.77.78.1/24 as their the default gateway. Sharing a single layer 3 default gateway IP address amongst a large number of layer 2 microsegmented clients dramatically improves the efficiency of IP address consumption.
It is important to note that only VLANs 3002 to 3254 inclusive are usable on igb3 when autoincrement BNG is enabled on igb3. It is impossible to assign additional VLANs to igb3 that fall outside of the BNG range as this would interfere with the autoincrement BNG functionality in the configuration described above. An operator may use Q-in-Q if they wish to configure both both BNG and non-BNG VLANs on the same physical interface. This is what we will discuss next.
In this example a single service VLAN (SVLAN 100) will be created and used as the parent VLAN that will contain many client VLANs (CVLANs 1000 to 1352 inclusive). Putting VLAN tags inside other VLAN tags is referred to as a Q-in-Q network architecture.
First create a new VLAN Interface that will be the parent VLAN that will contain the many VLANs. Give it a name. Select the Phyiscal Interface the VLAN will be attached to. Set the VLAN IDs that will be the parent VLAN. Set Autoincrement to none. If there are any Switch Port Profiles configured they can be added here to add the VLAN to any necessary ports. Click Create.
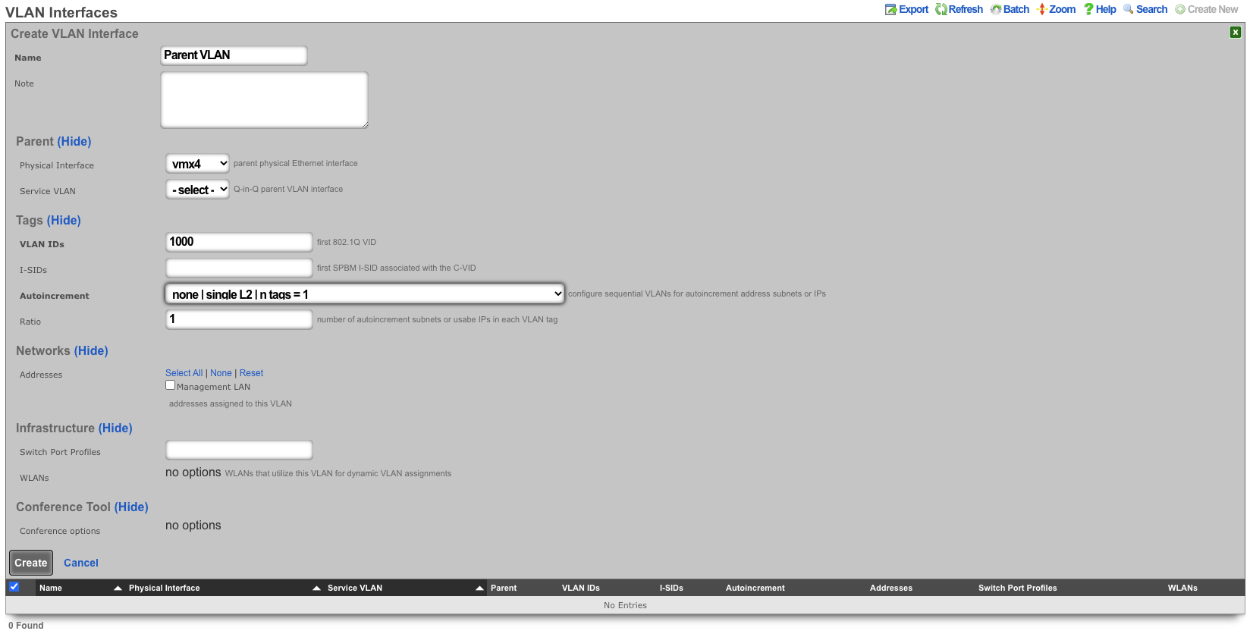
Next configure the VLAN pool that will be tied to the parent VLAN created in the previous step, these VLANs will be tied to IP address in that will be created in the next step as needed. Create a new VLAN Interface and give it a name. The Physical Interface should be unselected and the Service VLAN should be set to the Parent VLAN created in the previous step. The VLAN IDs should be set to the first VLAN to be used. Autoincrement should be set to per-ip , Ratio is set to 1. There is no need to select a Switch Port Profile as these VLANs will not be seen by the switch. Click Create.
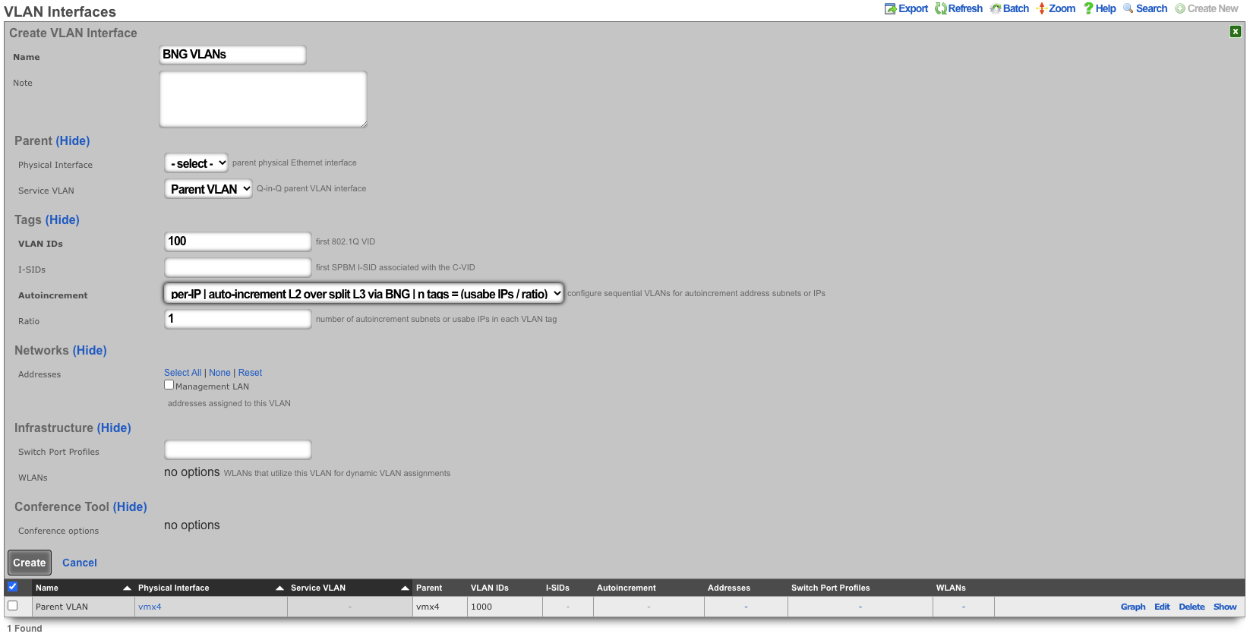
Next create a new Network Address , give it a name. Under Interface the Ethernet field should be set to -select- , and the VLAN field should be set to the VLAN created in the previous step. Enter the IP address in CIDR notation in the IP field. The Autoincrement and Span field should be set to 1. Checking the Create DHCP Pool box will automatically create a DHCP pool for the addresses. Click Create.
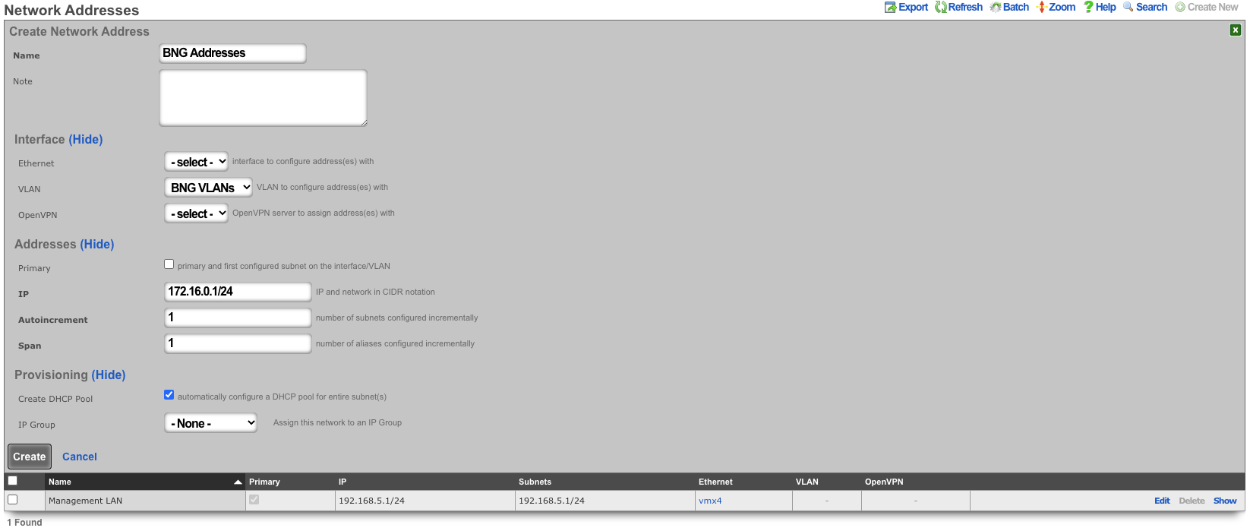

With this configuration we have a VLAN (VLAN 1000), that contains our BNG VLANs (VLANS 100-352) which allows for the BNG VLANs to be assigned individually to a single IP within the BNG Addresses that were configured. Multiple IPs can be assigned the same VLAN within the address pool as needed and each assignment only consumes a single IP instead of a minimum of 4.
The use of the Q-in-Q network architecture allows a single physical interface to be used with multiple autoincrement BNG interfaces as well as static or dynamically configured VLANs. For example:
Here we see multiple BNG interfaces are created to support distinct downstream distribution equipment. We also see that there is an additional SVLAN that is dedicated for management infrastructure. The standards based nature of the autoincrement BNG approach enables unparalleled flexibilty and diversity. Any VLAN-aware distribution equipment, wireline or wireless, may participate in an autoincrement BNG deployment. In fact, it is even possible to have a single distribution infrastructure composed of equipment from multiple vendors and even mixing different forms of technology. A single installation may use BNG to efficiently distribute public IP addresses across DSL, GPON, DOCSIS, fixed wireless and PLTE all within the same deployment.
Routing
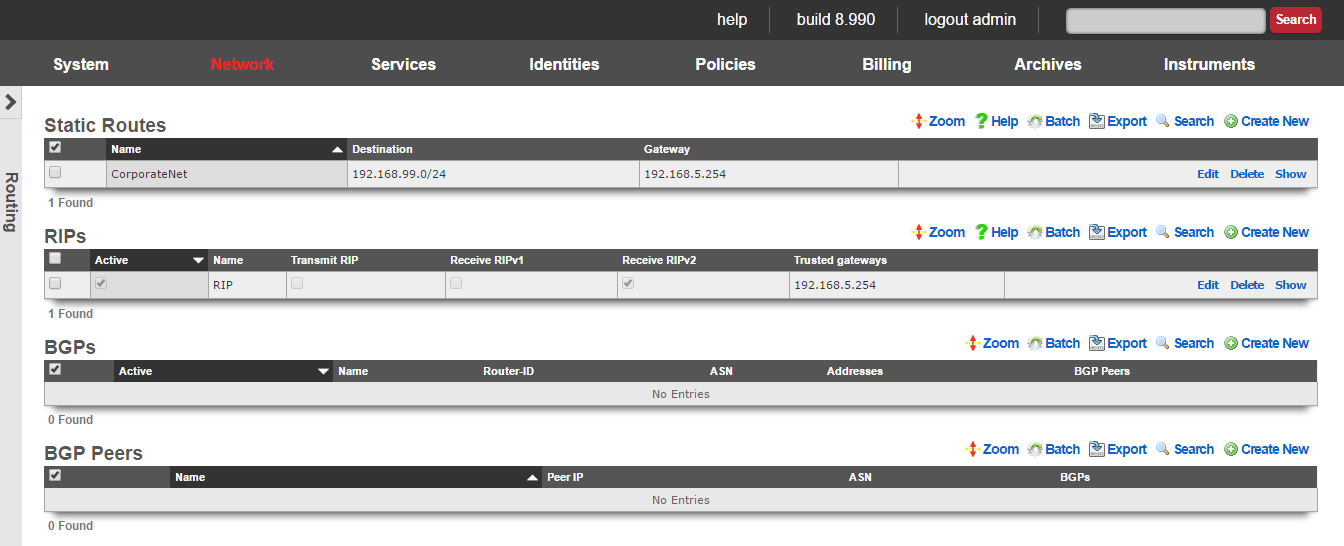
The routing view presents the scaffolds that configure settings to that control the static and dynamic entries into the rXg routing table.
The routing table of an rXg governs where packets are forwarded based on their desired destination. In a basic rXg installation where end-users are L2 connected to the LAN side of the rXg which is in turn connected to a single uplink, the routing table that is automatically created by the rXg is sufficient. In this case, no changes should be made to any of the scaffolds on the routing view.
If the rXg is deployed with a L3 routed distribution network for end-user access, then the rXg must be informed of all connected networks in order to properly route traffic and deliver forced browser redirection. This is typically accomplished by creating static routes for the various subnets that are connected behind L3 routers on the LAN side of the rXg.
The rXg supports distribution and integration of routes via RIP primarily for the purposes of simplifying cluster management. When an rXg cluster is deployed and routing between end-users on different nodes is desired, the rXgs must be informed as to all of the subnets that are behind the various cluster nodes. In addition, the rXg may broadcast router discovery responses to LAN nodes so that they may build up the internal routing tables on LAN nodes. This is particularly useful for LAN nodes that are locally and remotely accessible servers as this provides a simple mechanism for dynamic failover between multiple cluster nodes.
Static Routes
An entry in the static routes scaffold creates an entry in the IP routing table of the rXg.
The name field is an arbitrary string descriptor used only for administrative identification. Choose a name that reflects the purpose of the record. This field has no bearing on the configuration or settings determined by this scaffold.
The destination field configures the CIDR block for which a specific gateway is needed.
The gateway is the IP address of the next hop router for the CIDR block specified in the destination field.
The note field is a place for the administrator to enter a comment. This field is purely informational and has no bearing on the configuration settings.
BGP

The BGP scaffold configures the Border Gateway Protocol (BGP) daemon on the rXg. BGP is an exterior gateway protocol used to exchange routing information between autonomous systems. The rXg uses BGP to announce local networks to upstream providers and to receive routes from BGP peers.
The active field enables an option set. Exactly one option set may be active at any time. Enabling a particular option set will automatically disable another existing active option set. Note that BGP and RIP cannot be active simultaneously.
The name field is an arbitrary string descriptor used only for administrative identification. Choose a name that reflects the purpose of the record. This field has no bearing on the configuration or settings determined by this scaffold.
The router ID field specifies the BGP router identifier. This must be a valid IPv4 address and is typically set to one of the rXg's IP addresses. The router ID uniquely identifies this BGP speaker to its peers.
The ASN field configures the Autonomous System Number for this rXg. The ASN is a unique identifier assigned to your network by a regional internet registry. Valid ASN values range from 1 to 4294967295, with private ASN ranges available for internal use (64512-65534 for 16-bit, 4200000000-4294967294 for 32-bit).
The min prefix length and max prefix length fields filter the prefixes accepted from BGP peers based on their CIDR prefix length. For example, setting min to 8 and max to 24 would accept prefixes from /8 to /24 but reject more specific routes like /25 or /32.
The accept default route checkbox allows the rXg to accept a default route (0.0.0.0/0) from BGP peers. Enable this if your upstream provider advertises a default route via BGP.
The accept RFC 1918 CIDRs checkbox allows the rXg to accept private address space (10.0.0.0/8, 172.16.0.0/12, 192.168.0.0/16) from BGP peers. This is typically disabled for public BGP peering but may be useful for internal BGP deployments.
The accept RFC 3330 CIDRs checkbox allows the rXg to accept special-use address blocks defined in RFC 3330, such as loopback addresses and link-local addresses.
The peer failover checkbox enables automatic failover between BGP peers. When enabled, if the primary peer goes offline, traffic will automatically route through available backup peers.
The split announcements checkbox configures the rXg to announce different prefix sets to different peers. This is useful for traffic engineering scenarios where you want to influence inbound traffic paths. Note that this option cannot be enabled simultaneously with peer failover.
The addresses field associates network addresses with this BGP configuration. Associated addresses will be announced to BGP peers as locally originated prefixes.
The BGP peers field associates BGP peer configurations with this option set. At least one BGP peer must be configured for BGP to function.
The cluster node field associates this BGP configuration with a specific cluster node. In cluster deployments, each node may have its own BGP configuration.
The note field is a place for the administrator to enter a comment. This field is purely informational and has no bearing on the configuration settings.
BGP Peers

The BGP Peers scaffold configures the external BGP neighbors that the rXg will establish peering sessions with. Each peer represents an upstream provider or adjacent network that exchanges routing information with the rXg.
The name field is an arbitrary string descriptor used only for administrative identification. Choose a name that reflects the purpose of the record. This field has no bearing on the configuration or settings determined by this scaffold.
The IP field specifies the IP address of the BGP peer. This is the address the rXg will establish the BGP session with.
The ASN field configures the Autonomous System Number of the remote peer. This must match the ASN configured on the peer's side for the BGP session to establish.
The password field configures the MD5 authentication password for the BGP session. If specified, both sides of the peering session must use the same password. Leave blank if no authentication is required.
The uplink field associates this BGP peer with a specific uplink. This determines which interface and source IP address the rXg uses to reach the peer.
The active checkbox enables or disables this BGP peer. Disabled peers will not establish BGP sessions.
The note field is a place for the administrator to enter a comment. This field is purely informational and has no bearing on the configuration settings.
BGP Static Routes
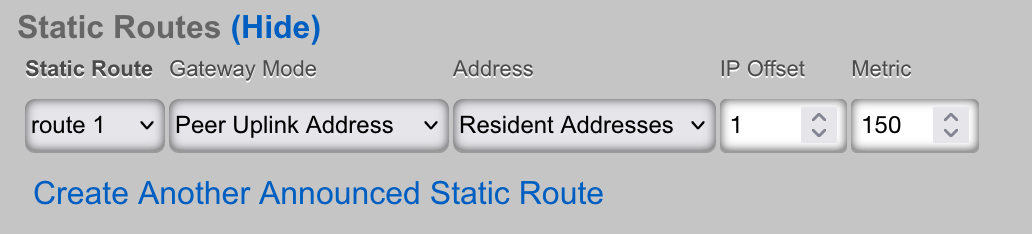
The BGP Static Routes scaffold enables the announcement of static routes via BGP. This allows operators to advertise specific prefixes to BGP peers with customized gateway and metric settings, independent of the routes configured in the Static Routes scaffold.
The static route field associates this BGP announcement with an existing static route. The destination prefix of the selected static route will be announced to BGP peers associated with the selected BGP option.
The BGP option field specifies which BGP configuration this route announcement belongs to. The route will only be announced when the associated BGP option is active.
The gateway mode field determines how the next-hop address is set for this route announcement:
- Default - Uses the gateway configured in the associated static route
- Static Route Gateway - Explicitly uses the static route's gateway as the BGP next-hop
- Peer Uplink Address - Sets the next-hop to the IP address of the uplink associated with each BGP peer, useful for multi-homed configurations
- Local Address - Uses a specific local address as the next-hop
The address field specifies a local network address to use as the next-hop when the gateway mode is set to "Local Address".
The gateway offset field adjusts the gateway address by the specified number of IP addresses. This is useful when the actual next-hop differs slightly from the static route gateway. Valid values range from 0 to 1024.
The metric field sets the BGP Multi-Exit Discriminator (MED) for this route announcement. Lower MED values are preferred by BGP peers when selecting between multiple paths to the same destination. Valid values range from 0 to 1024.
BGP Configuration Example
A typical BGP configuration involves the following steps:
- Create a BGP Options record with your ASN and router ID
- Create BGP Peers records for each upstream provider
- Associate network addresses with the BGP option to announce them
- Optionally create BGP Static Routes for granular control over specific prefix announcements
- Activate the BGP option to begin peering
The status of BGP sessions can be monitored in the Instruments :: Routes :: BGP Entries scaffold, which displays the state of each peering session, prefixes received, and message statistics.
RIP
The RIP scaffold controls the behavior of the rXg with respect to RFC 1058 and RFC 2453 router information protocol messages. The rXg may be configured to broadcast route advertisements as well as accept RIP announcements from other routers.
The active field enables an option set. Exactly one option set may be active at any time. Enabling a particular option set will automatically disable another existing active option set.
The name field is an arbitrary string descriptor used only for administrative identification. Choose a name that reflects the purpose of the record. This field has no bearing on the configuration or settings determined by this scaffold.
The transmit RIP checkbox enables the broadcast of route advertisements to locally connected networks. When this box is checked, the rXg will make RIP announcements
The receive RIPv1 and receive RIPv2 checkboxes enable the rXg to receive RIPv1 and RIPv2 route advertisements respectively.
The RIPv2 password field configures the shared security credential that will be used when sending and receiving RIPv2 announcements.
The trusted gateways field is where the operator specifies the routers from which RIP announcements will be accepted. In order to prevent injection of false routers, it is required that one or more trusted gateways be specified in order to receive RIP announcements.
The note field is a place for the administrator to enter a comment. This field is purely informational and has no bearing on the configuration settings.
BGP
The Border Gateway Protocol (BGP) scaffolds enable the rXg to participate in dynamic routing with upstream providers and peer networks using the industry-standard BGP-4 protocol. BGP is the routing protocol that powers the Internet, allowing autonomous systems to exchange routing information and make intelligent forwarding decisions.
Accessing BGP Configuration
BGP configuration is accessed via the Network::Routing view in the rXg administrative console. The routing view contains the following BGP-related scaffolds:
- BGP - Configures the BGP daemon settings including local ASN, router ID, and filtering options
- BGP Peers - Defines BGP neighbor relationships with upstream providers or peer networks
- Announced Static Routes - Configures static routes to be redistributed into BGP
To monitor BGP session status, navigate to Instruments::Routes and view the BGP Entries scaffold, which displays real-time peering session information.
                           rXg ADMIN CONSOLE NAVIGATION


    CONFIGURATION                                    MONITORING


    Network                                          Instruments

        Routing                                      Routes

                Static Routes                                 OpenVPN Entries
                RIP                                           IPsec Entries
                BGP             daemon config              BGP Entries     session status
                BGP Peers       neighbor config            Routes
                Announced       route redistribution
                   Static Routes
When to Use BGP
BGP is appropriate when the rXg deployment requires:
- Multi-homed connectivity with multiple upstream ISPs where the rXg needs to receive full or partial routing tables
- Provider-independent IP space that must be announced to upstream networks
- Traffic engineering capabilities to influence inbound and outbound traffic paths
- High availability with automatic failover based on BGP session state
- Peering relationships with other networks at Internet Exchange Points (IXPs)
                                                  INTERNET


                                  ISP A (AS 64501)      ISP B (AS 64502)
                                 Primary Provider      Backup Provider


                                    BGP Session            BGP Session
                                   (eBGP Peering)        (eBGP Peering)


                                            rXg (AS 65000)


                                          BGP Daemon (FRR)

                                    Announces: 203.0.113.0/24
                                    Announces: 198.51.100.0/24
                                    Receives:  Full/Partial Table


                                            LAN Networks
                                       (End Users / Servers)
BGP vs RIP
The rXg supports both RIP and BGP for dynamic routing, but they serve different purposes and cannot be enabled simultaneously. The following comparison helps determine which protocol is appropriate:
    Attribute                     RIP                              BGP

 Protocol Type       Interior Gateway Protocol (IGP)  Exterior Gateway Protocol (EGP)
 Typical Use         Internal/Cluster routing         Internet/ISP connectivity
 Scalability         Small networks (15 hops)        Internet scale
 Convergence         Slow (30-180 seconds)            Fast (seconds)
 Path Selection      Hop count only                   Multiple attributes (AS path,
                                                      local pref, MED, etc.)
 Authentication      Plaintext password               MD5 authentication
 Route Filtering     Limited                          Extensive prefix-list support
BGP Configuration Workflow
The following diagram illustrates the recommended order for configuring BGP on the rXg:
                           BGP CONFIGURATION WORKFLOW


    Step 1                    Step 2                    Step 3                    Step 4

  Configure              Configure               Create                Associate
    BGP         BGP Peers     Announced     Addresses
   Options              (Neighbors)           Static Routes             to BGP


  Set local ASN           Add peer IPs           Select routes           Link network
  Set router ID           Set remote ASNs         to announce              addresses to
  Configure prefix        Set passwords          Configure                BGP options
   length filters          Associate with          gateway modes           These will be
  Set RFC filtering        uplinks                Set metrics              announced to
   options                 Enable/disable                                   all peers
                            peers


                                 Activate BGP
                                 Configuration

                                Set 'Active' =
                                on BGP Options


                                Monitor Sessions

                                Instruments
                                Routes
                                BGP Entries
Prerequisites
Before configuring BGP, ensure the following requirements are met:
- Uplinks configured - At least one uplink must be configured and online in the Network::WAN view
- IP connectivity - The rXg must have IP reachability to the BGP peer addresses
- Coordination with upstream - Obtain the following from your upstream provider(s):
- Their Autonomous System Number (ASN)
- Their BGP peer IP address(es)
- MD5 authentication password (if required)
- Prefix announcements they expect to receive from you
- Any specific filtering requirements
BGP Session States
Understanding BGP session states is essential for troubleshooting. The rXg displays session states in the BGP Entries instrument:
    State                                 Description

 Idle          Initial state. BGP is waiting to start or has been reset.
               Check: Peer IP reachability, firewall rules (TCP 179)

 Active        BGP is actively trying to establish a TCP connection to the peer.
               Note: "Active" does NOT mean the session is established!
               Check: Remote peer configuration, network connectivity

 Connect       TCP connection is in progress.
               Transient state - should progress quickly

 OpenSent      TCP connection established, OPEN message sent, waiting for response.
               Check: ASN mismatch, authentication mismatch

 OpenConfirm   OPEN message received, waiting for KEEPALIVE or NOTIFICATION.
               Check: Capability negotiation issues

 Established   BGP session is fully operational. Routes are being exchanged.
               This is the desired operational state.

 Shutdown      Peer has been administratively disabled (Active checkbox unchecked).
               Action: Enable the peer if connectivity is desired
BGP Options
An entry in the BGP options scaffold configures the BGP daemon (bgpd) that runs on the rXg. This scaffold defines the local BGP speaker parameters including the Autonomous System Number, router identifier, and inbound route filtering policies.
The active field enables the BGP configuration. Exactly one BGP option set may be active at any time. Enabling a particular option set will automatically disable another existing active option set. Important: BGP and RIP cannot be active simultaneously; activating BGP will generate an error if RIP is already active.
The name field is an arbitrary string descriptor used only for administrative identification. Choose a name that reflects the purpose of the record. This field has no bearing on the configuration or settings determined by this scaffold.
The router ID field specifies the BGP router identifier, which uniquely identifies this BGP speaker. The router ID must be a valid IPv4 address format (even when using IPv6 BGP). Best practice is to use a loopback address or the primary WAN IP address of the rXg. The router ID should remain stable across reboots and configuration changes.
The ASN field specifies the local Autonomous System Number. This is the AS number that identifies your network to BGP peers. Valid values range from 1 to 4294967295 (supporting both 2-byte and 4-byte ASNs). If you have not been assigned an ASN by a Regional Internet Registry (RIR), you may use a private ASN in the range 64512-65534 (2-byte) or 4200000000-4294967294 (4-byte) for private peering arrangements.
The min prefix length field sets the minimum prefix length (in bits) that will be accepted from BGP peers. Routes with prefix lengths shorter than this value will be filtered. Valid values are 1-32 for IPv4. For example, setting this to 8 will reject any prefix shorter than /8 (such as a /4 or default route, unless explicitly allowed).
The max prefix length field sets the maximum prefix length (in bits) that will be accepted from BGP peers. Routes with prefix lengths longer than this value will be filtered. Valid values are 1-32 for IPv4. For example, setting this to 24 will reject any prefix longer than /24 (such as /25, /26, etc.). This helps prevent route table bloat from overly specific prefixes.
                         INBOUND PREFIX FILTERING

    Received               Prefix Length              Accepted/
    Prefix                 Filter Check               Rejected


    0.0.0.0/0        min=8, max=24        REJECTED (too short)
                          accept_default=NO           unless accept_default_route=YES

    10.0.0.0/8       min=8, max=24        REJECTED (RFC 1918)
                          accept_rfc_1918=NO          unless accept_rfc_1918_cidrs=YES

    192.0.2.0/24     min=8, max=24        REJECTED (RFC 3330)
                          accept_rfc_3330=NO          unless accept_rfc_3330_cidrs=YES

    8.8.8.0/24       min=8, max=24        ACCEPTED

    1.2.3.0/28       min=8, max=24        REJECTED (too long)
The accept default route checkbox, when enabled, allows the rXg to accept the default route (0.0.0.0/0) from BGP peers. When disabled (default), the default route is explicitly filtered regardless of the min/max prefix length settings. Enable this only if you want BGP peers to provide default routing for the rXg.
The accept RFC 1918 CIDRs checkbox, when enabled, allows the rXg to accept private network prefixes as defined in RFC 1918. These include 10.0.0.0/8, 172.16.0.0/12, and 192.168.0.0/16 and any more-specific prefixes within these ranges. When disabled (default), these prefixes are filtered to prevent private address space from polluting the routing table via BGP.
The accept RFC 3330 CIDRs checkbox, when enabled, allows the rXg to accept special-use and reserved address prefixes as defined in RFC 3330. These include addresses reserved for documentation (192.0.2.0/24, 198.51.100.0/24, 203.0.113.0/24), benchmarking (198.18.0.0/15), and other special purposes. When disabled (default), these prefixes are filtered.
The split announcements checkbox, when enabled, causes the rXg to subdivide the associated addresses across all BGP peers that have an online uplink. This feature is useful for load balancing outbound traffic across multiple upstream providers by announcing different portions of your address space to different peers. Note: Split announcements cannot be enabled simultaneously with peer failover.
                         SPLIT ANNOUNCEMENTS EXAMPLE

    Associated Addresses: 203.0.113.0/24 (256 IPs)
    Online Peers: 2 (ISP-A and ISP-B)


                            rXg BGP Speaker

       Address Pool: 203.0.113.0/24

       Split into:
        203.0.113.0/25   (0-127)
        203.0.113.128/25 (128-255)


          ISP-A                           ISP-B

     Receives:                       Receives:
     203.0.113.0/25                  203.0.113.128/25
The peer failover checkbox, when enabled, causes the rXg to announce networks only to the BGP peer associated with the highest-priority online uplink. When this peer's uplink goes offline, announcements automatically shift to the next highest-priority peer with an online uplink. This provides simple active/standby failover without requiring BGP communities or AS path manipulation. Note: Peer failover cannot be enabled simultaneously with split announcements.
                           PEER FAILOVER EXAMPLE

    Uplink Priorities:
     ISP-A Uplink: Priority 100 (Primary)
     ISP-B Uplink: Priority 50  (Backup)


                         NORMAL OPERATION

       ISP-A (Priority 100)  Networks announced here
       ISP-B (Priority 50)        (standby - no announcements)


                         FAILOVER CONDITION
                         (ISP-A Uplink Down)

       ISP-A (Priority 100)       OFFLINE
       ISP-B (Priority 50)   Networks announced here
The BGP peers field associates BGP peer (neighbor) configurations with this BGP option set. Peers must be created in the BGP Peers scaffold and then associated here.
The addresses field associates network addresses that will be announced to BGP peers. Select the addresses (from Network::WAN::Network Addresses) that represent your provider-independent IP space or any other networks you wish to advertise via BGP.
The static routes field (via the Announced Static Routes scaffold) associates static routes that will be redistributed into BGP. This allows the rXg to announce reachability to networks that are not directly connected but are reachable via static routing.
The note field is a place for the administrator to enter a comment. This field is purely informational and has no bearing on the configuration settings.
BGP Peers
An entry in the BGP peers scaffold defines a BGP neighbor relationship. Each peer represents an external BGP (eBGP) session with an upstream provider, peer network, or other BGP-speaking router.
The active field enables or disables this BGP peer. When unchecked, the BGP session will be administratively shut down (the peer will show "Shutdown" state in BGP Entries). This allows temporarily disabling a peer without deleting its configuration.
The name field is an arbitrary string descriptor used only for administrative identification. Choose a name that reflects the purpose of the record, such as the provider name or circuit ID. This field has no bearing on the configuration or settings determined by this scaffold.
The IP field specifies the IP address of the remote BGP peer. This must be the IP address configured on the upstream router's BGP session. The rXg must have IP connectivity to this address (verify with ping before configuring BGP). Both IPv4 and IPv6 peer addresses are supported.
The ASN field specifies the Autonomous System Number of the remote BGP peer. This value must match the ASN configured on the remote router. Valid values range from 1 to 4294967295. Your upstream provider will supply this value.
The password field configures MD5 authentication for the BGP session. When set, both the rXg and the remote peer must be configured with the same password. MD5 authentication provides protection against TCP-based attacks on the BGP session. Leave blank if the upstream provider does not require authentication.
The uplink field associates this BGP peer with a specific uplink. This association serves two purposes:
- Interface binding - The BGP session will be established through the interface associated with the selected uplink
- Status tracking - When peer failover or split announcements are enabled, the uplink's online/offline status determines whether this peer receives route announcements
                        BGP PEER TO UPLINK ASSOCIATION


                               rXg


         BGP Peer                                BGP Peer
         "ISP-A"                                 "ISP-B"

        IP: 1.2.3.1                             IP: 4.5.6.1
        ASN: 64501                              ASN: 64502


               Associated                               Associated


          Uplink                                  Uplink
         "WAN-A"                                 "WAN-B"

        Priority:100                            Priority:50
        Status: UP                              Status: UP


           ISP-A                                   ISP-B
          Router                                  Router
          1.2.3.1                                 4.5.6.1
The BGPs field shows which BGP option sets this peer is associated with. A peer can be associated with multiple BGP option sets, though typically only one is active at a time.
The note field is a place for the administrator to enter a comment. This field is purely informational and has no bearing on the configuration settings.
Announced Static Routes
An entry in the announced static routes scaffold configures a static route to be redistributed into BGP. This allows the rXg to announce reachability to networks that are accessible via static routing but are not directly connected interfaces.
This is commonly used when: - The rXg has static routes to downstream networks that should be announced upstream - Multiple rXg nodes in a cluster need to announce routes with different next-hop addresses - Custom routing policies require specific next-hop manipulation
The static route field selects which static route (from Network::Routing::Static Routes) will be announced via BGP. The destination CIDR of the selected static route becomes the prefix advertised to BGP peers.
The BGP field associates this announced route with a BGP option set. The route will be announced when the associated BGP configuration is active.
The gateway mode field determines how the next-hop (gateway) address is set when announcing this route to BGP peers:
     Gateway Mode                             Behavior

 Static Route Gateway    Uses the gateway IP configured in the static route itself.
 (Default)               The announced route's next-hop = static route's gateway.

 Peer Uplink Address     Uses the rXg's IP address on the uplink associated with
                         the highest-priority online BGP peer. Useful when the
                         upstream expects to route back to the rXg's WAN IP.

 Local Address           Uses a specific local address (selected in the Address
                         field). Useful in cluster deployments where each node
                         announces routes with its own address as next-hop.
The IP offset field adds an offset to the calculated gateway address. This is useful when the next-hop needs to be a different IP within the same subnet. For example, if the base gateway is 10.0.0.1 and the offset is 2, the announced next-hop becomes 10.0.0.3. Valid values are 0-1024.
The metric field sets the Multi-Exit Discriminator (MED) value for the announced route. The MED is used to influence inbound traffic when you have multiple connections to the same upstream AS. Lower MED values are preferred. Valid values are 0-1024. Leave blank to not set a specific MED.
The address field selects a local address to use as the next-hop when the gateway mode is set to "Local Address". This field is only relevant when using the Local Address gateway mode.
                    ANNOUNCED STATIC ROUTE EXAMPLE

    Scenario: rXg has a static route to a downstream network (172.16.0.0/16)
              that should be announced to upstream BGP peers

    Static Route Configuration:

      Name: Downstream-Network
      Destination: 172.16.0.0/16
      Gateway: 10.0.0.1 (downstream router)


    Announced Static Route Configuration:

      Static Route: Downstream-Network
      Gateway Mode: Peer Uplink Address
      Metric: 100


    Result: BGP announces 172.16.0.0/16 with next-hop = rXg's WAN IP
            and MED = 100


                            INTERNET


                        Upstream ISP

                       Learns route:
                       172.16.0.0/16
                       via rXg WAN IP


                            rXg         Static route to 172.16.0.0/16
                                               via 10.0.0.1


                        Downstream
                        Router
                        10.0.0.1


                        172.16.0.0/16
                        (Customer
                         Network)
BGP Monitoring
Once BGP is configured and active, session status can be monitored via the Instruments::Routes::BGP Entries scaffold. This scaffold displays real-time information about each BGP peering session including:
- State - Current BGP session state (Established = operational)
- Neighbor - IP address of the BGP peer
- ASN - Remote peer's Autonomous System Number
- Msg Rcvd/Sent - Count of BGP messages exchanged
- Prf Rcvd - Number of prefixes (routes) received from the peer
- Uptime - Duration the session has been established
The rXg generates notification events when BGP peers transition between online and offline states. These events can be configured to trigger alerts via the Policies::Notifications view.
BGP Troubleshooting
Common BGP issues and their resolutions:
 SYMPTOM: Session stuck in "Active" or "Idle" state

 CAUSES & SOLUTIONS:

 1. No IP connectivity to peer
     Verify: ping <peer_ip> from rXg console
     Check: Uplink status, gateway configuration, physical connectivity

 2. TCP port 179 blocked
     Check: Firewall rules on both sides
     Verify: BGP uses TCP port 179 for session establishment

 3. Peer not configured on remote side
     Verify: Remote router has matching neighbor configuration
     Check: Your ASN is correctly configured on remote peer

 4. ASN mismatch
     Verify: Remote ASN in BGP Peers matches actual remote AS
     Verify: Your ASN in BGP Options matches what remote expects


 SYMPTOM: Session established but no routes received

 CAUSES & SOLUTIONS:

 1. Prefix filtering too restrictive
     Check: min/max prefix length settings
     Adjust: If expecting /25s, ensure max_prefix_len  25

 2. RFC 1918/3330 filtering blocking needed routes
     Enable: accept_rfc_1918_cidrs if private routes needed
     Enable: accept_rfc_3330_cidrs if special-use routes needed

 3. Remote peer not sending routes
     Verify: Remote peer's outbound policy allows sending to you
     Check: Route announcements on remote side


 SYMPTOM: Routes not being announced to peers

 CAUSES & SOLUTIONS:

 1. No addresses associated with BGP Options
     Add: Network addresses to the BGP Options record

 2. Peer failover enabled but peer's uplink is not highest priority
     Check: Uplink priorities in Network::WAN::Uplinks
     Verify: Correct uplink associated with BGP Peer

 3. BGP peer marked inactive
     Enable: 'Active' checkbox on the BGP Peer

 4. Associated uplink is offline
     Check: Uplink status in Network::WAN
     Verify: Ping targets for uplink health monitoring
Example: Basic Dual-Homed BGP Configuration
This example configures the rXg with two upstream ISPs for redundancy:
NETWORK TOPOLOGY:


                                 INTERNET


               ISP-Primary                  ISP-Backup
               AS 64501                     AS 64502
               203.0.113.1                  198.51.100.1


                       eBGP                          eBGP


                                  rXg
                               AS 65000

            WAN-A: 203.0.113.2/30    WAN-B: 198.51.100.2/30
            (Priority: 100)          (Priority: 50)

            Announces: 192.0.2.0/24 (customer address space)


CONFIGURATION STEPS:

1. BGP Options:

    Name:                 Production-BGP
    Active:
    Router ID:            203.0.113.2
    ASN:                  65000
    Min Prefix Length:    8
    Max Prefix Length:    24
    Accept Default Route:
    Accept RFC 1918:
    Accept RFC 3330:
    Peer Failover:          (use primary, failover to backup)
    Split Announcements:
    Addresses:            192.0.2.0/24
    BGP Peers:            ISP-Primary, ISP-Backup


2. BGP Peers:

    Name:     ISP-Primary
    Active:
    IP:       203.0.113.1
    ASN:      64501
    Password: secretpass123
    Uplink:   WAN-A (Priority 100)


    Name:     ISP-Backup
    Active:
    IP:       198.51.100.1
    ASN:      64502
    Password: backuppass456
    Uplink:   WAN-B (Priority 50)


EXPECTED BEHAVIOR:
 Normal operation: 192.0.2.0/24 announced to ISP-Primary only
 WAN-A failure:    192.0.2.0/24 announced to ISP-Backup
 WAN-A recovery:   192.0.2.0/24 moves back to ISP-Primary
Step-by-Step Configuration Walkthrough
This walkthrough demonstrates the complete process of configuring BGP on an rXg from start to finish. The example assumes you are setting up a single BGP peer with your upstream ISP to announce your own IP space.
Prerequisites Checklist
Before starting BGP configuration, verify the following:
                              PRE-CONFIGURATION CHECKLIST


   1. WAN uplink is configured and online (Network::WAN::Uplinks)

   2. rXg has a routable IP address on the WAN interface
       (Network::WAN::Network Addresses)

   3. You have obtained from your ISP:
        Their ASN (e.g., 64501)
        Their BGP peer IP (e.g., 203.0.113.1)
        MD5 password (if required)

   4. You know your own ASN (assigned by RIR or private ASN 64512-65534)

   5. You have IP addresses to announce (provider-independent space)
       already configured in Network::WAN::Network Addresses

   6. You can ping the ISP's BGP peer IP from the rXg console
Step 1: Create the BGP Peer
First, define the BGP neighbor (your upstream ISP's router).
- Navigate to Network Routing in the admin console
- Locate the BGP Peers scaffold
- Click Create New to add a new BGP peer
- Fill in the peer details:
                              CREATE BGP PEER
                              Network::Routing::BGP Peers


   Name:        [  ISP-Upstream                                    ]
                Administrative name for this peer

   Active:      [] Enable this peer

   IP:          [  203.0.113.1                                     ]
                IP address of the remote BGP router

   ASN:         [  64501                                           ]
                Remote peer's Autonomous System Number

   Password:    [                                      ]
                MD5 authentication (leave blank if not required)

   Uplink:      [ WAN-Primary                                    ]
                Associate with the uplink connected to this ISP

   Note:        [  Primary upstream provider - Acme ISP            ]

                                              [ Cancel ]  [ Create BGP Peer ]
- Click Create BGP Peer to save
Step 2: Create the BGP Options (Daemon Configuration)
Next, configure the BGP daemon with your local AS information.
- In the Network Routing view, locate the BGP scaffold
- Click Create New to add a new BGP configuration
- Fill in the BGP daemon options:
                              CREATE BGP OPTIONS
                              Network::Routing::BGP


   Name:              [  Production-BGP                            ]

   Active:            [] Enable BGP (only one can be active)

   Router ID:         [  203.0.113.2                               ]
                      Use your primary WAN IP address

   ASN:               [  65000                                     ]
                      Your Autonomous System Number

    Inbound Filtering

   Min Prefix Length: [  8                                         ]
   Max Prefix Length: [  24                                        ]

   Accept Default Route:   [] Allow 0.0.0.0/0 from peers
   Accept RFC 1918 CIDRs:  [ ] Allow private networks (10.x, 172.16.x, 192.168.x)
   Accept RFC 3330 CIDRs:  [ ] Allow reserved/documentation prefixes

    Announcement Mode

   Split Announcements:    [ ] Divide addresses across peers
   Peer Failover:          [ ] Use highest-priority peer only

    Associations

   BGP Peers:         [] ISP-Upstream
                      [ ] ISP-Backup
                      Select peers to establish sessions with

   Addresses:         [] 192.0.2.0/24 (Customer-Space)
                      [ ] 203.0.113.2/30 (WAN-Primary)
                      Select addresses to announce via BGP

                                              [ Cancel ]  [ Create BGP ]
- Click Create BGP to save and activate
Step 3: Verify BGP Session Establishment
After saving the configuration, verify the BGP session comes up.
- Navigate to Instruments Routes
- Locate the BGP Entries scaffold
- Check the session state:
                              BGP ENTRIES
                              Instruments::Routes::BGP Entries


  Neighbor        BGP Peer       State        ASN    Msg Rcvd  Msg Sent  Uptime

  203.0.113.1     ISP-Upstream   Established  64501  1,247     1,152     2d 4h


   State = "Established" indicates successful BGP peering
- If the state is not "Established", refer to the Troubleshooting section above
Step 4: (Optional) Configure Announced Static Routes
If you need to announce routes to networks reachable via static routing:
- First, ensure a static route exists in Network Routing Static Routes
- In the Network Routing view, locate Announced Static Routes
- Click Create New
- Configure the route announcement:
                              CREATE ANNOUNCED STATIC ROUTE
                              Network::Routing::Announced Static Routes


   Static Route:    [ Downstream-Network (172.16.0.0/16)         ]
                    Select the static route to announce

   BGP:             [ Production-BGP                             ]
                    Associate with active BGP configuration

   Gateway Mode:    [ Peer Uplink Address                        ]
                     Static Route Gateway - use route's gateway
                     Peer Uplink Address - use rXg's WAN IP
                     Local Address - use specific local IP

   IP Offset:       [  0                                        ]
                    Add offset to gateway address (0-1024)

   Metric:          [  100                                      ]
                    MED value for route preference (0-1024)

   Address:         [ (not applicable for this gateway mode)     ]
                    Only used with "Local Address" gateway mode

                                    [ Cancel ]  [ Create Announced Static Route ]
- Click Create Announced Static Route to save
Step 5: Verify Route Announcements
Confirm your routes are being announced to the BGP peer:
- Contact your ISP to verify they are receiving your prefixes, OR
- Use a looking glass service to check route visibility from the Internet
- Monitor the Instruments Routes Routes scaffold to see routes learned from peers
Configuration Summary
The complete BGP configuration process follows this order:
                         BGP CONFIGURATION SEQUENCE


     STEP 1                 STEP 2                 STEP 3                 STEP 4

    Create              Create              Verify              Add
    BGP Peer       BGP        Session      Static
                        Options             Status              Routes


  Network::Routing       Network::Routing     Instruments::Routes   Network::Routing
  BGP Peers              BGP                  BGP Entries           Announced Static
                                                                    Routes


   Peer IP               Local ASN            State =              Select route
   Remote ASN            Router ID             "Established"        Set gateway
   Password              Prefix filters       Routes received       mode
   Uplink                Associate peers      Uptime > 0           Set metric
                          Associate addresses
                          Set Active =
Important Notes:
- BGP peers must be created before they can be associated with BGP Options
- The BGP configuration only becomes active when the Active checkbox is enabled
- Only one BGP configuration can be active at a time
- BGP and RIP cannot be active simultaneously
- Changes to BGP configuration take effect immediately; no restart is required
- Monitor BGP Entries after any configuration change to verify session stability
Wired
The Wired view presents the scaffolds associated with configuring the wired distribution layer of your network, and monitoring/configuring the switch ports throughout your infrastructure.
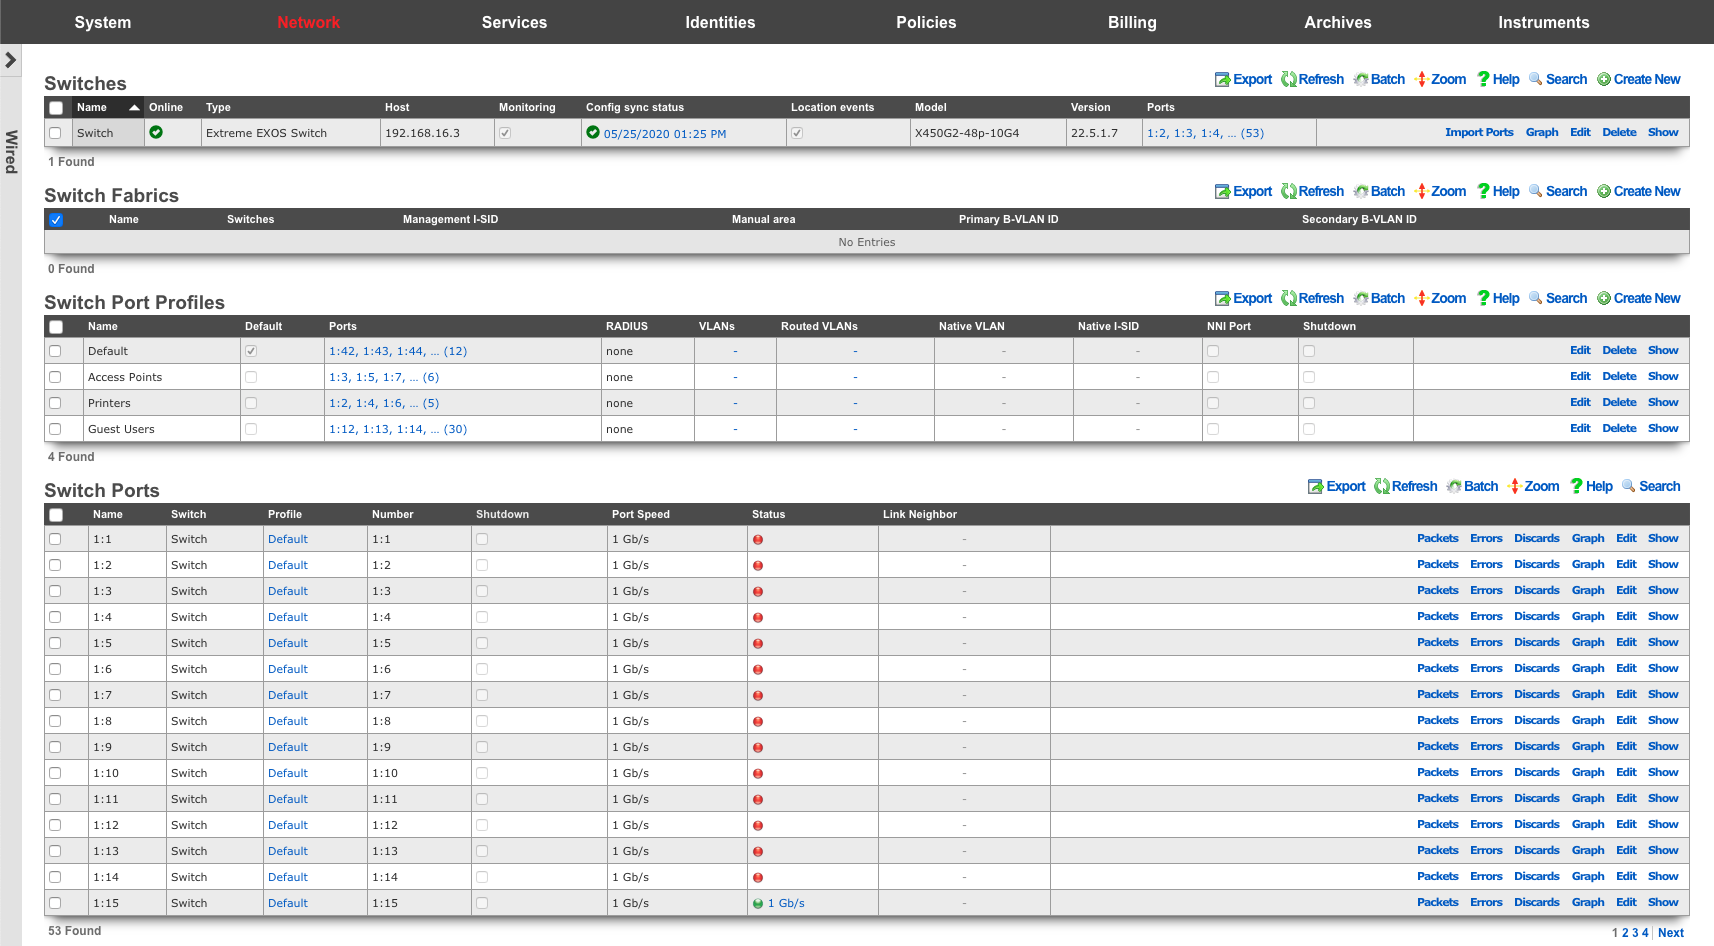
Switches
An entry in the switches scaffold defines a piece of switching equipment with which the rXg will communicate for the purpose of effecting dynamic VLAN changes when necessary due to a policy shift for a device on the network.
When a device's VLAN assignment has changed due to a policy shift, the rXg will connect to the switch associated with the device's RADIUS realm via the protocol specified in the configuration, and force a disconnect/reconnect, which will reinitiate the RADIUS authentication process, thereby resulting in the new VLAN assignment being applied to the client device.
The name field is an arbitrary string descriptor used only for administrative identification. Choose a name that reflects the purpose of the record. This field has no bearing on the configuration or settings determined by this scaffold.
The device section specifies information of equipment being configured. Fields with bold text are required. Choose the appropriate option from the supported device types drop-down menu.
Enabling the Monitoring checkbox results in the rXg attempting to import and synchronize Switch Ports from the device, as well as perform ping monitoring of the switch itself, and collect CPU and Memory statistics, where possible.
The SNMP community field specifies the SNMP community string that will be used when attempting to gather CPU and/or Memory information, as well as to collect Switch Port utilization/error/discard data for graphing.
The Switch Fabric field assigns a switch fabric profile to this switch. The Loopback IP , System name , and SPB-m nickname fields must be provided when assigning a switch fabric profile. After supplying the necessary information, the Config sync status link becomes available in the scaffold.
For switches that support configuration management, the Config sync status column contains a link that allows the operator to access bootstrap instructions and enable synchronization.
When bootstrapping a new switch, the operator may retrieve bootstrap commands that will bring a factory default switch or wireless controller into the necessary state to participate in the fabric network, which may be copy/pasted into a console session on the device.
After initial bootstrapping and network connectivity is established, the operator may download a running configuration backup or compare the current running configuration to the expected configuration, based on the associated configuration elements. If changes are needed, they may be pushed to the switch. After successfully synchronizing manually the first time, future configuration changes will be pushed to the device whenever relevant configuration changes are made in the database.
The note field is a place for the administrator to enter a comment. This field is purely informational and has no bearing on the configuration settings.
Automatic Onboarding
Supported switch types (such as Cisco Catalyst IOS-XE and EdgeCore) can be automatically onboarded from a factory-default state. This process eliminates the need to manually configure the switch via console before it can be managed by the rXg.
Prerequisites
Before initiating automatic onboarding, ensure the following:
- The switch must be connected to the network and able to obtain a DHCP address from the rXg.
- Create a switch record in the Switches scaffold with the desired target IP address (the management IP the switch will be assigned after onboarding).
- Enter the switch's MAC address in the device record. This allows the rXg to locate the switch on its temporary DHCP address.
- Configure the Management VLAN if different from VLAN 1.
- Provide valid SSH credentials (username and password) that match the switch's factory default or pre-configured credentials.
Onboarding Process
- Click the Auto Bootstrap action link in the switch record.
- The rXg looks up the switch's current DHCP IP address using the configured MAC address from the DHCP leases table.
- An SSH connection is established to the switch using the temporary DHCP IP.
- The system detects whether the switch is in factory-default state by checking for the absence of rXg-specific configuration elements (varies by switch model).
- If factory-default state is detected, bootstrap configuration is automatically applied, including:
- Management VLAN creation (if not VLAN 1)
- Static IP address assignment on the management VLAN interface
- Default gateway configuration
- SNMP community string
- AAA and RADIUS configuration for 802.1X
- Uplink port trunk configuration to carry the management VLAN (with native VLAN 1)
- NTP server configuration
- The switch saves its configuration and reconnects on the new management IP address.
After automatic onboarding completes, the switch will appear as online at its configured management IP address and will be ready for configuration synchronization.
Uplink Port Configuration
During automatic onboarding, the uplink port (default: GigabitEthernet1/0/1) is configured as a trunk port to carry both the native VLAN 1 (untagged) and the management VLAN (tagged). This allows the switch to maintain connectivity during the transition from DHCP to static IP addressing.
The trunk configuration is applied in the following order to minimize connectivity disruption:
- Trunk properties are configured first (native VLAN 1, allowed VLANs) while the port remains in access mode
- Configuration is saved to startup-config
- The port mode is changed to trunk, which causes a brief (~30 second) port flap
- The switch reconnects on its new management IP
Manual Onboarding
For switches that do not support automatic onboarding, or in situations where manual configuration is preferred, the operator may retrieve bootstrap commands and apply them manually.
- Create a switch record with the desired management IP address and credentials.
- Click the Config sync status link to access bootstrap instructions.
- Retrieve the bootstrap commands that will bring a factory-default switch into the necessary state.
- Connect to the switch via console cable or existing network access.
- Copy and paste the bootstrap commands into the switch's CLI session.
- After the configuration is applied, the switch will be reachable at its new management IP address.
Refer to the Switch Model-specific Configuration Details section below for detailed manual configuration steps for each supported switch type.
Switch Fabric
An entry in the Switch Fabric scaffold defines the fabric area of a 802.1aq Shortest Path Bridging-MAC (SPB-m) deployment. All participating fabric switches share the common configuration found here. In addition, each participating fabric switch should have an Infrastructure Device defined with the necessary SPB-m configuration specific to that device.
The name field is an arbitrary string descriptor used only for administrative identification. Choose a name that reflects the purpose of the record. This field has no bearing on the configuration or settings determined by this scaffold.
The Management I-SID field specifies the I-SID that will be associated with the Management VLAN for management traffic. The Management VLAN is configured per device, under the Switches scaffold.
The Manual area field specifies the IS-IS area that will be used within this fabric in the format: xx.xxxx (ex: 10.0001)
The Primary B-VLAN and Secondary B-VLAN fields indicate the VLANs which will be used for passing encapsulated traffic between participating fabric switches on switch ports designated as NNI ports. These VLANs should be unused elsewhere in your infrastructure.
Switch Ports
Entries in the Switch Ports scaffold are created automatically by enabling the Monitoring checkbox on a supported switch's Infrastructure Device. Ports are imported and speed, packet, error and discard rates are gathered via SNMP and made graphable for each switch port.
The name field represents the port's identification in the switch, and should not be changed.
The NNI Port designates this port as a Network-to-Network Interface. This option must be enabled for any port where two fabric-enabled switches interconnect.
The speed in bps field represents the port's maximum physical speed in bits per second.
Link Speed History
The Link Speed column in the Switch Ports scaffold displays the current port speed as a colored indicator. Hovering over the indicator shows a tooltip with the connected speed. Clicking the link speed indicator opens the Link Speed History panel, which shows a timestamped log of all detected speed changes for that port.
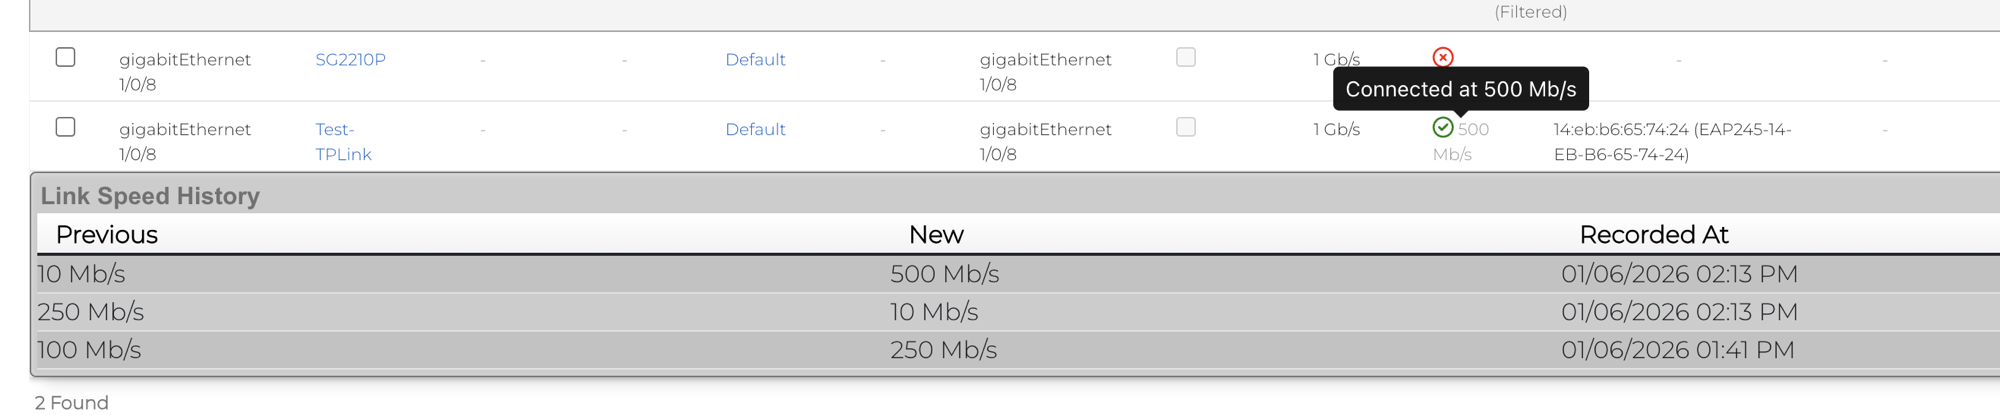
Each history entry records the previous link speed and new link speed at the time the change was detected. A link speed of zero is displayed as Down. Speed changes are detected automatically via SNMP polling and configuration sync no operator action is required to enable tracking.
Link speed history records are included in the Database Purger system, so operators can configure retention policies under System :: Options :: Database Purgers to control how long history records are kept.
Link Aggregation Groups (LAG)
Link Aggregation Groups (LAG), also known as port-channels or EtherChannels, allow multiple physical switch ports to be bundled together into a single logical interface. This provides increased bandwidth through load distribution and redundancy through automatic failover if a member link fails.
Supported Switch Types
LAG configuration management is currently supported on:
| Switch Type | LAG Support |
|---|---|
| Ruckus ICX | Fully supported |
| Cisco IOS | Not supported at this time |
| Cisco IOS-XE | Not supported at this time |
| Dell | Not supported at this time |
| EdgeCore | Not supported at this time |
For switches that do not support LAG management through the rXg, LAG interfaces must be configured manually via the switch CLI.
LAG Types
The rXg supports two types of LAG configurations:
| LAG Type | Description |
|---|---|
| Static | Member ports are manually assigned and do not negotiate with the remote device. Use when connecting to devices that do not support LACP. |
| Dynamic | Uses Link Aggregation Control Protocol (LACP / IEEE 802.1AX) to negotiate the aggregation with the remote device. Provides automatic detection of misconfigured or failed links. |
How LAG Ports Appear
When monitoring is enabled on a supported switch, LAG interfaces are automatically imported alongside regular switch ports. The port naming convention varies by switch vendor (e.g., on Ruckus ICX switches, LAG ports use the lg prefix such as lg1, lg2, lg3).
In the Switch Ports scaffold, LAG interfaces display:
- Name: A descriptive name for the LAG (e.g., "Uplink-LAG", "Server-Bond")
- Port: The LAG identifier (e.g.,
lg1on Ruckus ICX) - Port Type: Either "Static" or "Dynamic"
- Sub Interfaces: The member ports that belong to this LAG
- Speed: The aggregate bandwidth of all active member ports
Creating a LAG Interface
To create a new LAG interface on a supported switch (using a Ruckus ICX switch as an example):
- Navigate to Network :: Wired :: Switch Ports
- Click Create New to add a new switch port record
- Select the target Infrastructure Device (must be a supported switch)
- In the Port section:
- Leave the Port field empty (it will be auto-assigned, e.g.,
lg1,lg2on Ruckus ICX) - Set Port Type to either Static or Dynamic
- Select the Sub Interfaces (member ports) to include in the LAG
- Leave the Port field empty (it will be auto-assigned, e.g.,
- Assign a Switch Port Profile to define VLANs and other port settings
- Provide a descriptive Name for the LAG
- Click Create
The following example shows LAG creation on a Ruckus ICX switch:
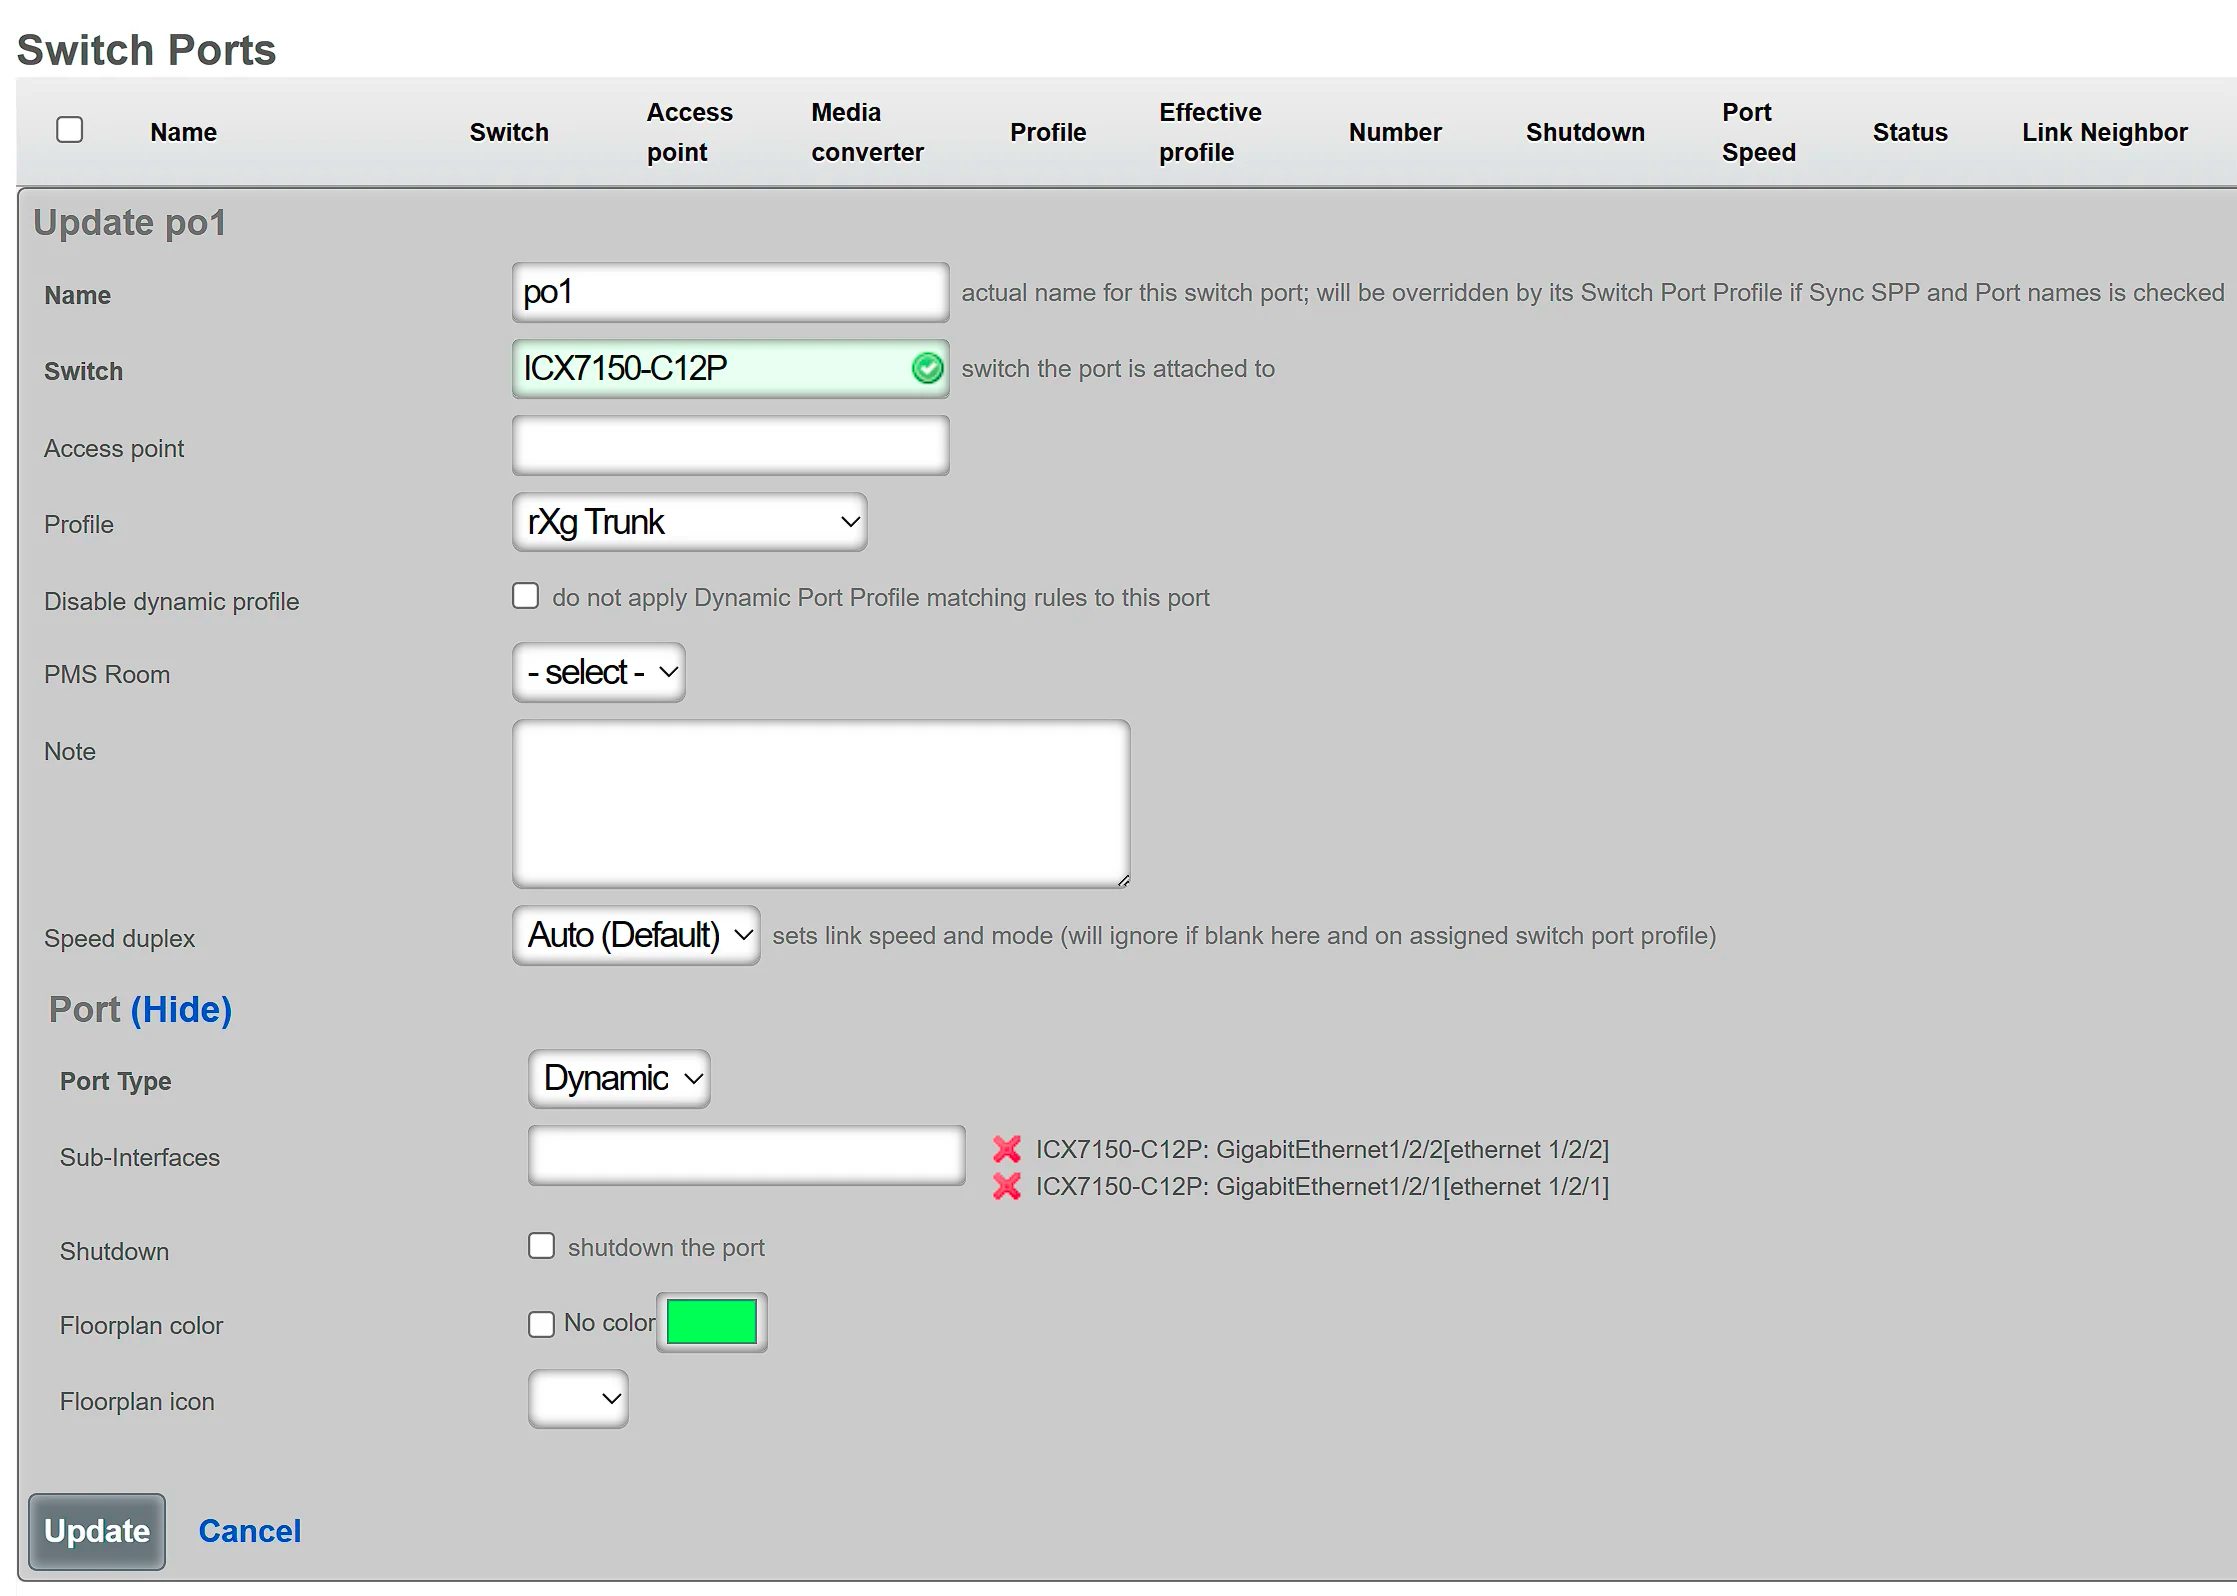
The rXg will automatically generate and push the appropriate LAG configuration commands to the switch during the next config sync.
Modifying a LAG Interface
To modify an existing LAG:
- Navigate to Network :: Wired :: Switch Ports
- Locate the LAG interface (e.g., ports starting with
lgon Ruckus ICX) - Click Edit on the LAG record
- Modify the desired settings:
- Name: Change the descriptive name
- Sub Interfaces: Add or remove member ports
- Switch Port Profile: Change VLAN assignments or other settings
- Shutdown: Enable to administratively disable the LAG
- Click Update
Important Notes: - The Port Type (Static/Dynamic) cannot be changed after creation. To change the LAG type, delete the LAG and recreate it with the desired type. - A LAG must have at least 1 member port and no more than 8 member ports. - LAG interfaces cannot have RADIUS authentication enabled (802.1X or MAB). The switch port profile assigned to a LAG must have RADIUS authentication set to "None".
Deleting a LAG Interface
To delete a LAG:
- Navigate to Network :: Wired :: Switch Ports
- Locate the LAG interface
- Click Delete on the LAG record
- Confirm the deletion
When a LAG is deleted: - All member ports are released and become individual ports again - Member ports are automatically disabled to prevent network loops - The ports can then be reassigned to profiles or new LAGs as needed
LAG Configuration on the Switch
The rXg automatically generates and pushes vendor-specific LAG configuration commands to the switch. The following example shows the commands generated for a Ruckus ICX switch:
! Create a dynamic LAG with LACP
lag "Uplink-LAG" dynamic id 1
  ports ethernet 1/1/1 ethernet 1/1/2
exit

! Create a static LAG without LACP
lag "Server-Bond" static id 2
  ports ethernet 1/1/5 ethernet 1/1/6
exit
VLANs configured on the LAG's switch port profile are applied to the LAG interface, not to individual member ports.
Best Practices
Use Dynamic LAGs when possible: LACP provides better failure detection and prevents misconfigurations from causing loops.
Match configuration on both ends: Ensure the remote device (switch, server, etc.) has matching LAG configuration:
- Same number of member ports
- Same LAG type (static requires static, dynamic requires LACP-enabled)
- Same VLAN configuration
Use consistent port speeds: All member ports in a LAG should have the same speed and duplex settings for optimal load distribution.
Plan LAG IDs: Different switch vendors have varying limits on LAG IDs (e.g., Ruckus ICX supports IDs from 1 to 256). The rXg auto-assigns IDs, but be aware of vendor-specific limits in large deployments.
Monitor LAG health: Check the Link Speed field to verify all member links are active. The aggregate speed should equal the sum of all member port speeds.
Troubleshooting LAG Issues
| Symptom | Possible Cause | Resolution |
|---|---|---|
| LAG shows lower speed than expected | One or more member links are down | Check physical connections and port status on both ends |
| Dynamic LAG not forming | LACP not enabled on remote device | Enable LACP on the remote switch or use Static LAG type |
| Config sync fails for LAG | LAG name contains invalid characters | Use only ASCII characters (spaces are allowed) in LAG names |
| Member ports not joining LAG | Ports already in another LAG | Remove ports from existing LAG before adding to new one |
| LAG interface is shutdown | All member ports are disabled | Enable at least one member port |
Switch Port Profiles
Entries in the Switch Port Profiles scaffold define the behavior of downstream wired infrastructure device ports. Switch port profiles enable an operator to manage virtually unlimited switch ports, without configuring them individually.
The name field is an arbitrary string descriptor used only for administrative identification. Choose a name that reflects the purpose of the record. This field has no bearing on the configuration or settings determined by this scaffold.
The Default checkbox, declares the selected switch port profile as the default for any newly imported switches
The Move Ports checkbox, if selected, will move ports associated with a different default profile to a profile upon save. This should be used in conjunction with the Default checkbox.
The Ports field defines individual switch ports to associate with this profile.
The Native VLAN field is used to define the untagged VLAN that ports associated to a profile should use.
The Shutdown checkbox declares ports associated to this profile to be disabled.
The VLANs field defines the VLANs that should be tagged on ports associated with a profile.
The RADIUS drop-down menu can be used to enable 802.1x or MAC Authentication Bypass, on ports associated to a profile.
The native I-SID specifies the network that untagged traffic from this port should be placed into when building a Fabric configuration script.
The NNI Port designates this port as a Network-to-Network Interface. This option must be enabled for any port where two fabric-enabled switches interconnect.
The Manual Tagged VLANs field allows specifying additional VLAN tags directly as a comma and/or dash-separated list of integers, without creating VLAN records. These VLANs are unioned (combined) with any VLANs selected in the VLANs field above. For example, 100,400,1400-1409,2000-2099 would add VLANs 100, 400, 1400 through 1409, and 2000 through 2099 to the port's tagged VLAN list. This is useful when integrating with existing infrastructure where some VLAN management is handled externally.
The Speed/Duplex field controls the port speed and duplex settings. Available options are:
| Setting | Description |
|---|---|
| auto (default) | Automatic speed and duplex negotiation |
| 1000-full | Force 1 Gbps full duplex |
| 10g-full | Force 10 Gbps full duplex |
The Hybrid Port checkbox enables hybrid port mode, allowing the port to function as both an access port (with untagged traffic on the native VLAN) and a trunk port (with tagged traffic on specified VLANs) simultaneously. When enabled, the profile must have either a Native VLAN or tagged VLANs configured. Note that hybrid port mode is not supported on all switch types.
The Inline Power field controls Power over Ethernet (PoE) priority for ports associated with this profile. This determines which ports receive power first when the switch's PoE budget is constrained. Valid values are:
| Value | Description |
|---|---|
| 0 | PoE disabled - no power delivered to this port |
| 1 | Critical priority - highest priority, powered first |
| 2 | High priority - powered after critical ports |
| 3 | Low priority - powered last when budget allows |
Leave this field blank to use the switch's default PoE settings. The actual power class (PoE/PoE+/PoE++) is typically negotiated automatically based on the connected device's requirements.
The Edge Protection checkbox enables STP edge port protection (similar to PortFast) on ports associated with this profile. Edge ports transition immediately to the forwarding state, bypassing the listening and learning states. This should only be enabled on ports connected to end devices, not on ports connected to other switches.
The STP Protect checkbox enables STP BPDU Guard on ports associated with this profile. When enabled, if a BPDU is received on the port, the port will be disabled to prevent potential loops. This is typically used in conjunction with Edge Protection on access ports.
The Trust DSCP checkbox enables DSCP (Differentiated Services Code Point) trust on ports associated with this profile. When enabled, the switch will honor the DSCP markings in incoming packets for Quality of Service (QoS) prioritization. This is useful for VoIP phones and other devices that mark their traffic for priority handling.
The Optical Monitor checkbox enables optical transceiver monitoring (DOM - Digital Optical Monitoring) on ports associated with this profile. When enabled, the system will collect and graph optical power levels, temperature, and other SFP/SFP+ diagnostic data where supported by the hardware.
The DHCP Snooping Trust checkbox marks ports associated with this profile as trusted for DHCP snooping. Trusted ports allow both DHCP client and server traffic, while untrusted ports (the default) block DHCP server responses. Enable this only on ports that face toward your legitimate DHCP server (uplinks and switch interconnects). See the DHCP Snooping section below for detailed configuration guidance.
The Sync Profile and Port Names checkbox, when enabled, will synchronize the switch port profile name to the port description/name on the physical switch. This helps maintain consistency between the rXg configuration and the switch's running configuration.
The Disable Dynamic Profile checkbox prevents this profile from being automatically assigned to ports via Automatic Port Match Rules. Use this for profiles that should only be manually assigned.
The Static Routes field associates static routes with ports using this profile. On fabric-enabled switches, this creates Flex-UNI mappings on the port for the I-SID/VLAN values defined in the selected Static Route records. This is an advanced feature for SPB (Shortest Path Bridging) fabric deployments.
The note field is a place for the administrator to enter a comment. This field is purely informational and has no bearing on the configuration settings.
Configuration Examples
The following examples demonstrate common switch port profile configurations for typical network scenarios.
Example 1: Access Port Profile (End User Devices)
An access port profile is used for ports connected to end-user devices such as computers, printers, and IP phones. This is the most common profile type.
| Field | Value | Rationale |
|---|---|---|
| Name | Access-Users |
Descriptive name for the profile |
| Native VLAN | Users (VLAN 100) |
Untagged VLAN for user traffic |
| VLANs | (none) | Access ports typically carry only untagged traffic |
| RADIUS | MAC Authentication Bypass |
Authenticate devices by MAC address |
| Edge Protection | Enabled | Ports connect to end devices, not switches |
| STP Protect | Enabled | Protect against accidental switch connections |
| Inline Power | 1 (Critical) |
High priority PoE for IP phones and devices |
| Shutdown | Disabled | Ports should be active |
This configuration places all connected devices on the Users VLAN, authenticates them via MAC address, enables critical PoE priority for powered devices, and protects against STP topology changes from unauthorized switches.
Example 2: Trunk/Uplink Profile (Switch Interconnects)
A trunk profile is used for ports that connect to other switches, routers, or the rXg. These ports carry multiple VLANs as tagged traffic.
| Field | Value | Rationale |
|---|---|---|
| Name | Trunk-Uplink |
Descriptive name for the profile |
| Native VLAN | Management (VLAN 1) |
Untagged management traffic |
| VLANs | Users, Voice, IoT, Guest |
All VLANs that need to traverse the link |
| RADIUS | none |
Trunk ports should not use RADIUS |
| Edge Protection | Disabled | These ports connect to other switches |
| STP Protect | Disabled | BPDUs are expected on trunk ports |
| DHCP Snooping Trust | Enabled | Allow DHCP server responses through |
| Speed/Duplex | auto (default) |
Allow negotiation for best speed |
| Shutdown | Disabled | Ports should be active |
This configuration allows the port to carry all necessary VLANs between switches while maintaining proper STP operation and DHCP snooping behavior.
Example 3: Wireless Access Point Profile
A specialized profile for ports connected to wireless access points, which typically need to trunk multiple SSIDs/VLANs while also receiving PoE power.
| Field | Value | Rationale |
|---|---|---|
| Name | WAP-Trunk |
Descriptive name for the profile |
| Native VLAN | AP-Management (VLAN 50) |
Management/control traffic for the AP |
| VLANs | Corporate, Guest, IoT |
VLANs mapped to wireless SSIDs |
| RADIUS | none |
APs handle their own client authentication |
| Edge Protection | Enabled | APs are edge devices, not switches |
| STP Protect | Enabled | APs should not send BPDUs |
| DHCP Snooping Trust | Disabled | APs should not originate DHCP responses |
| Inline Power | 1 (Critical) |
Highest PoE priority for enterprise APs |
| Trust DSCP | Enabled | Honor QoS markings from AP |
| Shutdown | Disabled | Ports should be active |
Automatic Port Match Rule for this profile:
- Logic: OR
- Attribute: LLDP Info (Neighbor Port Attributes)
- Pattern: lldpRemSysDesc.*(TIP OpenWiFi|Ruckus|UniFi|Aruba)
This configuration provides critical PoE priority to the access point (ensuring it receives power first when the PoE budget is constrained), allows it to trunk multiple VLANs for different SSIDs, trusts QoS markings for voice/video traffic, and can automatically match ports connected to common AP vendors via LLDP.
Automatic Port Match Rules
The Automatic Port Match Rules feature allows operators to define rules that automatically assign switch ports to profiles based on LLDP (Link Layer Discovery Protocol) information received from neighboring devices. This powerful automation reduces manual port configuration work by dynamically matching ports to appropriate profiles.
Overview
When a Switch Port Profile is saved with match rules configured, the system automatically evaluates all switch ports against the defined patterns. Ports that match the criteria are automatically assigned to the profile and receive its configuration. This is particularly useful for standardizing configurations for access points, uplink ports to other switches, or any other devices that can be identified via LLDP.
Configuring Match Rules
Each match rule consists of three components:
- Logic: Select
ORorANDoperator for combining multiple rules within the same profile - Port Attribute to Match: Select which attribute to evaluate (LLDP information, port properties, switch properties, etc.)
- Match Pattern: Enter a regular expression (regex) pattern that will be matched against the selected attribute
LLDP Field Mapping
When matching on neighbor LLDP information, the system uses standardized LLDP field names stored in YAML format. The following table shows the mapping between switch CLI output and the internal YAML field names:
| Switch CLI Output Field | YAML Key | Description |
|---|---|---|
| System name | lldpRemSysName |
Hostname of the neighboring device |
| System description | lldpRemSysDesc |
Model/description of the neighboring device |
| Chassis ID | lldpRemChassisId |
MAC address of the chassis |
| Port ID | lldpRemPortId |
MAC address or identifier of the port |
| Port description | lldpRemPortDesc |
Description of the remote port |
| Management address | lldpRemManAddr |
IP address of the neighboring device |
Pattern Syntax
The Match Pattern field accepts regular expressions that are matched against the YAML content of LLDP data. The basic pattern structure is:
lldpRemFieldName.*SearchText
Where:
- lldpRemFieldName is the YAML key to search in
- .* is a regex wildcard meaning "any characters"
- SearchText is the text you want to match
Common Pattern Examples
Match Specific Text in System Description
lldpRemSysDesc.*TIP OpenWiFi
This matches any device advertising "TIP OpenWiFi" in its system description, useful for identifying OpenWiFi access points.
Match Multiple Device Models (OR Logic)
lldpRemSysDesc.*(ECS2100-10P-TIPC|ECS5550-30X|ECS4155-30P)
This matches any of three Edgecore switch models (as an example) using the | (OR) operator in the regex pattern.
Match Any Device from a Vendor
lldpRemSysDesc.*ECS
This matches any Edgecore switch (all models starting with "ECS").
Match by System Name
lldpRemSysName.*core-switch-01
This matches a specific switch by its hostname.
Match by Chassis MAC Address
lldpRemChassisId.*94:ef:97:9e:cb:b6
This matches a specific device by its chassis MAC address.
How Matching Works
The matching process follows these steps:
- When a Switch Port Profile with match rules is saved, the system triggers automatic port matching
- The system iterates through all switch ports and evaluates each against the match rules
- For each port, the system retrieves the neighbor's LLDP data from the
link_neighbor.lldp_yamlfield - The regex pattern is applied against the entire YAML content
- Match results are determined based on the logic operators:
- OR rules: At least one rule must match
- AND rules: All rules must match
- Combined rules: All AND rules plus at least one OR rule must match
- If a port matches, it is automatically assigned to the profile and receives its configuration
Preview Feature
Before saving match rules, operators can preview which ports will be affected by clicking the "Preview match rule effects" button. This shows:
- Which ports currently match the configured rules
- What changes would occur (profile assignments)
- A summary of affected ports before committing the changes
This feature helps prevent unintended mass-assignment of ports to profiles.
Available Matching Attributes
Beyond neighbor LLDP information, match rules can be created using the following attribute categories:
Switch Port Attributes: - Port Name - Port Number - Port Type - LLDP Info (local port) - Current Profile Name - Link Speed - Note
Parent Switch Attributes: - Switch Name - Switch Model - Version - MAC Address - Note
Neighbor Port Attributes: - Port Name - Port Number - Port Type - LLDP Info (neighbor port) - Most commonly used for device identification - Profile Name - Note
Parent Media Converter Attributes: - Media Converter Name - Media Converter Model - Version - MAC Address - Note
Opting Out of Automatic Matching
Individual switch ports can be excluded from automatic profile matching by setting the disable_dynamic_profile flag on the switch port. This is useful for ports that require manual configuration and should not be automatically reassigned by match rules.
Best Practices
- Use Preview First: Always preview match rules before saving to avoid unintended changes
- Be Specific: Use specific patterns to avoid matching unintended devices
- Test Incrementally: Start with one match rule and verify it works before adding more
- Document Patterns: Keep track of which patterns are used for which purposes
- Case Sensitivity: Regex patterns are case-sensitive by default; use
(?i)prefix for case-insensitive matching - Escape Special Characters: If matching literal dots, parentheses, etc., escape them with backslash:
\.,\(,\)
Real-World Example: OpenWiFi Access Points
Use Case: Automatically assign ports connected to TIP OpenWiFi access points to an AP profile.
Configuration:
- Logic: OR
- Port Attribute to Match: LLDP Info (Neighbor Port Attributes)
- Match Pattern: lldpRemSysDesc.*TIP OpenWiFi
Sample LLDP Output from Access Point:
System name:                    CIG WF189H
System description:             TIP OpenWiFi
Chassis ID:                     D4:BA:BA:A4:DA:28
Port ID:                        D4:BA:BA:A4:DA:28
Port description:               eth0
Management address:             10.0.21.119
With this rule configured, any switch port that detects a neighbor advertising "TIP OpenWiFi" in its LLDP system description will automatically be assigned to this profile and receive the appropriate access point port configuration.
Real-World Example: Edgecore Switch Uplinks
Use Case: Automatically assign ports connected to Edgecore switches to an uplink profile.
Configuration:
- Logic: OR
- Port Attribute to Match: LLDP Info (Neighbor Port Attributes)
- Match Pattern: lldpRemSysDesc.*(ECS2100-10P-TIPC|ECS5550-30X|ECS4155-30P)
Sample LLDP Output from ECS2100-10P-TIPC:
Chassis ID           : 94-EF-97-9E-CB-B6
Port ID              : 94-EF-97-9E-CB-B7
Port Description     : Ethernet Port on unit 1, port 1
System Description   : ECS2100-10P-TIPC
System Capabilities  : Bridge
Enabled Capabilities : Bridge
Sample LLDP Output from ECS5550-30X:
Chassis ID           : 94-EF-97-9E-B8-F8
Port ID              : 94-EF-97-9E-B8-FC
Port Description     : Ethernet Port on unit 1, port 4
System Description   : ECS5550-30X
System Capabilities  : Bridge, Router
Enabled Capabilities : Bridge, Router
With this rule configured, any switch port connecting to one of the specified Edgecore switch models will automatically be assigned to the uplink profile with appropriate VLAN tagging, speed settings, and other uplink-specific configurations.
DHCP Snooping
DHCP snooping is a security feature that protects against rogue DHCP servers on the network. When enabled, the switch inspects DHCP traffic and filters out unauthorized DHCP server responses, preventing malicious or misconfigured devices from handing out incorrect IP addresses to clients.
How DHCP Snooping Works
DHCP snooping classifies switch ports into two categories:
| Port Type | DHCP Client Traffic | DHCP Server Traffic | Use Case |
|---|---|---|---|
| Untrusted (default) | Allowed (DISCOVER, REQUEST) | Blocked (OFFER, ACK) | Customer-facing ports, WAP trunks |
| Trusted | Allowed | Allowed | Uplinks toward DHCP server |
When a device connects to an untrusted port and sends a DHCP DISCOVER, the request passes through normally. However, if a rogue DHCP server on an untrusted port attempts to send an OFFER or ACK response, the switch drops those packets, preventing the rogue server from assigning IP addresses.
Configuration Components
DHCP snooping requires two configuration elements:
1. Trusted DHCP VLANs (Switch-level Setting)
The Trusted DHCP VLANs field on the Switch configuration specifies which VLANs should have DHCP snooping inspection enabled. Only traffic on these VLANs will be inspected; other VLANs are unaffected.
Note: VLAN 1 is automatically included when DHCP snooping is enabled, even if not explicitly configured. This ensures that daisy-chained switches can obtain their initial IP address during the onboarding/bootstrap process.
Common configurations include: - Management VLAN (e.g., VLAN 100): Target management VLAN for switches and access points - Additional VLANs where DHCP protection is desired
2. DHCP Snooping Trust (Switch Port Profile Setting)
The DHCP snooping trust checkbox on a Switch Port Profile marks ports as trusted, allowing both client and server DHCP traffic through. This setting should only be enabled on ports that face toward your legitimate DHCP server.
Which Ports Should Be Trusted?
The key principle is: only trust ports in the path toward your legitimate DHCP server.
Single Switch Deployment
| Port | Connects To | Trust Setting |
|---|---|---|
| Uplink | rXg / DHCP Server | Trusted |
| Access ports | Customer devices | Untrusted (default) |
| WAP trunks | Wireless access points | Untrusted (default) |
Daisy-Chained Switch Deployment
In a daisy-chain topology, each switch must trust its uplink port (the port facing toward the DHCP server):
[DHCP Server/rXg]  [Switch 1]  [Switch 2]  [Switch 3]

                     Uplink       Uplink       Uplink
                    (trusted)    (trusted)    (trusted)
| Switch | Port | Connects To | Trust Setting |
|---|---|---|---|
| Switch 1 | Uplink | rXg/DHCP Server | Trusted |
| Switch 1 | Downlink | Switch 2 | Untrusted (or Trusted*) |
| Switch 2 | Uplink | Switch 1 | Trusted |
| Switch 2 | Downlink | Switch 3 | Untrusted (or Trusted*) |
| Switch 3 | Uplink | Switch 2 | Trusted |
| All | Access ports | Customers | Untrusted |
*Note: For simplified management, switch interconnect ports can be trusted on both sides. This is acceptable when physical access to interconnect ports is controlled, as the primary threat (rogue DHCP servers on customer ports) remains blocked.
Best Practices
- Minimize trusted ports: Only trust ports that are in the direct path to your DHCP server
- Protect all client-facing VLANs: Include both onboarding and production VLANs in the trusted DHCP VLANs list
- WAP trunk ports should remain untrusted: Access points bridge client traffic but should not originate DHCP responses
- Use a common "Trunk/Interconnect" profile: For simplified management in daisy-chain deployments, create a single profile with DHCP snooping trust enabled for all switch-to-switch links
- Physical security matters: Since trusted interconnect ports bypass rogue server protection, ensure physical access to switch interconnects is controlled
Example Configuration
Scenario: A network with rXg providing DHCP, using VLAN 1 for onboarding and VLAN 100 for management.
Switch Settings:
- Trusted DHCP VLANs: 100 (VLAN 1 is automatically included)
Switch Port Profiles:
| Profile Name | DHCP Snooping Trust | Used For |
|---|---|---|
| Uplink | Enabled | Ports connecting toward rXg |
| Trunk/Interconnect | Enabled | Switch-to-switch links |
| Access | Disabled (default) | Customer-facing ports |
| WAP | Disabled (default) | Wireless access point connections |
Vendor-Specific Switch Configurations
- Adtran (DPU/ASE)
- Cambium cnMatrix
- Cisco IOS
- Cisco Catalyst IOS-XE
- Dell
- D-Link DGS
- Edgecore
- Extreme (ERS/VSP/EXOS)
- FS
- HP
- Juniper EX
- Meraki MS
- MikroTik RouterOS
- Nokia (PON/MF)
- Positron
- Ruckus ICX
- TP-Link
Adtran Switches
Adtran provides two distinct product lines integrated with rXg: Access Switch Elements (ASE) for traditional Ethernet switching and G.fast Distribution Point Units (DPU) for high-speed delivery over existing copper infrastructure. Each product line uses a different management approach.
Supported Models
ASE (Access Switch Element)
| Model/Series | Notes |
|---|---|
| NetVanta Series | Access switches with Layer 2/3 capabilities |
DPU (Distribution Point Unit)
| Model/Series | Ports | Notes |
|---|---|---|
| SDX2222-01-TP | 1 | Single-port G.fast DPU |
| SDX2221-04-TP | 4 | 4-port G.fast DPU |
| SDX2221-08-TP | 8 | 8-port G.fast DPU |
| SDX2221-16-TP | 16 | 16-port G.fast DPU |
| SDX2221-24-TP | 24 | 24-port G.fast DPU |
| SDX2221-48-TP | 48 | 48-port G.fast DPU |
Architecture
ASE (Traditional Switching)
ASE devices operate as standard managed switches with SSH-based CLI management. The rXg connects directly to ASE devices for configuration and monitoring.
DPU (G.fast via Mosaic Cloud)
DPU devices use G.fast technology to deliver multi-gigabit speeds (up to 2.5 Gbps) over existing copper telephone wiring. Unlike traditional switches, DPU management is performed through the Adtran Mosaic cloud platform:
rXg --> Mosaic Cloud API --> DPU Device --> G.fast CPE
The Mosaic platform provides: - Centralized device management - Service provisioning and activation - Performance monitoring - Firmware management
Features Supported
ASE Features
| Feature | Supported | Description |
|---|---|---|
| Config Sync | Yes | Automatic configuration synchronization from rXg |
| Auto Bootstrap | Yes | Zero-touch onboarding capability |
| SNMP Monitoring | Yes | Statistics collection via SNMP |
| Switch Port Import | Yes | Automatic import of switch ports |
| 802.1X Authentication | Yes | Port-based network access control |
| MAC Authentication Bypass | Yes | MAC-based authentication |
| Dynamic VLAN Assignment | Yes | RADIUS-assigned VLAN |
| Firmware Management | No | Manual firmware upgrades required |
| SPB-m Fabric | No | Not supported |
DPU Features
| Feature | Supported | Description |
|---|---|---|
| Config Sync | Yes | Service provisioning via Mosaic API |
| Service Provisioning | Yes | Create, deploy, and activate subscriber services |
| VLAN Management | Yes | Per-port VLAN assignment |
| QinQ Double Tagging | Yes | Inner/outer VLAN tag support |
| Bandwidth Profiles | Yes | Profile-based rate limiting |
| SNMP Monitoring | Yes | Statistics collection via SNMP |
| 802.1X Authentication | No | Not supported on G.fast |
| MAC Authentication Bypass | No | Not supported on G.fast |
| SPB-m Fabric | No | Not applicable |
Prerequisites
ASE Prerequisites
Firmware Requirements
| Version | Support Status | Notes |
|---|---|---|
| AOS R13+ | Supported | SSH and SNMP required |
Network Requirements
- Management IP connectivity to rXg
- SSH access (TCP port 22)
- SNMP access (UDP port 161)
- RADIUS connectivity (UDP ports 1812, 1813) for 802.1X/MAB
DPU Prerequisites
Mosaic Cloud Requirements
- Valid Mosaic cloud account credentials
- API access enabled for rXg integration
- DPU devices registered in Mosaic platform
Network Requirements
- HTTPS connectivity from rXg to Mosaic API
- DPU management network connectivity to Mosaic cloud
- SNMP access to DPU for local monitoring (optional)
Onboarding Process
ASE Onboarding
ASE devices require manual initial configuration before rXg integration:
- Configure management IP address
- Enable SSH service
- Create user account for rXg access
- Enable SNMP service
- Configure SNMP community
- Add device to rXg Infrastructure Devices
Initial CLI configuration:
enable
configure terminal

! Management IP
interface vlan 1
ip address <ip> <mask>
exit
ip default-gateway <gateway>

! SSH enable
ip ssh server

! User account
username <username> privilege 15 password <password>

! SNMP configuration
snmp-server community <community> ro
snmp-server enable

exit
write memory
DPU Onboarding
DPU devices are managed through the Mosaic cloud platform:
- Register DPU in Mosaic cloud portal
- Configure Mosaic API credentials in rXg
- Add DPU as Infrastructure Device in rXg with Mosaic connection details
- rXg will sync device information from Mosaic
rXg Infrastructure Device settings:
| Setting | Value | Notes |
|---|---|---|
| Type | Adtran DPU | Select DPU device type |
| Host | DPU serial number | Device identifier in Mosaic |
| API Host | Mosaic API URL | Mosaic cloud endpoint |
| Username | Mosaic username | API authentication |
| Password | Mosaic password | API authentication |
| Community String | SNMP community | For direct SNMP monitoring |
Configuration
ASE Connection Settings
The rXg connects to ASE devices via SSH using RubyExpect for CLI automation.
CLI prompts recognized:
- Password prompt: Password:
- Enabled prompt: #
- Disabled prompt: >
- Config prompt: (config)#
- Interface prompt: (config-if)#
DPU Connection Settings (Mosaic API)
The rXg connects to Mosaic cloud via REST API over HTTPS.
Authentication flow: 1. Obtain bearer token using username/password credentials 2. Include token in Authorization header for subsequent requests 3. Tokens are cached and refreshed as needed
API request format:
json
{
  "Authorization": "Bearer <token>",
  "Content-Type": "application/json"
}
DPU Service Provisioning Model
DPU subscriber services follow a three-phase provisioning model:
- Create Service: Define service parameters (VLANs, bandwidth profile)
- Deploy Service: Push configuration to DPU
- Activate Service: Enable service for subscriber traffic
Service configuration parameters: - Service ID (unique identifier) - Port assignment - VLAN configuration (single or QinQ) - Bandwidth profile
VLAN Configuration
ASE VLAN Configuration
Standard VLAN configuration via CLI:
vlan database
vlan <vlan_id>
exit

interface ethernet <port>
switchport mode access
switchport access vlan <vlan_id>
exit
DPU VLAN Configuration
Single VLAN
For simple deployments with single VLAN per subscriber:
{
  "vlan": <vlan_id>,
  "type": "untagged"
}
QinQ Double Tagging
For service provider deployments requiring double VLAN tagging:
Inner Tag (C-VLAN) : Customer VLAN, unique per subscriber
Outer Tag (S-VLAN) : Service VLAN, typically per DPU or service type
QinQ configuration:
json
{
  "innerVlan": <cvlan_id>,
  "outerVlan": <svlan_id>,
  "type": "qinq"
}
Bandwidth Profiles
DPU bandwidth profiles control subscriber throughput. The default profile provides symmetric high-speed service.
Default profile: GF940Mx200M (940 Mbps down / 200 Mbps up)
G.fast maximum theoretical speed: 2.5 Gbps
Bandwidth profiles are referenced by name when creating services. Custom profiles can be defined in the Mosaic platform.
RADIUS / AAA Configuration (ASE Only)
For 802.1X and MAB authentication on ASE switches:
! RADIUS server configuration
radius-server host <rxg_ip> key <shared_secret>
radius-server host <rxg_ip> auth-port 1812
radius-server host <rxg_ip> acct-port 1813

! AAA configuration
aaa authentication dot1x default group radius
aaa authorization network default group radius

! Enable 802.1X on ports
interface ethernet <port>
dot1x port-control auto
exit
Monitoring Capabilities
ASE Monitoring
| Metric | Collection Method | Notes |
|---|---|---|
| CPU Usage | SNMP | System health monitoring |
| Memory Usage | SNMP | System health monitoring |
| Port Statistics | SNMP | Traffic counters |
| Port Status | SNMP | Up/down, speed, duplex |
DPU Monitoring
| Metric | Collection Method | Notes |
|---|---|---|
| Port Statistics | SNMP / Mosaic API | Traffic counters |
| Service Status | Mosaic API | Active/inactive services |
| G.fast Line Stats | Mosaic API | SNR, attainable rate, actual rate |
| Device Status | Mosaic API | Online/offline, firmware version |
Data Gathered from DPU
The config sync process retrieves: - Device information (model, serial, firmware) - Port configurations - Active services - VLAN assignments - G.fast line statistics
Troubleshooting
Common ASE Issues
SSH Connection Failures
Symptom: Unable to establish SSH connection
Resolution:
- Verify SSH is enabled: show ip ssh
- Check firewall allows TCP port 22
- Verify user credentials and privilege level
- Check for IP lockout after failed attempts
802.1X Not Working
Symptom: Clients not authenticating Resolution: - Verify RADIUS server configuration - Check RADIUS shared secret matches rXg - Verify dot1x is enabled on port - Check rXg RADIUS logs for authentication attempts
Common DPU Issues
Mosaic API Connection Failures
Symptom: Unable to communicate with Mosaic cloud Resolution: - Verify Mosaic credentials are correct - Check HTTPS connectivity to Mosaic API endpoint - Verify API access is enabled for the account - Check for expired or invalid bearer token
Service Not Activating
Symptom: Service created but subscriber has no connectivity Resolution: - Verify service was deployed after creation - Check service activation status in Mosaic - Verify G.fast link is up between DPU and CPE - Check VLAN configuration on upstream network
G.fast Link Issues
Symptom: Poor performance or frequent disconnections Resolution: - Check line statistics in Mosaic (SNR, attainable rate) - Verify copper cable quality and distance - Check for electrical interference on the line - Ensure proper DPU and CPE grounding
Diagnostic Commands (ASE)
System information:
show version
show running-config
Interface status:
show interface status
show interface ethernet <port>
VLAN configuration:
show vlan
show vlan <vlan_id>
802.1X status:
show dot1x
show dot1x interface ethernet <port>
Diagnostic Information (DPU via Mosaic)
Device and service information is available through the Mosaic cloud portal or API:
- Device inventory and status
- Service configurations
- G.fast line statistics
- Performance history
- Event logs
Known Limitations
ASE Limitations
- Limited model support compared to other vendors
- Manual firmware upgrades required
- No SPB-m fabric support
DPU Limitations
- Cloud Dependency: All management via Mosaic cloud; no local CLI management
- No 802.1X/MAB: G.fast technology does not support port-based authentication
- Service Activation Delay: Services may take several seconds to activate after deployment
- Line Distance: G.fast performance degrades significantly beyond 250 meters
- Single Service per Port: Each DPU port supports one active service at a time
Operational Caveats
ASE Caveats
- CLI Syntax: Adtran AOS CLI is similar to but not identical to Cisco IOS
- Configuration Save: Changes must be saved with
write memoryto persist across reboots - SSH Timeout: Default SSH timeout may be short; rXg adjusts as needed
DPU Caveats
- Mosaic Account Required: DPU management requires active Mosaic cloud subscription
- Service Provisioning Order: Services must be created, deployed, then activated in sequence
- CPE Compatibility: Only Adtran-compatible G.fast CPE devices work with DPU
- Bandwidth Profile Names: Profile names must match exactly as defined in Mosaic
- QinQ Upstream: Upstream switch must support QinQ if double tagging is used
- G.fast Technology: Performance varies based on copper quality, distance, and interference
External References
- Adtran Support Portal
- Adtran Mosaic Platform
- G.fast Technology Overview
- ITU-T G.9700/G.9701 Standards
Cambium cnMatrix Switches
Cambium cnMatrix switches are enterprise-grade switching solutions designed to work seamlessly with Cambium's wireless portfolio, providing unified wired and wireless network management. The rXg integrates with cnMatrix switches via SSH for configuration synchronization, 802.1X/MAB authentication, and VLAN management.
Supported Models
| Model/Series | Notes |
|---|---|
| EX2010 | 8-port Gigabit + 2 SFP compact switch |
| EX2010-P | 8-port PoE Gigabit + 2 SFP compact switch |
| EX2016M-P | 16-port PoE Gigabit managed switch |
| EX2028 | 24-port Gigabit + 4 SFP managed switch |
| EX2028-P | 24-port PoE Gigabit + 4 SFP managed switch |
| EX2052 | 48-port Gigabit + 4 SFP managed switch |
| EX2052-P | 48-port PoE Gigabit + 4 SFP managed switch |
Features Supported
| Feature | Supported | Description |
|---|---|---|
| Config Sync | Yes | Automatic configuration synchronization from rXg |
| Auto Bootstrap | Yes | Zero-touch onboarding capability |
| SNMP Monitoring | Yes | CPU, memory, and port statistics collection |
| LLDP Neighbor Discovery | Yes | Automatic detection of connected devices |
| Switch Port Import | Yes | Automatic import and management of switch ports |
| 802.1X Authentication | Yes | Port-based network access control |
| MAC Authentication Bypass | Yes | MAC-based authentication for non-802.1X devices |
| Dynamic VLAN Assignment | Yes | RADIUS-assigned VLAN based on authentication |
| DHCP Snooping | No | Not managed by rXg |
| Firmware Management | No | Manual firmware upgrades required |
| SPB-m Fabric | No | Not supported |
Prerequisites
Firmware Requirements
| Version | Support Status | Notes |
|---|---|---|
| CNS 4.x+ | Supported | SSH and RADIUS support required |
Network Requirements
- Management IP connectivity to rXg
- SSH access (TCP port 22)
- SNMP access (UDP port 161)
- RADIUS connectivity (UDP ports 1812, 1813) for 802.1X/MAB
Onboarding Process
Auto Bootstrap
cnMatrix switches support automatic bootstrap configuration from rXg. The bootstrap process configures:
- Maximum VLAN count (requires reboot)
- SSH with RSA key and key exchange
- AAA authentication settings
- LLDP
- SNMP community
- User credentials
- Management VLAN and IP
- NTP server
Bootstrap Configuration
Phase 1 - Increase max VLANs (requires reboot):
enable
config terminal
system-max vlan 4095
write mem
exit
reload
y
Phase 2 - Configure remaining settings (after reboot):
enable
skip-page-display
config terminal

! SSH configuration
crypto key generate rsa modulus 2048
ip ssh key-exchange-method dh-group14-sha1

! AAA configuration
aaa authentication web-server default local
aaa authentication login default local
aaa authentication dot1x default radius

! LLDP
lldp run

! SNMP configuration
snmp-server community <community> ro

! User account
username <username> password <password>
enable super-user-password <enable_password>
aaa authentication login default local

! Management VLAN configuration
vlan 1
  ip address <ip> <subnet>
  management-vlan
  default-gateway <gateway> 1
exit

! NTP configuration
ntp
  server <rxg_ip>
exit

write mem
Manual Onboarding
For manual configuration before adding to rXg:
- Configure management IP address
- Enable SSH with RSA keys
- Create user account
- Configure SNMP community
- Add device to rXg Infrastructure Devices
Configuration
Connection Settings
The rXg connects via SSH using RubyExpect for CLI automation.
CLI prompts recognized:
- Press Enter prompt: Press ENTER to continue
- Password prompt: password:
- Enabled prompt: #
- Disabled prompt: >
- Configure prompt: (config)#
- Interface prompt: (config-if)#
- Paging prompt: --More--
Initial connection handling:
- The rXg handles "Press ENTER" prompts automatically
- Paging is disabled with no pagination command in config mode
Port Naming Convention
cnMatrix uses a type/slot/port naming format:
| Type | Abbreviation | Example |
|---|---|---|
| Gigabit Ethernet | Gi | Gi0/1, Gi0/48 |
| Extreme Ethernet (10G) | Ex | Ex0/1, Ex0/4 |
VLAN Configuration
Creating VLANs
vlan <vlan_id>
  name <description>
exit
Port VLAN Assignment
VLANs are configured within the VLAN context, specifying ports as tagged or untagged:
vlan <vlan_id>
  ports gigabitethernet 0/1-24 untagged gigabitethernet 0/1-24
exit
Port list format:
- Single port: gigabitethernet 0/1
- Range: gigabitethernet 0/1-24
- Multiple ranges: gigabitethernet 0/1-28,0/29-48 extreme-ethernet 0/1-4
802.1X / MAB Configuration
Global Authentication
aaa authentication dot1x default radius
RADIUS Server Configuration
radius-server host <rxg_ip> auth-port 1812 acct-port 1813 key <shared_secret> primary
Per-Port 802.1X
interface gigabitethernet 0/1
  dot1x port-control auto
exit
Per-Port MAB
interface gigabitethernet 0/1
  dot1x mac-auth-bypass
exit
Combined 802.1X and MAB
interface gigabitethernet 0/1
  dot1x port-control auto
  dot1x mac-auth-bypass
exit
SNMP Configuration
snmp-server community <community> ro
Port Enable/Disable
interface gigabitethernet 0/1
  enable
exit

interface gigabitethernet 0/2
  disable
exit
Port Descriptions
interface gigabitethernet 0/1
  description "Server Port"
exit
Monitoring Capabilities
| Metric | Collection Method | Notes |
|---|---|---|
| CPU Usage | SNMP | System health monitoring |
| Memory Usage | SNMP | System health monitoring |
| Port Statistics | SNMP | Packets in/out, errors |
| Port Status | SNMP / CLI | Up/down, speed, duplex |
| LLDP Neighbors | CLI | Connected device discovery |
| MAC Address Table | CLI | Client tracking |
Data Gathered
The config sync process collects: - Interface list and status - VLAN configurations - Port VLAN memberships (tagged/untagged) - 802.1X/MAB port configurations - RADIUS server configuration - Port descriptions
Troubleshooting
Common Issues
SSH Connection Failures
Symptom: Unable to establish SSH connection Resolution: - Verify SSH is enabled and RSA keys are generated - Check IP connectivity to switch management address - Verify user credentials are correct - Check for IP lockout after failed login attempts (60 second timeout)
802.1X Authentication Failures
Symptom: Clients failing to authenticate
Resolution:
- Verify RADIUS server is configured: show run radius
- Check RADIUS shared secret matches rXg
- Verify dot1x is enabled on port
- Review rXg RADIUS logs for authentication attempts
VLAN Configuration Not Applied
Symptom: Traffic not passing on expected VLANs
Resolution:
- Verify VLAN exists: show vlan
- Check port VLAN membership: show run vlan
- Verify port is enabled
- Note: VLANs above 4066 are not supported
Diagnostic Commands
System information:
show system information
show version
show running-config
Interface status:
show interfaces status
show interfaces description
show interface gigabitethernet 0/1
VLAN information:
show vlan
show run vlan
802.1X status:
show run interface all
RADIUS configuration:
show run radius
MAC address table:
show mac-address
IP configuration:
show ip interface
show ip route
LLDP neighbors:
show lldp neighbor
Known Limitations
- VLAN ID Limit: Maximum VLAN ID is 4066; VLANs above this are not supported
- No SPB-m Fabric: cnMatrix switches do not support SPB-m fabric mode
- Firmware Upgrades: Manual firmware upgrades required; not managed by rXg
- Max VLANs Reboot: Changing system-max vlan requires switch reboot
Operational Caveats
- Paging: Issue
no paginationin config mode orskip-page-displayin exec mode to disable output paging - Configuration Save: Changes must be saved with
write memto persist across reboots - Port Type Mapping: CLI uses full names (gigabitethernet) while show commands may use abbreviations (Gi)
- Bootstrap Reboot: Initial bootstrap requires a reboot to increase max VLAN count
- Press Enter Prompt: Some operations display "Press ENTER to continue" prompts that must be acknowledged
- RADIUS Primary: Use
primaryflag when configuring the RADIUS server - AAA Defaults: Configure
aaa authentication login default localfor CLI access
External References
Cisco IOS Switches
Cisco IOS switches are traditional Cisco Catalyst switches running the classic IOS operating system. These switches are widely deployed in enterprise environments and provide robust Layer 2/3 switching capabilities with comprehensive management features.
Supported Models
| Model/Series | Notes |
|---|---|
| Catalyst 2960 Series | Layer 2 access switches |
| Catalyst 3560 Series | Layer 2/3 access switches |
| Catalyst 3750 Series | Stackable Layer 2/3 switches |
| Catalyst 3850 Series | Stackable access/distribution switches |
| Other IOS-based switches | Generally supported if running classic IOS |
Note: For Catalyst switches running IOS-XE (such as Catalyst 9000 series), see the Cisco Catalyst IOS-XE documentation.
Features Supported
| Feature | Supported | Description |
|---|---|---|
| Config Sync | Yes | Automatic configuration synchronization from rXg |
| Auto Bootstrap | Yes | Zero-touch onboarding from factory-default state via DHCP discovery |
| SNMP Monitoring | Yes | CPU, memory, and port statistics collection |
| LLDP Neighbor Discovery | Yes | Automatic detection of connected devices |
| Switch Port Import | Yes | Automatic import and management of switch ports |
| 802.1X Authentication | Yes | Port-based network access control |
| MAC Authentication Bypass (MAB) | Yes | MAC-based authentication for non-802.1X devices |
| Dynamic VLAN Assignment | Yes | RADIUS-assigned VLAN based on authentication |
| DHCP Snooping | Yes | Protection against rogue DHCP servers |
| Firmware Management | No | Manual firmware upgrades required |
| SPB-m Fabric | No | Not supported on classic IOS |
Prerequisites
Firmware Requirements
- IOS 15.x or later recommended for full feature support
- SSHv2 support required (IOS 12.1(19)EA1 or later)
Network Requirements
- Management IP connectivity to rXg
- SSH access (TCP port 22)
- SNMP access (UDP port 161)
- RADIUS connectivity (UDP ports 1812, 1813)
Onboarding Process
Automatic Onboarding
Cisco IOS switches can be automatically onboarded from a factory-default state when:
- The switch is connected to the network and obtains a DHCP address from rXg
- A switch record exists in rXg with the switch's MAC address configured
- Valid SSH credentials are provided that match the switch's default or pre-configured credentials
The auto-bootstrap process will: - Configure the management VLAN and static IP address - Set up SSH access and credentials - Configure SNMP community string - Apply basic AAA and RADIUS configuration - Configure the uplink port as a trunk
Manual Onboarding
For manual configuration, apply the bootstrap commands below via console or existing network access.
Bootstrap Commands
The following baseline configuration changes are required to bring a Cisco IOS switch into a state compatible with rXg config sync.
Disable Unnecessary Services
Disable TCP and UDP small servers that run in the switch for diagnostics purposes:
no service udp-small-servers
no service tcp-small-servers
Disable local HTTP server (not used with config sync):
no ip http server
Enable password encryption service:
service password-encryption
Enable SSH Access
Enable SSHv2, generate the necessary RSA key, and enable SSH as the preferred transport protocol on the VTY lines. Note that the IP domain name must also be set for the RSA key to be generated.
ip domain name <your-local-domain-name>
crypto key generate rsa general-keys modulus 4096
ip ssh version 2
line vty 0 15
  login local
  transport input ssh
exit
Configure Credentials
Configure the 'enable' and admin passwords:
enable secret <secret-enable-password>
username <username> secret <password>
Ensure the corresponding credentials are configured in the rXg 'Network::Wired::Switches' scaffold:
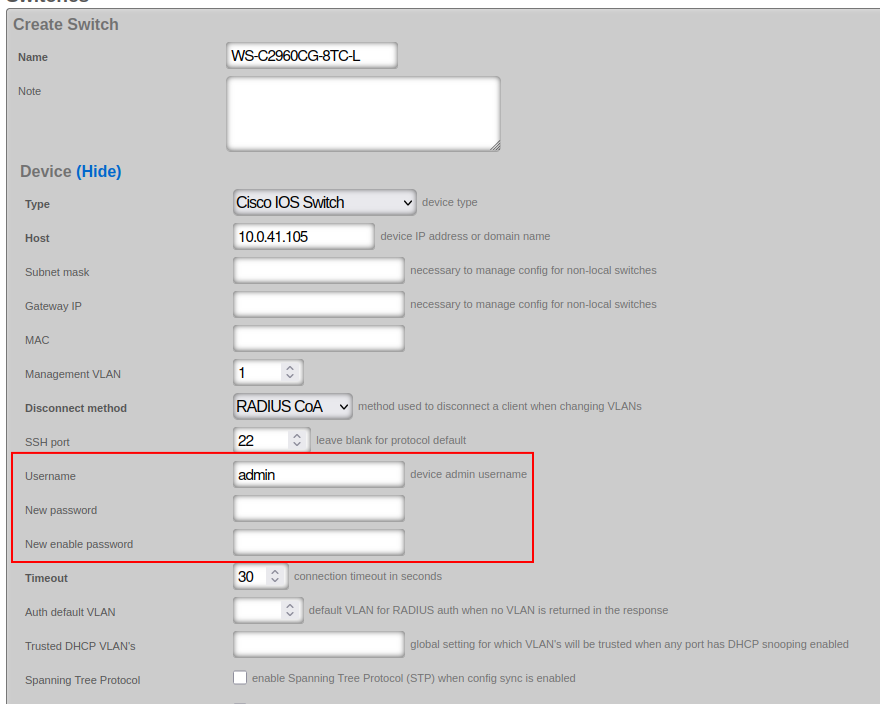
Configuration
SNMP Configuration
The SNMP read-only community access needs to be configured:
snmp-server community public ro
The default community used by rXg ('public') can be modified in the Cisco IOS switch configuration under 'Network::Wired::Switches' scaffold, in the 'Network Monitor' section. The example shows a non-default community name of 'publick':
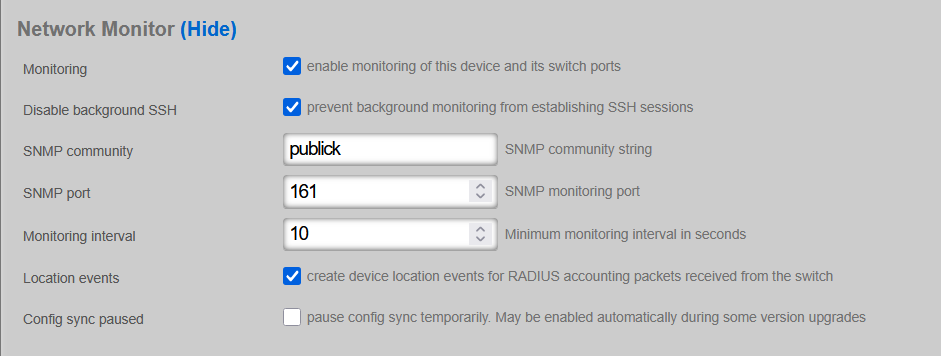
In active production networks, the use of non-default SNMP communities is strongly recommended.
VTP VLAN Mode
If the Cisco IOS switch supports VTP, change the VTP mode from the default 'client' to 'transparent':
(config)#vtp mode transparent
Once modified, verify the status:
show vtp status
VTP Version capable             : 1 to 3
VTP version running             : 3
VTP Domain Name                 : NAME
VTP Pruning Mode                : Disabled
VTP Traps Generation            : Disabled
Device ID                       : d4ad.7139.5480

Feature VLAN:
--------------
VTP Operating Mode                : Transparent
Number of existing VLANs          : 5
Number of existing extended VLANs : 0
Maximum VLANs supported locally   : 1005


Feature MST:
--------------
VTP Operating Mode                : Transparent
RADIUS / AAA Configuration
RADIUS Server Setup
Create a RADIUS server configuration on the switch. The IP address (radius-server-ip) must be reachable from the switch management interface (typically the default gateway). The RADIUS server key (radius-server-key) is obtained from the 'Services::RADIUS::RADIUS Server Options' scaffold:

radius server rXg
 address ipv4 <radius-server-ip> auth-port 1812 acct-port 1813
 key <radius-server-key>
exit
Basic AAA Configuration
Configure AAA settings for config sync with rXg:
aaa new-model
aaa authentication dot1x default group radius
dot1x system-auth-control
identity profile default
MAB with Dynamic VLAN Assignment
MAC Authentication Bypass (MAB) with Dynamic VLAN Assignment provides network access control for devices that do not support 802.1X (IP phones, printers, cameras, IoT devices), placing them into the correct VLAN based on their MAC address.
The switch learns the MAC address and sends it as both username and password to the RADIUS server. Upon successful authentication, the RADIUS server returns VLAN assignment attributes:
- Tunnel-Type = VLAN (Attribute 64)
- Tunnel-Medium-Type = 802 (Attribute 65)
- Tunnel-Private-Group-ID = VLAN ID (Attribute 81)
System-Level Configuration:
Variables used:
- radius-server-ip: IP address of the RADIUS server
- radius-server-key: Authentication key of the RADIUS server
- radius-server-name: Arbitrary name for the RADIUS server (e.g., 'rXg')
aaa new-model
!
# Defines authentication method for 802.1X (also used by MAB fallback)
aaa authentication dot1x default group radius

# Defines authorization method for network access
aaa authorization network default group radius

# Defines accounting for 802.1X sessions
aaa accounting dot1x default start-stop group radius

# Enable dynamic authorization (CoA - Change of Authorization)
# This allows the RADIUS server to dynamically re-authenticate or change VLANs without user re-authentication.
aaa server radius dynamic-author client <radius-server-ip> server-key 0 <radius-server-key>

# use the same session ID for all AAA accounting service types within a single call
aaa session-id common

# Define the RADIUS server(s)
radius server <radius-server-name>
 address ipv4 <radius-server-ip> auth-port 1812 acct-port 1813
 key 0 <radius-server-key>

# Send vendor-specific attributes (critical for dynamic VLAN assignment)
radius-server vsa send authentication
radius-server vsa send accounting

# Enable 802.1X globally (MAB requires this)
dot1x system-auth-control
Interface-Level Configuration:
The onboarding-vlan-id is the fallback VLAN used when no VLAN is assigned by the RADIUS server.
# MAB / dot1x authentication commands
authentication event fail action next-method
authentication host-mode multi-auth
authentication order mab dot1x
authentication periodic
authentication timer inactivity server
mab

# STP port protect commands
spanning-tree bpduguard enable
spanning-tree bpdufilter enable
spanning-tree guard root
spanning-tree guard loop
udld port aggressive

# fall back (onboarding) VLAN
switchport mode access
switchport access vlan <onboarding-vlan-id>
Monitoring Capabilities
| Metric | Collection Method | Notes |
|---|---|---|
| CPU Usage | SNMP | Collected at configured monitoring interval |
| Memory Usage | SNMP | Collected at configured monitoring interval |
| Port Statistics | SNMP | Packets in/out, errors, discards |
| Port Status | SNMP | Up/down, speed, duplex |
| LLDP Neighbors | SNMP | Connected device discovery |
Troubleshooting
Common Issues
Issue: Switch shows offline in rXg
Symptom: Switch appears offline despite being reachable via ping Cause: SSH or SNMP connectivity issues Resolution: Verify SSH credentials, SNMP community string, and firewall rules
Issue: Config sync fails
Symptom: Configuration changes not being applied to switch Cause: VTP mode not set to transparent, or credential mismatch Resolution: Verify VTP mode is 'transparent' and credentials match rXg configuration
Issue: Dynamic VLAN not assigned
Symptom: Devices remain in onboarding VLAN after authentication
Cause: RADIUS server not returning VLAN attributes, or VSA not enabled
Resolution: Verify radius-server vsa send authentication is configured
Diagnostic Commands
show vtp status
show aaa servers
show dot1x all
show authentication sessions
show radius statistics
show snmp
Known Limitations
- SPB-m fabric not supported (use Extreme VSP/ERS for fabric deployments)
- Firmware management not automated; upgrades must be performed manually
- Some older IOS versions may have limited SSHv2 support
Operational Caveats
- VTP must be set to 'transparent' mode for proper VLAN management
- RSA key generation is required before SSH will function
- Non-default SNMP communities are strongly recommended in production
- The 'admin' username can be customized but must match between switch and rXg
External References
Cisco Catalyst IOS-XE Switches
Cisco Catalyst IOS-XE switches are modern enterprise switches running the IOS-XE operating system, including the Catalyst 9000 series. IOS-XE provides enhanced programmability, modern firmware management via install mode, gRPC telemetry support, and improved performance compared to classic IOS.
Supported Models
| Model/Series | Notes |
|---|---|
| Catalyst 9200 Series | Entry-level access switches (C9200L, C9200) |
| Catalyst 9300 Series | Stackable access/distribution switches (C9300, C9300L) |
| Catalyst 9400 Series | Modular access switches |
| Catalyst 9500 Series | Fixed core/aggregation switches |
| Catalyst 9600 Series | Modular core switches |
Note: For classic IOS switches (Catalyst 2960, 3560, 3750, 3850, etc.), see the Cisco IOS documentation.
Features Supported
| Feature | Supported | Description |
|---|---|---|
| Config Sync | Yes | Automatic configuration synchronization from rXg |
| Auto Bootstrap | Yes | Zero-touch onboarding from factory-default state via DHCP discovery |
| SNMP Monitoring | Yes | CPU, memory, and port statistics collection |
| gRPC Telemetry | Yes | Streaming telemetry for real-time metrics |
| LLDP Neighbor Discovery | Yes | Automatic detection of connected devices |
| Switch Port Import | Yes | Automatic import and management of switch ports |
| 802.1X Authentication | Yes | Port-based network access control (EAP) |
| MAC Authentication Bypass (MAB) | Yes | MAC-based authentication for non-802.1X devices |
| MAB + EAP Combined | Yes | MAB first with EAP fallback |
| Dynamic VLAN Assignment | Yes | RADIUS-assigned VLAN based on authentication |
| DHCP Snooping | Yes | Protection against rogue DHCP servers |
| Firmware Management | Yes | Install mode via HTTP/HTTPS/TFTP |
| STP Protection | Yes | PortFast, BPDU guard, and root guard |
| Connection Pooling | Yes | Efficient SSH connection management |
| SPB-m Fabric | No | Not supported |
Prerequisites
Firmware Requirements
- IOS-XE 16.x or later recommended
- IOS-XE 17.x for latest features and gRPC telemetry
- SSH enabled with RSA keys generated
Licensing Requirements
- Network Essentials or Network Advantage license
- DNA licensing may be required for certain advanced features
Network Requirements
- Management IP connectivity to rXg
- SSH access (TCP port 22)
- SNMP access (UDP port 161)
- RADIUS connectivity (UDP ports 1812, 1813)
- HTTP/HTTPS access from switch to rXg for firmware upgrades (TCP port 80/443)
- gRPC connectivity (TCP port 57000 default) for streaming telemetry
Onboarding Process
Automatic Onboarding
Cisco Catalyst IOS-XE switches support automatic onboarding from factory-default state. The rXg detects factory-default switches by checking for the absence of rXg-specific configuration (SNMP community, RADIUS server, dot1x system-auth-control).
Prerequisites for Auto-Bootstrap:
- The switch must be connected to the network and obtain a DHCP address from rXg
- A switch record must exist in rXg with the switch's MAC address configured
- The target management IP address must be configured in the switch record
- Valid SSH credentials must be provided (factory default or pre-configured)
Auto-Bootstrap Process:
- The rXg looks up the switch's current DHCP IP address using the configured MAC address
- SSH connection is established to the DHCP IP
- The system checks for factory-default state by verifying absence of:
snmp-server community public ROradius server rXgdot1x system-auth-control
- If factory-default, bootstrap configuration is automatically applied:
- Management user credentials
- SSH configuration (domain name, RSA keys, VTY lines)
- Management VLAN interface with IP
- SNMP community configuration
- RADIUS server and AAA configuration (if RADIUS is active)
- 802.1X system-auth-control
- gRPC telemetry subscriptions
- Configuration is saved with
write memory - The switch reconnects on its new management IP address
Manual Onboarding
For manual configuration, connect to the switch via console or existing network access and apply the bootstrap commands below.
Bootstrap Commands
Enter Configuration Mode:
enable
configure terminal
Set Hostname:
hostname <switch-name>
Configure Management User:
username <admin-user> privilege 15 secret <password>
Configure SSH:
ip domain-name local
crypto key generate rsa modulus 2048
ip ssh version 2
ip ssh time-out 120
ip ssh authentication-retries 3
Configure VTY Lines:
line vty 0 15
 transport input ssh
 login local
 exec-timeout 30 0
 privilege level 15
 exit
Configure Management VLAN Interface:
For VLAN 1:
interface Vlan1
 ip address <switch-ip> <subnet-mask>
 no shutdown
 exit
For non-default management VLAN:
interface Vlan<management-vlan>
 ip address <switch-ip> <subnet-mask>
 no shutdown
 exit
Configure Default Route:
ip route 0.0.0.0 0.0.0.0 <gateway-ip>
Configure SNMP:
snmp-server community <community-string> RO
snmp-server enable traps
Configure AAA and RADIUS (if using 802.1X/MAB):
For IOS-XE 15.2+:
aaa new-model
radius server rXg
 address ipv4 <rxg-ip> auth-port 1812 acct-port 1813
 key <radius-secret>
 exit
aaa authentication dot1x default group radius
aaa authorization network default group radius
aaa accounting dot1x default start-stop group radius
aaa accounting update periodic 5
dot1x system-auth-control
authentication mac-move permit
Configure Dynamic Authorization (CoA):
aaa server radius dynamic-author
 client <rxg-ip> server-key <radius-secret>
 exit
Save Configuration:
end
write memory
Configuration
Connection Settings
Configure the switch in the Network::Wired::Switches scaffold with:
- Host: Target management IP address
- MAC Address: Required for auto-bootstrap DHCP lookup
- Username/Password: SSH credentials (privilege 15)
- Enable Password: If different from login password
- Management VLAN: VLAN for management traffic (default: 1)
- SNMP Community: Community string for monitoring (default: public)
RADIUS / AAA Configuration
When a RADIUS Server Option is active in rXg, the system supports three authentication modes per port:
MAB Only (mac):
interface <port>
 authentication event fail action next-method
 authentication host-mode multi-auth
 authentication order mab
 authentication periodic
 authentication timer inactivity server
 mab
802.1X EAP Only (eap):
interface <port>
 authentication event fail action next-method
 authentication host-mode single-host
 authentication order dot1x
 authentication periodic
 authentication timer inactivity server
 authentication timer reauthenticate server
 authentication violation restrict
 dot1x pae authenticator
 dot1x timeout tx-period 10
MAB + EAP Combined (maceap):
interface <port>
 authentication event fail action next-method
 authentication host-mode multi-auth
 authentication order mab dot1x
 authentication periodic
 authentication timer inactivity server
 authentication timer reauthenticate server
 authentication violation restrict
 mab
 dot1x pae authenticator
 dot1x timeout tx-period 10
VLAN Configuration
VLANs are automatically managed through Switch Port Profiles:
- Access ports:
switchport mode accesswithswitchport access vlan <id> - Trunk ports:
switchport mode trunkwithswitchport trunk allowed vlan <list> - VTP mode is automatically set to
transparentfor proper VLAN management
STP Protection
Switch Port Profiles support:
- PortFast:
spanning-tree portfastfor edge ports - BPDU Guard:
spanning-tree bpduguard enable - BPDU Filter:
spanning-tree bpdufilter enable - Root Guard:
spanning-tree guard root - UDLD:
udld port aggressive
gRPC Telemetry
IOS-XE switches support gRPC streaming telemetry for real-time monitoring. The rXg automatically configures telemetry subscriptions for:
- Interface statistics (
/interfaces-ios-xe-oper:interfaces/interface) - CPU utilization (
/process-cpu-ios-xe-oper:cpu-usage/cpu-utilization) - Memory statistics (
/memory-statistics/memory-statistic) - PoE data (
/poe-oper-data) - VLAN information (
/vlans/vlan) - STP details (
/stp-details) - Environment sensors (
/environment-sensors/environment-sensor)
Telemetry configuration example:
telemetry ietf subscription <id>
 encoding encode-kvgpb
 filter xpath <xpath>
 source-address <switch-ip>
 stream yang-push
 update-policy periodic 3000
 receiver ip address <rxg-ip> 57000 protocol grpc-tcp
Monitoring Capabilities
| Metric | Collection Method | Notes |
|---|---|---|
| CPU Usage | SNMP / gRPC | Real-time with gRPC telemetry |
| Memory Usage | SNMP / gRPC | Real-time with gRPC telemetry |
| Port Statistics | SNMP / gRPC | Packets in/out, errors, discards |
| Port Status | SNMP / gRPC | Up/down, speed, duplex |
| PoE Status | SNMP / gRPC | Power consumption, status per port |
| Environment | gRPC | Temperature, fan status, power supply |
| STP State | gRPC | Spanning tree port states |
| Device Info | SSH | Serial number, model, firmware version, MAC address |
Firmware Upgrade
IOS-XE switches use install mode for firmware upgrades, which provides atomic updates with automatic rollback capability.
Supported Upload Methods: - HTTP (recommended) - HTTPS - TFTP
Upgrade Process:
- Upload firmware file to rXg via Device Firmwares scaffold
- Associate firmware with the switch
- Initiate upgrade from the switch record
- The rXg:
- Cleans up inactive packages (
install remove inactive) - Copies firmware via HTTP/HTTPS/TFTP to bootflash
- Saves configuration (
write memory) - Executes one-shot install command
- Switch reloads automatically
- Cleans up inactive packages (
Firmware Upgrade Commands:
! Clean up old packages
install remove inactive
y

! Copy firmware to bootflash
copy http://<rxg-ip>/firmware/catalystiosxeswitch/<filename> bootflash:

! Save configuration
write memory

! One-shot install (add, activate, commit)
install add file bootflash:<filename> activate commit prompt-level none
Note: The prompt-level none option bypasses confirmation prompts for unattended operation.
Troubleshooting
Common Issues
Issue: Switch shows offline in rXg
Symptom: Switch appears offline despite being reachable via ping
Cause: SSH connectivity issues, SNMP community mismatch, or connection pool exhaustion
Resolution:
- Verify SSH credentials match switch configuration
- Check SNMP community string matches
- Ensure SSH is enabled: show ip ssh
- Check for locked-out IP (60 second lockout after failed attempts)
- Verify VTY line configuration allows SSH
Issue: Auto-bootstrap fails
Symptom: Switch detected at DHCP IP but bootstrap doesn't complete Cause: Credential issues or switch not in factory-default state Resolution: - Verify factory default credentials are correct - Check if switch already has partial configuration - Look for existing SNMP, RADIUS, or dot1x configuration - Try manual bootstrap via console
Issue: Config sync fails with "VTP mode" error
Symptom: VLAN changes fail to apply
Cause: VTP mode is set to client
Resolution:
- Config sync automatically sets vtp mode transparent
- If persistent, manually run: vtp mode transparent
Issue: Firmware upgrade fails
Symptom: Firmware install fails or switch doesn't boot new image
Cause: Insufficient bootflash space, incompatible firmware, or network issues
Resolution:
- Check bootflash space: show bootflash:
- Run cleanup: install remove inactive
- Verify HTTP connectivity from switch to rXg
- Check firmware file integrity
- Review install log: show install log
Issue: gRPC telemetry not working
Symptom: No telemetry data received by rXg
Cause: Firewall blocking gRPC port or misconfigured subscriptions
Resolution:
- Verify port 57000 is open
- Check subscription status: show telemetry ietf subscription all
- Verify receiver configuration: show telemetry receiver all
Diagnostic Commands
General:
show version
show running-config
show ip interface brief
show interfaces status
show vlan brief
SSH and Authentication:
show ip ssh
show users
show aaa sessions
show authentication sessions
show dot1x all
RADIUS:
show radius statistics
show aaa servers
Firmware:
show bootflash:
show install summary
show install log
Telemetry:
show telemetry ietf subscription all
show telemetry receiver all
show telemetry internal connection
Known Limitations
- SPB-m fabric not supported
- Some advanced features require DNA licensing
- gRPC telemetry requires IOS-XE 16.x or later
- Install mode firmware upgrades cause automatic reload
Operational Caveats
- Install Mode: IOS-XE uses install mode for firmware, which differs from classic IOS copy/boot method. The switch automatically reloads after
install add activate commit. - Connection Pooling: The rXg maintains a pool of SSH connections for efficiency. Connections idle for more than 5 minutes are automatically closed.
- IP Lockout: IOS-XE temporarily locks out IP addresses (60 seconds) after multiple failed SSH authentication attempts.
- VTP Mode: Config sync automatically sets VTP mode to transparent. If the switch is a VTP client, VLAN changes will fail until mode is changed.
- RADIUS Server Configuration: IOS-XE 15.2+ uses the
radius servercommand syntax instead of the legacyradius-server hostcommand. - gRPC Source Address: For multi-interface switches, configure the gRPC source IP to ensure telemetry reaches the rXg.
- DNA Licensing: Some advanced features (SD-Access, Assurance) require Cisco DNA licensing beyond Network Essentials/Advantage.
External References
- Cisco Catalyst 9000 Configuration Guides
- Cisco IOS-XE 802.1X Configuration Guide
- Cisco IOS-XE Programmability Guide
- Cisco DNA Center and DNA Licensing
Dell Switches
Dell enterprise switches provide robust Layer 2/3 switching capabilities for campus and data center deployments. The rXg integrates with Dell switches via SSH for configuration synchronization, 802.1X/MAB authentication, and VLAN management.
Supported Models
| Model/Series | Notes |
|---|---|
| S3100 Series | 1GbE campus access switches |
| S3124F | 24-port SFP switch |
| S3148 | 48-port access switch |
| S4048 | 10/40GbE ToR data center switch |
| N-Series | Campus networking switches |
Features Supported
| Feature | Supported | Description |
|---|---|---|
| Config Sync | Yes | Automatic configuration synchronization from rXg |
| Auto Bootstrap | Yes | Zero-touch onboarding capability |
| SNMP Monitoring | Yes | CPU, memory, and port statistics collection |
| LLDP Neighbor Discovery | Yes | Automatic detection of connected devices |
| Switch Port Import | Yes | Automatic import and management of switch ports |
| 802.1X Authentication | Yes | Port-based network access control |
| MAC Authentication Bypass | Yes | MAC-based authentication for non-802.1X devices |
| Dynamic VLAN Assignment | Yes | RADIUS-assigned VLAN based on authentication |
| DHCP Snooping | Yes | Protection against rogue DHCP servers |
| Firmware Management | No | Manual firmware upgrades required |
| SPB-m Fabric | No | Not supported |
Prerequisites
Firmware Requirements
| Version | Support Status | Notes |
|---|---|---|
| OS9 | Supported | Dell Networking OS9 (Force10 heritage) |
| OS10 | Supported | Dell OS10 Enterprise |
Network Requirements
- Management IP connectivity to rXg
- SSH access (TCP port 22)
- SNMP access (UDP port 161)
- RADIUS connectivity (UDP ports 1812, 1813) for 802.1X/MAB
Onboarding Process
Auto Bootstrap
Dell switches support automatic bootstrap configuration from rXg. The bootstrap process configures:
- Hostname and system identification
- SSH service with RSA key generation
- User credentials
- SNMP community
- NTP server
- 802.1X authentication settings
- RADIUS server configuration
Bootstrap Configuration
The following configuration is applied during bootstrap:
! System configuration
hostname <system_name>

! Generate RSA key for SSH
crypto key generate rsa modulus 2048

! SSH configuration
ip ssh server enable
ip ssh server version 2

! User account configuration
username <username> password <password> privilege 15

! SNMP configuration
snmp-server community <community> ro

! NTP configuration
ntp server <rxg_ip>

! 802.1X global configuration
dot1x system-auth-control

! RADIUS server configuration
radius-server host <rxg_ip> key <shared_secret>
aaa authentication dot1x default radius
aaa authorization network default radius

! Interface configuration for management
interface vlan <mgmt_vlan>
ip address <ip>/<mask>
no shutdown
exit

ip route 0.0.0.0/0 <gateway>
Manual Onboarding
For manual configuration before adding to rXg:
- Configure management IP address
- Generate SSH RSA keys
- Enable SSH server
- Create user account with privilege 15
- Configure SNMP community
- Add device to rXg Infrastructure Devices
Minimal manual configuration:
enable
configure terminal

! Management interface
interface vlan 1
ip address <ip>/<mask>
no shutdown
exit
ip route 0.0.0.0/0 <gateway>

! SSH setup
crypto key generate rsa modulus 2048
ip ssh server enable

! User account
username <username> password <password> privilege 15

! SNMP
snmp-server community <community> ro

exit
write memory
Configuration
Connection Settings
The rXg connects via SSH using RubyExpect for CLI automation. Legacy SSH key exchange algorithms are enabled for compatibility with older firmware.
SSH connection options:
-o KexAlgorithms=+diffie-hellman-group1-sha1
-o StrictHostKeyChecking=no
-o UserKnownHostsFile=/dev/null
CLI prompts recognized:
- Password prompt: Password:
- Enabled prompt: #
- Disabled prompt: >
- Configure prompt: (config)#
- Interface prompt: (conf-if-
VLAN Configuration
Creating VLANs
interface vlan <vlan_id>
description <description>
tagged <port_list>
untagged <port_list>
no shutdown
exit
Port Mode Configuration
Dell switches use portmode hybrid for ports requiring both tagged and untagged VLANs:
interface ethernet <port>
portmode hybrid
switchport
no shutdown
exit
Port modes:
- portmode access - Single untagged VLAN
- portmode hybrid - Both tagged and untagged VLANs (used for trunks)
802.1X / MAB Configuration
Global 802.1X Enable
dot1x system-auth-control
RADIUS Server Configuration
radius-server host <rxg_ip> key <shared_secret>
radius-server host <rxg_ip> auth-port 1812
radius-server host <rxg_ip> acct-port 1813

aaa authentication dot1x default radius
aaa authorization network default radius
Per-Port Authentication
802.1X only:
interface ethernet <port>
dot1x authentication
dot1x reauthentication
dot1x port-control auto
exit
MAB only:
interface ethernet <port>
dot1x mac-auth-bypass
dot1x auth-type mab-only
dot1x port-control auto
exit
802.1X with MAB fallback:
interface ethernet <port>
dot1x authentication
dot1x reauthentication
dot1x mac-auth-bypass
dot1x port-control auto
exit
Authentication Mode
For multi-host environments:
interface ethernet <port>
dot1x host-mode multi-auth
exit
SNMP Configuration
snmp-server community <community> ro
snmp-server contact <contact>
snmp-server location <location>
snmp-server enable traps
To restrict SNMP access:
ip access-list standard SNMP-ACCESS
permit <rxg_ip>/32
exit
snmp-server community <community> ro SNMP-ACCESS
DHCP Snooping
ip dhcp snooping
ip dhcp snooping vlan <vlan_list>

! Trust uplink ports
interface ethernet <uplink_port>
ip dhcp snooping trust
exit
Monitoring Capabilities
| Metric | Collection Method | Notes |
|---|---|---|
| CPU Usage | SNMP | System health monitoring |
| Memory Usage | SNMP | System health monitoring |
| Port Statistics | SNMP | Packets in/out, errors, discards |
| Port Status | SNMP | Up/down, speed, duplex |
| LLDP Neighbors | CLI/SNMP | Connected device discovery |
| 802.1X Status | CLI | Authentication session status |
Data Gathered
The config sync process collects: - Interface list and status - VLAN configurations - Port VLAN memberships (tagged/untagged) - 802.1X port configurations - LLDP neighbor information
Troubleshooting
Common Issues
SSH Connection Failures
Symptom: Unable to establish SSH connection
Resolution:
- Verify SSH is enabled: show ip ssh
- Check RSA keys are generated: show crypto key mypubkey rsa
- Verify firewall allows TCP port 22
- For older firmware, legacy SSH algorithms may be required
- Check user has privilege 15
Firewall/ACL check:
show ip access-lists
802.1X Authentication Failures
Symptom: Clients failing to authenticate
Resolution:
- Verify dot1x is enabled globally: show dot1x
- Check RADIUS server configuration: show radius-server
- Verify RADIUS shared secret matches rXg
- Check port has dot1x enabled: show dot1x interface ethernet <port>
- Review rXg RADIUS logs for authentication attempts
RADIUS server test:
test aaa group radius <username> <password> legacy
VLAN Configuration Not Applied
Symptom: Traffic not passing on expected VLANs
Resolution:
- Verify VLAN exists: show vlan
- Check port VLAN membership: show vlan id <vlan_id>
- Verify port mode is correct (hybrid for trunks)
- Check port is not shutdown
MAB Not Working
Symptom: MAC authentication bypass not functioning Resolution: - Verify MAB is enabled on port - Check auth-type is set correctly (mab-only vs fallback) - Verify MAC format in RADIUS matches expected format - Check RADIUS accepts MAB requests
Diagnostic Commands
System information:
show version
show running-config
show system
Interface status:
show interfaces status
show interface ethernet <port>
show interface ethernet <port> status
VLAN information:
show vlan
show vlan id <vlan_id>
show interfaces switchport
802.1X status:
show dot1x
show dot1x interface ethernet <port>
show dot1x interface ethernet <port> detail
RADIUS status:
show radius-server
show aaa authentication
show aaa authorization
LLDP neighbors:
show lldp neighbors
show lldp neighbors interface ethernet <port>
MAC address table:
show mac address-table
show mac address-table interface ethernet <port>
Known Limitations
- No SPB-m Fabric: Dell switches do not support SPB-m fabric mode
- Firmware Upgrades: Manual firmware upgrades required; not managed by rXg
- Port Range Syntax: Port ranges use different syntax than some other vendors
- Legacy SSH: Older firmware may require legacy SSH algorithms
Operational Caveats
- Configuration Save: Changes are applied immediately but must be saved with
write memoryto persist across reboots - Port Mode Changes: Changing port mode (access/hybrid) may require removing existing VLAN configurations first
- RSA Key Generation: SSH requires RSA keys to be generated before enabling; this may take time on first boot
- 802.1X System Auth: The
dot1x system-auth-controlcommand must be enabled globally before per-port configuration - RADIUS Key: RADIUS shared secret is case-sensitive and must match exactly
- Port Naming: Interface names follow pattern
ethernet 1/1/1(unit/slot/port) orethernet 1/1depending on model - Hybrid Mode Required: For 802.1X with dynamic VLAN assignment, ports should be in hybrid mode to allow VLAN changes
External References
- Dell Networking Documentation
- Dell OS9 Configuration Guide
- Dell OS10 Enterprise Documentation
- Dell Command Reference
D-Link DGS Managed Switches
D-Link DGS series switches are cost-effective managed switches suitable for SMB and enterprise edge deployments. The rXg integrates with DGS switches via SSH for configuration synchronization, 802.1X/MAB authentication, and VLAN management.
Supported Models
| Model/Series | Notes |
|---|---|
| DGS-1210 Series | Smart Managed switches (8-52 ports) |
| DGS-1510 Series | Stackable Smart Managed switches |
| DGS-3000 Series | Layer 2 Managed switches |
| DGS-3120 Series | Layer 2+ Managed switches with stacking |
| DGS-3130 Series | Lite Layer 3 Stackable Managed switches |
| DGS-3630 Series | Layer 3 Stackable Managed switches |
Features Supported
| Feature | Supported | Description |
|---|---|---|
| Config Sync | Yes | Automatic configuration synchronization from rXg |
| Auto Bootstrap | Yes | Zero-touch onboarding capability |
| SNMP Monitoring | Yes | CPU, memory, and port statistics collection |
| LLDP Neighbor Discovery | Yes | Automatic detection of connected devices |
| Switch Port Import | Yes | Automatic import and management of switch ports |
| 802.1X Authentication | Yes | Port-based network access control |
| MAC Authentication Bypass | Yes | MAC-based authentication for non-802.1X devices |
| Dynamic VLAN Assignment | Yes | RADIUS-assigned VLAN based on authentication |
| Hybrid Port Mode | Yes | Combined trunk/access port configuration |
| DHCP Snooping | No | Not managed by rXg |
| Firmware Management | No | Manual firmware upgrades required |
| SPB-m Fabric | No | Not supported |
Prerequisites
Firmware Requirements
| Version | Support Status | Notes |
|---|---|---|
| DGS Firmware 4.x+ | Supported | SSH and RADIUS support required |
Network Requirements
- Management IP connectivity to rXg
- SSH access (TCP port 22)
- SNMP access (UDP port 161)
- RADIUS connectivity (UDP ports 1812, 1813) for 802.1X/MAB
Onboarding Process
Auto Bootstrap
DGS switches support automatic bootstrap configuration from rXg. The bootstrap process configures:
- RSA key generation for SSH
- Terminal length settings
- Password encryption
- SSH server enable (Telnet disabled)
- LLDP
- SNMP community
- User credentials
- AAA and 802.1X global settings
- Management VLAN and IP
- NTP server
Bootstrap Configuration
enable
crypto key generate rsa modulus 2048
configure terminal

! Disable terminal paging
terminal length default 0

! Security best practices
service password-encryption 15
no ip telnet server

! Enable LLDP
lldp run

! Enable SSH
ip ssh server

! Enable password
enable password 0 <enable_password>

! SNMP configuration
snmp-server
snmp-server group <community> v1 read CommunityView notify CommunityView
snmp-server group <community> v2c read CommunityView notify CommunityView
snmp-server community <community> view CommunityView ro

! User account
username <username> password 0 <password>

! AAA configuration for 802.1X
aaa new-model
aaa authentication dot1x default group radius
dot1x system-auth-control

! Management VLAN configuration
vlan <mgmt_vlan>
exit
interface vlan <mgmt_vlan>
  ip address <ip> <subnet>
  no shutdown
  exit

! Default route
ip route 0.0.0.0 0.0.0.0 <gateway>

! Management port configuration (trunk)
interface <mgmt_port>
switchport mode trunk
exit

! NTP configuration
ntp server <rxg_ip>

exit
copy run start
y
Manual Onboarding
For manual configuration before adding to rXg:
- Configure management IP address
- Generate RSA keys and enable SSH
- Create user account
- Configure SNMP community
- Enable AAA and 802.1X globally
- Add device to rXg Infrastructure Devices
Configuration
Connection Settings
The rXg connects via SSH using RubyExpect for CLI automation. Legacy SSH algorithms are enabled for compatibility.
SSH algorithms enabled:
- Key Exchange: diffie-hellman-group1-sha1, diffie-hellman-group14-sha1
- Ciphers: aes128-cbc, 3des-cbc, aes192-cbc, aes256-cbc
- Host Key: ssh-rsa
CLI prompts recognized:
- Password prompt: password:
- Enabled prompt: #
- Disabled prompt: >
- Configure prompt: (config)#
- Interface prompt: (config-if)#
- Confirmation prompt: [y/n]:
Initial connection handling:
- Paging is disabled with terminal length 0 command
Port Naming Convention
DGS uses an interface naming format:
| Type | Format | Example |
|---|---|---|
| Ethernet | ethernet |
ethernet0/1, ethernet0/48 |
Port Modes
DGS switches support three port modes:
| Mode | Description |
|---|---|
| ACCESS | Single untagged VLAN |
| TRUNK | Multiple tagged VLANs with optional native VLAN |
| HYBRID | Combination of tagged and untagged VLANs on same port |
VLAN Configuration
Creating VLANs
vlan <vlan_id>
exit
Access Port Configuration
interface <port>
switchport mode access
switchport access vlan <vlan_id>
exit
Trunk Port Configuration
interface <port>
switchport mode trunk
switchport trunk allowed vlan <vlan_list>
switchport trunk native vlan <native_vlan>
exit
VLAN list format:
- Single VLAN: 100
- Range: 100-200
- Multiple: 100,200,300
- Combined: 100-200,300,400-500
Hybrid Port Configuration
Hybrid ports support both tagged and untagged VLANs:
interface <port>
switchport mode hybrid
switchport hybrid allowed vlan add tagged <tagged_vlan_list>
switchport hybrid allowed vlan add untagged <untagged_vlan_list>
switchport hybrid native vlan <native_vlan>
exit
802.1X / MAB Configuration
Global AAA Configuration
aaa new-model
aaa authentication dot1x default group radius
dot1x system-auth-control
RADIUS Server Configuration
radius-server host <rxg_ip> auth-port 1812 acct-port 1813 key <shared_secret>
Per-Port 802.1X
interface <port>
switchport mode access
dot1x port-control auto
dot1x pae authenticator
dot1x port-control force-unauthorized
authentication timer restart 30
exit
Per-Port MAB
interface <port>
switchport mode access
dot1x port-control auto
mac-auth enable
exit
SNMP Configuration
snmp-server
snmp-server group <community> v1 read CommunityView notify CommunityView
snmp-server group <community> v2c read CommunityView notify CommunityView
snmp-server community <community> view CommunityView ro
Port Enable/Disable
interface <port>
no shutdown
exit

interface <port>
shutdown
exit
Port Descriptions
interface <port>
description <description>
exit
Configuration Save
DGS switches require confirmation when saving configuration:
copy run start
y
Monitoring Capabilities
| Metric | Collection Method | Notes |
|---|---|---|
| CPU Usage | SNMP | System health monitoring |
| Memory Usage | SNMP | System health monitoring |
| Port Statistics | SNMP | Packets in/out, errors |
| Port Status | SNMP / CLI | Up/down, speed, duplex |
| LLDP Neighbors | CLI | Connected device discovery |
| MAC Address Table | CLI | Client tracking |
Data Gathered
The config sync process collects: - Interface list and status - VLAN configurations - Port VLAN memberships (access/trunk/hybrid modes) - 802.1X/MAB port configurations - RADIUS server configuration - Port descriptions
Troubleshooting
Common Issues
SSH Connection Failures
Symptom: Unable to establish SSH connection
Resolution:
- Verify SSH is enabled: show ip ssh
- Check RSA keys are generated
- Verify IP connectivity to switch management address
- Verify user credentials are correct
- Check for IP lockout after failed login attempts (60 second timeout)
- Legacy SSH algorithms may be required for older firmware
802.1X Authentication Failures
Symptom: Clients failing to authenticate
Resolution:
- Verify AAA is configured: show running-config | include aaa
- Verify RADIUS server is configured: show running-config | include radius
- Check RADIUS shared secret matches rXg
- Verify dot1x system-auth-control is enabled
- Verify dot1x is enabled on port: show running-config interface <port>
- Review rXg RADIUS logs for authentication attempts
VLAN Configuration Not Applied
Symptom: Traffic not passing on expected VLANs
Resolution:
- Verify VLAN exists: show vlan
- Check port mode: show running-config interface <port>
- Verify port VLAN membership matches expected configuration
- For trunk ports, verify allowed VLAN list
- For hybrid ports, verify tagged/untagged VLAN lists
Configuration Not Saving
Symptom: Changes lost after reboot
Resolution:
- Configuration must be saved with copy run start followed by y confirmation
- Verify save completed successfully with "Done" message
Diagnostic Commands
System information:
show version
show unit
show running-config
Interface status:
show interfaces status
show running-config interface <port>
show interface <port>
VLAN information:
show vlan
show vlan interface <port>
802.1X status:
show running-config | include dot1x
show running-config | include mac-auth
RADIUS configuration:
show running-config | include radius
IP configuration:
show ip interface
show ip route
LLDP neighbors:
show lldp neighbor
Known Limitations
- VLAN 1: Cannot be deleted; used as default VLAN
- Hybrid Port Mode: Some older firmware versions may have limited hybrid port support
- Firmware Upgrades: Manual firmware upgrades required; not managed by rXg
- DHCP Snooping: Not synchronized from rXg configuration
Operational Caveats
- Terminal Length: Issue
terminal length 0to disable output paging for automation - Configuration Save: Changes must be saved with
copy run startand confirmed withyto persist across reboots - Password Encryption:
service password-encryption 15encrypts passwords in configuration - SSH vs Telnet: Bootstrap disables Telnet with
no ip telnet serverfor security - Legacy SSH: Older firmware may require legacy SSH algorithms (group1-sha1, aes128-cbc, ssh-rsa)
- Port Mode Transitions: When changing from trunk to access mode, trunk VLAN settings are automatically cleared
- RSA Keys: Generate RSA keys with
crypto key generate rsa modulus 2048before enabling SSH
External References
Edgecore Switches
Edgecore switches are open networking switches commonly used with TIP OpenWiFi deployments and enterprise networks. The rXg supports both standard Edgecore firmware and OLS (OpenLAN Switch) firmware variants, providing comprehensive configuration management, monitoring, and zero-touch provisioning capabilities.
Supported Models
| Model/Series | Notes |
|---|---|
| ECS2100 Series | Gigabit access switches (e.g., ECS2100-10P-TIPC) |
| ECS4100 Series | Gigabit PoE access switches |
| ECS4155 Series | Multi-gigabit PoE switches (e.g., ECS4155-30P) |
| ECS5550 Series | 10G aggregation switches (e.g., ECS5550-30X) |
Both standard Edgecore firmware and OLS (OpenLAN Switch) firmware are supported. The rXg automatically detects firmware type and adjusts configuration commands accordingly.
Features Supported
| Feature | Supported | Description |
|---|---|---|
| Config Sync | Yes | Automatic configuration synchronization from rXg |
| Auto Bootstrap | Yes | Zero-touch onboarding from factory-default state via DHCP discovery |
| SNMP Monitoring | Yes | CPU, memory, and port statistics collection |
| LLDP Neighbor Discovery | Yes | Automatic detection of connected devices via SNMP |
| Switch Port Import | Yes | Automatic import and management of switch ports |
| 802.1X Authentication | Yes | Port-based network access control via dot1x |
| MAC Authentication Bypass (MAB) | Yes | MAC-based authentication for non-802.1X devices |
| Dynamic VLAN Assignment | Yes | RADIUS-assigned VLAN based on authentication |
| DHCP Snooping | Yes | Protection against rogue DHCP servers with per-port trust |
| Firmware Management | Yes | Upload and upgrade firmware via TFTP |
| PoE Power Priority | Yes | Configure inline power priority (1-3) per port |
| STP Protection | Yes | Edge protection and STP protect settings per port |
| SPB-m Fabric | No | Not supported |
Prerequisites
Firmware Requirements
- Standard Edgecore firmware or OLS (OpenLAN Switch) firmware
- SSH support required for config sync (enabled during bootstrap if not present)
Network Requirements
- Management IP connectivity to rXg
- SSH access (TCP port 22) - configured during bootstrap
- SNMP access (UDP port 161) - configured during bootstrap
- RADIUS connectivity (UDP ports 1812, 1813) - for 802.1X/MAB
- TFTP connectivity (UDP port 69) - for firmware upgrades
Onboarding Process
Automatic Onboarding
Edgecore switches support fully automatic onboarding from factory-default state. The rXg detects factory-default switches by checking if NTP/SNTP is disabled (NTP being disabled indicates factory state).
Prerequisites for Auto-Bootstrap:
- The switch must be connected to the network and obtain a DHCP address from rXg
- A switch record must exist in rXg with the switch's MAC address configured
- The target management IP address must be configured in the switch record
- Valid SSH credentials must be provided (factory default or pre-configured)
Auto-Bootstrap Process:
- Click the Auto Bootstrap action link in the switch record (or it triggers automatically when the switch is detected at a DHCP IP)
- The rXg looks up the switch's current DHCP IP address using the configured MAC address
- Connection is established via SSH (with fallback to Telnet for older/factory-default switches)
- The system detects factory-default state by checking if NTP is disabled
- If factory-default, bootstrap configuration is automatically applied:
- SSH host key generation (can take up to 3 minutes)
- Management VLAN creation (if not VLAN 1)
- Static IP address assignment on the management VLAN interface
- Default gateway configuration
- SNMP community string configuration
- SNTP/NTP server configuration (using rXg IP)
- DNS server configuration (using rXg IP)
- RADIUS server and dot1x system-auth-control (if RADIUS is configured)
- SSH server enabled, Telnet disabled
- Configuration is saved to startup-config
- The switch reconnects on its new management IP address
Connection Methods:
The rXg attempts connection in the following order: 1. SSH with modern algorithms 2. SSH with legacy algorithms (for older firmware) 3. Telnet (as fallback, triggers bootstrap to enable SSH)
Manual Onboarding
For manual configuration, connect to the switch via console or existing network access and apply the bootstrap commands below.
Bootstrap Commands
Generate SSH Host Keys (in enabled mode, before entering configure mode):
ip ssh crypto host-key generate
ip ssh save host-key
Note: SSH key generation can take up to 3 minutes on some models.
Enter Configuration Mode:
configure
Create Management VLAN (if not using VLAN 1):
vlan database
vlan <management-vlan-id>
exit
Configure Management VLAN Interface:
interface vlan <management-vlan-id>
ip address <switch-ip> <subnet-mask>
exit
Configure Default Route:
no ip route *
y
ip route 0.0.0.0 0.0.0.0 <gateway-ip>
Configure NTP and DNS:
sntp client
sntp server <rxg-ip>
ip name-server <rxg-ip>
no ip domain-lookup
Enable SSH and Disable Telnet:
ip ssh server
ip ssh timeout 15
no ip telnet server
Configure RADIUS (if using 802.1X/MAB):
radius-server 1 host <rxg-ip> auth-port 1812 acct-port 1813 timeout 5 retransmit 3 key <radius-secret>
dot1x system-auth-control
Configure SNMP:
For standard firmware:
snmp-server community <community-string> ro
For OLS firmware:
snmp
snmp-server community <community-string> ro
Exit and Save:
exit
copy running-config startup-config
startup1.cfg
Configuration
Connection Settings
Configure the switch in the Network::Wired::Switches scaffold with:
- Host: Target management IP address
- MAC Address: Required for auto-bootstrap DHCP lookup
- Username/Password: SSH credentials
- Enable Password: If different from login password
- Management VLAN: VLAN for management traffic (default: 1)
- Gateway IP: Default gateway for the switch
- SNMP Community: Community string for monitoring (default: public)
RADIUS / AAA Configuration
When a RADIUS Server Option is active in rXg, the bootstrap process automatically configures:
System-Level Configuration:
radius-server 1 host <rxg-ip> auth-port 1812 acct-port 1813 timeout 5 retransmit 3 key <radius-secret>
dot1x system-auth-control
Port-Level Configuration for MAB:
Ports configured for MAC authentication receive:
interface ethernet <port>
dot1x port-control auto
network-access mode mac-authentication
dot1x operation-mode mac-based-auth
exit
VLAN Configuration
VLANs are automatically managed through Switch Port Profiles:
- Access ports: Configured with a single untagged (native) VLAN
- Trunk ports: Configured with tagged VLANs and optional native VLAN
- VLAN database entries are automatically created/removed as needed
DHCP Snooping Configuration
DHCP snooping is configured through:
- Trusted DHCP VLANs on the Switch record - specifies which VLANs have DHCP snooping enabled
- DHCP Snooping Trust on Switch Port Profiles - marks uplink ports as trusted
When enabled, the rXg configures:
ip dhcp snooping
ip dhcp snooping vlan <vlan-list>
interface ethernet <trusted-port>
ip dhcp snooping trust
Note: VLAN 1 is automatically included when DHCP snooping is enabled to ensure daisy-chained switches can obtain DHCP addresses during onboarding.
PoE Configuration
PoE power priority can be configured per port through Switch Port Profiles:
- Priority 1: Critical (highest)
- Priority 2: High
- Priority 3: Low (default)
STP Protection
Switch Port Profiles support:
- Edge Protection: Enables spanning-tree edge port settings
- STP Protect: Enables BPDU guard and other STP protection features
Monitoring Capabilities
| Metric | Collection Method | Notes |
|---|---|---|
| CPU Usage | SNMP | Collected at configured monitoring interval |
| Memory Usage | SNMP | Collected at configured monitoring interval |
| Port Statistics | SNMP | Packets in/out, errors, discards |
| Port Status | SNMP | Up/down, speed, duplex |
| LLDP Neighbors | SNMP | Connected device discovery for automatic port matching |
| Device Info | SSH | Serial number, firmware version, MAC address |
Firmware Upgrade
Edgecore switches support firmware upgrades via TFTP:
- Upload firmware file to rXg via Device Firmwares scaffold
- Associate firmware with the switch
- Initiate upgrade from the switch record
- The rXg:
- Copies firmware to TFTP directory
- Connects to switch via SSH
- Executes interactive
copy tftp filecommand - Sets boot image to new firmware
- Optionally reboots the switch
Firmware Upgrade Commands:
copy tftp file
<tftp-server-ip>
2
<firmware-filename>
<firmware-filename>
boot system opcode:<firmware-filename>
copy running-config startup-config
reload
Troubleshooting
Common Issues
Issue: Switch shows offline in rXg
Symptom: Switch appears offline despite being reachable via ping
Cause: SSH connectivity issues or SNMP community mismatch
Resolution:
- Verify SSH credentials match switch configuration
- Check SNMP community string matches
- Ensure SSH is enabled on the switch (ip ssh server)
- Check firewall rules allow TCP/22 and UDP/161
Issue: Auto-bootstrap fails
Symptom: Switch detected at DHCP IP but bootstrap doesn't complete Cause: SSH key generation timeout or credential issues Resolution: - SSH key generation can take up to 3 minutes - wait for completion - Verify factory default credentials are correct - Check if switch is actually in factory-default state (NTP should be disabled) - Try manual bootstrap via console if SSH fails
Issue: Config sync shows differences but won't apply
Symptom: Config comparison shows changes needed but sync fails Cause: Configuration buffer locked by another session Resolution: - Wait for other CLI sessions to complete - Check for stuck SSH sessions on the switch - Reboot switch if necessary to clear locked sessions
Issue: DHCP snooping blocks legitimate traffic
Symptom: Devices not getting DHCP addresses after enabling snooping Cause: Uplink port not marked as trusted Resolution: - Ensure the Switch Port Profile for uplink ports has "DHCP Snooping Trust" enabled - Verify the path to the DHCP server has all intermediate ports trusted
Issue: Firmware upgrade fails
Symptom: Firmware upload fails or switch doesn't boot new firmware
Cause: TFTP connectivity issues or incorrect boot image setting
Resolution:
- Verify TFTP connectivity from switch to rXg
- Check firmware file exists in /space/tftpboot/
- Verify boot image is set correctly with show boot
Diagnostic Commands
show version
show system
show running-config
show interfaces brief
show vlan
show ip dhcp snooping
show ip dhcp snooping binding
show dot1x
show radius statistics
show sntp
show boot
show ip route
Check NTP Status (factory detection):
show ntp
Check SSH Status:
show ip ssh
Check LLDP Neighbors:
show lldp neighbors
Known Limitations
- SPB-m fabric not supported
- TFTP is the only supported firmware upload method (HTTP not supported)
- SSH key generation can take up to 3 minutes on initial bootstrap
- OLS firmware requires slightly different SNMP configuration syntax
Operational Caveats
- Factory Detection: The rXg uses NTP/SNTP disabled state to detect factory-default switches. If NTP is manually disabled on a configured switch, it may trigger re-bootstrap.
- SSH Timeout: SSH server timeout is set to 15 seconds during bootstrap to prevent session exhaustion from failed authentication attempts.
- Configuration Buffer: Only one session can modify configuration at a time. Config sync will fail if another session has the configuration buffer locked.
- OLS Firmware: OpenLAN Switch (OLS) firmware is automatically detected and handled. OLS requires the
snmpcommand before configuring SNMP community. - Legacy SSH: Older firmware may require legacy SSH algorithms. The rXg automatically falls back to legacy algorithms if modern algorithms fail.
- Telnet Fallback: For factory-default switches without SSH enabled, the rXg will connect via Telnet, apply bootstrap configuration to enable SSH, then reconnect via SSH.
External References
Extreme Switches
Extreme Networks switches include ERS (Ethernet Routing Switch), VSP (Virtual Services Platform), and EXOS-based platforms. VSP and ERS switches support SPB-m (Shortest Path Bridging - MAC) fabric deployments for enterprise campus and data center networks.
Supported Models
ERS (Ethernet Routing Switch)
| Model/Series | Notes |
|---|---|
| ERS 4850GTS | Stackable Gigabit switch with SPB-m support |
| ERS 4900 Series | High-performance stackable switches |
| ERS 5900 Series | Aggregation switches |
VSP (Virtual Services Platform)
| Model/Series | Notes |
|---|---|
| VSP 4450 | Compact aggregation switch |
| VSP 4900 | High-density aggregation switch |
| VSP 7200 Series | High-performance aggregation switches |
| VSP 7400 Series | Multi-rate aggregation switches |
| VSP 8200 | High-density campus/data center switch |
| VSP 8400 | Modular data center switch |
EXOS (ExtremeXOS)
| Model/Series | Notes |
|---|---|
| X440-G2 Series | Edge/access switches |
| X450-G2 Series | Mid-tier aggregation switches |
| X460-G2 Series | Enterprise aggregation switches |
| X465 Series | Universal switches with stacking |
| X590 Series | High-performance ToR switches |
| X620 Series | Compact access switches |
| X690 Series | Data center aggregation switches |
| X870 Series | Spine/leaf switches |
Features Supported
| Feature | ERS | VSP | EXOS | Description |
|---|---|---|---|---|
| Config Sync | Yes | Yes | Yes | Automatic configuration synchronization from rXg |
| Auto Bootstrap | Yes | Yes | Yes | Zero-touch onboarding capability |
| SNMP Monitoring | Yes | Yes | Yes | CPU, memory, and port statistics collection |
| LLDP Neighbor Discovery | Yes | Yes | Yes | Automatic detection of connected devices |
| Switch Port Import | Yes | Yes | Yes | Automatic import and management of switch ports |
| 802.1X Authentication | Yes | Yes | Yes | Port-based network access control |
| MAC Authentication Bypass | Yes | Yes | Yes | MAC-based authentication for non-802.1X devices |
| Dynamic VLAN Assignment | Yes | Yes | Yes | RADIUS-assigned VLAN based on authentication |
| DHCP Snooping | Yes | Yes | Yes | Protection against rogue DHCP servers |
| Firmware Management | Yes (TFTP) | Yes (TFTP) | No | Upload and upgrade firmware via rXg |
| SPB-m Fabric | Yes | Yes | No | Shortest Path Bridging - MAC mode |
| I-SID Management | Yes | Yes | No | Service Instance Identifier mappings |
Prerequisites
Firmware Requirements
| Platform | Minimum Version | Notes |
|---|---|---|
| ERS 4850/4900 | 7.x | SPB-m requires firmware with fabric support |
| VSP 4000/7000/8000 | VOSS 8.x | Virtual Services Platform Operating System |
| EXOS | 22.x+ | ExtremeXOS with JSON-RPC API support |
Network Requirements
- Management IP connectivity to rXg
- SSH access (TCP port 22) for ERS and VSP
- HTTP/HTTPS access for EXOS JSON-RPC API
- SNMP access (UDP port 161)
- RADIUS connectivity (UDP ports 1812, 1813)
- TFTP access from switch to rXg (UDP port 69) for config scripts (ERS/VSP)
Onboarding Process
ERS Bootstrap
The ERS bootstrap process configures SPB-m fabric, management IP, SSH, SNMP, and user credentials. Bootstrap scripts are generated from the rXg admin console.
Phase 1 - Enable SPB-m (requires reboot):
enable
config terminal
spbm
y
! Switch will reboot now
Phase 2 - Configure remaining settings (after reboot):
enable
config terminal
terminal length 0
no autosave enable

! Enable SSH
no ssh
ssh timeout 120
ssh

! SNMP configuration
snmp-server community ro
<community_string>
<community_string>
snmp-server name "<system_name>"
snmp-server enable

! User credentials
no password security
username RW password
<password>
<password>

vlan configcontrol flexible

! SPB-m configuration
spbm ethertype 0x8100
router isis
spbm 1
spbm 1 nick-name <nickname>
exit

! Loopback for IS-IS source
interface loopback 1
ip address <loopback_ip> 255.255.255.255
exit

! NTP configuration
ntp server <rxg_ip>
ntp

! Management IP configuration
no ip address
y
no ip netmask
y
no ip default-gateway
y

vlan create <mgmt_vlan> type port
vlan mgmt <mgmt_vlan>
ip address <ip>/<mask> default-gateway <gateway>

! B-VLAN configuration
vlan create <bvlan1> type spbm-bvlan
vlan create <bvlan2> type spbm-bvlan

! IS-IS routing configuration
router isis
ip-source-address <loopback_ip>
spbm 1 b-vid <bvlan1>,<bvlan2> primary <bvlan1>
is-type l1
manual-area <area_id>
exit

router isis enable

router isis
redistribute direct
redistribute direct enable
exit
isis apply redistribute direct

! NNI port configuration (for each NNI port)
vlan members remove 1 <nni_port>
interface ethernet <nni_port>
isis
isis spbm 1
isis enable
no spanning-tree stp 1
no shutdown
exit

! Management I-SID mapping
vlan i-sid <mgmt_vlan> <mgmt_isid>

exit
write mem
VSP Bootstrap
VSP switches use SFTP for configuration script delivery. Bootstrap configuration is generated from the Switch Fabric management interface.
Bootstrap configuration includes: - SSH enable with algorithm support - Password change from factory defaults - SPB-m fabric configuration (B-VLANs, IS-IS, nicknames) - NNI port configuration for fabric interconnects - Management VLAN and I-SID configuration - NTP server configuration - SNMP community setup
enable
configure terminal

! SSH configuration
ssh timeout 120
ssh

! SPB-m configuration
spbm
spbm ethertype 0x8100
router isis
spbm 1
spbm 1 nick-name <nickname>
spbm 1 b-vid <bvlan1>,<bvlan2> primary <bvlan1>
exit

! Loopback for IS-IS
interface loopback 1
ip address <loopback_ip>/32
exit

! IS-IS configuration
router isis
ip-source-address <loopback_ip>
is-type l1
manual-area <area_id>
redistribute direct
redistribute direct enable
exit

router isis enable

! NNI port configuration
interface GigabitEthernet <nni_port>
isis
isis spbm 1
isis enable
no shutdown
exit

save config
EXOS Bootstrap
EXOS switches use JSON-RPC API over HTTP/HTTPS for configuration. Bootstrap generates management configuration.
# Management IP configuration
configure vlan Default ipaddress <ip>/<mask>
configure iproute add default <gateway>

# DNS configuration
configure dns-client add name-server <dns_ip>
configure dns-client default-domain <domain>

# SNMP configuration
configure snmp sysName "<system_name>"
configure snmpv3 add community <community_string> name <community_name> user v1v2c_ro
enable snmp access

# SSH configuration
enable ssh2

# Change admin password
configure account admin password <password>

# NTP configuration
configure ntp server add <ntp_ip>
enable ntp
Configuration
Connection Settings
ERS/VSP (SSH)
The rXg connects via SSH using RubyExpect for CLI automation. Legacy SSH algorithms are enabled for compatibility with older firmware versions.
SSH algorithms enabled:
- Key Exchange: diffie-hellman-group14-sha1
- Host Key: ssh-rsa
CLI prompts recognized:
- Password prompt: password:
- Enabled prompt: #
- Disabled prompt: >
- Config prompt: (config)#
- Interface prompt: (config-if)#
EXOS (JSON-RPC)
The rXg connects via JSON-RPC API over HTTP or HTTPS.
API endpoint: http(s)://<host>:<port>/jsonrpc
Request format:
json
{
  "method": "cli",
  "id": "10",
  "jsonrpc": "2.0",
  "params": ["<command>"]
}
RADIUS / AAA Configuration
ERS RADIUS Configuration
802.1X and MAB authentication configuration is managed via config sync:
radius-server host <rxg_ip> key <shared_secret>
radius-server host <rxg_ip> auth-port 1812
radius-server host <rxg_ip> acct-port 1813

aaa authentication dot1x default radius
aaa authentication mac default radius
VSP RADIUS Configuration
radius-server host <rxg_ip> key <shared_secret>
radius server host <rxg_ip> used-by dot1x
radius server host <rxg_ip> used-by non-eap-mac

authentication mode multi-host
EXOS RADIUS/Netlogin Configuration
EXOS uses netlogin with policy-based VLAN authorization:
# Configure RADIUS server
configure radius netlogin primary server <rxg_ip> client-ip <switch_ip> vr VR-Default
configure radius netlogin primary shared-secret <shared_secret>

# Enable netlogin authentication modes
enable netlogin dot1x
enable netlogin mac

# Configure policy for VLAN assignment (created automatically by rXg)
create policy profile <profile_name> port-vlan <vlan_id>
SPB-m Fabric Configuration
For ERS and VSP switches participating in an SPB-m fabric:
B-VLAN Configuration
B-VLANs carry fabric traffic between switches:
# ERS
vlan create <bvlan_id> type spbm-bvlan

# VSP
vlan create <bvlan_id> type spbm-bvlan
I-SID to VLAN Mappings
Service Instance Identifiers map VLANs across the fabric:
# ERS - Flex-UNI mapping
i-sid <isid> vlan <vlan_id> port <port>

# VSP - L2 VSN mapping
i-sid <isid> vlan <vlan_id>
NNI Port Configuration
Network-to-Network Interface ports carry fabric traffic:
# Enable ISIS on NNI ports
interface ethernet <port>
isis
isis spbm 1
isis enable
no shutdown
exit
SNMP Configuration
ERS/VSP
snmp-server community ro
<community_string>
snmp-server enable
EXOS
configure snmpv3 add community <community_string> name <name> user v1v2c_ro
enable snmp access
Monitoring Capabilities
| Metric | ERS | VSP | EXOS | Collection Method |
|---|---|---|---|---|
| CPU Usage | Yes | Yes | Yes | SNMP |
| Memory Usage | Yes | Yes | Yes | SNMP |
| Port Statistics | Yes | Yes | Yes | SNMP |
| Port Status | Yes | Yes | Yes | SNMP |
| LLDP Neighbors | Yes | Yes | Yes | CLI/SNMP |
| I-SID Status | Yes | Yes | N/A | CLI |
| IS-IS Adjacencies | Yes | Yes | N/A | CLI |
Monitored Port Types
- Ethernet ports (physical interfaces)
- LAG interfaces (Link Aggregation Groups)
- NNI ports (fabric backbone)
Troubleshooting
Common Issues
SSH Connection Failures (ERS/VSP)
Symptom: Unable to establish SSH connection Resolution: - Verify SSH is enabled on the switch - Check firewall rules allow TCP port 22 - Verify SSH key algorithms are compatible (legacy algorithms may be required) - Check for IP lockout after failed login attempts (60 second timeout)
JSON-RPC Connection Failures (EXOS)
Symptom: HTTP connection refused or authentication errors
Resolution:
- Verify web server is enabled: enable web http or enable web https
- Check credentials are correct for admin user
- Verify REST API is enabled in EXOS configuration
SPB-m Fabric Not Synchronizing
Symptom: Config sync reports fabric not enabled
Resolution:
1. Verify SPB-m is enabled: show spbm should show "enabled"
2. Verify IS-IS is running: show isis or show isis interface
3. Check NNI ports are up and ISIS-enabled
4. Verify B-VLAN configuration matches fabric settings
I-SID Mappings Not Applied
Symptom: VLAN traffic not forwarding across fabric Resolution: - Verify I-SID is created and mapped to correct VLAN - Check port is member of the VLAN - Verify ISIS adjacency is established on NNI ports
Diagnostic Commands
ERS
show spbm                          # SPB-m global status
show isis                          # IS-IS protocol status
show isis interface                # IS-IS enabled interfaces
show isis spbm                     # SPB-m instance details
show i-sid                         # I-SID to VLAN mappings
show vlan members                  # VLAN membership
show running-config                # Current configuration
show interfaces loopback           # Loopback IP configuration
show lldp neighbor-mgmt-addr       # LLDP neighbors
VSP
show spbm                          # SPB-m status
show isis interface                # IS-IS interfaces
show isis spbm                     # SPB-m instance info
show vlan i-sid                    # I-SID mappings
show vlan members                  # VLAN membership
show running-config                # Current configuration
show lldp neighbor                 # LLDP neighbors
EXOS
show switch                        # System information
show vlan                          # VLAN configuration
show netlogin                      # Netlogin/authentication status
show radius                        # RADIUS server configuration
show policy profile all            # Policy profiles
show lldp neighbors                # LLDP neighbors
Known Limitations
- SPB-m fabric only supported on VSP and ERS platforms (not EXOS)
- EXOS switches use JSON-RPC API (not SSH CLI)
- ERS requires reboot to enable/disable SPB-m mode
- Configuration script execution via TFTP requires rXg TFTP service enabled
- Maximum script execution timeout is 120 seconds for large configurations
Operational Caveats
- ERS SPB-m Mode: Enabling or disabling SPB-m requires a switch reboot. Plan maintenance windows accordingly.
- IS-IS Source IP: The loopback interface IP is used as IS-IS source address. Changing it requires temporary workaround with secondary loopback.
- VLAN Tagging Modes: ERS supports
tagAll,unTagPvidOnly, andfilter-untagged-framemodes per port. - Config Script Delivery: ERS/VSP use TFTP/SFTP for config scripts. Ensure rXg is accessible from switch management network.
- NNI Port Changes: Modifying NNI ports affects fabric topology. IS-IS will reconverge.
External References
- Extreme Networks Documentation
- VSP VOSS Configuration Guide
- ERS Configuration Guide
- EXOS User Guide
- SPB-m Fabric Configuration Guide
FS.com (Fiberstore) Managed Switches
FS.com (Fiberstore) switches provide enterprise-grade switching with comprehensive Layer 2/3 features at competitive pricing. The rXg integrates with FS switches via SSH for configuration synchronization, 802.1X/MAB authentication, and VLAN management.
Supported Models
| Model/Series | Notes |
|---|---|
| S3900 Series | Stackable Managed switches (24-48 ports) |
| S5800 Series | High-performance L2+ switches |
| S5850 Series | 10GbE Data Center switches |
| S5860 Series | Multi-rate switches with 25/100G uplinks |
| S8050 Series | Campus Core switches |
Features Supported
| Feature | Supported | Description |
|---|---|---|
| Config Sync | Yes | Automatic configuration synchronization from rXg |
| Auto Bootstrap | Yes | Zero-touch onboarding capability |
| SNMP Monitoring | Yes | CPU, memory, and port statistics collection |
| LLDP Neighbor Discovery | Yes | Automatic detection of connected devices |
| Switch Port Import | Yes | Automatic import and management of switch ports |
| 802.1X Authentication | Yes | Port-based network access control (EAP) |
| MAC Authentication Bypass | Yes | MAC-based authentication for non-802.1X devices |
| Dynamic VLAN Assignment | Yes | RADIUS-assigned VLAN based on authentication |
| DHCP Snooping | No | Not managed by rXg |
| Firmware Management | No | Manual firmware upgrades required |
| SPB-m Fabric | No | Not supported |
Prerequisites
Firmware Requirements
| Version | Support Status | Notes |
|---|---|---|
| FSOS 7.x+ | Supported | SSH with legacy algorithms required |
Network Requirements
- Management IP connectivity to rXg
- SSH access (TCP port 22)
- SNMP access (UDP port 161)
- RADIUS connectivity (UDP ports 1812, 1813) for 802.1X/MAB
Onboarding Process
Auto Bootstrap
FS switches support automatic bootstrap configuration from rXg. The bootstrap process configures:
- Terminal length settings
- SSH server with version 2
- LLDP
- SNMP community
- User credentials
- Management VLAN and IP
- Default route
- NTP/SNTP server
Bootstrap Configuration
enable
config

! Disable terminal paging
terminal length 0

! Enable SSH (regenerate key for compatibility)
no ip sshd enable
ip sshd enable
ip sshd version 2

! Enable LLDP
lldp run

! SNMP configuration
snmp-server community public ro

! User account
username <username> password 0 <password>

! Management VLAN and IP
interface vlan <mgmt_vlan>
  ip address <ip> <subnet>
exit

! Default route
ip route 0.0.0.0 0.0.0.0 <gateway>

! NTP configuration
sntp server priority 1 <rxg_ip>

! Save configuration
write
Manual Onboarding
For manual configuration before adding to rXg:
- Configure management IP address
- Enable SSH server with version 2
- Create user account with enable privileges
- Configure SNMP community
- Add device to rXg Infrastructure Devices
Configuration
Connection Settings
The rXg connects via SSH using RubyExpect for CLI automation. FS switches require specific legacy SSH algorithms and an extended timeout due to slow key exchange.
SSH algorithms enabled:
- Key Exchange: diffie-hellman-group1-sha1, diffie-hellman-group14-sha1
- Ciphers: aes128-cbc, 3des-cbc, aes192-cbc, aes256-cbc
- MACs: hmac-sha1 (required - connection fails without this)
- Host Key: ssh-rsa
Connection timeout: 35 seconds (extended for slow SSH key exchange)
CLI prompts recognized:
- Password prompt: password:
- Enabled prompt: #
- Disabled prompt: >
- Configure prompt: (config)#
- Interface prompt: (config-if)#
Initial connection handling:
- After login, issues enable command with enable password
- Paging is disabled with terminal length 0 command
Port Naming Convention
FS switches use a specific interface naming format:
| Type | Format | Example |
|---|---|---|
| Gigabit Ethernet | GigaEthernet |
GigaEthernet0/1, GigaEthernet0/48 |
| 10G Ethernet | TenGigaEthernet |
TenGigaEthernet0/1 |
Note: The interface name uses "GigaEthernet" (not "GigabitEthernet" as in Cisco IOS).
VLAN Configuration
Creating VLANs
vlan <vlan_id>
exit
Access Port Configuration
interface <port>
switchport mode access
switchport pvid <vlan_id>
exit
Trunk Port Configuration
interface <port>
switchport mode trunk
switchport trunk vlan-allowed <vlan_list>
switchport pvid <native_vlan>
exit
VLAN list commands:
- Set allowed VLANs: switchport trunk vlan-allowed <range>
- Add VLANs: switchport trunk vlan-allowed add <range>
- Remove VLANs: switchport trunk vlan-allowed remove <range>
VLAN list format:
- Single VLAN: 100
- Range: 100-200
- Multiple: 100,200,300
802.1X / MAB Configuration
Global 802.1X Configuration
802.1X must be enabled globally before per-port configuration takes effect:
dot1x enable
dot1x re-authentication
dot1x mabformat 2
aaa authentication dot1x DOT1X-AUTH group radius
Note: dot1x mabformat 2 sets the MAC address format for MAB authentication.
RADIUS Server Configuration
RADIUS host and key are configured as separate commands:
radius-server host <rxg_ip> auth-port 1812 acct-port 1813
radius-server key <shared_secret>
Per-Port 802.1X (EAP)
interface <port>
dot1x authentication type eap
dot1x authentication method DOT1X-AUTH
dot1x port-control auto
exit
Per-Port MAB
interface <port>
dot1x mab
dot1x authentication method DOT1X-AUTH
dot1x port-control auto
exit
Combined 802.1X and MAB
interface <port>
dot1x authentication type eap
dot1x mab
dot1x authentication method DOT1X-AUTH
dot1x port-control auto
exit
Removing Authentication
interface <port>
no dot1x mab
no dot1x authentication type
no dot1x authentication method
no dot1x port-control
exit
SNMP Configuration
snmp-server community <community> ro
Or with read-only explicitly:
snmp-server community <community> read-only
Port Enable/Disable
interface <port>
no shutdown
exit

interface <port>
shutdown
exit
Port Descriptions
interface <port>
description <description>
exit
Configuration Save
write
Monitoring Capabilities
| Metric | Collection Method | Notes |
|---|---|---|
| CPU Usage | SNMP | System health monitoring |
| Memory Usage | SNMP | System health monitoring |
| Port Statistics | SNMP | Packets in/out, errors |
| Port Status | SNMP / CLI | Up/down, speed, duplex |
| LLDP Neighbors | CLI | Connected device discovery |
Data Gathered
The config sync process collects:
- Interface list and status (from show interface brief)
- VLAN configurations
- Port VLAN memberships (trunk/access modes)
- 802.1X/MAB port configurations
- RADIUS server configuration
- Device information (serial, model, firmware version)
Troubleshooting
Common Issues
SSH Connection Failures
Symptom: Unable to establish SSH connection or "unsupported message type" errors
Resolution:
- FS switches require the hmac-sha1 MAC algorithm - without it, connections fail with "unsupported message type(249)"
- Verify SSH is enabled: show ip sshd
- Check SSH version 2 is enabled: ip sshd version 2
- Verify IP connectivity to switch management address
- Verify user credentials are correct
- Note: SSH key exchange can be slow; allow up to 35 seconds for connection
- Check for IP lockout after failed login attempts (60 second timeout)
SSH connection test from command line:
bash
ssh -o KexAlgorithms=+diffie-hellman-group1-sha1 \
    -o Ciphers=+aes128-cbc \
    -o MACs=hmac-sha1 \
    -o HostKeyAlgorithms=+ssh-rsa \
    user@switch_ip
802.1X Authentication Failures
Symptom: Clients failing to authenticate
Resolution:
- Verify dot1x is enabled globally: show running-config | include dot1x
- Global dot1x enable is required before per-port settings take effect
- Verify RADIUS server is configured: show running-config | include radius
- Check RADIUS key matches rXg configuration
- Verify authentication method is configured on port
- Review rXg RADIUS logs for authentication attempts
VLAN Configuration Not Applied
Symptom: Traffic not passing on expected VLANs
Resolution:
- Verify VLAN exists: show vlan
- Check port mode: show running-config interface <port>
- For trunk ports, verify switchport trunk vlan-allowed includes the VLAN
- For access ports, verify switchport pvid is set correctly
- Use show vlan id <vlan_id> to see port memberships
Configuration Not Saving
Symptom: Changes lost after reboot
Resolution:
- Configuration must be saved with write command
- Verify save completed successfully
Diagnostic Commands
System information:
show version
show running-config
show interface brief
Interface status:
show interface brief
show interface <port>
show running-config interface <port>
VLAN information:
show vlan
show vlan id <vlan_id>
show vlan name
show vlan members port <port>
802.1X status:
show running-config | include dot1x
show dot1x
RADIUS configuration:
show running-config | include radius
IP configuration:
show interface vlan <vlan_id>
show ip route 0.0.0.0
Known Limitations
- VLAN 1: Cannot be deleted; used as default VLAN
- SSH Algorithm Requirements: Requires legacy SSH algorithms including
hmac-sha1MAC - SSH Key Exchange: Key exchange can be slow (up to 35 seconds)
- Interface Naming: Uses "GigaEthernet" not "GigabitEthernet"
- Firmware Upgrades: Manual firmware upgrades required; not managed by rXg
Operational Caveats
- Terminal Length: Issue
terminal length 0to disable output paging for automation - Configuration Save: Changes must be saved with
writecommand to persist across reboots - SSH Regeneration: When regenerating SSH keys, disable and re-enable:
no ip sshd enablethenip sshd enable - Global dot1x: The
dot1x enableglobal command is required before per-port 802.1X/MAB settings take effect - MAB Format: Use
dot1x mabformat 2for proper MAC address formatting in RADIUS requests - PVID Command: Use
switchport pvid(notswitchport access vlan) for native/access VLAN assignment - Slow SSH: Allow extended timeout (35+ seconds) for SSH connections due to slow key exchange on some models
- SNTP vs NTP: Use
sntp serverfor time synchronization (notntp server)
External References
HP Switches
HP (Hewlett Packard Enterprise / Aruba) switches provide enterprise-class switching solutions for campus and data center deployments. The rXg integrates with HP ProCurve and HPE switches via SSH for configuration synchronization, 802.1X/MAB authentication, and VLAN management.
Supported Models
| Model/Series | Notes |
|---|---|
| ProCurve 2500 Series | Legacy managed switches |
| ProCurve 2600 Series | Enhanced Layer 2 switches |
| ProCurve 2800 Series | Advanced managed switches |
| ProCurve 2900 Series | Stackable managed switches |
| ProCurve 3500 Series | Layer 3 switches |
| ProCurve 5400 Series | Modular switches |
| ProCurve 6600 Series | High-performance switches |
| HPE OfficeConnect | SMB switches |
| HPE 1920/1950 | Smart managed switches |
| Aruba 2530/2540 | Access layer switches |
| Aruba 2930 | Layer 3 access switches |
Features Supported
| Feature | Supported | Description |
|---|---|---|
| Config Sync | Yes | Automatic configuration synchronization from rXg |
| Auto Bootstrap | Yes | Zero-touch onboarding capability |
| SNMP Monitoring | Yes | CPU, memory, and port statistics collection |
| LLDP Neighbor Discovery | Yes | Automatic detection of connected devices |
| Switch Port Import | Yes | Automatic import and management of switch ports |
| 802.1X Authentication | Yes | Port-based network access control |
| MAC Authentication Bypass | Yes | MAC-based authentication for non-802.1X devices |
| Dynamic VLAN Assignment | Yes | RADIUS-assigned VLAN based on authentication |
| DHCP Snooping | Yes | Protection against rogue DHCP servers |
| Firmware Management | No | Manual firmware upgrades required |
| SPB-m Fabric | No | Not supported |
Prerequisites
Firmware Requirements
| Platform | Minimum Version | Notes |
|---|---|---|
| ProCurve | K.15.x+ | SSH and RADIUS support |
| HPE 1920/1950 | Latest | Web and CLI management |
| Aruba 2530/2930 | WC.16.x+ | Modern CLI with enhanced security |
Network Requirements
- Management IP connectivity to rXg
- SSH access (TCP port 22)
- SNMP access (UDP port 161)
- RADIUS connectivity (UDP ports 1812, 1813) for 802.1X/MAB
Onboarding Process
Auto Bootstrap
HP switches support automatic bootstrap configuration from rXg. The bootstrap process configures:
- Hostname
- Maximum VLAN count (requires reboot)
- Management VLAN and IP
- SSH service
- User credentials
- SNMP community
- NTP server
- RADIUS server
- 802.1X/MAB settings
Bootstrap Configuration
Note: Changing the maximum VLAN count requires a switch reboot. The bootstrap process handles this automatically.
! System configuration
hostname "<system_name>"
! Increase max VLANs (requires reboot)
max-vlans 256
! Management VLAN configuration
vlan <mgmt_vlan>
name "Management"
ip address <ip>/<mask>
exit
! Default gateway
ip default-gateway <gateway>
! SSH configuration
crypto key generate ssh rsa bits 2048
ip ssh
! Disable telnet (security)
no telnet-server
! Manager password
password manager user-name <username> plaintext <password>
! SNMP configuration
snmp-server community <community> unrestricted
! NTP configuration
timesync ntp
ntp server <rxg_ip>
! RADIUS configuration
radius-server host <rxg_ip> key <shared_secret>
radius-server host <rxg_ip> auth-port 1812
radius-server host <rxg_ip> acct-port 1813
! AAA configuration
aaa authentication port-access eap-radius
aaa authentication mac-based chap-radius
aaa port-access authenticator active
write memory
Manual Onboarding
For manual configuration before adding to rXg:
- Configure management VLAN and IP
- Generate SSH keys and enable SSH
- Configure manager password
- Configure SNMP community
- Add device to rXg Infrastructure Devices
Minimal manual configuration:
! Enter configuration mode (no enable required on some models)
config
! Management VLAN
vlan 1
name "Default"
ip address <ip>/<mask>
exit
ip default-gateway <gateway>
! SSH setup
crypto key generate ssh rsa bits 2048
ip ssh
! Manager credentials
password manager user-name <username> plaintext <password>
! SNMP
snmp-server community <community> unrestricted
write memory
Configuration
Connection Settings
The rXg connects via SSH using RubyExpect for CLI automation. Legacy SSH algorithms are enabled for compatibility with older ProCurve firmware.
SSH connection options:
-o KexAlgorithms=+diffie-hellman-group1-sha1,diffie-hellman-group14-sha1
-o HostKeyAlgorithms=+ssh-rsa
-o StrictHostKeyChecking=no
-o UserKnownHostsFile=/dev/null
CLI prompts recognized:
- Banner/Press any key prompt: Press any key to continue
- Password prompt: Password:
- Enabled prompt: #
- Disabled prompt: >
- Logout prompt: log out
- Maximum sessions: maximum number of sessions
Initial connection handling:
- The rXg handles "Press any key" prompts automatically
- Terminal paging is disabled with no page command
- Session timeouts are handled gracefully
VLAN Configuration
Creating VLANs
vlan <vlan_id>
name "<description>"
exit
Port VLAN Assignment
Untagged (access) port:
vlan <vlan_id>
untagged <port_list>
exit
Tagged (trunk) port:
vlan <vlan_id>
tagged <port_list>
exit
Port list format: Single ports 1, ranges 1-4, or comma-separated 1,3,5-8
Primary VLAN
The primary VLAN is used for switch management. Setting a VLAN as primary moves the management IP to that VLAN:
vlan <vlan_id>
ip address <ip>/<mask>
exit
802.1X / MAB Configuration
Global Authentication Enable
aaa port-access authenticator active
RADIUS Server Configuration
radius-server host <rxg_ip> key <shared_secret>
radius-server host <rxg_ip> auth-port 1812
radius-server host <rxg_ip> acct-port 1813
802.1X Configuration
Global 802.1X:
aaa authentication port-access eap-radius
Per-port 802.1X:
aaa port-access authenticator <port_list>
aaa port-access authenticator <port_list> client-limit 32
MAC Authentication Bypass (MAB)
Global MAB:
aaa authentication mac-based chap-radius
Per-port MAB:
aaa port-access mac-based <port_list>
aaa port-access mac-based <port_list> addr-limit 32
Combined 802.1X and MAB
For ports supporting both 802.1X clients and non-802.1X devices:
aaa port-access authenticator <port_list>
aaa port-access mac-based <port_list>
Authentication Modes
Port control modes:
aaa port-access authenticator <port> control auto
auto- Require authentication before accessforce-authorized- Always allow access (bypass authentication)force-unauthorized- Always deny access
SNMP Configuration
snmp-server community <community> unrestricted
snmp-server contact "<contact>"
snmp-server location "<location>"
Restricted access (operator vs manager):
snmp-server community <community> operator ! Read-only
snmp-server community <community> manager ! Read-write
snmp-server community <community> unrestricted ! Full access
DHCP Snooping
dhcp-snooping
dhcp-snooping vlan <vlan_list>
! Trust uplink ports
dhcp-snooping trust <port_list>
Spanning Tree Configuration
spanning-tree
spanning-tree <port_list> admin-edge-port
spanning-tree <port_list> bpdu-protection
Monitoring Capabilities
| Metric | Collection Method | Notes |
|---|---|---|
| CPU Usage | SNMP | System health monitoring |
| Memory Usage | SNMP | System health monitoring |
| Port Statistics | SNMP | Packets in/out, errors, discards |
| Port Status | SNMP | Up/down, speed, duplex |
| LLDP Neighbors | CLI/SNMP | Connected device discovery |
| 802.1X Status | CLI | Authentication session status |
| Temperature | SNMP | Chassis temperature sensors |
Data Gathered
The config sync process collects: - Interface list and status - VLAN configurations - Port VLAN memberships (tagged/untagged) - 802.1X/MAB port configurations - LLDP neighbor information - System identification
Troubleshooting
Common Issues
SSH Connection Failures
Symptom: Unable to establish SSH connection
Resolution:
- Verify SSH is enabled: show ip ssh
- Check SSH keys are generated: show crypto host-public-key
- Verify firewall allows TCP port 22
- For older firmware, legacy SSH algorithms are required
- Check manager password is set
Check SSH status:
show ip ssh
show crypto host-public-key
"Press Any Key" Loop
Symptom: Connection hangs at banner prompt Resolution: - The rXg handles this automatically - If manual connection, press Enter or any key - Check for session limit issues
Maximum Sessions Reached
Symptom: Connection refused with "maximum number of sessions" message
Resolution:
- Disconnect unused sessions
- Check for stuck sessions: show access-list sessions
- Increase session limit if available
802.1X Authentication Failures
Symptom: Clients failing to authenticate
Resolution:
- Verify authenticator is active: show port-access authenticator
- Check RADIUS server status: show radius
- Verify RADIUS shared secret matches rXg
- Check port has authenticator enabled
- Review rXg RADIUS logs
Debug authentication:
show port-access authenticator <port> clients
show port-access mac-based <port> clients
VLAN Configuration Not Applied
Symptom: Traffic not passing on expected VLANs
Resolution:
- Verify VLAN exists: show vlan
- Check port VLAN membership: show vlan <vlan_id>
- Verify port is not disabled
- Check for port security blocking
Diagnostic Commands
System information:
show system
show version
show running-config
show config
Interface status:
show interface brief
show interface <port>
show interface <port> status
VLAN information:
show vlan
show vlan <vlan_id>
show vlan ports <port> detail
802.1X status:
show port-access authenticator
show port-access authenticator <port>
show port-access authenticator <port> clients
show port-access mac-based <port> clients
RADIUS status:
show radius
show radius authentication
show radius host <rxg_ip>
LLDP neighbors:
show lldp info remote-device
show lldp info remote-device <port>
MAC address table:
show mac-address
show mac-address ethernet <port>
Spanning tree:
show spanning-tree
show spanning-tree <port>
DHCP snooping:
show dhcp-snooping
show dhcp-snooping binding
Known Limitations
- No SPB-m Fabric: HP switches do not support SPB-m fabric mode
- Firmware Upgrades: Manual firmware upgrades required; not managed by rXg
- Max VLANs Reboot: Increasing max-vlans requires switch reboot
- Legacy SSH: Older ProCurve firmware requires legacy SSH algorithms
- Session Limits: Some models have limited concurrent management sessions
Operational Caveats
- Configuration Mode: HP switches enter config mode directly without explicit
configure terminalon some models - No Page Command: Issue
no pageafter login to disable output paging for automated sessions - Write Memory: Changes must be saved with
write memoryto persist across reboots - Primary VLAN: Management IP is tied to the primary VLAN; changing primary VLAN moves the IP
- Max VLANs: Default max-vlans may be low (8-16); increase before creating many VLANs
- Port Numbering: Port numbers are typically simple integers (1, 2, 3) not slot/port format
- Menu Mode: Some older models boot to a menu interface; CLI access may need explicit selection
- Manager vs Operator: ProCurve has two privilege levels: operator (read-only) and manager (read-write)
- SSH Key Generation: RSA key generation can take 30+ seconds on older hardware
- Authentication Order: When both 802.1X and MAB are enabled, 802.1X is attempted first, then MAB fallback
External References
- HPE Networking Documentation
- ProCurve Configuration Guide
- Aruba Switch Configuration Guide
- HPE Networking Support
Juniper EX Switches
Juniper EX Series switches are enterprise-class Ethernet switches running Junos OS, providing robust Layer 2/3 switching with advanced features and high reliability. The rXg integrates with Juniper EX switches via NETCONF over SSH, providing configuration synchronization, VLAN management, and 802.1X/MAC-RADIUS authentication support.
Supported Models
| Model/Series | Notes |
|---|---|
| EX2300 Series | Compact, fanless access switches |
| EX3400 Series | Enterprise access switches |
| EX4300 Series | Stackable access/aggregation switches |
| EX4400 Series | High-performance access switches |
| EX4600 Series | Data center switches |
All models running Junos OS with NETCONF support are compatible.
Features Supported
| Feature | Supported | Description |
|---|---|---|
| Config Sync | Yes | Automatic configuration synchronization via NETCONF |
| Auto Bootstrap | Yes | Bootstrap configuration generation for initial setup |
| SNMP Monitoring | Yes | CPU, memory, and port statistics collection |
| LLDP Neighbor Discovery | Yes | Automatic detection of connected devices |
| LLDP Management Address | Yes | Automatic LLDP management address synchronization |
| Switch Port Import | Yes | Automatic import and management of switch ports |
| Port Descriptions | Yes | Sync port descriptions/names from rXg |
| 802.1X Authentication | Yes | Port-based network access control via dot1x |
| MAC-RADIUS Authentication | Yes | MAC-based authentication for non-802.1X devices |
| Dynamic VLAN Assignment | Yes | RADIUS-assigned VLAN based on authentication |
| DHCP Snooping | No | Not currently implemented |
| Firmware Management | No | Manual firmware upgrades required |
| SPB-m Fabric | No | Not supported |
Prerequisites
Firmware Requirements
- Junos OS 18.2R4 or later recommended
- NETCONF over SSH enabled (port 830 default for Junos 18.2R4+)
- SSH enabled with root login allowed
Network Requirements
- Management IP connectivity to rXg
- NETCONF/SSH access (TCP port 830 or 22)
- SNMP access (UDP port 161)
- RADIUS connectivity (UDP ports 1812, 1813) - for 802.1X/MAC-RADIUS
- NTP connectivity (UDP port 123) - recommended
Onboarding Process
Automatic Onboarding
Juniper EX switches support bootstrap configuration generation. The rXg can generate a complete bootstrap script that configures the switch for management.
Prerequisites for Bootstrap:
- Console access or existing network access to the switch
- A switch record must exist in rXg with management IP configured
- SSH/NETCONF credentials configured
Bootstrap Process:
- Create switch record in rXg with target management IP
- Generate bootstrap configuration from rXg
- Apply bootstrap commands via console or existing SSH
- Switch connects to rXg via NETCONF on management IP
Manual Onboarding
For manual configuration, connect to the switch via console and apply the bootstrap commands below.
Bootstrap Commands
Enter CLI and Configuration Mode:
cli
configure
Set Root Password:
set system root-authentication plain-text-password
<enter-password>
<confirm-password>
Disable Auto Image Upgrade:
delete chassis auto-image-upgrade
Enable NETCONF and SSH:
set system services netconf ssh
set system services ssh root-login allow
Configure Management Interface:
delete interfaces irb unit 0 family inet dhcp
set interfaces irb unit 0 family inet address <switch-ip>/<prefix-length>
set routing-options static route 0.0.0.0/0 next-hop <gateway-ip>
Configure Management VLAN:
set vlans vlan<vlan-id> vlan-id <vlan-id>
set vlans vlan<vlan-id> l3-interface irb.0
Configure Uplink Ports for Management VLAN:
set interface <port> native-vlan-id <vlan-id>
set interface <port> unit 0 family ethernet-switching interface-mode trunk
set interface <port> unit 0 family ethernet-switching vlan members <vlan-id>
Enable LLDP:
set protocols lldp interface all
set protocols lldp management-address <rxg-ip>
Configure NTP:
set system ntp server <rxg-ip>
set system ntp boot-server <rxg-ip>
Configure DNS:
set system name-server <rxg-ip>
Configure SNMP:
set snmp community <community-string> authorization read-only
Commit Configuration:
commit
Configuration
Connection Settings
Configure the switch in the Network::Wired::Switches scaffold with:
- Host: Management IP address
- Username/Password: SSH/NETCONF credentials (typically root)
- Port: NETCONF port (830 for Junos 18.2R4+, or 22)
- Management VLAN: VLAN for management traffic
- SNMP Community: Community string for monitoring (default: public)
NETCONF Configuration
The rXg uses NETCONF over SSH for configuration management. Ensure NETCONF is enabled on the switch:
set system services netconf ssh port 830
For older Junos versions that default to port 22:
set system services netconf ssh
RADIUS / AAA Configuration
When a RADIUS Server Option is active in rXg, the system configures RADIUS servers and profiles:
RADIUS Server Configuration:
set access radius-server <rxg-ip> port 1812 secret <radius-secret>
RADIUS Profile Configuration:
set access profile radius-auth-profile authentication-order radius
set access profile radius-auth-profile radius authentication-server <rxg-ip>
802.1X Port Configuration:
set protocols dot1x authenticator authentication-profile-name radius-auth-profile
set protocols dot1x authenticator interface <port>.0
MAC-RADIUS Port Configuration:
set protocols dot1x authenticator interface <port>.0 mac-radius restrict
VLAN Configuration
VLANs are automatically managed through Switch Port Profiles:
- VLANs created:
set vlans vlan<id> vlan-id <id> - Tagged ports:
set interfaces <port> unit 0 family ethernet-switching vlan members vlan<id> - Native VLAN:
set interfaces <port> native-vlan-id <id> - Trunk mode:
set interfaces <port> unit 0 family ethernet-switching interface-mode trunk
Note: Ports with 802.1X or MAC-RADIUS authentication are automatically configured as access ports (interface-mode removed).
Port Management
Port enable/disable is managed via NETCONF:
- Enable port: Remove
disablestatement - Disable port: Add
disablestatement to interface
Port descriptions are synchronized from switch port names in rXg.
Monitoring Capabilities
| Metric | Collection Method | Notes |
|---|---|---|
| CPU Usage | SNMP | Collected at configured monitoring interval |
| Memory Usage | SNMP | Collected at configured monitoring interval |
| Port Statistics | SNMP | Packets in/out, errors, discards |
| Port Status | NETCONF | Up/down via get-interface-information RPC |
| Port Speed/Duplex | NETCONF | Via interface information RPC |
| MAC Address Table | NETCONF | Via get-ethernet-switching-table-information RPC |
| LLDP Neighbors | SNMP | Connected device discovery |
| Device Info | NETCONF | Model, serial via get-chassis-inventory RPC |
| Junos Version | NETCONF | Via configuration XML |
Troubleshooting
Common Issues
Issue: Switch shows offline in rXg
Symptom: Switch appears offline despite being reachable via ping
Cause: NETCONF connectivity issues or credential mismatch
Resolution:
- Verify SSH/NETCONF credentials match switch configuration
- Ensure NETCONF is enabled: show system services netconf
- Check correct port (830 for Junos 18.2R4+, 22 for older)
- Verify root login is allowed for SSH
Issue: Config sync fails with lock error
Symptom: "LockError" during configuration sync
Cause: Another session has the configuration locked
Resolution:
- Check for other active configuration sessions: show system users
- Clear locked sessions: request system logout user <user>
- Wait for other sessions to complete
Issue: NETCONF connection refused
Symptom: Cannot establish NETCONF session
Cause: NETCONF not enabled or wrong port
Resolution:
- Enable NETCONF: set system services netconf ssh
- For Junos 18.2R4+, ensure port 830 is configured
- Verify firewall allows NETCONF port
Issue: VLAN changes not applying
Symptom: VLAN configuration shows in diff but doesn't apply Cause: Commit validation error or conflicting configuration Resolution: - Check for commit errors in sync output - Verify VLAN doesn't conflict with existing configuration - Ensure interface-mode is compatible with VLAN membership
Issue: 802.1X/MAC-RADIUS ports not authenticating
Symptom: Devices not authenticating on configured ports
Cause: RADIUS server or profile misconfiguration
Resolution:
- Verify RADIUS server is reachable from switch
- Check authentication profile is assigned to dot1x authenticator
- Verify port interface includes .0 unit suffix
- Check RADIUS logs on rXg for authentication attempts
Diagnostic Commands
General:
show system information
show version
show configuration
show interfaces terse
show vlans
NETCONF:
show system services netconf
show system connections | match 830
Authentication:
show dot1x interface
show dot1x interface detail
show authentication-session
RADIUS:
show access profile
show access radius-server
VLANs and MAC Table:
show vlans
show ethernet-switching table
show ethernet-switching interface
LLDP:
show lldp neighbors
show lldp local-information
Known Limitations
- Firmware upgrades not supported via rXg (manual upgrade required)
- DHCP snooping not implemented
- Only trunk interface-mode supported for tagged VLANs
- 802.1X/MAC-RADIUS ports must be access ports (no tagged VLANs)
Operational Caveats
- NETCONF Protocol: The rXg uses NETCONF over SSH for all configuration changes. This provides atomic configuration with automatic validation and rollback on failure.
- Commit Model: Junos requires explicit commits. Config sync locks the candidate configuration, applies changes, validates, and commits atomically.
- Configuration Locking: Only one session can modify configuration at a time. Config sync will fail if another session holds the lock.
- NETCONF Port: Junos 18.2R4+ defaults NETCONF to port 830. Older versions may use port 22. Ensure the correct port is configured in rXg.
- Root Login: SSH root login must be allowed for NETCONF access with root credentials.
- Interface Units: Junos uses unit numbers for interfaces. The rXg automatically appends
.0for dot1x interface configuration. - VLAN Names: VLANs are created with names in format
vlan<id>(e.g.,vlan100). - RADIUS Secret Encryption: Junos encrypts RADIUS secrets in configuration. The rXg decrypts them for comparison during config sync.
- LLDP Management Address: The rXg synchronizes LLDP management-address to ensure proper device identification.
- Auto Image Upgrade: Bootstrap automatically disables chassis auto-image-upgrade to prevent unexpected firmware changes.
External References
- Juniper EX Series Documentation
- Junos 802.1X Configuration Guide
- Junos NETCONF Developer Guide
- Junos CLI Reference
Meraki MS Switches
Cisco Meraki MS switches are cloud-managed enterprise switches providing simplified network management through the Meraki Dashboard. The rXg integrates with Meraki switches via the Meraki Dashboard API, enabling configuration synchronization, VLAN management, and 802.1X/MAB authentication through Access Policies.
Supported Models
| Model/Series | Notes |
|---|---|
| MS120 Series | Cloud-managed access switches |
| MS125 Series | Cloud-managed access switches with mGig |
| MS210 Series | Cloud-managed aggregation switches |
| MS225 Series | Cloud-managed aggregation switches |
| MS250 Series | Cloud-managed aggregation switches |
| MS350 Series | Cloud-managed aggregation switches |
| MS390 Series | Cloud-managed stackable switches |
| MS410 Series | Cloud-managed aggregation switches |
| MS425 Series | Cloud-managed aggregation switches |
| MS450 Series | Cloud-managed aggregation switches |
All Meraki MS switches with Dashboard API access are supported.
Features Supported
| Feature | Supported | Description |
|---|---|---|
| Config Sync | Yes | Configuration via Meraki Dashboard API with Action Batches |
| Auto Bootstrap | No | Cloud-managed; requires Meraki Dashboard setup first |
| SNMP Monitoring | Yes | Community string synced from Meraki Dashboard |
| Switch Port Import | Yes | Automatic import via API |
| Port Enable/Disable | Yes | Enable/disable ports via API |
| Port Names | Yes | Sync port names via API |
| PoE Control | Yes | Enable/disable PoE per port |
| 802.1X Authentication | Yes | Via Access Policies with RADIUS |
| MAC Authentication Bypass (MAB) | Yes | Via Access Policies with RADIUS |
| Hybrid Authentication | Yes | Combined MAB + 802.1X via Access Policies |
| Dynamic VLAN Assignment | Yes | Via RADIUS with Access Policies |
| RADIUS CoA Support | Yes | Change of Authorization enabled on Access Policies |
| DHCP Snooping | No | Not supported via API |
| Firmware Management | N/A | Managed automatically by Meraki cloud |
| SPB-m Fabric | No | Not supported |
Prerequisites
Licensing Requirements
- Valid Meraki license for each switch
- API access enabled in Meraki Dashboard
- Enterprise or Advanced license recommended for full feature support
API Requirements
- Meraki Dashboard API key with appropriate permissions
- Organization ID (auto-detected from API key)
- Network ID (auto-detected from device serial)
Network Requirements
- Internet connectivity for cloud management
- Switch must be online in Meraki Dashboard
- HTTPS access to api.meraki.com (TCP port 443)
- RADIUS connectivity (UDP ports 1812, 1813) - for 802.1X/MAB
Onboarding Process
Cloud-Based Onboarding
Meraki switches are managed through the Meraki Dashboard. The rXg integrates via the Dashboard API.
Prerequisites for Integration:
- Switch must be claimed and online in Meraki Dashboard
- API access enabled in Organization settings
- API key generated with appropriate permissions
Onboarding Process:
Claim Switch in Meraki Dashboard:
- Log into Meraki Dashboard
- Navigate to Organization Inventory
- Claim switch using serial number and order number
Configure Network in Dashboard:
- Create or select network for the switch
- Assign switch to the network
- Configure basic network settings
Enable API Access:
- Navigate to Organization Settings Dashboard API access
- Enable API access
- Generate API key (My Profile API access)
Enable SNMP (Optional but Recommended):
- Navigate to Network-wide General SNMP
- Enable "Allow SNMP v1/2c"
- Configure community string
Add Switch to rXg:
- Create switch record in Network::Wired::Switches
- Enter switch serial number (as the identifier)
- Enter API key as the password
- Enter Organization ID in Domain Filter (optional, auto-detected)
- Save and import ports
Bootstrap Configuration
The rXg displays a reminder for SNMP configuration:
Configure the SNMP Community in `Network Wide Settings` => `General` => `SNMP` => 'Allow SNMP v1/2c' and provide a community string
Configuration
Connection Settings
Configure the switch in the Network::Wired::Switches scaffold with:
- Serial Number: Meraki switch serial number (required)
- Password: Meraki Dashboard API key
- Domain Filter: Organization ID (optional, auto-detected)
- Host: Auto-populated with switch LAN IP from API
- MAC Address: Auto-populated from API
- SNMP Community: Auto-synced from Meraki Dashboard
RADIUS / AAA Configuration
When a RADIUS Server Option is active in rXg, the system automatically creates Access Policies in the Meraki Dashboard:
Access Policy Types Created:
| Policy Name | Authentication Type | Description |
|---|---|---|
rxg-<ip>-eap |
802.1X | Standard 802.1X EAP authentication |
rxg-<ip>-mac |
MAC authentication bypass | MAC-based authentication |
rxg-<ip>-maceap |
Hybrid authentication | MAB first, then 802.1X fallback |
Access Policy Configuration:
- RADIUS server: rXg IP address
- RADIUS auth port: From RADIUS Server Option
- RADIUS secret: From RADIUS Server Option
- Host Mode: Single-Host
- RADIUS CoA: Enabled
- RADIUS Testing: Enabled
- Increase Access Speed: Enabled (for Hybrid authentication only)
Note: Meraki Dashboard allows a maximum of 8 Access Policies per network.
Port Authentication Configuration
Ports are configured for authentication via Access Policies:
- Open: No authentication (accessPolicyType: "Open")
- Custom access policy: Use assigned Access Policy for authentication
VLAN Configuration
VLANs are automatically managed through Switch Port Profiles:
- Access ports: Single untagged VLAN (
type: access,vlan: <id>) - Trunk ports: Tagged VLANs with native VLAN (
type: trunk,allowedVlans: <list>,vlan: <native>)
VLAN Format:
- Trunk ports can use
allfor all VLANs or comma-separated list - VLAN ranges supported in format
100-200 - Native VLAN defaults to 1 if not specified
Port Management
Port settings managed via API:
| Setting | API Field | Description |
|---|---|---|
| Port Name | name |
Descriptive name for the port |
| Enabled | enabled |
Enable/disable port (true/false) |
| Port Type | type |
access or trunk |
| Native VLAN | vlan |
Untagged/native VLAN ID |
| Allowed VLANs | allowedVlans |
Tagged VLANs for trunk ports |
| PoE | poeEnabled |
Enable/disable Power over Ethernet |
| Access Policy | accessPolicyNumber |
Access Policy for authentication |
Monitoring Capabilities
| Metric | Collection Method | Notes |
|---|---|---|
| Port Status | API | Connected/Disconnected state |
| Port Speed | API | Negotiated link speed |
| Port Enabled | API | Admin enabled/disabled state |
| Port Type | API | Access or trunk mode |
| VLAN Configuration | API | Current VLAN assignments |
| Device Info | API | Model, firmware, LAN IP, MAC |
| SNMP Community | API | Configured community string |
| Access Policies | API | Configured authentication policies |
Note: The Meraki API does not provide real-time port statistics like traditional SNMP. Use SNMP monitoring with the community string from Dashboard for detailed statistics.
Action Batches
The rXg uses Meraki Action Batches for efficient configuration:
- Batch Size: Up to 20 actions per synchronous batch
- Concurrent Batches: Maximum 5 concurrent batches
- Synchronous Mode: Waits for completion before proceeding
Action Batches are used for: - Port configuration updates - Access Policy creation - Bulk VLAN changes
Troubleshooting
Common Issues
Issue: API connection fails
Symptom: Unable to communicate with Meraki switch Cause: Invalid API key, network ID, or permissions Resolution: - Verify API key is valid and has not expired - Check API key has access to the organization - Verify switch is online in Dashboard - Check Organization ID if specified
Issue: 401 Unauthorized error
Symptom: Authentication failed during API calls Cause: Invalid or revoked API key Resolution: - Generate new API key in Meraki Dashboard - Update API key in rXg switch record - Verify API access is enabled for organization
Issue: 429 Too Many Requests error
Symptom: API calls being rate limited Cause: Exceeding Meraki API rate limits Resolution: - Reduce sync frequency - Use Action Batches for bulk changes - Wait for rate limit window to reset
Issue: Access Policy creation fails
Symptom: Cannot create authentication policies Cause: Maximum 8 Access Policies reached Resolution: - Remove unused Access Policies in Dashboard - Consolidate policies if possible - Verify rXg-created policies exist
Issue: Port configuration not applying
Symptom: Port settings in rXg don't match Dashboard Cause: Conflicting settings or validation errors Resolution: - Check Action Batch results for errors - Verify port type supports configuration - Ensure VLANs exist in Dashboard - Check for port-specific restrictions (stack ports excluded)
Issue: SNMP monitoring not working
Symptom: No SNMP statistics collected Cause: SNMP not enabled in Dashboard Resolution: - Enable SNMP v1/2c in Network-wide General SNMP - Configure community string - Wait for rXg to sync community string from API
Diagnostic Steps
Via Meraki Dashboard:
- Verify switch is online (green status)
- Check port status in Switch Ports
- Review Access Policies in Switch Access policies
- Check SNMP settings in Network-wide General
Via rXg:
- Check sync log for API errors
- Verify API key and serial number
- Review port import results
- Check Access Policy creation status
Known Limitations
- Requires active Meraki license for switch operation
- Maximum 8 Access Policies per network
- No real-time port statistics via API (use SNMP)
- No direct CLI access - all configuration via API
- Stack ports automatically excluded from port list
- Firmware managed by Meraki cloud (not configurable)
- DHCP snooping not available via API
- Some features require specific license tiers
Operational Caveats
- Cloud Dependency: Meraki switches require internet connectivity to Meraki cloud for management. Local switching continues if cloud is unreachable, but configuration changes require connectivity.
- API Rate Limits: Meraki enforces API rate limits. The rXg uses Action Batches to minimize API calls and respect limits.
- Organization Auto-Detection: If Domain Filter (Organization ID) is not specified, the rXg uses the first organization associated with the API key.
- Network Auto-Detection: Network ID is automatically determined from the switch serial number via device lookup.
- LAN IP Sync: The switch's LAN IP is automatically synced to the Host field from the API response.
- MAC Address Sync: The switch's MAC address is automatically synced from the API response.
- SNMP Community Sync: The SNMP community string is automatically synced from Dashboard settings.
- Access Policy Naming: rXg creates Access Policies with names in format
rxg-<ip>-<type>for identification. - Port Speed: API reports port speed capability, not negotiated speed. Use SNMP for actual link speed.
- Hybrid Authentication: The
increaseAccessSpeedsetting is required for Hybrid (maceap) authentication and automatically enabled. - RADIUS CoA: Change of Authorization is enabled on all rXg-created Access Policies for dynamic VLAN assignment.
- Stack Ports: Stacking ports are automatically excluded from port management (identified by single link negotiation capability).
External References
MikroTik RouterOS Switches
MikroTik RouterOS devices provide versatile routing and switching capabilities, commonly used in ISP, WISP, and enterprise environments. The rXg integrates with MikroTik devices primarily for monitoring and configuration backup - configuration synchronization is not supported.
Supported Models
| Model/Series | Notes |
|---|---|
| CRS Series | Cloud Router Switches (CRS326, CRS328, CRS354, etc.) |
| CSS Series | Cloud Smart Switches |
| CCR Series | Cloud Core Routers |
| RB Series | RouterBoard devices with switching capabilities |
| hAP Series | Home Access Points with switching |
Features Supported
| Feature | Supported | Description |
|---|---|---|
| Config Sync | No | Configuration synchronization not supported |
| Auto Bootstrap | No | Manual configuration required |
| SNMP Monitoring | Yes | CPU, memory, and port statistics collection |
| Configuration Backup | Yes | Export and backup configuration via SFTP |
| Configuration Restore | Yes | Restore saved configuration via SFTP |
| Switch Port Import | Yes | Automatic import and management of switch ports |
| REST API Integration | Yes | Read-only monitoring via RouterOS REST API |
| 802.1X Authentication | No | Not managed by rXg |
| MAC Authentication Bypass | No | Not managed by rXg |
| Dynamic VLAN Assignment | No | Not managed by rXg |
| DHCP Snooping | No | Not managed by rXg |
| Firmware Management | No | Manual firmware upgrades required |
| SPB-m Fabric | No | Not supported by MikroTik |
Prerequisites
Firmware Requirements
| Version | Support Status | Notes |
|---|---|---|
| RouterOS 6.x | Supported | SSH with legacy algorithms may be required |
| RouterOS 7.x | Supported | REST API available, modern SSH algorithms |
Network Requirements
- Management IP connectivity to rXg
- SSH access (TCP port 22) for CLI and SFTP operations
- REST API access (HTTPS port 443) for RouterOS 7.x monitoring
- SNMP access (UDP port 161)
Required Packages
- SSH service enabled
- SNMP package installed and enabled
- REST API service enabled (RouterOS 7.x)
Onboarding Process
Manual Onboarding
MikroTik devices require manual configuration before adding to rXg:
- Configure management IP address
- Enable SSH service
- Create user account for rXg access
- Enable SNMP service
- Configure SNMP community
- Enable REST API (RouterOS 7.x)
- Add device to rXg Infrastructure Devices
Initial Configuration via CLI
Connect to the device via console, SSH, or WinBox, then configure:
Management IP and gateway:
/ip address add address=<ip>/<prefix> interface=<mgmt_interface>
/ip route add gateway=<gateway>
User account for rXg:
/user add name=<username> password=<password> group=full
SSH service:
/ip service set ssh port=22 disabled=no
SNMP configuration:
/snmp set enabled=yes contact="" location="" trap-community=<community>
/snmp community set [ find default=yes ] name=<community> read-access=yes write-access=no
REST API (RouterOS 7.x only):
/ip service set www-ssl disabled=no
/certificate add name=https-cert common-name=<hostname> days-valid=3650
/certificate sign https-cert
/ip service set www-ssl certificate=https-cert
Configuration
Connection Settings
The rXg uses a hybrid SSH and REST API approach for MikroTik devices.
SSH Connection
SSH is used for configuration backup/restore and CLI commands. Legacy SSH algorithms are enabled for compatibility with older RouterOS versions.
SSH options used:
- Key Exchange: diffie-hellman-group14-sha1 (added for compatibility)
- Host Key Algorithms: ssh-rsa (added for compatibility)
- Color output disabled via +ct username suffix
Connection string format:
ssh <username>+ct@<host>
The +ct suffix disables ANSI color codes in RouterOS output for cleaner parsing.
REST API Connection
For RouterOS 7.x devices, the REST API provides monitoring data over HTTPS.
API base URL: https://<host>/rest
Authentication: HTTP Basic Auth with device credentials
rXg Infrastructure Device Settings
When adding a MikroTik device to rXg:
| Setting | Value | Notes |
|---|---|---|
| Host | Management IP | Device management address |
| Username | RouterOS user | Account with full access |
| Password | User password | Account password |
| Community String | SNMP community | For SNMP monitoring |
| Port | 22 | SSH port (default) |
| API Host | Management IP | Same as Host (for REST API) |
SNMP Configuration
Complete SNMP setup for monitoring:
/snmp set enabled=yes
/snmp set contact="<contact_email>"
/snmp set location="<location>"
/snmp community set 0 name=<community> read-access=yes write-access=no addresses=<rxg_ip>/32
To restrict SNMP access to rXg only:
/snmp community set 0 addresses=<rxg_ip>/32
Monitoring Capabilities
| Metric | Collection Method | Notes |
|---|---|---|
| CPU Usage | SNMP / REST API | Collected at configured monitoring interval |
| Memory Usage | SNMP / REST API | Collected at configured monitoring interval |
| Port Statistics | SNMP | Packets in/out, errors, discards |
| Port Status | SNMP | Up/down, speed, duplex |
| System Uptime | SNMP | Device uptime tracking |
| RouterOS Version | REST API / CLI | Firmware version detection |
Device Profile Information
The following device information is collected:
- System identity (device name)
- RouterOS version
- Hardware model
- Architecture (ARM, MIPS, x86, etc.)
- Serial number
Configuration Backup and Restore
Configuration Export
The rXg can export MikroTik configurations via SFTP. Export format varies by RouterOS version.
RouterOS 7.x export:
/export terse show-sensitive
RouterOS 6.x export:
/export terse
Exported configurations are stored for backup and reference purposes.
Configuration Restore
Configurations can be restored via SFTP upload and import:
- Configuration file is uploaded via SFTP to the device
- Import command is executed via SSH
- Device applies the configuration
Note: Configuration restore should be used with caution as it may overwrite existing settings.
Backup File Location
Backup files are transferred to/from the device's file system:
- Upload path:
/(root of device filesystem) - File naming: Uses sanitized filenames (alphanumeric, underscores, hyphens, dots only)
Troubleshooting
Common Issues
SSH Connection Failures
Symptom: Unable to establish SSH connection
Resolution:
- Verify SSH service is enabled: /ip service print
- Check SSH port is correct (default 22)
- Verify firewall allows SSH from rXg IP
- For older RouterOS, legacy SSH algorithms may be required
- Check user has appropriate permissions
Firewall rule to allow SSH:
/ip firewall filter add chain=input src-address=<rxg_ip> protocol=tcp dst-port=22 action=accept
REST API Connection Failures
Symptom: REST API calls fail or timeout
Resolution:
- Verify www-ssl service is enabled: /ip service print
- Check SSL certificate is configured
- Verify HTTPS is accessible from rXg
- REST API requires RouterOS 7.x
SNMP Not Responding
Symptom: SNMP monitoring shows no data
Resolution:
- Verify SNMP is enabled: /snmp print
- Check community string matches rXg configuration
- Verify SNMP community allows rXg IP address
- Check firewall allows UDP 161 from rXg
Firewall rule to allow SNMP:
/ip firewall filter add chain=input src-address=<rxg_ip> protocol=udp dst-port=161 action=accept
Configuration Export Empty or Incomplete
Symptom: Exported configuration is missing settings
Resolution:
- User account may lack permissions to export sensitive data
- Use show-sensitive flag (RouterOS 7.x) to include passwords
- Verify user is in "full" group for complete access
Diagnostic Commands
System information:
/system resource print
/system identity print
/system routerboard print
Service status:
/ip service print
Interface status:
/interface print
/interface ethernet print
SNMP configuration:
/snmp print
/snmp community print
User and permissions:
/user print
/user group print
Active connections:
/ip firewall connection print
Logs:
/log print
Known Limitations
- No Config Sync: The rXg cannot push configuration changes to MikroTik devices. All configuration must be done manually via RouterOS CLI, WinBox, or WebFig.
- Monitoring Only: Integration is primarily for monitoring, backup, and inventory purposes.
- REST API Requires RouterOS 7.x: Older RouterOS 6.x devices do not have REST API support.
- SSH Algorithm Compatibility: Some older RouterOS versions require legacy SSH algorithms.
- No 802.1X/MAB Management: Authentication configuration is not managed by rXg.
- Limited VLAN Integration: VLAN configuration is not synchronized from rXg.
Operational Caveats
- RouterOS CLI Syntax: RouterOS uses a unique path-based CLI syntax different from traditional switch CLIs. Commands start with
/followed by the configuration path. - WinBox Recommended: For complex configuration changes, the WinBox GUI application is often easier than CLI.
- API Access Modes: RouterOS has multiple API modes (legacy API, REST API). The rXg uses REST API for RouterOS 7.x and SSH for all versions.
- Configuration Persistence: Changes made via CLI are immediately active but not automatically saved. Use
/system backup saveto create restore points. - Safe Mode: RouterOS has a safe mode feature that auto-reverts changes if connection is lost. This can interfere with scripted changes.
- Color Codes: The
+ctusername suffix is used to disable ANSI color codes in output, which simplifies automated parsing.
External References
- MikroTik Documentation
- RouterOS Manual
- RouterOS CLI Reference
- RouterOS REST API
- MikroTik Download Center
Nokia PON/MF Systems
Nokia PON (Passive Optical Network) and MF (Microfiber) systems provide fiber-to-the-premises (FTTP) infrastructure for residential and enterprise deployments. Unlike traditional Ethernet switches, these are optical access systems consisting of OLTs (Optical Line Terminals) at the central office and ONTs (Optical Network Terminals) at subscriber premises.
Management Modes
The rXg supports two distinct management modes for Nokia PON systems:
| Device Type | Mode | Connection | Use Case |
|---|---|---|---|
| Nokia PON | Altiplano-managed | REST API to Altiplano cloud platform | Multi-OLT deployments with centralized SDN management |
| Nokia MF | Direct-managed | NETCONF directly to OLT | Single-OLT deployments or Altiplano-free operation |
Both device types manage the same underlying Nokia MF2 hardware and ONT endpoints - the difference is the control plane used.
Nokia PON Mode (Altiplano)
REST API Intent-Based
rXg Nokia Altiplano OLT MF2
Cloud Platform
- Configuration via Altiplano intent-based API
- Supports multi-OLT orchestration
- Service profiles managed in Altiplano
- ONT firmware managed centrally
Nokia MF Mode (Direct NETCONF)
NETCONF
rXg OLT (MF2)
:831/:832/:833
NT IHUB LT1 LT2
- Direct NETCONF/YANG configuration to OLT
- No Altiplano dependency
- Full control of OLT configuration
- Simpler deployment for single-OLT scenarios
System Architecture
PON Network Overview
Nokia Altiplano (Optional - Nokia PON mode only)
Cloud Platform
REST API / Intents
rXg OLT (MF2) ONT
(050)
NT IHUB LT1 LT2
NETCONF
(MF mode) :831 :940 :833 :833
ONT
(880)
XGS-PON / GPON
Fiber
Subscriber ONTs
(up to 128/port)
Component Roles
| Component | Description |
|---|---|
| OLT (MF2) | Optical Line Terminal - central aggregation device |
| ONT | Optical Network Terminal - subscriber CPE with Ethernet/PoE ports |
| Altiplano | Nokia's cloud-based SDN management platform |
| IHUB | Integrated Hub - main control plane of MF2 |
| NT | Network Terminal - uplink module |
| LT | Line Terminal - PON port module (LT1, LT2) |
Supported Models
OLT (Optical Line Terminal)
| Model | Notes |
|---|---|
| Nokia MF2 | Nokia OLT platform with modular LT cards |
ONT (Optical Network Terminal)
| Model | PON Type | Ports | Notes |
|---|---|---|---|
| Nokia 040 | GPON | 4x GbE | Basic residential ONT |
| Nokia 050 | XGS-PON | 1x 10GE + 4x 2.5GE | Enterprise ONT, PoE on 2.5GE ports |
| Nokia 090 | XGS-PON | Varies | High-capacity ONT |
| Nokia 880 | XGS-PON | 1x 10GE + 7x 2.5GE | 8-port enterprise ONT, PoE on all ports |
Uplink Configurations
| Speed | Card Layout | Breakout |
|---|---|---|
| 2.5G | Simple ports | No breakout required |
| 10G | c1-10g | Connector breakout |
| 25G | c1-25g | Connector breakout |
| 100G | c1-100g | Connector breakout |
Features Supported
| Feature | Nokia PON | Nokia MF | Description |
|---|---|---|---|
| Config Sync | Yes | Yes | Automatic configuration synchronization |
| Auto Bootstrap | Yes | Yes | Zero-touch OLT onboarding from factory-default |
| SNMP Monitoring | Yes | Yes | OLT and ONT statistics collection |
| ONT Provisioning | Yes | Yes | Automated ONT discovery and configuration |
| Switch Port Import | Yes | Yes | Automatic import of ONT Ethernet ports |
| VLAN Management | Yes | Yes | Per-subscriber VLAN assignment |
| PoE Management | Yes | Yes | Per-port PoE enable/disable on ONT |
| 802.1X Authentication | Yes | Yes | Port-based authentication |
| MAC Authentication Bypass | Yes | Yes | MAB via service profiles |
| Dynamic VLAN Assignment | Yes | Yes | RADIUS-assigned VLAN |
| Firmware Management | Yes | No | ONT firmware upgrades (Altiplano only) |
| Multi-OLT Orchestration | Yes | No | Manage multiple OLTs from single platform |
| Intent-Based Config | Yes | No | Uses Altiplano intent abstraction layer |
| Direct NETCONF Access | No | Yes | Direct YANG/NETCONF to OLT |
| Altiplano-Free Operation | No | Yes | No external cloud dependency |
| LLDP Neighbor Discovery | No | No | Not applicable to PON architecture |
| SPB-m Fabric | No | No | Not supported |
Prerequisites
Firmware Requirements
| Component | Version | Notes |
|---|---|---|
| MF2 OLT | 24.12+ | Required for both modes |
| Altiplano | 24.12+ | Nokia PON mode only |
| ONT | Varies | Managed via OLT |
Network Requirements
Both modes: - SSH access to OLT (TCP port 940) for bootstrap - NETCONF access to OLT endpoints: - NT: TCP port 831 - Chassis: TCP port 832 - LT: TCP port 833 - SNMP access (UDP port 161) for monitoring - RADIUS connectivity (UDP ports 1812, 1813) for authentication
Nokia PON mode (additional): - Management IP connectivity to Altiplano platform - HTTPS access (TCP port 443) for Altiplano REST API
Altiplano Requirements (Nokia PON Mode Only)
The Nokia Altiplano platform must be configured with:
- Blueprint packages installed
- Device extension files uploaded
- Service profiles created
- User service profiles for MAB/non-MAB
- ONT profiles for each model
Note: Nokia MF mode does not require Altiplano - all configuration is pushed directly to the OLT via NETCONF.
Onboarding Process
OLT Auto Bootstrap
The MF2 OLT supports automatic bootstrap from factory-default state. The process involves a 4-step verification followed by configuration.
Bootstrap Verification Steps:
- Check existing configuration - Verify device not already at target management IP
- Connect to factory default - SSH to default IP (192.168.1.1) on port 940
- Login verification - Authenticate with default credentials (admin/admin)
- Management check - Verify device is ready for onboarding (mgmt_ztp interface present, no existing management config)
Bootstrap Configuration:
! Phase 1: Connect to ISAM shell (port 940)
ssh [email protected] -p 940
! Phase 2: Forward CLI to IHUB
forward cli to ihub
! Phase 3: Configure global settings
configure global
! Cleanup default configuration
delete system dhcpv4-client
delete system dhcpv6-client
delete system call-home
delete service ies 2 interface mgmt_ztp
delete service ies 2 interface telnet
! Configure ports (10G/25G with breakout)
port 1/1/c1 { }
port 1/1/c1 { admin-state enable }
port 1/1/c1 { connector }
port 1/1/c1 { connector breakout c1-10g }
port 1/1/c1/1 { }
port 1/1/c1/1 { admin-state enable }
port 1/1/c1/1 { ethernet }
port 1/1/c1/1 { ethernet mode access }
port 1/1/c1/1 { ethernet encap-type dot1q }
! Configure static route
router "Base" { }
router "Base" { static-routes }
router "Base" { static-routes route 0.0.0.0/0 route-type unicast }
router "Base" { static-routes route 0.0.0.0/0 route-type unicast next-hop "<gateway_ip>" }
router "Base" { static-routes route 0.0.0.0/0 route-type unicast next-hop "<gateway_ip>" admin-state enable }
! Configure IES management interface
service { }
service { ies "2" }
service { ies "2" admin-state enable }
service { ies "2" customer "1" }
service { ies "2" interface "management" }
service { ies "2" interface "management" admin-state enable }
service { ies "2" interface "management" sap 1/5/1:<mgmt_vlan> }
service { ies "2" interface "management" sap 1/5/1:<mgmt_vlan> admin-state enable }
service { ies "2" interface "management" ipv4 }
service { ies "2" interface "management" ipv4 primary }
service { ies "2" interface "management" ipv4 primary address <management_ip> }
service { ies "2" interface "management" ipv4 primary prefix-length 24 }
! Configure VPLS for management VLAN
service { vpls "<mgmt_vlan>" }
service { vpls "<mgmt_vlan>" admin-state enable }
service { vpls "<mgmt_vlan>" customer "1" }
service { vpls "<mgmt_vlan>" v-vpls true }
service { vpls "<mgmt_vlan>" vlan <mgmt_vlan> }
validate
commit
NETCONF Bootstrap (Fallback)
If SSH bootstrap fails, NETCONF can be used to enable SSH access:
<!-- Disable password change requirement -->
<edit-config xmlns="urn:ietf:params:xml:ns:netconf:base:1.0">
<target><running/></target>
<config>
<users xmlns="http://www.nokia.com/Fixed-Networks/BBA/yang/nokia-aaa">
<user>
<name>admin</name>
<login>
<new-password-at-login>false</new-password-at-login>
</login>
</user>
</users>
</config>
</edit-config>
<!-- Enable SSH on out-of-band management -->
<edit-config xmlns="urn:ietf:params:xml:ns:netconf:base:1.0">
<target><running/></target>
<config>
<system xmlns="urn:ietf:params:xml:ns:yang:ietf-system">
<management xmlns="http://www.nokia.com/Fixed-Networks/BBA/yang/nokia-ietf-system-aug">
<cli>
<transport>
<ssh>
<ip_itf>
<enable>true</enable>
</ip_itf>
</ssh>
</transport>
</cli>
</management>
</system>
</config>
</edit-config>
ONT Provisioning
ONTs are provisioned through Altiplano using "intents" - declarative configuration objects.
ONT Discovery: 1. ONT connects to OLT PON port 2. OLT reports ONT serial number to Altiplano 3. rXg creates MediaConverter record for ONT 4. Config sync creates l2-user intent for ONT
Intent Types Used:
| Intent Type | Purpose |
|---|---|
| device-mf | OLT device configuration |
| device-mf-config | OLT detailed configuration |
| l2-user | Subscriber/ONT service configuration |
| l2-infra | Infrastructure VLAN configuration |
Configuration
Connection Settings
Nokia PON Mode (Altiplano)
Altiplano REST API:
- Base URL: https://<host>/nokia-altiplano-ac/rest
- Authentication: OAuth bearer token
- Content-Type: application/yang-data+json
rXg Infrastructure Device Settings:
| Setting | Value | Notes |
|---|---|---|
| Device Type | Nokia PON | Select Altiplano-managed mode |
| Host | Altiplano IP/hostname | Platform management address |
| Username | API username | Altiplano credentials |
| Password | API password | Altiplano credentials |
| OLT Name | Device name | Must match Altiplano device-mf intent |
| OLT IP | OLT management IP | For direct OLT bootstrap/fallback |
| OLT Username | OLT SSH user | For direct OLT access |
| OLT Password | OLT SSH password | For direct OLT access |
| Network Card Layout | 10G/25G/100G | Uplink speed configuration |
| PON Card Layout | LT1/LT2/LT1+LT2 | Active PON cards |
Nokia MF Mode (Direct NETCONF)
OLT NETCONF Endpoints:
- NT endpoint: Port 831 (network terminal)
- Chassis endpoint: Port 832 (main chassis/IHUB)
- LT endpoint: Port 833 (line terminal/PON cards)
- Hello delimiter: ]]>]]>
OLT SSH (ISAM Shell) - for bootstrap:
- Port: 940
- Default credentials: admin/admin
- SSH algorithms: ssh-rsa host key
- Shell levels: ISAM CLI (via forward cli to ihub)
rXg Infrastructure Device Settings:
| Setting | Value | Notes |
|---|---|---|
| Device Type | Nokia MF | Select direct NETCONF mode |
| Host | OLT management IP | Direct OLT address |
| Username | OLT username | OLT credentials |
| Password | OLT password | OLT credentials |
| Network Card Layout | 10G/25G/100G | Uplink speed configuration |
| PON Card Layout | LT1/LT2/LT1+LT2 | Active PON cards |
Note: Nokia MF mode connects directly to the OLT without requiring Altiplano. All configuration is performed via NETCONF using BBF (Broadband Forum) and Nokia YANG models.
Service Profiles
Service profiles define ONT port behavior. These profiles are used in both modes but are configured differently:
- Nokia PON mode: Profiles are created and managed in Altiplano
- Nokia MF mode: Profiles are configured directly via NETCONF
| Profile | Description |
|---|---|
| rgn_HSI-2.5G-sec-fwd_nomab | Standard service, no MAB |
| rgn_HSI-2.5G-sec-fwd_mab | Standard service with MAB |
| rgn_nomab_poe | UNI profile with PoE, no MAB |
| rgn_mab_poe | UNI profile with PoE and MAB |
| rgn_nomab_nopoe | UNI profile without PoE |
VLAN Configuration
Reserved VLANs (Do Not Use): - VLAN 4092 - System reserved - VLAN 4093 - Management VLAN
Nokia PON mode: VLANs are assigned per-subscriber through l2-user intents, referencing l2-infra infrastructure VLANs configured in Altiplano.
Nokia MF mode: VLANs are configured directly on the OLT via NETCONF. The rXg creates the necessary BBF VLAN sub-interfaces and forwarding configuration for each subscriber port.
PoE Management
ONT PoE is managed per-port through UNI service profiles:
| ONT Model | PoE Ports |
|---|---|
| 050 | 2.5GE-1 through 2.5GE-4 (10GE port has no PoE) |
| 880 | All ports including 10GE |
PoE priority and PSE class are configured in the UNI service profile.
Monitoring Capabilities
| Metric | Collection Method | Notes |
|---|---|---|
| OLT Status | Altiplano API | Device health and alarms |
| ONT Status | Altiplano API / NETCONF | Online/offline, signal levels |
| Port Statistics | SNMP / NETCONF | Traffic counters |
| Optical Levels | NETCONF | Tx/Rx power per ONT |
| CPU/Memory | SNMP | OLT resource usage |
| Alarm Status | Altiplano notifications | Kafka event stream |
Endpoint Status Monitoring
The rXg monitors multiple OLT endpoints:
| Endpoint | Port | Status Indicator |
|---|---|---|
| NT | 831 | Network terminal connectivity |
| Chassis | 832 | Main chassis/IHUB status |
| LT1 | 833 | PON card 1 status |
| LT2 | 833 | PON card 2 status |
Status colors: - Green: All endpoints responding - Orange: Partial endpoint failure - Red: All endpoints offline
Troubleshooting
Common Issues
OLT Shows Offline
Symptom: OLT appears offline in rXg despite network connectivity Resolution: - Verify Altiplano platform is accessible - Check API credentials are valid - Verify OLT is registered in Altiplano (device-mf intent exists) - Check all endpoints (NT, Chassis, LT) are responding
ONT Not Discovered
Symptom: Physical ONT not appearing in Altiplano or rXg Resolution: - Verify fiber connection to OLT PON port - Check ONT power and optical link LED - Verify LT card is configured and enabled - Check PON port is not at maximum ONT capacity (128 per port)
Bootstrap Fails at Step 2
Symptom: Cannot connect to factory-default OLT Resolution: - Verify direct layer 2 connectivity to OLT default IP (192.168.1.1) - Check SSH on port 940 is reachable - Ensure no IP conflict with 192.168.1.1 - Try NETCONF bootstrap on port 832 as fallback
Bootstrap Fails at Step 4
Symptom: Device has existing management configuration
Resolution:
- Device may have been partially configured previously
- Check for existing static routes: show router static-route
- Check for management interface: show service id 2 interface
- Manual cleanup may be required before re-bootstrap
Intent Creation Fails
Symptom: Altiplano returns error when creating intents Resolution: - Verify intent type versions are available: check device extensions uploaded - Ensure blueprint packages are installed - Check service profiles exist in Altiplano - Verify target device name matches exactly
Endpoint Connection Issues
Symptom: Orange status indicating partial endpoint failure Resolution: - Individual endpoints (NT, Chassis, LT) may require different ports - Verify NETCONF ports 831-833 are accessible - Check LT card configuration matches PON Card Layout setting - Clear SSH host keys if OLT was reinstalled
Diagnostic Commands
ISAM Shell (port 940):
show hardware-state component Board-LT1
show hardware-state component Board-LT2
show hardware-state component Board-Nta
show hardware-state component Board-Ntb
CLI Shell (via forward cli to ihub):
show port
show service id 2 interface
show router static-route
show service service-using
configure global
Altiplano API: ```bash
Get device list
curl -X POST https://
Get OLT IP from intent
GET /nokia-altiplano-ac/rest/restconf/data/ibn:ibn/intent=device-mf,
Known Limitations
Both modes: - Reserved VLANs: VLANs 4092 and 4093 are reserved and cannot be used - PON Capacity: Maximum 128 ONTs per PON port - Queue Limits: OLT has 2048 queue limit; use 4Q scheduler profiles for scale - LLDP: Not available on PON architecture - Non-Standard SSH: OLT uses port 940, not standard port 22 - Multiple Endpoints: Different NETCONF ports for different OLT components
Nokia PON mode: - Altiplano Dependency: Operations require Altiplano platform availability - Intent Versioning: Must use compatible intent type versions
Nokia MF mode: - No Firmware Management: ONT firmware upgrades not supported in direct mode - Single OLT: Each infrastructure device manages one OLT directly - YANG Model Complexity: Requires extensive BBF/Nokia YANG namespace handling
Operational Caveats
Both modes:
- Shell Navigation: OLT has layered shell access: SSH ISAM shell CLI (via forward cli to ihub)
- Commit Required: Configuration changes require validate then commit commands
- Factory Default IP: New OLTs boot with IP 192.168.1.1 on management port
- Management VLAN: Must not be VLAN 1 or 4094; recommended to use dedicated VLAN (e.g., 4093)
- Breakout Ports: 10G/25G/100G uplinks require connector breakout configuration
- PoE by Model: PoE capability varies by ONT model and port; check ONU_HARDWARE_CONFIG
- Service Profiles: MAB and non-MAB require different service profiles
- Bootstrap Timing: Allow 5+ seconds for NETCONF changes to apply before retrying SSH
- Endpoint Polling: rXg monitors NT, Chassis, and LT endpoints separately for health status
Nokia PON mode: - Intent Versions: Altiplano tracks intent type versions; always use highest available version - Altiplano Dependency: Most operations require Altiplano connectivity
Nokia MF mode:
- Direct Control: All ONT configuration managed via NETCONF - changes take effect immediately
- Gemport Calculation: Gemport IDs are calculated deterministically: (ont_id * 8) + port_number + 1024
- ONT ID Range: Valid ONT IDs are 0-127 per PON port
External References
- Nokia Altiplano Documentation
- Nokia Fixed Networks Support
- Broadband Forum TR-385 (PON YANG Models)
- IETF NETCONF (RFC 6241)
Positron G.hn Media Converters
Positron Access Solutions provides G.hn (Gigabit Home Networking) media converter systems that deliver high-speed Ethernet connectivity over existing copper infrastructure (twisted pair, coaxial cable, or powerline). The rXg integrates with Positron GAM (G.hn Access Multiplexer) systems for automated subscriber provisioning, VLAN management, and bandwidth profile assignment.
Overview
G.hn technology enables multi-gigabit networking over legacy copper wiring, making it ideal for: - MDU (Multi-Dwelling Unit) deployments - Hospitality environments - Office buildings with existing copper infrastructure - Brownfield deployments where fiber installation is impractical
Supported Models
| Model/Series | Notes |
|---|---|
| GAM-4-CX | G.hn Access Multiplexer - 4-port coaxial |
| GAM-4-TP | G.hn Access Multiplexer - 4-port twisted pair |
| GAM-8-CX | G.hn Access Multiplexer - 8-port coaxial |
| GAM-8-TP | G.hn Access Multiplexer - 8-port twisted pair |
| GAM-16-CX | G.hn Access Multiplexer - 16-port coaxial |
| GAM-16-TP | G.hn Access Multiplexer - 16-port twisted pair |
| EPM Series | Endpoint media converters (subscriber-side) |
Architecture
The Positron system uses a three-tier architecture:
- GAM (G.hn Access Multiplexer): Central aggregation device managed by rXg
- Endpoints: Physical G.hn devices at subscriber locations
- Users/Subscribers: Logical entities representing subscriber configurations
Endpoint and Subscriber Model
The Positron client manages two distinct concepts:
- Endpoints: Physical devices identified by MAC address. These are automatically discovered when G.hn devices connect to the GAM.
- Users (Subscribers): Logical configurations applied to endpoints, containing VLAN assignments, bandwidth profiles, and other settings.
When a new endpoint is detected, the rXg can automatically create a corresponding subscriber configuration based on associated Account or MediaConverter settings.
Features Supported
| Feature | Supported | Description |
|---|---|---|
| Config Sync | Yes | Automatic configuration synchronization from rXg |
| Endpoint Auto-Discovery | Yes | Automatic detection of connected G.hn endpoints |
| Subscriber Provisioning | Yes | Automated user/subscriber creation |
| SNMP Monitoring | Yes | Statistics collection via SNMP |
| VLAN Management | Yes | Per-port VLAN assignment |
| QinQ Double Tagging | Yes | Inner/outer VLAN tag support |
| Bandwidth Profiles | Yes | Rate limiting per subscriber |
| Firmware Management | Yes | Endpoint firmware upgrade triggering |
| Port Management | Yes | Enable/disable ports per endpoint |
| 802.1X Authentication | No | Not supported on G.hn media |
| MAC Authentication Bypass | No | Not supported on G.hn media |
| SPB-m Fabric | No | Not applicable |
Prerequisites
Firmware Requirements
| Component | Minimum Version | Notes |
|---|---|---|
| GAM Firmware | 2.x+ | JSON-RPC API support required |
| EPM Firmware | Varies | Managed via GAM firmware upgrade feature |
Network Requirements
- Management IP connectivity from rXg to GAM
- HTTP API access (TCP port 80) for JSON-RPC
- SNMP access (UDP port 161) for monitoring
- Layer 2 connectivity for VLAN trunking to GAM uplink
Onboarding Process
GAM Initial Configuration
The GAM device requires basic network configuration before rXg integration:
- Configure management IP address on GAM
- Enable JSON-RPC API access
- Configure SNMP community
- Connect GAM uplink port to rXg-managed infrastructure
- Add GAM as Infrastructure Device in rXg
Adding GAM to rXg
When adding a Positron GAM to rXg Infrastructure Devices:
| Setting | Value | Notes |
|---|---|---|
| Type | Positron | Select Positron device type |
| Host | GAM management IP | Management address of GAM |
| Username | API username | GAM API credentials |
| Password | API password | GAM API credentials |
| Community String | SNMP community | For SNMP monitoring |
Endpoint Provisioning
Endpoints (subscriber G.hn devices) are provisioned through MediaConverter records in rXg:
- Create a MediaConverter record for each endpoint
- Associate the MediaConverter with the GAM's PON/G.hn port (Switch Port)
- Assign VLAN configuration via Switch Port Profile or direct VLAN assignment
- Associate with an Account for billing integration (optional)
- Config sync will automatically create the endpoint and subscriber on the GAM
Configuration
Connection Settings
The rXg connects to Positron GAM devices via JSON-RPC API over HTTP.
API endpoint: http://<host>/cgi/json-rpc
Request format:
json
{
"method": "<api_method>",
"id": "<request_id>",
"jsonrpc": "2.0",
"params": { ... }
}
API Methods
The Positron client uses the following JSON-RPC methods:
| rXg Method | JSON-RPC Method | Description |
|---|---|---|
| get_endpoint | ghnAgent.config.endpoint.get | Retrieve endpoint configuration |
| set_endpoint | ghnAgent.config.endpoint.set | Configure endpoint |
| get_user | ghnAgent.config.user.get | Retrieve subscriber configuration |
| set_user | ghnAgent.config.user.set | Configure subscriber |
| get_port | ghnAgent.config.port.get | Retrieve port configuration |
| set_port | ghnAgent.config.port.set | Configure port |
| apply_config | ghnAgent.config.apply | Apply pending configuration changes |
VLAN Configuration
Single VLAN Assignment
For simple deployments, assign a single VLAN to each subscriber port:
- Configure the Native VLAN on the MediaConverter's Switch Port Profile
- Config sync will configure the port as an untagged member of that VLAN
QinQ Double Tagging
For service provider deployments requiring double VLAN tagging:
Inner Tag (C-VLAN) : Customer VLAN, typically unique per subscriber
Outer Tag (S-VLAN) : Service VLAN, typically shared across the GAM
QinQ configuration is derived from: - Inner tag: From Account's VLAN assignment or Switch Port Profile - Outer tag: From second port VLAN configuration on the Switch Port
Management Port
Port Gi 1/1 is reserved as the management port on GAM devices and is not available for subscriber configuration.
Bandwidth Profiles
Bandwidth profiles are applied to subscribers based on associated Account settings:
- Account has an associated Usage Plan
- Usage Plan defines rate limits
- Config sync creates or assigns bandwidth profiles on the GAM
- Bandwidth profiles are applied per-subscriber
Bandwidth profile parameters: - Maximum upstream rate (bps) - Maximum downstream rate (bps)
Firmware Upgrade
The rXg can trigger firmware upgrades for G.hn endpoints:
- Upload firmware file to appropriate location
- Trigger upgrade via API
- GAM pushes firmware to connected endpoints
- Endpoints reboot with new firmware
Monitoring Capabilities
| Metric | Collection Method | Notes |
|---|---|---|
| Port Statistics | SNMP / API | Traffic counters per port |
| Endpoint Status | API | Online/offline status |
| Link Quality | API | G.hn PHY rate and SNR |
| System Status | SNMP | GAM health metrics |
Data Gathered
The config sync process gathers the following data from the GAM:
- Endpoints: List of all endpoints with MAC addresses
- Users/Subscribers: Current subscriber configurations
- Ports: Port configurations including VLANs
- VLAN Data: Current VLAN assignments (tagged/untagged)
Troubleshooting
Common Issues
Endpoint Not Appearing
Symptom: New G.hn device not showing in GAM Resolution: - Verify physical connectivity (coax/twisted pair connection) - Check G.hn link LED on endpoint - Verify endpoint is powered on - Check GAM port status via API or web interface
Subscriber Configuration Not Applied
Symptom: Config sync runs but subscriber settings not updated Resolution: - Verify MediaConverter MAC address matches endpoint MAC - Check MediaConverter is associated with correct Switch Port - Verify VLAN configuration on Switch Port Profile - Check API connectivity to GAM - Review config sync logs for errors
QinQ Not Working
Symptom: Double-tagged traffic not forwarding correctly Resolution: - Verify upstream switch supports QinQ - Check outer VLAN is configured on upstream trunk - Verify inner/outer tag values are correct - Check GAM uplink port VLAN configuration
API Connection Failures
Symptom: Unable to communicate with GAM API Resolution: - Verify GAM management IP is reachable - Check HTTP (port 80) connectivity - Verify API credentials are correct - Check GAM web interface is accessible
Diagnostic Information
Endpoint list from API:
json
{
"method": "ghnAgent.config.endpoint.get",
"params": {}
}
User/subscriber list:
json
{
"method": "ghnAgent.config.user.get",
"params": {}
}
Port configuration:
json
{
"method": "ghnAgent.config.port.get",
"params": {}
}
Known Limitations
- Management Port Reserved: Port
Gi 1/1cannot be used for subscriber traffic - No 802.1X: G.hn technology does not support 802.1X authentication
- MAC-Based Identification: Endpoints are identified by MAC address only
- API-Only Management: No SSH/CLI access; all management via JSON-RPC API
- Single GAM per Infrastructure Device: Each GAM requires its own Infrastructure Device record
Operational Caveats
- Endpoint Discovery Timing: New endpoints may take several minutes to appear in the GAM after physical connection
- Configuration Apply: Changes are staged and must be applied via
apply_configAPI call - Bandwidth Profile Creation: If a required bandwidth profile doesn't exist, config sync will create it automatically
- Endpoint-User Binding: Each endpoint can only have one active user/subscriber configuration
- VLAN Limits: Check GAM model specifications for maximum VLAN and subscriber counts
- G.hn Signal Quality: Performance depends on copper cable quality and distance
External References
Ruckus ICX Switches
Ruckus ICX switches are enterprise-class stackable switches providing high-performance Layer 2/3 switching with deep integration into Ruckus wireless ecosystems. The rXg supports both Layer 2 Switching (SPS) and Layer 3 Routing (SPR) firmware variants, with comprehensive configuration management, monitoring, and zero-touch provisioning capabilities.
Supported Models
| Model/Series | Notes |
|---|---|
| ICX 7150 Series | Compact enterprise access switches |
| ICX 7250 Series | Stackable enterprise access switches |
| ICX 7450 Series | High-performance enterprise switches |
| ICX 7550 Series | Campus aggregation switches |
| ICX 7650 Series | Multi-rate campus switches |
| ICX 7850 Series | 100G campus core switches |
| ICX 8200 Series | Next-gen campus switches with dynamic PoE |
Both Layer 2 Switching (SPS) and Layer 3 Routing (SPR/RDR) firmware variants are supported. The rXg automatically detects firmware type and adjusts configuration commands accordingly.
Features Supported
| Feature | Supported | Description |
|---|---|---|
| Config Sync | Yes | Automatic configuration synchronization from rXg |
| Auto Bootstrap | Yes | Zero-touch onboarding from factory-default state with default credentials |
| SNMP Monitoring | Yes | CPU, memory, and port statistics collection |
| LLDP Neighbor Discovery | Yes | Automatic detection of connected devices |
| Switch Port Import | Yes | Automatic import and management of switch ports |
| LAG Interfaces | Yes | Link Aggregation Group support with sub-interfaces |
| 802.1X Authentication | Yes | Port-based network access control |
| MAC Authentication Bypass (MAB) | Yes | MAC-based authentication for non-802.1X devices |
| MAB + 802.1X Combined | Yes | Auth-order configuration for combined authentication |
| Dynamic VLAN Assignment | Yes | RADIUS-assigned VLAN with per-port override |
| DHCP Snooping | Yes | Per-VLAN and per-port trust configuration |
| Firmware Management | Yes | Upload and upgrade via TFTP to primary/secondary slots |
| STP Protection | Yes | 802.1w support with edge-port and stp-protect |
| Optical Monitoring | Yes | SFP/SFP+ optical signal monitoring |
| PoE Management | Yes | Inline power priority configuration |
| IP Multicast | Yes | IGMP snooping with version 3 support |
| Custom Config | Yes | Support for custom configuration snippets |
| SPB-m Fabric | No | Not supported |
Prerequisites
Firmware Requirements
- ICX firmware version 8.x or later
- Version 9.x or later recommended for latest features
- Version 10.x supported with updated SSH key exchange
- SSH enabled with RSA keys generated
Licensing Requirements
- Base license included with switch
- PoE+ licensing may be required for higher power ports
Network Requirements
- Management IP connectivity to rXg
- SSH access (TCP port 22)
- SNMP access (UDP port 161)
- RADIUS connectivity (UDP ports 1812, 1813) - for 802.1X/MAB
- TFTP connectivity (UDP port 69) - for firmware upgrades
- NTP connectivity (UDP port 123) - recommended
Onboarding Process
Automatic Onboarding
Ruckus ICX switches support automatic onboarding from factory-default state. The rXg detects factory-default switches by attempting login with default credentials (super/sp-admin).
Prerequisites for Auto-Bootstrap:
- The switch must be connected to the network and obtain a DHCP address from rXg
- A switch record must exist in rXg with the switch's MAC address configured
- The target management IP address must be configured in the switch record
- Factory default credentials or pre-configured credentials
Auto-Bootstrap Process:
- The rXg looks up the switch's current DHCP IP address using the configured MAC address
- SSH connection is established to the DHCP IP
- Login is attempted with configured credentials, then default credentials (super/sp-admin)
- If factory-default (password prompt for new password), bootstrap configuration is applied:
- RSA key generation for SSH (2048-bit)
- SSH key exchange method (dh-group14-sha256 for v9+, dh-group1-sha1 for older)
- Management user credentials
- AAA configuration (local authentication)
- LLDP enabled
- SNMP community configured
- Management VLAN and IP address
- Default gateway
- NTP server configuration
- System max VLAN set to 4095
- Configuration is saved and switch is rebooted
- The switch reconnects on its new management IP address
Firmware-Specific Bootstrap:
- Switching Code (SPS): IP address configured on management VLAN interface
- Routing Code (SPR): IP address configured on virtual interface (VE) with IP routing
Manual Onboarding
For manual configuration, connect to the switch via console and apply the bootstrap commands below.
Bootstrap Commands
Enter Configuration Mode:
enable
skip-page-display
config terminal
Generate SSH Keys:
crypto key generate rsa modulus 2048
ip ssh key-exchange-method dh-group14-sha256
ip ssh idle-time 10
Configure AAA:
aaa authentication web-server default local
aaa authentication login default local
aaa authentication dot1x default radius
Enable LLDP:
lldp run
Configure SNMP:
snmp-server community <community-string> ro
Configure Management User:
username <admin-user> password <password>
Configure Management VLAN (Switching Code):
vlan <management-vlan>
tagged ethernet <uplink-ports>
management-vlan
default-gateway <gateway-ip> 1
exit
ip address <switch-ip> <subnet-mask>
ip default-gateway <gateway-ip>
Configure Management VLAN (Routing Code):
vlan <management-vlan>
tagged ethernet <uplink-ports>
exit
interface ve <management-vlan>
ip address <switch-ip> <subnet-mask>
exit
ip route 0.0.0.0/0 <gateway-ip>
Configure NTP:
ntp
server <ntp-server-ip>
exit
Set Maximum VLANs and Save:
system-max vlan 4095
write mem
exit
reload
Configuration
Connection Settings
Configure the switch in the Network::Wired::Switches scaffold with:
- Host: Target management IP address
- MAC Address: Required for auto-bootstrap DHCP lookup
- Username/Password: SSH credentials (default: super/sp-admin)
- Enable Password: If different from login password (deprecated in v9+)
- Management VLAN: VLAN for management traffic (default: 1)
- SNMP Community: Community string for monitoring (default: public)
RADIUS / AAA Configuration
When a RADIUS Server Option is active in rXg, the system supports combined MAB and 802.1X authentication:
System-Level Configuration:
aaa authentication dot1x default radius
authentication
auth-default-vlan <fallback-vlan>
auth-timeout-action failure
auth-mode multiple-untagged
auth-order mac-auth dot1x
mac-authentication enable
mac-authentication dot1x-override
mac-authentication dot1x-disable
dot1x enable
exit
Port-Level Configuration for MAB:
mac-authentication enable ethernet <port-list>
interface ethernet <port>
authentication auth-default-vlan <native-vlan>
exit
Port-Level Configuration for 802.1X:
dot1x enable ethernet <port-list>
dot1x port-control auto ethernet <port-list>
VLAN Configuration
VLANs are automatically managed through Switch Port Profiles:
- Access ports: Configured with
untaggedon the native VLAN - Trunk ports: Configured with
taggedVLANs anduntaggednative VLAN - VLANs are created/removed automatically as needed
VLAN Commands:
vlan <vlan-id>
tagged ethernet <port-list>
untagged ethernet <port-list>
exit
LAG Configuration
Link Aggregation Groups (LAGs) are fully supported with up to 256 LAG IDs:
lag "<lag-name>" <dynamic|static> id <lag-id>
ports ethernet <port-list>
exit
Sub-interfaces automatically inherit VLAN configuration from the parent LAG.
DHCP Snooping Configuration
DHCP snooping is configured through:
- Trusted DHCP VLANs on the Switch record - specifies which VLANs have DHCP snooping enabled
- DHCP Snooping Trust on Switch Port Profiles - marks uplink ports as trusted
ip dhcp snooping vlan <vlan-list>
interface ethernet <trusted-port>
dhcp snooping trust
exit
STP Protection
Switch Port Profiles support:
- Edge Protection:
spanning-tree 802-1w admin-edge-port - STP Protect:
stp-protectfor BPDU guard functionality
STP Priority Configuration:
spanning-tree single 802-1w
spanning-tree single 802-1w priority <priority>
Port Settings
Per-port settings available through Switch Port Profiles:
| Setting | Description |
|---|---|
| Optical Monitor | Enable SFP/SFP+ signal monitoring |
| Trust DSCP | Trust DSCP marking from incoming traffic |
| DHCP Snooping Trust | Mark port as trusted for DHCP snooping |
| Inline Power Priority | PoE priority (1=critical, 2=high, 3=low) |
| Speed/Duplex | Manual speed/duplex configuration |
Advanced Settings
Web Management:
no web-management https
DNS Server:
ip dns server-address <dns-ip>
Timezone:
Automatically configured based on rXg DeviceOption timezone setting.
IP Multicast (IGMP Snooping):
ip multicast active
ip multicast version 3
no ip multicast disable-flooding
Login Security:
aaa authentication login default <methods>
aaa authentication enable default <methods>
max-login-failures <count>
login-recovery-time <seconds>
Monitoring Capabilities
| Metric | Collection Method | Notes |
|---|---|---|
| CPU Usage | SNMP | Collected at configured monitoring interval |
| Memory Usage | SNMP | Collected at configured monitoring interval |
| Port Statistics | SNMP | Packets in/out, errors, discards |
| Port Status | SNMP/SSH | Up/down, speed, duplex via show interface brief |
| LLDP Neighbors | SNMP | Connected device discovery |
| MAC Address Table | SSH | Client discovery via show mac-address |
| LAG Status | SSH | LAG member ports and aggregated speed |
| Optical Levels | SSH | SFP/SFP+ Tx/Rx power levels |
| Device Info | SSH | Serial number, model, firmware version, MAC |
| Flash Status | SSH | Primary/secondary firmware versions |
| Boot Preference | SSH | Current boot configuration |
Firmware Upgrade
Ruckus ICX switches support firmware upgrades via TFTP:
Supported Upload Methods: - TFTP
Supported Flash Locations: - primary - secondary - bootrom
Upgrade Process:
- Upload firmware file to rXg via Device Firmwares scaffold
- Associate firmware with the switch
- Select target flash location (primary/secondary)
- Initiate upgrade from the switch record
- The rXg:
- Copies firmware to TFTP directory
- Connects to switch via SSH
- Executes
copy tftp flash <server> <filename> <location> - Waits for transfer completion (up to 10 minutes)
- Saves configuration (
write memory) - Sets boot system to new firmware
- Optionally reboots the switch
Firmware Upgrade Commands:
copy tftp flash <tftp-server-ip> <firmware-filename> primary
write memory
boot system flash primary yes
Troubleshooting
Common Issues
Issue: Switch shows offline in rXg
Symptom: Switch appears offline despite being reachable via ping
Cause: SSH connectivity issues or SNMP community mismatch
Resolution:
- Verify SSH credentials match switch configuration
- Check SNMP community string matches
- Ensure SSH is enabled: show ip ssh
- Check for locked-out IP (60 second lockout after failed attempts)
- Verify RSA keys are generated
Issue: Auto-bootstrap fails
Symptom: Switch detected at DHCP IP but bootstrap doesn't complete Cause: Credential issues or network configuration mismatch Resolution: - Verify factory default credentials (super/sp-admin) - For Switching Code: Ensure DHCP IP matches configured management IP and VLAN - For Routing Code: Ensure management VLAN is different from default if IP differs - Check if switch already has partial configuration - Try manual bootstrap via console
Issue: Config sync warning about no ports
Symptom: "No ports were imported" warning during sync Cause: SNMP community mismatch preventing port discovery Resolution: - Verify SNMP community string matches switch configuration - Run "Import Ports" from switch record - Check SNMP connectivity
Issue: DHCP snooping blocks legitimate traffic
Symptom: Devices not getting DHCP addresses after enabling snooping Cause: Uplink port not marked as trusted Resolution: - Ensure Switch Port Profile for uplink ports has "DHCP Snooping Trust" enabled - Verify path to DHCP server has all intermediate ports trusted
Issue: Firmware upgrade fails
Symptom: Firmware transfer times out or switch doesn't boot new image
Cause: TFTP connectivity issues or insufficient flash space
Resolution:
- Verify TFTP connectivity from switch to rXg
- Check firmware file exists in /space/tftpboot/
- Verify flash space: show flash
- Check boot preference: show boot-preference
Issue: LAG not forming
Symptom: LAG shows as down or sub-interfaces not bundled
Cause: Port configuration mismatch or LACP issues
Resolution:
- Verify all member ports have same speed/duplex
- Check LAG type (static vs dynamic/LACP)
- Verify member ports are enabled
- Check show lag brief for status
Diagnostic Commands
General:
show version
show running-config
show ip
show ip interface
show interface brief wide
show vlan
SSH and Authentication:
show ip ssh
show aaa
show authentication
show dot1x
show mac-authentication
RADIUS:
show radius statistics
show aaa servers
VLANs and Ports:
show run vlan
show mac-address
show interface configuration
show lldp neighbors
Firmware:
show flash
show boot-preference
LAG:
show lag brief
show lag <lag-id>
DHCP Snooping:
show ip dhcp snooping
show ip dhcp snooping binding
Spanning Tree:
show spanning-tree
show spanning-tree detail
Known Limitations
- SPB-m fabric not supported
- Maximum 4095 VLANs (requires
system-max vlan 4095and reboot) - LAG limited to 256 IDs
- TFTP is the only supported firmware upload method
- Some features deprecated in firmware v9+ (enable super-user-password)
Operational Caveats
- Firmware Types: Layer 2 Switching (SPS) and Layer 3 Routing (SPR/RDR) require different bootstrap configurations. The rXg automatically detects and handles both.
- Default Credentials: Factory default is super/sp-admin. First login requires password change.
- SSH Algorithm Support: The rXg uses diffie-hellman-group14-sha1 and ssh-rsa for compatibility. Version 9+ switches use dh-group14-sha256.
- IP Lockout: ICX switches may temporarily lock out IP addresses (60 seconds) after failed authentication attempts.
- DHCP Client: Switches with routing code may have DHCP client enabled. Config sync automatically disables it if IP address differs from configured management IP.
- VTP Mode: ICX does not use VTP; VLAN configuration is local only.
- Management VLAN: For Switching Code, management-vlan command moves management to specified VLAN. Ensure connectivity before applying.
- System Max VLAN: Changing maximum VLANs requires reboot. Bootstrap automatically sets to 4095.
- LAG Sub-Interfaces: Ports added to LAG inherit VLAN configuration from parent LAG. Individual port VLAN settings are ignored.
- Custom Config: Support for custom configuration snippets that are checked and applied during sync.
- Spanning Tree: Spanning tree configuration (802.1w) is handled at switch level and per-port via profiles.
- ICX 8200 Series: Supports dynamic PoE power management across all stack units.
External References
TP-Link Switches
TP-Link JetStream switches provide cost-effective enterprise switching solutions for SMB and enterprise deployments. The rXg supports managed JetStream switches with SSH connectivity, providing configuration synchronization, VLAN management, and 802.1X/MAB authentication capabilities.
Supported Models
| Model/Series | Notes |
|---|---|
| JetStream T1600G Series | Gigabit managed switches |
| JetStream T1700G Series | Gigabit managed PoE switches |
| JetStream T2600G Series | L2+ Gigabit managed switches |
| JetStream T2700G Series | L2+ Gigabit managed PoE switches |
| JetStream T3700G Series | L3 Gigabit managed switches |
| JetStream SG Series | Smart Gigabit switches with CLI support |
Note: Only models with SSH/Telnet CLI support are compatible. Web-only managed switches are not supported.
Features Supported
| Feature | Supported | Description |
|---|---|---|
| Config Sync | Yes | Automatic configuration synchronization from rXg |
| Auto Bootstrap | Yes | Zero-touch onboarding from factory-default state via Telnet fallback |
| SNMP Monitoring | Yes | CPU, memory, and port statistics collection |
| LLDP Neighbor Discovery | Yes | Automatic detection of connected devices |
| Switch Port Import | Yes | Automatic import and management of switch ports |
| 802.1X Authentication | Yes | Port-based network access control via dot1x |
| MAC Authentication Bypass (MAB) | Yes | MAC-based authentication for non-802.1X devices |
| Dynamic VLAN Assignment | Yes | RADIUS-assigned VLAN based on authentication |
| DHCP Snooping | No | Not currently implemented |
| Firmware Management | No | Manual firmware upgrades required |
| STP Protection | No | Not currently implemented |
| SPB-m Fabric | No | Not supported |
Prerequisites
Firmware Requirements
- JetStream firmware with SSH support
- SSH server must be enabled (automatically configured during bootstrap)
Network Requirements
- Management IP connectivity to rXg
- SSH access (TCP port 22) - configured during bootstrap
- Telnet access (TCP port 23) - required for initial bootstrap only
- SNMP access (UDP port 161)
- RADIUS connectivity (UDP ports 1812, 1813) - for 802.1X/MAB
Onboarding Process
Automatic Onboarding
TP-Link switches support automatic onboarding from factory-default state. The rXg detects factory-default switches by attempting SSH connection first, and if that fails (SSH not enabled), falls back to Telnet for initial configuration.
Prerequisites for Auto-Bootstrap:
- The switch must be connected to the network and have a management IP configured
- A switch record must exist in rXg with the switch's management IP
- Factory default credentials must be used (admin/admin) or pre-configured credentials
Auto-Bootstrap Process:
- The rXg attempts SSH connection to the switch
- If SSH fails and the switch has never been synced, Telnet connection is attempted
- Via Telnet, bootstrap configuration is automatically applied:
- SSH server enabled with multiple algorithm support (v1, v2)
- SSH encryption algorithms configured (AES128/192/256-CBC, 3DES-CBC, etc.)
- HTTPS secure server enabled
- SNMP community string configured
- Password updated if required by switch
- After Telnet bootstrap, reconnection via SSH is performed
- Additional configuration applied:
- Paging disabled (
no clipaging) - Console logging minimized
- Admin password set to configured value
- Paging disabled (
- Switch ports are automatically imported
Connection Methods:
The rXg attempts connection in the following order: 1. SSH with legacy algorithm support (diffie-hellman-group1-sha1, ssh-dss, aes256-cbc) 2. Telnet (as fallback for factory-default switches without SSH enabled)
Manual Onboarding
For manual configuration, connect to the switch via console and apply the bootstrap commands below.
Bootstrap Commands
Enable SSH Server:
enable
configure
ip ssh server
ip ssh version v1
ip ssh version v2
ip ssh algorithm AES128-CBC
ip ssh algorithm AES192-CBC
ip ssh algorithm AES256-CBC
ip ssh algorithm 3DES-CBC
ip ssh algorithm HMAC-SHA1
ip ssh algorithm HMAC-MD5
exit
Configure SNMP:
configure
snmp-server community <community-string> read-only
exit
Configure HTTPS (optional):
configure
ip http secure-server
ip http secure-protocol ssl3 tls1
exit
Configure Management User:
configure
user name admin password <password>
exit
Enable LLDP:
configure
lldp
exit
Save Configuration:
copy running-config startup-config
Configuration
Connection Settings
Configure the switch in the Network::Wired::Switches scaffold with:
- Host: Management IP address
- Username/Password: SSH credentials (default: admin/admin)
- Enable Password: If different from login password
- Management VLAN: VLAN for management traffic (default: 1)
- SNMP Community: Community string for monitoring (default: public)
RADIUS / AAA Configuration
When a RADIUS Server Option is active in rXg, the system configures RADIUS authentication:
System-Level Configuration:
radius-server host <rxg-ip> auth-port 1812 acct-port 1813 timeout 5 retransmit 2 key 0 <radius-secret>
dot1x system-auth-control
dot1x vlan-assignment
Port-Level Configuration for MAB:
Ports configured for MAC authentication receive:
interface gigabitEthernet <port>
dot1x
dot1x mab
dot1x port-method port-based
exit
Port-Level Configuration for 802.1X:
Ports configured for 802.1X authentication receive:
interface gigabitEthernet <port>
dot1x
exit
VLAN Configuration
VLANs are automatically managed through Switch Port Profiles:
- Access ports: Configured with native VLAN using
switchport pvid - Trunk ports: Configured with tagged VLANs using
switchport general allowed vlan X tagged - Native VLAN configured with
switchport general allowed vlan X untagged
VLAN Configuration Commands:
interface gigabitEthernet <port>
switchport general allowed vlan <vlan-list> tagged
switchport general allowed vlan <native-vlan> untagged
switchport pvid <native-vlan>
exit
Port Types
The rXg supports the following port naming conventions:
| Short Name | Full Name | Description |
|---|---|---|
| Gi | gigabitEthernet | 1 Gbps ports |
| Te | ten-gigabitEthernet | 10 Gbps ports |
| Fe | fastEthernet | 100 Mbps ports |
| Tw | two-gigabitEthernet | 2.5 Gbps ports |
Monitoring Capabilities
| Metric | Collection Method | Notes |
|---|---|---|
| CPU Usage | SNMP | Collected at configured monitoring interval |
| Memory Usage | SNMP | Collected at configured monitoring interval |
| Port Statistics | SNMP | Packets in/out, errors, discards |
| Port Status | SNMP | Up/down, speed, duplex |
| LLDP Neighbors | SNMP | Connected device discovery |
| MAC Address Table | SSH | Client discovery via show mac address-table |
| Device Info | SSH | Serial number, model, firmware version |
Troubleshooting
Common Issues
Issue: Switch shows offline in rXg
Symptom: Switch appears offline despite being reachable via ping
Cause: SSH connectivity issues or SNMP community mismatch
Resolution:
- Verify SSH credentials match switch configuration
- Check SNMP community string matches
- Ensure SSH is enabled on the switch (ip ssh server)
- Check for locked-out IP (60 second lockout after failed attempts)
Issue: Auto-bootstrap fails
Symptom: Switch detected but bootstrap doesn't complete Cause: SSH key generation or Telnet connectivity issues Resolution: - Verify Telnet is enabled on factory-default switch - Check factory default credentials (admin/admin) - Some switches require password change on first login - this is handled automatically - Try manual bootstrap via console if automated methods fail
Issue: Config sync shows differences but won't apply
Symptom: Config comparison shows changes needed but sync fails Cause: Session timeout or locked configuration Resolution: - Check for other active CLI sessions - Increase timeout setting on switch record - Reboot switch if sessions are stuck
Issue: 802.1X/MAB authentication not working
Symptom: Devices not authenticating on configured ports
Cause: RADIUS server configuration mismatch
Resolution:
- Verify RADIUS server IP and secret match rXg configuration
- Check dot1x system-auth-control is enabled
- Verify port is configured with dot1x and optionally dot1x mab
- Check RADIUS logs on rXg for authentication attempts
Issue: VLAN changes not applying
Symptom: VLAN configuration appears correct but traffic not working Cause: Native VLAN or PVID mismatch Resolution: - Verify both tagged VLAN and PVID are configured correctly - Check that VLAN exists in switch VLAN database - Ensure uplink ports have all required VLANs tagged
Diagnostic Commands
General:
show system-info
show running-config
show interface status
show vlan
SSH and Authentication:
show ip ssh
show dot1x
show radius statistics
VLAN and Ports:
show interface configuration
show mac address-table
show lldp neighbors-information
Known Limitations
- Firmware upgrades not supported via rXg (manual upgrade required)
- DHCP snooping not implemented
- STP protection features not implemented
- Some older models may have limited SSH algorithm support
- Password change prompt on first login requires Telnet fallback
Operational Caveats
- Default Credentials: Factory default is admin/admin. Some switches require password change on first login, which is handled automatically during Telnet bootstrap.
- SSH Algorithm Support: The rXg uses legacy SSH algorithms (diffie-hellman-group1-sha1, ssh-dss) for compatibility with older firmware. Modern algorithms are preferred when available.
- Telnet Fallback: For factory-default switches without SSH enabled, the rXg temporarily connects via Telnet to enable SSH, then reconnects securely.
- Temporary Password: During Telnet bootstrap, a temporary password derived from the switch IP is used if password change is required, then updated to the configured password after SSH reconnection.
- IP Lockout: TP-Link switches may temporarily lock out IP addresses (60 seconds) after multiple failed authentication attempts.
- LLDP: LLDP is automatically enabled during config sync if not already enabled.
- Paging: CLI paging is automatically disabled (
no clipaging) during connection to prevent session hangs.
External References
Wireless
The Wireless view presents the scaffolds associated with configuring the wireless distribution layer of your network, and monitoring/configuring the Wireless Access Points (WAPs) throughout your infrastructure.

Understanding Transmit Power
Transmit power (TX Power) is the RF power output by a WAP's radio when broadcasting signals to wireless clients. Proper power configuration is essential for optimal coverage, capacity, and interference management.
Note: This documentation applies to all supported wireless vendors (Ruckus, Aruba, Cambium, Extreme, Adtran, TP-Link, OpenWiFi, and others). The rXg provides a unified abstraction layer for TX power configuration, allowing operators to manage power settings consistently through the Access Point Zone, Profile, and WAP scaffolds regardless of the underlying controller or WAP hardware.
What is dBm?
Wireless power levels are measured in dBm (decibels relative to one milliwatt). This is a logarithmic scale where:
- 0 dBm = 1 milliwatt (reference point)
- Positive values = more than 1 mW (e.g., +20 dBm = 100 mW)
- Negative values = less than 1 mW (e.g., -10 dBm = 0.1 mW)
The logarithmic nature means: - Every +3 dB doubles the power - Every -3 dB halves the power - Every +10 dB multiplies power by 10 - Every -10 dB divides power by 10
TX Power Quick Reference
| TX Power (dBm) | Power (mW) | Typical Use Case |
|---|---|---|
| +30 dBm | 1000 mW | Maximum outdoor, long-range links |
| +27 dBm | 500 mW | High-power outdoor coverage |
| +24 dBm | 250 mW | Standard outdoor / large indoor |
| +20 dBm | 100 mW | Typical indoor maximum |
| +17 dBm | 50 mW | Medium indoor coverage |
| +14 dBm | 25 mW | High-density indoor |
| +10 dBm | 10 mW | Very high-density / small cells |
| +7 dBm | 5 mW | Micro-cells, close proximity |
WAP Hardware Power Capabilities
Not all WAPs can transmit at the same power levels. Maximum TX Power varies significantly based on:
- Hardware class - Enterprise outdoor WAPs have higher power amplifiers than indoor models
- Frequency band - 2.4 GHz radios typically support higher power than 5 GHz or 6 GHz
- Number of spatial streams - Power is divided across multiple antennas in MIMO configurations
- Form factor - Compact or low-cost WAPs often have lower maximum power
Typical Maximum TX Power by WAP Class:
| WAP Class | 2.4 GHz Max | 5 GHz Max | 6 GHz Max | Examples |
|---|---|---|---|---|
| Outdoor High-Power | +28 to +30 dBm | +25 to +27 dBm | +24 to +25 dBm | Outdoor sector, point-to-point |
| Outdoor Standard | +25 to +27 dBm | +23 to +25 dBm | +22 to +24 dBm | Outdoor omni, campus coverage |
| Indoor Enterprise | +22 to +25 dBm | +20 to +23 dBm | +20 to +22 dBm | CIG WF189, EdgeCore EAP |
| Indoor Standard | +20 to +22 dBm | +18 to +20 dBm | +18 to +20 dBm | Wall-mount, ceiling WAPs |
| Indoor Compact | +18 to +20 dBm | +16 to +18 dBm | N/A | Small office, desktop |
Important Considerations:
- Effective power is per-chain: A 4x4 MIMO WAP at +20 dBm total may only output +14 dBm per antenna chain
- Actual vs. configured: Setting TX Power to "Full" uses the WAP's hardware maximum, which may be lower than regulatory limits
- Band differences: The same WAP model will have different maximum power on each band - check specifications for each radio
- Current TX Power field: The WAP Radios scaffold displays the actual current TX Power in dBm, which reflects hardware capabilities and regulatory limits applied
Practical Tip: When planning coverage, use the TX Power values reported by deployed WAPs rather than assuming all WAPs operate at the same power level. This is especially important in mixed-model deployments.

Configuring TX Power
TX Power is configured as a relative reduction from a reference maximum, expressed in dB. Understanding the difference between configured power and actual power is critical.
Configured Power vs. Actual Power (OpenWiFi Specific)
The system uses two power values:
- Configured Power (reference maximum): A regulatory or system-defined maximum (e.g., 30 dBm for "Full")
- Actual Power: What the WAP hardware actually outputs, limited by its physical capabilities
The configured reduction is applied to the reference maximum, but the actual output is capped by the WAP's hardware maximum. This has important implications:
Example - OpenWiFi WAP with 26 dBm hardware maximum:
| Configuration | Configured Power | Actual Power | Effect |
|---|---|---|---|
| 0 (Full) | 30 dBm | 26 dBm | Capped at hardware max |
| -3 | 27 dBm | 26 dBm | Still capped at hardware max |
| -4 | 26 dBm | 26 dBm | Still at hardware max |
| -5 | 25 dBm | 25 dBm | Now actually reduced |
| -10 | 20 dBm | 20 dBm | Reduced |
Important: In this example, settings from Full (0) to -4 dB all produce the same actual power output of 26 dBm. The WAP cannot exceed its hardware capability, so small reductions from "Full" will have no effect until the configured power drops below the hardware maximum.
Configuration Reference
| Configuration Value | Reduction from Reference |
|---|---|
| 0 (Full) | No reduction (reference maximum) |
| -3 | Half power (-3 dB) |
| -6 | Quarter power (-6 dB) |
| -10 | One-tenth power (-10 dB) |
| -20 | One-hundredth power (-20 dB) |
| -99 (Minimum) | Lowest possible power |
Actual Power Varies by WAP Model
Because different WAPs, and different Radios within the same WAP, have different hardware maximums, the same configuration produces different actual power levels:
| Configuration | Indoor Compact | Indoor Enterprise | Outdoor |
|---|---|---|---|
| Hardware Max | 18 dBm | 23 dBm | 27 dBm |
| 0 (Full) | 18 dBm | 23 dBm | 27 dBm |
| -3 | 15 dBm | 20 dBm | 24 dBm |
| -6 | 12 dBm | 17 dBm | 21 dBm |
| -10 | 8 dBm | 13 dBm | 17 dBm |
Always verify actual operating power using the Current TX Power field in the WAP Radios scaffold, especially when fine-tuning power settings.
Configuration Hierarchy: TX Power can be set at multiple levels, with more specific settings overriding general ones:
- Access Point Zone (Network :: Wireless :: Access Point Zones) - Default for all WAPs in the zone. Configure using the TX Power fields (tx_power_24, tx_power_5, tx_power_6) per band.
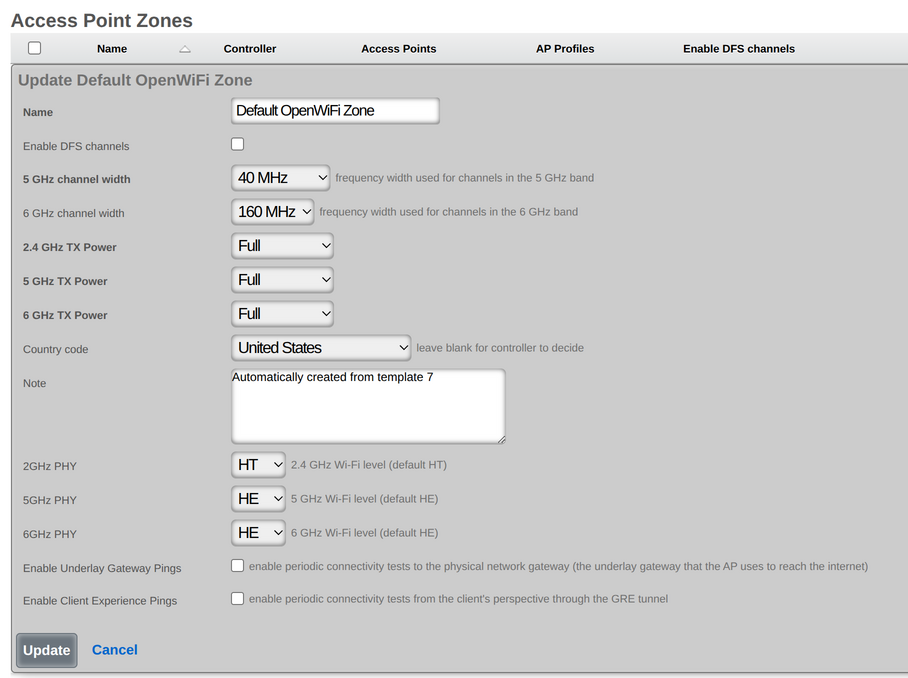
- Individual WAP (Network :: Wireless :: Access Points) - Overrides zone settings for a specific WAP.
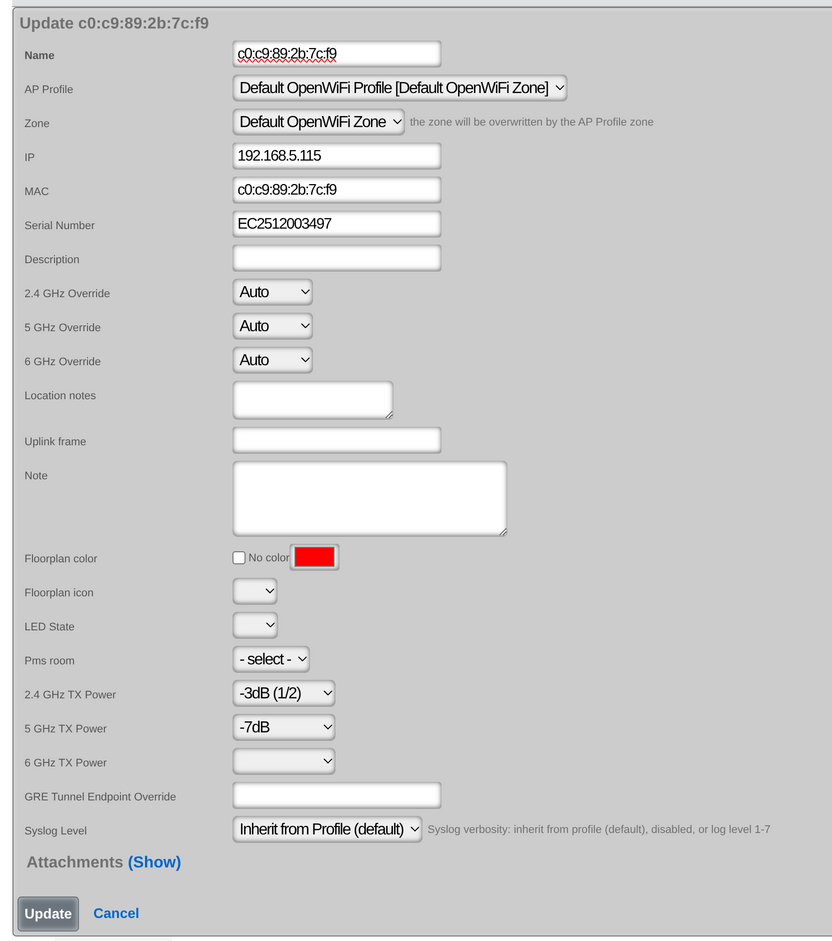
Note: Antenna gain is configured at the Access Point Profile level, not TX Power. See Antenna Gain Considerations for details.
Direct dBm Override (OpenWiFi Only)
OpenWiFi devices support an additional TX Power (dBm) field that sets the radio's transmit power directly in dBm, bypassing the relative reduction system described above. This is useful when you know the exact power level you want on the radio and don't want it translated through the plan-based conversion.
The valid range is 130 dBm.
Override priority:
- AP-level dBm override if set, used directly
- Zone-level dBm override if the AP's value is blank, the zone value is used
- Plan-based TX Power if both dBm overrides are blank, the existing relative reduction system is used
When a dBm override is set, the hardware will still cap the actual output at its maximum capability. For example, setting 30 dBm on an indoor AP with a 23 dBm hardware maximum will result in 23 dBm actual output.
TX Power and Client Signal Strength (RSSI)
The signal strength a client receives (RSSI) depends on the TX Power minus path loss:
Client RSSI TX Power + Antenna Gain - Path Loss
Example: A WAP transmitting at +20 dBm with +3 dBi antenna gain, and 60 dB path loss to the client:
Client RSSI 20 + 3 - 60 = -37 dBm (excellent signal)
| Client RSSI | Signal Quality | Expected Experience |
|---|---|---|
| -30 to -50 dBm | Excellent | Maximum speeds, very reliable |
| -50 to -60 dBm | Very Good | High speeds, reliable |
| -60 to -70 dBm | Good | Good speeds, occasional retries |
| -70 to -80 dBm | Fair | Reduced speeds, intermittent issues |
| -80 to -90 dBm | Poor | Slow speeds, frequent disconnections |
| Below -90 dBm | Unusable | Connection failures |
When to Adjust TX Power
| Scenario | Recommendation |
|---|---|
| Large open areas | Higher power for coverage |
| High-density venues (stadiums, conference rooms) | Lower power to reduce interference and improve capacity |
| Multi-floor buildings | Lower power to reduce floor-to-floor bleed |
| Adjacent WAPs on same channel | Lower power to reduce co-channel interference |
| Client roaming issues | Lower power to encourage clients to roam to closer WAPs |
| Coverage gaps | Higher power or additional WAPs |
Common Mistake: Setting TX Power too high in dense deployments. This causes: - Clients "stick" to distant WAPs instead of roaming to closer ones - Increased co-channel interference between WAPs - Reduced overall network capacity
Auto Cell Sizing
Note: Auto Cell Sizing is currently only available for Ruckus controllers. It is not supported for OpenWiFi or other vendors.
Auto Cell Sizing automatically adjusts TX Power based on the RF environment. When enabled:
- The system monitors neighboring WAPs and interference levels
- TX Power is dynamically reduced when conditions allow
- Coverage is maintained while minimizing interference
Requirements: - TX Power must be set to Full (0) - Background Scanning must be enabled for the same band - Available per band (2.4 GHz, 5 GHz)
Best For: Environments where RF conditions change (temporary events, variable occupancy) or where manual optimization is impractical.
Antenna Gain Considerations
Antenna gain (measured in dBi) adds to the effective radiated power:
Effective Radiated Power (EIRP) = TX Power + Antenna Gain
When using external antennas, configure the 2.4 GHz Antenna Gain and 5 GHz Antenna Gain fields (in dBi) in the Access Point Profiles scaffold (Network :: Wireless :: Access Point Profiles) so the system can: - Accurately calculate coverage - Ensure regulatory compliance (EIRP limits) - Properly coordinate Auto Cell Sizing
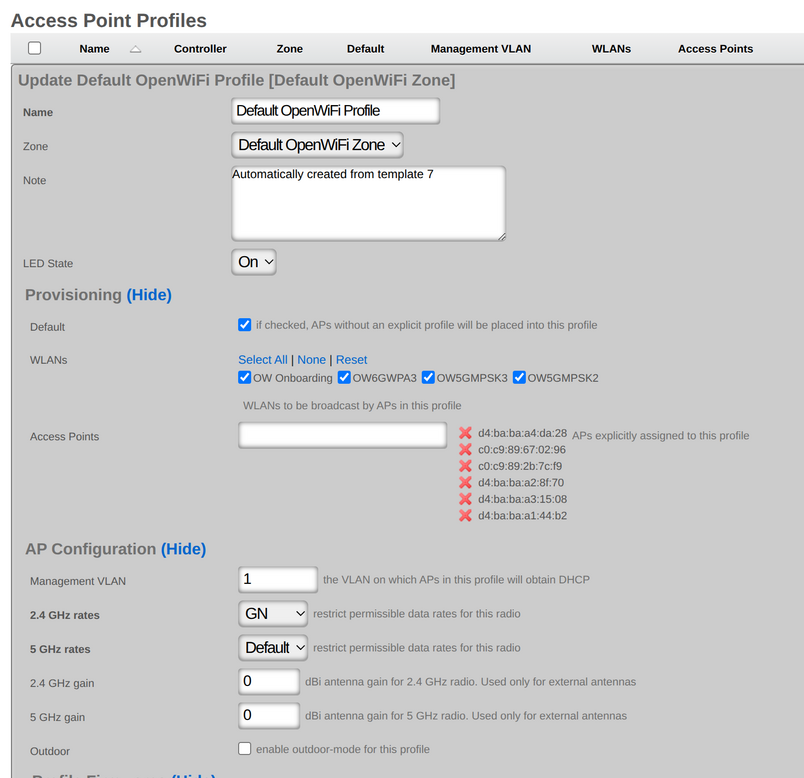
Regulatory Limits
TX Power is constrained by regulatory requirements based on:
- Country Code - Different countries have different maximum power limits
- Frequency Band - 2.4 GHz, 5 GHz, and 6 GHz have different limits
- Channel - DFS channels may have lower limits
- Indoor vs Outdoor - Outdoor operation often permits higher power
The Outdoor WAPs checkbox in Access Point Profiles enables outdoor-specific power and channel tables. Incorrect settings may violate local regulations.
Note: The rXg automatically enforces regulatory limits based on the configured Country Code. Setting TX Power to Full (0) will use the maximum power legally permitted, not necessarily the hardware maximum.
Data Flow: AP Provisioning and Client Onboarding
The following diagrams illustrate the end-to-end flow of how a wireless access point (WAP) is discovered, registered, configured, and begins serving clients.
AP Discovery, Registration, and Configuration Sync
sequenceDiagram
participant AP as New Access Point
participant SW as PoE Switch
participant DHCP as DHCP Server<br/>(rXg)
participant WC as WLAN Controller<br/>(Infrastructure Device)
participant DB as rXg Database
participant Op as Operator<br/>(Admin Console)
Note over AP,Op: Phase 1 Physical Connection & IP Assignment
AP->>SW: Power on (PoE) + Ethernet link
SW-->>AP: PoE power + link negotiation
AP->>DHCP: DHCP DISCOVER<br/>(management VLAN)
DHCP->>DHCP: Select pool<br/>(match on VLAN/class)
DHCP-->>AP: DHCP OFFER<br/>(IP, gateway, DNS)
AP->>DHCP: DHCP REQUEST
DHCP-->>AP: DHCP ACK<br/>(lease granted)
Note over AP,Op: Phase 2 Controller Discovery & Adoption
AP->>WC: Controller discovery<br/>(DNS/DHCP option/broadcast)
WC->>AP: Adoption request
AP-->>WC: Device info<br/>(MAC, model, firmware, serial)
alt OpenWiFi AP
AP->>WC: CSR (Certificate Signing Request)
WC->>WC: Sign certificate (mTLS)
WC-->>AP: Signed certificate
AP->>WC: mTLS connection established
else Ruckus / Other Vendor
AP->>WC: Direct adoption<br/>(vendor protocol)
WC-->>AP: Adoption confirmed
end
WC->>DB: Create/update AccessPoint record<br/>(MAC, model, IP, firmware, online=true)
Note over AP,Op: Phase 3 Profile Assignment & Config Push
Op->>DB: Assign AP to Access Point Profile<br/>(or use zone default)
DB-->>WC: Config change trigger
WC->>AP: Push configuration
Note right of WC: WLAN SSIDs + encryption<br/>Channel assignments<br/>TX power settings<br/>VLAN mappings<br/>RADIUS server config<br/>Tunnel parameters (if SoftGRE)
AP->>AP: Apply radio configuration<br/>(per band: 2.4/5/6 GHz)
AP-->>WC: Config sync confirmed
AP->>AP: Begin broadcasting SSIDs
SoftGRE Tunnel Establishment
When a WLAN is configured with tunneling enabled, the AP establishes a GRE tunnel back to the rXg for centralized traffic processing.
sequenceDiagram
participant CL as Wireless Client
participant AP as Access Point
participant RXG as rXg Gateway<br/>(GRE Endpoint)
participant PF as Packet Filter<br/>(Policy Engine)
Note over CL,PF: SoftGRE Tunnel Setup
AP->>RXG: GRE tunnel initiation<br/>(to gre_tunnel_gateway_ip)
RXG->>RXG: Create GRE pseudo-interface<br/>(greN + bridgeN)
RXG-->>AP: Tunnel established
Note over CL,PF: Client Traffic via Tunnel
CL->>AP: Associate with SSID
CL->>AP: Data frame<br/>(L2 Ethernet)
AP->>RXG: Encapsulate in GRE tunnel<br/>(L2oGRE: original frame + GRE header)
RXG->>RXG: Decapsulate GRE<br/>(extract original L2 frame)
RXG->>PF: Apply policy enforcement<br/>(NAT, bandwidth queues,<br/>captive portal redirect)
PF->>RXG: Forward to Internet<br/>(or redirect to portal)
Note over CL,PF: Return Traffic
RXG->>RXG: Receive Internet response
PF->>RXG: Policy applied (QoS shaping)
RXG->>AP: Encapsulate in GRE tunnel
AP->>CL: Deliver to client<br/>(L2 frame)
Wireless Client Authentication Flow (802.1X / MAC Auth)
sequenceDiagram
participant CL as Wireless Client
participant AP as Access Point
participant RAD as RADIUS Server<br/>(rXg)
participant DB as rXg Database
Note over CL,DB: MAC Authentication Bypass
CL->>AP: Association request
AP->>RAD: Access-Request<br/>(User-Name = client MAC,<br/>Calling-Station-Id = client MAC)
RAD->>DB: Lookup MAC in RADIUS realm
DB-->>RAD: Match found policy + VLAN
RAD-->>AP: Access-Accept<br/>(Tunnel-Type = VLAN,<br/>Tunnel-Medium-Type = IEEE-802,<br/>Tunnel-Private-Group-Id = VLAN tag)
AP->>AP: Assign client to DVLAN
AP-->>CL: Association confirmed<br/>(on assigned VLAN)
Note over CL,DB: 802.1X EAP Authentication
CL->>AP: EAPOL-Start
AP->>RAD: Access-Request<br/>(EAP-Message = EAP identity)
RAD->>RAD: Evaluate RADIUS realm<br/>(select backend server by priority)
loop EAP Exchange
RAD-->>AP: Access-Challenge<br/>(EAP method negotiation)
AP-->>CL: EAP-Request
CL->>AP: EAP-Response<br/>(credentials)
AP->>RAD: Access-Request<br/>(EAP-Message = response)
end
RAD->>RAD: Validate credentials<br/>(local DB / LDAP / external RADIUS)
RAD-->>AP: Access-Accept<br/>(VLAN assignment, Session-Timeout,<br/>Class attributes)
AP->>AP: Assign DVLAN + open port
AP-->>CL: EAP-Success + 4-way handshake
CL->>CL: DHCP on assigned VLAN
Note over CL,DB: Accounting
AP->>RAD: Accounting-Request<br/>(Acct-Status-Type = Start)
RAD->>DB: Create LoginSession record
Scan-Based RRM (ACS and TX Power Optimization)
The rXg includes a vendor-independent scan-based Radio Resource Management (RRM) system that complements the existing map-based RRM. While map-based RRM requires AP placement on floor plans, scan-based RRM uses live WiFi scan data to optimize channel selection and transmit power levels without map dependencies.
The scheduling logic, decision algorithms, and threshold configuration are fully vendor-independent. Vendor-specific execution (e.g., how to restart a radio or trigger a WiFi scan) is handled by pluggable concern modules. Currently supported: OpenWiFi WSS.
Automatic Channel Selection (ACS) Scheduling
ACS scheduling automatically triggers channel reselection on WAPs with radios configured for auto-channel. It uses a hybrid opportunistic + fallback approach to minimize client disruption while ensuring channels are periodically optimized.
ACS Workflow
+------------------+
| Every Hour |
| (24/7) |
+--------+---------+
|
v
+-------------------------------------------+
| For each Zone with ACS Scheduling Enabled |
+--------------------+----------------------+
|
v
+------------------------------+
| Is this a scheduled hour? |
| (fallback, +6h, +12h, +18h) |
+---------------+--------------+
|
+-----------+-----------+
| |
YES NO
| |
v v
+-----------------+ +---------------+
| Is this the | | Skip zone |
| fallback hour? | | (not aligned) |
+--------+--------+ +---------------+
|
+-----+--------------+
| |
YES NO
| |
v v
+---------------+ +---------------------+
| FORCE MODE | | OPPORTUNISTIC MODE |
| (all radios) | | (idle radios only) |
+-------+-------+ +----------+----------+
| |
+----------+----------+
|
v
+--------------------------------+
| For each online WAP |
| (staggered 30 seconds apart) |
+----------------+---------------+
|
v
+---------------------------+
| WAP has auto-channel |
| radio? (channel = 0) |
+--------------+------------+
|
+----------+----------+
| |
YES NO
| |
v v
+------------------+ SKIP
| Force mode? |
+---------+--------+
|
+-----+----------------+
| |
YES NO
| |
v v
+-----------+ +----------------------------+
| Restart | | For each radio: |
| ALL | | auto-channel? |
| radios | | telemetry fresh? (<5min) |
+-----------+ | 0 connected clients? |
+--------------+-------------+
|
+-----+-----+
| |
ALL YES ANY NO
| |
v v
+-----------+ +-----------+
| Restart | | Skip |
| that | | that |
| radio | | radio |
+-----------+ +-----------+
ACS Modes
- Opportunistic mode (every 6 hours, aligned to fallback hour): Individual idle radios (0 connected clients with fresh telemetry) are restarted to trigger channel reselection. Radios with connected clients are skipped no client disruption occurs.
- Fallback mode (at configured fallback hour, default 4am local time): All radios are restarted regardless of client count. This ensures every radio gets optimized at least once per day, even radios that always have clients connected.
The 6-hour cycle runs at: fallback hour, fallback+6h, fallback+12h, fallback+18h. For example, with the default fallback hour of 4am, cycles run at 4am, 10am, 4pm, and 10pm.
Staggering and Capacity
WAPs are processed with 30-second stagger intervals to prevent thundering herd effects on both the rXg and the wireless controller. Each zone receives a unique offset based on its ID to further distribute load when multiple zones share the same fallback hour.
A 6-hour cycle supports up to 720 WAPs (6 hours x 120 WAPs/hour at 30-second intervals). If the number of online WAPs exceeds this capacity, a warning is logged suggesting the operator stagger fallback hours across zones.
ACS Trigger Mechanism
When ACS is triggered on a radio configured with channel = auto:
- A radio restart command is sent to the WAP
- The radio's wireless interface goes down briefly
- The access point runs the ACS algorithm during radio startup, surveying the RF environment
- An optimal channel is selected based on current interference conditions
- The radio comes back up on the new channel
- Clients automatically reconnect (typically within 1-2 seconds)
Per-radio restarts allow optimizing one band at a time without affecting other bands. For example, the 5 GHz radio can be restarted while the 2.4 GHz and 6 GHz radios continue serving clients.
Typical ACS scan duration by band:
| Band | Typical Duration | Notes |
|---|---|---|
| 2.4 GHz | ~3-5 seconds | Fewer channels to scan |
| 5 GHz | ~5-10 seconds | More channels; DFS channels excluded by default |
| 6 GHz | ~30-50 seconds | Many channels to survey |
ACS Configuration
Zone-level settings (Network :: Wireless :: Access Point Zones):
| Setting | Type | Default | Description |
|---|---|---|---|
| Enable ACS Scheduling | boolean | false | Activates automatic channel optimization for this zone |
| ACS Fallback Hour | integer (0-23) | 4 | Hour in zone-local time for forced channel reselection |
Per-WAP settings (Network :: Wireless :: Access Points):
| Setting | Type | Default | Description |
|---|---|---|---|
| Exclude from ACS Scheduling | boolean | false | Skip this WAP during ACS scheduling |
Prerequisites: - WAP must have at least one radio with channel set to auto (channel override = 0) - WAP must be online and connected to the controller - WAP must be managed by a controller that supports scan-based RRM
ACS Client Impact
| Scenario | Impact |
|---|---|
| Opportunistic ACS on idle radio | None radio has 0 clients |
| Opportunistic ACS skipped | None radio has clients, waits for fallback |
| Fallback ACS (all radios) | Brief disconnection (~1-2 seconds) during radio restart; clients auto-reconnect |
ACS Edge Cases
- WAP goes offline during scheduled ACS: The job checks the WAP's online status before execution and skips offline WAPs
- Zone timezone not set: Falls back to UTC
- ACS scan fails: Logged as failed; WAP continues operating on its current channel
- Radio has stale telemetry (>5 minutes old): Skipped in opportunistic mode client count cannot be trusted
- Mixed radio state (e.g., 2.4 GHz has 0 clients, 5 GHz has clients): In per-radio mode, only the idle 2.4 GHz radio is restarted; the 5 GHz radio is left untouched
TX Power Optimization
TX Power optimization analyzes neighbor AP RSSI observations to automatically adjust transmit power levels, reducing co-channel interference while maintaining client coverage. The algorithm uses a neighbor-based approach the industry standard used by enterprise vendors like Cisco, Aruba, and Ruckus with client RSSI as a safety constraint.
TX Power Optimization Workflow
SCHEDULING (Hourly Check)
--------------------------
+-------------------+ +-------------------------------------+
| Scheduler |---->| TxPowerOptimizationJob |
| (every hour) | | |
+-------------------+ | - Check current hour per zone |
| - Find zones where hour matches |
| - Trigger WiFi scans on all WAPs |
| - Wait for scan data ingestion |
| - Queue per-AP job for each WAP |
+------------------+------------------+
|
v
+--------------------------------------------+
| For each zone where: |
| tx_power_optimization_enabled = true |
| tx_power_optimization_hour = local hour |
| |
| For each online, non-excluded WAP: |
| 1. Trigger WiFi scan (collect neighbor |
| BSSID data) |
| 2. Wait for scan ingestion |
| 3. Schedule TxPowerApJob |
+--------------------+-----------------------+
PER-WAP OPTIMIZATION (TxPowerApJob)
------------------------------------
+-------------------------------+
| Cooldown Check |
| Last optimization > 1 hour? |
+---------------+---------------+
|
+----------+----------+
| |
YES NO --> Skip (too soon)
|
v
+----------------------------+
| For each band: 2G, 5G, 6G |
+--------------+-------------+
|
v
+------------------------------------------------------+
| DECISION ENGINE |
| |
| 1. Query NeighborBssidObservation |
| - Find observations where this WAP sees our |
| OTHER WAPs on the SAME channel (last 24h) |
| - Get MAX(rssi) = strongest_neighbor |
| |
| 2. Query RadioMetric |
| - Get average rssi_min for this radio (last 24h) |
| - This is the client RSSI floor (safety check) |
| |
| 3. Apply Decision Logic (see matrix below) |
+------------------------------------------------------+
|
v
+----------------+
| Power changed? |
+--------+-------+
|
+----------+----------+
| |
YES NO --> Done
|
v
+-------------------------------+
| Update AccessPoint |
| tx_power_24/5/6 = new_value |
| Save triggers config sync |
+-------------------------------+
TX Power Decision Matrix
The algorithm evaluates two inputs neighbor RSSI (how strongly our other WAPs see this WAP on the same channel) and client RSSI (the minimum signal strength of connected clients) and applies the following decision logic:
| Neighbor RSSI | Client RSSI | Action | Rationale |
|---|---|---|---|
| > -50 dBm (strong) | > -70 dBm (good) | REDUCE power by step size | Neighbors see us too strongly (interference); clients have headroom to tolerate reduction |
| > -50 dBm (strong) | < -70 dBm (weak) | NO CHANGE | Interference present but clients need the power cannot safely reduce |
| -80 to -50 dBm | any | NO CHANGE | Optimal range neighbor signal is neither too strong nor too weak |
| < -80 dBm (weak) | < -75 dBm (poor) | INCREASE power by step size | Coverage gap clients are struggling and neighbors barely see us |
| < -80 dBm (weak) | > -75 dBm (ok) | NO CHANGE | Neighbors are weak but clients are fine no action needed |
| null (no data) | any | NO CHANGE | Insufficient neighbor data to make a decision |
Why neighbor-based power adjustment? - High data reliability: We control both WAPs, so RSSI observations between our own WAPs are trustworthy - Proactive: Detects interference potential before clients are affected - Industry standard: This is how Cisco RRM, Aruba ARM, and Ruckus ChannelFly approach TX power management - Client RSSI alone is ambiguous a phone close to the WAP has high RSSI regardless of AP power, which does not indicate excessive power
TX Power Optimization Example
Before Optimization:
+---------+ +---------+
| WAP-A | ------ -45 dBm ------------> | WAP-B |
| 30 dBm | (too strong!) | 30 dBm |
+---------+ +---------+
| |
| clients: -55 dBm avg | clients: -60 dBm avg
| (good headroom) | (good headroom)
After Optimization (2 iterations, 1 hour apart):
+---------+ +---------+
| WAP-A | ------ -51 dBm ------------> | WAP-B |
| 27 dBm | (now optimal) | 27 dBm |
+---------+ +---------+
| |
| clients: -58 dBm avg | clients: -63 dBm avg
| (still good) | (still good)
Result: Reduced co-channel interference while maintaining good client signal.
Same-Channel Filtering
The algorithm only considers same-channel neighbors when evaluating interference. WAPs operating on different channels do not cause co-channel interference (CCI), even if they are physically close. This means:
- A 5 GHz WAP on channel 36 only compares against other WAPs also on channel 36
- WAPs on adjacent but non-overlapping channels (e.g., 36 vs 40) are not considered
- This filtering dramatically reduces false positives and ensures power adjustments target actual interference
Config Sync Flow
When the algorithm determines a power change is needed:
- The
tx_power_24,tx_power_5, ortx_power_6field on the AccessPoint record is updated AccessPoint.save!triggers anafter_commitcallback for configuration synchronization- The infrastructure device sync job builds the radio configuration with the new TX power value
- The configuration is pushed to the WAP via the controller
- The WAP applies the new power setting and the affected radio reloads
- The device clamps the requested power to regulatory maximums automatically
Power changes can be applied per-radio only the affected band's radio reloads, minimizing client disruption.
TX Power Configuration
Zone-level settings (Network :: Wireless :: Access Point Zones):
| Setting | Type | Default | Description |
|---|---|---|---|
| Enable TX Power Optimization | boolean | false | Activates power optimization for this zone |
| TX Power Optimization Hour | integer (0-23) | 3 | Hour in zone-local time to run daily optimization |
| Neighbor Too Strong | integer (dBm) | -50 | RSSI threshold above which power should be reduced |
| Neighbor Too Weak | integer (dBm) | -80 | RSSI threshold below which power may be increased |
| Client RSSI Floor | integer (dBm) | -75 | Minimum acceptable client signal strength |
| Client RSSI Headroom | integer (dBm) | -70 | Client signal strength that allows safe power reduction |
| Step Size | integer (dBm) | 3 | Power adjustment increment per optimization cycle (range: 1-10) |
Per-WAP settings (Network :: Wireless :: Access Points):
| Setting | Type | Default | Description |
|---|---|---|---|
| Exclude from TX Power Optimization | boolean | false | Skip this WAP during TX power optimization |
TX Power Safety Mechanisms
- Gradual changes: Power is adjusted in configurable step sizes (default 3 dBm) to avoid oscillation and allow metrics to stabilize between changes
- 1-hour cooldown: After any power change, the WAP is excluded from further adjustments for 1 hour to allow client RSSI metrics to reflect the new power level
- Client RSSI floor: Power is never reduced if clients are already below the headroom threshold, even if neighbor interference is high
- Regulatory clamping: The WAP automatically clamps requested power to the regulatory maximum for its country code, band, and channel the system does not need to track per-device limits
- 24-hour data window: Neighbor and client RSSI data is evaluated over a 24-hour window to smooth out transient conditions
RRM Event Audit Trail
All ACS and TX Power actions are recorded in the RRM Events table for audit and debugging:
| Event Type | Description |
|---|---|
| ACS Fallback | Forced ACS at fallback hour (all radios restarted) |
| ACS Opportunistic | Opportunistic ACS on idle radios |
| ACS Manual | Manual ACS trigger by administrator |
| TX Power Adjust | TX power optimization adjustment |
| WiFi Scan | WiFi scan triggered for neighbor data collection |
Each event records the execution status (executed, skipped, or failed), the skip reason if applicable, and a rich decision context including neighbor RSSI values, client RSSI floor, and the thresholds that were evaluated. For TX power changes, the previous and new power values are recorded per band.
WLAN Controllers
An entry in the WLAN controllers scaffold defines a piece of wireless equipment with which the rXg will communicate for the purpose of effecting dynamic VLAN changes when necessary due to a policy shift for a device on the network.
When a device's VLAN assignment has changed due to a policy shift, the rXg will connect to the WLAN controller associated with the device's RADIUS realm via the protocol specified in the configuration, and force a disconnect/reconnect, which will reinitiate the RADIUS authentication process, thereby resulting in the new VLAN assignment being applied to the client device.
The name field is an arbitrary string descriptor used only for administrative identification. Choose a name that reflects the purpose of the record. This field has no bearing on the configuration or settings determined by this scaffold.
The device field specifies the type of equipment being configured. Choose the appropriate option from the supported device types drop-down menu.
Aruba Device Types: When configuring Aruba wireless equipment, select the appropriate device type based on your deployment:
| Device Type | Description |
|---|---|
| ArubaOS | Aruba Mobility Master or Mobility Controller (on-premises controller) |
| Aruba Central | Aruba Central cloud management platform |
| Aruba IAP | Aruba Instant Access Point (standalone or virtual controller mode) |
The host field specifies the IP address or hostname of the WLAN controller for API and management communication.
The username and password fields provide the credentials for authenticating API connections to the controller. These must match the administrative account configured on the controller.
The enable telemetry boolean completely controls whether the rXg will attempt to receive and process telemetry data at all.
The Instrument from Telemetry checkbox results in the rXg using telemetry data to instrument the WAPs and Wireless Clients for this controller, instead of the regular API integration. If telemetry is enabled, the rXg will always instrument radio and client data, regardless of whether instrument from telemetry is enabled.
Enabling the Monitoring checkbox results in the rXg attempting to import and synchronize WAPs from the device, as well as perform ping monitoring of the Infrastructure Device itself, and collect CPU and Memory statistics, where possible.
The SNMP community field specifies the SNMP community string that will be used when attempting to gather CPU and/or Memory information, or WAP data from WLAN controllers where an API is not available.
The NB portal password and NB portal usernames are used when executing API calls against RUCKUS's northbound portal interface. These must correlate with what is configured in the controller.
The Telemetry username and Telemetry password are used when authenticating an MQTT session with this WLAN Controller. These must correlate with what is configured in the controller's northbound data streaming subscriptions.
Vendor Specific Configuration Examples
For Infrastructure Devices which support configuration management, the Config sync status column contains a link that allows the operator to access bootstrap instructions and enable synchronization.
When enabling automatic WLAN controller configuration management, the operator should ensure that the timezone and country code set in the Device Options scaffold are accurate as they will be used when configuring wireless infrastructure.
After initial bootstrapping and network connectivity is established, the operator may download a running configuration backup or compare the current running configuration to the expected configuration, based on the associated configuration elements. If changes are needed, they may be pushed to the controller. After successfully synchronizing manually the first time, future configuration changes will be pushed to the device whenever relevant configuration changes are made in the database.
Vendor Specific Configuration Examples
The note field is a place for the administrator to enter a comment. This field is purely informational and has no bearing on the configuration settings.
Piglet Sensor
Piglets are small, low-cost, Raspberry Pi-based network sensors that can be used for monitoring network performance from the client's perspective. They support ping tests, speed tests, and WLAN-scoping to validate wireless network quality. Adding a WLAN Controller with a device type of "Piglet" and a host address of "127.0.0.1" in this scaffold will allow the Piglet sensors to discover the rXg for adoption. See Piglet Sensors for complete documentation.
WLANs
An entry in the WLANs scaffold defines a wireless network that you wish to deploy on a supported WLAN controller.
The SSID field specifies the WLAN SSID that will be broadcast and visible to users.
The Hidden SSID checkbox prevents the SSID from being broadcast in beacon frames. Clients must know the network name to connect.
The Encryption selection specifies the encryption algorithm which will be used for this WLAN: - None: Open network with no encryption - WEP 128-bit: Legacy encryption (not recommended for security reasons) - WPA2: AES-CCMP encryption (IEEE Std 802.11i) - WPA3: Enhanced encryption with SAE authentication (IEEE Std 802.11-2020) - WPA2/WPA3: Transitional mode supporting both WPA2 and WPA3 clients - WPA Mixed: Supports both TKIP and AES clients (legacy compatibility) - OWE: Opportunistic Wireless Encryption for open networks with encryption
The Authentication selection specifies the type of authentication that should take place in order for users to join the network: - None: No authentication required - MAC Authentication Bypass: RADIUS authentication using client MAC address - Multiple PSK (DPSK): Dynamic Pre-Shared Key allowing unique keys per device or account - IEEE Std 802.1X EAP: Enterprise authentication using RADIUS and EAP - IEEE Std 802.1X EAP-PSK: Combines EAP authentication with a pre-shared key - IEEE Std 802.1X EAP-MAC: Combines EAP authentication with MAC-based fallback
In order for Dynamic VLANs to be assigned, authentication must utilize MAC Authentication Bypass or one of the IEEE Std 802.1X methods.
The Management Frame Protection (MFP) selection controls IEEE Std 802.11w protection for management frames: - Disabled: No management frame protection - Capable: Clients may use MFP if supported - Required: Only clients supporting MFP can connect
The Default VLAN field specifies the VLAN that users should be placed into, assuming it is not overridden by Dynamic VLAN behavior.
The PSK (Pre-Shared Key) field specifies the network password when using WPA2, WPA3, or WPA Mixed encryption without IEEE Std 802.1X authentication. The key must be 8-63 characters for ASCII or 64 hexadecimal characters. This field is not used when encryption is set to None or when using Multiple PSK (DPSK) authentication.
The Hotspot 2.0 checkbox enables Passpoint/Hotspot 2.0 functionality for this WLAN. When enabled, authentication is locked to IEEE Std 802.1X EAP and encryption to WPA2. A Hotspot WLAN Profile must be associated to configure the Passpoint parameters.
Radio Band Enablement
The Enabled checkboxes allow the operator to enable or disable a WLAN for a particular radio across all profiles where it is utilized: - Enabled 2.4 GHz: Enable the WLAN on 2.4 GHz radios - Enabled 5 GHz Lower: Enable the WLAN on lower 5 GHz channels (UNII-1) - Enabled 5 GHz Upper: Enable the WLAN on upper 5 GHz channels (UNII-2/3) - Enabled 6 GHz: Enable the WLAN on 6 GHz radios (Wi-Fi 6E)
Client Isolation
The Client Isolation checkbox prevents wireless clients on this WLAN from communicating directly with each other. Traffic between clients is blocked at the WAP level, forcing all communication through the network gateway. This is useful for guest networks and hotspot deployments.
Tunnel Configuration
The Tunnel checkbox instructs WAPs to build a tunnel to the controller or some other location, depending on the vendor, instead of locally bridging the client traffic.
The GRE Tunnel Type selection specifies the tunnel encapsulation method: - Ruckus GRE: Standard Ruckus GRE tunneling - SoftGRE: Software-based GRE tunneling compatible with rXg
The GRE Tunnel Gateway IP field specifies the destination IP address for GRE tunneled traffic. This is typically the rXg or another concentrator device.
The IPsec Option association allows selecting an IPsec configuration for encrypting tunnel traffic.
Application Examples: - RUCKUS SoftGRE Tunnel
RADIUS and VLAN Configuration
Dynamic VLANs require the association of at least one VLAN record which is tied to a RADIUS Realm.
The RADIUS Accounting checkbox instructs the WAP to send accounting information to the RADIUS server as users join, use, and leave the network.
The Access Point Profiles selection specifies which Profiles should include this WLAN.
Hotspot WLAN Profiles
An entry in the Hotspot WLAN Profiles scaffold becomes available for selection on a WLAN which has the hotspot20 boolean enabled, and is used to configure the Hotspot 2.0 parameters of a WLAN. The WLAN profile is comprised of several components:
- Operator Profile: Specifies the descriptive information about the operator of the wireless network
- Identity Providers: Specifies the identity providers that will be used to authenticate users
- Home Organization IDs: Specifies the home service provider network.
- Public Land Mobile Networks (PLMN): Used to match mobile network identities (e.g., SIM-based authentication). This allows for configuration of the MCC / MNC (Mobile Country Code and Mobile Network Code) that define the PLMN.
- Hotspot RADIUS Realms: Specifies RADIUS realms used to route authentication requests.
- EAP Methods: Defines authentication methods used for client authentication.
- Authorization Settings: Used to apply access policy or vendor-specific extensions.
An example config template that creates a Hotspot WLAN Profile is as follows:
---
HsWlanProfile:
- name: OpenRoaming Profile
internet_option: true
access_network_type: FREE_PUBLIC
ipv4_address_type: SINGLE_NATED_PRIVATE
ipv6_address_type: UNAVAILABLE
hs_operator_profile:
name: OpenRoaming Operator
domain_name: rgnets.com
friendly_name: RG Nets
hs_identity_providers:
- name: OpenRoaming Provider
hs_home_oids:
- name: WBA OpenRoaming RCOI
oi: 5a03ba0000
hs_radius_realms:
- name: OpenRoaming-Realm
encoding: RFC4282
hs_eap_methods:
- name: EAP-1
eap_type: EAP_TTLS
hs_auth_settings:
- name: Auth-1
auth_info: Non
auth_type: MSCHAPV2
WAP Profiles
An entry in the Access Point Profiles scaffold defines a set of common configuration parameters to be applied to a set of WAPs.
The Default checkbox indicates that this Profile will be the default Profile for this Infrastructure Device. Any WAP which has not been explicitly assigned to a Profile will be placed into this Profile.
The WLANs association defines which WLANs will be broadcast on WAPs that fall into this Profile.
The Access Points association allows the operator to explicitly assign a profile to one or more WAPs. Selected WAPs which do not belong to the Infrastructure Device that the Profile is assigned to will be automatically deselected upon saving.
The Management VLAN field specifies which VLAN the WAPs in this profile will use to attempt to obtain an IP address via DHCP.
The 2.4 GHz Data Rates and 5 GHz Data Rates fields allow the operator to restrict the types of devices that may join the network to only those supporting a specific subset of data rates. By default, IEEE Std 802.11b rates are disabled to improve network performance.
The 2.4 GHz Antenna Gain and 5 GHz Antenna Gain fields allow the operator to specify antenna gain values (in dBi) that will be applied to WAPs which use external antennas.
The Outdoor WAPs checkbox instructs the system to enable or disable outdoor power and channel tables for the radios in order to be compliant with regulatory rules.
Wireless Access Points
Entries in the Access Points scaffold are created automatically by enabling the Monitoring checkbox on a supported wireless controller's Infrastructure Device. Status and statistics are gathered on an ongoing basis via API and/or SNMP.
After creation, the operator may reassign a WAP's Access Point Profile in order to control the WLAN and radio settings applied to it. WAP details are updated on a regular basis via background interaction with the Infrastructure Device.
The Name field displays the WAP's configured name or hostname.
The MAC field shows the WAP's primary MAC address, used for identification.
The IP field displays the WAP's current IP address.
The Model field indicates the WAP hardware model (e.g., R650, WF189).
The Version field shows the currently installed firmware version.
The Online indicator shows whether the WAP is currently reachable and operational.
The Client Count field displays the number of wireless clients currently connected to this WAP.
Channel Configuration
Each WAP supports channel configuration across three frequency bands: 2.4 GHz, 5 GHz, and 6 GHz.
The Channel fields (channel_24, channel_5, channel_6) display the current operating channel for each band.
The Channel Override fields allow operators to manually specify a channel, overriding automatic channel selection.
The Channel Plan fields show planned channel assignments for scheduled optimization.
Power and Radio Settings
The TX Power fields (tx_power_24, tx_power_5, tx_power_6) control transmit power levels per band.
The LED State field controls the WAP's LED indicators (On, Off, or Blink).
The Syslog Level field configures logging verbosity (1=Alert through 7=Debug).
Geographic and Floor Plan Integration
The Latitude and Longitude fields store the WAP's geographic coordinates for mapping.
The X and Y fields store floor plan coordinates for indoor positioning.
The Location and Location Notes fields provide human-readable location descriptions.
OpenWiFi Certificate Management
For OpenWiFi WAPs, the Approved checkbox indicates mTLS certificate approval status.
The Certificate field stores the WAP's client certificate for secure communication.
The CSR field contains the Certificate Signing Request for certificate enrollment.
The Firmware Compatibility field specifies the device type string for firmware matching (e.g., cig_wf189).
The GRE Endpoint field allows per-WAP override of the GRE tunnel destination IP address.
WAP Radios
Entries in the Access Point Radios scaffold are created automatically by enabling the Monitoring checkbox on a supported wireless controller's Infrastructure Device. Status and statistics are gathered on an ongoing basis via API and/or SNMP.
Each WAP typically has multiple radios, one per frequency band (2.4 GHz, 5 GHz, and optionally 6 GHz).
The MAC field displays the radio's BSSID (Basic Service Set Identifier).
The Slot ID field identifies the radio slot within the WAP hardware.
The Access Point association links the radio to its parent WAP.
Current Radio Status
The Current Channel field shows the channel the radio is currently operating on.
The Current Channel Width field displays the current channel bandwidth (20, 40, 80, or 160 MHz).
The Current TX Power field shows the current transmit power level in dBm.
The Current Gain field displays the current antenna gain setting.
The Current HW Mode field indicates the active IEEE Std 802.11 mode (a/b/g/n/ac/ax).
The Current Client Count field shows how many clients are connected via this radio.
The Current Frequencies field lists the frequencies in use, relevant for bonded channels.
Radio Capabilities
The Available Channels field lists channels the radio hardware supports.
The Available HW Modes field shows supported IEEE Std 802.11 modes.
Monitor Mode
The Monitor Mode checkbox enables the radio for passive scanning and testing rather than serving clients. When enabled, the radio can be associated with Ping Targets and Speed Tests for wireless network diagnostics.
Note: Monitor mode cannot be enabled when the radio has active Ping Target or Speed Test associations in client-serving mode.
Radio Profile Association
The Access Point Radio Profile association allows assigning a radio profile to control channel selection and hardware mode preferences.
Metrics and Neighbor Detection
WAP Radios collect ongoing metrics including channel utilization, received signal strength, and transmit/receive statistics.
The system tracks Neighbor BSSIDs detected by each radio, enabling interference analysis and channel optimization based on nearby wireless networks.
WAP Radio Profiles
Entries in the Access Point Radio Profiles scaffold can be assigned to WLANs in the Access Point Profiles scaffold.
The HW Mode Preference field is a comma-separated listing of supported radio types: - A: 5 GHz, IEEE Std 802.11a - AC: 5 GHz, IEEE Std 802.11ac - B: 2.4 GHz, IEEE Std 802.11b - G: 2.4 GHz, IEEE Std 802.11g
The order matters, as HW Modes are preferred as listed, left to right. The default preference is "A,G,B".
The Selected Channels field is a list of channels associated with the HW Mode Preference. The list can be a comma-separated list of individual channels, or ranges of channels (e.g., '1,2,3,4,5,6,7,8,10,11' can be represented as '1-11'). Valid 2.4 GHz channels are 1-11. Valid 5 GHz channels include 36-40, 44-48, 149-153, and 157-161.
The Default checkbox marks this profile as the default for radios without explicit assignment.
WAP Zones
An entry in the Access Point Zones scaffold defines the configuration common throughout this site.
Entries in the Access Point Zones scaffold are populated automatically after enabling the monitoring checkbox for a supported WLAN controller Infrastructure Device.
Channel Configuration
The Enable DFS channels checkbox instructs the WAPs in this WAP Zone to broadcast at the 5 GHz frequencies that are generally reserved for radars. Disabling the Dynamic Frequency Selection (DFS) prevents the use of 5 GHz channels 52-140.
The 5 GHz Channel Width and 6 GHz Channel Width options configure channel bandwidth for their respective bands. Valid widths include Auto, 20 MHz, 40 MHz, 80 MHz, 80+80 MHz, 160 MHz, and 320 MHz (6 GHz only).
The Channels Disabled fields (channels_disabled_24, channels_disabled_5, channels_disabled_6) allow excluding specific channels from use within each band.
Auto Channel Selection
The Auto Channel Selection fields (per band) control automatic channel assignment: - Disabled: Manual channel assignment only - Background Scanning: Periodic background scans to optimize channels (not available for 6 GHz) - ChannelFly: Dynamic channel hopping based on real-time RF conditions
When ChannelFly is enabled, the Channel Optimization Hour field specifies the hour (0-23) when channel optimization occurs.
Radio Mode Selection
The Radio Mode fields (radio_mode_2g, radio_mode_5g, radio_mode_6g) configure the IEEE Std 802.11 mode per band: - HT: High Throughput (IEEE Std 802.11n) - VHT: Very High Throughput (IEEE Std 802.11ac) - HE: High Efficiency (IEEE Std 802.11ax / Wi-Fi 6) - EHT: Extremely High Throughput (IEEE Std 802.11be / Wi-Fi 7)
Transmit Power Control
The TX Power fields (tx_power_24, tx_power_5, tx_power_6) control transmit power per band, with values ranging from Full (0) to Minimum (-99), expressed in dB reduction from maximum power.
The Auto Cell Sizing checkboxes (per band) enable automatic transmit power adjustment. When enabled, TX Power must be set to Full, and background scanning must be enabled.
The Background Scan checkboxes (per band) enable periodic RF environment scanning for channel and power optimization.
Geographic and Regional Settings
The Country Code field sets the regulatory domain (e.g., US, GB, DE), which determines available channels and power limits.
The Time Zone field configures the zone's local time zone for scheduling and logging.
The Latitude and Longitude fields store the zone's geographic coordinates.
WAP Authentication
The AP Login Name and AP Login Password fields configure credentials for WAP management access. Password requirements vary by controller type.
Advanced Features
The RRM (Radio Resource Management) checkbox enables automatic radio resource optimization.
The Smart Monitor checkbox enables advanced monitoring features.
The Proxy AAA Requests checkbox controls whether authentication requests are proxied through the controller.
The Log Connection Failures checkbox enables logging of client connection failures for troubleshooting.
Client Experience Monitoring
The Client Experience Pings checkbox enables ping-based client connectivity monitoring.
The Underlay Gateway Pings checkbox enables monitoring of the network path to the gateway.
The Client Experience Ping Targets field specifies IP addresses or hostnames for client connectivity testing.
Switch Ports (WAP Connections)
The Switch Ports scaffold on the Wireless page displays a filtered view of switch ports that have an associated WAP. This allows operators to quickly identify which physical switch ports WAPs are connected to across the network infrastructure.
Each entry shows the switch port details along with its associated WAP, providing visibility into the physical network topology of the wireless infrastructure. The Access Point column displays the WAP connected to each port.
The Infrastructure Device column indicates which switch or infrastructure device the port belongs to. The Port field shows the physical port identifier on that device.
Additional fields include Link Speed showing the current negotiated speed, Speed/Duplex for the configured port settings, and Switch Port Profile if a port profile has been assigned.
This view is particularly useful for troubleshooting connectivity issues, verifying WAP installations, and auditing the physical network infrastructure supporting the wireless deployment.
Device Firmwares
The Device Firmwares scaffold manages firmware images for OpenWiFi WAPs. Firmware can be uploaded directly or downloaded from a remote URL for distribution to WAPs.
The Name field provides a descriptive identifier for the firmware image. This is automatically populated from the filename if not specified.
The Version String field displays the firmware version extracted from OpenWiFi firmware packages. This is automatically populated when an OpenWiFi firmware file is processed.
The Firmware Compatibility field specifies the device type this firmware is compatible with (e.g., cig_wf189, edgecore_eap101). This field is used to match firmware to compatible WAPs and is required for OpenWiFi firmware.
The Status column indicates the current state of the firmware record: - init: Initial state when the record is created - process: Firmware is being downloaded or processed - success: Firmware has been successfully downloaded and verified - failed: An error occurred during download or processing
The MD5 and SHA256 fields display the cryptographic hashes of the firmware file, used to verify integrity during distribution to WAPs.
The Default checkbox marks this firmware as the global default for all WAPs that don't have a specific firmware assignment.
The Default for Firmware Compatibility checkbox marks this firmware as the default for WAPs matching the specified firmware compatibility string. Only one firmware per compatibility type can have this enabled.
The Infrastructure Devices association links this firmware to specific WLAN controllers that should be aware of and distribute this firmware.
Firmware can be acquired from the RG Nets firmware distribution server or uploaded manually. When creating a new firmware record, provide either a Remote URL to download from, or upload a file directly. For authenticated downloads, Username and Password fields are available.
Infrastructure Softwares
The Infrastructure Softwares scaffold manages firmware images for infrastructure devices such as switches and PON equipment. This is distinct from the Device Firmwares scaffold which is specific to OpenWiFi WAPs.
The Name field provides a descriptive identifier for the firmware image.
The Device field specifies the type of infrastructure device this firmware is for (e.g., nokiamf_altiplano, edgecoreswitch, catalystiosxeswitch).
The Firmware Type field is used for Nokia PON devices to distinguish between OLT (Optical Line Terminal) and ONT (Optical Network Terminal) firmware. Valid values are: - OLT: Firmware for the central office equipment - ONT: Firmware for customer premises equipment
The Version field displays the firmware version string.
The File Name field shows the name of the firmware file. This is automatically populated from the uploaded file or extracted from the download URL.
The URL field allows specifying a remote URL to download the firmware from. Either a URL or a direct file upload must be provided when creating a new record.
The Status column indicates: - pending: Firmware is queued for download - exists: Firmware file has been downloaded and is available locally
The Model Pattern field is used for Nokia ONT firmware to specify which ONT models this firmware applies to.
The Default Firmware checkbox marks this as the default firmware for automatic upgrades of matching devices.
The Infrastructure Devices association links this firmware to specific infrastructure devices (for OLT firmware).
The Media Converters association links this firmware to specific ONT devices (for ONT firmware).
The Perform Upgrades option, when enabled during save, triggers automatic firmware upgrades on all associated and matching devices.
Infrastructure Device Users
The Infrastructure Device Users scaffold defines user accounts that are pushed to managed infrastructure devices. This allows centralized management of device access credentials across the network infrastructure.
The Username field specifies the login username for the account. This must be unique within each associated infrastructure device and cannot be reserved names like 'admin', 'super', or 'sp-admin'.
The Password field stores the encrypted password for the account. Passwords are securely encrypted in the database.
The Privilege Level field determines the access level for the user: - Read/Write: Full administrative access to the device - Port Read/Write: Access limited to port configuration - Read Only: View-only access to device configuration
The Login Role field specifies an optional role identifier used by some device types for role-based access control.
The Expires At field allows setting an expiration date/time for the account, after which the credentials will no longer be valid.
The Infrastructure Devices association specifies which devices this user account should be pushed to. When the account is created or modified, the credentials are automatically synchronized to all associated devices.
The Note field provides space for administrative comments about the account.
When an Infrastructure Device User is created, modified, or deleted, the rXg automatically triggers a configuration sync to push the updated credentials to all associated infrastructure devices.
Vendor-Specific Wireless Controller Configurations
- Adtran vWLAN
- Aruba Wireless
- Cambium / cnMaestro
- Extreme WiNG
- OpenWiFi
- Piglet Sensors
- Ruckus vSZ
- TP-Link Omada
Adtran vWLAN
Deploy vWLAN controller in VMware.
On windows machine navigate to ESXI host and download the ova file from the datastore. Storage-->Lab Files-->Browse Datastore. Download the vWLAN-X-X-X.ova file.
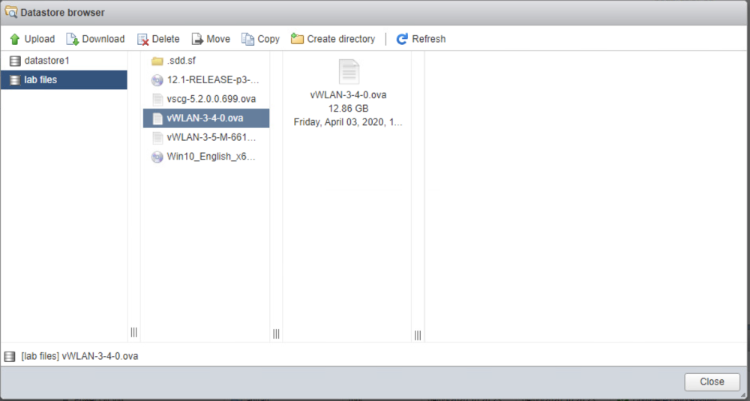
Create new virtual machine, select "Deploy a virtual machine from an OVF or OVA file".
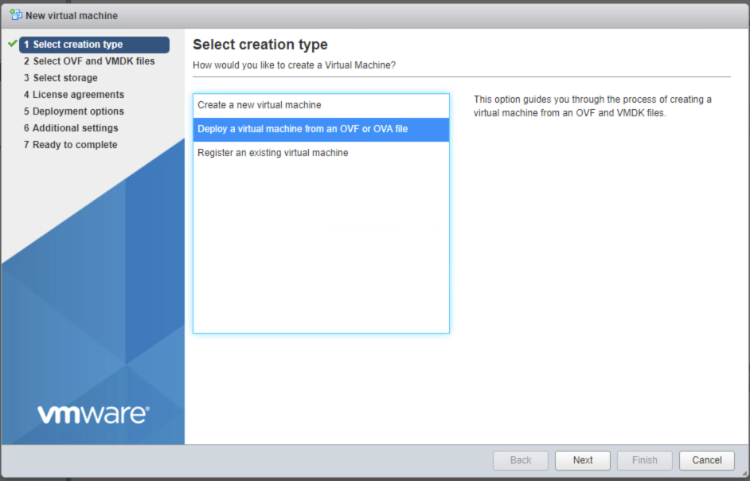
Give the vm a name, click on "Click to select files or drag/drop" and select the ova file, click next.

Select datastore1 (should be selected by default), click next.

Deployment options network mappings: VM Network change to VM Lan Network, leave the rest default and click next.
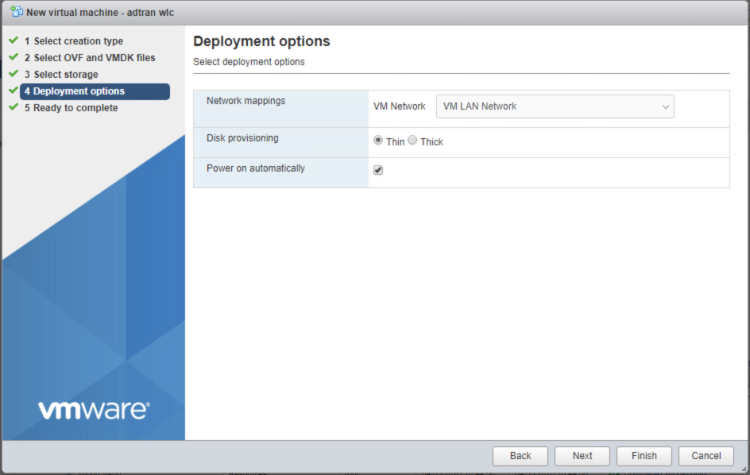
Click Finish, and wait for the VM to be deployed.
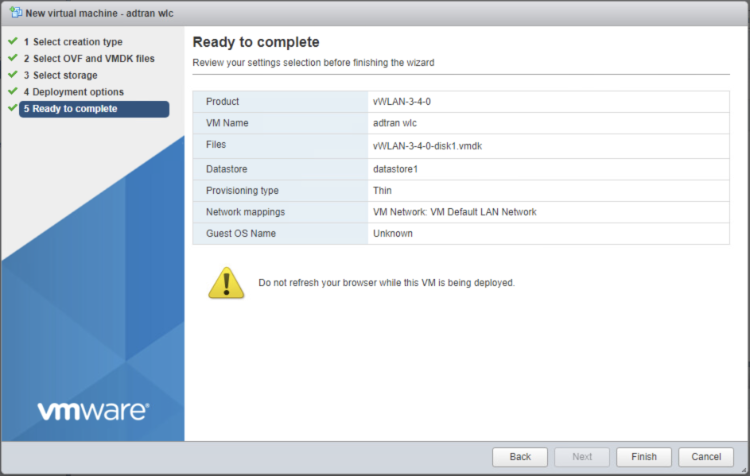

In ESXi click on the adtran wlc VM to get IP address it received via DHCP from the rXg.
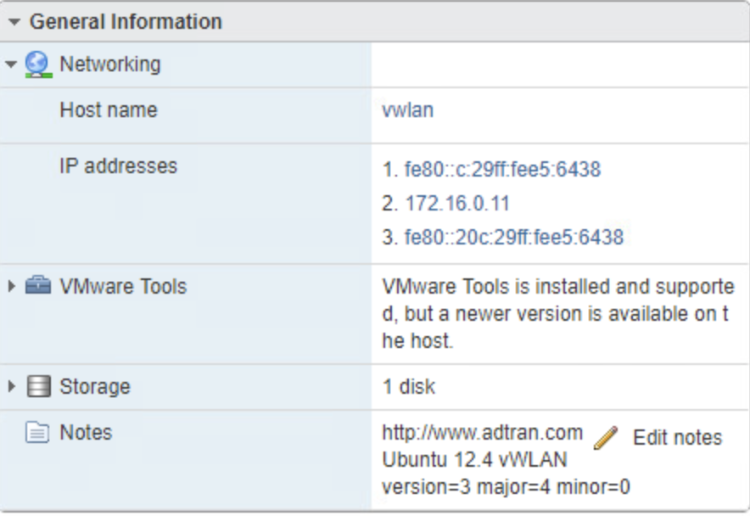
Access the vWLAN, use system on the mgmt lan, OR create virtual host for initial access remotely. Default username/password for Adtran WLC is [email protected]/blueblue. Set a static IP address to 172.16.0.5 by navigating to Configuration-->Network Interfaces-->Public. Uncheck DHCP and change the fields to the correct values, and click update network interface.
| Field | Value |
|---|---|
| Address | 172.16.0.5 |
| Netmask | 255.255.255.0 |
| Gateway | 172.168.0.1 |
| DNS 1 | 172.16.0.1 |
| DNS 2 | 8.8.8.8 |
| Hostname | vwlan |
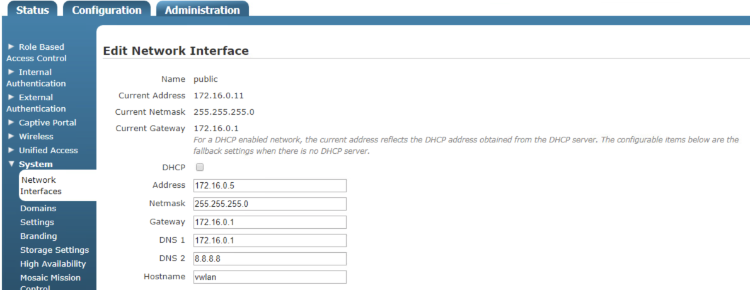
Changes will not take effect until you run the Platform Task in the wlc. Click on Platform Tasks in the upper right corner and run the "Must restart network" task by clicking on it.
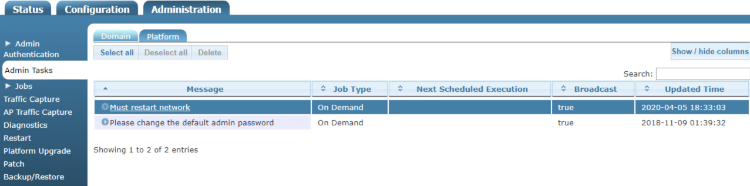
We will now upgrade the WLC navigate to Administration-->Platform Upgrade (Remember to use the new IP address that was configured in the previous step). Click Choose File and select the vWLAN-X-X-X-xxxxxx.img file, click "Run Task" and wait for it to complete.
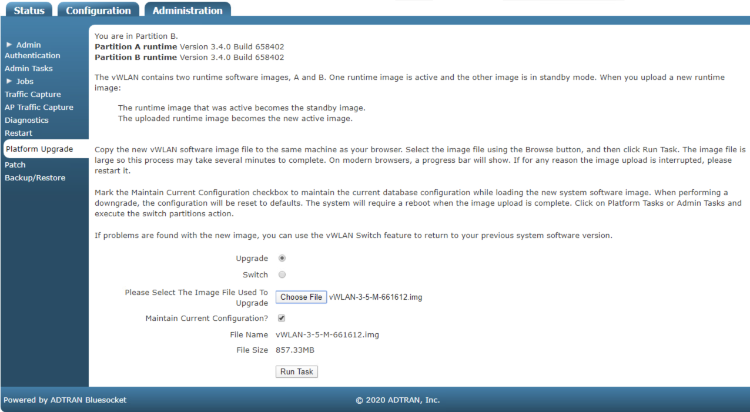
Click on Platform Tasks in the upper right corner and run any pending tasks. Apply license to the WAP by navigating to Configuration-->Wireless-->AP Licenses, click on Upload AP Licenses. Click choose file and select the txt file the license key is saved in, set Domain to default and click Upload licenses.
Create DNS entries for WAP discovery in rXg
Create DNS entries so that the WAP can find the vWLAN. In the rXg navigate to Services-->DNS and create a new DNS Zone. Name: .local Type: master Domain name: local Master hostname: rxg.local. Hostmaster email: hostmaster@local Click on create.
| Field | Value |
|---|---|
| Name | .local |
| Type | master |
| Domain name | local |
| Master hostname | rxg.local. |
| Hostmaster email | hostmaster@local |
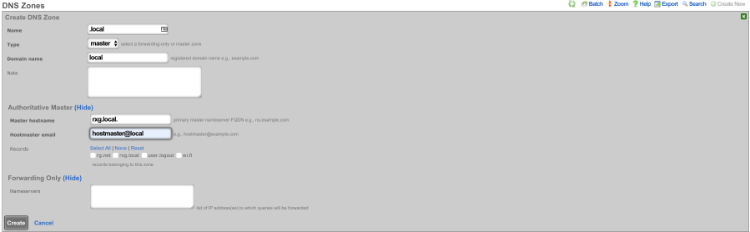
Create a new DNS record, Name: apdiscovery.local Type: A Host: apdiscovery remove dynamic data Data: 172.16.0.5 TTL 60 Zone: .local Click create.
| Field | Value |
|---|---|
| Name | apdiscovery.local |
| Type | A |
| Host | apdiscovery |
| Data | 172.16.0.5 |
| TTL | 60 |
| Zone | .local |
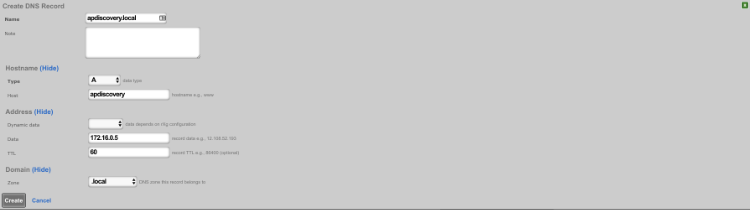
Add Adtran vWLAN controller as infrastructure device.
Add the vWLAN as infrastructure device. Navigate to Network-->Wireless and create a new WLAN Controller. Name: Adtran WLC Type: ADTRAN vWLAN Host: Ip address of vWLAN change username/password accept defaults click create.
| Field | Value |
|---|---|
| Name | Adtran vWLAN |
| Type | ADTRAN vWLAN |
| Host | IP address of vWLAN |
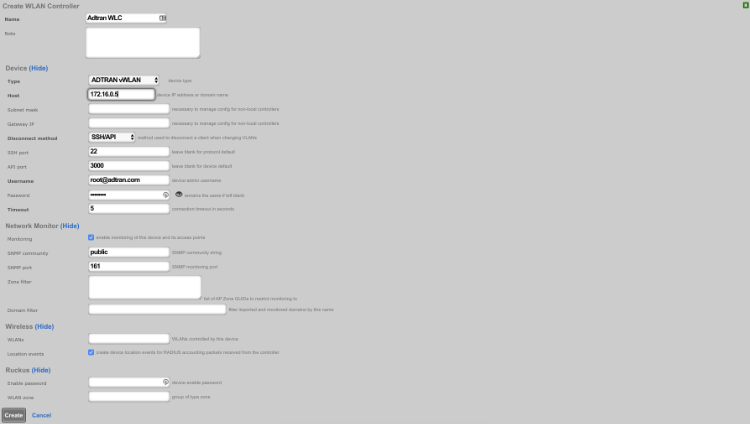
Reload page and click "Sync not enabled"

Click enable config sync
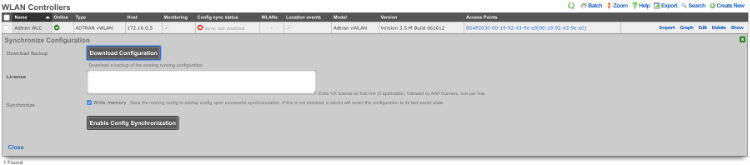
Create WLAN.
Navigate to Network-->Wireless and create new WLAN. Fill out the name with your lab number, select the Adtran controller, fill out SSID, and click create.
| Field | Value |
|---|---|
| Name | lab0X |
| Controller | ADTRAN vWLAN |
| SSID | lab0X |
| Encryption | none |
| Authentication | none |
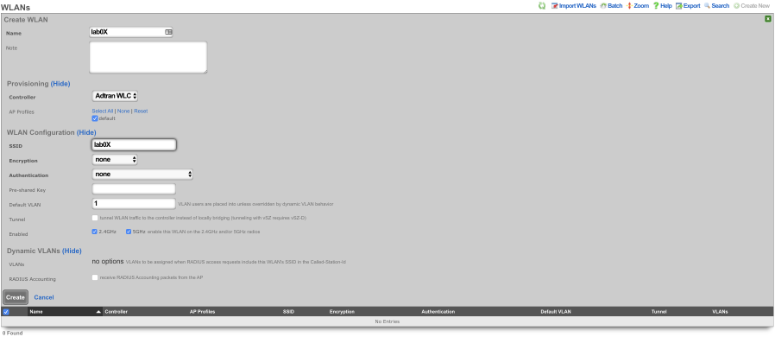
Aruba Wireless
Deploy a Mobility Master (MM)
Follow manufacturer guidelines for deployment, and licensing, of Aruba Networks Mobility Master. MPSK is only available with a MM.
Configure Mobility Master
Locate the MAC address of the Mobility Controller by logging into the MC GUI, or running
show switchinfoat the MC CLI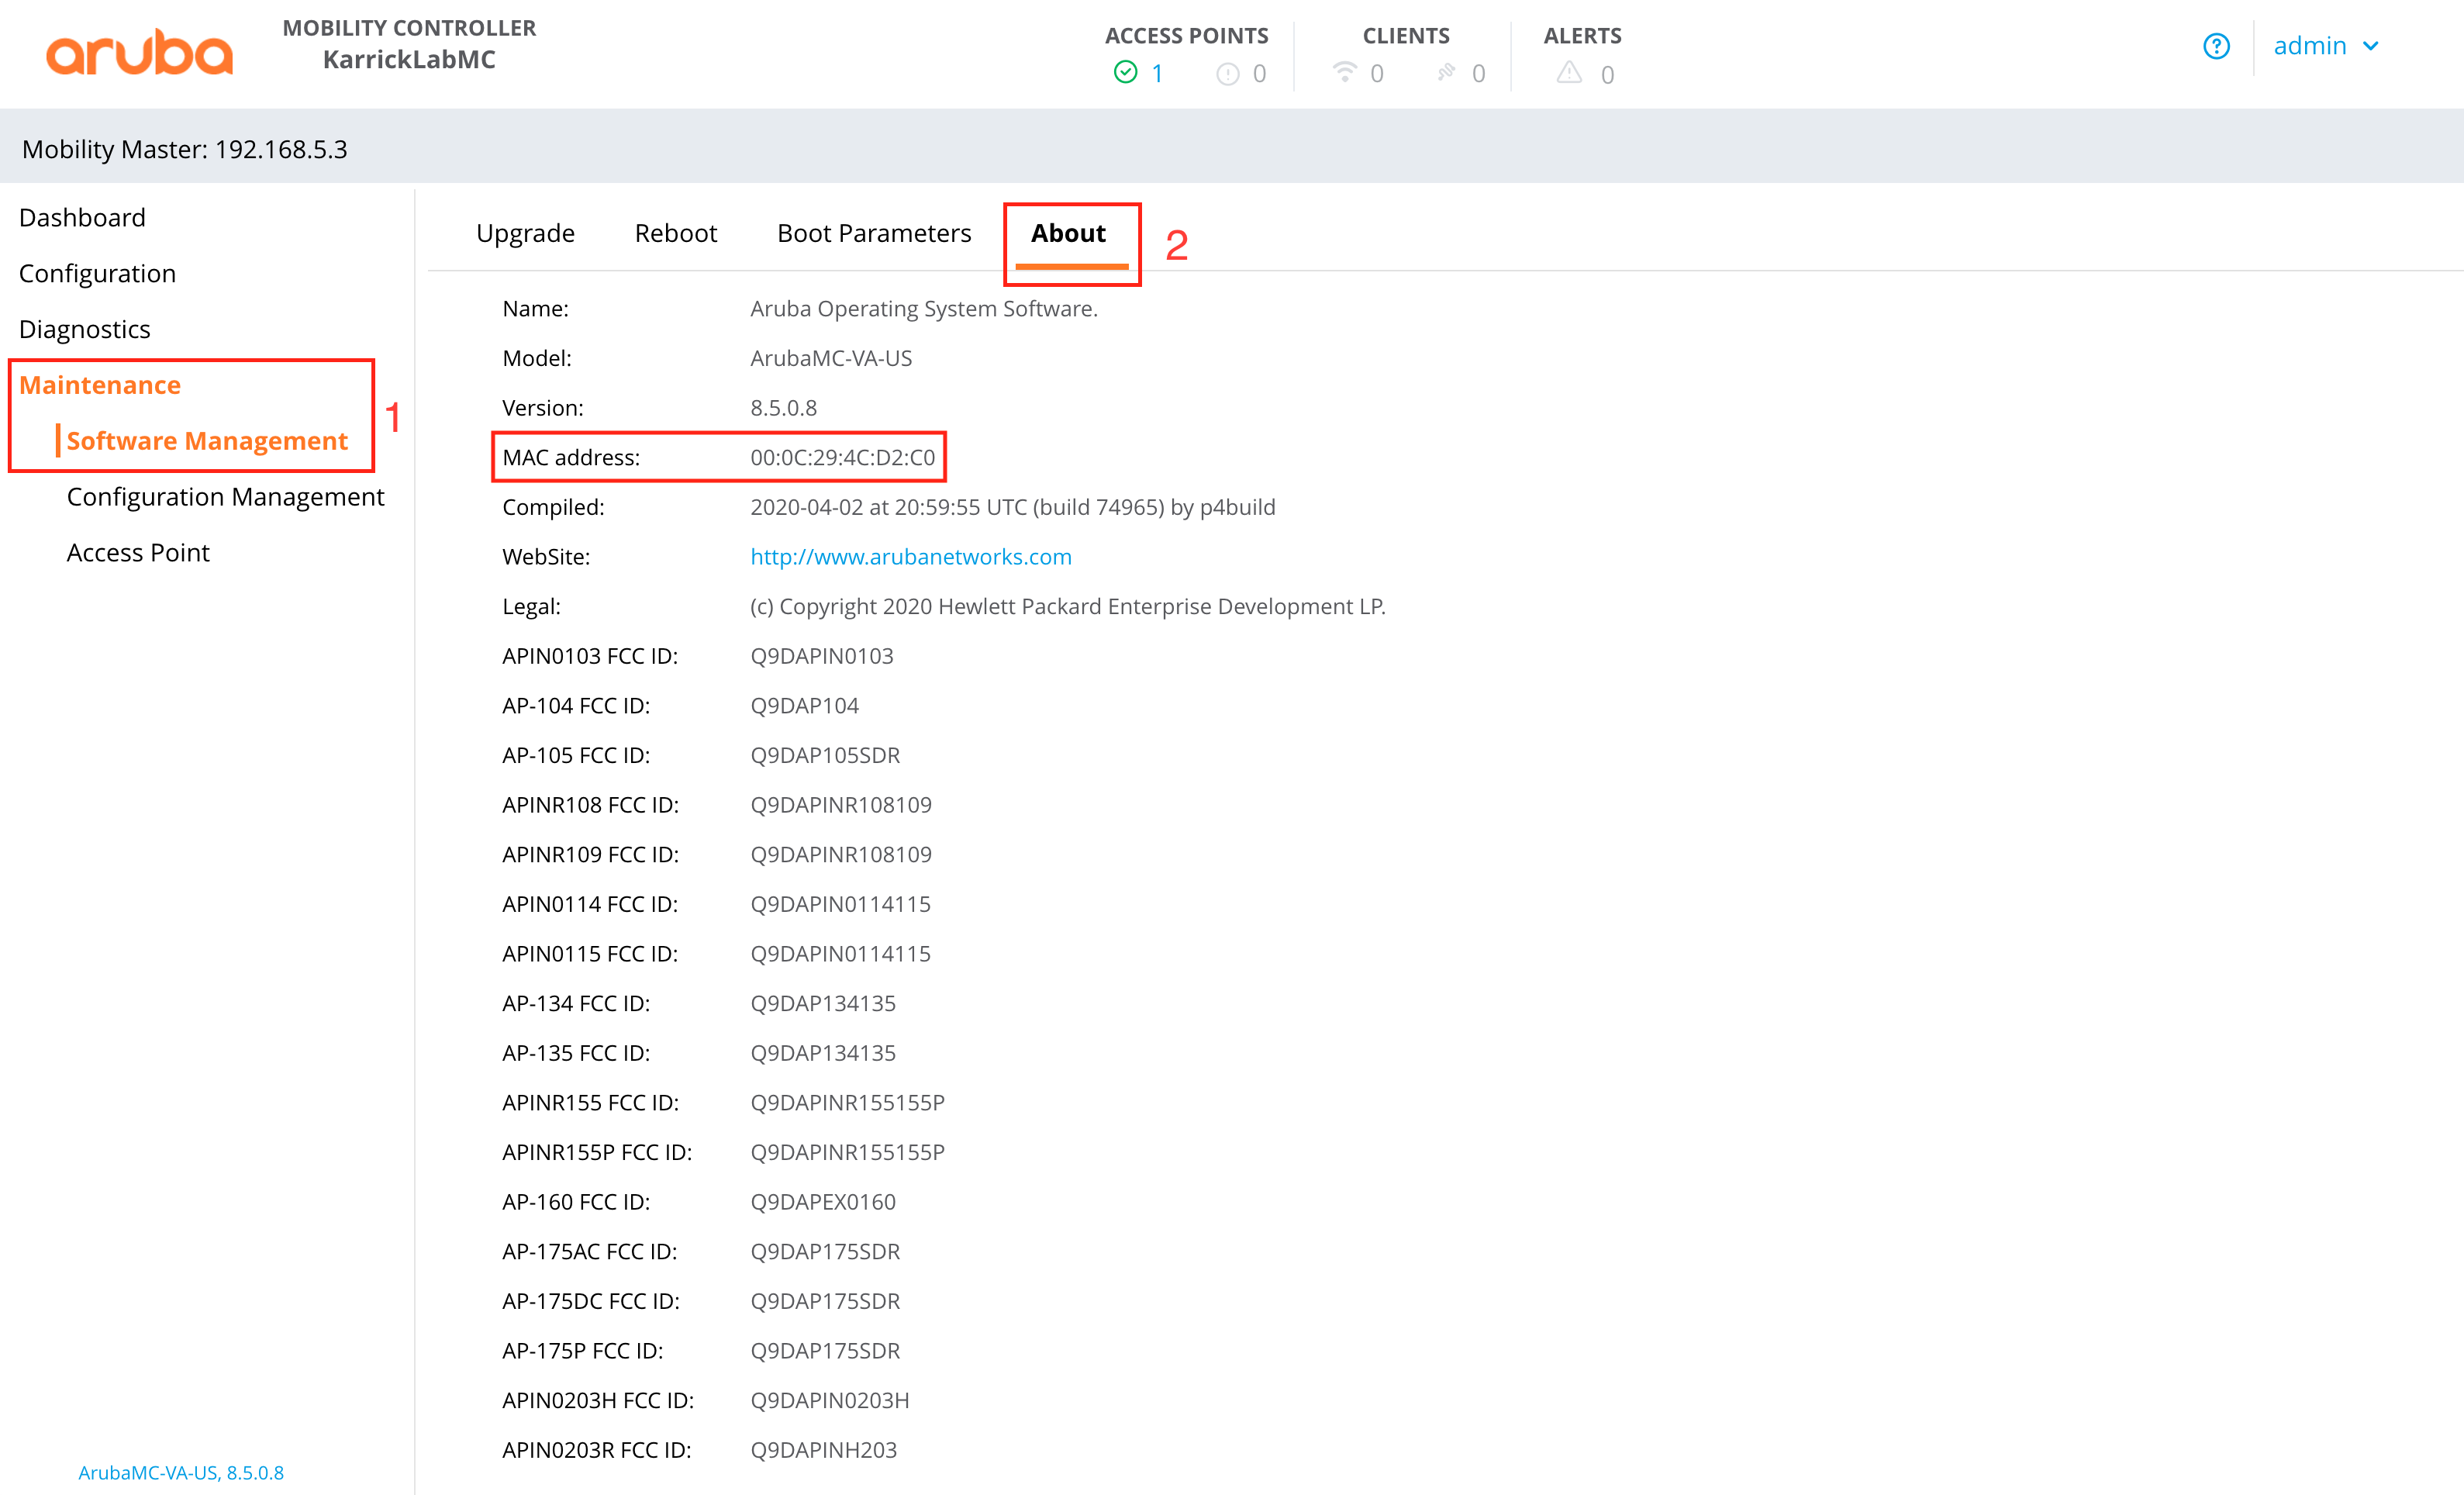
Add a Mobility Controller (MC) to the Managed Network Section.
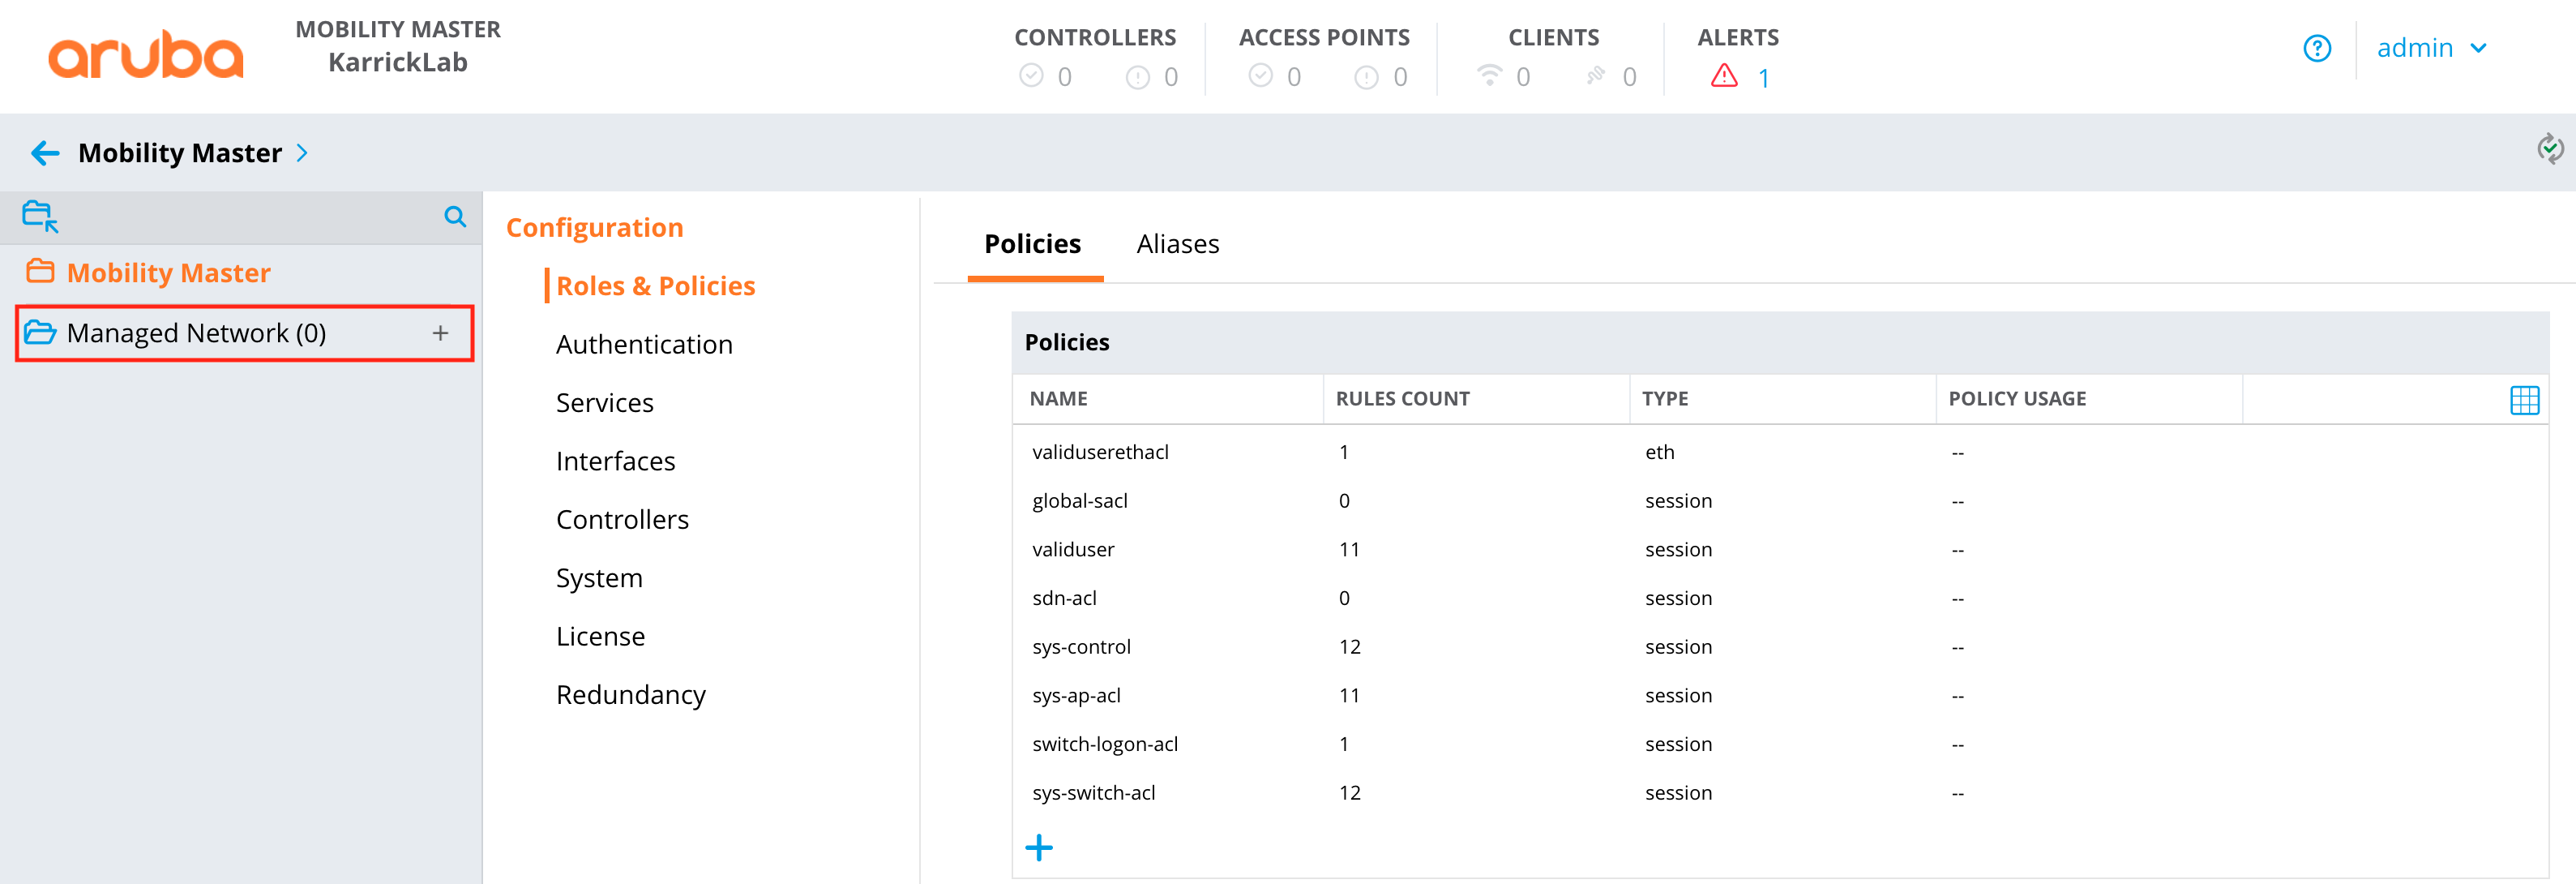
Add the IP address of the MC to the controller definition.
Add the MAC from the MC to the controller definition.
Choose the appropriate device type for the controller definition.
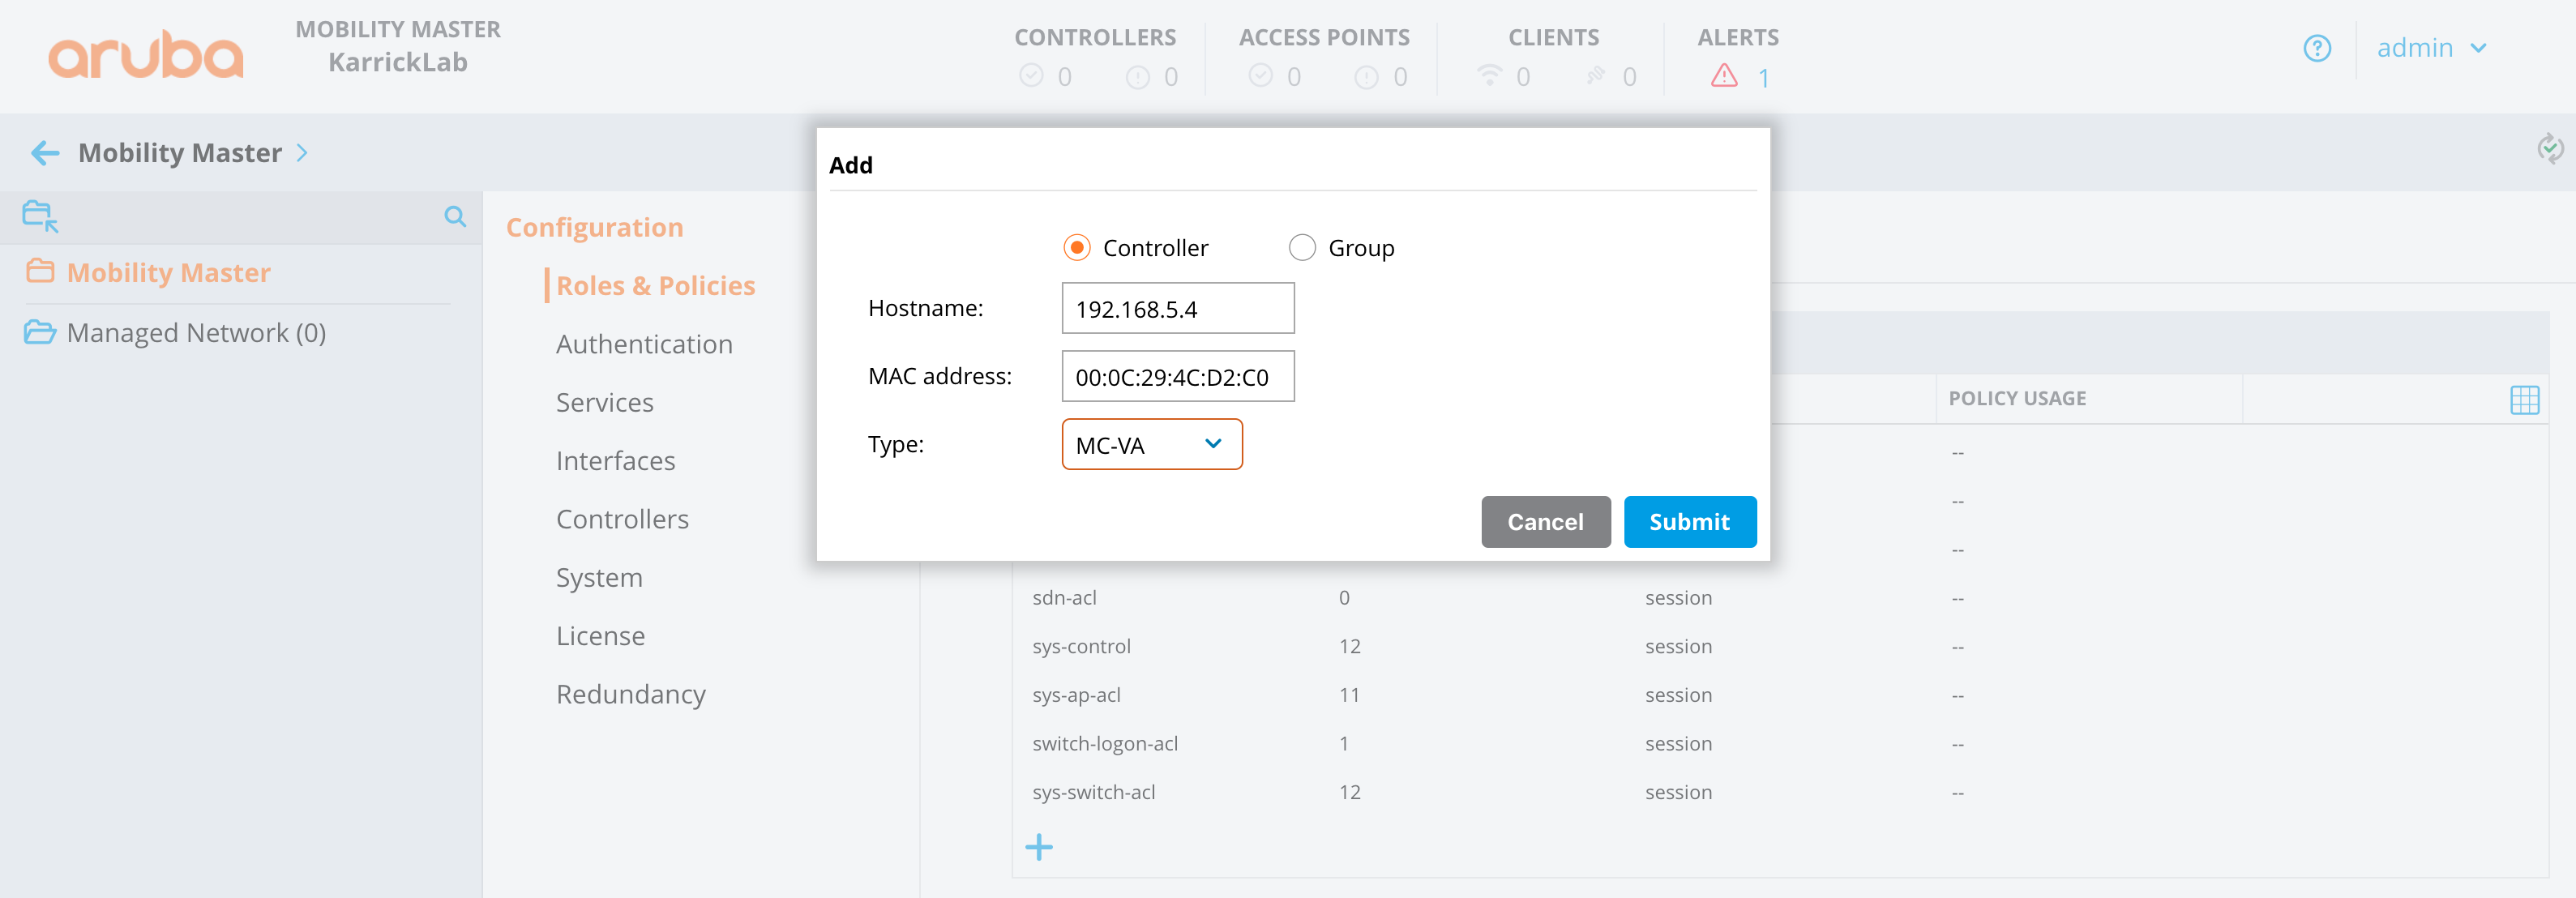
Click the "Mobility Master" hierarchy level of the left panel, then Configuration -> Controllers.
Create a new controller IPSec key value. (This will be used in the MC deployment)
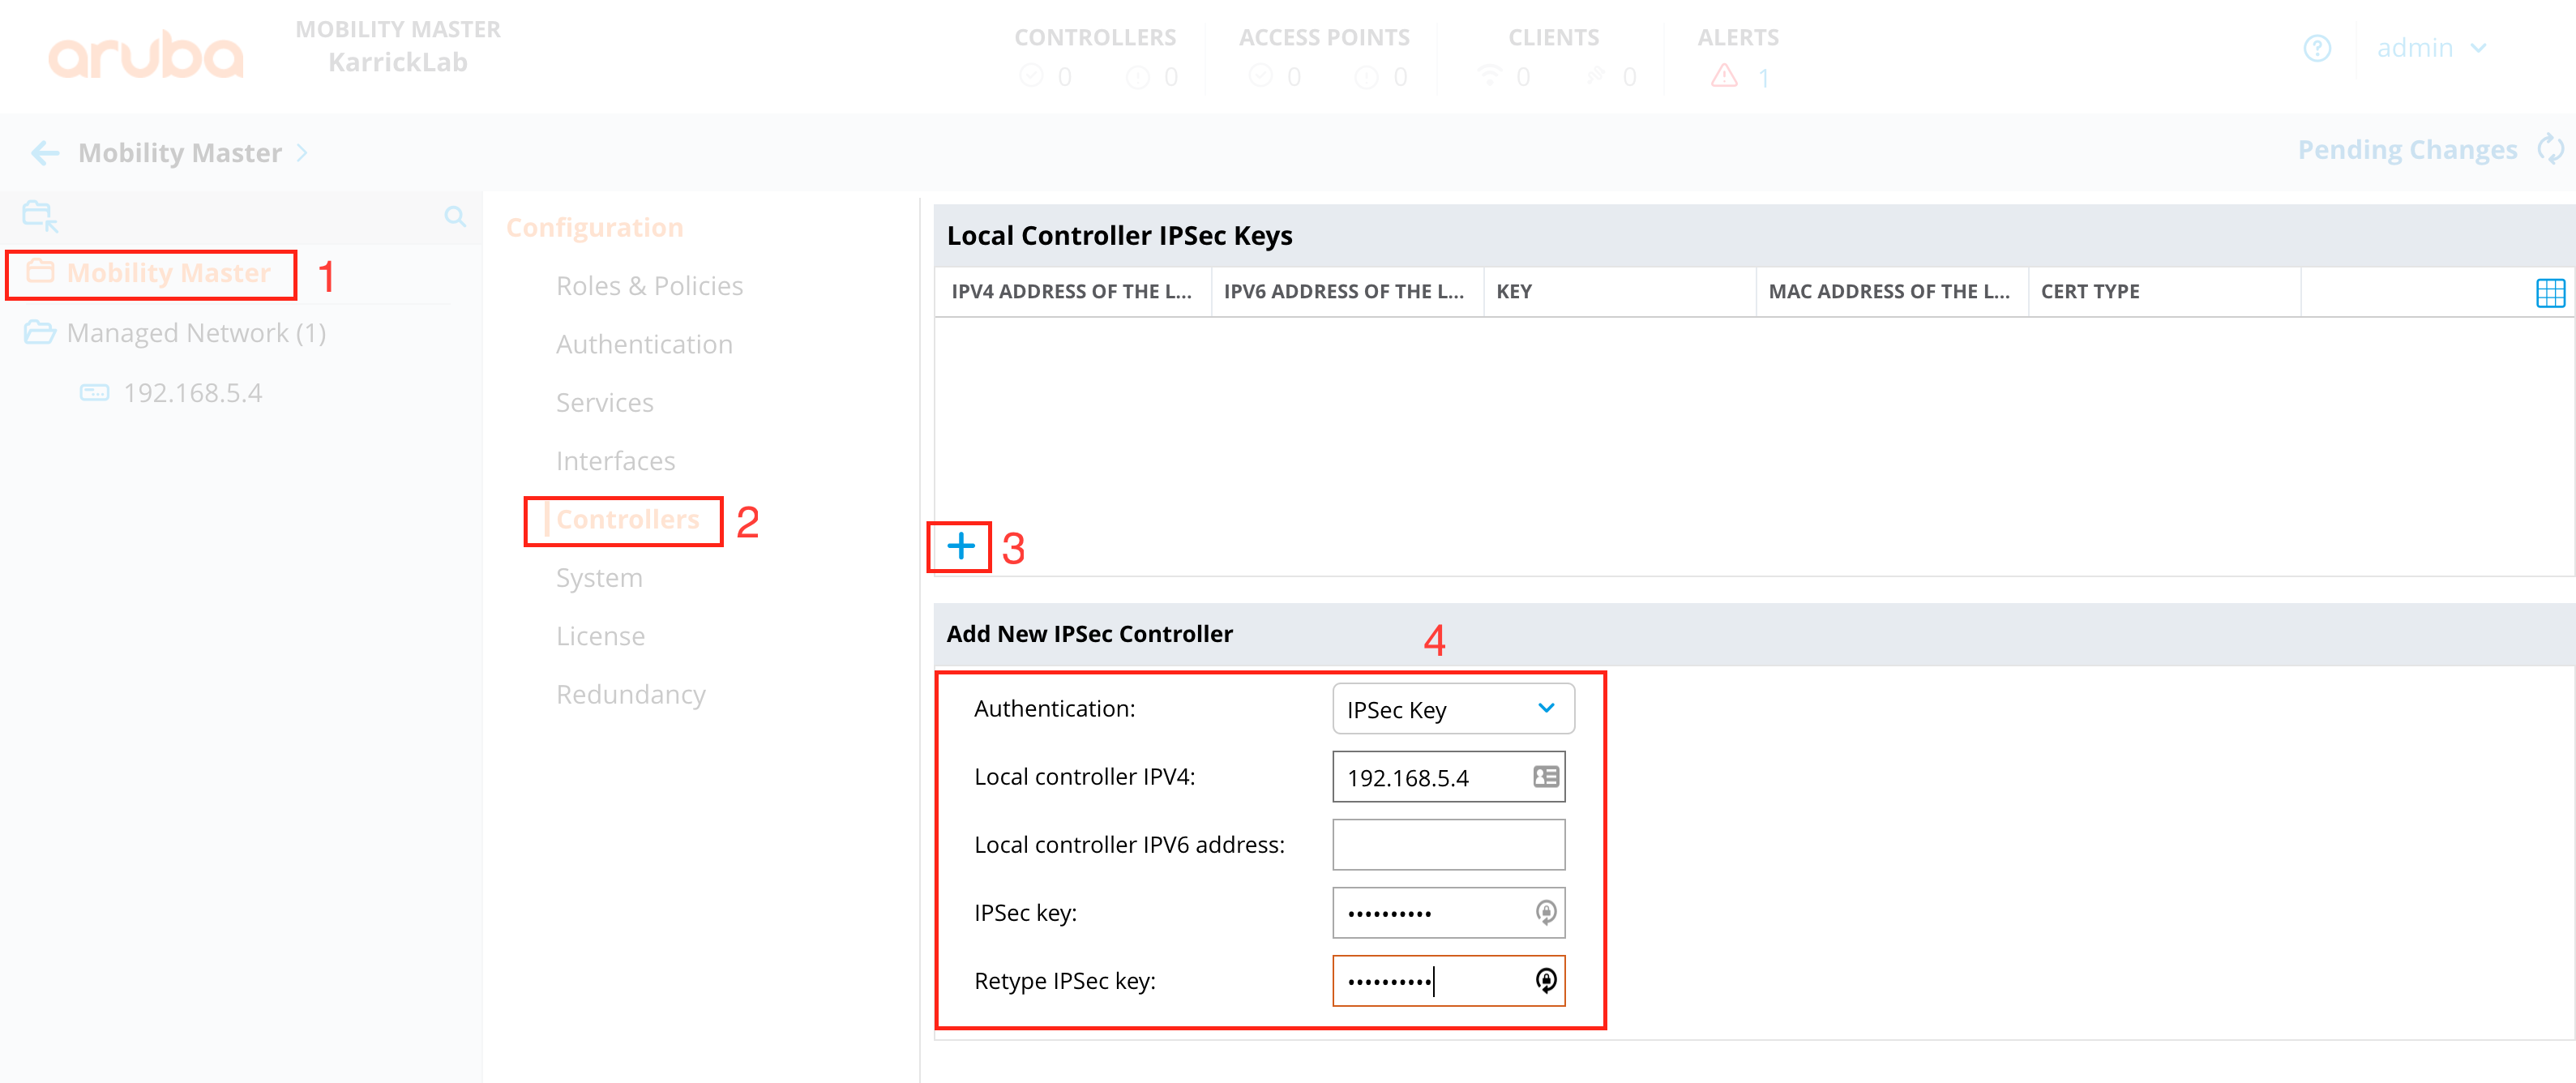
Deploy changes
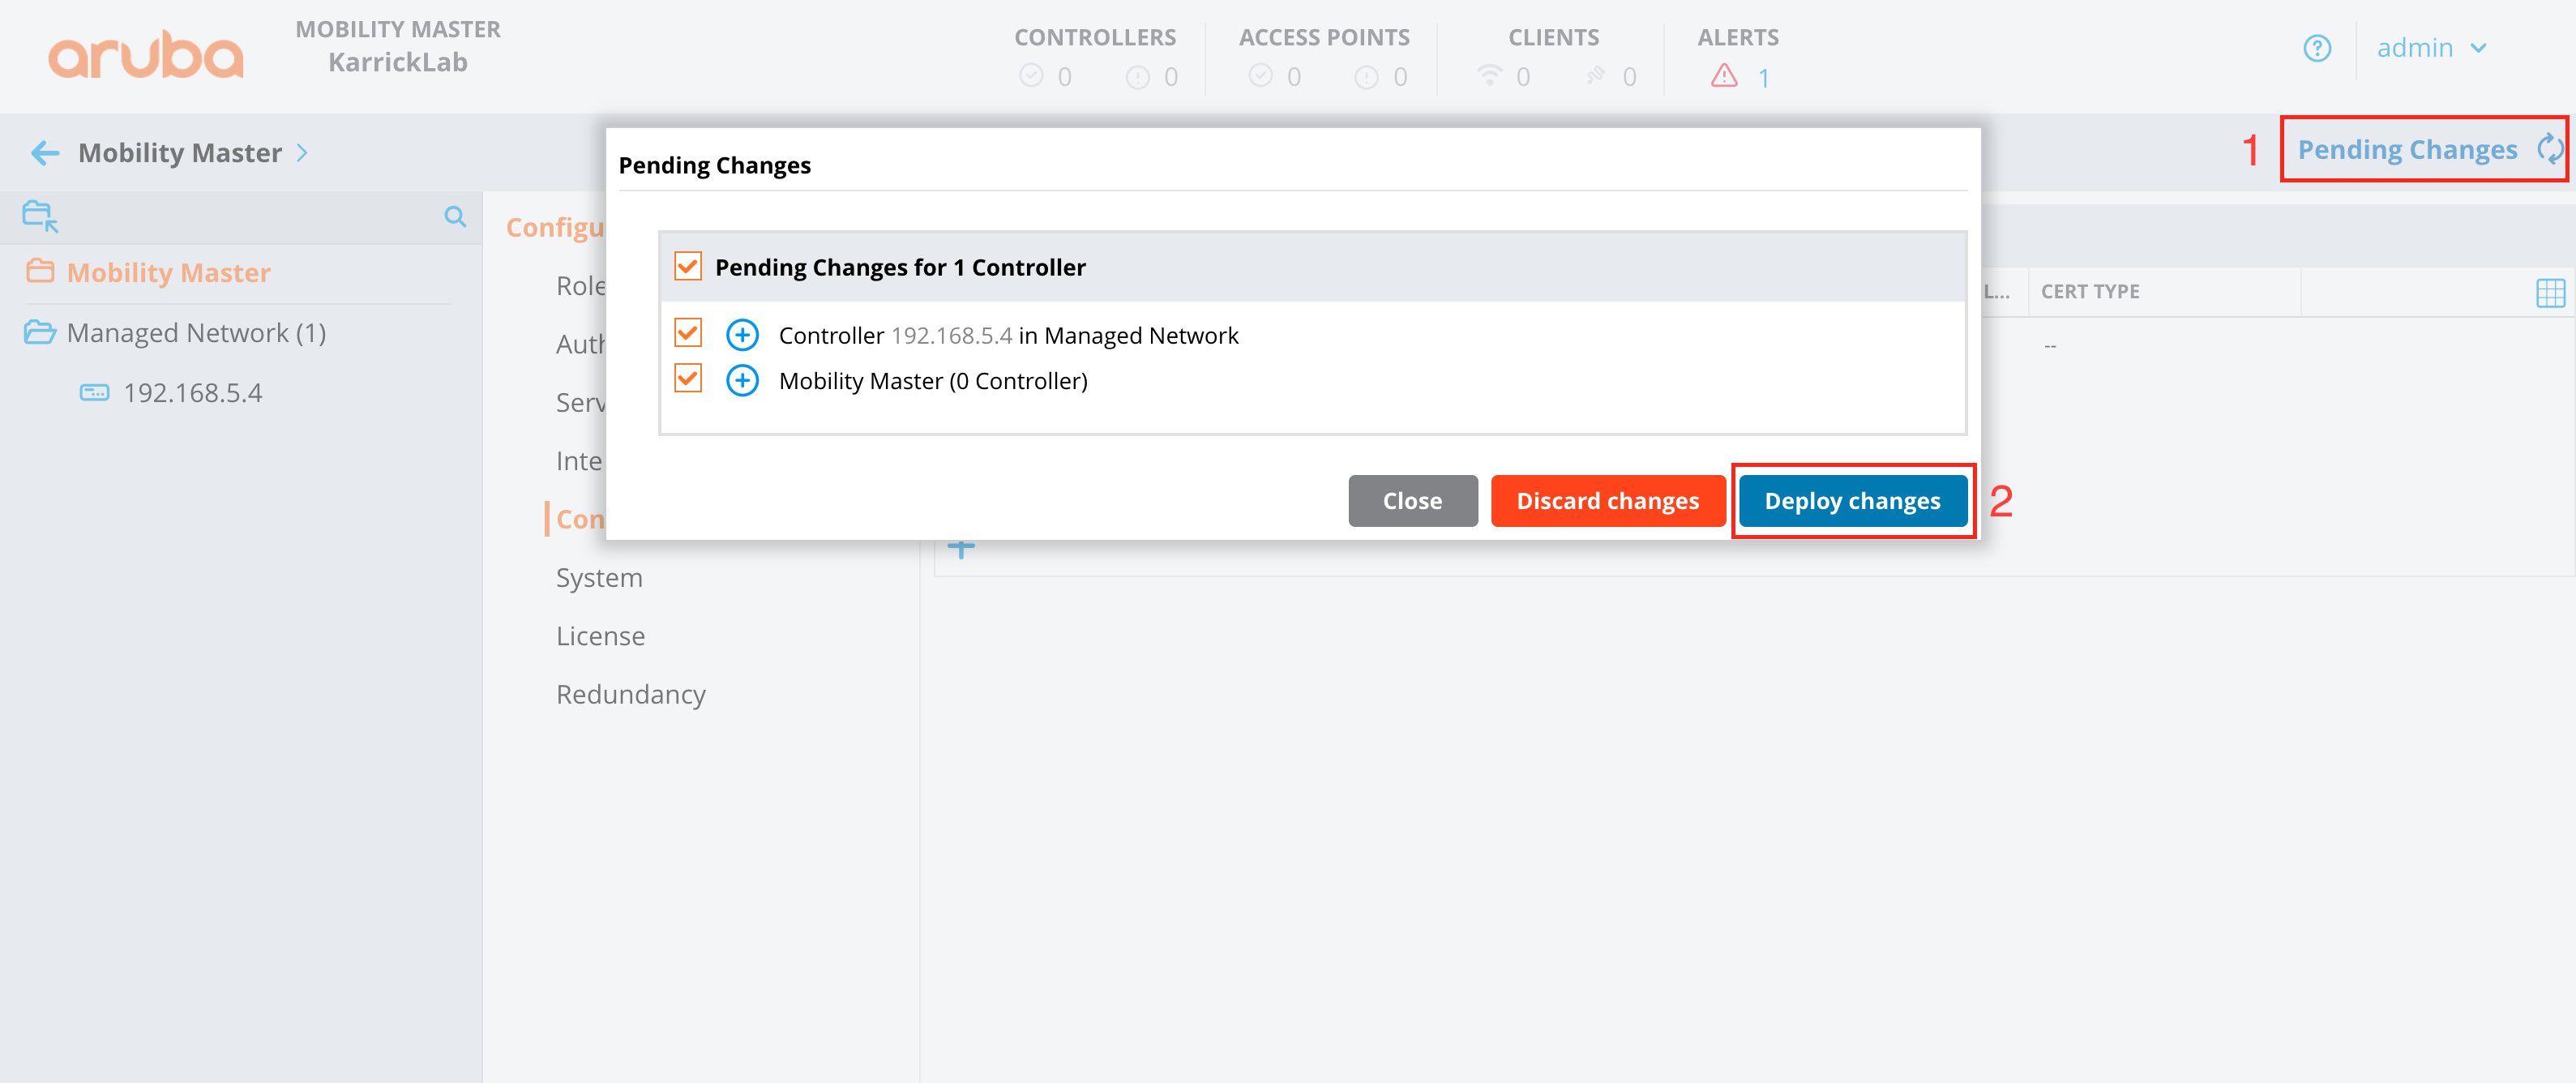
Deploy Mobility Controller (MC)
Follow manufacturer guidelines for deployment of Aruba Networks Mobility Controller. Provide the IP, and IPSec PSK of the MM during setup.
Configure Mobility Controller
Once the MC is added to the Mobility Master, configuration is completed from the MM GUI.
At the hierarchy level of the group created in step 1 above, deploy a WLAN.

Provide an SSID Name, and choose Tunneling
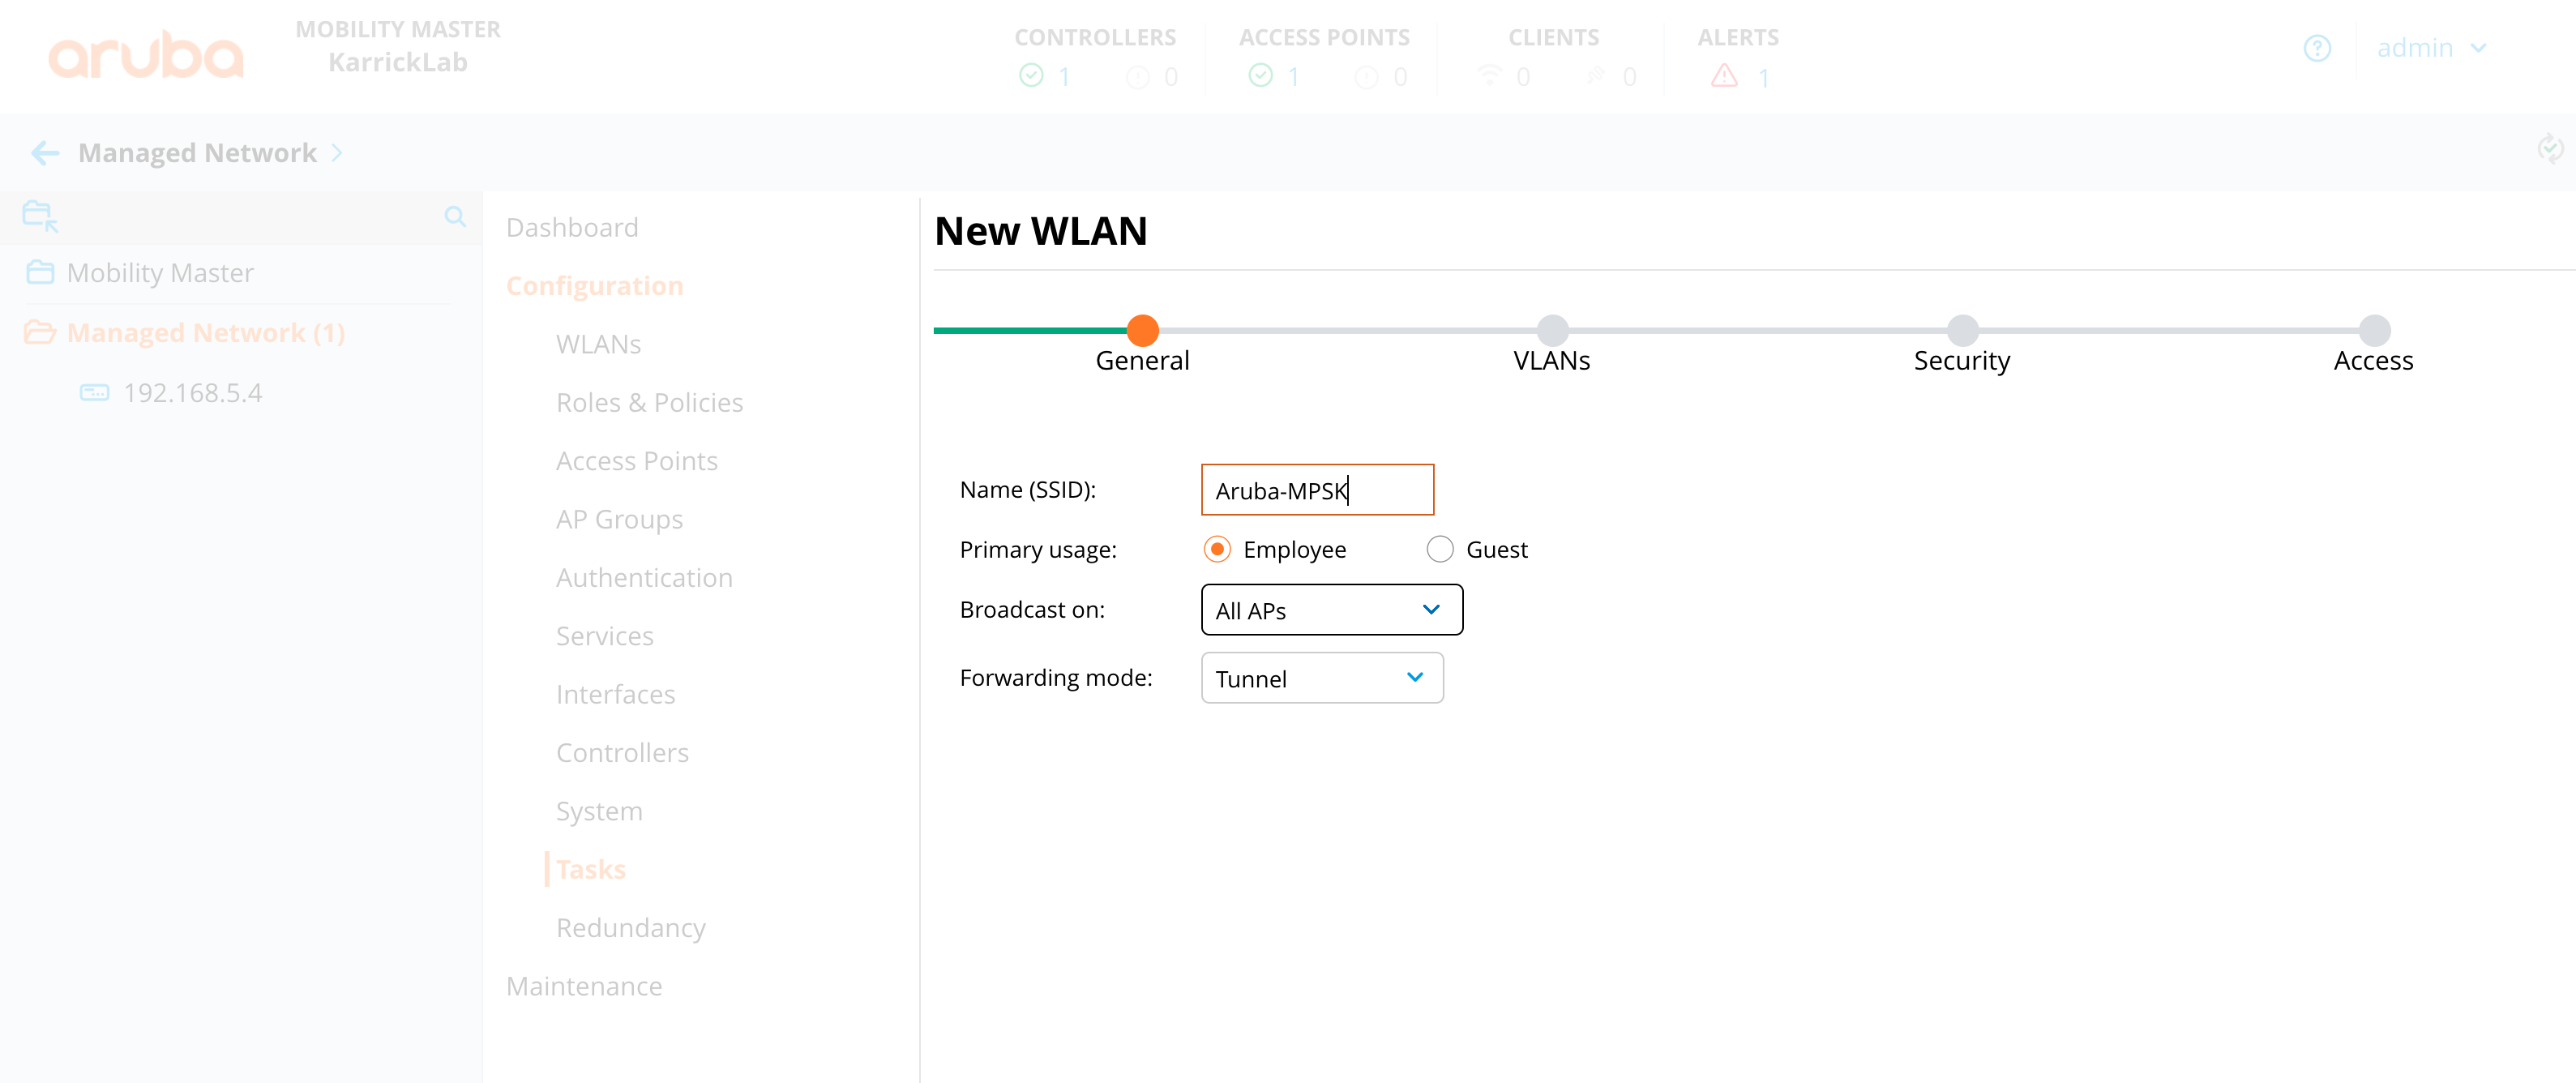
Leave the default VLAN selection.
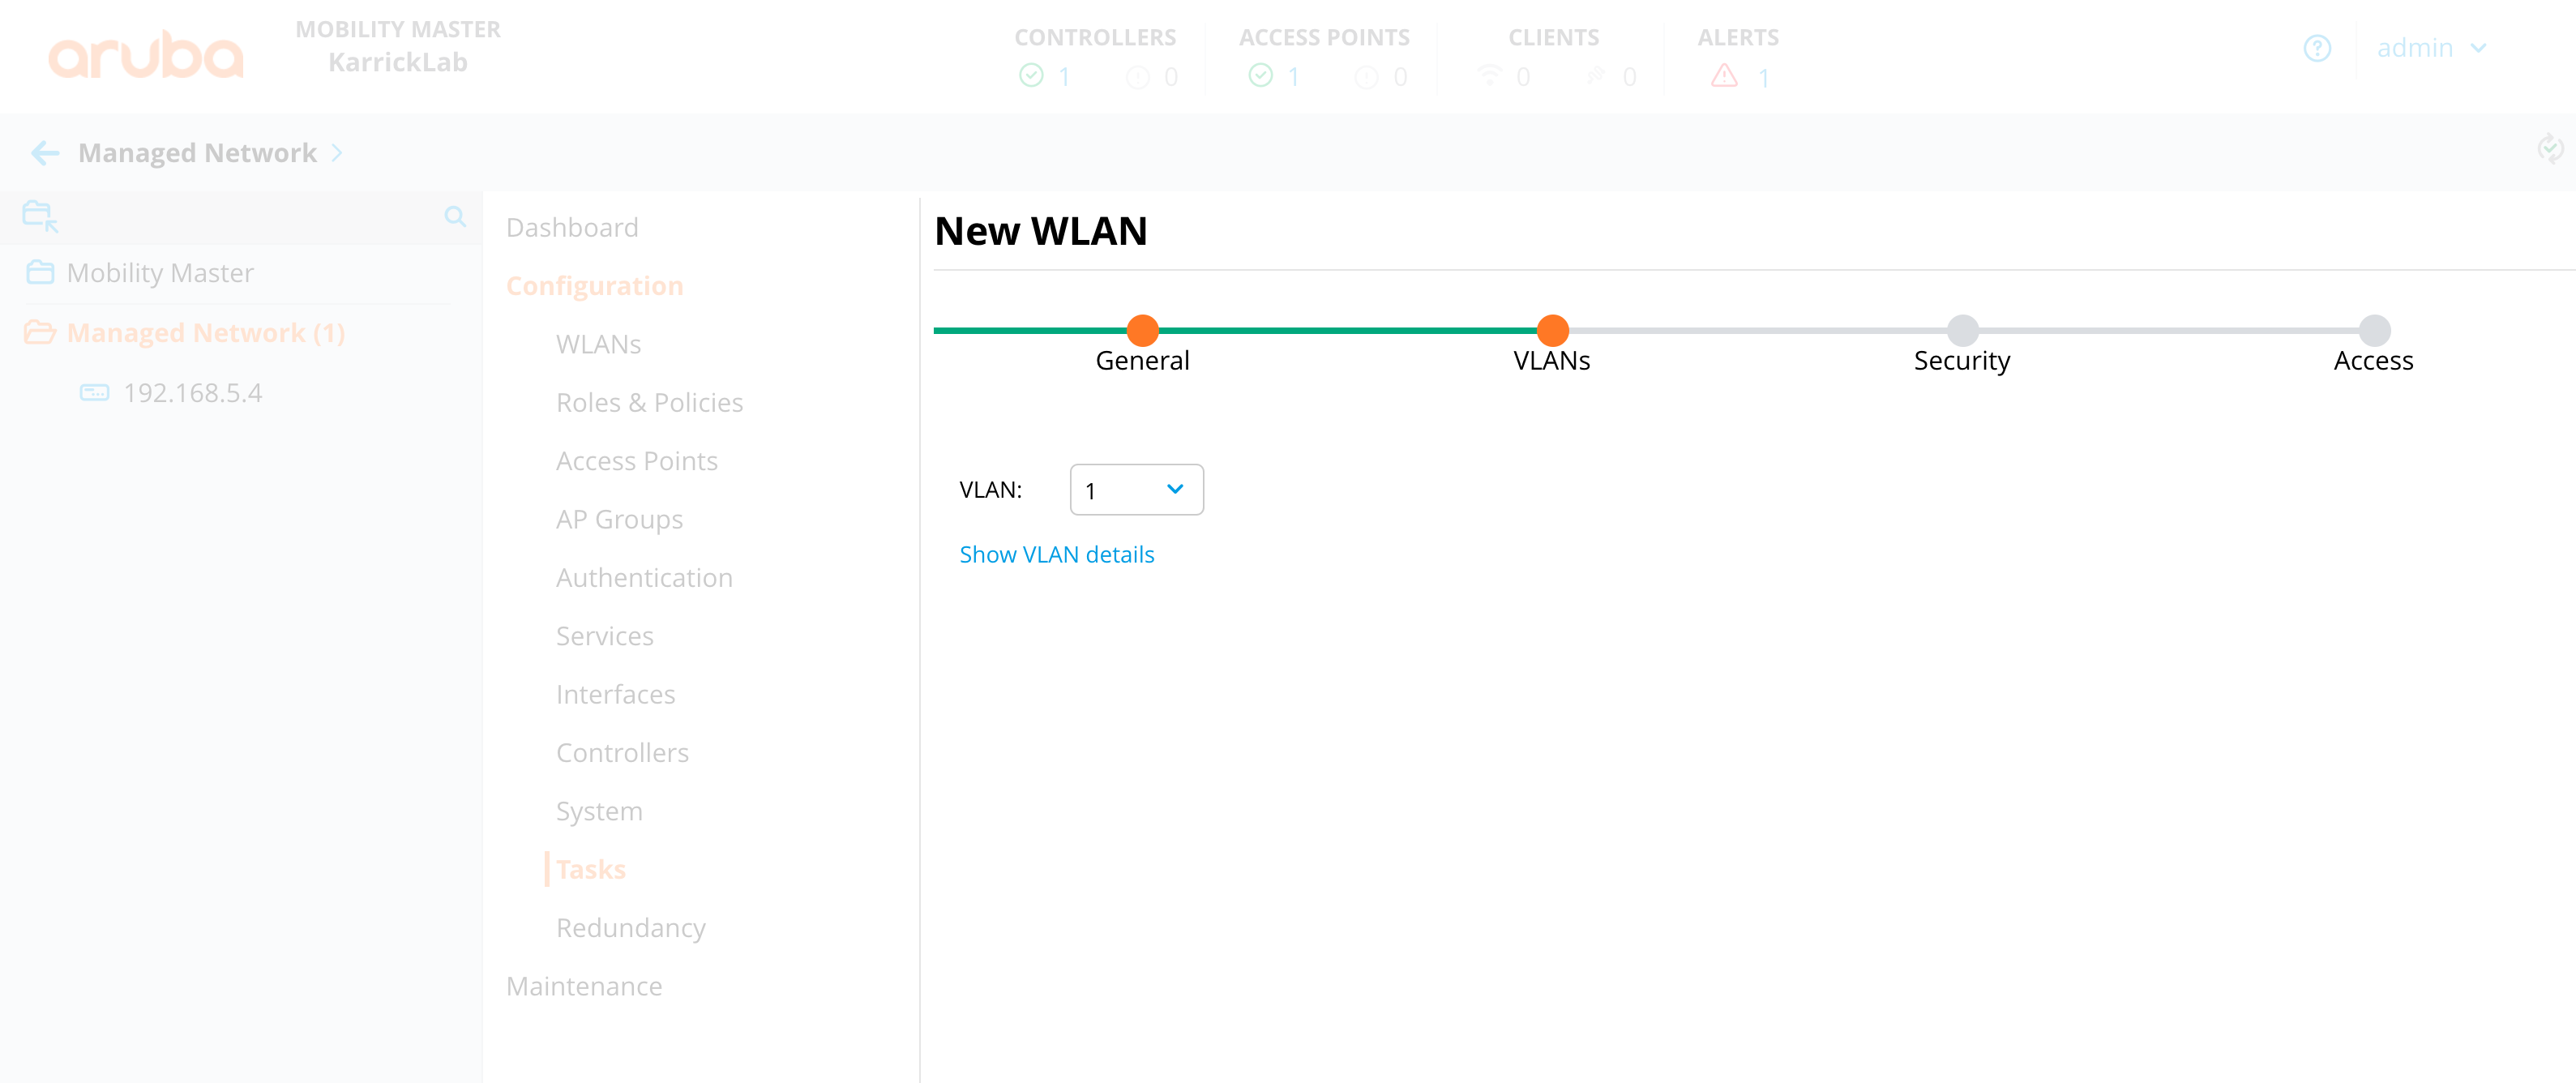
Set the security to wpa2personal, choose mpsk.
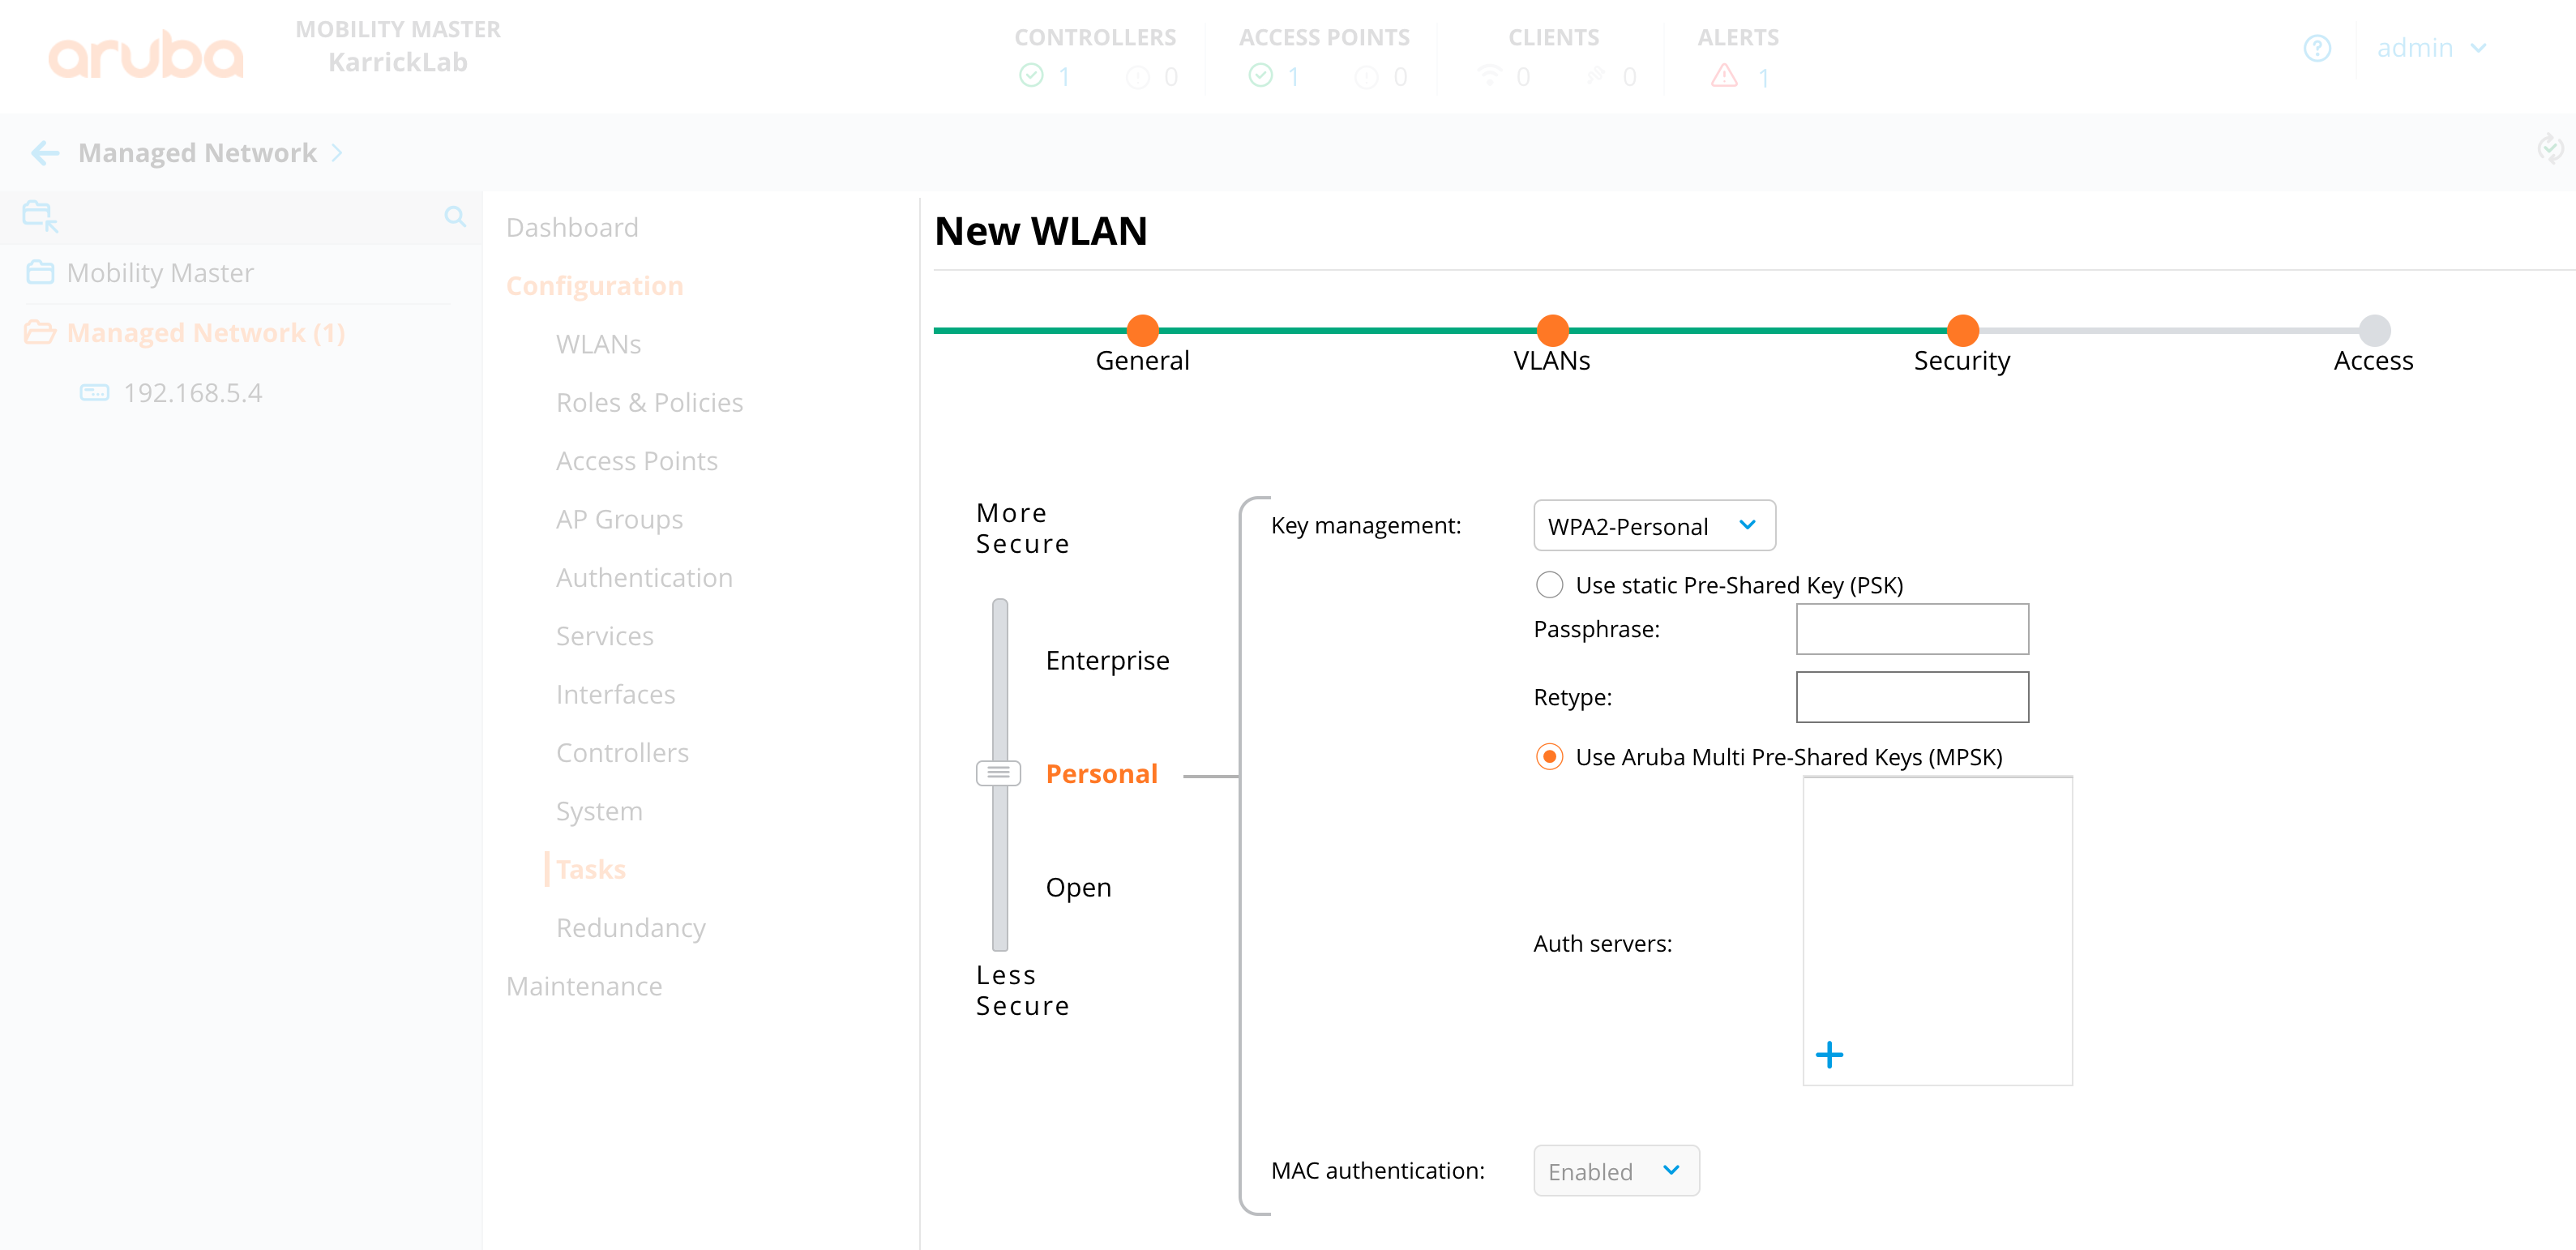
Create a new RADIUS Authentication Server with details with regards to rXg

Leave the default role selections
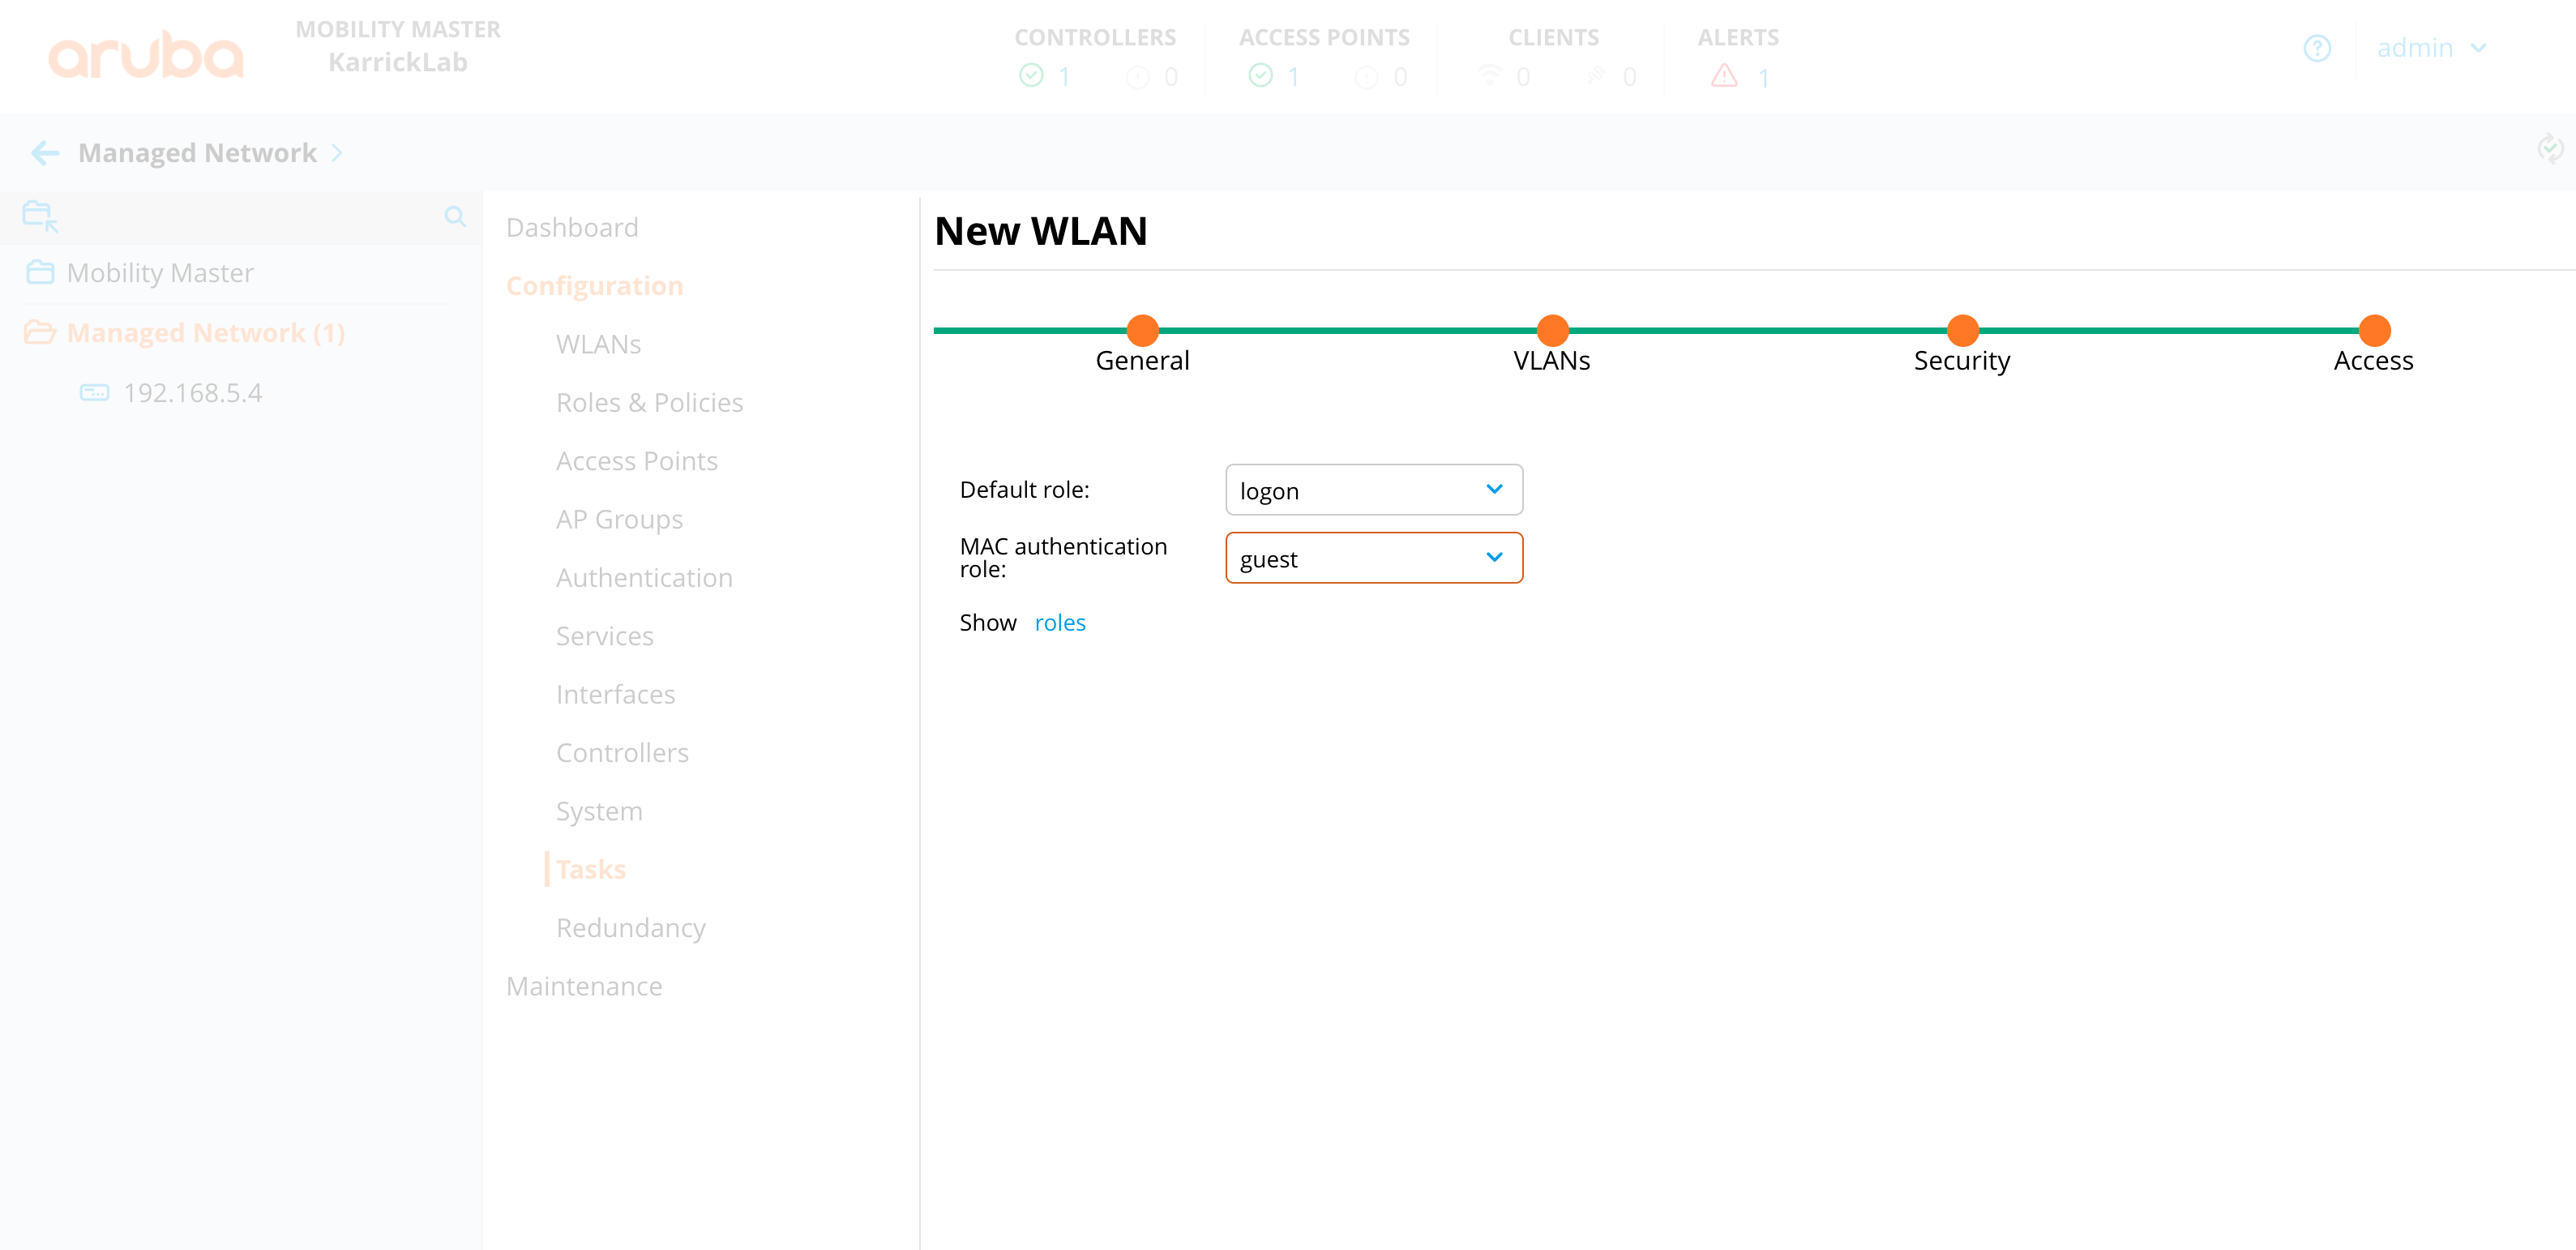
MAC authentication is enabled with MPSK by default. Manually edit the profile in order to associate the WLAN with the correct AAA server group. It does not use the server assigned for MPSK settings.
- From the group hierarchy level go to configuration -> system -> profiles -> Wireless LAN -> AAA -> (wlanname)_aaa_prof -> MAC Authentication Server Group -> set to the (wlanname)_dot1_svg group that got created from the mpsk IEEE Std 802.1X settings
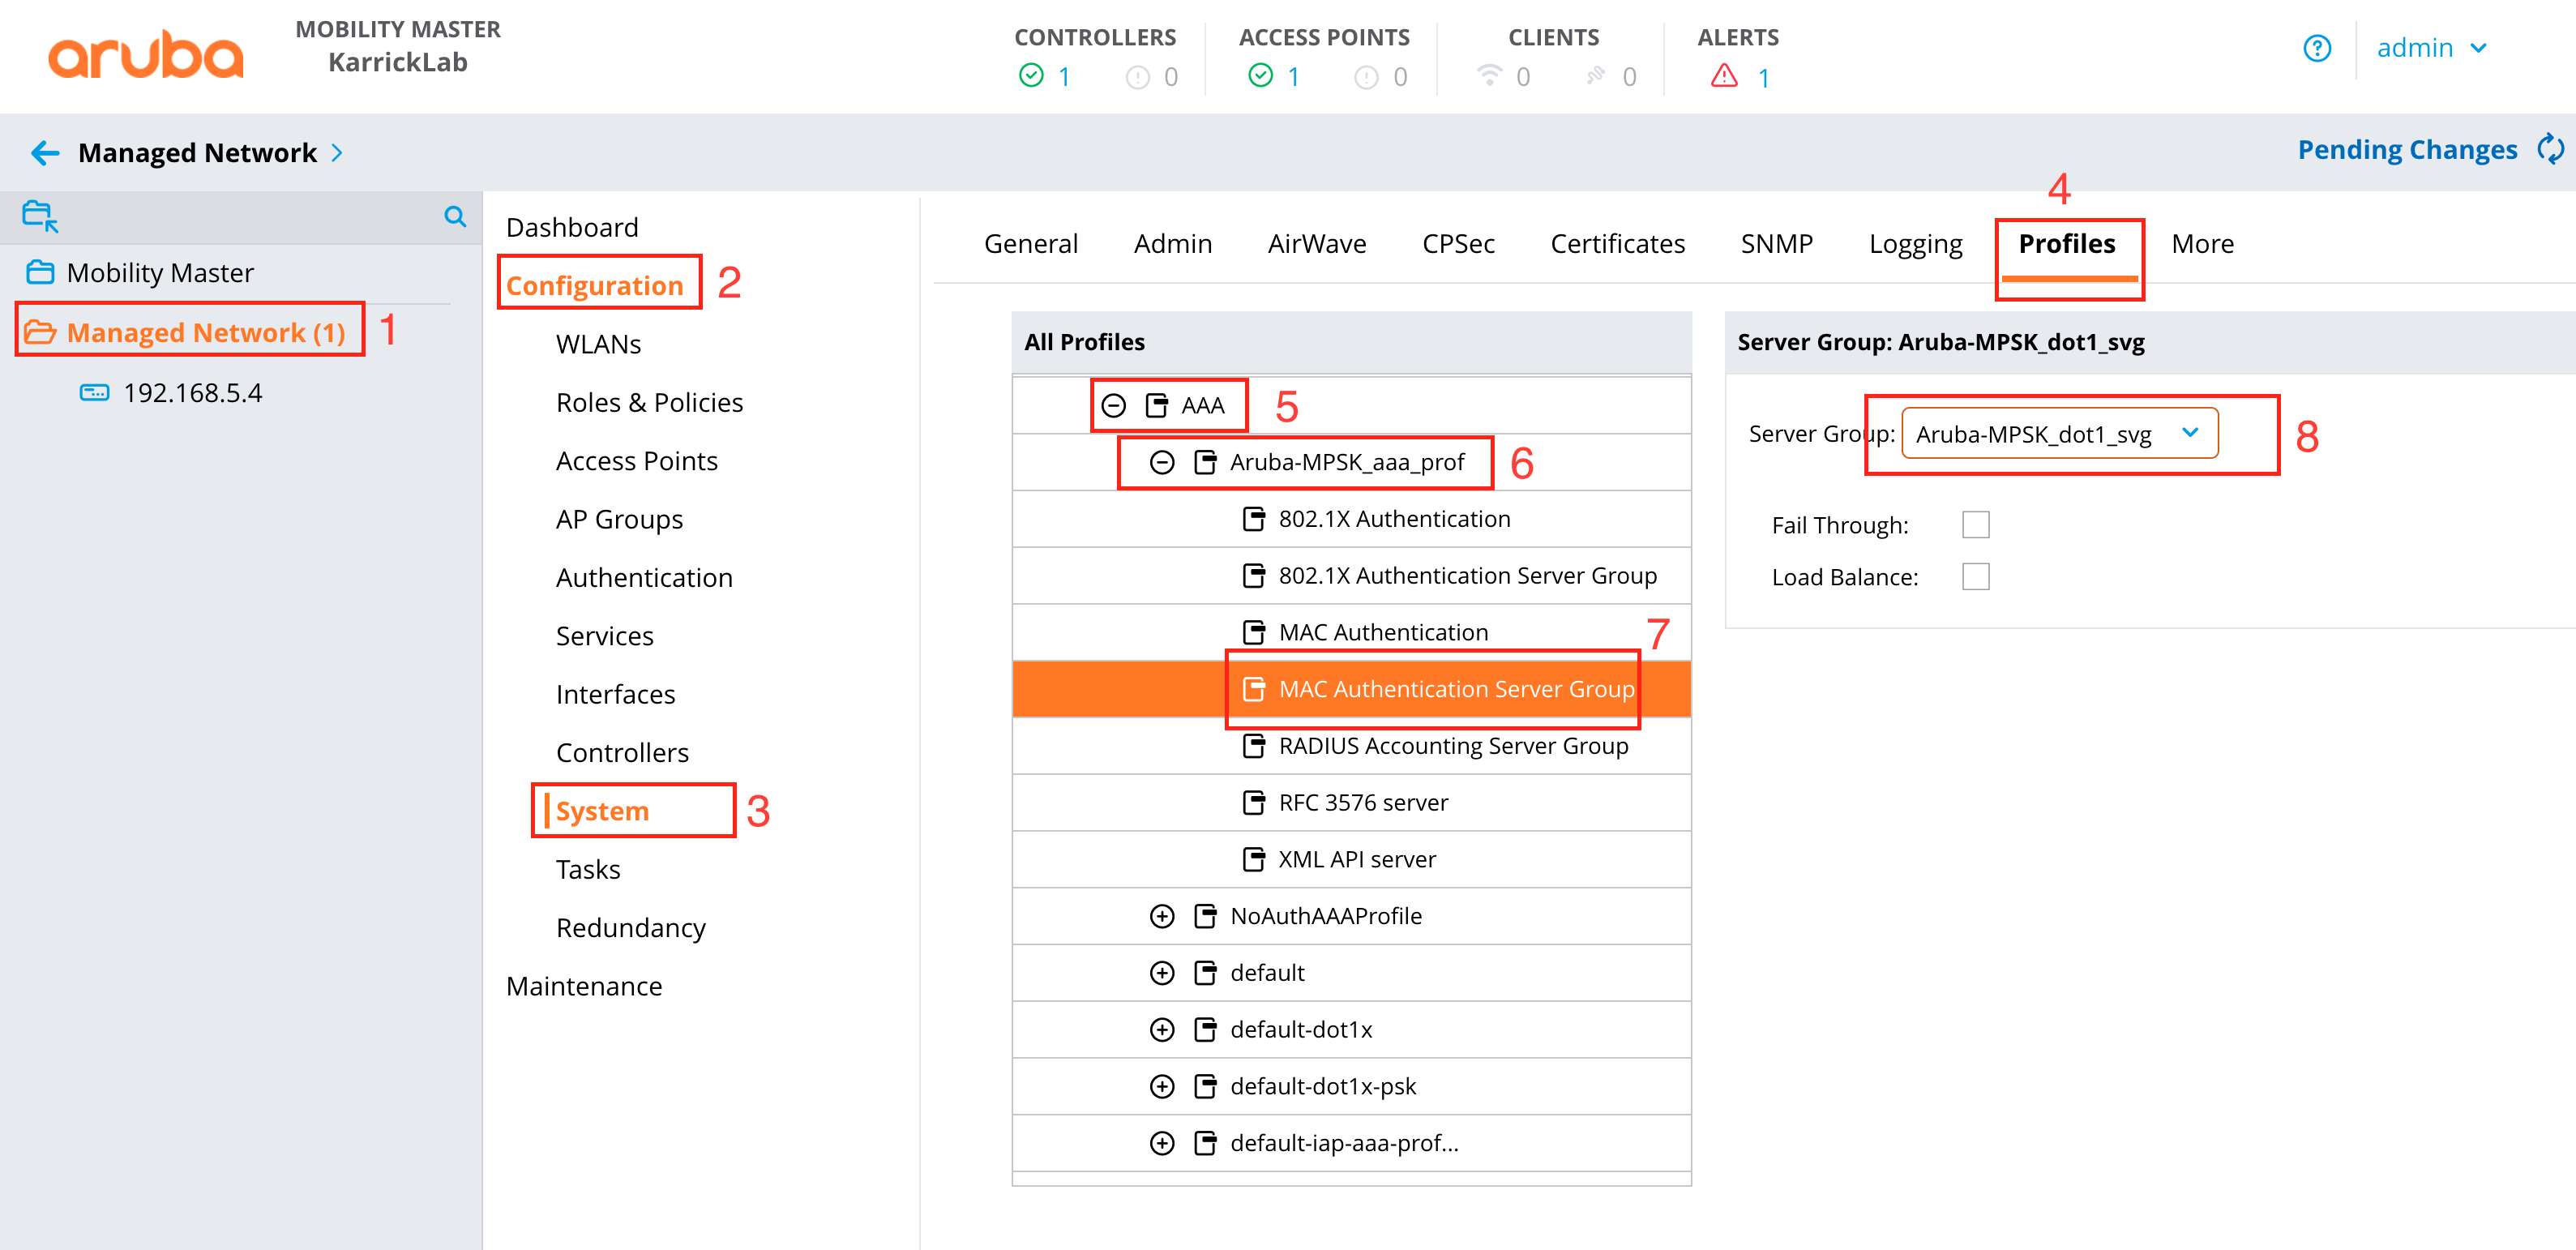
- From the group hierarchy level go to configuration -> system -> profiles -> Wireless LAN -> AAA -> (wlanname)_aaa_prof -> MAC Authentication Server Group -> set to the (wlanname)_dot1_svg group that got created from the mpsk IEEE Std 802.1X settings
On the Group level, go to Configuration -> Interfaces -> VLANs and create the range of possible VLANs
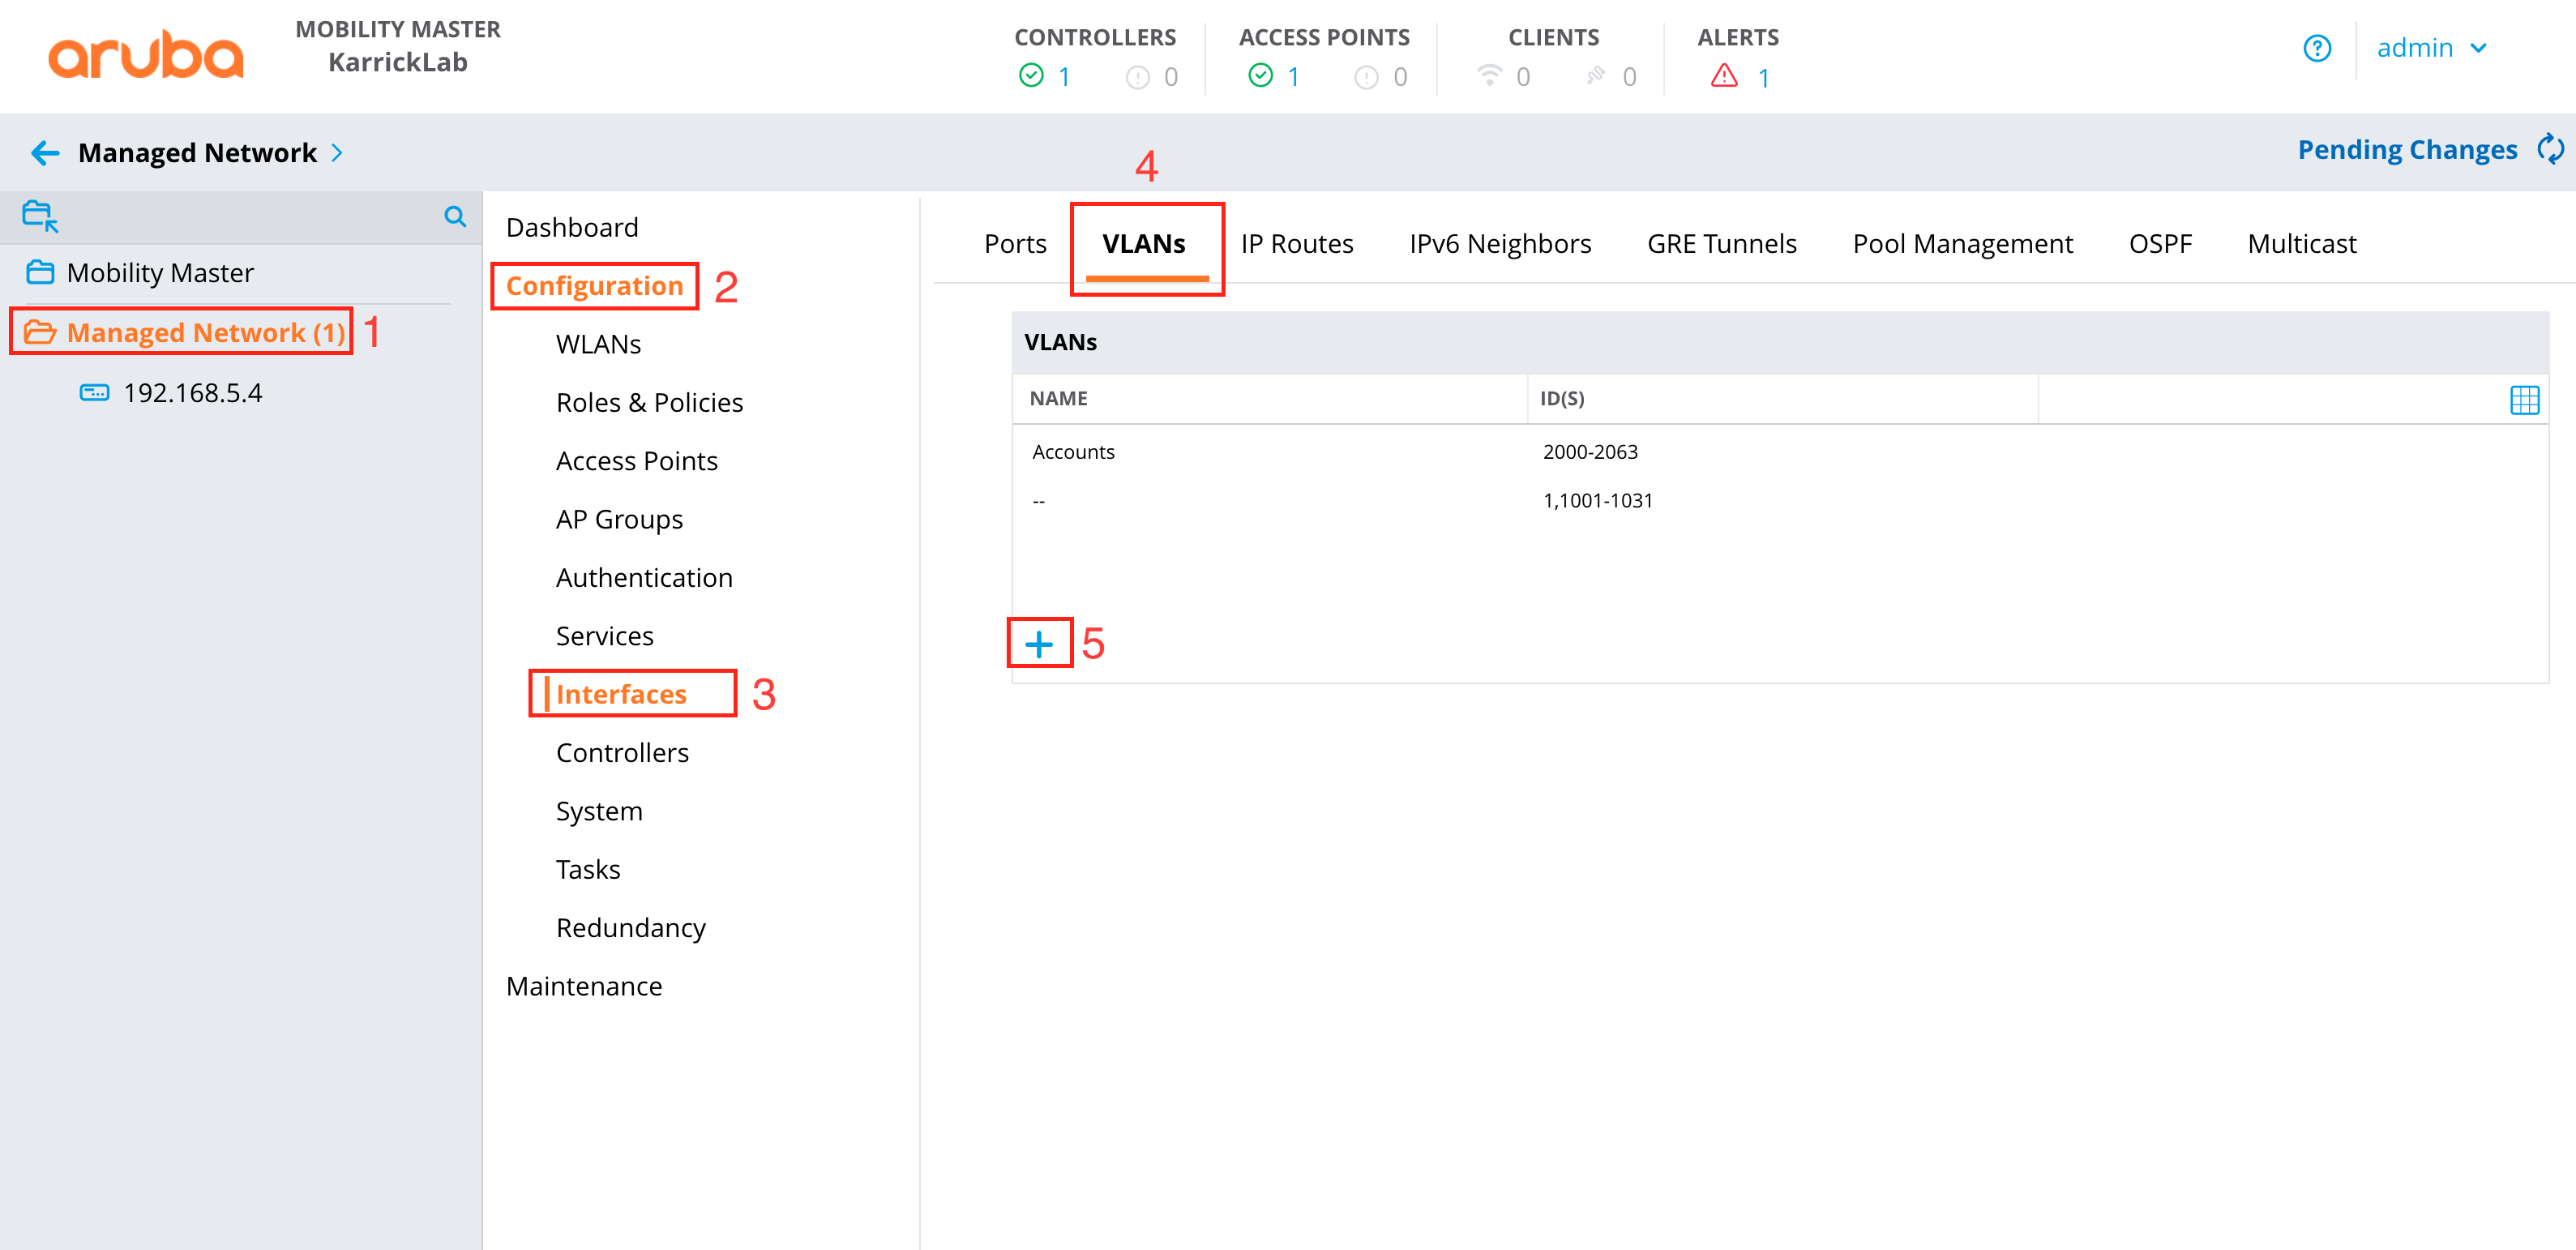
In the same section, verify the ethernet port you are using is set to "trunk allow all", under the Ports tab
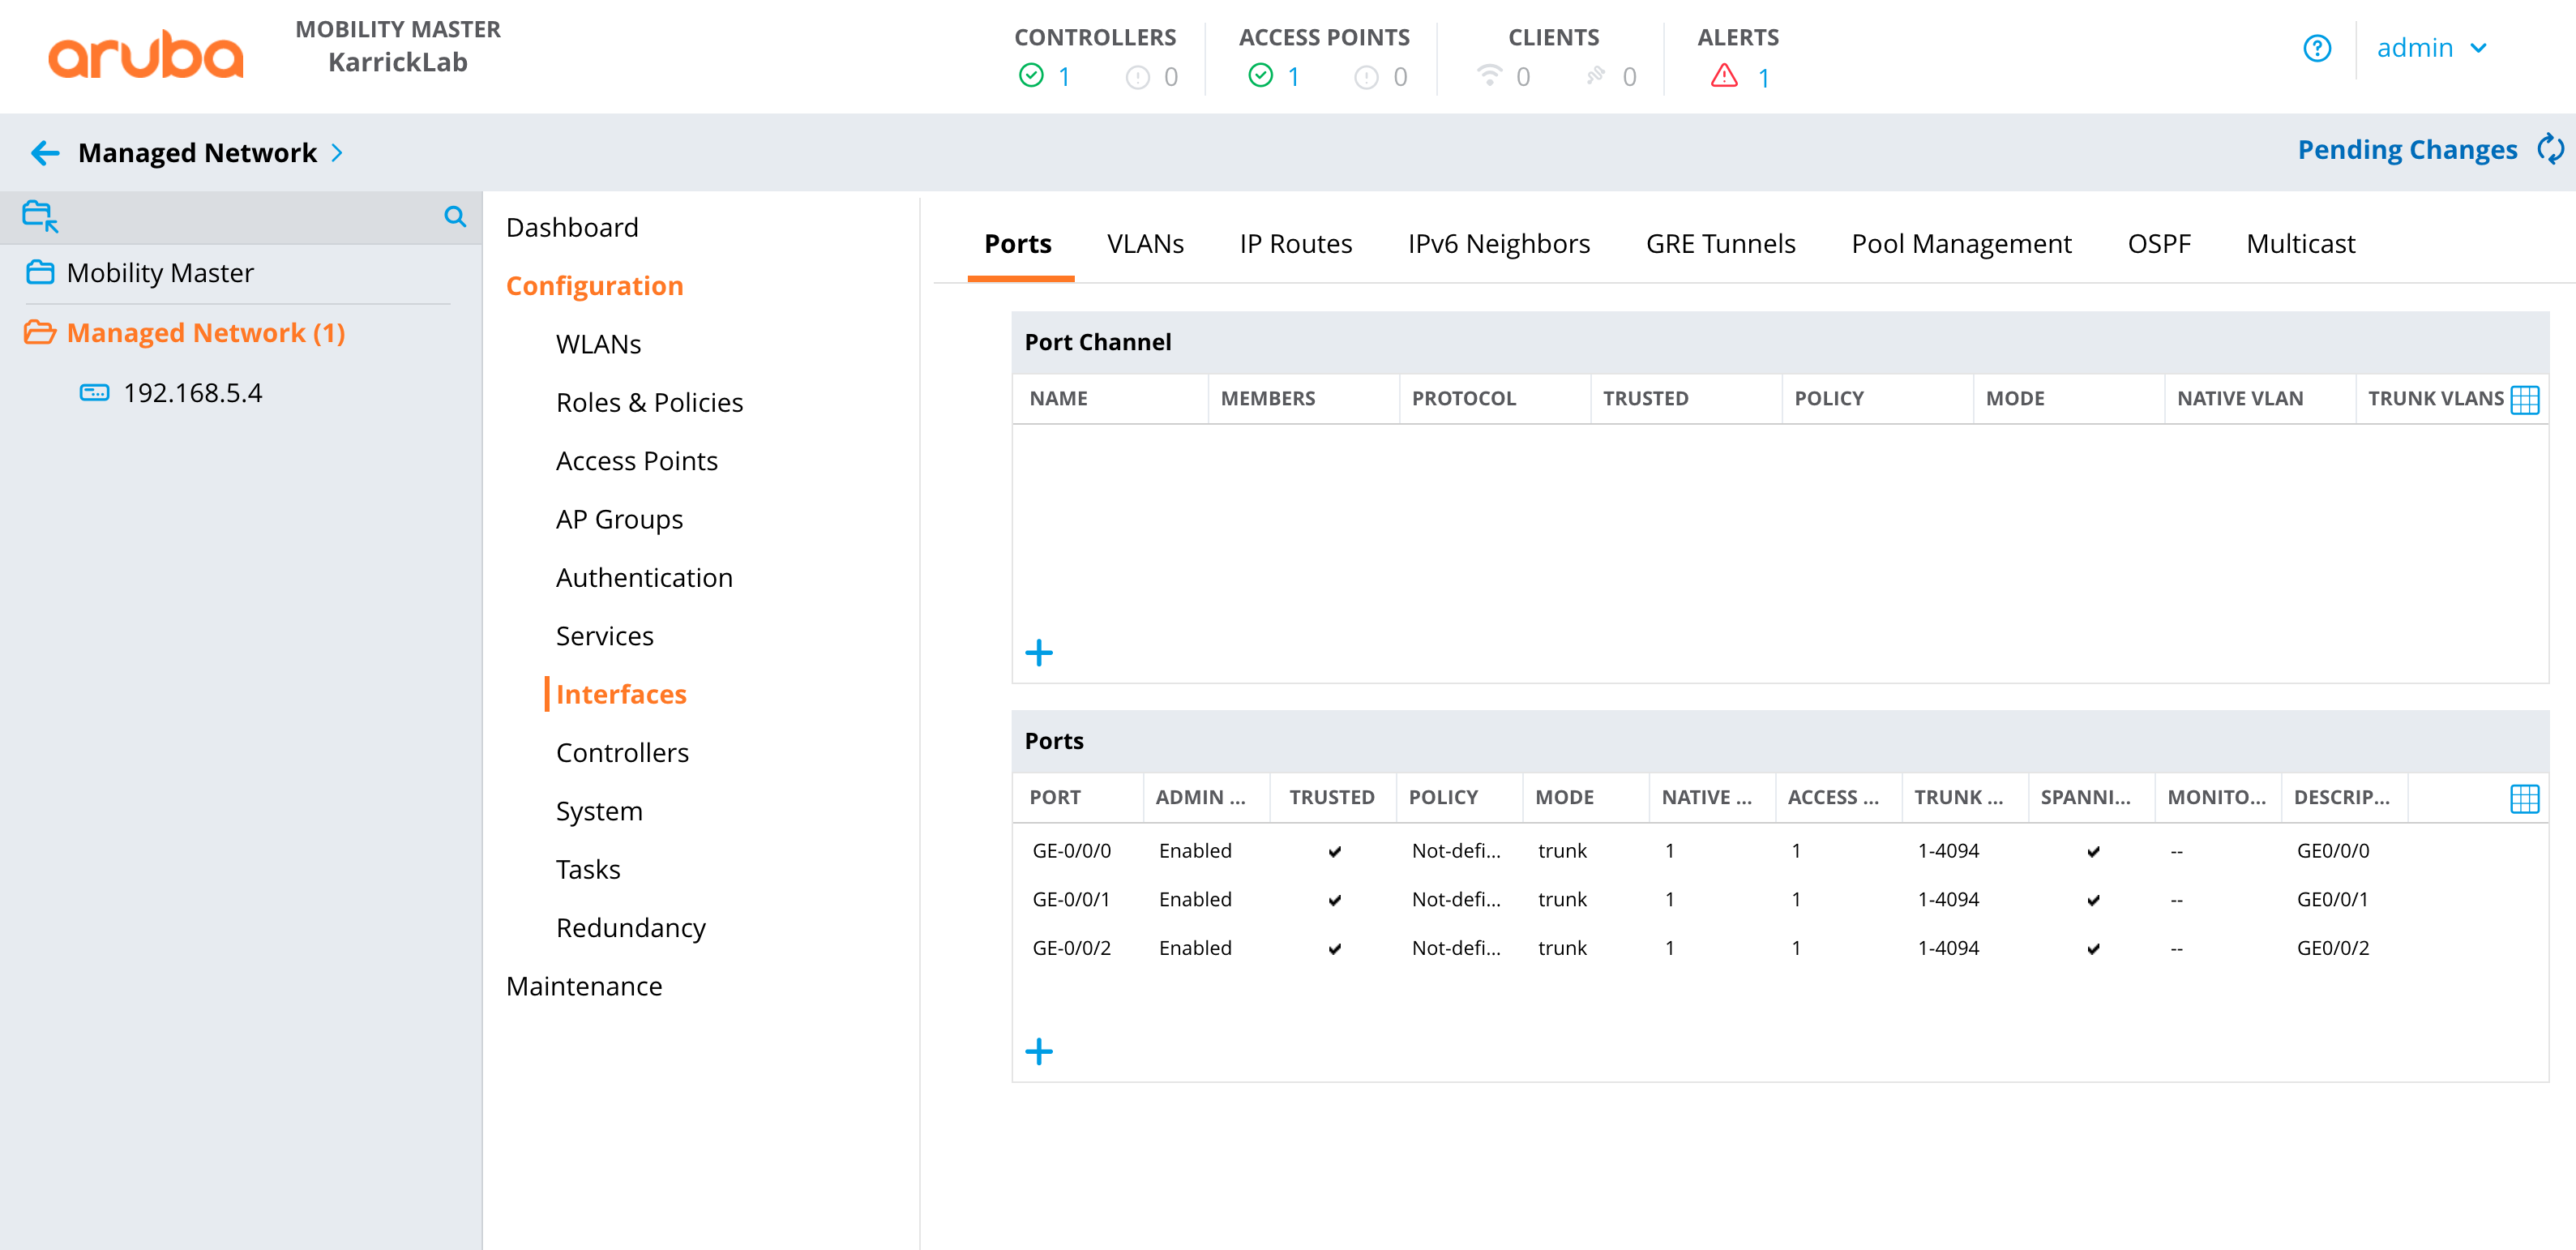
Deploy changes
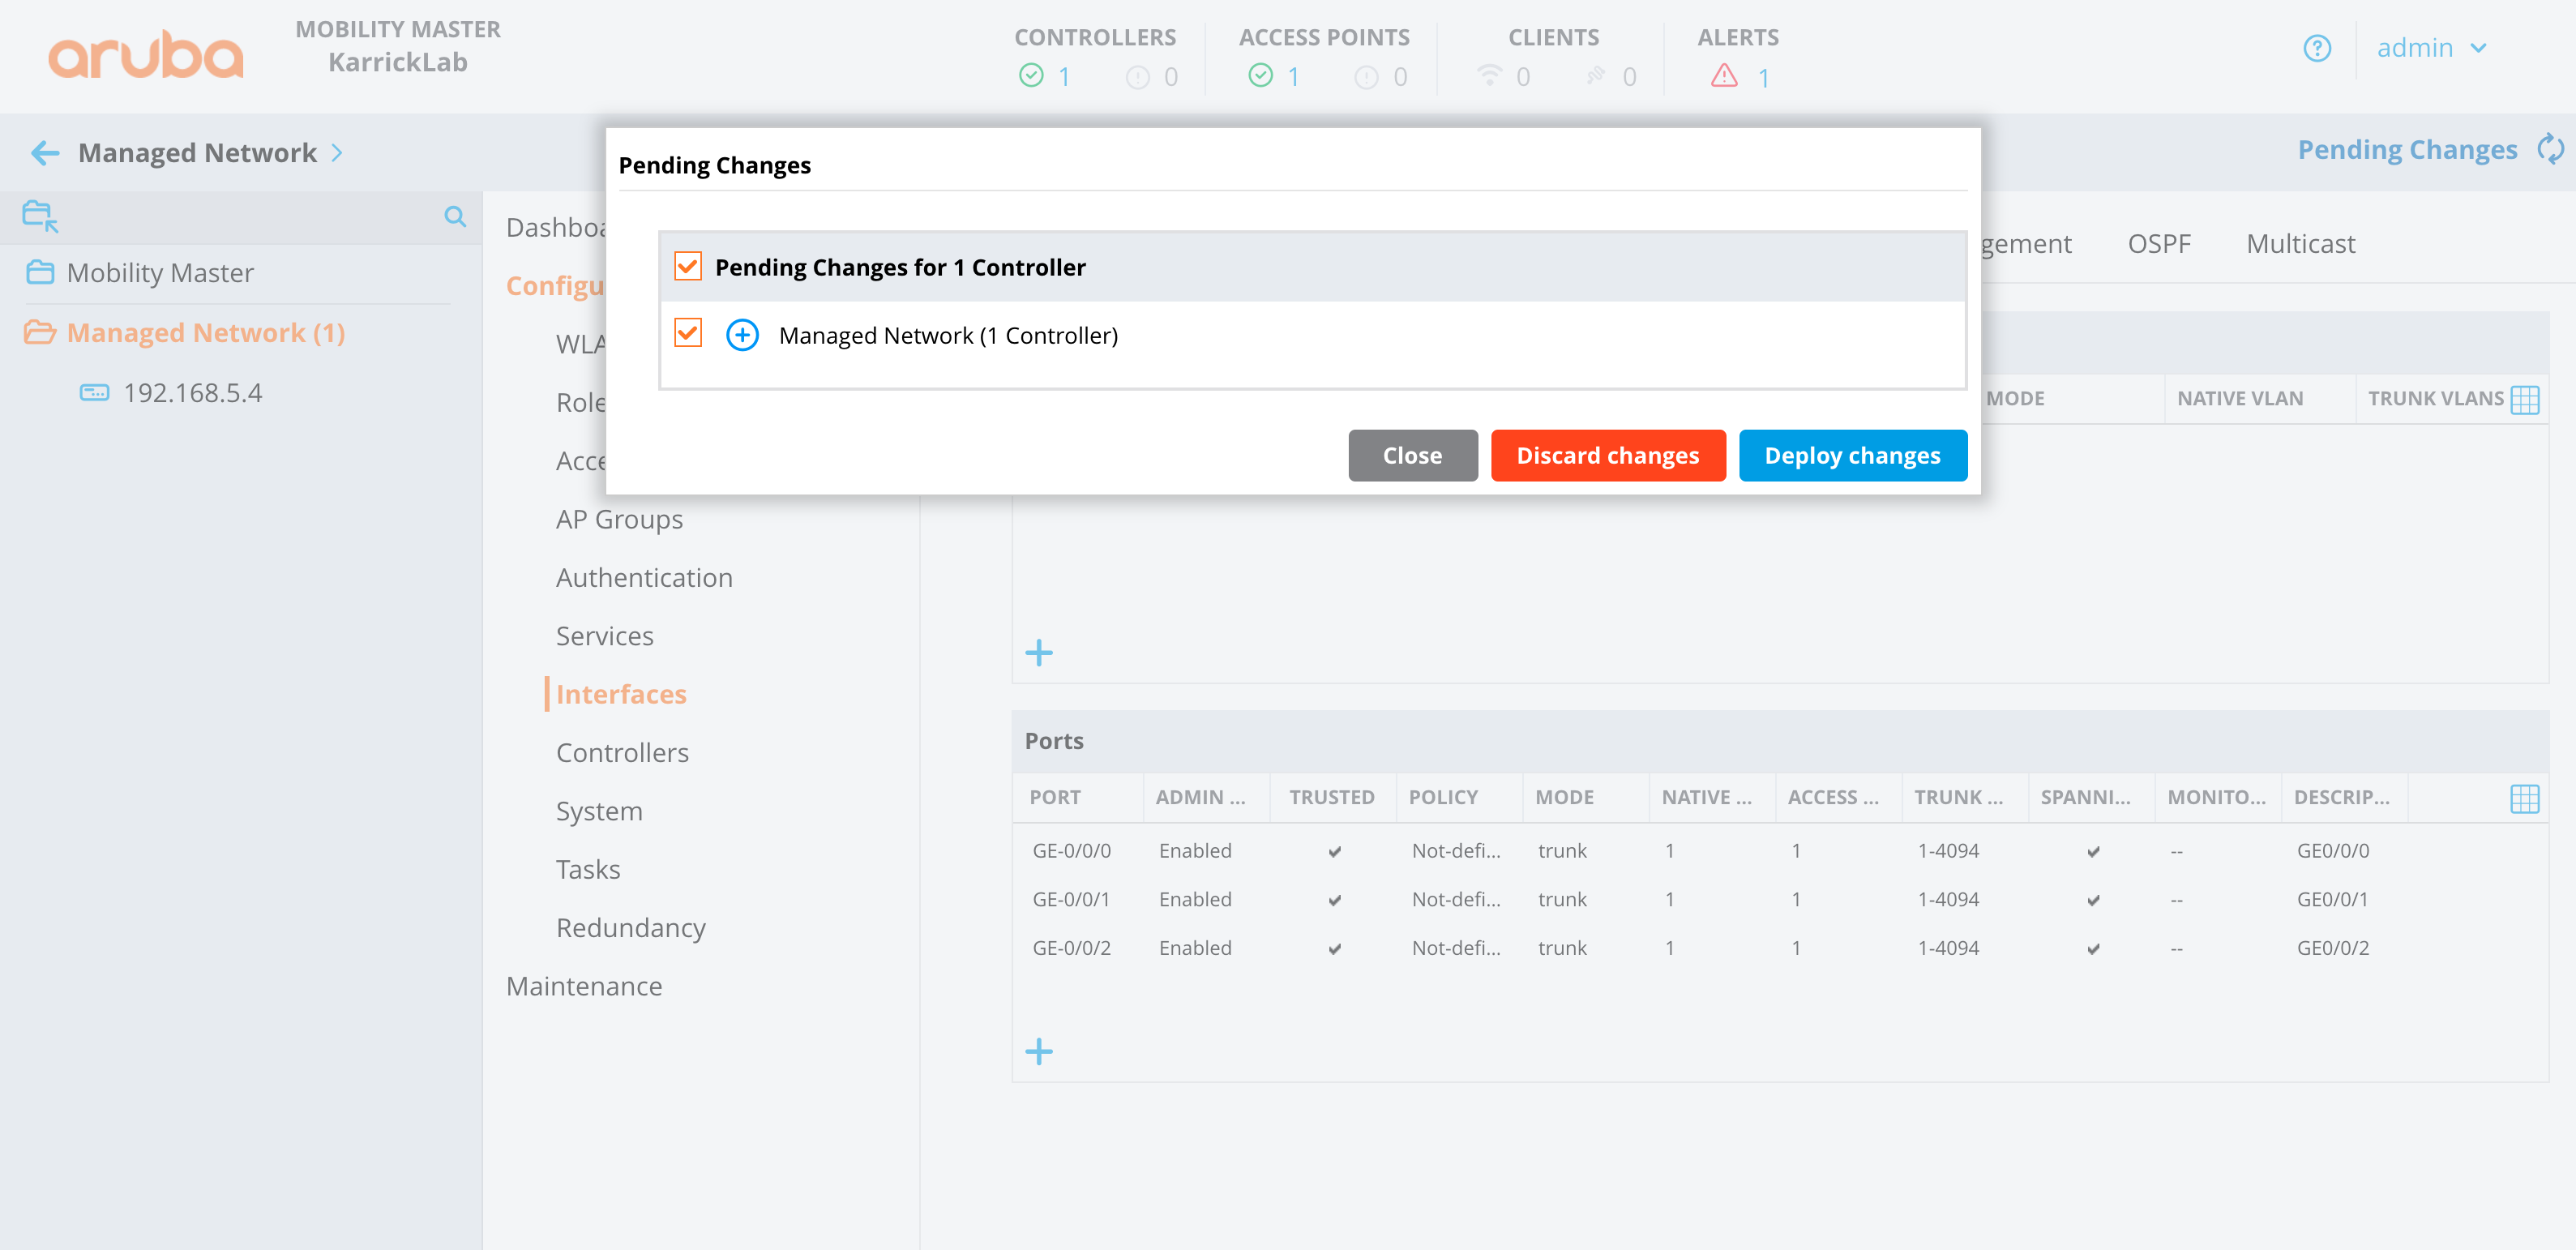
Configure Aruba Central
- Make sure the correct group is selected that contains the WAP(s), you can verify this by looking in the upper left corner.
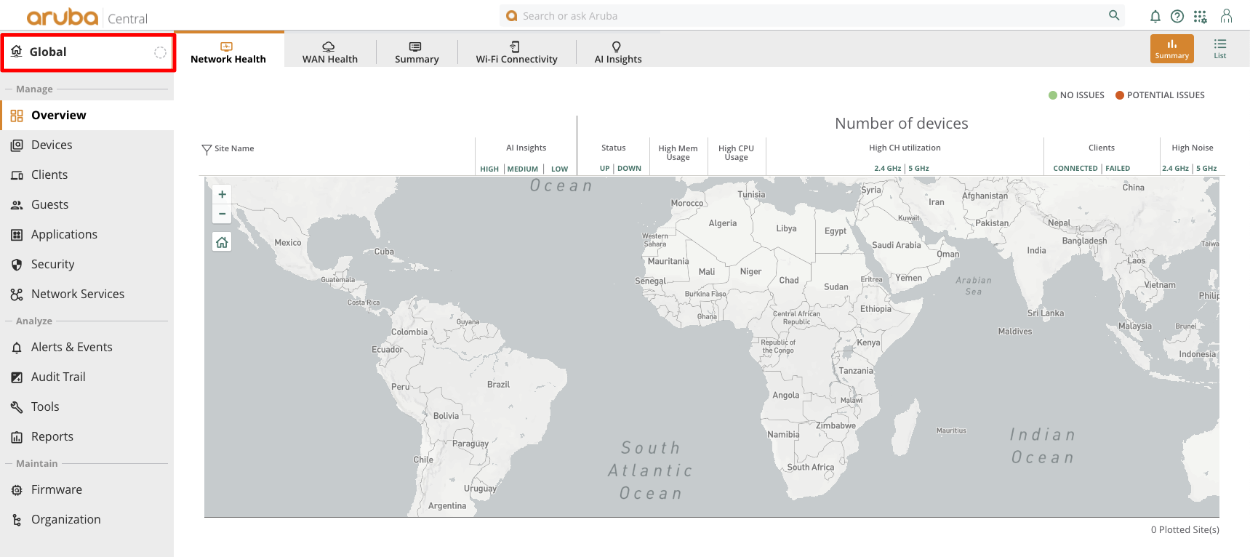
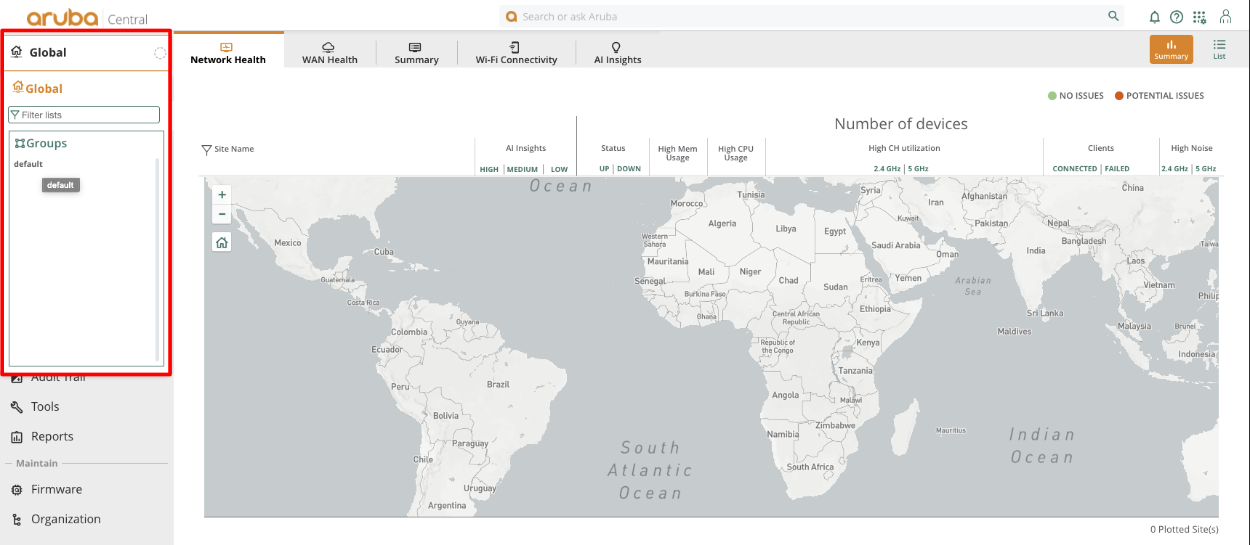
Click on devices, which will take us to the WLANs section. Click Add SSID
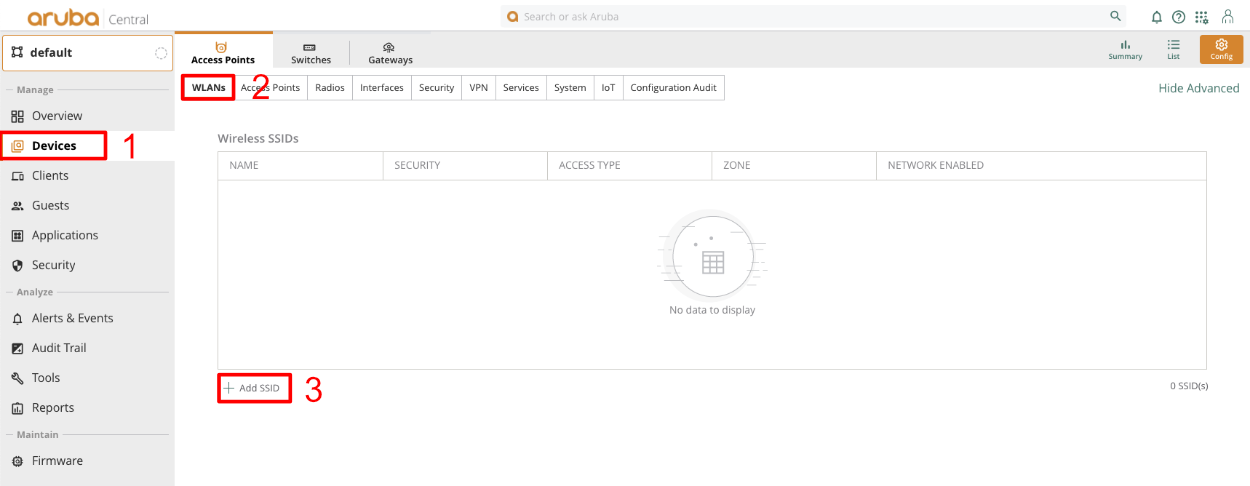
Give the SSID a name. Click next.
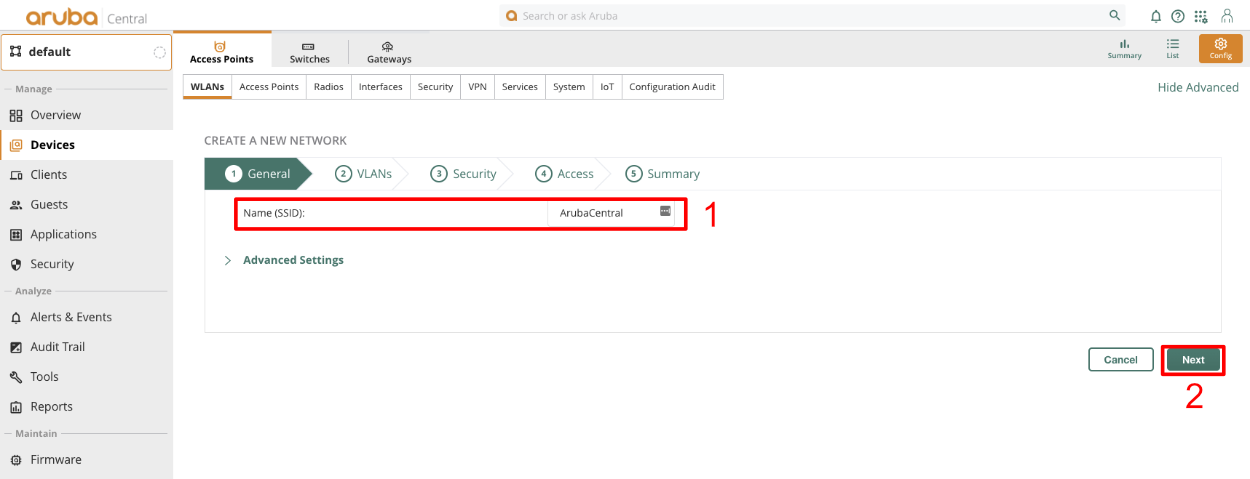
In the VLAN section leave defaults and click next.
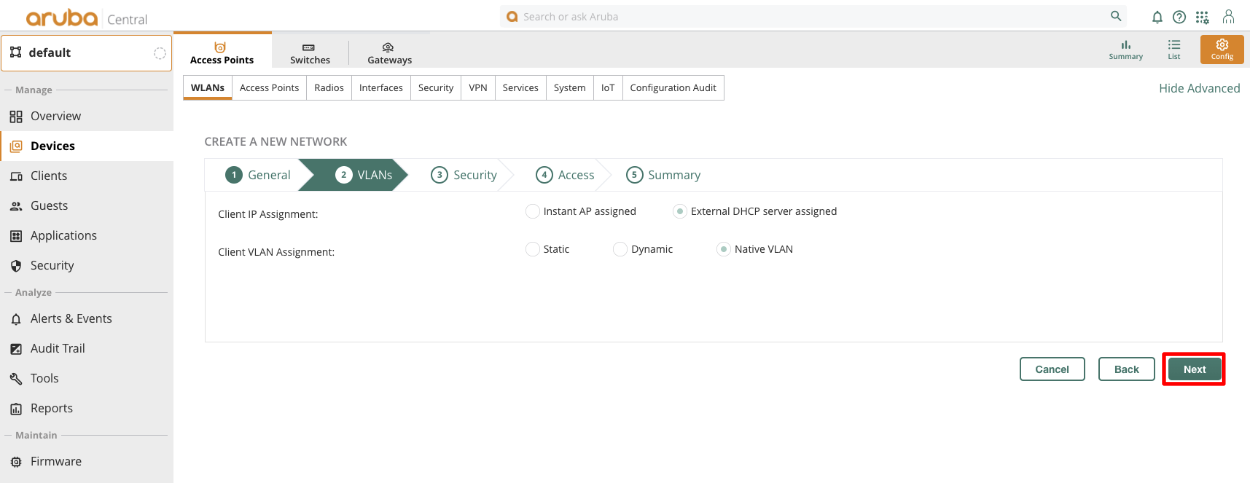
Change Key Management to MPSK AES.Click the + in the Primary Server field, give the Server a name, and copy the shared secret from the Radius Server Options to the Shared Key and retype Key fields. Set the IP field to the IP Aruba Central will talk to the rxg on, and click OK. The Shared Secret can be obtained by navigating to Services::Radius in the rXg.
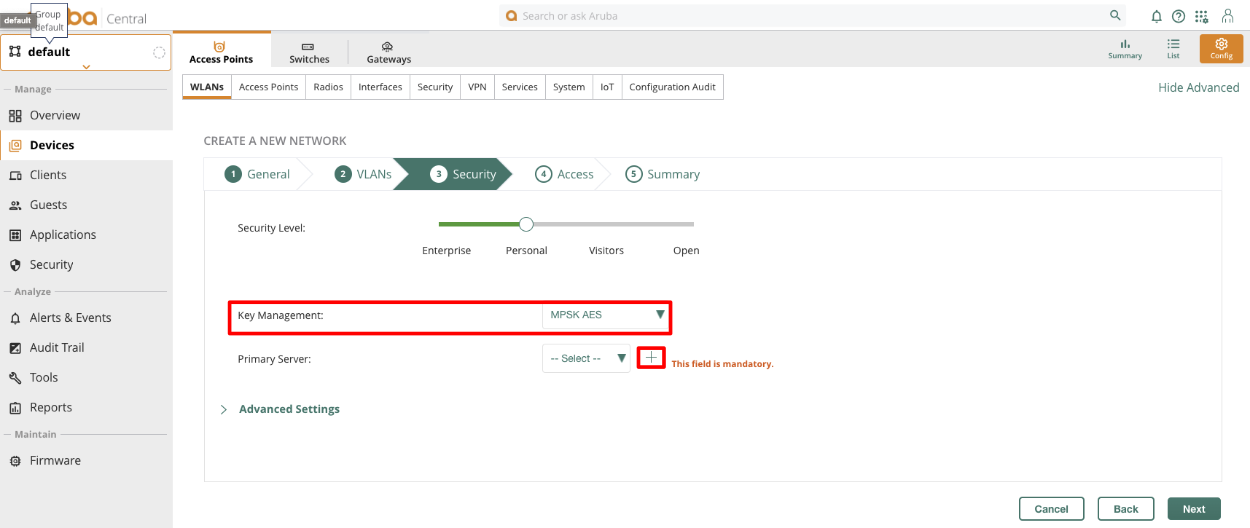
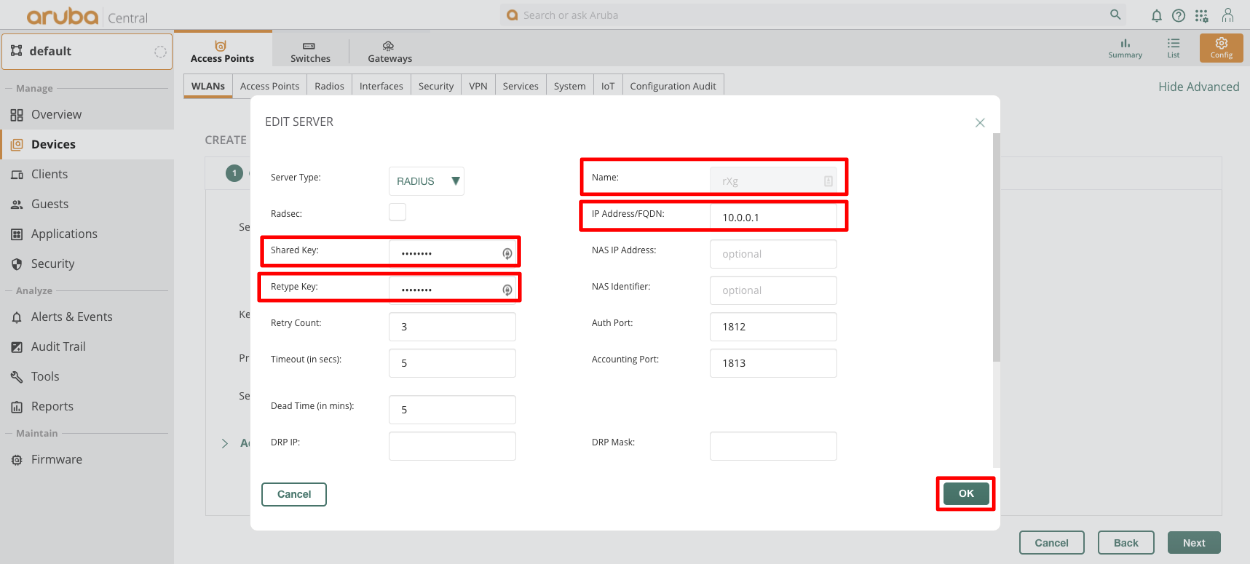
Expand advanced settings and enable "Called station ID include SSID" Click next.
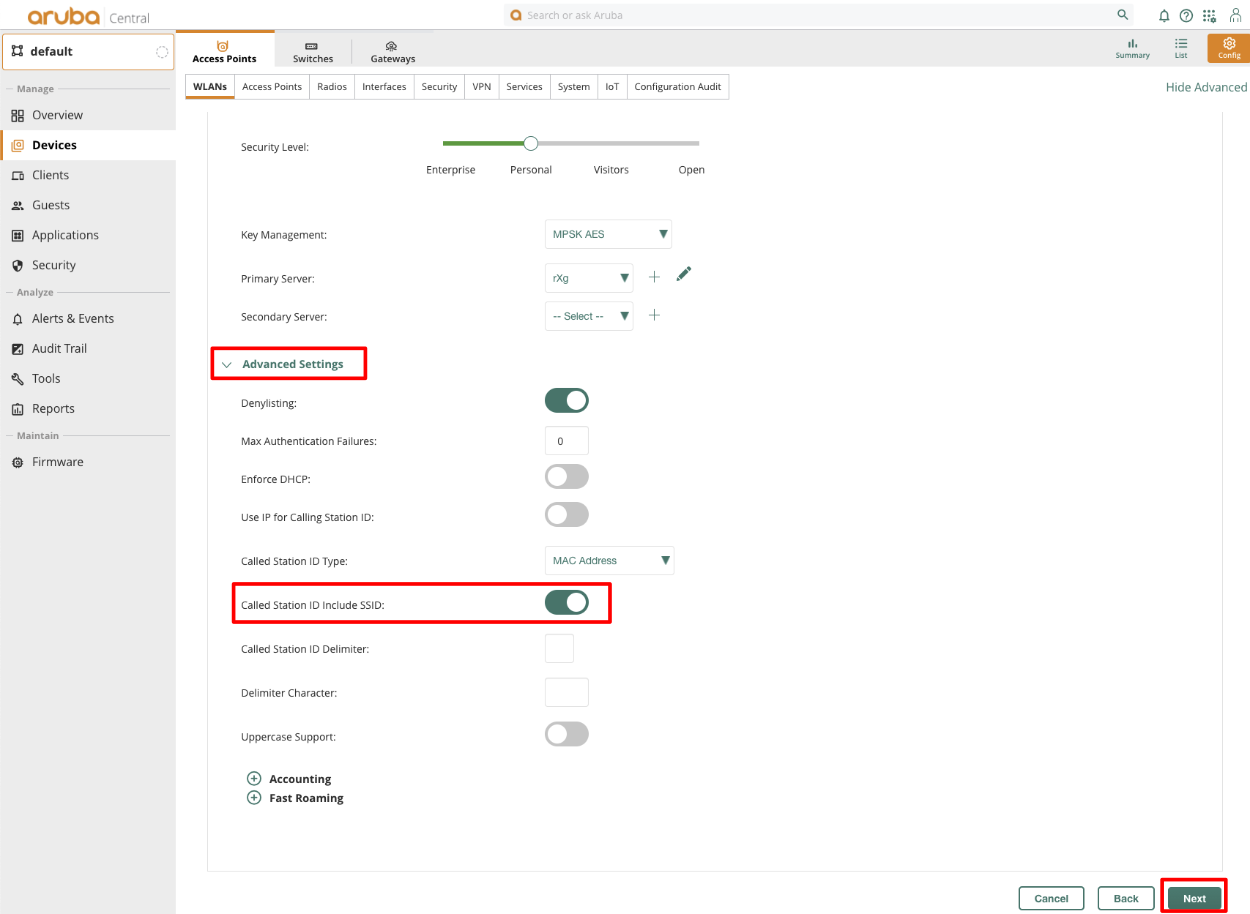
For the Access section, click next without making changes.
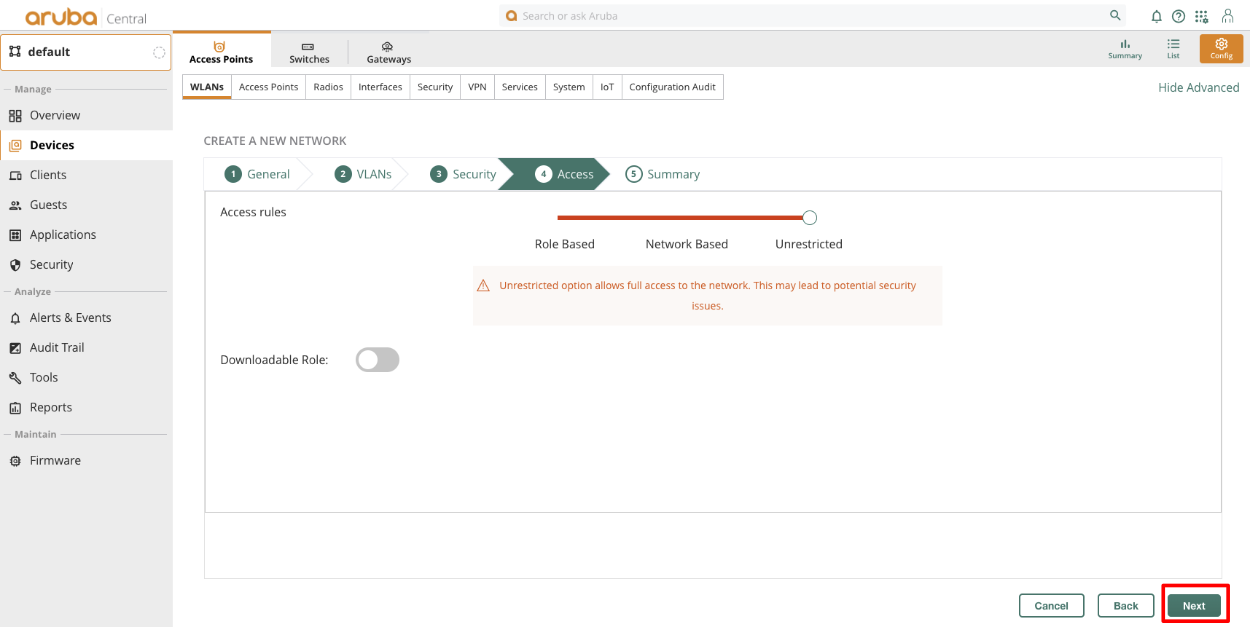
Verify settings in the Summary view and click Finish. Note that with Aruba MPSK it is required that a devices MAC address be present in an account for the MPSK to work on any given device.
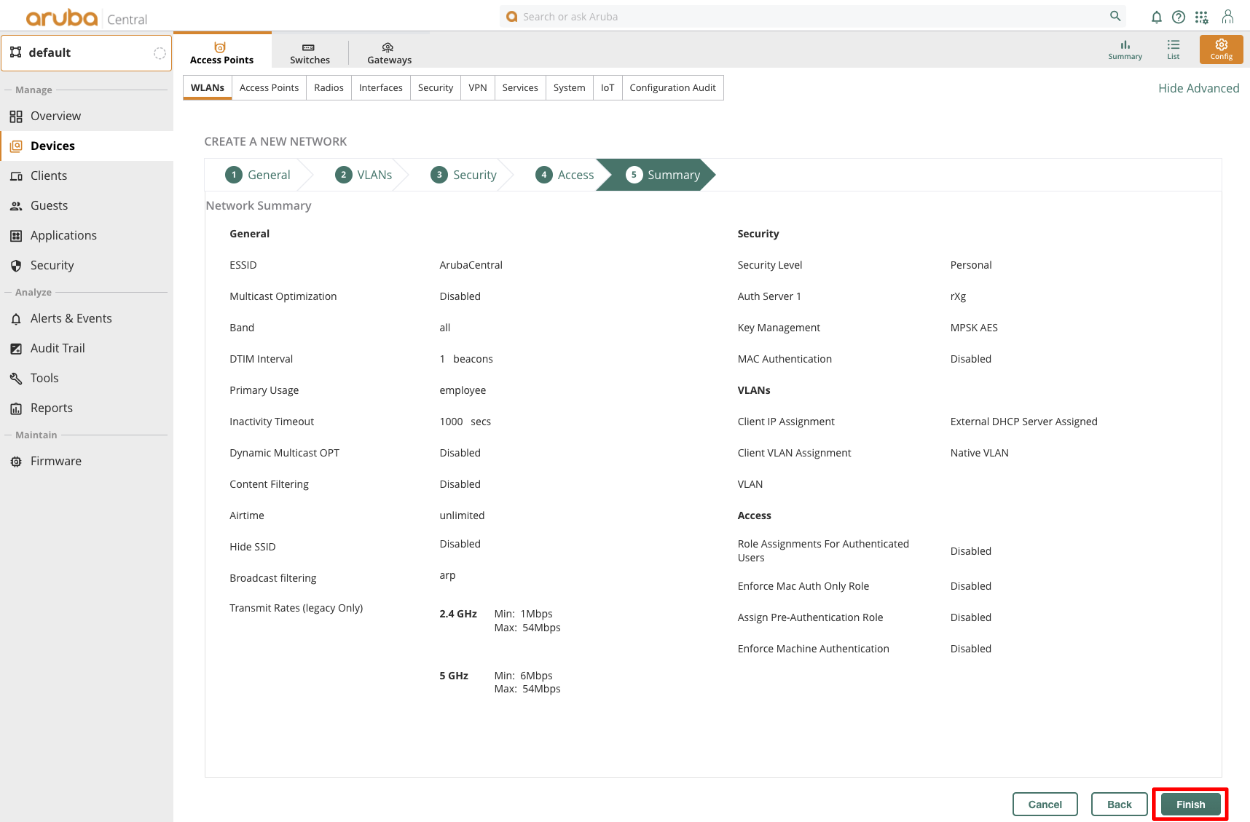
Configure Change of Authorization (CoA)
- At the Group hierarchy level, navigate to Configuration -> Authentication -> Auth Servers -> All Servers
- Create a new server, and provide the rXg IP, and RADIUS shared secret
Edit the AAA Profile and specify the newly created server under RFC3576
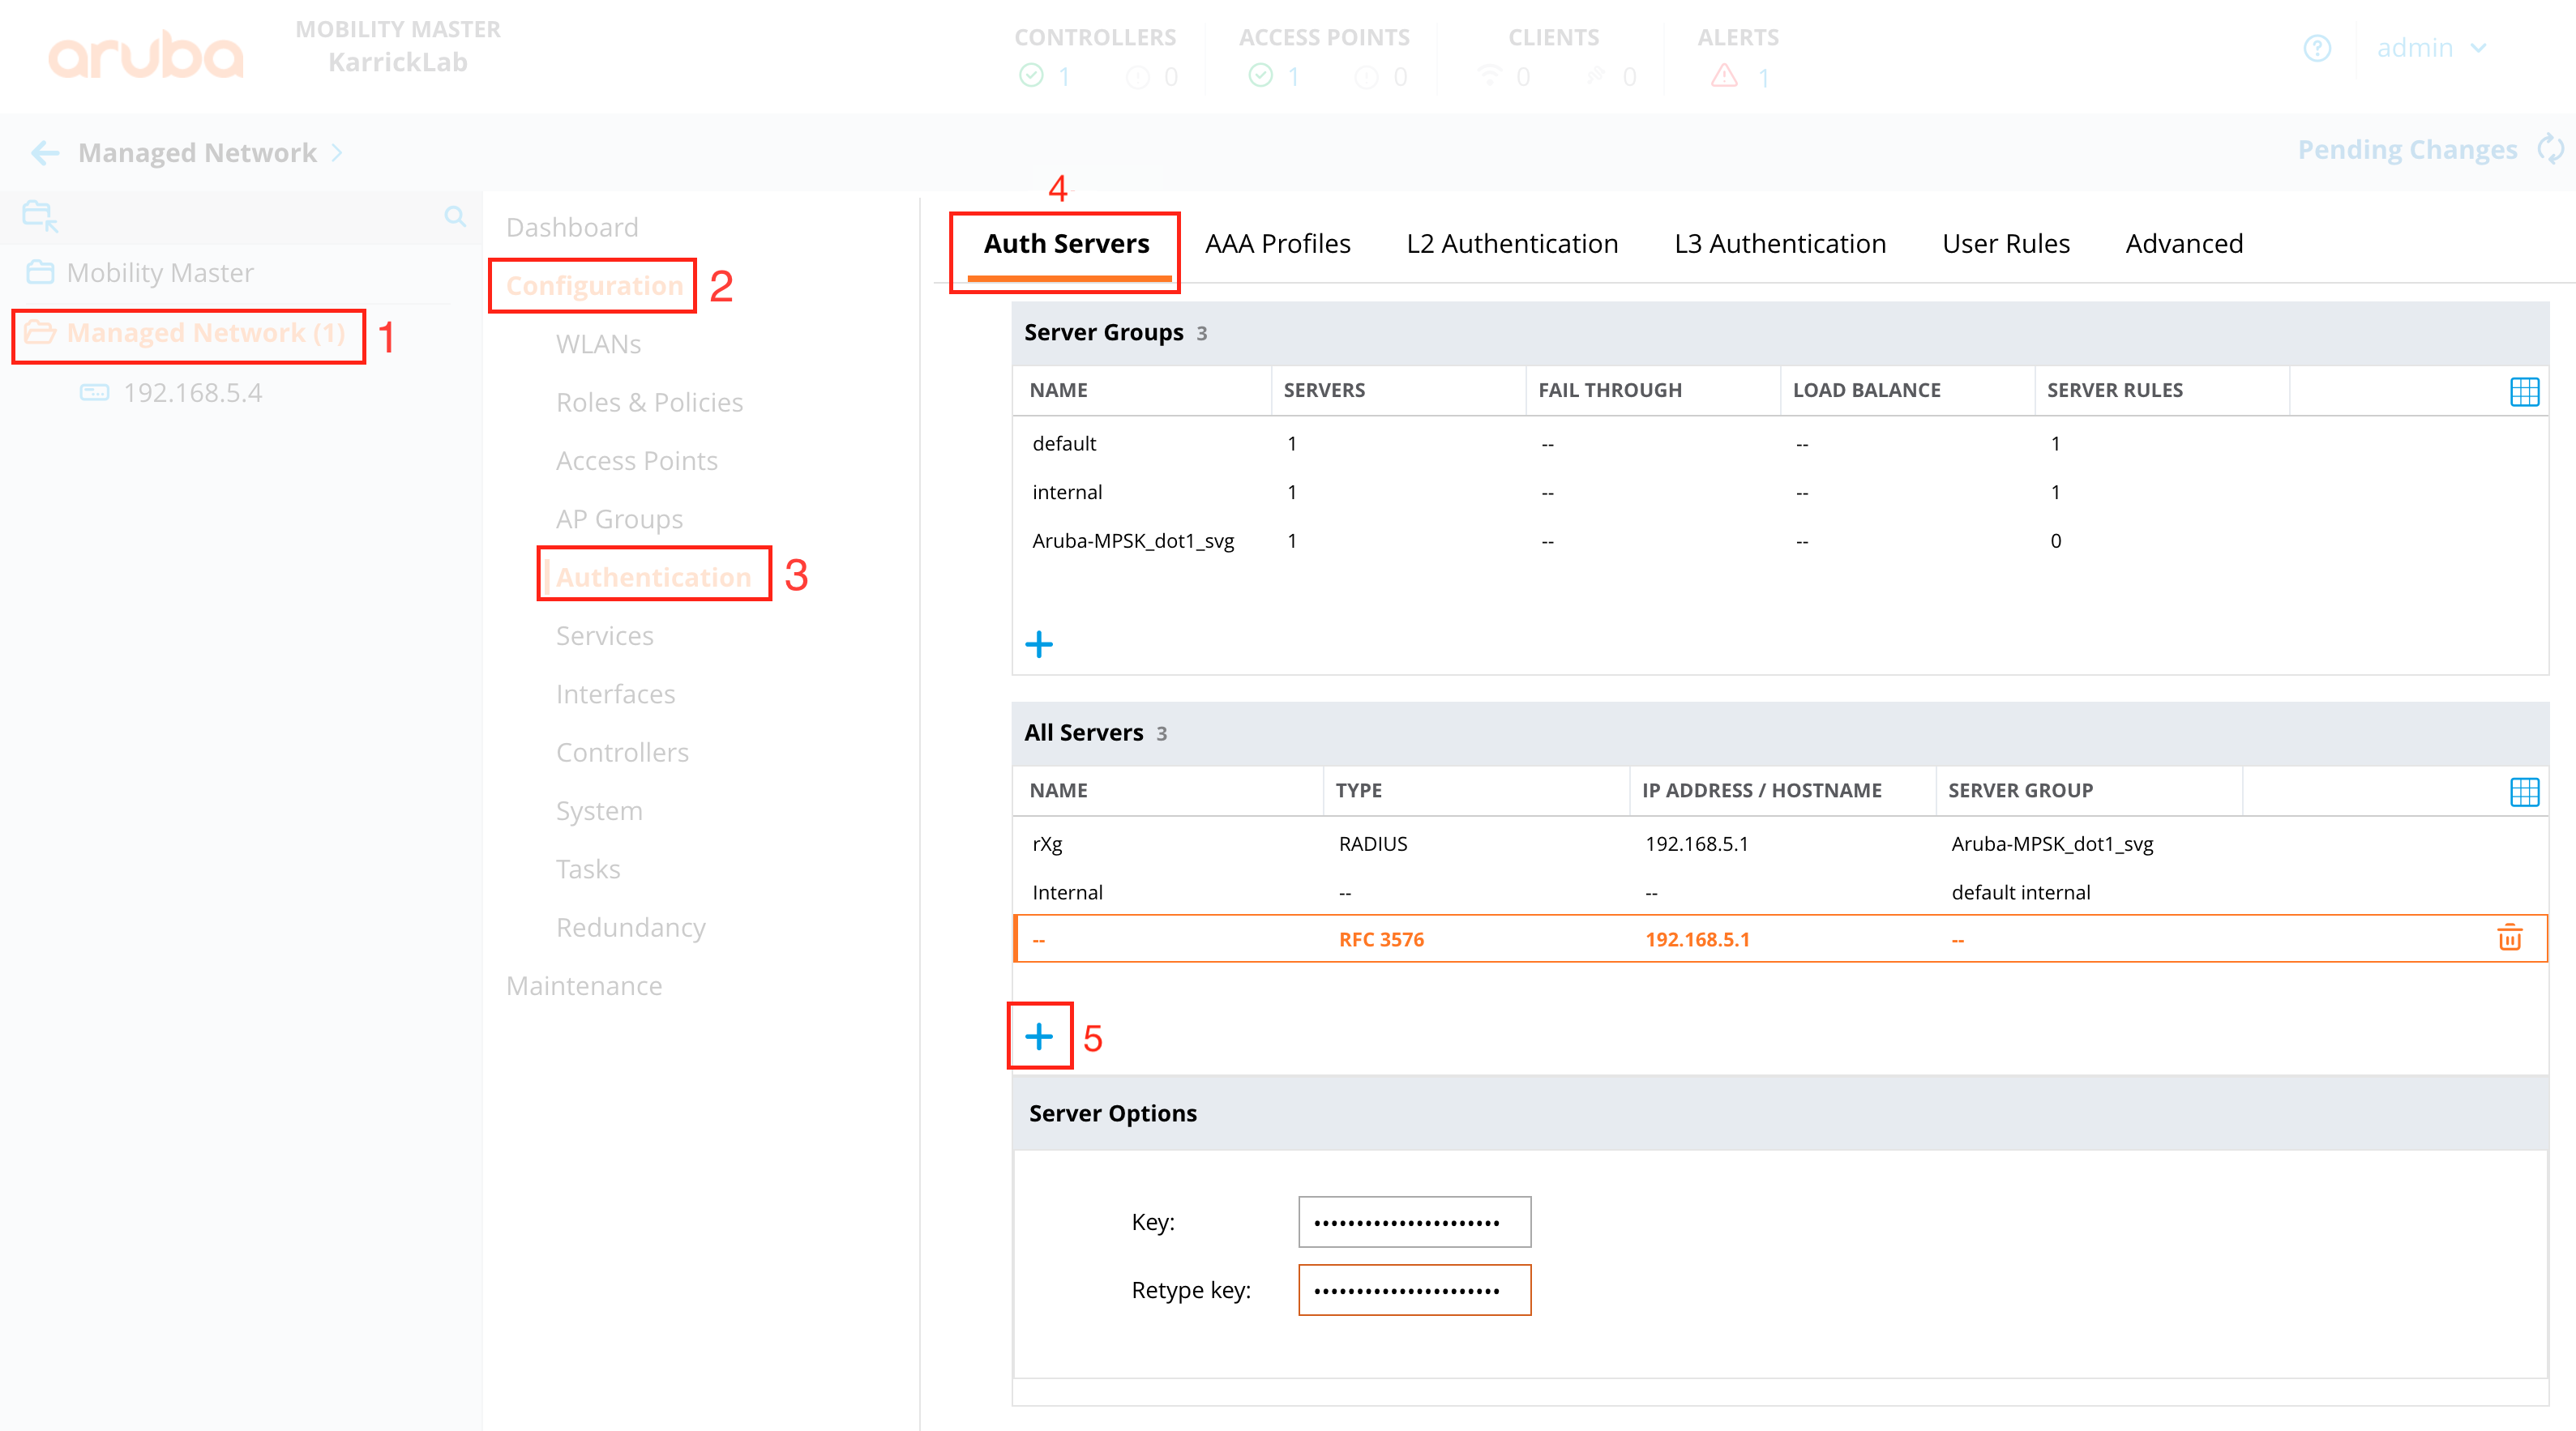
At the MC Hierarchy level (NOT the group level), navigate to Configuration -> Authentication -> Advanced
Set the RADIUS Client to the correct interface, and IP of the MC, so that the NAS-IP of RADIUS requests will be the MC (where CoA must be sent), and not the MM.

Configure rXg
Associate a RADIUS Server Attribute "Aruba-MPSK-Passphrase" with the value "%account.pre_shared_key%" to the RADIUS Realm
Cambium / cnMaestro
Introduction
The Cambium Networks cnMaestro is a comprehensive, cloud-first network management system designed for Cambium's wired and wireless portfolio. It acts as a centralized controller, simplifying the deployment, monitoring, and troubleshooting of Cambium devices across various network types. The rXg provides a native API-based connector to the cnMaestro, though requiring the following features to available within the cnMaestro controller configuration
cnMaestro X Account: The API Client feature is generally available in cnMaestro X (the advanced version). If you are using cnMaestro Essentials, you need to upgrade to gain access to the API configuration scaffold.
Super Admin Privileges: You must have a Super Admin account in cnMaestro to access and configure API clients.
Access: API communication occurs over HTTPS. Ensure your client application can properly validate SSL/TLS certificates for your cnMaestro instance (whether cloud-hosted or on-premises).
The cnMaestro controller configuration process is outlined in the following sections.
Deploy cnMaestro On-Premises in VMware
Navigate to ESXI host and create new virtual machine, select "Deply a virtual machine from an OVF or OVA file".
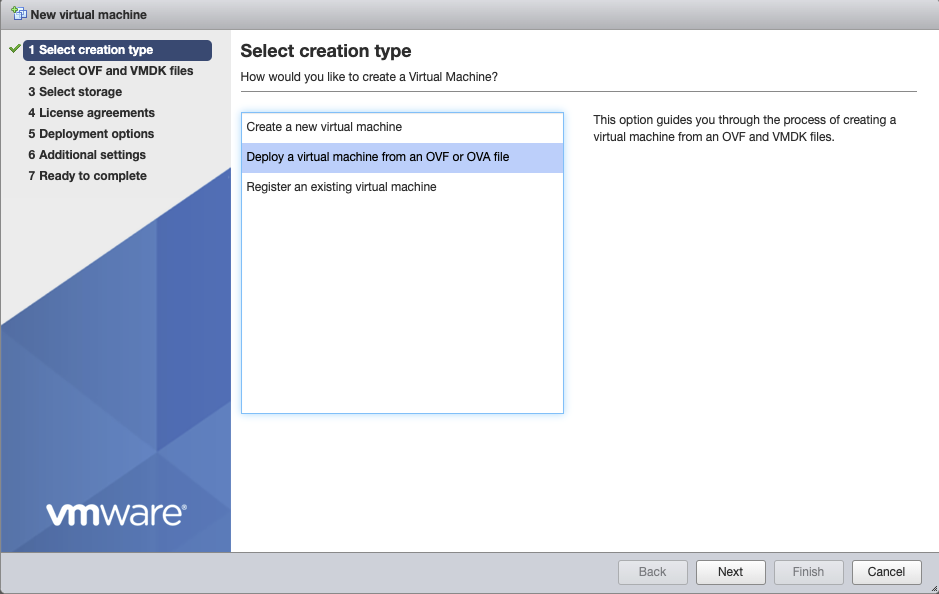
Give the vm a name, click on "Click to select files or drag/drop" and select the ova file, click next.

Select the storage where VM will be created, click next.

Agree to the License Agreements by clicking 'I Agree', and then click next.
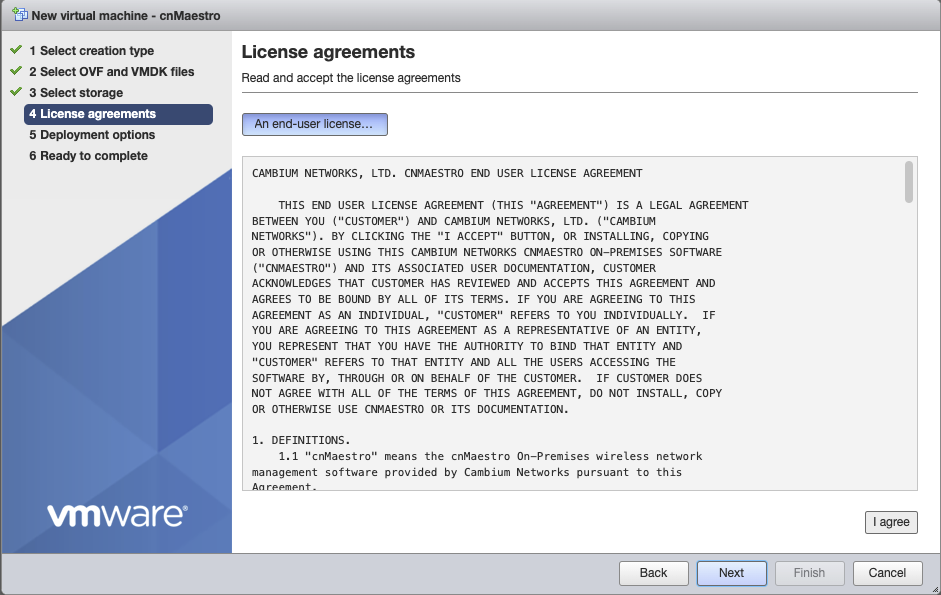
Select the appropriate Network mapping for your network, should be connect to the LAN of the rXg. Verify settings, click next.
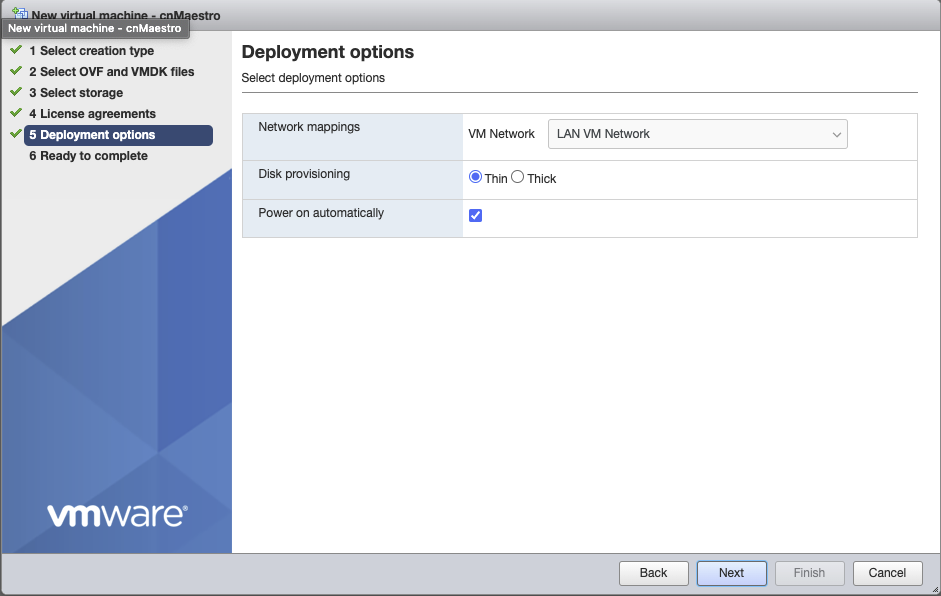
Click Finish, and wait for the VM to be deployed.
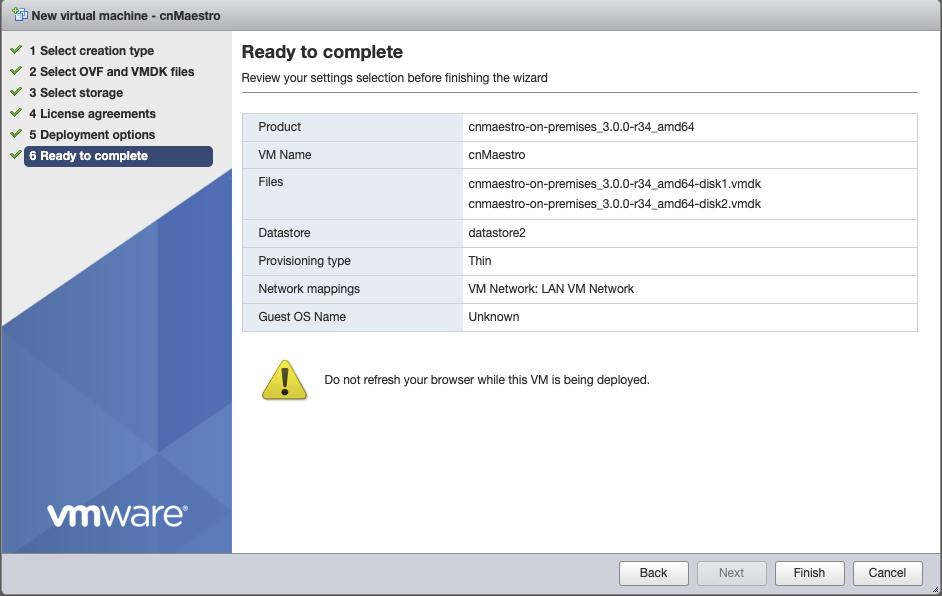

Configure cnMaestro
For On-Premises navigate to IP address of cnMaestro VM and login with admin/admin.
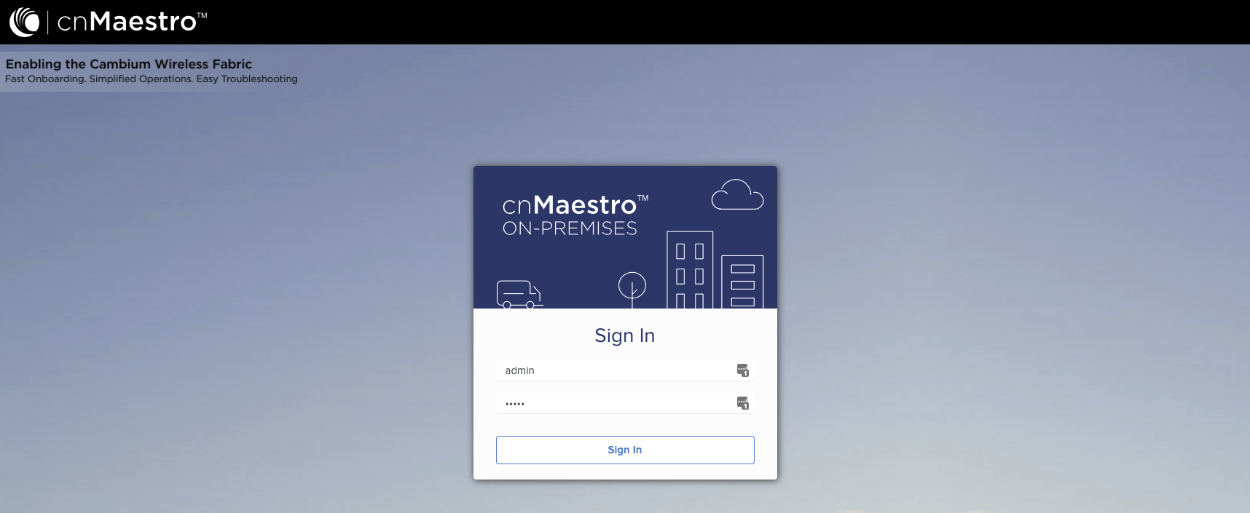
Set Country and Time Zone.

Change the Default "Admin user" Password, and re-authenticate.
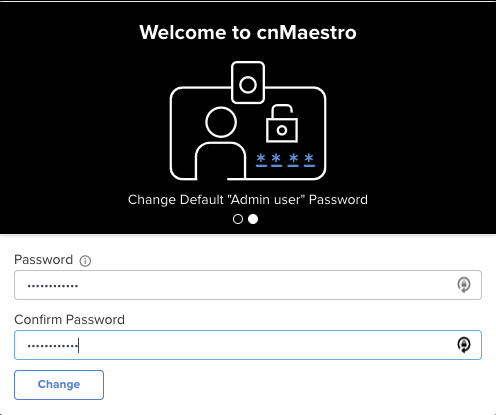
API client ID and client secret
Steps to Generate API Credentials (Client ID and Client Secret), required to connect the rXg to the cnMaestro controller:
Log in to cnMaestro:
- Access your cnMaestro web interface (e.g., cloud.cambiumnetworks.com for cloud instances, or your specific URL for on-premises deployments).
- Authenticate with your Super Admin credentials.
Navigate to the API Client Section:
- In the cnMaestro web interface, locate and click on "Network Services".
- Within that section, find and select "API Client".

Add a New API Client:
- On the API Client page, click the button to "Add API client".

Provide Client Details:
- You will be prompted to enter information for your new API client. This typically includes:
- Application Name: A descriptive name for your API client (e.g., "My_Automation_Script," "Inventory_Sync_Tool").
- Description: An optional, brief explanation of the client's purpose.
- Expiration Time (Optional): Some cnMaestro versions allow you to set a validity period for the access tokens generated by this client (e.g., 3600 seconds for 1 hour, which is often the default).

Save the Configuration:
- After entering the required details, click "Save".
Retrieve Client ID and Client Secret:
- Upon successful saving, cnMaestro will generate credentials but not display the client secret. Proceed to download the credentials and store them in a safe location.
- If you lose the client_secret, you will typically need to revoke the existing API client and create a new one.

An example of access credentials created for the purpose of this tutorial is shown below.
{
"application_name": "Test",
"application_description": "Test",
"client_id": "OBB8Xiq7RPo3cNpd",
"client_secret": "JmraMgSQ0hp8N3irU5DTBhAQ2J2Yke"
}
Enable SNMP (On-Premises only)
Note: This step should be skipped if not using On-Premises. First navigate to Administration.
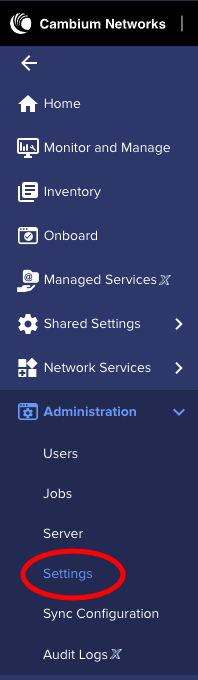
Expand Optional Features and check the Enable SNMP box, click save.
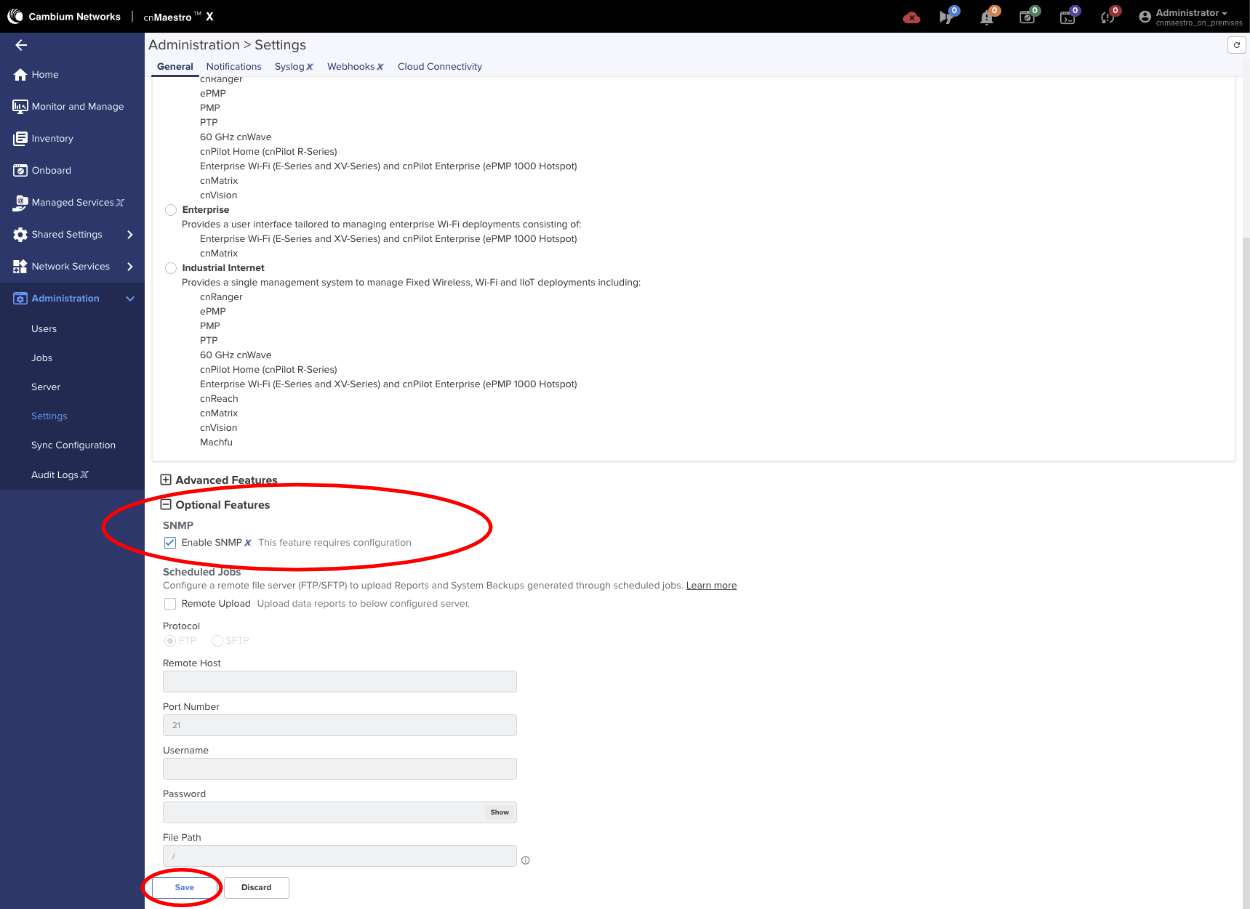
Set SNMPv2c RO Community name, by navigating to Network Services => SNMP Configuration.
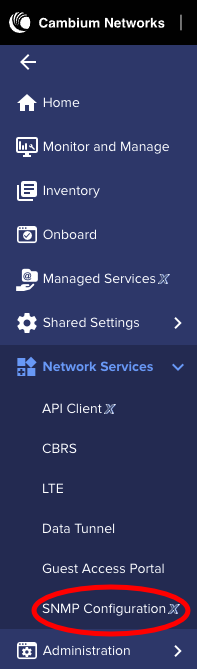
Set the SNMPv2c RO Community string and click save.
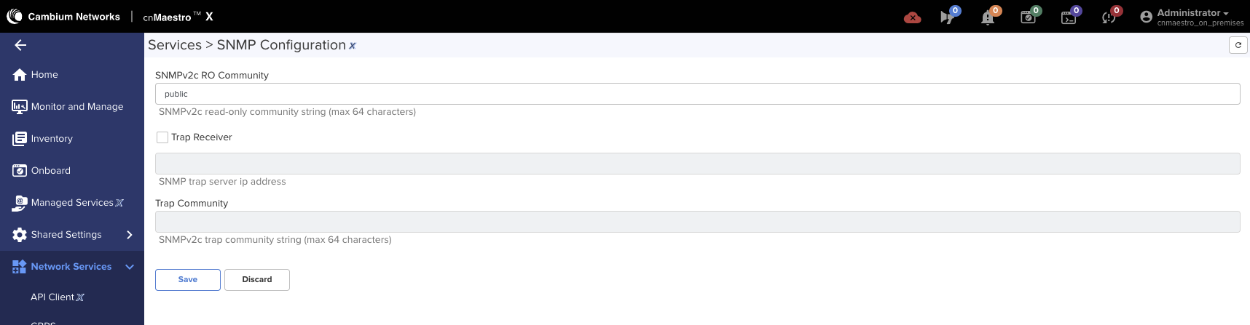
Point WAP to the controller
Access the WAP via its IP address and login using admin/admin.

Select System from the menu and look for cnMaestro under Management. Enter the URL or IP address of the cnMaestro in the cnMaestro URL. Click Save.
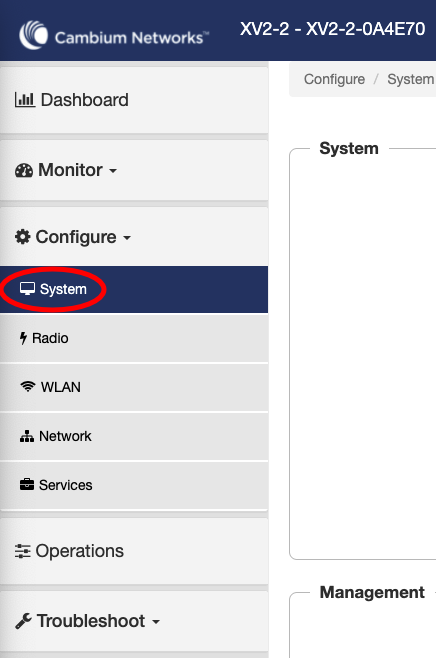
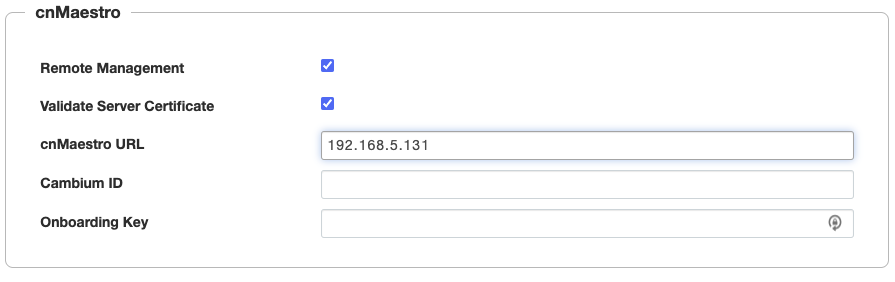
Next we need to claim the WAP, navigate to the cnMaestro Dashboard and click onboarding under Devices.

Approve the WAP by clicking the Approve button.
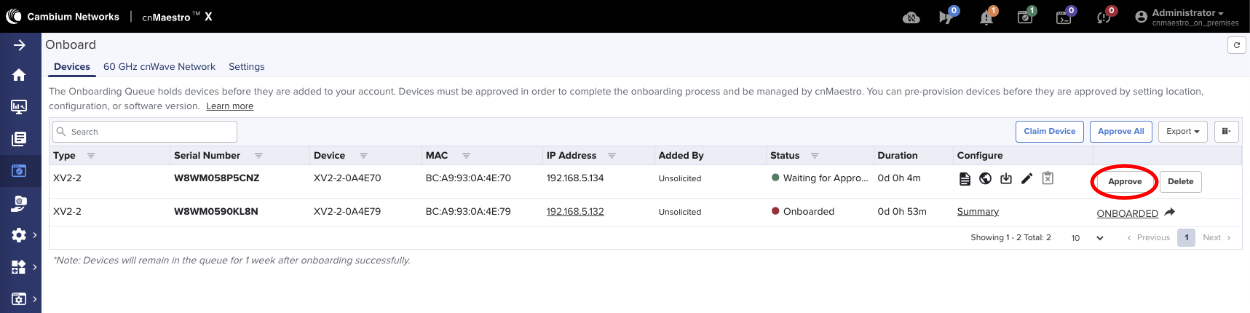
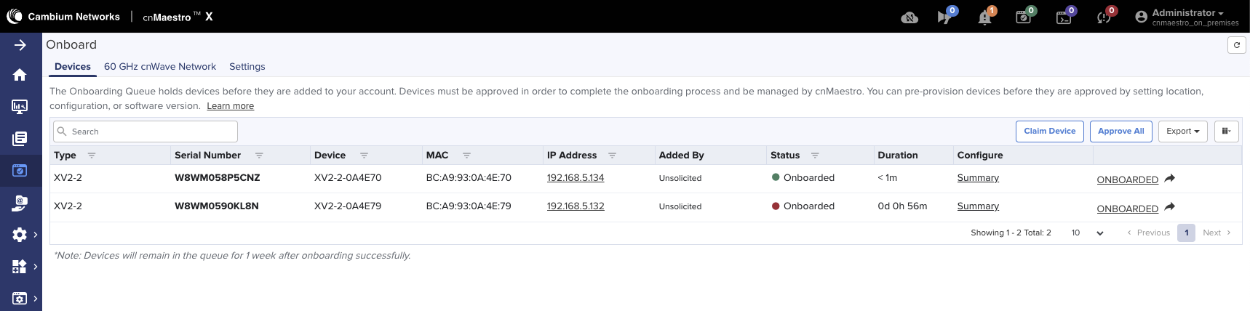
Next add the WAP to a Wi-Fi WAP Group. Click on Monitor and Manage and find the WAP under Networks, click on the 3 dots next to the WAP and select edit.
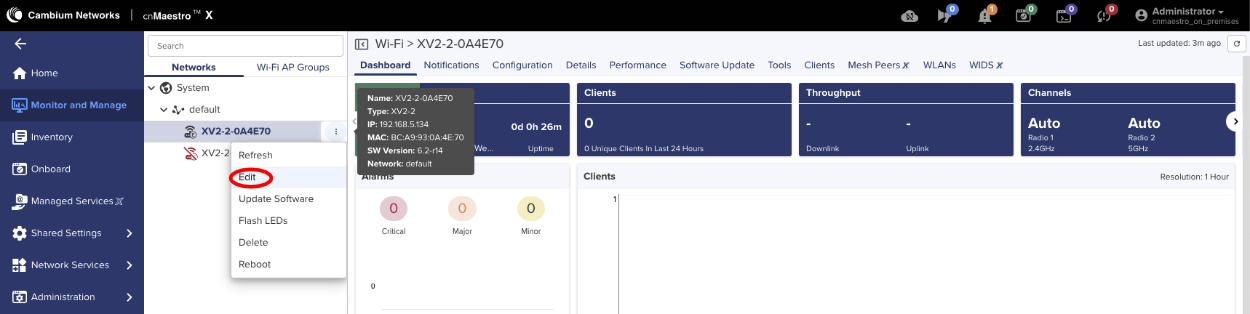
Under Device Configuration, change WAP group to Default Enterprise and Apply Configuration.
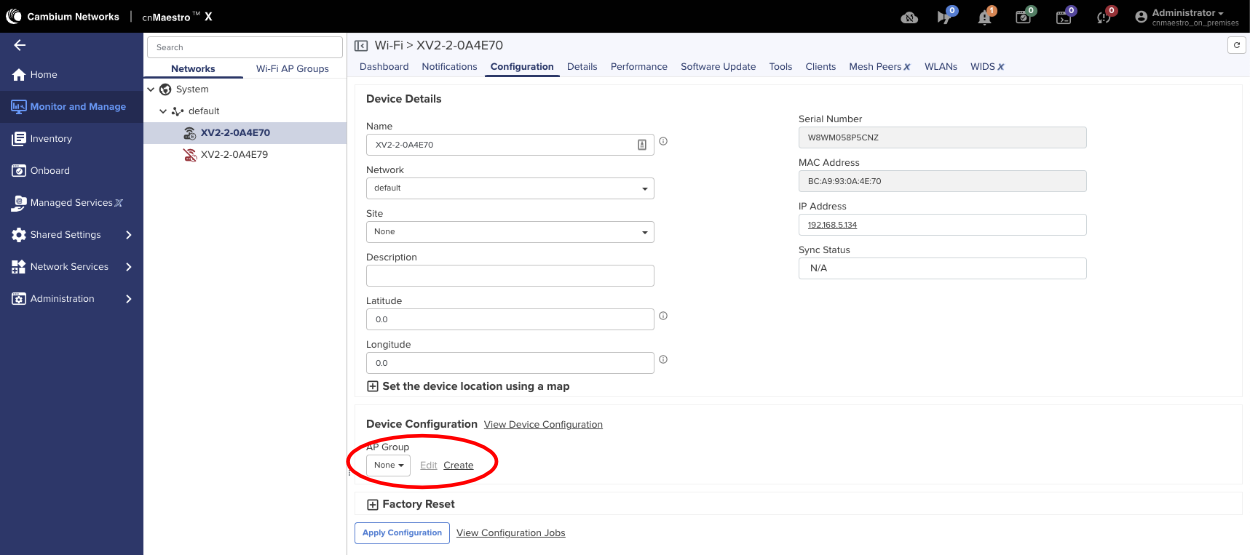
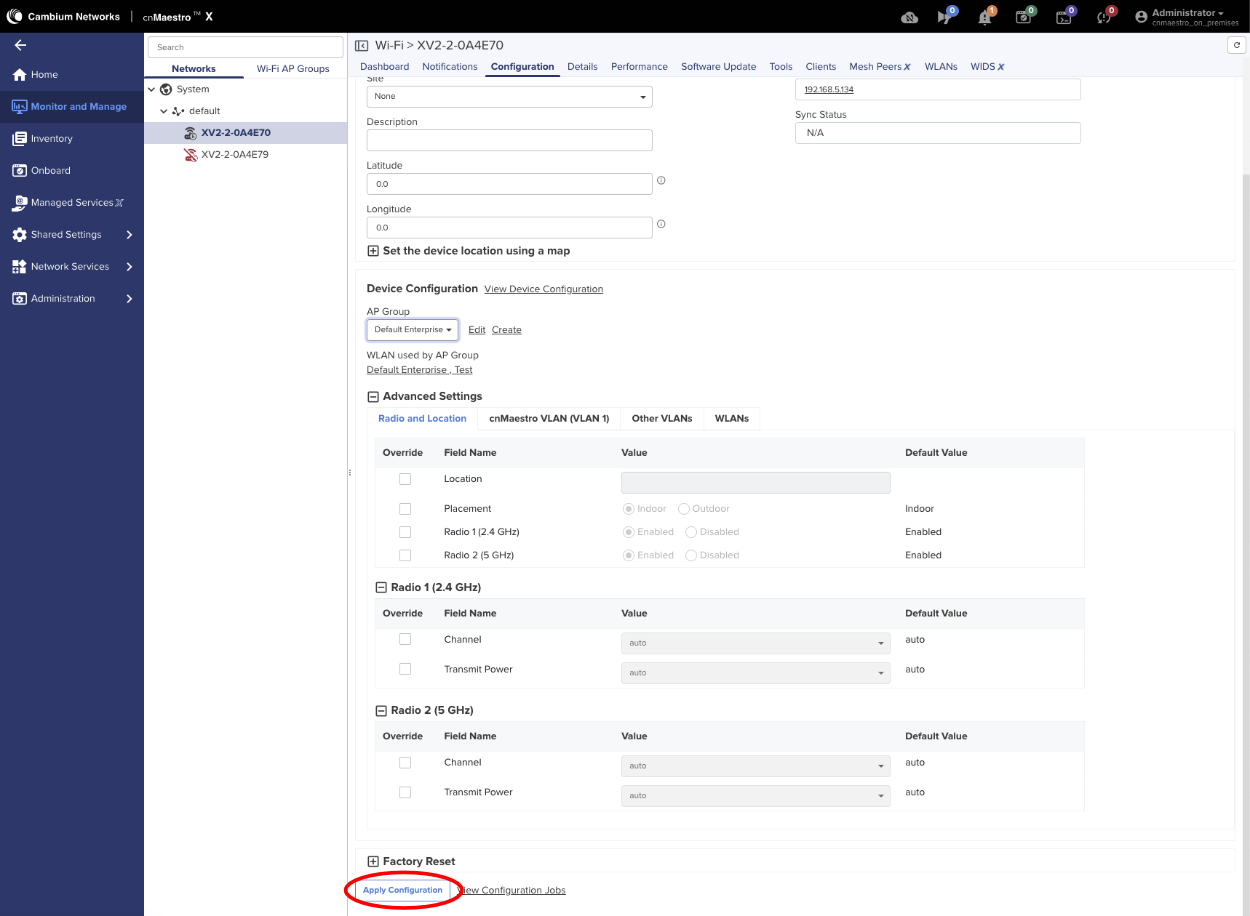
WLAN configuration
To create a new WLAN in cnMaestro, navigate to the Configuration > Wi-Fi Profiles section, then click the "Add New" button in the "WLANs" section.

You will need to input a name for the new WAP group and configure its settings, including the device type, country, and any associated WLANs.
- Access the WLANs page: In cnMaestro, navigate to the Configuration section and then to the "Wi-Fi Profiles" section.

Start the WLAN creation: Click the "Add New" button to create a new WLAN, and configure the following basic settings. Note that some of the properties, such as Description, are optional. All mandatory fields are marked with an asterisk (*).
- Type: Select the appropriate WLAN type (e.g., Enterprise Wi-Fi for Cambium WAPs).
- Name: Enter a descriptive name for your WAP group (e.g., "Office WAPs"). The Name may match the SSID.
- Scope: Select one of the available of the existing scopes (sometimes referred to as 'zones')
- SSID: The SSID of this WLAN (up to 32 characters).
- VLAN: Default VLAN assigned to clients on this WLAN (1-4094)
- Security: Set authentication and encryption type. When a non-open SSID is configured, a new Passphrase field is presented.
- Passphrase: Pre-shared security passphrase or key (must contain 8 to 63 ASCII or 64 Hexadecimal digits). Applicable to WPA2/WPA3 Security types.

- The remaining parameters may remain in their default state, e.g., the radio types (2.4 GHz, 5 GHz, 6 GHz) on which this WLAN should be supported, client isolation, roaming, etc. The advanced options are typically not configured in the majority of the deplyments.

The resulting view of a number of WLANs in the system is shown below

WAP Group configuration
To create a new WAP group in cnMaestro, navigate to the Configuration > Wi-Fi Profiles section, then click the "Add New" button in the "AP Groups" section.

You will need to input a name for the new WAP group and configure its settings, including the device type, country, and any associated WLANs.
- Access the AP Groups page: In cnMaestro, navigate to the Configuration section and then to the "Wi-Fi Profiles" section.
Start the WAP Group creation: Click the "Add New" button to create a new WAP group, and configure the following basic settings. Note that some of the properties, such as Location, Contact, Description, are optional. All mandatory fields are marked with an asterisk (*).
- Type: Select the appropriate device type (e.g., Enterprise Wi-Fi for Cambium WAPs).
- Name: Enter a descriptive name for your WAP group (e.g., "Office WAPs").
- Scope: Select one of the available of the existing scopes (sometimes referred to as 'zones')
- Auto Sync: Enable this option to automatically push configuration changes to WAPs within the group. This option is selected by default.
- Country: Select the country where the WAPs are located.
- Placement: Specify whether the WAPs are indoors or outdoors. Indoor placement is the default.

- WLANs: Add the WLANs you want to be broadcast by the WAPs in this group. An existing WLAN can be added using the 'Add VLAN' button, or a new one can be created using the 'Create WLAN' button.

Switch over to the "Management" section of the dialog and fill in the following mandatory information. The remaining configuration elements are optional and do not need to be filled in.
Admin Password: Configure password for authentication of GUI and CLI sessions (max 32 characters)
Time Zone: Select the time zone for the given WAP Group

- Save the configuration: Once you've configured the basic settings, save the new WAP group.
The resulting view of a number of Wi-Fi Profiles in the system is shown below

rXg-side Configuration Elements
All operations are performed in the 'Network::Wireless' scaffold, and specific sub-scaffolds.
Navigate to Network::Wireless.

Create a new WLAN Controller.

Create a new wireless controller using the 'Create New' button in the 'WLAN Controllers' scaffold and fill in the following information:
Name: field is an arbitrary string descriptor used only for administrative identification. Choose a name that reflects the purpose of the record. This field has no bearing on the configuration or settings determined by this scaffold.
Type: select the 'Cambium cnMaestro' controller type
Host: select the host portion of the URL used to access the cnMaestro controller, e.g., 'us-e1-s21-g2ynoku0yo.cloud.cambiumnetworks.com'. It is recommended to use the gateway address, rather than the explicit IP address, in case the public IP address changes over time.
Username: copy the 'client_id' value from the API access credentials created in the cnMaestro
New Password: copy the 'client_secret' value from the API access credentials created in the cnMaestro

- Managed Account / Network values are populated from the cnMaestro scaffold, whereby the first value shown below is the Managed Account, and the second one - the Network. These values will depend on your particular cnMaestro configuration, and organization of your accounts and networks.

NOTE: If you are using the Cambium Cloud, the Host field will be cloud.cambiumnetworks.com. The username and password fields are the same as a local instance documented above.
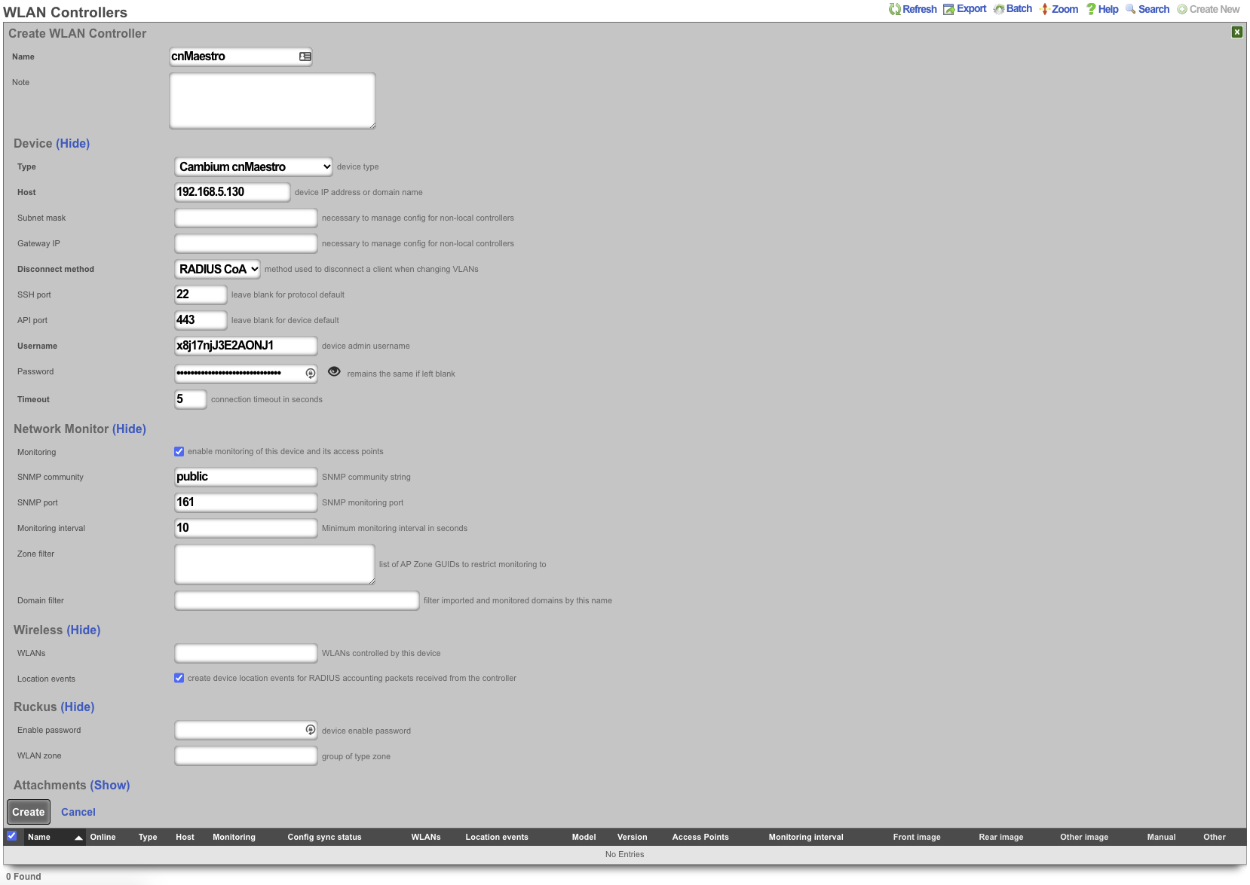
- Click the 'Create' button to complete the process.

Once created, a new entry in the 'WLAN Controllers' is created, as shown below.

After a few seconds the Controller will appear online. Click on Sync not enabled.

Click on 'Enable Config Synchronization'.
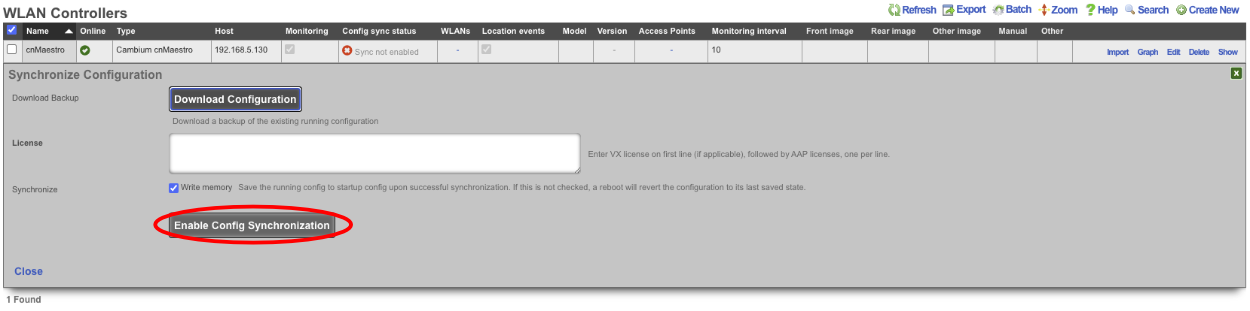
The Controller is now managed by the rXg.
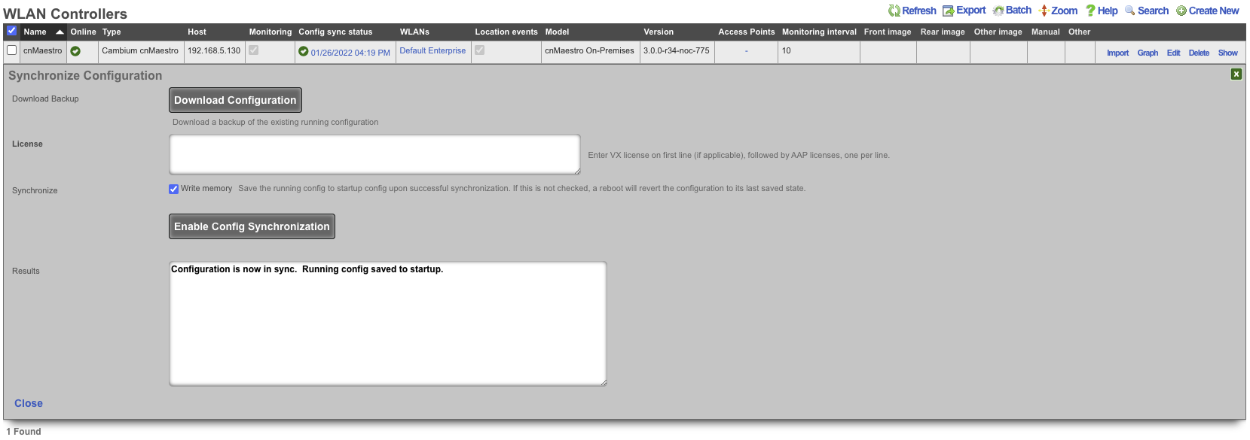
The setup process and API exchange between the rXg and the cnMaestro can take several minutes, depending on the complexity of the network structure created in the cnMaestro controller. Once the controller comes online, use the 'Import' button to import WAPs, associated WLANs, and zone configuration. The example below shows the following sceffolds with elements imported from cnMaestro: 'WLANs', 'Access Point Profiles', 'Access Point Zones', and 'Access Points'.


Extreme WiNG
Build VX9000 in vmware
Create a new virtual machine, select 'Create a new virtual machine'. Click next.
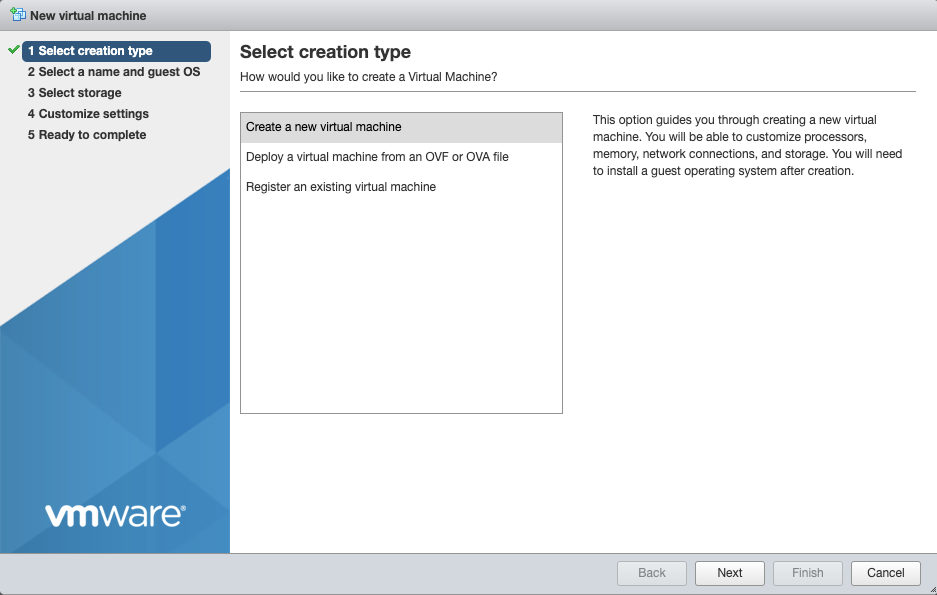
Add a name, and choose 'Other' for OS Family, and 'Other (64-bit)' for OS Version. Click next.
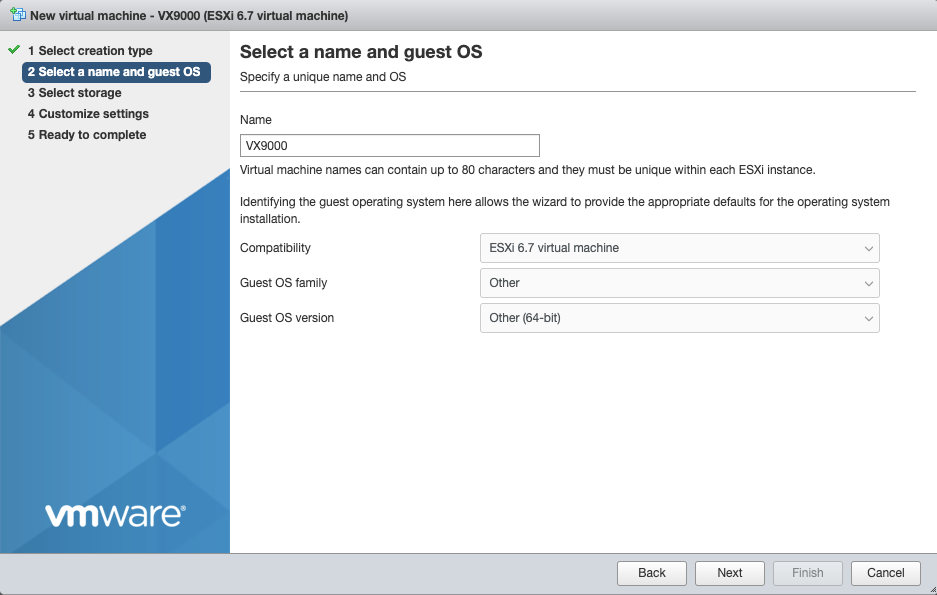
Select 'datastore1' for storage (default). Click Next.

Increase Memory to 4GB Increase Hard Disk to 20GB Select 'Thin Provisioned' under Hard Disk options. Scroll down
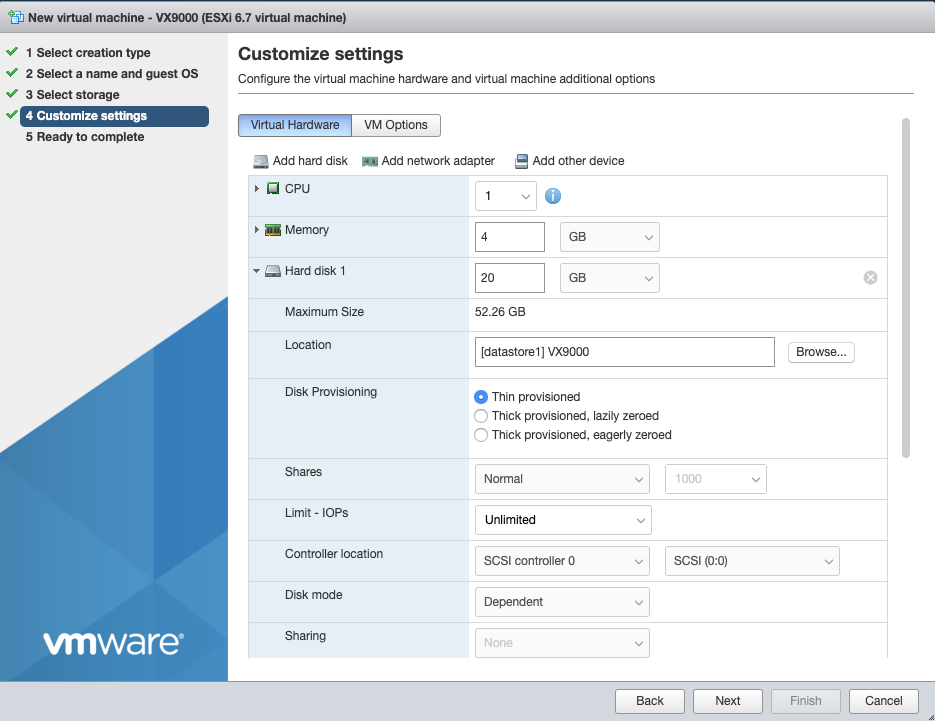
For 'CD/DVD Media' select 'Datastore ISO file', and choose the VX9000-DEMO-x.x.x.x-xxxR.iso. Click Next
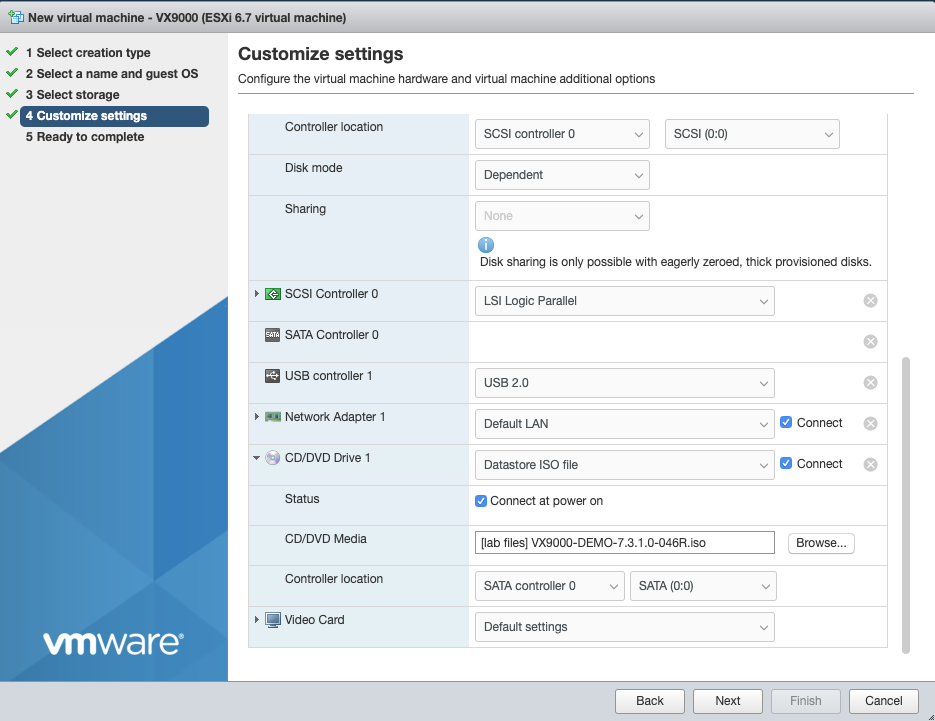
Verify settings, and click finish.

Power on the VM. Using the vmware console press enter/return to start the installation
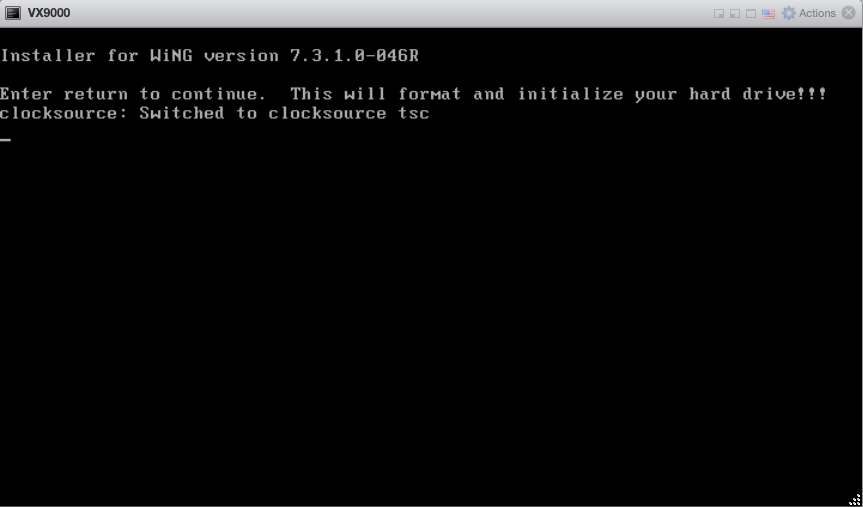
Accept these defaults by pressing enter/return
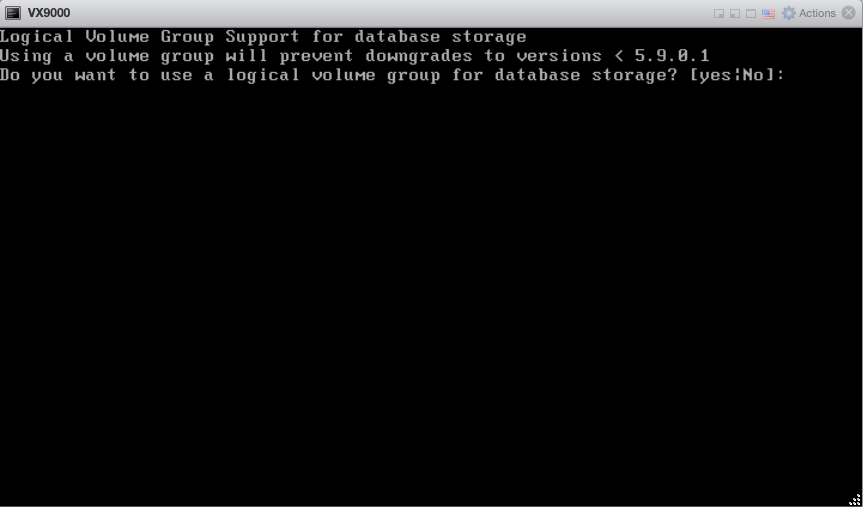
The installation is finished when you reach this screen. Go to VM Settings, and change CD/DVD back to 'Host Device'.
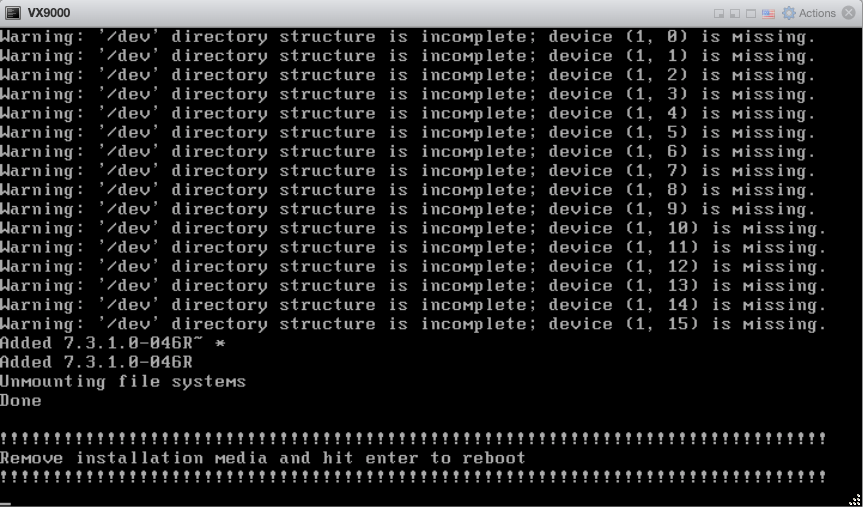
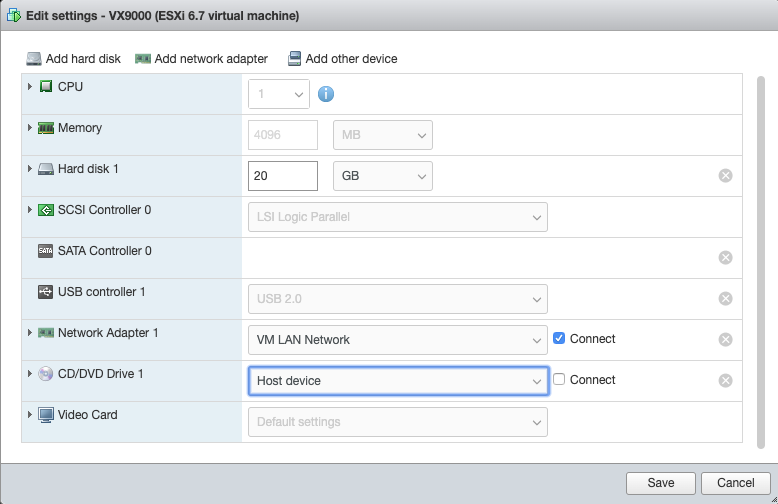
Press enter/return to intiate the reboot.
Add VX9000 to Wireless Infrastructure Devices
Navigate to Network::Wireless
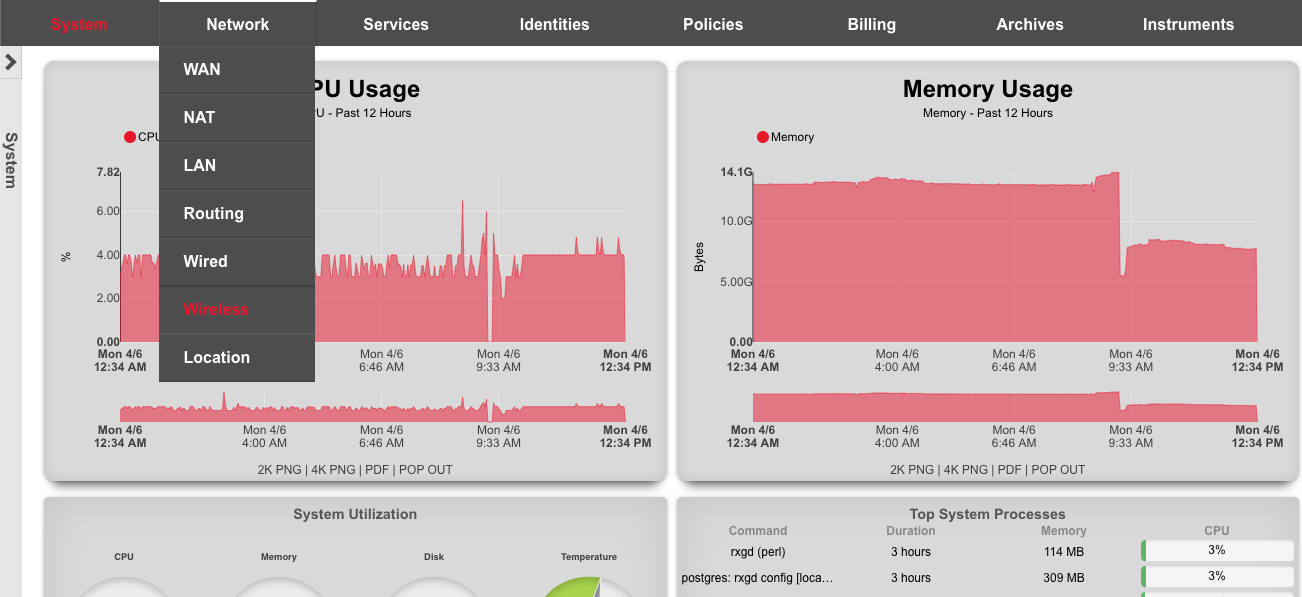
Click 'Create New' on the WLAN Controllers scaffold. Populate the form using the following:
| Field | Value |
|---|---|
| Name | VX9000 |
| Type | Extreme WiNG VX/NX |
| Host | 172.16.0.5 |
| Subnet Mask | 255.255.255.0 |
| Gateway IP | 172.16.0.1 |
| Username | admin |
| Password | lab01admin! |
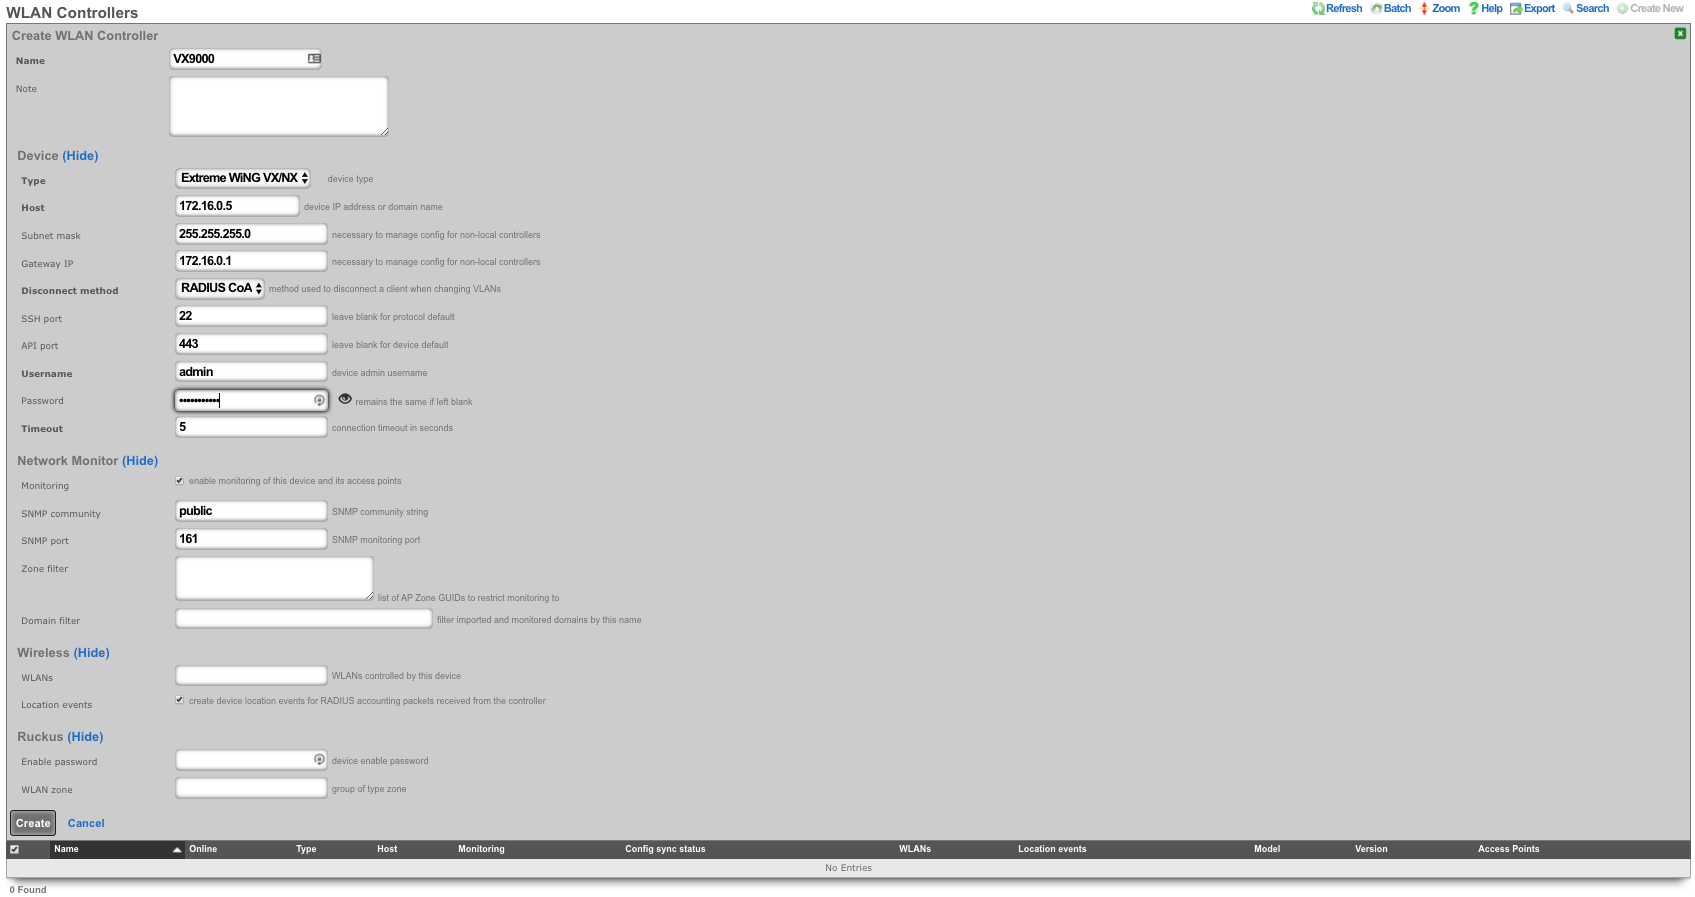
Click on "Sync not enabled" to generate a bootstrap configuration
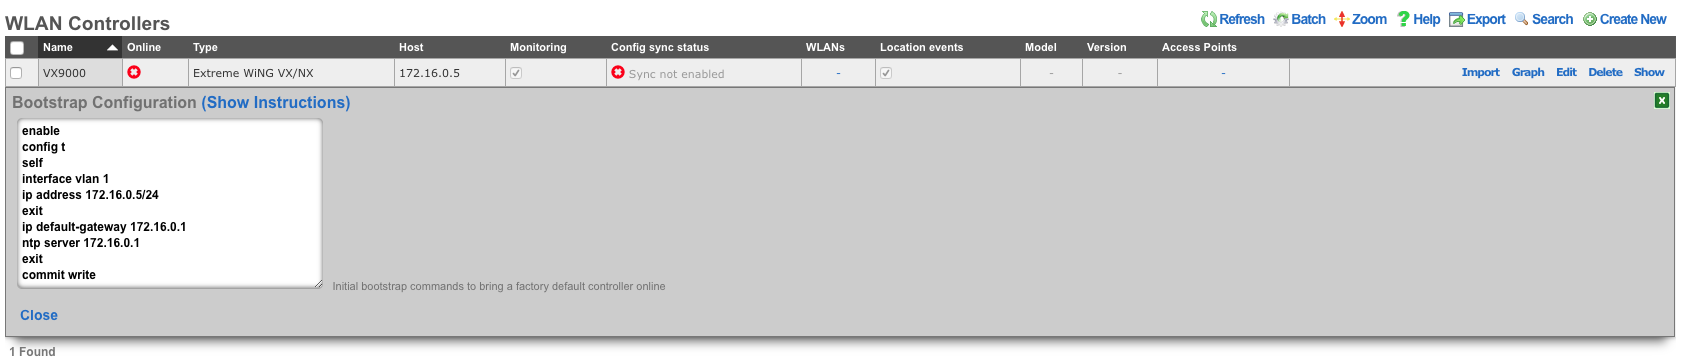
Apply Bootstrap Configuration and Enable Sync
In vmware console, login to the VX9000 with default credentials admin/admin123 . You will be prompted to change the password. Type 'lab01admin!' substituting your lab number. Then type the commands from the bootstrap configuration.
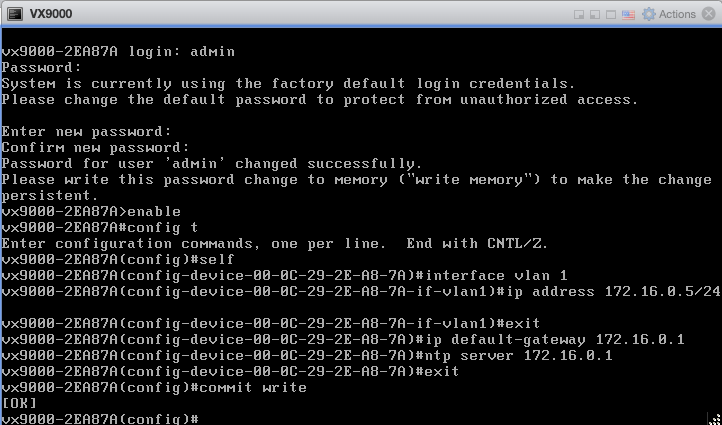
The VX9000 will become reachable, refreshing the rXg screen. Click 'Enable Config Synchronization'.
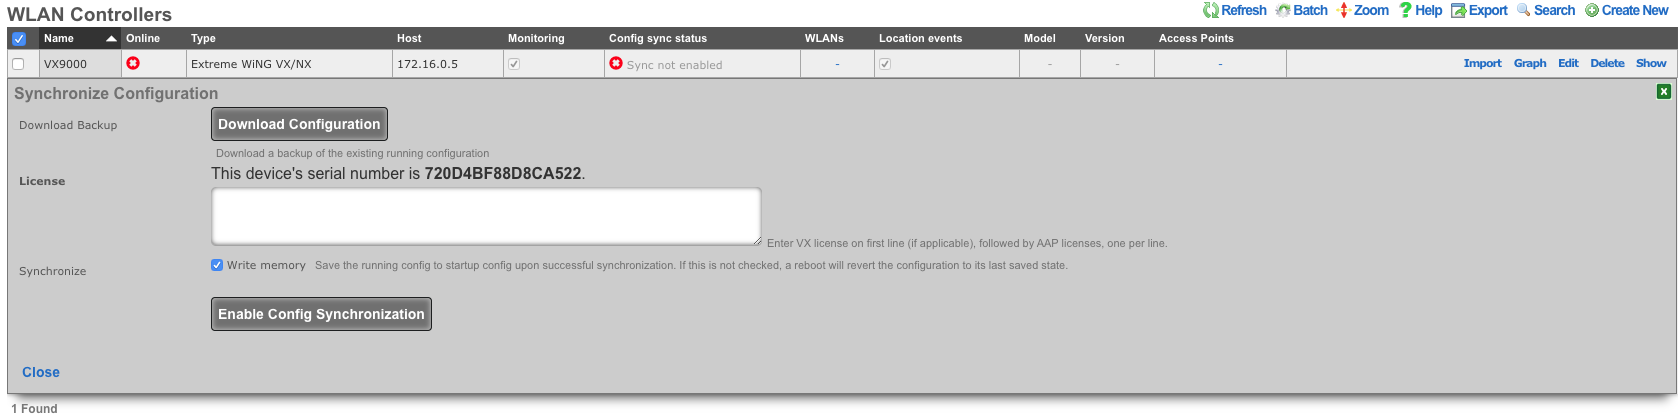
The VX9000 is now managed by the rXg

Create WLAN
Navigate to Network::Wireless and create new WLAN. Fill out the name with your lab number, select the VX9000, fill out SSID, and click create.
| Field | Value |
|---|---|
| Name | lab0X |
| Controller | VX9000 |
| SSID | lab0X |
| Encryption | none |
| Authentication | none |
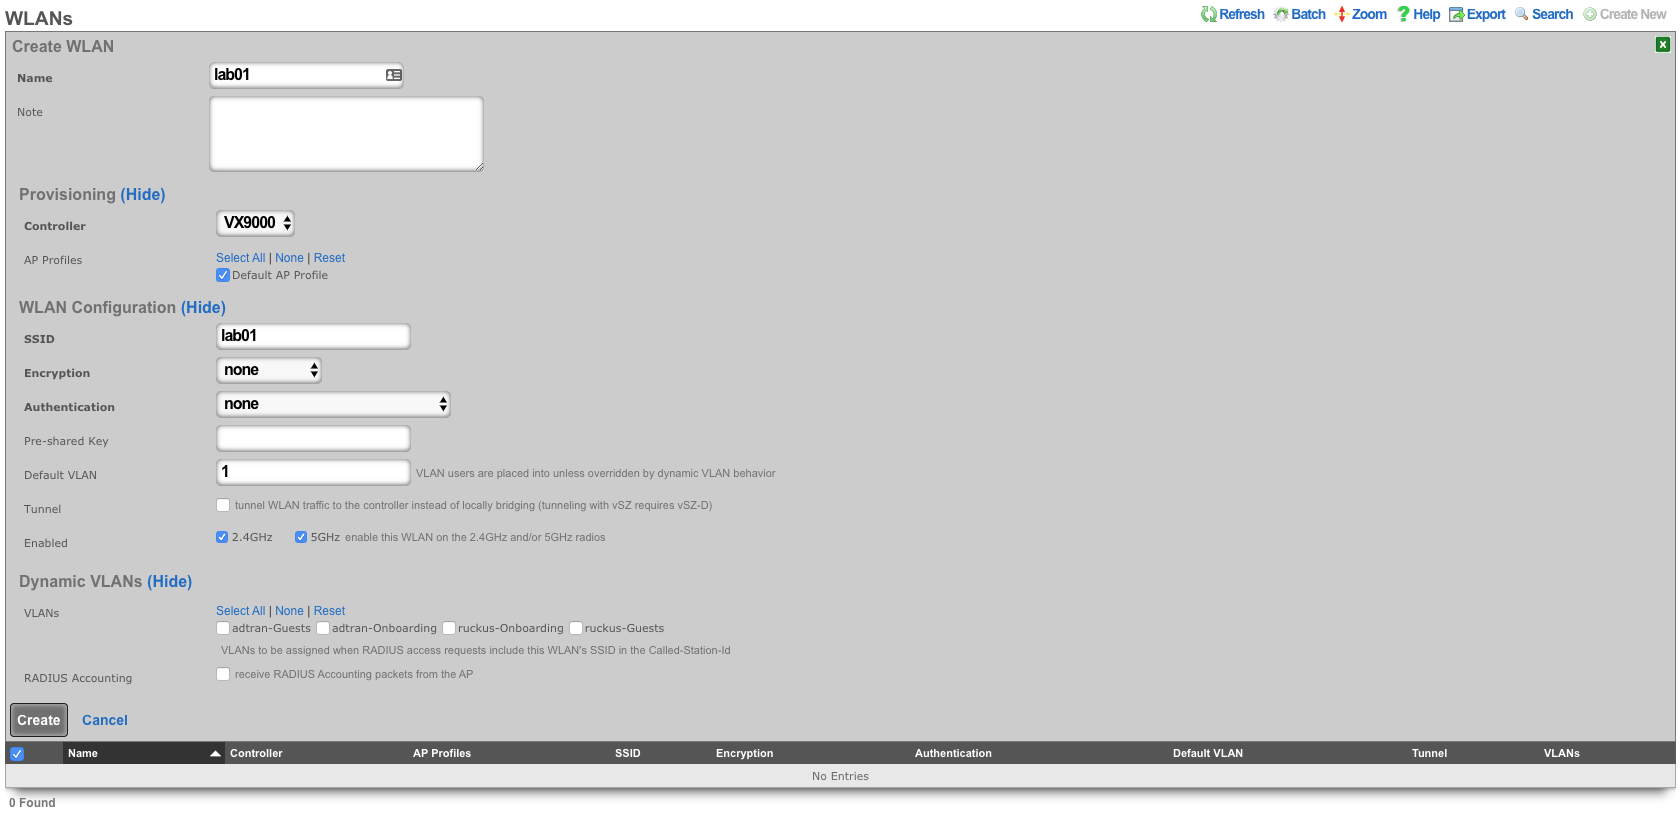
OpenWiFi
Overview
OpenWiFi (OW) is an OpenWRT-derived firmware that bundles drivers, the Linux OS, and Ucentral command and control software to create an IEEE Std 802.11 Wireless Access Point (WAP). The rXg uses components of Ucentral to discover, configure, monitor, and manage these WAPs.
Controller Types
There are two controller types available:
| Feature | WSS (Recommended) | SDK (Deprecated) |
|---|---|---|
| Architecture | rXg acts as controller directly | External OWGW VM |
| Deployment | Simple, no VM required | Requires virtualization |
| Resource Usage | Minimal | 8 GB RAM, 8 cores, 40 GB storage |
| Use Case | All new deployments | Legacy support only |
| Status | Active Development | Deprecated - No new features |
Important: The OpenWiFi SDK (OWGW) controller is deprecated and receives no new feature development. All new OpenWiFi deployments should use the WSS controller. Downstream port configuration and other advanced features are only available in WSS mode.
How It Works
The rXg interacts with OpenWiFi devices using a combination of Secure Shell (SSH) for initial setup and a persistent Websocket Secure (WSS) connection for ongoing management.
The adoption process consists of these parts:
- Installation of Correct Firmware onto Target WAP: The rXg includes built-in methods for using SSH to setup a target WAP with the proper firmware.
- C&C Acquisition: Once the WAP boots on the proper firmware, it discovers its Command and Control rXg through DHCP option 224. It downloads the latest available copy of the RG WSS Client from this rXg.
- Certificate Management: The RG WSS Client acquires a certificate for the WAP if necessary, via EST, with the rXg acting as the EST server.
- Persistent WSS Management: The WAP opens a persistent WSS connection to the rXg which is used for all further management of the WAP.
Once the WSS connection is active, it becomes the primary channel for all subsequent operations, including configuration updates and firmware management.
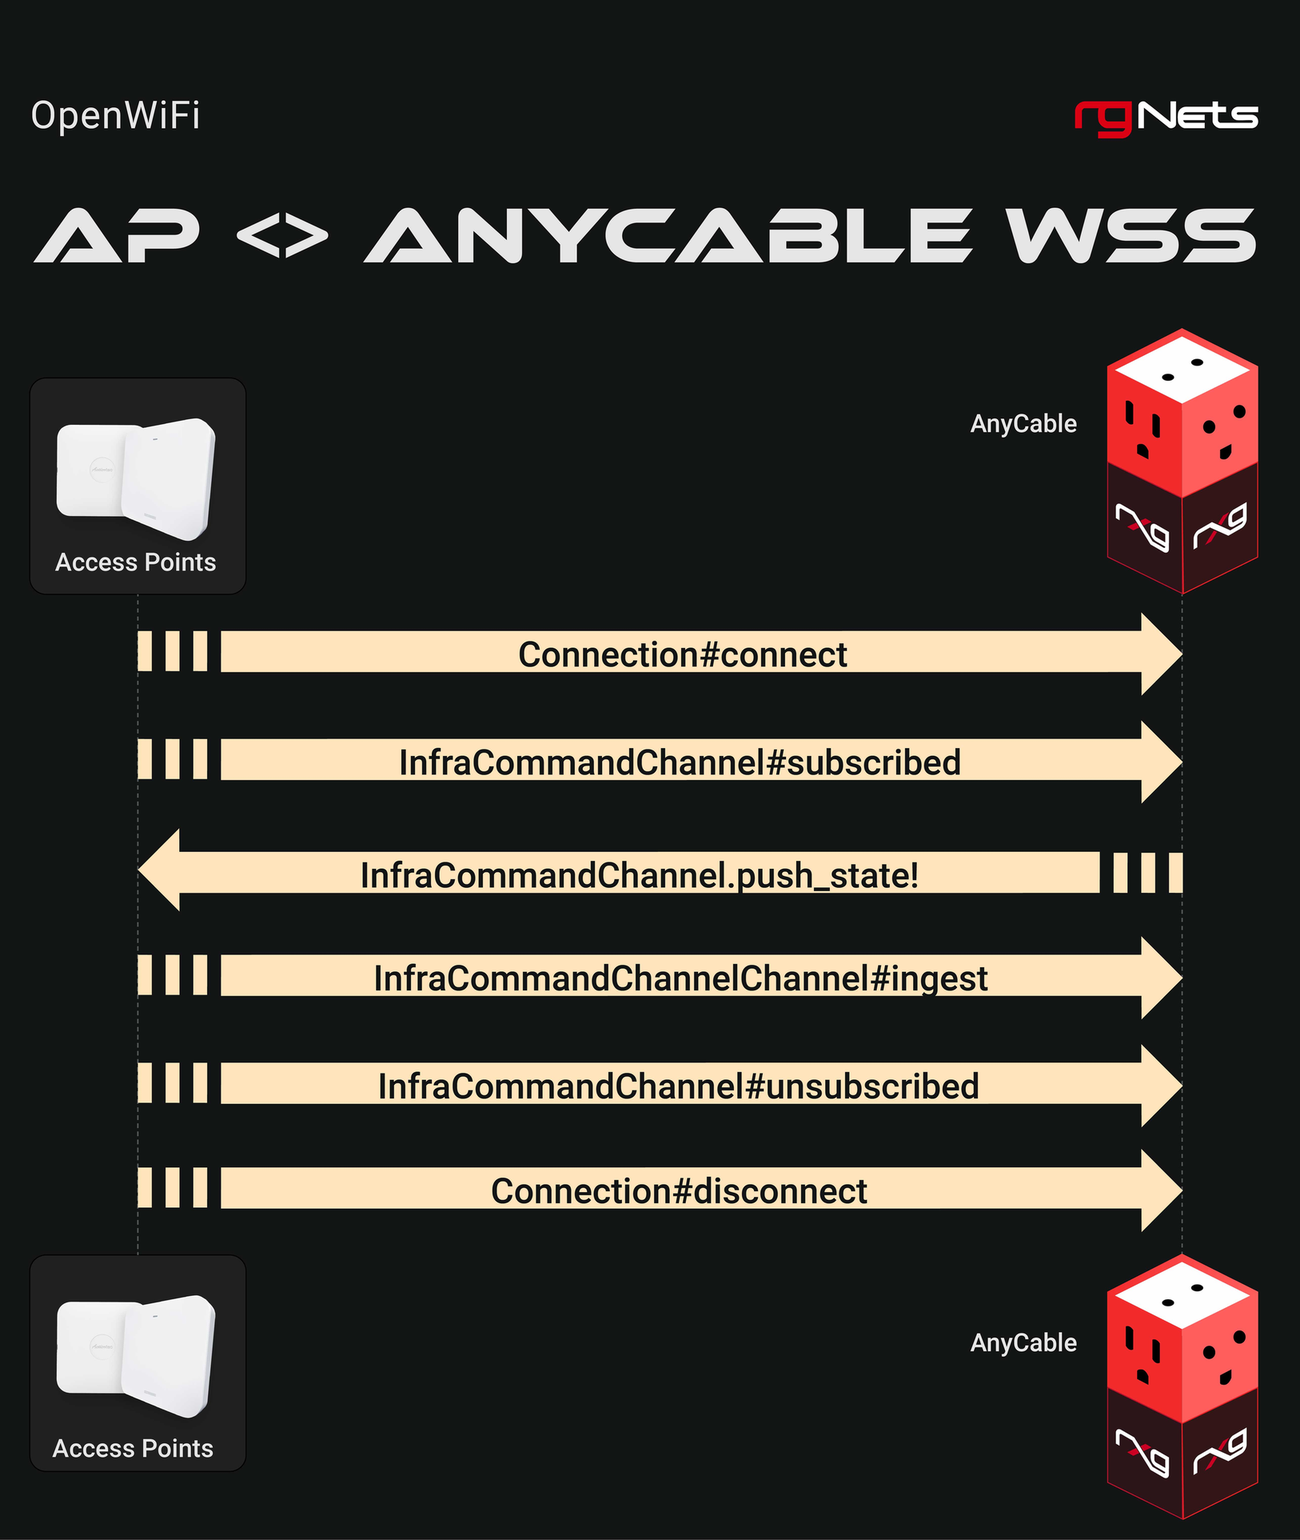
Installation
This section covers the installation and deployment of OpenWiFi controllers on the rXg. Both controller types use Config Template #7 for deployment, which can be found in System >> Backup >> Config Templates (click "Show Examples" to reveal example templates).
Prerequisites
Before installing either controller type, ensure the following requirements are met:
Network Requirements: - It is recommended that the rXg WAN uplink be on a public IP address or CGNAT address space (100.64.0.0/10). While WSS can function with a private WAN address as long as the rXg hostname resolves correctly and has a valid SSL certificate, a public or CGNAT address simplifies certificate validation and WAP connectivity. - The rXg hostname must be resolvable by WAPs and must match the SSL certificate installed on the rXg - WAPs must be able to reach the rXg on HTTPS (port 443) - DHCP must be configured to provide Option 224 for WAP controller discovery (part of Template 7 for automated creation)
Certificate Requirements:
- A valid SSL certificate must be installed on the rXg before beginning WSS setup. WAPs validate the rXg certificate during the WSS handshake, and self-signed or expired certificates will prevent successful connections.
- A Local Certificate Authority (CA) must be created on the rXg (part of Template 7 for automated creation)
- The CA Common Name (CN) must match the rXg hostname
- The CA should have a long lifespan (recommended: 10 years / 3650 days)
Software Requirements: - The rXg must be running code version 16.247 or newer for WSS support. On code version 16.246 or older, WSS functionality is not available. It is recommended to update to the latest code when possible to get access to WSS features. - After upgrading the rXg to a new code version, navigate to System >> Backup >> Config Templates, delete all existing example templates, and click the Create Defaults button to regenerate them. This ensures that the templates are up to date and include the latest WSS configuration options.
WSS Installation (Recommended)
The WSS controller is the recommended deployment method. The rXg acts as the OpenWiFi controller directly, communicating with WAPs via secure WebSocket connections. This approach requires no external VM and is simpler to deploy and maintain.
Step 1: Apply Config Template #7
- Navigate to System >> Backup >> Config Templates
- Click Show Examples to reveal example templates
- Locate Example: 07 Deploy Virtual Openwifi Controller
- Verify the
infdev_devicevariable is set toopenwifi_wss(this is the default) - Optionally customize the CA parameters:
ca_country ||= 'US'
ca_state ||= 'California'
ca_locale ||= 'San Francisco'
ca_common_name ||= DeviceOption.active.domain_name
ca_email_address ||= "certs@#{DeviceOption.active.domain_name}"
- Click Apply and confirm the deployment
The template automatically creates: - A Local Certificate Authority for WAP authentication - An EST Server Option for certificate enrollment - A WLAN Controller configured for WSS mode (host: 127.0.0.1) - A default Access Point Zone and Profile - DHCP Option 224 for WAP controller discovery
Step 2: Configure WSS Client Access Control
After applying the template, you must configure WSS Client Access Policies or WSS Client Access WAN Targets on the wireless device. The controller will not show as Online until at least one of these is configured.
- Navigate to Network >> Wireless >> WLAN Controllers
- Edit the OpenWiFi WSS wireless device
- Configure at least one of the following:
- WSS Client Access Policies: Select the LAN policies that should be allowed to download the WSS client. Use this when WAPs are on a managed LAN segment with an assigned policy.
- WSS Client Access WAN Targets: Select the WAN targets that define the IP ranges from which WSS client downloads are permitted. Use this when WAPs connect from WAN-side addresses.
- Click Update
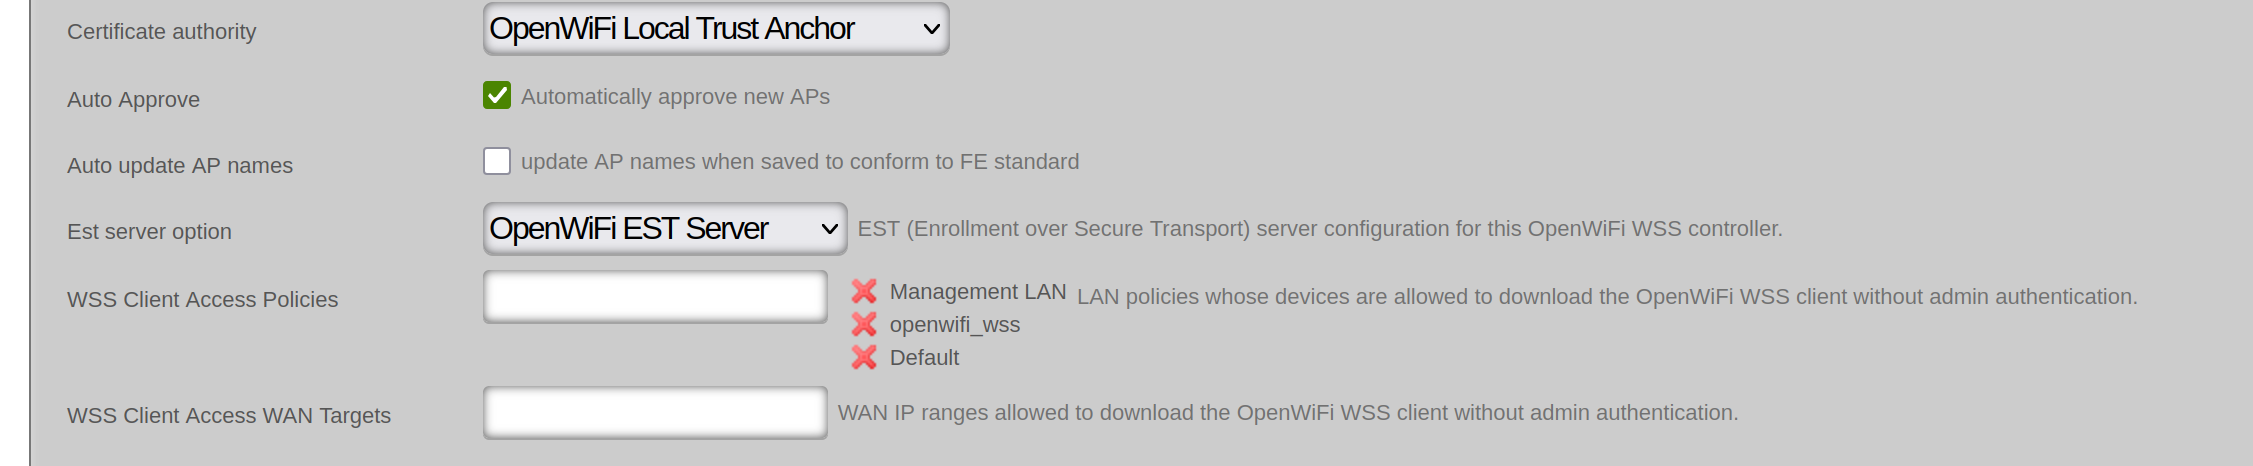
Note: This is a security requirement. The system uses a fail-closed model where WAPs cannot download the WSS client package until access control is explicitly configured. If neither policies nor WAN targets are set, the controller will display as Offline with a warning icon.
Step 3: Verify Post-Template Configuration
After applying the template, verify that the following records were created correctly:
EST Server: 1. Navigate to Services >> Servers >> EST Server Options 2. Confirm that an EST Server Option named OpenWiFi EST Server exists and is active 3. Verify that the EST Server Option has appropriate policies or WAN targets associated with it to allow certificate enrollment from your WAPs. In a most common scenario, it is sufficient to use the OpenWiFi related infrastructure device as shown below

DHCP Option 224:
- Navigate to Services >> DHCP
- Confirm that a Custom DHCP Option with code 224 exists (e.g., "OP224 For OW")
- Confirm that a DHCP Option record exists (e.g., "OW OPT 224") that uses the custom option and has the rXg hostname as its value
- Verify that the DHCP Option is associated with the appropriate Option Group so that WAPs on the correct network segments receive the controller discovery address
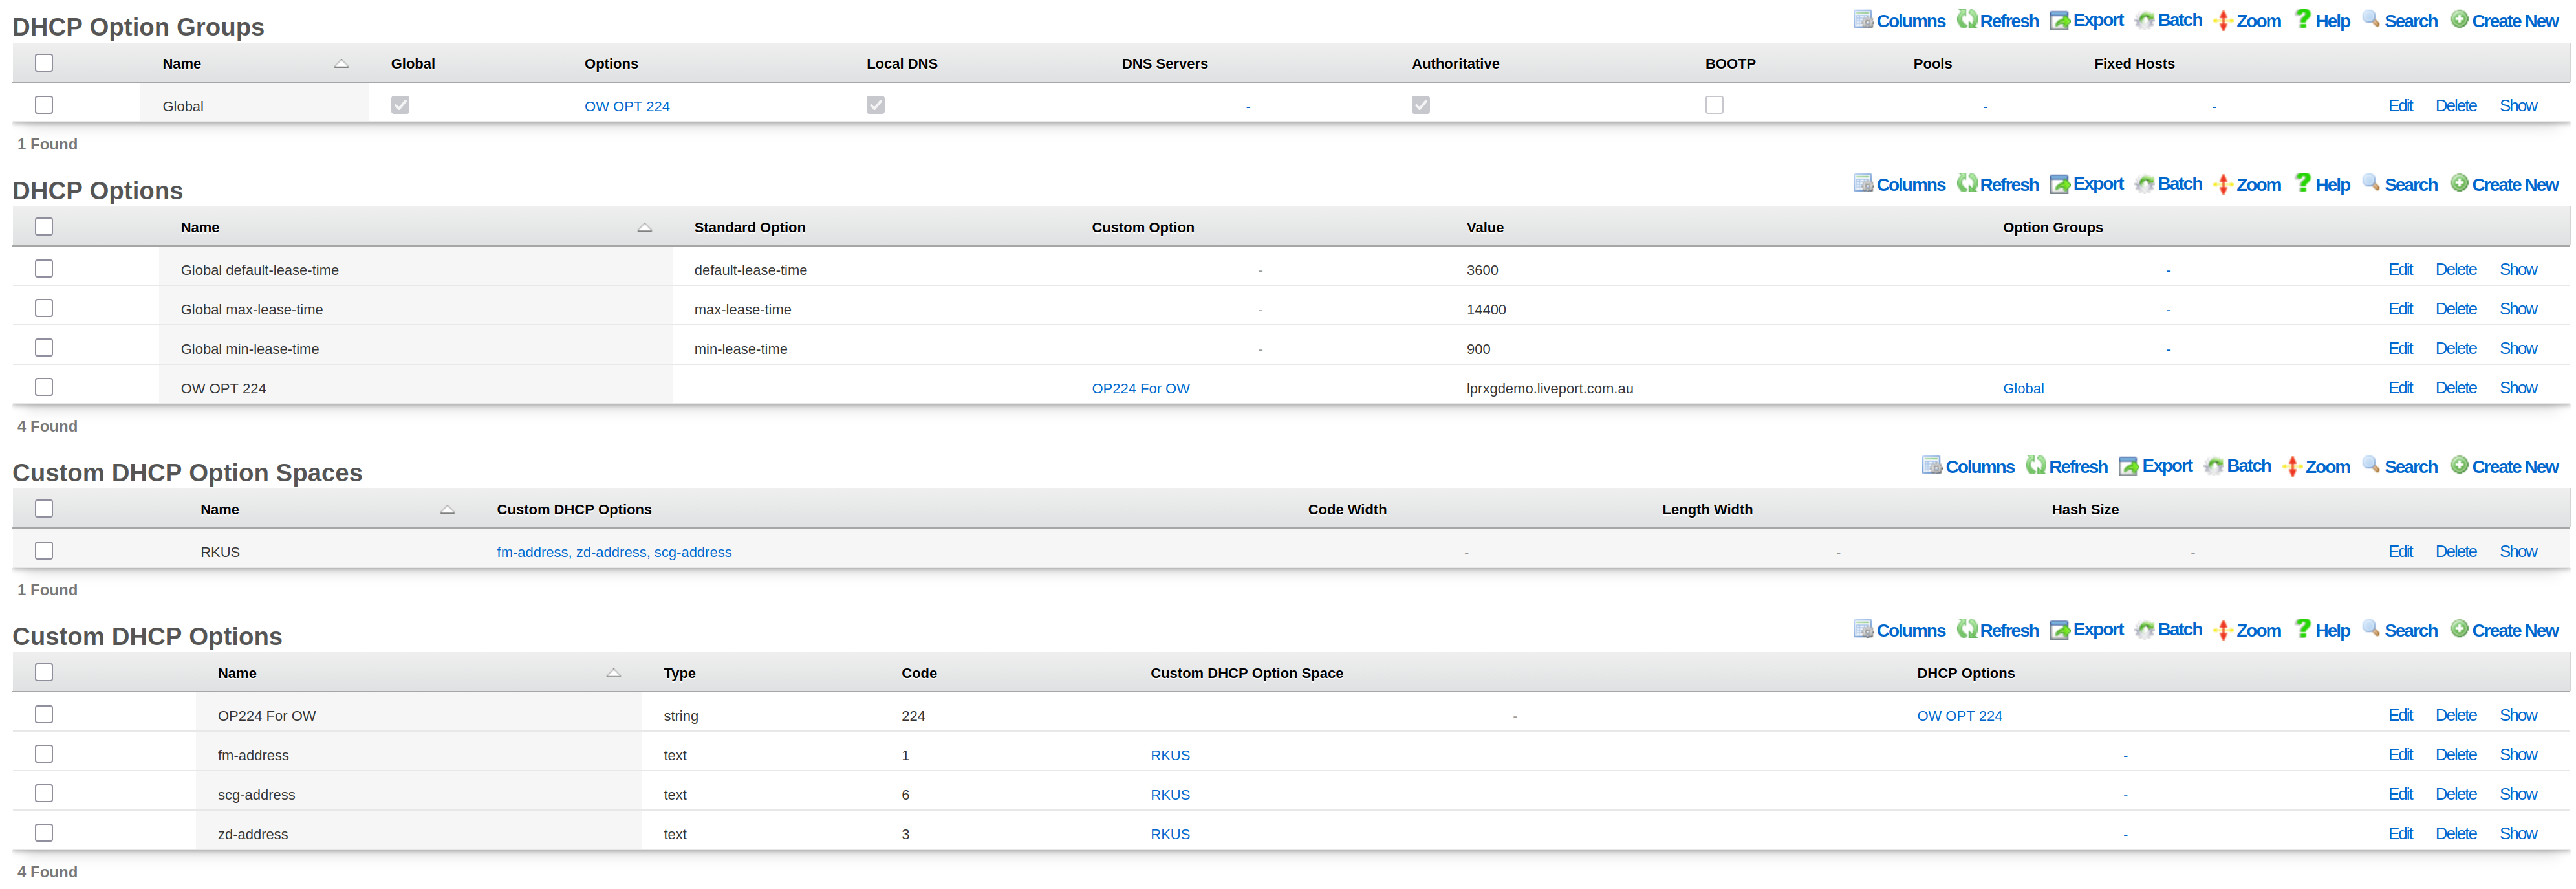
Step 4: Verify Controller Status
- Navigate to Network >> Wireless >> WLAN Controllers
- Verify the controller shows Online status
- If offline, check the following:
- WSS Client Access Policies or WAN Targets are configured (Step 2)
- The EST Server Option is properly configured and active (Step 3)
- The rXg has a valid SSL certificate installed
- The rXg hostname is resolvable by WAPs and matches the installed SSL certificate

SDK Installation (Legacy)
Note: The SDK deployment is a legacy approach maintained for specific use cases. For new deployments, the WSS method above is recommended.
The SDK deployment uses the OpenWiFi Gateway (OWGW) running as a VM on the rXg. This approach requires virtualization support and additional system resources.
SDK Prerequisites
Hardware Requirements (minimum for < 50 WAPs): - 8 GB of memory - 8 CPU cores - 40 GB of storage - Virtualization-capable rXg hardware
Software Requirements: - An administrator account with a public SSH key defined - A physical network interface available for VM bridging
Step 1: Create a Certificate Authority
- Navigate to System >> Certificates >> Certificate Authorities
- Click Create New
- Configure the CA:
- Set lifespan to 3650 days (10 years)
- Set Common Name to match your rXg hostname
- Click Create
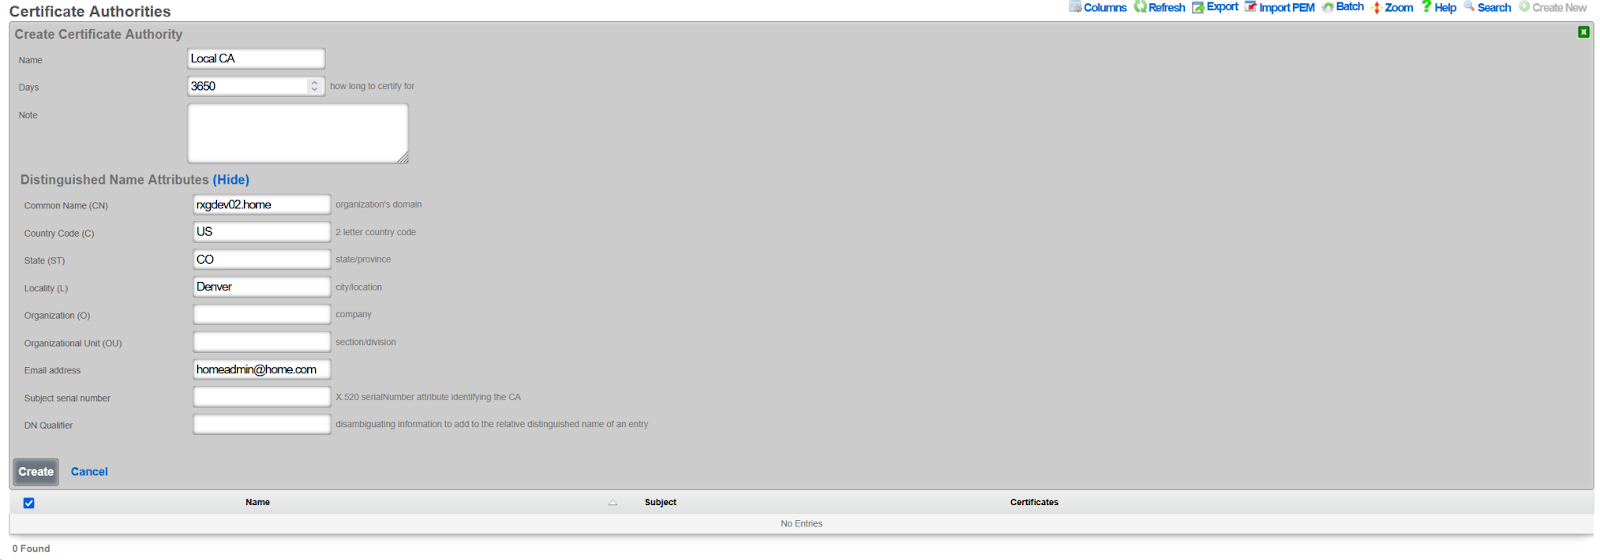
Step 2: Create a Virtualization Host
- Navigate to Services >> Virtualization >> Virtualization Hosts
- Click Create New
- Configure the virtualization host:
- Assign a physical interface (e.g.,
igb1) - Create a virtual switch name (e.g.,
rxg-openwifi-vs) - Enable Detect IPs for troubleshooting visibility
- Assign a physical interface (e.g.,
- Click Create
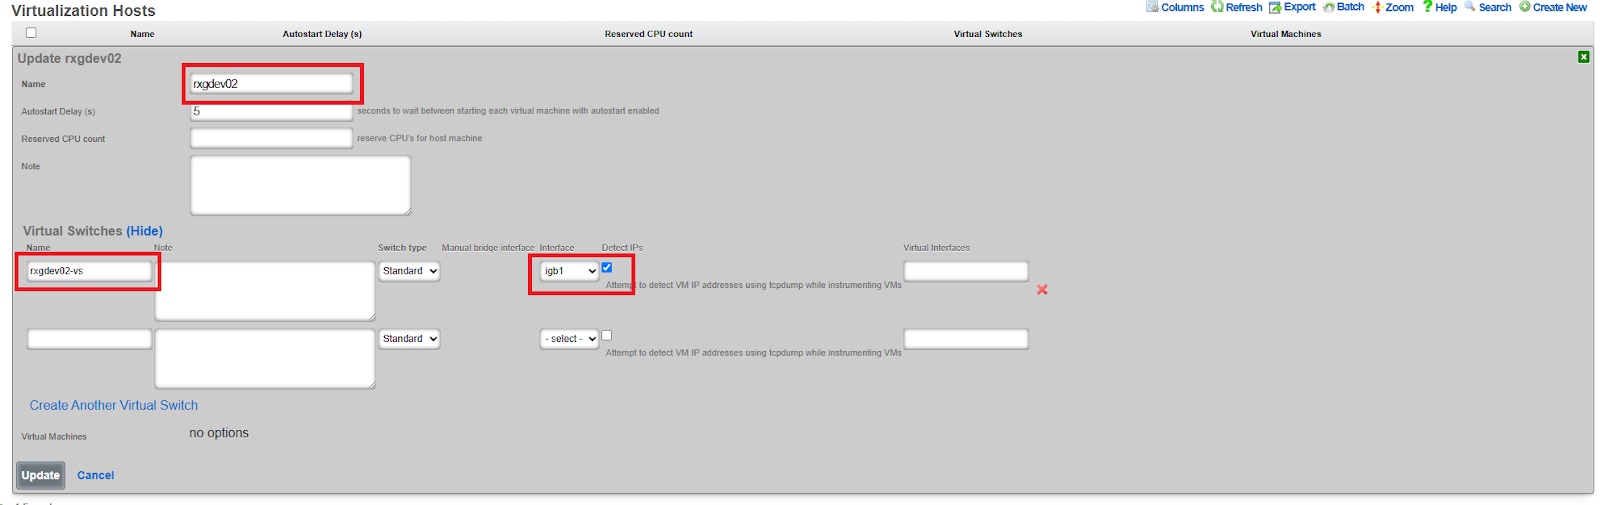
Step 3: Download OpenWiFi Image
- Navigate to System >> Backup >> Config Templates
- Click Show Examples
- Locate Example: 06 Download Rxg Openwifi Image Config
- Click Apply (no modifications needed)
- Monitor download progress in Services >> Virtualization >> Disk Images
- Wait for the download to complete (~2.8 GB)


Step 4: Deploy OpenWiFi Controller VM
- Navigate to System >> Backup >> Config Templates
- Locate Example: 07 Deploy Virtual Openwifi Controller
- Edit the template and modify these key variables:
<%
# Set to SDK mode
infdev_device = 'openwifi_sdk'
# VM Resources
memory_gb ||= 8
ncpu ||= 8
disk_size_gb ||= 40
# Network Configuration - match your virtual switch
mapped_switches = ["rxg-openwifi-vs"]
# IP Addressing
cidr ||= '192.168.5.5/24'
gateway ||= '192.168.5.1'
nameservers ||= '192.168.5.1'
# SSH Access - specify your SSH keypair name
ssh_keypair ||= 'My SSH Key'
ssh_user = 'openwifi-admin'
ssh_pass = 'P@ssw0rd123'
%>
- Click Apply and confirm
- Monitor VM creation in Services >> Virtualization >> Virtual Machines

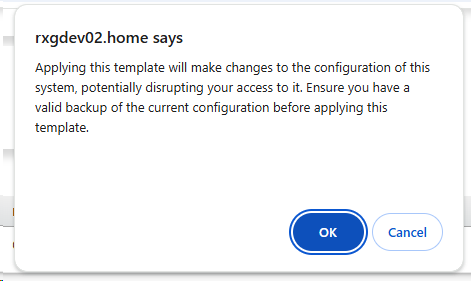
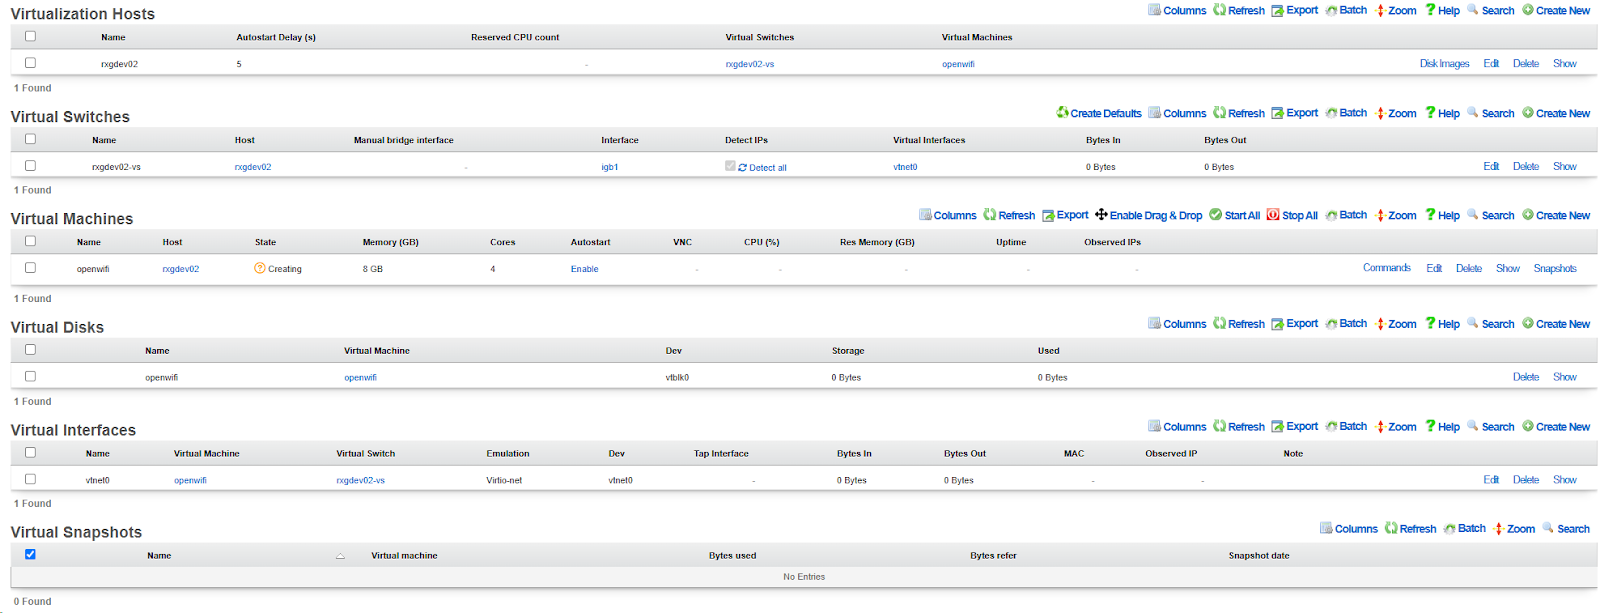
- Once created, enable Autostart for the VM
- Click Start in the Commands menu
- Allow several minutes for first boot
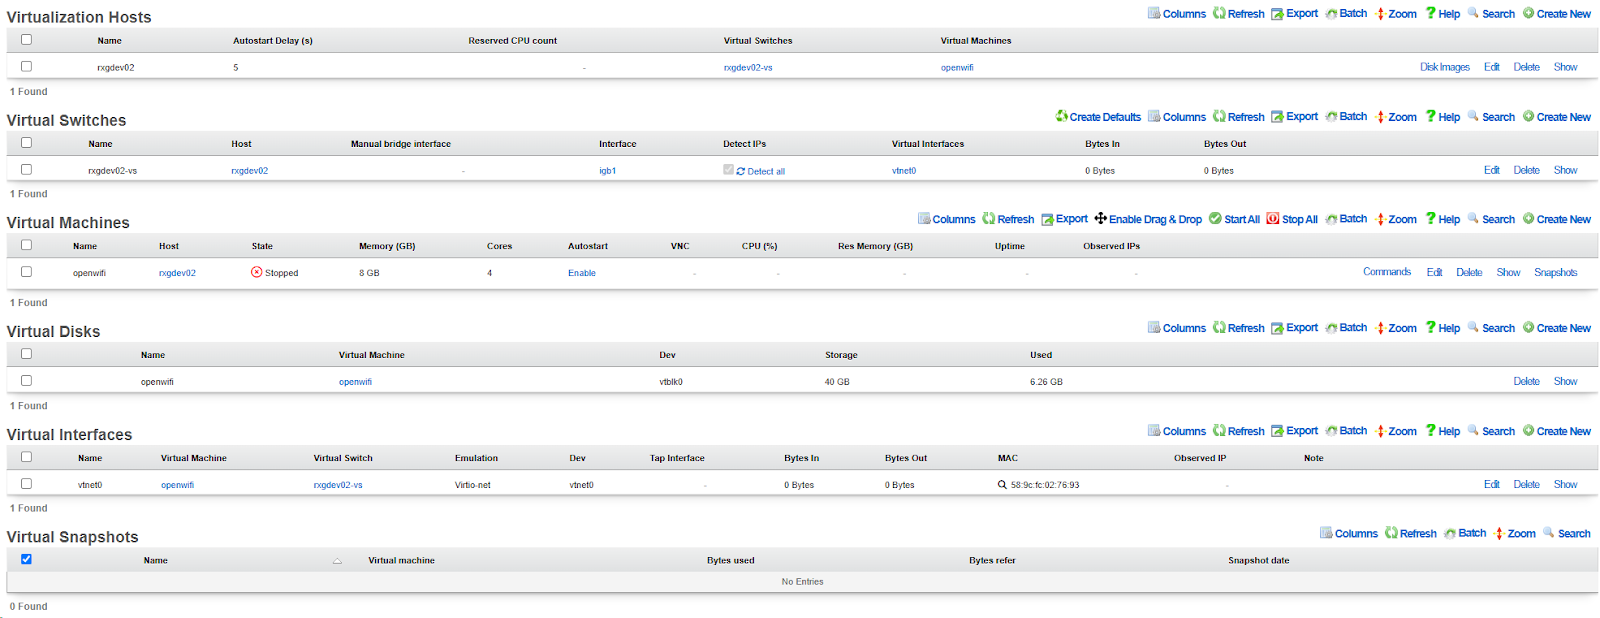


Step 5: Create WLAN Controller Integration
- Navigate to Network >> Wireless >> WLAN Controllers
- Click Create New
- Configure the controller:
- Name: Arbitrary name (e.g.,
OpenWiFi SDK) - Type: Select
OpenWiFi SDK - Host: VM IP address (e.g.,
192.168.5.5) - Password: Set a password for the API (complexity requirements apply)
- Certificate Authority: Select the CA created in Step 1
- Virtual Machine: Select the VM created in Step 4
- Enable telemetry: Check this box
- Allow updates: Check this box
- Name: Arbitrary name (e.g.,
- Click Create
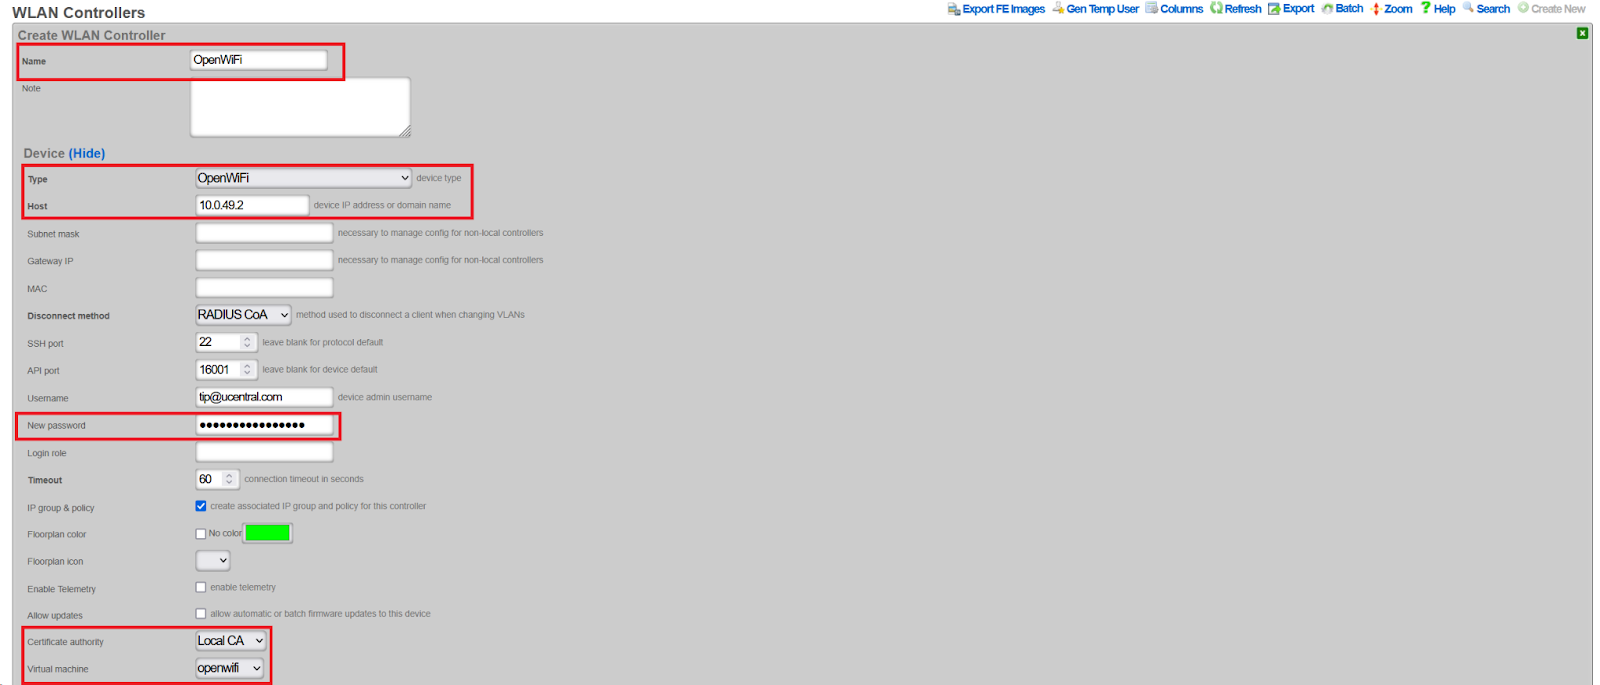
The controller will initially show Offline, then transition to Online once communication with the VM is established.


Step 6: Enable Configuration Synchronization
- Navigate to Network >> Wireless >> WLAN Controllers
- Click the Sync not enabled button (shown in red)
- Click Generate Diff
- Click Enable Config Synchronization
- Confirm manual configuration application
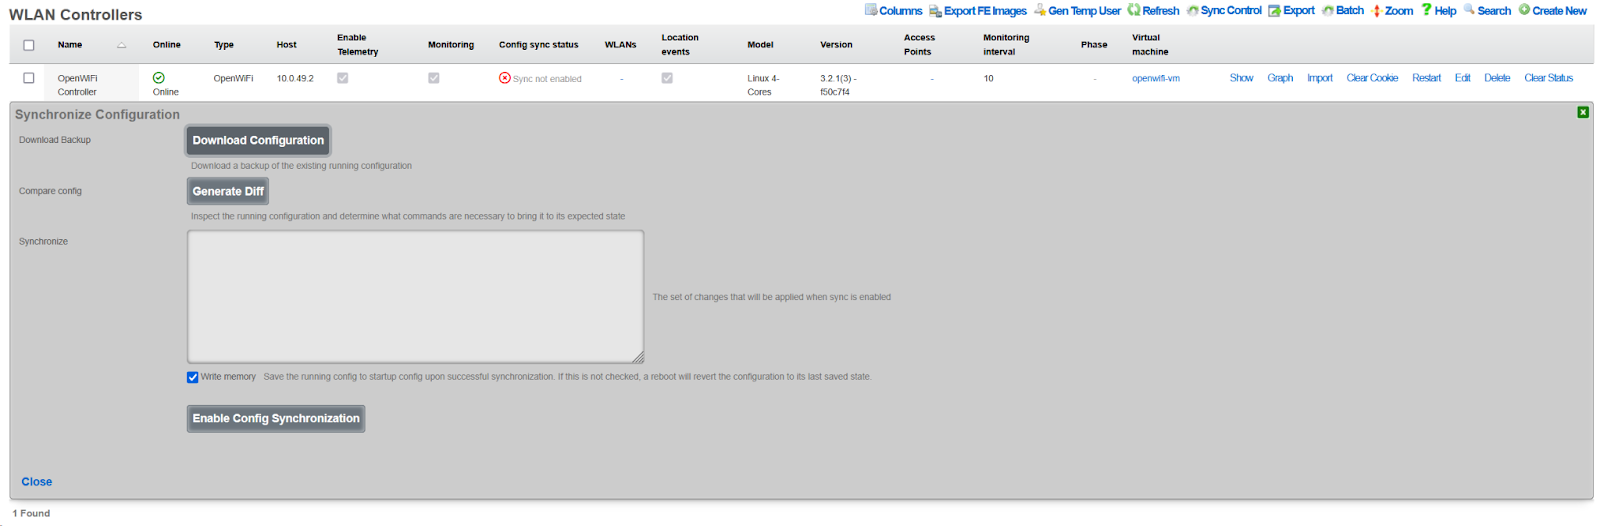
Configuration
After completing the WSS or SDK installation, use these steps to import WAPs and configure your wireless network.
Import and Approve WAPs
- Power on the WAP in factory default state
- Ensure the WAP can acquire a DHCP address from the rXg
- Navigate to Network >> Wireless >> WLAN Controllers
- Click the Import button for the OpenWiFi controller
- Enter the WAP IP address with /32 prefix (e.g.,
10.0.47.3/32) - Click Import to begin discovery (WAP LED will blink rapidly)
- Close the dialog after import completes
- Navigate to Network >> Wireless >> Access Points
- Click Approve on the discovered WAP
- The WAP will reboot and transition to Online status


Create Access Point Zone
- Navigate to Network >> Wireless >> Access Point Zones
- Click Create New
- Configure zone settings:
- Name: Zone identifier (e.g.,
Main Building) - Controller: Select your OpenWiFi controller
- Enable DFS channels: Check if DFS channels are required
- 5 GHz channel width: 40 MHz recommended for high-density
- 6 GHz channel width: 80 MHz recommended
- Country code: Set to local country code
- Enable RRM: Leave enabled for dynamic resource management
- Name: Zone identifier (e.g.,
- Click Create
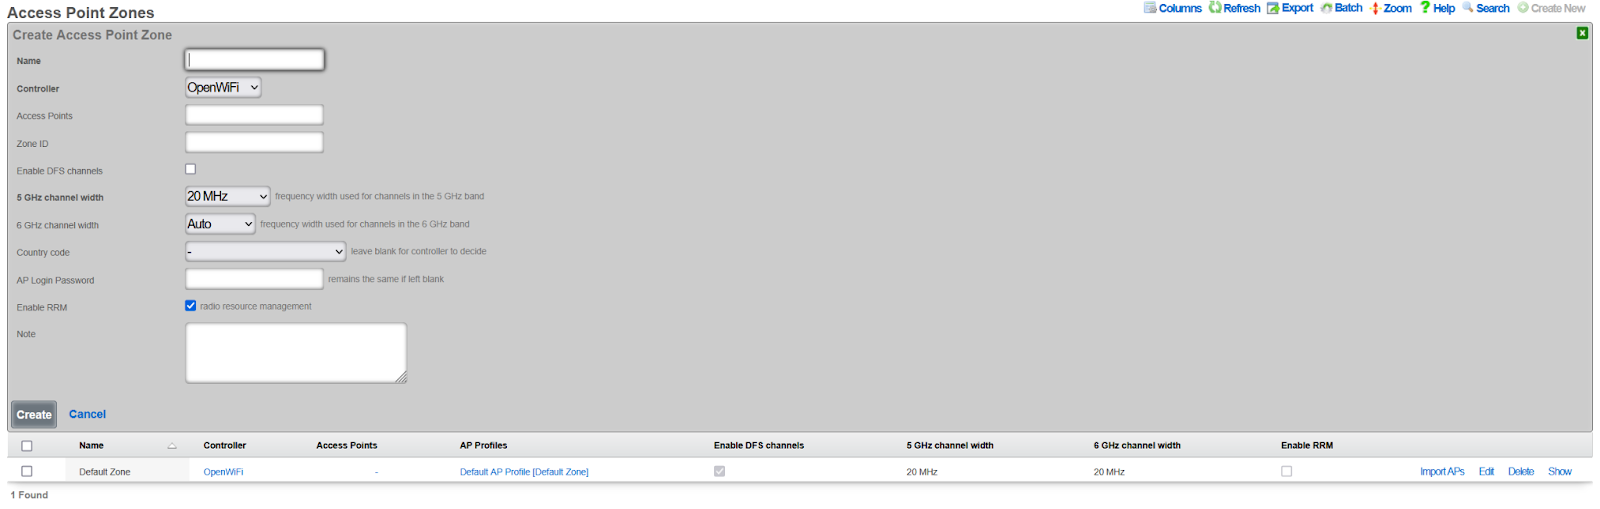
Downstream Port Configuration
OpenWiFi WSS access points with downstream (wired) Ethernet ports can be configured to provide network access to wired clients. This feature is useful for: - Guest rooms with both wireless and wired devices - Public areas with kiosks or other wired equipment - Locations where APs double as wired network extenders
Note: Downstream port configuration is only available for OpenWiFi WSS controllers. This feature is not supported in SDK mode.
Version Requirement: This feature requires OpenWiFi firmware version 4.2.0 or later. Earlier versions do not support downstream port management.
How Downstream Ports Work
The rXg WSS controller manages downstream ethernet ports through the rg_wss_client Python application running on each access point. The system automatically detects available LAN ports from the AP's hardware capabilities and configures them based on the selected VLAN mode.
Technical Implementation:
- Port Detection: LAN ports are automatically discovered from
/etc/ucentral/capabilities.jsonon the AP - Bridge Integration: In static VLAN mode, downstream ports are added to the upstream bridge alongside wireless clients
- VLAN Tagging: Bridge VLAN filtering (802.1Q) tags untagged ingress packets from wired clients
- Port Cycling: After configuration, ports are cycled (brought down, then up) to force clients to reconnect with correct VLAN settings
- State Management: Downstream port configuration is pushed to APs via the WebSocket state message
Supported Scenarios:
| Scenario | Wireless | Wired | Tunnel | Use Case |
|---|---|---|---|---|
| RADIUS + Tunnel | RADIUS dynamic VLAN | 802.1X MAC auth | Yes | Enterprise with both wireless and wired authentication |
| Static + Tunnel | Static VLAN (from SSID) | Static VLAN (from room) | Yes | Hotel rooms with tunneling |
| Static + No Tunnel | Static VLAN (from SSID) | Static VLAN (from room) | No | Local bridging without tunneling |
| RADIUS + No Tunnel | RADIUS dynamic VLAN | 802.1X MAC auth | No | Local enterprise network |
Downstream Port VLAN Modes
Three modes are available for downstream port configuration:
Disabled (default) - Downstream ports are not configured - No wired client access is provided - This is the default setting for new zones
RADIUS MAC Authentication - Uses IEEE 802.1X MAC-based authentication - APs act as authenticators, forwarding MAC addresses to the RADIUS server - VLAN assignment is determined dynamically by RADIUS server responses - Requires: - RADIUS server configured in RGConsole - RADIUS policies that assign VLANs based on MAC address - Use case: Dynamic VLAN assignment based on device identity
Static VLAN from Room - Assigns wired clients to the same VLAN as the associated PMS room - Wired clients send untagged traffic; the AP applies VLAN tagging via bridge filtering - Requires: - AP associated with a PMS room - Room configured with VLAN tag assignment - Optional tunnel configuration for traffic encapsulation - Use case: Guest room wired devices on same network as wireless devices
Technical Details - Static VLAN Mode:
In static VLAN mode, the system uses Linux bridge VLAN filtering to tag untagged traffic from wired clients:
Port Configuration:
- Downstream port (e.g.,
eth1) is added to the upstream bridgeup - Bridge VLAN configuration applies PVID (Port VLAN ID) with "untagged" flag
- Example:
bridge vlan add vid 303 dev eth1 pvid untagged
- Downstream port (e.g.,
Traffic Flow:
- Ingress (wired AP): Untagged packets from wired clients are tagged with the configured VLAN ID
- Egress (AP wired): VLAN tags are stripped before forwarding to wired clients
- Wireless clients: Continue to use dynamic VLAN assignment via RADIUS (if configured)
Tunnel Compatibility:
- When tunneling is enabled, the system avoids creating a downstream bridge in uCentral config
- This prevents
gre4t-gre.{vlan}interfaces from intercepting VLAN-tagged traffic - Instead,
rg_wss_clientmanages the downstream port directly using bridge VLAN filtering - Both wireless RADIUS clients and wired static VLAN clients can coexist on the same VLAN
Automatic Reconnection:
- After applying bridge VLAN configuration, the system cycles the downstream port (down/up)
- This forces connected clients to acquire fresh DHCP leases with correct VLAN configuration
- Eliminates the need for manual client reconnection after AP configuration changes
Example Configuration Flow:
1. AP assigned to PMS Room 101
2. Room 101 has Account with VLAN 303 assignment
3. Downstream port has SwitchPortProfile with:
- radius_authentication='none'
- native_vlan=303
4. rXg generates state with: downstream_port_config={'LAN': {'mode': 'static', 'vlan': 303}}
5. rg_wss_client on AP:
- Detects eth1 from capabilities.json
- Adds eth1 to bridge 'up'
- Configures: bridge vlan add vid 303 dev eth1 pvid untagged
- Cycles eth1 down/up (only on first configuration)
6. Wired PC connects and gets DHCP lease on VLAN 303
7. Wireless phone connects via RADIUS and gets dynamic VLAN (can be same or different)
Per-Port Configuration via SwitchPortProfile
Downstream ports are configured individually using SwitchPortProfile:
Creating a Profile for RADIUS Mode:
- Navigate to Network >> Switching >> Switch Port Profiles
- Create a new profile or edit existing one
- Set RADIUS Authentication to MAC Authentication Bypass
- Leave Native VLAN empty
- Click Create or Update
Creating a Profile for Static VLAN Mode:
- Navigate to Network >> Switching >> Switch Port Profiles
- Create a new profile or edit existing one
- Set RADIUS Authentication to none
- Set Native VLAN to desired VLAN ID (e.g., 303)
- Click Create or Update
Assigning Profile to Downstream Port:
- Navigate to Network >> Switching >> Switch Ports
- Find the AP's downstream port (port_type: ap_downstream)
- Edit the port
- Select the desired Switch Port Profile
- Click Update
The configuration automatically pushes to the AP when the profile is saved.
Configuration Notes
- Downstream port configuration requires compatible AP hardware with downstream ethernet ports
- Each downstream port can have its own independent configuration via different profiles
- Multiple ports can share the same profile for consistent configuration
- Automatic Port Detection: LAN ports are detected from AP hardware capabilities; no manual port specification needed
- Mixed Deployments: Per-AP overrides allow different modes in different areas (e.g., RADIUS in offices, Static in guest rooms)
- Automatic Reconfiguration: Changes to downstream port mode trigger immediate AP reconfiguration via WebSocket
- RADIUS Requirements: Authentication server must be reachable from AP management network
- Static Mode Requirements: Requires AP assigned to PMS room with VLAN tag assignment; silently disabled otherwise
- Port Cycling: After configuration, ports are automatically cycled to force client DHCP renewal
- Tunnel Compatibility: Static VLAN mode works with or without tunneling
AP Login Password (OpenWiFi WSS)
The AP Login Password field allows you to configure SSH root access passwords for access points at three levels of specificity: per-AP, zone-level, and device-level. The system uses a hierarchy from most specific to least specific.
Password Hierarchy (Most Specific Least Specific):
- Per-AP Password: Individual access point override (highest priority)
- Zone Password: All access points in a specific zone
- Infrastructure Device Password: All access points on the wireless controller
- Default Password:
openwifi(when no password is configured at any level)
Configuration Locations:
Per-AP Password (Individual Access Point): 1. Navigate to Network >> Wireless >> Access Points 2. Edit a specific OpenWiFi WSS access point 3. Enter a password in the AP Login Password field 4. This password takes precedence over zone and device-level passwords
Zone Password (All APs in Zone): 1. Navigate to Network >> Wireless >> Access Point Zones 2. Edit an existing OpenWiFi WSS zone or create a new one 3. Enter a password in the AP Login Password field 4. This password applies to all APs in the zone (unless overridden at AP level)
Infrastructure Device Password (All APs on Controller): 1. Navigate to Network >> Wireless >> Wireless Devices 2. Edit the OpenWiFi WSS wireless device 3. Enter a password in the AP Login Password field 4. This password applies to all APs on this controller (unless overridden at zone or AP level)
General Notes:
- This feature is available for: OpenWiFi WSS, OpenWiFi SDK, Ruckus, and Omada wireless devices
- Password changes trigger a configuration sync to affected WAPs
- Minimum password length: 8 characters
- Empty strings are ignored (treated as if no password is set)
OpenWiFi-specific behavior:
- The username is always
root- only the password is configurable - Leave the field blank to use default credentials (
openwifi) - SSH access example:
bash ssh root@<wap-ip-address> # Enter the configured password (per-AP, zone, or device-level)
Ruckus/Omada behavior:
- Both username and password are configurable (use the AP Login Name field for username)
- Credentials are required - there is no default fallback
SSID Quality Thresholds
OpenWiFi zones support SSID quality thresholds that allow operators to control client connectivity based on signal strength. These settings help maintain network quality by preventing weak clients from degrading overall performance.
Available Thresholds:
Probe Request RSSI: Minimum RSSI (dBm) for probe requests to be accepted. Probe requests below this threshold will be ignored by the WAP. Leave blank to accept all probe requests.
Association Request RSSI: Minimum RSSI (dBm) for association requests to be accepted. Clients with signal strength below this threshold will be denied association. Leave blank to accept all associations.
Client Kick RSSI: Minimum RSSI (dBm) threshold for connected clients. Clients whose signal drops below this value will be disconnected from the WAP. Leave blank to disable client kicking.
Client Kick Ban Time: Duration in seconds that a kicked client is banned from re-joining the same SSID. Set to 0 or leave blank for no ban (client can immediately attempt to reconnect). This field is only visible when Client Kick RSSI is configured.
Configuration:
Quality thresholds are configured at the Access Point Zone level and apply to all WLANs and WAPs in that zone. Navigate to Wireless Access Point Zones, edit an OpenWiFi zone, and configure the threshold values.
Example Values:
Probe Request RSSI: -75
Association Request RSSI: -70
Client Kick RSSI: -80
Client Kick Ban Time: 60
In this configuration: - Probe requests weaker than -75 dBm are ignored - Associations weaker than -70 dBm are denied - Connected clients dropping below -80 dBm are kicked - Kicked clients are banned for 60 seconds before they can reconnect
Use Cases:
Dense Deployments: In high-density environments with many overlapping APs, use quality thresholds to encourage clients to roam to closer APs rather than staying connected to distant ones.
Capacity Management: Prevent weak clients from consuming excessive airtime by setting association and kick thresholds.
Band Steering: Use different thresholds on 2.4 GHz vs 5 GHz to encourage dual-band clients to prefer 5 GHz.
Validation Rules:
- RSSI values must be negative integers (e.g., -70, -75, -80). Positive or zero values are rejected.
- Ban time must be a non-negative integer (0 or greater). A value of 0 means no ban.
- All fields are optional leave blank to disable that threshold.
Important Notes:
- These thresholds are based on the OpenWiFi uCentral
interface.ssid.quality-thresholdsschema - Threshold values are in dBm (negative numbers, e.g., -70, -75, -80)
- More negative values represent weaker signals (e.g., -80 is weaker than -70)
- Aggressive thresholds can cause connectivity issues - start with conservative values and adjust based on monitoring
- Quality thresholds apply per-SSID and are evaluated independently for each radio band
Per-Radio Client Limits
Access Point Zones support per-radio maximum client limits for load balancing. These limits control how many wireless clients can associate with each radio band across all WAPs in the zone.
Configuration Fields:
| Field | Description |
|---|---|
| Maximum Clients 2.4 GHz | Maximum clients per 2.4 GHz radio, accumulative across all SSIDs on that radio |
| Maximum Clients 5 GHz | Maximum clients per 5 GHz radio, accumulative across all SSIDs on that radio |
| Maximum Clients 6 GHz | Maximum clients per 6 GHz radio, accumulative across all SSIDs on that radio (only shown if controller supports 6 GHz) |
| Ignore Probe Requests | When enabled, the radio will not respond to probe requests from new clients once the limit is reached |
Behavior:
- When a radio reaches its maximum client limit, new association requests are rejected
- When Ignore Probe Requests is enabled, the radio stops responding to probe requests, causing clients to not see the network and naturally steer to other WAPs or radios
- Setting a field to blank (null) means no limit is enforced for that band
- These limits are accumulative across all SSIDs (VAPs) attached to the radio e.g., a limit of 64 means 64 total clients across all SSIDs on that radio, not 64 per SSID
Defaults and Recommendations:
When no limit is configured (field left blank), the radio accepts clients up to hardware/firmware capacity (typically 127-128 per radio). This is suitable for most deployments.
| Deployment Type | Recommended Limit | Notes |
|---|---|---|
| High-density (stadiums, conference halls) | 30-50 per radio | Ensures acceptable per-client throughput |
| Medium-density (hotels, offices) | 50-60 per radio | Balances capacity with airtime fairness |
| Low-density (small offices, retail) | Leave blank | Hardware limits are sufficient |
Use Cases:
- High-density venues: Prevent any single radio from becoming overloaded
- Load distribution: Encourage clients to distribute across multiple WAPs
- Quality of service: Maintain acceptable per-client throughput by limiting radio congestion
Create Access Point Profile
- Navigate to Network >> Wireless >> Access Point Profiles
- Click Create New
- Configure profile settings:
- Name: Profile identifier (e.g.,
Standard Profile) - Zone: Select the zone created above
- Controller: Select your OpenWiFi controller
- Default: Check to make this the default profile
- LED State: On or Off per preference
- Name: Profile identifier (e.g.,
- Click Create
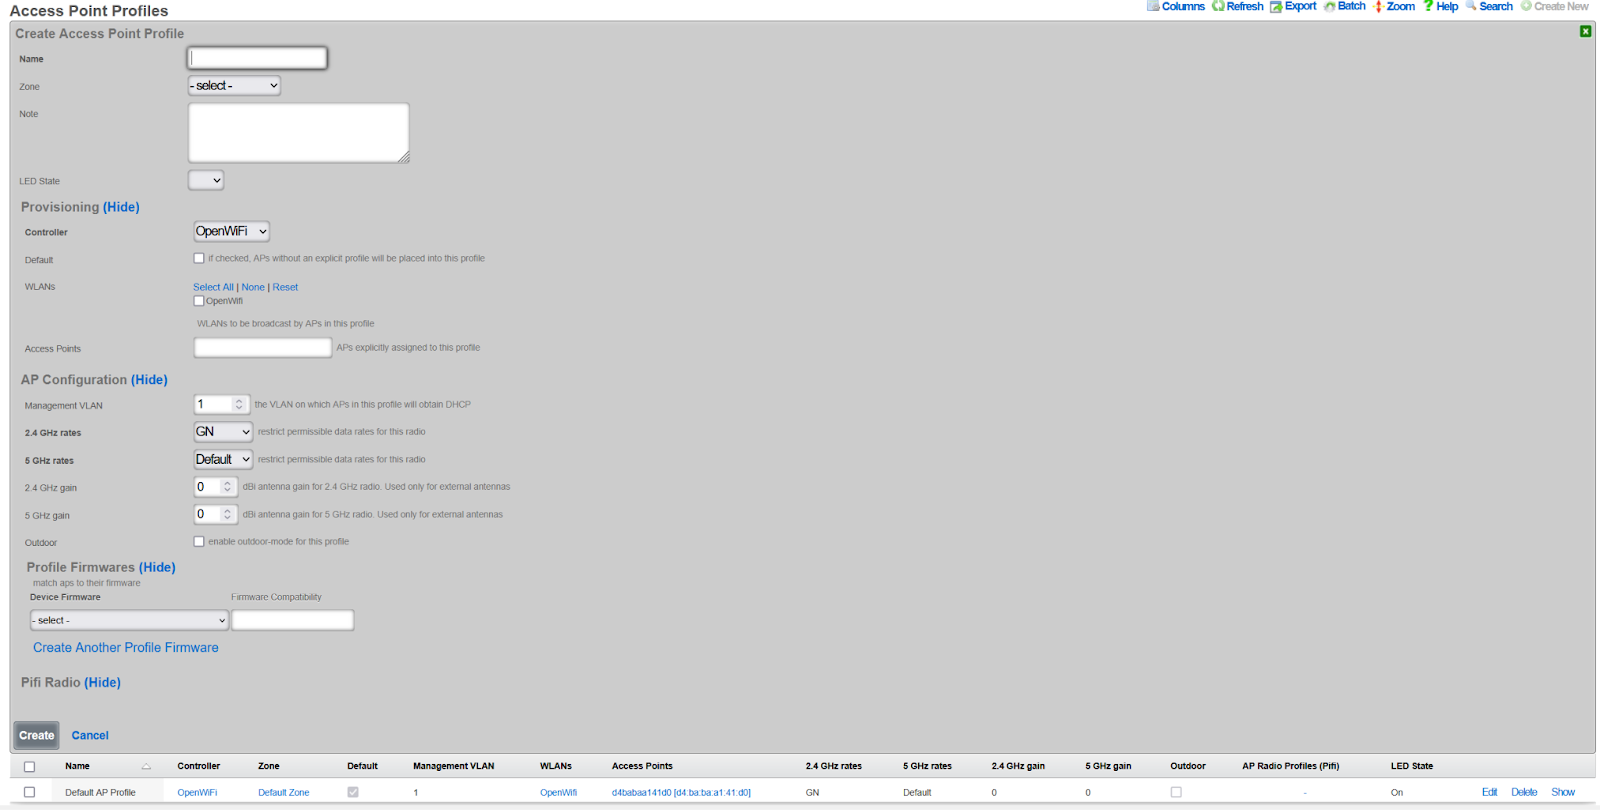
Create WLAN
- Navigate to Network >> Wireless >> WLANs
- Click Create New
- Configure WLAN settings:
- Name: WLAN identifier (not the SSID)
- SSID: The broadcast network name
- Controller: Select your OpenWiFi controller
- Zone: Select your zone
- AP Profiles: Select profiles to include this WLAN
- Encryption: WPA3 recommended. Note: WPA2/3 mixed is not supported for OpenWiFi.
- Authentication: Select appropriate method
- PSK: Enter pre-shared key if applicable
- Enabled bands: Select 2.4 GHz, 5 GHz, and/or 6 GHz
- Max Client Limit: Optional limit on clients that may connect to this specific SSID/VAP (OpenWiFi only)
- Click Create

Per-SSID Client Limit
OpenWiFi WLANs support a per-SSID maximum client limit. This limit controls how many wireless clients can associate with this specific SSID across all radios on a WAP.
Configuration:
- Maximum Clients: Set the maximum number of clients allowed on this SSID per WAP. Leave blank for no limit.
Behavior:
- When the limit is reached, new association requests for this SSID are rejected
- The limit applies per-WAP, not globally across all WAPs
- This limit is independent of per-radio limits configured at the zone level
- Both limits can be used together for fine-grained control
- When left blank, no limit is enforced and clients can connect up to hardware capacity
Interaction with Per-Radio Limits:
When both per-SSID and per-radio limits are configured, the lower limit takes effect first. For example, if a radio limit is set to 50 and the SSID limit is set to 30, the SSID will reject clients at 30 even though the radio could still accept more on a different SSID.
Use Cases:
- Service tiers: Limit a guest SSID to fewer clients than a premium SSID
- Capacity planning: Ensure no single SSID dominates WAP resources
- Fair access: Distribute clients across multiple SSIDs
Assign WAPs to Profile
- Navigate to Network >> Wireless >> Access Point Profiles
- Edit the target profile
- Select WAPs in the Access Points field
- Click Update
- WAPs will reboot and begin broadcasting the configured SSIDs
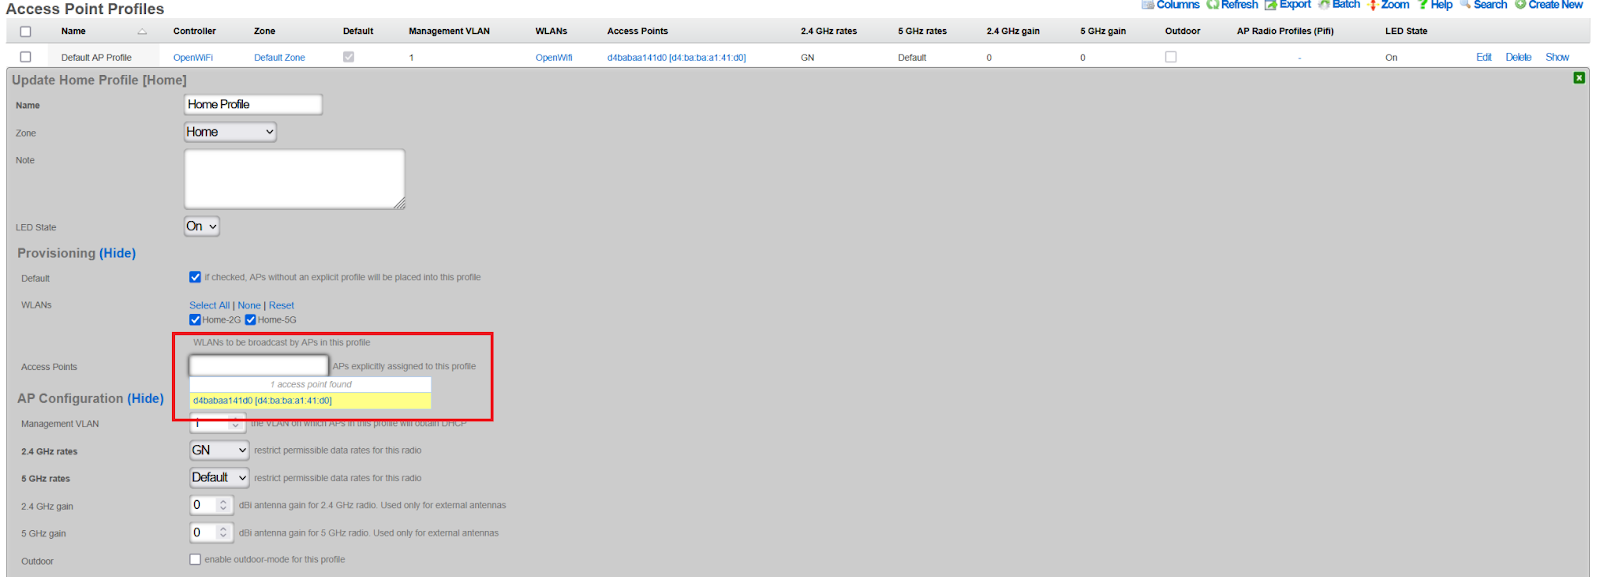
Operations
This section covers the day-to-day operational aspects of managing OpenWiFi WAPs.
Discovery and Adoption
The rXg can discover OpenWiFi WAPs using one of three methods: Direct IP Scanning, MAC prefix matching, or via the App. Once a WAP is discovered, the rXg initiates an automated import process that upgrades the device's firmware and provisions it with an rXg-signed certificate. No further operator intervention is needed to bring the device online.
Default Radio Status
The OpenWiFi WSS controller provides a "Default Radio Status" setting for each radio band (2.4 GHz, 5 GHz, and 6 GHz) to control the initial state of radios on newly adopted WAPs. This feature is especially useful in production environments with large numbers of WAPs.
Available Options:
- Disabled (default): New WAPs will have their radios disabled and must be manually enabled by the operator.
- Auto: New WAPs will have their radios automatically enabled upon adoption.
Configuration:
The default radio status can be configured per band in the WLAN Controller settings under the "Wireless" section.
Behavior:
- When set to "Disabled" (or left unset), newly adopted WAPs will require manual intervention to enable radios.
- When set to "Auto", newly adopted WAPs will have radios enabled automatically, allowing them to begin serving clients immediately after adoption.
- This setting only applies to new WAPs at the time of adoption. Existing WAPs are not affected by changes to this setting.
- Radio status can always be overridden on a per-WAP basis after adoption using the WAP's channel override settings.
Configuration Synchronization
After adoption, the WAP can be configured through the rXg's vendor-neutral interface. When an administrator makes a change on the rXg, the rXg immediately pushes the latest configuration state down to the WAP via the WSS connection. The WAP is then responsible for applying this new state.
Per-WAP GRE Endpoint Override
OpenWiFi WSS WAPs support per-WAP tunnel endpoint overrides, allowing individual WAPs to tunnel traffic to different tunnel endpoints while sharing the same WLAN configurations.
How It Works:
- WLANs define a default tunnel endpoint (
gre_tunnel_gateway_ip) that applies to all WAPs broadcasting that WLAN - Individual WAPs can override this setting with their own
gre_endpointvalue - When a WAP has a
gre_endpointconfigured, it takes precedence over the WLAN's default tunnel endpoint for all tunneled WLANs on that WAP - If the WAP's
gre_endpointis not set, the WLAN'sgre_tunnel_gateway_ipis used (standard behavior)
Use Cases:
- Routing traffic from specific WAPs to regional aggregation points
- Testing new tunnel endpoints on a subset of WAPs before widespread deployment
- Implementing site-specific or building-specific traffic routing policies
- Multi-tenant scenarios where different WAPs need to tunnel to different controllers
Configuration:
The GRE Endpoint field is available in the Access Points scaffold (Wireless -> Access Points) and is only editable for OpenWiFi WSS access points. The field accepts an IPv4 or IPv6 address and will override the WLAN's tunnel endpoint for all tunneled traffic from that WAP.
This feature follows the same override pattern as TX power settings: zone-level defaults can be overridden at the profile level, which can then be overridden at the individual WAP level.
Monitoring and Telemetry
The rXg uses the persistent WSS connection to monitor the WAP's health. - If a WAP becomes unsubscribed, the rXg marks it as offline and creates a health notice which it will send out to network operators. - The WAP client periodically sends telemetry data--such as Wi-Fi scans, current configuration, and firmware version--back to the rXg.
LED Status Indicators
OpenWiFi WAPs use LED patterns to indicate system status and connectivity issues. The LED system follows a priority hierarchy where higher-priority issues override lower-priority indicators.
Hardware Limitations:
Note: Some WAP models have hardware limitations that affect LED status indication:
Single-color LED models (e.g., CIG 188N): These devices have only a single-color LED and cannot display the color-coded status patterns described below. On these models, LED status indication is not available.
Non-ideal color reproduction (e.g., EdgeCore EAP111): Some models have LEDs with poor color accuracy, making it difficult to distinguish between certain colors (e.g., cyan vs. blue, or yellow vs. green). When troubleshooting these devices, consider using other diagnostic methods such as the rXg interface or SSH access rather than relying solely on LED colors.
LED Priority Hierarchy:
| Priority | LED Pattern | Meaning | Notes |
|---|---|---|---|
| 0 | White blink (1x/sec) | rxg_sdan dataplane unavailable | Highest priority. The kernel-module dataplane (rxg_sdan) failed to initialize, so the WAP passes no client traffic; the WSS control plane stays connected so the WAP remains manageable from the rXg. A CRITICAL message is also sent to syslog. Distinct from the temporary white rapid "locate" blink (see Manual LED Blink below). |
| 1 | Red blink (2x/sec) | Gateway unreachable | Data plane failure |
| 2a | Blue blink (1x/sec) | WebSocket disconnected | Management plane failure |
| 2b | Slow blue blink (every 2s) | Subscribed, awaiting initial configuration from rXg | Channel is up but the rXg has not pushed the AP's state yet; the AP re-requests it every 60s. Distinct from the faster 2a blink. |
| 2c | Yellow blink (1x/sec) | RADIUS unreachable | Control plane failure |
| 2d | Cyan blink (1x/sec) | EST server unreachable | Certificate management failure (when enabled) |
| 3 | Tunnel-Specific States (when a tunnel is configured): | ||
| Solid blue | Clients connected + traffic flowing | Active tunnel traffic | |
| Solid magenta | Clients connected + no traffic | Idle tunnel clients | |
| Solid green | No clients connected | tunnel ready | |
| 3 | Standard States (when no tunnel is configured): | ||
| Solid blue | Stations connected | Active service | |
| Solid green | Ready, no stations | Idle state | |
| 4 | LED off | LEDs disabled |
Special States:
- All Colors Alternating "Disco Blink": Working on downloading
rg_wss_clientmanagement software from rXg. - Error states always display: Blinking patterns (white/red/blue/yellow/cyan) show regardless of LED configuration for troubleshooting
Key Behaviors:
- Higher priority issues always override lower priority indicators
- Tunnel configurations use special LED states to indicate tunnel health and client activity
- Solid LEDs respect the
unit.leds-activeconfiguration setting - Error indicators (blinking patterns) always display for visibility
- EST server monitoring only activates during certificate management operations
Manual LED Blink
OpenWiFi WAPs support a manual blink feature that helps operators physically identify specific WAPs in large deployments. When triggered from the rXg, the WAP will blink its LED rapidly in white for 5 minutes, overriding all normal LED monitoring behavior.
LED Configuration:
- On: LED system fully active (error states + solid OK states)
- Off: LED system shows only error states (white/red/blue/yellow/cyan blinks), suppresses solid OK states
Note: "Blink" is not available as a persistent LED configuration optionit is a temporary manual action only.
Manual Blink Behavior:
- Triggers rapid white LED blink for 5 minutes
- Overrides all normal LED monitoring during this period
- Automatically expires after 5 minutes and returns to normal monitoring
- Can be immediately cancelled by clicking "LED On" or "LED Off" buttons
- Status is shown in the rXg interface with a live countdown timer
Use Case: When managing multiple WAPs in a venue, operators can use the manual blink feature to quickly locate a specific WAP by triggering the distinctive white rapid blink pattern from the rXg interface.
Client Experience Ping Monitoring
OpenWiFi WSS WAPs can perform connectivity monitoring from the client's perspective by simulating real client traffic through the tunnel. This feature helps operators verify that clients would experience proper network connectivity.
How It Works:
The client experience monitoring system performs periodic ping tests that simulate actual client traffic:
- Tunnel-encapsulated Pings: Pings are sent as Tunnel-encapsulated packets through the same tunnel that client traffic uses
- DHCP Acquisition: The WAP acquires a DHCP lease on the test VLAN to obtain a valid client IP address
- DNS Resolution: Target hostnames are resolved to IP addresses with DNS caching (5-minute TTL) to reduce resolver load
- Custom Targets: Operators configure which domains or IP addresses to test (comma-separated list)
- MAC-Based Timing: Pings are staggered across the WAP fleet using MAC-based timing offsets (0-59 seconds) to prevent network spikes
- Telemetry Reporting: Results are reported back to the rXg via the telemetry system with packet loss, latency, and jitter metrics
Configuration:
Client experience ping monitoring is configured at the Access Point Zone level and applies to all WAPs in that zone. The configuration is only available for OpenWiFi WSS zones.
Navigate to Wireless Access Point Zones, edit an OpenWiFi WSS zone, and configure:
- Enable Client Experience Pings: Checkbox to enable/disable the client experience ping monitoring
- Enable Underlay Gateway Pings: Checkbox to enable/disable pings to the underlay gateway (the physical network gateway)
- Client Experience Ping Targets: Comma-separated list of domains or IP addresses to ping (e.g.,
google.com, 8.8.8.8, cloudflare.com)
Important Notes:
- Targets must be explicitly configured - there are no default ping targets
- Client experience pings will only run when enabled and targets are configured
- The WAP must have a test VLAN ID configured (from an account associated with the WAP's PMS room)
- Pings require tunnel configuration to be present on the WAP
- Invalid targets (malformed domains/IPs) are rejected by validation
Room Size Limit:
To prevent DHCP pool exhaustion on test VLANs, client experience monitoring is automatically disabled for rooms containing 25 or more WAPs. This limit protects deployments with many "common area" WAPs (lobbies, conference centers, ballrooms) that share a single test VLAN.
When a room reaches this threshold:
- All WAPs in that room will have test_vlan_id: nil in their state
- Client experience pings will not run on any WAP in that room
- Underlay gateway pings will continue to function normally
- The WAP will log: "No test VLAN ID configured in AP state"
This limit is defined by the constant MAX_APS_PER_ROOM_FOR_MONITORING = 25 in console/app/models/concerns/openwifi/configuration_management.rb.
Why This Limit Exists:
Each WAP performing client experience monitoring acquires a DHCP lease on the test VLAN. In typical hotel deployments, guest rooms have 1-2 WAPs and share a VLAN through their account assignment. However, large common areas (conference centers, ballrooms, lobbies) may have dozens of WAPs assigned to a single non-resident "house" account.
Without this limit, 50+ WAPs in a ballroom could exhaust a /24 test VLAN's DHCP pool, preventing legitimate client traffic or causing monitoring failures. The 25 AP threshold provides sufficient protection while allowing monitoring in most scenarios.
Prerequisites for Monitoring:
Client experience monitoring will only run when ALL of the following conditions are met:
Zone Configuration:
- "Enable Client Experience Pings" is checked in the Access Point Zone
- "Client Experience Ping Targets" field contains valid targets
WAP Assignment:
- WAP is assigned to a PMS Room (Wireless >> Access Points >> edit >> PMS Room field)
Account Association:
- The PMS Room has at least one associated Account
VLAN Configuration:
- The Account has a VLAN Tag Assignment
- The VLAN must belong to a tunnel pseudo interface (client experience pings require tunnel encapsulation)
Room Size:
- The PMS Room contains fewer than 25 WAPs
- If the room has 25+ WAPs, monitoring is automatically disabled to prevent DHCP pool exhaustion
Tunnel:
- At least one WLAN on the WAP must have tunneling configured
- The test VLAN uses tunnel encapsulation to reach the rXg
To verify these prerequisites, check the AP state message for test_vlan_id. If nil, one or more prerequisites are not met.
Example Configuration:
Enable Client Experience Pings: (checked)
Enable Underlay Gateway Pings: (checked)
Client Experience Ping Targets: google.com, youtube.com, 1.1.1.1
Monitoring Results:
Ping results are available in the telemetry system and include: - Success/failure status - Packet loss percentage - Average, minimum, and maximum round-trip time (RTT) - Jitter measurements - Target domain/IP being tested - DHCP-acquired client IP and gateway information
LED Feedback:
When all client experience ping tests fail, the WAP will show a magenta blinking LED pattern to indicate the connectivity issue. This provides immediate visual feedback to operators about client experience problems.
Key Performance Indicators (KPIs)
The rXg collects and stores detailed performance metrics from OpenWiFi WAPs. These Key Performance Indicators (KPIs) provide visibility into wireless network health, client experience, and radio performance. KPIs are collected at two levels: per-client metrics and per-radio aggregated metrics.
Data Collection
KPIs are extracted from state messages sent by WAPs via the persistent WSS connection. The rXg processes these messages in real-time, storing metrics in TimescaleDB for efficient time-series analysis.
Collection Frequency: State messages are sent periodically by WAPs (typically every 60 seconds).
Data Retention:
| Resolution | Retention Period |
|---|---|
| Full resolution | 3 days |
| 15-minute averages | 1 week |
| 30-minute averages | 2 weeks |
| 1-hour averages | 30 days |
| 2-hour averages | 1 year |
| 1-day averages | 10 years |
Client KPIs
Client KPIs are collected for each individual wireless client connected to a WAP. These metrics help diagnose individual device connectivity issues and track client experience.
| Metric | Unit | Description |
|---|---|---|
| SNR | dB | Signal-to-Noise Ratio. Measures the quality of the wireless signal relative to background noise. Higher values indicate better signal quality. |
| RSSI | dBm | Received Signal Strength Indicator. The absolute signal power received by the WAP from the client. Values closer to 0 are stronger. |
| Bytes To Client | bytes | Payload bytes transmitted from the WAP to the client in the sampling interval. |
| Bytes From Client | bytes | Payload bytes received by the WAP from the client in the sampling interval. |
| Cumulative Bytes To Client | bytes | Total payload bytes transmitted to the client since association. |
| Cumulative Bytes From Client | bytes | Total payload bytes received from the client since association. |
| Throughput Rate To Client | bps | Current data rate from WAP to client (download). |
| Throughput Rate From Client | bps | Current data rate from client to WAP (upload). |
| TX Link Speed | Mb/s | Negotiated transmit link speed from WAP to client. |
| RX Link Speed | Mb/s | Negotiated receive link speed from client to WAP. |
| TX MCS | index | Transmit Modulation and Coding Scheme index. Higher values indicate faster potential speeds. |
| RX MCS | index | Receive Modulation and Coding Scheme index. |
| Channel | number | The channel on which the client is connected. |
| NSS | count | Number of Spatial Streams in use. More streams enable higher throughput. |
| PHY | string | Physical layer standard (e.g., "802.11ax", "802.11ac"). Indicates the Wi-Fi generation. |
| TX PER | % | Transmit Packet Error Rate. Percentage of transmitted packets that failed. |
| Cumulative TX Packets | count | Total packets transmitted to the client since association. |
| Cumulative TX Failed | count | Total failed packet transmissions since association. Used for packet loss calculation. |
Signal Quality Reference:
| SNR Value | Quality Assessment |
|---|---|
| 40 dB | Excellent |
| 30 dB | Very Good |
| 20 dB | Good (adequate for connection) |
| < 20 dB | Poor (inadequate for reliable WiFi) |
| RSSI Value | Quality Assessment |
|---|---|
| -70 dBm | Good (reliable WiFi) |
| -70 to -80 dBm | Fair (intermittent issues possible) |
| -90 dBm | Poor (inadequate for WiFi) |
Radio KPIs
Radio KPIs are aggregated metrics calculated across all clients connected to a specific radio. These metrics provide a high-level view of radio performance and capacity utilization.
Client and Capacity Metrics
| Metric | Unit | Description |
|---|---|---|
| Client Count | clients | Number of clients currently connected to the radio. |
| Channel Utilization | % | Percentage of airtime being used on the channel. High values indicate congestion. |
| TX Channel Utilization | % | Percentage of airtime used for transmitting. |
| RX Channel Utilization | % | Percentage of airtime used for receiving. |
Capacity Reference:
| Client Count | Assessment |
|---|---|
| < 50 | Normal |
| 50-60 | Warning (approaching capacity) |
| > 60 | Critical (overloaded) |
| Channel Utilization | Assessment |
|---|---|
| < 85% | Normal |
| 85-90% | Warning |
| > 90% | Critical (congested) |
Signal Quality Aggregates
For each signal quality metric, the rXg calculates statistical aggregates across all connected clients:
| Metric | Unit | Description |
|---|---|---|
| RSSI Min/Max/Avg/Stddev | dBm | Statistical distribution of RSSI values across all clients. |
| SNR Min/Max/Avg/Stddev | dB | Statistical distribution of SNR values across all clients. |
| Noise Floor | dBm | Environmental RF noise level detected by the radio. Lower (more negative) values indicate a cleaner RF environment. |
Link Speed and MCS Aggregates
| Metric | Unit | Description |
|---|---|---|
| Speed Min/Max/Avg/Stddev | Mb/s | Statistical distribution of negotiated link speeds across all clients. |
| MCS Negotiated Min/Max/Avg/Stddev | index | Statistical distribution of MCS indices across all clients. |
MCS Reference:
| Average MCS | Assessment |
|---|---|
| > 5 | Normal |
| 2-5 | Warning |
| 1 | Critical (severe performance issues) |
Throughput Aggregates
| Metric | Unit | Description |
|---|---|---|
| TP Min/Max/Avg/Stddev | Mb/s | Throughput from WAP to clients (TX only). Statistical distribution across all clients. |
| Agg TP Min/Max/Avg/Stddev | Mb/s | Aggregate throughput (TX + RX combined). Statistical distribution across all clients. |
Throughput Reference (per radio):
| Aggregate Throughput | Assessment |
|---|---|
| < 1 Gb/s | Normal |
| 1-1.5 Gb/s | Warning |
| > 1.5 Gb/s | Critical (approaching radio limits) |
Packet Loss Aggregates
| Metric | Unit | Description |
|---|---|---|
| PL Min/Max/Avg/Stddev | % | Packet loss percentage. Statistical distribution across all clients. |
Channel and Radio Configuration
| Metric | Unit | Description |
|---|---|---|
| Channel 2.4 | number | Current 2.4 GHz channel. |
| Channel 5 | number | Current 5 GHz channel. |
| Channel 6 | number | Current 6 GHz channel. |
| Channel Str | string | Channel representation for bonded frequencies (e.g., "116, 120"). |
| Frequency Str | string | Operating frequencies in MHz (e.g., "5580, 5600"). |
| Channel Width | MHz | Current channel width (20, 40, 80, 160 MHz). |
| TX Power | dBm | Transmit power level before antenna gain. |
| Gain | dB | Antenna gain applied to the signal. |
Data Volume Metrics
| Metric | Unit | Description |
|---|---|---|
| TX Bytes | bytes | Total bytes transmitted by the radio to clients. |
| RX Bytes | bytes | Total bytes received by the radio from clients. |
| TX Packets | count | Total packets transmitted by the radio. |
| RX Packets | count | Total packets received by the radio. |
Viewing KPIs
KPIs can be viewed in several locations within the rXg interface:
Access Points Dashboard: Navigate to Network >> Wireless >> Access Points to see real-time KPI summaries for each WAP.
Radio Metric Graphs: Click on an individual WAP to view time-series graphs of radio KPIs.
KPI Dialogs: Real-time dashboard widgets displaying current KPI values.
Heatmaps: Visual representation of KPIs across floor plans. Available metrics for heatmaps include:
- Client Count
- Average SNR
- Average RSSI
- Noise Floor
- Channel Utilization
Reports: KPI data can be exported for analysis via the ATT Reports feature.
Aggregation Methodology
Per-radio aggregated metrics are calculated from individual client values using the following methodology:
- Minimum: Lowest value among all connected clients
- Maximum: Highest value among all connected clients
- Average: Arithmetic mean of all client values
- Standard Deviation: Measure of value dispersion across clients
This statistical approach enables operators to quickly identify:
- Outliers: Min/max values reveal clients with unusually good or poor connections
- Typical Experience: Average values represent the typical client experience
- Consistency: Standard deviation indicates whether clients have similar or varied experiences
WSS Processor Metrics
The rXg processes AP telemetry asynchronously using a dedicated background daemon. When APs send telemetry, command responses, or state data over the WSS connection, the messages are published to a Redis Stream and processed by the OpenWiFi WSS Processor Daemon. This offloads database operations from the WebSocket workers and improves scalability for large AP fleets.
The WSS Processor Metrics panel is available from the Access Points scaffold as a collection-level action. It displays a compact status bar with:
- Daemon Status: Badge showing Running (with PID) or Stopped.
- Stream Length: Total messages in the Redis Stream. This grows as APs send data and is trimmed automatically a growing number is normal.
- Pending: Unprocessed messages waiting for the daemon. This is the key health indicator. Non-zero means the daemon is behind or failing.
- Log: Opens a modal with the last 50 lines of the daemon log and a copy-to-clipboard button.
- Refresh indicator: A spinning icon shows that the panel is auto-refreshing (every 5 seconds). Click to pause; the panel also pauses automatically while the log modal is open.
When to check this panel:
- After initial deployment or upgrade, to verify the daemon started and is processing messages.
- When APs appear to be connected but telemetry data (state, wireless clients, KPIs) is not updating.
- When a health notice reports WSS processor errors or stalled processing.
Health Notices:
The daemon automatically creates health notices for the following conditions:
| Condition | Severity | Auto-Cures |
|---|---|---|
| 50+ pending unprocessed messages | WARNING | Yes, when pending drops to 0 |
| 10+ consecutive processing errors | CRITICAL | Yes, on next successful process |
| No messages processed for 5+ minutes | CRITICAL | Yes, on next successful process |
Daemon lifecycle:
The daemon is managed automatically by rxgd. It starts when openwifi_wss infrastructure devices exist and stops when they are removed. No manual intervention is required. The daemon log is available in System >> Logs as "OpenWiFi WSS Processor.log".
Firmware Management
The rXg manages the entire firmware lifecycle for the WAPs. The state message pushed from the rXg includes the required firmware version, and the WAP self-enforces this version. If an upgrade is needed, the WAP requests a temporary download URL from the rXg.
- Compatibility: Firmware compatibility is tracked using a
firmware_compatibilitystring, which must match on both the WAP and the firmware record on the rXg. - Acquisition: New firmware can be acquired and stored on the rXg for deployment. An operator can manually upload firmware by providing a file or a download URI, but must ensure the
firmware_compatibilitystring is set correctly. - Versioning: The rXg can automatically extract the version string from an OpenWiFi firmware binary.
Automatic NTP Synchronization
As part of the firmware upgrade process, the rXg automatically applies an NTP fix to ensure proper time synchronization before proceeding with firmware upgrades. This addresses potential clock synchronization issues that can prevent proper HTTPS connectivity during the upgrade process.
The NTP process includes:
- NTP Configuration: Configures the WAP to use
time.google.comas the NTP server using UCI commands - Service Restart: Restarts the NTP daemon to apply the new configuration
- Date Verification: Verifies the WAP's system time is reasonable before proceeding
- Upgrade Protection: If time synchronization fails, the firmware upgrade is aborted to prevent connectivity issues
This process is automatically applied during WAP adoption and requires no operator intervention. If the NTP fix fails, the adoption status will be set to ntp_fix_failed and the firmware upgrade will be skipped.
Viewing Available Firmware
Navigate to Network >> Wireless >> Device Firmware to view available firmware and access the OpenWiFi Firmware Menu.
Firmware Sources: - Original TIP OpenWiFi releases - Custom RG Nets firmware with upstream patches and extensions
Available Release Trains: - TIP 3.2.1 - TIP 4.0.0 - Future releases as available
Supported Models: - CIG 196, 660A, 188N, 189 - EdgeCore 101, 105
Note: The "Show feature builds" checkbox exposes alpha builds (marked in red). These are unstable and intended for lab testing only.
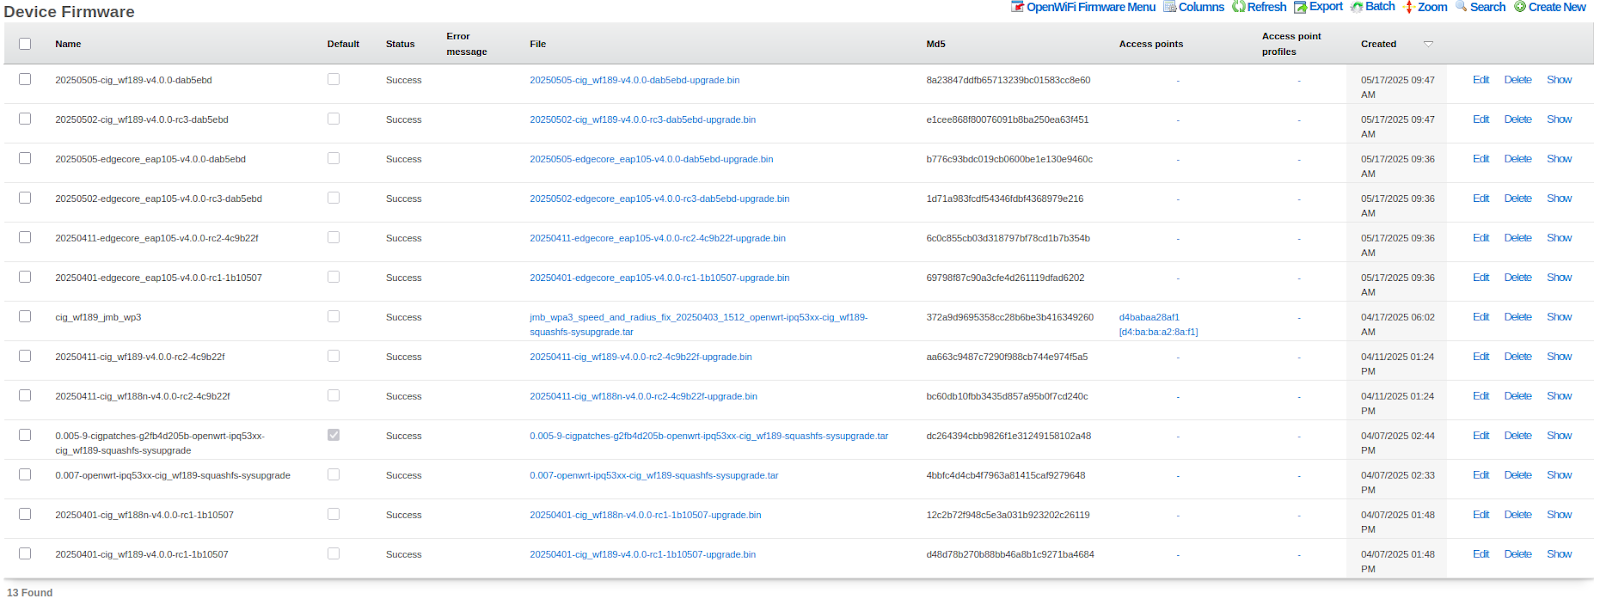
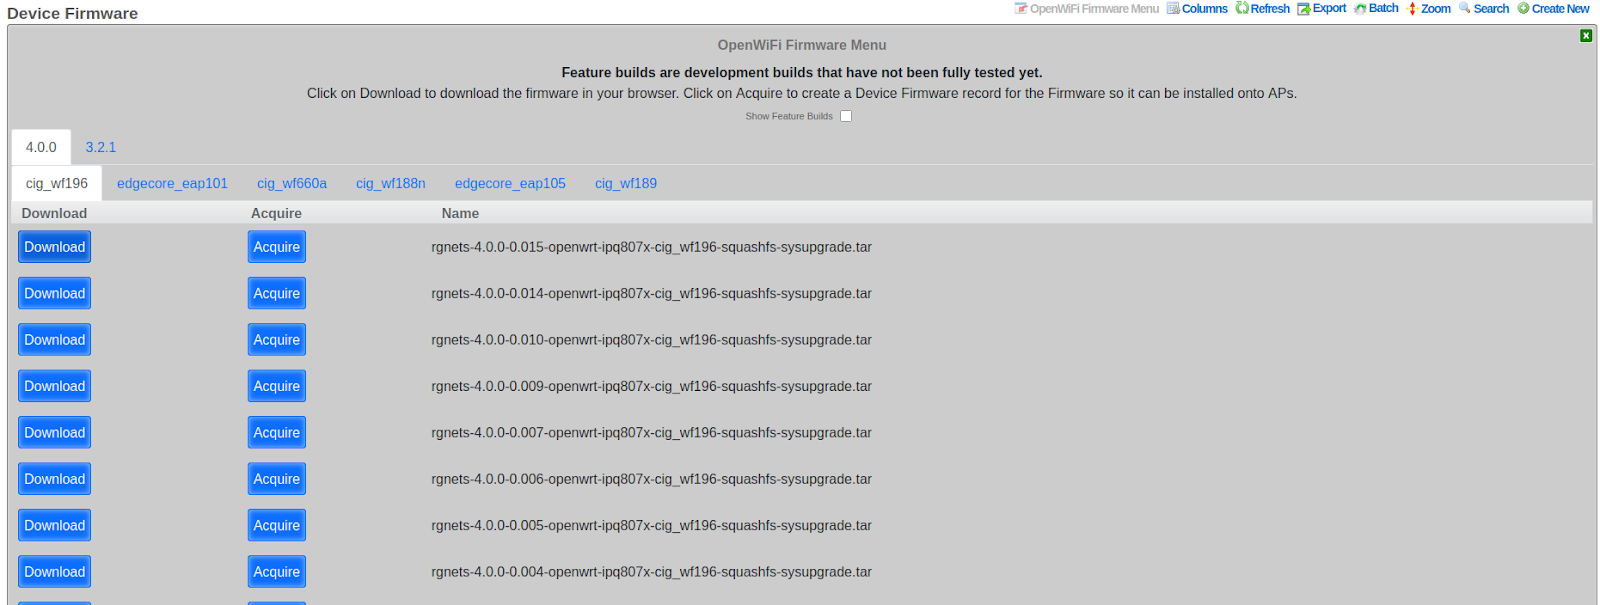
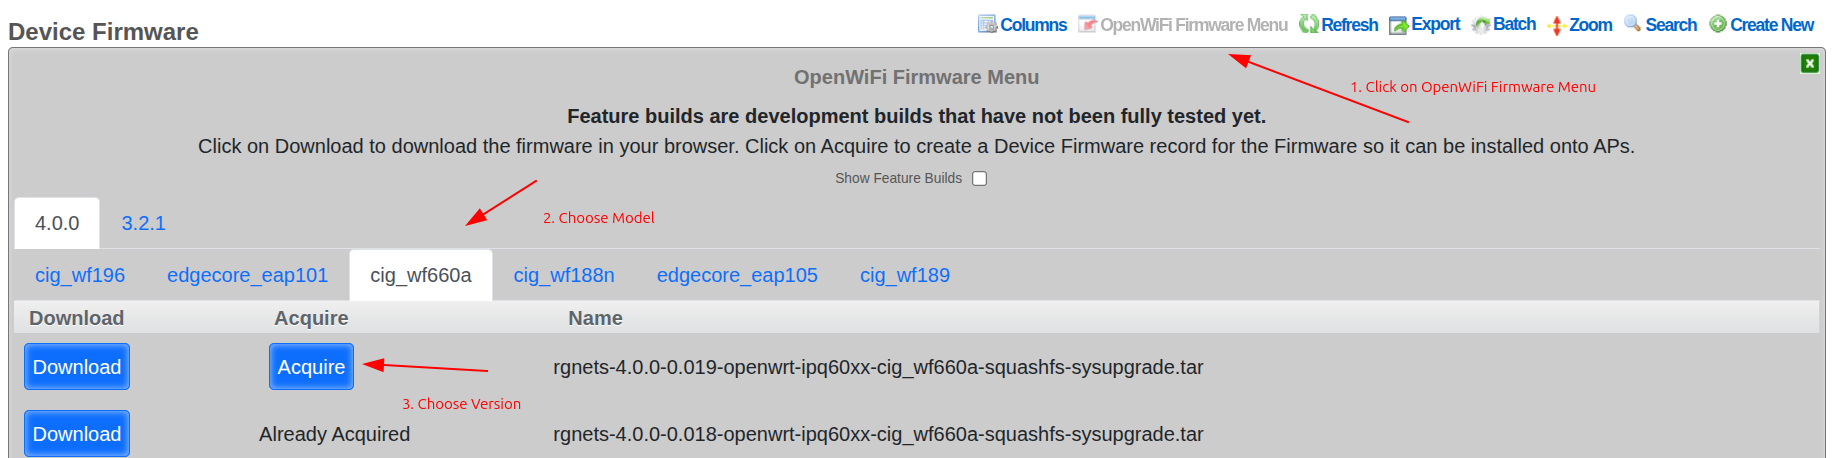
The rXg includes a built-in interface for easily acquiring the latest firmware. The Acquire button downloads it to the rXg for easy installation onto WAPs. The Download button downloads it to your PC.
Method A: Per-Device Firmware Assignment
- Navigate to Network >> Wireless >> Device Firmware
- Edit the target firmware record
- Select specific WAPs in the Access points field
- Click Update
This method provides selective upgrade capability for testing before wider rollout.

Method B: Profile-Based Firmware Assignment
- Navigate to Network >> Wireless >> Access Point Profiles
- Edit the target profile
- Under Profile Firmwares, select the target firmware
- Associate with specific device models (e.g.,
cig_wf189) - Click Update
This method rolls out firmware to all WAPs with matching hardware models in the profile.
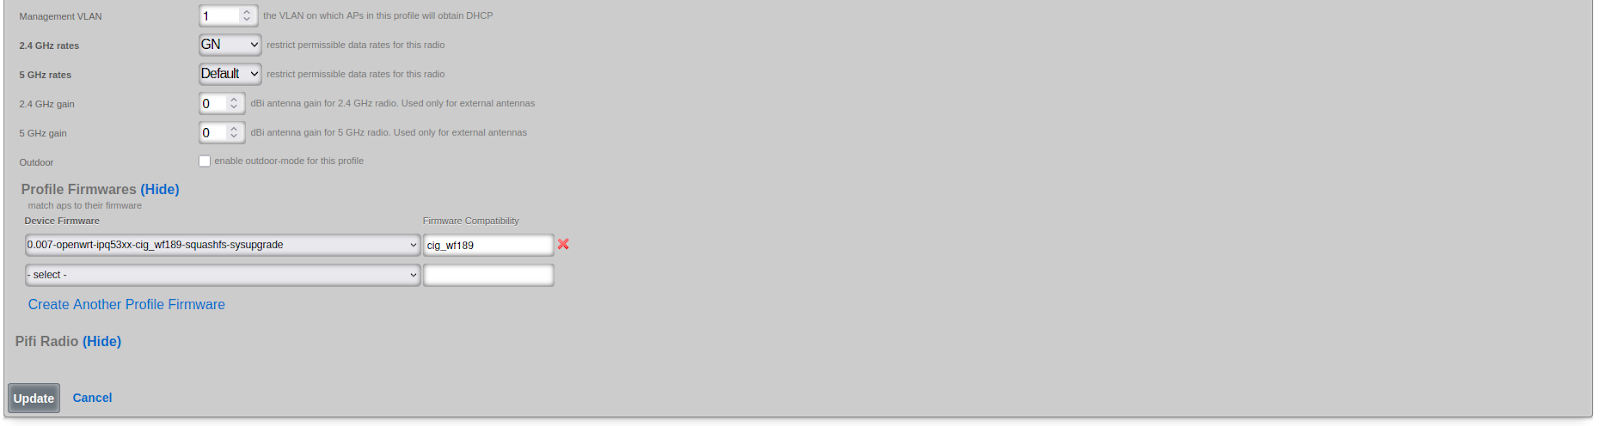
Firmware Upgrade Behavior:
- The Sync Firmware button upgrades WAPs only if target version is higher
- The Upgrade Firmware button on individual WAPs forces upgrade regardless of version
- Firmware compatibility is tracked via a firmware_compatibility string
Cluster Configuration
When deploying OpenWiFi WSS in a multi-node rXg cluster, the system automatically distributes WAP connections across all available cluster nodes for improved performance and high availability.
Note: This section applies only to WSS deployments in clustered environments.
How Cluster Load Balancing Works
Endpoint Discovery and Persistence:
- Initial Bootstrap: On first connection, WAPs discover the cluster controller via DHCP option 224
- Endpoint Distribution: Once connected, the rXg sends a list of all active cluster nodes (
rxg_endpoints) in the state message - Persistent Storage: The WAP stores this endpoint list in
/root/rxg_endpoints.jsonfor future use
Load Distribution:
- On startup, WAPs load the persisted endpoint list and randomly select a cluster node to connect to
- This random selection naturally distributes WAP connections across all available nodes
- Each WAP independently makes its selection, resulting in balanced load distribution
Automatic Failover:
- If a WAP loses connection to its current node, it immediately tries the next endpoint in its list
- No exponential backoff occurs between trying different nodes
- Only after exhausting all available endpoints does the WAP wait before retrying
- This ensures rapid failover with minimal downtime
Example /root/rxg_endpoints.json:
[
{
"name": "rxg-node-01.example.com",
"domain_name": "rxg-node-01.example.com"
},
{
"name": "rxg-node-02.example.com",
"domain_name": "rxg-node-02.example.com"
}
]
Monitoring Node Distribution
The rXg provides real-time visibility into WAP distribution across cluster nodes through the Node Distribution dashboard widget.
Access: Navigate to Wireless Access Points, then click the "Node Distribution" button in the action bar.
The dashboard displays:
- Pie Chart: Visual representation of which WAPs are connected to which cluster nodes
- Summary Statistics: Total connected WAPs, active cluster nodes, and average WAPs per node
- Detailed Breakdown: Table showing WAP count and percentage per node
Technical Details:
- Connection tracking uses Redis to store the WAP-to-node mapping (
openwifi_ap_nodeshash) - Data is updated in real-time as WAPs connect and disconnect
- The dashboard auto-refreshes every 30 seconds to show current distribution
- This information helps operators verify load balancing effectiveness and identify potential issues
Benefits:
- High Availability: WAPs automatically failover to healthy nodes without operator intervention
- Load Distribution: Random selection ensures even distribution of WAP connections
- No Single Point of Failure: Any cluster node can serve as the WSS endpoint for any WAP
- Self-Healing: WAPs automatically return to optimal nodes as cluster health improves
- Visibility: Real-time monitoring of connection distribution across the cluster
Enabling Nodes for WSS Management
Each cluster node can be individually configured for WSS management participation using the Use for WSS Management boolean in the Cluster Node settings (System Cluster).
How It Works:
- When enabled, the node participates in the WSS management plane and accepts WAP connections
- When disabled, the node is excluded from the endpoint list sent to WAPs and will not accept new WSS connections
- This setting allows operators to designate specific nodes for WSS management while using other nodes for different purposes
Use Cases:
- Dedicated Management Nodes: Reserve specific nodes exclusively for WAP management in large clusters
- Maintenance Mode: Temporarily exclude a node from receiving new WAP connections during maintenance
- Capacity Planning: Gradually introduce new nodes into the management plane
- Resource Isolation: Separate management traffic from data plane or control plane operations
Configuration:
Navigate to System Cluster, edit a cluster node, and toggle the "Use for WSS Management" checkbox. Changes take effect on the next state message push to WAPs (typically within 60 seconds).
Important Notes:
- Disabling WSS management on a node does not disconnect currently connected WAPs immediately
- WAPs will naturally reconnect to other nodes during their next connection cycle or failover event
- At least one node must have WSS management enabled for the cluster to function properly
- The automatic rebalancing system only considers nodes with WSS management enabled
Automatic Load Rebalancing
In addition to initial load distribution, the rXg includes an automatic rebalancing system that continuously monitors and optimizes WAP distribution across cluster nodes to prevent overload conditions.
How Automatic Rebalancing Works:
The rebalancing job runs every minute and evaluates the current WAP distribution. It only triggers a rebalance when specific conditions are met:
Trigger Conditions:
- Minimum Threshold: The busiest node must have at least 100 WAPs connected
- Imbalance Detection: The difference between the most and least loaded nodes exceeds 15% of total WAPs (minimum 10 WAP difference)
- Target Health: The target node must be active and healthy and have WSS management enabled
Rebalancing Process:
When triggered, the system:
- Identifies Source and Target: Finds the most overloaded and least loaded WSS-capable nodes
- Calculates Move Count: Determines how many WAPs to move (2% of overloaded node's count, maximum 10 per run)
- Selects Candidate WAPs: Randomly selects WAPs from the overloaded node, excluding recently rebalanced WAPs
- Triggers Reconnection: Sends a state message with
intended_nodefield to selected WAPs - Prevents Ping-Ponging: Marks moved WAPs with a 10-minute cooldown to prevent oscillation
WAP Response to Rebalancing:
When a WAP receives a state message containing an intended_node different from its current connection:
- The Python WSS client detects the intended node in the state data
- The WAP immediately disconnects from its current node
- The intended node is prioritized in the reconnection attempt
- The WAP establishes a new connection to the specified node
Example Scenario:
Initial state:
Node A: 150 WAPs
Node B: 50 WAPs
Total: 200 WAPs
Imbalance: 100 WAPs (50% difference)
Threshold: 30 WAPs (15% of 200)
Action: Move 3 WAPs from Node A to Node B (2% of 150)
Result:
Node A: 147 WAPs
Node B: 53 WAPs
Monitoring:
The Node Distribution dashboard displays a visual threshold indicator showing which nodes are above or below the rebalancing threshold:
- Green badge: Node is below threshold (normal operation)
- Amber badge: Node is at or above threshold (may trigger rebalancing)
Configuration:
The rebalancing threshold is currently set to 100 WAPs and is defined in the ClusterNode::WSS_REBALANCING_THRESHOLD constant. This value represents the minimum number of WAPs on the busiest node before automatic rebalancing will consider triggering.
Benefits:
- Prevents Overload: Automatically redistributes load before any single node becomes overwhelmed
- Gradual Convergence: Small, incremental moves (2% per run) prevent disruption while achieving balance over time
- Stability: Cooldown periods and thresholds prevent unnecessary WAP movement
- Zero Operator Intervention: Runs automatically in the background with no configuration required
- Graceful: WAPs reconnect cleanly using the same mechanism as normal failover
Technical Details:
- Job runs via ActiveJob queue:
RebalanceOpenwifiWssNodesJob - Execution frequency: Every 1 minute
- Maximum WAPs moved per run: 10
- Cooldown per WAP: 10 minutes
- Health check: Uses
is_activemethod to verify target node availability
Troubleshooting
This section covers common issues and recovery procedures for OpenWiFi WAPs.
Common Issues
Broken NTP on Prior-Configured WAPs
If the WAP is struggling to connect to the rXg's HTTPS interface, it may have a malfunctioning clock. This should be fixed during the firmware installation process, but in case it is not, here are two solutions.
Solutions:
- Factory Reset WAP
- Via SSH:
uci delete system.ntp.server
uci add_list system.ntp.server='time.google.com'
uci commit system
/etc/init.d/sysntpd restart
Client Experience Monitoring Not Running
If client experience pings are not appearing in telemetry, check the following:
Step 1: Verify Zone Configuration
- Navigate to Wireless >> Access Point Zones
- Edit the OpenWiFi WSS zone
- Ensure "Enable Client Experience Pings" is checked
- Ensure "Client Experience Ping Targets" contains valid domains or IP addresses (e.g., google.com, 8.8.8.8)
Step 2: Check WAP State
- Navigate to Wireless >> Access Points
- Find the WAP in question
- Check the test_vlan_id field in OpenWiFi -> Expected State Data
- If nil, monitoring will not run
Step 3: Verify PMS Room Assignment - Ensure the WAP is assigned to a PMS Room - Navigate to Wireless >> Access Points >> edit >> PMS Room field
Step 4: Check Account and VLAN Assignment - Navigate to the PMS Room (Users >> PMS Rooms) - Verify at least one Account is associated with the room - Check that the Account has a VLAN Tag Assignment - Verify the VLAN belongs to a tunnel pseudo interface (not a standard VLAN)
Step 5: Check Room Size - Count the number of WAPs assigned to the same PMS Room - If 25 or more WAPs share the room, monitoring is automatically disabled for DHCP pool protection
Step 6: Verify Tunnel Configuration - At least one WLAN must have tunneling configured - Navigate to Wireless >> WLANs >> edit WLAN >> Tunnel Type - Ensure tunnel destination is configured
Step 7: Check WAP Logs - SSH to the WAP and check logs for client experience monitor status - Look for messages like: - "Starting client experience monitor" - "No test VLAN ID configured in AP state" - "tunnel configuration not found" - "DHCP acquisition failed on test VLAN"
Using an rXg as an HTTP Virtual Host to L7 Proxy WAP <> rXg WSS Traffic
WAP -> WSS GET /cable -> HTTP Virtual Host rXg -> proxied request -> OW Controller rXg
This configuration is not supported and will prevent OpenWiFi WAPs from authenticating properly.
The mTLS authentication fails because the intermediary rXg's HTTP proxy terminates the TLS connection and does not forward the client certificate to the controlling rXg. OpenWiFi WAPs require bidirectional certificate verification, and the controlling rXg cannot verify the WAP's identity without access to the client certificate.
Solution: Use Direct Routing Establish network routing that allows OpenWiFi WAPs to communicate directly with the controlling rXg without passing through an intermediary proxy. This can be achieved through proper network segmentation, VPN tunnels, or dedicated routing rules that bypass the proxy rXg entirely for OpenWiFi WSS traffic while maintaining the proxy for other services. Consider using policy-based routing or VLAN separation to achieve this configuration.
Certificate Problems
Certificate issues can prevent WAPs from establishing WSS connections to the rXg. Use the following steps to diagnose and resolve certificate-related problems.
Symptoms: - WAPs show "Offline" status and never transition to "Online" - WAP LED shows cyan blink (EST server unreachable) - Adoption process stalls after firmware installation - WSS connection fails with TLS/SSL errors
Step 1: Verify Certificate Authority Status
Navigate to System >> Certificates >> Certificate Authorities and check:
- CA exists and is associated with the WLAN Controller
- CA has not expired (check the Not After date)
- CA Common Name matches the rXg hostname
Via CLI:
# Check CA certificate details
openssl x509 -in /etc/ssl/rxg/ca.crt -text -noout | grep -E "Subject:|Not After"
# Verify CA is not expired
openssl x509 -in /etc/ssl/rxg/ca.crt -checkend 0
If the CA has expired, create a new CA and update the WLAN Controller association.
Step 2: Verify EST Server Configuration
Navigate to System >> DHCP >> Options and verify:
- An EST Server Option exists
- The option is associated with the correct DHCP pool(s)
- The Certificate Authority field references a valid CA
The EST Server Option is required for WAPs to obtain certificates during the adoption process.
Step 3: Check WLAN Controller Certificate Association
Navigate to Network >> Wireless >> WLAN Controllers and verify:
- The controller has a Certificate Authority selected
- The selected CA matches the one used for EST Server
Step 4: Verify WAP Certificate (via SSH)
If you can SSH to the WAP, check its certificate status:
# Check if certificate exists
ls -la /etc/ucentral/cert.pem /etc/ucentral/key.pem
# Verify certificate details
openssl x509 -in /etc/ucentral/cert.pem -text -noout | grep -E "Subject:|Issuer:|Not After"
# Verify certificate is signed by the rXg CA
openssl verify -CAfile /etc/ucentral/ca.pem /etc/ucentral/cert.pem
Example Output - Working Certificate:
$ openssl x509 -in /etc/ucentral/cert.pem -text -noout | grep -E "Subject:|Issuer:|Not After"
Issuer: C = US, ST = California, L = San Francisco, CN = rxg.example.com, emailAddress = [email protected]
Not After : Dec 25 12:00:00 2034 GMT
Subject: CN = d4:ba:ba:a1:41:d0
$ openssl verify -CAfile /etc/ucentral/ca.pem /etc/ucentral/cert.pem
/etc/ucentral/cert.pem: OK
In a working configuration:
- Issuer matches the rXg's Certificate Authority CN
- Not After date is in the future (certificate not expired)
- Subject contains the WAP's MAC address
- Verification returns OK
Example Output - Expired Certificate:
$ openssl x509 -in /etc/ucentral/cert.pem -text -noout | grep -E "Subject:|Issuer:|Not After"
Issuer: C = US, ST = California, L = San Francisco, CN = rxg.example.com, emailAddress = [email protected]
Not After : Jan 15 08:30:00 2024 GMT
Subject: CN = d4:ba:ba:a1:41:d0
$ openssl verify -CAfile /etc/ucentral/ca.pem /etc/ucentral/cert.pem
C = US, ST = California, L = San Francisco, CN = rxg.example.com, emailAddress = [email protected]
error 10 at 1 depth lookup: certificate has expired
error /etc/ucentral/cert.pem: verification failed
Example Output - CA Mismatch:
$ openssl x509 -in /etc/ucentral/cert.pem -text -noout | grep -E "Subject:|Issuer:|Not After"
Issuer: C = US, ST = California, L = San Francisco, CN = old-rxg.example.com, emailAddress = [email protected]
Not After : Dec 25 12:00:00 2034 GMT
Subject: CN = d4:ba:ba:a1:41:d0
$ openssl verify -CAfile /etc/ucentral/ca.pem /etc/ucentral/cert.pem
error 20 at 0 depth lookup: unable to get local issuer certificate
error /etc/ucentral/cert.pem: verification failed
In this case, the WAP certificate was signed by a different CA (old-rxg.example.com) than the one currently configured. Factory reset the WAP to re-enroll with the correct CA.
Example Output - Missing Certificate:
$ ls -la /etc/ucentral/cert.pem /etc/ucentral/key.pem
ls: /etc/ucentral/cert.pem: No such file or directory
ls: /etc/ucentral/key.pem: No such file or directory
The WAP never completed EST enrollment. Check EST Server configuration and re-import the WAP.
Step 5: Test mTLS Connection
From the WAP, test the WSS connection manually:
# Test mTLS handshake to rXg
openssl s_client -connect <rxg-hostname>:443 \
-cert /etc/ucentral/cert.pem \
-key /etc/ucentral/key.pem \
-CAfile /etc/ucentral/ca.pem
Look for:
- Verify return code: 0 (ok) - Certificate chain is valid
- Verify return code: 10 - Certificate has expired
- Verify return code: 18 - Self-signed certificate (CA mismatch)
- Verify return code: 21 - Unable to verify first certificate
Step 6: Check rXg Logs
On the rXg, check for certificate-related errors:
# Check AnyCable logs for WSS connection issues
tail -f /var/log/anycable.log | grep -i cert
# Check nginx logs for TLS errors
tail -f /var/log/nginx/error.log | grep -i ssl
Common Fixes:
| Problem | Solution |
|---|---|
| Expired CA | Create new CA, update WLAN Controller, re-adopt WAPs |
| Missing EST Server Option | Create EST Server Option in DHCP settings |
| CA mismatch | Ensure WLAN Controller and EST Server use same CA |
| WAP certificate expired | Factory reset WAP and re-adopt |
| Clock skew on WAP | Fix NTP (see "Broken NTP" section above) |
Re-issuing WAP Certificates:
If a WAP's certificate is invalid or expired:
- Factory reset the WAP:
firstboot -yrvia SSH, or hold reset button - Wait for WAP to reboot and acquire DHCP
- Re-import the WAP from the WLAN Controllers page
- Approve the WAP in Access Points
The adoption process will automatically provision a new certificate via EST.
WAP Recovery
This section covers hardware-level recovery for completely unresponsive OpenWiFi WAPs using U-Boot TFTP recovery. Use this procedure when the WAP has corrupted firmware, failed upgrades, or is otherwise unrecoverable through normal means.
When to Use This Procedure: - WAP is stuck in a boot loop - Firmware upgrade failed and WAP won't boot - WAP is completely unresponsive to network commands - Normal factory reset does not resolve the issue
Required Materials
| Item | Description |
|---|---|
| USB-to-Serial Cable | CP2102 USB to TTL RS232 (3.3V) - Example |
| TFTP Server | Software running on your laptop (e.g., Tftpd64, Fast TFTP) |
| Ethernet Cable | Direct connection between laptop and WAP LAN port |
| PoE Injector | Power source for WAP via WAN port |
| Terminal Software | PuTTY, screen, minicom, or similar |
Required Firmware Files:
| File | Purpose |
|---|---|
openwrt-ipq53xx-cig_wf189-initramfs-kernel.bin |
Temporary boot image loaded via TFTP |
rgnets-X.X.X-openwrt-ipq53xx-cig_wf189-squashfs-sysupgrade.tar |
Permanent firmware flashed to WAP |
Note: Replace
cig_wf189with your WAP model andX.X.Xwith the appropriate firmware version.

Phase 1: Hardware Setup
Step 1: Identify the Serial Port
Locate the serial console header on your WAP. The pinout varies by model.
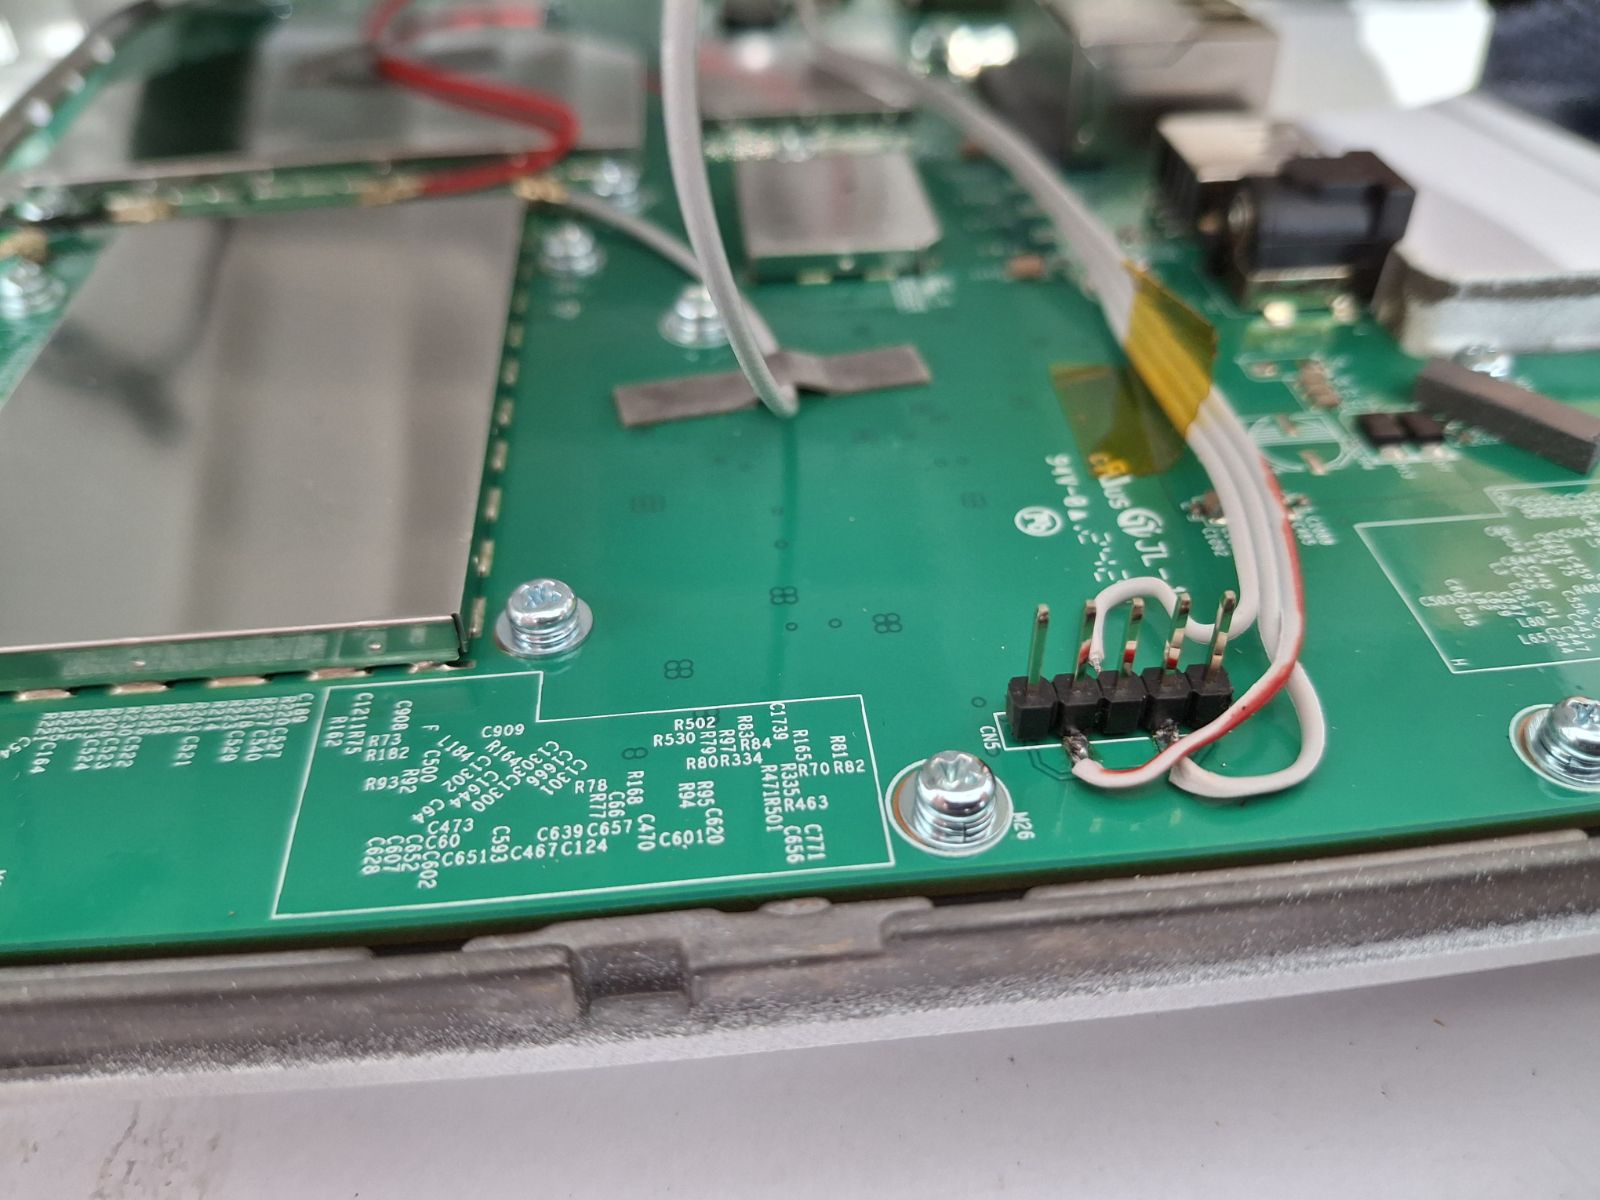
Step 2: Connect the Serial Cable
Connect only 3 wires from the USB-to-serial cable to the WAP:
| Cable Wire | Color (typical) | WAP Pin |
|---|---|---|
| TX | White | Pin 2 |
| GND | Black | Pin 3 |
| RX | Green | Pin 4 |
Warning: Do not connect the red (VCC/5V) wire - it can damage the WAP.
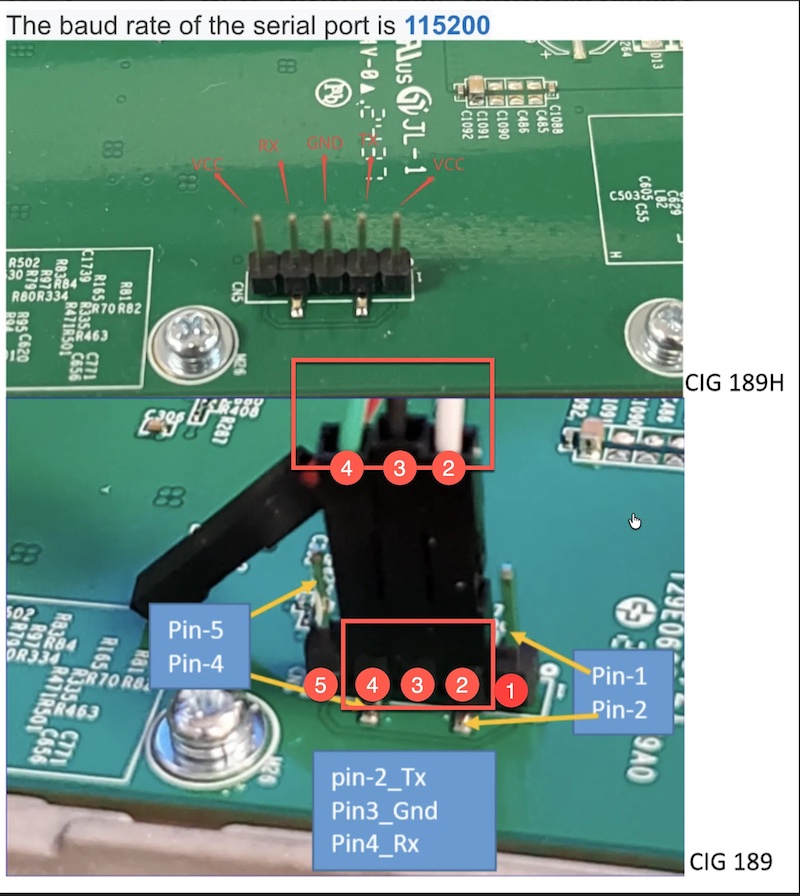
Step 3: Configure Terminal Software
Open your terminal application with these settings:
| Setting | Value |
|---|---|
| Baud Rate | 115200 |
| Data Bits | 8 |
| Parity | None |
| Stop Bits | 1 |
| Flow Control | None |
Step 4: Configure Network
- Connect WAP WAN port to PoE injector (power source)
- Connect WAP LAN port to your laptop's Ethernet port
- Configure your laptop's IP address:
- IP:
192.168.1.10 - Subnet:
255.255.255.0 - Gateway: (leave blank)
- IP:
Step 5: Start TFTP Server
- Launch your TFTP server application
- Set the TFTP root directory to the folder containing the firmware files
- Ensure the server is listening on
192.168.1.10
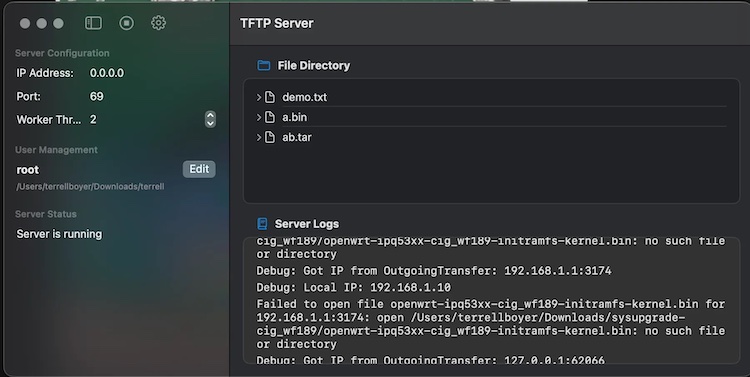
Phase 2: Boot into U-Boot
Step 1: Enter U-Boot Console
- With serial terminal open, power on the WAP
- Immediately and repeatedly press Enter or Space (try alternating)
- You must interrupt the boot within 2-3 seconds
Expected Output - Successful Interrupt:
U-Boot 2016.01 (Feb 15 2023 - 12:00:00 +0000)
...
Hit any key to stop autoboot: 0
IPQ9574#
The IPQ9574# prompt (or similar) indicates you are in U-Boot. If you see Linux boot messages scrolling, power cycle and try again.
Step 2: Configure U-Boot Networking
At the U-Boot prompt, enter these commands:
setenv ipaddr 192.168.1.1
setenv serverip 192.168.1.10
Step 3: Verify Connectivity
ping 192.168.1.10
Expected Output - Success:
Using eth0 device
host 192.168.1.10 is alive
If the ping fails, check your Ethernet cable and laptop IP configuration.
Phase 3: Load Temporary Boot Image
Step 1: Download initramfs Image via TFTP
tftpboot openwrt-ipq53xx-cig_wf189-initramfs-kernel.bin
Expected Output:
Using eth0 device
TFTP from server 192.168.1.10; our IP address is 192.168.1.1
Filename 'openwrt-ipq53xx-cig_wf189-initramfs-kernel.bin'.
Load address: 0x44000000
Loading: #################################################################
#################################################################
#####################
3.2 MiB/s
done
Bytes transferred = 7864320 (780000 hex)
Step 2: Boot the Image
bootm
The WAP will boot into a temporary Linux environment. Wait for the boot process to complete (approximately 30-60 seconds).
Expected Output - Boot Complete:
...
[ 5.432100] NET: Registered protocol family 10
[ 5.567890] Segment Routing with IPv6
BusyBox v1.35.0 () built-in shell (ash)
_______ ________ __
| |.-----.-----.-----.| | | |.----.| |_
| - || _ | -__| || | | || _|| _|
|_______|| __|_____|__|__||________||__| |____|
|__| W I R E L E S S F R E E D O M
-----------------------------------------------------
root@OpenWrt:/#
Step 3: Log In
If prompted, log in with:
- Username: root
- Password: openwifi (or blank on some builds)
Important: This is a temporary RAM-based system. If you reboot now, you will need to repeat Phase 2 and 3.
Phase 4: Flash Permanent Firmware
Step 1: Start HTTP Server on Laptop
On your laptop, open a terminal and navigate to the folder containing the sysupgrade file:
cd /path/to/firmware/files
python3 -m http.server 80
Expected Output:
Serving HTTP on 0.0.0.0 port 80 (http://0.0.0.0:80/) ...
Step 2: Download Firmware to WAP
On the WAP serial console:
cd /tmp
wget http://192.168.1.10/rgnets-4.0.0-0.027-openwrt-ipq53xx-cig_wf189-squashfs-sysupgrade.tar
Expected Output:
Connecting to 192.168.1.10 (192.168.1.10:80)
saving to 'rgnets-4.0.0-0.027-openwrt-ipq53xx-cig_wf189-squashfs-sysupgrade.tar'
rgnets-4.0.0-0.027 100% |*******************************| 12.5M 0:00:02 ETA
'rgnets-4.0.0-0.027-openwrt-ipq53xx-cig_wf189-squashfs-sysupgrade.tar' saved
Step 3: Flash the Firmware
sysupgrade -n rgnets-4.0.0-0.027-openwrt-ipq53xx-cig_wf189-squashfs-sysupgrade.tar
The -n flag performs a clean flash without preserving settings.
Expected Output:
Commencing upgrade. Closing all shell sessions.
Sending TERM to remaining processes ...
Sending KILL to remaining processes ...
Switching to ramdisk...
Performing system upgrade...
Unlocking firmware ...
Writing from <stdin> to firmware ...
Upgrade completed
Rebooting system...
Phase 5: Verify Recovery
- Wait for Reboot: Allow 2-3 minutes for the WAP to fully boot
- Check LED Status: Look for the "disco ball" pattern (alternating colors) indicating the WAP is ready for adoption
- Verify Network: From your laptop, ping the WAP:
ping 192.168.1.1
- Re-adopt WAP: Use the rXg's WAP discovery to import and approve the device
Recovery Troubleshooting
TFTP Download Fails - Check TFTP server is running and accessible - Verify Ethernet connections - Ensure firmware files are in TFTP root
Cannot Enter U-Boot - Try Space or Ctrl+C instead of Enter - Press keys immediately after power-on - Some models require holding reset button during power-on
Boot Failure After Recovery - Verify correct firmware for WAP model - Check firmware compatibility string - Try different firmware version
Post-Recovery
- Initial Setup: WAP boots with factory defaults at
192.168.1.1 - Re-adoption: Use rXg's WAP discovery to re-adopt the device
- Verification: Confirm WSS connection and configuration sync
Alternative Methods
Web Recovery (Limited Models)
1. Hold reset button while powering on (10-15 seconds)
2. Connect via Ethernet to 192.168.1.1
3. Upload firmware through web interface
Serial Console Benefits - Full visibility into boot process - Error message monitoring - Maximum recovery control
Technical Reference
This section provides technical details for advanced configuration and troubleshooting.
Public Key Infrastructure (PKI)
- A Local Certificate Authority (CA) must be created on the rXg and associated with the OpenWiFi WLAN Controller.
- All WAPs must receive a certificate signed by this CA, which they use to authenticate themselves to the rXg via mTLS.
DNS and Network Considerations
- Public IP: Ideally, the rXg has a public IP address that the WAP can resolve via public DNS.
- NAT Scenario: OpenWiFi WAPs have rebind protection and will not accept RFC1918 addresses from DNS. If the rXg is behind NAT, it will attempt to manage the
/etc/hostsfile on the WAP via SSH so the WAP can resolve the rXg's private IP.
Key Files and Directories
On the WAP:
- /certificates: Works with /etc/ucentral to persist certificate data.
- /etc/ucentral/: Main configuration directory for Ucentral.
- /usr/share/ucentral/: Contains .uc files for commands like wifiscan.
- /etc/hosts: Managed by the rXg for DNS resolution in NAT scenarios.
- /etc/config/: Key OpenWRT Configuration files pertaining to DHCP, DNS, and a lot more.
- /etc/config-shadow/: OpenWiFi extension of /etc/config
Command-Line Interface (CLI)
WAP Commands:
- firstboot -yr: Performs a factory reset on the WAP.
rXg Commands:
- anycab: Used to view WAP-to-rXg activity in AnyCable on the rXg.
Onboarding
- OpenWiFi WAPs must be discovered by a scan and approved by the rXg to be onboarded.
- Approval can be either manual or automatic. This is set by an Auto Approve boolean in the WlanDevice.
SDK Technical Reference
This section provides technical details specific to the SDK (OWGW) deployment.
OWGW Architecture
The OpenWiFi Gateway controller SDK is deployed as Docker containers inside an Ubuntu VM. The VM is pre-built by RG Nets with: - OWGW software from the TIP community - Additional functionality for rXg discovery and integration - The VM expects the rXg to be its IP gateway
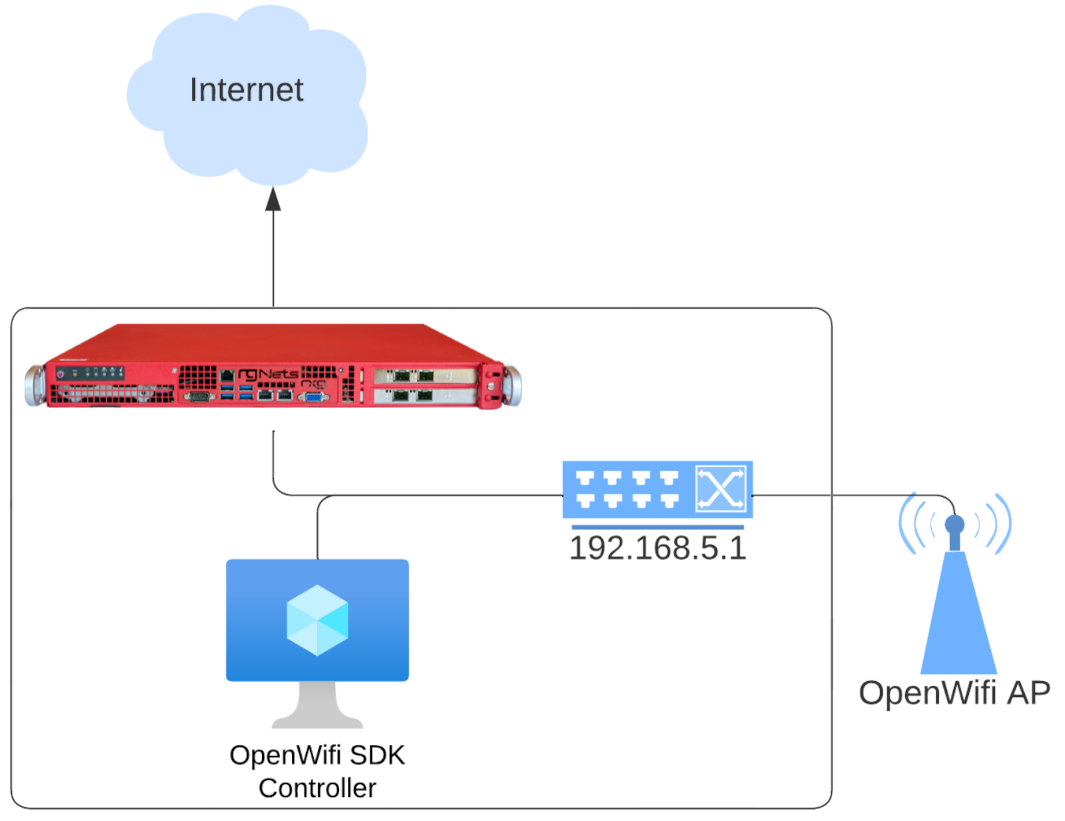
OWGW Adoption Workflow

The adoption workflow illustrates the 18-step process between the build server, rXg controller, OWGW, and WAPs during device onboarding, including: - OWGW deployment - Certificate signing requests (CSR) - Certificate distribution - Firmware updates - Configuration management - mTLS WebSocket connection establishment
DNS Considerations (SDK)
- OpenWiFi WAPs will not accept private IPs in DNS responses (rebind protection)
- The rXg manages
/etc/hostson WAPs for DNS resolution in NAT scenarios - Default FQDN:
openwifi.wlan.local - The OWGW reconfigures its DNS server to use its gateway
OWGW Management
All OWGW functions are managed via systemctl:
# Restart OWGW services
sudo systemctl restart docker-compose-openwifi
This command re-runs controller acquisition, fixes DNS, and restarts Docker containers.
Key Directories:
- /work_dir/wlan-cloud-ucentral-deploy/docker-compose - Docker compose files
- /work_dir/wlan-cloud-ucentral-deploy/docker-compose/certs - Certificates
- /usr/local/bin - Management scripts
- /etc/resolv.conf - DNS configuration
WAP Key Files (SDK Mode)
/certificates- Works with/etc/ucentralto persist certificate data/etc/ucentral/- Main Ucentral configuration directory/etc/ucentral/gateway.json- Controller discovery configuration/etc/hosts- DNS rebinding for NAT'd deployments
Testing WSS Connection:
openssl s_client -connect openwifi.wlan.local:15002 \
-cert /etc/ucentral/cert.pem \
-key /etc/ucentral/key.pem
Success is indicated by Post-Handshake New Session Ticket arrived: in the output.
rXg Integration
- The OWGW exposes Kafka on a port for rXg telemetry collection
- Use
tfltelcommand on the rXg to view telemetry traffic - If monitoring is enabled, Kafka telemetry creates WAP radios but not wireless clients or WAPs
SSH Access
Cloud-init allows adding users during first VM launch:
- Default user: openwifi-admin
- SSH keypair must be configured in the template
Network Topology
WAPs do not need to be in the same L2 domain as the OWGW. They can operate on different network segments as long as IP routing is available.
Piglet Sensors
Overview
The Piglet is a powerful network monitoring application developed by RG Nets, designed to be installed on a Raspberry Pi (3, 4, or Compute Module 4). Commonly referred to as a network sensor, the Piglet provides comprehensive insights into network performance from the client's perspective.

Deployment and Functionality
The Piglet is strategically deployed within a network south of the rXg. It is capable of running tests over both wired and wireless connections, with the results being sent back to the rXg. These results can either be reviewed directly via the rXg interface or trigger notifications to network administrators for further action.
Testing Capabilities
A Piglet can execute two primary types of tests:
Ping Tests - Measure latency, jitter, and uptime - Can be directed towards a specified target over the wired connection or a specified WLAN
Speed Tests - Speedtest.net: Perform a standard internet speed test by setting the destination to speedtest.net - iPerf3: Run speed tests to a specified destination. The rXg includes a built-in iPerf server which can be used as a target for evaluating LAN infrastructure
Use Cases
The Piglet is an essential tool for a variety of network monitoring and validation tasks:
- Throughput and Reliability Testing: Assess the performance of downstream network infrastructure
- Client Network Experience Measurement: Evaluate the actual network experience from any client location within the network
- Policy and Segmentation Verification: Remotely confirm the effectiveness of network policies, segmentation, and routing
WLAN-Scoping
The Piglet supports WLAN-Scoping, which allows all aforementioned tests to be configured over a specified wireless network. This ensures that network administrators have continuous visibility into the performance of all wireless networks within the environment.
Hardware Requirements
Raspberry Pi Compute Module 4 (Recommended)
This version can be purchased directly from RG Nets (Product Code: Piglet-HW).
- No SD/USB required (uses eMMC)
- Internal Wireless Adapter:
- PCIe to mPCIe adapter
- AX210 Wi-Fi 6E Card
Raspberry Pi 3 or 4
- Recommended to use a USB drive instead of SD card (e.g., Samsung Bar Plus USB 3.1, 32 GB)
- Minimum 8 GB memory
- External Wireless Adapters:
- Netgear AC 1200 A6210
Installation
Install Boot Loader Image (Compute Module 4)
To flash the eMMC directly, you will need to run a provisioner on your local network and provide the boot loader image to the active project.
- Connect a USB cable between the provisioning server and the micro USB port of the Raspberry Pi Compute Module 4 IO Board
- Place a jumper on the CM4 IO Board
This causes the compute module to perform a USB boot, where the provisioning server transfers the utility OS files over USB. After the utility OS has booted, it contacts the provisioning server over Ethernet to receive further instructions and download additional files (e.g., the OS image to be written to eMMC).
Install Boot Loader Image (Raspberry Pi 3 or 4)
Piglets rely on a compact boot loader that automates rXg server discovery. This boot loader also enables remote software updates for Piglets, eliminating the need for physical intervention.
- Use a program such as Rufus (Windows) or balenaEtcher (Mac) to create a bootable USB or SD card with the boot loader image. It is recommended to use a USB drive.
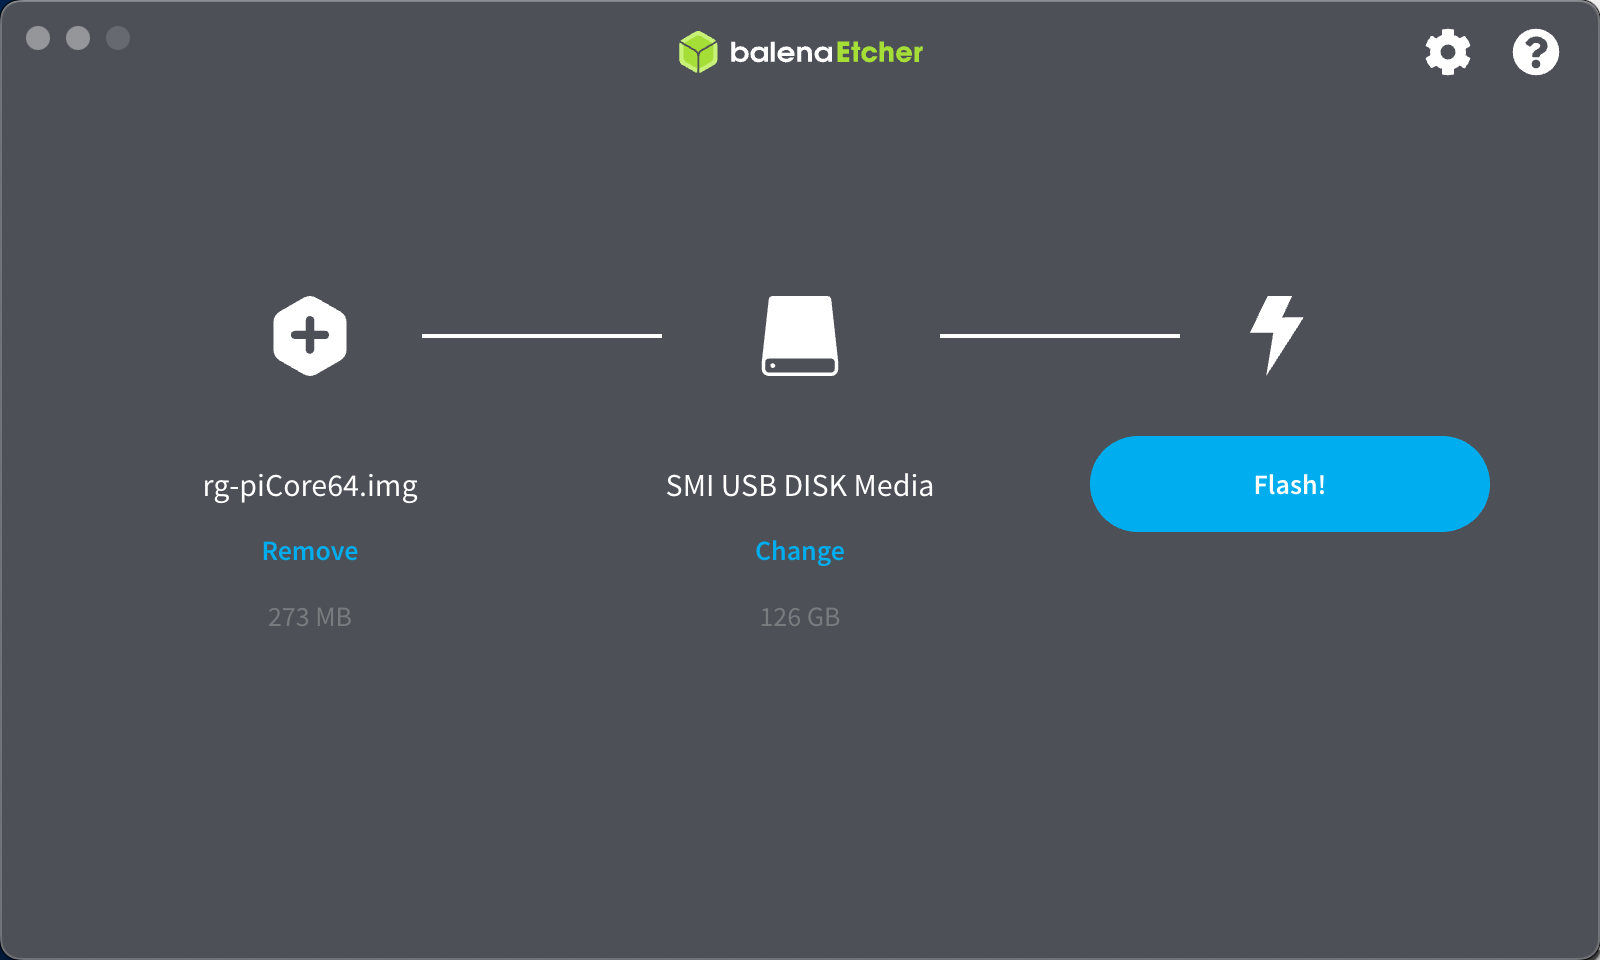
Add a Piglet Image to the rXg
- Navigate to Network >> Wireless >> Device Firmwares
- Click "Create New" on the Device Firmwares scaffold
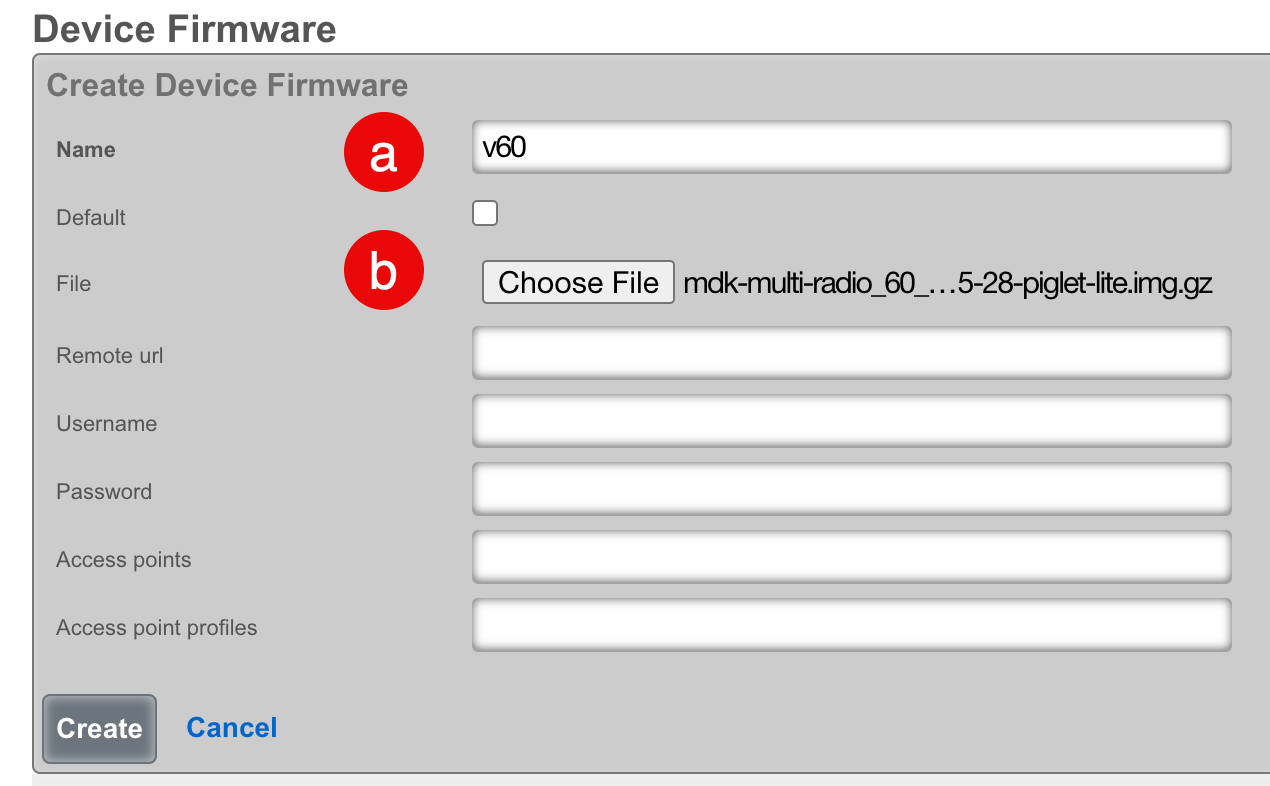
- Configure the firmware record:
- Select a name for the record
- Click "Choose File" and browse to the Piglet image, or provide a remote URL with username and password
- If you wish this image to be used as the default, check the "Default" field
- Click "Create"
Note: rXg Device Firmware management can be used for other images that are compatible with Raspberry Pi such as WLAN Pi.
Configure the rXg for Piglet Discovery
- Navigate to Network >> Wireless >> WLAN Controllers
- Click "Create New" on the WLAN Controllers scaffold
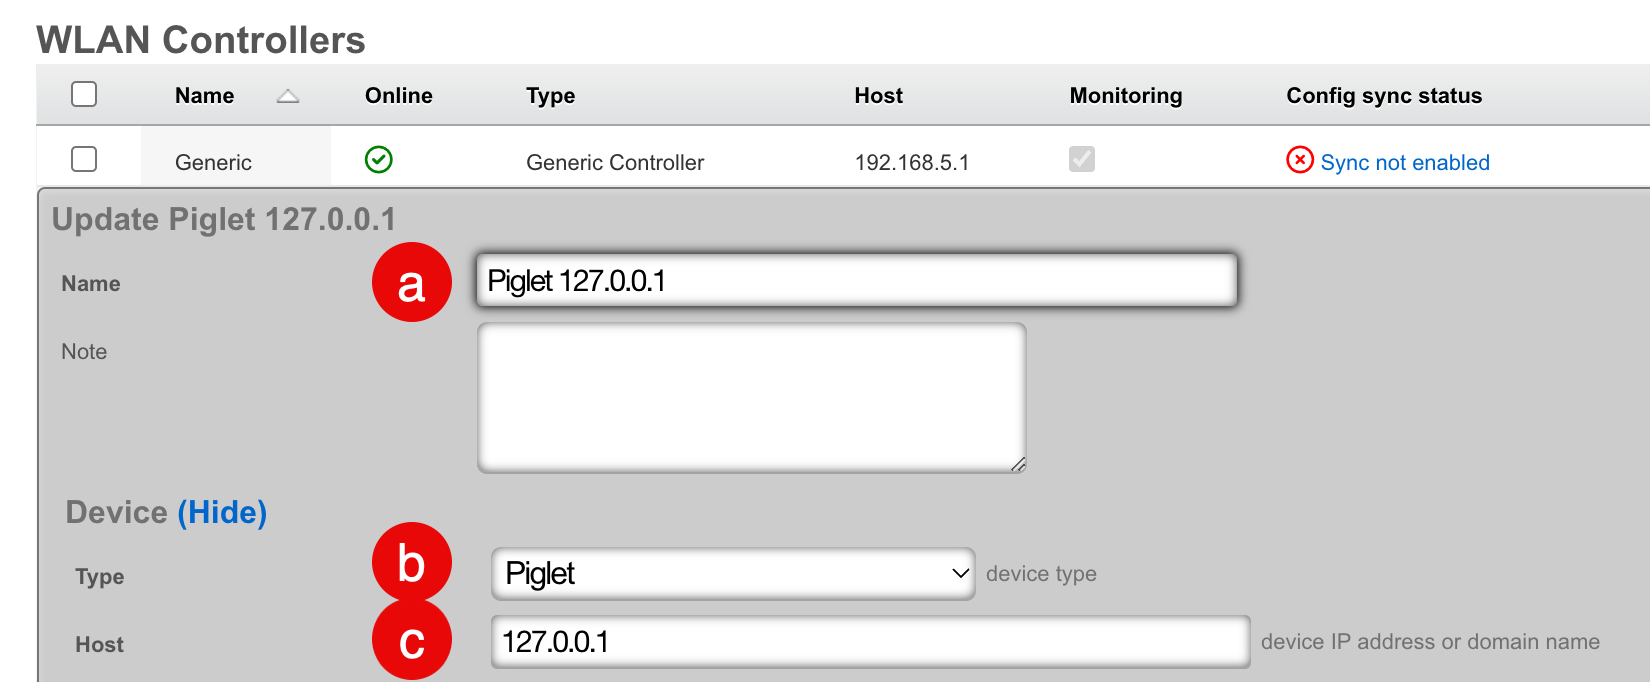
- Configure the controller record:
- Select a name for the record
- Set the Device Type to "Piglet"
- Set the Host address to "127.0.0.1"
- Click "Create"
Approve Piglet and Select Default Image
When the Piglet boots, it will automatically pull a DHCP address and discover the rXg.
- Navigate to Network >> Wireless >> Access Points
- Edit the record for the newly discovered Piglet
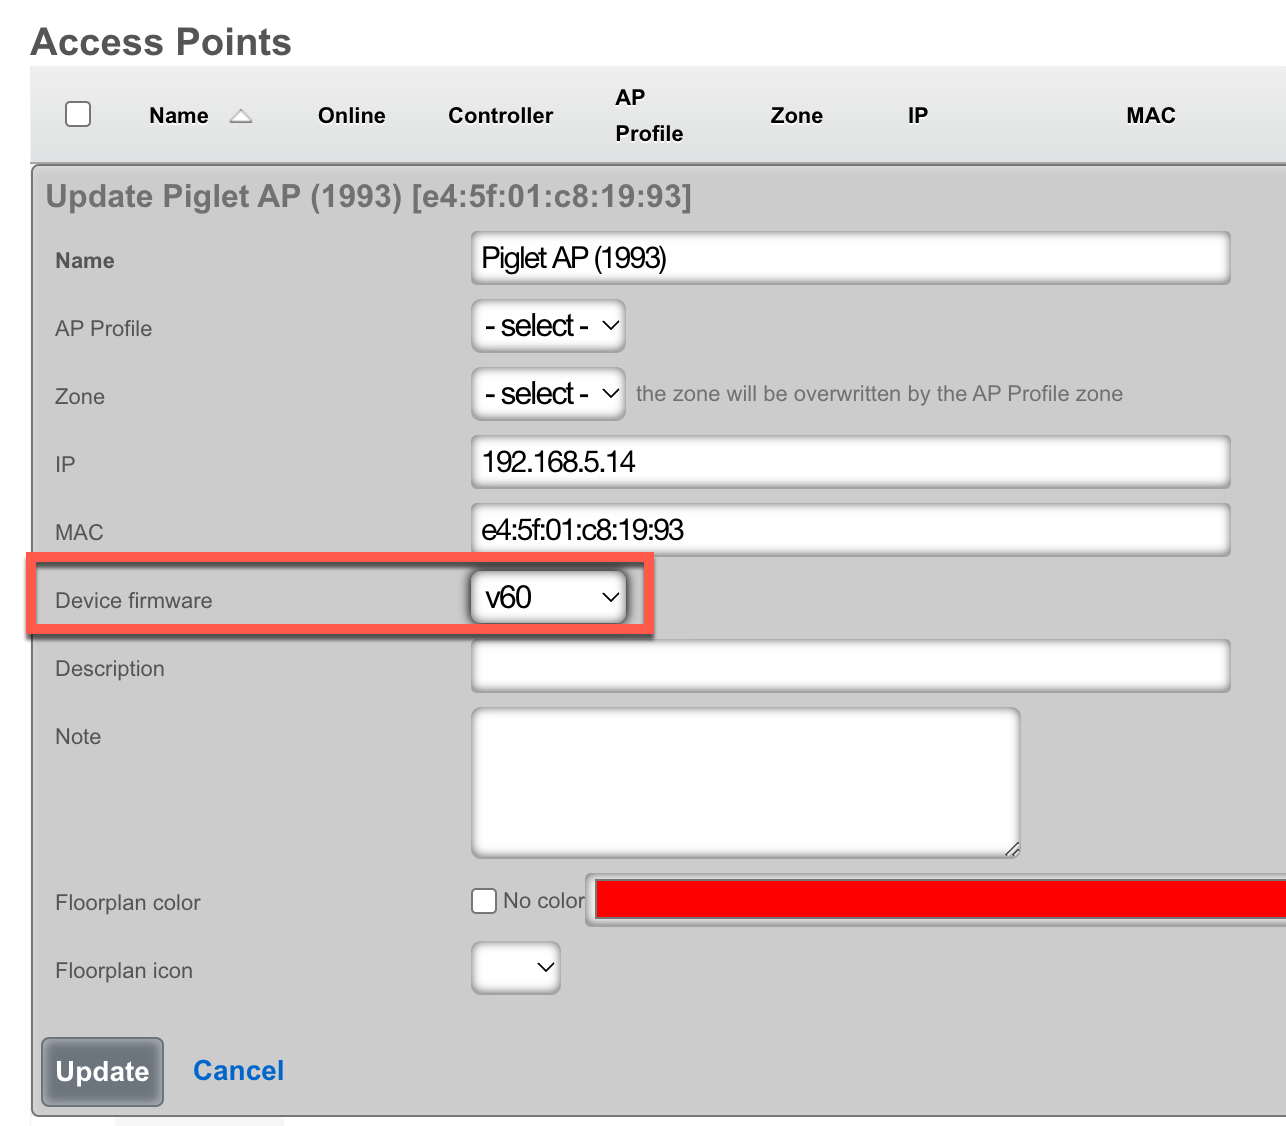
- Select the desired Device Firmware
- Click "Update"

- Click "Approve" on the appropriate row
Configuration
Ping Tests
Ping tests can be scheduled to run from any approved Piglet on either the wired or wireless connection.
- Navigate to Instruments >> Network Monitor >> Ping Targets
- Click "Create New" on the Ping Targets scaffold
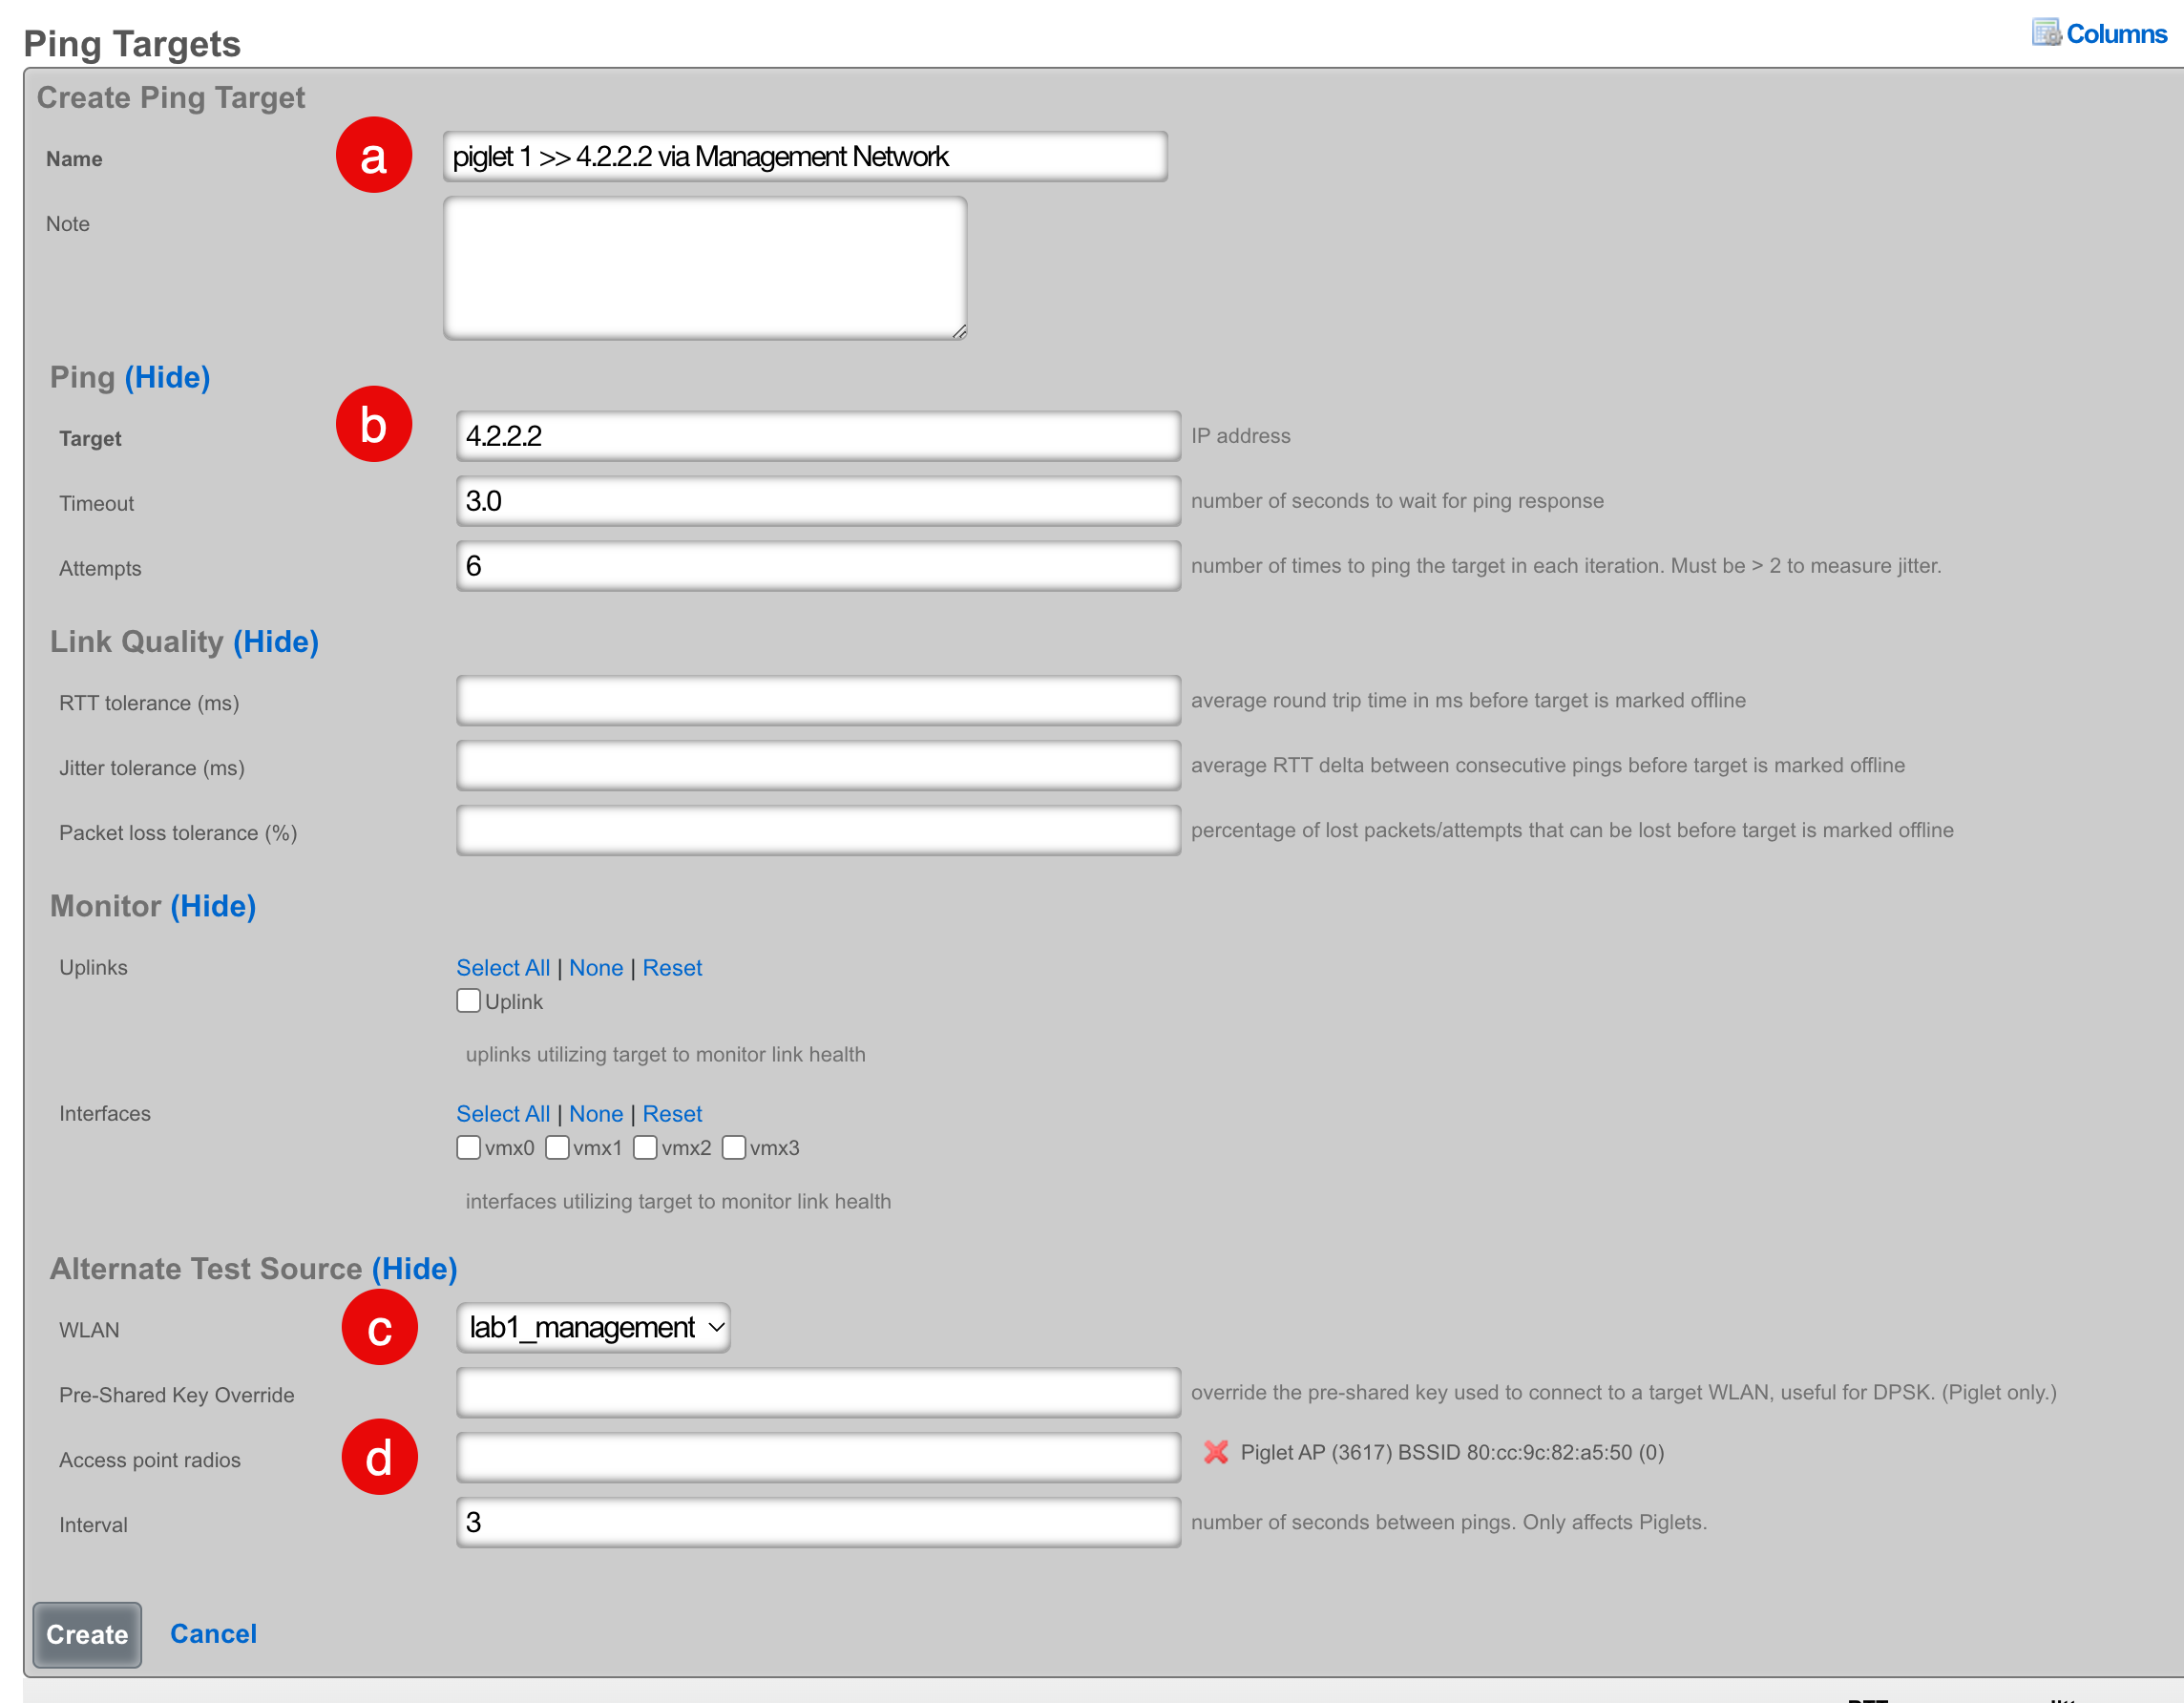
- Configure the ping target:
- Select a meaningful name that accurately reflects the purpose
- Select the destination address to ping
- Select "Wired" to use the wired interface, or select a WLAN to use a wireless interface
- Select the Piglet and radio that the ping should source from
Viewing Ping Results
There are two methods to view results:
Method 1: Click "Graph" on the Ping Targets record

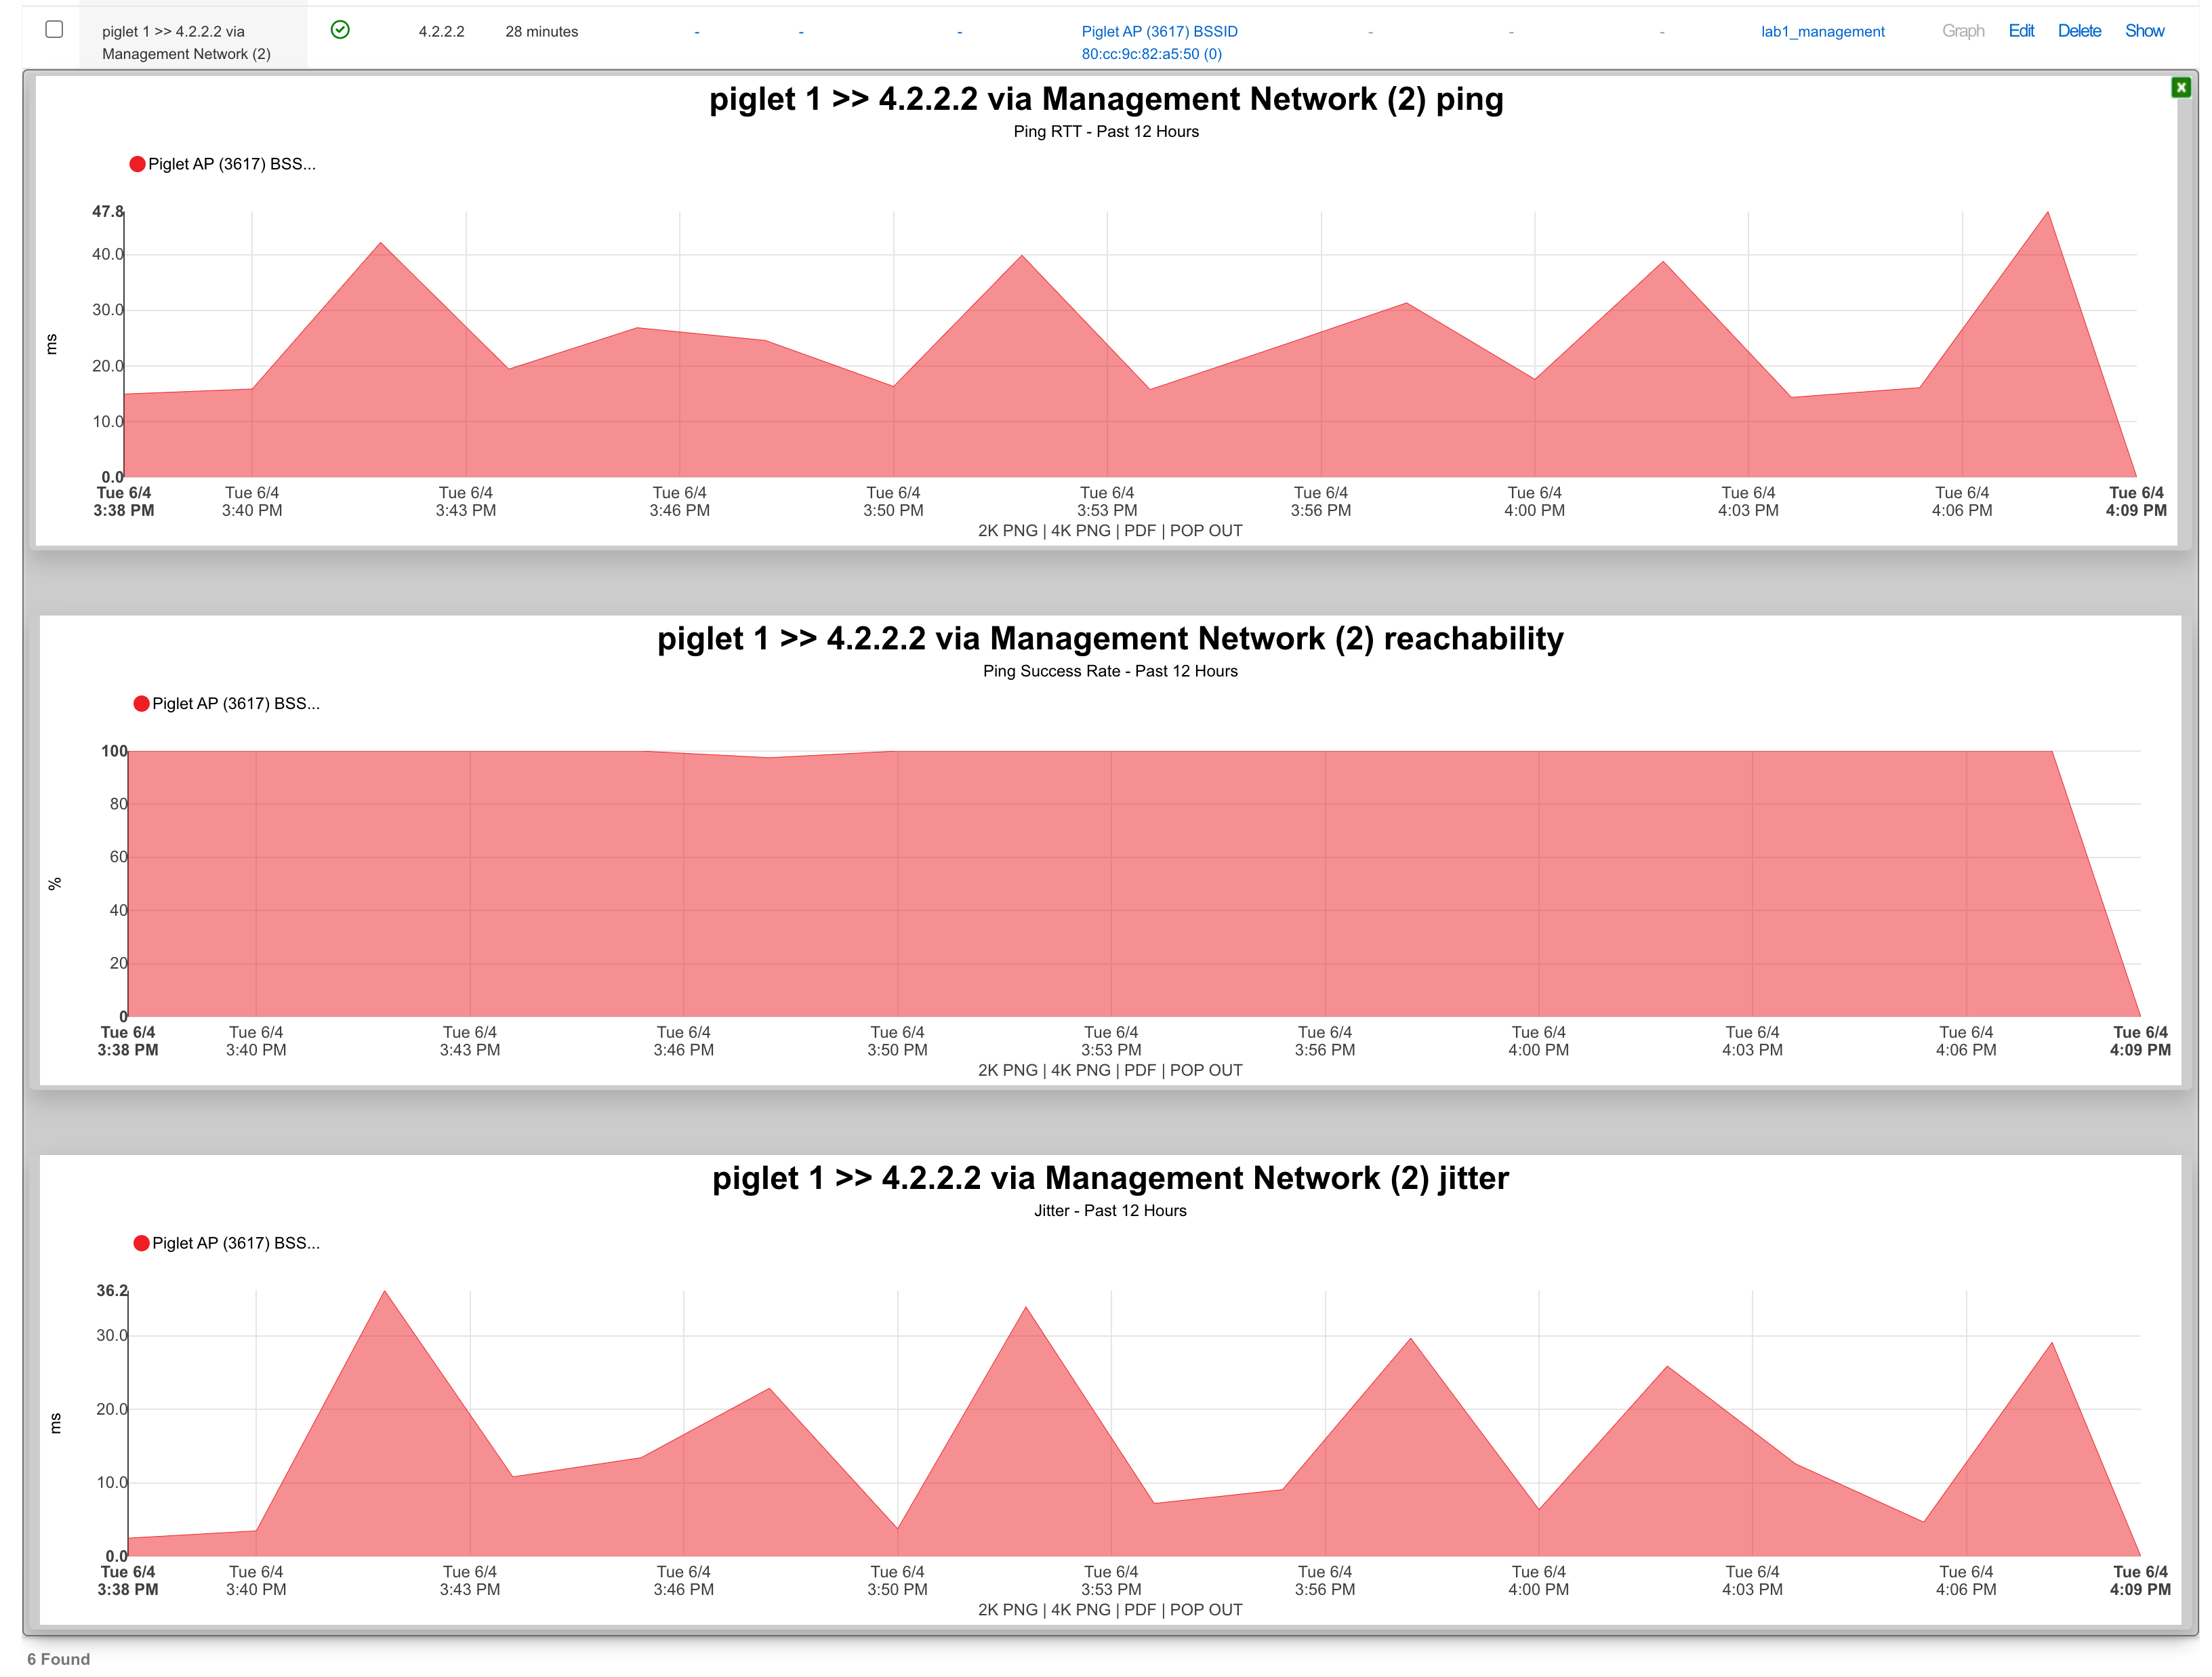
Method 2: Create a System Graph
- Navigate to Archives >> Reports >> System Graphs
- Click "Create New" on the System Graphs scaffold

- Configure the graph:
- Select a meaningful name
- Select the instrument to graph (several are applicable to ping targets)
- Select the period for data visualization
- Select the data interval for grouping results
- Select the ping target to be graphed
- Click "Create"
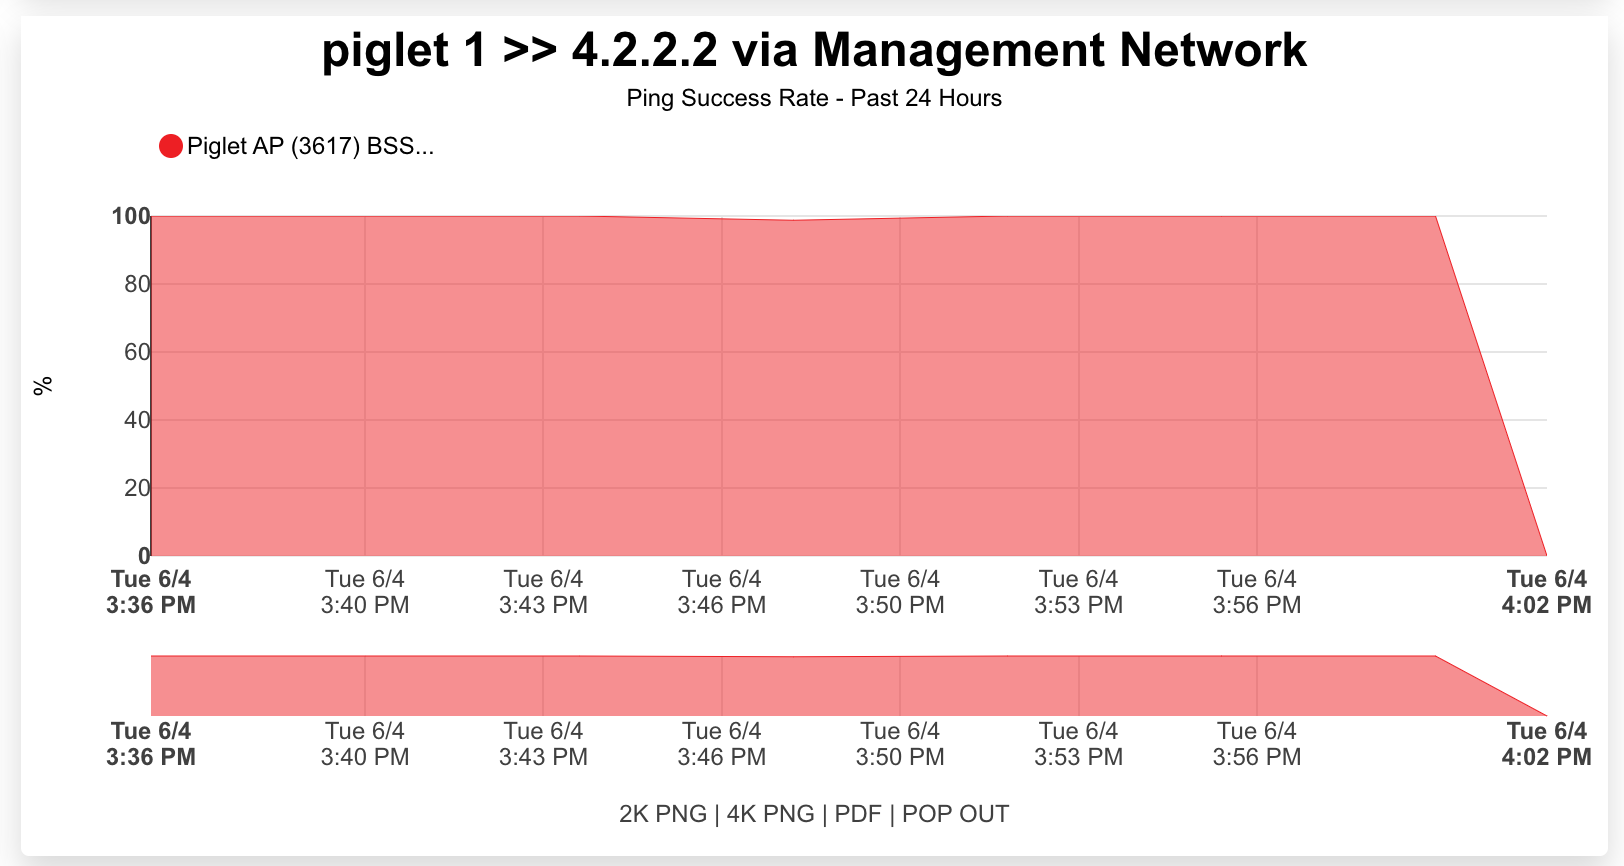
Speed Tests
Speed tests can be scheduled to run from any approved Piglet on either the wired or wireless connection.
- Navigate to Instruments >> Network Monitor >> Speed Tests
- Click "Create New" on the Speed Tests scaffold
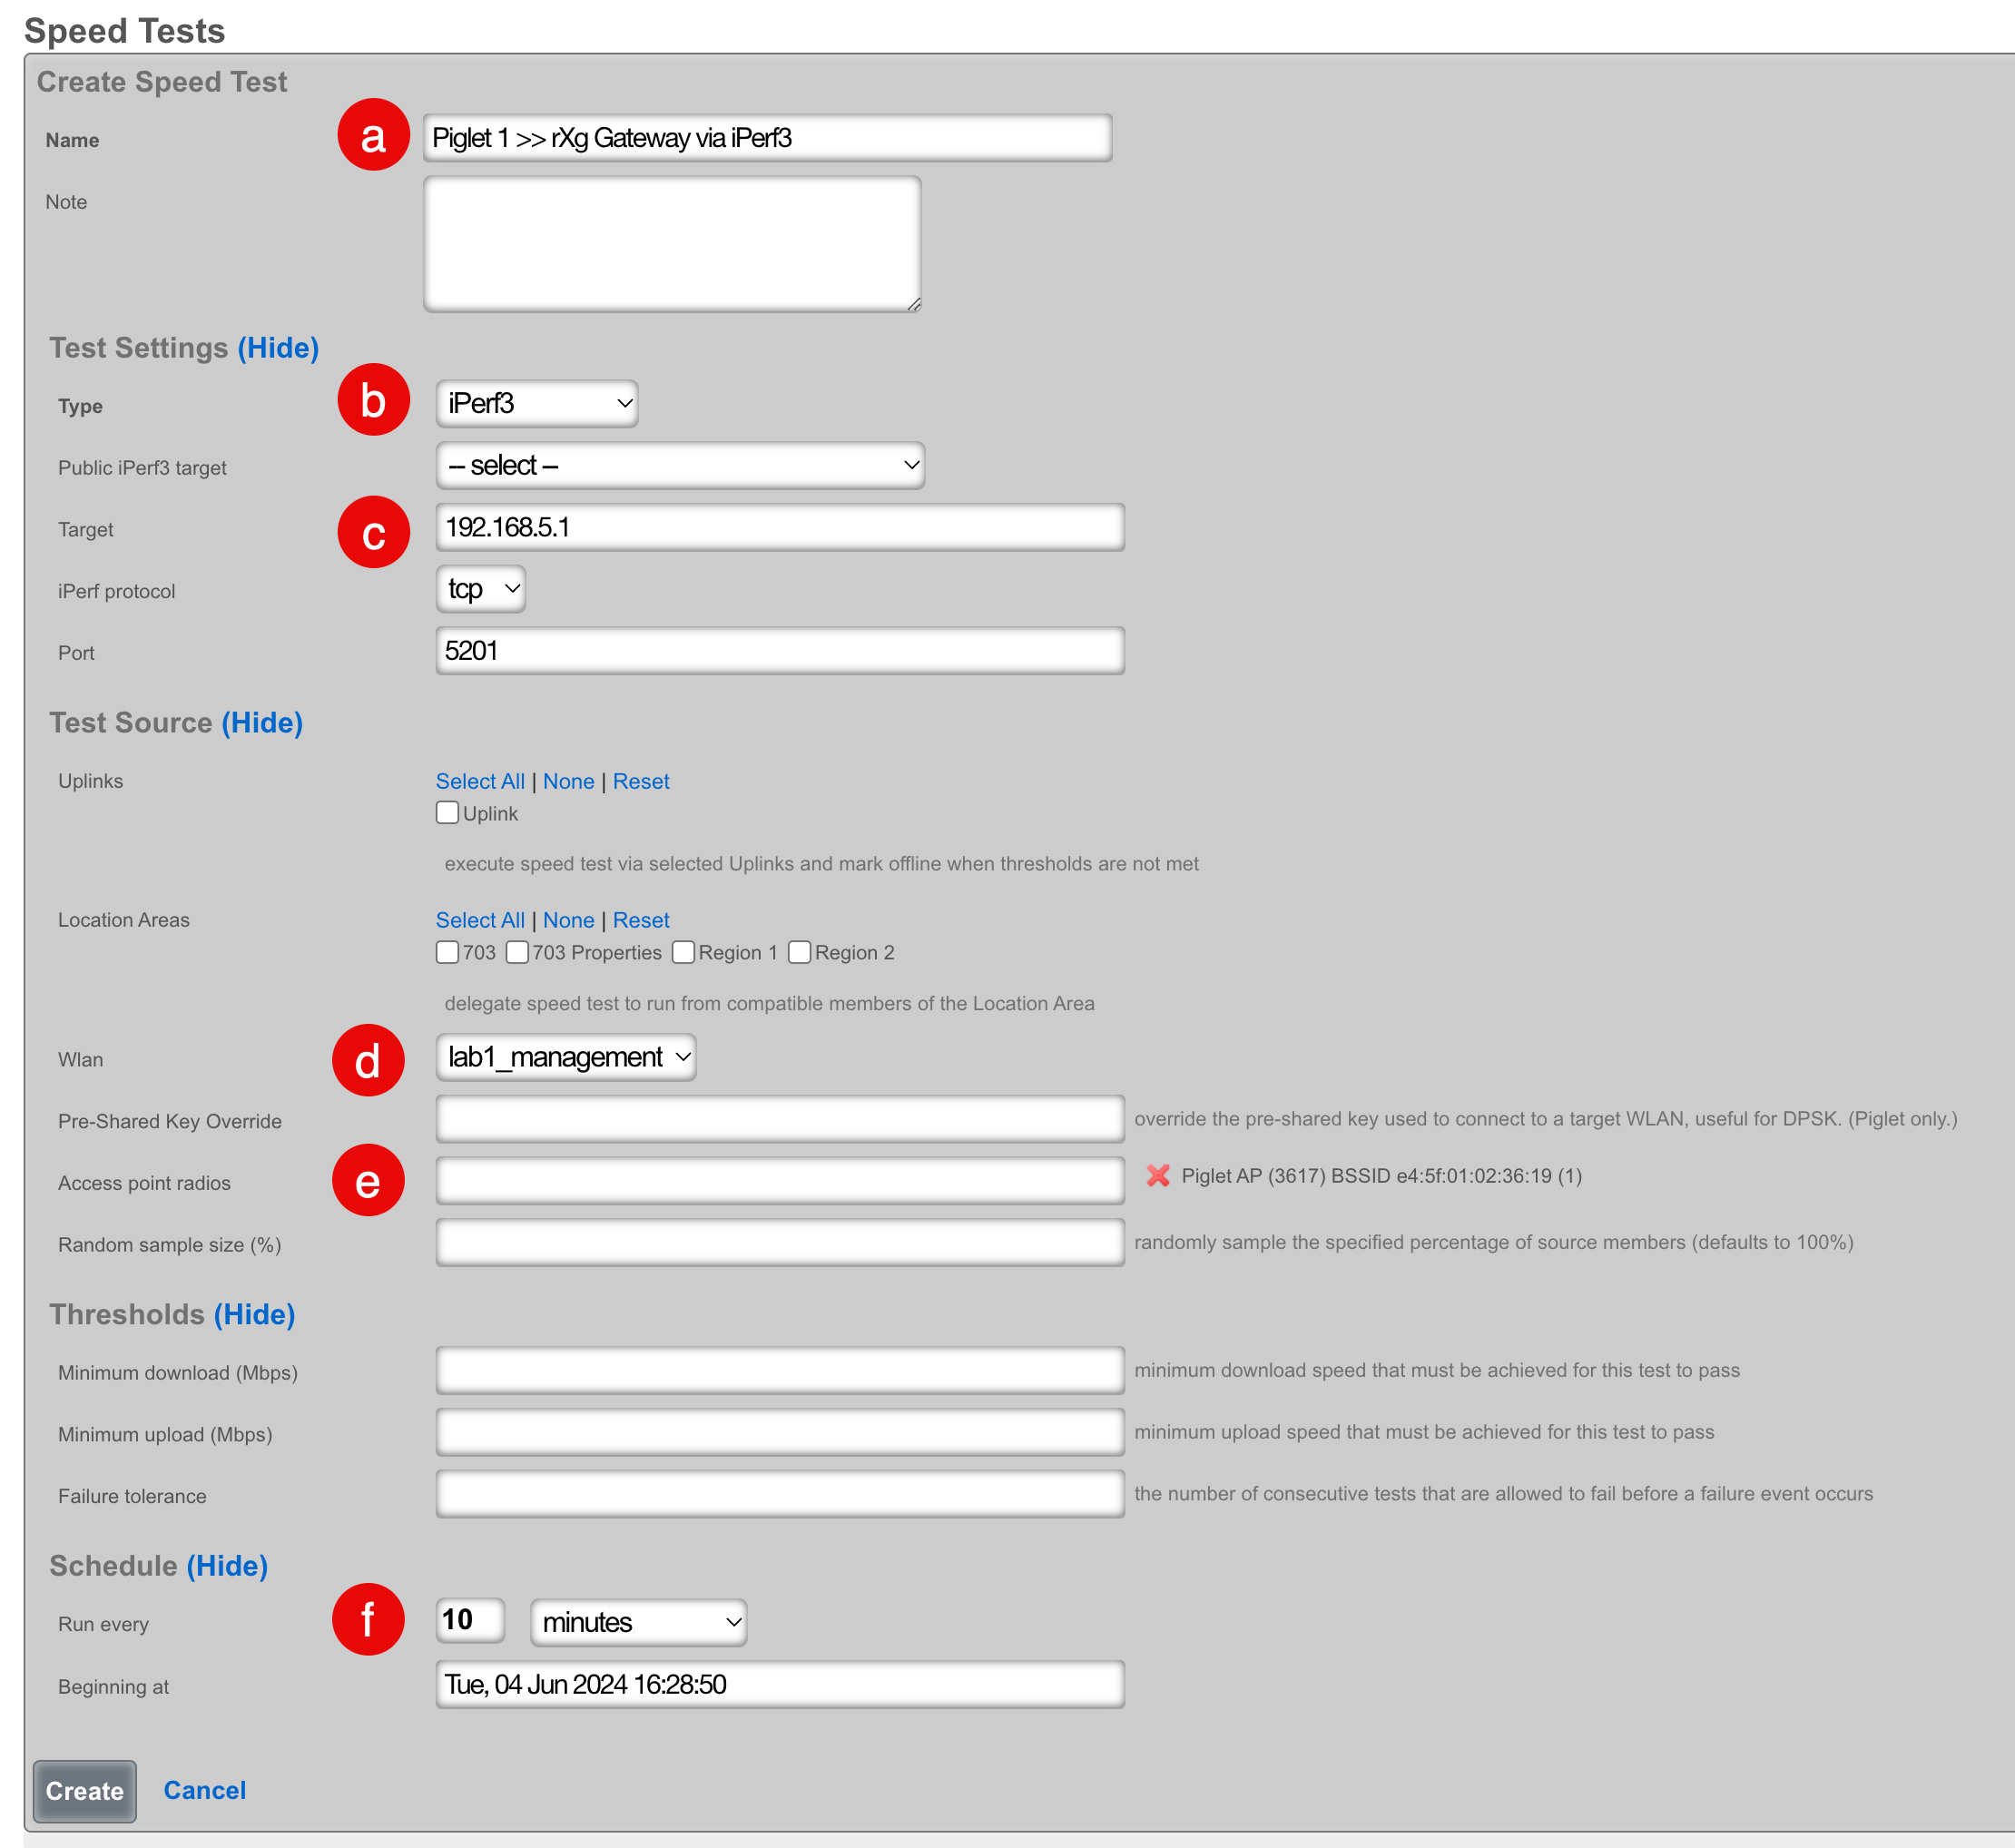
- Configure the speed test:
- Select a meaningful name that accurately reflects the purpose
- Select the type of speed test:
- iPerf3: Choose from public targets or specify your own target
- Speedtest.net: Automatically determines the closest server on the WAN
- If using iPerf3 without a public target, designate an iPerf3 server on the WAN or LAN of the rXg
- Select "Wired" to use the wired interface, or select a WLAN to use a wireless interface
- Select the Piglet and radio that the speed test should source from
- Select how frequently the speed test should run
- Click "Create"
Note: An iPerf server must exist prior to creating this test if using iPerf3 to the rXg gateway.
Viewing Speed Test Results
There are two methods to view results:
Method 1: Click "History" on the Speed Test record
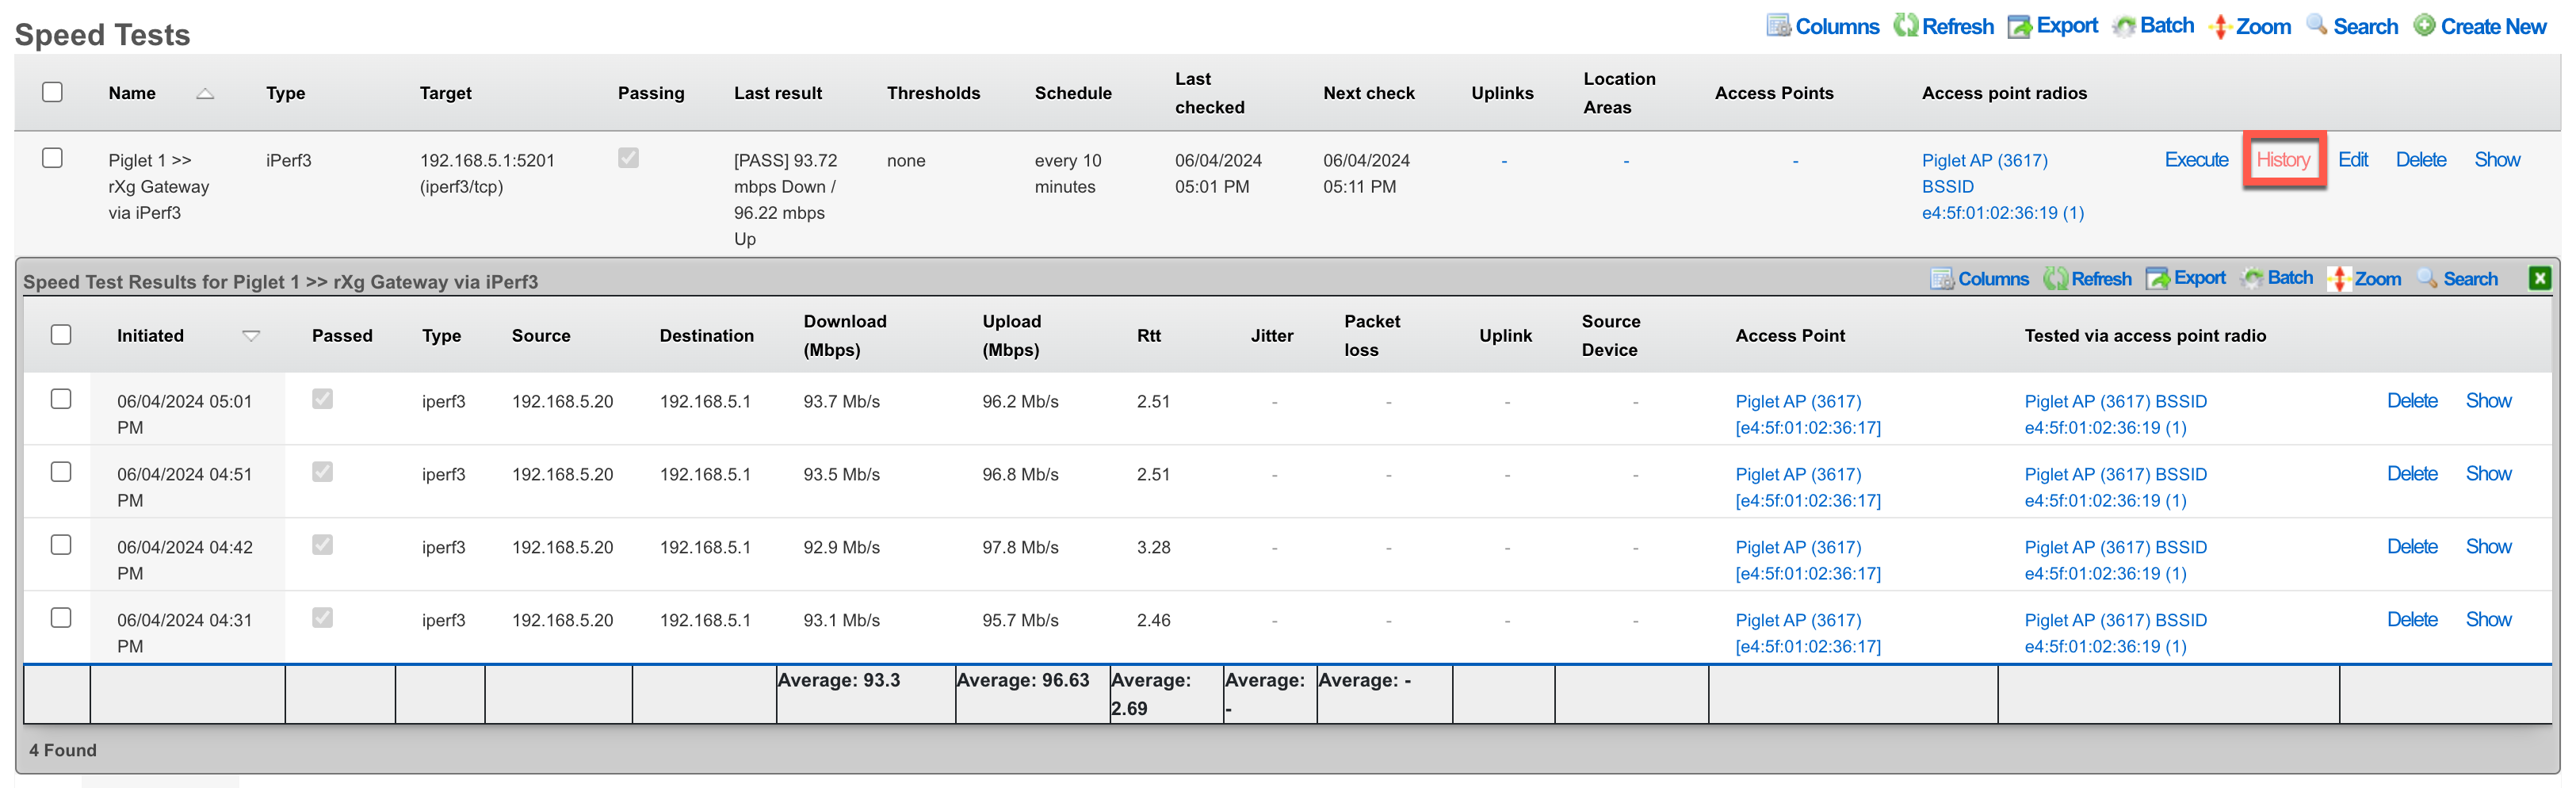
Method 2: Navigate to Instruments >> Network Monitor >> Speed Test Results

Remote Deployment
By default, the Piglet contacts its default gateway as the controller. For Piglets deployed on remote networks from the controller, you can specify the controller IP address through a custom DHCP option:
Option 43: suboption 1, type text, data: <IP address of rXg controller>
Note: The Piglet sends a Vendor Client Identifier (option 60) with the value "RG Nets".
Ruckus vSZ
Deploy the vSZ Controller in vmware
On windows machine navigate to ESXI host and download the ova file from the datastore. Storage-->Lab Files-->Browse Datastore. Download the vscg-X.X.X.X.XXX.ova file.
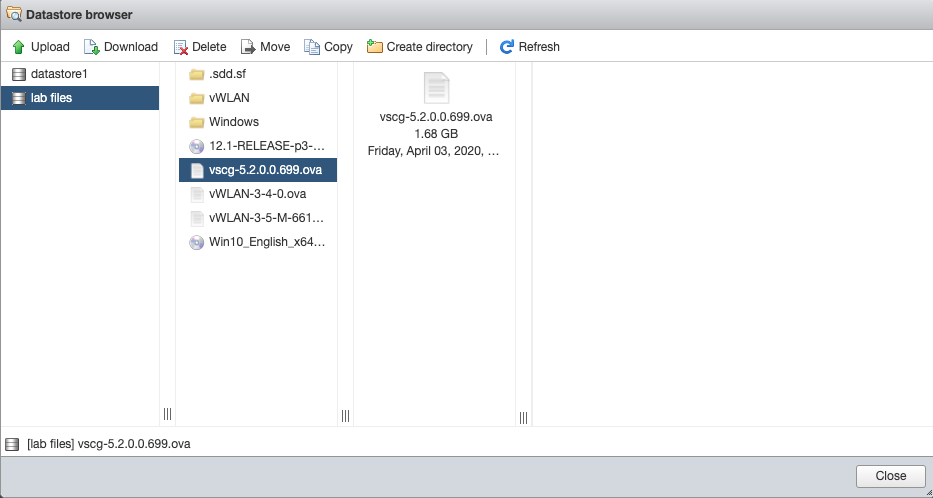
Create new virtual machine, select "Deploy a virtual machine from an OVF or OVA file".

Give the vm a name, click on "Click to select files or drag/drop" and select the ova file, click next.
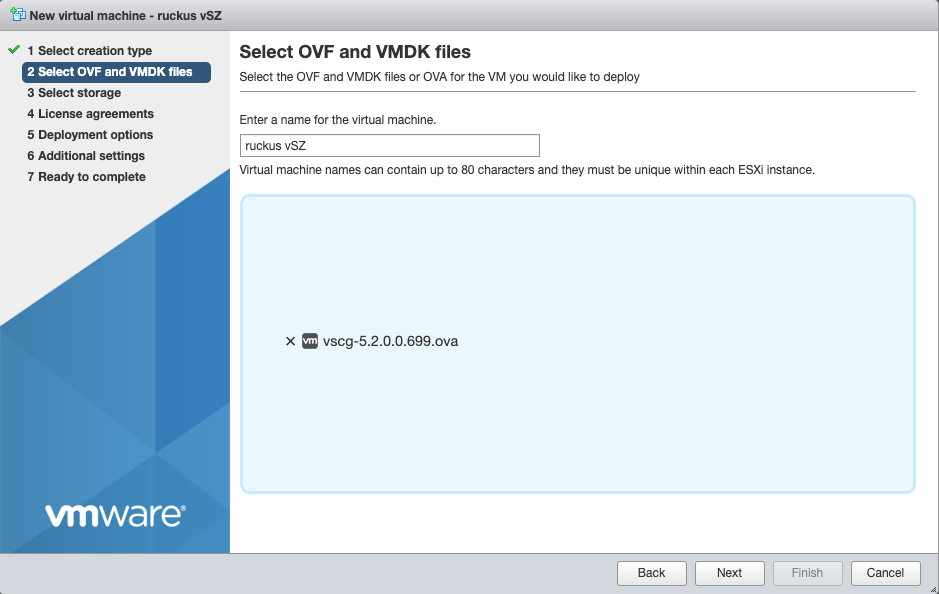
Select datastore1 (should be selected by default), click next.
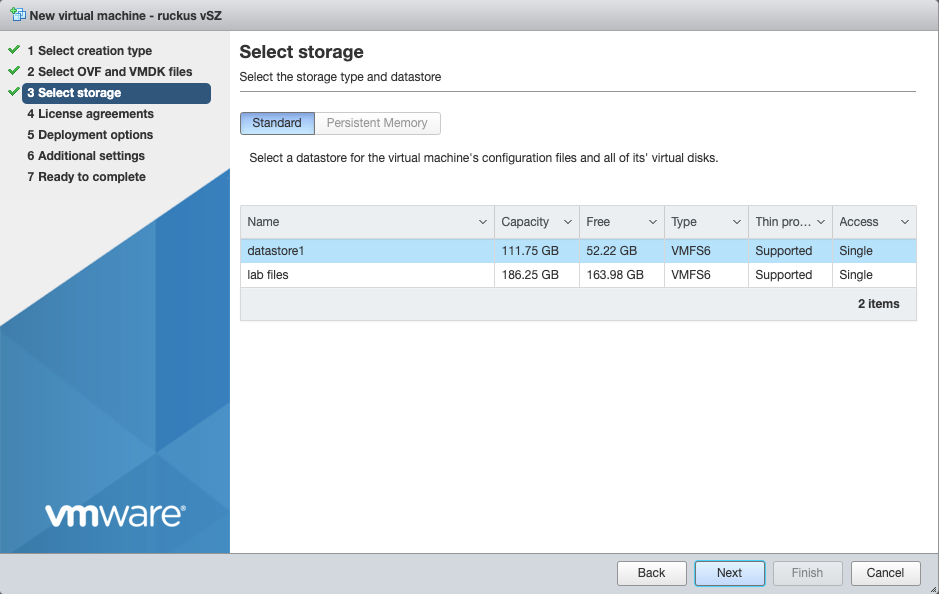
Agree to the License Agreements by clicking 'I Agree', and then click next.
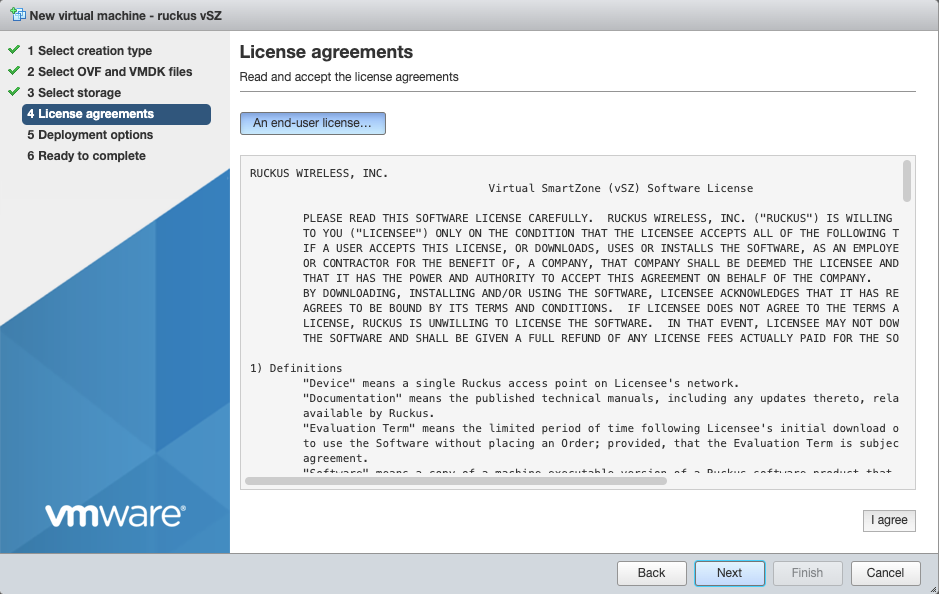
Deployment options network mappings: VM Network change to VM Lan Network Uncheck 'Power on automatically', and click next.

Click Finish, and wait for the VM to be deployed.
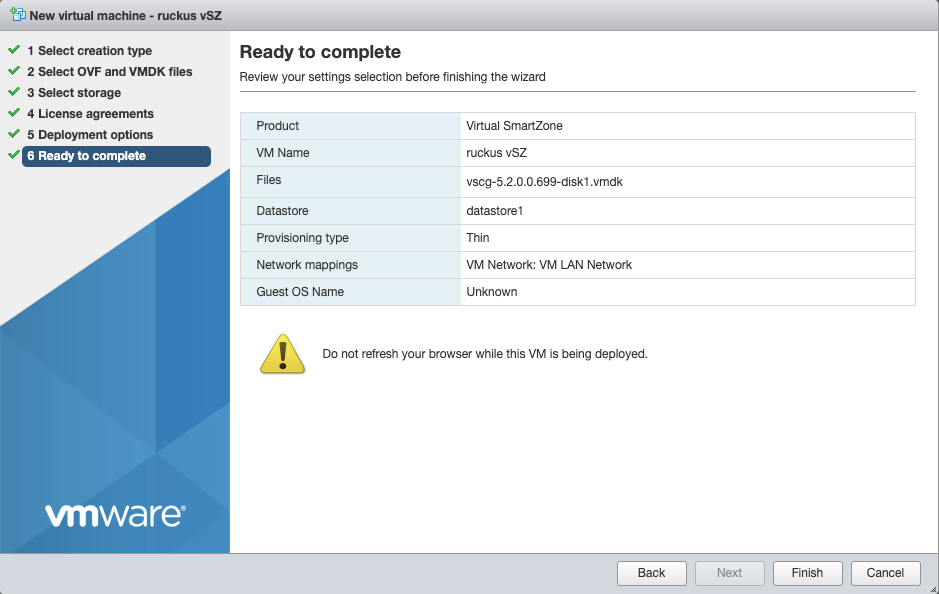

Edit Settings on the VM, and delete network adapters 2 & 3.
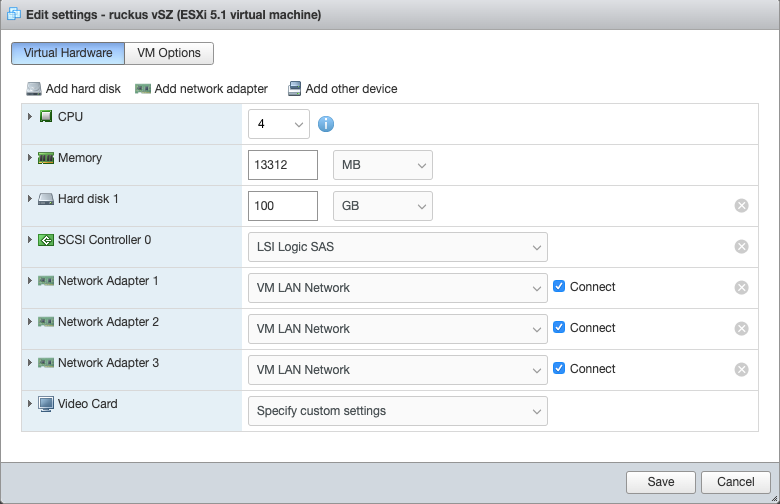
It should resemble this:
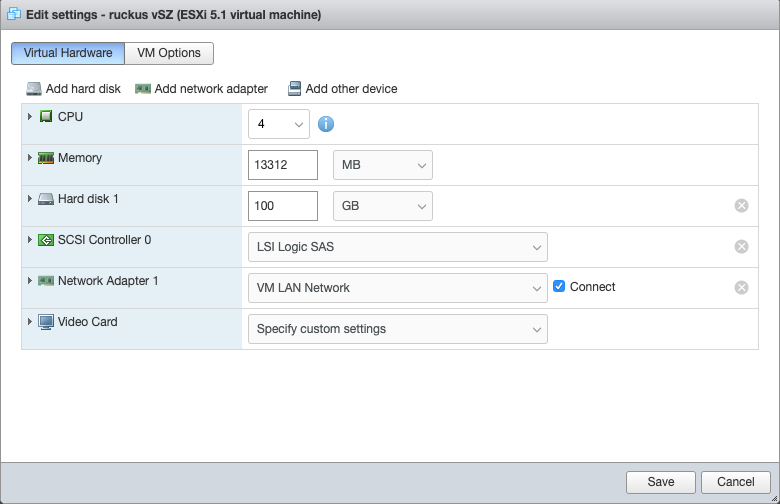
Power on the VM.
Configure IP Address, and Admin Password
Using the vmware console, login to the vSZ. Default credentials are admin / admin Run the command 'setup' to start the setup wizard
| Field | Value |
|---|---|
| vSZ Profile | Essentials |
| IP Version Support | IPv4 Only |
| IPv4 configuration | Manual |
| IP Address | 172.16.0.5 |
| Netmask | 255.255.255.0 |
| Gateway | 172.16.0.1 |
| Primary DNS | 172.16.0.1 |
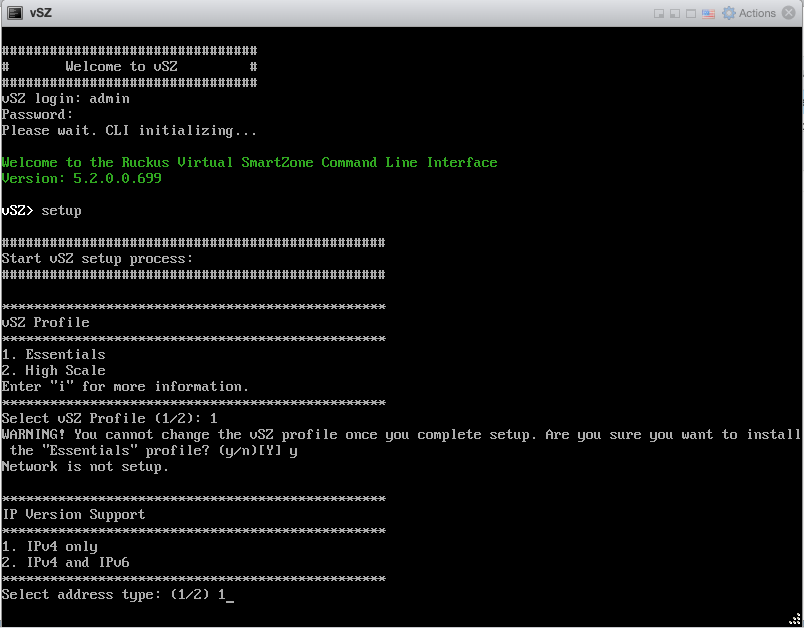

Enter 'y' to apply settings Enter 'y' to accept changes
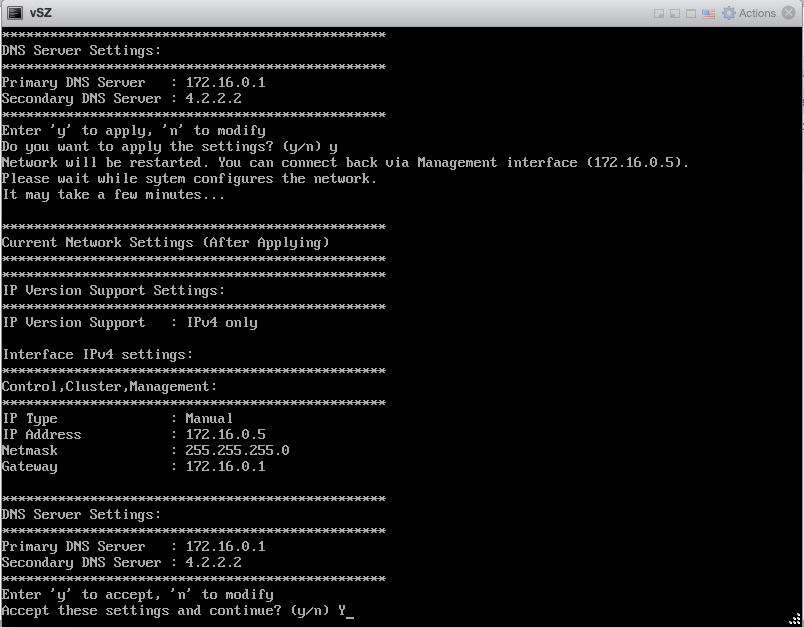
Browse to https://172.16.0.5:8443Fill in cluster name, controller name, and description, leave other defaults
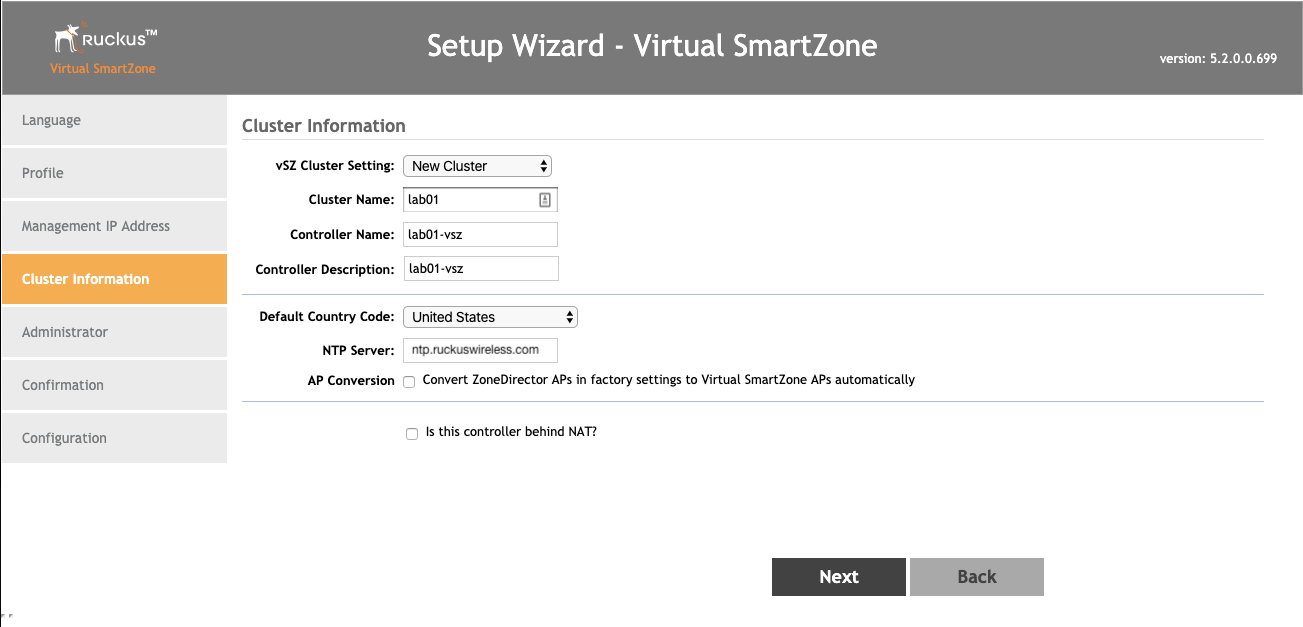
Enter 'lab01admin!' for the admin, and enable passwords.
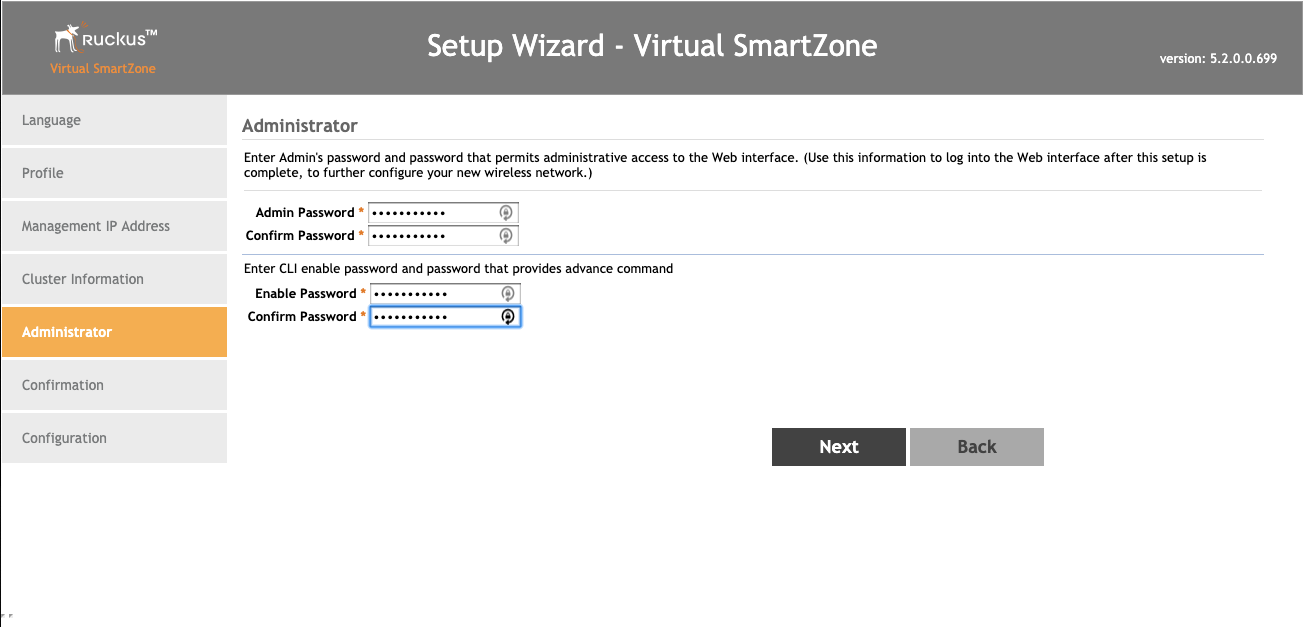
Click finish.
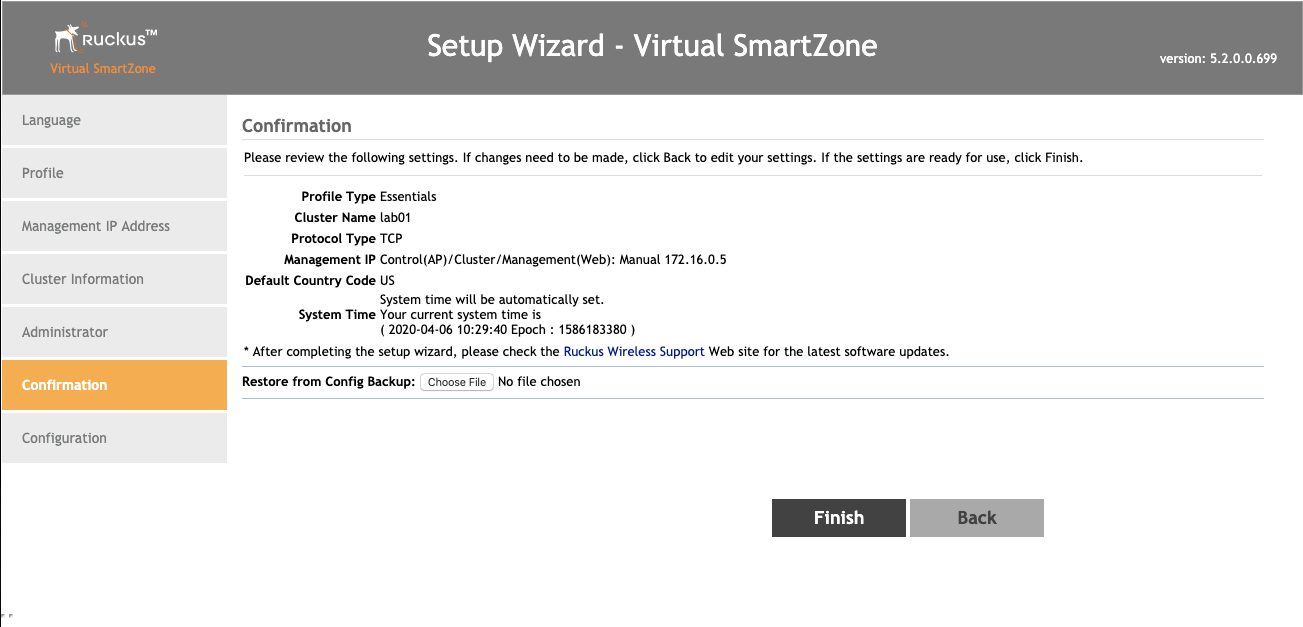
Wait while the controller initializes.
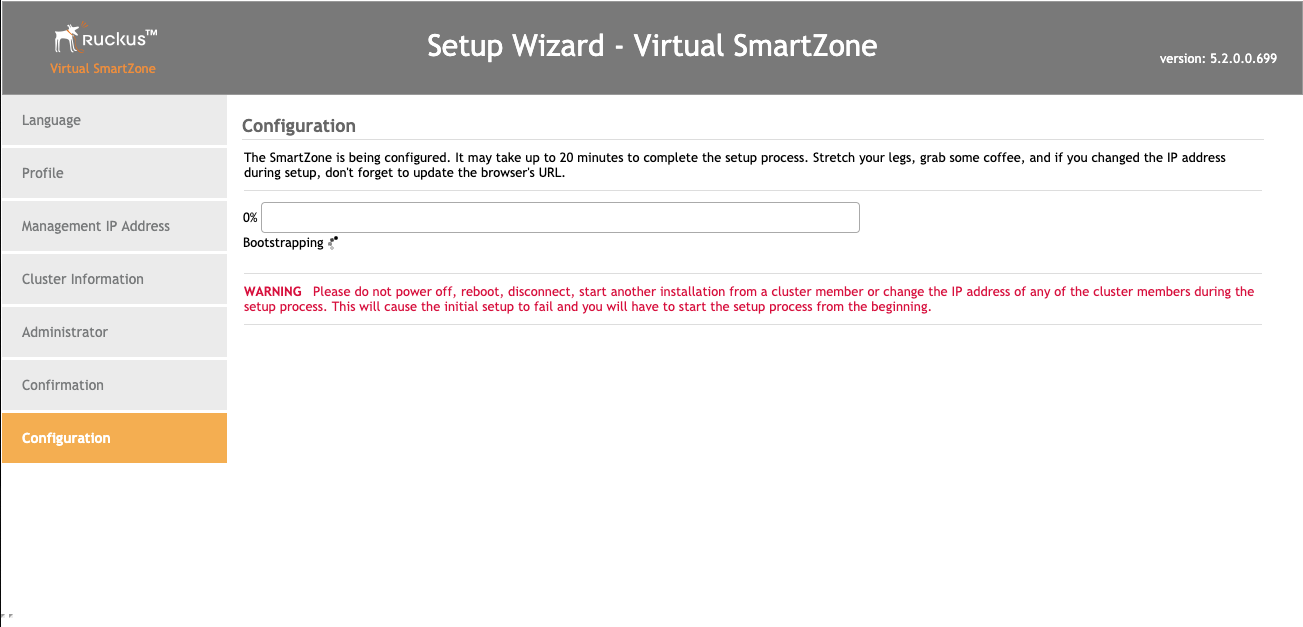
This screen means you are ready to continue.
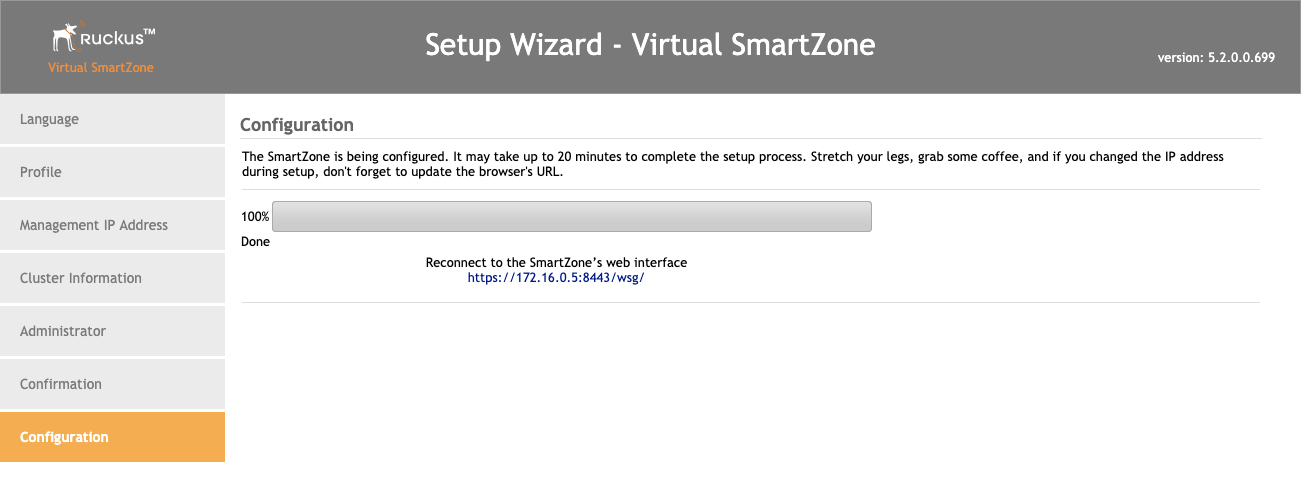
Add RUCKUS vSZ Controller as Infrastructure Device
Navigate to Network::Wireless

Click on 'create new' in the WLAN Controllers scaffold. Use the following table to populate the form, and click create.
| Field | Value |
|---|---|
| Name | ruckus vSZ |
| Type | RUCKUS SmartZone |
| Host | 172.16.0.5 |
| Username | admin |
| Password | lab01admin! |
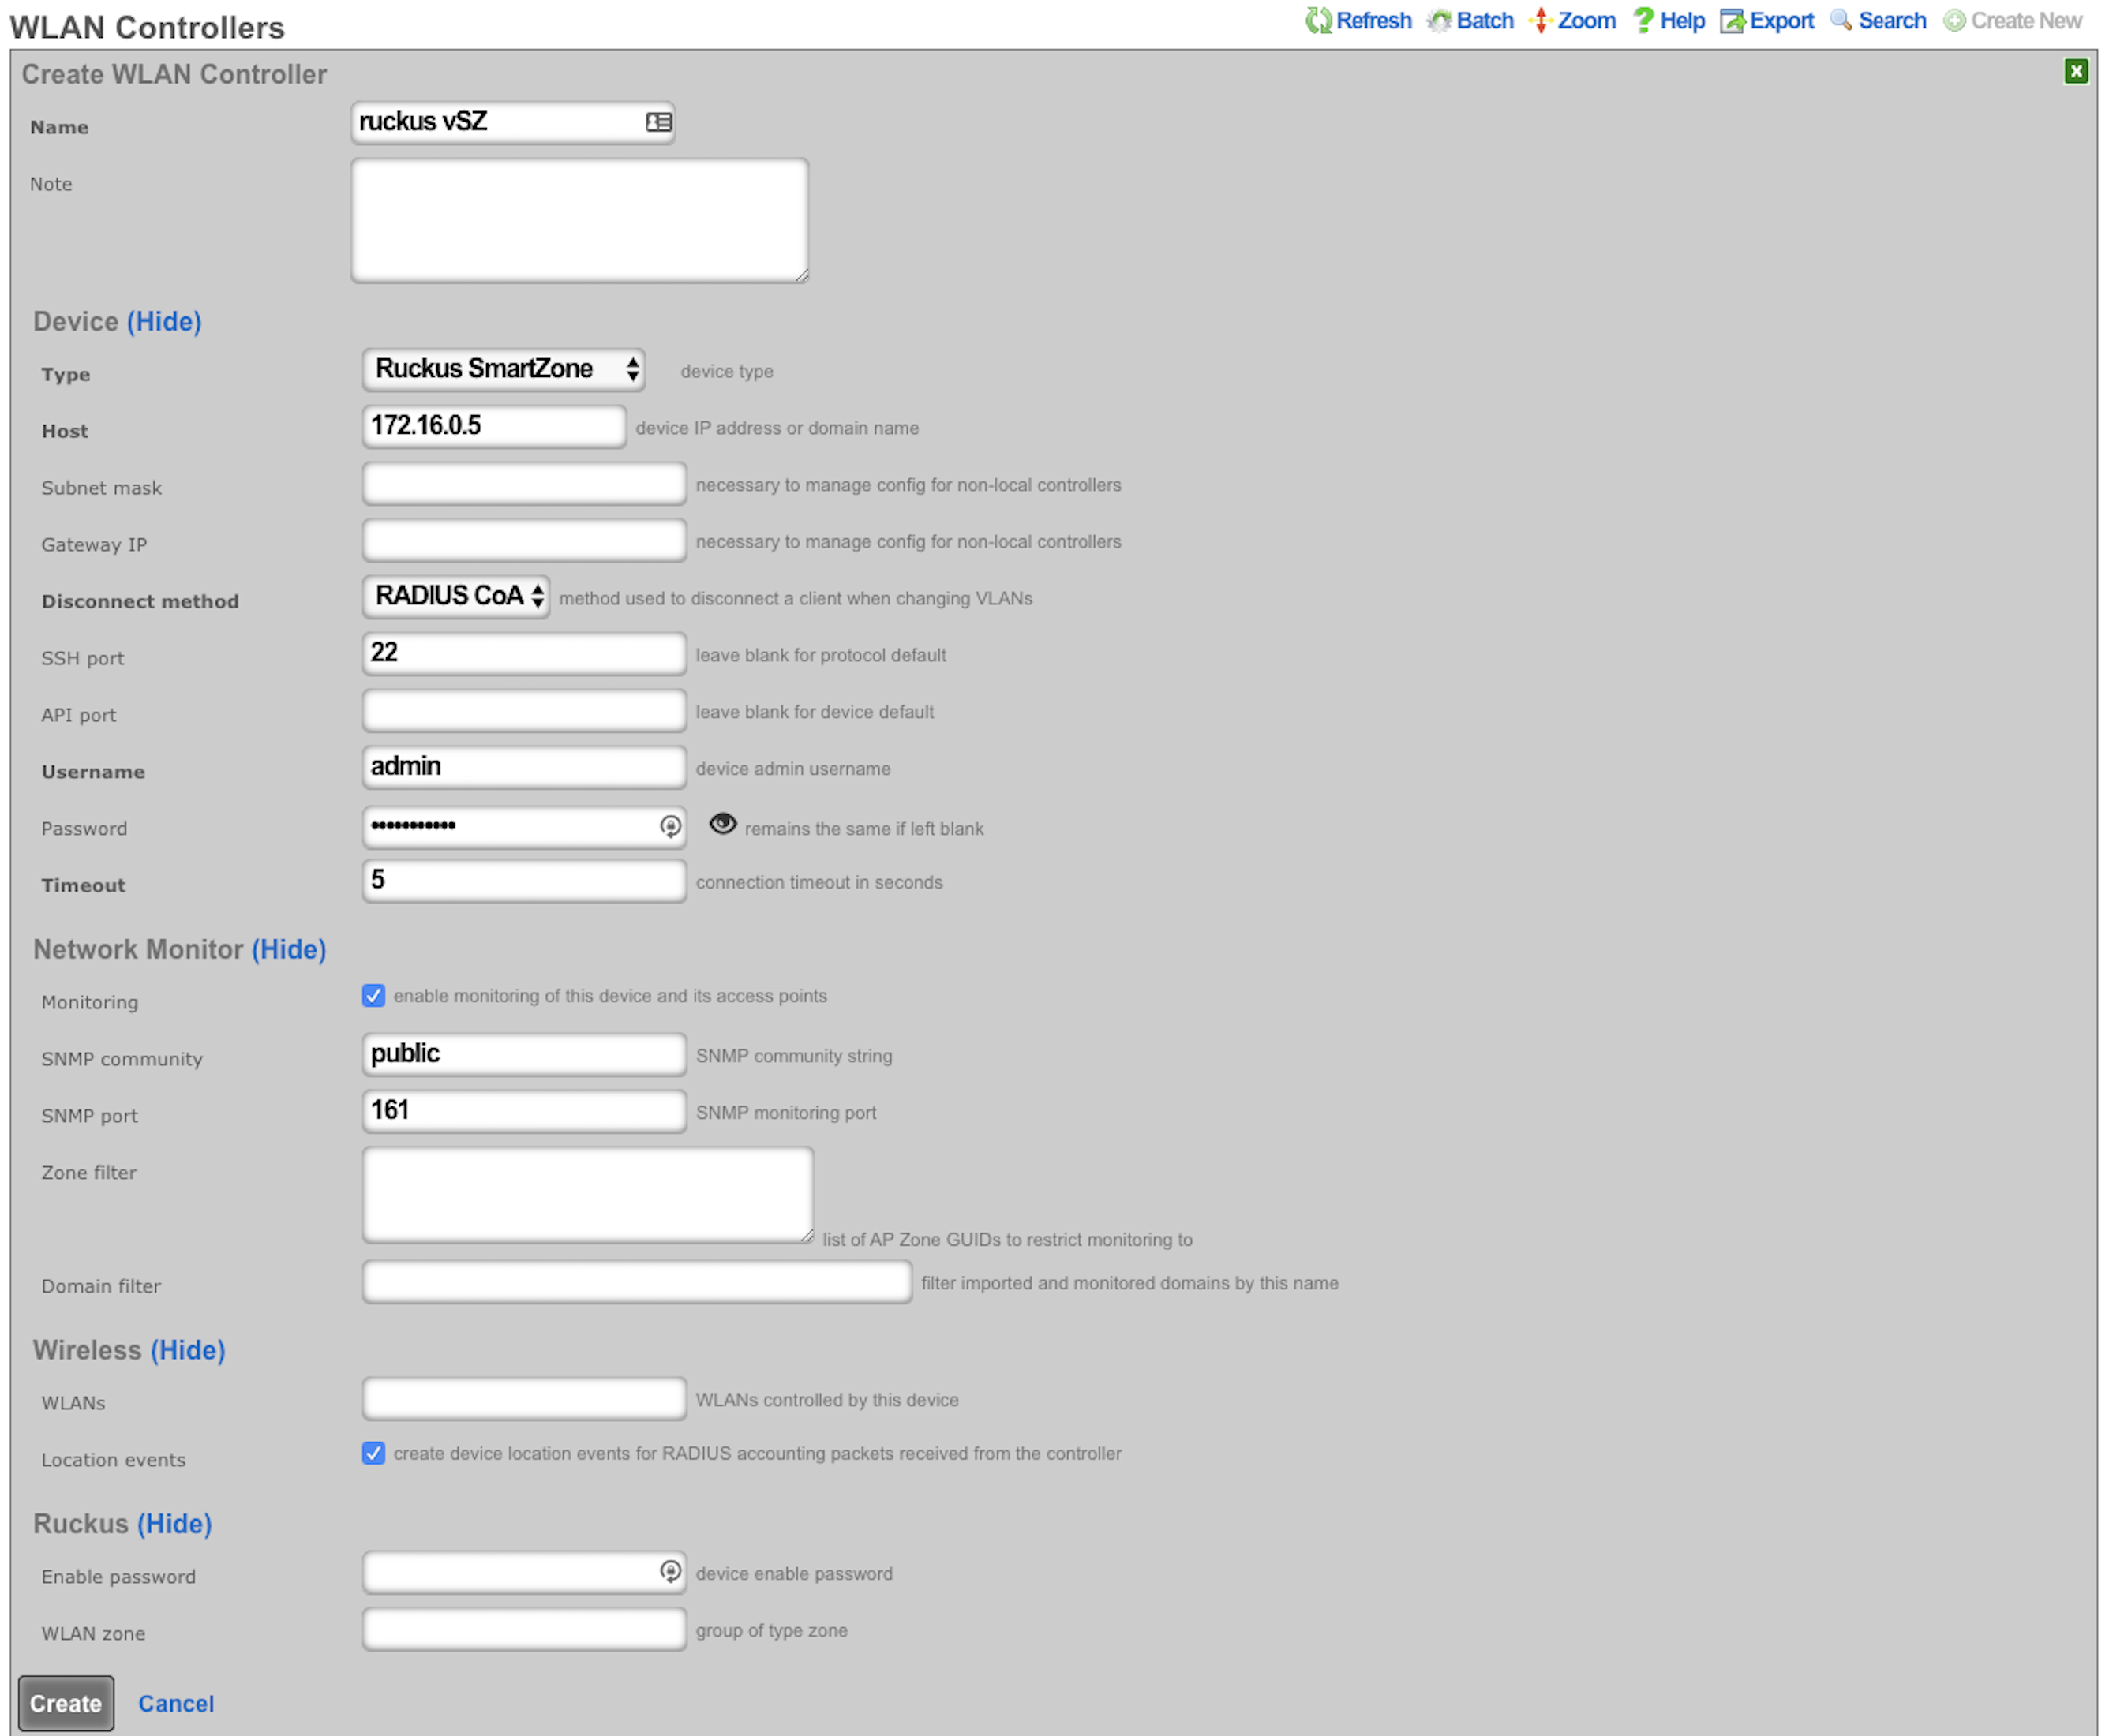
After a few seconds the Controller will appear online. Click on Sync not enabled.

Click on 'Enable Config Synchronization'.
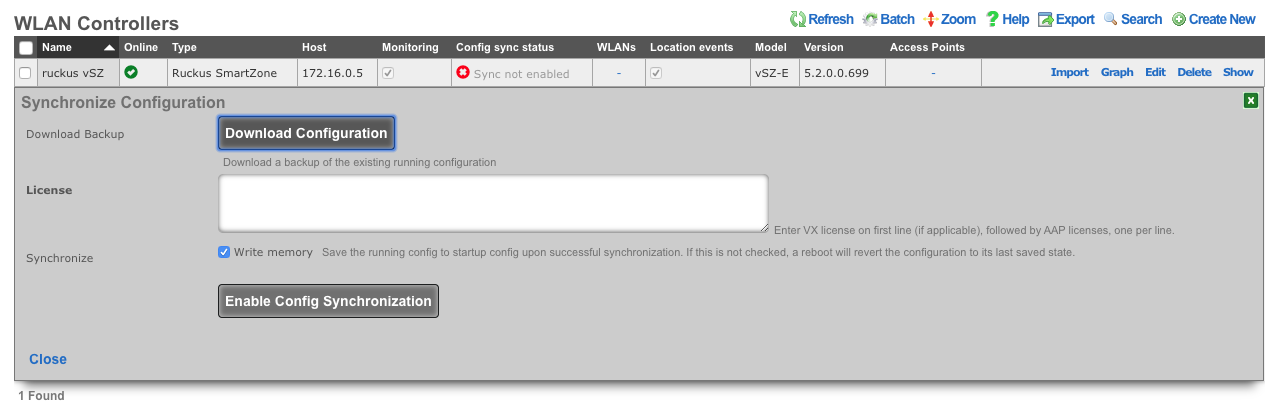
The Controller is now managed by the rXg
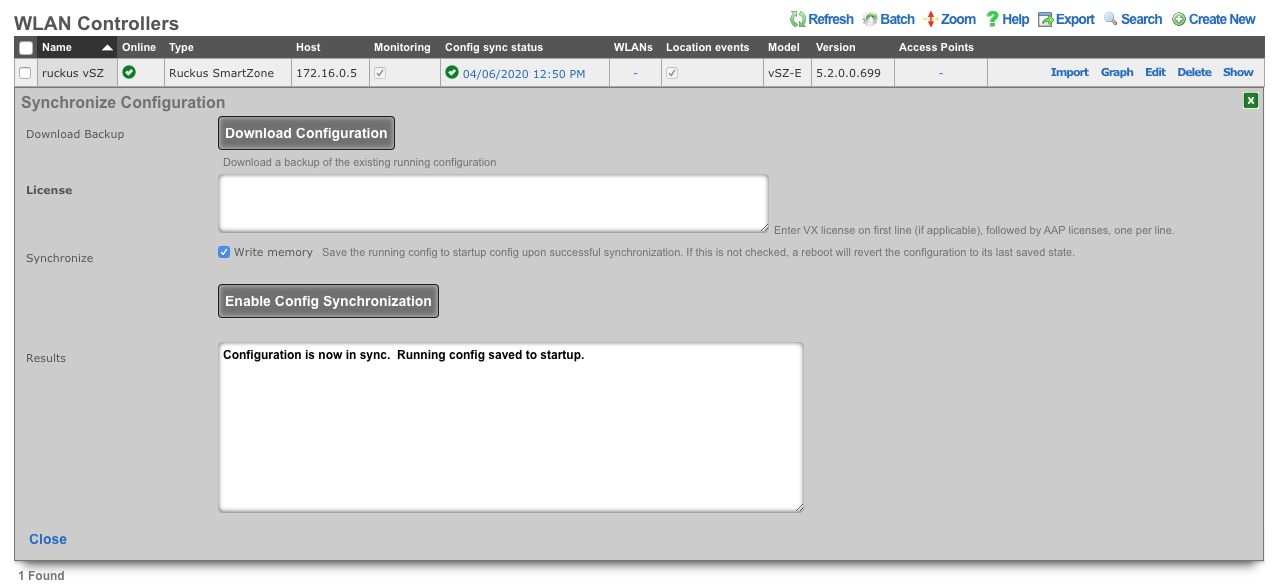
Create WLAN
Navigate to Network::Wireless and create new WLAN. Fill out the name with your lab number, select the vSZ, fill out SSID, and click create.
| Field | Value |
|---|---|
| Name | lab0X |
| Controller | ruckus vSZ |
| SSID | lab0X |
| Encryption | none |
| Authentication | none |
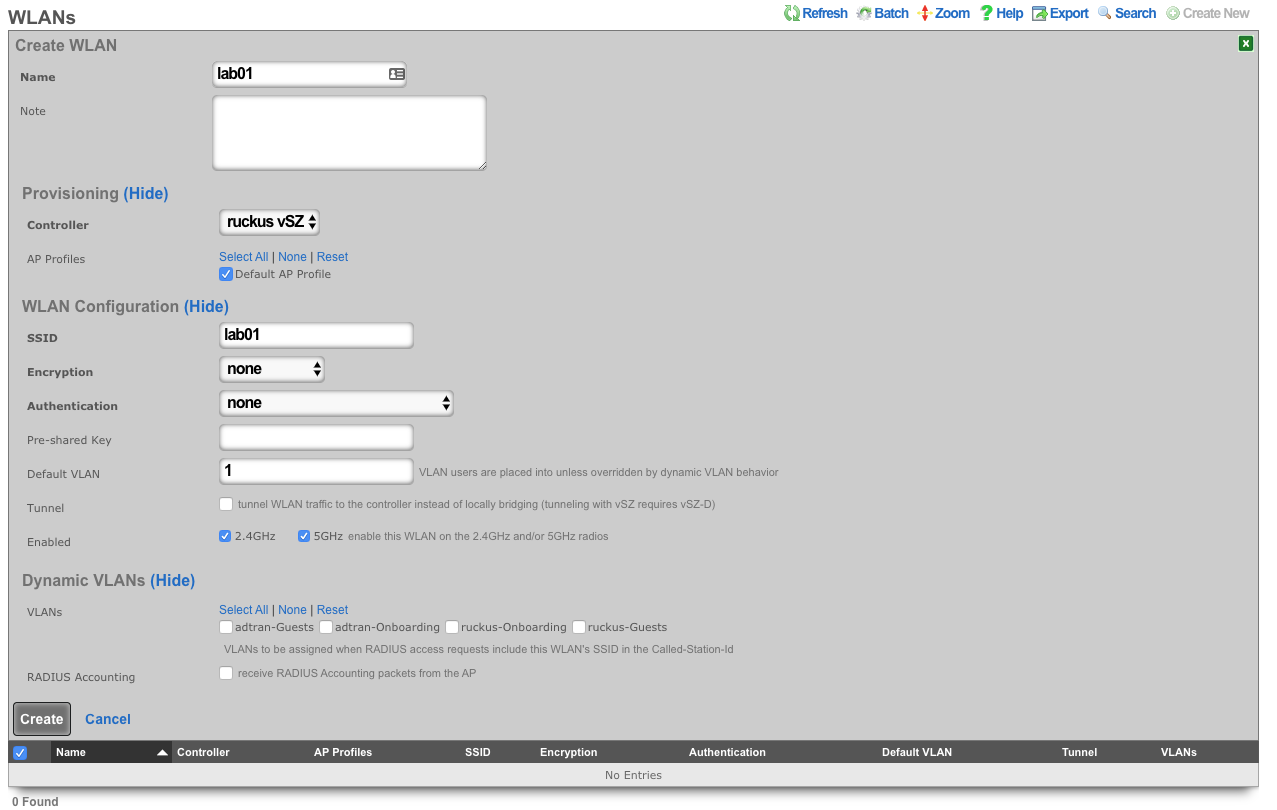
TP-Link Omada
Environment
This document was created using the following hardware and software:
rXg: Version: 14.284 Controller Model: TP-Link Omada Controller (Windows) Controller Version: 5.6.13 AP Model: EAP610-Outdoor(US) v1.0 AP Version: 1.1.0 Build 20220930 Rel 65326
Deploy TP-Link Omada controller on Windows
The installation process for the Windows-based controller was documented using the following hardware and software:
rXg: Version: 14.284 Controller Model: TP-Link Omada Controller (Windows) Controller Version: 5.6.13 AP Model: EAP610-Outdoor(US) v1.0 AP Version: 1.1.0 Build 20220930 Rel 65326
Obtain the Omada installation file from TP-Link (https://support.omadanetworks.com/us/product/omada-software-controller/?resourceType=download). Double-click to begin the installation. Click "Next" through the typical installation wizard. On the final screen, make sure that "Start Omada Controller after installation is checked"
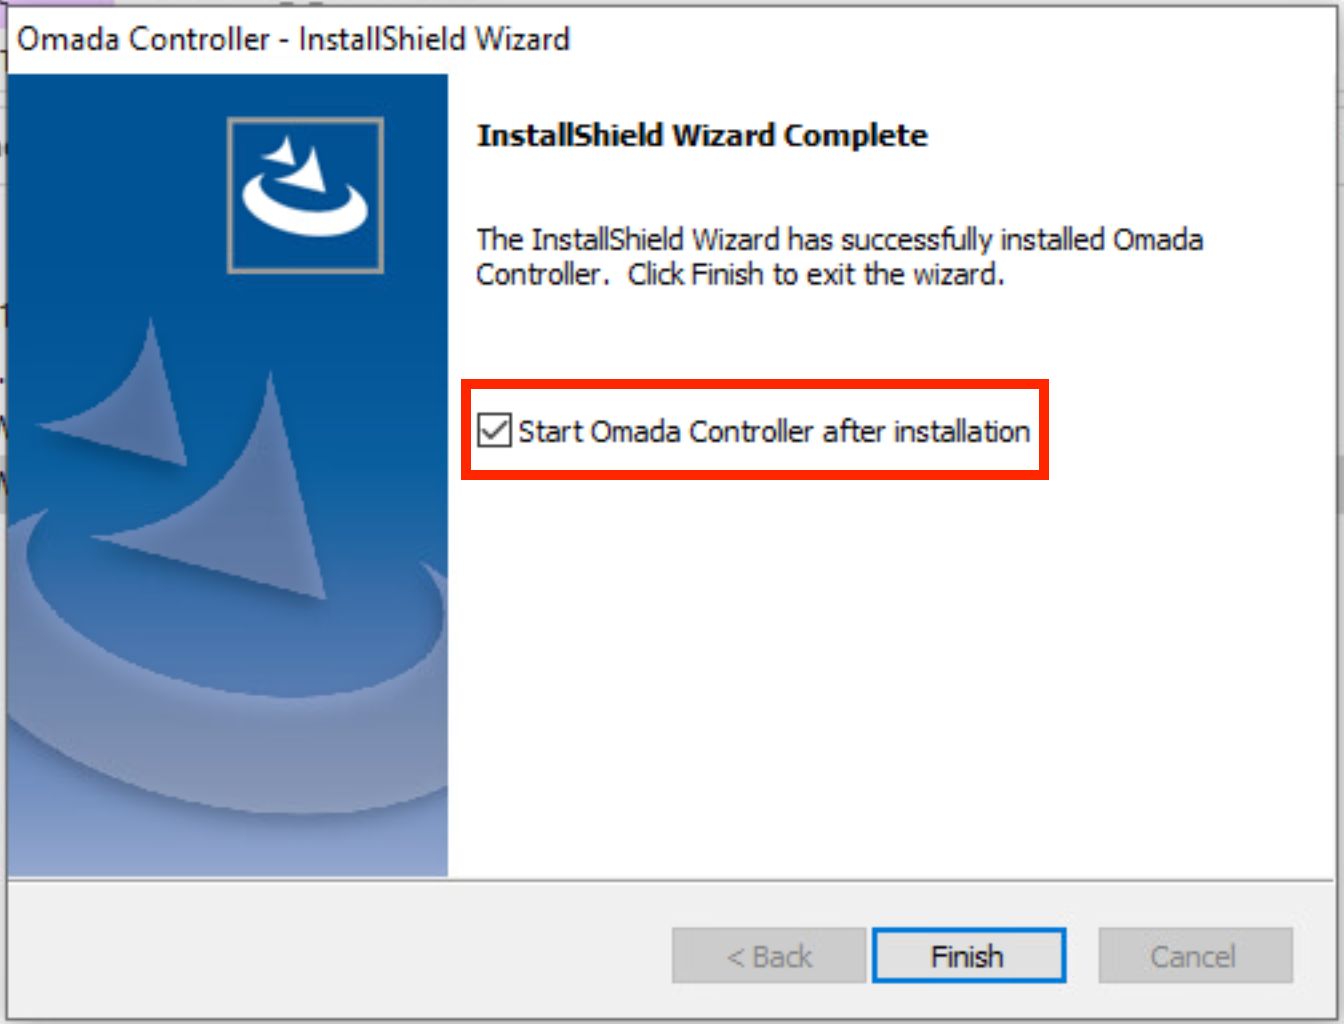
Allow access through the Windows firewall.
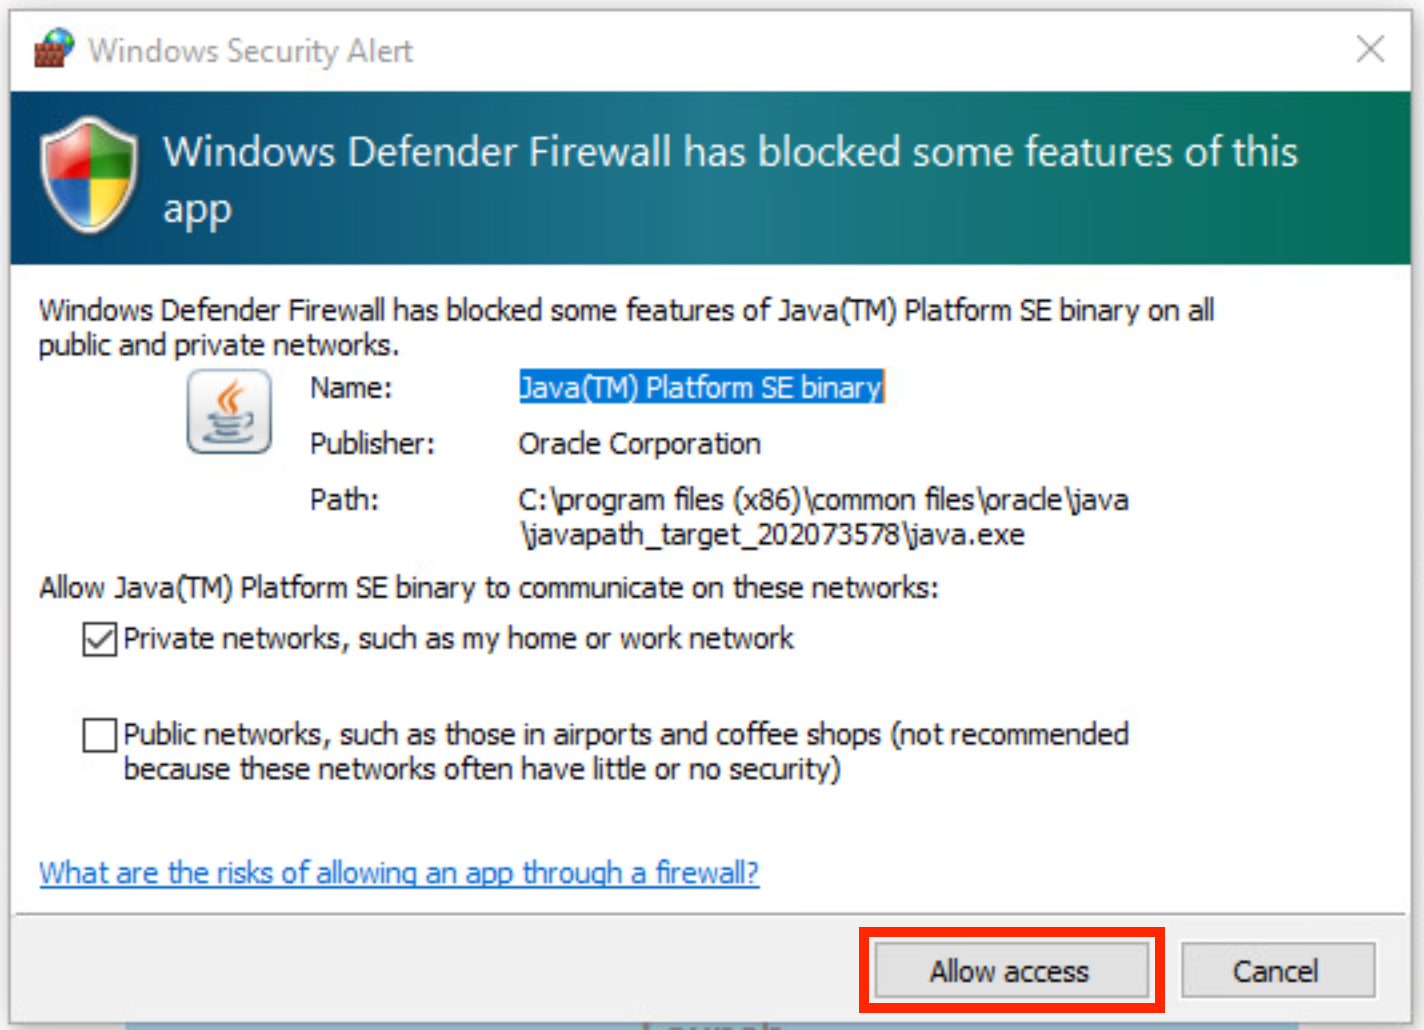
Deploy TP-Link Omada controller on Linux
The installation process for the Linux-based controller was documented using the following hardware and software:
rXg: Version: 16.116 Controller Model: TP-Link Omada Controller (Debian) Controller Version: 5.15.20.18 AP Model: AEP750-Wallmount(US) v1.1 AP Version: 1.0.2 Build 20241017 Rel. 74083
Obtain the Omada installation file from TP-Link (https://support.omadanetworks.com/us/product/omada-software-controller/?resourceType=download). In this example, a Ubuntu server 22.04.5 LTS with the latest upgrades is used.
Install openjdk-17-jre-headless:
sudo apt install openjdk-17-jre-headless
Download the controller debian package:
wget https://static.tp-link.com/upload/software/2025/202503/20250331/Omada_SDN_Controller_v5.15.20.18_linux_x64.deb
Install the latest MongoDB - these instructions may need to be modified for other OS versions.
sudo apt-get install gnupg curl
curl -fsSL https://www.mongodb.org/static/pgp/server-8.0.asc | \
sudo gpg -o /usr/share/keyrings/mongodb-server-8.0.gpg \
--dearmor
echo "deb [ arch=amd64,arm64 signed-by=/usr/share/keyrings/mongodb-server-8.0.gpg ] https://repo.mongodb.org/apt/ubuntu jammy/mongodb-org/8.0 multiverse" | sudo tee /etc/apt/sources.list.d/mongodb-org-8.0.list
sudo apt-get update
sudo apt-get install -y mongodb-org
Install the Omada controller directly from the Debian package
sudo apt install ./Omada_SDN_Controller_v5.15.20.18_linux_x64.deb
The controller should start automatically during the installation process. The status can be checked as follows:
sudo tpeap status
Omada Controller is running. You can visit http://localhost:8088 on this host to manage the wireless network.
If needed, start the controller using
sudo tpeap start
Configure TP-Link Omada controller
Click "Launch" to open the configuration page at https://localhost:8043 (when installing on Windows locally) or at https://<FQDN/IP>:8043 (when installing remotely on a VM / applicance). The following start up screen is applicable to the Windows installation only - there is no splash screen when running it on a Linux system.

Click "Let's Get Started"

Set your Controller name, region (should be automatically populated), timezone, and select the deployment scenario. Then click "Next"

Click "Skip" (note that the screen below shows the Controller view when a test WAP is powered on and discovered on the local L2 segment shared with the controller, i.e., both the Controller and the WAP belong to the same IP prefix)

Click "Skip" on the Configure WAN Settings Override screen
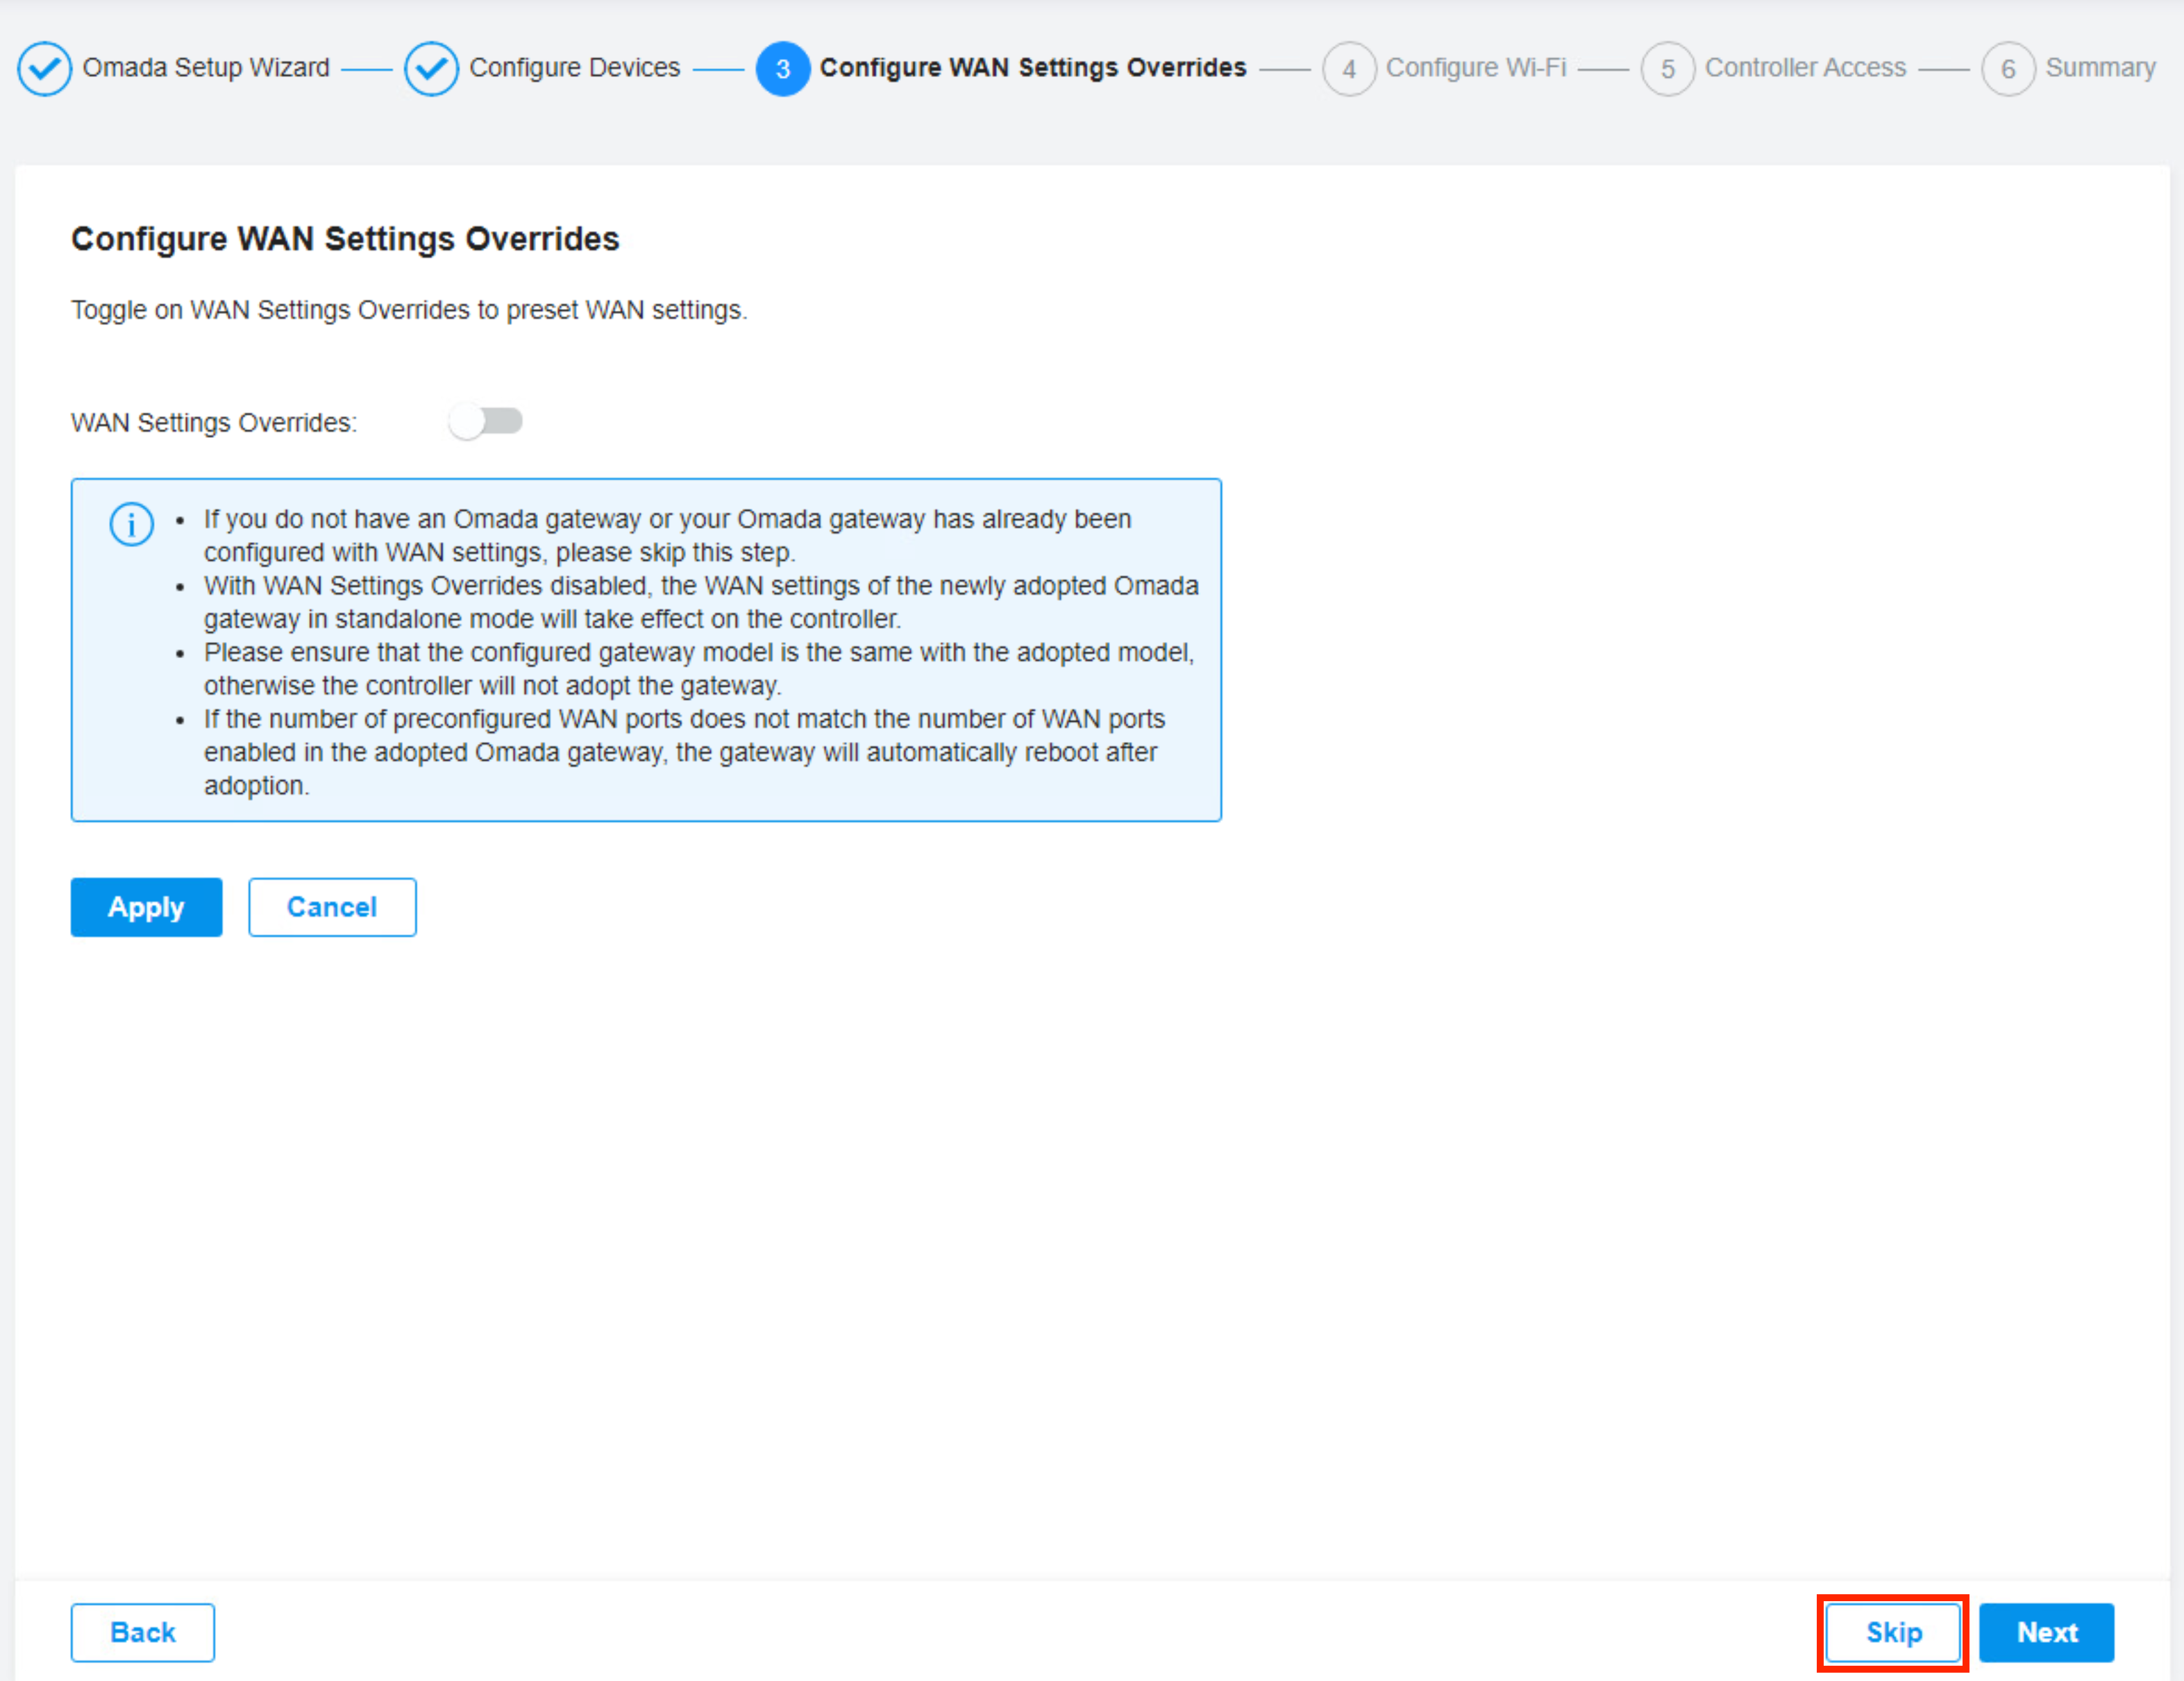
Click "Skip" on the SSID configuration screen (can be set up later on)
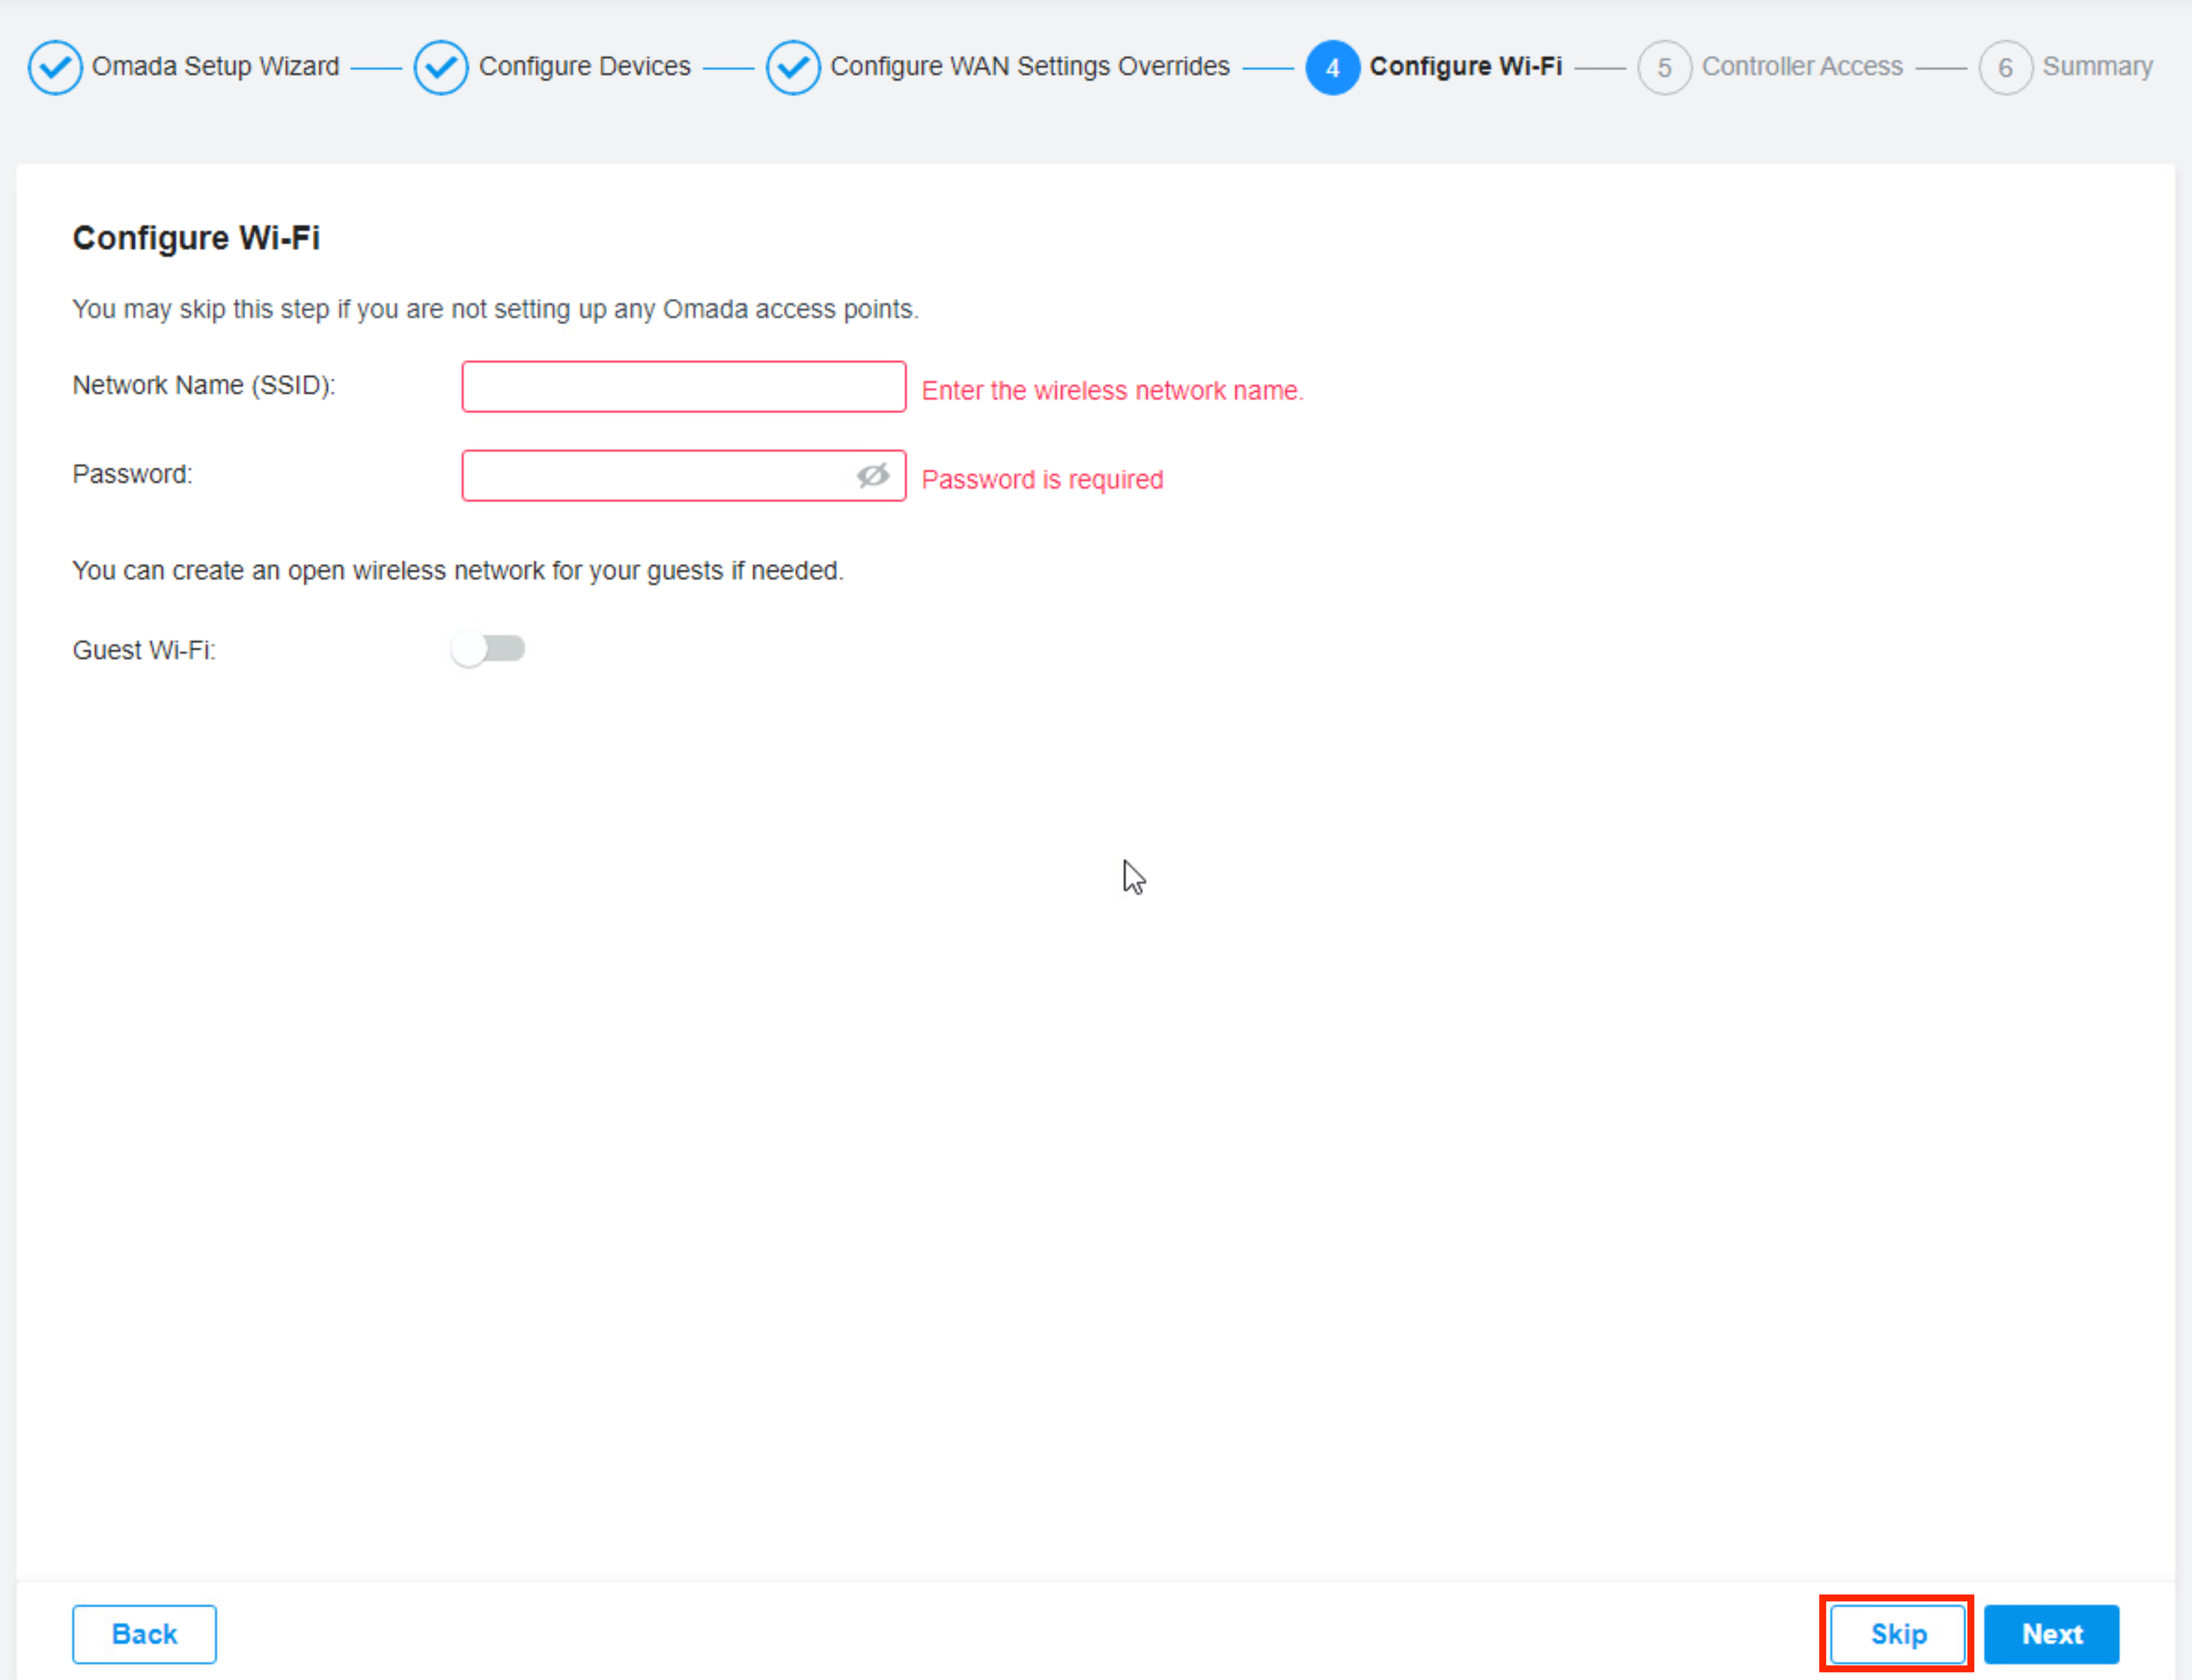
Configure credentials for the controller and WAPs. Disable Cloud Access Accept Terms of Use Click "Next"
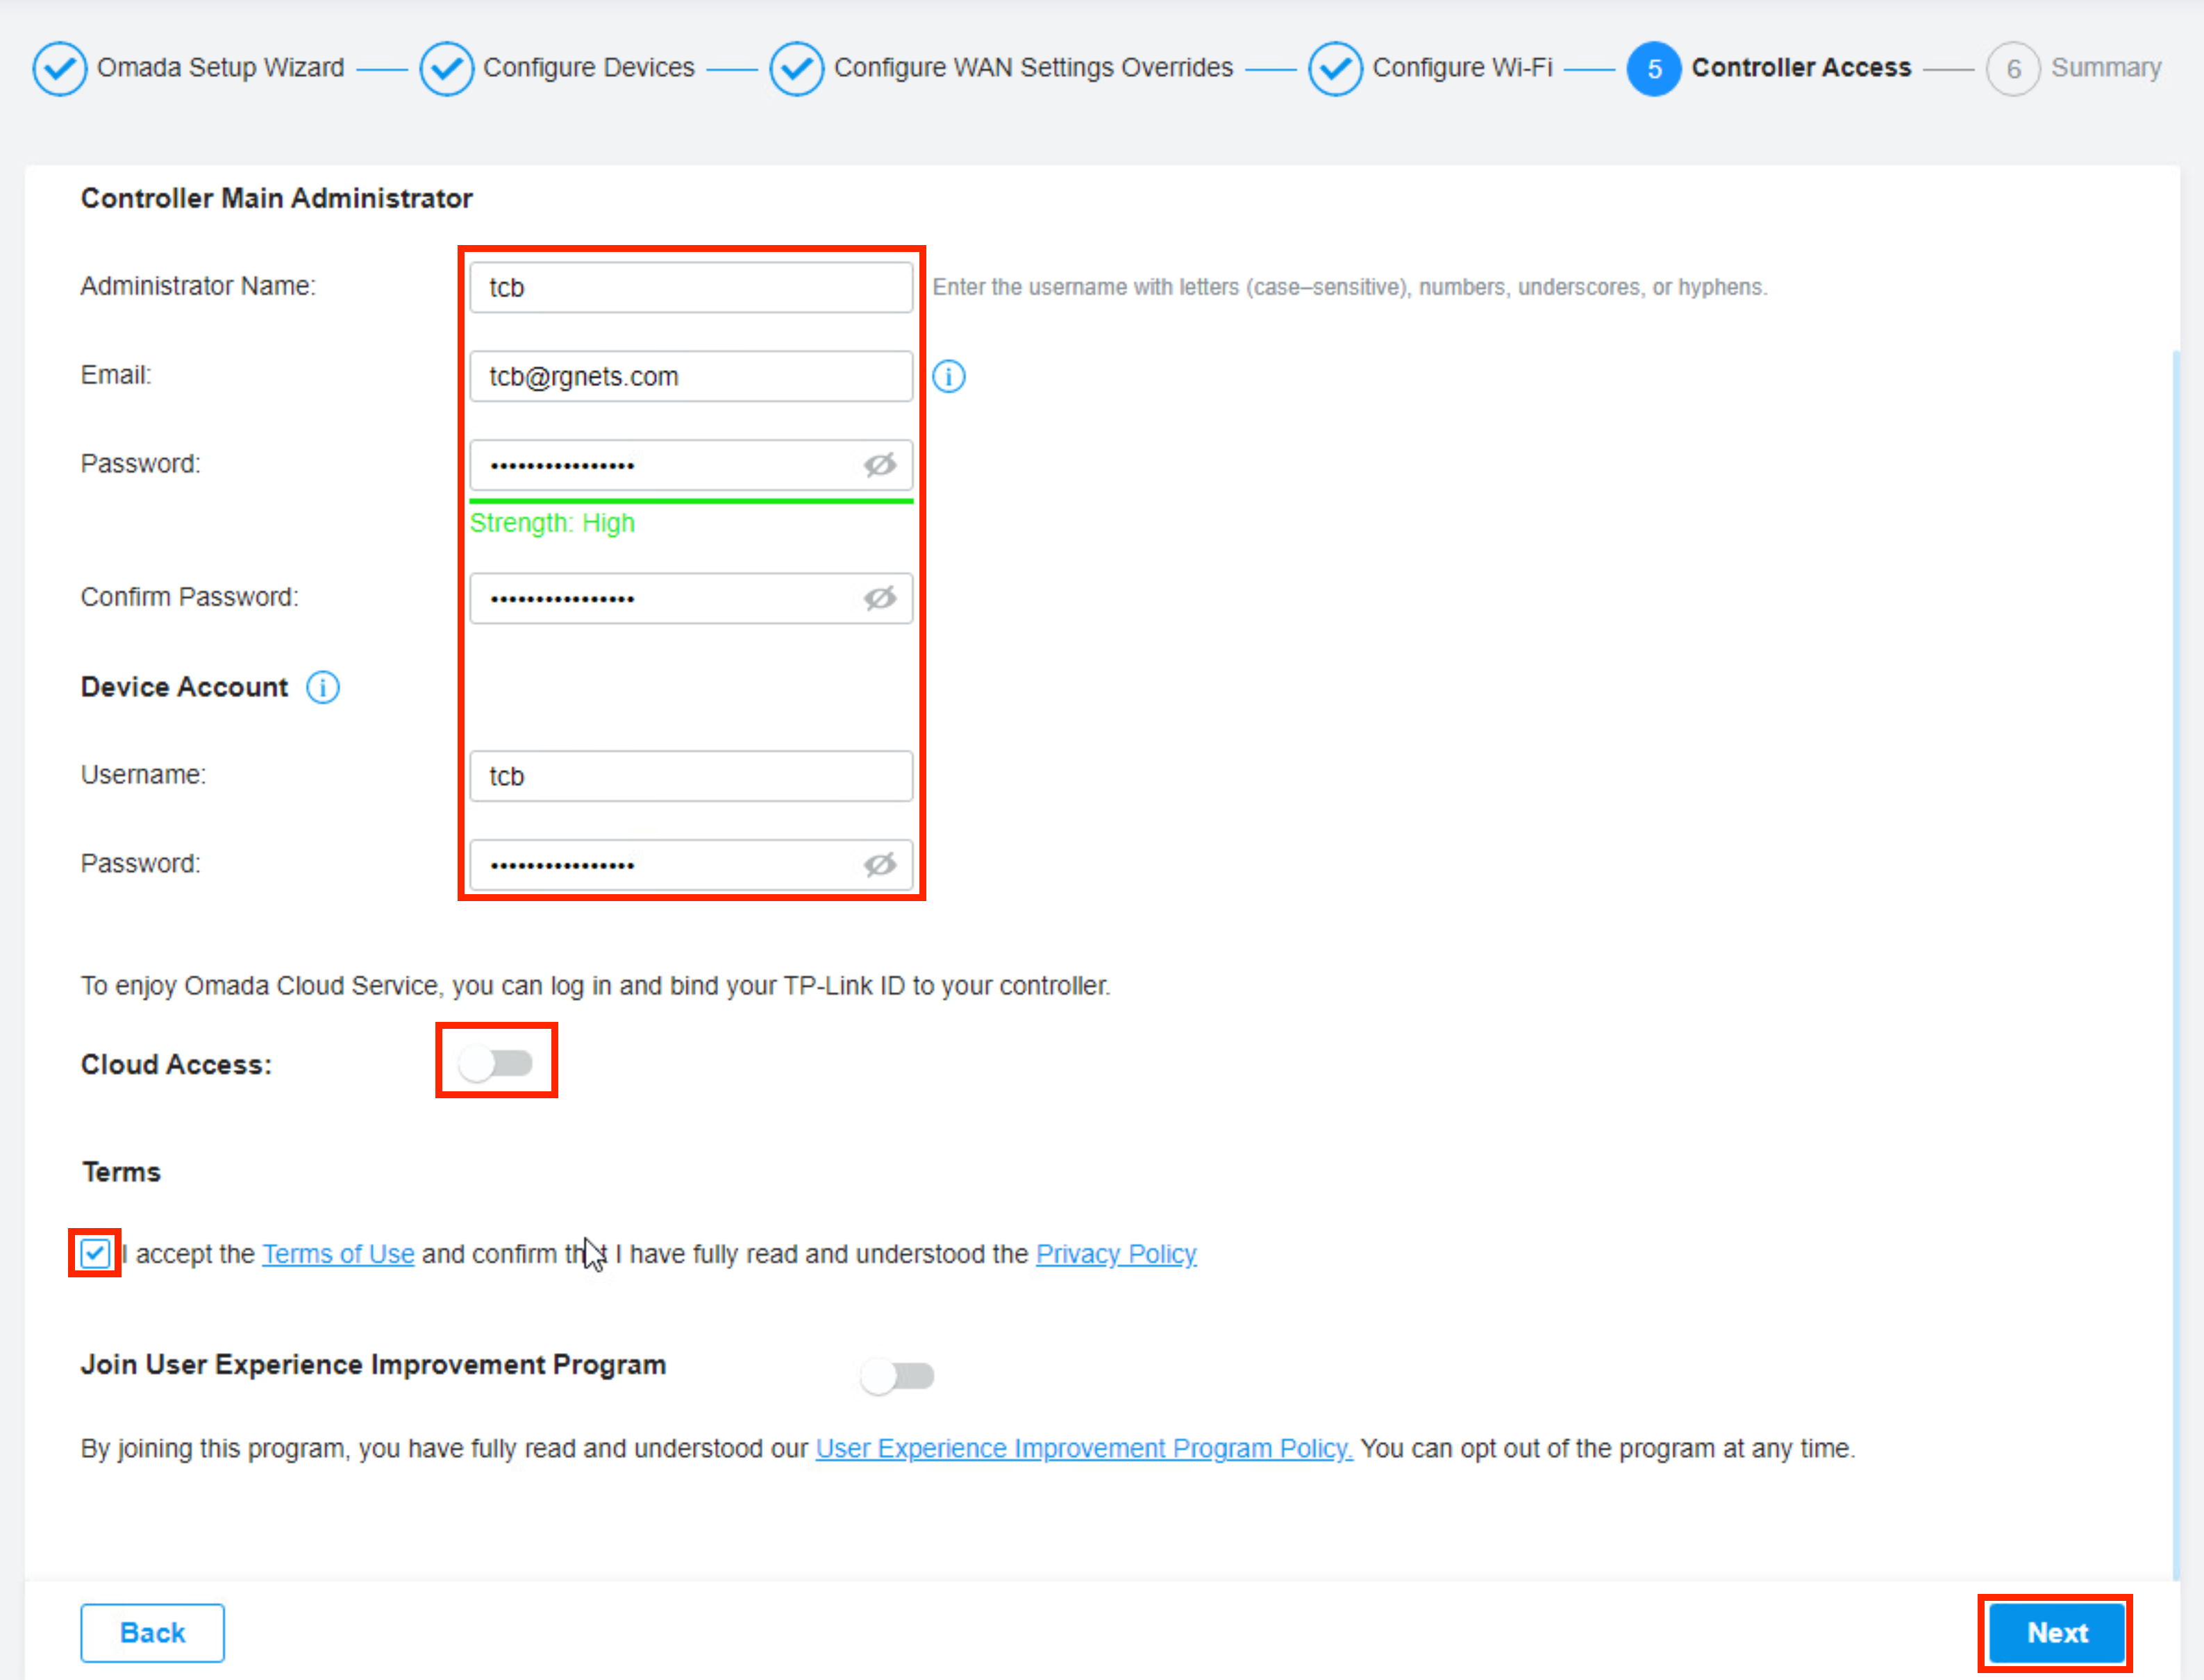
Click "Finish" to complete the initial Controller configuration
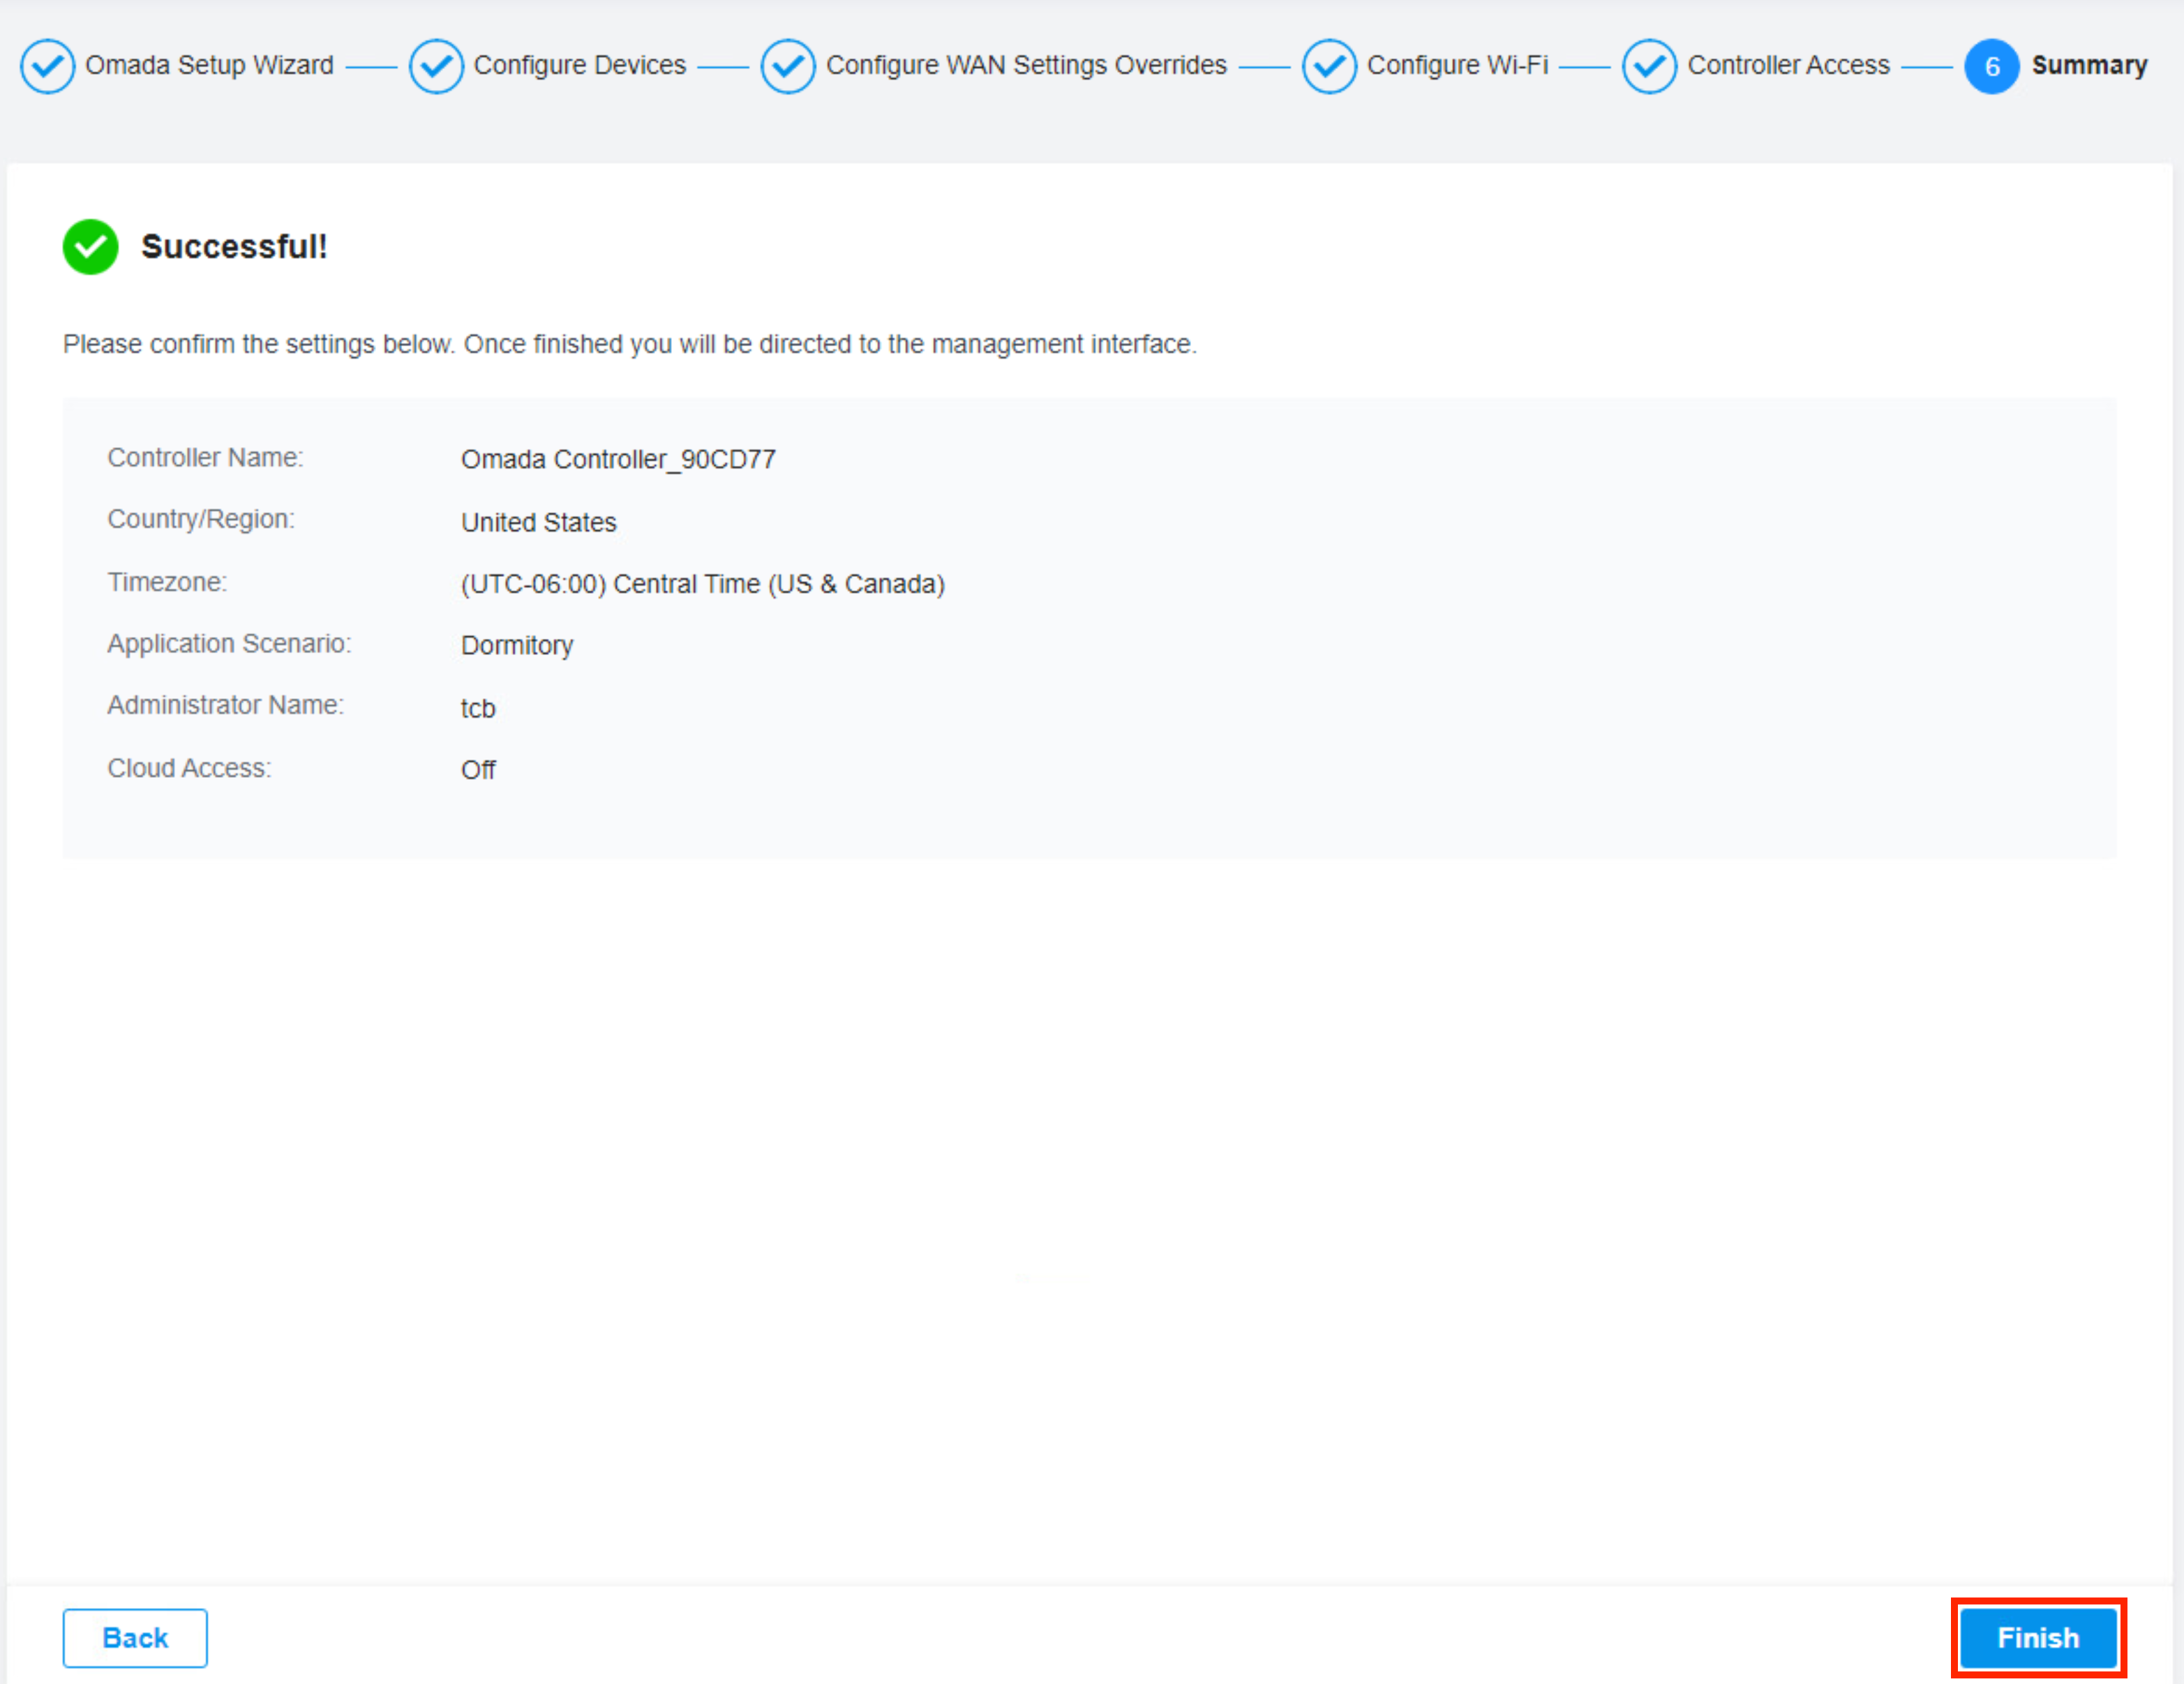
TP-Link Omada Controller Configuration for PPSK
Login using the credentials created in the previous step.

You can skip the tutorial here by clicking the X.
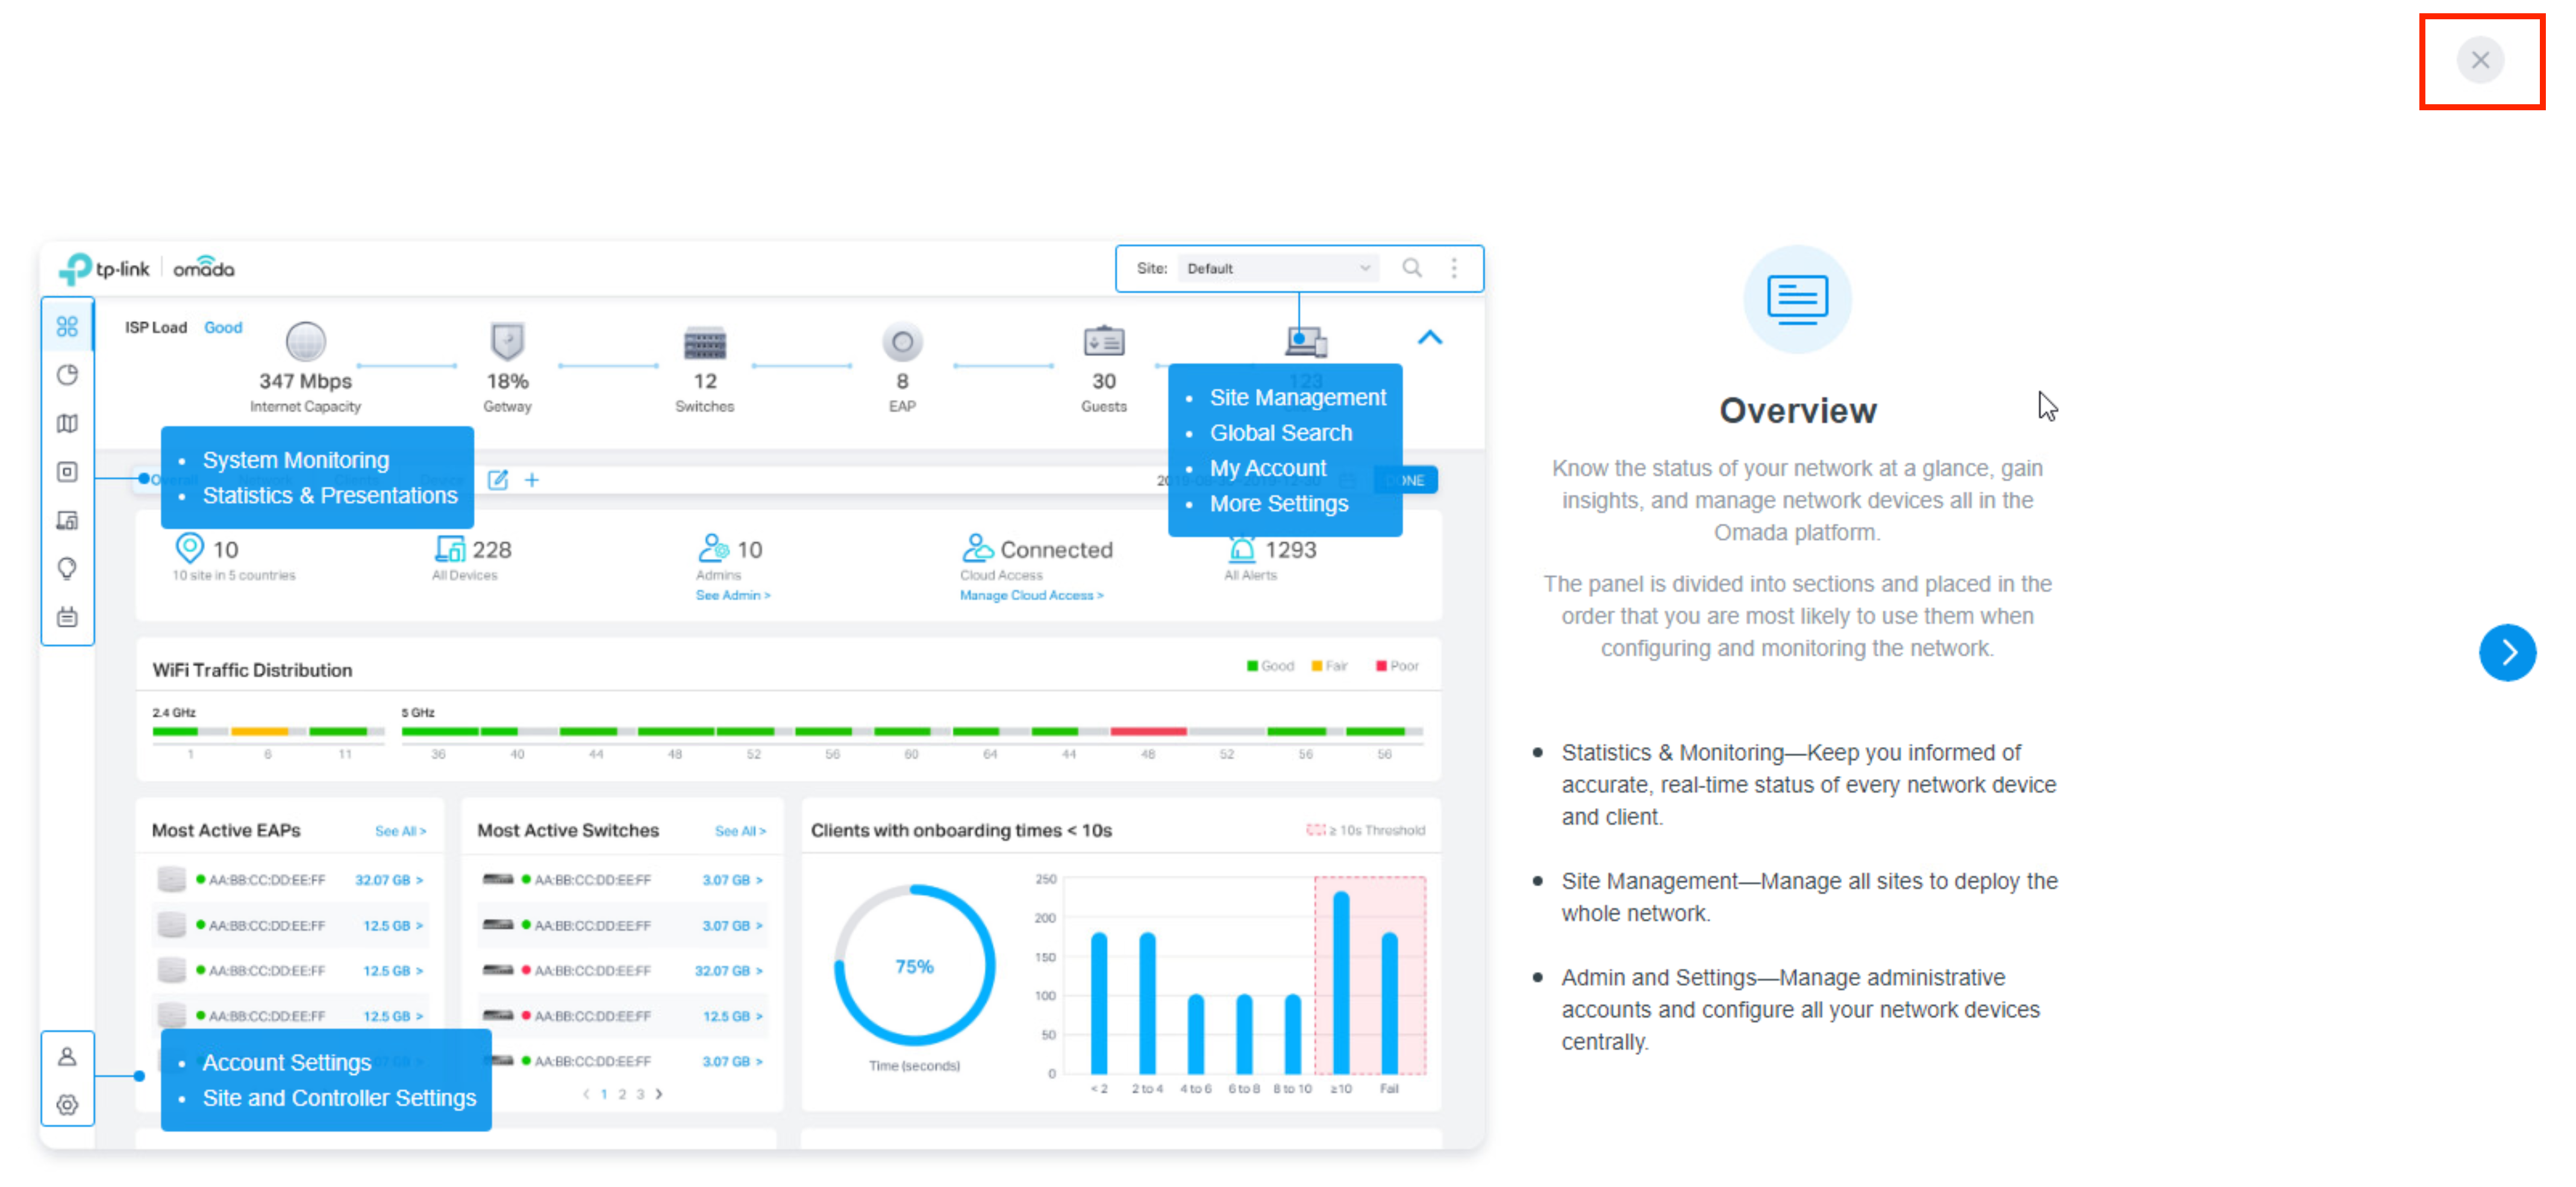
Create RADIUS profile
Click the gear icon in the bottom left-hand corner for settings. Browse to Authentication >> RADIUS Profile Click "+ Create New RADIUS Profile"

Before you configure this section, you will need to have the IP address of the rXg, and the RADIUS shared secret. The IP address of the rXg should be reachable from the Omada controller. The shared secret can be obtained from the rXg Admin UI by browsing to Services >> RADIUS and then scroll down to the RADIUS Server Options scaffold. Use this password for all password fields in the RADIUS profile below.
Click "Save" once the form is complete.

We now need to configure a RADIUS profile so that the Omada controller can send RADIUS requests to the rXg.
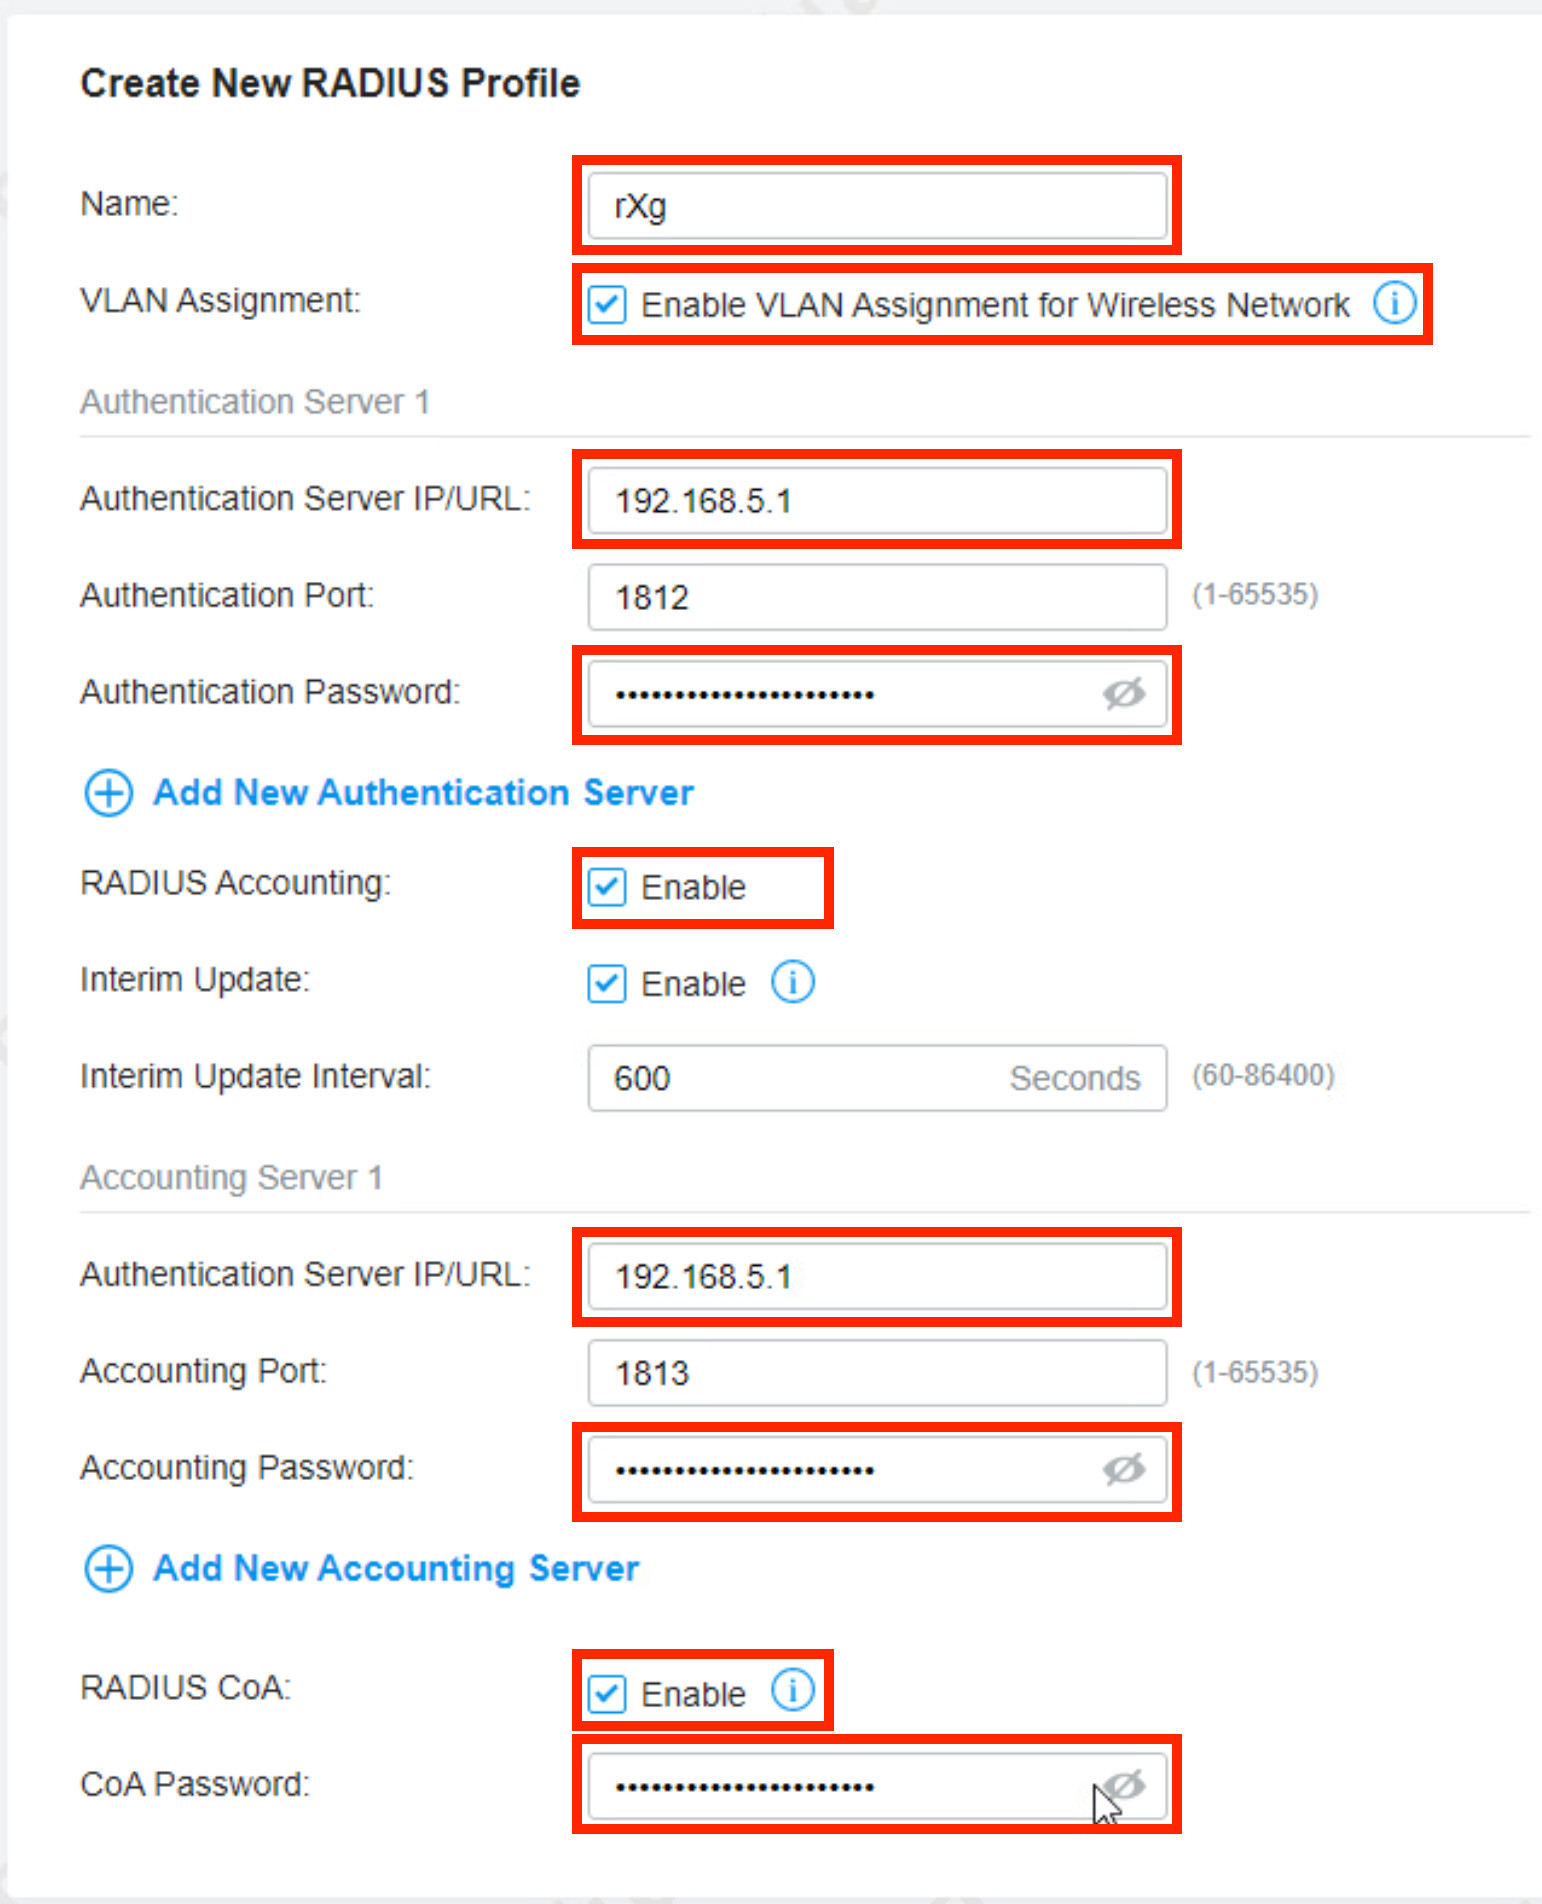
Add WAPs via AutoDiscovery
On the Omada Admin UI, browse to Devices on the side menu. Note that the Autodiscovery mechanism is only available when the WAP and the Controller are on the same IP prefix (same L2 segment).

In this section, we need to adopt the WAPs. The easiest way to do this is by using the batch adopt button under Batch Action.

Then select all of the WAPs and click "Done".

Once the adoption process is complete, you should see the WAP show connected.

Add WAPs via DHCP Option 138
When the WAP and the Controller are on different L2 segments (different IP prefixes), the Controller is not able to automatically discover WAPs. WAPs need to be offered with the IP address of the Controller using the DHCP Option 138 (CapWap). The DHCP Option 138 can be configured as a custom DHCP option on the rXg as follows:
- create a custom DHCP option under the Services::DHCP::Custom DHCP Options scaffold, as shown below:
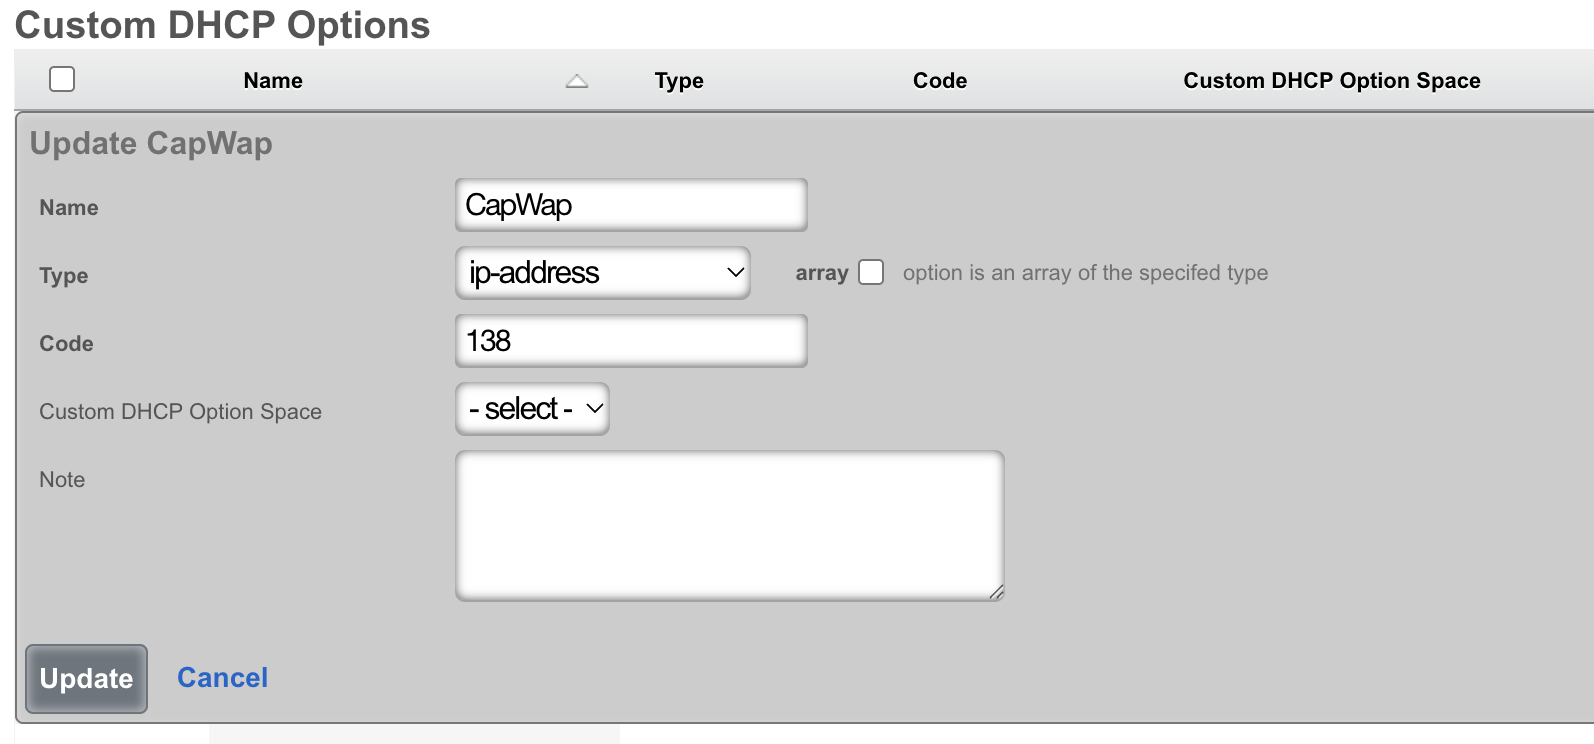
- create an instance of the DHCP Option 138 under the Services::DHCP::DHCP Options scaffold, with the value assigned to the previously created option, as shown below
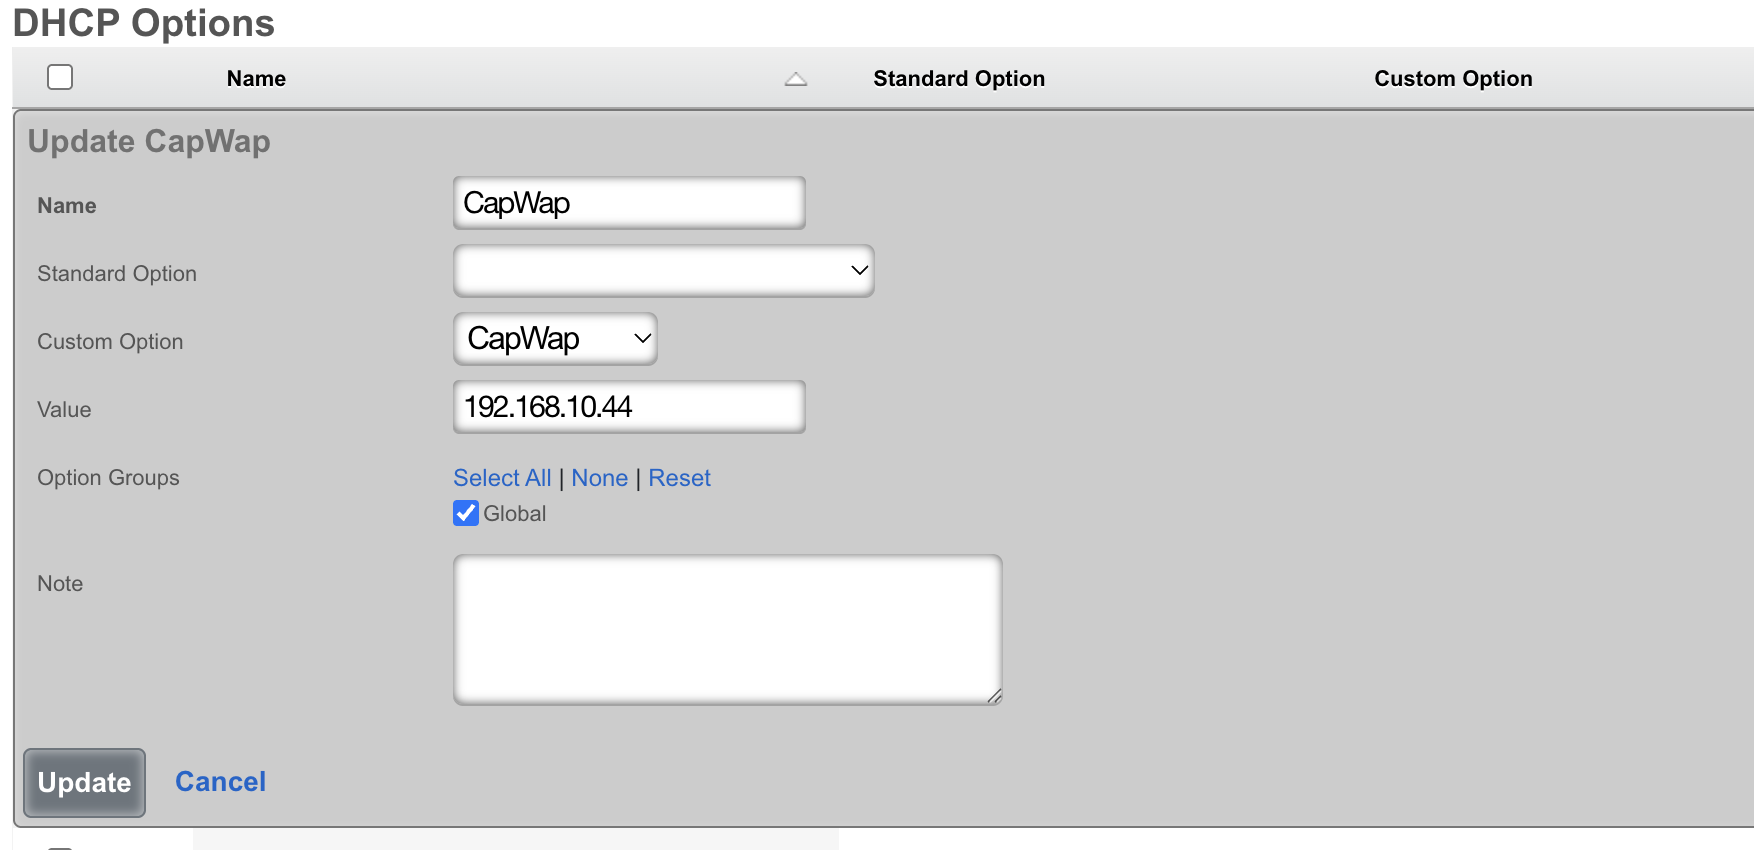
Once the WAP is rebooted, the DHCP Option 138 is offered to the WAP, informing the device about the IP address of the Controller. Afterwards, the device becomes visible in the Controller device scaffold as ready for adoption.
Add WAPs via Inform setting on WAP
In certain network configurations, it is not possible to add custom DHCP Option 138 due to functional limitations of the DHCP server. WAPs need to be configured with the IP address of the Controller using the Inform statement in their web UI. This method is the least recommended one, since it requires each individual WAP to complete the configuration using the web UI, to gain access to the Controller Settings, as shown below:
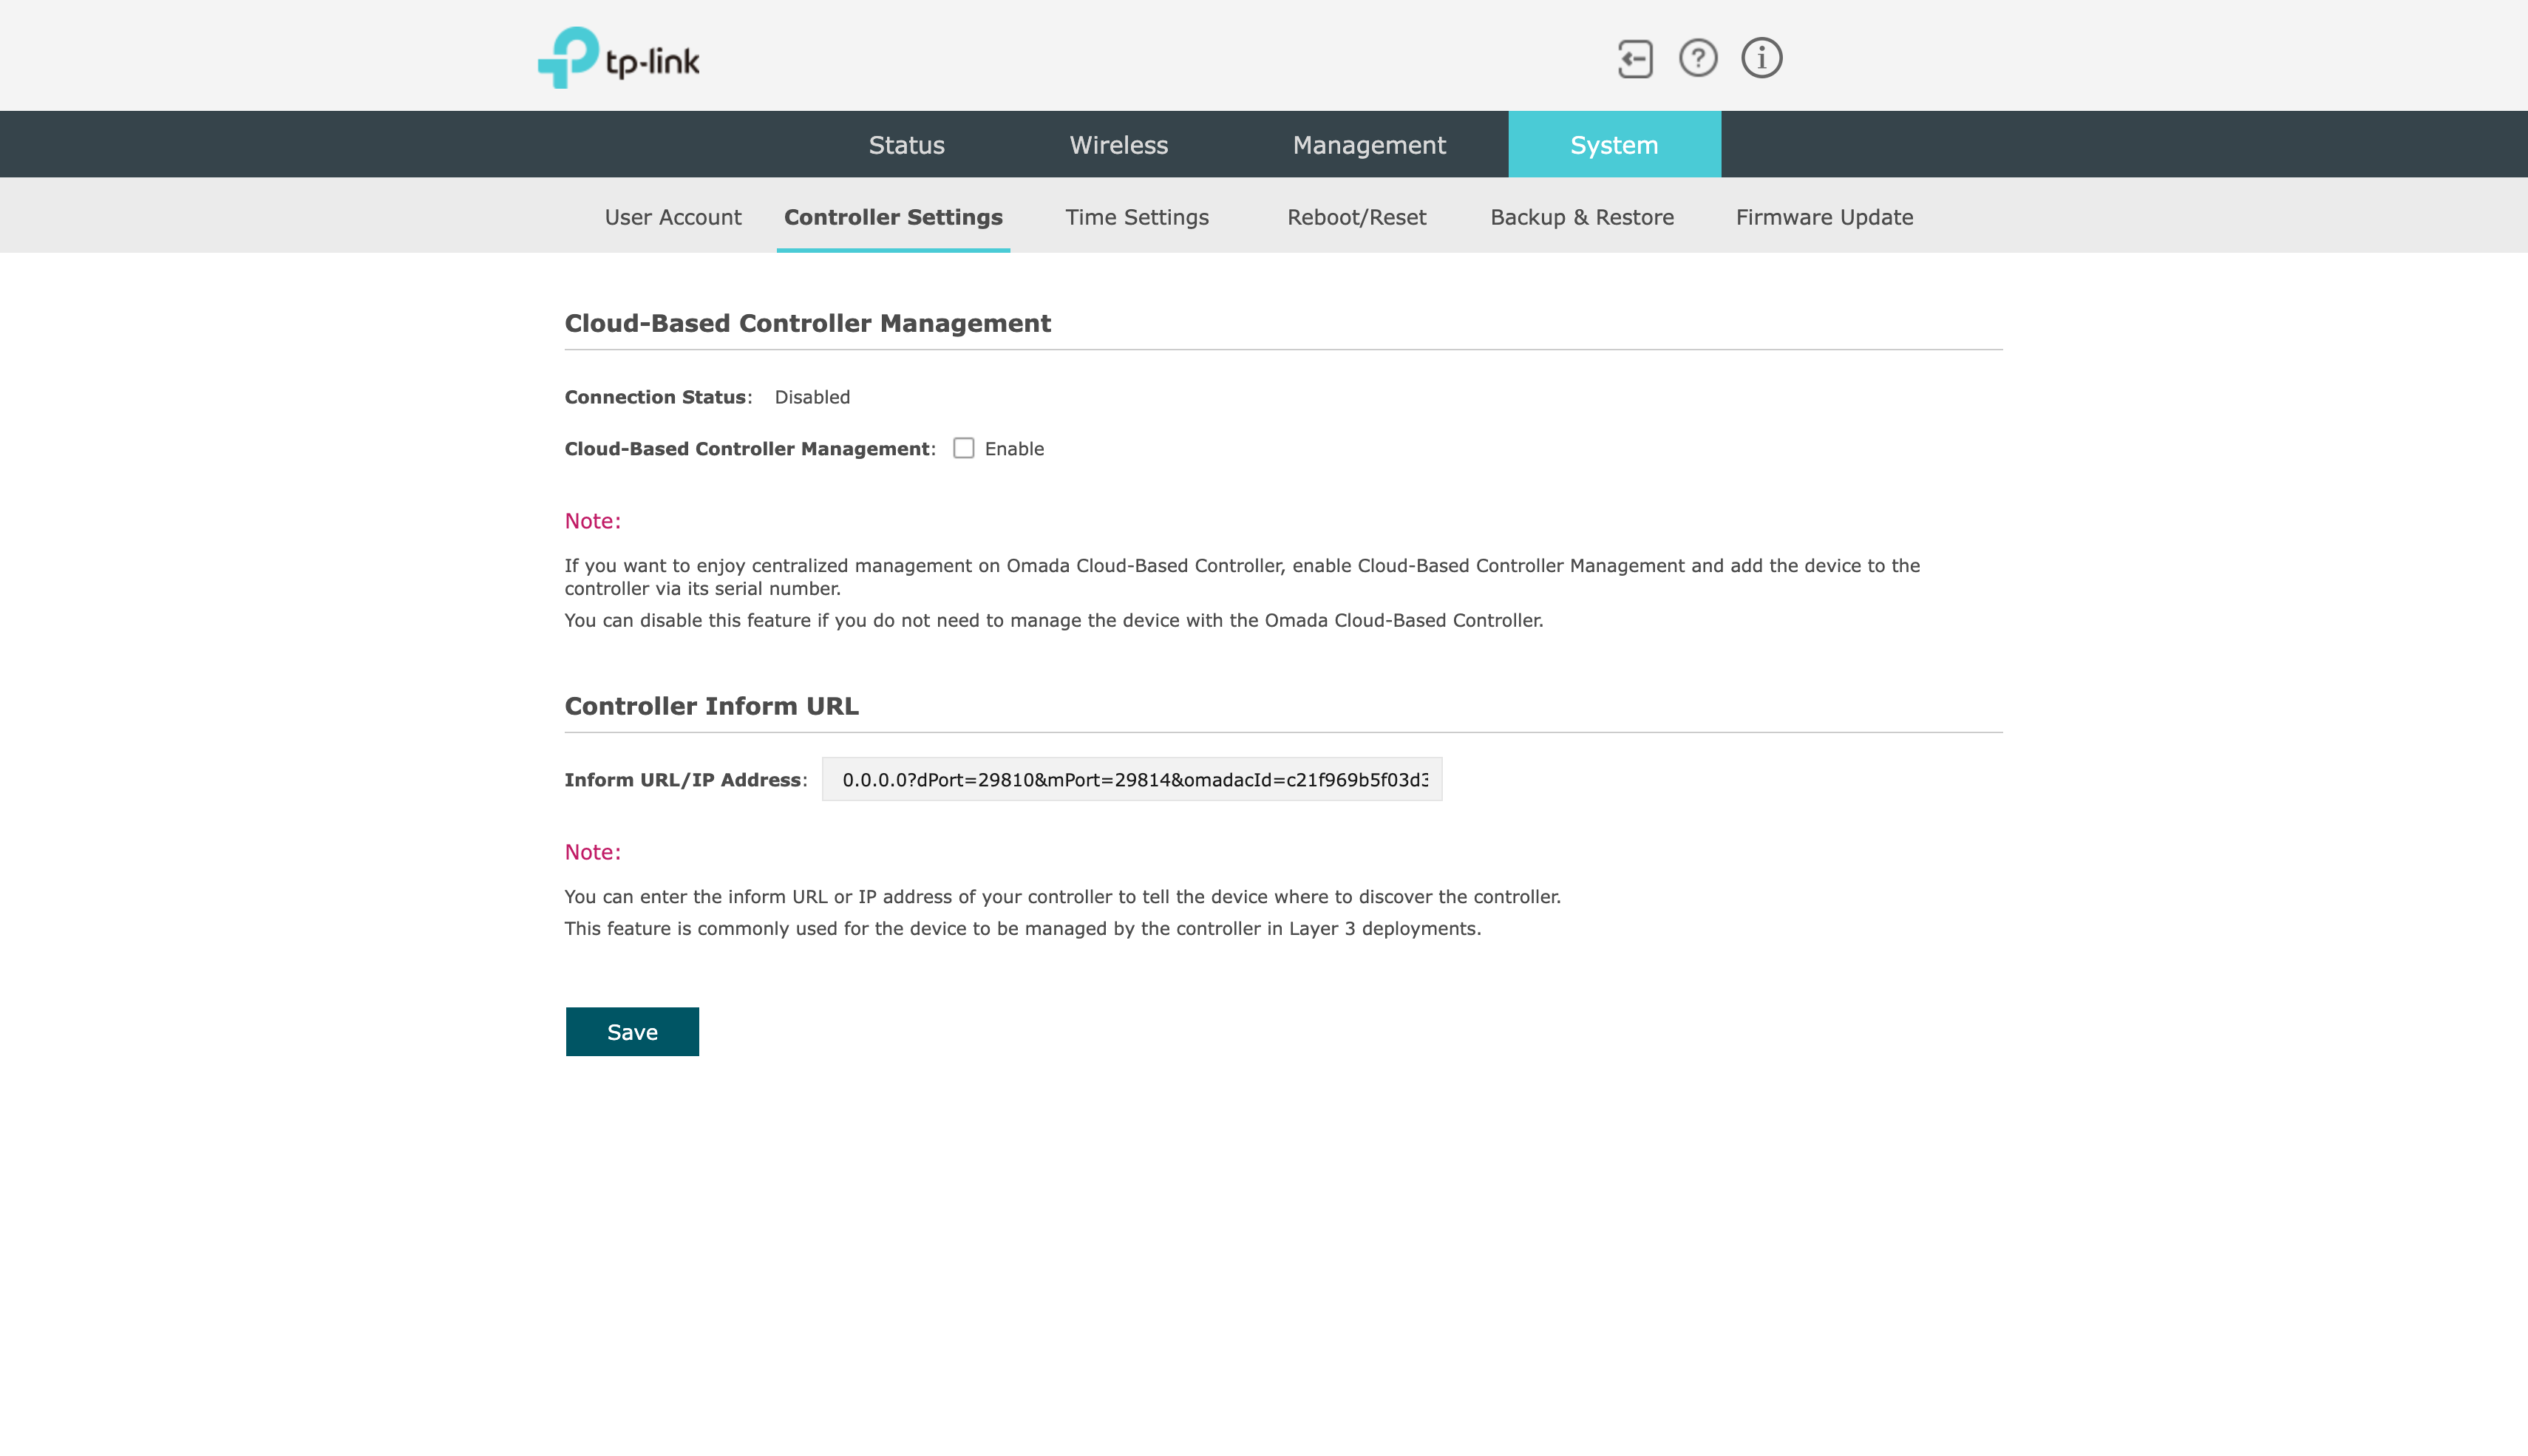
Add WLAN configuration
In this section, we will configure a WLAN for unbound PSK.
In the bottom left corner, click "Settings".
Click "Wireless Networks" to expand the menu. Click "WLAN"

Click "+ Create Wireless Network".

Complete the form below as indicated. Be sure to uncheck the 6 GHz band or the SSID will not broadcast. Click "Apply"
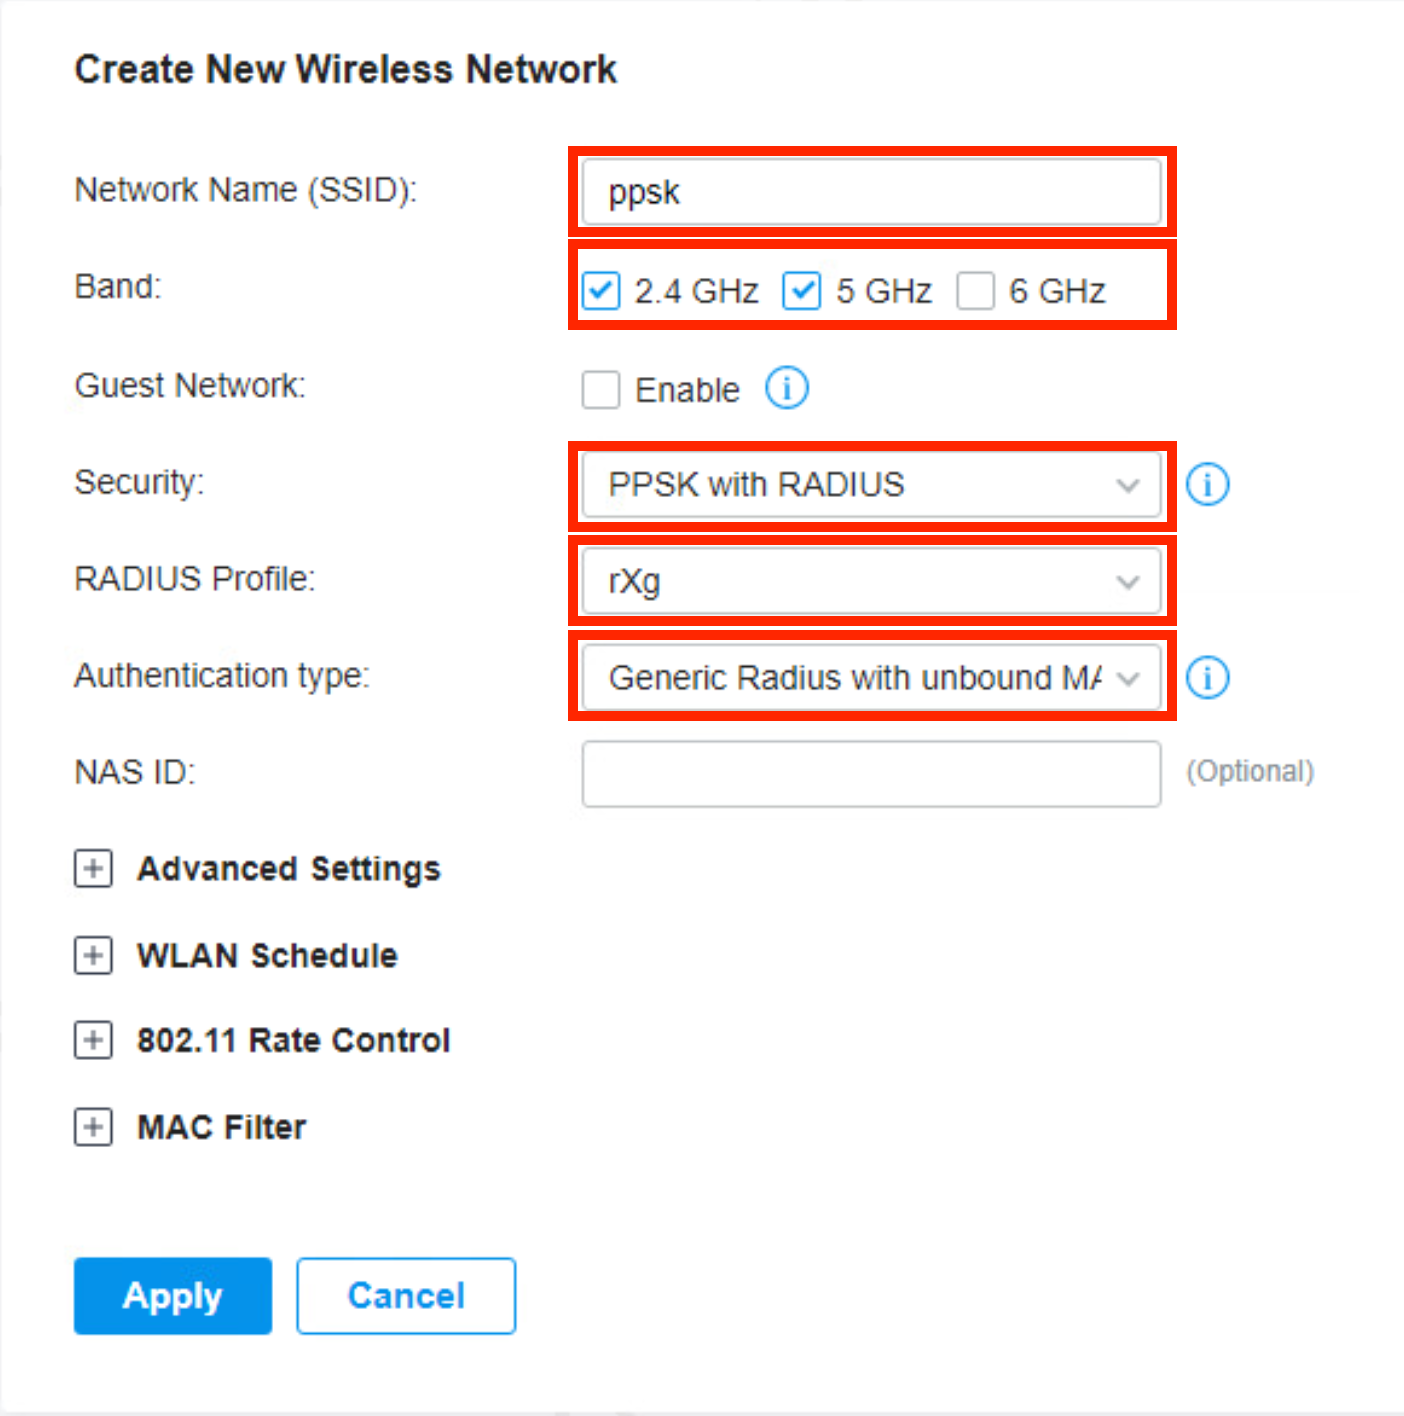
You should now see the SSID being broadcast as a secure network.

rXg Configuration
The following configuration assumes that the rXg has been previously configured for an MDU deployment. The steps below demonstrate how to add the TP-Link Omada controller to the existing configuration.
Add Omada Controller and WLAN
From the rXg UI, browse to Network >> Wireless Click "Create New" on the WLAN Controllers scaffold.

Complete the following fields with the appropriate information as it relates to the Omada controller. Click "Create"
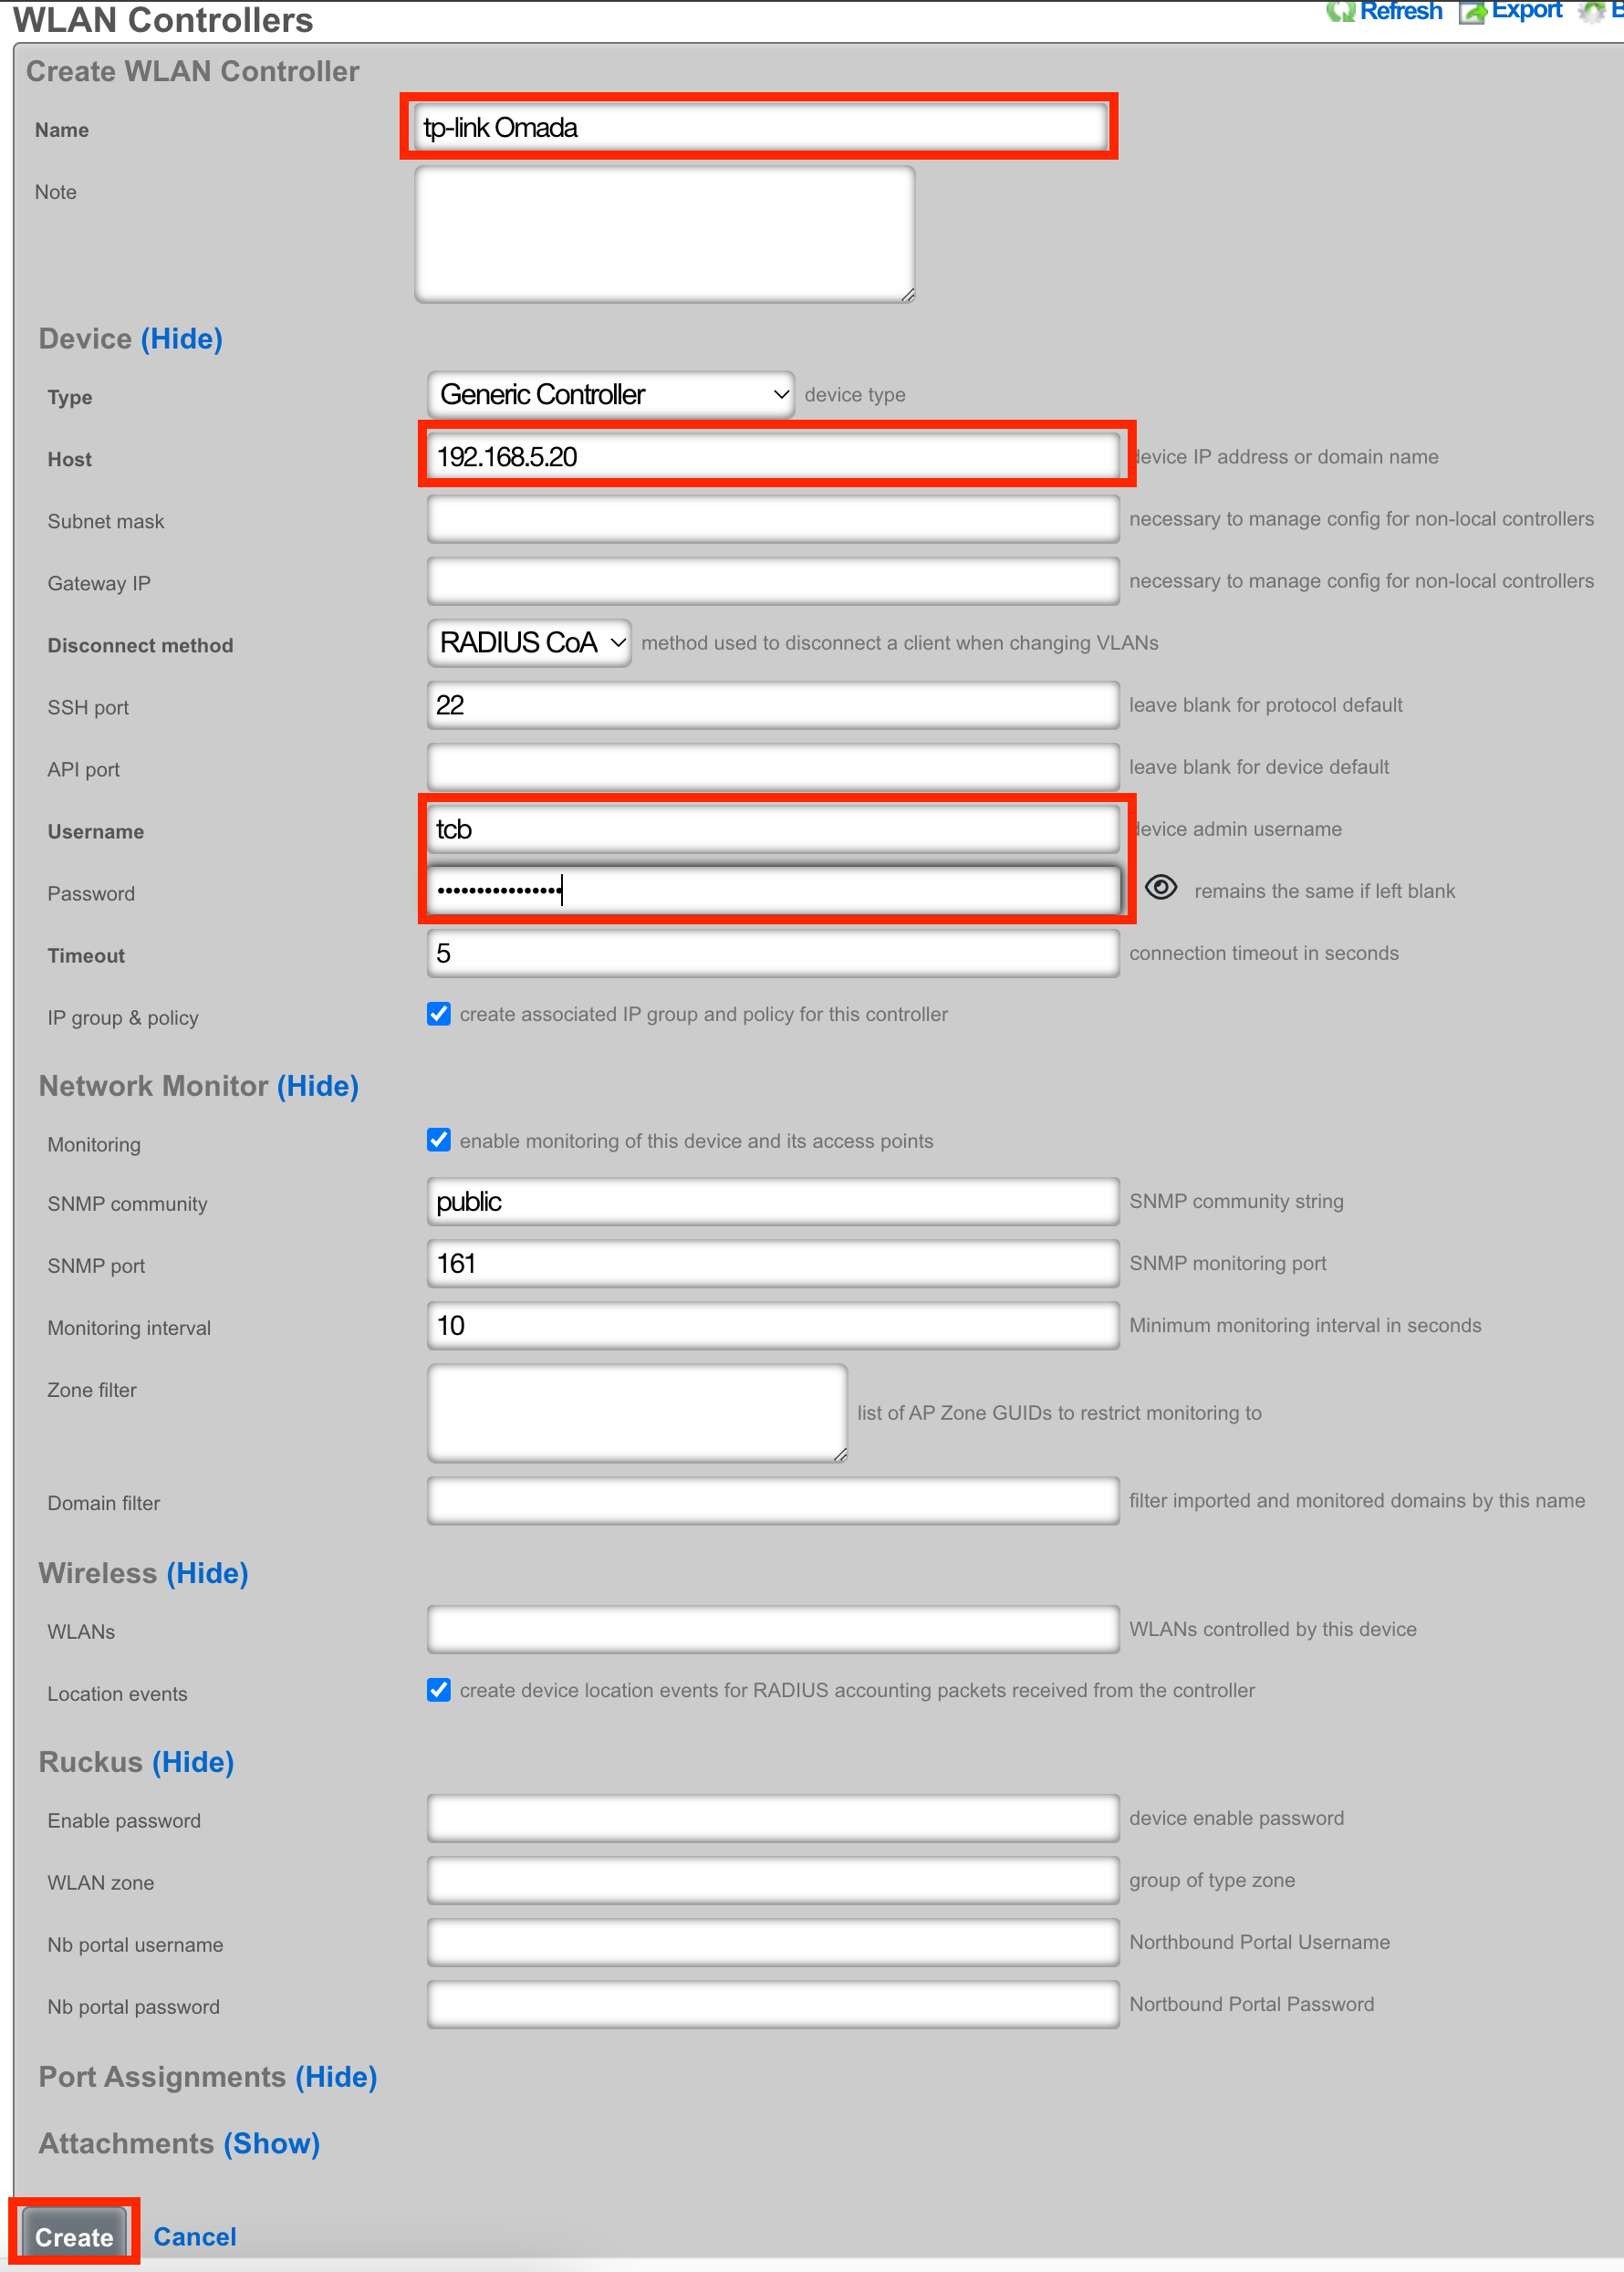
Click "Create New" on the WLANs scaffold.

Configure the following fields as indicated.
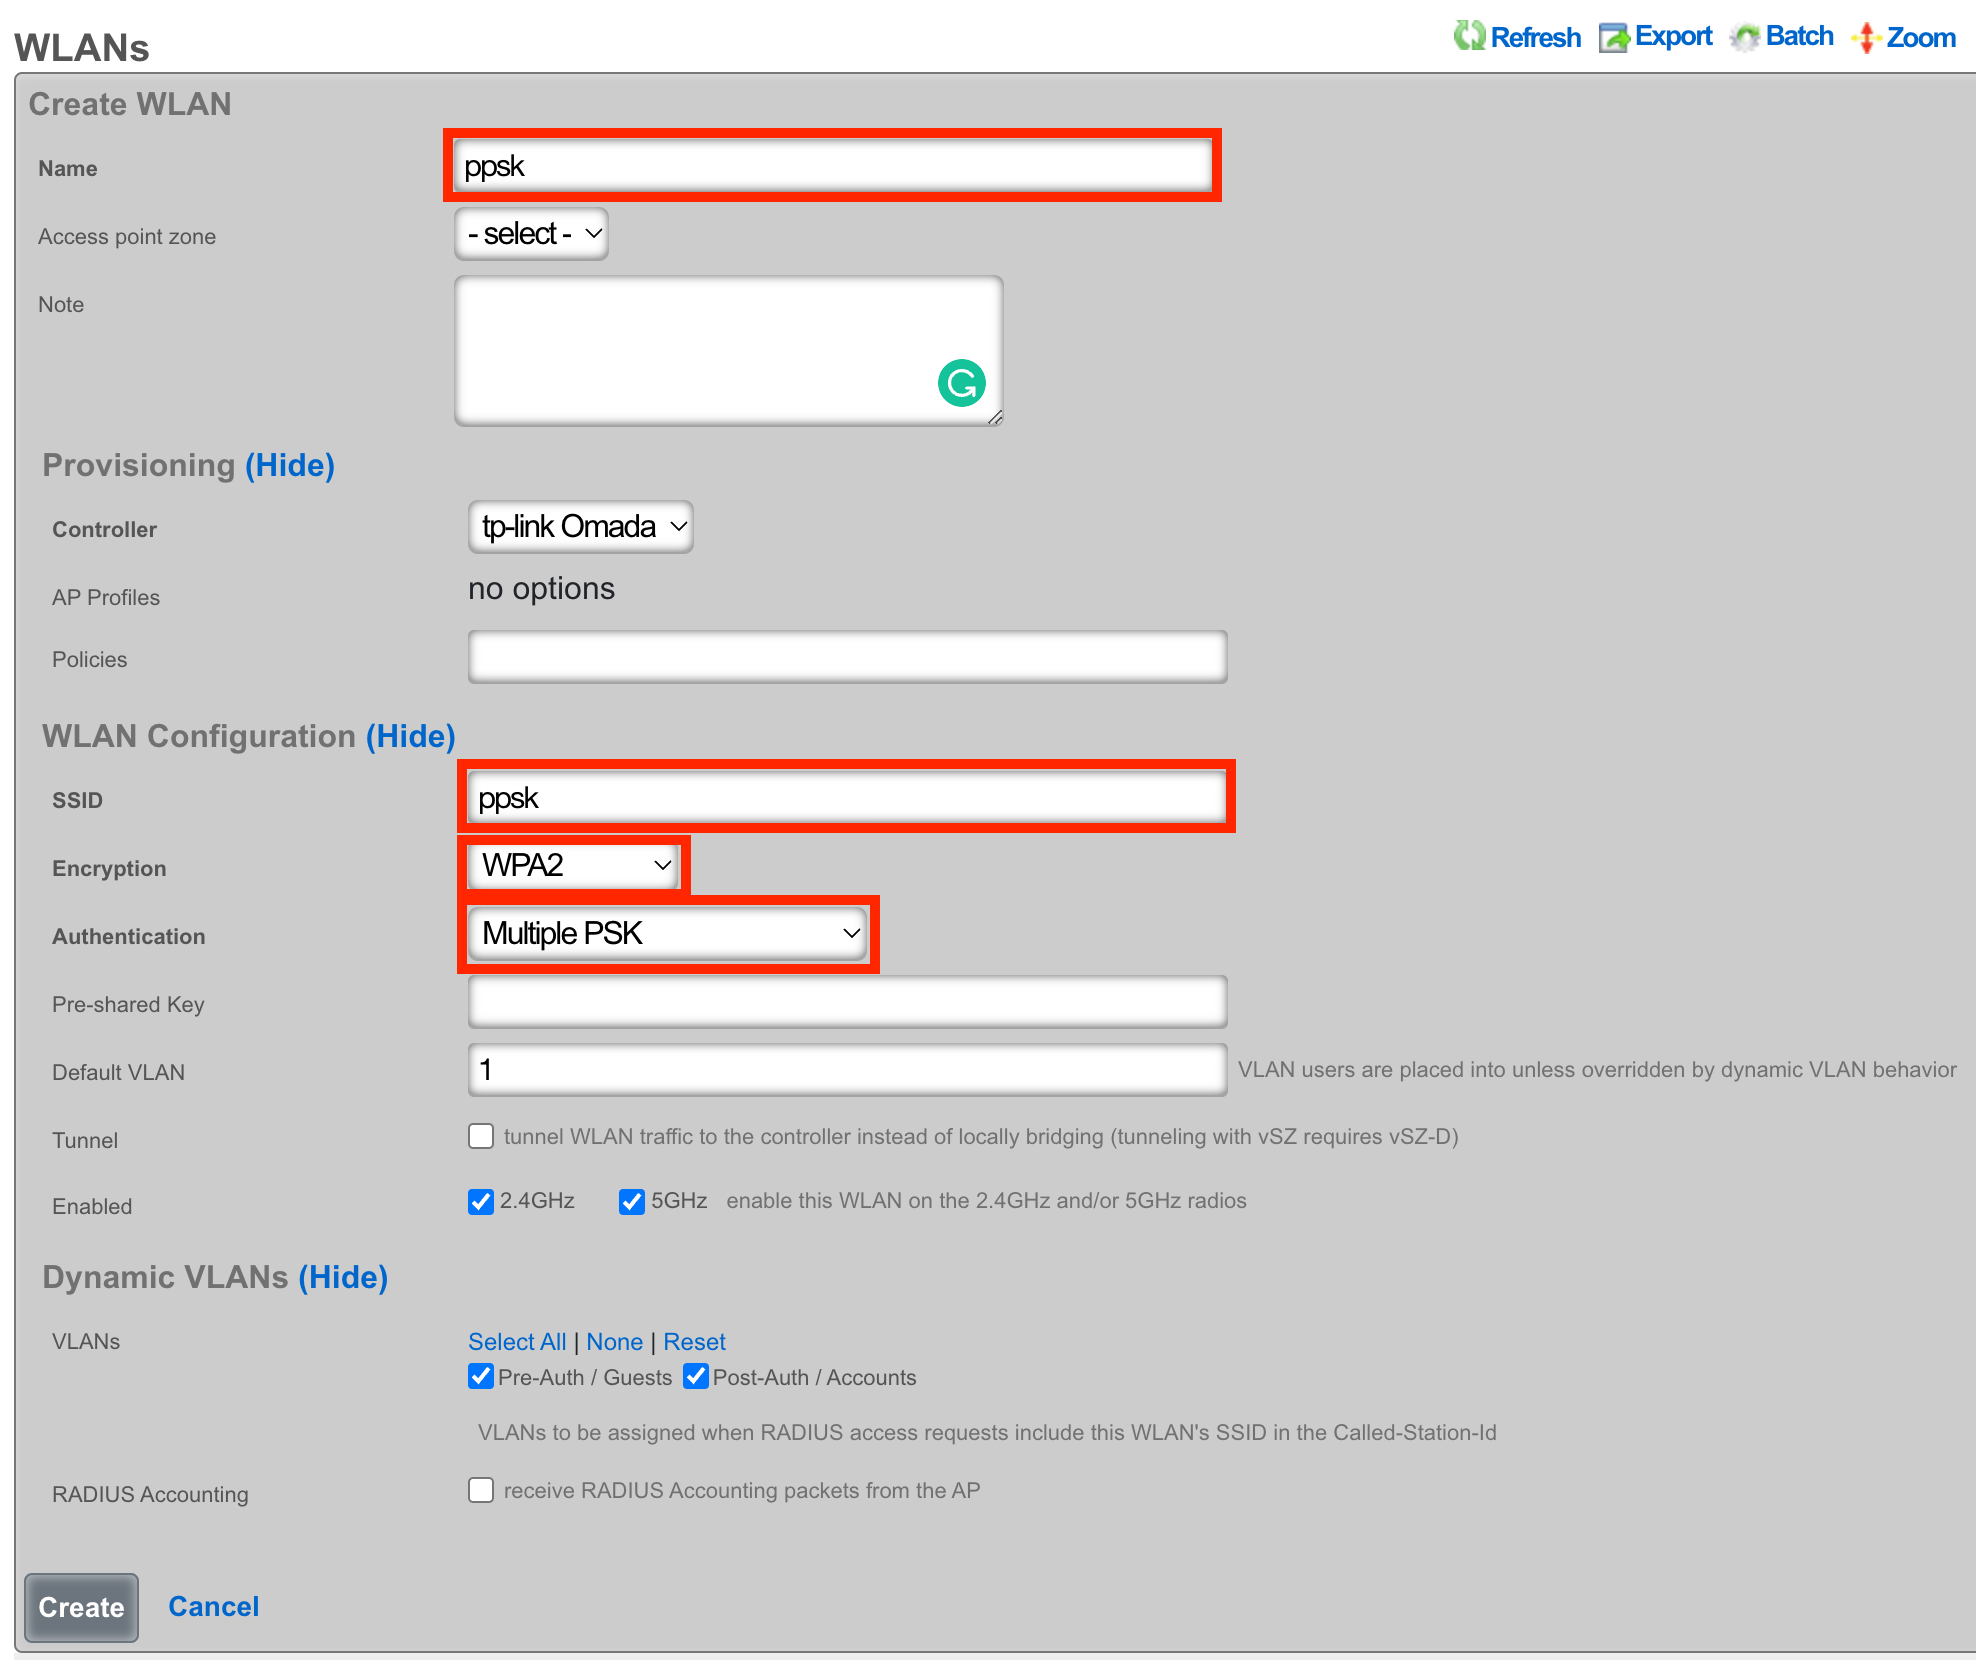
Configure RADIUS
From the rXg UI, browse to Services >> RADIUS Click "Create New" on the RADIUS Server Attributes scaffold.
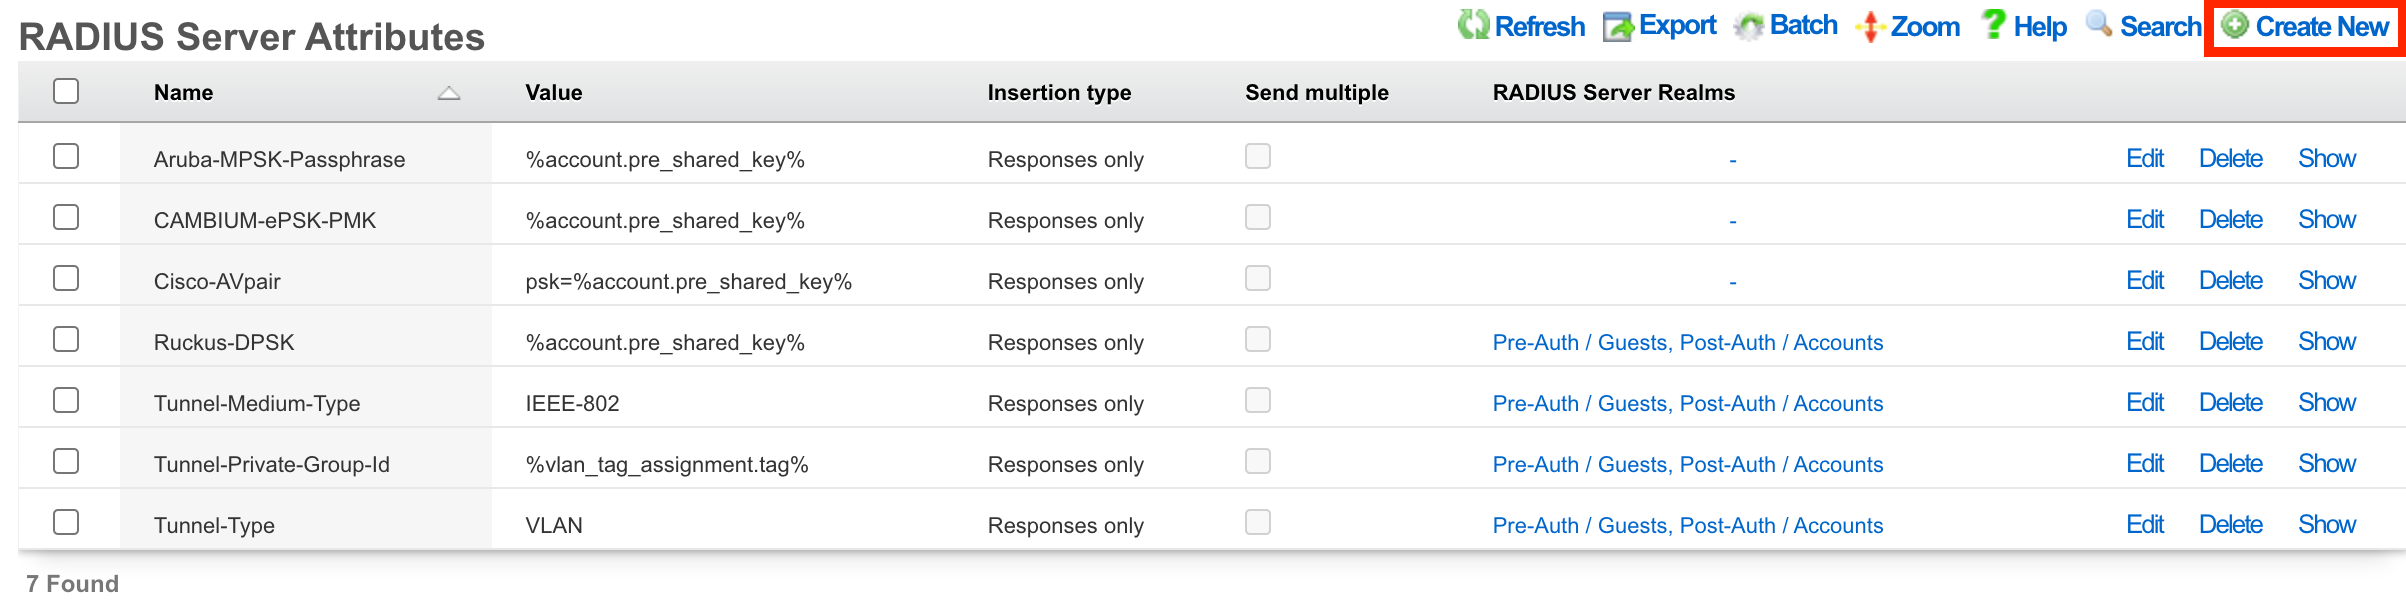
Set the Name of the Attribute to TPLink-EAPOL-Found-PMK Set the Value of the Attribute to %account.pre_shared_key% Make sure that your Post-Auth realm is selected. Click "Create"
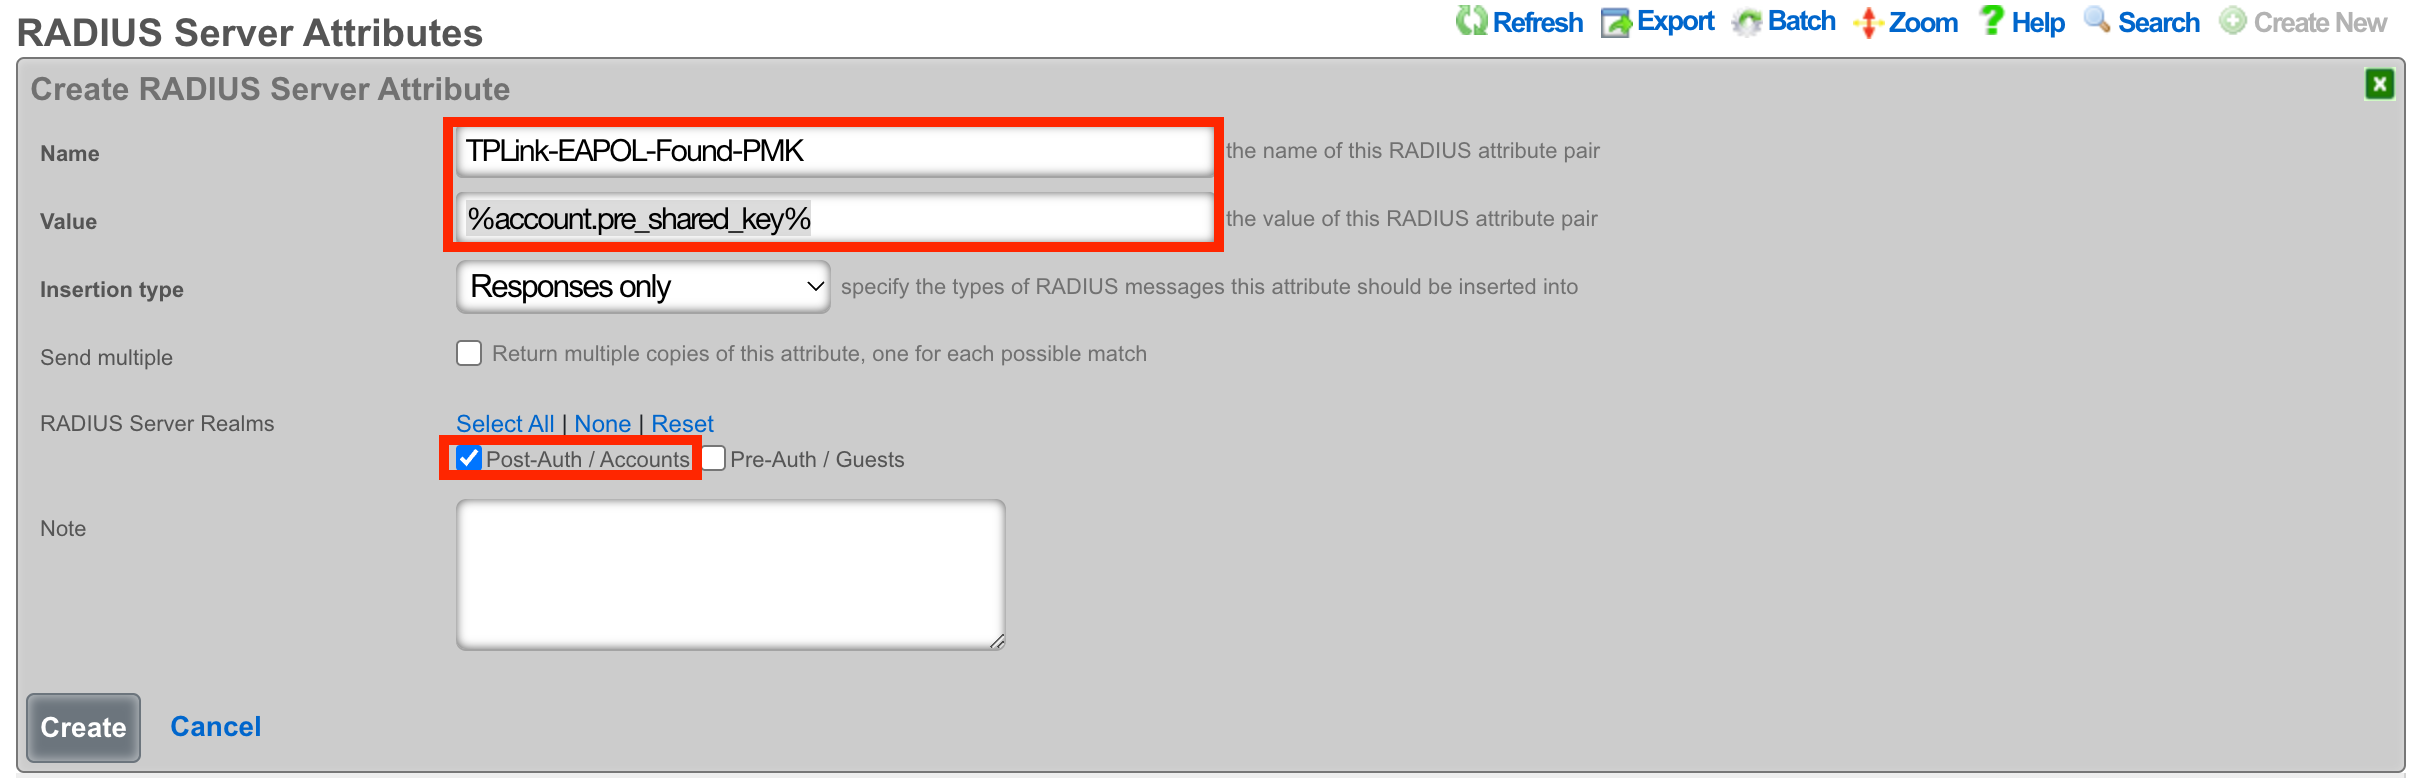
At this point, you should be able to associate to the ppsk SSID and enter a Pre-Shared Key that was previously configured for an account.
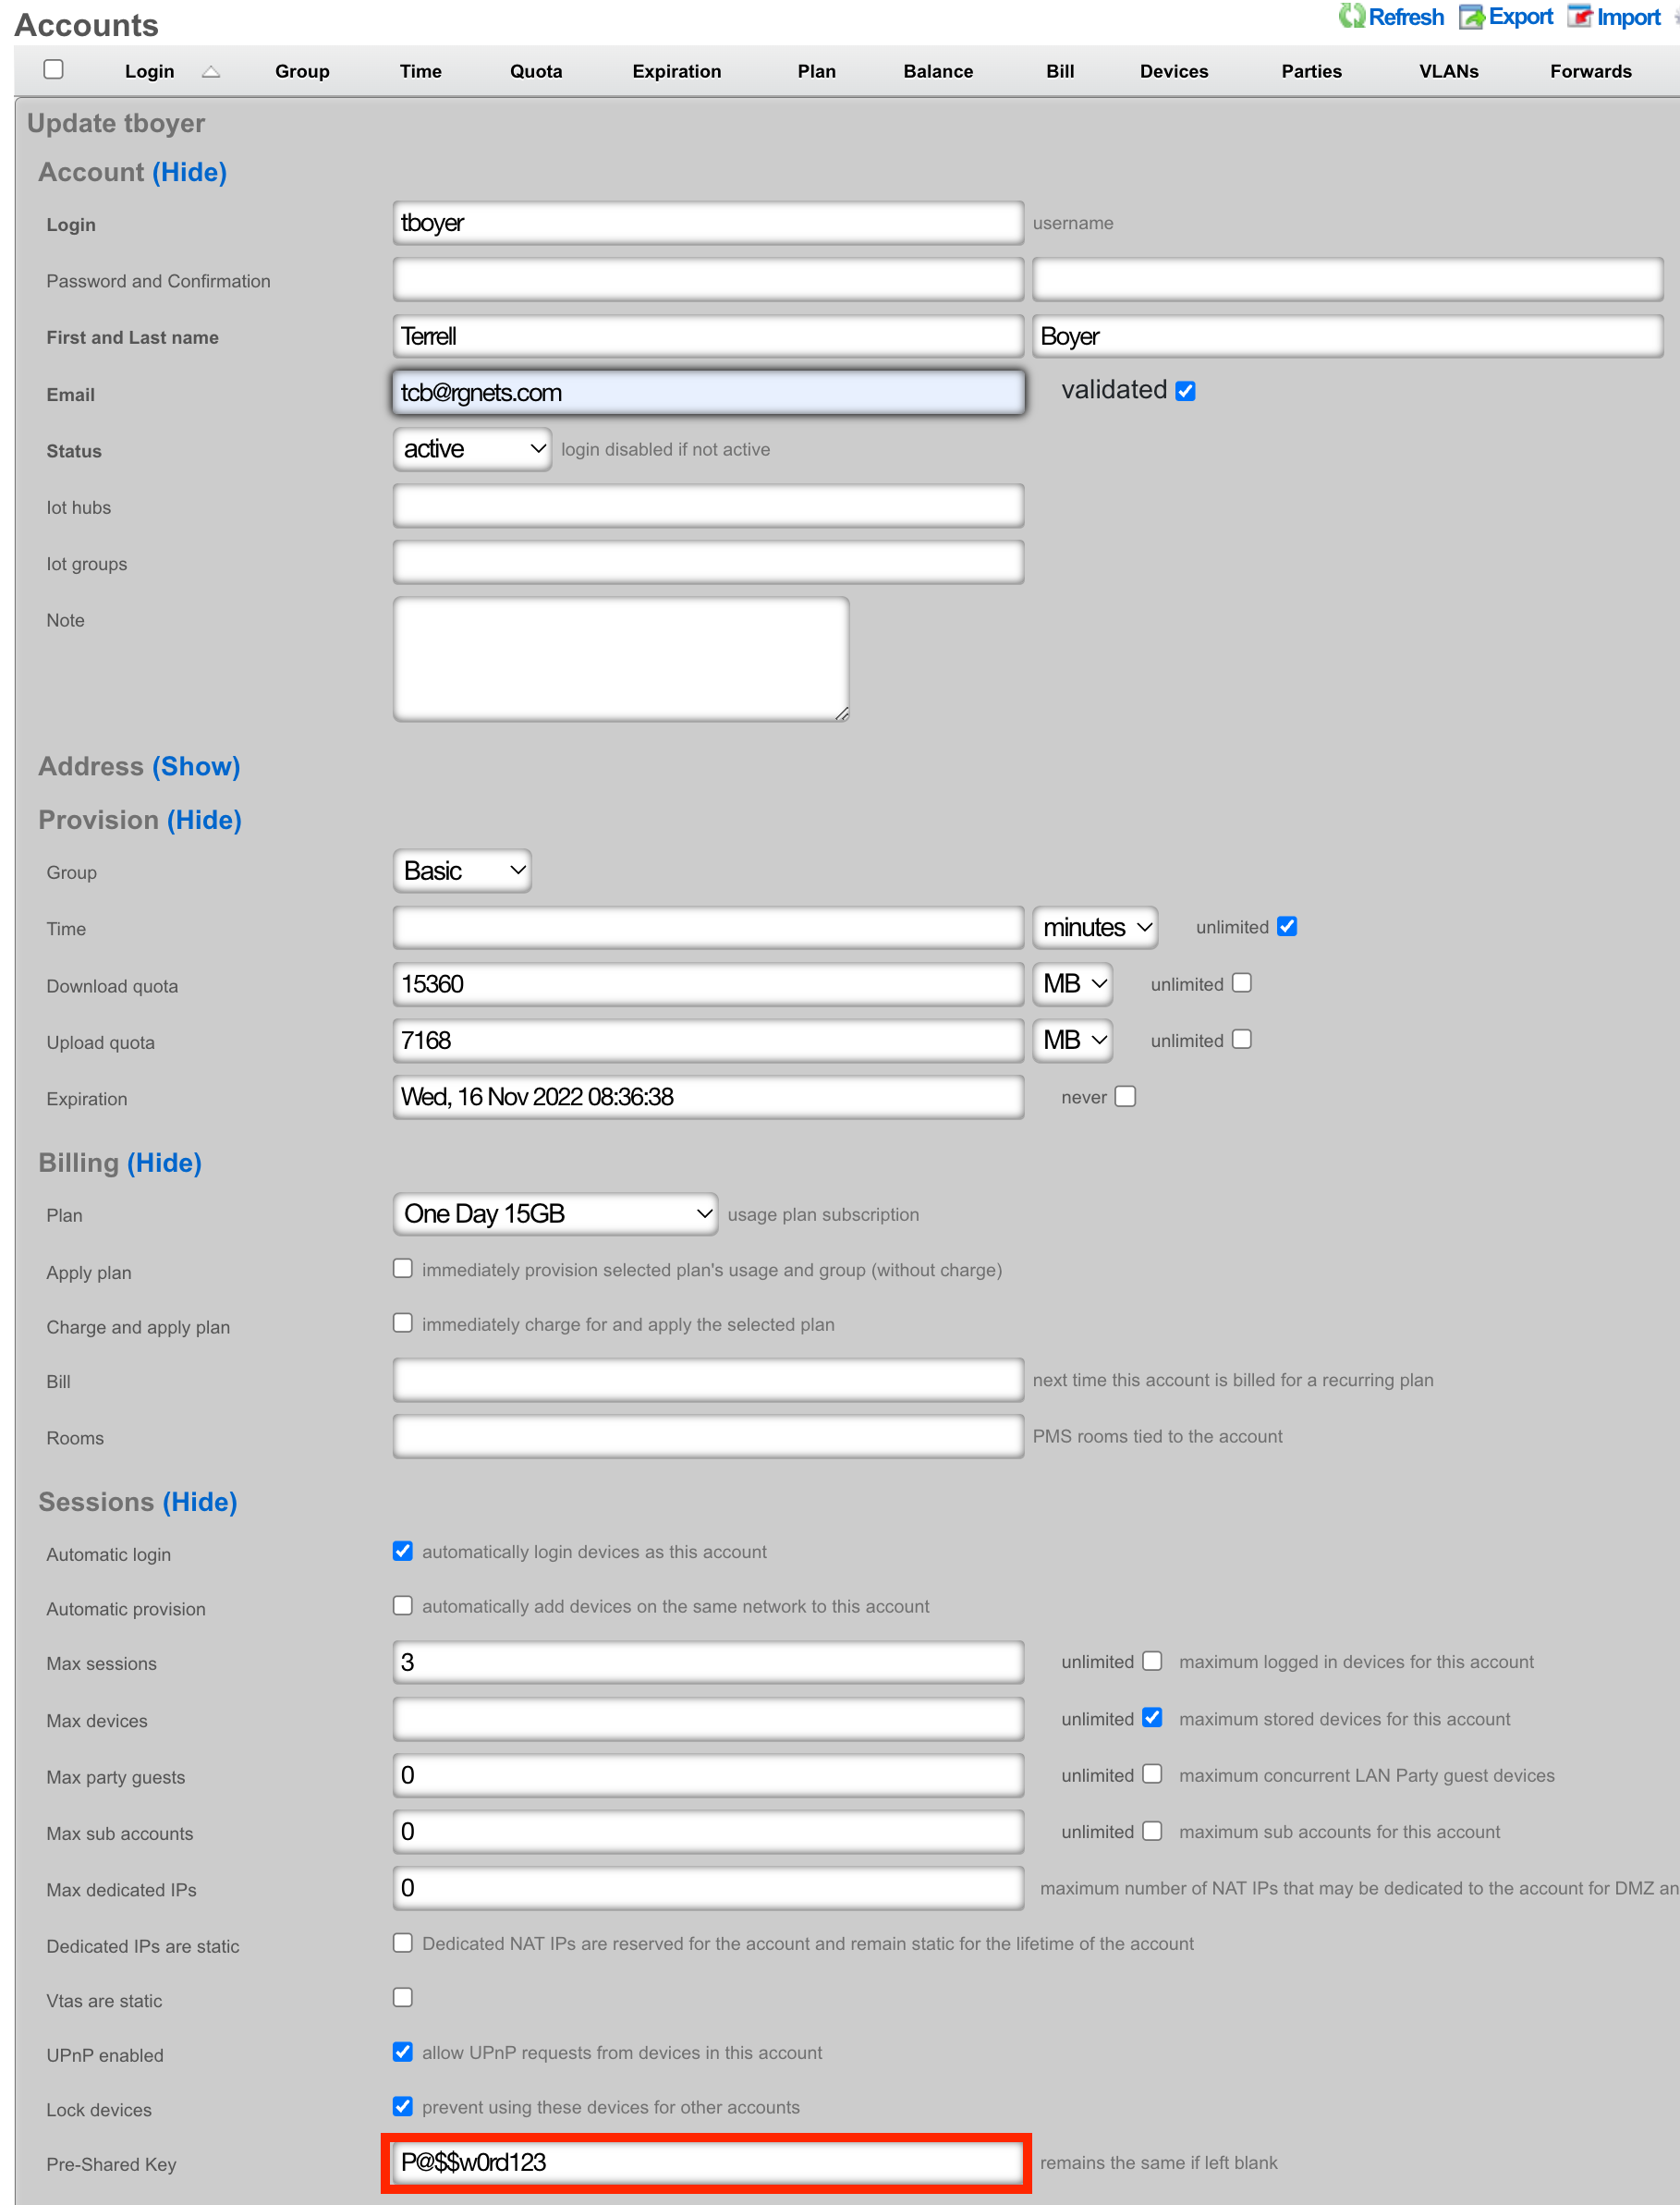
Location
The Location view presents the scaffolds associated with configuring the location services layer of your network.
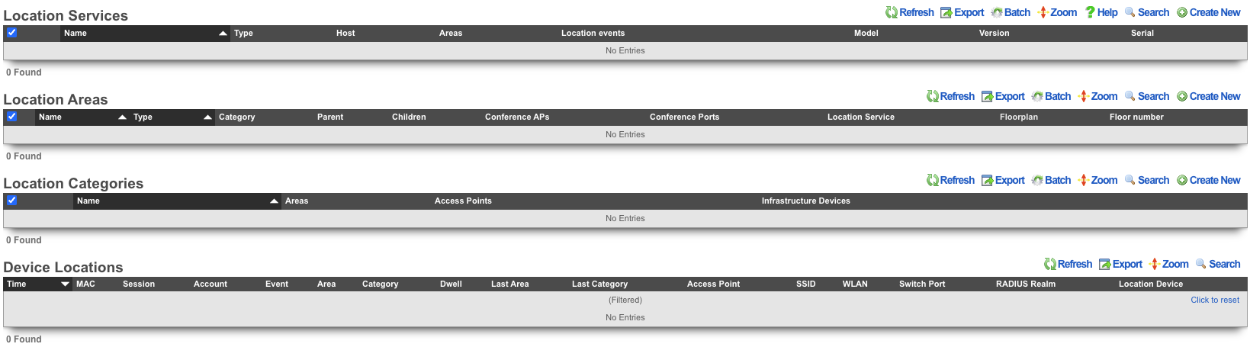
Location Services
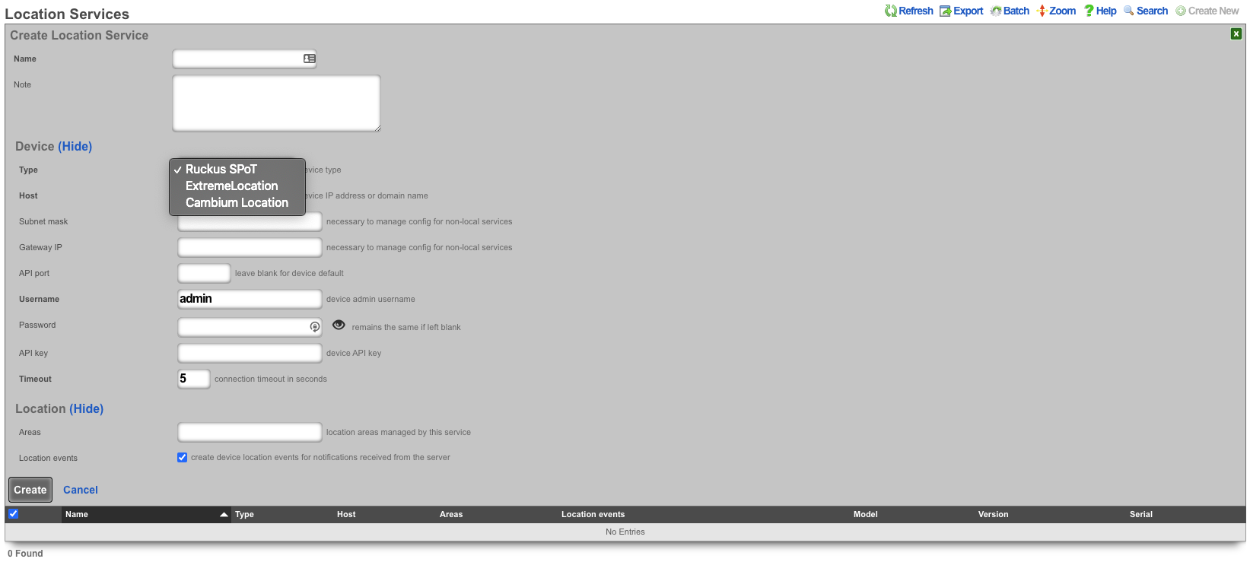
An entry in the Location Services scaffold defines a Location server with which the rXg will use to determine the location of a wireless client.
The name field is an arbitrary string descriptor used only for administrative identification. Choose a name that reflects the purpose of the record. This field has no bearing on the configuration or settings determined by this scaffold.
The note field is a place for the administrator to enter a comment. This field is purely informational and has no bearing on the configuration settings.
The Type field specifies the type of equipment being configured. Choose the appropriate option from the supported device types drop-down menu.
The Host field is the IP address or domain name of the Location device.
The Subnet mask field is used to enter the subnet mask of the network the location device is on.
The Gateway IP field is used to enter the gateway IP address of the location device.
The API port field is used to set the API port, leave blank for device default.
The Username field sets the device admin username.
The Password field sets the device password, note password will remains the same if left blank.
The API key field sets the device API key.
The Timeout field sets the connection timeout in seconds.
The Areas field sets the location areas managed by this service.
The Location events checkbox will create device location events for notifications received from the server if checked.
Location Areas
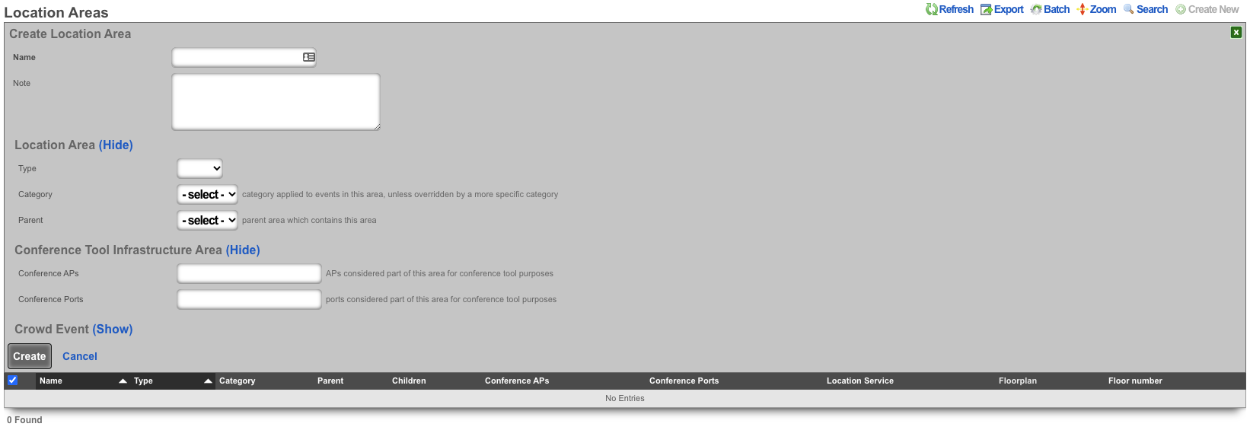
An entry in the Location Areas scaffold allows the Operator of the rXg to define areas that can then be tied to Location Categories.
The Type field is used to determine if the area is a floor or site.
The Category field if set specifies the category applied to events in this area, unless overridden by a more specific category.
The Parent field sets the parent are which contains this area. Example, a site may be a parent to floor.
The Conference APs field allows the Operator to add any APs that should be used for Conferences, this used in conjunction with the conference tool makes it easy to broadcast Conference SSIDs to only the areas where the conference is taking place.
The Conference Ports field allows the Operator to add switch ports that should be used for Conferences.
When configured the Admin Roles field sets the admin roles that will be able to request pending admin transactions from APs in this Location Area.
The Min Gradient and Max Gradient fields allow the operator to override the default heatmap gradiation coloration.
Location Categories
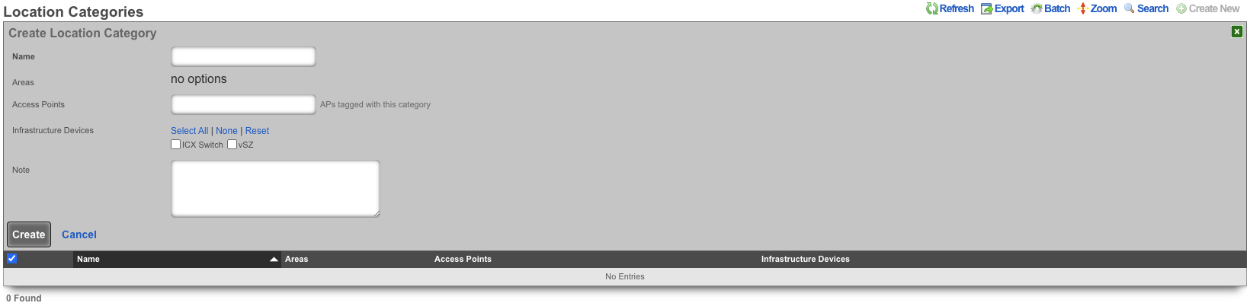
The Areas field allows the Operator of the rXg to assign categories to specific Location Areas , which includes any APs selected when creating the category.
The Access Points field allows the Operator to select specific APs that will be tied to this Location Category.
The Infrastructure Devices field allows the Operator to assign Infrastructure Devices to the Location Category.
Device Locations

The Device Locations scaffold lists the reported location of devices on the network. The Time entry shows the time the record was created. The MAC entry lists the MAC address of the connected device. The Session entry shows the login session for the device. The Account entry lists the account the device is a member of. The Event field shows the event type for record. The Area field shows the Location Area the record belongs to and the Category field shows the Location Category the record is associated with. The Dwell entry displays the amount of time the device has been in a given area. The Last Area and Last Category entries display the previous are and category the device was associated with. The Access Point entry lists the IP and MAC address the device was connected to at the time the entry was created. The SSID field displays the SSID the client device was connected to. The WLAN entry shows the WLAN on the rXg the client device was associated with. The RADIUS Realm entry shows the radius realm the device authenticated against. The Location Device lists the Infdev device providing the location information.
Example Setup
In this example shows the process of setting up location in a MDU.
- Add floorplan to location area.
- Create regions for AP placement.
- Place AP's into regions.
- Create Location Categories and add AP's.
1. Add floorplan to location area.
Navigate to **Network::Location** and create a new **Location Area**. The **Name** field is arbitrary, enter a name. Change the **Type** field to **Floor**. Note: by selecting floor it allows the operator to upload a floor plan and this will become the partent for any regions that are created, if **Site** is selected this will be the parent of the floors. Leave **Category** on -select- as there are none to select at this time. For the **Floorplan** field click the Choose File button and select the floorplan image to be used. Set the **Floor number** field to set the floor number. Leave the **Parent** field on -select- and hit the **Create** button.

2. Create regions for AP placement.
To create regions click on the Floorplan in the **Location Area** scaffold, this will open up the map allowing the placement of APs and Regions.


In the **Add a Region** section enter a name for the region, pick a color for the region and then click **Add Region**. This create a region that can be placed on the floorplan. The region can be resized by dragging the bottom right corner.

Drag the region to the desired area on the floor plan, adjust size and click save.

Repeat for each area that needs a region.

3. Place AP's into regions.
Select an AP from the **Place an Access Point / Senso:** dropdown. Click the **Drag me** button.

This will generate an AP that can be placed on the floor plan, the first AP will go in Unit1.

Drag AP to its placement on the map and click **Save**.

Repeat this step for each AP that is present on the floorplan.

4. Create Location Categories and add AP's.
Create a new **Location Category**.

The **Name** field is arbitrary, in this case there will be a **Location Category** created for each unit, the name will reflect the unit. Select the unit for in the **Areas** field. Select the AP or APs from the **Access Points** field. Click **Create**.

Repeat for each Unit.

The rXg is now configured to start keeping track of **Device Locations**. In order for this to work at a minimum, radius account packets must be received. The below image shows the **WLAN** settings for the SSID setup for this example. Note: In this example we have control of the wireless infrastructure creating the WLAN pushed all needed settings, without control the WLAN would need to be configured manually on the wireless infrastructure.

The below image shows the information received in the **Device Location** scaffold.

Recalibration
In order for location-aware functionality to work as well as possible, setting the right calibration on your floorplan is essential. In order to begin recalibration, click on 'Begin Recalibration' In the floorplan view:
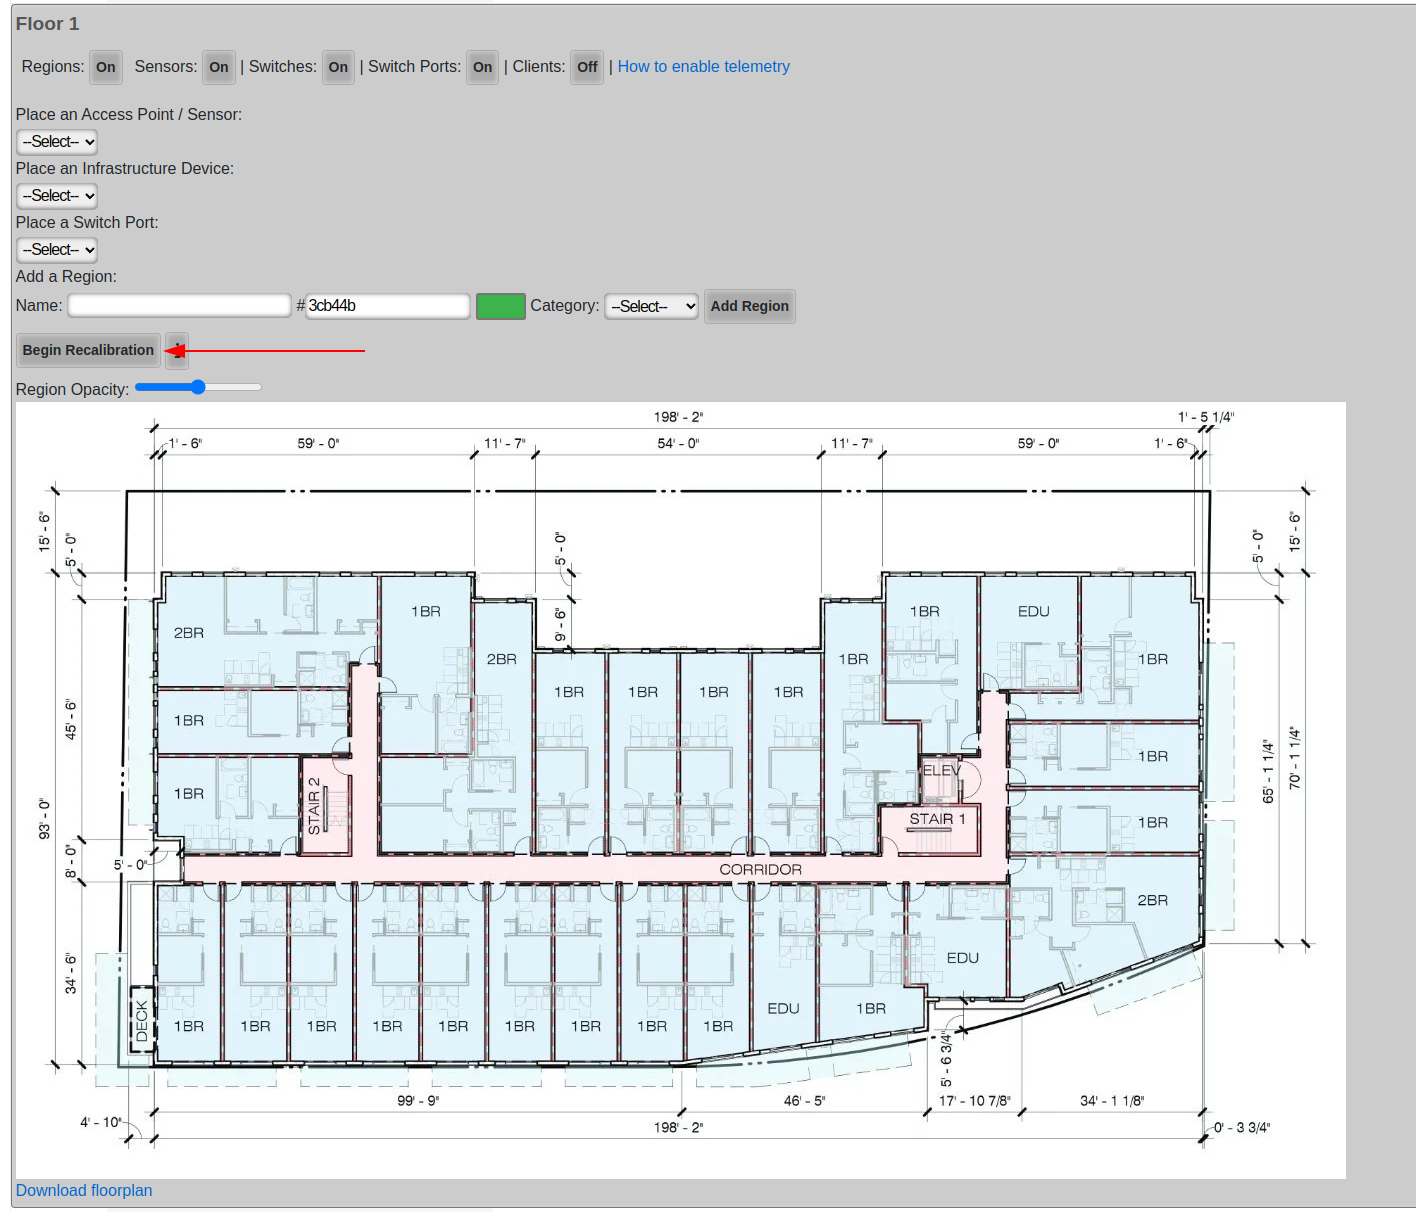
Next, click a point on the map. Often times, a wall or one side of a door frame is a good choice because they are easy to measure, in fact most doors are roughly 1 meter wide.
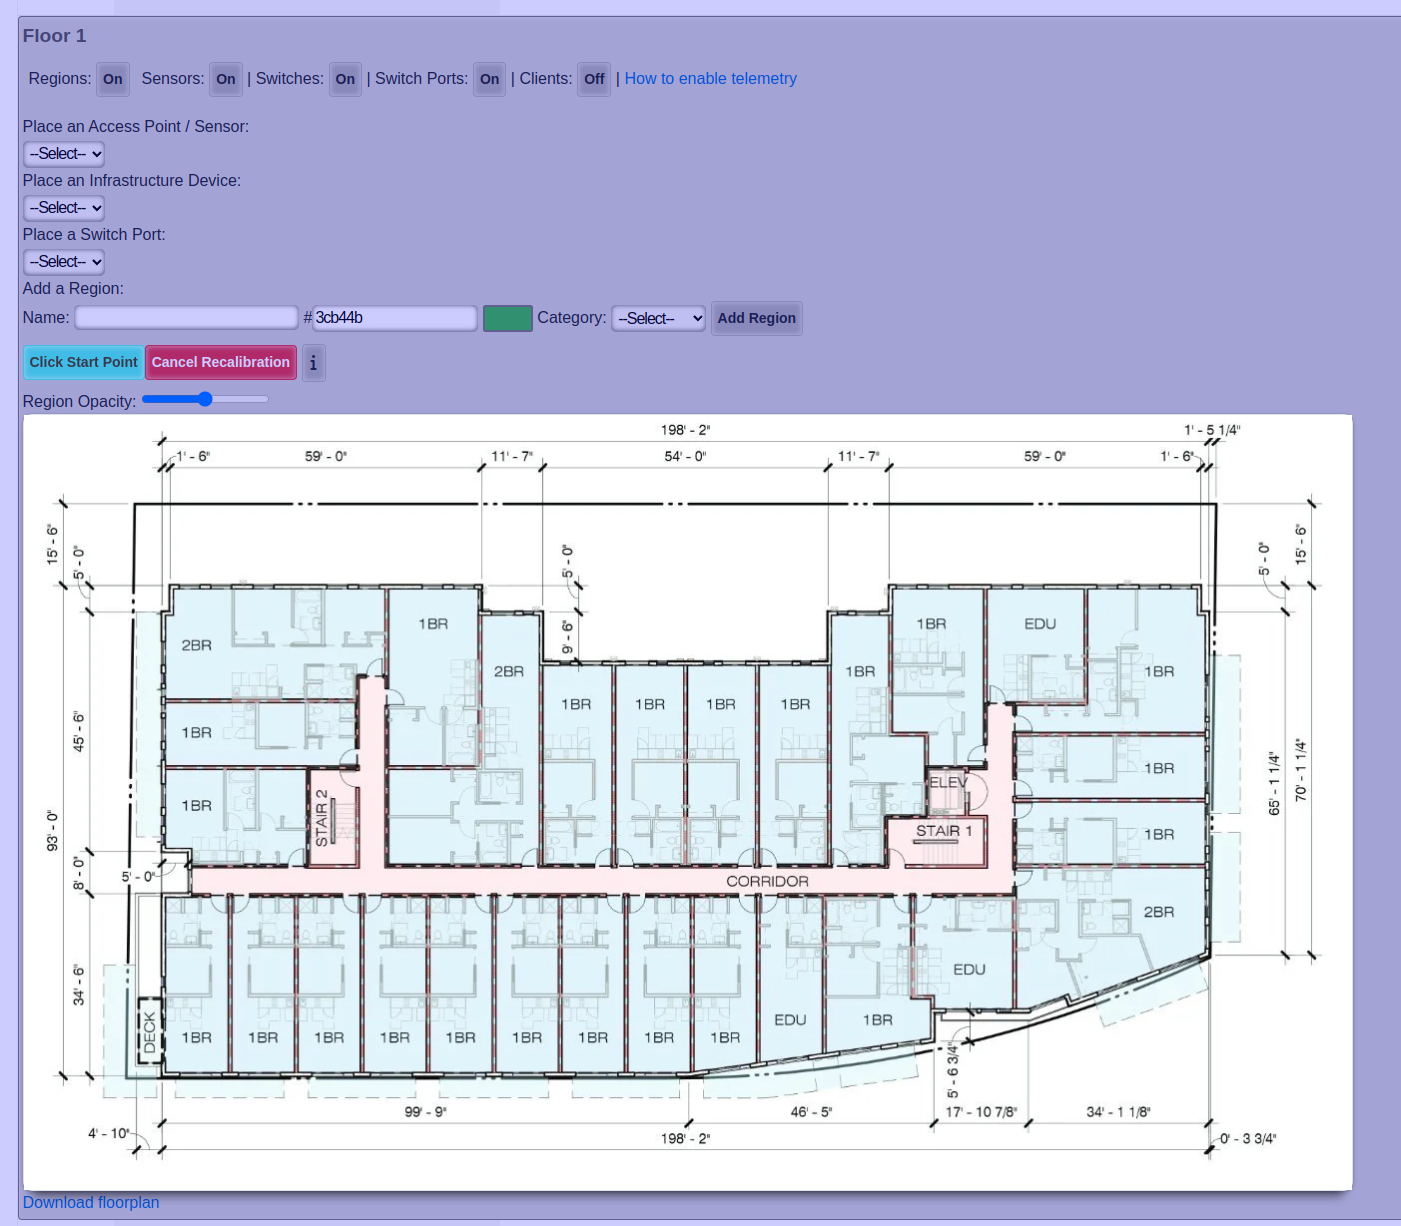
After you clicked your first point, click your second point
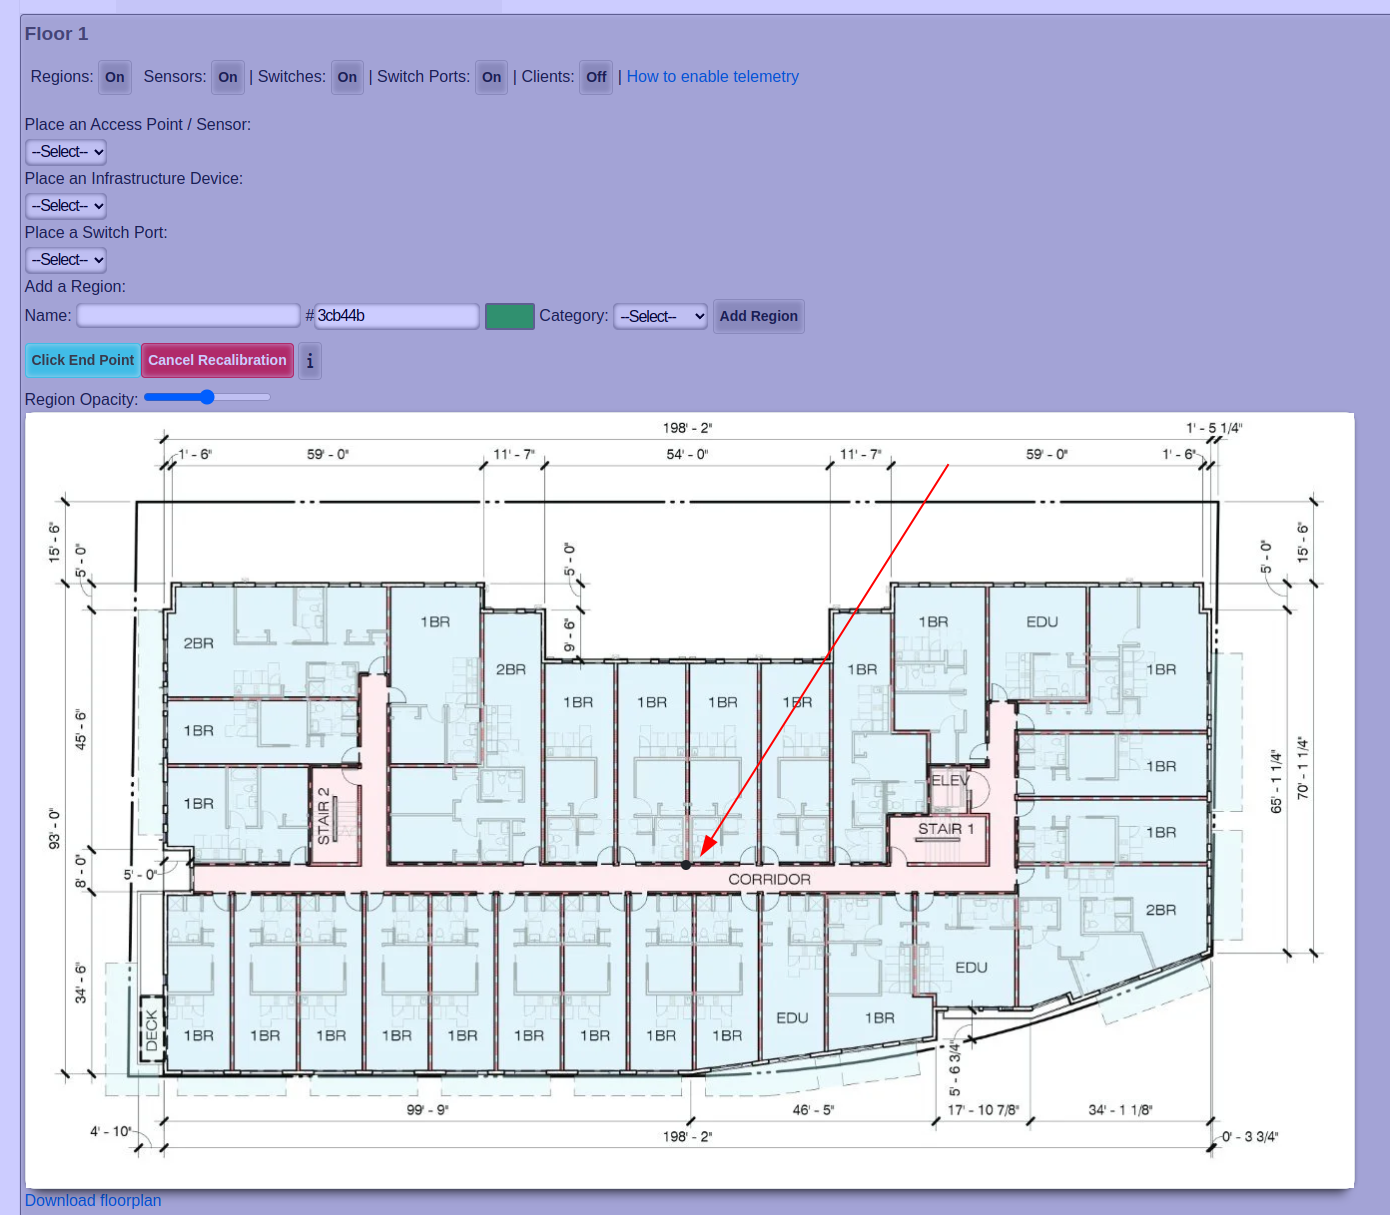
After you clicked your second point, enter the distance between the two points in meters, and click Finish.
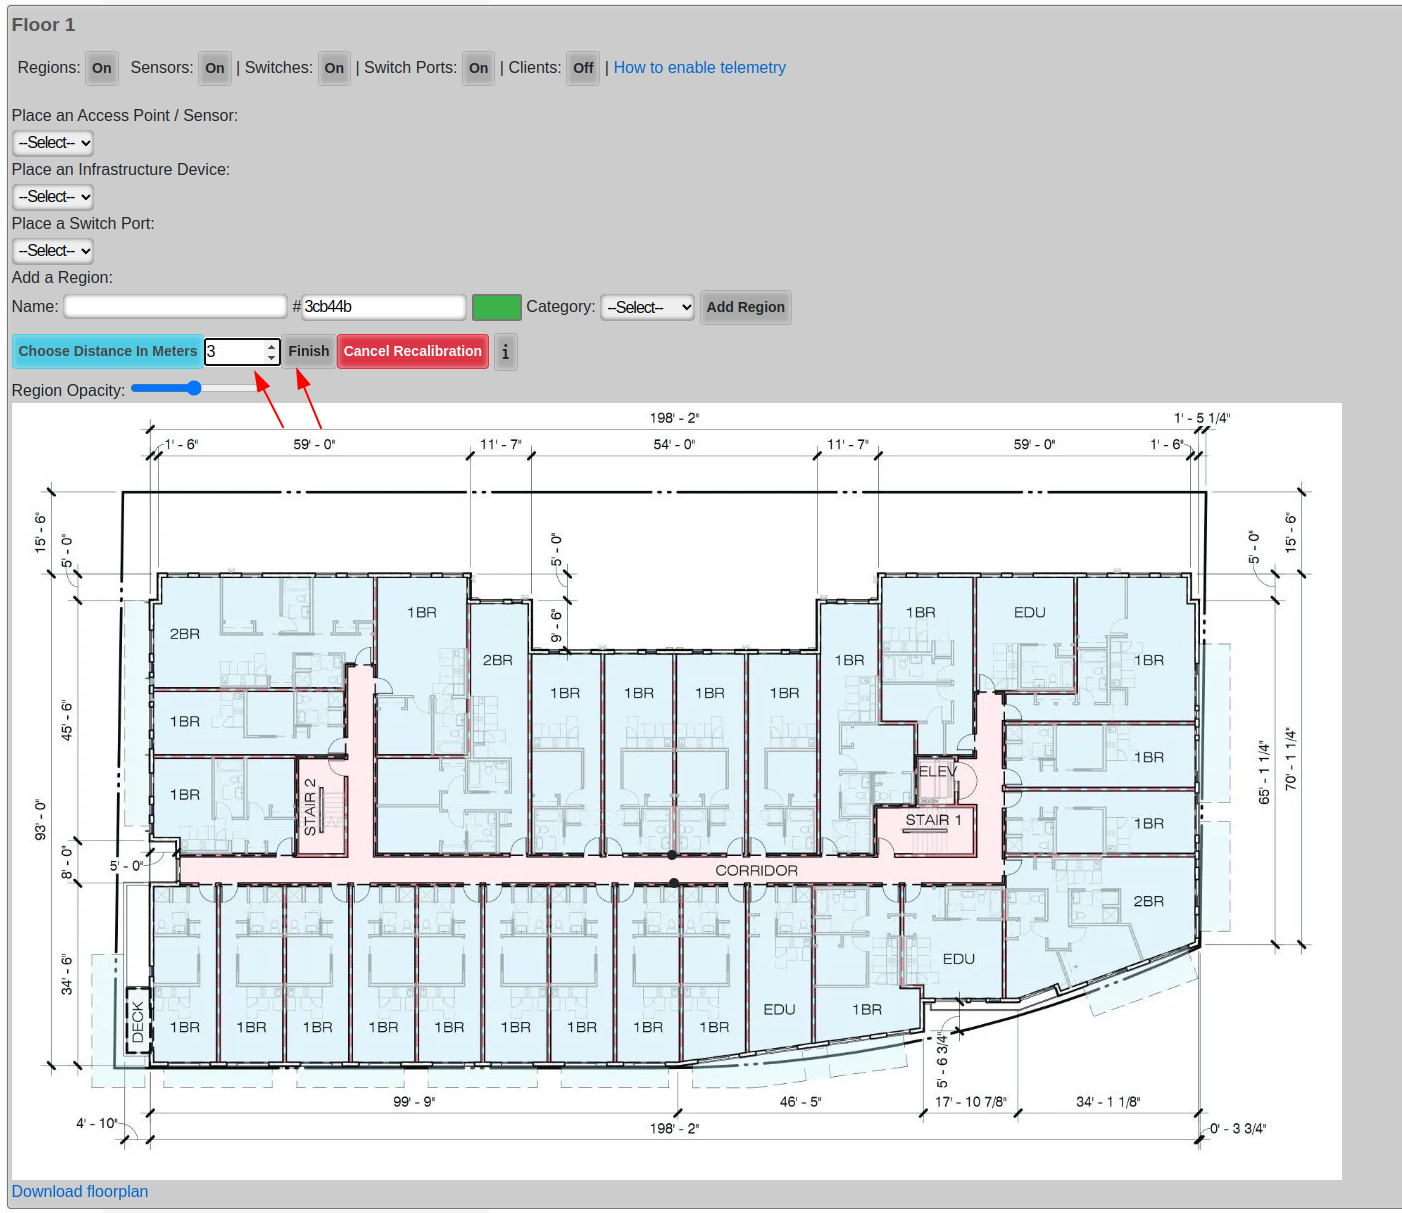
Finally just let the floor plan view close on its own and reopen it.
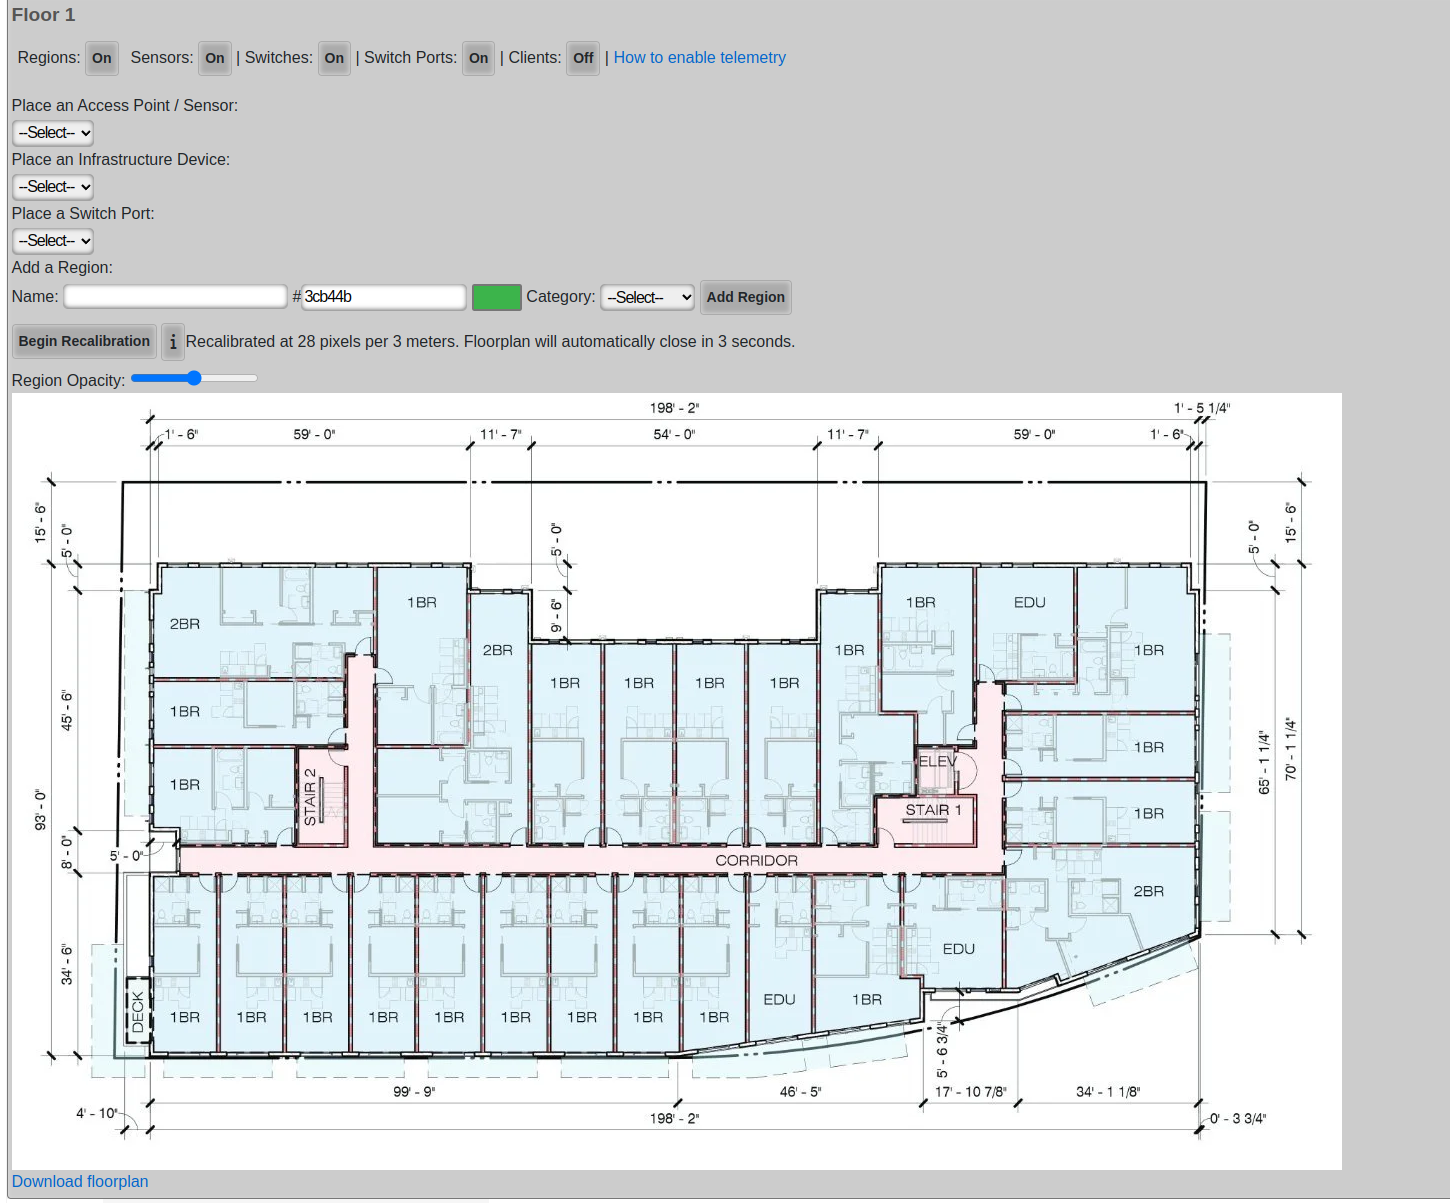
After you re-open the floor plan, the new calibration will be displayed.
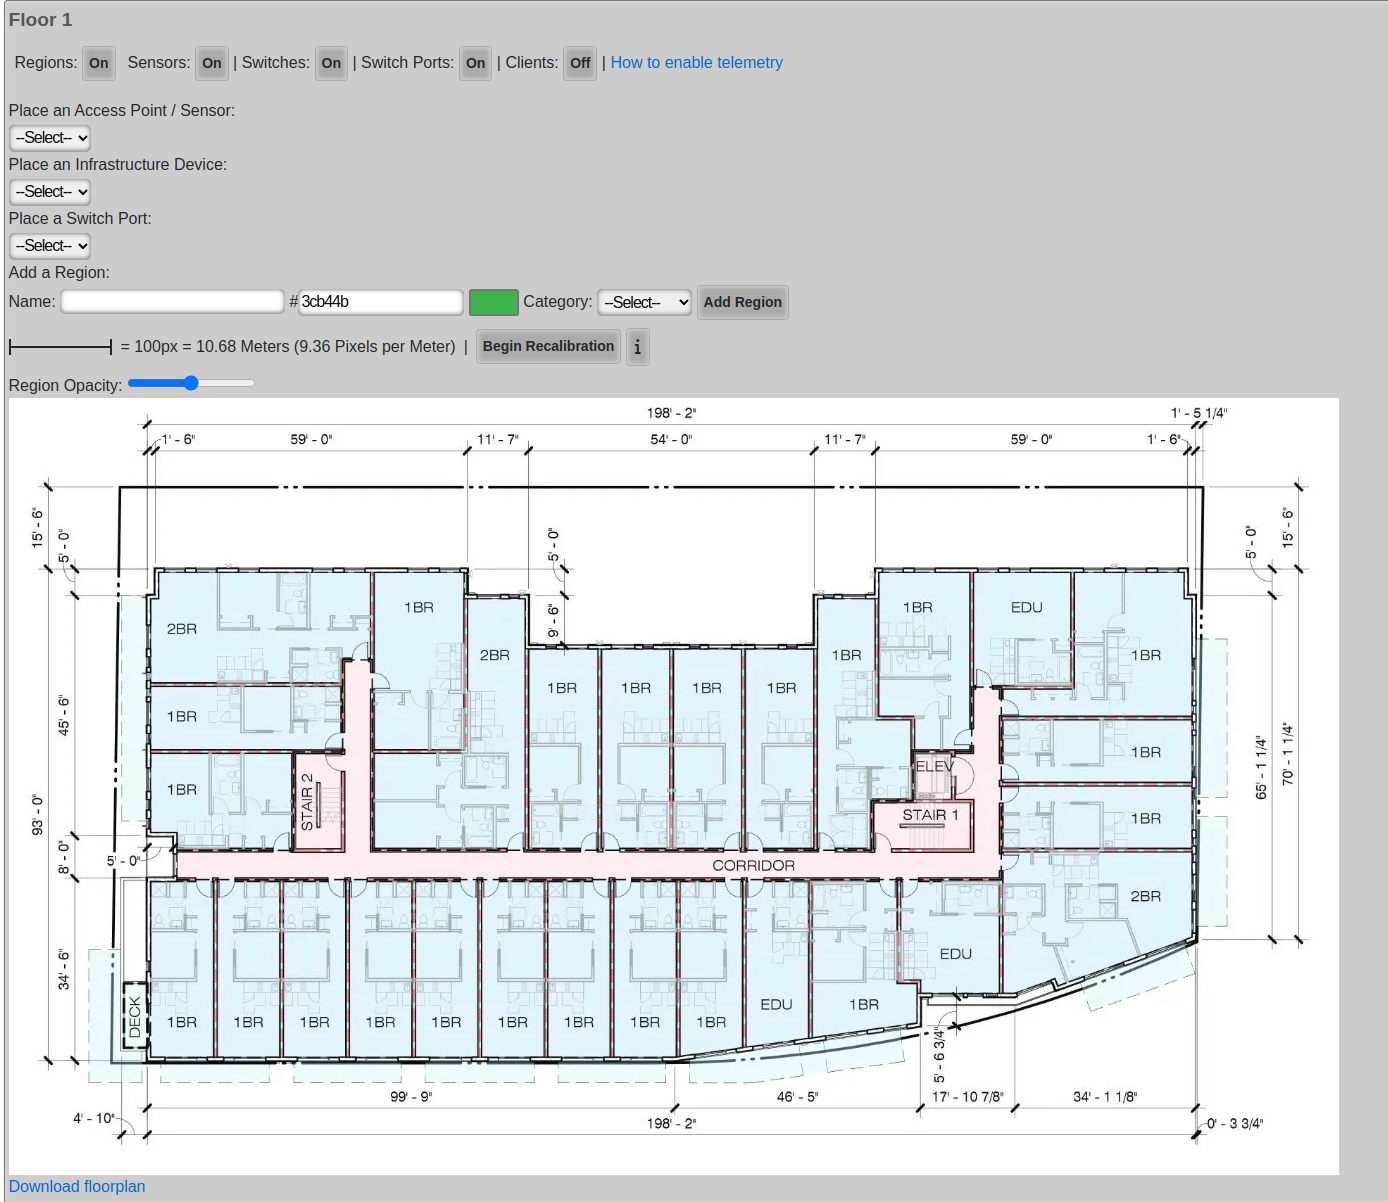
RRM
Radio Resource Management (RRM) optimizes wireless network performance by dynamically adjusting radio channels and power levels. The rXg includes the capability to manage this through the Location page in the Location Areas scaffold and the RRM Profiles scaffold.

Channel Planning
Wi-Fi channel planning, a part of Radio Resource Management (RRM), is crucial for optimizing Wi-Fi network performance by strategically assigning channels to access points. Proper channel planning minimizes interference from neighboring Wi-Fi networks and co-channel interference within the same network, leading to a more stable and efficient wireless environment with improved speeds and reliability for all connected devices.
- Ensure all floor Location Areas within the site have floor plans uploaded with Access Points placed on the floor plan. The floor plan should be accurately calibrated to ensure the scale is accurate.
- It's recommended to ensure all floor plans are the same dimensions and each floor plan is positioned so the walls line up between floors. Alternatively, the origin X and Y should be used to nudge the floor plan into the correct location so the rXg knows how much difference there is between floor plans (in meters).
- Populate the Z axis of the origin of each Floor to specify the offset in height (in meters) between the floors compared to the ground.
- Edit a Location Area
- When editing a Location Area for a Floor, the channel planning will occur only for that floor.
- When editing a Location Area for a Site, the channel planning will occur for the entire site.
- Next to Channel Plan click Create
Before Channel plan
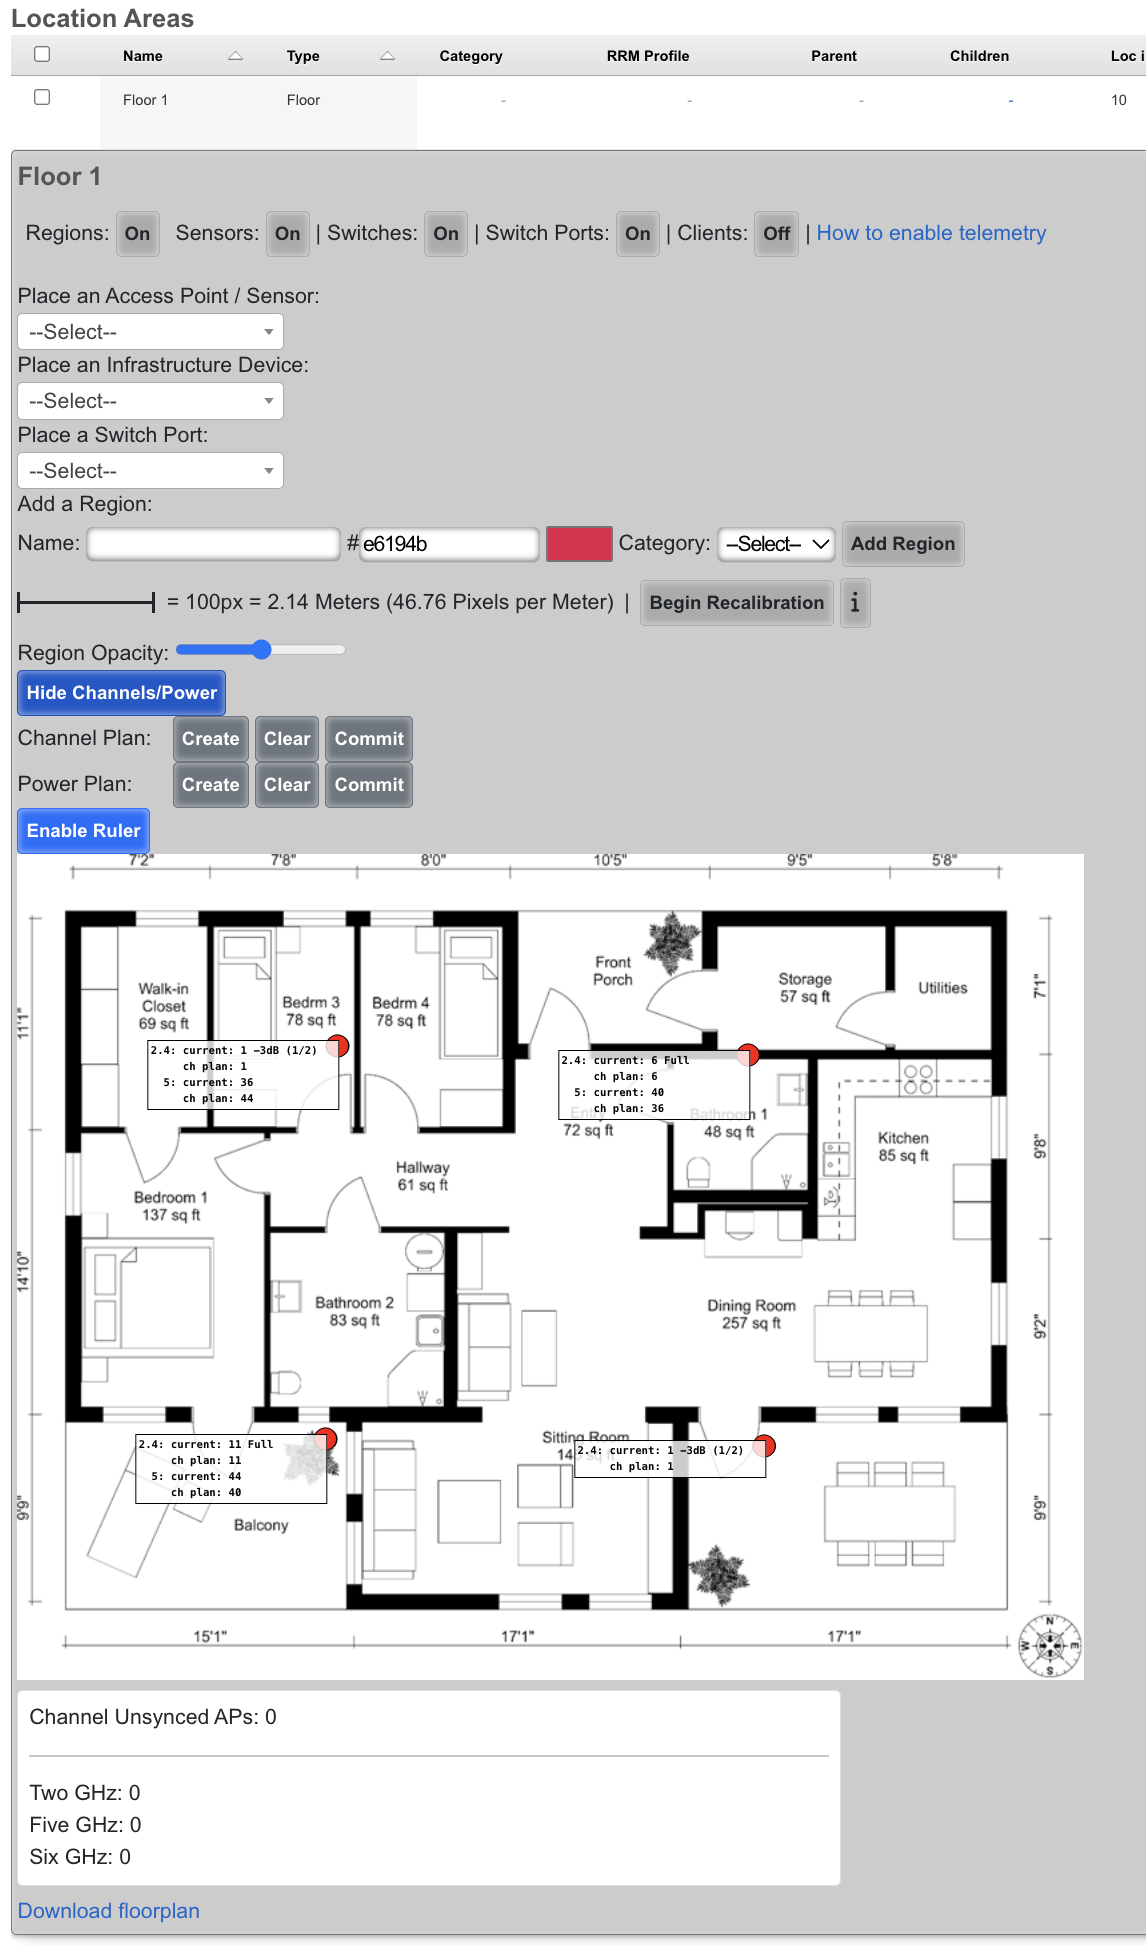
After Channel plan
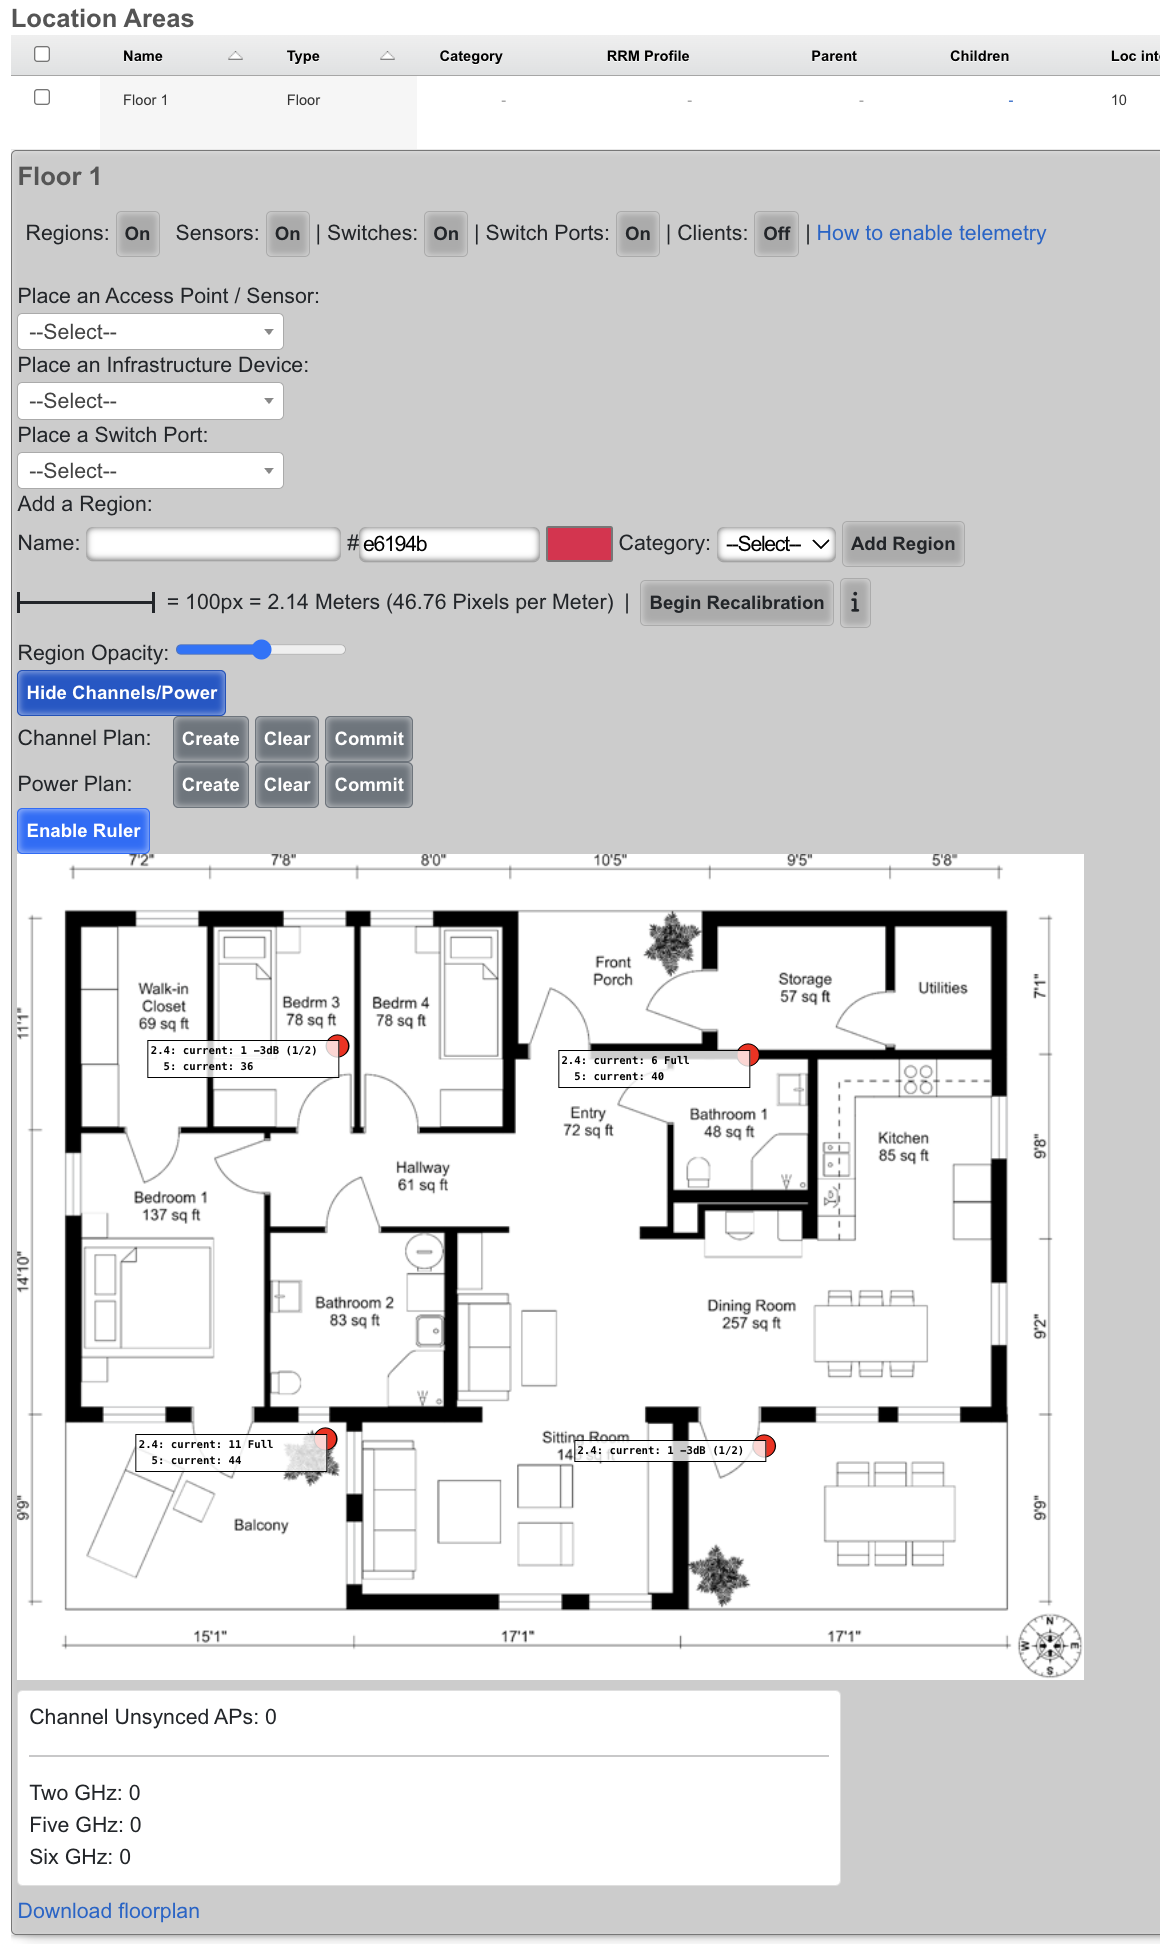
RRM Profiles
The RRM Profiles scaffold defines reusable sets of radio resource management parameters that control channel planning and heuristic transmit power adjustments. Each Infrastructure Area can be associated with an RRM Profile; areas without an explicit profile assignment will use the profile marked as Default.

The name field is an arbitrary string descriptor used only for administrative identification. Each RRM Profile must have a unique name.
The default checkbox designates this profile as the system default. Only one profile may be marked as default at a time enabling this on a profile will automatically clear the default flag on any other profile.
Channel Mapper
The Simulated Annealing Steps field controls the number of iterations used when executing the channel planning algorithm. Higher values produce more optimal channel assignments at the cost of additional computation time. The default is 10000.
The Channel Mapper Telemetry checkbox enables the use of telemetry data reported by supported Wireless LAN controllers when computing channel plans. When enabled, the channel mapper incorporates real-world RF measurements from the wireless infrastructure.
The Min 2.4 GHz Radio Distance, Min 5 GHz Radio Distance, and Min 6 GHz Radio Distance fields set per-band distance thresholds (in meters) for disabling radios. When two Access Points are closer together than the specified distance, the rXg may disable one of the radios on that band to reduce co-channel interference. This evaluation is channel-agnostic it considers physical proximity regardless of channel assignment.
Heuristic Tx Power
The Heuristic Tx Power section configures distance-based transmit power reduction on a per-band basis (2.4 GHz, 5 GHz, and 6 GHz). The rXg uses a two-tier power reduction model based on the distance between Access Points:
By Channel When checked for a given band, distance calculations consider only the nearest Access Point on the same channel rather than the nearest AP on the same band. This is useful in deployments where co-channel APs are farther apart than same-band APs on different channels.
Distance (Medium) The distance threshold (in meters) per band at which an AP's transmit power will be reduced to the Medium power setting. When an AP is closer than this distance to another AP, the medium power level is applied.
Power (Medium) The transmit power level applied when an AP is within the Medium distance threshold. Options range from Full power to -18dB (1/64) and Minimum, specified independently for each band.
Distance (Low) The distance threshold (in meters) per band at which an AP's transmit power will be further reduced to the Low power setting. This should typically be set to a shorter distance than the Medium threshold.
Power (Low) The transmit power level applied when an AP is within the Low distance threshold. The same power options are available as for the Medium setting (Full through -18dB and Minimum), specified independently for each band.
Power Level Options
The available transmit power levels for both Medium and Low tiers range from Full (maximum) to Minimum (lowest supported), with intermediate options available in 1dB increments:
| Power Level | Relative Output |
|---|---|
| Full | Maximum transmit power |
| -3dB | 1/2 power |
| -6dB | 1/4 power |
| -9dB | 1/8 power |
| -12dB | 1/16 power |
| -15dB | 1/32 power |
| -18dB | 1/64 power |
| Minimum | Lowest supported transmit power |
Usage
RRM Profiles separate the tuning parameters from the location areas where they are applied. This allows the same set of power and channel planning settings to be shared across multiple floors or sites without duplicating configuration.
When to create an RRM Profile: A single default profile is sufficient for most deployments where all areas have similar AP density and coverage goals. Create additional profiles when different areas require different power behavior for example, a high-density conference hall may need more aggressive power reduction (shorter distances, lower power levels) than a low-density office floor.
Prerequisites: Before RRM Profiles have any effect, the following must be in place: 1. Location Areas configured with floor plans uploaded and calibrated (see Recalibration section above). 2. Access Points placed on the floor plans with accurate positions. 3. At least one RRM Profile must exist and be marked as Default, or explicitly assigned to the Location Area.
How it connects: Each Location Area (Infrastructure Area) has an optional RRM Profile association. When a channel plan or power plan is created from a Location Area, the rXg looks up the area's assigned profile. If none is assigned, it falls back to the profile marked as Default. If no default profile exists, channel and power planning will not have RRM parameters to work with.
Power planning requires at least one complete tier to be configured either a Distance (Medium) and Power (Medium) pair, or a Distance (Low) and Power (Low) pair, for a given band. If neither tier is fully configured for a band, power planning is skipped for that band.
Data Processing Units (DPU)
Overview
Data Processing Units (DPUs) are specialized System-on-Chip (SoC) processors designed to offload and accelerate data center infrastructure tasks from the main CPU. The rXg platform provides comprehensive support for NVIDIA BlueField DPUs, enabling hardware-accelerated packet processing, advanced network virtualization, and integrated security services that dramatically improve system performance and efficiency.
DPU Architecture and Capabilities
Modern DPUs represent a convergence of multiple processing technologies that work together to deliver unprecedented network performance and functionality. At the heart of each DPU lies an ARM-based control plane that operates independently from the host system, providing a complete computing environment for network services and management functions.
The ARM processor subsystem varies by generation, with BlueField-3 featuring multi-core ARM Cortex-A78 processors while BlueField-2 utilizes Cortex-A72 cores. These processors run a full Linux operating system, typically Ubuntu 22.04 LTS, providing a familiar environment for deploying standard Linux applications and services. The dedicated memory subsystem ranges from 8GB to 32GB of DDR4 memory, ensuring sufficient resources for complex network functions without impacting host system memory. The independent boot process, managed through UEFI firmware, allows the DPU to initialize and begin processing even before the host operating system loads, enabling critical network services to be available immediately upon system power-on.
Hardware acceleration engines form the core of the DPU's performance advantages. These specialized processors implement programmable packet processing pipelines that can be configured for specific network functions without requiring software changes. The encryption and decryption engines support industry-standard algorithms including AES-256 and ChaCha20, processing encrypted traffic at line rate without CPU intervention. Compression and decompression acceleration enables efficient data transfer and storage, particularly valuable for backup and replication scenarios. Pattern matching and deep packet inspection capabilities allow real-time content analysis for security and application identification purposes. These acceleration engines work in concert to enable complex network function virtualization (NFV) deployments that would otherwise require dedicated hardware appliances.
The high-speed network interfaces provide the physical connectivity required for modern data center networks. DPUs support a range of speeds from 25Gbps to 200Gbps Ethernet, with flexible configuration options that allow administrators to match interface speeds to their specific requirements. For example, a single 200Gbps interface can be split into two 100Gbps interfaces or four 25Gbps interfaces, providing deployment flexibility without hardware changes. Advanced traffic shaping and quality of service capabilities ensure that critical traffic receives appropriate prioritization, while hardware-based VLAN tagging, tunneling protocols, and overlay network support enable complex network virtualization schemes. The entire packet forwarding path is optimized for low latency, achieving sub-microsecond processing times for most operations.
PCIe host integration provides the critical link between the DPU and the host system. The PCIe interface supports both Gen3 x16 and Gen4 configurations, with the specific requirements depending on the DPU model and desired performance characteristics. Direct memory access (DMA) capabilities allow the DPU to transfer data directly to and from host memory without CPU involvement, significantly reducing overhead for high-bandwidth applications. Shared memory regions facilitate efficient communication between host applications and DPU services, enabling tight integration while maintaining isolation boundaries. The support for virtual functions (VF) and sub-functions (SF) enables advanced virtualization scenarios where multiple virtual machines or containers can have dedicated network resources managed by the DPU.
rXg DPU Integration Benefits
The integration of DPUs into the rXg platform delivers transformative benefits across performance, security, and operational domains. These advantages stem from the fundamental architectural shift of moving infrastructure functions from general-purpose CPUs to purpose-built processing units optimized for network and security workloads.
Performance enhancement represents the most immediately visible benefit of DPU deployment. By offloading network processing tasks to the DPU, host CPU utilization can be reduced by up to 80%, freeing these valuable compute resources for application workloads. Hardware-accelerated packet processing delivers throughput improvements of 10 to 15 times compared to software-only solutions, enabling organizations to handle growing traffic volumes without proportional increases in hardware investment. The parallel processing architecture of DPUs allows multiple network and security functions to execute simultaneously without the context switching overhead inherent in CPU-based processing. Furthermore, the dedicated resources within the DPU eliminate performance contention between network functions and applications, ensuring predictable performance even under peak load conditions.
Advanced network services that would traditionally require dedicated appliances can now be consolidated onto the DPU infrastructure. High-performance firewalling with stateful connection tracking processes millions of concurrent sessions while maintaining line-rate throughput. IPsec VPN acceleration leverages hardware encryption engines to establish secure tunnels without the CPU overhead typically associated with cryptographic operations. Support for high-performance L2GRE and other tunneling mechanisms enables sophisticated overlay networks for multi-tenancy and workload mobility. Load balancing and traffic distribution functions operate at wire speed, intelligently directing traffic based on application requirements and server availability. Network address translation (NAT) performs address mapping at line rate, supporting complex networking topologies without performance penalties. Advanced routing protocols benefit from hardware-based Forwarding Information Base (FIB) support, enabling rapid route convergence and lookup operations.
Security improvements extend beyond performance to include architectural advantages that enhance the overall security posture. The isolated security processing environment within the DPU ensures that security functions operate independently of the host operating system, protecting against compromise even if the host is breached. Hardware-based cryptographic operations provide both performance and security benefits, as cryptographic keys and operations remain within the secure confines of the DPU hardware. Zero-trust network micro-segmentation becomes practical at scale, with the DPU enforcing granular security policies between workloads without impacting application performance. Real-time threat detection and mitigation capabilities leverage the DPU's position in the data path to identify and respond to security events as they occur. Encrypted storage and secure boot capabilities ensure that both data at rest and the DPU firmware itself remain protected against tampering.
Operational efficiency gains simplify the deployment and management of complex network infrastructure. The centralized management through the rXg interface provides a single pane of glass for configuring and monitoring all DPU resources, eliminating the need for separate management tools. Automated provisioning and configuration reduce deployment time from hours to minutes, with the rXg platform handling the complex orchestration required to initialize and configure DPU resources. Real-time monitoring and telemetry provide unprecedented visibility into network operations, with detailed metrics collected directly from the hardware acceleration engines. Simplified maintenance and updates ensure that DPU firmware and software remain current without requiring manual intervention or service disruption. Integration with existing rXg policy frameworks means that DPU capabilities can be leveraged immediately within established operational procedures, without requiring staff retraining or process changes.
Supported Hardware
The rXg platform provides comprehensive support for NVIDIA BlueField-2 and BlueField-3 DPU families across multiple SKUs and configurations. Each generation offers distinct capabilities and performance characteristics optimized for different deployment scenarios.
BlueField-2 Family
BlueField-2 DPUs represent the second generation of NVIDIA data processing units, offering a mature platform with proven reliability and extensive field deployment experience. These DPUs have been widely adopted across data center environments, providing a stable foundation for network acceleration and offload capabilities.
The core processing power of BlueField-2 comes from eight ARM Cortex-A72 processor cores operating at 2.5GHz, delivering substantial compute capacity for control plane operations and network services. The ConnectX-6 Dx network controller provides the foundation for high-speed networking, implementing advanced features in hardware to achieve consistent performance regardless of packet size or traffic patterns. Hardware acceleration extends across networking, security, and storage domains, enabling comprehensive infrastructure offload. RDMA over Converged Ethernet (RoCE) support enables ultra-low latency communication for storage and high-performance computing applications, while SR-IOV capabilities supporting up to 127 virtual functions per port provide the flexibility needed for modern virtualized environments.
Memory and storage configurations in BlueField-2 DPUs are optimized for embedded network applications. The LPDDR4 memory subsystem ranges from 8GB to 16GB depending on the SKU, providing sufficient capacity for running complex network functions while maintaining power efficiency. The integrated eMMC storage hosts the operating system and applications, eliminating the need for external storage devices and simplifying deployment. Hardware memory protection and encryption features ensure that sensitive data remains secure, even in multi-tenant environments where isolation is critical.
Network interface flexibility allows BlueField-2 DPUs to adapt to various deployment scenarios. Single-port configurations support up to 100GbE or even 200GbE on select SKUs, ideal for high-bandwidth applications requiring maximum throughput on a single connection. Dual-port options provide 50GbE or 25GbE per port, enabling redundant connections or traffic segregation between different network segments. Port splitting capabilities allow administrators to divide high-speed interfaces into multiple lower-speed connections, providing deployment flexibility without requiring different hardware SKUs.
The BlueField-2 product line includes several popular SKUs, each optimized for specific use cases. The MBF2H332A provides dual 25GbE ports with 16GB memory, making it ideal for edge deployments requiring redundancy. The MBF2H516A offers a single 100GbE port with 16GB memory, perfect for high-throughput applications. The MBF2M516A provides the same specifications in an OCP 3.0 form factor, designed for Open Compute Platform deployments. The BFM2515A represents a special case, physically containing dual-port hardware that requires cross flashing to unlock the second port, providing a cost-effective upgrade path for organizations whose needs evolve over time.
BlueField-3 Family
BlueField-3 represents the latest generation of NVIDIA DPUs, delivering substantial performance improvements and expanded capabilities that address the demands of modern data center infrastructure. This generation introduces architectural enhancements that significantly increase processing power while improving efficiency.
The processing capabilities of BlueField-3 center around sixteen ARM Cortex-A78 cores operating at 2.6GHz, doubling the core count from BlueField-2 while also moving to a more advanced architecture. The ConnectX-7 network controller introduces new capabilities including enhanced programmability, improved packet processing efficiency, and support for emerging network protocols. The enhanced hardware acceleration engines provide greater throughput for cryptographic operations, compression, and pattern matching, enabling more complex security and networking functions to be offloaded from the host CPU. Despite the increased performance, BlueField-3 incorporates improved power efficiency features and thermal management capabilities that optimize performance per watt. Advanced telemetry and monitoring features provide detailed insights into system operation, enabling proactive management and optimization.
Memory and storage options in BlueField-3 reflect the increased demands of modern network functions. DDR4 memory configurations range from 16GB to 32GB, providing ample capacity for running multiple concurrent services and maintaining large connection state tables. NVMe storage options deliver the high-performance I/O required for logging, packet capture, and application data, with significantly improved throughput compared to the eMMC storage used in previous generations. Enhanced security features including secure boot, encrypted memory, and hardware root of trust provide defense-in-depth protection for critical infrastructure.
Network interface configurations in BlueField-3 support the highest speeds available in modern data centers. Single-port 400GbE configurations provide maximum bandwidth for backbone connections, while dual-port 200GbE options offer redundancy at ultra-high speeds. For environments requiring more ports at lower speeds, 100GbE dual-port and quad-port 25GbE configurations provide flexibility to match specific deployment requirements. Advanced traffic management and quality of service capabilities ensure that critical traffic receives appropriate treatment even under congestion conditions.
Power requirements for BlueField-3 reflect its increased capabilities, with power consumption exceeding 150W under full load. This necessitates dual PCIe power connectors to ensure stable power delivery, and deployments must account for this additional power infrastructure. Enhanced cooling becomes critical for maintaining optimal performance, as thermal throttling will reduce performance if adequate cooling is not provided. Integration with IPMI-based power management allows remote monitoring and control of power states, facilitating data center automation and energy efficiency initiatives.
Hardware Compatibility Requirements
Successful DPU deployment requires careful attention to system compatibility across multiple dimensions. The rXg platform requires a minimum version of 16.011 for initial DPU support, though version 16.100 or later is recommended for access to all features and optimizations. This version requirement ensures that all necessary kernel modules, drivers, and management software are present and properly integrated.
PCIe slot requirements vary based on the specific DPU model and desired performance characteristics. While a Gen3 x16 slot represents the minimum requirement, Gen4 x8 or x16 slots provide improved bandwidth that can be beneficial for high-throughput applications. The system must allocate at least 8GB of RAM specifically for DPU operations, in addition to the base memory requirements for the rXg platform itself. Proper cooling and airflow are essential, as DPUs generate significant heat that must be dissipated to maintain stable operation.
Power and thermal considerations differ significantly between DPU generations. BlueField-2 DPUs consume a maximum of 75W and require only a single PCIe power connector, making them suitable for systems with limited power budgets. BlueField-3 DPUs consume 150W or more and require dual PCIe power connectors, necessitating more robust power infrastructure. Both generations benefit from ambient temperature monitoring and support thermal throttling to protect against overheating, though maintaining ambient temperatures below 35C is recommended for optimal performance.
Network cabling requirements depend on the interface speeds and distances involved in the deployment. High-quality Direct Attach Copper (DAC) cables provide cost-effective connectivity for short distances, typically up to 5 meters for 100GbE and 3 meters for higher speeds. Fiber optic transceivers enable longer distance connections and are required for distances exceeding DAC cable capabilities. Proper impedance matching and signal integrity are critical for achieving rated speeds, particularly at 200GbE and above.
Verification and Compatibility Checking
Before deployment, verify hardware compatibility:
# Check PCIe slot capabilities
pciconf -lv | grep -A 5 -B 5 mellanox
# Verify power delivery
dmidecode -t slot | grep -A 10 "PCIe"
# Check thermal monitoring
sysctl hw.acpi.thermal
# Verify rXg version
cat /etc/rxg_release
rXg Version Features: - 16.011: Initial DPU support with basic management capabilities - 16.050: Enhanced VPP integration and monitoring improvements - 16.100: Advanced cross flashing and recovery options - 16.200+: Full feature parity and automated provisioning
For the most current list of tested and validated DPU models, including firmware compatibility matrices and known limitations, please refer to the rXg Hardware Compatibility Guide at https://support.rgnets.com/knowledge/104.
Cross Flashing
Cross flashing refers to the process of configuring a DPU with different firmware characteristics than its default configuration. This advanced procedure enables unlocking additional ports, resolving MAC address conflicts, and optimizing virtualization settings for specific deployment scenarios.
Warning: Cross flashing modifies low-level firmware settings and should only be performed by experienced administrators. Incorrect configuration may render the DPU inoperable and require RMA.
Prerequisites for Cross Flashing
Before beginning the cross flashing process, ensure all prerequisites are met to minimize risk and enable recovery if issues occur.
Physical and Remote Access Requirements:
Console access to both the host system and DPU is essential for monitoring the cross flashing process and troubleshooting any issues that arise. Ensure IPMI or similar out-of-band management is configured and tested, as power cycling is often required to complete firmware changes. The command ipmitool power status should return the current power state successfully before proceeding.
Configuration Documentation: Document the current firmware configuration comprehensively before making any changes: ```bash
Save current configuration to file
mlxconfig -d pci0:1:0:0 q > dpu_config_backup.txt
Record current firmware version
mstflint -d pci0:1:0:0 q > firmware_version_backup.txt ```
Firmware and Tool Requirements: Ensure you have the necessary firmware files and tools: - Target firmware binary (.bin file) for the desired PSID - Mellanox Firmware Tools (MFT) version 4.32.0 or later - Known-good BFB image for recovery (e.g., bf-bundle-3.0.0-135_25.04_ubuntu-22.04_prod.bfb) - Access to NVIDIA firmware download portal for obtaining firmware files
Firmware Download Sources: Official firmware can be obtained from: ```bash
Example for MT_0000000561 PSID (dual-port 100GbE)
Extract the firmware
unzip fw-BlueField-2-rel-24_43_1014-MBF2M516A-CEEO_Ax_Bx.bin.zip ```
Network Isolation: Schedule cross flashing during a maintenance window to avoid service disruption. Ensure that critical services can continue operating without the DPU during the cross flashing process, which typically takes 30-60 minutes including verification.
Recovery Preparation: Prepare recovery procedures before starting: - Have physical access to the server for manual intervention if needed - Document the original PSID and firmware version - Test RSHIM connectivity before beginning - Ensure you have administrator credentials for both host and DPU systems
PSID Modification for Port Unlocking
Some DPU models ship with firmware that restricts the number of available ports. The BFM2515A, for example, physically contains two ports but firmware limits access to only one.
Identifying Cards Requiring PSID Change
Check your card's current PSID:
bash
mlxconfig -d pci0:1:0:0 q | grep PSID
For BFM2515A cards showing MT_0000000750, change to MT_0000000561 to unlock the second port.
PSID Change Procedure
Verify Current Configuration:
bash mlxconfig -d pci0:1:0:0 q PSIDApply PSID Change:
bash mlxconfig -d pci0:1:0:0 -y s PSID=MT_0000000561Confirm Change:
bash mlxconfig -d pci0:1:0:0 q PSIDPower Cycle Required: A full system power cycle is mandatory for PSID changes to take effect.
Real-World PSID Change Example
The following example demonstrates converting a BlueField-2 from single-port 200GbE to dual-port 100GbE configuration:
Initial Hardware State:
Model: NVIDIA BlueField-2 Ethernet DPU 200GbE
Part Number: BF2M515A
PSID: MT_0000000750
Description: BlueField-2 E-Series DPU 200GbE Single-Port QSFP56
Target Configuration:
Model: BlueField-2 E-Series DPU 100GbE Dual-Port
Part Number: MBF2M516A-CEEO_Ax_Bx
PSID: MT_0000000561
Description: BlueField-2 E-Series DPU 100GbE Dual-Port QSFP56
Step 1 - Query Current Firmware:
bash
sudo mstflint -d 0000:03:00.0 q
Output shows:
Image type: FS4
FW Version: 24.31.2006
Base GUID: b8cef6030075621c
Base MAC: b8cef675621c
PSID: MT_0000000750
Step 2 - Flash New Firmware with PSID Change:
bash
sudo mstflint -d 0000:03:00.0 -i fw-BlueField-2-rel-24_43_1014-MBF2M516A-CEEO_Ax_Bx.bin \
-allow_psid_change burn
When prompted about PSID change from MT_0000000750 to MT_0000000561, confirm with 'y'.
Step 3 - Verify After Reboot:
bash
lspci | grep BlueField
Expected output showing dual ports:
03:00.0 Ethernet controller: Mellanox Technologies MT42822 BlueField-2
03:00.1 Ethernet controller: Mellanox Technologies MT42822 BlueField-2
Common PSID Configurations
Different PSIDs unlock specific hardware capabilities:
MT_0000000750 - Single-Port 200GbE configuration with crypto disabled, suitable for maximum bandwidth on a single connection.
MT_0000000561 - Dual-Port 100GbE configuration with crypto enabled, recommended for redundancy and security requirements.
MT_0000000376 - Dual-Port 100GbE/EDR/HDR100 VPI configuration.
MT_0000000765 - Dual-Port 25GbE configuration with integrated BMC and 32GB DDR, ideal for edge deployments.
MAC Address Conflict Resolution
After cross flashing, DPUs may experience MAC address conflicts between interfaces. This occurs when the out-of-band (OOB) management interface shares the same MAC address as a data plane interface.
Detecting MAC Address Conflicts
- Connect to DPU: Use the rXg
sshdpucommand to access the DPU ARM OS - Check Interface Status: Verify expected interfaces are present (p0, p1, oob_net0)
- Run Conflict Detection:
bash ip a | awk '/^[0-9]+: (p0|p1|oob_net0):/{f=1} f&&/link\/ether/{print $2; f=0}' | sort -u | awk 'END{if(NR==3) print " OK"; else print " Conflict"}'
MAC Address Conflict Resolution Procedure
When conflicts are detected:
Mount EFI Variables Filesystem:
bash mount | grep efivarsIf not mounted:bash mount -t efivarfs none /sys/firmware/efi/efivarsRemove Immutability Protection:
bash chattr -i /sys/firmware/efi/efivars/OobMacAddr-8be4df61-93ca-11d2-aa0d-00e098032b8cCalculate and Set New OOB MAC: The new OOB MAC is derived by adding 8 to the last byte of the p0 interface MAC address:
bash printf "\x07\x00\x00\x00$(ip link show p0 | awk '/link\/ether/{split($2,m,":"); printf "\\x%s\\x%s\\x%s\\x%s\\x%s\\x%02x", m[1],m[2],m[3],m[4],m[5], ("0x"m[6])+8}')" > /sys/firmware/efi/efivars/OobMacAddr-8be4df61-93ca-11d2-aa0d-00e098032b8cReboot DPU: A DPU reboot is required to apply MAC address changes
Verify Resolution: Re-run the conflict detection script to confirm resolution
DPU Mode Configuration via Host
The rXg supports configuring DPU virtualization settings directly from the FreeBSD host using mlxconfig, eliminating the need for manual UEFI configuration.
Identifying DPU PCI Address
Locate the DPU device on the PCI bus:
bash
pciconf -lv | grep 0x15b3
Example output showing device at pci0:1:0:0:
mlx5_core0@pci0:1:0:0: class=0x020000 rev=0x01 hdr=0x00 vendor=0x15b3 device=0xa2d6
mlx5_core1@pci0:1:0:1: class=0x020000 rev=0x01 hdr=0x00 vendor=0x15b3 device=0xa2d6
none1@pci0:1:0:2: class=0x080100 rev=0x01 hdr=0x00 vendor=0x15b3 device=0xc2d3
BlueField-2 Virtualization Configuration
For BlueField-2 DPUs, apply the following configuration as root:
bash
mlxconfig -d pci0:1:0:0 -y s \
INTERNAL_CPU_MODEL=1 \
INTERNAL_CPU_PAGE_SUPPLIER=0 \
INTERNAL_CPU_ESWITCH_MANAGER=0 \
INTERNAL_CPU_IB_VPORT0=0 \
INTERNAL_CPU_OFFLOAD_ENGINE=0 \
VIRTIO_NET_EMULATION_ENABLE=1 \
VIRTIO_NET_EMULATION_NUM_PF=4 \
VIRTIO_NET_EMULATION_NUM_VF=126 \
VIRTIO_NET_EMULATION_NUM_MSIX=64 \
PCI_SWITCH_EMULATION_ENABLE=0 \
PCI_SWITCH_EMULATION_NUM_PORT=0 \
PER_PF_NUM_SF=1 \
PF_TOTAL_SF=512 \
PF_BAR2_ENABLE=0 \
PF_SF_BAR_SIZE=8 \
NUM_VF_MSIX=0 \
SRIOV_EN=1
BlueField-3 Virtualization Configuration
For BlueField-3 DPUs, use this configuration:
bash
mlxconfig -d pci0:1:0:0 -y s \
INTERNAL_CPU_MODEL=1 \
EXP_ROM_UEFI_ARM_ENABLE=1 \
VIRTIO_NET_EMULATION_ENABLE=1 \
VIRTIO_NET_EMULATION_NUM_PF=4 \
VIRTIO_NET_EMULATION_NUM_VF=126 \
VIRTIO_NET_EMULATION_NUM_MSIX=64 \
PCI_SWITCH_EMULATION_ENABLE=0 \
PCI_SWITCH_EMULATION_NUM_PORT=0 \
PER_PF_NUM_SF=1 \
PF_TOTAL_SF=512 \
PF_BAR2_ENABLE=0 \
PF_SF_BAR_SIZE=8 \
NUM_VF_MSIX=0 \
SRIOV_EN=1
Configuration Parameters Reference
| Parameter | Description | Purpose |
|---|---|---|
| INTERNAL_CPU_MODEL | Enables embedded ARM SoC as DPU controller | Required for DPU mode operation |
| INTERNAL_CPU_PAGE_SUPPLIER | Controls page allocation between host and embedded CPU | Set to 0 for host-managed memory |
| INTERNAL_CPU_ESWITCH_MANAGER | Manages eSwitch control plane location | Set to 0 for host-based management |
| INTERNAL_CPU_IB_VPORT0 | Controls InfiniBand vport0 management | Set to 0 to disable for Ethernet-only (the mode supported by rXg) |
| INTERNAL_CPU_OFFLOAD_ENGINE | Enables offload between host and ARM | Set to 0 for simplified configuration |
| EXP_ROM_UEFI_ARM_ENABLE | Enables UEFI expansion ROM for ARM boot | Required on BF3 for embedded boot |
| VIRTIO_NET_EMULATION_ENABLE | Enables firmware-level virtio-net emulation | Core virtualization functionality |
| VIRTIO_NET_EMULATION_NUM_PF | Number of virtio Physical Functions | Controls PF exposure to host |
| VIRTIO_NET_EMULATION_NUM_VF | Number of virtio Virtual Functions | Total VFs across all PFs |
| VIRTIO_NET_EMULATION_NUM_MSIX | MSI-X vectors per virtio function | Interrupt handling capacity |
| PER_PF_NUM_SF | Sub-Functions per Physical Function | Advanced virtualization features |
| PF_TOTAL_SF | Total available Sub-Functions | System-wide SF allocation |
| SRIOV_EN | Enables SR-IOV exposure to host | Required for VF functionality |
Verifying Applied Configuration
After applying configuration changes, verify the settings:
bash
mlxconfig -d pci0:1:0:0 q | egrep "VIRTIO_NET_EMULATION|PCI_SWITCH_EMULATION|PF_|NUM_VF_MSIX|SRIOV|PER_PF_NUM_SF|INTERNAL_CPU|EXP_ROM"
Post-Configuration Procedures
Power Cycle Requirements
All cross flashing operations require a complete power cycle to take effect:
bash
ipmitool power cycle
Important: A warm reboot is insufficient. The system must be fully powered off and restarted for firmware changes to initialize properly.
Firmware Image Updates
After successful cross flashing and power cycle:
- Navigate to DPU Software Management: Network DPU DPU Software
- Upload Latest BFB: Use the most recent stable image (e.g.,
bf-bundle-3.1.0-76_25.07_ubuntu-22.04_prod.bfb) - Perform Firmware Upgrade: Follow standard firmware update procedures
- Final Power Cycle: Execute one additional power cycle after firmware installation
Validation Steps
After completing cross flashing, perform comprehensive verification to ensure all interfaces and services are operational.
Step 1 - Verify DPU Detection in rXg: Navigate to Network DPU DPU Devices and confirm the DPU appears with correct status.
Step 2 - Confirm Network Interface Availability:
bash
sudo lshw -class network -businfo
Expected output after successful dual-port configuration: ```
Bus info Device Class Description
pci@0000:03:00.0 p0 network MT42822 BlueField-2 integrated ConnectX-6 Dx pci@0000:03:00.1 p1 network MT42822 BlueField-2 integrated ConnectX-6 Dx virtio@1 tmfifo_net0 network Ethernet interface oob_net0 network Ethernet interface ```
Step 3 - Verify Firmware Details:
bash
sudo mlxfwmanager
Confirm the output shows: - Correct Part Number (e.g., MBF2M516A-CEEO_Ax_Bx for dual-port) - Updated PSID (e.g., MT_0000000561) - Description indicating dual-port configuration
Step 4 - Test RSHIM Communication:
bash
cat /dev/rshim0/misc
This should return JSON telemetry data confirming the RSHIM interface is operational.
Step 5 - Verify Management Connectivity:
Test SSH access to the DPU:
bash
ssh [email protected]
Step 6 - Check VPP Service Status:
Once connected to the DPU:
bash
sudo systemctl status vpp
Step 7 - Monitor System Logs:
Review logs for any errors or warnings:
bash
grep -i "dpu\|rshim\|mlx" /var/log/messages | tail -20
Recovery Procedures
If cross flashing results in an unresponsive DPU:
- Attempt Software Reset: Use Network DPU DPU Devices Software Reset
- Force Firmware Reflash: Upload a known-good BFB image and force upgrade
- Power Cycle Sequence: Perform multiple power cycles with 30-second intervals
- RSHIM Recovery: Check
/dev/rshim*/miscfor device status and reset capabilities
Cross Flashing Best Practices
Cross flashing success depends on following established best practices that minimize risk and ensure recoverability. Always document all configuration changes and original settings before beginning any cross flashing operation, including the original PSID, firmware version, and any custom configurations. Test cross flashing procedures in staging environments before attempting production deployments, as this allows validation of the process and identification of potential issues without risking critical infrastructure.
Implement comprehensive monitoring and alerting for DPU status changes during and after cross flashing operations. This includes setting up notifications for RSHIM connectivity loss, firmware version mismatches, and interface state changes. Maintain detailed rollback plans that include known-good firmware images, configuration backups, and step-by-step recovery procedures. Version control for firmware files and configuration parameters ensures that successful configurations can be replicated and problematic changes can be quickly identified.
Cross Flashing Troubleshooting Guide
When cross flashing encounters issues, systematic troubleshooting helps identify and resolve problems quickly.
Firmware Flash Fails to Start:
If mstflint returns errors when attempting to flash:
```bash
Verify device is not in use
lsof | grep mlx
Reset device to clear any locks
sudo mlxfwreset -d 0000:03:00.0 reset
Retry with verbose output
sudo mstflint -d 0000:03:00.0 -i firmware.bin -allow_psid_change burn -v ```
RSHIM Interface Not Available After Flash: ```bash
Restart RSHIM service
sudo systemctl stop rshim sudo systemctl start rshim
Check for device presence
ls -la /dev/rshim*/
If still unavailable, perform cold reset
sudo mlxfwreset -d 0000:03:00.0 -l 1 -t 4 r ```
DPU Stuck in Boot Loop: Access the console to diagnose boot issues: ```bash
Connect to console
sudo screen /dev/rshim0/console 115200
Monitor boot messages for errors
Common issues include:
- Corrupted filesystem: Requires BFB reflash
- Network configuration conflicts: Boot to recovery mode
- Driver version mismatches: Update host drivers
**Verifying Successful PSID Change**:
```bash
# From host system
sudo mstflint -d 0000:03:00.0 query full | grep PSID
# From DPU after boot
sudo devlink dev info
# Check both ports are visible (for dual-port configs)
ip link show | grep "^[0-9]" | grep -E "p0|p1"
Initial Setup
The initial setup process for DPU integration with rXg involves hardware installation, automatic discovery, and configuration validation. This section provides comprehensive guidance for successfully deploying DPUs in production environments.
Prerequisites
Before beginning DPU configuration, ensure all prerequisites are met to avoid installation issues and performance degradation.
Physical Installation Requirements
The physical installation of a DPU requires careful attention to several critical factors. The PCIe slot must be properly prepared, starting with verification of slot compatibility. While Gen3 x16 is the minimum requirement, Gen4 x8 or x16 slots are recommended for optimal performance. The slot should be clean and free from debris, with proper grounding and static protection in place. BIOS or UEFI settings must be configured to disable PCIe power saving features and set maximum payload sizes. Additionally, Above 4G Decoding must be enabled in the BIOS to ensure proper BAR mapping for the DPU's memory regions.
Power connectivity differs significantly between DPU generations. BlueField-2 cards require only a single 6-pin or 8-pin PCIe power connector, while BlueField-3 cards demand dual 8-pin PCIe power connectors, both of which must be connected for proper operation. The system's power supply should provide at least 750W capacity when hosting BlueField-3 DPUs, with dedicated PSU rails recommended to avoid power fluctuations that could impact performance or stability. Power monitoring tools should be installed to track consumption patterns and identify potential issues before they affect production workloads.
Thermal management represents one of the most critical aspects of DPU deployment. These high-performance processors generate significant heat that must be effectively dissipated to maintain optimal operation. The ambient temperature should be maintained below 35C, with a minimum of 200 CFM airflow directed across the DPU heatsink. When installing multiple DPUs, maintain at least a one-slot gap between cards to ensure adequate airflow. Temperature monitoring sensors should be deployed if not already integrated into the system, and thermal throttling policies should be configured in the BIOS to protect against overheating conditions.
Network cabling requires careful selection based on interface speeds and distances. For Direct Attach Copper (DAC) cables, maximum lengths are 5 meters for 100GbE connections and 3 meters for 200GbE interfaces. When using fiber optic transceivers, compatibility with the DPU firmware must be verified before deployment. All cables should be clearly labeled to distinguish between management and data plane connections, and cable integrity should be tested before production deployment to avoid connectivity issues.
System Requirements
The rXg platform requires specific configuration to support DPU operations effectively. The minimum rXg version for DPU support is 16.011, though version 16.100 or later is recommended for access to the full feature set including advanced monitoring and automated provisioning capabilities. Each DPU requires 8GB of dedicated RAM in addition to the base rXg memory requirements, ensuring sufficient resources for packet processing and management operations. The system should maintain at least 10GB of free storage space for BFB firmware images and operational logs. A multi-core processor is recommended to handle the management operations without impacting data plane performance.
Operating system configuration involves several components working together. The kernel must have both cuse.ko and mlx5_core.ko modules loaded for DPU communication and management. The RSHIM user-space daemon must be installed and running to provide the management interface between the host and DPU. Firewall rules need to be configured to permit TMFIFO communication on the management network, typically using the 192.168.100.0/24 subnet. The SSH key infrastructure must be properly established to enable secure passwordless authentication between the rXg and DPU operating systems.
Network architecture planning should be completed before beginning installation. This includes defining the management network topology, particularly the TMFIFO addressing scheme that will be used for host-to-DPU communication. Data plane interface assignments should be documented, mapping physical DPU ports to their intended network segments. VLAN and tunneling requirements must be established based on the network design, and QoS and traffic prioritization policies should be defined to ensure critical traffic receives appropriate handling through the DPU acceleration engines.
Automatic Discovery
The rXg platform implements a sophisticated automatic discovery mechanism that significantly simplifies DPU deployment. Upon system boot, the platform initiates a comprehensive discovery process that begins with PCIe enumeration to detect all installed DPU devices. This enumeration identifies NVIDIA/Mellanox vendor IDs and determines the specific DPU model, generation, and capabilities based on the device ID and subsystem information.
Once a DPU is detected, the system automatically loads the required kernel modules, primarily cuse.ko, which provides the character device in userspace functionality necessary for RSHIM communication. The platform then installs and configures the rshim-user-space-rs daemon, which serves as the primary management interface between the host system and the DPU's embedded ARM processor. This daemon handles all low-level communication protocols and provides abstraction layers for higher-level management operations.
The TMFIFO (Tile Management FIFO) network interface creation represents a critical step in establishing host-to-DPU communication. The system automatically creates a virtual network interface, typically named tmfifo_net0 for the first DPU, which provides IP-based connectivity over the PCIe bus. This interface operates independently of the DPU's physical network ports and remains available even when data plane interfaces are misconfigured or offline. The default configuration assigns 192.168.100.1 to the host interface and 192.168.100.2 to the DPU, though these addresses can be modified if needed.
Security configuration occurs automatically through the generation of 4096-bit RSA SSH keys specifically for DPU communication. These keys are stored at /root/.ssh/dpu_id_rsa and are distinct from other system SSH keys to maintain security isolation. The public key is automatically deployed to the DPU's authorized_keys file, enabling passwordless authentication for management operations. If the DPU already contains existing keys from a previous installation, the system will attempt to update them while preserving any custom configurations that may have been applied.
The discovery process also includes capability detection, where the system queries the DPU to determine supported features such as VPP compatibility, available memory, firmware version, and hardware acceleration capabilities. This information is stored in the rXg database and used to optimize subsequent configuration and management operations. The entire discovery process typically completes within 30-60 seconds per DPU, depending on the firmware state and system load.
Manual Configuration
While automatic discovery handles most deployment scenarios, manual configuration may occasionally be necessary for specialized environments or when recovering from configuration issues. Manual configuration should generally be avoided to prevent misconfiguration, but understanding the process is valuable for troubleshooting and advanced deployments.
To begin manual configuration, navigate to Network DPU DPU Devices in the rXg interface. The system will display any auto-discovered DPUs with a status of "missing," indicating they have been detected but not yet configured. Clicking on a DPU entry opens the configuration interface where several parameters can be customized.
The Name field should contain a descriptive identifier for the DPU that clearly indicates its role or location in the network infrastructure. Examples include "Production DPU 1" or "Edge-Router-DPU-A". This naming convention becomes particularly important in multi-DPU deployments where clear identification is essential for management and troubleshooting.
The TMFIFO Address field specifies the management IP address assigned to the DPU side of the TMFIFO interface. While the default of 192.168.100.2 works for single-DPU systems, environments with multiple DPUs require unique addresses for each device. The system automatically manages the host-side addressing to correspond with the configured DPU addresses, maintaining the .1 and .2 relationship within each subnet.
Authentication credentials consist of the Username and Password fields for the DPU operating system. The default username is "ubuntu" for all NVIDIA-provided firmware images. When the Password field is left blank, the system generates a cryptographically secure password of at least 16 characters, combining uppercase and lowercase letters, numbers, and special characters. This auto-generated password is stored securely and can only be viewed through the Show action after initial configuration. Alternatively, administrators can specify a custom password, though this should meet complexity requirements to maintain security.
For DPUs equipped with baseboard management controllers, the BMC Username, BMC Password, and BMC IP fields provide out-of-band management capabilities. The default BMC credentials are typically "root" and "0penBmc" respectively, though these should be changed after initial deployment for security reasons. The BMC IP address must be on a separate network from the TMFIFO interface and should be accessible from the rXg management network.
After entering all required configuration parameters, clicking Create saves the configuration and initiates the connection process. The system immediately attempts to establish communication with the DPU using the provided credentials and begins deploying the necessary management components. Success is indicated by the status changing from "missing" to "active" within approximately 30 seconds. If the connection fails, detailed error messages in the system log help identify whether the issue relates to network connectivity, authentication, or DPU firmware state.
Cluster Environments
DPU deployment in clustered rXg environments requires special consideration to ensure proper node affinity, failover behavior, and management isolation. The rXg clustering architecture automatically handles most aspects of DPU integration, but understanding the underlying mechanisms helps optimize performance and troubleshooting.
When a DPU is installed in a cluster node, the system automatically associates it with that specific node through PCIe bus enumeration and persistent device mapping. This association ensures that DPU resources remain tied to their physical host even during cluster reconfiguration or node maintenance. The automatic naming convention incorporates the cluster node prefix, such as "node1-dpu0" or "node2-dpu1", providing immediate visual identification of the DPU's physical location within the cluster infrastructure.
Management traffic isolation represents a critical security and reliability feature in clustered deployments. Each node maintains its own TMFIFO network segment for DPU communication, preventing management traffic from traversing the cluster interconnect. This isolation ensures that DPU management operations continue to function even if the cluster network experiences issues. The TMFIFO interfaces use non-overlapping IP ranges, with each node allocated a unique /24 subnet from the 192.168.x.0 private address space.
Failover scenarios in clustered environments are handled through state synchronization rather than live migration. When a node fails, its DPU resources become unavailable until the node is restored. However, the cluster maintains a synchronized copy of the DPU configuration in the distributed database, allowing rapid reconfiguration when the node returns to service. Critical network services configured on DPUs should be deployed in active-active or active-passive pairs across multiple nodes to ensure continuity during node failures.
The cluster coordination mechanism ensures that DPU firmware updates and configuration changes are properly sequenced across nodes. When updating DPU firmware in a cluster, the system automatically implements a rolling update strategy, upgrading one node's DPUs at a time to maintain service availability. This process includes automatic traffic draining from DPUs scheduled for update, firmware application with verification, and gradual traffic restoration after successful update completion.
Password Management
Default Credentials
The rXg uses the following default credentials:
DPU Operating System:
- Username: ubuntu
- Password: Auto-generated 16+ character secure password
The password is displayed only in the 'Show' action output, as shown below:
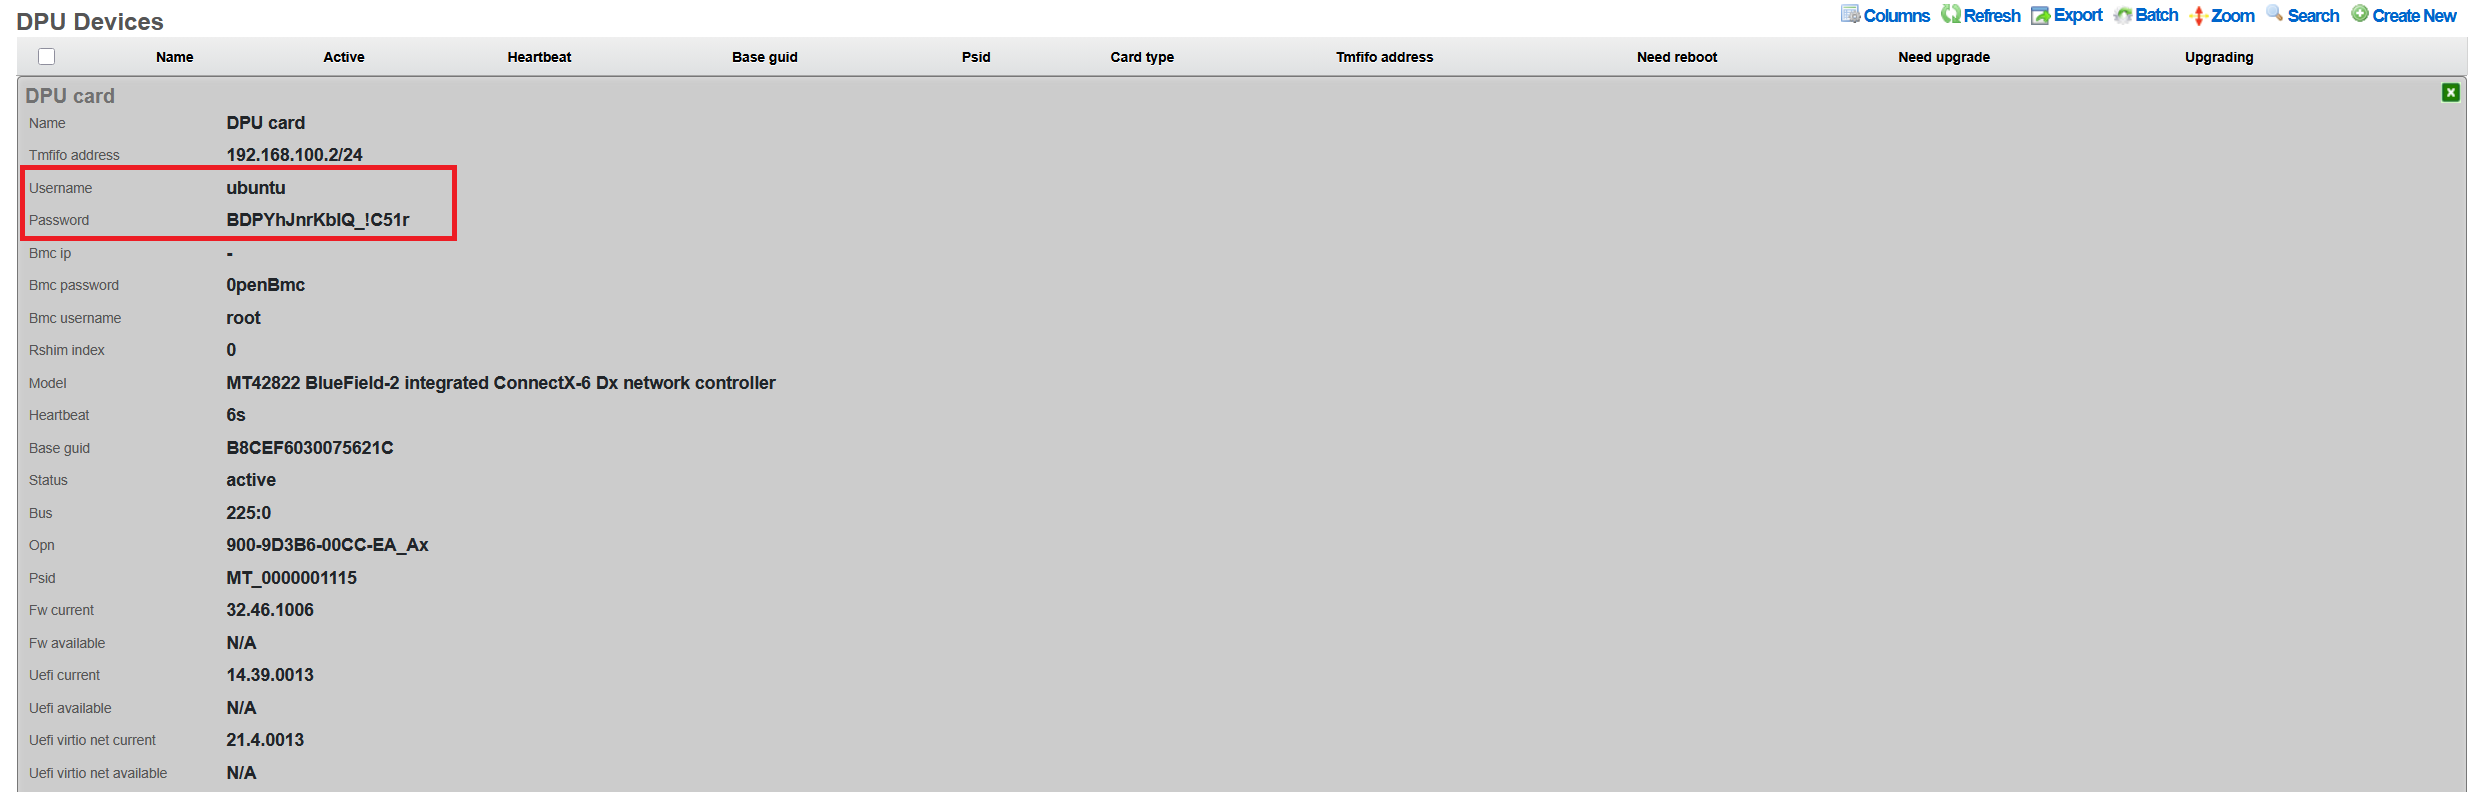
Changing Passwords
DPU OS Password
To change the DPU operating system password:
- Navigate to Network DPU DPU Devices
- Click Edit on the target DPU
- Enter new password in the Password field
- Click Update
The password change is applied immediately via the TMFIFO management interface. The system: - Validates SSH connectivity before applying changes - Updates both shadow file and cloud-init configuration - Maintains password through firmware updates
Password Recovery
If the DPU password is lost or forgotten, password recovery requires a complete DPU reflash:
- Navigate to Network DPU DPU Devices
- Click Upgrade on the affected DPU
- Select any available BFB firmware package (even the same version)
- Ensure Reboot After Upgrade is checked
- Click Submit Upgrade
The reflash process will: - Reset the DPU to factory defaults - Generate a new auto-generated password - Re-apply rXg SSH keys - Restore network configuration - The new password will be visible in the DPU Show action
Note: This process takes 15-30 minutes and requires a host system reboot.
After rXg Factory Reset
Important: If DPUs were previously configured with custom passwords and the rXg is factory reset, you must either: - Know the existing DPU passwords to reconfigure them - Perform a firmware reflash to reset DPU passwords (see Password Recovery above)
When the rXg is factory defaulted, DPU passwords must be reconfigured, since the DPU is not reflashed and the previous configured password remains on the DPU itself.
- Auto-discovered DPUs: The system will detect DPUs with status "missing"
- Navigate to Network DPU DPU Devices
- For each DPU, click Edit and set the password recorded from the DPU before the rXg was factory defaulted.
- Click Update to apply
The system will:
- Generate new SSH keys at /root/.ssh/dpu_id_rsa
- Deploy keys to all configured DPUs
- Validate connectivity before confirming
Password Security
The rXg implements several security measures: - Passwords are never displayed in the UI after initial entry - Export operations exclude password fields - Generated passwords use cryptographically secure random selection - Passwords include alphanumeric and special characters (!_-) - Minimum length of 16 characters for auto-generated passwords - SHA-512 hashing for password storage on DPU
SSH Key Management
The system automatically manages SSH keys for passwordless authentication:
- RSA 4096-bit keys generated at /root/.ssh/dpu_id_rsa
- Public keys automatically deployed to DPUs
- Legacy key migration supported from /root/.ssh/id_rsa
- Keys persist through firmware updates
Firmware Updates
Understanding BFB Files
BlueField Boot (BFB) files contain: - DPU operating system (Ubuntu-based) - Device firmware and drivers - Hardware initialization code - Network configuration templates
Uploading BFB Files
- Navigate to Network DPU DPU Software
- Click Create New
Configure the software package:
- Name: Descriptive name (e.g., "BlueField-2 v24.46.1006")
- Version: Firmware version number
- BFB File: Click Choose File and select the .bfb file
- Metadata: Optional JSON metadata for tracking
- Description: Optional description of changes
Click Create to upload
Note: BFB files are typically 1-2GB. Upload may take several minutes. Note that rXg also provides links to integrated DPU images with all rXg-specific extensions, which are recommended for production deployments.
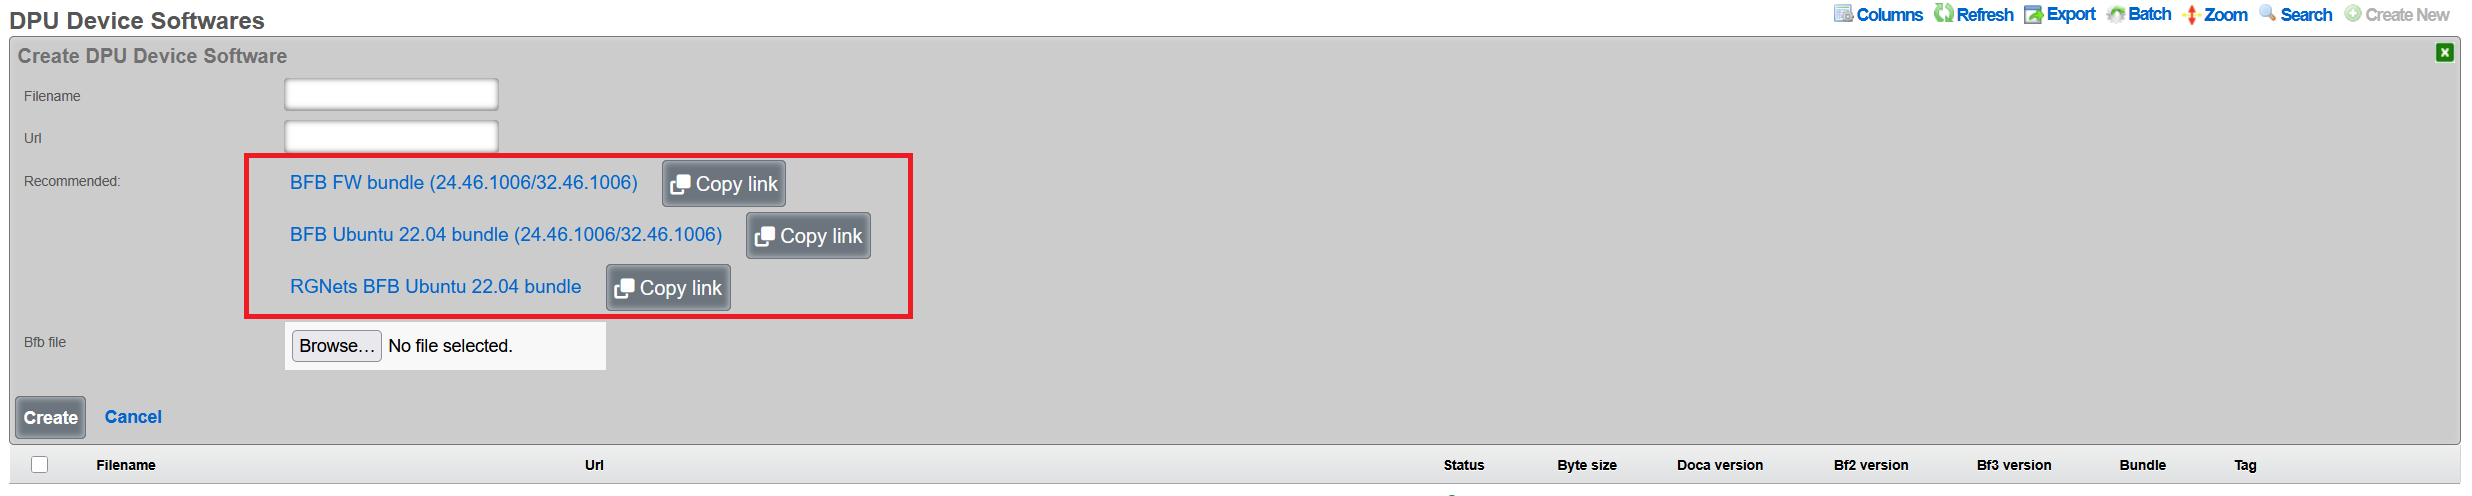
Performing Firmware Updates
- Navigate to Network DPU DPU Devices
- Click Upgrade on the target DPU
- Select the uploaded BFB software package
Configure upgrade options:
- Reboot After Upgrade: Automatically reboot host system
- Review current vs. available firmware versions
Click Submit Upgrade
Upgrade Process
The firmware upgrade process: 1. Validates current DPU status (not already upgrading) 2. Writes BFB image via RSHIM boot interface 3. Monitors upgrade progress through log messages 4. Updates configuration (passwords, network settings) 5. Verifies "DPU is ready" status 6. Optionally reboots host system
Duration: Typical upgrade takes 15-30 minutes, and includes the recommended optional host system reboot to properly apply all the firmware patches.
Viewing Upgrade History
To view past upgrades: 1. Navigate to Network DPU DPU Devices 2. Click Upgrade History on the target DPU 3. Review: - Timestamp of each upgrade - BFB filename used - Duration of upgrade - Log messages from process - Any errors encountered
Network Configuration
TMFIFO Interface
The TMFIFO (Tile Management FIFO) provides the primary management channel:
- Created automatically as tmfifo_net[N] where N is the RSHIM index
- Default network: 192.168.100.0/24
- Host IP: 192.168.100.1
- DPU IP: 192.168.100.2 (for the first DPU in the system)
Configuring TMFIFO Network
To modify the TMFIFO network:
- Navigate to Network DPU DPU Devices
- Click Edit on the target DPU
- Update TMFIFO Address field
- Click Update
The system automatically: - Updates host interface configuration - Reconfigures DPU via netplan - Maintains connectivity during transition - Validates no IP conflicts exist
NOTE: the TMFIFO network address change is not recommended.
Network Isolation
The TMFIFO network architecture provides complete isolation between management and production traffic, ensuring that administrative operations never impact data plane performance. This isolation is achieved through the use of PCIe transport for all management communications, eliminating any dependency on external network infrastructure. The management traffic flows entirely within the server chassis, using the PCIe bus as a secure, high-speed transport mechanism that cannot be accessed from outside the host system. This design ensures that DPU management remains available even during network outages or misconfigurations. The data plane interfaces operate independently, processing production traffic without any awareness of the management channel. Host firewall rules provide an additional layer of protection, restricting access to the TMFIFO interfaces to authorized management processes only.
DPU Data Interfaces
Physical network interfaces connected to the DPU undergo a sophisticated abstraction process to enable high-performance packet processing. These interfaces initially appear as PCI devices enumerated under the DPU's PCIe bridge, maintaining their hardware characteristics while being managed by the DPU's embedded operating system. The VPP framework then takes control of these interfaces, detaching them from the kernel network stack and implementing poll-mode drivers for maximum performance. This acceleration layer bypasses traditional interrupt-driven processing, achieving near line-rate performance even with small packet sizes. The final abstraction layer presents these VPP-managed interfaces as pseudo-interfaces in the rXg UI, providing administrators with a familiar management experience while leveraging the underlying acceleration capabilities.
Health Monitoring
The rXg platform implements comprehensive health monitoring for DPUs, providing real-time visibility into operational status, performance metrics, and potential issues. This monitoring framework operates continuously, collecting telemetry data from multiple sources to ensure administrators have the information needed to maintain optimal system performance.
Status Indicators
DPU operational status is communicated through a clear visual indicator system that provides immediate understanding of device health. The Active status, indicated by a green LED color in the interface, confirms that the DPU is fully operational with current heartbeat communication, meaning all management channels are functioning correctly and the device is processing traffic as expected. When a DPU enters Timeout status, shown with a yellow indicator, it signals that the heartbeat has been missed for more than 30 seconds, suggesting potential communication issues that require investigation but not necessarily complete failure. The Upgrading status, displayed in blue, indicates that a firmware update is currently in progress, during which normal operations may be suspended or degraded. A Missing status with red indication represents the most critical condition, where no communication can be established with the DPU, requiring immediate administrative attention.
Monitoring Features
The health monitoring system continuously tracks multiple operational parameters to provide comprehensive visibility into DPU health and performance. Heartbeat monitoring forms the foundation of health tracking, with status updates transmitted every 30 seconds via the RSHIM interface. This regular polling ensures rapid detection of communication failures or device issues. Firmware status monitoring compares the currently installed firmware version against the running version, identifying situations where a reboot is required to activate newly installed firmware. The system also tracks whether a reboot is pending, helping administrators plan maintenance windows for firmware activation.
Temperature monitoring, when supported by the hardware, provides critical thermal management data. The DPU's internal sensors report temperature readings that are compared against configured thresholds, with automatic alerts generated when limits are approached or exceeded. Memory usage tracking monitors the DPU's RAM utilization, helping identify memory leaks or capacity issues before they impact performance. CPU load monitoring tracks the utilization of the ARM cores, providing insights into processing bottlenecks and helping with capacity planning. These metrics are collected continuously and stored in a time-series database, enabling both real-time monitoring and historical analysis.
Viewing DPU Logs
Access to DPU system logs provides detailed insights into operational events and potential issues. Administrators can quickly access recent log entries by navigating to the DPU Devices section within the Network menu and selecting the Last Logs option for the target DPU. These logs contain system messages from the DPU's operating system, including kernel messages, service status changes, and error conditions. The log viewer presents entries in reverse chronological order, with the most recent events appearing first, and includes timestamp information for precise event correlation. Log entries are categorized by severity level, making it easy to identify critical issues that require immediate attention versus informational messages that provide operational context.
Health Notifications
The automated notification system ensures that administrators are promptly informed of significant health events affecting DPU operations. DPU offline events generate WARNING severity notifications when a device becomes unreachable, providing early warning of potential failures. SSH credential failures trigger FATAL severity alerts, as these prevent the rXg from managing the DPU and require immediate resolution. Firmware version mismatches between installed and running versions generate notifications to remind administrators that a reboot is required to activate updates. Temperature threshold violations produce alerts with escalating severity based on how far the temperature exceeds normal operating ranges. RSHIM communication failures generate critical notifications as they indicate a complete loss of management connectivity to the DPU. These notifications can be configured to trigger email alerts, SNMP traps, or webhook calls to integrate with existing monitoring infrastructure.
VPP Integration
Overview
Vector Packet Processing (VPP) represents a critical component of the rXg DPU architecture, providing a high-performance userspace packet processing framework that leverages the DPU's hardware acceleration capabilities. VPP operates as a software dataplane that processes packets in batches, achieving near line-rate performance while maintaining flexibility for complex network functions. The rXg platform automatically manages VPP version 25.02 or newer on DPUs, ensuring compatibility with the latest performance optimizations and feature sets.
The integration between rXg and VPP enables sophisticated packet processing pipelines that combine the flexibility of software-defined networking with the performance of hardware acceleration. VPP's graph-based architecture allows packets to flow through a series of processing nodes, each performing specific functions such as routing, filtering, encapsulation, or encryption. This modular approach enables administrators to construct complex network services without sacrificing performance.
VPP Configuration
The automated VPP configuration process begins immediately after successful DPU initialization. The system first establishes a secure connection to the DPU's operating system and verifies the current software state. It then proceeds to configure the FD.io (Fast Data Input/Output) package repositories, which provide access to the latest stable VPP releases and associated plugins. The repository configuration includes GPG key verification to ensure package authenticity and integrity.
Package installation follows a carefully orchestrated sequence that accounts for dependencies and version compatibility. The system installs the core VPP package along with essential plugins and libraries required for rXg integration. To prevent inadvertent updates that might introduce incompatibilities, the system implements APT package holds on critical VPP components, ensuring that automated system updates do not disrupt the carefully tuned VPP configuration.
One of the most important components deployed during VPP configuration is the L2 Open GRE (l2ogre) plugin, which enables high-performance Layer 2 tunneling over GRE (Generic Routing Encapsulation). This plugin provides essential functionality for extending Layer 2 networks across Layer 3 infrastructure, supporting use cases such as distributed switching, VXLAN gateway services, and seamless VM migration across data centers. The l2ogre plugin integrates directly with VPP's graph processing architecture, ensuring minimal latency and maximum throughput for tunneled traffic.
Physical interface mapping represents the final critical step in VPP configuration. The system automatically identifies all network interfaces connected to the DPU and determines which should be managed by VPP versus those reserved for system management. Data plane interfaces are detached from the kernel networking stack and attached to VPP, where they benefit from poll-mode drivers and zero-copy packet processing. The mapping process preserves interface naming consistency and maintains correlation between physical ports and their VPP representations.
Interface Management
The rXg interface management system provides a unified view of DPU network resources, abstracting the complexity of VPP-managed interfaces while maintaining full visibility and control. Physical interfaces represent the actual hardware ports on the DPU, typically showing as mlx5_core devices in the system. These interfaces connect directly to network infrastructure and handle the physical transmission and reception of packets.
Pseudo interfaces serve as the VPP-managed virtual representations of physical interfaces, providing the abstraction layer necessary for software-defined networking operations. These interfaces exist entirely within the VPP dataplane and can be configured with advanced features such as bonding, sub-interfaces for VLAN tagging, and tunnel endpoints. The pseudo interface abstraction allows administrators to configure complex networking topologies without directly manipulating the underlying hardware.
Interface Type 5 designation within the rXg system specifically identifies DPU VPP interfaces, distinguishing them from traditional kernel-managed network interfaces. This classification enables the rXg policy engine to apply appropriate configuration templates and management procedures specific to VPP-accelerated interfaces. The Type 5 designation also triggers specialized monitoring and statistics collection suited to VPP's high-performance characteristics.
The interface lifecycle management includes automatic recovery mechanisms for various failure scenarios. If a VPP crash occurs, the system automatically detects the failure through heartbeat monitoring and initiates recovery procedures. These procedures include restarting the VPP service, reapplying interface configurations, and restoring traffic flows. The recovery process typically completes within seconds, minimizing service disruption.
Viewing VPP Status
Monitoring VPP operations requires understanding both the high-level service status and detailed performance metrics. The rXg interface provides comprehensive visibility into VPP operations through multiple viewing contexts. By navigating to Network DPU DPU Devices and selecting a specific DPU, administrators gain access to real-time status information and historical data.
The VPP Interfaces link presents a detailed view of all VPP-managed interfaces, including their operational status, configuration parameters, and performance statistics. Each interface entry shows packet and byte counters, error statistics, and queue utilization metrics. The interface mapping table correlates physical ports with their VPP representations, making it easy to trace traffic flows through the system. Advanced statistics include detailed histograms of packet sizes, inter-packet arrival times, and processing latencies.
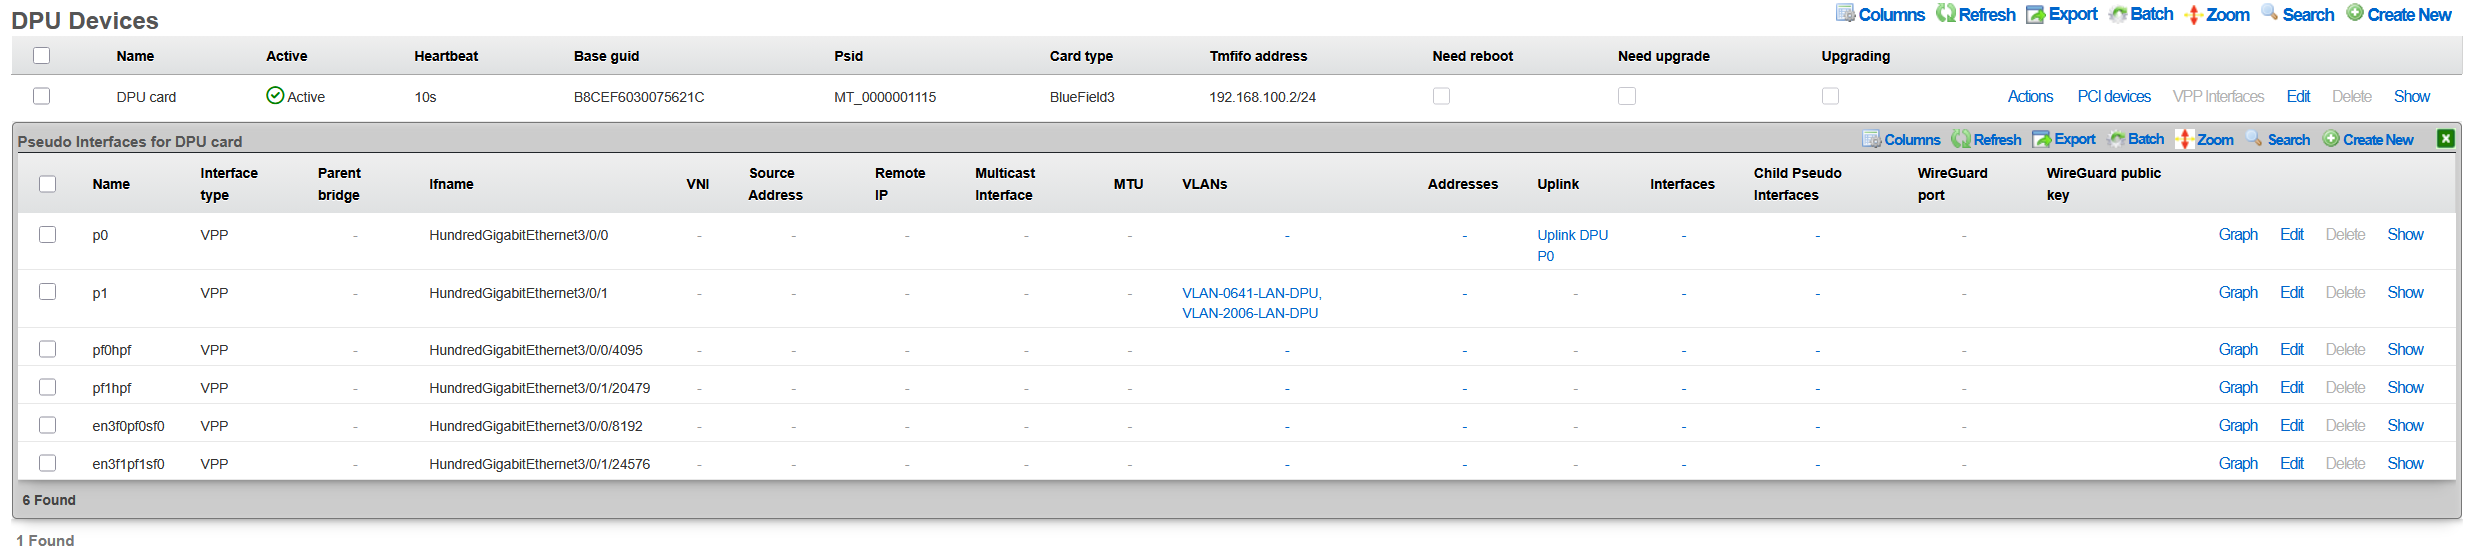
Performance metrics are collected continuously and stored in a time-series database for historical analysis. Administrators can view throughput graphs, latency measurements, and resource utilization trends over various time periods. This historical data proves invaluable for capacity planning, performance optimization, and troubleshooting intermittent issues.
VPP Logs
The VPP logging system provides detailed insights into service operations, configuration changes, and error conditions. When VPP requires restart due to configuration changes or error recovery, the system maintains comprehensive logs of the event sequence. Accessing these logs through Network DPU DPU Devices VPP Restart Logs reveals the complete restart history, including timestamps, triggering conditions, and recovery actions. Additionally, the Last Logs action provides access to the DPU's system log messages for general troubleshooting.
Log entries include multiple severity levels ranging from debug messages that detail packet processing decisions to critical errors that indicate service failures. The logging system implements intelligent filtering to prevent log flooding while ensuring that important events are captured. Each log entry includes contextual information such as the affected interface, processing graph node, and relevant packet headers when applicable.
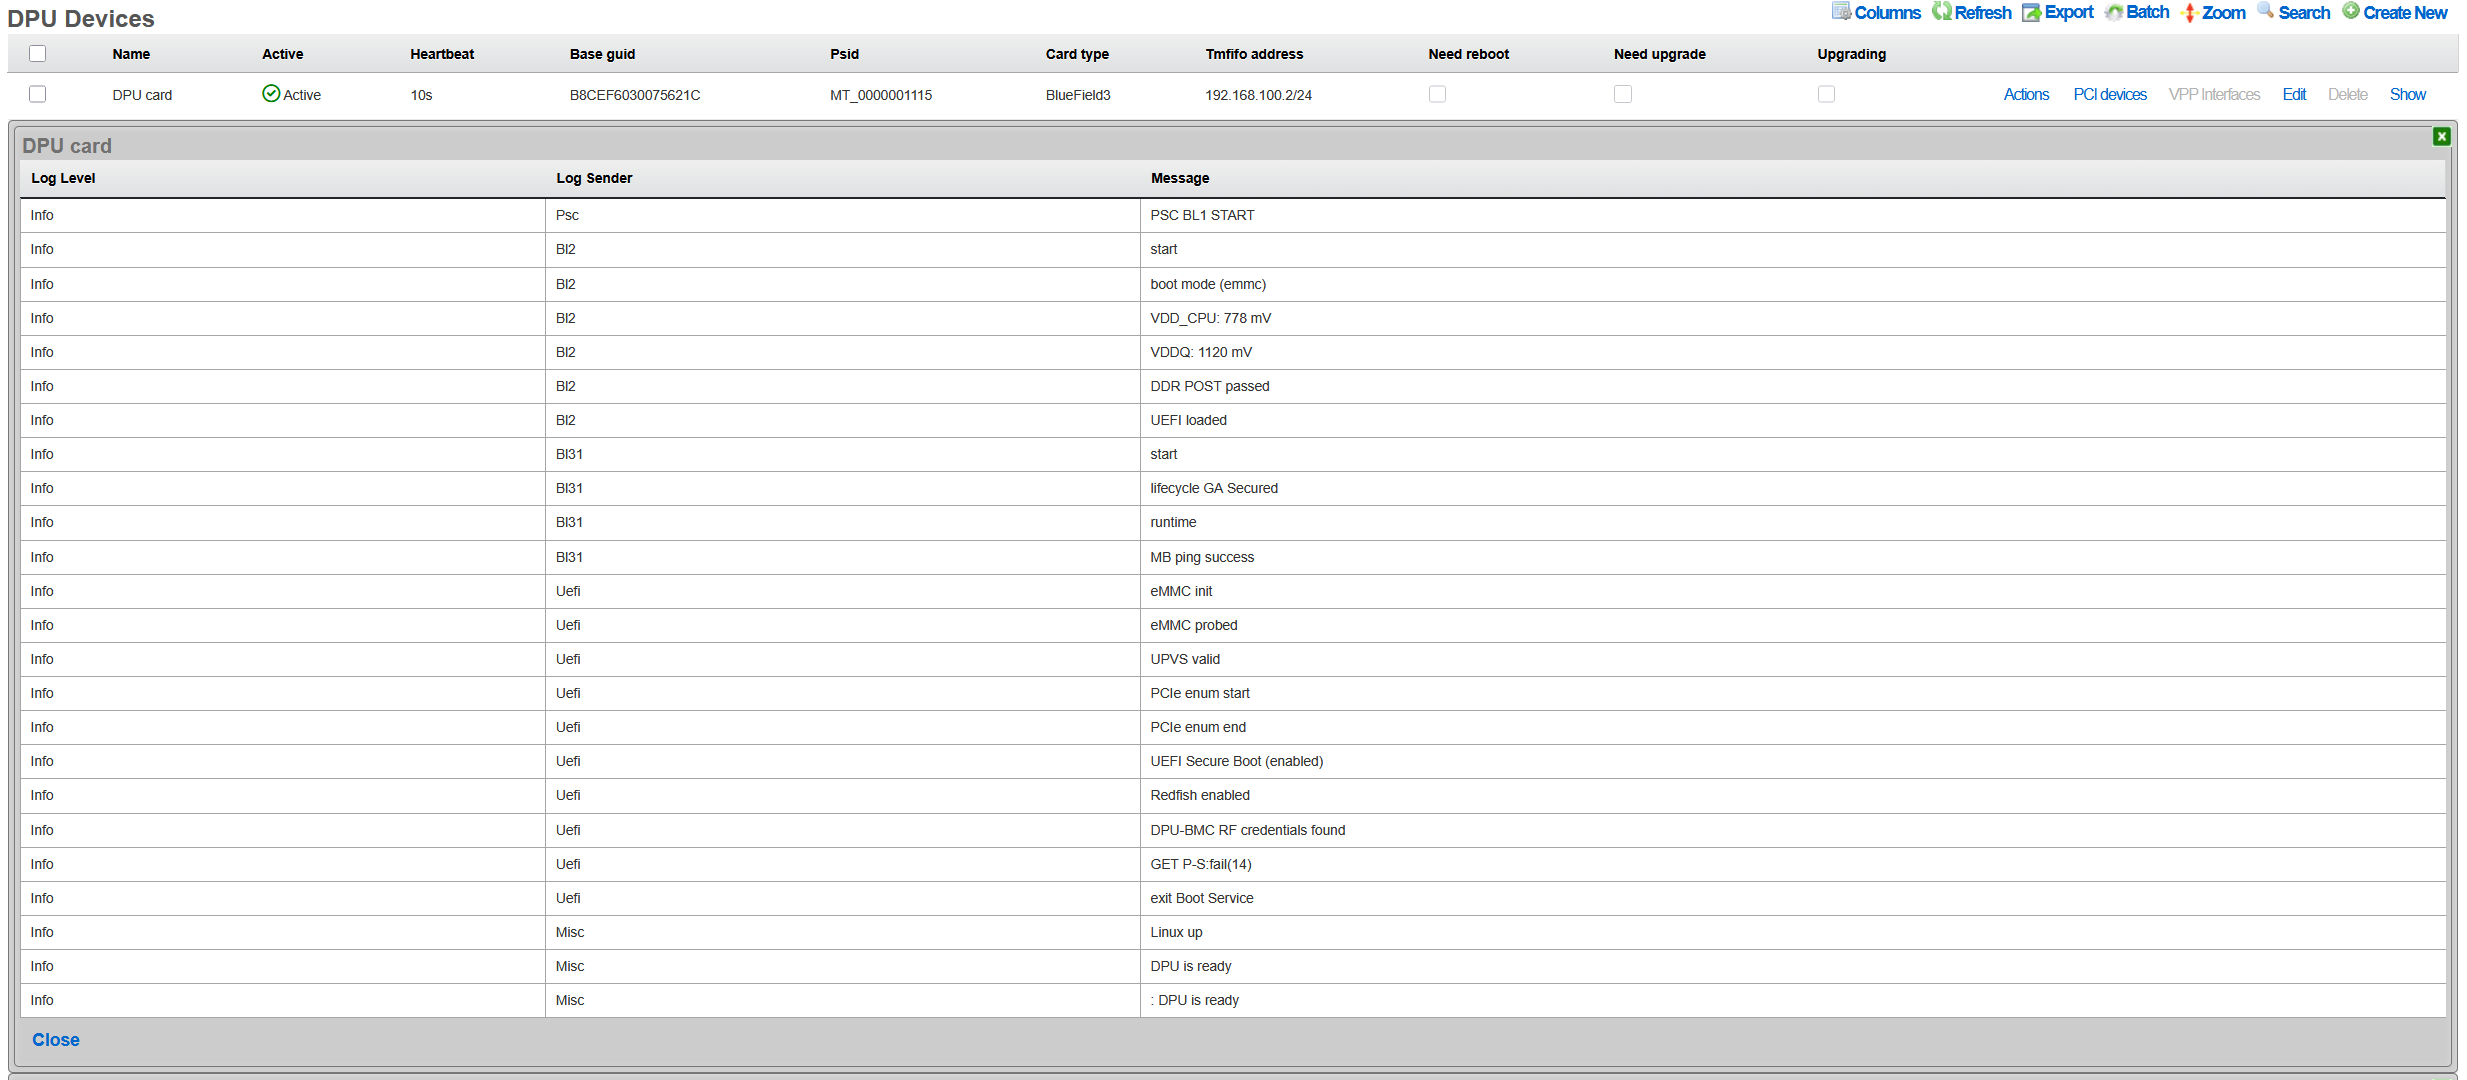
The log analysis tools within rXg can correlate VPP logs with system events, providing a comprehensive view of DPU operations. This correlation helps identify patterns such as configuration changes that trigger VPP restarts or network conditions that cause packet processing errors. Administrators can configure alerts based on specific log patterns, enabling proactive monitoring and rapid response to potential issues.
L2oGRE (SoftGRE) Integration
The rXg DPU architecture provides hardware-accelerated Layer 2 GRE tunneling through the l2ogre VPP plugin. This integration enables high-performance bridging of Layer 2 traffic across Layer 3 networks, commonly used for wireless access point deployments where client traffic is tunneled back to the rXg for policy enforcement, authentication, and internet access.
Underlay vs Overlay Network Architecture
Understanding the distinction between underlay and overlay networks is essential for proper L2oGRE configuration:
Underlay Network: The physical or logical network that carries the GRE-encapsulated packets. This is typically the VLAN where access points and the rXg communicate. For example, VLAN 100 might serve as the underlay, providing IP connectivity between APs and the rXg. The underlay VLAN carries the outer IP headers of the GRE tunnel.
Overlay Networks: The VLANs being transported inside the GRE tunnels. These represent the actual client networks (e.g., guest VLAN 200, corporate VLAN 300). From the perspective of clients and the overlay VLANs, traffic appears to be locally bridgedthey are unaware that their packets are being encapsulated and transported over the underlay network.
VLAN Selection for L2oGRE Bridging
The system automatically determines which VLANs participate in L2oGRE bridging based on explicit configuration and network address overlap analysis:
Direct Association: VLANs explicitly assigned to the L2oGRE pseudo interface through the rXg configuration interface are automatically included in L2oGRE bridging. These VLANs must belong to the local cluster node to be configured.
Whitelist-Based Selection: For DPU/VPP L2oGRE bridging, the system performs intelligent VLAN selection based on:
WAN Targets: If WAN targets are associated with the L2oGRE pseudo interface, VLANs whose configured IP addresses overlap with those WAN target networks are whitelisted for L2oGRE bridging.
Policies with IP Groups: If policies are associated with the L2oGRE pseudo interface, VLANs whose addresses overlap with the IP groups defined in those policies are whitelisted.
Address Overlap Analysis: The system evaluates each VLAN's configured addresses against the WAN targets and IP groups. A VLAN is whitelisted if any of its addresses fall within (or contain) the defined network ranges.
This automated selection ensures that only relevant VLANs participate in L2oGRE bridging, optimizing resource utilization and preventing unintended traffic flows.
NAT and L2oGRE Considerations
A critical architectural consideration when deploying L2oGRE on DPUs involves Network Address Translation (NAT) processing. This applies to all NAT variants supported by VPP, including NAT44, NAT46, NAT64, and NAT66.
VPP Limitation: VPP interfaces configured to receive SoftGRE packets cannot simultaneously perform NAT processing. This is a fundamental limitation of the VPP packet processing pipelinean interface must choose between being a GRE tunnel endpoint or a NAT translation point.
Underlay VLAN Behavior: The underlay VLAN (the network carrying GRE-encapsulated traffic) has NAT automatically disabled in VPP when L2oGRE is enabled. This is typically not a concern because:
- The underlay VLAN's primary purpose is to transport tunneled traffic between APs and the rXg
- Devices on the underlay network (primarily APs) that require internet access use the rXg as their default gateway
- Traffic from underlay devices is processed by the rXg's standard routing and NAT infrastructure, bypassing VPP NAT
Overlay VLAN Behavior: Overlay VLANs (the client networks transported inside GRE tunnels) function normally with full NAT support. From the perspective of these VLANs, traffic appears to be locally bridgedthey are unaware of the GRE encapsulation. NAT processing occurs as packets egress through the appropriate WAN interface, completely independent of the L2oGRE tunnel processing.
Example Deployment Scenario
Consider a typical deployment with the following configuration:
VLAN 100 (Underlay): Management/AP network, 10.100.0.0/24
- Access points connect here
- rXg address: 10.100.0.1 (default gateway for APs)
- NAT disabled in VPP (by design)
- APs needing internet access route through rXg normally
VLAN 200 (Overlay): Guest wireless, 10.200.0.0/24
- Client traffic tunneled from APs via GRE
- Full NAT support in VPP
- Clients see the rXg as their default gateway
VLAN 300 (Overlay): Corporate wireless, 10.300.0.0/24
- Client traffic tunneled from APs via GRE
- Full NAT support in VPP
- May have different policies than guest network
In this scenario, guest and corporate clients on VLANs 200 and 300 experience full DPU-accelerated NAT and policy enforcement. The underlay VLAN 100 provides reliable transport for the tunneled traffic, with AP management traffic handled through traditional rXg routing.
Configuring L2oGRE for DPU
To enable L2oGRE on DPU:
- Navigate to Network Pseudo Interfaces
- Create or edit an L2oGRE pseudo interface
- Set the SoftGRE Operation Mode to one of the following:
- Enable All Modes: L2oGRE processing on both DPU/VPP and the traditional host daemon
- Host Mode: L2oGRE processing handled by the traditional host daemon only
- DPU: L2oGRE processing handled exclusively by DPU/VPP hardware acceleration
- Associate the appropriate VLANs with the pseudo interface (these are the underlay VLANs that will transport tunneled traffic)
- Configure WAN targets and/or policies to whitelist overlay VLANs (at least one is required for L2oGRE to function)
- Configure GRE key mode and other tunnel parameters as needed
The system automatically generates the VPP configuration, creates the necessary bridge domains, and establishes the L2oGRE tunnel interfaces.
Troubleshooting
Common Issues and Solutions
DPU Not Detected
Symptoms: No DPU appears in device list
Solutions:
1. Verify physical installation:
bash
pciconf -lv | grep -i mellanox
2. Check kernel module:
bash
kldstat | grep cuse
3. Restart RSHIM service:
bash
service rshim restart
Firmware Upgrade Stuck
Symptoms: Upgrade status remains "upgrading" > 1 hour
Solutions:
1. Check RSHIM device:
bash
ls -la /dev/rshim*/boot
2. View upgrade logs via Upgrade History
3. Perform software reset:
- Click Software Reset on DPU device
4. If unresponsive, power cycle host system
VPP Not Running
Symptoms: No pseudo interfaces visible
Solutions:
1. Check VPP service on DPU:
bash
ssh [email protected] "sudo systemctl status vpp"
2. Review VPP logs:
bash
ssh [email protected] "sudo journalctl -u vpp -n 50"
3. Restart VPP:
bash
ssh [email protected] "sudo systemctl restart vpp"
Network Performance Issues
Symptoms: Lower than expected throughput
Solutions:
1. Verify PCIe link speed:
bash
pciconf -lc pci0:42:0:0 | grep "Link Speed"
2. Check DPU temperature:
- High temperatures throttle performance
3. Review interface statistics for errors
4. Ensure TSO/LRO offloads are configured correctly
Advanced Diagnostics
Accessing DPU Console
For direct DPU access: ```bash
Via TMFIFO SSH
ssh [email protected] ```
Checking RSHIM Status
To verify RSHIM communication: ```bash
Read RSHIM misc information
cat /dev/rshim0/misc
View JSON telemetry
cat /dev/rshim0/misc_json | python -m json.tool ```
API Reference
REST API Endpoints
The rXg provides REST API access for DPU management through standard RESTful endpoints:
DPU Devices (/api/dpu_devices):
- GET /api/dpu_devices - List all DPU devices
- GET /api/dpu_devices/{id} - Get specific DPU details
- POST /api/dpu_devices - Create a new DPU device record
- PUT /api/dpu_devices/{id} - Update DPU configuration
- DELETE /api/dpu_devices/{id} - Delete a DPU device record
DPU Software (/api/dpu_device_softwares):
- GET /api/dpu_device_softwares - List available firmware packages
- GET /api/dpu_device_softwares/{id} - Get specific firmware details
- POST /api/dpu_device_softwares - Upload new BFB file
- DELETE /api/dpu_device_softwares/{id} - Delete a firmware package
Note: Administrative actions such as software reset and firmware upgrade are performed through the web UI scaffold interface rather than the REST API.
Authentication
API requests require authentication via:
- API key in header: X-API-Key: [key]
- OAuth 2.0 bearer token
- Session cookie (web UI)
Example API Usage
# List DPU devices
curl -H "X-API-Key: your-api-key" \
https://rxg.example.com/api/dpu_devices
# Get specific DPU device details
curl -H "X-API-Key: your-api-key" \
https://rxg.example.com/api/dpu_devices/1
# Update DPU device configuration
curl -X PUT -H "X-API-Key: your-api-key" \
-H "Content-Type: application/json" \
-d '{"name": "Production DPU 1", "tmfifo_address": "192.168.100.2"}' \
https://rxg.example.com/api/dpu_devices/1
# Upload BFB firmware
curl -X POST -H "X-API-Key: your-api-key" \
-F "filename=bf-bundle-3.1.0-76_25.07_ubuntu-22.04_prod.bfb" \
-F "bfb_file=@/path/to/firmware.bfb" \
https://rxg.example.com/api/dpu_device_softwares
Services
All IP-data networks must provide several core services in order for end-users to establish connectivity. The vast majority of IP-data networks use DHCP for provisioning end-user IP addresses. Thus a DHCP server is a requirement for almost every IP-data network. DHCP server responses include DNS server information. Most IP-data networks incorporate a local, caching DNS server, to improve network performance. Furthermore, information security is another critical aspect of the contemporary IP-data networks. One commonly deployed service to help increase the trustworthiness of the network is an IPsec VPN concatenator. Many IP-data network also incorporate network time (NTP) and SNMP services to ease administration.
Revenue generating networks must deliver several additional services in addition to which most other IP-data networks must provide. If a captive portal is used, then a web application server must be present on the RGN. If the captive portal is to incorporate advertising, an advertising proxy and rotation server is needed. Email broadcasts, transparent web proxies and many other possibilities exist. In many cases, the profitability of the RGN is directly related to the availability and provisioning of the network core services.
The rXg incorporates all of the core services needed to operate a revenue generating network. The services menu enables the operator to access the views needed to configure core services integrated into the rXg.
Services Dashboard
The services dashboard presents an overview of the current status and configured settings for the various core services executing on the rXg.

The left column presents dialogs depicting summaries of the latest instrumentation gathered from the DHCP server.

The top dialog in the left column displays statistical information about the DHCP pools offered by the DHCP server. Next to the name of the pool, the current number of free and used leases is displayed. The right column displays the maximum number of leases that may be in use simultaneously. This dialog is extremely useful in determining if the DHCP pool is configured in a way that makes it capable of serving the entire end-user population.
The bottom dialog in the left column displays the four latest DHCP leases that were issued by the DHCP server. The IP address issued is listed along with the MAC address and DHCP client ID (if the client transmitted one in the request). This dialog is very useful for quickly tracking down problematic end-users who have recently joined the network. First call end-user support personnel will find the information presented in this dialog very useful in identifying and isolating end-users with connectivity problems.
The right column presents graphs describing the recent load of various core rXg services.

The first graph in the right column presents the recent average number of DHCP leases.

The second graph in the right column presents the recent average number of VLAN tag assignments.

The last graph in the right column presents the recent average number of web server hits. The web server hit count is determined by the number of end-users hitting the captive portal web application, typically as a result of forced web browser redirection. Keep in mind that the default interstitial advertising methodology uses the captive portal to deliver the ad content as well.

The dialog presented at the bottom of the left column displays a dashboard of status lights for the various services offered by the rXg. A red light means the service is currently offline or disabled. A green light means that the service is currently running. This dialog is the quickest way to obtaining a first order understanding of why a particular rXg subsystem is misbehaving when troubleshooting new service deployment scenarios. Clicking on the light will take you to a relevant view for configuring the service. This dialog also displays the current instantaneous rate of web server, web proxy and HTML injection hits. This is very useful for comparing the current rate with the rates presented in the graphs to see where the current load of the rXg fits in the overall picture of recent load.
DHCP
The DHCP view presents the scaffolds associated with configuring the DHCP server and DHCP relay features of the rXg.
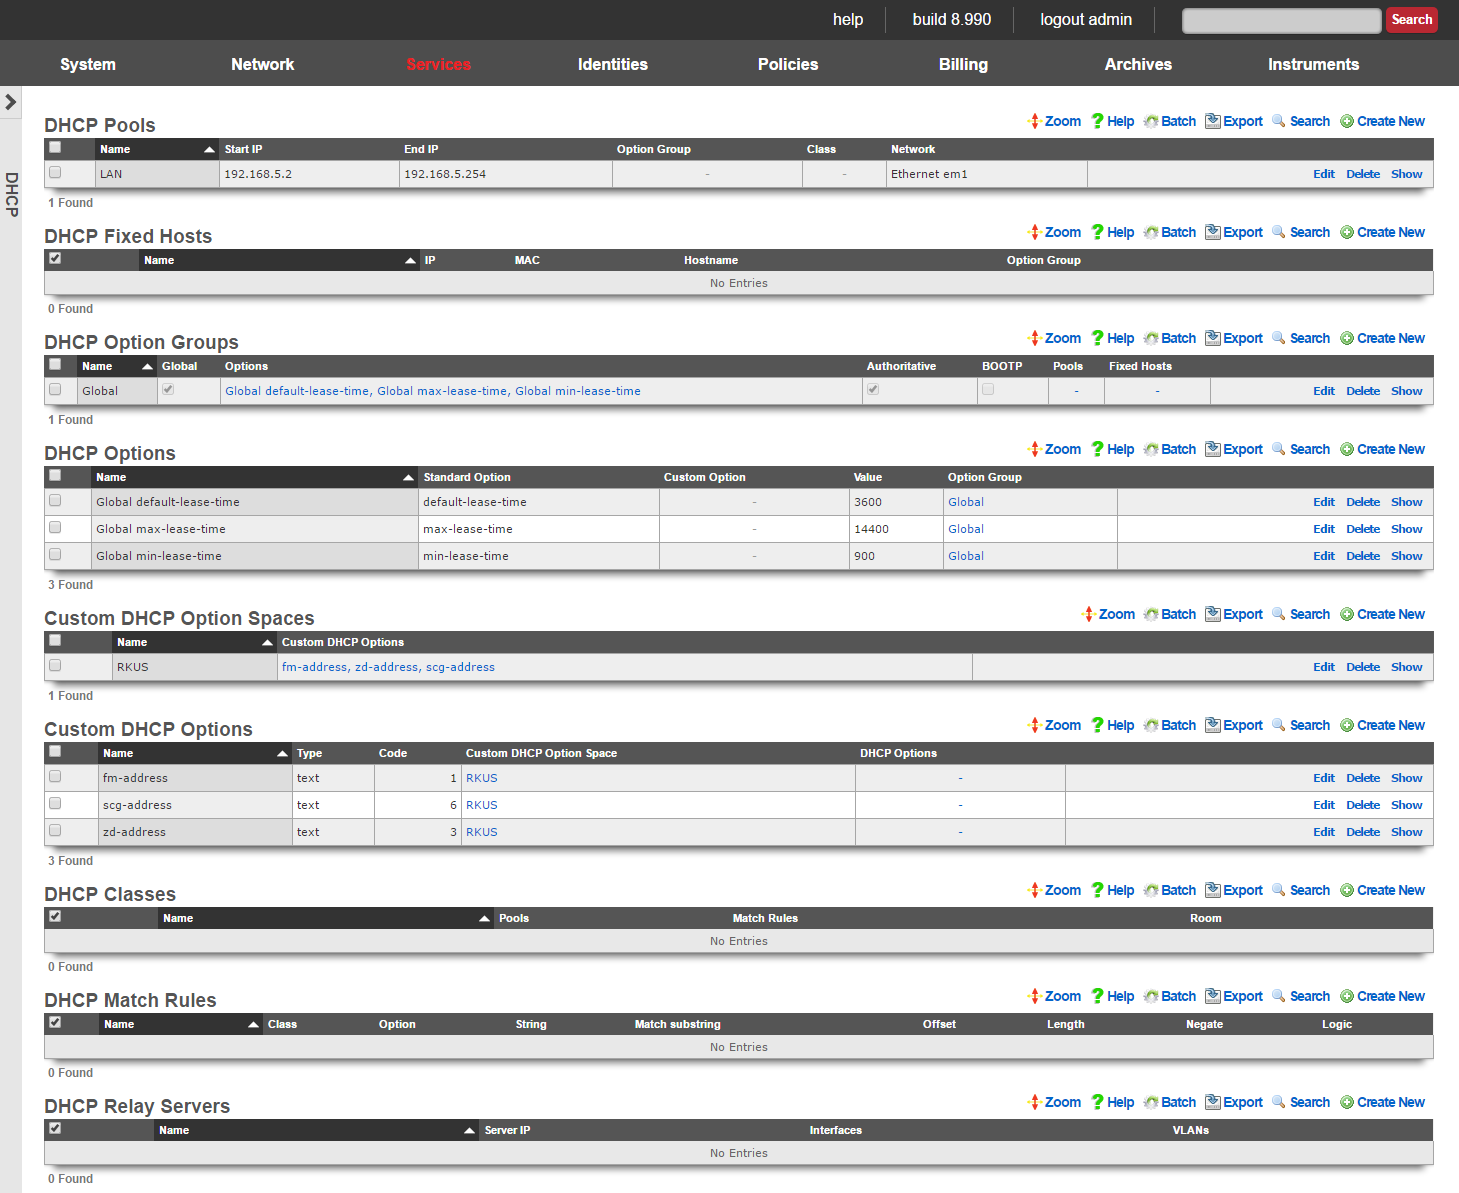
The rXg integrates a fully featured DHCP server capable of meeting the needs of nearly any imaginable environment. By default, the rXg DHCP server responds to all DHCP requests on the LAN with a temporary address assignment from within a pool. This behavior may be modified and augmented via the scaffolds presented on this view to deliver a broad spectrum of possible responses.
To enable the rXg integrated DHCP server, the operator must create a DHCP pool that falls within the CIDR of an address that is on the LAN of the rXg. An address is considered to be on the LAN of the rXg if the address is associated with an Ethernet interface , VLAN or is the destination in a static route.
The CIDR of the address from which the pool draws IP addresses from automatically determines the DHCP server listening interface as well as the subnet mask and default route that is presented to the client.
For example, given an rXg that has the following addresses :
- Ethernet Interface en1: 192.168.5.1 / 24
- VLAN 3800: 172.16.16.1 / 22 If a DHCP pool for with a range of 192.168.5.100 to 192.168.5.200 is created, the rXg integrated DHCP server will listen on en1 for DHCP requests in the native VLAN and respond with:
- IP address in range 192.168.5.100 to 192.168.5.200
- subnet mask 255.255.255.0
- default gateway 192.168.5.1 Similarly, if a pool with a range of 172.16.23.1 to 172.16.28.255 is created, then DHCP requests present on VLAN 3800 will see a response of:
- IP address in range 172.16.23.1 to 172.16.28.255
- subnet mask 255.255.240.0
- default gateway 172.16.16.1
Many networks combine DHCP assigned addresses with manually assigned static addresses. Use the pools scaffold to control the range of addresses issued by the rXg. It is extremely important to ensure that network administrators manually configure statically assigned addresses correctly to prevent overlap. It is also suggested that VLANs be used for L2 segregation of machines with statically assigned addresses from those pulling from DHCP in order to prevent IP address collisions. Alternatively, the network operator may choose to use DHCP fixed hosts in lieu of statically assigned addresses to achieve the same goal.
In most networks, there are some devices which should obtain the same IP address every time a request is made. A common occurrence of this is when a Static IP has been configured for a device that is using DHCP. To ensure connectivity, the BiNAT'ed device must have a static IP address or must be established as a fixed host. It is important to make sure that fixed hosts are assigned IP addresses that are outside of the ranges specified by the pools
Two, non-overlapping pools may also be configured for the same Ethernet interface or VLAN. Given the example rXg network address configuration above, 172.16.23.1 to 172.16.28.1 and 172.16.20.1 to 172.16.22.255 may both be configured as pools simultaneously. By default, requests originating from VLAN 3800 will draw addresses from both pools. This behavior is usually modified through the use of classes and match rules.
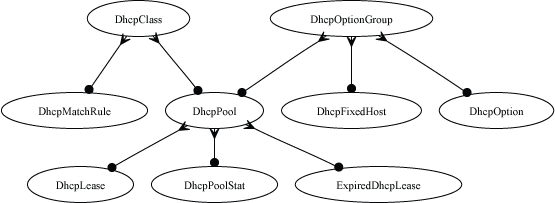
Match rules may be used to differentiate between requests originating from the same physical or logical media. For example, match rules may be used to associate devices presenting DHCP client identifiers containing a specific prefix with a class. Another common use of match rules is to place all devices presenting a MAC address from a specific vendor into a class.
A class may be used to determine the pool from which the requesting device acquires an address. This is useful for IP-based policy management as certain devices may be placed into specific ranges of IP addresses which can have different policies associated with them. In addition, different pools may have different DHCP options. For example, pools may have different maximum lease times, DNS servers, default routes, etc.
If there is a LAN CIDR block configured on the rXg for which there is no pool , the rXg may also be configured as a DHCP relay server. This feature enables a DHCP proxy server on the rXg that forwards DHCP requests originating from the associated Ethernet interface or VLAN to an external DHCP server.

Pools
An entry in the DHCP Pools scaffold configures a pool of IP addresses that are to be offered to end-user devices requesting an IP address.
The name field is an arbitrary string descriptor used only for administrative identification. Choose a name that reflects the purpose of the record. This field has no bearing on the configuration or settings determined by this scaffold.
The start IP and end IP fields define the range of addresses to be offered by this pool. The pool of offered addresses must fall within the range of an IP network configured on an interface and must not include the address(es) consumed by the rXg or the broadcast address. For example, if the 192.168.5.1/24 IP network is configured on the LAN, the maximum allowable range is from the start IP of 192.168.5.2 to the end IP of 192.168.5.254.
It is critically important to be very precise when entering these values to prevent IP address conflicts. Some of the many things to keep in mind include:
- Devices with statically assigned IP addresses must not use addresses within the DHCP pool range.
- IP address reservations (specified in the fixed hosts scaffold) must not be in the pool.
- The pool ranges must be large enough to accommodate the end-user population.
The Reserved options let you specify addresses you wish to reserve either at the begining of each subnet in the pool via the First field or at the end of the subnet via the Last field. For example a network address consisting of 32 /24 subnets (x.x.0.1/24 - x.x.31.1/24 (32)) setting the First field to 4 would reserve x.x.0.2 - x.x.0.5 in the first subnet and .2 - .5 in each subsequent subnet. Setting the Last field to 4 would reserve x.x.0.251 - x.x.0.254 in the first subnet and 251 - 254 in each subsequent subnet. The Router field can change the gateway IP in each subnet. Incremented from the network address, where 1 is the first usable IP address (e.g. x.x.x.1/24). Decremented from the last usable address, where -1 means the last host address (e.g. x.x.x.254/24).
The note field is a place for the administrator to enter a comment. This field is purely informational and has no bearing on the configuration settings.
The option group and class fields link this DHCP pool with options and configuration rules. For example, the WINS server DHCP option can be transmitted to only those end-users running Window through the use of the option group and class fields.

Fixed Hosts
An entry in the Fixed Hosts scaffold reserves an IP address for a particular device. When a device with the MAC address specified in this record requests network configuration via DHCP, the specified IP address is offered. This mechanism is often used as an alternative to manually assigning static IP addresses to devices.
The name field is an arbitrary string descriptor used only for administrative identification. Choose a name that reflects the purpose of the record. This field has no bearing on the configuration or settings determined by this scaffold.
The IP field contains the IP address to be reserved for this device. It is critically important that the reserved IP be outside of any pools specified in the pools scaffold.
The MAC field contains the MAC address of the device that this reservation is being held for.
The hostname field is an optional parameter that, if specified, will cause the DHCP server to deliver a client identifier to the device via a DHCP option.
The note field is a place for the administrator to enter a comment. This field is purely informational and has no bearing on the configuration settings.
The option group links this reservation with a set of DHCP options that control additional information that may be delivered to the device beyond IP address, hostname, subnet mask and gateway. For example, an option group may be used to specify alternative DNS servers for the device specified in this reservation.

Option Groups
An entry in the option groups scaffold links one or more options to devices that are offered addresses from a pool or set of fixed hosts. When an option is linked, the specified payload will be delivered as part of the DHCP response offered to a requesting device. The use of option groups to link options to pools and fixed hosts maximizes the flexible reuse of configuration options.
The global check box links the associated options with all DHCP responses. Only a single option group can have the global field checked. Furthermore, the global checkbox should be used in exclusion to linking any specific pools and fixed hosts and vice versa.
The authoritative check box indicates whether or not the DHCP server should be authoritative for the network(s) its attached to. An authoritative DHCP server will assume that the configuration information about a given network segment is known to be correct and authoritative, and thus will send DHCPNAK messages to misconfigured clients. Operators setting up DHCP servers for their networks should usually have this checked to indicate that the DHCP server should send DHCPNAK messages to misconfigured clients. If this is not done, clients will be unable to get a correct IP address after changing subnets until their old lease has expired, which could take quite a long time. For certain cluster deployment configurations it is necessary to put the server in non authoritative mode. For example, when two or more cluster nodes are performing the role of the DHCP server on the same network. This is so that the nodes do not NAK each others lease assignments.
The BOOTP check box allows or denies address assignment from the related pool(s) for BOOTP clients.
The options field specifies the members of the options scaffold that will be linked to the targets specified in this option groups record.
The pools and fixed hosts fields specify targets for receiving the DHCP configuration options specified by the options fields.
The note field is a place for the administrator to enter a comment. This field is purely informational and has no bearing on the configuration settings.
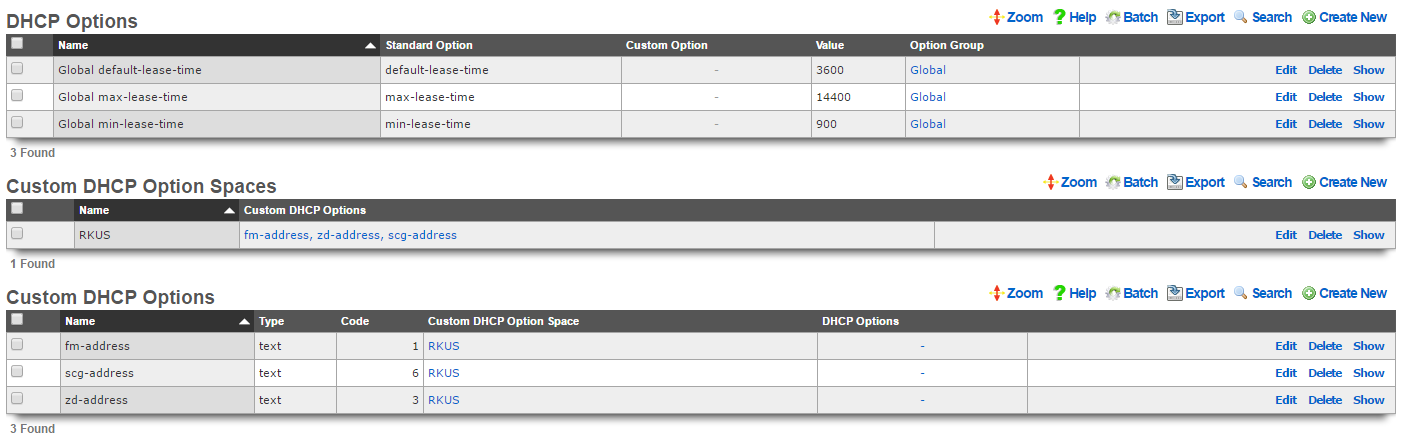
Options
An entry in the options scaffold establishes a key-value pair that can be appended to any DHCP response via an option group.
The name field is an arbitrary string descriptor used only for administrative identification. Choose a name that reflects the purpose of the record. This field has no bearing on the configuration or settings determined by this scaffold.
The standard option field specifies the DHCP option that is to be defined by this record. The purpose of the vast majority of the DHCP options is easily derived by the name. The set of all available standard DHCP options is defined by IETF RFC 2132. The custom option field enables the operator to deploy DHCP options that are not part of IETF RFC 2132.
The name makes the purpose of the option self evident in many cases. Here are some common required use cases:
routersWhen the rXg integrated DHCP server is responding to requests originating from a network that is L2 connected to the rXg, the DHCP server automatically populates the response with a next hop router specified as the rXg. However, if the rXg integrated DHCP server is responding to requests on a network that is L3 connected behind a router, the routers option must be specified. In general, it is not possible to automatically determine the IP address of the next hop router that faces the clients being served DHCP, hence the requirement for manual specification.tftp-server-nameCertain forms of customer premises equipment require BOOTP or TFTP provisioning (e.g., DOCSIS cable modems or WiMAX subscriber terminals). To accommodate this, the rXg incorporates a TFTP server and supports the delivery of DHCP responses with the requisite options. The value of the tftp-server-name option should be the IP address of the rXg that is closest to the end-user.
The value is the value that will be used when the key-value pair is appended to the DHCP request. For example, if max-lease-time is chosen as the option name for a record, the option value should be set to the maximum number of seconds that a DHCP lease can be used by a end-user device.
The note field is a place for the administrator to enter a comment. This field is purely informational and has no bearing on the configuration settings.
The option group field determines which DHCP responses will contain the key-value option pair configured in this record.
The following DHCP client options are currently supported:
| Code | Option | Name | Description |
|---|---|---|---|
| 1 | subnet-mask | Subnet Mask | Subnet Mask Value |
| 2 | time-offset | Time Offset | Time Offset in Seconds from UTC (note: deprecated by 100 and 101) |
| 3 | routers | Router | N/4 Router addresses |
| 4 | time-servers | Time Server | N/4 Timeserver addresses |
| 5 | ien116-name-servers | Name Server | N/4 IEN-116 Server addresses |
| 6 | domain-name-servers | Domain Server | N/4 DNS Server addresses |
| 7 | log-servers | Log Server | N/4 Logging Server addresses |
| 8 | cookie-servers | Quotes Server | N/4 Quotes Server addresses |
| 9 | lpr-servers | LPR Server | N/4 Printer Server addresses |
| 10 | impress-servers | Impress Server | N/4 Impress Server addresses |
| 11 | resource-location-servers | RLP Server | N/4 RLP Server addresses |
| 12 | host-name | Hostname | Hostname string |
| 13 | boot-size | Boot File Size | Size of boot file in 512 byte chunks |
| 14 | merit-dump | Merit Dump File | Client to dump and name the file to dump it to |
| 15 | domain-name | Domain Name | The DNS domain name of the client |
| 16 | swap-server | Swap Server | Swap Server address |
| 17 | root-path | Root Path | Path name for root disk |
| 19 | ip-forwarding | Forward On/Off | Enable/Disable IP Forwarding |
| 20 | non-local-source-routing | SrcRte On/Off | Enable/Disable Source Routing |
| 21 | policy-filter | Policy Filter | Routing Policy Filters |
| 22 | max-dgram-reassembly | Max DG Assembly | Max Datagram Reassembly Size |
| 23 | default-ip-ttl | Default IP TTL | Default IP Time to Live |
| 24 | path-mtu-aging-timeout | MTU Timeout | Path MTU Aging Timeout |
| 25 | path-mtu-plateau-table | MTU Plateau | Path MTU Plateau Table |
| 26 | interface-mtu | MTU Interface | Interface MTU Size |
| 27 | all-subnets-local | MTU Subnet | All Subnets are Local |
| 28 | broadcast-address | Broadcast Address | Broadcast Address |
| 29 | perform-mask-discovery | Mask Discovery | Perform Mask Discovery |
| 30 | mask-supplier | Mask Supplier | Provide Mask to Others |
| 31 | router-discovery | Router Discovery | Perform Router Discovery |
| 32 | router-solicitation-address | Router Request | Router Solicitation Address |
| 33 | static-routes | Static Route | Static Routing Table |
| 34 | trailer-encapsulation | Trailers | Trailer Encapsulation |
| 35 | arp-cache-timeout | ARP Timeout | ARP Cache Timeout |
| 36 | ieee802-3-encapsulation | Ethernet | Ethernet Encapsulation |
| 37 | default-tcp-ttl | Default TCP TTL | Default TCP Time to Live |
| 38 | tcp-keepalive-interval | Keepalive Time | TCP Keepalive Interval |
| 39 | tcp-keepalive-garbage | Keepalive Data | TCP Keepalive Garbage |
| 40 | nis-domain | NIS Domain | NIS Domain Name |
| 41 | nis-servers | NIS Servers | NIS Server Addresses |
| 42 | ntp-servers | NTP Servers | NTP Server Addresses |
| 44 | netbios-name-servers | NETBIOS Name Srv | NETBIOS Name Servers |
| 45 | netbios-dd-server | NETBIOS Dist Srv | NETBIOS Datagram Distribution |
| 46 | netbios-node-type | NETBIOS Node Type | NETBIOS Node Type |
| 47 | netbios-scope | NETBIOS Scope | NETBIOS Scope |
| 48 | font-servers | X Window Font | X Window Font Server |
| 49 | x-display-manager | X Window Manager | X Window Display Manager |
| 54 | dhcp-server-identifier | DHCP Server Id | DHCP Server Identification |
| 61 | dhcp-client-identifier | Client Id | Client Identifier |
| 64 | nisplus-domain | NIS-Domain-Name | NIS+ v3 Client Domain Name |
| 65 | nisplus-servers | NIS-Server-Addr | NIS+ v3 Server Addresses |
| 66 | tftp-server-name | Server-Name | TFTP Server Name |
| 67 | bootfile-name | Bootfile-Name | Boot File Name |
| 68 | mobile-ip-home-agent | Home-Agent-Addrs | Home Agent Addresses |
| 69 | smtp-server | SMTP-Server | Simple Mail Server Addresses |
| 70 | pop-server | POP3-Server | Post Office Server Addresses |
| 71 | nntp-server | NNTP-Server | Network News Server Addresses |
| 72 | www-server | WWW-Server | WWW Server Addresses |
| 73 | finger-server | Finger-Server | Finger Server Addresses |
| 74 | irc-server | IRC-Server | Chat Server Addresses |
| 75 | streettalk-server | StreetTalk-Server | StreetTalk Server Addresses |
| 114 | captive-portal-api | Captive Portal API | Captive Portal API URL |
The following DHCP server options are currently supported:
| Option | Description |
|---|---|
| abandon-lease-time | Maximum amount of time (in seconds) that an abandoned lease remains unavailable for assignment to a client |
| adaptive-lease-time-threshold | Specify the % of active leases before the server hands out only short min_lease_time leases |
| always-broadcast | Always broadcast responses to clients, regardless of the broadcast bit in the request header |
| always-reply-rfc1048 | Always respond with RFC1048-style responses |
| default-lease-time | length in seconds that will be assigned to a lease if the client does not ask for a specific expiration time |
| dynamic-bootp-lease-length | length in seconds of leases dynamically assigned to BOOTP clients |
| filename | Name of the initial boot file which is to be loaded by a client |
| get-lease-hostnames | Perform reverse lookup of IP to determine hostname |
| infinite-is-reserved | |
| one-lease-per-client | Automatically free any other leases the client holds when responding to a request |
| ping-check | Ping the IP to ensure it is free before assigning to a client |
| ping-timeout | Timeout in seconds to wait for the ping-check to complete |
| server-name | Inform the client of the name of the server from which it is booting |
| site-option-space | Determine from what option space site-local options will be taken |
| stash-agent-options | Record the relay agent information options sent during the initial request message and behave as if those options are included in all subsequent renewal requests |
| update-conflict-detection | |
| max-lease-time | Maximum length in seconds that will be assigned to a lease |
| min-lease-time | Minimum length in seconds that will be assigned to a lease |
| min-secs | Minimum number of seconds since a client began trying to acquire a new lease before the DHCP server will respond to its request |
| next-server | Address of the server from which the initial boot file is to be loaded |
| use-host-decl-names | Supply the scope's host declaration name to the client as its hostname |
Custom DHCP Options
The vast majority of client devices require only basic DHCP in order to achieve network connectivity. Some operators may choose to use standard DHCP options that are defined in IETF RFC 2132 to deliver specific additional configuration. Standard DHCP options may be configured via the DHCP Options scaffold. Between basic DHCP and standard options almost all client devices will get everything they need. Infrastructure devices are a different story.
In some cases certain kinds of devices may require configuration to be delivered via non-standard DHCP options. This usually applies to thin, headless infrastructure devices that depend on a central controller or server such as VoIP handsets, VoD set top boxes, wireless access points, etc. Specialized infrastructure devices. Custom DHCP Options are usually used to deliver bootstrap configuration information such as the IP address and filestore location of initial bootstrap configuration.
The Custom DHCP Options scaffold enables operators to configure the rXg to deliver DHCP options that are not defined byIETF RFC 2132. Each record in the Custom DHCP Option scaffold adds an option to the custom option drop down list in the DHCP Options scaffold. The payload ( value ) to be delivered to the device is configured in the DHCP Options scaffold.
The name field is an arbitrary string descriptor used only for administrative identification. Choose a name that reflects the purpose of the record. This field has no bearing on the configuration or settings determined by this scaffold.
The type , array and code fields enable the operator to define the headers in the DHCP option that is to being defined. When the array checkbox is enabled, the option will be defined as an array of the type designated. The values of the corresponding DHCP Options should be entered in comma separated format. DHCP vendor-specific option 43 as well as DHCP site-specific option codes between 128 to 254 may be configured to be delivered by the rXg. The exception to this is option 121, classless-static-routes. Static routes may be provided to clients by creating a custom DHCP option and specifying the type as an array of unsigned integer 8, and a code of 121. The value of the corresponding DHCP Option record may be 24,192,168,99,10,10,10,1, 24,172,16,32,10,10,10,2. This would provide a route to 192.168.99.0/24 via 10.10.10.1 and a route to 172.16.32.0/24 via 10.10.10.2. Refer to IETF RFC 3442 for more information.
If the operator desires to deliver payloads via vendor-specific DHCP option 43 then the type should be set to vendor-specific. In this case the code field should be configured to be the DHCP option sub-code that is desired. The settings of the type to vendor-specific implicitly defines the format of the payload to be hex. The payload that is configured by the value field in associated the DHCP Option will be automatically converted to hex from ASCII before being encoded into the option packet.
If the operator sets the type to anything other than vendor-specific then the code represents the site-specific DHCP option that must be between 128 and 254. This limitation is due to the fact that IETF RFC 2132 has already defined DHCP option codes from 0 to 127. The exception to this is the classless-static-routes option, code 121.
The payload of the Custom DHCP Option is defined in the option field of the DHCP Options scaffold and must fall within the range of acceptable possibilities for the given type.

Classes
An entry in the classes scaffold links one or more match rules to devices that are offered addresses from pools. When a match rule is linked, the specifications in the match rule are used to determine membership of the class.
The name field is an arbitrary string descriptor used only for administrative identification. Choose a name that reflects the purpose of the record. This field has no bearing on the configuration or settings determined by this scaffold.
Classes are used to differentiate groups of clients based on matching a substring transmitted as part of the DHCP request or the MAC address of the requesting device. If two pools are created within the network address range associated with a single interface (e.g., 192.168.5.100-150 and 192.168.5.151-200), classes can then be used to populate devices into one of the two ranges based on the request. For example, all requesting devices presenting a dhcp-client-identifier with a well known predefined prefix can be put into the first pool while all others into the second pool. This alleviates the need to collect and enter the MAC addresses of all devices in a group as fixed hosts in order to place them into a pool.
The note field is a place for the administrator to enter a comment. This field is purely informational and has no bearing on the configuration settings.
The pools fields specifies the pool to place devices into that meet the criteria of the match rules specified by this class.
The match rules field links this class with the match rules that will determine membership.

Match Rules
An entry in the match rules scaffold creates a criteria for selecting DHCP requests to be a member of a class.
The name field is an arbitrary string descriptor used only for administrative identification. Choose a name that reflects the purpose of the record. This field has no bearing on the configuration or settings determined by this scaffold.
The negate field configure the way the match rule specified by this record behaves. If negate is checked, a DHCP request is considered to be part of a class if it does not meet criteria specified by this match rule.
The logic field controls the way multiple match rules belonging to the same class behave. A setting of andrequires that all criteria be met. Conversely, a setting of orallows a request to become part of a class if only one of the match rule criteria is met.
The option substring , substring offset and substring length fields control the matching criteria specified in the option value field. If option substring is unchecked, the data in the option value field must exactly match the payload of the DHCP option in the request in order for the request to be considered a match by this match rule. Inversely, if option substring is checked, the substring offset and substring length fields can be used to make a request considered a match if only a portion of the data in option value matches what is presented in the DHCP request. The values that are matched in the option substring are inclusive of the specified boundaries.
The option name and option value are the criteria that determine whether or not a request is a match for this rule. If a DHCP request contains a DHCP option name-value pair matching the data entered into option name and option value , then the DHCP request is considered a match for this rule.
For example, let us consider the case where the RGN distribution infrastructure is DOCSIS cable and composed of Motorola SURFboard cable modems with MAC prefix 00:0A:28, In order to simplify administration, the operator wishes to give all of the cable modems addresses in the 192.168.10.0/24 block and serve 172.16.16.0/24 to the end-users. To accomplish this, the operator would need to configure both DHCP pools and then associate the 172.16.16.0/24 pool with a class that has a match rule configured with:
- option substring - checked
- substring offset - 1
- substring length - 3
- option name - hardware
- option value - 000A28 At first glance, this would seem to be incorrect because we want to match the zeroth through the second byte of the MAC address inclusive. However, the hardware field has the Ethernet prepended onto the MAC address as the zeroth byte. Therefore the actual MAC address is the first to the seventh of the _hardware_field.
The note field is a place for the administrator to enter a comment. This field is purely informational and has no bearing on the configuration settings.
The class field specifies the class for which this matching rule should be used to determine membership.

Relay Servers
An entry in the Relay Servers scaffold enables the DHCP relay feature for the specified interface. DHCP relay allows an rXg to proxy DHCP requests to an upstream DHCP server rather than managing a DHCP pool locally. DHCP relay cannot be used in conjunction with the DHCP server (pools and fixed hosts).
The name field is an arbitrary string descriptor used only for administrative identification. Choose a name that reflects the purpose of the record. This field has no bearing on the configuration or settings determined by this scaffold.
The server IP field configures the IP address of the upstream DHCP server that will respond to the proxy DHCP requests.
The note field is a place for the administrator to enter a comment. This field is purely informational and has no bearing on the configuration settings.
The interfaces and VLANs fields specify the local physical and logical interfaces to proxy DHCP requests to the server specified by server IP.
DNS
The DNS view contains the scaffolds to configure the rXg core services related to the domain name system.
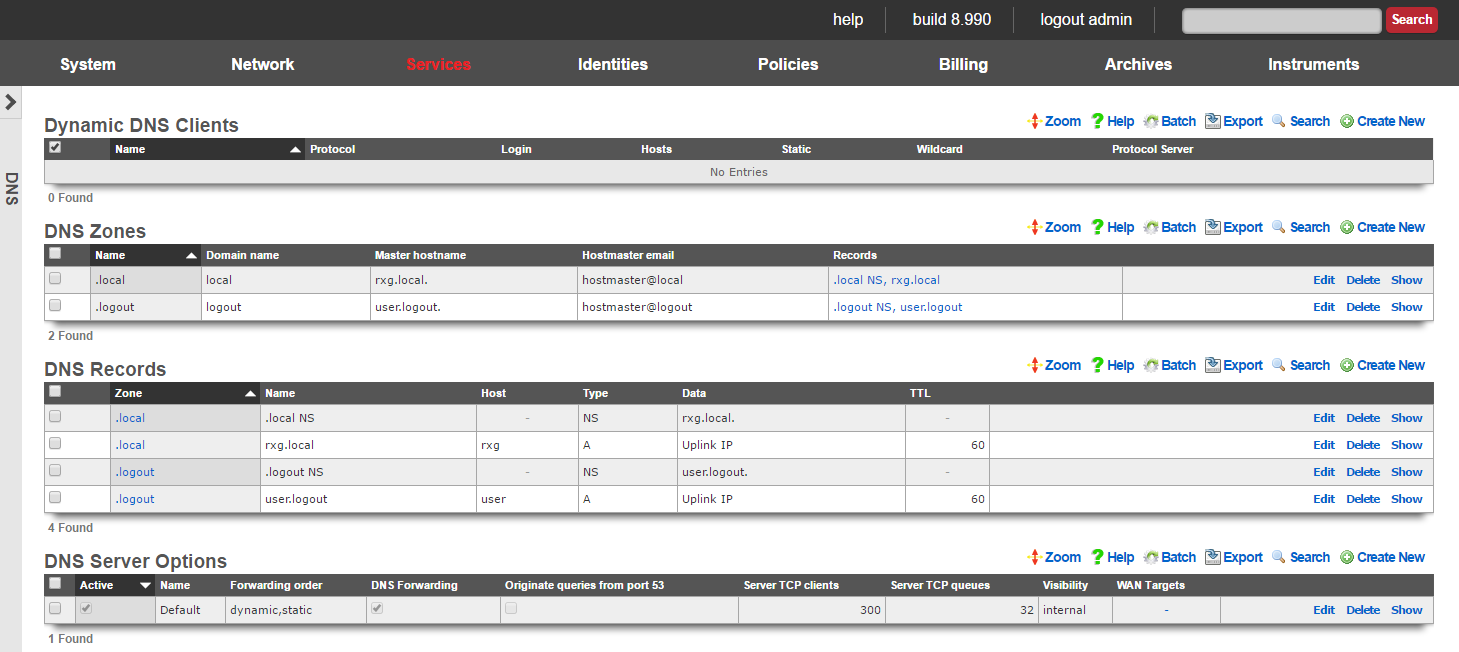
The rXg integrates a dynamic DNS client that supports all of the major third party dynamic DNS services. Dynamic DNS is an essential part of deploying an rXg in an environment where the uplink address is dynamically assigned and may change.
Many of the rXg services (most notably, the forced browser redirect), require DNS resolution of a domain name to the IP address of the WAN uplink. If the IP address of the WAN uplink is configured via DHCP, it is critically important to reconfigure the DNS whenever the assigned IP address changes. The simplest way to accomplish this is to use the rXg dynamic DNS client.
The rXg also incorporates a fully featured DNS server. The operator can configure the rXg to be a primary, secondary or tertiary domain name server for any domain. Before using the DNS server features of the rXg, it is highly recommended that the administrative staff be familiar with the deployment and operation of the domain name system. Incorrect configuration may render the rXg inoperable. An excellent reference on the domain name system is DNS and BIND (ISBN 0596100574) by Cricket Lui and Paul Albitz.
To configure the rXg as a primary domain name server, the DNS glue records for the domain name must contain the IP address of an rXg uplink. To configure the rXg as a secondary name server, create a DNS zone specifying the primary name server in the master hostname field.
When using the rXg as a primary domain name server, proper DNS glue records must be in place. Most DNS registrars have a web application that enables glue record changes. Updates to glue records sometimes take days to propagate so it important to use a manually assigned static IP address for the rXg uplink.
With the DNS glue records in place, a new entry must be added to the DNS zone scaffold. Set the master hostname to the host name of the rXg and the hostmaster email to something appropriate. At a minimum, two entries must be added to the DNS records scaffold (the nameserver and address records for the rXg itself). Additional resource records may be added so that the rXg provides resolution of desired hostnames.

Dynamic DNS Clients
An entry in the Dynamic DNS scaffold enables the rXg to update third-party dynamic DNS services with the latest WAN IP address configuration. In most cases, a DNS record must be created on the third party dynamic DNS service before updates can be made by the rXg.
The name field is an arbitrary string descriptor used only for administrative identification. Choose a name that reflects the purpose of the record. This field has no bearing on the configuration or settings determined by this scaffold.
The protocol field determines the communication protocol that will be used to perform dynamic DNS updates. Most of the popular dynamic DNS services have developed their own proprietary protocols. In most cases, the protocol is synonymous with the service, making the choice obvious.
The login and password fields are the authentication credentials that are supplied to the dynamic DNS service when sending updates. These credentials must match those of the account at the third party service in order for updates to be authenticated and accepted.
The hosts field is a comma-delimited list specifying the DNS name(s) that are to be updated. Typically this will be the same DNS name that is specified in the domain name field of the device options scaffold.
The static and wildcard checkboxes modify the payload of the update message sent to the dynamic DNS service. Some services permit automated update of statically configured IP addresses. Usually there is a stipulation that the update frequency must be much lower than that of a dynamic IP. In addition, some services permit the use of wildcard DNS names so that a single entry can cover several hosts. If either kind of record is established on the third party dynamic DNS service, the appropriate checkbox must be set.
The protocol server field is an optional parameter that can be used to specify an alternate destination for dynamic DNS update messages. Since most dynamic DNS services use their own proprietary protocol, selecting a protocol usually determines the destination for the messages. This field enables the operator to override the default destination.
The note field is a place for the administrator to enter a comment. This field is purely informational and has no bearing on the configuration settings.
The IP address sent to the dynamic DNS service in an update message is the uplink IP address of the default rXg route. In single uplink scenarios, this is the network address that is statically associated with the uplink or the dynamic address acquired by the uplink via DHCP. In multiple uplink scenarios, the choice of the default route is controlled by the priority setting of the uplink.

DNS Zones
An entry in the DNS zones scaffold defines a new domain that the rXg integrated DNS server will respond to.
The name field is an arbitrary string descriptor used only for administrative identification. Choose a name that reflects the purpose of the record. This field has no bearing on the configuration or settings determined by this scaffold.
The domain name field configures the domain that this record will enable responses to.
The master hostname must be set to the fully qualified domain name of the primary master nameserver for this domain. If the rXg is to be the primary master nameserver for the domain, an address record must be configured in the DNS records scaffold.
The hostmaster email field specifies the administrative email address that is reported by the DNS server.
The note field is a place for the administrator to enter a comment. This field is purely informational and has no bearing on the configuration settings.

DNS Records
An entry in the DNS records scaffold creates a new record in a zone specified in the DNS zones scaffold.
The host is the host name for this record. The host name is the parameter that is matched when a DNS query is made.
The type field determines the DNS resource record type. The list of dns record types and their function is defined by a series of RFCs published by the IETF.
The dynamic data and data fields define the payload for the DNS resource record. The use of dynamic data and data are mutually exclusive. If a dynamic data field is chosen from the drop down, the response to a query matching the host specified in this record will be the IP address of the uplink specified by the drop down. If data is populated and no dynamic data field is specified, then the response will contain the static payload configured in the data field.
The zone field specifies the DNS zone that this record will be attached to. If "DNS Override" is selected, the rXg will resolve this specific record to the data listed, but all other requests for the same domain will be forwarded on for normal DNS lookup via upstream providers. This avoids having to maintain all records for a domain when attempting to override a single A record.
Domains may be "black-holed" by creating two CNAME DNS Override records, one for domain.com and one for *.domain.com, and setting the data field for both records to "." (no quotes).
The note field is a place for the administrator to enter a comment. This field is purely informational and has no bearing on the configuration settings.
A complete reference of DNS resource records is found in BIND 9 DNS Administration Reference Book (ISBN 0979034213) by Jeremy Reed.

DNS Server
Entries in the DNS Server scaffold define configuration profiles for the rXg integrated DNS server.
The active field enables an option set. Exactly one option set may be active at any time. Enabling a particular option set will automatically disable another existing active option set.
The name field is an arbitrary string descriptor used only for administrative identification. Choose a name that reflects the purpose of the record. This field has no bearing on the configuration or settings determined by this scaffold.
A properly configured DNS server takes part in a hierarchy of servers starting with the operator of the next hop network all the way to the root DNS servers. By default, the rXg is properly configured to forward requests to the next hop DNS servers. Clearing the request forwarding check box will force the rXg DNS server to make requests directly to the root. Avoid this configuration when possible.
The request forwarding order drop down menu determines the which DNS servers the rXg will query as the next hop. Dynamic servers are those that have been provided via WAN DHCP configuration. Static servers are those that have been manually configured by the operator using the DNS Servers scaffold of the WAN view of the rXg console. Choosing the dynamic,static option tells the rXg to query the dynamically assigned servers first and then the statically assigned servers. Choosing the static or dynamic options tells the rXg to limit queries to the selected set of servers. When multiple uplink control is deployed, the set of dynamic DNS servers is limited to those that are presented by the DHCP server of each pipe. Furthermore, the set of statically configured servers must be accessible via all pipes. This drop down has no effect unless request forwarding is enabled.
The originate queries from port 53 check box configures the DNS server so that upstream UDP queries originate from port 53. This setting may be required if a strict firewall is positioned between the rXg and the upstream DNS server(s).
By default, access to rXg services are either limited to the LAN or disabled entirely. In certain cases, the operator may desire to permit accessibility to services over the WAN and/or LAN. To enable access to rXg services over the WAN, the operator should specify one or more WAN targets containing the list of allowed hosts and then set the visibility appropriately. If no WAN target is specified and WAN visibility is enabled, any node on the WAN may connect to the service. It is highly recommended that this wide-open configuration be avoided to ensure system security. If LAN visibility is included then all authenticated nodes on the LAN may access this service.
The note field is a place for the administrator to enter a comment. This field is purely informational and has no bearing on the configuration settings.
Example: Setup CloudFlare Dynamic DNS
Before we begin we must obtain an API Key from CloudFlare. Navigate to their site and login with your credentials. Click on the person icon in the upper right-hand corner.

Click on "My Profile".
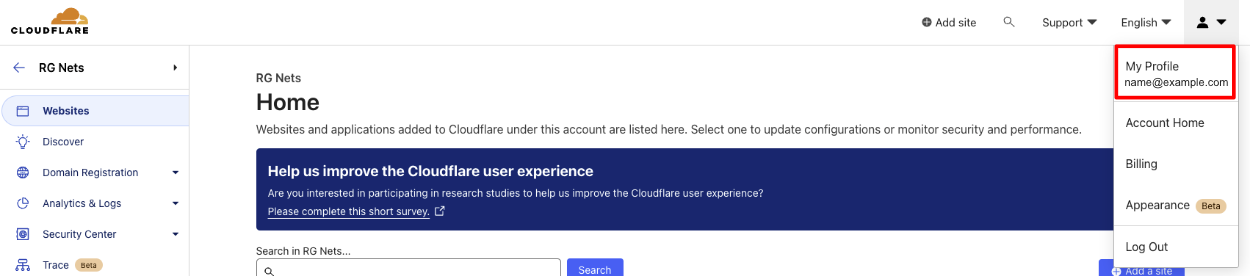
Click on "API Tokens".
Click "View" on the "Global API key".
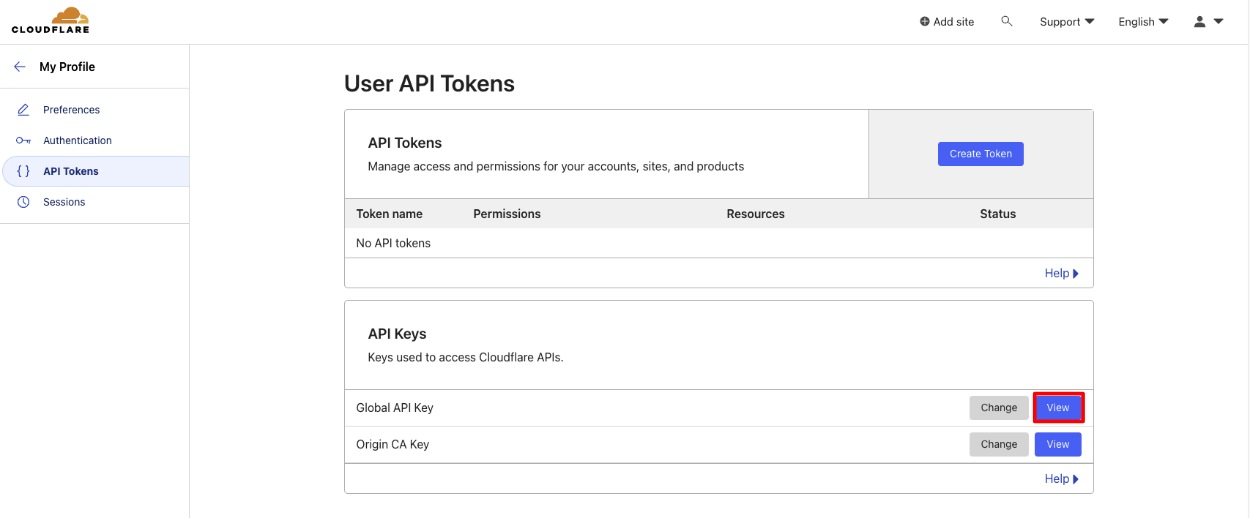
Enter your CloudFlare password when prompted.
Copy your API Key.
In the rXg navigate to Services::DNS and create a new Dynamic DNS Client.
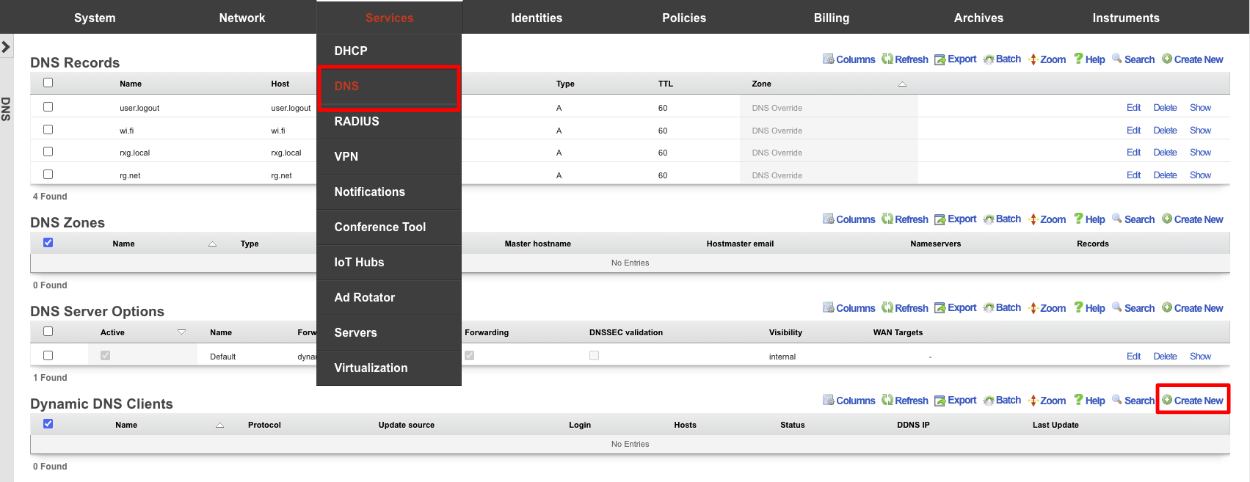
Give the record a Name. Change the Protocol field to CloudFlare. Enter your email address into the Login field. Enter your API key into the Password field. The Host field is the FQDN to be updated in CloudFlare, and the Zone field is the root domain of the FQDN. Click Create.
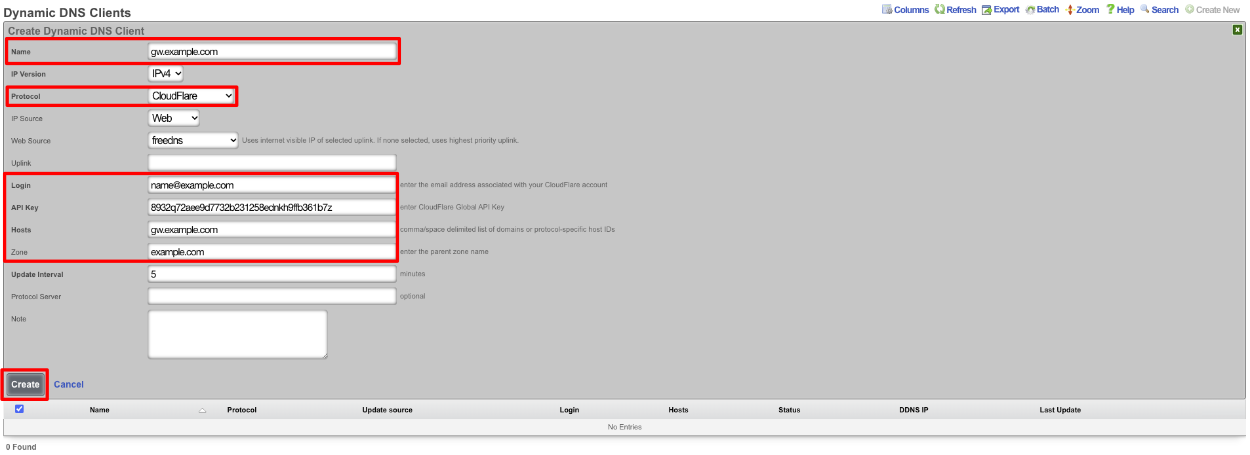
When setup the scaffold will update when there is a change.

VPN
The VPN view presents the scaffolds associated with configuring the IPsec, OpenVPN, and WireGuard services integrated into the rXg. A quick comparison of individual supported VPN solutions is shown below:
| Feature | WireGuard | OpenVPN | IPsec |
|---|---|---|---|
| Performance | Very fast (kernel-level, minimal code) | Moderate (user-space, slower) | High (varies by implementation) |
| Ease of Setup | Simple (few lines of config) | More complex (certs, configs) | Complex (many options, key exchanges) |
| Security | Modern cryptography (ChaCha20, etc.) | Strong, but older ciphers | Strong, supports many ciphers |
| Codebase Size | ~4,000 lines (easily auditable) | >100,000 lines (harder to audit) | Very large (varies widely) |
| Cross-Platform | Yes (Linux, Windows, macOS, mobile) | Yes | Yes |
| NAT Traversal | Built-in | Built-in | Sometimes requires extra config/tools |
OpenVPN Servers
Entries in the OpenVPN Servers scaffold define configuration profiles for the rXg integrated SSL(TLS) VPN.
OpenVPN is an industry standard, open-source software application that the rXg leverages to implement virtual private network (VPN) techniques to create secure point-to-point connections in a routed configuration. It uses a custom security protocol that utilizes SSL/TLS for key exchange. It is capable of traversing network address translators (NATs) and firewalls. The OpenVPN functionality allows peers to authenticate each other using certificates and/or username/password. When used in a multiclient-server configuration, it allows the server to release an authentication certificate for every client, using signatures and certificate authority. It uses the OpenSSL encryption library extensively, as well as the TLS protocol, and contains many security and control features.
https://community.openvpn.net/openvpn/wiki
The name field is an arbitrary string descriptor used only for administrative identification. Choose a name that reflects the purpose of the record. This field has no bearing on the configuration or settings determined by this scaffold.
Each server represents a virtual network interface on a subnet specified by a related Network Address. A separate VPN instance exists for each configured server. A Network Address that is assigned to an OpenVPN interface cannot be configured on a traditional ethernet Interface or VLAN. All servers/networks operate in OpenVPN's TUN (tunnel) mode, which transports only layer 3 IP packets.
If the default gateway field is checked the client will use the VPN interface's IP as its default gateway and DNS server, and route everything over the VPN. An OpenVPN server's Network Address behaves similarly to any other routed subnet behind an ethernet interface or VLAN, in that IP clients behind it are subject to Policy enforcement. For example, creating an IP Group and Landing Portal Policy without a subnet filter for the VPN network would permit the client to access all networks. Conversley, a portal-enabled Policy could be deployed for the VPN client's network. If gateway redirect is not enabled on the server, then it will push routes for all other local networks to a VPN client, which allows it to route through the normal Internet whilst also having knowledge of networks behind the VPN. Note that like any other traditionally-attached subnet, or when the VPN is the default gateway, the routes pushed to the client do not necessarilly ensure firewall access to all networks. In general, an OpenVPN client can also manipulate its routing table independently on a per-client basis.
Authentication from a client may be multi or single-factor via certificates ( require certificate ) and/or username/password ( require login ). If certificates are required, clients must have a unique certificate installed to authenticate. The certificate must be signed by the same CA as the OpenVPN Server's certificate. If multiple devices need to use the same client certificate, the allow duplicate certificates field must be checked, otherwise only one connection per certificate Common Name is permitted. Requiring a unique certificate per client is more secure, but requires each client to have a unique configuration.
If client-to-client behavior is enabled, then clients on the same virtual network can route to each other as if the firewall was disabled. This does not include L2 traffic. Otherwise, if this behavior is disabled, all traffic is forced to route through the rXg and is thus filtered according to Policy enforcement. This should only be enabled when_everyone_ connecting to the same OpenVPN Server should be allowed to communicate.
Configuring the Admin Roles field restricts VPN access to administrators with specific roles. This is useful for providing remote management access, implementing role-based network access, and segregating administrative domains.
Configuring the Account Groups field allows end-users in selected groups to connect to the VPN. This enables premium VPN services for specific customer tiers, employee remote access by department, and guest VPN access with limited permissions. If client certificates are required, the login is only half the authentication process. If client login is not required then these selections are ignored.
It is recommended that operators (Admins) and end-users (Accounts) connect to separate OpenVPN Servers. In the case where an OpenVPN Server has both Admins and Accounts allowed, an Admin having the same login as an Account always takes precedence for login and instrumentation purposes.
The port and protocol fields define how a client initially connects to the VPN server. A TCP and UDP server may be configured to run on the same port. There are advantages and disadvantages to either protocol (OpenVPN tcp vs udp).
An OpenVPN Server must have a Certificate configured. This identifies the server's certificate and private key in additon to the Certificate Authority (CA) that establishes the PKI used to trust clients. The selected Certificate must be associated with and created from a local Certificate Authority. The certificate must be marked for server usage, meaning it was signed with an explicit key usage and extended key usage based on RFC3280 TLS rules. This can be done when creating the Certificate Signing Request (CSR). This is an important security precaution to protect against a man-in-the-middle attack where an authorized client attempts to connect to another client by impersonating the server.
The cipher algorithm encrypts the data channel. Available options include: - AES-256-GCM: Highest security, AEAD cipher (recommended for new deployments) - AES-192-GCM: Balance of security and performance - AES-128-GCM: Good performance, adequate security for most uses - AES-256-CBC: Legacy mode, highest security for older clients - AES-192-CBC: Legacy mode, balance of security and performance - AES-128-CBC: Legacy mode for compatibility with older clients
The digest (authentication) algorithm provides HMAC authentication: - SHA512: Highest security, more CPU intensive - SHA256: Recommended balance of security and performance (default) - SHA1: Legacy support only, should be avoided for new deployments
Note: GCM ciphers include built-in authentication, making them more secure and efficient.
Data compression options include: - lz4-v2: Newest and most efficient LZ4 implementation with improved framing - lz4: Fast compression with low CPU overhead (recommended) - lzo: Legacy compression, compatible with older clients - off: Disable compression (recommended for already-compressed traffic like HTTPS)
Compression reduces bandwidth usage for uncompressed traffic but adds CPU overhead. It may actually increase bandwidth for already-compressed data and should be disabled for primarily HTTPS traffic.
The TLS Auth option adds an additional layer of HMAC authentication on top of TLS to mitigate DoS and other attacks against the TLS layer. This is accomplished by including a unique key that resides on top of TLS. The key is generated behind the scenes when an OpenVPN Server is created, and included in the client config output. If a client is configured manually and this is enabled, then the operator must obtain the key from the record via scaffold show action.
The keepalive ping and keepalive ping restart parameters control connection monitoring. The keepalive ping interval (default: 10 seconds) determines how frequently keepalive pings are sent to maintain connections through stateful firewalls. The keepalive ping restart timeout (default: 120 seconds) determines how long to wait before considering a connection dead and restarting it. These settings help maintain connections through stateful firewalls and detect failed connections quickly.
The MSS fix parameter (Maximum Segment Size) helps prevent fragmentation at the TCP layer by limiting the size of TCP data packets. The valid range is 1200-1460 bytes, with the default of 1432 working well for most deployments. This may need adjustment based on the underlying network MTU, overhead from additional encapsulation (PPPoE, etc.), and performance requirements.
The fragment option enables OpenVPN to fragment packets at the application layer to work around path MTU discovery issues. This is particularly useful when the VPN must traverse networks that have MTU restrictions. For UDP connections, if fragmentation is enabled, MSS fix inherits the fragment maximum value.
The debug mode option enables verbose logging for troubleshooting connection issues. When enabled, detailed connection logs are written to /var/log/openvpn.log. This should only be enabled for troubleshooting as it increases log volume significantly.
WAN Targets provide access control for OpenVPN servers accessible from the WAN. To enable WAN access, specify one or more WAN targets containing the list of allowed source IP addresses or networks. If no WAN target is specified and WAN visibility is enabled, any node on the WAN may connect to the service. It is highly recommended that this wide-open configuration be avoided to ensure system security. WAN targets support both individual IP addresses and CIDR network ranges.
The note field is a place for the administrator to enter a comment. This field is purely informational and has no bearing on the configuration settings.
Clicking the Download Config link will generate an OpenVPN config (.ovpn) file containing the necessary client connection parameters based on the server's configuration, including the Server certificate. Currently, if a client certificate is required, it must be generated manually via the local CA and installed in the client along with the config file.
Advanced OpenVPN Server Features
Fragmentation and MSS Settings
The fragment option enables OpenVPN to fragment packets at the application layer to work around path MTU discovery issues. This is particularly useful when the VPN must traverse networks that have MTU restrictions.
The mssfix parameter (Maximum Segment Size) helps prevent fragmentation at the TCP layer by limiting the size of TCP data packets. The valid range is 1200-1460 bytes. The default value of 1432 works well for most deployments, but may need adjustment based on: - Underlying network MTU - Overhead from additional encapsulation (PPPoE, etc.) - Performance requirements
For UDP connections: - If fragmentation is enabled, mssfix inherits the fragment maximum value - If fragmentation is disabled, mssfix operates independently - TCP connections do not use mssfix as TCP has built-in MSS negotiation
Keepalive Settings
The keepalive ping and keepalive ping restart parameters control connection monitoring:
- keepalive ping: Interval in seconds between keepalive pings (default: 10)
- keepalive ping restart: Timeout in seconds before considering the connection dead and restarting (default: 120)
These settings help maintain connections through stateful firewalls and detect failed connections quickly. Adjust based on: - Network reliability - Firewall timeout settings - Desired failover speed - Battery considerations for mobile clients
Compression Options
OpenVPN supports multiple compression algorithms:
- lz4-v2: Newest and most efficient LZ4 implementation with improved framing
- lz4: Fast compression with low CPU overhead (recommended)
- lzo: Legacy compression, compatible with older clients
- off: Disable compression (recommended for already-compressed traffic like HTTPS)
Compression considerations: - Reduces bandwidth usage for uncompressed traffic - Adds CPU overhead on both client and server - May actually increase bandwidth for already-compressed data - Can potentially be exploited in CRIME/BREACH-style attacks on HTTPS traffic
Certificate Management
Advanced certificate options include:
Allow duplicate certificates: When enabled, multiple clients can connect using the same certificate. This is less secure but simplifies deployment when: - Multiple devices need to share credentials - Temporary access needs to be granted quickly - Legacy systems cannot support unique certificates
Require certificate: Controls whether clients must present a valid certificate: - When enabled with require login: Two-factor authentication (certificate + password) - When enabled without require login: Certificate-only authentication - When disabled: Username/password authentication only
The certificate chain is validated against the Certificate Authority specified in the SSL Key Chain. Ensure: - Certificates are marked for appropriate usage (server vs client) - Certificate dates are valid - The CA chain is complete and trusted - Revoked certificates are properly managed
Cipher and Authentication Algorithms
The cipher algorithm encrypts the data channel: - AES-256-GCM: Highest security, AEAD cipher (recommended for new deployments) - AES-192-GCM: Balance of security and performance - AES-128-GCM: Good performance, adequate security for most uses - AES-xxx-CBC: Legacy mode for compatibility with older clients
The authentication algorithm provides HMAC authentication: - SHA512: Highest security, more CPU intensive - SHA256: Recommended balance of security and performance - SHA1: Legacy support only, should be avoided for new deployments
Note: GCM ciphers include authentication, making the separate auth setting less relevant.
TLS Authentication
The TLS Auth feature adds an additional HMAC signature to all TLS handshake packets, providing: - Protection against DoS attacks on the TLS stack - Prevention of port scanning detection - Additional authentication layer before TLS negotiation
The TLS auth key is automatically generated when the server is created and included in client configurations. For manual client configuration, the key can be obtained from the scaffold show action.
Access Control Integration
OpenVPN Servers integrate with the rXg's access control system:
Admin Roles: Selecting specific admin roles restricts VPN access to administrators with those roles. This is useful for: - Providing remote management access - Implementing role-based network access - Segregating administrative domains
Account Groups: Selecting account groups allows end-users in those groups to connect. This enables: - Premium VPN services for specific customer tiers - Employee remote access by department - Guest VPN access with limited permissions
When both are configured, administrators take precedence over regular accounts with the same username.
Performance Tuning
For optimal OpenVPN performance:
Protocol Selection:
- UDP: Lower latency, better for real-time applications
- TCP: Better for restrictive firewalls, may cause TCP meltdown
Cipher Selection:
- Use GCM ciphers when possible (hardware acceleration on modern CPUs)
- Avoid CBC ciphers unless required for compatibility
Compression:
- Disable for primarily HTTPS traffic
- Enable LZ4 for mixed traffic types
- Monitor CPU usage when enabled
Buffer Sizes:
- Adjust mssfix based on measured path MTU
- Enable fragment only when necessary
Concurrent Connections:
- Each OpenVPN server process is single-threaded
- For high connection counts, run multiple servers on different ports
- Use UDP for better scaling
OpenVPN Client Configuration
Once the server is configured and the .ovpn configuration file is downloaded, it can be imported into OpenVPN clients on various platforms. The following examples show how to configure popular OpenVPN clients:
Android (OpenVPN Connect)
- Install the official OpenVPN Connect app from Google Play Store
- Open the app and tap the + icon to add a profile
- Select Import Profile File
- Navigate to and select the downloaded .ovpn file
- The profile will be imported automatically with all settings from the server
- If username/password authentication is required, enter credentials when prompted
- Tap the profile name to connect to the VPN
- Grant VPN permission when Android requests it
The connection status will show in the app and Android's notification bar. To disconnect, tap the profile again or use the disconnect button in notifications.
iOS (OpenVPN Connect)
- Install the official OpenVPN Connect app from the App Store
- Transfer the .ovpn file to your iOS device via email, AirDrop, or cloud storage
- Open the .ovpn file, which should automatically launch OpenVPN Connect
- Tap Add to import the profile
- If username/password authentication is required, enter credentials
- Tap the toggle switch next to the profile to connect
- Grant VPN permission when iOS requests it
- The VPN icon will appear in the status bar when connected
To disconnect, return to the app and toggle the connection off, or use iOS Settings VPN.
Windows (OpenVPN GUI)
- Download and install OpenVPN GUI from the official OpenVPN website
- Copy the .ovpn configuration file to the OpenVPN config directory:
- Default location:
C:\Program Files\OpenVPN\config\ - Or:
C:\Users\[username]\OpenVPN\config\
- Default location:
- Right-click the OpenVPN GUI system tray icon
- Select Connect from the context menu for your profile
- If username/password authentication is required, enter credentials in the popup window
- The system tray icon will turn green when connected
- A notification will confirm the successful connection
To disconnect, right-click the system tray icon and select Disconnect.
macOS (Tunnelblick)
- Download and install Tunnelblick (free, open-source OpenVPN client)
- Launch Tunnelblick - it will appear in the menu bar
- Click the Tunnelblick icon and select VPN Details
- Drag and drop the .ovpn file onto the Configurations tab, or click + and browse to the file
- Enter an admin password if prompted to install the configuration
- Click Connect next to the profile name
- If username/password authentication is required, enter credentials
- The menu bar icon will change to indicate connection status
To disconnect, click the Tunnelblick menu bar icon and select Disconnect.
Linux (Network Manager / Command Line)
Using Network Manager (Ubuntu/GNOME):
1. Install the Network Manager OpenVPN plugin:
bash
sudo apt install network-manager-openvpn network-manager-openvpn-gnome
2. Go to Settings Network VPN
3. Click the + to add a VPN connection
4. Select Import from file and choose your .ovpn file
5. Review the imported settings and add username/password if required
6. Click Add to save the configuration
7. Toggle the VPN connection on to connect
Using command line:
1. Install OpenVPN: sudo apt install openvpn
2. Copy the .ovpn file to a secure location
3. Connect using: sudo openvpn --config /path/to/your/config.ovpn
4. Enter username/password if prompted
5. Press Ctrl+C to disconnect
Windows 10/11 (Built-in VPN)
For simple configurations without certificates, Windows' built-in VPN client can be used: 1. Go to Settings Network & Internet VPN 2. Click Add a VPN connection 3. Select Windows (built-in) as the VPN provider 4. Enter connection details: - Connection name: Descriptive name - Server name or address: rXg's public IP or domain - VPN type: Select appropriate protocol - Sign-in info: Username and password 5. Click Save 6. Click the connection name to connect
Note: This method works best with simple username/password authentication. For certificate-based authentication, use OpenVPN GUI instead.
Troubleshooting Client Connections
Connection Fails: - Verify the server address is correct and accessible - Check that firewall rules allow the OpenVPN port (default 1194) - Ensure the client device has internet connectivity - Try connecting from a different network to rule out local firewall issues
Authentication Errors: - Double-check username and password if using credential authentication - Verify certificates are properly embedded in the .ovpn file - Check that the client certificate hasn't expired - Ensure the CA certificate matches the server's certificate authority
Connected but No Internet: - Check if "redirect gateway" is enabled on the server (routes all traffic through VPN) - Verify DNS settings - try using public DNS servers (8.8.8.8, 1.1.1.1) - Test connectivity to the rXg's LAN network first - Check MTU settings if web browsing is slow or fails
Performance Issues: - Try UDP protocol instead of TCP if experiencing slowdowns - Disable compression if connecting over already-compressed connections - Check for MTU/MSS issues with large file transfers - Monitor CPU usage on both client and server during heavy usage
Mobile Device Battery Drain: - Adjust keepalive settings on the server to reduce ping frequency - Use on-demand VPN connections when possible - Consider split-tunneling to reduce VPN traffic for non-sensitive apps
OpenVPN Operational Management
Logging and Debugging
OpenVPN logs are written to multiple locations:
- System log: Basic connection/disconnection events via syslog
- OpenVPN log: Detailed logs at
/var/log/openvpn.log - Debug mode: When enabled on server or client, increases verbosity
Log levels can be controlled through the configuration: - Level 0: No output except fatal errors - Level 3: Normal usage (default) - Level 5: Useful for debugging - Level 9: Extremely verbose
Process Management
OpenVPN servers run as separate daemon processes. Management commands:
- Restart without disconnecting clients: Send SIGUSR1 to the process
- Full restart with configuration reload: Send SIGHUP to the process
- Graceful shutdown: Send SIGTERM to the process
The process name format is openvpn_server_[port]_[protocol] for servers and openvpn_client_[name] for clients.
Monitoring and Health Checks
Monitor OpenVPN health through:
Connection Status:
- Check OpenVPN Entries for active sessions
- Monitor the online status of OpenVPN Clients
- Review connection logs for authentication failures
Performance Metrics:
- CPU usage per OpenVPN process
- Bandwidth utilization per tunnel
- Packet loss and latency through tunnels
Certificate Expiration:
- Monitor server certificate expiration dates
- Track client certificate validity
- Plan CA certificate renewal
Common Issues and Solutions
Connection Failures: - Verify firewall rules permit the OpenVPN port - Check certificate validity and trust chain - Ensure time synchronization (certificates are time-sensitive) - Verify network connectivity to the remote endpoint
Performance Issues: - Disable compression for encrypted traffic - Adjust mssfix for optimal packet size - Use UDP instead of TCP when possible - Check CPU usage and consider cipher changes
Routing Problems: - Verify no IP range conflicts between sites - Check that routes are properly pushed to clients - Ensure IP forwarding is enabled - Validate NAT rules for client traffic
Authentication Failures: - Check username/password credentials - Verify certificate signatures and CA chain - Ensure certificates are marked for correct usage - Check for account lockouts or disabled users
Security Best Practices
Use Strong Encryption:
- Deploy AES-256-GCM for new installations
- Enable TLS Auth for DoS protection
- Use SHA256 or higher for authentication
Certificate Management:
- Use unique certificates per client when possible
- Implement certificate revocation lists (CRL)
- Set appropriate certificate lifetimes
- Protect private keys appropriately
Access Control:
- Implement least-privilege access policies
- Use two-factor authentication for sensitive access
- Regularly audit VPN access logs
- Disable unused VPN servers
Network Segmentation:
- Place VPN clients in dedicated subnets
- Apply appropriate firewall policies
- Disable client-to-client routing unless required
- Monitor for unusual traffic patterns
IPsec VPN
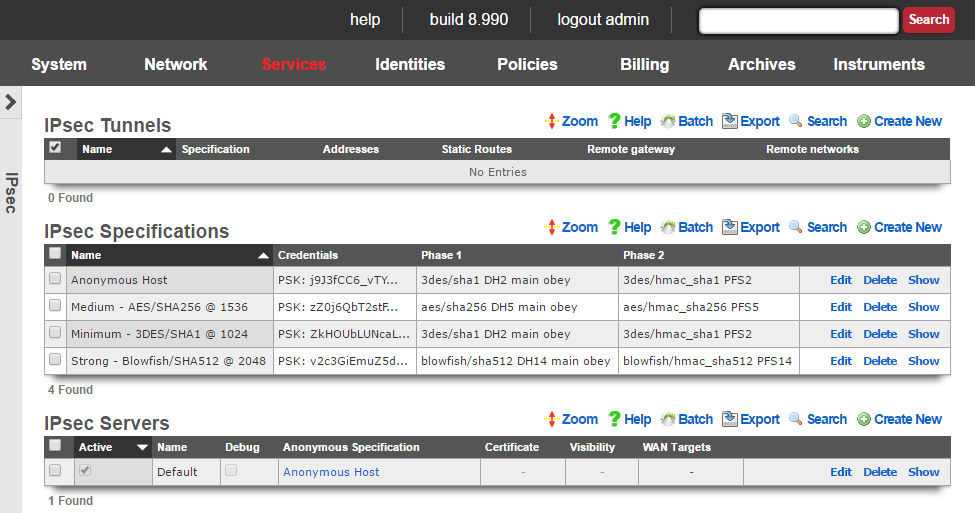
IPsec is an industry standard mechanism that enables secure communication between two nodes or networks that are connected by a potentially insecure IP transit. The rXg supports bidirectional site-to-site IPsec VPNs between rXgs and between rXgs and other kinds of routers. In addition, the rXg may be configured to be a concatenator for host-to-site VPNs originating from nearly any operating system.
Site-to-site VPNs are typically used to enable secure bidirectional communication between two private IP blocks that are behind different routers that are located in geospatially distinct locations. For example, if a WISP has three distinct fixed wireless broadband coverage areas, all three could be linked together via site-to-site VPNs. This could be used as part of a revenue generation strategy such as allowing business customers to access their systems from home for an additional fee.
Site-to-site VPNs are very useful in geospatially diverse deployments that are connected via a central cluster controller. Establishing site-to-site VPNs between the rXgs and the cluster controller enables the operator to easily access all nodes at any part of the network. It is important to keep in mind that the private LAN addresses blocks behind the various rXgs be kept distinct as having the same private LAN block behind two rXgs would cause routing confusion.
Host-to-site VPNs are often used by operators for remote administration. An operator that is on the WAN side of a rXg may use host-to-site IPsec VPNs to directly access machines that are connected to a private address range. In a typical deployment, LAN equipment is assigned IP addresses from private ranges that cannot be reached from the WAN. An operator who is on the WAN side on the rXg (e.g., away on business) that wishes to have complete and direct access to the LAN equipment private address range would setup a host-to-site IPsec VPN using the rXg as the concatenator.
Host-to-site VPNs are also used as a revenue generation mechanism as they are typically sold as a premium service or as a value-added extra part of business class service. End-users originating traffic from the LAN side of the rXg may create a host-to-site VPN using the rXg as a concatenator to protect their traffic from sniffers present in the distribution network. Of course, end-users may also be sold host-to-site VPNs as a mechanism for remote connectivity to nodes addressed on a private LAN.
The rXg uses an industry standard reference implementation of the IPsec suite. Site-to-site VPNs are easily established between an rXg and nearly any other router that supports IPsec VPNs. In addition, site-to-site and site-to-host VPNs may be established between the rXg and almost any operating system released since 2005. Most operating systems have a built-in IPsec stack that is meant to be configured by a trained and certified specialist. However, VPN client software (e.g., Greenbow for Windows and IPsecuritas for Mac OS X) simplify the process to the extent that anybody with a working knowledge of basic TCP/IP can accomplish the task.

IPsec Tunnels
An entry in the IPsec tunnels scaffold is used to configure a site-to-site IPsec VPN.
The name field is an arbitrary string descriptor used only for administrative identification. Choose a name that reflects the purpose of the record. This field has no bearing on the configuration or settings determined by this scaffold.
The specification field selects the credential and encryption settings for this IPsec tunnel. It is critically important to ensure that the settings in the chosen IPsec specification matches those of the node at the other end of the site-to-site VPN created by this IPsec tunnel.
The Pre-Shared key and Certificates fields are used to configure the certificates or pre-shared key that will be used for authenticating IPsec tunnels that use this IPsec specification. The operator may choose to use one or more certificates or a pre-shared key but not both. If one or more certificates are chosen, then the node at the other end of the IPsec tunnel must have the matching private key. If a pre-shared key is chosen, then the node at the other end of the IPsec tunnel must have the exact same pre-shared key programmed.
The addresses and static routes checkboxes specify which LAN address blocks will be forwarded to the remote node of this site-to-site VPN.
The remote gateway field specifies the IP address of the node at the other end of this site-to-site IPsec VPN.
The remote networks field specifies the IP address blocks at the other end of this site-to-site VPN that will be routable once the VPN is established.
Conflicts between addresses or static routes and remote networks will cause severe routing problems. In situations where multiple site-to-site VPNs will be deployed, it is critically important to carefully plan the addressing across all current and potential future networks.
The note field is a place for the administrator to enter a comment. This field is purely informational and has no bearing on the configuration settings.
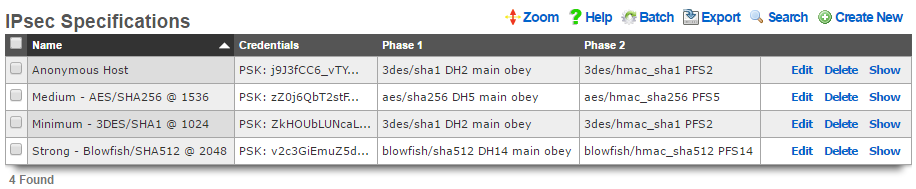
IPsec Specifications
An entry in the IPsec specifications scaffold defines an IPsec policy that can be used for bidirectional site-to-site VPN tunnels as well as host-to-site VPN concatenation.
The name field is an arbitrary string descriptor used only for administrative identification. Choose a name that reflects the purpose of the record. This field has no bearing on the configuration or settings determined by this scaffold.
The note field is a place for the administrator to enter a comment. This field is purely informational and has no bearing on the configuration settings.
The IKE Version field allows the operator to select which IKE(Internet Key Exhange) version to use for the tunnel. IKEv1 and IKEv2 are supported.
The phase 1 and phase 2 groups are used to configure the encryption specifications for the initialization and operational phases of a IPsec tunnel. The chosen encryption , authentication , Diffie-Hellman group , exchange mode and proposal check must exactly match the settings on the node at the other end of the IPsec tunnel.
The encryption field specifies the algorithm that will be used for bulk encryption of the packet data that will transit the VPN connection. The DES option is included for reference only and should be avoided as it is trivially broken given contemporary computing power. The 3DES and AES options are the most compatible and generally accepted to be strong enough for most purposes. AES is preferable as it is the new government standard encryption protocol. Blowfish and CAST are less known protocols but widely believed to be as strong if not stronger than AES but not as well supported.
The authentication field specifies the algorithm that will be used for generating cryptographic hashes to authenticate data passing through the VPN connection. The MD5 option is included for reference only and should be avoided as researchers have discovered methods to break it. The SHA1 option is the most compatible option as it is broadly supported. If possible, the SHA256, SHA384 or SHA512 options as researchers have found a handful of minor vulnerabilities in SHA1 to date.
The Diffie-Hellman group and PFS group fields configure the strength of the encryption keys that will be used to protect the session keys used by the encryption algorithm. The stronger the key, the less likely that it will be broken. However, the stronger the key, the more CPU utilization and entropy it will consume and less compatible it will be. The Group 1 / 768 bit key length option should be avoided unless the other end of the VPN cannot support any other option. The Group 2 / 1024 bit key length is the absolute minimum key strength that should be used for a production environment. The longer key lengths are recommended if the other end of the VPN connection supports it.
The lifetime field configures the length of time in seconds of the security association. A shorter lifetime causes the system to rotate keys more often (potentially increasing security). As a result, shorter lifetimes will increase CPU utilization and entropy consumption.
The nonce field configures the size of the "number used once" for IPsec initialization. A longer nonce helps prevent replay attacks, but trades off CPU utilization and entropy consumption. A longer nonce is also less compatible with other IPsec implementations.

IPsec Server
Entries in the IPsec Server scaffold define configuration profiles for the rXg integrated IPsec server.
The active field enables an option set. Exactly one option set may be active at any time. Enabling a particular option set will automatically disable another existing active option set.
The name field is an arbitrary string descriptor used only for administrative identification. Choose a name that reflects the purpose of the record. This field has no bearing on the configuration or settings determined by this scaffold.
The Pre-Shared key and Certificates fields are used to configure the certificates or pre-shared key that will be used for authenticating IPsec tunnels that use this IPsec specification. The operator may choose to use one or more certificates or a pre-shared key but not both. If one or more certificates are chosen, then the node at the other end of the IPsec tunnel must have the matching private key. If a pre-shared key is chosen, then the node at the other end of the IPsec tunnel must have the exact same pre-shared key programmed.
The anonymous specification field selects the credential and encryption settings for anonymous IPsec connections (i.e., where the client's originating IP address is unknown). Pre-shared-key authentication may not be used for anonymous connections. An anonymous IPsec client must authenticate using a certificate. The certificates to be used by the anonymous clients should be configured in the IPsec Specifications scaffold for the selected anonymous specification. It is critically important to ensure that the settings in the chosen anonymous specification match those of the IPsec client.
The certificate field specifies an alternate certificate to configure the IPsec server with.
By default, access to rXg services are either limited to the LAN or disabled entirely. In certain cases, the operator may desire to permit accessibility to services over the WAN and/or LAN. To enable access to rXg services over the WAN, the operator should specify one or more WAN targets containing the list of allowed hosts and then set the visibility appropriately. If no WAN target is specified and WAN visibility is enabled, any node on the WAN may connect to the service. It is highly recommended that this wide-open configuration be avoided to ensure system security. If LAN visibility is included then all authenticated nodes on the LAN may access this service.
The note field is a place for the administrator to enter a comment. This field is purely informational and has no bearing on the configuration settings.
Site-to-site IPsec VPN Configuration
Site-to-site IP-sec VPNs enable devices that are behind VPN concatenators to communicate with each other securely without any configuration changes to the end-user devices. In most cases, site-to-site IPsec VPNs are deployed with privately addressed end-user devices behind the VPN concatenators. Without a site-to-site IPsec VPN, the privately addressed devices would not be able to initiate communication with each other due to the one-way nature of network address translation. Consider the following network diagram:
In this example, we have two rXgs and we desire to create a site-to-site IPsec VPN to enable two way communication for devices that are on private addresses behind the rXgs. We will call the rXg on the left with WAN IP 66.67.68.2 east and the rXg on the right with WAN IP 55.45.35.2 west. The network dashboard of the_east_ rXg is shown below:
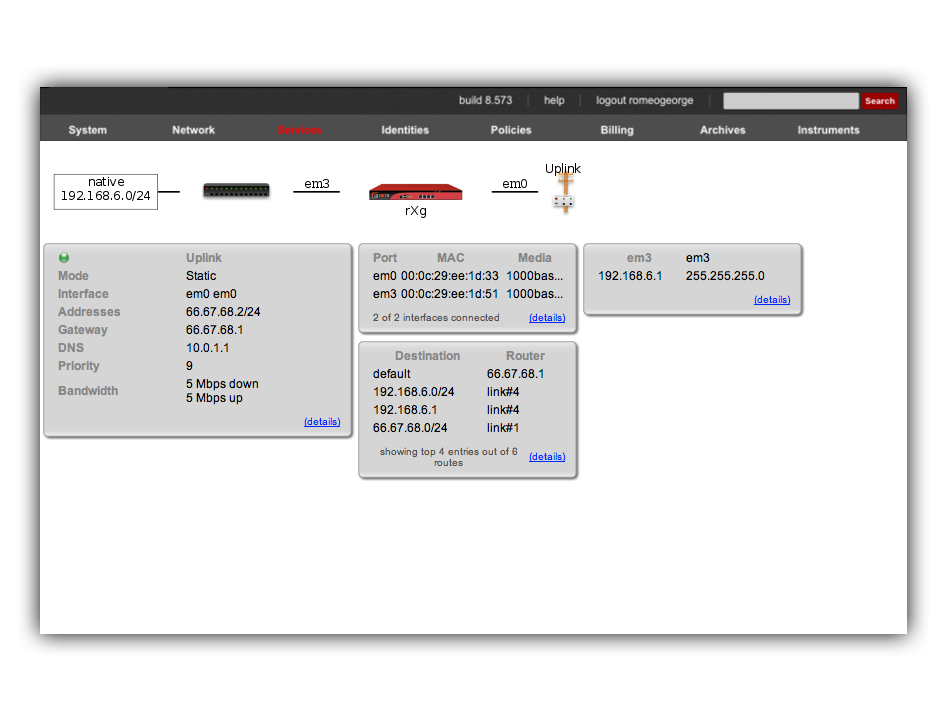
The rXg IPsec VPN feature is compatible with a broad spectrum of IPsec implementations. It is not necessary for a site-to-site VPN to be established between two rXgs. We have used two rXgs in this example so that we can best illustrate the appropriate configuration for either end of the site-to-site VPN. The network dashboard of the_west_ rXg is shown below:
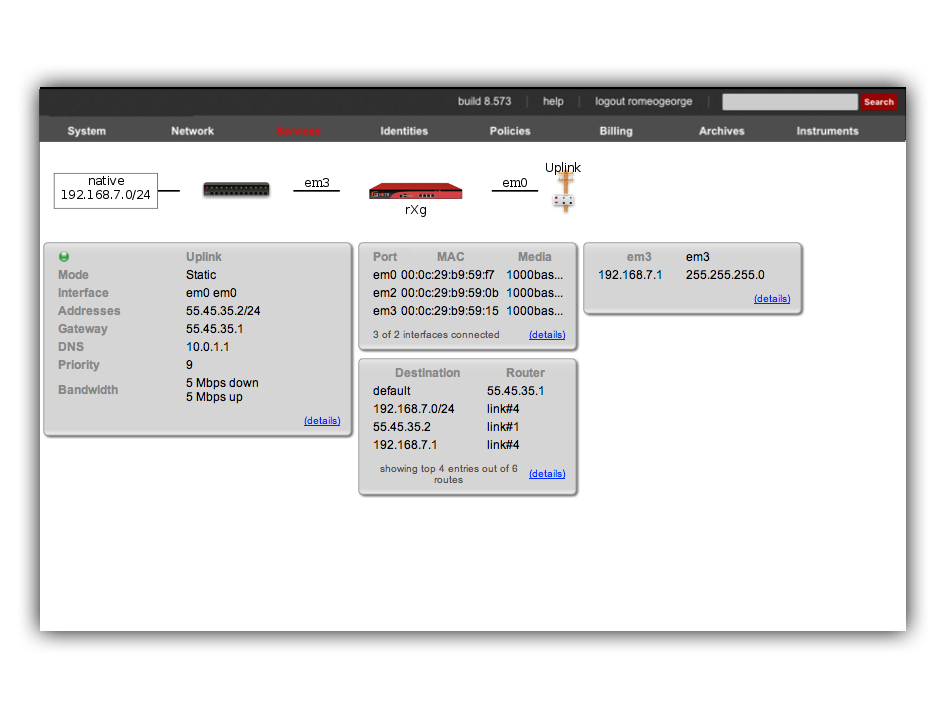
Notice that both rXgs have a single private LAN block associated with them. The east rXg has 192.168.6.0/24 behind it and the west rXg has 192.168.7.0/24 behind it. When configuring IPsec VPNs, it is critically important to ensure that the networks behind the various endpoints of the IPsec VPN do not intersect. This is because IPsec depends on a valid L3 (routing layer) configuration in order to operate.
Establishing a site-to-site VPN is simply a matter of creating a single record in the IPsec Tunnel scaffold on both ends of the connection. The remote gateway field must be set to the IP address of the concatenator on the other end of the site-to-site VPN. The remote networks field must contain the CIDR of the block present on the other end of the site-to-site VPN.
Following our example, the IPsec tunnel record on east(which has WAN IP address 66.67.68.2, LAN address 192.168.6.1 / 24) must have the following settings:
- remote gateway - 55.45.35.2
- remote networks - 192.168.7.0/24
Below is a screenshot of the configuration that is present on east:

Similarly, west (which has WAN IP address 55.45.35.2, LAN address 192.168.7.1 / 24) must have the following settings in the IPsec tunnel record:
- remote gateway - 66.68.67.2
- remote networks - 192.168.6.0/24
Below is a screenshot on configuration that is present on west:
Notice that the IPsec Tunnel records depend on the existence of an IPsec Specification record in order to configure the encryption protocol and keys for the tunnel. In the configuration screenshots shown above, we seen that the specification is referenced as PSK for S2S. A screen shot of the configuration for_PSK for S2S_ that is present on both east and _west_is shown below:
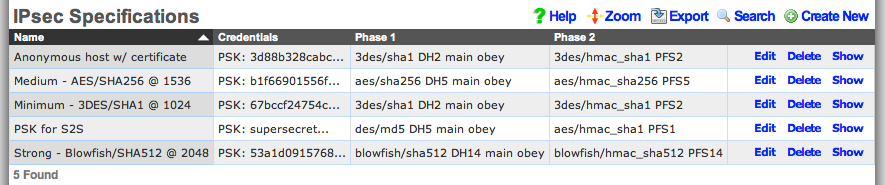
Since we are configuring a site-to-site VPN, we are assuming that both ends of the connection are controlled by trusted parties. Thus we will use a pre-shared key to secure the connection. To accomplish this, we will create a new record in the IPsec Specifications scaffold on both the east and west rXgs. To get a site-to-site IPsec VPN up and running, the individual choices for the encryption protocol and credentials are not as important as the simple fact that they must be exactly the same on both machines. Using a strong pre-shared key is obviously a prerequisite to maintaining the confidentiality and integrity of the VPN.
Several templates are provided as examples for strong, medium and minimum security configurations. The minimum security configuration is the least secure against brute force attacks but is the most compatible. The template for the most secure setting will only function with KAME derived IPsec stacks such as the ones present in OpenBSD and FreeBSD. For more information on the precise meaning behind each of the settings, we recommend reading information that may acquired via a search on IPsec. When configuring a site-to-site VPN, keep in mind that even the slightest difference in a single setting will prevent the site-to-site IPsec VPN from initializing.
For your reference, the complete IPsec configuration for both_east_ and west is shown below:
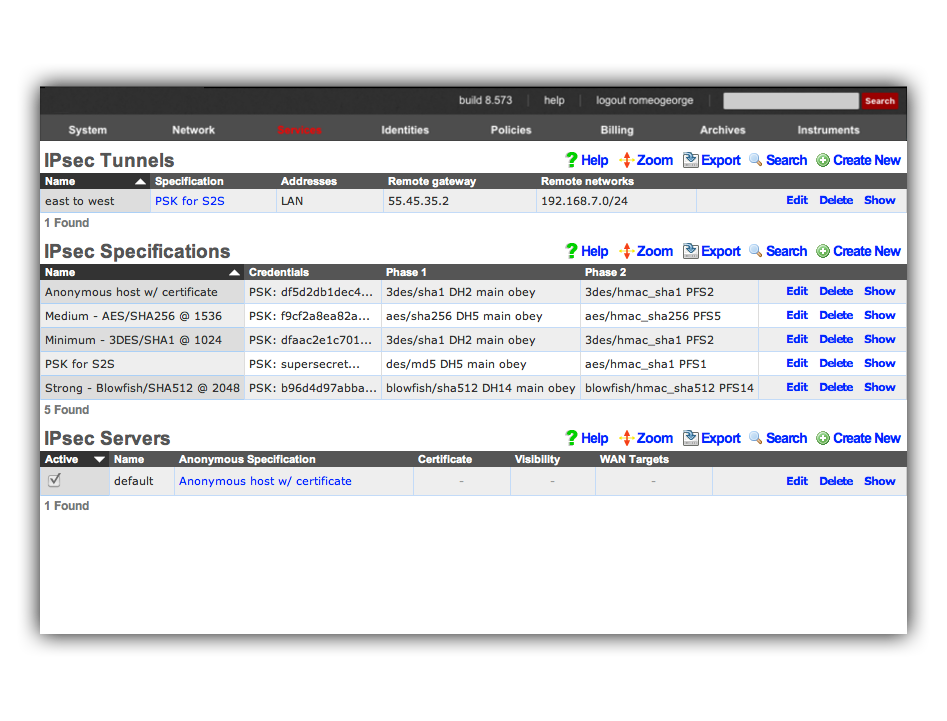
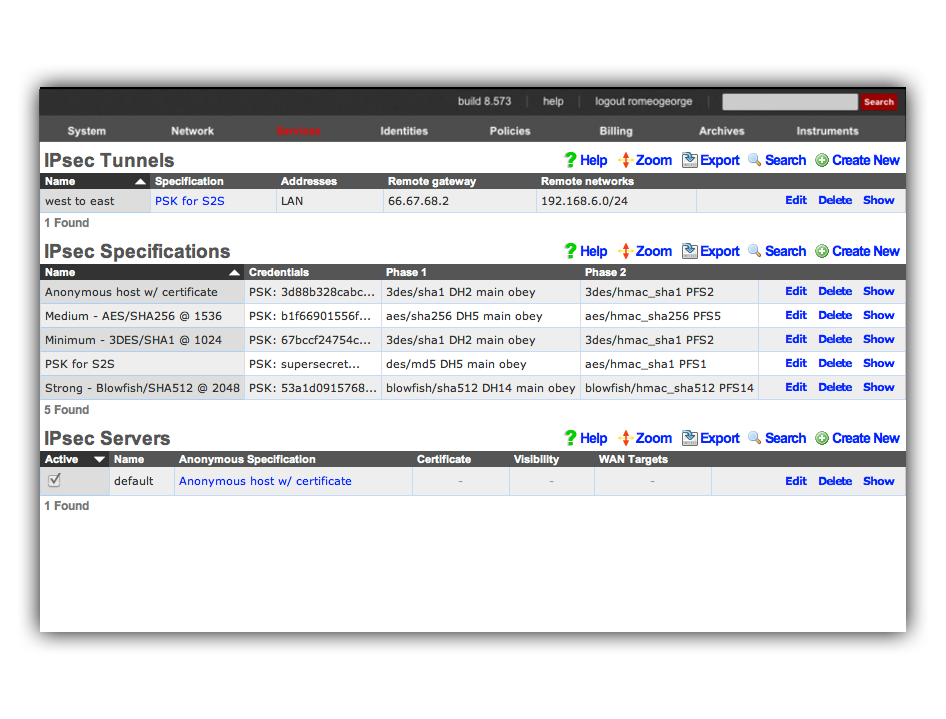
Once we have this configuration in place on both east and_west_, devices on the 192.168.6.0 / 24 private network behind_east_ may directly contact devices on the 192.168.7.0 / 24 private network behind west and vice versa. Note that absolutely no configuration changes needs to be made on the end-user devices whatsoever. All of the encryption, decryption and routing between the private networks is handled by the IPsec VPN endpoints, which in this case are the east and west rXgs.
For example, let us assume there is a Windows XP laptop behind_east_. The XP machine will acquire a DHCP address in the 192.168.6.0 / 24 CIDR. Similarly, let us assume there is a Windows 2003 server behind west that is on the 192.168.7.0 / 24 CIDR. Given the site-to-site VPN configuration that we have created on the rXgs, the XP laptop will be able to directly communicate with the Win2k3 server without any configuration changes to the clients.
The screenshot below shows the desktop of the Windows XP laptop that is behind east. It has acquired address 198.168.6.100 / 24 from the east rXg. Notice that it can ping the private address 192.168.7.100 directly. The 192.168.7.100 address is configured on the Windows 2003 Server that is behind the _west_rXg.
No configuration changes were made to the Windows XP laptop whatsoever. The Windows XP laptop has no knowledge that the 192.168.7.100 is behind the west rXg. The 192.168.7.100 could be on the other side of the world and the XP laptop would not know any better. Furthermore, the XP laptop does not do any encryption or decryption of traffic. It merely sends traffic to the east rXg which does all of the work in encrypting and forwarding the traffic to the west router for delivery to 192.168.7.100.
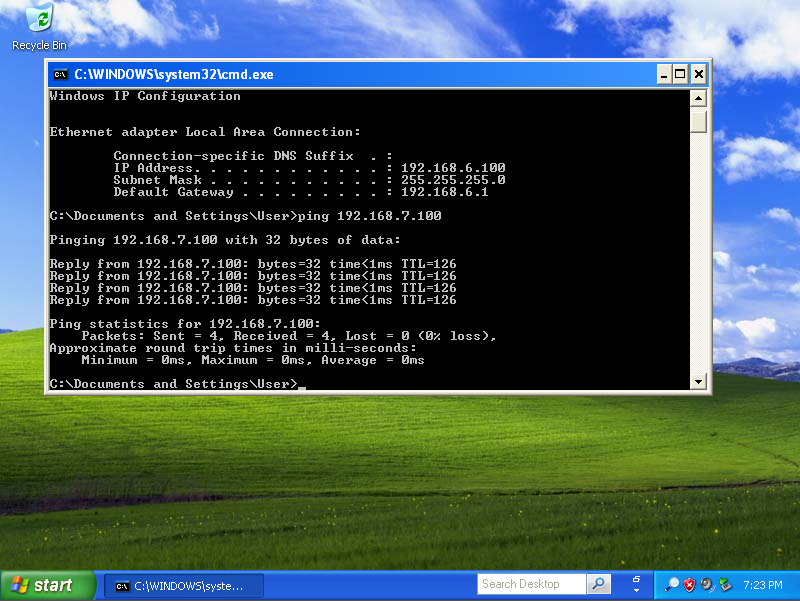
The screenshot below shows the desktop of the Windows 2003 Server that is behind east. It has an address of 198.168.7.100 / 24 which is behind the west rXg. Notice that it can ping the private address 192.168.6.100 directly. As depicted in the previous screenshot, the 192.168.6.100 address belongs to the Windows XP laptop behind the east rXg.
The Windows 2003 Server has no knowledge about the site-to-site IPsec VPN. The Win2k3 server simply forwards packets to the_west_ rXg which does all of the work involved in the encryption and routing of packets to 192.168.6.100 via east.
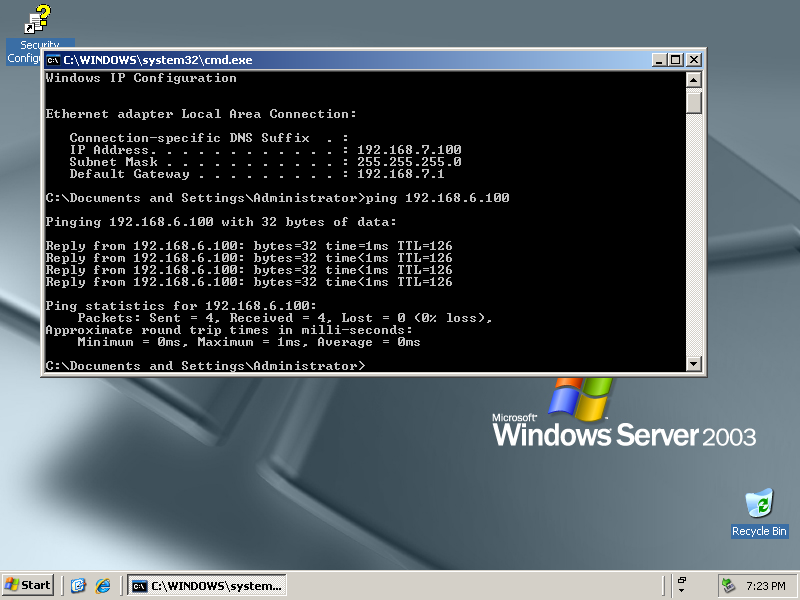
The site-to-site IPsec VPN enables routing between private networks to occur over the public Internet that is otherwise not possible. Once established, any network application may be used. In the screenshots below, the Windows XP client on 192.168.6.100 behind east_is shown initiating and utilization a remote desktop connection to manage the Windows 2003 Server on 192.168.7.100 behind _west.
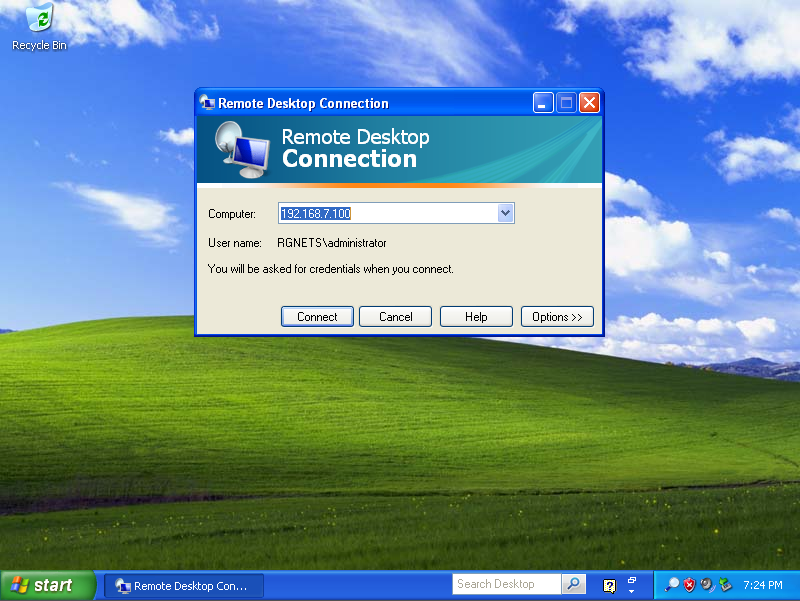
Site-to-site IPsec VPNs enable RGN operators to have secure remote access to all of their various networks. Any devices that is on a private network behind an rXg may be accessed as if it is a local device at the other end of the site-to-site VPN without any configuration changes to the devices themselves. The possibilities of what site-to-site IPsec VPNs may be used for is limitless. Many RGN operators deploy site-to-site VPNs for remote access as demonstrated above. Another frequent use of site-to-site VPNs is for monitoring. For example, site-to-site VPNs may be used to enable a central site to have a single network monitoring system (NMS) or element monitoring system (EMS) to monitor multiple remote networks.
Host-to-site IPsec VPN Configuration
Host-to-site VPNs are used with the rXg to securely route data between a specific end-user device and the rXg. Host-to-site VPNs may be initiated to the rXg from the WAN or the LAN. The process and technical steps of creating either a WAN to rXg or LAN to rXg host-to-site VPN are identical. However, the use case and business reasons for using the two topologies are radically different.
If the end-user device is on the WAN-side of the rXg, a host-to-site VPNs is usually deployed for the purpose of remote access to local privately addressed machines similar to a site-to-site VPN. However, a host-to-site VPN obviates the need to deploy and configure a VPN concatenator on the end-user network.
A WAN host-to-site VPN is the appropriate methodology to use with a mobile client used by a network administrator that requires access to privately addressed resources when the mobile client must connect to networks which the administrator does not control. For example, if the mobile client uses a wireless WAN connection (e.g., cellular 3G), it would be more difficult to install a VPN concatenator for site-to-site VPN than it would be to configure the device for host-to-site VPN. The use of host-to-site VPNs is ubiquitous in enterprise networks to the extent that even mobile phones operating systems such as Symbian, Windows Mobile and Apple iPhone OS are capable of initiating host-to-site VPNs.
Host-to-site VPNs originating from the LAN-side of the rXg are typically deployed as a facet of revenue generation for the operator. Popular media has helped educate most end-users to understand that there are many security issues present when computer networks are used. This effect may be exploited by RGN operators for the purpose of generating additional revenue by offering security related premium services.
For example, if the LAN distribution mechanism is wireless, a host-to-site IPsec VPN upgrade may be offered to end-users to provide confidentiality and integrity to the traffic over the wireless portion of the Internet link. Enabling the anonymous IPsec VPN capability and integrating the generation of a client certificate into the rXg captive portal allows operators to enjoy zero operator intervention provisioning of host-to-site VPNs.
Host-to-site IPsec VPNs typically use public key cryptography in order to authenticate the initiating hosts. Each initiating host must have a unique keypair in order to ensure the confidentiality and integrity of the IPsec VPN connection. In addition, the IPsec VPN concatenator must identify itself with a keypair to the initiating client. The rXg uses X.509 certificates and private keys for the purposes of authenticating both ends of a host-to-site IPsec VPN.

The rXg expects that the operator has stored certificates for each of the hosts that will be initiating a host-to-site IPsec VPN in the certificates scaffold on the certificates view. When a host-to-site IPsec VPN connection is initialized, the rXg expects that the initiating client will authenticate by using the matching private key to sign an authentication credential. Similarly, the rXg must be configured with a private key and certificate for authenticating the site. The initiating client is assumed to have a copy of the rXg certificate and the rXg will sign an authentication credential with the matching private key.
The certificates view of the rXg administrative console may also be used to create keypairs that may be used for authenticating host-to-site IPsec VPNs. To accomplish this, use the certificate authorities scaffold to create a new authority that can be used to sign certificate signing requests to fully populate certificates. For more information, please see the documentation on the certificates view.
In order to instantiate a host-to-site IPsec VPN, configuration changes must be executed on both the rXg and the end-user device. However, the same process is used to configure the end-user device and the rXg to enable a host-to-site IPsec VPN concatenator regardless of whether the VPN will be initiated from the WAN or LAN. Let us consider the east rXg that was discussed earlier. The configuration and network diagram for the east rXg is shown below:

The rXg must be configured to allow anonymous connections to enable the host-to-site IPsec VPN capability. To accomplish this, an entry in the IPsec servers scaffold must be created that specifies the site authentication certificate. The IPsec server record must be linked to a IPsec specification record that defines the encryption protocol as well as the client certificates that will be accepted for connection initiation.
The configuration steps of the end-user device needed to setup a host-to-site VPN follow the same pattern regardless of the operating system of the end-user device. At a bare minimum, the following items need to be configured in order for a host-to-site IPsec VPN to be established:
- host certificate
- host private key
- IP address of VPN router
- remote network CIDR
- encryption protocol and associated parameters The precise steps that are needed depend on both the operating system as well as the VPN client software. Many popular operating systems have "bare metal" VPN clients built into them that are suited for operation by IT professionals. However, in almost all cases, user friendly VPN client GUIs are available from both free and commercial sources.
The IPsec capabilities of all recent versions of Microsoft Windows is configured using the Microsoft Management Console. Depending on the specific of Windows, the MMC snap-in will be called something like "IP Security Policy Management" or "Windows Firewall with Advanced Security." Search the web for Microsoft'sstep by step guide to deploying Windows firewall and IPsec policies and review pages 15-17 as well as 89-91 for specific instructions. For those who are less technically inclined, we have that the Greenbow VPN client greatly simplifies the creation of host-to-site IPsec VPNs on Windows.
The MacOS X operating system incorporates numerous open source components into its IPsec VPN stack. This makes the MacOS X IPsec VPN one of the most compatible of the commonly available commercial offerings. However, the command line configuration is needed to setup the IPsec stack for the vast majority of use cases. For this reason, we recommend that users download and install the IPsecuritas freeware GUI to configure host-to-site IPsec VPNs between MacOS X clients and rXgs.
Example OpenVPN Configuration
- Create certificate
- Create Networking
- Configure OpenVPN in rXg
Navigate to System-->Certificates. If there are no Certificate Authorities we will need to create one to self sign our OpenVPN certificate. Click Create New on the Certificate Authorities scaffold.

Name is arbitrary and be set to anything. Days by default will be 825. Common Name does not need to resolve for the purposes of using OpenVPN. Fill out the remaining fields with the appropriate information for your location. Click Create.
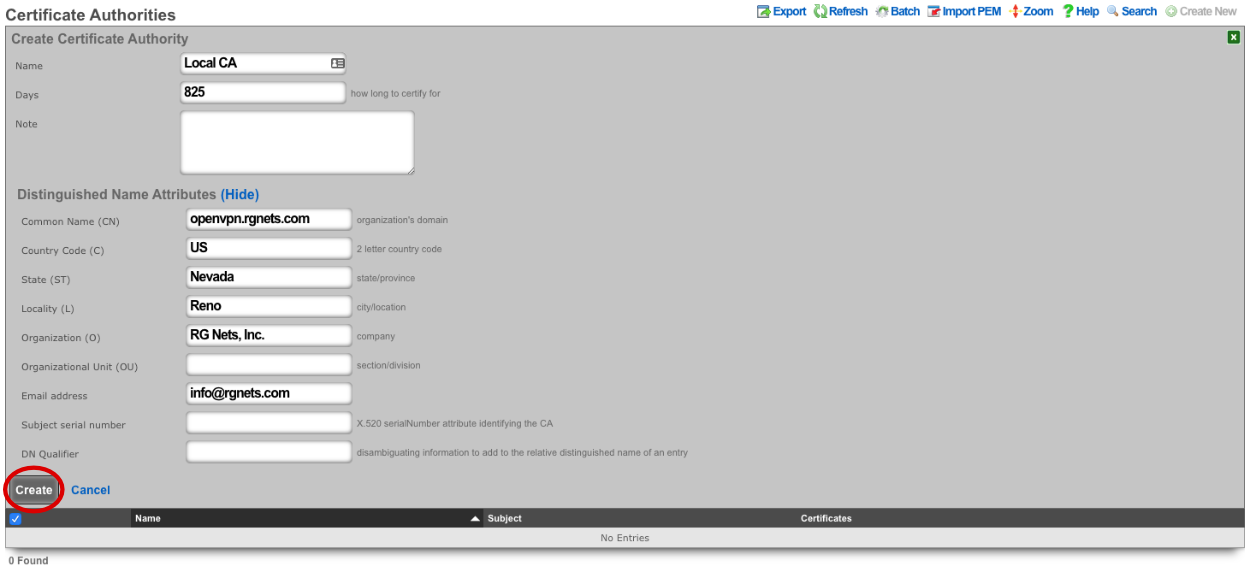
Next create a new Certificate.

For the certificate only the name needs to be entered at this step. Verify CA is set to Local CA. Click Create.
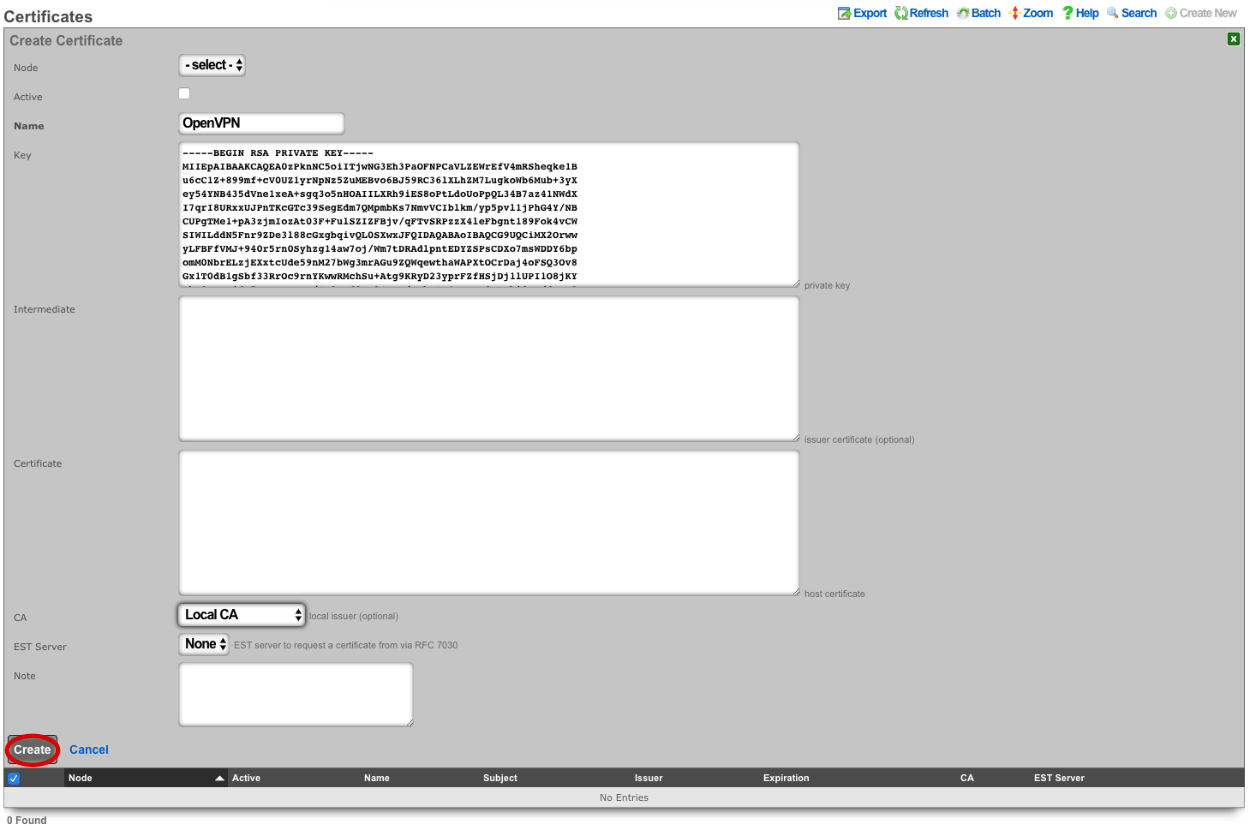
Next create a new Certificate Signing Request.

Verify that the Certificate field is set to the correct certificate. Sign mode should be set to Generate CSR and sign with linked local Certificate Authority. Common Name should match the Common Name in the Certificate Authority. Fill out the remaining fields with the appropriate information if applicable. Click Create.
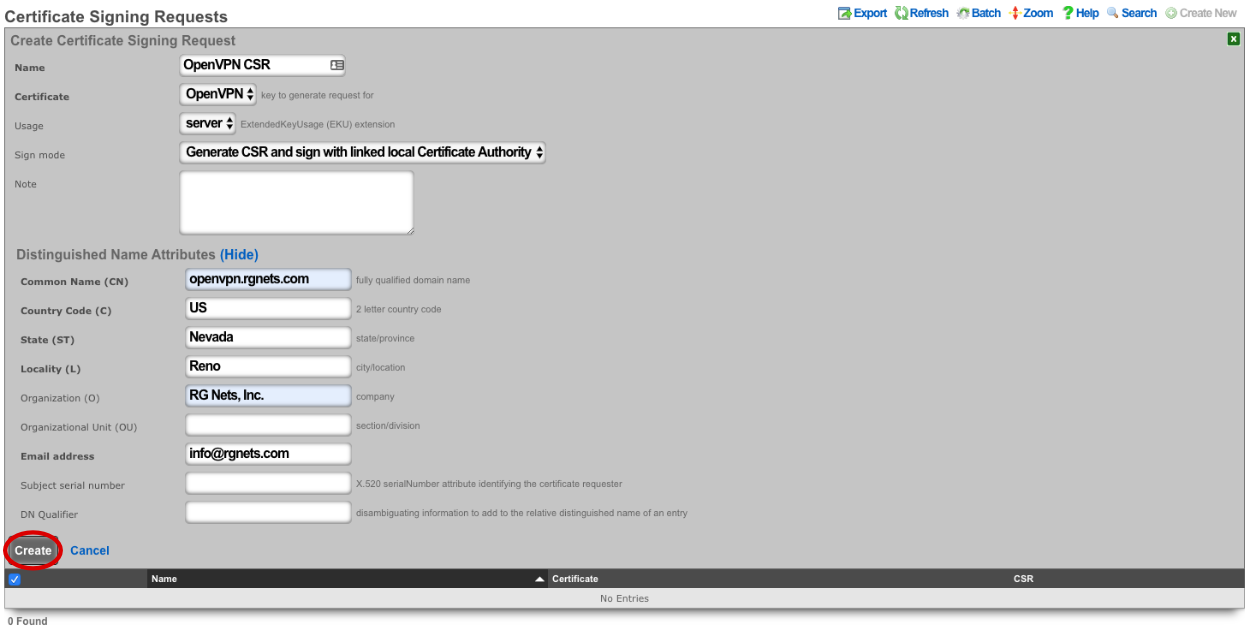
Next we need to create the networking that will be used for devices connecting to the OpenVPN. Navigate to Network-->LAN, and create a new Network Address.

Enter a name. Make sure that Interface is set to -select- for each box. The IP field will be the addresses available to devices connecting via OpenVPN and should be entered in CIDR notaton. Autoincrement and Span should be left set to 1, do not check Create DHCP Pool. Click Create.
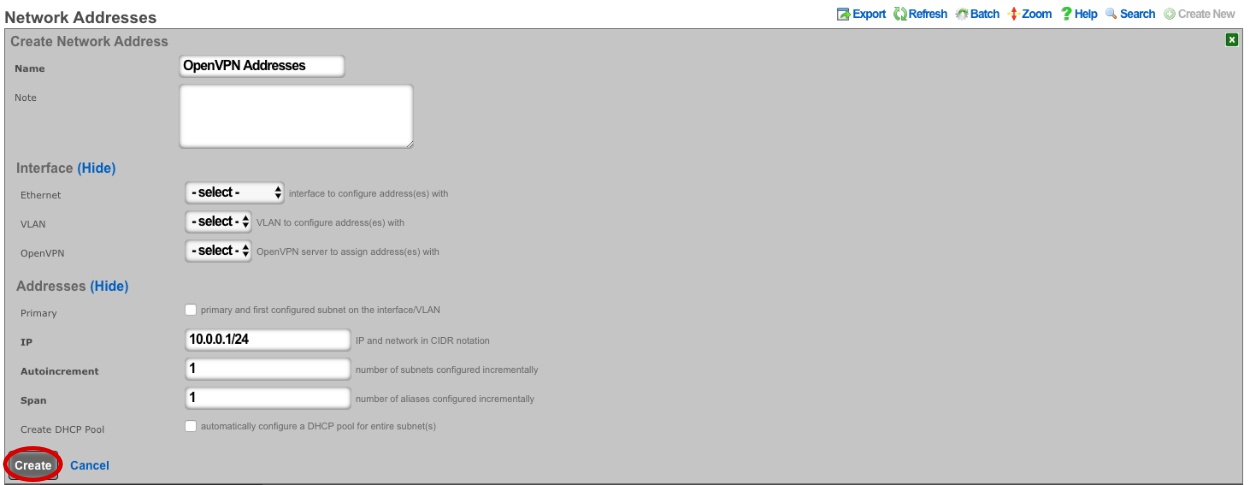
Navigate to Services-->VPN and create a new OpenVPN Server.

Enter a name, or use the default. Under Client Configuration Network should be set to the Network Addresses we created earlier. If you want traffic to route through the remote system check the Default gateway option. Require login is checked by default and this prevents access except for Admin Roles we have selected in this example. Server Options will be left at their default values for this example. WAN Targets can be selected to further restrict access if desired. Click Create.
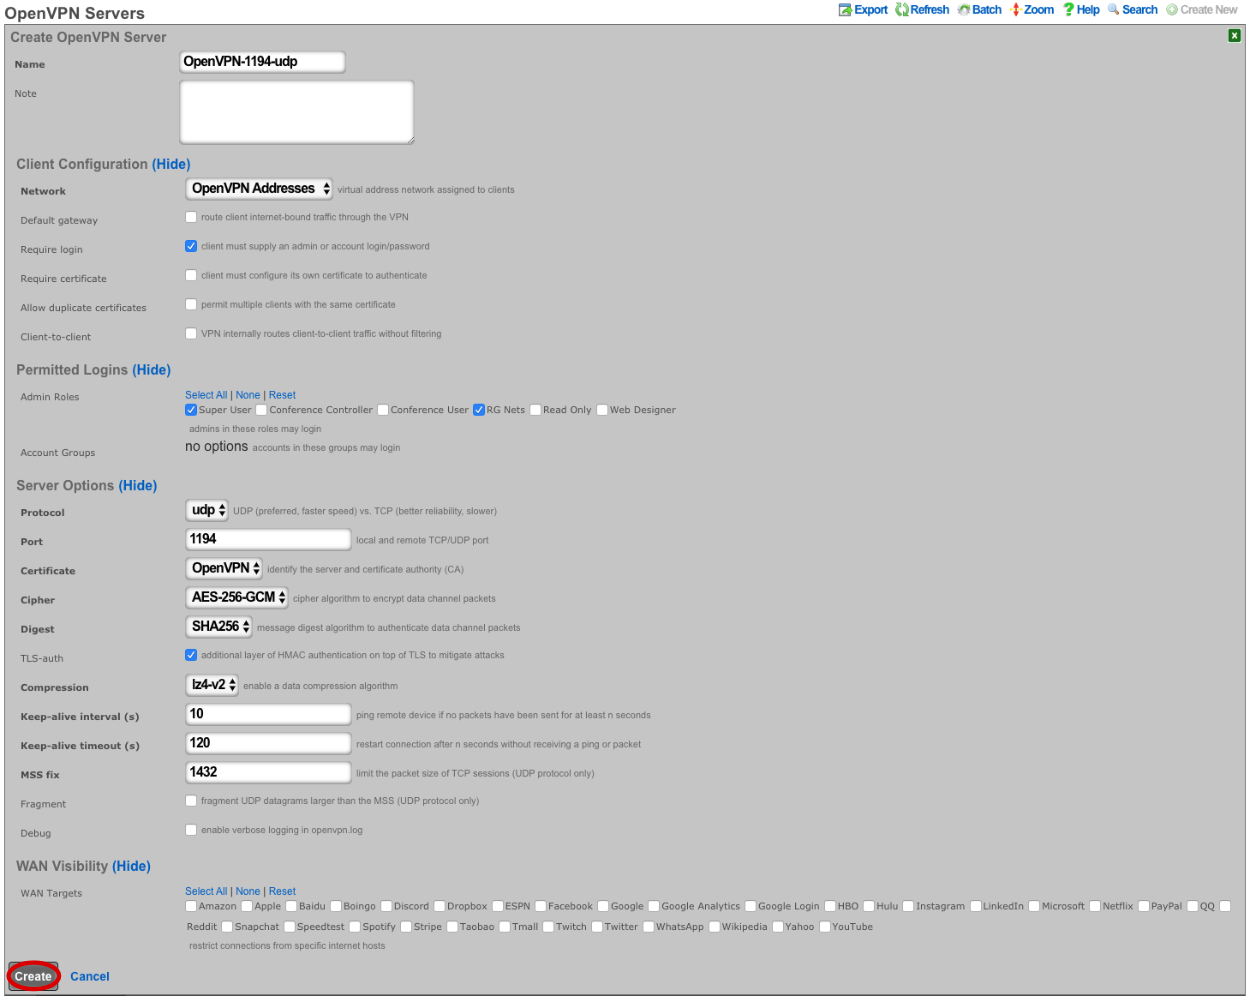
Now the config can be downloaded from the rXg and imported into a VPN client of choice.

## WireGuard VPN
WireGuard is a modern, lightweight VPN protocol known for its simplicity, speed, and strong cryptography. It uses public key authentication and runs in the Linux \ FreeBSD kernel for high performance, though it is also available on Windows, macOS, Android, and iOS. Configuration is minimal, often requiring just a few lines per peer. WireGuard establishes encrypted tunnels between devices, routing selected IP traffic securely. It is ideal for both personal VPNs and site-to-site secure networking.
The WireGuard configuration involves the rXg-side configuration (WireGuard server) and the client side configuration (WireGuard client).
### WireGuard server (rXg) configuration
The WireGuard server configuration features two steps, i.e.,
creating a WireGuard pseudointerface in the
System::LAN::Pseudo Interfacesscaffoldcreating at least one WireGuard client (tunnel) in the
Services::VPN::WireGuard Tunnelsscaffold and then transfer this configuration to the client side usign the QR code or the configuration file download
In order to create a WireGuard pseudointerface, click the Create New button in the System::LAN::Pseudo Interfaces scaffold and fill in the following parameters:
Nameof the pseudointerface interface, comprising an arbitrary string descriptor used only for administrative identification. Choose anamethat reflects the purpose of the record. This field has no bearing on the configuration or settings determined by this scaffold.Interface type: select theWireGuardtypethe
WireGuard port,WireGuard private key, andWireGuard public keyare best left to their default values, though may be modified as needed. TheWireGuard portdesignates the remote TCP/UDP port used for WireGuard communications, while theWireGuard private keyandWireGuard public keyare used for authentication purposes between the remote client and the server.the
IP Configurationsection allows to select one of the already existing local IP interfaces created on the rXg (using theAddressesentry) or create a new IP interface specifically for WireGuard purposes (using theWireGuard IPentry)
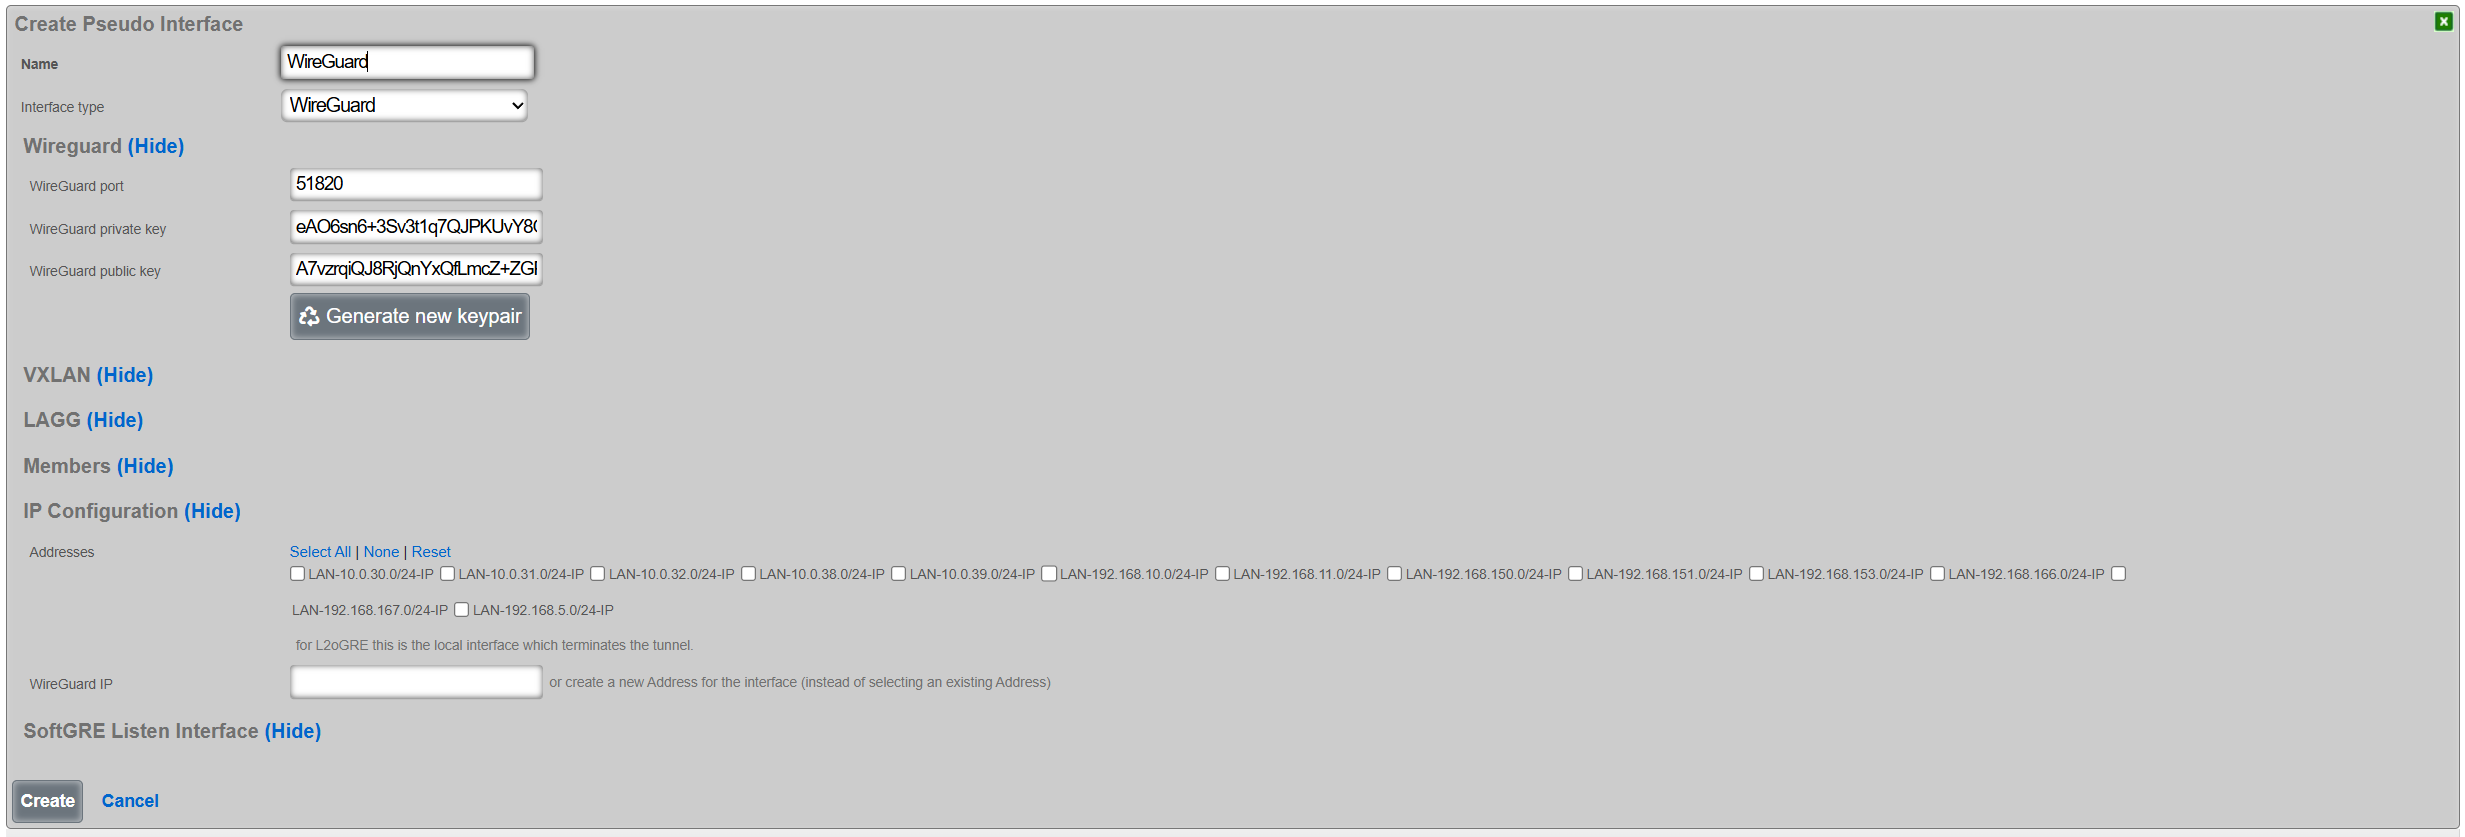
Once created, the pseudointerface is then displayed under the respective scaffold, as shown below:

Once the WireGuard pseudointerface is created, at least one WireGuard tunnel needs to be created using the Services::VPN::WireGuard Tunnels scaffold, filling in the following parameters:
Nameof the WireGuard tunnel, comprising an arbitrary string descriptor used only for administrative identification. Choose anamethat reflects the purpose of the record. This field has no bearing on the configuration or settings determined by this scaffold.WireGuard Pseudo Interfaceallows to select one of the WireGuard pseudointerfaces already created on the given rXg systemLocal Addressesallows to (optionally) select at least one of the existing IP groups that will be permitted to communicate with devices across the WireGuard tunnelPublic keyandPrivate keyis the WireGuard tunnel public / public key pair for authentication purposes, which is generated using theGenerate new keypairbutton.Remote Endpointand theRemote Portrepresent the IP address / TCP/UDP port tuple for the remote side of the WireGuard tunnel instance. If not filled in, the given WireGuard tunnel permits access from any source IP / port tuple, making the WireGuard tunnel effectively open to public Internet. If filled in, the WireGuard tunnel will accept traffic only from the given source IP address and the given source TCP/UDP port, rejecting any other traffic.Remote Allowed IPsdescribes which remote IP prefixes are reachable across the given WIreGuard tunnel. Make sure that the IP prefixes on the local rXg system and IP prefixes across the WireGuard tunnel do not overlap. For WireGuard tunnel configuration for a single client (e.g., a laptop, a smartphone), this field is expected to contain a host prefix (/32) assigned to the given target device.IP Groupdesignates the IP Group applies to traffic originating across the WireGuard tunnel. This selection is optional.
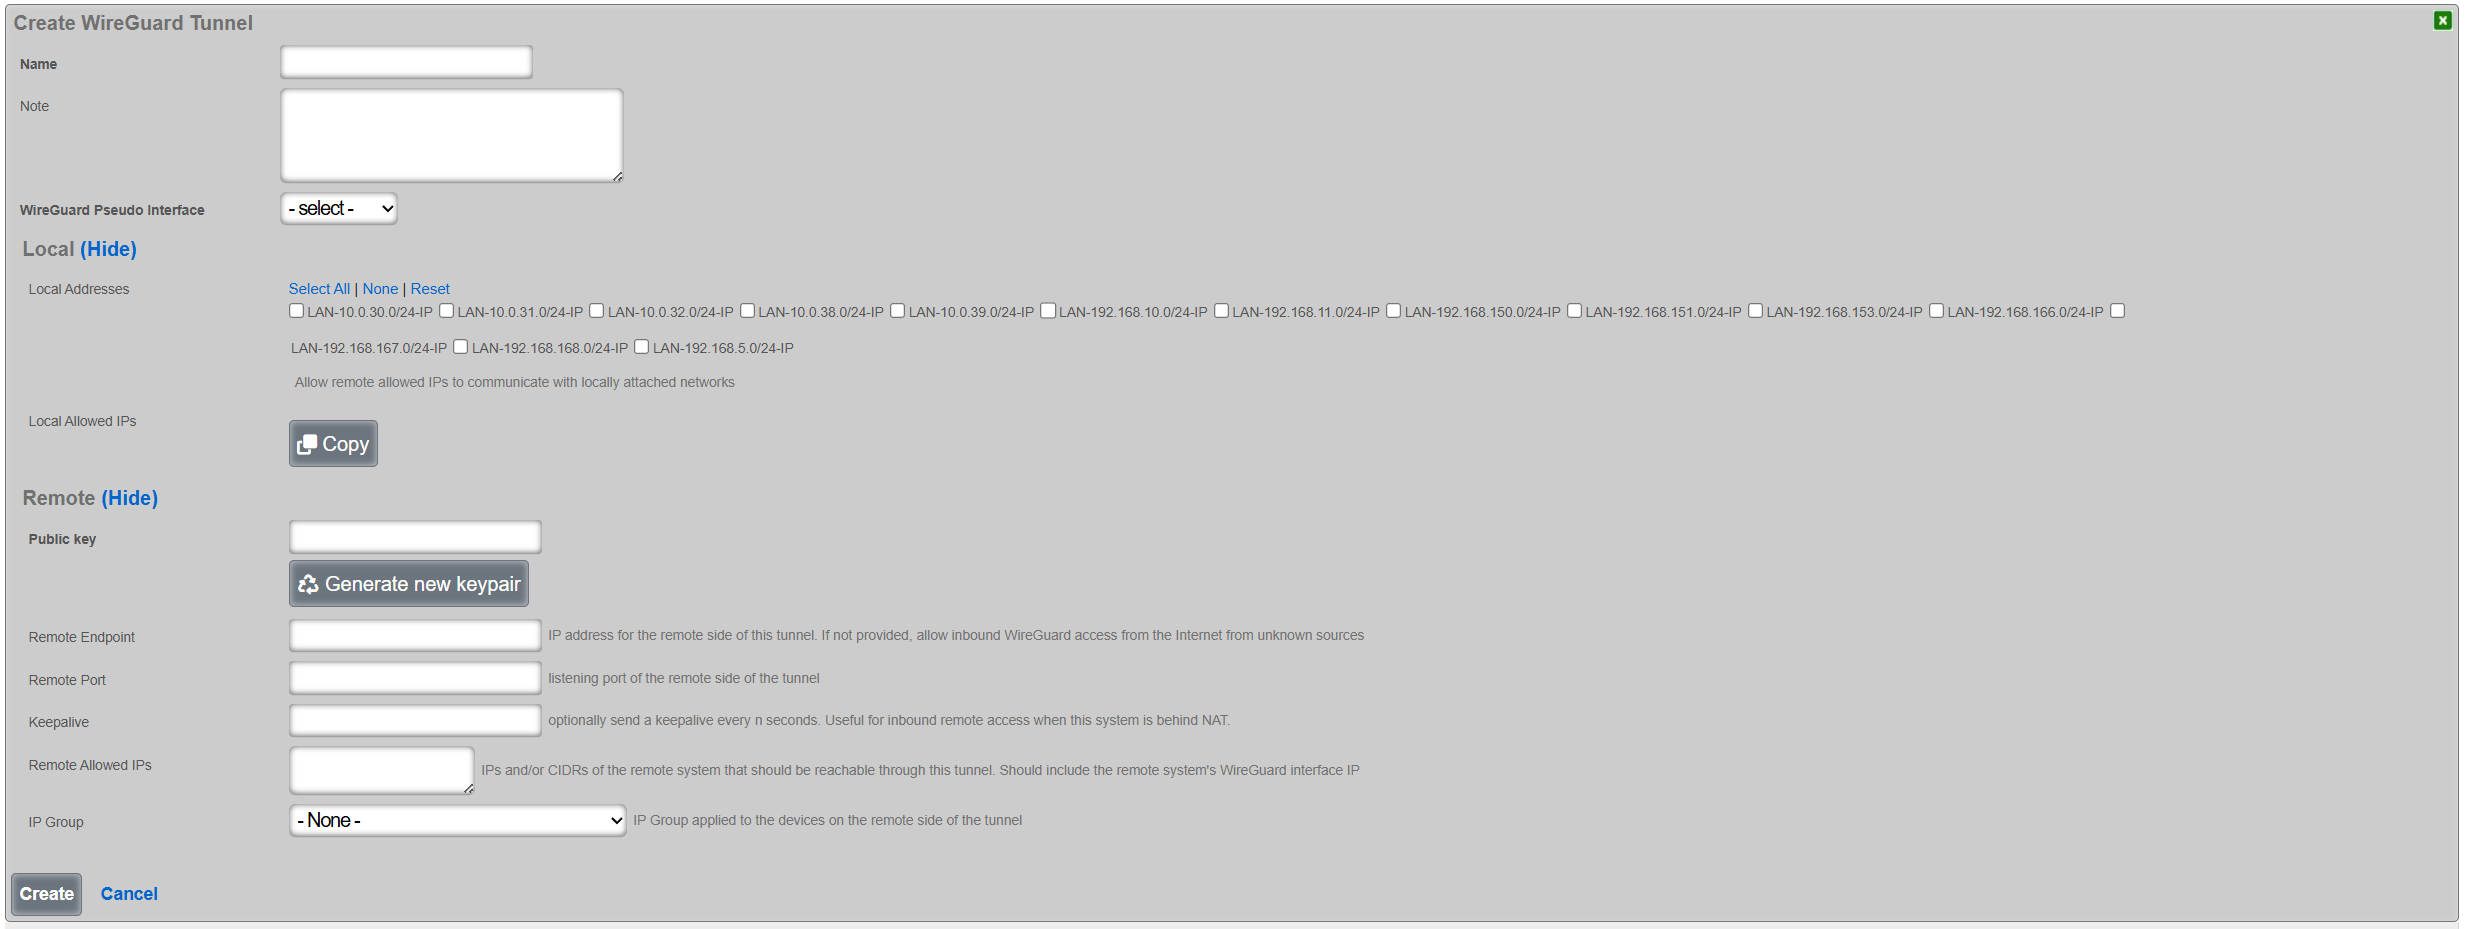
Once created, the tunnel is then displayed under the respective scaffold, as shown below:

The configuration for the given tunnel can be then displayed using the Client Config::View Config menu, as shown below. A QR code and a textual representation of the client (tunnel) parameters is displayed. The QR code can be used to conveniently apply the configuration to client devices, e.g., a smartphone, laptop, etc.
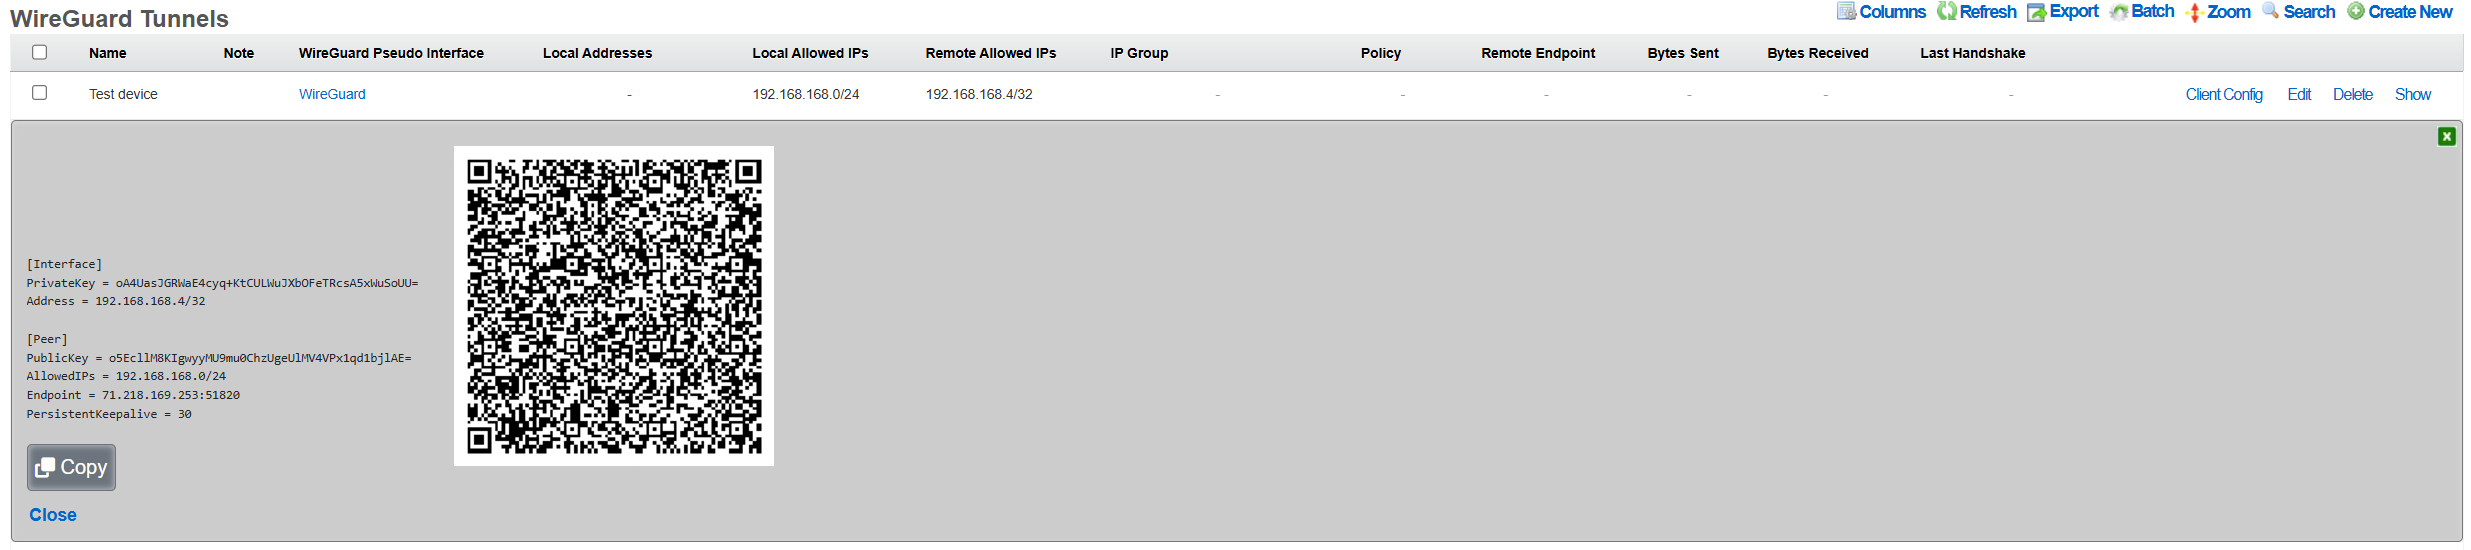
The WireGuard tunnel configuration can be also exported using the Client Config::Download Config menu, and then transfered to the target client and uploaded to the local WireGuard application.
### WireGuard client configuration
The client configuration is highly dependent on the platform being used by the customer. The following two examples show the use of the WireGuard tunnel configuration on an Android smartphone and an Apple laptop.
#### Android smartphone
Open the official WireGuard Android application and select the + symbol in teh bottorm right hand corner of the screen.

Select the Scan from QR code or Import from file or archive, depending on the preference. There is also an option to Create from scratch and add specific configuration elements manually. If the QR code-based or the file import-based method was selected, name the newly imported tunnel configuration
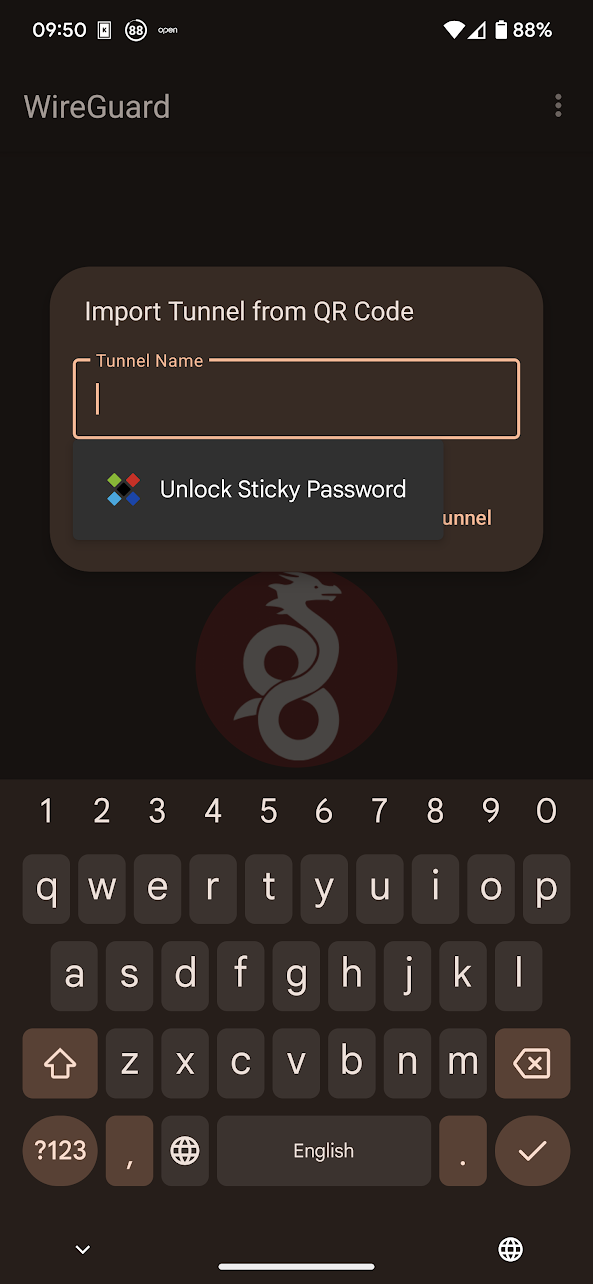
and the WireGuard tunnel configuration is then imported and ready to use.
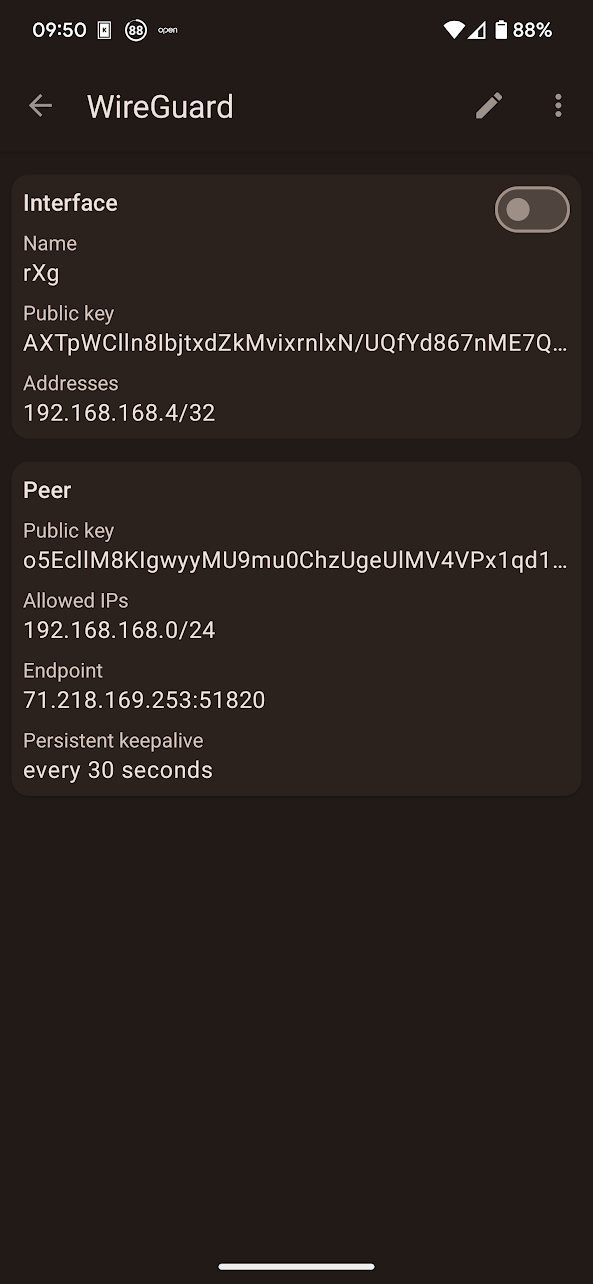
Toggle the Interface button and the tunnel will come online, with bytes sent/received incrementing on the rXg side, and the Latest Hanshake field indicating the time when the latest communication hanshake was completed.

#### Apple laptop
Open the official WireGuard Apple application and select the Import tunnel(s) from file symbolin the middle of the screen. Note that the import via QR code is not supported in the laptop / desktop version of the WireGuard client.
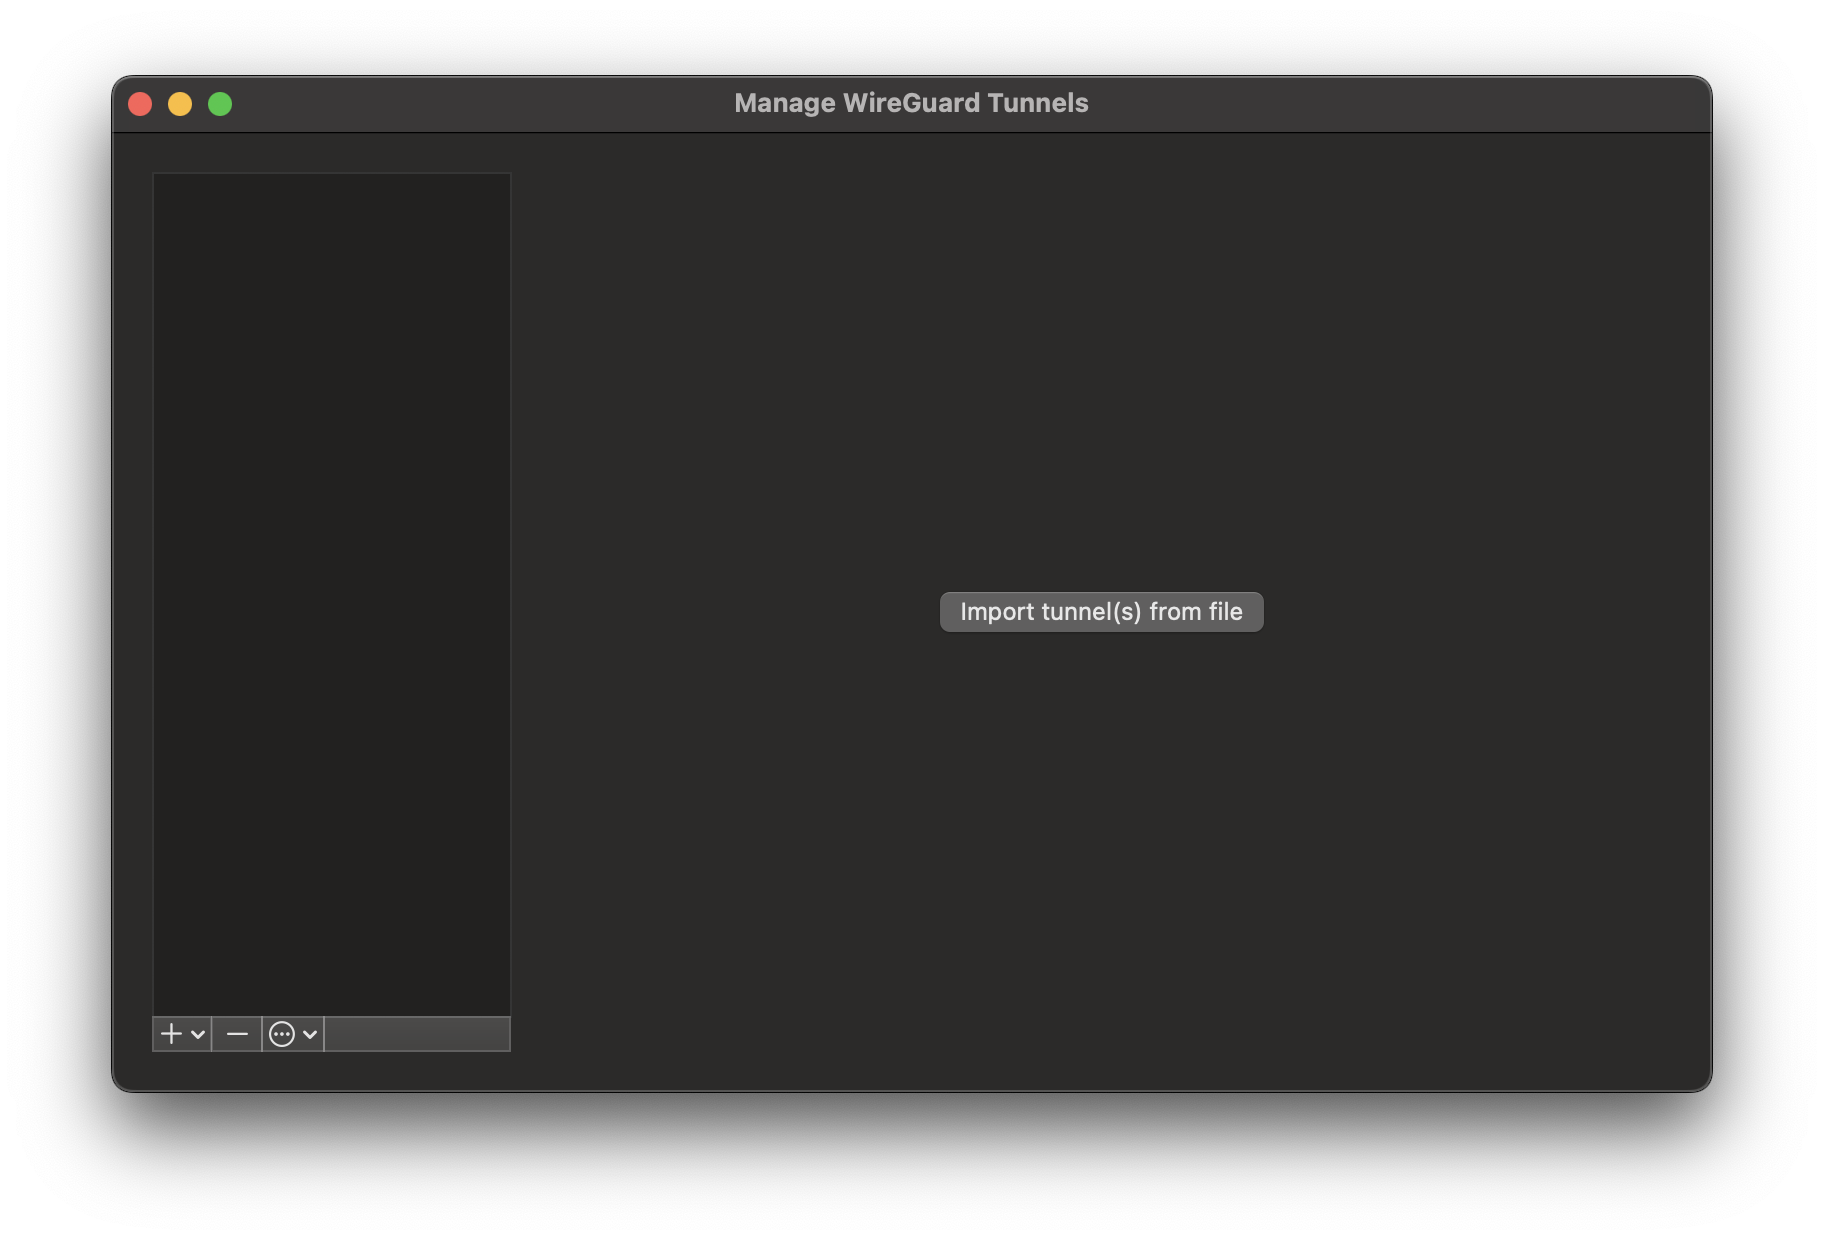
Select the *.conf file (extension is critical, the WireGuard Apple application will not permit the selection of any other files) and confirm the VPN tunnel is indeed intended to be created.
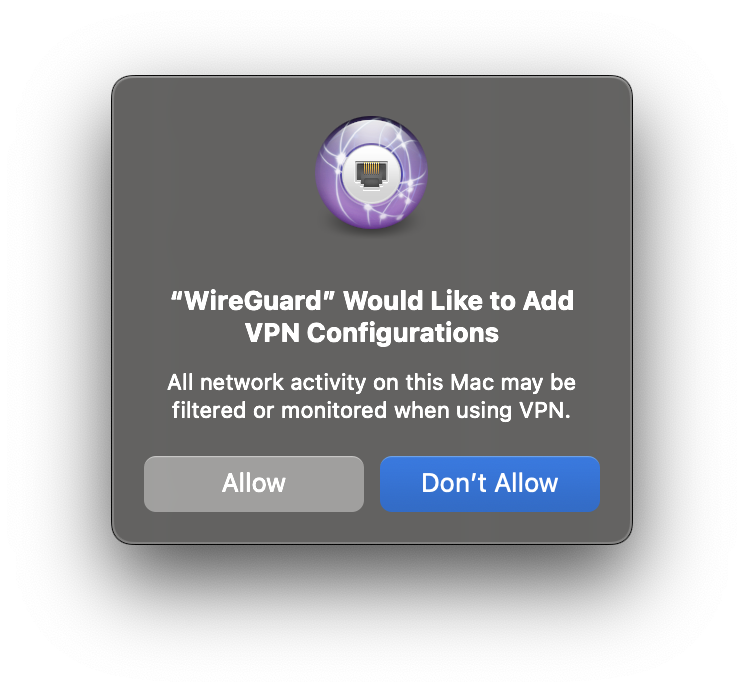
Once confirmed, the tunnel configuration is imported and can be activated using the Activate button. There is also an on-demand option, which triggers the WireGuard tunnel when and if specific select destinatio is identified.
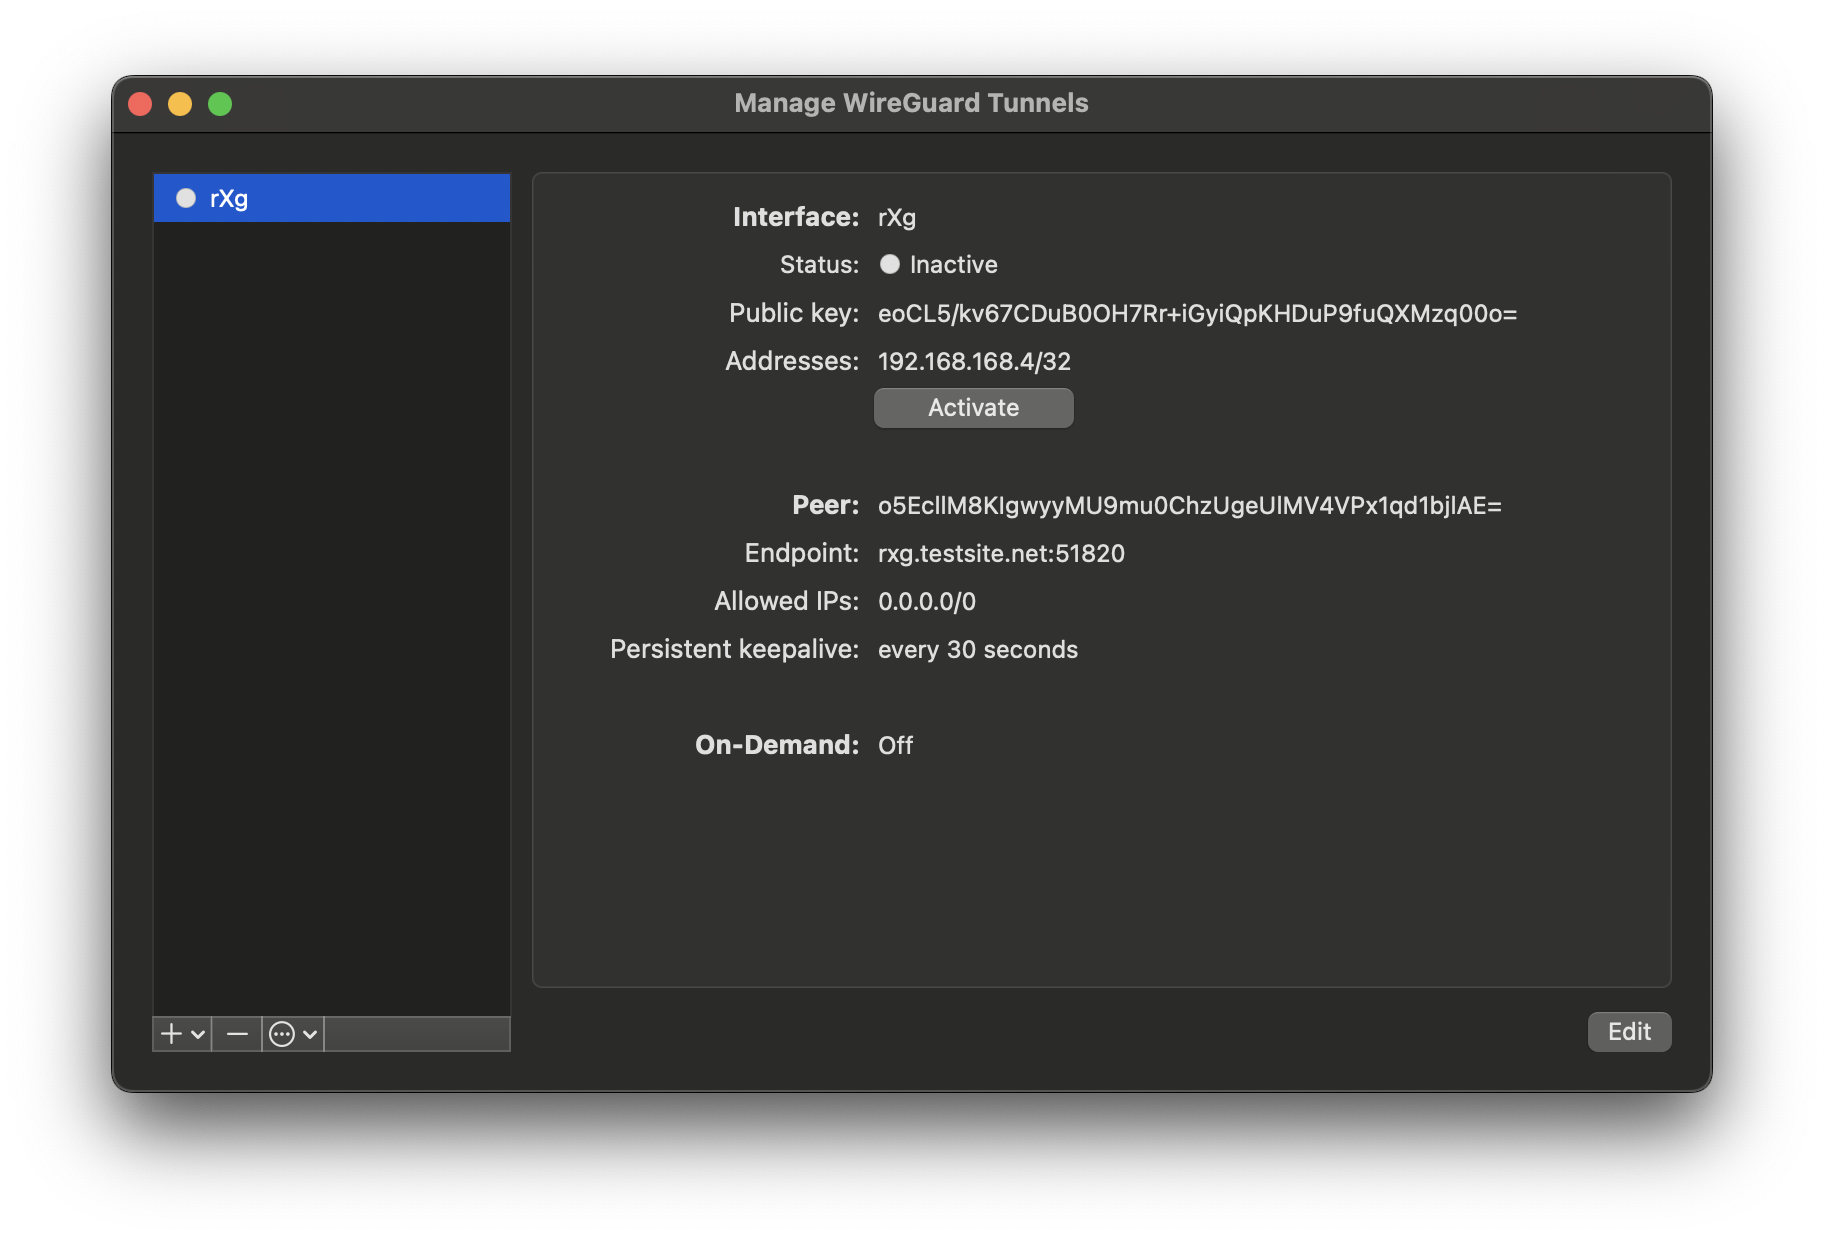
Toggle the Activate button and the tunnel will come online, with bytes sent/received incrementing on the rXg side, and the Latest Hanshake field indicating the time when the latest communication hanshake was completed.
IPv6 IPsec Support
The rXg IPsec implementation provides comprehensive support for IPv6 in addition to IPv4:
IPv6 Site-to-Site Tunnels
IPv6 site-to-site IPsec tunnels operate identically to IPv4 tunnels with the following considerations:
- Remote Networks: Specify IPv6 networks in CIDR notation (e.g.,
2001:db8:1::/64) - Mixed Protocol Support: A single tunnel can carry both IPv4 and IPv6 traffic by specifying both types of networks
- Gateway Addressing: Remote gateways can be IPv6 addresses or dual-stack hostnames
IPv6 Host-to-Site (Anonymous) VPN
Anonymous IPsec clients can connect over IPv6 and receive IPv6 address assignments:
- IP Pools: Configure IPv6 address pools using prefix delegation (e.g.,
2001:db8:vpn::/64) - Dual-Stack Clients: Clients can receive both IPv4 and IPv6 addresses simultaneously
- Policy Integration: IPv6 traffic through IPsec tunnels is subject to the same policy enforcement as IPv4
Configuration Notes for IPv6
- Ensure your uplink interfaces have IPv6 connectivity configured
- IPv6 IPsec tunnels require appropriate firewall rules for ICMPv6 and IPsec protocols
- Consider IPv6 fragmentation issues with path MTU discovery
Advanced Troubleshooting
Debugging IPsec Connections
Enable Debug Logging
- IPsec Server Options: Enable "Debug Mode" in the IPsec Server scaffold for anonymous connections
- Tunnel-Specific Debugging: Monitor logs in
/var/log/messagesfor strongSwan output - Connection Status: Use
swanctl --list-sascommand to view active security associations
Common Issues and Solutions
Tunnel Won't Establish - Verify both ends have matching IPsec specifications (encryption, authentication, DH groups) - Check that Phase 1 and Phase 2 proposals are compatible - Ensure certificates are valid and properly installed - Verify pre-shared keys match exactly (case-sensitive)
Tunnel Establishes but No Traffic Flows - Check that local and remote network ranges don't overlap - Verify routing is correctly configured for tunnel traffic - Ensure firewall rules permit IPsec traffic - Check for conflicting NAT rules
Frequent Disconnections - Adjust DPD (Dead Peer Detection) settings for network conditions - Review lifetime settings for Phase 1 and Phase 2 - Check for NAT timeout issues on intermediate devices
Certificate Authentication Failures - Verify certificate chains are complete - Check that certificate usage flags are set correctly (server vs client) - Ensure CA certificates are installed and trusted - Validate certificate expiration dates
Log Analysis
Key log entries to monitor:
charon: IKE_SA established
charon: CHILD_SA established
charon: authentication of peer failed
charon: DPD detected dead peer
Network Diagnostics
- Packet Capture: Use tcpdump to capture IPsec traffic (ESP/IKE protocols)
- Connectivity Testing: Test basic IP connectivity before enabling IPsec
- MTU Issues: IPsec adds overhead; consider reducing MTU for client connections
Performance Optimization
Encryption Algorithm Selection
For optimal performance, consider the following recommendations:
High Throughput Scenarios: - Use hardware-accelerated AES (AES-NI) when available - AES-128-GCM provides good security with excellent performance - ChaCha20/Poly1305 is ideal for systems without AES hardware acceleration
Low-Power/Mobile Devices: - ChaCha20/Poly1305 offers better power efficiency than AES on mobile CPUs - Consider smaller DH groups (Group 19/ECP-256) for faster key exchange
System Tuning
Network Interface Optimization: - Enable large receive offload (LRO) and transmit segmentation offload (TSO) on interfaces - Tune network buffer sizes for high-throughput scenarios - Consider jumbo frames for site-to-site connections over dedicated links
Strongswan Configuration:
- Adjust threads setting in strongswan.conf for multi-core systems
- Enable load_modular = yes for optimized plugin loading
- Tune rekey timing to balance security and performance
Monitoring Performance: - Monitor CPU utilization during IPsec operations - Track throughput using the IPsec Entries instrumentation - Use system monitoring tools to identify bottlenecks
Scalability Considerations
- Connection Limits: Plan for maximum concurrent anonymous connections
- Certificate Management: Use efficient certificate storage and validation
- Memory Usage: Monitor memory consumption with large numbers of active tunnels
WLAN-IPsec Integration
The rXg supports integrating wireless networks with IPsec for enhanced security:
Automatic IPsec for WLAN Clients
When configured, WLAN clients can be automatically enrolled in IPsec tunnels:
- WLAN Configuration: In the WLAN scaffold, select an IPsec option to associate with the wireless network
- Client Certificate Distribution: Certificates can be automatically distributed to connecting clients
- Policy Integration: WLAN clients using IPsec are subject to the IP group policies associated with the IPsec option
Use Cases
- Public Wi-Fi Security: Automatically encrypt all traffic from wireless clients
- Enterprise WLAN: Provide additional security layer for corporate wireless networks
- Guest Network Isolation: Use IPsec to provide secure guest access with policy isolation
Configuration Steps
- Create an IPsec specification with appropriate encryption settings
- Create an IPsec server option with certificate-based authentication
- Configure the WLAN to use the IPsec option
- Deploy client certificates to connecting devices
API Documentation
The rXg provides REST API access to IPsec configuration and monitoring:
Available Endpoints
IPsec Tunnels (/api/ipsec_tunnels):
- GET: List all configured tunnels with status
- POST: Create new site-to-site tunnel
- PUT/PATCH: Modify existing tunnel configuration
- DELETE: Remove tunnel configuration
IPsec Specifications (/api/ipsec_specifications):
- Full CRUD operations for encryption/authentication specifications
- Supports validation of cryptographic parameters
IPsec Options (/api/ipsec_options):
- Manage anonymous IPsec server configurations
- Control active server option selection
IPsec Entries (/api/ipsec_entries):
- Read-only access to active connection instrumentation
- Monitor connection status, traffic counters, and timing
Authentication
API access requires proper authentication tokens and appropriate administrative permissions. IPsec configuration requires system-level permissions.
Example Usage
# List all IPsec tunnels
curl -H "Authorization: Bearer $TOKEN" https://rxg.example.com/api/ipsec_tunnels
# Get tunnel status and statistics
curl -H "Authorization: Bearer $TOKEN" https://rxg.example.com/api/ipsec_entries
# Create new tunnel
curl -X POST -H "Authorization: Bearer $TOKEN" -H "Content-Type: application/json" \
-d '{"name":"Branch-Office","remote_gateway":"203.0.113.1","remote_networks":"10.1.0.0/24"}' \
https://rxg.example.com/api/ipsec_tunnels
Notifications
The notifications view presents the scaffolds associated with configuring templates for email, SMS, webhooks, and event health notices in response to events.
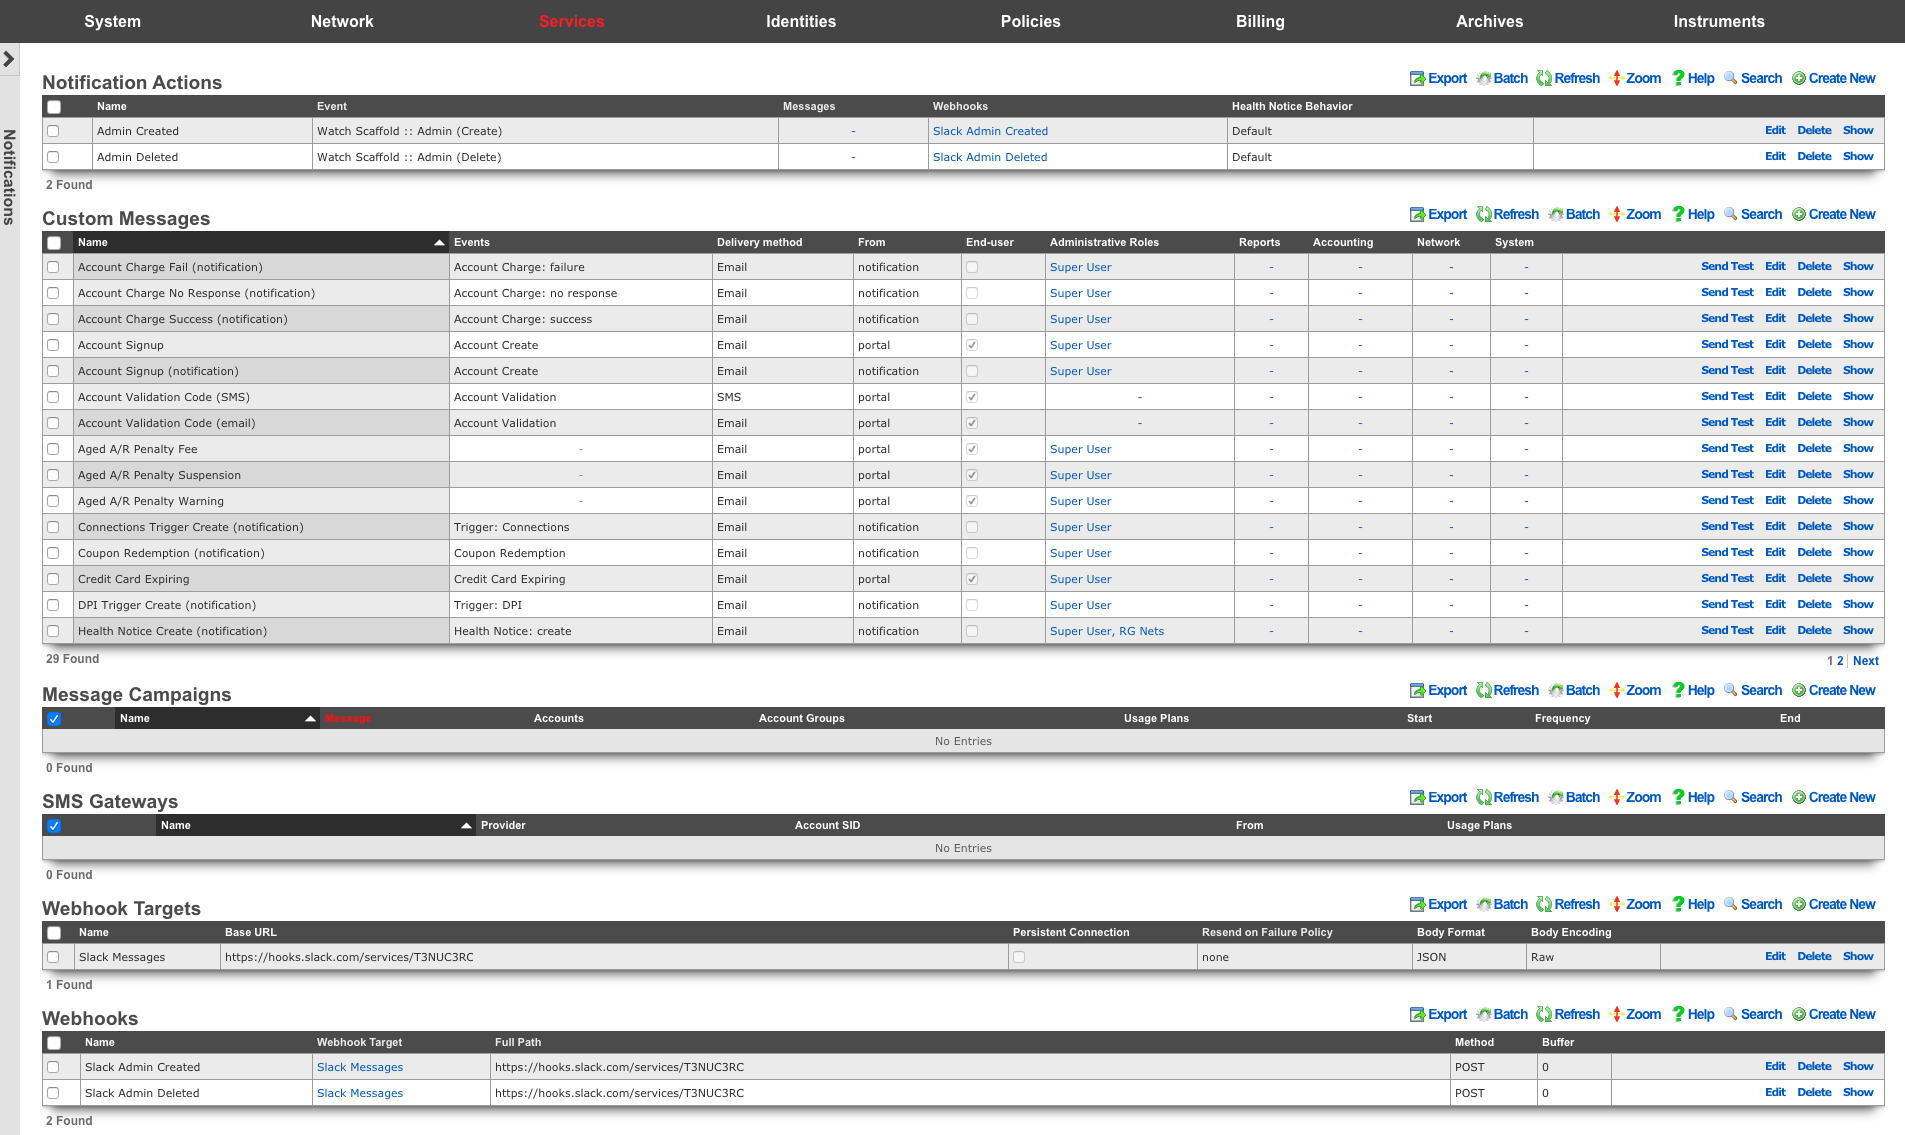
The notification actions scaffold enables clear communication to the RG end-user population, operators and administrators, as well as other systems.
Email is one of several end-user communication methods that are used to create a complete revenue generating network strategy. Email is an important part of the feedback loop when end-users purchase services. Event-based email notifications bring confidence to the end-user by offering a "receipt" when billing events occur. In addition, email can be used for marketing and administrative communication conveyance.
The rXg also uses email as a mechanism to communicate events to administrators. Events may be end-user related such as the service purchase case discussed before, or they may be system generated. Examples of system generated events include, but are not limited to, output from daily, weekly and monthly recurring system maintenance tasks, changes to uplink and monitored node status as well as detection of internal system problems.
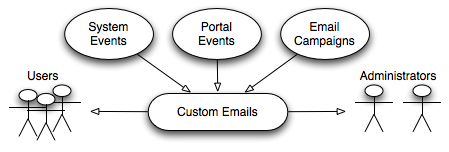
The rXg sends emails to administrators and end-users when certain events occur (e.g., account creation, plan selection, etc.). These event-based email notifications draw from templates defined in the custom messages template. The templates may be customized for content, look and feel as well to change the language to match the locale.
custom message templates also be used by the administrator initiated bulk email jobs. For example, the administrator may wish to send some or all end-users an email indicating a maintenance window, a reduced price service special or a paid advertisement from a partner.
The rXg email mechanism also helps operators generate revenue by enabling bulk email marketing. For example, if an operator becomes an affiliate marketing program subscriber, the operator will receive email notifications of special offers. In many cases, affiliate marketing program subscribers are given the opportunity to offer exclusive discount codes to their market base as a purchasing incentive. When an operator receives such a notification, a new email template incorporating affiliate program linkage and incentive information may be formulated and a job created broadcast to the end-user population. The operator is then issued a credit For end-users who take advantage of the opportunity described in the bulk email.
Significant operational cost reduction may also be achieved through the use of the rXg bulk email mechanism. Notification of maintenance windows, end-user surveys, promotions and well-checks may all be accomplished via the bulk email mechanism. Using the bulk email mechanism minimizes the hours utilized by support staff to communicate system and network administration events. In addition, keeping end-users informed often and ahead of time helps reduce support load in maintenance situations.
Below is an example Custom Message that reports to the recipients the amount of revenue generated in the previous 24 hour period:
<p>Good Morning,</p>
<%
rev = ArTransaction.where(['created_at > ?', 24.hours.ago]).sum(:credit)
%>
<p>Your network generated $
<b><tt><%= sprintf("%.2f", rev) %></tt></b>
yesterday. Have a nice day.
</p>
The Ruby script embedded inside the Custom Message above performs a calculation on the ArTransactions to generate a report for the recipients. Ruby scripts may also perform write operations on the database. For example, below is a Custom Message that is configured to be sent to a guest services representative on a daily basis.
<p>Good Morning,</p>
<%
todays_credential = sprintf("%x%d", rand(255), rand(9999))
scg = SharedCredentialGroup.find_by_name('Guests')
scg.credential = todays_credential
scg.save
%>
<p>Today's shared credential for guest access is:</p>
<p><b><tt><%= todays_credential %></tt></b></p>
<p>Thank you.</p>
The Ruby script embedded inside the Custom Message changes the designated Shared Credential Group to a randomly generated value and notifies the associated administators.
Adding Graphs to Custom Messages
Network, System, and Accounting graphs may be added to your custom messages in order to provide enhanced reporting emails to operators and administrators. By selecting associated Graph records in the custom messages's configuration, the system will automatically generate and attach PNG images of those graphs to the email as attachments.
Additionally, graph images may be inserted into the body of an email by calling the insert_attached_graphs method inside the body. The method takes an optional argument specifying the resolution of the image, such as_1000px*600px_ (the default). The resulting images will be stored on the rXg in a publicly accessible directory such that they may be retrieved by email clients.
For example, below is a Custom Message that inserts all associated graphs into the body of the email, separated by a line-break (<br>).
<h2>Weekly Report</h2>
<h3><%= Date.today.strftime("%a, %B %d, %Y") %></h3>
<br>
<%= insert_attached_graphs('1200px*700px') %>
If you wish to exercise greater control over the structure of your HTML email, you may provide a block to the method. The block will yield an array of hashes in the format of { graph_object => image_tag_string }. The array may be iterated over to insert each image tag into your desired HTML structure. For example:
<h2>Weekly Report</h2>
<h3><%= Date.today.strftime("%a, %B %d, %Y") %></h3>
<br>
<table>
<% insert_attached_graphs('600px*500px') do |graph_tags| %>
<% graph_tags.each do |graph, image_tag| %>
<tr> <td align="center" style="font-size:34px"><%= graph.title %></td> </tr>
<tr> <td align="center" style="font-size:14px"><%= graph.subtitle %></td> </tr>
<tr> <td><%= image_tag %></td> </tr>
<% end %>
<% end %>
</table>
Adding WLAN QR Codes to Custom Messages
QR codes may be sent as an attachment with your custom messages in order to provide an end-user with easy access to the WLAN associated to their usage plan's policy. Below is a very basic template you may add to the body of a custom email to accomplish this:
<%
raise CustomEmail::DoNotSendError unless (account = Account.find_by(login: '%account.login%'))
wlan = account.usage_plan.policy.wlan
%>
<%= qr_code_image_tag_for_email(account, wlan) %>
The policy associated with the account's usage plan must be associated with a WLAN.
Data Flow: Event Messaging and Webhook Delivery
The following diagrams illustrate how the rXg notification system processes events and delivers messages to external systems via webhooks, emails, health notices, and backend scripts.
Notification Action Event Processing
sequenceDiagram
participant SRC as Event Source<br/>(Database / Timer / Manual)
participant NA as Notification Action<br/>(Event Router)
participant WH as Webhook Engine
participant WT as Webhook Target<br/>(External Endpoint)
participant CM as Custom Message<br/>(Email Engine)
participant HN as Health Notice<br/>(System Alert)
participant BS as Backend Script<br/>(Ruby Executor)
Note over SRC,BS: Event Trigger Watch Scaffold Example
SRC->>SRC: Database record changed<br/>(create / update / delete)
SRC->>NA: NotificationEvent.trigger<br/>(:watch_model, model, action)
NA->>NA: Evaluate event criteria<br/>(model match? action match?)
par Webhook Delivery
NA->>WH: Fire associated webhooks
WH->>WH: Render ERB body template<br/>(substitute record attributes)
WH->>WH: Apply body format<br/>(JSON / Protobuf / raw)
WH->>WH: Apply encoding<br/>(raw / Base64)
WH->>WT: HTTP request<br/>(POST/PUT/GET + headers + body)
alt Success (2xx response)
WT-->>WH: 200 OK
else Error response
WT-->>WH: Error status code
WH->>WH: Check resend_on_failure
opt Buffered webhook
WH->>WH: Queue for retry<br/>(buffer period in minutes)
end
end
and Email Notification
NA->>CM: Send custom message
CM->>CM: Render ERB template<br/>(substitute %account.field%)
CM->>CM: Attach graphs (if configured)
alt Send to account
CM->>CM: Deliver to subscriber email
end
alt Send to admin roles
CM->>CM: Deliver to admin emails
end
and Health Notice
NA->>HN: Generate health notice
HN->>HN: Evaluate severity<br/>(warning / critical)
HN->>HN: Send to configured admins
and Backend Script
NA->>BS: Execute Ruby script
BS->>BS: Load custom modules
BS->>BS: Run script body<br/>(with event context)
end
Event Type Categories
flowchart LR
subgraph triggers[Event Triggers]
WS[Watch Scaffold<br/>DB record changes]
PER[Periodic<br/>Timed schedule]
MAN[Manual<br/>API / mobile app]
ERR[Error Conditions<br/>System failures]
THR[Thresholds<br/>Resource utilization]
CL[Cluster Events<br/>Node status / HA]
end
subgraph actions[Configured Actions]
WH2[Webhooks<br/>HTTP callbacks]
EM[Custom Messages<br/>Email / SMS]
HN2[Health Notices<br/>System alerts]
BS2[Backend Scripts<br/>Ruby automation]
end
WS --> WH2
WS --> EM
WS --> HN2
WS --> BS2
PER --> WH2
PER --> EM
PER --> BS2
MAN --> WH2
MAN --> BS2
ERR --> EM
ERR --> HN2
THR --> EM
THR --> HN2
CL --> EM
CL --> HN2
style triggers fill:#e3f2fd
style actions fill:#f3e5f5
Webhook Delivery Detail
sequenceDiagram
participant NA as Notification Action
participant WH as Webhook
participant WT as Webhook Target
participant EP as External Endpoint
NA->>WH: Event triggered
WH->>WH: Build request
Note right of WH: 1. Start with target base_url<br/>2. Append webhook path<br/>3. Merge target + webhook headers<br/>4. Merge target + webhook query params<br/>5. Render body (ERB template)
WH->>WH: Apply target body_format
Note right of WH: JSON Content-Type: application/json<br/>Protobuf serialize with schema<br/>Raw no transformation
WH->>WH: Apply body_encoding
Note right of WH: RAW send as-is<br/>Base64 encode body<br/>Base64+newline encode with line breaks
alt Buffer > 0 minutes
WH->>WH: Queue in buffer<br/>(wait buffer period)
WH->>WH: Aggregate buffered events
WH->>EP: Send buffered batch<br/>(HTTP method + path + body)
else No buffering
WH->>EP: Send immediately<br/>(HTTP method + path + body)
end
alt Persistent connection
WH->>EP: Keep-Alive header set
end
EP-->>WH: Response
alt Response code in error_status_codes
WH->>WH: Mark as failed
opt resend_on_failure enabled
WH->>WH: Schedule retry
WH->>EP: Resend request
end
opt All retries exhausted
WH->>NA: Trigger: Buffered Webhook Failure<br/>(generates health notice)
end
else Success
WH->>WH: Mark as delivered
end
Proposed: Event Streaming Architecture (Future)
Note: The following diagram represents a proposed architecture for high-throughput event streaming. This pattern extends the existing webhook system with a message broker (such as Kafka) for guaranteed delivery and fan-out to multiple consumers.
flowchart TD
subgraph rxg[rXg Platform]
DB[(Database)]
NA[Notification Actions]
WH[Webhook Engine]
DB -->|record change| NA
NA -->|fire| WH
end
subgraph bus[Message Bus Proposed]
K[Message Broker<br/>e.g., Kafka]
end
subgraph consumers[External Consumers]
SCPS[SCPS<br/>Policy Control]
BILL[Billing System<br/>CDR Processing]
ANLZ[Analytics Platform<br/>Usage Dashboards]
SIEM[SIEM<br/>Security Monitoring]
end
WH -->|webhook POST| K
K -->|topic: sessions| SCPS
K -->|topic: billing| BILL
K -->|topic: traffic| ANLZ
K -->|topic: security| SIEM
SCPS -->|REST API callback| rxg
BILL -->|REST API callback| rxg
style rxg fill:#e8f5e9
style bus fill:#fff3e0
style consumers fill:#fce4ec
Webhooks, and Webhook Targets 
The webhooks and webhook targets scaffolds enable an operator to integrate other systems with the rXg. Webhooks user defined HTTP callbacks which are triggered by specific events. The events are configured in the notification actions scaffold. When the triggered event occurs, a webhook gathers the required data (headers, and body), and sends it to the configured URL.
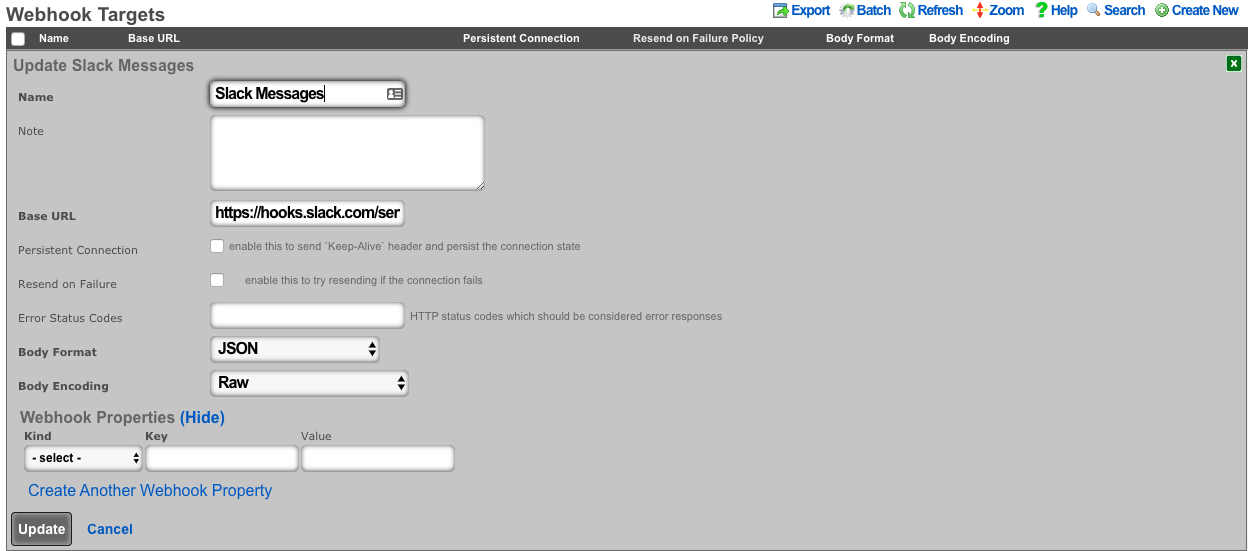
An entry in the webhook targets scaffold defines a set of 'global' parameters that all webhooks configured for the target will use. These include the Base URL, body formatting, error code response, as well as any global HTTP headers, or query parameters an operator may need to configure. This enables the flexibility to configure multiple unique webhooks, utilizing a common target, and eliminates the need for repeating common elements such as API-keys, or content-types on each configured webhooks
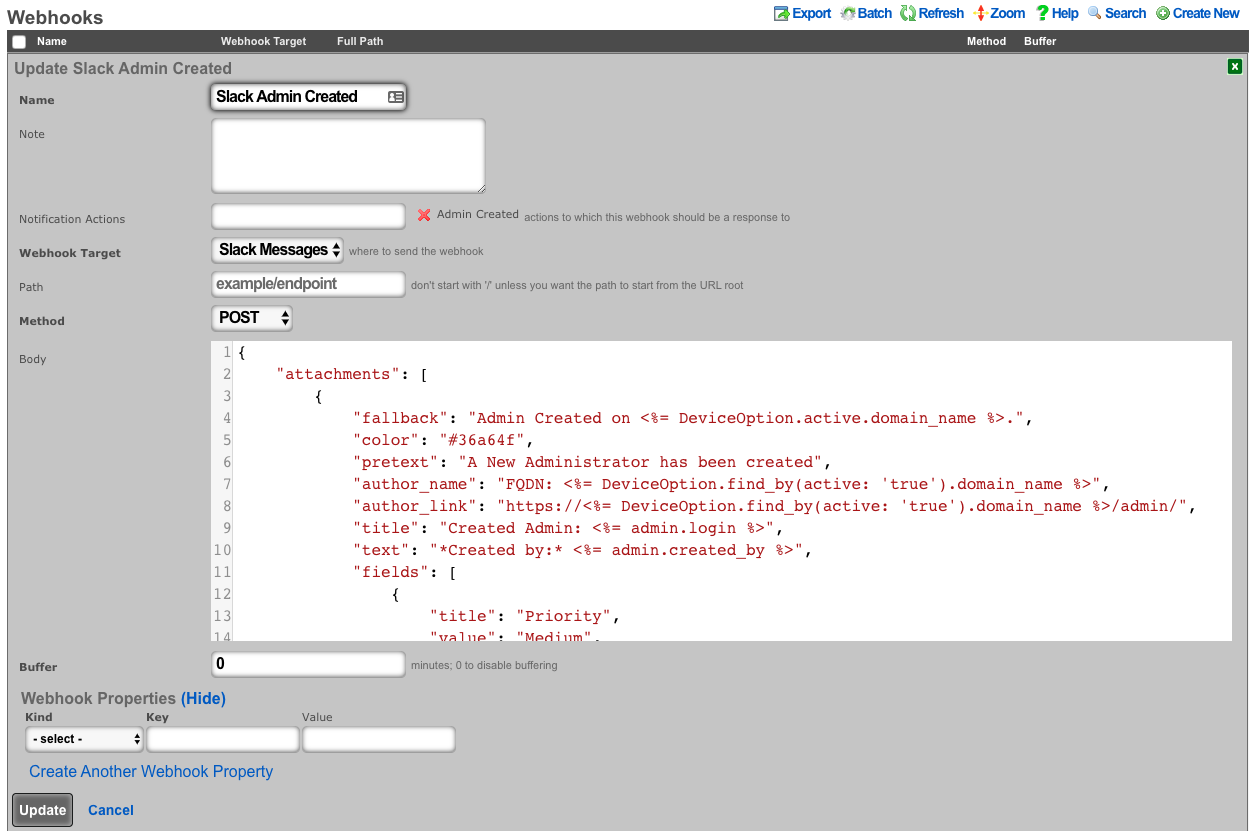
An entry in the webhooks scaffold defines the parameters for a single webhook. A webhook must have an associated webhook target, containing the base URL. The specific endpoint path is defined in the webhook scaffold entry. The path will be appended to the webhooks configured target base URL. An operator can override the base URL by starting the webook path with a /. The HTTP request method, as well as the body or data is also configured within the webhook scaffold. Any additional HTTP headers, or query parameters that are unique to the configured webhook can be added.
Notification Actions
An entry in the notification actions scaffold defines an event of which the rXg should complete the selected action(s). Events can include database changes, time and/or location based triggers, and more.
The name field is an arbitrary string descriptor used only for administrative identification. Choose a name that reflects the purpose of the record. This field has no bearing on the configuration or settings determined by this scaffold.
The note field is a place for the administrator to enter a comment. This field is purely informational and has no bearing on the configuration settings.
The event type field selects what kind of events should trigger a configured action. Depending on the selection, additional options may be rendered for operator configuration. For database changes, an operator can select Watch Scaffold, choose the appropriate modifiers (create, update, and/or delete).
The messages field configures a custom message to be sent when the criteria of the event is met. The message receivers are configured in the custom messages scaffold entry.
The webhooks field defines configured webhooks to be triggerd when the criteria of the event is met.
The health notice field defines whether the system should send a health notice. Choosing default will result in the default behavior of a configured event. For instance, "Certbot Failure" is configured to send a health notice on failure. If the event does not have a default health notice action, nothing is changed, and no health notice is sent. Choosing Disabled, will override the configured default health notice the event type, and not send it. For instance, with "Certbot Failure", choosing disabled will disable a health notice from being sent. Choosing Custom allows the operator to configure or override an existing health notice. For instance, "Watch Scaffold :: Administrators" wouldn't trigger a health notice by default. Choosing custom would allow an operator to configure a health notice for this event type.
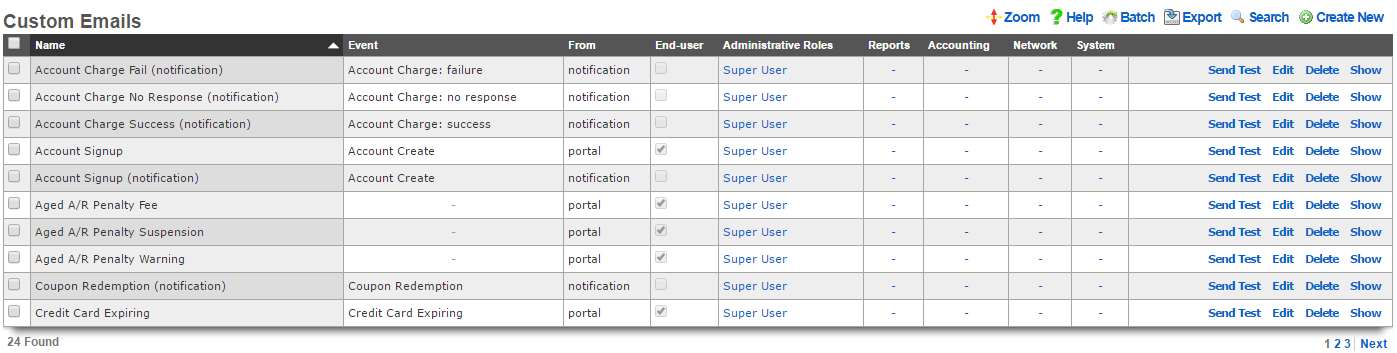
Event Type Reference
The event type field determines what triggers a notification action. Each event type category serves a distinct purpose:
Special Events
| Event Type | Description |
|---|---|
| Watch Scaffold | Triggers when database records are created, updated, or deleted. Select the model to watch and which operations (create/update/delete) should fire the action. Useful for auditing changes, syncing data to external systems, or triggering workflows on record changes. |
| Periodic | Triggers on a configurable schedule. Specify the interval (minutes, hours, days, weeks, or months) and optionally set start/end times to constrain when the action runs. Useful for scheduled reports, recurring maintenance tasks, or timed integrations. |
| Manual | Triggers only when explicitly invoked via the API or the mobile Action Button app. Useful for on-demand operations like toggling configurations, running ad-hoc scripts, or operator-initiated workflows. |
General Error Conditions
| Event Type | Description |
|---|---|
| Backend Daemon Delayed | Triggers when a backend daemon (background processing service) is running slower than expected. Indicates potential performance issues or resource constraints affecting background jobs. |
| Backend Daemon Not Responding | Triggers when a backend daemon fails to respond entirely. Indicates a critical failure requiring immediate attention to restore background processing. |
| BGP Peer Offline | Triggers when a configured BGP (Border Gateway Protocol) peer becomes unreachable. Indicates routing issues that may affect network connectivity. |
| Buffered PMS Charge Failure | Triggers when a Property Management System charge that was queued for later processing fails. Indicates billing integration issues with hospitality PMS systems. |
| Buffered Webhook Failure | Triggers when a webhook that was buffered for later delivery fails after all retry attempts. Indicates connectivity or endpoint issues with external integrations. |
| Certbot Failure | Triggers when automatic SSL/TLS certificate renewal via Certbot fails. Requires attention to prevent certificate expiration. |
| Config Template Download Failure | Triggers when the system fails to download a configuration template from a remote source. May indicate network issues or invalid template URLs. |
| Custom Health Notice Failure | Triggers when a custom health notice (configured in a notification action) fails to render due to ERB template errors. Check the template syntax in the notification action. |
| Disk Image Download Failure | Triggers when downloading a disk image (for virtualization or fleet deployment) fails. May indicate network issues or storage problems. |
| Event Response Failure | Triggers when a notification action's response (webhook, script, or message) fails during execution. The related notification action is linked to the event for debugging. |
| IPsec Tunnel Offline | Triggers when an IPsec VPN tunnel goes down. Indicates VPN connectivity issues affecting secure site-to-site communications. |
| (Domain/Host) Name Not Resolving | Triggers when DNS resolution fails for a monitored hostname. Indicates DNS configuration issues or upstream resolver problems. |
| PF Error | Triggers when the packet filter (firewall) encounters an error. May indicate rule syntax issues or resource exhaustion affecting traffic filtering. |
| Portal Asset Precompile Failure | Triggers when captive portal assets (CSS, JavaScript) fail to precompile. May affect portal appearance or functionality. |
| Portal Controller Error | Triggers when the captive portal application encounters an unhandled error. Check portal logs for details. |
| Portal Sync Failure | Triggers when synchronizing portal configuration or assets to cluster nodes or fleet devices fails. |
| Protobuf Schema Error | Triggers when there's an error with Protocol Buffer schema parsing or encoding. Affects integrations using Protobuf body format. |
| License Expiration Issue | Triggers when the system license is approaching expiration or has expired. Contact support to renew the license. |
| Infrastructure Import Error | Triggers when importing infrastructure configuration (from backup or migration) fails. Check import file format and compatibility. |
| Version is not compatible | Triggers when a version mismatch is detected, such as between cluster nodes or with external integrations. |
| Configuration out of sync | Triggers when configuration drift is detected between cluster nodes or between the database and running state. |
Cluster Error Conditions
| Event Type | Description |
|---|---|
| Cluster Node Status | Triggers when a cluster node's activity status changes (e.g., becomes unreachable or comes back online). |
| Cluster Node Replication | Triggers when database replication between cluster nodes encounters issues or falls behind. |
| Cluster Node HA | Triggers when high-availability failover events occur or when HA state changes between cluster nodes. |
| CIN Interface Warning | Triggers when the Cluster Interconnect Network interface experiences issues such as speed degradation or errors. |
General Threshold Events
These events trigger when monitored system metrics cross configured thresholds. Configure thresholds in System :: Options :: Notification Thresholds.
| Event Type | Description |
|---|---|
| Accounts Limit (%) | Triggers when the number of accounts approaches the licensed limit. Default: Warning at 85%, Critical at 95%. |
| BiNAT Pool Utilization (%) | Triggers when Bi-directional NAT IP pool usage is high. Indicates potential IP address exhaustion for NAT translations. Default: Warning at 85%, Critical at 95%. |
| CIN Speed | Triggers when Cluster Interconnect Network speed drops below expected levels. Low values indicate potential network hardware issues. Default: Critical below 1000 Mb/s. |
| CPU Core Temperature (C) | Triggers when CPU temperature exceeds safe operating levels. High temperatures may indicate cooling issues. Default: Warning at 70C, Critical at 75C. |
| DHCP Pool Utilization (%) | Triggers when DHCP address pools (larger than /28) are running low on available addresses. Default: Warning at 85%, Critical at 95%. |
| DHCP Shared Network Utilization (%) | Triggers when DHCP shared network pools (larger than /29) are running low. Default: Warning at 85%, Critical at 95%. |
| Filesystem Utilization (%) | Triggers when disk space usage is high. Critical levels may cause system instability. Default: Warning at 75%, Critical at 80%. |
| Fleet Nodes Limit (%) | Triggers when the number of fleet nodes approaches the licensed limit. Default: Warning at 85%, Critical at 95%. |
| Filesystem Utilization Squid | Triggers when the Squid proxy cache filesystem is running low on space. Default: Critical at 80%. |
| Load Average | Triggers when system load (CPU demand) is consistently high. High values indicate the system is under heavy processing load. Default: Warning at 1.5, Critical at 2.0. |
| Local IPs Limit (%) | Triggers when local IP address allocation approaches the licensed limit. Default: Warning at 85%, Critical at 95%. |
| Login Sessions Limit (%) | Triggers when concurrent login sessions approach the licensed limit. Default: Warning at 85%, Critical at 95%. |
| Memory Utilization (%) | Triggers when RAM usage is high. High memory usage may cause performance degradation or out-of-memory conditions. Default: Warning at 90%, Critical at 95%. |
| Missing Backup Servers | Triggers when no backup servers are configured or reachable. Ensures backup infrastructure is available. |
| Connection States Limit (%) | Triggers when the firewall connection state table approaches capacity. High utilization may cause new connections to be dropped. Default: Warning at 85%, Critical at 95%. |
| VLAN Utilization (%) | Triggers when VLAN address space utilization is high. Default: Warning at 85%, Critical at 95%. |
Other Threshold Events
| Event Type | Description |
|---|---|
| Location: Crowd Formed | Triggers when the number of devices in a location area exceeds the configured crowd threshold. Useful for occupancy monitoring and crowd management. Configure thresholds in Network :: Location. |
| Location: Crowd Dispersed | Triggers when a previously formed crowd disperses (device count drops below threshold). |
| Filesystem Utilization Threshold | General filesystem monitoring event for custom threshold configurations. |
| Speed Test Failed | Triggers when an automated speed test fails to complete or returns unexpected results. |
Scheduled Upgrades
| Event Type | Description |
|---|---|
| Upgrade Initiated | Triggers when a scheduled system upgrade begins. Useful for notifying operators that maintenance has started. |
| Upgrade Completed | Triggers when a scheduled system upgrade completes successfully. Confirms the system is back online with the new version. |
| Upgrade Failed | Triggers when a scheduled system upgrade fails. Requires immediate attention to assess system state and potentially rollback. |
Fleet Nodes
| Event Type | Description |
|---|---|
| Fleet Node Offline | Triggers when a managed fleet node becomes unreachable. May indicate network issues, power loss, or device failure at the remote site. |
| Fleet Node Online | Triggers when a fleet node that was previously offline comes back online. Confirms connectivity restoration. |
DPU Devices
| Event Type | Description |
|---|---|
| DPU Device Offline | Triggers when a Data Processing Unit device becomes unreachable. Indicates connectivity or device issues. |
| DPU Device SSH Credentials Invalid | Triggers when SSH authentication to a DPU device fails. Indicates credential mismatch requiring reconfiguration. |
Custom Messages
An entry in the custom messages scaffold creates a template that can be used for email notifications and bulk emails originating from the rXg.
The name field is an arbitrary string descriptor used only for administrative identification. Choose a name that reflects the purpose of the record. This field has no bearing on the configuration or settings determined by this scaffold.
The event drop down associates this template with an event which will trigger an email notification to an end-user. If no event is chosen, the template is assumed to be used in only an email campaign.
The from field defines the address from which emails sent using this template will originate. This email address should lead to an account that is regularly monitored because end-users who receive emails based on this template are likely to reply with questions.
The account and admin roles check boxes enables automatic sending of emails using this custom message for event notification. If the account check box is checked, then the custom message template will be populated with the appropriate data and transmitted to the end-user when the selected event occurs. Similarly, when one or more admin roles check boxes are checked, the custom message template will be populated with the appropriate data and send to the administrators who are linked of the to the checked admin role.
The subject and body fields define the payload of the email template. Place the desired content for the subject and message into the appropriate field. Placeholders for variable substitutions begin and end with the percent sign and must refer to fields from the usage plans or accounts scaffolds. For example, %account.first_name% %account.last_name% will be substituted for the full name of the end-user being targeted by the email. See the full manual page for more information about the values available for substitution.
The note field is a place for the administrator to enter a comment. This field is purely informational and has no bearing on the configuration settings.

Email Campaigns
An entry in the email campaigns scaffold defines a bulk email job. Once the job is complete (i.e., all emails are queued for transmission), the entry in email campaigns is automatically deleted.
The name field is an arbitrary string descriptor used only for administrative identification. Choose a name that reflects the purpose of the record. This field has no bearing on the configuration or settings determined by this scaffold.
The custom message field selects the template that will be used for this bulk email job. The template payload is defined in the custom messages scaffold.
The account groups field configures the set of end-users who will be sent the email template selected by the custom message via this job. The members of the groups are controlled by the account groups scaffold on the accounts view of the identifies subsystem.
The start at field defines the starting time and date for this job. If the value of the start at field is before the current date and time, the job will be started immediately. If the start at is set to the future, the job will start at the specified future date and time.
A job is automatically deleted after it is finished. The optional frequency field determines if this job is run more than once, and how often. The optional end at field defines when a repeat job is finished. A job with a set frequency and a blank end at field will repeat indefinitely at the configured frequency. A periodic job with a configured end at field is deleted when the time of the next iteration exceeds the end at date/time.
The note field is a place for the administrator to enter a comment. This field is purely informational and has no bearing on the configuration settings.
SMS Gateways
The SMS Gateways scaffold enables the creation of an SMS Gateway service which will be utilized for verifying a user's mobile number for the purpose of new account signups and/or password resets.
The name field identifies this SMS Gateway in the system.
The provider field specifies which provider this SMS Gateway relates to. Select a supported provider from the list.
The from field specifies the phone number, shortcode, or Alphanumeric Sender ID (not supported in all countries) to be used when sending SMS messages through this gateway. This value must correspond to a number purchased from or ported to the provider.
The Account SID and Auth Token fields specify the API credentials used to access the provider's REST API, and may be obtained from your dashboard within the provider's website.
The Usage Plans selections determine which usage plans are configured to utilize this SMS Gateway. The usage plan must also specify a validation method which includes SMS in order for messages to be sent via SMS.
The Splash Portals selections determine which splash portals are configured to utilize this SMS Gateway for the purposes of performing password resets. Accounts with a valid mobile phone number may request a password reset token via SMS or Email, depending on the password reset method specified in the splash portal.
The note field is a place for the administrator to enter a comment. This field is purely informational and has no bearing on the configuration settings.
For more information, see the SMS Integration manual entry.
Webhook Targets
An entry in the webhook targets scaffold defines a remote endpoint the rXg should send configured webhooks to.
The name field is an arbitrary string descriptor used only for administrative identification. Choose a name that reflects the purpose of the record. This field has no bearing on the configuration or settings determined by this scaffold.
The note field is a place for the administrator to enter a comment. This field is purely informational and has no bearing on the configuration settings.
The base url field should be configured with the top-level/base URL of the remote API endpoint. This allows for flexibility to have multiple webhooks configured to use the same target.
The persistent connection checkbox configures the rXg to send 'keep-alive' headers and persist the connection state.
The resend on failure checkbox configures the rXg to attempt resending if the initial connection fails.
The error status codes field defines a list of codes that should be considered error responses. The use of wildcard 'x' is available to the operator. Examples include: (400, 401, 4xx, 500, 5xx, 50x).
The body format selector defines the formatting of the body of webhooks configured to use this target. Selecting JSON automatically addsapplication/json to the HTTP Header content-type. SelectingProtobuf requires the operator to define a protobuf schema.
The body encoding selector defines an optional encoding scheme. Options include RAW (no encoding), Base64, and Base64 w/newline every 60 characters.
The webhook properties fields allow the operator to define additional HTTP Headers, or Query Parameters to send globally with all webooks configured to use this target.
Webhooks
An entry in the webhooks scaffold defines the body, target, method, and additional HTTP Headers and/or Query Parameters for a configured webhook.
The name field is an arbitrary string descriptor used only for administrative identification. Choose a name that reflects the purpose of the record. This field has no bearing on the configuration or settings determined by this scaffold.
The note field is a place for the administrator to enter a comment. This field is purely informational and has no bearing on the configuration settings.
The notification actions field displays what actions this webhook is configured for.
The webhook target dropdown configures the webhook target this webhook will use.
The path field is appended to the base url of the webhook target. This allows multiple webhooks to use the same webhook target, and be configured for unique endpoints.
The body field contains the body of the webhook.
The buffer field configures a time period (in minutes) before sending the webhook. "0" will disable buffering.
The webhook properties selector defines an optional encoding scheme. Options include RAW (no encoding), Base64, and Base64 w/newline every 60 characters.
The webhook properties fields allow the operator to define additional HTTP Headers, or Query Parameters to send only with this individual webhook.
Substitution
Payload fields may contain special keywords surrounded by % signs that will be substituted with relevant values. This enables the operator to deliver values stored in the database as part of the payload.
List of objects available:
| Account Create | Usage Plan Purchase | Transaction: success/failure |
|---|---|---|
| cluster_node | cluster_node | cluster_node |
| custom_email | custom_email | custom_email |
| device_option | device_option | device_option |
| ip_group | login_session | login_session |
| login_session | usage_plan | merchant |
| usage_plan | account | payment_method |
| account | merchant_transaction | |
| usage_plan | ||
| account |
| Credit Card Expiring | Coupon Redemption | Account Charge: success/failure/no response |
|---|---|---|
| cluster_node | cluster_node | cluster_node |
| custom_email | custom_email | custom_email |
| device_option | device_option | device_option |
| login_session | coupon | login_session |
| payment_method | login_session | payment_method |
| usage_plan | usage_plan | response |
| account | account | usage_plan |
| account |
| Trigger: Connections | Trigger: Quota | Trigger: DPI |
|---|---|---|
| cluster_node | cluster_node | cluster_node |
| custom_email | custom_email | custom_email |
| device_option | device_option | device_option |
| login_session | login_session | login_session |
| max_connections_trigger | quota_trigger | snort_trigger |
| transient_group_membership | transient_group_membership | transient_group_membership |
| account | account | account |
| Trigger: Time | Trigger: Log Hits | Health Notice: create |
|---|---|---|
| cluster_node | cluster_node | cluster_node |
| custom_email | custom_email | custom_email |
| device_option | device_option | device_option |
| login_session | login_session | health_notice |
| time_trigger | log_hits_trigger | |
| transient_group_membership | transient_group_membership | |
| account | account |
| Health Notice: cured |
|---|
| cluster_node |
| custom_email |
| device_option |
| health_notice |
List of objects available for all associated record types:
| Aged AR Penalty |
|---|
| cluster_node |
| custom_email |
| device_option |
| aged_ar_penalty |
| login_session |
| payment_method |
| usage_plan |
| account |
List of attributes available for each object:
| account | usage_plan | merchant |
|---|---|---|
| id | id | id |
| type | account_group_id | name |
| login | name | gateway |
| crypted_password | description | login |
| salt | currency | password |
| state | recurring_method | test |
| first_name | recurring_day | note |
| last_name | variable_recurring_day | created_at |
| automatic_login | updated_at | |
| usage_plan_id | note | created_by |
| usage_minutes | created_at | updated_by |
| unlimited_usage_minutes | updated_at | signature |
| usage_expiration | created_by | partner |
| no_usage_expiration | updated_by | invoice_prefix |
| automatic_login | time_plan_id | integration |
| note | quota_plan_id | store_payment_methods |
| logged_in_at | usage_lifetime_time | live_url |
| created_at | absolute_usage_lifetime | pem |
| updated_at | unlimited_usage_lifetime | scratch |
| created_by | no_usage_lifetime | dup_timeout_seconds |
| updated_by | recurring_retry_grace_minutes | |
| mb_up | recurring_fail_limit | |
| mb_down | prorate_credit | |
| pkts_up | permit_unpaid_ar | |
| pkts_down | pms_server_id | |
| usage_mb_up | lock_devices | |
| usage_mb_down | scratch | |
| unlimited_usage_mb_up | max_sessions | |
| unlimited_usage_mb_down | max_devices | |
| company | unlimited_devices | |
| address1 | unlimited_sessions | |
| address2 | usage_lifetime_time_unit | |
| city | max_dedicated_ips | |
| region | pms_guest_match_operator | |
| zip | recurring_lifetime_time | |
| country | recurring_lifetime_time_unit | |
| phone | unlimited_recurring_lifetime | |
| bill_at | sms_gateway_id | |
| lock_version | validation_method | |
| charge_attempted_at | validation_grace_minutes | |
| lock_devices | max_party_devices | |
| relative_usage_lifetime | unlimited_party_devices | |
| scratch | upnp_enabled | |
| portal_message | automatic_provision | |
| max_devices | conference_id | |
| unlimited_devices | ips_are_static | |
| max_sessions | base_price | |
| unlimited_sessions | vtas_are_static | |
| max_dedicated_ips | manual_ar | |
| account_group_id | ||
| email2 | ||
| pre_shared_key | ||
| phone_validation_code | ||
| email_validation_code | ||
| phone_validated | ||
| email_validated | ||
| phone_validation_code_expires_at | ||
| email_validation_code_expires_at | ||
| max_party_devices | ||
| unlimited_party_devices | ||
| nt_password | ||
| upnp_enabled | ||
| automatic_provision | ||
| ips_are_static | ||
| guid | ||
| vtas_are_static | ||
| account_id | ||
| max_sub_accounts | ||
| unlimited_sub_accounts | ||
| approved_by | ||
| approved_at | ||
| pending_admin_approval | ||
| wispr_data | ||
| hide_from_operator |
| payment_method | merchant_transaction | coupon |
|---|---|---|
| id | id | id |
| account_id | account_id | usage_plan_id |
| active | payment_method_id | code |
| company | merchant_id | credit |
| address1 | usage_plan_id | expires_at |
| address2 | amount | note |
| city | currency | created_by |
| state | test | updated_by |
| zip | ip | created_at |
| country | mac | updated_at |
| phone | customer | batch |
| note | scratch | |
| created_at | merchant_string | max_redemptions |
| updated_at | description | unlimited_redemptions |
| created_by | success | |
| updated_by | response_yaml | |
| scratch | created_at | |
| customer_id | updated_at | |
| card_id | created_by | |
| nickname | updated_by | |
| encrypted_cc_number | message | |
| encrypted_cc_number_iv | authorization | |
| encrypted_cc_expiration_month | hostname | |
| encrypted_cc_expiration_month_iv | http_user_agent_id | |
| encrypted_cc_expiration_year | account_group_id | |
| encrypted_cc_expiration_year_iv | subscription_id | |
| encrypted_first_name | ||
| encrypted_first_name_iv | ||
| encrypted_middle_name | ||
| encrypted_middle_name_iv | ||
| encrypted_last_name | ||
| encrypted_last_name_iv | ||
| cc_number | ||
| cc_expiration_month | ||
| cc_expiration_year | ||
| first_name | ||
| middle_name | ||
| last_name |
| login_session | ip_group | device_option |
|---|---|---|
| id | id | id |
| account_id | policy_id | name |
| radius_realm_id | name | active |
| login | priority | device_location |
| ip | note | domain_name |
| mac | created_at | ntp_server |
| expires_at | updated_at | time_zone |
| online | created_by | smtp_address |
| radius_acct_session_id | updated_by | rails_env |
| radius_response | scratch | note |
| radius_class_attribute | created_at | |
| created_at | updated_at | |
| updated_at | created_by | |
| created_by | updated_by | |
| updated_by | smtp_port | |
| bytes_up | smtp_domain | |
| bytes_down | smtp_username | |
| pkts_up | smtp_password | |
| pkts_down | cluster_node_id | |
| usage_bytes_up | scratch | |
| usage_bytes_down | log_rotate_hour | |
| ldap_domain_id | log_rotate_count | |
| radius_realm_server_id | ssh_port | |
| ldap_domain_server_id | country_code | |
| cluster_node_id | disable_hyperthreading | |
| shared_credential_group_id | developer_mode | |
| ip_group_id | sync_builtin_admins | |
| account_group_id | delayed_job_workers | |
| usage_plan_id | log_level | |
| lock_version | max_forked_processes | |
| hostname | soap_port | |
| total_bytes_up | reboot_timestamp | |
| total_bytes_down | reboot_time_zone | |
| total_pkts_up | limit_sshd_start | |
| total_pkts_down | limit_sshd_rate | |
| radius_server_id | limit_sshd_full | |
| radius_request | use_puma_threads | |
| backend_login_at | ||
| http_user_agent_id | ||
| backend_login_seconds | ||
| portal_login_at | ||
| omniauth_profile_id | ||
| encrypted_password | ||
| encrypted_password_iv | ||
| conference_id | ||
| password |
| custom_email | transient_group_membership | time_trigger |
|---|---|---|
| id | id | id |
| name | ip_group_id | account_group_id |
| from | mac_group_id | name |
| subject | account_group_id | mon |
| body | account_id | tues |
| event | ip | wed |
| note | mac | thurs |
| created_by | reason | fri |
| updated_by | expires_at | sat |
| created_at | created_by | sun |
| updated_at | updated_by | start |
| send_to_account | created_at | end |
| scratch | updated_at | note |
| email_recipient | cluster_node_id | created_by |
| include_custom_reports_in_body | max_connections_trigger_id | updated_by |
| attachment_format | quota_trigger_id | created_at |
| custom_event | time_trigger_id | updated_at |
| delivery_method | snort_trigger_id | ip_group_id |
| sms_gateway_id | hostname | mac_group_id |
| reply_to | radius_group_id | scratch |
| ldap_group_id | flush_states | |
| login_session_id | flush_dhcp | |
| log_hits_trigger_id | flush_arp | |
| flush_states | flush_vtas | |
| flush_dhcp | infrastructure_area_id | |
| flush_arp | previous_infrastructure_area_id | |
| flush_vtas | duration | |
| vulner_assess_trigger_id | current_dwell | |
| previous_dwell |
| log_hits_trigger | snort_trigger | max_connections_trigger |
|---|---|---|
| id | id | id |
| ip_group_id | ip_group_id | ip_group_id |
| mac_group_id | name | name |
| name | duration | max_connections |
| note | note | duration |
| log_file | created_by | note |
| duration | updated_by | created_by |
| max_hits | created_at | updated_by |
| window | updated_at | created_at |
| scratch | scratch | updated_at |
| created_by | mac_group_id | scratch |
| updated_by | flush_states | mac_group_id |
| created_at | flush_dhcp | flush_states |
| updated_at | flush_arp | flush_dhcp |
| flush_states | flush_vtas | flush_arp |
| flush_dhcp | flush_vtas | |
| flush_arp | max_duration | |
| flush_vtas | max_mb | |
| period | ||
| active_or_expired | ||
| max_duration_logic | ||
| max_mb_logic |
| quota_trigger | health_notice | cluster_node |
|---|---|---|
| id | id | id |
| account_group_id | cluster_node_id | name |
| name | name | iui |
| usage_mb_down | short_message | database_password |
| usage_mb_down_unit | long_message | note |
| usage_mb_up | cured_short_message | created_by |
| usage_mb_up_unit | cured_long_message | updated_by |
| up_down_logic_operator | severity | created_at |
| note | cured_at | updated_at |
| created_by | created_at | ip |
| updated_by | updated_at | ssh_public_key |
| created_at | created_by | scratch |
| updated_at | updated_by | heartbeat_at |
| radius_group_id | fleet_node_id | data_plane_ha_timeout_seconds |
| ldap_group_id | node_mode | |
| period | cluster_node_team_id | |
| unlimited_period | wal_receiver_pid | |
| duration | wal_receiver_status | |
| unlimited_duration | wal_receiver_receive_start_lsn | |
| scratch | wal_receiver_receive_start_tli | |
| ip_group_id | wal_receiver_received_lsn | |
| mac_group_id | wal_receiver_received_tli | |
| flush_states | wal_receiver_latest_end_lsn | |
| flush_dhcp | wal_receiver_slot_name | |
| flush_arp | wal_receiver_sender_host | |
| flush_vtas | wal_receiver_sender_port | |
| wal_receiver_last_msg_send_time | ||
| wal_receiver_last_msg_receipt_time | ||
| wal_receiver_latest_end_time | ||
| op_cluster_node_id | ||
| priority | ||
| auto_registration | ||
| permit_new_nodes | ||
| auto_approve_new_nodes | ||
| pending_auto_registration | ||
| pending_approval | ||
| control_plane_ha_backoff_seconds | ||
| data_plane_ha_enabled | ||
| upgrading | ||
| enable_radius_proxy |
| aged_ar_penalty |
|---|
| id |
| name |
| amount |
| days |
| suspend_account |
| note |
| created_at |
| updated_at |
| created_by |
| updated_by |
| custom_email_id |
| scratch |
| record_type |
| days_type |
Use Cases
Slack Integration: Notification when an admin is created or deleted
Procedure:
- Use Slack guide to create a new app, and configure incoming webhooks.
Navigate to Services-->Notifications and create a new webhook target.
Insert the webhook address from your slack app as the base URL.Create a webhook for created admins. An example body is:
{
"attachments": [
{
"fallback": "Admin Created on <%= DeviceOption.active.domain_name %>.",
"color": "#36a64f",
"pretext": "A New Administrator has been created",
"author_name": "FQDN: <%= DeviceOption.active.domain_name %>",
"author_link": "https://<%= DeviceOption.active.domain_name %>/admin/",
"title": "Created Admin: <%= admin.login %>",
"text": "*Created by:* <%= admin.created_by %>",
"fields": [
{
"title": "Priority",
"value": "Medium",
"short": false
}
],
"footer": "Slack API"
}
]
}
- Create a webhook for deleted admins An example body is: (notice the use of <%= admin_hash %> because the record has been deleted.)
{
"attachments": [
{
"fallback": Admin Deleted on <%= DeviceOption.active.domain_name %>.",
"color": "#FF0000",
"pretext": "An Administrator has been deleted",
"author_name": "FQDN: <%= DeviceOption.find_by(active: 'true').domain_name %>",
"author_link": "https://<%= DeviceOption.find_by(active: 'true').domain_name %>/admin/",
"title": "Deleted Admin: <%= admin_hash[:login] %>",
"text": "*Deleted by:* <%= admin_hash[:updated_by] %>",
"fields": [
{
"title": "Priority",
"value": "High",
"short": false
}
],
"footer": "Slack API"
}
]
}
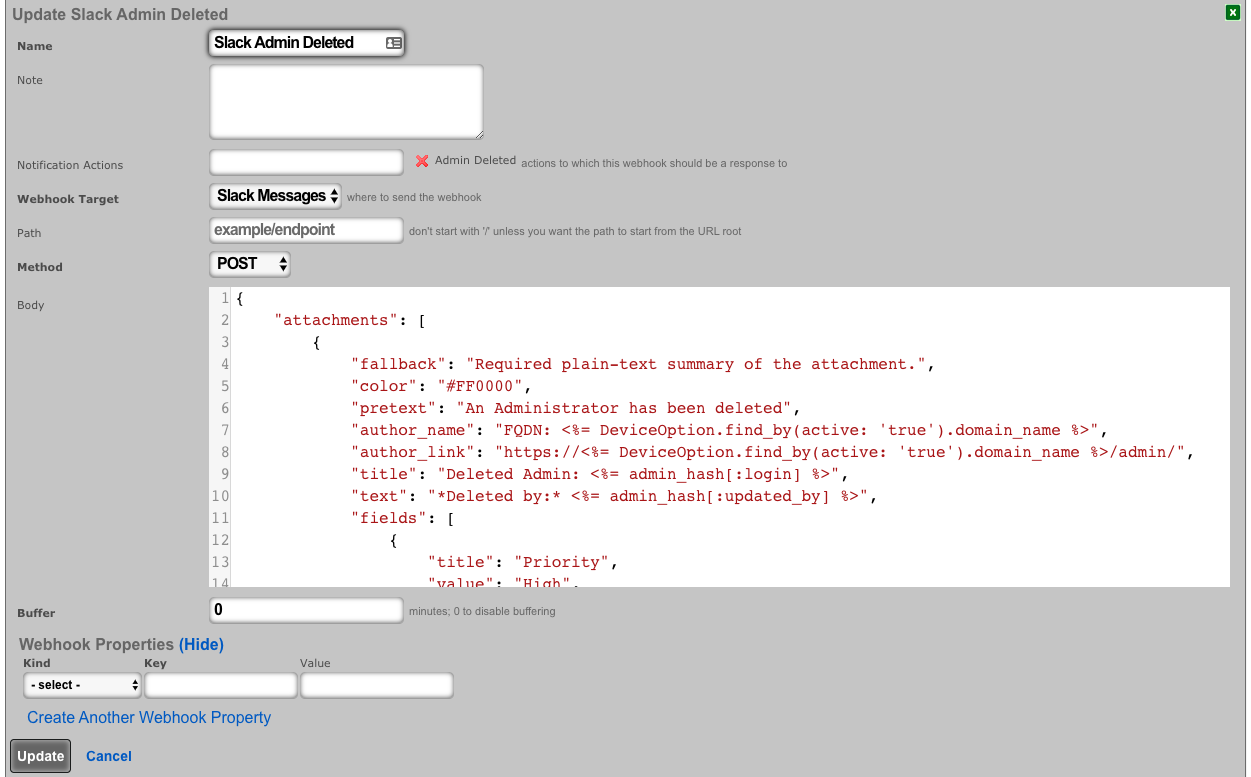
- Create a notification action for created admins.
- Choose Event Type: Watch Scaffold
- Choose Watched Model: Administrators
- Select: Watch Create
- Choose the Admin Created Webhook under actions
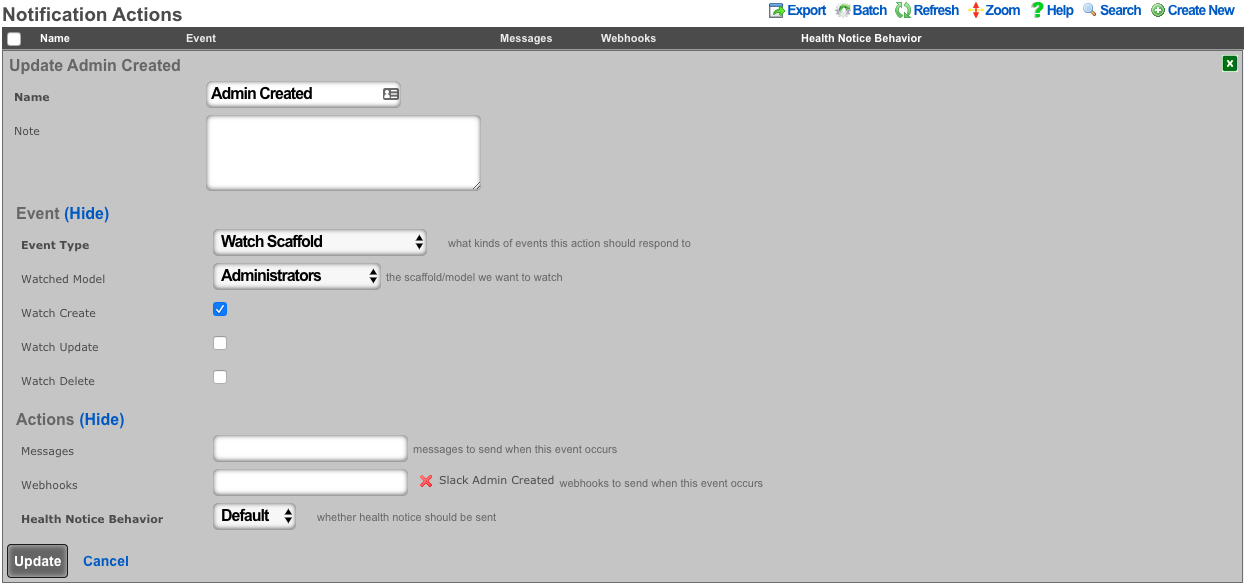
- Create a notification action for deleted admins.
- Choose Event Type: Watch Scaffold
- Choose Watched Model: Administrators
- Select: Watch Delete
- Choose the Admin Deleted Webhook under actions
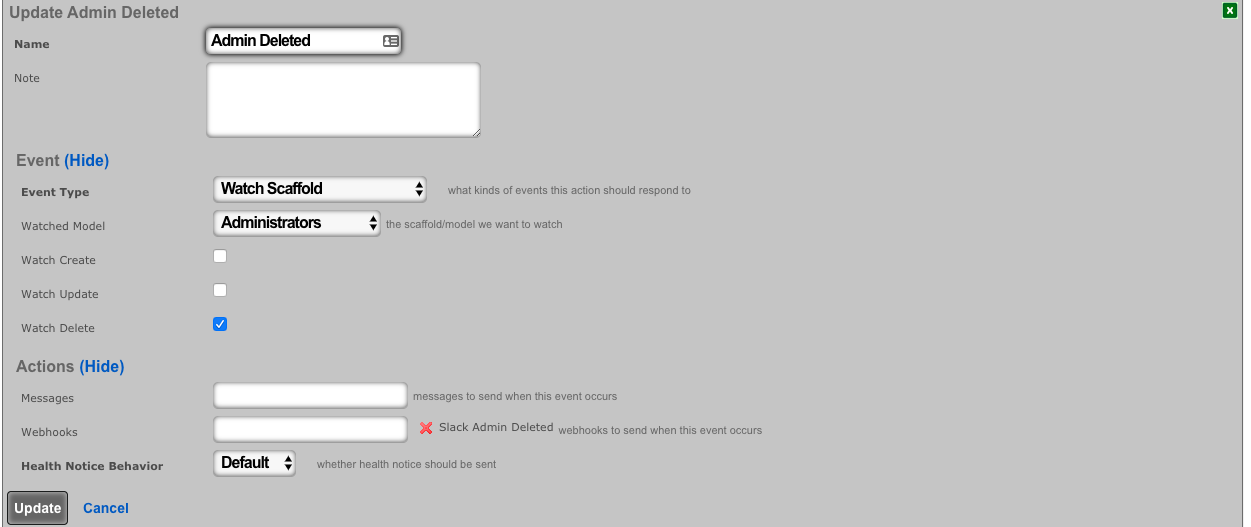
- Navigate to System-->Admins, and create a new admin. Then delete the new admin.
The channel configured in your Slack app will have messages posted via the rXg Notification Actions subsystem.
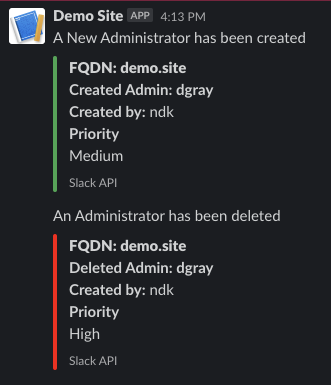
Location Based Crowding Notifications
Procedure:
- Navigate to Network :: Location
Create or edit existing location areas.
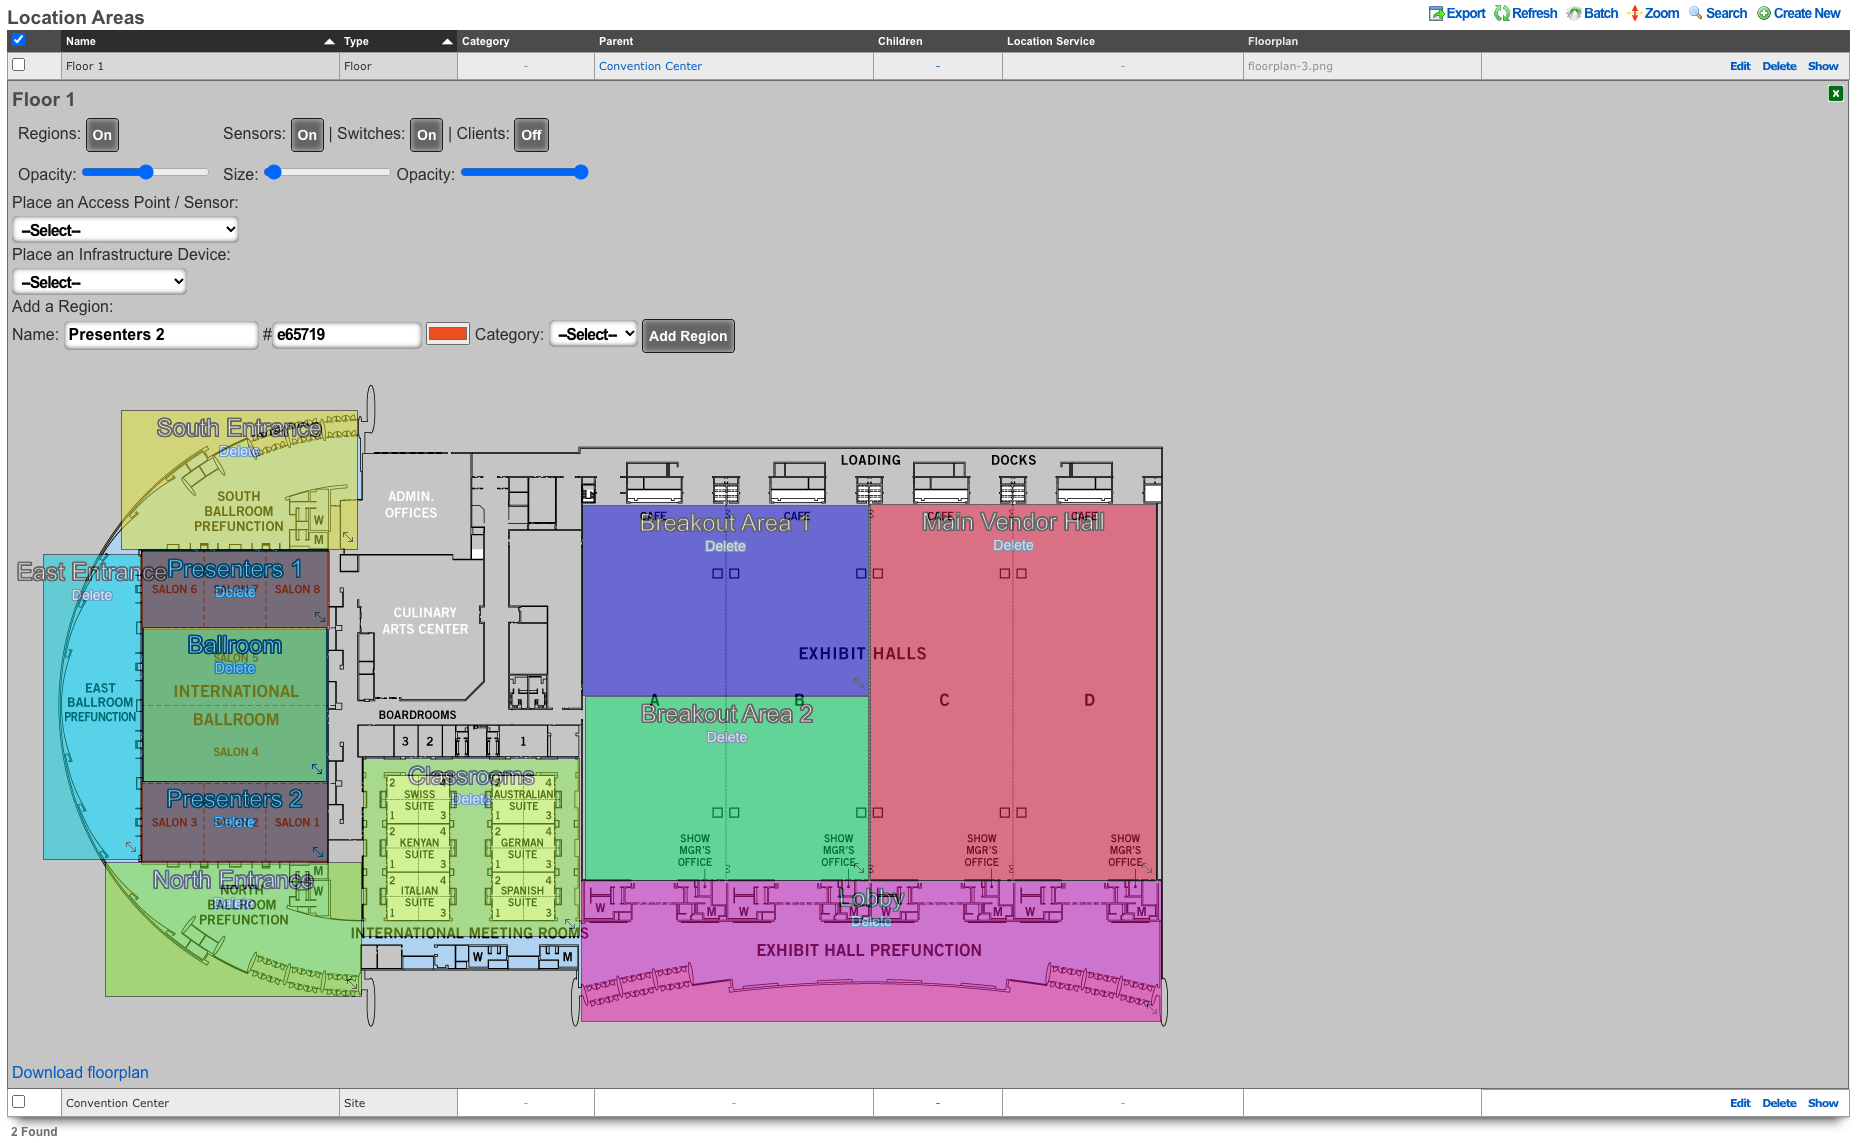
Edit individual areas and set crowd event thresholds. Thresholds can be set at region, floor, and site levels.
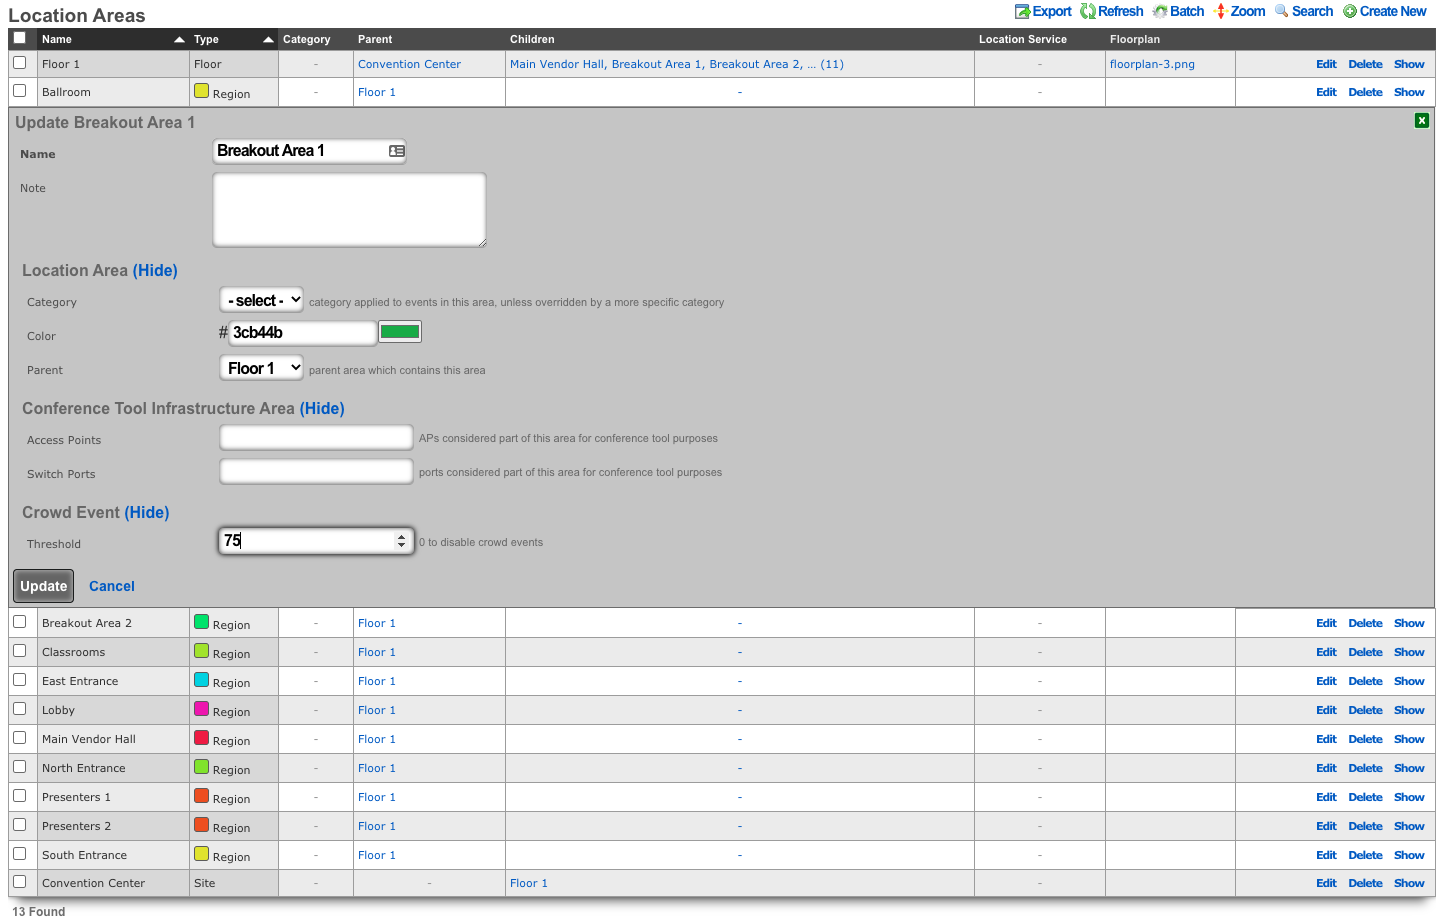
Navigate to Services :: Notifications
Create a notification action and select desired messages, webhooks and/or health notices to trigger.
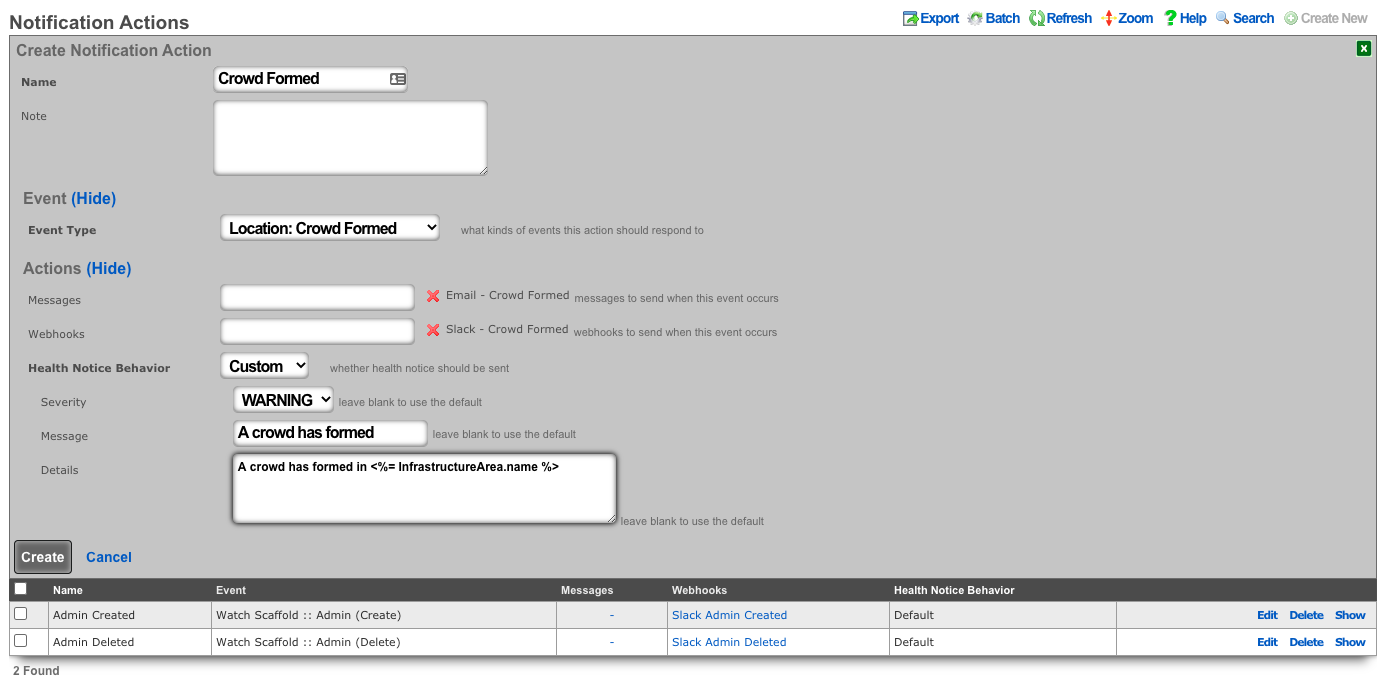
Push Account To Remote rXg On Create
Procedure:
- Navigate to Services :: Notifications
Create a new Notification Action
- Event Type set to Watch Scaffold
- Watched Model set to Accounts
- Check the Watch Create checkbox
- Click Create.
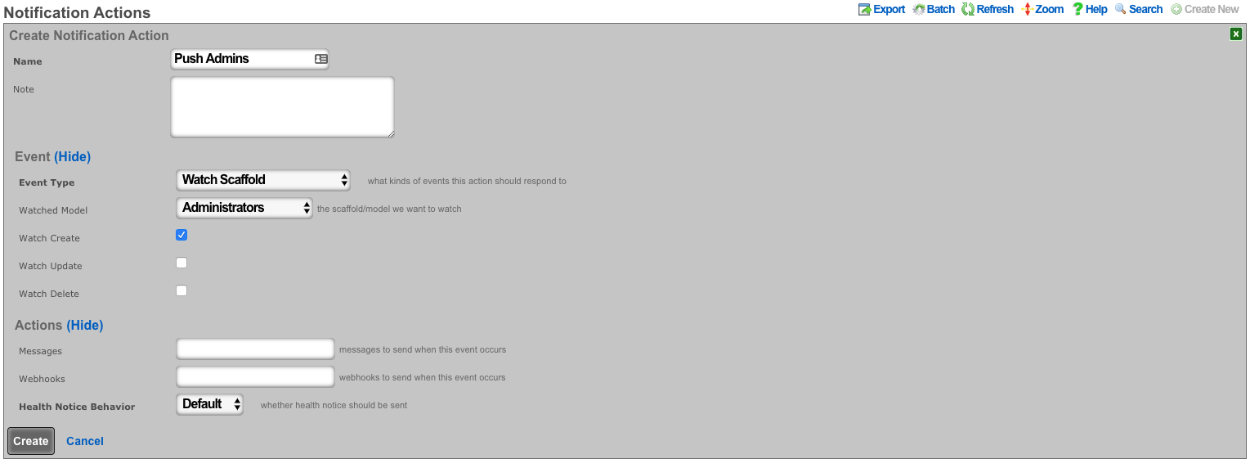
Create a new Webhook Target
- Input a Name
- The base url will be https://FQDN\_of\_remote\_system/admins/scaffolds/
- Select body format, JSON in this case, and Body Encoding as RAW
- Add Webhook Property, Kind = Query Paramater, Key = api_key, the value will be the API key of an admin on remote system
- Click Create
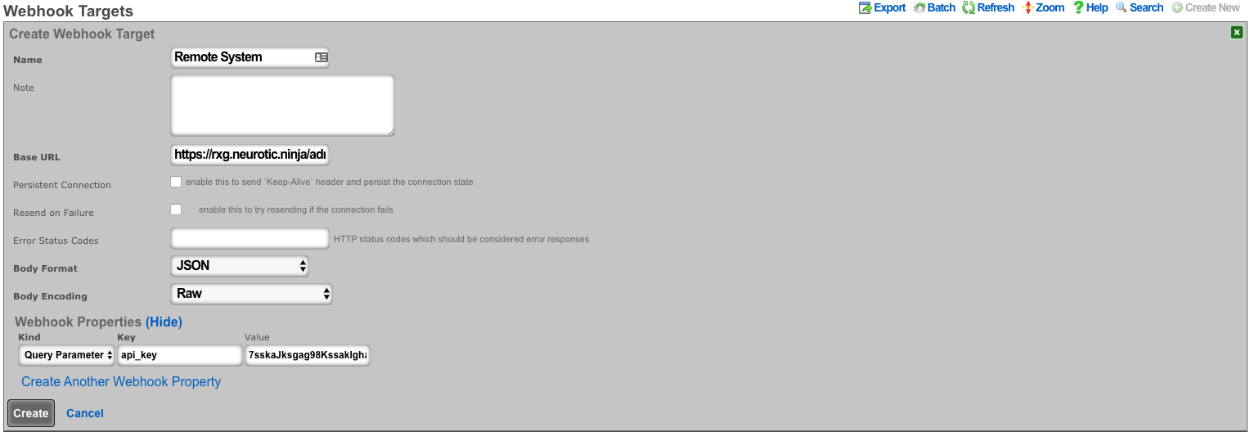
Create a new Webhook
- Input a name
- Select Notification action created in step 1
- Select the webhook target created above
- Set path to accounts/create.json
- Set Method to POST
- Enter code into body (example below), click create.
<%
# get remote usage plan hash
result = HTTParty.post('https://FQDN_of_remote_system/admin/scaffolds/usage_plans/index.xml',
body: {:api_key=>"REMOTE_ADMIN_API_KEY",
:search=>account.usage_plan.try(:name)})
up = result["usage_plans"].try(:first)
# get remote account group hash
result = HTTParty.post('https://FQDN_of_remote_system/admin/scaffolds/account_groups/index.xml',
body: {:api_key=>"REMOTE_ADMIN_API_KEY",
:search=>account.account_group.try(:name)})
ag = result["account_groups"].try(:first)
# varible for device creation
count = 1
acct_hash = account.attributes
# remove attrs we dont want to push
acct_hash.delete("id")
acct_hash.delete("usage_plan_id")
acct_hash.delete("account_group_id")
acct_hash.delete("type")
acct_hash.delete("created_at")
acct_hash.delete("updated_at")
acct_hash.delete("created_by")
acct_hash.delete("updated_by")
acct_hash.delete("mb_up")
acct_hash.delete("mb_down")
acct_hash.delete("crypted_password")
acct_hash.delete("salt")
# make temporary password
acct_hash["password"] = acct_hash["password_confirmation"] = acct_hash["pre_shared_key"]
# add usage plan and do_apply_plan to hash if found on remote system
if up
acct_hash["usage_plan"] = up["id"]
acct_hash["do_apply_usage_plan"] = 1
end
# add account group to hash if found on remote system
if ag
acct_hash["account_group"] = ag["id"]
end
# add all devices to account hash
acct_hash["devices"] = {}
account.devices.each do |device|
acct_hash["devices"]["device#{count.to_s}"] = {
"name" => device.name,
"mac" => device.mac
}
count += 1
end
%>
{
"record": <%= acct_hash.to_json %>
}
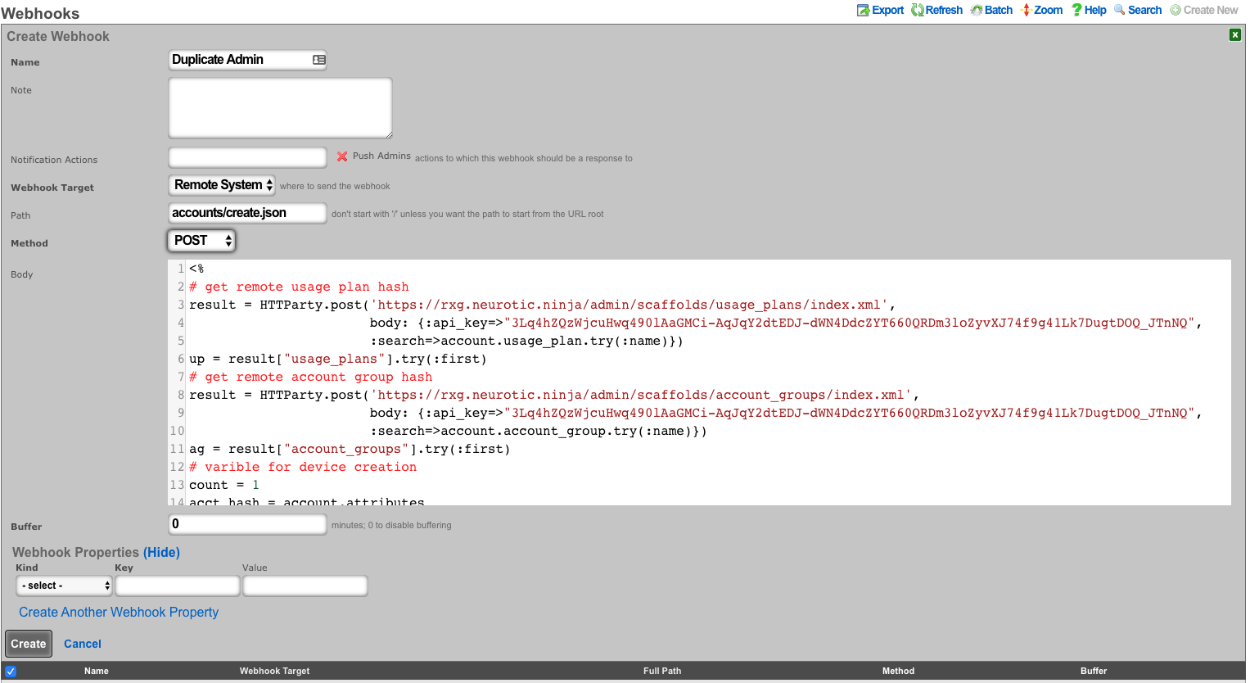
CRM Integration
This example will explore integrating the rXg with the community edition of vTiger CRM. This case demonstrates using an API requiring a multistep login process, and use of a disposable session key rather than static credentials.
Procedure:
- The community edition of vTiger uses a combination of a challenge token, username, and access key to generate an expiring session key to be used with API calls. Create a custom data key under System :: Portals as a place to store the key.
- The only necessary field to populate is the name.
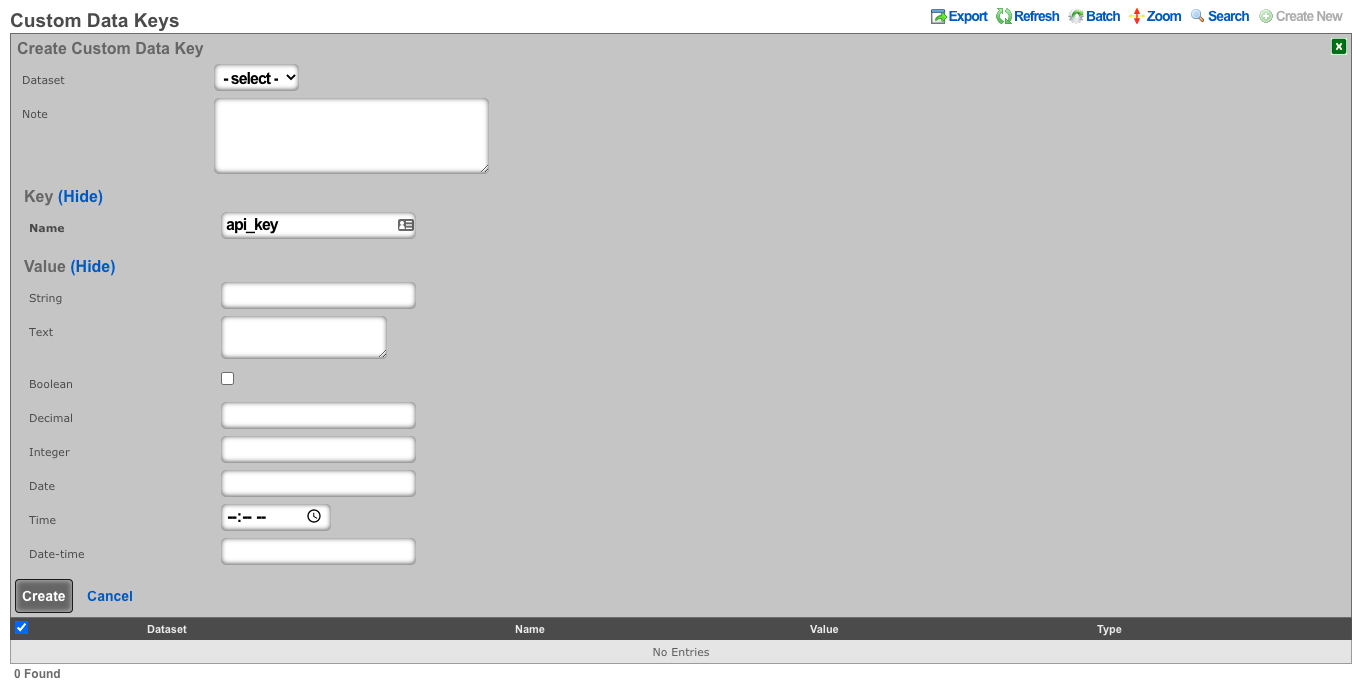
- Create a notification action to periodically get the session key, and perform a log in to the CRM.
- Set the event type to periodic.
- Choose a time within the session key expiration (the webhook will contain logic to determine if a refresh is necessary).
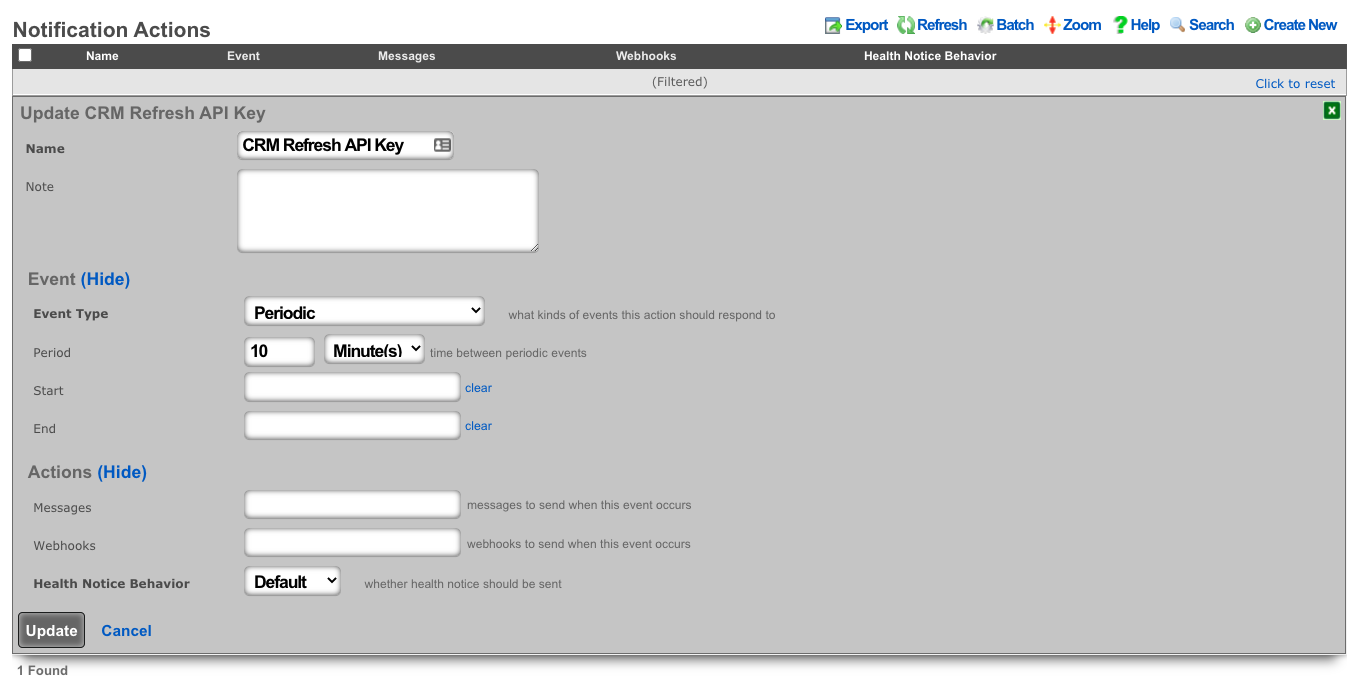
- Create a webhook target for the CRM.
- Add an HTTP header of "Content-Type": "application/x-www-form-urlencoded"
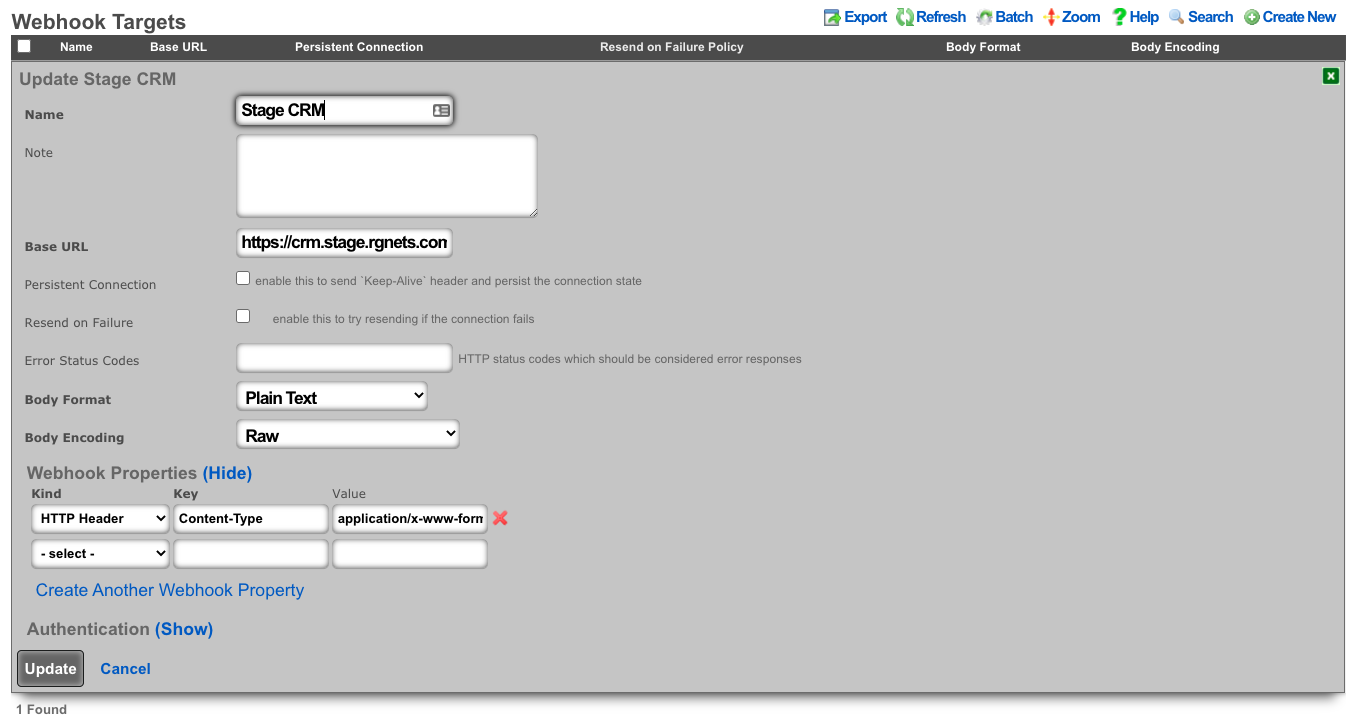
- Create a webhook that uses embedded ruby to store the current session key in the previously defined custom data key. This example looks at the age of the current key to see if a new key is necessary before executing.
- Choose the previously created notification action.
- Choose the CRM webhook target.
- Example Body:
<%
api_key = CustomDataKey.find_by(name: 'api_key')
if api_key.value_string.blank? || 30.minutes.since > api_key.updated_at
query = {
operation: "getchallenge",
username: "username",
}
resp = HTTParty.get(webhook_target.base_url, query: query)
token = JSON.parse(resp.body)['result']['token']
access_key = Digest::MD5.hexdigest(token + 'access_key_from_GUI')
body = {
operation: "login",
username: "username",
accessKey: access_key,
}
login = HTTParty.post(webhook_target.base_url, body: body)
session_id = JSON.parse(login.body)['result']['sessionName']
api_key.value_string = session_id
api_key.save!
end
raise DoNotSendError
%>
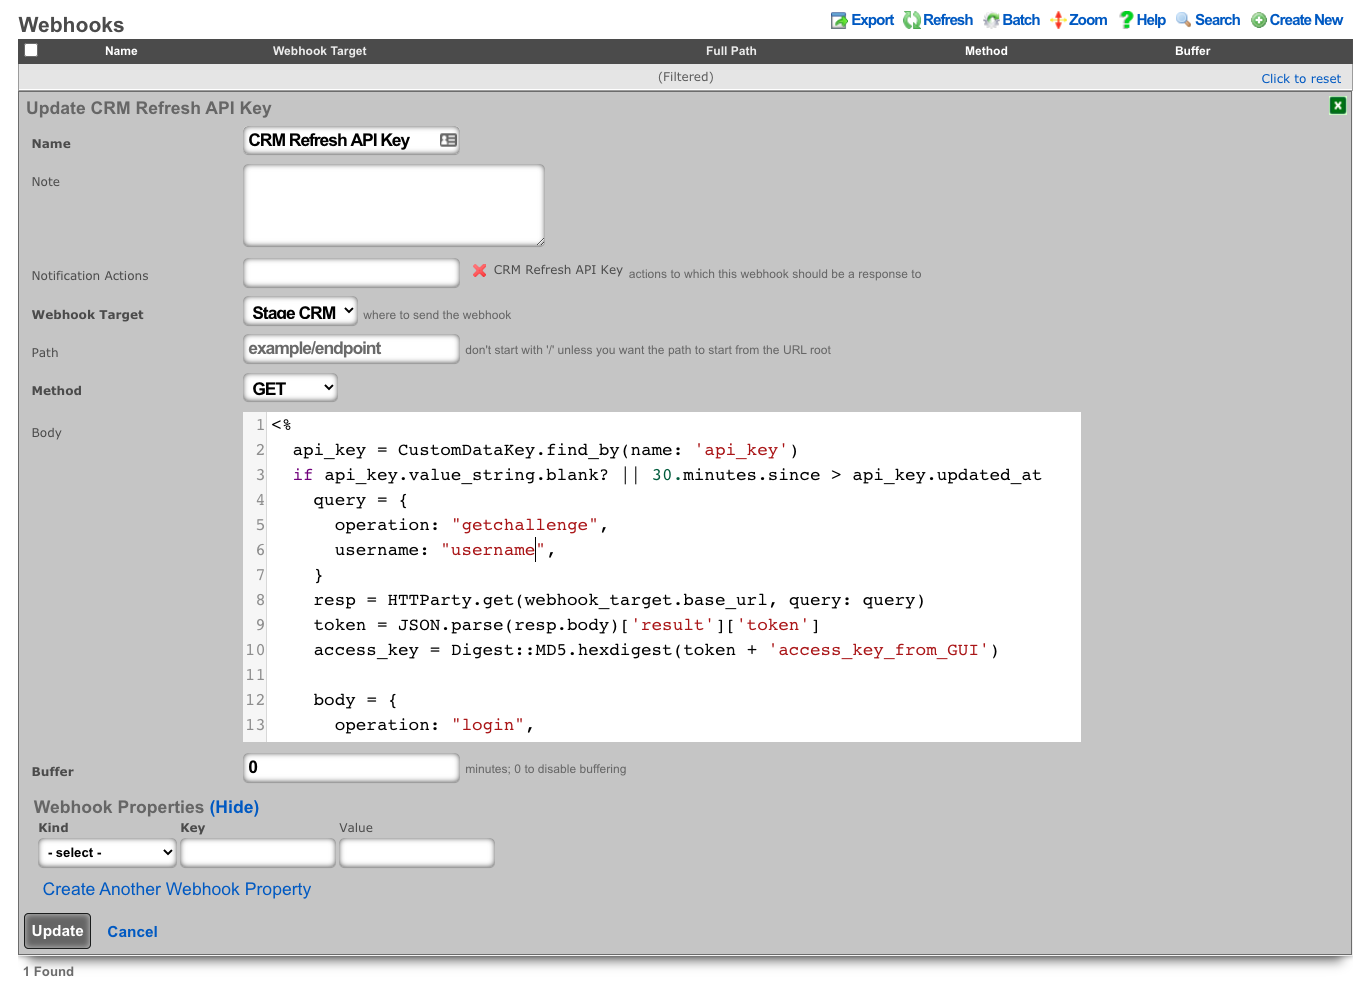
- Create a notfication action to trigger when a new account is created.
- Choose the event type: Watch Scaffold
- Choose the watched model: Accounts
- Check: Watch Create

- Create a webhook to create the account on the CRM.
- Select the previously created notification action.
- Choose the CRM webhook target.
- Set the method to POST
- Example Body:
<%=
{
operation: "create",
sessionName: CustomDataKey.find_by(name: 'api_key').value_string,
elementType: "Contacts",
element: {
firstname: record_hash["first_name"],
lastname: record_hash["last_name"],
assigned_user_id: "20x4",
}.to_json
}.to_query
%>
- Because vTiger CRM expects the body of the HTTP POST to be url-encoded the body is enclosed in ERB tags "<%= ... %>" so certain methods can be used to make formatting easier.
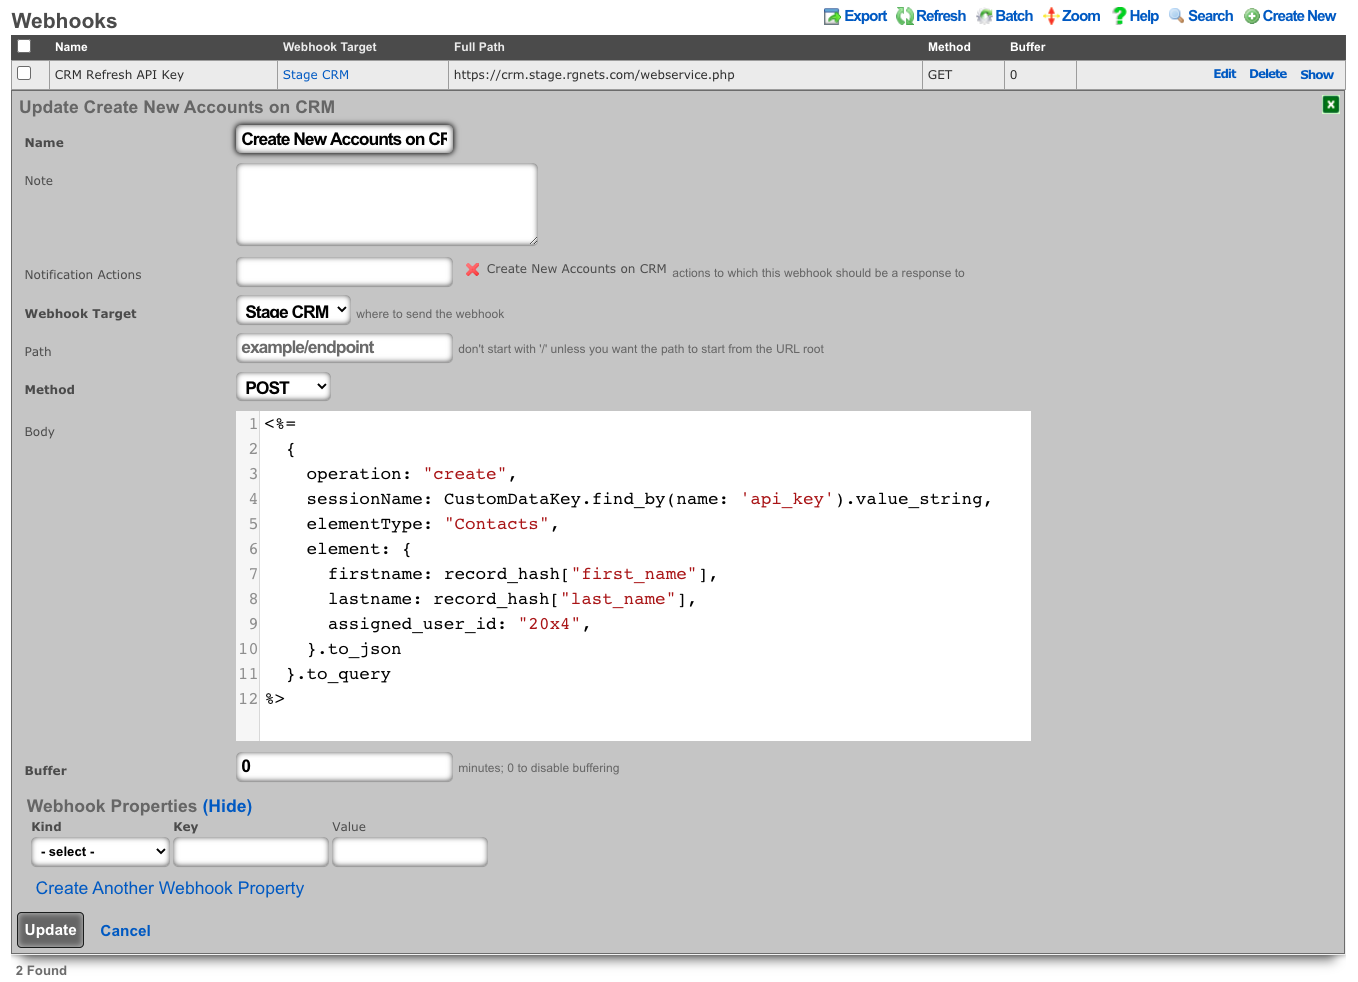
Webhook to retrieve System Info
In this example will show how to setup a Webhook to push System Info on a periodic interval.
Procedure:
- Create a new Notification Action
- Populate the name field with the desired name.
- Set the Event Type field to Periodic.
- Specify how often the action should run using the Period field. Default is 5 minutes.
- Click Create.
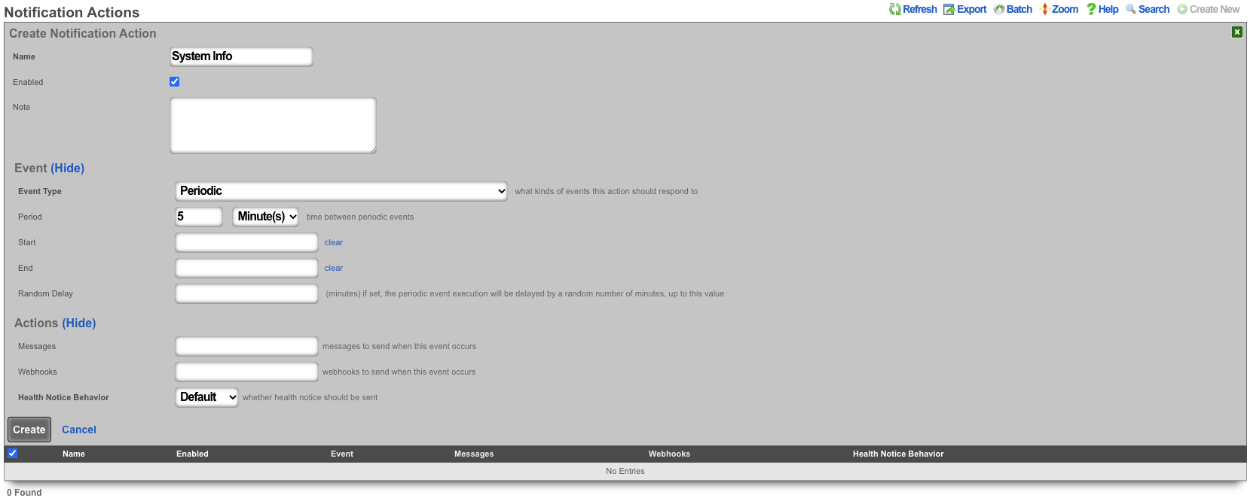
- Create a new Webhook Target
- Populate the name field with the desired name.
- Specify the URL of the target using the Base URL field.
- Click Create.
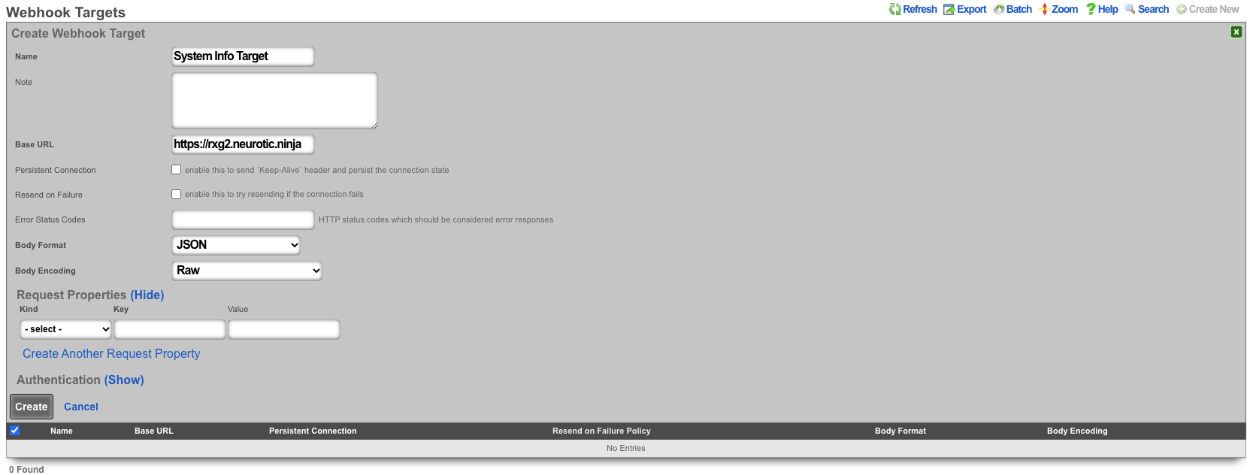
- Create a new Webhook
- Populate the name field with the desired name.
- Use the Notification Actions field to select the notification action created in step 1.
- Select the webhook target created in step 2 in the Webhook Target field.
- Set the path in the Path field.
- The Body field is where we will put our payload.
\<%=
SystemInfo.first.attributes.to\_json
%\>
- Click Create.
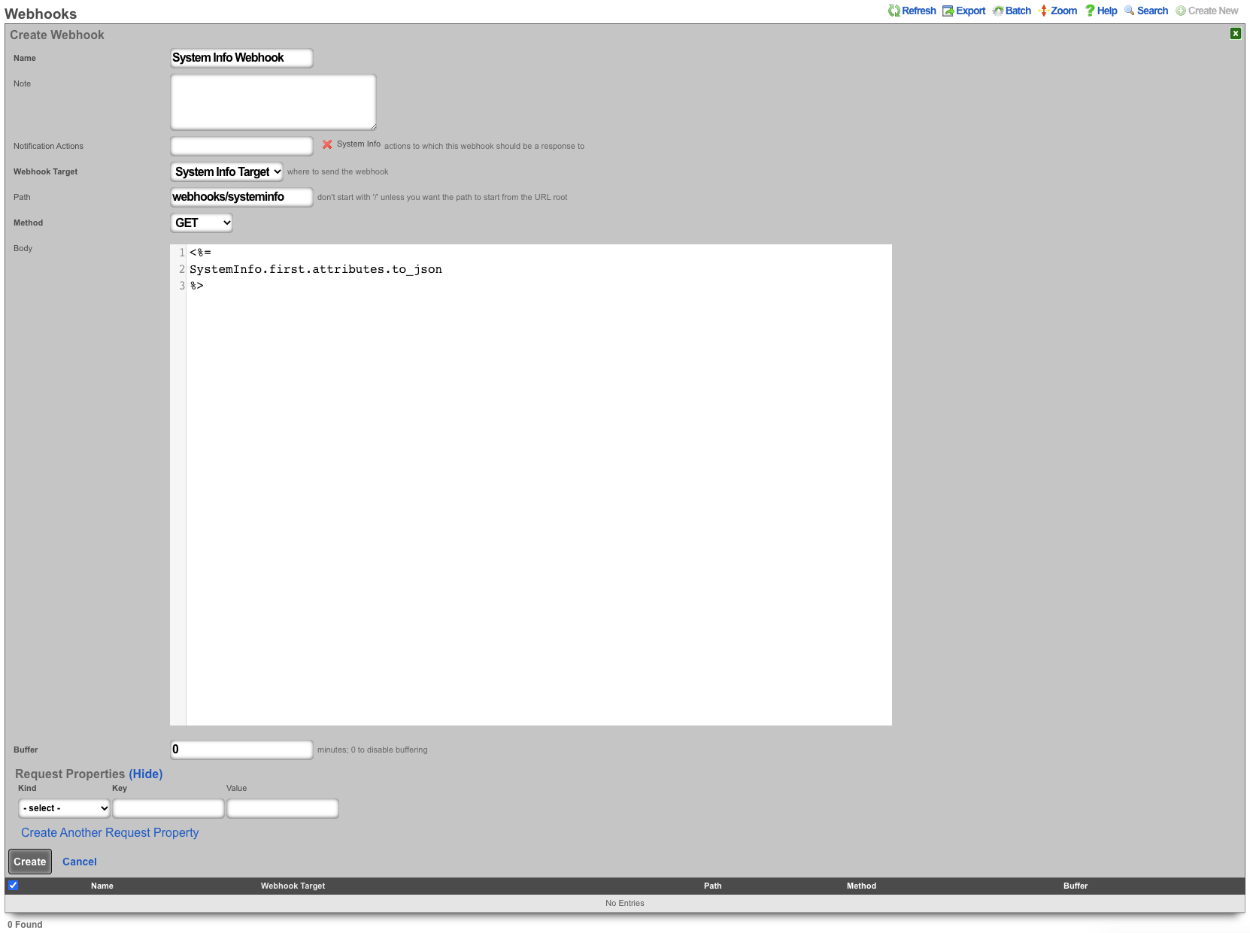
This will pass the following information.
{
"id": 1048577,
"cluster_node_id": null,
"baseboard_asset_tag": "Not Specified",
"baseboard_manufacturer": "Intel Corporation",
"baseboard_product_name": "440BX Desktop Reference Platform",
"baseboard_serial_number": "None",
"baseboard_version": "None",
"bios_vendor": "Phoenix Technologies LTD",
"bios_version": "6.00",
"chassis_asset_tag": "No Asset Tag",
"chassis_manufacturer": "No Enclosure",
"chassis_serial_number": "None",
"chassis_type": "Other",
"chassis_version": "N/A",
"disk_device": "NECVMWar VMware SATA CD00 1.00",
"hostname": "rxg.example.com",
"os_arch": "amd64",
"os_branch": "RELEASE",
"os_kernel": "FreeBSD 12.2-RELEASE-p9 #16 476551a338d",
"os_name": "FreeBSD",
"os_release": "12.2-RELEASE-p9 #16",
"os_version": "12.2",
"processor_family": "Unknown",
"processor_frequency": "2300 MHz",
"processor_manufacturer": "GenuineIntel",
"processor_version": "Intel(R) Xeon(R) D-2146NT CPU @ 2.30GHz",
"rxg_build": "12.999",
"system_manufacturer": "VMware, Inc.",
"system_product_name": "VMware Virtual Platform",
"system_serial_number": "VMware-56 4d fd 29 e4 1a c1 4e-a2 60 81 57 54 ff dd 51",
"system_uuid": "29fd4d56-1ae4-4ec1-a260-815754ffdd51",
"system_version": "None",
"disk_total_gb": 111,
"memory_free_mb": 3874,
"memory_total_mb": 8192,
"memory_used_mb": 4317,
"processor_count": 4,
"uptime": 85371,
"load_avg_15m": "0.78",
"load_avg_1m": "1.09",
"load_avg_5m": "0.84",
"processor_temp": "0.0",
"bios_release_date": "2018-12-12",
"booted_at": "2021-08-30T08:37:23.000-07:00",
"created_by": "rxgd(InstrumentVitals)",
"updated_by": "rxgd(InstrumentVitals)",
"created_at": "2021-08-11T08:38:58.800-07:00",
"updated_at": "2021-08-31T08:20:14.808-07:00",
"rxg_iui": "4 2290 8192 111 ZKORHJVPDUQUZUNIBEWLHDFQ GZQQJUTGUDOIFDNTDUFQSKTW NLDQYHFARJWE",
"system_family": "Not Specified",
"fleet_node_id": null
}
Custom Modules
Custom modules are reusable Ruby code libraries that can be shared across multiple custom emails, custom portals, operator portals, webhooks, and backend scripts. They provide a way to define common functionality once and reuse it across different notification contexts.
Overview
A custom module is a Ruby code snippet stored in the custom modules scaffold that can be associated with multiple records. When a custom email is rendered, a webhook is executed, or a backend script runs, any associated custom modules are automatically loaded and made available to the template or script.
Creating a Custom Module
To create a custom module:
- Navigate to Services Notifications Custom Modules
- Click Create New
- Provide a unique name for the module
- Enter Ruby code in the body field
- Optionally add a note for documentation purposes
The body field should contain valid Ruby code that will be evaluated in the context where it's used. This can include:
- Helper methods
- Class definitions
- Constants
- Utility functions
Example custom module body:
# Helper method to format currency
def format_currency(amount)
sprintf("$%.2f", amount)
end
# Helper method to calculate revenue for a time period
def revenue_for_period(hours_ago)
ArTransaction.where(['created_at > ?', hours_ago.hours.ago]).sum(:credit)
end
Associating Custom Modules
Custom modules can be associated with:
- Custom Emails (custom messages scaffold)
- Custom Portals
- Operator Portals
- Webhooks
- Backend Scripts
When editing any of these records, select one or more custom modules from the custom modules field. The selected modules will be automatically loaded when the record is executed or rendered.
How Custom Modules Work
Custom Emails
When a custom email is rendered (either for delivery or preview), associated custom modules are automatically loaded and made available to the email template. You can use the helper methods and classes defined in your custom modules directly in the email body.
Example custom email using a custom module:
<p>Good Morning,</p>
<p>Your network generated <%= format_currency(revenue_for_period(24)) %> in the last 24 hours.</p>
If you need to explicitly load a module (for example, to load it with a specific binding context), you can use:
<% CustomModule.load('module_name', binding) %>
Webhooks
Associated custom modules are automatically loaded before the webhook body is evaluated. The modules are evaluated in the webhook's binding context, making all defined methods and classes available.
Example webhook body using a custom module:
{
"daily_revenue": "<%= format_currency(revenue_for_period(24)) %>",
"weekly_revenue": "<%= format_currency(revenue_for_period(168)) %>"
}
Backend Scripts
Associated custom modules are automatically loaded before the backend script executes. The modules are evaluated in the script's execution context.
Example backend script using a custom module:
# Custom modules are already loaded at this point
puts "Revenue: #{format_currency(revenue_for_period(24))}"
Custom Portals and Operator Portals
Associated custom modules are loaded when the portal is rendered, making helper methods available to portal templates and embedded Ruby code.
Manual Loading
In some contexts, you may want to manually load a custom module. Use the CustomModule.load class method:
# Load a module by name
CustomModule.load('my_module')
# Load a module with a specific binding context
CustomModule.load('my_module', binding)
The second parameter allows you to specify the binding context where the module should be evaluated. This is useful when you need the module's code to have access to specific local variables or instance variables.
Best Practices
- Keep modules focused: Each custom module should have a single, well-defined purpose
- Use descriptive names: Choose module names that clearly indicate their functionality
- Document your code: Use comments in the module body to explain complex logic
- Test thoroughly: Use the preview/trigger functionality to test modules before deploying
- Avoid global state: Custom modules should not rely on or modify global variables when possible
- Handle errors gracefully: Include error handling in your module code to prevent failures
Example Use Cases
Revenue Reporting Module:
# Name: revenue_helpers
def daily_revenue
ArTransaction.where(['created_at > ?', 24.hours.ago]).sum(:credit)
end
def format_currency(amount)
sprintf("$%.2f", amount)
end
User Statistics Module:
# Name: user_stats
def active_users_count
Account.where(['logged_in_at > ?', 7.days.ago]).count
end
def new_users_today
Account.where(['created_at > ?', 1.day.ago]).count
end
Network Health Module:
# Name: network_health
def uplink_status
# Custom logic to determine uplink health
PingTarget.where(name: 'Primary Uplink').first&.online? ? 'Online' : 'Offline'
end
Troubleshooting
Module not found error: - Verify the module name is spelled correctly - Ensure the module is associated with the record - Check that the module exists in the custom modules scaffold
Undefined method error: - Verify the method is defined in the associated custom module - Check that the module is being loaded before the method is called - Ensure there are no syntax errors in the module body
Syntax errors: - Use the Ruby console to test module code before saving - Check the module body for proper Ruby syntax - Review error messages in health notices or logs
Backend Scripts
The backend script allows the operator to write custom ruby scripts that can be used for things like interacting with mobile applications or performing a configuration change on a regular schedule. From the Notification Actions scaffold you can choose a trigger for the script from the drop down list. Some examples included manual, periodic, errors, and thresholds.
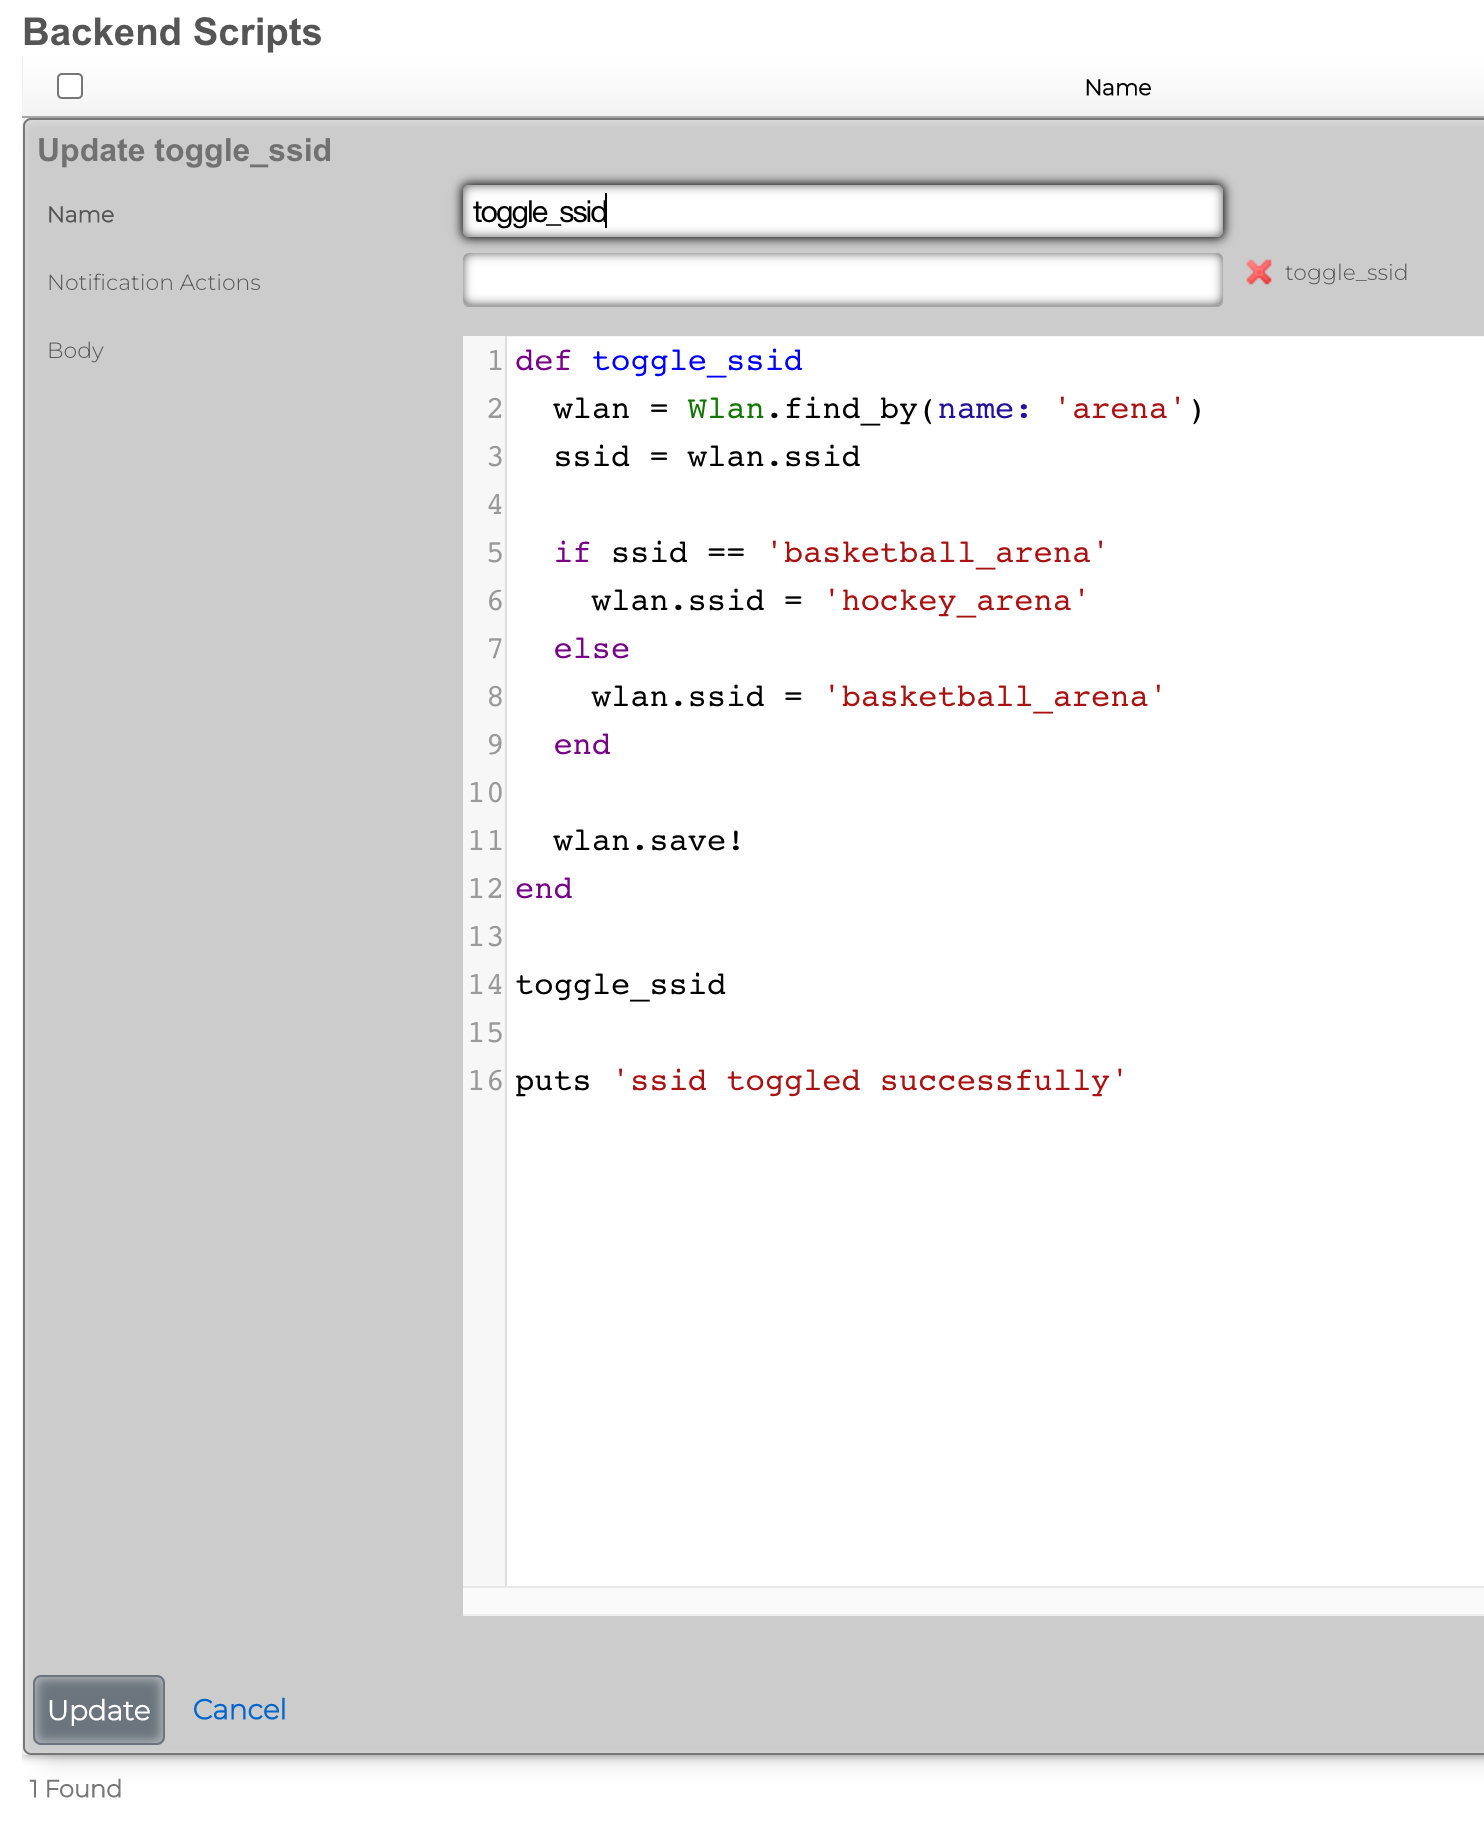
Send SNMP Trap via BackEnd Script
As an example, when a change in the Ping Target scaffold is detected, a custom SNMP trap can be sent to a destination (SNMP trap collector) of choice, using a custom enterprise ID, relaying event time and specific action (interface up/down).
To create a new Notification Action, the Services::Notifications::Notification Actions scaffold is used, and a following entry is created: * Name field contains an arbitrary name for this particular notification action entry, * Enabled field is checked, to make sure the action is indeed active * Event Type is configured as Watch Scaffold, which essentially watches and notifies the action about any changes in the given scaffold * Watch Model indicates which of the system scaffolds are to be watched for changes - in this case, the Ping Target scaffold is selected * Watch Create and Watch Delete fields are marked, in which case both the up and down events for each and every Ping Target is generated
All other fields are left in their default state and not modified.

Once created, a new entry in the Services::Notifications::Notification Actions scaffold becomes visible, as shown below.

The given action can be disabled, if needed, without being permanently deleted. Also, it is possible to track the execution of the given action using the Event Logs action, which will display any execution errors for the given script, when such errors take place.
There are many event types that can be created, including periodic execution, manual execution, scaffold status changes, trigger on general error conditions, threshold events, and others. Available event configuration options depend on the given event type.
Once the Notification Event is created, the associated Backend Script needs to be created. To create a new Backend Script, the Services::Notifications::Backend Scripts scaffold is used, and a following entry is created with the following fields to be filled in: * Name is an arbitrary name for the backend script, * Notification Actions indicates which of the available actions this script is tied to; in this case, the previously created PING Target SNMP trap is selected * Body is filled in with the target execution script, which in this case sends a SNMPv1 trap to a specific target, with an indication of whether the given PING Target is online or offline, depending on the status of the given ping_target. The script uses Ruby, and no other scripting languages are supported at this time.
The example of the SNMP Trap sending Ruby script is shown below.
require 'snmp'
# for T/S purposes only
puts "Script started at #{Time.current}"
var_trap_agent = "192.168.150.4" # target SNMP agent
var_trap_enterprise_id = 666 # per https://www.iana.org/assignments/enterprise-numbers/
SNMP::Manager.open(:Host => var_trap_agent, :Version => :SNMPv1) do |snmp|
snmp.trap_v1(
"enterprises.#{var_trap_enterprise_id}",
ping_target.target,
ping_target.online ? :linkUp : :linkDown, # send linkUp/Down event type depending on the status of the given PingTarget
42,
Time.current
)
end
# for T/S purposes only
puts "Script completed at #{Time.current}"
Once created, a new entry in the Services::Notifications::Backend Scripts scaffold becomes visible, as shown below.

Note that it is possible to test the given created backend script, using the Trigger action associated with the given script. However, when internal rXg objects are used in the script (ping_target in the example used in this KB), the Trigger action will result in execution errors due to the object missing in the scope. Internal rXg objects become available only when triggered through the associated Notification Action.
For reference, the structure of the ping_target object is as follows, showing a number of fields which can be used for internal scripting purposes. Individual objects can be previewed in the rXg shell using the Ruby console.
<PingTarget:0x000038a380ef50b8
id: 5,
name: "9.9.9.9",
target: "9.9.9.9",
timeout: 0.3e1,
attempts: 6,
online: true,
note: nil,
created_by: "adminuser",
updated_by: "rxgd(PingMonitor)",
created_at: Thu, 30 Jan 2025 09:24:53.456740000 PST -08:00,
updated_at: Thu, 30 Jan 2025 10:40:38.619050000 PST -08:00,
cluster_node_id: nil,
scratch: nil,
rtt_tolerance: nil,
jitter_tolerance: nil,
packet_loss_tolerance: nil,
wlan_id: nil,
interval: 0.3e1,
psk_override: nil,
wireguard_tunnel_id: nil,
traceroute_interval: nil,
fom_configurable: false>
To trigger the condition from the rXg shell without having to wait for the Ping Target timeout, execute the following command set in the repl (Perl) console.
my $pt = Rxg::ActiveRecord::PingTarget->last(); $pt->flipBooleanAttribute('online'); $pt->saveAndTrigger(); Rxg::ActiveRecord->commitDeferredSql()
Every time the script is executed, the last Ping Target state is flipped and SNMP traps are generated, as shown on SNMP trap collector below. The linkUp/linkDown event is showing up in the log in a quick succession.
#00:17:46.091437 08:62:66:48:67:83 > bc:24:11:01:8f:af, ethertype IPv4 (0x0800), length 87: (tos 0x0, ttl 64, id 24299, offset 0, flags [none], proto UDP (17), length 73)
192.168.150.38.30776 > 192.168.150.4.162: [udp sum ok] { SNMPv1 { Trap(30) .1.3.6.1.4.1.57404 9.9.9.9 linkDown[specific-trap(42)!=0] 1738369066 } }
#00:18:35.113910 08:62:66:48:67:83 > bc:24:11:01:8f:af, ethertype IPv4 (0x0800), length 87: (tos 0x0, ttl 64, id 37016, offset 0, flags [none], proto UDP (17), length 73)
192.168.150.38.48770 > 192.168.150.4.162: [udp sum ok] { SNMPv1 { Trap(30) .1.3.6.1.4.1.57404 9.9.9.9 linkUp[specific-trap(42)!=0] 1738369115 } }
#00:18:47.357938 08:62:66:48:67:83 > bc:24:11:01:8f:af, ethertype IPv4 (0x0800), length 87: (tos 0x0, ttl 64, id 57315, offset 0, flags [none], proto UDP (17), length 73)
192.168.150.38.29247 > 192.168.150.4.162: [udp sum ok] { SNMPv1 { Trap(30) .1.3.6.1.4.1.57404 9.9.9.9 linkDown[specific-trap(42)!=0] 1738369127 } }
#00:18:49.443970 08:62:66:48:67:83 > bc:24:11:01:8f:af, ethertype IPv4 (0x0800), length 87: (tos 0x0, ttl 64, id 24438, offset 0, flags [none], proto UDP (17), length 73)
192.168.150.38.33871 > 192.168.150.4.162: [udp sum ok] { SNMPv1 { Trap(30) .1.3.6.1.4.1.57404 9.9.9.9 linkUp[specific-trap(42)!=0] 1738369129 } }
#00:18:53.628644 08:62:66:48:67:83 > bc:24:11:01:8f:af, ethertype IPv4 (0x0800), length 87: (tos 0x0, ttl 64, id 37059, offset 0, flags [none], proto UDP (17), length 73)
192.168.150.38.26210 > 192.168.150.4.162: [udp sum ok] { SNMPv1 { Trap(30) .1.3.6.1.4.1.57404 9.9.9.9 linkDown[specific-trap(42)!=0] 1738369133 } }
The recorded packets indicate that the rXg (at 192.168.150.38 in this case) sends SNMP traps towards the collector at 192.168.150.4 with the appropriate structure, changing between the target up and down states, as expected.
Big Red Button Mobile Application
This example will show how to setup a backend script that can be triggered by an API call executed by a mobile application which is available in the Apple and Google Play app stores.
This example assumes that you have an existing WLAN created under the WLANs scaffold with a record name of arena.
Procedure:
1) Browse to Services >> Notifications >> Backend Scripts 2) Click Create New 3) Name the backend script toggle_ssid. 4) Paste the following script into the body and click create.
def toggle_ssid wlan = Wlan.find_by(name: 'arena') ssid = wlan.ssid
if ssid == 'basketball_arena' wlan.ssid = 'hockey_arena' else wlan.ssid = 'basketball_arena' end
wlan.save! end
toggle_ssid
puts 'ssid toggled successfully'
5) Browse to Services >> Notifications >> Notification Actions 6) Click Create New 7) Name the notification action toggle_ssid. 8) Set the event type field to Manual. 9) Select toggle_ssid from the available scripts in the list.
Install the rXg Action Button Mobile App
Apple: https://apps.apple.com/us/app/rxg-action-button/id1483547358 Android: https://play.google.com/store/apps/details?id=net.lok.aidan.rxg_action_button
1) On the rXg browse to System >> Admins 2) Next to your admin account, click on the API Keys link. 3) Click Create New 4) Provide the API Key a name and click Create.
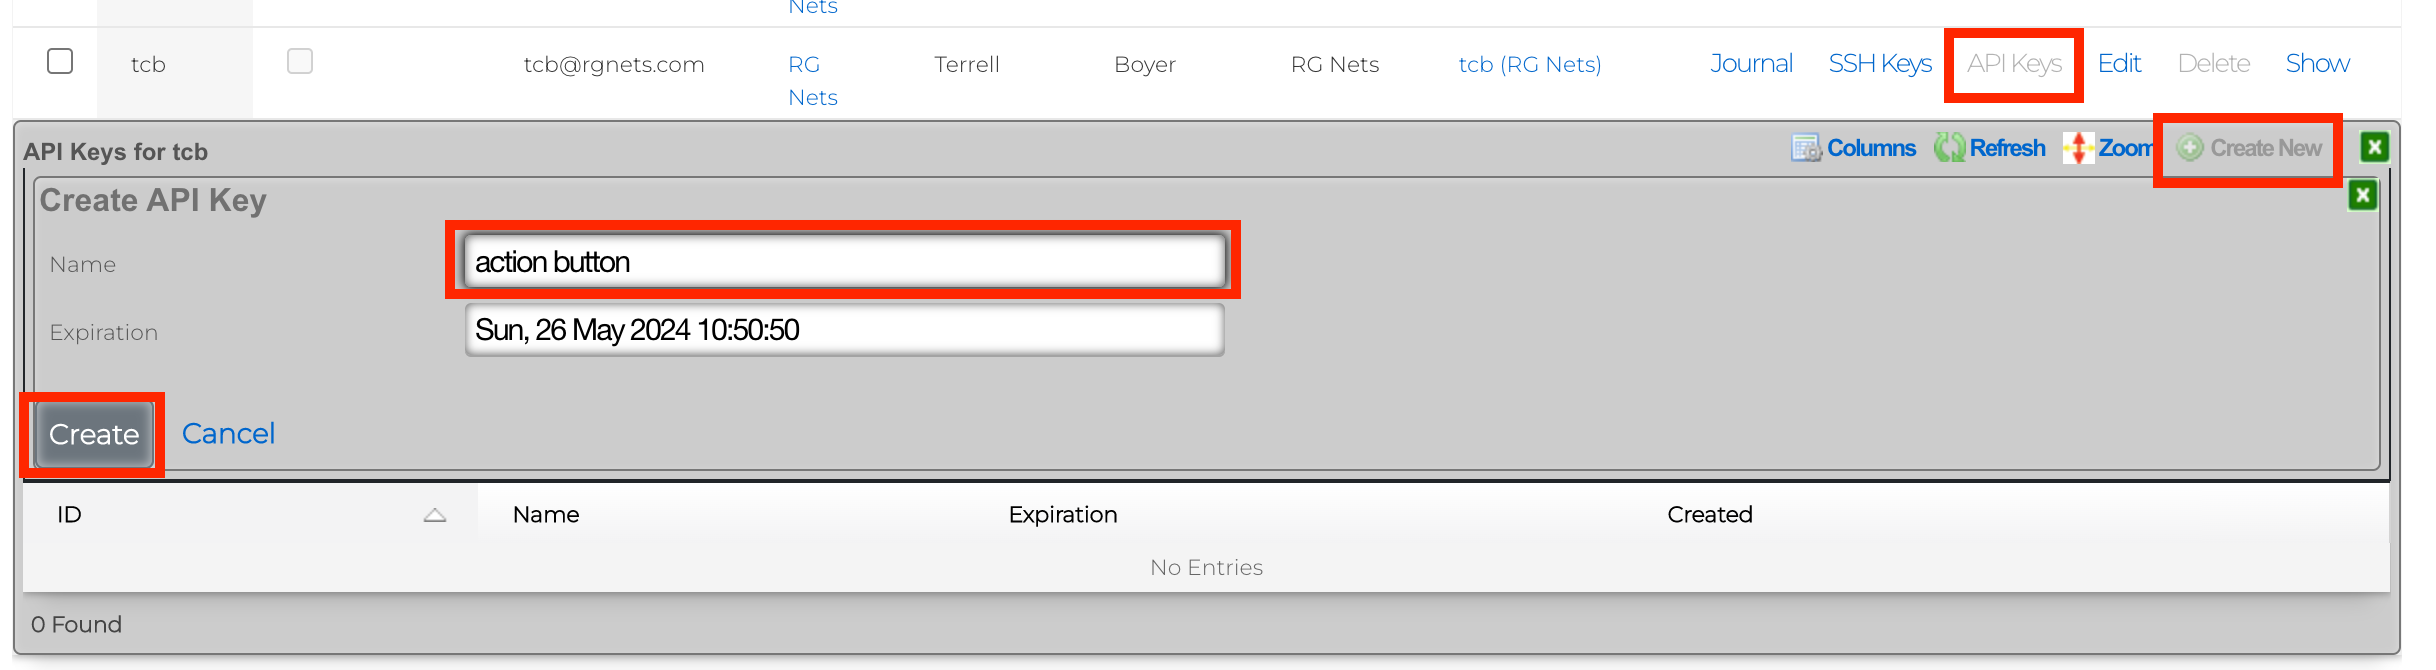
5) You will be presented with several QR codes. Make sure to leave this screen up.
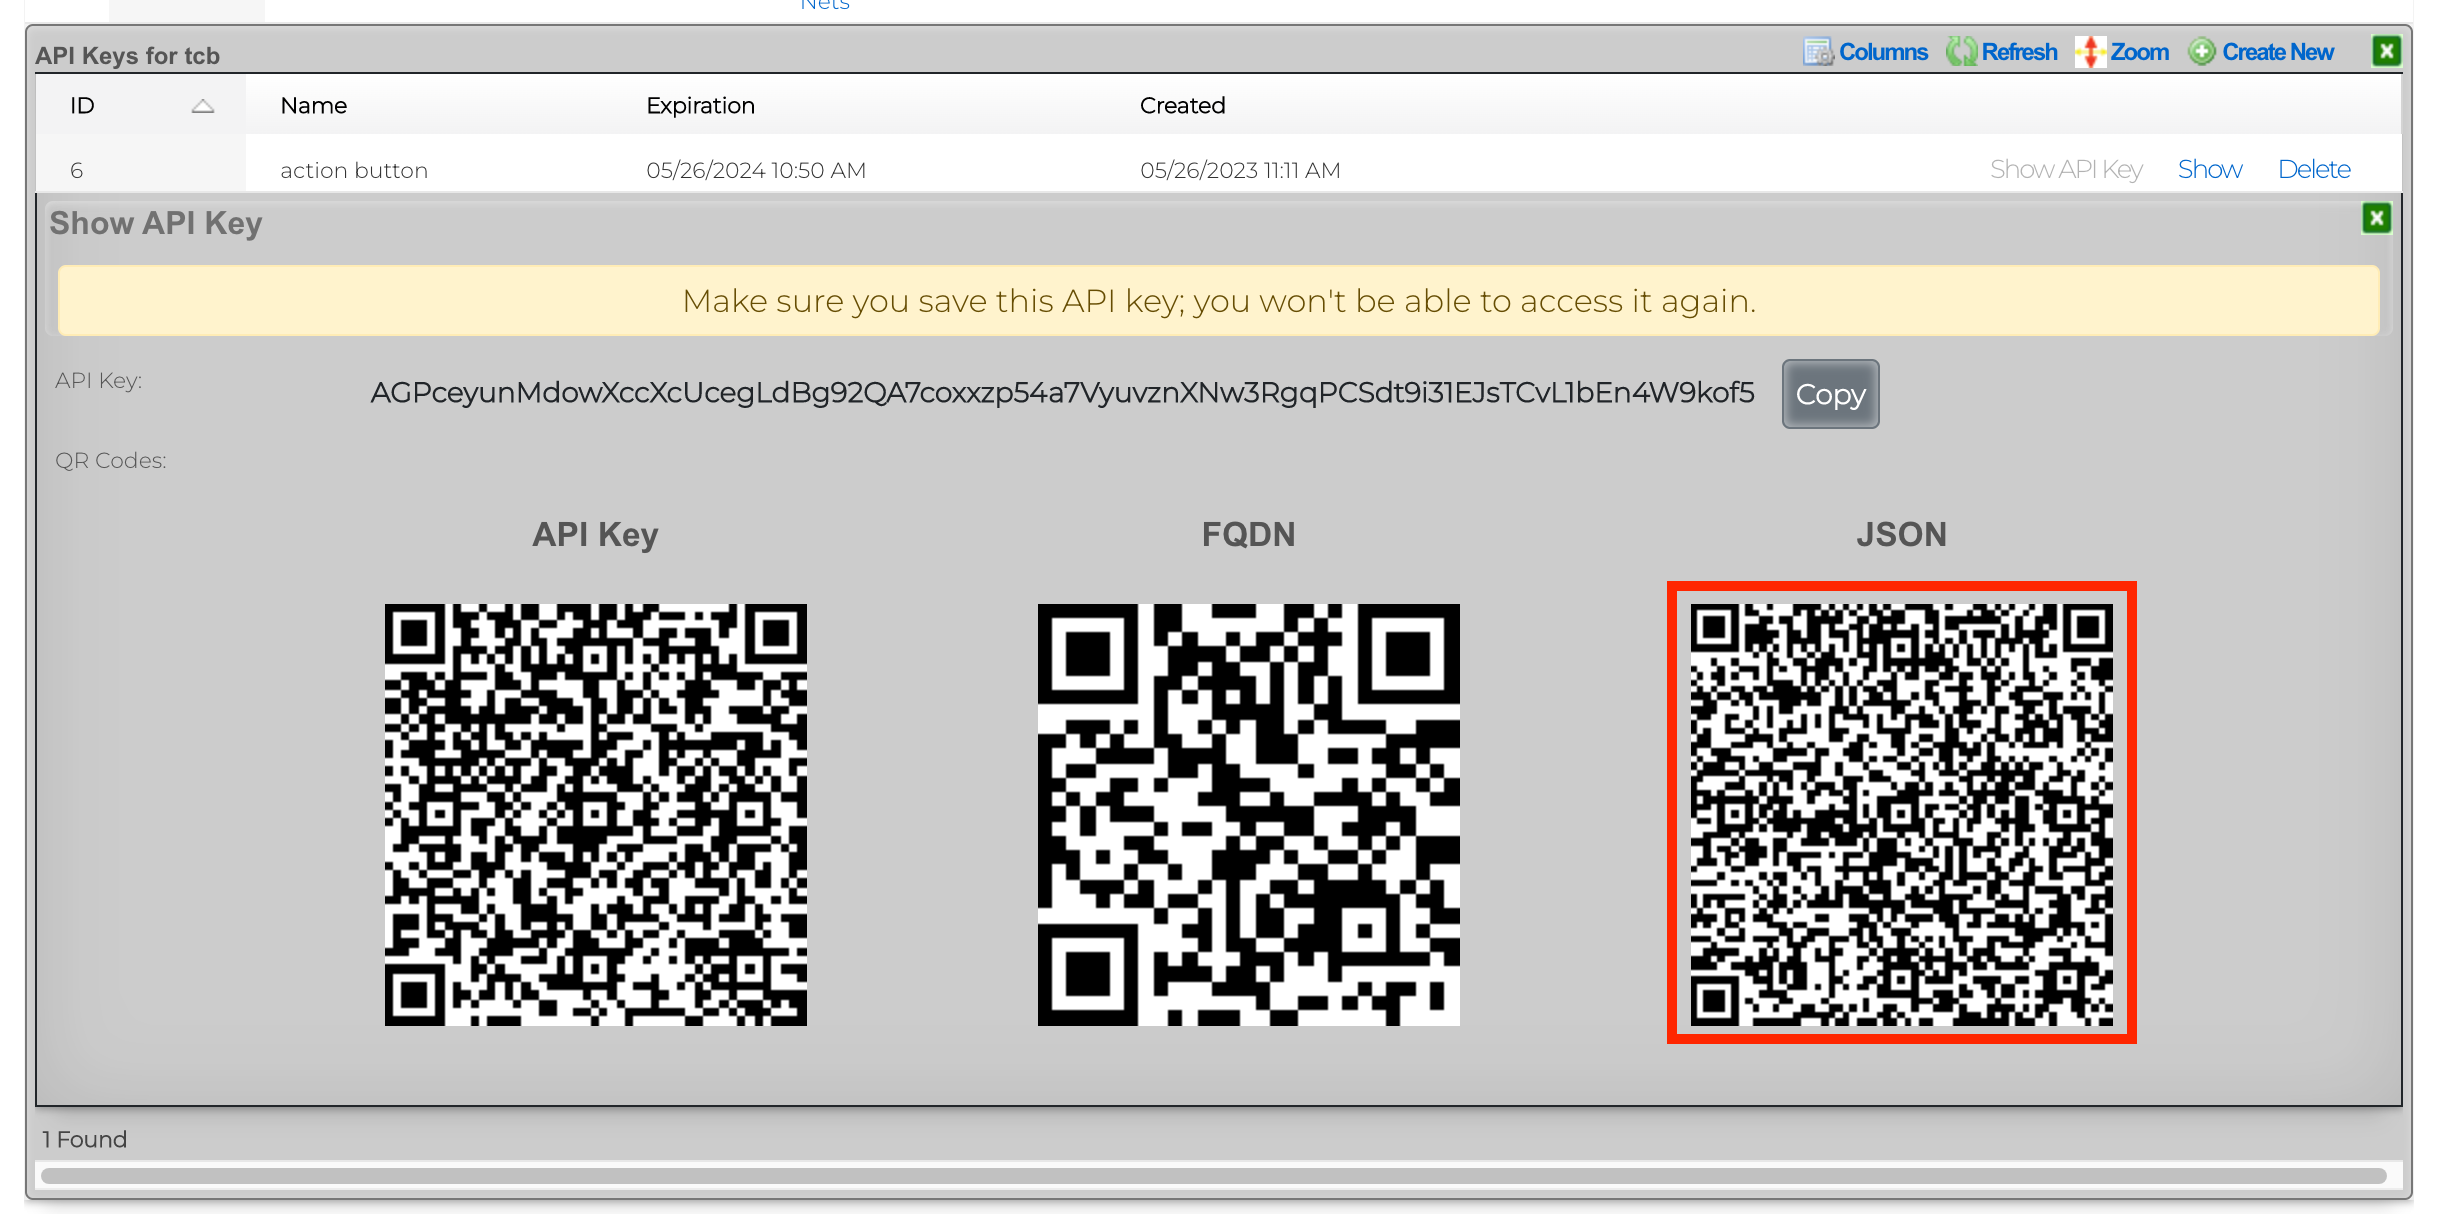
6) From the mobile app, click Scan QR Code.
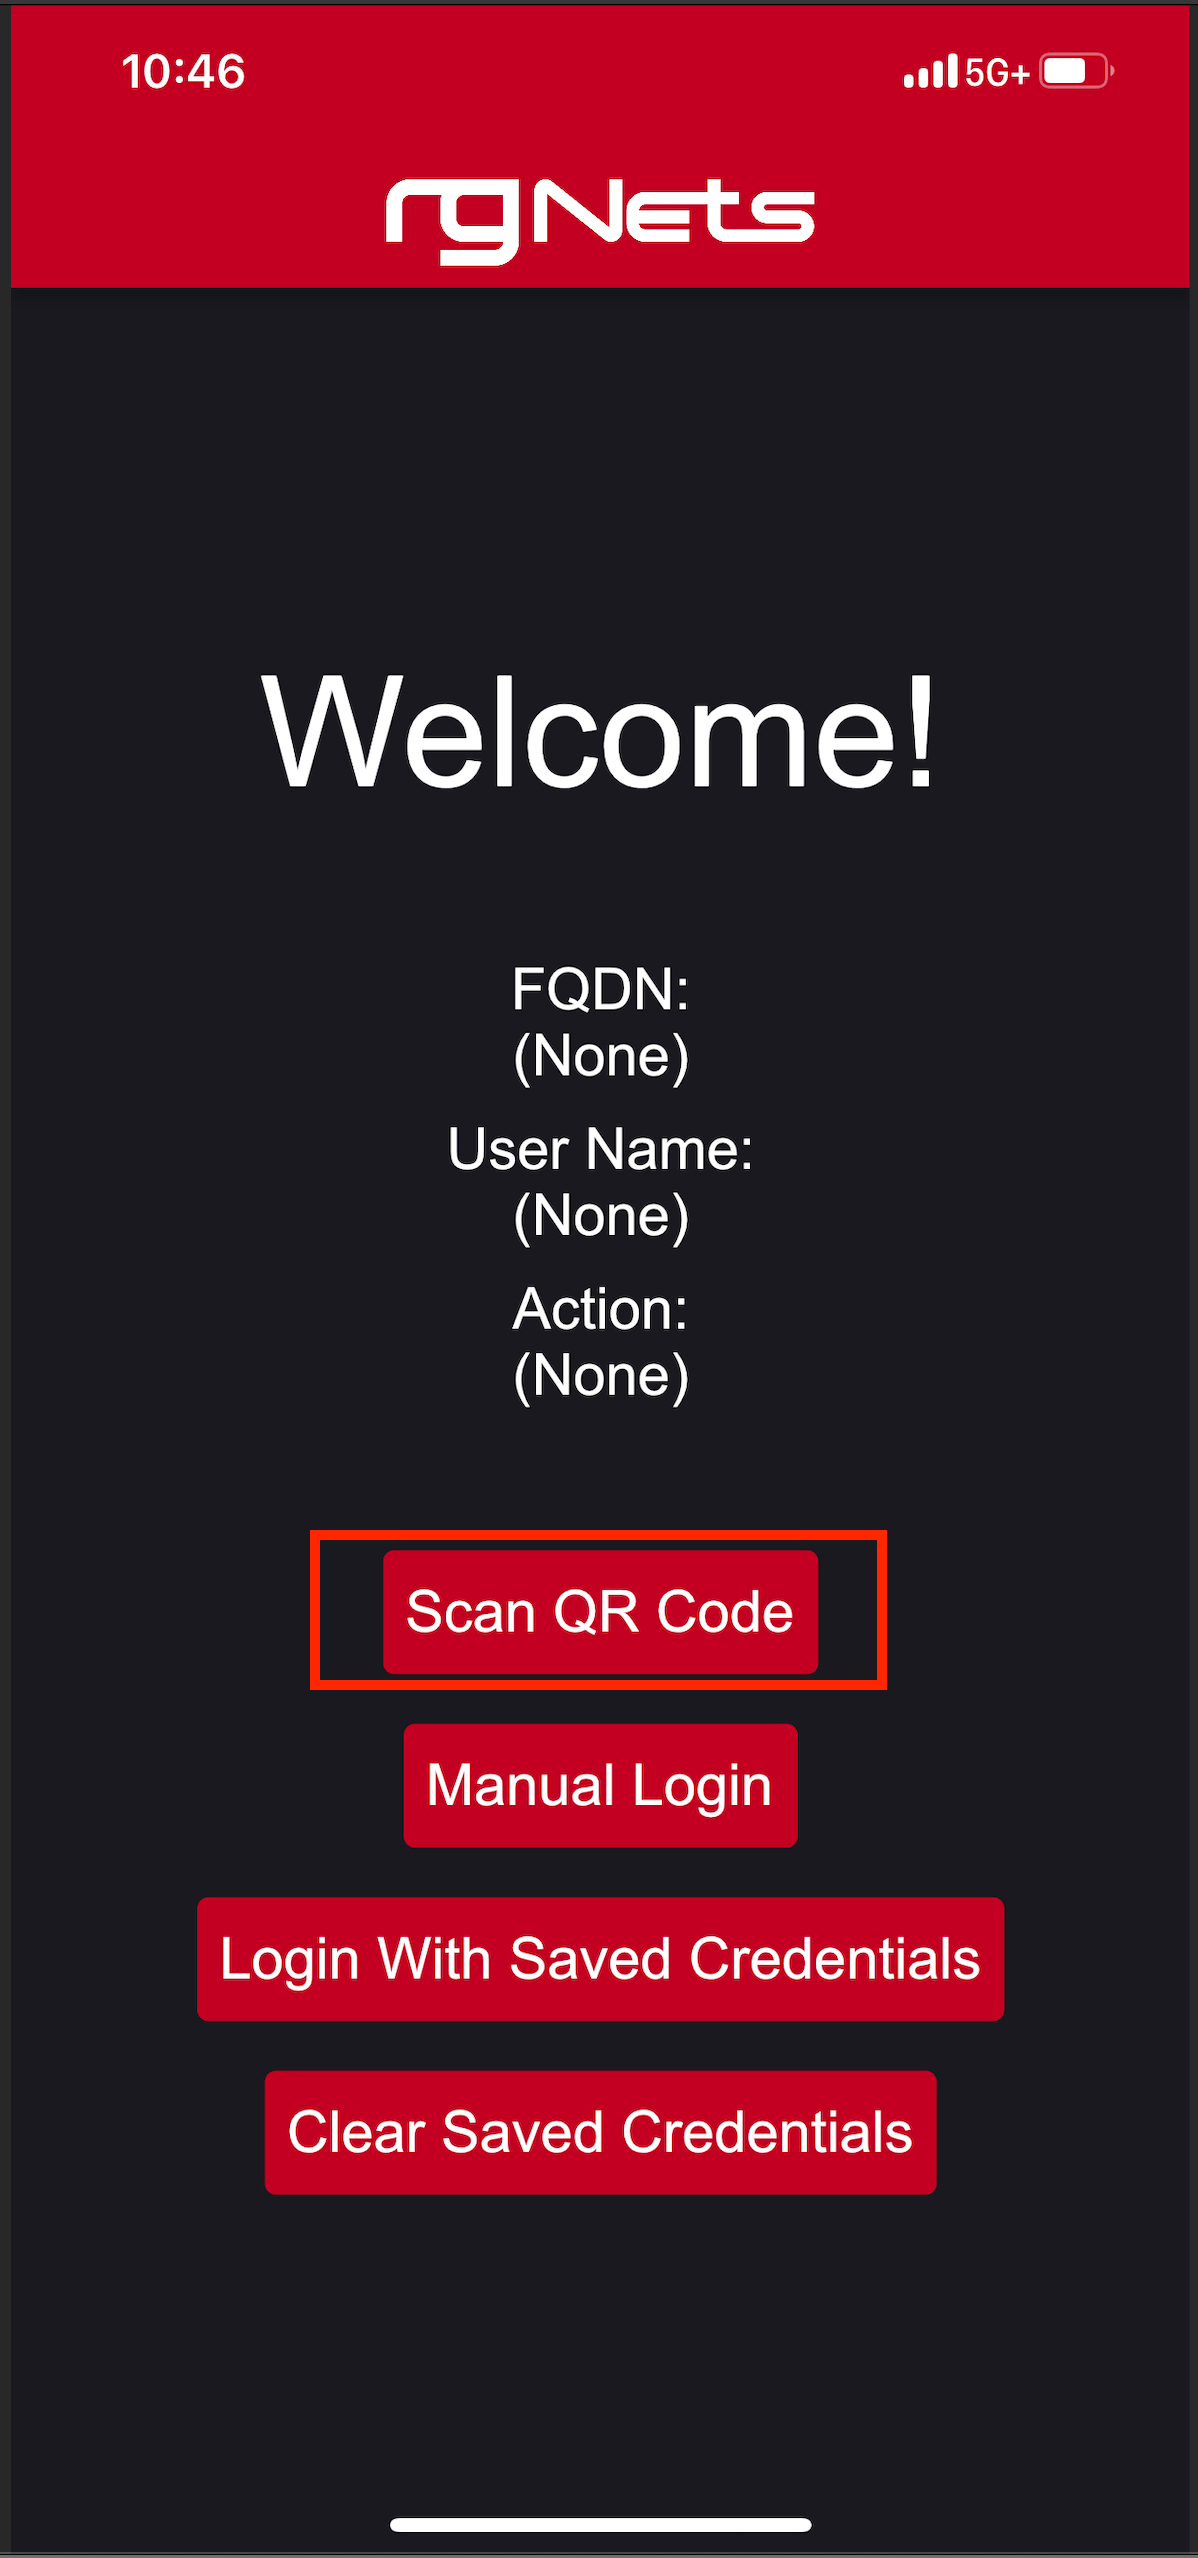
7) Scan the QR code labeled JSON. 8) Click Login With Saved Credentials
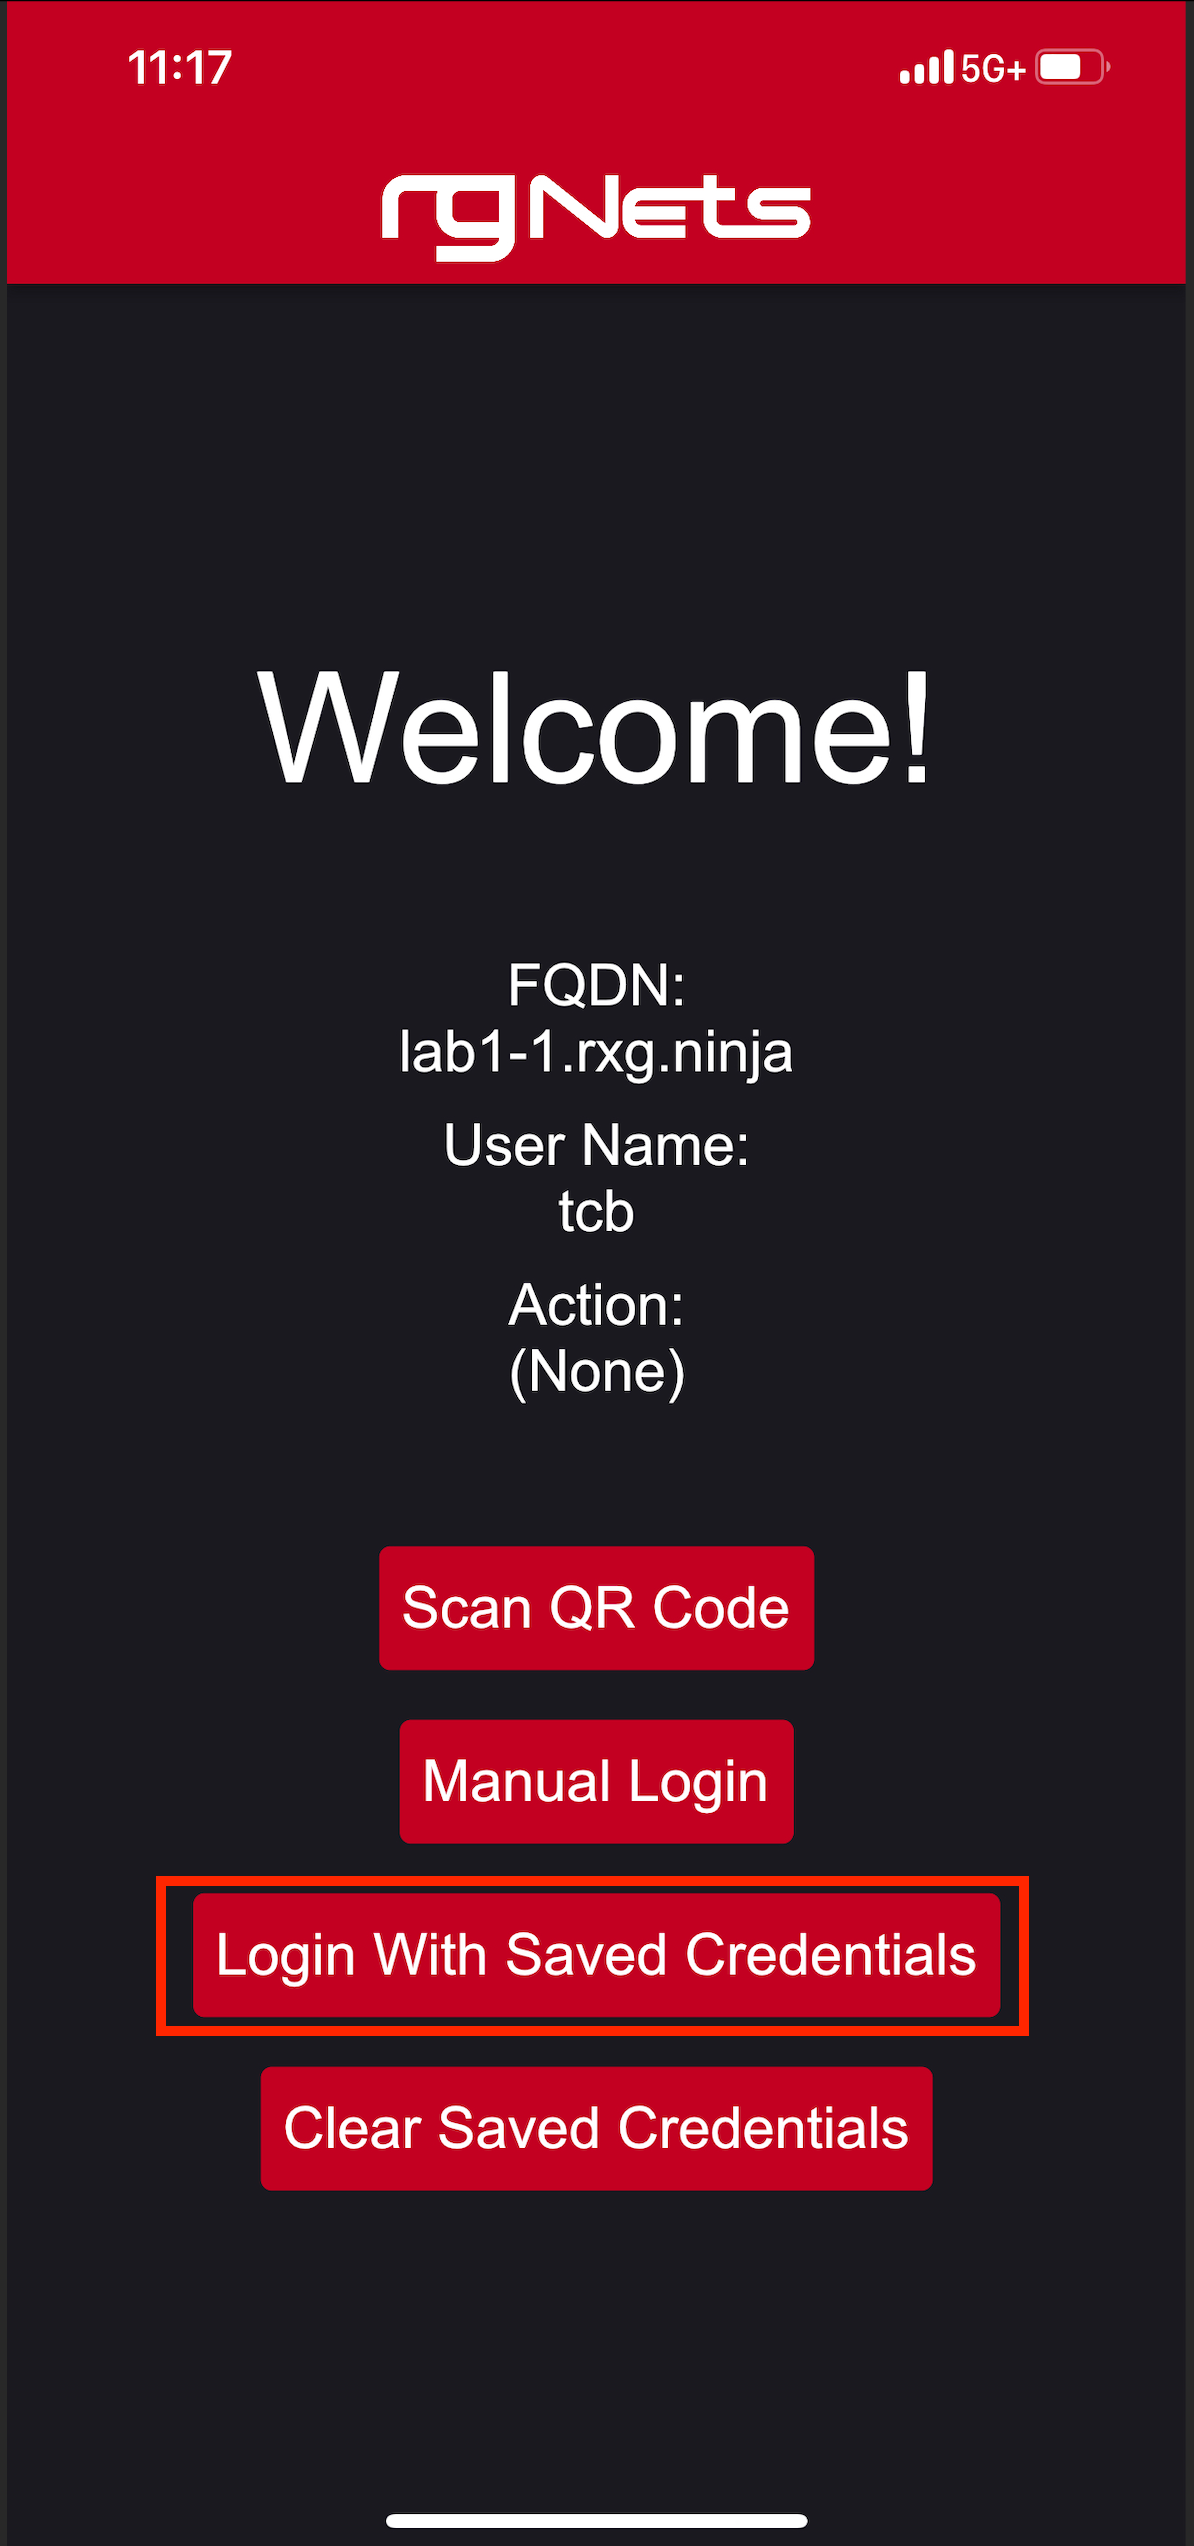
9) Set the action to toggle_ssid 10) Click on the slider to enable the button.
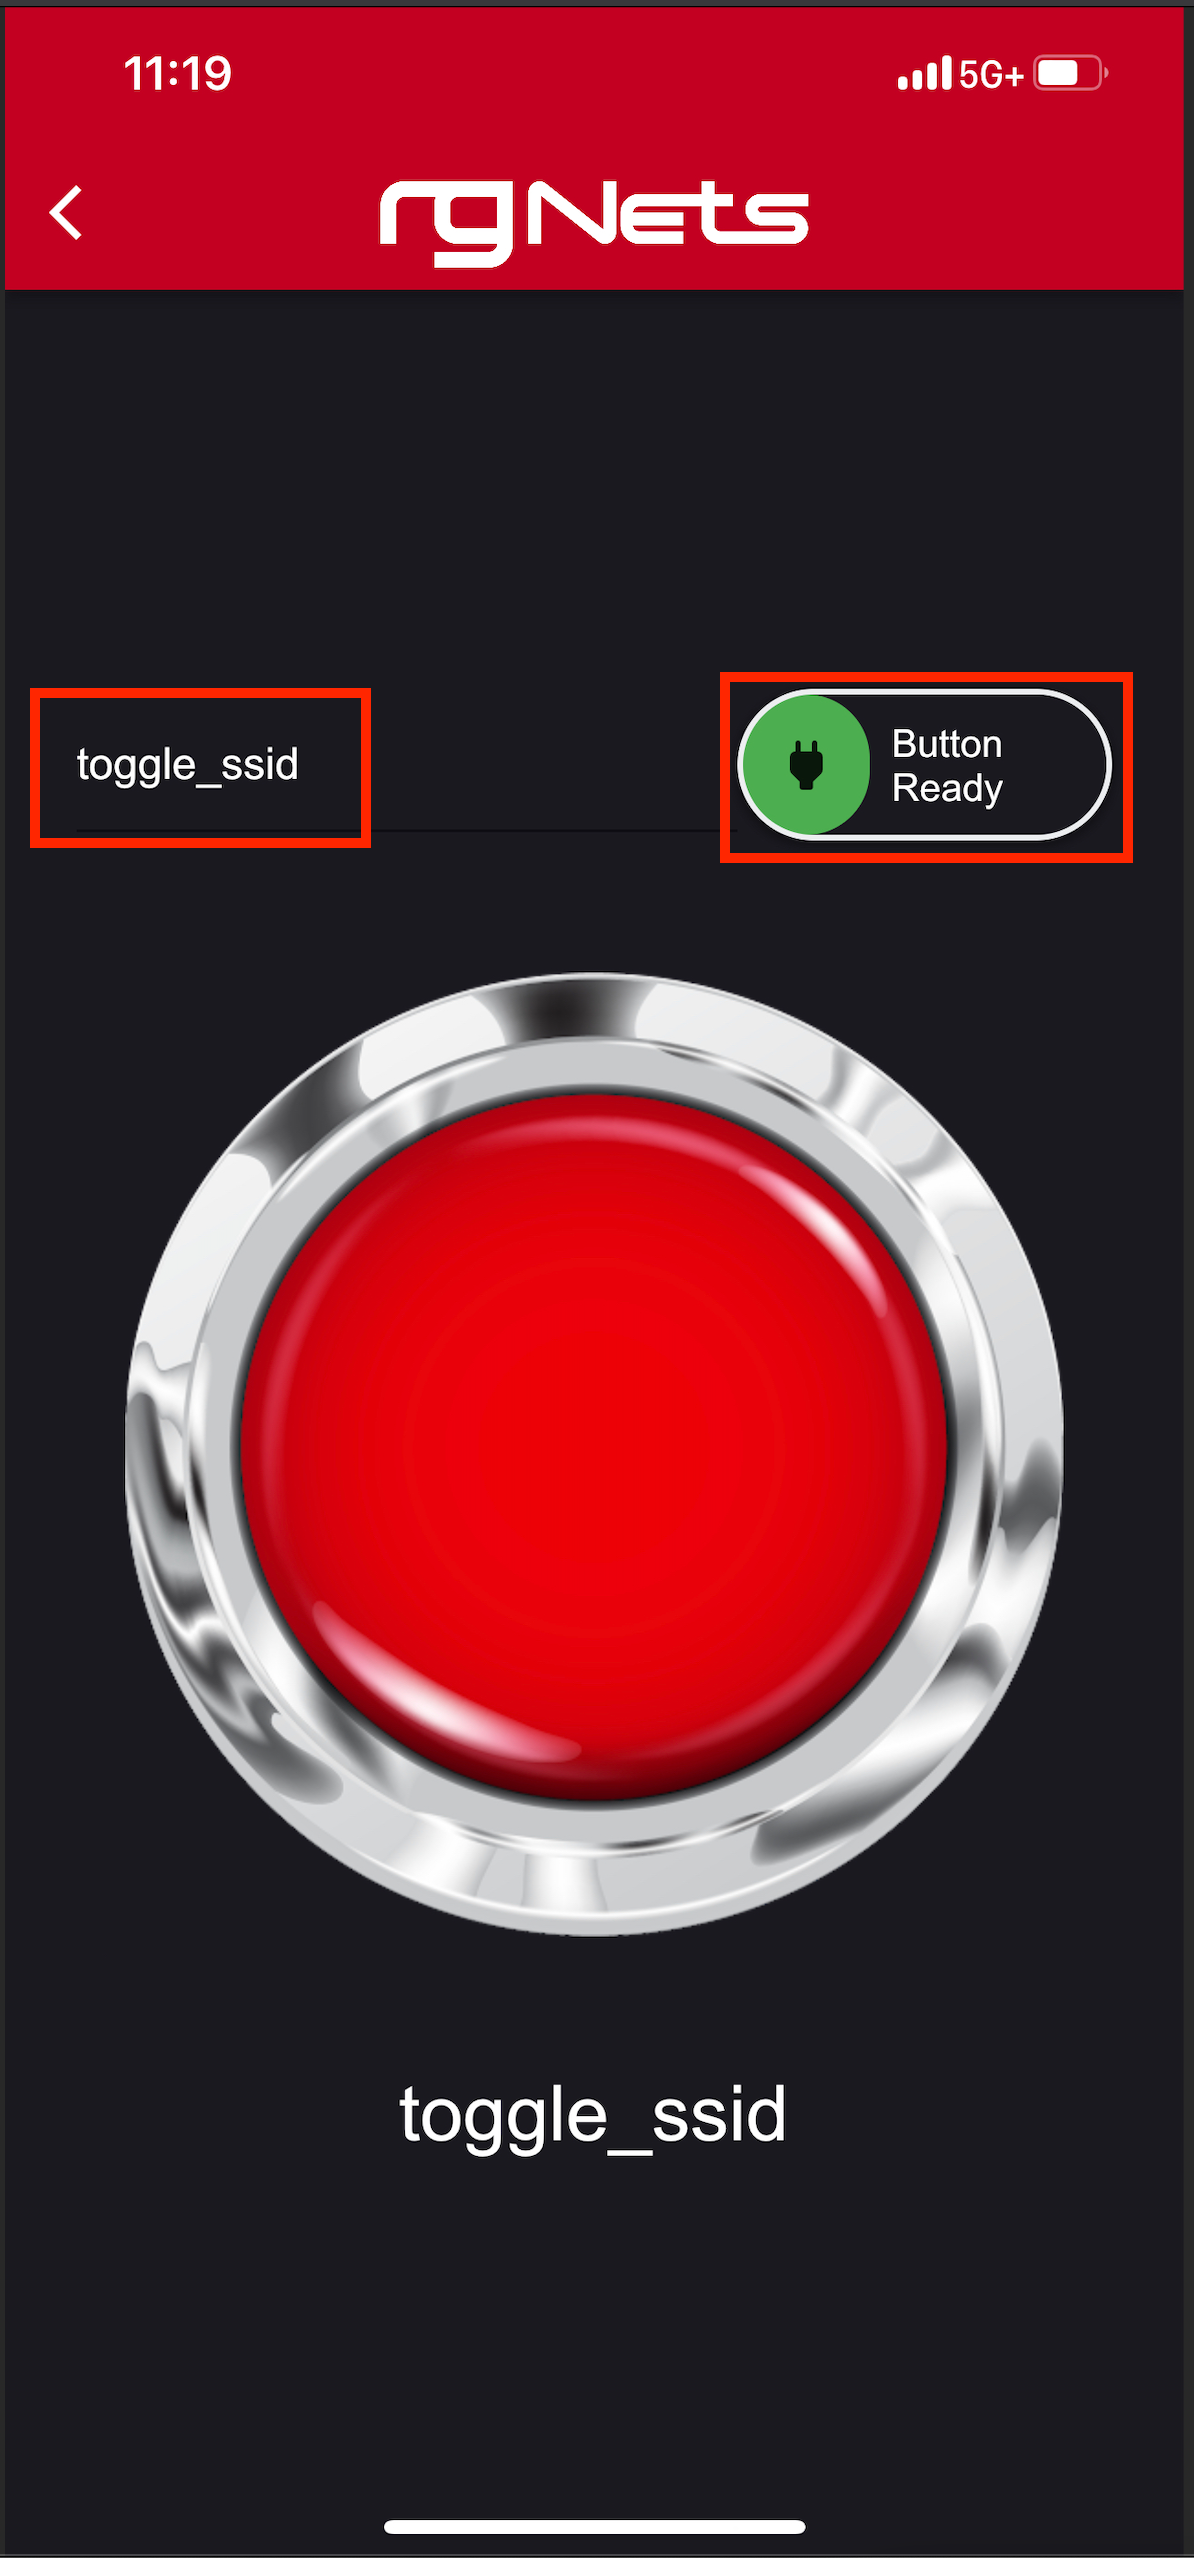
Now, simply press the red action button to toggle the SSID from basketball_arena to hockey_arena. These changes will be pushed to the wireless controller via config sync.
This is a very simple example of what can be done using a combination of a mobile application and the rXg backend scripts.
Conference Tool
The Conference Tool allows operators to create and manage temporary, isolated networks for events, meetings, and conferences. Each conference gets its own SSIDs, VLANs, credentials, and policies that are automatically provisioned when the conference starts and torn down when it ends.
Overview
A conference defines a time-bounded event with dedicated networking. When a conference begins, the system automatically:
- Creates WLANs (SSIDs) on Access Points in the associated Location Areas
- Provisions DHCP pools on the assigned VLANs
- Configures bandwidth queues, policies, and shared credentials
- Pushes SSID configurations to the wireless controller
When the conference ends, all of these resources are automatically cleaned up.
Prerequisites
Before setting up the Conference Tool, ensure the following:
- Infrastructure devices (switches and wireless controllers) must be in sync. Navigate to Network :: Wireless and Network :: Wired to verify. The Config sync status field should be green.
- At least one physical LAN interface (e.g.,
igb3) is configured. - Access Points are discovered and associated with the system.
Setup Instructions
Step 1: Create VLANs
Navigate to Network :: LAN and open the VLAN Interfaces scaffold.
The Conference Tool supports two types of networks:
- Per-User VLANs put each device (or a small group of devices) in its own VLAN, providing Layer 2 isolation between conference attendees.
- Non-Per-User VLANs place all devices in a single shared VLAN, allowing devices to communicate with each other on the same Layer 2 network.
Important: Create the VLAN first, then create the Address in Step 2 and associate it with the VLAN. An Address cannot belong to both an Interface and a VLAN simultaneously. If you create an Address without selecting a VLAN, it will be auto-assigned to a physical Interface, and you will need to clear the interface association before it can be moved to a VLAN.
Per-User VLAN
Click Create New on the VLAN Interfaces scaffold:
- Name: a descriptive name (e.g.,
Conference Per-User) - Physical Interface: select your LAN interface
- VLAN IDs: the starting VLAN tag (e.g.,
100) - Autoincrement: select
per-IP | auto-increment L2 w/ L3 | n tags = (subnets / ratio)— this creates a separate VLAN for each subnet (or group of subnets based on the ratio) - Ratio: the number of subnets to place in each VLAN tag (e.g.,
1for true per-user isolation)
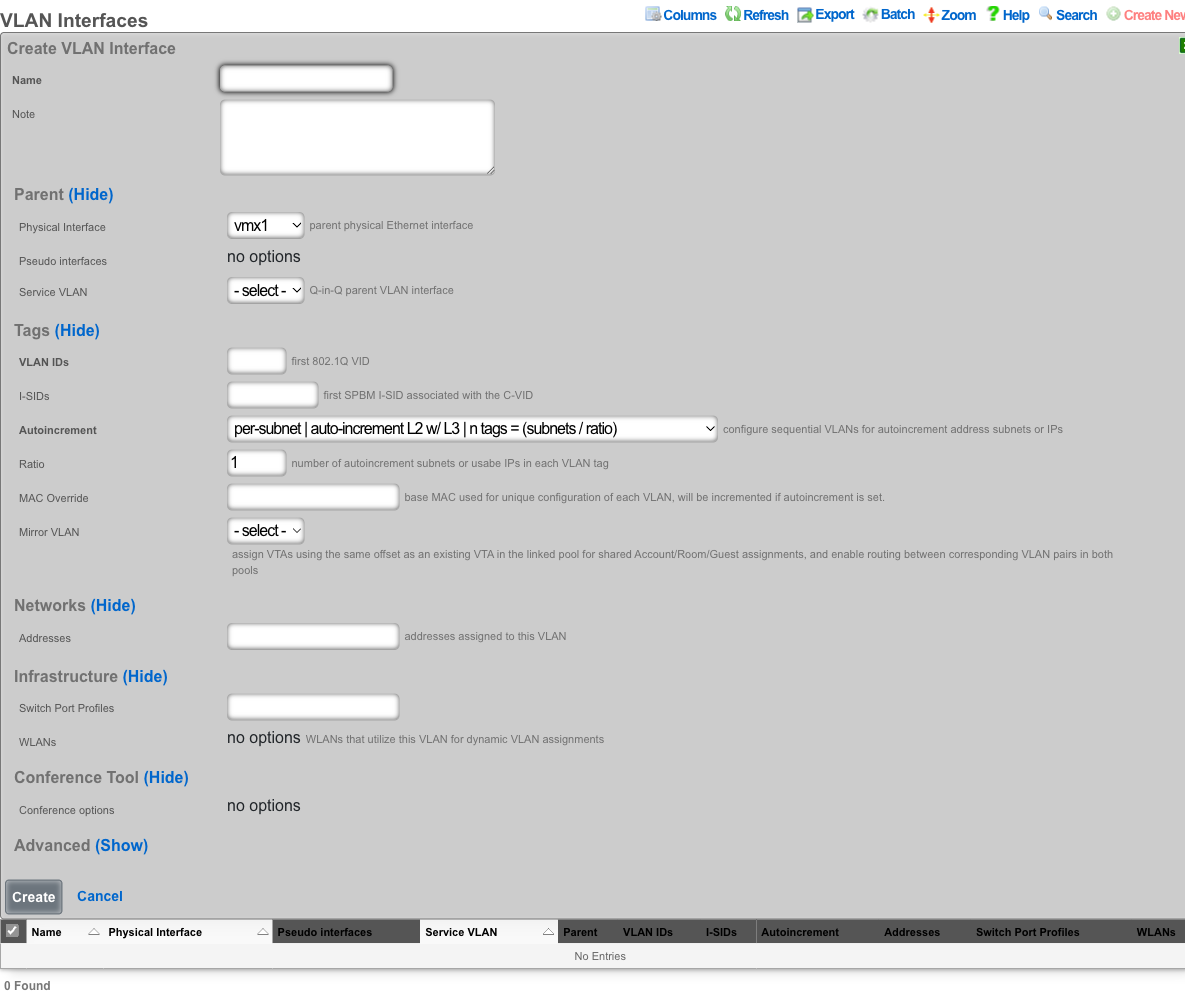
Non-Per-User VLAN
Click Create New on the VLAN Interfaces scaffold:
- Name: a descriptive name (e.g.,
Conference Shared) - Physical Interface: select your LAN interface
- VLAN IDs: the VLAN tag (e.g.,
99) - Autoincrement: select
none | single L2— all devices share a single VLAN - Ratio: leave at
1
Step 2: Create Network Addresses
Navigate to Network :: LAN and open the Network Addresses scaffold. Create an Address for each VLAN created in Step 1.
Per-User Address
Click Create New:
- Name: a descriptive name (e.g.,
Conference Per-User) - VLAN: select the Per-User VLAN created in Step 1
- IP: the network address in CIDR notation (e.g.,
192.168.100.1/30). Use a small subnet like/30for per-user networking — each device gets its own subnet. - Autoincrement: the number of subnets to create (e.g.,
64). This should be large enough to accommodate the expected number of simultaneous conference attendees. - Create DHCP Pool: leave unchecked — the Conference Tool will automatically create and manage DHCP pools when conferences are active.
- IP Group: select Create New to automatically create an IP Group for this address space.
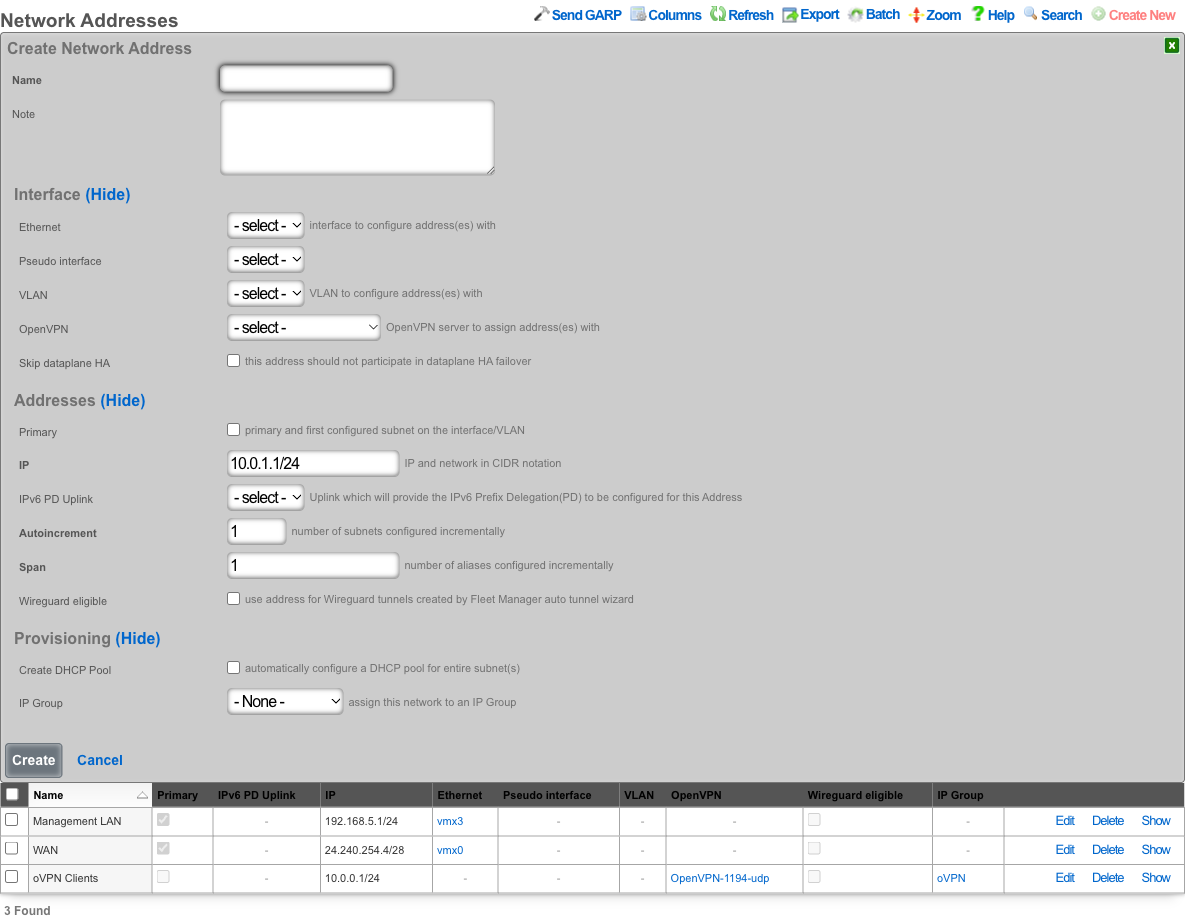
Non-Per-User Address
Click Create New:
- Name: a descriptive name (e.g.,
Conference Shared) - VLAN: select the Non-Per-User VLAN created in Step 1
- IP: the network address in CIDR notation (e.g.,
192.168.99.1/24) - Autoincrement: set to
1 - Create DHCP Pool: leave unchecked
- IP Group: select Create New
Step 3: Create Location Areas
Navigate to Network :: Infrastructure and open the Location Areas scaffold. A Location Area represents a physical conference space and maps Access Points and switch ports to that space.
Create a Location Area for each conference space:
- Name: a descriptive name for the space (e.g.,
Ballroom A,Meeting Room 101) - Conference APs: select the Access Points physically located in this space
- Conference Ports: select any switch ports in this space (optional)

Common Gotcha: Conferences will not create SSIDs unless Location Areas are associated with both the Conference Option (Step 4) and the individual conference. If your conference appears to be configured correctly but no SSIDs are being created, verify that Location Areas are properly assigned.
Step 4: Create a Conference Option
Navigate to Services :: Conference Tool and open the Conference Options scaffold. A Conference Option is a template that defines the defaults and constraints for conferences.
Click Create New:
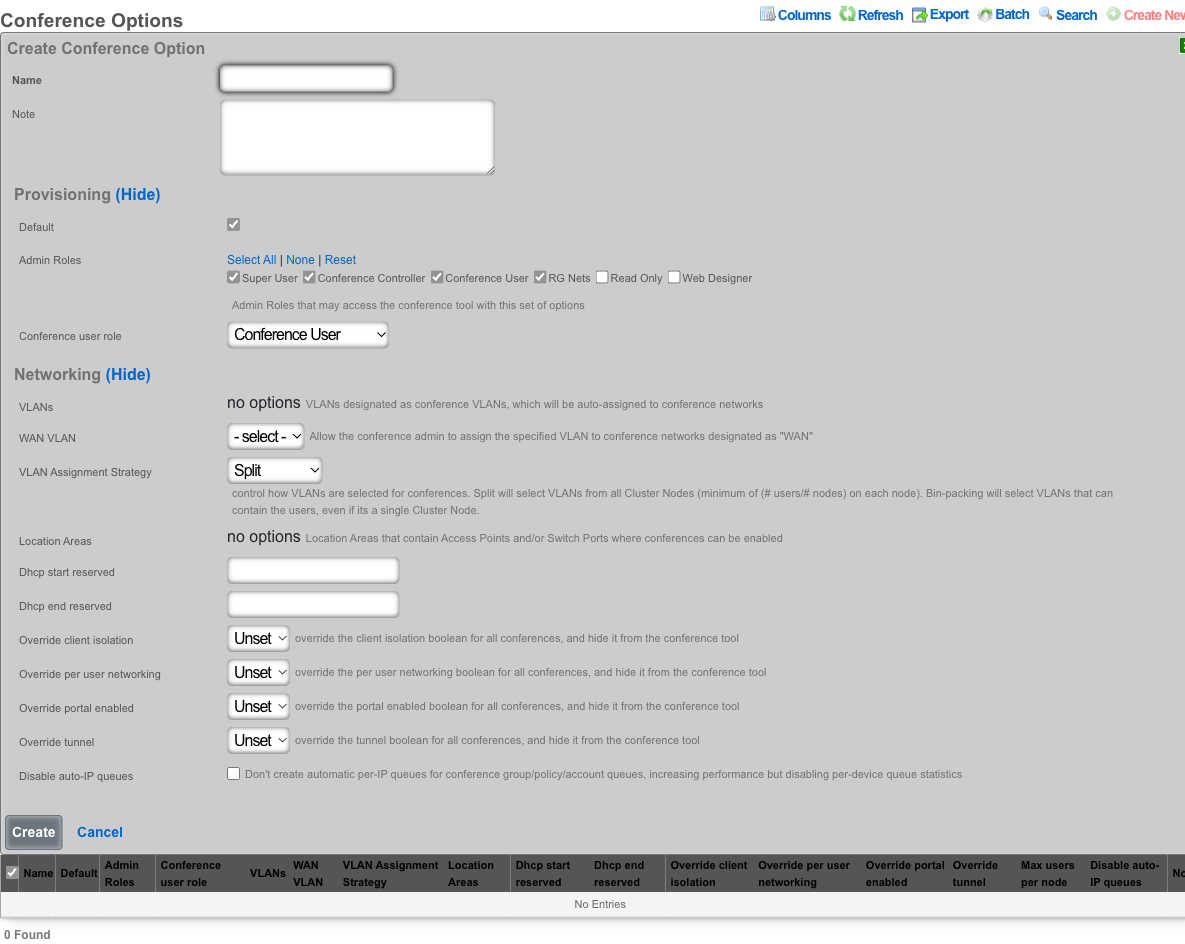
General
- Name: a descriptive name (e.g.,
Default Conference) - Default: check this if it should be the default option used when creating new conferences
Provisioning
- Admin Roles: select which admin roles are allowed to access the Conference Tool with this option (e.g., Super User, Conference Controller, Conference User, RG Nets)
- Conference user role: select the admin role for delegated conference management. Admins with this role can manage their own conferences but not system-wide settings.
Networking
- VLANs: select the VLANs created in Step 1. These VLANs will be available for assignment to conference networks.
- WAN VLAN: optionally select a VLAN to allow conference admins to assign upstream WAN connectivity to conference networks.
- VLAN Assignment Strategy: controls how VLANs are distributed across cluster nodes.
- Split selects VLANs from all cluster nodes (minimum of users/nodes on each node), even on a single node.
- Bin-packing selects VLANs from nodes that can fully contain the users.
- Location Areas: select the Location Areas created in Step 3. These define where conferences can be hosted.
- DHCP start reserved / DHCP end reserved: number of IPs to reserve at the start and end of each DHCP pool created for conferences.
- Override client isolation: when set to On or Off, overrides the client isolation setting for all conferences using this option and hides the toggle from the Conference Tool interface. When set to Unset, the conference creator can choose.
- Override per user networking: same behavior as above, for per-user networking.
- Override portal enabled: same behavior as above, for captive portal.
- Override tunnel: same behavior as above, for tunnel mode.
- Max users per node: limits the number of conference users per cluster node.
- Disable auto-IP queues: when checked, disables automatic per-IP bandwidth queues for conference groups/policies/accounts, improving performance but removing per-device queue statistics.
Step 5: Create the Operator Portal
Navigate to System :: Portals and open the Operator Portals scaffold.
Click Create New:

- Name:
Conference(or any descriptive name) - Controller name:
conference— this becomes the URL path. The conference portal will be accessible athttps://<rxg-fqdn>/conference. Use only alphanumeric characters and underscores; do not use a name that conflicts with an existing controller. - Template: select Conference
- Admin Roles: grant access to the appropriate roles (e.g., Super User, RG Nets, Conference Controller, Conference User). If admin access is not properly configured, navigating to the conference URL will redirect back to the admin console.
After creating the Operator Portal, the webserver will restart automatically. Wait for the restart to complete before continuing.
Step 6: Access the Conference Tool
Navigate to https://<rxg-fqdn>/conference (or whatever controller name you chose in Step 5).
From the Conference Tool interface, you can:
- View the conference calendar
- Create new conferences by clicking on a date
- Edit existing conferences by clicking on calendar events
- Manage conference networks, SSIDs, PSKs, and attendee limits
- Send messages to conference participants
Troubleshooting
SSIDs not being created when a conference starts
The most common cause is missing Location Area associations. Verify that:
- Location Areas have Access Points assigned in the Conference APs field
- Location Areas are associated with the Conference Option (Step 4)
- Location Areas are associated with the individual conference when creating/editing it
- The wireless controller is in sync (Network :: Wireless, check Config sync status)
"Address is invalid" when associating an Address with a VLAN
This typically means the Address already belongs to a physical Interface. An Address cannot belong to both an Interface and a VLAN. Fix via the Rails console:
a = Address.find_by(name: "YourAddressName")
a.update(interface_id: nil)
Or delete and re-create the Address from the Network Addresses scaffold, selecting the VLAN instead of an Interface.
Conference portal redirects to admin console
This happens when the logged-in admin's role is not granted access on the Operator Portal. Edit the Operator Portal and ensure the appropriate Admin Roles have access checked in the Module Configuration section.
Conference disappears from calendar after editing dates
This is a known issue where the start/end date parser can silently fail, setting ends_at to nil. Ensure you are running a build that includes the fix for this behavior.
IoT Hubs
An entry in the IoT Hubs scaffold defines a device capable of controlling IoT devices. The rXg supports two controllers currently, RUCKUS IoT and RG Nets Piglet. The RUCKUS IoT (RIoT) controller is a virtualized software application that connects to RUCKUS IoT-enabled access points to provide support for BLE and ZigBee devices. One RIoT application per 500 IoT devices is the typical deployment model. RG Nets Piglet runs on a Raspberry Pi 4 and supports multiple protocols. One Piglet per account is the typical deployment model.

IotHubs
The online field when green indicates that the IoT Websocket Client is running and subscribed to streaming changes from this device. If red, the websocket client is not subscribed to streaming changes, so the state of IoT entities may not accurately reflect the actual, current state.
The Piglet Version field indicates the version of the Piglet software running on the IoT Hub.
The HA Version field indicates the version of Home Assistant running on the IoT Hub.
The name field is an arbitrary string descriptor used only for administrative identification. Choose a name that reflects the purpose of the record. This field has no bearing on the configuration or settings determined by this scaffold.
The Host field is the IP address of the Iot Hub.
The Port field is used to change ssh port, default is 22.
The Api Port field sets the API port for the Pi, default is 8123.
The Username field is used to set the username for the IotHub.
The Password field is used to set the password for the IotHub.
The Monitor state changes box if checked indicates the websocket client should subscribe to streaming changes from this IoT Hub.
The Iot hub profile field is currently reserved for future use.
The Pms property field is optional, used to select the PMS property that the IotHub is associated with.
The Pms room field is optional, used to select the PMS room that the IoT Hub is associated with.

IotHubProfiles
Reserved for future use.

IotGroups
IotGroups are used to logically group IotHubs, IotEntities, and nested IotGroups. In addition, admin role access is granted at the IotGroup level. At a minimum, you will need to define an IotGroup that consists of the IotHubs you will want to control and assign the appropriate admin role access. Otherwise, IotHubs will not be populated on the iot hub dashboard in the operator portal due to lack of privileges.
The name field is an arbitrary string descriptor used only for administrative identification. Choose a name that reflects the purpose of the record. This field has no bearing on the configuration or settings determined by this scaffold.
The Description field is a place for the administrator to enter a comment. This field is purely informational and has no bearing on the configuration settings.
The Group type field is reserved for future use.
The Admin roles field allows the operator to select which admin roles should have access to the group.
The Iot hubs field allows the operator to select the IotHubs included in the group.
The Iot entities field allows the operator to select which IotEntities are included in the group.
The Iot groups field is the nested IotGroups for the group.

IotEntities
IotEntities are the devices that are controlled and/or monitored by an IotHub. They can be lights, switches, sensors, or any supported IoT device. These are typically Z-Wave or Zigbee devices, but there are many different types of IoT control. These entities will be populated during an Import Entities for each hub. If you add devices after the initial import, you will want to run the import entities again.
The Iot type field is used to specify the type of entity, light, sensor, binary_sensor, etc.
The name field is an arbitrary string descriptor used only for administrative identification. Choose a name that reflects the purpose of the record. This field has no bearing on the configuration or settings determined by this scaffold.
The Description field is a place for the administrator to enter a comment. This field is purely informational and has no bearing on the configuration settings.
The Is property controlled field is reserved for future use.
The State field is the last recored state of this entity, for example 'on' for a light.
The Iot actions field is reserved for future use.
The Iot hub field indicates the IotHub that this entity is associated with.
vRIoT Integration
The following section will outline the process of attaching RUCKUS vRIoT as an IoT hub in rXg and setup the MQTT service.
Add vRIoT as IoT Hub
- Browse to Services >> IoT Hubs
- In the IoT Hubs scaffold, click Create New
- Name the controller
- Set the Model dropdown to RUCKUS IoT Controller
- Add the IP address of the vRIoT server to the host field
- Provide a username and password to access the vRIoT server
- Press Create
- In the IoT Hubs scaffold, click Create New
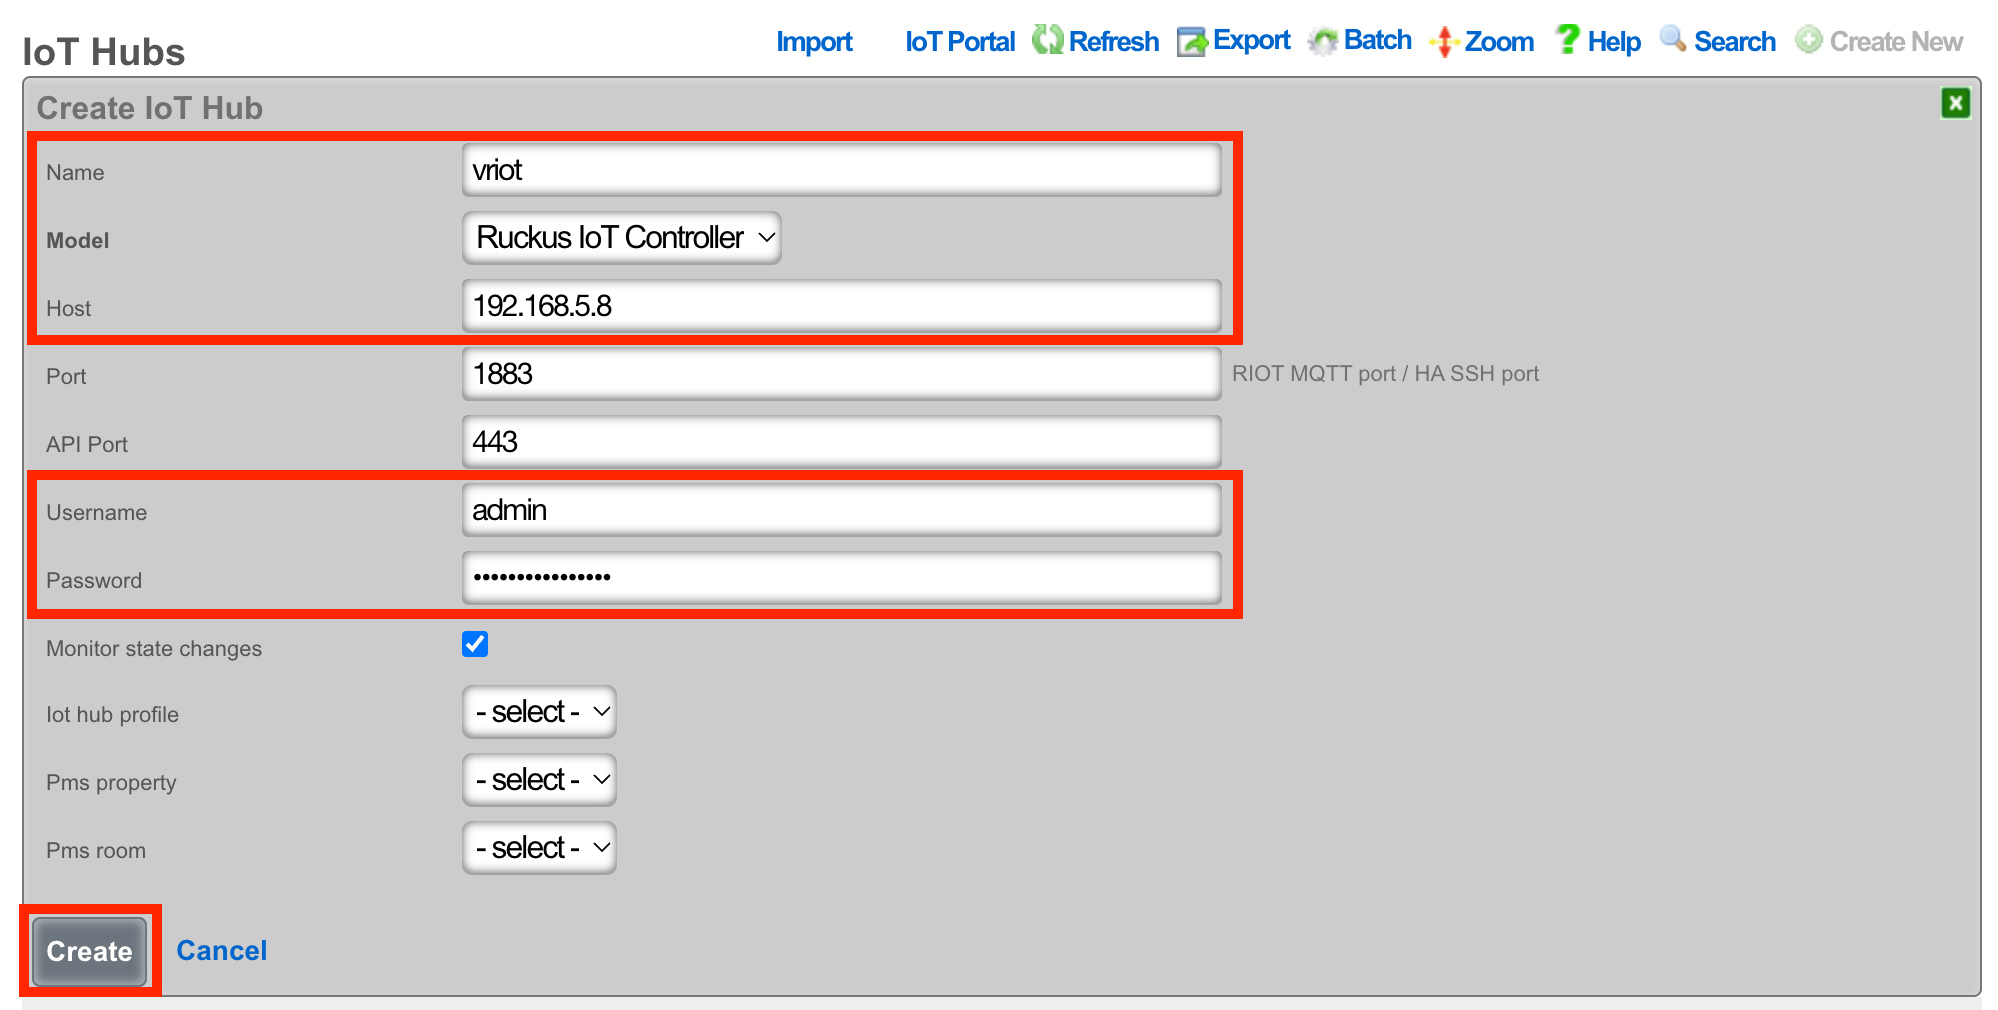
- Click Import Entities link to complete the process.

Setup MQTT on the vRIoT Server
On the vRIoT server, Browse to Admin >> Plugins

From the dropdown, select Controller Data Stream
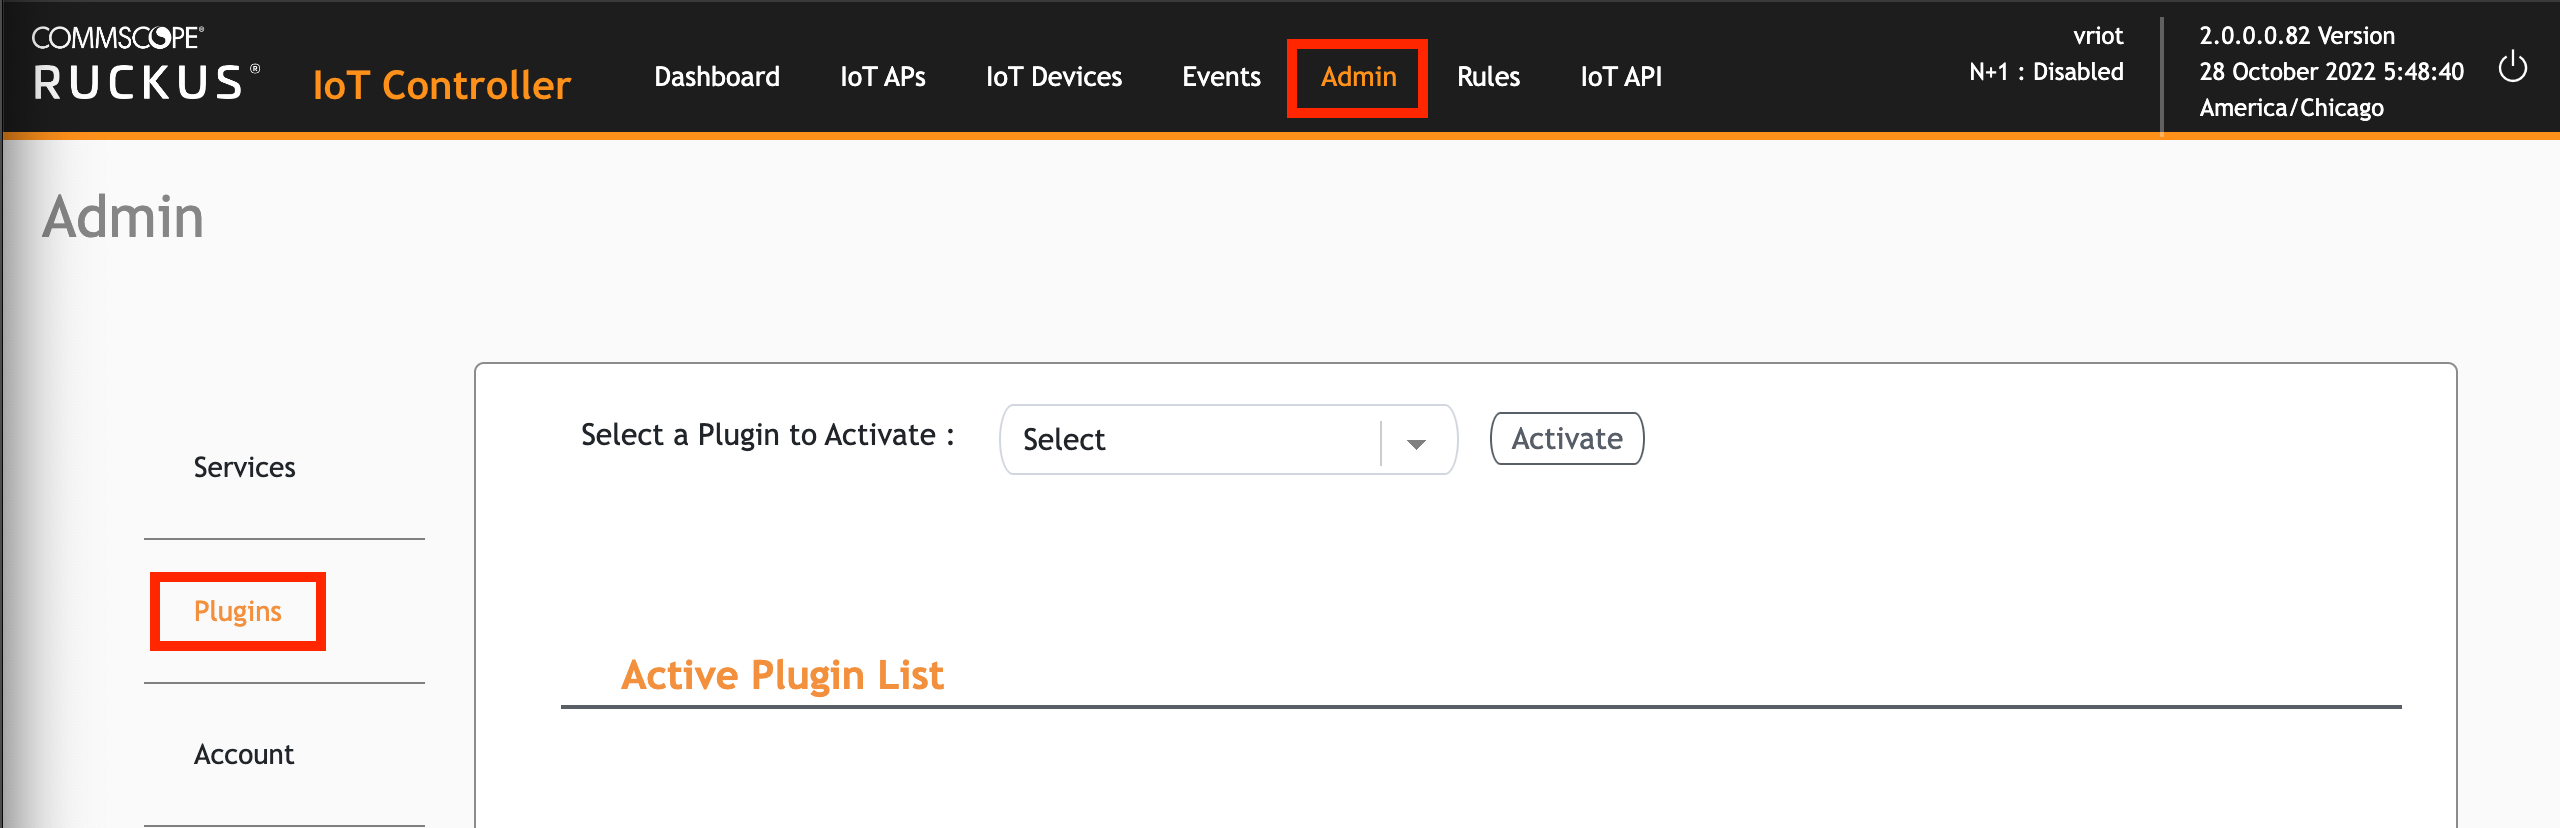
Press the Activate button

Configure the controller data stream as follows:
MQTT Broker IP: 127.0.0.1
MQTT Broker Port: 1883
MQTT Publish Topic: /events
Device Reporting: Yes
Device Reporting Topic: /events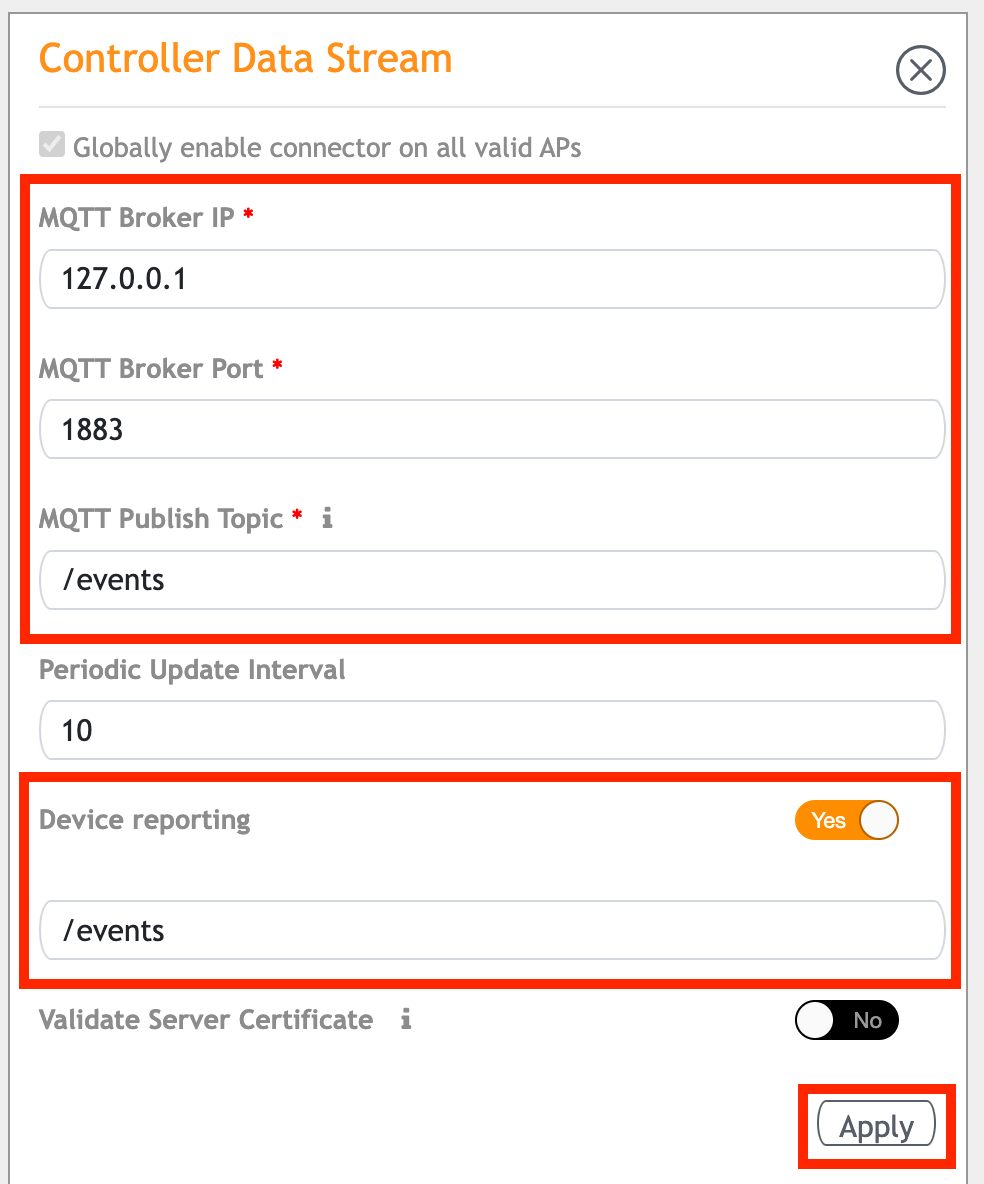
To confirm the MQTT service is working, SSH to the rXg and type
tail -f /var/log/mqtt_subscriber_iot.logto check for activity.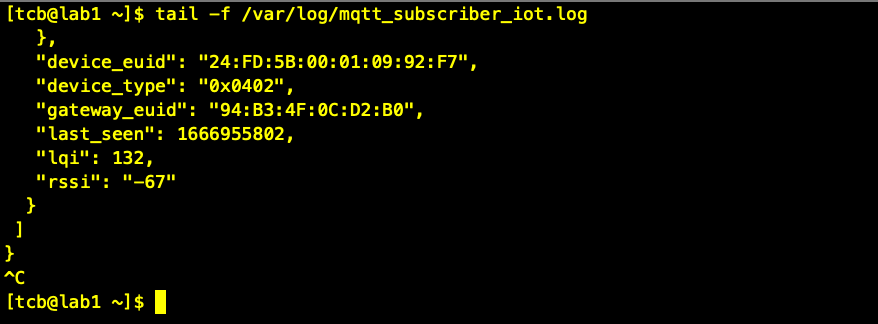
RADIUS
The RADIUS view presents the scaffolds associated with configuring the rXg integrated RADIUS server.
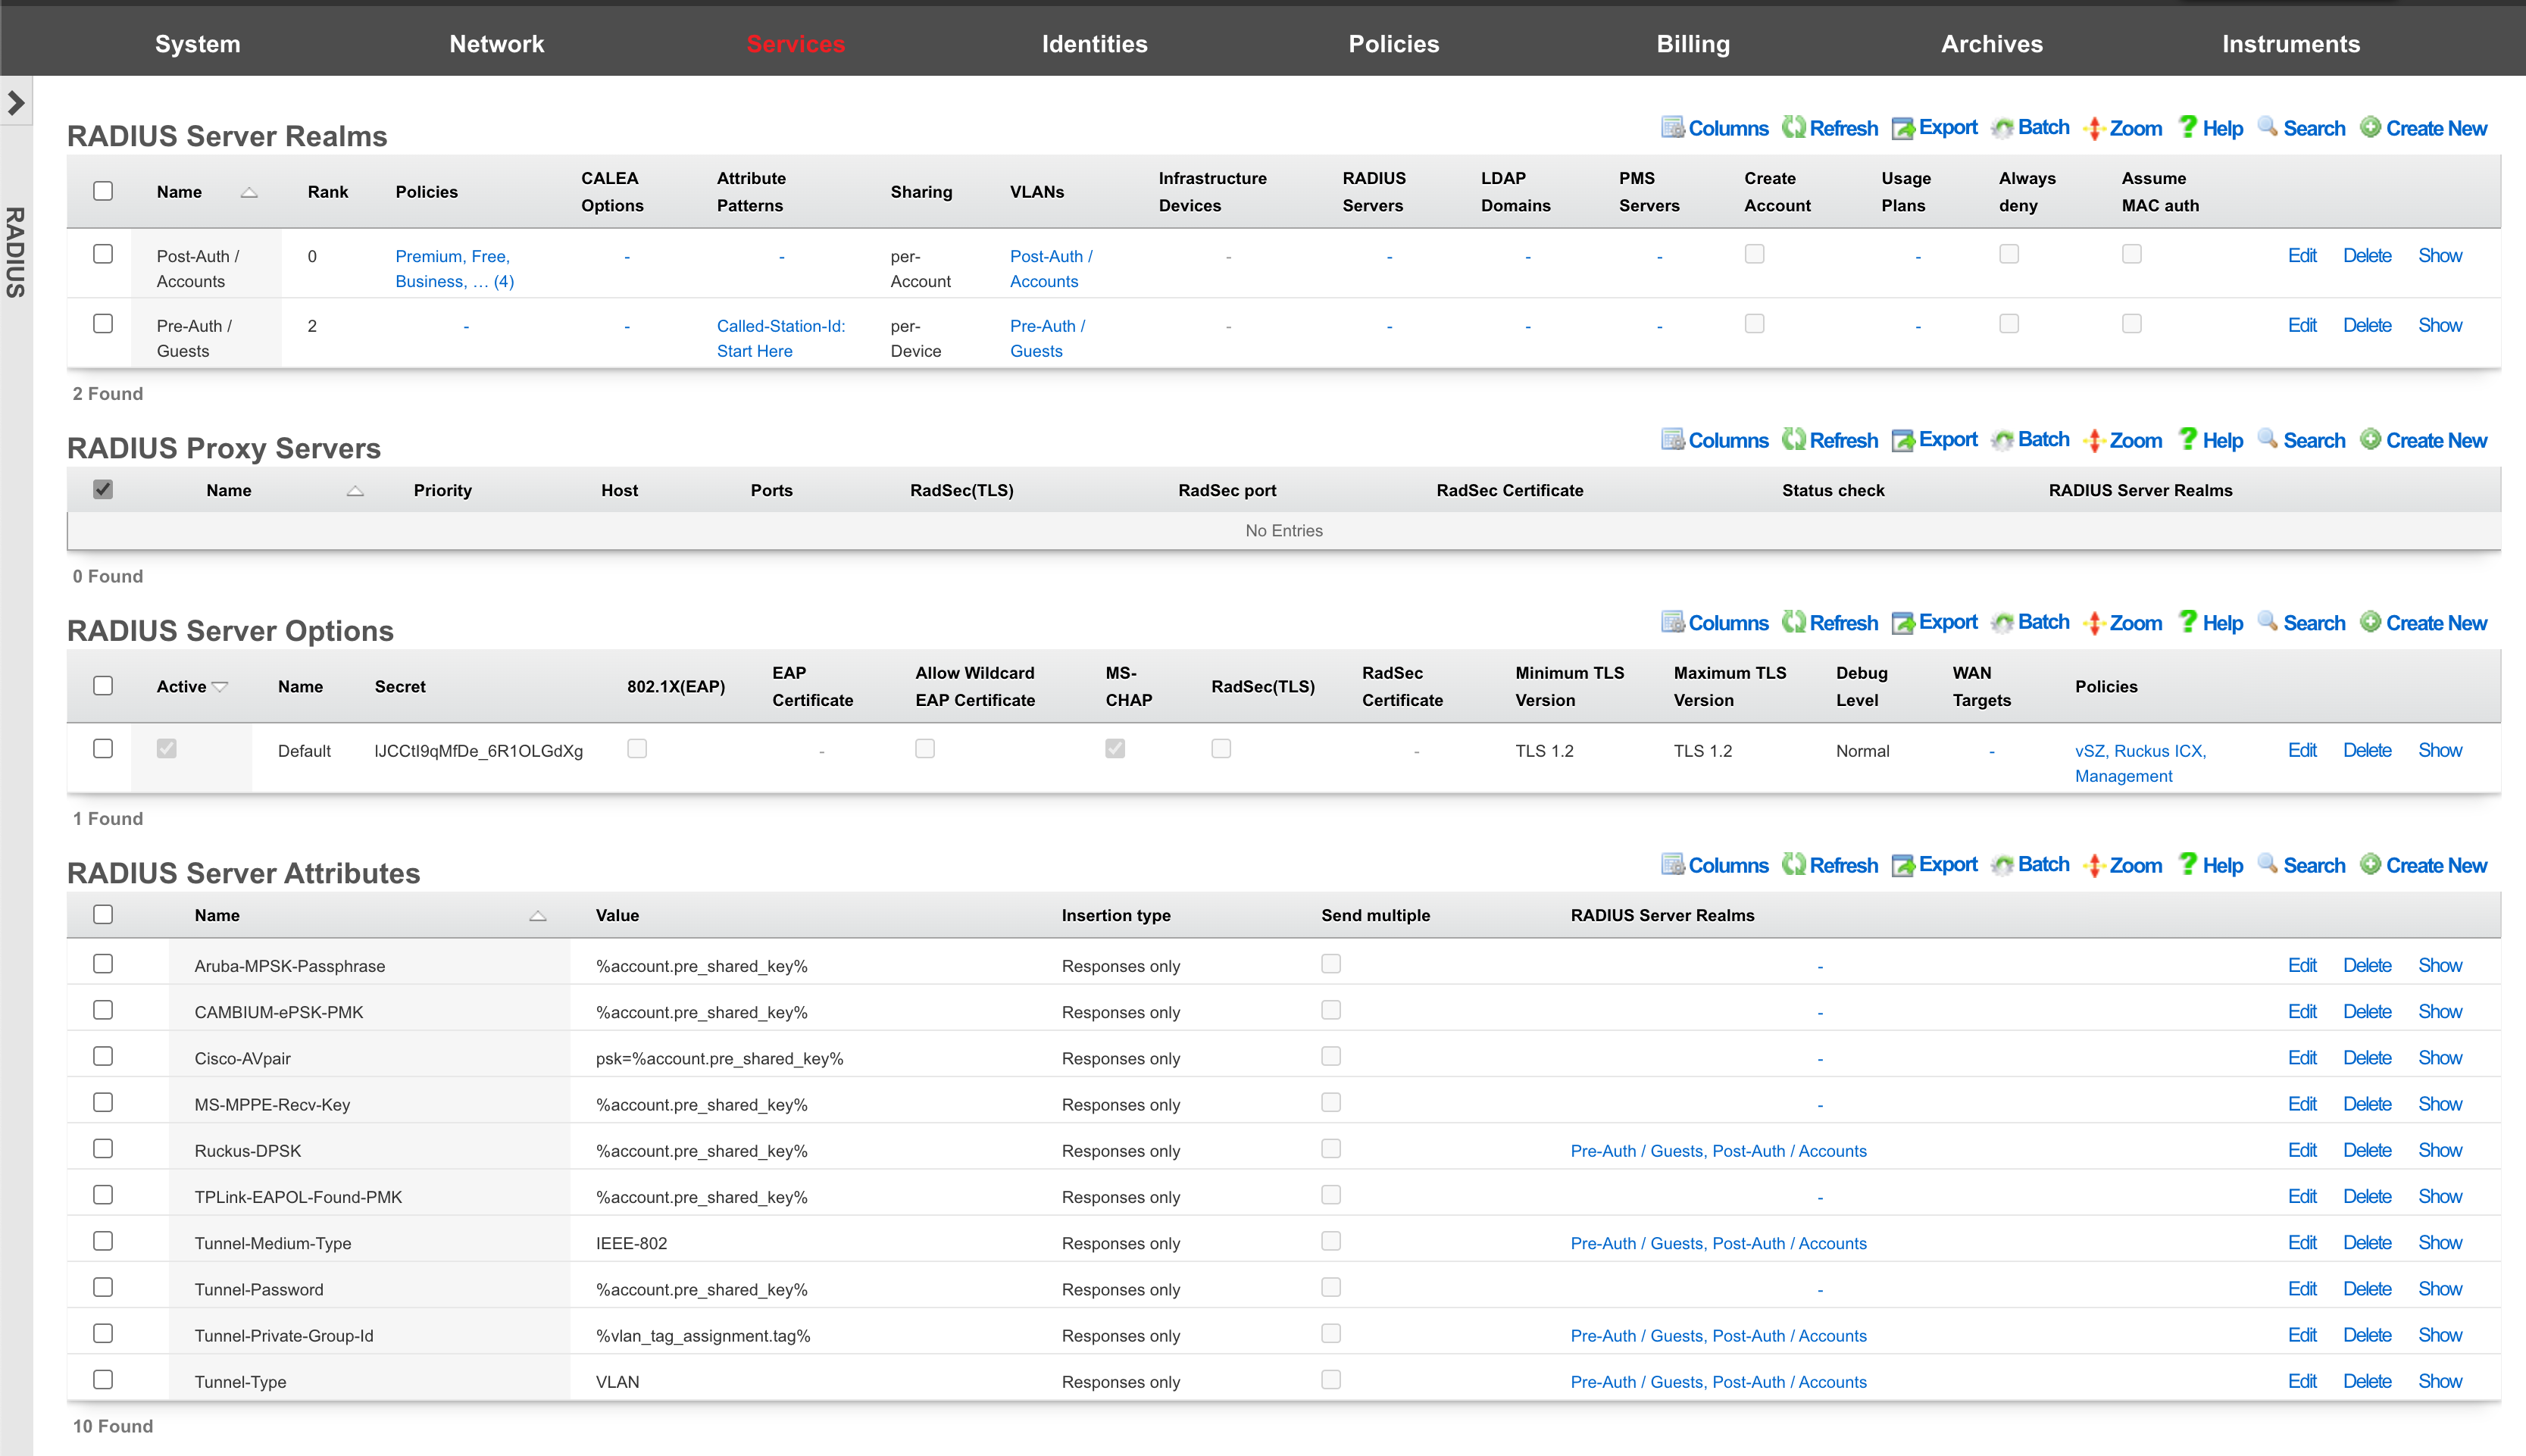
Understanding RADIUS in Network Authentication
Background and Context
RADIUS (Remote Authentication Dial-In User Service) has been the cornerstone of network authentication for decades. Originally developed for dial-up access, RADIUS has evolved to become the standard protocol for network access control in modern wired and wireless networks. In today's environments, RADIUS servers must handle authentication requests from diverse sources including:
- Wireless access points and controllers
- Ethernet switches with IEEE Std 802.1X port security
- VPN concentrators and remote access servers
- Network Access Servers (NAS) of various types
- IoT gateways and specialized network equipment
Each authentication request carries a wealth of information in the form of RADIUS attributes that describe:
- The connection attempt: Username, password, authentication method
- The requesting device: MAC address, IP address, device type
- The network infrastructure: Access point SSID, switch port, NAS identifier
- The connection context: Location, time, port type, protocol
The rXg integrated RADIUS server leverages this rich attribute data to make intelligent routing decisions, ensuring that each authentication request is handled by the appropriate backend system with the correct policies applied.
The Need for Intelligent Realm Selection
Traditional RADIUS deployments often rely on simple realm stripping (using the @ symbol in usernames like [email protected]) to route authentication requests. However, modern networks require more sophisticated approaches due to several factors:
Multi-Tenancy Requirements
Service providers and managed service organizations hosting multiple customers need to route each tenant's authentication to their respective authentication servers while maintaining complete isolation between tenants. Each organization may have different:
- Authentication backends (LDAP, Active Directory, cloud services)
- Security policies and access controls
- Network segments and VLAN assignments
- Bandwidth and usage limitations
Device-Based Routing
Different device types require different authentication paths and policies:
- Corporate laptops: Authenticate against Active Directory with certificate validation
- Employee smartphones: Use different credentials or authentication methods
- IoT devices: MAC-based authentication with specific network isolation
- Guest devices: Captive portal with self-registration
- Printers and servers: Special handling with static VLAN assignment
Location-Aware Authentication
Users in different physical locations or connecting through different network segments may require different authentication servers and policies:
- Executive floors: Higher security requirements with additional authentication factors
- Conference rooms: Temporary access with time-based restrictions
- Manufacturing floor: Device-specific authentication with restricted access
- Remote sites: Local authentication with failover to central servers
Protocol Flexibility
Supporting various authentication protocols simultaneously with different backend requirements:
- IEEE Std 802.1X: Full enterprise authentication with dynamic VLAN assignment
- MAC Authentication Bypass (MAB): For devices unable to perform IEEE Std 802.1X
- Captive Portal: Web-based authentication for guests
- VPN: Remote access with different policy sets
- API-based: Modern cloud authentication services
Dynamic Network Segmentation
Modern networks require dynamic assignment of network resources based on multiple factors:
- User role: Different VLANs for students, faculty, and staff
- Device type: Separate networks for corporate vs. personal devices
- Security posture: Quarantine networks for non-compliant devices
- Time of day: Different access levels during business hours vs. after hours
- Location: Resources available based on physical connection point
How rXg Addresses These Challenges
The rXg RADIUS Server Realms system addresses these challenges through a sophisticated multi-layered approach:
- Flexible Attribute Matching: Use any RADIUS attribute with regular expressions for precise request identification
- Policy-Based Control: Group users and devices with common requirements
- Hierarchical Evaluation: Rank-based server selection ensures proper precedence
- Dynamic Resource Assignment: Automatic VLAN and bandwidth allocation
- Multi-Backend Support: Native integration with RADIUS, LDAP, and PMS servers
- Validation and Conflict Prevention: Built-in rules prevent ambiguous configurations
This intelligent realm selection capability transforms RADIUS from a simple authentication protocol into a powerful policy engine that can adapt to the most complex network requirements while maintaining security, performance, and manageability.
Centralized Infrastructure Device AAA Server
The rXg identity database may be used as a credential store for rXg units or other third party devices via the RADIUS protocol. One common use of the rXg RADIUS server is to serve as a central credential database for administrative access to infrastructure equipment. For example, most VLAN "smart" switches and "enterprise" wireless access points may be configured to look to a RADIUS server for authenticating administrative access. Using the integrated rXg RADIUS server as a central credential store for infrastructure is a simple and effective way to reduce the complexity that is usually associated with networks that have a large number of devices.
Configuring rXg For Centralized Infrastructure Device AAA Server
Procedure:
- Create an Account Group that will be tied to Administrator Account(s)
- Create a policy for Administrator Account(s) Account Group
- Check the AAA Account Group in the Account group section.
- Create a WAN Target that contains the public IP the radius request will come from.
- Edit Radius Server Options add WAN target previously created.
- Create a RADIUS realm and attach the policy created from the Administrator Account(s).
Create a new Account that will contain the credentials.
Attach account to the policy for Administrator Account(s)
Point remote device to the rXg RADIUS server.
Navigate to Identities-->Groups and create a new Account Group.
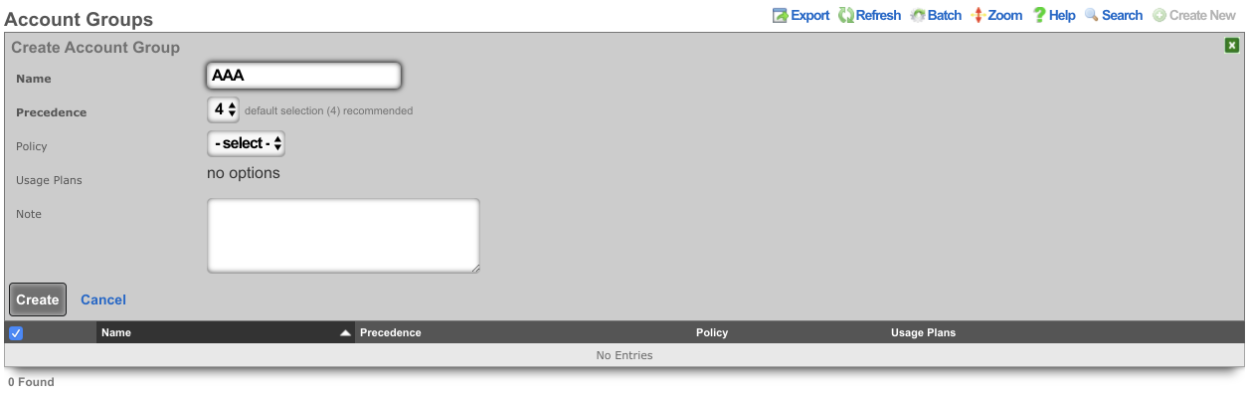
Navigate to Policies-->Captive Portal and create a new Policy. Enter a name for the new policy and check the Account Group created in the previous step.
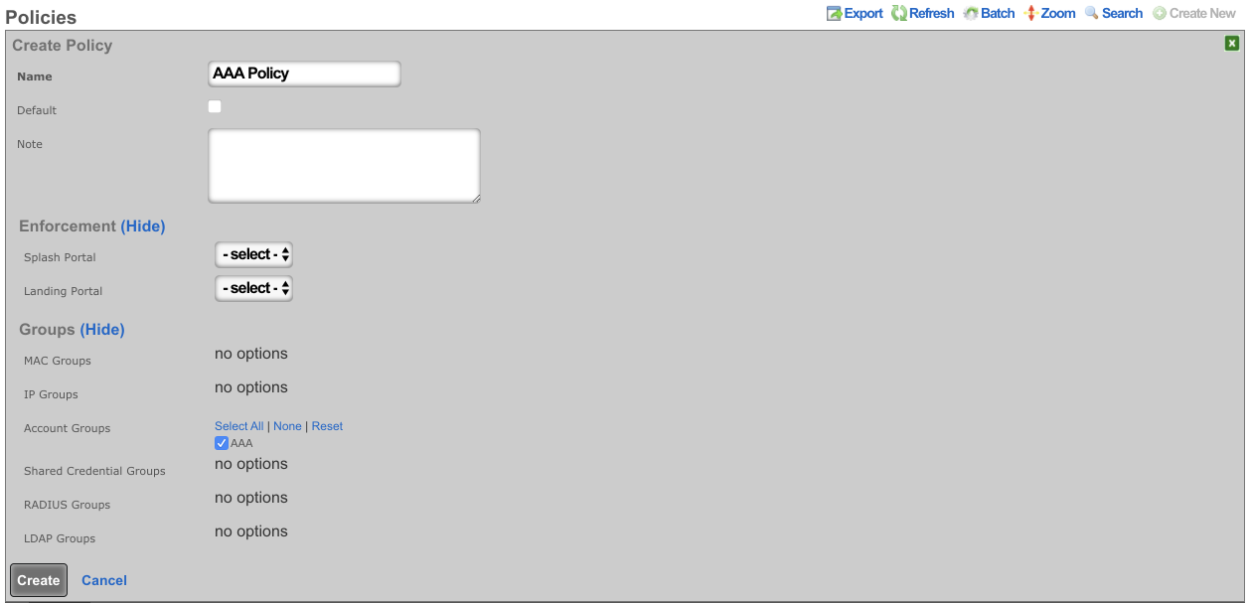
Create a new WAN Target or edit existing WAN Target by navigating to Identities-->Definitions. Enter the IP(s) that should be allowed access to the Radius Server.
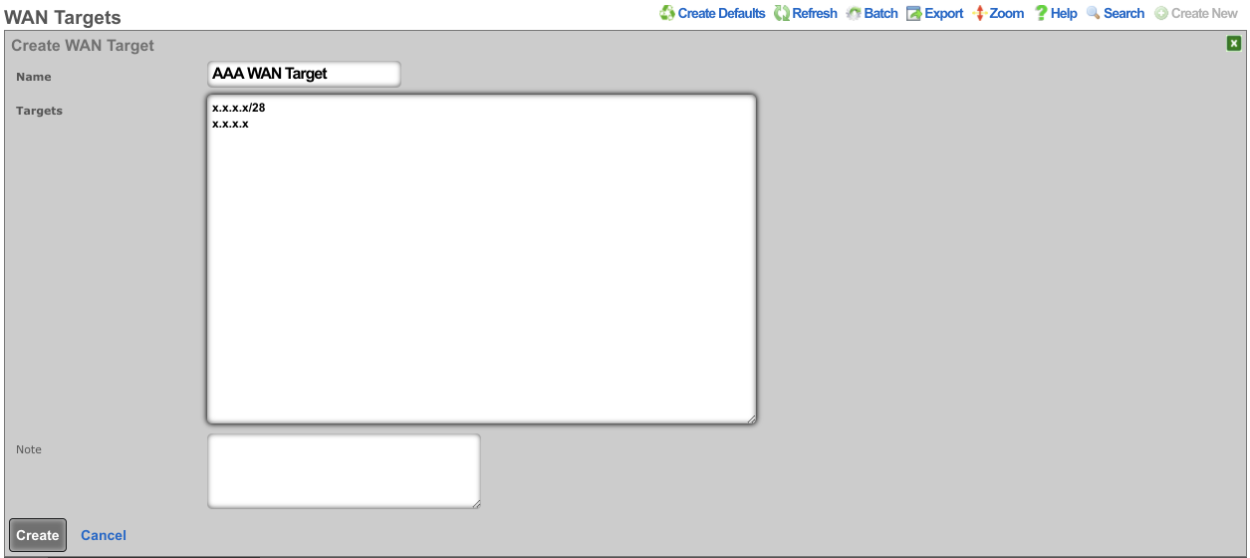
Edit the RADIUS Server Options by navigating to Services-->RADIUS and check the WAN Target. Click Update.
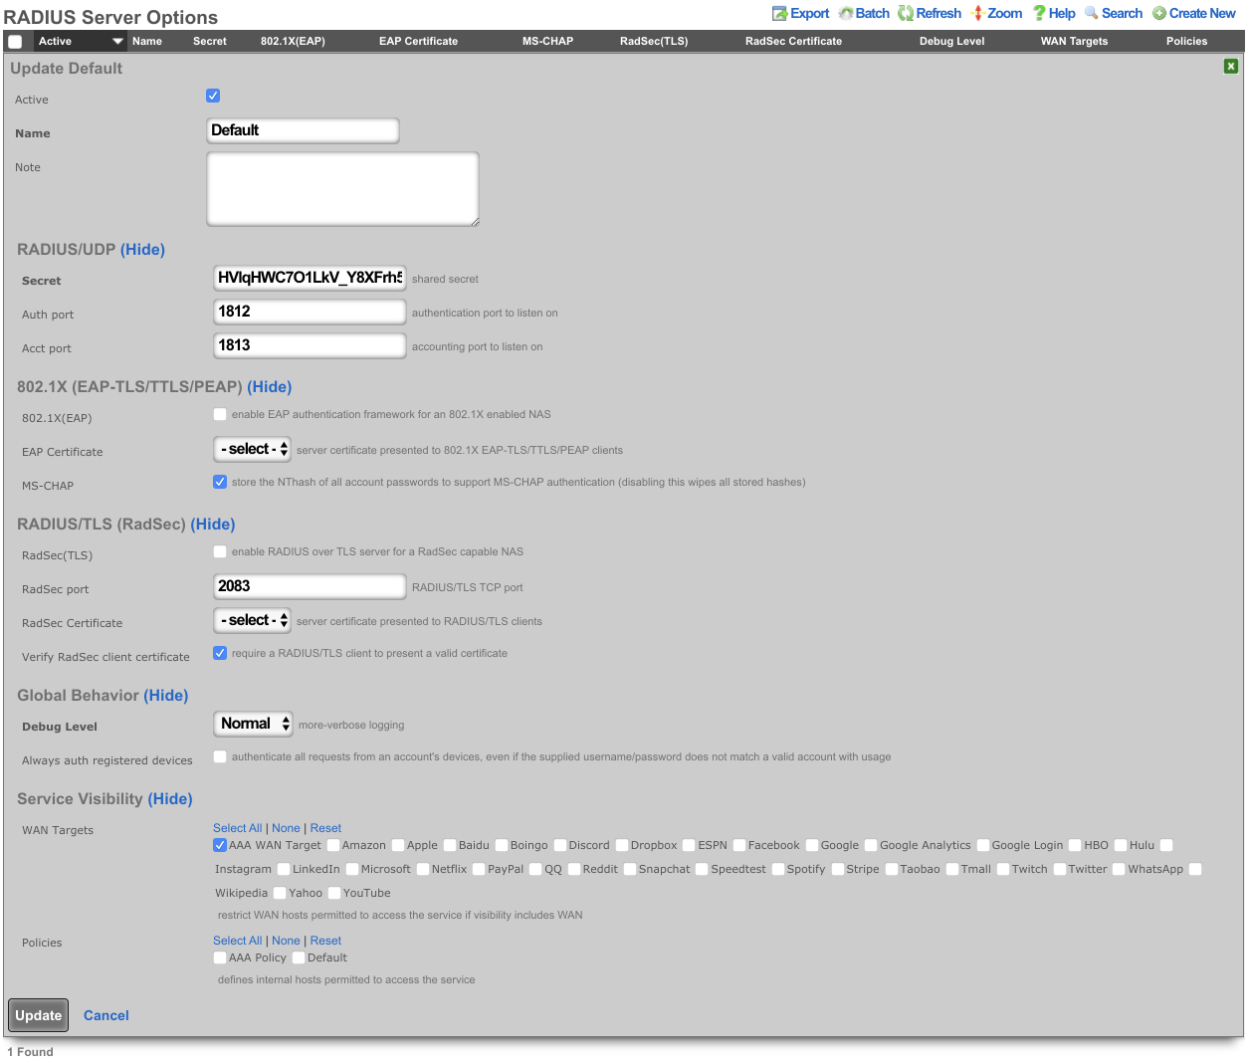
Create a new RADIUS Server Realm and select the policy that was created for the Administator account(s). Click Create.
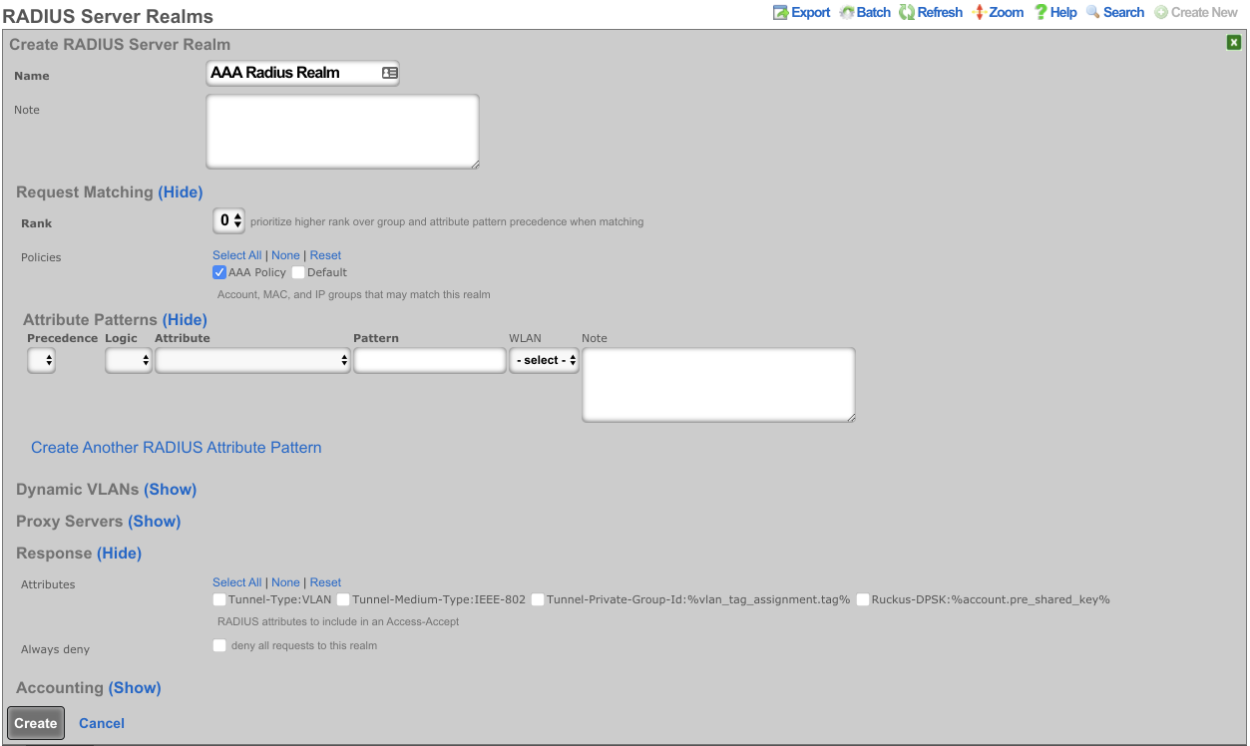
Create a new Account by navigating to Identities-->Accounts, Enter the Login name and password. Under Provision set the Group to the Account Group created previously. A First and Last name will also need to be provided along with an email address.
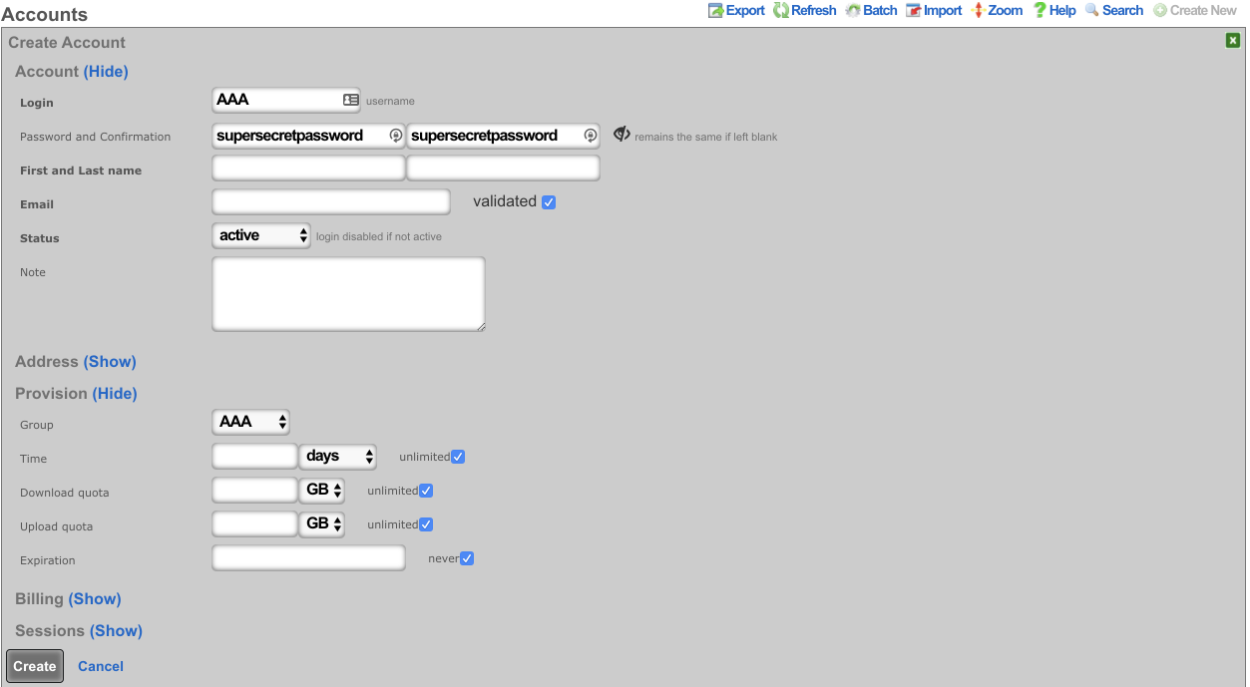
Point the device to use the RADIUS server running on the rXg, set the primary IP address of the rXg as the AAA server, and adjust the ports if necessary. The key can be copied from the Radius Server Options on the rXg.
Subscriber Roaming
Another common use of the integrated rXg RADIUS server is to share a single centrally located end-user database amongst a set of geographically diverse RADIUS NAS capable devices. For example, "smart" access points, DSLAMs and even modem banks may be configured to use RADIUS to use an rXg with the RADIUS server enabled as a credential store. Using a single unified credential store across devices that controls access to multiple media helps control operational costs.
In many cases, the RADIUS NAS may also be configured for forced browser redirect of unauthenticated end-users to the rXg captive portal. This enables end-user self-provisioning and further reduces operational overhead. Since the rXg billing mechanisms are fully integrated into with the RADIUS server enabling operators to easily bill end-users for access to a diverse set of media.
The rXg integrated RADIUS server may also be used as a mechanism to loosely federate multiple rXg units. RG Nets recommends the deployment of the rXg clustering mechanism with an rXg cluster controller for unified and simplified clustering of multiple rXg units. However, for certain special cases, it may be more appropriate to use the RADIUS server of an rXg node or an rXg cluster controller along with the RADIUS NAS of multiple other rXgs to create a federation of rXg devices that share a single database.
One rXg unit is then dedicated to being the federation master. The captive portal web application server and end-user database are centrally stored on the federation master. The federation nodes are configured to authenticate using the RADIUS NAS clients and the rXg federation master is configured to be a RADIUS server.
Enterprise NAC
The rXg integrated RADIUS Server can be used to as a centralized AAA server for enterprise wired and wireless networks. Edge infrastructure devices are configured as access servers with port control enabled. Both username/password tuples and MAC address authentication credentials are supported. The rXg can proxy authentication to an external LDAP or RADIUS server (discussed later in this manual page) and/or check the local database.
If the local database is used then the operator may choose to create accounts for each employee and set a password. Alternatively, the administrator can use MAC address device authentication. To accomplish this, the operator will need to populate an account with desired MAC addresses. In either case, the account(s)should be associated with an account group. The account group also needs to be associated to a policy that is selected under a RADIUS Server Realm's matching options. By associating VLAN(s) to the RADIUS Server Realm , an operator can control what network(s) enterprise owned devices are assigned.
For example, in the packet exchange below, the Calling-Station-IDattribute contains the MAC Address of the requesting device. The highest-priority policy will be used to determine which RADIUS Server Realm the device matches. The Tunnel-Private-Group-IDattribute in the Access-Accept packet shows the VLAN assigned to this device.
14:38:33.381021 IP (tos 0x0, ttl 64, id 0, offset 0, flags [DF], proto UDP (17), length 206)
10.103.254.4.56792 > 10.103.254.1.1812: [udp sum ok] RADIUS, length: 178
Access-Request (1), id: 0xe5, Authenticator: 2b9a4726041df0639dcc5f8574c30f5a
User-Name Attribute (1), length: 14, Value: 449160ece7fa
0x0000: 3434 3931 3630 6563 6537 6661
User-Password Attribute (2), length: 18, Value:
0x0000: a0e8 7cc3 4eb8 c07f 2322 714c a2e7 416e**Calling-Station-Id Attribute (31), length: 19, Value: 44-91-60-EC-E7-FA** 0x0000: 3434 2d39 312d 3630 2d45 432d 4537 2d46
0x0010: 41
NAS-IP-Address Attribute (4), length: 6, Value: 10.103.254.4
0x0000: 0a67 fe04
Called-Station-Id Attribute (30), length: 32, Value: D4-68-4D-2A-39-F0:SomeSSID
0x0000: 4434 2d36 382d 3444 2d32 412d 3339 2d46
0x0010: 303a 4b61 7272 6963 6b48 6f75 7365
Service-Type Attribute (6), length: 6, Value: Framed
0x0000: 0000 0002
NAS-Port-Type Attribute (61), length: 6, Value: Wireless - IEEE 802.11
0x0000: 0000 0013
NAS-Identifier Attribute (32), length: 19, Value: D4-68-4D-2A-39-F8
0x0000: 4434 2d36 382d 3444 2d32 412d 3339 2d46
0x0010: 38
Vendor-Specific Attribute (26), length: 20, Value: Vendor: Unknown (25053)
Vendor Attribute: 3, Length: 12, Value: KarrickHouse
0x0000: 0000 61dd 030e 4b61 7272 6963 6b48 6f75
0x0010: 7365
Message-Authenticator Attribute (80), length: 18, Value: .,H..-..S@.)..X.
0x0000: 842c 481d 8a2d 8c03 5340 0c29 deeb 5881
14:38:33.414314 IP (tos 0x0, ttl 64, id 6773, offset 0, flags [none], proto UDP (17), length 74)
10.103.254.1.1812 > 10.103.254.4.56792: [bad udp cksum 0x111c -> 0x598a!] RADIUS, length: 46
Access-Accept (2), id: 0xe5, Authenticator: d6f41b864e670829842982228b59649e
Class Attribute (25), length: 8, Value: Family
0x0000: 4661 6d69 6c79
Tunnel-Medium-Type Attribute (65), length: 6, Value: Tag[Unused] 802
0x0000: 0000 0006**Tunnel-Private-Group-ID Attribute (81), length: 6, Value: 2002**0x0000: 3230 3032
Tunnel-Type Attribute (64), length: 6, Value: Tag[Unused] VLAN
0x0000: 0000 000d
The enterprise NAC functionality can be used to augment other functions of the rXg. For instance, some WLAN controllers proxy RADIUS access-requests through the controller for client authentication, while others send the requests directly from each AP. Because the rXg utilizes ACLs to limit access to the RADIUS server function, the operator should utilize RADIUS MAC authentication on switchports to automate servicing access-requests from many APs.
Procedure:
- Create AP managment VLANs
- Create an IP group for AP Managment VLANs
- Create a policy for AP Management IP group
- Add AP Management policy to RADIUS Server Options scaffold
- Create a MAC group containing a wildcard of the OUIs of Access Points
- Attach MAC group to a policy
- Create a RADIUS realm for the AP MAC group policy
- Attach AP Management VLANs
- Enable RADIUS MAC authentication bypass on switch ports
RADIUS Password Authentication
When using password-based RADIUS authentication methods (such as PAP, CHAP, EAP-PEAP, EAP-TTLS, or MS-CHAPv2), it is important to understand the distinction between the two types of credentials stored for each account.
Account Credentials
Each account in the rXg has two separate password fields:
- Login Password - The password used for web portal authentication and password-based RADIUS authentication. When authenticating via RADIUS, users must enter this password.
- Pre-Shared Key (PSK) - The key used exclusively for wireless encryption in Dynamic PSK (DPSK) deployments. This key is used by the wireless infrastructure to encrypt the connection between the client device and the access point. It is not used for RADIUS authentication.
MS-CHAP Authentication
MS-CHAP and MSCHAPv2 are commonly used as inner authentication methods within EAP-PEAP or EAP-TTLS. These protocols require the server to store an NT hash of the password. To enable MS-CHAP support:
- Navigate to Services :: RADIUS and edit the RADIUS Server Options
- Enable the MS-CHAP checkbox
- Click Update
Important: The MS-CHAP option must be enabled before account passwords are set. The NT hash is computed when the password is initially saved. If MS-CHAP is enabled after accounts already exist, the operator must reset each account's password to generate the NT hash. Disabling MS-CHAP will remove all stored NT hashes.
IEEE Std 802.1X EAP-PEAP/TTLS Authentication
The rXg integrated RADIUS server supports IEEE Std 802.1X authentication using EAP-PEAP and EAP-TTLS with inner authentication methods such as MSCHAPv2, PAP, and CHAP. This enables enterprise-grade wireless and wired network access control using username/password credentials stored in rXg Accounts.
How It Works
When a client device connects to an IEEE Std 802.1X-enabled network:
- The client initiates EAP authentication with the access point or switch
- The infrastructure device forwards the RADIUS Access-Request to the rXg
- The rXg establishes a TLS tunnel (PEAP or TTLS) with the client
- Inside the tunnel, the client sends credentials (username/password)
- The rXg retrieves the NT-Password hash from the matching Account record
- The inner authentication method (e.g., MSCHAPv2) validates the credentials
- On success, the rXg returns Access-Accept with optional VLAN assignment
Critical Configuration Settings
The following RADIUS Server Realm settings are essential for IEEE Std 802.1X EAP-PEAP/TTLS authentication:
| Setting | Required Value | Reason |
|---|---|---|
| Assume MAC auth | Unchecked | When checked, the rXg treats requests as MAC authentication and does NOT retrieve the NT-Password from the Account. This causes MSCHAPv2 to fail with "No NT-Password" errors. |
| Always perform Account lookup | Checked | Ensures the Account record is retrieved to obtain the NT-Password hash, even when matching by attribute pattern rather than account group membership. |
When to Use Each Setting
| Use Case | Assume MAC auth | Always perform Account lookup |
|---|---|---|
| IEEE Std 802.1X EAP-PEAP/MSCHAPv2 (username/password) | Unchecked | Checked |
| IEEE Std 802.1X EAP-TTLS/PAP (username/password) | Unchecked | Checked |
| IEEE Std 802.1X EAP-TLS (certificate-based) | Unchecked | Unchecked |
| MAC Authentication Bypass (MAB) only | Checked | Optional |
| Mixed IEEE Std 802.1X + MAB fallback | Unchecked | Checked |
Configuration Procedure
Prerequisites: - MS-CHAP enabled in RADIUS Server Options (see above) - A valid TLS certificate configured for the RADIUS server - User Accounts created with passwords (NT-Password hash is generated automatically when MS-CHAP is enabled) - Infrastructure devices (APs, switches) configured as RADIUS clients
Procedure:
- Navigate to Services :: RADIUS
- Configure RADIUS Server Options:
- Enable the MS-CHAP checkbox
- Set a secret (shared with infrastructure devices)
- Select WAN targets or policies to allow RADIUS client access
- Optionally select a certificate for EAP-TLS tunnels
- Create a RADIUS Server Realm for IEEE Std 802.1X authentication:
- Enter a descriptive name (e.g., "Enterprise IEEE Std 802.1X")
- Select policies containing the Account Groups for authorized users
- Uncheck "Assume MAC auth"
- Check "Always perform Account lookup"
- Optionally configure Dynamic VLANs for VLAN assignment
- Optionally add RADIUS Server Attributes for vendor-specific responses
- Create user Accounts under Identities :: Accounts:
- Set Login (username) and Password
- Assign to an Account Group linked to a Policy selected in step 3
- Configure infrastructure devices to use the rXg as their RADIUS server
Troubleshooting
If RADIUS authentication fails, verify that:
- The user is entering their account login password (not their PSK)
- For MS-CHAP: the MS-CHAP option is enabled and the account password was set after enabling it
Error: "No NT-Password. Cannot perform authentication"
This error indicates MSCHAPv2 cannot find the password hash. Common causes:
| Cause | Solution |
|---|---|
| MS-CHAP not enabled | Enable MS-CHAP in RADIUS Server Options |
| Password set before MS-CHAP enabled | Reset the account password to regenerate the NT hash |
| "Assume MAC auth" is checked | Uncheck this setting on the RADIUS Server Realm |
| Account lookup not performed | Check "Always perform Account lookup" on the realm |
| No matching Account found | Verify the username exists as an Account login |
| Account not in correct group | Ensure the Account is in an Account Group linked to a Policy selected on the realm |
Verification Steps:
- Enable debug on the RADIUS Server Options to log packet contents
- Check
/var/log/radius/radius.logfor authentication flow - Successful authentication shows:
perl: &control:NT-Password = $RAD_CHECK{'NT-Password'} -> '0x...' mschap: Found NT-Password - Failed authentication shows:
WARNING: mschap: No Cleartext-Password configured. Cannot create NT-Password ERROR: mschap: FAILED: No NT-Password. Cannot perform authentication
Account Requirements
For MSCHAPv2 authentication, each Account must have:
- Login: The username the client will enter
- Password: Set via the admin UI (the NT-Password hash is computed automatically when MS-CHAP is enabled)
- Account Group membership: The Account must belong to an Account Group that is linked to a Policy selected on the RADIUS Server Realm
The NT-Password (NTLM hash) is automatically generated when: - Creating or updating an Account with a password in the rXg admin UI (with MS-CHAP enabled) - Importing accounts via CSV with plaintext passwords - Syncing from LDAP/Active Directory (if NT hash is available)
IEEE Std 802.1X EAP-TLS Authentication (Certificate-Based)
EAP-TLS provides the highest level of security for IEEE Std 802.1X authentication by using client certificates instead of passwords. Both the server and client authenticate each other using X.509 certificates, eliminating the risks associated with password-based authentication.
How EAP-TLS Works
When a client device connects to an EAP-TLS enabled network:
- The client initiates EAP authentication with the access point or switch
- The infrastructure device forwards the RADIUS Access-Request to the rXg
- The rXg presents its server certificate to the client
- The client validates the server certificate against its trusted CA list
- The client presents its client certificate to the rXg
- The rXg validates the client certificate against the configured CA and optionally checks CRL
- On successful mutual authentication, the rXg returns Access-Accept with optional VLAN assignment
Prerequisites
- A Certificate Authority (CA) infrastructure for issuing client certificates
- Server certificate for the RADIUS server (non-wildcard recommended)
- Client certificates issued to each authenticating device or user
- CA certificate chain imported into the rXg
Configuration Procedure
Import or create certificates under System :: Certificates:
- Import or create the CA certificate that will sign client certificates
- Import or create a server certificate for the RADIUS server
- Ensure the server certificate is signed by a CA trusted by your clients
Configure RADIUS Server Options under Services :: RADIUS:
- Enable the active checkbox
- Set the secret (shared with infrastructure devices)
- Enable the enable EAP checkbox
- Select the server certificate (the TLS certificate for EAP)
- Optionally enable check CRL if using Certificate Revocation Lists
- Select WAN targets or policies to allow RADIUS client access
Create a RADIUS Server Realm for EAP-TLS authentication:
- Enter a descriptive name (e.g., "Certificate Auth")
- Configure policies if restricting by identity group
- Optionally configure attribute patterns for SSID-based matching
- Uncheck "Assume MAC auth"
- "Always perform Account lookup" can be left unchecked for pure certificate authentication
- Optionally configure Dynamic VLANs for VLAN assignment
Configure client devices:
- Install the CA certificate as a trusted root CA
- Install the client certificate and private key
- Configure the IEEE Std 802.1X supplicant to use EAP-TLS
- Set the identity to match the certificate Common Name (CN) or Subject Alternative Name (SAN)
Configure infrastructure devices (APs, switches) to use the rXg as their RADIUS server
Certificate Requirements
Server Certificate: - Must not be a wildcard certificate (Windows clients reject these by default) - Should be signed by a CA trusted by client devices - Must include the RADIUS server's FQDN in the CN or SAN
Client Certificates: - Must be signed by a CA whose certificate is imported into the rXg - Should include user or device identification in the CN or SAN - Must not be expired or revoked (if CRL checking is enabled)
CRL Checking
To enable Certificate Revocation List checking:
- Ensure your CA publishes CRLs at the URLs specified in the CA certificate's CRL Distribution Points extension
- Enable check CRL in the RADIUS Server Options
- The rXg will periodically fetch and cache CRLs from the distribution points
- Client certificates listed in the CRL will be rejected
Troubleshooting EAP-TLS
Client fails to connect - certificate validation error: - Verify the server certificate is not expired - Ensure the server certificate is signed by a CA trusted by the client - Check that the server certificate is not a wildcard (or enable "allow wildcard EAP certificate")
Server rejects client certificate:
- Verify the client certificate is signed by a CA imported into the rXg
- Check that the client certificate is not expired
- If CRL checking is enabled, verify the certificate is not revoked
- Check /var/log/radius/radius.log for specific certificate validation errors
Authentication succeeds but no VLAN assigned: - Verify the RADIUS Server Realm has VLANs configured - Check that the matching policy or attribute pattern is correct - Review RADIUS Server Attributes for proper Tunnel-* attributes
DVLAN for Large Public Venues
The rXg incorporates intelligent VLAN assignment in the RADIUS Server. A RADIUS Server Realm with the per-device setting is used for guest, quarantine and onboarding networks where true device isolation is desired. This mechanism is often used a large public venues so that event attendees can be split across operator chosen VLANs. Optionally each device can be assigned a /30 network. To accomplish this, the operator will need to create a RADIUS Server Realm matching a policy, or attribute pattern, and select per-account or per-device in the Dynamic VLANs sharing menu. To enable microsegmented L3s or L2s for attendees, VLANs with proper auto-increment, and ratio settings should be implemented. VLAN re-use can be used in LPVs, where capacity exceeds available VLANs. This allows for high-density deployments, with minimal broadcast domains.
For example, in the packet exchange below, theCalled-Station-ID attribute contains the AP Radio MAC Address, and SSID the client device requested. By using a attribute pattern match, the operator can have all devices requesting this WLAN match this RADIUS Realm. The rXg has a variety of built in attributes, and allows the operator to define custom attributes to match
14:38:33.381021 IP (tos 0x0, ttl 64, id 0, offset 0, flags [DF], proto UDP (17), length 206)
10.103.254.4.56792 > 10.103.254.1.1812: [udp sum ok] RADIUS, length: 178
Access-Request (1), id: 0xe5, Authenticator: 2b9a4726041df0639dcc5f8574c30f5a
User-Name Attribute (1), length: 14, Value: 449160ece7fa
0x0000: 3434 3931 3630 6563 6537 6661
User-Password Attribute (2), length: 18, Value:
0x0000: a0e8 7cc3 4eb8 c07f 2322 714c a2e7 416e
Calling-Station-Id Attribute (31), length: 19, Value: 44-91-60-EC-E7-FA
0x0000: 3434 2d39 312d 3630 2d45 432d 4537 2d46
0x0010: 41
NAS-IP-Address Attribute (4), length: 6, Value: 10.103.254.4
0x0000: 0a67 fe04**Called-Station-Id Attribute (30), length: 32, Value: D4-68-4D-2A-39-F0:EventSSID**0x0000: 4434 2d36 382d 3444 2d32 412d 3339 2d46
0x0010: 303a 4b61 7272 6963 6b48 6f75 7365
Service-Type Attribute (6), length: 6, Value: Framed
0x0000: 0000 0002
NAS-Port-Type Attribute (61), length: 6, Value: Wireless - IEEE 802.11
0x0000: 0000 0013
NAS-Identifier Attribute (32), length: 19, Value: D4-68-4D-2A-39-F8
0x0000: 4434 2d36 382d 3444 2d32 412d 3339 2d46
0x0010: 38
Vendor-Specific Attribute (26), length: 20, Value: Vendor: Unknown (25053)
Vendor Attribute: 3, Length: 12, Value: KarrickHouse
0x0000: 0000 61dd 030e 4b61 7272 6963 6b48 6f75
0x0010: 7365
Message-Authenticator Attribute (80), length: 18, Value: .,H..-..S@.)..X.
0x0000: 842c 481d 8a2d 8c03 5340 0c29 deeb 5881
14:38:33.414314 IP (tos 0x0, ttl 64, id 6773, offset 0, flags [none], proto UDP (17), length 74)
10.103.254.1.1812 > 10.103.254.4.56792: [bad udp cksum 0x111c -> 0x598a!] RADIUS, length: 46
Access-Accept (2), id: 0xe5, Authenticator: d6f41b864e670829842982228b59649e
Class Attribute (25), length: 8, Value: Family
0x0000: 4661 6d69 6c79
Tunnel-Medium-Type Attribute (65), length: 6, Value: Tag[Unused] 802
0x0000: 0000 0006
Tunnel-Private-Group-ID Attribute (81), length: 6, Value: 2002
0x0000: 3230 3032
Tunnel-Type Attribute (64), length: 6, Value: Tag[Unused] VLAN
0x0000: 0000 000d
DVLAN Microsegmentation for Multi-Tenant and Hospitality
By configuring a RADIUS Server Realm in the rXg to use per-room, or per-guest VLANs, users can be dynamically assigned a microsegmented network. This enables users to have private LANs on a shared infrastructure, enabling property wide coverage of their personal network. Unique features such as screencasting, printing, etc., can happen via standard L2 protocols. To accomplish this, the operator will need to create a RADIUS Server Realm matching a policy associated to the desired account group , and select per-room in the Dynamic VLANs sharing menu.
For example, a hotel client would integrate the rXg with their existing PMS, and assign per-room VLANs to segment guests. This enables the guests to use services like screencasting in their rooms without the need to download an app. A shared office space environment would implement per-guest VLANs, and segment traffic from other guests, while making tasks like printing and file-sharing seamless.
An operator can associate a Bi-NAT pool to a policy, and utilize the per-room DVLAN mechanism to provide a "virtual Residential Gateway" or vRG. This enables end-users to manage their own port forwards for web-hosting, and gaming. In MDU or Dorm environments, this enables zero-operator intervention, and instant provisioning of typically complex configurations.
RADIUS Proxying
RADIUS Proxy Servers can be used in a variety of ways. By defining a RADIUS Proxy Server an operator can choose to proxy authentication, accounting, or all RADIUS packets to a remote RADIUS Server, LDAP Server, or PMS Server. By proxying authentication requests to a remote server, an operator can enable centralized credential management in distributed rXg deployments.
For example, the rXg can proxy ONLY RADIUS Accounting packets to an upstream device. This is useful in routed scenarios, where the rXg is not the head-end. This enables the operator to send user-name and IP/session information to upstream devices such as content filters, or firewalls.
An operator may also choose to proxy authentication requests against a configured LDAP Server. This enables IEEE Std 802.1X authentication directly against an LDAP server such as Microsoft Active Directory, without the use of Microsoft Network Policy Server (NPS).
RADIUS Proxy with RadSec
RadSec is a a protocol for transporting RADIUS datagrams over TCP and TLS. Standard RADIUS communications depend upon the unreliable transport protocol UDP, and lack security for large parts of the packet payload. RadSec provides a means to secure the communication between a RADIUS NAS and Server by utilizing Transport Layer Security (TLS). By utilizing RadSec, an operator can proxy incoming RADIUS requests securely to a centralized credential store.
To learn more about RADIUS, there are numerous web pages that provide background information on the RADIUS protocol. In addition, the O'Relly RADIUS (ISBN 0596003226) book provides a basic overview of the protocol. A good reference for how to use RADIUS in more complex environments is AAA and Network Security for Mobile Access: Radius, Diameter, EAP, PKI and IP Mobility (ISBN 0470011947).
Multiple PSK with Adtran vWLAN
AdTran supports multiple sets of tagged Tunnel-* RADIUS attributes where each set represents a 'guess' of what the end user may have entered into her device as the PSK. When a set of Tunnel-* attributes tagged with :1 are configured in the rXg, the rXg will automatically create additional sets of Tunnel-* attributes that represent additional possible Accounts the device may belong to. The rXg will create up to 24 total attribute sets. The AP will determine which set contains the correct PSK, and if it finds one, will allow the device to connect and start tagging the device traffic with the VLAN from the set that contained the correct PSK. Assuming 'Automatic Provisioning' is enabled in the account, the rXg will then automatically add the new device to the Account that corresponds to the VLAN from the attribute set.
Prerequisites
- Have Onboarding VLANs, associated to policy with a splash portal
- Have usage plan available for selection on splash portal
- Make sure the "Automatic Provision" checkbox is selected
- Have VLAN(s) available for registered accounts
- Have account group(s) for registered accounts associated to a policy with a landing portal
Configuration
- 1. Deploy vWLAN OVA
- vWLAN Appliance gets DHCP by default
- Login to vWLAN and add AP Licensing
- Either set Static IP on vWLAN, or add fixed-host address in DHCP
- Create "domain-name" DHCP Option , and attach to Global DHCP Option Group (Ex. Domain-Name = local)
- Create DNS Entry for apdiscovery.local to point to vWLAN controller (replace local with your domain name)
- Add vWLAN Controller to rXg wireless Infrastructure Devices
- Create an "Onboarding" RADIUS Realm and use an Attribute Pattern match since these devices would be unknown.
- Select your Onboarding VLANs, to ensure that users are presented the splash portal
- Create a Radius Realm for the policy of registered accounts
- - Select your Account VLANs
- Enable config sync on the vWLAN infrastructure device on the rXg
- Create a new WLAN choosing the following options
- Encryption: WPA2
- Authentication: Multiple PSK
- VLANs (Any associated with both realms)
- New RADIUS Server Attributes will be automatically created
- Create new RADIUS Server Attribute for onboarding
- Name: Tunnel-Password:1
- Value: onboarding (or whatever you want the onboarding PSK to be)
- Edit your Onboarding RADIUS Realm to respond with these attributes (notice the :1)
- Tunnel-Private-Group-Id:1 : %vlan_tag_assignment.tag%
- Tunnel-Type:1 : VLAN
- Tunnel-Medium-Type:1 : IEEE-802
- Tunnel-Password:1 : onboarding
- Edit your registered account RADIUS Realm to respond with these attributes (notice NO :1)
- Tunnel-Private-Group-Id : %vlan_tag_assignment.tag%
- Tunnel-Type : VLAN
- Tunnel-Medium-Type : IEEE-802
- Tunnel-Password : %account.pre_shared_key%
Dynamic PSK with RUCKUS virtual SmartZone (vSZ)
RUCKUS eDPSK enables an external AAA server to manage multiple PSKs associated with a single SSID. the rXg leverages eDPSK in conjunction with internal and external account management to deleiver person area networks (PANs) and virtual residential gateway (vRG) for MDUs.
Prerequisites
- Have Onboarding VLANs, associated to policy with a splash portal
- Have usage plan available for selection on splash portal
- Make sure the "Automatic Provision" checkbox is selected
- Have VLAN(s) available for registered accounts
- Have account group(s) for registered accounts associated to a policy with a landing portal
Configuration
- Deploy vSZ OVA, configure the following in the VM console:
- Configure vSZ in Essentials mode
- Set Static IP Address, or set DHCP Reservation
- Continue the vSZ deployment at web GUI -
https://{vSZ IP}:8443 - Add vSZ to rXg wireless Infrastructure Devices
- Create an "Onboarding" RADIUS Realm and use an Attribute Pattern match since these devices would be unknown.
- Select your Onboarding VLANs, to ensure that users are presented the splash portal
- Create a Radius Realm for the policy of registered accounts
- - Select your Account VLANs
- Enable config sync on the vWLAN infrastructure device on the rXg
- Create a new WLAN choosing the following options
- Encryption: WPA2
- Authentication: Multiple PSK
- VLANs (Any associated with both realms)
- Create new RADIUS Server Attribute for onboarding
- Name: Ruckus-DPSK
- Value: onboarding (or whatever you want the onboarding PSK to be)
- Edit your Onboarding RADIUS Realm to respond with these attributes
- Tunnel-Private-Group-Id : %vlan_tag_assignment.tag%
- Tunnel-Type : VLAN
- Tunnel-Medium-Type : IEEE-802
- Ruckus-DPSK : onboarding
- Edit your registered account RADIUS Realm to respond with these attributes
- Tunnel-Private-Group-Id : %vlan_tag_assignment.tag%
- Tunnel-Type : VLAN
- Tunnel-Medium-Type : IEEE-802
- Tunnel-Password : %account.pre_shared_key%

RADIUS Server Realms
An entry in the radius server realms scaffold creates a response realm that enables the rXg to respond to RADIUS requests. The RADIUS Server Realms system provides an advanced, multi-layered authentication routing mechanism that intelligently directs RADIUS authentication requests to appropriate backend servers based on configurable criteria.
One or more radius server realms are required in order to link RADIUS requests with attributes. Only one radius server realm is required if the network design requires that the same set of RADIUS attributes to be transmitted to all RADIUS requests.
Multiple radius server realms may be created in order to allow the rXg integrated RADIUS Server to respond with different RADIUS attributes depending upon the request. The most common usage scenario that requires the creation of two or more radius server realms is a network design that requires different VLANs or sets of VLANs to be assigned based on information present in the incoming RADIUS request. A RADIUS Access-Request will match at most a single RADIUS Server Realm.
Authentication Flow and Realm Selection
The system employs a dual-evaluation approach: policy-based admission control combined with attribute pattern matching. When a RADIUS authentication request arrives, the following sequence occurs:
- Request Reception: RADIUS request received and attributes extracted (User-Name, NAS-IP, Called-Station-Id, etc.)
- Server Ranking: All configured RADIUS servers are sorted by rank (highest to lowest: 9 to 0)
- Sequential Evaluation: For each server in ranked order:
- Evaluate attribute patterns by priority
- Check if request matches configured policies
- Apply realm admission logic (OR/AND)
- If admitted, select this server and proceed
- If not admitted, continue to next server
- Backend Authentication: Proxy request to selected backend (RADIUS, LDAP, or PMS)
- Session Establishment: Create session with VLAN assignment and send accounting start
RADIUS Server Realm Configuration Guide
This section provides comprehensive step-by-step procedures for configuring RADIUS Server Realms for common deployment scenarios.
Prerequisites
Before configuring a RADIUS Server Realm, ensure the following are in place:
- RADIUS Server Options configured and active under Services :: RADIUS
- Policies created for identity-based access control under Policies :: Captive Portal
- Account Groups and/or MAC Groups created under Identities :: Groups
- VLANs configured if dynamic VLAN assignment is required under Network :: VLANs
- Infrastructure Devices configured if switch/AP integration is needed under Network :: Infrastructure Devices
Procedure: Basic RADIUS Server Realm
This procedure creates a basic realm for authenticating users against the local rXg account database.
- Navigate to Services :: RADIUS
- Click Create New in the RADIUS Server Realms scaffold
- Configure basic settings:
- Name: Enter a descriptive name (e.g., "Employee WiFi")
- Rank: Set to 0 for default priority, or higher (1-9) for override scenarios
- Realm Admission Logic: Select "Policy OR Attribute Pattern logic must succeed" for typical deployments
- Configure request matching:
- Policies: Select one or more policies containing the Account Groups or MAC Groups that should be authenticated by this realm
- Optionally add Attribute Patterns to restrict by SSID, NAS-IP, or other RADIUS attributes
- Click Create
Procedure: RADIUS Server Realm with Dynamic VLANs
This procedure creates a realm that assigns VLANs dynamically based on authentication.
- Navigate to Services :: RADIUS
- Click Create New in the RADIUS Server Realms scaffold
- Configure basic settings:
- Name: Enter a descriptive name (e.g., "Guest DVLAN")
- Rank: Set appropriate priority (0-9)
- Realm Admission Logic: Select based on requirements
- Configure request matching:
- Policies: Select applicable policies
- Add Attribute Patterns if needed (e.g., match specific SSID)
- Configure Dynamic VLANs:
- VLAN Sharing: Select the sharing mode:
- per-Device: Maximum isolation, each device gets unique VLAN
- per-Account: All devices for same user share VLAN
- per-Room: Hospitality mode, all devices in room share VLAN
- per-Guest: Hospitality mode, each guest gets unique VLAN
- VLANs: Select one or more VLAN pools
- Reuse VLANs: Enable for high-turnover environments
- Inherit static VTA: Enable to preserve existing VLAN assignments
- VTA timeout: Set timeout for VLAN tag assignments
- Expire VTAs at logout: Enable to release VLANs when sessions end
- Max VLANs per Called-Station-Id/MAC: Set limit or check "Unlimited"
- Infrastructure Devices: Select devices that need VLAN change notifications
- VLAN Sharing: Select the sharing mode:
- Configure RADIUS Server Attributes:
- Add Tunnel-Type:
VLAN - Add Tunnel-Medium-Type:
802 - Add Tunnel-Private-Group-ID:
%vlan_tag_assignment.tag%
- Add Tunnel-Type:
- Click Create
Procedure: RADIUS Server Realm with SSID-Based Routing
This procedure creates a realm that matches requests based on the SSID clients connect to.
- Navigate to Services :: RADIUS
- Click Create New in the RADIUS Server Realms scaffold
- Configure basic settings:
- Name: Enter a descriptive name (e.g., "Corporate SSID")
- Rank: Set priority (higher rank = evaluated first)
- Realm Admission Logic: Select based on requirements
- Configure request matching:
- Policies: Select applicable policies (or leave empty for pattern-only matching)
- Add Attribute Patterns:
- Click Add in the Attribute Patterns subsection
- RADIUS Attribute: Select "Called-Station-Id (BSSID/SSID)"
- Pattern: Enter regex pattern (e.g.,
.*:CorpWiFi$to match SSID ending with "CorpWiFi") - Priority: Set pattern priority (0-9)
- Logic: Select OR (any pattern matches) or AND (all patterns must match)
- Add additional patterns as needed for multiple SSIDs or other criteria
- Configure Dynamic VLANs and Attributes as needed
- Click Create
Procedure: RADIUS Server Realm with Proxy Authentication
This procedure creates a realm that proxies authentication to an external RADIUS server.
Create a RADIUS Proxy Server first:
- Navigate to Services :: RADIUS
- Click Create New in the RADIUS Proxy Servers scaffold
- Configure the remote server connection details
- Click Create
Create the RADIUS Server Realm:
- Click Create New in the RADIUS Server Realms scaffold
- Name: Enter a descriptive name (e.g., "External Auth")
- Rank: Set appropriate priority
- Realm Admission Logic: Configure as needed
Configure Proxy Settings:
- RADIUS Proxy Servers: Select the proxy server created in step 1
- Proxy Authentication: Enable to forward Access-Request packets
- Proxy Accounting: Enable to forward Accounting packets
- Proxy MAC Auth: Enable if MAC authentication should also be proxied
- Replace username with Account: Enable to substitute local account login
- Create Account: Enable to create local accounts for proxied users
- Usage Plans: Select plan to apply to auto-created accounts
Click Create
Procedure: RADIUS Server Realm with LDAP/Active Directory Authentication
This procedure creates a realm that authenticates users against Active Directory.
Configure LDAP Domain first under System :: LDAP Servers:
- Create an LDAP Domain record with Active Directory binding enabled
- Ensure "Join Domain" is enabled for the domain
Create the RADIUS Server Realm:
- Navigate to Services :: RADIUS
- Click Create New in the RADIUS Server Realms scaffold
- Name: Enter a descriptive name (e.g., "AD Authentication")
- Rank: Set appropriate priority
Configure LDAP Proxy:
- LDAP Domains: Select the configured Active Directory domain
- Proxy Authentication: Enable
- Configure other proxy options as needed
Click Create
Procedure: Multi-Realm Configuration with Priorities
This procedure demonstrates configuring multiple realms with priority-based selection.
Scenario: Corporate network with three authentication tiers: - Executives on "Executive-WiFi" SSID VLAN 100 (highest priority) - Employees on "Corp-WiFi" SSID VLAN 200 - Guests on any SSID VLAN 300 (fallback)
Create Executive Realm (Rank 9 - Highest Priority):
- Name: "Executive Access"
- Rank: 9
- Realm Admission Logic: AND (require both policy AND pattern match)
- Policies: Select policy containing Executive Account Group
- Attribute Pattern: Called-Station-Id matches
.*:Executive-WiFi$ - VLANs: Select VLAN 100 pool
- Click Create
Create Employee Realm (Rank 5 - Medium Priority):
- Name: "Employee Access"
- Rank: 5
- Realm Admission Logic: AND
- Policies: Select policy containing Employee Account Group
- Attribute Pattern: Called-Station-Id matches
.*:Corp-WiFi$ - VLANs: Select VLAN 200 pool
- Click Create
Create Guest Realm (Rank 0 - Lowest Priority/Fallback):
- Name: "Guest Access"
- Rank: 0
- Realm Admission Logic: OR (accept any matching policy OR pattern)
- Policies: Select policy containing Guest MAC Group
- VLANs: Select VLAN 300 pool
- Click Create
Result: Authentication requests are evaluated in order: Executive (9) Employee (5) Guest (0). The first matching realm handles the request.
Field Reference
The name field is an arbitrary string descriptor used only for administrative identification. Choose a name that reflects the purpose of the record. This field has no bearing on the configuration or settings determined by this scaffold.
The rank of a RADIUS server realm (0-9 scale), allows the operator to designate multiple RADIUS realms with the same policy selection. If a RADIUS request matches multiple RADIUS realms, the highest ranking realm is used. This is typically used to override RADIUS realms when specific criteria is met, such as a user of a given policy connecting to a special SSID.
The policies field enables the operator to restrict this response realm to one or more sets of Identities. RADIUS Access-Request messages usually contain the MAC address of the end-user device. Thus a radius server realm may be restricted to answer RADIUS Access-Requests originating from end-user devices whose MAC addresses are present within MAC Groups and Account Groups. If no policies are enabled then the rXg will not restrict this response realm based on Identities but may still be restricted by other parameters such as attribute patterns.
The attribute patterns subsection enables the operator to restrict this response realm to RADIUS Access-Requests that contain the specified RADIUS attributes. One common use for this is mechanism is to restrict a response realm to only respond to RADIUS Access-Requests originating from end-user devices that are attaching to a specific SSID. This capability enables the operator associate respond with different RADIUS attributes depending upon the data in RADIUS Access-Request.
Attribute Pattern Matching System
The attribute pattern matching system uses regular expression patterns to match RADIUS attributes. The system uses Perl-compatible regular expressions (PCRE). Understanding how to construct effective patterns is crucial for implementing robust authentication routing.
Supported RADIUS Attributes:
- Called-Station-Id: Access point BSSID and/or SSID (e.g.,
.*:CorpWiFi$matches SSID ending with "CorpWiFi") - Calling-Station-Id: Client device MAC address (e.g.,
^AA:BB:CC.*matches specific OUI) - User-Name: Username or email format (e.g.,
^[^@]+@company\.com$matches company domain) - NAS-IP-Address: Network Access Server IP (e.g.,
^10\.1\..*matches subnet) - NAS-Port: Physical or logical port number
- NAS-Port-Id: Text description of the port
- NAS-Port-Type: Connection type (Ethernet, Wireless, etc.)
- NAS-Identifier: Network Access Server identifier
- Custom Attributes: Any valid RADIUS attribute name
Pattern Priority System:
- Patterns are assigned priorities from 0 to 9
- With OR logic: Evaluation stops at first match
- With AND logic: All patterns must match
- Patterns with same priority are evaluated together
Patterns use Perl-compatible regular expressions (PCRE). For regex syntax reference, see Regular-Expressions.info or Regex101.
Realm Admission Logic
The realm admission logic field determines how policies and attribute patterns are combined:
OR Logic - Inclusive Routing:
- Server accepts requests matching EITHER a configured policy OR attribute pattern
- Useful for broad access scenarios, fallback mechanisms, or migration scenarios
- Example: Accept any employee (by policy) OR any device on CorpWiFi SSID
AND Logic - Restrictive Routing:
- Server only accepts requests matching BOTH a configured policy AND attribute pattern
- Essential for high-security environments and disambiguation
- Example: User must be in "Executives" policy AND connecting from "Executive-Floor" SSID
Pattern Evaluation with Uneven Priorities:
When patterns have non-sequential priorities (e.g., 0, 3, 3, 7, 9):
- Patterns are grouped by priority value
- All patterns with same priority are evaluated together
- Groups are processed in ascending order
Example evaluation:
Patterns: Priority 0 (NAS-IP), Priority 3 (two SSID patterns), Priority 7 (Username)
OR Logic:
1. Check priority 0 If match, STOP (patterns match)
2. Check both priority 3 If either matches, STOP
3. Check priority 7 Return result
AND Logic:
1. Check priority 0 If no match, STOP (patterns don't match)
2. Check both priority 3 If both don't match, STOP
3. Check priority 7 Return final result
Configuration Validation
The system enforces validation rules to prevent ambiguous configurations:
Policy Overlap Prevention:
- Same policy cannot be associated with multiple servers using OR logic
- Requires disambiguation through attribute patterns or AND logic
Pattern Uniqueness:
- Identical pattern sets cannot be used by multiple servers with AND logic
- Ensures deterministic realm selection
Logical Consistency:
- AND logic requires at least one attribute pattern
- Patterns must be achievable for successful matching
The dynamic VLANs section determines which VLANs will be passed from the rXg to the RADIUS NAS when a RADIUS Access-Accept message is sent. VLAN assignments are typically passed through RADIUS Attributes.
VLAN Assignment Strategies
VLAN Sharing Modes:
per-Device: Each unique device (by MAC address) receives its own VLAN
- Provides maximum isolation between devices
- Consumes the most VLANs from the pool
- Ideal for guest networks and quarantine scenarios
- Example: Device AA:BB:CC:01 VLAN 100, Device AA:BB:CC:02 VLAN 101
per-Account: All devices authenticated with the same account share a VLAN
- Balances security and resource usage
- Allows device roaming within same account
- Suitable for corporate BYOD environments
- Example: All devices for user "john" VLAN 100
per-Room (Hospitality): All devices in the same room/location share a VLAN
- Enables in-room device communication
- Supports services like screencasting and printing
- Integrates with Property Management Systems
- Example: All devices in Room 101 VLAN 100
per-Guest (Hospitality): Each guest receives a unique VLAN regardless of devices
- Isolates guests from each other
- Allows multiple devices per guest
- Supports VIP and loyalty tier differentiation
- Example: Guest "Smith" all devices VLAN 100
One or more VLAN records must be configured and selected in order for the dynamic VLAN mechanism to be enabled. In most cases each RADIUS Server Realm will be associated with only a single VLAN record.
VLAN Pool Management:
VLANs will be assigned to devices / accounts / PMS-Rooms per the above described selection until all available VLANs in the selected record are exhausted.
Reuse VLANs Option:
- Enabled: VLANs are returned to pool when sessions end and can be immediately reassigned
- Suitable for high-turnover environments
- Reduces VLAN exhaustion issues
- Disabled: VLANs remain assigned until manually cleared
- Provides consistent network identity
- Useful for static device deployments
- Requires unlimited VLANs per Called-Station-Id/MAC setting
VLAN Limits:
- Max VLANs per Called-Station-Id/MAC: Configurable limit (1-4094) or unlimited
- Prevents VLAN exhaustion from single access point
- Critical for large public venue deployments
The infrastructure devices setting enables the operator to tie this RADIUS Server Realm with an infrastruture device for the purpose of sending vendor specific instructions when VLANs change. This configuration is an absolute requirement when the dynamic VLAN capability is used with most wireless LAN controllers and wired switches.
The Proxy Servers field enables the operator to proxy incoming RADIUS packets to configured RADIUS Proxy Servers , LDAP Domains , or PMS Servers.
The Proxy Options enable an operator to choose what type of RADIUS packets to proxy, Accounting, Authentication, or both. By default, the rXg integrated RADIUS Server will only proxy IEEE Std 802.1X authentications. The Proxy MAC Auth selection enables the operator to also proxy MAC based authentications. The Replace username selection will override the "User-Name" attribute with the associated accounts login. If the Proxy Server is being used for authentication, the Create Account selection will create a local account on the rXg, and optionally apply a Usage Plan.
The attributes field defines one or more RADIUS attributes that will be appended to all RADIUS responses. Use this mechanism to send vendor specific attributes to the devices making RADIUS requests.
The Assume MAC auth option specifies that when an Account is located during RADIUS lookup and the request looks like a MAC auth request (i.e., the username looks like a MAC address) that we should treat the request as a MAC auth request and use the MAC address as the cleartext password instead of setting the NT-Password.
The Always perform Account lookup option ensures that an Account lookup occurs for the request while checking this realm, assuming it has not been performed already by a higher ranked realm. This is in contrast to the normal behavior where Account lookup is skipped unless there are Account Group-based Policies attached to the realm (or a higher ranked realm). This is necessary if performing MSCHAP authentication and the realm is being selected based on a RADIUS Attribute match pattern, rather than group membership. In this case the lookup is still necessary in order to set the NT-Password for the MSCHAP module.

RADIUS Proxy Servers
An entry in the RADIUS proxy servers scaffold defines a server that may be used to proxy requests to other remote RADIUS servers.
The name field is an arbitrary string descriptor used only for administrative identification. Choose a name that reflects the purpose of the record. This field has no bearing on the configuration or settings determined by this scaffold.
The RADIUS server realms field determines which logical partitions of the RADIUS Server will proxy requests to THIS server.
The note field is a place for the administrator to enter a comment. This field is purely informational and has no bearing on the configuration settings.
The priority field is used when multiple RADIUS proxy servers are associated with a RADIUS realm. The RADIUS proxy server with the highest priority is queried first. If the RADIUS proxy server with the highest priority does not respond within the window defined by the tries and timeout fields, the next highest priority server is queried. If no RADIUS proxy servers respond, the end-user is denied access.
The IP field specifies the IP address of the RADIUS server to be queried for credential validation.
The port field specifies the UDP port to use when sending the RADIUS request for credential validation. Similarly the accounting port field specifies the UDP port to use when sending the RADIUS accounting start, stop and intermediate updates. Leave these fields blank to use the defaults.
The secret field is the RADIUS shared secret. It is used to encode and decode messages being sent to and from the RADIUS server. This setting must match that of the RADIUS server in order for credential validation to operate.
If a server does not respond to a request within the timeout time, the server marks the request as timed out. After the configured number of tries , the server is marked as being "zombie", and the zombie period starts. The default timeout window is large because responses may be slow, especially when proxying across the Internet.
A server that is marked "zombie" will be used for proxying as a low priority. If there are live servers, they will always be preferred to a zombie. Requests will be proxied to a zombie server ONLY when there are no live servers. Any request that is proxied to a server will continue to be sent to that server until the server is marked dead. At that point, it will fail over to another server, if a live server is available. If the server does not respond to ANY packets during the zombie period , it will considered to be dead.
If status check is something other than "none", then the server will start sending status checks at the start of the zombie period. It will continue sending status checks until the server is marked "alive". These status packets are sent ONLY if the server is believed to be dead. They are NOT sent if the server is believed to be alive. They are NOT sent if this server is not proxying packets. If the server responds to the status check packet, then it is marked alive again, and is returned to use.
The check interval field configures the number of status checks in a row that the server needs to respond to before it is marked alive. If you want to mark a server as alive after a short time period of being responsive, it is best to use a small check interval , and a large value for answers to alive. Using a long check interval and a small number for answers to alive increases the probability of spurious fail-over and fallback attempts.
RADIUS layer "status checks" are used to see if a server is alive when status check is set to "Status-Server".
Some servers do not support status checks via the Status-Server packet. Others may not have a "test" user configured that can be used to query the server, to see if it is alive. For those servers, there is NO WAY of knowing when it becomes alive again. In this case, after the server has been marked dead, the revival interval must elapse before it is marked alive again, in the hope that it has come back to life. If it has NOT come back to life, the zombie period must elapse before marking it dead again. During the zombie period , all authentications will fail, because the server is still dead. There is nothing that can be done about this, other than to enable the status checks. e.g. if zombie period is 40 seconds, and revive interval is 300 seconds, then for 40 seconds out of every 340, or about 10% of the time, all authentications will fail. If the zombie period and revive interval configurations are set smaller, then it is possible for up to 50% of authentications to fail. We recommend enabling status check , and we do NOT recommend relying on revive interval. The revive interval is used ONLY if status check is set to "none".
If the server does not support Status-Server packets, then the proxying server can still send Access-Request or Accounting-Request packets with a pre-defined username. This behavior is enabled by setting status check to "Access-Request". This practice is NOT recommended, as it may potentially let users gain network access by using these "test" accounts. If it is used, we recommend that the server ALWAYS respond to these Access-Request status checks with Access-Reject. The status check just needs an answer, it does not need an Access-Accept. For Accounting-Request status checks, only the username needs to be set. The rest of the accounting attribute are set to default values. The server that receives these accounting packets SHOULD NOT treat them like normal user accounting packets.

RADIUS Server
The rXg internal credential database of users and tokens may be remotely accessed via the RADIUS protocol. Records in the RADIUS Server scaffold configure the behavior of the rXg RADIUS server.
The active field enables an option set. Exactly one option set may be active at any time. Enabling a particular option set will automatically disable another existing active option set.
The name field is an arbitrary string descriptor used only for administrative identification. Choose a name that reflects the purpose of the record. This field has no bearing on the configuration or settings determined by this scaffold.
The secret field defines the RADIUS shared secret. This shared credential must be identical to one configured on the RADIUS NAS devices that will access this RADIUS server.
The auth port and acct port fields configure the ports that the RADIUS server will listen for requests on. In most cases, the RFC defined ports of 1812 and 1813 should be used as many RADIUS NAS devices are only able to connect to those ports.
The debug field configures the RADIUS server to log the contents of all request and response packets to the log file.
The certificate field specifies an alternate certificate chain to configure the RADIUS server with.
The WAN targets and policies fields determine the set of devices that are allowed to have access to the rXg integrated RADIUS server. By default the rXg has packet filtering rules in place that prevent access to the integrated RADIUS server. This ensures that no devices of any kind may access the RADIUS server unless the operator takes specific action to enable access.
Access to the rXg integrated RADIUS server for RADIUS NAS devices that are on the WAN is enabled by creating one or more WAN targets for the RADIUS NAS devices and then enabling the appropriate check boxes. RADIUS NAS devices on the LAN may be granted access by placing the IPs of the RADIUS NAS devices into an IP Group and then linking the IP Group into a Policy which may be selected here.
The note field is a place for the administrator to enter a comment. This field is purely informational and has no bearing on the configuration settings.
IEEE Std 802.1X (EAP-TLS/TTLS/PEAP) Settings
The rXg RADIUS server supports IEEE Std 802.1X authentication using EAP methods. The following settings control EAP behavior:
The enable EAP checkbox activates EAP authentication support. When enabled, the RADIUS server can process EAP-TLS, EAP-TTLS, and EAP-PEAP authentication requests. This must be enabled for any IEEE Std 802.1X deployment.
The certificate field specifies the TLS certificate chain used for EAP authentication. This certificate is presented to clients during the TLS handshake in EAP-TLS, EAP-TTLS, and EAP-PEAP sessions. The certificate must be a valid, non-expired certificate. Wildcard certificates are rejected by Windows IEEE Std 802.1X clients by default.
The check CRL checkbox enables Certificate Revocation List checking. When enabled, the RADIUS server verifies that client certificates (in EAP-TLS) have not been revoked. The associated certificate chain must have CRL distribution points configured.
The allow wildcard EAP certificate checkbox overrides the default restriction against wildcard certificates. Enable this only if your client devices support wildcard certificates for IEEE Std 802.1X authentication. Windows 8.x and later clients typically reject wildcard certificates.
The store NT password checkbox (also referred to as MS-CHAP) enables storage of NT password hashes for accounts. This is required for MSCHAPv2 authentication, which is commonly used as the inner authentication method in EAP-PEAP and EAP-TTLS. When enabled, NT hashes are computed when account passwords are set. If disabled, all stored NT hashes are removed and MSCHAPv2 authentication will fail.
RADIUS/TLS (RadSec) Settings
RadSec (RADIUS over TLS) provides secure transport for RADIUS packets using TCP and TLS instead of UDP. This eliminates the security limitations of traditional RADIUS shared secrets and enables secure RADIUS communication over untrusted networks.
The RadSec enabled checkbox activates the RadSec listener. When enabled, the RADIUS server accepts TLS-encrypted RADIUS connections on the configured RadSec port.
The RadSec port field specifies the TCP port for RadSec connections. The default port is 2083 as defined in RFC 6614.
The RadSec certificate field specifies the TLS certificate chain used for RadSec connections. This certificate is presented to RadSec clients during the TLS handshake and must be trusted by connecting clients.
The require client certificate checkbox enforces mutual TLS authentication. When enabled, RadSec clients must present a valid client certificate during the TLS handshake. This provides strong authentication of RADIUS clients and is recommended for production deployments.
The minimum TLS version and maximum TLS version fields constrain the TLS protocol versions accepted for RadSec connections. Available options are:
| Version | Notes |
|---|---|
| TLS 1.0 | Insecure - not recommended |
| TLS 1.1 | Insecure - not recommended |
| TLS 1.2 | Recommended minimum |
| TLS 1.3 | Most secure, but may have compatibility issues with older clients |
The default configuration uses TLS 1.2 for both minimum and maximum, providing a balance of security and compatibility.
Global Behavior Settings
The debug level field controls the verbosity of RADIUS server logging. Available levels are:
| Level | Description |
|---|---|
| Normal | Standard logging of authentication events |
| Debug | Includes packet contents and processing details |
| Debug-2 | More verbose debugging output |
| Debug-3 | Very verbose debugging output |
| Debug-4 | Maximum verbosity for troubleshooting |
The always find account by MAC checkbox forces the RADIUS server to perform an account lookup using the client MAC address for all requests, regardless of the username provided.
The ignore account usage checkbox disables usage tracking and quota enforcement for RADIUS-authenticated sessions.
The authenticate port ownership checkbox enables verification that the requesting device is connected to an expected switch port.
The require message authenticator field controls Message-Authenticator attribute validation:
| Setting | Behavior |
|---|---|
| auto | Require Message-Authenticator if present in request |
| yes | Always require Message-Authenticator attribute |
| no | Do not require Message-Authenticator attribute |
The max servers field limits the number of FreeRADIUS worker processes. Leave blank for automatic configuration based on system resources.
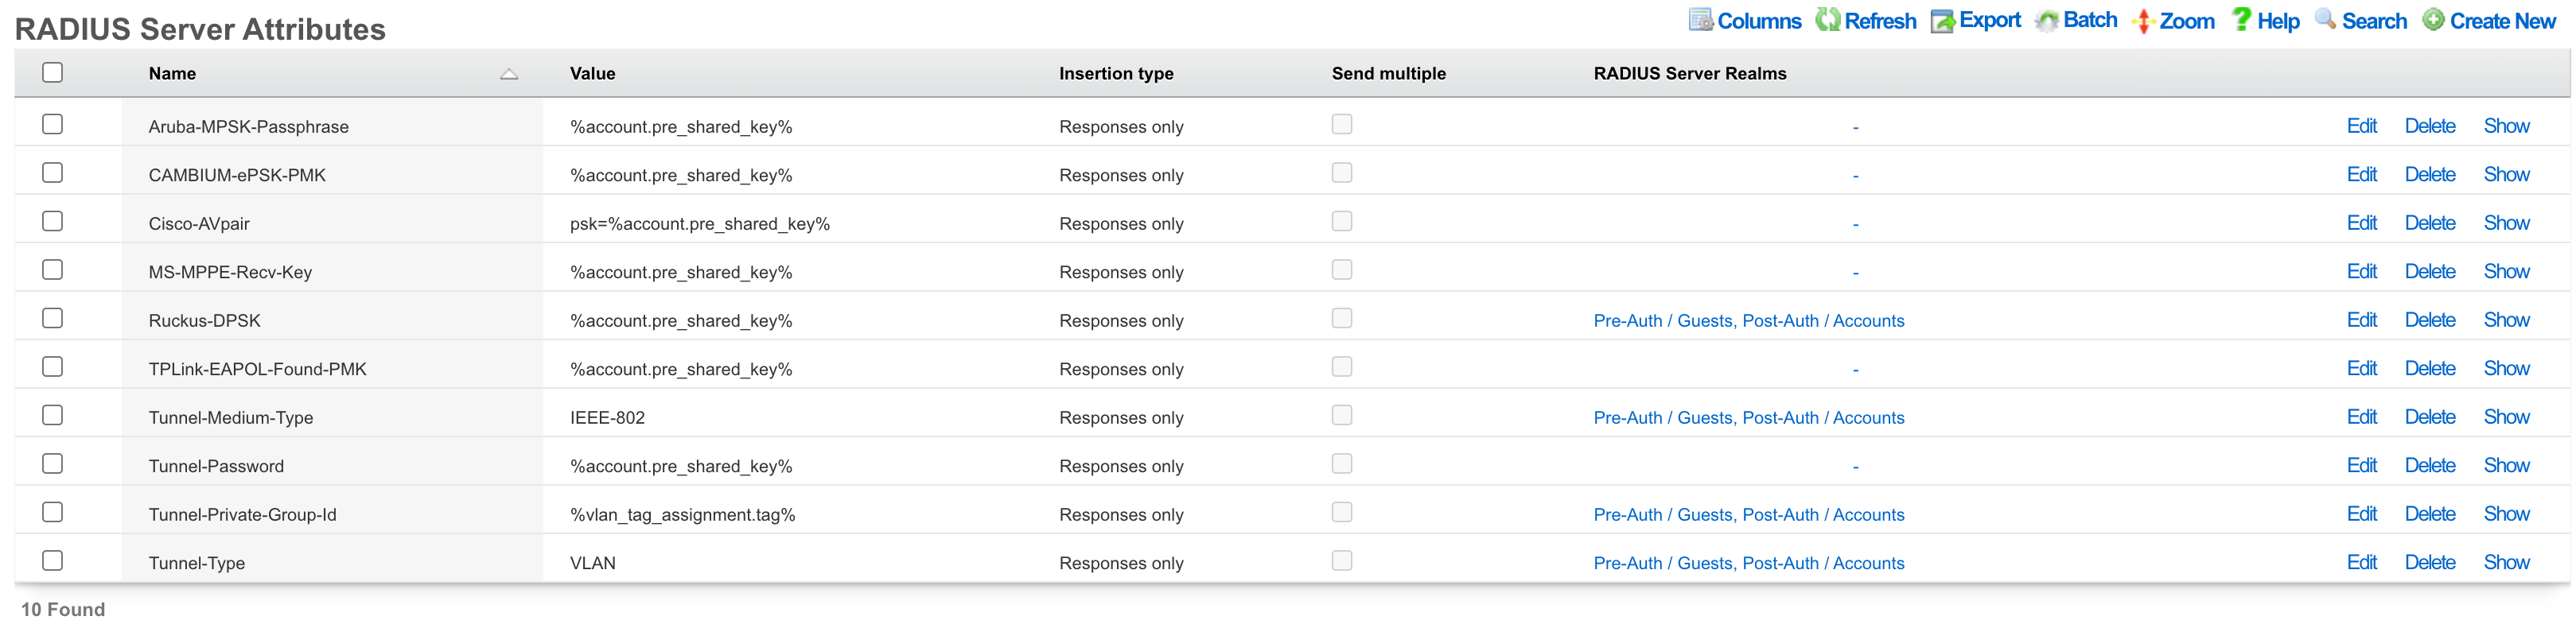
RADIUS Server Attributes
The rXg integrated RADIUS server responds to RADIUS requests with RFC defined attributes. The operator may define additional attributes to be present in RADIUS responses by creating RADIUS Server Attribute records. Each record defines one additional attribute that will be presnet
The name configures the name of the RADIUS attribute that will be sent to the RADIUS NAS. The name must be agreed upon and configured identically on both the RADIUS server and the RADIUS NAS.
The value configures the value of the payload of the RADIUS attribute that will be sent to the RADIUS NAS in RADIUS server response. The value may be static (e.g., 'IEEE-802' for the 'Tunnel-Medium-Type' when configuring dynamic VLANs). Alternatively the value may be a dynamic value configured through substitution variables.
The RADIUS Server Realms field determines which RADIUS requests will contain the RADIUS Server Attribute defined by this record. More than one RADIUS Server Realm may be selected and thus the RADIUS Server Attribute defined by this record will be present in the responses to each of the defined realms.
The note field is a place for the administrator to enter a comment. This field is purely informational and has no bearing on the configuration settings.
Most dynamic VLAN configurations require the following three attributes to be configured:
| Attribute | Value |
|---|---|
| Tunnel-Medium-Type | 802 |
| Tunnel-Private-Group-ID | %vlan_tag_assignment.tag% |
| Tunnel-Type | VLAN |
Dynamic PSK Support
The system automatically detects and supports Dynamic PSK implementations from various vendors, allowing each device to use a unique pre-shared key while connecting to the same SSID:
Supported Dynamic PSK Attributes:
- Ruckus-DPSK: Ruckus Dynamic PSK
- Aruba-MPSK-Passphrase: Aruba Multiple PSK
- Cisco-AVPair: Cisco Identity PSK (format:
psk-mode=ascii psk=passphrase) - Tunnel-Password: Generic PSK delivery
- MS-MPPE-Recv-Key: Microsoft encryption key
- CAMBIUM-ePSK-PMK: Cambium enhanced PSK
- TPLink-EAPOL-Found-PMK: TP-Link PSK
When Dynamic PSK attributes are detected, the system enables portal-based PSK management allowing users to view and modify their unique PSK through the self-service portal.
Substitution
Payload fields may contain special keywords surrounded by % signs that will be substituted with relevant values. This enables the operator to deliver values stored in the database as part of the payload.
List of objects available:
| Account Create | Usage Plan Purchase | Transaction: success/failure |
|---|---|---|
| cluster_node | cluster_node | cluster_node |
| custom_email | custom_email | custom_email |
| device_option | device_option | device_option |
| ip_group | login_session | login_session |
| login_session | usage_plan | merchant |
| usage_plan | account | payment_method |
| account | merchant_transaction | |
| usage_plan | ||
| account |
| Credit Card Expiring | Coupon Redemption | Account Charge: success/failure/no response |
|---|---|---|
| cluster_node | cluster_node | cluster_node |
| custom_email | custom_email | custom_email |
| device_option | device_option | device_option |
| login_session | coupon | login_session |
| payment_method | login_session | payment_method |
| usage_plan | usage_plan | response |
| account | account | usage_plan |
| account |
| Trigger: Connections | Trigger: Quota | Trigger: DPI |
|---|---|---|
| cluster_node | cluster_node | cluster_node |
| custom_email | custom_email | custom_email |
| device_option | device_option | device_option |
| login_session | login_session | login_session |
| max_connections_trigger | quota_trigger | snort_trigger |
| transient_group_membership | transient_group_membership | transient_group_membership |
| account | account | account |
| Trigger: Time | Trigger: Log Hits | Health Notice: create |
|---|---|---|
| cluster_node | cluster_node | cluster_node |
| custom_email | custom_email | custom_email |
| device_option | device_option | device_option |
| login_session | login_session | health_notice |
| time_trigger | log_hits_trigger | |
| transient_group_membership | transient_group_membership | |
| account | account |
| Health Notice: cured |
|---|
| cluster_node |
| custom_email |
| device_option |
| health_notice |
List of objects available for all associated record types:
| Aged AR Penalty |
|---|
| cluster_node |
| custom_email |
| device_option |
| aged_ar_penalty |
| login_session |
| payment_method |
| usage_plan |
| account |
List of attributes available for each object:
| account | usage_plan | merchant |
|---|---|---|
| id | id | id |
| type | account_group_id | name |
| login | name | gateway |
| crypted_password | description | login |
| salt | currency | password |
| state | recurring_method | test |
| first_name | recurring_day | note |
| last_name | variable_recurring_day | created_at |
| automatic_login | updated_at | |
| usage_plan_id | note | created_by |
| usage_minutes | created_at | updated_by |
| unlimited_usage_minutes | updated_at | signature |
| usage_expiration | created_by | partner |
| no_usage_expiration | updated_by | invoice_prefix |
| automatic_login | time_plan_id | integration |
| note | quota_plan_id | store_payment_methods |
| logged_in_at | usage_lifetime_time | live_url |
| created_at | absolute_usage_lifetime | pem |
| updated_at | unlimited_usage_lifetime | scratch |
| created_by | no_usage_lifetime | dup_timeout_seconds |
| updated_by | recurring_retry_grace_minutes | |
| mb_up | recurring_fail_limit | |
| mb_down | prorate_credit | |
| pkts_up | permit_unpaid_ar | |
| pkts_down | pms_server_id | |
| usage_mb_up | lock_devices | |
| usage_mb_down | scratch | |
| unlimited_usage_mb_up | max_sessions | |
| unlimited_usage_mb_down | max_devices | |
| company | unlimited_devices | |
| address1 | unlimited_sessions | |
| address2 | usage_lifetime_time_unit | |
| city | max_dedicated_ips | |
| region | pms_guest_match_operator | |
| zip | recurring_lifetime_time | |
| country | recurring_lifetime_time_unit | |
| phone | unlimited_recurring_lifetime | |
| bill_at | sms_gateway_id | |
| lock_version | validation_method | |
| charge_attempted_at | validation_grace_minutes | |
| lock_devices | max_party_devices | |
| relative_usage_lifetime | unlimited_party_devices | |
| scratch | upnp_enabled | |
| portal_message | automatic_provision | |
| max_devices | conference_id | |
| unlimited_devices | ips_are_static | |
| max_sessions | base_price | |
| unlimited_sessions | vtas_are_static | |
| max_dedicated_ips | manual_ar | |
| account_group_id | ||
| email2 | ||
| pre_shared_key | ||
| phone_validation_code | ||
| email_validation_code | ||
| phone_validated | ||
| email_validated | ||
| phone_validation_code_expires_at | ||
| email_validation_code_expires_at | ||
| max_party_devices | ||
| unlimited_party_devices | ||
| nt_password | ||
| upnp_enabled | ||
| automatic_provision | ||
| ips_are_static | ||
| guid | ||
| vtas_are_static | ||
| account_id | ||
| max_sub_accounts | ||
| unlimited_sub_accounts | ||
| approved_by | ||
| approved_at | ||
| pending_admin_approval | ||
| wispr_data | ||
| hide_from_operator |
| payment_method | merchant_transaction | coupon |
|---|---|---|
| id | id | id |
| account_id | account_id | usage_plan_id |
| active | payment_method_id | code |
| company | merchant_id | credit |
| address1 | usage_plan_id | expires_at |
| address2 | amount | note |
| city | currency | created_by |
| state | test | updated_by |
| zip | ip | created_at |
| country | mac | updated_at |
| phone | customer | batch |
| note | scratch | |
| created_at | merchant_string | max_redemptions |
| updated_at | description | unlimited_redemptions |
| created_by | success | |
| updated_by | response_yaml | |
| scratch | created_at | |
| customer_id | updated_at | |
| card_id | created_by | |
| nickname | updated_by | |
| encrypted_cc_number | message | |
| encrypted_cc_number_iv | authorization | |
| encrypted_cc_expiration_month | hostname | |
| encrypted_cc_expiration_month_iv | http_user_agent_id | |
| encrypted_cc_expiration_year | account_group_id | |
| encrypted_cc_expiration_year_iv | subscription_id | |
| encrypted_first_name | ||
| encrypted_first_name_iv | ||
| encrypted_middle_name | ||
| encrypted_middle_name_iv | ||
| encrypted_last_name | ||
| encrypted_last_name_iv | ||
| cc_number | ||
| cc_expiration_month | ||
| cc_expiration_year | ||
| first_name | ||
| middle_name | ||
| last_name |
| login_session | ip_group | device_option |
|---|---|---|
| id | id | id |
| account_id | policy_id | name |
| radius_realm_id | name | active |
| login | priority | device_location |
| ip | note | domain_name |
| mac | created_at | ntp_server |
| expires_at | updated_at | time_zone |
| online | created_by | smtp_address |
| radius_acct_session_id | updated_by | rails_env |
| radius_response | scratch | note |
| radius_class_attribute | created_at | |
| created_at | updated_at | |
| updated_at | created_by | |
| created_by | updated_by | |
| updated_by | smtp_port | |
| bytes_up | smtp_domain | |
| bytes_down | smtp_username | |
| pkts_up | smtp_password | |
| pkts_down | cluster_node_id | |
| usage_bytes_up | scratch | |
| usage_bytes_down | log_rotate_hour | |
| ldap_domain_id | log_rotate_count | |
| radius_realm_server_id | ssh_port | |
| ldap_domain_server_id | country_code | |
| cluster_node_id | disable_hyperthreading | |
| shared_credential_group_id | developer_mode | |
| ip_group_id | sync_builtin_admins | |
| account_group_id | delayed_job_workers | |
| usage_plan_id | log_level | |
| lock_version | max_forked_processes | |
| hostname | soap_port | |
| total_bytes_up | reboot_timestamp | |
| total_bytes_down | reboot_time_zone | |
| total_pkts_up | limit_sshd_start | |
| total_pkts_down | limit_sshd_rate | |
| radius_server_id | limit_sshd_full | |
| radius_request | use_puma_threads | |
| backend_login_at | ||
| http_user_agent_id | ||
| backend_login_seconds | ||
| portal_login_at | ||
| omniauth_profile_id | ||
| encrypted_password | ||
| encrypted_password_iv | ||
| conference_id | ||
| password |
| custom_email | transient_group_membership | time_trigger |
|---|---|---|
| id | id | id |
| name | ip_group_id | account_group_id |
| from | mac_group_id | name |
| subject | account_group_id | mon |
| body | account_id | tues |
| event | ip | wed |
| note | mac | thurs |
| created_by | reason | fri |
| updated_by | expires_at | sat |
| created_at | created_by | sun |
| updated_at | updated_by | start |
| send_to_account | created_at | end |
| scratch | updated_at | note |
| email_recipient | cluster_node_id | created_by |
| include_custom_reports_in_body | max_connections_trigger_id | updated_by |
| attachment_format | quota_trigger_id | created_at |
| custom_event | time_trigger_id | updated_at |
| delivery_method | snort_trigger_id | ip_group_id |
| sms_gateway_id | hostname | mac_group_id |
| reply_to | radius_group_id | scratch |
| ldap_group_id | flush_states | |
| login_session_id | flush_dhcp | |
| log_hits_trigger_id | flush_arp | |
| flush_states | flush_vtas | |
| flush_dhcp | infrastructure_area_id | |
| flush_arp | previous_infrastructure_area_id | |
| flush_vtas | duration | |
| vulner_assess_trigger_id | current_dwell | |
| previous_dwell |
| log_hits_trigger | snort_trigger | max_connections_trigger |
|---|---|---|
| id | id | id |
| ip_group_id | ip_group_id | ip_group_id |
| mac_group_id | name | name |
| name | duration | max_connections |
| note | note | duration |
| log_file | created_by | note |
| duration | updated_by | created_by |
| max_hits | created_at | updated_by |
| window | updated_at | created_at |
| scratch | scratch | updated_at |
| created_by | mac_group_id | scratch |
| updated_by | flush_states | mac_group_id |
| created_at | flush_dhcp | flush_states |
| updated_at | flush_arp | flush_dhcp |
| flush_states | flush_vtas | flush_arp |
| flush_dhcp | flush_vtas | |
| flush_arp | max_duration | |
| flush_vtas | max_mb | |
| period | ||
| active_or_expired | ||
| max_duration_logic | ||
| max_mb_logic |
| quota_trigger | health_notice | cluster_node |
|---|---|---|
| id | id | id |
| account_group_id | cluster_node_id | name |
| name | name | iui |
| usage_mb_down | short_message | database_password |
| usage_mb_down_unit | long_message | note |
| usage_mb_up | cured_short_message | created_by |
| usage_mb_up_unit | cured_long_message | updated_by |
| up_down_logic_operator | severity | created_at |
| note | cured_at | updated_at |
| created_by | created_at | ip |
| updated_by | updated_at | ssh_public_key |
| created_at | created_by | scratch |
| updated_at | updated_by | heartbeat_at |
| radius_group_id | fleet_node_id | data_plane_ha_timeout_seconds |
| ldap_group_id | node_mode | |
| period | cluster_node_team_id | |
| unlimited_period | wal_receiver_pid | |
| duration | wal_receiver_status | |
| unlimited_duration | wal_receiver_receive_start_lsn | |
| scratch | wal_receiver_receive_start_tli | |
| ip_group_id | wal_receiver_received_lsn | |
| mac_group_id | wal_receiver_received_tli | |
| flush_states | wal_receiver_latest_end_lsn | |
| flush_dhcp | wal_receiver_slot_name | |
| flush_arp | wal_receiver_sender_host | |
| flush_vtas | wal_receiver_sender_port | |
| wal_receiver_last_msg_send_time | ||
| wal_receiver_last_msg_receipt_time | ||
| wal_receiver_latest_end_time | ||
| op_cluster_node_id | ||
| priority | ||
| auto_registration | ||
| permit_new_nodes | ||
| auto_approve_new_nodes | ||
| pending_auto_registration | ||
| pending_approval | ||
| control_plane_ha_backoff_seconds | ||
| data_plane_ha_enabled | ||
| upgrading | ||
| enable_radius_proxy |
| aged_ar_penalty |
|---|
| id |
| name |
| amount |
| days |
| suspend_account |
| note |
| created_at |
| updated_at |
| created_by |
| updated_by |
| custom_email_id |
| scratch |
| record_type |
| days_type |
Rotator
The rXg rotator service enables operators to simply and easily integrate content rotation into the captive portal web application. The system is designed to deliver zero-intervention advertising rotation via the captive portal web application to provide dynamic pre-authentication, post-authentication and interstitial advertising. In addition, the system can be used for a broad spectrum of other communication purposes other than advertising. For example, an operator may choose to use the rotator service to communicate late breaking news, integrate with third party messaging transport mechanisms or photographic galleries and real-time web cameras.
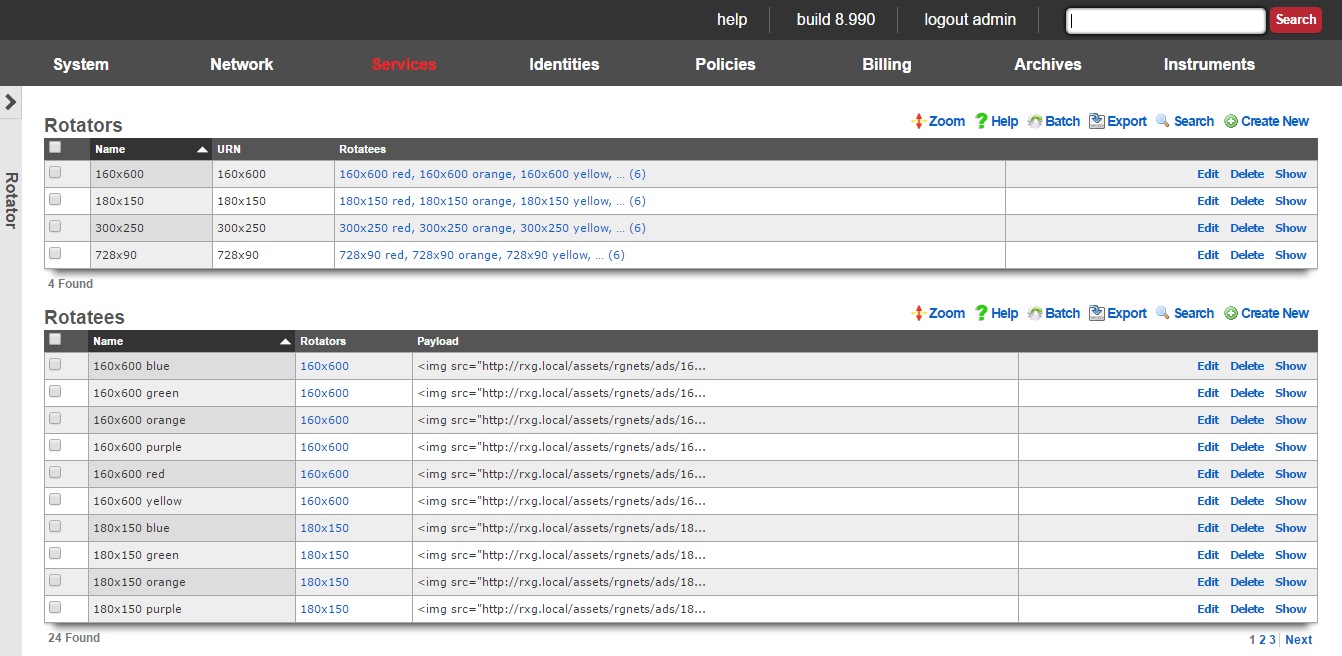
The rotator service may be directly accessed via an HTTP request to the rXg with a suffix of rotator. The URN parameter must be specified to identify a particular rotator set that is to be accessed. Since the rotator service is accessible via a URL, it can be integrated into any third party display mechanism capable of making HTTP requests. For example, using a web browser connected to the LAN side of a newly installed rXg, open the URL:
https://rxg.local/rotator/?urn=postauth.
The postauth URN is a demonstration rotator that is part of the default rXg installation. It contains a series of advertisements that are displayed on the post-authentication landing page of the default portal. Reloading the web browser window will result in the rotation of the advertisements that are present in the chosen rotator.
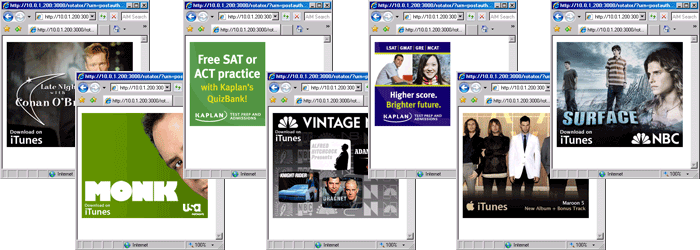
The rotator service is implemented as a Ruby on Rails controller so that it may be easily integrated into the captive portal web application. Each time the captive portal page is loaded, the rotator displays a different payload.
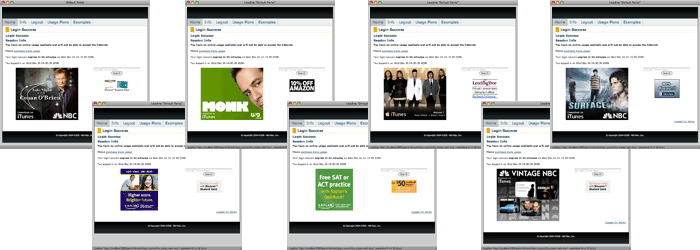
To add a rotator to a captive portal page, edit the page and insert the following embedded ruby code where you would like the rotatee payload to be inserted:
<!-- Basic single rotator --> <%= render partial: 'rotator', locals: { urn: 'postauth' } %> <!-- Multiple rotators with count --> <%= render partial: 'rotator', locals: { urn: ['promo', 'seasonal'], count: 2 } %> <!-- All rotatees from a rotator --> <%= render partial: 'rotator', locals: { urn: 'homepage', count: 0 } %>
The urn parameter must be replaced with a string corresponding to a rotator scaffold entry. You can also specify an array of URNs for random selection, and use the count parameter to control how many rotatees are displayed (0 for all). Incorrect specification of a rotator with a matching urn field will result in an error message being embedded into the portal page.
Advanced Integration Features
ERB Template Processing
The payload field supports ERB (Embedded Ruby) templating, allowing dynamic content generation:
erb
<div class="ad-container">
<h3>Welcome <%= user.name if defined?(user) %></h3>
<img src="/images/ad_<%= Time.current.hour > 12 ? 'afternoon' : 'morning' %>.png">
</div>
Multiple Rotator Selection
The rotator partial supports random selection from multiple rotators:
erb
<%= render partial: 'rotator', locals: { urn: ['promo1', 'promo2', 'seasonal'], count: 2 } %>
Content Layout
Rotator content is automatically arranged in groups of 3 for responsive layout. The system handles both clickable advertisements (with URL) and static content.
The rotator service is one of the many ways that the rXg enables operators to quickly and easily generate revenue from an end-user population. To maximize revenue, we strongly suggest that you partner with numerous affiliate programs that are appropriate to your end-user population. A good introductory text on affiliate programs is Make a Fortune Promoting Other People's Stuff Online: How Affiliate Marketing Can Make You Rich (ISBN 0071478132) by Rosalind Gardner. An excellent affiliate marketing recipe and ideas reference book is A Practical Guide to Affiliate Marketing: Quick Reference for Affiliate Managers & Merchants (ISBN 0979192706) by Evgenii Prussakov.

Rotators
An entry in the rotators scaffold creates a rotation group that can be integrated into the captive portal web application.
The name field is an arbitrary string descriptor used only for administrative identification. Choose a name that reflects the purpose of the record. This field has no bearing on the configuration or settings determined by this scaffold.
The URN field configures the uniform resource name that uniquely identifies this rotator. The URN is the parameter that is used to choose a specific rotator when incorporating the rotator service into a captive portal page.
The rotatees list enables the operator to select rotatees from the set of all rotatees to associate with this rotator. The rotator will choose one rotatee to display from among the associated rotatees.
The note field is a place for the administrator to enter a comment. This field is purely informational and has no bearing on the configuration settings.
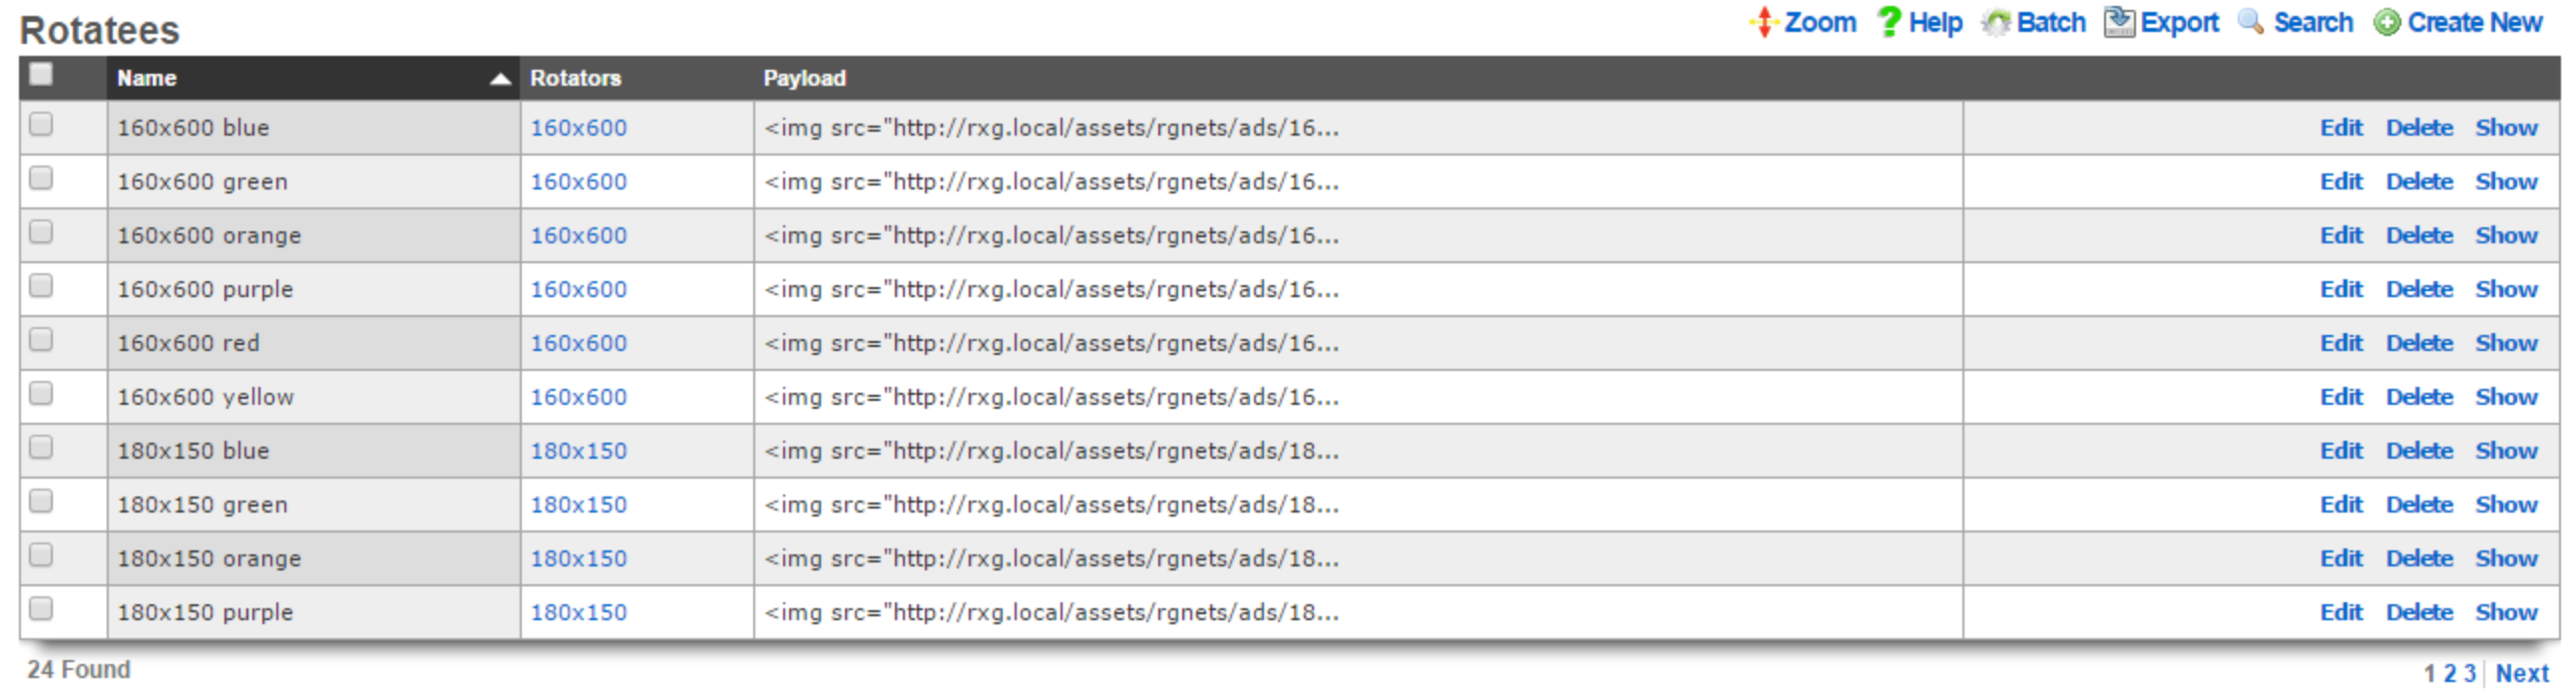
Rotatees
An entry in the rotatees scaffold creates a member of a rotator group and specifies the payload that should be displayed.
The name field is an arbitrary string descriptor used only for administrative identification. Choose a name that reflects the purpose of the record. This field has no bearing on the configuration or settings determined by this scaffold.
The rotator field defines one or more rotators for this rotatee to be associated with.
Content Management: Rotatees support multiple content types: - Payload field: HTML content with ERB template support for dynamic content generation - Content field: Rich text editor for WYSIWYG content creation - Image field: Direct image upload (JPEG, PNG, GIF, SVG, favicon up to 20MB) - Content Mode: Choose between "HTML" (payload) or "Rich Text" (content) editing
Note: Payload takes precedence over content when both are present. When an image is uploaded without payload content, the system automatically generates HTML payload code.
Click Tracking: - URL field: Destination URL when users click the advertisement
The note field is a place for the administrator to enter a comment. This field is purely informational and has no bearing on the configuration settings.
Display and track advertisements
Navigate to Services::Ad Rotator.
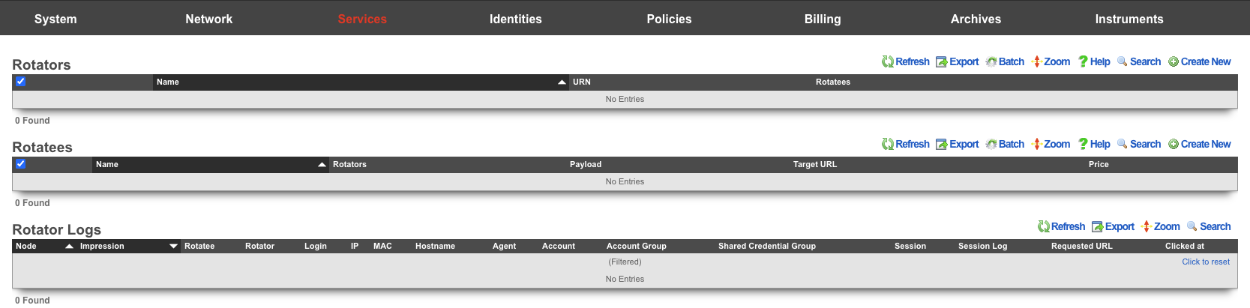
The default portal by default looks for a Rotator with a URN of default to display the Rotatees. Create a new Rotator. The Name field is arbitrary. Since the default portal looks for the URN of default set the URN field to default. Click Create.

Now that the Rotator has been configured, Rotatees can now be created that will contain the payload for the advertisement. In this example we will create Rotatees that will display on the main page of the default portal. Create a new Rotatee. The Name field is arbitrary. In the Rotators field check the default box. The Payload field contains the HTML content of the advertisement. The URL field contains the destination URL when users click the advertisement. Do note that if the Payload contains references to content hosted outside the rXg, then those domains must be whitelisted on the splash portal in order for the content to be displayed. Click Create.
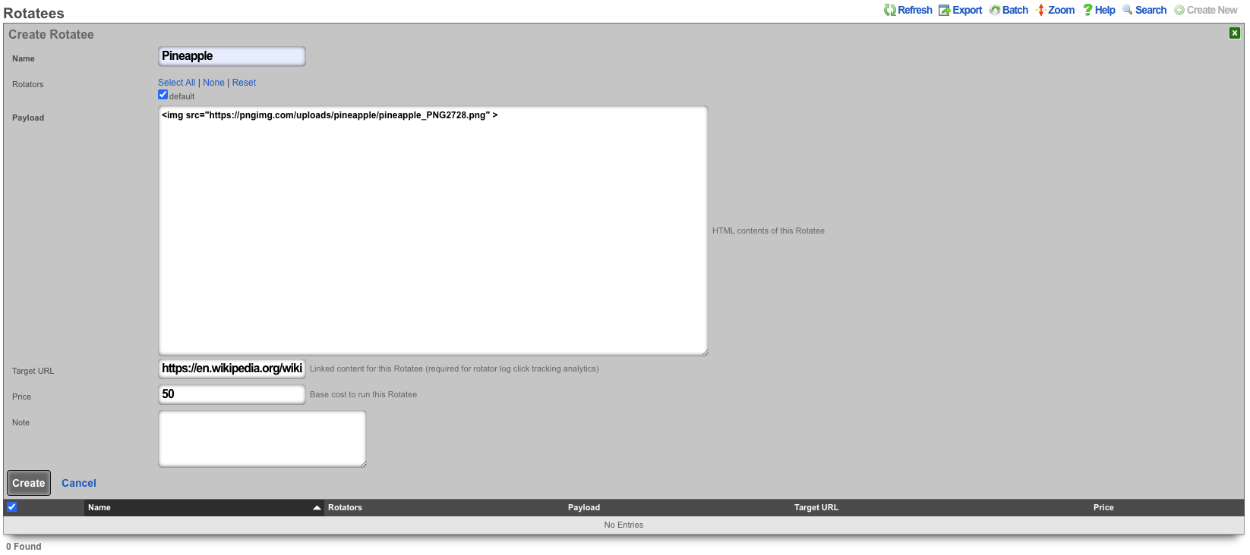
Repeat creating a Rotatee for each advertisement. In this example each advertisement is an image of fruit, and clicking on the advertisement image will link to wikipedia, but this could be the products homepage.

Rotator Logs provide comprehensive tracking for each advertisement impression:
Impression Tracking: Every rotatee display creates a unique log entry capturing: - Client identification (IP, MAC address, hostname) - Device information (browser, operating system, user agent) - Session context (login session, account, policy) - Original page URL where ad was displayed - Timestamp of impression
Click Tracking: When users click advertisements:
- System records exact click timestamp (clicked_at)
- Calculates conversion time (time between impression and click)
- Safely redirects to target URL
- Maintains click attribution to specific impressions
This enables detailed analytics including conversion ratios, click-through rates, and user behavior patterns.
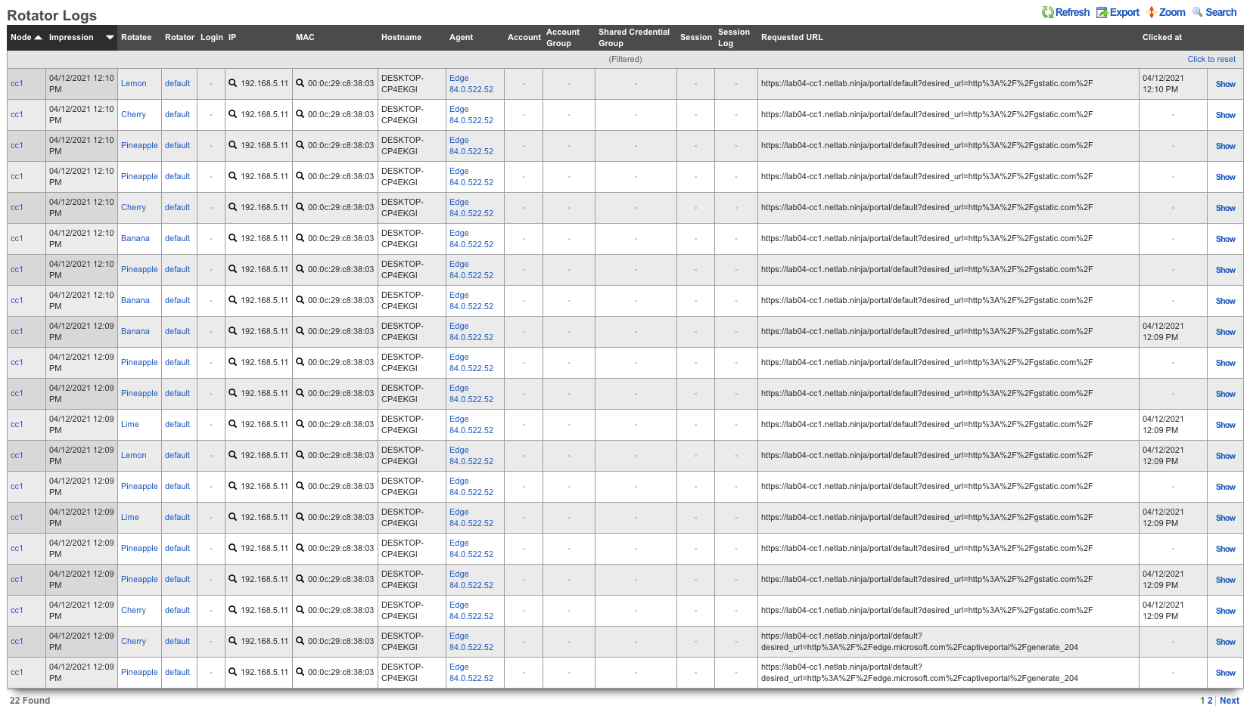
The operator of the rXg can create reports showing detailed information about the number of clicks and conversions related to each Rotatee. To create a custom report navigate to Archives::Reports::Custom Reports.

There are two reports specific to the Ad Rotators. The first one is the Rotatee Metrics Custom Report. Create a new Custom Report. The Name field is arbitrary. Under Report set the Type field to Rotatee Metrics. Set the Time field to the desired time. Everything else can be left to the defaults. Click Create.
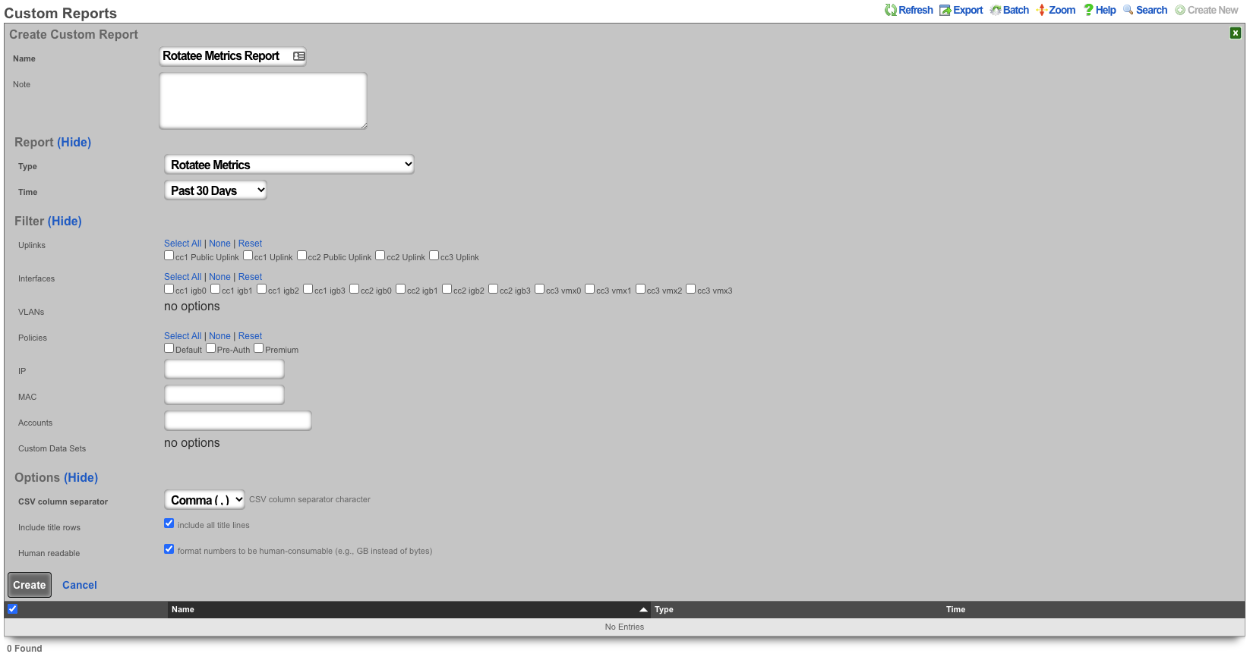
The report can be viewed by clicking the view option on the left side of the scaffold. The Rotatee field shows the name of the Rotatee. The Impressions column displays the number of times the Rotatee was loaded and displayed. The Conversions column displays the number of times the Rotatee was clicked. The Conversion Ratio column displays the ratio of times Rotatee was loaded and clicked (Conversions divided by the number of Impressions). The Conversion Time(s) section of the report gives you the average, minimum, and maximum number of conversions. Lastly the Cost section of the report displays the Price paid, the per impression cost (Price divided by the number of impressions), and the per conversion price (Price divided by the number of conversions).
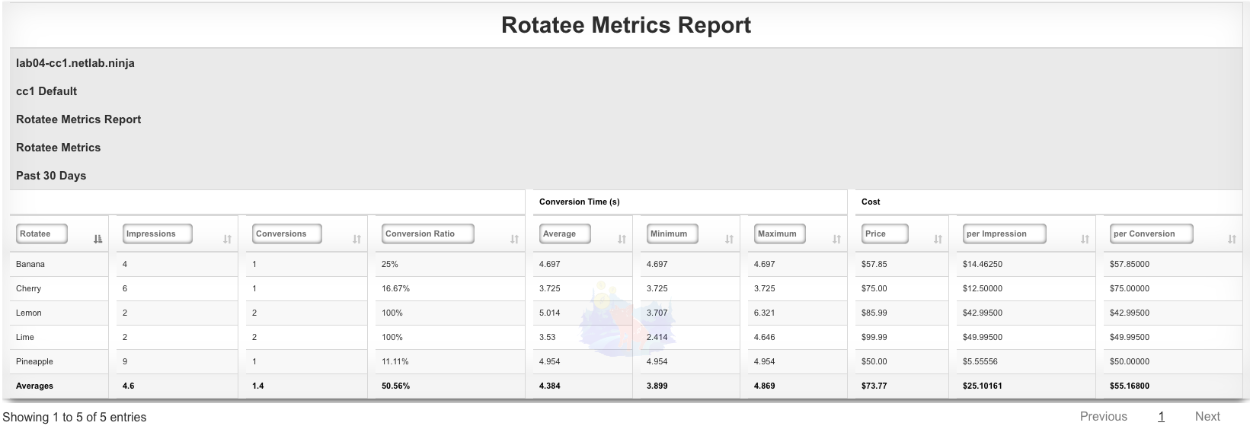
The second report is the Rotator Impressions report. Create a new Custom Report. The Name field is arbitrary. Under Report set the Type field to Rotator Impressions, and set the desired time for the report using the Time field. Click Create.
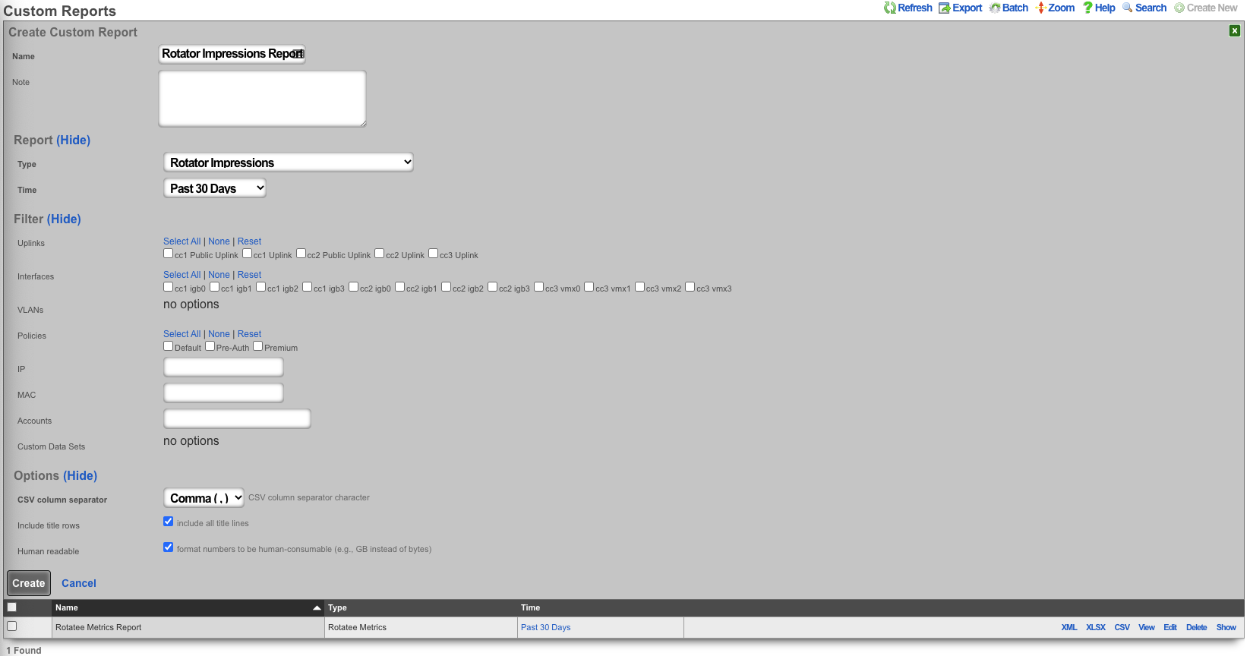
The report can be viewed by clicking the view option on the left side of the scaffold. The Impression column shows the date and time the Rotatee was displayed. The Rotator/Rotatee column shows which Rotatee the entry is for. The URL column shows the URL the device was trying to access when it was presented with the Rotatee. The IP field lists the IP of the device. The MAC field displays the MAC address of the device. The Hostname field will display the hostname of the device if available. The OS field displays the OS running on the device. The Browser field displays the browser the device is using along with the Version. The Login field displays the Policy the device is a member of. Lastly the Conversion Time(s) field displays the time between when the Rotatee was loaded and the user clicked on the Rotatee if applicable.
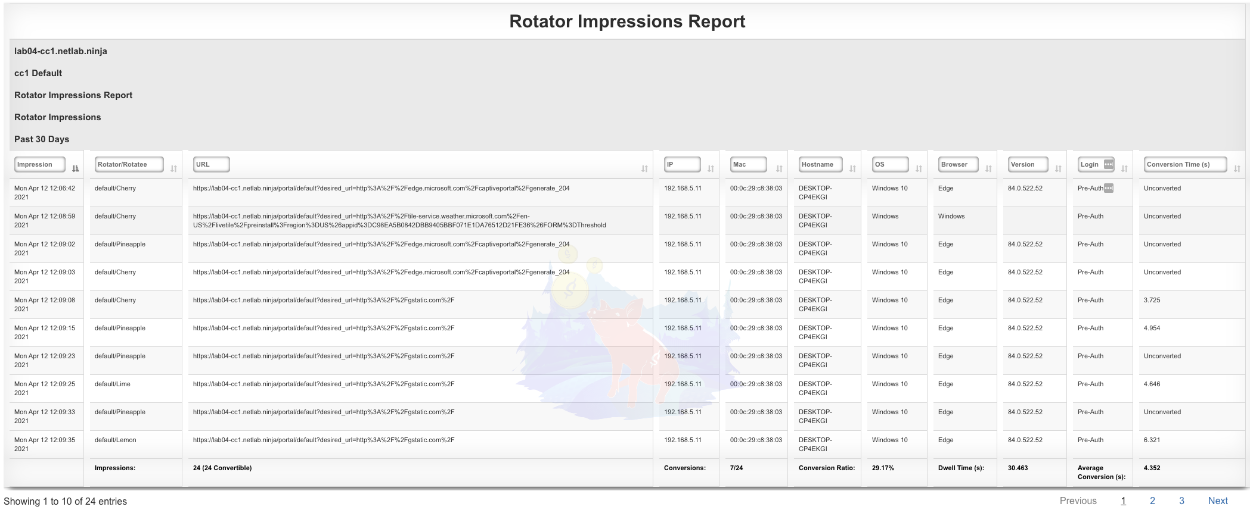
Content Management Best Practices
Image Handling
- Supported formats: JPEG, PNG, GIF, SVG, favicon (.ico)
- Size limit: 20 MB maximum
- Auto-generation: Uploading an image without payload automatically creates display code
- Local vs Remote: Local images don't require whitelisting; remote content must be whitelisted
Template Variables
Available variables in ERB payload templates:
- rotatee: Current rotatee object with all fields (name, payload, url, etc.)
- rotator_log: Impression tracking record for click attribution
Performance Considerations
- Random selection uses database-level randomization for performance
- Rotator logs can be disabled if table becomes large (handled automatically)
- ERB processing occurs at render time, not storage time
Display videos in captive portal based on location
In this example the rXg will be configured to display an advertisement video and static image in the captive portal based on the portal the device is associated and the location of the device when it connects, using a prebuilt portal.
Create Custom Portal

The Name field is arbitrary, for this example it will be named "videotest". The Controller name field is what is displayed in the URL when accessing the portal, for this example it will be "videotest". Set the Portal source field to Duplicate Local and the Duplicate field to default as the default portal will be used here. Click Create.


Create Splash and Landing portal to associate to Custom Portal

The Name field is arbitrary, for this example it will be named "Splash". The rXg Portal field should be set to the portal created in step 1 which is "videotest". Select the policy associated with unknown devices (devices connecting to the network for the first time), for the purpose of this example the "Onboarding Policy" will be selected. Click Create.
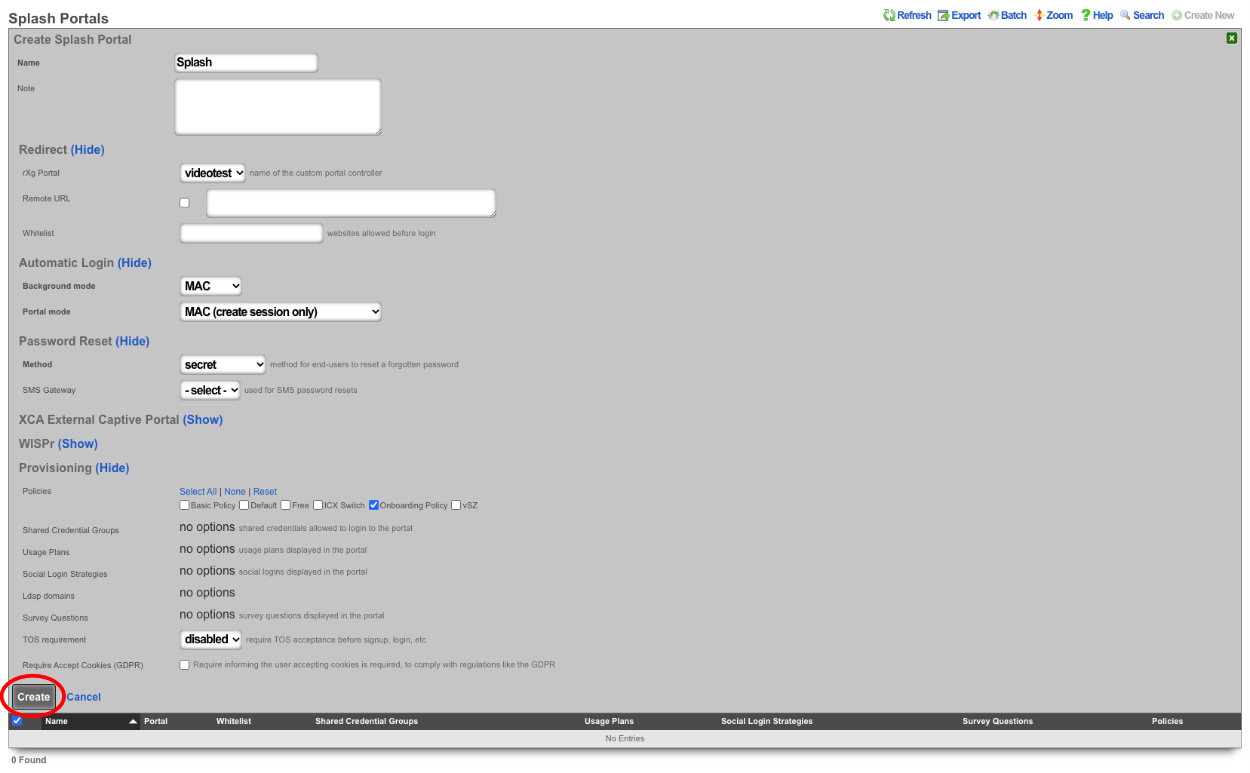
Create a new Landing Portal.

The Name field is arbitrary, for this example it will be named "Landing". The rXg Portal field should be set to the portal created in step 1 which is "videotest". Select the policy associated with devices that have authenticated for the purpose of this example the "Free Policy" will be selected. Click Create.
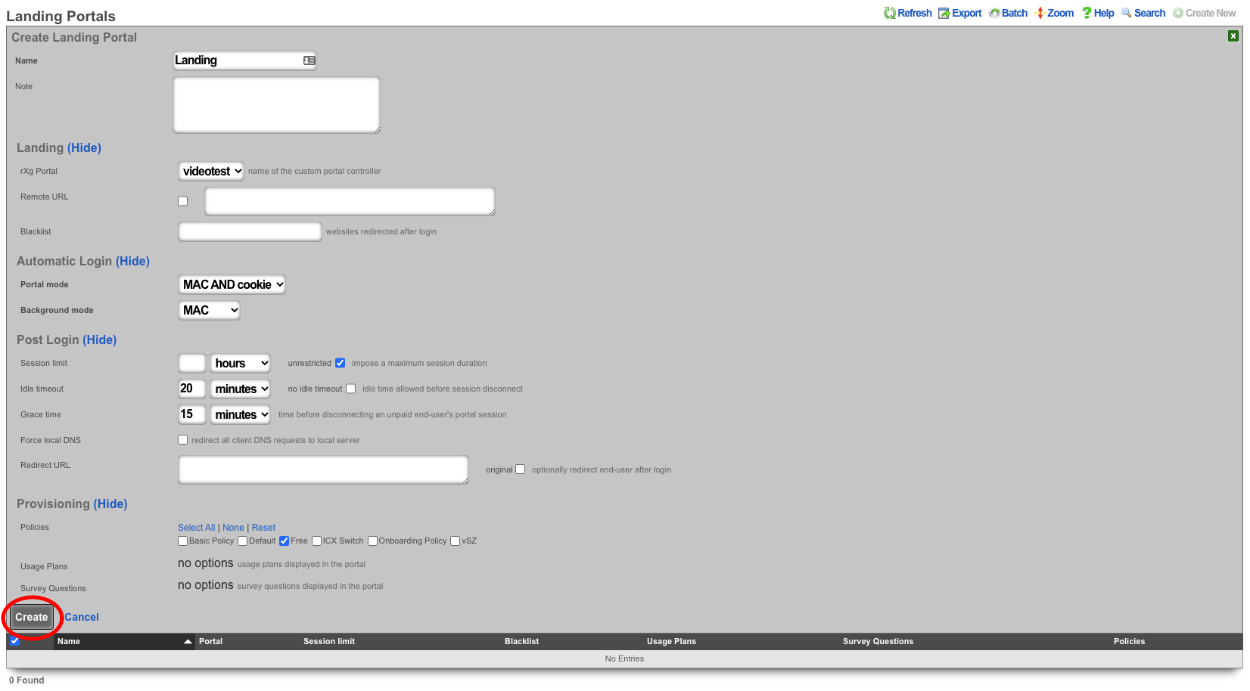

Create Shared Credential to activate ad rotator and allow access after advertisement

The Name field is arbitrary, for this example it will be named "videotest". Remove the characters from the Credential field, the code is looking for a blank credential to activate the advertisements. The Policy field is used to select which policy the end user will become a member of after watching/viewing the advertisement, for this example the "Free" policy will be used. The Time field is used to set the amount of time the end user will be granted after authenticating, this will be set to 1 hour in this example. Both the Download quota and the Upload quota fields will be set to unlimited. By default a shared credential is valid for one week, this can be extended by changing the date in the Expires field, this will be set to the year 2099. Make sure that the "Splash" portal is selected in the Splash Portals field. We can limit the number of simultaneous users by setting a value in the Simultaneous Users field, here it will be set to unlimited. If desired the Intersession field can be used to set a period of time that must pass before the same device can use the credential, this will be left at 0 for this example. Finally if we want the end user to be presented with the portal again if they leave the network and return we can uncheck the Automatic login checkbox. Click Create.
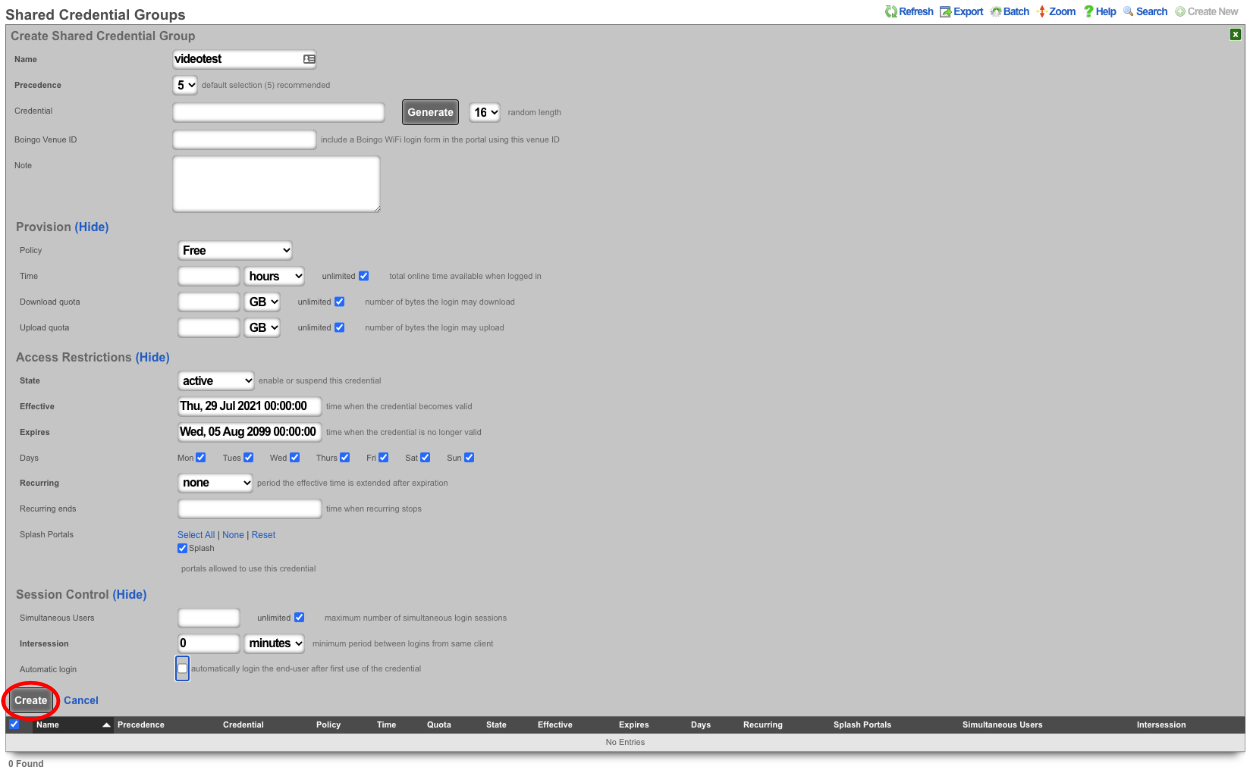

Create Rotators, this is what is used to determine which set of advertisements to display.

Because this is the fallback enter "Fallback" in the Name field and the URN field value will be "video". Click Create.
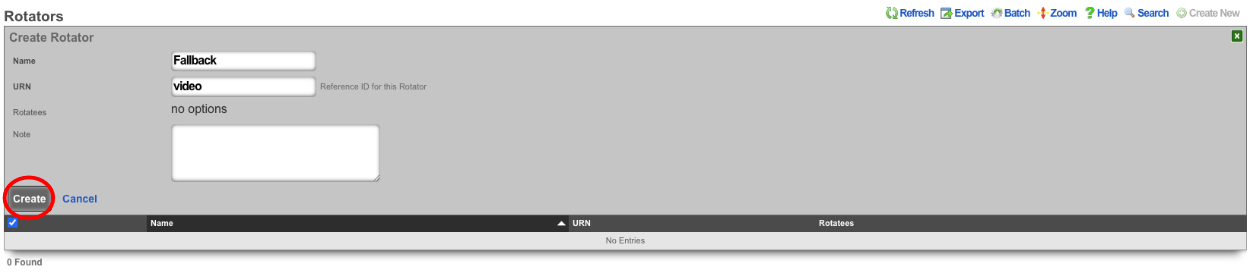
The next Rotator will match against the portal created in Step 1. Create a new Rotator , for this example the value of the Name field will be "videotest" which matches the portal created earlier. Note: this name can be anything and does not need to match the portal name. The URN field will need to match the portal name as this Rotator will be used to match against the portal created in Step 1, the value for the URN field will be "videotest_video". Click Create.
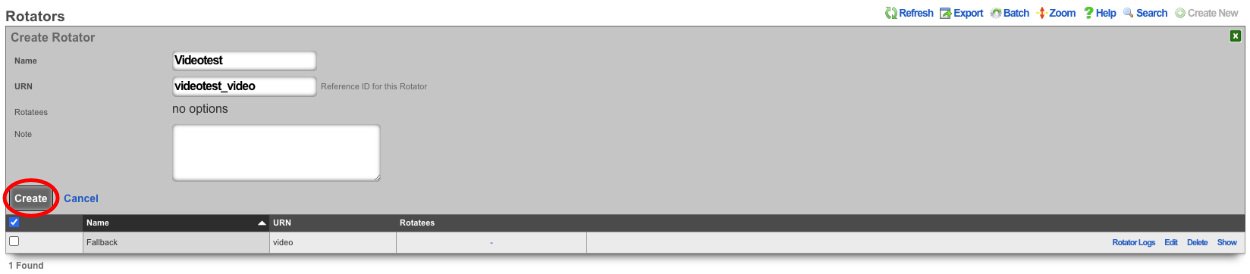
This system is configured with Location Areas that consist of a Floor and two Regions we can match against. The floor is named "building1" and then there are two regions name "room1" and "room2" that can be used to match against. If the match is against "building1" then any device connected to an AP located within the regions attached to "building1" will display advertisements assigned to the Rotator. "Building1" contains the regions "room1" and "room2".

To match against "building1" create a new Rotator , the Name field is arbitrary for this the value will be set to Videotest_building1, and the URN value is "videotest_building1_video". Click Create.
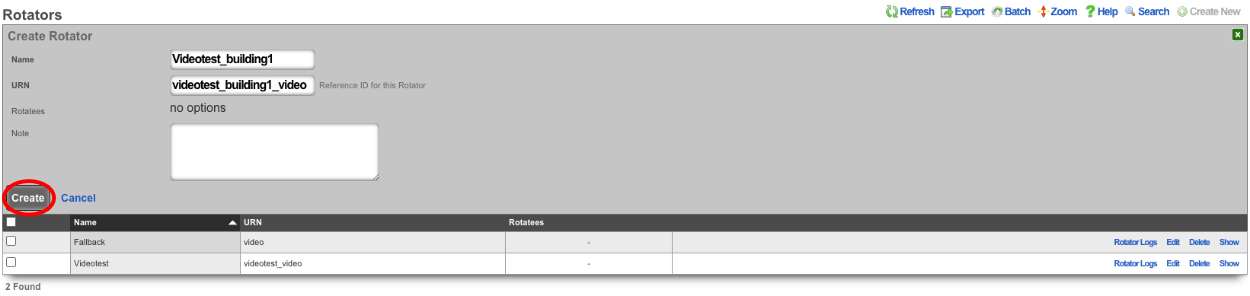
To make the match specific to a region we can use the region name instead of "building1", create a new Rotator , the value for the Name field is arbitrary and will be set to "Videotest_room1" in this example. The URN field will be the portal we want to display this on followed by the region and then video, which results in "videotest_room1_video". Click Create.
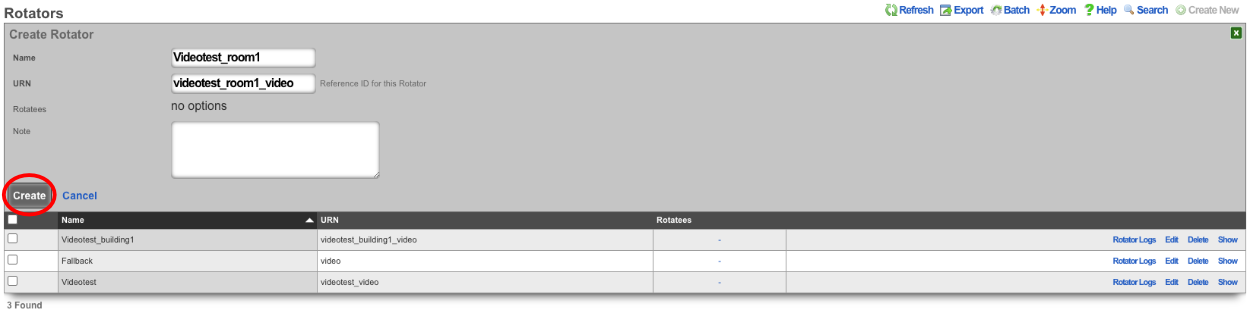
Create Rotatees, this is the advertisement content that will be displayed.

The Name field is arbitrary and its value will be set to "Video1" for this example. Select the "Videotest_room1" checkbox in the Rotators field to display this content to an end user connected in room1. For this example we will display a video of clouds in this Rotatee using the following Payload:
<video class="w-100 mb-3" src="/static/portal/videotest/clouds_1.mp4" preload="none" muted webkit-playsinline playsinline style="display: none;">. Click Create This step can be repeated for each advertisement that should be displayed.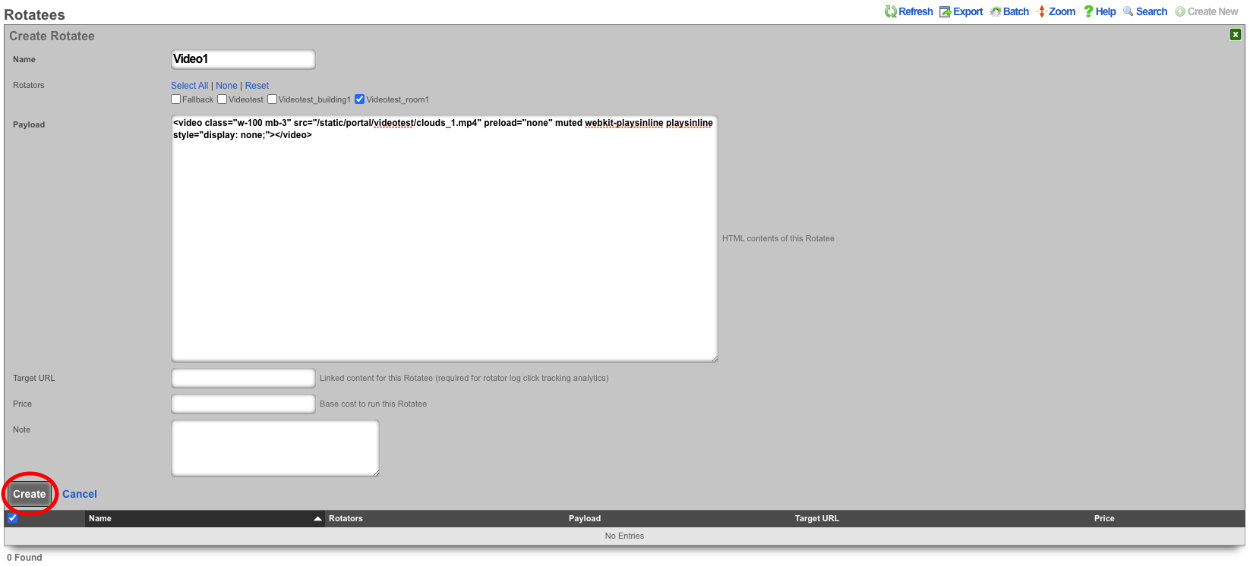
For the last example a Rotatee that contains a static image will be created to be displayed to end users as a fallback in the event they do not match against the portal or a location area. Create a new Rotatee. Provide a name and select the "Fallback" checkbox in the Rotators field. For this example we will use the payload
<img src="/static/portal/videotest/ad_one.png" width="80%" class="d-block mx-auto my-3">. Click Create. Note: for a list of images and videos provided in the default portal please scroll down.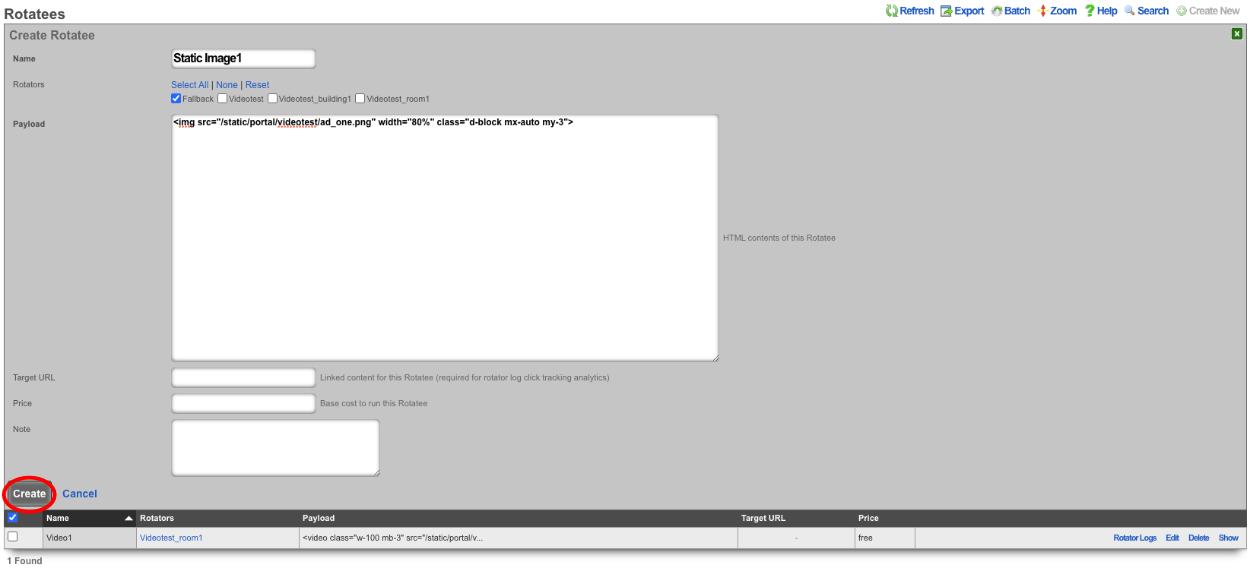
The above examples were all locally hosted files within the /static directory of the captive portal. To use content that is stored remotely, a WAN target must be configured containing the domains and/or IP addresses of where the content resides and it must be applied as a whitelist to the Splash portal. To create a WAN target navigate to Identities::Definitions and create a new WAN Target.
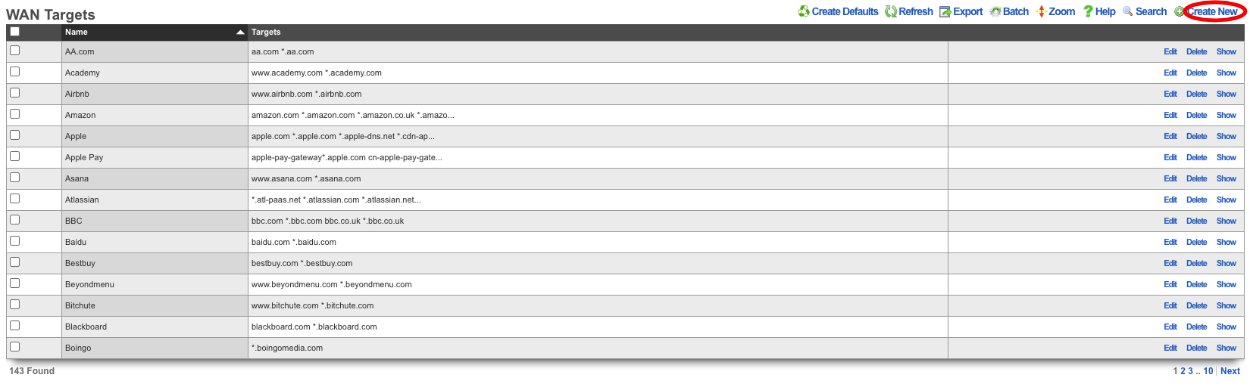
The Name field is arbitrary, value here will be "Ad Whitelist". In the Targets field enter the domains and/or IP addresses that will contain content then click Create.
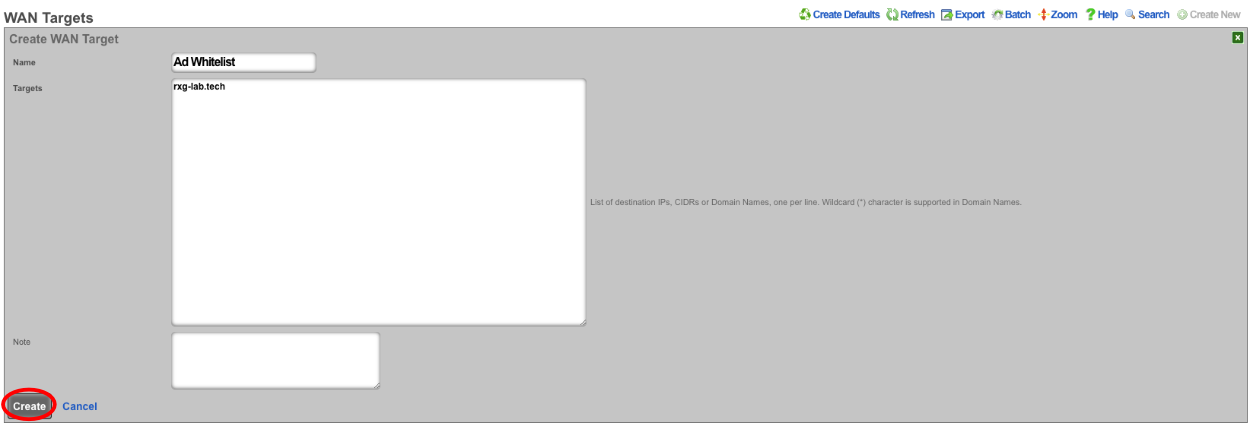
Once the WAN Target has been created, it must be set as a whitelist on the captive portal. Navigate to Policies::Captive Portal and edit the Splash portal.

Type the name of the WAN target into the Whitelist field and it will bring up any matching results, click on each one to add it to the whitelist. Click Update.
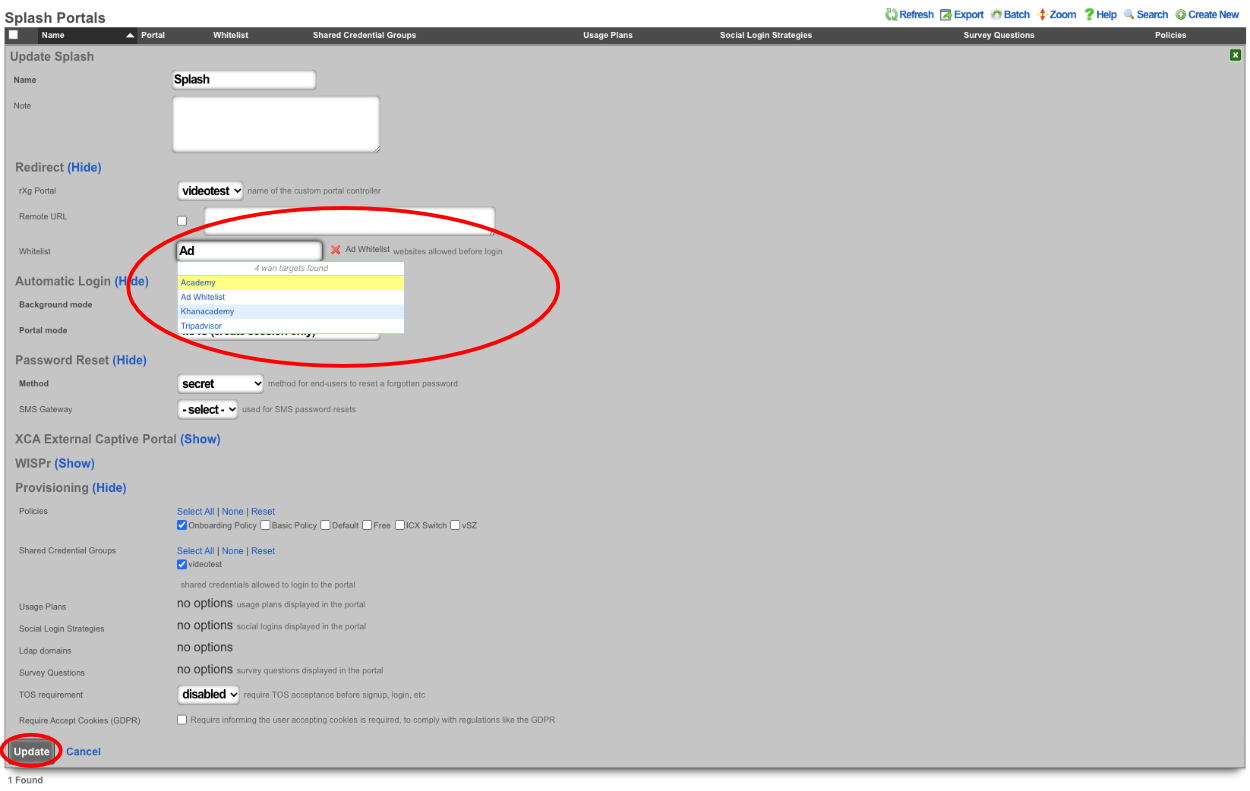
Now we can pull content from the domain(s) that are in the Whitelist. For example to pull content from rxg-lab.tech which is included in the Whitelist that was created. Create a new Rotatee give it a name, and the Payload will be
<img src="https://rxg-lab.tech/images/ad_two.png" width="80%" class="d-block mx-auto my-3">. Include the Rotators the content should be associated with and click Create. Note: to include external content it is important that you define a WAN target that contains all the domains and IP addresses content will be pulled from and this needs to be assigned to the Whitelist of the portal where the content will be displayed.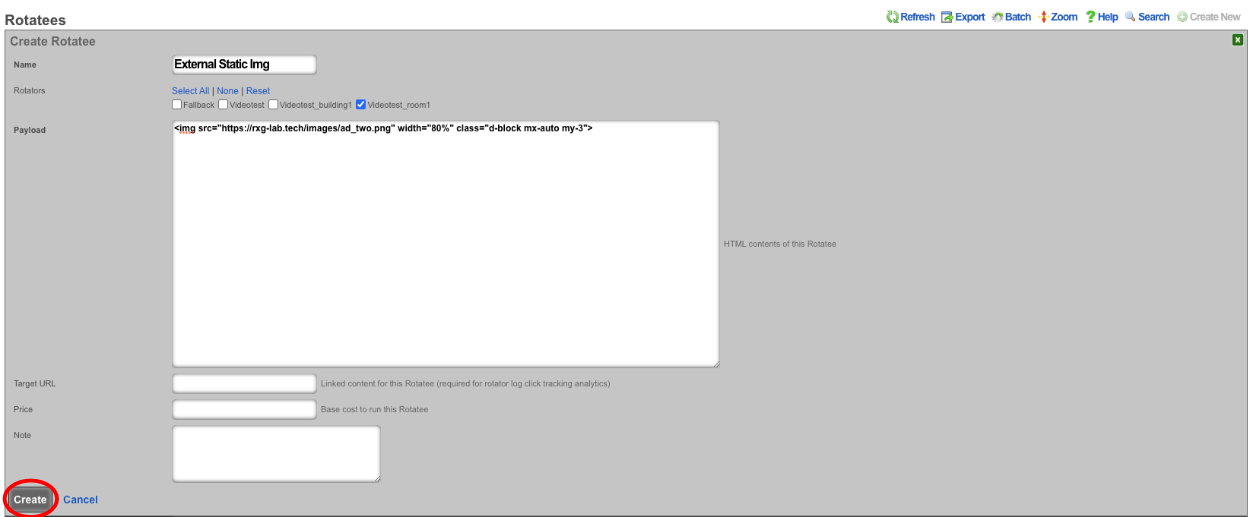
Static Image examples included in default portal.
- ad_one.png
<img src="/static/portal/videotest/ad_one.png" width="80%" class="d-block mx-auto my-3"> - ad_two.png
<img src="/static/portal/videotest/ad_two.png" width="80%" class="d-block mx-auto my-3"> - ad_three.png
<img src="/static/portal/videotest/ad_three.png" width="80%" class="d-block mx-auto my-3">
Video examples included in default portal.
1. Big_Buck_Bunny_360_10s_1MB.mp4
<video class="w-100 mb-3" src="/static/portal/videotest/Big_Buck_Bunny_360_10s_1MB.mp4" preload="none" muted webkit-playsinline playsinline style="display: none;">
2. clouds_1.mp4
<video class="w-100 mb-3" src="/static/portal/videotest/clouds_1.mp4" preload="none" muted webkit-playsinline playsinline style="display: none;">
3. control_vid.mp4
<video class="w-100 mb-3" src="/static/portal/videotest/control_vid.mp4" preload="none" muted webkit-playsinline playsinline style="display: none;">
4. money.mp4
<video class="w-100 mb-3" src="/static/portal/videotest/money.mp4" preload="none" muted webkit-playsinline playsinline style="display: none;">
5. mountains_2.mp4
<video class="w-100 mb-3" src="/static/portal/videotest/mountains_2.mp4" preload="none" muted webkit-playsinline playsinline style="display: none;">
Note: The links provided above are linked to the custom portal created for the example, if you use these you may need to change the "videotest" portion of the link to match the name of the custom portal you created.
Advanced Servers
The servers view of the services menu displays scaffolds that allow the operator to customize the behavior of various services integrated into the rXg.
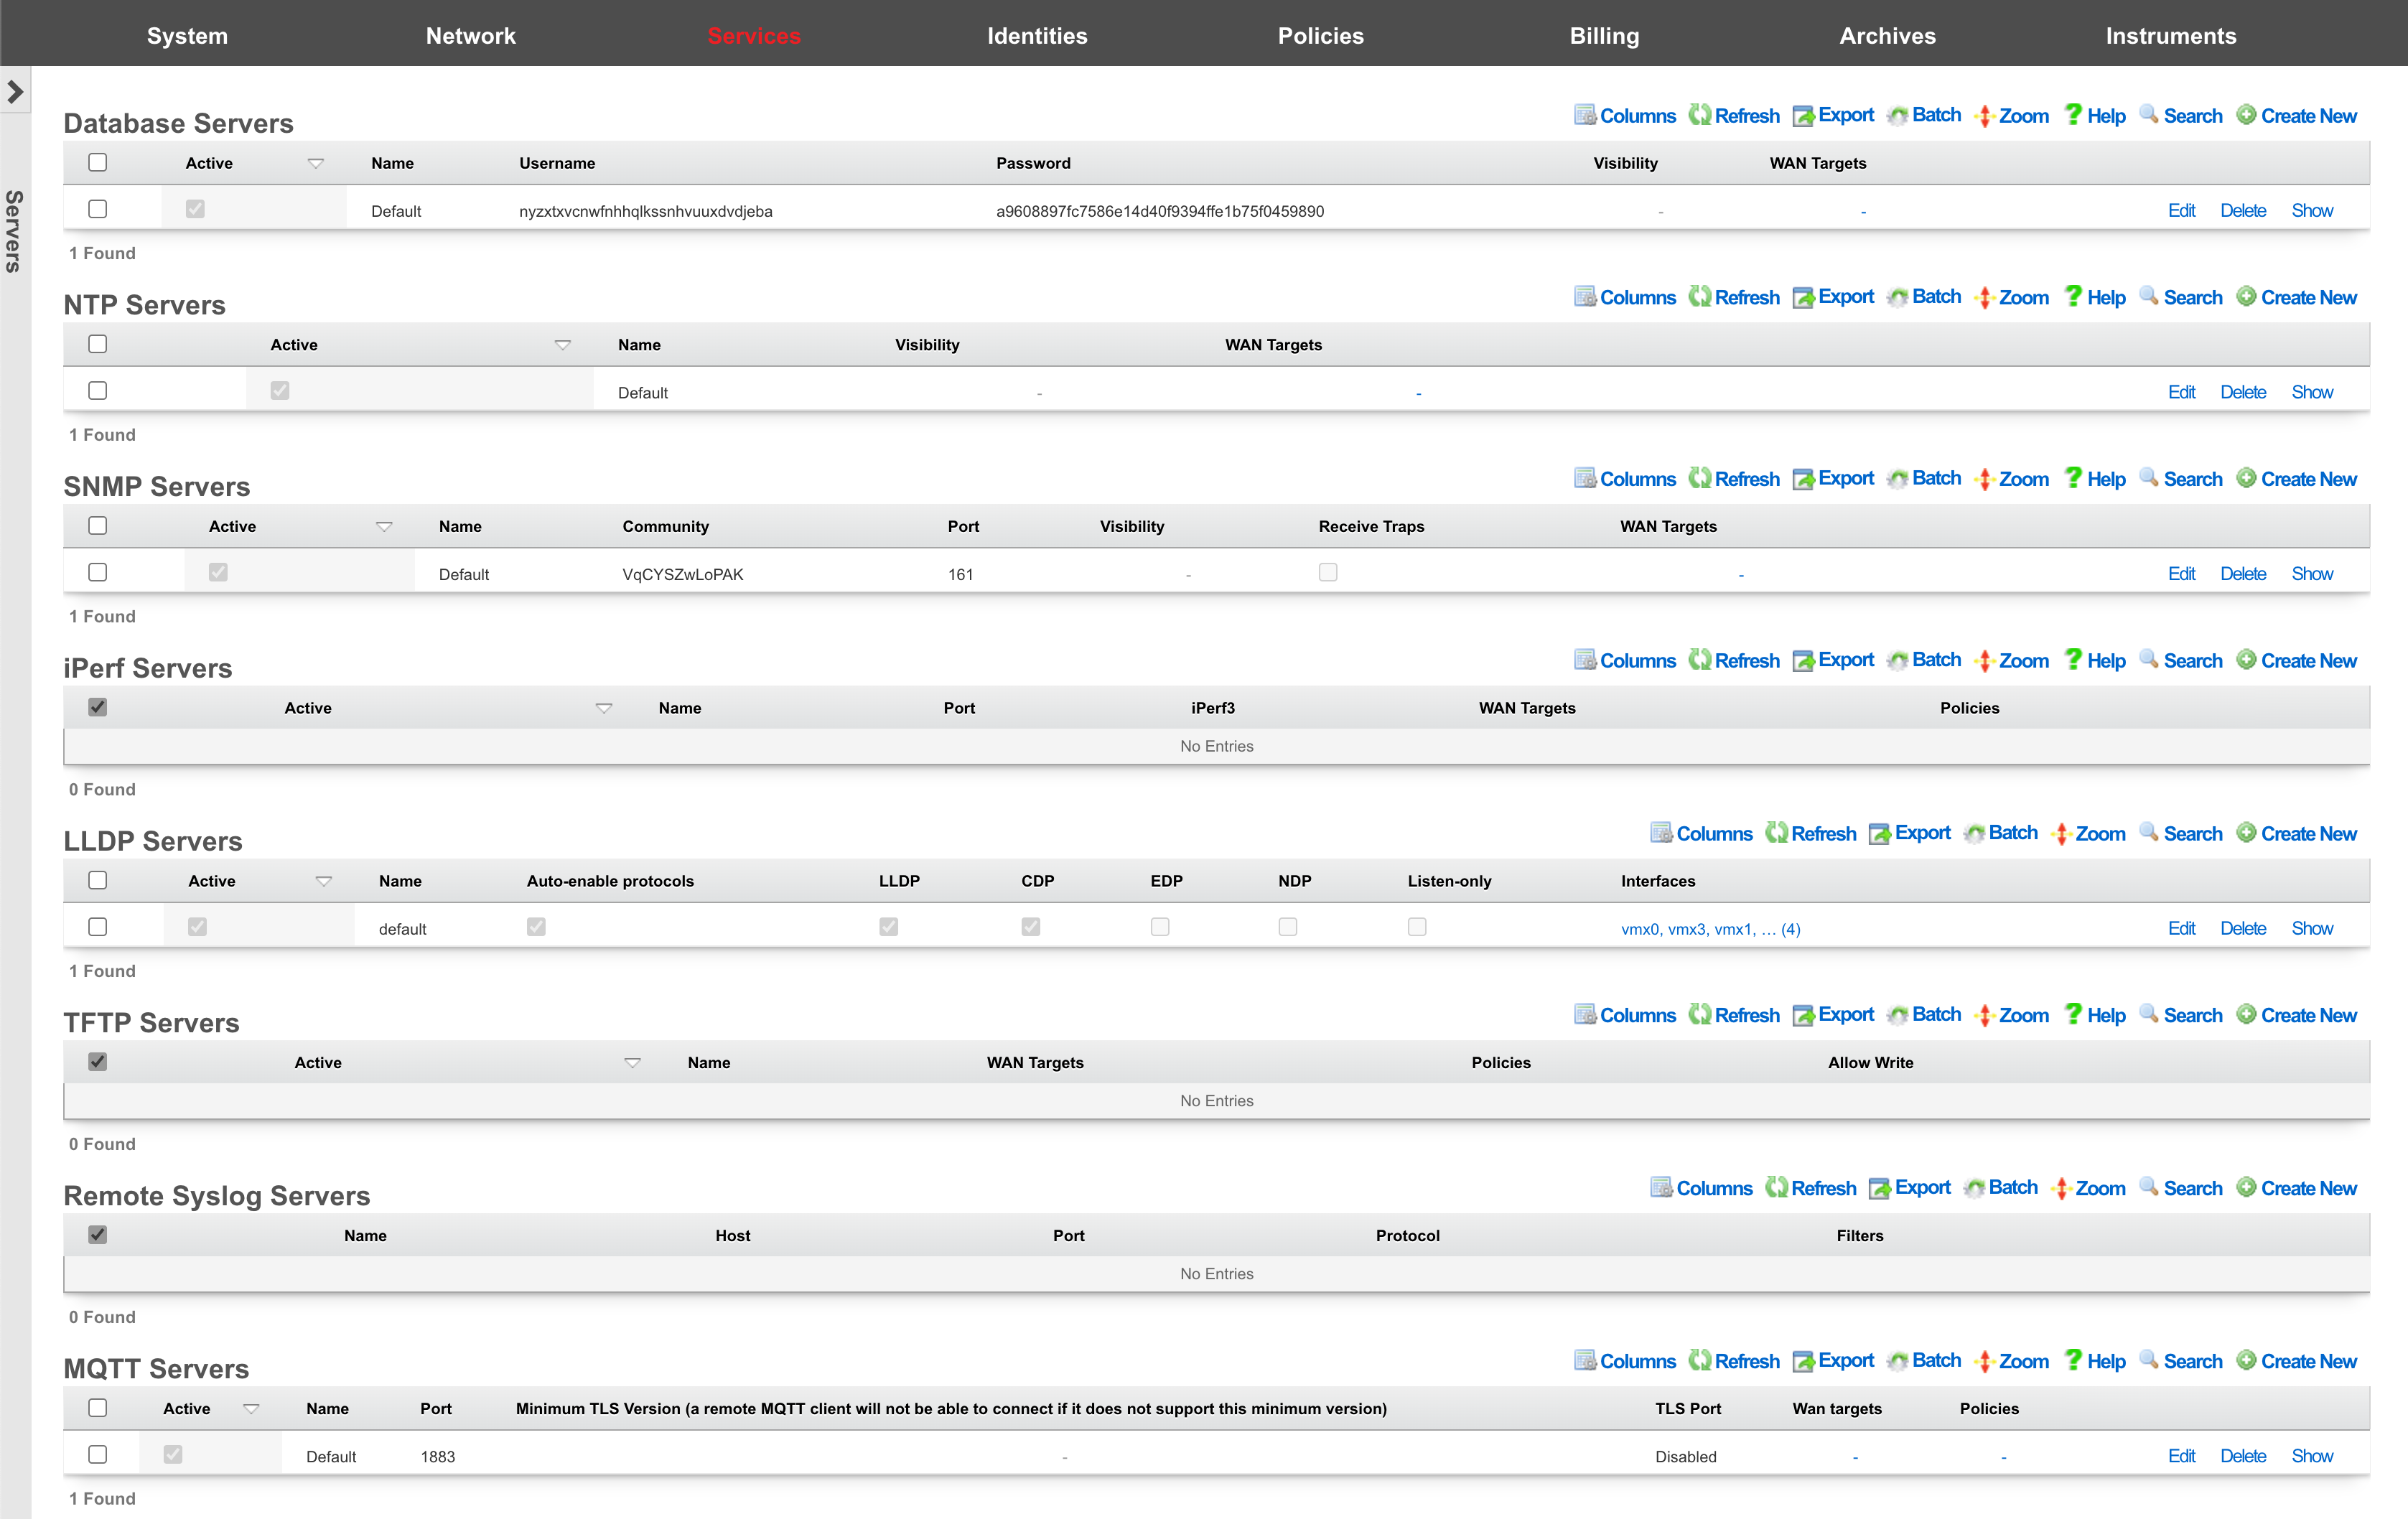

Remote Database Access
The local database of an rXg may be configured for read-only access by third-party software tools When an rXg is configured with local server database storage. The local server database storage methodology configures the rXg to utilize PostgreSQL as the on board database. PostgreSQL is an advanced open source relational database with a wide variety of access options supported by both community-based open source projects as well as proprietary commercial offerings. A quick search for PostgreSQL GUIreveals numerous possibilities.

Many of the tools that integrate with PostgreSQL have GUIs for exploration. In addition, the vast majority allow for arbitrary execution of SQL queries.
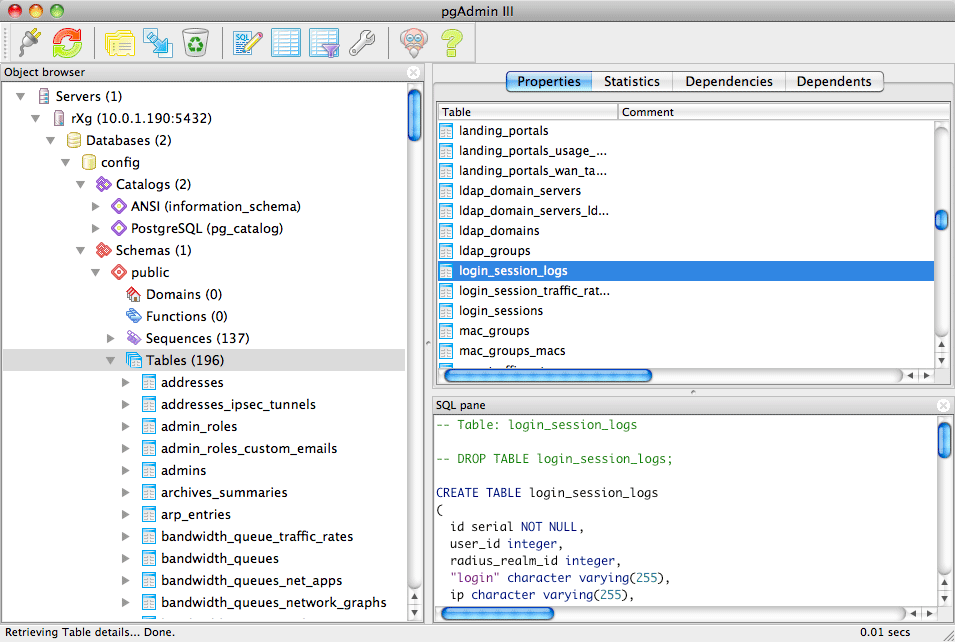
Remote access to the on board rXg database is used to accomplish a broad spectrum of tasks. Advanced and highly customized reporting is one common use case. Below is an example of a report generated by the pgAdmin PostgreSQL GUI tool for the login log.
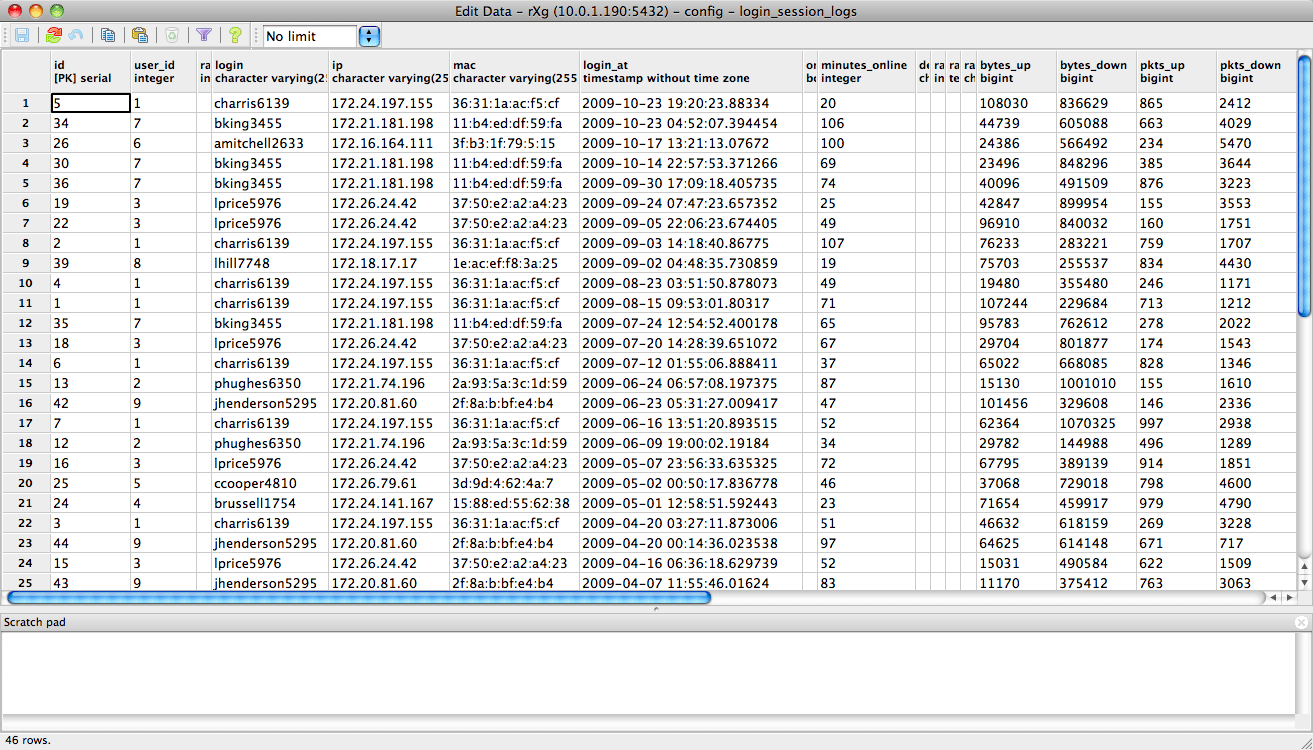
Another common use for remote database access is for integration with a third-party accounting system. Below is a report generated by pgAdmin from the credit card transactions log. A third-party accounting package could be configured to retrieve all of the transactions recorded in a particular time for automatic posting and reconciliation.
![]()
The remote database access feature is also a very convenient way to take periodic backups of the rXg database. This may be accomplished via GUI tools, but is also very easy to script. For example, thepg_dump utility may be run as a scheduled task on Windows or a cron job on a UNIX-based system to automate periodic backups of the rXg.
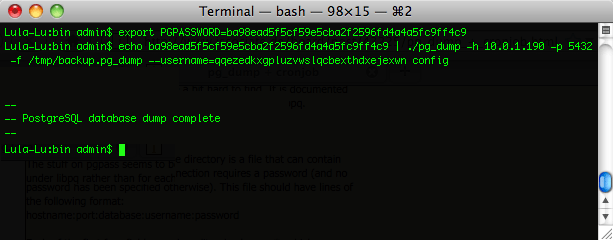
Remote database access is governed by the Database scaffold as discussed below. The default PostgreSQL port is used and the default database name is config. The name of the database being used by the rXg may be changed via the Cluster view of the administrative console. It is strongly advised that the default database name be used.
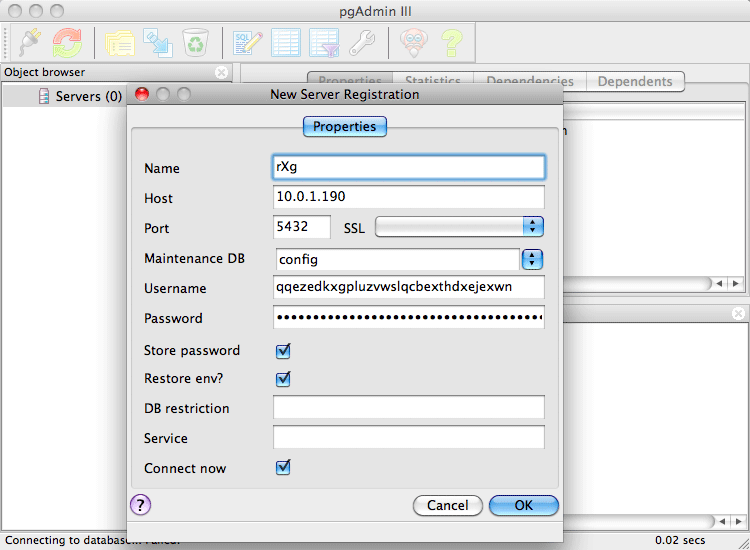
Remote database access is a powerful tool for operators who wish to integrate the rXg with third-party devices, systems and software. Nearly any form of read-only integration may be achieved. To obtain read-write access to the database, the rXg API key mechanism (discussed in the Adminis view) must be used.
Database
Entries in the database scaffold define the remote access policy and credentials for the local database on an rXg. This scaffold is only accessible on an rXg that is configured to use a local server database storage type.
The active field enables an option set. Exactly one option set may be active at any time. Enabling a particular option set will automatically disable another existing active option set.
The name field is an arbitrary string descriptor used only for administrative identification. Choose a name that reflects the purpose of the record. This field has no bearing on the configuration or settings determined by this scaffold.
By default, access to rXg services are either limited to the LAN or disabled entirely. In certain cases, the operator may desire to permit accessibility to services over the WAN and/or LAN. To enable access to rXg services over the WAN, the operator should specify one or more WAN targets containing the list of allowed hosts and then set the visibility appropriately. If no WAN target is specified and WAN visibility is enabled, any node on the WAN may connect to the service. It is highly recommended that this wide-open configuration be avoided to ensure system security. If LAN visibility is included then all authenticated nodes on the LAN may access this service.
The username and password fields contain the credentials for accessing the database. These credentials are generated by the rXg and are immutable.
The note field is a place for the administrator to enter a comment. This field is purely informational and has no bearing on the configuration settings.
NTP Server
The rXg incorporates a sophisticated Network Time Protocol server implementation that serves dual roles within your network infrastructure. Acting both as a time synchronization client to maintain precise local timekeeping and as a time distribution server for downstream network devices, the rXg NTP service ensures consistent temporal accuracy across your entire managed environment. This comprehensive time synchronization capability is fundamental to the reliable operation of billing systems, security protocols, log correlation, and numerous other time-sensitive network services.
Time Synchronization Architecture
The rXg NTP implementation utilizes a hierarchical approach to time distribution, positioning itself strategically between authoritative time sources and client devices throughout your network. The system continuously synchronizes with configured upstream NTP servers while simultaneously providing time services to local area network clients, access points, infrastructure devices, and other network elements that require accurate temporal references.
During periods when upstream connectivity becomes unavailable, the rXg maintains service continuity by automatically transitioning to its internal clock reference configured as a stratum 10 time source. This failover mechanism ensures that network devices can continue receiving time synchronization services even during extended uplink outages, preventing time drift that could compromise security certificates, log file timestamps, and billing accuracy.
Configuration Profile Management
NTP server operation is governed through configuration profiles defined in the NTP Server scaffold, where the active field designates which configuration set controls current system behavior. The rXg enforces a single active configuration policy, automatically deactivating any previously active profile when a new one is enabled. This approach prevents configuration conflicts while enabling administrators to maintain multiple operational profiles suited for different network conditions or maintenance scenarios.
The name field provides administrative identification for each configuration profile, allowing operators to maintain descriptive labels that reflect the intended purpose or deployment context of each configuration set. While this field serves purely administrative functions and does not influence operational behavior, meaningful naming conventions facilitate configuration management in complex environments with multiple operational profiles.
Network Access Control and Security
The rXg NTP server implements comprehensive access control mechanisms that balance service availability with security requirements. By default, NTP services operate with restrictive access policies that limit client interactions while preventing potential security vulnerabilities. The system automatically restricts client capabilities to essential time query functions while blocking administrative operations that could compromise server integrity.
Visibility settings provide granular control over service accessibility across network boundaries. When internal visibility is configured, NTP services become available exclusively to devices connected to local network segments, providing time synchronization for infrastructure equipment, user devices, and access points within the managed environment. The WAN visibility option extends service availability to external networks, enabling remote devices or distributed network components to synchronize with the rXg time source.
WAN targets configuration provides additional security refinement when external access is required. Rather than exposing NTP services to unrestricted internet access, administrators can specify particular host addresses or network ranges that should be permitted to access the time service. This targeted approach maintains security while accommodating legitimate external synchronization requirements for distributed infrastructure or partner network integration scenarios.
Upstream Server Configuration and Authentication
The rXg maintains synchronization accuracy through connection to authoritative time sources configured in the associated Device Option profile. Multiple upstream servers can be specified to ensure redundancy and accuracy, with the system automatically managing server selection and failover based on network reachability and synchronization quality metrics. When no specific servers are configured, the system defaults to the public NTP pool infrastructure, providing reliable time synchronization for standard deployments.
Authentication capabilities enable secure time synchronization in environments where time source verification is critical for security or compliance requirements. The system supports symmetric key authentication using a comprehensive range of cryptographic hash algorithms including MD5, SHA-1, SHA-256, SHA-384, SHA-512, and modern alternatives such as SHA-3 and BLAKE2 variants. Each authentication configuration requires a unique key identifier ranging from 1 to 65535, along with the shared secret key and specified algorithm type.
Authentication key management follows security best practices by requiring unique key identifiers within each device option scope, preventing key collision issues that could compromise synchronization integrity. The system validates authentication parameters during configuration to ensure compatibility with upstream server requirements and cryptographic standards.
Interface Binding and Network Optimization
The rXg NTP implementation includes intelligent interface management designed to optimize performance while avoiding potential socket limitations in complex network environments. Rather than binding to all available network interfaces, which could create resource constraints in networks with extensive VLAN configurations, the system selectively listens on uplink interfaces required for upstream synchronization and localhost for client service delivery.
Client access is facilitated through packet filter redirection mechanisms that transparently route NTP requests to the localhost service endpoint. This architecture enables comprehensive client service coverage while maintaining efficient resource utilization and avoiding the socket limitations that could occur when attempting to bind directly to thousands of VLAN interfaces in large-scale deployments.
The interface selection process automatically adapts to network configuration changes, including uplink modifications, address updates, and interface state transitions. This dynamic adaptation ensures consistent service availability as network infrastructure evolves without requiring manual intervention or service disruption.
Service Reliability and Health Monitoring
Operational reliability is maintained through comprehensive monitoring and automatic service management capabilities integrated into the rXg task execution framework. The NTP service automatically responds to configuration changes affecting network interfaces, addressing, uplink connectivity, and server specifications by regenerating appropriate configuration files and restarting services as necessary to maintain optimal operation.
Health monitoring systems continuously evaluate synchronization status and generate appropriate notifications when time synchronization failures occur or when upstream server connectivity is compromised. These monitoring capabilities integrate with the broader rXg notification infrastructure, enabling administrators to receive timely alerts regarding time service disruptions that could affect dependent systems.
The service management framework includes coordination with other system components to prevent conflicts during maintenance operations and ensure proper startup sequencing during system initialization. Priority scheduling ensures that time synchronization is established before dependent services that require accurate timestamps, such as monitoring data collection and log rotation processes.
Integration with Infrastructure Components
The NTP server seamlessly integrates with other rXg subsystems to provide comprehensive network timing services. Access points and infrastructure devices can be automatically configured to use the rXg as their primary time source, reducing dependency on external time services while improving synchronization accuracy through reduced network hop counts. This integration is particularly valuable in environments where infrastructure devices have limited external connectivity or where centralized time source management is preferred for security or operational reasons.
DHCP and network configuration services can automatically distribute NTP server information to client devices, enabling automatic time synchronization configuration without requiring manual client setup. This automated distribution capability ensures consistent time synchronization across user devices while reducing configuration complexity and support requirements.
The billing system integration ensures that time synchronization accuracy meets the stringent requirements necessary for precise usage tracking, session duration calculations, and financial transaction logging. The system maintains synchronization accuracy standards that support legally compliant billing practices and audit requirements in commercial service provider environments.
The note field is a place for the administrator to enter a comment. This field is purely informational and has no bearing on the configuration settings.
SNMP Server
Entries in the SNMP Server scaffold define configuration profiles for the rXg integrated SNMP server. Many of the instruments that may be accessed via the rXg administrative console are also available via SNMP. This allows the rXg to be probed by a SNMP network or element management system and enables the operator to use to integrate the rXg as part of a large scale heterogeneous network.
The active field enables an option set. Exactly one option set may be active at any time. Enabling a particular option set will automatically disable another existing active option set.
The name field is an arbitrary string descriptor used only for administrative identification. Choose a name that reflects the purpose of the record. This field has no bearing on the configuration or settings determined by this scaffold.
The community is the read only (r/o) string that is used to gain access to this rXg via SNMP. Remote access to SNMP is disabled by default.
The port field specifies which port the SNMP server should listen for SNMP probes.
By default, access to rXg services are either limited to the LAN or disabled entirely. In certain cases, the operator may desire to permit accessibility to services over the WAN and/or LAN. To enable access to rXg services over the WAN, the operator should specify one or more WAN targets containing the list of allowed hosts and then set the visibility appropriately. If no WAN target is specified and WAN visibility is enabled, any node on the WAN may connect to the service. It is highly recommended that this wide-open configuration be avoided to ensure system security. If LAN visibility is included then all authenticated nodes on the LAN may access this service.
The Receive Traps option enables the SNMP Trap listener on the rXg. Access to the server is restricted by the visibility and WAN Target selections. SNMP agents may use the community string specified here or the community string of an Infrastructure Device.
The note field is a place for the administrator to enter a comment. This field is purely informational and has no bearing on the configuration settings.
SNMP MIBs
Integrating any network device with an SNMP monitoring solution usually requires MIBs. The following is list of MIBs that are available to download to assist with SNMP integration to the rXg:
- ADTRAN-VWLAN-MIB.txt
- ADTRAN-VWLAN-PF-MIB.txt
- ADTRANVWLAN-TC.txt
- ADVWLAN-ROOT.txt
- ATM-TC-MIB.txt
- BGP4-MIB.txt
- CISCOSB-BRIDGEMIBOBJECTS-MIB.txt
- CISCOSB-DEVICEPARAMS-MIB.txt
- CISCOSB-MIB.mib.txt
- CISCOSB-TRAPS-MIB.mib.txt
- DIFFSERV-DSCP-TC.mib
- DIFFSERV-MIB.mib
- DVMRP-MIB.txt
- ENTITY-MIB.txt
- IEEE8021-SECY-MIB.mib
- IGMP-MIB.txt
- INTEGRATED-SERVICES-MIB.mib
- IPMROUTE-MIB.txt
- IPV6-MLD-MIB.mib
- LLDP-MIB.txt
- MPLS-TC-STD-MIB.mib
- MSDP-MIB.txt
- P-BRIDGE-MIB.txt
- POWER-ETHERNET-MIB.txt
- Q-BRIDGE-MIB.txt
- RADIUS-DYNAUTH-SERVER-MIB.txt
- RAPID-CITY-MIB.txt
- RMON2-MIB.txt
- RUCKUS-ADAPTER-MIB.txt
- RUCKUS-DEVICE-MIB.txt
- RUCKUS-DHCP-MIB.txt
- RUCKUS-ETH-MIB.txt
- RUCKUS-EVENT-MIB.txt
- RUCKUS-HWINFO-MIB.txt
- RUCKUS-L2TP-MIB.txt
- RUCKUS-PPPOE-MIB.txt
- RUCKUS-PRODUCTS-MIB.txt
- RUCKUS-RADIO-MIB.txt
- RUCKUS-ROOT-MIB.txt
- RUCKUS-SWINFO-MIB.txt
- RUCKUS-SYSTEM-MIB.txt
- RUCKUS-TC-MIB.txt
- RUCKUS-UPGRADE-MIB.txt
- RUCKUS-VF2825-MIB.txt
- RUCKUS-WLAN-MIB.txt
- RUCKUS-WLINK-MIB.txt
- RUCKUS-ZD-AAA-MIB.txt
- RUCKUS-ZD-AP-MIB.txt
- RUCKUS-ZD-EVENT-MIB.txt
- RUCKUS-ZD-SYSTEM-MIB.txt
- RUCKUS-ZD-WLAN-CONFIGURATION-MIB.txt
- RUCKUS-ZD-WLAN-MIB.txt
- SAMSUNG-TELECOM-PRODUCTS-MIB
- SAMSUNG-TELECOM-SMI
- SAMSUNG-TELECOM-TC-MIB
- SAMSUNG-WEC-IF-MIB.my
- SAMSUNG-WEC-IPAPPL-MIB.my
- SAMSUNG-WEC-NW-MIB.my
- SAMSUNG-WEC-SEQ-MIB.my
- SAMSUNG-WEC-SMI
- SAMSUNG-wec8050-MIB.mib
- SAMSUNG-wec8050-TC-MIB.mib
- TOKEN-RING-RMON-MIB.txt
- VRRP-MIB.mib
- WING-MIB.mib
- WS-SMI.mib
The current set of MIB files distributed with the rXg can be downloaded here: MIBs.zip
A number of standard IETF MIBs are also included, namely:
- DISMAN-EVENT-MIB
- HOST-RESOURCES-MIB
- IF-MIB
- IP-FORWARD-MIB
- IP-MIB
- IPV6-ICMP-MIB
- IPV6-MIB
- MTA-MIB
- NET-SNMP-MIB
- NOTIFICATION-LOG-MIB
- RFC1213-MIB
- SNMP-FRAMEWORK-MIB
- SNMP-MPD-MIB
- SNMP-USER-BASED-SM-MIB
- SNMPv2-MIB
- SNMP-VIEW-BASED-ACM-MIB
- TCP-MIB
- UCD-SNMP-MIB
- UDP-MIB
The standard IETF MIB files can be downloaded here: MIBs OS.zip
TFTP Server
Entries in the TFTP Server scaffold define configuration profiles for the rXg integrated TFTP server. May third-party networking devices are configured by loading files over TFTP. The intended use of the rXg integrated TFTP server is to simplify the process of configuring and configuring provisioning of third-party devices.
The TFTP server delivers files out of /space/tftpboot. It is assumed that the operator will use SFTP to transfer files to the rXg that will be served by the rXg integrated TFTP server. In addition, the rXg captive portal may be customized to generate files into this directory for zero operator intervention provisioning scenarios. For example, the captive portal may be customized to generate files for provisioning VoIP ATAs and telephones for end-users who have purchased a usage plan that incorporates a VoIP package.
The active field enables an option set. Exactly one option set may be active at any time. Enabling a particular option set will automatically disable another existing active option set.
The name field is an arbitrary string descriptor used only for administrative identification. Choose a name that reflects the purpose of the record. This field has no bearing on the configuration or settings determined by this scaffold.
The WAN targets and policies fields specify which sets of hosts should be allowed access to the rXg integrated TFTP server. TFTP does not include any authentication. Thus, by default, no access is allowed to the rXg integrated TFTP server. The operator must specifically enable access to hosts on the WAN by creating WAN targets and enabling the appropriate check boxes. Hosts on the LAN may be granted access by placing the hosts into a group and then linking them into a policy which is selected here.
The note field is a place for the administrator to enter a comment. This field is purely informational and has no bearing on the configuration settings.
iPerf Server
Entries in the iPerf Server scaffold define configuration profiles for the rXg integrated iPerf server. iPerf is the de-fato standard mechanism for measuring the available network bandwidth. To use this feature of the rXg, the operator must have an iPerf client installed on one or more external devices.
The active field enables an option set. Exactly one option set may be active at any time. Enabling a particular option set will automatically disable another existing active option set.
The name field is an arbitrary string descriptor used only for administrative identification. Choose a name that reflects the purpose of the record. This field has no bearing on the configuration or settings determined by this scaffold.
The port field configures the port that the iPerf server will be listening for connections on. The default port is 5201.
The WAN targets and policies fields specify which sets of hosts should be allowed access to the rXg integrated iPerf server. iPerf does not include any authentication. Thus, by default, no access is allowed to the rXg integrated iPerf server. The operator must specifically enable access to hosts on the WAN by creating WAN targets and enabling the appropriate check boxes. Hosts on the LAN may be granted access by placing the hosts into a group and then linking them into a policy which is selected here.
The rXg integrated iPerf server is most often used with devices on the LAN to instrument the maximum bandwidth between an end-user device and the rXg. The maximum speed reported by iPerf will be determined by the physical media speed and the bandwidth queue that is associated with the client device. Note that if the end-user has been associated with a usage quota, the use of iPerf will be counted into the quota.
iPerf may also be used from the WAN side to instrument the maximum bandwidth available on WAN uplinks. In order to acquire correct data, the iPerf client should be placed immediately adjacent to the rXg on the WAN. Using a iPerf client that is multiple hops away from the rXg will usually provide nonsensical results because it is impossible to guarantee that the intermediate hops will have sufficient bandwidth for the test.
The use of iPerf is highly preferred to web-based online bandwidth meters such as speedtest.net. This is because the iPerf server enables the operator to independently test the LAN distribution network and the WAN uplinks. A web-based online bandwidth meter can only perform a complete end-to-end test that does not provide any information as to where the potential problem is. Also, the results from an web-based online bandwidth meter test may be skewed by proxies, including the rXg integrated transparent web proxy.
The note field is a place for the administrator to enter a comment. This field is purely informational and has no bearing on the configuration settings.
MQTT Server
Entries in the MQTT Server scaffold define configuration profiles for the rXg integrated MQTT server.
The active field enables an option set. Exactly one option set may be active at any time. Enabling a particular option set will automatically disable another existing active option set.
The name field is an arbitrary string descriptor used only for administrative identification. Choose a name that reflects the purpose of the record. This field has no bearing on the configuration or settings determined by this scaffold.
The WAN targets and policies fields specify which sets of hosts should be allowed access to the rXg integrated MQTT server. MQTT does not include any authentication. Thus, by default, no access is allowed to the rXg integrated MQTT server. The operator must specifically enable access to hosts on the WAN by creating WAN targets and enabling the appropriate check boxes. Hosts on the LAN may be granted access by placing the hosts into a group and then linking them into a policy which is selected here.
The note field is a place for the administrator to enter a comment. This field is purely informational and has no bearing on the configuration settings.
EST Server
Entries in the EST Server scaffold define configuration profiles for the rXg integrated EST (Enrollment over Secure Transport) server. The EST server provides RFC 7030 compliant certificate enrollment services for OpenWiFi access points and other infrastructure devices requiring automated certificate management.
The EST server enables zero-touch certificate provisioning for OpenWiFi deployments, allowing access points to automatically discover and enroll with the rXg certificate authority via DHCP Option 224. This eliminates manual certificate distribution and ensures secure, authenticated communication between access points and the OpenWiFi WSS (WebSocket Server) client.
The active field enables an option set. Exactly one option set may be active at any time. Enabling a particular option set will automatically disable another existing active option set. When no EST server option is active, the EST server is completely disabled and returns HTTP 503 for all EST endpoints.
The name field is an arbitrary string descriptor used only for administrative identification. Choose a name that reflects the purpose of the record. This field has no bearing on the configuration or settings determined by this scaffold.
The WAN targets and policies fields specify which sets of hosts should be allowed access to the rXg integrated EST server. EST server access follows a fail-secure model: when an EST server option is active but has no policies or WAN targets configured, all access is denied with HTTP 403. The operator must specifically enable access to hosts on the WAN by creating WAN targets that encompass the IP ranges where access points are located. Hosts on the LAN may be granted access by placing the hosts into IP groups linked to policies which are then associated with the EST server option.
The EST server uses the same effective policy resolution logic as the rest of the rXg system. When a client requests access, the system determines the client's effective policy using standard group membership rules and checks if that policy is associated with the active EST server option. This ensures consistent access control behavior across all rXg services.
The note field is a place for the administrator to enter a comment. This field is purely informational and has no bearing on the configuration settings.
EST Server Endpoints
The EST server provides standard RFC 7030 endpoints:
/.well-known/est/cacerts- Returns CA certificate chain in PKCS#7 format/.well-known/est/simpleenroll- Handles certificate enrollment requests/.well-known/est/simplereenroll- Handles certificate renewal requests
Integration with OpenWiFi
The EST server integrates seamlessly with OpenWiFi deployments:
- Automatic Discovery: Access points use DHCP Option 224 to discover the rXg hostname for EST services
- Certificate Binding: Certificates include MAC address binding via subjectAltName for device correlation
- Automatic Renewal: Access points automatically renew certificates at 66.6% of validity period with device-specific jitter
- Zero-Touch Provisioning: New access points automatically create inventory records during first enrollment
Virtualization
- Virtualization Overview and Getting Started
- Virtualization Deployment Guide
- VM Network Configuration Guide
- VM Snapshot Management Guide
- Virtualization Design Guide
The rXg virtualization platform provides enterprise-grade virtual machine management built on FreeBSD's bhyve hypervisor. This comprehensive solution includes advanced features like cloud-init automation, ZFS-based snapshots, sophisticated network configuration, and robust VM lifecycle management.
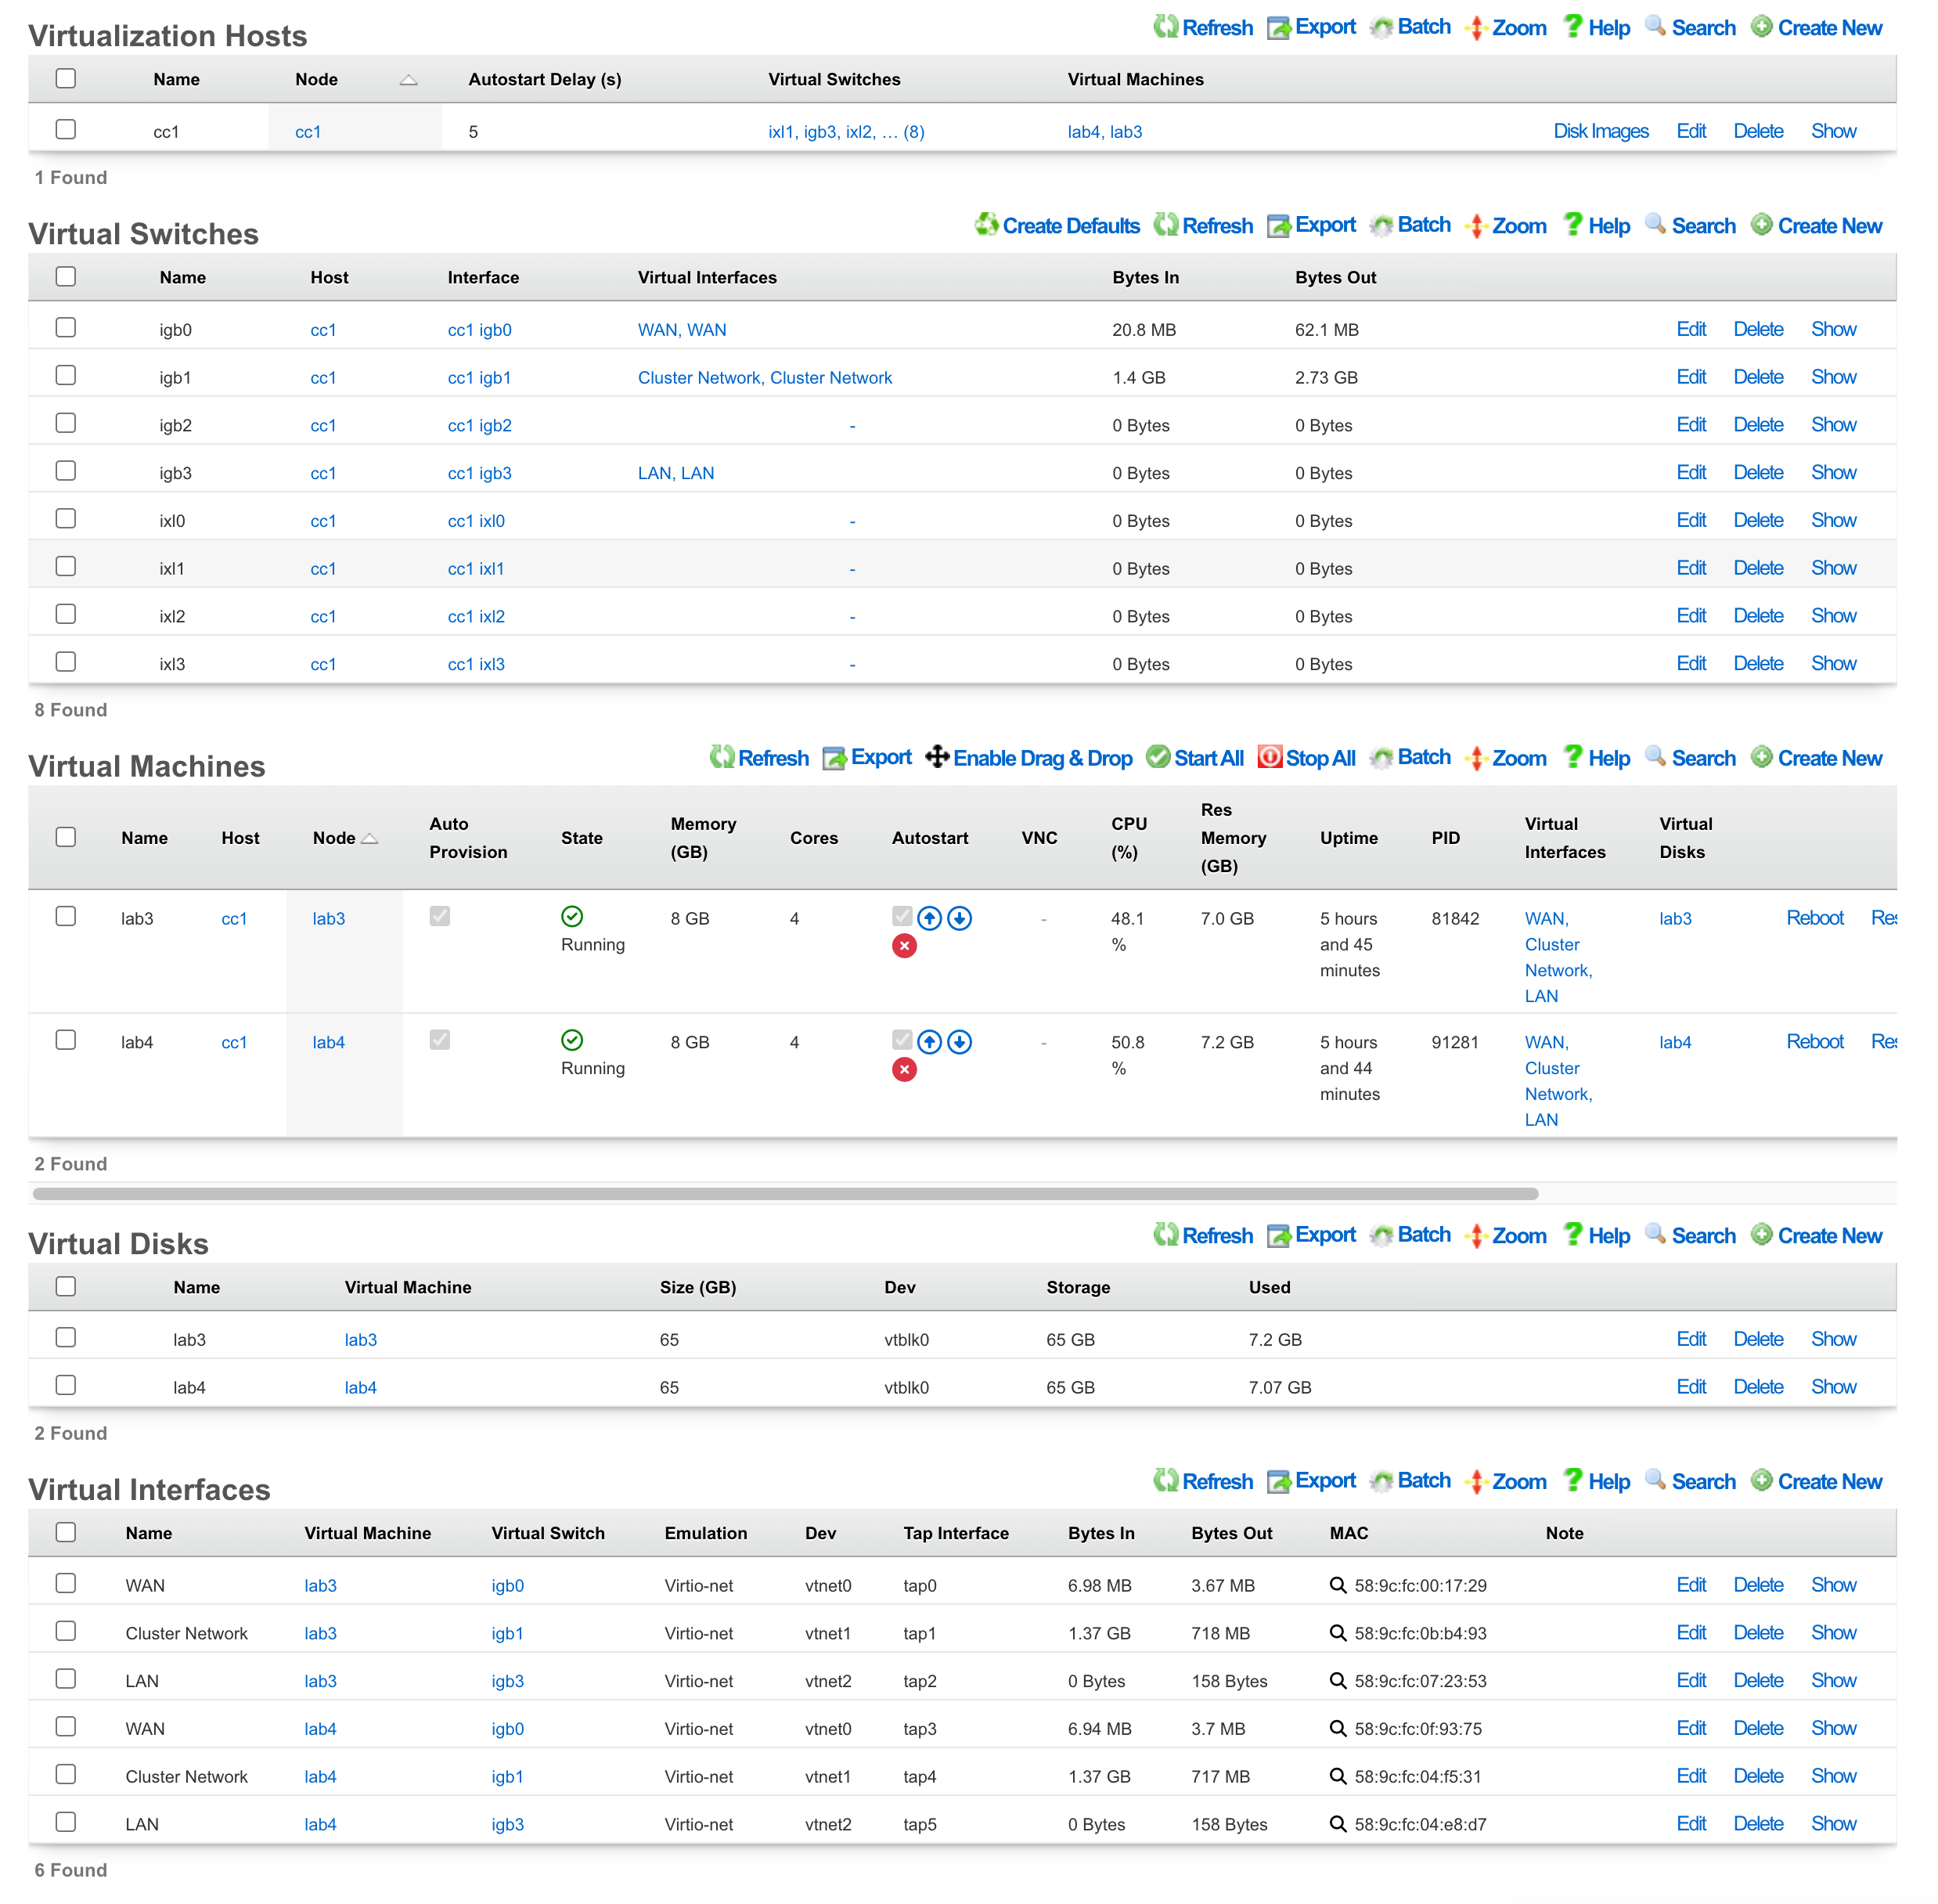
Virtualization Deployment Guide
The most common use case of virtualization within the rXg is to cluster multiple rXgs together on the same bare metal machine to maximize the use of available resources. The following steps will guide you through building a virtual infrastructure capable of clustering.
Note: If rXg virtualization host is itself installed onto a virtual machine running on ESXi, ensure that hardware virtualization is enabled in the VM options.
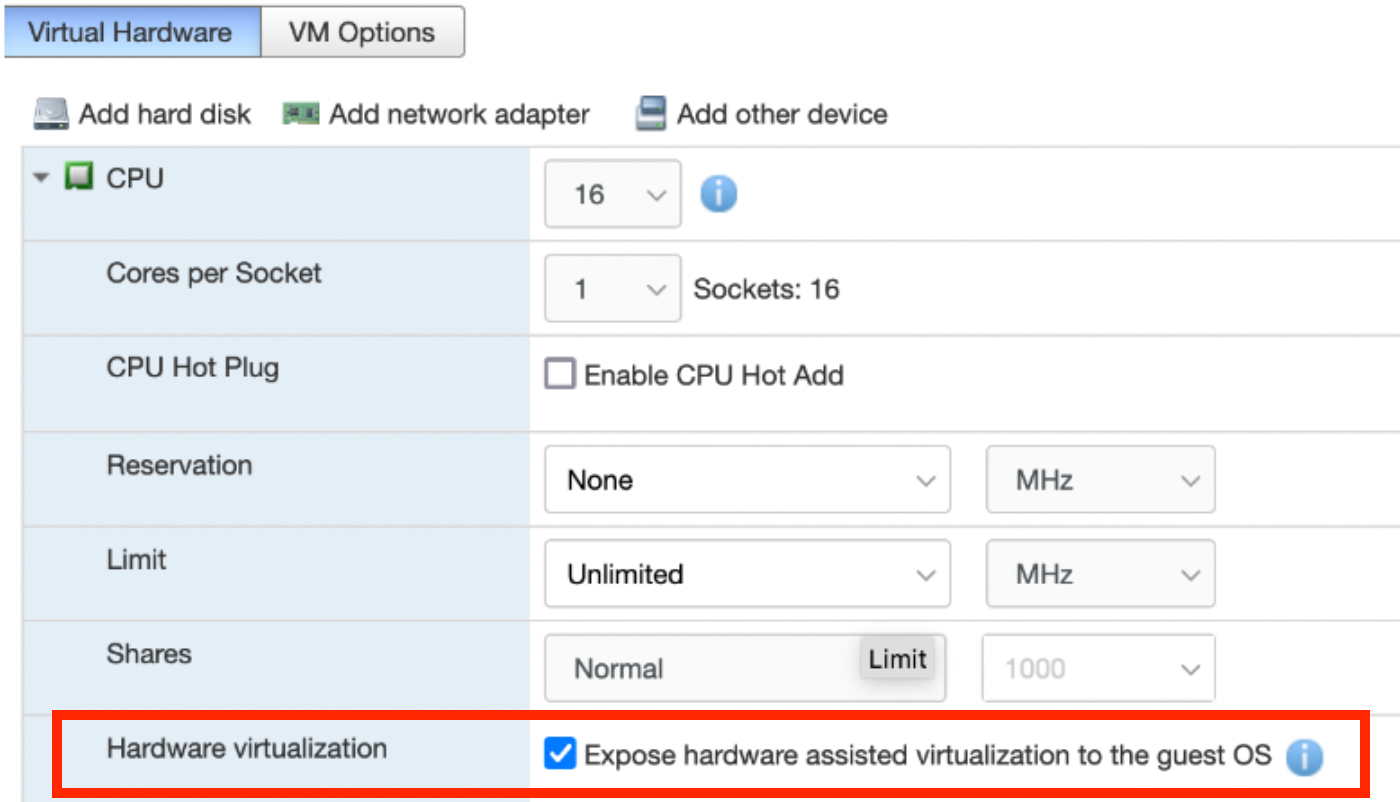
Create a Virtualization Host
From the Virtualization Hosts scaffold, click Create New

A host can be created on any bare metal node you wish to use as a virtualization environment. Assign the host a name and select the node that will be used for virtualization. The Autostart delay can be left at the default of 5 seconds. You will notice that a virtual switch has already been added for each physical interface on the host. These virtual switches will function whether or not the physical interfaces are connected - you can configure network connectivity using either direct bridge mode (with physical uplink) or routed mode (without physical uplink) as described in the Advanced Networking Architecture section. Click create at the bottom to proceed.
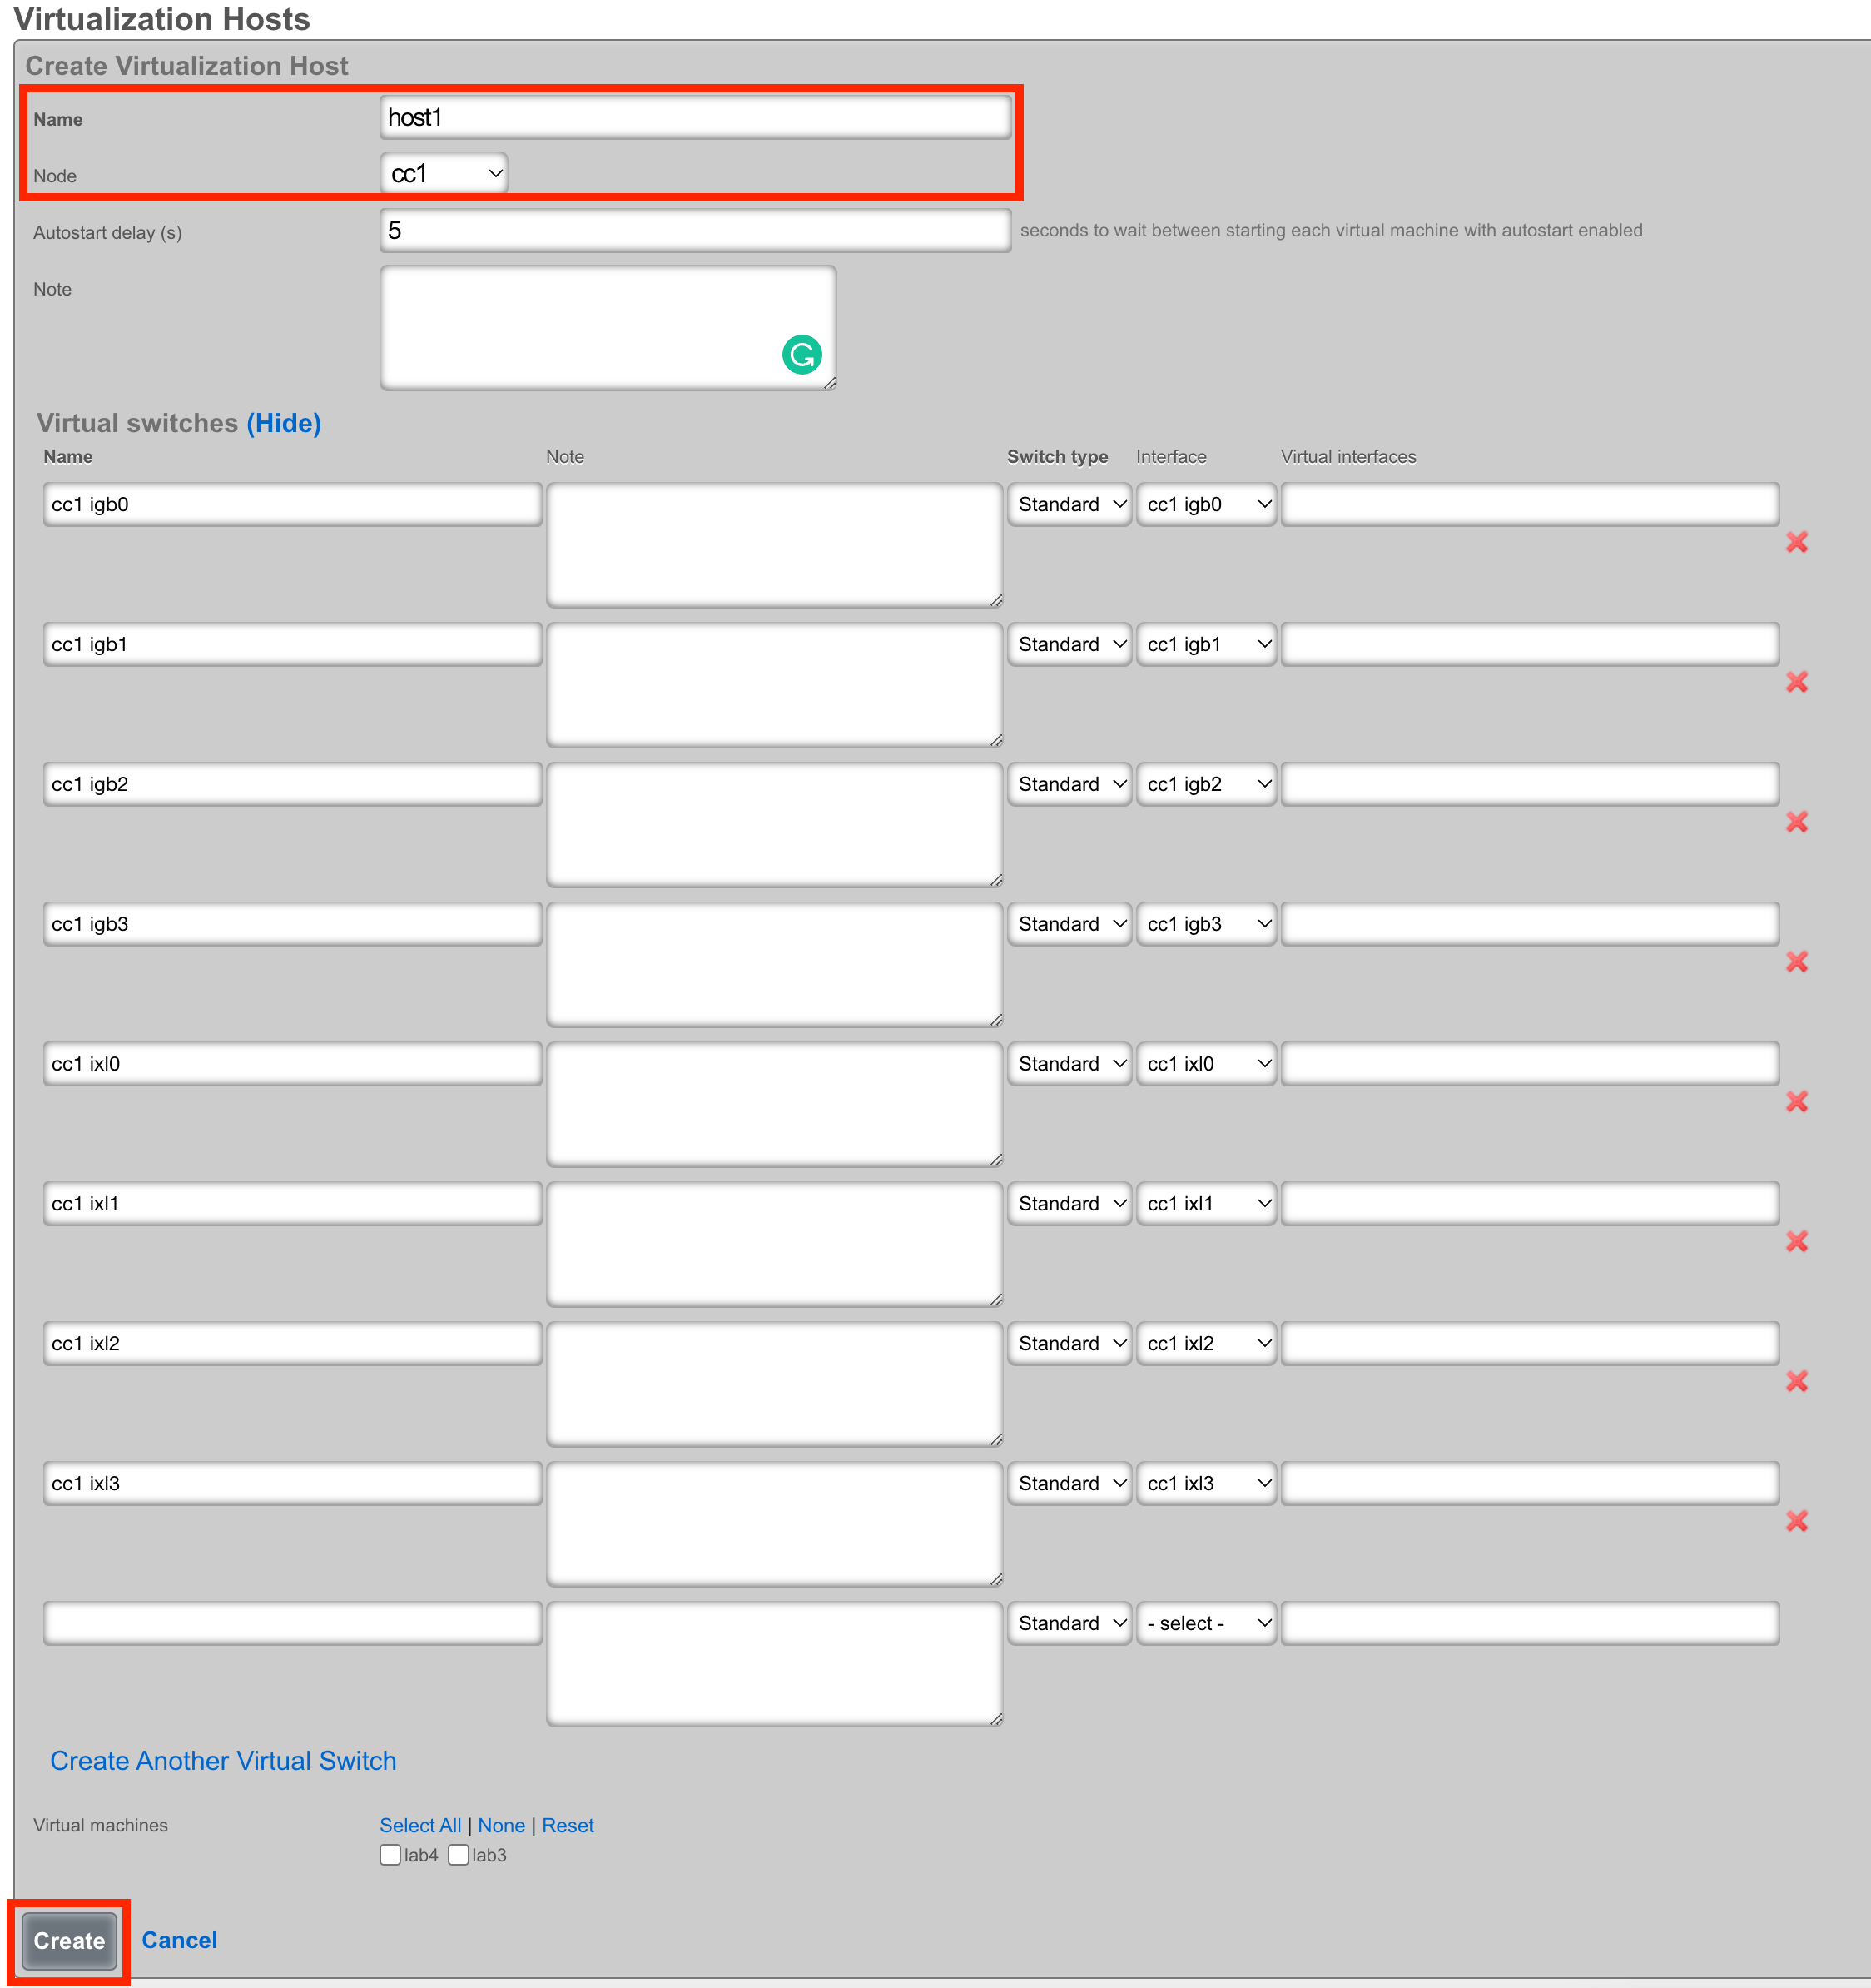
Load the ISO onto the Host
Once the host is created, you can click Disk Images to load the ISO file that will be used as the operating system for your virtual machines.

Next, click Create New.

The Filename field is required. This will be used to reference the associated .iso file. The rXg provides two methods to load the .iso file onto the system. You can provide a URL that points to the .iso file, and the rXg will download it directly, or you can use the File Upload method to select an .iso from your local machine to upload to the system.
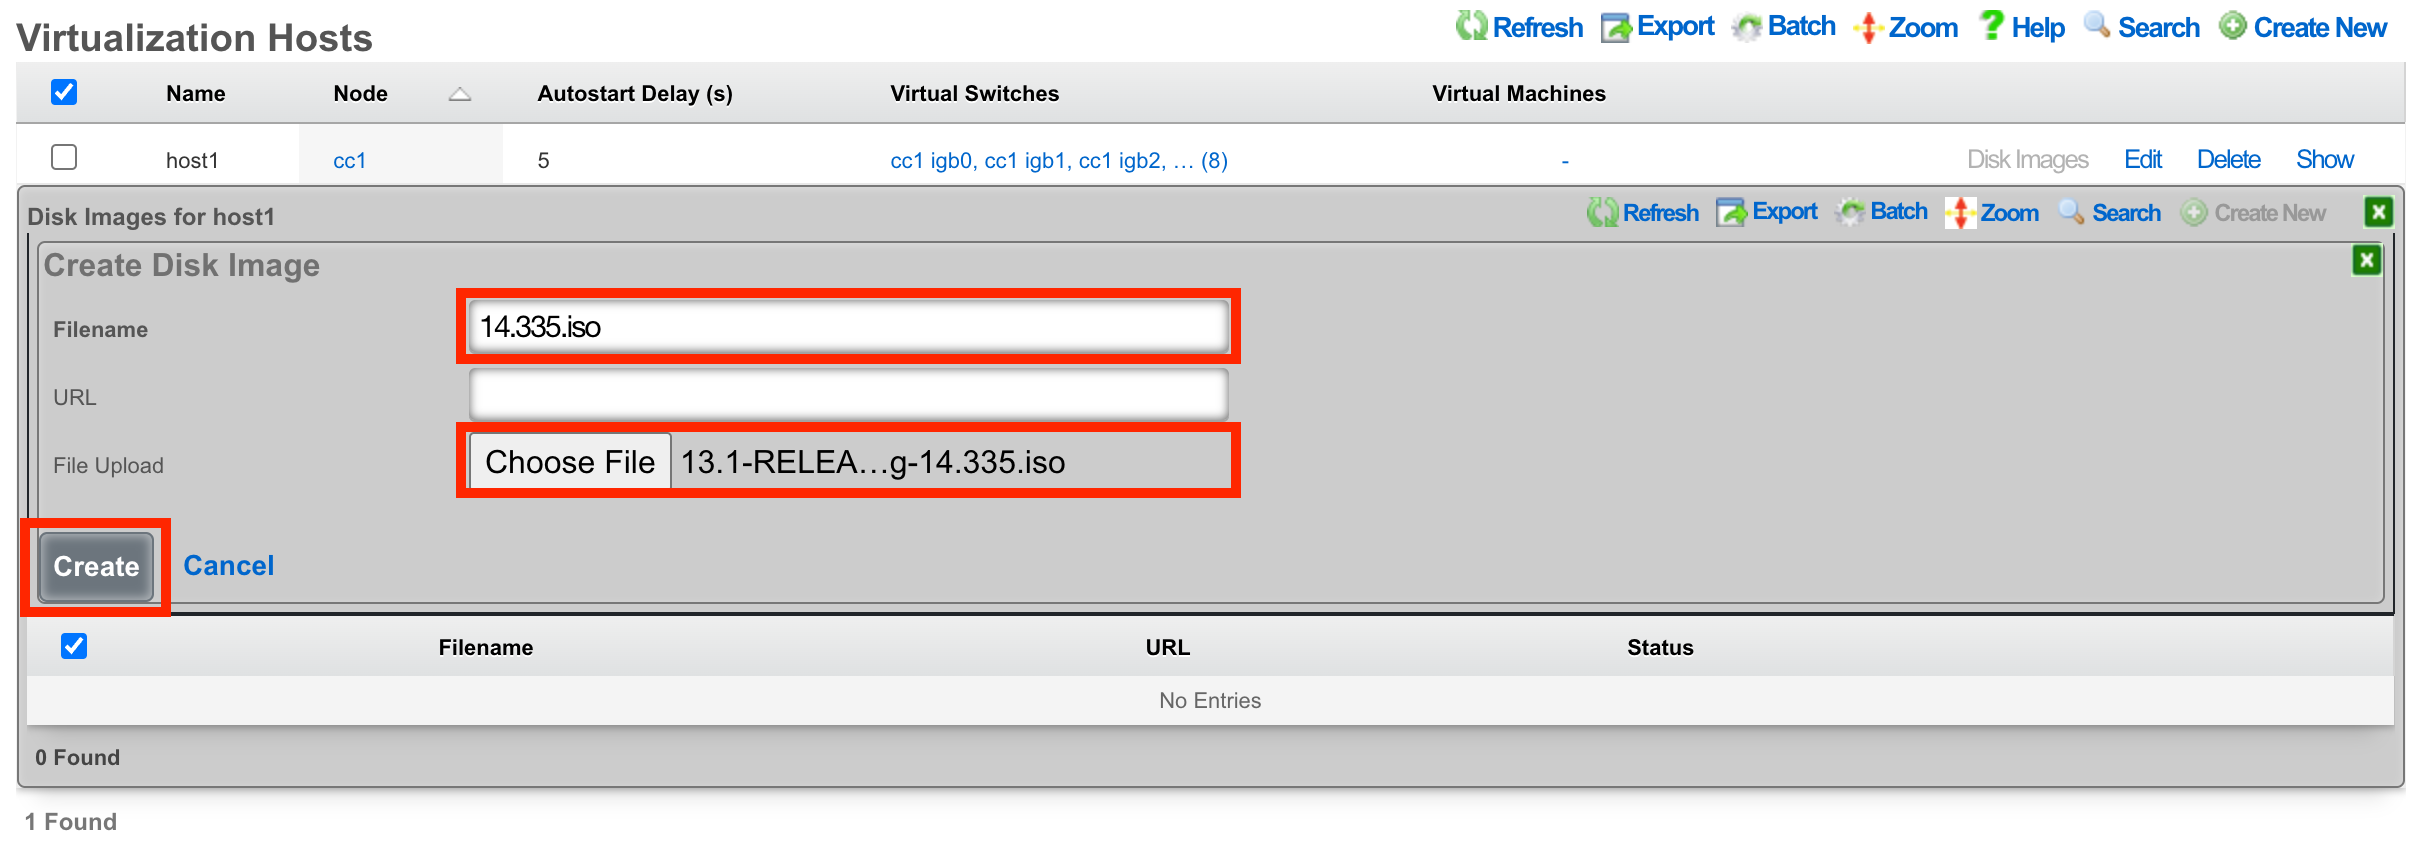
Once the upload/download is complete, you will see the file in the list.

Create a Virtual Machine
From the Virtualization Machines scaffold, click Create New

Assign the virtual machine a name and select the host that it should be built on.
Cluster Node Auto Provision
If this VM is to be part of a cluster, and the Virtualization Host is the CC, you can use the Cluster Node dropdown to automate the clustering configuration. The rXg will combine the data collected from this form with available information from the CC, create a configuration template, and automatically apply it after the software installation is complete. This process allows the VM to join the cluster automatically.
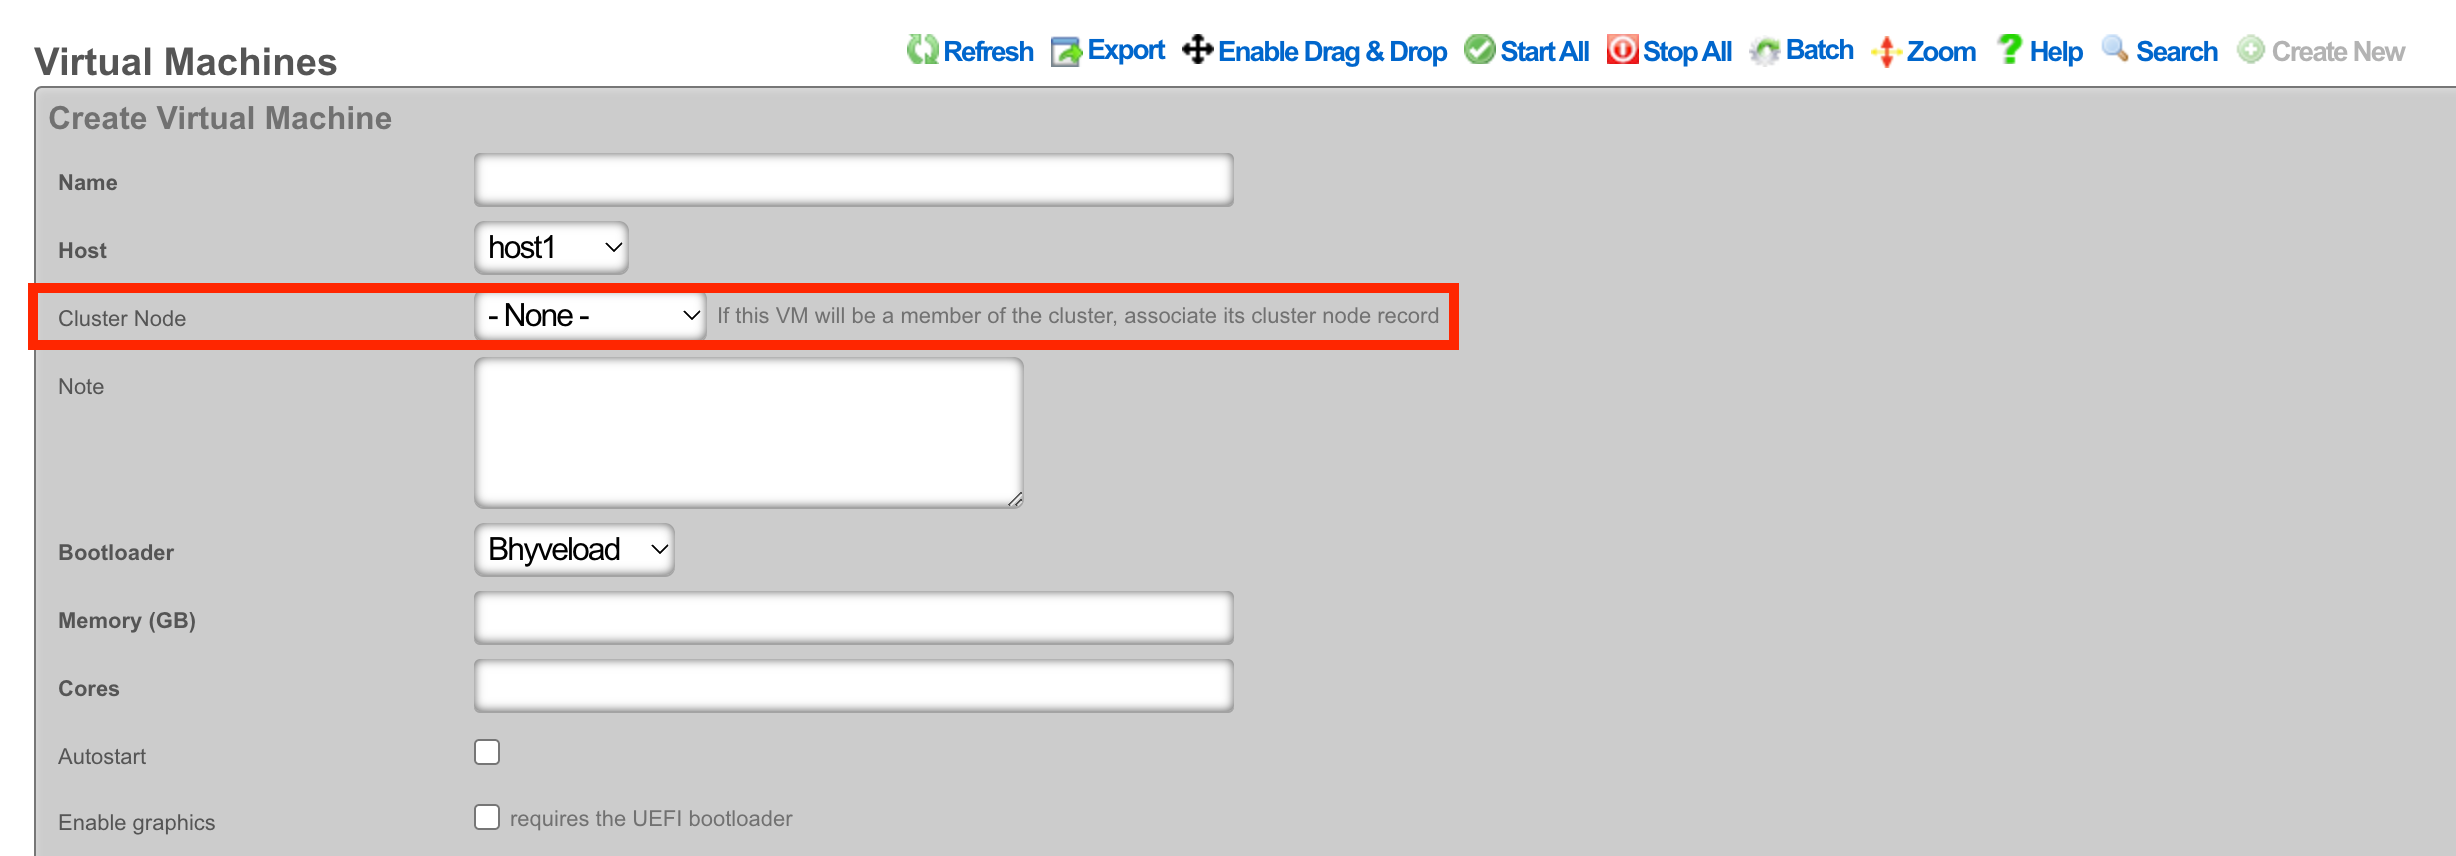
Note: The host CC record (System >> Cluster) will need to be configured for Automatic Registration.
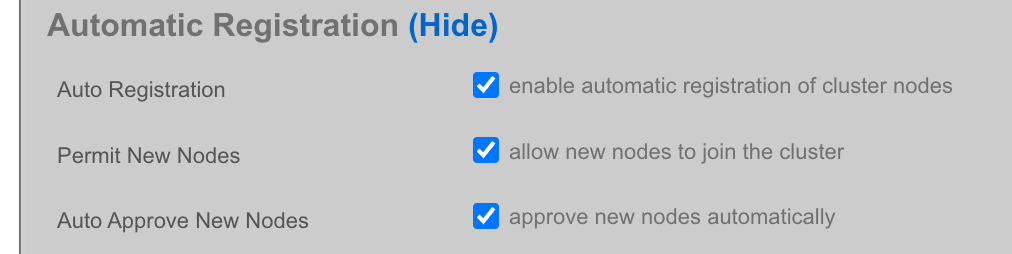
The Cluster Node dropdown will allow you to select an existing cluster node record or create a new one. If you choose an existing record, you need to check the Auto Provision option to activate this feature. All other required information is collected from the current configuration. If you choose Create New, providing the Node Mode and Node IP address will also be necessary.
Create New

Existing Record

The bootloader can stay at the default setting for the rXg installation. Other operating systems, such as Windows, may require a different bootloader. Set the memory and CPU count as necessary to support the VM that you are creating. It is recommended to enable Autostart so that if the host is power cycled, the guest VM will automatically start back up. Add virtual interfaces as needed and assign them to a virtual switch. In this example, I have created a virtual interface for the WAN, CIN, and LAN and matched them to the physical ports I plan to use on the host. Add a virtual disk to the VM of the appropriate size to support the rXg that you are installing. Adding an additional 20 GB of space is necessary to allow for overhead here. Click Create.
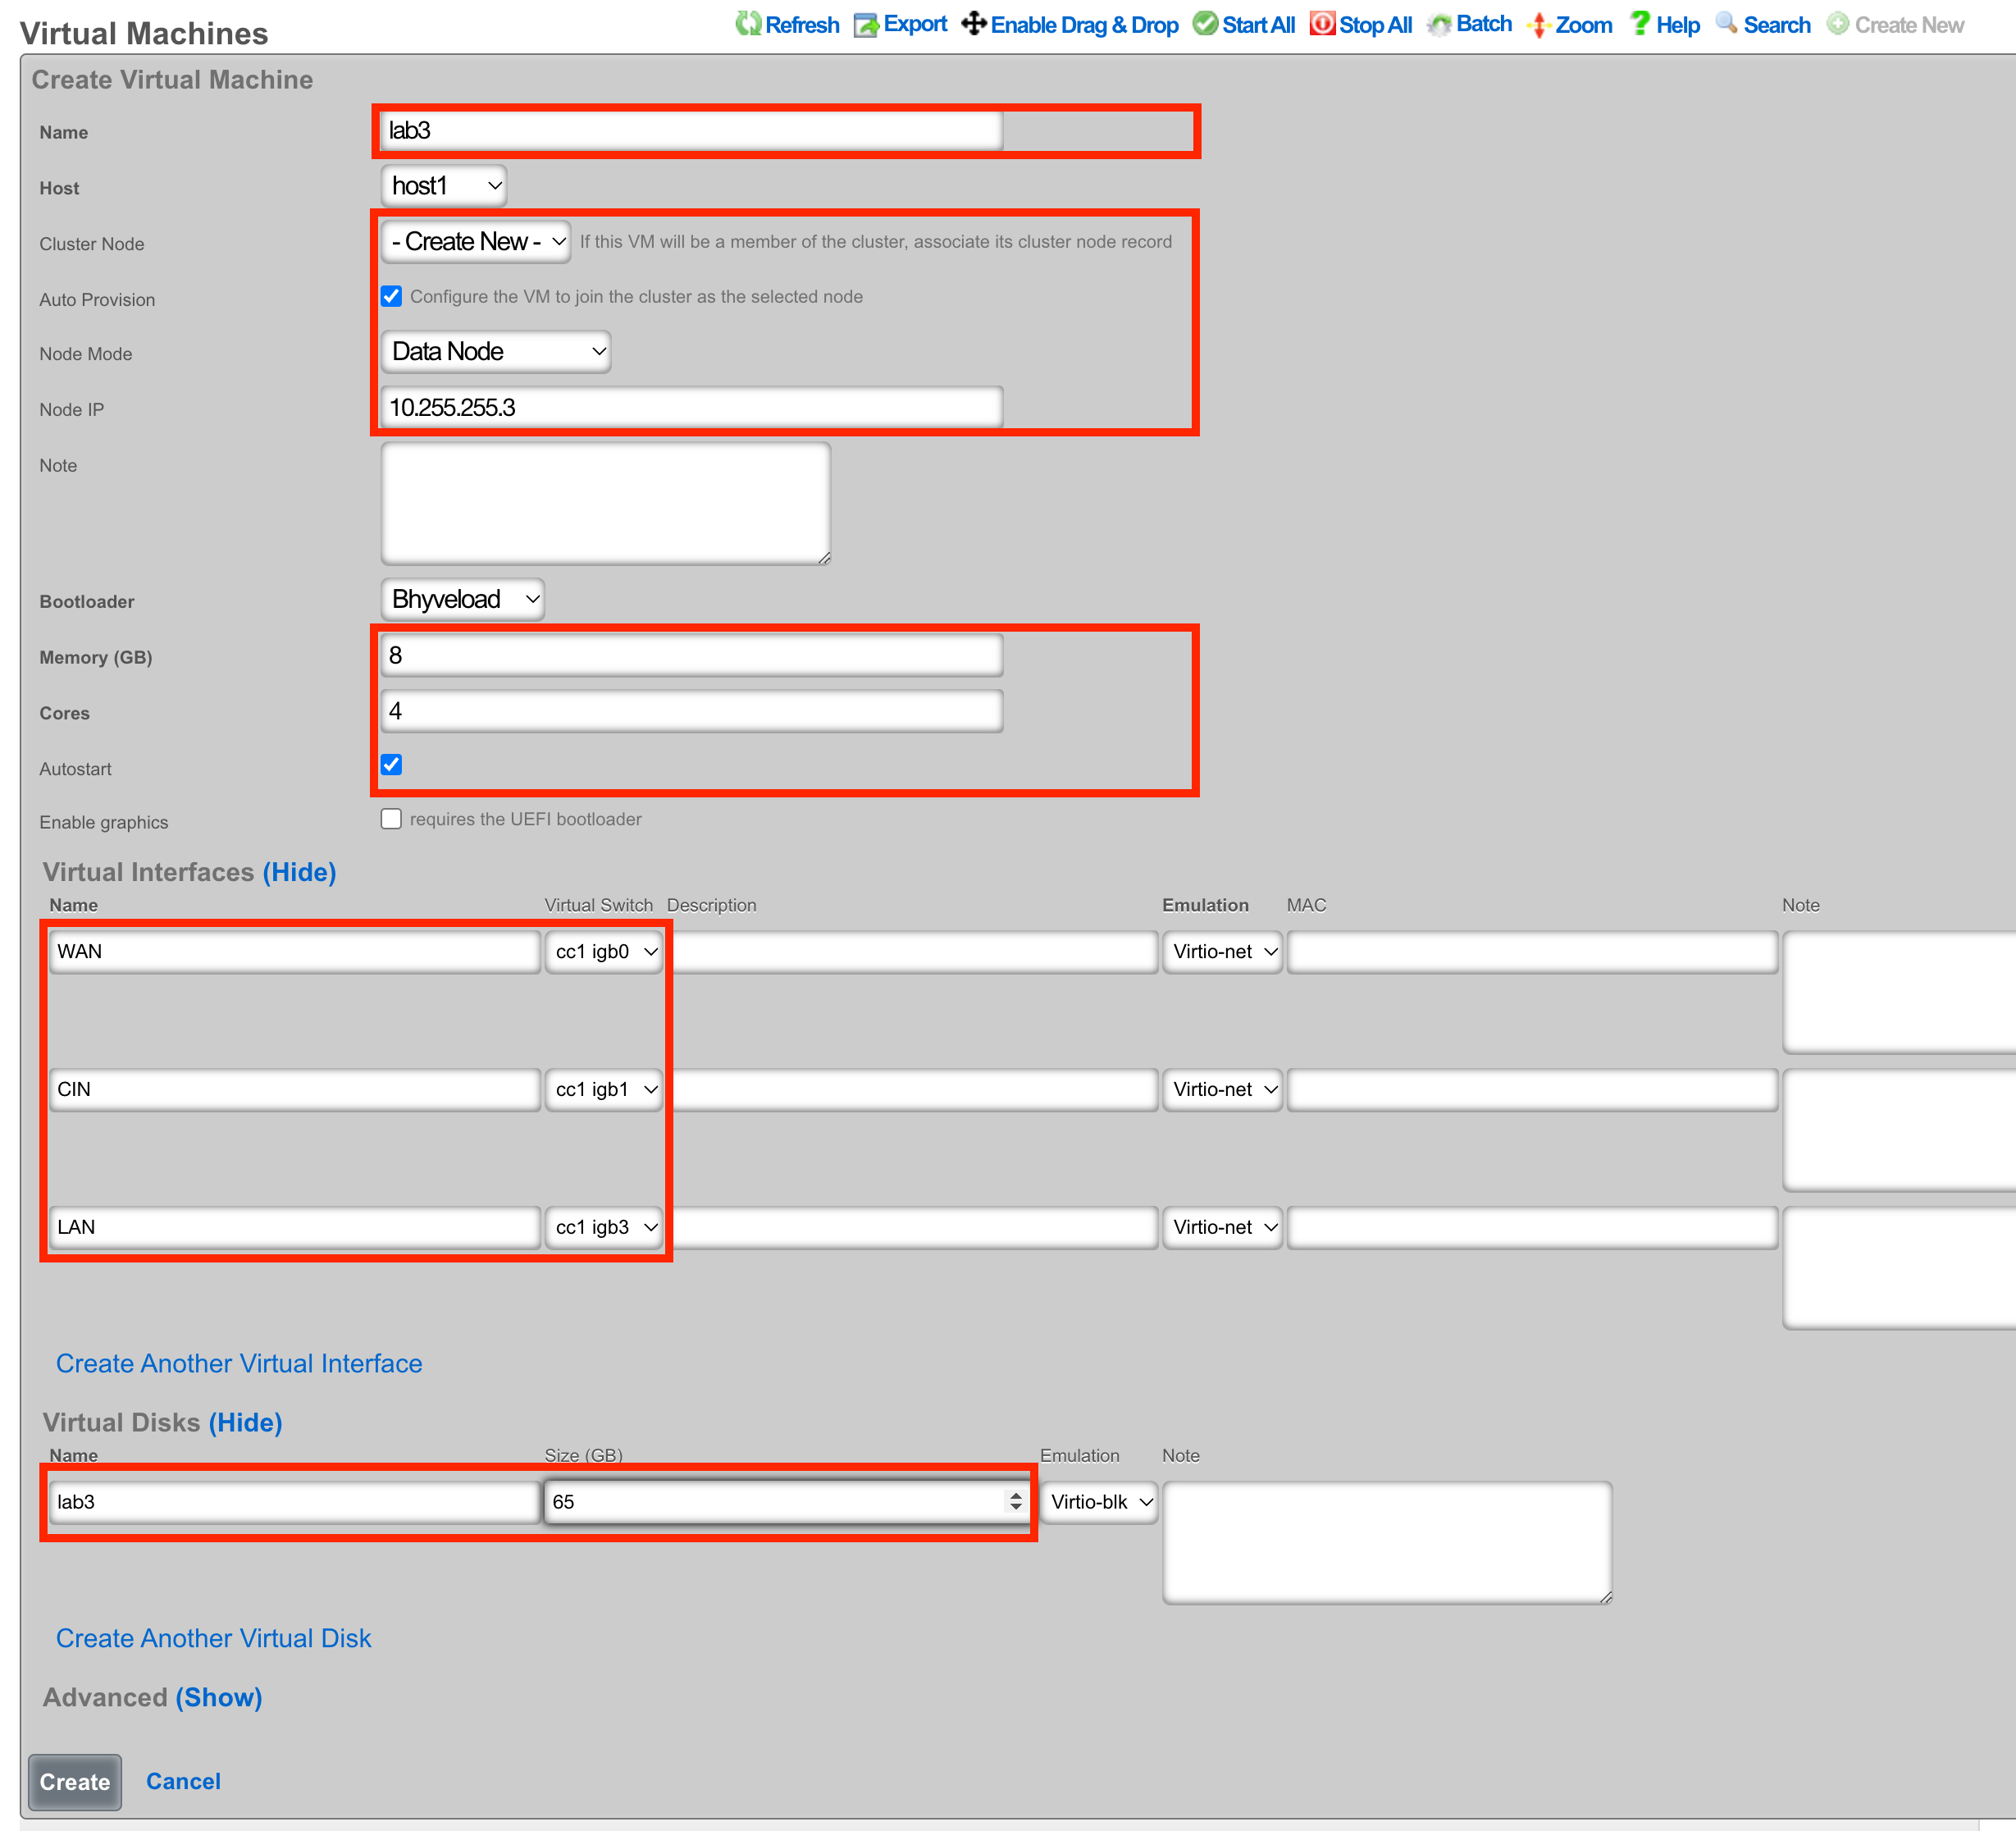
Begin the OS Installation
With the VM created, you can click the Install link to select a disk image for installation.

Select the desired image and click Install.
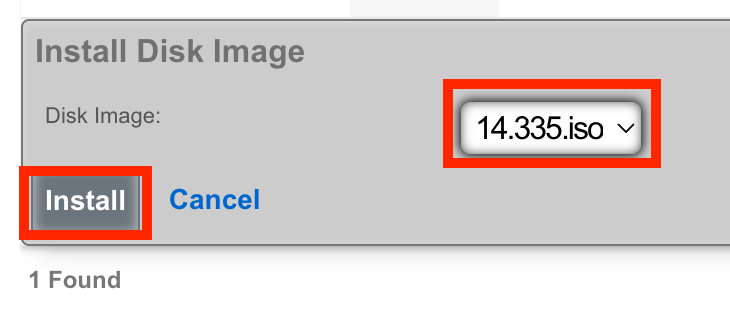
Console Access
The console can be reached via an SSH session to the host node and then switching to the root user.
Type vm console your_vm_name.
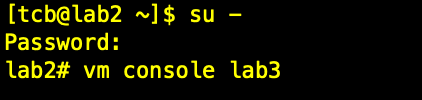
Press Enter
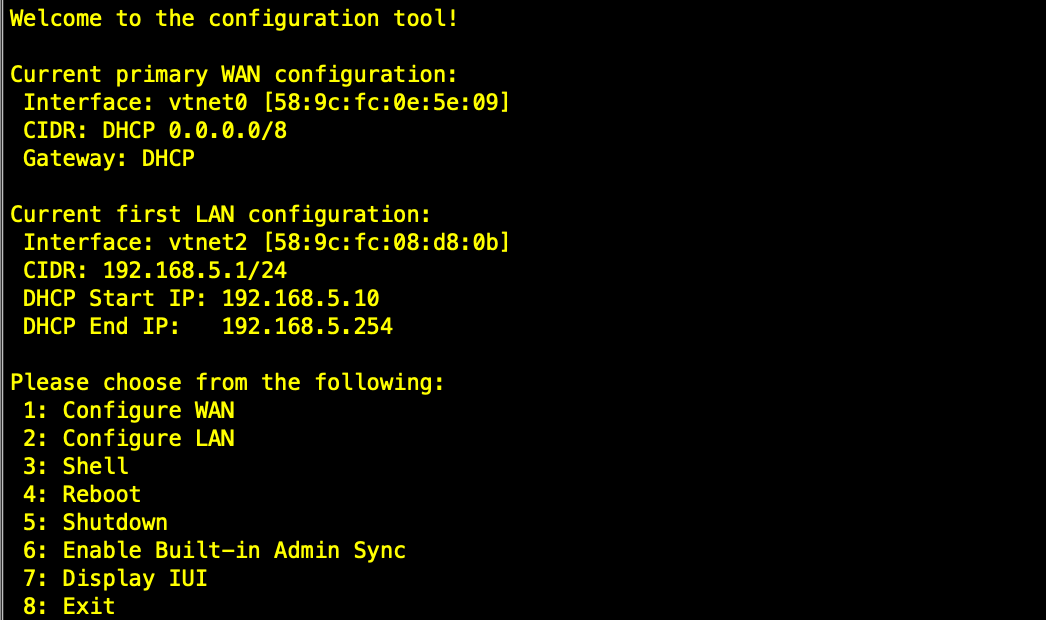
To exit the console session, assuming you were SSH'd to the host, type "~~." You may need to press enter before the first ~ if it doesn't work the first time. (needs to be entered on its own input line)
After installation, the node can be configured from the primary CC.
Ubuntu Server VM Installation Example
This section provides a comprehensive walkthrough for creating and configuring a virtual machine to run Ubuntu Server, demonstrating the complete process from initial VM creation through application deployment.
Step 1: Create Ubuntu Virtual Machine
Begin by accessing the Virtualization Management interface and navigate to the Virtual Machines section. Click "Create Virtual Machine" to open the VM creation wizard.
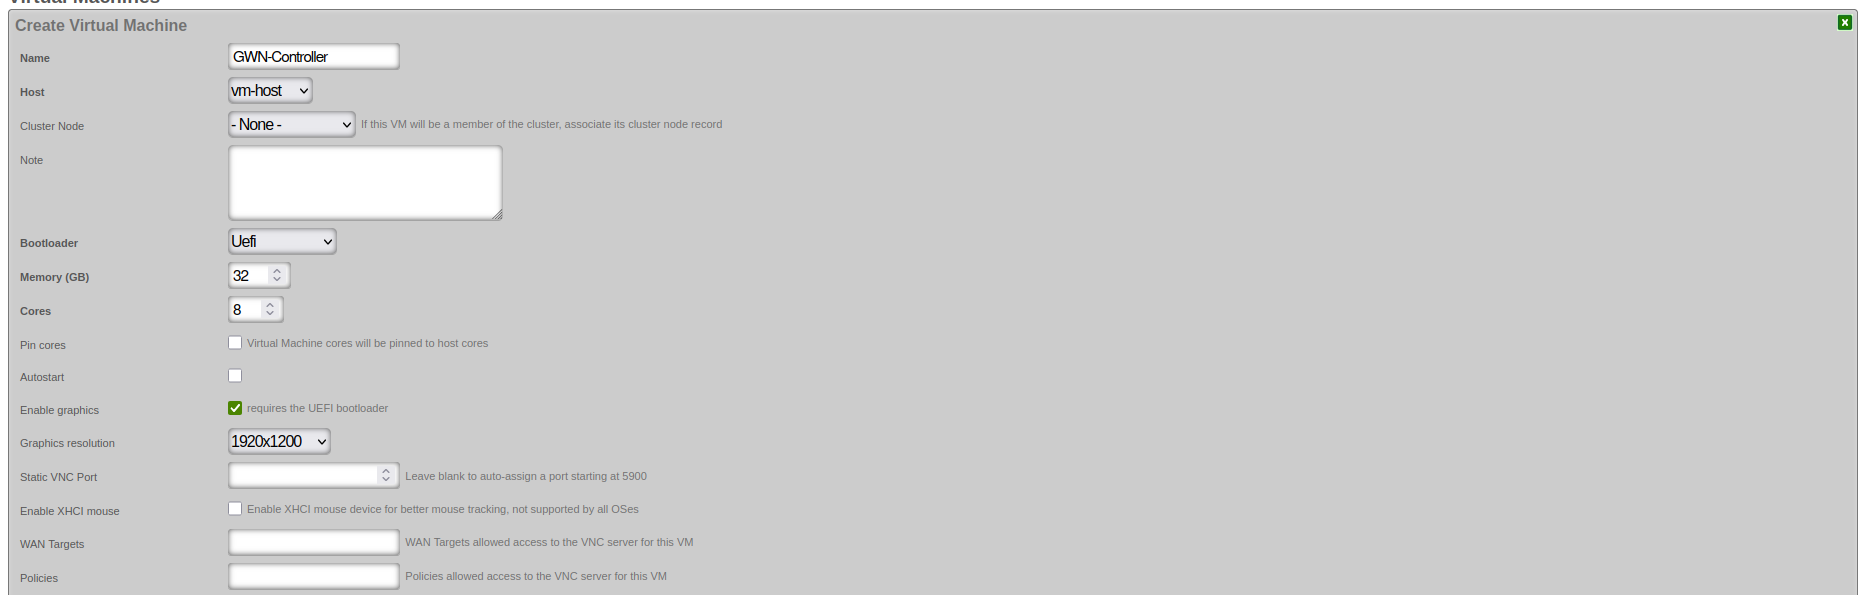
Basic Configuration Parameters:
Virtual Machine Identification: - Name: Enter a descriptive name for your VM (e.g., "Ubuntu-Server-01") - Host: Select the physical host system where the VM will run - Cluster Node: Select "- None -" if the VM won't be part of a cluster
Resource Allocation: - Memory (GB): Allocate appropriate RAM based on your workload requirements - Ubuntu Server minimum: 2GB - Recommended for applications: 8GB+ - Enterprise applications: 32GB+ for optimal performance - Cores: Assign CPU cores based on expected workload - Basic server: 2-4 cores - Application server: 4-8 cores - Database or enterprise applications: 8+ cores - Pin cores: Leave unchecked for general use
Boot Configuration: - Bootloader: Select "Uefi" for modern operating systems - Autostart: Check if VM should start automatically when host boots
Graphics and Remote Access:
- Enable graphics: Required for graphical VNC console access via the scaffold. This option may only be enabled for VMs using the UEFI bootloader. Note that CLI console access is always available via vm console <vmname> from the rXg CLI regardless of this setting.
- Graphics resolution: Select appropriate resolution (e.g., 1920x1200)
- Static VNC Port: Leave blank for auto-assignment
- Enable XHCI mouse: Leave unchecked unless needed
Step 2: Configure Network and Storage
After setting basic parameters, configure the network interfaces and virtual disks for your VM.

Virtual Network Interface Configuration:
Primary Interface (eth0): - Name: eth0 (default primary interface name) - Virtual Switch: Select appropriate virtual switch (e.g., vs-bge0) - Emulation: E1000 (broad compatibility) or Virtio-net (better performance) - MAC Address: Auto-generated or specify custom if required
Virtual Disk Configuration:
Primary Disk: - Name: drive (default primary disk identifier) - Disk Image: Select "Create New blank disk" - Size (GB): Allocate appropriate storage - Ubuntu Server minimum: 10GB - Recommended for applications: 25-50GB - Enterprise deployments: 50GB+ - Emulation: Virtio-blk (recommended for Linux guests)
Cloud-init Configuration (Optional):
Cloud-init configuration is used for automated initial setup of cloud-init enabled images (such as Ubuntu Cloud Images). Note: Cloud-init requires a pre-built cloud-init enabled disk image, not an ISO installation. When using cloud-init, select the cloud image in the Virtual Disk configuration instead of creating a new blank disk. The VM will boot from this image and automatically apply the cloud-init configuration.
Cloud-init options: - IP/CIDR: Static IP configuration (e.g., 192.168.1.100/24) - Gateway IP: Default gateway for the network - Nameservers: DNS servers (comma-separated) - Hostname: System hostname - Username: Default user account - SSH keypair: SSH public key for passwordless access
Step 3: Select Installation Media
Once VM configuration is complete, you'll see it listed in the Virtual Machines table. Select the installation ISO and begin the installation process.

Installation Media Selection: 1. Locate your VM in the Virtual Machines list 2. Click the "Install" action link on the VM row to access installation media selection 3. Select installation ISO from the dropdown - Choose "ubuntu-22.04.5-live-server-amd64.iso" or similar Ubuntu Server ISO - Ensure the ISO matches your intended OS version and architecture 4. Confirm to mount the ISO and prepare for installation
Important: If you have graphics enabled on the VM, you must connect to the console using VNC or the scaffold console link before the VM will begin the installation process.
Step 4: Monitor Installation Status
After mounting the installation ISO, verify that the VM is ready for OS installation.

Installation Status Verification: - Status Message: "Install initiated" confirms ISO was successfully mounted - VM State: Shows as "Stopped" (expected before starting installation) - Next Steps: Click on VM name to access detailed controls and start the VM
Step 5: Access VNC Console
Use the VNC console to interact with the VM during installation and initial configuration.
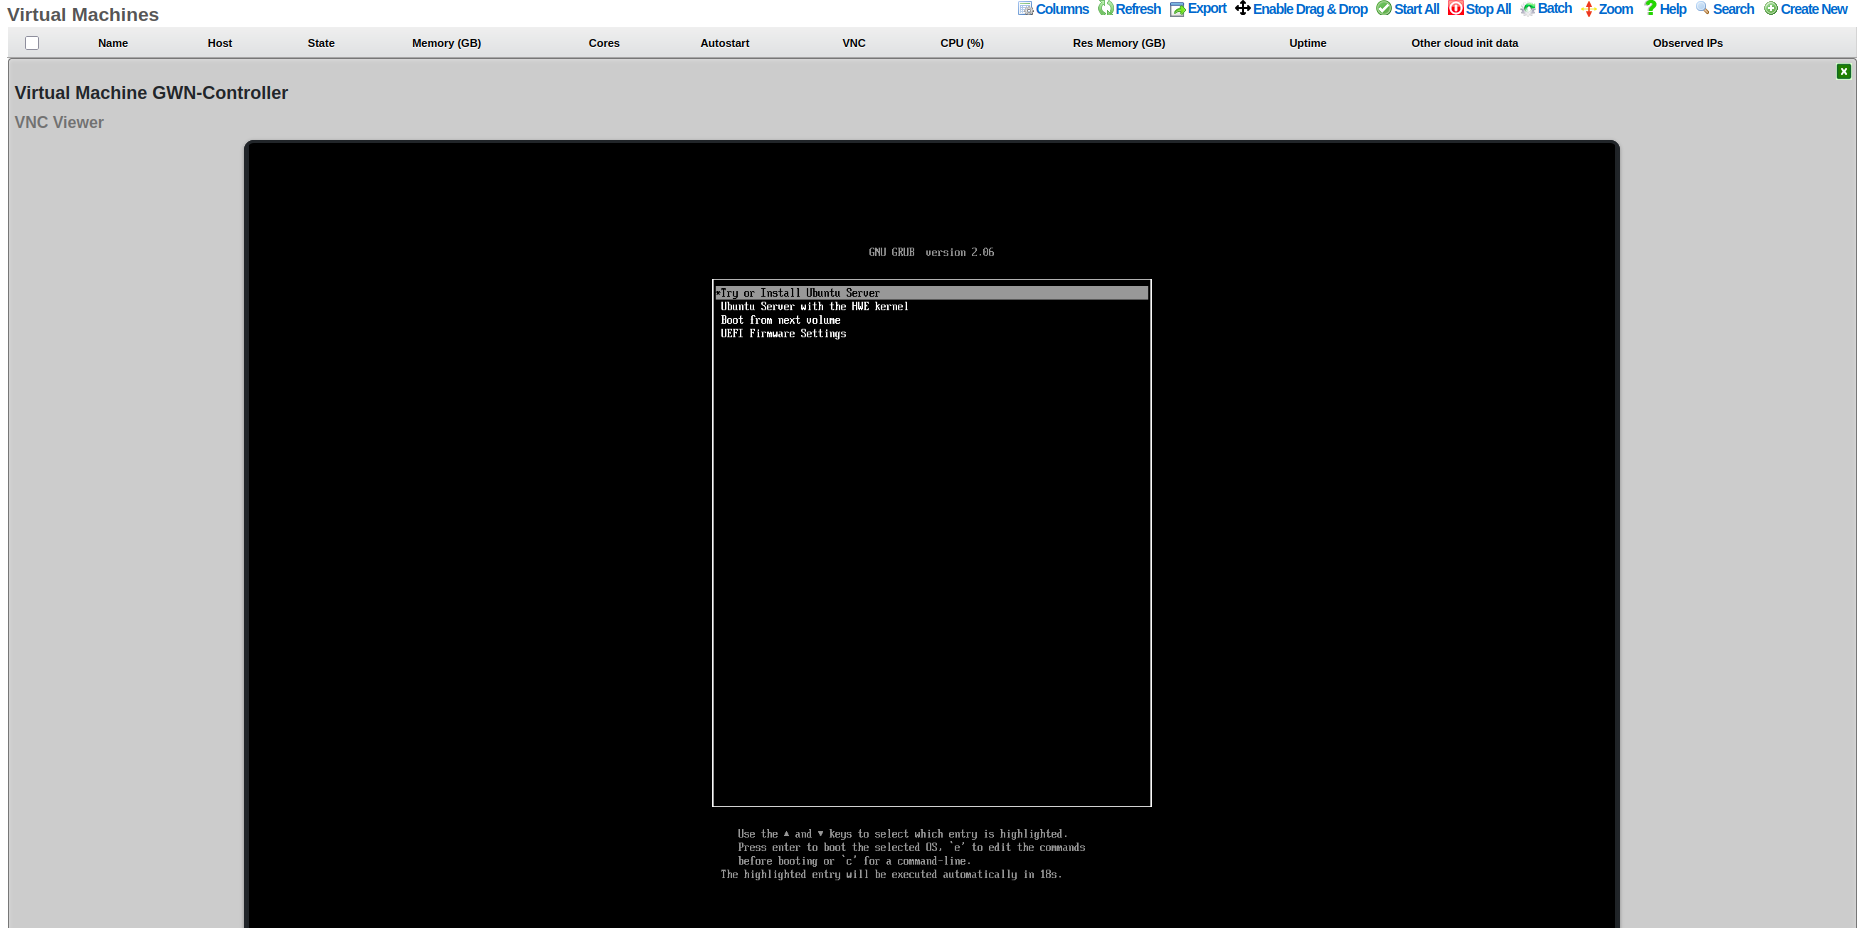
VNC Console Access: 1. Click on the VM name to access the detailed management page 2. VNC Viewer section provides browser-based console access 3. Boot process shows GRUB bootloader with Ubuntu installation options: - "Try or Install Ubuntu Server" (standard installation) - "Ubuntu Server with the HWE kernel" (Hardware Enablement kernel) - "Boot from next volume" (skip to next boot device) - "UEFI Firmware Settings" (access UEFI configuration)
Installation Process: Navigate through the Ubuntu Server installation wizard using: - Arrow keys ( ) to navigate menu options - Tab to move between form fields - Enter to select/confirm options - Space to toggle checkboxes - Esc to go back or cancel
Installation Wizard Steps: 1. Language selection: Choose installation language 2. Keyboard configuration: Select keyboard layout 3. Network configuration: Usually auto-configured via DHCP 4. Disk partitioning: Select "Use entire disk" for VMs 5. User account creation: Set username, password, and server name 6. Package selection: Enable OpenSSH server (recommended)
Step 6: Post-Installation Configuration
After installation completes and the system reboots, the console shows the login prompt with network configuration information.
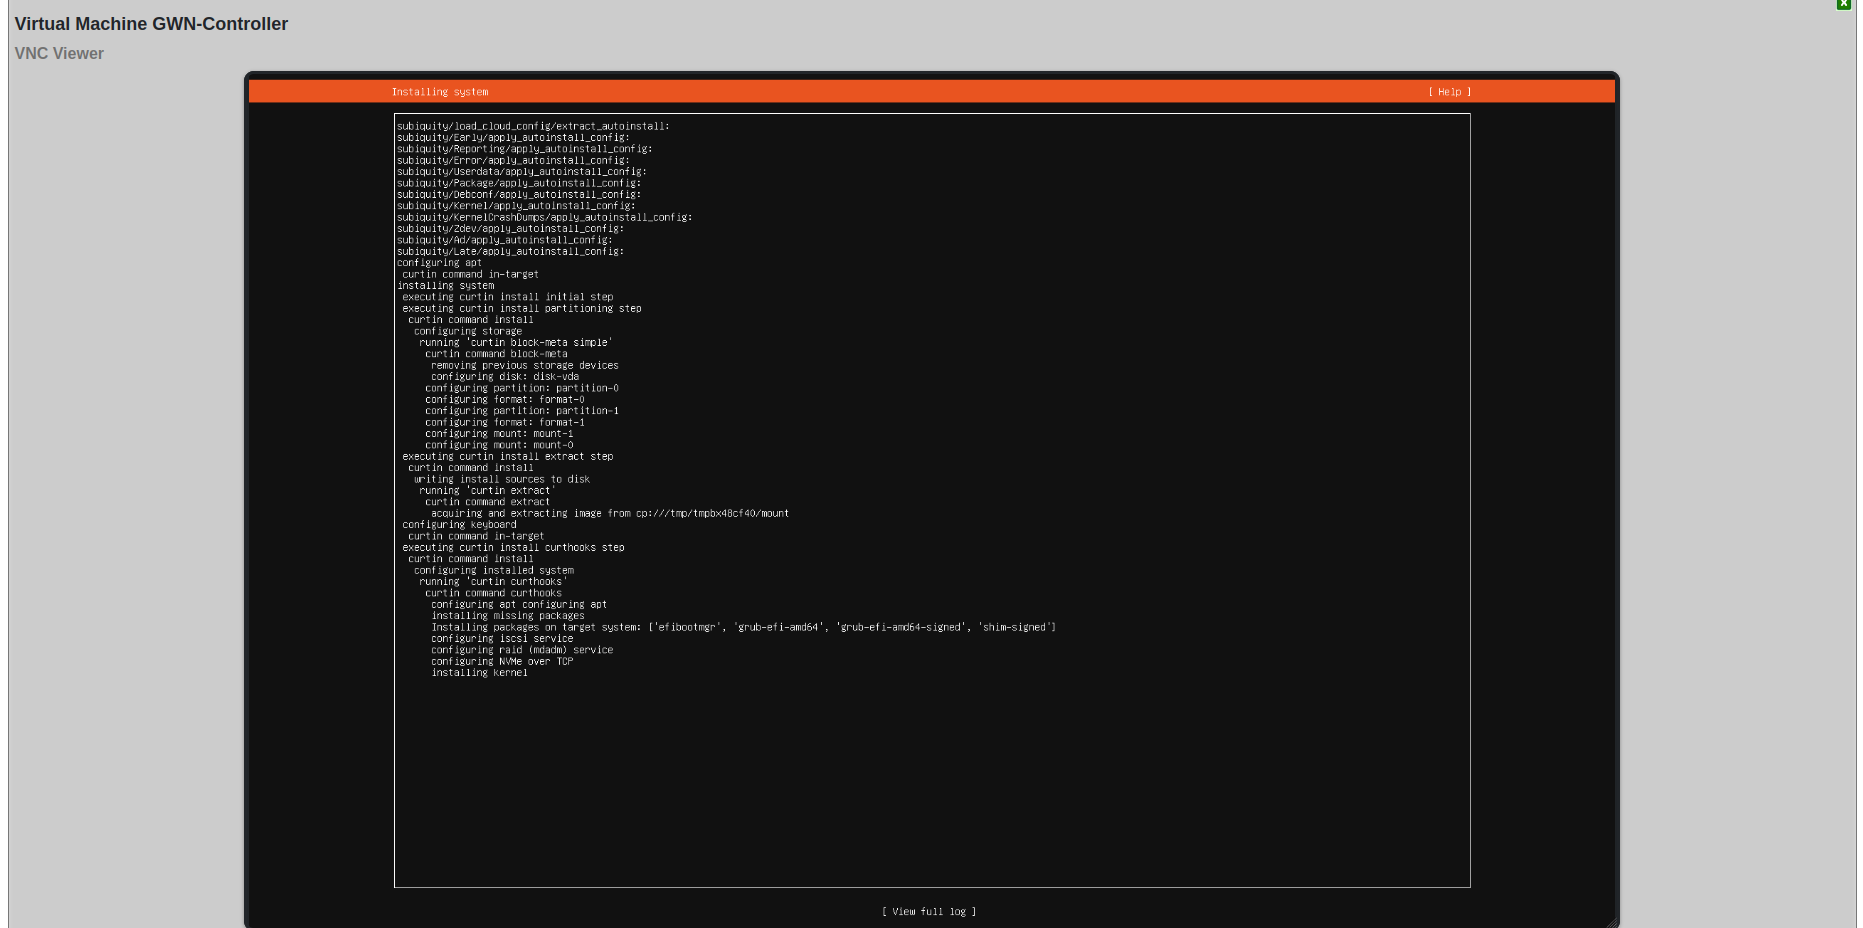
First Boot Information: The system displays: - Network interface configuration with assigned IP addresses - Available management tools and commands - System services status - Installation completion status
Initial System Configuration:
1. Note the IP address displayed at login prompt
2. SSH into the system using credentials created during installation:
bash
ssh username@ip-address
3. Update the system immediately after first login:
bash
sudo apt update
sudo apt upgrade -y
sudo reboot
4. Configure additional settings as needed:
- Set static IP if required
- Configure firewall rules
- Set hostname if not done during installation
Virtualization Hosts
The Virtualization Hosts scaffold enables creation, modification, and deletion of a host. The first step to creating a virtual machine in rXg is creating a virtualization host.
The Name field is an arbitrary string used to identify the host. This string is used for identification purposes only.
A virtualization host can be created on any of the bare metal machines in a cluster. The Node dropdown allows you to select the intended target for this configuration.
The Autostart Delay field defines the number of seconds to wait between starting each virtual machine with autostart enabled.
The Virtual Switches field allows for the creation of vswitches that virtual ports can later be attached to. One virtual switch per host interface will automatically be created when you create a new host.
The Virtual Machines field displays all virtual machines that are either unassigned (unchecked) or assigned (checked) to this host.
The Disk Images link, when selected, will allow the operator to manage the .iso files stored for virtual machine creation. Create New will provide the operator with options to either upload or download a new .iso file. The Filename field is required and will be used to reference the associated .iso file. The rXg can directly download a .iso file from a remote destination specified in the URL field. Alternatively, you can select Choose File and select a .iso file from your local machine for upload.
Virtual Machines
The Virtual Machines scaffold enables creation, modification, and deletion of virtual machines.
The Name field is an arbitrary string used to identify the host. This string is used for identification purposes only.
The Host dropdown allows you to specify the host for the virtual machine creation.
If this VM is to be part of a cluster, and the Virtualization Host is the CC, you can use the Cluster Node dropdown to automate the clustering configuration. The rXg will combine the data collected from this form with available information from the CC, create a configuration template, and automatically apply it after the software installation is complete. This process allows the VM to join the cluster automatically. The cluster node dropdown will allow you to select an existing cluster node record or create a new one. If you choose an existing record, you need to check the Auto Provision option to activate this feature. All other required information is collected from the current configuration. If you choose Create New , providing the Node Mode and Node IP address will also be necessary.
The Bootloader field allows for selecting a specific set of booting instructions that is most appropriate for your virtual machine. Use Bhyveload for rXg.
The Memory field allows the number of gigabytes of memory that should be allocated from the host to the virtual machine to be specified.
The Cores field allows the number of CPU cores that should be allocated from the host to the virtual machine to be specified.
The Autostart checkbox, if checked, will automatically start the virtual machine when the host starts. A delay between virtual machine starts can be configured in the host scaffold.
The Enable Graphics field, if selected, will start a VNC server to provide GUI access to the VM.
The Virtual interfaces section allows for the creation of virtual interfaces that can connect the virtual machine to the virtual switch. Creating a virtual interface in this scaffold will also add it to the Virtual Interfaces scaffold. The name field is an arbitrary string used to identify the interface. This string is used for identification purposes only. The emulation field allows for the specification of the emulation type. Virtio-net is recommended in most cases. The virtual switch dropdown allows you to select with which switch the interface you are creating will be assigned. A virtual switch enables VM interfaces to communicate with each other; VMs can reach external networks via Layer 3 routing through the host, or via direct Layer 2 bridging if the switch has a physical interface assigned. The MAC field allows the assignment of a custom MAC address to the interface. Leaving this field blank will result in a MAC address being automatically created.
The Virtual disks section allows for creating a virtual drive that can connect to this virtual machine. Creating a virtual disk in this scaffold will also add it to the Virtual Disks scaffold. The name field is an arbitrary string used to identify the interface. This string is used for identification purposes only. The Size field specifies the number of gigabytes of drive space that should be allocated from the host to the virtual machine. The emulation field allows for the specification of the emulation type. Virtio-blk is recommended in most cases.
Virtual Switches
The Virtual Switches scaffold enables the creation, modification, and deletion of virtual switches.
The Name field is an arbitrary string used to identify the host. This string is used for identification purposes only.
The Host dropdown allows you to specify the host for the virtual switch creation.
The Switch Type dropdown allows a switch type to be specified. Standard is recommended for most cases.
The Interface dropdown provides a list of available physical interfaces from the host machine. Selecting a physical interface is optional - virtual switches function fully without a physical interface assigned. When a physical interface is selected, VMs on the switch gain direct Layer 2 access to that physical network segment. When no physical interface is assigned, VMs can still communicate with each other on the switch and reach external networks via Layer 3 routing through the host. Each physical interface can only be assigned to one virtual switch.
The Virtual Interfaces field provides a list of available virtual interfaces that can be assigned to this switch. Selecting an interface from this dropdown will assign it to this virtual switch and unassign it from any other switch.
Virtual Disks
The Virtual Disks scaffold enables the creation, modification, and deletion of virtual disks.
The Name field is an arbitrary string used to identify the host. This string is used for identification purposes only.
The Virtual Machine dropdown specifies with which virtual machine this disk should be associated.
The Size (GB) field specifies the number of gigabytes of drive space that should be allocated from the host to the virtual machine.
The emulation field allows for the specification of the emulation type. Virtio-blk is recommended in most cases.
Virtual Interfaces
The Virtual Interfaces scaffold enables the creation, modification, and deletion of virtual interfaces.
The Name field is an arbitrary string used to identify the host. This string is used for identification purposes only.
The Virtual Machine dropdown allows you to select with which virtual machine the interface you are creating will be assigned.
The Virtual Switch dropdown allows you to select with which switch the interface you are creating will be assigned. A virtual switch enables VM interfaces to communicate with each other. VMs can reach external networks via Layer 3 routing through the host, or via direct Layer 2 bridging if the switch has a physical interface assigned.
The Emulation field allows for the specification of the emulation type. Virtio-net is recommended in most cases.
The MAC field allows the assignment of a custom MAC address to the interface. Leaving this field blank will result in a MAC address being automatically created.
Virtual Snapshots
The Virtual Snapshots scaffold represents one of the most powerful features of the rXg virtualization platform, providing comprehensive snapshot management capabilities that leverage the advanced features of ZFS technology for reliable backup and recovery operations. This sophisticated system enables administrators to create point-in-time captures of virtual machine states, providing an essential foundation for data protection, disaster recovery, and system maintenance workflows.
The snapshot creation process captures the complete state of a virtual machine at a specific moment in time, including all virtual disk data, system configuration settings, and the current operational state of the VM. This comprehensive capture is made possible through ZFS copy-on-write technology, which provides extremely efficient storage utilization by only storing the differences between the original data and any subsequent changes. This approach means that creating a snapshot is nearly instantaneous regardless of the size of the virtual machine, and the initial storage overhead is minimal.
Rollback operations provide administrators with the ability to restore virtual machines to previous snapshot states, enabling quick recovery from system issues, failed updates, or configuration problems. However, it is crucial to understand that rollback operations automatically delete all snapshots that were created after the selected restore point. This behavior ensures data consistency but requires careful planning when implementing rollback procedures, as any changes made after the snapshot was taken will be permanently lost.
The backup and export functionality allows snapshots to be downloaded as standalone backup files, facilitating external storage for long-term archival, disaster recovery planning, or virtual machine migration between different rXg systems. These exported snapshots maintain complete fidelity to the original VM state and can be imported into other compatible systems, making them invaluable for creating development environments, testing scenarios, or implementing comprehensive disaster recovery strategies.
Storage efficiency remains a key advantage of the ZFS-based snapshot system, as snapshots only consume additional storage space for data blocks that have changed since the snapshot was created. This characteristic makes regular snapshot creation practical even for large virtual machine deployments, as the storage overhead grows incrementally with the amount of data modification rather than requiring full copies of the virtual machine disk images. Nonetheless, attention should be paid to the number of snapshots and their size over time, since snapshots will continue to grow as data changes on the virtual machine's disk, and can potentially consume a large portion of the host's disks if left to grow unchecked.
Virtual Host Replication Groups
Virtual Host Replication Groups enable VM replication across multiple virtualization hosts for high availability, disaster recovery, and automated backup scheduling. This feature ensures that VMs can be recovered on alternate hosts in case of hardware failure, providing enterprise-grade data protection capabilities.
How Replication Works
The rXg uses ZFS replication to efficiently transfer VM data between hosts in a replication group:
- Initial backup: Creates a full ZFS snapshot of each VM's storage datasets
- Incremental backups: Subsequent backups transfer only changed blocks since the previous backup, dramatically reducing transfer time and bandwidth requirements
- Compression: Backup data is compressed during transfer to minimize network bandwidth consumption
- Online operation: VMs can continue running during backup operations with minimal performance impact
Replication Group Requirements
To configure a functional replication group:
- Minimum hosts: A replication group requires at least two virtualization hosts to ensure there is always an alternate destination for VM recovery
- Matching switch configuration: All virtualization hosts in a replication group must have the same number of virtual switches, ensuring VMs can maintain network connectivity when restored to a different host
- Storage capacity: Destination hosts must have sufficient storage capacity to accommodate replicated VM data
Backup Scheduling
Configure automated backup schedules based on your recovery point objective (RPO):
- Daily backups: Suitable for most workloads with moderate data change rates
- Weekly backups: Appropriate for static systems or development environments
- Monthly backups: For archival purposes or systems with minimal changes
- Manual backups: Use the "Create Backup Now" action before major changes or maintenance operations
Schedule backups during periods of low VM activity to minimize performance impact and reduce backup duration.
Failover and Recovery
In case of host failure, VMs can be restored on any other host in the replication group:
- Data availability: VM data is already present on the destination host from replication
- Network mapping: Virtual Switch Replication Groups ensure correct network configuration by mapping source virtual switches to destination virtual switches
- Recovery time: Depends on the age of the most recent backup; more frequent backups provide lower recovery time objectives (RTO)
Best Practices
- Monitor backup status: Regularly check the "Last Backup At" timestamp to ensure backups are completing successfully
- Test recovery procedures: Periodically test VM recovery to ensure backups are valid and the recovery process is well understood
- Off-peak scheduling: Schedule backups during low-usage periods to minimize impact on production workloads
- Storage monitoring: Monitor ZFS storage utilization on destination hosts to ensure adequate capacity for ongoing replication
Advanced VM Features
The rXg virtualization platform extends far beyond basic virtual machine creation and management, incorporating sophisticated features that address enterprise-level requirements for automation, performance optimization, and operational efficiency. These advanced capabilities transform the platform from a simple virtualization solution into a comprehensive infrastructure management system that can handle complex deployment scenarios and demanding performance requirements.
IP Address Assignment and Cloud-Init Integration
The network configuration capabilities of rXg virtual machines represent a significant advancement in deployment automation and operational consistency. The system supports both static IP configuration and dynamic DHCP assignment, with each method offering distinct advantages for different use cases and deployment scenarios.
Static IP configuration enables administrators to assign fixed IP addresses using industry-standard CIDR notation, such as "192.168.1.100/24", providing predictable network addressing that is essential for server deployments, service hosting, and infrastructure components that require consistent network accessibility. This configuration method extends beyond simple IP assignment to include comprehensive network parameter specification, including default gateway configuration for external network routing and DNS server assignment for domain name resolution. The system automatically generates cloud-init configuration files that ensure these network settings are properly applied during the virtual machine boot process, eliminating the need for manual network configuration within the guest operating system.
DHCP support provides flexibility for dynamic network environments and temporary deployments where fixed IP addresses are not required or practical. Administrators can simply leave the IP configuration fields blank, and the virtual machine will automatically obtain network configuration from DHCP services provided by the virtual switch infrastructure or external DHCP servers. This approach is particularly valuable for development environments, temporary testing scenarios, and workstation-style deployments where network mobility and simplified configuration management are prioritized.
The cloud-init automation system represents a fundamental shift in virtual machine deployment methodology, providing comprehensive initialization capabilities that extend far beyond network configuration. This sophisticated system automatically handles network configuration based on the specified IP settings, creates user accounts with appropriate permissions and access controls, deploys SSH public keys for secure remote access, configures hostname and system identification parameters, and executes custom initialization scripts and configuration procedures. The integration of cloud-init technology ensures that virtual machines are fully configured and ready for use immediately upon first boot, dramatically reducing deployment time and eliminating configuration inconsistencies that can arise from manual setup procedures.
Manual Cloud-Init Configuration Examples
For advanced deployment scenarios that require precise control over virtual machine initialization, administrators can utilize the "Other Cloud Init Data" field within the virtual machine configuration interface to specify custom cloud-init YAML configuration. This capability enables sophisticated deployment automation that extends beyond the standard IP assignment fields to include complex network topologies, custom software installation, user management, and automated system configuration procedures.
A basic static IP configuration example demonstrates the fundamental approach to manual cloud-init network specification. To configure a virtual machine with a static IP address of 192.168.1.100 with a 24-bit subnet mask, default gateway at 192.168.1.1, and DNS servers at 8.8.8.8 and 8.8.4.4, administrators would include the following YAML configuration in the "Other Cloud Init Data" field:
# Network configuration for static IP assignment
network:
version: 2
ethernets:
eth0:
addresses:
- 192.168.1.100/24
gateway4: 192.168.1.1
nameservers:
addresses:
- 8.8.8.8
- 8.8.4.4
search:
- example.com
- localdomain
# System configuration
hostname: web-server-01
fqdn: web-server-01.example.com
timezone: America/New_York
# Package installation
packages:
- htop
- curl
- vim
- nginx
# User management
users:
- name: admin
groups: [sudo, www-data]
shell: /bin/bash
ssh_authorized_keys:
- ssh-rsa AAAAB3NzaC1yc2EAAAA... [email protected]
# Custom commands executed after boot
runcmd:
- systemctl enable nginx
- systemctl start nginx
- ufw allow 'Nginx Full'
- echo "Web server configured" >> /var/log/cloud-init-setup.log
For more complex deployments involving multiple network interfaces, administrators can specify detailed configurations for each interface with different IP addressing schemes, routing tables, and network purposes. A multi-interface configuration example might include a management interface on the 192.168.1.0/24 network, an application interface on the 10.0.1.0/24 private network, and a storage interface on the 172.16.1.0/24 network with jumbo frame support:
# Multi-interface network configuration
network:
version: 2
ethernets:
eth0:
# Management interface
addresses:
- 192.168.1.100/24
gateway4: 192.168.1.1
nameservers:
addresses: [192.168.1.10, 8.8.8.8]
routes:
- to: 0.0.0.0/0
via: 192.168.1.1
metric: 100
eth1:
# Application interface
addresses:
- 10.0.1.50/24
routes:
- to: 10.0.0.0/8
via: 10.0.1.1
metric: 200
eth2:
# Storage interface with jumbo frames
addresses:
- 172.16.1.10/24
mtu: 9000
# Complete system configuration
hostname: database-server
fqdn: database-server.company.local
timezone: America/New_York
# Comprehensive package installation
packages:
- postgresql-13
- postgresql-contrib
- fail2ban
- ufw
- htop
- iotop
# Advanced user configuration
users:
- name: dbadmin
groups: [sudo, postgres]
shell: /bin/bash
ssh_authorized_keys:
- ssh-rsa AAAAB3NzaC1yc2EAAAA... [email protected]
sudo: ['ALL=(ALL) NOPASSWD:ALL']
# File system configuration
mounts:
- ["/dev/vdb", "/var/lib/postgresql", "ext4", "defaults", "0", "2"]
# Custom file creation
write_files:
- path: /etc/postgresql/13/main/postgresql.conf
content: |
listen_addresses = '192.168.1.100'
port = 5432
max_connections = 100
shared_buffers = 256MB
permissions: '0644'
owner: postgres:postgres
# Post-installation commands
runcmd:
- systemctl enable postgresql
- systemctl start postgresql
- ufw default deny incoming
- ufw allow ssh
- ufw allow 5432/tcp
- ufw --force enable
- sudo -u postgres createdb company_db
- echo "Database server setup completed" >> /var/log/cloud-init-setup.log
The cloud-init configuration system supports extensive customization options including VLAN configuration for network segmentation, custom routing tables for complex network topologies, file system mounting for additional storage devices, and comprehensive security configuration including firewall rules and access controls. The YAML format requires precise indentation and syntax adherence, making it essential to validate configurations in development environments before applying them to production virtual machines.
Performance and Resource Management
The performance optimization features built into the rXg virtualization platform address the critical need for consistent, predictable performance in enterprise virtual machine deployments. These capabilities enable administrators to fine-tune resource allocation and ensure that critical workloads receive appropriate system resources while maintaining overall system stability and efficiency.
CPU core pinning functionality allows administrators to dedicate specific physical CPU cores exclusively to individual virtual machines, providing improved performance isolation and ensuring consistent CPU performance characteristics. This feature is particularly valuable for latency-sensitive applications, real-time processing workloads, and high-performance computing scenarios where CPU scheduling predictability is essential. By preventing the hypervisor from migrating virtual machine threads across different CPU cores, core pinning eliminates cache pollution effects and reduces context switching overhead, resulting in more consistent performance characteristics and reduced performance variability.
Memory wiring capabilities prevent virtual machine memory from being swapped to disk storage, ensuring consistent memory performance and eliminating the performance penalties associated with swap operations. This feature is crucial for applications with strict latency requirements, database workloads, and memory-intensive applications where swap-induced delays would significantly impact performance. Memory wiring requires careful planning to ensure that sufficient physical RAM is available on the host system, but provides substantial performance benefits for critical workloads that justify the resource reservation.
Graphics support extends the virtualization platform's capabilities to include desktop virtualization scenarios and applications that require graphical user interfaces. The integrated VNC server provides remote access to virtual machine desktops with configurable resolution settings ranging from standard definitions up to high-definition formats. Static VNC port assignment ensures consistent remote access capabilities, while XHCI mouse support provides improved mouse performance and responsiveness in graphical environments. These features are particularly valuable for Windows virtual machines, desktop virtualization deployments, and applications that require interactive graphical interfaces.
Priority control mechanisms enable administrators to establish resource allocation hierarchies that ensure critical virtual machines receive preferential treatment during periods of resource contention. By setting appropriate priority levels, administrators can guarantee that essential services maintain adequate performance even when the host system experiences high resource utilization. This capability is essential for mixed workload environments where different virtual machines have varying criticality levels and performance requirements.
Storage and Template Management
The storage subsystem of the rXg virtualization platform leverages the advanced capabilities of ZFS to provide a robust, efficient, and feature-rich foundation for virtual machine storage requirements. This integration goes beyond simple disk provisioning to include comprehensive data protection, performance optimization, and management capabilities that address enterprise storage needs.
ZFS integration provides automatic dataset creation with optimized configuration parameters specifically tuned for virtual machine workloads. The system automatically configures ZFS datasets with a 64K record size that aligns with typical virtual machine I/O patterns, providing improved performance for database workloads, file systems, and general-purpose virtual machine operations. The copy-on-write functionality inherent in ZFS provides data integrity guarantees while enabling efficient snapshot operations that consume minimal additional storage space.
Template support revolutionizes virtual machine deployment by enabling rapid provisioning from pre-configured disk images and cloud-ready templates. The system supports automatic conversion and application of various image formats, including qcow2, raw disk images, and cloud-optimized images from popular Linux distributions. This capability dramatically reduces deployment time by eliminating the need for manual operating system installation and basic configuration, enabling administrators to deploy fully configured virtual machines in minutes rather than hours.
Disk image management capabilities provide comprehensive support for multiple image formats with integrated upload and download functionality for both ISO installation media and cloud-ready disk images. The system handles format conversion automatically, ensuring compatibility across different image types while maintaining data integrity throughout the import and export process. This flexibility enables administrators to leverage existing image libraries, create standardized deployment templates, and maintain consistent virtual machine configurations across different environments.
Network Configuration and Security
The networking capabilities of the rXg virtualization platform represent a sophisticated approach to virtual network management that addresses both performance requirements and security considerations essential for enterprise deployments. This comprehensive networking framework provides administrators with the tools necessary to create complex network topologies, implement security boundaries, and optimize network performance for diverse workload requirements.
Advanced Networking Architecture
The virtual switch infrastructure forms the foundation of the rXg networking architecture, providing Layer 2 connectivity services that enable virtual machines to communicate with each other and with external networks. These virtual switches incorporate advanced features that extend beyond basic network connectivity to include comprehensive management, monitoring, and optimization capabilities.
Understanding Virtual Switch Network Modes
Virtual switches in the rXg virtualization platform operate using FreeBSD bridge interfaces, which provide flexible networking capabilities through two distinct operational modes. Understanding these modes is essential for designing effective network topologies and implementing appropriate connectivity patterns for different deployment scenarios.
Direct Bridge Mode (Layer 2 Bridging)
When a virtual switch is connected to a physical network interface, it operates in direct bridge mode, creating a Layer 2 network segment that spans both virtual and physical networks. In this configuration, virtual machines connected to the switch share the same broadcast domain as devices on the physical network, enabling direct communication without routing overhead.
Key characteristics of direct bridge mode: - Virtual machine traffic is directly bridged to the physical network - VMs appear as peers on the physical network segment - No IP address assignment required on the bridge interface itself - Minimal latency and maximum throughput - VMs can obtain DHCP addresses from physical network DHCP servers - Suitable for scenarios requiring direct Layer 2 connectivity
This mode is ideal for deployments where virtual machines need to integrate seamlessly with existing physical network infrastructure, such as when migrating physical servers to virtual machines while maintaining existing network addresses and connectivity patterns.
Routed Mode (Layer 3 Routing)
When a virtual switch operates without a physical interface connection, it creates an isolated Layer 2 segment where virtual machines can communicate with each other at the data link layer. However, the underlying FreeBSD bridge interface can be assigned an IP address, enabling the rXg host to route traffic between the virtual switch network and other networks (both physical interfaces and other virtual switches) at Layer 3.
Key characteristics of routed mode: - Virtual machines form an isolated Layer 2 segment - The bridge interface acts as the default gateway for VMs on the switch - Traffic between virtual switches and physical networks is routed by the rXg host - Enables network segmentation and security boundary implementation - Supports complex multi-tier network architectures - Allows firewall rules and traffic shaping between network segments
This mode provides maximum flexibility for creating sophisticated network topologies with controlled traffic flow between different security zones, application tiers, and functional network segments.
Network Traffic Flow Architecture
The following diagram illustrates how network traffic flows through the virtualization infrastructure in both bridge and routed modes:
DIRECT BRIDGE MODE
VM 1 192.168.1.100
tap0 (no IP)
bridge0/vm-lan (no IP configured)
Layer 2 only
Physical Interface Member
em0 Physical Connected to external switch
Interface
External Network (192.168.1.0/24)
VM traffic is directly bridged - no routing involved
ROUTED MODE
VM 1 VM 2
10.10.1.10 10.10.1.11
tap0 tap1
bridge0/vm-internal
IP: 10.10.1.1/24 Bridge has IP address!
(VM default gateway)
No physical interface - isolated L2 segment
rXg Host Routing Stack Layer 3 routing happens here
(gateway_enable="YES")
Routes between interfaces
Routing decisions based on destination
em0 bridge1 (Another virtual switch)
Physical 10.20.1.1
Other VMs (10.20.1.0/24)
External Network
VM traffic is routed through the rXg host's routing stack
HYBRID MODE (COMBINED)
Production VMs (Direct Bridge) Internal VMs (Routed)
Web VM 192.168.1.50 App VM 10.10.1.10
bridge-dmz (no IP) bridge-app 10.10.1.1
+ em0 (isolated)
rXg Routing
+ Firewall
External Network
DMZ VMs have direct L2 access - App VMs routed with firewall control
Configuration Requirements for Routed Mode
To enable Layer 3 routing between virtual switches and physical interfaces, the rXg host must have IP forwarding enabled. This is controlled by the FreeBSD gateway_enable parameter, which sets the net.inet.ip.forwarding sysctl value to 1. The rXg automatically configures this parameter appropriately for virtualization deployments.
When implementing routed mode networking: 1. Assign an IP address to the bridge interface (becomes the VM gateway) 2. Configure VMs with IP addresses in the bridge's subnet 3. Set the bridge IP as the VM default gateway 4. Implement appropriate firewall rules to control inter-network traffic 5. Configure routing policies for traffic between virtual and physical networks
Network Topology Design Patterns
The flexibility of the virtual switch architecture enables several common network topology patterns:
- Single Bridge with Physical Uplink: All VMs share one network segment with direct external access
- Multiple Isolated Bridges with Routing: Different VM groups on separate networks with controlled routing
- DMZ + Internal Architecture: Public-facing VMs on bridged network, application VMs on routed internal network
- Three-Tier Architecture: Separate networks for presentation, application, and data tiers with routing policies
- Management Network Separation: Dedicated isolated network for administrative access with restricted routing
CIDR configuration capabilities enable administrators to define and manage IP address spaces at the virtual switch level, providing automatic subnet management and IP validation services that ensure network configuration consistency. When a virtual switch is configured with a specific CIDR range, the system automatically validates virtual machine IP assignments against this range, preventing configuration errors and network conflicts that could disrupt service availability. This validation extends to gateway configuration verification, ensuring that default gateways are properly positioned within the defined subnet boundaries and are accessible from assigned virtual machine IP addresses.
Private network functionality provides the capability to create completely isolated network segments that operate independently of external network infrastructure. These private networks enable virtual machines to communicate with each other using standard networking protocols while remaining completely isolated from external network access. This isolation is particularly valuable for creating secure development environments, implementing network segmentation for compliance requirements, and establishing protected communication channels for sensitive applications that require network isolation.
MTU configuration support enables administrators to optimize network performance by adjusting the Maximum Transmission Unit size to match specific application requirements and network infrastructure capabilities. Standard Ethernet networks typically operate with 1500-byte MTU values, but the system supports configuration of jumbo frames up to 9000 bytes for high-throughput applications that can benefit from reduced packet processing overhead. The system also supports MTU reduction for networks that require additional protocol overhead or tunneling encapsulation that would otherwise cause packet fragmentation.
Traffic monitoring and statistics collection provide comprehensive visibility into network utilization patterns and performance characteristics. The system automatically tracks and reports detailed statistics including total bytes transmitted and received, packet counts, error rates, and bandwidth utilization patterns. These metrics are essential for capacity planning, performance troubleshooting, and identifying network bottlenecks that could impact virtual machine performance. The monitoring system integrates with the broader rXg management infrastructure to provide alerts and notifications when network utilization exceeds defined thresholds or when error conditions are detected.
Network segmentation capabilities enable administrators to create sophisticated network topologies that separate different types of traffic based on security requirements, performance characteristics, and functional purposes. DMZ networks can be established for internet-facing services that require external connectivity while maintaining isolation from internal network resources. Internal networks provide secure communication channels for application components that require high-speed, low-latency connectivity without exposure to external threats. Management networks enable administrative access and monitoring traffic to be segregated from production application traffic, improving both security and performance predictability. Storage networks can be dedicated to backup, replication, and storage access traffic, ensuring that these high-bandwidth operations do not interfere with application performance.
MAC address management incorporates both automatic generation capabilities and support for custom address assignment based on specific deployment requirements. The automatic generation system utilizes a reserved vendor prefix of 58:9c:fc that identifies virtual machines created within the rXg environment, followed by algorithmically generated address components that ensure uniqueness within the network domain. This approach provides consistent, predictable MAC address assignment while eliminating conflicts that could arise from random address generation. For deployments that require specific MAC address assignments due to licensing requirements, wake-on-LAN functionality, or integration with external network management systems, the platform supports manual MAC address specification with validation to prevent duplicate assignments.
Security and Isolation Framework
The security architecture of the rXg virtualization networking system incorporates multiple layers of protection and isolation mechanisms designed to address the complex security requirements of modern virtual infrastructure deployments. These security features operate at both the network and system levels to provide comprehensive protection against unauthorized access, data exfiltration, and lateral movement threats.
Network isolation represents the primary security mechanism for controlling communication between virtual machines and external network resources. Private virtual switches create completely isolated network segments that prevent unauthorized network access while enabling legitimate communication between authorized virtual machines. This isolation operates at the network layer, preventing any network traffic from traversing between isolated segments regardless of the network protocols or applications involved. The isolation is enforced by the underlying FreeBSD networking stack and bhyve hypervisor, providing robust protection that cannot be bypassed through software manipulation or configuration changes within the virtual machines themselves.
Resource control mechanisms extend beyond simple network isolation to include comprehensive resource allocation and limitation capabilities that prevent resource exhaustion attacks and ensure fair resource distribution among virtual machines. CPU resource controls enable administrators to establish maximum CPU utilization limits for individual virtual machines, preventing any single virtual machine from consuming excessive CPU resources that could impact the performance of other virtual machines on the same host. Memory allocation controls ensure that virtual machines cannot exceed their allocated memory limits, preventing memory exhaustion conditions that could destabilize the host system or impact other virtual machines. Storage resource controls limit disk I/O rates and storage space consumption, ensuring that virtual machines cannot monopolize storage resources or perform disk-based denial of service attacks against other virtual machines.
Access management capabilities provide multiple layers of authentication and authorization controls that ensure only authorized users and systems can access virtual machine resources and management interfaces. Network-based access controls enable administrators to implement IP address restrictions, MAC address filtering, and protocol-based access limitations that restrict network access based on source identity and connection characteristics. Authentication integration with enterprise directory services ensures that virtual machine access is governed by centralized identity management policies and that access permissions are automatically updated when user roles or responsibilities change. Multi-factor authentication support provides additional security for administrative access to critical virtual machine infrastructure and management interfaces.
Command-Line Tools and Automation Infrastructure
The rXg virtualization platform incorporates a comprehensive suite of command-line tools and automation capabilities designed to streamline virtual machine deployment, management, and operational procedures. These tools enable both interactive administration and fully automated deployment scenarios, supporting everything from single virtual machine creation to large-scale infrastructure provisioning and management operations.
VM Deployment Tool and Interactive Provisioning
The deploy_vm command-line utility represents a sophisticated approach to virtual machine provisioning that combines the flexibility of command-line operation with the convenience of interactive configuration assistance. This tool addresses the common challenge of virtual machine deployment complexity by providing a guided interface that ensures all necessary configuration parameters are properly specified while maintaining the efficiency and automation potential of command-line operations.
The tool accepts comprehensive configuration parameters directly from the command line, enabling fully automated deployment scenarios where all necessary parameters are known in advance. A typical deployment command such as deploy_vm web-server-01 -c 4 -m 8 -g 50 -n production-switch creates a virtual machine named "web-server-01" with 4 CPU cores, 8 gigabytes of memory, 50 gigabytes of storage, and connectivity to the "production-switch" virtual switch. This direct parameter specification approach is ideal for scripted deployments, infrastructure-as-code implementations, and batch provisioning operations where consistent configuration parameters are applied across multiple virtual machines.
Interactive prompting capabilities ensure that missing or incomplete configuration parameters are properly collected during the deployment process, preventing deployment failures due to incomplete specifications. When required parameters are not provided via command-line arguments, the tool enters an interactive mode that guides administrators through the configuration process, providing context-sensitive help and validation to ensure that all specifications are appropriate for the intended deployment scenario. This interactive approach is particularly valuable for one-off deployments, exploratory configurations, and situations where configuration requirements may not be fully defined at the time of initial deployment.
Disk image selection and management functionality enables administrators to choose from available installation media and pre-configured disk images during the deployment process. The tool provides access to the complete library of uploaded ISO files and cloud-ready disk images, enabling administrators to select the most appropriate base image for their specific deployment requirements. The integration with the disk image management system ensures that selected images are properly validated and compatible with the target virtual machine configuration before deployment proceeds.
Network configuration assistance helps administrators navigate the complexities of virtual network setup by providing guidance on virtual switch selection, IP address assignment, and network connectivity requirements. The tool can automatically suggest appropriate network configurations based on existing virtual switch definitions and network topology, while also supporting manual specification of detailed network parameters for complex deployment scenarios that require specific connectivity arrangements.
API Integration and Programmatic Management
The RESTful API infrastructure provides comprehensive programmatic access to all virtualization platform capabilities, enabling integration with external management systems, automation frameworks, and custom applications that require virtual machine management functionality. These APIs adhere to modern REST architectural principles, providing predictable, standards-based interfaces that support both individual operations and bulk management scenarios.
The virtual machine lifecycle management API accessible at /api/virtual_machines provides complete control over virtual machine creation, configuration, operation, and deletion. This API supports all virtual machine management operations including power state control, configuration modification, resource allocation adjustment, and performance monitoring. The API accepts JSON-formatted requests that specify virtual machine parameters and configuration settings, returning detailed response information that includes virtual machine status, resource utilization metrics, and operational state information. This comprehensive API enables external systems to implement sophisticated virtual machine management workflows that can respond to changing operational requirements and automatically adjust virtual machine configurations based on performance metrics or business logic.
Host configuration management through the /api/virtualization_hosts endpoint enables programmatic management of virtualization host settings including resource allocation policies, network configuration, and performance tuning parameters. This API provides the capability to dynamically adjust host-level settings in response to changing workload requirements, implement automated resource rebalancing across multiple hosts, and maintain consistent configuration standards across the virtualization infrastructure. The API supports both individual host management operations and bulk operations that can simultaneously update configuration settings across multiple hosts in a coordinated manner.
Network management capabilities exposed through the /api/virtual_switches API enable dynamic network topology management including virtual switch creation, configuration modification, and traffic policy implementation. This API supports sophisticated network automation scenarios including automatic network segmentation based on virtual machine characteristics, dynamic VLAN assignment, and traffic shaping policy implementation. The integration with the underlying network infrastructure ensures that API-driven network changes are properly coordinated with physical network configuration and that network policies are consistently enforced across the entire virtual infrastructure.
Snapshot management operations provided by the /api/virtual_snapshots endpoint enable programmatic backup and recovery workflows that can be integrated with broader data protection and disaster recovery systems. This API supports automated snapshot creation based on schedules or trigger events, snapshot lifecycle management including automatic cleanup of old snapshots, and coordinated backup operations that can span multiple virtual machines to ensure consistent backup points across related systems.
Backup and Recovery Tools and Operational Procedures
The specialized backup and recovery utilities integrated into the rXg virtualization platform provide enterprise-grade data protection capabilities that address both routine backup requirements and disaster recovery scenarios. These tools leverage the underlying ZFS storage capabilities to provide efficient, reliable backup operations while maintaining the flexibility necessary to support diverse operational requirements and recovery scenarios.
The bhyve_create_backup utility implements comprehensive virtual machine backup functionality that captures complete virtual machine state including all disk data, configuration settings, and metadata necessary for complete restoration. This tool supports both full and incremental backup operations, with incremental backups leveraging ZFS snapshot capabilities to capture only changed data blocks since the previous backup operation. The backup process includes extensive validation procedures that verify backup completeness and integrity, ensuring that backup files are suitable for reliable restoration operations. The tool supports various backup destinations including local storage, network-attached storage systems, and cloud storage services, providing flexibility in backup storage strategy implementation.
Virtual machine restoration capabilities provided by the bhyve_restore_backup utility enable complete recovery of virtual machines from backup files created by the backup system. The restoration process includes extensive validation of backup file integrity and compatibility with the target virtualization environment, ensuring that restoration operations complete successfully and that restored virtual machines operate correctly. The tool supports restoration to the original virtualization host or to alternative hosts within the virtualization infrastructure, enabling both routine recovery operations and disaster recovery scenarios where the original host system may not be available.
Snapshot export functionality implemented in the bhyve_snapshot_download utility provides the capability to extract individual snapshots from the ZFS storage system for external storage, archival, or migration purposes. This tool creates portable snapshot files that maintain complete fidelity to the original snapshot while being independent of the source ZFS storage system. The export process includes compression and integrity verification capabilities that optimize storage efficiency while ensuring that exported snapshots can be reliably imported into other compatible systems. The tool supports both individual snapshot export operations and batch export scenarios where multiple snapshots can be processed simultaneously.
Snapshot import and restoration capabilities provided by the bhyve_snapshot_restore utility enable the integration of externally stored snapshots back into the active virtualization environment. This tool supports restoration from snapshot files created by the export utility as well as compatible snapshot formats from other virtualization platforms, providing migration capabilities that enable virtual machine movement between different virtualization environments. The import process includes extensive compatibility validation and automatic conversion capabilities that ensure imported snapshots are properly integrated into the target virtualization environment and that restored virtual machines operate correctly within the new environment.
Virtualization Design Guide
Note: We recommend that a single machine with a single instance of rXg be limited to 1500 DPL, 8 CPU cores, and 16 GB of RAM.
No HA Required
- Single rXg Host Internal Dataplane Virtualization
HA Required
- 2-way Symmetric rXg Cluster
- 3-way Symmetric rXg Cluster
- 3-way Asymmetric rXg Cluster
- 4-way Asymmetric rXg Cluster
- 8-way Asymmetric rXg Cluster
Single rXg Host Internal Dataplane Virtualization
- Install rXg on bare metal machine
- Configure bare metal rXg as CC
- Also use the bare metal rXg as virtualization host
- Install (6) vDPs
- Configure bare metal rXg as CC
Example:
- Server with AMD 64-core CPU / 256 GB of RAM
- 6-way IDV (8 cores / 16 GB each)
- 16 cores and 64GB RAM for CC
- 6000 DPL in full operation
2-way Symmetric rXg Cluster
- Install rXg on both bare metal machines.
- Configure bare metal rXgs as symmetric rXg cluster with (2) CCs
- Also use the bare metal rXgs as virtualization hosts
- Install (2) vDPs per node
- Use cluster teaming to facilitate deterministic failover
- Configure bare metal rXgs as symmetric rXg cluster with (2) CCs
Example:
- 2 x servers with AMD 24-core CPU / 64 GB of RAM
- 2-way IDV (8 cores / 16 GB each) on each server
- 8 cores and 32GB RAM for CC
- 4000 DPL in full operation (2000 DPL if one fails)
3-way Symmetric rXg Cluster
- Install rXg on all 3 bare metal machines.
- Configure bare metal rXgs as symmetric rXg cluster with (3) CCs
- Also use the bare metal rXgs as virtualization hosts
- Install (4) vDPs per node
- Use cluster teaming to facilitate deterministic failover
- Configure bare metal rXgs as symmetric rXg cluster with (3) CCs
Example:
- 3 x servers with AMD 48-core CPU / 128 GB of RAM
- 4-way IDV on each server
- 16 cores and 64 GB RAM for CC
- 12000 DPL in full operation (8000 DPL if one fails)
3-way Asymmetric rXg Cluster
- Install rXg on all 3 bare metal machines.
- Configure bare metal rXgs as asymmetric rXg cluster with (1) CC and (2) DPs
- Use the bare metal DP nodes as virtualization hosts
- Install (4) vDPs per DP node
- Configure bare metal rXgs as asymmetric rXg cluster with (1) CC and (2) DPs
Example:
- 3 x servers with AMD 32-core CPU / 64 GB of RAM
- rXg CC runs on bare metal
- 4-way IDV on bare metal rXg DPs
- 16 cores and 40 GB RAM for CC
- 16 cores and 24 GB RAM for VMs - 8000 DPL in full operation (4000 DPL if one fails)
6-way Asymmetric rXg Cluster
- Install rXg on all 4 bare metal machines.
- Configure bare metal rXgs as asymmetric rXg cluster with (2) CCs and (2) DPs
- Use the bare metal DP nodes as virtualization hosts
- Install (4) vDPs per DP node
- Use cluster teaming to facilitate deterministic failover
- Configure bare metal rXgs as asymmetric rXg cluster with (2) CCs and (2) DPs
Example:
- 6 x servers with AMD 32-core CPU / 64 GB of RAM
- 4-way IDV (8 cores / 16 GB each) on each vDP
- Full capacity of bare metal for master and standby CC
- 16000 DPL in full operation (12000 DPL if one CP or DP or both fails)
8-way Asymmetric rXg Cluster
- Install rXg on all 8 bare metal machines.
- Configure bare metal rXgs as asymmetric rXg cluster with (2) CCs and (6) DPs
- Use the bare metal DP nodes as virtualization hosts
- Install (16) vDPs per DP node
- Use cluster teaming to facilitate deterministic failover
- Configure bare metal rXgs as asymmetric rXg cluster with (2) CCs and (6) DPs
Example:
- 8 x servers with 2x AMD 64-core CPU / 512 GB of RAM
- 16-way IDV (8 cores / 16 GB each) on each vDP
- Full capacity of bare metal for master and standby CC
- 96,000 DPL in full operation with room to grow!
LLM
The LLM view enables the operator to configure a cutting-edge retrieval augmented generation (RAG) large language model (LLM) artificially intelligent (AI) feature designed to empower network operators to harness the power of advanced language models within their private networks. By leveraging this innovative technology, operators can revolutionize network operations, enhance customer experiences, and unlock new revenue streams.
LLM Options
The LLM Options scaffold configures the end-user behavior of the LLM feature. It may be useful to think of each LLM Option as a unique chatbot. In a scenario where there are multiple end-user and operator portals, multiple LLM Option records may be created to drive each portal to a unique chatbot experience.

The name field is an arbitrary string descriptor used only for administrative identification. Choose a name that reflects the purpose of the record. This field has no bearing on the configuration or settings determined by this scaffold.
The default checkbox, if checked specifies this LLM Option will be used for all portals without an explicit LLM option defined.
The temperature field is a number between 0 and 1 (0.8 default). Increasing the temperature value will make the model answer more creatively.
The chatbot name field is used to set the name of the chatbot, default is Romeo George.
The chatbot avatar field allows the operator to upload a custom image to be as the chatbots avatar in chatbox window.
The apply guardrails checkbox applies guardrails against harmful, unethical, racist, sexist, toxic, etc. conversations. This is applied after any custom instructions and is enabled by default.
The custom instructions field allows the operator to provide the LLM with a full set of custom system instructions.
The initial greeting field allows the operator to specify a specific greeting the chatbox will use to introduce itself when a user initiates a new chat.
The default llm model drop down is used to specify the default LLM modem this LLM will use.
The llm models field allows the operator to select all the models that can be used with this LLM Option.
The admin roles field sets the admin roles that will use this LLM option, selecting any roles here will remove them from being selected in another LLM option.
The operator portal field selects which Operator Portals are assigned to this LLM Option. Note that an admin role match is prioritized over an operator portal match. Associating a record removes it from other options.
The landing portals field sets which splash/landing portals use this LLM option. Associating a record removes it from the other options.
The alow anonymous chats field, if checked allows users to chat via the portal without being logged in with an account.
LLM Workers
The LLM Workers scaffold configures an LLM back-end service that will be used by the chatbots defined by LLM Options. LLM Workers may leverage both local as well as remote GPU resources. The remote GPU resource configuration is intended to be used with a Fleet Manager. An organization might wish to install one or more GPUs into the Fleet Manager and thus have a centralized pool of GPU resources that are shared amongst of a fleet in order to meet cost, power, and cooling budgets at the edge. It is also possible to create LLM Workers that leverage cloud AI systems. We highly recommend that operators deploy their own GPUs to maximize ROI and information security. Tying an LLM Worker to a cloud system is primarily included for the purpose of demonstration.

The name field is an arbitrary string descriptor used only for administrative identification. Choose a name that reflects the purpose of the record. This field has no bearing on the configuration or settings determined by this scaffold.
The adapter field specifies the adapter to be used, Ollama is selected by default.
The run locally checkbox tells the system to run a local server for the specfied backend (adapter) and optionally can be made available to specific WAN targets and or policies.
The host field is used to specify the IP or FQDN of the host providing the API interface for the designated backend.
The port field specifies the port to be used for communication.
The timeout field sets the amount of time the system should wait for the LLM worker to respond.
The online checkbox, if checked indicates that the LLM worker is online and ready to process reqquests, unchecking this field will make the LLM worker unavailable.
The llm model drop down specifies which LLM Model this worker will use by default.
The llm models field specfies which LLM Models this worker is allowed to use.
The use for embeddings field if checked, designates the worker that will be used to generate embeddings for context lookup. Enabling will deactive embedding for other workers.
LLM Models
The LLM Models scaffold displays the models that are available to the LLM Worker. Use the import models action link on the LLM Worker to bring in the available models and populate this scaffold. This scaffold is primarily for informational purposes. We recommend pulling llama3.1:latest for most purposes, or llama3.1:70b if you have more than 40 GB of VRAM. We recommend pulling nomic-embed-text (or mxbai-embed-large if you have a powerful machine) for embeddings.

The name field is the name of the model as recognized by the LLM Workers running it. This name needs to match the model name this field is not arbitrary.
The url field specifies the URL where the model definition and weights can be downloaded from. When importing models from a worker, this field is typically populated automatically.
The formatter field specifies the prompt formatting style used when sending requests to the LLM Worker. Available options are Mistral and Llama3. The formatter ensures that prompts are structured correctly for the specific model architecture being used.
The context window field sets the maximum number of tokens (words/word pieces) that can be considered when generating a response. Available values are 512, 768, 1K, 2K, 4K, 8K, 16K, 21K, 32K, 65K, 100K, and 128K tokens. The maximum context window is determined by the specific model being used. Setting a larger context window allows for more detailed and comprehensive answers but requires more memory. Default values are automatically assigned based on the model name (e.g., llama3 defaults to 8K, mistral/mixtral defaults to 32K).
The embedding dimensions field specifies the dimensionality of the vector embeddings produced by the model. Supported values are 512, 768, and 1024 dimensions. This field is required when using a model for embeddings and is typically populated automatically when importing models from a worker. The default is 768 if the field is left blank.
The quantization level field indicates the quantization applied to the model weights, which affects the precision and memory requirements. Lower quantization levels (fewer bits per weight) reduce memory usage and can improve inference speed, but may slightly reduce model accuracy. This value is typically set automatically when importing models.
LLM Sources
The LLM Sources scaffold allows operators to upload data sources that are used by the retrieval augmented generation (RAG) system. Documents uploaded to this scaffold are indexed using an embeddings model. Vector similarity search is performed upon the chatbot input to acquire relevant fragments of LLM Sources to provide context to the LLM when generating a chatbot response.
The intended method of use is for the operator to upload a large number of files from their existing dataset. For example, the operator might upload all of the menus for all of the restaurants at a large public venue. Another common use case would be an upload of all of the recommended nearby activities for a hospitality venue. The LLM Sources are unique to each edge. Synchronization of LLM Sources between edges is accomplished using a Fleet Manager.

The name field is an arbitrary string descriptor used only for administrative identification. Choose a name that reflects the purpose of the record. This field has no bearing on the configuration or settings determined by this scaffold.
The llm_remote_data_source if selected, marks this LLM Source as remote, meaning that the rXg is expected to fetch the source data from a remote host.
The frequency selector allows the operator to choose whether to make the llm source get called live, or periodically. If it is called periodically, it will not have access to a specific user's specific query, the way it will if being called live. If this LLM Option is periodic, the remote source will be called periodically and the result will be stored in the LLM Option's source attachment, and a button to manually refresh it will be made available. If this is a Live LLM Source, the query will be accessible from within the parameterization's ERB context as the query variable.
The source field lets you choose the file to upload that will be used as an embeded source.
The visibilty field sets which users can access this information, if set to admins only, the source will only be referenced if you are logged in as an admin. Admins and Users allows both admins and client users to receive information from this source, and setting it to anonymous allows any user interacting with the LLM to receive this information regardless of being logged in or not. The anonymous setting should only be used if the client would be interacting with the chatbot without a login sessions, ie from the splash portal.
The request properties are merged with the request properties of the remote llm data source when this data is retreived.
These request properties can use ERB, and if they do, the user's query will be available in that ERB context as the query variable. Other variables such as client_ip, client_mac, current_account_id, anonymous_user_id, connected_ap_id, current_admin_id will be available if possible.
The path attribute is merged with the base url of the LLM Remote Data Source to determine the URI that will be called. This allows the operator to configure different paths with different query parameters off of one LLM Remote Data Source.
The timeout attribute determines how long the rXg will wait for a response when it tries to query the remote data source.
The frequency field choice determines how often a periodic remote data source is redownloaded.
The cache duration field determines how long an on-demand response is cached for. This works in conjunction with the cache duration unit field.
LLM Remote Data Sources
LLM Remote Data Sources Represent "base" configuration for getting data from remote web servers to use in LLM generated responses. LLM Remote Data Sources contain properties that are used when requesting data from that remote llm source.
The name field is an arbitrary string descriptor used only for administrative identification. Choose a name that reflects the purpose of the record. This field has no bearing on the configuration or settings determined by this scaffold.
The base url field will be combined with the path attribute of a correlated LLM Source. This is intended to give operators significant flexibility when using LLM Remote Data Sources.
The request properties will be merged with the LLM Source's request properties when making the request.
These request properties can use ERB, and if they do, the user's query will be available in that ERB context as the query variable. Other variables such as client_ip, client_mac, current_account_id, anonymous_user_id, connected_ap_id, current_admin_id will be available if possible.
The basic auth username and basic auth password will be included as basic auth if they are present.
LLM Embeddings
The LLM Embeddings scaffold displays all of the indexes that have been created by the embeddings model for the various LLM Sources. This scaffold is intended for informational purposes only.

An entry in the embedding scaffold represents data the LLM can pull from to answer client questions. The source shows where the data is from, updated reflects the last time this information was updated, the llm model used and the dimensionality.
LLM Prompts

This scaffold is a list of all the prompts sent to the LLM from the clients.
LLM Requests

This scaffold is a list of all the prompts sent to the LLM from the clients, it will list which llm model was used, the LLM worker, when the task was started, when it completed, and how long it took to complete the response.
Chats

The chats scaffold is a history of the chats that have been initiated on the system.
LLM MCP Options
The LLM MCP Options scaffold configures the rXg's own Model Context Protocol (MCP) server endpoint at /api/mcp. One record is active at a time and governs which administrators may connect, from which networks, and which tools are advertised to connecting clients. The active record is the source of truth for the MCP controller; checking another record's active box transparently demotes the previously-active record so that exactly one option is in force at any time.
The name field is an arbitrary string descriptor used only for administrative identification. Choose a name that reflects the purpose of the record. This field has no bearing on the configuration or settings determined by this scaffold.
The active checkbox, when checked, designates this record as the singleton governing /api/mcp. Saving an activated record automatically deactivates any other record. Only one option may be active at a time.
The enabled checkbox, when unchecked, suspends the MCP server endpoint while preserving the record for later use. Disabled options reject every connection regardless of the bearer credentials presented.
The llm mcp server drop down designates the on-board MCP server record that represents this rXg's own endpoint. When set, chats associated with this option mint per-chat administrator API Keys for authenticating against the on-board endpoint, rather than expecting an operator-supplied bearer credential on the LlmMcpServer record.
The enable describe model, enable find record, enable get record, enable list records, enable get telemetry, and enable get health notices checkboxes individually toggle each Phase 1 tool's exposure via the MCP tools/list endpoint. An external MCP client cannot discover or invoke a tool whose checkbox is unchecked. These provider-side toggles are independent from the per-server tool toggles described under LLM MCP Server Tools below, which gate the consumer side.
The admins field lists administrators individually authorized to connect to this rXg's MCP server. Either direct membership in this field or membership in a listed admin role grants access.
The admin roles field lists administrator roles whose members are authorized to connect. Any administrator belonging to a listed role is granted access without needing to appear in the admins field individually.
The wan targets field restricts which WAN-side source IP addresses may connect. When at least one WAN target is associated, requests from source IPs outside those targets are refused. When no WAN targets are set, the option permits connections from any source IP that also satisfies the administrator authorization. Loopback connections (originating from 127.0.0.0/8 or ::1) are always permitted; chat-driven calls from this rXg's own LLM workers reach the MCP controller via loopback and are not subject to WAN gating.
The policies field restricts which client policies are permitted to connect from LAN-side source IPs. This field is reserved for future LAN-side MCP usage and may be left empty in typical configurations.
The note field is a free-form text area for the operator's own documentation, such as identifying the deployment or use case that the active option was provisioned for.
LLM MCP Servers
The LLM MCP Servers scaffold registers remote MCP endpoints that this rXg's chat orchestrator is allowed to consume. The on-board MCP server should be registered here as well, so chats associated with the active LLM MCP Option can call tools against this rXg's own data. Additional records may be added to point at other rXgs (for cross-rXg lookups), at an RG Nets Infrastructure deployment, or at any compliant third-party MCP server.
The name field is an arbitrary string descriptor used to identify this MCP server in the admin scaffold and in tool-call audit records. The name is also normalized into a slug that prefixes the server's tool names in the chat orchestrator's catalog. For example, an LLM MCP Server named "Peer rXg" exposes peer_rxg__find_record, preventing collisions between servers that advertise tools with identical names.
The url field specifies the full HTTPS URL of the remote MCP endpoint, typically of the form https://<host>/api/mcp for an rXg-hosted server.
The enabled checkbox, when checked, makes this server available to LLM MCP Options that have associated it. Unchecking the box suspends use of this server without removing the record or its child tool list.
The api key field stores the bearer credential to use when this rXg's chat orchestrator authenticates against the remote MCP server. The value is encrypted at rest and is displayed in the form as a write-only field the existing value is not echoed back, only replaced when a new value is entered. The intended use of this column is the cross-rXg administrator-chat scenario, in which an operator pastes a peer rXg's administrator API Key here so that chats originating from this rXg can authenticate against the peer's MCP server. For all other chat surfaces, the bearer credential is sourced from a per-chat property rather than this field.
Phase 1 limitation the **api key field on this record is not consumed by the chat orchestrator automatically.** When the chat's LLM Option has more than one enabled MCP server (the typical configuration: an on-board server plus one or more remote servers), the orchestrator resolves per-server credentials from
ChatPropertyrows rather than from this column, so an operator-pasted api key here is not used for chat-driven tool calls. The cross-rXg path therefore requires either a per-chatChatPropertyseeded in advance, or a single-enabled-server configuration. See the Phase 1 release notes for the manual workaround and roadmap to make this column authoritative.
The llm options field associates this server with one or more LLM MCP Options. Only chats whose LLM Option matches an associated record will dispatch tool calls to this server.
The llm mcp server tools subform displays the tools currently advertised by this server, populated automatically by the chat orchestrator on first contact. See the next section for the per-tool toggle behavior.
LLM MCP Server Tools
The LLM MCP Server Tools subform, embedded inside the LLM MCP Server form, displays the set of tools currently advertised by an LLM MCP Server as discovered through the remote server's tools/list response. The chat orchestrator refreshes these rows on every successful discovery, so the form reflects what the remote is presently exposing.
The name field is the tool's identifier as reported by the remote server. The field is read-only; operators cannot create or rename tools through this form.
The description field is the tool's free-form description as reported by the remote. The field is read-only and is refreshed by the discovery loop whenever the remote server modifies its advertised description.
The enabled checkbox is the only operator-controlled column. Unchecking it suppresses the tool from this rXg's chat orchestrator's catalog without affecting tool exposure at the remote. A disabled tool remains visible to other MCP clients connecting directly to the same remote server.
Rows on this scaffold cannot be created or deleted by the operator. The discovery loop owns the row lifecycle. Tools no longer advertised by the remote become orphan rows that the operator may leave in place their enabled state is harmless once the tool is gone and the discovery loop will reinstate them automatically if the remote re-advertises the tool name.
LLM Tool Calls
The LLM Tool Calls scaffold is an audit log of every MCP tool invocation that traversed this rXg's chat orchestrator, including calls from external MCP clients connecting to /api/mcp and calls made internally by chats associated with an active LLM MCP Option. The scaffold is read-only; rows are inserted by the orchestrator and may be filtered using the standard active-scaffold search to locate calls by tool name, administrator, time window, or error condition.
Each row records the chat the call belonged to, the authenticated administrator, the MCP server invoked, the tool name and arguments, the success status, any error message returned, the size of the result payload, the call's duration in milliseconds, and the timestamp.
External MCP client calls those originated from outside of any rXg-side chat are distinguished by an empty chat reference. The simplest query against the table for external-client activity, useful when verifying that a newly-connected MCP client is reaching the rXg, is:
LlmToolCall.where(chat_id: nil).order(created_at: :desc)
.limit(20).pluck(:tool_name, :admin_id, :success, :error, :created_at)
LLM Setup Example
In this example the hardware is a pc with a 3090 graphics card, WAN + certificate is configured, no other configuration has been done.
Navigate to Services::LLM
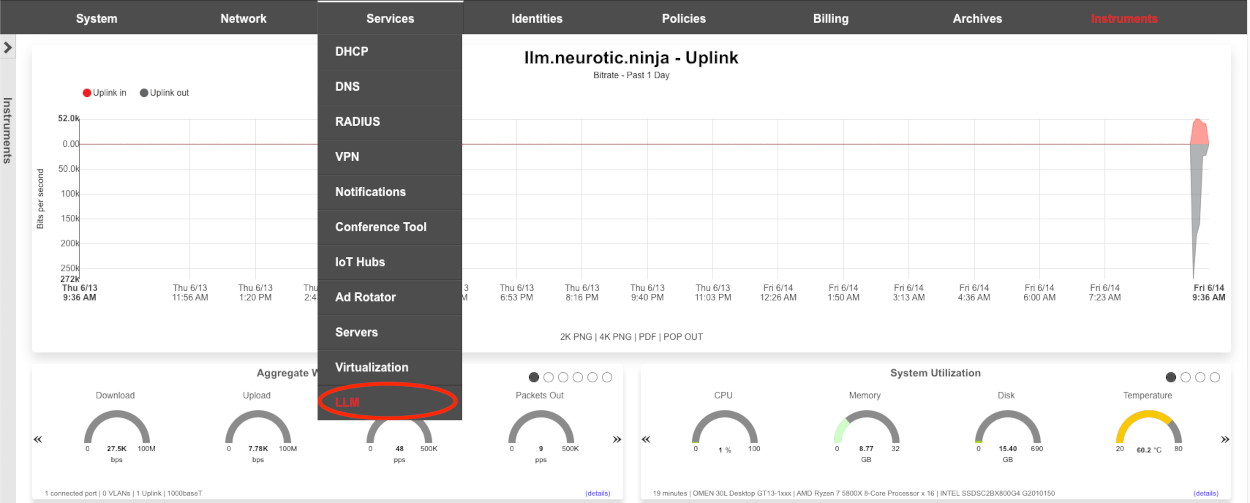
Create a new LLM Worker.

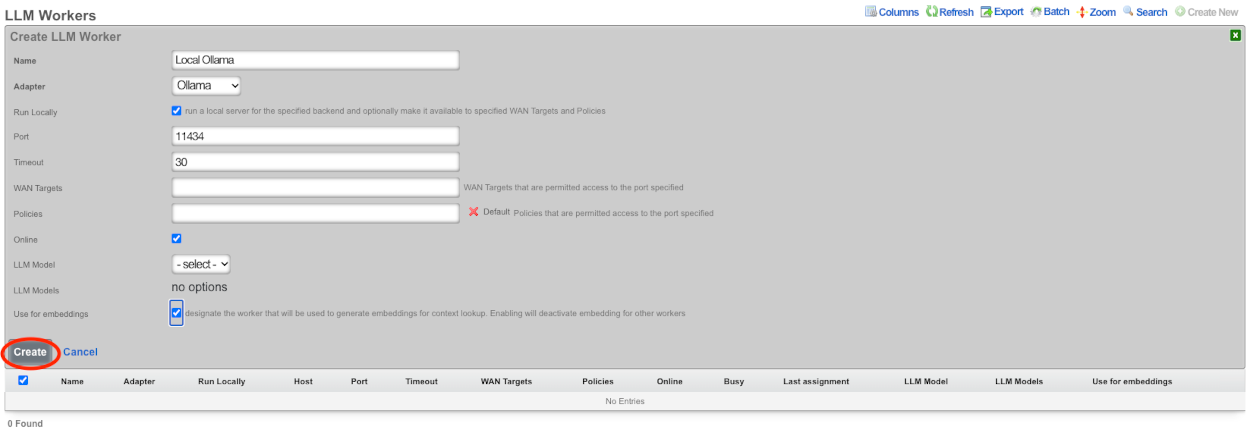
Give the record a name, in this case since it will be running locally on the system using Ollama I will use the name Local Ollama.
The adapter field should be set to Ollama, and the run locally checkbox should be checked.
The default port value of 11434 should be used, and timeout can be left at 30 seconds. It may be necessary to increase the timeout to 120 seconds to support larger models such as the 70b variant of llama.
Add any WAN targets that should be allowed to communicate on this port and/or any polcies that should be allowed. Being that there is no other configuration currently on this system I will select the default policy, if this were a live deployment I would need to add any client policies that will have access to the chatbot.
Leave the online checkbox, checked.
We do not have any llm models yet so we will leave those fields blank. In this demo we will also be using this worker for the embedding so the use for embeddings checkbox should be checked.
Click Create.
To pull a new model click the pull model link and enter the name of the model to be fetched.

Here we will pull the latest llama3 model, then click submit. This process can take a long time to complete as it must download and process the model file which an be quite large. If the model does not automatically appear in the model scaffold after pulling, wait a bit longer, and click the Import models link in the scaffold.

Repeat for each desired model.

Edit the LLM Worker created previously and now we can select the default model to use with this worker as well as specify other models the worker can use.

After selecting the default LLM model and any additional models click create.
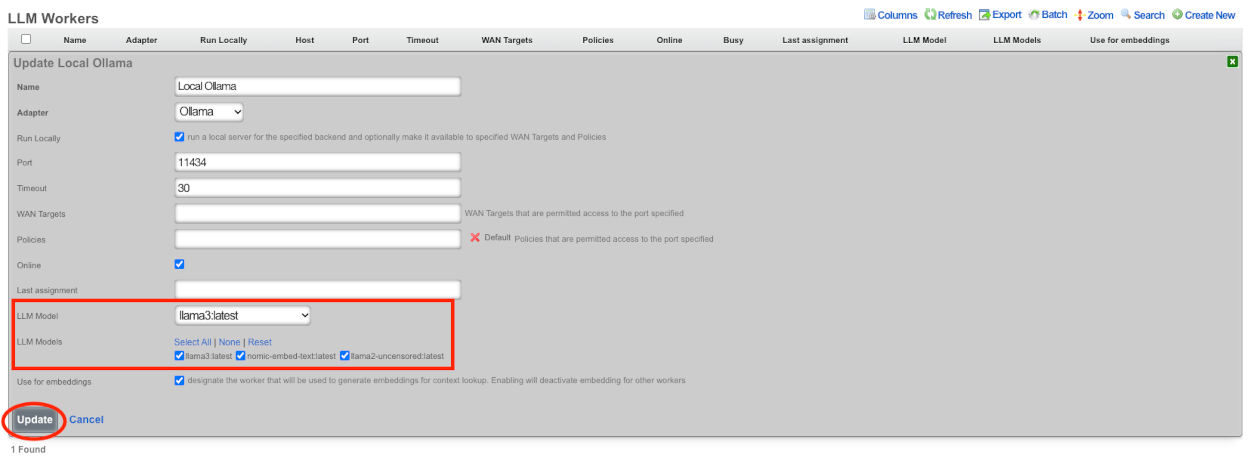
Next we will enable embedding generation. Embeddings are numerical representations of text or other data, which can be compared against each other in order to detect similarity between different data. If enabled, embeddings will be created for the Retrieval Augmented Generation (RAG) sources, as well as the admin manual and the Active Record Models that make up the database. There must be a worker designated for creating embeddings as well as a model designated for embeddings. For this we will use the nomic-embed-text:latest model. Edit the nomic LLM worker.

The embedding dimensions field is required when using a model for embedding. This field is typically populated automatically when importing models from a worker. Valid values are as follows: 512, 768, 1024. Default is 768 and will be used if the field is blank. Check the use for embeddings checkbox and click update. NOTE It will not start generating LLM embeddings until we create the LLM Option which brings us to the next step.
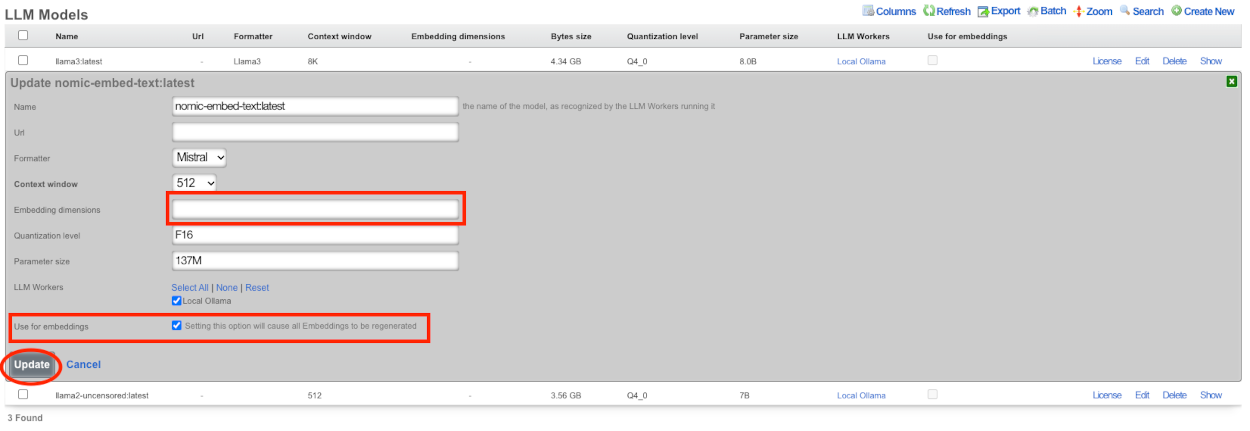
Create a new LLM Option.

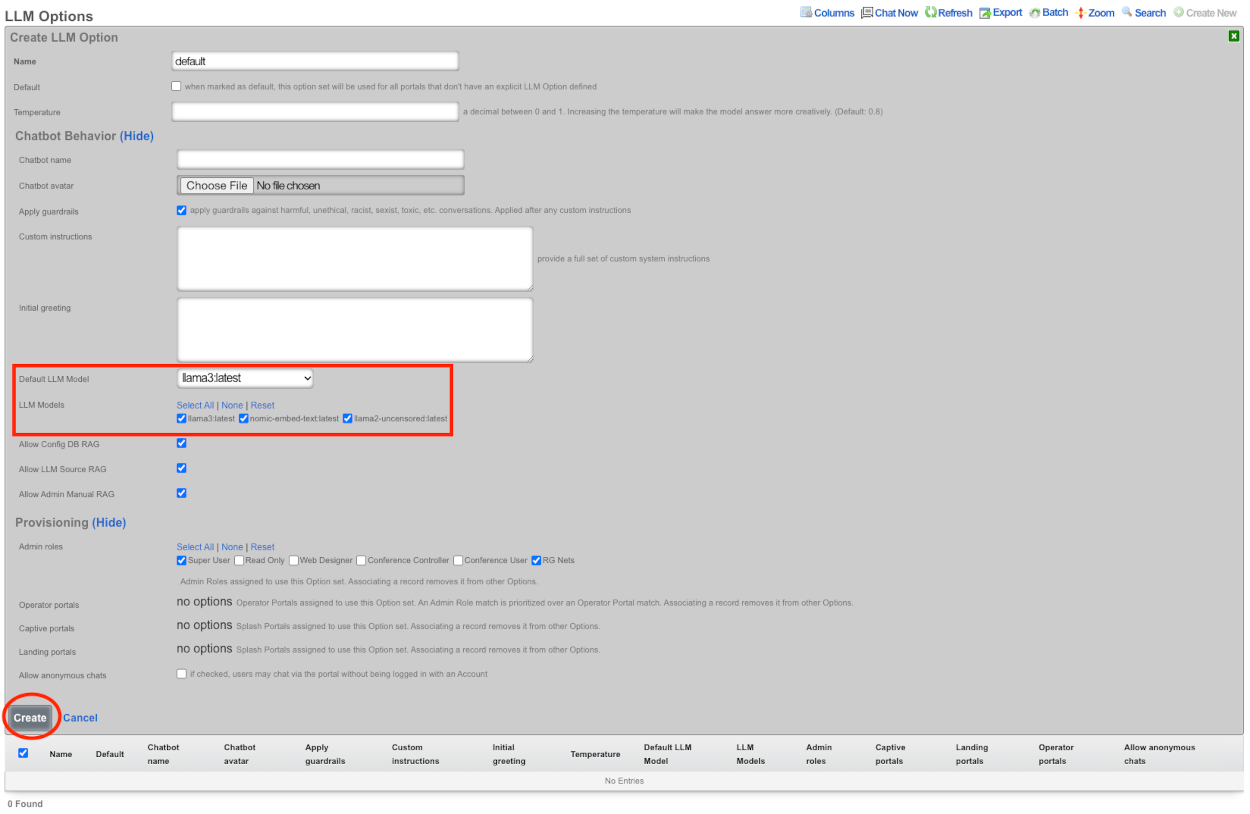
Give the record a name, since this will be the default LLM Option I will call it default, and check the default box below the name field. If desired you can enter a name for the chatbot, and upload a custom avatar.
Be default apply guardrails is checked, for the purpose of this demo it will remain checked.
I will not be changing the custom instructions or the the initial greeting at this time.
Select the default LLM model, for this we will be using llama3:latest, I will select the other models as well.
In the Provisioning section select which admin roles that will use this option set. If there are any operator portals or splash/landing portals that should use this LLM option they can be selected at this time as well. If the goal is to allow anyone to access the chatbot without a login session check allow anonymous chats. Primarily this would be checked if you intend to have the chatbot on the splash portal before authentication.
Click create.
This will then start generating the LLM Embeddings to be used as resources for chat responses. The time it will take to generate the embeddings depends on hardware.
The Chat is now available for use in the admin gui.

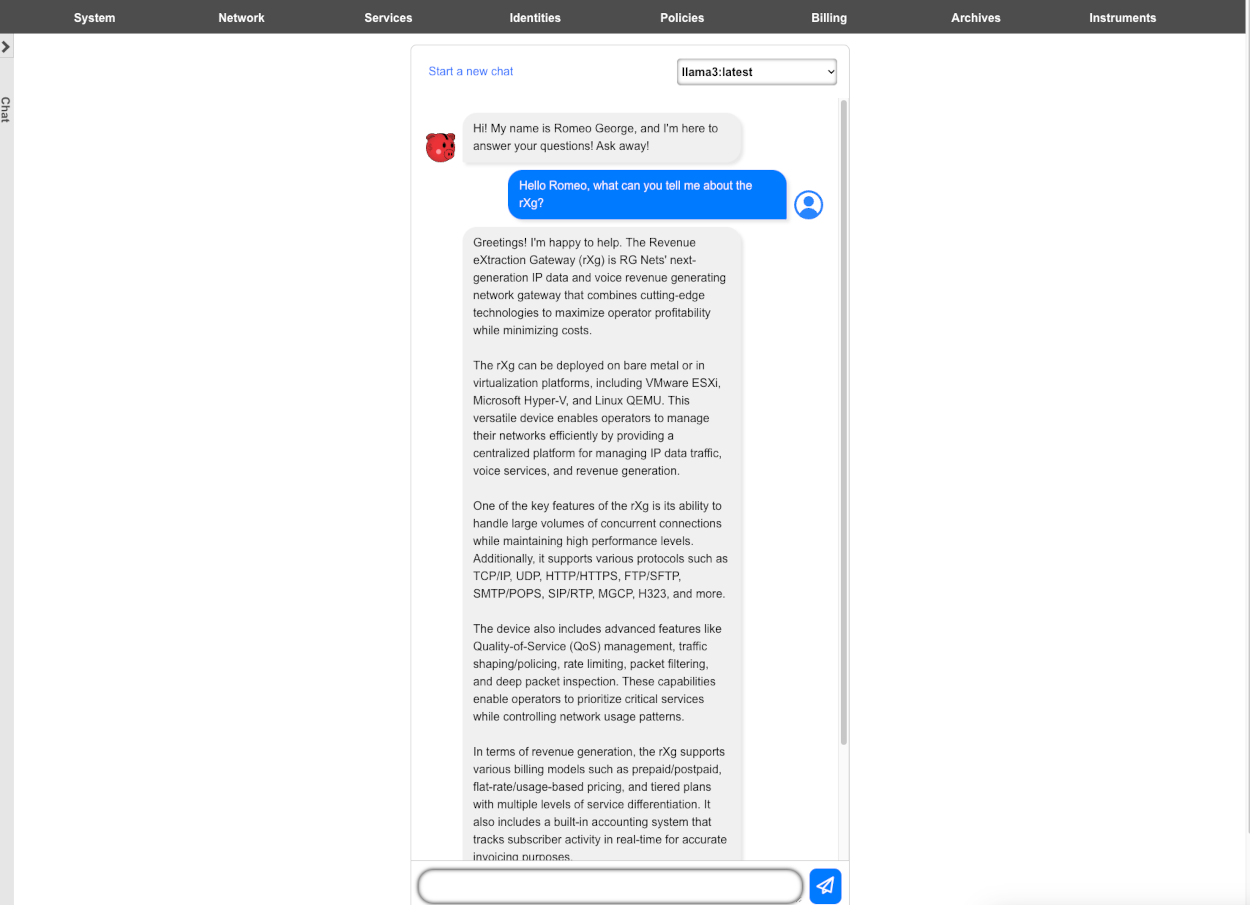
LLM Remote Sources Example
Using the LLM Remote Data Source feature allows the system to pull in realtime data via API calls. In this example we will create a remote data source that pulls information from Aviationstack.com. In this example we are using the paid service, however I believe a free account allows 100 API calls per month.
Before we begin we should determine which API endpoints we will use. We can see a list of available API calls for Aviationstack here aviationstack.com/documentation. For this example we will using the following endpoints.

dep_iata which allows us to narrow the scope of our searches to a specific airport.

flight_date which allows us to specify a time for our queries.

flight_number which allows us to inquire about specific flights.
Lastly access_key which is required and will pass our API access key.

To begin using Remote Data Sources navigate to Services::LLM and create a new LLM Remote Data Source.

Give the record a name. Enter the base URL, which for aviationstack is https://api.aviationstack.com/. Next we need to configure a Request property. Kind should be set to Query Parameter, key set to access_key from the endpoint above, and the value is the API key provided by aviationstack. Click Create.
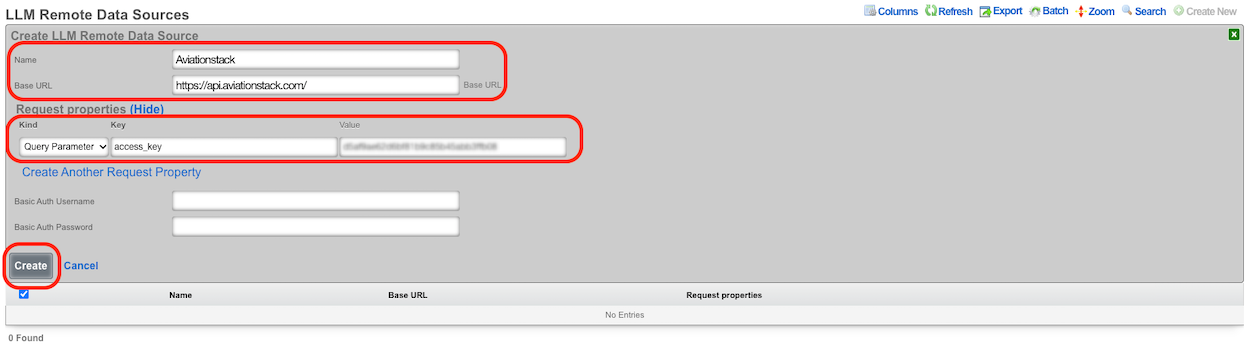
Next create a new LLM Source.

Give the record a name. Set the Visibility field to Admins and users, if we leave it at the defult Admins, then only admins will be able to access this source, we want clients on the network that have logged in to be able to access this. Setting it to anonymous then a client would be able to access the source regardless of login status.
The path here needs to be set to v1/flights for aviationstack. Select the LLM Remote Data Source that we created previously in the LLM remote data source field.
The Remote Data Description field is important and we must provide a value here. This is what the system will look at to determine if this source has information relevant to the inquery.
Next we need to create the Request Properties to use for this source. We will be using dep_iata to narrow the scope to a specific airport in this example DEN (Denver), flight_date which allows to search for a specific dates/times, and finally flight_number which allows us to retrieve information based on the specific flight numbers.
Click Create.
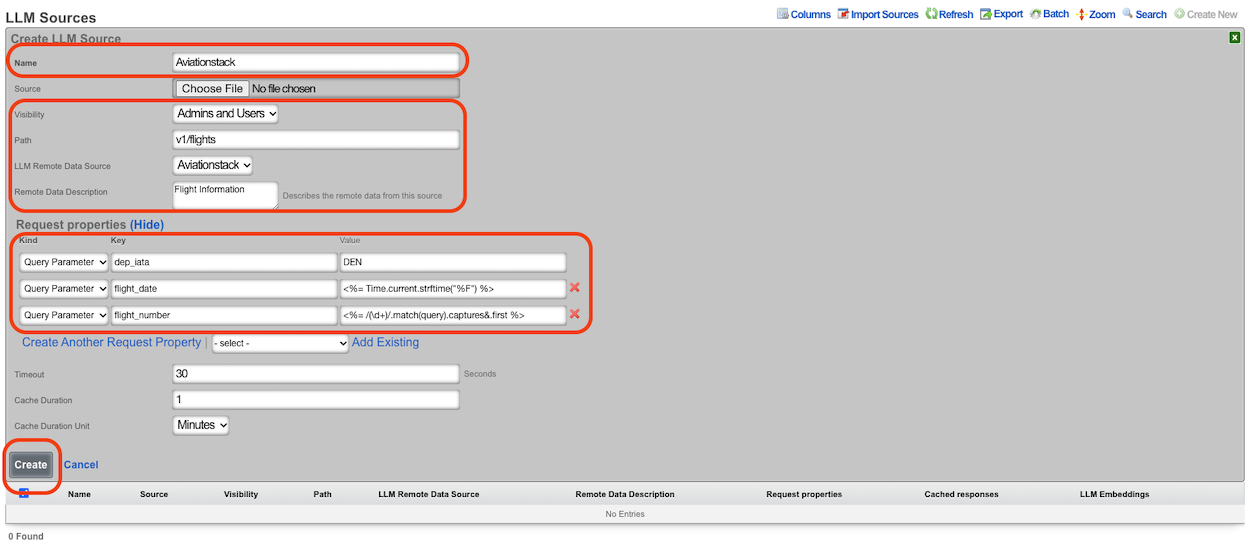
Now we should see a new LLM Embedding for this source, if not, click the Regenerate Embeddings link above the LLM Embeddings.
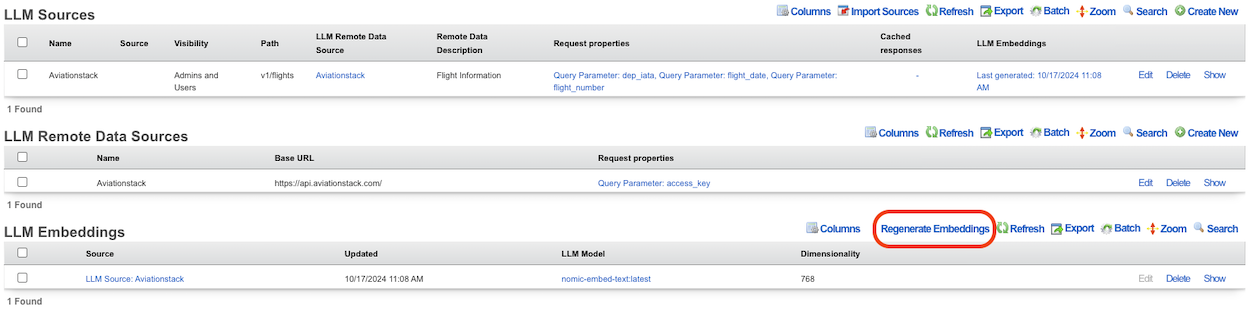
Now we are ready to start asking questions.
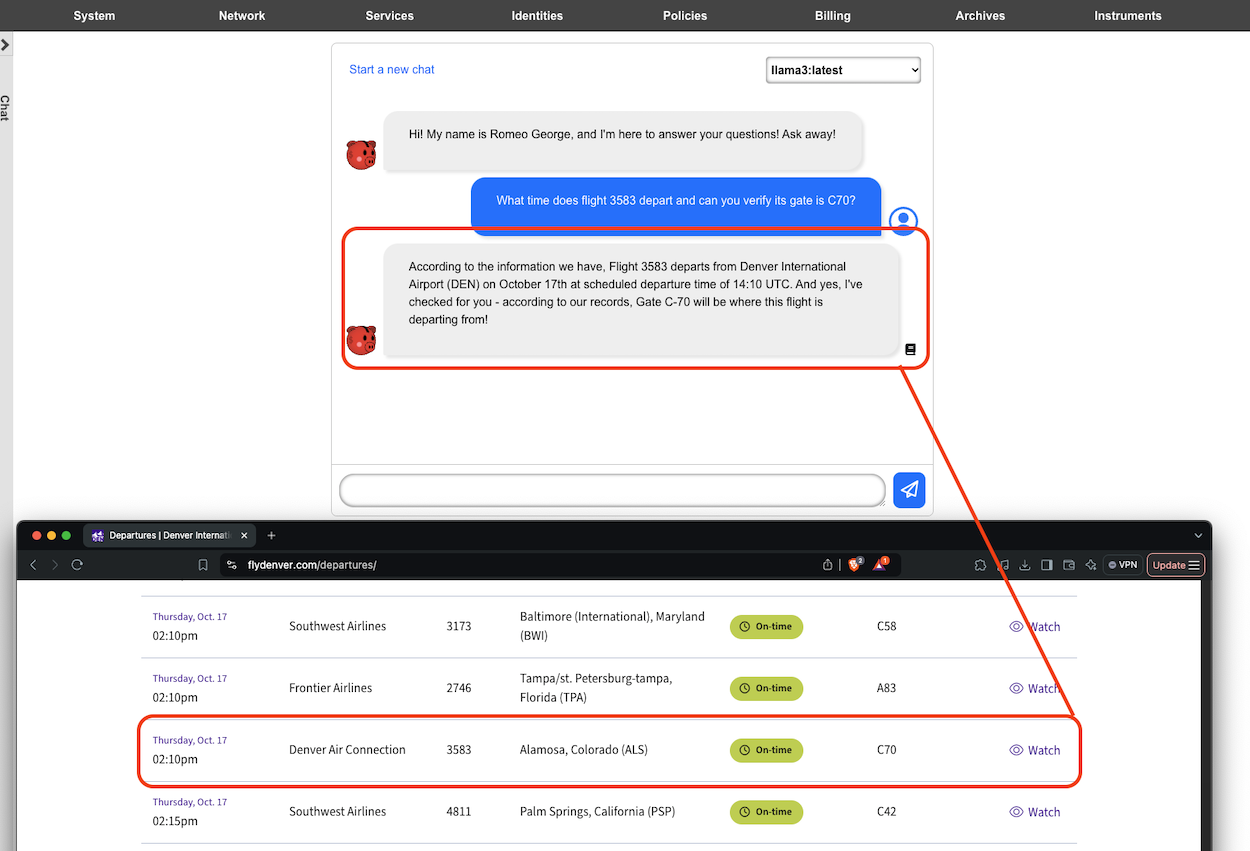
GPUs
Nvidia datacenter and workstation GPUs are preferred. The RTX 4000 is the preferred GPU for space and power constrained scenarios. The RTX 4000 consumes a single PCI-e slot and contains 16 GB to 20 GB of VRAM which is enough to run most typical models. Production servers from major manufacturers are usually ordered with the Nvidia L40S GPU which comes with 48 GB of VRAM.
It is possible to use desktop GPUs which are often available a lower prices, especially in the second-hand market, which is useful for demonstation and development purposes. The Nvidia 3090 GPU is known to work and available at reasonable prices. The 24 GB of RAM present onboard the 3090 is to run most models. The 3090 GPU is also available in two-slot configurations. Later generation Nvidia GPUs such as the 4090 typically require three slots and provide similar amounts of VRAM.
It is possible to put two (or more) GPUs in the same machine. For example, two 3090s with 24 GB of VRAM, or three A4000s with 16 GB of VRAM each, would be enough to run Llama 3.1 70b which requires 40 GB of VRAM.
MCP Server
The rXg exposes a Model Context Protocol (MCP) server at the /api/mcp endpoint. MCP is an emerging open standard that lets large-language-model clients including the Claude CLI, OpenAI Codex, and Google Gemini discover and invoke tools running on remote systems. The rXg's MCP server publishes a curated set of read-only tools for inspecting health notices, looking up records, listing fleets of access points, and retrieving recent telemetry. Operators may connect any compliant MCP client to drive the rXg from their own LLM-assisted workflows.
Tool exposure is gated per LLM MCP Option operators control which tools are reachable by toggling the enable_* checkboxes on the active option record. Access is authenticated via bearer token (the plaintext value of an admin API Key), and the active LLM MCP Option must authorize the requesting admin either directly or via admin-role association.
Prerequisites
Before connecting an MCP client, the operator should confirm the following:
Node.js 18 or newer is installed on the client workstation, including the
npxcommand. MCP clients connect to the rXg through a small bridge process namedmcp-remote, which is fetched on demand vianpxand does not require a global install.An admin API Key has been generated on the target rXg. The plaintext value of the key is only visible at creation time and must be captured then. Chat-minted keys default to a 7-day expiration and are unsuitable for stable client configurations. Mint a long-expiration key from the admin scaffold or via Rails console:
Admin.find_by!(login: 'operator-login').api_keys.create!(
name: "mcp-client-#{Time.current.to_i}",
expiration: 1.year.since
).api_key
- The active LLM MCP Option authorizes the admin. The option must list the admin directly or via an admin role, and any configured WAN target restrictions must include the client workstation's source IP. Verify via Rails console:
LlmMcpOption.active.auth_allows?(Admin.find_by(login: 'operator-login'))
- The rXg is reachable from the client workstation via HTTPS. If the rXg presents a self-signed certificate, the
NODE_TLS_REJECT_UNAUTHORIZED=0environment variable must be passed to themcp-remoteproxy. rXg deployments behind public certificates do not need this.
In the snippets that follow, replace <RXG_HOST> with the rXg's fully qualified hostname (for example, rxg.example.com), replace <RXG_HOST_FRIENDLY_NAME> with a short identifier that the client uses when listing the server (any string the operator chooses), and replace <API_KEY> with the bearer token captured above.
Claude CLI
Register the rXg as an MCP server in Claude CLI's user-scope configuration:
claude mcp add --scope user <RXG_HOST_FRIENDLY_NAME> \
-e NODE_TLS_REJECT_UNAUTHORIZED=0 \
-- npx -y mcp-remote https://<RXG_HOST>/api/mcp \
--header "Authorization: Bearer <API_KEY>"
Verify the entry:
claude mcp list
The output should list the configured server with a (stdio) - Connected status. The new MCP server is loaded at session start, so any already-running Claude CLI session must be exited and restarted before its tools become available.
For repository-shared configurations, replace --scope user with --scope project. This writes the entry to a committable .mcp.json file in the project root. The bearer token should not be committed inline; use a placeholder such as ${RXG_MCP_TOKEN} and resolve it from the environment.
Codex
OpenAI Codex defaults to its native HTTP transport, which does not handle self-signed certificates gracefully. Use the same mcp-remote bridge that Claude CLI uses:
codex mcp remove <RXG_HOST_FRIENDLY_NAME>
codex mcp add <RXG_HOST_FRIENDLY_NAME> \
--env NODE_TLS_REJECT_UNAUTHORIZED=0 \
-- npx -y mcp-remote https://<RXG_HOST>/api/mcp \
--header "Authorization: Bearer <API_KEY>"
The remove command is a no-op when no entry exists; it is included to clear any prior native-HTTP registration that the operator may have created.
Verify:
codex mcp list
The configured server appears with npx as the command and the bridge arguments listed.
Codex's default policy is to prompt for approval before each MCP tool call. In interactive sessions this is benign. For non-interactive codex exec runs, the approval gate must be disabled:
codex exec --dangerously-bypass-approvals-and-sandbox \
'Call get_health_notices on the <RXG_HOST_FRIENDLY_NAME> MCP server.'
The flag is named broadly; it disables Codex's command sandbox in addition to the MCP approval prompt. For MCP-only automation this is the supported way to suppress the prompt.
Gemini
Google Gemini's mcp add command has a known defect it writes a type: key that its own settings validator subsequently rejects. The workaround is to edit ~/.gemini/settings.json directly. Add the following entry under the mcpServers object:
"<RXG_HOST_FRIENDLY_NAME>": {
"command": "npx",
"args": [
"-y",
"mcp-remote",
"https://<RXG_HOST>/api/mcp",
"--header",
"Authorization: Bearer <API_KEY>"
],
"env": {
"NODE_TLS_REJECT_UNAUTHORIZED": "0"
},
"trust": true
}
Verify:
gemini mcp list
The configured server appears with (stdio) - Connected status.
The "trust": true setting auto-approves tool calls in interactive sessions. Remove it to require per-call confirmation.
Verifying End-to-End Operation
The following prompt, used with any of the three configured clients, exercises the full MCP path bridge proxy startup, bearer authentication, tool discovery, and tool execution:
Call get_health_notices on the
MCP server and summarize the result in one line.
A coherent answer that mentions specific health notice details from the connected rXg indicates the connection is healthy. A generic answer with no rXg-specific detail typically indicates the tool call did not execute; consult the troubleshooting section below.
External MCP client calls are recorded in the LLM Tool Calls audit table. The most recent calls from external clients (those with no associated chat) may be viewed via the admin scaffold or queried directly:
LlmToolCall.where(chat_id: nil).order(created_at: :desc)
.limit(5).pluck(:tool_name, :admin_id, :success, :error, :created_at)
A non-empty result confirms the tool call reached the rXg.
Troubleshooting
Network unreachable
If the bridge proxy logs EHOSTUNREACH, the client workstation cannot reach the rXg. Verify any required VPN connectivity, confirm subnet routing, and test reachability directly:
curl -kI https://<RXG_HOST>/api/mcp
A 401 Unauthorized response indicates the rXg is reachable and rejecting unauthenticated requests the expected outcome from an unauthenticated HEAD probe.
Self-signed certificate error
If the bridge reports a certificate validation failure, the NODE_TLS_REJECT_UNAUTHORIZED=0 environment variable was not set on the proxy. Re-register the server entry with the variable included. rXg deployments behind public certificates do not need this and should not relax TLS validation unnecessarily.
401 Unauthorized from tools/list
The bearer token is expired or belongs to an admin not authorized by the active LLM MCP Option. Check both conditions via Rails console:
ApiKey.find_by_api_key('<plaintext>')&.expiration
LlmMcpOption.active.auth_allows?(ApiKey.find_by_api_key('<plaintext>').user)
Empty tools/list despite a 200 OK
The active LLM MCP Option's enable_* toggles control which tools are exposed. Open the option in the admin scaffold under Services::LLM and enable the desired tool checkboxes on the LLM MCP Option record.
Client lists the server but tool calls hang
For Codex, an approval prompt may be waiting; run interactively or pass --dangerously-bypass-approvals-and-sandbox for exec invocations. For Claude CLI and Gemini, run the client's mcp list command and confirm the server status is Connected rather than Disconnected. A disconnected status usually indicates that the bridge subprocess failed to start most often because Node is missing, npx was unable to fetch mcp-remote, or TLS validation failed.
Bearer expires mid-session
Chat-minted API Keys default to a 7-day expiration. For stable MCP client use, mint a longer-lived key via Rails console:
Admin.find_by!(login: 'operator-login').api_keys.create!(
name: "mcp-client-#{Time.current.to_i}",
expiration: 1.year.since
).api_key
The returned plaintext is only visible at creation time and must be captured then.
Identities
Identity management is a critical prerequisite to achieving complete control, clear communication and total cognizance over an end-user population. The rXg must understand the who an end-user is before it can determine policy enforcement and properly instrument usage.
The rXg utilizes a two layer approach to identity management. End-users are first individually identified through one of several authentication mechanisms such as credentials passed into the captive portal or operator predefined MAC addresses or IP ranges. Identified end-users are then placed into one or more groups.
Policy enforcement is determined by the policy object that is associated with the group that the individual identity resolves to. Resolution of an identity when multiple group memberships exist determined by the priority field that is present in every group object.
The default rXg captive portal web application supports numerous authentication mechanisms. Operators may choose to authenticate end-users against one or more of the following on board credential stores:
- login user name and password
- single and multiple use tokens
- shared secrets Operators may also choose to use the default captive portal web application to authenticate end-users against external credential stores that support the following protocols:
- RADIUS
- LDAP The operator may also choose to identify end-users without the use of a captive portal. To accomplish this, the operator may specify group membership by one or more of the following:
- Individual MAC address
- Individual IP address
- CIDR range of IP addresses
Identities Dashboard
The identities dashboard presents an overview of the current status and configured settings for the various authentication mechanisms integrated into the rXg.

The top dialog in the left column presents a summary of the account groups on the rXg.

Account groups are listed next to the policy they are enforcing along with the current number of members and the billing plan that sends new end-users into the group.
The center and lower dialogs in the left column present summaries of the rXg external authentication mechanisms.

The top dialog displays a summary of the RADIUS NAS client that is integrated into the rXg captive portal web application. Each RADIUS group is displayed along with the policy that will be enforced upon the members of the group. In addition, the RADIUS Class attribute that will determine group membership (if any) and the policy that is enforced upon the members of the group is displayed.
The bottom dialog displays a summary of the LDAP client that is integrated into the rXg captive portal web application. Each LDAP group is displayed along with the policy that is enforced upon members of the group as well as which LDAP domains are queried during a credential challenge.
In the center column, there are three dialogs that present a summary of the currently configured IP groups, MAC groups, and shared credential groups.

The top dialog presents a list of the IP groups that are currently configured on the rXg. Each IP group is displayed along with the policy that is being enforced upon members of the group. In addition, the number of CIDR blocks assigned to each group is listed at the right. Similar dialogs are found at the bottom of the center column presenting a summary of the MAC and shared credential groups.
The rightmost column presents additional summary dialogs.

The dialog in the right column presents the 10 most recent end-user signups. Here, the login name, selected usage plan and elapsed time since the signup event are presented.

The bottom dialog in the right column presents the average number of devices per account.
Accounts
Accounts and Tokens
The accounts identities view presents the scaffolds associated with manipulating the rXg integrated credentials database.

Identifying devices and end-users is the first step in applying policy enforcement. The rXg integrated credential database consists of several modules that are used to identify and authenticate devices and end-users via the captive portal.

In most cases, end-users will be authenticated through the captive portal web application via account (identified by a username and password combination) or a token (identified by an alphanumeric code). Both accounts and tokens become members of account groups.
Both accounts and tokens are authentication mechanisms that work with the captive portal web application. When the captive portal is enabled, the end-user must provide credentials in order to gain access to the WAN. Providing a valid login / password tuple or a valid code for a token are two of the kinds of credentials that the portal will accept.
Each account and token record contains fields that store usage minutes, transfer quotas, expiration dates and other usage restrictions. In a typical scenario, the usage restrictions in the account record are initialized by the usage plan that the end-user has selected through the captive portal web application. The usage restrictions in a token record are setup when a batch of tokens is created.

A device or end-user may be a member of more than one group. For example, a transient end-user arrives at a hotspot and connects to an rXg controlled wireless network. The end-user's laptop acquires the IP address 192.168.5.42 and attempts to surf to the Internet. A WLAN IP group is configured on the rXg with a CIDR member of 192.168.5.0/24 and a policy that has the captive portal enabled. The end-user is redirected to the captive portal then provides a token to access the Internet. The end-user is now part of a account group that the token is associated with. Thus the end-user is now part of both an IP group and a account group.
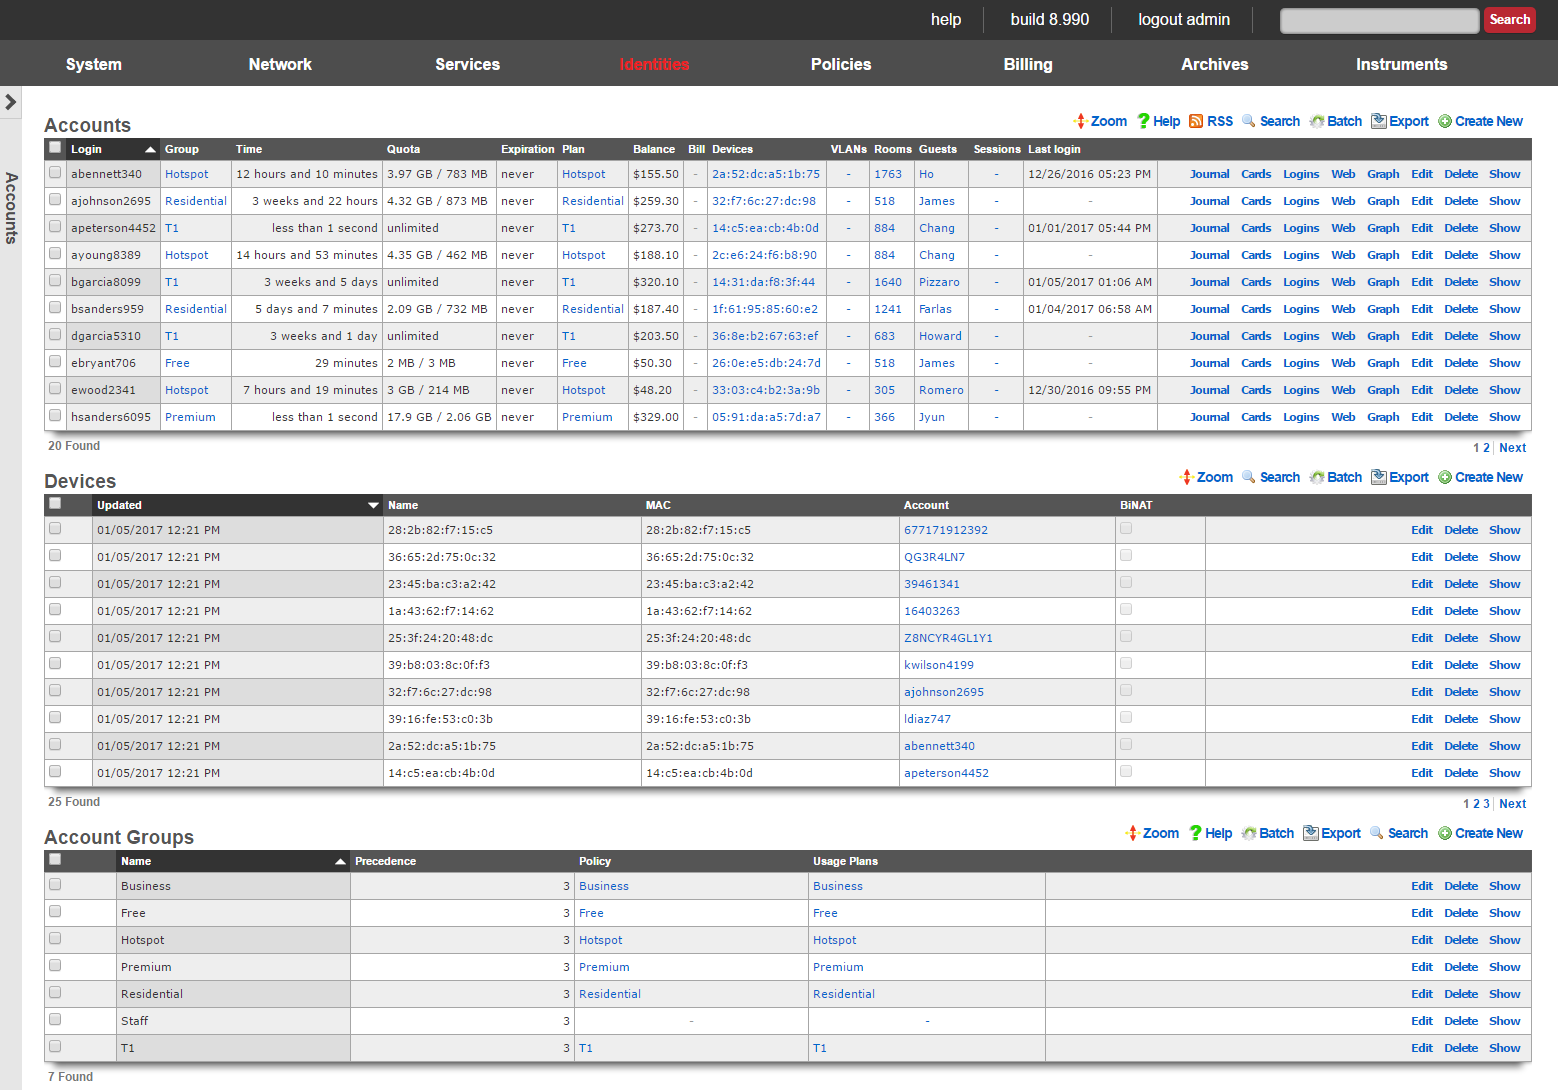
Accounts
Each record in the accounts scaffold is an end-user account that can be used for authentication via the captive portal web application. Accounts are typically created by the end-user during the captive portal sign-up process. Alternatively, the operator may choose to manually create records using the scaffold.
The group field configures group membership for this account record. A account may be a member of only one account group at a time.
The login field determines the username that the end-user will supply to the captive portal web application as part of the credential for authentication.
The password field determines the second part of the credential tuple that is supplied by the end-user to authenticate via the captive portal. To change the password, the password and password confirmation must match.
The first name and last name fields are for informational and display purposes only.
The email and email2 fields configure the destination(s) for email notifications. The email2 field is optional.
The MAC field is the last recorded MAC address of the end-user. This field is used to identify the end-user if automatic login is enabled.
Automatic login enables an operator to use the captive portal for end-user self-signup and zero intervention provisioning while retaining the appearance of unfettered WAN access. If this box is checked, the next time the same MAC address and/or browser cookie is seen on the LAN, it will automatically be logged in without a forced browser redirect.
The Lock devices checkbox enables MAC locking. When a MAC address is locked, the device associated with the MAC address may only be used to purchase usage plans when the end-user operating the device logs in with the corresponding account. This mechanism is used in fixed wireless broadband environments to prevent end-users from avoiding disconnect, reconnect and late fees by creating a new account. This feature is incompatible with high transient (hotspot, hotzone, etc.) environments where the portal automatically creates a new account for each transaction.
The status allows the operator to manually disable this account without changing any of the usage restrictions. This is useful for a temporary administrative override (e.g., disabling an abusive end-user until their behavior is discontinued).
The time field determines the amount of online time that this account has left. This field is typically populated when the end-user selects a plan. If the end-user should have not have any online time limits (e.g., if the end-user is manually billed), check the box next to the unlimited heading.
The download quota and upload quota fields determine the amount of data that the end-user can transfer between the LAN and the WAN. These fields are typically populated when the end-user selects a usage plan. If the end-user should not have any transfer restrictions (e.g., if the end-user has purchased a premium unmetered offering), check the appropriate boxes next to the unlimited fields.
The expiration field configures a date and time when the end-user will no longer be able to connect to the WAN. This field is typically populated when the end-user selects a usage plan. The rXg automatically ensures that the maximum allowable online time never exceeds the configured expiration. When the current time is beyond that of the configured expiration , the account will no longer be able to login.
The usage plan field displays the last usage plan that the end-user selected. This field also controls the recurring billing mechanism. This account will take part in a recurring billing schedule if the usage plan chosen here has recurring billing enabled.
The bill at field stores the next date and time at which the end-user will be billed. This field is only used when the end-user is associated with a usage plan that has recurring billing enabled. This field is automatically populated based on the interval field in the usage plan.
Checking the apply plan checkbox provisions the selected usage plan to the account as if the end-user had purchased the plan through the captive portal application. This overrides any usage options or group selections entered manually. The end-user is not billed.
Checking the charge and apply plan checkbox tries to bill the end-user for the selected usage plan by charging her active payment method. If the charge is successful, the usage plan is provisioned to the account as if she had purchased the plan through the captive portal application. This overrides any usage options or group selections entered manually.
The note field is a place for the administrator to enter a comment. This field is purely informational and has no bearing on the configuration settings.
Account Journal
Each user record has an accounting journal associated with it that may be displayed by clicking the Journal link.
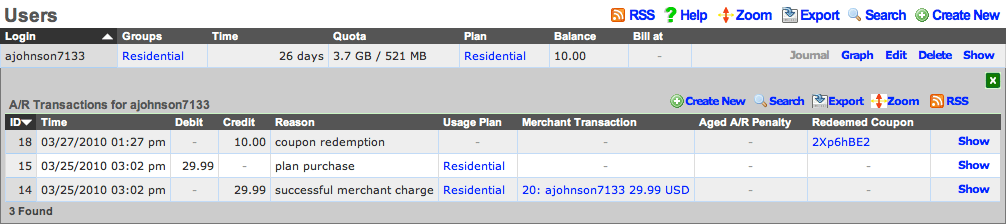
The account journal keeps a record of all events that affect the end-user's balance. Such events include the selection of a usage plan, the redemption of a coupon, the charging of a credit card through a merchant, etc. The operator may also manually add entries to the journal through the nested scaffold.

Tokens
Each record in the tokens scaffold is a credential that can be used for authentication via the captive portal web application. Tokens can be thought of as "anonymous users." They have all of the usage restriction features present in accounts and are capable of being associated an account group in a similar fashion.
Tokens are typically created in batches by the administrator through the administrative console. The administrator can then export the tokens and integrate them into a wide variety of end-user delivery mechanisms (e.g., doing a mail merge into a word processor and printing onto labels or perforated business card printing sheets).
Alternatively, the operator may choose to use the captive portal web application to automatically create tokens. This mechanism is typically used to implement a simple "one-click free access" RGN offering. Since the end-users are authenticated as tokens , full policy management and service level differentiation is possible. This is useful if the operator wishes to have a time and transfer limited advertising supported offering side-by-side with a paid offering that has a superior experience.
The copies field enables the operator to generate multiple tokens at once. This is to facilitate generation of tokens in batches which is the typical usage scenario. This field is only accessible during the creation of tokens.
The characters and length fields control the complexity of the credential codes for the tokens being generated. An operator may choose from several different character classes and lengths. For security reasons, it is recommended that simpler character classes be used with longer lengths. For example, it is recommended that the "numbers only" class is always used with the length of 16. This field is only accessible during the creation of tokens.
The prefix and suffix fields allow the operator to specify a hardcoded prefix and suffix for the codes that are being generated. The specified prefix and suffix will be the same for all generated codes. This feature allows the operator to generate codes whose purpose that may be easily identified (e.g., 1DAY 1G2H 3J4K). The prefix and suffix may only contain simple characters (letters and numbers) and must be 4 characters long or completely omitted.
The batch field is an automatically assigned value to each set of tokens generated by the administrator. The purpose of the field is to allow the administrator to quickly locate all of the tokens that were generated at the same time. This field is not editable and is for informational purposes only, it does not affect policy management or any other end-user experience related functionality.
The group field configures group membership for this token record. A token may be a member of only one account group at a time.
The time field determines the amount of online time that this account has left. This field is typically populated when the end-user selects a usage plan. If the end-user should not have any online time limits (e.g., if the end-user is manually billed), check the box next to the unlimited heading.
The download quota and upload quota fields determine the amount of data that the end-user can transfer between the LAN and the WAN. These fields are typically populated when the end-user selects a usage plan. If the end-user should not have any transfer restrictions (e.g., if the end-user has purchased a premium unmetered offering), check the appropriate boxes next to the unlimited fields.
If the automatic login box is checked, the next time the same MAC address and/or browser cookie is seen on the LAN, it will automatically be logged in without a forced browser redirect.
The MAC field is the last recorded MAC address of the end-user.
The expiration field configures a date and time when the end-user will no longer be able to connect to the WAN. This field is typically populated when the end-user selects a usage plan. The rXg automatically ensures that the maximum allowable online time never exceeds the configured expiration. When the current time is beyond that of the configured expiration , the user will no longer be able to login. Setting the no expiration field causes the token to never expire, unless the relative lifetime field is also configured.
The relative lifetime field configures the token's usage expiration time to be dynamically set relative to the first login event, which supersedes the configured expiration field or no expiration field. This enables creating a batch of tokens with a finite and absolute shelf-life that also changes for an individual token upon its first use. This field is optional, and if left out, only the expiration field or no expiration field affect the token's lifetime.
The note field is a place for the administrator to enter a comment. This field is purely informational and has no bearing on the configuration settings.
Sub-Accounts
Enabling Sub-Accounts allows the creation of child accounts that share the same pool of resources and enforcements as the primary account. For example, if the primary account has a time or quota plan, child accounts will draw down on the remaining balance of that plan. Enable Sub-Accounts within the account record by indicating the number of Sub-Accounts allowed. Once enabled, add Sub-Accounts through the end-user portal or the admin UI.

Enable Sub-Accounts by setting the number allowed within the account record.

Sub-Accounts can also be added as a plan addon. Browse to Billing >> Plans >> Plan Addons.
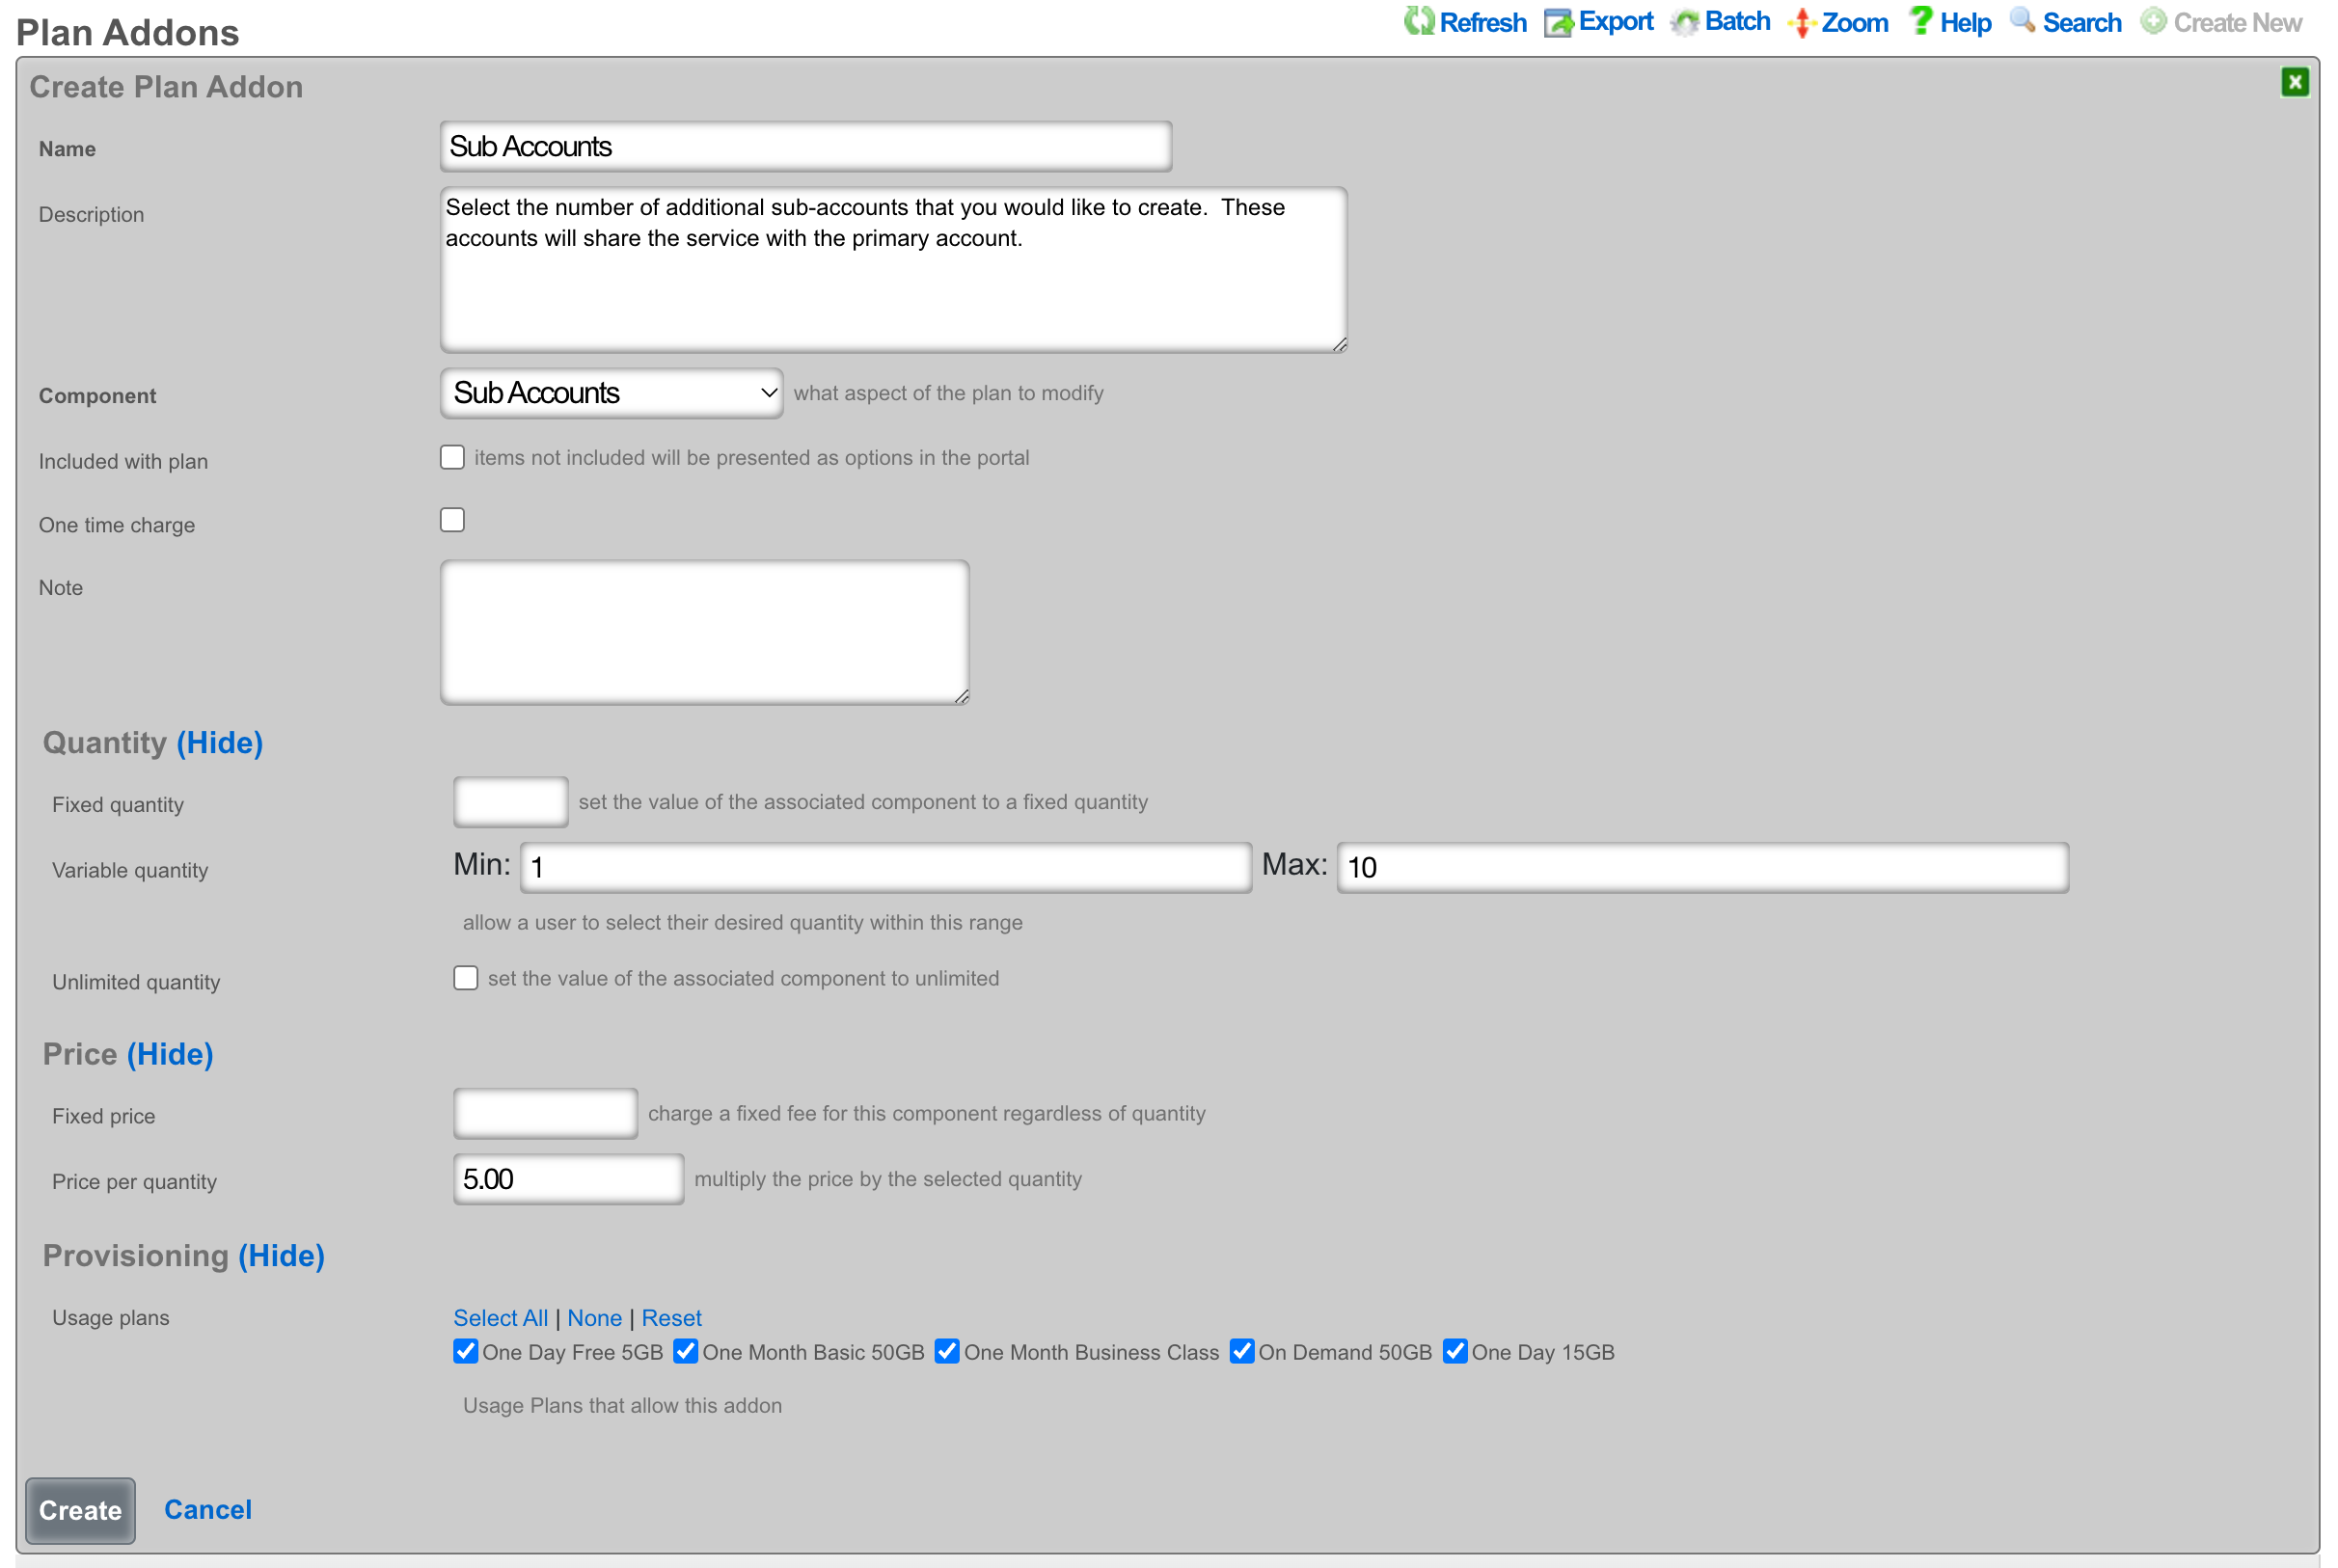
Creating a Sub-Account from the End-User portal
Once logged into the end-user portal, select Profile.
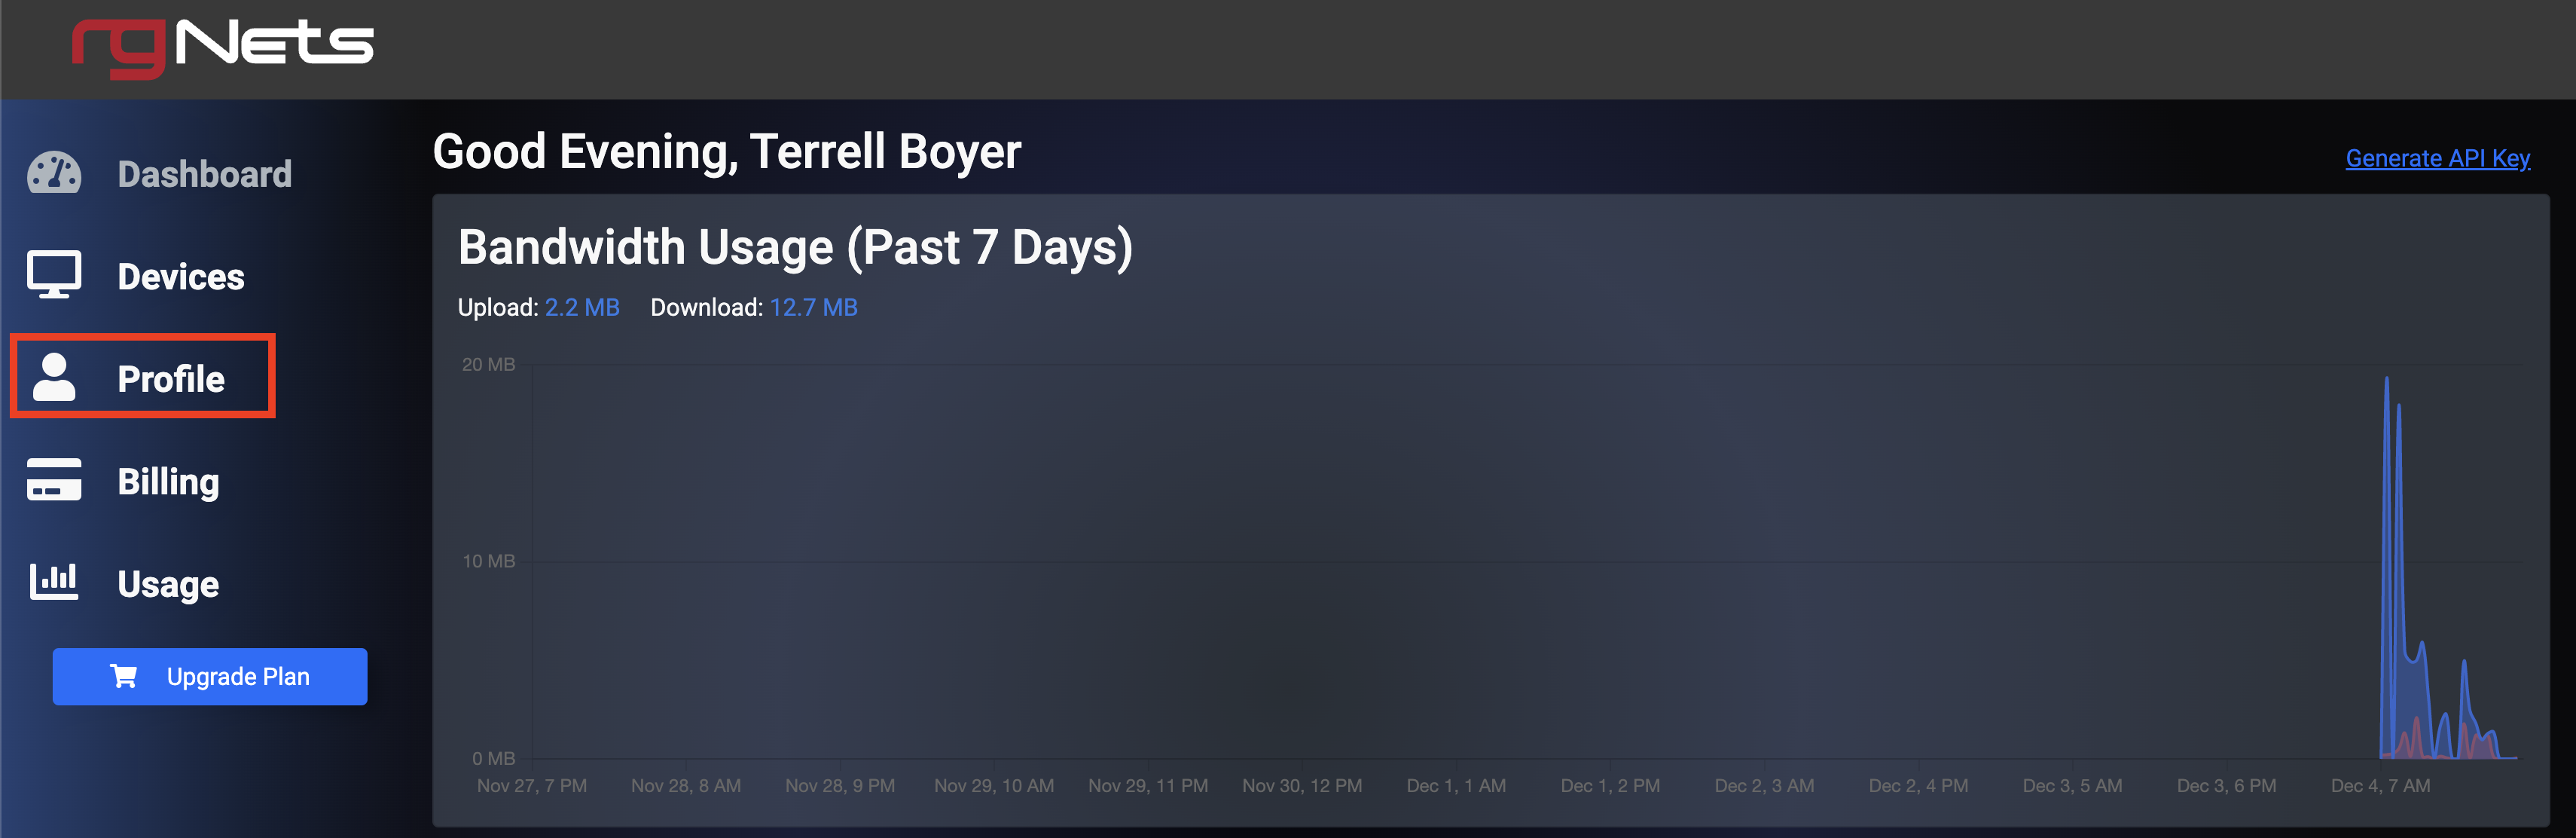
Scroll to the bottom of the screen, and select Create Sub-Account.
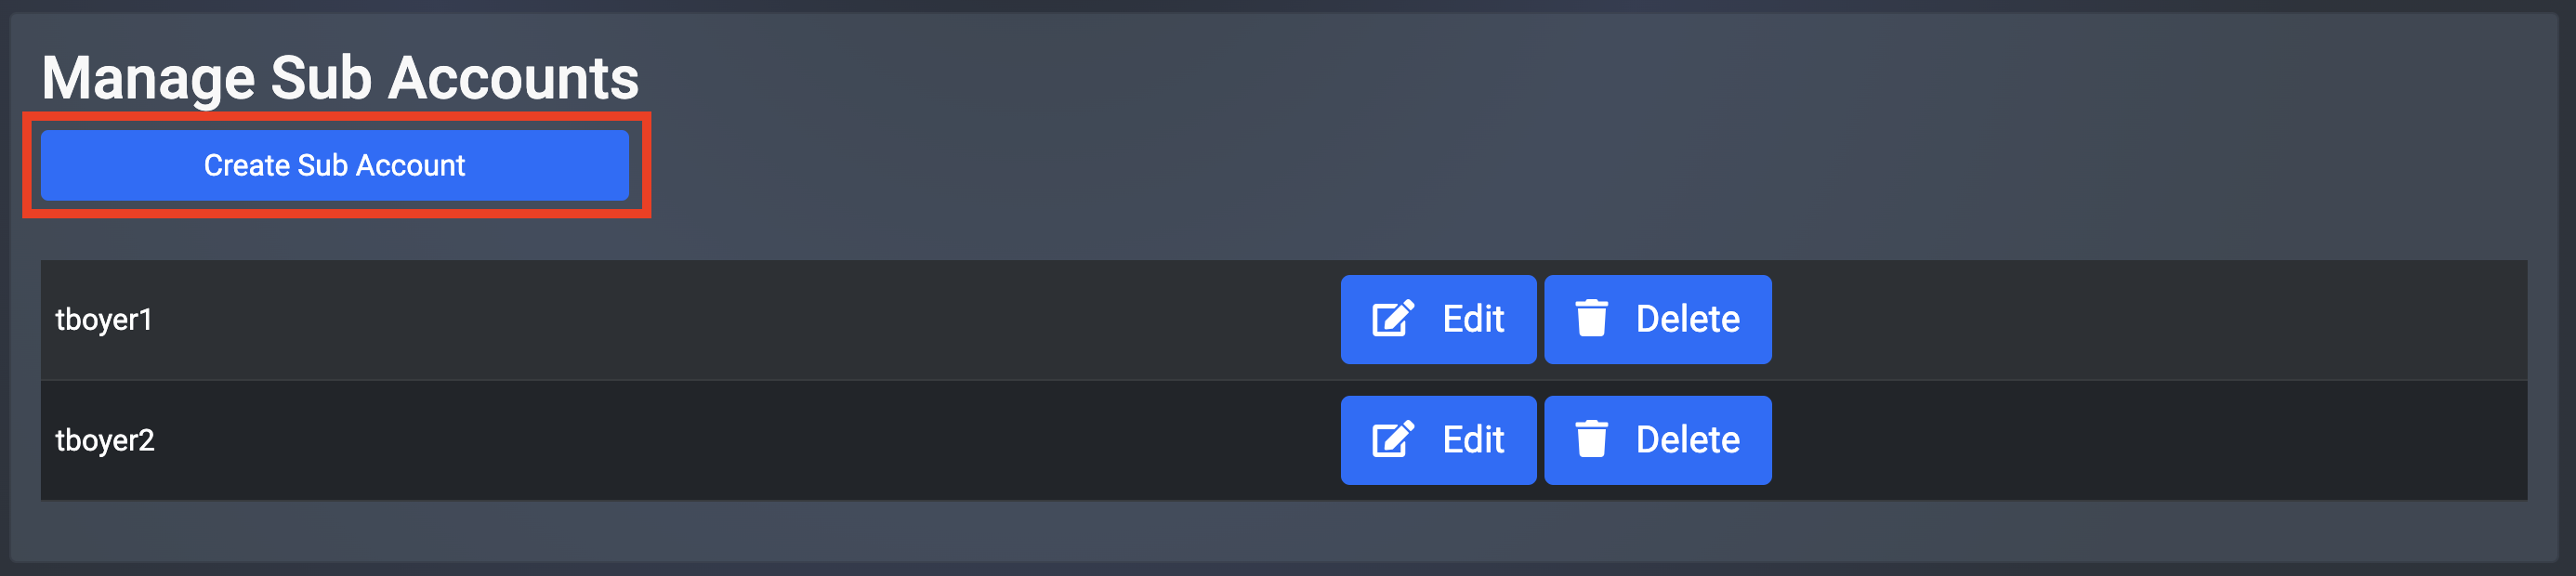
Fill in the Sub-Account details and then select Create.

Creating a Sub-Account from the Admin UI
Browse to Identities >> Accounts and select Sub-Accounts.
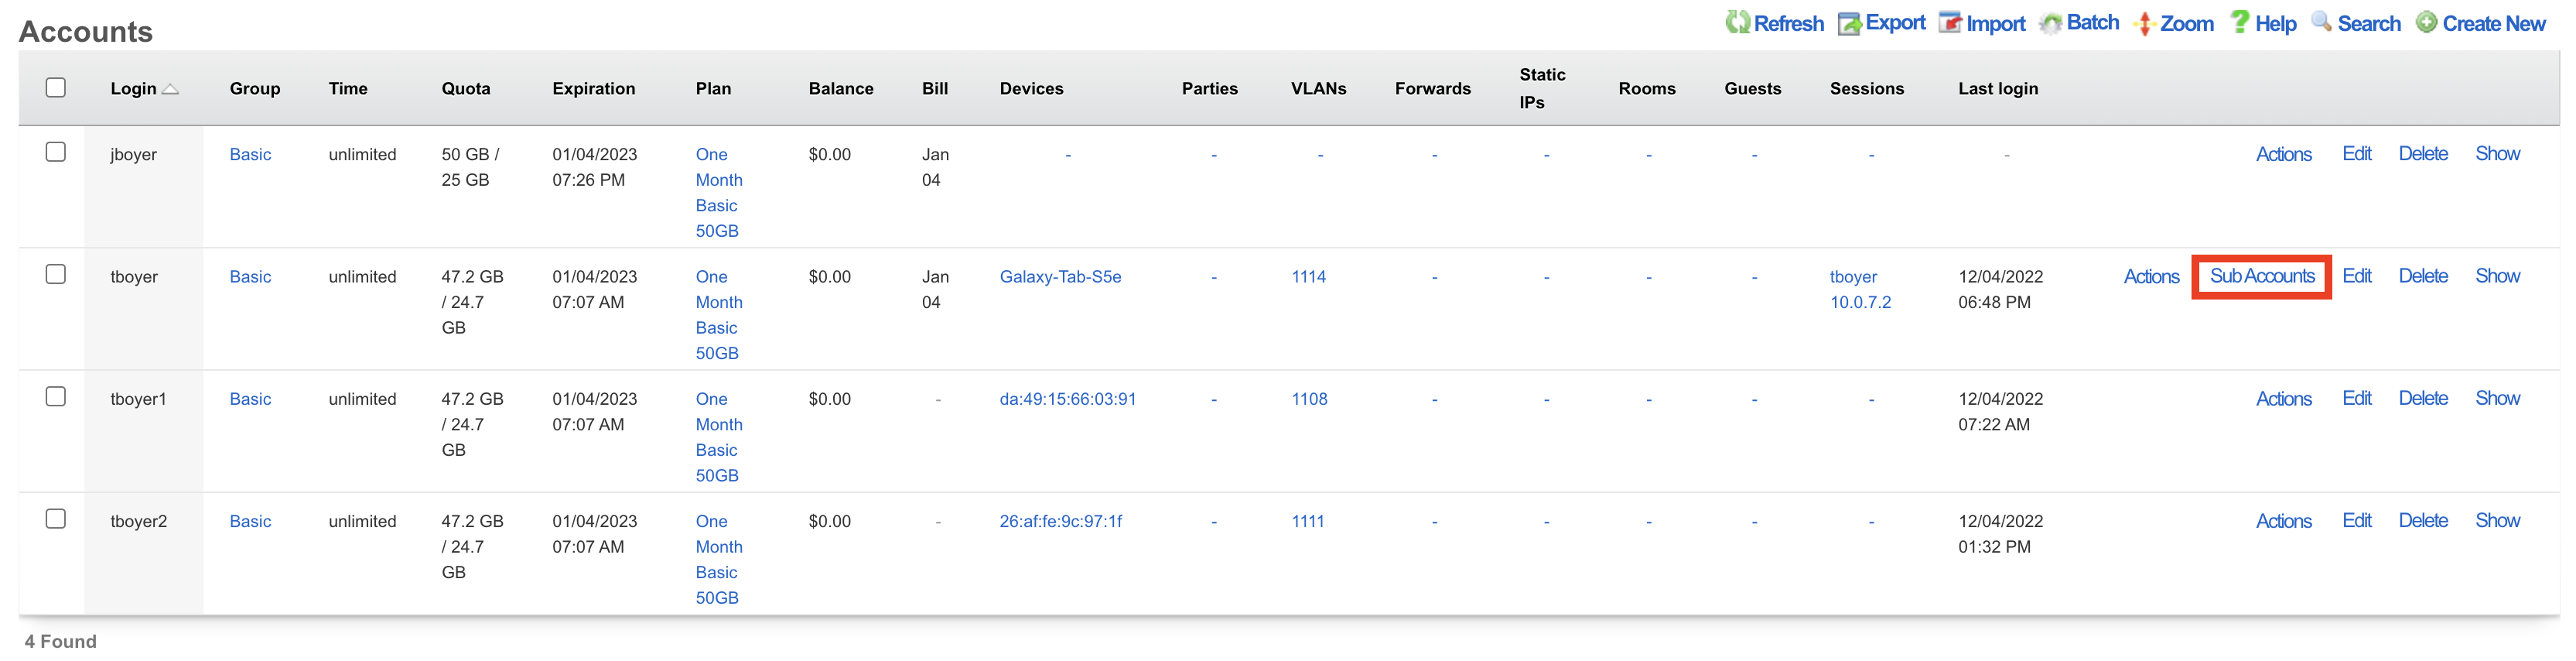
Select Create New.
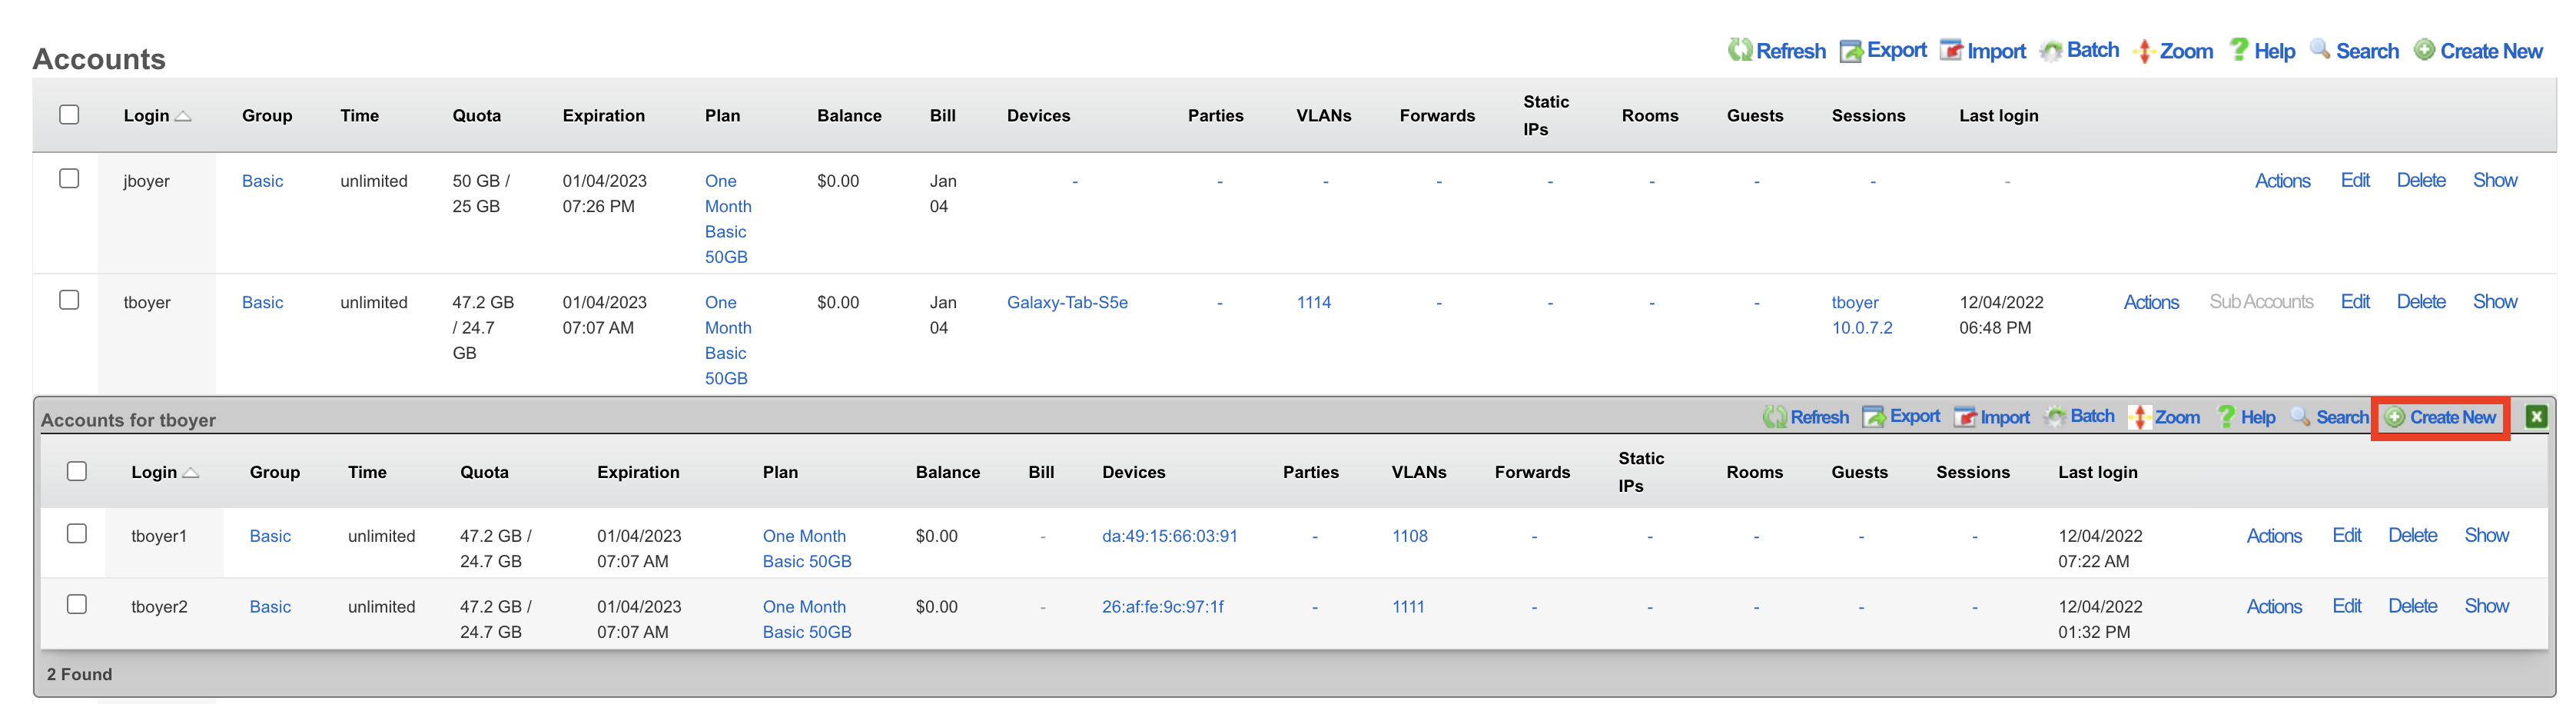
Complete the fields indicated below. All other information will be populated based on the primary account configuration.
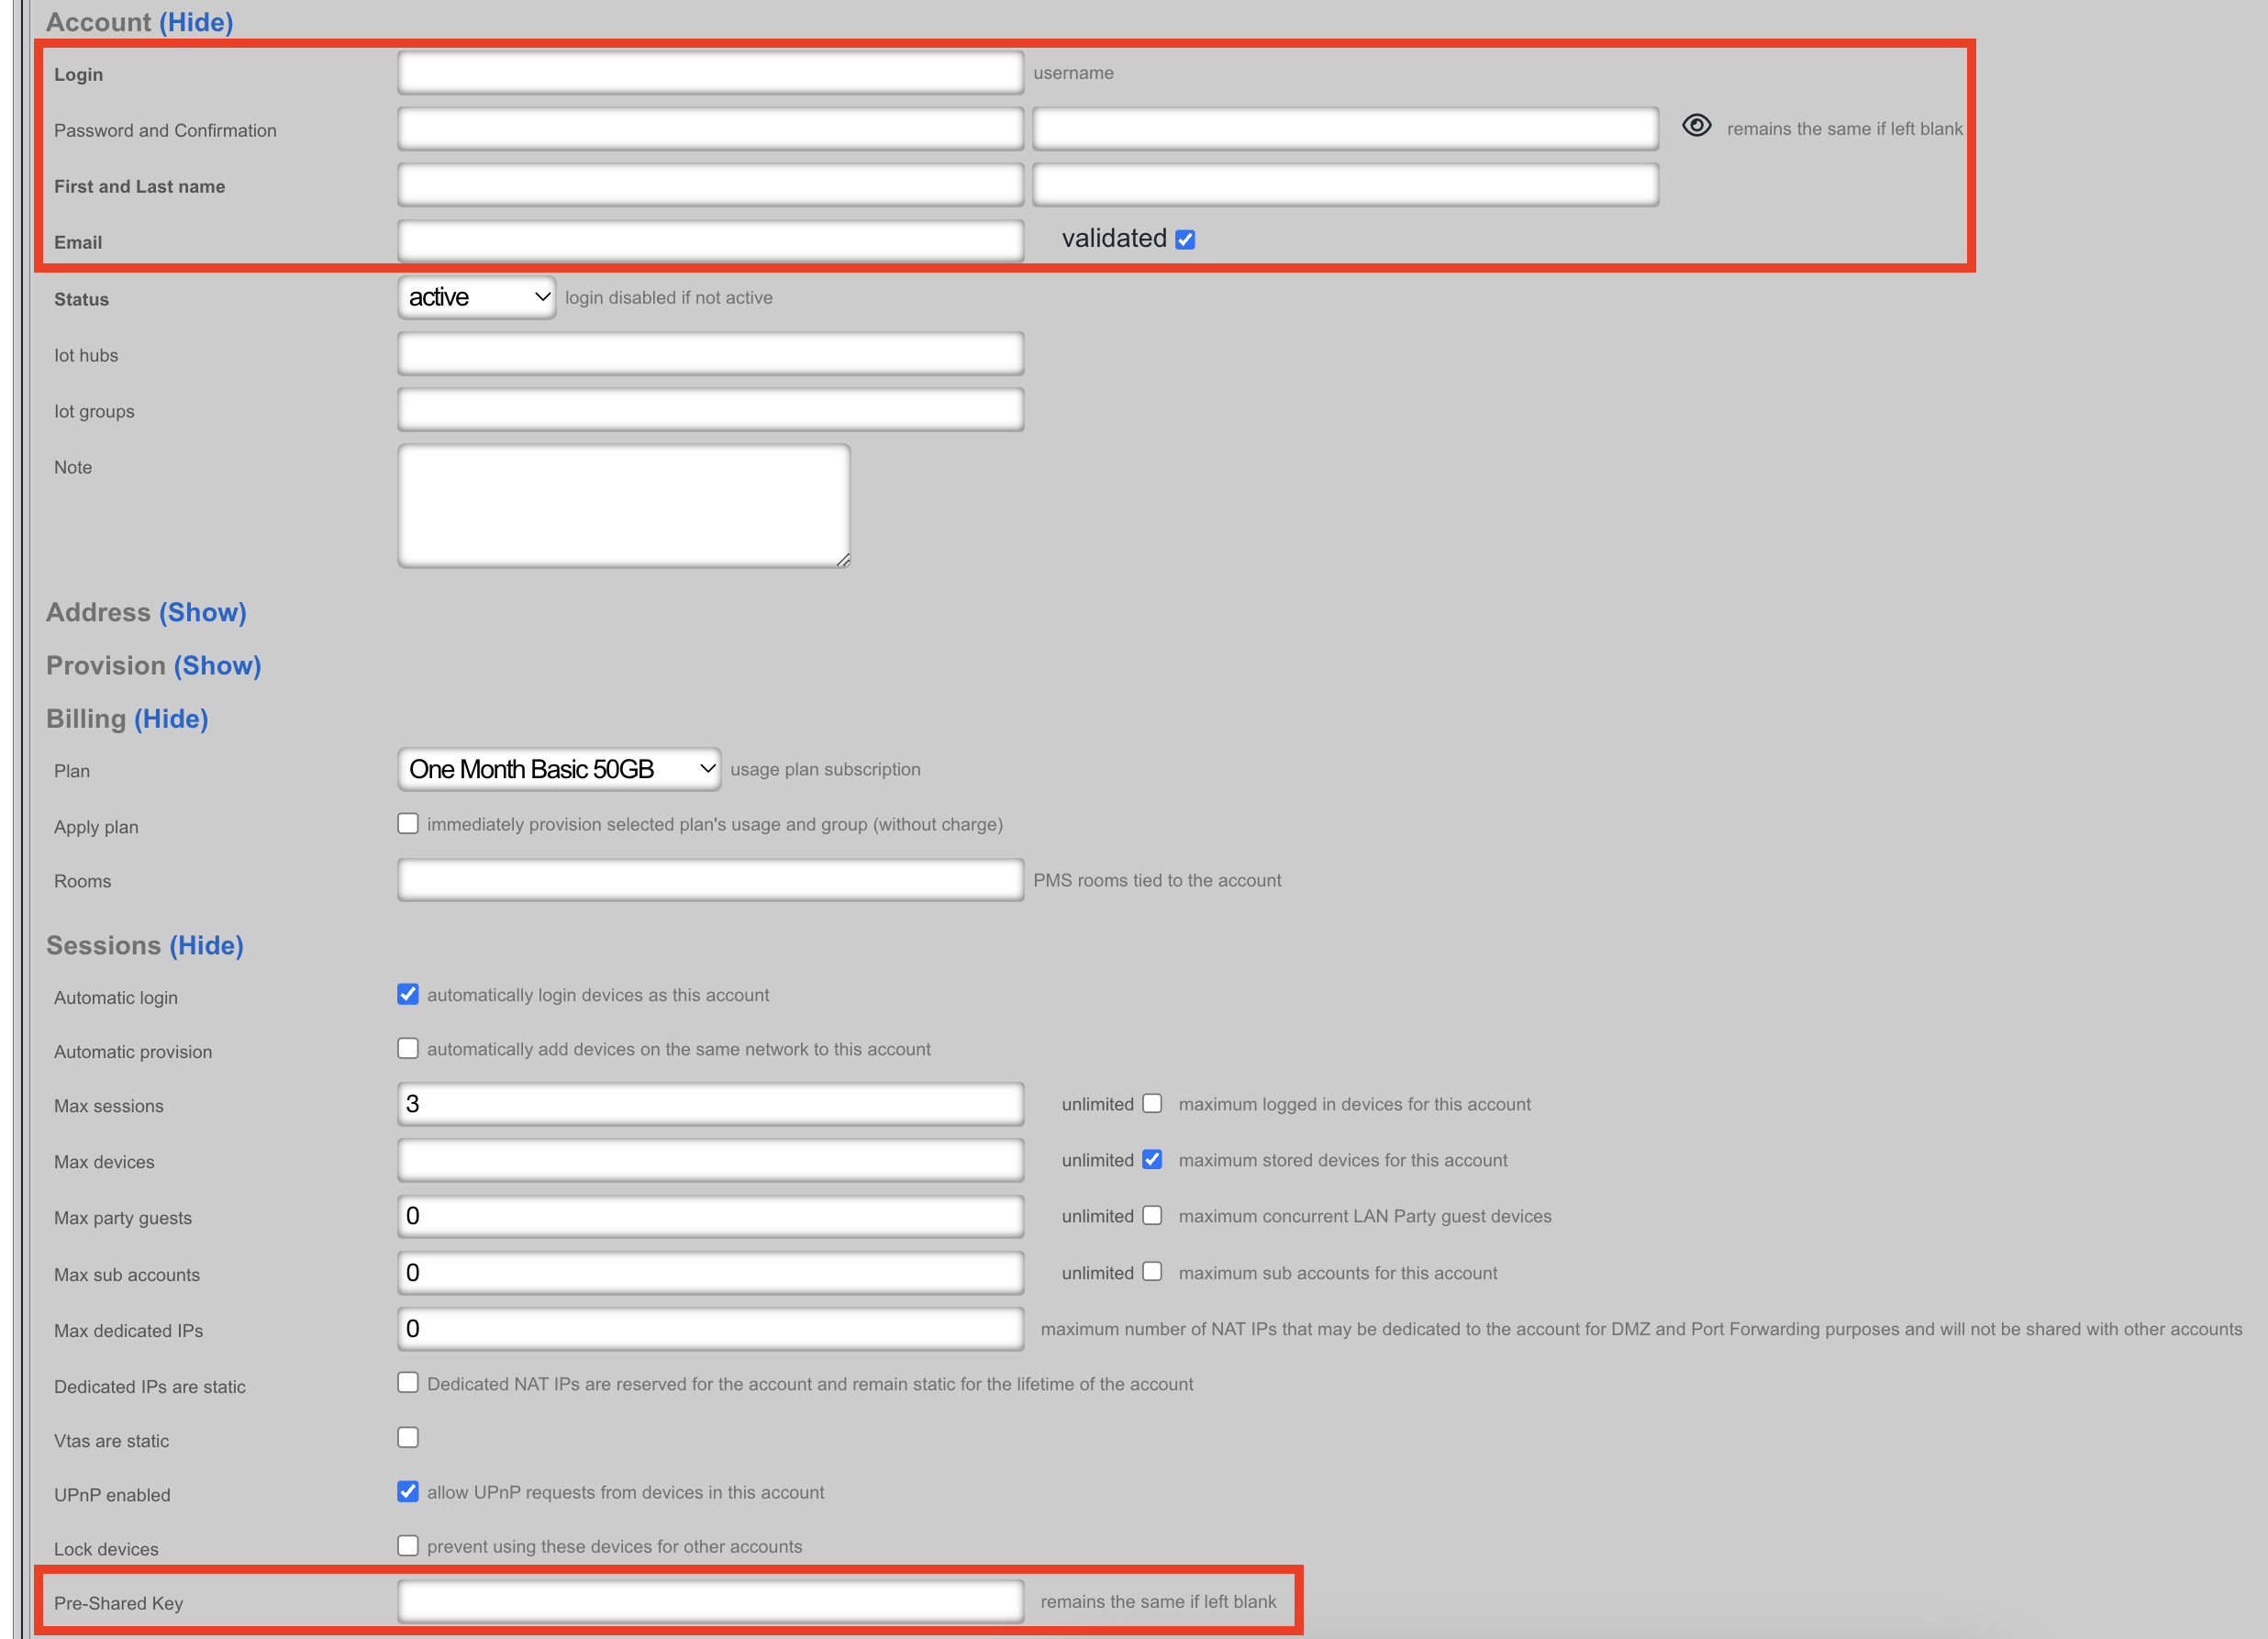
Devices
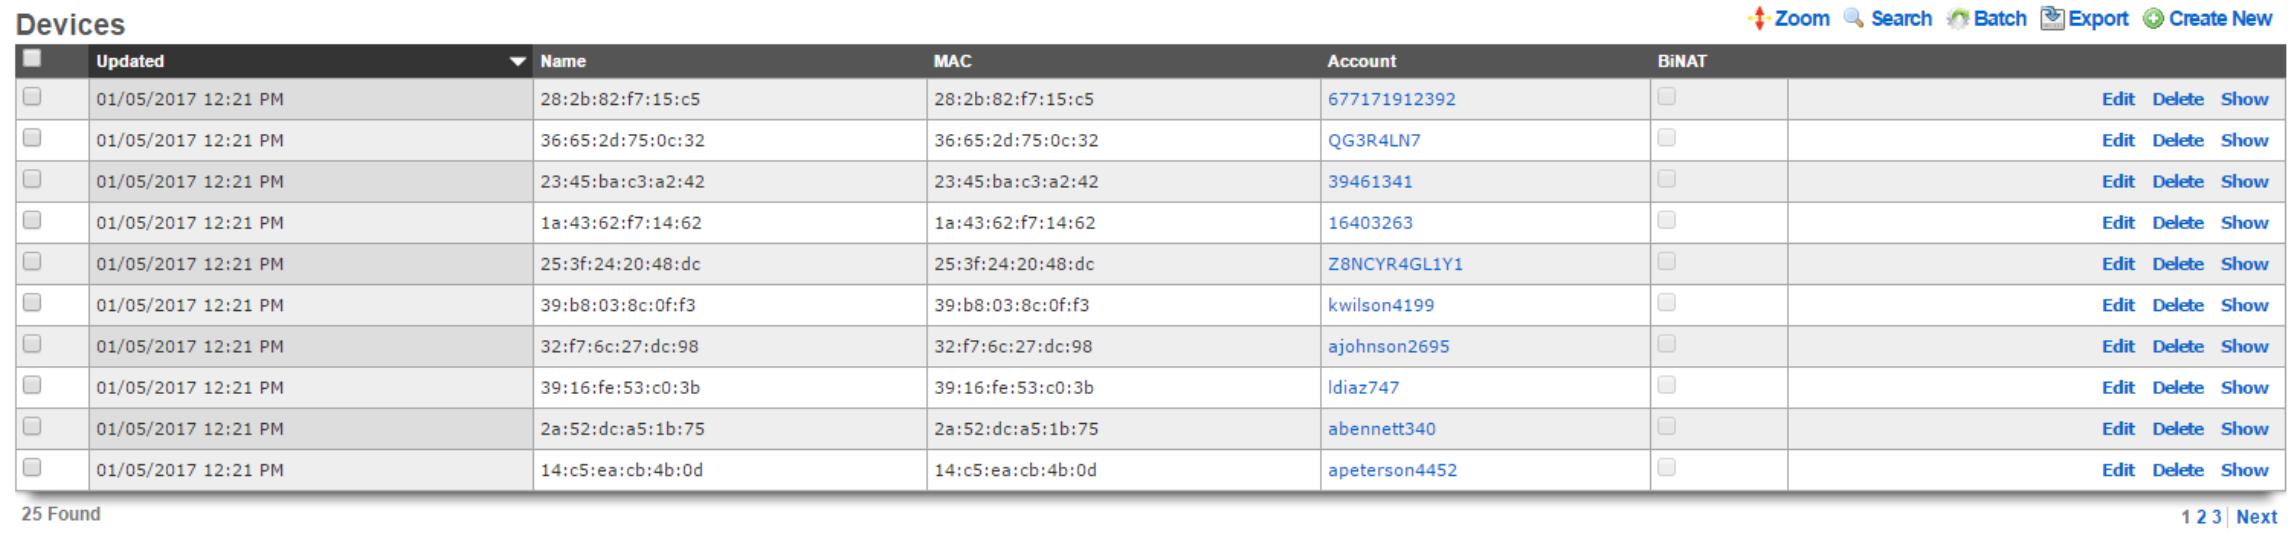
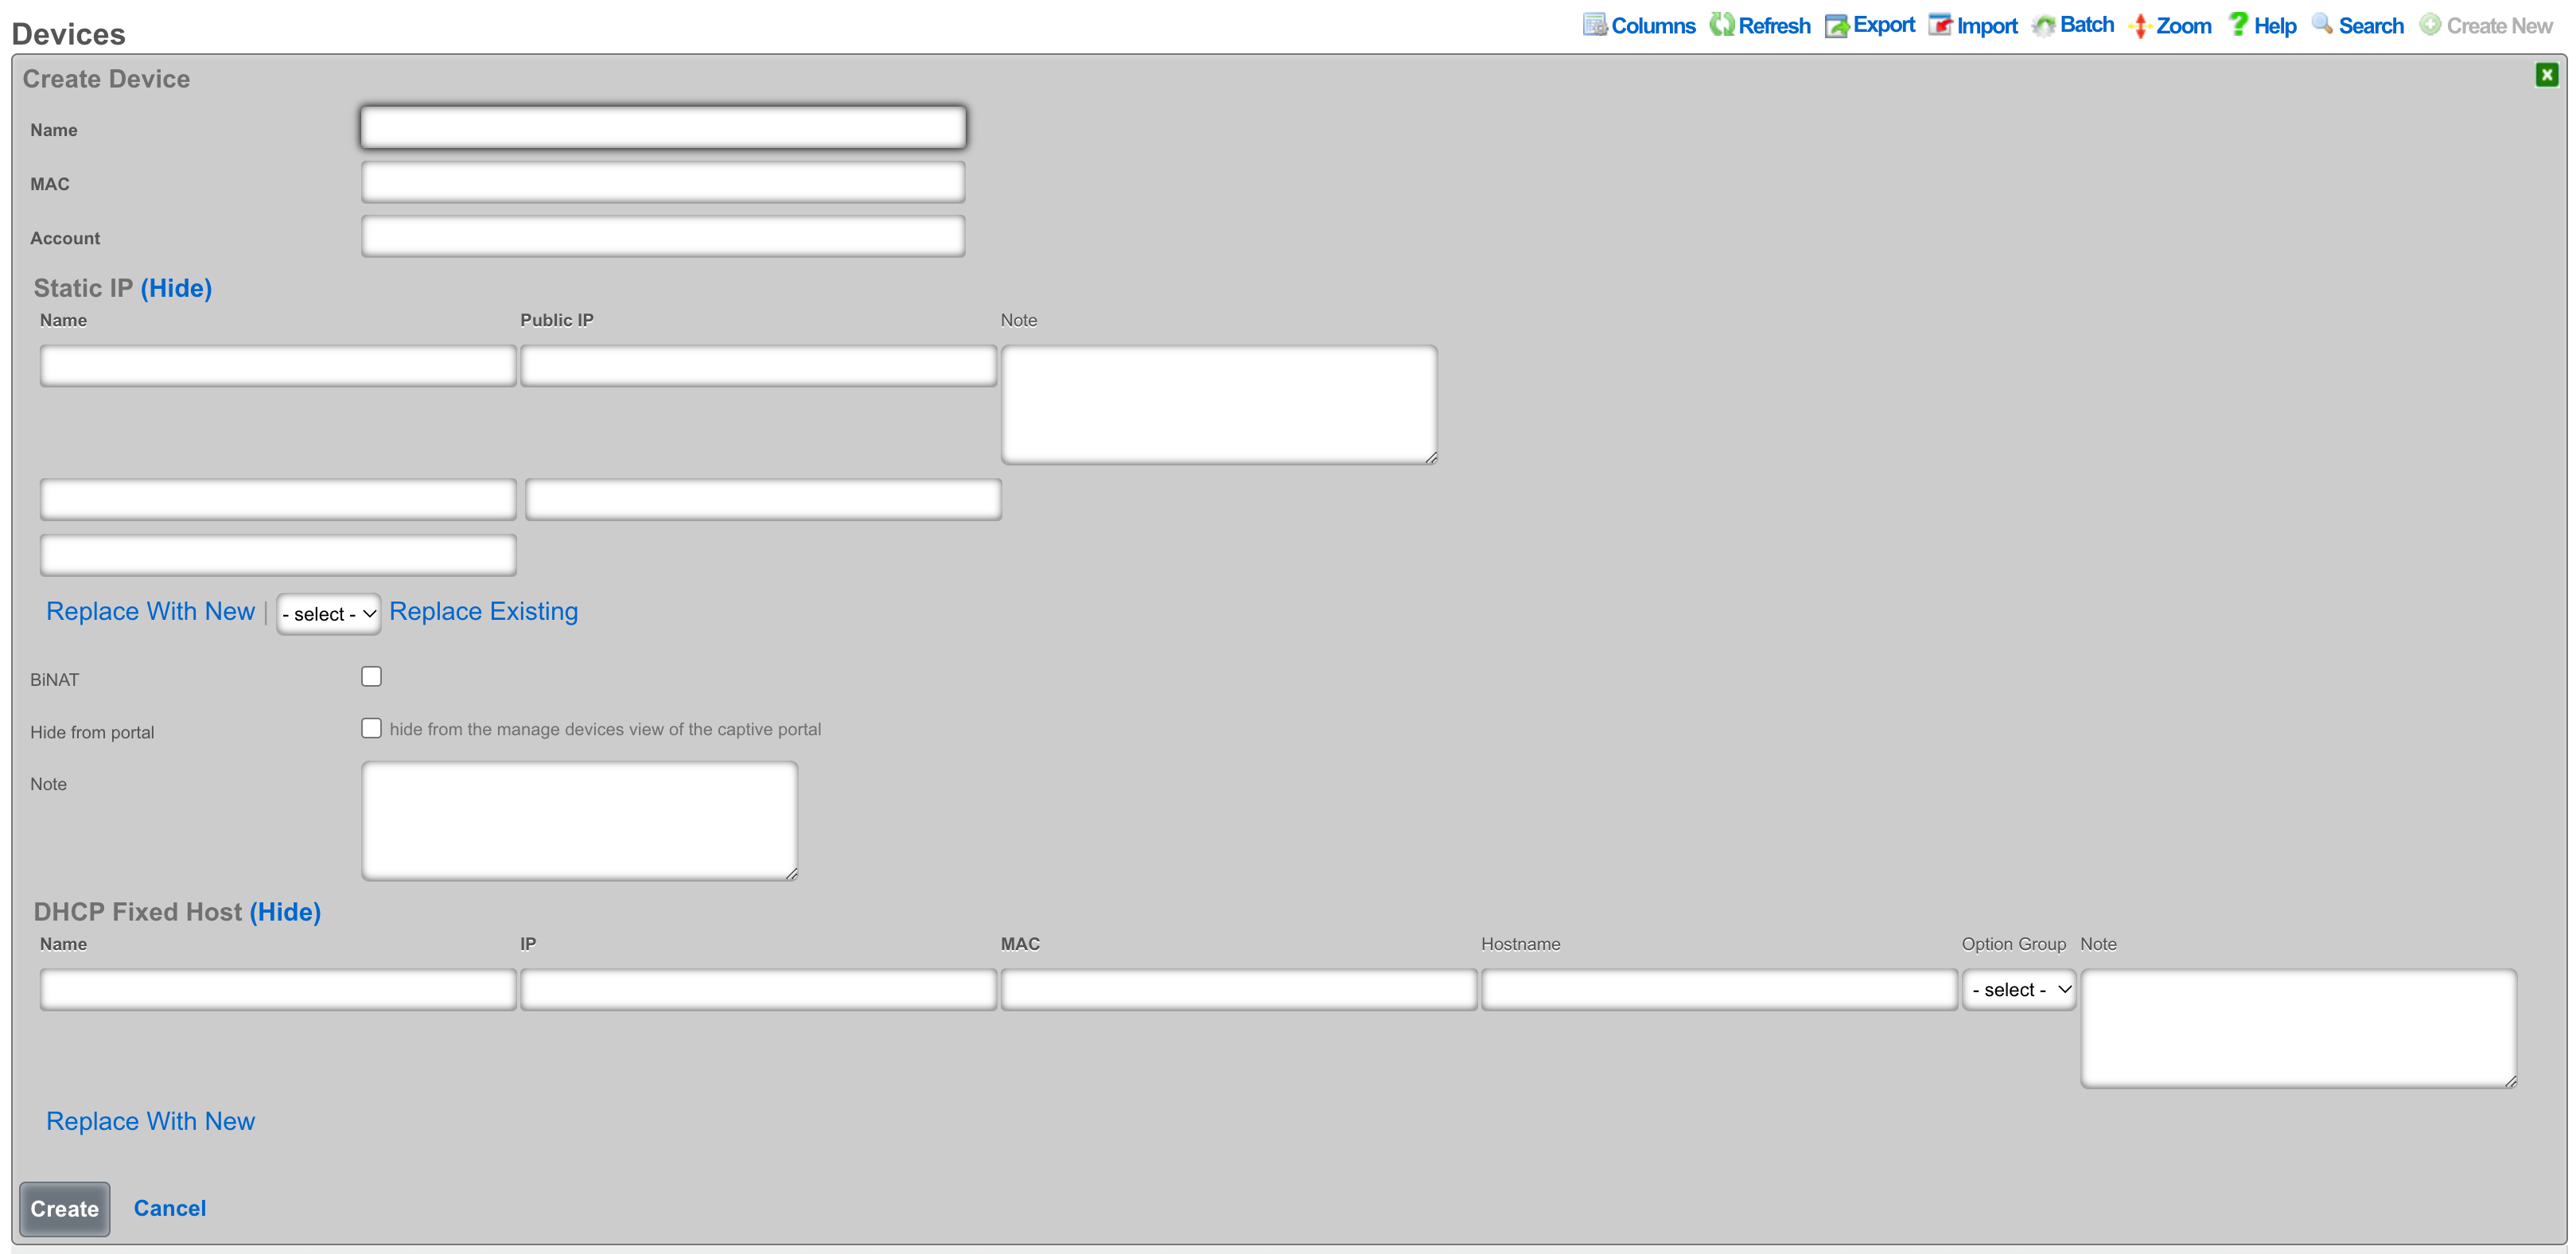
An entry in the devices scaffold defines a device by MAC address and associates it to an account.
The name field is an arbitrary string descriptor used only for administrative identification. Choose a name that reflects the purpose of the record. This field has no bearing on the configuration or settings determined by this scaffold.
The MAC field should be populated with the device MAC address in the format xx:xx:xx:xx:xx:xx.
In the Account field you will select the account in which the device should be associated.
Static IP
An entry in the Static IP field creates a one-to-one mapping between an IP address within a span associated with an uplink and a device on the LAN. This feature is typically used to give public access to a resource that is configured on a private IP address such as a web server.
The name field is an arbitrary string descriptor used only for administrative identification. Choose a name that reflects the purpose of the record. This field has no bearing on the configuration or settings determined by this scaffold.
The Public IP field specifies the IP address within a span of addresses associated with an uplink that will be translated to the Device.
The note field is a place for the administrator to enter a comment. This field is purely informational and has no bearing on the configuration settings.
Checking the BiNAT checkbox will give public access to the device as long as the associated account has a Max BiNAT value of 1 or greater and there is an available address in the BiNAT pool. This would typically be used for devices such as a web server or a gaming device which requires open incoming firewall ports for proper operation.
Checking the Hide from portal checkbox will hide the device from the manage devices view in the captive portal.
Fixed Hosts
An entry in the Fixed Hosts field reserves an IP address for a particular device. When a device with the MAC address specified in this record requests network configuration via DHCP, the specified IP address is offered. This mechanism is often used as an alternative to manually assigning static IP addresses to devices.
The name field is an arbitrary string descriptor used only for administrative identification. Choose a name that reflects the purpose of the record. This field has no bearing on the configuration or settings determined by this scaffold.
The IP field contains the IP address to be reserved for this device. It is critically important that the reserved IP be outside of any pools specified in the pools scaffold.
The MAC field contains the MAC address of the device that this reservation is being held for.
The hostname field is an optional parameter that, if specified, will cause the DHCP server to deliver a client identifier to the device via a DHCP option.
The note field is a place for the administrator to enter a comment. This field is purely informational and has no bearing on the configuration settings.
The option group links this reservation with a set of DHCP options that control additional information that may be delivered to the device beyond IP address, hostname, subnet mask and gateway. For example, an option group may be used to specify alternative DNS servers for the device specified in this reservation.
Groups
The group identities view presents the scaffolds associated with manipulating the rXg internal credential database and integrated authentication mechanisms.
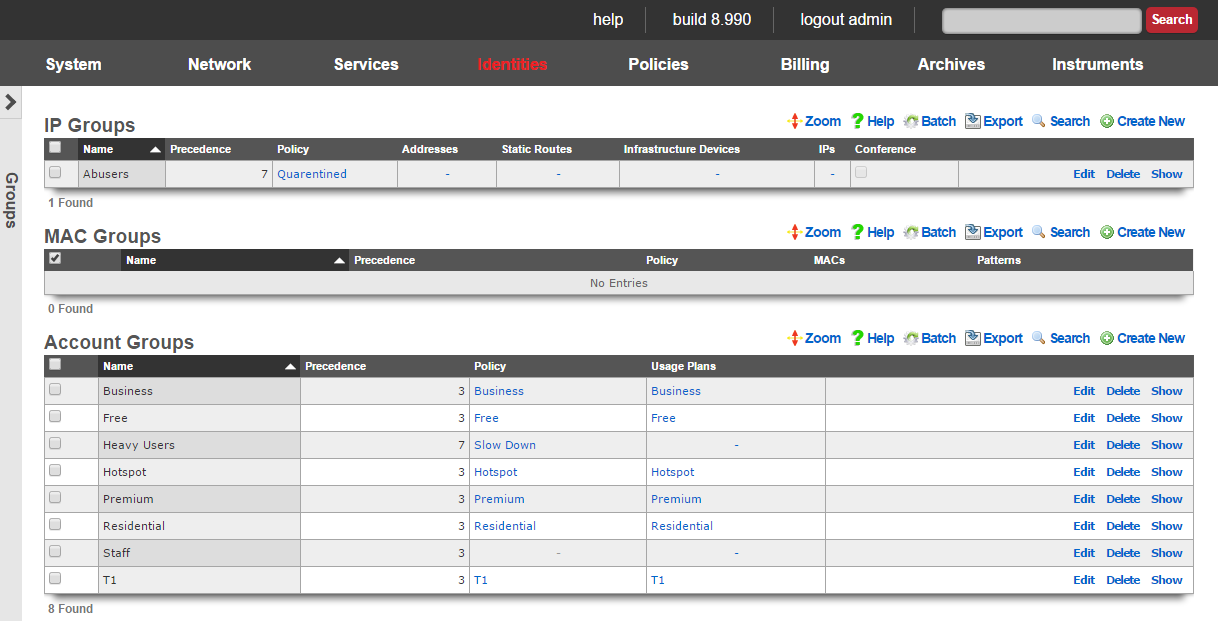
Policy enforcement on the rXg begins with groups. The rXg group objects ( IP groups , MAC groups and account groups ) may all be associated with a policy object. The policy object is then associated with any of the various end-user communication and control features of the rXg.
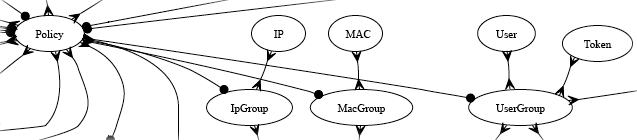
Devices may be directly authenticated by operator specified IP address and/or MAC address. This is accomplished by adding IP and MAC members to IP group and MAC group records. When the captive portal disabled, direct authentication through groups is required for policy enforcement.
All group objects have a priority field to to disambiguate the choice of a policy when an end-user or device is a member of more than one group. By default, IP groups have a lower priority than MAC groups which have a lower priority than account groups. This default is designed around the concept of creating a default policy via IP groups (typically portal enabled, no access to the WAN) with exceptions specified via MAC groups and account groups.

IP Groups
An entry in the IP groups scaffold defines a group object that contains IP blocks as members.
The name field is an arbitrary string descriptor used only for administrative identification. Choose a name that reflects the purpose of the record. This field has no bearing on the configuration or settings determined by this scaffold.
The priority field determines the effective group when an end-user or device is a member of more than one group. By default, IP groups have the lowest possible priority.
The note field is a place for the administrator to enter a comment. This field is purely informational and has no bearing on the configuration settings.
The addresses and static routes fields are easy ways to add an entire subnet to the IP group. For example, selecting an address configured with 192.168.5.1/24 is equivalent to entering 192.168.5.0/24 in the IPs sub form. Similarly, selecting a static route with a destination of 10.1.0.0/24 is equivalent to entering 10.1.0.0/24 in the IPs sub form.
The IPs sub form enables specification of IP ranges that are to be assigned to the IP group. To specify a single IP address as a member of a group, enter the IP address followed by a suffix of /32(e.g., 192.168.8.168/32).
The policy field associates this group object with a policy object. The policy object relates the group to objects that specify the configuration of the control and communication features of the rXg that determine the end-user experience.
In a typical scenario, each and every address range on the LAN of the rXg will be a member of an IP group. This is used to set the default policy for all devices on the rXg managed network. The default policy for IP groups typically incorporates a policy that specifies denial of all routing or redirection of all traffic to the portal.
Multiple IP groups are configured in scenarios when the rXg managed LAN has well understood IP boundaries with differing policy enforcement requirements. For example, location-based services that require displaying a different captive portal is one common reason why numerous IP groups are created. Deploying a DMZ for servers which require direct access to the WAN is another common scenario where multiple IP groups are needed.

MAC Groups
An entry in the MAC groups scaffold defines a group object that contains MAC addresses as members.
The name field is an arbitrary string descriptor used only for administrative identification. Choose a name that reflects the purpose of the record. This field has no bearing on the configuration or settings determined by this scaffold.
The priority field determines the effective group when an end-user or device is a member of more than one group. By default, MAC groups have a priority of 2, placing them higher than the default priority of IP groups.
The note field is a place for the administrator to enter a comment. This field is purely informational and has no bearing on the configuration settings.
The MACs sub form enables specification of MAC addresses that are to be assigned to the MAC group. MAC addresses must be specified in hexadecimal in any of the typical MAC address formats. MACs will be scrubbed and normalized to a colon-separated tuple format (e.g., 01:23:45:67:89:ab) before being stored in the database.
The policy field associates this group object with a policy object. The policy object relates the group to objects that specify the configuration of the control and communication features of the rXg that determine the end-user experience.
MAC groups are typically used to identify specific end-user devices that require a different policy from the default policy for the IP range specified by an IP group. MAC groups are also the only way that headless and browser-less devices may be identified.
For example, MAC groups are typically used to identify infrastructure equipment (switches, access points, power controllers, etc.) and handheld devices used by administrators. The higher default priority is typically used to enable access to the WAN as the IP groups are usually set to deny all access.
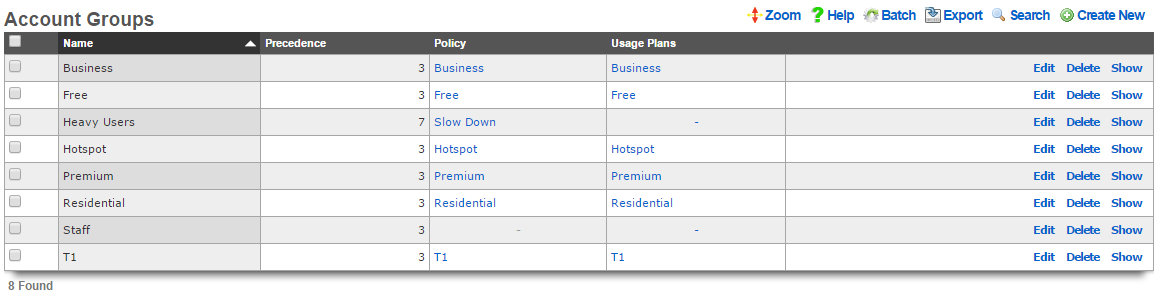
Account Groups
An entry in the account groups scaffold defines a group object that contains accounts members.
The name field is an arbitrary string descriptor used only for administrative identification. Choose a name that reflects the purpose of the record. This field has no bearing on the configuration or settings determined by this scaffold.
The priority field determines the effective group when an end-user or device is a member of more than one group. By default, account groups have a priority of 3, placing them higher than the default priority of both IP groups and MAC groups.
The note field is a place for the administrator to enter a comment. This field is purely informational and has no bearing on the configuration settings.
By checking the box next to a usage plans , end-users will be automatically added to this account group when they select the specified usage plan. This is the primary mechanism that enables zero operator intervention self-provisioning of end-users. By associating plans with groups and groups with policies, end-users are delivered operator specified RGN offerings in a completely automated fashion.
Unlike other group objects, membership in a account group is controlled exclusively within the account record. This is because production rXg units will have hundreds of accounts in a account group making a membership UI in the account group to be ineffective.
The policy field associates this group object with a policy object. The policy object relates the group to objects that specify the configuration of the control and communication features of the rXg that determine the end-user experience.
account groups are typically the most specific (and hence by default have the highest priority) identification mechanism. An end-user may be a member of more than one account group so long as none of the account groups have the same priority. This is a scenario which is typical of an end-user who has selected a plan that enables a basic level of access but then later upgrades to a different plan that has enhanced access. Careful configuration of the group priority is a critical facet of delivering a deterministic and reliable RGN product to the end-user population.
Shared Credentials
The shared credentials view of the identities menu displays scaffolds that allow the operator to configure the shared credential access features of the rXg.
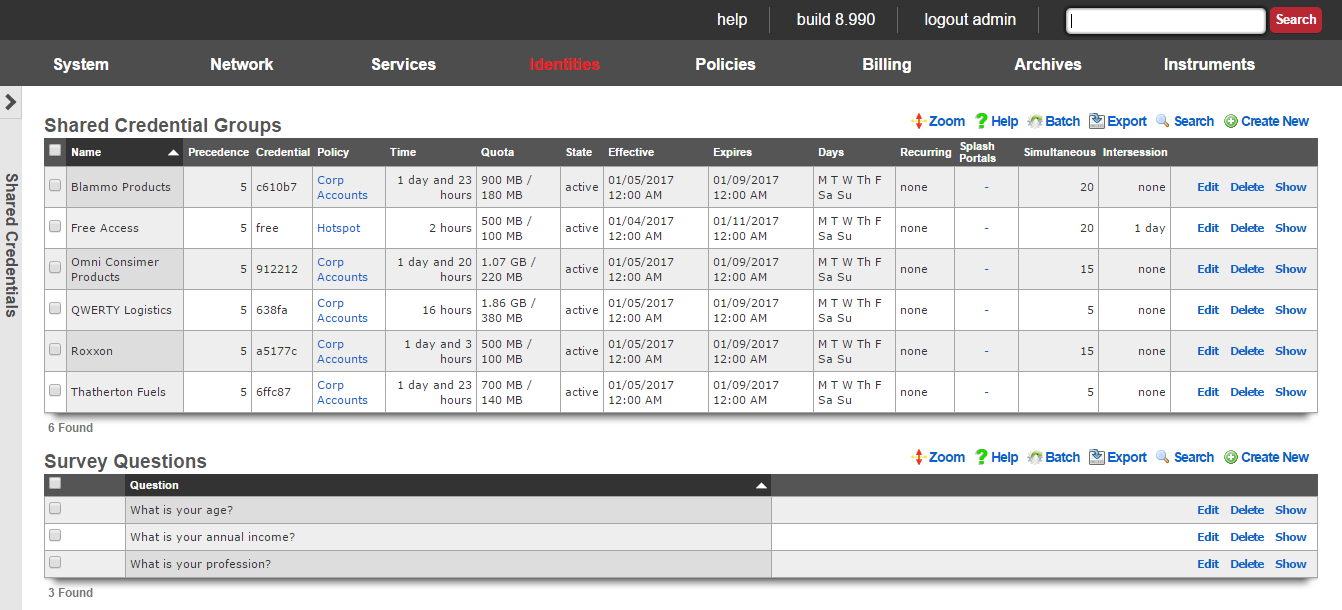
There are many situations when an operator wishes to allow access to a network without requiring each end-user to supply unique credentials. For example, the operator may wish to provide a "free access" service at certain locations for marketing purposes. Many rural WISPs and telcos are able to obtain subsidies from local governments for provided limited or advertising supported free access.
Another common use case for this capability is a "shared password" scenario. For example, if a hotel wishes to allow several end-users who have booked a conference room to use a single, shared password, to gain access. Conference centers also use this functionality to provide groups who purchase Internet access as an additional feature of booth space.
The rXg enables the operator to provide such services while applying the rich functionality of the rXg to each individual end-user. shared credential groups are linked to policies in the same manner as the all of the other group objects in the rXg. The user experience of end-users whe are members of shared credential groups may be controlled by the broad spectrum of capabilities that the rXg offers.
The "free access" service may utilize the interstitial redirects and HTML injection mechanisms to generate revenue from advertising. Similarly, per-device bandwidth queues may be configured to restrict the utilization of of end-users of a "free access" or "shared password" group to an acceptable rate and priority given the amount of revenue generated (or lack thereof).
The rXg also has an integrated end-user survey mechanism. This mechanism allows the operator to quickly and easily build a survey for end-users to fill out before they are allowed to gain access. It is possible to use this mechanism with any of the login methods, but it is most often used with the "free access" paradigm to capture marketing data. The results of the survey are collated in the surveys view of the archives menu.
The easiest way to integrate survey questions into a login form is to render the survey_question_fields partial with the following Ruby code:
<%= render :partial => 'survey_questions_fields' %>
It is also very easy to manually generate the survey questions. To require responses for some of all survey questions, simply add the appropriate data format checks to Javascript. 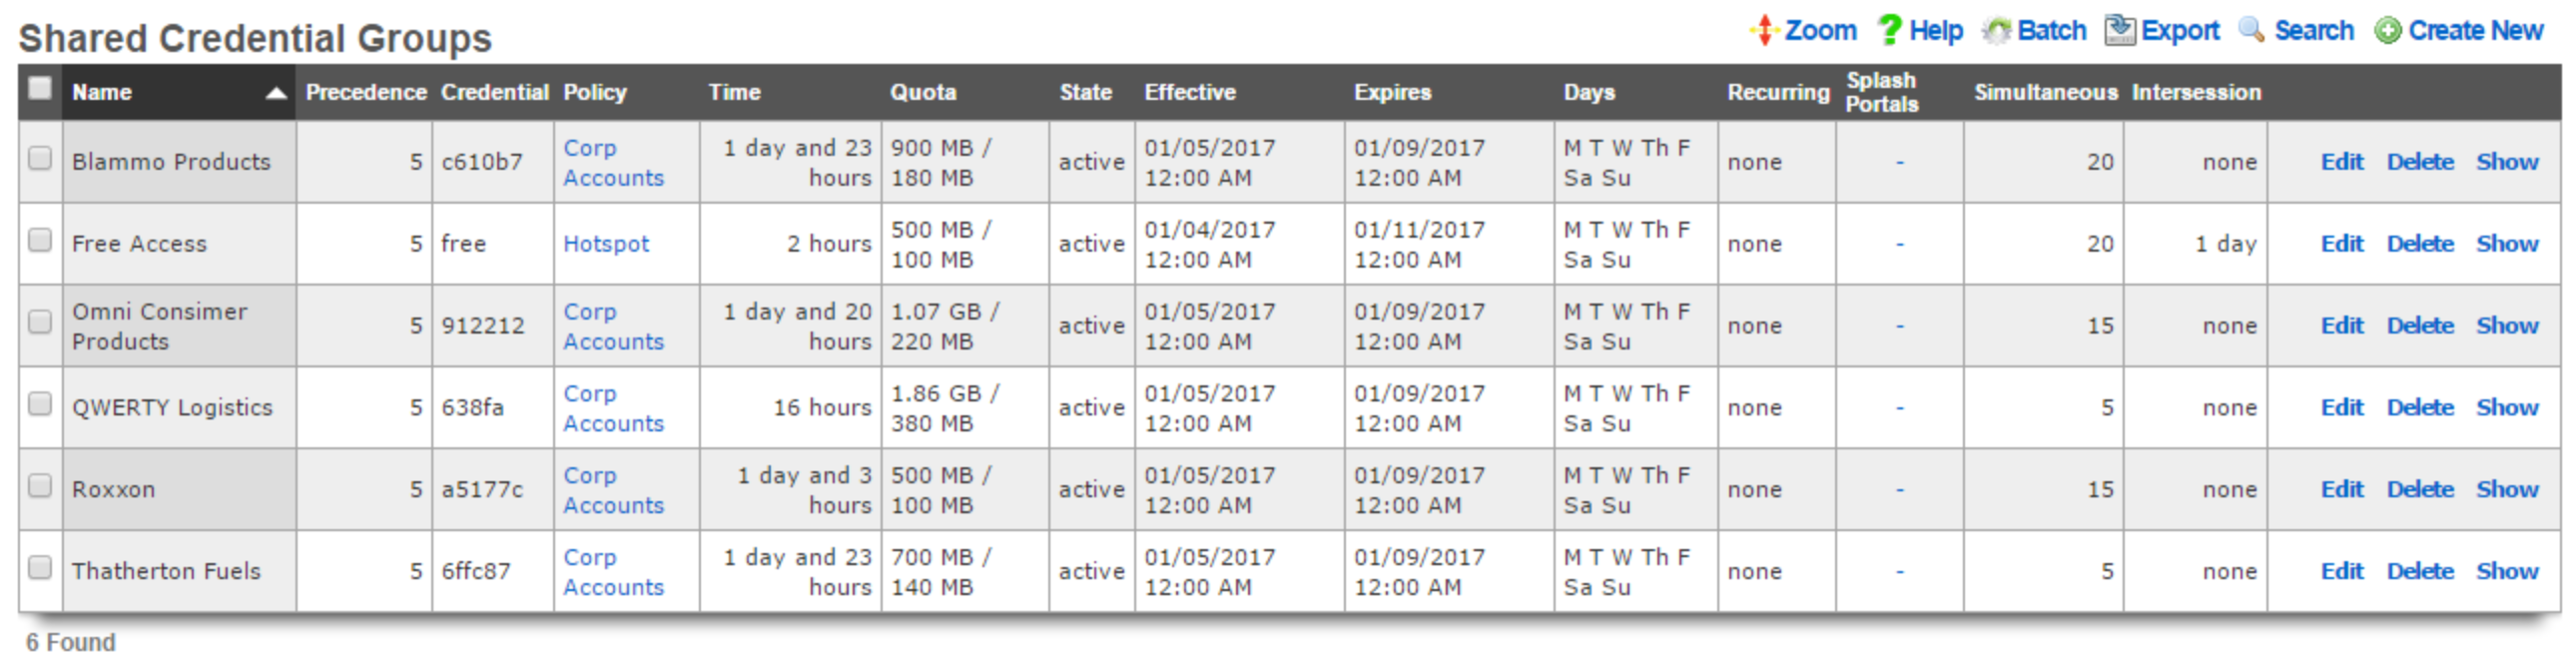
Shared Credential Groups
The shared credential groups scaffold configures the rXg "free access" and "shared password access" captive portal credential mechanisms.
The name field is an arbitrary string descriptor used only for administrative identification. Choose a name that reflects the purpose of the record. This field has no bearing on the configuration or settings determined by this scaffold.
The priority field determines the effective group when an end-user or device is a member of more than one group.
The credential field configures the shared password that will be supplied by end-users to the captive portal in order to gain membership into this shared credential group. In order to configure a "free access" group, the credential that is configured here should be passed as an HTML hidden input field in the login form.
The policy field associates this group object with a policy object. The policy object relates the group to objects that specify the configuration of the control and communication features of the rXg that determine the end-user experience.
The note field is a place for the administrator to enter a comment. This field is purely informational and has no bearing on the configuration settings.
The time , download quota and upload quota fields configure the maximum amount of usage that an end-user may consume before membership to a shared credential group is canceled and the intersession (if specified) takes effect. The usage fields are enforced on a per-device basis and logical disjunction between all three fields is used to determine if usage has been exhausted.
The state field allows the operator to enable or disable logins for the credential.
The effective and expires fields configure the window of time this credential is valid. Logins are permitted during the window.
The days fields restrict the credential to particular days of the week. Logins are permitted on days that are checked.
The recurring option allows the effective and expires times to be adjusted on a recurring interval basis. When recurring is enabled by a setting other than "none", after the expires time has past, the effective time will be adjusted based on the recurring setting. For example, a recurring of "daily" will cause the effective time to be bumped up to the same time of the following day. Recurring behavior stops after the recurring end time (if configured).
The splash portals fields define which captive portals this credential may be logged in from. Use these fields to limit the availability of certain shared credentials to specific portals which in turn are displayed based on geographic location, network subnet, the expected class of end-users, etc.
The simultaneous sessions field specifies the maximum number of sessions that may exist at any given time for the shared credential group being created. Choosing unlimited disables this restriction and allows an unlimited number of simultaneous sessions to be created as a result of an end-user passing the matching credential. Specifying a number enables this feature and restricts the number of simultaneous sessions to the number specified. This feature is useful in a enterprise or hospitality guest access setting where Internet is purchased for a group with a size that is known ahead of time.
The intersession field specifies the amount of time that an end-user must wait they can login again. This field is used to enforce a policy such as one that only allows one hour of free access per day. The intersession takes effect based on the time shared credential group login. If an end-user has a 24 hour intersession logs in at 9:00 AM, then they will be able to login again at 9:00 AM the next day.
If the automatic login box is checked, the rXg will attempt to automatically login a returning end-user after the first successful authentication, assuming the user has the same MAC address and/or browser cookie. Credential, access and session restrictions are still enforced on subsequent automatic login attempts.

Survey Questions
The survey questions scaffold enables the operator to easily build a form that collects data before allowing an end-user to login.
The position field determines the order the questions appear in the form. A question with a lower position number is displayed before a question with a higher position number. If a record is updated or created and its position conflicts with another record, the conflicting record and all records with a higher position are incremented by one.
The question field specifies the question that will appear in the form.
The question type drop-down specifies what type of input will be used in the survey form. Radio Group s, Select Menu s, and Number Field s will utilize associated Survey Question Options in order to build the appropriate form elements.
The required checkbox determines whether user input will be required for this survey question. If required is enabled, the input will use the HTML5 'required' attribute to validate input, which may not be enforced by all browsers.
When creating a Radio Group or Select Menu , Survey Question Options should be specified to provide the user a list of options to choose from. The Display Text field will be shown in the drop-down menu or next to the radio button as a label, and the value field will be stored in the database as the Survey Answer.
When creating a Number Field , Survey Question Options may be used to specify options that will be provided to the number field input. The option's display name should be one of the following:
- min
- max
- in
- within
- step
The value should be the desired limit for the option.
The note field is a place for the administrator to enter a comment. This field is purely informational and has no bearing on the configuration settings.
LDAP Client
The LDAP client view presents the scaffolds associated with manipulating the external LDAP server identity management integration mechanisms built into the rXg captive portal web application.
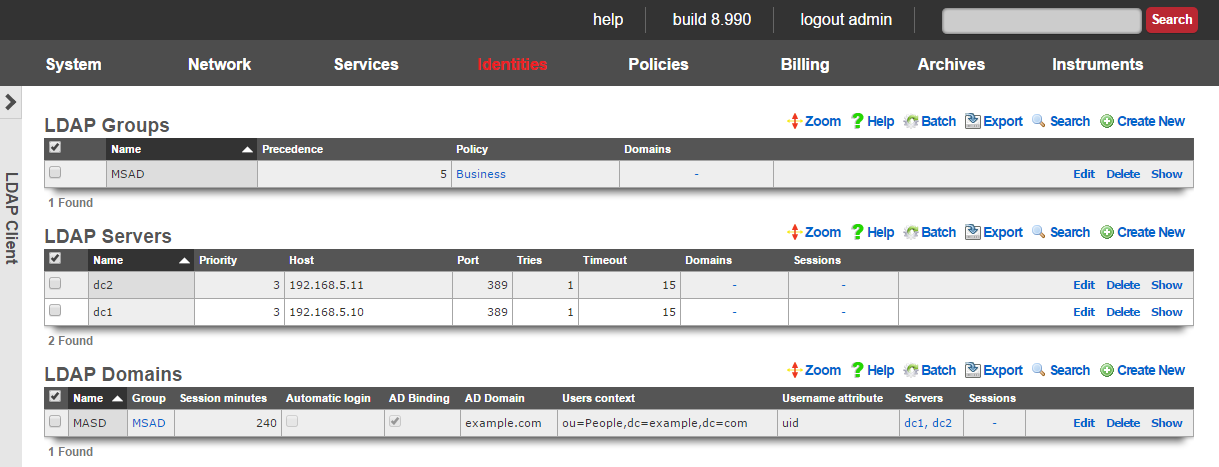
When an external LDAP server is used as the credential store, the captive portal must be enabled. The end-user web browser is then redirected to the rXg captive portal web application. At this point, the end-user must present credentials to the external authentication client that is integrated into the portal. The end-user supplied credentials are then sent to an external LDAP server. The response is then interpreted by the rXg integrated external authentication client and access to the WAN is manipulated appropriately.

Group membership is determined by the creation of the LDAP groups records and the association of those records with LDAP domains. In addition, LDAP groups are associated with policies in a manner similar to local groups ( MAC groups , IP groups and account groups ).

Several LDAP domain records may be configured to support multiple simultaneous logical partitions. For example, an operator may choose to have separate LDAP domain records for students and faculty in a campus setting as those two sets of identities may be either stored on different LDAP servers or as cousins in a large LDAP hierarchy of a single server.
Access to LDAP servers is defined by the associated records in the LDAP servers scaffold. Following the above example, if students and faculty are stored as cousins within the same LDAP hierarchy, two LDAP domains would be associated with a single LDAP server. Of course, if the two end-user pools are stored in different trees, then distinct LDAP server records must be created for the server hosting each tree. Multiple LDAP server records may be associated with a single LDAP domain to enable server failover.
The rXg LDAP client is fully compatible with Microsoft Active Directory (MSAD). To integrate with an MSAD, the LDAP domain must be designated as such via the AD binding field and the associated LDAP server records must point to MSAD domain controllers. Using both standard LDAP and MSAD servers in the same LDAP domain is not supported.

LDAP Groups
The name field is an arbitrary string descriptor used only for administrative identification. Choose a name that reflects the purpose of the record. This field has no bearing on the configuration or settings determined by this scaffold.
An entry in the LDAP groups scaffold defines a group object that can be used as a membership destination for end-users that have been authenticated via the LDAP protocol.
The priority field determines the effective group when an end-user or device is a member of more than one group. By default, LDAP groups have a priority of 4, which puts them ahead of the default priority of all group objects configured by internal identities.
The LDAP domains field determines which logical partitions of the LDAP client will send end-users to become members of this LDAP group (and hence, take part in the enforcement defined by the policy ).
The policy field associates this group object with a policy object. The policy object relates the group to objects that specify the configuration of the control and communication features of the rXg that determine the end-user experience.
The note field is a place for the administrator to enter a comment. This field is purely informational and has no bearing on the configuration settings.

LDAP Servers
An entry in the LDAP servers scaffold defines a server that may be queried for end-user credential validation using the LDAP protocol.
The name field is an arbitrary string descriptor used only for administrative identification. Choose a name that reflects the purpose of the record. This field has no bearing on the configuration or settings determined by this scaffold.
The priority field is used when multiple LDAP servers are associated with a LDAP domain. The LDAP server with the highest priority is queried first.
The IP field specifies the IP address of the LDAP server to be queried for credential validation.
The port field specifies the TCP port to use when sending the LDAP query for credential validation. Leave this field blank to use the default.
The tries and timeout fields govern the retry and failure detection behavior of the LDAP client. Increase these values when communicating with servers that are heavily loaded or connected via congested networks.
The LDAP domains field determines which logical partitions of the LDAP client will use the server specified in this record for queries. LDAP trees are designed to support several different organizations and organizational units through a unified hierarchical structure. The same LDAP server may be associated with several different LDAP domains to provide access to different facets of the hierarchy.
The note field is a place for the administrator to enter a comment. This field is purely informational and has no bearing on the configuration settings.

LDAP Domains
An entry in the LDAP domains scaffold defines a logical partition for the LDAP client that is integrated into a captive portal web application.
The name field is an arbitrary string descriptor used only for administrative identification. Choose a name that reflects the purpose of the record. This field has no bearing on the configuration or settings determined by this scaffold.
If the Create Account box is checked, the rXg will create or update an Account object after successful user authentication against the LDAP server. Creating an Account for the user enables the user to take advantage of the manage devices, usage reporting, and DMZ and port forwarding functionality. This behavior is mutually exclusive to specifying an LDAP Group and session attributes.
Associating one or more Usage Plans to the LDAP Domain instructs the rXg to perform a search against the LDAP server to determine group membership. The names of the user's groups are compared against names of the associated Usage Plans to attempt to find a matching plan. If there is a singular match, the Usage Plan is applied automatically. If there are no matches or multiple matches, the Account will be created with no usage plan and the user must select or purchase a usage plan via the captive portal before gaining access to the Internet.
The LDAP group field specifies the membership destination for end-users that have presented valid credentials.
The session minutes field specifies the length of the login session for end-users that have presented valid credentials.
If the automatic login box is checked, the rXg will attempt to automatically login a returning end-user after the first successful authentication, assuming the user has the same MAC address and/or browser cookie. This requires storing the end-user's password in the rXg's database in encrypted format.
If the logical partition of the LDAP client defined by this record is to be used with Microsoft Active Directory, check the box next to AD binding and enter the MSAD domain into the AD domain field.
The Users context field specifies the base DN to be used when searching for LDAP users or when building a user's DN for authentication against a non-Active Directory LDAP server. User records must reside below the specified DN in order to be located via LDAP searches for usage plan matching when Account creation behavior is enabled.
The Username field specifies the LDAP attribute that will be used to build a user's DN when using non-AD binding, as well as for performing searches against LDAP when account creation behavior is enabled. The value should be the name of an attribute identifies the the user's username, such as samaccountname when utilizing Active Directory.
The Bind username and Bind password fields specify the credentials that will be used to perform searches against the LDAP database when Account creation behavior is enabled.
The note field is a place for the administrator to enter a comment. This field is purely informational and has no bearing on the configuration settings.
RADIUS NAS
The RADIUS NAS view presents the scaffolds associated with manipulating the external RADIUS server identity management integration mechanisms built into the rXg captive portal web application.
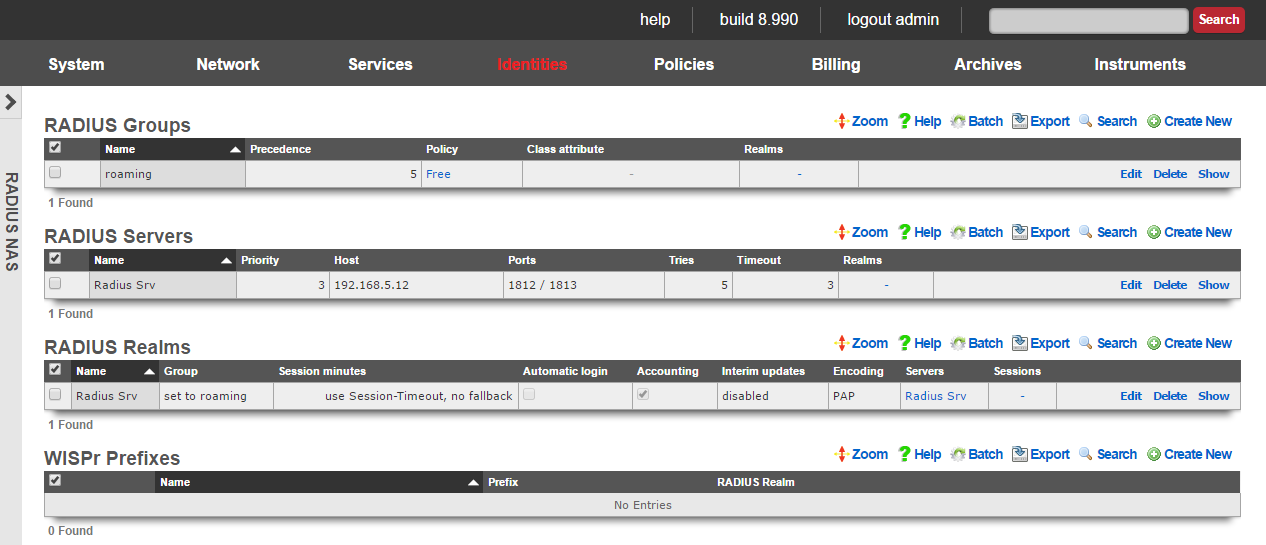
When an external RADIUS server is used as the credential store, the captive portal must be enabled. The end-user web browser is then redirected to the rXg captive portal web application. At this point, the end-user must present credentials to the external authentication client that is integrated into the portal. The end-user supplied credentials are then sent to an external RADIUS server. The response is then interpreted by the rXg integrated external authentication client and access to the WAN is manipulated appropriately.
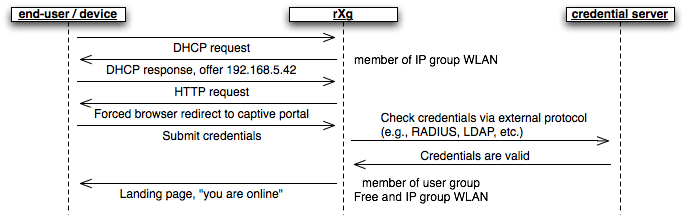
Group membership is determined by the creation of the RADIUS groups records and the association of those records with RADIUS realms. In addition, RADIUS groups are associated with policies in a manner similar to local groups ( MAC groups , IP groups and account groups ). Membership of end-users into particular RADIUS groups may also be specified by the RADIUS server through the Class attribute that passed back in Access-Accept messages.
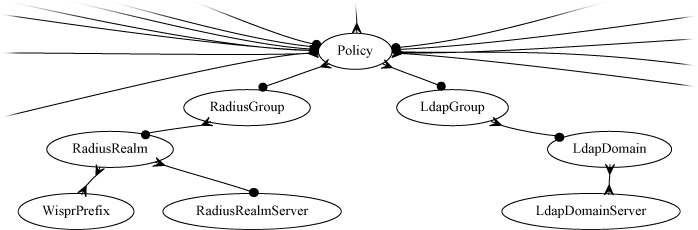
Several RADIUS realms may be configured to support multiple simultaneous logical partitions. For example, many operators wish to setup agreements with as many wireless account aggregators (e.g., iPass, Boingo, T-mobile, etc.) as possible. Each of the aggregators has their own servers that require specific RADIUS attributes to be transmitted with Access-Request messages. Thus, each aggregator must be configured as an independent RADIUS realm record.
Credential database servers are defined by the associated records in the server scaffolds of the associated protocol. For example, the RADIUS servers that will be queried are defined by the RADIUS servers scaffold. Several RADIUS servers may be associated with a single RADIUS realm for failover purposes.

RADIUS Groups
The name field is an arbitrary string descriptor used only for administrative identification. Choose a name that reflects the purpose of the record. This field has no bearing on the configuration or settings determined by this scaffold.
An entry in the RADIUS groups scaffold defines a group object that can be used as a membership destination for end-users that have been authenticated via the RADIUS protocol in a partition defined by a RADIUS realm.
The priority field determines the effective group when an end-user or device is a member of more than one group. By default, RADIUS groups have a priority of 4, which puts them ahead of the default priority of all group objects configured by internal identities.
The Class attribute field is used when RADIUS realms are configured to read group from Class. When configured in this manner, a single RADIUS realm can make end-users members of several different RADIUS groups. The RADIUS Access-Accept message is parsed for a Class attribute. If found, the value of the Class attribute is compared to the Class attribute field of all RADIUS groups. If a match is found, the matching RADIUS group becomes the destination for the end-user.
The RADIUS realms field determines which logical partitions of the RADIUS NAS will send end-users to become members of this RADIUS group (and hence, take part in the enforcement defined by the policy ).
The policy field associates this group object with a policy object. The policy object relates the group to objects that specify the configuration of the control and communication features of the rXg that determine the end-user experience.
The note field is a place for the administrator to enter a comment. This field is purely informational and has no bearing on the configuration settings.

RADIUS Servers
An entry in the RADIUS servers scaffold defines a server that may be queried for end-user credential validity using the RADIUS protocol.
The name field is an arbitrary string descriptor used only for administrative identification. Choose a name that reflects the purpose of the record. This field has no bearing on the configuration or settings determined by this scaffold.
The priority field is used when multiple RADIUS servers are associated with a RADIUS realm. The RADIUS server with the highest priority is queried first. If the RADIUS server with the highest priority does not respond within the window defined by the tries and timeout fields, the next highest priority server is queried. If no RADIUS servers respond, the end-user is denied access.
The IP field specifies the IP address of the RADIUS server to be queried for credential validation.
The port field specifies the UDP port to use when sending the RADIUS request for credential validation. Similarly the accounting port field specifies the UDP port to use when sending the RADIUS accounting start, stop and intermediate updates. Leave these fields blank to use the defaults.
The tries and timeout fields govern the retry and failure detection behavior of the RADIUS NAS. Increase these values when communicating with servers that are heavily loaded or connected via congested networks.
The secret field is the RADIUS shared secret. It is used to encode and decode messages being sent to and from the RADIUS server. This setting must match that of the RADIUS server in order for credential validation to operate.
The RADIUS realms field determines which logical partitions of the RADIUS NAS will use the server specified in this record for queries. There are several reasons a given RADIUS server will be shared across multiple RADIUS realms. One very common scenario is when an account aggregator outsources the operation of their OSS to a well established third-party. Another is when a single corporate RADIUS server is used for authenticating several different classes of devices or end-users.
The note field is a place for the administrator to enter a comment. This field is purely informational and has no bearing on the configuration settings.

RADIUS Realms
An entry in the RADIUS realms scaffold defines a logical partition for the RADIUS NAS that is integrated into the captive portal web application.
The name field is an arbitrary string descriptor used only for administrative identification. Choose a name that reflects the purpose of the record. This field has no bearing on the configuration or settings determined by this scaffold.
If read group from Class is checked, the RADIUS NAS will look for the RADIUS Class attribute in Access-Accept messages. If the RADIUS Class attribute is found, the value is decoded and compared with the values of the class attribute field of the RADIUS groups that are configured. If a match is found, the authenticated end-user is made a member of the RADIUS group with the matching class attribute. If no match is found, the RADIUS group setting of the RADIUS realm is used to determine group membership.
The RADIUS group field specifies the default RADIUS group record that authenticated end-users will be made members of. If the read group from class field is not checked, the authenticated end-users are always made members of the RADIUS group specified here.
The accounting checkbox enables the transmission of start and stop RADIUS accounting messages. Accounting messages are sent to the same RADIUS server as authentication messages but on a different port as specified in the RADIUS Server configuration.
The encoding field specifies the password encoding used when sending RADIUS Access-Request messages. This setting must match what is accepted by the RADIUS server.
The use Session-Timeout and session minutes fields control the length of the user session for authenticated end-users. If use Session-Timeout is checked, the RADIUS NAS will look for the RADIUS Session-Timeout attribute in all Access-Accept messages. The session length of the end-user is set to the decoded value If a reasonable value is found. If no reasonable value is found, the session minutes field is used to set the end-user session length. If the use Session-Timeout field is not checked, the end-user session length is always set to session minutes.
If the automatic login box is checked, the rXg will attempt to automatically login a returning end-user after the first successful authentication, assuming the user has the same MAC address and/or browser cookie. This requires storing the end-user's password in the rXg's database in encrypted format.
The servers field associates the logical partition defined by this RADIUS realm record with one or more RADIUS server records that define which RADIUS servers to send Access-Request messages.
The RADIUS NAS can send optional RADIUS attributes to the RADIUS server in Access-Accept messages. The supported optional RADIUS attributes are NAS-IP-Address, Called-Station-Id, NAS-Identifier, NAS-Port and NAS-Port-Type. Many RADIUS servers and third-party account aggregation services have very specific requirements for the attributes and values present in RADIUS Access-Request messages. Incorrect configuration of optional attributes usually results in universal rejection of all Access-Accept messages.
Each of these optional attributes has a set of synonymous configuration fields. A checkbox is provided to enable the sending of the optional attribute (e.g., send NAS-IP-Address ). Optional attributes will not be sent unless the appropriate box is checked. The values to be sent in the optional attribute is also configurable. All optional attributes may be transmitted with an arbitrary static value that is specified in a text-field. In addition, different dynamic values are available for the the optional attributes. For example, a common value for the NAS-Identifier attribute is the domain name of the RADIUS NAS and this is enabled by checking the box next to the use domain name field.
The IP and/or MAC address of the rXg may be sent to the RADIUS server in all Access-Request messages by checking the boxes next to the send requesting node IP and send requesting node MAC fields. The RADIUS attribute that will contain the address is configured via the requesting node IP attribute and requesting node MAC attribute. Many RADIUS servers and third-party account aggregation services have specific requirements regarding these fields. In addition, some third-party account aggregators require pre-registration of the MAC and/or IP address of the RADIUS NAS (i.e., the rXg) before credential validation will operate.
The note field is a place for the administrator to enter a comment. This field is purely informational and has no bearing on the configuration settings.

WISPr Prefixes
WISPr (Wireless Internet Service Provider roaming) is a mechanism that allows software clients installed on devices to authenticate end-users without the end-user experiencing a forced browser redirect. Each entry in the WISPr prefixes scaffold defines a prefix that is used by all software clients from the same account aggregator and associates that prefix with a RADIUS realm. Enabling WISPr support on the rXg requires documentation and cooperation of the account aggregator providing the software clients to end-users.
The name field is an arbitrary string descriptor used only for administrative identification. Choose a name that reflects the purpose of the record. This field has no bearing on the configuration or settings determined by this scaffold.
The prefix field stores the string that is defined by the account aggregators and needs to match the value sent in the software clients.
The RADIUS realm field associates a RADIUS realm record that defines the logical partition of the RADIUS NAS with the prefix that will be transmitted by software clients.
The note field is a place for the administrator to enter a comment. This field is purely informational and has no bearing on the configuration settings.
Definitions
The definitions view presents the scaffolds associated with configuring mechanisms to identify applications and WAN targets.
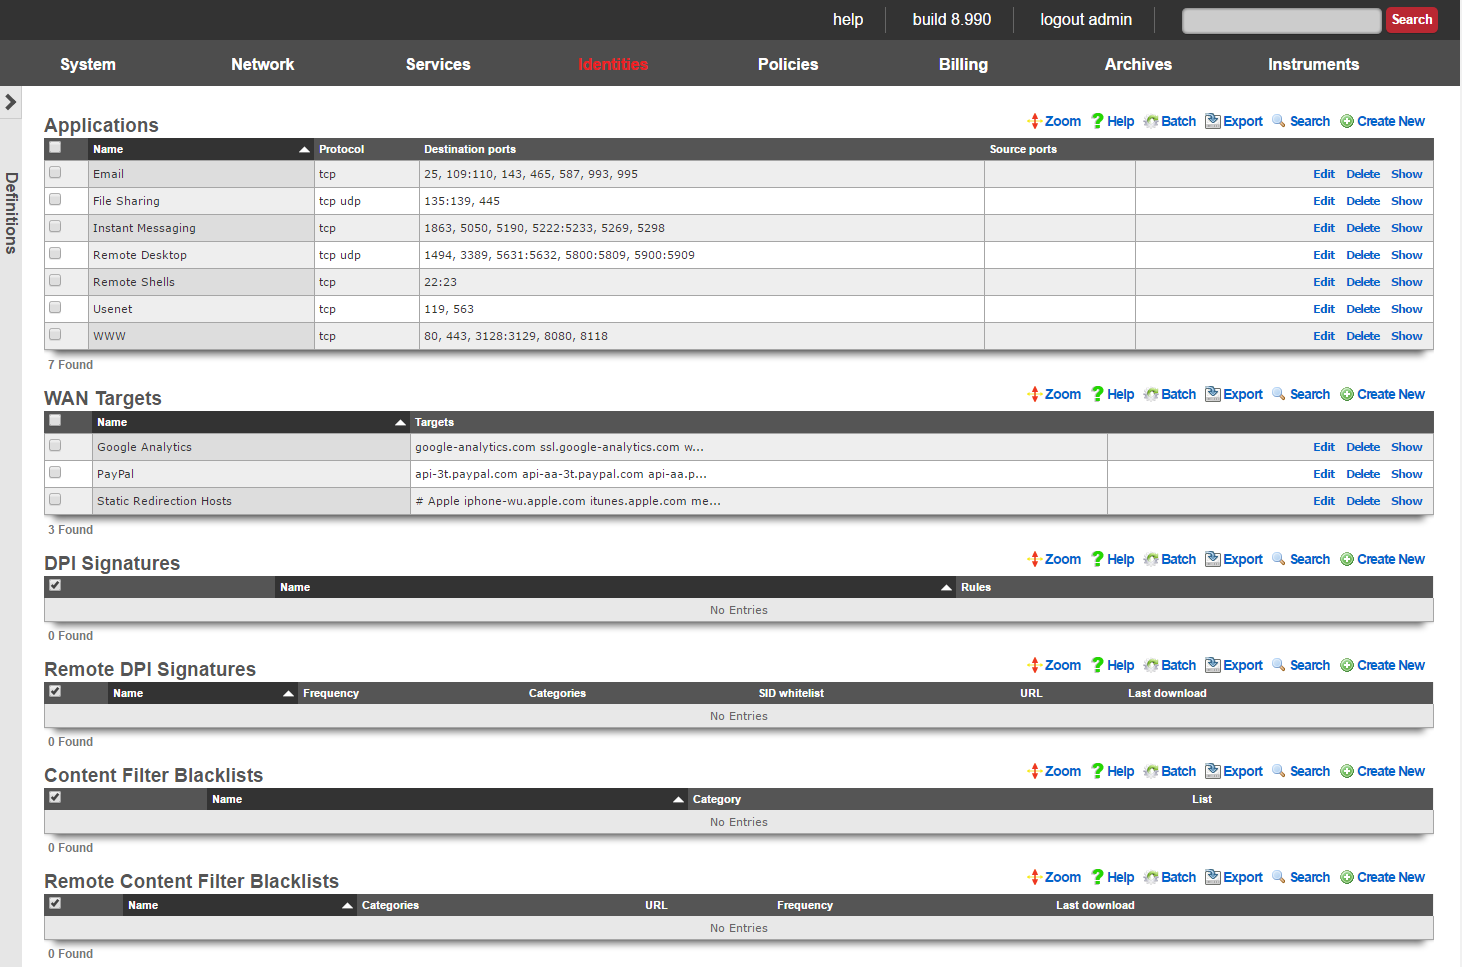
The rXg identifies applications by traffic characteristics and WAN targets by IP address or domain name. Identified applications and WAN targets are used in many facts of the policy enforcement engine.
For example, when used with bandwidth queues, application identification is useful for reducing the priority of bulk transfer of data over FTP and NNTP and increasing the priority of interactive applications such as web surfing. WAN targets may be used with bandwidth queues to restrict the utilization of social networking websites and/or guarantee the bandwidth to video on demand servers.
WAN targets are in many other facets of the policy enforcement engine. For example, WAN targets are used as whitelists to enabled unfettered access to certain websites when forced browser redirection to a captive portal is enabled. In addition, WAN targets are used to select destinations for link affinity when an rXg is deployed in a link control scenario.

Applications
An entry in the applications scaffold defines a set of ports that are considered by the rXg to be a singular logical group for policy enforcement.
The name field is an arbitrary string descriptor used only for administrative identification. Choose a name that reflects the purpose of the record. This field has no bearing on the configuration or settings determined by this scaffold.
The protocol field configures this application definition to match to a particular class of transport. In most cases, a given application will only transport over only one TCP, UDP or ICMP, not
The destination ports and source ports fields specify the ports that are used to identify the application defined by this record. Multiple ports and ranges of ports are specified by using these operators:
!=xAll ports not equal to the specified value. For example,!=80matches all ports other than 80.<xand<=xAll ports less then and less than or equal to the specified value. For example,<1024matches all ports less than 1024 (i.e., 1 to 1023 inclusive) and<=1024matches all ports less or equal to 1024 (i.e., 1 to 1024 inclusive).>xand>=xAll ports greater than and greater than or equal to the specified value. For example,>40000matches all ports greater than 40000 (i.e., 40001 to 65535 inclusive) and<=40000matches all ports greater than or equal to 40000 (i.e., 40000 to 65535 inclusive).x-yandx:yAll ports within the range specified by the numbers on either side of the operator including boundaries. For example,5900-5909and5900:5909are two ways to specify ports 5900 to 5909 inclusive.x><yAll ports within the range specified by the numbers on either side of the operator excluding boundaries. For example1025><1030specifies ports 1026 to 1029 inclusive.x<>yAll ports except those specified by the numbers on either side of the operator.x,yMultiple port specifications may be included in a single field by separating them with commas. For example, `8080-8090, 9080-9090,=9300`
The note field is a place for the administrator to enter a comment. This field is purely informational and has no bearing on the configuration settings.

WAN Targets
WAN targets define WAN IP addresses and DNS entries that are to be considered as a single logical group for the purposes of policy enforcement.
The name field is an arbitrary string descriptor used only for administrative identification. Choose a name that reflects the purpose of the record. This field has no bearing on the configuration or settings determined by this scaffold.
The targets field configures the list of WAN IPs and/or DNS entries that are members of this WAN target. Any combination of IP addresses (IPv4 or IPv6), CIDR notation, DNS names, and wildcard domain patterns is valid. Enter one target per line, or separate multiple targets with commas.
The source URL field configures an optional remote URL from which the targets list can be automatically downloaded and synchronized. When configured, the rXg will periodically fetch the contents of the URL and update the targets list accordingly. This enables operators to maintain centrally-managed target lists that are automatically distributed across their fleet.
The sync frequency field determines how often the rXg will re-download and synchronize the targets list from the configured source URL. Available options include hourly, twice-daily, daily, weekly, bi-weekly, and monthly.
Using DNS names reduces the performance of the system due to the need to perform DNS lookup. Use IP addresses when possible.
The note field is a place for the administrator to enter a comment. This field is purely informational and has no bearing on the configuration settings.
Default WAN Target Lists
The rXg ships with a comprehensive library of pre-configured WAN target definitions covering popular services, platforms, and network infrastructure endpoints. These default lists are designed to give operators immediate, out-of-the-box policy enforcement capabilities without requiring manual research or configuration of destination addresses for well-known services.
Default WAN target lists can be created or restored at any time using the Create Defaults action in the WAN Targets scaffold. Operators are free to customize any default list to suit their specific deployment requirements entries can be added, removed, or the list can be deleted entirely without affecting system operation.
DNS over HTTPS Providers
The DNS over HTTPS Providers default WAN target is a curated list of known DNS-over-HTTPS (DoH) and DNS-over-TLS (DoT) service endpoints. This list includes the domain names and IP addresses of public encrypted DNS resolvers operated by providers worldwide.
Purpose and Intent
The inclusion of this list is not an indication that these services are malicious or harmful. DNS over HTTPS is a legitimate privacy-enhancing technology used by millions of users globally. The rXg includes this comprehensive list to empower network operators with visibility and policy control over encrypted DNS traffic within their managed networks.
The list is intentionally broad in geographic and provider coverage to support operators deploying across diverse regions and subscriber populations. Whether an operator manages networks in North America, Europe, Asia-Pacific, or any other region, the default list provides identification of regional and global DoH/DoT providers that subscribers' devices may be configured to use.
Why Operators Need This
In managed network environments such as service provider, hospitality, enterprise, and multi-dwelling unit deployments operators rely on DNS infrastructure for critical network functions including:
- Captive portal enforcement Subscriber devices using external encrypted DNS can bypass captive portal detection mechanisms
- Content filtering and compliance Regulatory or policy-driven content restrictions require DNS-level visibility
- Security monitoring DNS query logs provide essential threat intelligence; encrypted DNS to external resolvers creates blind spots
- Network diagnostics DNS-based troubleshooting and traffic analysis depend on queries traversing the local resolver
The DNS over HTTPS Providers WAN target allows operators to build policies that address these requirements while maintaining a positive subscriber experience. Common use cases include:
- Associating the list with content filters to block or shape encrypted DNS traffic to external resolvers
- Using the list with bandwidth queues to manage DoH traffic
- Attaching to uplink control policies to route DoH traffic through specific paths
- Excluding from captive portal bypass whitelists to ensure portal enforcement is not circumvented by encrypted DNS
Customization
Operators should review and tailor this list to their specific deployment needs. Some considerations:
- Remove entries for providers not relevant to your subscriber base or geographic region
- Add new providers as the DoH ecosystem evolves
- Use the source URL and sync frequency fields to subscribe to a centrally-maintained and regularly-updated list
- Some entries in the default list may trigger alerts in third-party security monitoring systems (e.g., next-generation firewalls or SIEM platforms) that categorize any DNS resolution outside their known-good list as suspicious. This is expected behavior the WAN target entries are domain names being identified for policy enforcement, not indicators of compromise
DPI Signatures
An entry in the DPI Signatures scaffold specifies a set of deep packet inspection rules that are used to identify and classify of end-user traffic.
The name field is an arbitrary string descriptor used only for administrative identification. Choose a name that reflects the purpose of the record. This field has no bearing on the configuration or settings determined by this scaffold.
The rules field contains the deep packet inspection specifications that are used to identify the end-user traffic. Rules are specified using the Snort rule format. The rXg is designed to be compatible with most Snort rulesets that are commonly available for download. For example, the Sourcefire Vulnerability Research Team publishes a list of Snort rules that identify common attacks.
The rXg requires that rules follow a few additional specifications in addition to the Snort grammar:
The
alertaction must be specified. Thelogandpassactions will not have any affect when used with the rXg. In other words, any rule that does not begin with thealertidiom will be ignored when used with the rXg.The
sididiom (Snort rule ID) is required for each and every rule. Furthermore no two rules may have the samesid. Ensure that rules abide by the Snortsidconventions to preventsidconflict. Values ofsidless than one million are reserved for "official" rules. Bleeding Snort publishes rules starting atsidtwo million. Entirely new custom rules should start atsidnine million.
The msg idiom is used by the rXg for logging. For example, when DPI signatures are used with triggers, the string specified by the msg idiom is used to populate the reason field.
Here is a simple example rule that checks to see if a node transmits 10 emails (via port 25) in the past 60 seconds:
alert tcp $HOME_NET any -> any 25 (msg:"possible spammer"; content:"rcpt to\:"; nocase; flow:to_server, established; threshold:type both, track by_src, count 10, seconds 60; sid:9000000; rev:1;)
Here is a another example rule that checks to see if a node opens more than 10 SSH connections (via port 25) in the past 60 seconds:
alert tcp any any -> any 22 (msg:SSH incoming; flow:stateless; flags:S+; threshold:type both, track by_src, count 10, seconds 60; sid:9000001; rev:1;)
Nodes that exhibit such behavior are likely to be zombies that are transmitting spam. The above rule is intended to be used in a DPI signature linked to a policy that is associated with throttling via bandwidth queues or quarantine via captive portal to prevent upstream spamming.
The note field is a place for the administrator to enter a comment. This field is purely informational and has no bearing on the configuration settings.
Remote DPI Signatures
An entry in the Remote DPI Signatures scaffold configures the rXg for automatic download of deep packet inspection signatures that are used to identify and classify of end-user traffic from a third-party website.
The name field is an arbitrary string descriptor used only for administrative identification. Choose a name that reflects the purpose of the record. This field has no bearing on the configuration or settings determined by this scaffold.
The categories field allows the operator to choose from one or more groups of predefined signatures present on the third-party server. This field is only useful when the URL of this remote DPI signature refers to a gzipped tarball archive. The signatures present in the archive are presumed to be organized by file name. Each file should contain signatures that are relevant to the name of the file.
The SID whitelist field enables the operator to exclude specific rules from being used. This feature is typically used to exclude overly aggressive rules and thus reduce the possibility of false positives. Consider the following rule from the Snort emerging threats list:
emerging-p2p.rules:alert udp $HOME_NET 1024:65535 -> $EXTERNAL_NET 1024:65535 (msg:"ET P2P Edonkey Publicize File"; dsize:>15; content:"|e3 0c|"; depth:2; reference:url,www.giac.org/certified_professionals/practicals/gcih/0446.php; reference:url,doc.emergingthreats.net/bin/view/Main/2003310; classtype:policy-violation; sid:2003310; rev:3;)
The example rule shown above is known to occasionally trip false positives with Skype file sharing. Listing 2003310 into the SID whitelist field causes the rule to be ignored. Multiple SIDs may be listed in the SID whitelist to tell the DPI engine to ignore more than one rule in the remote set.
When a remote DPI signature record is first created, the categories field will be empty. Once the signatures have been downloaded and extracted for the first time, the names of the files will then appear in this field. After creating a remote DPI signature it is necessary to edit the record and select the desired categories in order for proper operation. Initial download time (and hence, population of the categories field depends upon the size of the archive file as well as the speed of the network connection between the server addressed by the URL.
The URL field contains the URL of the file that the rXg will download. The target file is expected to be in one of two formats: .tar.gz archive or a .txt plain text file. If the file is a gzipped tarball archive (.tar.gz), it is expected to extract multiple files named by category, each of which contains DPI signatures. If the file is plain-text, it is expected that the file is simply a file of the the DPI signatures. The rXg supports DPI signatures formatted for Snort 2.9. Well known remote DPI signature repositories include the official Snort rules and the Snort emerging threats list.
The frequency field specifies the download interval. Some sites have terms of use that specify appropriate download intervals. Please check the remote site terms and conditions carefully before using.
The note field is a place for the administrator to enter a comment. This field is purely informational and has no bearing on the configuration settings.
Content Filter Lists
Entries in the content filter lists scaffold are used to define sets of domain names and URLs that are to be blocked or passed by the rXg content filter. Each content filter list record should store a list of domains, wildcards, or URLs that are similar in nature for organizational purposes. Multiple content filter lists may be used simultaneously in a single content filter enforcement.
The name field is an arbitrary string descriptor used only for administrative identification. Choose a name that reflects the purpose of the record. This field has no bearing on the configuration or settings determined by this scaffold.
The category field is used to store a short phrase that is meant to help the end-user understand the reason why the URL is being blocked. The text in this field is presented on the access denied page on the captive portal. For example, if the list includes domains and URLs that refer to online casinos, the phrase "gambling" would be appropriate for the category.
The list field contains the set of entries that comprise this content filter list. When this content filter list is associated with a content filter enforcement, HTTP requests that match entries in this list will be denied. Valid entries include domain names (e.g., somedomain.com) as well as URL fragments (e.g., somedomain.com/somepath/).
The note field is a place for the administrator to enter a comment. This field is purely informational and has no bearing on the configuration settings.
Remote Content Filter Lists
Entries in the remote content filter lists scaffold are used to configure the parameters needed to periodically download third party maintained lists. The de facto standard list format is a compressed archive (.tar.gz) file that extracts into a series of subdirectories named by blocking category. Each entry in this scaffold configures the periodic download of a compressed archive (.tar.gz) file. Multiple archive files may be used in a single content filter policy enforcement.
The name field is an arbitrary string descriptor used only for administrative identification. Choose a name that reflects the purpose of the record. This field has no bearing on the configuration or settings determined by this scaffold.
The categories field allows the operator to choose from one or more groups of URLs and/or domains to include in this remote content filter list definition. This field is only useful when the URL of this remote content filter list refers to a gzipped tarball archive. The names of subdirectories present in the archive are presumed to be the names of blocking categories and show up in this field.
When a remote content filter list is created, this field will be empty. Once the list is downloaded and extracted for the first time, the subdirectories will then appear in this field. After creating a remote content filter list it is necessary to edit the record and select the desired categories in order for proper operation. Initial download time (and hence, population of the categories field depends upon the size of the archive file as well as the speed of the network connection between the server addressed by the URL.
When Custom is selected in the Provider field it allows the operator to specify a custom URL to a list maintained by the operator or another source.
The URL field contains the URL of the file that the rXg will download. The target file is expected to be in one of two formats: .tar.gz archive or a .txt plain text file. If the file is a gzipped tarball archive (.tar.gz), it is expected to extract multiple subdirectories named by category, each of which contains a "urls" file containing a list of specific URLs to list, and/or a "domains" file containing a list of domains (i.e., entire sites) to list. If the file is plain-text, it is expected that the file is a list of domains and URLs to list. The rXg supports lists formatted for ufdbGuard,DansGuardian and SquidGuard. Well known providers include URLfilterDB, Shalla Listand Squidblacklist.org.
The frequency defines the periodicity with which the rXg will download the list archive file from the URL specified. The request to download a new remote content filter list occurs immediately after the create button is clicked. The periodicity of subsequent downloads are determined by the value of specified in this field. The downloading of subsequent updates will always occur between 4 and 5 AM local time.
The note field is a place for the administrator to enter a comment. This field is purely informational and has no bearing on the configuration settings.
Policies
The rXg policy enforcement engine is configured via three classes of objects: group records, enforcement records and policy records. Group records (e.g, account groups , MAC groups , LDAP groups , etc.) identify and classify end-users and devices into roles. Enforcement records (e.g., splash portals , application forwards , bandwidth queues ) define and configure behaviors that are to be applied to some or all end-users and devices managed by the rXg. Policy records associate the group records to the enforcement records and define who receives what treatment.

Policies link groups that identify end-users and devices with the enforcement capabilities of the rXg. In the example configuration depicted above, the groups are in the left column and the enforcement records are in the right column. The policies are in the center column and link the groups to the enforcement records. It is these links that define the network experience of the end-user.
If you are familiar with SQL and relational database management systems, then you may recognize the organization of the identity :: group :: policy :: enforcement mechanism. From a DBMS / ERD perspective, the policies should be thought of as rows in a join table that has columns to hold the foreign keys for tables that define kind of group and enforcement configuration.
The network experience for each end-user is determined by the policy. Each and every end-user is identified through one or more mechanisms (e.g., portal credentials, IP address, MAC address, etc.) and assigned to one or more groups. The effective group for a given end-user is resolved through the priority field present in all group objects. The rXg will apply the enforcement capabilities that are connected by the policy that is associated with the effective group.
The identity :: group :: policy :: enforcement mechanism is the method by which all network experience related features are delivered to the end-user. This mechanism determines everything including but not limited to the portal (which one is presented, what usage plans may be selected, etc.), the advertising experience (interstitial and injection), traffic shaping (rate limits and guarantees) and much more.
Consider the following example simple network configuration in conjunction with the policy shown above:
Assume that an end-user opens a laptop and connects to a wireless access point that is bridged into the switch on the LAN side of the rXg. The rXg serves the laptop a DHCP address of 192.168.5.254. Since the rXg is not aware of any identity for the end-user other than the IP address which falls into the IP group called_LAN IPs_, the end-user experiences the splash portal that is associated with the pre-auth policy.

Now let us say that the end-user navigates the splash portal, signs up for an account, selects and then purchases a usage plan. Let us also say that the usage plan that the end-user purchases is linked to the Hotspot group. The end-user now has two independent identities on the rXg (IP 192.168.5.254 and their user account). The IP places the end-user into the IP group called LAN IPs and the account places the end-user into the account group called hotspot.
When a single identity is present in more than one group, the group priority is used to disambiguate the membership. This concept is discussed in more detail in the identities portion of the operator's manual. Notice that the hotspot account group has a priority of 3 while the LAN IPs IP group has a priority of 2. Thus the end-user will now experience the enforcement options associated with the policy named hotspot.

To expand on this example and concept, let us assume that the operator has decided enable Internet access for the smartphones that technicians and administrators carry with them. The flexible nature of the rXg enables the operator to choose amongst many ways that this could be accomplished. Let us assume that the operator wishes to use a MAC address access control list as the authentication mechanisms for the smartphone fleet.

Notice that the Admin SmartPhones MAC group is associated with the T1 policy. Also notice that the priority of the Admin SmartPhones MAC group is 5. When a field technician or system administrator uses the Wi-Fi capability of their smartphone to connect an access point bridged to the LAN side of the rXg, they are issued a DHCP address in the 192.168.5.0/24 block. This makes the smartphone a member of the LAN IPs IP group. Since the priority of the_LAN IPs_ IP group is 2 and the priority of the_Admin SmartPhones_ MAC group is 5, the effective group is the Admin SmartPhones MAC group. Thus the smartphones experience the T1 policy that assigns a 1544 kbps symmetric amount of bandwidth without any forced browser redirection.
Now let us expand on this example. Consider an expanded as depicted by the network diagram shown below. In this example RGN, the operator has setup VLANs that are bridged to geospatially distinct locations.
End-users that connect to access points deployed at a local hotel are bridged into VLAN 2801. Similarly end-users that connect to access points deployed at a local gated community are bridged into VLAN 2808. Thus end-users that are at the hotel are assigned addresses in the 10.0.10.0/24 CIDR and end-users that are at the gated community are assigned addresses in the 172.16.16.0/24 CIDR.
The operator wishes to display distinct captive portals to the end-users at the hotel and the gated community. To accomplish this, two new policy objects are created along with two new splash portal objects. The actual captive portal that is displayed to each end-user is determined by the fields in the splash portal object. Several other aspects of the captive portal (e.g., which usage plans are displayed on the portal) are also determined by the configuration fields in the splash portal object.

In addition, IP group objects that contain the CIDRs for each geospatial location are created so that the non-authenticated end-users are associated with the appropriate policy that displays the desired captive portal. Following the network diagram depicted previously, the appalachian hotel IP group would need to have an IP CIDR member of 10.0.10.0/24 and the black creek sanctuary IP group would have an IP CIDR member of 172.16.16.0/24.
Policies Dashboard
The policies dashboard presents an overview of the current status and configured settings of the rXg policy enforcement engine.

At the top of the policies dashboard is a node-edge graph that depicts the current configured state of the rXg policy enforcement engine.
Groups are presented in a single column on the left. Enforcement records are presented in a single column on the right. Policy objects link groups and enforcement records and are in the middle of the group.
A graph that is isolated to a single policy may be generated by clicking on a policy or group object in the graph.

In addition, the operator may enter an identity (IP address, MAC address, username, token, etc...) into the search field at the top right of the dashboard. The result is an isolate graph (similar to the one shown above) of the groups, policies and enforcement records that are related to the data that is entered. This mechanism is useful for troubleshooting the operation of an rXg. The vast majority of perceived enforcement errors are a result of incorrect configuration that results in the application of a policy other than what is desired.

The views for each policy enforcement feature include a subset of the policies scaffold with the fields that are relevant to each specific enforcement capability. In this scaffold, all of the available enforcement features are presented. This enables the operator to quickly reconfigure what enforcement capabilities are linked to a policy.
At the very bottom of the policy dashboard are graphs that displays the number of sessions and the amount of data transferred for each policy over the course of the past 24 hours.

Captive Portals
The captive portal view presents the scaffolds that configure the behavior of the rXg forced browser redirect mechanism.
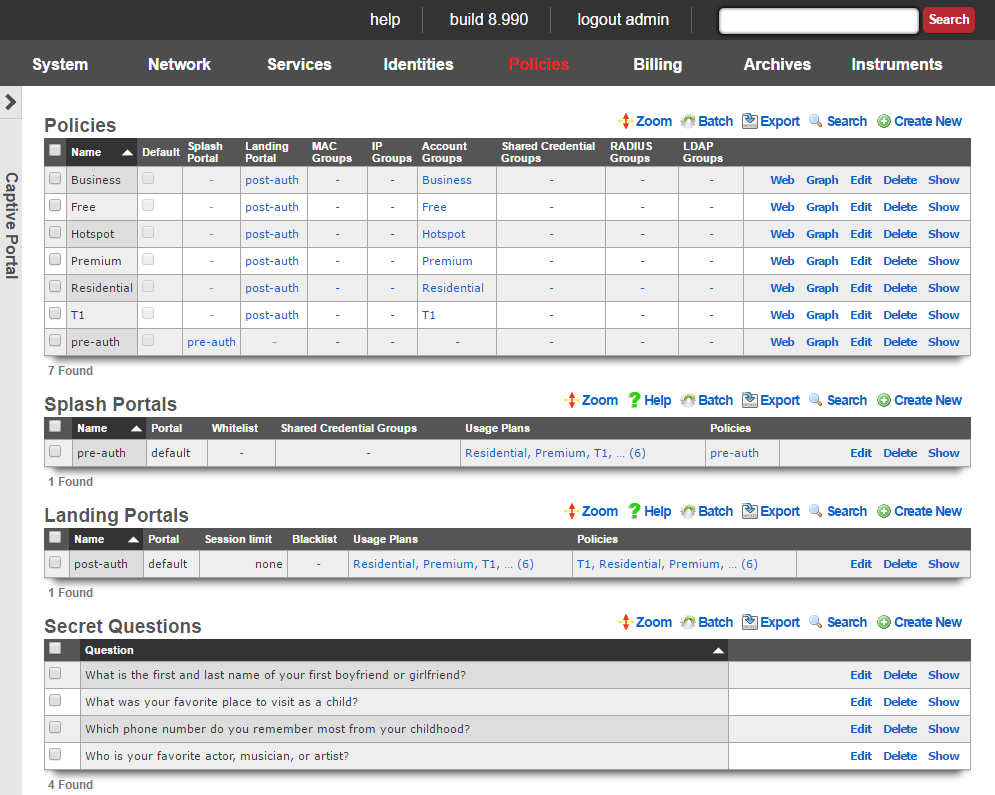 Figure: The Captive Portal view showing Policies, Splash Portals, Landing Portals, and Secret Questions scaffolds.
The initial forced browser redirect is configured via the splash portals scaffold. Once a device has acquired an IP address via DHCP or via static assignment, the rXg enforces policy based on the group membership. In a typical scenario, most devices will initially be members of an IP group that spans the entire subnet from which the IP address of the device is assigned. To enable the forced browser redirect, the IP group must be configured with a policy that is associated with a splash portal record.
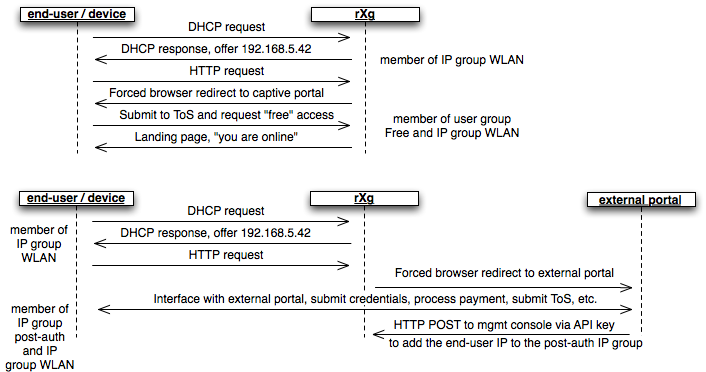 Figure: Sequence diagram showing captive portal authentication flow. Top: local portal with TOS acceptance. Bottom: external portal with API callback to update group membership.
Once redirected to the captive portal specified in the splash portal record, the end-user must present credentials to access the WAN. The supplied credentials determine the new group that the device will be a member of. In a typical scenario, the end-user will supply a username / password pair or a token code that is associated with a account group. If external identification is used, the device will be associated with a RADIUS group or LDAP group.
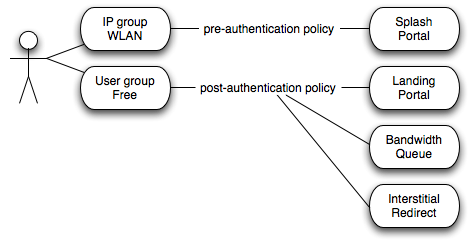 Figure: Policy association diagram. Pre-authentication policy links IP group to Splash Portal. Post-authentication policy links User group to Landing Portal plus additional enforcement mechanisms.
To complete the captive portal configuration, the new group must be associated with a policy that is linked to a landing portal. In addition, the new group must be of a higher priority than the first group. In a typical scenario, the new group is associated with a policy that is linked to several other enforcement mechanisms (e.g., bandwidth queues, multiple uplink controls, web experience manipulation, etc.).
Splash Portals vs Landing Portals
The captive portal system uses two types of portal configurations that work together:
| Portal Type | When It Applies | Purpose | Key Settings |
|---|---|---|---|
| Splash Portal | Before authentication | Controls the login experience for unauthenticated users | Whitelist, automatic login, TOS, accepted credentials |
| Landing Portal | After authentication | Controls the post-login experience for authenticated users | Session restrictions, idle timeout, redirect URL, blacklist |
Typical flow: 1. Device connects to network assigned to IP group with Splash Portal policy 2. User redirected to Splash Portal enters credentials 3. Credentials validated device moves to Account/RADIUS/LDAP group with Landing Portal policy 4. User experiences Landing Portal settings (session limits, post-login redirect, etc.)
 Figure: Splash Portals scaffold listing showing portal assignment, whitelist, shared credentials, usage plans, and policy associations.
Splash Portals
Splash portals define the pre-authentication settings that are used when forced browser redirect is in effect.
The name field is an arbitrary string descriptor used only for administrative identification. Choose a name that reflects the purpose of the record. This field has no bearing on the configuration or settings determined by this scaffold.
The note field is a place for the administrator to enter a comment. This field is purely informational and has no bearing on the configuration settings.
The portal field determines the local captive portal that will be used for pre-authentication. The default RG Nets portal is always available as a choice from this list. Additional choices for the portal field are determined by the custom portals scaffold on the portals view of the system module.
Setting the remote checkbox and specifying a remote URL enables forced browser redirect to a captive portal web application that is stored on a remote host. Using a remote host for the pre-authentication pages is not recommended for typical deployment scenarios due to increased latency and complexity. In most clustering and multi-unit central management scenarios, a customized local pre-authentication portal contains hyperlinks to a centrally served portal for unified end-user credential management.
The following substitutions are available for the remote URL :
- %url% - the original URL (desired URL) that the end-user surfed to
- %rxg% - the name of the rXg that executed the redirection
- %ip% - the IP address of the end-user
- %mac% - the MAC address of the end-user
- %wan_ip% - the WAN NAT IP address of the end-user
- %wan_mac% - the MAC address of the interface for the Uplink the user is assigned to
- %wan_mac_last6% - The last 6 characters of the WAN MAC, excluding colons
- %hostname% - the DHCP client hostname of the end-user
- %group% - the name of the group that the end-user was a member of during redirection
- %policy% - the name of policy that the end-user experienced during redirection
- %landing_portal% - the name of the splash portal that the end-user was presented
- %portal_controller% - the name of the custom portal controller that the end-user was presented
- %logged_in% - true or false depending on whether or not the end-user is logged in
- %random_number% - a random eight digit integer
- %error% - an error string
- %notice% - a notice string
- %exception% - an exception string
- %action% the custom portal action that the end-user was redirected to
- %redirect_action% - the custom portal action/view that the end-user was redirected to after processing the request
- %vlan% - client VLAN tag, if any
- %ap_mac% - MAC address of the AP to which the client is currently connected
An example of a remote URL that utilizes substitution is: http://central.srvr/port_app/?orig_url=%url%&subscriber_ip=%ip%
The whitelist field enables the operator to choose one or more wan targets that list IP addresses and/or DNS entries of websites that are to be exempt from the forced browser redirection policy configured by this splash portal record. There are many common uses for the whitelist. When credit card payment gateways are used, the payment gateway servers may need to be whitelisted in order for payments to be processed. If pay-per-click advertising is placed on the pre-authentication portal, the advertising destinations must be in the whitelist to enable proper click through and tracking. Cluster configurations require the cluster controller to be in the whitelist to enable unified user management. In addition, many operators use the whitelist to enable unfettered access to a handful of websites of their choosing.
Automatic Login
The automatic login settings control how the rXg handles accounts that have the automatic login flag enabled. These settings allow recognized devices to connect without manually entering credentials at the captive portal.
There are two distinct mechanisms for automatic login: background mode and portal mode. Understanding the difference is critical for proper configuration.
| Mode | When It Triggers | User Experience | Best For |
|---|---|---|---|
| Background mode | Continuously polls the network for known MAC addresses | User typically never sees the portal - session created automatically in the background | IoT devices, game consoles, devices that never open a browser |
| Portal mode | Only when user visits the captive portal URL | User is redirected to portal, then auto-logged in before seeing login form | Browser-based devices where you want seamless re-authentication |
Background Mode
Background mode continuously polls the ARP table and/or DHCP leases (as defined by the MAC to IP mapping setting in the device options) looking for devices with MAC addresses that match accounts with automatic login enabled. When a match is found, the rXg automatically creates a login session without the end-user ever experiencing forced browser redirection.
| Setting | Behavior |
|---|---|
| disabled | No background polling. Devices must visit the portal to authenticate. |
| MAC | Poll for known MAC addresses and auto-create sessions for matching accounts. |
When to disable background mode: - When deploying behind NAT devices or firewalls that present a single MAC address for multiple users (e.g., FortiGate, other upstream routers) - In extremely high load environments where polling overhead is a concern - When deploying with wireless infrastructure that spoofs or randomizes MAC addresses
Portal Mode
Portal mode triggers only when a device actually visits the captive portal URL. If the device matches an account with automatic login enabled, the rXg can automatically create a session and/or log the user into the portal.
| Setting | Identifies By | Creates Session | Logs Into Portal | Best For |
|---|---|---|---|---|
| disabled | N/A | No | No | Force manual credential entry every time |
| MAC (create session only) | MAC address | Yes | No | High-transient environments (hotspots, hotels, conferences) |
| MAC (create session, login to portal) | MAC address | Yes | Yes | Fixed broadband with static user population |
| MAC AND cookie | MAC + browser cookie | Yes | Yes | High security - requires same browser as previous login |
| MAC OR cookie | MAC or browser cookie | Yes | Yes | Users who switch between wired/wireless (MAC changes) |
| cookie | Browser cookie only | Yes | Yes | Environments where MAC addresses are unreliable (NAT, MAC spoofing) |
Choosing the right portal mode: - Use cookie mode when devices connect through NAT or firewall devices that mask the true MAC address - Use MAC modes when you have direct Layer 2 visibility to end-user devices - Use disabled when you want users to enter credentials on every visit
The WISPr settings are arbitrary strings that pass meta-data to WISPr client software. Consult the documentation that is provided by wireless service aggregators for the proper settings for these fields.
The TOS checkbox enables a terms of service requirement for the pre-authentication captive portal.
The policy field relates this record to a set of groups through a policy record.
The shared credential groups field determines which shared credential logins are to be accepted by this portal.
The usage plans field determines which usage plans are to be displayed and accepted by this portal.
 Figure: Landing Portals scaffold listing showing portal assignment, session limits, blacklist, usage plans, and policy associations.
Landing Portals
Landing portals define the post-authentication settings that are used when forced browser redirect is in effect.
The name field is an arbitrary string descriptor used only for administrative identification. Choose a name that reflects the purpose of the record. This field has no bearing on the configuration or settings determined by this scaffold.
The note field is a place for the administrator to enter a comment. This field is purely informational and has no bearing on the configuration settings.
The portal field determines the local captive portal that will be used for post-authentication. The default RG Nets portal is always available as a choice from this list. Additional choices for the portal field are determined by the custom portals scaffold on the portals view of the system module.
Setting the remote checkbox and specifying a remote URL enables post-login browser redirect to a captive portal web application that is stored on a remote host. The same URL substitutions available for Splash Portals (see above) are also available here.
An example of a remote URL that utilizes substitution is: http://central.srvr/port_app/?logged_in=%logged_in%&subscriber_ip=%ip%
The blacklist field enables the operator to choose one or more wan targets that list IP addresses and/or DNS entries of websites that are always to be redirected to the captive portal web application selected in this landing portal record. In a clustering scenario, it may be useful to redirect certain web accessible cluster resources back to the post authentication portal for load balancing. In an advertising scenario, it may be useful to redirect access for particular websites to the local captive portal web application so that focused local content is delivered over generic content.
Session Restrictions
The session restrictions settings control the length of the end-user session as well as the automatic logout mechanism.
| Setting | Description |
|---|---|
| restriction | Maximum time a user can be logged in before requiring re-authentication. |
| unrestricted | Check to allow unlimited login time (no session expiration). |
| idle timeout | Time of inactivity before automatic logout. When the user is logged out, usage minute depletion stops. |
| no idle timeout | Check to disable automatic logout on idle. Usage minutes deplete regardless of traffic. |
| grace time | Short period allowing users to remain logged in while selecting and purchasing a usage plan. |
| redirect URL | URL to redirect user to after successful login. Leave blank to show the landing portal success page. |
| original | Check to redirect user to their originally requested URL instead of redirect URL. |
Note: These settings may be overridden by other rXg configurations. For example: - RADIUS Class attribute may specify session length for external authentication - Accounts with automatic login enabled will not see the portal again until usage minutes are exhausted
The policy field relates this record to a set of groups through a policy record.
The usage plans field determines which usage plans are to be displayed and accepted by this portal.
Users Behind NAT or Upstream Devices
The rXg identifies end-users primarily by their MAC address, which is obtained from the ARP table or DHCP leases. This design assumes that each end-user device is directly Layer 2 connected to the rXg, allowing the rXg to see the actual MAC address of each device.
Direct LAN Connection (Recommended)
In the recommended deployment topology, end-user devices connect to access points or switches that are Layer 2 connected to the rXg. The rXg observes each device's unique MAC address and can accurately identify individual users for authentication and policy enforcement.
+----------------------+
| User A |
| MAC: aa:bb:cc:11:22:33 |----+
+----------------------+ |
| +------------+ +-----------+
+----------------------+ +----->| | LAN | |
| User B |---------->| Switch |------>| rXg |-----> WAN
| MAC: dd:ee:ff:44:55:66 |-------->| or AP | L2 | |
+----------------------+ +----->| | +-----------+
| +------------+ |
+----------------------+ | v
| User C |----+ +-------------------------------+
| MAC: 11:22:33:77:88:99 | | Captive Portal |
+----------------------+ | Sees: |
| aa:bb:cc:11:22:33 --> User A |
| dd:ee:ff:44:55:66 --> User B |
| 11:22:33:77:88:99 --> User C |
+-------------------------------+
In this configuration, the captive portal correctly identifies each user by their unique MAC address. MAC-based automatic login functions as expected, and each user maintains an independent session.
Portal Traffic Through Northbound NAT Device (Problematic)
When the rXg connects to the internet through a northbound firewall using cgNAT or private WAN addresses, and the portal DNS (e.g., wi.fi) resolves to the firewall's public IP address, portal traffic exits the rXg, reaches the firewall, and hairpins back to the rXg. In most configurations, this traffic arrives with the firewall's MAC and IP address instead of the original user's. The IP address is rewritten by the firewall's NAT/SNAT, while the MAC address changes because the firewall is the Layer 2 next-hop when returning the traffic.
+----------------------+
| User A |----+
| MAC: aa:bb:cc:11:22:33 | |
+----------------------+ |
| +------------+ +-------+ +------------+
+----------------------+ +----->| | LAN | | WAN | Firewall |
| User B |---------->| Switch |------>| rXg |----->| (NAT) |-> Internet
| MAC: dd:ee:ff:44:55:66 |-------->| or AP | | |cgNAT | |
+----------------------+ +----->| | +-------+ +------------+
| +------------+ ^ Public IP: 203.0.113.1
+----------------------+ | | (wi.fi resolves here)
| User C |----+ |
| MAC: 11:22:33:77:88:99 | |
+----------------------+ +----------+----------+
| Portal request for |
| wi.fi (203.0.113.1) |
| goes OUT to firewall|
| and comes BACK with |
| firewall's MAC/IP |
+---------------------+
Captive Portal Sees:
fe:dc:ba:98:76:54 --> ?
fe:dc:ba:98:76:54 --> ?
fe:dc:ba:98:76:54 --> ?
(All users appear as firewall's MAC)
In this configuration, the rXg cannot distinguish between individual users because they all appear to have the same MAC address. This commonly occurs when:
- Portal DNS resolves to a public IP address on a northbound firewall, causing traffic to hairpin back through the firewall
- The rXg WAN interfaces use cgNAT or private address space behind an upstream NAT device
Why Not Point Portal DNS to the rXg cgNAT Address?
Pointing the portal DNS to the rXg's cgNAT WAN address would avoid the hairpin NAT problem, as traffic would arrive directly at the rXg and the original client MAC address would be visible. However, this approach has significant drawbacks:
SSL/TLS certificate issues: Publicly trusted certificates cannot be issued for private or cgNAT (RFC 6598 - 100.64.0.0/10) IP addresses. Users would see certificate warnings or errors in their browsers, which degrades the user experience and may prevent portal access on devices with strict certificate validation.
Multiple uplinks: When the rXg has multiple cgNAT uplinks, determining which IP address the portal DNS should resolve to becomes problematic. Users connected via different uplinks would need to reach different addresses.
External access: cgNAT addresses are not routable from the public internet. If users need to access portal features (such as account management) from outside the network, they would be unable to reach the portal.
For these reasons, when the portal must be accessible via a public IP address on a northbound NAT device, the recommended approach is to use cookie-based authentication as described below.
Symptoms of Shared MAC Address Issues
When multiple users share the same apparent MAC address, the following problems may occur:
- The first user logs in successfully, but subsequent users are automatically logged in as the first user due to MAC-based automatic login
- Subsequent users receive errors indicating the device is already registered to another account
- Only one user can maintain an active session at a time, with new logins terminating existing sessions
- All users are assigned to the same account group regardless of their individual credentials
Lock Devices Feature and Shared MAC Environments
The lock_devices setting on accounts and usage plans binds a device's MAC address to a specific account, preventing that MAC from being used with other accounts. This feature is designed to prevent users from avoiding disconnect fees or late payments by creating new accounts with the same device.
In standard deployments where each user has a unique MAC address visible to the rXg, lock_devices works as intended:
- User A signs up with
lock_devicesenabled on their account or usage plan - Their MAC address (e.g., aa:bb:cc:11:22:33) is bound to their account
- If User A sells their router to User B, User B cannot create a new account with that MAC - they must contact support to release the device
However, in shared MAC environments (such as hairpin NAT scenarios), lock_devices causes complete service disruption:
- When any user with
lock_devicesenabled authenticates, the shared MAC address (the firewall's MAC) becomes locked to that user's account - All other users will be blocked from logging in because the MAC is already locked to someone else
- Users will see "device locked" errors at the portal and be unable to authenticate
| Deployment | Each user has unique MAC? | lock_devices safe? |
|---|---|---|
| rXg direct to internet | Yes | Yes |
| rXg behind NAT, portal resolves to rXg LAN/WAN IP | Yes | Yes |
| rXg behind NAT, portal resolves to upstream NAT device | No - all share NAT device MAC | No |
Recommendation: When deploying in shared MAC environments, ensure that lock_devices is disabled on all accounts and usage plans. This setting can be configured at the account level or inherited from the usage plan.
Recommended Configuration for Shared MAC Environments
When deploying the rXg in environments where users may share a common MAC address, the portal automatic login and background automatic login settings must be configured to avoid MAC-based identification.
Solution 1: Cookie-Based Authentication
Set the portal mode in the splash portal to cookie instead of any MAC-based option. With this configuration:
- Users must enter credentials on their first visit to the captive portal
- The rXg stores a session cookie in the user's browser upon successful authentication
- Returning users are identified by this browser cookie rather than their MAC address
- Multiple users behind the same NAT device can each maintain separate sessions as long as they use different browsers or devices
Additionally, set background mode to disabled to prevent the background automatic login process from associating the shared MAC address with a single account.
Solution 2: Shared Credential Groups
For environments where individual user accounts are not required, shared credential groups provide an alternative approach. Configure a shared credential group with the following settings:
- Set the credential to a common password or leave blank for free access
- Set unlimited simultaneous sessions or configure max simultaneous sessions to accommodate the expected number of concurrent users
- Each user who authenticates with the shared credential receives a unique login session with a randomly generated login identifier
This approach is appropriate for guest networks, public hotspots, or venues where individual user tracking is not required.
Solution 3: Disable Automatic Login
Set both portal mode and background mode to disabled. This configuration requires users to enter their credentials each time they access the network. While less convenient for end-users, this approach ensures that MAC addresses are never used for automatic session creation and eliminates the possibility of users being incorrectly associated with another user's account.
Solution 4: LAN-Based Portal Address
If the hairpin NAT problem is the root cause of shared MAC addresses, pointing the portal DNS (e.g., wi.fi) to a LAN address on the rXg eliminates the issue entirely. When clients connect to the portal via a LAN address, traffic remains on the local network and the rXg observes each client's actual MAC address directly from the ARP table.
To implement this solution:
- Configure the portal DNS record (e.g., wi.fi) to resolve to a LAN IP address on the rXg that all clients can reach
- Ensure this LAN address is accessible from all VLANs or network segments where clients reside
- MAC-based automatic login modes will function correctly since the rXg sees authentic client MAC addresses
Certificate Warning Considerations
This approach introduces SSL/TLS certificate complications that operators must carefully evaluate:
Publicly trusted certificates cannot be issued for private IP addresses. Certificate authorities will not issue certificates for RFC 1918 (10.0.0.0/8, 172.16.0.0/12, 192.168.0.0/16) or RFC 6598 cgNAT (100.64.0.0/10) address space.
Users will see certificate warnings when accessing the portal. Modern browsers display prominent security warnings for sites with untrusted certificates, which may alarm users or prevent access entirely on devices with strict certificate validation (such as some mobile devices or managed enterprise endpoints).
Captive portal detection may fail on some devices. Operating systems that perform HTTPS-based captive portal detection may not properly trigger the sign-in prompt when certificate validation fails.
Self-signed or internal CA certificates can mitigate warnings for managed device fleets, but require certificate distribution to all client devices - which is impractical for guest networks or BYOD environments.
This solution is most appropriate when:
- The network serves a controlled device population where certificates can be distributed
- Users are technically sophisticated and can accept certificate warnings
- The degraded user experience from certificate warnings is acceptable compared to the complexity of cookie-based authentication
- External portal access from outside the network is not required
Automatic Login Mode Reference
The following table summarizes when each automatic login mode is appropriate:
| Mode | MAC Required | Cookie Required | Appropriate Use Case |
|---|---|---|---|
| MAC AND cookie | Yes | Yes | High security environments with direct L2 connection to the rXg |
| MAC OR cookie | Either | Either | Users who may switch between wired and wireless connections |
| MAC (create session, login to portal) | Yes | No | Fixed broadband environments with static user population and direct L2 connection |
| MAC (create session only) | Yes | No | High transient environments with direct L2 connection |
| cookie | No | Yes | Users behind NAT devices, shared MAC environments, or where browser cookies are retained |
| disabled | No | No | Force credential entry on every visit; required when cookie retention is unreliable |
Portal Mods
Portal Mods allow the operator of the rXg to modify an existing portal, content can be modified by selecting the view and adding HTML content that will replace the view. Images can also be replaced as well. This allows the operator to easily change images and specify the login options for example.
The name field is an arbitrary string descriptor used only for administrative identification. Choose a name that reflects the purpose of the record. This field has no bearing on the configuration or settings determined by this scaffold.
The note field is a place for the administrator to enter a comment. This field is purely informational and has no bearing on the configuration settings.
The Custom field allows the operator to select the custom portal the Portal Modification record applies to.
The Splash and Landing fields allow the operator to select which Splash and Landing portals the record will apply to. This allows the operator to use the same portal but have different changes to either the Splash or Landing side of the portal(s).
The Splash field allows the operator to specify the Splash portal(s) the Portal Modification will apply to.
The Landing field allows the operator to specify the Landing portal(s) the Portal Modification will apply to.
The View field selects the view in the portal that will be modified.
The HTML(ERB) field, contains the code that will modify the selected view.
The Image field, is used to upload an image to replace an existing image in the portal, or can be used to upload an image to be used in the HTML(ERB) field.
The Image to Replace field combined with the Image field allows the operator to replace and existing image on the portal with a custom image.
For examples of how to use Portal Mods see the Portal Customization::Portal Modifications section of the manual.
 Figure: Portal Modifications scaffold showing columns for Name, Splash, Landing, Custom portal, View, Image, and HTML(ERB) content.
WiFi Profiles
WiFi Profiles allow the operator of the rXg to configure profiles that are downloaded to client devices when they successfully connect to the network. The profile contains the information needed to connect to the network and can install a certificate on the device if configured.
 Figure: WiFi Profiles scaffold listing showing Name, SSID, Default, Auto Download, Server Certificate, and Landing Portals columns.
| Field | Description |
|---|---|
| Name | Arbitrary identifier for administrative purposes. |
| SSID | The SSID that the client device will connect to after downloading the profile. |
| Default | If checked, this WiFi Profile applies to all landing portals. |
| Auto Download | If checked, automatically downloads the profile to the client device after successful login. |
| Server Certificate | The SSL certificate to include with the profile. |
| Landing Portals | Specifies which landing portal(s) will present this WiFi Profile when a client successfully connects. |
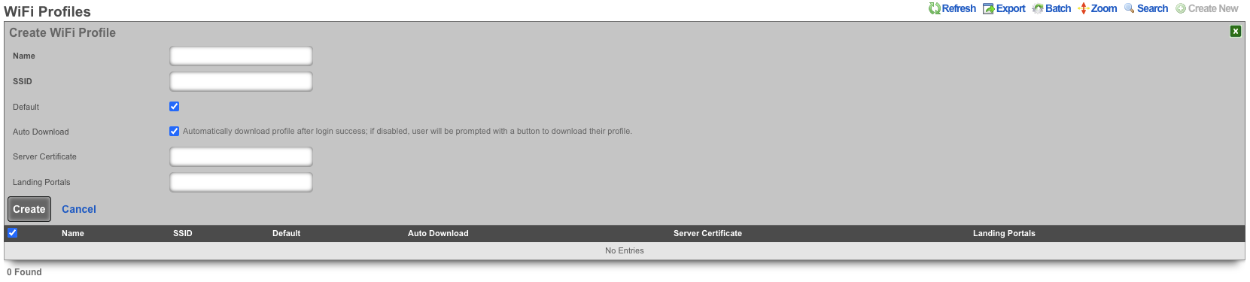 Figure: Create WiFi Profile form showing configuration fields including Auto Download option to automatically download profile after login success.
Content Filtering
Content filtering enables the operator to deny the transit of web pages that contain textual media that matches filters specified by the operator.
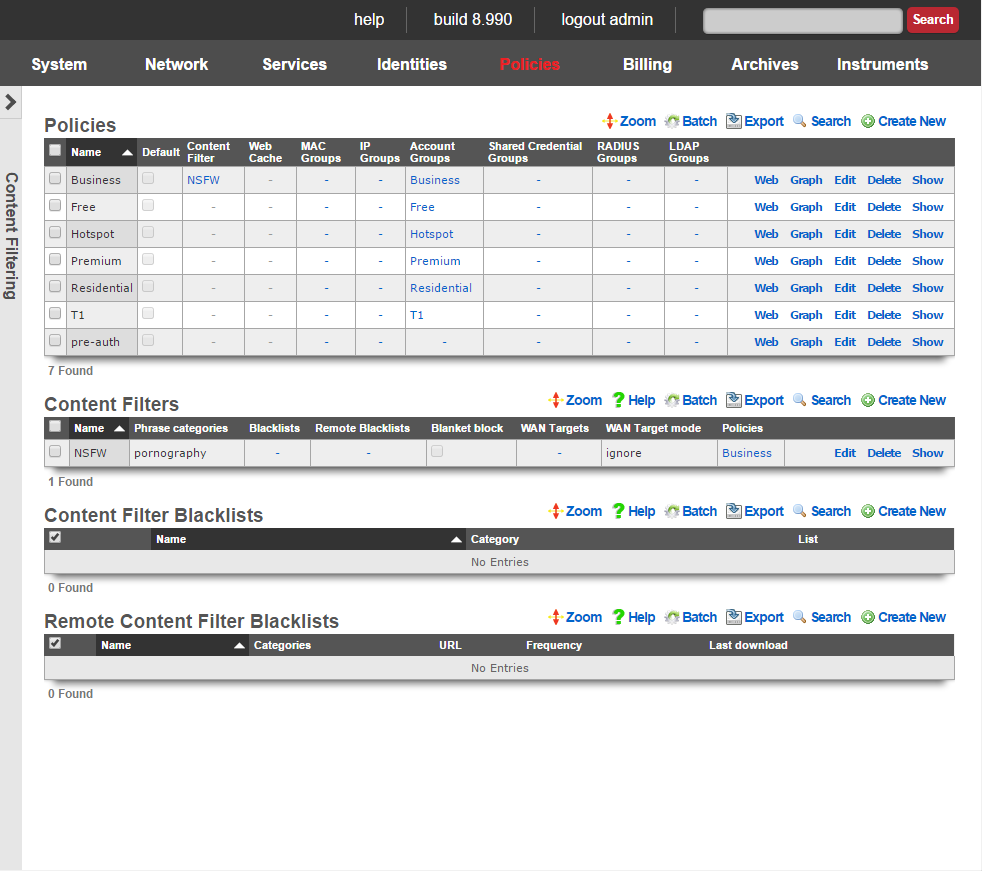
The content filtering mechanism allows the operator to specify independent content filtering policies for different groups. The intention is to allow the operator to generate direct revenue from the application of filtering or for enabling unfettered Internet access.
For example, residential customers may be offered a porn blocking premium service while business customers receive unfettered access. The converse may also be useful where advertising supported hotspot access is restricted from accessing all known objectionable content and a paid upgrade enables unfettered access to the Internet.
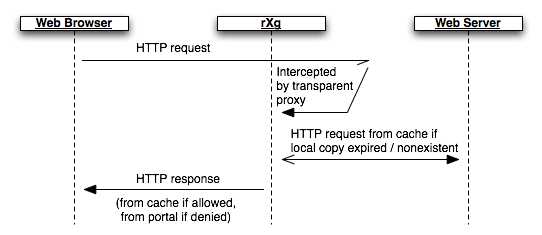
In order for content filtering to operate, the rXg must have access to the web page that the end-user requests. This is accomplished by enabling the transparency web proxy which intercepts end-user HTTP requests. If locally cached copies of the content are expired or out of date, a new copy is requested from the server. The rXg content filtering mechanism then operates on the local copy of the end-user requested web page. If the requested web page does not match the profile configured by the operator, an HTTP response containing the requested page is then transferred to the end-user.
Content Not Permitted
When an end-user attempts to access prohibited content, they are redirected to /content_filter view of the captive portal. By default, this view displays a denied graphic along with the desired URL, the reason for the denial and the categories that were matched. This view of the portal may be customized to any format that the operator desires.
The /content_filter view of the portal is an integral part of revenue generation through content filtering. For example, if the content filter is being applied to limit access for to end-users in an advertising supported group, the /content_filterview should be customized to advertise the availability of unfettered access for a fee. If the content filter is enabled as part of a threat management package, affiliate program links to security software downloads (e.g., McAfee, Norton, etc.) would be appropriate.

Content Filters
The content filters scaffold presents the fields necessary to configure the rXg policy enforcement engine to deny access to HTTP responses containing operator specified classes of content.
The name field is an arbitrary string descriptor used only for administrative identification. Choose a name that reflects the purpose of the record. This field has no bearing on the configuration or settings determined by this scaffold.
The note field is a place for the administrator to enter a comment. This field is purely informational and has no bearing on the configuration settings.
The filtering section configures the global behavior and filtering sources for this content filter.
The lists and remote lists fields specify the lists of URLs and domains that will be pass or denied in this content filter. The lists and remote lists are configured using the scaffolds below.
The blanket block checkbox is used to place the content filter into whitelist mode. All web pages except those specified in the whitelists are denied when this mode is enabled.
The denied portal action specifies the action on the captive portal that will be called when prohibited content is requested.
The WAN targets field limits the effect of the content filtering settings defined by this record to traffic that is destined to the IP addresses or DNS names listed in the selected WAN targets. By default, a content filter record affects all HTTP traffic matched by the policy regardless of WAN origin / destination. Setting a WAN target causes the breadth of the content filter to be limited to the specified hosts in the manner specified by the WAN target mode.
The content filter only manipulates HTTP traffic by default. Setting the intercept SSL/TLS checkbox enables the content filter to manipulate encrypted HTTPS traffic in the same manner as if it were regular HTTP traffic.
The safesearch checkbox causes the content filter to always enable safe-search mode in search engines. This feature requires the intercept SSL/TLS feature to be enabled because almost all search engines run over HTTPS.
The YouTube EDU ID field configures the content filter to add the specified data to all traffic to/from YouTube. This mechanism enables server-side content filtering for YouTube. Use of this feature requires educational facility registration with Google / YouTube.
The tunnel detection field configures the content filter to look for IP tunneling over HTTPS. The detection may be configured in real-time (higher overhead) or background (higher performance). The operator may also choose to log the presence of HTTPS tunneling rather than denying this behavior outright.
The enhanced HTTPS security checkbox configures the content filter to block access to HTTPS sites that fail to present a SSL certificate that is signed by a trusted third-party.
The policy field relates this record to a set of groups through a policy record.
Remote Content Filter Lists
Entries in the remote content filter lists scaffold are used to configure the parameters needed to periodically download third party maintained lists. The de facto standard list format is a compressed archive (.tar.gz) file that extracts into a series of subdirectories named by blocking category. Each entry in this scaffold configures the periodic download of a compressed archive (.tar.gz) file. Multiple archive files may be used in a single content filter policy enforcement.
The name field is an arbitrary string descriptor used only for administrative identification. Choose a name that reflects the purpose of the record. This field has no bearing on the configuration or settings determined by this scaffold.
The categories field allows the operator to choose from one or more groups of URLs and/or domains to include in this remote content filter list definition. This field is only useful when the URL of this remote content filter list refers to a gzipped tarball archive. The names of subdirectories present in the archive are presumed to be the names of blocking categories and show up in this field.
When a remote content filter list is created, this field will be empty. Once the list is downloaded and extracted for the first time, the subdirectories will then appear in this field. After creating a remote content filter list it is necessary to edit the record and select the desired categories in order for proper operation. Initial download time (and hence, population of the categories field depends upon the size of the archive file as well as the speed of the network connection between the server addressed by the URL.
When Custom is selected in the Provider field it allows the operator to specify a custom URL to a list maintained by the operator or another source.
The URL field contains the URL of the file that the rXg will download. The target file is expected to be in one of two formats: .tar.gz archive or a .txt plain text file. If the file is a gzipped tarball archive (.tar.gz), it is expected to extract multiple subdirectories named by category, each of which contains a "urls" file containing a list of specific URLs to list, and/or a "domains" file containing a list of domains (i.e., entire sites) to list. If the file is plain-text, it is expected that the file is a list of domains and URLs to list. The rXg supports lists formatted for ufdbGuard,DansGuardian and SquidGuard. Well known providers include URLfilterDB, Shalla Listand Squidblacklist.org.
The frequency defines the periodicity with which the rXg will download the list archive file from the URL specified. The request to download a new remote content filter list occurs immediately after the create button is clicked. The periodicity of subsequent downloads are determined by the value of specified in this field. The downloading of subsequent updates will always occur between 4 and 5 AM local time.
The note field is a place for the administrator to enter a comment. This field is purely informational and has no bearing on the configuration settings.

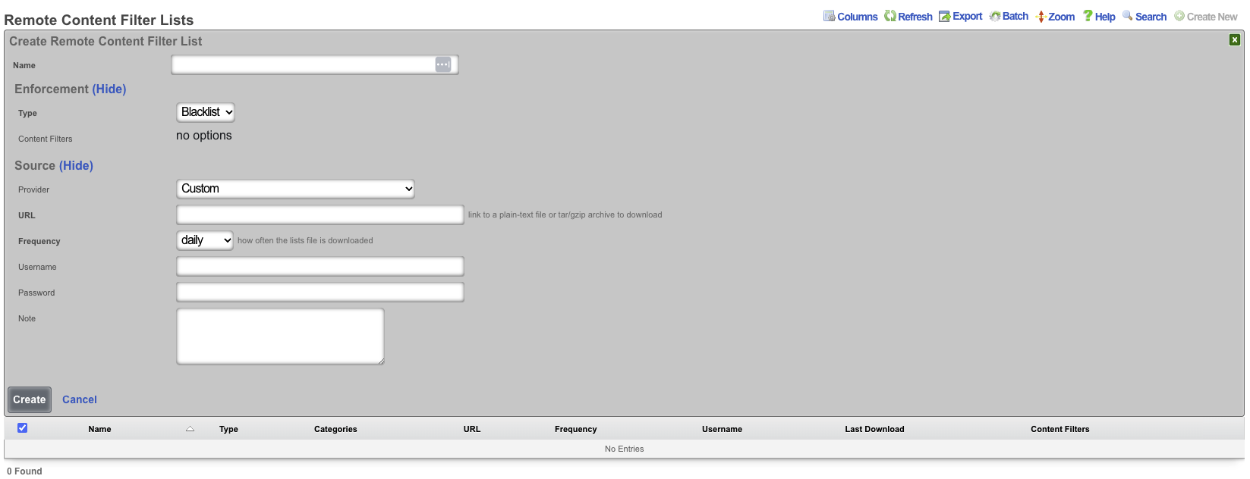
Example Content Filter Configuration
In this example we will configure content filter that will block adult content. Navigate to Policies::Content Filtering and create a new Remote Content Filter List.

Give it a name, type should be set to Blacklist. For this example we will use the UT1 Provider. Set the Frequency for often it downloads the list, for UT1 we do not need a username/password, click create.
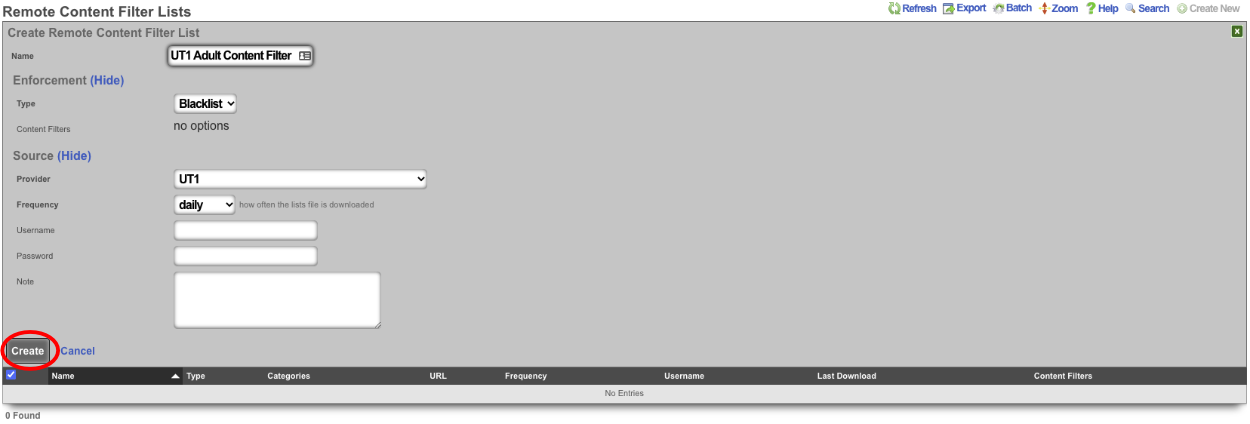
The system will download the remote list, after waiting about a minute we can edit the Remote Content Filter List we created. The Categories section should now list the categories that can be filtered. For this example adult, dating, and lingerie is selected. Click update.
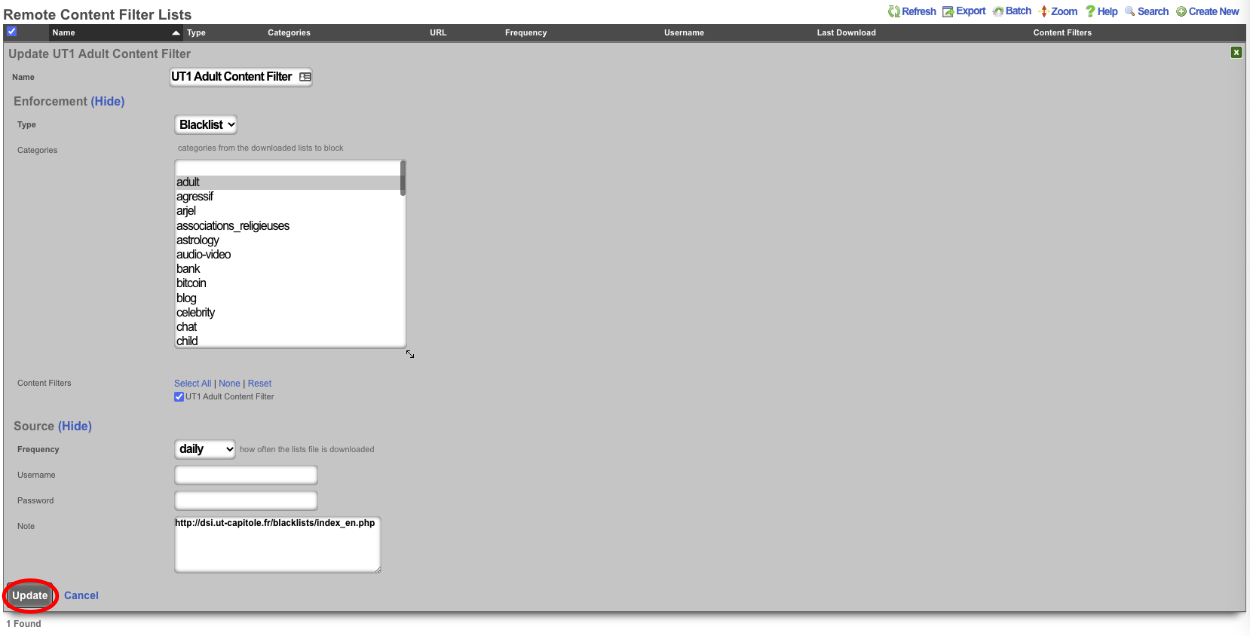

Next create a new Content Filter.

Give it a name, leave Filter DNS checked, we can change how it lookup response behaves by changing the response, for this example I will leave it on Block w/ NXDOMAIN (return name does not exist). Under Content Lists verify that the Remote list created in the previous step is checked. Lastly select the polices the filter should apply to, and click create.
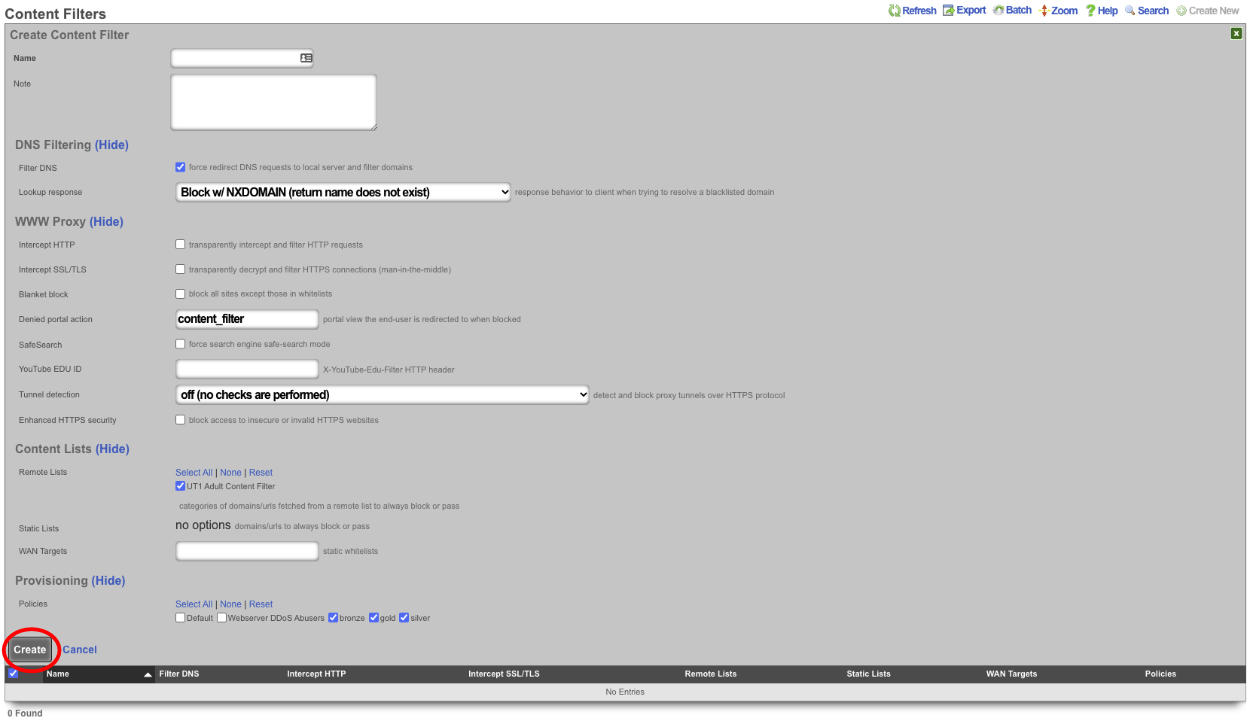
A custom Content Filter list can be hosted on any accessible web server. The rXg can be configured to use this Custom Content Filter (plain-text or tar/gzip) file by creating a new Remote content Filter List and selecting Custom for the Provider and populating the URL with the direct link to the file. The content filter can be set to synchronize as a daily, weekly, or monthly recurrence.
To host the Custom Content Filter on a rXg device, the filter list can be uploaded to the /space/rxg/console/public folder on the host.
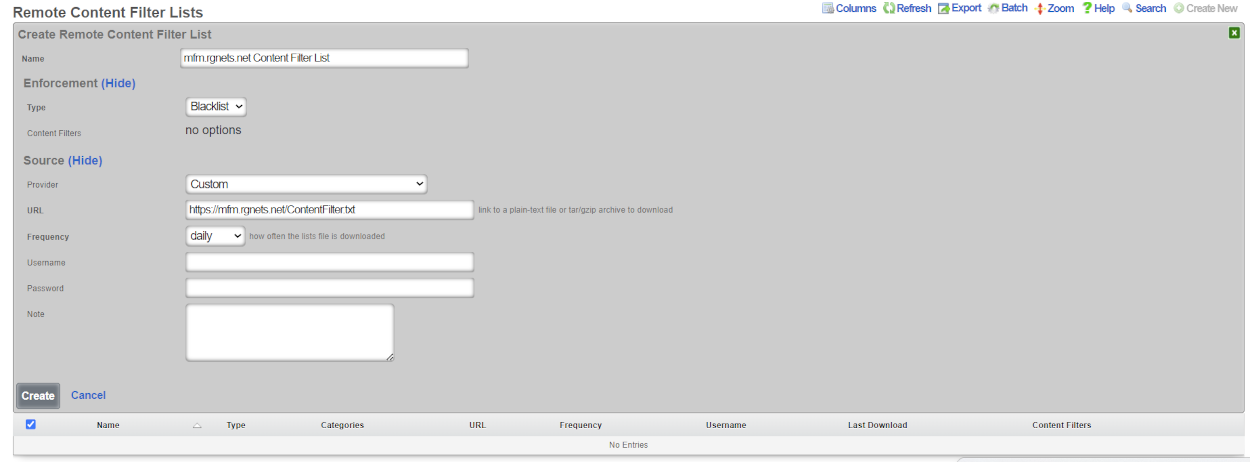
A content filter list is contained within a tar.gz file. The root of the file contains a set of directories which serve as categories for the filter list. The categories are used to select specific types of content to filter from the broader list. Inside each folder there are one or more extensionless text files which contain lists of domains and URLs. The file domains consists of fully qualified domain names for entire websites to be used in a content filter list. The file urls consists of full paths to pages which will be used in the content filter list.
File Structure:
Domain List:
URL List
Event Triggers
The event triggers view displays the scaffolds that configure the events that define transient group membership policy.

The transient group membership mechanism temporarily changes the group membership of an end-user. Since group membership determines which policies are enforced, event triggers are a simple way to temporarily change the end-user experience.
The possibilities of what can be accomplished through transient group memberships are endless. For example, when max connections triggers can be configured to establish transient IP group membership for abusive behavior. The transient IP group may then be associated with a splash portal policy to quarantine the user, a packet filter policy to blackhole the user or a bandwidth queue policy to throttle the user for some specified period of time.
The space-time triggers and quota triggers are typically used for end-user communication and upselling of premium services. A simple way to utilize this is to create a quota trigger that triggers on high utilization and places these end-users into a group. This transient group can then be associated with a policy that is linked to interstitial redirection to a page that communicates with the end-user about their high utilization and offers them the opportunity to buy more. In addition, the interstitial page might offer the end-user the ability to switch to a plan that has higher bandwidth rates.
The DPI triggers enable the operator to apply transient group memberships to subsets of the end-user population that match any profile that may be described in the form of a deep-packet inspection rule. This may be used to detect specific kinds of applications (e.g., BitTorrent, VoIP, etc.) or specific usage patterns (e.g., the presence of a streaming media center or a NAT router). The remote DPI signatures capability enables the operator to deploy DPI triggers as a malware egress filtering mechanism.
All triggers are configured to enforce upon policy and send matches to transient group memberships. End-users are sourced from the policies associated with trigger record. End-users that match the trigger enforcement are then destined for the configured transient group memberships.
Connections Triggers
Records in the connections triggers scaffold define the configuration of the rXg behavioral intrusion protection system.
The name field is an arbitrary string descriptor used only for administrative identification. Choose a name that reflects the purpose of the record. This field has no bearing on the configuration or settings determined by this scaffold.
The policy field relates this record to a set of groups through a policy record.
The note field is a place for the administrator to enter a comment. This field is purely informational and has no bearing on the configuration settings.
The max connections field specifies the number of simultaneous connections that an end-user or device can utilize before the behavioral IPS is triggered. The number of connections is determined by counting the number of TCP and UDP streams that transit to the WAN through the rXg. Currently observed active connections, recently attempted connections (regardless of whether or not they actually connected) as well as recently closed connections are all counted. How long recent connection attempts and recently closed connections are counted is determined by the setting the state timeout in the network options.
The operator should tune value for the max connections to a value that best fits the nature of the end-users on the LAN. Many applications utilize multiple TCP and/or UDP streams in parallel. For example many web browsers will open several connections to a web server in order to download multiple assets referenced by a web page at the same time. Cloud computing applications tend to have software hooks that keep several background connections active at all times. Thus a value too small will trip a very large number of false positives.
Setting the max connections field to a value that is overly large prevents the behavioral IPS from detecting malicious software that is designed to avoid attracting attention. Worms that rapidly proliferate by opening as many connections per second as the infected CPU will support have given way to worms that attempt to proliferate under the radar. Many P2P software systems have a setting that configures the maximum number of simultaneous connections whose purpose is to help prevent the software from being detected. Thus it is important to tune the max connections field that is small enough to allow the kinds of applications present on the network while detecting malicious activity.
The behavioral IPS should always be enabled for all networks. If the operator is unwilling to cope with even a single false positive then the max connections should simply be set large enough to put the most egregious offenders into a transient group membership for instant remediation. The transietn group membership is typically associated with a policy that blocks all traffic (e.g., via a splash portal) or slows all traffic down (e.g., via a traffic shaping queue) and notifies the end-user of the violation (e.g., via an interstitial redirect or injection).
The duration determines the length of time that an end-user or device that has triggered the IPS will remain a member of the transient group. Once the duration is reached the transient group membership expires and the end-user or device will be returned to their original policy. If the number of connections being utilized exceeds the configured max connections the trigger will be fired again and the end-user or device will be placed into a new transient group membership for the specified duration.
If an end-user or device triggers the behavioral IPS, they will become a transient member of the IP group specified by the IP group field. connections triggers affect all devices that are associated with the record through the policy regardless of authentication method.
Quota Triggers
Records in the quota triggers scaffold define rules that will change the effective policy of end-users based on the data transfer utilization over a specified period of time.
The name field is an arbitrary string descriptor used only for administrative identification. Choose a name that reflects the purpose of the record. This field has no bearing on the configuration or settings determined by this scaffold.
The policy field relates this record to a set of groups through a policy record.
The note field is a place for the administrator to enter a comment. This field is purely informational and has no bearing on the configuration settings.
Quota triggers operate on calculated aggregate traffic transfer over an operator specified period of time. Thus operators configure the quota in multiples of bytes (e.g., megabytes, gigabytes, etc.). Furthermore the operator specifies the quota trigger time period to be since the last recharge or a rolling window of time. The values are mathematically to the traffic shaping system which is deals with instantaneous transfer rates configured in multiples of bits per second (e.g., kilobits per second, megabits per second, etc.) but the use cases are usually very different.
The download , download unit , upload and upload unit fields configure the aggregate amount of data transfer that must be recorded before a triggering a transient group membership. The download and upload fields specify the value representing the utilization level that needs to be met while the download unit and upload unit fields specify the type of the value fields.
When the download unit and/or upload unit is set to % , the download and/or upload value is taken to mean a percentage of the quota stored in the usage plan record associated with the end-user record. For example, if the download quota in the usage plan record is 500 MB and the download field is configured to be 25 with a download unit of % , when the end-user utilization reaches 125 MB, the transient group membership will be triggered.
When the download unit and/or upload unit is set to MB or GB , the download and/or upload value is taken to mean an absolute value in megabytes or gigabytes respectively. The utilization stored in the end-user record must exceed the value configured in the record in order for the transient group membership to be triggered.
The logic field configures whether one or both of the utilization levels specified in the upload and download fields must be met before this record triggers a transient group membership. A setting of and requires both the upload and download utilization levels be met before a transient group membership is triggered. When set to or , satisfying either upload or download utilization level is sufficient to trigger a transient group membership.
The window field specifies the amount of time over which the the quota trigger will measure usage. The window is specified as the time in the past for the beginning of the measurement period. The measurement period always ends at the present. For example if a window of 2 days is specified then the usage will be measured starting from two days ago until the present.
Rolling window based quotas are most often used to control end-user behavior in a manner similar to the rate limiting mechanisms found in the traffic shaper. A rolling window-based quota enables the operator enforce a lower effective transfer rate. For example, a rolling quota of 5 GB per month that is popular with WWAN data providers is comes to an average rate that is only 15 kbps. A relatively loose rolling quota of 10 GB per week comes to only 277 kbps.
This mode is used to apply control over transient or fixed end-user populations regardless of whether or not quota is being explicitly sold to the population. The destination transient group membership is typically associated with a lower maximum instantaneous rate queue along with some kind of end-user notification (e.g., an interstitial that informs the end-user of their overage condition).
If no window is specified then the quota trigger will measure usage since the last quota recharge. This mode is most used in scenarios with a fixed end-user population where the operator wants to upsell additional quota to end-users when their consumption is approaching their purchased limit. The destination transient group membership is typically associated with a notification mechanism (e.g., an injection with copy informing of the overage condition and a link to the portal to purchase an upgrade).
The duration field specifies the amount of time that an end-user will remain a member of the transient group after exceeding the defined transfer quotas. By default the transient group membership is in effect for as long as the quota trigger condition is met.
The account group field configures the destination where end-user matching the utilization values specified in this record will be sent. If an end-user's utilization meets the criteria defined in this quota trigger , they will become a transient member of the account group specified by the account group field.
Space-Time Triggers
Records in the space-time triggers scaffold define rules that will change the effective policy of end-users based on the time of day, day of the week, and physical location.
The name field is an arbitrary string descriptor used only for administrative identification. Choose a name that reflects the purpose of the record. This field has no bearing on the configuration or settings determined by this scaffold.
The policy field relates this record to a set of groups through a policy record.
The note field is a place for the administrator to enter a comment. This field is purely informational and has no bearing on the configuration settings.
The start and end fields configure the range of time that the time trigger is active. The start time must precede the end. The trigger is active for the time period between start and end. To specify an entire day, use a start of 00:00:00 and an end of 23:59:59. To specify more than one time period during a single day, multiple time trigger records must be created.
The days field specifies the days of the week that this time trigger is active. A checked box indicates that the the time trigger is active during the day that is labeled. The parameters specified by the days field as well as the the start and end fields must both be satisfied (logical and) in order for the trigger to be active.
The logic field configures whether one or both of the utilization levels specified in the upload and download fields must be met before this record triggers a transient group membership. A setting of and requires both the upload and download utilization levels be met before a transient group membership is triggered. When set to or , satisfying either upload or download utilization level is sufficient to trigger a transient group membership.
The IP group , MAC group and account group fields configure the destination for the IPs, MACs and users associated with this trigger through the selected policy when the trigger is active. Only one of the three possible destinations should be selected for any given record. The account group destination is only effective when the policy is associated with a user group as no login session is created for IP groups and MAC groups.
DPI Triggers
Records in the DPI triggers scaffold define rules that will change the effective policy of end-users based on a DPI signature.
The name field is an arbitrary string descriptor used only for administrative identification. Choose a name that reflects the purpose of the record. This field has no bearing on the configuration or settings determined by this scaffold.
The policy field relates this record to a set of groups through a policy record.
The note field is a place for the administrator to enter a comment. This field is purely informational and has no bearing on the configuration settings.
The DPI signatures field links the DPI trigger to one or more DPI signatures specified on the definitions view. The DPI signatures are what are used to determine the firing of the trigger and the temporary IP group membership.
The duration field specifies the amount of time that an end-user will remain a member of the transient group after matching a DPI signature. For example, if a DPI signature specifies a virus and the target transient group is linked to quarantine policy, the duration represents the length of time that the end-user would remain quarantined after the virus is initially detected.
The IP group field configures the destination where end-user matching the DPI signature specified in this record will be sent. DPI triggers affect all devices that are associated with the record through the policy regardless of authentication method.
Remote DPI Signatures
An entry in the Remote DPI Signatures scaffold configures the rXg for automatic download of deep packet inspection signatures that are used to identify and classify of end-user traffic from a third-party website.
The name field is an arbitrary string descriptor used only for administrative identification. Choose a name that reflects the purpose of the record. This field has no bearing on the configuration or settings determined by this scaffold.
The categories field allows the operator to choose from one or more groups of predefined signatures present on the third-party server. This field is only useful when the URL of this remote DPI signature refers to a gzipped tarball archive. The signatures present in the archive are presumed to be organized by file name. Each file should contain signatures that are relevant to the name of the file.
The SID whitelist field enables the operator to exclude specific rules from being used. This feature is typically used to exclude overly aggressive rules and thus reduce the possibility of false positives. Consider the following rule from the Snort emerging threats list:
emerging-p2p.rules:alert udp $HOME_NET 1024:65535 -> $EXTERNAL_NET 1024:65535 (msg:"ET P2P Edonkey Publicize File"; dsize:>15; content:"|e3 0c|"; depth:2; reference:url,www.giac.org/certified_professionals/practicals/gcih/0446.php; reference:url,doc.emergingthreats.net/bin/view/Main/2003310; classtype:policy-violation; sid:2003310; rev:3;)
The example rule shown above is known to occasionally trip false positives with Skype file sharing. Listing 2003310 into the SID whitelist field causes the rule to be ignored. Multiple SIDs may be listed in the SID whitelist to tell the DPI engine to ignore more than one rule in the remote set.
When a remote DPI signature record is first created, the categories field will be empty. Once the signatures have been downloaded and extracted for the first time, the names of the files will then appear in this field. After creating a remote DPI signature it is necessary to edit the record and select the desired categories in order for proper operation. Initial download time (and hence, population of the categories field depends upon the size of the archive file as well as the speed of the network connection between the server addressed by the URL.
The URL field contains the URL of the file that the rXg will download. The target file is expected to be in one of two formats: .tar.gz archive or a .txt plain text file. If the file is a gzipped tarball archive (.tar.gz), it is expected to extract multiple files named by category, each of which contains DPI signatures. If the file is plain-text, it is expected that the file is simply a file of the the DPI signatures. The rXg supports DPI signatures formatted for Snort 2.9. Well known remote DPI signature repositories include the official Snort rules and the Snort emerging threats list.
The frequency field specifies the download interval. Some sites have terms of use that specify appropriate download intervals. Please check the remote site terms and conditions carefully before using.
The note field is a place for the administrator to enter a comment. This field is purely informational and has no bearing on the configuration settings.
Log Hits Trigger
Records in the log Hits Triggers scaffolds defines rules that will dynamic blacklisting with transient WAN membership based on log hits.
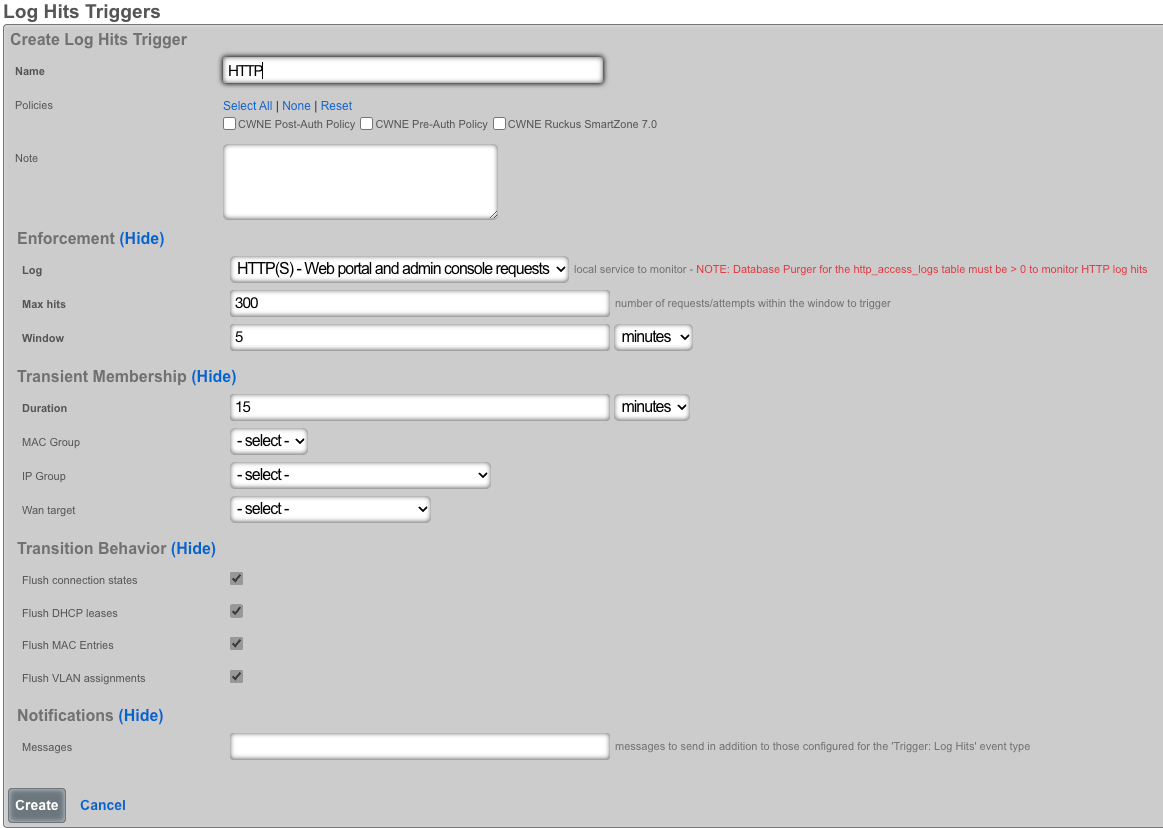
The*name*field is an arbitrary string descriptor used only for administrative identification. Choose a name that reflects the purpose of the record. This field has no bearing on the configuration or settings determined by this scaffold.
The*policyfield relates this record to a set of groups through apolicy*record.
The log field allows the operator to select which log will be monitored for predetermined behaviors.
The max hits field specifies the number of log hits for a specified service by a device on the LAN or WAN before the behavior IPS is triggered.
The window field specifies the the amount of time over which the log hits trigger will measure usage. The window is specified as the time in the past for the beginning of the measurement period. The measurement period always ends at the present. For example if a window of 5 minutes is specified then the connection will measure starting from 5 mins ago until the present.
The duration field specifies the amount of time that a connection that an end-user or IP has triggered the IPS will remain a member of the transient group. The the duration is reached the transient group membership expires and the end-user or IP will be removed. If the number of connection being utilized exceeds the configured max hits the trigger will be fired again and the end-user or IP will be placed into a new transient group membership for the specified duration.
The MAC group and IP group fields configure the identity for the IPs, MACs, and users associated with this trigger through the selected policy when the trigger is active. The WAN Target field selects the destination for violating IPs originating from the WAN. This list of IPs can be used in other areas of the rXg configuration. Only one of the three possible destinations should be selected for any given record.
The flush connection states allows an operator to clear some or all of the active session data. Flushing DHCP leases erases IP address assigned. Flushing MAC entries erases the saved MAC addresses from the devices table. Flushing VLAN assignments clears the the VLAN association from the device MAC.
In the notifications section, the message fields allows you to specify which custom email will be sent when an event is triggered.
Interstitial Redirection
Interstitial redirection is the periodic application of forced browser redirection to end-users for the purposes of generating impressions to an operator specified web page.
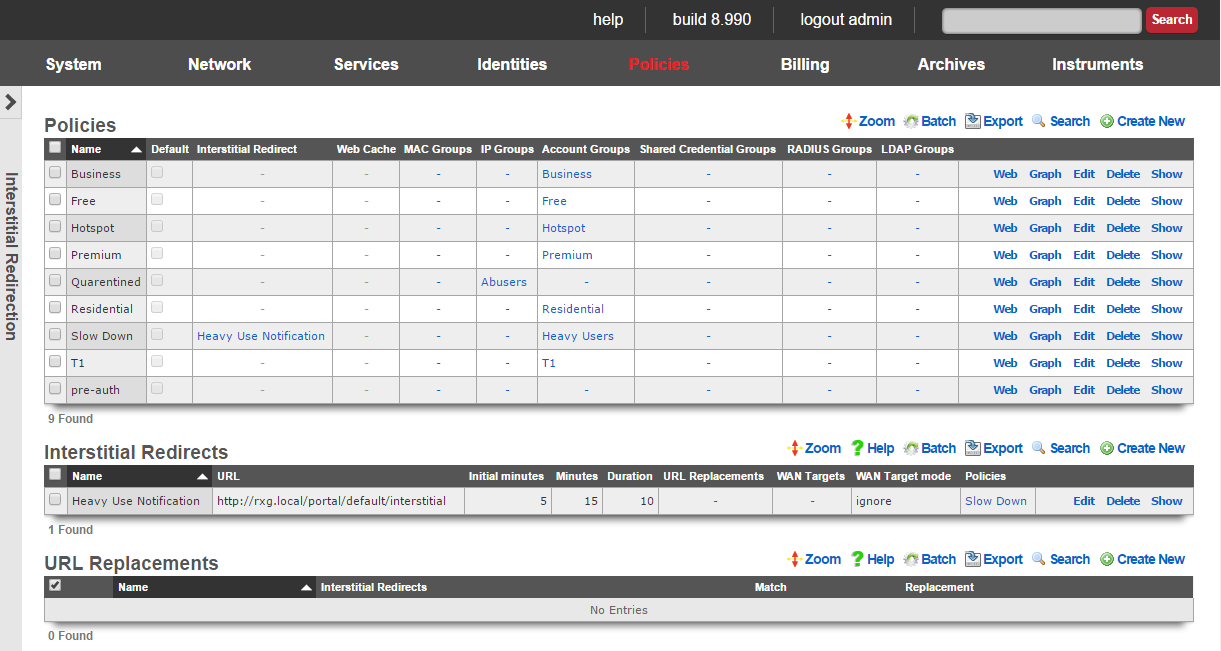
Interstitial redirection is a mechanism that enables operators to deploy advertising or other messaging on broadband networks in a manner that is similar to TV commercials. End-users and devices that been selected to take part in interstitial redirection are periodically redirected to a target of the operator's choosing. Furthermore, the rXg may require that the end-user experience the chosen target for a specified amount of time before they are able to continue on to their original destination.
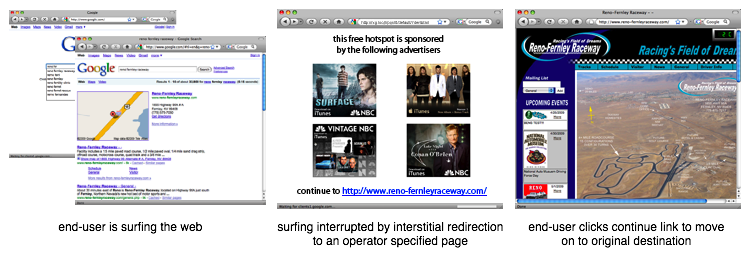
Specific criteria must be met in order of a HTTP request to be redirected so that only "normal browsing" WWW sessions are interrupted. This enables web applications such as web-based email to continue to operate correctly even with interstitial redirection is enabled. In addition, interstitial redirection does not modify the content of transit pages in any way. The rXg goes to great lengths to ensure that interstitial redirection does not adversely affect the end-user in any way. 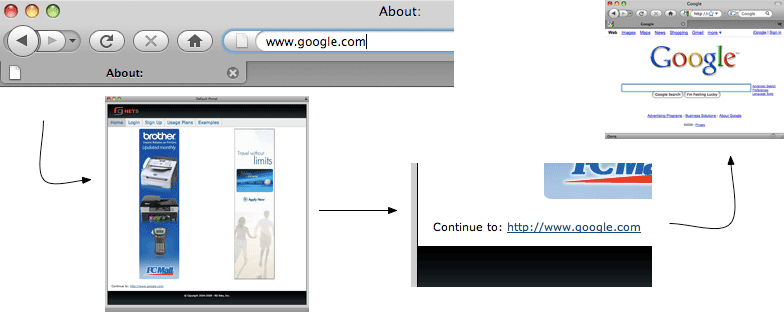
In most cases, the interstitial redirection is a specialized view of the captive portal web application. This enables the operator to have complete control over the content. In a typical deployment, the interstitial view of the captive portal displays a "continue to original request" link as well as several rotated advertisements or other messages. The /interstitial view of the default portal is provided as an example of how an interstitial redirect target should be formatted.
The choice of content for the target of the interstitial redirects is entirely up to the operator. Any combination of static or dynamic images, JavaScript generated text or just about anything else imaginable can be placed on the redirection target. The most common application of interstitial redirection is to generate impressions of advertiser supplied videos. Forced viewing of video advertisements generate dramatically higher revenue per impression than image or text based advertisements (except for affiliate program conversions).

Interstitial Redirects
The interstitial redirects scaffold configures the periodic forced browser redirection of connected end-users to web content specified by the operator.
The name field is an arbitrary string descriptor used only for administrative identification. Choose a name that reflects the purpose of the record. This field has no bearing on the configuration or settings determined by this scaffold.
The initial minutes , minutes and duration fields control the timing behavior of the interstitial redirect mechanism. Using the broadcast television commercial analogy, the end-users experience a commercial that is duration seconds long with a periodicity specified by minutes. The initial minutes field specifies the amount of time before the first redirect. If the initial minutes is set to 0 then the end-user will experience redirect immediately upon login.
The URL field specifies the target for the forced browser redirect that occurs during an interstitial redirect. In most cases, the specified URL wll be a view of the onboard captive portal web application. The interstitial.erb in the default captive portal provides an example of an interstitial redirect target with advertising integration. An external web server may also be used as an interstitial redirection target.
Several substitution variables are available for dynamic URL assembly.
%url%The original URL that the browser requested when the interstitial redirection took affect. When the interstitial redirection workflow is complete, the end-user should be directed to this URL.%rxg%The domain name of the rXg as configured in Options view of the System menu.%ip%The IP address of the end-user device that has been subjected to the interstitial redirect.%mac%The MAC address of the end-user device that has been subjected to the interstitial redirect.%hostname%The DHCP client hostname of the end-user device that has been subjected to the interstitial redirect.%group%The effective group of the end-user when the interstitial redirect was initiated. %policy%The effective policy of the end-user when the interstitial redirect was initiated. %landing_portal%The landing portal associated with the effective policy of the end-user when the interstitial redirect was initiated. If no landing portal enforcement record exists, then the value of this variable will be 'default'.%portal_controller%The custom portal controller name associated with the effective policy of the end-user when the interstitial redirect was initiated. If no landing portal enforcement record exists, then the value of this variable will be 'default'.%random_number%A random eight digit integer.
An example of a URL that utilizes substitution variables is:
https://%rxg%/portal/%portal_controller%/interstitial?desired_url=%url%
The WAN targets field limits the effect of the interstitial redirect settings defined by this record to traffic that is originating from or destined to the IP addresses or DNS names listed in the selected WAN targets. By default, an interstitial redirect record affects all HTTP traffic matched by the policy regardless of WAN origin / destination. Setting a WAN target causes the breadth of the interstitial redirect to be limited to the specified hosts in the manner specified by the WAN target mode.
The WAN target mode field determines the effect of choosing WAN targets. When set to ignore, all HTTP requests originating from end-users and devices selected by the associated policy will take part in the interstitial redirect except for the requests that are headed to the IP addresses and DNS names in the chosen WAN targets.
The policy field relates this record to a set of groups through a policy record.
The note field is a place for the administrator to enter a comment. This field is purely informational and has no bearing on the configuration settings.

URL Replacements
The URL replacements scaffold enables fine grain configuration of the rXg HTTP URL request rewriting mechanism. URL replacements enable arbitrary modifications to the URL in an HTTP request. Thus an end-user retrieves a web page that is different from what they originally requested. The URL replacements mechanism uses the same underlying technology as the interstitial redirection feature. The key difference between the two is that the URL replacements mechanism allows for fine grain control. The interstitial redirection mechanism replaces the entire URL whereas the URL replacements mechanism only replaces a portion of the URL.
URL replacements must be associated with a interstitial redirection in order to function. The timing of the URL replacement is defined in the interstitial redirection. Only the first HTTP request in the periodicity defined in the interstitial redirection will be rewritten. All subsequent HTTP requests will pass unchanged.
The match and replacement fields configure the search and replace parameters used to rewrite the URL. For example if a match of microsoft is configured with a replacement of apple then an end-user HTTP request forwww.microsoft.com would be rewritten to www.apple.com. The match and replacement fields may also be used to modify the parameters passed in a HTTP GET. For example, a match of ?query=hello and a replacement of?query=goodbye would result in payload of the variablequery being changed from hello to goodbye. Thus an end-user that enters the string hello into an HTML form with an input of query that is submitted via a HTTP GET would end up being rewritten into submitting the stringgoodbye.
Packet Filters
The packet filters view presents the scaffolds that configure settings to modify the rXg per-packet filtering engine.
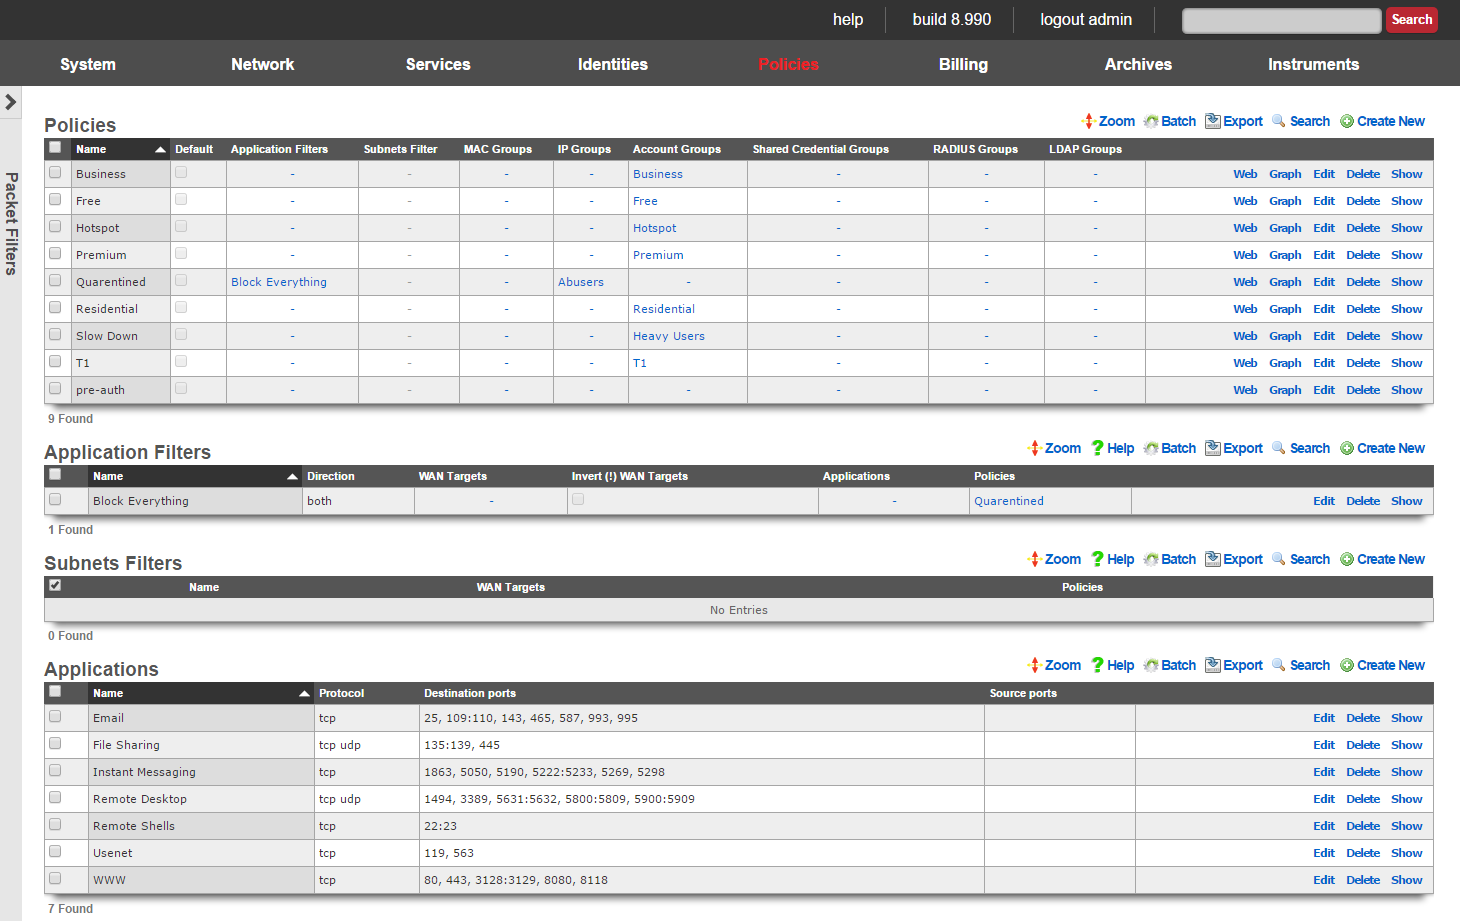
The packet filtering is most often configured to deny certain end-users and/or devices access to certain kinds of applications. For example, some revenue generating network operators choose to deny access to P2P file sharing applications in order to conserve bandwidth. The rXg application filters scaffold is used to accomplish this.
Selection of end-users and/or devices is accomplished by associating a policy and applications are selected by associating application definitions to an application filter record. Since account group membership is usually determined by end-user self-provisioning via the captive portal web application, it is possible to enforce different application filters based on the usage plan selected by the end-user (and hence, revenue generated). This enables revenue generating network operators to limit access to certain applications (e.g., P2P file sharing and VoIP) to plans that are premium offerings.

Application Filters
An entry in the application filters scaffold creates a firewall rule that prohibits a particular application from reaching and/or being reached by specified WAN targets
The name field is an arbitrary string descriptor used only for administrative identification. Choose a name that reflects the purpose of the record. This field has no bearing on the configuration or settings determined by this scaffold.
Rules for a given policy are checked in a top-down order, and the LAST rule to match a packet is the one which will be applied. Care should be given to order the rules appropriately to achieve the desired behavior and avoid being overly restrictive or permissive. More specific rules should be placed below more general rules.
The Action field allows the operator to set the mode to either Block or Pass the traffic as defined in the WAN Targets and Applications fields.
The direction field limits the prohibition of traffic to packets transiting the rXg in a particular direction. The outbound setting configures the firewall rule to drop packets originating from the LAN and destined for the WAN. Conversely, the inbound setting configures the firewall rule to drop packets originating from the WAN and destined for the LAN. The both setting drops all matching packets regardless of the direction of travel.
The WAN targets field limits the effect of the application filter rule defined by this record to traffic that is originating from or destined to the IP addresses or DNS names listed in the selected WAN targets. By default, an application filter denies all traffic matched by the policy regardless of WAN origin / destination. Setting a WAN target causes the breadth of the application filter to be limited to the specified hosts.
By default the WAN Target acts as a blacklist, however by checking the*Invert(!) WAN Targets* box, it will reverse the rule and make it a whitelist so instead of blocking access to what is defined in the WAN target it, it will only allow access to what is defined in the WAN target.
The applications field configures the kinds of applications that will be blocked by the application filter defined by this rule. Selecting multiple application groups applies this rule to all of the selected applications (logical or). By default, all types of packets that match the chosen policy , WAN targets , and applications are blocked.
The policy field relates this record to a set of groups through a policy record.
The note field is a place for the administrator to enter a comment. This field is purely informational and has no bearing on the configuration settings.
Filtering rules are applied in a top down order, with the last rule that matches being the one the takes effect, thus rule ordering is important. The Application Filters scaffold also has links to "Move Up" or "Move Down" an entry. More general rules should be at the top of the list and and as the rules get more specific they should be moved down. For example if there are two rules created, one that blocks all traffic and another that passes traffic to a set of WAN targets, the rule blocking all traffic should be moved up to the top, and the rule passing traffic to the set of WAN targets should be below it. This will block all traffic except for sites defined in the WAN target. If the rule order were reversed, where the pass rule is positioned at the top of the list and the rule blocking all traffic is below it, all traffic would be blocked including what is defined in the pass rule because the last rule that matched is the block rule.

Subnet Filters
The subnets filter scaffold configures the rXg packet filtering to enable or disable reachability between LAN subnets. By default, with no subnet filters configured, the rXg permits routing between subnets.
The name field is an arbitrary string descriptor used only for administrative identification. Choose a name that reflects the purpose of the record. This field has no bearing on the configuration or settings determined by this scaffold.
The policies field configures which clients will not be able to access hosts on LAN subnets other than their own. The filtering is unidirectional; clients affiliated with a policy that does not have a subnets filter configured can still access other subnets.
The WAN targets field configures a list of destination hosts that are exempt from the filtering. Clients of the selected policies will still be able to access these hosts, even if they are on a different subnet.
Example filter configurations.
Multi Tenant Example
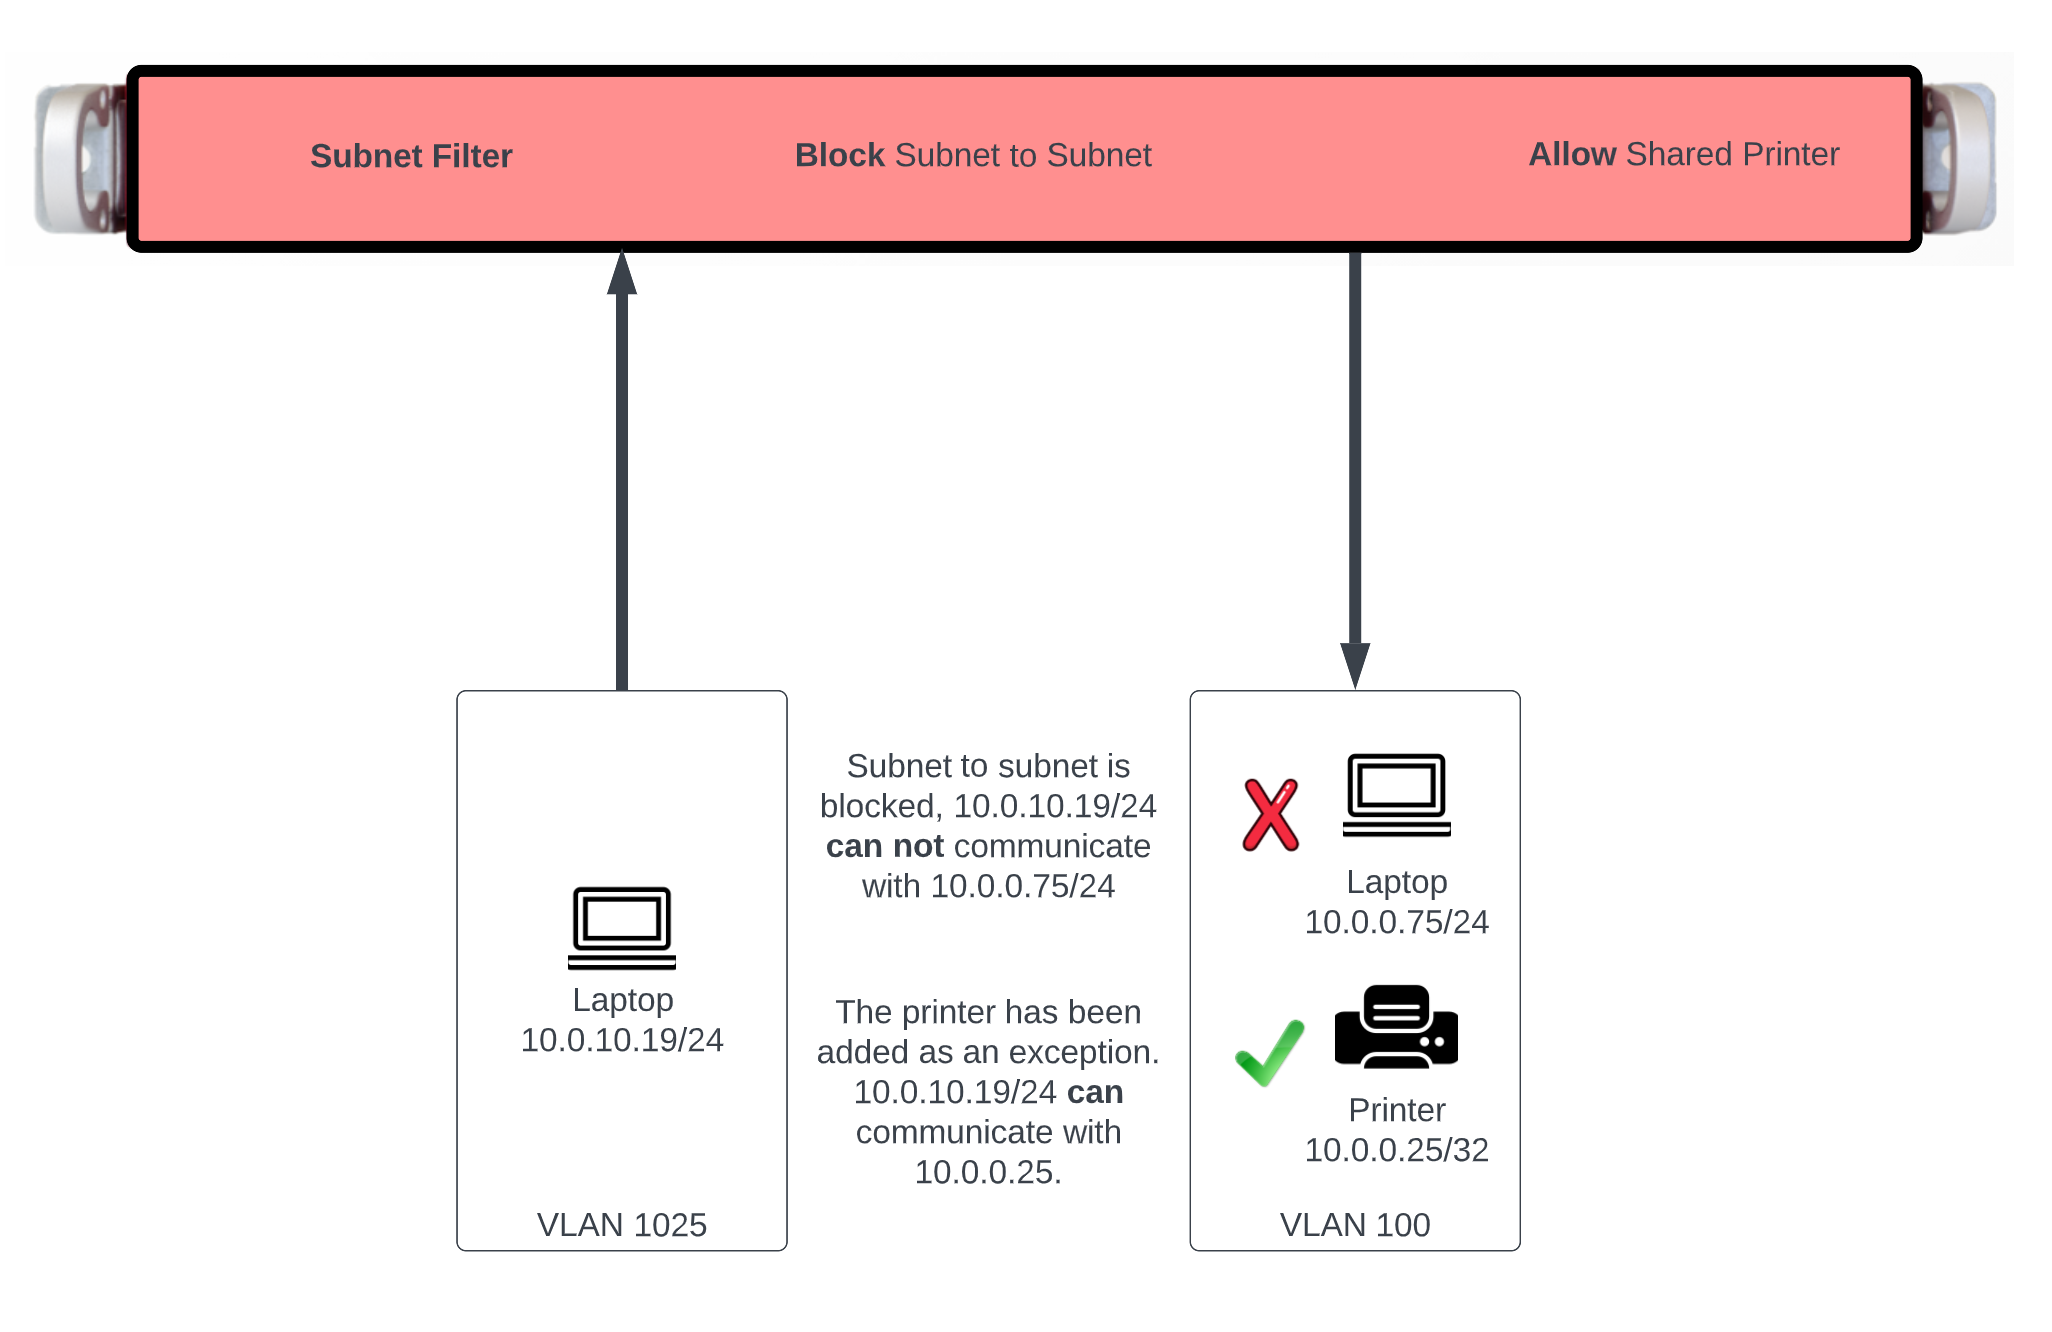
In this example users will be blocked from communicating across subnets but will have access to a shared resource. First we need to define the resources we want to share by creating a WAN Target by navigating to Identities::Definitions. Create a new WAN Target , the Name field is arbitrary. Enter the IP address or FQDN of resources to be shared. Click Create.
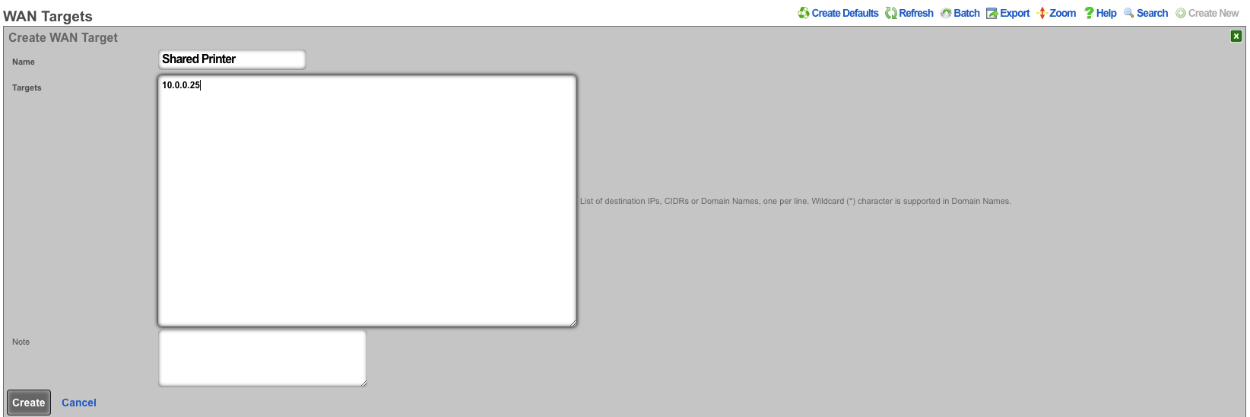
Next navigate to Policies::Packet Filters , edit the existing Subnet Filter or create a new one. The Name field is arbitrary. Select the Shared Printer in the WAN Target field. Lastly use the Policies field to select the policies that should be included for this Subnet Filter. Click Create or Update.
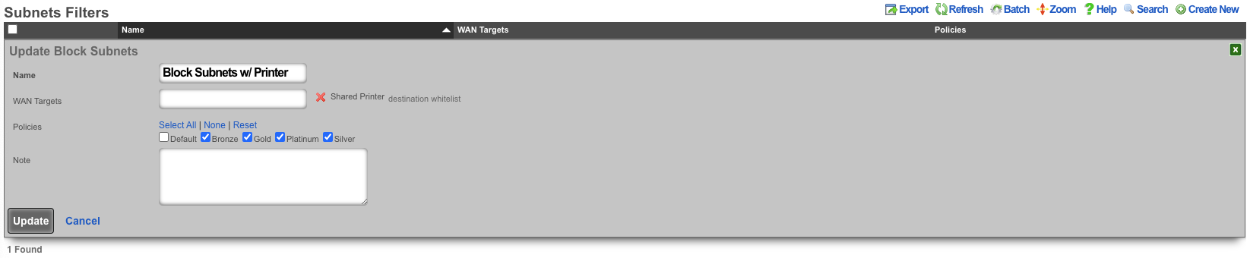
With this configurations tenants will not be allowed to communicate with anything outside of their subnet with the exception of the Shared Printer.
Content Filter Example
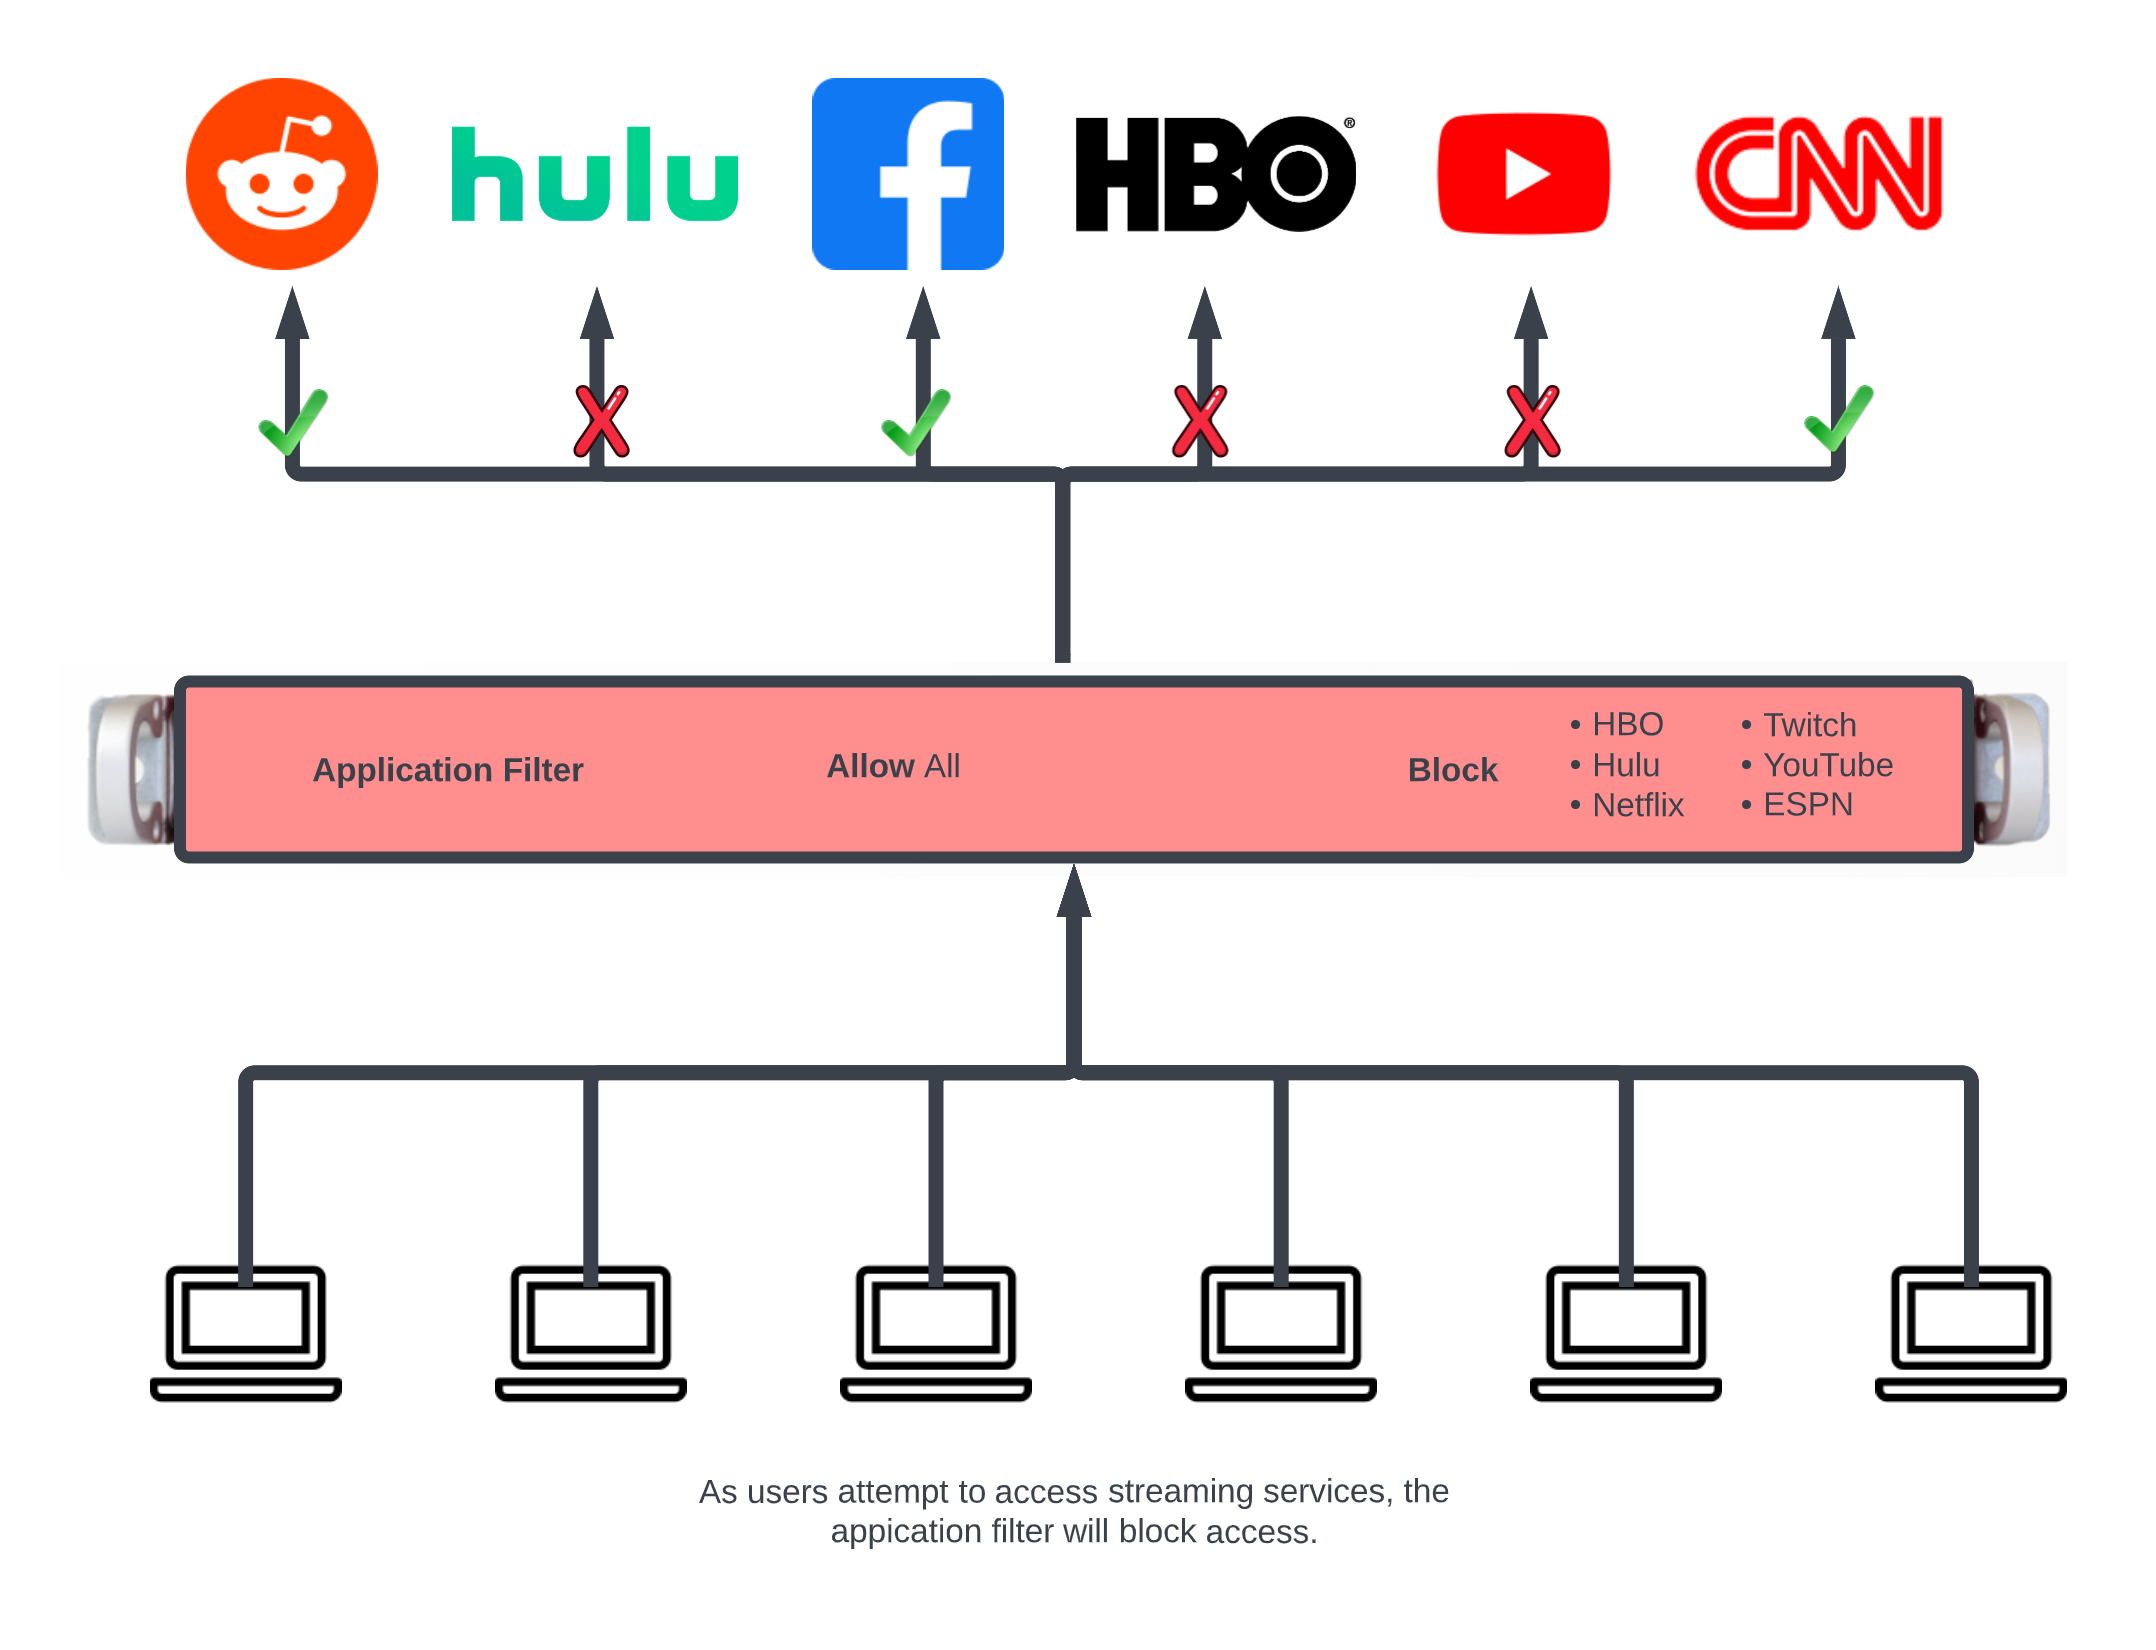
In this example an Application Filter will be created that will block streaming services. By default the rXg comes with Applications that includes both Destination Ports and WAN Targets for popular streaming services. Create a new Application Filter , the Name field is arbitrary. Specify if inbound/outbound or both should be blocked using the Direction field. Leave the WAN Target field blank as the WAN Targets are attached to the Applications already in the included applications. In the Applications field, select the Applications to block. Lastly using the Policies field select the policies that this filter should be applied to. Click Create.
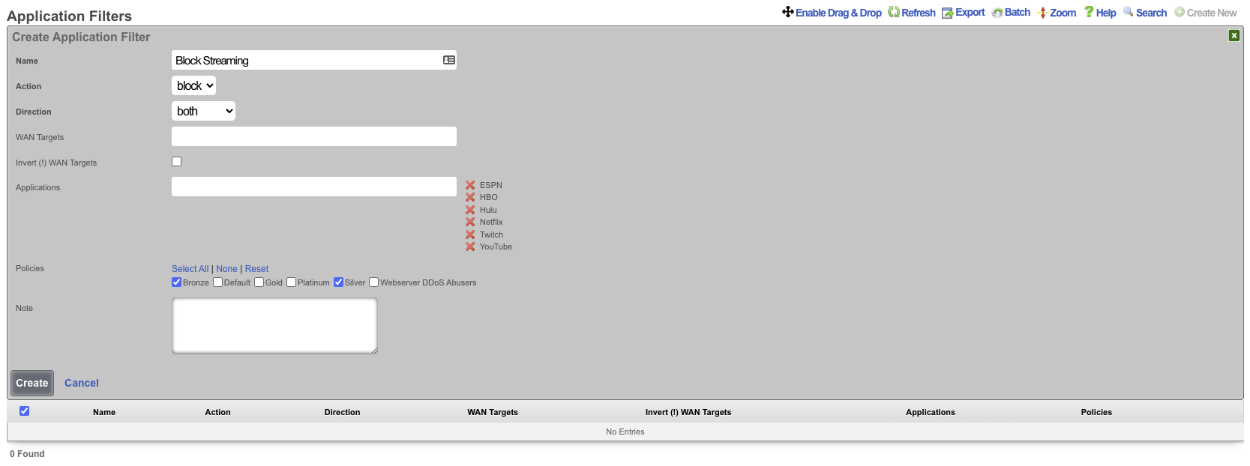
Block all traffic except what is whitelisted.
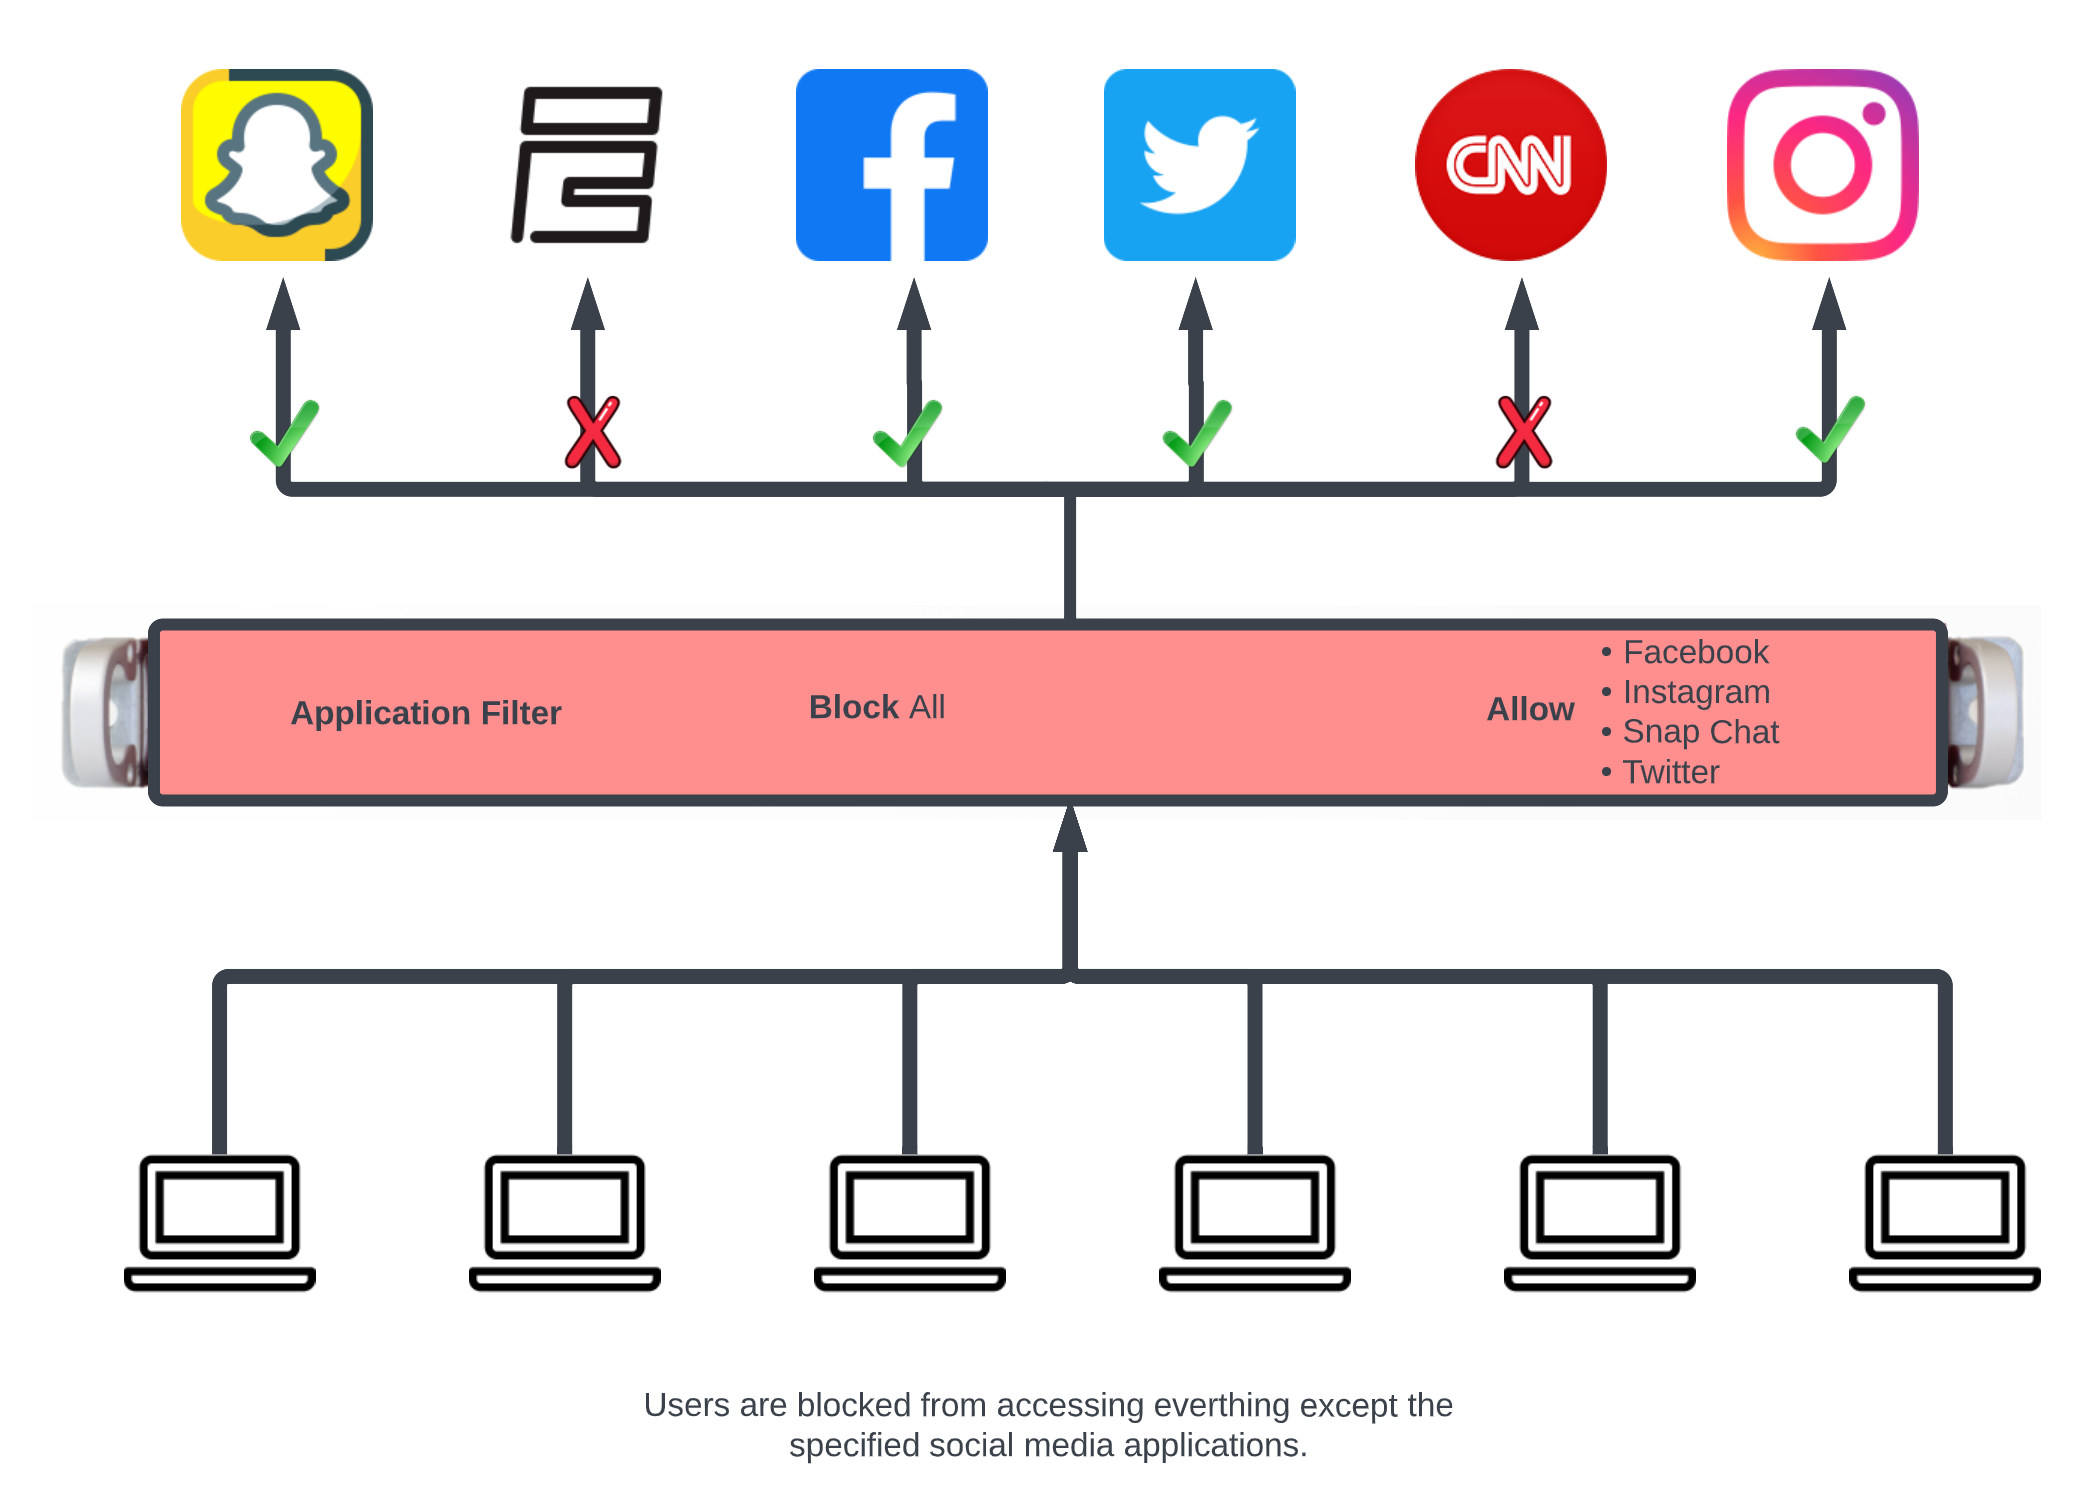
In this example the packet filter will be configured to block all traffic except for what is defined in the selected Wan Targets.
First define the site or sites we wish to allow access to by creating a WAN Target. Navigate to Identities::Definitions. Create or edit and existing WAN Target. For this example Social Media will be allowed but everything else will be blocked.

Next navigate to Policies::Packet Filters and create a new Application. The Name field is arbitrary. Protocol field should be set to tcp udp. For the Destination ports field enter >0, this will include all ports greater than 0. Click Create.
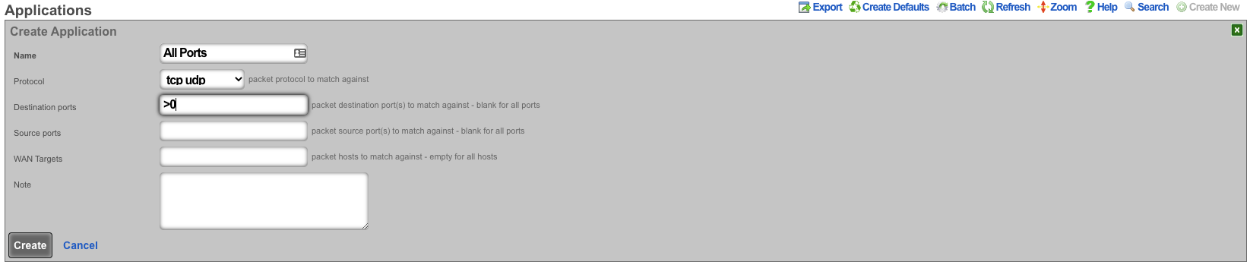
Next create a new Application Filter , the Name field is arbitrary. Set the Direction field to both. Use the WAN Targets field to select the desired WAN targets. To make the WAN targets a whitellist instead of a blacklist check the*Invert (!) WAN Targets* checkbox. In the Applications field select the Application created earlier that contains all ports. Lastly use the Policies field to select the policies to apply the filter to.
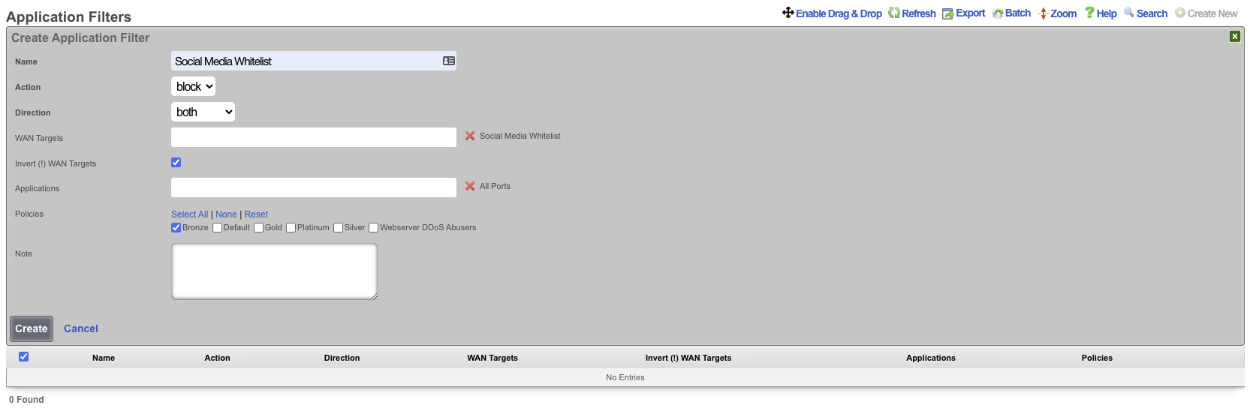
This configuration will only allow members of the Bronze policy access to social media sites and not allow them to access other sites.
Pass/Block Filter Example
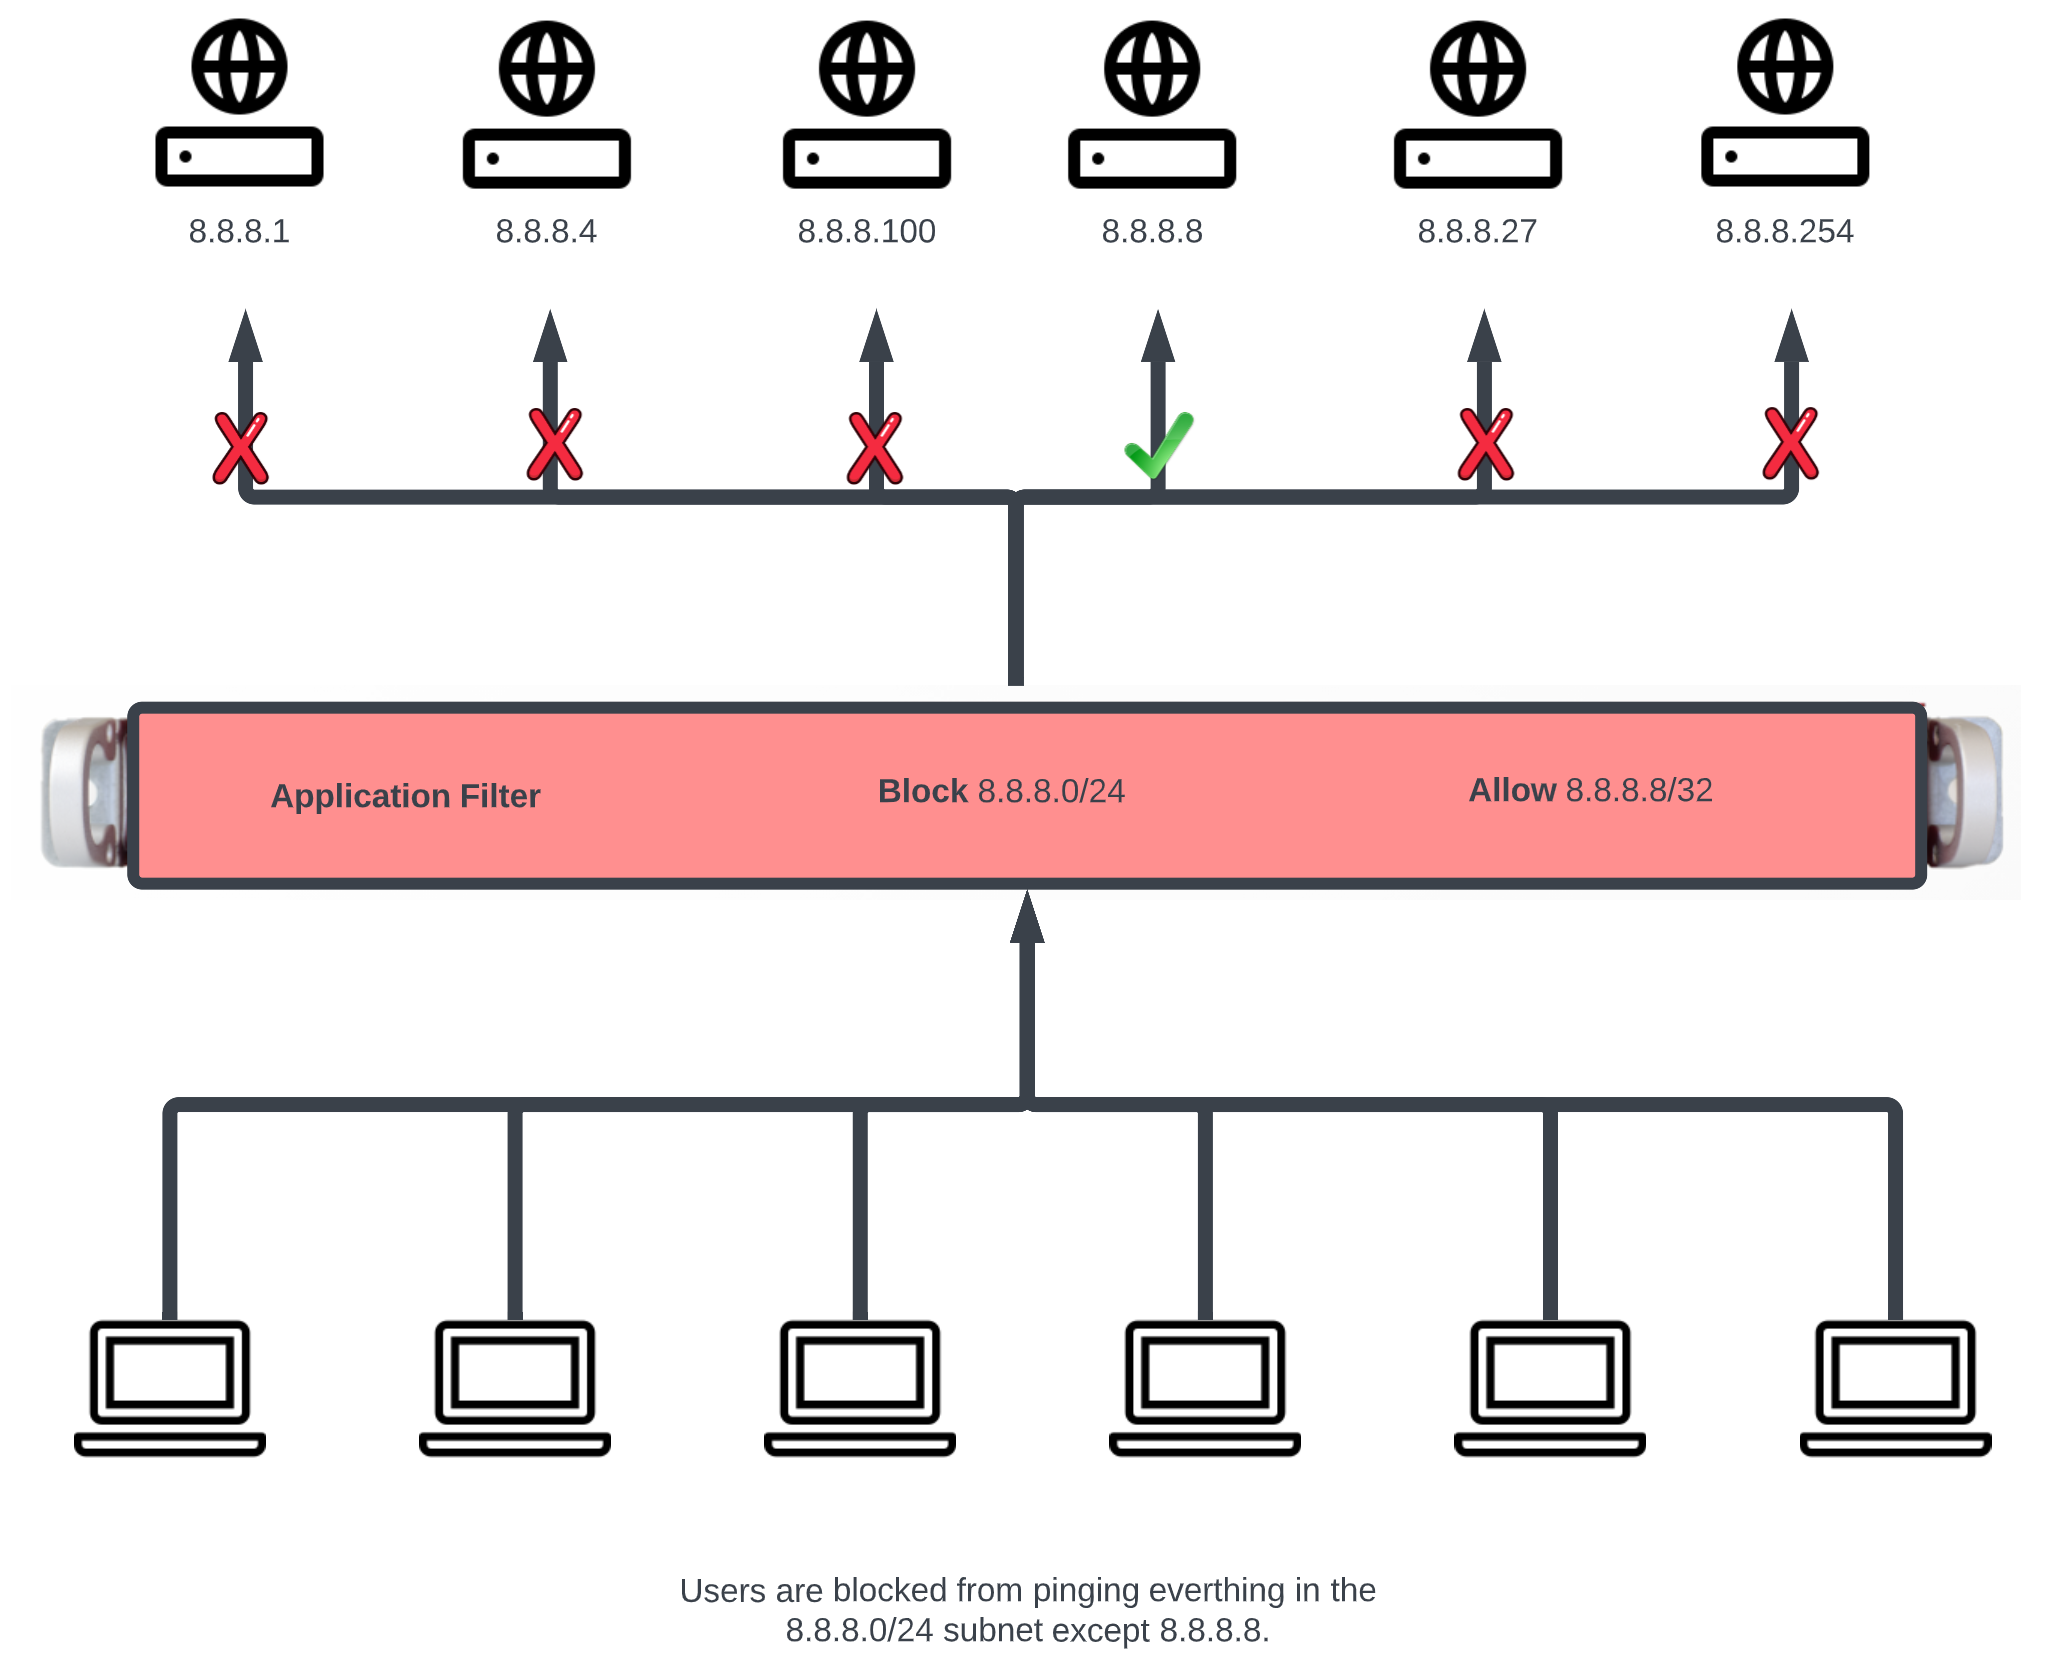
In this example a rule will be created that blocks ICMP to the 8.8.8.0/24 subnet, and another rule will be created to pass ICMP traffic to 8.8.8.8.
First create the WAN target that contains the IP's to be blocked and another that contains the IP's to allow. Navigate to Identities::Definitions. Create a new WAN Target. Give the WAN target a name, and for the target enter 8.8.8.0/24. Click Create.
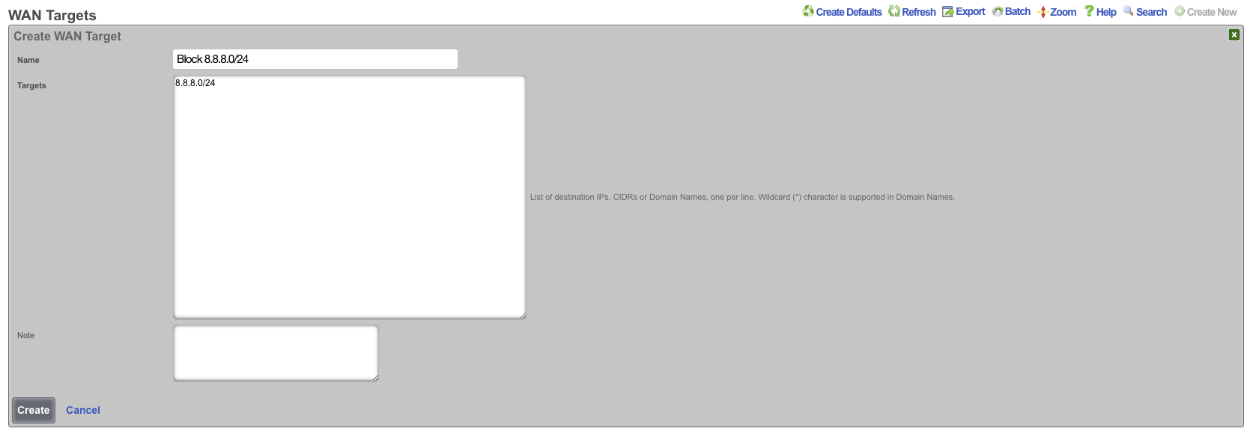
Create another WAN Target , this time the target will be the address to allow, in this case 8.8.8.8, click Create.
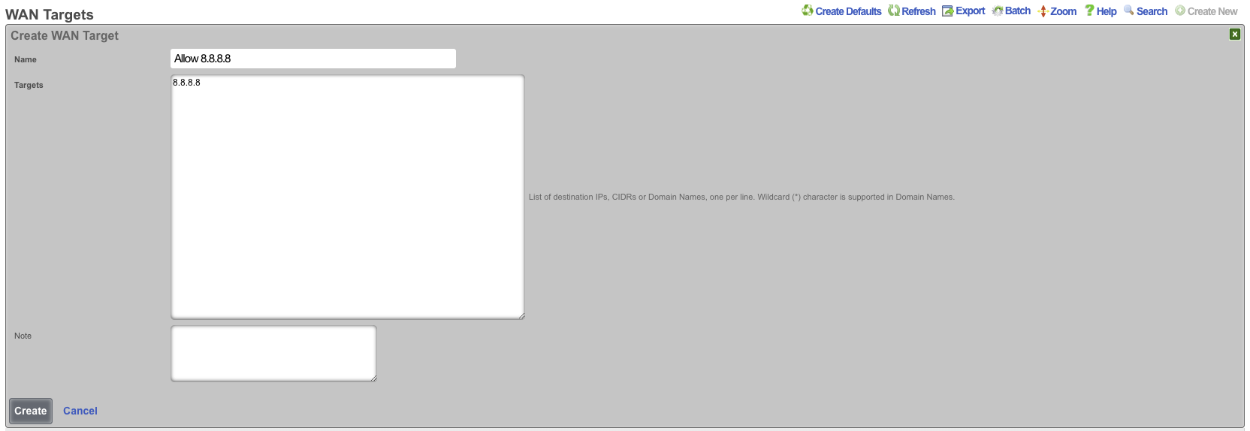
Next navigate to Policies::Packet Filters and create a new Application Filter. Give the application filter a name, Action should be set to block , Direction set to both. In the WAN Target field select the WAN target that contains the 8.8.8.0/24 subnet. In the Applications field select the ICMP application. Select the policies this rule should apply to, and click Create.
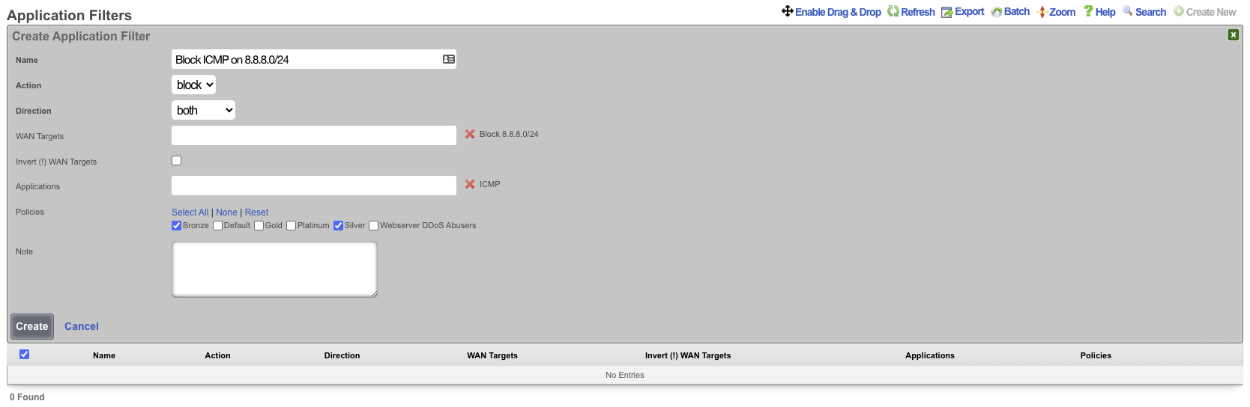
Create another Application Filter , give it a name. The Action field should be set to pass , and the Direction Field set to both. In the WAN Targets field select the WAN target contaning the addresses that are to be allowed. Select the ICMP application in the Applications field. Select the polcies the filter should apply to and click Create.
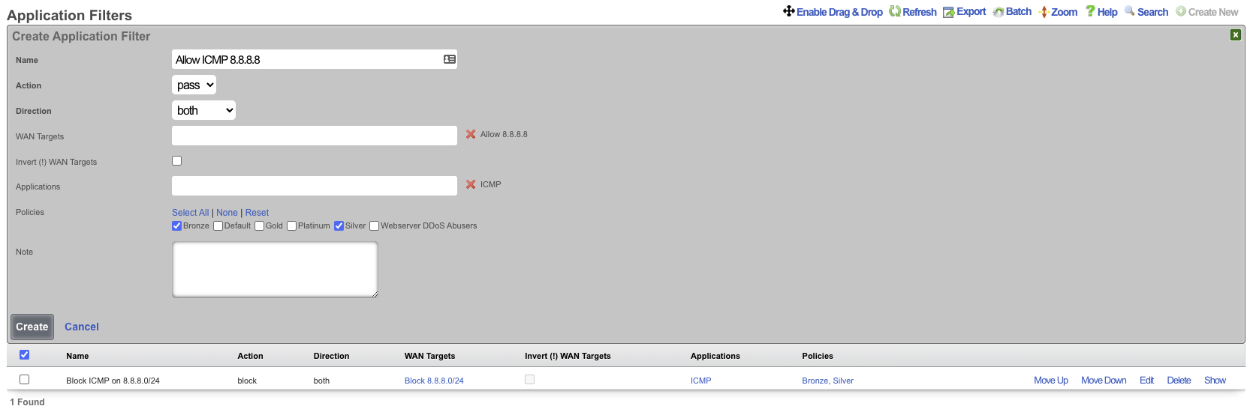
Now members of the Bronze and Silver policies can ping 8.8.8.8 but cannot ping other addresses in the 8.8.8.0/24 subnet. NOTE: the order of the rules are important, for this to work the PASS rule must be below the block rule in the scaffold. The order can be changed by clicking the Enable Drag & Drop link above the scaffold, or using the Move Up/Move Down links for an individual rule.

Packet Forwards
The packet forwards view presents the scaffolds that configure settings to modify the per-packet forwarding configuration.
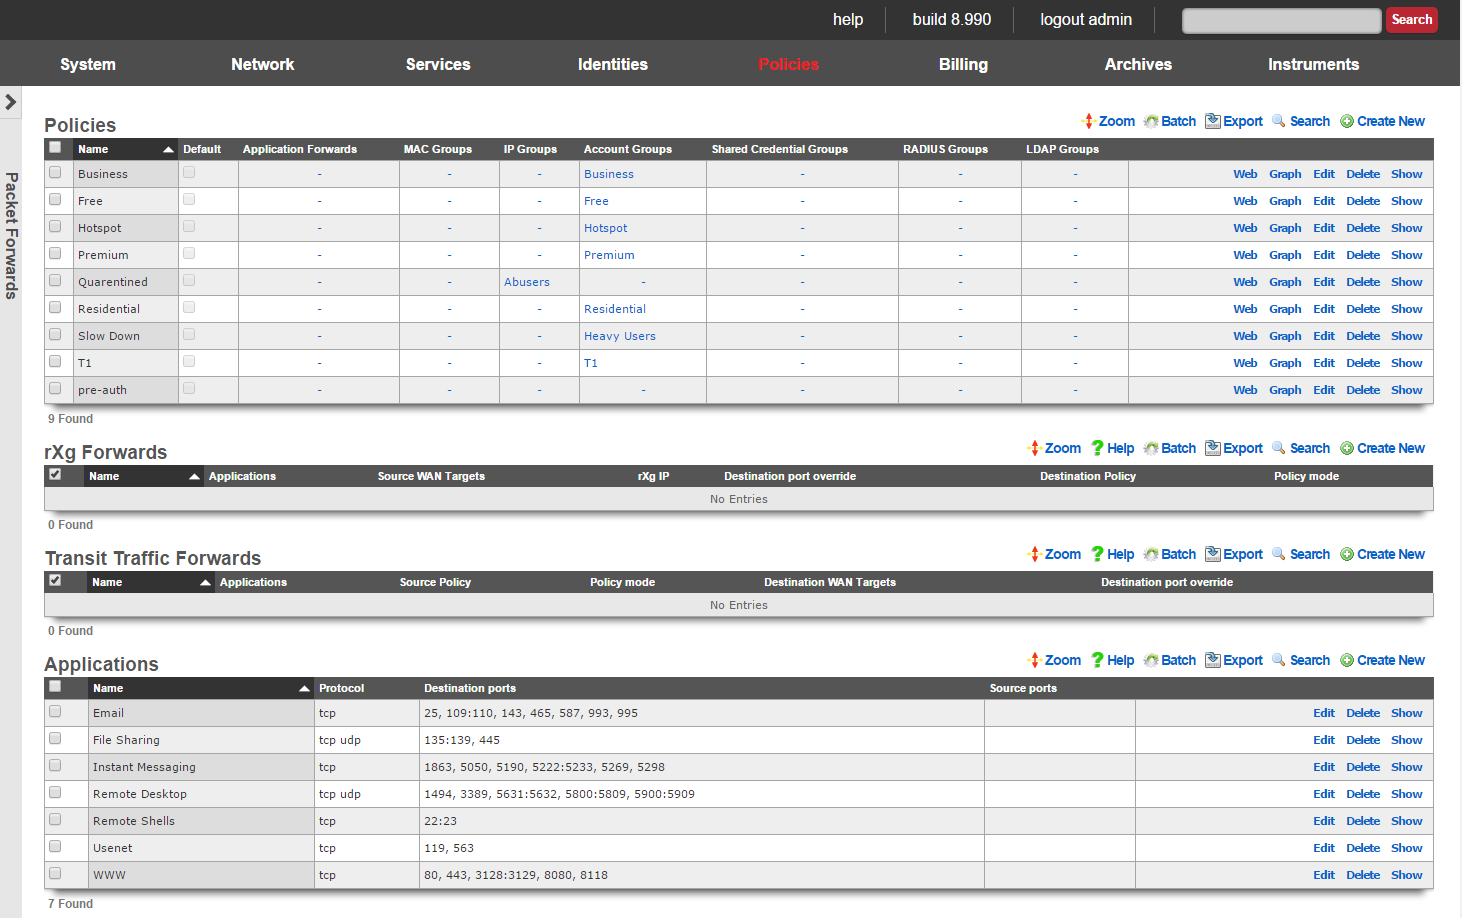
The rXg packet forwarding engine enables the revenue generating network operator to reroute traffic according to predefined rules. There are classes of forwarding rules that the operator may specify. The operator may choose to create rXg forwards that reroute traffic that is originally destined for the rXg. In addition, the operator may choose to create transit traffic forwards that reroute traffic that originates from the LAN and is transitting the rXg ot the WAN.
rXg forwards enable the operator to deploy publicly accessible services on hosts that are on private IP addresses and using NAT to access the WAN. In a typical scenario, rXg forwards are used to enable remote access to infrastructure management mechanisms, public web servers, etc. When deployed generically, this concept is called port forwarding.

The rXg packet forwarding mechanism builds upon the generic port forwarding concept by enabling the same port to be forwarded to different hosts depending on the originating (WAN) host. In addition, the application forward is limited in effect via policy. This enables the revenue generating network operator to use application forwarding to sell a premium service in a similar manner to application filters.
Transit traffic forwards enable the operator to reroute end-user traffic to operator specified destinations. In a typical scenario, transit traffic forwards are used to require end-users to use operator specified proxies. For example, transit traffic forwards are particularly useful for rerouting all outbound email tranmissions through an operator specified SMTP relay. Another example would be to forward all Jabber IM requests to a Jabber proxy that injects advertising.
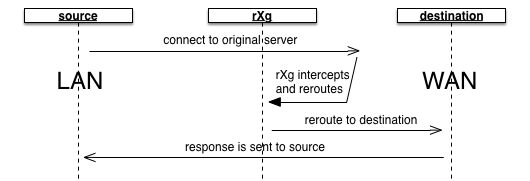
The operator specifies which end-users are affected by transit traffic forwards through policies. This fits naturally with the rXg zero operator intervention provisioning methodology and enables operators to deploy transit traffic forwarding as a premium service. For example, hotspot operators may desire to charge a premium for SMTP relay.

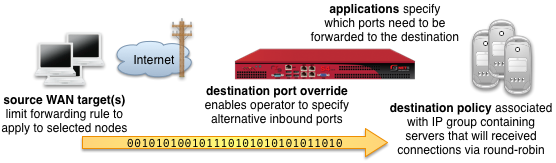
rXg Forwards
An entry in the rXg forwards scaffold creates a packet forwarding rule that reroutes traffic originally destined for the specified applications on the rXg to a destination specified by one or more IP groups associated with the selected policy.
The name field is an arbitrary string descriptor used only for administrative identification. Choose a name that reflects the purpose of the record. This field has no bearing on the configuration or settings determined by this scaffold.
The applications field configures the class(es) of packets that will be forwarded by the rules generated as a result of this record. Selecting multiple application groups applies this rule to all of the selected applications (logical or).
The source WAN targets field limits the effect of the inbound application forward rule defined by this record to traffic that is originating from the IP addresses or DNS names listed in the selected source WAN targets. By default, an rXg forward rule acts as a generic port forwarder that redirects all traffic matching the configured applications. Setting a source WAN target causes the rXg forward to limit the breadth of the rule to packets originating from the specified host(s).
The destination port override field specifies an alternative port to send the forward traffic. If left unspecified, the original destination port specified by the application is used as the destination port. If specified, all traffic is redirected to the selected port. For example, if the application is configured to be SMTP (destination port 25) and the destination port override is configured to be 587, all port 25 traffic will be forwarded to port 587 on hosts contained in the destination policies.
The policy field relates this record to a set of groups through a policy record.
The policy mode field configures the forwarding behavior when the linked policy contains multiple groups or multiple members in a group. The first member only option causes all traffic coming in from the WAN to the port specified by the application to be forwarded to the first member of the first group. The round-robin option causes inbound traffic on the port specified by application to be load balanced between all members linked to the policy. If only a single group with a single member is linked to the enforcement record, the behavior will be identical to first member only. This option is useful for having inbound requests load balanced to a farm of servers. The autoincrement option causes the enforcement record to create a many to many mapping between ports and group members. For example, if the application specifies a port of 5000, and the policy links to a group with members 10.0.1.100, 10.0.1.101 and 10.0.1.102, then port 5000 will forward to 10.0.1.100, port 5001 will forward to 10.0.1.101, port 5002 will forward to 10.0.1.102, etc. The autoincrement option is useful for easily configuring remote monitoring of a large number of LAN devices when site-to-site VPN is not possible.
The note field is a place for the administrator to enter a comment. This field is purely informational and has no bearing on the configuration settings.

![]()
Transit Traffic Forwards
An entry in the transit traffic forwards scaffold creates a forwarding rule that reroutes traffic originating from the LAN to the destination specified on the WAN. The rXg transit traffic forwarding mechanism supports generic (universal) port forwarding as well as policy specific forwarding.
The name field is an arbitrary string descriptor used only for administrative identification. Choose a name that reflects the purpose of the record. This field has no bearing on the configuration or settings determined by this scaffold.
The applications field configures the class(es) of packets that will be forwarded by firewall rules generated as a result of this record. Selecting multiple application groups applies this rule to all of the selected applications (logical or).
The policy field relates this record to a set of groups through a policy record.
The policy mode field for outbound forwards is always set to round-robin. If only a single WAN target is specified, then all traffic will always be redirect to the specified WAN target. If multiple WAN targets are specified, outbound traffic is load balanced amongst the specified WAN targets /.
The destination WAN targets field specifies the destination of the traffic for the transit traffic forward. If multiple hosts are defined by the specified WAN targets, the destinations are forwarded connections on a round-robin basis.
The destination port override field specifies an alternative port to send the forward traffic. If left unspecified, the original destination port specified by the application is used as the destination port. If specified, all traffic is redirected to the selected port. For example, if the application is configured to be SMTP (destination port 25) and the destination port override is configured to be 587, all port 25 traffic will be forwarded to port 587 on hosts contained in the destination WAN targets.
The note field is a place for the administrator to enter a comment. This field is purely informational and has no bearing on the configuration settings.
Payload Rewriting
The payload rewriting feature of the rXg allows operators to dynamically modify the content of any or all HTML pages that transit the rXg. Payload rewriting is embodied by two key features: HTML injection and HTML rewriting. HTML injection enables operators to easily add content to transit web pages. HTML rewriting enables operators to arbitrarily modify the HTML of transit web pages.
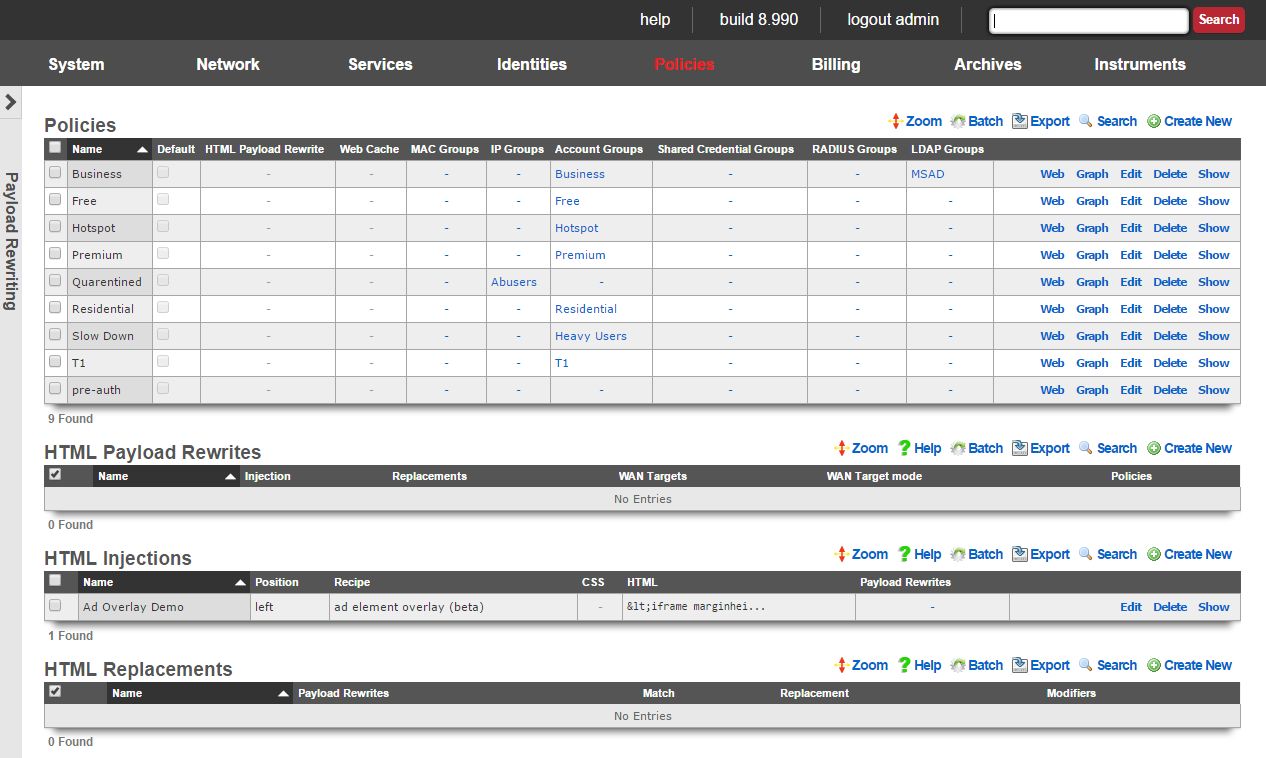
Enabling the payload rewriting feature of the rXg is accomplished by add the desired rewriting configurations into a HTML Payload Rewrites record which is related to a Policy. The effect of the rewrite is controlled by configuring the HTML Injections and HTML Rewrites scaffolds.
HTML Payload Rewrites
The HTML payload rewrites scaffold configures the replacement of web content in web pages that transit the rXg. It is used to link the definitions of desired rewriting configured in the HTML Injections and HTML Rewrites scaffolds to a Policy.
The name field is an arbitrary string descriptor used only for administrative identification. Choose a name that reflects the purpose of the record. This field has no bearing on the configuration or settings determined by this scaffold.
The WAN targets field limits the effect of the HTML payload rewrite settings defined by this record to traffic that is originating from or destined to the IP addresses or DNS names listed in the selected WAN targets. By default, an HTML payload rewrite record affects all HTTP traffic matched by the policy regardless of WAN origin / destination. Setting a WAN target causes the breadth of the HTML payload rewrite to be limited to the specified hosts in the manner specified by the WAN target mode.
The WAN target mode field determines the effect of choosing WAN targets. When set to ignore, all HTTP requests originating from end-users and devices selected by the associated policy will take part in the HTML payload rewrite except for the requests that are headed to the IP addresses and DNS names in the chosen WAN targets.
The policy field relates this record to a set of groups through a policy record.
The note field is a place for the administrator to enter a comment. This field is purely informational and has no bearing on the configuration settings.
HTML Injections
The HTML injections scaffold configures the insertion of operator specified web content into web pages that transit the rXg.
The name field is an arbitrary string descriptor used only for administrative identification. Choose a name that reflects the purpose of the record. This field has no bearing on the configuration or settings determined by this scaffold.
The position field specifies the location where the operator specified web content will be inserted into every web page that transits the rXg.
The recipe field configures which methodology the rXg will use to inject HTML content into web pages. Setting this field to virtual frames will result in HTML content being injected as a header, footer or sidebar (depending on the setting of the position ). Setting this field to floating overlay results in the injected HTML payload being delivered in a stylized HTML div element that floats over existing web content. The ad element overlay option is a specialized recipe designed to work with the rXg integrated advertising rotation mechanism to deliver advertising overlay.
The CSS and HTML fields specify the web content that will be inserted into every web page that transits the rXg.
The policy field relates this record to a set of groups through a policy record.
The note field is a place for the administrator to enter a comment. This field is purely informational and has no bearing on the configuration settings.
HTML injection is a unique capability of the rXg that enables operators to insert snippets of HTML into any transit web page. When enabled, the response from upstream web servers (or local stores if the persistent cache is enabled) are buffered into the RAM of the rXg. The payload is then analyzed for compatibility with injection.
Compatible payloads are rewritten according to the operator selected recipe. The virtual frames recipe converts the original web page into one that uses CSS to emulate frames. The original web content appears at the center of the frame emulated page with operator specified content around the four edges.
The floating overlay recipe enables operators to insert contant that they desire in a stylized HTML div that is present on all web pages. A small red button is present so that the end-user may close the overlay in case critical content is residing behind the div.
The ad element overlay recipe specifically targets well known advertising delivery mechanisms for HTML injection. This recipe demonstrates the ability of the rXg to seemlessly deliver advertising impressions by overlaying existing publisher-controlled advertisments with operator-controlled advertising inventory.
The ad element overlay recipe works in conjunction with the rXg integrated advertising delivery mechanism. This recipe expects that rotators named "160x600," "180x150", "300x250" and "728x90" exist. Rotatees associated with the appropriate rotator should contain the operator-controlled advertising inventory that will be overlaid on top of publisher-controlled advertising content that is present on web pages. Furthermore, the advertising overlay script must be executed by injecting:
<script type='text/javascript'>
adRotatorOverlay();
</script>
HTML injection is typically deployed for three purposes: messaging, up-selling and advertising.
One common application of HTML injection is operators to broadcast messages to the end-user population. Operators are most often going to communicate service messages such as notification of a scheduled system outage. Some operators choose to make use of HTML injection messaging as part of a larger emergency notification system strategy. Sometimes it is possible for operators to leverage this capability to partially fund their networks using federal emergency management grants.
Operators may also use the HTML injection mechanism to up-sell premium services. For example, injection may be used to bring parts of the captive portal into the view to allow an end-user to easily purchase more quota, higher rate limits, etc. In a typical deployment, a quota trigger is configured to place end-users with high percentage or absolute value of quota utilization into a transient group that is associated with a policy that has injection enabled. The injection payload is then configured to notify the end-user of their high utilization and offer them the option of clicking through to purchase more quota and/or upgrade to a higher bandwidth plan.
Many operators choose to use the HTML injection mechanism to deliver advertising. By incorporating operator specified content into potentially every single web page that transits the rXg, a tremendous number of advertising impressions may be generated. In a typical deployment, HTML injection used to generate advertising impressions is associated with a policy that contains "free" end-users while paid end-users do not experience any advertisements.
HTML Replacements
The HTML replacements scaffold configures the generic search-and-replace engine for web pages that transit the rXg.
The name field is an arbitrary string descriptor used only for administrative identification. Choose a name that reflects the purpose of the record. This field has no bearing on the configuration or settings determined by this scaffold.
The match field the string that the engine will use to search for. The entirety of the match field will be replaced with the contents of the replacement field. Parenthesis may be used to store all or part of the contents in the match field for use in the replacement field.
The replacement field is the string that will be used by the engine to replace the match string. The replacement field may contain text or substitution variables such as $1, $2, etc. The number after the $ represents the contents of the parenthesis specified in the match.
The replacement field may also contain a server-side include substitution variable of the form %ssi%FILENAME%. For example, %ssi%/space/portals/your_portal/static/abc.html% will substitute tag with the contents of the file abc.html.
The note field is a place for the administrator to enter a comment. This field is purely informational and has no bearing on the configuration settings.
HTML rewriting enables operators to perform "search and replace" on the web pages that transit the web page. The operator configures a string to match and a string to replace. The rXg loads each transit web page in memory and looks for the match string. If found, the match string is removed and the replacement is inserted in its place.
Consider the following example:
<html>
<head>
<title> A Simple Page</title>
</head>
<body>
<h1> Simple Web Page </h1>
This is the simplest web page possible.
Here is an image:
<img src="/some_photo.jpg"/>
</body>
</html>
If a HTML rewriting record is created with the match field set to simplest and the replacement field set to most complicated, the resulting web page that the end-user sees would be:
<html>
<head>
<title> A Simple Page</title>
</head>
<body>
<h1> Simple Web Page </h1>
This is the simplest web page possible.
Here is an image:
<img src="/some_photo.jpg"/>
</body>
</html>
HTML rewriting records apply to every part of the HTML present in the web page. This allows the operator to effect dramatic changes to the look and feel as well as the structure of the web page. For example, it is possible to create a match rule to replace the stylesheet referenced by a page or add a CSS class to every instance of a particular element. The generic nature of the HTML rewriting engine opens up a broad spectrum of possible applications.
Persistent Caching
Persistent caching is a feature of the rXg that benefits the both end-users and operators with both a perceived and actual increase in performance and as well as a decrease in uplink utilization. When enabled, the local persistent store is consulted before any request is sent to the original web server destination. The request is serviced using a local copy if one exists. If not, the request is serviced by originating a HTTP request from the rXg and transmitting the response to the original end-user or device that made the request.
![]()
The HTTP headers of the response are checked for cache control options. If the content is cacheable, it is placed into the persistent store. To keep the cached content up to date, the proxy will transmit a request to the original web server to check to see if content has modified based on an expiration timetable configured by the operator. Enabling the persistent cache is a simple way to dramatically improve the performance and reduce the WAN uplink utilization of most revenue generating networks.
Web Caches
Records in the web caches scaffold enable the rXg integrated transparent web cache. The transparent web cache utilizes persistent storage to store HTML pages and assets that transit the rXg. Enabling the web cache reduces WAN uplink utilization as commonly accessed files will be served from the rXg persistent store.
The name field is an arbitrary string descriptor used only for administrative identification. Choose a name that reflects the purpose of the record. This field has no bearing on the configuration or settings determined by this scaffold.
The note field is a place for the administrator to enter a comment. This field is purely informational and has no bearing on the configuration settings.
The Intercept SSL/TLS checkbox enables the rXg integrated HTTPS proxy. Enabling this feature tells the rXg to intercept all HTTPS traffic, determine the destination and generate an SSL certificate matching the destinaion on-the-fly. Client software will report an SSL certificate error unless the rXg SSL certificate which is used to sign all of the on-the-fly generated certificates is installed on the client device.
The WAN targets field limits the effect of the web cache settings defined by this record to traffic that is originating from or destined to the IP addresses or DNS names listed in the selected WAN targets. By default, a web cache record affects all HTTP traffic matched by the policy regardless of WAN origin / destination. Setting a WAN target causes the breadth of the web cache to be limited to the specified hosts in the manner specified by the WAN target mode.
The WAN target mode field determines the effect of choosing WAN targets. When set to ignore, all HTTP requests originating from end-users and devices selected by the associated policy will take part in the web cache except for the requests that are headed to the IP addresses and DNS names in the chosen WAN targets. Conversely, when set to cache, only the HTTP requests headed to the chosen WAN targets originating from end-users selected via the policy will be cached and all other requests will not be cached.
The policy field relates this record to a set of groups through a policy record.
Web Proxy Servers
Entries in the Web Proxy Servers scaffold define configuration profiles for the rXg integrated web proxy and cache.
The active field enables an option set. Exactly one option set may be active at any time. Enabling a particular option set will automatically disable another existing active option set.
The name field is an arbitrary string descriptor used only for administrative identification. Choose a name that reflects the purpose of the record. This field has no bearing on the configuration or settings determined by this scaffold.
The note field is a place for the administrator to enter a comment. This field is purely informational and has no bearing on the configuration settings.
The mode field affects how and when objects are cached.
The memory (diskless) option utilizes an in-memory cache that is faster than storing cached objects to disk, but sacrifices caching larger files. This mode utilizes a heap GDSF algorithm which optimizes object hit rate by keeping smaller popular objects in the cache so a request has a better chance of getting a hit. It achieves a lower byte hit rate by evicting larger (possibly popular) objects.
The disk + memory option utilizes both an in-memory cache and a disk cache, which facilitates caching larger objects, and more content in general, which optimizes uplink bandwidth utilization at the expense of performance compared to the memory-only mode. The disk cache utilizes a heap LFUDA algorithm which keeps popular objects in cache regardless of their size and thus optimizes byte hit rate at the expense of hit rate since one large, popular object will prevent many smaller, slightly less popular objects from being cached.
The disabled (proxy-only) mode disables all object caching and is useful in conjunction with the content filtering and/or payload rewriting proxies, when caching is not desired or performance is of higher priority than optimizing uplink utilization.
The disk cache size field limits the amount of disk space to use for the disk cache when the mode field includes the disk method. This field is automatically calculated based on the size of the system's disk and cannot be set higher. Setting it lower may be desired to affect cache behavior.
The disk file size field limits the maximum size of an object cached to disk. This field may be changed to affect the byte versus object hit rate of the disk cache.
The memory file size field limits the maximum size of an object cached to memory. This field may be changed to affect the byte versus object hit rate of the memory cache.
The prefetch limit field sets an upper limit on how far (number of bytes) into the file a Range request may be to cause the web cache to prefetch the whole file. If beyond this limit, the proxy forwards the Range request as it is and the result is NOT cached. This is to stop a far ahead range request (lets say start at 17MB) from making the web proxy fetch the whole object up to that point before sending anything to the client. A size of 0 causes the web proxy to never fetch more than the client requested.
The clear cache field forces the disk cache to be flushed. It is necessary to check this field when making changes to some of the above options.
The Certificate Authority and Certificate fields are used to specify the rXg certifcate that will be used to sign the on-the-fly generated certificates used by the SSL intercept mechanism. The certificate specified here must be installed on client devices that participate an rXg policy with SSL interception enabled in order to avoid certificate errors. The Certificate Authority and Certificate fields are mutually exclusive (only one may be specified).
By default, access to rXg services are either limited to the LAN or disabled entirely. In certain cases, the operator may desire to permit accessibility to services over the WAN and/or LAN. To enable access to rXg services over the WAN, the operator should specify one or more WAN targets containing the list of allowed hosts and then set the visibility appropriately. If no WAN target is specified and WAN visibility is enabled, any node on the WAN may connect to the service. It is highly recommended that this wide-open configuration be avoided to ensure system security. If LAN visibility is included then all authenticated nodes on the LAN may access this service.
Traffic Shaping
The rXg traffic shaping mechanism offers five key bandwidth management capabilities: rate limiting, link share equalization, burst rates, bandwidth guarantees and packet prioritization.
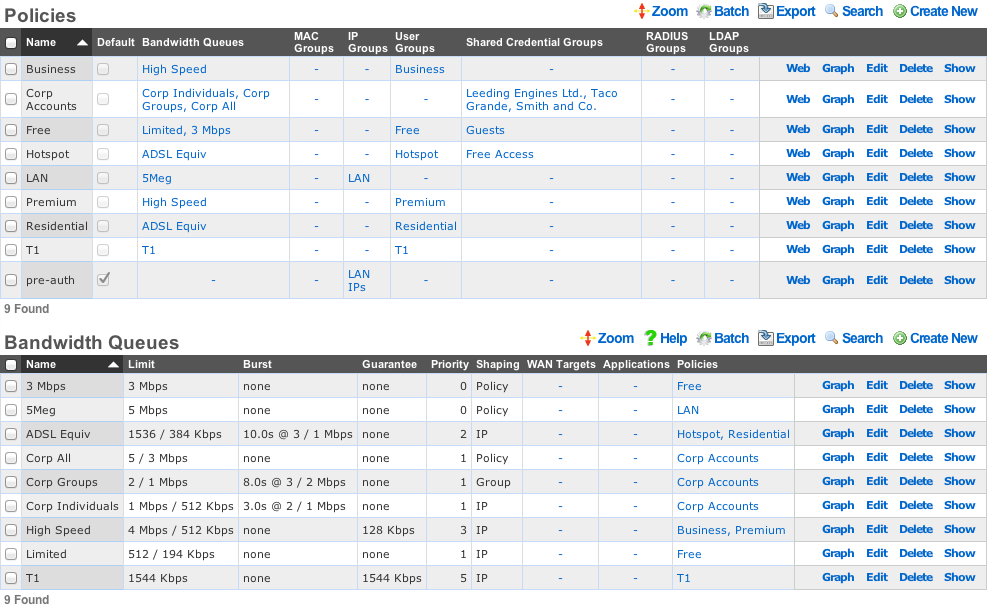
All shaping capabilities are configured through bandwidth queue records which are specified to operate on each individual IP, each group or the policy as a whole. Multiple bandwidth queue records may be associated with a single policy to define a hierarchy of shaping controls.
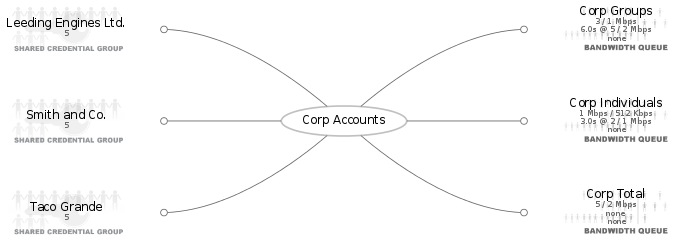
Furthermore, enforcement may be limited to specific applications and/or WAN targets. The rXg applies more specific definitions first when multiple bandwidth queues records are associated with the same policy.

Rate Limiting
Rate limiting is a key capability that enables operators to oversubscribe WAN uplinks. In most usage scenarios, end-users consume little to no bandwidth most of the time interspersed with occasional spikes of heavy utilization. Rate limiting controls the maximum value of the heavy utilization periods. Preventing a handful of end-users from overwhelming the network with heavy utilization enables operators to dramatically oversubscribe WAN uplinks and profit from the results.
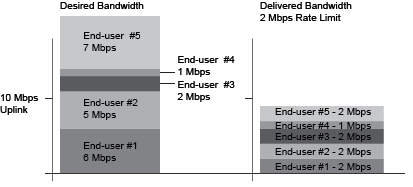
Rate limiting is a central aspect to the marketing program of most revenue generating networks. For example, the operator may choose to offer three tiers of service (768k / 256k, 1.5M / 512k, 5M / 1M) at prices that increase appropriately ($19, $39, $99). These tiers of service are configured as rate limits and tied to the billing system through group membership. When an end-user comes to the captive portal, they are given the opportunity to choose from the plans being offered. Once a plan is selected, they will be charged appropriately and then placed into a group automatically which has been associated with the appropriate bandwidth queue. Thus the rXg enables operators to offer multiple tiers of service that are integrated into the billing system and self-provisioned by the end-user with zero operator intervention.
Link Sharing and Flow Equalization
Profitable networks are oversubscribed and heavily oversubscribed networks will have periods where uplinks will be saturated. Many traffic shaping solutions fail to address the potential for random flow starvation with saturated uplinks that is a result of the nature of packet based network architectures. For example, if the uplink is 10 Mbps and the rate limit is 3 Mbps and there are 10 end-users, then just 4 out of the 10 end-users can fully saturate the uplink at which point some of the end-users will undoubtedly have a very poor experience due to the random nature of packets being dropped.
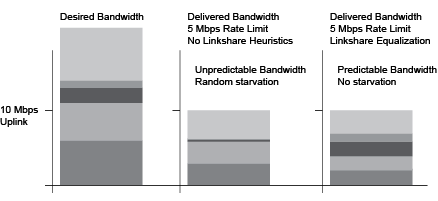
The rXg automatically enforces heuristic link sharing and per-flow packet rate equalization when traffic shaping is enabled. This feature prevents flow rate reduction from being exacerbated into extremely poor service. The rXg automatically slows down the highest rate flows as uplinks begin to saturate. Given a 10 Mbps uplink and 10 end-users that are all attempting to pull the full 3 Mbps specified in their rate limit, the rXg would automatically enforce link sharing at 1 Mbps to each end-user.
Burst Rates
Highly profitable revenue generating networks depend on creative service offerings that entice end-users to purchase premium services. Burst rate limiting enables operators to make service offerings that have a higher initial rate. The burst rate is typically much higher than the sustained rate limit in order to maximize marketing potential. For example, an operator may wish to offer a basic service that has a 3 Mbps sustained rate limit and a premium service that has a 5 Mbps sustained rate limit. The premium service could be enhanced with a 20 Mbps burst rate without dramatically affecting the oversubscription ratio. A premium service of 20 Mbps burst with 5 Mbps sustained is dramatically more attractive than the 5 Mbps sustained without the burst rate.
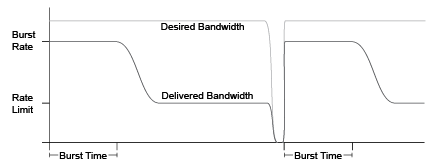
The rXg enforces burst rate limiting when the queue for an end-user is empty. The end-user will be delivered the burst rate at best effort for the configured burst time. Once the burst time has expired then the sustained rate limit will be delivered at best effort. The burst rate may be delivered to the end-user again if the end-user queue empties. It is important to note that the burst rate is delivered with best effort. It is unlikely that burst rates will ever be delivered when a link is saturated as the rXg will enforce linkshare equalization on highly oversaturated links.
Bandwidth Guarantees
Bandwidth guarantees enables operators to offer service level agreements that specify a minimum committed rate. In a typical deployment scenario, bandwidth guarantees are packaged as a premium service offering to end-users. For example, a "business class" offering may include a committed symmetric rate of 1.544 Mbps as a T-1 equivalent. Another common offering is a 128 Kbps committed symmetric rate for VoIP.

Bandwidth guarantees may not compose more than a fraction of the total available bandwidth on a WAN uplink. A good rule of thumb is that no more than 25% of the total available bandwidth should be allocated as a guarantee. Furthermore, bandwidth guarantees are only relevant within traffic shaping definitions that have the same priority.
The automatic link sharing and flow equalization feature of the rXg traffic shaping mechanism obviates the need to explicitly specify a rate guarantee for "best effort" service delivery. Guarantees should deployed carefully and always in conjunction with a premium service offerings to maximize revenue potential. In most cases, it is appropriate to think of the bandwidth guarantee as a mechanism to override linkshare equalization and give a small population of end-users an unequal share of the bandwidth.
Packet Prioritization
Packet prioritization enables operators to enforce hard priority on different classes of traffic. This enables the operator to ensure that certain end-users or devices are always serviced before other end-users or devices.
In a typical usage scenario a very high priority is assigned for VoIP and infrastructure management traffic. This ensures proper voice quality and the ability to manage the devices that power the infrastructure. In addition, "free" and pre-authenticated end-user traffic is typically given a very low priority.
Hierarchachal Enforcement
The rXg enables the operator to specify the traffic shaping enforcement at three different levels. Shaping by IP address is the finest grain enforcement support of the rXg and is at the bottom of a shaping hierarchy. Enforcement of shaping by group and policy enables operators to configure aggregate queuing and build up two more levels of a traffic shaping hieararchy.
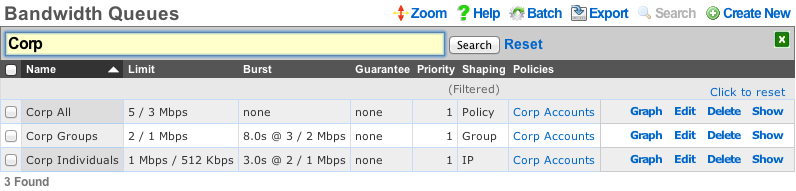
The operator may specify up to three hierarchachal levels of enforcement for a given set of applications and WAN targets. Levels of the heirarchy that are omitted default to 100% of the parent. The implied parent of all policies is the uplink.

Shaping by IP address treats the configured bandwidth queue as a template to be replicated to each and every associated IP address. Every IP in the CIDR range that is associated with a linked bandwidth queue is assigned independent rate limits, bursts and guarantees when shaping by IP enforcement is enabled for policies associated with IP groups. Similarly, when shaping by IP enforcement is enabled for other types of groups (e.g., MAC groups, Account groups, RADIUS groups, etc.), each resolved IP address that is a member of associated groups is assigned an independent rate limit, burst and guarantee.

Shaping by group treats the configured bandwidth queue as a template to be replicated for each group linked to the bandwidth queue. This shaping mode is useful for applying the same rate limits to a set of groups linked through a single policy. Consider a network where VLANs are being used to identify end-users. Unique IP groups could be created for each VLAN and then the IP groups could all be associated through one or more policies associated with a single bandwidth queue.

Shaping by policy creates a single aggregate queue for each policy associated with the bandwidth queue. This shaping mode is less granular than shaping by group. All IP groups , MAC groups , etc., associated with a single policy will be assigned to the same aggregate queue. However if multiple policies are associated with the bandwidth queue then each policy will each be shaped independently.
The rXg generates a diagram of the configured hierarchy to help operators visualize the enforcement. The lowest level of the hierarchy (shaping by IP) is on the left. Packets are first shaped by IP, then by group and then by policy moving from the left to the right of the diagram.

The first example (shown above) depicts the simplest case of traffic shaping where an aggregate queue over all entities within a policy is desired. Since only the policy level of the hierarchy is defined the other levels default to 100%.

Alternatively the operator might desire to only configure shaping by IP without any aggregate queueing. This scenario is depicted in the example shown above. The diagram gets more interesting when more levels of the traffic shaping heirarchy are configured.
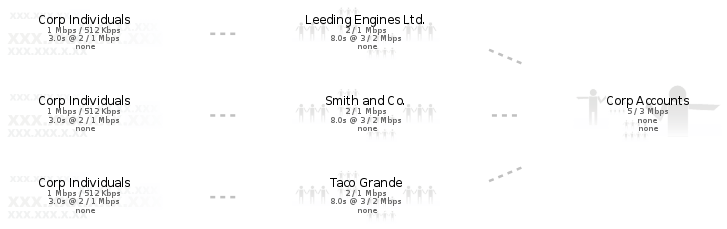
In the example given above, all three levels of the heirarchy are explicity specified. Thus an individual IP address is limited to 1 Mbps / 512 Kbps (with a 2 Mbps / 1 Mbps burst), while the group that the IP belongs (which in this case represents a corporate account) to is limited to 2 / 1 Mbps (with a 3 / 2 burst) and finally the set of all corporate accounts that fall within this structure are limited to 5 / 3 Mbps.
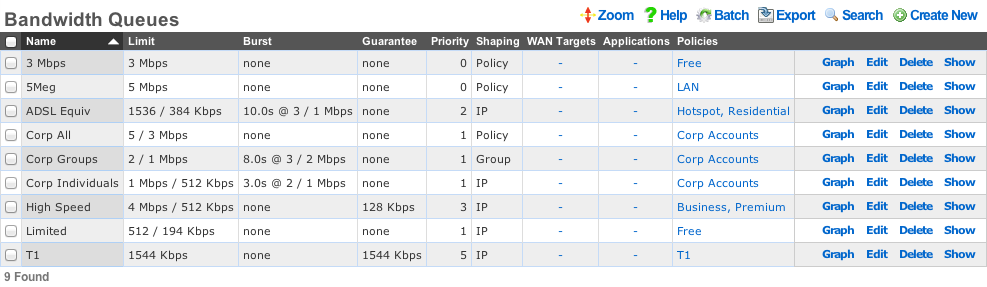
Bandwidth Queues
Bandwidth queues define traffic shaping policies.
The name field is an arbitrary string descriptor used only for administrative identification. Choose a name that reflects the purpose of the record. This field has no bearing on the configuration or settings determined by this scaffold.
The priority field determines the relative priority of the traffic that is assigned to this bandwidth queue. All packets waiting in a queue with higher priority are forwarded before packets waiting queues in lower priorities are serviced. The priority is completely independent from the rate limits and guarantees of a queue.
The absolute value of the priority field has no meaning as the enforcement of the packet priority policy is based on the relative values of each queue. The priority of 0 is the lowest and used to designate queues that are filled with packets that are least important or the least sensitive to delay. For example, bulk web traffic might be assigned a priority of 1 while VoIP traffic might be assigned a priority of 5.
The download rate limit and upload rate limit fields configure the absolute maximum steady-state transfer rate for this queue. These values are often described as being delivered with "best effort" in oversubscribed networks. This is because the actual maximum transfer rate is determined by numerous factors such as the size of the WAN uplink and the amount of traffic being generated by other end-users.
In heavily oversubscribed scenarios, the actual achievable maximum transfer rate experienced by the end-user will likely be much lower than the rates specified. In lightly used networks or networks with lower oversubscription ratios the data transfer rate may come be equal to but will never exceed the rate specified by these values unless a burst setting is configured.
The download rate burst and upload rate burst determine the initial maximum traffic rates for the specified burst time. These optional values allow the operator to offer end-users an initial burst of higher speed for a short period of time. These values are similar to the download rate limit and upload rate limit fields in that the specified rates are delivered with "best effort" and the actual maximum rate is determined by the amount of traffic being generated by the end-user population.
The download rate guarantee and upload rate guarantee are optional fields that configure the desired of amount of bandwidth that is dedicated to the queue. This value must be set carefully as it is a true dedicated guarantee and may not be oversubscribed. The operator should never guarantee more than 25% of the available bandwidth at any given time as doing so will likely result in an unstable network. It is particularly important to be very judicious with the use guarantees when configuring per-device Bandwidth Queues scenarios because the actual bandwidth guaranteed is determined by the specified value multiplied by the number of end-user devices. The bandwidth required to configure the guarantee may quickly become unmanageably large if an unexpectedly large number of end-users joins the network.
The WAN targets field limits traffic admitted to the queue defined by this record to traffic that is originating from the IP addresses or DNS names listed in the selected WAN targets. By default, a bandwidth queue will admit all traffic that is originating from and destined for the end-users and devices linked through the associated policies. Setting a WAN target causes the bandwidth queue to limit the breadth of admission to traffic destined for and originating from the designated hosts.
The applications field configures the kinds of packets that will be admitted to the bandwidth queue defined by this record. Selecting multiple application groups admits the packets from all of the selected applications (logical or). By default, all types of packets that match the chosen policy and WAN targets are admitted. Selecting one or more applications reduces the breadth of the queue admission configured by this record to the packets classified as being part of the chosen applications.
The shaping field configures the granularity of the traffic shaping enforcement. Setting this field to policy , group account or IP results in the configured settings being used as a template that is replicated for each associated policy , group or IP respectively. See the full traffic shaping help page for details.
The disable auto-IP queues field (a.k.a. LPV-mode) can be enabled only for queues configured for group or account sharing. This option disables the generation of the auto-IP queues for each IP member of an IP group, unless there is an explicit device sharing queue that also applies to the device. This drastically reduces the number of queues and firewall rules, thereby enhancing packet processing performance in scenarios where there is no portal and no device-specific rules. The trade-off to this is that there are no longer per-IP queue counters to instrument, meaning some visibility into device traffic rates is lost. This mode is not enabled if the policy has multiple link controls, since it would cause all traffic within the group to use a single uplink, or if there is a Captive Portal, since device-specific rules are required to pass traffic after authentication.
The policy field relates this record to a set of groups through a policy record.
The note field is a place for the administrator to enter a comment. This field is purely informational and has no bearing on the configuration settings.
Uplink Control
The uplink control view presents the scaffolds that configure the multiple uplink control mechanism of the rXg.
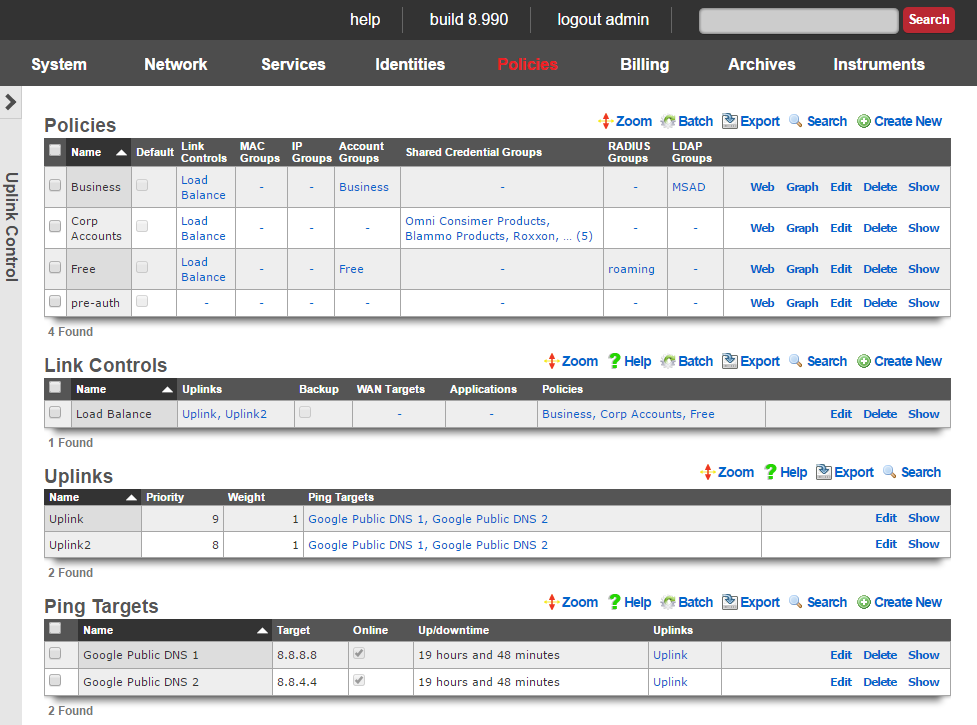
The multiple uplink control mechanism of the rXg enables operators to leverage the capacity and diversity of multiple WAN uplinks without the complexity, operational difficulty and support burden associated with traditional multihoming techniques (e.g., ARIN ASNs, upstream network cooperation and reconfiguration, etc. ). Multiple uplink control provides the operator with four distinct capabilities: bandwidth aggregation, uplink failover, carrier diversity and application affinity.
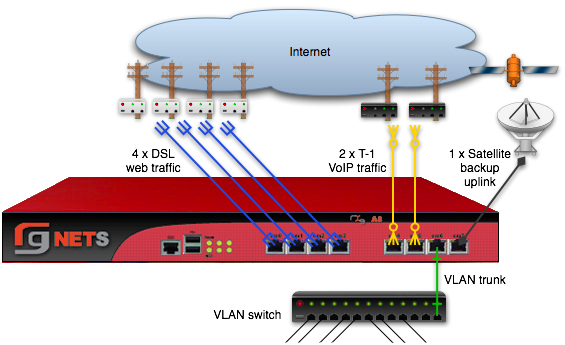
Bandwidth Aggregation
The rXg multiple uplink control mechanism utilizes multiple WAN uplinks as a team. This allows the operator to treat several uplinks as if they were a single high bandwidth uplink. Significant operational cost savings may be achieved through proper employment of this feature. For example, a turn-key rXg can be deployed with multiple uplink control to aggregate seven standard 7.1 Mbps x 768 Kbps ADSLs resulting in a virtual link that is nearly 50 x 5.5 Mbps. The MRCs associated with seven ADSLs is approximately $300, a fraction of the $5000 or more that would be incurred for a 45 Mbps T3.
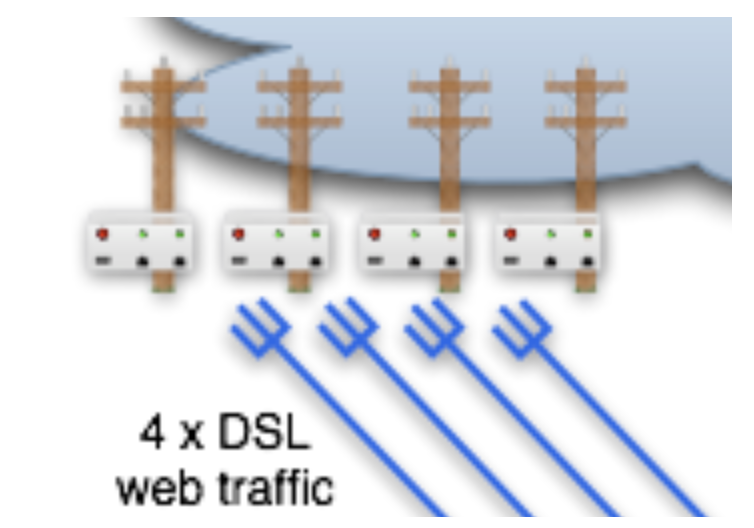
Aggregating numerous WAN uplinks is also an effective way to scale uplink bandwidth with the end-user population. Since MRCs tend to scale with uplink bandwidth and revenue tends to scale with end-user population, multiple uplink control enables proportional scaling of cost with revenue. In addition, most high-bandwidth leased lines have long deployment lead times. Multiple uplink control enables operators to quickly deploy RGNs with one or two commonly available WAN uplinks (e.g., cable modems and DSLs). The operator may then dynamically increase total available bandwidth by simply adding more WAN uplinks from any ISP of the operator's choosing.
Uplink Failover
The multiple uplink control mechanism enables operators to easily increase the fault tolerance of the network and decrease the dependence of operator on WAN uplink providers. When several WAN uplinks are configured for aggregation, the rXg automatically monitors the health of the WAN uplinks and removes uplinks that have failed from the active pool. If a failed uplink returns to proper operation, the rXg automatically adds the WAN uplink to the active pool.
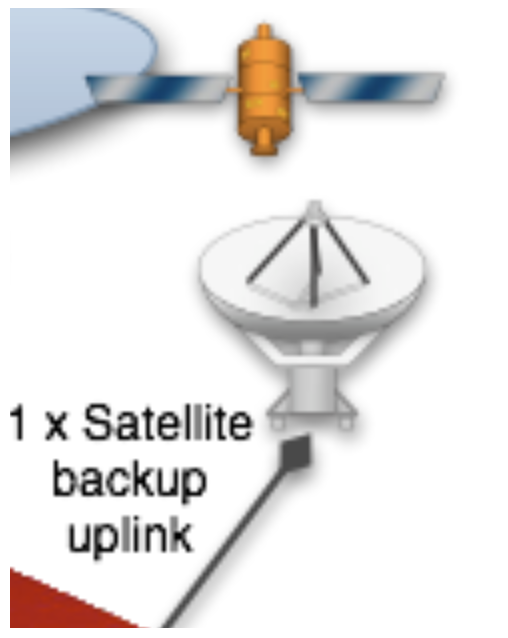
In addition, the rXg supports explicit configuration of backup WAN uplinks. This is useful for situations where a backup uplink that has different characteristics from the one or more primary uplinks. For example, satellite WAN uplink may be designated as an explicit backup uplink that is never used unless all members of a pool of primary DSLs have failed.
Carrier Diversity
The rXg multiple uplink control mechanism operates independently of the upstream carriers. The upstream carriers do not need to make any configuration changes or cooperate with the operator in any way. The multiple uplink control mechanism is so transparent that in most cases upstream carriers do not even know that their link is taking part in a connection pool. The rXg supports multiple uplink control over any number of carriers that are supplying an arbitrary set of uplinks.
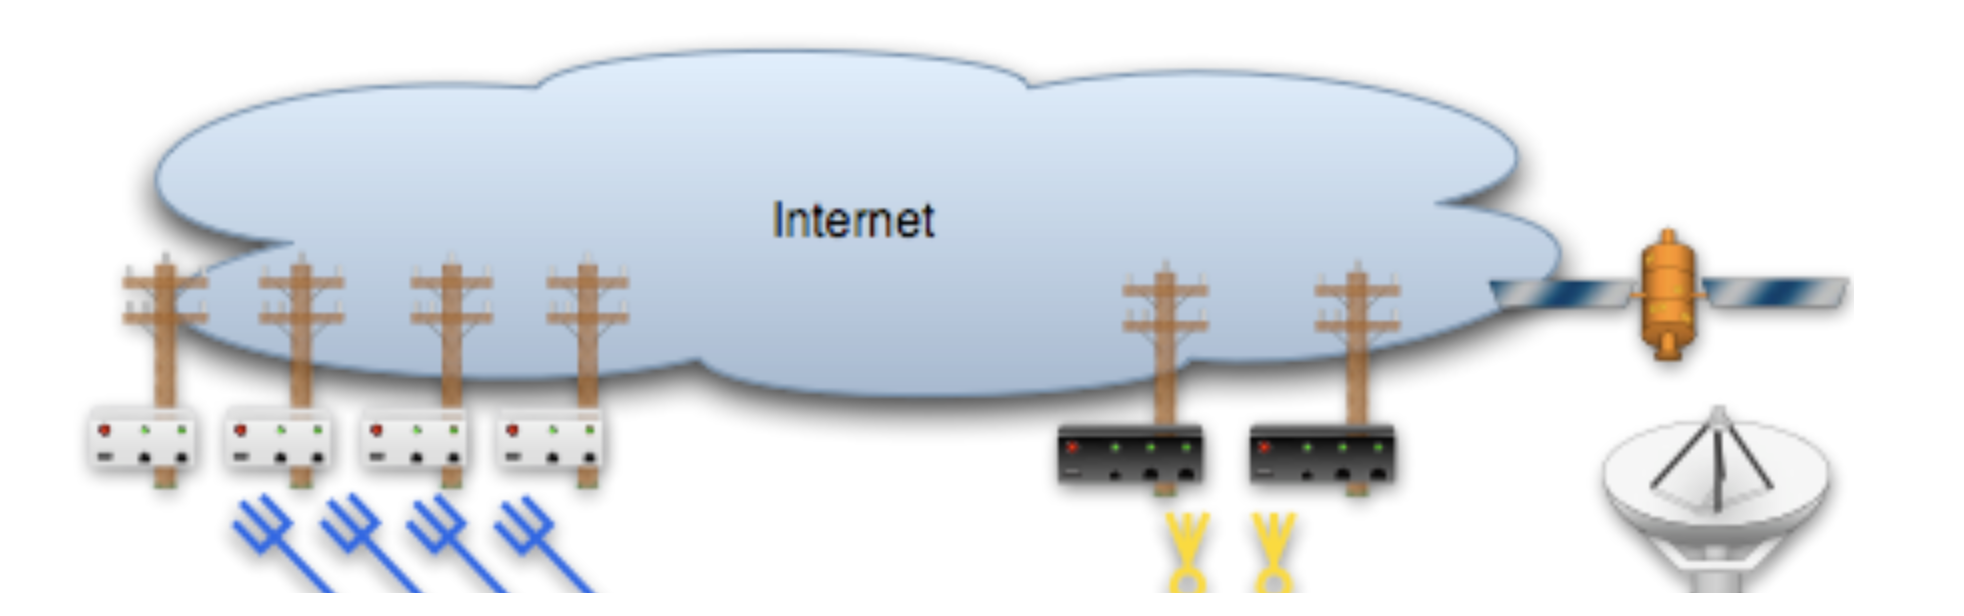
With third-party ping targets configured, the rXg multiple uplink control mechanism can determine the health of the uplink carrier's upstream connectivity. This capability combined with WAN uplinks that are being supplied provided by different upstream carriers enables the rXg to provide carrier diversity and failover. Uplinks that are associated with carriers that are having peering difficulty are removed from the active pool.
Application Affinity
The rXg multiple uplink control mechanism can affine specific outgoing traffic to particular WAN uplinks. This capability enables operators to maximize the utilization and capabilities available through a diverse set of WAN uplinks. In a typical configuration, most traffic is sent across one set of WAN uplinks while traffic with special needs are sent through a different set of WAN uplinks.
For example, an operator that has a single T-1 and three ADSLs may choose to affine all VoIP traffic to the T-1. This allows the VoIP to be delivered at a lower latency that will make a noticeable difference in call quality. Link affinity may also be used in conjunction with application forwards and DNS mappings to reserve certain WAN uplinks for public facing services.

Uplink Control
Uplink Control records define the configuration of the multiple rXg uplink control mechanism.
The name field is an arbitrary string descriptor used only for administrative identification. Choose a name that reflects the purpose of the record. This field has no bearing on the configuration or settings determined by this scaffold.
The uplinks field determines which WAN uplinks will take part in the multiple uplink control policy configured by this record. When more than one uplink is set, the rXg will automatically load balance the links. The distribution of load across the selected uplinks is determined by the weight field of the WAN uplink records.
The backup checkbox configures the Uplink Control group configured by this record to remain inactive unless all other links associated with an Uplink Control record that is not designated as a backup have failed. At least two Uplink Control records (one designated as backup and one that is not) must be associated with the same policy in order for this field to have any effect.
The WAN targets field limits the effect of the Uplink Control defined by this record to traffic that is originating from or destined to the IP addresses or DNS names listed in the selected WAN targets. By default, an Uplink Control affects all traffic originating from and destined to the members of all groups associated through the linked policies. Setting a WAN target causes the Uplink Control to limit the breadth of the rule to the specified hosts.
The applications field configures the kinds of packets that will be link controlled as a result of this record. Selecting multiple application groups applies this rule to all of the selected applications (logical or). By default, all types of packets that match the chosen policy and WAN targets are link controlled. Selecting one or more applications reduces the breadth of the rule configured by this record to the packets classified as being part of the chosen applications.
The policy field relates this record to a set of groups through a policy record.
The note field is a place for the administrator to enter a comment. This field is purely informational and has no bearing on the configuration settings.
Validation Requirements
When creating or updating an Uplink Control, the following validation rules apply:
- Each selected uplink must have at least 2 ping targets configured. This ensures reliable health monitoring with redundancy.
- If WAN Targets or Applications are specified, the associated policies must have Traffic Shaping records matching those filters.
- At least one uplink must be selected.
Uplink Control Behaviors
Single Uplink in Group: All associated policy traffic uses that uplink. Simple assignment with no load balancing.
Multiple Uplinks in Group: Traffic is distributed by weight ratio across all online uplinks. Provides bandwidth aggregation.
Backup Flag Enabled: The Uplink Control remains inactive until all non-backup Uplink Controls for the same policy have no online uplinks. Use for explicit failover without aggregation.

Uplinks
This scaffold brings visibility to the columns of the uplinks scaffold that are relevant for multiple uplink control. Since uplinks are defined via the uplinks scaffold in the WAN view of the Network subsystem, this scaffold is limited to editing settings relevant to multiple uplink control.
The name field is an arbitrary string descriptor used only for administrative identification. Choose a name that reflects the purpose of the record. This field has no bearing on the configuration or settings determined by this scaffold.
The priority field determines the order of precedence during failover in a multiple uplink control scenario. When only one uplink is configured, this field has no effect as there is no uplink to failover to. When multiple uplinks are configured and connection aggregation is enabled, a failure of a link will cause another member of the pool to forward all traffic. If aggregation is not enabled, or all uplinks within a pool have failed, then the uplink with the highest priority amongst all of the remaining uplinks will be used to forward the traffic.
The weight field is used to determine how load is distributed across a set of uplinks that have been grouped together into a single Uplink Control. If all uplinks in the Uplink Control have the same weight, the end-users will be assigned to the uplinks in a simple round-robin (uniformly distributed) fashion. If the uplinks have different weights, end-users are assigned to uplinks in a distribution that uses the uplink weight as a ratio with respect to the sum total of the weights. For example, if an Uplink Control has two uplinks associated with it and the weights of the uplinks are 2 and 5, 28% (2/7) of the end-users will be assigned to the first link and 72% (5/7) of the end-users will be assigned to the second link.
Where to configure: Weight is configured via Policies :: Uplink Control Uplinks (a separate section on the same page). Edit a specific uplink from this section to adjust its weight. Note: Weight is a global property of the uplink, not per-Uplink Control.
The ping targets field associates ping targets with this uplink. Ping targets are used to determine the health of the uplink. When all of the ping targets associated with the given uplink fail, i.e., are not reachable via an ICMP ping, the uplink is marked as down until at least one of the ping targets recovers and responds to the ICMP pings.
The note field is a place for the administrator to enter a comment. This field is purely informational and has no bearing on the configuration settings.

Ping Targets
The ping targets scaffold configures the third-party ping targets that are used to determine availability of various system services, including the uplink availability. Each uplink should have more than one ping target associated with it in order to properly determine uplink health. Individual ping targets may be associated with instances of DNS server or uplink interfaces, as shown below.

The name field is an arbitrary string descriptor used only for administrative identification. Choose a name that reflects the purpose of the record. This field has no bearing on the configuration or settings determined by this scaffold.
The target is the IP address or hostname of the device that is to be sent an ICMP ping. For reliable uplink monitoring, use external targets such as 8.8.8.8 (Google), 1.1.1.1 (Cloudflare), or 9.9.9.9 (Quad9) rather than ISP infrastructure.
The timeout is the number of seconds (maximum 10) that the rXg will wait for a response from the target to an ICMP ping request. Default is 3.0 seconds.
The attempts is the number of times (1-12) an ICMP ping will be tried per check cycle before evaluating the result. Default is 6 attempts.
Link Quality Thresholds
The following threshold fields allow fine-grained control over uplink health determination. When any threshold is exceeded, the uplink may be marked offline.
The RTT tolerance field specifies the maximum acceptable round-trip time in milliseconds. If the average RTT exceeds this value, the ping target is considered unhealthy.
The jitter tolerance field specifies the maximum acceptable variation in round-trip time in milliseconds. High jitter indicates unstable connectivity and may affect real-time applications like VoIP.
The packet loss tolerance field specifies the maximum acceptable packet loss percentage (0-100). For example, setting this to 20 allows up to 20% packet loss before the target is considered unhealthy.
These thresholds enable detection of degraded links that are technically reachable but performing poorly. This is especially useful for identifying ISP congestion or routing issues that wouldn't be detected by simple reachability tests.
The uplinks field associates this ping target with one or more uplinks for health monitoring.
The interfaces field associates this ping target with one or more interfaces for monitoring.
The check span checkbox enables pinging from all span IPs associated with the interface.
The note field is a place for the administrator to enter a comment. This field is purely informational and has no bearing on the configuration settings.
Simple Example Configurations
A minimum of two Uplinks must be configured to enable multiple uplink control functionality. Physically connect two distinct Internet connections to the rXg. Use the Network :: WAN view to create the appropriate Network Address objects as well as the associated Uplink objects. Ensure that reasonable Ping Targets are associated with each Uplink object.
Uplink Control is defined by Policy. The operator must identify the people and/or devices to which they wish to apply Uplink Control. For the purposes of demonstration the creation of a single IP Group to cover the management Network Address is sufficient. Most production environments will have Account Groups representing tiers of service. In either case, Policy objects connected to Uplink Control object(s) determine the behavior.
Bandwidth Aggregation and Failover

Bandwidth aggregation is configured by associating a single Uplink Control record to a Policy. The Uplink Control record must have multiple Uplinks selected to enable aggregation. If a single link in the aggregation pool fails all traffic will be automatically moved over to the remaining operational uplink(s).
Uplink Failover Only

Uplink failover without aggregation is configured by associating at least two Uplink Control records to a Policy. The Uplink Control record for the primary uplink must have the Backup checkbox cleared and the appropriate Uplink associated. The Uplink Control record for the failover uplink must have the Backup checkbox enabled and the appropriate Uplink associated. All traffic will flow over the primary Uplink until there is a failure. No traffic will pass over the secondary Uplink until primary uplink failure occurs.
Application Affinity

Application affinity is configured by associating at least two Uplink Control records to a Policy. The Uplink Control record for the primary Uplink should have the appropriate Uplink associated. The Uplink Control record for the specific traffic designed to go over the secondary uplink should have the appropriate Application and/or WAN Target configured as well as the appropriate Uplink associated.
Policy-Based Routing
Policy-based routing connects user and device groups to Uplink Controls, enabling differentiated routing based on identity, application, or destination.
Traffic Flow
The path from device to uplink follows this sequence:
Device Group Policy Uplink Control Uplink(s)
- Device connects and is identified (IP, MAC, credentials)
- System determines group(s) the device belongs to based on identity
- Group's associated policy determines enforcement rules
- Policy's Uplink Control(s) specify which uplink(s) to use
- Traffic is routed through the selected uplink(s)
Multiple Uplink Controls per Policy
A single policy can have multiple Uplink Controls with different routing behaviors:
| Uplink Control | WAN Targets | Applications | Uplinks | Effect |
|---|---|---|---|---|
| VoIP Traffic | - | SIP, RTP | T1 Line | VoIP uses low-latency link |
| Video Streaming | Netflix, YouTube IPs | - | Cable Modem | Streaming uses high-bandwidth link |
| Default | - | - | All Uplinks | Everything else load-balanced |
Traffic is matched against Uplink Controls in order of specificity. More specific rules (with WAN Targets or Applications defined) take precedence over general rules.
Viewing Current Uplink Assignments
To see which uplink each device is currently using:
Navigate to Policies :: Uplink Assignments
This shows: - Device IP and MAC address - Currently assigned uplink - Associated policy - Uplink Control rule that made the assignment
Quick Reference
Priority and Weight
| Setting | Default | Range | Purpose |
|---|---|---|---|
| Priority | Auto-assigned | 1-9 | Failover precedence (higher = preferred) |
| Weight | 1 | 1-9 | Traffic distribution ratio in aggregation |
Weight Distribution Examples
| Uplink A Weight | Uplink B Weight | Traffic to A | Traffic to B |
|---|---|---|---|
| 1 | 1 | 50% | 50% |
| 2 | 5 | 28.6% | 71.4% |
| 1 | 9 | 10% | 90% |
| 3 | 1 | 75% | 25% |
Distribution is per-device/session, not per-packet, ensuring session continuity.
Minimum Requirements
| Component | Requirement |
|---|---|
| Uplinks for failover | 2 minimum |
| Ping targets per uplink | 2 minimum |
| Uplink Control records for backup mode | 2 (one primary, one with backup flag) |
Health Check Timing
The PingMonitor service checks all configured ping targets approximately every 37 seconds. When all ping targets for an uplink fail, the uplink is marked offline and traffic is redistributed to remaining healthy uplinks.
Online Status
Each uplink maintains an online/offline status:
- Online: Uplink is healthy (at least one ping target responding within thresholds)
- Offline: All ping targets have failed or thresholds exceeded
The highest-priority online uplink becomes the default route when Uplink Controls are not configured.
Billing
Zero operator intervention provisioning is a key benefit of using an rXg as the head-end for revenue generating networks. Automated subscriber provisioning reduces costs and increases reliability for the operator while simultaneously providing subscribers with instantaneous changes to their network experience. rXg automated provisioning enables the operator to deploy a broad spectrum of product offerings with unparalleled agility through a combination of internal and external integrations.
The rXg incorporates hundreds of capabilities that are typically deployed using individual point solutions resulting in a the rack of equipment and a jumble of virtual machines. Dozens of third-party integrations with the distribution infrastructure equipment enable operators to create unprecedented mash-ups with rXg internal capabilities. The breadth of capabilities enabled by the rXg combined with the in-depth control of each individual feature enables operators to generate profits through entirely new business models that leverage automation, microtransactions and subscriptions.
Automated billing is a key component of zero operator intervention provisioning. The rXg billing engine allows operators to define a set of billable items and tie these to deliverables. The full spectrum of rXg features may be tied through deliverables. Examples of possible deliverables with fully automated and instanteous subscriber provisioning may include, but are not limited to:
| Layer | Example Deliverables |
|---|---|
| Layer 1 | Enable Ethernet switch port(s), custom SSID name |
| Layer 2 | Admission to a particular VLAN, enable temporary group VLAN |
| Layer 3 | cgNAT vs dedicated public IP, multiple public IPs, choice of a particular uplink |
| Layer 4 | throughput rate limits and guarantees, usage quotas |
| Layer 5 | time online, VPN |
| Layer 7 | Content filtering, deep packet inspection |
Subscriptions are typically established using the rXg integrated captive portal. End-users typically arrive at the portal through forced browser redirection at which point they are asked to select and pay for a usage plan. Once payment has cleared, the rXg automatically provisions the policy defined by the end-user. During the course of normal RGN operation where end-users are signing up and selecting services, the RGN operator is a passive recipient of notifications. For many RG Nets customers, once the rXg is installed and configured, they can sit back and simply watch as the money flows into their bank accounts.
The billing menu enables the operator to access the views associated with configuring the rXg billing system. The operator uses the billing menu to configure usage plans, credit card merchant gateways as well as promotional coupons. The billing menu also enables operators to access historical billing information.
Billing Dashboard
The billing dashboard presents an overview of recent end-user signups, transactions and the plans that are currently being offered.

The dialog along the top of the billing dashboard presents a summary of recent revenue and activity.

In the center of the billing dashboard are graphs that presents a summary of revenue and transaction trends.

The amount charged, plan selected and merchant used are displayed of recent transactions are displayed. Click on the details link to navigate to the complete transaction log.
Below the billing dashboard are dialogs that presents a summary of the recent transactions.
![]()
The account, name and group association of the plans are displayed in the dialog. Click on the details link to navigate to the plan configuration page.
Plans
The plans view presents the scaffolds that configure usage plans that are offered to end-users for purchase.
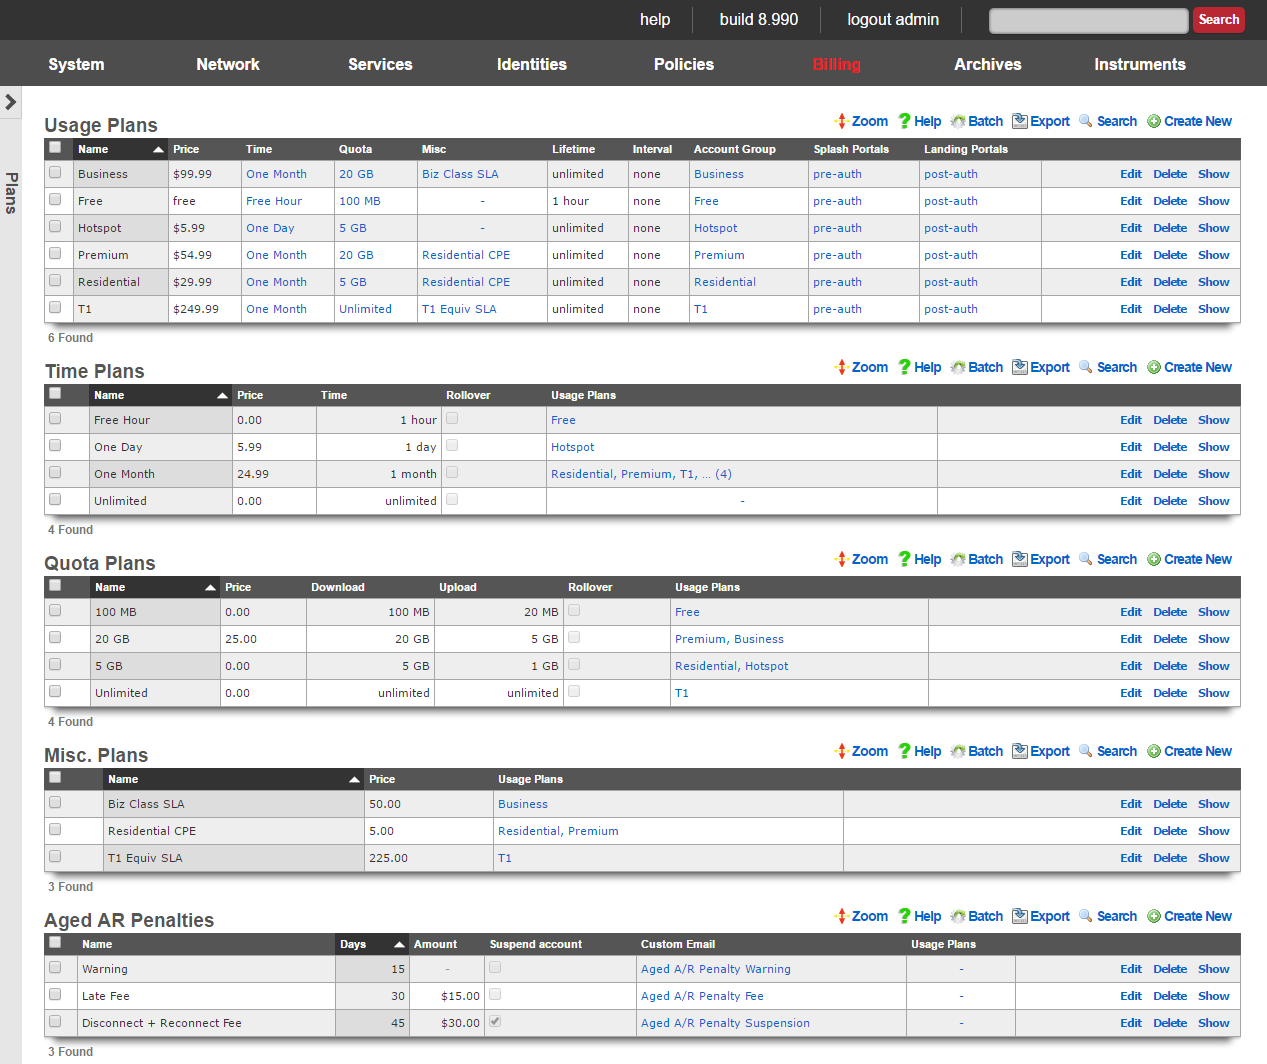
Usage Plans
Each record in the usage plans scaffold represents a service offering that the end-user may select.
The name field is an arbitrary string descriptor used only for administrative identification. Choose a name that reflects the purpose of the record. This field has no bearing on the configuration or settings determined by this scaffold.
The optional description field will be displayed to users in the captive portal if you want to add further detail. The data in this field has no bearing on the provisioning or billing of the service offering represented by this record.
The note field is a place for the administrator to enter a comment. This field is purely informational and has no bearing on the configuration settings.
Provisioning
The account group field specifies the group that the end-user will be placed in upon selecting this usage plan. This field enables zero operator intervention provisioning. The end-user experience is determined by the policies that are associated with a group. By automatically putting an end-user into group based, end-users are instantly provisioned into defined of service offering upon plan selection.
The splash portals and landing portals fields define which captive portals that this plan may be purchased from. Use these fields to limit the availability of certain plans to specific portals which in turn are displayed based on geographic location, the expected class end-users, etc.
The social login strategies field defines which Social Login Strategies may use this plan. If an account has logged in via social login, they will only see usage plans that include their strategy in the list of available usage plans.
The PMS guest matches field defines which users will see this plan in the portal. PMS guest match rules are configured in the Billing::Gateways page of the admin console.
The automatic login field configures end-users that selects this plan with a flag that causes the rXg to log the end-user in without displaying the captive portal. When combined with recurring billing, this feature enables operators to use the captive portal as a zero operator intervention end-user self-service provisioning system for long term recurring subscriptions.
The automatic provision field configures the rXg to automatically add devices in the same subnet to an end-users account. This is useful when deploying dynamic pre-shared keys. This enables an end user to input their pre-shared key to gain access to their VLAN, and automatically register the new device to their account, without requiring captive portal input.
The Lock devices field sets the corresponding field in the account record when the usage plan is purchased. Devices with locked MAC addresses may only purchase usage plans when they are logged in as the account with the corresponding MAC. This feature is most often used in fixed wireless broadband environments to prevent end-users from avoiding disconnect, reconnect and late fees. This feature is incompatible with quick purchase and other transient specific portal methodologies where accounts are created automatically. Attempting to user this feature in portal workflows that involve automatic account creation will result in the denial of subsequent transactions initiated by the same end-user using the same piece of equipment because a new user account cannot be created for the same MAC address.
Lifetime
The fields in the lifetime section allows the operator to configure how the utilization defined by the time and quota portions of the usage plan will expire.
The relative lifetime configures how long the utilization will remain usable relative to the time that the end-user selects the usage plan. The absolute lifetime configures a specific date and time in the future when the utilization will expire. If both a relative lifetime and an absolute lifetime is configured, the shorter of the two defines the actual lifetime of the utilization. If the unlimited lifetime check box is set, the utilization defined by the associated quota and time never expires.
If the do not set lifetime check box is set, then the utilization lifetime present in the account record is carried forward unmodified. If there is no utilization lifetime present in the account record, then the behavior specified by the absolute lifetime , relative lifetime and unlimited lifetime fields is then configured.
Included Plan Features
This section defines the plan attributes that will be provisioned if the user does not select any Plan Addons.
The Quota selection specifies the Quota Plan that will be applied if the user does not select an alternate Quota Plan from the Optional Quota Plans section.
The Time selection specifies the Time Plan that will be applied if the user does not select an alternate Time Plan from the Optional Time Plans section.
The max sessions field specifies the maximum number of simultaneously logged in devices for the account.
The max devices field specifies the maximum number of devices that may be stored in the account. When more devices exist in an account than its max sessions value, subsequent login attempts require logging out another device before logging in.
The max party devices field specifies the maximum number of devices that may be joined to LAN parties for the account in order to allow guest devices from another account to join a temporary shared VLAN to have direct access to one another while the LAN party is active.
The max dedicated IPs field specifies the maximum number of dynamic WAN IP addresses that the account may use for port forwarding and DMZ purposes. The IPs may change between sessions, unless the Dedicated IPs are static option is enabled.
The Dedicated IPs are static option specifies that the number of public IPs specified in the max dedicated IPs field will be assigned to the account and remain constant for the lifetime of the account. This is useful when accounts wish to host servers and require consistent IPs.
The UPnP permitted option allows the user to enable UPnP (Universal Plug-N-Play) so that devices may negotiate port forward requirements with the Rxg automatically. This is required for some games as well as some applications.
Available Plan Addons
The Plan Addons selection makes Plan Addon packages available to the user in the portal so that they may customize the usage plan's contents. Plan addons that have the included with plan option selected will be included in this plan automatically and will not be displayed to the user in the portal.
The optional Quota Plans selection makes additional Quota Plans other than the one specified in the included Quota Plan available to the user as options in the portal. The user's selection will override the included Quota Plan.
The optional Time Plans selection makes additional Time Plans other than the one specified in the included Time Plan available to the user as options in the portal. The user's selection will override the included Time Plan.
Billing
The fields in the billing section allows the operator to configure fully automated end-user billing. For example, if the operator wishes to automatically charge credit cards, these fields configure where the charges will be sent.
The merchant field relates this usage plan to a payment gateway defined by an entry in the merchant scaffold. Each usage plan is related a merchant independently from all other plans. Thus it is possible for an operator to use different merchants for different classes of service to facilitate separation of revenue by account.
The currency field specifies the localized currency that will be used to whenever the aforementioned merchant is contacted to execute a transaction. The currency must be supported by the payment gateway specified by the merchant merchant in order for the transaction to be processed.
If the prorate credit check box is set, then the account is refunded for unused usage time when purchasing a different plan. The refund is given in the form of credit and is automatically deducted from the price of the purchase. Any remaining credit is stored in the user's account. Additional credit may be given to a account manually by the operator via the users scaffold, or the account may redeem a coupon to obtain credit.
The manual billing check box dictates that transactions must be approved by an admin before applying the usage to the account. This billing method assumes that the user physically exchanges money with an operator (reseller) who then approves the user's transaction via the AR Transactions scaffold or FOM Operator Portal to complete the login process.
The fields in the recurrence section contains fields that allow an operator to configure this usage plan to repeatedly bill the end-user on a specified schedule. These fields enable the operator to offer recurring services (e.g., monthly billed IP-data similar to DSL and cable modem).
The interval field defines the recurring billing interval. By default, the interval field is set to none which indicates that the usage plan will only be billed when the end-user selects it. Choosing any other interval will enable recurring billing. Note that off site merchants such as PayPal Website Payments Standard do not support recurring billing.
The recurring day field configures the number of days into the interval during which the end-user will be billed. If the relative checkbox is set, then the recurring day will be configured relative to the day that the end-user first selected the plan. For example, if the interval is set to monthly, the recurring day is set to 5 and the relative checkbox is unset, then the end-user will be billed on the 5th day of every month regardless of when they first selected the usage plan. Given the same scenario with the relative checkbox set would result in the end-user being billed 5 days after the day that they first selected the usage plan.
The charge retry grace time specifies the interval between billing attempts if a billing transaction failure occurs. When an end-user selects a plan that has a recurring method other than none, the end-user is billed automatically according to the predefined interval. If the transaction fails for any reason, the rXg will retry the transaction repeatedly according to the rate specified by the recurring retry grace time until the number of retries is exhausted. The number of retries is defined by the max charge attempts field.
The permit unpaid A/R checkbox allows the operator to offer a usage plan on A/R terms. If this checkbox is set, then the policy associated with a usage plan will continue to be provisioned to an end-user even in the event of billing transaction failure. If this happens, a receivable will be posted to the end-user's journal.
The aged A/R penalties field associates the usage plan with one or more records in the aged A/R penalties scaffold. Each of these associations triggers the posting of a receivable given the conditions set in the associated record. Associated records may also disable the account. The use of aged A/R penalties requires the setting of the permit unpaid A/R checkbox.
Account Validation
A usage plan may be configured to require that the end user validate either their Email address or mobile phone number or both prior to the usage plan being applied to the account.
The validation method field specifies which forms of validation must take place before applying the plan.
The validation grace minutes field allows the plan to be applied to the account for a limited amount of time, allowing the end user time to access their Email and retrieve the validation code. This value will be set to 0 if the validation method does not include Email.
The SMS Gateway field specifies the SMS Gateway that will be utilized when sending validation codes via SMS.
Time Plans
Usage plans consist of three elements. This is the time element. This is where you configure how long the customer will have access.
The name field is an arbitrary string descriptor used only for administrative identification. Choose a name that reflects the purpose of the record. This field has no bearing on the configuration or settings determined by this scaffold.
The Price entered will make up a part of the total usage plan price a customer will see when signing up for a plan.
The optional Description will be displayed to users in the captive portal if you want to add further detail.
The Time and Time unit make up the actual amount of time provisioned to an associated account. Check the Unlimited checkbox if you want to allow unlimited online time.
The Rollover checkbox will allow an associated account to keep any unused time when purchasing a new plan from a captive portal.
Check the Usage Plans that this time configuration should be a part of. This is usually configured in the usage plans configuration section.
The note field is a place for the administrator to enter a comment. This field is purely informational and has no bearing on the configuration settings.
Quota Plans
Usage plans consist of three elements. This is the quota element. This is where you configure how much data the user can transfer over the period of the usage plan.
The name field is an arbitrary string descriptor used only for administrative identification. Choose a name that reflects the purpose of the record. This field has no bearing on the configuration or settings determined by this scaffold.
The Price entered will make up a part of the total usage plan price a customer will see when signing up for a plan.
The optional Description will be displayed to users in the captive portal if you want to add further detail.
The Upload and Upload unit make up the upload portion of the quota provisioned to an associated account. Check the Unlimited U/L checkbox if you want to allow an unlimited amount of upload.
The Download and Download unit make up the download portion of the quota provisioned to an associated account. Check the Unlimited D/L checkbox if you want to allow an unlimited amount of download.
The Rollover checkbox will allow an associated account to keep any unused quota when purchasing a new plan from a captive portal.
Check the Usage Plans that this quota configuration should be a part of. This is usually configured in the usage plans configuration section.
The note field is a place for the administrator to enter a comment. This field is purely informational and has no bearing on the configuration settings.
Aged A/R Penalties
Each record in the Aged A/R Penalty scaffold defines an action to take given certain A/R conditions. This scaffold is used to define late fees and reconnect fees. It is also used to automatically disconnect delinquent users.
The name field is an arbitrary string descriptor used only for administrative identification. Choose a name that reflects the purpose of the record. This field has no bearing on the configuration or settings determined by this scaffold.
The days field specifies the number of days that the A/R must be aged in order for the penalty specifies in this record to take effect.
The amount field specifies a monetary amount to post to the end-user's journal when the conditions are met. For example, if a late fee or reconnect fee is to be imposed, field should be populated with the amount of the fee that should be collected from the end-user.
Setting the suspend user checkbox will cause an end-user to be suspended if the conditions in this record are met.
Selecting a custom message will email the end-user when the conditions in this record are met.
The usage plans field associates the penalty defined by this record with one or more usage plans. An aged A/R penalty must be associated with a usage plan that has the permit unpaid A/R checkbox set to have any effect.
Gateways
The gateways view presents the scaffolds that configure the third-party automatic charge posting mechanisms that are built into the rXg.
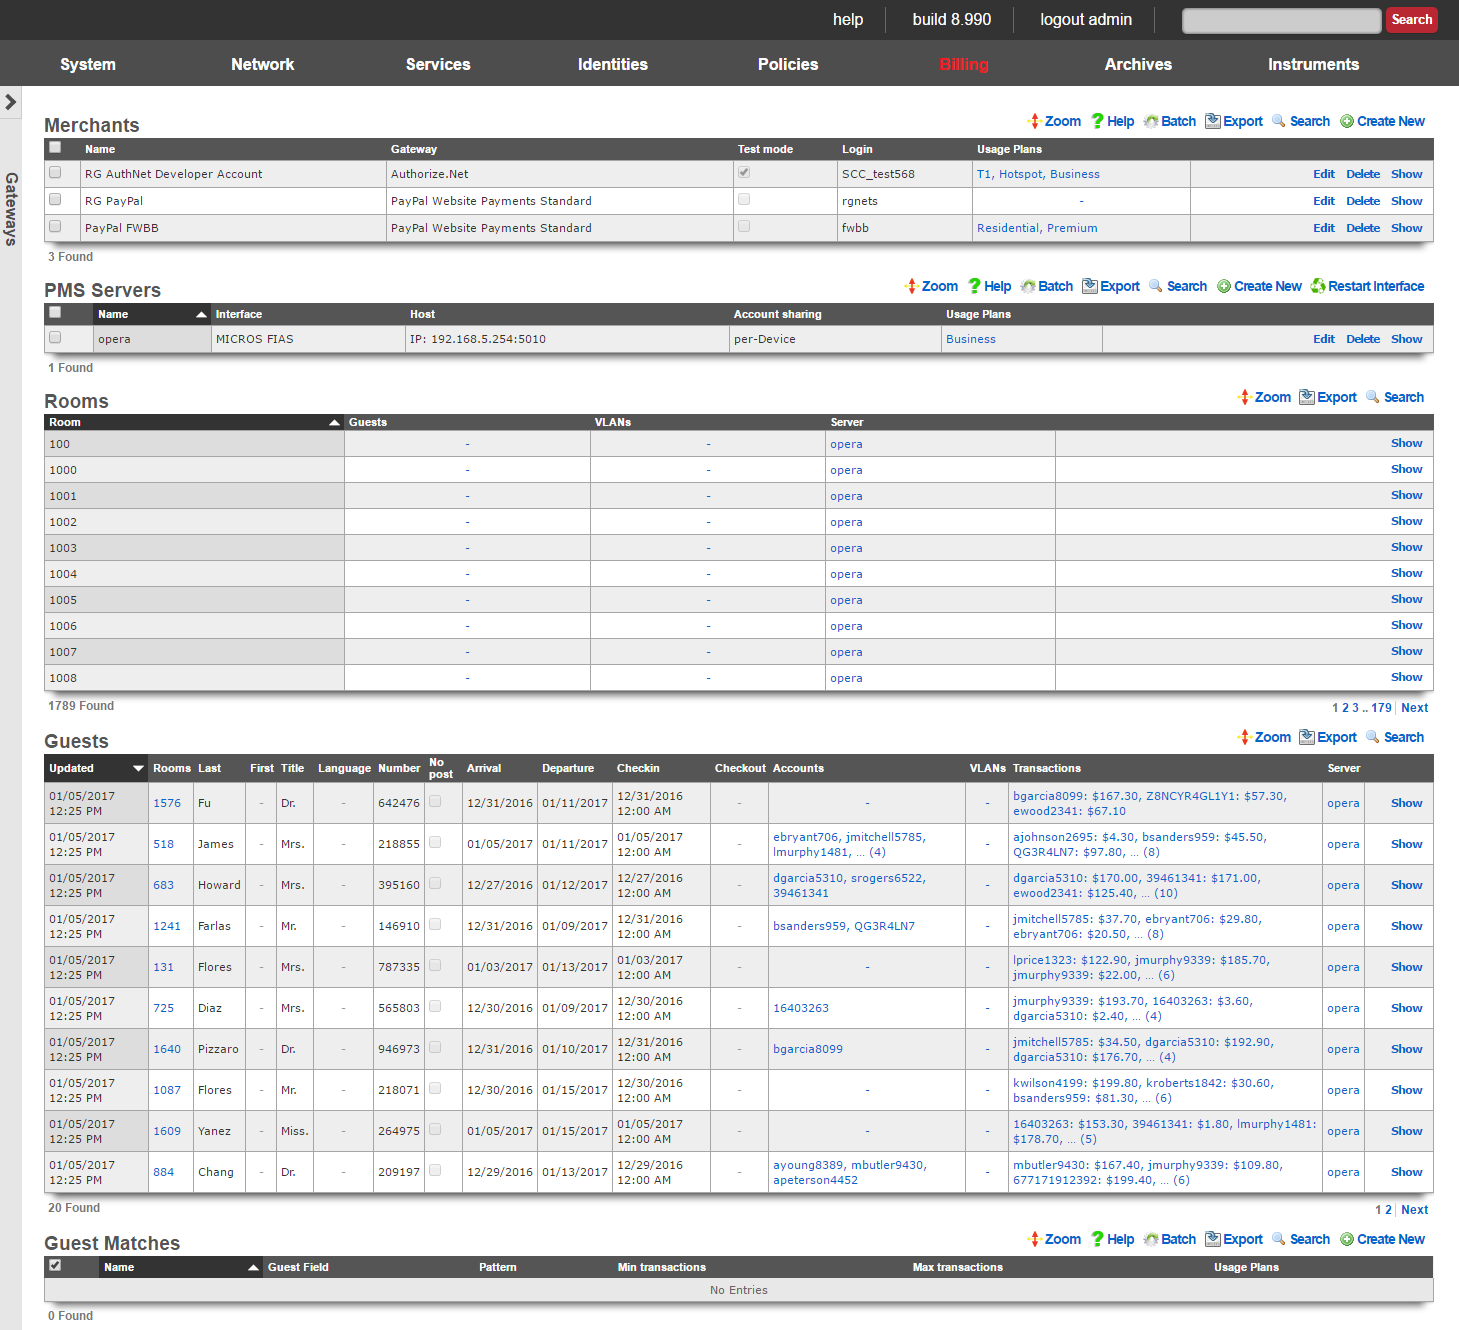
The rXg has a fully integrated double-entry accounting system that keeps an accounting journal for each Account. The rXg may be configured to automatically post credits to the journals associated with each Account through a number of manual and automated mechanisms. The operator may choose to manually issue credit based on manual payment processing. Alternatively, the operator may sell or issue coupons that are automatically redeemed for credits in the captive portal.
The mechanism that achieves the most benefit when deployed in conjunction with zero operator intervention is fully automatic payment processing. To accomplish this, the rXg integrates with third party billing gateways through well understood and published APIs. The rXg sends messages to the configured gateways when billing events occur. The rXg then expects replies from the third party billing gateways in the format specified by their API. When properly configured, absolutely no operator intervention needs to occur to process payments and provision customers.

Merchants
In order to accept payment via credit card, or other mechanism such as PayPal, you need to configure a merchant record that contains the information necessary to contact the external payment gateway. Each merchant record requires an account that must be setup with the external payment gateway before any charges may be posted. For example, having a valid PayPal account is a prerequisite to creating a working merchant record that posts to PayPal.
The name field is an arbitrary string descriptor used only for administrative identification. Choose a name that reflects the purpose of the record. This field has no bearing on the configuration or settings determined by this scaffold.
Some merchants support Test or sandbox mode. Checking this checkbox will alert the merchant that you are operating in a testing mode and will not charge the accounts used while testing is enabled. Refer to your merchant's documentation for more information, as some merchants (e.g., Paypal) require you to create special test accounts to use sandbox mode.
The Login, Password, Signature, and Partner fields will be provided by the merchant you are using. Not all merchants use all four pieces of information.
When performing a charge to direct merchant gateways (e.g., Authorize.Net), the id of the Merchant Transaction record stored on the rXg is passed along to the merchant as the invoice and order_id fields. The optional invoice prefix field is prepended to the invoice and order_id. For offsite merchant gateways (e.g., PayPal Website Payments Standard), the invoice and order_id fields are determined by the merchant.
You will also need to check the Usage Plans that you want to be purchasable through this merchant. Please note that this can also be done from the usage plan configuration section.
The note field is a place for the administrator to enter a comment. This field is purely informational and has no bearing on the configuration settings.
Direct Gateways
The rXg supports the following direct payment gateways.
| name | supported countries |
|---|---|
| 1stPayGateway.Net | US |
| Adyen | AT, AU, BE, BG, BR, CH, CY, CZ, DE, DK, EE, ES, FI, FR, GB, GI, GR, HK, HU, IE, IS, IT, LI, LT, LU, LV, MC, MT, MX, NL, NO, PL, PT, RO, SE, SG, SK, SI, US |
| Allied Wallet | US |
| Authorize.Net | AU, CA, US |
| Axcess MS | AD, AT, BE, BG, BR, CA, CH, CY, CZ, DE, DK, EE, ES, FI, FO, FR, GB, GI, GR, HR, HU, IE, IL, IM, IS, IT, LI, LT, LU, LV, MC, MT, MX, NL, NO, PL, PT, RO, RU, SE, SI, SK, TR, US, VA |
| Bambora Asia-Pacific | AU, NZ |
| Bank Frick | LI, US |
| Banwire | MX |
| Barclaycard Smartpay | AL, AD, AM, AT, AZ, BY, BE, BA, BG, HR, CY, CZ, DK, EE, FI, FR, DE, GR, HU, IS, IE, IT, KZ, LV, LI, LT, LU, MK, MT, MD, MC, ME, NL, NO, PL, PT, RO, RU, SM, RS, SK, SI, ES, SE, CH, TR, UA, GB, VA |
| Barclays ePDQ Extra Plus | GB |
| BBS Netaxept | NO, DK, SE, FI |
| Be2Bill | FR |
| Beanstream.com | CA, US |
| BluePay | US, CA |
| BlueSnap | US, CA, GB, AT, BE, BG, HR, CY, CZ, DK, EE, FI, FR, DE, GR, HU, IE, IT, LV, LT, LU, MT, NL, PL, PT, RO, SK, SI, ES, SE, AR, BO, BR, BZ, CL, CO, CR, DO, EC, GF, GP, GT, HN, HT, MF, MQ, MX, NI, PA, PE, PR, PY, SV, UY, VE |
| Bogus | |
| Borgun | IS, GB, HU, CZ, DE, DK, SE |
| BPoint | AU |
| Braintree | US, CA, AD, AT, BE, BG, HR, CY, CZ, DK, EE, FI, FR, GI, DE, GR, GG, HU, IS, IM, IE, IT, JE, LV, LI, LT, LU, MT, MC, NL, NO, PL, PT, RO, SM, SK, SI, ES, SE, CH, TR, GB, SG, HK, MY, AU, NZ |
| Braintree (Blue Platform) | US, CA, AD, AT, BE, BG, HR, CY, CZ, DK, EE, FI, FR, GI, DE, GR, GG, HU, IS, IM, IE, IT, JE, LV, LI, LT, LU, MT, MC, NL, NO, PL, PT, RO, SM, SK, SI, ES, SE, CH, TR, GB, SG, HK, MY, AU, NZ |
| Braintree (Orange Platform) | US |
| BridgePay | CA, US |
| CAMS: Central Account Management System | US |
| Card Connect | US |
| Cardknox | US, CA, GB |
| CardProcess VR-Pay | BE, BG, CZ, DK, DE, EE, IE, ES, FR, HR, IT, CY, LV, LT, LU, MT, HU, NL, AT, PL, PT, RO, SI, SK, FI, SE, GB, IS, LI, NO, CH, ME, MK, AL, RS, TR, BA |
| CardSave | GB |
| CardStream | GB, US, CH, SE, SG, NO, JP, IS, HK, NL, CZ, CA, AU |
| CC5 | |
| Cecabank | ES |
| CenPOS | AD, AI, AG, AR, AU, AT, BS, BB, BE, BZ, BM, BR, BN, BG, CA, HR, CY, CZ, DK, DM, EE, FI, FR, DE, GR, GD, GY, HK, HU, IS, IL, IT, JP, LV, LI, LT, LU, MY, MT, MX, MC, MS, NL, PA, PL, PT, KN, LC, MF, VC, SM, SG, SK, SI, ZA, ES, SR, SE, CH, TR, GB, US, UY |
| Checkout.com | AD, AT, BE, BG, CH, CY, CZ, DE, DK, EE, ES, FO, FI, FR, GB, GI, GL, GR, HR, HU, IE, IS, IL, IT, LI, LT, LU, LV, MC, MT, NL, NO, PL, PT, RO, SE, SI, SM, SK, SJ, TR, VA |
| Checkout.com Unified Payments | AD, AE, AR, AT, AU, BE, BG, BH, BR, CH, CL, CN, CO, CY, CZ, DE, DK, EE, EG, ES, FI, FR, GB, GR, HK, HR, HU, IE, IS, IT, JO, JP, KW, LI, LT, LU, LV, MC, MT, MX, MY, NL, NO, NZ, OM, PE, PL, PT, QA, RO, SA, SE, SG, SI, SK, SM, TR, US |
| Citrus Pay | AR, AU, BR, FR, DE, HK, MX, NZ, SG, GB, US |
| Clearhaus | DK, NO, SE, FI, DE, CH, NL, AD, AT, BE, BG, HR, CY, CZ, FO, GL, EE, FR, GR, HU, IS, IE, IT, LV, LI, LT, LU, MT, PL, PT, RO, SK, SI, ES, GB |
| CommerceGate | AD, AT, AX, BE, BG, CH, CY, CZ, DE, DK, ES, FI, FR, GB, GG, GI, GR, HR, HU, IE, IM, IS, IT, JE, LI, LT, LU, LV, MC, MT, NL, NO, PL, PT, RO, SE, SI, SK, VA |
| Conekta Gateway | MX |
| Creditcall | US |
| Credorax Gateway | AD, AT, BE, BG, HR, CY, CZ, DK, EE, FR, DE, GI, GR, GG, HU, IS, IE, IM, IT, JE, LV, LI, LT, LU, MT, MC, NO, PL, PT, RO, SM, SK, ES, SE, CH, GB |
| CT Payment | US, CA |
| Culqi | PE |
| CyberSource | US, AE, BR, CA, CN, DK, FI, FR, DE, IN, JP, MX, NO, SE, GB, SG, LB, PK |
| DataCash | GB |
| Decidir | AR |
| DIBS | US, FI, NO, SE, GB |
| Digitzs | US |
| dLocal | AR, BR, CL, CO, MX, PE, UY, TR |
| E-xact | CA, US |
| EBANX | BR, MX, CO, CL, AR, PE |
| Efsnet | US |
| Elavon MyVirtualMerchant | US, CA, PR, DE, IE, NO, PL, LU, BE, NL, MX |
| Element | US |
| ePay | DK, SE, NO |
| EVO Canada | CA |
| eWAY | AU |
| eWay Managed Payments | AU |
| eWAY Rapid 3.1 | AU, NZ, GB, SG, MY, HK |
| Ezic | AU, CA, CN, FR, DE, GI, IL, MT, MU, MX, NL, NZ, PA, PH, RU, SG, KR, ES, KN, GB, US |
| Fat Zebra | AU |
| Federated Canada | CA |
| Finansbank WebPOS | US, TR |
| FirstData Global Gateway e4 | CA, US |
| FirstData Global Gateway e4 v27 | CA, US |
| Flo2Cash | NZ |
| Flo2Cash Simple | |
| Forte | US |
| Garanti Sanal POS | US, TR |
| Global Transport | CA, PR, US |
| GlobalCollect | AD, AE, AG, AI, AL, AM, AO, AR, AS, AT, AU, AW, AX, AZ, BA, BB, BD, BE, BF, BG, BH, BI, BJ, BL, BM, BN, BO, BQ, BR, BS, BT, BW, BY, BZ, CA, CC, CD, CF, CH, CI, CK, CL, CM, CN, CO, CR, CU, CV, CW, CX, CY, CZ, DE, DJ, DK, DM, DO, DZ, EC, EE, EG, ER, ES, ET, FI, FJ, FK, FM, FO, FR, GA, GB, GD, GE, GF, GH, GI, GL, GM, GN, GP, GQ, GR, GS, GT, GU, GW, GY, HK, HN, HR, HT, HU, ID, IE, IL, IM, IN, IS, IT, JM, JO, JP, KE, KG, KH, KI, KM, KN, KR, KW, KY, KZ, LA, LB, LC, LI, LK, LR, LS, LT, LU, LV, MA, MC, MD, ME, MF, MG, MH, MK, MM, MN, MO, MP, MQ, MR, MS, MT, MU, MV, MW, MX, MY, MZ, NA, NC, NE, NG, NI, NL, NO, NP, NR, NU, NZ, OM, PA, PE, PF, PG, PH, PL, PN, PS, PT, PW, QA, RE, RO, RS, RU, RW, SA, SB, SC, SE, SG, SH, SI, SJ, SK, SL, SM, SN, SR, ST, SV, SZ, TC, TD, TG, TH, TJ, TL, TM, TN, TO, TR, TT, TV, TW, TZ, UA, UG, US, UY, UZ, VC, VE, VG, VI, VN, WF, WS, ZA, ZM, ZW |
| HDFC | IN |
| Heartland Payment Systems | US |
| iATS Payments | AU, BR, CA, CH, DE, DK, ES, FI, FR, GR, HK, IE, IT, NL, NO, PT, SE, SG, TR, GB, US, TH, ID, PH, BE |
| Inspire Commerce | US |
| InstaPay | US |
| IPP | AU |
| Iridium | GB, ES |
| iTransact | US |
| iVeri | US, ZA, GB |
| Ixopay | AO, AQ, AR, AS, AT, AU, AW, AX, AZ, BA, BB, BD, BE, BF, BG, BH, BI, BJ, BL, BM, BN, BO, BQ, BQ, BR, BS, BT, BV, BW, BY, BZ, CA, CC, CD, CF, CG, CH, CI, CK, CL, CM, CN, CO, CR, CU, CV, CW, CX, CY, CZ, DE, DJ, DK, DM, DO, DZ, EC, EE, EG, EH, ER, ES, ET, FI, FJ, FK, FM, FO, FR, GA, GB, GD, GE, GF, GG, GH, GI, GL, GM, GN, GP, GQ, GR, GS, GT, GU, GW, GY, HK, HM, HN, HR, HT, HU, ID, IE, IL, IM, IN, IO, IQ, IR, IS, IT, JE, JM, JO, JP, KE, KG, KH, KI, KM, KN, KP, KR, KW, KY, KZ, LA, LB, LC, LI, LK, LR, LS, LT, LU, LV, LY, MA, MC, MD, ME, MF, MG, MH, MK, ML, MM, MN, MO, MP, MQ, MR, MS, MT, MU, MV, MW, MX, MY, MZ, NA, NC, NE, NF, NG, NI, NL, NO, NP, NR, NU, NZ, OM, PA, PE, PF, PG, PH, PK, PL, PM, PN, PR, PS, PT, PW, PY, QA, RE, RO, RS, RU, RW, SA, SB, SC, SD, SE, SG, SH, SI, SJ, SK, SL, SM, SN, SO, SR, SS, ST, SV, SX, SY, SZ, TC, TD, TF, TG, TH, TJ, TK, TL, TM, TN, TO, TR, TT, TV, TW, TZ, UA, UG, UM, US, UY, UZ, VA, VC, VE, VG, VI, VN, VU, WF, WS, YE, YT, ZA, ZM, ZW |
| JetPay | US, CA |
| JetPay | US, CA |
| Komoju | JP |
| Kushki | CL, CO, EC, MX, PE |
| Latitude19 Gateway | US, CA |
| LinkPoint | US |
| MasterCard Internet Gateway Service (MiGS) | AU, AE, BD, BN, EG, HK, ID, JO, KW, LB, LK, MU, MV, MY, NZ, OM, PH, QA, SA, SG, TT, VN |
| maxiPago! | BR |
| Mercado Pago | AR, BR, CL, CO, MX, PE, UY |
| Merchant e-Solutions | US |
| Merchant One Gateway | US |
| Merchant Partners | US |
| Merchant Warrior | AU |
| MerchantWARE | US |
| Metrics Global | US |
| micropayment | DE |
| Modern Payments | US |
| Monei | AD, AT, BE, BG, CA, CH, CY, CZ, DE, DK, EE, ES, FI, FO, FR, GB, GI, GR, HU, IE, IL, IS, IT, LI, LT, LU, LV, MT, NL, NO, PL, PT, RO, SE, SI, SK, TR, US, VA |
| Moneris | CA |
| MoneyMovers | US |
| Mundipagg | US |
| NAB Transact | AU |
| NCR Secure Pay | US |
| NELiX TransaX | US |
| Netbanx by PaySafe | AF, AX, AL, DZ, AS, AD, AO, AI, AQ, AG, AR, AM, AW, AU, AT, AZ, BS, BH, BD, BB, BY, BE, BZ, BJ, BM, BT, BO, BQ, BA, BW, BV, BR, IO, BN, BG, BF, BI, KH, CM, CA, CV, KY, CF, TD, CL, CN, CX, CC, CO, KM, CG, CD, CK, CR, CI, HR, CU, CW, CY, CZ, DK, DJ, DM, DO, EC, EG, SV, GQ, ER, EE, ET, FK, FO, FJ, FI, FR, GF, PF, TF, GA, GM, GE, DE, GH, GI, GR, GL, GD, GP, GU, GT, GG, GN, GW, GY, HT, HM, HN, HK, HU, IS, IN, ID, IR, IQ, IE, IM, IL, IT, JM, JP, JE, JO, KZ, KE, KI, KP, KR, KW, KG, LA, LV, LB, LS, LR, LY, LI, LT, LU, MO, MK, MG, MW, MY, MV, ML, MT, MH, MQ, MR, MU, YT, MX, FM, MD, MC, MN, ME, MS, MA, MZ, MM, NA, NR, NP, NC, NZ, NI, NE, NG, NU, NF, MP, NO, OM, PK, PW, PS, PA, PG, PY, PE, PH, PN, PL, PT, PR, QA, RE, RO, RU, RW, BL, SH, KN, LC, MF, VC, WS, SM, ST, SA, SN, RS, SC, SL, SG, SX, SK, SI, SB, SO, ZA, GS, SS, ES, LK, PM, SD, SR, SJ, SZ, SE, CH, SY, TW, TJ, TZ, TH, NL, TL, TG, TK, TO, TT, TN, TR, TM, TC, TV, UG, UA, AE, GB, US, UM, UY, UZ, VU, VA, VE, VN, VG, VI, WF, EH, YE, ZM, ZW |
| NETbilling | US |
| NETPAY Gateway | MX |
| NetRegistry | AU |
| Network Merchants (NMI) | US |
| NMI | US |
| Ogone | BE, DE, FR, NL, AT, CH |
| Omise | TH, JP |
| Open Payment Platform | AD, AI, AG, AR, AU, AT, BS, BB, BE, BZ, BM, BR, BN, BG, CA, HR, CY, CZ, DK, DM, EE, FI, FR, DE, GR, GD, GY, HK, HU, IS, IN, IL, IT, JP, LV, LI, LT, LU, MY, MT, MX, MC, MS, NL, PA, PL, PT, KN, LC, MF, VC, SM, SG, SK, SI, ZA, ES, SR, SE, CH, TR, GB, US, UY |
| Openpay | CO, MX |
| Optimal Payments | CA, US, GB, AU, AT, BE, BG, HR, CY, CZ, DK, EE, FI, DE, GR, HU, IE, IT, LV, LT, LU, MT, NL, NO, PL, PT, RO, SK, SI, ES, SE, CH |
| Orbital Paymentech | US, CA |
| Pagar.me | BR |
| PagoFacil | MX |
| Pay Way | AU |
| Paybox Direct | FR |
| PayConex | US, CA |
| Payeezy | US, CA |
| Payex | DK, FI, NO, SE |
| PayGate PayXML | US, ZA |
| PayHub | US |
| PayJunction | US |
| PayJunction | US |
| Paymentez | MX, EC, CO, BR, CL, PE |
| PAYMILL | AD, AT, BE, BG, CH, CY, CZ, DE, DK, EE, ES, FI, FO, FR, GB, GI, GR, HR, HU, IE, IL, IM, IS, IT, LI, LT, LU, LV, MC, MT, NL, NO, PL, PT, RO, SE, SI, SK, TR, VA |
| PayPal Express Checkout | |
| PayPal Payflow Pro | US, CA, NZ, AU |
| PayPal Payments Pro (UK) | GB |
| PayPal Payments Pro (US) | CA, NZ, GB, US |
| PayPal Website Payments Pro (CA) | CA |
| Payscout | US |
| PaySecure | AU |
| Paystation | NZ |
| PayU India | IN |
| PayU Latam | AR, BR, CL, CO, MX, PA, PE |
| Pin Payments | AU |
| Plug'n Pay | US |
| ProPay | US, CA |
| Psigate | CA |
| PSL Payment Solutions | GB |
| Quantum Gateway | US |
| QuickBooks Merchant Services | US |
| QuickBooks Payments | US |
| Quickpay | |
| Qvalent | AU |
| Raven | US |
| Realex | IE, GB, FR, BE, NL, LU, IT, US, CA, ES |
| Redsys | ES |
| S5 | DK |
| SafeCharge | AT, BE, BG, CY, CZ, DE, DK, EE, GR, ES, FI, FR, GI, HK, HR, HU, IE, IS, IT, LI, LT, LU, LV, MT, MX, NL, NO, PL, PT, RO, SE, SG, SI, SK, GB, US |
| SagePay | GB, IE |
| Sallie Mae | US |
| SecureNet | US |
| SecurePay | US, CA, GB, AU |
| SecurePay (AU) | AU |
| SecurePayTech | NZ |
| SecurionPay | AD, BE, BG, CH, CY, CZ, DE, DK, EE, ES, FI, FO, FR, GI, GL, GR, GS, GT, HR, HU, IE, IS, IT, LI, LR, LT, LU, LV, MC, MT, MU, MV, MW, NL, NO, PL, RO, SE, SI |
| SkipJack | US, CA |
| SoEasyPay | US, CA, AT, BE, BG, HR, CY, CZ, DK, EE, FI, FR, DE, GR, HU, IE, IT, LV, LT, LU, MT, NL, PL, PT, RO, SK, SI, ES, SE, GB, IS, NO, CH |
| Spreedly | AD, AE, AT, AU, BD, BE, BG, BN, CA, CH, CY, CZ, DE, DK, EE, EG, ES, FI, FR, GB, GI, GR, HK, HU, ID, IE, IL, IM, IN, IS, IT, JO, KW, LB, LI, LK, LT, LU, LV, MC, MT, MU, MV, MX, MY, NL, NO, NZ, OM, PH, PL, PT, QA, RO, SA, SE, SG, SI, SK, SM, TR, TT, UM, US, VA, VN, ZA |
| Stripe (Legacy) | AT, AU, BE, BG, BR, CA, CH, CY, CZ, DE, DK, EE, ES, FI, FR, GB, GR, HK, IE, IT, JP, LT, LU, LV, MT, MX, NL, NO, NZ, PL, PT, RO, SE, SG, SI, SK, US |
| Stripe Payment Intents | AT, AU, BE, BG, BR, CA, CH, CY, CZ, DE, DK, EE, ES, FI, FR, GB, GR, HK, IE, IT, JP, LT, LU, LV, MT, MX, NL, NO, NZ, PL, PT, RO, SE, SG, SI, SK, US |
| Swipe Checkout | NZ, CA |
| Telr | AE, IN, SA |
| TNS | AR, AU, BR, FR, DE, HK, MX, NZ, SG, GB, US |
| Transact Pro | US |
| TransFirst | US |
| TransFirst Transaction Express | US |
| Transnational | US |
| Trexle | AD, AE, AT, AU, BD, BE, BG, BN, CA, CH, CY, CZ, DE, DK, EE, EG, ES, FI, FR, GB, GI, GR, HK, HU, ID, IE, IL, IM, IN, IS, IT, JO, KW, LB, LI, LK, LT, LU, LV, MC, MT, MU, MV, MX, MY, NL, NO, NZ, OM, PH, PL, PT, QA, RO, SA, SE, SG, SI, SK, SM, TR, TT, UM, US, VA, VN, ZA |
| TrustCommerce | US |
| USA ePay | US |
| USA ePay Advanced SOAP Interface | US |
| UsaEpay | |
| Vanco Payment Solutions | US |
| Verifi | US |
| ViaKLIX | US |
| VisaNet Peru Gateway | US, PE |
| WebPay | JP |
| WePay | US, CA |
| Windcave (formerly PaymentExpress) | AU, FJ, GB, HK, IE, MY, NZ, PG, SG, US |
| Wirecard | AD, CY, GI, IM, MT, RO, CH, AT, DK, GR, IT, MC, SM, TR, BE, EE, HU, LV, NL, SK, GB, BG, FI, IS, LI, NO, SI, VA, FR, IL, LT, PL, ES, CZ, DE, IE, LU, PT, SE |
| WorldNet | IE, GB, US |
| Worldpay Global | HK, GB, AU, AD, AR, BE, BR, CA, CH, CN, CO, CR, CY, CZ, DE, DK, ES, FI, FR, GI, GR, HU, IE, IN, IT, JP, LI, LU, MC, MT, MY, MX, NL, NO, NZ, PA, PE, PL, PT, SE, SG, SI, SM, TR, UM, VA |
| Worldpay Online Payments | HK, US, GB, BE, CH, CZ, DE, DK, ES, FI, FR, GR, HU, IE, IT, LU, MT, NL, NO, PL, PT, SE, SG, TR |
| Worldpay US | US |
Offsite Gateways
The rXg supports the following offsite payment gateways.
Example Configuration for Gateways
- Card Connect (Direct Gateway)
- Authorize.net (Direct Gateway)
- PayPal (Offsite Gateway)

PMS Servers
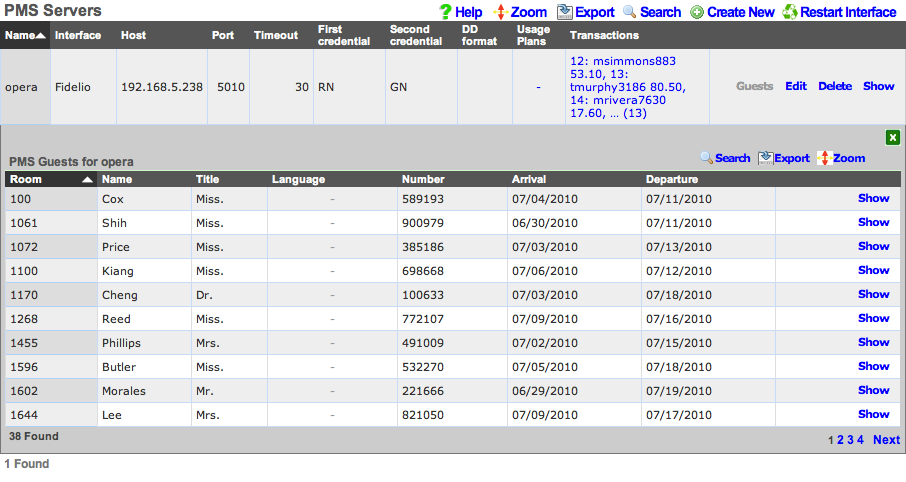
The PMS servers scaffold configures the rXg property management system interface mechanism. The rXg property management system interface operates in a manner that is nearly identical to that of credit card processing gateways. However, rather than sending credit card information to the third-party server for processing, the PMS interface sends credentials such as a room number and guest name or number for charge posting. Successful charge posts result in a credit being applied to the Account journal.
Once a PMS server record is created, the rXg will immediately begin communication with the PMS and synchronize the guest database. Thus it is absolutely necessary that the PMS be setup and ready to receive interface communication from the rXg before a PMS server record is created.
Use the Guests action link on the right side of each PMS server record to view list of all guests that the rXg believes to be currently checked in and valid for charge posting. The Guests sub scaffold is particularly useful when a hospitality guest reports that they cannot login with their credentials. Searching the Guests sub scaffold is the easiest way to find what credentials the rXg is expecting for a given guest.
The name field is an arbitrary string descriptor used only for administrative identification. Choose a name that reflects the purpose of the record. This field has no bearing on the configuration or settings determined by this scaffold.
The interface field configures the API that the rXg will use to communicate with the property management system. The property management system must be configured accept communication using the same protocol that is specified here.
The usage plans field enables the operator to choose plans that are allowed to be billed to the property management system. Usage plans may only be associated with one external billing gateway such as a merchant or a property management system. Thus any usage plan that is being directly billed to a credit card may not be used in conjunction with a pms server record.
The account sharing field configures how accounts are shared between multiple registered guests in a room's folio. per-Device: an Account is created for every device (old behavior). per-Guest: an Account is created for each unique guest name checked into a room and shared by all devices that supplied the same name and room. per-Room: an Account is created for each set of guest names checked into a room at the same time and shared between all devices.
The host field must contain the IP address or domain name of the property management system interface server. It is assumed that the property management system interface server will use TCP/IP for third-party integration.
The port field must contain the port on which the property management system is listening for connections. The rXg will initiate the connection from a random high port. It is expected that traffic originating from any port on the rXg be allowed to access the property management server on this port.
The timeout field specifies the number of seconds that the rXg will wait for a response from the property management system. If the property management system fails to respond by the configured timeout , the transaction will be considered a failure by the rXg.
The UDF Behaviors define patterns that will be used to determine deployment specific behavior for particular cases of updates to the PMS. For instance, in the Infor REST integration, this is used to define patterns that will be considered for detecting when the guest has been assigned a one time access (OTA) email from a travel platform like Expedient, Agoda or similar. This is only implemented for Infor REST currently.
The dialed digits (DD) field is used by the rXg to communicate the MAC address of the end-user device that executed the charge posting. This allows the operator to understand how many individual devices are being used by a hospitality guest to access the Internet. The DD format field configures how the end-user's MAC address is formatted before sending it to the property management system as the DD field. The rXg sends the MAC address in decimal format by default because the FIAS standard specifies that the DD field be numeric. However, in practice many operators find that sending the MAC in hex is the easiest way to ensure that the posts for hospitality guests is accurate.
The subsequent transaction fields configure the PMS gateway to change the amount billed for subsequent transactions that originate from the same PMS guest. This feature allows the operator to charge less (or charge nothing) for a specified number of additional devices beyond the primary registered device. A follow-on transaction will only be marked subsequent (and thus discounted), if it satisfies both the subsequent transaction max count restriction as well as the subsequent transaction lifetime restriction.
The subsequent transaction max count specifies the maximum number of transactions that will be considered subsequent after a primary (non-subsequent) transaction. Setting the subsequent transaction max count to 0 disables this feature entirely as no transactions will ever be considered subsequent.
The subsequent transaction lifetime (s) field specifies the maximum amount of time (in seconds) that may elapse between a primary (non-subsequent) transaction and a sub-sequent transaction. If the elapsed time between a primary (non-subsequent) transaction and a follow-on transaction exceeds the configured subsequent transaction lifetime (s), the transaction will not be marked as subsequent and will not be discounted.
The subsequent transaction price reduction specifies the reduction in amount to be charged for follow-on transactions marked as subsequent. The value may be specified as an absolute number (e.g., 12.95) or as a percentage (e.g., 75%). If an absolute number is specified, the specified value will be subtracted from the plan price. If the resulting amount is less than zero, a charge of 0.00 will be sent to the PMS. Similarly, if a percentage is specified, the final amount transmitted to the PMS is calculated by discounting the specified percentage of the original usage plan price.
For example, if an operator wishes to allow three devices per day to acquire Internet access based on a PMS charge posting, the appropriate settings are:
| subsequent transaction max count | 2 | | subsequent transaction lifetime | 86400 | | subsequent price reduction | 99999 |
Alternatively, if an operator wishes to allow up to 5 additional devices to acquire Internet at a significant (75%) discount within two days the first full price PMS posting, the appropriate settings are:
| subsequent transaction max count | 5 | | subsequent transaction lifetime | 172800 | | subsequent price reduction | 75% |
The note field is a place for the administrator to enter a comment. This field is purely informational and has no bearing on the configuration settings.

PMS Guest Matches
The PMS Guest Matches scaffold enables operators to control the availability of the Usage Plans that are associated with the PMS Server to certain PMS Guests. For example, this scaffold may be used to configure the rXg to offer free Internet to PMS Guests who are checked in with a rate code ofINTC, reduced price Internet to PMS Guests with a block code of ACORP and special high speed, high priority Internet access with an SLA for PMS Guests staying in suites (identified by room type STE).
The name field is an arbitrary string descriptor used only for administrative identification. Choose a name that reflects the purpose of the record. This field has no bearing on the configuration or settings determined by this scaffold.
The Guest Field specifies the PMS Guest field that is the location that will be considered for this PMS Guest Match rule. The operator may choose from almost any field present in the PMS Guest record. The most frequently used options for this are the custom0, custom1, ... custom9fields which correspond to the FIAS A0, A1, ...A9 fields. Typically, the Ax FIAS fields are mapped to:
Field Name A0Rate Code A1Group Code A2Block Code A3Room Type A4Membership Type A5Membership Number A6Source
The Pattern field specifies a string that must match the value of the field specified in the Guest Field parameter in order for this PMS Guest Match to be effective. For example, if the operator desires to have this match rule take effect when the rate code is INTC, the Guest Field would be set to custom0 and the Pattern would be set toINTC.
The Min transactions and Max transactions fields restrict this PMS Guest Match rule to only affect a PMS Guest that has completed a certain number of transactions. Only transactions that represent active (non-expired) Usage Plans purchased by the PMS guest are counted. For example, the PMS Guest Match mechanism will not count a transaction made by a PMS Guest that purchases a Usage Plan with two days of usage when the guest comes back to purchase another plan three days later.
One common use of the Min transactions and Max transactions fields is to configure the availability of "free Internet for the first device." To accomplish this the operator would create a PMS Guest Match rule with Min transactions set to 0 and Max transactions to set 1 linked to a Usage Plan that is free. Thus the PMS Guest has access to purchasing the "free plan" when there are no active Usage Plans associated with the account. The PMS Guest Match mechanism determines that there are no active Usage Plans because none have been purchased or because the ones that have been purchased have already expired.
These fields may also be used to configure the converse, for example, "buy one device, get free Internet for three additional devices." To accomplish this the operator would create a PMS Guest Match rule with Min transactions set to 1 and Max transactions set to 4. In this case access to the the "free plan" is only available to PMS Guests that have at least one active (non-expired) Usage Plan which the PMS Guest would have to pay for.
The checkboxes specified by the Usage Plans field are the Usage Plans that will be available to the user that is matched by this PMS Guest Match rule.
To create a "catch all" or "default" rule, create a PMS Guest Match rule with an empty Guest Field and Pattern. The Usage Plans selected by a PMS Guest Match rule configured as a "catch all" will be available to all PMS Guests that do not match any PMS Guest Match rules with an explicitly defined Guest Field and Pattern.
The note field is a place for the administrator to enter a comment. This field is purely informational and has no bearing on the configuration settings.
PMS Guest Match Examples
Example 1: Match "free" in custom 0 field and offer free plan.
In this example we will be looking at Custom field 0 containing a value of "free". If the field contains the word free the guest will have access to the same plan as other guests, but at zero cost. Guests that do not match will in this case pay $10.
When configuring the PMS server the following settings should be set to ensure the guest only sees the plans that match, and not the plan(s) that are available if they don't match anything. These settings are under the Plan Behavior section of the PMS server configuration. The main setting we are interested in here is the Show only matched plans checkbox. With this enabled the guest will only be displayed plans that they have matched against.
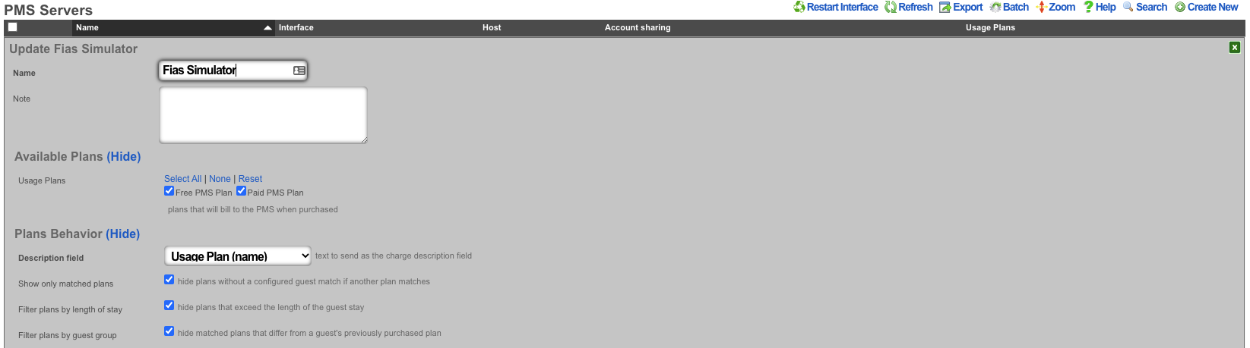
At a minimum we need to have two plans configured 1 that will be displayed to guests that match and the other free plan that will be displayed to guests that match our configured guest match. Below we can see that we have two plans configured 1 with a $5 price and the other with a price of free.

Next we will configure the Guest Match. Navigate to Billing::Gateways and create a new Guest Match. The Name field is arbitrary. The Guest Field for this example shoudl be set to custom0. The pattern we are looking for is the word free so we will enter that into the Pattern field. The Min transaction field is the minimum number of transactions the guest has before this plan will be displayed, in this case it should be set to 0 as we want the guest to be presented with this plan immediatly. The Max Transactions field can be used to no longer display a plan to a guest if they exceed the number of transactions, in this case we want the guest to always be presented with the free plan if they match. Lasty the Usage Plans field is used to pick which plans will be displayed to the guest if they match, for this example the Free PMS Plan will be selected. Then click the Create button.
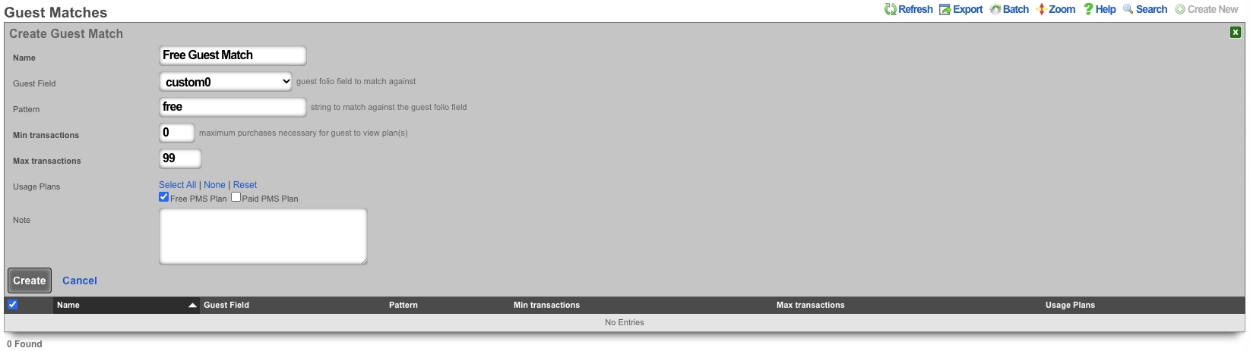

Now we will look at a guest that does not have the word free in the Custom0 field. Below is a screenshot showing that the guest Khan does not the word free in the Custom0 field.
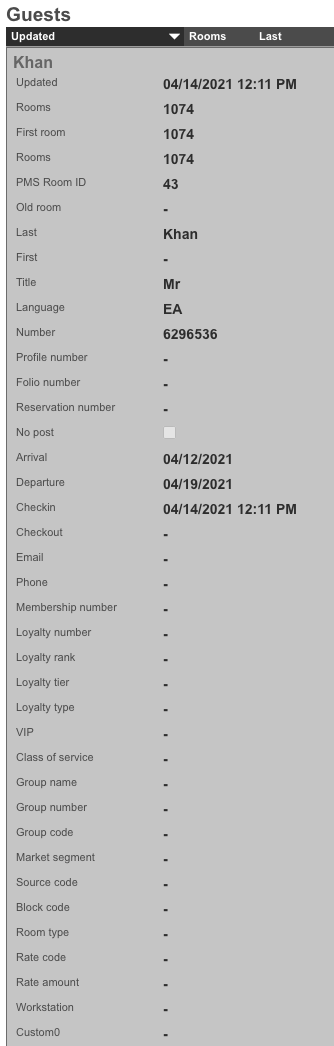
The screenshots below shows the guest entering their credentials and being presented with only the paid plan.

Next we will look at a guest that has the word free in the Custom0 field.
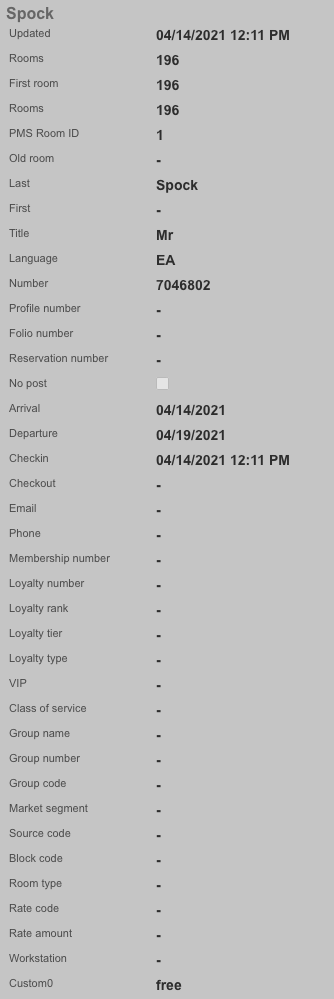
The screenshots below shows the guest entering their credentials and being presented with only the free plan.
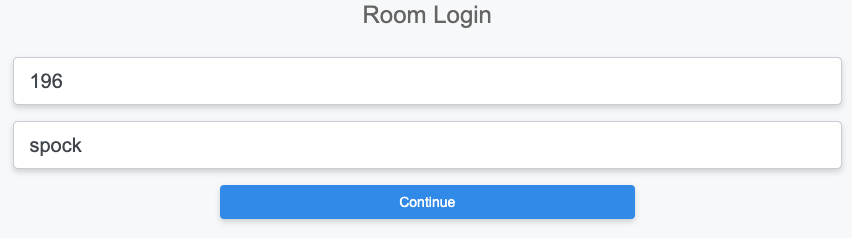
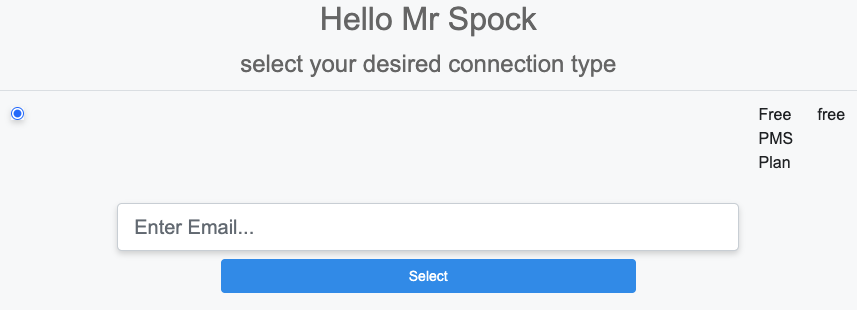
Example 2: If room type is a suite offer free 200Mbps plan.
In this example we will configure a room type match against suite. We will leave the plans from above but also include a 200mbps plan that is paid and another that is free. We will also leave the free guest match we created before. This time when we log in with the guest room and name we will be offered the 200Mbps plan for free instead of the free plan.

Next we will create a new Guest Match that will match against the room_type field. The Name field is arbitrary. For Guest Match we will set the Guest Field to room_type , and the Pattern field to suite. Min and Max Transaction fields can be adjusted to change how many transactions the guest must have before it shows up, and determine after a number of transactions when the plan will no longer be offered. In this example we want it to be available to the guest all the time so Min Transactions will be set to 0, and Max Transactions will be set to 99 so that the guest would have to have over 99 transactions before the plan would no longer be presented. Lastly in the Usage Plans field we want to select the plans to be presented when the room type is suite, in this case we will select the 200Mbps Free Plan
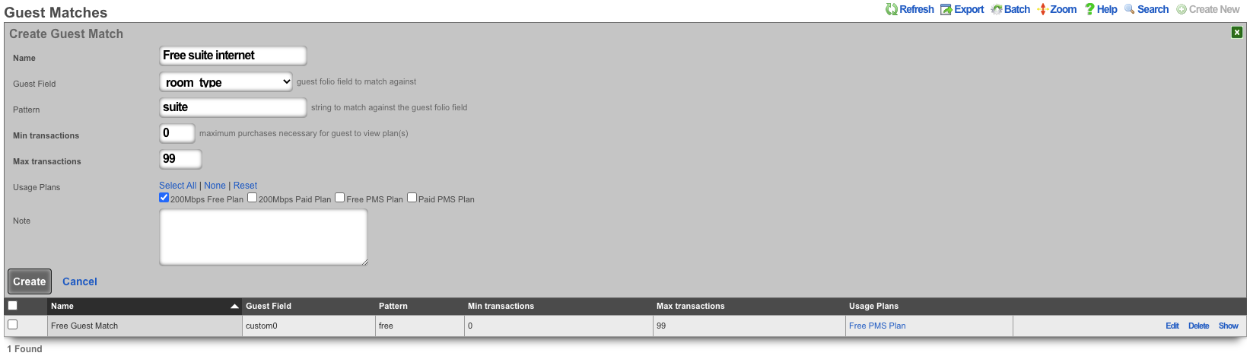

Now we will look at a guest that does not have a room_type of "suite". We will use the guest Khan from the first example because we know they will not match.
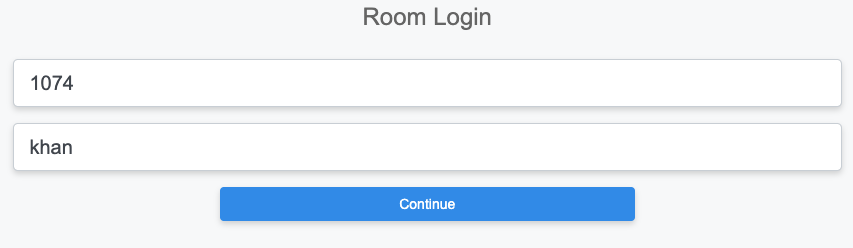

Now we will find a guest that has "suite" in the room_type field.
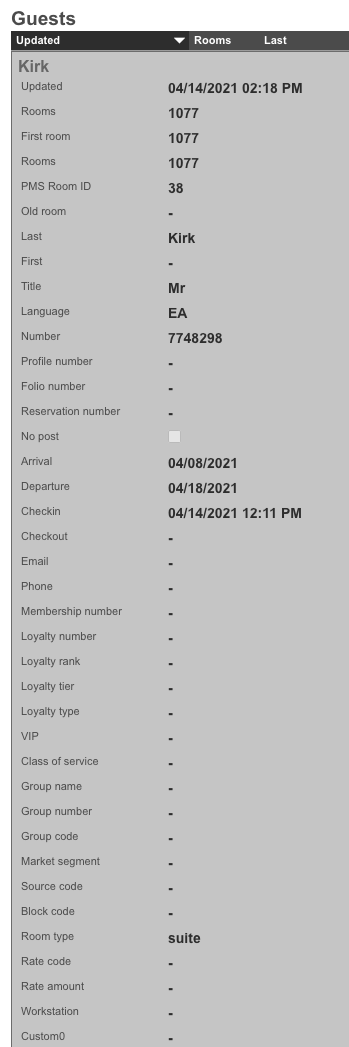
The below screenshots show the guest with the room_type set to suite logging in and being presented with the 200Mbps free plan.
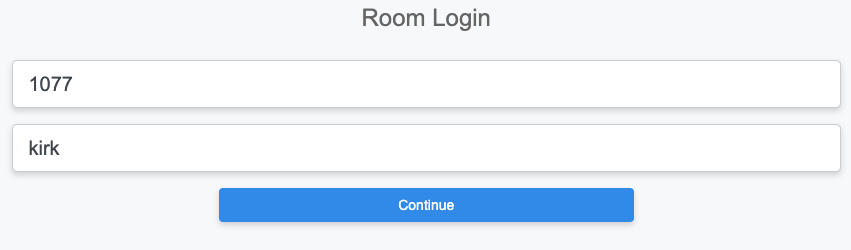
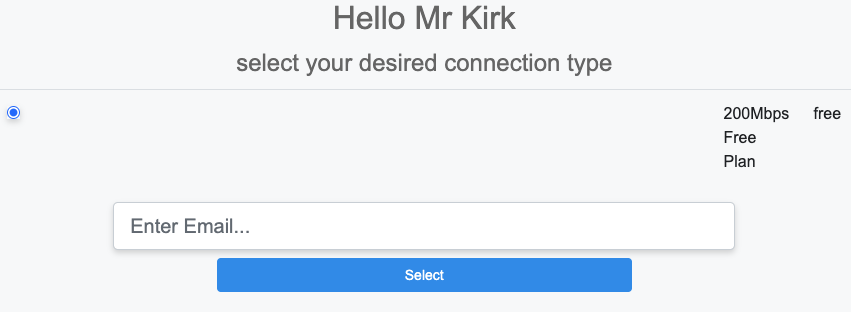
Card Connect Setup
When creating a Card Connect account there will be 3 pieces of information needed to setup the merchant in the rXg. Card Connect will provide an API Username & Password, along with a Merchant ID. For this example the API Username & Password will be testing:testing123, and the Merchant ID will be 496160873888.
Create a new Merchant. The Name field is arbitrary. Select the Usage plans that can use this merchant by selecting them in the Usage Plans field. Select Card Connect in the Direct Gateway field. The API Username testing will go into the Login field. The API Password testing123 will go into the Password field. Lastly the Merchant ID 496160873888 will go in the Partner field.
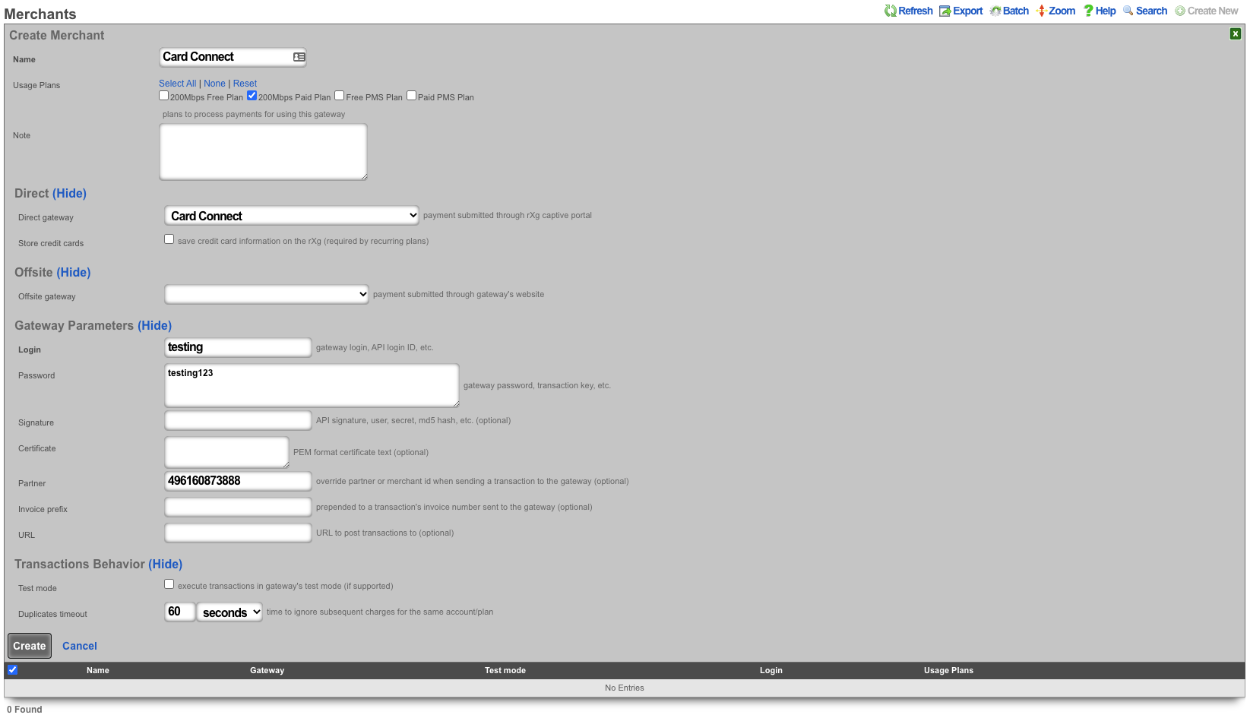
Authorize.net Setup
When creating an Authorize.net account there will be 2 pieces of information needed to setup the merchant in the rXg. Authorize.net will provide an API Login ID, and a Transaction Key. For example the API Login ID will be 63RkqZy7B, and the Transaction Key will be 6HKJywh3634Md83g.
Create a new Merchant. The Name field is arbitrary. Select the Usage plans that can use this merchant by selecting them in the Usage Plans field. Select Authorize.net in the Direct Gateway field. The API Login ID 63RkqZy7B will go into the Login field. The Transaction Key 6HKJywh3634Md83g will go in the Password field.
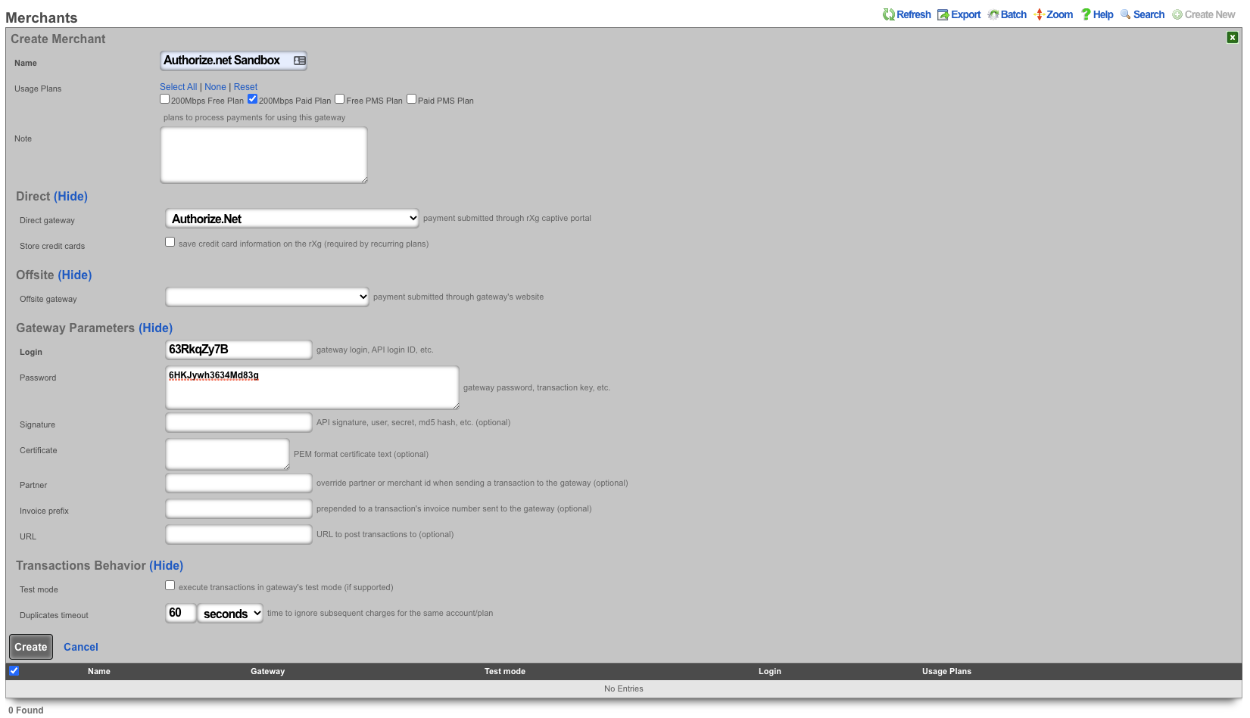
PayPal Setup
When creating a PayPal merchant you only need to enter in the email address associated to the PayPal account you want the transactions to be delivered to. The PayPal account must have IPN (Instant Payment Notifications) enabled. If IPN is not enabled the rXg will not receive notification that the payment was successful. PayPal must be whitelisted in the Splash Portal otherwise users will not be able to communicate with PayPal and will not be able to complete the transaction.
Create a new Merchant. The Name field is arbitrary. Select the Usage plans that can use this merchant by selecting them in the Usage Plans field. Select Paypal Website Payments Standard from the Offsite Gateway field. Put the email address associated to your Paypal account in the Login field.
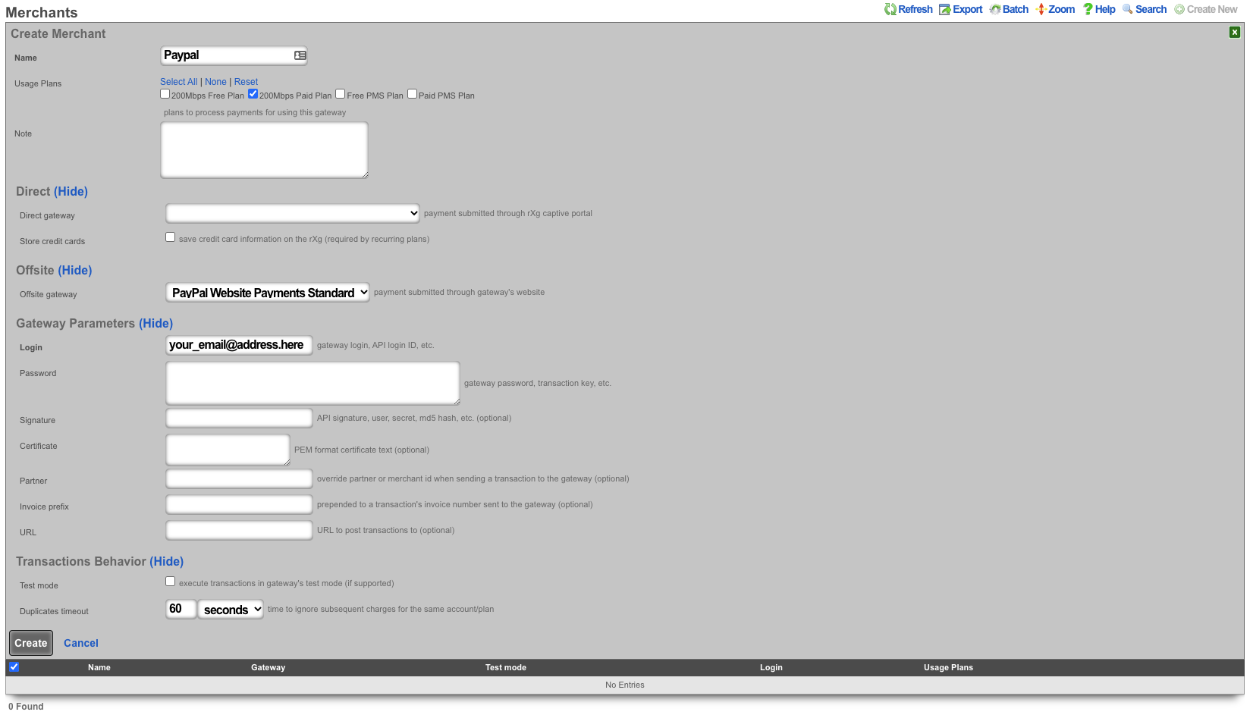
Hotel Key PMS Server Setup
The rXg integrates with the Hotel Key PMS using their JSON-based REST API for room inquiries and charge posting.
Configuration Fields
To configure the Hotel Key PMS integration, create a new PMS Server record with the following settings:
- Interface: Select
Hotel Keyfrom the dropdown menu. This will display the fields specific to the Hotel Key integration. - URL: Enter the complete API URL provided by Hotel Key, including protocol and port (e.g.,
https://hk-data.hotelkeyapp.com/). This is the base URL for all API requests. - Username/APIkey: Enter the API Username provided by Hotel Key for authentication.
- Password: Enter the API Password provided by Hotel Key for authentication.
- Hotel Key Property Code: Enter the Property Code for your hotel, as provided by Hotel Key. This identifies your specific property in the Hotel Key system.
The other fields (timeout, account sharing, usage plans, etc.) can be configured as described in the general "PMS Servers" section above.
Note: The Host and Port fields in the PMS Server form are not used by the Hotel Key integration. The complete URL (including protocol, hostname, and port) should be specified in the URL field.
Guest Data Captured
When the rXg performs a room inquiry against the Hotel Key API, the following guest information is captured and stored in the PMS Guest record:
| Hotel Key API Field | PMS Guest Field | Description | |
|---|---|---|---|
check_in_date |
arrival |
Guest check-in date | |
check_out_date |
departure |
Guest check-out date | |
guest_first_name |
first_name |
Guest's first name | |
guest_last_name |
name |
Guest's last name | |
confirmation_no |
number |
Confirmation number (used as guest identifier) | |
confirmation_no |
reservation_number |
Reservation number | |
folio_no |
folio_number |
Folio number for billing | |
room_type_name |
room_type |
Room type name (e.g., "Platinum", "Deluxe") | |
room_type_code |
custom1 |
Room type code (e.g., "APC", "DLX") | |
folio_name |
custom2 |
Folio name | |
external_confirmation_no |
custom3 |
External confirmation number from the booking platform | |
id |
custom0 |
Hotel Key's unique guest ID (UUID) | |
stop_charge |
no_post |
Whether the guest is restricted from making charges |
The no_post flag is particularly important: when set to true, the guest will not be able to charge Internet access to their room. This typically indicates that the guest needs to provide a credit card on file before making additional charges.
InnKey PMS Server Setup
InnKey PMS provides a JSON-based REST API for room inquiries and charge posting. The rXg integrates with InnKey's Wi-Fi Interface API (v1.0.0) using JWT token-based authentication.
InnKey will provide four pieces of information for each property:
- URL - The host the API (e.g.,
https://api.innkeypms.com) - Username - x-partner
- Password - x-accesskey
- InnKey Security Key - InnKey: x-securitykey Hotel-level site identifier (unique per property)
PMS Properties
The name field is an arbitrary string descriptor used only for administrative identification. Choose a name that reflects the purpose of the record. This field has no bearing on the configuration or settings determined by this scaffold.
The note field is a place for the administrator to enter a comment. This field is purely informational and has no bearing on the configuration settings.
The code field is a place to put a string that correlates with this property and its rooms.
Transactions
The transactions view presents the list of all credit card transactions that have been processed.
![]()
Every credit card transaction record has an ID number that is used to uniquely identify the transaction. The date , time and amount charged are stored in the transaction record along with two boolean flags denoting whether the transaction was a success and whether or not it was a test.
Transaction records are linked to accounts , the payment method (which contains the credit card information), the usage plan selected and the merchant used to clear the transaction. Clicking on any of these fields in the list view of the transaction log displays the linked record.
Coupons
Coupons enable an operator to offer new or existing end-users an operator defined credit.

Coupons are similar to tokens in that the operator generates a batch of codes that are to be distributed to end-users. Whereas tokens may be used as login credentials, coupons require the end-user to have an account. Coupons may be redeemed for credit by an end-user during the sign-up process or through a specific link on the captive portal web application.
There is a diverse set of use cases for coupons. Operators may generate a batch of coupons to enable end-users to "try before they buy" service. By using coupons the operator is able to capture the personal information from potential subscriber and use that for direct marketing. Coupons are also often used as a mechanism to avoid micro-payment transactions fees. Tokens can accomplish the same goal, however, with coupons, the operator maintains an identifiable database of end-users.
Coupons must be assigned a numerical credit or an association to a usage plan , that allows the end user to redeem the coupon to purchase the plan or unlocks the plan for purchase. When assigned a credit , the amount is transferred into the end-user's account upon redemption of the coupon. The end-user may then use the credit to purchase any plan of their choosing. When associated with a usage plan , the coupon enables the end-user to select the associated plan without supplying direct payment via credit card. Alternatively a usage plan may be unlocked and becomes avialable for purchase.
The Code field shows the code that the end user will enter to redeem the coupon on the captive portal.
The Batch field is an automatically assinged value to each set of coupons generated by the administrator. This allows the administrator to quickly locate all of the coupons that were generated at the same time.
The Credit field displays the credit value that will be received by the end user when the coupon is redeemed, if applicable.
The Usage Plan field displays the plan the end user will be granted when redeeming the coupon.
The Expires field displays the date and time the coupon will no longer be valid, if applicable..
Coupons are also assigned an expiration date and time via the expires field. This allows the operator to issue coupons for time-limited promotions or to support event management.
The Usage Plans field displays which usage plans are unlocked for purchase by redeeming the coupon.
The Redeemed coupons field displays how many times the coupon has been redeemed. Coupons that have no remaining redemptions left will be removed from the Coupons list.

When creating a new Coupon , the Copies field will determine the number of coupons that will be created. The operator can specify the number of times a coupon can be redeemed using the Max redemptions field, check the unlimited box to allow unlimited redemptions. The Character code dropdown lets the operator specify which characters will be used when generating the code. The Length field allows the operator to specify the number of characters the code will be in length. The Prefix / Suffix field allows the operator to attach a specific set of characters to the beginning and/or ending of the generated code. The Expires field allows the operator to specify the date and time the coupon will no longer be valid if desired. The Note field is for internal notes and will have no bearing on the generation of the coupon. Under Coupon Effect the Usage Plan dropdown allows the operator to select a specific usage plan that will be granted to the end user when redeemed. The Credit field is used to specify the amount of credit that will be applied when redeemed. The Usage Plans Available for Purchase field allows the operator to specify which usage plans will become available for purchase after redeeming the code. This is used to only allow certain plans to be purchased if the end user has the code to ulock them (Gated Access).
Examples of Coupon Usage
1. MDU - Each lease holder gets a code that unlocks free service, without code only paid plans are available.
For this scenario create a new Coupon. Enter the number of copies of the coupon to be created in the Copies field. For this scenario the Max redemptions field should be left at the default of 1 to prevent the coupon from being given out to those that should not have access. Change the Character code , Length and, Prefix / Suffix field if desired. It is up to the operator if they want to set an expiration using the Expires field. Note that once the coupon is redeemed it will no longer be valid. For this use case the fields under Coupon Effect will not be used. Under Usage Plans Available for Purchase select the plan(s) that this coupon will unlock, in thise case it will be the Gated Plan. Click Create.

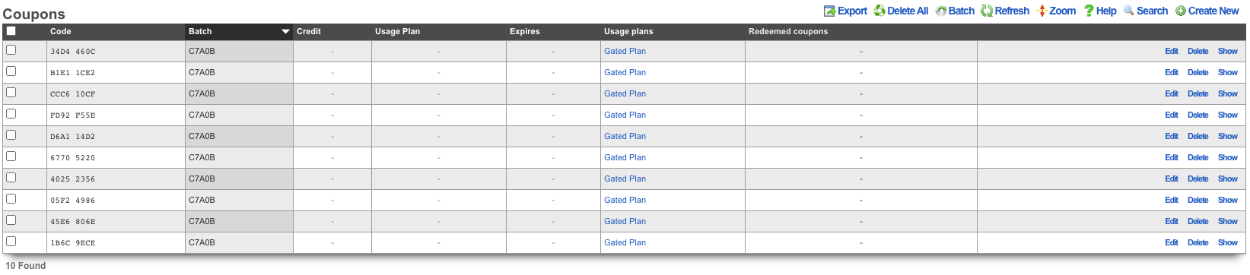
In this scenario when an end user is redirected to the portal and signs up for an account if they do not have a code only the Public Plan will be presented.
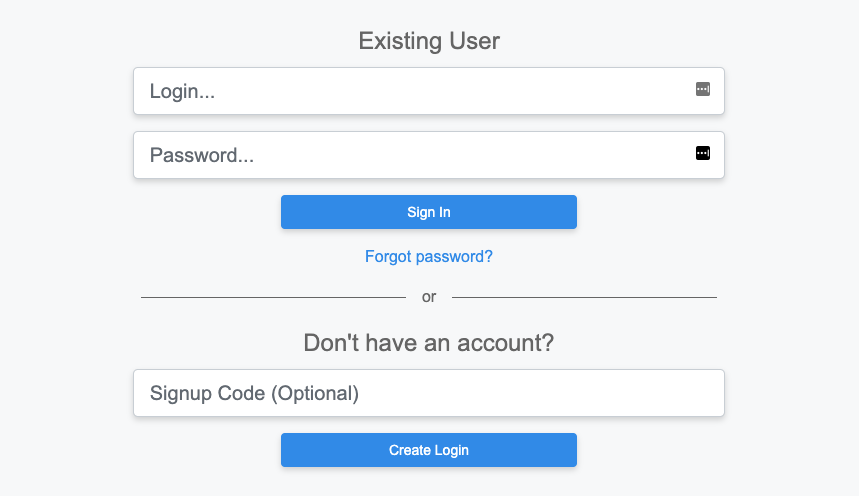
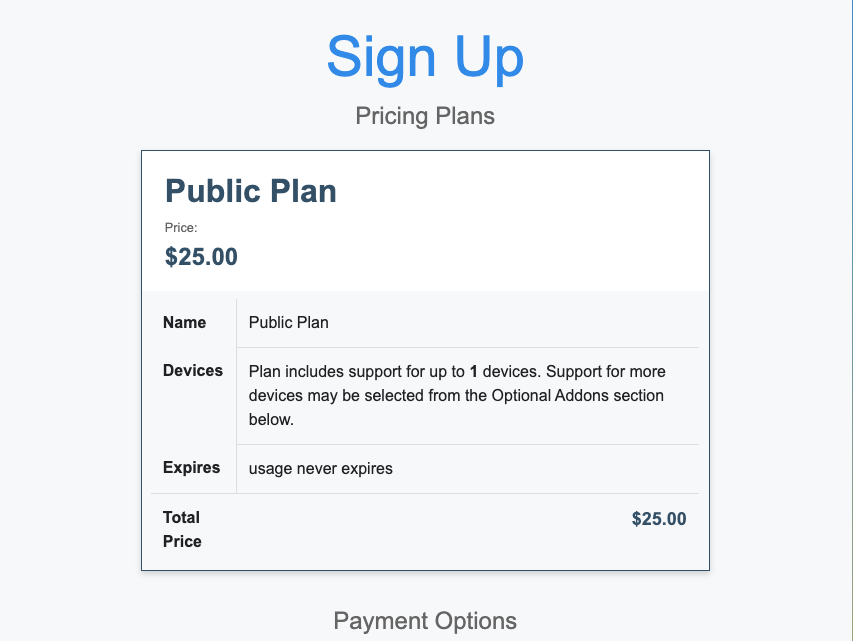
With Coupon that allows access to the Gated Plan.
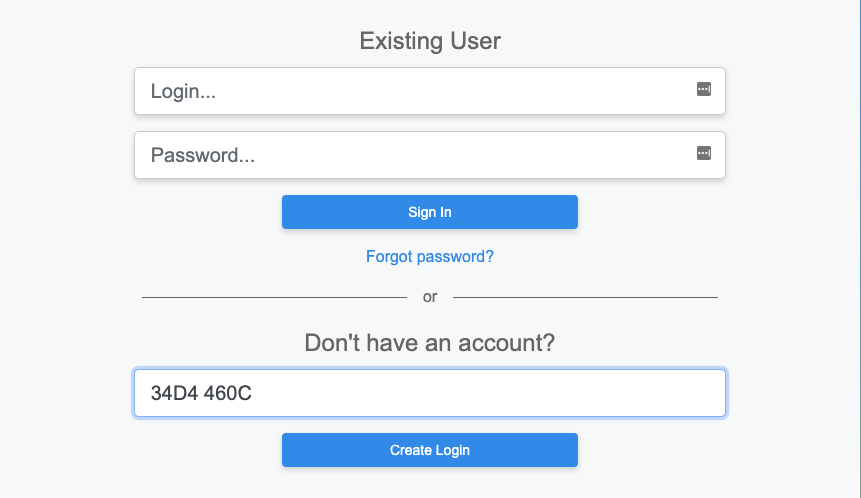
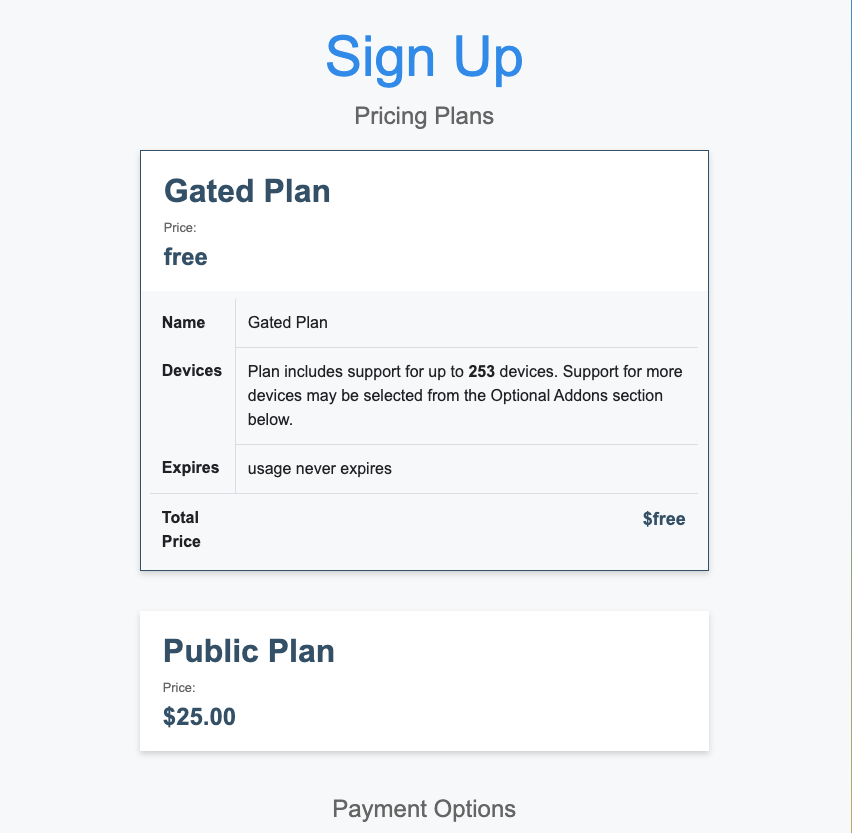
2. Dorm Rooms - Each room is issued a code that is good for a number of signups equal to the number of people sharing the room.
For this scenario create a new Coupon. Enter the number of copies of the coupon to be created in the Copies field. In this case the Max redemptions field should be set to the number of people the room is shared with. Change the Character code , Length and, Prefix / Suffix field if desired. It is up to the operator if they want to set an expiration using the Expires field. Note that once the coupon is redeemed it will no longer be valid. For this use case the fields under Coupon Effect will not be used. Under Usage Plans Available for Purchase select the plan(s) that this coupon will unlock, in thise case it will be the Gated Plan. Click Create.


In this scenario when an end user is redirected to the portal and signs up for an account if they do not have a code the will not be able to gain access.
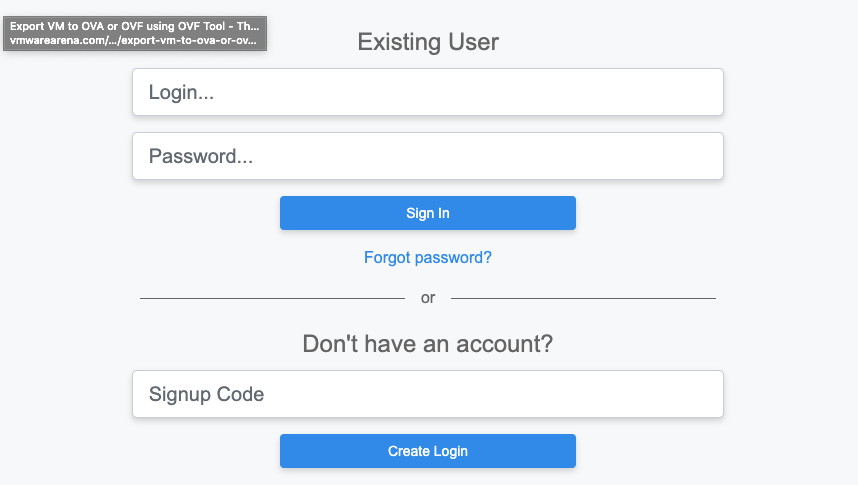
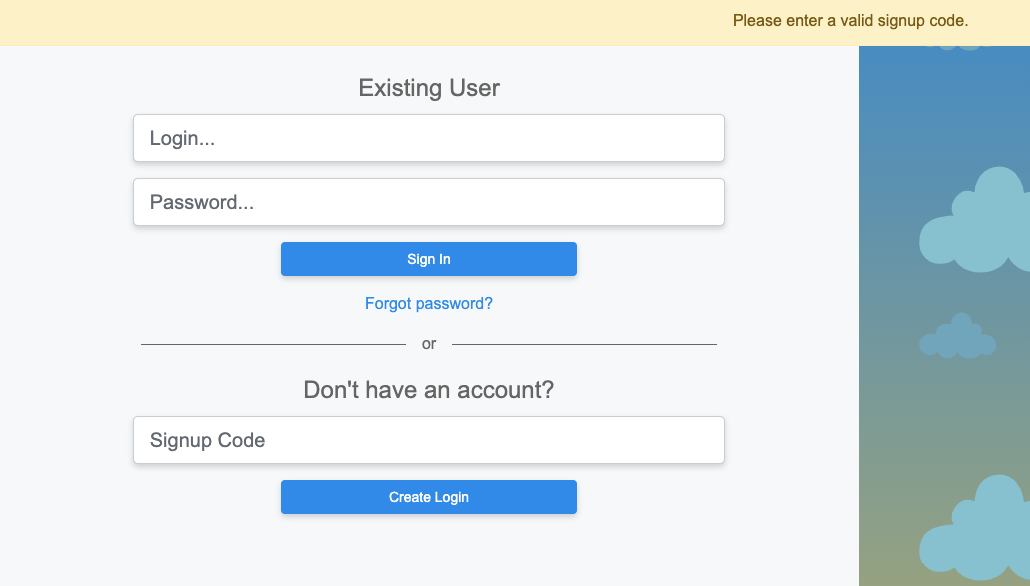
With a Coupon code the user will gain access to the plan(s) the operator has selected.
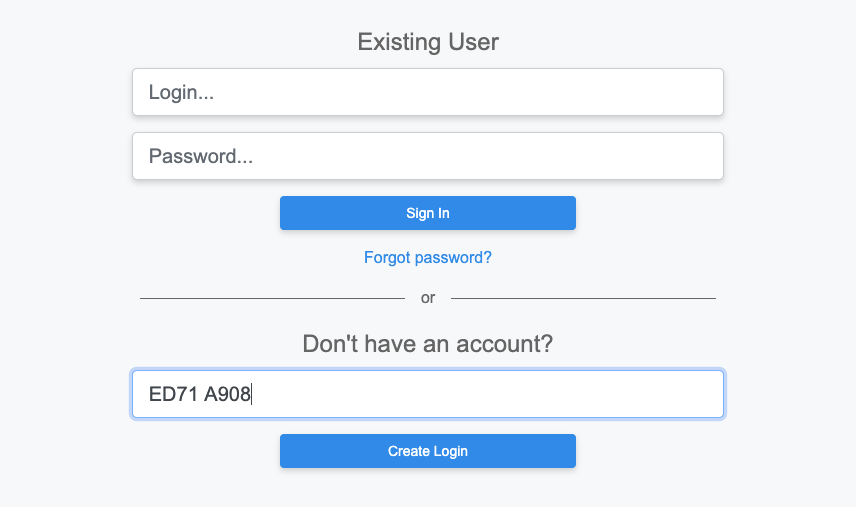

3. MTU - Leasing office has a unique code for each property.
For this scenario 2 coupons will be created one that allows access to Property 1 and the second coupon will allow access for property 2. For the first coupon enter the number of copies to be created in the Copies field. In this case the Max redemptions field will be set to unlimited. Change the Character code and Length field if desired. In this case the Prefix field will be set to pr1 to denote the property. It is up to the operator if they want to set an expiration using the Expires field. For this use case the fields under Coupon Effect will not be used. Under Usage Plans Available for Purchase select the plan(s) that this coupon will unlock, in thise case it will be the Gated Plan. Click Create.
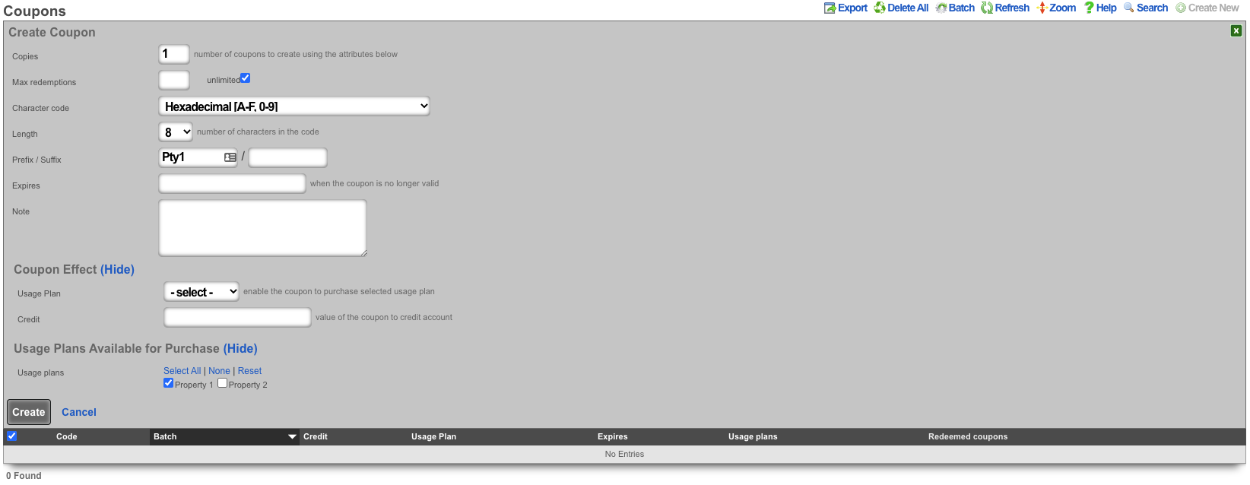
Repeat the previous steps for the second coupon this time change the Prefix field to represent the 2nd property, and select the appropriate Usage Plan.
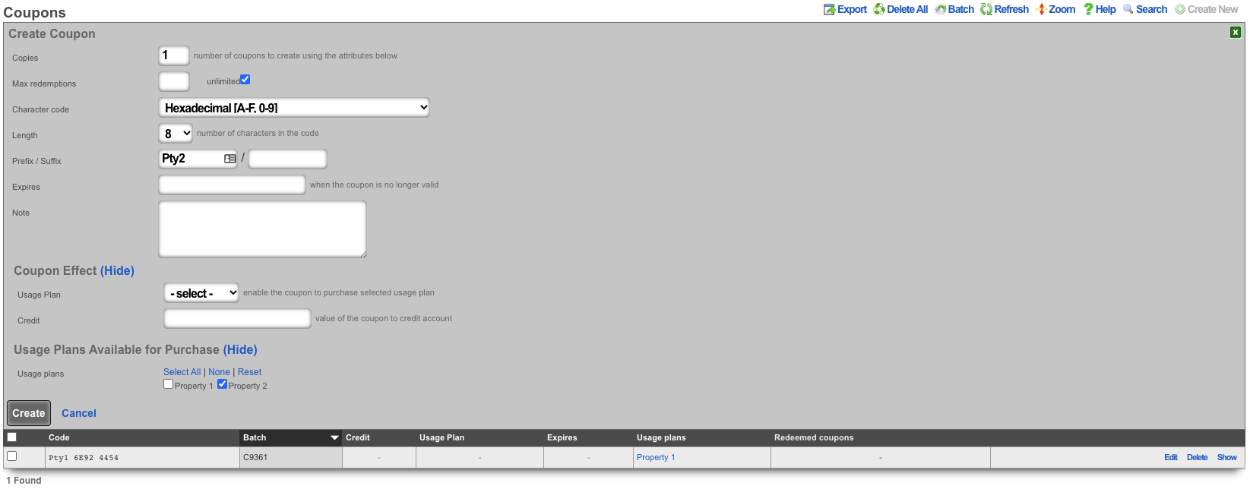

Now depending on which code is entered different plans will be presented.
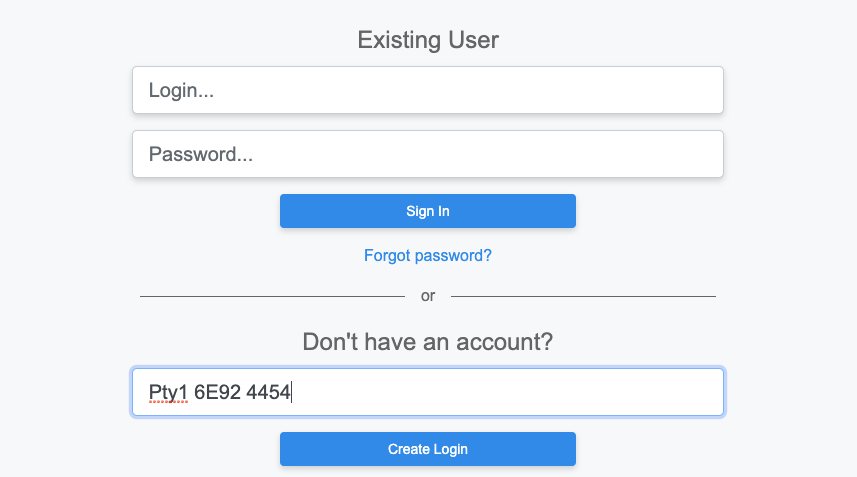
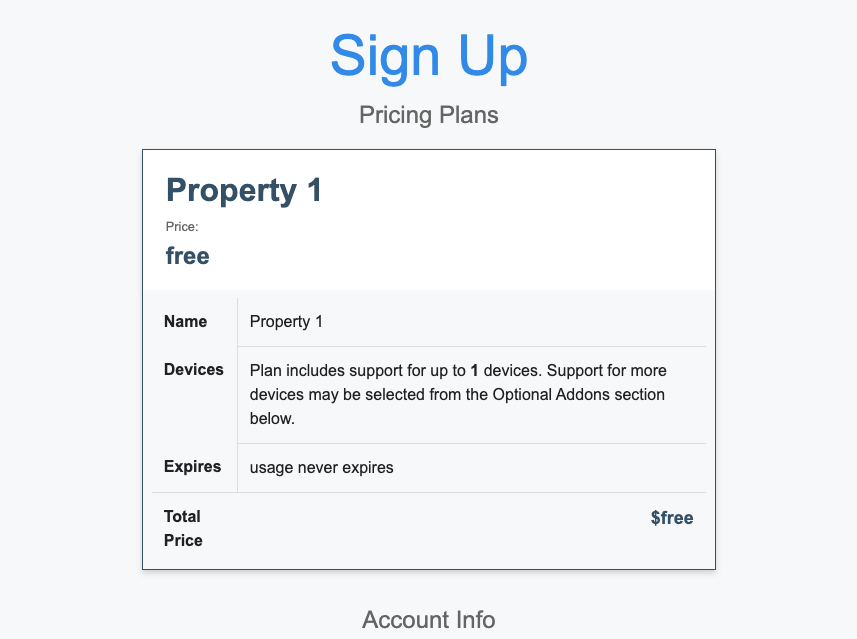
Using the coupon for the second property we are presented with the plan for that location.
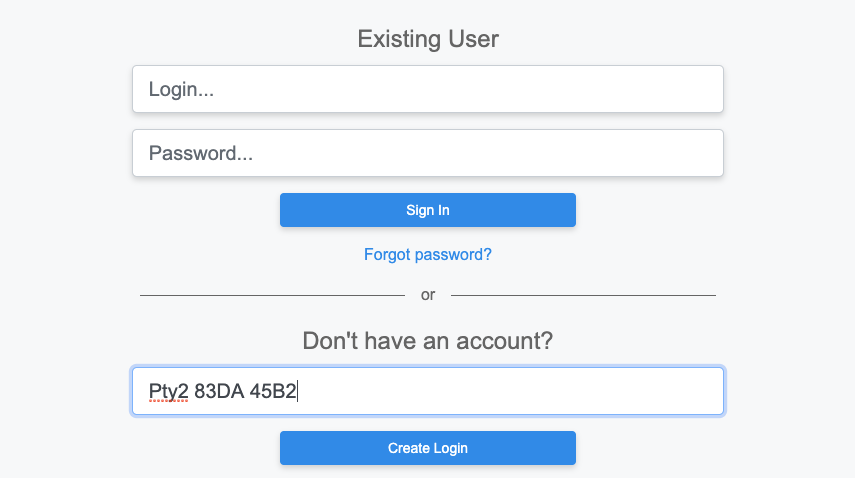
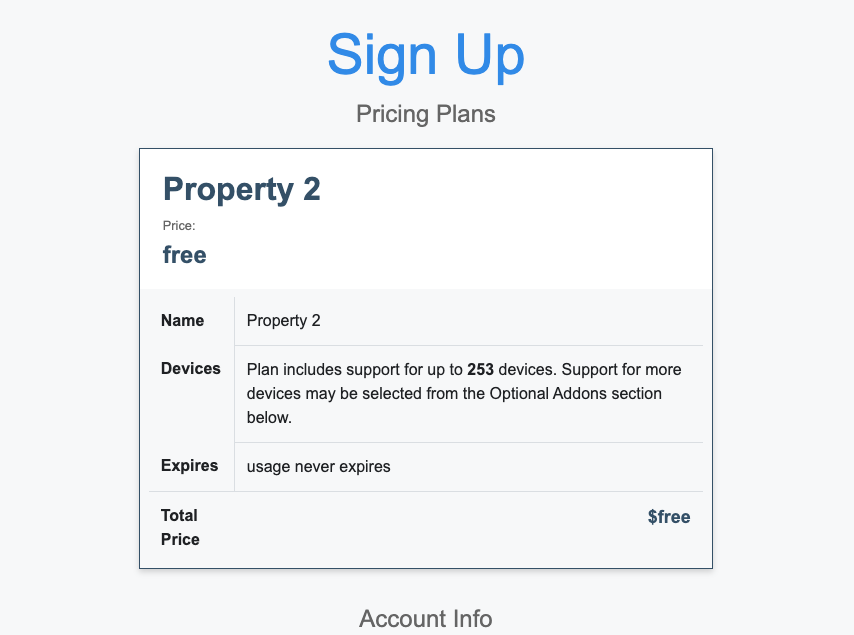
Customers
The customers view displays the payment information for the end-users of the network. These records are created and updated by your end-users though an operator can also update these records if necessary.
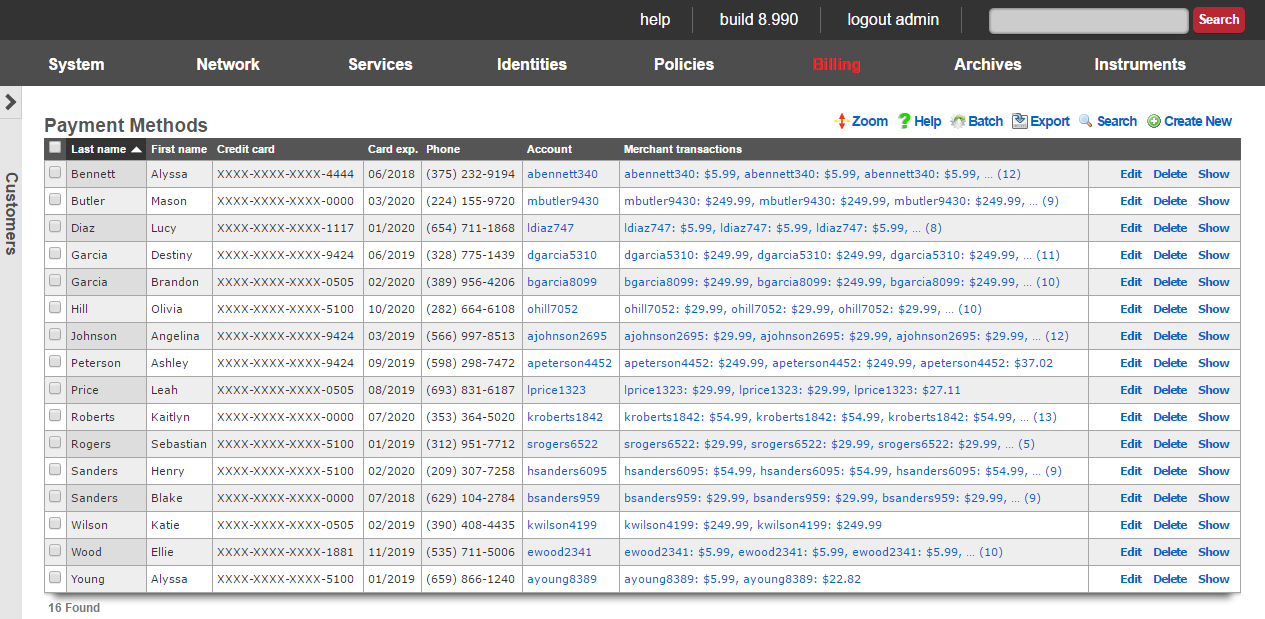
All credit card information is stored using symmetric encryption to maintain PCI compliance. In addition, CVV2 data is never stored per PCD guidelines. All stored data is exportable and viewable by administrators who have read privilege to the billing section.
The active checkbox signifies which set of billing data is currently being used for a specific users recurring bills. If a customer recharges, this will also be the billing information used by default unless changed.
The CC Number is the credit card number.
The Expiration month and Expiration year make up the expiration for the above credit card.
The First Name , Middle Name or initial, and Last Name need to match the name on the credit card.
Company is an optional field. Some corporate cards require that this field be filled out appropriately.
The Address1, Address2, City, State, Zip, and Country need to match the billing address of the credit card.
The Phone Number should also match the records on file with the credit card company.
The Account is the end-user account that this billing information is associated with.
The note field is a place for the administrator to enter a comment. This field is purely informational and has no bearing on the configuration settings.
Archives
The rXg stores long term archives of data instrumented from end-users as well as from the rXg system itself. The archives are most often used to diagnose network problems as well as resolve billing problems.
Archives Dashboard
The archives dashboard presents several dialogs containing the most recent entries in several logs files.

Clicking on each of the dialogs brings up the detailed view of the log where the complete contents of the log file may be viewed.
The set of logs and length of each log that is displayed on the archives dashboard is controlled by the form at the bottom of the detailed view of each log.
Health Notices System
The rXg incorporates a sophisticated health monitoring and notification system that continuously monitors all critical aspects of system operation, network infrastructure, and service delivery. Health notices serve as the primary mechanism for alerting administrators to conditions that require attention, from routine capacity warnings to critical system failures.
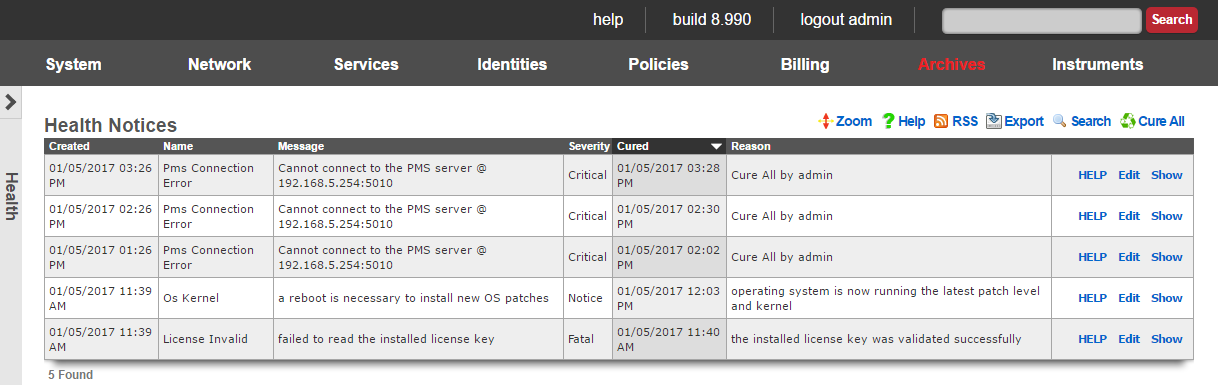
The health notices system operates as both a proactive monitoring tool and a reactive alerting mechanism. It continuously evaluates system metrics against predefined thresholds and generates notices when conditions warrant administrative attention. For clustered deployments, individual rXg nodes report all health notices to the cluster controller for centralized logging and management, providing administrators with a unified view of the entire infrastructure's health status.
Health Notice Lifecycle and Mechanism
Health notices follow a well-defined lifecycle that begins with detection and progresses through notification, acknowledgment, and resolution phases. The system creates health notices through multiple detection mechanisms including real-time monitoring, scheduled checks, exception handling, and external system integration.
When a monitored condition exceeds its threshold or an error condition occurs, the system immediately creates a health notice record containing comprehensive details about the condition, including a unique identifier, severity level, timestamp, descriptive messages, and contextual information. The notice generation process is atomic, ensuring that critical conditions are never lost due to system race conditions or failures.
The system maintains both short and long message formats for each health notice. The short message provides a concise summary suitable for dashboard displays and quick reference, while the long message contains detailed diagnostic information, stack traces, configuration details, and remediation guidance. This dual-message approach ensures that administrators can quickly assess situations while having access to comprehensive diagnostic data when needed.
Health Notice Severity Levels
The rXg health notice system employs four distinct severity levels, each corresponding to different urgency levels and required response timeframes.
NOTICE level health notices indicate informational conditions that administrators should be aware of but do not require immediate action. These typically include successful completion of maintenance operations, configuration changes that completed successfully but may have implications for future operations, or approaching but not critical threshold conditions. Notice-level health notices serve primarily as audit trails and early indicators of trends that may require future attention.
WARNING level health notices indicate conditions that require administrative attention within a reasonable timeframe but do not immediately threaten system operation. These include capacity utilization approaching configured thresholds, configuration inconsistencies that may impact performance, deprecated feature usage, non-critical service disruptions, and environmental conditions approaching operational limits. Warning-level notices often represent opportunities for proactive intervention before conditions escalate to critical levels.
CRITICAL level health notices indicate serious conditions that require immediate administrative attention and may impact system operation if not addressed promptly. These include service failures, significant capacity constraints, authentication system problems, network connectivity issues affecting core functionality, and hardware conditions that may lead to failure. Critical-level notices typically indicate that some system functionality may already be compromised or is at immediate risk of compromise.
FATAL level health notices represent the most severe conditions that require immediate emergency response. These indicate system conditions that have already caused significant service disruption or present imminent risk of complete system failure. Fatal-level notices include core system component failures, complete network isolation, licensing violations that prevent operation, and hardware failures that compromise system integrity.
Health Notice Creation and Sources
Health notices originate from multiple sources throughout the rXg system, each contributing specialized monitoring capabilities for different aspects of system operation. The backend monitoring subsystem continuously evaluates system resources, network connectivity, service health, and infrastructure status. This subsystem generates notices for conditions such as memory utilization, filesystem capacity, network interface status, and process health.
The web portal subsystem creates health notices when exceptions occur during user interactions, asset compilation failures prevent proper portal operation, or authentication system irregularities are detected. These notices help administrators identify and resolve issues that directly impact end-user experience and system accessibility.
The DHCP monitoring subsystem generates notices related to IP address pool utilization, lease conflicts, configuration errors, and service availability. Given the critical role of DHCP in network operations, these notices help prevent IP address exhaustion and ensure continuous network connectivity for end users.
Database and transaction monitoring creates notices when connection failures occur, transaction deadlocks are detected, or data integrity issues arise. These notices help maintain system reliability and data consistency across all rXg operations.
Network infrastructure monitoring generates notices for ping target failures, uplink status changes, access point connectivity issues, and general network reachability problems. This monitoring extends beyond the rXg itself to include critical network infrastructure components that affect overall service delivery.
Automatic Health Notice Curing
The rXg health notice system includes sophisticated automatic curing capabilities that resolve health notices when the underlying conditions improve without administrative intervention. This auto-curing mechanism prevents the accumulation of outdated notices and ensures that the health notice dashboard accurately reflects current system status.
Auto-curing operates through continuous re-evaluation of monitored conditions. When a health notice exists for a particular condition, the monitoring system continues to evaluate that condition at regular intervals. If the condition returns to acceptable parameters and remains stable for a configured period, the system automatically marks the health notice as cured and records the resolution details.
For capacity-related health notices, auto-curing occurs when utilization drops below the warning threshold and remains stable. For connectivity-related notices, auto-curing happens when network reachability is restored and sustained. For service-related notices, auto-curing takes place when the affected services return to normal operation and pass health checks.
The auto-curing process includes comprehensive logging of resolution details, including timestamps, final condition values, and the duration between the original notice creation and automatic resolution. This information helps administrators understand the natural lifecycle of system conditions and identify patterns that may warrant proactive intervention.
Certain types of health notices require manual intervention and cannot be automatically cured. These include configuration errors that require administrative correction, hardware failures that need physical intervention, licensing issues that require administrative action, and security-related notices that require explicit administrator acknowledgment.
Manual Health Notice Curing
Administrators can manually cure health notices through the web interface when conditions require explicit acknowledgment or when automatic curing is inappropriate for the situation. Manual curing allows administrators to add specific resolution notes, document corrective actions taken, and ensure that critical conditions receive proper attention before being marked as resolved.
The manual curing process requires administrators to provide both short and long resolution messages. The short message provides a brief description of the resolution action, while the long message allows for detailed documentation of troubleshooting steps, corrective measures taken, root cause analysis, and preventive actions implemented.
Manual curing also supports bulk operations, allowing administrators to cure multiple related health notices simultaneously when addressing systemic issues or completing maintenance activities that resolve multiple conditions. This bulk capability streamlines administrative workflows while maintaining proper audit trails for all resolution activities.
Custom Threshold Configuration
The rXg health notice system provides extensive customization capabilities for threshold values and monitoring parameters, allowing administrators to tailor the monitoring sensitivity to their specific operational requirements and environment characteristics. Threshold configuration is distributed across multiple system areas, each corresponding to different categories of monitored conditions.
Capacity monitoring thresholds can be configured for filesystem utilization, memory usage, DHCP pool utilization, license limits, connection states, and various other resource pools. Administrators can typically set both warning and critical threshold levels, allowing for graduated response to approaching capacity limits. These thresholds are expressed as percentages of maximum capacity, absolute values, or rate-based limits depending on the specific resource type.
Network monitoring thresholds include ping timeout values, retry counts, failure duration tolerances, and connectivity test intervals. These settings allow administrators to balance monitoring sensitivity with network conditions, accommodating temporary connectivity issues while ensuring prompt detection of sustained problems.
Performance monitoring thresholds encompass load average limits, response time tolerances, queue depth limits, and throughput baselines. These thresholds help identify performance degradation before it significantly impacts user experience.
Service-specific thresholds are available for individual system components, including database connection timeouts, web server response limits, authentication service tolerances, and external system integration parameters. These specialized thresholds ensure that service-specific conditions are monitored according to their unique operational characteristics.
Comprehensive Health Notice Types
The rXg system supports an extensive array of health notice types, each designed to monitor specific aspects of system operation and provide appropriate alerting for different categories of conditions. This comprehensive monitoring ensures that administrators are informed of all significant events that may require attention or intervention.
System Infrastructure Health Notices
Backend Error Notices are generated when the core rXg backend processes encounter error conditions that may impact system operation. These notices capture detailed information about the error context, affected processes, and potential impact on system functionality. Backend errors often indicate underlying system issues that require investigation and may signal the need for configuration changes or system maintenance.
Backend Warning Notices alert administrators to non-critical backend conditions that warrant attention but do not immediately threaten system operation. These may include queue configuration irregularities not caught by validation routines, minor process anomalies, or performance conditions approaching concerning levels. Backend warnings serve as early indicators of potential issues that may require proactive intervention.
Backend Failure Notices represent critical backend process failures that significantly impact system operation. These fatal-level notices indicate that core system functionality has been compromised and requires immediate administrative intervention to restore normal operation. Backend failures often require emergency response procedures and may necessitate system restart or failover operations.
CPU Core Temperature Notices monitor thermal conditions within the rXg hardware, alerting administrators when processor temperatures exceed safe operating thresholds. Elevated CPU temperatures can lead to system instability, performance degradation, and hardware damage if not addressed promptly. These notices help prevent thermal-related system failures and ensure reliable hardware operation.
Memory Utilization Notices track system memory usage and alert when available memory drops below configured thresholds. Memory exhaustion can lead to process failures, system instability, and service interruptions. These notices provide early warning of memory pressure conditions, allowing administrators to investigate memory usage patterns and take corrective action before critical conditions develop.
Disk Failure Notices detect hardware-level disk problems through system log analysis and direct hardware monitoring. These critical notices indicate potential or actual disk hardware failures that threaten data integrity and system availability. Disk failure notices require immediate attention to prevent data loss and may necessitate emergency backup and replacement procedures.
Filesystem Utilization Notices monitor disk space usage across all system filesystems and alert when available space drops below configured thresholds. Filesystem exhaustion can prevent normal system operation, block log writing, and interfere with user data storage. These notices help prevent disk space-related outages and provide guidance for capacity management.
Network Infrastructure Health Notices
Ping Target Monitor Notices track the reachability of operator-configured network targets through continuous ICMP ping testing. These notices help monitor network connectivity to critical infrastructure components, internet gateways, DNS servers, and other essential network services. Ping target failures can indicate network path problems, target system failures, or general connectivity issues that may impact user experience.
Uplink Monitor Notices specifically track the status of configured network uplinks by monitoring next-hop router reachability. Uplink failures can result in complete internet connectivity loss or force traffic onto backup connections. These critical notices require immediate attention to maintain network connectivity and service availability.
Access Point Monitor Notices track the connectivity and health status of managed wireless access points. These notices detect when access points become unreachable, experience configuration problems, or exhibit performance anomalies. Access point monitoring helps ensure wireless network reliability and coverage continuity.
IP Conflict Notices detect situations where multiple network devices attempt to use the same IP address, creating network communication problems and potential security issues. These notices help identify network configuration errors, DHCP misconfigurations, or unauthorized device activity that may disrupt network operations.
Interface Error Notices monitor network interface hardware for error conditions, performance problems, and connectivity issues. These notices help identify network hardware problems, cable faults, or configuration issues that may impact network performance and reliability.
Interrupt Storm Notices detect when network interfaces or other hardware components generate excessive interrupt activity that can impact system performance. Interrupt storms often indicate hardware problems, driver issues, or network conditions that require investigation and resolution.
Service-Specific Health Notices
DHCP Server Error Notices alert administrators when the DHCP service cannot start or encounters critical operational problems. DHCP service failures prevent new devices from obtaining network addresses and can disrupt existing network connectivity. These notices require immediate attention to restore network service functionality.
DHCP Pool Utilization Notices monitor IP address pool usage and alert when available addresses drop below configured thresholds. Address pool exhaustion prevents new devices from connecting to the network and can indicate the need for pool expansion or subnet reconfiguration.
DHCP Message Rate Notices detect potentially malicious DHCP request patterns that may indicate denial-of-service attacks or misconfigured network equipment. These notices help protect the DHCP service from abuse and maintain service availability during attack conditions.
Email Error Notices track problems with email notification delivery, including SMTP server connectivity issues, authentication failures, and message delivery problems. Email service problems can prevent administrators from receiving critical system notifications and may indicate broader network connectivity issues.
Portal Warning Notices detect problems with the captive portal system, including asset compilation failures, template processing errors, and service integration issues. Portal problems directly impact user experience and network access functionality.
Certificate Error Notices monitor SSL certificate validity and alert when certificates are approaching expiration or have become invalid. Certificate problems can prevent secure connections and may disrupt normal system operation if not addressed promptly.
PMS Connection Error Notices track connectivity to Property Management System integrations, alerting when communication failures occur. PMS integration problems can impact guest management, billing functionality, and automated system operations in hospitality environments.
License and Resource Limit Health Notices
Accounts Limit Notices monitor user account utilization against license restrictions, alerting when the number of configured accounts approaches licensed limits. Account limit notices help ensure compliance with licensing agreements and provide early warning of capacity constraints.
Login Sessions Limit Notices track active user sessions against license-defined limits, preventing license violations and ensuring system compliance. Session limit monitoring helps manage system resources and maintain licensing compliance.
States Limit Notices monitor packet filtering state table utilization, alerting when the number of active connection states approaches system limits. State table exhaustion can impact network performance and prevent new connections from being established.
Local IPs Limit Notices track the utilization of locally managed IP addresses against licensing restrictions, ensuring compliance with address management limits and preventing configuration errors that might violate licensing terms.
VLAN Utilization Notices monitor VLAN tag assignment pools in environments using per-user VLAN assignment, alerting when available VLAN tags become scarce. VLAN exhaustion can prevent new user authentication and may require pool expansion or configuration adjustment.
The comprehensive nature of the rXg health notice system ensures that administrators maintain complete visibility into all aspects of system operation, from low-level hardware conditions to high-level service delivery metrics. This extensive monitoring capability enables proactive system management, rapid problem identification, and informed decision-making for capacity planning and infrastructure optimization.
Through careful attention to health notice patterns and trends, administrators can identify emerging issues before they impact service delivery, plan capacity expansions based on actual utilization data, and maintain optimal system performance across all operational domains. The health notice system serves as both an operational monitoring tool and a strategic planning resource, providing the information necessary for effective infrastructure management and service delivery optimization.
Notification Events

When a Notification Action is triggered a Notification Event will be logged by the rXg. It will list the ID of the event, the timestamp when it was Created , the Event Type , along with the Related object (Account, LoginSession, etc). The Resolved checkbox allows the operator to resolve any health notices generated from the event, editing the event and checking the resolved box will cure any health notices generated from the event. The Processed box indecates that the any responses to the event were completed.
Reports
The network graphs, system graphs, radio metric graphs and accounting graphs views allow the operator to view and configure the rXg graphing mechanisms.
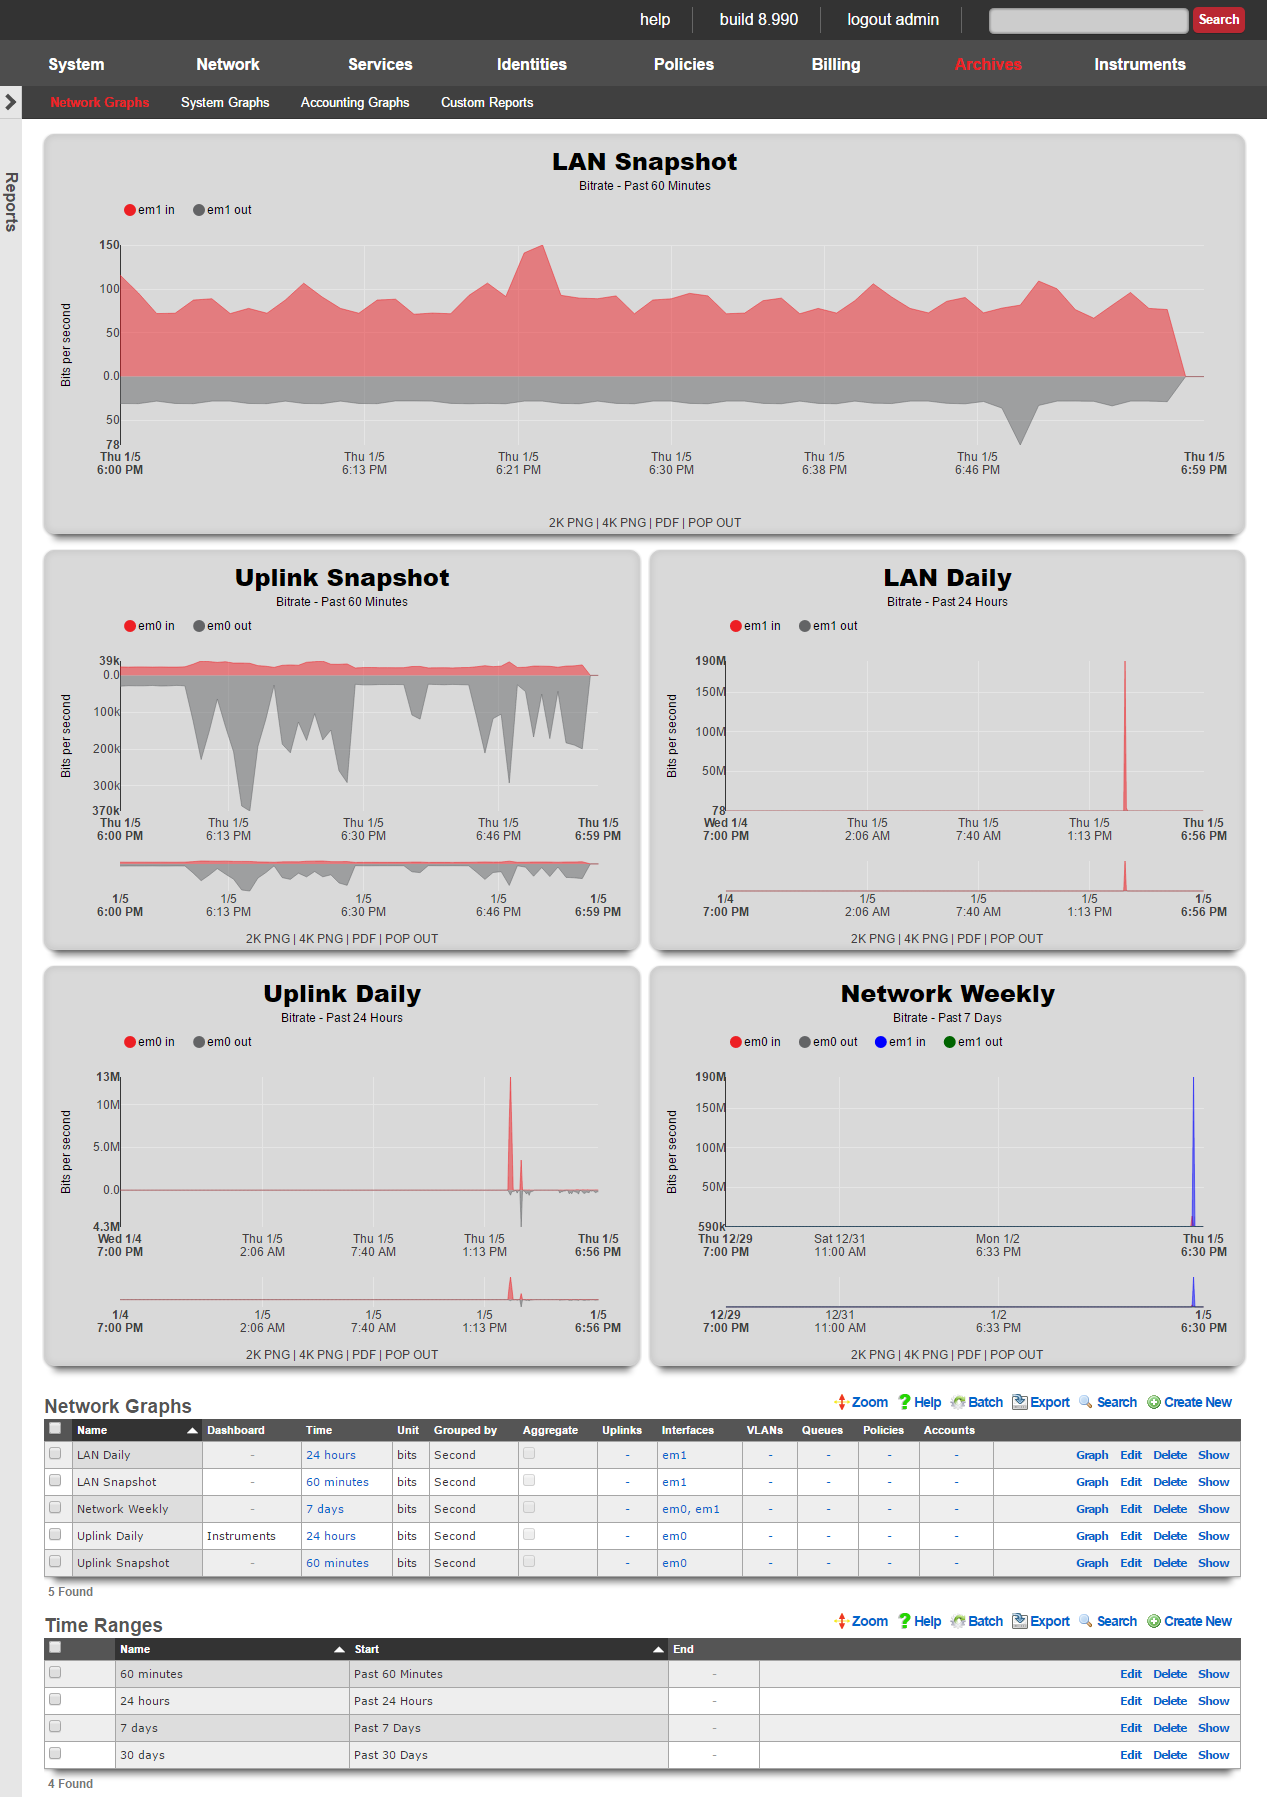
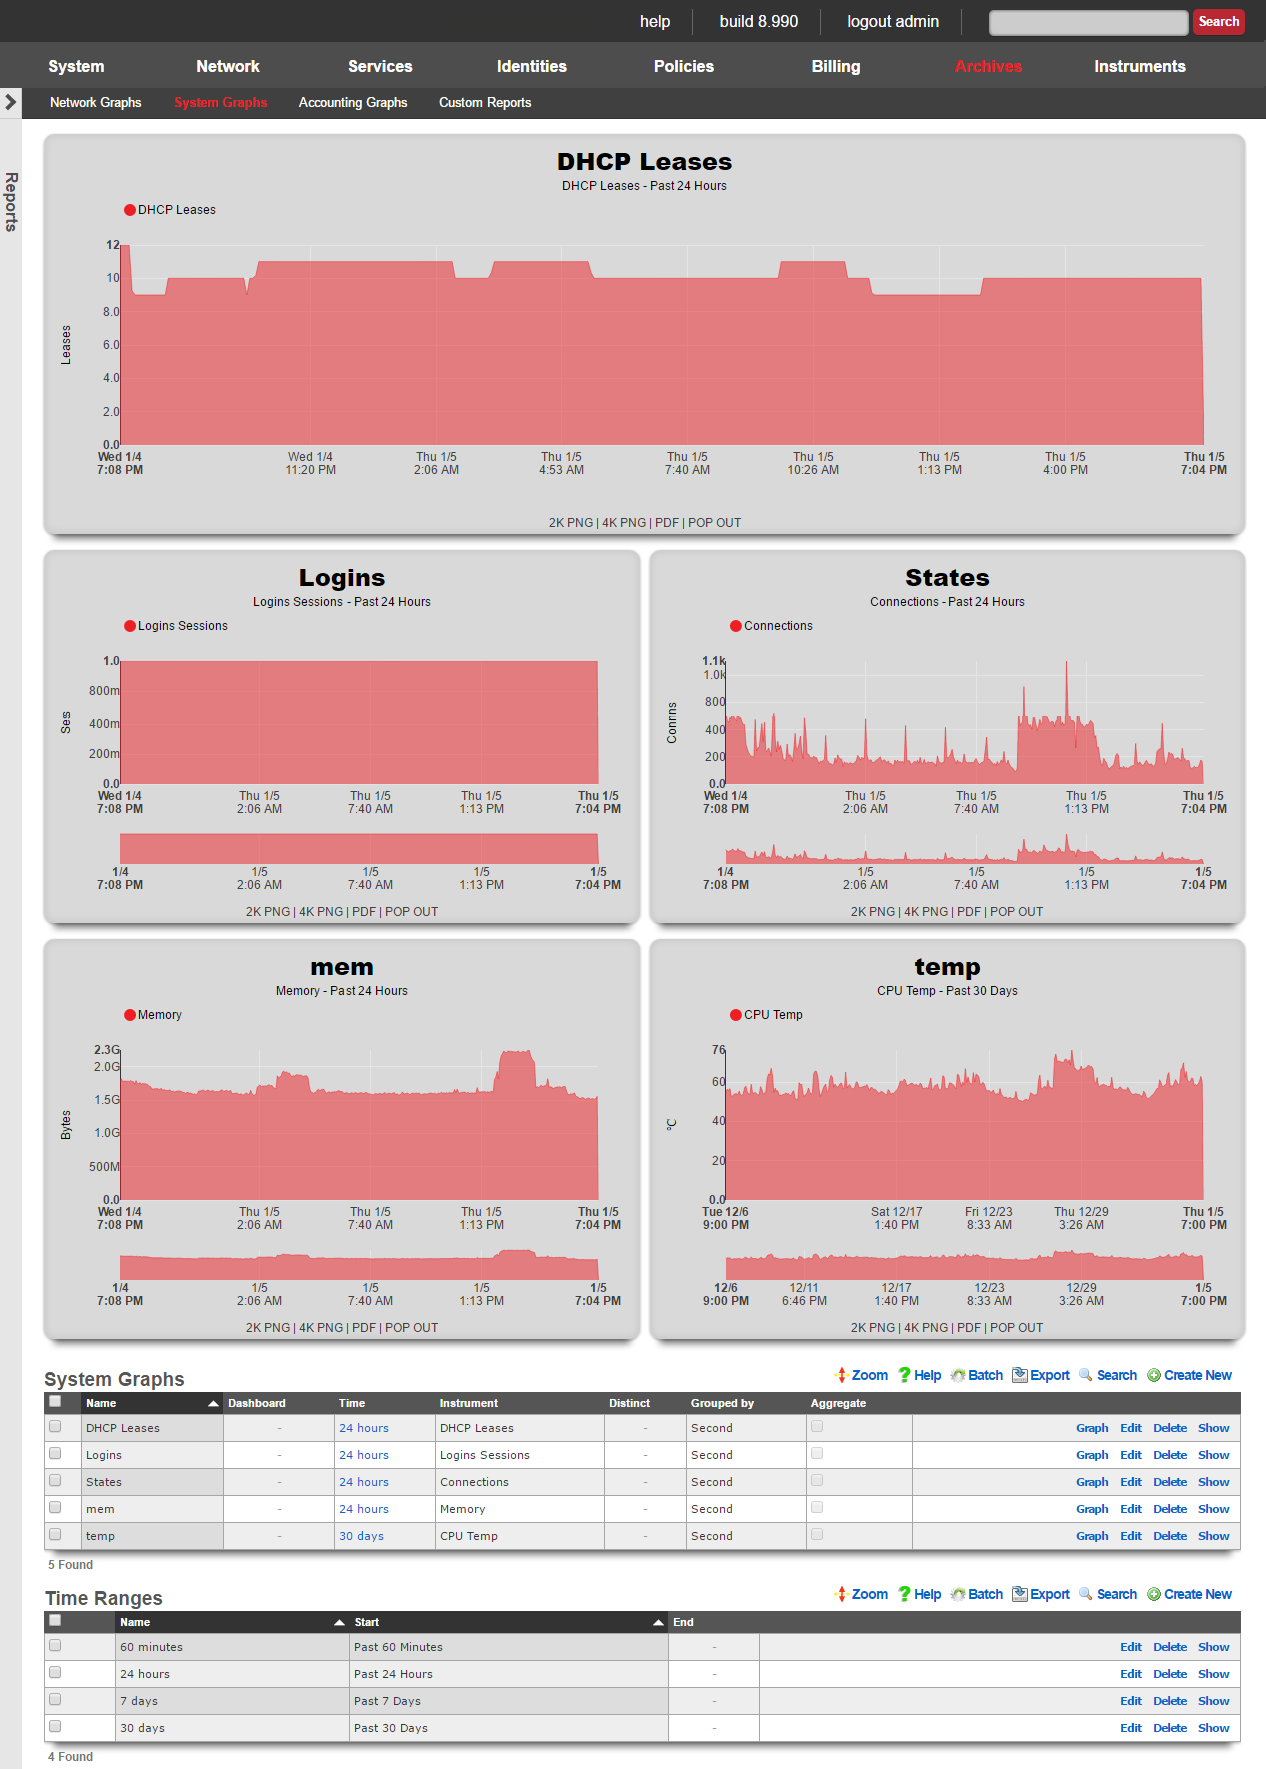
The rXg includes a fully feature graphing package that allows operators to generate graphs for a wide variety data that is collected and stored on the rXg persistent storage. The graphs are divided amongst four views: network graphs, system graphs, radio metric graphs and accounting graphs.
- Network graphs - Interface rates, packet counts, etc.
- System graphs - Global operating system and service data such as the number of simultaneous logins and the number of entries in the ARP table at any given time
- Radio metric graphs - Graphs built from telemetry information ingested from the wireless infrastructure
The network graphs view contains the graphs of interface rates, packet counts, etc. The system graphs view contains the graphs of global operating system and service data such as the number of simultaneous logins and the number of entries in the ARP table at any given time.
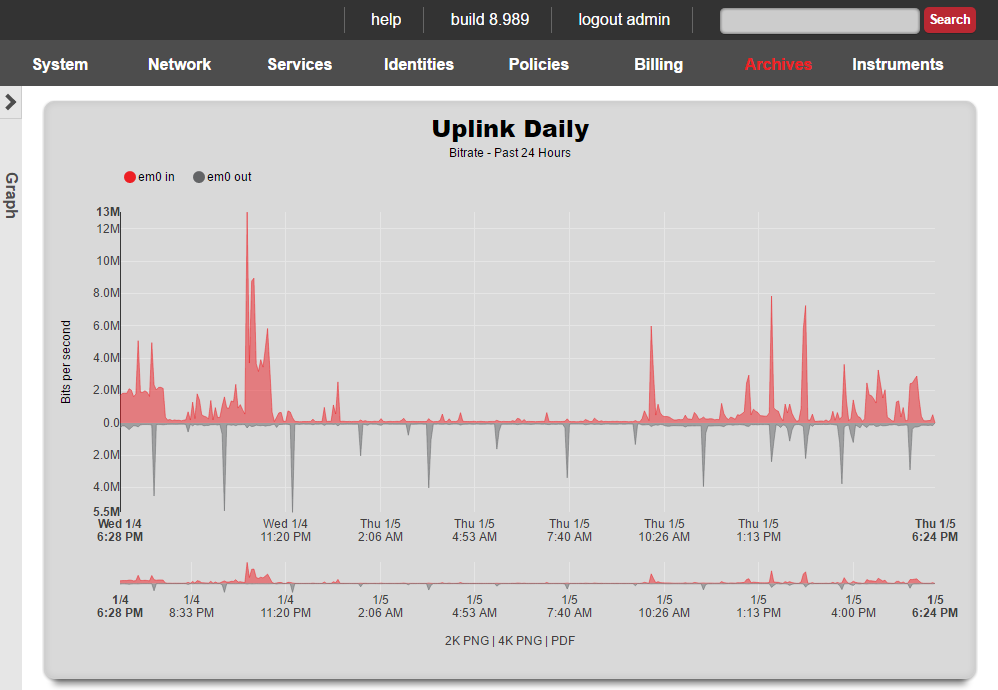

Network Graphs
The network graphs scaffold tells the rXg to generate a graph of the specified network statistics.
The name field is an arbitrary string descriptor used only for administrative identification. Choose a name that reflects the purpose of the record. This field has no bearing on the configuration or settings determined by this scaffold.
Four kinds of data are counted and saved for each network interface: traffic, packets, errors and discards. The unit field tells the graphing system which dataset which of these four to place on the graph.
The bits and bytes options both specify graphing of the traffic dataset with the respective unit. The packets option graphs the count of packets that transited the interface. It is important to use both traffic and packet counts for troubleshooting. Relying on a graph of the traffic or packets alone is an ineffective diagnostic strategy as Ethernet ports are just as easily overrun by a large number of small packets as they are by a small number of large packets.
The errors and discards options count the number of packets that were not processed. Packets that are dropped because of errors arrived at the Ethernet interface in an illegal state. The most common reason is a bad checksum due to a malformed packet. This indicates that there is a physical problem with the connection or a logical issue with the device at the other end of the connection. Well-formed packets that are dropped because of a problem on the rXg are logged as discards. A typical scenario where discards are recorded is when the buffer for the Ethernet interface is overflowing. Errors and discards are only valid for interfaces as this information is not stored for other entities.
The interfaces , PPPoEs , VLANs , queues , policies and accounts fields enable the operator to specify which entities for which to graph data stored data.
The function field tells the graphing system what to do when the pixel resolution is less than the data resolution. A choice of average will cause the graphing system to take the average of the data and plot the result. A choice of max will cause the graphing system to plot the maximum value amongst the data points.
The aggregate check box, when checked, tells the graphing system to add up multiple sources into a single line instead of a line for each source.
The time and image fields link this graph specification to a record in the time range and image configuration scaffolds respectively. The time range controls the span of the x-axis while the image configuration controls the drawing specifications.
When the dashboard check box is enabled, the graph specified by this record will be used in the instruments dashboard. Only one graph may be configured to be the instruments dashboard graph at any given time.

System Graphs
The system graphs scaffold tells the rXg to generate a graph of the specified network statistics.
The name field is an arbitrary string descriptor used only for administrative identification. Choose a name that reflects the purpose of the record. This field has no bearing on the configuration or settings determined by this scaffold.
The instrument field specifies the dataset to graph.
The function field tells the graphing system what to do when the pixel resolution is less than the data resolution. A choice of average will cause the graphing system to take the average of the data and plot the result. A choice of max will cause the graphing system to plot the maximum value amongst the data points.
The aggregate check box, when checked, tells the graphing system to add up multiple sources into a single line instead of a line for each source.
The time and image fields link this graph specification to a record in the time range and image configuration scaffolds respectively. The time range controls the span of the x-axis while the image configuration controls the drawing specifications.
When the dashboard check box is enabled, the graph specified by this record will be used in the instruments dashboard. Only one graph may be configured to be the instruments dashboard graph at any given time.
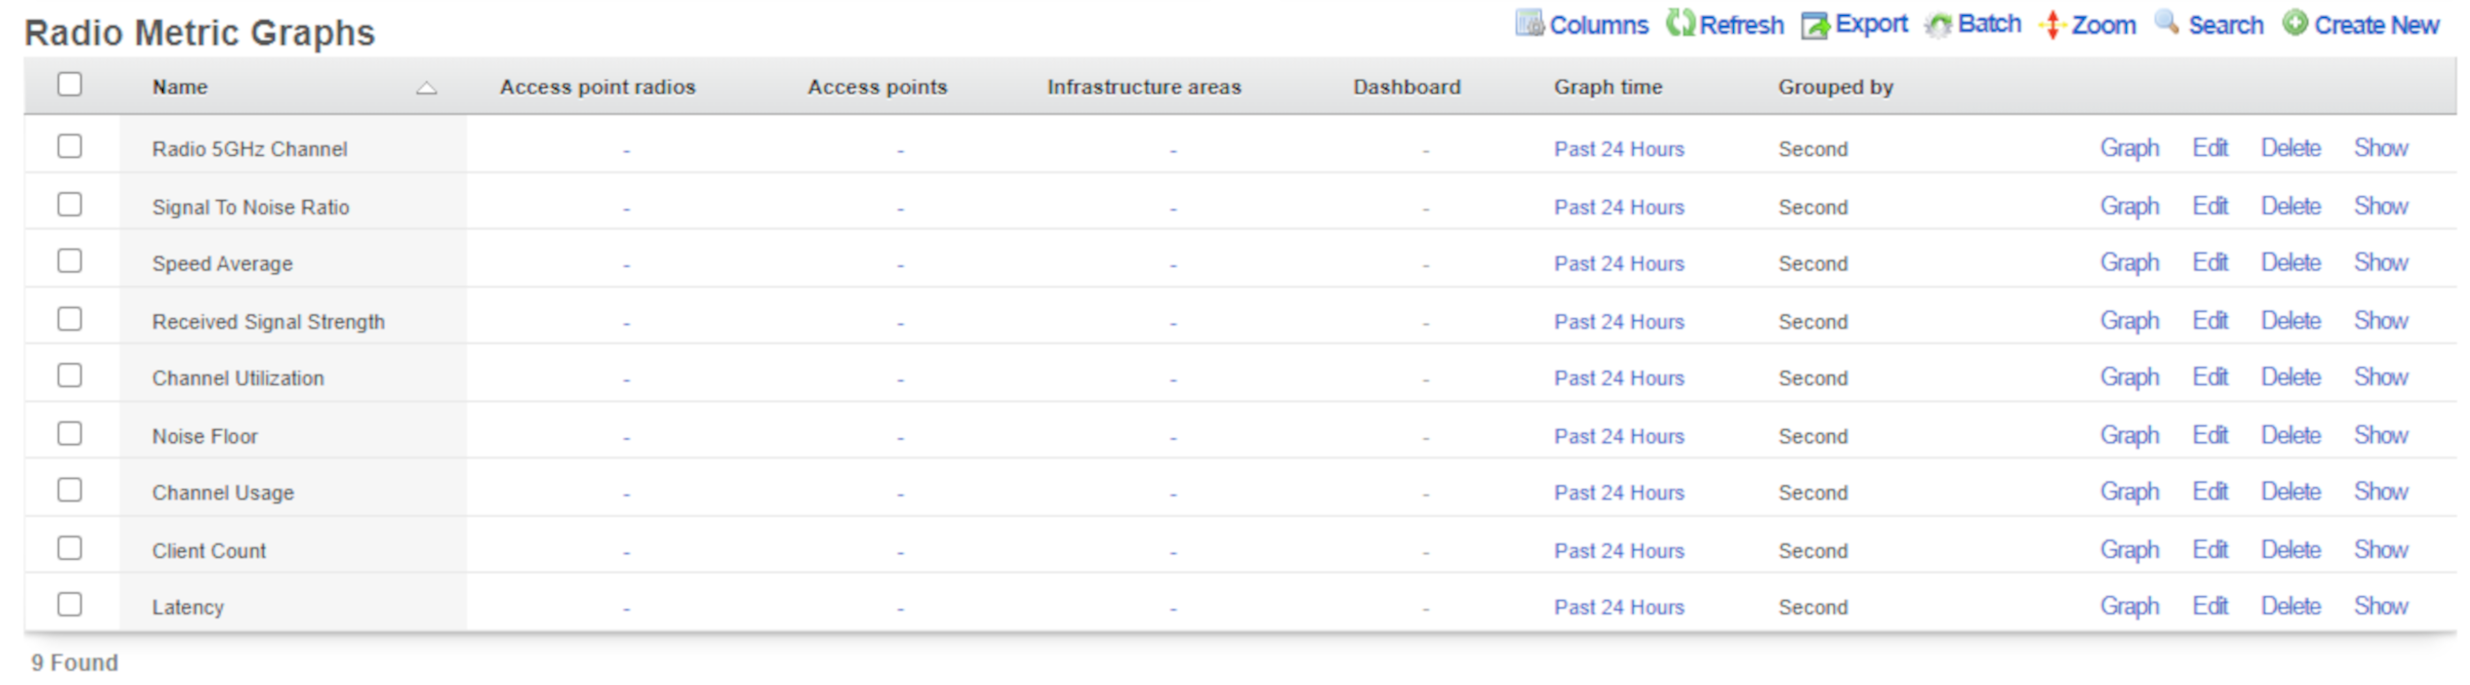
Radio Metric Graphs
The radio metric graphs view allows the operator to generate graphs based on telemetry information ingested from the wireless infrastructure. This data can be ingested using either GRPC streaming or MQTT. Telemetry is configured on a WLAN Controller. Radio metric graphs provide the operator with granular customizable views of data ingested directly from the network hardware over a specified period of time, empowering them to configure the network to be optimal for any use case.
- Optimize the network - see network throughput and latency to see where your network is struggling
- Grade the network - see real data about what users of the network are experiencing in a given time and location
- Prove the network is meeting requirements - provide documented proof that the network is or is not performing to standards set by SLAs and other agreements
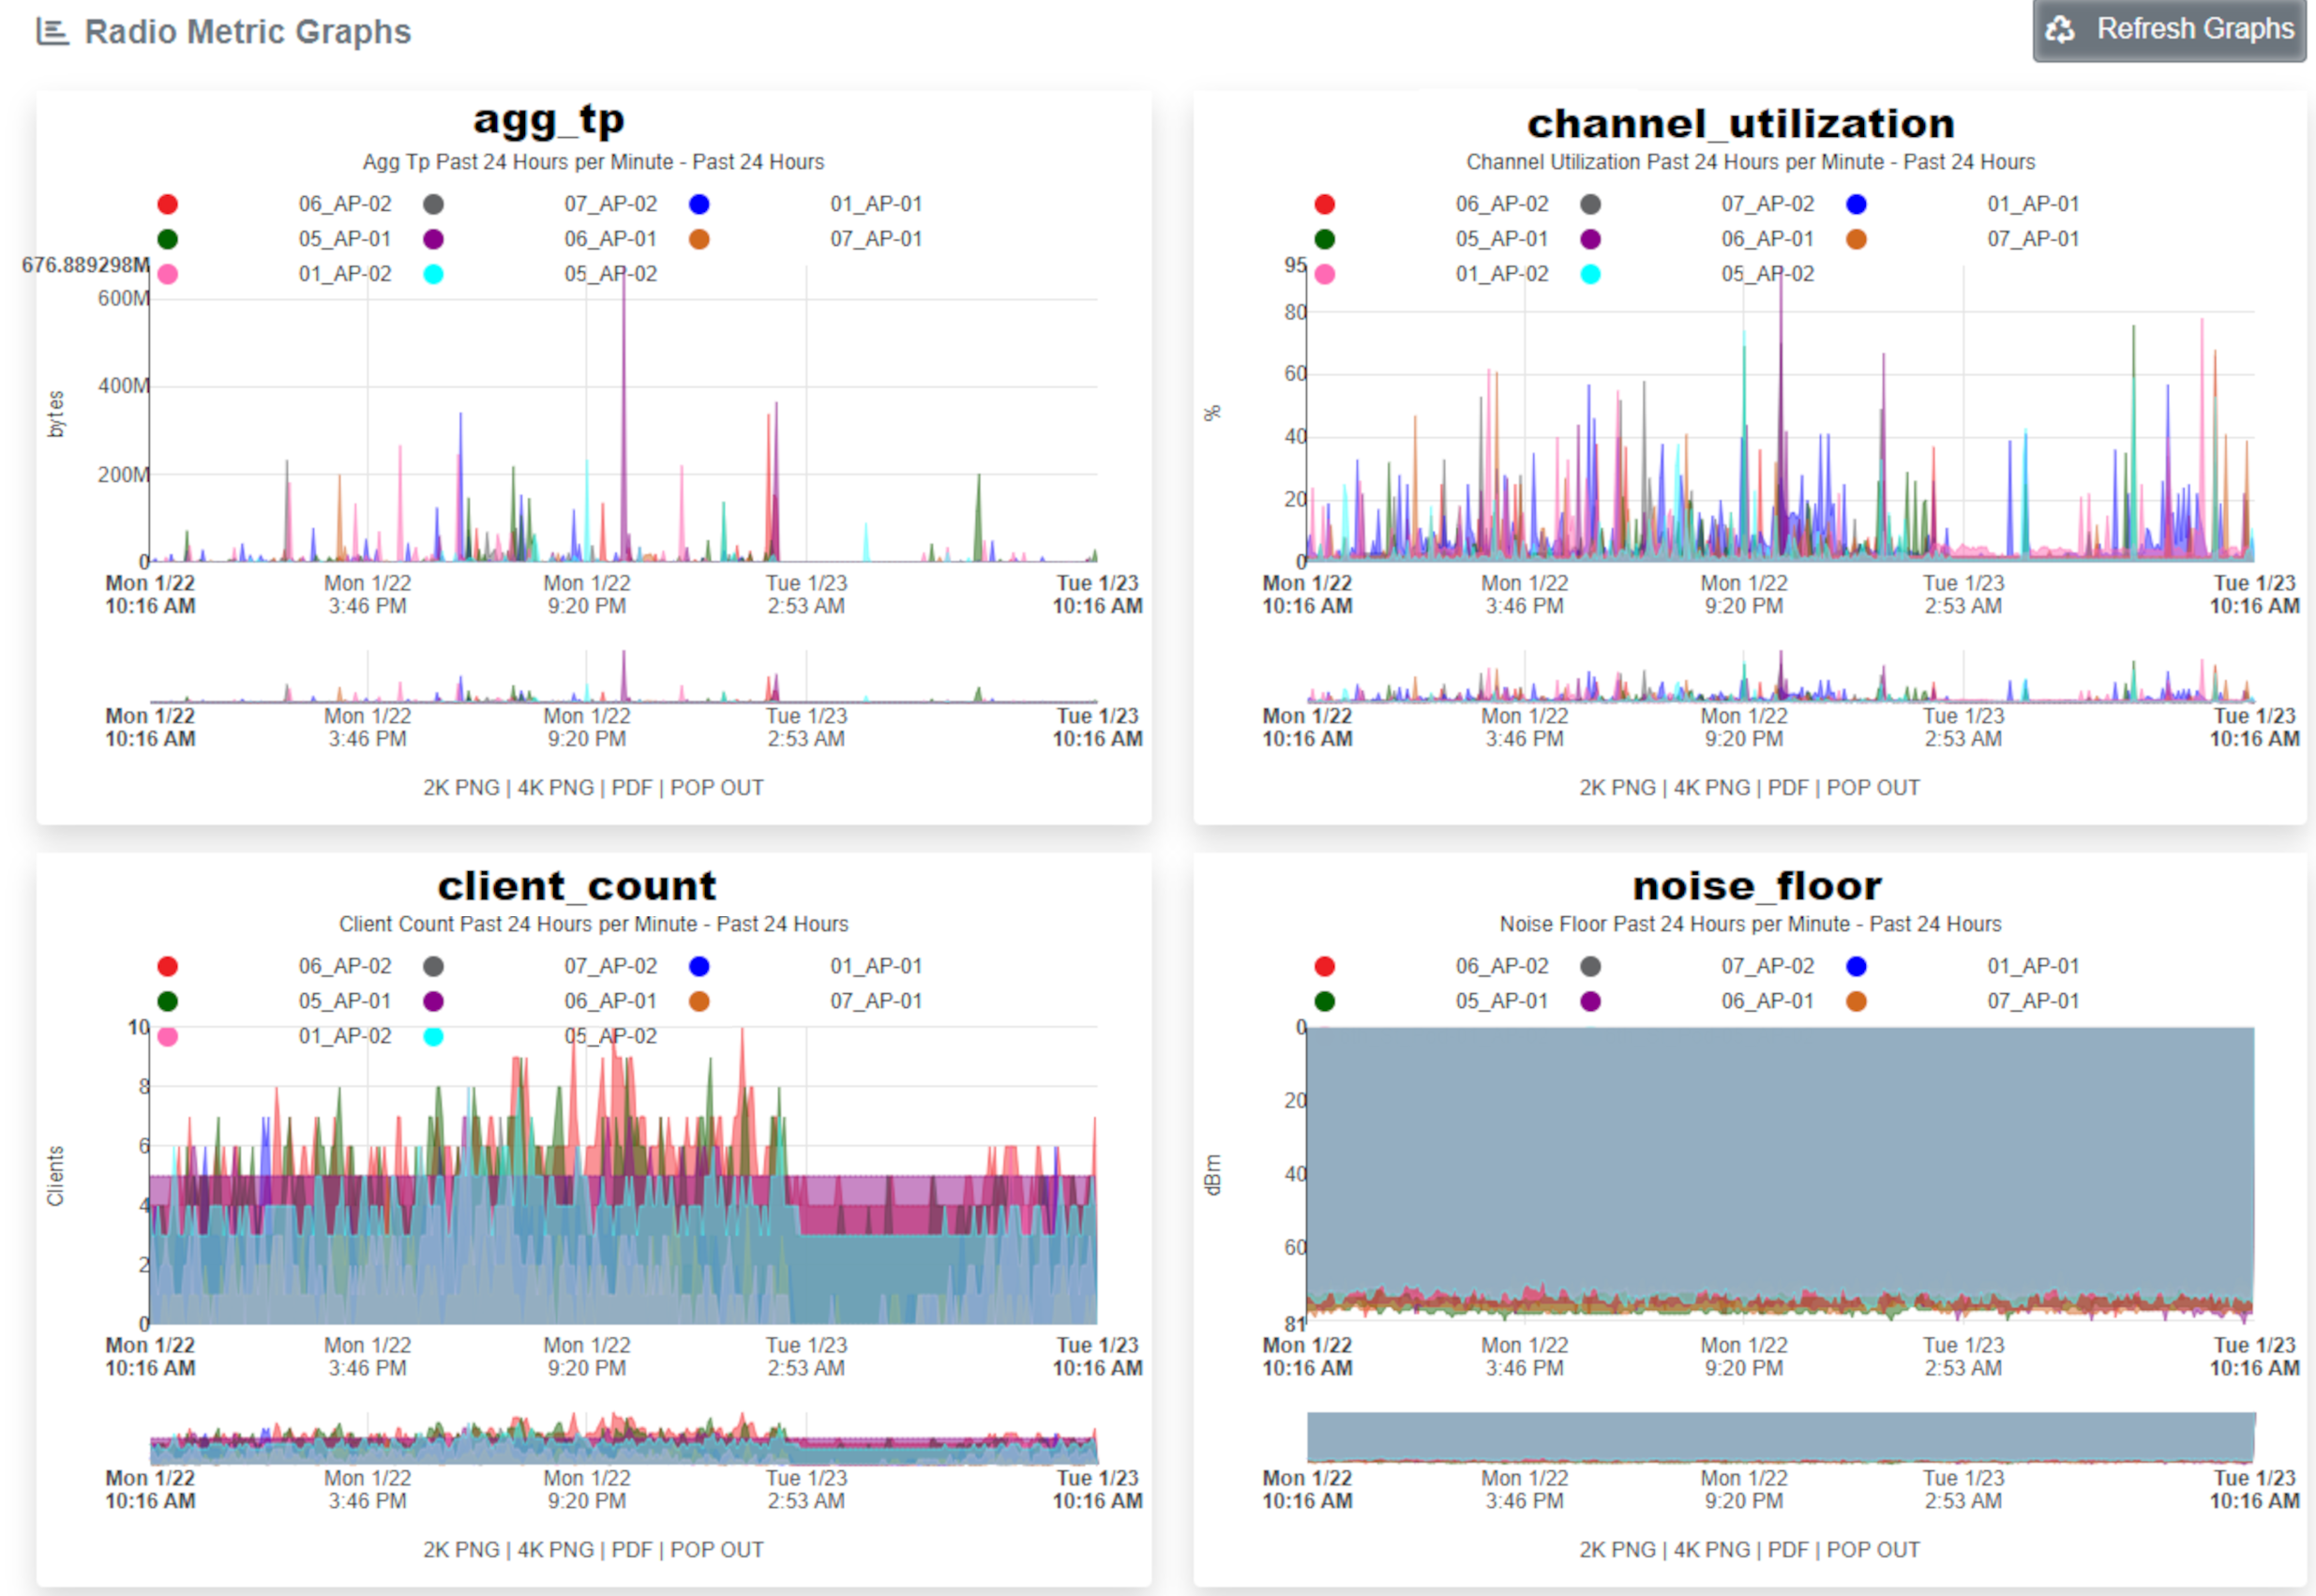
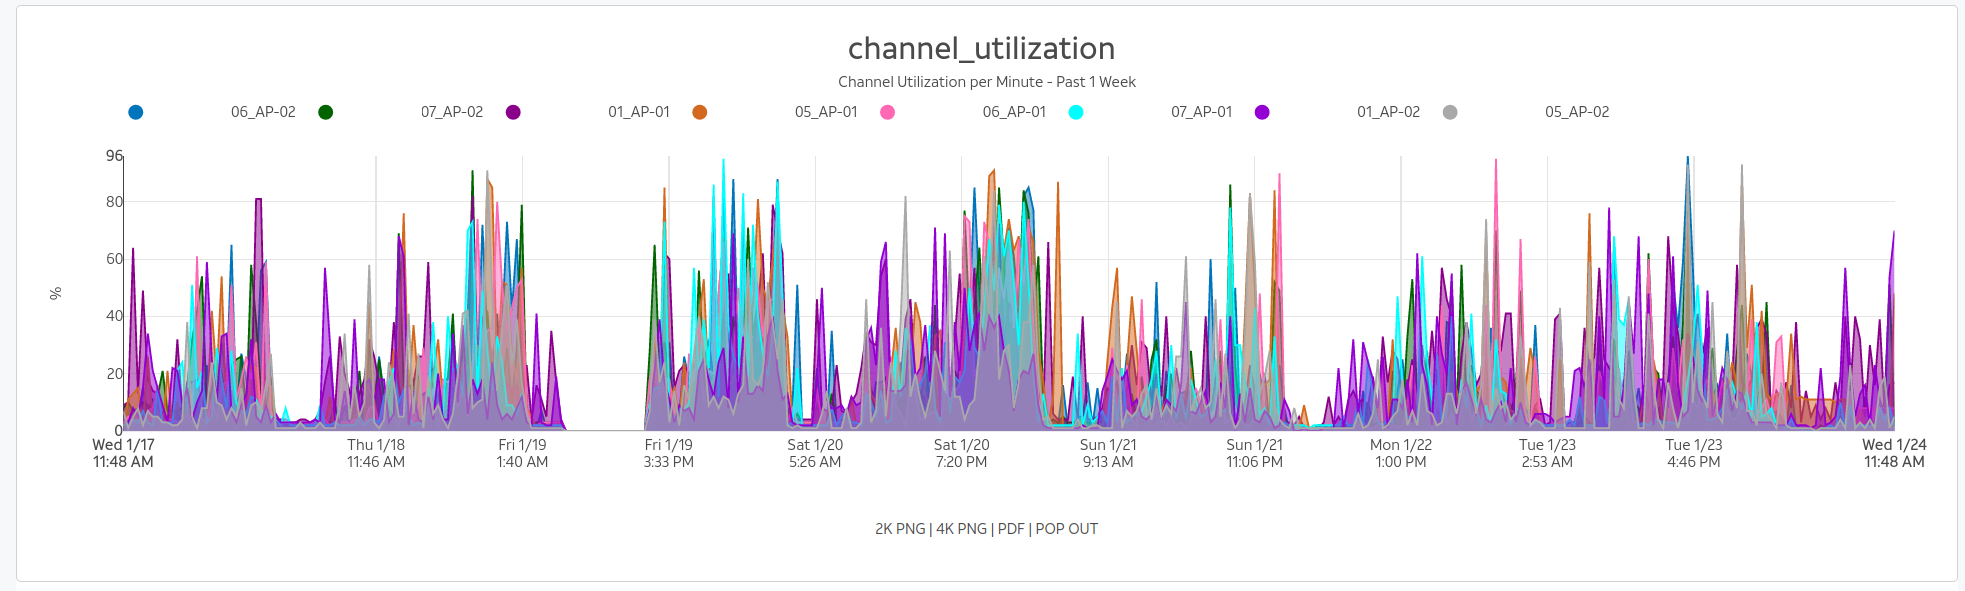
Configuration
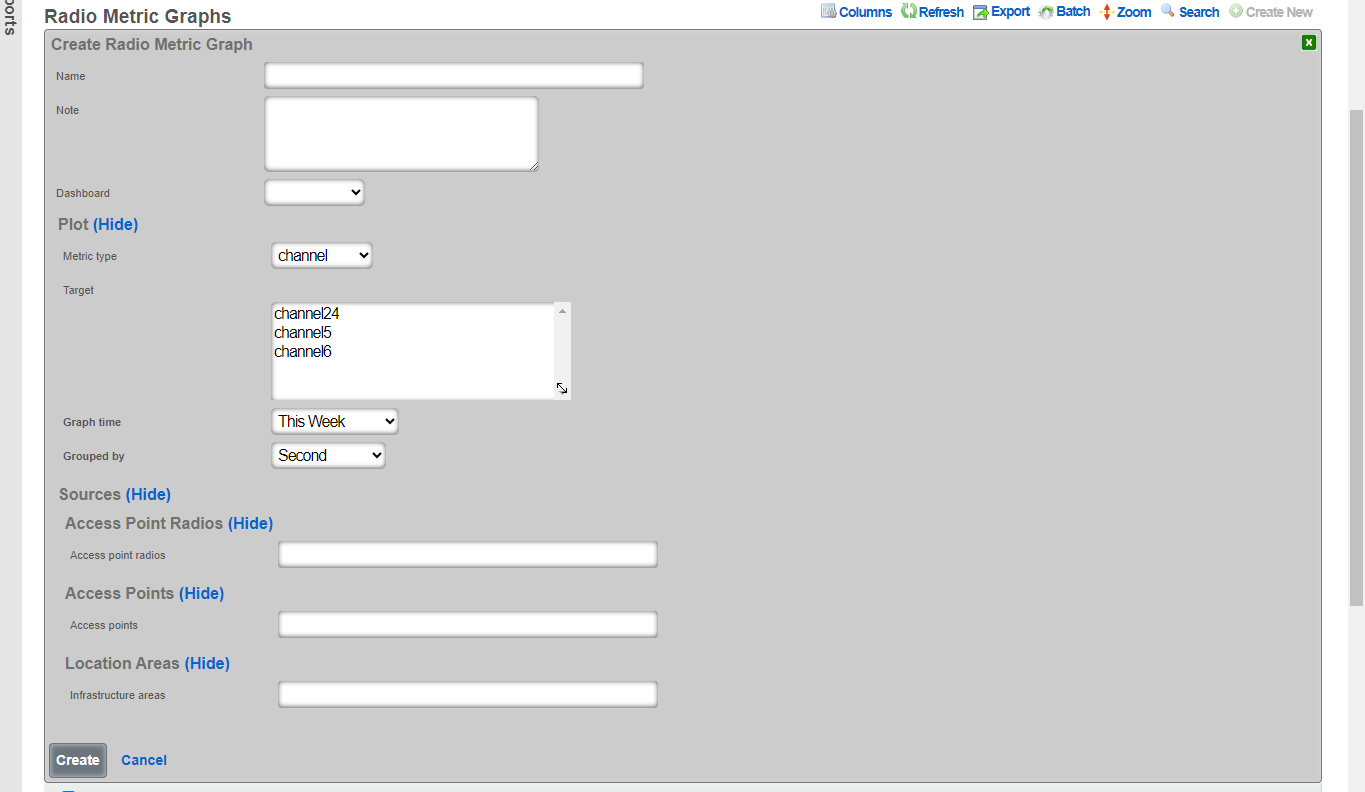
The name field is an arbitrary string descriptor used only for administrative identification. Choose a name that reflects the purpose of the record. This field has no bearing on the configuration or settings determined by this scaffold.
The graph time determines what time period the graph will represent. There are default options available and custom time frames can be selected in the time ranges scaffold located directly below the radio metric graphs scaffold.
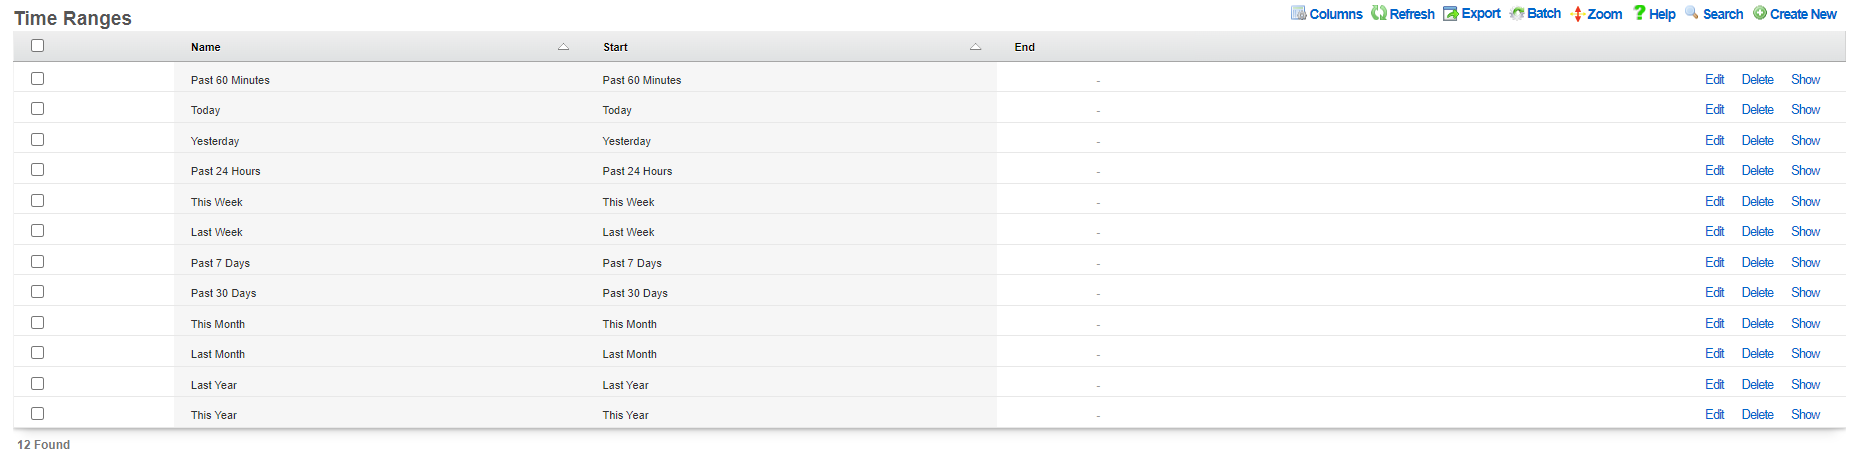 The grouped by option selects what time interval the graph will be divided into, with the smaller the time resulting in more detailed graphs.
The metric type and target fields tells the graphing system which set of collected data to use for generating the graph:
The grouped by option selects what time interval the graph will be divided into, with the smaller the time resulting in more detailed graphs.
The metric type and target fields tells the graphing system which set of collected data to use for generating the graph:
- Channel - What channel the radio was operating on for the selected frequency
- Client count - The number of clients connected
- Latency - The latency of the infrastructure
- Rate - The data rate on the network
- RRM - Channel utilization and noise floor statistics
- RSSI - Received signal strength statistics
- SNR - Signal to noise ratio average
- Transfer - The amount of data transferred over the network
The sources tell the graphing system which devices to pull data from to generate the graph. Sources can be individual access point radios, individual access points, or location areas.
Sample Configurations
To begin creating a radio metric graph click the Create New button above the scaffold.

Client Count Graph
This client count graph builds a graph showing the number of clients connected to each of a group of individually selected access points. The information will be presented from information from the last 24 hours and the data will be broken down by the second.
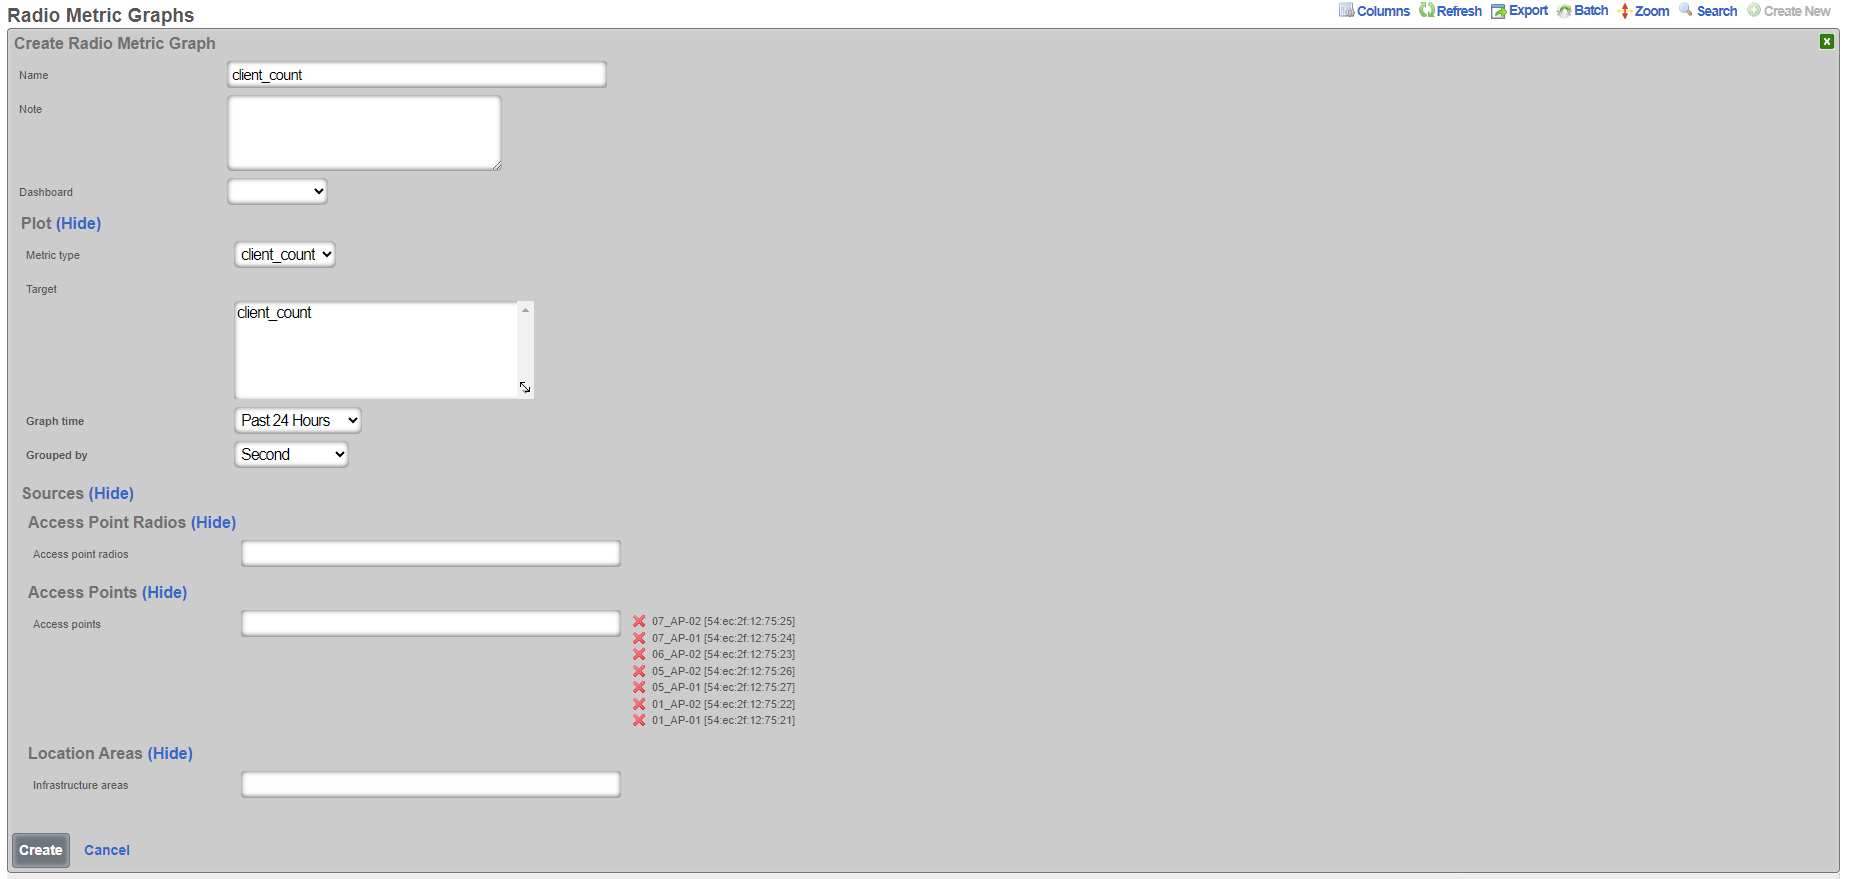

Channel Utilization Graph
This channel utilization graph will show the amount of time a channel is utilized in all of the access points in the location area Lab Access Points over the last 24 hours with the data broken down into one minute samples.
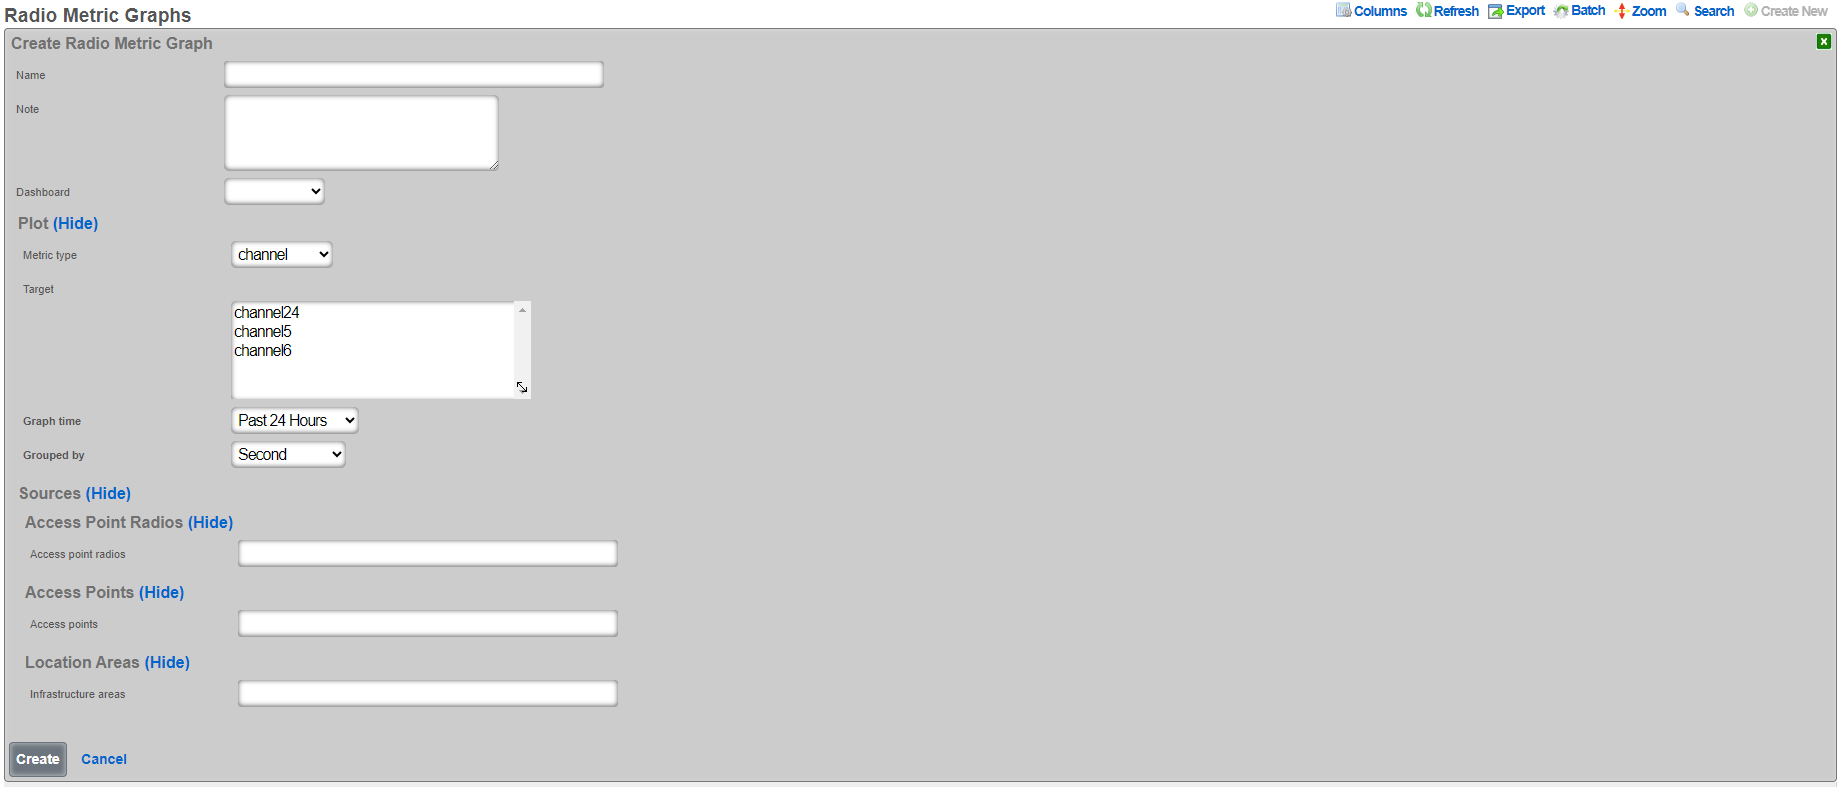
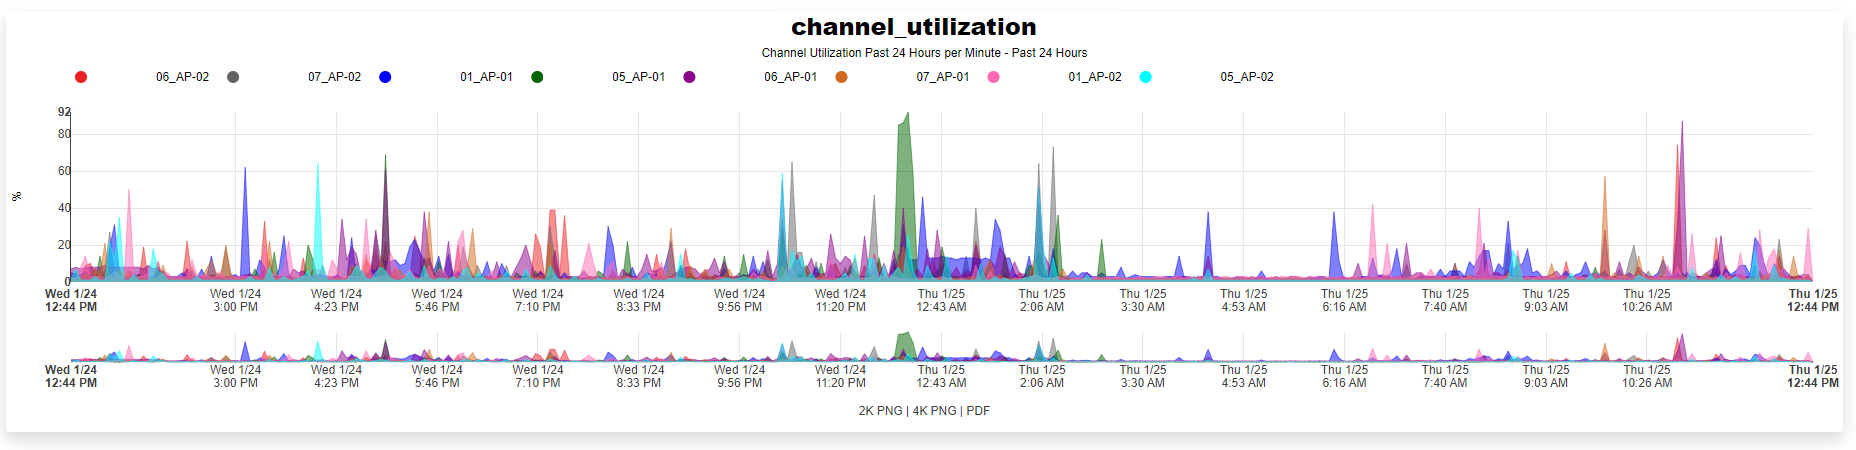

Time Ranges
Entries in the time ranges scaffold define spans of time for creating network graphs and system graphs. Graphs are linked to entries in this scaffold to determine the span of time that will be graphed on the x-axis.
The name field is an arbitrary string descriptor used only for administrative identification. Choose a name that reflects the purpose of the record. This field has no bearing on the configuration or settings determined by this scaffold.

Custom Reports
In addition to the graphs available in the reporting section, Custom Reports allows for the creation of text reports that may be exported to the Excel , CSV , or XML formats.
Entries in the time ranges scaffold define spans of time for creating network graphs and system graphs. Graphs are linked to entries in this scaffold to determine the span of time that will be graphed on the x-axis.
The name field is an arbitrary string descriptor used only for administrative identification. Choose a name that reflects the purpose of the record. This field has no bearing on the configuration or settings determined by this scaffold.
The type field specifies the template used to generate the report. Templates are instances of the CustomReport ruby class, and new ones may be added, as well as the existing of the x-axis while the image configuration controls the drawing specifications.
The time field links this graph specification to a record in the time range scaffold. The time range controls the span of time used to filter the data.
Admin Logs
The admin logs scaffold provides a detailed history of operator changes to the rXg. By utilizing unique administrator usernames for each operator, non-repudiation is achieved. The length of history can be adjusted in the System::Options scaffold.
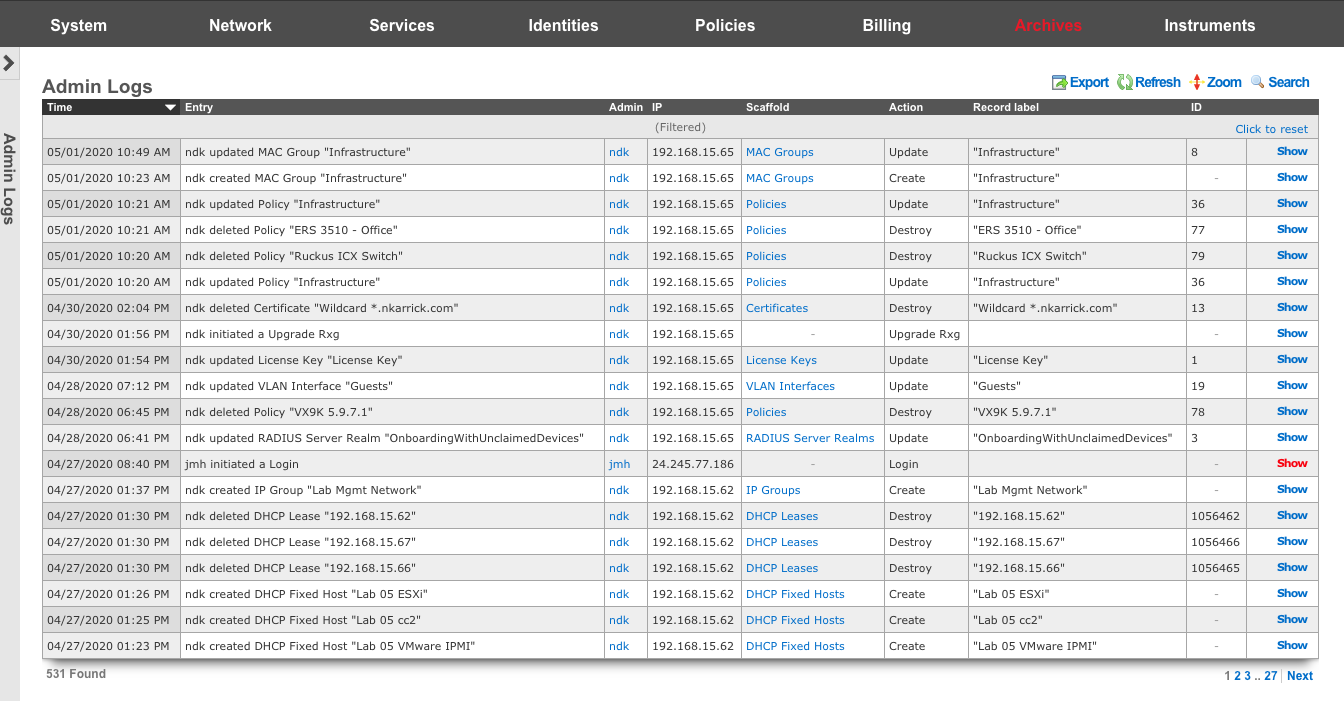
Admin Logs
The time column displays the time the associated action took place.
The entry column displays a brief description of the action.
The admin column displays the login of the administrator that performed the action.
The IP column displays the IP associated with the administrative login session.
The scaffold column displays which scaffold in the administrative GUI was modified.
The action column describes what type of action was taken.
The record label column displays a specific entry in a scaffold that was created, modified, or destroyed.
Connection Logs
The connection logs scaffold provides a historical log of every connection that crosses between the LAN and the WAN. All Connections, including but not limited to, every HTTP(S) transaction, every SSH session, every video stream, etc., is recorded in the connection logs. The connection log is a powerful resource from which the rXg acquires complete cognizance over the end-user population. Data within the connection logs is tied to connection triggers, enabling total control.
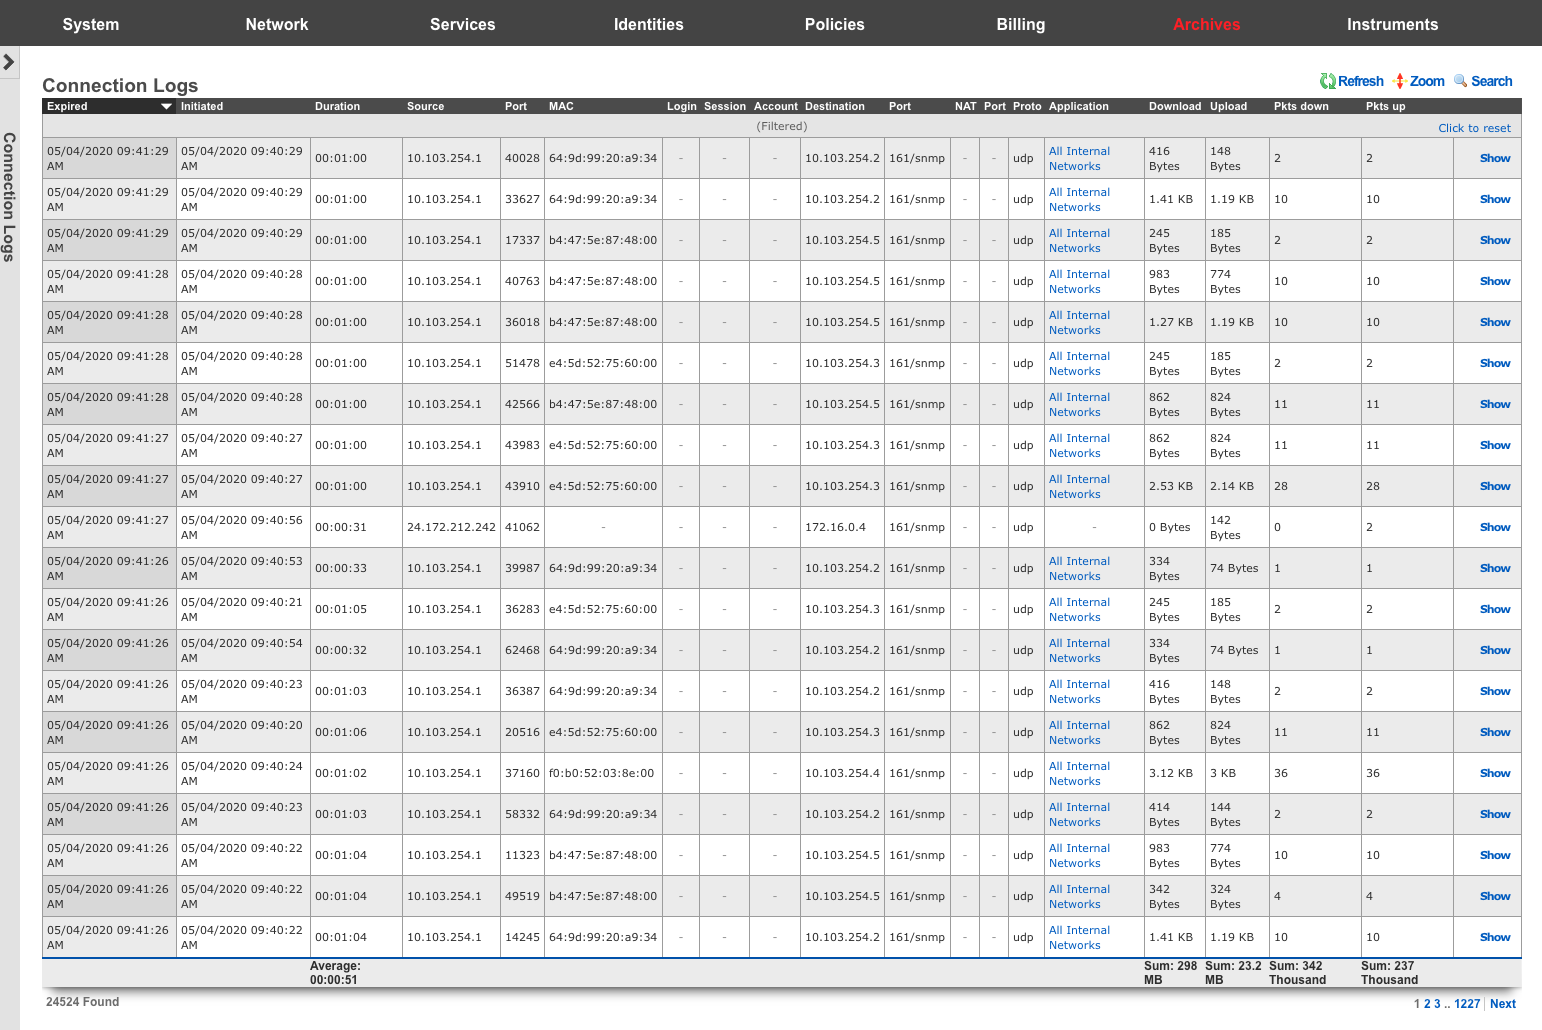
Connection Logs
The expired column shows a timestamp of the end of the associated connection.
The initiated column shows a timestamp of the start of the associated connection.
The duration column shows the length of time the associated connection was open.
The source , port , and MAC columns display the originating source IP address, MAC address, and TCP/UDP port of the associated connection.
The login , session , and account columns displays layer 5+ source identification of the associated connection.
The destination , and port columns display the destination IP address, and TCP/UDP ports of the associated connection.
The NAT , and port columns display the WAN IP address and translated port used for the associated connection.
The proto column displays layer 4 protocol information for the associated connection.
The application column displays operator definable application information for the associated connection.
The download , upload , pkts down , and pkts up columns display the amount of data transferred in both bytes, and packets for the associated connection.
DHCP and DNS Logs
The DHCP and DNS Logs view is an archive of all expired leases that have been issued by the rXg integrated DHCP server.
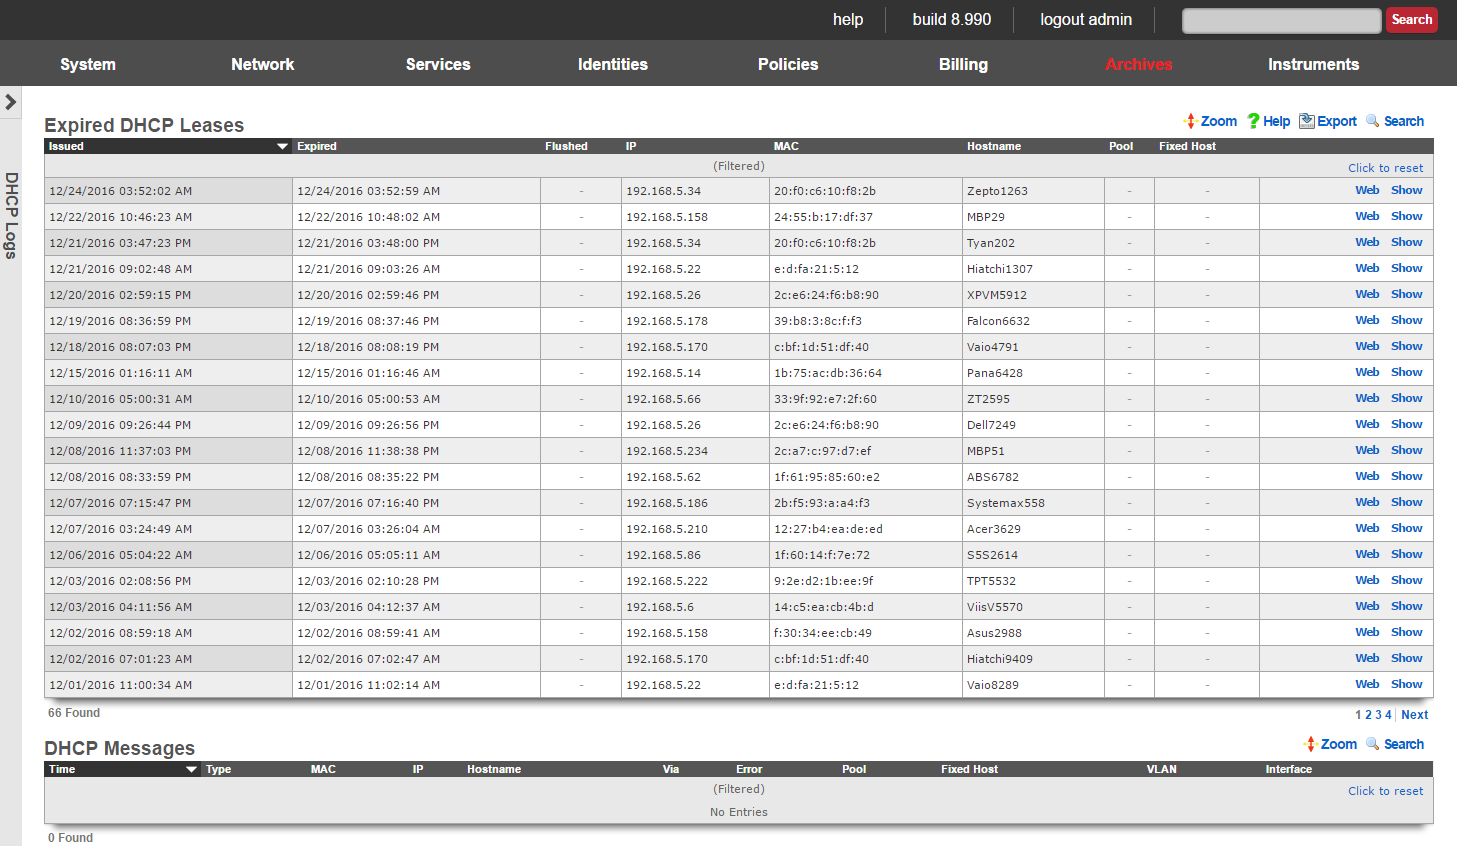
DHCP leases are issued by the rXg integrated DHCP server based on the configuration specified by the network operator. End-users that make DHCP requests are issued IPs from pools that intersect the subnet ranges of configured addresses that are associated with the interfaces from which the end-user is connected to. Once an IP is issued to an edn-user, the DHCP server records that there is a lease on that IP. When the lease expires, the an entry is made into the expired DHCP leases scaffold and the IP address is ready to be leased to an end-user again.
Expired DHCP Leases
The issued field is the timestamp recorded when the DHCP lease was originally issued.
The expired field is the timestamp recorded when the DHCP lease expired and the IP has been reclaimed.
The IP field stores the IP address that was leased to the end-user.
The MAC and Hostname fields are the data items recorded that identify the end-user.
The pool field relates this record to the DHCP pool from which the IP was drawn when the lease was issued.
Portal Archives
The portal archives view presents scaffolds that display database records that are created when certain captive portal end-user events occur.
Login Sessions
The login sessions scaffold enables the operator to view a log of all the login sessions that have expired.
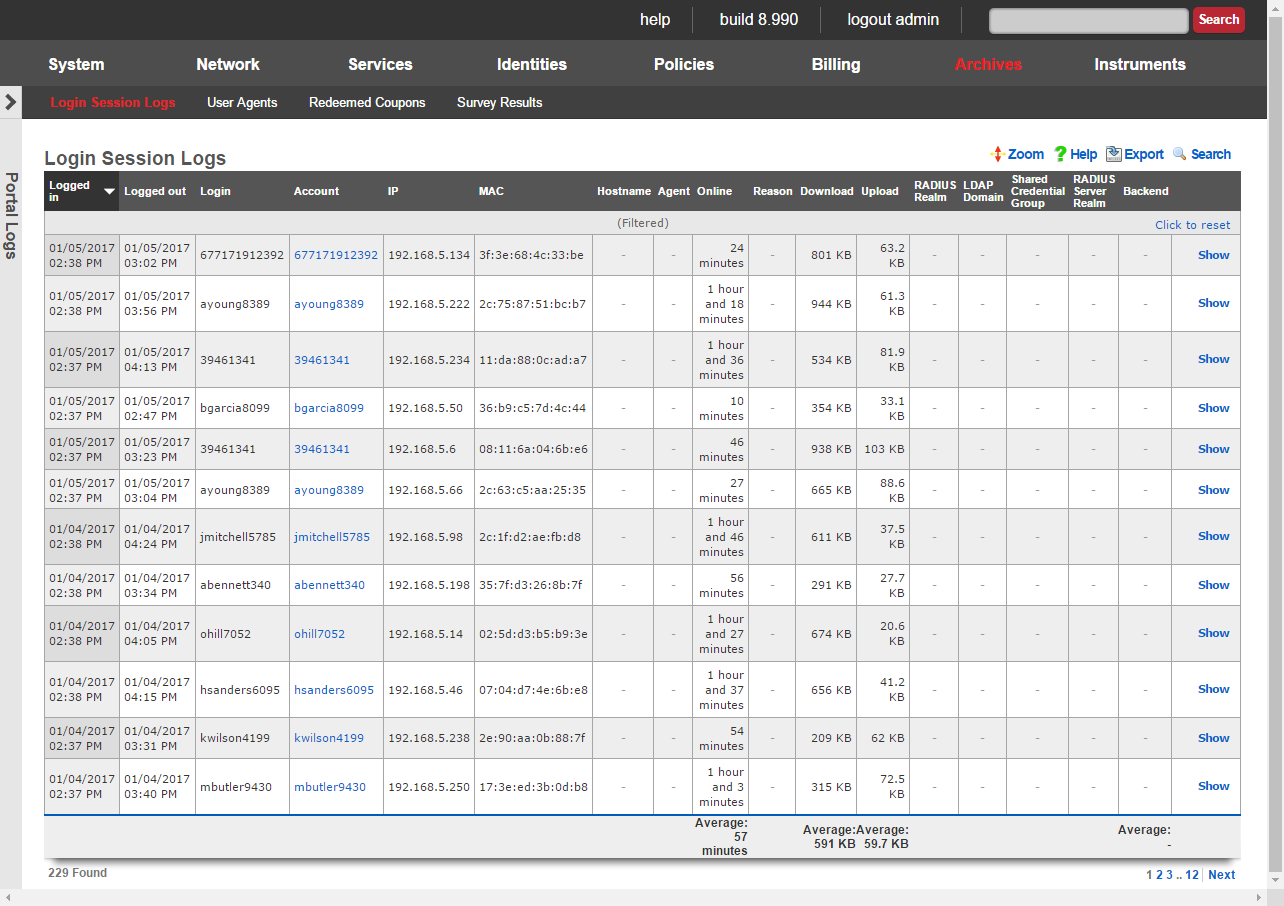
The login and logout fields contain the timestamps for when the login session was initiated and when it expired.
The username field stores the login of the user that initiated the login session.
The IP and MAC fields store the IP address and MAC address of the machine from which the end-user logged in.
The online , U/L and D/L fields stores the utilization of the end-user during this login session. Note that these values only account for what is used during this single login session. In environments where accounts are created and automatic login is enabled, end-users may create more than one login sessions over the period of time during which they have Internet access.
The reason field stores information regarding the cause of login session termination. This field helps the operator understand why a login session ends. The following reasons are considered normal termination of login sessions in a zero operator intervention environment:
User-RequestThe end-user clicked on the logout or end session link in their browser when surfing the rXg captive portal.Session-TimeoutThe session reached the maximum allowed time. For example, if the end-user purchased a 3 day plan, the 3 days have elapsed and thus the rXg automatically deleted the end-user session. Another example would be where the end-user is logged in via shared credential group that sets a 1 hour session time limit and 1 hour has elapsed.Quota-ExceededThe end-user device has consumed all of the available quota in the session. For example, if the end-user purchased a 5 GB quota plan and more than 5 GB have been transferred. Another example, the end-user is logged in via a shared credential group that sets a 256 MB maximum transfer and the end-user device transfers more than 256 MB of data.Sessions-ExceededThe end-user exceeded the configured maximum number of login sessions.Recurring-BillThe account has recurring billing enabled and the recurrence interval has been met. For example, if the account is set to monthly recurring billing and 1 month has elapsed since the account was first used. Idle-TimeoutThe end-user device has been idle (no traffic to or from the IP) for at least the amount of time that is configured in the idle timeout setting of the corresponding landing portal.Account-IP-Changed/Device-IP-ChangedThe account or device has come onto the network with a different IP address. This may happen if the DHCP lease for the end-user device has expired and the DHCP server issues a new lease with a different IP address.IP-ReclaimedA different end-user has come onto the network with the IP address associated with this login session and end-user. This may happen if the end-user device leaves the network and the rXg DHCP server assigns the IP address to a different end-user device. The following reasons may be encountered in the login session log during normal rXg operation and are a result of direct operator action: Admin-ResetThe operator manually deleted the login session using the Instruments :: Sessions view.Account-SuspendedThe operator manually deactivated the account by editing the account record. The following reasons are generally indicative of a misconfiguration or of malicious activity on the network: MAC-MismatchThe MAC address of a logged in session changed. This may occur if an end-user or other party deliberately attempts to steal a login session using a second device. For example, if the end-user logs in via a laptop, then shuts down their laptop and statically configures their phone to use the same IP address in an attempt to obtain Internet access for their phone without buying a plan. MAC-Mismatches may also result if the MAC <=> IP mapping network option is set incorrectly or if there is a conflict between the DHCP lease table and the ARP table when both the DHCP lease table and ARP table are both being considered for the MAC <=> IP mapping.
Survey Results
The rXg captive portal includes an end-user survey capability that allows operators to collect arbitrary data from end-users. The results from the end-user surveys are collected and stored in the rXg database. The operator accesses the collected survey data through the survey results scaffold.
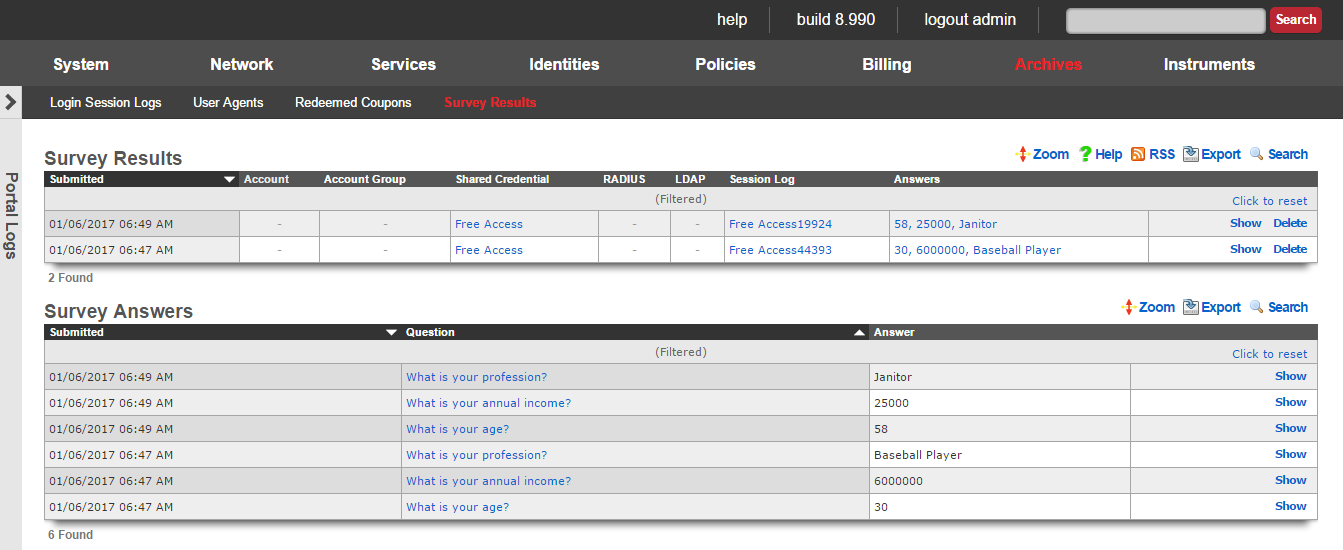
The submitted field stores the time stamp of when the survey was collected. This is typically concurrent with the a login event.
The account , shared credential , RADIUS and LDAP fields store the login information that was provided when the survey was submitted. Exactly one of these fields should be populated as it is not possible to login with two sets of credentials.
The session field stores a reference to the IP session that was created when the login was processed.
The answers field stores the questions and answers that the were part of the survey taken and submitted by the end-user. Clicking on the list of answers opens a nested scaffold that displays questions and answers in a tabular format.
Redeemed Coupons
The redeemed coupons scaffold is an archive of all coupons that have been redeemed by end-users.
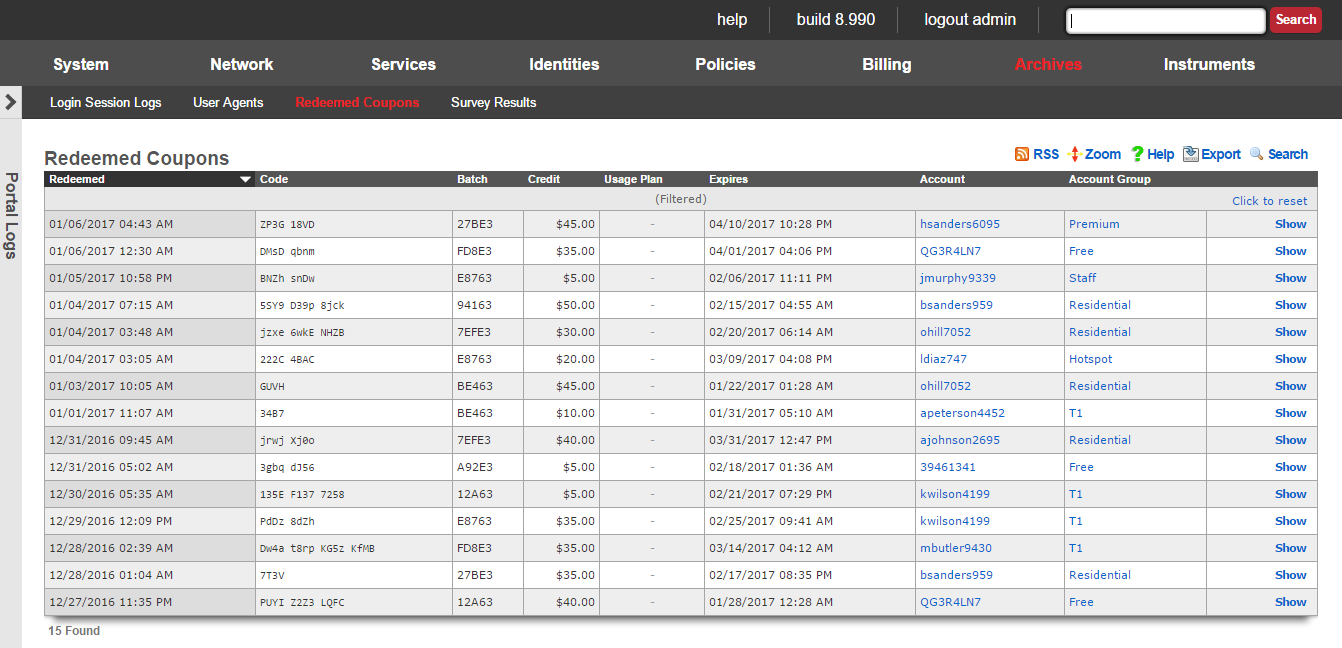
Coupons are redeemed via the captive portal web application. A successful coupon redemption results in the account being given the credit or access to the usage plan specified in the coupon. In addition, the redeemed coupon is removed from the pool of available coupons and an entry made into the redeemed coupons scaffold.
The redeemed field is the timestamp recorded when the coupon redemption.
The code , batch , credit , usage plan and expires fields contain copies of the data from the coupon that was redeemed.
The account field stores the login of the end-user that redeemed the coupon.
The same coupon code made be present multiple times in the redeemed coupon archive. Once a coupon is redeemed, the code is available and may be chosen by the coupon generator. Thus the same code may be allocated to different coupons at different times. The only stipulation is that the same code is never used for two active coupons at the same time.
The list in redeemed coupons combined with the list of coupons does not represent the set of all coupons that were ever present on the rXg. Coupons that are manually deleted by administrators as well as those that are automatically deleted by the rXg coupon expiration mechanism are not tracked.
Queue Logs
The queue logs scaffold provides a historical log of the bandwith queuing mechanism built in to the rXg.

Queue Logs
The sampled column shows a timestamp of the start of the associated connection.
The bytes , pkts , and direction columns display the amount of data transfered, and whether it was uploaded or downloaded, for the associated connection.
The IP , and MAC columns display layer 2 and 3 source information for the associated connection.
The login , session , account , IP group , account group , MAC Group , shared credential group , RADIUS group , and LDAP group columns display the layer 5+ source information for the associated connection.
The policy column displays the policy matched to the associated connection.
The bandwidth queue column displays the name of the operator-defined queue used for the associated connection.
The uplink column displays the uplink record that was utilized for the associated connection.
The interface , and VLAN columns display the originating LAN for the associated connection.
RADIUS Server Logs
The RADIUS server logs view presents an archive of all RADIUS requests that have been made to the rXg integrated RADIUS server.
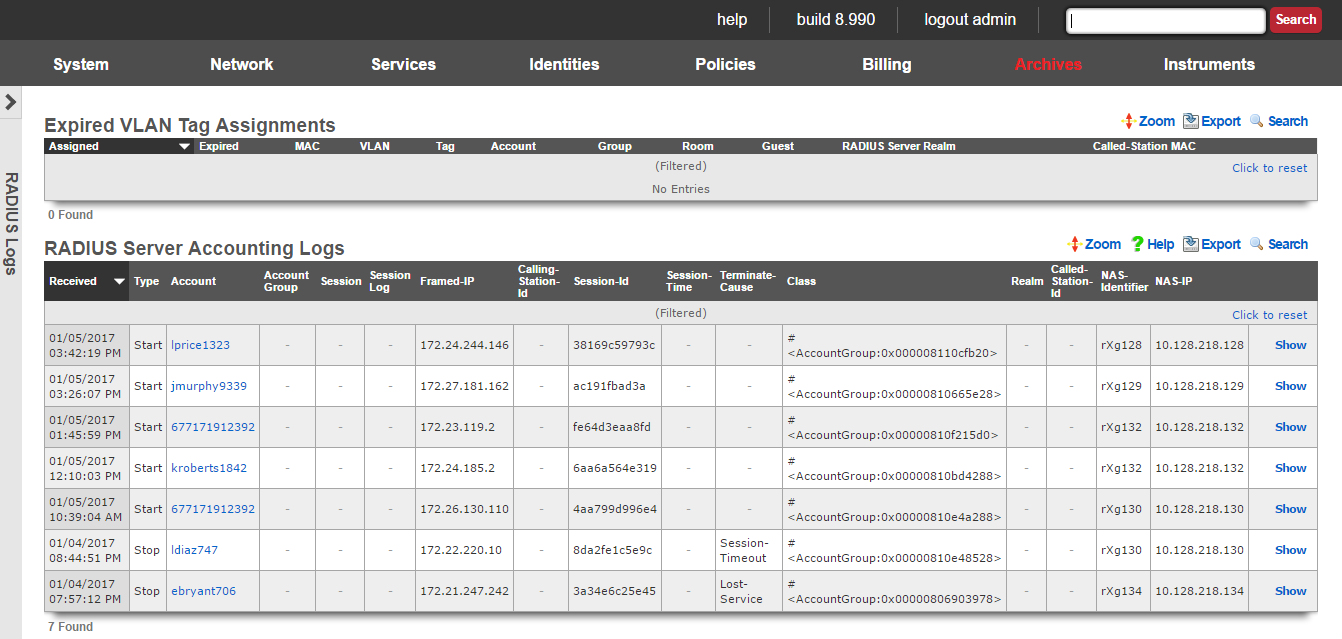
The rXg integrated RADIUS server enables operators to expose the local user database for use with RADIUS NAS devices. An entry is made into the RADIUS server logs scaffold whenever a RADIUS NAS makes a successful RADIUS accounting request to the rXg integrated RADIUS server.
RADIUS Server Logs
The received field is the timestamp marking when the RADIUS accounting request was received by the RADIUS server.
The account field relates this accounting request to a account record in the accounts scaffold.
The Acct-Session-Id , Acct-Session-Time , Acct-Session-Id , Acct-Status-Type , Event-Timestamp , and other attributes beginning with Acct- are RADIUS accounting attributes. The possible values and meaning of these attributes are defined by RADIUS Accounting RFC 2139 and RADIUS Extensions RFC 2869.
The class , Framed-IP-Address , NAS-Identifier , NAS-IP-Address , NAS-Port , NAS-Port-Type and other key/value pairs listed are RADIUS attributes. The possible values are meaning of these attributes are defined by RADIUS RFC 2865. When the requesting RADIUS NAS is an rXg, the class attribute is used to pass the group and policy association information which enables differentiated service.
The raw attributes field contains a dump of the unprocessed RADIUS accounting request. This field is useful when troubleshooting problematic RADIUS server to RADIUS NAS connectivity, and may contain key/value pairs for some attributes not listed above.
Triggered Events
The triggered events scaffold stores a log of every event trigger that occurred on the rXg.
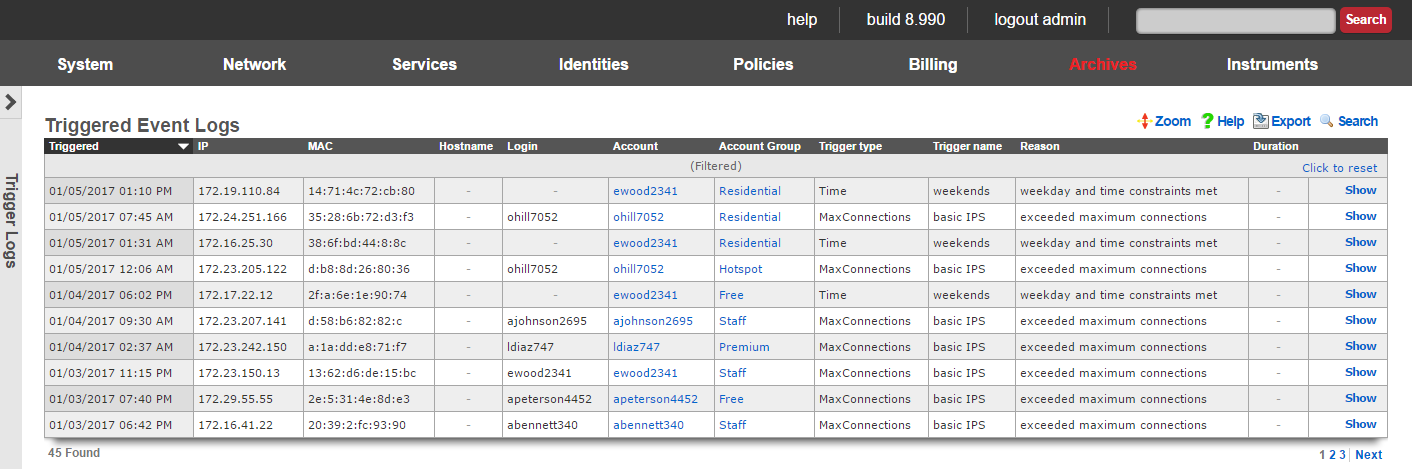
Triggered Event Logs
The triggered field stores the time stamp of when the event was triggered.
The IP , MAC , account fields store the identity of the end-user that triggered the event.
The trigger type and trigger name fields store the kind and identifier of the event trigger that occurred.
The reason field specifies a description of why the event trigger fired.
Web Proxy Requests
The web proxy requests view displays data collected by the rXg integrated transparent web proxy. Each and every web request that transits the rXg is logged into the rXg database. This enables the operator to have complete cognizance over the end-user population.
The rXg transparent web proxy must be enabled in order for the web proxy requests to be logged. The rXg transparent web proxy is configured through the persistent caching view of the policies menu. The operator may choose to enable the transparent web cache for only the subset of the end-user population for which deep cognizance is desired.
At the top of the web proxy requests view is a summary report.
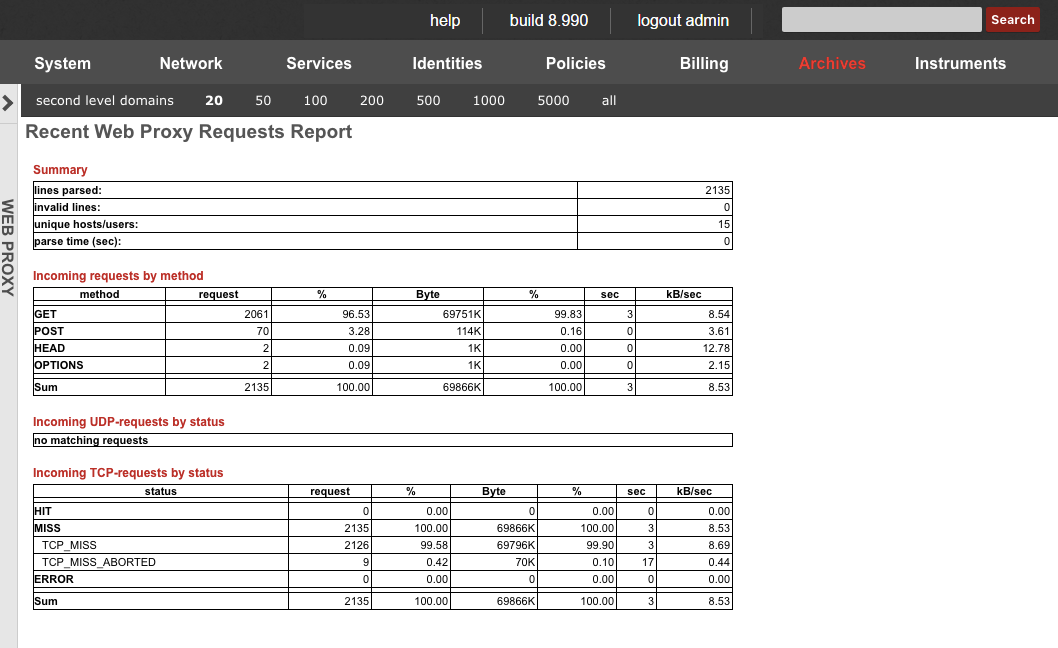
Direct access to data is available through a scaffold at the bottom of the view.
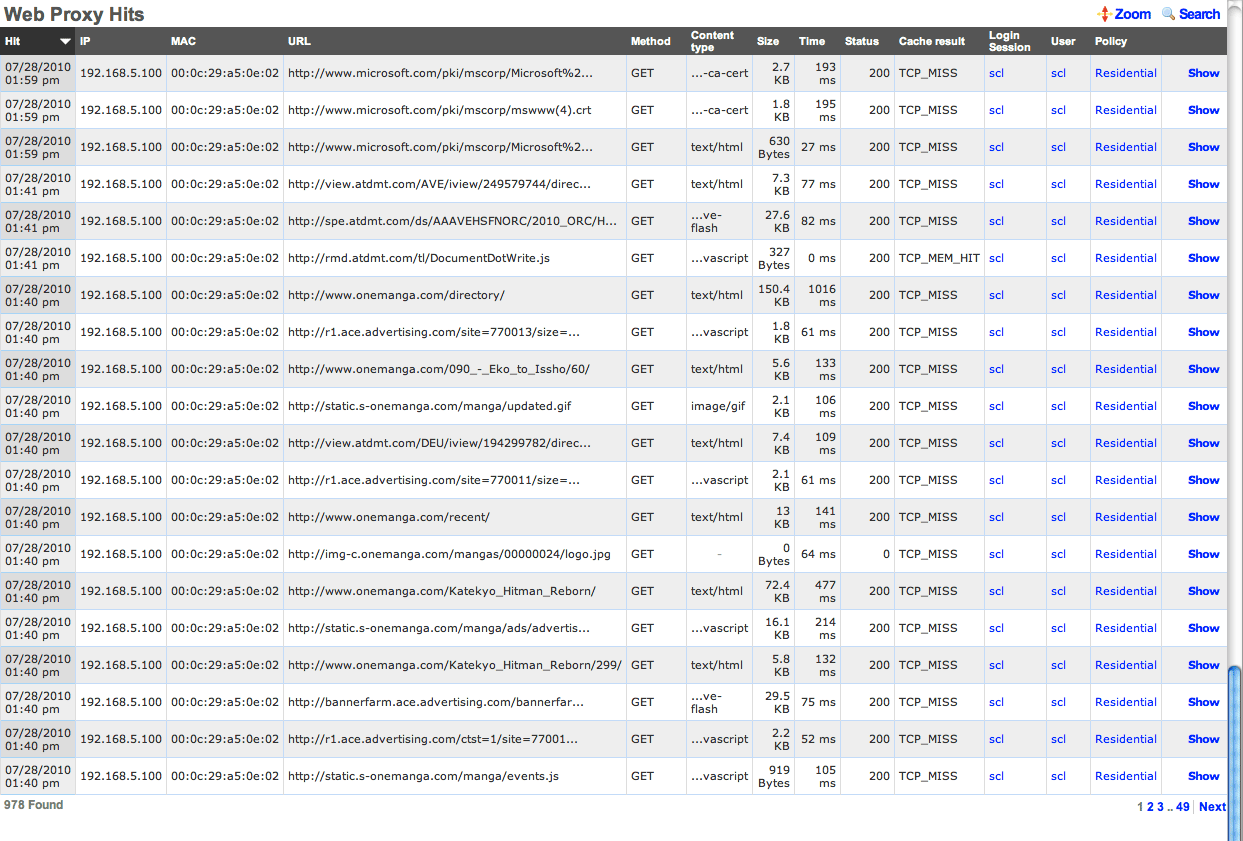
The operator may also generate reports for activity by account , IP address or MAC address by using the action links found at the right side of the various scaffolds throughout the administrative console.
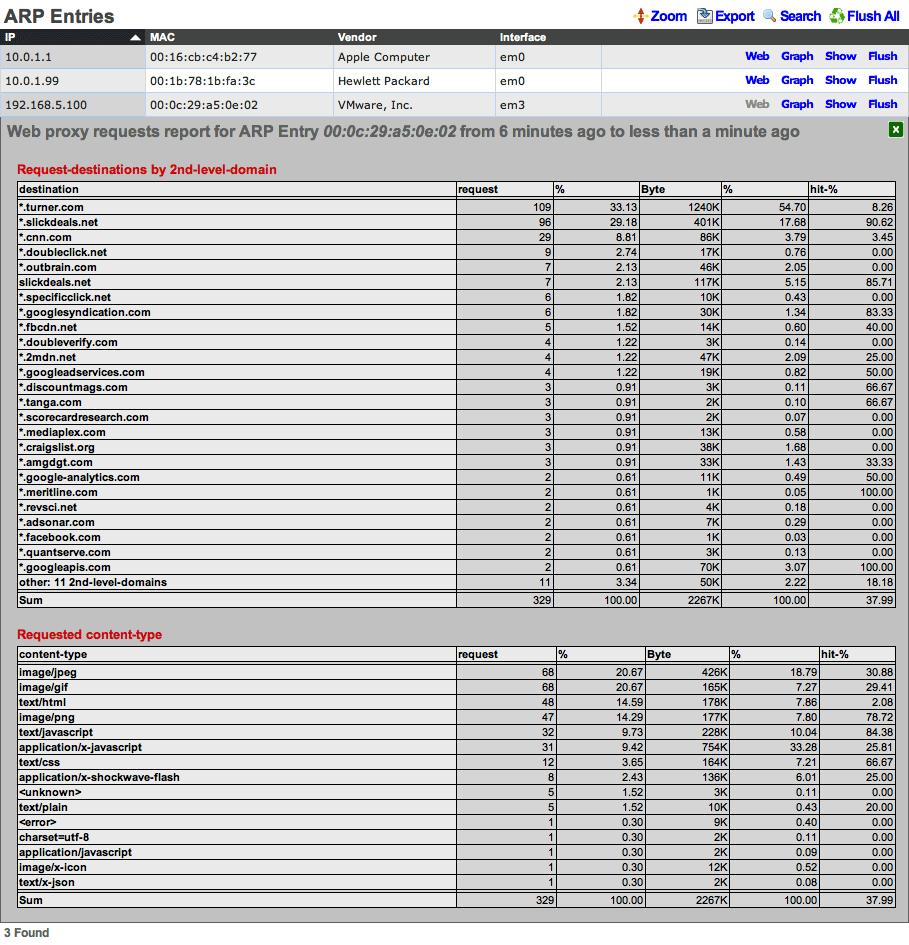
In the example above, the operator has accessed a web proxy requests report through the ARP view of the instruments menu. Similar reports may be generated through the scaffolds on the policies , accounts , sessions and DHCP views.
Logs
The logs view enables the operator to delve into the log files generated by the daemons that underly the rXg.
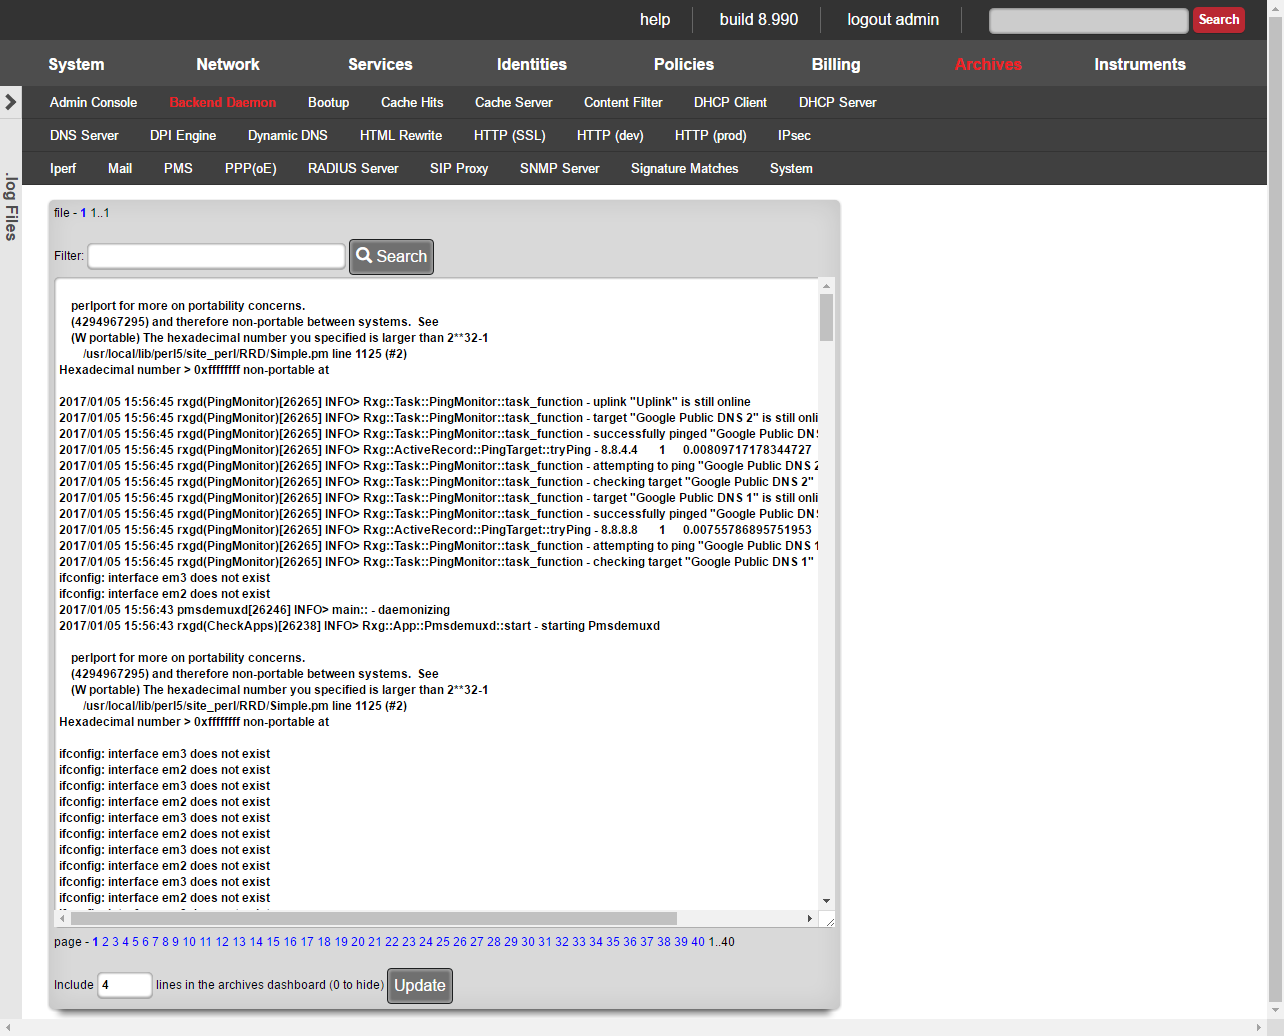
Numerous software modules are utilized to implement many of the features present in the rXg. During the course of normal operations, the software modules generate information which is stored in log files unique to the software module. The logs view enables the operator to browser through the log files for diagnostic purposes.
Log files tend to contain a large amount of data and become unwieldy after a while. The rXg rotates the log files periodically to mitigate size issue. As a result, the logs view contains several navigation mechanisms that assist the operator with browsing the available log files.

The menu near the top lists the names of the software modules. When a module name is clicked, the logs for the named module are brought into focus in the main dialog below. The name that is highlighted in red indicates the current module that is in focus.
The following logs are available:
Admin ConsoleA log of all actions that have been executed on the rXg administrative console along with the name of the administrator that executed the action and the IP address from which the request originated.Proxy HitsThe web proxy logs all request hits here. Proxy ServerThe web proxy logs global information and errors here. DHCP ClientInformation regarding the WAN links that obtain configuration via DHCP is logged here.DHCP ServerThe DHCP server logs global information and errors here. DNS ServerThe DNS server logs global information and errors here. DPI EngineThe deep packet inspection engine logs global information and errors here. Display MessagesOperating system kernel display messages are logged here.Dynamic DNSInformation regarding dynamic DNS servers via DHCP is logged here.HTTP (SSL)The web multiplexer that accepts HTTPS requests for the portal and console writes an entry for all requests in this log.HTTP (dev)The rails servers log here when in development mode. HTTP (prod)The rails servers log here when in production mode. IPsecThe IPsec engine logs connection information and errors here. HTML RewriteThe HTML payload rewriting engine logs information here.PPP(oE)Information about WAN uplinks that are configured for PPPoE is logged here.RADIUS ServerThe RADIUS server logs global information and errors information here.SNMP ServerThe SNMP server logs global information and errors information here.Signature MatchesThe deep packet inspection engine logs matches to configured rules here. System LogThe operating system logs errors and diagnostic information here.rXgThe rXg backend daemon logs diagnostic information and errors here. 
At the top of the main dialog is a series of numbers that follow the file label. These numbers represent the various log files that are present on the filesystem for the module chosen in the menu above. The file number 1 represents the current log file that the software module is writing to. The largest number represents the oldest log file that is still present on the rXg filesystem. The number in bold is the log file that is currently in focus.
The rXg periodically rotates the files and deletes the oldest one. The rotation policy depends on the software module. Most logs are rotated daily though some are rotated based on the size of the file. The rXg keeps at least a few rotations worth of log files on the filesystem at any given time to aid in troubleshooting.
Many log files are thousands of lines long to it would be impractical to load entire log files into the browser. The main dialog displays on a slice of the log file chosen above. A series of numbers that follow the page label appear at the bottom of the main dialog that enables the operator to change the focus to a difference slice within the file. Smaller numbers represent slices at the top of the file while large numbers represent slices closer to the bottom. The number in bold represents the current slice of the log file.
At the bottom of the dialog there is a small textfield that allows the operator to enter the number of lines of this log that are desired for the archives dashboard. If the value is zero, then this log will be omitted from the dashboard. It is recommended that no more than five logs with five rows each be placed on the archives dashboard.
Syslog Receivers
The syslog receivers feature enables the rXg to act as a centralized syslog server, receiving and storing log messages from network devices, servers, and other infrastructure equipment using the standard syslog protocol (RFC 3164).
Overview
Syslog is a standard protocol for message logging that allows separation of the software that generates messages, the system that stores them, and the software that reports and analyzes them. By configuring the rXg as a syslog receiver, operators can:
- Centralize log collection from multiple network devices
- Monitor and troubleshoot network infrastructure from a single location
- Archive log data for compliance and auditing purposes
- Search and filter log messages using the standard log viewer
- Correlate events across different systems and devices
The rXg supports both UDP (default) and TCP syslog protocols and can listen on any available port, with port 514 being the standard syslog port.
Configuring Syslog Receivers
To create a new syslog receiver:
- Navigate to Services > Servers in the rXg console
- Scroll down to the Syslog Receivers section
- Click Create New to add a receiver
- Configure the following settings:
Configuration Options
Active (checkbox) : Enable or disable the syslog receiver. When active, the receiver will listen for and store incoming syslog messages, and the log file will appear in Archives > Log Files.
Name (required) : A descriptive name for the syslog receiver (e.g., "Cisco Switches", "Linux Servers", "Firewall Logs"). This name will appear in the log file list as "Syslog Receiver: [Name].log".
Protocol (required, default: UDP) : The transport protocol to use: - UDP: Connectionless protocol, faster but no delivery guarantee - TCP: Connection-oriented protocol, reliable but slightly slower
Port (required, default: 514) : The UDP or TCP port on which the receiver will listen for incoming syslog messages. Standard syslog uses port 514, but any port between 1-65535 can be used.
WAN Targets (optional) : Associate WAN targets to allow specific external sources to send logs to this receiver. This integrates with the rXg firewall system to automatically configure access rules.
Policies (optional) : Associate policies to control which policies' traffic can send syslog messages to this receiver.
Note (optional) : Administrative notes about this receiver's purpose or configuration.
Multiple Active Receivers
Unlike many rXg features that allow only one active instance, multiple syslog receivers can be active simultaneously. This design allows operators to:
- Listen on different ports for different device types
- Separate UDP and TCP syslog streams
- Associate different WAN targets or policies with different receivers
For example, you might configure: - Receiver 1: "Network Devices" - Port 514/UDP for switches and routers - Receiver 2: "Servers" - Port 6514/TCP for servers requiring reliable delivery - Receiver 3: "IoT Devices" - Port 515/UDP for IoT devices on a separate network
Viewing Syslog Logs
Once a syslog receiver is active and collecting logs, you can view them in the standard log viewer:
- Navigate to Archives > Log Files in the rXg console
- In the log source dropdown menu, locate Syslog Receiver: [Receiver Name].log
- Click on the log name to view its contents
The log viewer provides the standard features available for all rXg log files:
- Pagination: Browse through pages of log entries
- Search/Filter: Enter search terms to filter log entries
- Context Lines: Show lines before/after matches
- Archived Files: View rotated log files by clicking different file numbers
- Dashboard Integration: Add frequently-viewed logs to the Archives dashboard
Log File Format
Each active syslog receiver writes logs to /var/log/syslog-receiver-[ID].log on the rXg filesystem. These files are rotated periodically to manage disk space and are viewable through the web interface.
Log entries are stored in their original format as received from the sending device, preserving the complete syslog message including priority, timestamp, hostname, tag, and message content.
Syslog Message Format
The rXg parses incoming syslog messages according to RFC 3164 format:
<PRI>TIMESTAMP HOSTNAME TAG: MESSAGE
Example:
<134>Oct 10 13:03:44 firewall kernel: [UFW BLOCK] IN=eth0 OUT=
Components: - PRI: Priority value encoding facility and severity - Priority = (Facility 8) + Severity - Example: 134 = (16 8) + 6 = local0.info - TIMESTAMP: Three-letter month, day, time (MMM DD HH:MM:SS) - HOSTNAME: Source hostname or IP address - TAG: Application name, optionally with process ID in brackets - MESSAGE: The actual log message content
Facility Codes
| Code | Facility | Description |
|---|---|---|
| 0 | kern | Kernel messages |
| 1 | user | User-level messages |
| 2 | Mail system | |
| 3 | daemon | System daemons |
| 4 | auth | Security/authorization messages |
| 5 | syslog | Syslog internal messages |
| 6 | lpr | Line printer subsystem |
| 7 | news | Network news subsystem |
| 8 | uucp | UUCP subsystem |
| 9 | cron | Cron daemon |
| 10 | authpriv | Security/authorization messages (private) |
| 11 | ftp | FTP daemon |
| 16-23 | local0-local7 | Locally defined facilities |
Severity Levels
| Code | Severity | Description |
|---|---|---|
| 0 | Emergency | System is unusable |
| 1 | Alert | Action must be taken immediately |
| 2 | Critical | Critical conditions |
| 3 | Error | Error conditions |
| 4 | Warning | Warning conditions |
| 5 | Notice | Normal but significant condition |
| 6 | Informational | Informational messages |
| 7 | Debug | Debug-level messages |
Configuring Network Devices
To send logs to the rXg syslog receiver, configure your network devices to use the rXg as a syslog server. Replace 192.168.1.1 with the IP address of your rXg interface that the devices can reach, and ensure the port matches your configured receiver port.
Cisco IOS
logging host 192.168.1.1
logging trap informational
Linux (rsyslog)
# /etc/rsyslog.conf
*.* @192.168.1.1:514 # UDP
*.* @@192.168.1.1:514 # TCP
Juniper JunOS
set system syslog host 192.168.1.1 any info
pfSense / OPNsense
Navigate to Status > System Logs > Settings - Remote Logging Options: Check "Enable Remote Logging" - Remote Log Servers: Enter rXg IP address - Remote Syslog Contents: Select facilities to log
Windows Event Log Forwarding
Use third-party tools like nxlog or Snare to forward Windows Event Logs as syslog messages to the rXg.
MikroTik RouterOS
/system logging action
set remote=192.168.1.1 remote-port=514
/system logging
add action=remote topics=info
Firewall and WAN Target Integration
Syslog receivers integrate with the rXg firewall system to automatically open the necessary ports:
- When a receiver is created, modified, or its active state changes, firewall rules are updated automatically
- WAN targets can be associated with receivers to allow specific external sources
- Policies can be associated with receivers to control which traffic sources are permitted
- Changes to syslog receivers trigger a firewall configuration update
This integration ensures that network devices can reach the syslog receiver without manual firewall rule configuration.
Use Cases
Network Device Monitoring
Configure all switches, routers, firewalls, and wireless controllers to send logs to a central syslog receiver. Use the search feature to quickly identify critical errors, link state changes, or security events.
Compliance and Auditing
Centralize authentication logs from servers and network devices to meet compliance requirements for log retention and monitoring. Syslog logs are retained according to configured log rotation policies.
Troubleshooting
When investigating network issues, correlate timestamps across multiple devices by viewing all logs in a central location. Search for specific MAC addresses, IP addresses, or error messages across all collected logs.
Infrastructure Monitoring
Set up separate receivers for different types of infrastructure: - "Network Devices" - Port 514/UDP for switches, routers, and APs - "Security Devices" - Port 515/UDP for firewalls and IDS/IPS - "Servers" - Port 6514/TCP for critical servers requiring reliable delivery
This separation makes it easier to locate and analyze logs by infrastructure category.
Limitations and Considerations
- UDP vs TCP: UDP is faster but messages may be lost under heavy load or network congestion. Use TCP for critical logs where reliability is essential.
- Log Volume: High-volume logging can consume disk space. Log files are rotated automatically, but monitor disk usage if receiving logs from many devices.
- Time Synchronization: Ensure all devices sending logs use NTP to synchronize their clocks. RFC 3164 syslog timestamps don't include timezone or year information, so accurate clocks are critical for log correlation.
- Security: Associate specific WAN targets or policies to control which sources can send logs to the receiver.
- Parsing: The rXg parses RFC 3164 syslog format. Some devices may send non-standard formats that may not parse cleanly, but the complete raw message is always stored.
Troubleshooting
Logs Not Appearing
- Verify the receiver is marked as Active
- Check that the sending device can reach the rXg IP address and port
- Verify the sending device's network is permitted by checking WAN Targets and Policies associations
- Test connectivity from sending device:
- Linux:
logger -n <rxg-ip> -P <port> "Test message" - Test with netcat:
echo "<134>Test message" | nc -u <rxg-ip> <port>
- Linux:
- Check the raw log file on the rXg:
/var/log/syslog-receiver-[ID].log - Check
/var/log/rxgd.logfor errors related to syslog reception
Log File Not Listed in Archives > Log Files
- Verify the receiver is marked as Active - only active receivers appear in the log list
- Try refreshing the page
- Check that the receiver was saved successfully in Services > Servers
Incorrect Timestamps
- Ensure sending devices have accurate clocks (use NTP)
- Verify timezone settings on sending devices match expectations
- Note that RFC 3164 syslog timestamps lack year information - the rXg infers the year based on the current date
- Messages from December viewed in January may show the previous year
Performance Issues
- Consider reducing log volume at the source (filter less critical severities)
- Use UDP instead of TCP if message loss is acceptable (reduces overhead)
- Monitor disk space usage if collecting high-volume logs
- Spread load across multiple receivers if necessary
Messages Appear Garbled or Incomplete
- Some devices send non-RFC-compliant syslog formats
- Check the raw log file at
/var/log/syslog-receiver-[ID].logto see the original format - The complete raw message is always stored even if parsing fails
- Contact RG Nets support if consistent parsing issues occur with standard devices
See Also
- System Logs - Viewing and filtering rXg system logs
- WAN Targets - Managing external network access
Instruments
Instruments provides the operator of the rXg with real time data, such as DHCP, Device sessions, throughput etc.
Instruments Dashboard

The Instruments Dashboard provides the operator with information relating to the current throughput of the WAN, Top Connection and Data Consumers, as well as current number of sessions. It also provides the operator with information about the current status of DHCP pools and vlans.
MAC DHCP DNS
The MAC-DHCP-DNS scaffold allows the operator of the rXg to quickly find/search information about the current MAC Entries, DHCP Leases, and DNS Cache Records. It also provides the operator the status of the DHCP Shared Network Stats, and the status of the configured DHCP Pools.
Note: In cluster deployments, a Cluster Node field is displayed in applicable scaffolds to indicate which node the entry belongs to.
MAC Entries
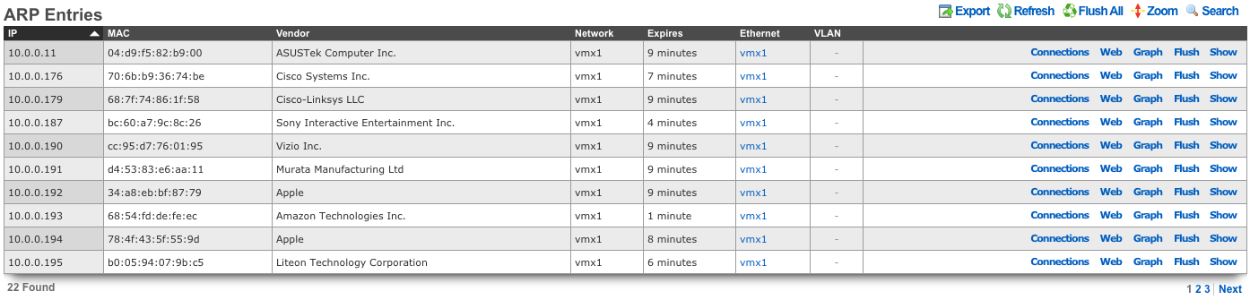
MAC Entries displays information about devices connected to the rXg. The IP field shows the device's IP address. The MAC field displays the hardware MAC address. The Vendor field shows the manufacturer identified from the MAC address OUI. The If field indicates the network interface. The Expires At field shows when the ARP entry will expire. The Interface and VLAN fields link to the corresponding rXg configuration. The IP6 field indicates whether this is an IPv6 entry.
DHCP Leases
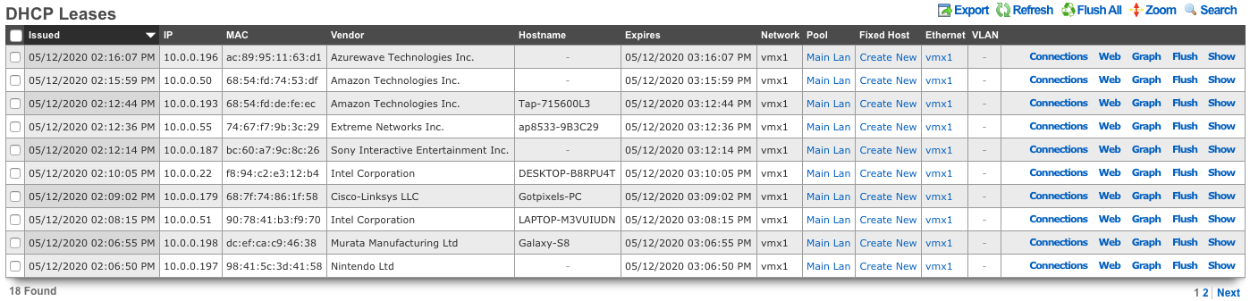
DHCP Leases provides the operator with a list of the current DHCP leases assigned to client devices. The Start field shows when the lease was issued. The IP field displays the assigned IP address. The Client Identifier field shows the unique identifier provided by the DHCP client. The Identifier Type field indicates the type of client identifier used. The Resolved Hostname field displays the hostname if it could be resolved.
The Shared Network field shows which DHCP shared network the lease belongs to. The DHCP Pool field indicates the specific pool from which the address was assigned. The Interface and VLAN fields show the network segment. The IP6 field indicates whether this is an IPv6 lease.
The Fixed Host action provides the operator the ability to quickly create a fixed host reservation for the device. It should be noted that any address assigned to a fixed host should fall outside the range of any configured DHCP pool.
DHCP Fingerprinting
The rXg captures DHCP fingerprinting information from client devices during the DHCP negotiation process. This passive identification technique allows the system to determine device operating systems and types without requiring any user interaction or HTTP traffic.
How DHCP Fingerprinting Works
When a device connects to the network and requests an IP address via DHCP, it sends a DHCPDISCOVER or DHCPREQUEST message containing DHCP Option 55 (Parameter Request List). This option specifies which DHCP options the client would like the server to include in its response. Different operating systems and device types request different combinations of options in a specific order, creating a unique "fingerprint" that can identify the device type.
The rXg DHCP server captures this fingerprint using the ISC DHCP binary-to-ascii function to convert the option codes into a comma-separated decimal string format (e.g., "1,121,33,3,6,12,15,28,51,58,59").
Fingerprint Data Fields
The following fingerprinting-related fields are captured for each DHCP lease and are visible in the detailed view:
Parameter Request List: The core fingerprint data consisting of DHCP option codes requested by the client. Example fingerprints include:
1,121,3,6,15,108,114,119,252- Apple iOS/macOS devices1,15,3,6,44,46,47,31,33,121,249,43- Microsoft Windows Vista/7/Server 20081,121,33,3,6,12,15,28,51,58,59,119- Generic Android devices1,2,3,4,5,6,11,12,13,15,16,17,18,22,23,28,40,41,42,43,50,51,54,58,59,60,66,67,128,129,130,131,132,133,134,135- PXE boot clients
Vendor Class Identifier: DHCP Option 60, a string sent by clients to identify the vendor and functionality. Common examples:
MSFT 5.0- Microsoft Windowsandroid-dhcp-10- Android version 10dhcpcd- Linux DHCP client daemonudhcp- Lightweight DHCP client (embedded devices)
User Class: DHCP Option 77, an optional identifier indicating the type of user or device class. This is less commonly used but can provide additional classification data.
Device Type Identification
The rXg maintains a comprehensive fingerprint database containing over 900 known device signatures, combining data from the Fingerbank project with patterns observed in production deployments. When identifying a device, the system uses a priority-based lookup:
HTTP User Agent (highest priority): If the device has generated HTTP traffic through the captive portal or proxy, the browser's User-Agent string provides precise OS identification.
DHCP Fingerprint (fallback): If no HTTP User Agent data is available, the Parameter Request List fingerprint is matched against the known signature database.
Default: If no match is found, the device is classified as "Other".
The system generalizes detailed OS versions into broad categories for reporting purposes: Windows, Mac, iOS, Android, Chrome OS, Kindle, Blackberry, Linux, and Other.
Fingerprint Data Preservation
DHCP fingerprint data is preserved even after leases expire. When a lease ends, all fingerprint fields are copied to the Expired DHCP Leases archive (accessible under Archives DHCP and DNS Logs). This allows for historical device type analysis and ensures fingerprint data remains available for:
- Device identification on subsequent connections
- Historical usage reports by device type
- Trend analysis of device populations over time
Integration with Other rXg Features
DHCP fingerprinting integrates with several rXg subsystems:
DHCP Classes and Match Rules: Create DHCP classes that match on
dhcp-parameter-request-listto apply different DHCP options or pool assignments based on device type. Configure these under Services DHCP.Reports and Analytics: The fingerprint data powers device type breakdowns in RADIUS usage reports, showing data consumption and session statistics grouped by operating system type.
Captive Portal: Fingerprint data is exposed via the captive portal API, allowing custom portal implementations to adapt behavior based on detected device type.
Device Sessions: The Field Operations Manager (FOM) uses fingerprint data to display device types when detailed HTTP User Agent data is unavailable.
IPv6 Limitations
DHCP fingerprinting is currently supported for DHCPv4 (IPv4) leases only. DHCPv6 uses a different protocol structure where the equivalent option (Option 6, also known as ORO or Option Request Option) is not currently captured by the rXg.
For IPv6 devices, the rXg identifies clients using the DUID (DHCP Unique Identifier) rather than fingerprinting. The DUID is a unique identifier assigned to each DHCPv6 client and is stored in the Client Identifier field for IPv6 leases. The rXg supports all four DUID types defined in RFC 3315:
- DUID-LLT (Type 1): Link-layer address plus time
- DUID-EN (Type 2): Vendor-assigned unique ID based on Enterprise Number
- DUID-LL (Type 3): Link-layer address only
- DUID-UUID (Type 4): UUID-based identifier (RFC 6355)
While DUIDs provide unique client identification for IPv6, they do not enable operating system or device type detection like DHCPv4 fingerprinting does. For IPv6 devices, device type identification relies primarily on HTTP User Agent data when available.
Viewing Fingerprint Information
To view the fingerprinting information for a specific lease, click on the show action for that lease in the DHCP Leases table. The detailed view displays all DHCP options including Parameter Request List, Vendor Class Identifier, User Class, and additional relay agent information (Agent Circuit ID and Agent Remote ID) if present. For IPv6 leases, the DUID is displayed in the Client Identifier field.
DNS Cache Records
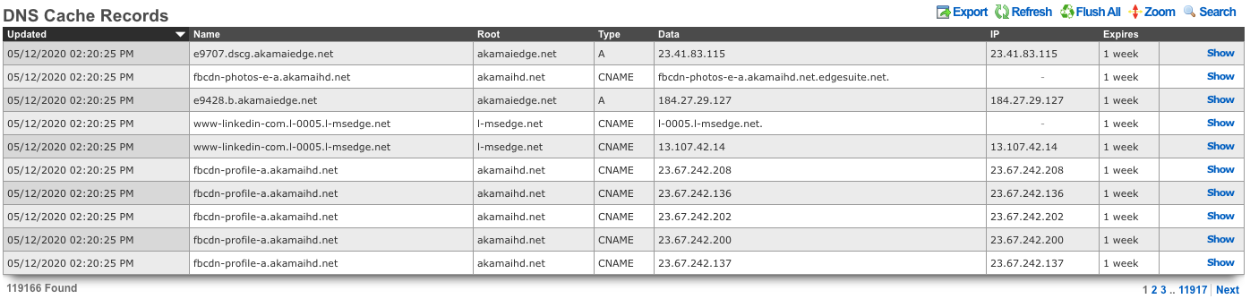
The DNS Cache Records scaffold displays the current entries in the rXg DNS cache. The Updated At field shows when the record was last refreshed. The Name field displays the fully qualified domain name. The Root Domain field shows the top-level domain portion. The Record Type field indicates the DNS record type (A, AAAA, CNAME, MX, etc.). The Data field displays the record data (e.g., the resolved IP address). The IP field shows the IP address if applicable. The Expires At field indicates when the cached record will expire. The IP6 field indicates whether this is an IPv6 record.
DHCP Shared Network Stats
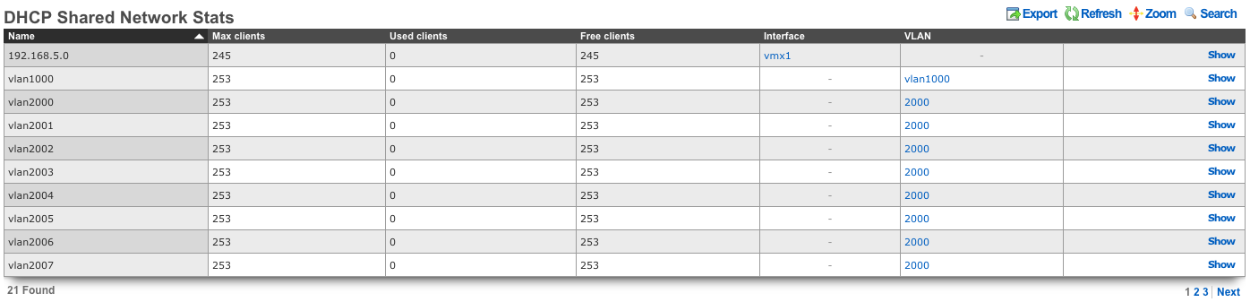
DHCP Shared Network Stats displays statistics for each DHCP shared network. The Name field shows the shared network name. The Size field indicates the total number of addresses available in the network. The Active field shows the number of addresses currently leased. The Available field displays the remaining unleased addresses. The Interface and VLAN fields indicate which network segment the shared network serves.
DHCP Pool Stats

DHCP Pool Stats displays statistics for each configured DHCP pool. The DHCP Pool field shows the pool name. The Size field indicates the total number of addresses in the pool. The Active field shows the number of addresses currently leased from the pool. The Available field displays the remaining unleased addresses in the pool.
Connection States
The Connection States instrument displays the current packet filter (PF) state table entries, showing all active network connections passing through the rXg.
Note: In cluster deployments, a Cluster Node field is displayed in applicable scaffolds to indicate which node the entry belongs to.
Connection States
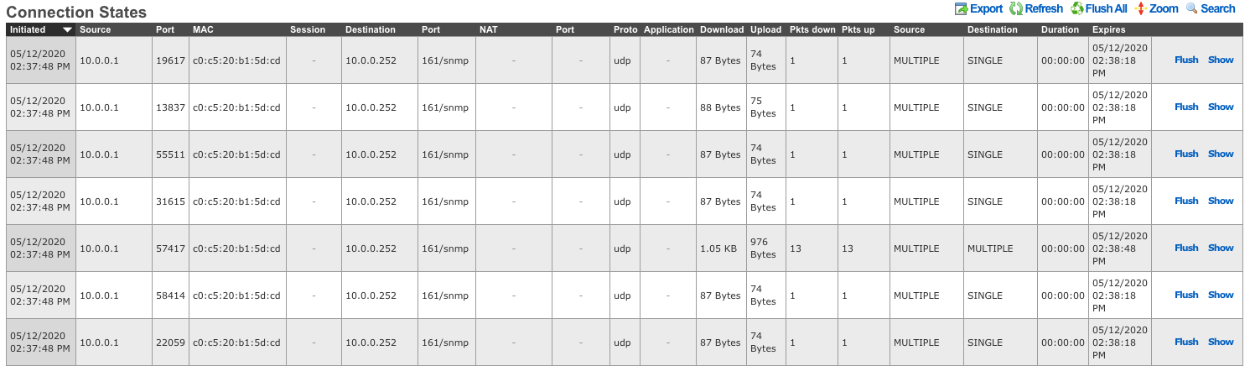
The Connection States table provides the operator with a list of all current connection states tracked by the rXg firewall.
The Initiated At field shows when the connection was established. The Source IP and Source Port fields display the originating endpoint of the connection. The MAC field shows the source device's MAC address. The Login Session field links to the associated login session if the connection belongs to an authenticated user.
The Destination IP and Destination Port fields show the remote endpoint of the connection. The Translated IP and Translated Port fields display the NAT-translated address and port if network address translation is applied to the connection.
The Protocol field indicates the transport protocol (TCP, UDP, ICMP, etc.). The Net App field shows the identified application or service if application identification is enabled.
The Bytes Down and Bytes Up fields display the amount of data transferred in each direction. The Pkts Down and Pkts Up fields show the packet counts in each direction.
The Source State and Destination State fields indicate the TCP connection state for each endpoint (e.g., ESTABLISHED, TIME_WAIT, FIN_WAIT). The Duration field shows how long the connection has been active. The Expires At field indicates when the state entry will be removed if no further traffic is seen. The IP6 field indicates whether this is an IPv6 connection.
Device Sessions
The Device Sessions instrument displays information about currently active login sessions and IP sessions on the rXg.
Note: In cluster deployments, a Cluster Node field is displayed in applicable scaffolds to indicate which node the entry belongs to.
Login Sessions
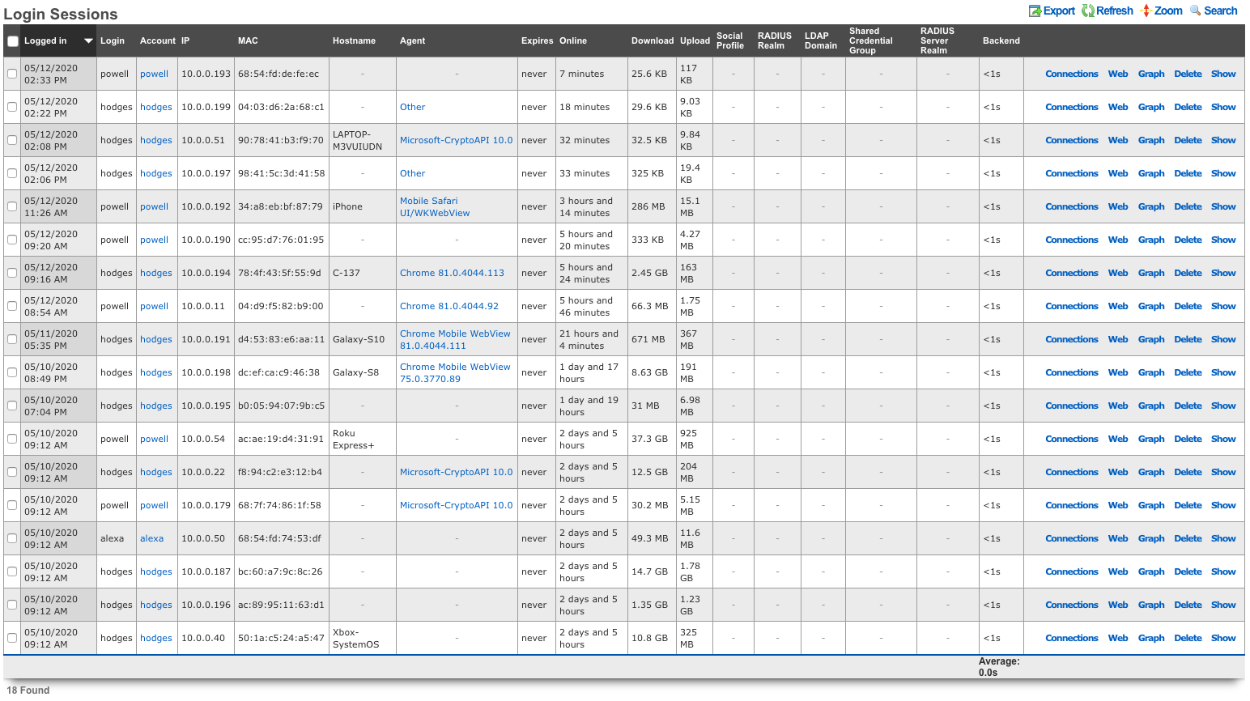
The Login Sessions table displays the current authenticated login sessions. The Created At field shows when the session was established. The Login field displays the username or credential that was provided at login. The IP field shows the IP address of the device. The MAC field displays the MAC address of the device. The Hostname field shows the hostname of the device if known.
The Expires At field displays when the login session will expire. The Minutes Online field shows how long the device has been online since the login session was created. The All Bytes Down and All Bytes Up fields display the amount of data the device has downloaded and uploaded since the login session was created.
The Backend Login Seconds field displays the time in seconds it took for the rXg to create the login session. The RADIUS Realm field displays the RADIUS realm if any that was used to authorize the device access. The LDAP Domain field displays the LDAP domain used if any to authorize the device. The Shared Credential Group field displays the shared credential group the device belongs to if a shared credential was used as the login mechanism. The Omniauth Profile field displays the social profile used to login, for example if Facebook or Google was used to authenticate the login session.
IP Sessions
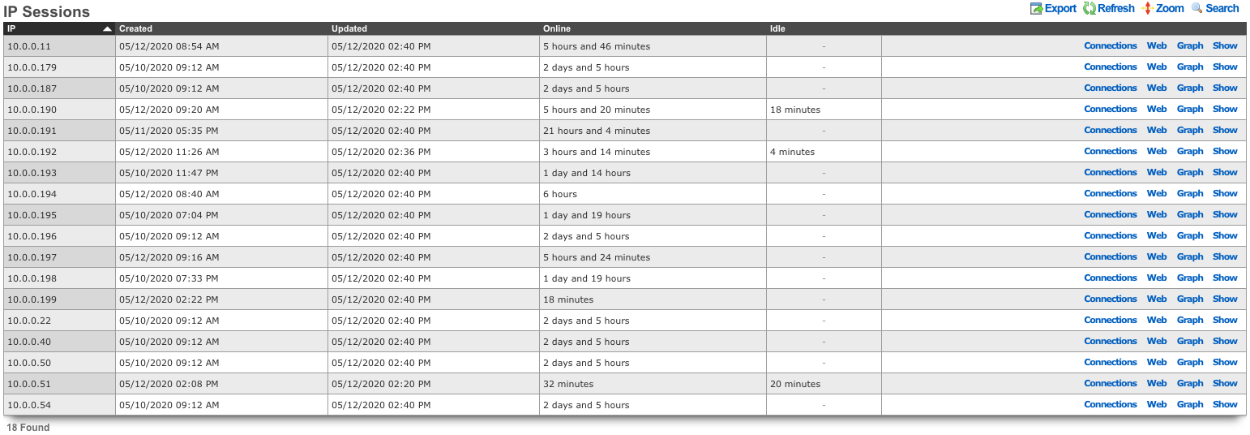
The IP Sessions table displays the current IP sessions of devices connected to the rXg. An IP session is created whenever a device first communicates through the rXg, regardless of whether the device has authenticated.
The IP field displays the IP address of the session. The Created At field displays the timestamp of when the session was created. The Updated At field displays the timestamp of the last activity on the IP session. The Minutes Online field displays the total lifetime of the session in minutes. The Minutes Idle field displays the amount of time in minutes the IP session has been idle if any.
Interface Assignments
The Interface Assignments instrument displays information about VLAN tag assignments and uplink assignments for devices on the network.
Note: In cluster deployments, a Cluster Node field is displayed in applicable scaffolds to indicate which node the entry belongs to.
VLAN Tag Assignments

The VLAN Tag Assignments table lists information about each VLAN tag that has been assigned. The Created At field displays when the VLAN Tag Assignment was created. The Updated At field shows when the device was last seen on the network. The MAC field lists the MAC address of the device. The VLAN field displays the name of the VLAN or VLAN pool the assignment is from. The Tag field shows the specific VLAN tag number assigned. The Tag Count field shows the number of devices that have been assigned to that tag. The I-SID field shows the I-SID of the VLAN if applicable.
The Account field displays the account the VLAN Tag Assignment is assigned to. The Account Group field displays the account group the device belongs to. The Lan Party field displays the LAN party the VLAN tag belongs to. The PMS Room field displays the room the VTA is associated with if applicable. The PMS Guest field displays the name of the guest if applicable.
The RADIUS Server field displays the RADIUS server that assigned the VLAN Tag Assignment. The Called Station ID MAC field displays the MAC of the AP if used to match the device. The Distinct CSID Tags Count field displays the number of VLAN tags that have been assigned via that called station ID. The Switch Port field displays the specific switch port the VTA is assigned to if applicable. The Access Point field displays the access point the VTA is specifically assigned to if applicable. The Static field indicates if the VTA has been statically assigned (checked) or dynamically assigned.
Uplink Assignments

The Uplink Assignments table displays information showing the uplink assignment of devices connected to the network. The IP field displays the IP address of the device. The MAC field displays the MAC address of the device. The Hostname field displays the hostname of the device if available. The Login Session field displays the current login session of the device. The Account field displays the account the device belongs to if applicable. The Uplink field displays the name of the uplink the device has been assigned to. The Weighted Uplink field displays the weighted uplink rule that assigned the device's uplink assignment. The Policy field displays the policy the device belongs to.
NAT Assignments
The NAT Assignments instrument displays information about NAT address assignments and NAT pool statistics.
Note: In cluster deployments, a Cluster Node field is displayed in applicable scaffolds to indicate which node the entry belongs to.
NAT Assignments

The NAT Assignments table lists the NAT IP address assigned to each device. The Created At field shows when the NAT assignment was created. The Source IP field shows the LAN address of the device. The NAT IP field shows the public NAT IP address. The MAC field shows the MAC address of the device. The Hostname field shows the hostname of the device if available.
The Login Session field shows the login session of the device. The Login Session Log field links to the historical session log if applicable. The Account field shows the account the device belongs to. The Address field shows the LAN network address the device is on. The Static Route field lists any static routes assigned to the device if applicable.
The Uplink field lists the uplink the NAT IP belongs to. The Is BiNAT field indicates whether a BiNAT IP address has been assigned specifically to the device. The BiNAT Pool field shows which BiNAT pool the NAT IP belongs to if applicable. The Static IP field indicates if the device has been assigned a specific static NAT IP address. The Updated At field shows the last time the device was seen on the network. The Expires At field shows when the NAT assignment will expire if applicable.
NAT Pool Stats

The NAT Pool Stats table lists the current state of the configured NAT pools. The Uplink field displays the name of the uplink the pool belongs to. The NAT Total field shows the total number of IP addresses available for CGNAT. The NAT Assigned field shows the number of NAT addresses currently assigned. The NAT Avg field displays the average number of devices sharing each NAT IP.
The table also shows BiNAT statistics per uplink: BiNAT Total shows the total BiNAT addresses available, BiNAT Assigned shows how many are assigned, and BiNAT Available shows the remaining unassigned BiNAT addresses.
BiNAT Pool Stats

The BiNAT Pool Stats table lists the current state of any configured BiNAT pools. The Uplink field lists the uplink the IP addresses of the BiNAT pool belong to. The BiNAT Pool field displays the name of the BiNAT pool. The BiNAT Total field shows the total number of IP addresses in the pool. The BiNAT Assigned field displays the number of addresses that have been assigned from the pool. The BiNAT Available field displays the remaining number of IPs available to be assigned for BiNAT.
Network Monitor
The Network Monitor instrument displays information regarding the status of APs, along with channel information for both 2.4GHz and 5GHz. The operator is also able to see the status of any Ping Targets configured, SNMP Trap messages, and run Speed Tests.
Note: In cluster deployments, a Cluster Node field is displayed in applicable scaffolds to indicate which node the entry belongs to.

The above pie chart displays information on the percentage of APs that are online/offline, the channels used for 2.4GHz/5GHz, and what percentage of APs are on each channel.

Wireless Clients
The Wireless Clients scaffold displays the current devices connected to the wireless network. The IP field displays the client device's IP address. The MAC field displays the MAC address of the client device. The Hostname field displays the hostname of the device if known. The Login Session field displays the current login session for the device. The Account field displays the account the client device is attached to.
The OS Type field displays the operating system of the client device if known. The VLAN field displays the VLAN pool the VTA assigned to the device comes from, if applicable. The VLAN Tag field displays the VLAN tag number assigned to the client device. The TX Link Speed and RX Link Speed fields display the transmit and receive link speeds for the client device.
The Channel field displays the wireless channel of the AP the client device is connected to. The Access Point field displays the AP the client device is connected to. The WLAN field displays the SSID the client device is connected to. The Infrastructure Device field displays the wireless controller managing the AP the client device is connected to. The Status field displays the status of the client device.
The SNR field shows the signal-to-noise ratio (the difference between the received wireless signal and the noise floor). The RSSI field is a measurement of how well the device can hear a signal from the AP, with values closer to 0 being better. The Bytes To Client and Bytes From Client fields display the amount of data downloaded and uploaded by the client device.

Wired Clients
The Wired Clients scaffold displays the current devices connected on the wired infrastructure. The IP field displays the client device's IP address. The MAC field displays the MAC address of the client device. The Hostname field displays the hostname of the device if known. The Login Session field displays the current login session for the device. The Account field displays the account the client device is attached to.
The VLAN field displays the VLAN pool the VTA assigned to the device comes from, if applicable. The VLAN Tag field displays the VLAN tag number assigned to the client device. The Switch Port field displays the physical port the device is connected to. The Infrastructure Device field displays the name of the switch as configured in the wired infrastructure. The TX Link Speed field displays the link speed.

Ping Targets
The Ping Targets scaffold displays and configures the ping targets used to determine uplink availability and network health. Each uplink should have more than one ping target associated with it in order to properly determine uplink health.
The Name field is an arbitrary string descriptor used for administrative identification. The Online field indicates the current status of the ping target (whether it is responding to pings). The Target field shows the IP address or hostname that is pinged. The Updated At field shows when the ping target status was last updated.
The Uplinks field shows which uplinks are associated with this ping target for failover monitoring. The Interfaces field shows any specific interfaces associated with the target. The Access Points and Access Point Radios fields show wireless infrastructure used for client experience monitoring.
The RTT Tolerance field shows the maximum acceptable round-trip time in milliseconds. The Jitter Tolerance field shows the maximum acceptable latency variation. The Packet Loss Tolerance field shows the maximum acceptable packet loss percentage. The WLAN field shows the wireless network used for client experience ping tests. The FOM Configurable field indicates whether the ping target can be managed through Fleet Operations Manager.

Speed Tests
Speed Tests allow the operator to set up periodic speed tests to monitor the speed of a specific uplink, as well as speed tests from different points of the network, via an internet-based speed test or using iperf3 to monitor local network infrastructure.
The Name field displays the name of the speed test. The Test Type field displays the type of speed test being run (speedtest.net or iperf3). The Target field shows the target server for the test. The Passing field displays if the most recent test was a success or failure. The Last Result field displays the results of the last test run, including speeds achieved.
The Threshold Display field shows the conditions that need to be met for the test to be deemed a success. The Schedule Display field shows how often the test is performed. The Last Checked At field displays the date and time of the last check. The Next Check At field displays the date and time of the next scheduled check.
The Uplinks field displays the uplinks that the test runs against. The Infrastructure Areas field displays any infrastructure areas selected to run the test from. The Access Points and Access Point Radios fields show any wireless infrastructure used to run the tests.
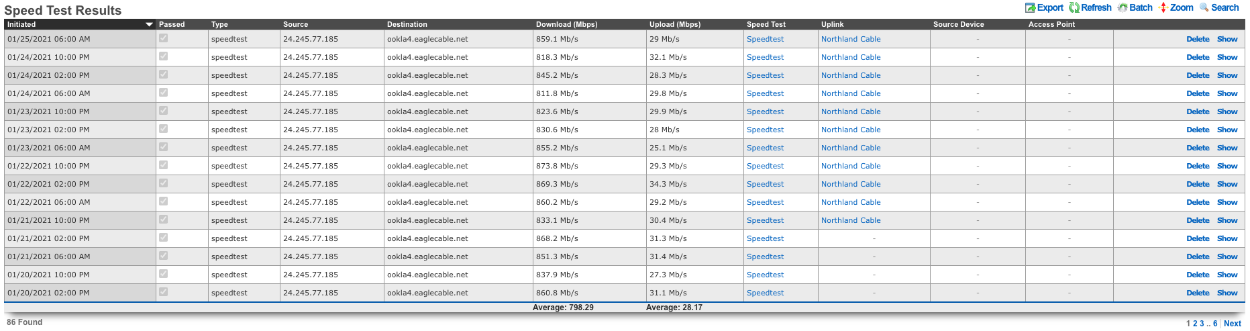
Speed Test Results
The Speed Test Results scaffold gives the operator a history of speed test results. The Initiated At field displays the date and time the test was performed. The Passed field displays if the test passed or failed. The Test Type field displays the type of test performed.
The Source field displays the IP address that was used at the time the test ran. The Destination field shows the server that the test ran against. The Download Mbps and Upload Mbps fields display the measured speeds of the test in megabits per second.
The RTT field shows the round-trip time latency. The Jitter field displays the latency variation. The Packet Loss field shows the percentage of packets lost during the test.
The Speed Test field displays the name of the speed test configuration that was run. The Uplink field displays the uplink that was used for the test if applicable. The Access Point field displays the AP used for the test.
The Tested Via Access Point, Tested Via Access Point Radio, and Tested Via Media Converter fields indicate which infrastructure device initiated the test. The Admin field shows if an administrator manually triggered the test. The PMS Room and Room Type fields show property management system information if applicable. The Is Applicable field indicates whether the result should be considered for threshold evaluation.
SNMP Traps

The SNMP Traps table displays SNMP trap messages received by the rXg from network devices.
The Received At field shows when the trap was received. The Source IP field displays the IP address of the device that sent the trap. The Infrastructure Device field links to the corresponding infrastructure device if configured. The Access Point field links to the access point if the trap originated from a managed AP.
The Uptime field shows the device uptime reported in the trap. The OID field displays the SNMP Object Identifier indicating the type of trap. The Payload field shows the trap data content.
The Acknowledged At and Acknowledged By fields indicate when and by whom the trap was acknowledged, if applicable.
Routes
The Routes instrument provides the operator with real-time information about VPN connections and routing tables on the rXg.
Note: In cluster deployments, a Cluster Node field is displayed in applicable scaffolds to indicate which node the entry belongs to.
OpenVPN Entries
The OpenVPN Entries scaffold displays all currently connected OpenVPN clients and their connection details.
The Username field displays the authenticated username for the VPN connection. The Common Name field shows the certificate common name used for authentication. The Real Address field displays the actual IP address and port from which the client is connecting. The Virtual Address field shows the IP address assigned to the client within the VPN tunnel. The Virtual IPv6 Address field displays the IPv6 address assigned to the client if applicable. The Connected At field shows when the client established the connection. The Bytes Sent and Bytes Received fields display the amount of data transferred over the VPN connection. The OpenVPN Server field indicates which OpenVPN server configuration the client is connected to. The Account field shows the associated account if the user authenticated with account credentials. The Admin field shows the associated admin if the user authenticated with admin credentials.
IPsec Entries
The IPsec Entries scaffold displays the current IPsec Security Associations (SAs) on the rXg.
The Created field indicates when the SA was established. The Src field displays the source IP address of the IPsec tunnel. The Dst field shows the destination IP address of the tunnel endpoint. The Bytes In and Bytes Out fields display the data transferred through the tunnel. The Protocol field displays the security protocol in use (ESP or AH). The Mode field indicates the IPsec mode (tunnel or transport). The Lifetime field shows the remaining lifetime of the SA in seconds. The Validtime field displays the validity time remaining for the SA.
BGP Entries
The BGP Entries scaffold displays the status of BGP peering sessions on the rXg.
The Cluster Node field shows which node in a cluster the BGP session belongs to. The Neighbor field displays the IP address of the BGP peer. The BGP Peer field links to the configured BGP peer definition. The State field indicates the current BGP session state (Idle, Connect, Active, OpenSent, OpenConfirm, or Established). The ASN field shows the Autonomous System Number of the peer. The Msg Rcvd field displays the number of BGP messages received from the peer. The Msg Sent field shows the number of BGP messages sent to the peer. The Prf Rcvd field shows the number of prefixes received from the peer. The Uptime field displays how long the session has been established.
Routes
The Routes scaffold displays the current routing table entries on the rXg.
The Cluster Node field shows which node in a cluster the route belongs to. The Destination field shows the destination network or host for the route. The Gateway field displays the next-hop IP address or interface for reaching the destination. The Flags field shows the route flags indicating route characteristics (U=Up, G=Gateway, H=Host, S=Static, etc.). The Use field displays the number of times this route has been used. The MTU field shows the Maximum Transmission Unit for packets using this route. The If field indicates the network interface used for this route. The Expire field indicates when a dynamic route will expire. The BGP Peer, IPsec Tunnel, OpenVPN Client, and Tunnel Interface fields show associations with VPN configurations that may have created the route. The IP6 field indicates whether this is an IPv6 route.
System
The System instrument provides the operator with detailed information about the rXg hardware, operating system, and running processes.
Note: In cluster deployments, a Cluster Node field is displayed in applicable scaffolds to indicate which node the entry belongs to.
System Infos
The System Infos scaffold displays comprehensive hardware and software information about the rXg system.
The Cluster Node field shows which node in a cluster the system info belongs to. The Hostname field displays the configured system hostname. The Booted At field indicates when the system was last started. The Uptime field shows how long the system has been running since the last boot.
The rXg Build and rXg IUI fields show the current rXg software version and interface version. The OS Release field displays the operating system release version. The BIOS Version field shows the system BIOS version.
The System Manufacturer, System Family, and System Product Name fields provide system identification information. The Processor Version field shows detailed processor identification. The Processor Count field shows the number of CPU cores. The Processor Temp field displays the current CPU temperature if available.
The Disk Device field shows the primary storage device. The Disk Total GB field displays the total disk capacity.
The Memory Total MB field shows the total system memory in megabytes. The Memory Used MB field displays the amount of memory currently in use. The Memory Free MB field indicates the available free memory. The Load Avg 15m field displays the system load average over fifteen minutes.
Interface Stats
The Interface Stats scaffold displays detailed information about all network interfaces on the system.
The Cluster Node field shows which node in a cluster the interface belongs to. The If field shows the interface name. The Media field indicates the interface media type and link status.
The Interface, Pseudo Interface, and VLAN fields link to the corresponding rXg configuration records. The Parent field shows the parent interface for VLANs. The Tag field displays the VLAN tag if applicable.
The Aliases field displays all IP addresses configured on the interface. The MAC field displays the hardware MAC address. The MTU field shows the Maximum Transmission Unit. The PPP and Uplink fields indicate associations with WAN connectivity configurations.
Uplink Stats
The Uplink Stats scaffold displays dynamic information about configured uplinks.
The Cluster Node field shows which node in a cluster the uplink belongs to. The Uplink field links to the uplink configuration record. The Gateway field displays the IPv4 default gateway obtained via DHCP or configured statically. The Gateway6 field shows the IPv6 gateway if applicable. The DNS field displays the DNS servers provided by the uplink.
Sendmail Queue Entries
The Sendmail Queue Entries scaffold displays emails currently queued for delivery on the rXg.
The Cluster Node field shows which node in a cluster the queue entry belongs to. The QTime field indicates when the message was queued. The QID field shows the unique queue identifier for the message. The Sender field shows the envelope sender address. The Recipient field displays the envelope recipient address(es). The Info field provides additional status information about the queued message.
Filesystems
The Filesystems scaffold displays ZFS dataset and filesystem usage information.
The Cluster Node field shows which node in a cluster the filesystem belongs to. The Mount field displays the mount point. The Used field displays the amount of space used. The Available field indicates the remaining available space. The Size field shows the total size of the dataset. The Capacity field shows the percentage of space used.
The Ratio field shows the compression ratio achieved. The Used DS field shows space used by the dataset itself. The Refquota field displays any configured reference quota. The Used Snap field shows space consumed by snapshots. The Filesystem field shows the ZFS dataset name.
SMART Entries
The SMART Entries scaffold displays S.M.A.R.T. (Self-Monitoring, Analysis and Reporting Technology) data for storage devices.
The Device field shows the device name. The POH field displays Power-On Hours. The PCC displays Power Cycle Count. The USC shows Unsafe Shutdown Count. The EC shows Erase Count.
The Reads and Writes fields show total bytes read and written to the device. For SSDs, the Spare field shows the available spare capacity percentage. The Spare Thresh field indicates the threshold below which spare capacity is considered critical. The Spare Used field displays the percentage of spare capacity consumed.
Kernel States
The Kernel States scaffold displays kernel sysctl values from the rXg system.
The Cluster Node field shows which node in a cluster the kernel state belongs to. The Key field shows the sysctl variable name. The Value field displays the current value of the sysctl. This scaffold provides visibility into system tuning parameters and runtime kernel statistics.
Process Entries
The Process Entries scaffold displays running processes on the rXg system, similar to the output of the ps command.
The Cluster Node field shows which node in a cluster the process is running on. The Started At field indicates when the process was started. The Command field shows the process command name.
The CPU field displays the CPU usage percentage. The Mem field shows the memory usage percentage. The VSZ field indicates the virtual memory size in kilobytes. The RSS field displays the resident set size (physical memory used) in kilobytes. The Time field shows the cumulative CPU time.
The Usr field displays the username running the process. The Stat field shows the process state codes (R=Running, S=Sleeping, etc.). The MWChan field displays the wait channel if the process is sleeping.
The PID field shows the process ID. The UID field shows the user ID. The PPID field displays the parent process ID. The PRI field displays the scheduling priority. The NI field shows the nice value.
Delayed Jobs
The Delayed Jobs scaffold displays background jobs queued for asynchronous processing.
The Run At field shows when the job is scheduled to run. The Created At field indicates when the job was created. The Handler field contains the serialized job payload describing the task to be performed. The Queue field indicates which job queue the job is assigned to.
The Priority field shows the job priority (lower numbers run first). The Attempts field displays how many times the job has been attempted. The Locked At field indicates when the job was locked for processing. The Locked By field displays which worker has locked the job.
The Failed At field shows when a job failed if applicable. The Last Error field displays the error message from the most recent failure. The Updated At field shows when the job record was last modified.
PCI Devices
The PCI Devices scaffold displays PCI devices detected in the system.
The Cluster Node field shows which node in a cluster the device belongs to. The Name field shows the device name as identified by the system. The Vendor field shows the hardware vendor name. The Vendor ID field displays the PCI vendor ID. The Device field shows the device description. The Device ID field displays the PCI device ID.
The Device Class field indicates the device class (Network controller, Storage controller, etc.). The Device Subclass field provides more specific classification. The Bus field displays the PCI bus location. The Unique ID field shows a unique identifier for the device.
Queues
The Queues instrument provides the operator with real-time bandwidth queue statistics, traffic rates, and quality of service (QoS) information.
Note: In cluster deployments, a Cluster Node field is displayed in applicable scaffolds to indicate which node the entry belongs to.
Traffic Rate Summaries
The Queues instrument displays several summary panels providing at-a-glance traffic rate information:
Login Session Traffic Rates Summary shows aggregate throughput statistics for active login sessions, allowing operators to quickly identify high-bandwidth users.
MAC Traffic Rates Summary displays traffic rates organized by MAC address, useful for identifying devices consuming significant bandwidth.
IP Traffic Rates Summary shows bandwidth consumption organized by IP address.
Policy Traffic Rates Summary displays aggregate traffic rates for each configured bandwidth policy.
Bandwidth Queue Traffic Rates Summary shows throughput statistics for each bandwidth queue definition.
PF Queues Summary provides an overview of packet filter queue utilization and statistics.
Interface Rates
The Interface Rates scaffold displays real-time throughput statistics for all network interfaces.
The Cluster Node field shows which node in a cluster the interface belongs to. The If field shows the interface name. The BPS In field displays the current inbound throughput in bytes per second. The BPS Out field shows the current outbound throughput in bytes per second. The PPS In field displays the inbound packets per second. The PPS Out field shows the outbound packets per second.
The Uplink, Interface, VLAN, and PPP fields link to the corresponding rXg configuration records, allowing operators to identify which configured network element the interface belongs to.
PF Queues
The PF Queues scaffold displays detailed information about active packet filter queues used for traffic shaping and quality of service.
The Cluster Node field shows which node in a cluster the queue belongs to. The BPS field shows the current throughput in bytes per second. The PPS field displays the current packets per second. The Direction field indicates whether the queue handles inbound or outbound traffic.
The IP field shows the IP address associated with the queue if it is a per-device queue. The MAC field displays the MAC address if applicable. The Login field shows the login session identifier for session-based queues.
Association fields link the queue to relevant rXg configuration objects: Login Session, Account, IP Group, Account Group, MAC Group, Shared Credential Group, RADIUS Group, LDAP Group, Policy, and Bandwidth Queue.
The Priority field shows the queue priority level. The Upperlimit field indicates the maximum bandwidth the queue may use. The Realtime field shows the realtime (guaranteed minimum) bandwidth allocation.
The Uplink, Interface, and VLAN fields link to the network interface configuration. The If field displays the interface name the queue is attached to. The Name field shows the full queue name, which typically follows a hierarchical naming convention. The Root Queue field shows the parent queue in the hierarchy.
The Clear Assignment Cache action clears the cached mappings between accounts, IP addresses, and bandwidth queues. Use this when queue assignments appear out of sync (e.g., traffic not being shaped correctly) or after making significant changes to bandwidth queue configurations. The system will rebuild queue assignments automatically after the cache is cleared.
Utilities
The Utilities instrument provides network diagnostic tools and packet capture capabilities for troubleshooting connectivity and analyzing network traffic.
Note: In cluster deployments, a Cluster Node field is displayed in applicable scaffolds to indicate which node the entry belongs to.
Ping
The Ping utility allows the operator to send ICMP echo requests to test connectivity to a target host.
Enter an IP address or hostname in the Target field and click Ping to execute the test. The results will display in the Result text area, showing the round-trip time for each ping packet and summary statistics including packet loss percentage and average latency.
This tool is useful for quickly verifying network connectivity to upstream providers, DNS servers, or any host reachable from the rXg.
Traceroute
The Traceroute utility displays the network path taken by packets from the rXg to a destination host.
Enter an IP address or hostname in the Target field. Optionally check resolve DNS to display hostnames for each hop instead of just IP addresses. Click Traceroute to execute the test.
The results show each router hop along the path to the destination, including the IP address (or hostname if DNS resolution is enabled) and round-trip time for each hop. This tool is invaluable for diagnosing routing problems and identifying where packet loss or latency is occurring in the network path.
Ping Targets
The Ping Targets scaffold configures persistent ping monitoring targets used to determine uplink availability and network health.
The Cluster Node field shows which node in a cluster the ping target belongs to. The Name field is an arbitrary descriptor for administrative identification. The Online field displays the current status of the ping target based on recent ping results. The Target field specifies the IP address or hostname to ping. The Updated At field shows when the ping target status was last updated.
The Uplinks field associates the ping target with specific uplinks for failover monitoring. The Interfaces field allows association with specific interfaces. The Access Points and Access Point Radios fields enable client experience monitoring from wireless access points.
Tolerance thresholds define acceptable network quality: RTT Tolerance sets the maximum acceptable round-trip time in milliseconds. Jitter Tolerance sets the maximum acceptable variation in latency. Packet Loss Tolerance sets the maximum acceptable percentage of lost packets.
The WLAN field specifies a wireless network for client experience ping tests. The FOM Configurable field indicates whether the ping target can be configured through the Fleet Operations Manager.
When creating or editing a ping target, additional configuration options are available: Timeout sets how many seconds to wait for a response. Attempts specifies the number of ping packets to send per monitoring cycle. Interval sets the time between ping packets. Check SPAN enables SPAN port monitoring. Note provides space for administrative comments.
Tcpdumps
The Tcpdumps scaffold allows operators to capture network traffic for analysis and troubleshooting.
The Capture Behavior field determines how the capture is handled: Store to file saves the capture to disk for later download, while Stream to browser provides real-time packet viewing.
The Cluster Node field shows which node in a cluster to capture from. The Interface field selects which network interface to capture traffic from. Alternatively, the VLAN field allows capturing on a specific VLAN. The Access Point Radio field enables remote packet capture from compatible wireless access points.
Capture limits can be set using Max Packets to stop after capturing a specific number of packets, or Max Time and Max Time Unit to stop after a duration.
The Host A field filters the capture to only include traffic involving a specific IP or MAC address. The Host B field adds a second host filter to capture traffic between two specific endpoints. The Port field filters to capture only traffic on a specific TCP/UDP port. The Filter field allows entering a custom tcpdump filter expression for advanced filtering.
Action links are provided to Show Packets for streaming captures, Download completed captures as pcap files for analysis in tools such as Wireshark, and Terminate running captures.
LDAP User Info
When LDAP domains are configured, the LDAP User Info utility allows operators to look up user information from the LDAP directory.
Enter a Username and select the LDAP Domain to query, then click Lookup. The results display the LDAP attributes associated with the user account, including group memberships and other directory information.
This tool is useful for verifying that LDAP integration is working correctly and for troubleshooting user authentication issues.
LDAP Authentication Test
When LDAP domains are configured, the LDAP Authentication Test utility allows operators to verify that user credentials are valid.
Enter a Username and Password, select the LDAP Domain, then click Authenticate. The result indicates whether authentication succeeded or failed, helping operators troubleshoot login problems and verify LDAP connectivity.
Installation
The rXg may be installed on bare metal or in virutalization platforms including, but not limited to, VMware ESXi, Microsoft Hyper-V and Linux QEMU.
Installation Options: Storage
rXg File System
The rXg platform uses the ZFS (Zettabyte File System) file system, which is a high-performance, scalable file system and volume manager designed by Sun Microsystems. ZFS provides advanced features like data integrity verification, snapshots, copy-on-write, and automatic repair. ZFS eliminates the need for a separate volume manager by managing storage pools dynamically, allowing for easy expansion and redundancy without the need for hardware/software based RAID solutions. ZFS supports high storage capacities, compression, and deduplication, making it ideal for enterprise and cloud environments. With built-in RAID (RAID-Z), self-healing properties, and efficient data management, ZFS is a robust choice for ensuring data reliability and reducing administrative overhead while maintaining optimal performance.
Hardware RAID with ZFS
There are numerous benefits to implementing ZFS in a configuration where the ZFS software has direct access to the drives. ZFS delivers greater efficiency and reliability than hardware RAID in all cases that RG Nets has encountered over the past decade. Running ZFS on top of hardware RAID systems has been demonstrated to result in degraded performance in several instances, even if the hardware RAID system is presenting as JBOD.
ZFS needs direct disk access (HBA Mode). Hardware RAID hides individual disks from ZFS, preventing these features from working correctly. ZFS is designed to manage disks directly so it can perform the following:
- Detect and correct silent data corruption
- Maintain checksums
- Use self-healing and scrubbing features
Both ZFS and hardware RAID offer redundancyusing both can lead to:
- Confusing failure detection
- Slower performance
- Difficult recovery
ZFS rebuilds (resilvering) are faster and safer because they only copy used data, unlike hardware RAID which rebuilds entire disks, increasing risk of failure during the rebuild.
What to do when you have to use a Hardware RAID Controller to attach drives?
Set RAID Controller to HBA/JBOD/IT mode: if your RAID Controller supports it, configure it to "pass-through" or "IT mode" so ZFS sees each physical disk directly.
No redundancy in Hardware RAID controller: if HBA mode isn't available, and you must use hardware RAID, only use RAID 0 (no redundancy) on each disk and let ZFS manage redundancy itself. This is a last resort to try to minimize the interference of the RAID Controller with the drives and conflicts with ZFS.
Storage Options during installation
When installing an operating system with ZFS support, choosing the right RAID configuration depends on factors like data redundancy, performance, and storage efficiency. Below are key recommendations for the number of drives and the pros and cons of each and every combination in terms of rXg installation.
Single Disk (No RAID)
- Use Case: Non-critical personal systems or testing environments.
- Pros: Simplicity.
- Cons: No redundancy; data loss if the disk fails.
RAID-Z (RAID-Z1, RAID-Z2, RAID-Z3)
RAID-Z1(Single Parity, Like RAID 5)- Use Case: Minimum 3 disks; offers redundancy but can only tolerate one disk failure.
- Pros: Good balance of redundancy and storage capacity.
- Cons: Risk of data loss if two disks fail.
RAID-Z2(Double Parity, Like RAID 6)- Use Case: Minimum 4 disks; can withstand two disk failures.
- Pros: Better reliability than RAID-Z1.
- Cons: Slightly reduced storage efficiency.
RAID-Z3(Triple Parity)- Use Case: Minimum 5+ disks; tolerates three disk failures.
- Pros: Maximum fault tolerance.
- Cons: More storage overhead.
Mirrored vdevs (Like RAID 1)
- Use Case: Minimum 2 disks per mirror; commonly used in high-performance environments.
- Pros: Fastest rebuild times, best read performance.
- Cons: Requires more disks; less storage efficiency.
Striped vdevs (RAID 0 Not Recommended)
- Use Case: High-performance scenarios with no redundancy.
- Pros: Maximum speed and storage utilization.
- Cons: No fault tolerance; one disk failure means total data loss.
Drive Selection Options
The drive count translates then into specific selection options during the installation process, as shown below for drive count 1-6. Higher drive counts will default to RAID-Z3 configuration style.
| Drive count | Installer options |
|---|---|
| 1 | Automatic drive selection, no options to consider |
| 2 | 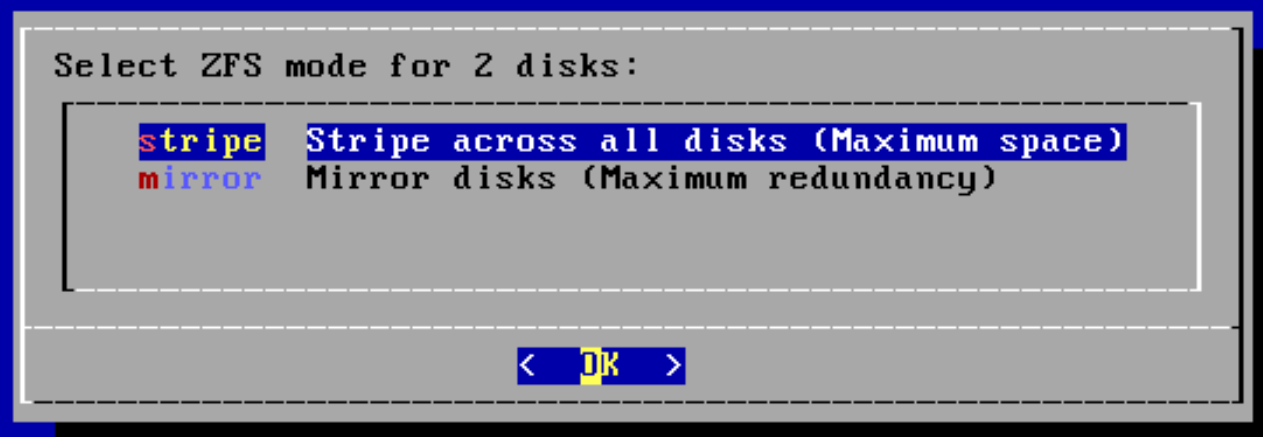 |
| 3 | 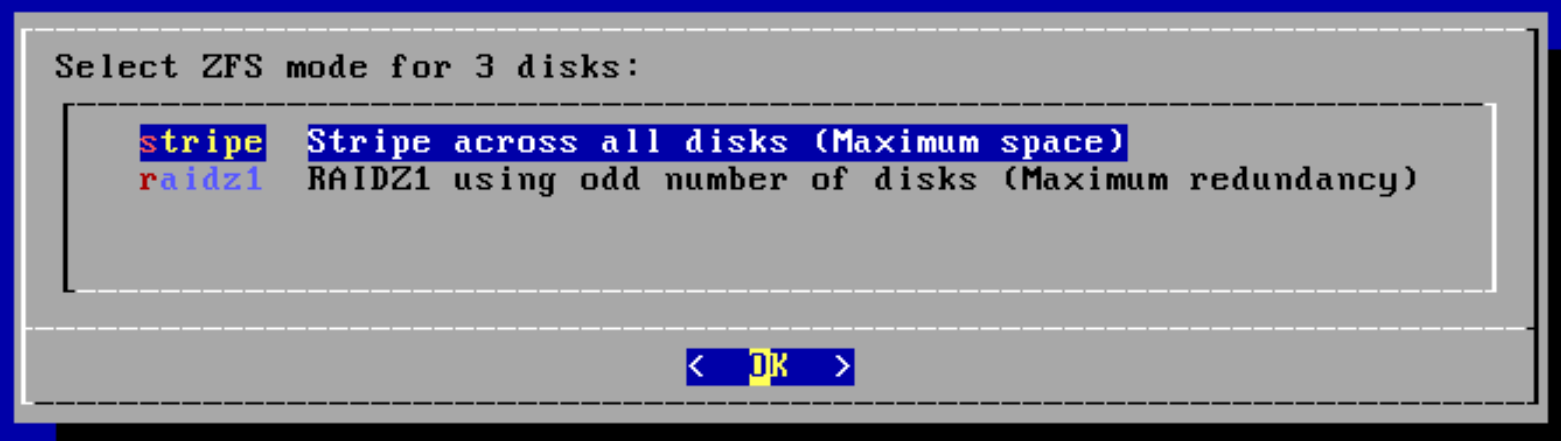 |
| 4 | 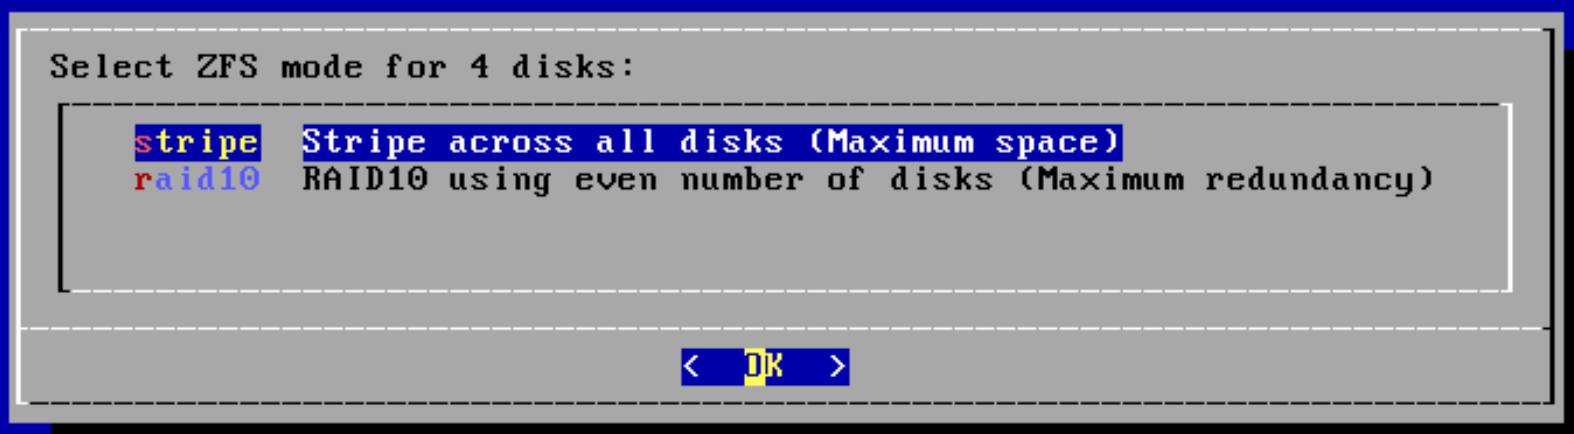 |
| 5 | 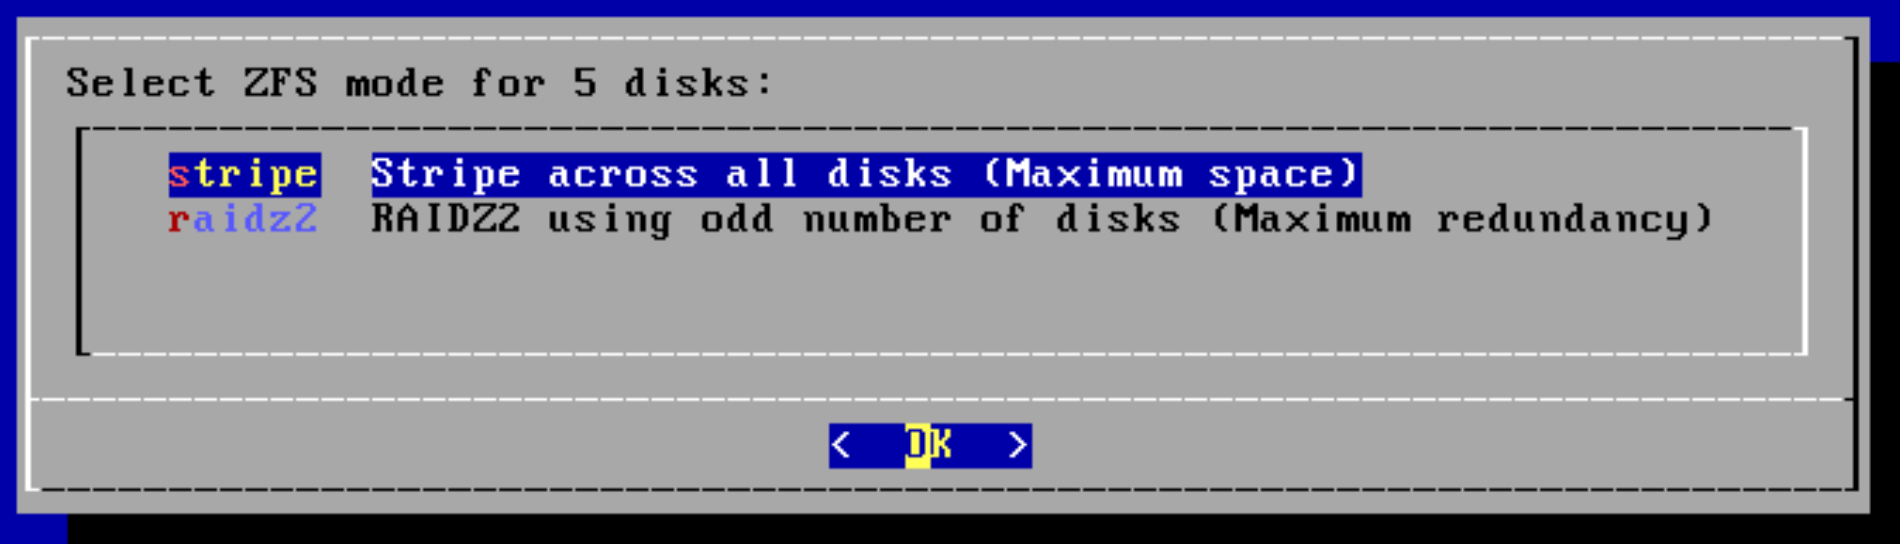 |
| 6 |  |
Installation on VMware ESXi
Step 1: Set up switches
The rXg is a router, and thus it requires separate network segments for the WAN and LAN. A default VMware ESXI installation includes a single virtual switch. Youll need to edit the existing switch as well as create a second virtual switch.
Navigate to the networking settings and edit the default switch.
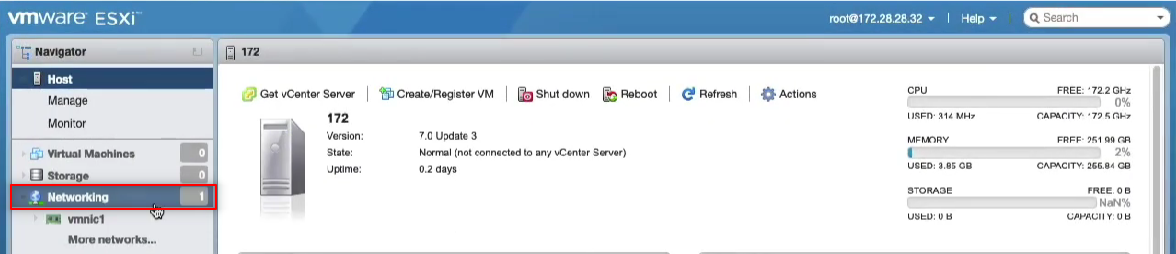
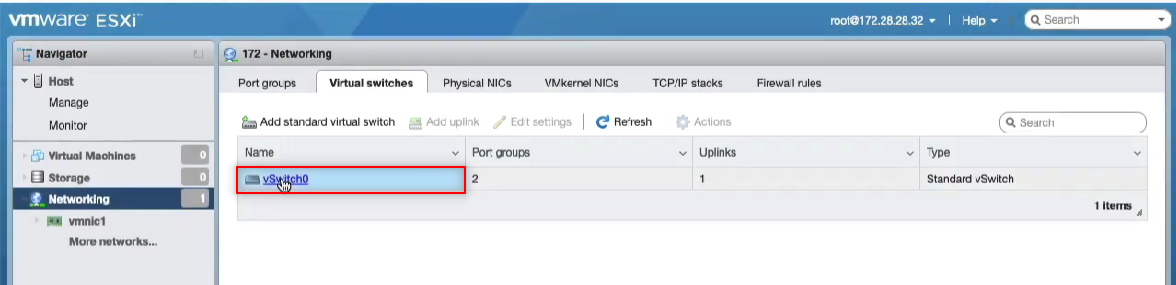
Click Actions >> Edit Settings and enable all the options under the security setting. This allows DHCP to pass.
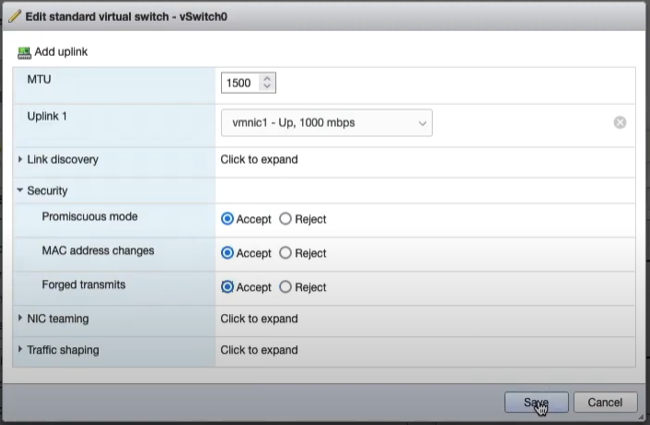
Create a second virtual switch and enable all the options under the security setting as you did before.
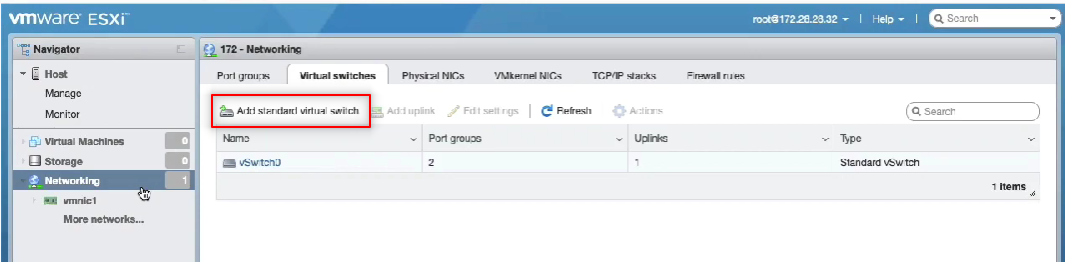
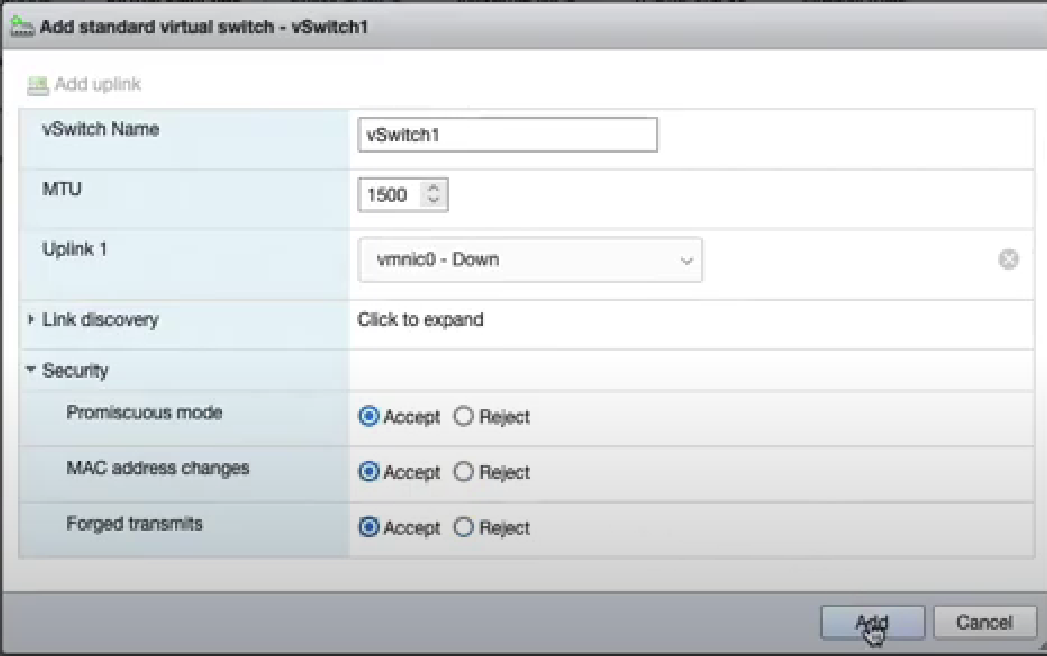
It is also possible to use the command line to easily create an arbitrary number of virtual switches. This is typically done to create a large number of isolated L2 segments within a single hypervisor. The command to create a single virtual switch on the ESXi CLI is:
esxcli network vswitch standard add -v VS_NAME
Here is a script that you can run on ESXi to create an arbitrary number of virtual switches:
if ["$#" -ne 1]; then max=8; else max=$1; fi
for i in `seq 0 $max`
do
n=`printf "%02d\n" $i`
esxcli network vswitch standard add -v isol_$n
done
Step 2: Create port groups
You need to create port groups for the LAN and WAN. Navigate to the port groups tab and create the WAN port group.
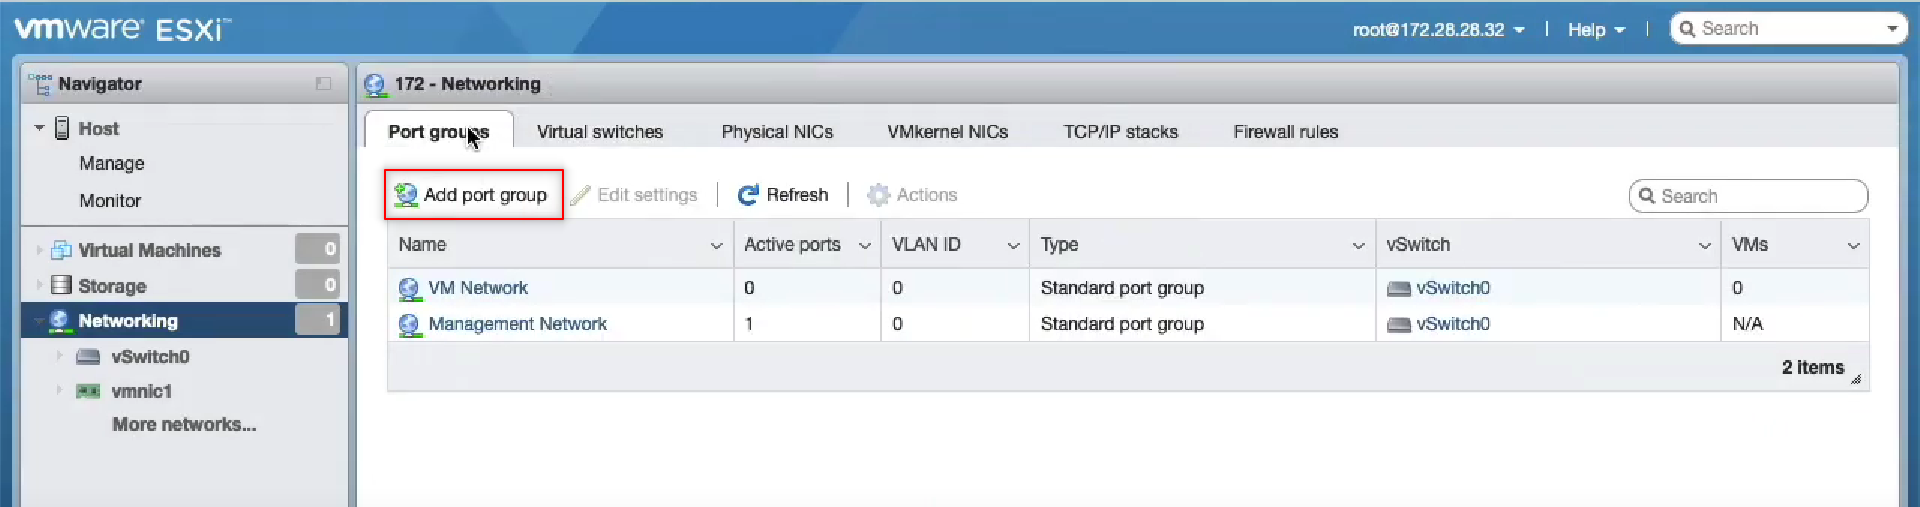
Attach the WAN port group to your desired switch attached to the interface. Repeat this for the LAN, attaching it to the other switch. You must set the VLAN ID of this port group to 4095 in order to enable it as a trunk port.

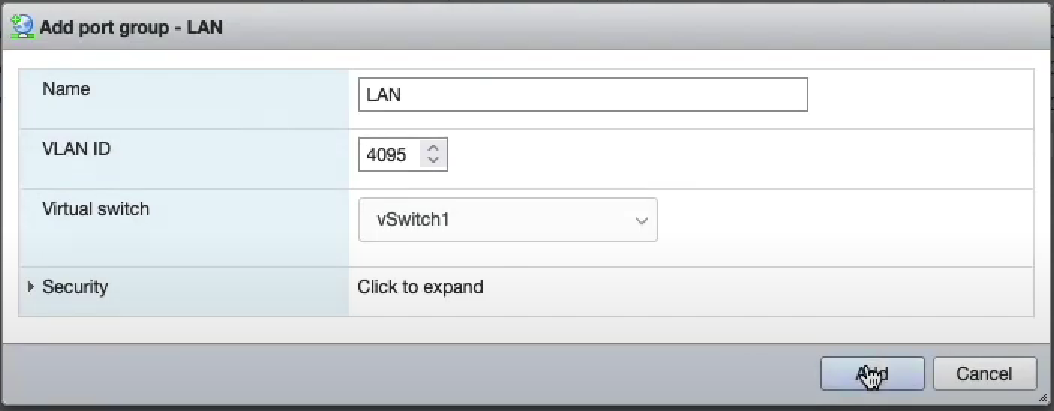
It is also possible to use the command line to easily create an arbitrary number of virtual switches. This is typically done to create a large number of isolated L2 segments within a single hypervisor. The command to create a single virtual switch on the ESXi CLI is:
esxcli network vswitch standard portgroup add -v VS_NAME -p VS_NAME_trunk
esxcli network vswitch standard portgroup set -p VS_NAME_trunk --vlan-id 4095
Here is a script that you can run on ESXi to create an arbitrary number of port groups:
if ["$#" -ne 1]; then max=8; else max=$1; fi
for i in `seq 0 $max`
do
n=`printf "%02d\n" $i`
esxcli network vswitch standard portgroup add -v isol_$n -p isol_$n_tnk
esxcli network vswitch standard portgroup set -p isol_$n_tnk --vlan-id 4095
done
Step 3: Prepare the storage subsystem
Navigate to the storage settings and select New datastore.
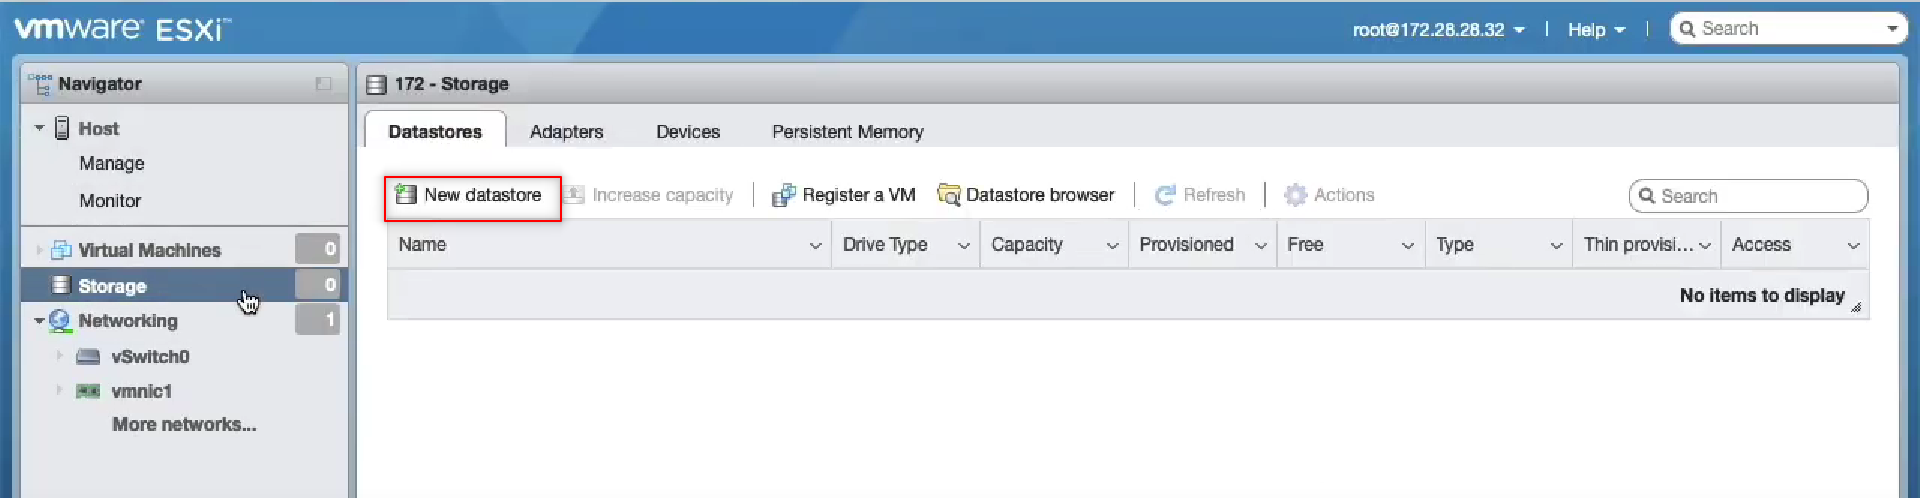
Format your new datastore as VMFS.

Name your datastore and click through to Finish.
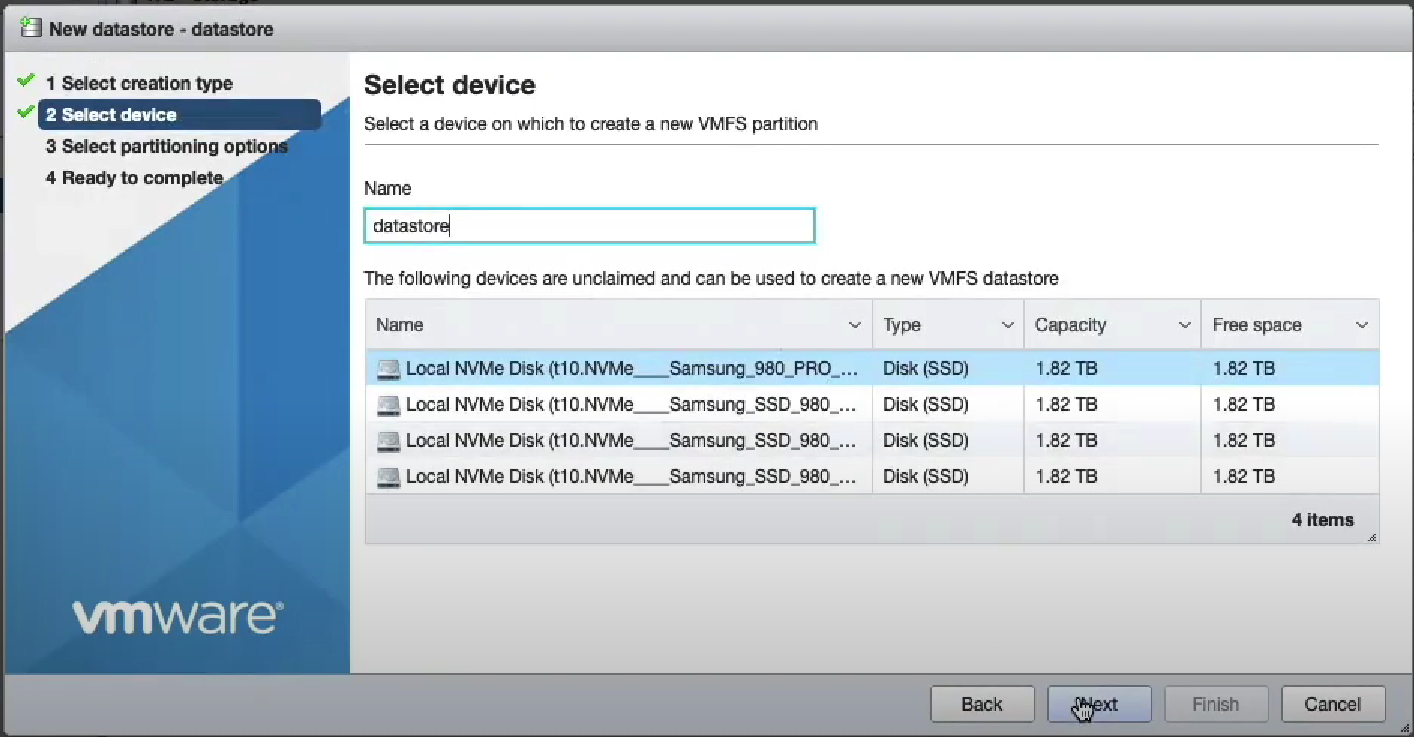
Step 4: Upload the rXg ISO to the ESXI datastore using the browser.
Click on the name of the datastore and Datastore browser.
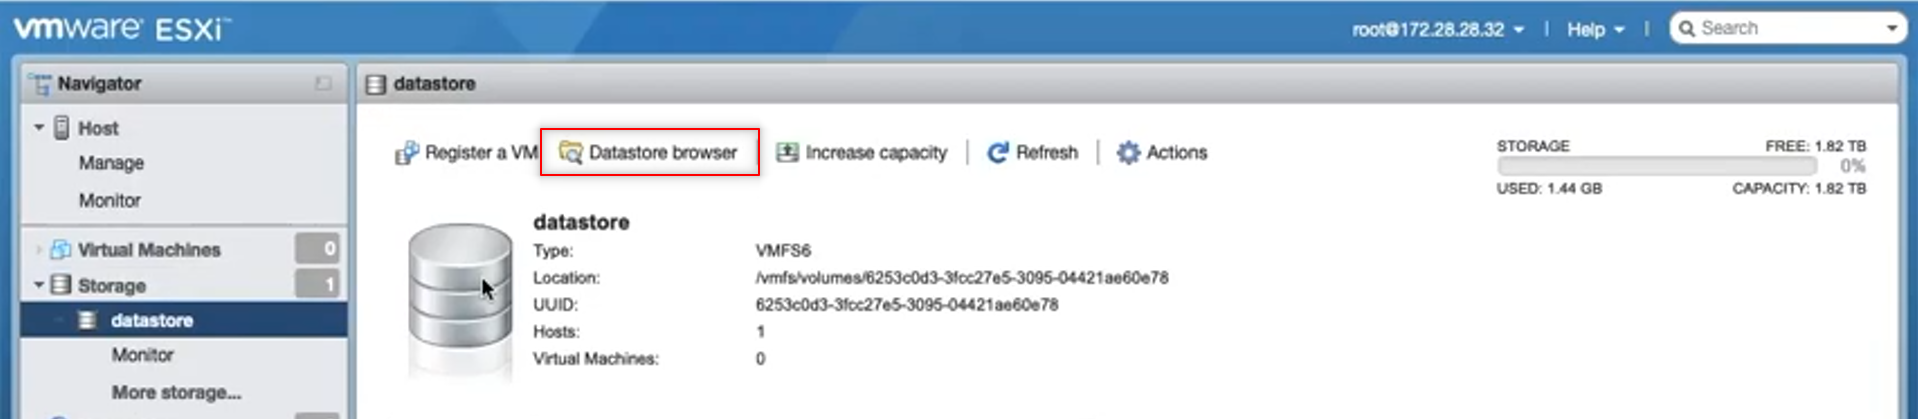
Find Upload
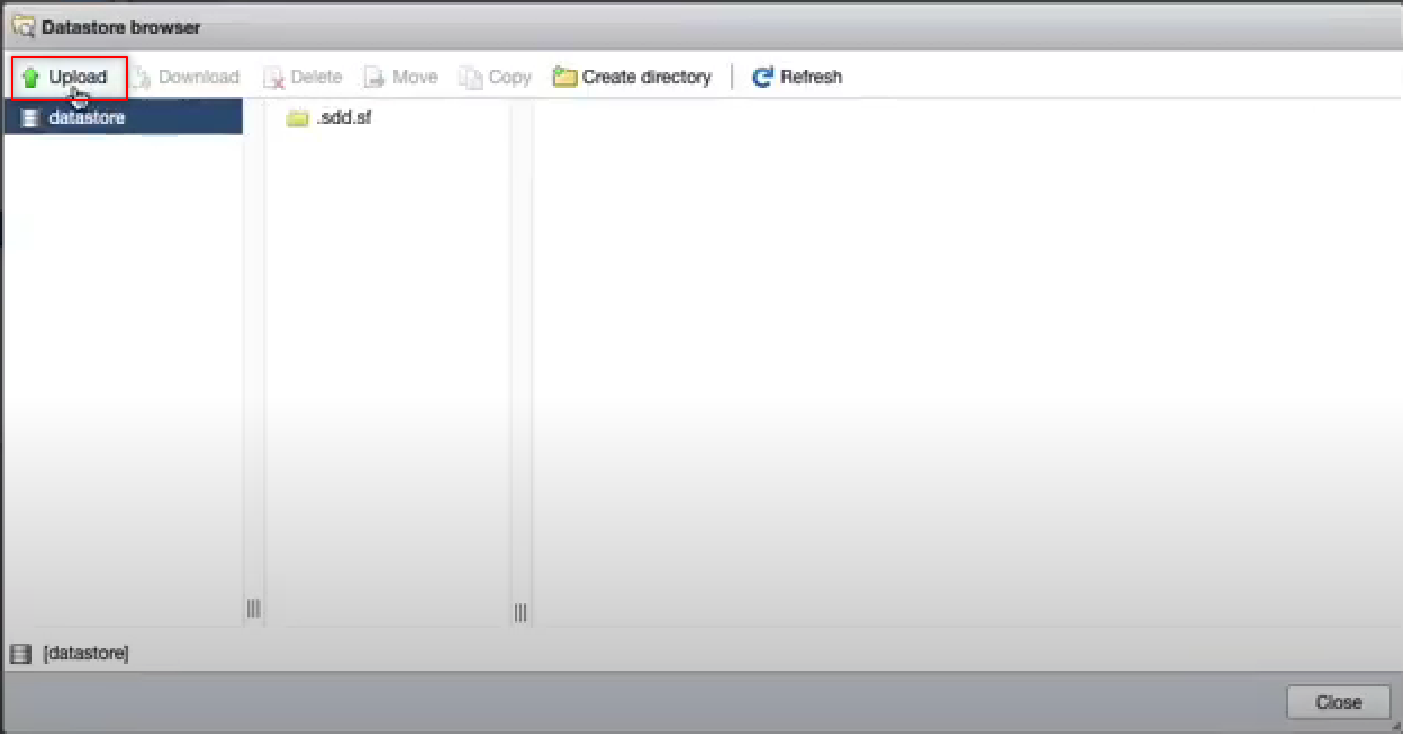
This may take a few minutes to complete. Select the uploaded file and close.
Step 5: Create the rXg virtual machine.
Select Virtual Machines from the menu on the left, and then Create / Register VM.
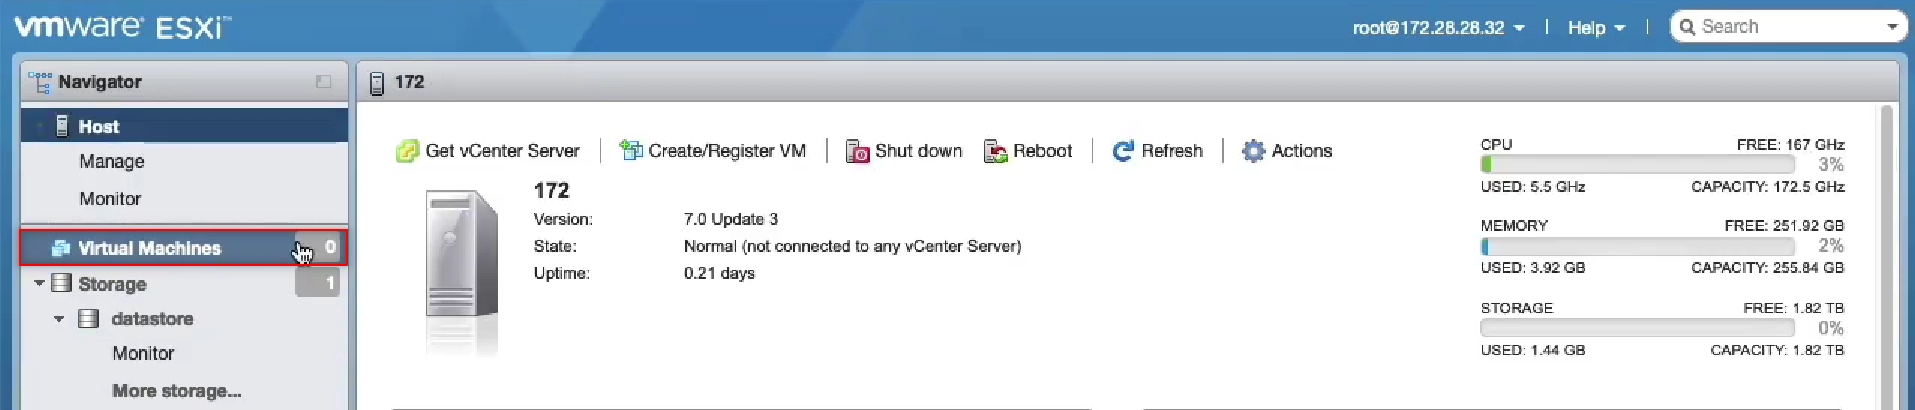
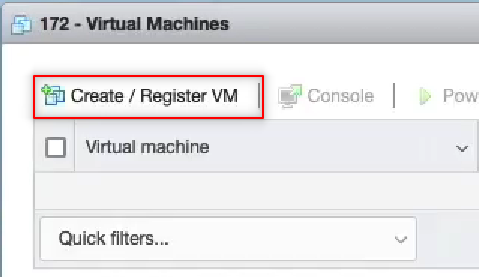
The guide will pop up on the screen. Select Next to move to Step 2: Select a name and guest OS. Choose Other as the Guest OS family and FreeBSD 13 (64-bit) for the Guest OS Version.
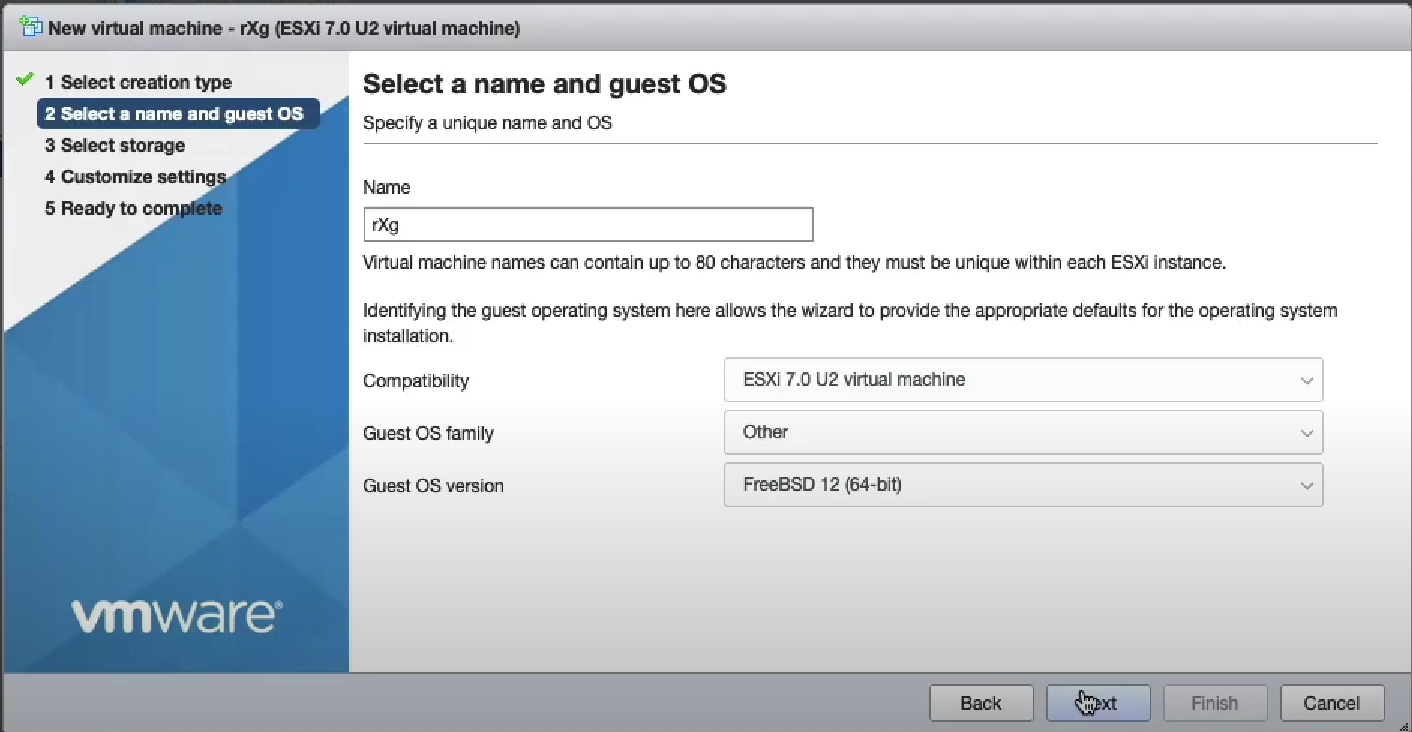
Click on Next two times.
In Step 4: Customize Settings, youll need to configure the CPU, RAM and disk settings based on the values required for this installation.

Add at least one more network adapter. In this example we have added three additional network adapters.
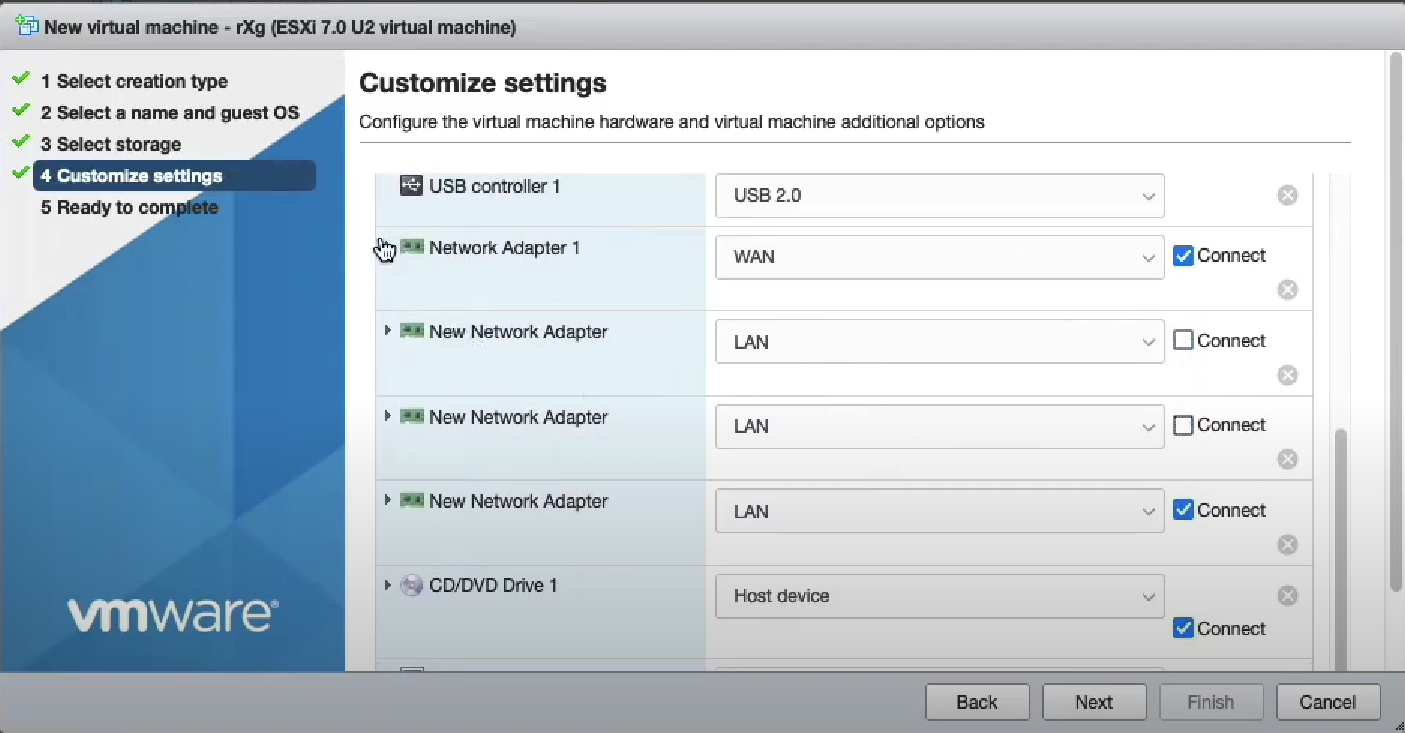
We use the VMX net 3 adapter type. Be careful to attach the network adapters to the appropriate port groups.
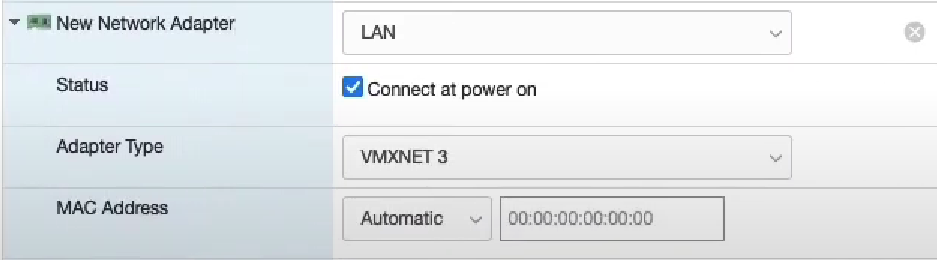
Finally, attach the rXg ISO file to the CDROM.

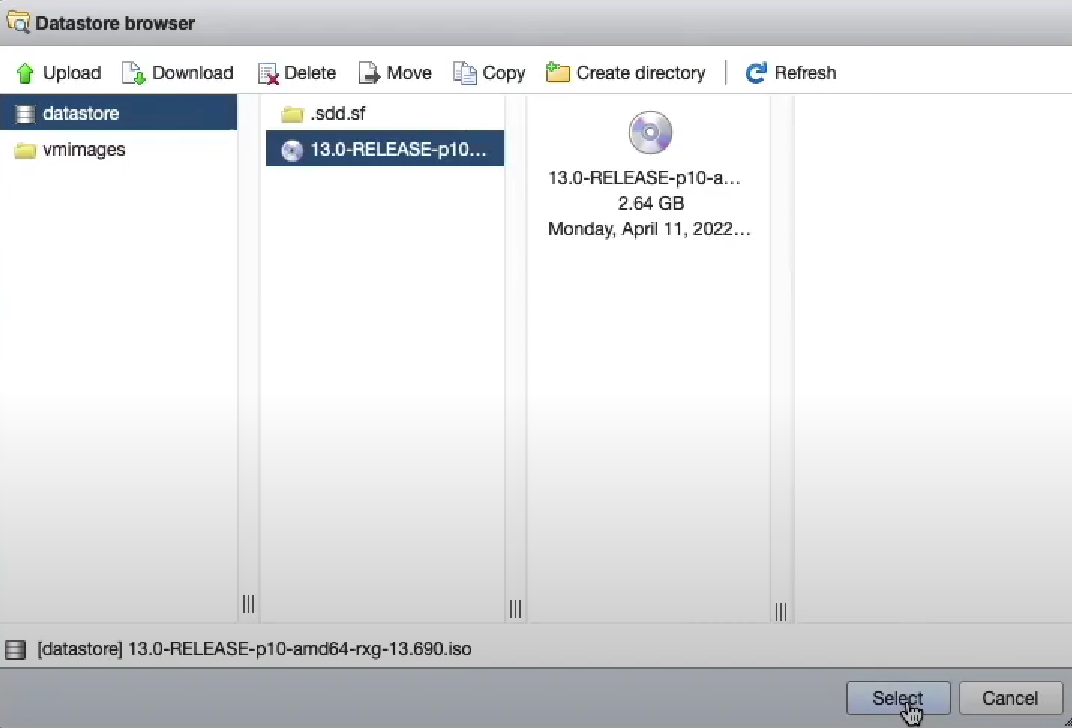
Click Next and Finish.
Select your newly created virtual machine and power on to start the installation.

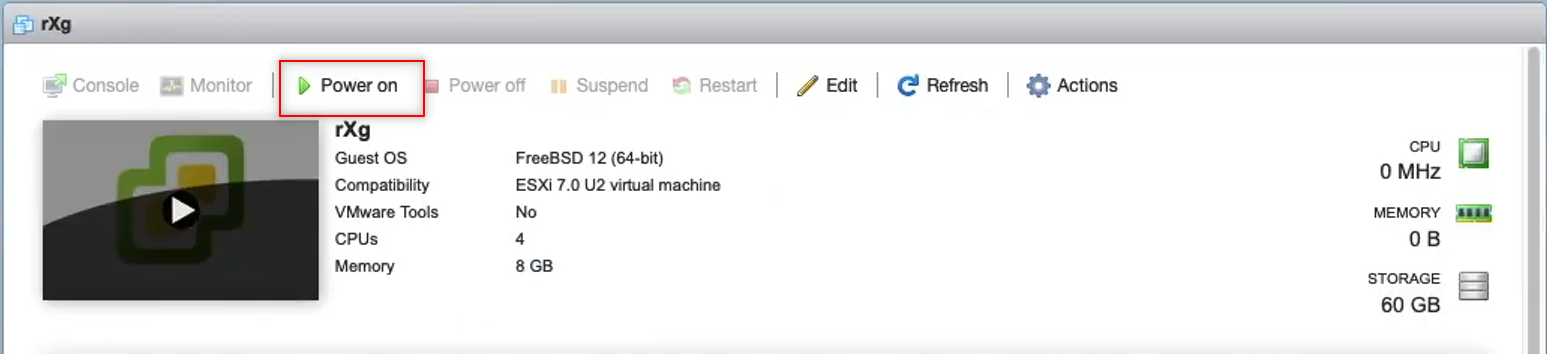
Installation will begin. Hit enter to proceed past the prompt.

The installation will take a few minutes to complete. Once the installation is complete, power down the virtual machine.


Step 6: Edit the settings of the virtual machine
Click on Edit and use the VM options tab.


Select Advanced and Edit Configuration. Search for Ethernet.

Youll need to enter a reasonable sequence for the slot numbers to ensure that the Network Adapters line up with the virtual interfaces. In this example we use 1184, 2208, 3232, and 4256. These are known good values. If you need more we know that 5280, 6304 and 7328 work for the next few interfaces.
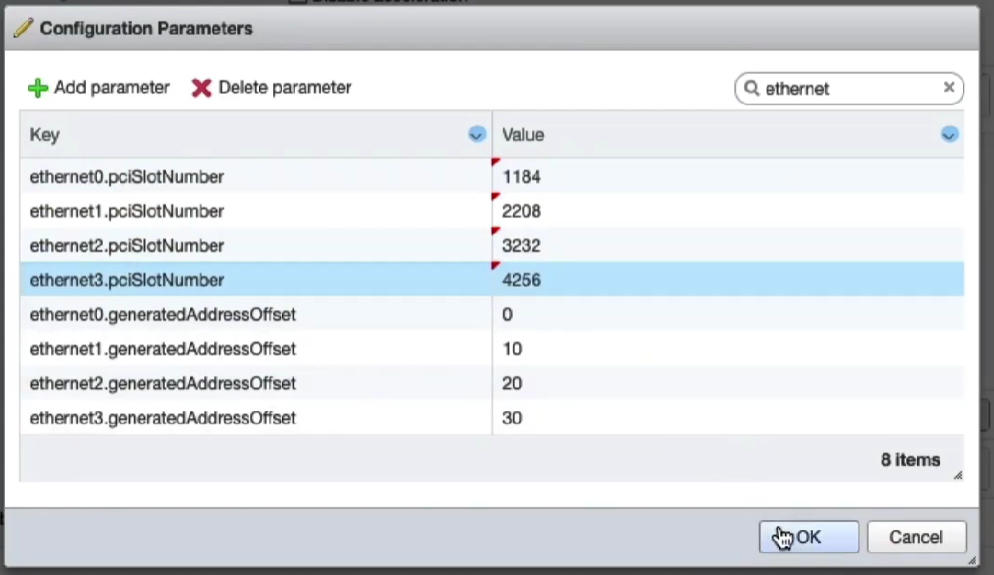
Save these settings and power on the virtual machine.
The rXg virtual machine will go through the initialization process. This will take several minutes. Once this is complete you may now proceed with accessing the web GUI.
Lab Manual
The Lab Manual contains instructions for many common configurations.
Bootstrap License
Access the rXg Admin interface
After installing the ISO and viewing the CLI, find the IP address and use a browser to navigate to https://%lt;ip.address%gt;/admin and you will be presented with the create first admin GUI.
You may choose to access the rXg from the LAN or the WAN. For the purposes of this lab, use your management computer to connect to the LAN side of the rXg via the wireless network that has been created for your lab (lab0X SSID).
When configuring a single physical rXg, this will be the_highest_ numbered port. Usually this is EM3 or IGB3. For a virtual installation, you must connect to the same vSwitch portgroup as the last virtual interface of the guest VM.
The LAN interface runs a DHCP server, handing out addresses in consecutive /30 subnets starting at 192.168.5.0/30. Check your computers network configuration to find the default gateway you were assigned (usually will be 192.168.5.1 ). This is the IP you will use to access the rXg from the LAN.
Alternatively, the lowest numbered port (EM0 or IGB0) will act as the default WAN port, and will function by default as a DHCP_client_. If you have a DHCP server connected to the WAN side, you can see the IP address that the rXg receives by checking the DHCP servers logs or by looking at the physical or virtual console:
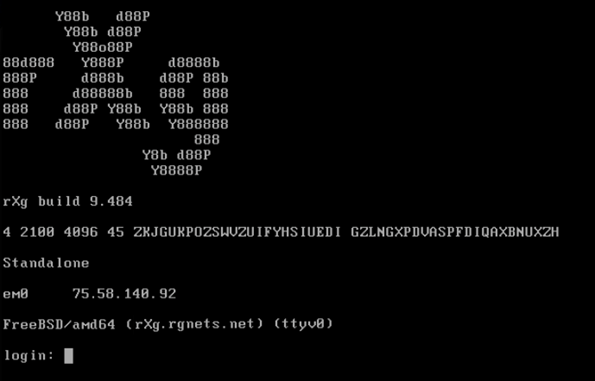
In a web browser, access the url https://<ip.of.rxg>/admin. For example:
Surf to https://192.168.5.1/admin/
Accept the self-signed certificate warning.
Create the first Administrator
When creating the first administrator credentials, strong passwords are required. Passwords should include lower case, upper case, numbers and symbols. If you have a private/public key pair that you will use for SSH/ SCP access to the rXg, include the public key in your admin record. Note: When creating the first administrator you will see a QR Code and a long string of alpha numeric characters. You will need to copy these characters to license your copy of the rXg.
Click Create New in the Administrators scaffold.
Enter a login and a secure password. Passwords that do not meet complexity requirements will not be accepted. Good passwords are long, and contain characters from multiple classes (lower case, upper case, numbers and symbols). If you have a private/public key pair that you wish to use for SSH/SCP access to the rXg, you may enter your public key in your admin record.
Click Create when finished.
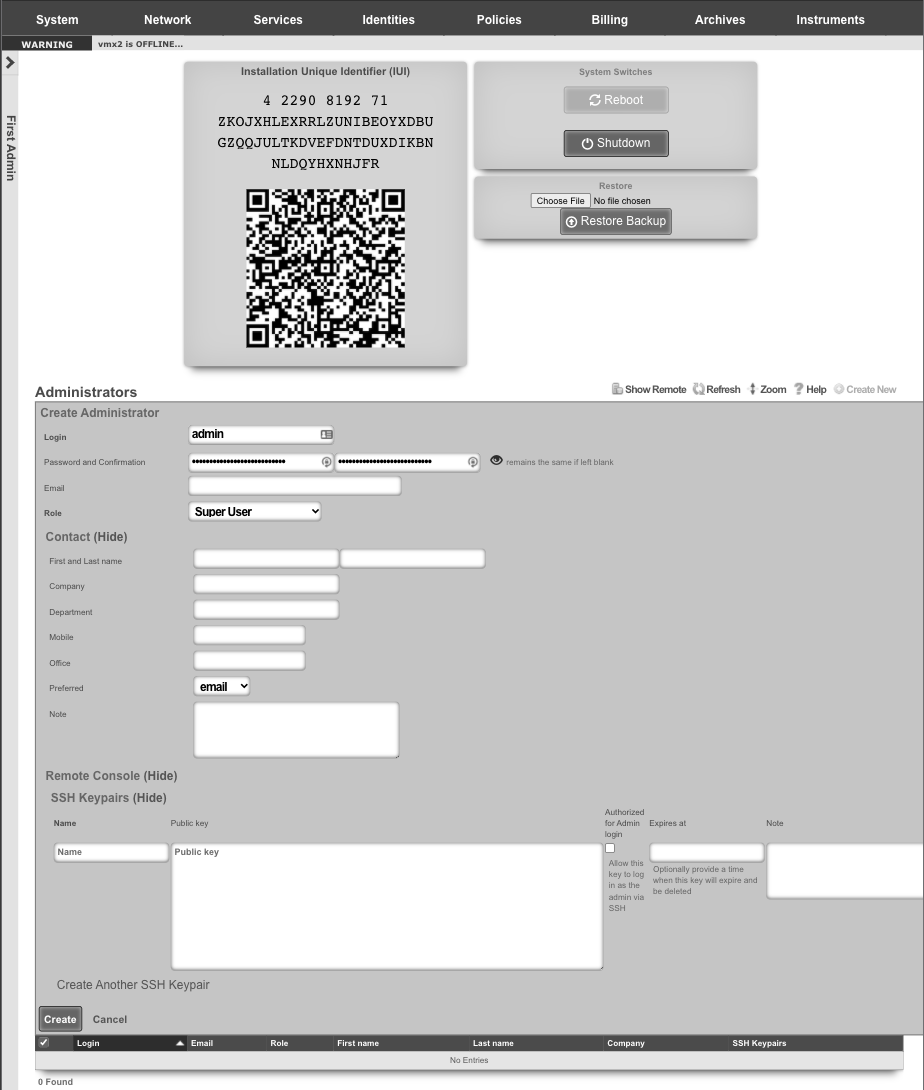
Access License Portal
When you signed up for your Free version of the rXg or made your purchase, an asset was assigned to your unique credentials on the store. Login to https://store.rgnets.com with those same credentials to obtain your license.
The rXg will not route traffic until it is licensed. Connect to a network with Internet access ( RGNets Training SSID).
Visit https://store.rgnets.com and log in with your RG Nets support credentials. Click on Asset Manager on the top of the page.
Update DNS name
Within the Asset Manager at https://store.rgnets.com navigate to "Asset Manager" in the main navigation. Find the asset assigned in the table below, if this is your first installation or the Free Version of the rXg you will only have one asset to update the FQDN and IUI. In the space provided, type or paste the fully qualified domain name (can be subdomained) associated with this installation (example shown here for lab04-cc1.netlab.ninja).
Enter fully qualified domain name and press the rename button. Press the Set FQDN button when complete.
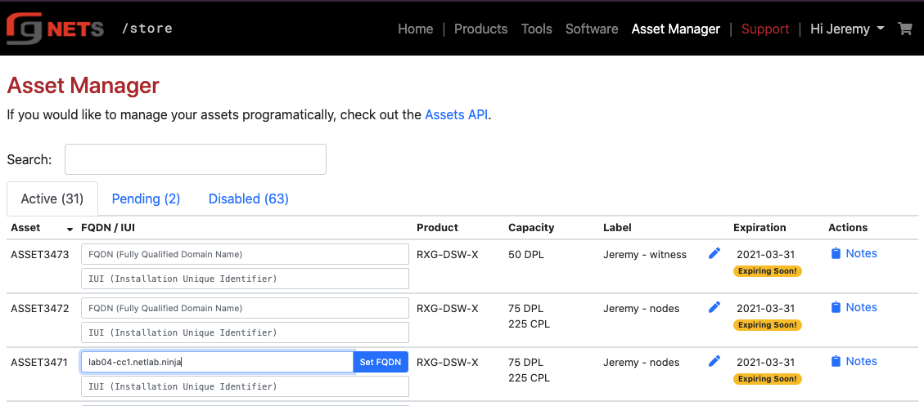
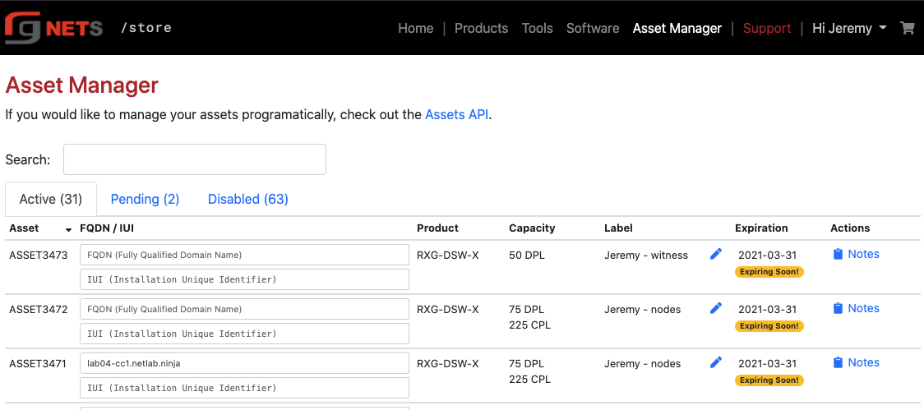
Update the IUI
From the initial "Create First Administrator" screen, copy and paste the Installation Unique Identifier (IUI) in the field provided in the Asset Manager table.
The IUI uniquely identifies the rXg installation, and is tied to the hardware in the system. Any hardware changes after the IUI has been entered into the licensing portal requires re-licensing with RG Nets.
Enter the IUI obtained from the first new admin view of the rXg admin console and press the Set IUI button. On the next screen press Set IUI button again.
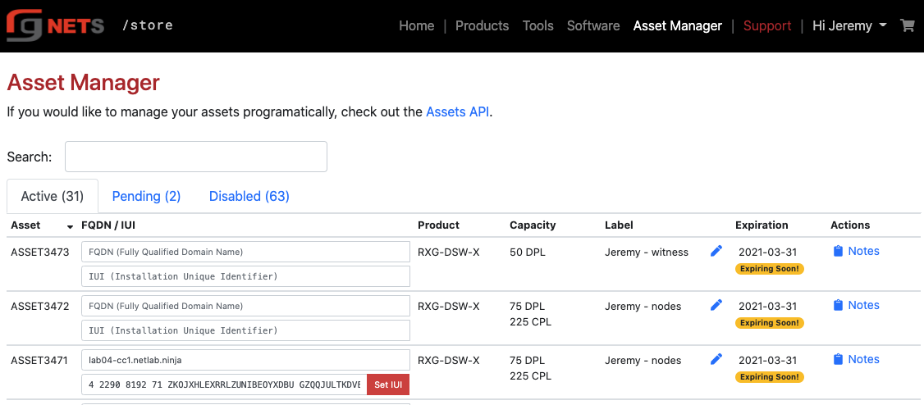
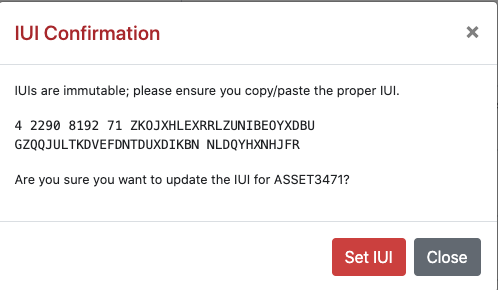
Obtain License
Once you have set the FQDN and IUI, click the Get License button. In the popup, the Asset Manager will provide a unique license key. Press the Copy to Clipboard button to copy the license.
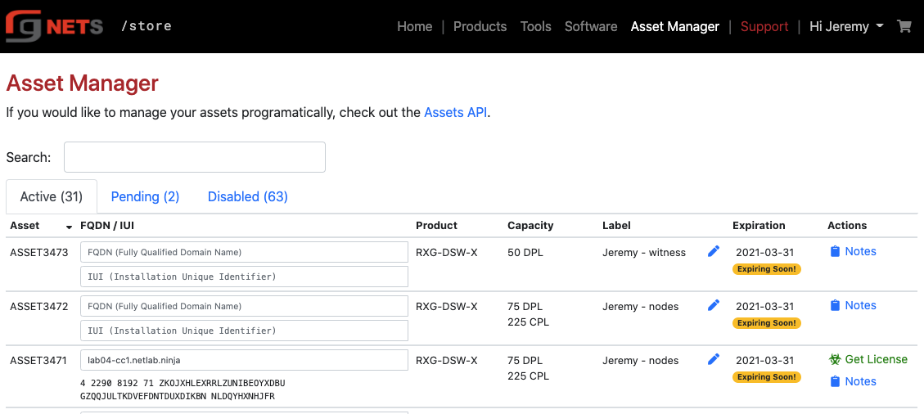
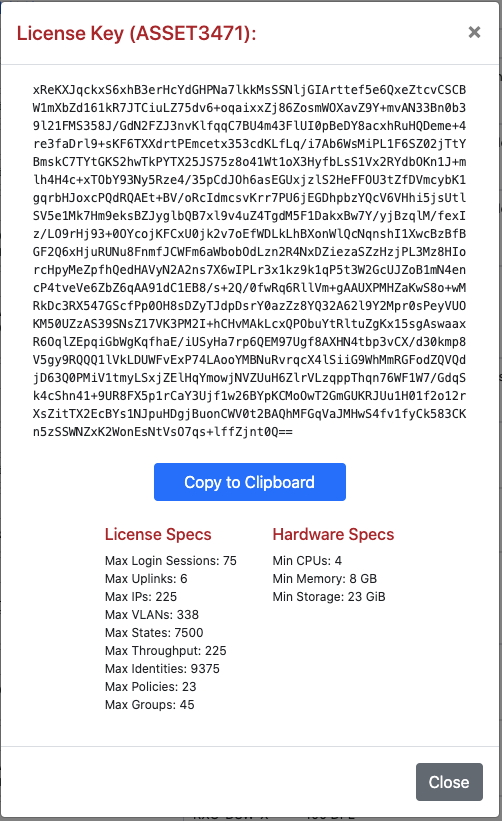
Navigate to System :: Licenses
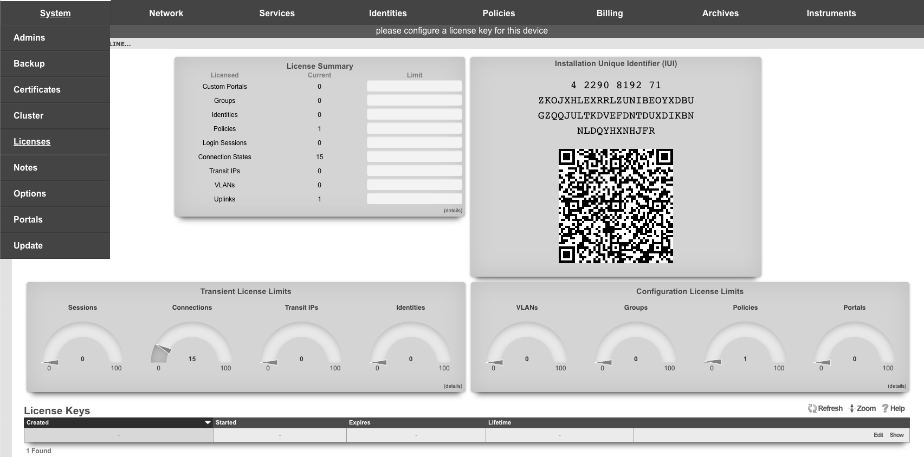
Edit the License Key
Click Edit in the license keys scaffold.
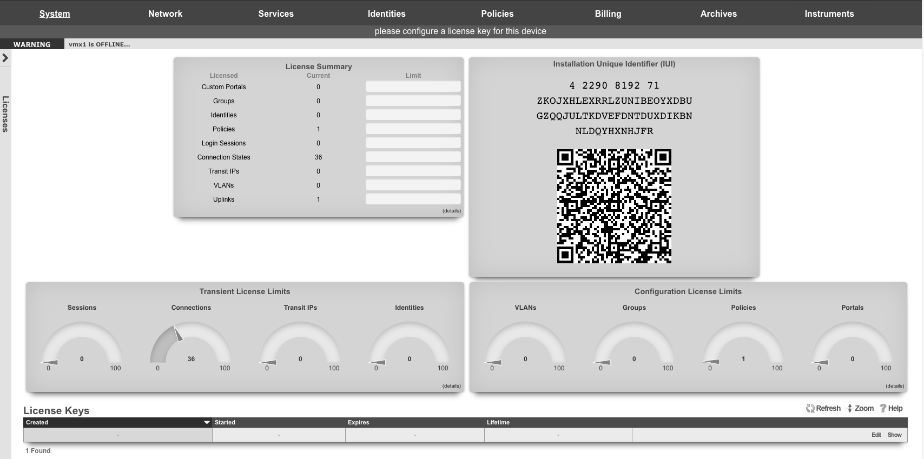
Paste the license from license portal
Click Update when complete.
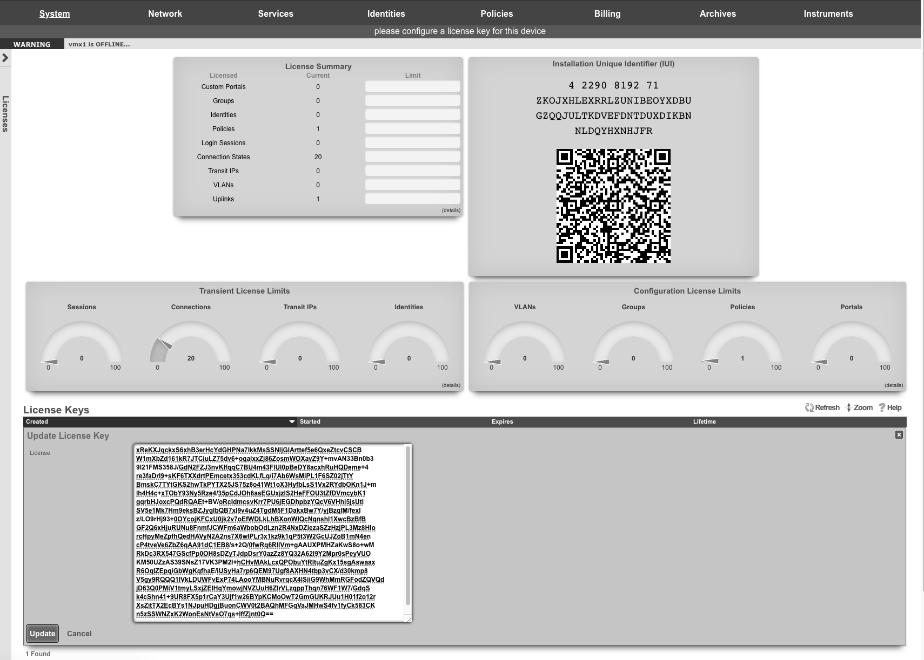
After updating the license, the rXg will take a moment to restart its background processes to open up access to the rest of the admin console.
Bootstrap WAN
After licensing the system, we will configure the WAN uplink.
Navigate to Network :: WAN
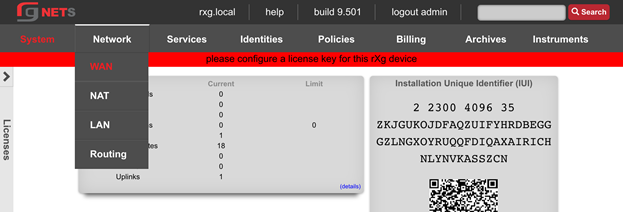
Edit Uplink
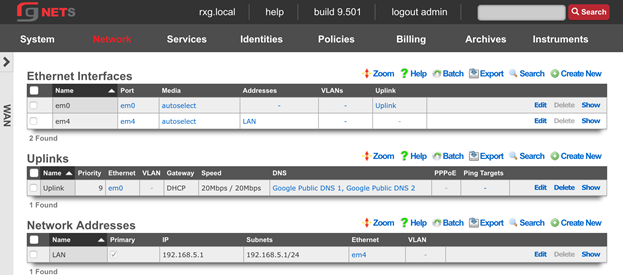
Lower Priority to 5
The Priority field determines the order of precedence during failover in a link control scenario. When only one uplink is configured, this field has no effect as there is no uplink to failover to. When multiple uplinks are configured and connection aggregation is enabled, a failure of a link will cause another member of the pool to forward all traffic. If aggregation is not enabled, or all uplinks within a pool have failed, then the uplink with the highest priority amongst all of the remaining uplinks will be used to forward the traffic. The Uplink with the highest priority becomes the default route for the rXg.
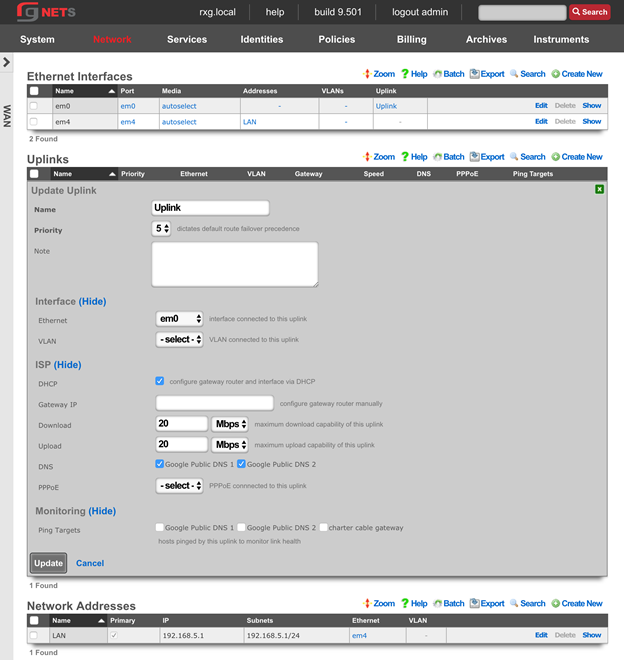
Create New em1 Ethernet Interface
Click Create New under Ethernet interfaces. Accept the defaults provided to add the em1 interface.
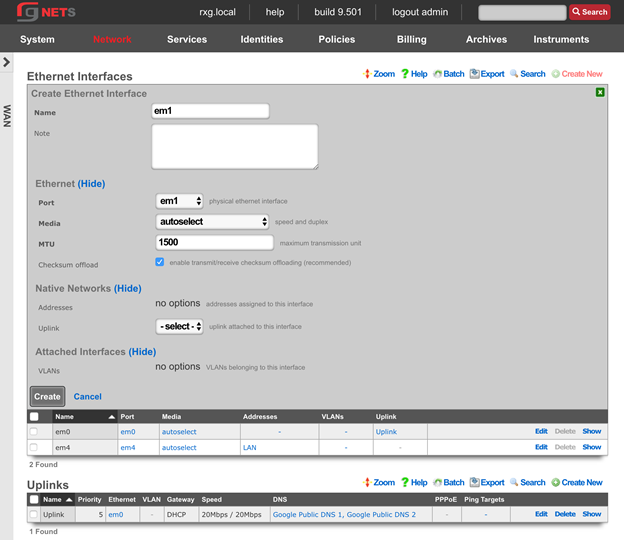
Create the Charter Cable Uplink
Click Create New under the Uplinks scaffold.
| Field | Value |
|---|---|
| Ethernet | em1 |
| Priority | 9 |
| DHCP | Unchecked |
| Gateway IP | Obtain from Lab Sheet |
| Download | 60 Mbps |
| Upload | 40 Mbps |
| DNS | Google Public DNS servers |
| Ping Targets | Google Public DNS servers |
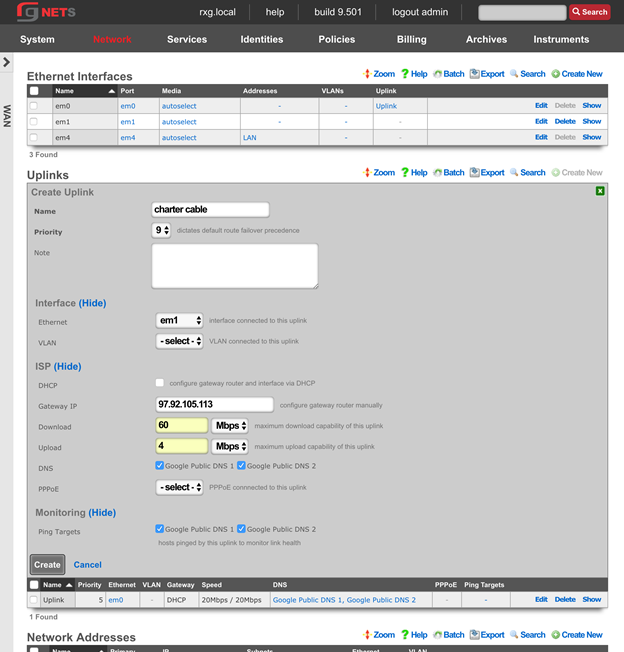
Create the Charter Cable Network Address
Click Create New under the Network Addresses scaffold.
| Field | Value |
|---|---|
| Name | Charter Cable |
| IP | Obtain from lab sheet |
| Subnet | Obtain from lab sheet |
| Autoincrement | 1 |
| Span | 1 |
Autoincrement tells the rXg to automatically configure multiple, consecutively addressed, subnets on a single native or logical (VLAN) interface. Span tells the rXg to consume one or more consecutive IP addresses on a native or logical (VLAN) interface.
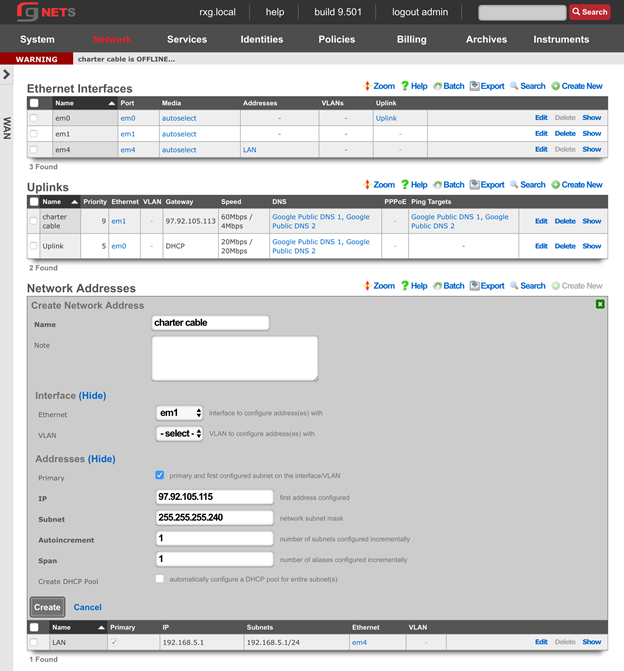
Final result
We now have a higher-priority static uplink, and a lower priority DHCP uplink.
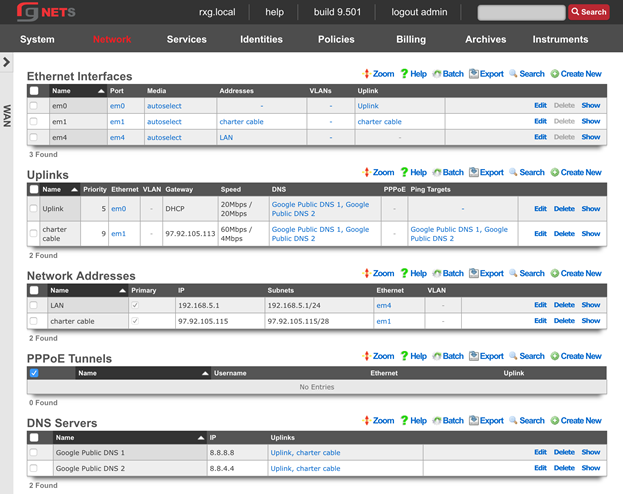
Bootstrap System
Navigate to System :: Options
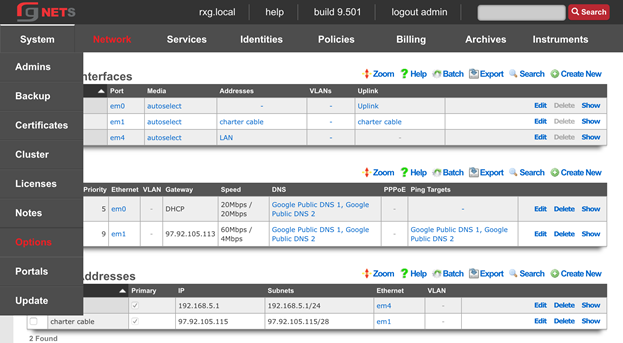
Enter the FQDN and Timezone
Edit the Default System Options and enter the rXgs fully qualified domain name ( FQDN ). Leave all other defaults. Click Update when done.
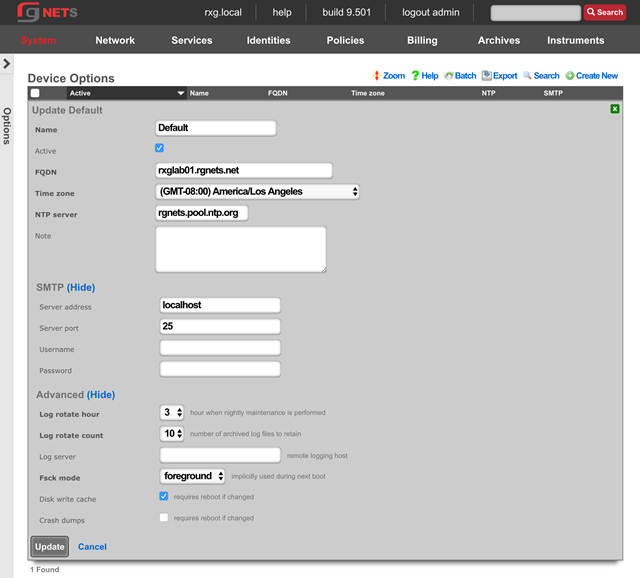
System :: Certificates
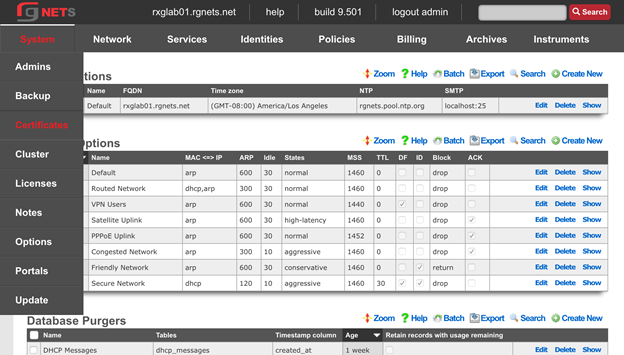
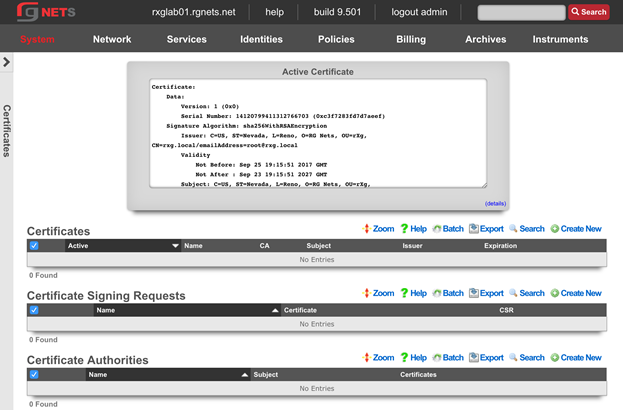
Create a new Certificate
Click Create New in the Certificates scaffold. The name will be filled in automatically from the system options. The rXg has generated a private key for the certificate already, and nothing else needs to be added yet. The private key will be utilized when the rXg generates a Certificate Signing Request in the next step.
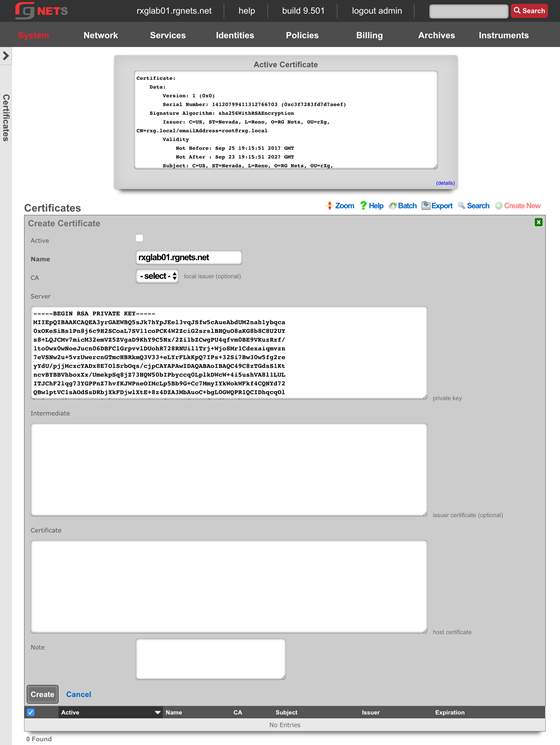
Create a new Certificate Signing Request
Click Create New in the Certificate Signing Requests scaffold.
Complete the form with information to identify yourself to your 3rd party signing authority.
The Common Name (CN) must match the FQDN that will be used to access this rXg. If you will be purchasing a wildcard certificate from your certificate vendor, the CN should be *.domain.com
The email address will be tied to the certificate, so do not use your personal email address.
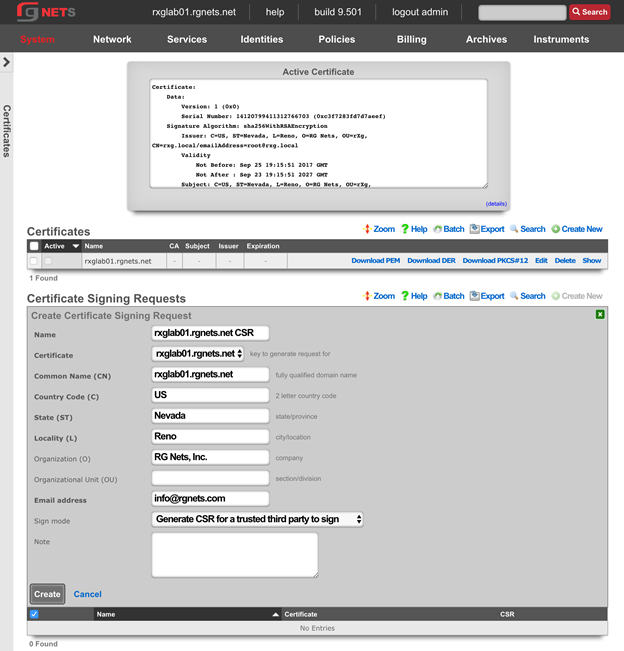
Copy the CSR
Copy the entire textblock of the CSR column of the newly created record, including -----BEGIN CERTIFICATE REQUEST----- and -----END CERTIFICATE REQUEST-----
The CSR will be provided to your certificate vendor, which they will use to generate the intermediate and server certificates used in the next steps.
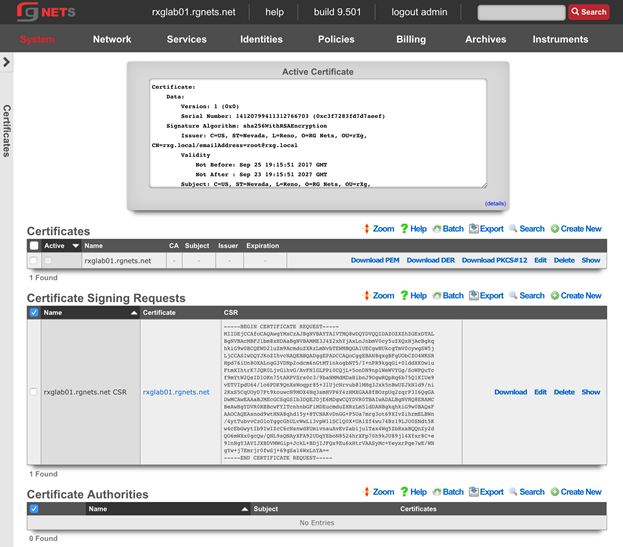
Submit CSR to 3rd party Certificate Authority
Submit the CSR obtained above and provide it to the certificate authority for them to generate and sign your certificate. When downloading the certificates, you should request apache format.
Once you have the intermediate certificates and the server certificates from your CA, proceed with the next step.
Update the Certificate Chain
Open the downloaded intermediate and server certificates in a text editor. For the purposes of this lab, intermediate and server certificates will be provided to you by the instructor. 
Click Edit on the Certificate we created previously and supply the entire text of the intermediate and server certificates. Ensure that the Active checkbox is enabled. Click Update when complete. The webserver will restart while the new certificate is activated.
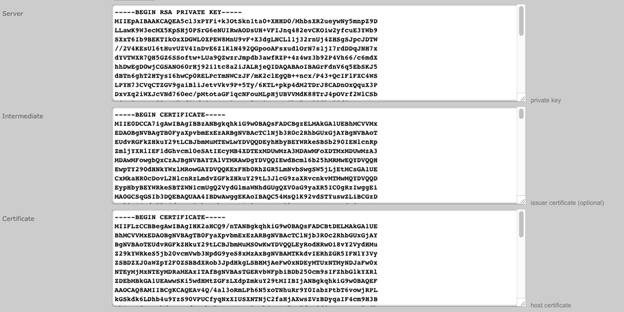
Bootstrap LAN
We will now configure the LAN side of the rXg.
Review Network Dashboard
The network dashboard shows a dynamic overview of the current network topology as well as utilization info.
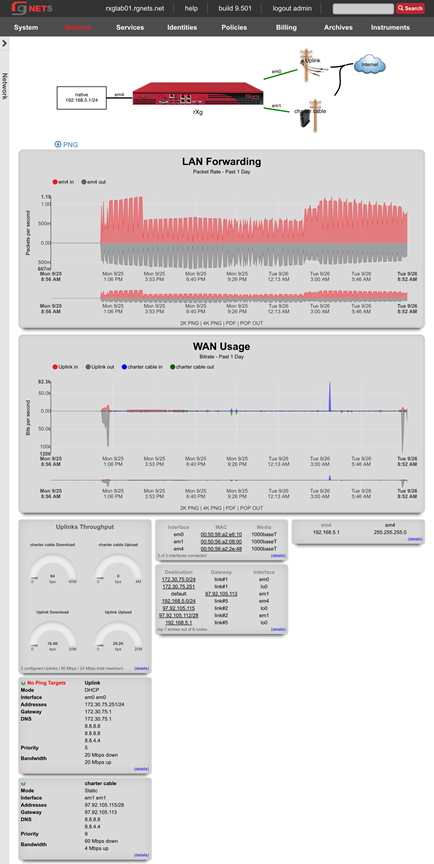
Network :: LAN
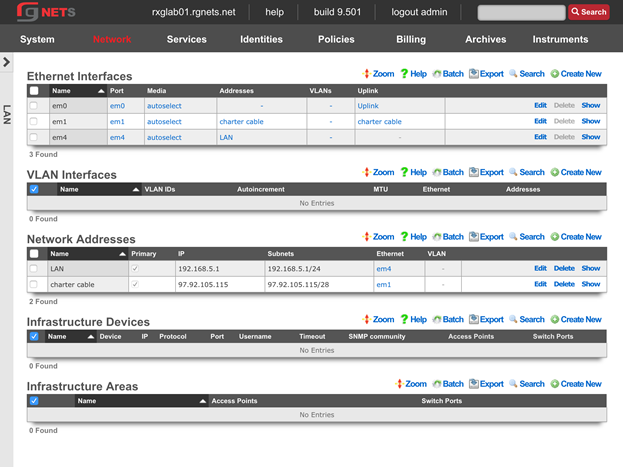
Edit the Management LAN Network Address
Change the subnet mask to be 255.255.255.0 (changing from a /30 to a /24).
Set autoincrement to 1
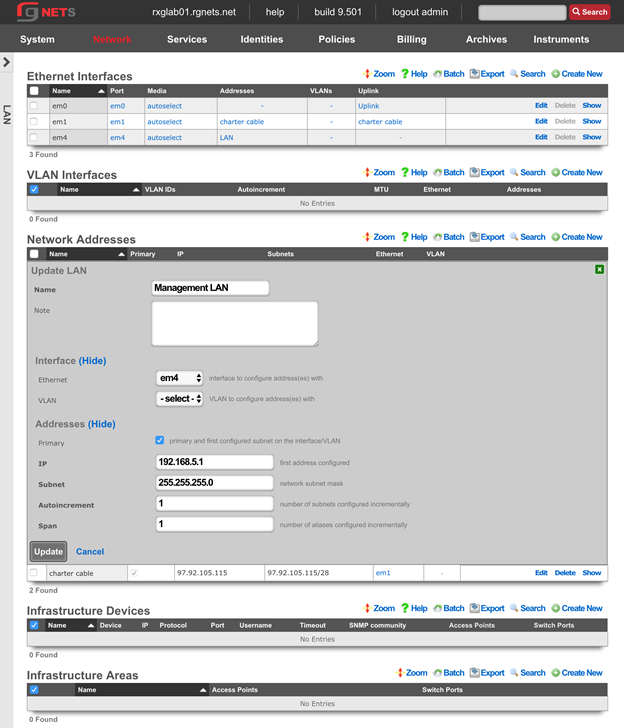
Create an Infrastructure Device
Create an Infrastructure Device for your labs wireless controller. In this case, it is a RUCKUS virtual SmartZone (vSZ).
| Field | Value |
|---|---|
| Device | RUCKUS SmartZone |
| IP | 192.168.5.2 |
| Protocol | SSH |
| Port | 22 |
| Username | admin |
| Password | lab01admin! *note: substitute lab number for 01 |
| Enable Password | lab01admin! *note: substitute lab number for 01 |
Creation of an Infrastructure Device allows the rXg to notify the RADIUS NAS (either the wireless controller or the wired switch) that a VLAN change has taken place, and that the connected device should be disconnected and immediately reconnected in order to re-initiate the RADIUS authentication process and be assigned the new VLAN tag assignment. Infrastructure Devices are also utilized by the conference tool to allow configuration changes such as the creation of WLANs for the duration of a conference.
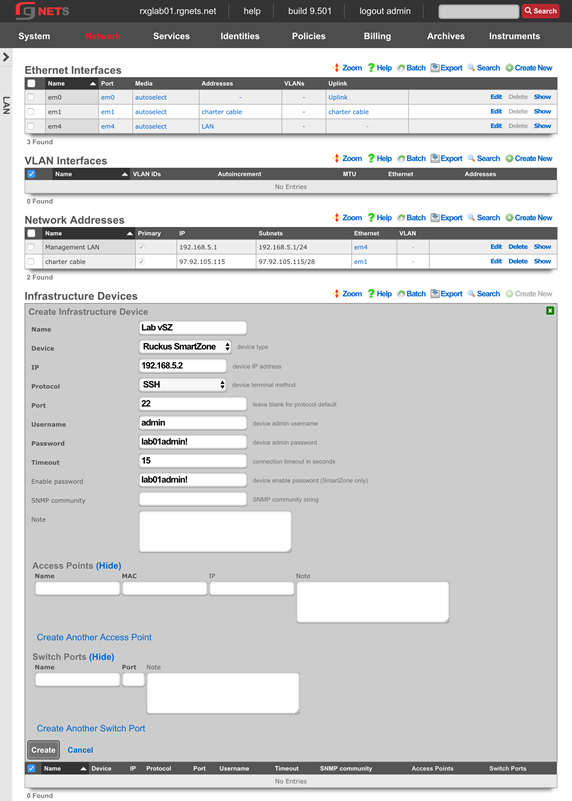
Create a new em3 Ethernet Interface
This interface will be the source of the VLAN-tagged traffic coming from our wireless infrastructure.
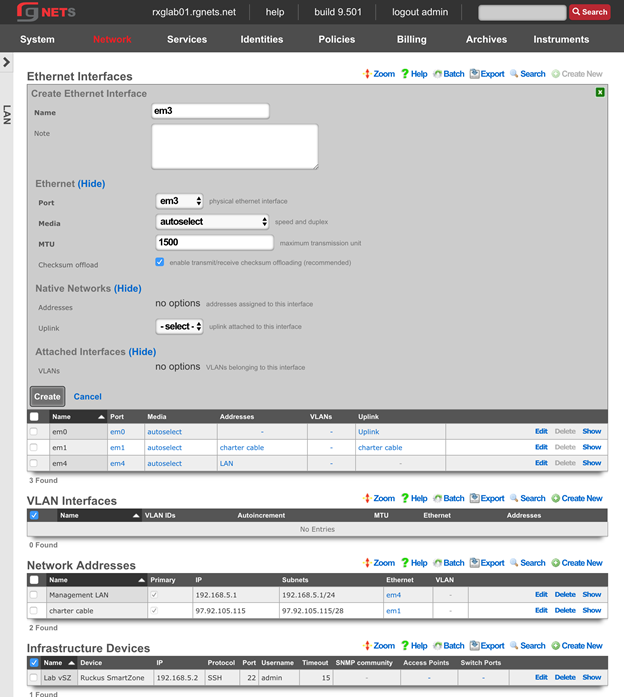
Create a new Customer VLAN
Click Create New in the VLANs scaffold.
Name it Customer VLAN 1100. Select our newly created em3 interface. Enter 1100 for the VLAN ID. Do not check auto increment.

Create a new Customer Network Address
Click Create New in the Network Addresses scaffold.
Make sure Ethernet does not have a selection. Select our newly created VLAN (Customer VLAN 1100).
| Field | Value |
|---|---|
| Ethernet | - Select - *make sure this has no option selected |
| VLAN | Customer VLAN 1100 |
| IP | 10.0.0.1 |
| Subnet | 255.255.255.0 |
| Autoincrement | 1 |
| Span | 1 |
| DHCP pool | checked |
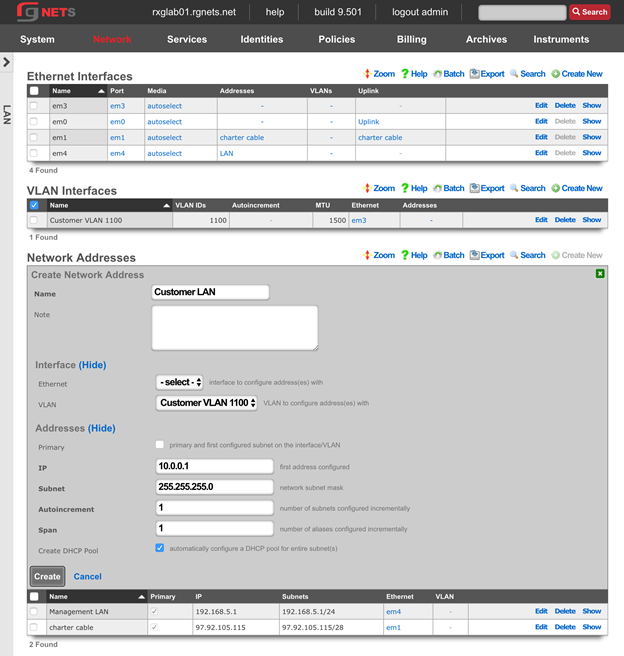
Final result
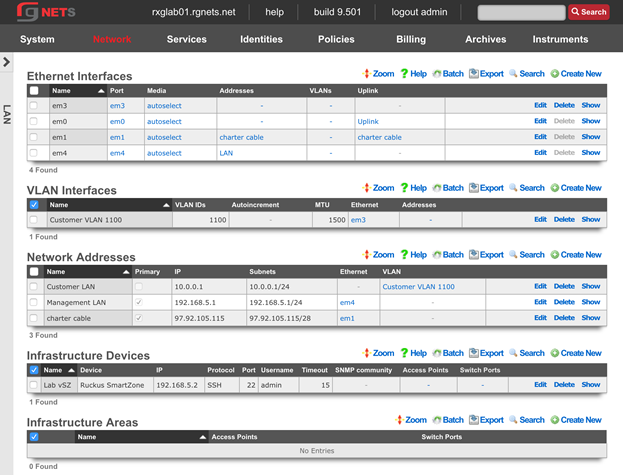
Navigate to System :: Portals
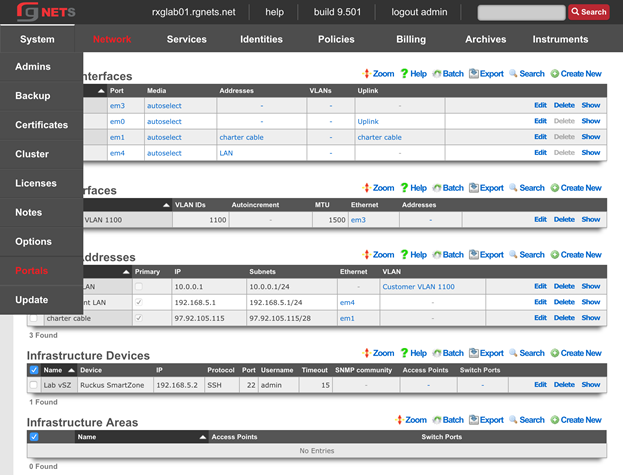
Create a new HTTP Virtual Host
An HTTP Virtual Host proxies web access to devices on the LAN based on the hostname of the request.
Click Create New in the HTTP Virtual Host scaffold.
Enter the FQDN of your wireless controller, as listed on your lab sheet.
| Field | Value |
|---|---|
| Hostname | Obtain from lab sheet |
| IP | 192.168.5.2 |
| Local server HTTP(s) Port | 8443 |
| HTTPS | checked |
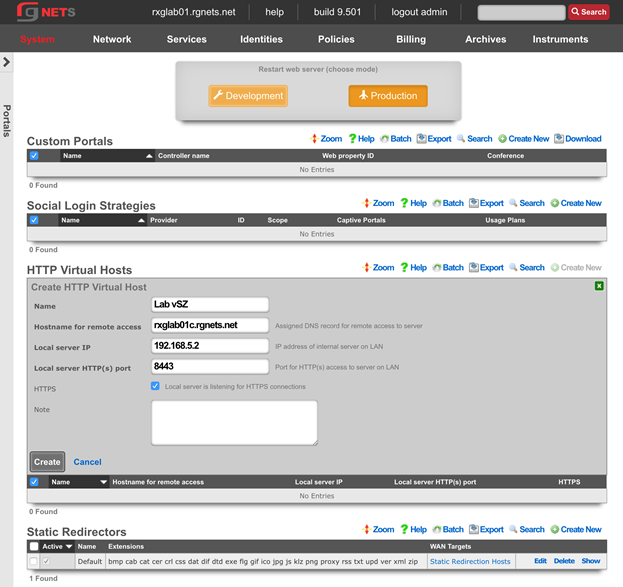
ENABLE AUTOINCREMENTED VLANs
Edit the Customer LAN Network Address
Click Edit on the Customer LAN Network Address.
Change the Subnet to 255.255.255.252 (/30) and change Autoincrement to 64.
The rXg will automatically configure 64 contiguous /30 subnets to replace the single /24 subnet we created previously.
Note: Because 64 /30 subnets fit exactly into a single /24 subnet, we are still consuming the same overall network address space, and therefore do not need to edit our DHCP pools. If we had chosen a smaller or larger autoincrement number, the DHCP pool that was created automatically when this Network Address was created would now be invalid, raising a health notice and requiring manual intervention.
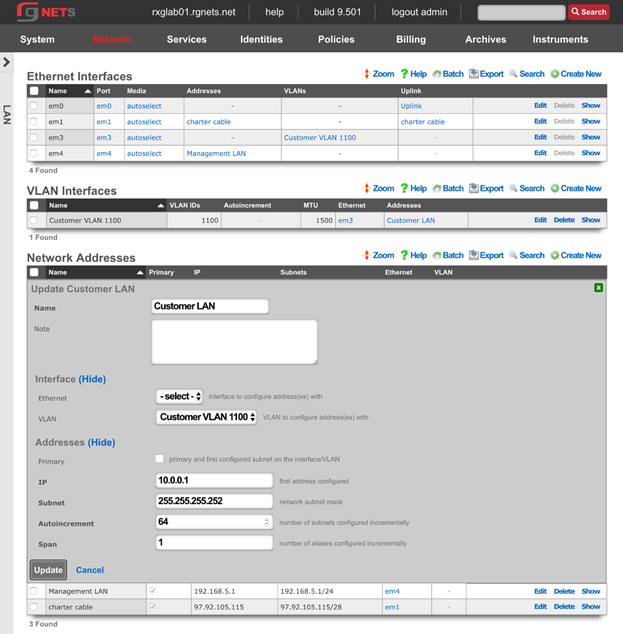
Edit the Customer VLAN
Click Edit on the Customer VLAN 1100 record in the VLANs scaffold.
Enable the Autoincrement checkbox.
Set the Autoincrement Ratio to 8.
Click Update.
If the autoincrement ratio were set to 1, the rXg would automatically create one VLAN interface for each autoincremented subnet in the associated Network Address (64 unique VLAN interfaces). Because we have set a ratio of 8, the rXg will create one VLAN interface for every 8 subnets. (64 subnets / 8 = 8 unique VLAN interfaces).
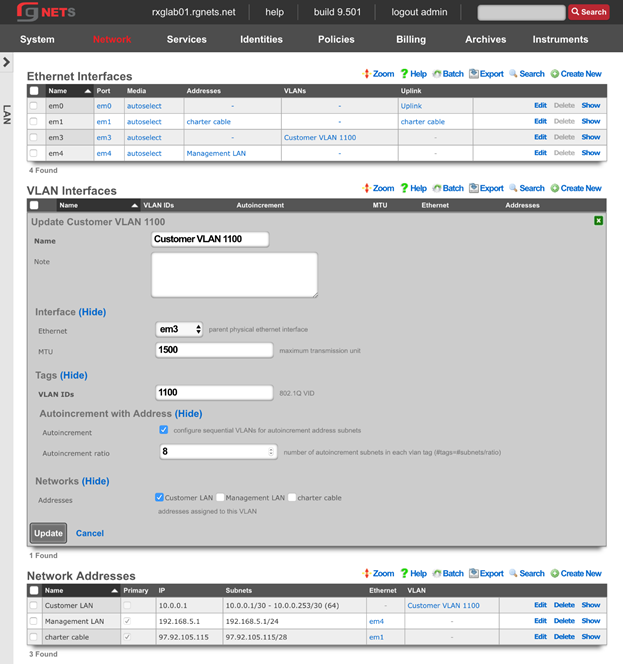
Final Result
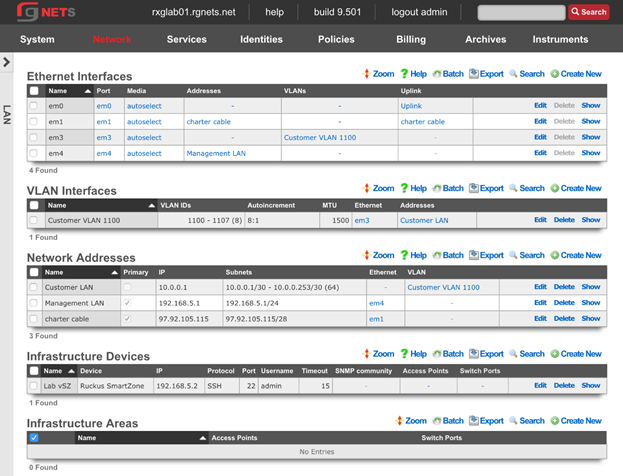
Dynamic VLANs
Navigate to Identities :: Groups
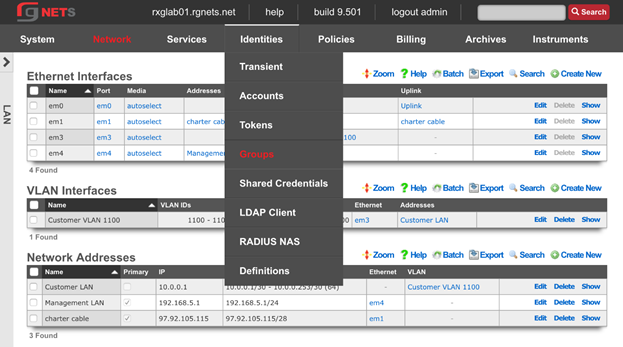
Notice that there is already an IP Group for the vSZ. It was created automatically when we created the infrastructure device.
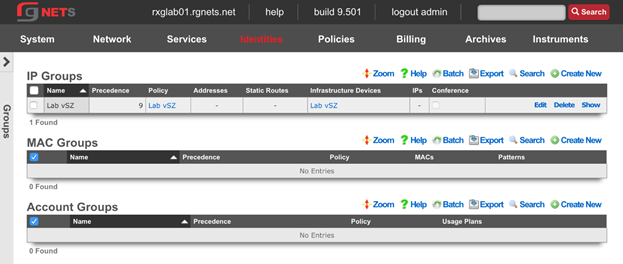
Create a Management IP Group
Click Create New in the IP Groups scaffold.
| Field | Value |
|---|---|
| Name | Management |
| Priority | 8 |
| Addresses | Management LAN |
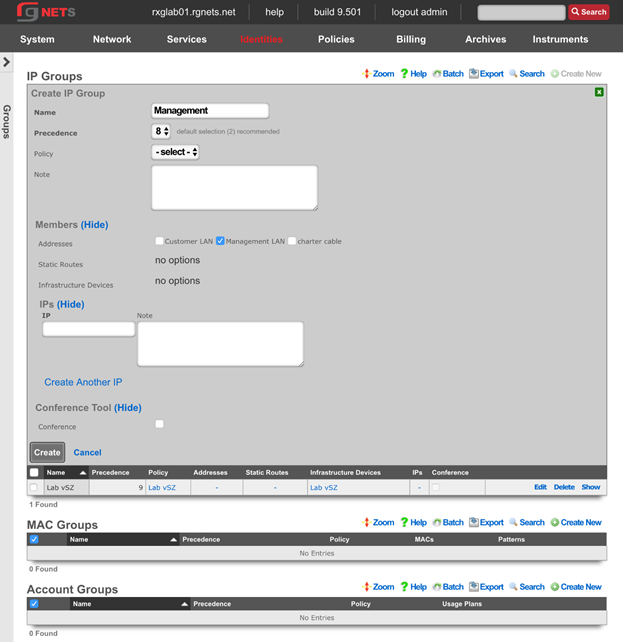
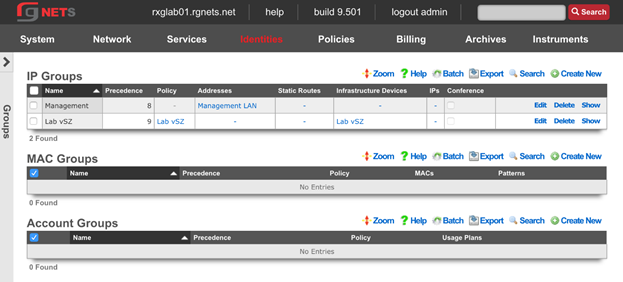
Navigate to Policies :: Captive Portals
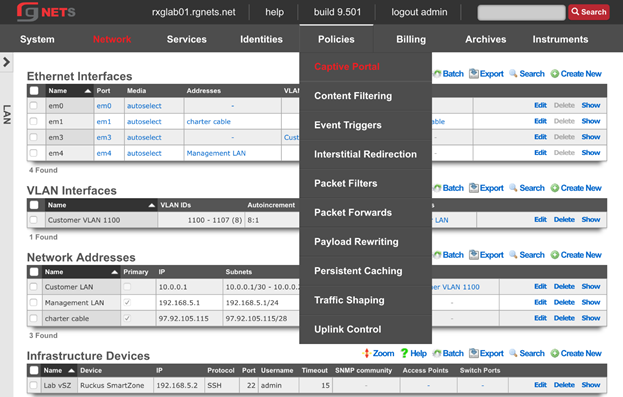
Create the Management Policy
Notice there is already a Lab vSZ policy, which was created when the infrastructure device was created.
Click Create New in the Policies scaffold. This policy will be added to the RADIUS server ACL in the next step.
| Field | Value |
|---|---|
| Name | Management |
| IP Groups | Management |
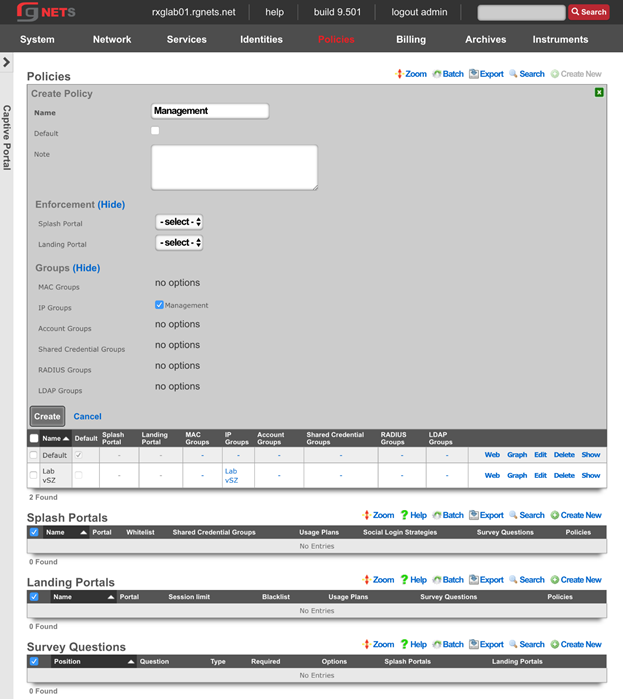
Navigate to Services :: RADIUS
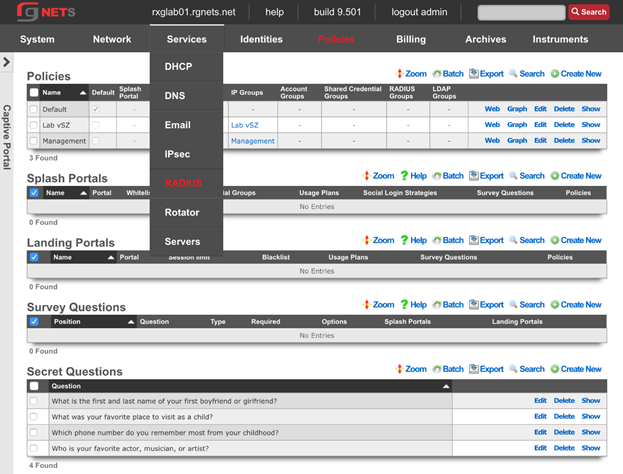
Edit the Default RADIUS Server Options
Click Edit in the Default record of the RADIUS Server Options scaffold.
Enable the Management policy. Notice that the Lab vSZ Policy was added automatically at creation.
Click Update.
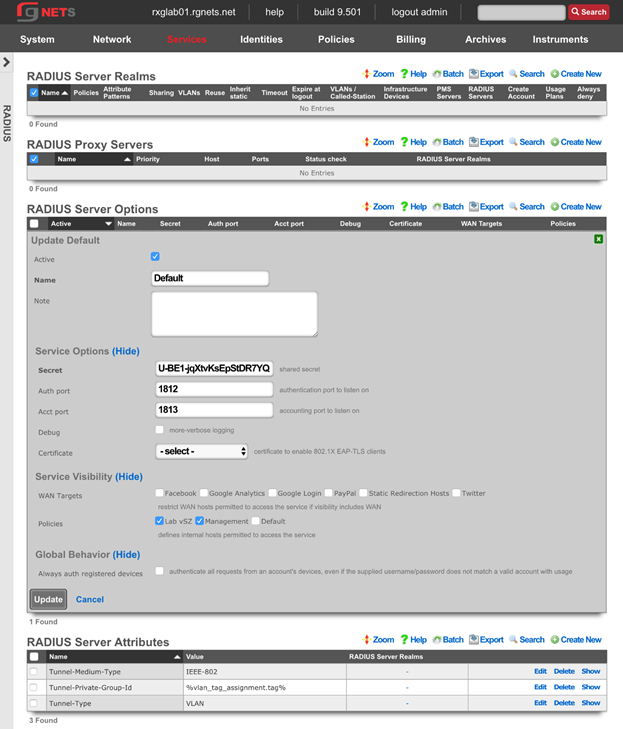
Create a New RADIUS Server Realm
Click Create New in the RADIUS Server Realm scaffold.
| Field | Value |
|---|---|
| Name | Customer Assignment |
| Policies | None selected |
| Attribute Patterns | |
| Priority | 0 |
| Attribute | Called-Station-ID |
| Pattern | lab01-customer |
| Sharing | Per-Device |
| VLANs | Customer VLAN 1100 |
| Reuse | Checked |
| Infrastructure Devices | Lab vSZ |
| Respone Attributes | Tunnel-Type: VLAN |
Tunnel-Medium-Type: IEEE-802 Tunnel-Private-Group-ID: %vlan_tag_assignment.tag% |
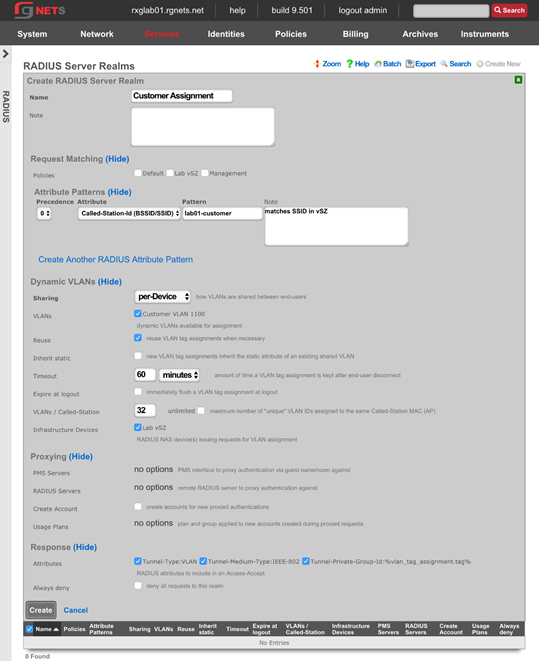
Final result
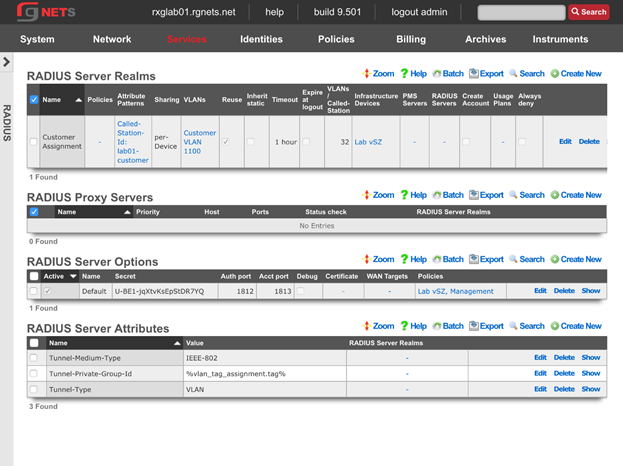
CONFIGURE CONTROLLER FOR DVLAN
Create AAA Server

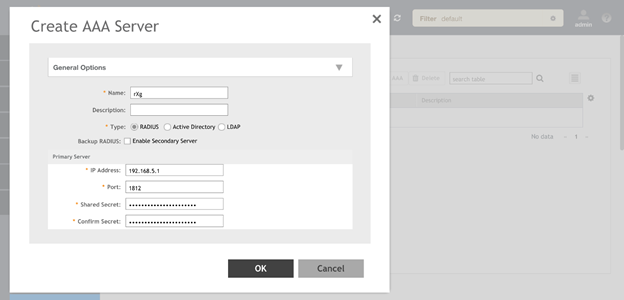
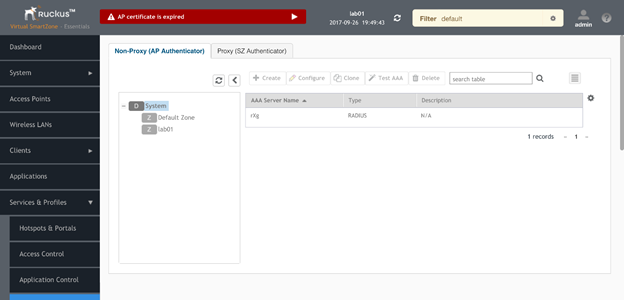
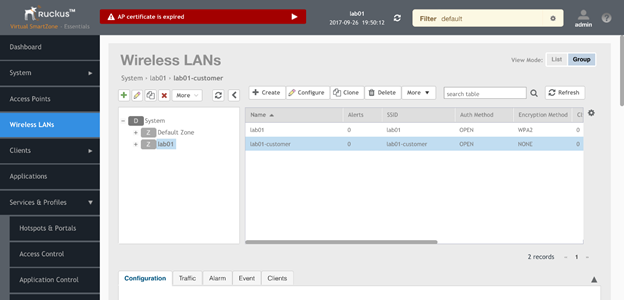
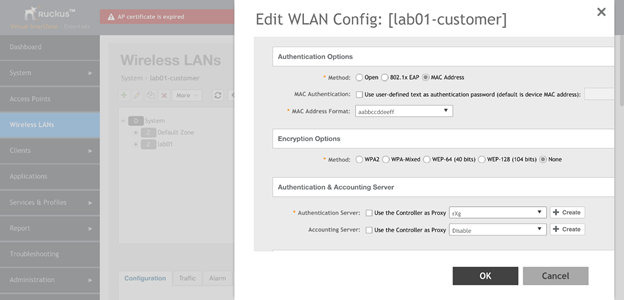
Add Account VLANs
Navigate to Network :: LAN
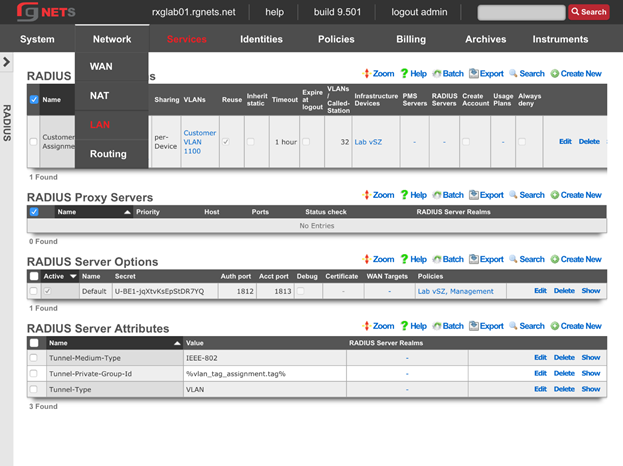
Create the Account VLANs
Click Create New in the VLAN Interfaces scaffold.
| Field | Value |
|---|---|
| Name | Account VLANs |
| Ethernet | em3 |
| VLAN IDs | 1108 |
| Autoincrement | Checked |
| Autoincrement Ratio | 1 |
| Addresses | None selected |
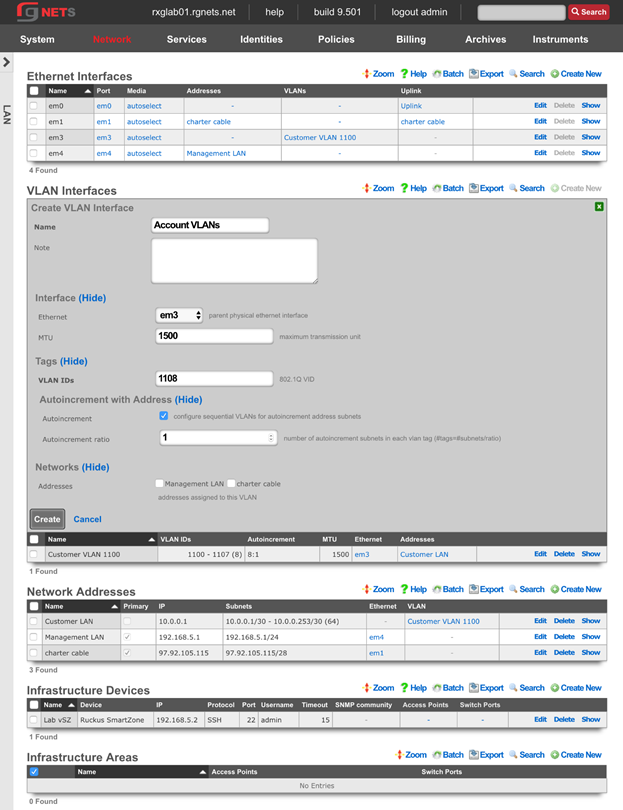
Create the Account Network Address
Click Create New in the Network Addresses scaffold.
| Field | Value |
|---|---|
| Name | Account LANs |
| Ethernet | None selected |
| VLAN | Account VLANs |
| IP | 10.0.1.1 |
| Subnet | 255.255.255.240 |
| Autoincrement | 64 |
| Span | 1 |
| Create DHCP Pool | Checked |
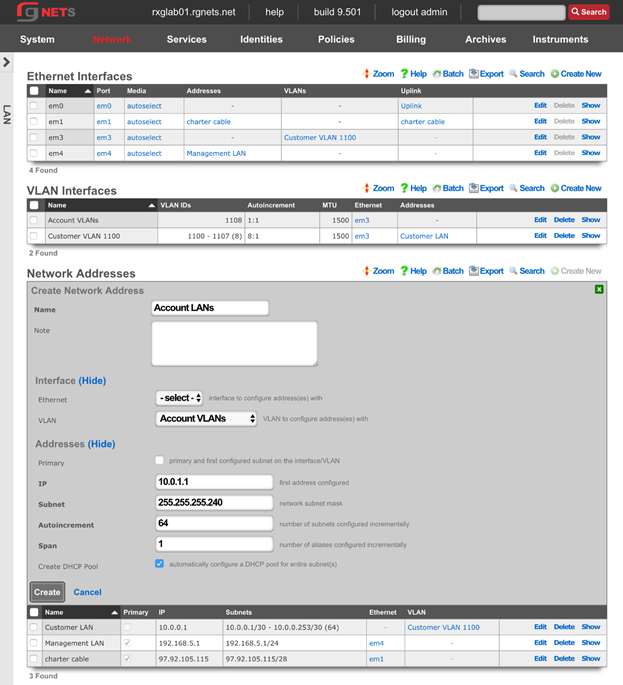
Review Network Dashboard
Click on the Network menu header to see the updated network diagram.
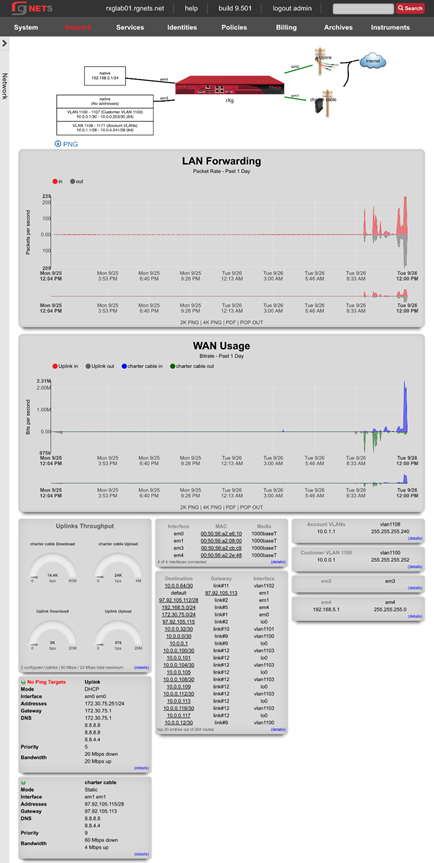
Navigate to Services :: RADIUS
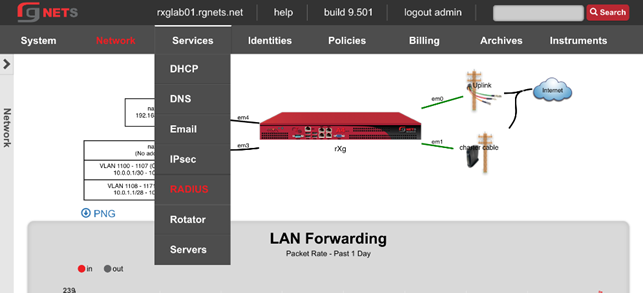
Create the Account RADIUS Server Realm
Click Create New in the RADIUS Server Realms scaffold.
| Field | Value |
|---|---|
| Name | Account Assignment |
| Policies | None selected |
| Attribute Patterns | None |
| Sharing | Per-Account |
| VLANs | Account VLANs |
| Reuse | Unchecked |
| Infrastructure Devices | Lab vSZ |
| Respone Attributes | Tunnel-Type: VLAN |
Tunnel-Medium-Type: IEEE-802 Tunnel-Private-Group-ID: %vlan_tag_assignment.tag% |
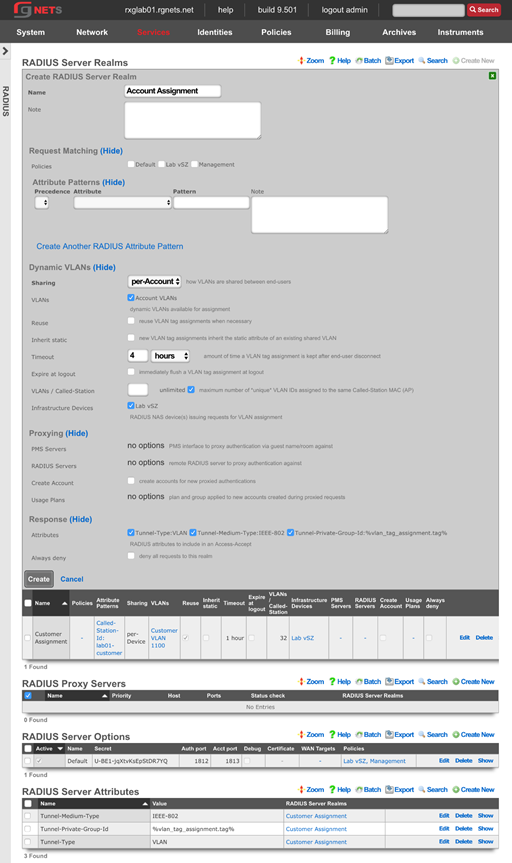
Identities
Navigate to Identities :: Groups
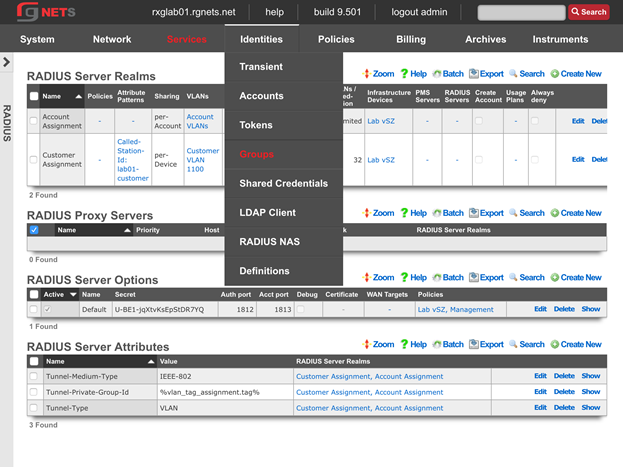
Create a new Customer Onboarding IP Group
Click Create New in the IP Groups scaffold.
| Field | Value |
|---|---|
| Name | Customer Onboarding |
| Priority | 2 |
| Addresses | Customer LAN |
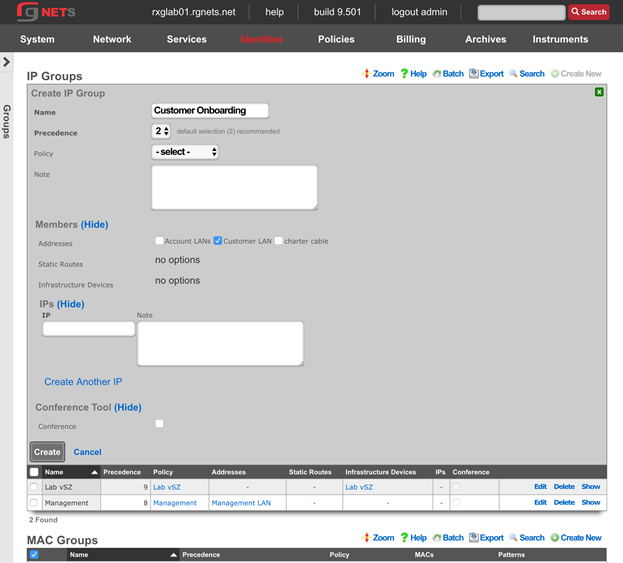
Create Accounts IP Group
Click Create New in the IP Groups scaffold.
| Field | Value |
|---|---|
| Name | Account Networks |
| Priority | 2 |
| Addresses | Account LANs |
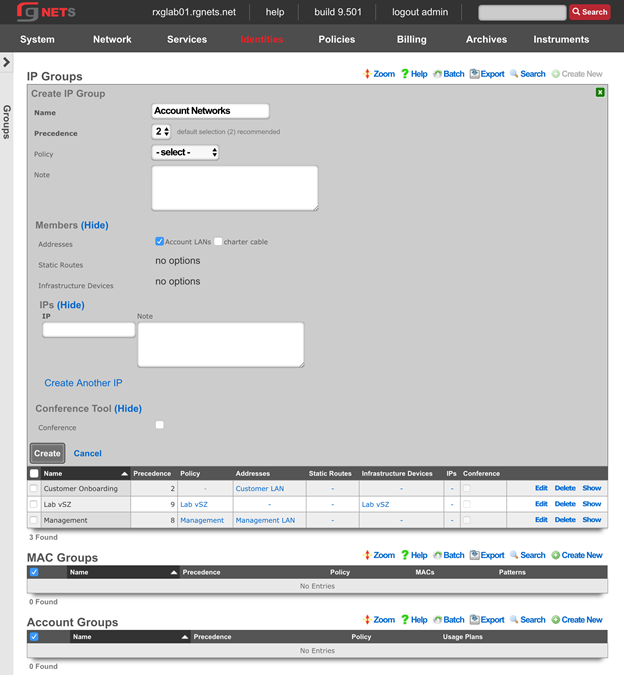
Create Free Account Group
Click Create New in the Account Groups scaffold.
| Field | Value |
|---|---|
| Name | Free |
| Priority | 4 |
| Policy | None selected |
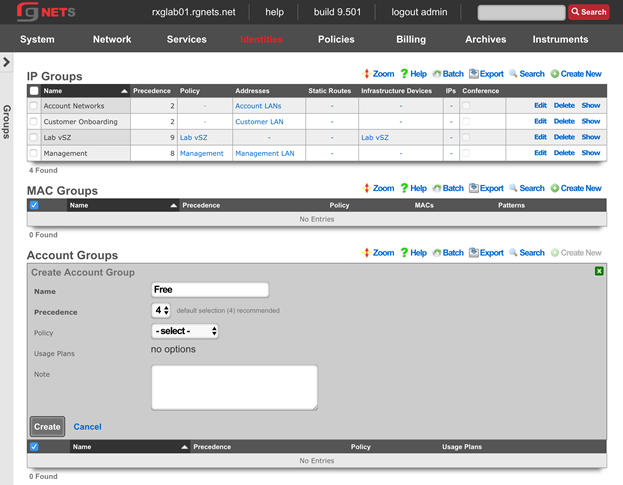
Create Basic Account Group
Click Create New in the Account Groups scaffold.
| Field | Value |
|---|---|
| Name | Basic |
| Priority | 4 |
| Policy | None selected |

Create Premium Account Group
Click Create New in the Account Groups scaffold.
| Field | Value |
|---|---|
| Name | Premium |
| Priority | 4 |
| Policy | None selected |
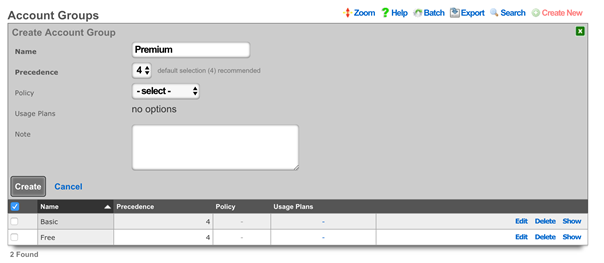
Create Business Account Group
Click Create New in the Account Groups scaffold.
| Field | Value |
|---|---|
| Name | Business |
| Priority | 4 |
| Policy | None selected |
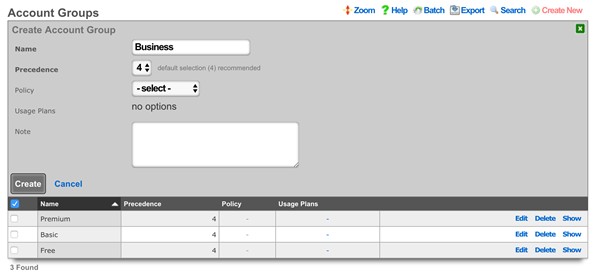
Navigate to Identities :: Shared Credentials
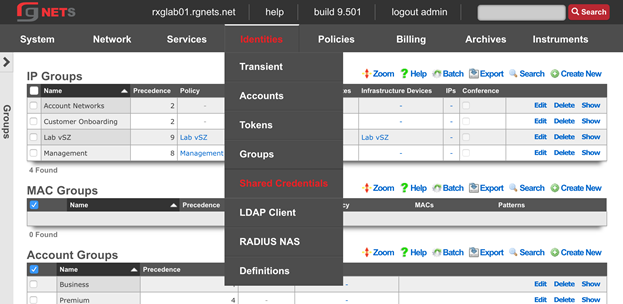
Create Free Shared Credential Group
Click Create New in the Shared Credential Groups scaffold.
| Field | Value |
|---|---|
| Name | Free |
| Priority | 5 |
| Credential | free (note: case sensitive) |
| Policy | None Selected |
| Time | 1 Hour |
| Quota | Unlimited (up and down) |
| Recurring | none |
| Simultaneous | unlimited |
| Intersession | 1 day |
| Automatic Login | Unchecked |
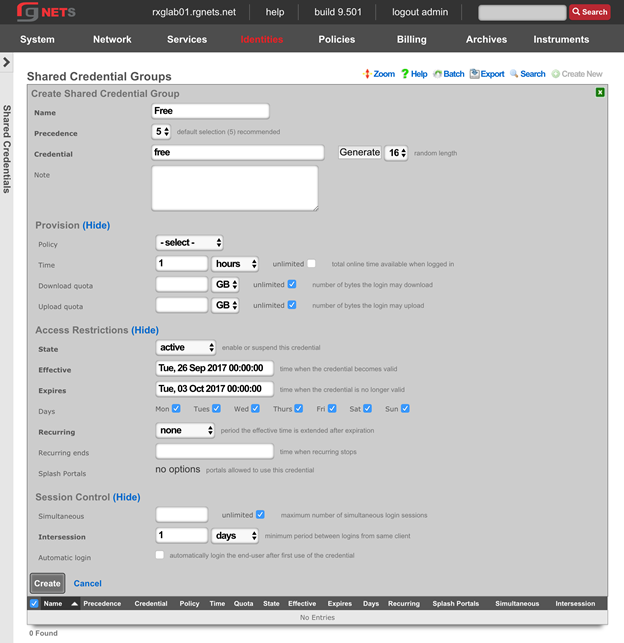
Portal Policies
Navigate to Policies :: Captive Portal
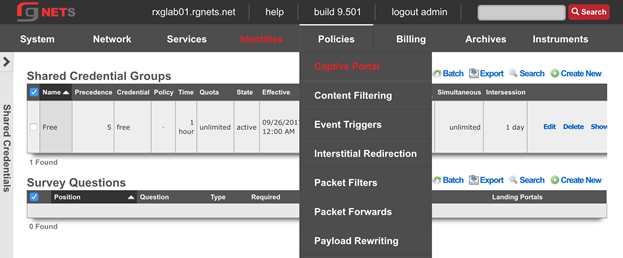
Create Default Splash Portal
Click Create New in the Splash Portals scaffold.
| Field | Value |
|---|---|
| Name | Default Splash |
| Portal | default |
| Whitelist | paypal |
| Background mode | MAC |
| Portal mode | MAC or Cookie |
| Policies | Default |
| Shared Credential Groups | Free |
Background mode controls automatic login for devices detected in the background (not actively visiting the portal). When set to "MAC", devices with a recognized MAC address are automatically logged in without requiring portal interaction.
Portal mode controls automatic login when a device visits the portal. Options include requiring MAC address, browser cookie, or both for automatic authentication.
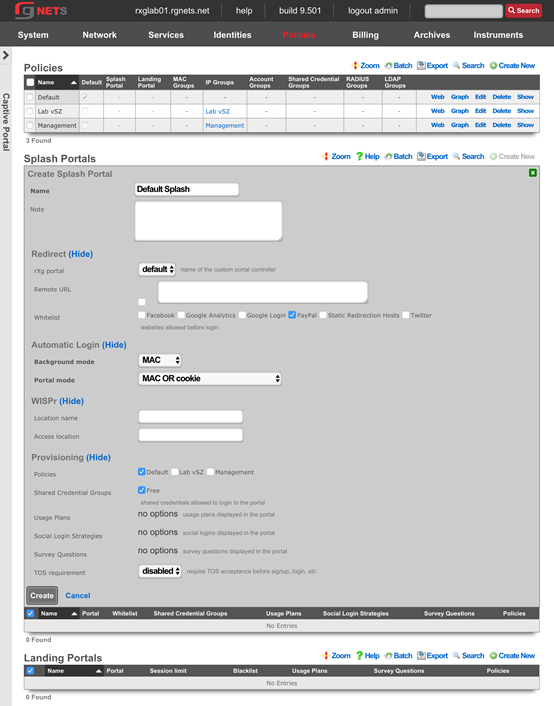
Create Default Landing Portal
Click Create New in the Landing Portals scaffold.
| Field | Value |
|---|---|
| Name | Default Landing |
| Portal | default |
| Blacklist | paypal |
| Background mode | MAC |
| Portal mode | MAC or Cookie |
| Session limit | unrestricted |
| Idle timeout | 20 |
| Grace time | 15 |
| Policies | None Selected |
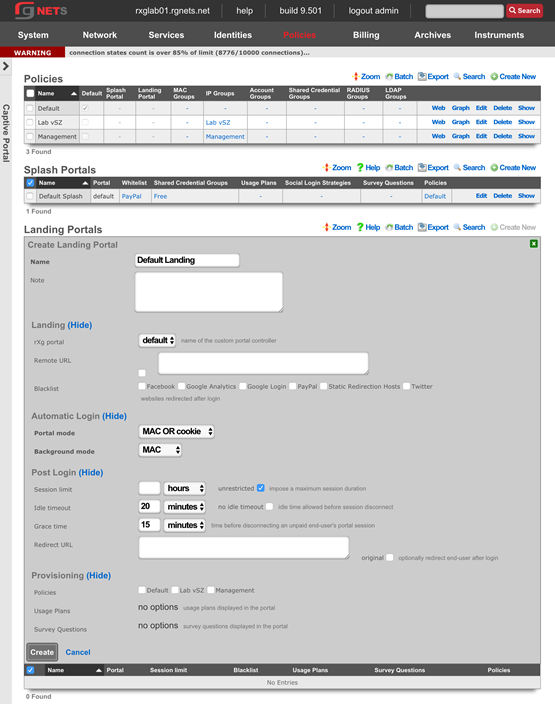
Create a new Survey Question
Click Create New in the Survey Questions scaffold.
| Field | Value |
|---|---|
| Question | Email Address |
| Position | 1 |
| Type | Email Address |
| Required | Checked |
| Splash Portals | Default Splash |
| Landing Portals | Default Landing |
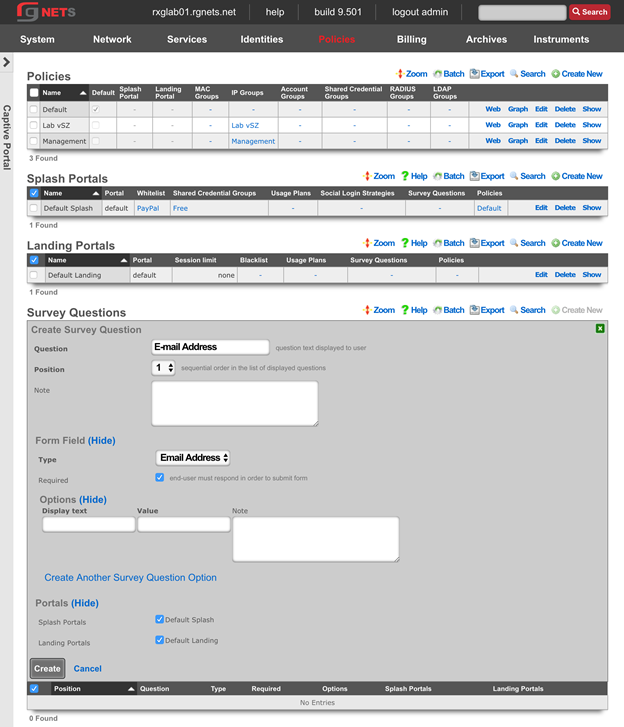
Create Customer Onboarding Policy
Click Create New in the Policies scaffold.
| Field | Value |
|---|---|
| Name | Customer Onboarding |
| Splash Portal | Default Splash |
| IP Groups | Customer Onboarding |
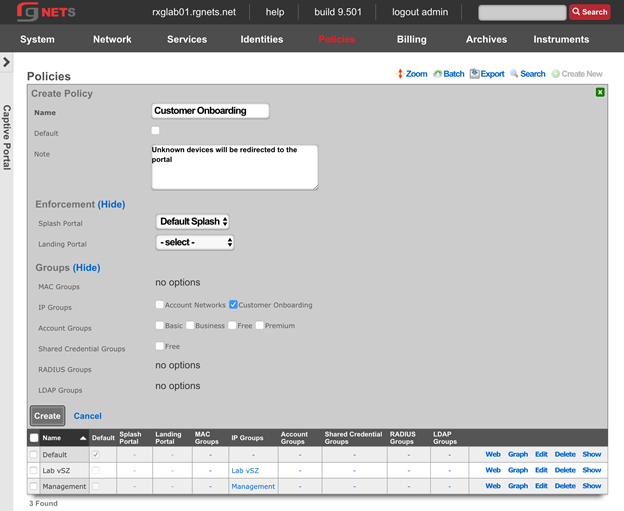
Create Free Policy
Click Create New in the Policies scaffold.
| Field | Value |
|---|---|
| Name | Free |
| Landing Portal | Default Landing |
| Account Groups | Free |
| Shared Credential Groups | Free |
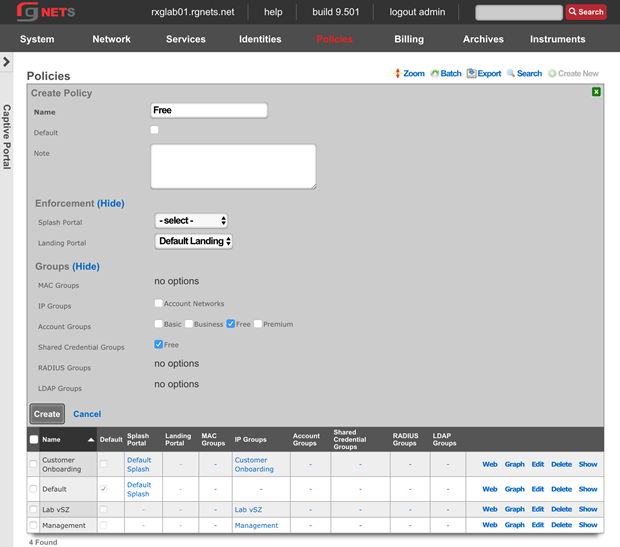
Create Basic Policy
Click Create New in the Policies scaffold.
| Field | Value |
|---|---|
| Name | Basic |
| Landing Portal | Default Landing |
| IP Groups | Account Networks |
| Account Groups | Basic |
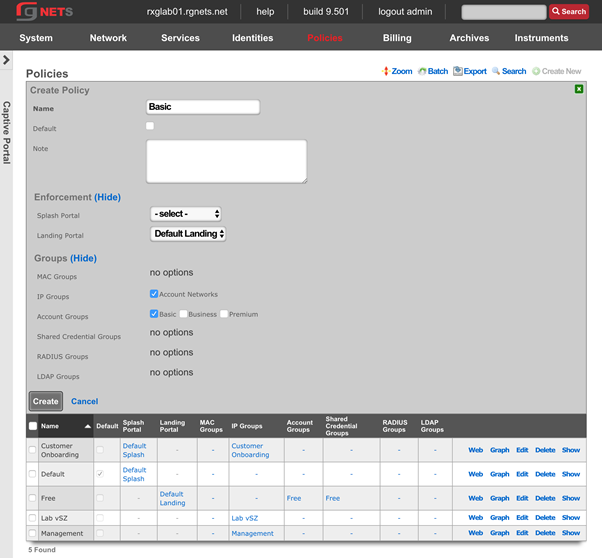
Create Premium Policy
Click Create New in the Policies scaffold.
| Field | Value |
|---|---|
| Name | Premium |
| Landing Portal | Default Landing |
| Account Groups | Premium |

Create Business Policy
Click Create New in the Policies scaffold.
| Field | Value |
|---|---|
| Name | Business |
| Landing Portal | Default Landing |
| Account Groups | Business |
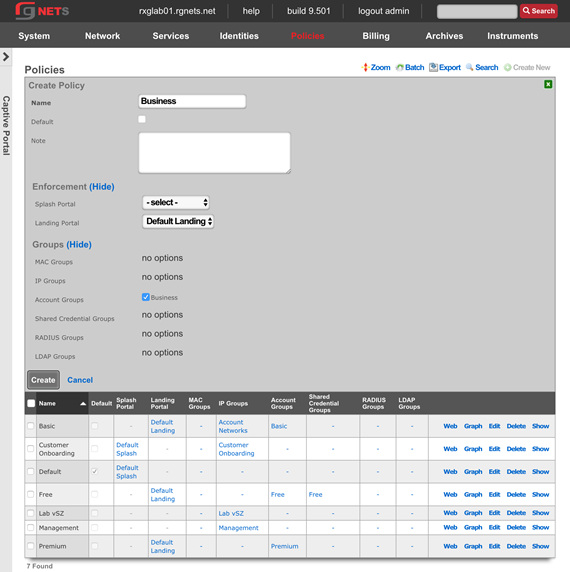
Final result
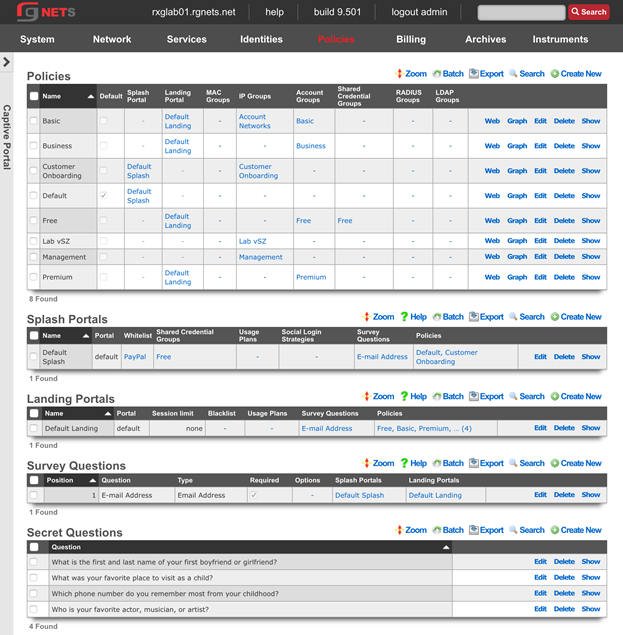
Review Policy Dashboard
Click on the Policies menu link to view the Policy Dashboard. This page gives a graphical representation of the policy enforcement engine. Network devices are categorized into the highest priority group to which they belong, and that groups policy is applied.
In the graph, Groups are listed on the left, Policies in the middle, and Policy Enforcement Elements on the right. Groups may only have 1 associated policy. Devices will typically belong to multiple groups (such as an IP group and an Account Group), but only the highest priority group has an effect on the devices policy. Policy enforcement elements may be shared between multiple policies.
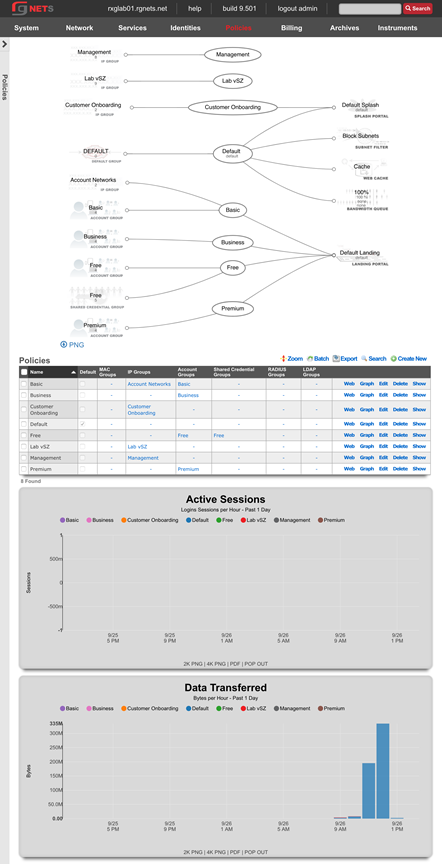
Gateways and Plans
Navigate to developer.authorize.net
Click Sign Up
Sign up for a free account 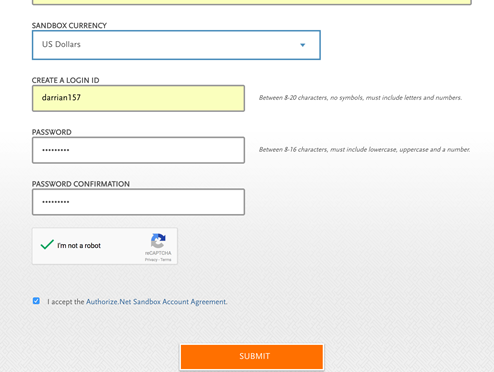
Collect API Credentials
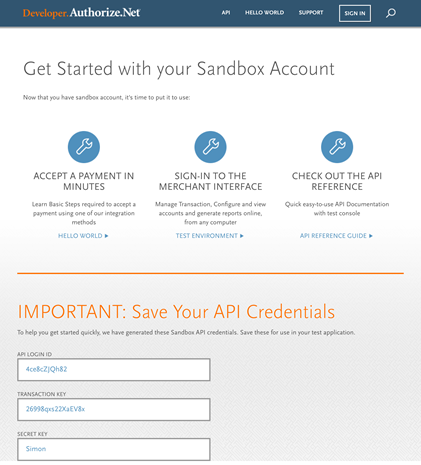
Navigate to Billing :: Gateways
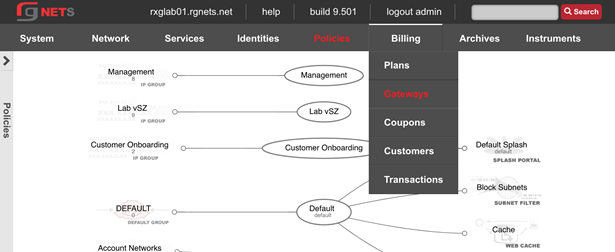
Create a Merchant
| Field | Value |
|---|---|
| Name | Auth.net Developer |
| Direct Gateway | Authorize.net |
| Store Credit Cards | checked |
| Login | API login ID from authorize.net API credential page |
| Password | Transaction key from API credential page |
| Test mode | checked |
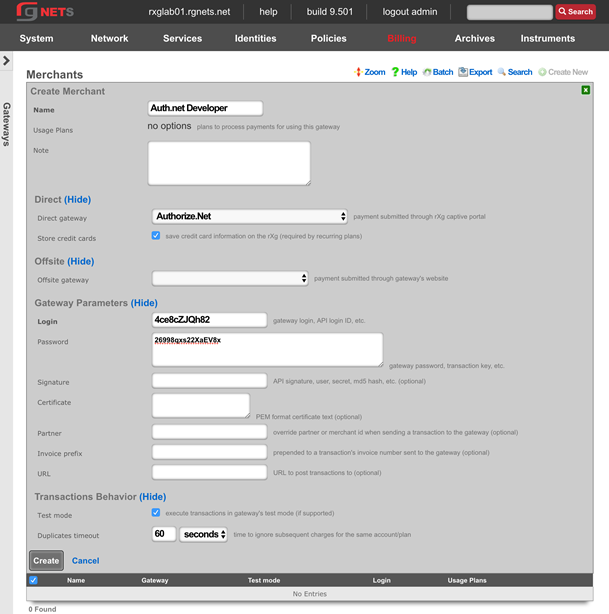
Create Paypal Offsite Merchant
Click Create New in the Merchants scaffold.
| Field | Value |
|---|---|
| Name | Paypal Standard |
| Offsite Gateway | PayPal Website Payments Standard |
| Login | your email |
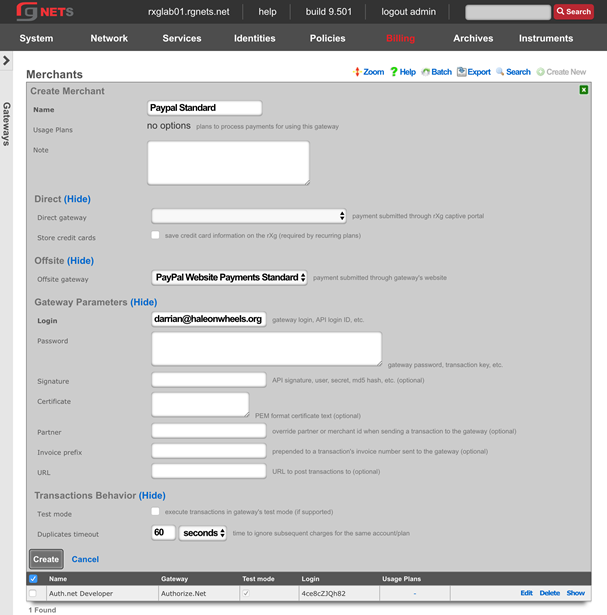
Navigate to Billing :: Plans
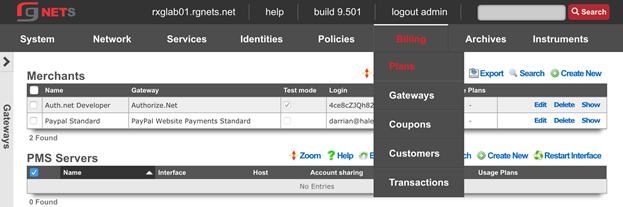
Create an Unlimited Time Plan
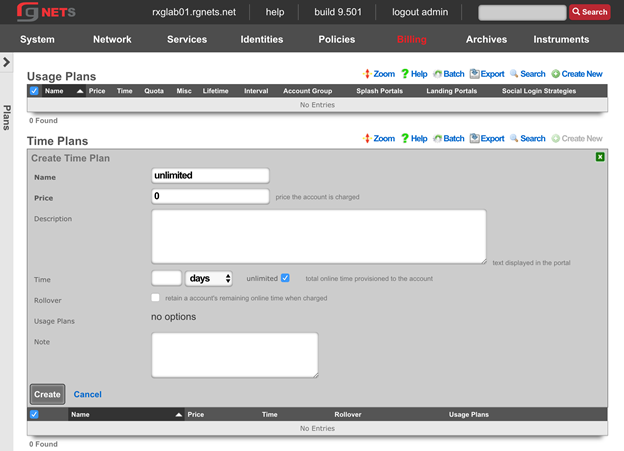
Create a 5GB/2GB Quota Plan (free)
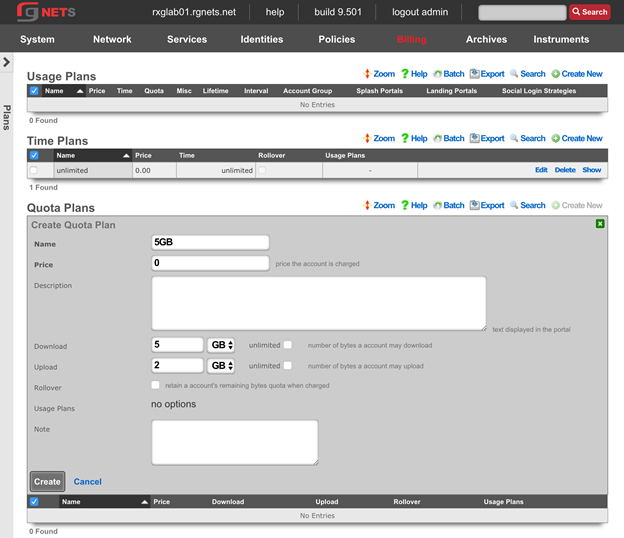
Create a 15GB/7GB Quota Plan ($10)
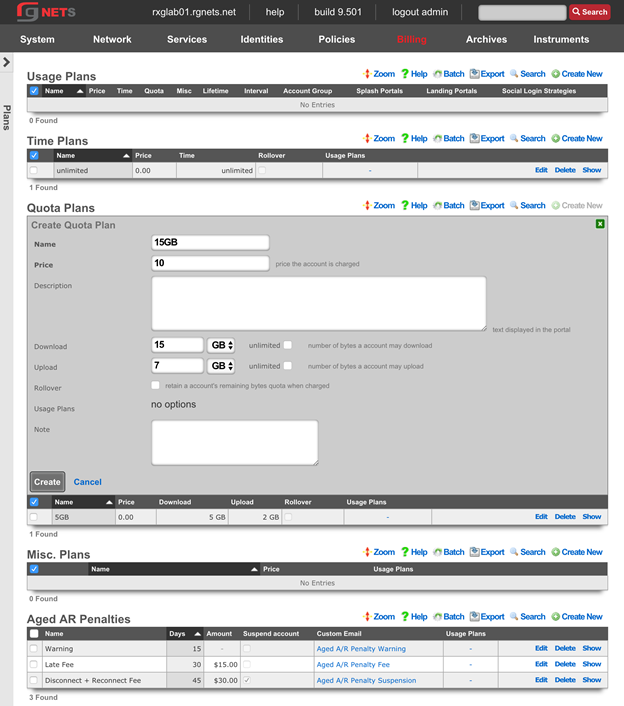
Create a 50GB/25GB Quota Plan ($25)
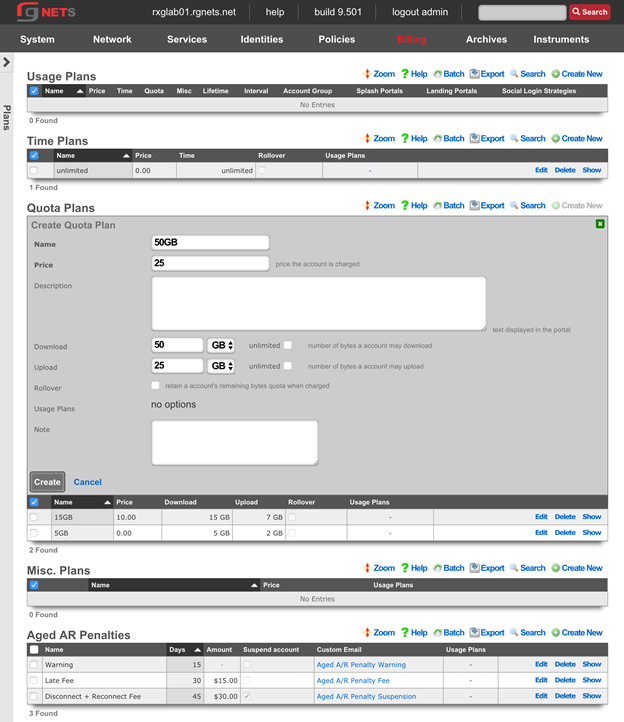
Create an Unlimited Quota Plan ($50)
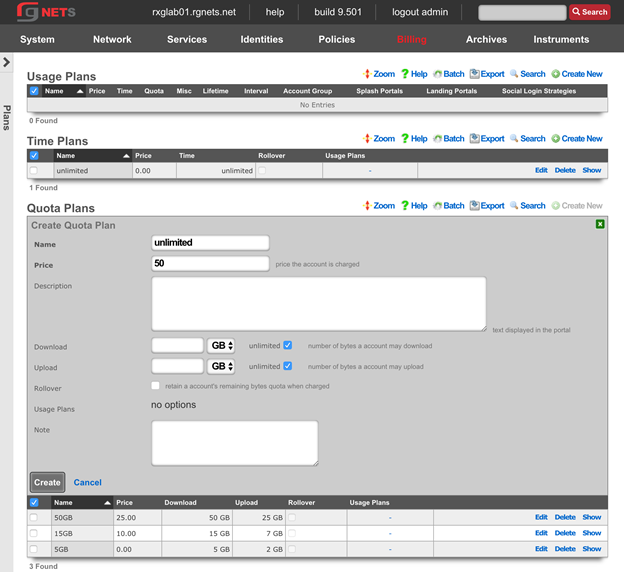
Create a Business SLA Misc. Plan ($100)
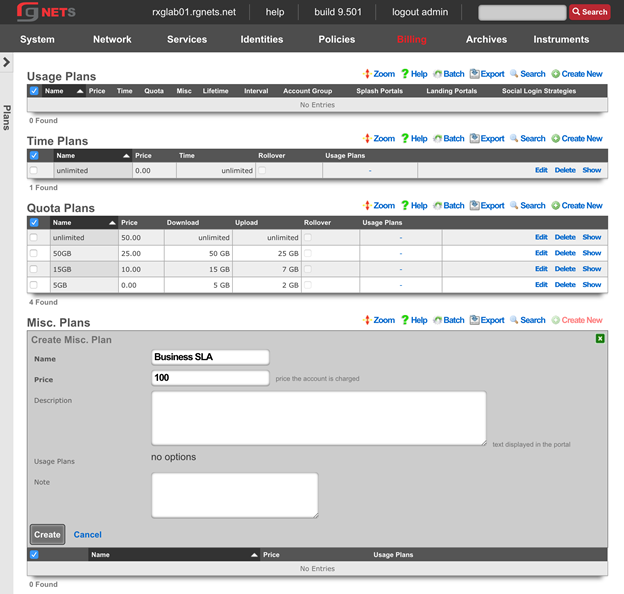
Create a CPE Lease Misc Plan ($5)

Create One Day Free 5GB Usage Plan
| Field | Value |
|---|---|
| Name | One Day Free 5GB |
| Account Group | Free |
| Splash Portals | Default Splash |
| Landing Portals | Default Landing |
| Time Plan | Unlimited |
| Quota Plan | 5GB |
| Misc. Plans | none selected |
| Relative Lifetime | 1 day |
| Automatic Login | checked |
| Max Sessions | 3 |
| Max Devices | unlimited |
| Max BiNATs | 0 |
| Lock Devices | checked |
| Merchants | none selected |
| Interval | None |
| Expiration | Never |
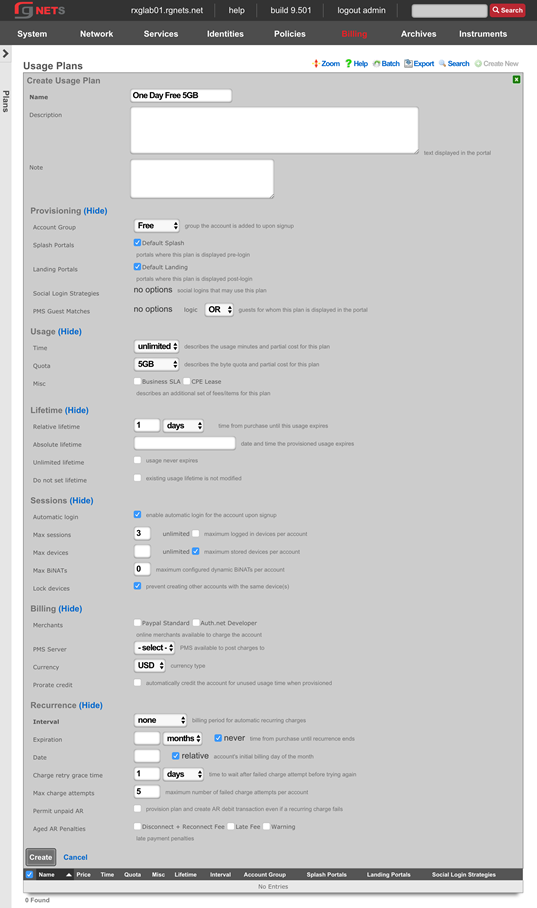
Create One Day 15GB Usage Plan
| Field | Value |
|---|---|
| Name | One Day 15GB |
| Account Group | Basic |
| Splash Portals | Default Splash |
| Landing Portals | Default Landing |
| Time Plan | Unlimited |
| Quota Plan | 15GB |
| Misc. Plans | none selected |
| Relative Lifetime | 1 day |
| Automatic Login | checked |
| Max Sessions | 3 |
| Max Devices | unlimited |
| Max BiNATs | 0 |
| Lock Devices | checked |
| Merchants | Authorize.net Developer, Paypal |
| Interval | None |
| Expiration | Never |
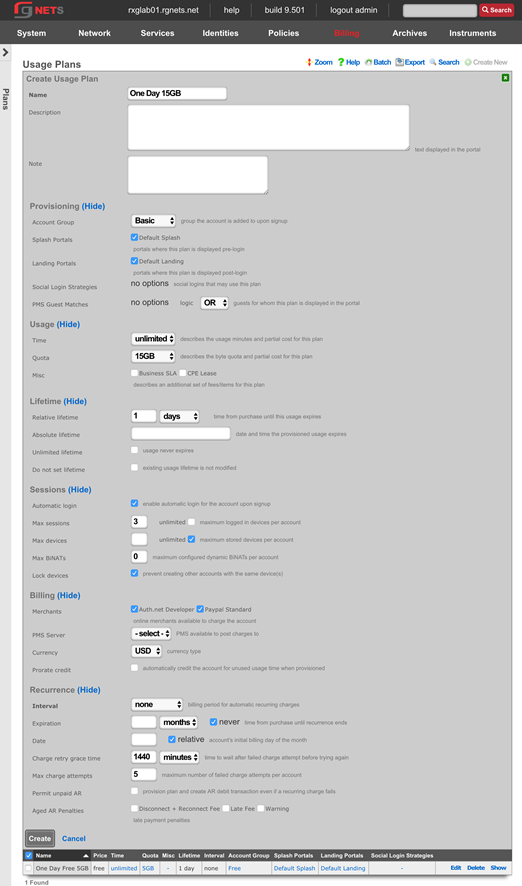
Create One Month Basic 50GB Usage Plan
| Field | Value |
|---|---|
| Name | One Month Basic 50GB |
| Account Group | Basic |
| Splash Portals | Default Splash |
| Landing Portals | Default Landing |
| Time Plan | Unlimited |
| Quota Plan | 50GB |
| Misc. Plans | none selected |
| Relative Lifetime | 1 month |
| Automatic Login | checked |
| Max Sessions | 3 |
| Max Devices | unlimited |
| Max BiNATs | 0 |
| Lock Devices | checked |
| Merchants | Authorize.net Developer |
| Interval | Monthly |
| Expiration | Never |
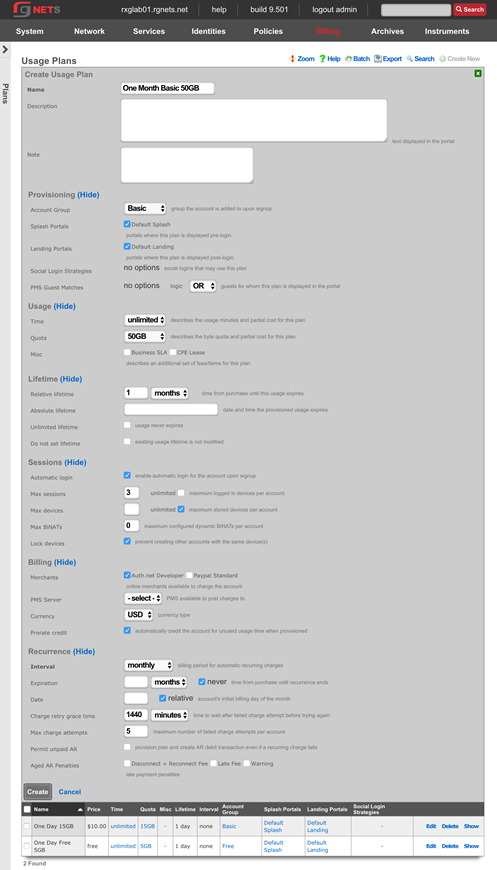
Create One Month Business Class Usage Plan
| Field | Value |
|---|---|
| Name | One Month Business Class |
| Account Group | Business |
| Splash Portals | Default Splash |
| Landing Portals | Default Landing |
| Time Plan | Unlimited |
| Quota Plan | Unlimited |
| Misc. Plans | Business SLA |
| Relative Lifetime | 1 month |
| Automatic Login | checked |
| Max Sessions | unlimited |
| Max Devices | unlimited |
| Max BiNATs | 0 |
| Lock Devices | checked |
| Merchants | Authorize.net Developer |
| Pro-rate Credit | checked |
| Interval | Monthly |
| Expiration | Never |
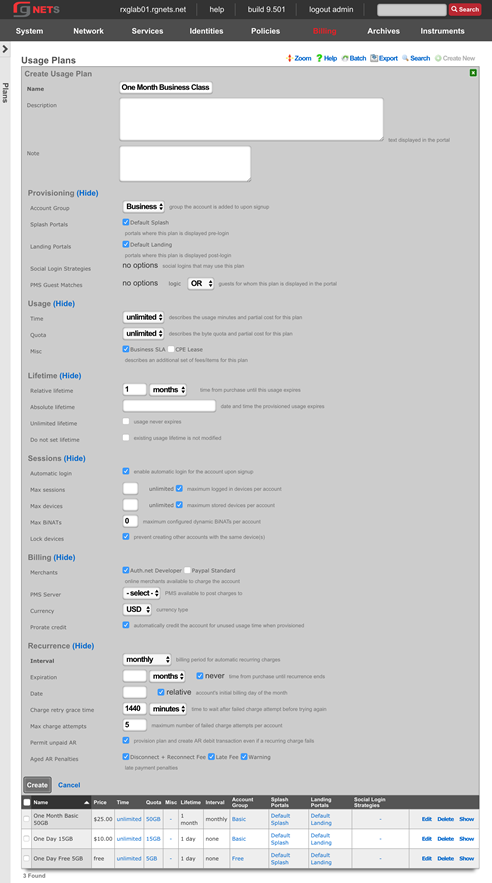
Create On-Demand 50GB Usage Plan
| Field | Value |
|---|---|
| Name | On Demand 50GB |
| Account Group | Premium |
| Splash Portals | Default Splash |
| Landing Portals | Default Landing |
| Time Plan | Unlimited |
| Quota Plan | 50GB |
| Misc. Plans | none selected |
| Unlimited Lifetime | checked |
| Automatic Login | checked |
| Max Sessions | unlimited |
| Max Devices | unlimited |
| Max BiNATs | 0 |
| Lock Devices | checked |
| Merchants | Authorize.net Developer |
| Interval | Monthly |
| Expiration | Never |
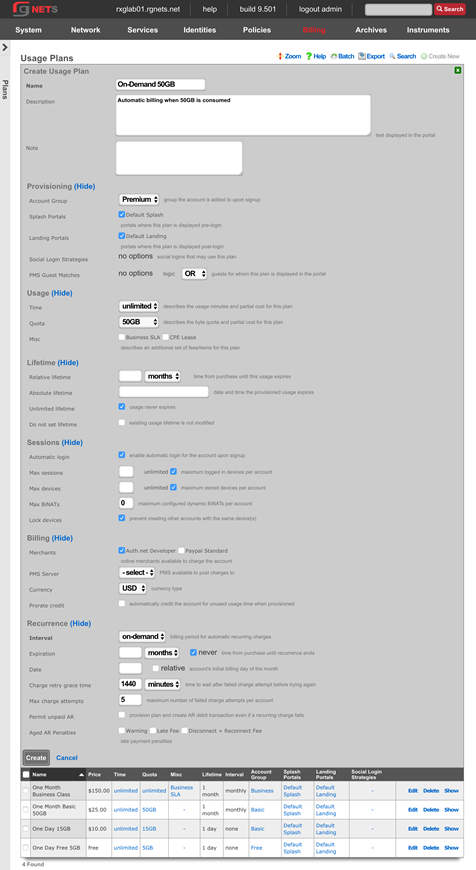
Content Filter Policies
Navigate to Policies :: Content Filtering
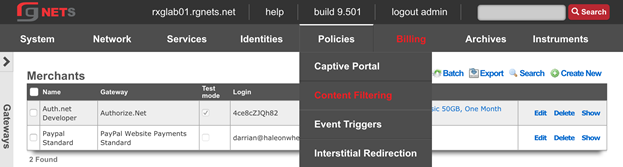
Create a new Remote Content Filter Blacklist
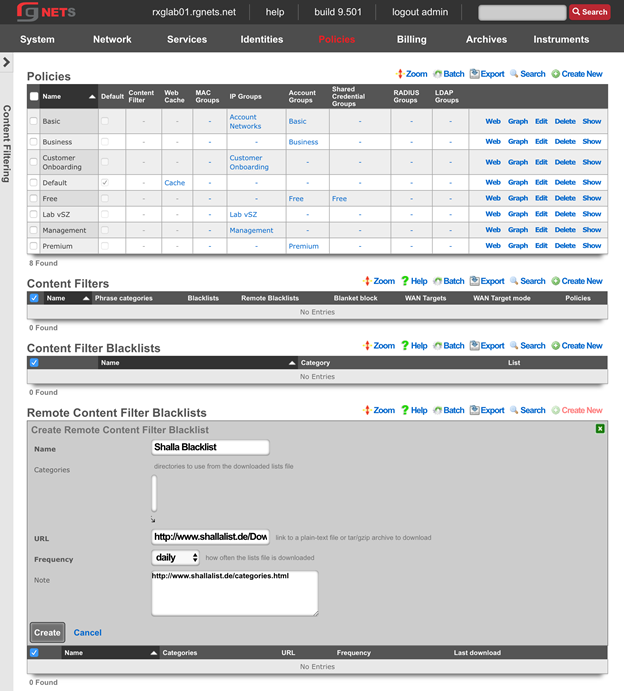
Edit the new Remote Content Filter Blacklist
Select gamble from the multi-select category list. You may select other categories by holding down the command or control key. Click Update when finished.
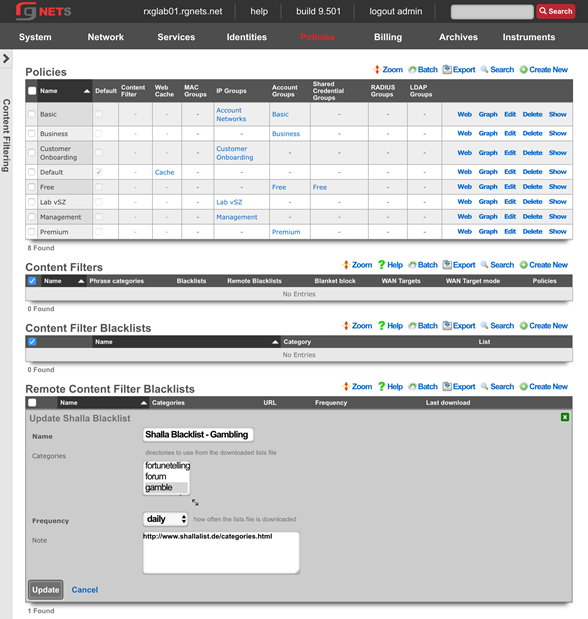
Create a new Content Filter
The Content Filter is the policy element that gets tied to a specific policy. It may reference Content Filter Blacklists or Remote Content Filter Blacklists , or specify phrase categories that should be filtered. The rXg will inspect the contents of all HTTP traffic to determine if the content is permitted. If not, the user is redirected to the specified page of the captive portal.
Click Create New in the Content Filters scaffold.
| Field | Value |
|---|---|
| Name | Block Gambling |
| Policies | Free |
| Remote Blacklists | Shalla Blacklist Gambling |
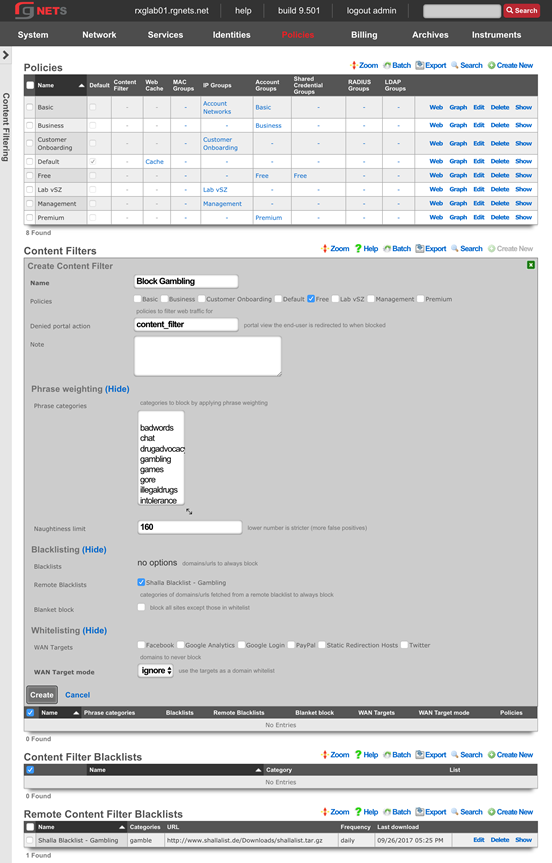
Interstitial Redirection Policies
Navigate to Policies :: Interstitial Redirection
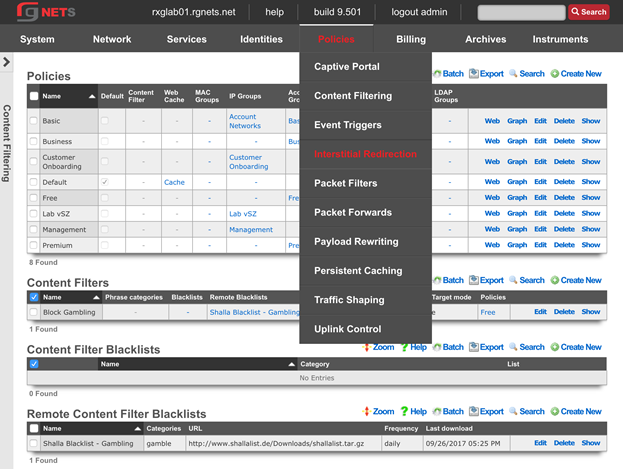
Create a new Interstitial Redirect
An interstitial redirect forces end user browser redirection to a page of your choosing based on a timed interval. You may specify how many minutes the end user may browser before being redirected ( Initial minutes ), how often the user is redirected after the initial redirect ( Minutes ), as well as how long the rXg should force redirection at each redirect interval ( Duration ).
Click Create New in the Interstitial Redirect scaffold.
| Field | Value |
|---|---|
| Name | Test Redirect |
| URL | Accept default |
| Initial Minutes | 3 |
| Minutes | 15 |
| Duration | 0 |
| Policies | Free |
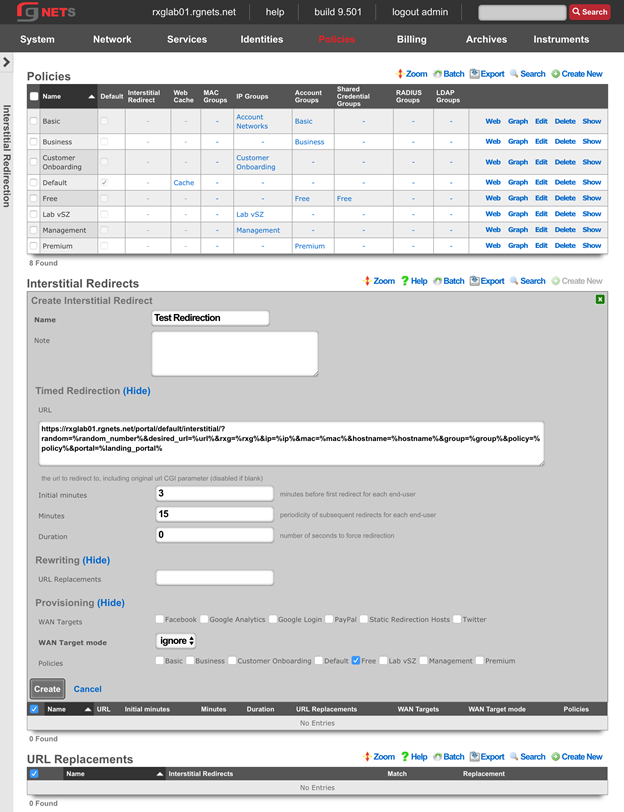
Create a new URL Replacement
A URL replacement will rewrite the URL of every matching HTTP URL which transits the rXg, allowing the operator to substitute phrases or even entire domains of the users attempted URL.
Click Create New in the Interstitial Redirect scaffold.
| Field | Value |
|---|---|
| Name | rewrite restaurant search |
| Interstitial Redirect | Test Redirection |
| Match | q=restaurant |
| Replacement | q=bjs restaurant |
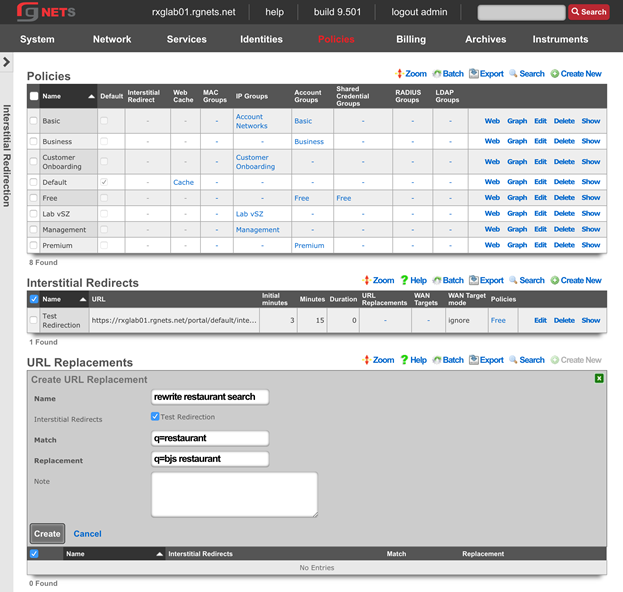
Packet Filter Policies
Navigate to Policies :: Packet Filters
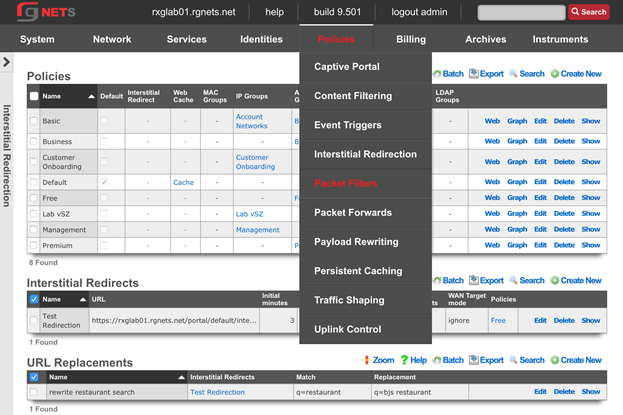
Create a new Application
Click Create New in the Applications scaffold.
| Field | Value |
|---|---|
| Name | smtp |
| protocol | tcp udp |
| Destination ports | 25 |
| source ports |
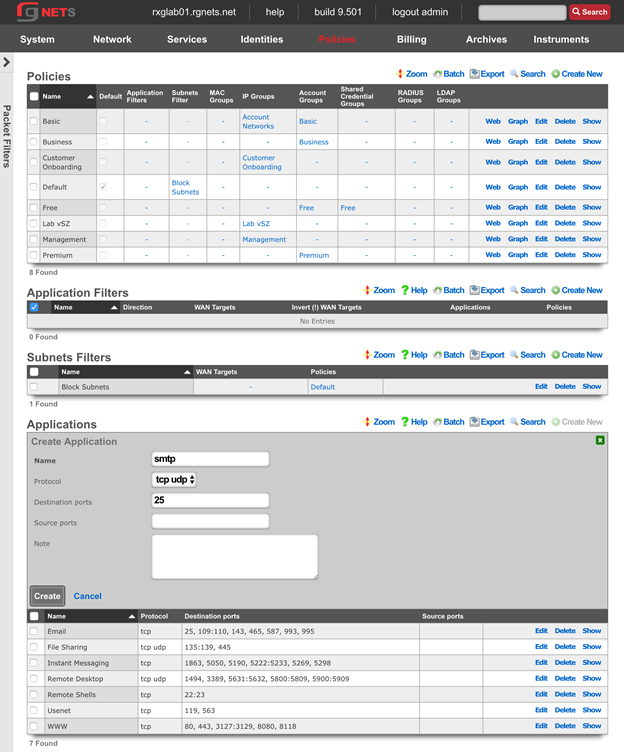
Create a new Application Filter
Click Create New in the Application Filter scaffold.
| Field | Value |
|---|---|
| Name | block smtp |
| direction | outbound |
| Applications | smtp |
| Policies | Free |
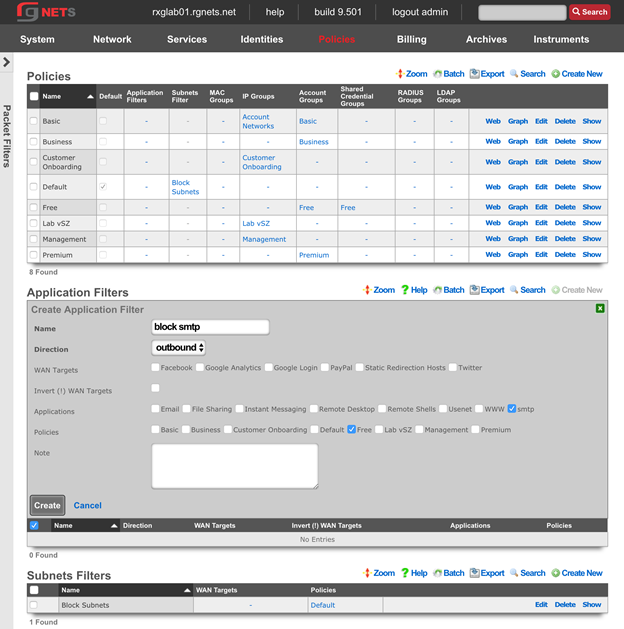
Update the Subnet Filter
A Subnet Filter instructs the rXg to block all packets that attempt to cross from one subnet to another. Because the rXg is the default route for all devices, any attempt to reach another subnet must pass through the rXg. Any device which is in a policy attached to the subnet filter will not be able to route to any other local subnet, except those defined in an associated WAN target.
Click Edit on the Block Subnets subnet filter (this filter was created by default upon installation).
Include all of the customer facing policies:
Default, Basic, Business, Free, Premium
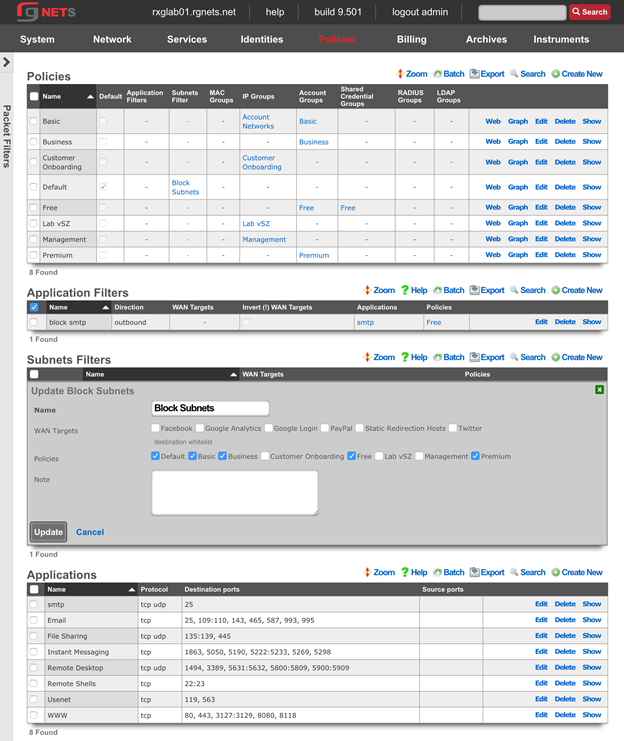
Packet Forward Policies
Navigate to Policies :: Packet Forwards
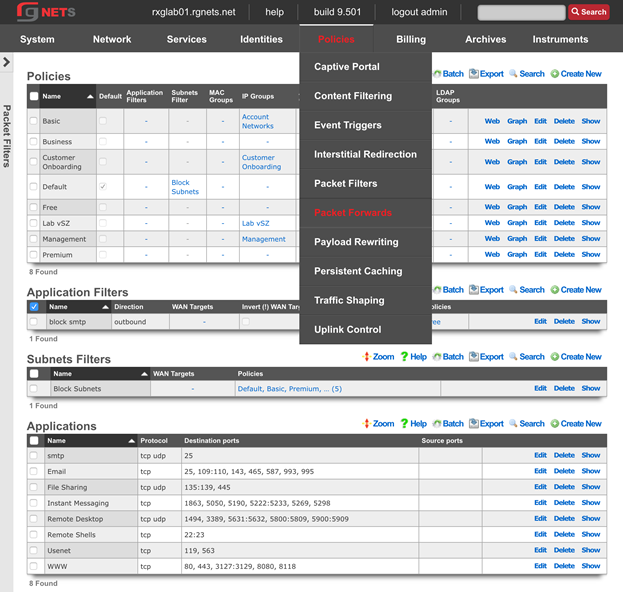
Create a new Application
Click Create New in the Application scaffold.
| Field | Value |
|---|---|
| Name | 8443 |
| Protocol | tcp udp |
| Destination Ports | 8443 |
| Source Ports |
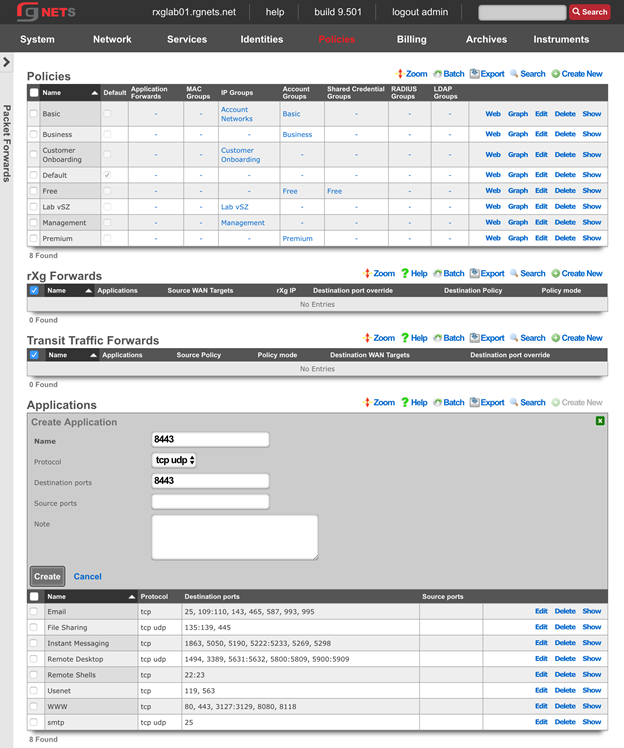
Create a new rXg Forward
Click Create New in the rXg Forwards scaffold.
| Field | Value |
|---|---|
| Name | forward 8443 to vSZ |
| Applications | 8443 |
| Destination Policy | Lab vSZ |
| Policy Mode | first member only |
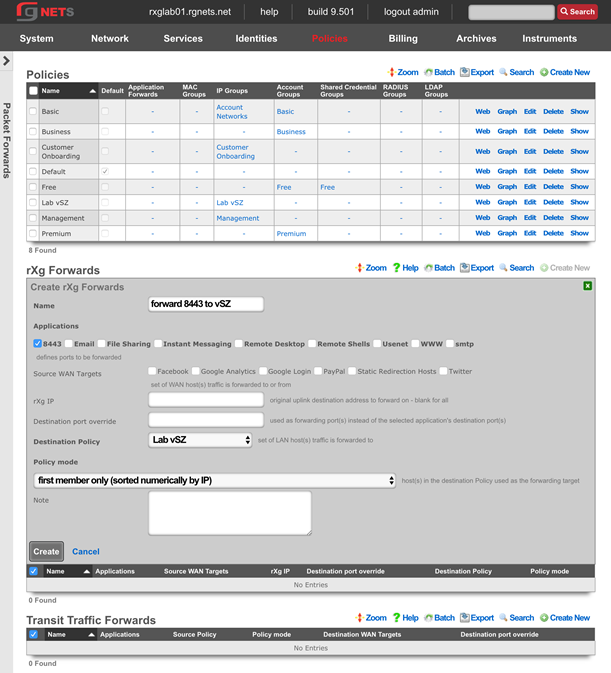
Payload Rewriting Policies
Navigate to Policies :: Payload Rewriting
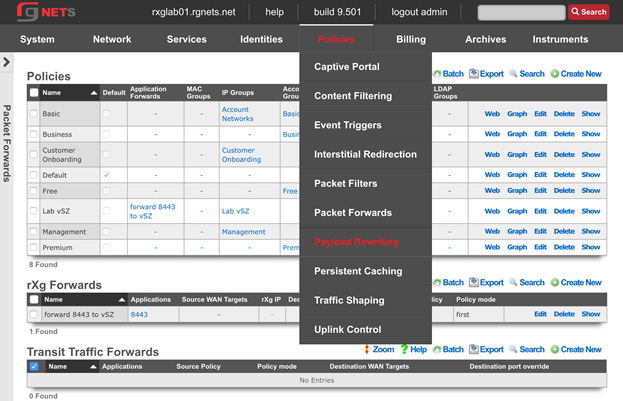
Create a new HTML Injection
An HTML Injection allows the operator to insert content into the body of the HTTP pages which transit the rXg. The rXg offers several recipes for injecting content into the page. The HTML injection does not become active until it is tied to a HTML Payload Rewrite record.
Virtual Frames: Place an iframe into the page in the position of your choice which contains your custom content.
Floating Overlay: Place a floating div onto the page in the position of your choice which contains your custom content.
Ad Element Overlay (beta): Position a floating element onto the page on top of existing advertisements, as determined by common well-known banner dimensions.
Click Create New in the HTML Injections scaffold.
| Field | Value |
|---|---|
| Name | test injection |
| position | top |
| Recipe | floating overlay |
| HTML | <h1>This is a test</h1> |
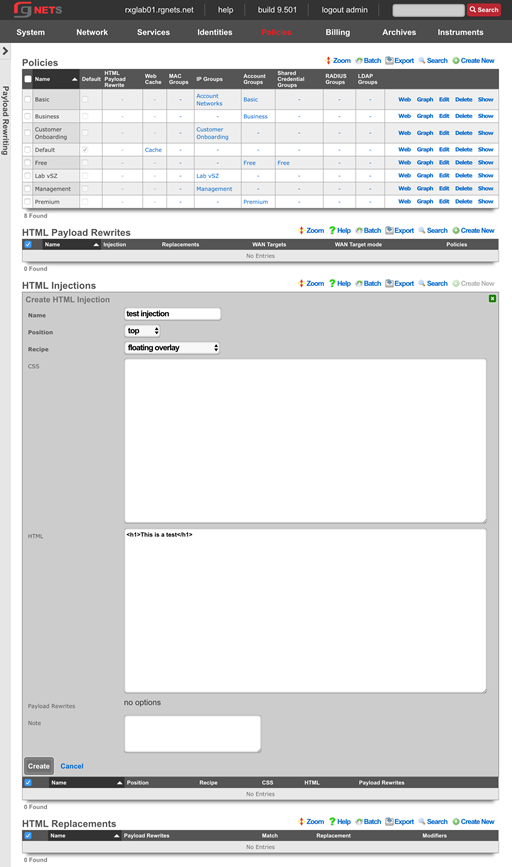
Create a new HTML Payload Rewrite
An HTML Payload Rewrite ties an HTML Injection or HTML Replacement record to a policy. Some sites may render incorrectly when an injection or replacement is performed. WAN Targets allow the operator to exclude specific sites from the payload rewrite.
Click Create New in the rXg Forwards scaffold.
| Field | Value |
|---|---|
| Name | test injection |
| Injection | test injection |
| Policies | Free |
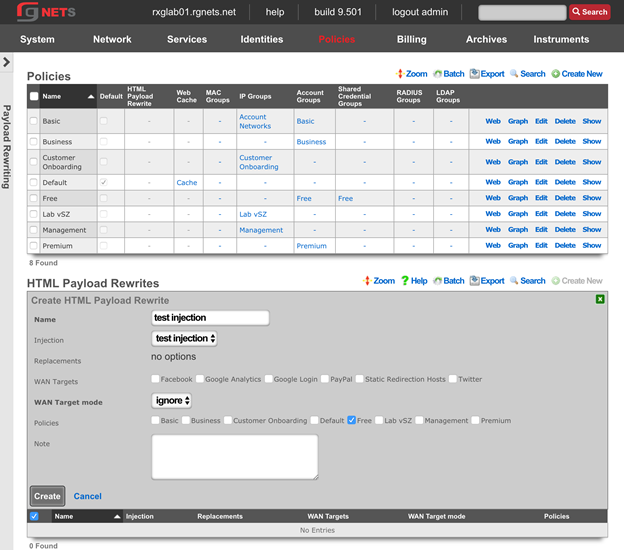
Persistent Caching Policies
Navigate to Policies :: Persistent Caching
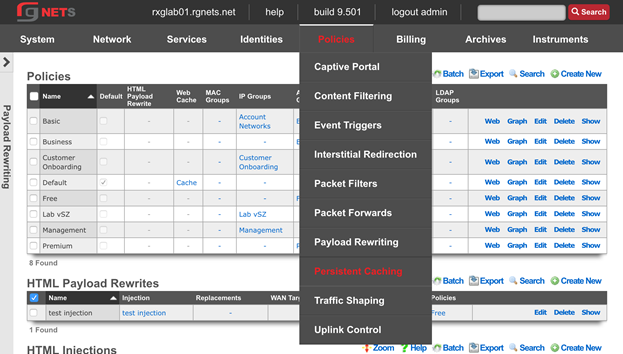
Edit the Web Cache
Click Edit on the Cache web cache record. Enable the Free , Basic and Default policies. 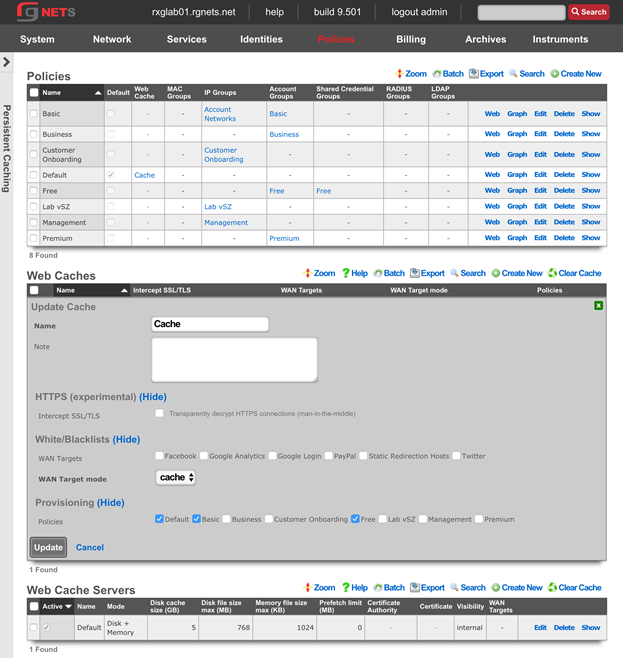
Traffic Shaping Policies
Navigate to Policies :: Traffic Shaping
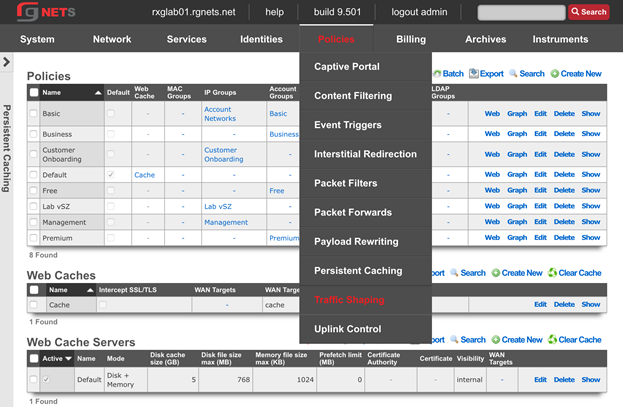
Create a new 3x1 w/ burst Bandwidth Queue
Click Create New in the Bandwidth Queues scaffold.
| Field | Value |
|---|---|
| Name | 3x1 Mbps with burst |
| Priority | 0 |
| Download Rate Limit | 3 Mbps |
| Upload Rate Limit | 1 Mbps |
| Download Rate Burst | 10 Mbps |
| Upload Rate Burst | 2 Mbps |
| Burst time | 5000 |
| Guarantee | none |
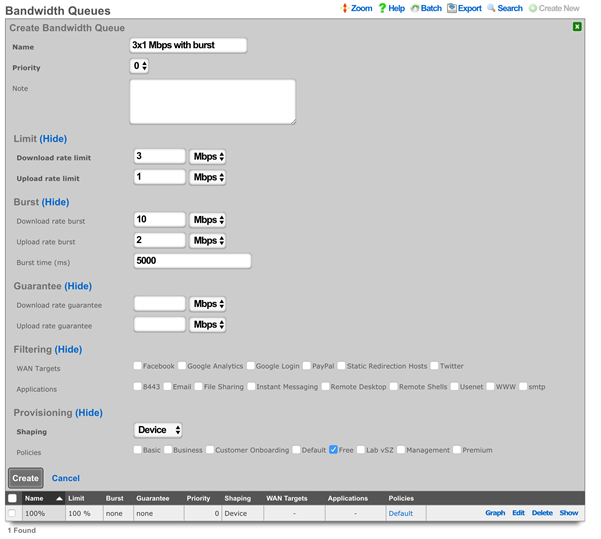
Create a new 20x2/acct Bandwidth Queue
Click Create New in the Bandwidth Queues scaffold.
| Field | Value |
|---|---|
| Name | 20x2 Mbps per account |
| Priority | 0 |
| Download Rate Limit | 20 Mbps |
| Upload Rate Limit | 2 Mbps |
| Burst | none |
| Guarantee | none |
| Shaping | Account |
| Policies | Basic |

Create a new 50x2 w/guarantee Bandwidth Queue
Click Create New in the Bandwidth Queues scaffold.
| Field | Value |
|---|---|
| Name | 50x2 Mbps with guarantee |
| Priority | 0 |
| Download Rate Limit | 50 Mbps |
| Upload Rate Limit | 2 Mbps |
| Burst | none |
| Download Rate Guarantee | 10 Mbps |
| Upload Rate Guarantee | 1 Mbps |
| Shaping | Account |
| Policies | Business |
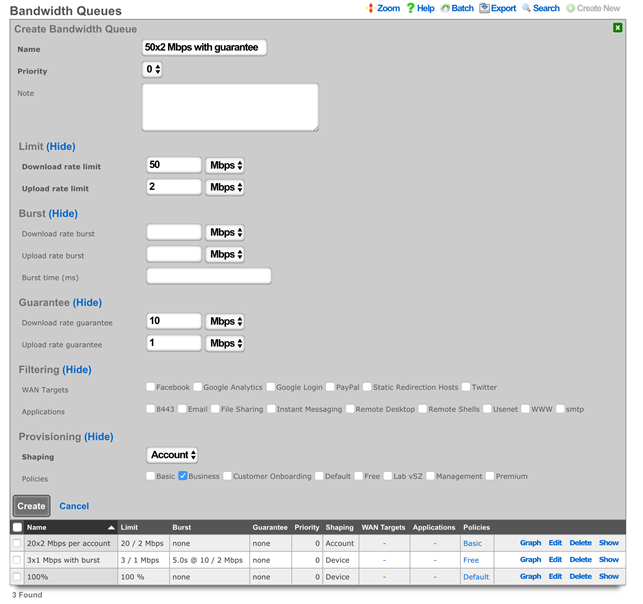
Create a new 512x128 Kbps usenet Bandwidth Queue
Click Create New in the Bandwidth Queues scaffold.
| Field | Value |
|---|---|
| Name | 512x128 Kbps usenet |
| Priority | 0 |
| Download Rate Limit | 512 Kbps |
| Upload Rate Limit | 128 Kbps |
| Burst | none |
| Guarantee | none |
| Applications | usenet |
| Policies | Basic, Free |
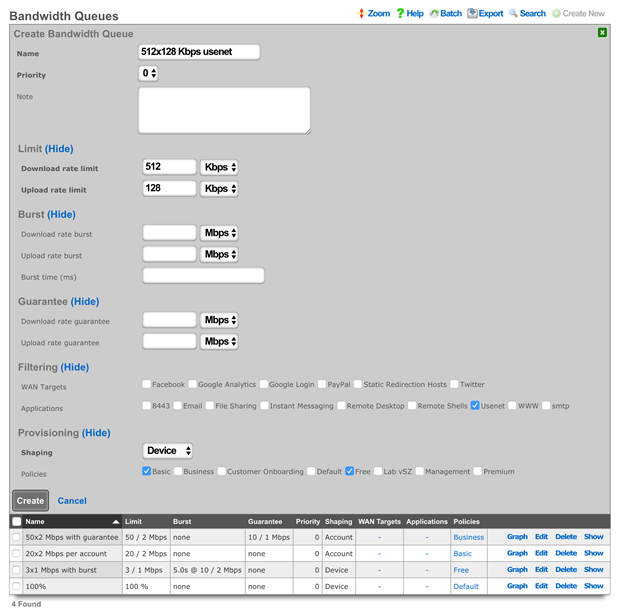
Create a new 50x2/account Bandwidth Queue
Click Create New in the Bandwidth Queues scaffold.
| Field | Value |
|---|---|
| Name | 50x2 Mbps per account |
| Priority | 0 |
| Download Rate Limit | 50 Mbps |
| Upload Rate Limit | 2 Mbps |
| Burst | none |
| Guarantee | none |
| Shaping | Account |
| Policies | Premium |
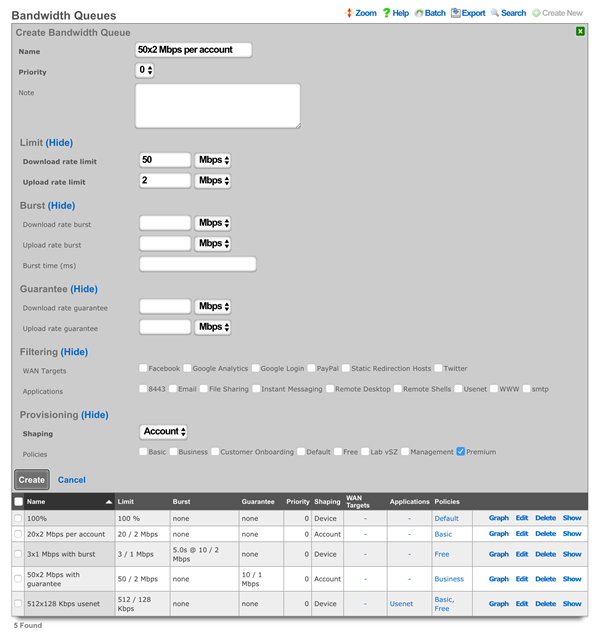
Final Bandwidth Queue Result
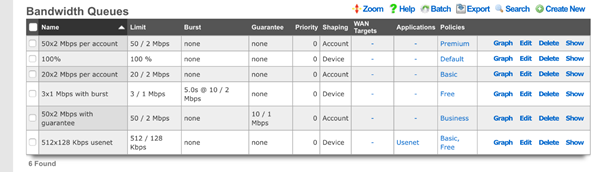
Uplink Control Policies
Navigate to Policies :: Uplink Control
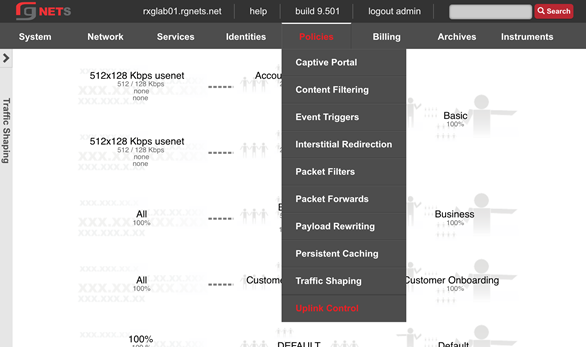
Edit the Uplink
Click Edit on the Uplink record of the Uplinks scaffold. Enable the Google Public DNS 1 and Google Public Dns 2 ping targets.
Ping Targets are necessary for the rXg to monitor uplink health and ensure proper link, and you cannot add an Uplink to a Link Control unless it has at least 2 ping targets.
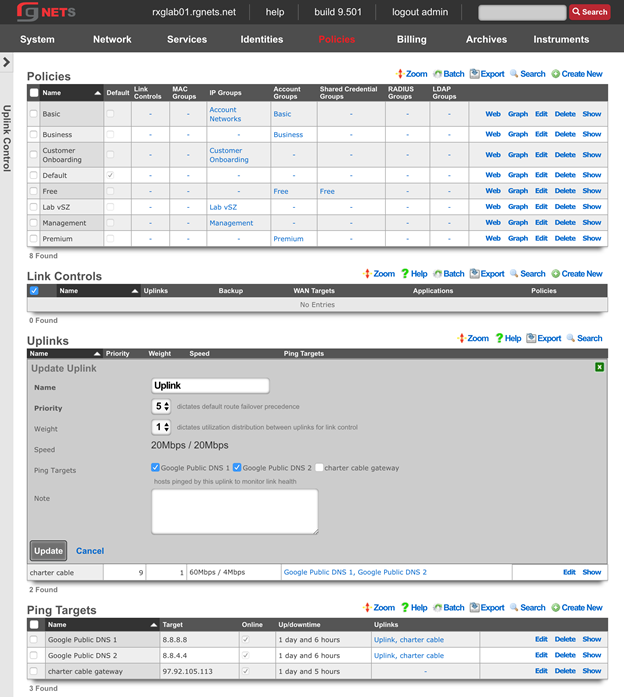
Create a new Load Balance Link Control
Link Controls enable the operator to control which Uplinks the user population utilizes. Policies may be restricted to using one or more uplinks. When multiple Uplinks exist in a policys Link Control, the user devices will be load balanced across those Uplinks in accordance with the weight of the associated uplinks.
The breadth of Link Controls effect can be limited by associating Applications or WAN Targets. When either are selected, there must be a Bandwidth Queue for the same combination of Applications or WAN Targets.
Click Create New in the Link Controls scaffold.
| Field | Value |
|---|---|
| Name | Load Balance |
| Uplinks | Uplink, Charter Cable |
| Policies | Premium, Basic |
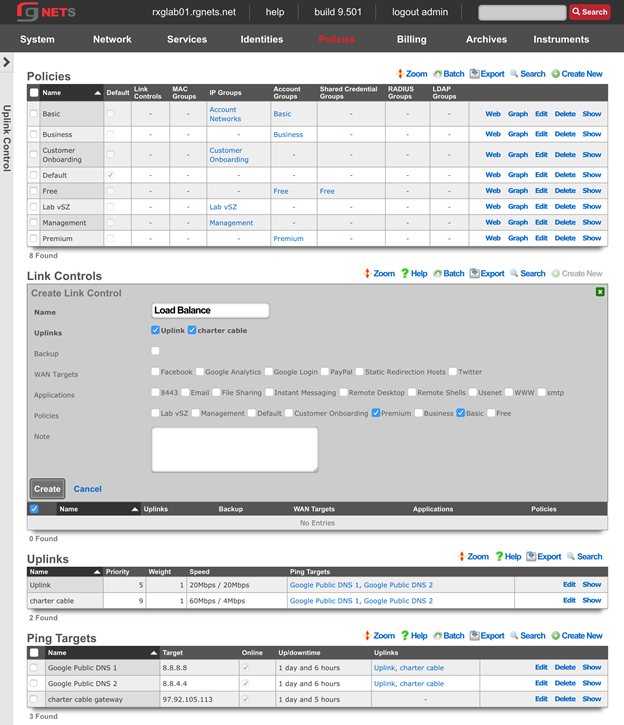
Create a Charter Only Link Control
Click Create New in the Link Controls scaffold.
| Field | Value |
|---|---|
| Name | Charter only |
| Uplinks | Charter Cable |
| Policies | Business |
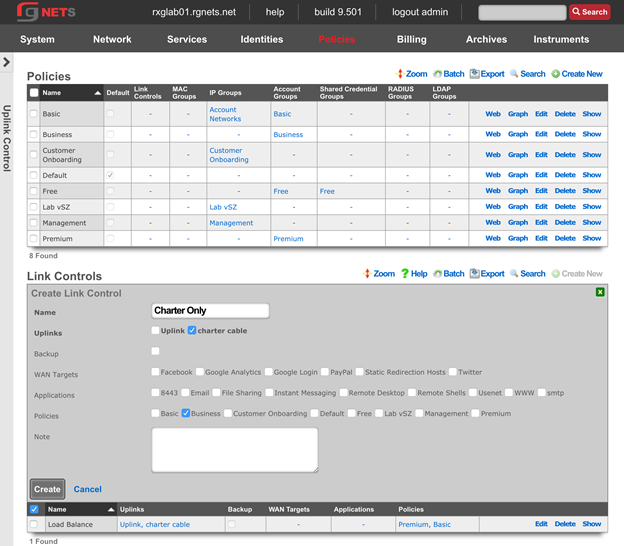
Create an Uplink Only Link Control
Click Create New in the Link Controls scaffold.
| Field | Value |
|---|---|
| Name | Uplink only |
| Uplinks | Uplink |
| Policies | Free |
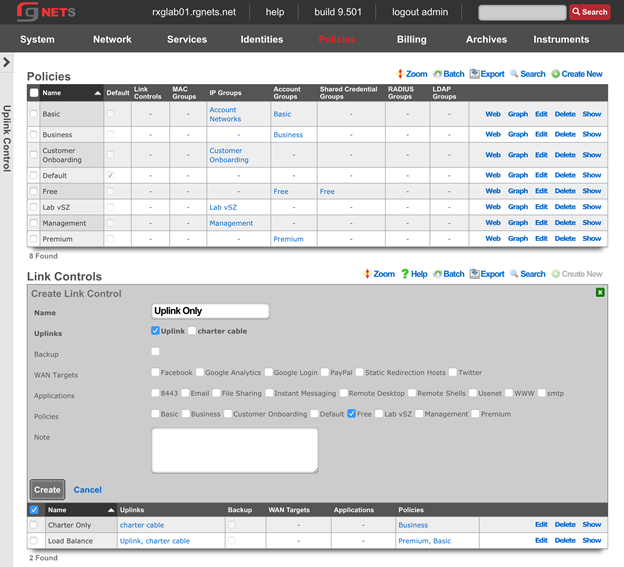
Create a Backup Link Control
Click Create New in the Link Controls scaffold.
| Field | Value |
|---|---|
| Name | uplink backup |
| Uplinks | Uplink |
| Backup | checked |
| Policies | Business |
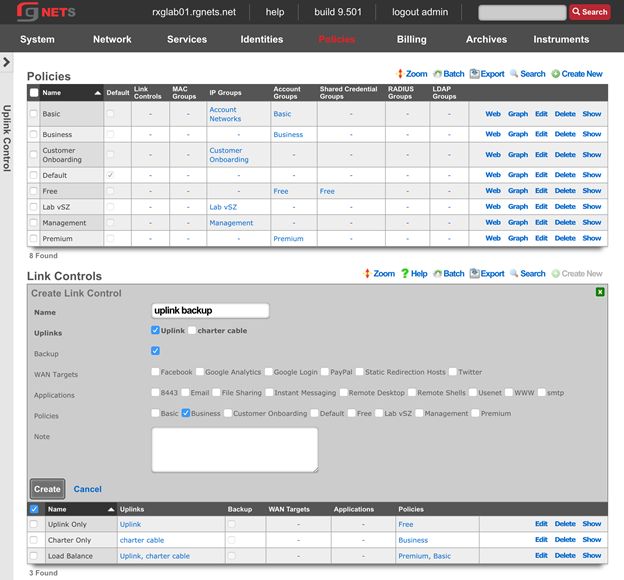
Create an Application-Specific Bandwidth Queue
Click Create New in the Link Controls scaffold.
| Field | Value |
|---|---|
| Name | usenet through uplink |
| Uplinks | Uplink |
| Applications | usenet |
| Policies | Basic |

Event Trigger Policies
Navigate to Identities :: Groups
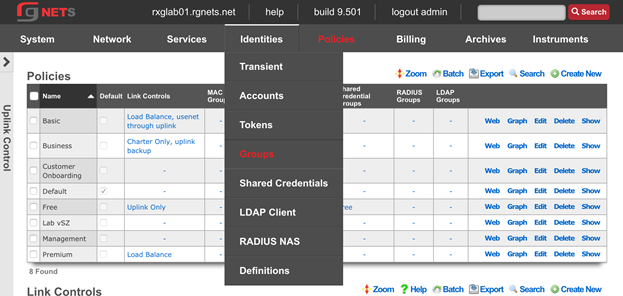
Create a Quarantine IP Group
We will temporarily place users who violate our DPI and Connection Event Triggers into a Transient IP Group. We will assign the Quarantine Group to the Triggers, and while in this group, users will not have internet access and will be directed to the Splash Portal associated with the Customer Onboarding Policy.
Click Create New in the Link Controls scaffold.
| Field | Value |
|---|---|
| Name | Quarantine |
| Priority | 7 |
| Policy | Customer Onboarding |
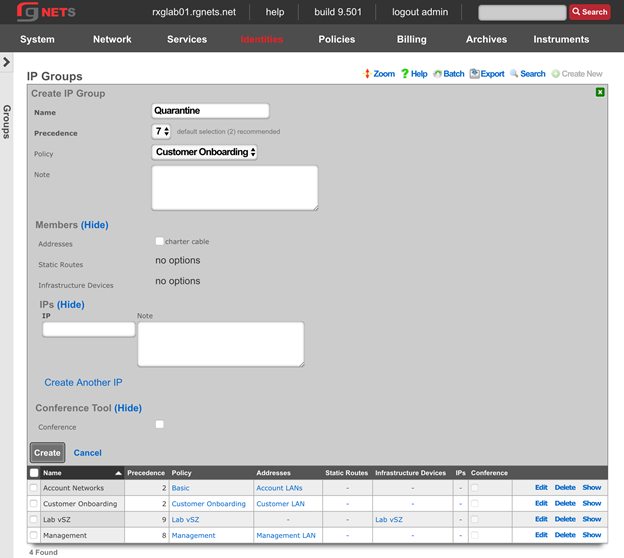
Navigate to Policies :: Event Triggers
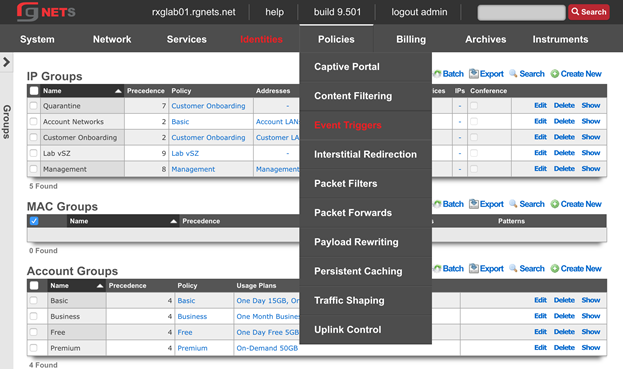
Create a new Connections Trigger
Click Create New in the Connections Triggers scaffold.
| Field | Value |
|---|---|
| Name | 1000 Connections |
| Policies | Basic, Free |
| Max Connections | 1000 |
| Duration | 15 minutes |
| IP Group | Quarantine |
| Flush Connection States | checked |
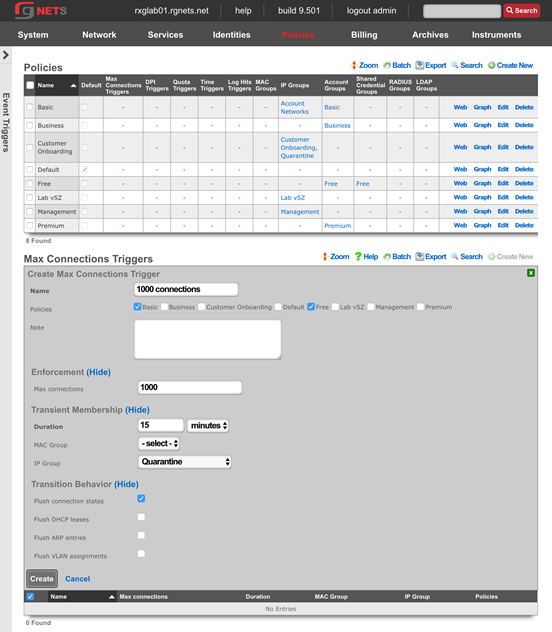
Create a new Quota Trigger
Click Create New in the Connections Triggers scaffold.
| Field | Value |
|---|---|
| Name | Premium Abuser slowdown |
| Policies | Premium |
| Download | 50 GB |
| Upload | 25 GB |
| Window | 7 days |
| Duration | 1 days |
| Account Group | Basic |
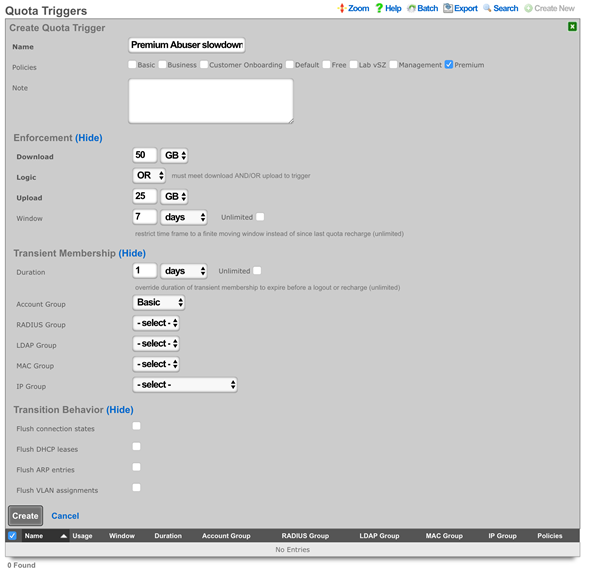
Create a new Remote DPI Signature
Click Create New in the Remote DPI Signature scaffold. Accept the defaults, which will pull from emergingthreats.net 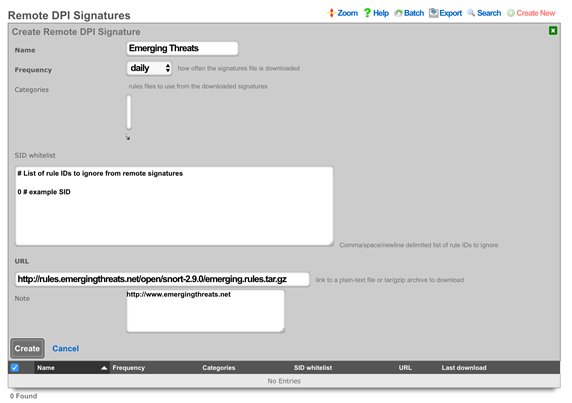
Edit the Emerging Threats Remote DPI Signature
Click Edit on the Emerging Threats Remote DPI Signature record. Review the list of categories and select several categories by command or control clicking items in the box. 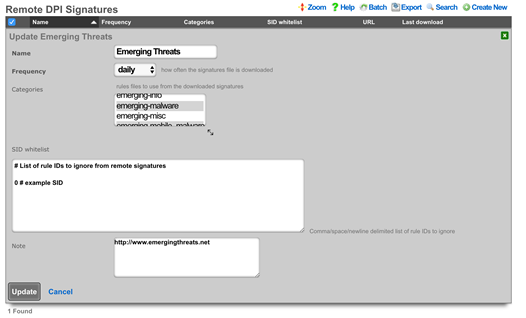
Create a new DPI Trigger
Click Create New in the DPI Triggers scaffold.
| Field | Value |
|---|---|
| Name | Quarantine Bad Behavior |
| Policies | Basic, Free, Premium |
| Remote Signatures | Emerging Threats |
| IP Group | Quarantine |
| Duration | 30 Minutes |
| Flush connection states | Checked |
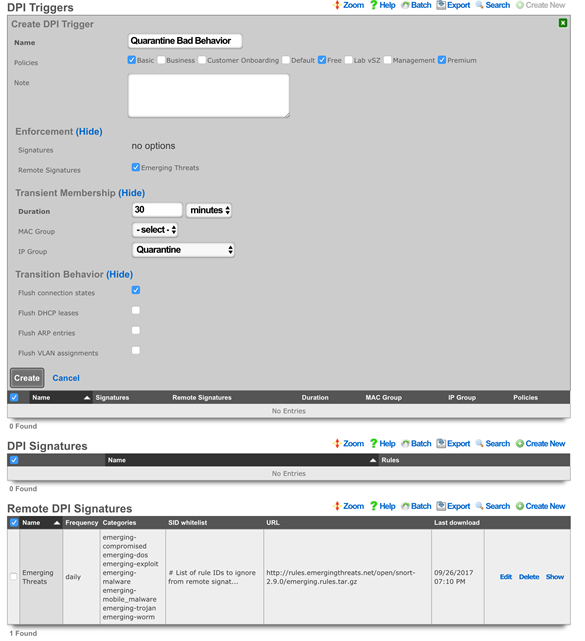
Review Policy Dashboard
Click Policies in the top menu. The Policy Dashboard now illustrates our policy enforcement configuration.

Navigate to Identities :: Groups
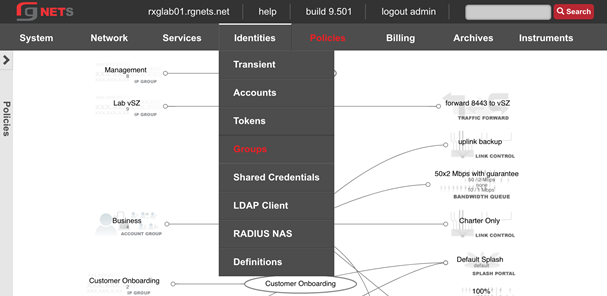
Update Basic Account Group Priority
When users trigger the Premium Quota Trigger, they are temporarily placed into the Basic Account Group (a transient group membership). Currently, the groups priority is the same as the Premium Account Group (all account groups are set to 4 by default). We need to increase the priority of the Basic Account Group so that it takes priority over the devices other group memberships.
Click Edit on the Basic Account Group.
Increase the priority to 5
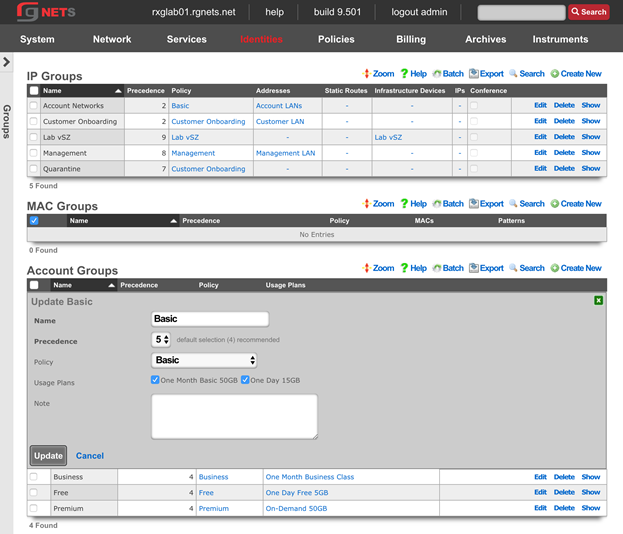
Review Final Policy Dashboard
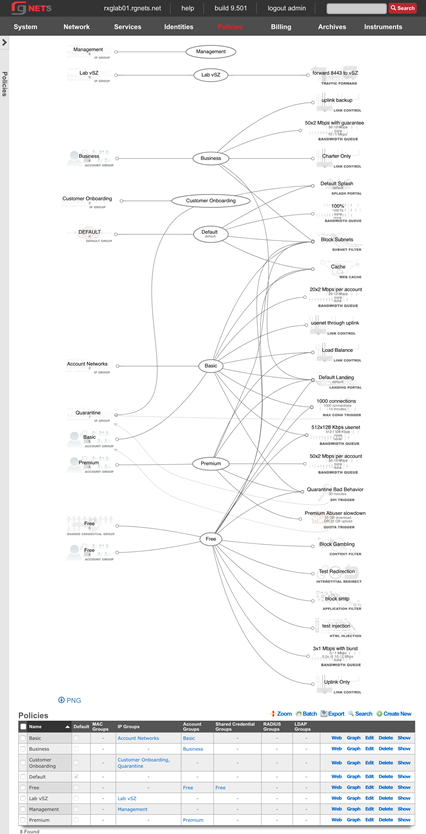
Logs Hits Trigger
The Log Hits Trigger function automatically adds identified IP addresses to a WAN target for a predefined timeframe when events such as repeated failed SSH login attempts or excessive traffic directed at a web server occur. This function allows for targeted restrictions on specific types of traffic, including blocking SSH, HTTP, or HTTPS access. This functionality works on both the LAN and the WAN. The configuration outlined below is intended for events on the WAN side of the rXg.

Create Blacklisted WAN Target Click on Identity :: Definitions. Create a WAN Target definition.
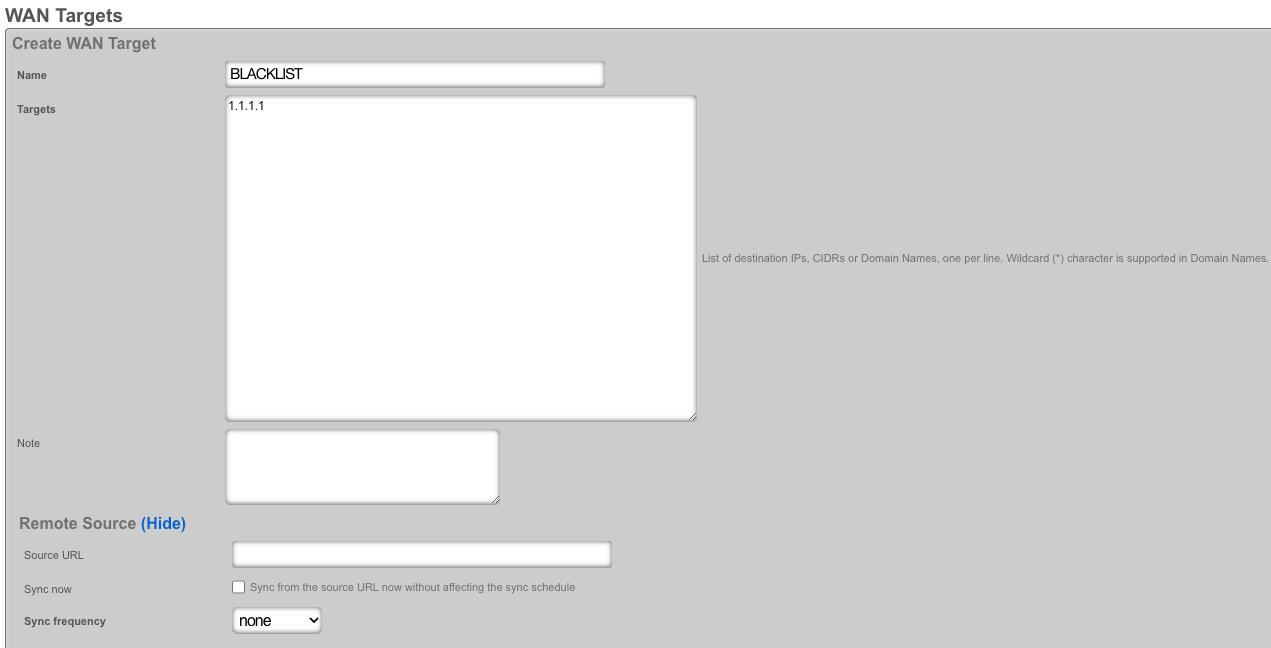
Add WAN Target to Admin ACL Click on System :: Admins. Modify ACL by adding a defined WAN Target.
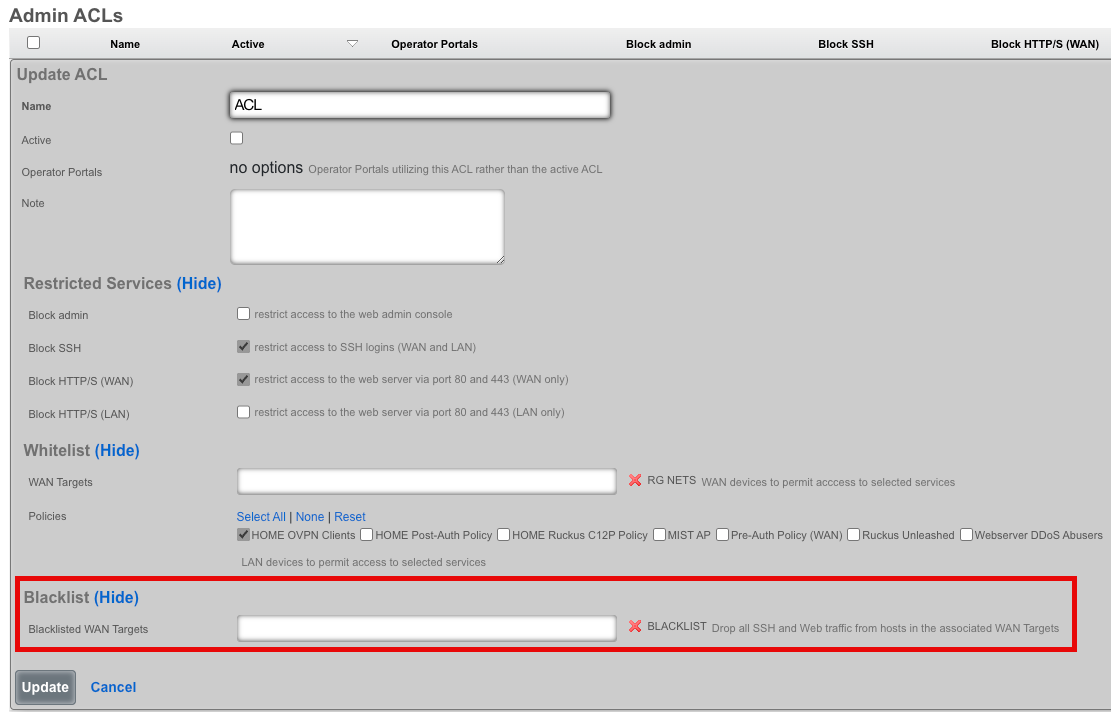
Create Log Hits Triggers
Proceed to Policies :: Event Triggers. - Click create. - Name the trigger for identification. - Select the Policy that will be enforced. - Define Enforcement Thresholds. - Specify the Duration of transient membership. - Assign a blacklisted WAN target. - Select an email notification for the Log Hits Trigger Record.

Viewing Event Logs Navigate to Archives :: Trigger Logs for detailed event logs.
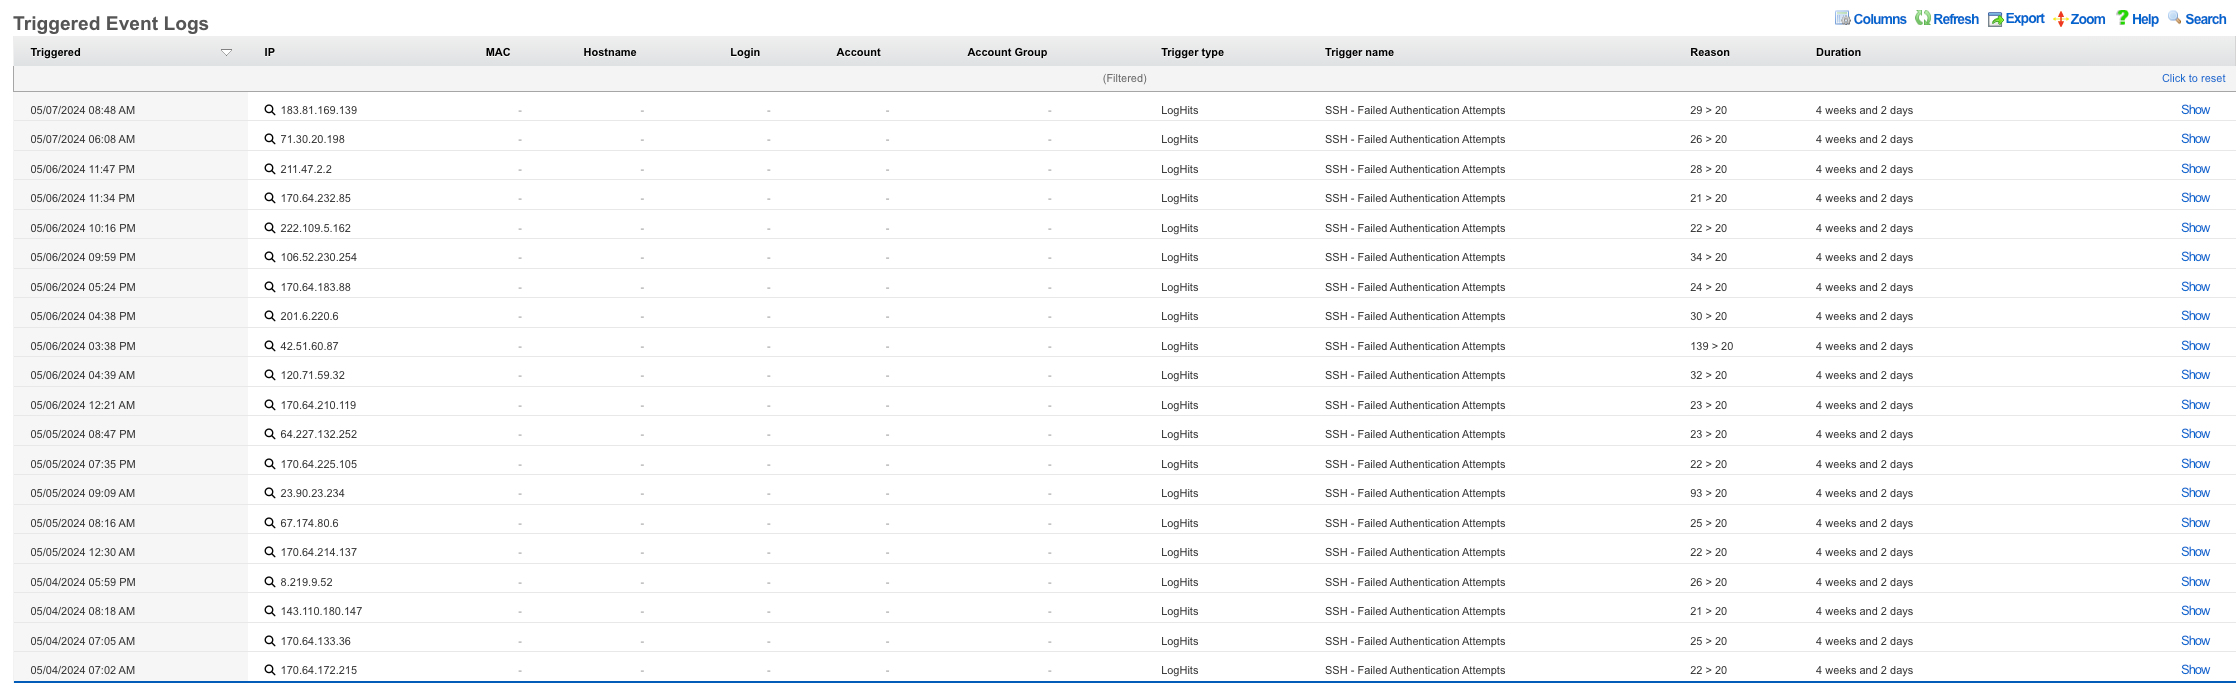
Additionally the Trigger Logs button under each listed Log Hits Trigger will display the log as well.
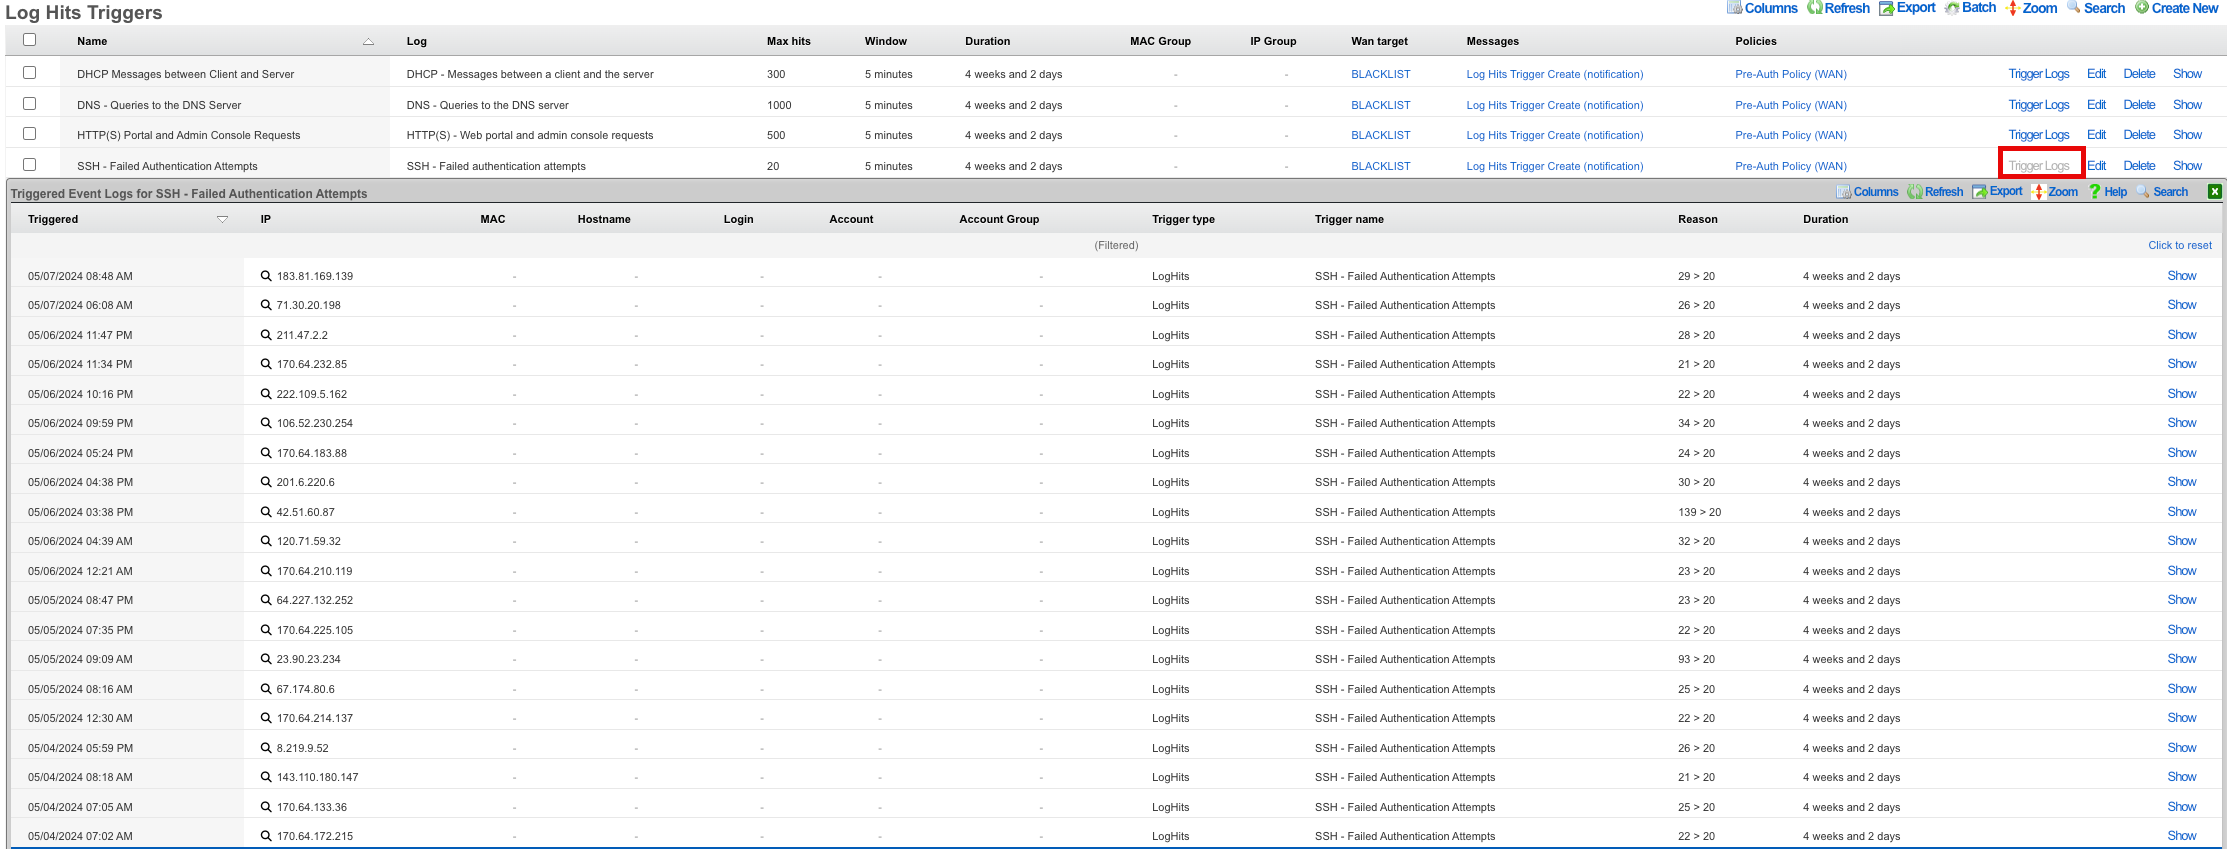
IPs are automatically removed after the expiration of the set threshold time duration.
SAML Admin Authentication
Create a SAML App in Google Admin Console
Log in to your Google Admin Console and navigate to "Apps"
Click on "SAML Apps"
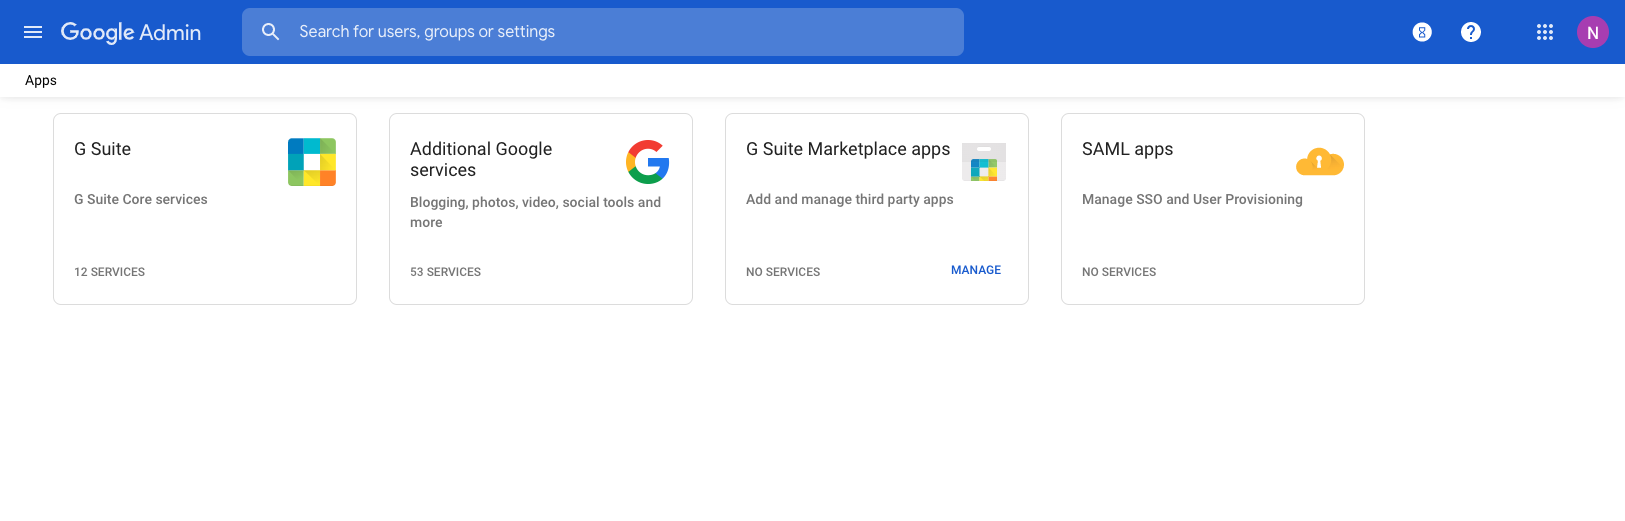
Click "Add a service/App to your domain"

Click "Setup My Own Custom App"
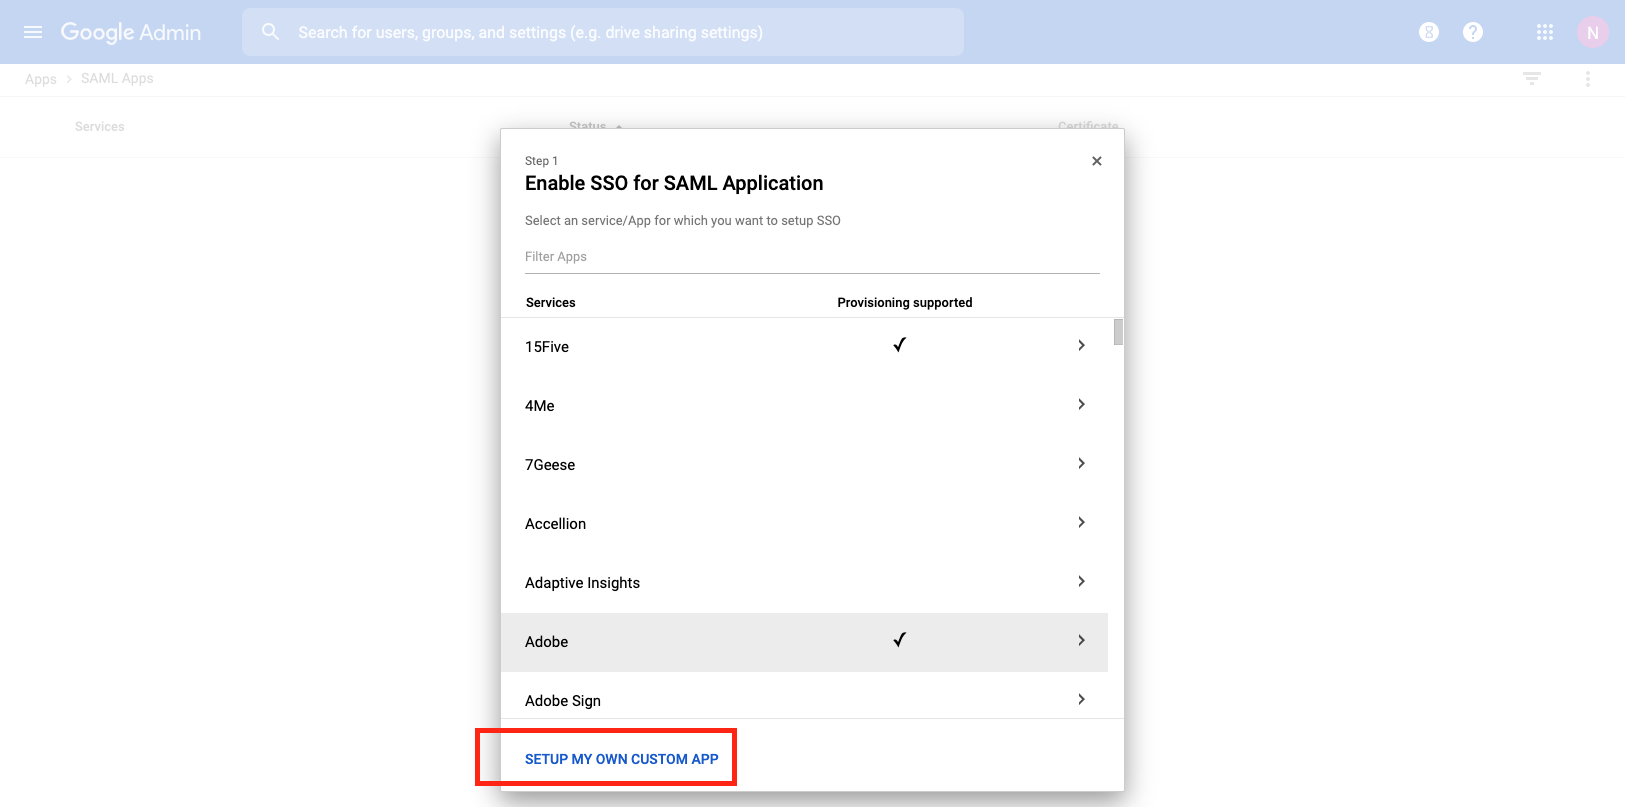
Copy the SSO URL, and click "Next"
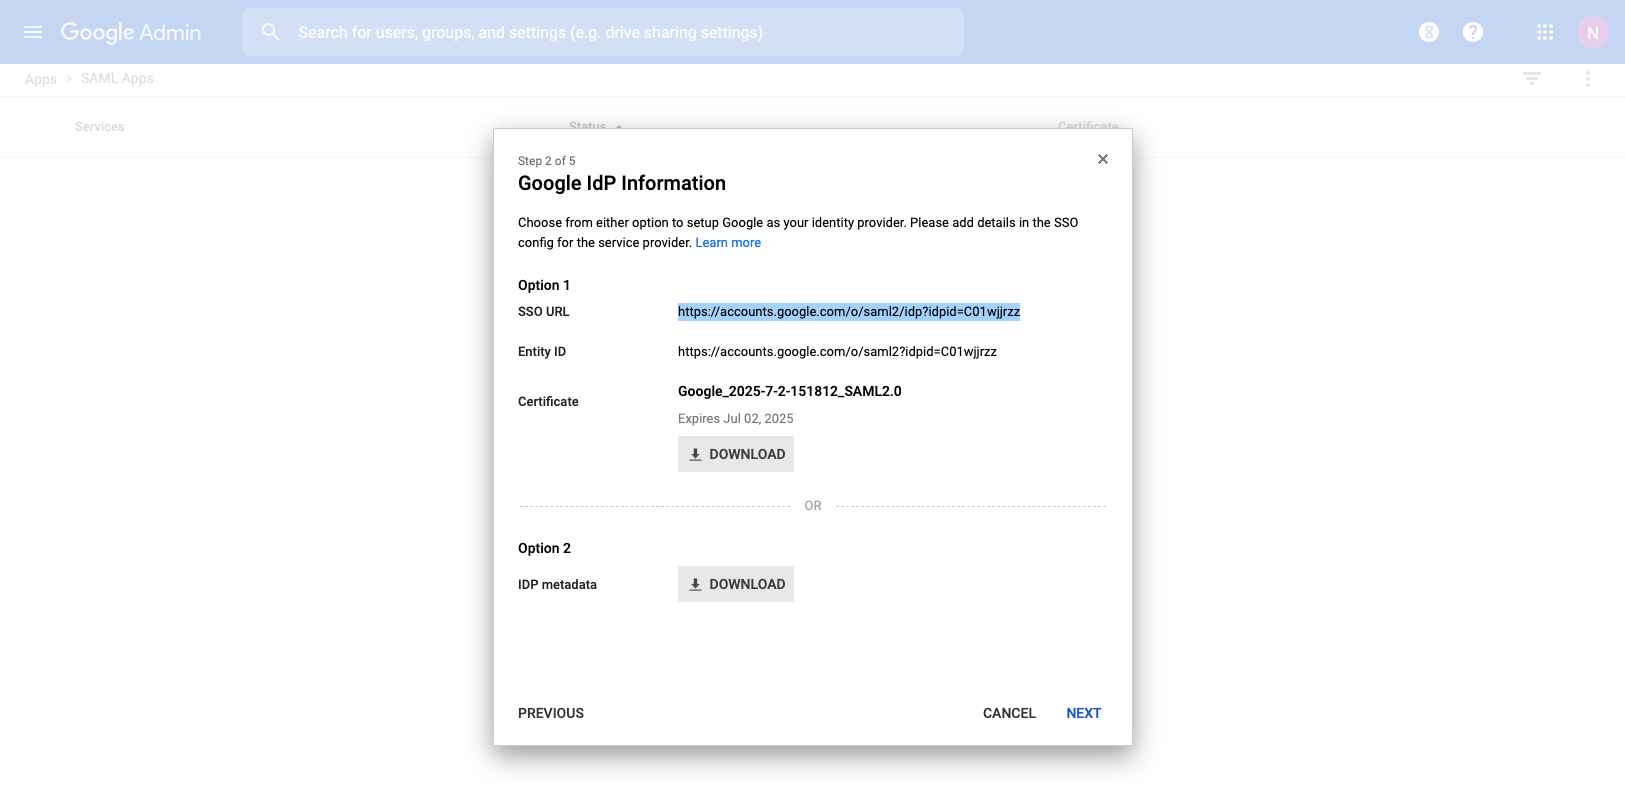
Give the Application a Unique Name. Optionally provide a description and custom logo, then Click "Next"
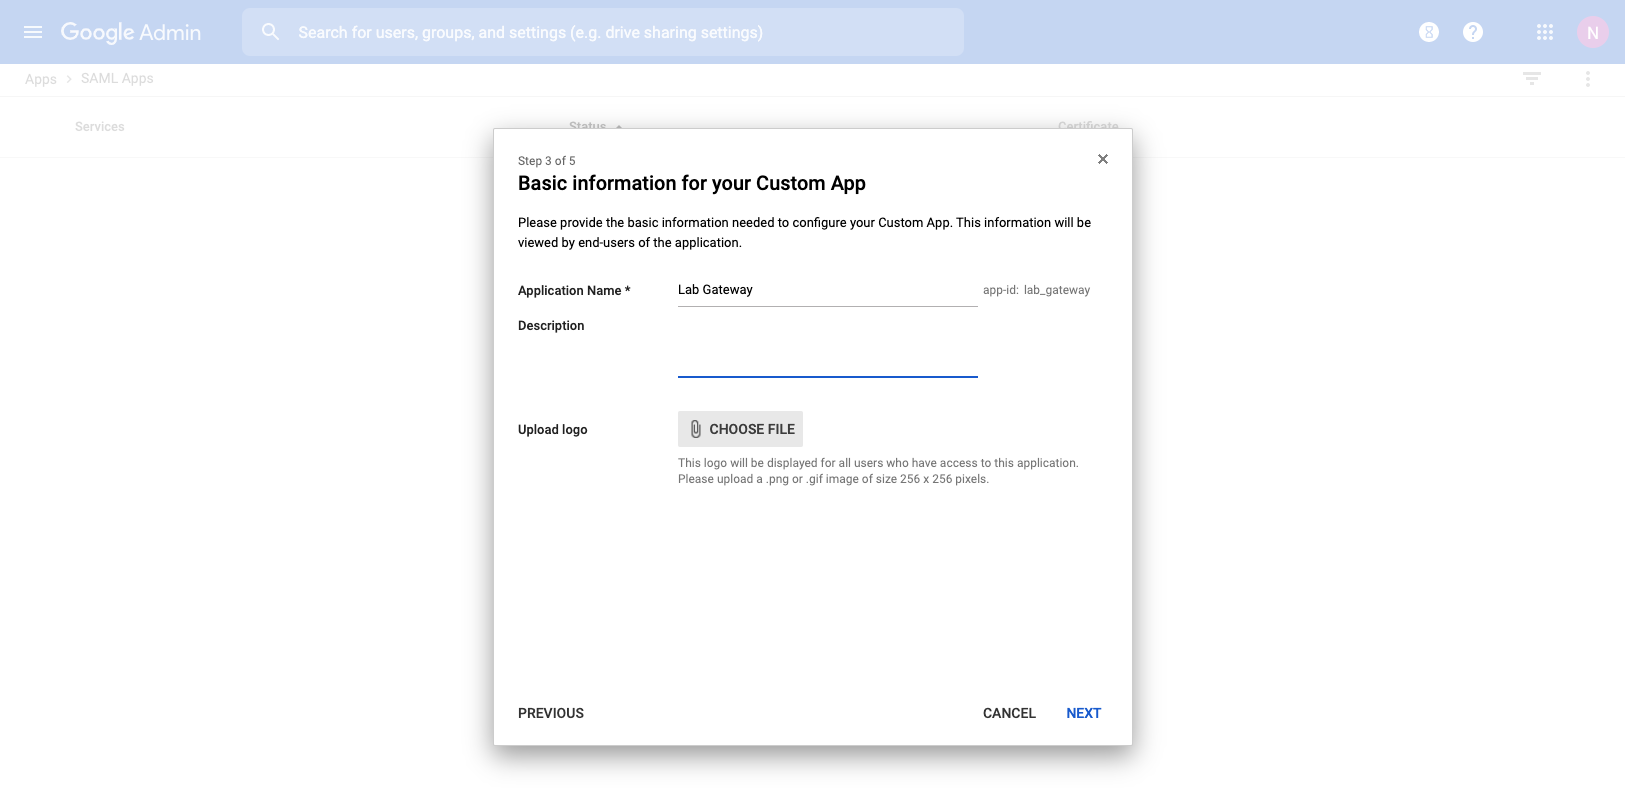
Create a new SSO Strategy in rXg
On the rXg, navigate to System::Admins. Create a new SSO Strategy. Paste the SSO URL Copied Earlier.
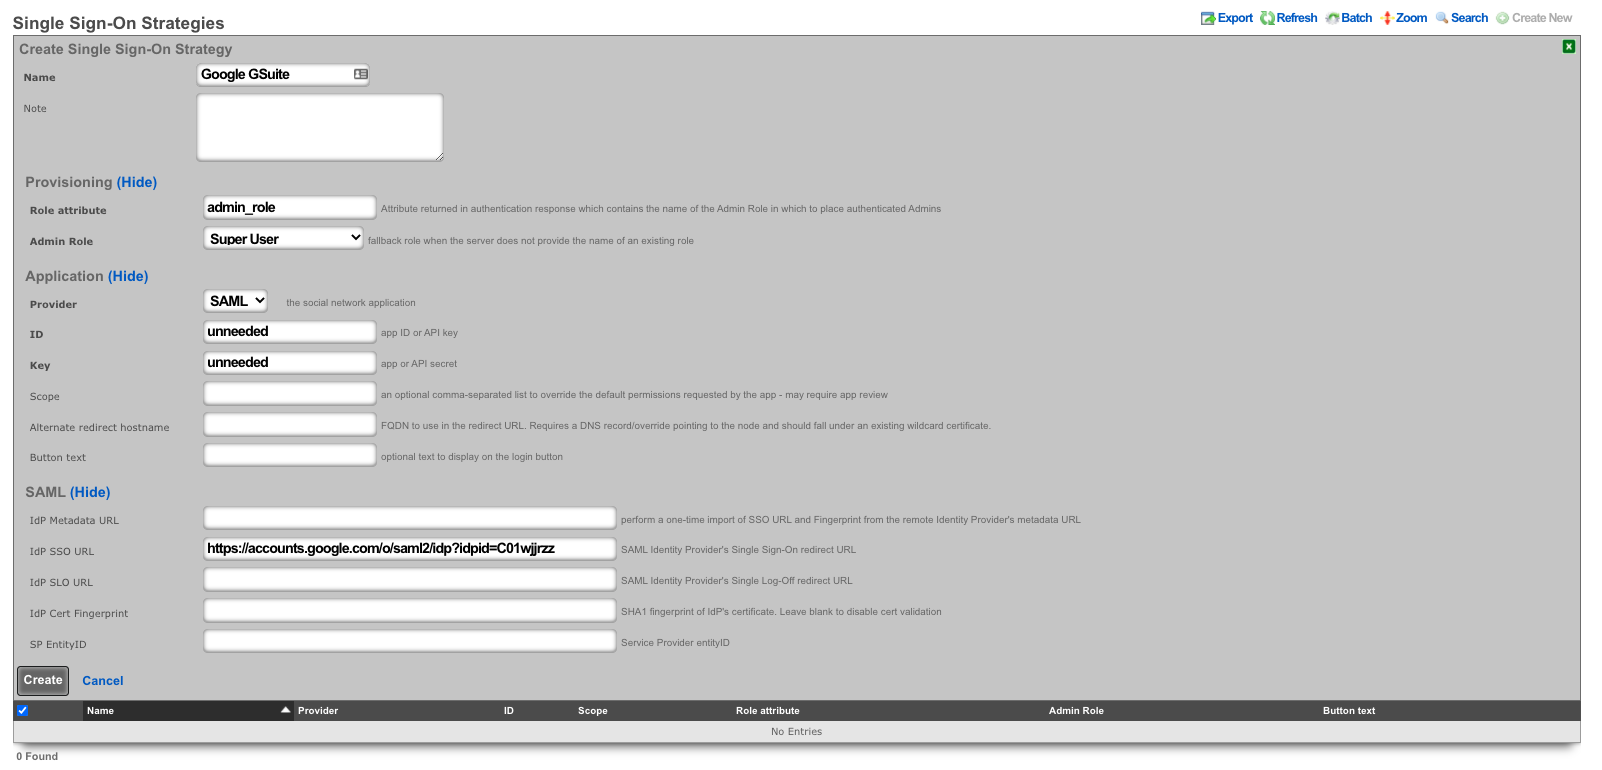
After clicking "Create", wait for the webserver to restart. Click "Show" on the SSO Strategy.
Copy the OAuth Redirect URLs (this is needed in the Google Admin Console).
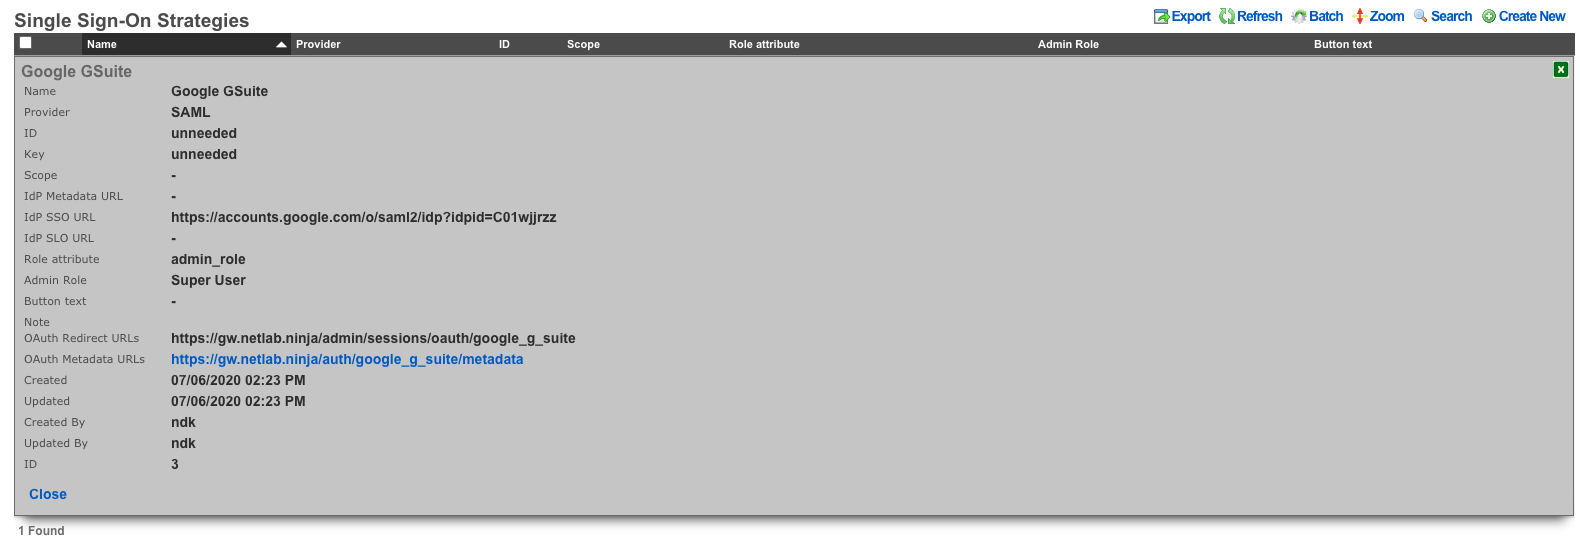
Click on the Oauth Metadata URLs and locate the "entityID" field. (This is also needed in the Google Admin Console)

Finish SAML App in Google Admin Console
Provide the Redirect URL from above as the ACS URL. Also provide the Entity ID, and click "Next".
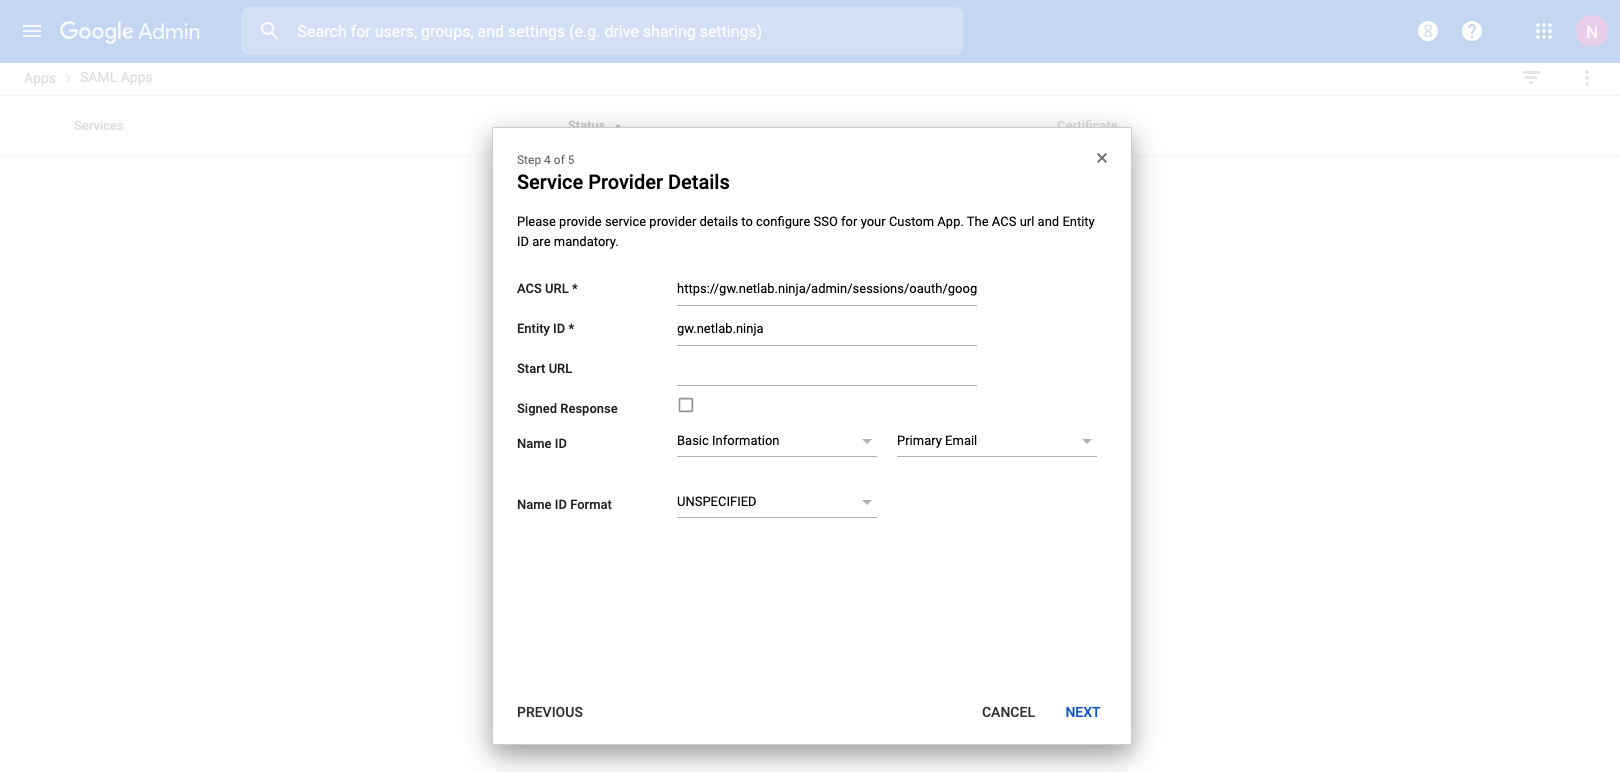
Create Attribute Mappings for all desired attributes. This example shows first_name and last_name. Additional custom attributes will be added, and mapped in later steps. Once complete click "Finish"
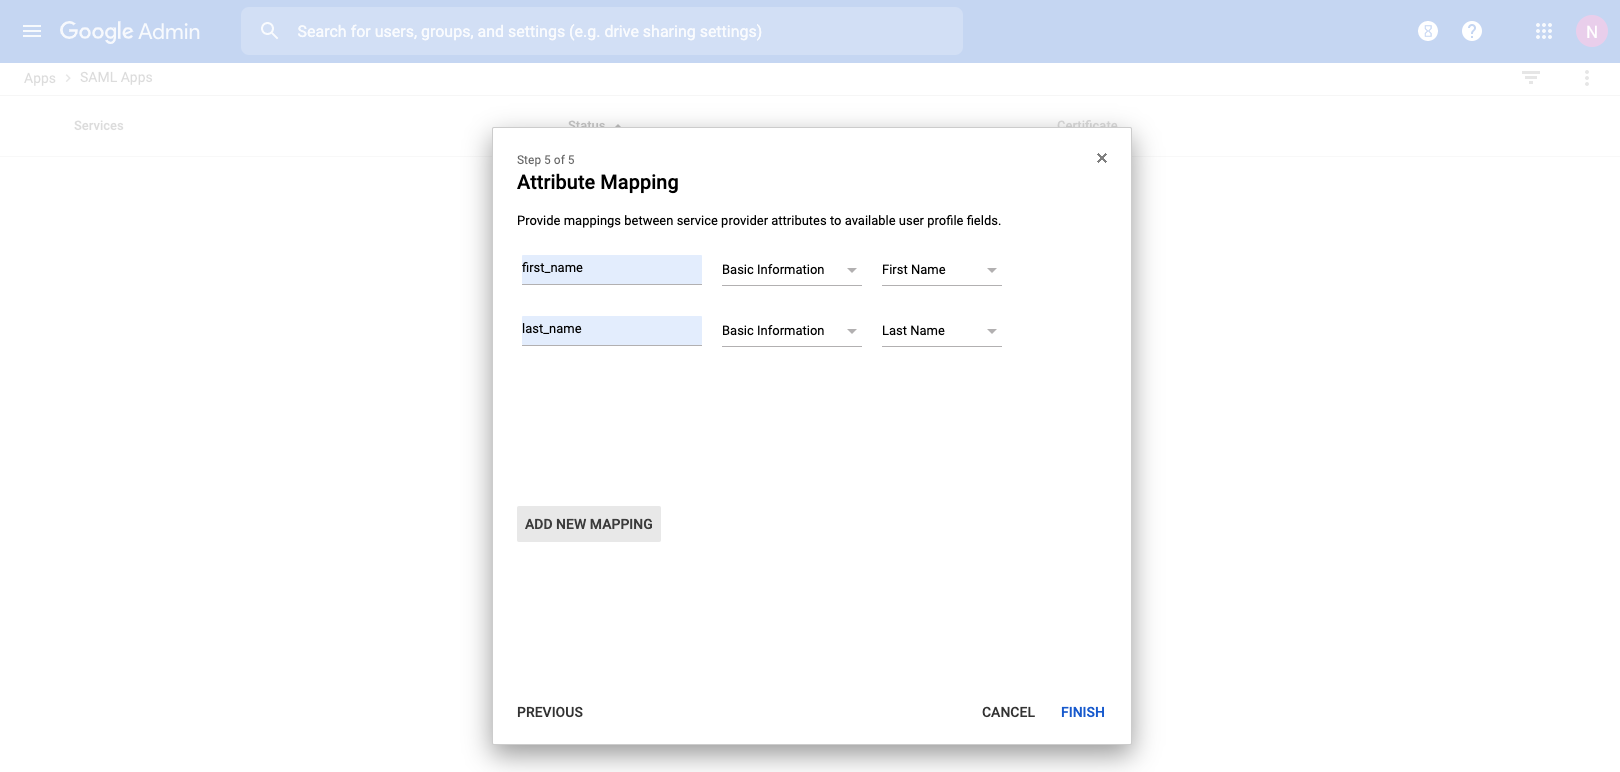
The new SAML App will be created disabled by default. Make sure to turn the App on for it to function.
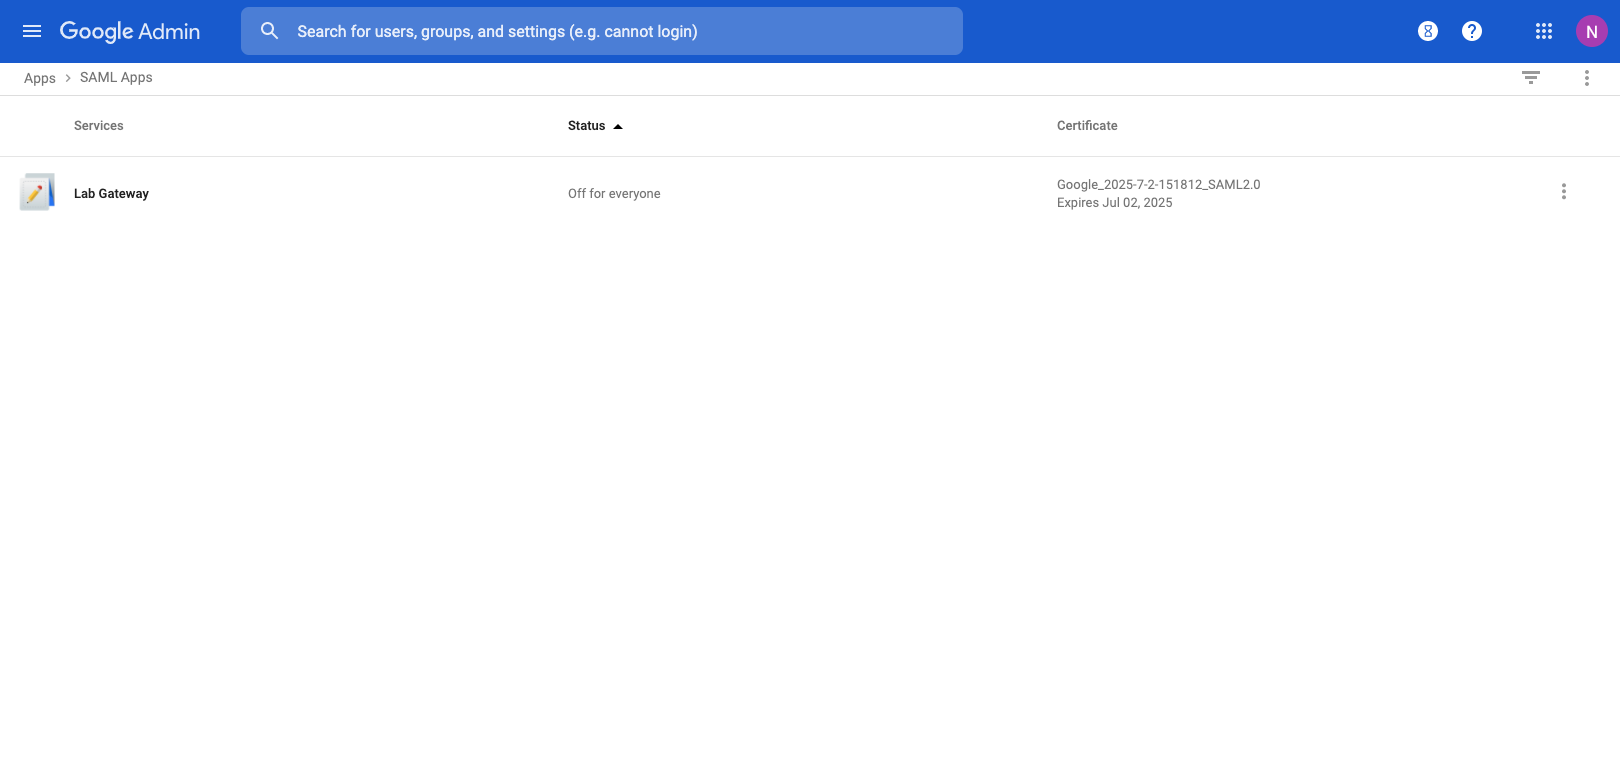
Add Custom Attributes to GSuite Users
Navigate to "Users" in the Google Admin Console, and choose "Manage Custom Attributes" under the More dropdown menu.
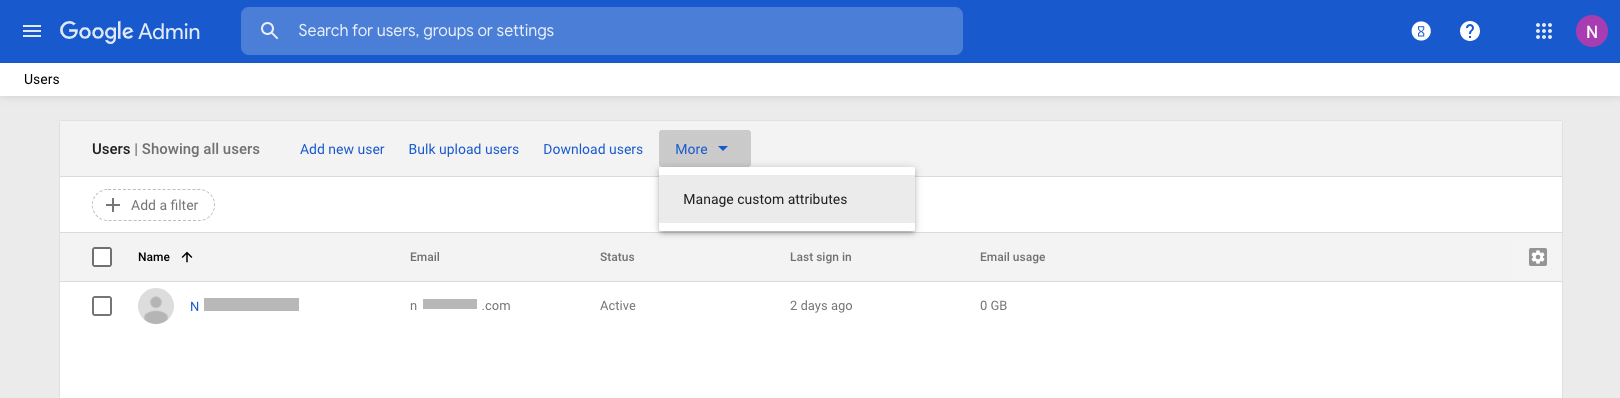
Click on "Add a Custom Attribute" and provide a category name. Create a field for each custom attribute you want to provide. In this example an attribute field of admin_role will be used to assign an Administrative Role on the rXg.
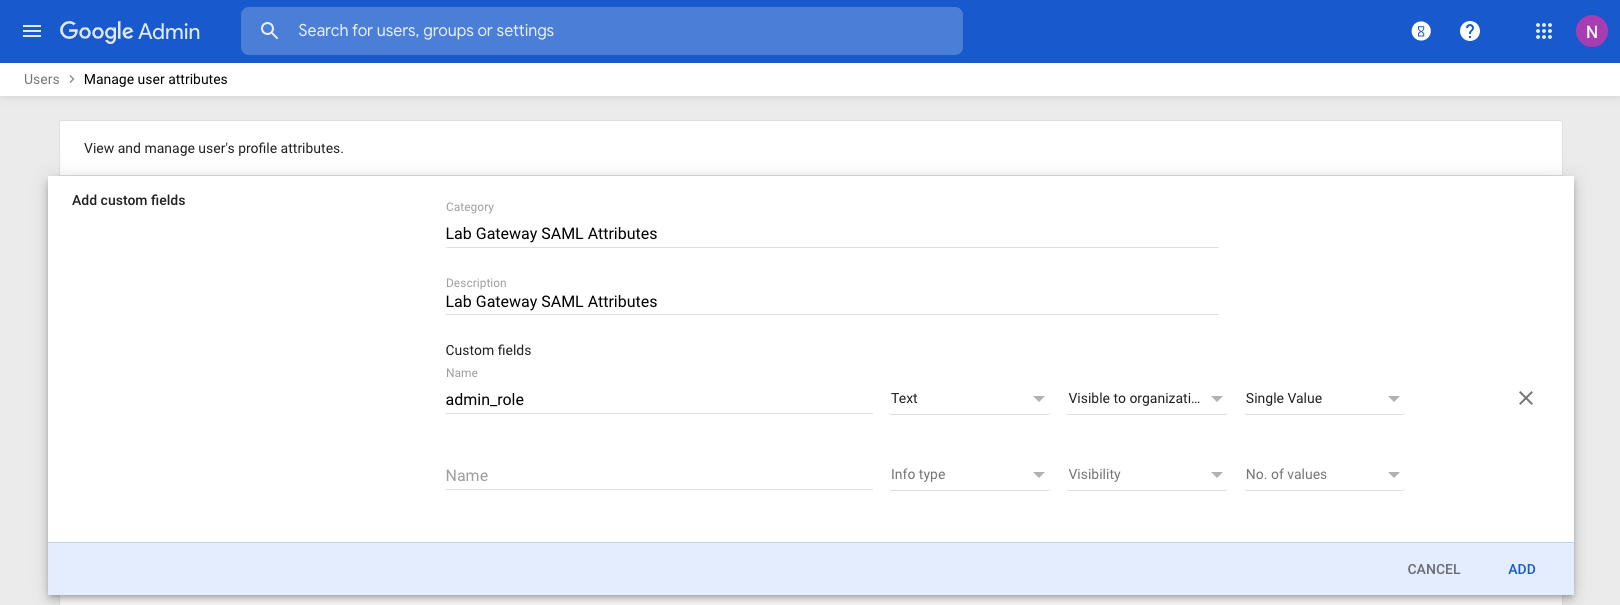
Edit a user to see the new Custom Attributes category, along with the defined fields. Populate the field with the name of an Administrative Role on the rXg.
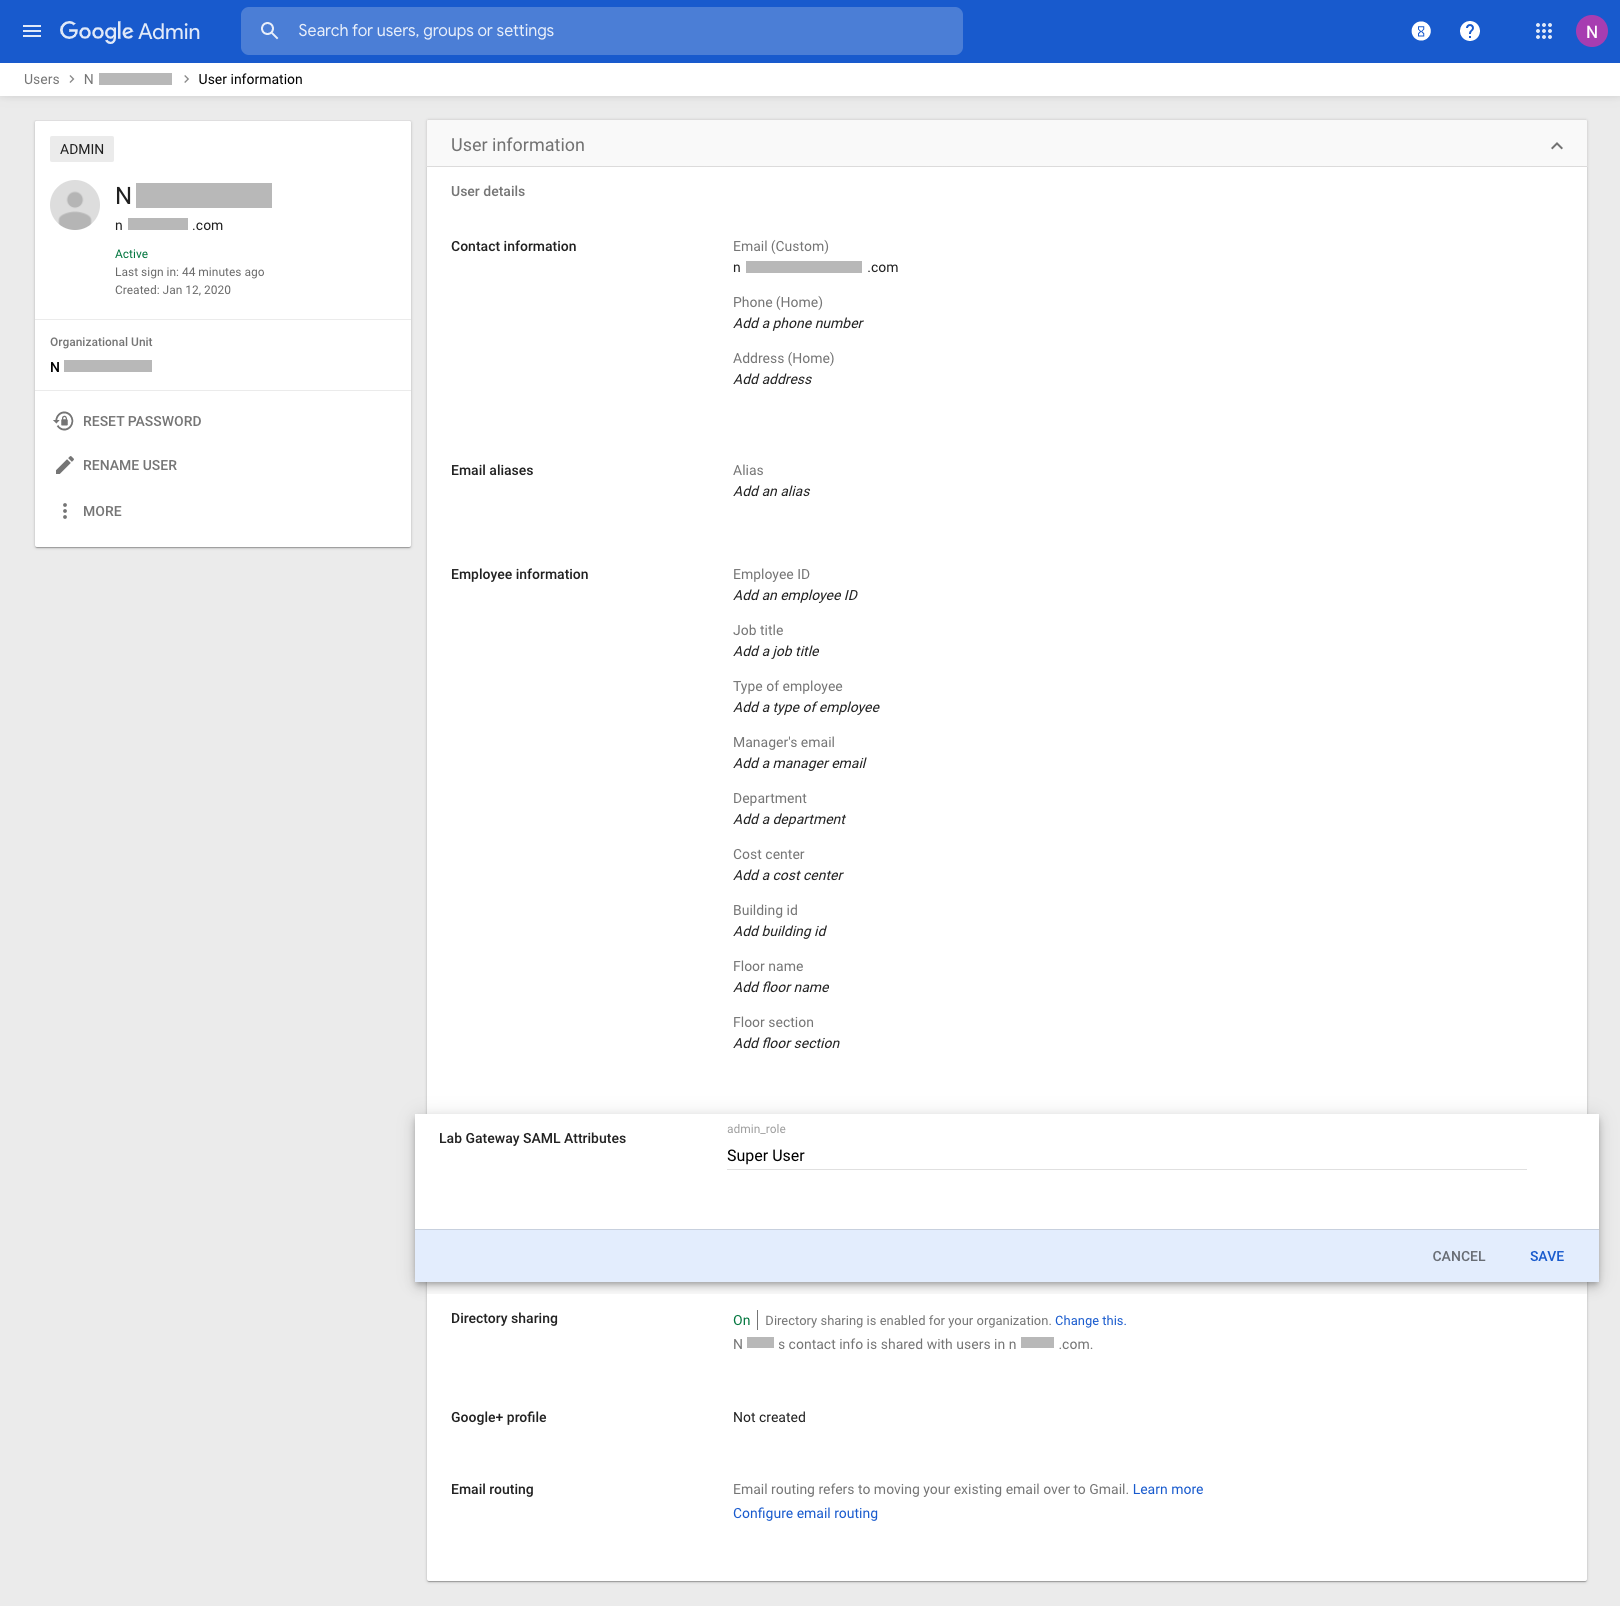
Return to the SAML Application settings in the Google Admin Console, and add an attribute mapping for any custom attributes that have been added.

Log in Using SAML
You can now see a SAML login option available on the admin login portal.
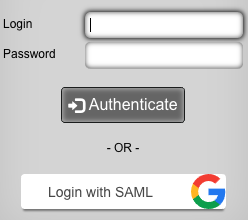
Alternatively, an app is available in the list of Google Apps, that will immediately take you to the rXg administrative interface, as the user logged in to Google.
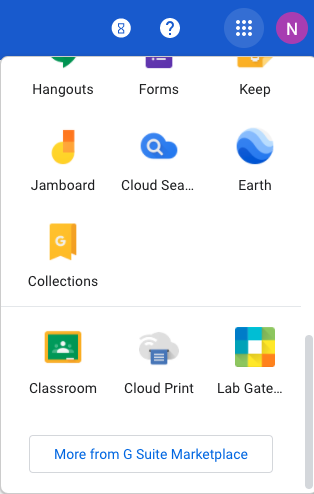
Radius Based Location
Navigate to Network :: Locattion
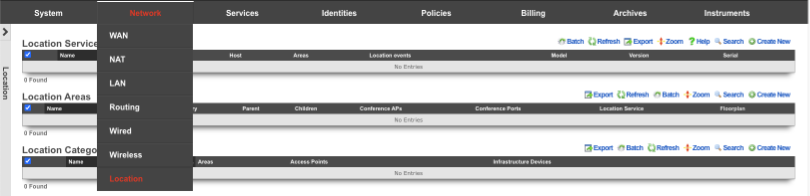
Create a new Location Area
Name is arbitrary. Set Type to Floor. Choose File to use as the Floorplan. Click Create.
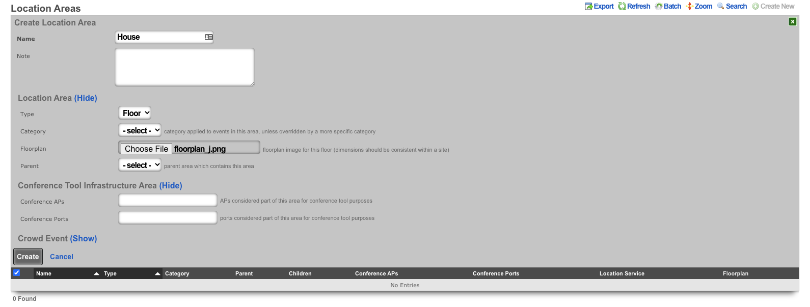
Click on the floorplan and create a Region
In the Add a Region section give the Region a name, and select a color if desired. Click Add Region Drag the Region to the upper left corner of the room it represents and drag the corner to expand the Region to cover the room. Click Save in the Region to save the size and placement of the region.
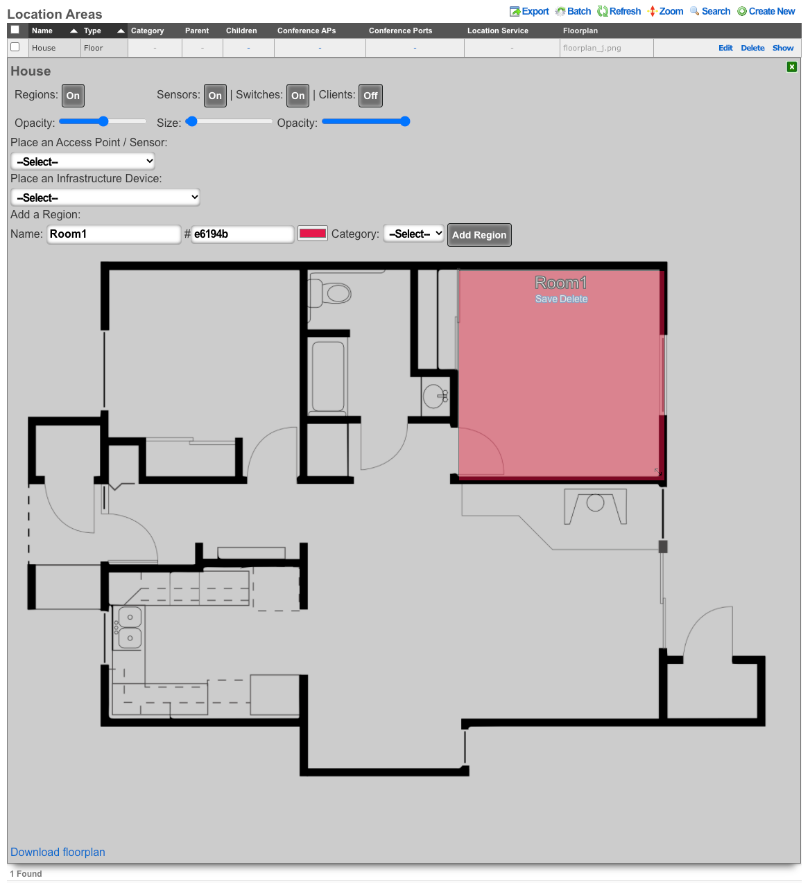
Place the Access Point
In the Place an Access Point / Sensor section click the dropdown and select the Access Point. Click the Drag me button, and drag the Access Point into the Region that was previously created. Click Save on the Access Point box. Click the Green box in the upper right corner to close the Floorplan.
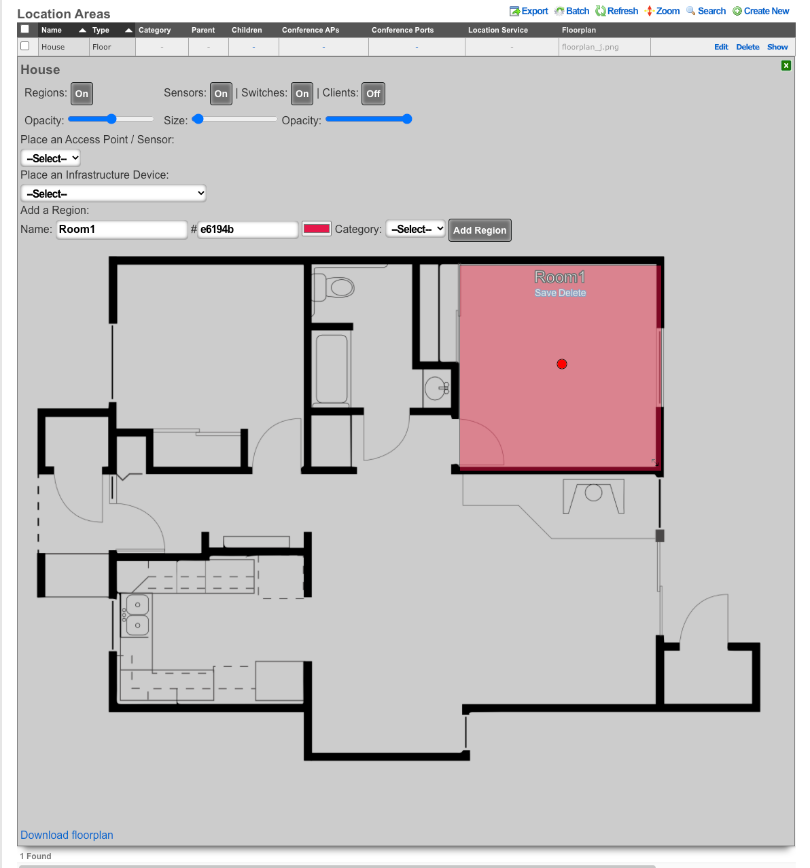
Create a new Location Category
Create a new Location Category. Name is arbitrary. For the Areas field select the Region creatd previously that contains the Access Point. For the Access Point field, click into the box and select the AP that is located within the Region created previously. Click Create.
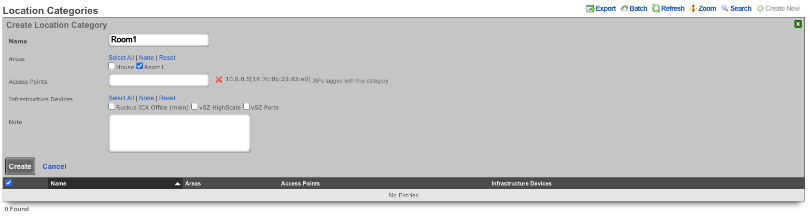
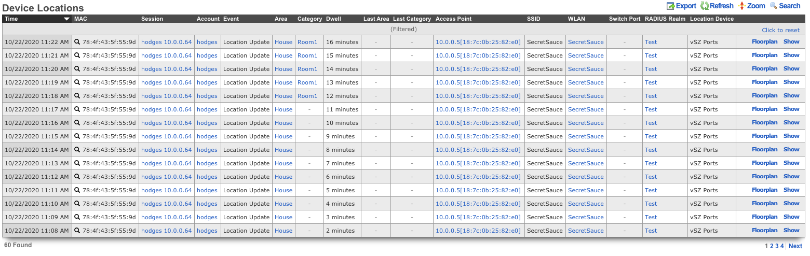
Example of Location based Space-Time Trigger
In this example we will setup a Space-Time Trigger that looks at the dwell time of a device and sends an email when the dwell time is exceeded. First we will need to create the email to send out when the dwell time is exceeded. Navigate to Services :: Notifications.

Create a new Custom Message. Name is arbitrary. Destination should have the End-user check box selected by default, do not select any Administrative Roles unless you want those admins to also receive the message. Under Message, set the Subject and fill out the Body with the message you want the end user or admin to receive. Click Create.
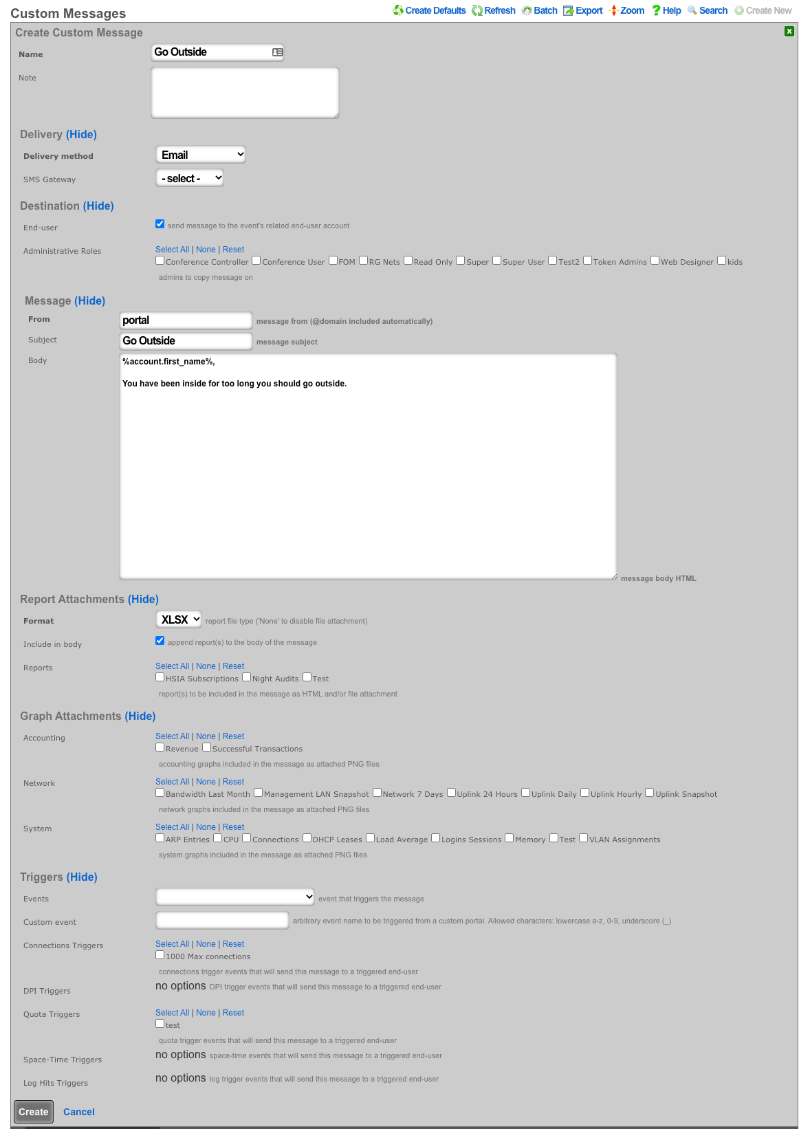
Navigate to Policies :: Event Triggers.
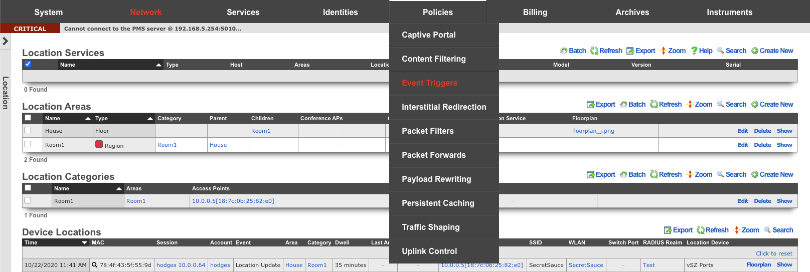
Create a new Space-Time Trigger. Name is arbitrary. Select the Policies that the Space-Time Trigger will be enforced on. Under Space Enforcement set the Current Area to area the Access Point is associated with. Set Current dwell to the amount of time that must be met to set off the trigger. Under Transition Behavior uncheck Flush connection states. Under Notifications specify the message that will be sent by clicking in the Messages box and then select the message created previously. Click Create.
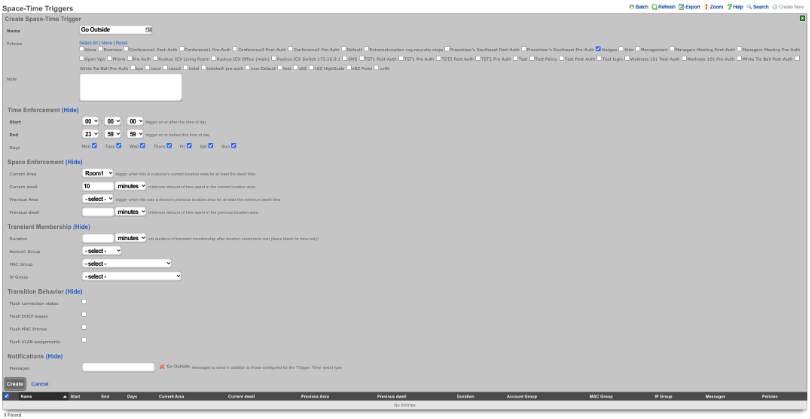
This will now send an email to end user if they dwell in the area for more than 10 minutes.
Example of Location based Crowd Event
Navigate to Network :: Location
Edit the Location Area where the crowd event should take place. Click Show for Crowd Event. Set the Threshold to the desired number of devices that should trigger the event. Click Update.
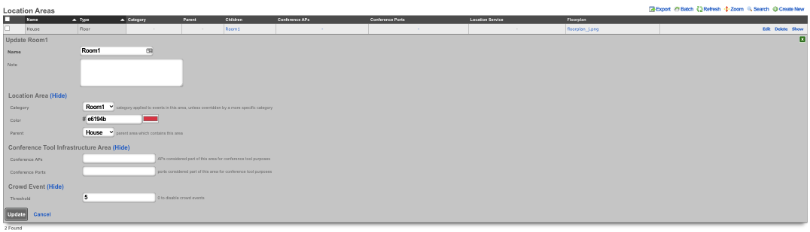
Navigate to Services :: Notifications
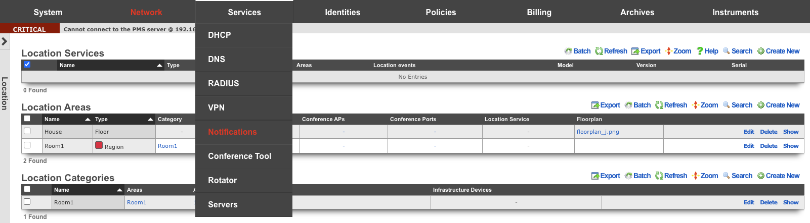
Create a new Custom Message. Name is arbitrary. Destination should have the End-user check box unselected. Check the admin roles you want to receive the crowd formed message. Under Message, set the Subject and fill out the Body with the message you want admin to receive. Click Create.
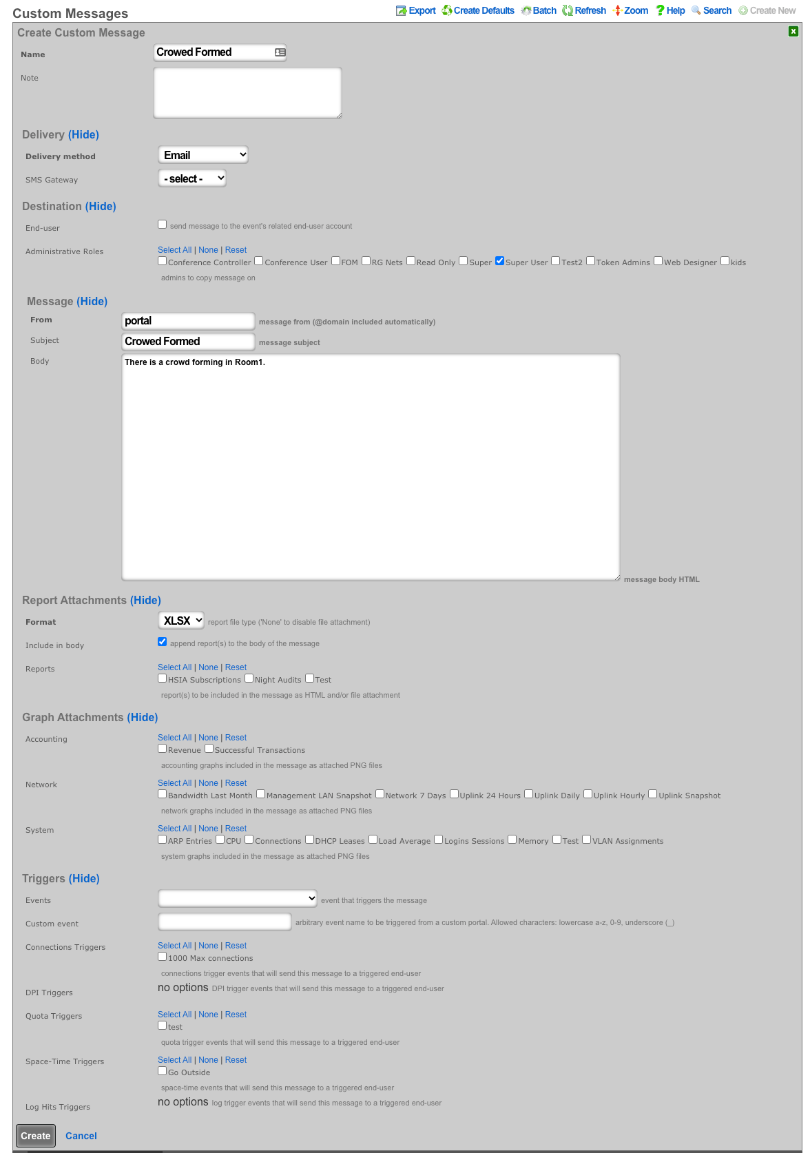
Create a new Notification Action. Name is arbitrary. Set Event Type to Location: Crowd Formed. Click in the Messages box and select the Custom Message created in the previous step. Click Create. Now when a crowd forms a message will be sent to the admin(s) roles selected.

FIAS PMS Simulator
Setup the FIAS simulator to start on boot
Login to the machine via SSH. Elevate to root access.
Create an rc.local.hook that contains the appropriate commands to generate a fresh guest list and start the PMS simulator upon boot.
cat > /etc/rc.local.hook
#!/bin/sh
/space/rxg/rxgd/debug/gen_fias_guest_list > /space/guest_list.csv
nohup /space/rxg/rxgd/debug/fias_server.py -g /space/guest_list.csv &
CTRL-D
Now make the rc.local.hook executable.
chmod +x /etc/rc.local.hook
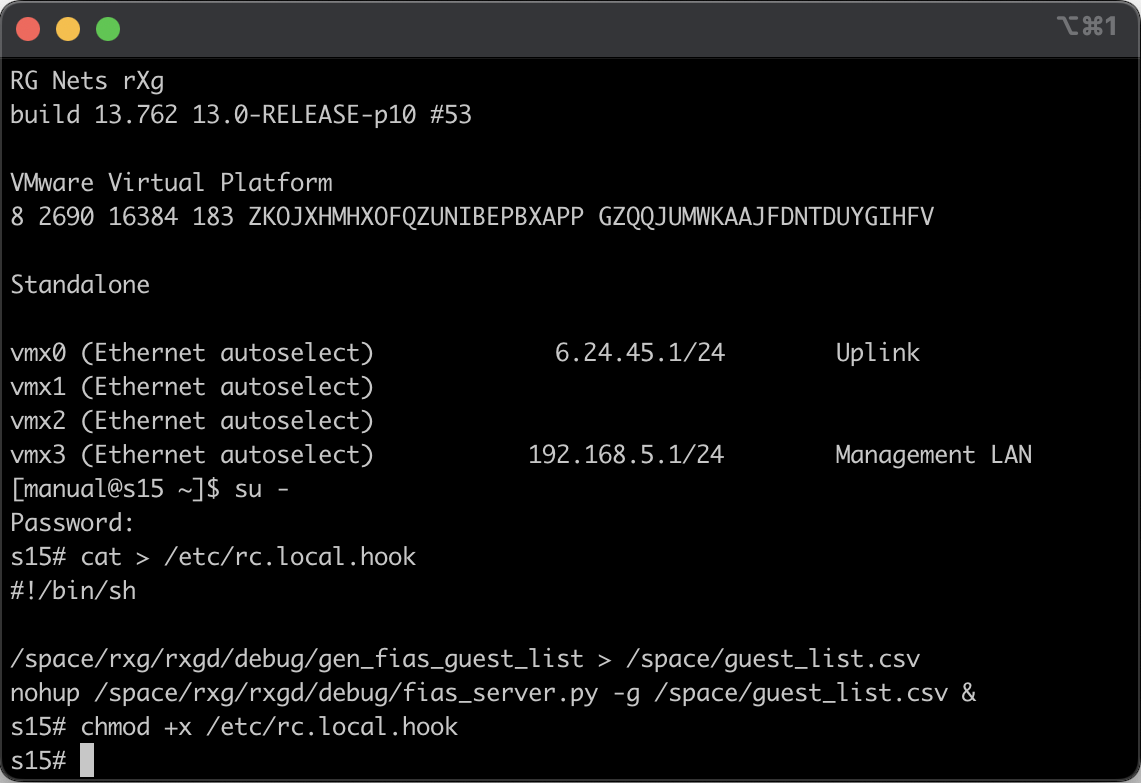
Reboot the rXg to ensure that the FIAS simulator comes up. You may manually start the FIAS simulator without rebooting by executing sh /etc/rc.local.hook with root privileges. You may check on the status of the FIAS simulator by running ps ax | grep fias.
Configure rXg to communicate with local PMS simulator
Navigate to Gateways view through the Billing menu. Create a record in the PMS Server scaffold. We call it FIAS simulator. You may call it whatever you wish.
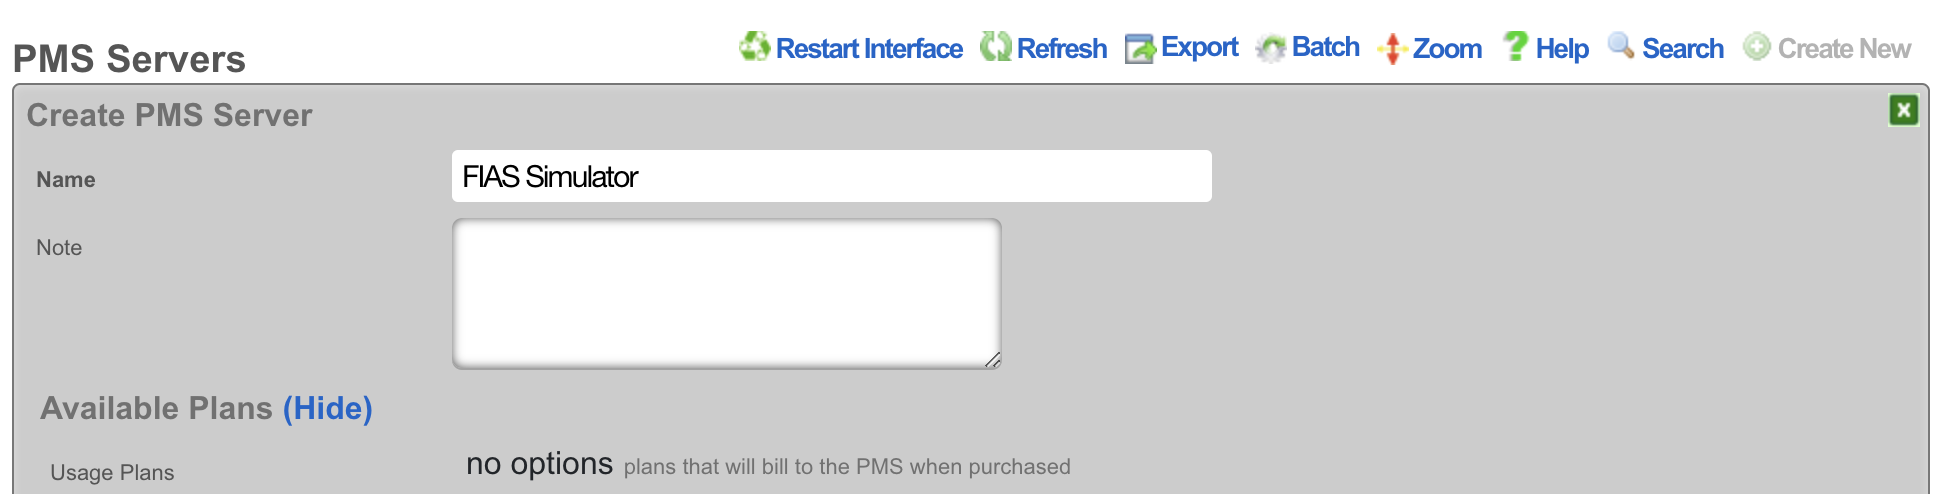
In the Interface Specifications subsection choose the MICROS FIAS for the Internet. Set the Host to be 127.0.0.1 and the Port to be 5010.
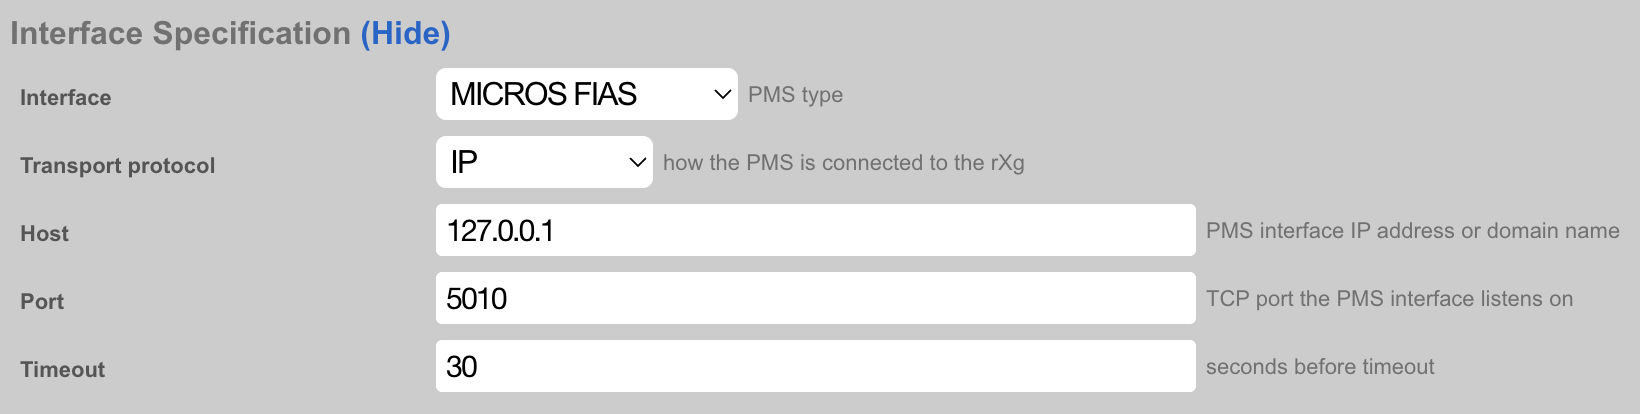
Refresh the page to find the Guests scaffold populated with Guest and Room data from the FIAS simulator. This information should match the entires in the guest_list.csv file.
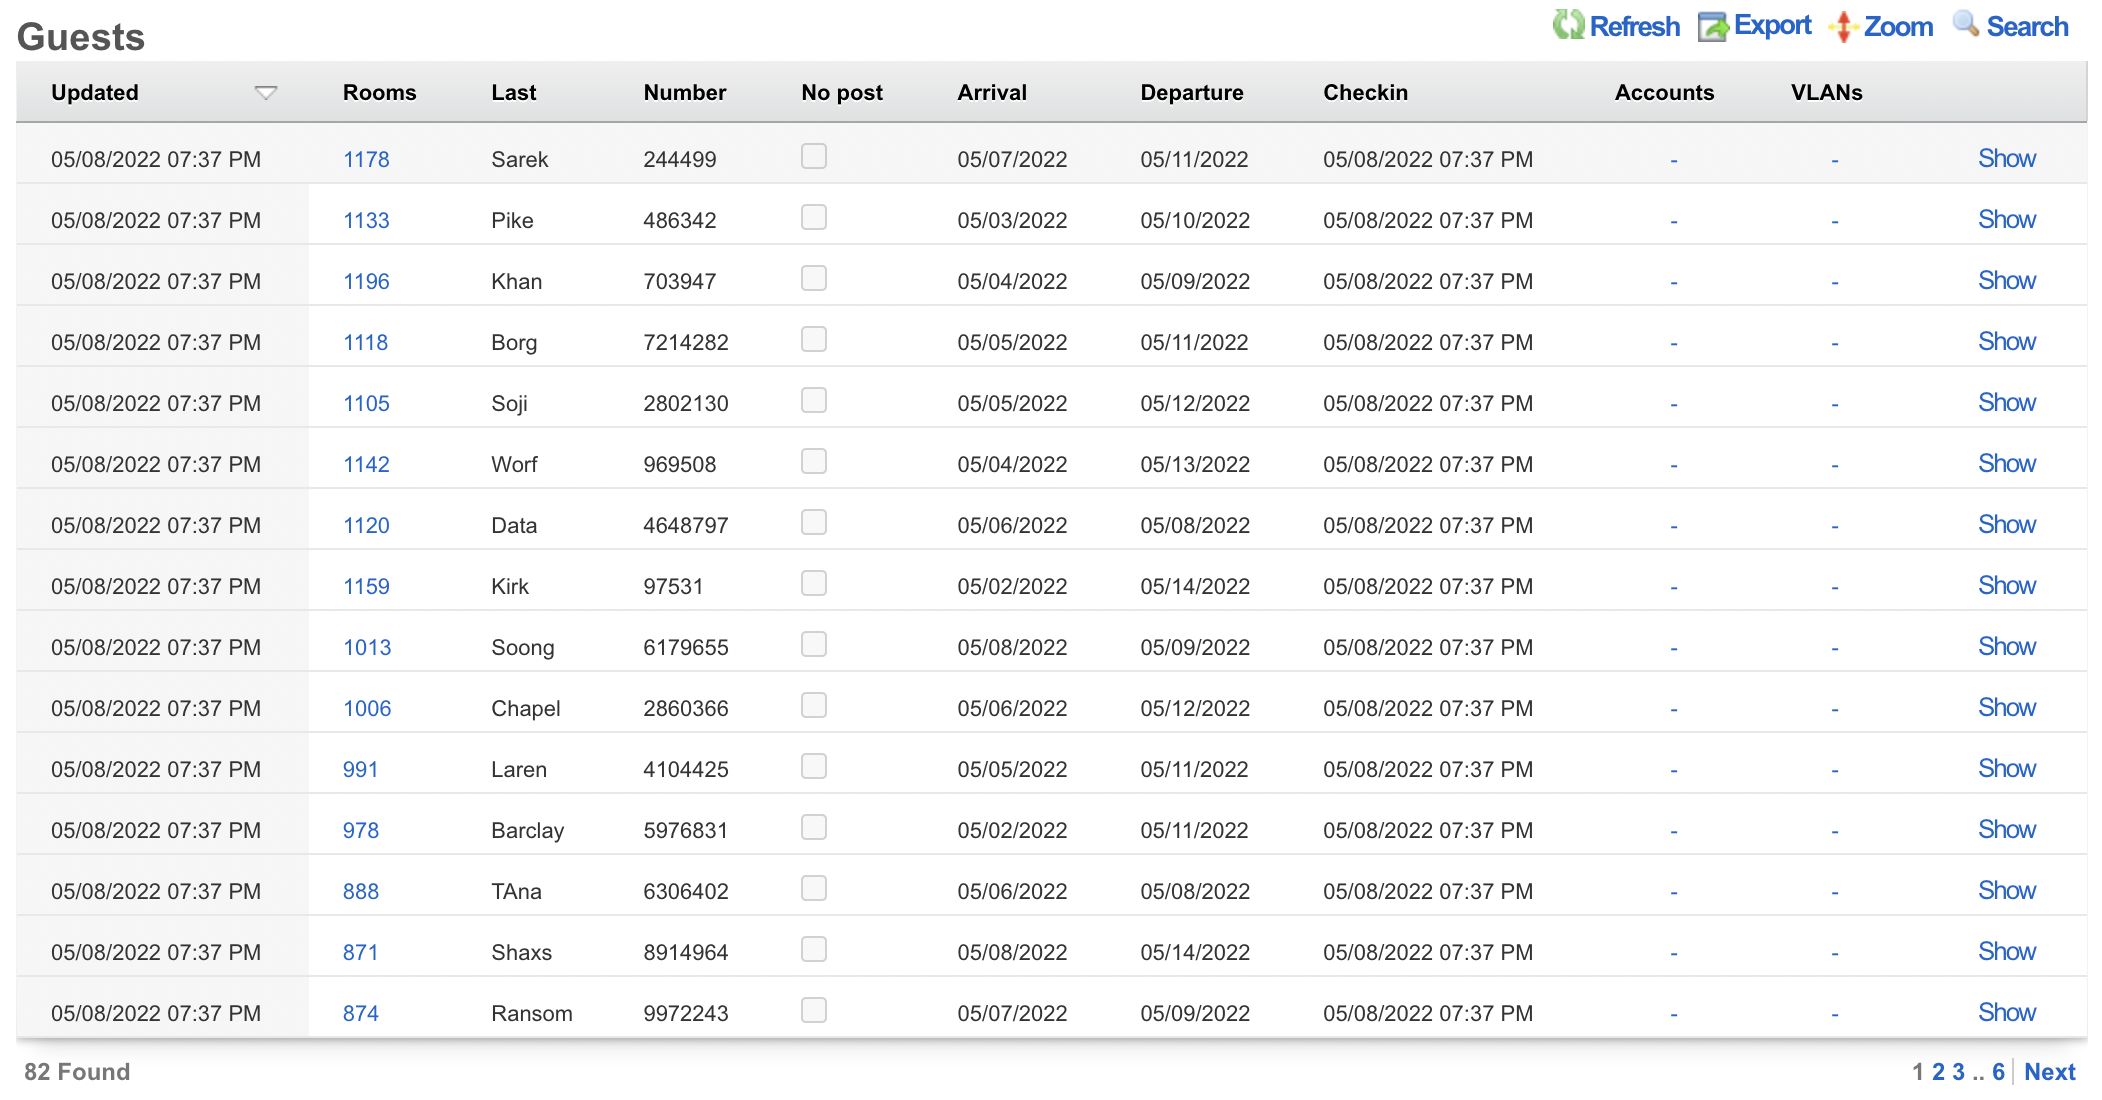
Bootable USB
Overview
dd is a command line utility for FreeBSD that allows the rXg to write to a USB drive. This capability is beneficial if you have out-of-band access to a rXg such as IPMI or iDRAC and wish to reinstall the OS remotely.
As with any remote operation, things can go wrong, so only perform these steps if you are willing to accept the risk. Make sure to have a backup plan, such as deploying somebody to the site if this process fails.
Once this process is complete, make sure that you either remove the USB drive or change the boot order of the system to avoid booting to the USB during a power cycle.
Process
SSH to the rXg and ensure you are root.
Check if the USB is plugged in by typing
geom disk list. You can also get the drive name here for later in the process. In the image below, you can see a SanDisk Ultra USB is plugged in with a name of 'da0'.
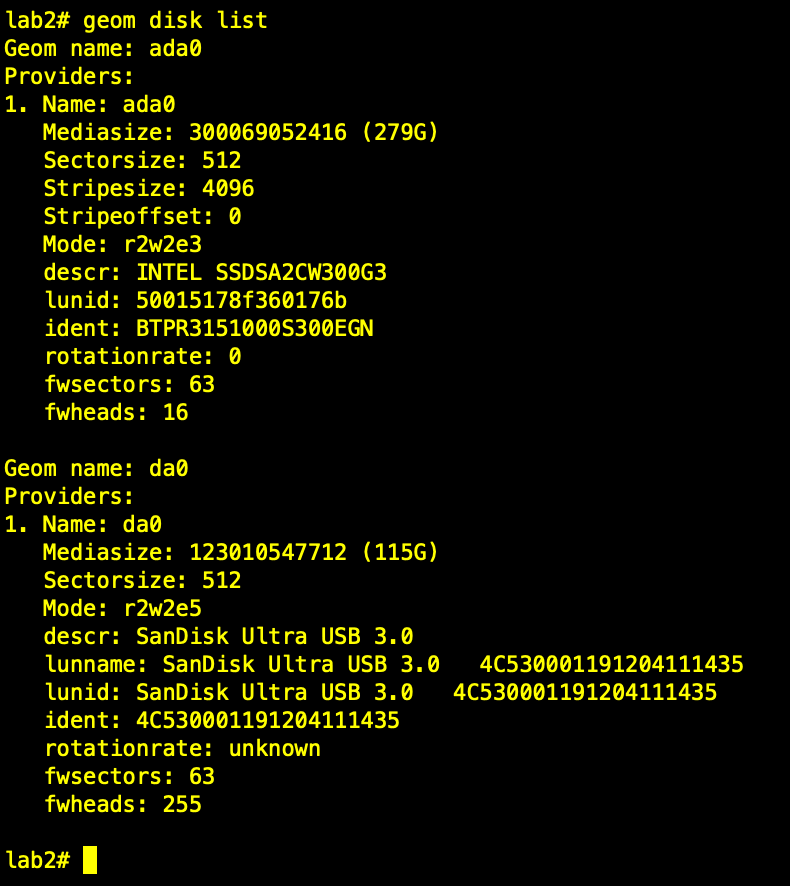
- The next step is to get the source .img file on the rXg. There are many methods that can be used to accomplish this. In this example, the image file will be directly downloaded from the RG Nets build server. Now the rXg will fetch the image using
wget.
cd /tmp
wget --user your_user_name --ask-password https://build.rgnets.com/build/official/iso/13.1-RELEASE-amd64-rxg-14.065.img

After submitting the above command, you should see the progress of the file download.

- Unmount the media
umount -f /media/

- Finally, use dd to write the file to the USB. Note the drive name 'da0' may be different in your environment. You can use
geom disk listto check.
dd if=/tmp/13.1-RELEASE-amd64-rxg-14.065.img of=/dev/da0 bs=1m conv=noerror,sync

Once you have issued the dd command, you will have to wait for some time. The amount of time will vary based on the type of USB drive being used. It could be anywhere from 10 minutes to multiple hours. You can open a separate session and type gstat -p to see if the USB drive is busy.

When the CLI returns, the USB is ready to be used.
Once the installation is complete, make sure that you either remove the USB drive or change the boot order of the system to avoid booting to the USB during a power cycle.
Telemetry KPI Reports
The rXg telemetry system provides unified Key Performance Indicator (KPI) reporting for network infrastructure devices through the to_kpi_report method. This functionality supports both Cisco gRPC telemetry and Ruckus MQTT telemetry systems, providing standardized performance metrics for wireless and switching infrastructure.
Overview
KPI reports transform raw telemetry data into structured performance metrics that can be consumed by monitoring dashboards, analytics systems, and operational tools. The system supports:
- Cisco Devices: Via gRPC telemetry for Catalyst IOS-XE switches and wireless controllers (full infrastructure coverage)
- Ruckus Devices: Via MQTT telemetry for wireless controllers and access points only (switching telemetry not implemented)
Cisco gRPC KPI Reports
Implementation: Telemetry::Cisco::Grpc::Grpc
The Cisco implementation (console/app/lib/telemetry/cisco/grpc/grpc.rb:103) provides comprehensive metrics for:
Supported Device Types
- Radio metrics: Wireless access points and controllers
- Port metrics: Switch port statistics and configuration
- Switch metrics: Device-level performance and status
Key Performance Indicators
Radio KPIs (lines 31-49): - Client counts, channel utilization, noise floors - SNR/RSSI averages, throughput metrics - Channel configuration (width, channels, bonded channels) - Power levels and antenna gains - MCS rate averages
Port KPIs (lines 7-28): - Speed, status, uptime, duplex configuration - Traffic statistics (bytes, packets, discards) - VLAN configuration (tagged, access, native VLANs) - PoE usage per port - CDP neighbor information
Switch KPIs (lines 51-63): - CPU load, memory usage, device uptime - Temperature monitoring, PoE budget/usage - Routing table information - Spanning tree protocol status - VTY line configuration
Usage Example
# Generate comprehensive KPI report for all device types
cisco_telemetry = Telemetry::Cisco::Grpc::Grpc.new(
start_time: 15.minutes.ago.utc,
end_time: Time.current.utc
)
metrics = cisco_telemetry.to_kpi_report(types: [:radio, :port, :switch])
Data Structure
Each metric includes standardized fields:
ruby
{
measurement_id: "noise_avg", # Metric identifier
value: -85, # Numeric value
humanized_value: "-85 dBm", # Human-readable format
source_id: "aa:bb:cc:dd:ee:ff", # Device MAC address
extra: "0", # Additional context (slot ID, etc.)
source_subtype: 0, # Device type (0=AP, 1=Switch)
source_subcategory: 1 # Band (0=2.4GHz, 1=5GHz, 2=6GHz)
}
Ruckus MQTT KPI Reports
Implementation: Telemetry::Ruckus::Mqtt::Mqtt
The Ruckus implementation (console/app/lib/telemetry/ruckus/mqtt/mqtt.rb:82) focuses exclusively on wireless performance metrics. Note: Switching telemetry collection for Ruckus devices is not yet implemented.
Supported Message Types
- AP_REPORT_MESSAGE_TYPE (0): Client statistics and radio performance
- AP_STATUS_MESSAGE_TYPE (1): Access point status and configuration
Key Performance Indicators
Wireless-Only KPIs (lines 7-25): - Client counts per radio - Channel utilization and noise floors - Signal quality (SNR, RSSI averages) - Throughput metrics (bidirectional) - Channel configuration and power levels - MCS rate calculations with PHY mode detection
Limitations: - No switch port metrics available - No device-level switching statistics - Limited to wireless controller and access point data
Usage Example
# Generate Ruckus wireless KPI report
ruckus_telemetry = Telemetry::Ruckus::Mqtt::Mqtt.new(
start_time: 15.minutes.ago,
end_time: Time.current
)
metrics = ruckus_telemetry.to_kpi_report
Data Structure
Ruckus metrics follow the same standardized format but focus on wireless-specific measurements:
ruby
{
measurement_id: "client_count_per_ap",
value: 12,
source_id: "AA:BB:CC:DD:EE:FF", # AP MAC address
extra: "1", # Radio slot ID
source_subcategory: 1 # Band (0=2.4G, 1=5G, 2=6G)
}
Common Measurement IDs
Both systems provide these standardized metrics:
Universal Wireless Metrics
noise_avg: Average noise floor in dBmchannel_utilization_avg: Channel busy percentageclient_count_per_ap: Connected clients per radioradio_band_primary_channel: Primary channel numberradio_channel_width: Channel width in MHzradio_power_level: Transmit power levelsnr_avg: Signal-to-noise ratio averagerssi_avg: Received signal strength averagethroughput_per_client_avg: Per-client throughputaggregate_throughput_avg: Total radio throughput
Cisco-Specific Metrics
speed: Port speed in bits per secondconnection_status: Port up/down statuscpu_utilization: Switch CPU usage percentagememory_utilization: Switch memory usage percentagedevice_uptime: Device uptime in secondspoe_usage: Power over Ethernet consumption
Administrative Interface
KPI reports can be accessed through the admin scaffolds:
Cisco gRPC Subscriptions
Path: /admin/scaffolds/grpc_subscriptions
The Cisco telemetry scaffold provides two distinct data access methods:
Lookups (Raw Data Layer)
The Lookups button group provides access to the base layer of raw telemetry lookups. These represent the fundamental SQL queries that extract data directly from the gRPC telemetry streams. Each lookup corresponds to a specific telemetry path and provides unprocessed data as received from the network devices.
Available Raw Lookups: - Direct SQL access to telemetry subscription data - Raw device responses without aggregation or processing - Base-level metrics as streamed from gRPC subscriptions - Useful for debugging telemetry collection issues
Performance Data Elements (Processed KPI Layer)
The Performance Data Elements button group presents the finalized, processed version of the telemetry data. This is the output of the to_kpi_report method, where raw telemetry has been:
- Aggregated and calculated into meaningful KPIs
- Standardized with consistent measurement IDs
- Enhanced with human-readable values
- Organized by device type (radio/port/switch)
Available Processed Elements:
- Radio: Wireless performance metrics (signal quality, throughput, channel utilization)
- Port: Switch port statistics (speed, VLAN config, traffic counters)
- Switch: Device-level metrics (CPU, memory, uptime, PoE usage)
Data Flow: Raw gRPC Subscriptions SQL Lookups KPI Calculations Performance Data Elements
Ruckus Telemetry Payloads
- Path:
/admin/scaffolds/telemetry_payloads - Performance Data Elements: Unified wireless metrics view
- Message Type Filtering: Filter by AP report vs. status messages
Configuration Requirements
Cisco Devices
- Enable telemetry on infrastructure device:
enable_telemetry = true - Configure gRPC source settings:
grpc_source_host,grpc_source_ip - Ensure gRPC subscriptions are configured for required metrics
Ruckus Devices
- Enable telemetry:
enable_telemetry = true - Configure MQTT message collection
- Ensure AP_REPORT (0) and AP_STATUS (1) message types are being received
Error Handling and Validation
Both implementations include: - Initialization checks: Verify required data sources are available - Graceful degradation: Missing metrics don't break the entire report - Logging: Detailed debug information for troubleshooting - Data validation: Type checking and range validation for metric values
The KPI reporting system provides a unified interface for accessing performance data across diverse network infrastructure, enabling consistent monitoring and analysis regardless of the underlying vendor technology.
Webhook Integration Example
The KPI reporting system can be integrated with external systems through webhooks. Below is an example webhook body that combines both Cisco and Ruckus telemetry data into a standardized reporting format:
<%=
PROTOBUF_MEASUREMENT_TYPES = {
"client_count_per_ap_avg" => 111,
"channel_utilization_avg" => 112,
"throughput_per_client_avg" => 113,
"aggregate_throughput_avg" => 114,
"rssi_avg" => 115,
"snr_avg" => 116,
"mcs_avg" => 117,
"packet_retransmit_avg" => 118,
"latency_avg" => 119,
"jitter_avg" => 120,
"packet_loss_avg" => 121,
"noise_avg" => 122,
'radio_band_primary_channel' => 123,
'radio_channel_width' => 124,
#'radio_channel_list' => 125,
'radio_power_level' => 126
}
# Collect KPI data from both platforms
cisco_measurements = Telemetry::Cisco::Grpc::Grpc.new.to_kpi_report
ruckus_measurements = Telemetry::Ruckus::Mqtt::Mqtt.new.to_kpi_report
# Tag measurements with manufacturer
cisco_measurements.each do |m|
m[:device_manufacturer] = 'cisco'
end
ruckus_measurements.each do |m|
m[:device_manufacturer] = 'ruckus'
end
# Combine all measurements
raw_measurements = cisco_measurements + ruckus_measurements
# Standardize measurement format for external reporting
raw_measurements.each do |m|
m[:measurement_type] = PROTOBUF_MEASUREMENT_TYPES[m[:measurement_id].to_s]
m[:measurement_id] = m[:measurement_id].gsub('_', ' ')
# Convert throughput measurements to Mbps
if m[:measurement_id].in? ['aggregate throughput avg','throughput per client_avg']
m[:value] = m[:value] / 10**6
end
end
measurements = raw_measurements.map { |measurement| HashWithIndifferentAccess.new(**measurement) }
venue_info = CustomDataSet.find_by(name: 'venue_info')
# Generate standardized webhook payload
{
message_type: 'Measurement_event',
message: {
measurements: measurements.map do |measurement|
new_measurement = {
measurement_id: measurement['measurement_id'].to_s,
customer_id: venue_info.try(:get, :customer_id).to_s,
venue_id: venue_info.try(:get, :venue_id).to_s,
measurement_type: measurement['measurement_type'],
timestamp: measurement['timestamp'] || Time.now.to_i,
collection_interval: 300, # time in seconds
reporter_id: DeviceOption.active.domain_name,
reporter_id_type: 1, # MAC
reporter_type: 0,
source_id: measurement['source_id'].to_s,
source_id_type: 1, # MAC address
source_type: 0, # device
source_subtype: measurement['source_subtype'].to_i,
source_vendor: 0,
extra: measurement['extra'],
source_subcategory: measurement['source_subcategory']
}
new_measurement[:svalue] = measurement['svalue'] if measurement['svalue']
new_measurement[:value] = measurement['value'].to_i if measurement['value']
new_measurement
end
}
}.to_json
%>
Webhook Integration Features
Multi-Vendor Support: - Combines Cisco gRPC and Ruckus MQTT telemetry in a single payload - Tags measurements with manufacturer for filtering
Standardized Format: - Maps measurement IDs to protobuf message types - Converts underscore notation to space-separated format - Normalizes throughput values to Mbps
External Reporting Structure:
- Venue and customer identification
- Timestamp and collection interval metadata
- Reporter and source device information
- Flexible value types (numeric and string values)
Configuration Requirements:
- Venue information stored in CustomDataSet named 'venue_info'
- Active device domain name from DeviceOption.active.domain_name
This example demonstrates how KPI data from multiple telemetry sources can be unified and formatted for external system integration.
Portal Customization
The predominant forced browser redirection deployment methodology is to use the rXg captive portal as the destination for web requests originating from unauthenticated devices. End-users then navigate and utilize the functionality present in the captive portal web application to obtain transit to the WAN. Thus the rXg captive portal represents the vast majority of the end-user experience and customization of the captive portal is an integral facet of the operator marketing strategy.

The default captive portal web application contains a plethora of functionality that is fully integrated into the packet management capabilities of the rXg. The operator may choose to instantly deploy a fully operational revenue generating network by using the default captive portal as is. Alternatively, the operator may choose to customize the captive portal in a number of ways ranging from changing the artwork and layout to implementing entirely new functionality through the underlying the Ruby on Rails infrastructure.

Modifying the artwork and layout of the default captive portal is easily accomplished. The rXg uses industry standard CSS and HTML to control the presentation of the captive portal. Anybody who is skilled in the art of web publishing is capable of dramatically changing the default look and feel into any of the examples depicted.

Ruby on Rails is the web application infrastructure used to implement the rXg captive portal. When customizing the captive portal, the operator has complete access to the underlying Ruby on Rails infrastructure. Using rails, the operator can modify the default captive portal functionality in nearly any way imaginable.
The rails framework also enables the operator to rapidly create entirely new functionality that is not present on the default rXg. Most operators create new functionality in the portal to benefit the end-user experience in some way. One popular customization is integration of the token and/or coupon generation functionality with an external trigger. For example, this allows an operator to have real-time token or coupon generation linked to a point-of-sale system.
New functionality is not limited to end-user facing capabilities. Full access to the rXg persistent store through the rails-based database abstraction layer enables the operator to implement entirely new administrative capabilities through the portal customization infrastructure. For example, many operators use the captive portal infrastructure to create reporting engines. Some have even integrated their accounting system with the rXg using a custom portal view. Rails can even be used to open network sockets for real-time event-driven integration with external systems.
Setup
There are several prerequisites that must be completed before captive portal customization may begin. First and foremost the web developer must be given access to the rXg filesystem by an administrator. The rXg supports filesystem access via SSH/SFTP as well as SMB/CIFS. SSH/SFTP is the preferred method as it is generally considered to be more secure and is much more reliable when used over the WAN. SMB/CIFS is a less desirable alternative that is suitable for use from developer machines on the LAN as well as over encrypted VPN connections.
SSH / SFTP Access
There are three main steps to granting administrative access to the rXg filesystem over SSH/SFTP. First, The administrator's computer must have an SSH client installed and a key pair must be generated. Next, administrative access to the rXg file system via SSH must be granted by installing the administrator's public key. Finally, the operator must declare that a new customizable portal controller is to be created and specify a name.
SSH and SFTP are the mechanisms used to access the rXg file system and make changes to custom portals. Thus an SSH client must be installed on the computer that will be used by the administrator who will be customizing the portals. OpenSSHis included with MacOS X and most UNIX and Linux distributions. Microsoft does not ship with SSH by default, but there are many third party options for running SSH on Windows.
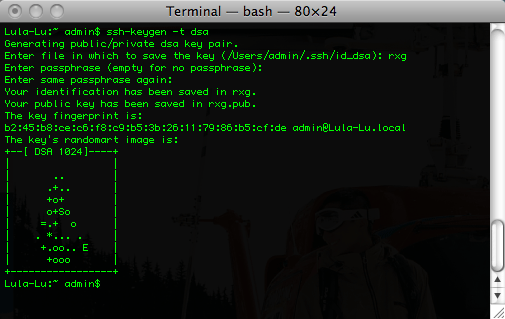
The rXg requires the use of the public key authentication to gain access to the file system. To accomplish this, a key pair must be generated that is 4096-bit RSA or stronger. For example, togenerate an OpenSSH keypair, use the command linessh-keygen -t rsa -b 4096 -f rxg. Most of the Windows SSH utilities come with a GUI to generate keys. Make sure that the private key stored in a safe place on the administrators computer. Keep the public key handy (e.g., pasted into a notepad or textedit window) as it needs to be installed onto the rXg in the next step to enable remote access to the file system.

An administrator with SSH access must be established to enable access to the rXg file system. This is accomplished through the Admins view in the System sub-menu. To enable SSH, a change must be made (or the data validated) in at least one record in both scaffolds that are present in this view.
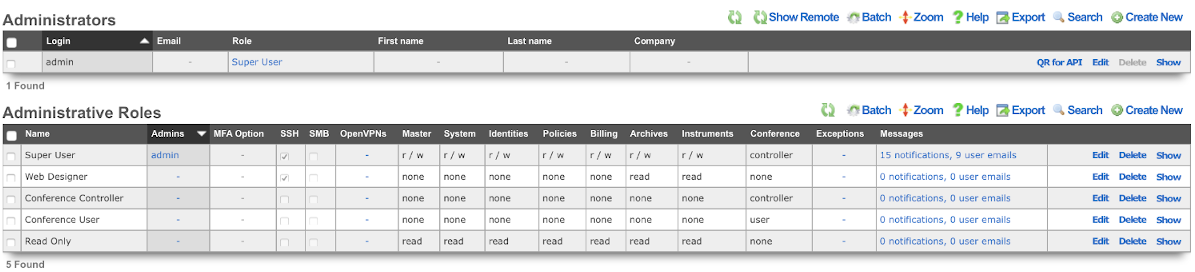
An SSH public key must be added to a record in the administrators scaffold. The operator may choose to edit an existing record or create a new record to grant access to an individual who has never before required administrative access to the rXg. In either case, the public SSH key must be pasted into the text area that is provided. In addition, the role field must be set to an administrative role that has SSH access enabled.
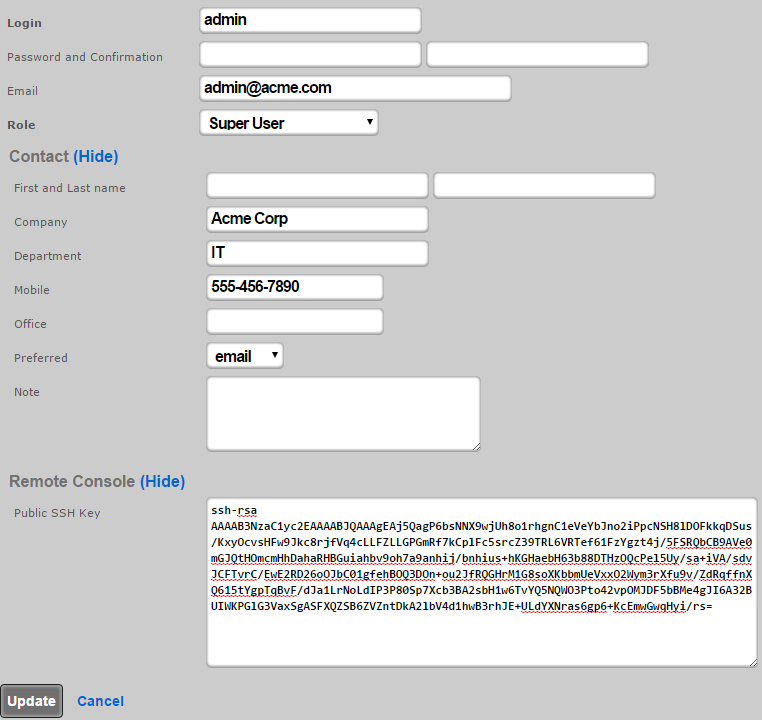
By default, there is a "Web Designer" admin role that will allow members of that role to SSH to the box to edit and save captive portals, as well as view logs and graphs. Of course, custom roles with SSH access may be created if the default ones are not sufficient.

When creating or editing a role that will contain administrators that need to customize captive portals, the check box next to the SSH field should be checked. To disable SSH access for administrators that are assigned a role that has the SSH field is checked, delete the public SSH key from the administrator record.
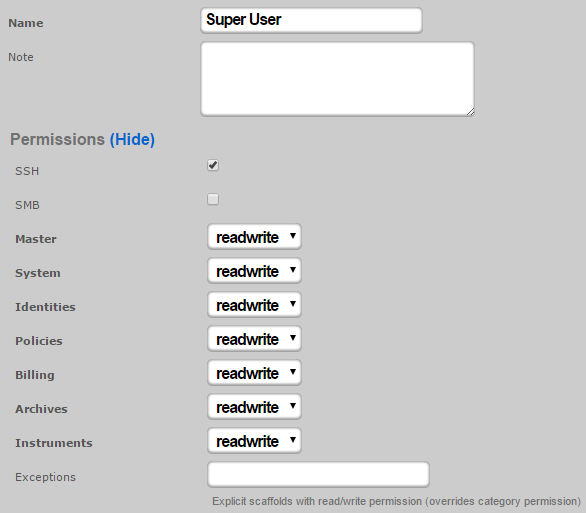
SMB / CIFS Access
Access to the rXg filesystem via SMB / CIFS is disabled by default. An administrator must create an active record in the SMB Server scaffold found on the Admins view.
SMB / CIFS access must be restricted to the specific IP addresses that will be used by the web developers to access the rXg filesystem. LAN IPs and CIDRs are added to the SMB / CIFS ACL by associating the SMB Server record with a Policy record that is linked to IP and MAC groups. WAN IPs and DNS names are added to the SMB / CIFS ACL by associating the SMB Server record with WAN targets listing devices that should be allowed access.
Only Administrators that are members of Administrative Roles that have SMB access enabled will be able to gain access over SMB / CIFS. By default, no Administrative Roles have SMB / CIFS access enabled. To enable SMB / CIFS access, an administrator must check the SMB checkbox in an administrative role. If no roles have SMB checked, the SMB server will not be started.
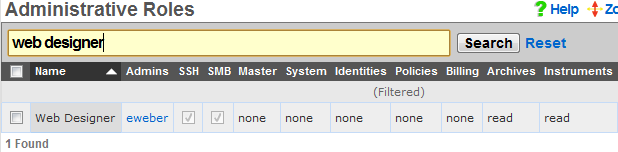
Once the SMB Server is properly configured, the web developer uses the Explorer (Windows), Finder.app (Mac OS X) or SMB client (UNIX) to browser to the IP address or DNS name of the rXg. The captive portals are located in a share called portals.
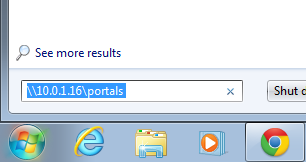
The username and password credentials that are used for web administrative console access are also used to obtain SMB / CIFS access.

Once authenticated, the web developer may access the captive portals stored on the rXg filesystem as a network share. Most operating systems make SMB / CIFS network shares behave like locally stored files.
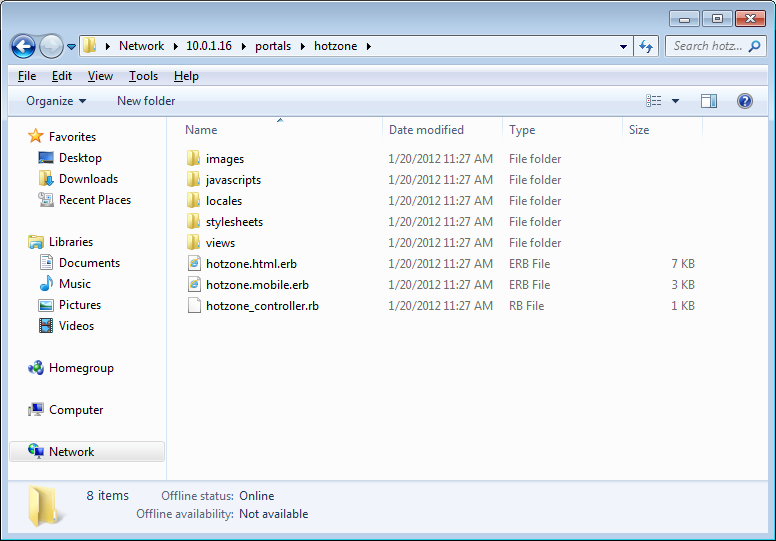
SMB / CIFS access is designed to facilitate rapid portal development for operators with web development resources. The SMB / CIFS server should only be used on dedicated development rXgs. It is strongly recommended that SMB / CIFS never be used on production rXgs as the overall security of the SMB / CIFS protocol is inferior to the SSH / SFTP protocol. Once a portal has been developed, the SSH / SFTP protocol should be used to move portals onto production rXgs.
Create New Portal
The default rXg captive portal may not be edited directly. To create a custom portal, a copy of the default portal is made and saved to an operator chosen name. This is accomplished using the Portals view of the System menu.
Portal Source Types
The rXg supports multiple methods for creating custom portals:
- Duplicate Local: Creates a copy of the default portal or another existing portal
- Git: Clone portal from a Git repository with automatic sync capabilities
- Archive file via HTTP GET: Download portal from a remote HTTP/HTTPS URL
- rsync: Synchronize portal from a remote rsync server
Automated Sync Features
For Git, HTTP, and rsync sources, the rXg can automatically sync portal updates: - Sync Frequency: hourly, twice-daily, daily, weekly, bi-weekly, monthly - Automatic restart: Option to restart web server after sync - SSH keypairs: For authenticated Git/rsync access - Client certificates: For HTTPS authentication

To begin, use the create action in the custom portals scaffold. This will drop down a dialog with two fields that must be completed. The name field is an arbitrary name you choose for this portal and will be used in other areas of the administration console. The controller name field will be the text inserted into the URL when users access this portal. This field should be all lowercase and only one word. If it is left blank, it will be the same as the name field you entered above.
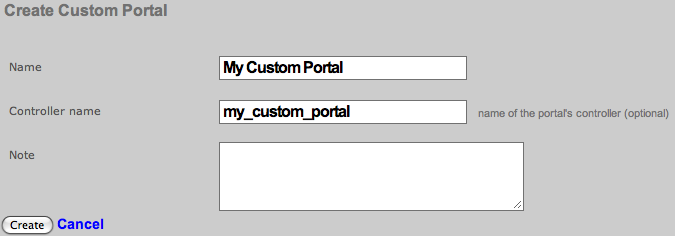
In order for your new captive portal to become usable, you will need to restart the web server. Click on either Production or Development buttons in the Restart Web Server dialog. Production mode is the normal operating mode and is recommended when the rXg is deployed. Development mode will limit access to the administrative console and portals to only one simultaneous user. In addition, server-side page caching is disabled in development mode so changes that are made are reflected immediately.
It is highly recommended that the rXg be left in development mode while captive portals are being developed. This prevents issues from coming about due to the uploaded or edited portals being out of the sync with the version in memory. In addition, it is critically important to click on the Production button even if the web server is running in production mode on when the captive portal is updated on a deployed rXg. Failure to follow this procedure will result in all sorts of bizarre issues ranging from improperly rendered images to browsers intermittently displaying an error 500.
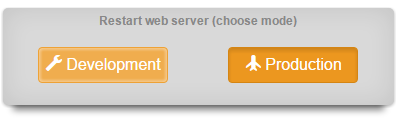
At this point, you should now have a custom captive portal that is a copy of the default portal running on an rXg. You can preview this portal by visiting https://rxg.domain/portal/my_custom_controllerin your browser. rxg.domain is the domain name or IP address of your rXg. my_custom_controller is the one-word lowercase name you defined above.
Structure
The default working directory presented to a client when the rXg file system is accessed via SSH is the administrator's home directory. A subdirectory called portals is present in every administrator's home directory that is linked to the location of where all captive portal as stored. A single persistent storage location is used for all custom captive portals on an rXg and is shared by all administrators.
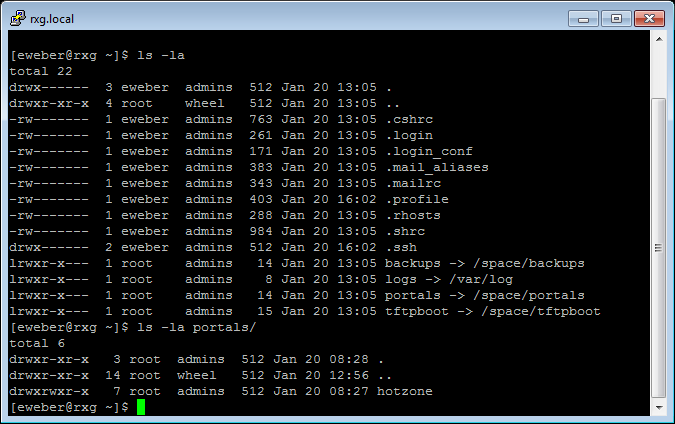
Within the portals is a series of subdirectories. Each subdirectory contains a custom captive portal. The name of the subdirectory will be the same as the 'Controller name' as defined when creating the portal. Using SSH, it is possible to login to the rXg and edit the custom portal files directly using the built-in text editor vi. However, in most cases, administrators will want to use a SCP or SFTP client to copy the files from the rXg to a local computer for editing.
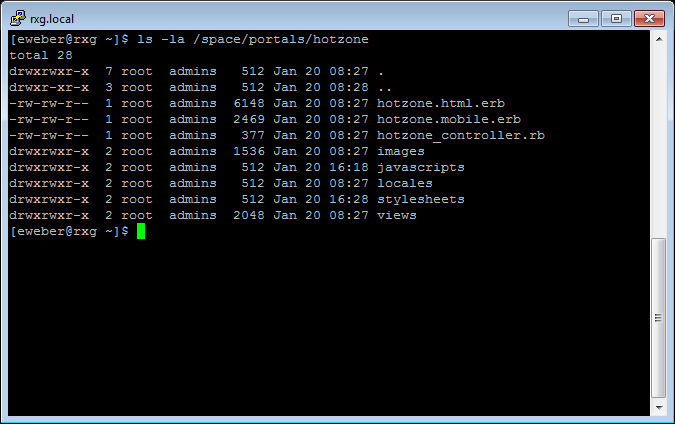
If you are using an SSH command line tool such as OpenSSH, a command like the following will copy the contents of the custom portal named by CONTROLLER_NAME into the local current working directory.
scp **ADMIN\_LOGIN** @rxg.domain:~/portals/ **CONTROLLER\_NAME**.
Most GUI SSH clients have enable bulk copying of entire directory trees from a remote file system. Typically, this is accomplished by logging into the remote server and then dragging and dropping the desired folder onto a destination on the local machine.
We recommend that the administrators copy the entire directory tree of a custom portal onto a local workstation, making changes, and then copying the entire directory tree back to the rXg. Although this requires more transfer time between the administrative workstation and the rXg, adhering to this protocol helps prevent numerous classes of common issues that result in strange portal behavior.
The folder structure for a custom captive portal looks like the following:
CONTROLLER_NAME/
images/
javascripts/
static/
stylesheets/
views/
CONTROLLER_NAME.erb
CONTROLLER_NAME.rb
bootstrap.yml (optional)
Directory and File Descriptions:
- images/: The directory where artwork assets are stored.
- javascripts/: The directory where client-side JavaScript code assets are stored. The
portal.js.erbfile is the main entry point. All other files present in this directory are automatically assembled into a single URI via the Rails asset pipeline. - static/: The directory where file resources are stored that can be accessed from the WAN. Use this for downloadable files and other static content.
- stylesheets/: The directory where cascading style sheet assets are stored. Both CSS and Sass/SCSS are supported. The main files are
portal.css.scss.erbandportal_mobile.css.scss.erb. Additional stylesheets may be placed into this directory and referenced for asset pipelining by listing them at the top of the main stylesheet files. - views/: The directory where HTML files with embedded Ruby templates for views and partials are stored. Templates for views are named according to the controller action that is requested. For example, when the end-user browser requests
/portal/CONTROLLER_NAME/session_info/, thesession_info.erbfile is picked for rendering. Partials begin with an underscore character (_) and are included by file name within views throughrender partialstatements. - CONTROLLER_NAME.erb: The desktop portal layout. This file is the foundation of the portal and incorporates the HTML and embedded Ruby that will be present in all Rails-generated views.
- CONTROLLER_NAME.rb: The controller file for the custom captive portal. Existing actions may be customized and new actions may be created by editing this file. This file may be ignored if only cosmetic changes are desired.
- bootstrap.yml: Optional configuration file for automated portal setup. When present, this file can automatically create Account Groups, Policies, Shared Credentials, and other configuration objects when the portal is deployed.
The rXg portal is implemented in Ruby on Rails. Becoming versed in rails is a critical aspect of portal customization. Mastery of rails enables the administrator to create entirely new functionality that suit your exact needs. However, it is possible to customize the presentation of a portal without any knowledge or experience with Ruby on Rails. Knowledge of HTML and CSS are all that is required to change the look and feel of the default portal. Dramatic results may be achieved through modification of the CSS alone.
Layout
The CONTROLLER_NAME.erb file is called the layout in Ruby on Rails. This file contains all of the HTML and embedded Ruby that is present in all rails rendered views of a captive portal. Any content that is present in the layout is visible on all the pages of the portal. A simplified version of the default portal layout follows.
<!DOCTYPE html PUBLIC "-//W3C//DTD XHTML 1.0 Transitional//EN"
"http://www.w3.org/TR/xhtml1/DTD/xhtml1-transitional.dtd">
<html>
<head>
<title>Captive Portal</title>
<%= portal_stylesheet_link_tag %>
<%= portal_javascript_include_tag %>
</head>
<body>
<!-- renders view based on the action (e.g., sign up, login, etc.) -->
<%= yield %>
</body>
</html>
There are four bits of ruby in the above example. Three of which are in the <head> element and include the CSS and javascript into your portal. The fourth is <%= yield %>. That very simple line of code calls the code for the individual views, as defined in the views folder, and places the result in that location.
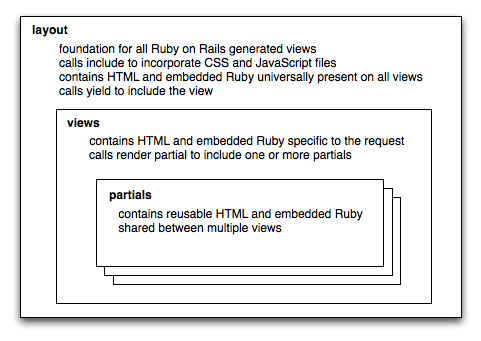
We will look at the individual views later, for now we will continue to work on the main layout. While this example is sufficient, it is pretty boring and contains no branding. Lets take the above example and include a company logo and some verbiage. First we need to copy an image into the images folder, simply drag a file, lets call it logo.png into the images folder inside your custom directory. For simplicity, lets only look at the <body>element.
<body> <%= portal_image_tag('logo.png') %>
<p>Welcome to my captive portal!</p>
<!-- renders the content of the page being viewed (e.g., sign up, login, etc.) -->
<%= yield %>
</body>
With two more lines we now have a portal that is starting to look real. It is branded with your logo and has some text in it. The only line that needs further explanation is the line that contains portal_image_tag. That function creates an <img> tag that will link to the image specified. In the above example the location just links to the portal currently being viewed and logo.png is the file we placed in the images folder inside our portal.
Portal Helper Methods
The rXg provides helper methods for portal development:
<!-- Image handling with Portal Mod support -->
<%= portal_image_tag('logo.png', alt: 'Company Logo', class: 'img-fluid') %>
<!-- Render partials with Portal Mod override support -->
<%= render_portal_partial(:welcome_message) %>
<%= render_portal_partial(:login_options) %>
The portal_image_tag helper creates an <img> tag that links to portal assets. If a Portal Mod with an Image Override exists for that filename, the Portal Mod image will be served instead.
The render_portal_partial helper renders a partial template and automatically checks for Portal Mod overrides. If a Portal Mod with a matching Partial Override exists, the Portal Mod HTML content will be rendered instead of the default partial.
Development Best Practices
Development vs Production Modes
- Development Mode: Single user access, no caching, immediate updates
- Production Mode: Multi-user access, full caching, requires restart for updates
Critical: Always restart web server after portal changes in production mode.
Error Handling
Portal modifications include validation:
- Image files: JPEG, PNG, GIF, SVG, favicon support (20MB max)
- ERB syntax: Template validation prevents broken portals
- Controller actions: Ruby syntax validation
- Partial resolution: Automatic fallback to default templates
Performance Considerations
- Portal mods are cached in production mode
- Image overrides are processed through Active Storage
- Controller action mods use
eval- use sparingly - Rich text content is stored separately from HTML content
Assets
All aspects of the rXg captive portal web application may take advantage of assets that are loaded over HTTP. You may add an arbitrary number of static web assets (e.g., HTML pages, images, etc.) to a rXg captive portal. Static HTML assets should be placed within the base portal directory (CONTROLLER_NAME/). Static image assets should be placed within the CONTROLLER_NAME/images/directory.
Static HTML assets may be included from within embedded ruby files using the following syntax:
<%= portal_static_path 'YOURFILE.html' %>
Rendering a referenced static HTML asset takes longer than rendering directly from embedded ruby. However, externalized static HTML may make the captive portal more maintainable. For example, an operator may choose to place all portal presentation conditionals within.erb files and all bare text within .htmlfiles.
For example, if the operator wished to display different messages depending on whether the end-user is logged in, the following might be a part of a embedded ruby file:
<% if logged_in %>
<%= portal_static_path 'logged_in_message.html' %>
<% else %>
<%= portal_static_path 'not_logged_in_message.html' %>
<% end %>
Static image assets may be placed inside embedded ruby files using<%= portal_image_tag 'YOURFILE.jpg' %>
. Static HTML assets may also reference static image assets using the HTML <img /> tag. Operators may also use CSS to incorporate images by setting the background-imageproperty of any element.
For example, let us assume that the operator wishes to incorporate an image called example.jpg. The first step is to copy the example.jpg file into the CONTROLLER_NAME/images/directory. To incorporate the image directly into an embedded ruby file, the following code would be placed into a layout or view:
<%= portal_image_tag 'example.jpg' %>
Alternatively, the operator may choose to incorporate the image via CSS. To accomplish this, the operator must include a named element into the embedded ruby (or a reference static HTML asset). For example, incorporate the following <div into the embedded ruby:
<div id=someUniqueName />
Then edit the CONTROLLER_NAME/CONTROLLER_NAME.css.scss.erb file and add the following:
div#someUniqueName {
width: 320px;
height: 240px;
background-image: url(<%= portal_asset_data_uri 'example.jpg' %>);
}
The result will be an image that appears where the <div>tag is placed. Images that are referenced from the stylesheets are precompiled and integrated into the stylesheet resulting in a significant performance improvement. Use stylesheet images to when possible in order to maximize portal performance.
Files that the operator wants to make available for download should be placed into the static directory within the portal files. The files can then be accessed via https://fqdn.of.rxg/static/portal/custom/yourfile.ext. Note that fqnd.of.rxg should be changed to the domain name that resolves to your system, and "custom" is the controller name of the custom portal.
For example placing an image file named logo.png into the static directory of a custom portal allows anyone to access that file by going to https://fqdn.of.rxg/static/portal/access/logo.png (in this case the custom portal controller is access).
We can view our image by going to https://fqdn.of.rxg/static/portal/access/logo.png, results in the below image.
Menu
Ruby on Rails uses the link_to keyword to generate HTML anchor tags with hyper link reference attributes. In a typical portal, a series of link_to tags are used to create a navigation menu. The code below expands on the simple example used to describe the structure of the captive portal.
<body>
<%= portal_image_tag 'logo.png' %>
<p>Welcome to my captive portal!</p>
<div> <!-- BEGIN MENU -->
<%= link_to 'Home', { :action => :index }, { :class => 'menu' } %>
<% unless @logged_in %>
<%= link_to 'Login', { :action => :login }, { :class => 'menu' } %>
<%= link_to 'Sign Up', { :action => :account_new }, { :class => 'menu' } %>
<% else -%>
<%= link_to 'Logout', { :action => :login_session_destroy, :method => :delete }, { :class => 'menu' } %>
<% end -%>
<%= link_to 'Usage Plans', { :action => :usage_plan_list }, { :class => 'menu' } %>
<%= link_to 'Custom Example', { :action => :custom_example }, { :class => 'menu' } %>
</div> <!-- END MENU -->
<!-- renders the content of the page being viewed, such as sign up, or login -->
<%= yield %>
</body>
The code contained with the <div> tags delimited by the BEGIN MENU and END MENU comments. Each link in the menu has been given a class named 'menu'. A style sheet must be defined the look and feel of the links. The default style sheet comes with a presentation that may be accessed by creating HTML unordered list items with the class menuparent and is shown below. The presentation may be customized to almost anything imaginable by simply editing the CSS file.
There are several embedded Ruby elements incorporated into the menu example above. Starting from the top, the first Ruby element we see is link_to. The first argument to link_to is the name of the link as you want it displayed. The second argument is the action definition, this definition determines what page should be viewed after clicking the link. The last argument is the optional class argument that will specify the class of your link.

Embedded Ruby conditionals in the code change the HTML that is generated based on whether or not the end-user viewing the portal is logged in. Most end-users will first reach the portal while not logged in and first see the default menu example as shown above.

Once the end-user logs in, the menu will change. We only want to display the 'Login' and 'Sign Up' links if the user is not already logged in. The line <% unless @logged_in %> executes the lines of code underneath it when @logged_in variable is not set. The conditional ends with the <% end -%>element. The HTML and embedded Ruby from the unless all the way to the end are subject to the conditional.
The @logged_in variable is dynamically created based on the current state of the user looking at your captive portal.@logged_in is only set when the end-user has provided valid credentials to the portal web application. Thus the link_toembedded Ruby anchor HREF generators for Login and Sign Up links are ignored when the end-user is logged in. The embedded Ruby else clause causes the Logout link to be displayed in their place.
<%= link_to 'Custom Example', { :action => :custom_example }, { :class => 'menu' } %>
Continuing with the example, the next element demonstrates how to add a custom view to the menu. The link specifies custom_exampleas the target. Aside from all of the built-in views for things such as login and usage_plan_list, you can create your own custom view. One has been created for you called custom_example.
You may also want to display static content that is not framed by your portal layout. One example would be a page that is intended for printing that should not be contain the portal menu. You can do this by using normal HTML anchor tags with a little bit of Ruby helper to get the content.
<a href="<%= portal_static_path 'static.html' class="menu">Static Example</a>
This example shows that ruby can even be included in-line into an html tag. Our example says, lets get content from the current portal being viewed. Any content referenced in this manner will come from the 'static' folder. Keep in mind html without any ruby is perfectly acceptable.
To add drop-down sub-menus that appear when the mouse moves over the menu items, add a unordered list (HTML ul tag) with list items (HTML li tags) within the context of the menu item. The menu is defined in the PORTAL_CONTROLLER_NAME.erbfile.
For example, given the original menu item:
<li class="menuactive"> <%= link_to 'Home', { :action => :index }, { :class => 'menuactive' } %> <!-- INSERT HERE --> </li>
Add the following code:
<ul>
<li><%= link_to 'Custom Template', { :action => :custom_example }, { :class => 'menuactive' } %></li>
<!-- MORE MENU ITEMS HERE-->
</ul>
The result should look like the following:
<li class="menuactive"> <%= link_to 'Home', { :action => :index }, { :class => 'menuactive' } %>
<ul>
<li><%= link_to 'Custom Template', { :action => :custom_example }, { :class => 'menuactive' } %></li>
<!-- MORE MENU ITEMS HERE-->
</ul>
</li>
By integrating the code above with the layout example shown previously, you have a fully functional portal with menu. Now you can clean it up, add your own design, style, etc. All with just normal HTML, using the example Ruby from above where necessary.
Views
Full pages rendered in the web browser are called views in Ruby on Rails. Views are usually displayed as a result of the end-user clicking on a link that is generated via the link_tofunction present in the menu generator. It is also possible to manually specify a URL to go directly to each full view. End-user web browser makes requests of the formhttps://rxg/portal/CONTROLLER_NAME/ACTION. TheCONTROLLER_NAME is typically the name of the custom portal and the ACTION is one of the various web pages of the portal that present the functionality.
In our main page layout example we had the following line of code:<%= link_to 'Home', { :action => :index }, { :class =>
'menu' } %>. Lets now look closer at the action portion. The { :action => :index } portion says, I want to link to the full view called index. The corresponding file in your views folder is index.erb. The index view also happens to be the view displayed if no view is specified. This could also be thought of as the splash view.
Another way to look at it is that the action name, such asindex above, is determined from its filename. The portion before the .erb in the filename is the name of the action. For example, if the end-user web browser requests the URLhttps://rxg/portal/CONTROLLER_NAME/session_info, then the file session_info.erb will be used to render the presentation.
There are three valid suffixes on the filename that coincides with an action: .tablet.erb, .mobile.erb and simply.erb. This enables the administrator to create different presentations for different kinds of devices and/or browsers. By default, a desktop web browser that requests the URLhttps://rxg/portal/CONTROLLER_NAME/action, will loadaction.erb. Similarly, a web browser running on a mobile device (e.g., an iPhone, BlackBerry, etc.) will loadaction.mobile.erb. If the administrator does not wish to differentiate between the desktop, tablet, or mobile views, a singleaction.erb file may be created and that will always be used.
All of the views that ship with the default captive portal are functional as-is and require no modification. However if you would like to edit the verbiage or change the layout of a specific view, you can edit it as you see fit. The contents of a view file are HTML and embedded Ruby, similar to that of the layout file. Below is a simple example of a view.
<h2>Login</h2>
<%= portal_image_tag 'login.jpg' %>
<%= render :partial => 'login_form_account' %>
Notice that HTML elements (<h2>) are present side by side with embedded ruby elements (<% ruby code %>). Since the view will be rendered into the layout where the yield command is, the view file does not contain the HTML that forms the foundation of the page (e.g.,<head>, <body>, etc.).
Minimizing redundant HTML and embedded Ruby code is an important part of custom captive portal implementation. Ruby on Rails supports the use of page partials that are reusable within many views. To create a partial, put whatever HTML and/or embedded Ruby code into a file with a name that begins with an underscore (_) character. You may then reference the file name (without the underscore) in any view using the embedded Ruby code
<%= render :partial => 'PARTIAL_FILE_NAME' %>to have the partial rendered in place.
Custom Data Sets and Keys
The use of Custom Data Sets and Custom data Keys always revolves around doing portal customization. Logic can be added to the portal so that it can pull data from a Custom Data Key, that allows you to deploy the same portal code in many locations and "configure it" with Custom Data Sets and Keys. The below example will show how to use Custom Data Keys to display an address in the footer of a custom portal. This allows the address to be changed at each location by changing the Custom Data Key and not editing the portal directly. For most use cases Portal Modifications may be the better option, Custom Data Sets/Keys can also be combined with Portal Modifications.
For this example we do not need to use a Custom Data Set, we could just use a Custom Data Key by itself, we will configure it both ways. First without using a Custom Data Set. First navigate to System::Portals and create a new Custom Data Key.

Leave the Dataset field set to -select->. Give the record a name, the name will be refereced in the code so the name should reflect the purpose of the record. This will be named address since that is the information we are storing. It should be noted that while Custom Data Set names are unique it is possible to have mutlple Custom Data Key records with the same name. The address will be entered into the Text field. A value of each type can be stored in a single Custom Data Key if desired. Click Create.
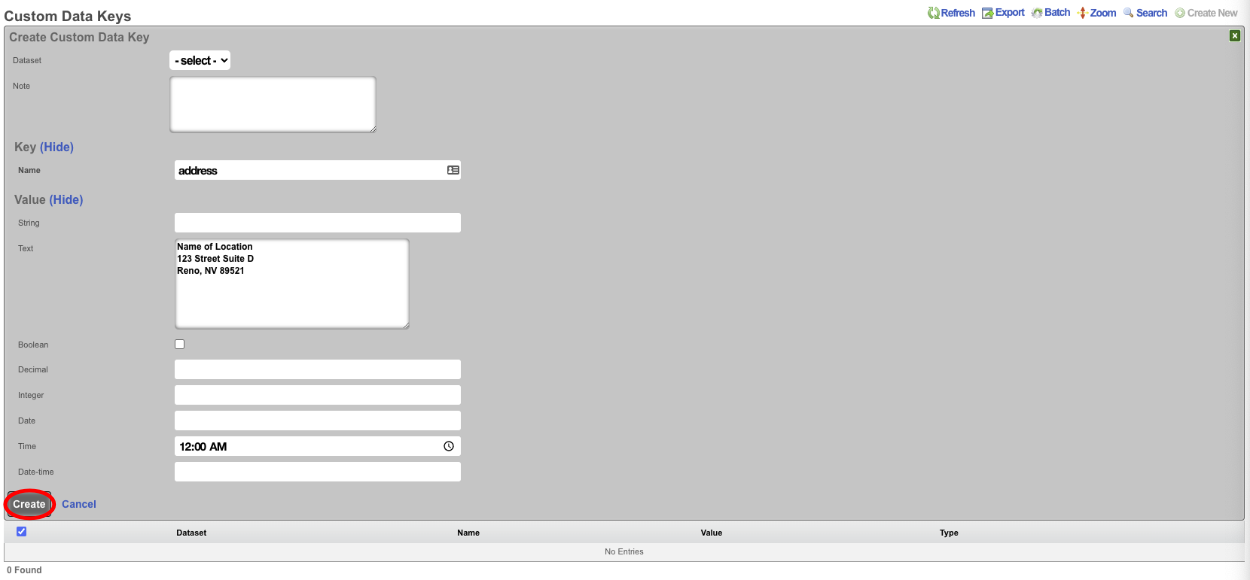
To display this data in a portal we can edit the footer view in the portal or we can use a Portal Modification to override the footer view in the portal. For the purpose of this example we will create a Portal Modification. Create a new Portal Modification.

Give the Portal Modification a name, and select which portals the Portal Modification will apply to. In this case we will select both the Splash and Landing portals, if we selected only Splash then the address would only display in the Splash side of the portal and will not be present in the Landing portal after the user authenticates. In the Parital tab start to type footer and select footer from the dropdown menu. In the HTML b> field we can enter the code the will call the address, we can also use HTML here to center the data. To access the data stored in the Custom Data Key use <%= CustomDataKey.find_by(name: 'address').value_text %>. Click Create.

Now if we visit the portal we will see the address displayed in the footer. However it is all on one line.
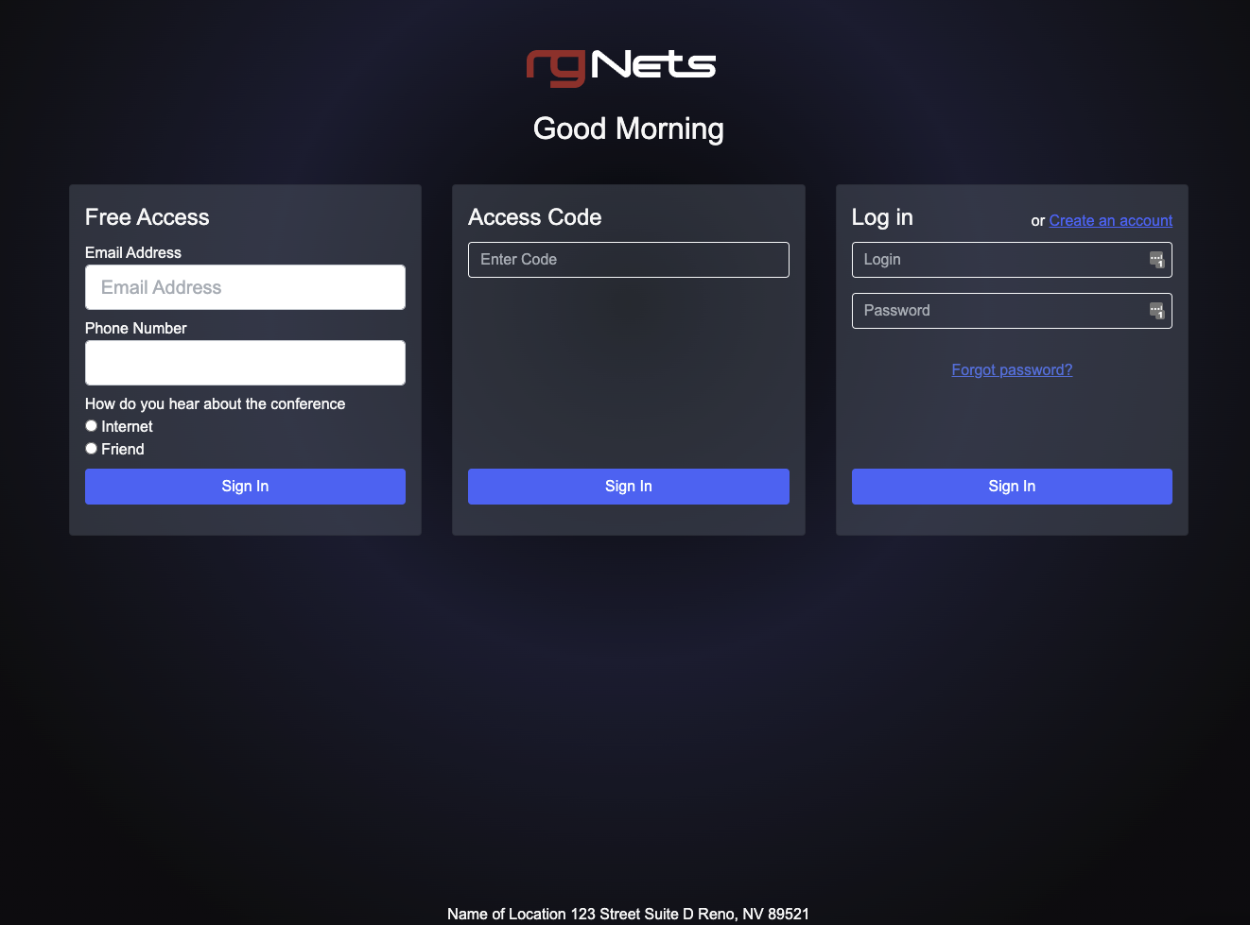
This can be corrected by editing the Custom Data Key and adding <br> after each line, then updating the record.
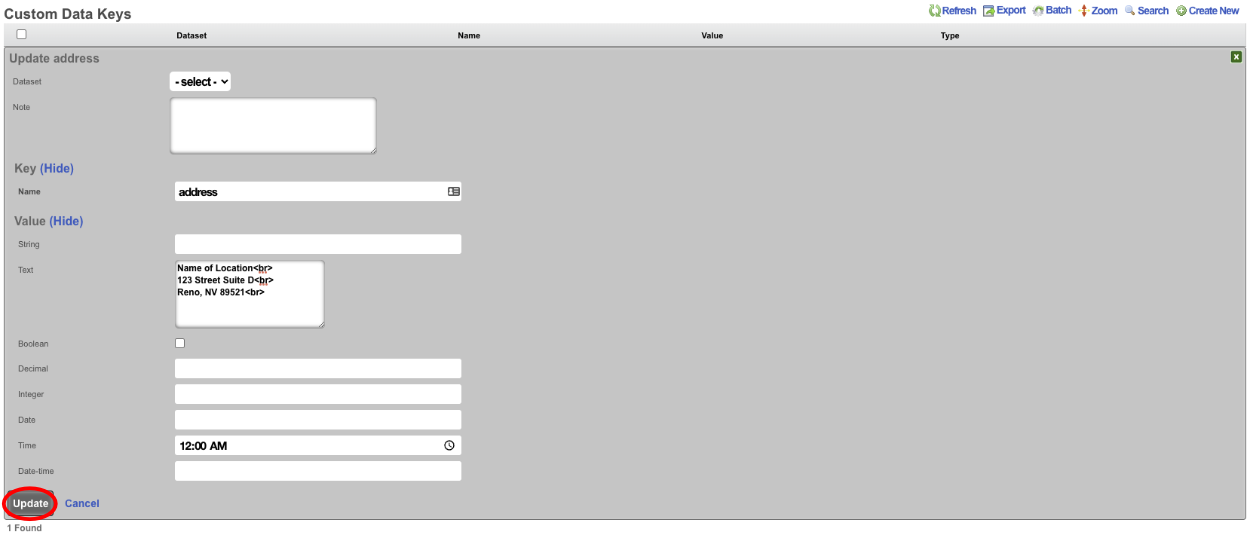
Now when the portal is viewed, each line of the address will now be on its own line.
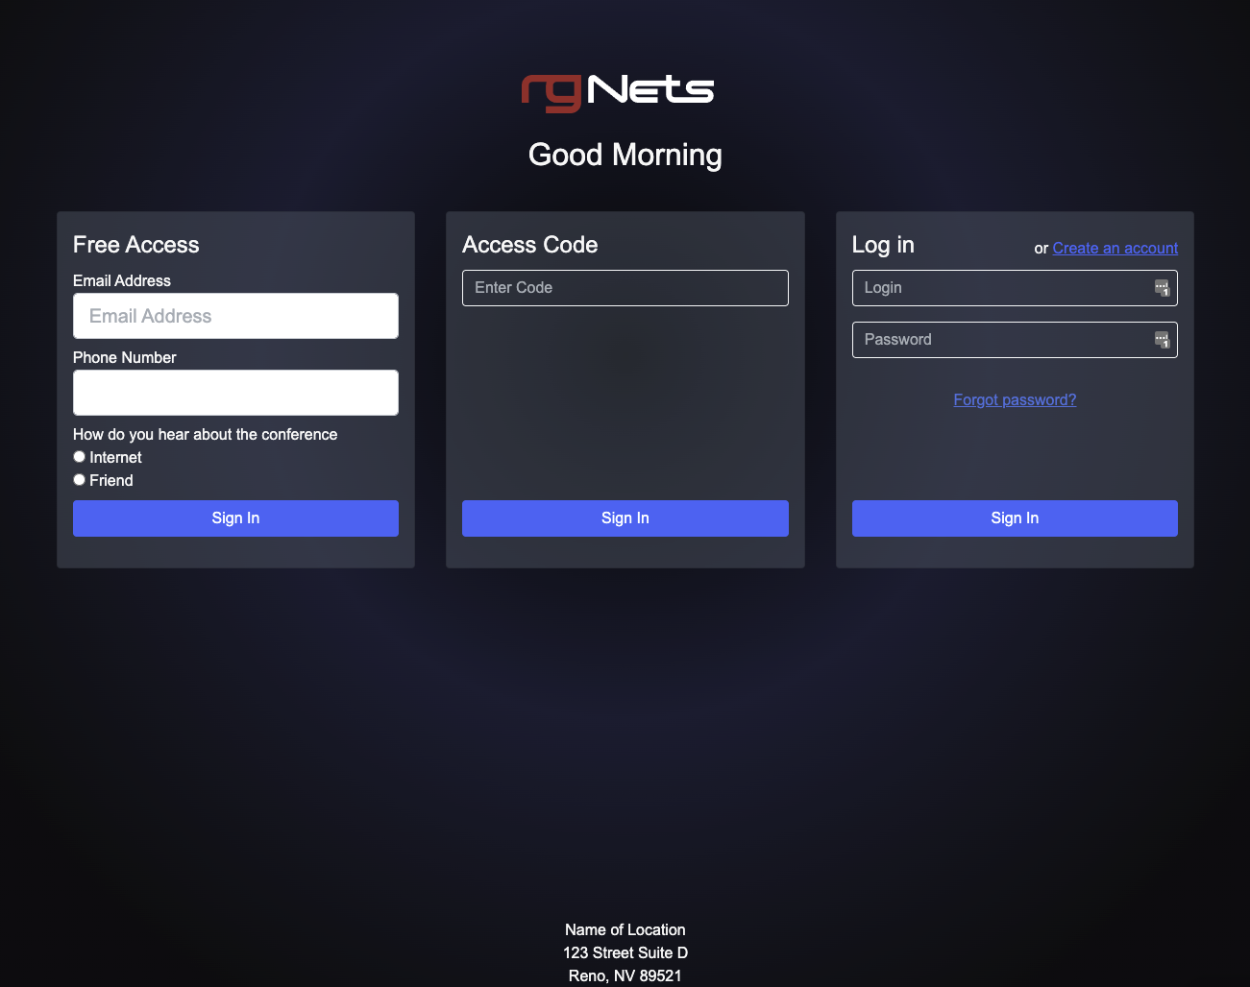
There may be a need to display a different address on another portal, we could create a Custom Data Key, but we would need to change the name of the key which means we cannot use the same code on each portal. However if we tie the Key into a Custom Data Set we can recall the Key from the Set. To configure this for this example create a new Custom Data Set.

Give the Custom Data Set record a name, this will be used in the code to reference the record. For this example we do not need to restrict the Set to specifc policy or group of policies so do not select any. Under Attributes check the address record in the Key field, and click Create.
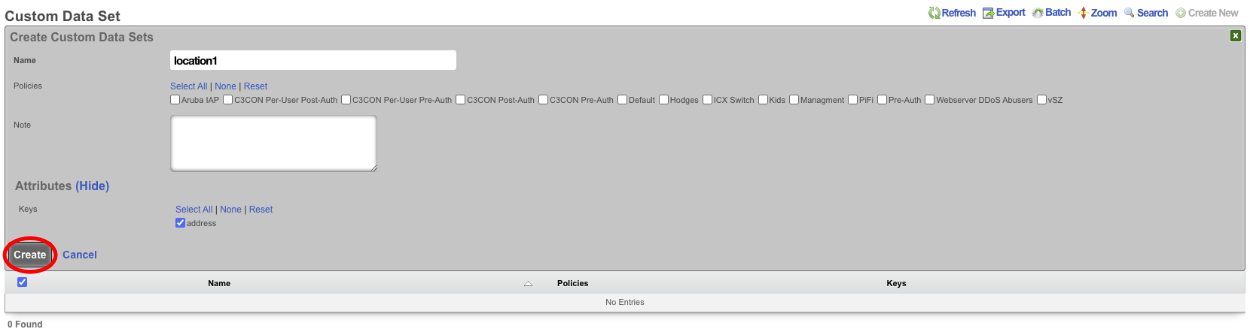
Next we need to edit the Portal Modification we created earlier.

We need to change the line <%= CustomDataKey.find_by(name: 'address').value_text %> to <%= CustomDataSet.find_by(name: 'location1').get('address') %>. Update the record. When viewing the portal it will display the same information we are just pulling it from the Key via the Data Set instead of directly from the Key itself.
Portal Mods

Portal Mods provide comprehensive portal customization capabilities through five modification types:
Modification Types:
- View Override: Replace entire view templates (e.g., login.erb, session_info.erb)
- Partial Override: Replace specific partial templates (e.g., _welcome_message.erb, _footer.erb)
- Image Override: Replace portal images and assets
- Variable Customization: Modify theme colors, Bootstrap variables, and appearance settings
- Controller Action: Add custom Ruby code to execute new controller actions
Content Modes:
- HTML Mode: Direct HTML/ERB code editing with full template access
- Rich Text Mode: WYSIWYG editor with image upload and formatting tools
Appearance Settings:
- Light Mode / Dark Mode: Portal appearance themes
- Color Customization: Bootstrap theme colors, button colors, background gradients
- CSS Variable Override: Complete control over portal styling
Example Portal Mod
In this example Portal Mods will be used to change the greeting on the default portal, the login types and the logo on the splash and landing page. To change the default greeting (Good Morning, Good Afternoon, and Good Evening) create a new Portal Mod. The Name field is arbitrary. Select the Splash portal the change should be applied to. In the Partial Override select welcome_message from the drop down. In the HTML field the code for the welcome_message view is displayed, and can be edited.
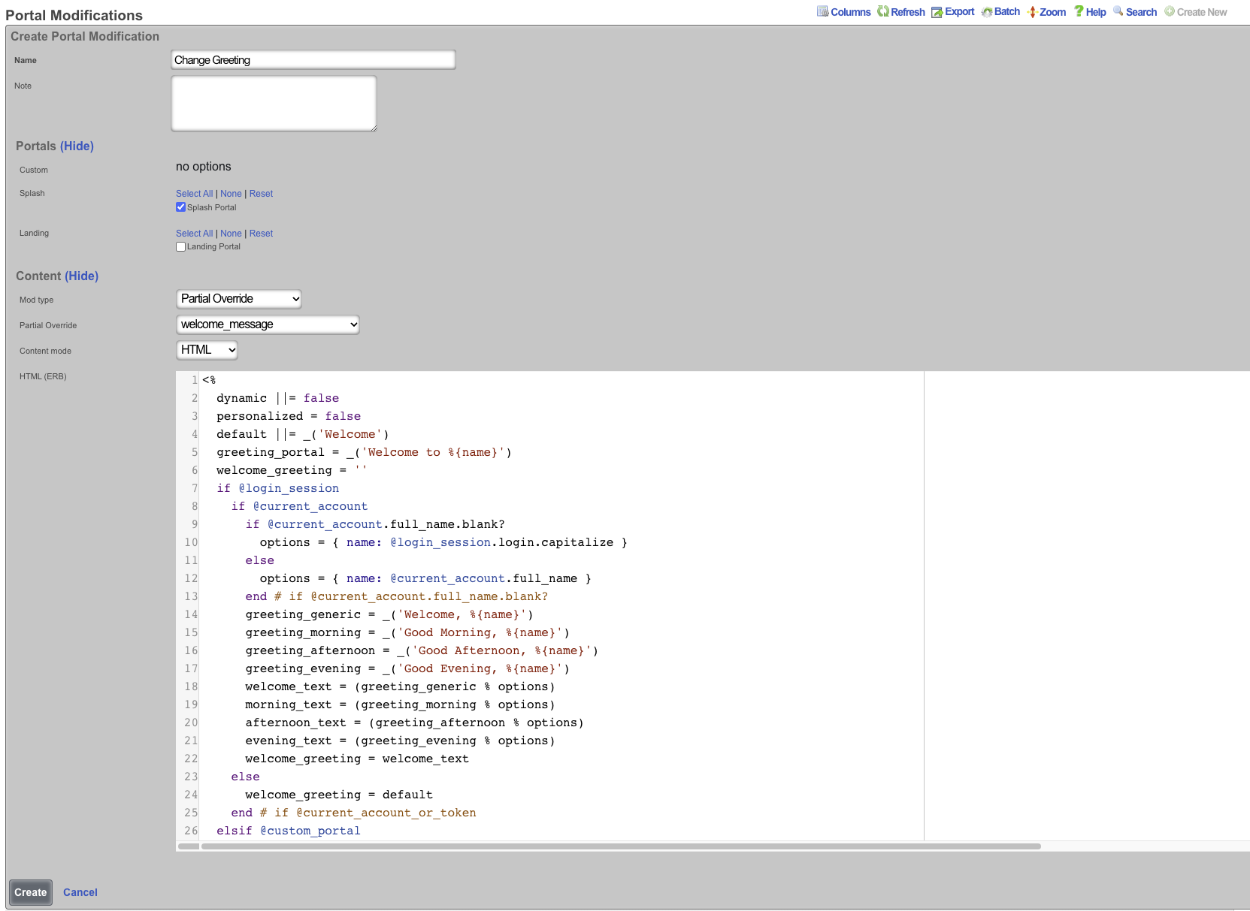
If the goal is to change the message that is displayed in the afternoon the following code can be changed on lines 31 and 41 "greeting_afternoon = _('Good Afternoon')". If "Good Afternoon" is changed to "Hello, Good Afternoon", then in the afternoon the message displayed will change from "Good Afternoon" to "Hello, Good Afternoon".
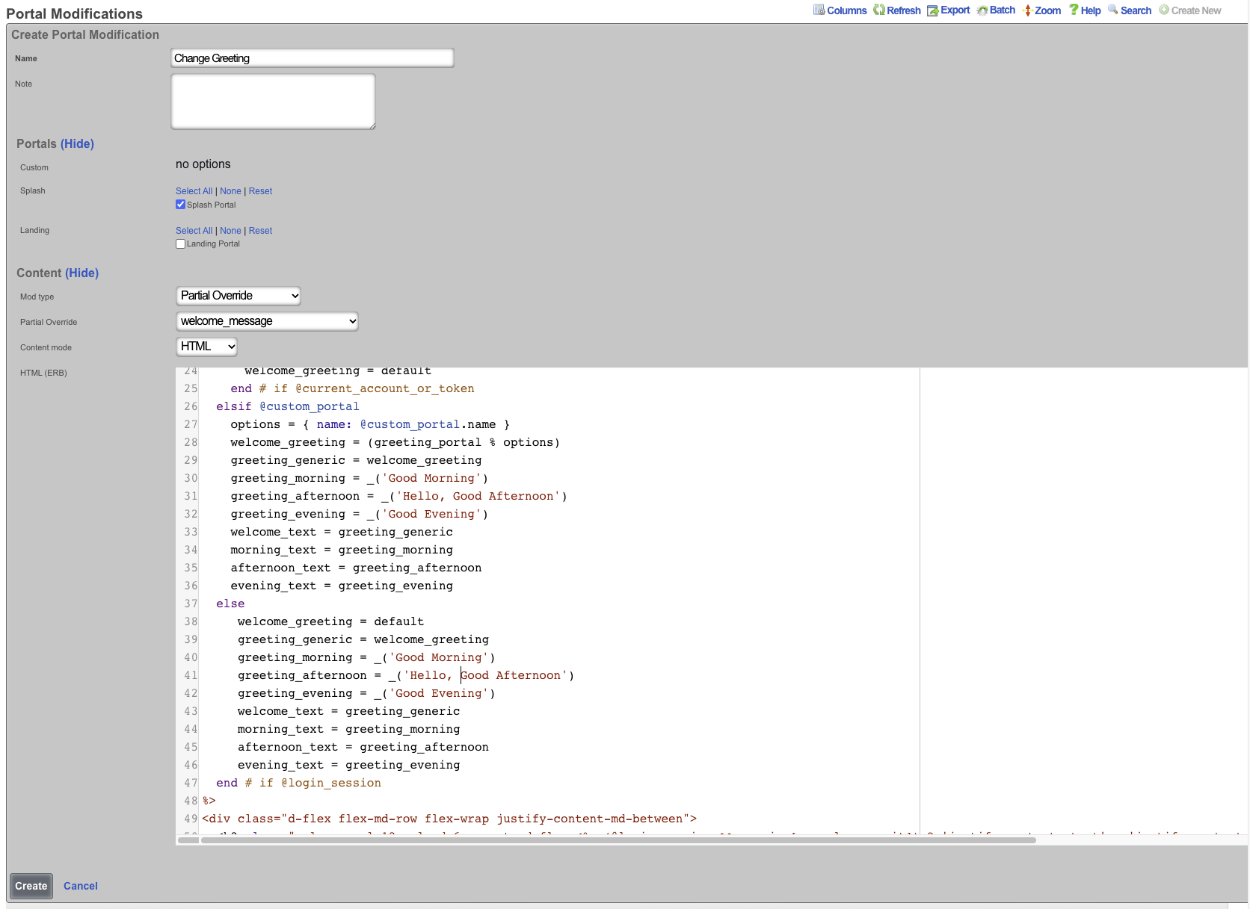
This will result in the following change, the first image is the unmodified portal and the 2nd is with the modification.
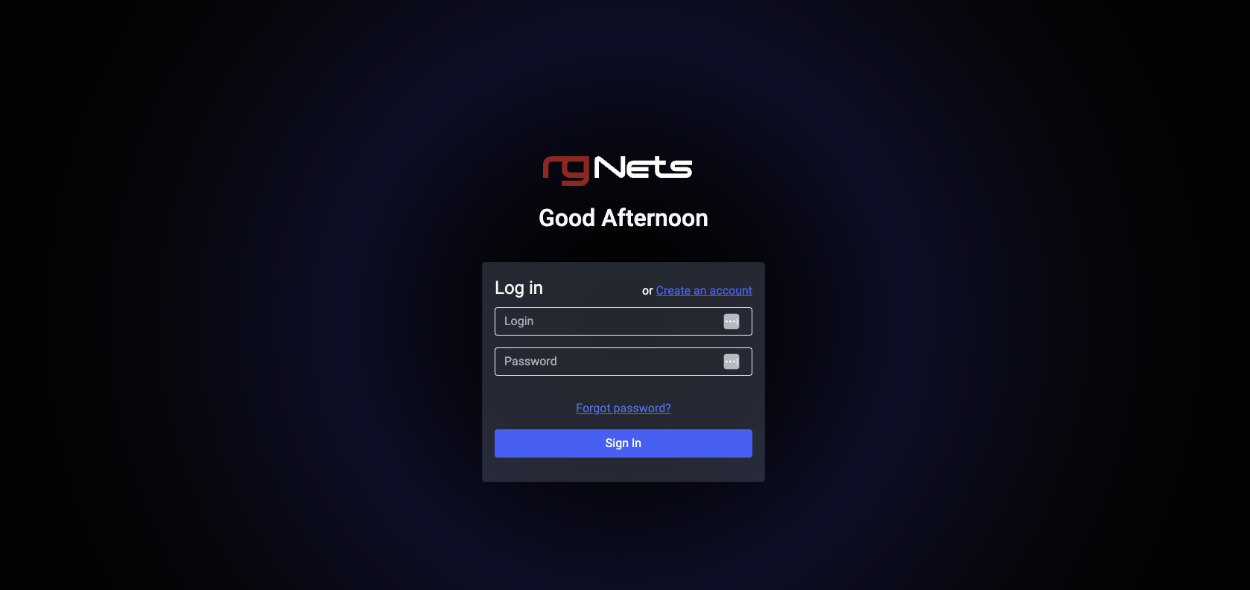
It is also possible to replace the code entirely. Here is an example where the code has been erased and replaced with custom code to display a static greeting message.
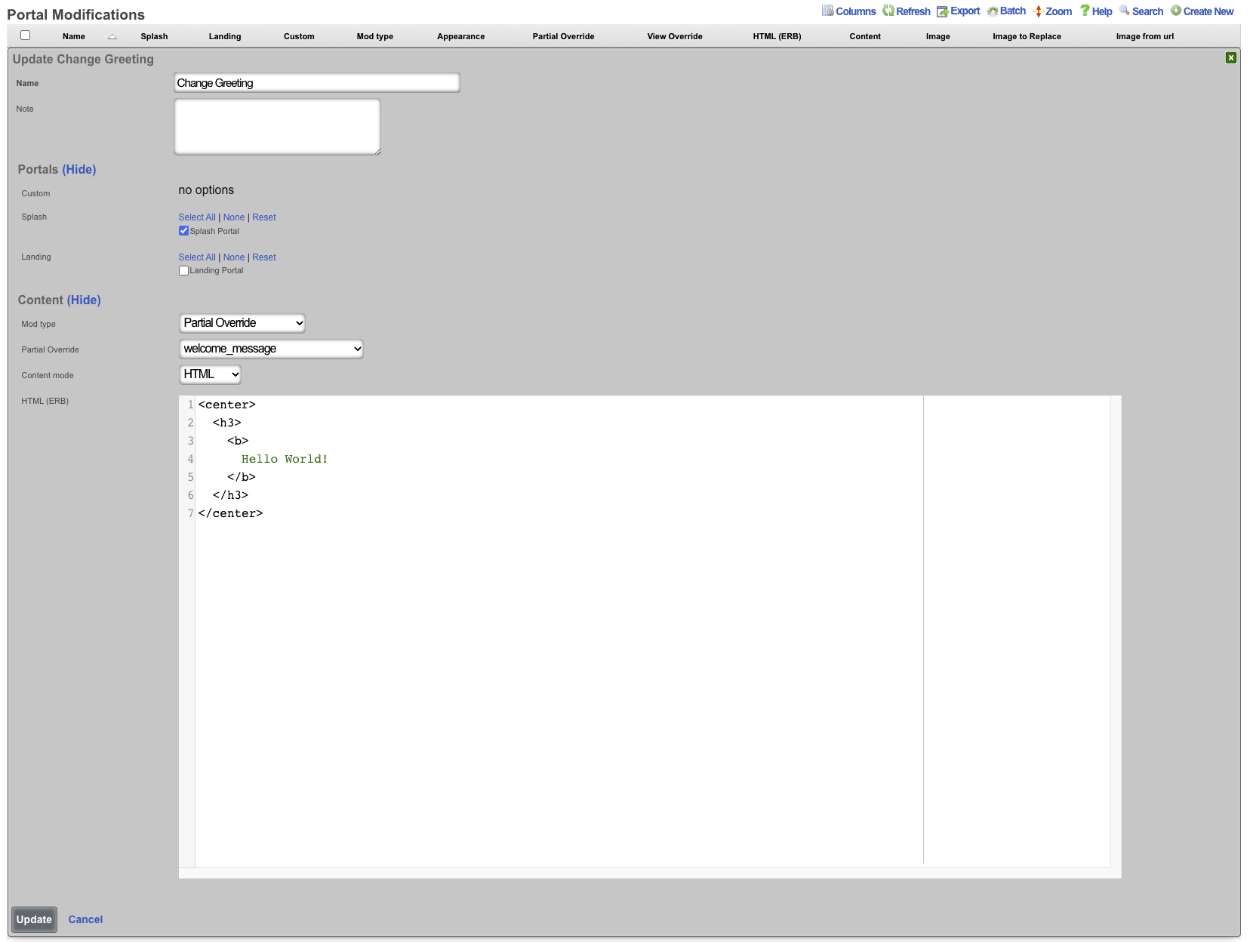
This results in the following to be displayed regardless of time of day.
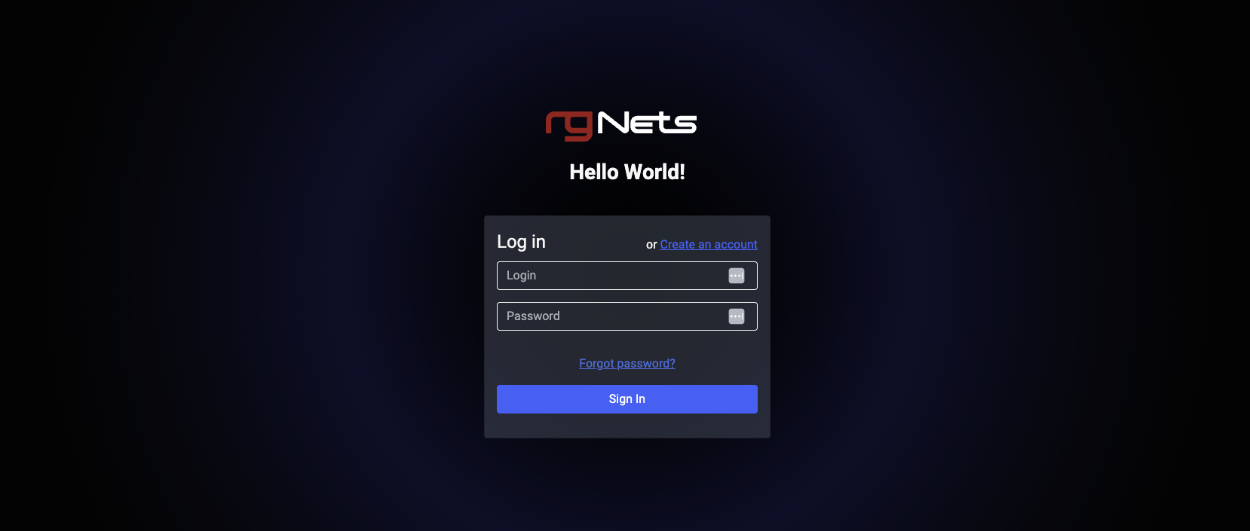
Using Portal Modifications the operator of the rXg can also change which login options are displayed overriding the default portal that displays login options based on the configuration. The operator may only want to display a click through option and PMS login for example. The below image shows the default portal with the login options displayed dynamically based on what is currently configured on the rXg.
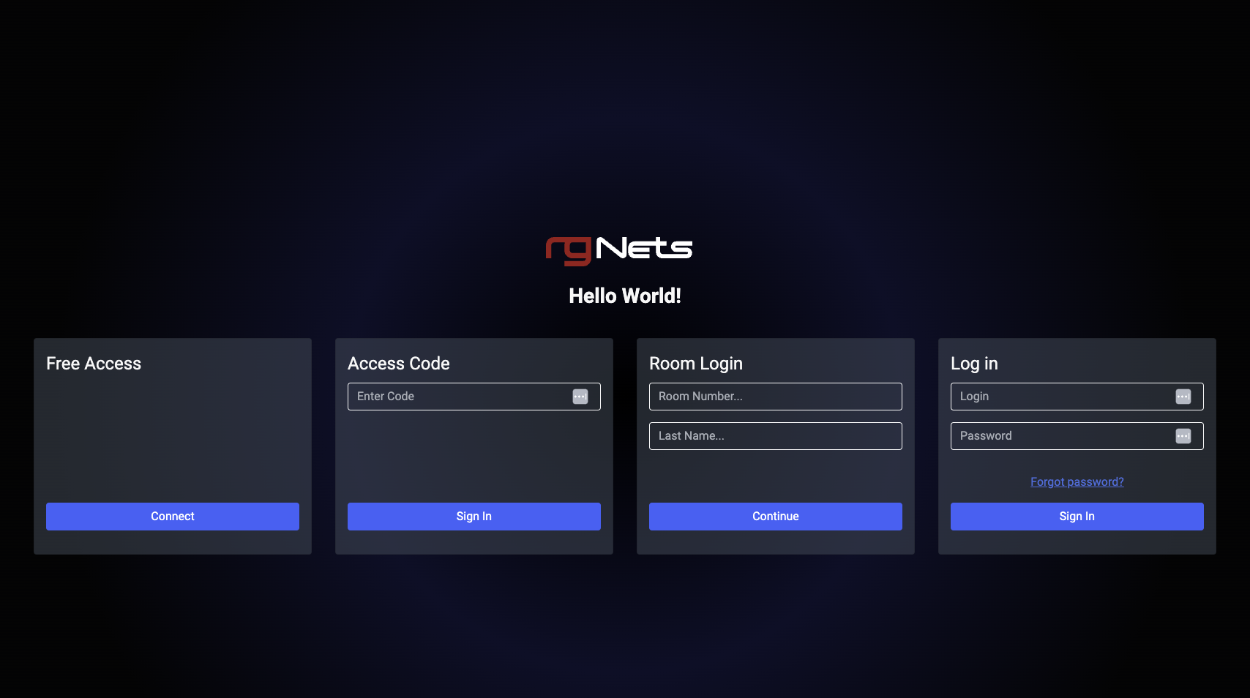
To only display the free options an the PMS room/name login, create a new Portal Modification. The Name field is arbitrary, enter a name for the record, check the Splash portal(s) this modification will apply to. The Mod type field should be set to Partial Override , and the Partial Override field should be set to login_forms_conditional. To display the free option and PMS room/name option on the portal remove or comment out the section of code for the login option that is to be removed.
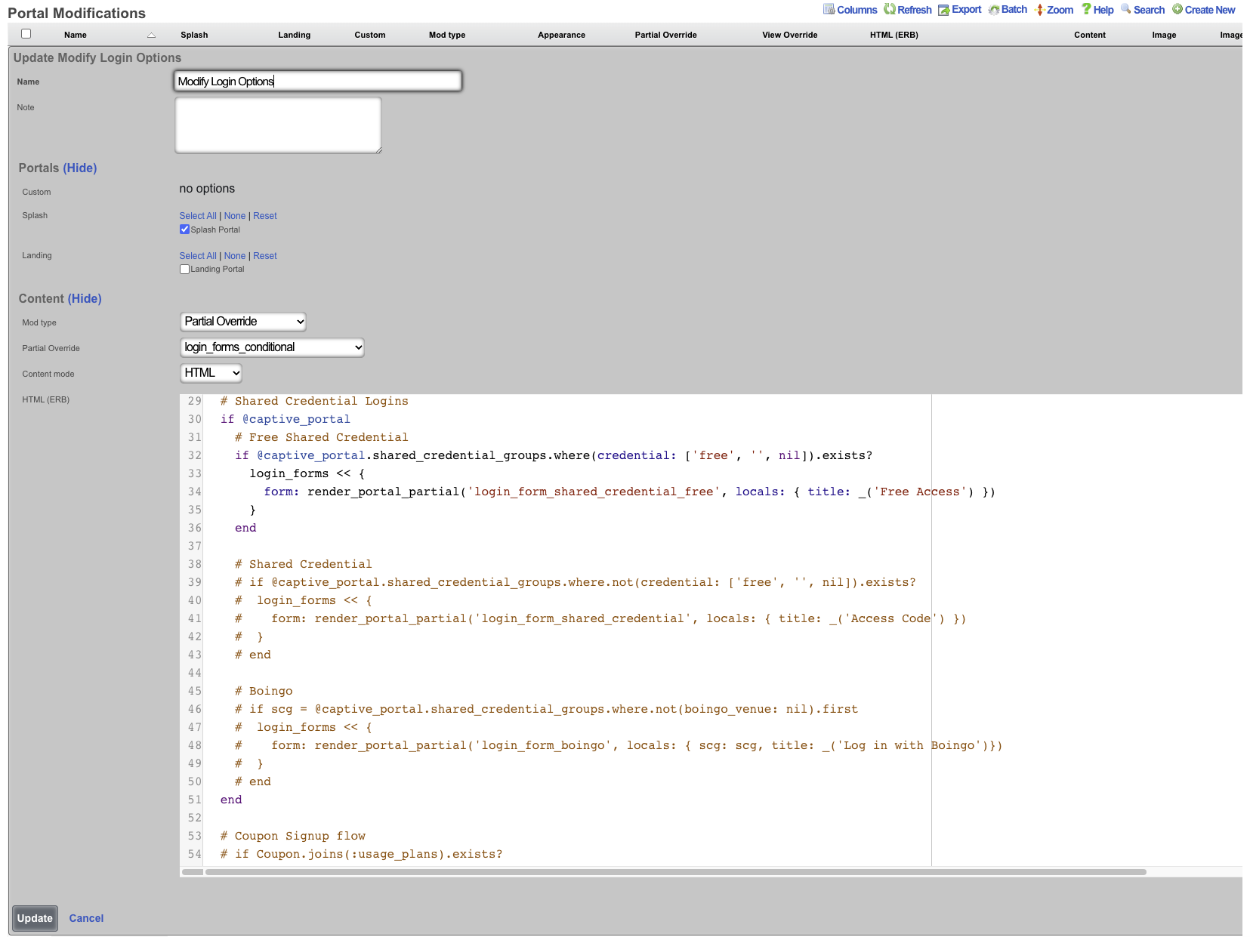
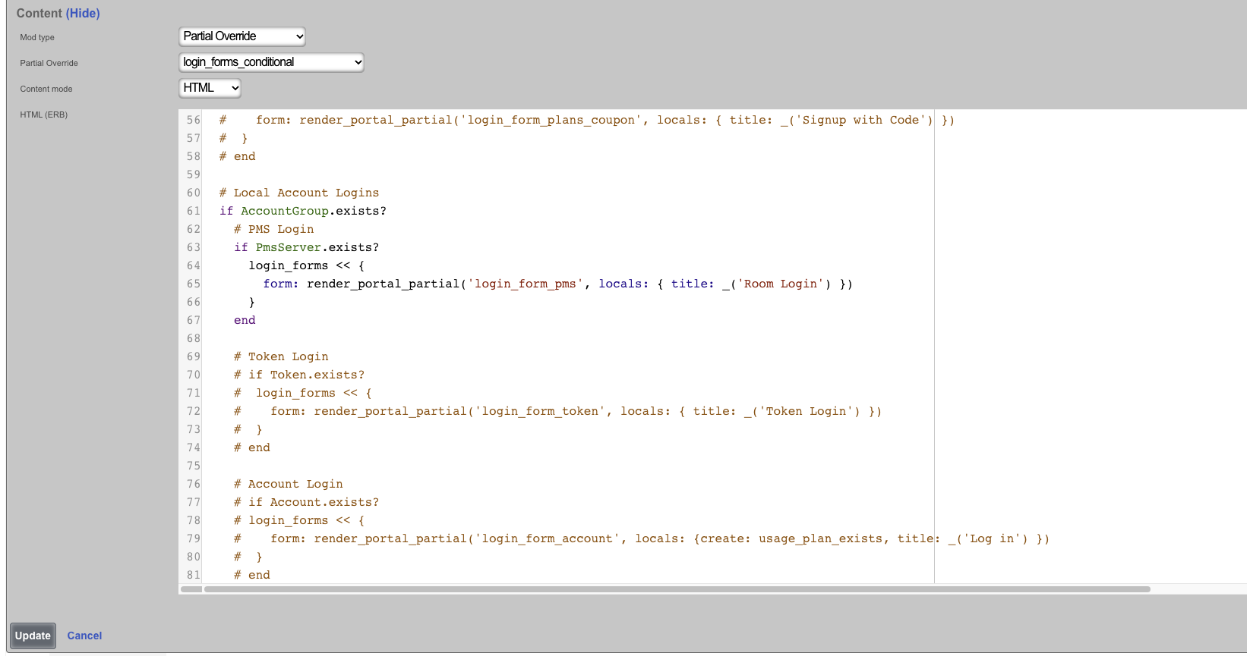
Now the portal will only display the login options we put in the Portal Modification.
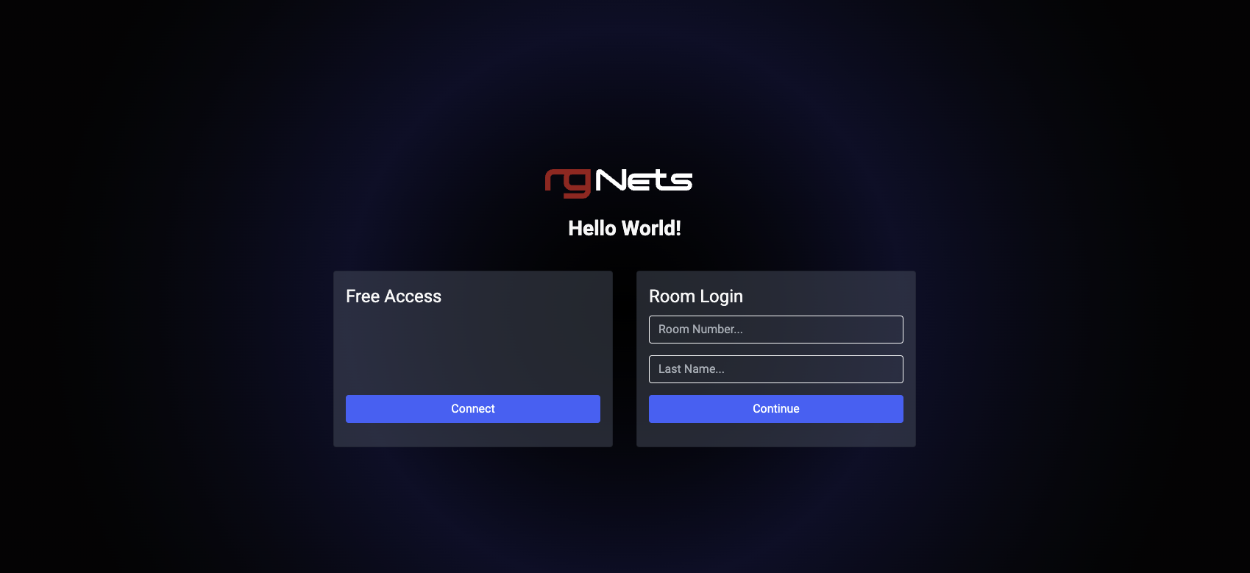
In this last example we will change the logo displayed at the top of the portal page.
To change the logo, create a new Portal Modification , give it a name, select both the Splash and Landing portals the logo will be changed on. Change the Mod type field to Image Override , a URL can be entered load the image from a remote location, for this example we will use the Image field and click the Choose File button and select the file to be used. In the Image To Replace field enter "default_icon.svg". Click Create.
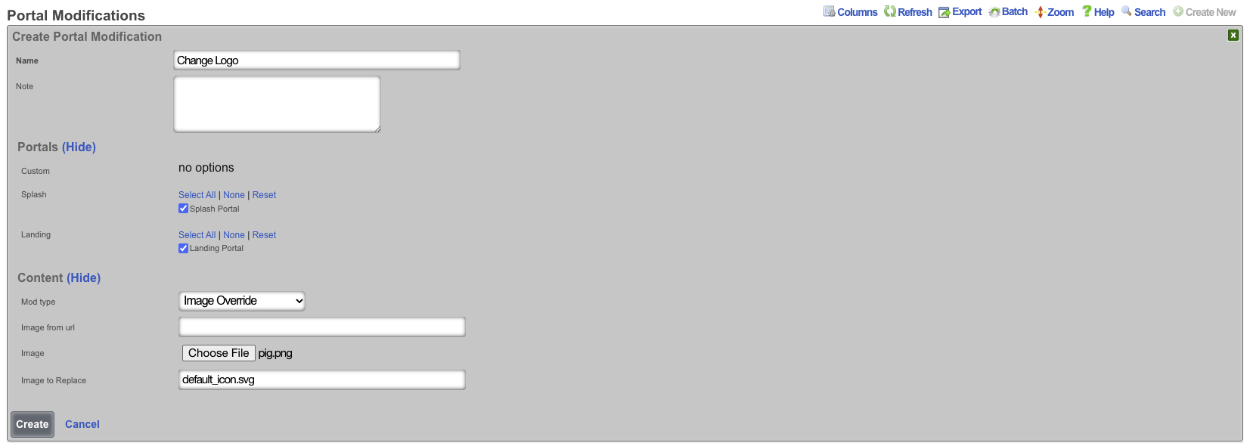
Now the logo displayed at the top is changed. Note: that if this is done on a cluster the configuration will be pushed to the portal on each node, there is no need to create a record for each node in the cluster.
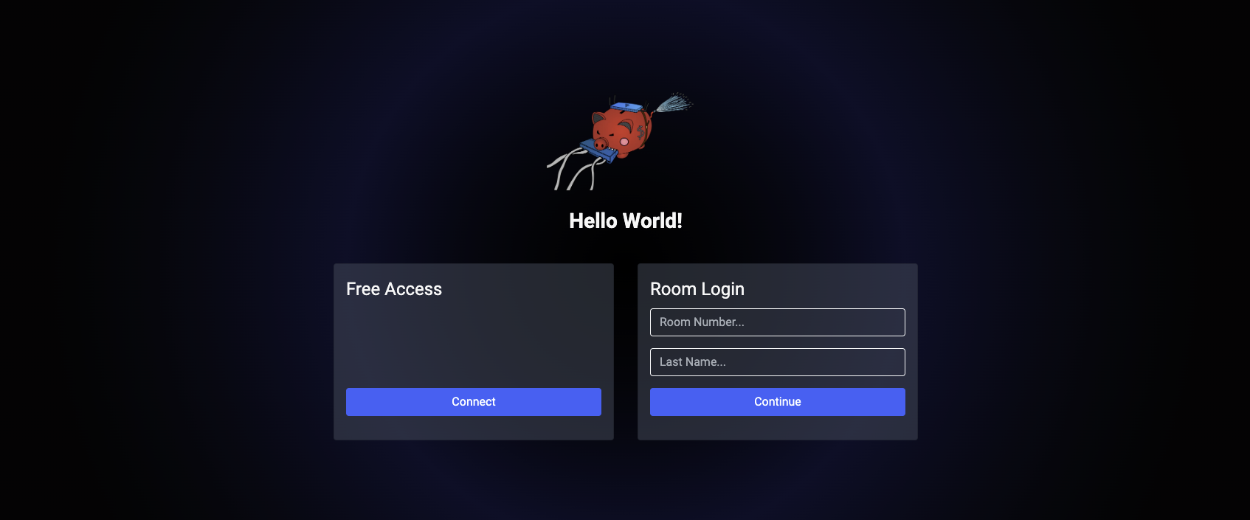
Example: Using template to replace portal logo.
In this example, a template will be used to upload an image to replace the default logo. Below is the template that will be used, the variable data will be populated with the image after it is run through a Base64 Image Encoder, note for the sake of space the data variable has been truncated. For this example https://www.base64-image.de was used to convert the rgnets_logo.png to Base64.
<%
mod_name = 'Replace Logo'
image_to_replace = 'default_icon.svg'
filename = 'rgnets_logo.png'
data = "data:image/png;base64,iVBORw0KGgoAAAANSUhEUgAAAawAAABXCAYAAABY6nHCAAAEsmlUWHRYTUw6Y29tLmFkb2JlLnhtcAAAAAAAPD94cGF"
%>
PortalMod:
- name: <%= mod_name %>
image_to_replace: <%= image_to_replace %>
image:
data: <%= data %>
filename: <%= filename %>
Navigate to System::Backup and create a new Config Template.

Give the Config Template a name, and enter the code into the Config field. Check the Apply Template box, this will save the template and apply it at the same time. Click Create
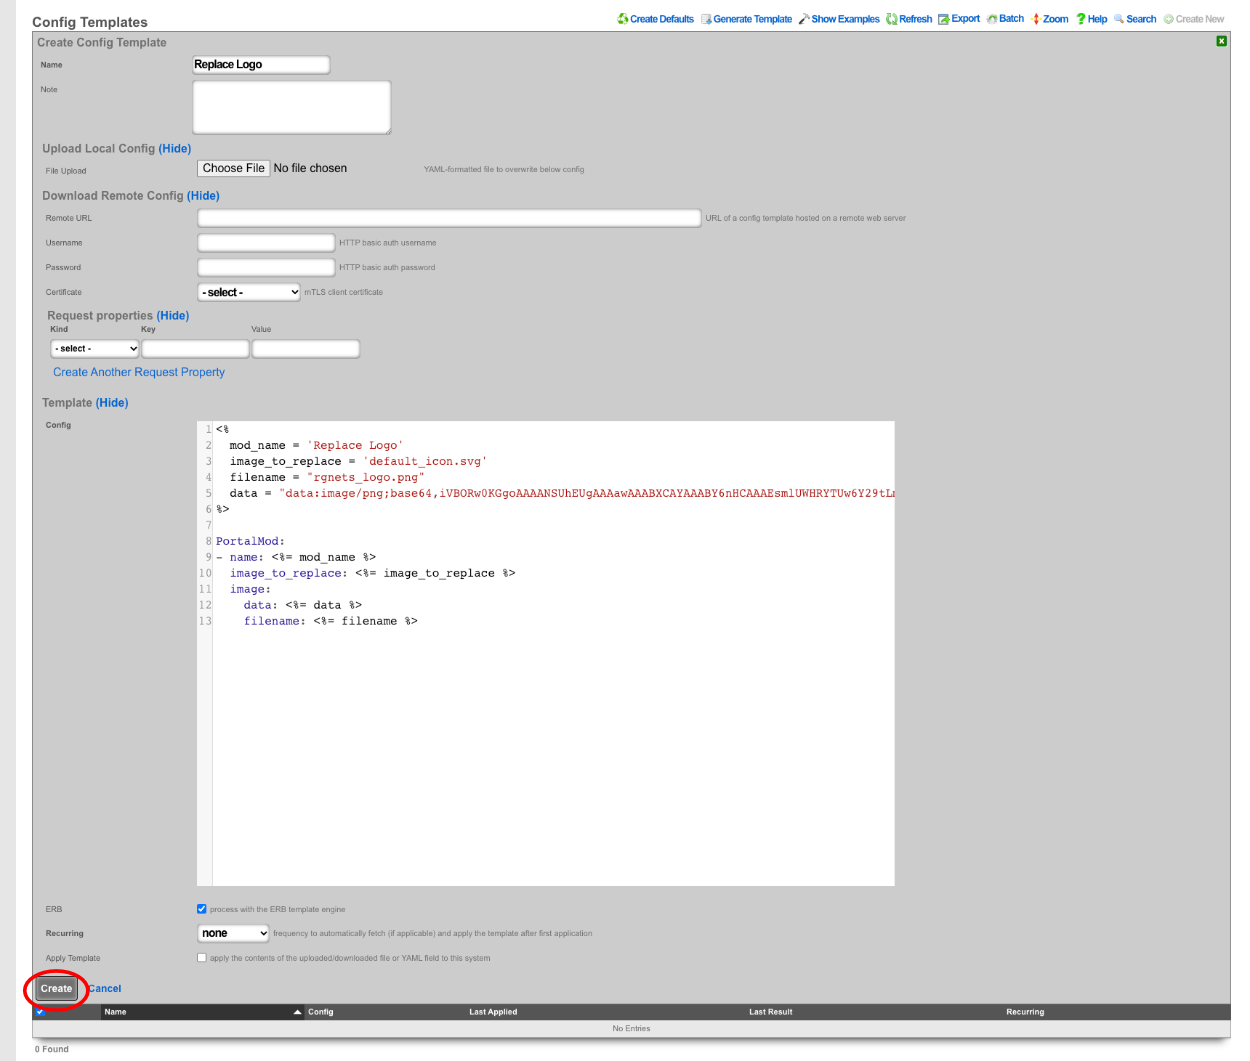

Next navigate to Policies::Captive Portal , the template has created a Portal Modification that can be used to replace the default_icon.svg file.

Example: Using Actiontext With Portal Mods
In this example we will create a Portal Modification that will allow us to quickly and easily modify the information found in the footer of portals all from a single location. Operators can use this to change or modify all or a select group of portals all at once. There are two portals that will be modified in this example.

Navigate to Policies::Captive Portal. First we need to create a Portal Modification that will display the custom view we are going to create to display our footer information.

Give it a name and select which portals this Portal Mod will be applied to. In this example we want the information we are including in the footer to display on each page, so we will select both portals under the Custom field. If we only want the information to display on the splash portal then we would select both portals under the Splash field, and the same could be done for Landing as well. Since we are modifying the footer we need to specify that under the Partial field. When you start to type the name of the Partial it will give you a list to choose from, we want to select footer. For this first Portal Mod leave the Content mode set to HTML. Here we are creating a div that will display the view we will create in the next step, this also allows us to give it some formatting like centering the text. See screenshot below, click Create.
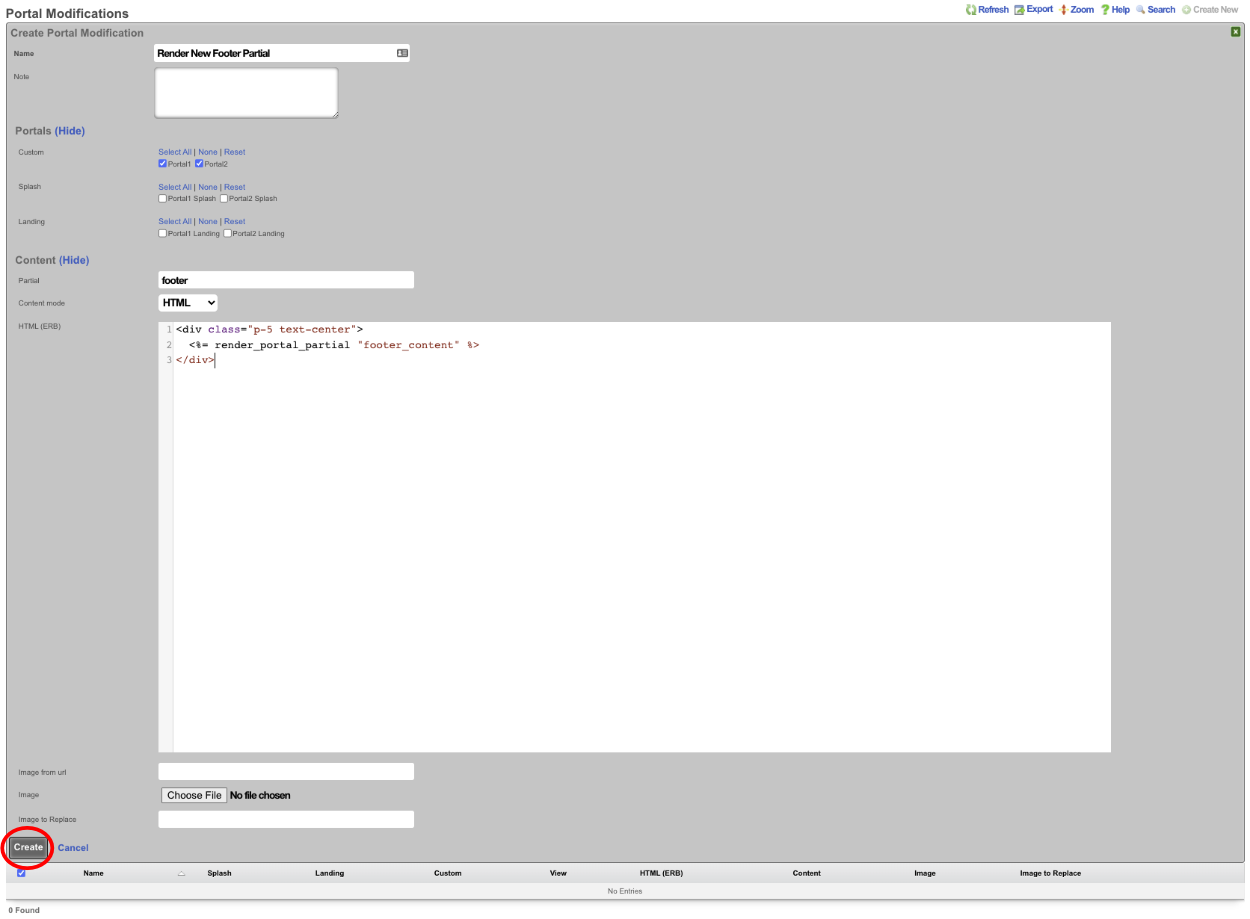
Next create a second Portal Modification , this one will contain the information we want to display in the footer. Give it a name and select which portals this content will be added to. For this example I am selecting both portals under the Custom field. In the Partial field we are going to enter in the name of the view we are calling in the previous step, in this example that was footer_content. Change the Content mode to Rich Text , we can now enter in the content for our footer. Images can be included as well by clicking the paperclip icon and selecting an image. Click Create.
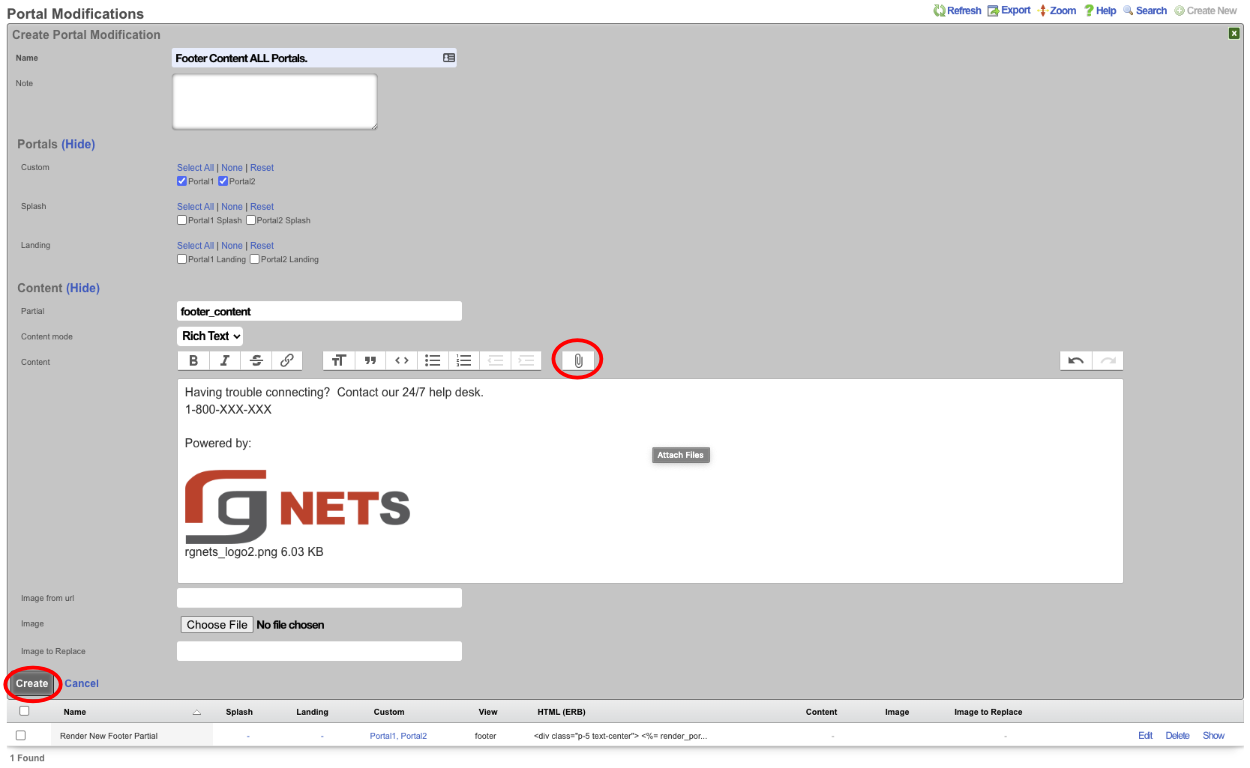
Now if we visit the default portal which the Portal modifications haven't been applied to we get the following.
If we visit portalone or portaltwo we will see that the mods we created show up because these were the portals we selected.
We can take this a step further by editing the Portal Modification record that contains the phone number and image and change it so that it only applies to portalone, and we will create another record that applies to only portaltwo. Edit the record and unselect portaltwo.
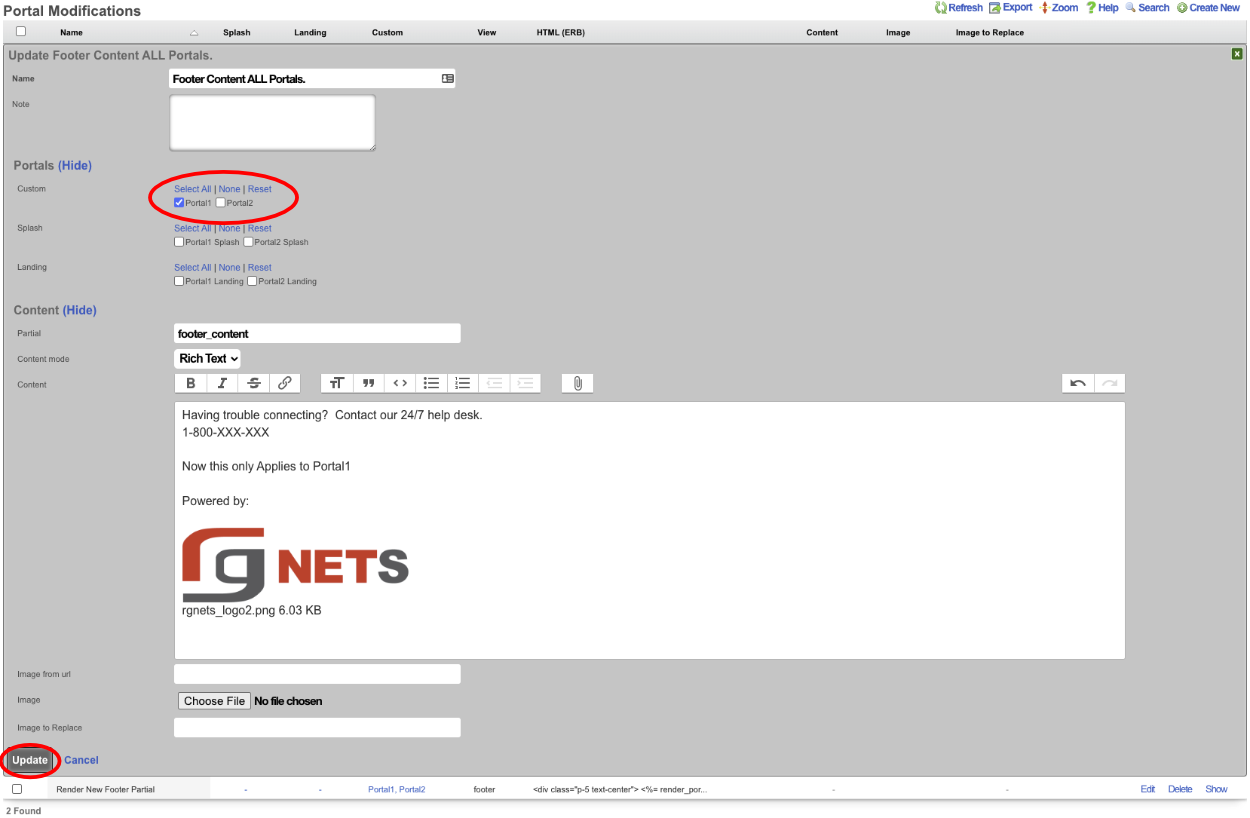
Now create a new Portal Modification selecting only portaltwo, and change the content. We will move the logo above the other content for this one.
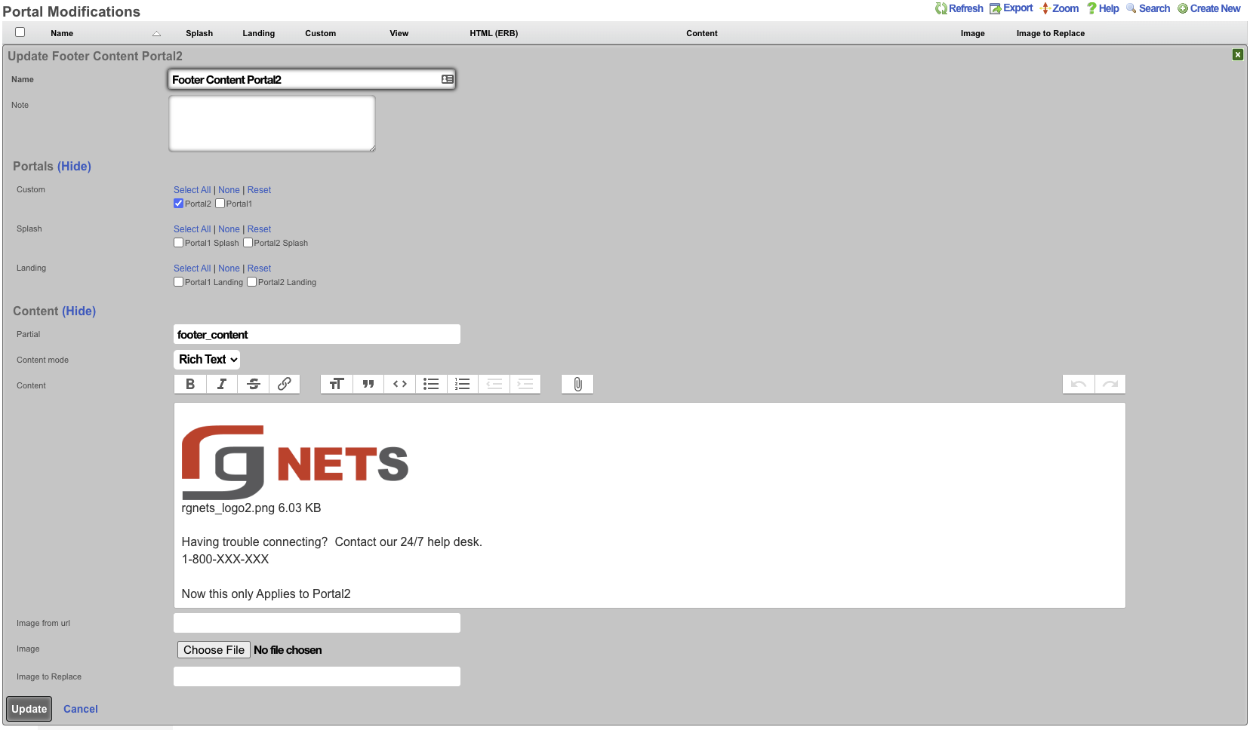
Now if we look at portalone, we get the following result.
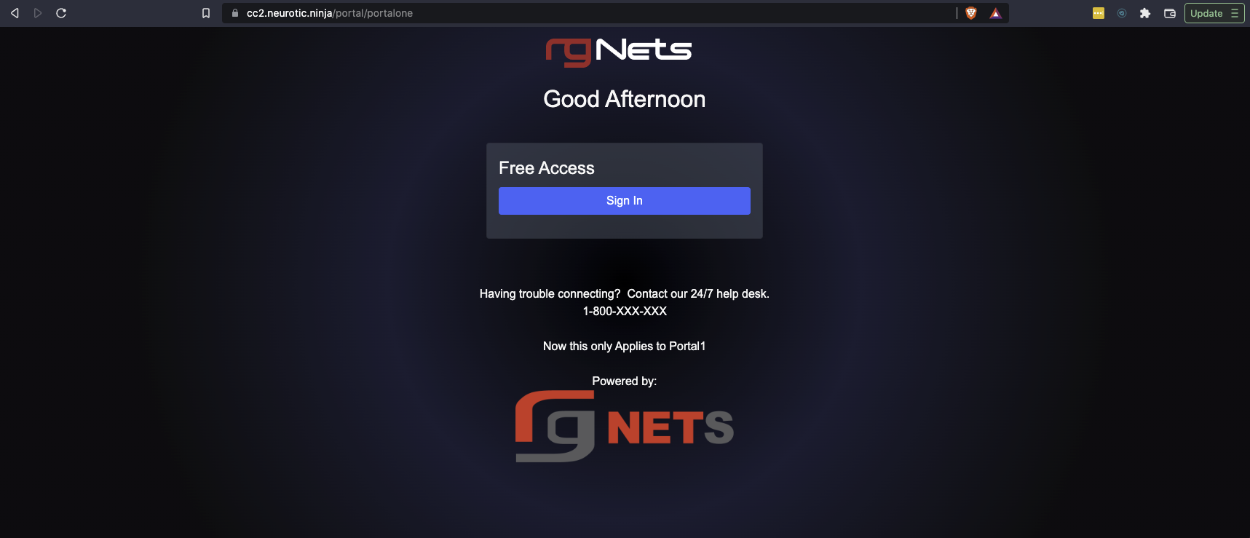
And finally looking at portal two we get the following result.
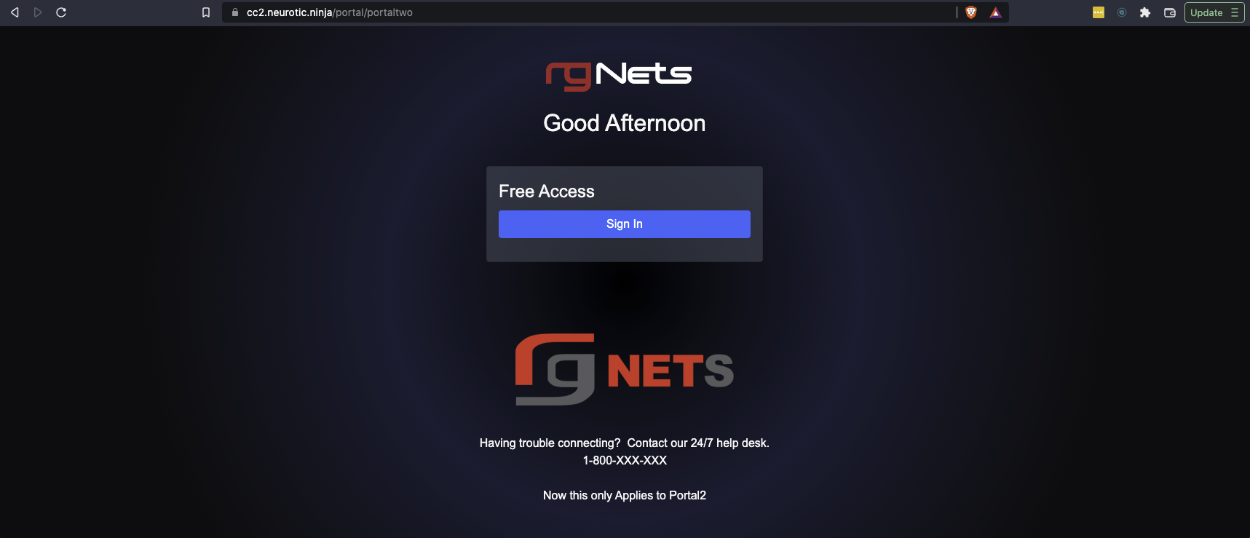
Example: Change Background Image
In this example, we will use Portal Modifications to add a background image to the default portal. Because the default portal's background gradient is defined solely using CSS rules, we will need to add some CSS in order to set a background-image. We will create two portal modifications to accomplish this. The first will serve the purpose of storing the background image, which will be referenced by the second Portal Mod's CSS rules.

Give the portal mod a name, which should reflect the purpose of the modification (this name will be referenced by our second Portal Mod). For this example we will use "Default-bgimage". Since this Portal Mod won't be rendered directly, there is no need to select any portals in the Custom, Splash, or Landing fields so those fields should be left blank. Next, click on the Choose File button and select the image to be used for the background. Click Create. Note: recommended formats are .jpg for reduced size or .svg for better resizing.
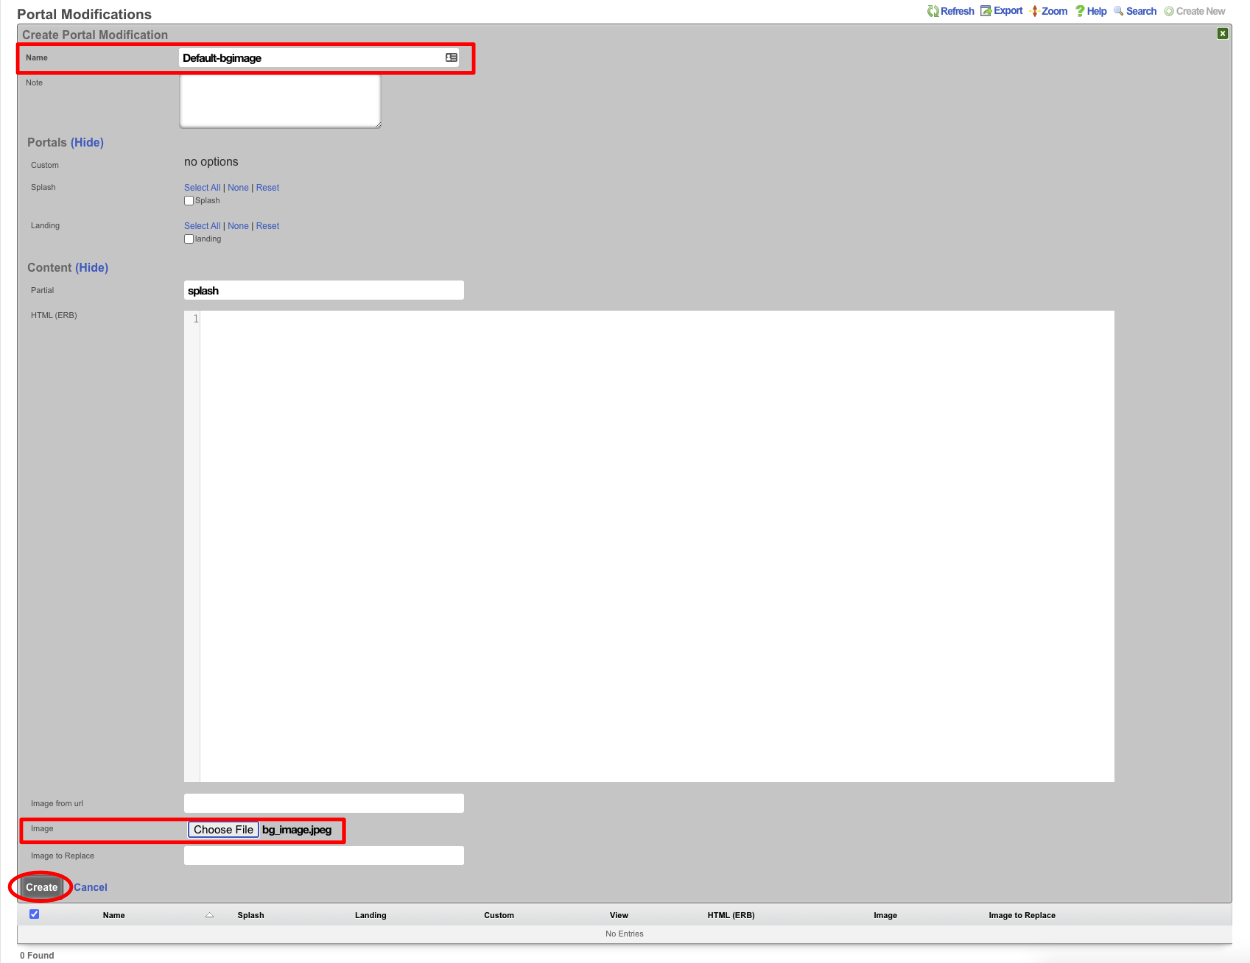
Create a Second Portal Mod, which will modify the CSS Partial. Give the portal mod a name, again it should reflect its purpose. Select the Splash and Landing portal to which it will apply. Enter "CSS" in the partial field. Add the following code to the HTML(ERB) field:
<style>
body, body.bg-dark {
background-image: url(<%= rails_blob_url PortalMod.find_by(name: 'Default-bgimage').image %>) !important;
}
</style>
Click Create.
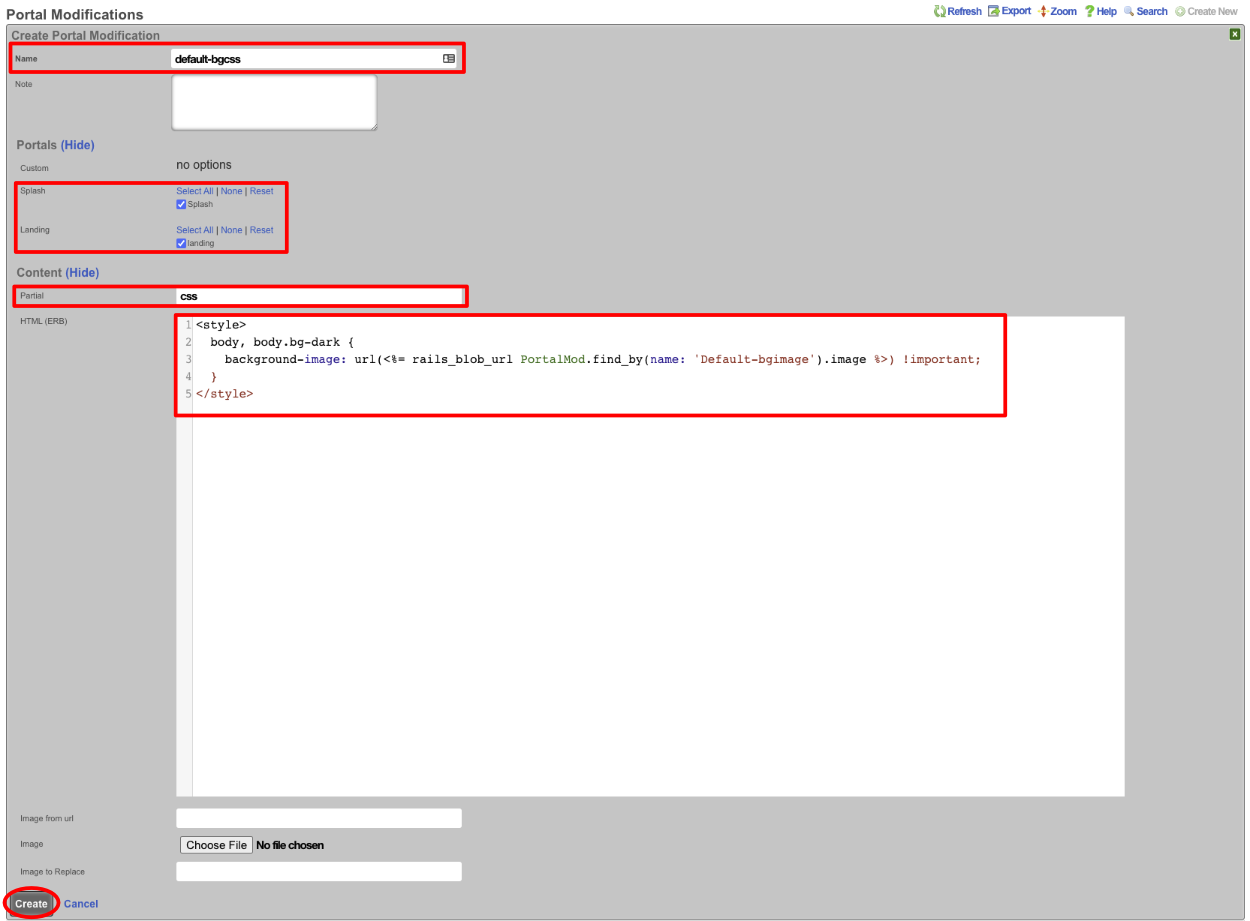
We should have two Portal Modifications now, and when we view the default portal it will have our new background image.


Advanced Portal Features
Google Analytics Integration
The rXg portal system provides seamless integration with Google Analytics to track user behavior, conversion rates, and portal performance metrics. This integration supports both the legacy Universal Analytics (GA3) and the modern Google Analytics 4 (GA4) platforms, allowing operators to maintain existing analytics setups while transitioning to newer measurement frameworks.
Universal Analytics Configuration (GA3)
To configure Universal Analytics tracking, navigate to System::Portals and edit your custom portal. In the Google Analytics Web Property field, enter your Universal Analytics property ID in the format UA-123456-1, where the numbers correspond to your specific Google Analytics account and property identifiers. For example, if your Google Analytics account ID is 98765432 and this is your first property, you would enter UA-98765432-1.
Once configured, the portal will automatically inject the Universal Analytics tracking code into every page load. This includes tracking for page views, session duration, bounce rates, and custom events such as login attempts, authentication successes, and portal navigation patterns.
Google Analytics 4 Configuration (GA4)
For the newer Google Analytics 4 platform, use the Google Analytics Measurement ID field instead. GA4 measurement IDs follow the format G-ABC123DEF4, where the alphanumeric string after the 'G-' prefix uniquely identifies your GA4 data stream. For instance, a typical measurement ID might look like G-XXXXXXXXXX where the X's represent your specific measurement identifier.
GA4 provides enhanced event tracking capabilities that the rXg portal automatically leverages. The system will track enhanced ecommerce events for payment transactions, user engagement metrics for portal interaction quality, and conversion tracking for successful authentications and policy assignments.
Configuration Workflow Example
To set up Google Analytics tracking for a hotel portal, begin by creating your custom portal named "Hotel Guest Portal" with the controller name "hotel_guest". After the portal is created and the web server restarted, edit the portal record and locate the analytics configuration section.
If you are using Universal Analytics, obtain your tracking ID from your Google Analytics dashboard (typically found under Admin Property Tracking Info Tracking Code) and enter it in the Web Property field. For a hotel with account number 87654321, this might be UA-87654321-1.
Alternatively, for GA4 implementation, create a new GA4 property in your Google Analytics account, establish a web data stream for your portal domain, and copy the Measurement ID (found in the data stream details) into the Measurement ID field. This ID will appear similar to G-ABC123DEF4.
After saving the portal configuration, restart the web server in production mode to ensure the tracking code is properly integrated. You can verify successful integration by viewing the page source of your portal and confirming the presence of either the gtag or analytics.js tracking script, depending on your chosen analytics platform.
Bootstrap Configuration
The rXg portal system supports automated configuration through bootstrap YAML files, enabling operators to deploy portals with pre-configured account groups, policies, shared credentials, and other essential objects. This bootstrap mechanism eliminates the need for manual configuration after portal deployment and ensures consistent setup across multiple rXg installations or when redeploying portals.
Bootstrap File Structure and Location
The bootstrap configuration file must be named bootstrap.yml and placed in the root directory of your custom portal alongside the controller files and asset directories. When the portal is first activated or when the bootstrap process is manually triggered, the rXg system reads this YAML file and creates or updates the specified configuration objects according to the defined specifications.
Comprehensive Bootstrap Example
Consider a complete bootstrap configuration for a hotel guest portal that requires multiple account groups, differentiated service policies, and various authentication methods:
# Hotel Guest Portal Bootstrap Configuration
# This file automatically configures account groups, policies, and credentials
# Place this file as bootstrap.yml in the portal root directory
AccountGroup:
- name: "Standard Hotel Guests"
note: "Regular hotel guests with basic internet access"
default_policy: "Basic Internet Access"
session_timeout: "4 hours"
- name: "Premium Hotel Guests"
note: "Suite guests with enhanced service levels"
default_policy: "Premium Internet Access"
session_timeout: "24 hours"
- name: "Hotel Staff"
note: "Hotel employees and management personnel"
default_policy: "Staff Network Access"
session_timeout: "8 hours"
Policy:
- name: "Basic Internet Access"
note: "Standard internet service for hotel guests"
captive_portal: "hotel_guest_splash"
landing_portal: "hotel_guest_landing"
download_bandwidth: "10 Mbps"
upload_bandwidth: "2 Mbps"
content_filtering: "Family Safe Browsing"
- name: "Premium Internet Access"
note: "Enhanced service for suite guests"
captive_portal: "hotel_premium_splash"
landing_portal: "hotel_premium_landing"
download_bandwidth: "50 Mbps"
upload_bandwidth: "10 Mbps"
content_filtering: "Minimal Restrictions"
- name: "Staff Network Access"
note: "Internal network access for hotel operations"
captive_portal: "hotel_staff_splash"
landing_portal: "hotel_staff_dashboard"
download_bandwidth: "100 Mbps"
upload_bandwidth: "50 Mbps"
content_filtering: "Business Appropriate"
SharedCredential:
- name: "Guest WiFi Access"
credential: ""
policy: "Basic Internet Access"
time: "4 hours"
note: "Click-through access for standard hotel guests"
- name: "Premium Guest Access"
credential: "SUITE2024"
policy: "Premium Internet Access"
time: "24 hours"
note: "Password-based access for suite guests"
max_simultaneous_users: 50
- name: "Conference Room Access"
credential: "MEETING"
policy: "Basic Internet Access"
time: "2 hours"
note: "Temporary access for meeting attendees"
max_simultaneous_users: 20
CaptivePortal:
- name: "Hotel Guest Splash"
controller_name: "hotel_guest_splash"
note: "Main landing page for hotel internet access"
- name: "Hotel Premium Splash"
controller_name: "hotel_premium_splash"
note: "Premium guest portal with enhanced branding"
- name: "Hotel Staff Splash"
controller_name: "hotel_staff_splash"
note: "Internal staff portal with administrative links"
LandingPortal:
- name: "Hotel Guest Landing"
controller_name: "hotel_guest_landing"
note: "Post-authentication page for standard guests"
- name: "Hotel Premium Landing"
controller_name: "hotel_premium_landing"
note: "Enhanced post-auth experience for premium guests"
- name: "Hotel Staff Dashboard"
controller_name: "hotel_staff_dashboard"
note: "Staff dashboard with operational tools and reports"
Bootstrap Processing Workflow
When a portal containing a bootstrap.yml file is deployed, the rXg system initiates an automated configuration process. First, the system validates the YAML syntax and checks for required fields in each configuration object. If validation succeeds, the system proceeds to create or update each object type in dependency order, ensuring that referenced objects exist before creating objects that depend on them.
For example, policies must be created before shared credentials that reference them, and captive portals must exist before policies can reference them. The bootstrap processor handles these dependencies automatically, creating objects in the correct sequence to avoid reference errors.
Manual Bootstrap Execution
While bootstrap processing typically occurs automatically during portal deployment, operators can manually trigger the bootstrap process by accessing the portal configuration interface and selecting the "Apply Bootstrap" option. This capability proves valuable when updating existing configurations or when troubleshooting bootstrap-related issues.
To manually execute bootstrap processing, navigate to System::Portals, locate your custom portal, and click the "Apply Bootstrap" button. The system will display processing results, including any errors encountered during object creation or updates. Successful processing results in a summary showing the number of objects created or modified in each category.
Bootstrap Configuration Best Practices
When designing bootstrap configurations, use descriptive names and comprehensive notes for all objects to facilitate future maintenance and troubleshooting. Organize the YAML file with consistent indentation and logical grouping of related objects. Consider the interdependencies between objects and structure the file to reflect these relationships clearly.
Test bootstrap configurations in a development environment before deploying to production systems. This testing approach allows you to identify and resolve configuration issues without impacting live portal operations. Additionally, maintain version control for bootstrap files to track changes and enable rollback capabilities when needed.
Template Variables and Helpers
The rXg portal template system provides access to contextual variables and helper methods for dynamic content generation. These are available in ERB templates within your custom portal.
Instance Variables
The portal controller sets up several instance variables that are available in templates:
- @account - The authenticated user's Account record (nil if not logged in)
- @login_session - The current LoginSession record with connection details
- @captive_portal - The current CaptivePortal configuration
- @landing_portal - The current LandingPortal configuration (if applicable)
Account Information
Access authenticated user information through the @account variable:
<div class="welcome-section">
<% if @account %>
<h2>Welcome back, <%= @account.first_name || @account.login %>!</h2>
<p>Account: <%= @account.login %></p>
<% if @account.email.present? %>
<p>Email: <%= @account.email %></p>
<% end %>
<% else %>
<h2>Welcome to our network!</h2>
<p>Please authenticate to access internet services.</p>
<% end %>
</div>
Login Session Information
The @login_session variable provides network session details:
<div class="connection-details">
<% if @login_session %>
<h3>Your Connection Details</h3>
<p><strong>IP Address:</strong> <%= @login_session.ip %></p>
<p><strong>MAC Address:</strong> <%= @login_session.mac %></p>
<p><strong>Connected Since:</strong> <%= @login_session.created_at.strftime("%I:%M %p") %></p>
<% else %>
<p>Connection details will appear after authentication.</p>
<% end %>
</div>
Portal Helpers
The portal system provides helper methods for common operations:
Image handling with Portal Mod support:
erb
<%= portal_image_tag('logo.png', alt: 'Company Logo', class: 'img-fluid') %>
Rendering partials with Portal Mod override support:
erb
<%= render_portal_partial(:welcome_message) %>
<%= render_portal_partial(:login_options) %>
The render_portal_partial helper checks for Portal Mod overrides. If a Portal Mod with a matching Partial Override exists for the portal, the Portal Mod HTML content is rendered instead of the default partial file.
Time-Based Greetings
Create dynamic greetings using Ruby's Time class:
<div class="greeting">
<% current_time = Time.current %>
<% if current_time.hour < 12 %>
<p>Good morning!</p>
<% elsif current_time.hour < 17 %>
<p>Good afternoon!</p>
<% else %>
<p>Good evening!</p>
<% end %>
</div>
Portal-Specific Content
Customize content based on which portal is being accessed:
<div class="portal-branding">
<% if @captive_portal %>
<h1><%= @captive_portal.name %></h1>
<% end %>
</div>
Defensive Programming
Always check for variable availability before use to prevent errors:
<%= @account.first_name if @account %>
<%= @login_session.ip if @login_session %>
Portal Inheritance and Controller Architecture
Custom portals follow a controller inheritance hierarchy:
ApplicationController
BasePortalController (shared portal logic)
PortalController (main captive portal functionality)
Portal::DefaultController (default portal)
Portal::<CustomName>Controller (your custom portal)
This architecture allows custom portals to: - Override specific actions while inheriting base functionality - Add new controller actions via Portal Mods - Access all rXg helper methods and models - Implement custom authentication flows
Advanced Sync and Deployment
The rXg portal system provides sophisticated deployment and synchronization capabilities that enable automated portal updates from external sources. These advanced deployment methods facilitate development workflows, version control integration, and automated distribution of portal updates across multiple rXg installations.
Git Repository Integration
Git integration enables direct deployment of portals from version control repositories, supporting both public repositories and private repositories with authentication. This integration maintains full version control history and enables automated deployment workflows triggered by repository changes.
To configure Git-based portal deployment, create a new custom portal and select "Git" as the portal source. In the Remote Sync URL field, specify the Git repository URL using either HTTPS or SSH protocols. For public repositories, use HTTPS URLs such as https://github.com/username/hotel-portal.git. Private repositories require SSH URLs like [email protected]:username/private-hotel-portal.git along with SSH key authentication.
For SSH key authentication with private repositories, generate an SSH keypair specifically for the rXg portal deployment. Navigate to System::SSH Keypairs and create a new keypair with a descriptive name like "Hotel Portal Git Access". Copy the public key portion and add it to your Git repository's deploy keys or your user account's SSH keys, depending on your repository hosting platform's requirements.
After configuring the SSH keypair, return to the portal configuration and select the appropriate keypair from the SSH Keypair dropdown. Specify the desired branch or tag in the Git Ref field, using standard Git reference formats such as main, production, v1.2.3, or refs/heads/development.
The automatic sync functionality enables scheduled updates from the Git repository without manual intervention. Configure the Sync Frequency to match your deployment requirements, choosing from hourly updates for active development environments, daily updates for staging systems, or weekly updates for production deployments. When Restart After Sync is enabled, the system automatically restarts the web server after successful synchronization to ensure updated portal files are immediately active.
A comprehensive Git deployment workflow begins with repository preparation. Structure your Git repository to match the rXg portal directory layout, placing assets in appropriate subdirectories and ensuring the bootstrap.yml file is present in the repository root if automated configuration is required. Tag releases using semantic versioning to enable stable production deployments while maintaining development flexibility.
Monitor synchronization status through the portal management interface, which displays the last sync timestamp, current commit hash, and any synchronization errors. Failed synchronizations retain the previous portal version while logging detailed error information for troubleshooting purposes.
HTTP Archive Deployment
HTTP archive deployment enables portal distribution through web-accessible ZIP or TAR archive files, facilitating integration with build systems, content delivery networks, and automated deployment pipelines. This deployment method proves particularly valuable for organizations with existing web-based artifact distribution systems.
Configure HTTP archive deployment by selecting "Archive file via HTTP GET" as the portal source and specifying the archive URL in the Remote Sync URL field. The system supports both HTTP and HTTPS URLs, with HTTPS strongly recommended for production deployments. Archive URLs might resemble https://cdn.company.com/portals/hotel-portal-v1.3.2.zip or https://build.company.com/artifacts/portal-builds/latest.tar.gz.
Authentication options include basic HTTP authentication and SSL client certificate authentication. For basic authentication, configure the Remote Sync Username and Remote Sync Password fields with appropriate credentials. The system securely stores these credentials and includes them in archive retrieval requests.
SSL client certificate authentication provides enhanced security for archive retrieval from enterprise systems. Upload the client certificate through the Client Certificate configuration field, ensuring the certificate includes both the certificate and private key components. The remote server must be configured to accept the specified client certificate for authentication.
Archive processing involves automatic extraction and validation of portal files. The system supports ZIP archives created with standard compression utilities and TAR archives with optional gzip compression. Archives must contain the complete portal directory structure, including all required files and subdirectories.
Design your archive creation process to include version information and validation checks. Consider including a manifest file that lists expected files and their checksums, enabling the rXg system to verify archive integrity after extraction. Implement archive rotation policies to prevent excessive storage consumption while maintaining deployment history.
Scheduled archive deployment follows the same frequency options as Git integration, enabling automated updates from build systems and continuous integration pipelines. Configure appropriate sync frequencies based on your release cadence and testing requirements, typically using daily or weekly schedules for production environments.
rsync Synchronization
rsync synchronization provides efficient, differential file transfer capabilities that minimize bandwidth usage and transfer time by synchronizing only changed files. This deployment method excels in scenarios requiring frequent updates or when working with large portal assets that change incrementally.
Configure rsync deployment by selecting "rsync" as the portal source and specifying the rsync source path in the Remote Sync URL field. rsync URLs follow the format user@hostname:/path/to/portal/ for SSH-based transfers or rsync://hostname/module/path for rsync daemon connections. For example, a development server synchronization might use [email protected]:/var/www/portals/hotel/ as the source path.
Authentication options include SSH key authentication and password authentication. SSH key authentication provides secure, automated access without interactive password prompts. Configure SSH key authentication using the same keypair management system used for Git integration, ensuring the public key is installed in the authorized_keys file on the source server.
Password authentication requires configuration of the Remote Sync Username and Remote Sync Password fields. While simpler to configure than key-based authentication, password authentication requires careful credential management and may not be suitable for automated deployments in high-security environments.
rsync deployment excels at maintaining exact directory synchronization, including file permissions, timestamps, and directory structures. The system uses rsync options that preserve file metadata while efficiently transferring only modified content. This efficiency makes rsync ideal for portals with large asset collections or frequent incremental updates.
Advanced rsync configuration options include bandwidth throttling to prevent synchronization operations from impacting network performance. Configure bandwidth limits appropriate for your network capacity and usage patterns, typically setting limits during peak usage hours while allowing full bandwidth utilization during maintenance windows.
Implement selective synchronization by configuring rsync include and exclude patterns on the source server. This capability enables synchronization of specific portal components while excluding development files, temporary content, or environment-specific configurations. Maintain separate rsync configurations for different deployment environments to ensure appropriate file selection for each target system.
Monitor rsync operations through detailed logging that captures transferred files, bandwidth utilization, and synchronization duration. Use this information to optimize synchronization schedules and identify potential performance improvements in portal asset organization or network configuration.
Portal Modification Security
Portal Mods include several security features: - ERB Template Validation: Syntax checking prevents broken portals - Controller Action Sandboxing: Ruby code validation before execution - Image Upload Restrictions: File type and size validation (20MB max) - XSS Prevention: Automatic HTML sanitization in Rich Text mode - Portal Isolation: Mods only affect specified portals
Performance Optimization
The rXg portal system implements comprehensive performance optimization strategies that ensure responsive user experiences even under high-traffic conditions. These optimizations encompass caching mechanisms, asset processing, load distribution, and resource management techniques that automatically adapt to usage patterns and system capacity.
Caching Strategies and Implementation
The portal system employs multi-layered caching strategies that significantly improve response times and reduce server load. Production mode enables comprehensive caching of rendered pages, processed templates, and database queries, resulting in sub-second response times for authenticated users and near-instantaneous responses for cached content.
Page-level caching stores complete rendered HTML output for frequently accessed portal pages, eliminating the need to process templates and execute database queries for subsequent requests. The system intelligently invalidates cached pages when portal modifications occur or when underlying data changes, ensuring users always receive current content while benefiting from caching performance improvements.
Template compilation caching pre-processes ERB templates into executable Ruby code, eliminating template parsing overhead during request processing. This optimization proves particularly beneficial for complex templates with extensive conditional logic or data manipulation operations. Template caches automatically refresh when template files change, maintaining development flexibility while maximizing runtime performance.
Database query caching reduces database load by storing frequently executed query results in high-speed memory storage. The system identifies repeatable queries such as policy lookups, user authentication checks, and configuration retrievals, caching results for configurable time periods. Query cache invalidation occurs automatically when underlying data changes, preventing stale data issues while maximizing cache effectiveness.
Development mode deliberately disables caching mechanisms to facilitate rapid development and testing cycles. In development mode, every request processes templates fresh from disk, executes database queries without caching, and reflects file system changes immediately. This behavior enables developers to see modifications instantly without manual cache clearing or server restarts.
The asset pipeline implements sophisticated asset processing and caching that optimizes CSS, JavaScript, and image resources for web delivery. CSS preprocessing combines multiple stylesheet files, processes Sass/SCSS syntax, applies vendor prefixes, and minifies output for reduced file sizes and faster loading times. JavaScript processing concatenates multiple script files, applies compression algorithms, and implements dead code elimination to minimize client-side loading requirements.
Image optimization automatically processes uploaded images to generate multiple size variants optimized for different display contexts. The system creates thumbnail, medium, and full-resolution versions of uploaded images while applying compression algorithms that maintain visual quality while reducing file sizes. WebP format generation provides modern browsers with highly optimized image formats while maintaining JPEG/PNG fallbacks for legacy browser compatibility.
Load Balancing and High Availability
rXg cluster configurations implement automatic load balancing that distributes portal requests across multiple cluster nodes while maintaining session consistency and failover capabilities. Portal files replicate automatically across all cluster nodes, ensuring consistent user experiences regardless of which node services individual requests.
Session affinity mechanisms maintain user session consistency across load-balanced requests while enabling failover to alternative nodes when primary nodes become unavailable. The system stores session data in shared storage accessible by all cluster nodes, preventing session loss during node failures and enabling seamless user experience continuity.
Automatic failover monitoring continuously assesses node health and availability, redirecting traffic away from problematic nodes while maintaining service availability. Health checks include portal responsiveness testing, database connectivity verification, and system resource monitoring to ensure comprehensive service availability assessment.
Load distribution algorithms consider node capacity, current request load, and response times when directing new requests to optimal nodes. The system adapts load distribution patterns based on observed performance characteristics and usage patterns, ensuring efficient resource utilization across the entire cluster.
CDN integration capabilities enable distribution of static portal assets through content delivery networks, reducing bandwidth requirements on rXg nodes while improving global access performance. Configure CDN integration by specifying appropriate asset URLs that reference CDN-hosted versions of images, stylesheets, and JavaScript files. The system maintains fallback capabilities to serve assets directly when CDN services become unavailable.
Resource Management and Optimization
Memory management optimization ensures efficient resource utilization even during peak usage periods. The portal system implements garbage collection tuning, object pooling, and memory leak prevention mechanisms that maintain consistent performance regardless of request volume or session duration.
Database connection pooling optimizes database resource utilization by maintaining reusable connection pools that serve multiple concurrent requests without connection establishment overhead. Connection pool sizing automatically adjusts based on observed usage patterns while maintaining sufficient capacity for peak demand periods.
Asset delivery optimization includes HTTP/2 server push capabilities that proactively deliver critical CSS and JavaScript resources before browsers request them, reducing perceived page loading times. The system identifies critical rendering path resources and implements push strategies that improve user experience without overwhelming client connections.
Bandwidth optimization techniques include response compression using gzip algorithms that reduce transfer sizes for HTML, CSS, and JavaScript content. The system automatically negotiates compression capabilities with client browsers and applies appropriate compression levels that balance transfer speed improvements with server processing requirements.
Monitoring and performance analytics provide detailed insights into portal performance characteristics, enabling identification of optimization opportunities and capacity planning. Performance metrics include response time distributions, cache hit ratios, database query performance, and resource utilization patterns that inform optimization decisions and capacity management strategies.
Debugging and Troubleshooting
Effective debugging and troubleshooting of custom portals requires systematic approaches to identifying, diagnosing, and resolving issues that can arise during portal development, deployment, and operation. The rXg system provides comprehensive diagnostic tools and logging capabilities that facilitate rapid issue resolution while maintaining system stability and user experience quality.
Common Issues and Resolution Strategies
Template errors represent the most frequent category of portal issues, typically manifesting as ERB syntax errors, undefined variable references, or missing helper method calls. When template errors occur, the portal system displays detailed error messages in development mode that include the specific template file, line number, and error description. Production mode suppresses detailed error information to prevent information disclosure while logging complete error details for administrative review.
To resolve template errors systematically, begin by switching to development mode if the issue appeared in production. Development mode provides immediate error feedback without caching interference, enabling rapid iteration and testing of potential solutions. Examine the error message for specific syntax issues such as missing closing tags, unmatched parentheses, or incorrect ERB syntax patterns.
Variable availability issues occur when templates reference variables that are not properly initialized or are unavailable in the current context. Common variable issues include referencing current_user before authentication, accessing policy information without proper user assignment, or using helper methods that require specific portal configurations. Implement defensive programming techniques by checking variable availability before use: <%= current_user.name if current_user %> instead of direct references that can cause errors when variables are nil.
Asset pipeline issues typically manifest as missing stylesheets, broken JavaScript functionality, or images that fail to load. These issues often result from incorrect asset path references, missing asset compilation, or web server restart requirements. Verify asset pipeline configuration by examining the Rails logs for asset compilation messages and ensuring all referenced assets exist in the correct directory locations.
When assets fail to load, check the browser's developer tools network tab to identify specific failed requests and their associated error codes. HTTP 404 errors indicate missing files or incorrect path references, while HTTP 500 errors suggest server-side processing issues that require log file examination.
Portal loading failures can result from various causes including template errors, missing controller actions, incorrect routing configuration, or server resource constraints. Begin troubleshooting by accessing the portal URL directly and observing any error messages or unexpected redirections. Examine the Rails logs for request processing information and any error messages associated with the failed requests.
Permission issues often prevent portal file access, deployment operations, or administrative functions. These issues typically result from incorrect SSH key configuration, missing administrative role assignments, or file system permission problems. Verify SSH access by attempting direct command-line connection to the rXg system and confirming access to the portals directory. Check administrative role configurations to ensure appropriate permissions are assigned for the intended operations.
Comprehensive Debug Tools and Techniques
Development mode serves as the primary debugging environment for portal development, providing detailed error messages, stack traces, and immediate file change reflection without caching interference. When debugging complex issues, always ensure the system operates in development mode to eliminate caching variables and enable maximum diagnostic information availability.
The Rails console provides direct access to the underlying Ruby on Rails framework, enabling interactive debugging, data inspection, and system state examination. Access the console through SSH connection to the rXg system and executing the rails console command from the portal application directory. Use the console to inspect database records, test helper methods, and examine variable states that may contribute to portal issues.
Logging infrastructure captures comprehensive information about portal operations, including request processing, database queries, template rendering, and error occurrences. Rails logs are accessible through the administrative interface or via direct file system access through SSH. Log analysis tools can help identify patterns, performance bottlenecks, and recurring errors that may not be immediately apparent during manual testing.
Template inspection capabilities allow examination of compiled template output, including the Ruby code generated from ERB templates and the final HTML output sent to browsers. This inspection proves valuable when debugging complex template logic or when template behavior does not match expectations.
Asset pipeline debugging involves examining asset compilation processes, identifying missing dependencies, and verifying correct asset path generation. The Rails asset pipeline provides detailed debugging information when configured appropriately, including asset dependency graphs, compilation timestamps, and error messages for failed asset processing operations.
Browser-based debugging tools complement server-side debugging by providing client-side perspective on portal behavior. Use browser developer tools to examine HTTP requests, response headers, JavaScript console messages, and CSS application. Network monitoring capabilities help identify slow-loading resources, failed requests, and caching behavior that may impact user experience.
Development and Deployment Best Practices
Establish systematic testing procedures that begin with development mode validation before advancing to production deployment. This approach ensures issues are identified and resolved in environments that facilitate debugging while preventing production disruptions that could impact end users.
Implement version control systems for all portal files, including templates, assets, controller code, and configuration files. Version control provides rollback capabilities when issues arise, enables collaboration among multiple developers, and maintains audit trails for all portal modifications. Use branching strategies that isolate development work from stable production versions while facilitating controlled integration of new features and modifications.
Maintain comprehensive backup strategies that include both portal files and associated configuration data. Regular backups enable rapid recovery from significant issues while providing testing environments for complex modifications or upgrades. Document backup procedures and test restoration processes to ensure backup reliability when needed.
Establish cross-browser and cross-device testing protocols that verify portal functionality across the range of client devices and browsers used by your user population. Different browsers may handle CSS, JavaScript, and HTML differently, requiring testing across major browser families including Chrome, Firefox, Safari, and Edge. Mobile device testing ensures portal accessibility and functionality on smartphones and tablets that may represent significant portions of user traffic.
Implement performance monitoring that tracks portal response times, resource utilization, and user experience metrics both during development and after deployment. Performance monitoring helps identify optimization opportunities while detecting degradation that may result from configuration changes or increased usage levels.
Develop documentation standards that capture portal architecture decisions, customization approaches, and operational procedures. Comprehensive documentation facilitates troubleshooting by providing context for design decisions while enabling other administrators or developers to understand and maintain portal implementations effectively.
Social Login (OAuth)
The portal supports logging in users against several Oauth providers:
- SAML
When a user logs in with one of these platforms, a local account will be created and the user will be logged in with that account. At that point, the user can proceed to purchase a usage plan from the plans associated with the strategy and the current captive/landing portal. If there is only one plan and it is free, it will be applied for the user automatically. If there are no usage plans associated with the strategy, the usage plans are controlled by the normal captive/landing portal logic. The user may continue to log in via the social provider on return visits, and they will be logged into their existing account.
The information returned from the provider's API will also be stored into a Social Profile record associated with the account, which may be viewed by clicking on the 'Social Logins' submenu item on the 'Archives::Portal Logs' page.
Requirements
Utilizing an Oauth login flow requires first creating an application with the desired provider, and Oauth login must be enabled in the application. The steps required to do this vary by provider, and are subject to change in the future, but a general outline is below.
A WAN Target should be associated with the Captive Portal where you intend to use the strategy which allows the user to access the provider's site for the login process. Twitter, Facebook, and Google WAN Targets are created automatically and should be selected when utilizing these providers.
If you have not done so, you will need to upgrade your personal Facebook account to a developer account.You may do this, as well as register the app for your business at the following link:
- https://developers.facebook.com/docs/apps/register When prompted for choose a platform, select "Website (WWW)".You will need to specify a category for your application before you make make the app live.
Once you have created the app, go to your Facebook developers dashboard, and add the 'Facebook Login' product to your app. In the 'Client OAuth Settings' dialog, ensure that the 'Web OAuth Login' option is set to YES.
After making any other desired changes to the application (image, etc), copy your App ID and App Secret from the Basic Settings page, as they will be used in the configuration on the rXg.
IMPORTANT: In order for Facebook to allow OAuth requests from this rXg, the redirect URIs must be whitelisted in your app's Facebook Login settings. Complete the section below titled Configuration , then click the show link in the Social Login Strategies scaffold next to Facebook strategy you created. Obtain the list of OAuth Redirect URIs which must be entered within the Facebook developer console's Facebook Login settings section. If this step is not completed, users will experience an error when Facebook login is initiated.
Based on the current configuration of this rXg, the following URIs may need to be added to the application:
Before your app can be used by the public, you must make it 'live' by going to the App Review page and taking the app out of development by setting the toggle to 'YES'. By default, the rXg does not ask for any user permissions that require Facebook to review the application before going live.
Visit the Twitter Apps page to create your app:
- https://apps.twitter.com/ Click 'Create New App' and fill out the resulting form.
Give the app a name and description. The website and Callback URL fields must also be filled out. The website can be your business' main website, or the address of the rXg. The Callback URL will be provided by the rXg during authentication, but we must enter any URL here in order for OAuth to be enabled for the app.
Once you've created your application and customized it as desired, go to the 'Keys and Access Tokens' to obtain your API Key and API Secret which will be utilized in the configuration of the rXg.
IMPORTANT: In order for Twitter to allow OAuth requests from this rXg, the redirect URIs must be whitelisted in your app's redirect URI list. Complete the section below titled Configuration , then click the show link in the Social Login Strategies scaffold next to the Twitter strategy you created. Obtain the list of OAuth Redirect URIs which must be entered into the application's Callback URLs field of the application's settings tab. If this step is not completed, users will experience an error when Twitter login is initiated.
Based on the current configuration of this Rxg, the following URIs may need to be added to the application:
- Go to https://console.developers.google.com
- under the 'Select a project' dropdown, select or create a new app.
- Click 'Library' on the left.
- Enable the "Contacts API" and "Google+ API" (optional -- this is not required to provide credential verification functionality).
- Go to 'Credentials' on the left, then select the 'OAuth consent screen' tab on top, and provide an 'EMAIL ADDRESS' and a 'PRODUCT NAME'
- Wait 10 minutes for changes to take effect.
- Click 'Create Credentials' and choose 'OAuth Client ID'
- Choose 'Web Application' and give it a name
- IMPORTANT: Google requires that the complete Redirect URI be entered, rather than just the hostname. Based on the current configuration of this rXg, the following URIs should be added to the application:
- Enter the client ID and client Secret into the social login configuration
Visit the Instagram Developer page to create your app:
- http://instagram.com/developer/ Click 'Register Your Application' and fill out the resulting form to register as a developer if you are not already. Register a new Client ID and fill out name, description, and other mandatory fields.
Once you've created your application and customized it as desired, click 'Manage' to obtain your Client ID and Client Secret which will be utilized in the configuration of the rXg.
IMPORTANT: In order for Instagram to allow OAuth requests from this rXg, the redirect URIs must be whitelisted in your app's redirect URI list. Complete the section below titled Configuration , then click the show link in the Social Login Strategies scaffold next to the Instagram strategy you created. Obtain the list of OAuth Redirect URIs which must be entered into the application's Valid redirect URIs field of the application's security settings. To access these settings, click the Manage Clients button at the top of the Instagram Developers console, and click the Manage button next to the client you registered in the previous step, then click the Security tab. If this step is not completed, users will experience an error when Instagram login is initiated.
Based on the current configuration of this rXg, the following URIs may need to be added to the application:
Visit the LinkedIn Apps page to create your app:
- https://www.linkedin.com/secure/developer Click 'Create Application' button and fill out the resulting form.
Once you've created your application, go to the Authentication portion of the Application's settings to obtain your Client ID and Client Secret which will be utilized in the configuration of the rXg. You may also choose to include the r_emailaddress default application permission to allow for retrieval of the user's Email address after authentication.
IMPORTANT: In order for LinkedIn to allow OAuth requests from this rXg, the redirect URIs must be whitelisted in your app's redirect URI list. Complete the section below titled Configuration , then click the show link in the Social Login Strategies scaffold next to Facebook strategy you created. Obtain the list of OAuth Redirect URIs which must be added to the application's OAuth 2.0 Authorized Redirect URLs within the settings section. If this step is not completed, users will experience an error when LinkedIn login is initiated.
Based on the current configuration of this Rxg, the following URIs may need to be added to the application:
SAML
Configuration begins by creating a Social Login Strategy on the rXg. This can be accomplished on the System::Portals view.
Next, enter the Identity Provider's metadata URL into the IdP Metadata URL field. The rXg will retrieve the metadata from the Identity Provider and attempt to locate the Single Sign-On URL and Fingerprint. If the remote metadata cannot be retrieved or parsed, the values may be entered manually.
After the record has been saved, click the show link. Depending on the configured usage plans, captive portals, and cluster nodes, one or more metadata URLs will be listed. These can be provided to the Identity Provider out of band to be established as a Service Provider for login trust.
Visit the following URL for an introduction to the concepts of SAML oauth login:
Omniauth Strategies
The Social Login Strategies scaffold enables creation, modification, and deletion of login strategies for supported Omniauth providers.
The name field identifies this login strategy in the system.
The provider name field determines which Oauth provider this strategy relates to. Select a supported provider from the list.
The app ID field defines the ID of the application that has been created with the provider chosen in the provider name field. For Facebook, this is the App ID , but for Twitter this is the API Key. This value should be obtained from the developer console of the associated provider.
The app secret field defines the app's secret value which authenticates the app. This value should be obtained from the developer console of the associated provider.
The captive portals selections define for which captive portals this strategy is enabled. This strategy will not be available unless it is associated with at least one captive portal.
The usage plans selections determine which usage plans are available for users who log in using this strategy. The plans selected here must also be associated with the end user's effective portal; however, users who have not logged in via this strategy won't be able to see these plans in the usage plan list. If there are no usage plans associated with this strategy, an account will be created for the user, who will then be redirected to the usage plan list view. If there is only one associated usage plan, and it is free, the plan will automatically be applied to the account.
The SAML section contains configuration options which pertain only to SAML login strategies. When utilizing a SAML strategy, the App ID and App Key are not necessary.
A SAML configuration requires at a minimum, an Identity Provider (IdP) SSO URL, and optionally, a IdP Cert Fingerprint to enable validation of the IdP's certificate. Both the SSO URL and Fingerprint may be determined automatically by providing a IdP metadata URL.
The Service Provider (SP) Entity ID is a unique identifier for the service provider, which will be entered into the IdP when adding the SP.
After creating the login strategy , the webserver will restart. Clicking the show link will provide the metadata URL that can be provided out-of-band to the Identity Provider in order to establish a login trust.
Users who log in with an Omniauth strategy only have access to usage plans that are associated with their strategy AND the current captive portal. Users who log in with a non-social account do not have access to the usage plans associated with the portal's Omniauth strategies.
The note field is a place for the administrator to enter a comment. This field is purely informational and has no bearing on the configuration settings.
A WAN target should be associated with the captive portal where the operator intends to use the strategy which allows the user to access the provider's site for the login process. Twitter, Facebook, and Google WAN targets are created automatically and should be selected when utilizing these providers.
Customized Login Flow
If you wish to customize the actions taken when a user successfully logs in with a defined strategy, you may override the <provider>_success and <provider>_failure actions of the portal controller (ie, facebook_success or twitter_failure).
SMS Integration
The rXg offers the ability to require validated contact information for a user prior to registering for service. A user who wishes to subscribe to a usage plan that requires Acccount validation must retrieve a validation code, either by SMS message, or by Email, depending on the configuration of the usage plan.
The rXg also supports password resets after validating that the user has access to the account's mobile number or email address, depending on the configuration of the active Splash Portal.
In order to send SMS messages, the operator must first register for service with a supported provider and configure a record in the SMS Gateways scaffold with a valid phone number or shortcode, and the API credentials required to access the API of the slected provider.
Twilio Configuration
To begin, visit Twilio to register for a trial account. After creating an account, you will be prompted to create a new project. Under the Products heading, select the Programmable SMS option and click continue. Give your project a name.
A trial account may only send messages to its own phone number. Click the Upgradelink in the upper right hand corner of the page. Verify your phone number and provide payment details to fund your account. SMS messaging requires a Twilio phone number, which has a cost of $1 per month, and pricing per message varies by location. See the Twilio Pricing page for more details.
From your Twilio dashboard, click the Programmable SMS icon in the left hand menu, and follow the prompt to get started. Request a Twilio phone number by clicking Get a Number. Record the assigned number to enter into the SMS Gateway record in the rXg. You may manage your Twilio Phone Numbersto add or change phone numbers at a later date.
Visit the Settingspage of your dashboard and obtain the Account SID and Auth Token values (click the Auth Token to view the unobscured value), which act as the API credentials in order to send SMS messages via Twilio's REST API. Be sure to obtain the LIVE API credentials, not the TEST credentials.
Once you have your phone number, Account SID and Auth Token, proceed with configuring the SMS Gateway record in the System::Portals view of the rXg admin console.
SMS Gateways
The SMS Gateways scaffold enables the creation of an SMS Gateway service which will be utilized for verifying a user's mobile number for the purpose of new account signups and/or password resets.
The name field identifies this SMS Gateway in the system.
The provider field specifies which provider this SMS Gateway relates to. Select a supported provider from the list.
The from field specifies the phone number, shortcode, or Alphanumeric Sender ID (not supported in all countries) to be used when sending SMS messages through this gateway. This value must correspond to a number purchased from or ported to the provider.
The Account SID and Auth Token fields specify the API credentials used to access the provider's REST API, and may be obtained from your dashboard within the provider's website.
The Usage Plans selections determine which usage plans are configured to utilize this SMS Gateway. The usage plan must also specify a validation method which includes SMS in order for messages to be sent via SMS.
The Splash Portals selections determine which splash portals are configured to utilize this SMS Gateway for the purposes of performing password resets. Accounts with a valid mobile phone number may request a password reset token via SMS or Email, depending on the password reset method specified in the splash portal.
The note field is a place for the administrator to enter a comment. This field is purely informational and has no bearing on the configuration settings.
Free SMS alternative
As an alternative to SMS integration via a paid third-party SMS Gateway, the rXg also supports a simplified SMS account signup flow which attempts to deliver SMS messages by sending an Email to an Email-to-SMS gateway provided by the end user's cellular carrier. This method does not integrate with Usage Plans, and requires that the user select their cellular carrier from a dropdown list, and not all carriers are supported. Delivery is on a best-effort basis.
To enable the simplified SMS signup flow, simply create an Account Group with the name 'SMS', and an additional login option will be presented in the captive portal, which, upon completion, will place the user into the SMS Account Group with unlimited usage.
Internationalization
All aspects of the rXg captive portal web application are internationalized and capable of supporting localized presentations. This enables operators to deploy captive portals that vary in presentation based on browser language preference and/or manually selected language overrides.
Localization Selection
The rXg captive portal web application internationalization supports selection of localization in two different ways:
- Automatic determination of preferred localization through browser preference supplied via HTTP header
- Manual selection of desired localization via CGI parameter
Most operators will choose to use both localization selectors in parallel. The automatic selector is used to determine the initial localization preference and display a portal. The assumption is that the end-user will have selected a language preference in their browser or OS that is reasonable and meaningful. However, in some cases the OS and/or browser setting may be incorrect or insufficient to select an appropriate localization for display. Therefore most localized portals will also have links incorporated into the views them that enable manual localization override.
The key of the CGI parameter used to override the localization preference read from the browser is locale. The value of the locale key is the desired language abbreviation (e.g., en, fr, etc.). An example of a link to override the automatically selected localization is:
<a href="/portal/default/?locale=en">English</a>
Localization Implementation
The rXg captive portal web application internationalization features support implementation of localization in three different ways:
- String Translation with Gettext
- Localization conditionals within a view
- Selection of localized views Operators may choose to use any of the three available mechanisms individually or in any combination that is desired. ## String Translation with Gettext
The globalization support features of the rXg captive portal web application implement translation using the gettext application. Gettext allows the externalization of translation text while still maintaining the readability of the underlying views and partials. The source language is used in the views within the _() helper function, and external files map these strings to their translated counterparts.
For example, consider the following simple (untranslated) view (logout_success.erb):
<h2> Logout Successful </h2>
<p> You have successfully logged out. </p>
<p> Please come and visit us again. </p>
Implementing the string translation mechanism results in the following code for the view:
<h2> <%= _('Logout Successful') %> </h2>
<p> <%= _('You have successfully logged out.') %> </p>
<p> <%= _('Please come and visit us again.') %> </p>
The view code calls the _() function to look up a localized string in the appropriate place in the view. The set of available strings are stored in resource files in the locale/gettext directory of a custom portal.
An example of the source language (English) Gettext resource file (en.po) that corresponds to the string view shown above is shown below:
msgid "Logout Successful"
msgstr ""
msgid "You have successfully logged out."
msgstr ""
msgid "Please come and visit us again."
msgstr ""
An example of a French Gettext resource file (fr.po) that would work with the same view we have been considering is shown below:
msgid "Logout Successful"
msgstr "Dconnexion russie"
msgid "You have successfully logged out."
msgstr "Vous vous tes dconnect avec succs."
msgid "Please come and visit us again."
msgstr "S'il vous plat revenez nous rendre visite."
The default.pottemplate file may be copied into the portals gettext directory as_languagecode_.po (where languagecode represents the two-letter locale code for the language, e.g. fr or es) and edited/translated directly, or it may be provided to a third-party translation service, with the resulting .po files stored in the gettext directory of the custom portal.
For example, a new French locale translation file for the myportal Custom Portal can be started by running
mkdir -p /space/portals/myportal/gettext
cp /space/rxg/console/config/locales/gettext/default.pot /space/portals/myportal/gettext/fr.po
and then editing the fr.po file with the appropriate translations for the listed strings.
This enables the captive portal web application to use the appropriate strings for a given language preference. The strings in the source files are used when the captive portal web application renders the the view for a request from a web browser with an English language preference. The strings in the portal_directory/gettext/fr.po file are used when a request is fulfilled from a browser with a French language preference.
Inline Conditionals
Conditionals may be placed inline in a layout or a view to modify content based on language preference. For example, if a captive portal is localized for English and Spanish languages, then it would be appropriate to have an English override link when Spanish is being displayed and vice versa. The following code fragment exemplifies how this might be accomplished:
<% if I18n.locale == :en %>
<li class="menuparent"> <%= link_to 'Espaol',
{ :action => :index, :locale => :es },
{ :class => 'menuactive' } %></li>
<% else %>
<li class="menuparent"> <%= link_to 'English',
{ :action => :index, :locale => :en },
{ :class => 'menuactive' } %></li>
<% end %>
It is possible to use inline conditionals instead of string externalization to change the text being displayed. However the result is view code that is difficult to read. Thus, inline conditionals should be reserved for situations where small structural changes to the view are desired.
View Selection
The rXg captive portal web application supports view selection based on language preference. The operator may choose to have bothlogout_success.en.erb and logout_success.fr.erbfiles instead of a single logout_success.erb view file. Thus entirely different views may be presented to the end-user based on browser language preference.
Environment
One feature that you may want to use in your portal frame is the flash notice. The flash notice is available for you to use after certain events happen. For example after a user logs in, a message that states, 'login successful' is available for you to display in your portal. You can render this flash message anywhere in your portal layout with the following additional code:
<%= render :partial => 'flash', :object => flash %>
The flash notice is one of many aspects of the portal environment. Variables are another aspect of the portal environment that we wish to consider. We briefly touched on this subject above when looking at the @logged_in variable. There are many variables available for you to use, and are used in the many pre-defined views. You can see the available variables by turning on debugging. First you will need to add the following code into your main portal layout:
<% if params.has_key? :debug %>
<br />
<%= debug_inline.html_safe %>
<% end %>
Once you have that code in your main layout, you can enable the debugging by adding ?debug=true to the end of the URL you are using to view the portal. You can use these variables to dynamically generate content that suits your needs.
The debug variables may also be brought up by clicking on the_Show Debug Popup_ button that is displayed at the top of every page when the web server is in development mode.
The following variables are relevant for most portal conditionals:
@current_login_identifierThe login of the end-user. This is usable for both local and remote authentication.@current_accountThe current local user object for a logged in end-user (if local authentication is being used).@client_ipThe IP address of the device that is hitting the portal.@client_macThe MAC address of the device that is hitting the portal.@effective_portal The end-user's configured splash portal or landing portal depending upon login state. Landing_portal is usually defined only if logged_in? is true. An exception is when an end-user has an existing LoginSession stored but has to re-authenticate because her session is empty (cleared cookies/new browser).@groupThe effective group of the end-user. If the end-user is a member of multiple groups, only the final disambiguated group (based on group priority) is reported.@policyThe policy that is linked to the effective group of the end-user. @logged_intrue if the end-user has supplied valid credentials to the portal.@portal_nameThe controller name of the portal being displayed.@portal_controllerThe controller name of the portal being displayed.@usage_plansThe list of usage plans that this end-user may select from.
Example Customization
One very simple and common portal customization is to change the display of the usage plans. A quick search of the captive portal directory structure reveals the following:
$ ls | grep usage
_current_usage_plan.erb
_online_usage.erb
_usage_plan.erb
_usage_plan_purchase_link.erb
usage_plan_charge.erb
usage_plan_list.erb
usage_plan_purchase.erb
The display of an individual usage plan are rendered by the partial _usage_plan.erb and the display of the set of all available usage plans is rendered by the viewusage_plan_list.erb.
The contents of the default usage_plan_list.erbshould resemble the following:
<h2>Usage Plan List</h2>
<%= render :partial => 'prorated_credit' %>
<table>
<% @usage_plans.each do |usage_plan| %>
<tr>
<td>
<%= render :partial => 'usage_plan',
:object => usage_plan %>
</td>
<td>
<%= render :partial => 'usage_plan_purchase_link',
:locals => { :usage_plan => usage_plan } %>
</td>
</tr>
<tr><td> <br/> </td></tr>
<% end %>
</table>
One simple way to change the order of the list of usage plans is to modify the looping structure. The default structure
@usage_plans.each do |usage_plan|
generates a list that may appear to be randomly ordered. To generate a list of the usage plans sorted by price, the looping structure should be changed to:
@usage_plans.sort_by(&:price_cents).each do |usage_plan|
To generate a list of the usage plans sorted by name, the looping structure should be changed to:
@usage_plans.sort_by(&:name).each do |usage_plan|
A custom sort order may be easily achieved by using the note field present in each usage plan record. Place a number (prefixed with a zero for multiple digits) inside the note field. Then change the looping structure to:
@usage_plans.sort_by(&:note).each do |usage_plan|
Another common portal customization is to change the layout of the usage plan list. For example, instead of a simple list, the operator may desire to have a multicolumn column list. One simple way to achieve this is add a variable to keep track of which column the usage plan should appear in. For example:
<h2>Usage Plan List</h2>
<%= render :partial => 'prorated_credit' %>
<table>
<% @u_p_cnt = 0 %>
<% @u_p_columns = 3 %>
<% @usage_plans.each do |usage_plan| %>
<% if @u_p_cnt % @u_p_columns == 0 %>
<tr><td>
<% else %>
<td>
<% end %>
<%= render :partial => 'usage_plan',
:object => usage_plan %>
<br/>
<%= render :partial => 'usage_plan_purchase_link',
:locals => { :usage_plan => usage_plan } %>
<% if @u_p_cnt % @u_p_columns == 0 %>
</td></tr>
<% else %>
</td>
<% end %>
<% @u_p_cnt = @u_p_cnt + 1 %>
<% end %>
</table>
The code above will generate a three column list of usage plans. The @up_cnt variable starts at zero and is incremented every time a usage plan is rendered. Every third usage plan (as determined by the modulo operation), a new table row is created. To change the number of rows, one would only need to change the value of the @u_p_columnsvariable.
RESTful API
The rXg provides two RESTful APIs for third-party integration. The Modern API at /api/ is the recommended interface for all new integrations, offering built-in pagination, rate limiting, and a browsable HTML interface. The legacy scaffold API at /admin/scaffolds/ remains available for backward compatibility.
Access to both APIs is controlled by the API key mechanism. Use the Admins page to set up API key access. It is good security practice to ensure that separate accounts (and hence, unique API keys) are used for each mechanism that will access the rXg via the RESTful API. Furthermore, each account and associated API key should be limited to the absolute minimum access rights needed to accomplish the desired tasks.
Legacy Scaffold API
Note: The documentation below describes the legacy scaffold API at
/admin/scaffolds/. For new integrations, see the Modern API section.
The base URL for the legacy scaffold API follows the form:
https://DNS.record.for.rXg/admin/scaffolds/
The use of HTTPS is required. Thus it is necessary to ensure that a proper DNS record and SSL certificate is configured on the target rXg. Furthermore, it is important that the caller be able to correctly validate the installed SSL certificate.
The desired model must be appended to the base URL. The model describes the underlying database table that will be accessed. For example:
https://DNS.record.for.rXg/admin/scaffolds/accounts/
The models that are available for access via the RESTful API are described in the rXg API documentation.
The desired action must also be appended to the URL. For example:
https://DNS.record.for.rXg/admin/scaffolds/accounts/create/
The set of possible actions are create, show (or list), update and destroy. These correspond to the standard database CRUD semantics. The appropriate HTTP verb must be used in conjunction with the selected action.
| create | HTTP POST | | show | HTTP GET | | list | HTTP GET | | update | HTTP PUT | | destroy | HTTP DELETE |
There is an optional format parameter that may be appended to the URL. For example:
https://DNS.record.for.rXg/admin/scaffolds/accounts/index.html/
https://DNS.record.for.rXg/admin/scaffolds/accounts/index.xml/
https://DNS.record.for.rXg/admin/scaffolds/accounts/index.json/
Specifying the optional parameter changes the format for both the input and output presentation. For example, sending a HTTP GET to:
https://DNS.record.for.rXg/admin/scaffolds/accounts/index/3.html
Results in the following output:
<dl>
<dt>Login</dt>
<dd class="login-view"> cpatterson746 </dd>
<dt>First name</dt>
<dd class="first_name-view"> Colin </dd>
<dt>Last name</dt> <dd
class="last_name-view"> Patterson </dd>
<dt>Email</dt> <dd
class="email-view"> [email protected] </dd>
[unknown] </dd>
...
Use the XML format specification by sending sending a HTTP GET to:
https://DNS.record.for.rXg/admin/scaffolds/accounts/index/3.xml
Results in the following output:
<account>
<bill-at type="datetime" nil="true"/>
<created-at type="datetime">2012-05-10T11:41:40-04:00</created-at>
<email>[email protected]</email>
<first-name>Colin</first-name>
<id type="integer">3</id>
<last-name>Patterson</last-name>
<logged-in-at type="datetime">2012-05-08T01:24:51-04:00</logged-in-at>
<login>cpatterson746</login>
...
For JSON, send a HTTP GET such as:
https://DNS.record.for.rXg/admin/scaffolds/accounts/index/3.json
Results in the following output:
{"created_at":"2012-05-10T11:41:40-04:00",
"email":"[email protected]","first_name":"Colin","id":3,
"last_name":"Patterson","logged_in_at":"2012-05-08T01:24:51-04:00",
"login":"cpatterson746",
...
}
It is also necessary to set the Content-Type HTTP header to the appropriate value (e.g., application/xml for XML) when using the optional format parameters.
Data Flow: External System Integration via RESTful API
The following diagrams illustrate how external systems integrate with the rXg through its RESTful API, including the proposed Subscriber and Content Policy System (SCPS) integration pattern using event-driven messaging.
RESTful API Integration Pattern
The rXg RESTful API enables external systems to perform CRUD operations on any scaffold. The following diagram shows how a typical external provisioning system interacts with the rXg.
sequenceDiagram
participant EXT as External System<br/>(OSS/BSS, CRM, SCPS)
participant API as rXg RESTful API<br/>(HTTPS + API Key)
participant DB as rXg Database
participant RXG as rXg Backend<br/>(rxgd)
participant NET as Network<br/>(Data Plane)
Note over EXT,NET: Provisioning a New Subscriber
EXT->>API: POST /admin/scaffolds/accounts/create.json<br/>(api_key, record: {login, name, email, ...})
API->>API: Authenticate API key<br/>(verify admin permissions)
API->>DB: Create Account record
DB-->>API: Account created (id: 42)
API-->>EXT: 200 OK + JSON response<br/>(account attributes)
EXT->>API: POST /admin/scaffolds/accounts/update/42.json<br/>(api_key, record: {usage_plan: 5, do_apply_usage_plan: 1})
API->>DB: Update Account + apply Usage Plan
DB->>DB: TriggerCallbacks fire<br/>(policy recalculation)
DB-->>API: Account updated
API-->>EXT: 200 OK
Note over EXT,NET: Configuration Change Propagates to Network
DB->>RXG: Trigger: account updated
RXG->>RXG: Recalculate policy for account devices
RXG->>NET: Update PF rules, bandwidth queues,<br/>NAT assignments
Note over EXT,NET: Querying Subscriber State
EXT->>API: GET /admin/scaffolds/login_sessions/index.json<br/>(api_key, search: "subscriber_mac")
API->>DB: Query LoginSession records
DB-->>API: Matching sessions
API-->>EXT: 200 OK + JSON<br/>(session details, traffic stats, policy)
EXT->>API: GET /admin/scaffolds/nat_assignments/index.json<br/>(api_key, search: "subscriber_ip")
API->>DB: Query NatAssignment records
DB-->>API: NAT mapping details
API-->>EXT: 200 OK + JSON<br/>(source_ip, nat_ip, uplink, is_binat)
Proposed: Event-Driven Integration via Webhooks
For real-time event streaming to external systems (such as an SCPS, Kafka consumer, or analytics platform), the rXg uses its webhook and notification action system to push events as they occur.
sequenceDiagram
participant SUB as Subscriber
participant RXG as rXg Gateway
participant DB as rXg Database
participant NA as Notification Action<br/>(Watch Scaffold)
participant WH as Webhook Engine
participant EXT as External System<br/>(SCPS / Kafka / Analytics)
Note over SUB,EXT: Event: Subscriber Login
SUB->>RXG: Authenticate (portal / RADIUS)
RXG->>DB: Create LoginSession
DB->>NA: Watch Scaffold trigger<br/>(model: LoginSession, action: create)
NA->>WH: Fire associated webhook
WH->>WH: Render webhook body<br/>(ERB template with session data)
WH->>EXT: POST /events/session-start<br/>(JSON: login, IP, MAC,<br/>policy, account, timestamp)
EXT-->>WH: 200 OK
Note over SUB,EXT: Event: Policy Change
RXG->>DB: Update LoginSession<br/>(policy shift, VLAN change)
DB->>NA: Watch Scaffold trigger<br/>(model: LoginSession, action: update)
NA->>WH: Fire webhook
WH->>EXT: POST /events/session-update<br/>(JSON: new policy, new VLAN,<br/>reason for change)
Note over SUB,EXT: Event: Subscriber Logout
SUB->>RXG: Disconnect / session expires
RXG->>DB: Destroy LoginSession
DB->>NA: Watch Scaffold trigger<br/>(model: LoginSession, action: delete)
NA->>WH: Fire webhook
WH->>WH: Use record_hash<br/>(record already deleted)
WH->>EXT: POST /events/session-stop<br/>(JSON: final traffic stats,<br/>session duration, terminate cause)
Note over SUB,EXT: Event: NAT Assignment Change
DB->>NA: Watch Scaffold trigger<br/>(model: NatAssignment, action: create)
NA->>WH: Fire webhook
WH->>EXT: POST /events/nat-assignment<br/>(JSON: source_ip, nat_ip,<br/>uplink, is_binat, account)
Proposed: SCPS Subscriber Policy Control (Future Architecture)
Note: The following diagram represents a proposed architecture for Subscriber and Content Policy System (SCPS) integration. This event-driven pattern uses the rXg's existing webhook infrastructure and RESTful API as the integration layer between the rXg BNG (Broadband Network Gateway) and an external policy control system.
sequenceDiagram
participant UE as Subscriber Device
participant BNG as rXg BNG<br/>(Data Plane)
participant CP as rXg Control Plane
participant API as rXg RESTful API
participant SCPS as SCPS<br/>(Policy Control)
participant MSG as Message Bus<br/>(Webhook / Kafka)
Note over UE,MSG: Subscriber Session Establishment
UE->>BNG: Connect + DHCP + Auth
BNG->>CP: LoginSession created
CP->>MSG: Webhook: session-start<br/>(subscriber ID, IP, MAC, plan)
MSG->>SCPS: Deliver session event
SCPS->>SCPS: Evaluate subscriber policy<br/>(tier, quotas, content rules)
SCPS->>API: PUT /accounts/update<br/>(apply bandwidth queue,<br/>content filter profile)
API->>CP: Update policy configuration
CP->>BNG: Push updated PF rules<br/>(TriggerCallback)
BNG->>BNG: Apply policy to subscriber traffic
Note over UE,MSG: Mid-Session Policy Change
SCPS->>SCPS: Detect quota threshold<br/>(e.g., 80% data usage)
SCPS->>API: PUT /accounts/update<br/>(shift to throttled tier)
API->>CP: Policy update
CP->>BNG: Reconfigure bandwidth queue
BNG->>UE: Throttled speed applied
Note over UE,MSG: Session Teardown
UE->>BNG: Disconnect
BNG->>CP: LoginSession destroyed
CP->>MSG: Webhook: session-stop<br/>(final stats, duration)
MSG->>SCPS: Deliver termination event
SCPS->>SCPS: Finalize billing record
Create
Creating a record is simply a matter of sending an HTTP POST to the appropriate URL. Consider the simple example of creating a WAN Target. To accomplish this an HTTP POST request would be sent to a URL of the form:
https://rxg.dns/admin/scaffolds/wan_targets/create.xml?api_key=8f8eab...868c
with a header containing:
Content-Type: application/xml
and a payload of the form:
<?xml version="1.0"?>
<record>
<name>Desired New Name</name>
<targets>1.2.3.4</targets>
</record>
This entire process may be accomplished by using the cURLcommand line utility. Below is an example command line that demonstrates the use of cURL to execute a create through the RESTful API.
curl -i -X POST -H 'Content-Type: application/xml'
-d '<?xml version="1.0"?><record><name>Desired New Name</name>
<targets>1.2.3.4</targets></record>'
https://rxg.dns/admin/scaffolds/wan_targets/create.xml?api_key=486...a5a
The RESTful API endpoint will respond with a HTTP/1.1 201 Createdthat has a Location header containing the URL to retrieve the record upon successful creation. The content of the response is a copy of the created record.
HTTP/1.1 201 Created
Location: https://rxg.dns/admin/scaffolds/wan_targets/show/5.xml?api_key=486...876a
Content-Type: application/xml; charset=utf-8
X-UA-Compatible: IE=Edge
ETag: "40c13943442b4dd5646d264fdb738909"
Cache-Control: max-age=0, private, must-revalidate
Set-Cookie: _rxg_console_session=BAh7Ck...ea6e5; path=/; HttpOnly
X-Request-Id: 43eda966fa00bd1347f48583f37e5392
X-Runtime: 0.439131
Content-Length: 155
Connection: keep-alive
Server: thin 1.3.1 codename Triple Espresso
<?xml version="1.0" encoding="UTF-8"?>
<wan-target>
<name>New Target Name A</name>
<note nil="true"></note>
<targets>2.2.3.4</targets>
</wan-target>
If an error occurs and the record is not created the response will be an HTTP error status (usually HTTP/1.1 422) and the content will contain the error messages. For example, if the same request is run twice, then the response would take the form:
HTTP/1.1 422
Content-Type: application/xml; charset=utf-8
Cache-Control: no-cache
Date: Mon, 28 May 2012 17:35:23 GMT
X-UA-Compatible: IE=Edge,chrome=1
Set-Cookie: _rxg_console_session=BAh7C...098b1; path=/; HttpOnly
X-Request-Id: 63bb95530945b6be578eaf4485d7a337
X-Runtime: 1.800010
X-Rack-Cache: invalidate, pass
Connection: close
Server: thin 1.3.1 codename Triple Espresso
<?xml version="1.0" encoding="UTF-8"?>
<errors>
<error>Name has already been taken</error>
<error>Targets has already been taken</error>
</errors>
There are requirements that need to be met when creating records. Required fields are marked in bold in the web administrative console.
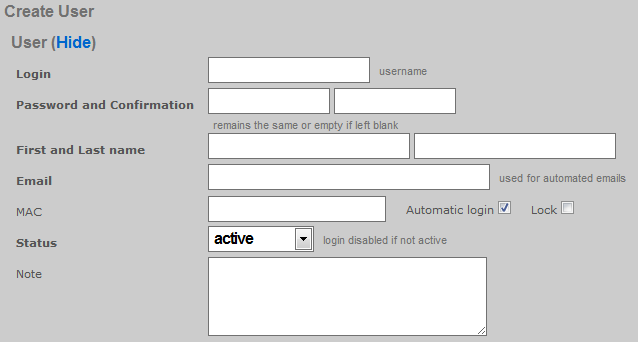
Hitting the appropriate URL without sending the required input will result in a dump of error messages that describe the requirements. For example, using cURL to send the following request:
curl -i -X POST -H 'Content-Type: application/xml'
-d '<?xml version="1.0"?><record><login>restfulapitest</login></record>'
https://rxg.dns/admin/scaffolds/accounts/create.xml?api_key=WR5..KLw
Results in the the following response.
HTTP/1.1 422
Content-Type: application/xml; charset=utf-8
X-UA-Compatible: IE=Edge,chrome=1
Cache-Control: no-cache
Set-Cookie: _rxg_console_session=BAh...8b1; path=/; HttpOnly
X-Request-Id: 63bb95530945b6be578eaf4485d7a337
X-Runtime: 1.800010
Date: Mon, 28 May 2012 14:32:18 GMT
X-Rack-Cache: invalidate, pass
Connection: close
Server: thin 1.3.1 codename Triple Espresso
<?xml version="1.0" encoding="UTF-8"?>
<errors>
<error>Email can't be blank</error>
<error>Email is too short (minimum is 3 characters)</error>
<error>Email is invalid</error>
<error>Password can't be blank</error>
<error>Password is too short (minimum is 1 characters)</error>
<error>Password confirmation can't be blank</error>
<error>First name can't be blank</error>
<error>First name is too short (minimum is 2 characters)</error>
<error>Last name can't be blank</error>
<error>Last name is too short (minimum is 2 characters)</error>
<error>Time must be configured unless unlimited is checked</error>
<error>Upload quota must be configured unless unlimited is checked</error>
<error>Download quota must be configured unless unlimited is checked</error>
<error>Expiration must be configured unless unlimited is checked</error>
</errors>
The reported errors may be used to construct a correct request to send to the RESTful API endpoint such as the following example:
curl -i -X POST -H 'Content-Type: application/xml' \
-d '<?xml version="1.0"?><record><login>restfulapitest</login>
<email>[email protected]</email><password>1234567890</password>
<password_confirmation>1234567890</password_confirmation>
<first_name>api</first_name><last_name>test</last_name>
<unlimited-usage-mb-down>1</unlimited-usage-mb-down>
<unlimited-usage-mb-up>1</unlimited-usage-mb-up>
<unlimited-usage-minutes>1</unlimited-usage-minutes>
<no-usage-expiration>1</no-usage-expiration></record>'
https://rxg.dns/admin/scaffolds/accounts/create.xml?api_key=WR5...KLw
Which results in a response of:
HTTP/1.1 201 Created
Location: https://rxg.dns/admin/scaffolds/accounts/show/36.xml?api_key=WR5...KLw
Content-Type: application/xml; charset=utf-8
X-UA-Compatible: IE=Edge,chrome=1
ETag: "e71...4c7"
Cache-Control: max-age=0, private, must-revalidate
Set-Cookie: _rxg_console_session=BAh...dc6; path=/; HttpOnly
X-Request-Id: 111b836e66f0883a4900d37a8c0ff42e
X-Runtime: 0.040524
Date: Mon, 28 May 2012 18:55:57 GMT
X-Rack-Cache: invalidate, pass
Connection: close
Server: thin 1.3.1 codename Triple Espresso
<?xml version="1.0" encoding="UTF-8"?>
<account>
<address1 nil="true"></address1>
<address2 nil="true"></address2>
<automatic-login type="boolean" nil="true"></automatic-login>
<bill-at type="datetime" nil="true"></bill-at>
<charge-attempted-at type="datetime" nil="true"></charge-attempted-at>
<city nil="true"></city>
<company nil="true"></company>
<country nil="true"></country>
<created-at type="datetime">2012-05-28T14:55:57-04:00</created-at>
<created-by>apikeytest</created-by>
<crypted-password>y/j0nSYiWmwho4X8jj0symrxccU=</crypted-password>
<email>[email protected]</email>
<first-name>api</first-name>
<id type="integer">36</id>
<last-name>test</last-name>
<lock-mac type="boolean" nil="true"></lock-mac>
<lock-version type="integer">0</lock-version>
<logged-in-at type="datetime" nil="true"></logged-in-at>
<login>restfulapitest</login>
<mb-down type="integer" nil="true"></mb-down>
<mb-up type="integer" nil="true"></mb-up>
<no-usage-expiration type="boolean">true</no-usage-expiration>
<note nil="true"></note>
<phone nil="true"></phone>
<pkts-down type="integer" nil="true"></pkts-down>
<pkts-up type="integer" nil="true"></pkts-up>
<region nil="true"></region>
<relative-usage-lifetime type="integer" nil="true"></relative-usage-lifetime>
<salt>dcfae2f069cb8167972225ba7c33d6ac5642fd2a</salt>
<state>active</state>
<unlimited-usage-mb-down type="boolean">true</unlimited-usage-mb-down>
<unlimited-usage-mb-up type="boolean">true</unlimited-usage-mb-up>
<unlimited-usage-minutes type="boolean">true</unlimited-usage-minutes>
<updated-at type="datetime">2012-05-28T14:55:57-04:00</updated-at>
<updated-by nil="true"></updated-by>
<usage-expiration type="datetime" nil="true"></usage-expiration>
<usage-mb-down type="integer" nil="true"></usage-mb-down>
<usage-mb-up type="integer" nil="true"></usage-mb-up>
<usage-minutes type="integer" nil="true"></usage-minutes>
<usage-plan-id type="integer" nil="true"></usage-plan-id>
<zip nil="true"></zip>
</account>
Accounts must be assigned policy in order for enforcement to take effect. Policies are associated to Accounts through Account Groups. Associating Accounts with Account Groups is usually accomplished by setting either the do_apply_usage_planor the do_bill_and_apply_usage_plan virtual attribute. For example:
curl -i -X POST -H 'Content-Type: application/xml'
-d '<?xml version="1.0"?><record><login>restfulapitest</login>
<email>[email protected]</email><password>1234567890</password>
<password_confirmation>1234567890</password_confirmation>
<first_name>api</first_name><last_name>test</last_name>
<usage-plan>3</usage-plan>
<do_apply_usage_plan>1</do_apply_usage_plan></record>'
https://rxg.dns/admin/scaffolds/accounts/create.xml?api_key=w1f...kkQ
Notice that the usage time, usage expiration and upload/download usages are not specified because they are defined by the plan. Also notice that the usage-plan attribute is used to specify the desired Usage Plan by ID. The Usage Plan ID may be acquired by using the list action for the usage-plansscaffold. Note that the value of do_apply_usage_plan or the do_bill_and_apply_usage_plan virtual attributes should always be 1. If you set the value of thedo_apply_usage_plan or the do_bill_and_apply_usage_planto anything other than 1 then the system will not execute the command at all. The following is an example of the response to a successful Account record creation with Usage Plan specification and application as shown above.
HTTP/1.1 201 Created
Location: https://rxg.dns/admin/scaffolds/accounts/show/24.xml?api_key=LjU...kkQ
Content-Type: application/xml; charset=utf-8
X-UA-Compatible: IE=Edge,chrome=1
ETag: "4dcf...2322"
Cache-Control: max-age=0, private, must-revalidate
Set-Cookie: _rxg_console_session=BAh...03f; path=/; HttpOnly
X-Request-Id: 5c4...841
X-Runtime: 0.039446
Date: Fri, 22 Jun 2012 21:49:40 GMT
X-Rack-Cache: invalidate, pass
Connection: close
Server: thin 1.3.1 codename Triple Espresso
<?xml version="1.0" encoding="UTF-8"?>
<account>
<address1 nil="true"></address1>
<address2 nil="true"></address2>
<automatic-login type="boolean" nil="true"></automatic-login>
<bill-at type="datetime" nil="true"></bill-at>
<charge-attempted-at type="datetime" nil="true"></charge-attempted-at>
<city nil="true"></city>
<company nil="true"></company>
<country nil="true"></country>
<created-at type="datetime">2012-06-22T16:49:40-05:00</created-at>
<created-by>useronly</created-by>
<crypted-password>pMId/QzJ.....NMc1vjObnk=</crypted-password>
<email>[email protected]</email>
<first-name>api</first-name>
<id type="integer">24</id>
<last-name>test</last-name>
<lock-mac type="boolean" nil="true"></lock-mac>
<lock-version type="integer">0</lock-version>
<logged-in-at type="datetime" nil="true"></logged-in-at>
<login>restfulapitest</login>
<mb-down type="integer" nil="true"></mb-down>
<mb-up type="integer" nil="true"></mb-up>
<no-usage-expiration type="boolean" nil="true"></no-usage-expiration>
<note nil="true"></note>
<phone nil="true"></phone>
<pkts-down type="integer" nil="true"></pkts-down>
<pkts-up type="integer" nil="true"></pkts-up>
<region nil="true"></region>
<relative-usage-lifetime type="integer" nil="true"></relative-usage-lifetime>
<salt>37ddbeec583e.....04d94ab939f5</salt>
<state>active</state>
<unlimited-usage-mb-down type="boolean">true</unlimited-usage-mb-down>
<unlimited-usage-mb-up type="boolean">true</unlimited-usage-mb-up>
<unlimited-usage-minutes type="boolean">true</unlimited-usage-minutes>
<updated-at type="datetime">2012-06-22T16:49:40-05:00</updated-at>
<updated-by nil="true"></updated-by>
<usage-expiration type="datetime">2012-07-22T16:49:40-05:00</usage-expiration>
<usage-mb-down type="integer" nil="true"></usage-mb-down>
<usage-mb-up type="integer" nil="true"></usage-mb-up>
<usage-minutes type="integer" nil="true"></usage-minutes>
<usage-plan-id type="integer">3</usage-plan-id>
<zip nil="true"></zip>
</account>
Show
Retrieving a single record is simply a matter of hitting the appropriate URL with a HTTP GET. Record retrieval via show requires knowledge of the record ID. It is more appropriate to use the list action is when searching is required. For example, hitting a URL of the form:
https://rxg.dns/admin/scaffolds/accounts/show/3.json?api_key=P7Z...idA
Results in the rXg retrieving the account with record ID 3 and sending a response of the form:
{"address1":null,"address2":null,"automatic_login":null,"bill_at":null,
"city":null,"company":null,"country":null,"created_at":"2012-05-10T11:41:40-04:00",
"created_by":null,"email":"[email protected]","first_name":"Colin","id":3,
"last_name":"Patterson","lock_devices":null,"logged_in_at":"2012-05-08T01:24:51-04:00",
"login":"cpatterson746","note":"Automatically generated by script run by root\n",
"phone":"4997197472","region":null,"state":"active",
"updated_at":"2012-05-10T11:41:40-04:00","updated_by":null,
"usage_expiration":null,"usage_minutes":28180,"zip":null}
Similarly hitting a URL of the form:
https://rxg.dns/admin/scaffolds/accounts/show/3.xml?api_key=P7Z...idA
Results in a response of the form:
<account>
<address1 nil="true"/>
<address2 nil="true"/>
<automatic-login type="boolean" nil="true"/>
<bill-at type="datetime" nil="true"/>
<charge-attempted-at type="datetime" nil="true"/>
<city nil="true"/>
<company nil="true"/>
<country nil="true"/>
<created-at type="datetime">2012-05-10T11:41:40-04:00</created-at>
<created-by nil="true"/>
<crypted-password>V3QlqyDanC4/mfbe+tIN3Zpfzbs=</crypted-password>
<email>[email protected]</email>
<first-name>Colin</first-name>
<id type="integer">3</id>
<last-name>Patterson</last-name>
<lock-mac type="boolean" nil="true"/>
<lock-version type="integer">0</lock-version>
<logged-in-at type="datetime">2012-05-08T01:24:51-04:00</logged-in-at>
<login>cpatterson746</login>
<mb-down type="integer">3747</mb-down>
<mb-up type="integer">730</mb-up>
<no-usage-expiration type="boolean">true</no-usage-expiration>
<note>Automatically generated by script run by root</note>
<phone>4997197472</phone>
<pkts-down type="integer">251049192</pkts-down>
<pkts-up type="integer">70080583</pkts-up>
<region nil="true"/>
<relative-usage-lifetime type="integer" nil="true"/>
<salt>964fbe3ceea48ac7a1960bc99bed912f0cafae53</salt>
<state>active</state>
<unlimited-usage-mb-down type="boolean">false</unlimited-usage-mb-down>
<unlimited-usage-mb-up type="boolean">false</unlimited-usage-mb-up>
<unlimited-usage-minutes type="boolean">false</unlimited-usage-minutes>
<updated-at type="datetime">2012-05-10T11:41:40-04:00</updated-at>
<updated-by nil="true"/>
<usage-expiration type="datetime" nil="true"/>
<usage-mb-down type="integer">1372</usage-mb-down>
<usage-mb-up type="integer">293</usage-mb-up>
<usage-minutes type="integer">28180</usage-minutes>
<usage-plan-id type="integer">1</usage-plan-id>
<zip nil="true"/>
</account>
List
Retrieving a set of records through the RESTful API is simply a matter of sending an HTTP GET to the appropriate URL. Let us consider the example of retrieving the ping targets instrument for the purpose of integrating edge device monitoring with a central NMS. Using cURL to execute the following command:
curl https://rxg.dns/admin/scaffolds/ping_targets/index.json?api_key=P7Z...idA
The rXg responds with a JSON formatted dump of the current state of the ping targets.
[{"name":"Google Public DNS 1","online":true,
"target":"8.8.8.8","updated_at":"2012-06-13T17:11:04-04:00"},
{"name":"Google Public DNS 2","online":true,
"target":"8.8.4.4","updated_at":"2012-04-23T12:10:11-04:00"},
{"name":"IDF Switch 2","online":true,
"target":"192.168.117.20","updated_at":"2012-06-13T18:10:09-04:00"},
{"name":"VM NAT Net Router","online":false,
"target":"192.168.117.254","updated_at":"2012-06-13T18:09:53-04:00"},
{"name":"Zone Director","online":false,
"target":"172.30.80.10","updated_at":"2012-06-13T18:10:48-04:00"}]
The suffix may be changed to retrieve the same information in XML format.
<?xml version="1.0" encoding="UTF-8"?>
<ping-targets type="array">
<ping-target>
<attempts type="integer">3</attempts>
<cluster-node-id type="integer" nil="true"></cluster-node-id>
<created-at type="datetime">2012-01-23T12:29:22-05:00</created-at>
<created-by nil="true"></created-by>
<id type="integer">1</id>
<name>Google Public DNS 1</name>
<note>http://code.google.com/speed/public-dns/</note>
<online type="boolean">true</online>
<target>8.8.8.8</target>
<timeout type="decimal">2.0</timeout>
<updated-at type="datetime">2012-06-13T17:11:04-04:00</updated-at>
<updated-by>rxgd (PingMonitor)</updated-by>
</ping-target>
<ping-target>
<attempts type="integer">3</attempts>
<cluster-node-id type="integer" nil="true"></cluster-node-id>
<created-at type="datetime">2012-01-23T12:29:23-05:00</created-at>
<created-by nil="true"></created-by>
<id type="integer">2</id>
<name>Google Public DNS 2</name>
...
</ping-target>
</ping-targets>
Filtering of the list is accomplished by passing CGI parameters to the RESTful API endpoint that match the fields of the model being retrieved. For example:
curl https://rxg.dns/admin/scaffolds/ping_targets/index.json?api_key=P7Z...idA&name=Zone+Director'
Results in the filtered response:
[{"name":"Zone Director","online":false,
"target":"172.30.80.10","updated_at":"2012-06-13T18:10:48-04:00"}]
The same example formatted in XML:
curl https://rxg.dns/admin/scaffolds/ping_targets/index.xml?api_key=P7Z...idA&name=Zone+Director'
Results in the filtered response:
<?xml version="1.0" encoding="UTF-8"?>
<ping-targets type="array">
<ping-target>
<attempts type="integer">3</attempts>
<cluster-node-id type="integer" nil="true"></cluster-node-id>
<created-at type="datetime">2012-06-13T18:09:36-04:00</created-at>
<created-by>admin</created-by>
<id type="integer">4</id>
<name>Zone Director</name>
<note nil="true"></note>
<online type="boolean">false</online>
<target>172.30.80.10</target>
<timeout type="decimal">3.0</timeout>
<updated-at type="datetime">2012-06-13T18:10:48-04:00</updated-at>
<updated-by>rxgd (PingMonitor)</updated-by>
</ping-target>
</ping-targets>
Filtering a retrieved list is commonly used to acquire the ID that needs to be passed during the create or update of a record. For example, if a account needs to be placed into a specific account group , the ID of the account group must be passed into the update request. It is highly recommended that external systems rely on names rather than IDs because the ID of records are automatically generated by the rXg and are not reliably replicated across a fleet. Therefore, most external systems must look up the ID of related objects before executing a create or update. Consider the following example Perl script:
use LWP::Simple;
use XML::Simple;
my $api_key = 'P7Z...idA';
my $groupname = 'Premium';
my $rxg = 'rxg.dns';
my $ctrl_action = 'admin/scaffolds/account_groups/index.xml';
$xml_raw = get("https://$rxg/$ctrl_action?api_key=$api_key;name=$groupname");
my $doc = XMLin($xml_raw);
my $id_of_group = ${$doc}{'account-group'}{'id'}{'content'};
print "ID: $id_of_group\n";
This script acquires the record ID of the account group named "Premium". The external system can reliably move a account object into the "Premium" account_group by running this script to acquire the appropriate record ID.
Update
Updating a record is accomplished by sending a HTTP PUT to the appropriate URL. The form of the URL requires knowledge of the record ID being updated. If the record ID is not known, then it must be looked up using the list action. The payload of the PUT needs to only contain the fields that are to be changed. The contents of the payload must meet the model requirements otherwise an error will be thrown. Consider the following example where the first name associated with account ID 36 is being updated via XML:
curl -i -X PUT -H 'Content-Type: application/xml'
-d '<?xml version="1.0"?><record><first-name>Alfred</first-name></record>'
https://rxg.dns/admin/scaffolds/accounts/update/36.xml?api_key=WR5...KLw
or via JSON:
curl -i -X PUT -H 'Content-Type: application/json'
-d '{"record": {"first_name": "Anson"}}'
https://rxg.dns/admin/scaffolds/accounts/update/36.xml?api_key=WR5...KLw
If the request is successful the rXg responds with a HTTP/1.1 200 OK:
HTTP/1.1 200 OK
Content-Type: application/xml; charset=utf-8
X-UA-Compatible: IE=Edge,chrome=1
ETag: "6189032e56e827aafd5543357368d300"
Cache-Control: max-age=0, private, must-revalidate
Set-Cookie: _rxg_console_session=BAh...66d; path=/; HttpOnly
X-Request-Id: de794ed53142ffc00c9e5c135716edfc
X-Runtime: 0.062918
Date: Thu, 14 Jun 2012 01:07:10 GMT
X-Rack-Cache: invalidate, pass
Connection: close
Server: thin 1.3.1 codename Triple Espresso
<?xml version="1.0" encoding="UTF-8"?>
<account>
<address1 nil="true"></address1>
<address2 nil="true"></address2>
<automatic-login type="boolean" nil="true"></automatic-login>
<bill-at type="datetime" nil="true"></bill-at>
<charge-attempted-at type="datetime" nil="true"></charge-attempted-at>
<city nil="true"></city>
<company nil="true"></company>
<country nil="true"></country>
<created-at type="datetime">2012-05-28T14:55:57-04:00</created-at>
<created-by>apikeytest</created-by>
<crypted-password>y/j0nSYiWmwho4X8jj0symrxccU=</crypted-password>
<email>[email protected]</email>
<first-name>Alfred</first-name>
<id type="integer">36</id>
<last-name>test</last-name>
<lock-mac type="boolean" nil="true"></lock-mac>
<lock-version type="integer">5</lock-version>
<logged-in-at type="datetime" nil="true"></logged-in-at>
<login>restfulapitest</login>
<mb-down type="integer" nil="true"></mb-down>
<mb-up type="integer" nil="true"></mb-up>
<no-usage-expiration type="boolean">true</no-usage-expiration>
<note nil="true"></note>
<phone nil="true"></phone>
<pkts-down type="integer" nil="true"></pkts-down>
<pkts-up type="integer" nil="true"></pkts-up>
<region nil="true"></region>
<relative-usage-lifetime type="integer" nil="true"></relative-usage-lifetime>
<salt>dcfae2f069cb8167972225ba7c33d6ac5642fd2a</salt>
<state>active</state>
<unlimited-usage-mb-down type="boolean">true</unlimited-usage-mb-down>
<unlimited-usage-mb-up type="boolean">true</unlimited-usage-mb-up>
<unlimited-usage-minutes type="boolean">true</unlimited-usage-minutes>
<updated-at type="datetime">2012-06-13T21:07:10-04:00</updated-at>
<updated-by>apikeytest</updated-by>
<usage-expiration type="datetime" nil="true"></usage-expiration>
<usage-mb-down type="integer" nil="true"></usage-mb-down>
<usage-mb-up type="integer" nil="true"></usage-mb-up>
<usage-minutes type="integer" nil="true"></usage-minutes>
<usage-plan-id type="integer" nil="true"></usage-plan-id>
<zip nil="true"></zip>
</account>
If the request fails, then the rXg responds with an HTTP error code, usually HTTP/1.1 422. For, example, if an invalid first name is passed in:
curl -i -X PUT -H 'Content-Type: application/xml'
-d '<?xml version="1.0"?><record><first-name>a</first-name></record>'
https://rxg.dns/admin/scaffolds/accounts/update/36.xml?api_key=WR5...KLw
The response would be:
HTTP/1.1 422
Content-Type: application/xml; charset=utf-8
X-UA-Compatible: IE=Edge,chrome=1
Cache-Control: no-cache
Set-Cookie: _rxg_console_session=BAh...1f6
X-Runtime: 0.041413
Date: Thu, 14 Jun 2012 01:18:57 GMT
X-Rack-Cache: invalidate, pass
Connection: close
Server: thin 1.3.1 codename Triple Espresso
<?xml version="1.0" encoding="UTF-8"?>
<errors>
<error>First name is too short (minimum is 2 characters)</error>
</errors>
Destroy
Deleting a record is accomplished by sending a HTTP DELETE to the appropriate URL. The record ID must be known in order to execute this request. Use the list action to retrieve the record ID if it is not known. To delete account record number 38, an HTTP request such as the following must be sent:
curl -i -X DELETE -H 'Content-Type: application/xml'
https://rxg.dns/admin/scaffolds/accounts/destroy/38.xml?api_key=WR5...KLw
If the record was successfully deleted, a response of the following form will be returned:
HTTP/1.1 200 OK
Content-Type: application/xml; charset=utf-8
X-UA-Compatible: IE=Edge,chrome=1
Cache-Control: no-cache
Set-Cookie: _rxg_console_session=BAh...1f3; path=/; HttpOnly
X-Request-Id: 1fe3fccbf67bc8430ed74bd354cc2c95
X-Runtime: 0.056364
Date: Thu, 14 Jun 2012 01:26:05 GMT
X-Rack-Cache: invalidate, pass
Connection: close
Server: thin 1.3.1 codename Triple Espresso
Attempting to delete a nonexistent record will result in a response of HTTP/1.1 404 Not Found.
Sample SDKs
cURL SDK
The following files are provided as part of a sample SDK that takes advantage of the rXg RESTful API. These shell scripts may be executed on any administrator device that has BASH and cURL installed on it.
00_get_account_id.sh
00_get_bandwidth_queue_id.sh
00_get_device_id.sh
00_get_plan_id.sh
00_get_quota_trigger_id.sh
00_get_time_plan_id.sh
00_set_globals.sh
00_urlencode.sed
00_xml_extract_integer.sh
01_create_account.sh
02_show_account_json.sh
02_show_account_xml.sh
02_show_device_usage.sh
02_show_pfqueuelogs_for_mac.sh
03_reset_total_utilization_counters.sh
03_update_account.sh
04_add_device_to_account.sh
04_remove_device.sh
05_suspend_account.sh
05_unsuspend_account.sh
06_delete_account.sh
07_change_bandwidth_queue.sh
07_change_quota_trigger.sh
07_change_time_plan_price.sh
Rxg_Curl_Class.php
The scripts with the 00 prefix are called from the other scripts. Make sure that all of the scripts with the 00prefix are accessible and executable before attempting to run any of the other scripts.
The 00_set_globals.sh script must be edited so that the global variables reflect the target rXg. The RXG_NAME must be set to the DNS name of the rXg that is being accessed via the RESTful API. Furthermore the RXG_API_KEY must be changed to reflect an API key that has been obtained from the administrative console.
The scripts in this SDK may be used as provided to integrate a remote portal mechanism. A remote portal application must be able to grant access to certain end-users and devices. To accomplish this the remote server would execute the 01_create_account.shscript to create an account and then run the04_add_device_to_account.sh to add the end-user device to the account.
To utilize this pattern the operator must setup Account Groups, Policies and Usage Plans for the various tiers of service. Automatic login should be enabled in the Usage Plans that are to be used with this mechanism. In the example below the operator wishes to authorize the MAC address 00:01:af:cc:38:4f to have access via a Usage Plan named Basic. Most operators choose to use the MAC address as the Account login if only a single device per Account is desired. For example:
./01_create_account.sh -a 00:01:af:cc:38:4f -p Basic
./04_add_device_to_account.sh 00:01:af:cc:38:4f 00:01:af:cc:38:4f
Changing the provisioned Usage Plan for an Account may be accomplished by running the 03_update_account.sh script. Following the above example, we would do the following if the end-user upgrades to the Premium plan:
./03_update_account.sh -a 00:01:af:cc:38:4f -p Premium
Suspending an Account for any reason (e.g., payment processing failure) is easily accomplished by using the 05_suspend_account.shscript. Following the above example:
./05_suspend_account.sh 00:01:af:cc:38:4f
Unsuspending the Account is just as easy:
./05_unsuspend_account.sh 00:01:af:cc:38:4f
The operator has numerous choices on how to instrument the data transfer consumed by an Account or Device. Use the02_show_device_usage.sh script to retrieve a simple account utilization total for a device over a period of time. For example:
./02_show_device_usage.sh 01:50:56:00:00:99 '2014-03-21 00:00:00' '2014-03-22 23:59:59'
More detailed usage information may be acquired by looking at the PF Queue Logs and the PF Connection Logs. The PF Queue Logs are stored in decreasing resolution over time. Samples are stored every 30 seconds for an hour and then reduced to once an hour for a week and finally once a day after a week has passed. The entries in PF Connection Logs are different from the PF Queue Logs in that they also contain the IP addresses of the destinations.
If multiple Devices are associated with a single Account then their total utilization is stored in the Device object. The mb_up,mb_down, pkts_up and pkts_downfields reflect the utilization of all Devices associated with the Account. The 02_show_account_xml.sh retrieves all fields including the four total utilization fields. Use the 03_reset_total_utilization_counters.sh script to reset the total utilization counters to zero at any time.
PHP SDK
Download the PHP SDK. Save it into your PHP project directory and require_once to include the library into your application.
Note: Use of this library requires that the PHP cURL extension be enabled in your php.ini file. Edit the file and uncomment the following line (remove the ; from the beginning of the line):
;extension=php_curl.dll
Examples
<?php
require_once("Rxg_Curl_Class.php");
# Initialize a new instance of the Rxg_Curl_Class
$rxg = new Rxg_Curl_Class("hostname.domain.com", "apikey");
# Create a record
$result = $rxg->create("admins",
array(
"login" => "operator",
"password" => '$uperP@ssword',
"password_confirmation" => '$uperP@ssword',
"admin_role" => 1
)
);
var_dump($result);
# Retrieve a record
$result = $rxg->show("wan_targets", 1);
var_dump($result);
# List all records
$result = $rxg->search("accounts");
var_dump($result);
# List records filtered by search params
$result = $rxg->search("accounts", array('first_name' => 'Romeo'));
var_dump($result);
# Update a record
$result = $rxg->update("accounts", 43, array("first_name" => 'George'));
var_dump($result);
# Delete a record
$result = $rxg->delete("accounts", 41);
var_dump($result);
?>
Graph API
The rXg records a great deal of instrumentation data as it operates. The data is stored in a combination of round-robin database files (RRD files) as well as the standard database, depending on the element of the system being instrumented. The rXg makes this data available through the admin console in the form of interactive graphs, as well as through the Graph API in the form of JSON or XML data points. Graphs may also be retrieved in PNG or PDF format.
Authentication:
All calls to the Graph API must be accompanied by an API key which may be obtained by clicking the show link next to an Admin in the administration console.
Extracting Data points
The database entries consist of timestamp values and the recorded value at the given time. These data points may be extracted using the Graph API.
If there is an existing Graph object stored in the database (created under the Archives::Reports subviews) which references the desired graphables, the Graphs ID may be used to simplify the parameters that must be sent in the request.
If there is no pre-existing Graph object, the necessary parameters may be assembled manually and included in the request.
Endpoint: /admin/graphs/graph_export.[json|xml]
cURL example:
curl -i -X POST -H 'Content-Type: application/json' -d '{ "graph": { "id":"1", "type":"NetworkGraph" } }' https://rxg.dns/admin/graphs/graph_export.json?api_key=rJ8FygG...
Example Request: (no pre-existing graph):
{
"graph":
{
"aggregate":"false",
"graph_time":
{
"past_time":"1",
"past_time_unit":"months"
},
"graphables":
[
{"id":"1", "model":"UsagePlan"},
{"id":"2", "model":"UsagePlan"},
{"id":"3", "model":"UsagePlan"}
],
"grouped_by":"week",
"target":"revenue",
"type":"AccountingGraph"
}
}
Example Request: (pre-existing graph):
{
"graph":
{
"id":"4",
"type":"AccountingGraph"
}
}
Note: Clicking on the title of any graph within the admin console and inspecting the resulting URL in the address bar is an easy way to determine the request parameters that comprise that graph.
Example Response (line graph):
[
{
"key": "Uplink in",
"values": [
{
"x": 1752772800,
"y": 1914221.4393
},
{
"x": 1752773040,
"y": 1892728.4784
},
[... additional datapoints ...]
],
"area": true
},
{
"key": "Uplink out",
"values": [
{
"x": 1752772800,
"y": 391642.1333
},
{
"x": 1752773040,
"y": 550121.9461
},
],
"area": true
},
[... additional series ...]
]
Example Response (Bar Graph)
[
{
"values": [
{"x":"Sunday","y":24.0},
{"x":"Monday","y":14.0},
{"x":"Tuesday","y":12.0},
{"x":"Wednesday","y":12.0},
{"x":"Thursday","y":20.0},
{"x":"Friday","y":30.0},
{"x":"Saturday","y":16.0}
],
"key":"Basic",
"color":"#01545A"
},
{
"values": [
{"x":"Sunday","y":10.0},
{"x":"Monday","y":16.0},
{"x":"Tuesday","y":18.0},
{"x":"Wednesday","y":12.0},
{"x":"Thursday","y":8.0},
{"x":"Friday","y":20.0},
{"x":"Saturday","y":12.0}
],
"key":"Enhanced",
"color":"#017351"
}
]
The response array includes an object for each series. Each object contains a "key" and "values" key. The values key contains an array of objects each with an "x" and "y" value for every datapoint in the graph.
The x value may be either an integer timestamp in the unix epoch format (e.g. 1752773040) or in the case of a bar graph, it may be a string containing the label for that x coordinate (e.g. "Sunday").
NOTE that as of build 16.202 the format of both line and bar graphs has been unified to the structure shown above. Previously, line graphs which source their data from an RRD file would output their data using an RRD-specific structure, while bar graphs used the structure above.
Requesting Graph Images, PDF or CSV exports
Obtaining PNG, PDF or CSV output is a 3-step process. Upon requesting an image, the system will launch a background process to generate the data, and returns two URLs: one to check on the status of the file generation, and another to retrieve the generated file.
The request parameters are almost identical to the parameters that would be sent to export the datapoints, but also includes the desired image format "image_format". Valid image format values are "png_2k", "png_4k", "pdf", and "csv".
- ## Generate the file
Endpoint: /admin/graphs/generate_graph_file.[json|xml]
Example Request: (no pre-existing graph):
{
"graph"=>
{
"aggregate"=>"false",
"graph_time"=>
{
"past_time"=>"1",
"past_time_unit"=>"months"
},
"graphables"=>
[
{"id"=>"1", "model"=>"Policy"},
{"id"=>"2", "model"=>"Policy"},
{"id"=>"3", "model"=>"Policy"}
],
"grouped_by"=>"day",
"target"=>"bits",
"type"=>"NetworkGraph"
},
"image_format" => "png_2k"
}
Example Request: (pre-existing graph):
{
"graph"=>
{
"id"=>"4",
"type"=>"AccountingGraph"
},
"image_format" => "png_2k"
}
Example Response:
{
"status_url":"https://gw1.company.com/admin/menu/check_tmp_file.json?filename=rxg.local_NetworkGraph_Uplink_2K_2017-03-14_15-44-50.png",
"download_url":"https://gw1.company.com/admin/menu/send_tmp_file.json?filename=rxg.local_NetworkGraph_Uplink_2K_2017-03-14_16-44-50.png",
"filename":"rxg.local_NetworkGraph_Uplink_2K_2017-03-14_16-44-50.png"
}
- ## Check the Status
Endpoint: https://gw1.company.com/admin/menu/check\_tmp\_file.json?filename=rxg.local\_NetworkGraph\_Uplink\_2K\_2017-03-14\_16-44-50.png (obtained from previous call)
Example Response:
{
"exists":true,
"download_url":"https://gw1.company.com/admin/menu/send_tmp_file.json?filename=rxg.local_NetworkGraph_Uplink_2K_2017-03-14_16-44-50.png"
}
OR
{"exists":false}
- ## Download the file
Endpoint: https://gw1.company.com/admin/menu/send\_tmp\_file.json?filename=rxg.local\_NetworkGraph\_Uplink\_2K\_2017-03-14\_16-44-50.png (obtained from previous call)
Exported graph is returned as a file download
Modern API
The rXg provides a modern RESTful API at /api/ that is the recommended interface for all new integrations. This API offers a browsable HTML interface, built-in pagination, rate limiting, and consistent JSON responses. It covers all rXg models and supports full CRUD operations.
The legacy scaffold-based API at /admin/scaffolds/ remains available for backward compatibility, but all new development should target the /api/ endpoints documented here.
Base URL
The base URL for the modern API is:
https://DNS.record.for.rXg/api/
Navigating to this URL in a browser while logged in as an admin displays the browsable API root, which lists all available endpoints and their routes.
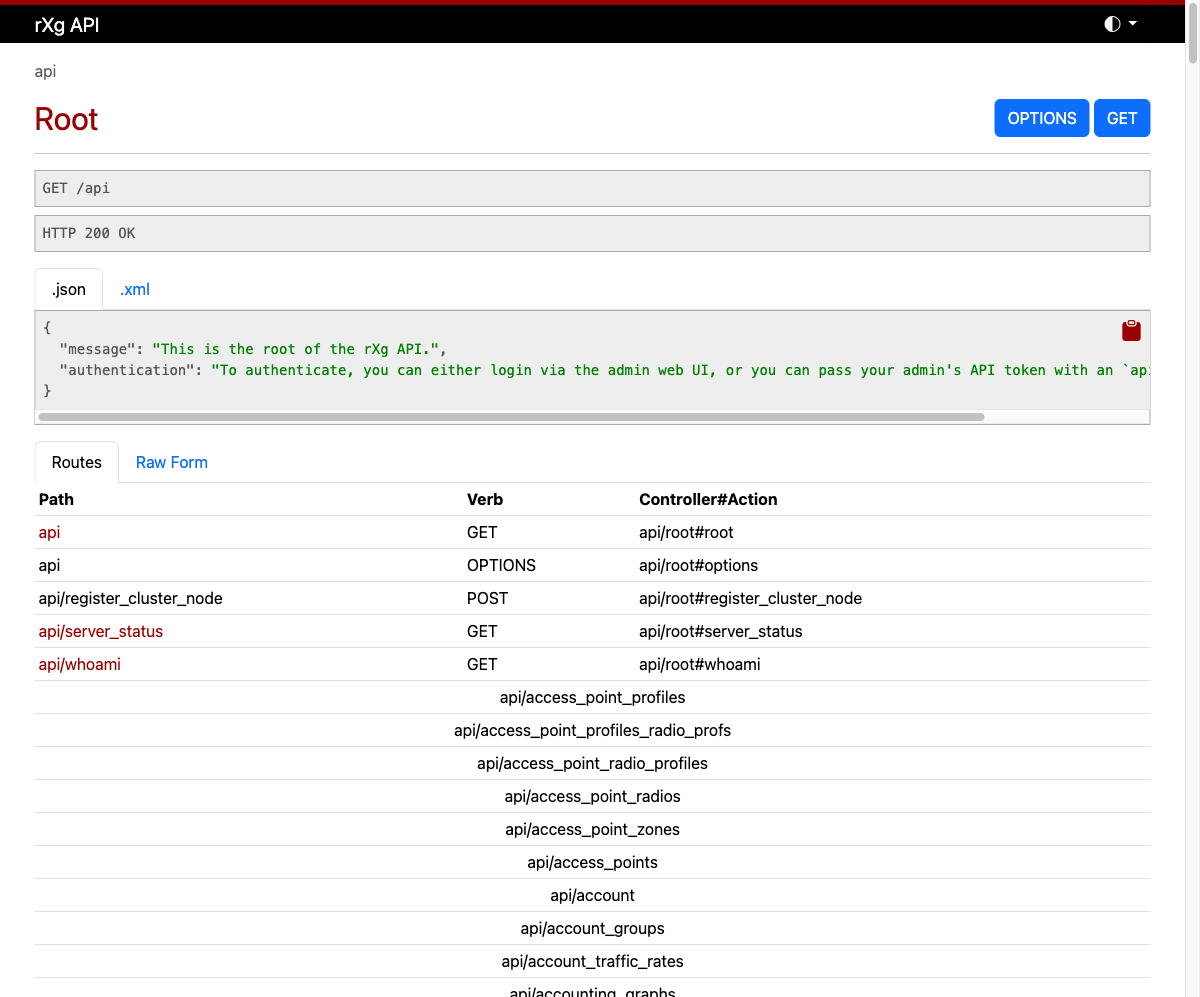
Authentication
There are three ways to authenticate with the API:
API Key (Query Parameter)
Pass your API key as a URL parameter:
https://DNS.record.for.rXg/api/accounts?api_key=YOUR_API_KEY
API Key (Bearer Token)
Pass your API key in the Authorization header:
curl -H "Authorization: Bearer YOUR_API_KEY" \
https://DNS.record.for.rXg/api/accounts
Login Endpoint
If you do not have an API key, you can authenticate with admin credentials to receive a temporary API key valid for 7 days:
curl -X POST https://DNS.record.for.rXg/api/login \
-d "username=admin&password=secret"
Response:
{
"api_key": "abc123...",
"name": "a1b2c3d4-e5f6-...",
"expiration": "2026-04-25T12:00:00-04:00"
}
API keys are managed on the Admins page. Each admin account can have multiple API keys with optional expiration dates. It is good security practice to create separate API keys for each integration.
Data Formats
The API supports both JSON and XML output. JSON is the default and recommended format.
To request a specific format, append the format extension to the URL:
https://DNS.record.for.rXg/api/accounts.json
https://DNS.record.for.rXg/api/accounts.xml
You can also set the Accept header:
curl -H "Accept: application/json" https://DNS.record.for.rXg/api/accounts?api_key=KEY
curl -H "Accept: application/xml" https://DNS.record.for.rXg/api/accounts?api_key=KEY
CRUD Operations
The API follows standard REST conventions using HTTP verbs:
| Operation | HTTP Method | URL Pattern | Description |
|---|---|---|---|
| List | GET | /api/accounts |
Retrieve all records (paginated) |
| Show | GET | /api/accounts/42 |
Retrieve a single record by ID |
| Create | POST | /api/accounts |
Create a new record |
| Update | PUT/PATCH | /api/accounts/42 |
Update an existing record |
| Destroy | DELETE | /api/accounts/42 |
Delete a record |
List
Retrieve a paginated list of records:
curl https://DNS.record.for.rXg/api/accounts?api_key=KEY
Response:
{
"count": 150,
"page": 1,
"page_size": 30,
"total_pages": 5,
"results": [
{
"id": 1,
"login": "jsmith",
"first_name": "John",
"last_name": "Smith",
"email": "[email protected]",
...
},
...
]
}

Show
Retrieve a single record by ID:
curl https://DNS.record.for.rXg/api/accounts/1?api_key=KEY
Create
Create a new record by sending a POST with the record attributes:
curl -X POST https://DNS.record.for.rXg/api/accounts?api_key=KEY \
-H "Content-Type: application/json" \
-d '{"login": "newuser", "first_name": "New", "last_name": "User", "email": "[email protected]", "password": "secret", "password_confirmation": "secret"}'
Update
Update an existing record:
curl -X PATCH https://DNS.record.for.rXg/api/accounts/42?api_key=KEY \
-H "Content-Type: application/json" \
-d '{"first_name": "Updated"}'
Destroy
Delete a record:
curl -X DELETE https://DNS.record.for.rXg/api/accounts/42?api_key=KEY
Filtering and Search
The API provides two complementary mechanisms for narrowing results: field filtering and full-text search.
Field Filtering
Filter results by passing field names as query parameters. This performs an exact match on the specified field:
curl "https://DNS.record.for.rXg/api/accounts?api_key=KEY&login=jsmith"
Multiple filters can be combined:
curl "https://DNS.record.for.rXg/api/accounts?api_key=KEY&state=active&account_group_id=3"
Field filtering also supports comparison predicates by appending a suffix to the field name:
| Suffix | Operator | Example |
|---|---|---|
_lt |
Less than | ?created_at_lt=2026-01-01 |
_lte |
Less than or equal | ?mb_down_lte=100 |
_gt |
Greater than | ?created_at_gt=2025-01-01 |
_gte |
Greater than or equal | ?mb_up_gte=50 |
_cont |
Contains (case-sensitive) | ?login_cont=smith |
_in |
In list | ?state_in=active,suspended |
These predicates can be combined to form range queries:
# Accounts created in 2025
curl "https://DNS.record.for.rXg/api/accounts?api_key=KEY&created_at_gte=2025-01-01&created_at_lt=2026-01-01"
# Accounts with login containing "admin"
curl "https://DNS.record.for.rXg/api/accounts?api_key=KEY&login_cont=admin"
Full-Text Search
Some endpoints support the search query parameter, which performs a case-insensitive partial match (ILIKE) across one or more fields:
curl "https://DNS.record.for.rXg/api/ar_transactions?api_key=KEY&search=10.0.0.1"
The fields searched depend on the endpoint. For example, the AR Transactions endpoint searches across the reason, ip, mac, and login fields. Not all endpoints have full-text search configured; use field filtering as the primary approach for narrowing results.
Combining Filters
Field filters, search, sorting, and pagination can all be combined in a single request:
curl "https://DNS.record.for.rXg/api/accounts?api_key=KEY&state=active&login_cont=smith&ordering=login&page=1&page_size=10"
Sorting
Sort results using the ordering query parameter. Prefix a field name with - for descending order:
# Sort ascending by login
curl "https://DNS.record.for.rXg/api/accounts?api_key=KEY&ordering=login"
# Sort descending by created_at
curl "https://DNS.record.for.rXg/api/accounts?api_key=KEY&ordering=-created_at"
Pagination
All list endpoints are paginated with a default page size of 30 records. Pagination metadata is returned in the response body.
Query Parameters
| Parameter | Description |
|---|---|
page |
Page number (default: 1) |
page_size |
Records per page (default: 30) |
curl "https://DNS.record.for.rXg/api/accounts?api_key=KEY&page=2&page_size=10"
Response Body
The response includes pagination metadata and navigation links:
{
"count": 150,
"page": 2,
"page_size": 10,
"total_pages": 15,
"next": "https://DNS.record.for.rXg/api/accounts?api_key=KEY&page=3&page_size=10",
"previous": "https://DNS.record.for.rXg/api/accounts?api_key=KEY&page=1&page_size=10",
"results": [...]
}
Rate Limiting
The API enforces rate limits to protect the system from excessive requests. Rate limits are applied per IP address and can be further customized per API key.
Default Limits
| Operation | Default Limit | Period |
|---|---|---|
| Read (GET) | 200 requests | 60 seconds |
| Write (POST/PUT/PATCH/DELETE) | 60 requests | 60 seconds |
| Authentication (POST /api/login) | 10 requests | 60 seconds |
These defaults can be adjusted system-wide via the Device Options scaffold.
Per-Key Overrides
Individual API keys can have custom rate limits configured via the rate_limit_override field on the API key record.
Response Headers
Every API response includes rate limit information:
| Header | Description |
|---|---|
X-RateLimit-Limit |
Maximum requests allowed in the current period |
X-RateLimit-Remaining |
Requests remaining in the current period |
X-RateLimit-Reset |
Unix timestamp when the rate limit resets |
When the rate limit is exceeded, the API responds with HTTP 429 and includes a Retry-After header indicating how many seconds to wait.
Utility Endpoints
Server Status
A lightweight health check endpoint that requires no authentication:
curl https://DNS.record.for.rXg/api/server_status
{"message": "Server Operational"}
Who Am I
Returns metadata about the currently authenticated user:
curl https://DNS.record.for.rXg/api/whoami?api_key=KEY
{"type": "admin", "id": 1, "login": "admin"}
Help
Every model endpoint provides a help action that returns the scaffold documentation:
curl https://DNS.record.for.rXg/api/accounts/help?api_key=KEY
Execute
The execute action allows calling model methods via the API. This is restricted to admin accounts with write-master permissions:
curl -X POST "https://DNS.record.for.rXg/api/accounts/execute?api_key=KEY" \
-H "Content-Type: application/json" \
-d '{"method": "count"}'
For instance methods, include the record ID in the URL:
curl -X POST "https://DNS.record.for.rXg/api/accounts/42/execute?api_key=KEY" \
-H "Content-Type: application/json" \
-d '{"method": "devices"}'
Browsable API
When accessed from a web browser, the API renders an interactive HTML interface. This interface displays:
- The current endpoint and HTTP method
- Response data formatted as JSON or XML (switchable via tabs)
- A route table showing all available sub-endpoints
- HELP, OPTIONS, and action buttons
This is useful for exploring the API interactively without writing code.
Comparison with Legacy Scaffold API
| Feature | Modern API (/api/) |
Legacy Scaffold API (/admin/scaffolds/) |
|---|---|---|
| Base URL | /api/ |
/admin/scaffolds/ |
| Default format | JSON | XML |
| Pagination | Built-in with metadata | Manual (per_page parameter) |
| Rate limiting | Per-IP and per-key with headers | None |
| Browsable interface | Yes | No |
| Inline help | Yes (/help action) |
No |
| Authentication | API key (query param or Bearer header) | API key (query param only) |
| Sorting | ordering parameter (prefix - for descending) |
Limited |
Both APIs authenticate using the same API keys managed on the Admins page.
Miscellaneous
This section of the manual will include miscellaneous articles.
SoftGRE Tunnels
Ruckus SmartZone Configuration
Overview
The following steps will guide you through configuring a SoftGRE tunnel between a Ruckus AP and an rXg.
Environment
This document was written and tested using the following components from the RG Nets and RUCKUS ecosystem.
| Manufacturer | Component | Version |
|---|---|---|
| RG Nets | rXg | 13.2 - 15.251 |
| RUCKUS | Virtual SmartZone Essentials | 6.1.1.0.959 |
| RUCKUS | R650 | 6.1.1.0.1274 |
Important Notes:
- SoftGRE tunnels are a licensed feature with RUCKUS. A demo license or SoftGRE license is required for this application.
- It is recommended to only use SoftGRE tunnels over the LAN as the traffic is currently unencrypted.
Prerequisites
This document assumes the following has already been configured: 1. IP Address for the SmartZone, AP, and rXg are all in the same subnet. 2. The subnet has been tied to an IP group and policy called Management. 3. The AP has already been discovered by the SmartZone 4. While not required, in the case of this lab, a functional eDPSK configuration has already been deployed and tested using config sync.
Configuration
SmartZone
All required configuration changes to the SmartZone will be applied using config sync from the rXg.
rXg WLAN Configuration
Network >> Wireless >> WLANs
The modifications in the WLAN profile are quite simple. On an existing WLAN, you can check the box for tunnel, set the tunnel type to SoftGRE, and then add the IP address for the interface on the rXg that will be the endpoint for the tunnel.
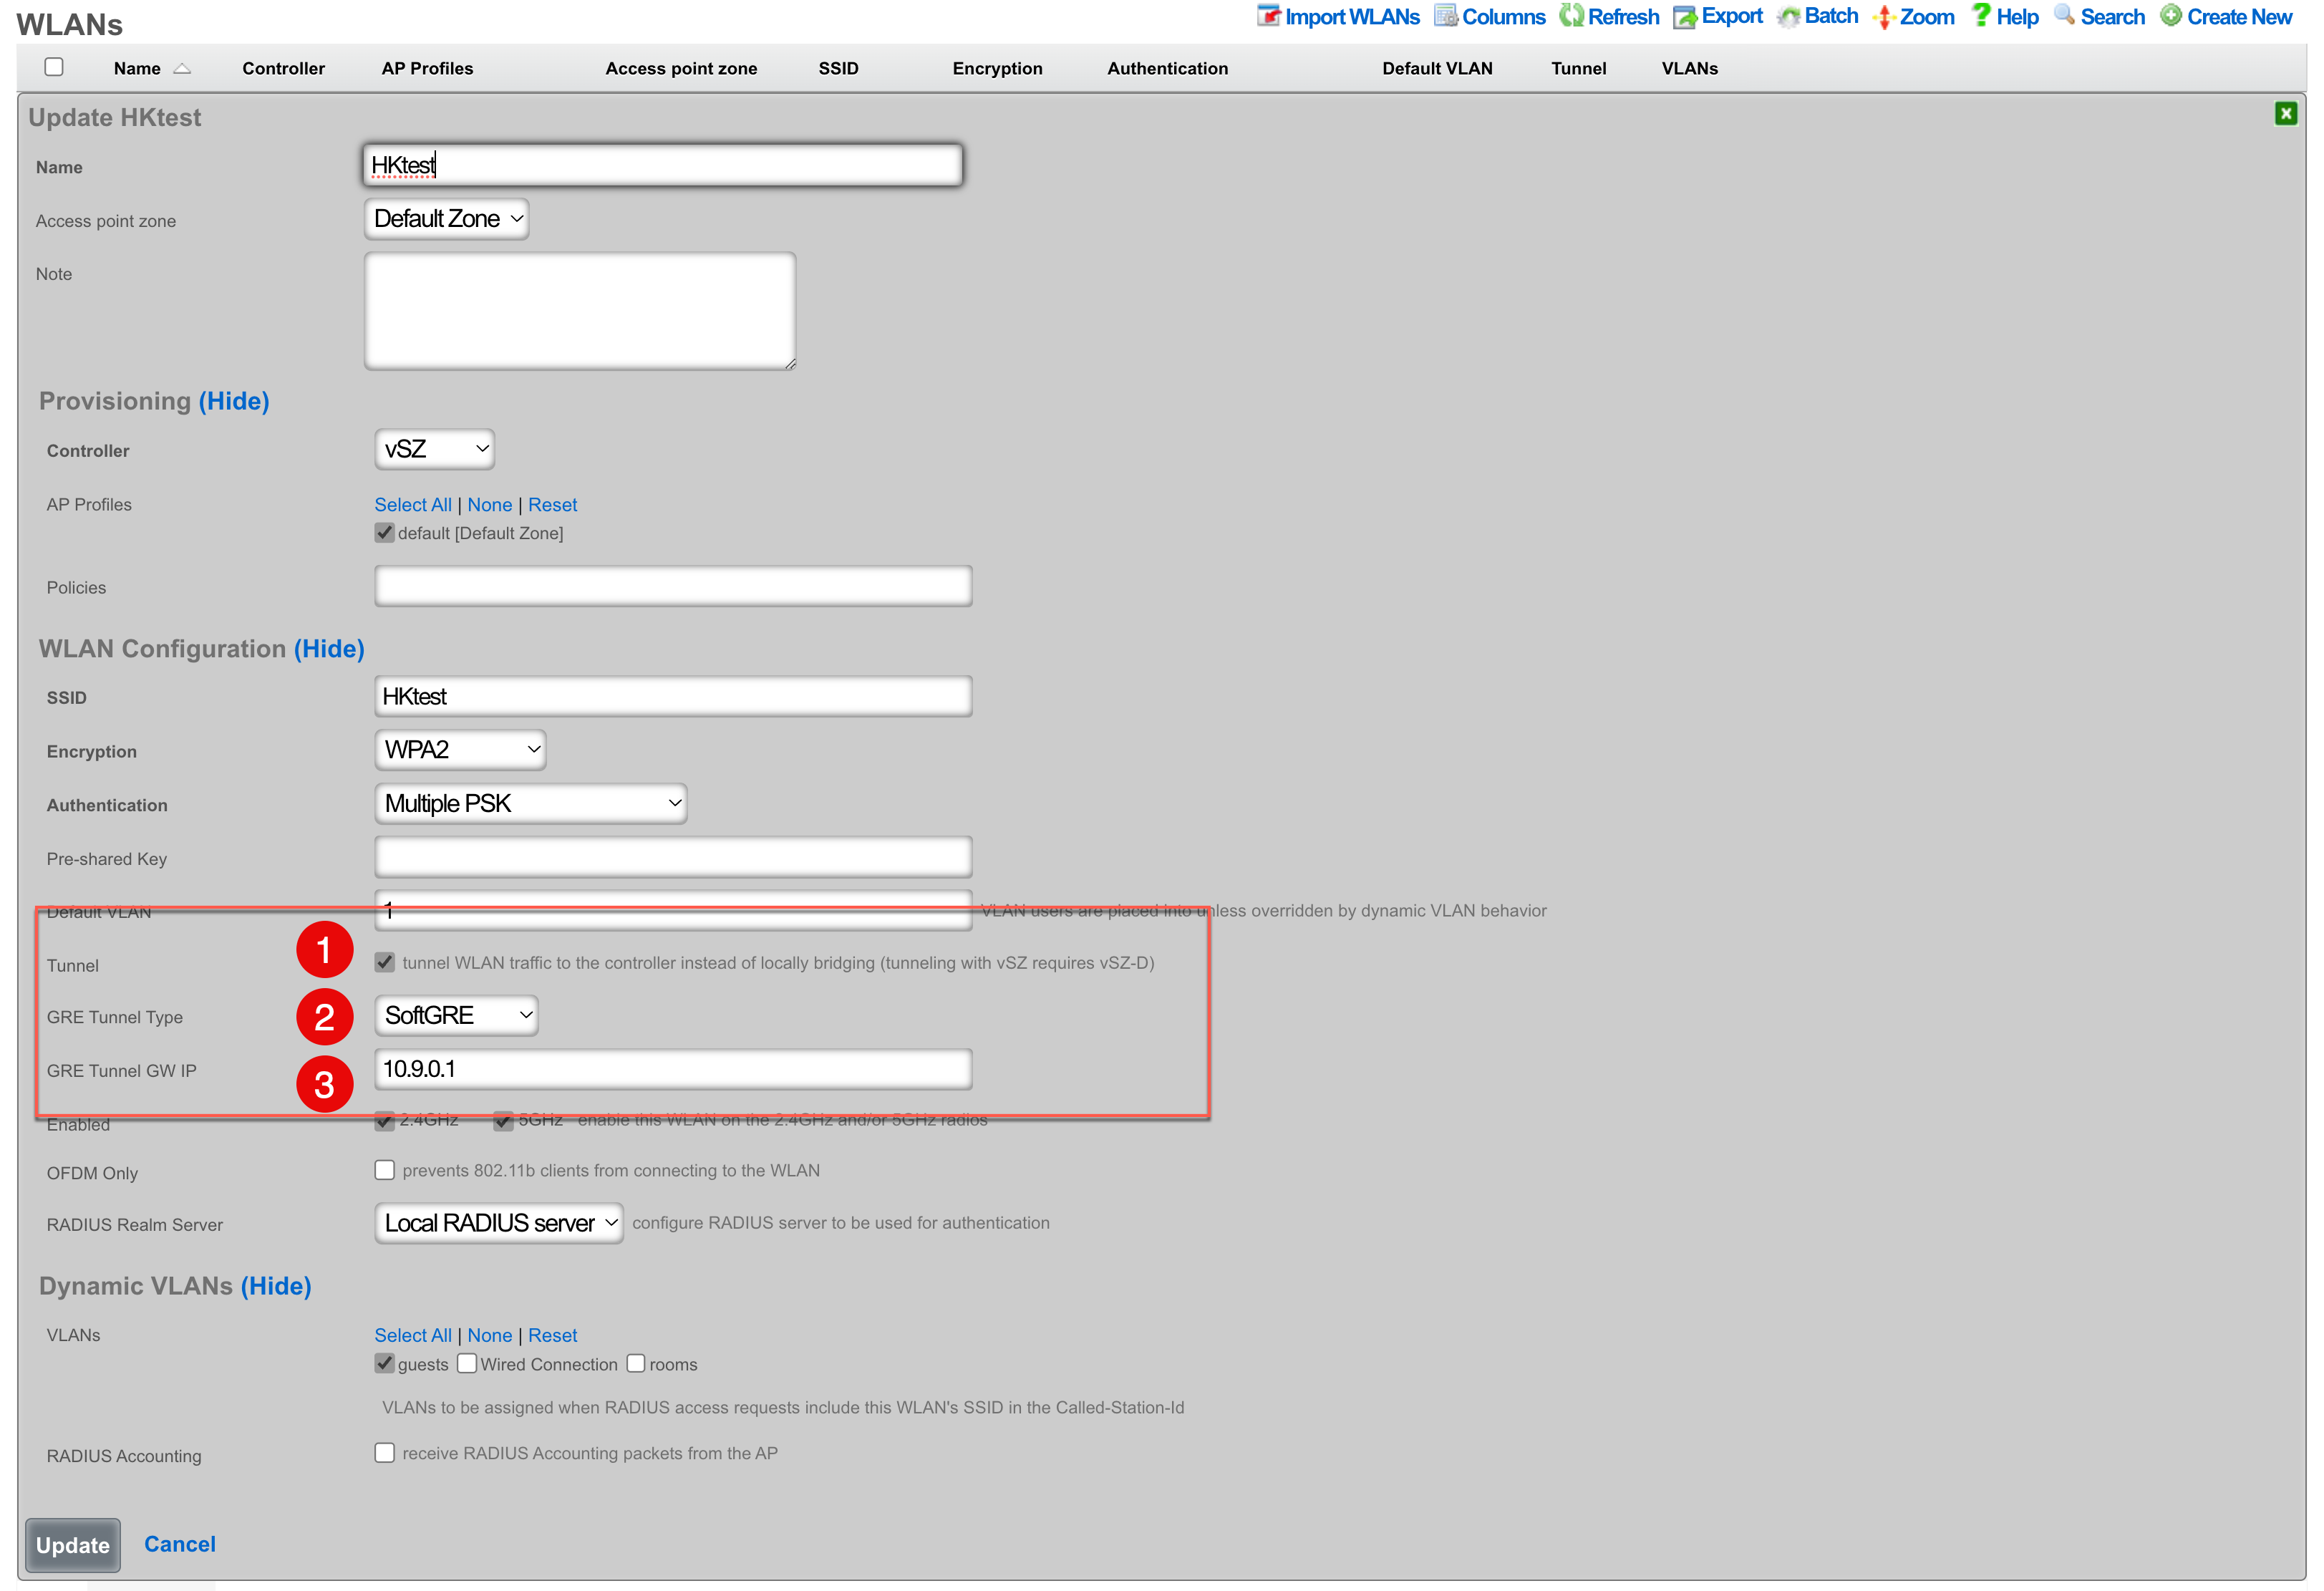
- The Tunnel checkbox instructs access points to build a tunnel to the controller instead of locally bridging the client traffic. In the case of Ruckus, this checkbox will create a SoftGRE tunnel between the APs and the rXg. This capability does require that the Ruckus controller has an appropriate SoftGRE license.
- The Tunnel Type field allows you to select between RuckusGRE and SoftGRE. RuckusGRE is for use with the Ruckus virtual data plane. SoftGRE allows for tunnel creation to the rXg as the endpoint. A third option, VXLAN, is available for OpenWiFi WSS devices but is not applicable to Ruckus deployments.
- The Tunnel Gateway IP should be the IP address of the interface on the rXg that the tunnel will connect to.
rXg Pseudo Interfaces
Network >> LAN >> Pseudo Interfaces
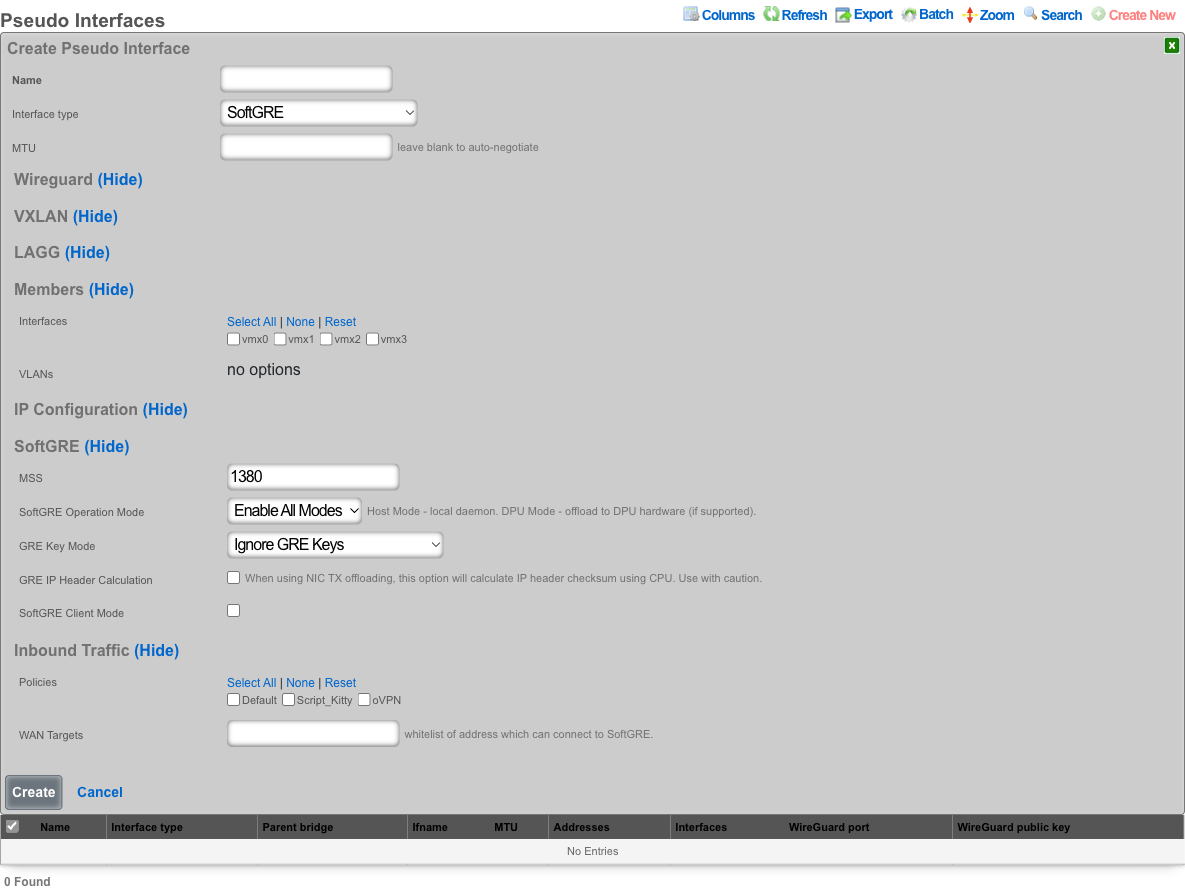
- Name for the SoftGRE tunnel interface.
- Select an Interface type of SoftGRE.
- In the Members section, select the Interfaces to be used for untagged traffic and the VLANs that will be allowed over the SoftGRE tunnel.
- In the SoftGRE section, configure the MSS (default 1380), SoftGRE Operation Mode, GRE Key Mode, and optionally enable SoftGRE Client Mode and GRE IP Header Calculation.
- In the Inbound Traffic section, select the Policies that contain the APs that will establish a tunnel and optionally configure WAN Targets to whitelist remote addresses.
The SoftGRE Operation Mode controls how the tunnel is processed: - Enable All Modes runs the SoftGRE daemon on the host and offloads to DPU hardware if available. - Host Mode runs the SoftGRE daemon on the host CPU only. - DPU Mode offloads tunnel processing to DPU hardware (requires a compatible DPU device).
For detailed field descriptions, see the LAN Pseudo Interfaces documentation.
Troubleshooting
Confirm the presence of interface bridges.
In the GUI this can be confirmed by browsing to Instruments >> System Info >> Interface Configurations and checking that there is a bridge for each VLAN that should be carried over the tunnel. The bridge number will be the same as the VLAN with an extra 1 at the beginning. For example if vlan2000 should be carried over the tunnel, you should also have a bridge12000.

This can also be seen via SSH with a command like ifconfig | grep bridge12000

Confirm the traffic is flowing over the bridge interface.
This can be done by using tcpdump to confirm that you see unicast traffic over the interface. For example, have a client connect and ping 4.2.2.2.
Continuing the use of bridge12000, I will use the following tcpdump statement tcpdump -ni bridge12000 and confirm that I can see unicast traffic from my client device.
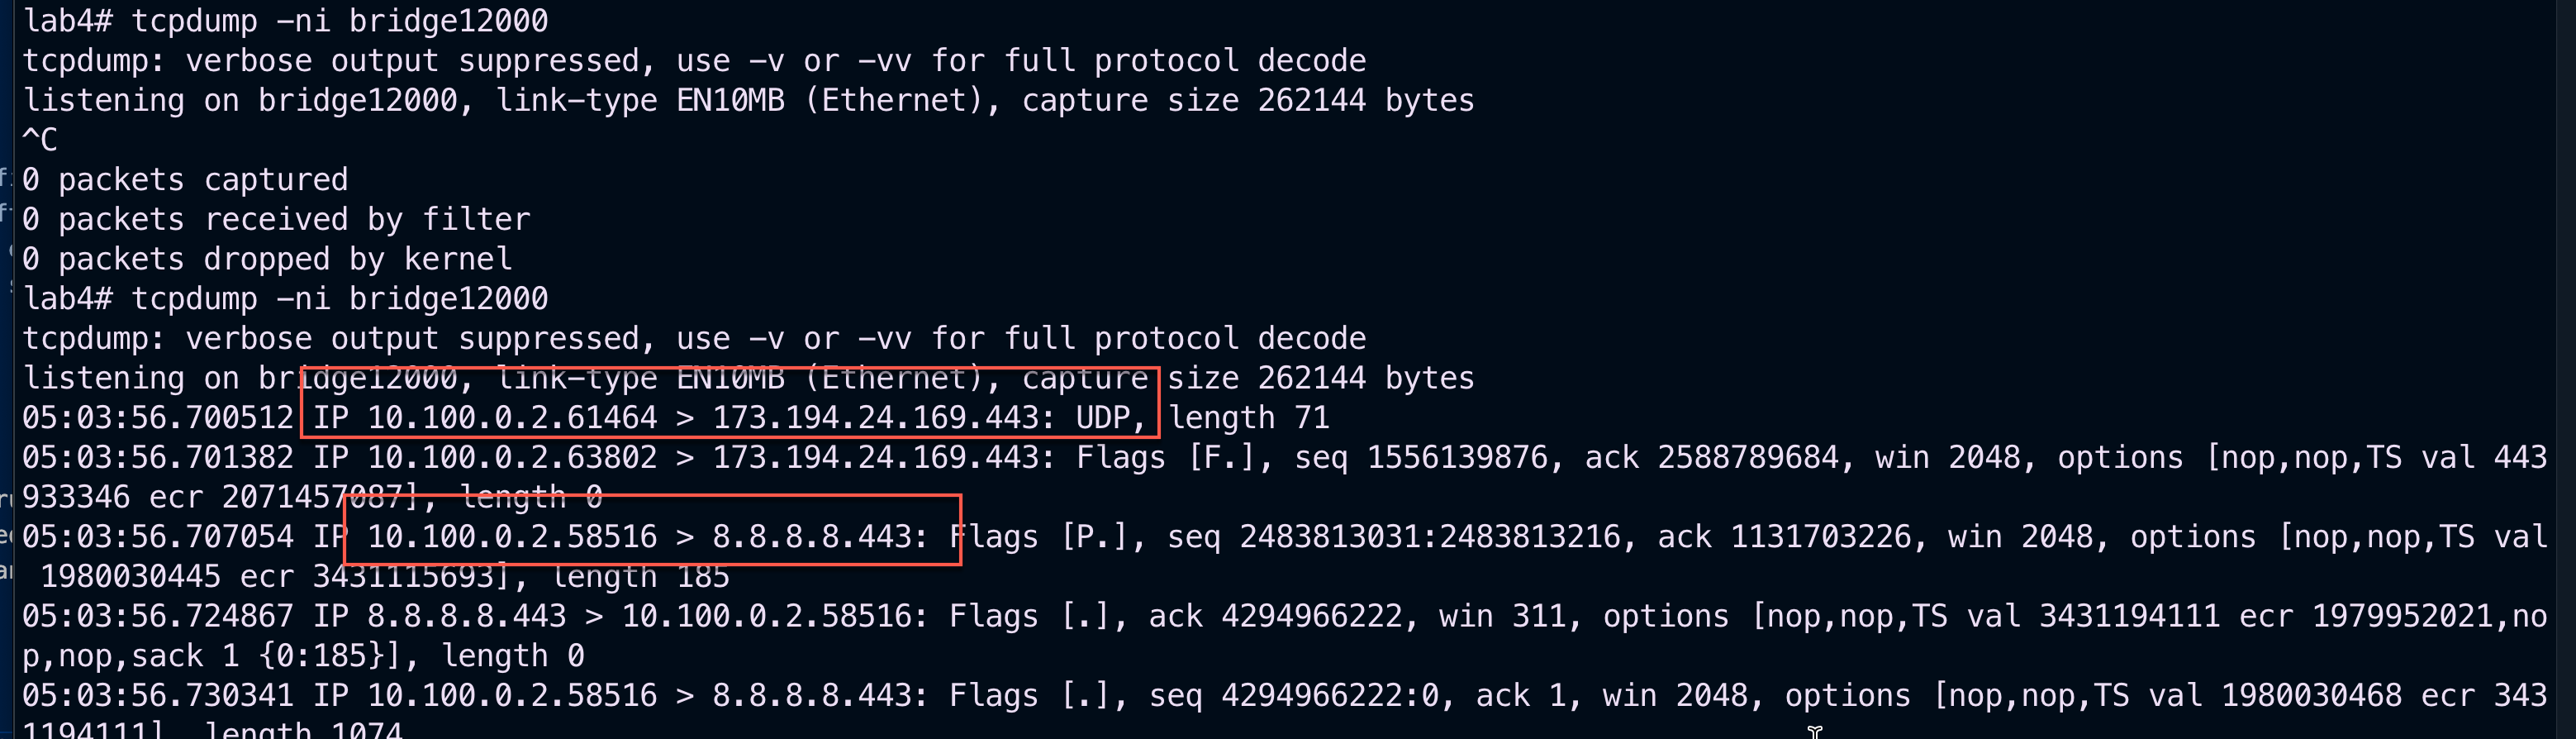
SoftGRE Client Configuration on Linux Host
This section presents an example of softGRE client configuration on a generic Debian-based host. Ubuntu 22.04.5 variant was used to test these commands in detail.
All commands are executed as root or in sudo mode. Install vlan package and modprobe 8021q on the host:
apt install vlan
modprobe 8021q
The local host is assumed to be connected to the WAP via wireless interface and have an address assigned either via DHCP or static allocation. As an example, the local Linux host has the IP address of 10.0.47.3 (client) and the target server has the address of 10.0.48.2 (server) to demonstrate network traversal capability. VLAN 602 is used as an overlay in the softGRE tunnel, i.e., all customer traffic is tagged with VLAN 602 and then transported over the softGRE tunnel. To avoid routing problems, a static route is added for server address (10.0.48.2) as reachable via the underlay gateway (10.0.47.1).
A shell script can be prepared to simplify the provisioning process. The local address MUST correspond to the IP address of the underlay interface, otherwise the communication will not be properly established with the remote softGRE gateway (rXg system).
#!/usr/bin/bash
ip link add name gre1 type gretap local 10.0.47.3 remote 10.0.48.2 ttl 255
ip link add link gre1 name gre1.602 type vlan id 602
ip link set gre1 up
ip link set gre1.602 up
ip addr add 10.60.2.2/24 dev gre1.602
route add -net 10.0.48.2/32 gw 10.0.47.1 netmask 255.255.255.255
Before the softGRE tunnel is established, the interfaces on the server host look as follows:

and the routing table is as follows

Once the script is executed, the interfaces change as follows

and the routing table changes as follows

If the target VLAN (in this case, vlan602) is configured with a DHCP pool, the new gre1.602 interface can acquire address dynamically, using the following command
dhcpclient -v -i gre1.602
Additional Troubleshooting
Confirm the presence of interface bridges
The bridge number will be the same as the VLAN with an extra 1 at the beginning. For example if vlan2000 should be carried over the tunnel, you should also have a bridge12000. In our example, there will also be an additional 0 because the VLAN ID is only 3 digits. VLAN 777 becomes bridge10777.
This can be confirmed via SSH with the following command:
ifconfig | grep bridge10777

Confirm the traffic is flowing over the bridge interface
This can be done by using tcpdump to confirm that you see unicast traffic over the interface. For example, have a client connect and ping 4.2.2.2.
Continuing the use of bridge10777, I will use the following tcpdump statement tcpdump -ni bridge10777 and confirm that I can see unicast traffic from my client device.

Telemetry
Overview
The rXg supports the ingest of streaming telemetry data from three different sources: gRPC, MQTT, and Kafka. All of these ingest data types are used to get and analyze radio metrics and client metrics, which are presented in Radio Metric Graphs and the KPI dialog types.
Cisco 9800 (via gRPC) and Ruckus vSZ (via MQTT) operate with the rXg acting as a server.
OpenWiFi (via Kafka) operates with the OpenWiFi Kafka process as the server, also known as the broker in the Kafka terminology.
Individual Wi-Fi controllers may be instantiated locally on the rXg, running on the rXg virtualization host, or instantiated externally on some other virtualization platform, in an appliance, etc. In either case, the rXg is capable of receiving streaming telemetry from such devices and processing it locally.
Prerequistes
The WLAN Controller and the rXg MUST be time synchronized to the same epoch to avoid interpretation problems.
OpenWiFi Gateway via Kafka bus
The rXg automatically attempts to connect to the OpenWiFi Gateway (OWGW) on the Kafka bus on port 9094. If you have installed the OWGW using the image provided by RG Nets using the config template example, this communication path is established automatically.
Cisco 9800 WLC via gRPC
The Cisco 9800 Wireless Lan Controller (WLC) uses gRPC to stream telemetry data.
The Cisco 9800 WLC MUST have Netconf Yang enabled. This can be done with the netconf-yang CLI directive or in the GUI via Administration>HTTP/HTTPS/Netconf/VTY.
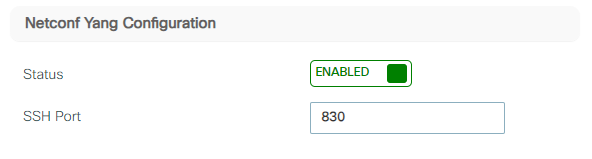
If you use the bootstrap script automatically generated from the rXg, that will
have the netconf-yang directive in it, providing the simplest path to enable the streaming telemetry in this setup.
rXg Setup
To enable gRPC streaming, create a WLAN Controller record for your WLAN Controller if there is not one already. If the rXg supports gRPC streaming for your WLAN controller, a gRPC port input field will be available. Put in the port number that you want the rXg to listen on for this device's gRPC telemetry data.

It is critically important to have the port that the rXg is listening for telemetry data on be exactly the same port that the WLC is configured to send the telemetry data TO. If you wish to stream telemetry data from multiple WLCs to one rXg, each WLC must stream to a different port on that rXg.
Cisco 9800 Setup
The rXg provides a built in facility for building the exact script necessary to to create the streaming telemetry subscriptions on the Cisco 9800 WLC.
First scroll to the right of your WLAN device record to access the Bootstrap view.
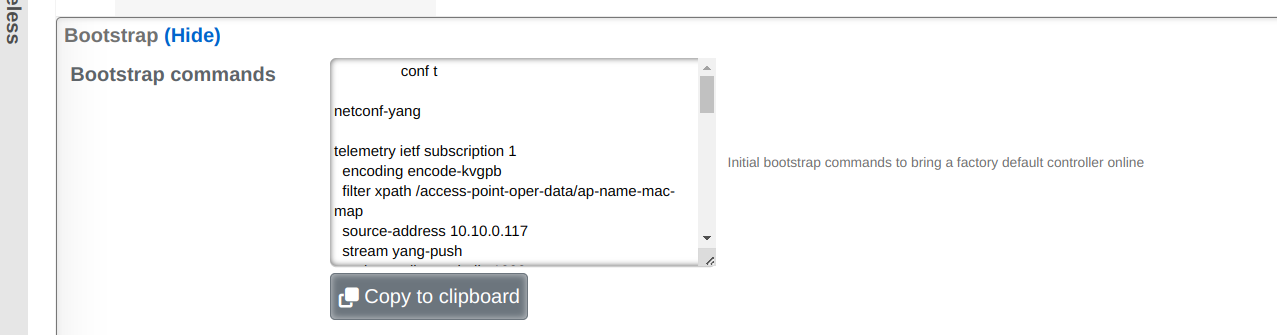
Then click on Show to present the telemetry bootstrap configuration script.
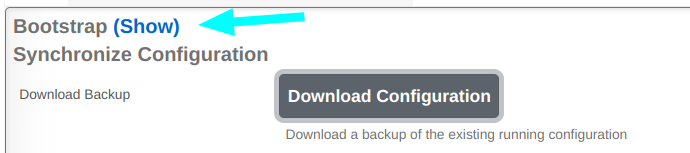
Next click on Copy to Clipboard to copy this configuration.
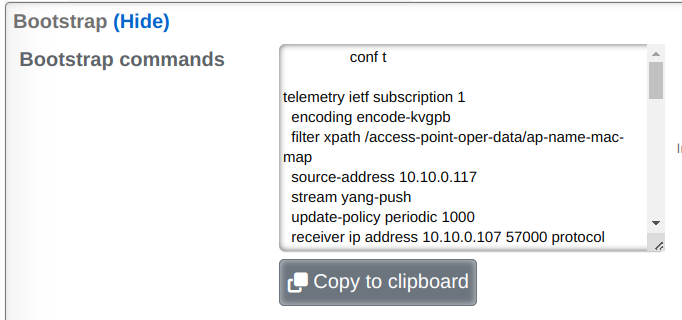
Next paste the configuration into the Cisco 9800 WLC to run it:
NOTE: This will update existing low numbered subscriptions if you have any
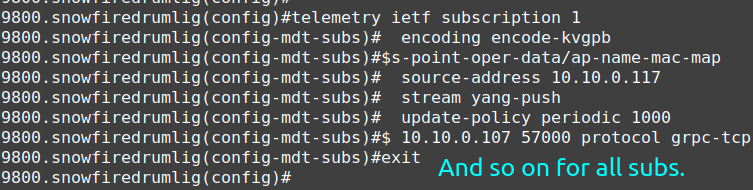
Setup Confirmation
Next you may be wondering if your rXg is receiving the streaming telemetry data.
Check Access Point Radios on rXg
The easiest, fastest and simplest way to check if your Telemetry data is streaming in is to check if any Access Point Radios are now present. In the Network >> Wireless view of your rXg, scroll down to the Access Point Radios Scaffold and see if there are new ones:
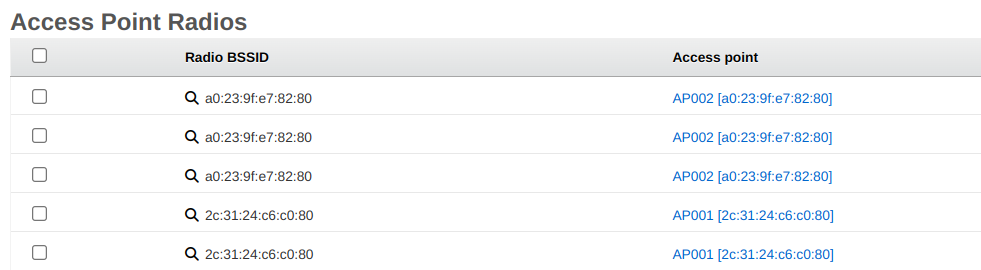
Health Check on rXg
Another way to check is to make a "Cisco Telemetry Health Check" widget.
In order to do this, setup a new custom dashboard with the Cisco Telemetry health check widget on it. Widgets and dashboards and dashboard configuration is covered in the Archives >> Reports section of this manual, but here is an example of configuring such a widget.
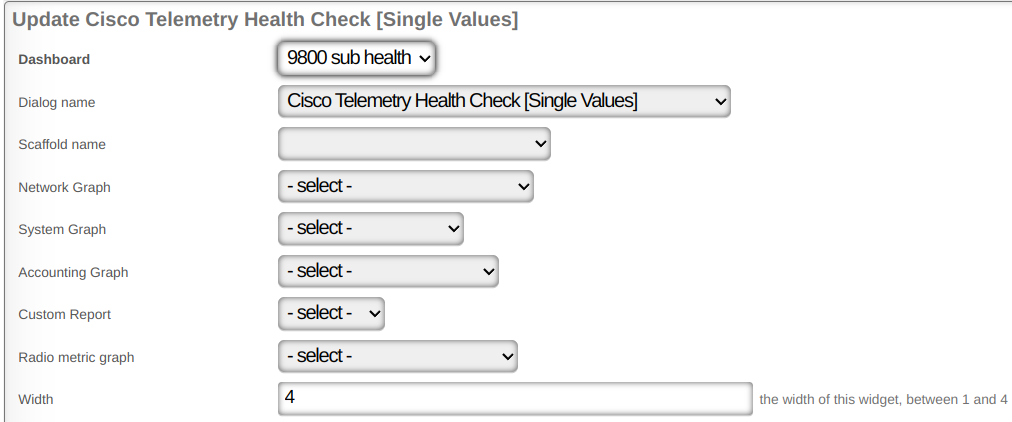
Here is what the widget will look like when the data is being received.
NOTE: You will not receive data for client_oper_data_common_oper_data,
client_oper_data_dot11_oper_data or client_oper_data_traffic_stats when no
clients are associated.

Health Check on Cisco 9800 WLC
The best way to check the status of the subscriptions on the Cisco 9800 WLC is with the
command show telemetry ietf subscription all detail.
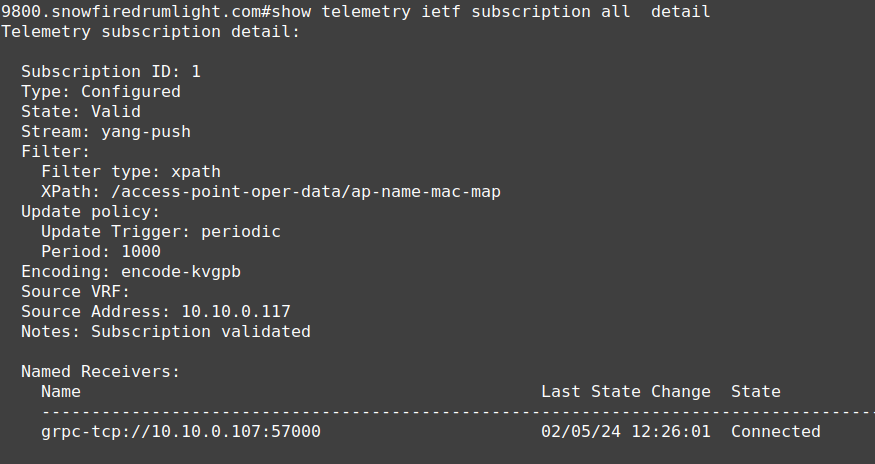
All the rest of the subscriptions should also say Connected and Subscription Validated as well.
Ruckus vSZ Setup
The rXg can receive telemetry data from the RUCKUS Virtual Smart Zone via the MQTT (Message Queuing Telemetry Transport) protocol.
rXg Setup
To enable MQTT streaming, we will need to create a local MQTT server. This can be done by browsing to Network >> Wireless >> WLAN Controllers and editing an existing vSZ WLAN Controller profile, or creating a new one if needed. A new vSZ WLAN Controller profile is needed even if the vSZ instance is running external to the rXg and the streaming telemetry data is intended to be collected and procsssed on the rXg.
The example below shows a vSZ WLAN Controller instance created for an external vSZ to collect the streaming telemetry data.

Scroll down to the RUCKUS section of the WLAN Controller profile and populate telemetry_username and telemetry_psk fields.
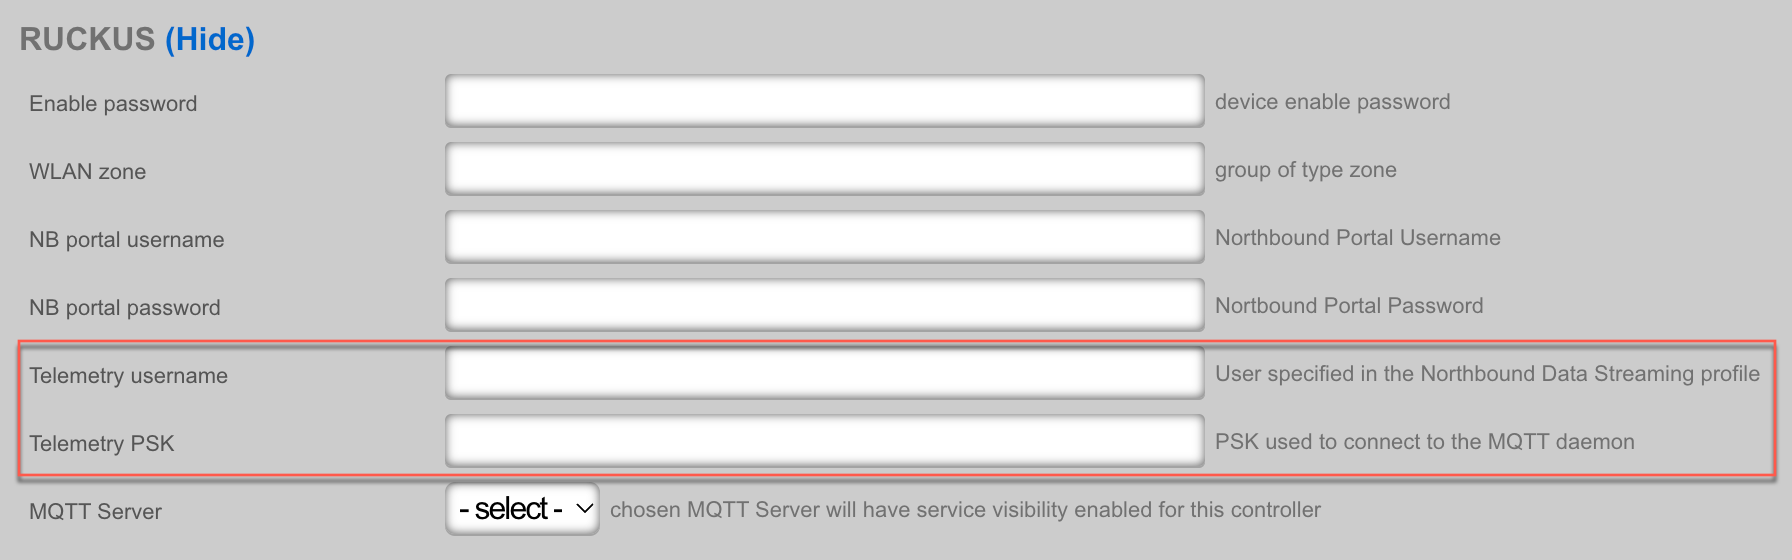
Once the changes are saved, a local MQTT server will be created to receive the streaming data from the vSZ. You can see the MQTT server configuration under the Services >> Servers >> MQTT Server scaffold.
If the vSZ WLAN Controller VM is locally hosted on the rXg, the vSZ will automatically be configured to start sending telemetry data.
If the vSZ WLAN Controller VM is hosted off the rXg (in a private or public cloud, in an appliance, etc.), the vSZ streaming telemetry configuration needs to be modified manually, by creating a new profile in the Administration >> NB Streaming area of the vSZ WLAN controller, as shown below:

The profile configuration includes the following fields:
The Name field is an arbitrary string used to identify the portal. This string is used for identification purposes only.
The Server Host field is populated with the FQDN or the IP address of the WAN interface on the rXg system that is collecting the streaming telemetry data.
The Server Port field is populated with the port number of the MQTT server, as configured on the rXg side.
The User and Password fields are populated with the respective fields from the vSZ WLAN Controller as discussed before.
The System ID field is populated with the vSZ WLAN Controller ID value, which can be found by browsing in the rXg to Network >> Wireless >> WLAN Controllers and clicking "Show" on the scaffold for the previously configured WLAN controller. You will then scroll down to the bottom and find the ID field.

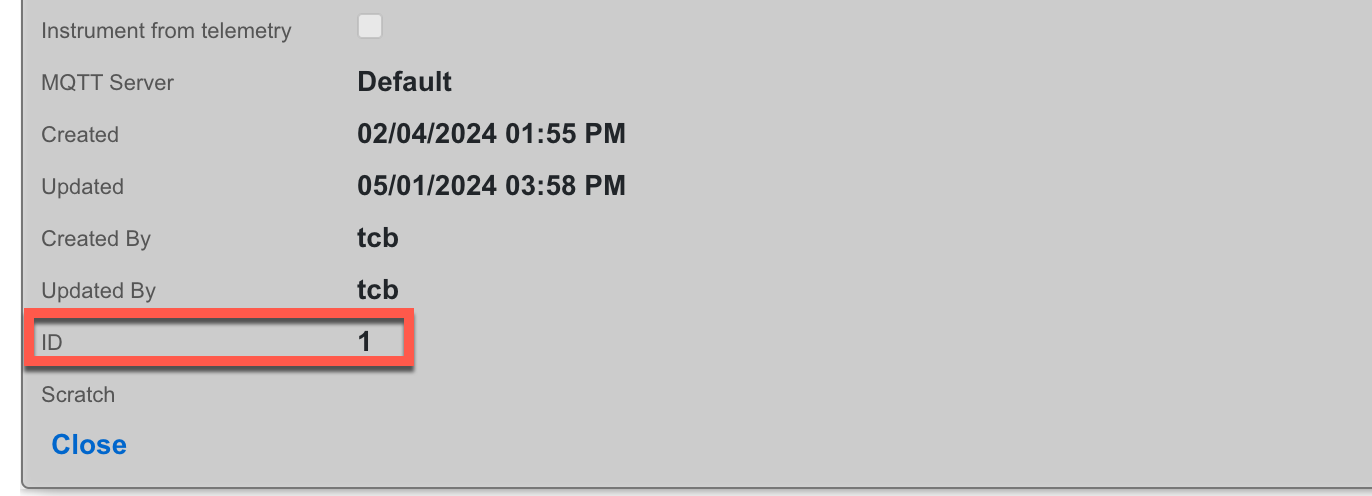
- The Data Type field allows to select which of the vSZ data points will be streamed from the vSZ WLAN Controller to the rXg, including the 4 primary groups, i.e., AP data, Client data, System data, and Switch data. Individual data groups have further data categories, when expanded.
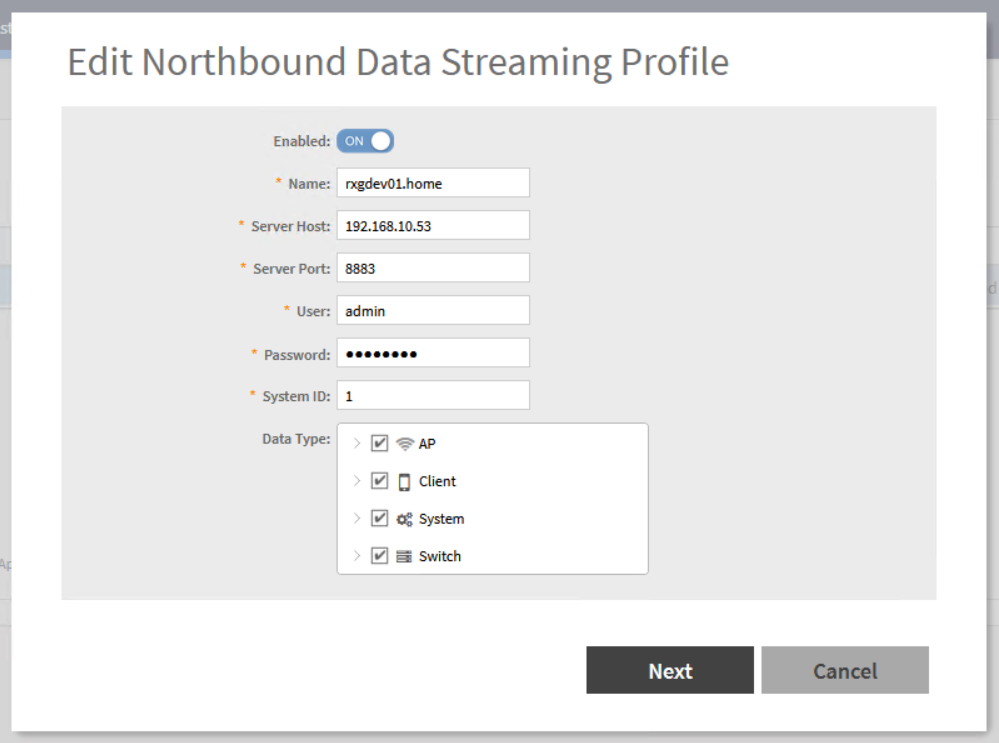
Setup Confirmation
Check Access Point Radios
The easiest, fastest and simplest way to check if the telemetry data is streaming in is to check if any Access Point Radios are now present.
In the Network >> Wireless view of the rXg, scroll down to the Access Point Radios Scaffold and see if there are new WAPs:
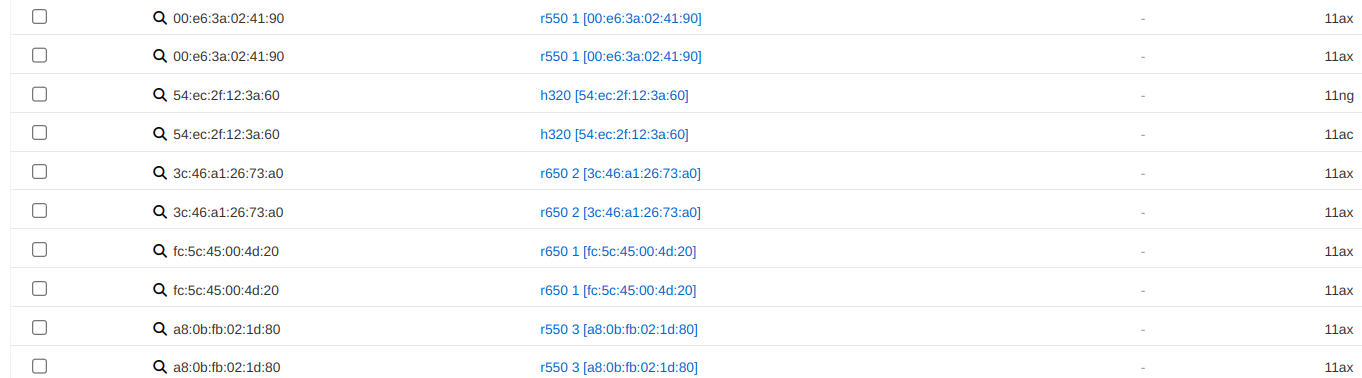
Check Subscription in vSZ WLAN Controller (local or remote)
Another good place to check is in the vSZ itself. In Administration >> NB Streaming
you should be able to find your subscription. When it is working, you should see
Connected to the right in the list view.
Check MQTT Server on rXg
In the Services >> Servers scaffold in the rXg, scroll down to MQTT Servers. Create or edit an MQTT Server with the following attributes:
active: true
tls version: 1.2
tls_port: 8883
infrastructure_devices: <YOUR vSZ>
In order for the rXg to create all the necessary firewall rules for the MQTT Server, you must have an active MQTT Server associated with your WLAN Controller via your WLAN Controller's MQTT Server attribute.
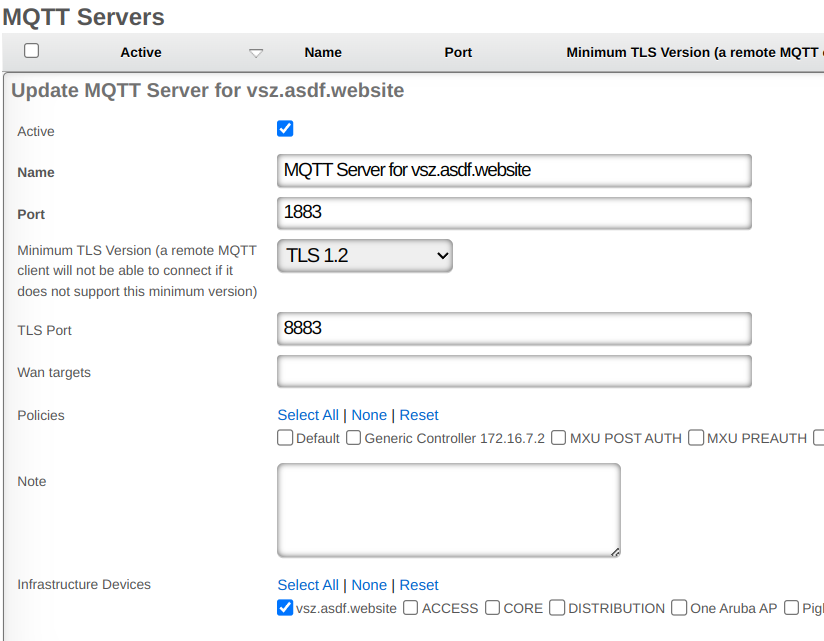
instrument_from option.
The instrument_from option tells the rXg to create and update
Access Points and Wireless Clients based on telemetry data if it is set to telemetry.
If you are running with config sync turned on, or monitoring turned on, your rXg
will be able to import infrastructure updates through the regular infrastructure
monitoring process, and you are recommended to run with instrument_from set to 'integration'.
If you are not using monitoring or config sync and are just receiving telemetry
data from an infrastructure device, then you are recommended to run with instrument_from set to 'telemetry'.
Config Sync
Example Ruckus One Setup
Connecting Ruckus One to rXg
Steps to connect Ruckus One
- You will need to collect (3) pieces of information from your Ruckus Cloud Account.
Tenant ID - This can be found under your user profile in the upper right hand corner of your Ruckus One Portal.
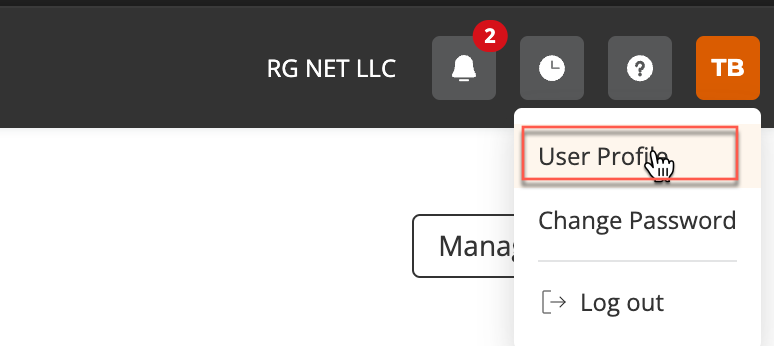
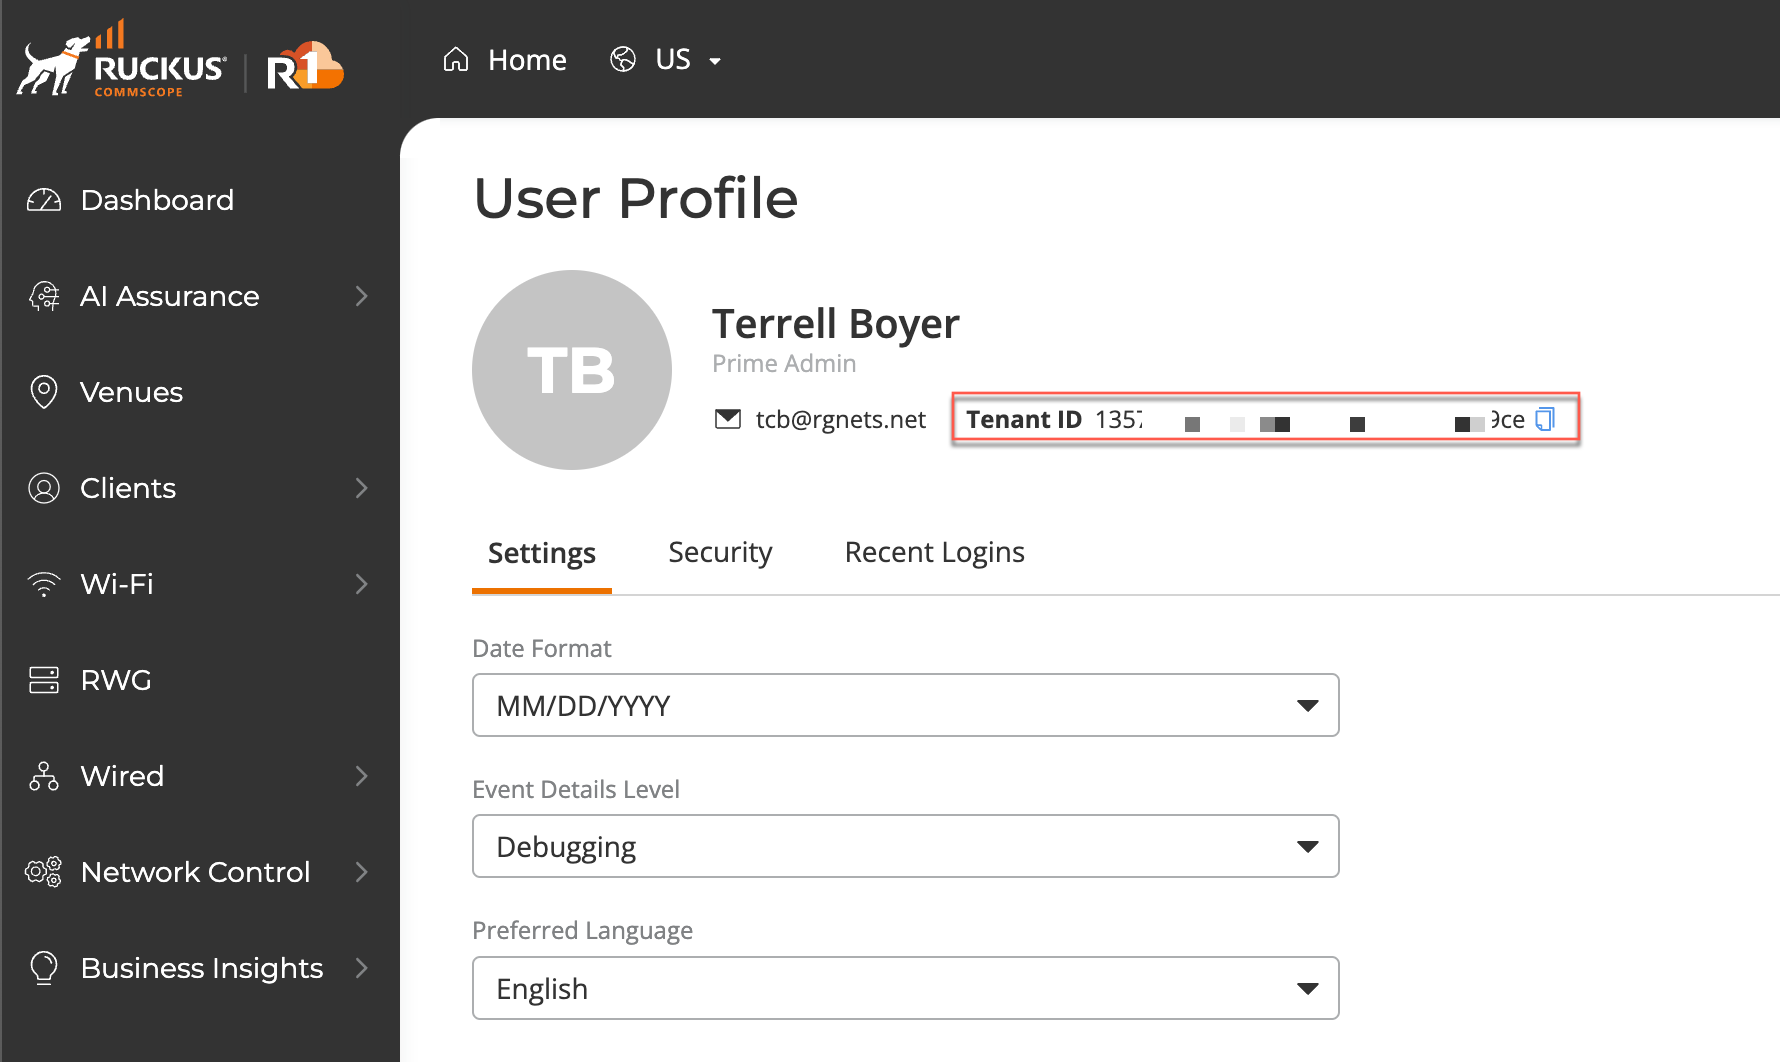
Client ID - This can be found by browsing to Administration >> Account Management >> Settings in the Ruckus One portal. Client Secret - This can be found by browsing to Administration >> Account Management >> Settings in the Ruckus One portal.
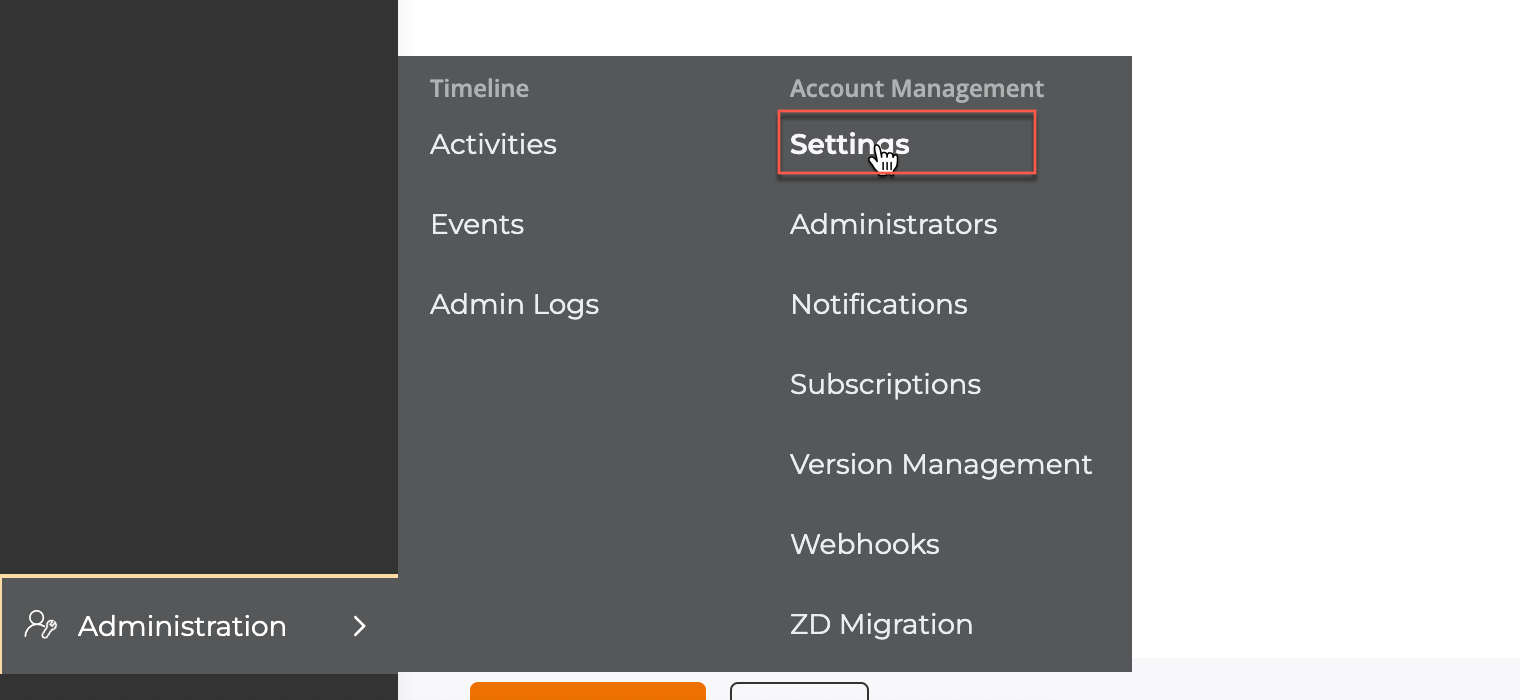
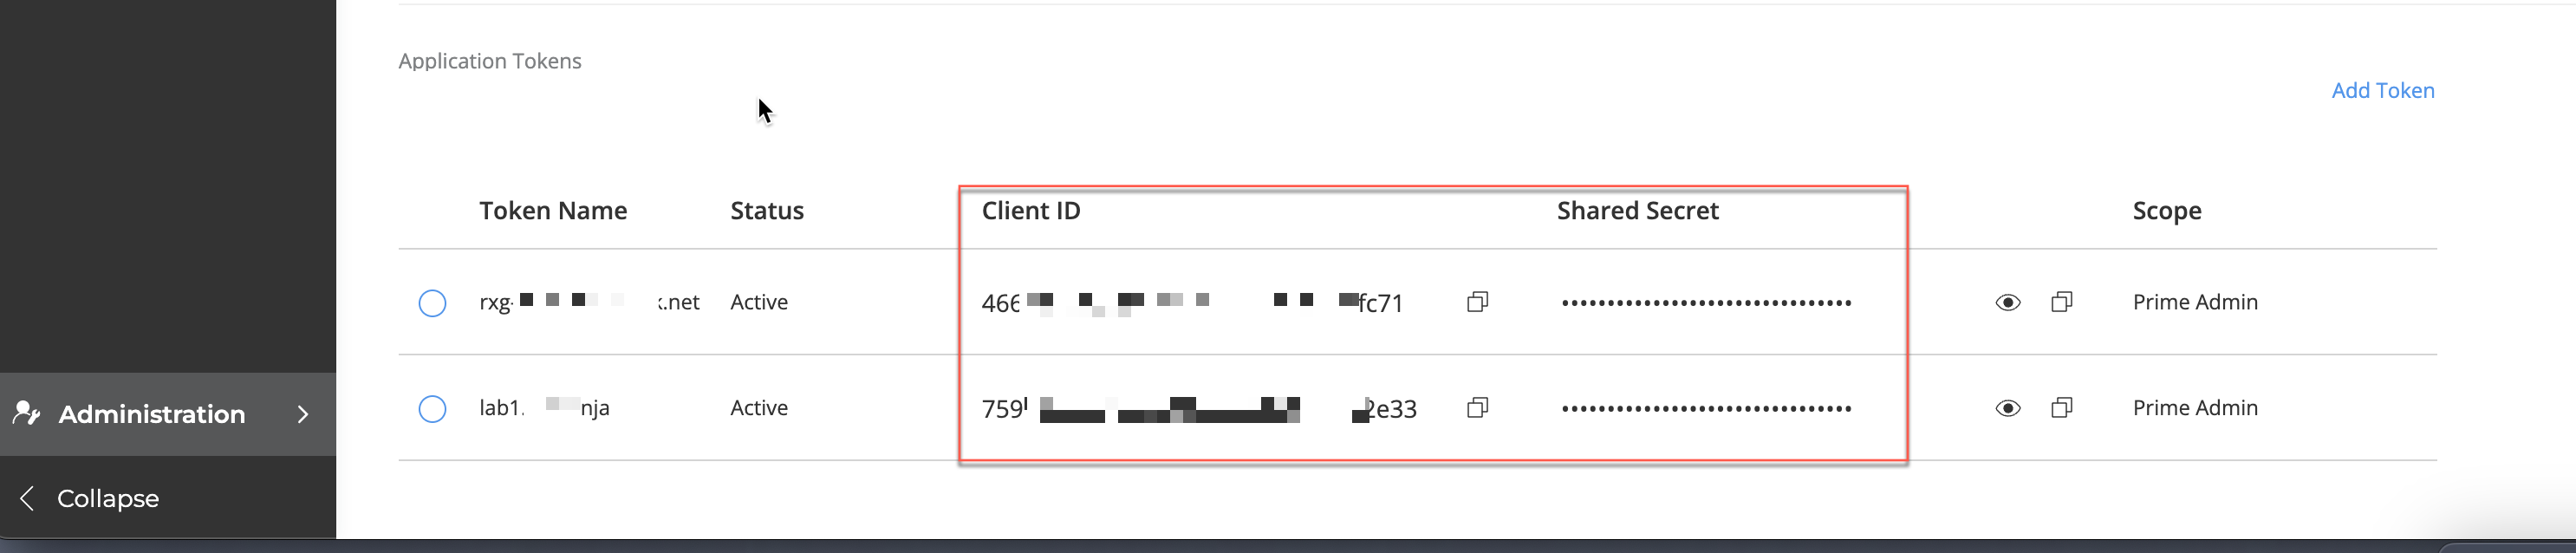
- Create InfDev for Ruckus One
In the rXg GUI, browse to Network >> Wireless >> WLAN Controllers and click Create New. Update the fields below to use the information you collected in step one and click create.
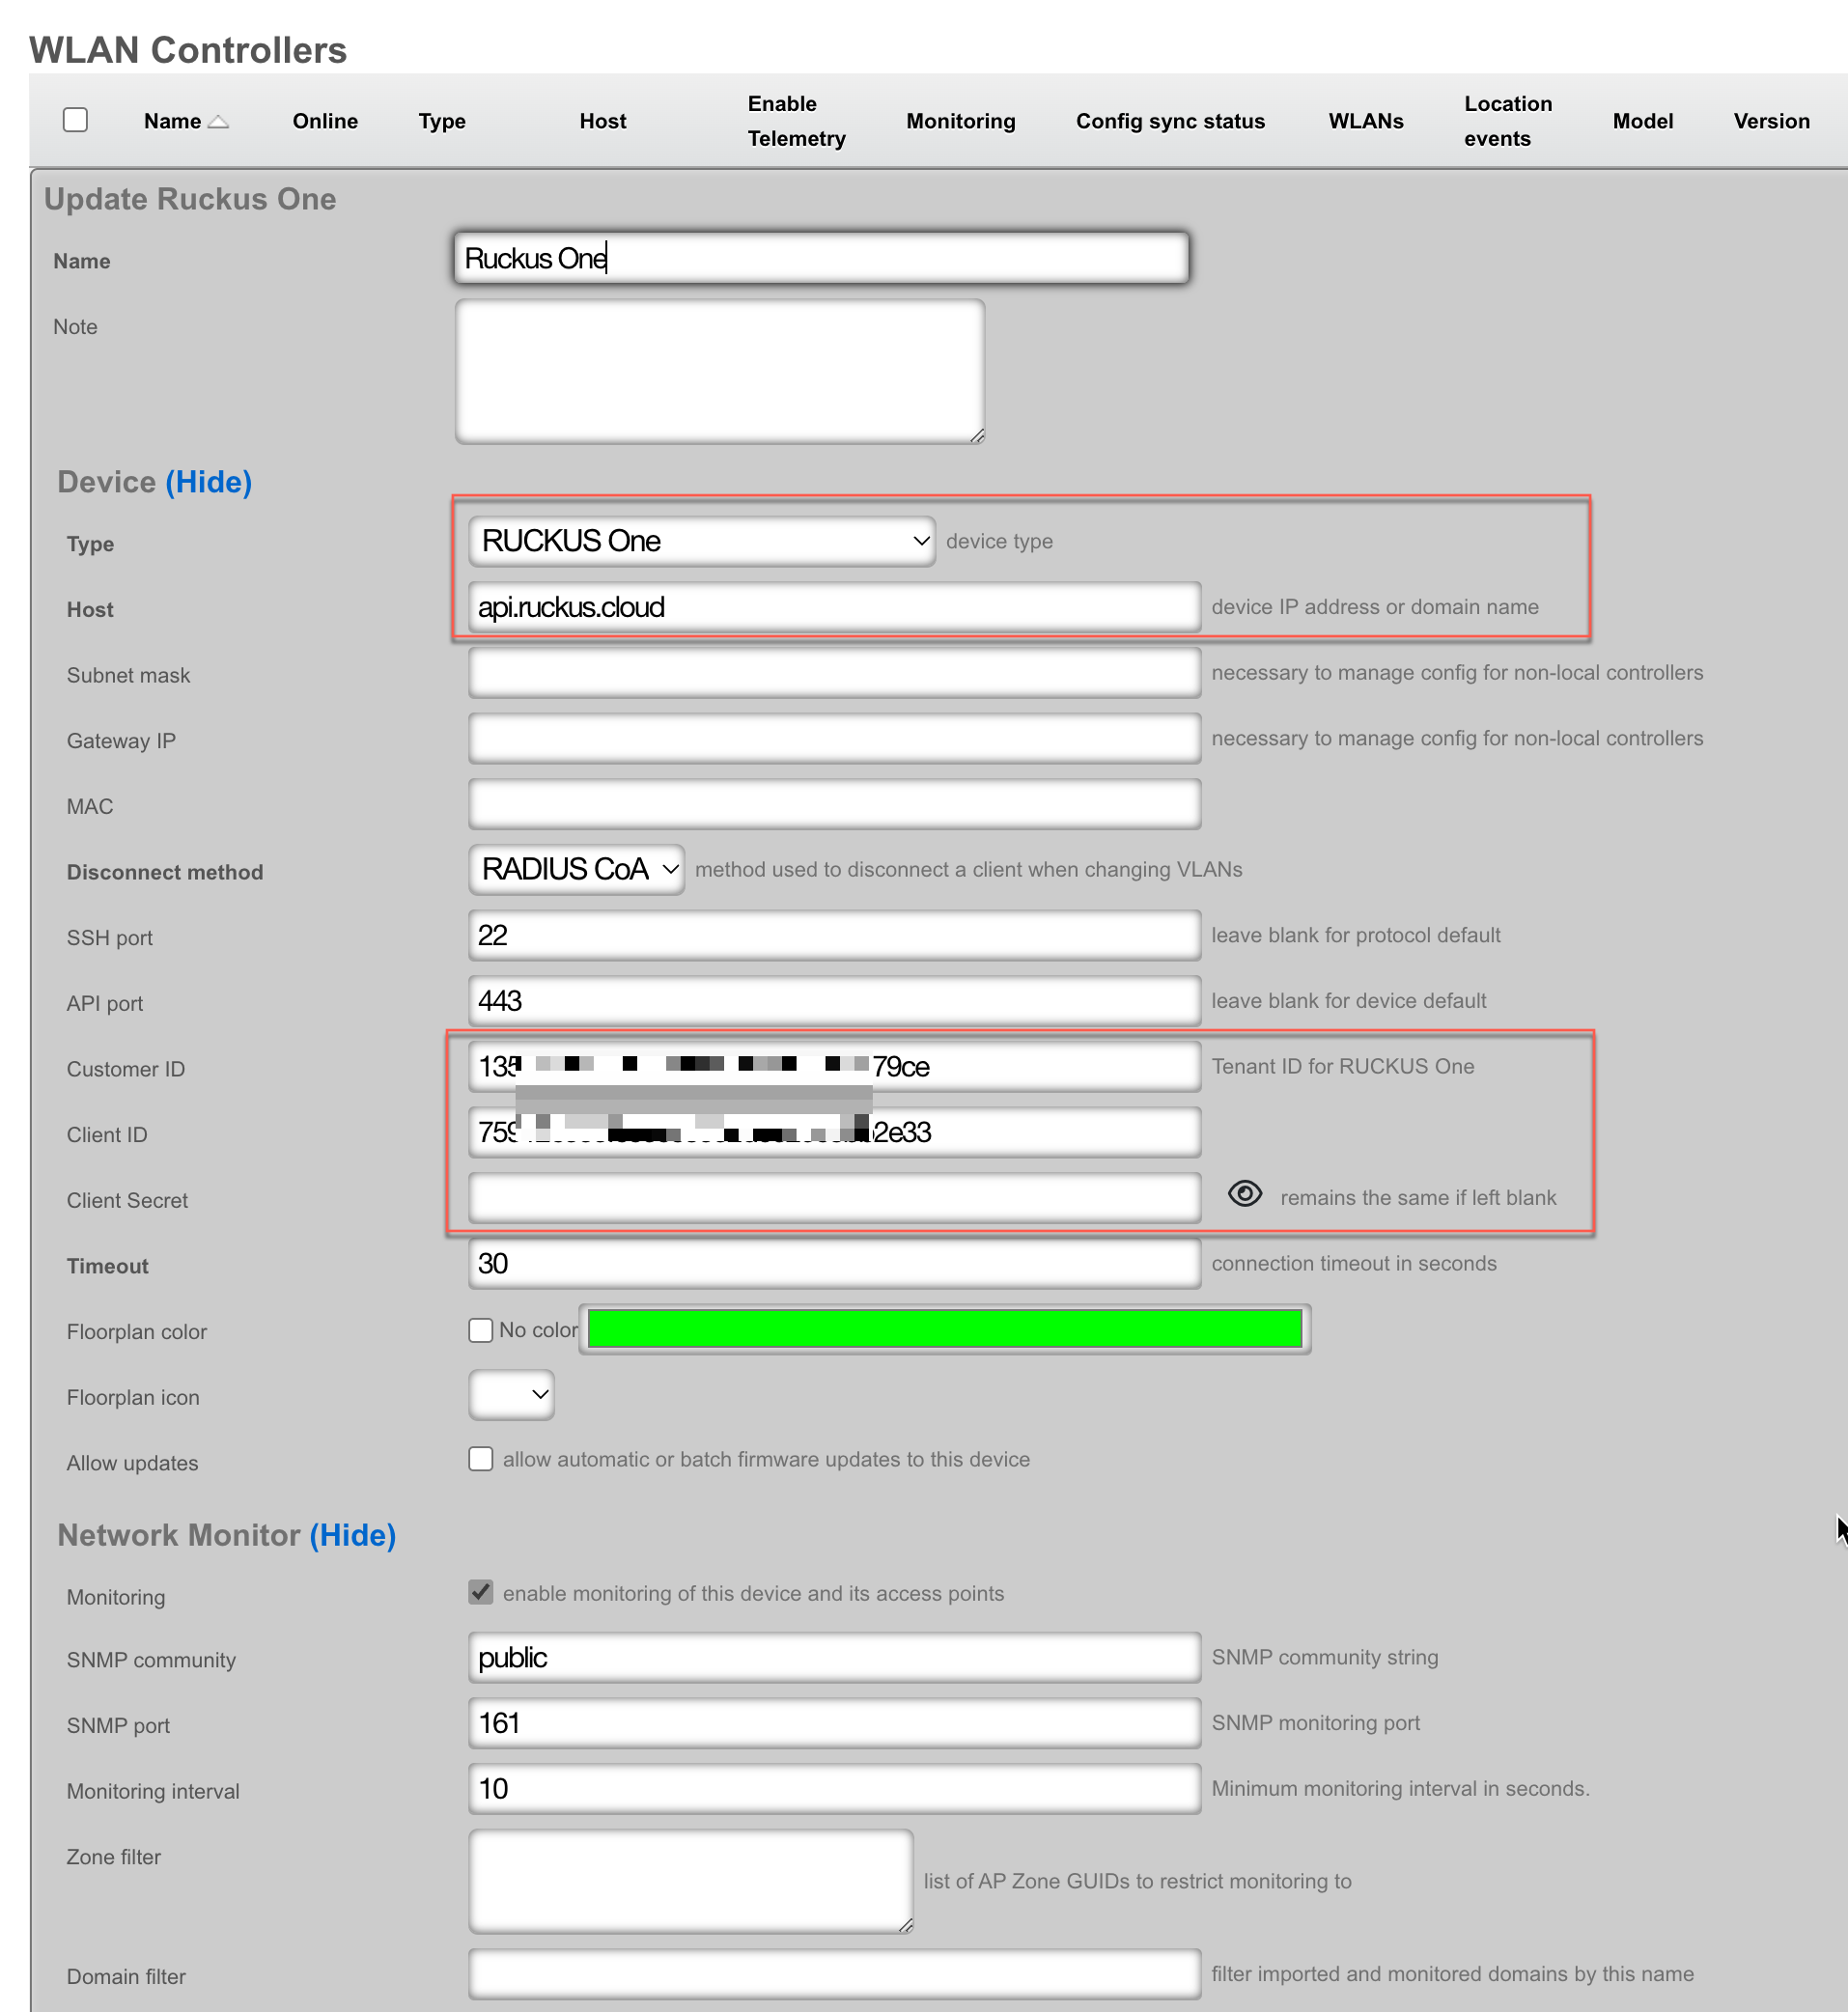
- On the record that you created in the WLAN Controllers scaffold, click Import. You can then select which zones you would like to import. Leave blank for all zones. Press Import.
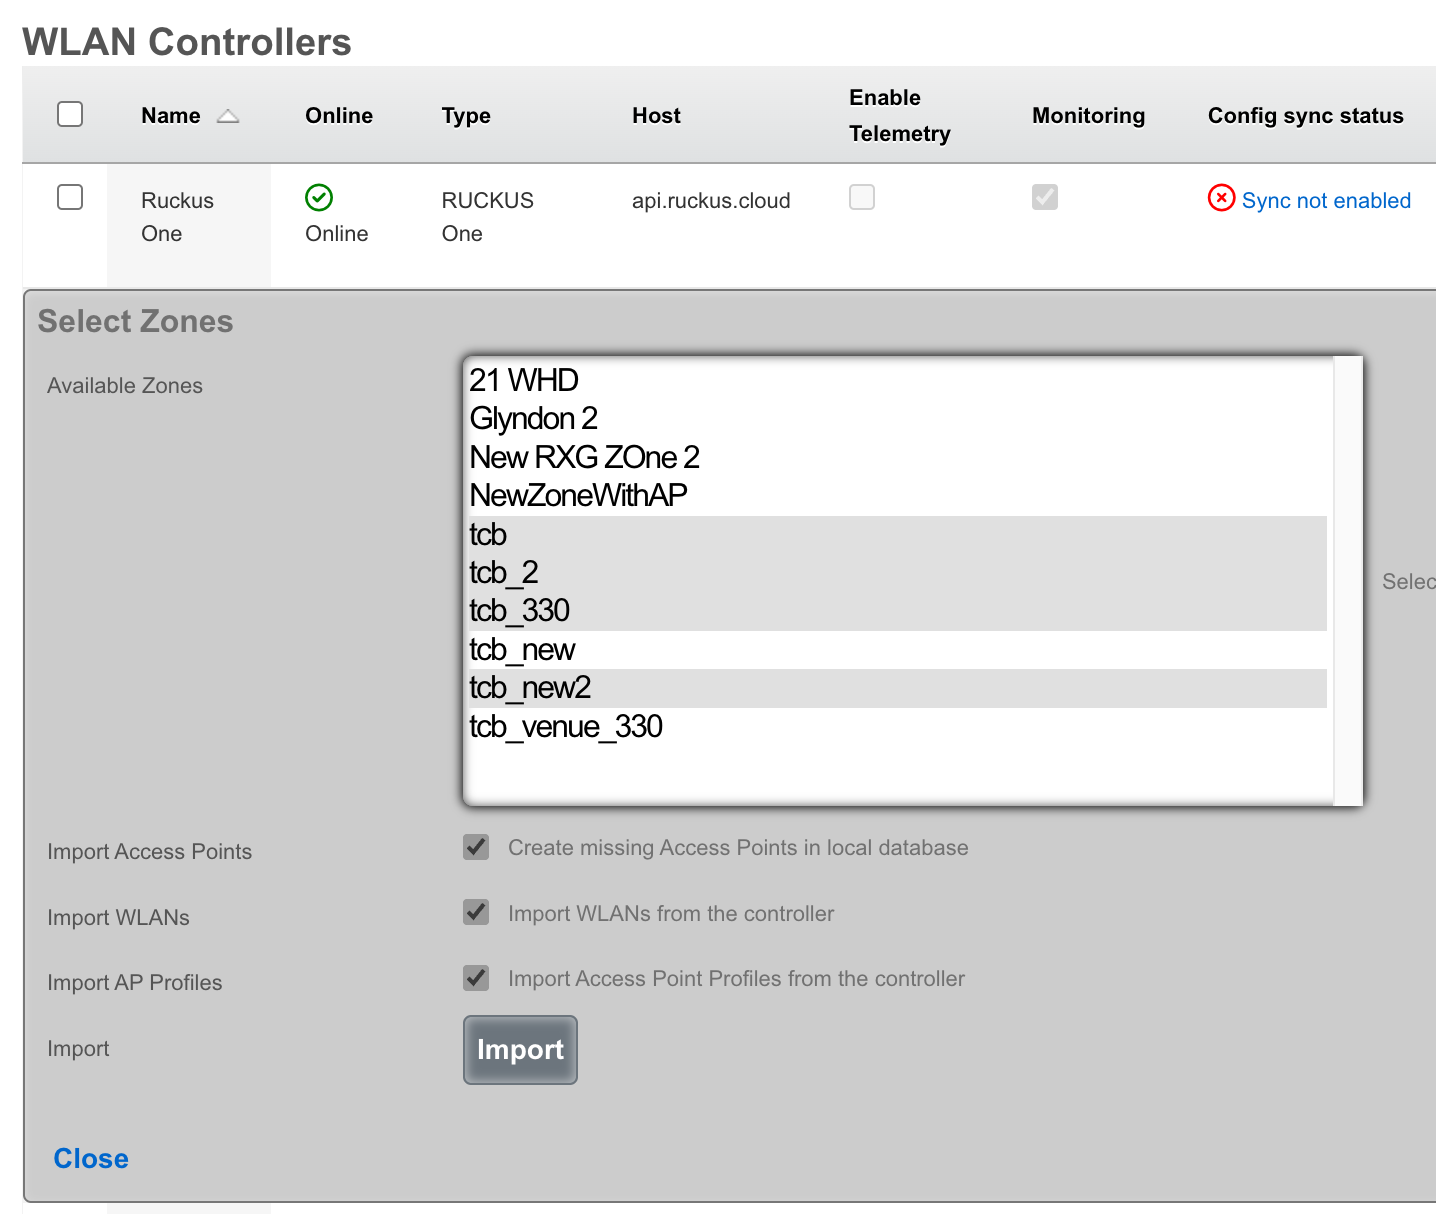
- Click Sync Not Enabled

Click Generate Diff This will generate a list of changes that the rXg plans to make once you enable config sync.
Click Enable Config Synchronization If you agree with the diff, click the button to enable config sync.
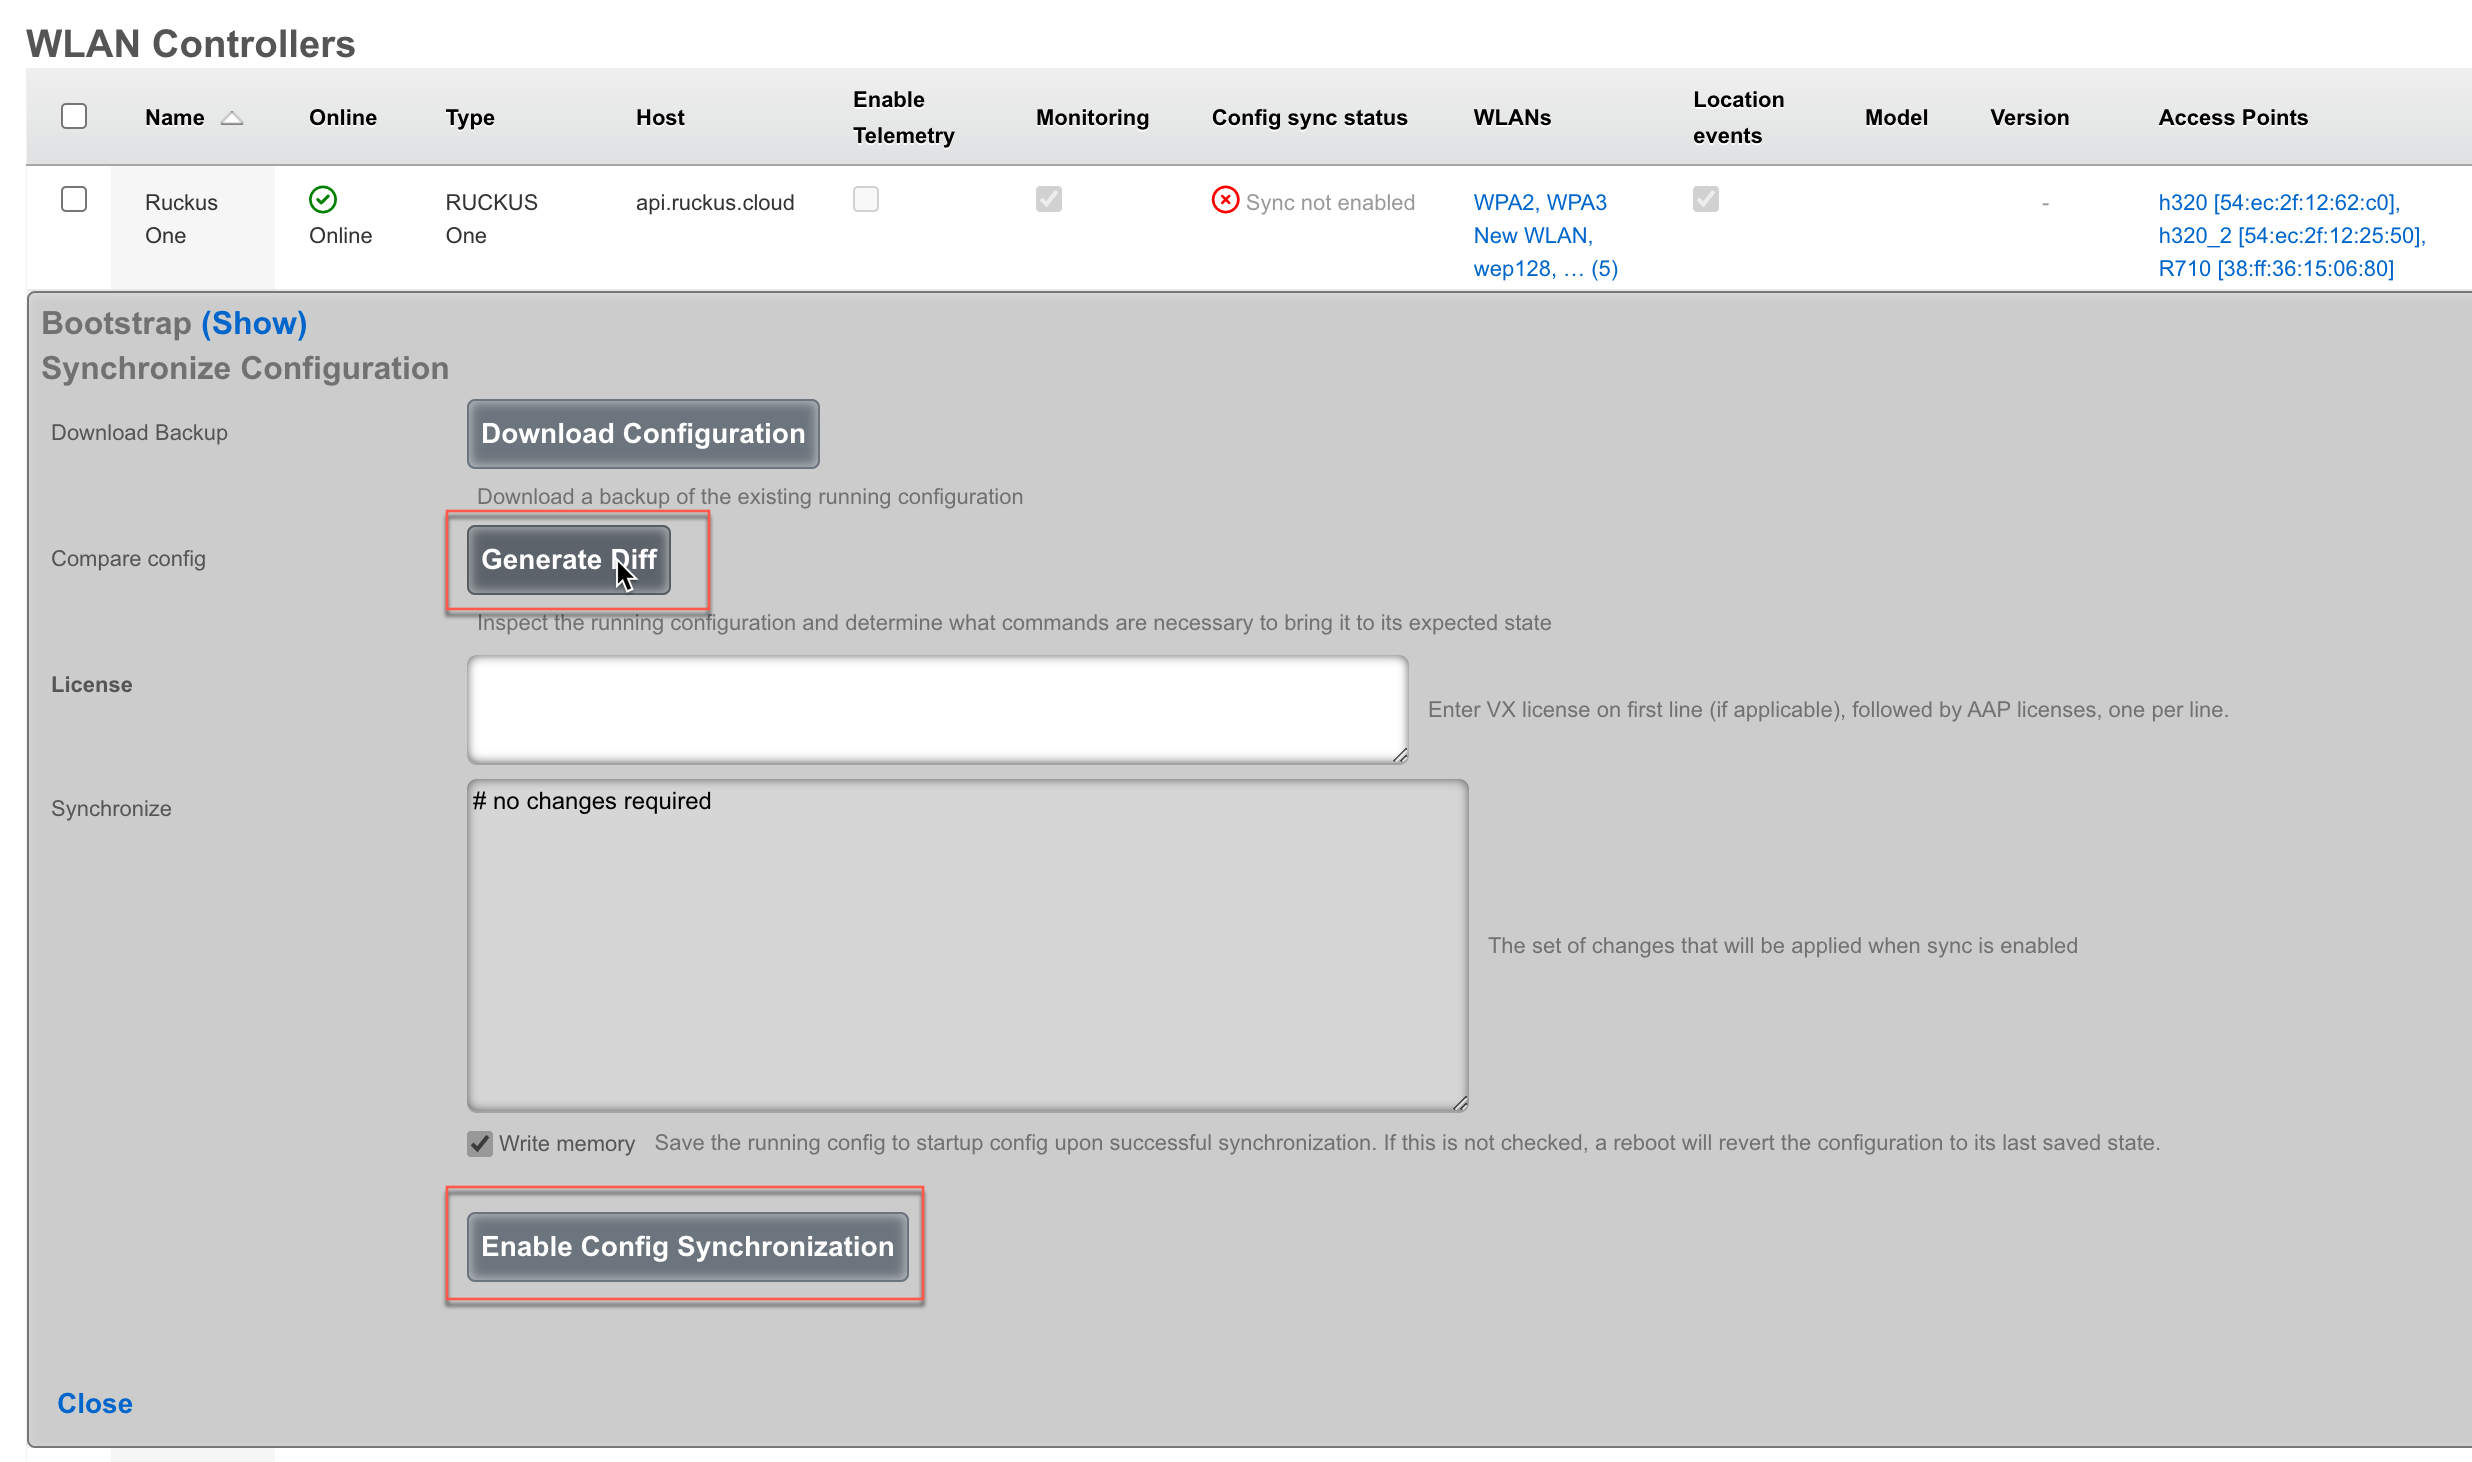

Example Aruba Setup
Connecting Aruba IAP to rXg
Steps to connect Aruba IAP
- Create InfDev for Aruba IAP
- Generate and apply bootstrap configuration to Aruba IAP
- Import pre-existing WLAN's if needed
Enable sync
Create InfDev for Aruba IAP
Navigate to Network::Wireless and create a new WLAN Controller.

The Name field is arbitrary and can be set to anything. The Type field should be set to Aruba IAP. The Host field is the IP address we want the virtual controller to have. If the controller is local to the rXg then the Subnet mask and Gateway IP fields can be left blank. Set the API port field to the correct port, by default it is set to 4343 and shouldn't be changed the Aruba IAP has been configured to use a different port. Set the Username and Password field with the correct username and password and click Create.
Note: If the Host IP is already set in the Aruba IAP, then it will not show the commands that need to be run. The commands will be provided in a step below.
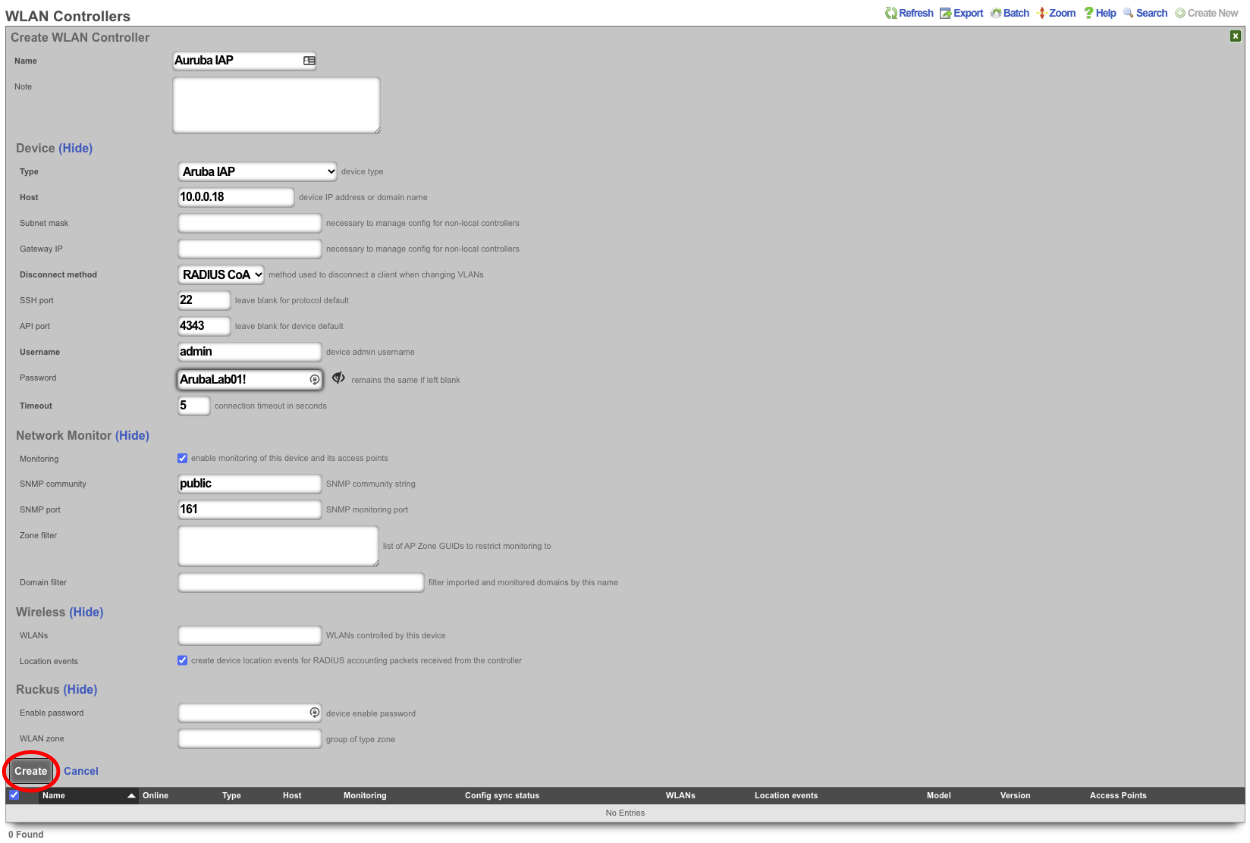
- Generate and apply bootstrap configuration to Aruba IAP.
Click on the Sync not enabled link.

This will provide the Bootstrap Configuration that must be run on the IAP to allow API commands as well as set the virtual controller IP.
Note: If the virtual controller IP has been set and the Aruba IAP shows as online it will not show the Bootstrap commands. If this is the case the virtual controller IP does not need to be set so only the following commands should be run on the AP by first SSH'ing to it.
configure** allow-rest-api** end commit apply
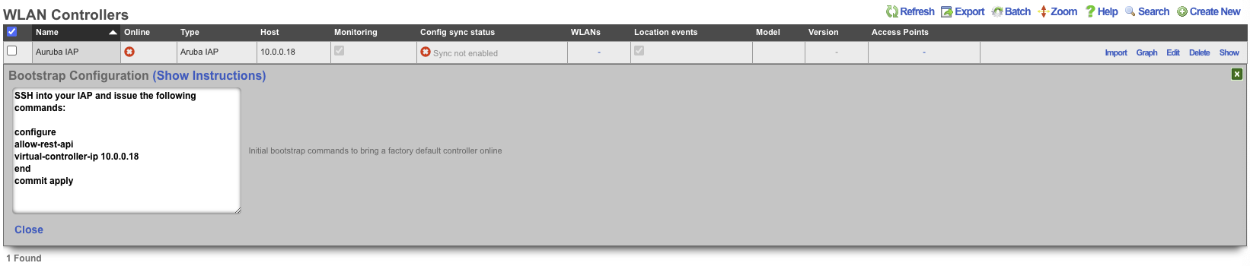
SSH to the controller IP and run the Bootstrap Configuration commands.

- Import pre-existing WLAN's if needed
To import any existing WLANs that may already exist, click the import link on the WLAN Controllers scaffold.


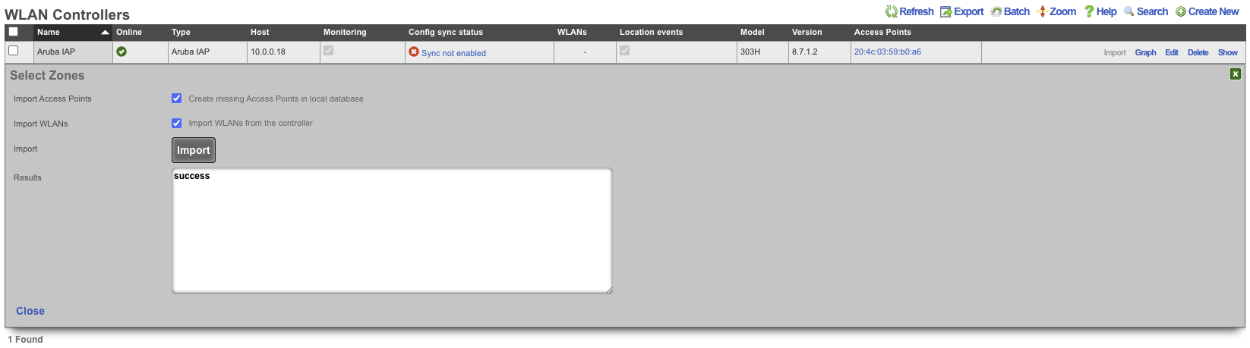
Any WLANs that exist will then be shown on the WLANs scaffold.

- Enable sync.
This step will allow the rXg sync with the Aruba IAP so that any configuration done on the rXg will be pushed (synchronized) to the Aruba IAP. To enable sync click the Sync not enabled link in the WLAN Controller scaffold.

Next click on the Enable Config Synchronization button.
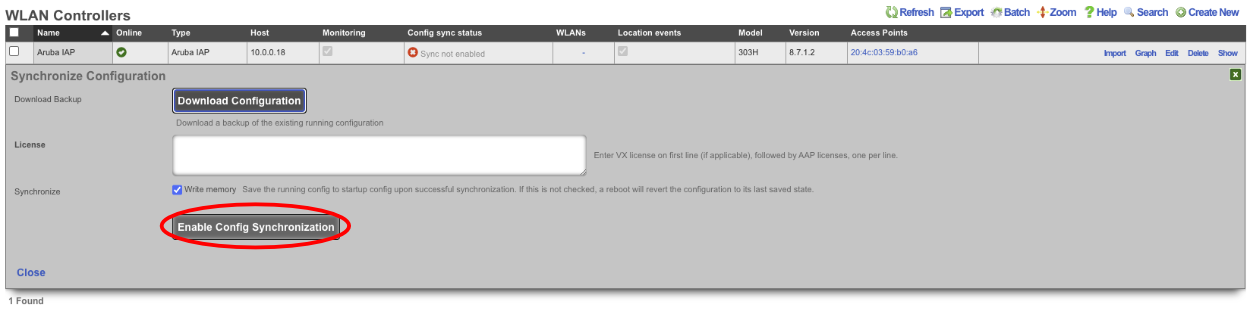
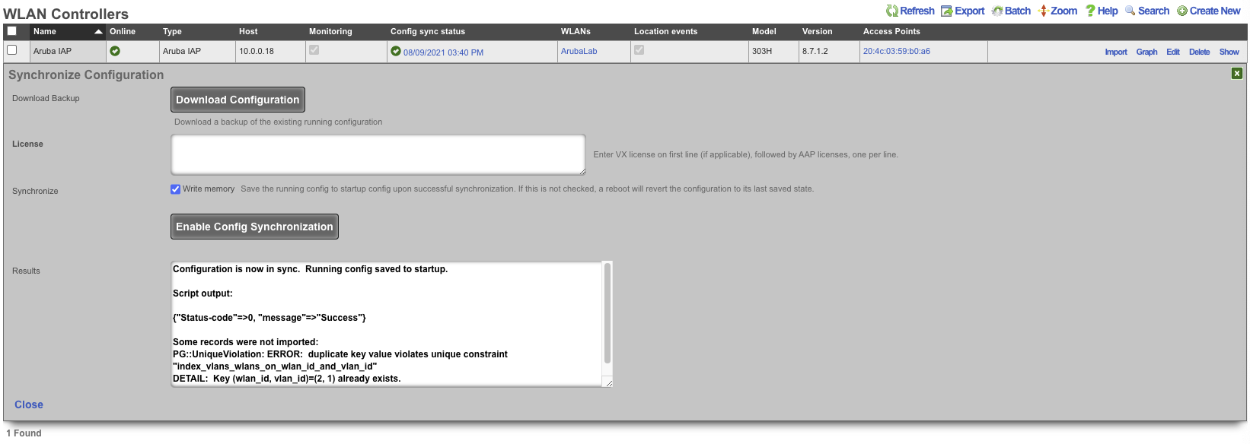

The rXg has now been configured to take control of the Aruba IAP, configuration changes to the WLANs from the admin gui of the rXg will be pushed automatically to the Aruba IAP.
Aruba MPSK Setup
A WLAN must exist that matches the SSID of the WLAN in the Aruba controller, the rXg can import this information by creating a WLAN Controller. Configure a WLAN Controller by navigating to Network::Wireless and click create new on the WLAN Scaffold. This will allow the rXg to import the WLAN's from the Aruba controller.

Enter a name in the Name field, the Name is arbitrary. The Type field should be set to either ArubaOS or Aruba IAP depending on the type of controller the rXg is connecting to. The Host field is the IP address or domain name of the controller. If the Controller is local, setting a value in the Subnet mask and Gateway IP field is not needed. The Disconnect method , SSH port and API port fields can be left on the default values unless the controller is using non default ports. Enter the Username and Password in the Username and Password fields. Click Create.
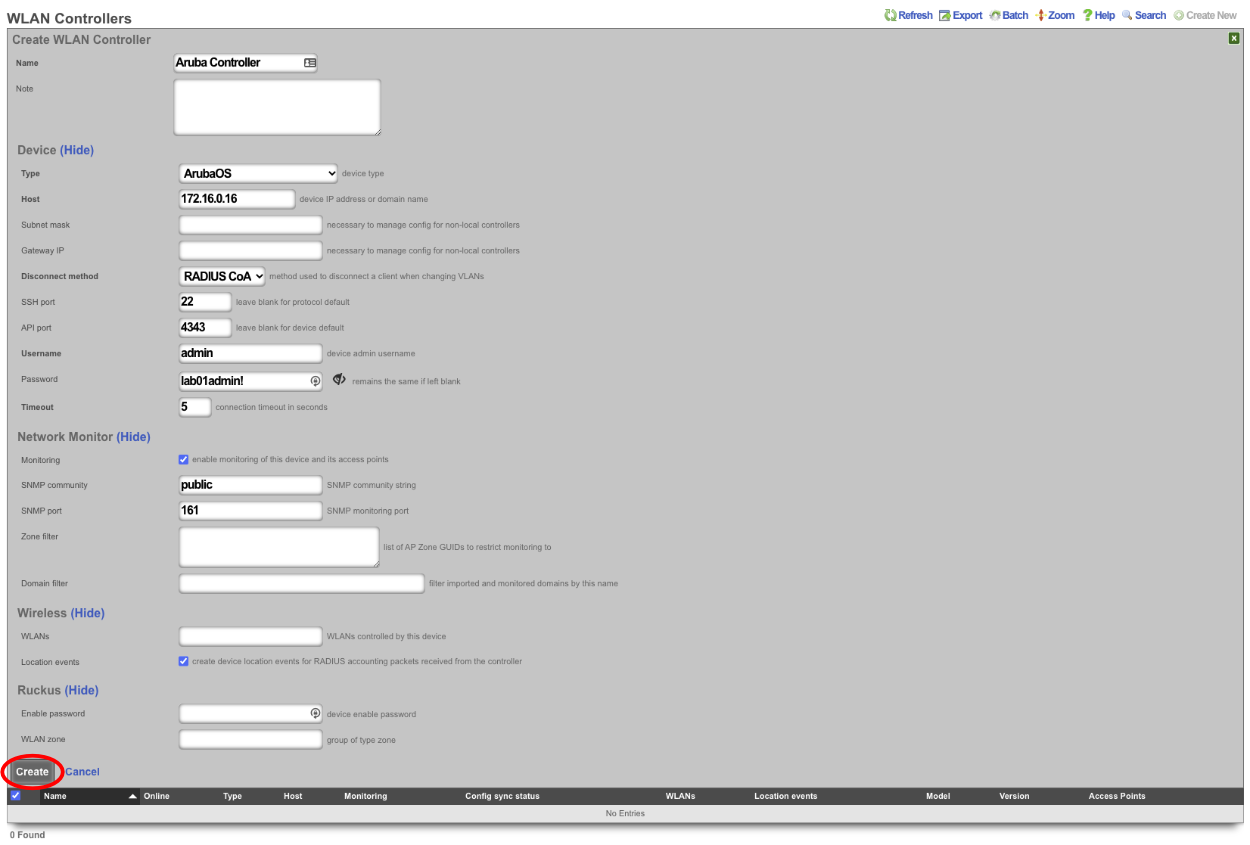
The rXg will import the WLANs and AP's from the Aruba controller.
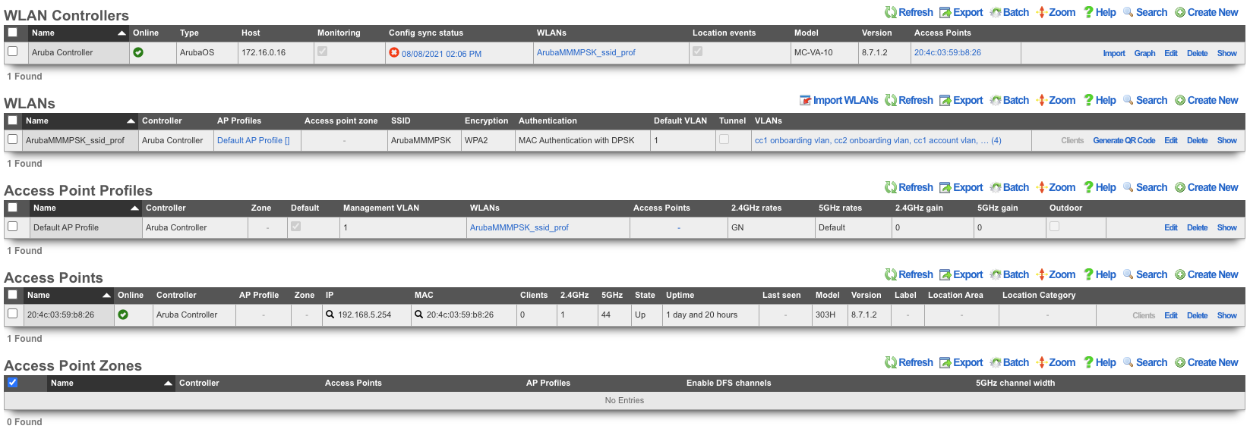
Next the RADIUS Server Realms must be configured to use MPSK. Navigate to Services::Radius.
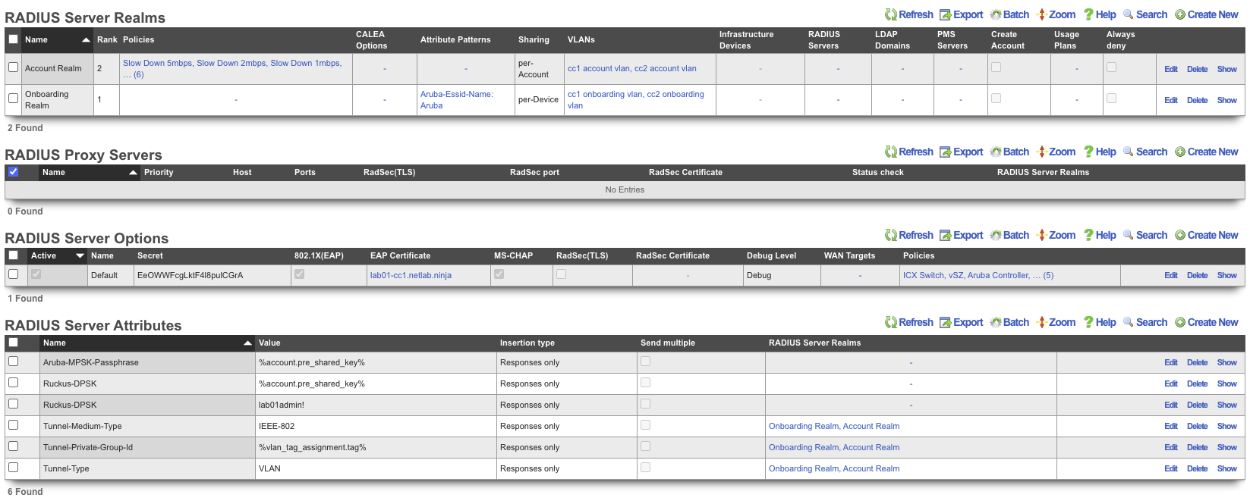
In order to use MPSK the correct RADIUS Server Attributes must be tied the to the RADIUS Server Realms. By default there is a RADIUS server attribute for use with Aruba MPSK. This Attribute must be tied to each realm that will use MPSK typically this will be the POST auth realms, but for certain locations with pre-setup accounts this may be attached to both POST and PRE auth realms. For this example there will be a RADIUS server attribute created that will have a known PSK and this will be attached to the Onboarding realm. This allows anyone to connect with the known PSK and after account creation they will be able to use their unique MPSK to connect. In the RADIUS Server Attributes scaffold, click edit on the Aruba-MPSK-Passphrase entry.

Select the RADIUs realms that will use the variable MPSK attribute, in this example only the Account Realm will be selected in the RADIUS Server Realms field. Click Update.
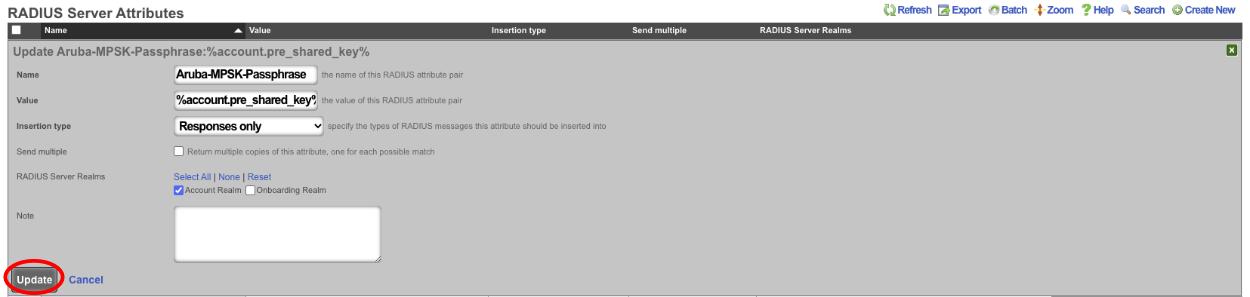
Next create a new RADIUS Server Attribute. In the Name field enter Aruba-MPSK-Passphrase. In the Value field enter in the known PSK, in this example lab01admin! will be used as the known PSK. In the RADIUS Server Realms field make sure that only the realms that are using the known PSK are selected in this case only the Onboarding Realm will be selected. Click Create.

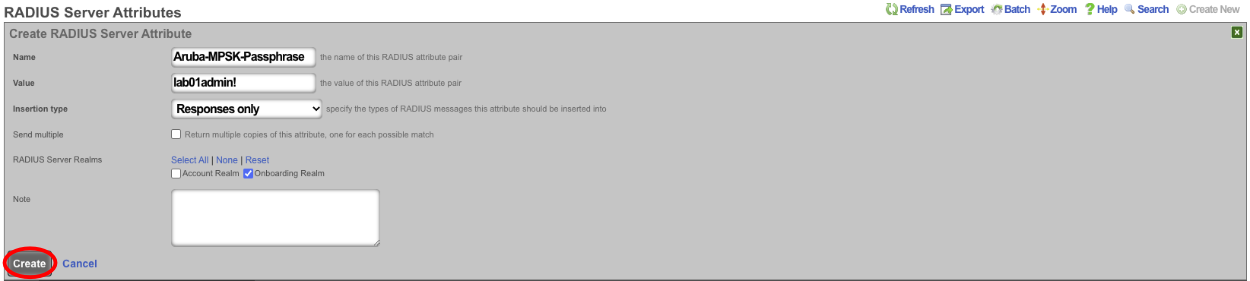
With this setup, a user connecting for the first time would connect to the SSID using the known PSK of lab01admin!. This will connect them to the network and they will get redirected to the captive portal where they can then sign up for an account. During account creating the end user will create their own PSK, at this point the end user will need to forget the wireless network on their device and connect using the PSK they set during account creation. The advantage to using MPSK is that now the end user can connect a device and have it attached to their account by simply connecting to the network using their unique PSK. This means that headless devices can be added to an account by connecting to the network and using the unique PSK for the account. The end user will not need to enter the MAC address of the headless device to their account this will be done automatically when connecting to the network. This also means devices with MAC randomization will be added back to the correct account if the MAC address changes without the end user even being aware.


