Portals
The Portals view configures the rXg captive portal web application framework enabling self-provisioning and advertising communication for the end-users population.
The primary purpose of the captive portal is to provide a destination for end-users after a forced browser redirect. The end-user population that experiences a forced browser redirect is controlled through the policies subsystem.
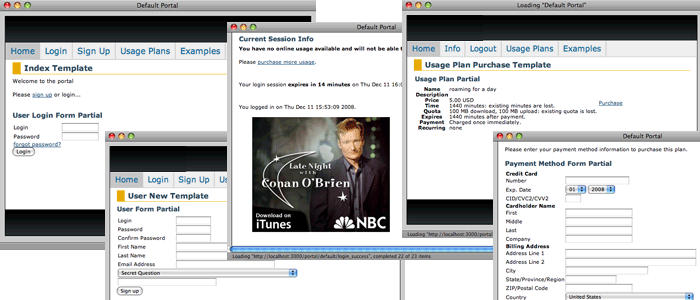
The rXg is prepackaged with a default captive portal containing several revenue-generating web applications. Prepackaged end-user self-provisioning modules include sign-up via account creation, payment via real-time credit card processing, usage plan selection, coupon code redemption, viewing and editing of current profile , and more. In addition, the default captive portal includes several modules that assist with the delivery of pre authentication , post authentication , HTML injected , and web session interstitial advertising.
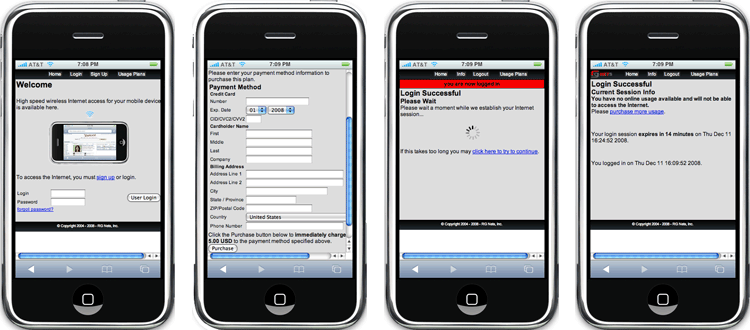
The captive portal infrastructure includes small format device detection and automatic routing of requests made by such devices to alternative layouts and stylesheets. This enables the portal to have unique and independent views for smart phones, PDAs, gaming devices, and other handheld devices.
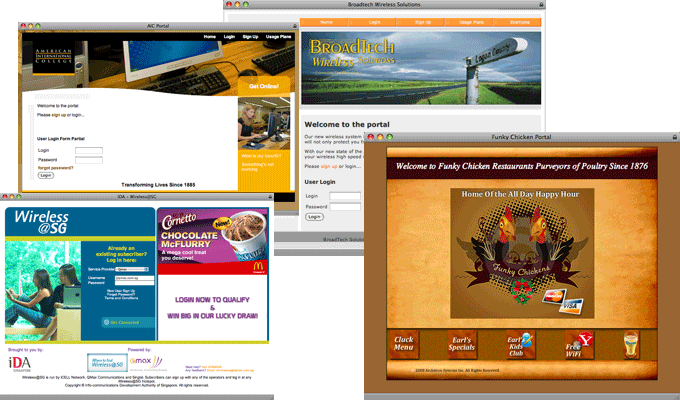
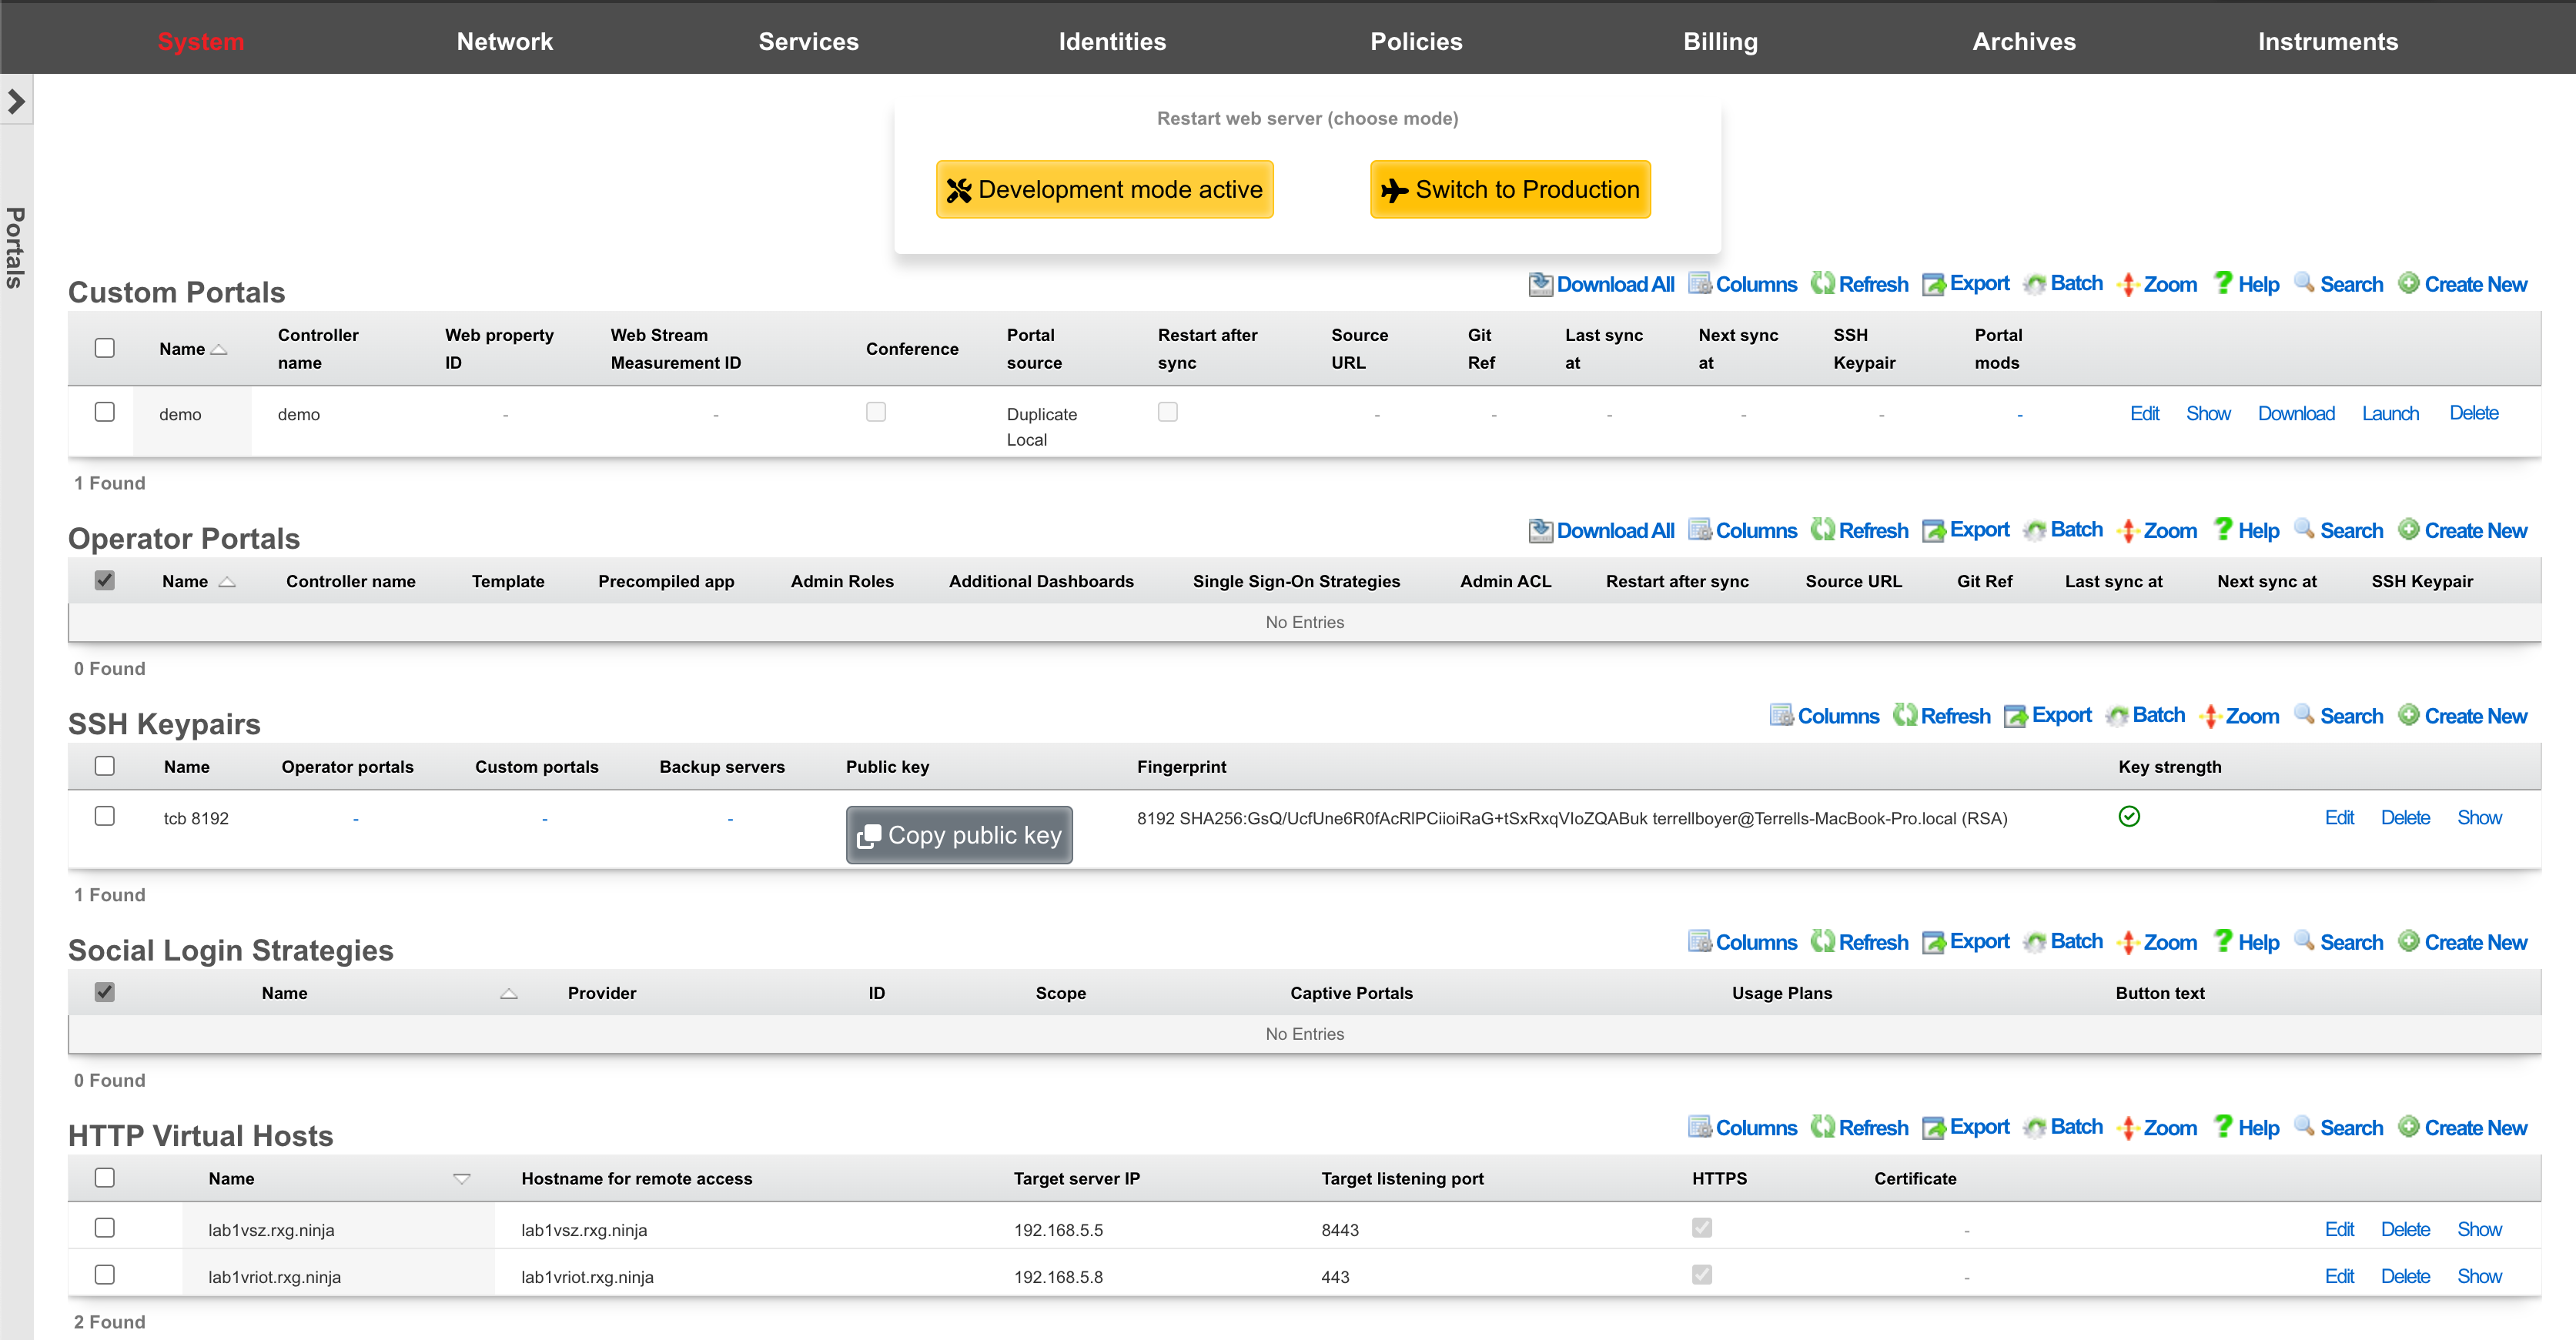
While the default captive portal is fully functional, it is designed to be a basis for operators to create their own customized portal with operator specific art, identity, and even functionality. The process of customizing the captive portal begins with the creation of a new record in the Custom Portals scaffold on this view.
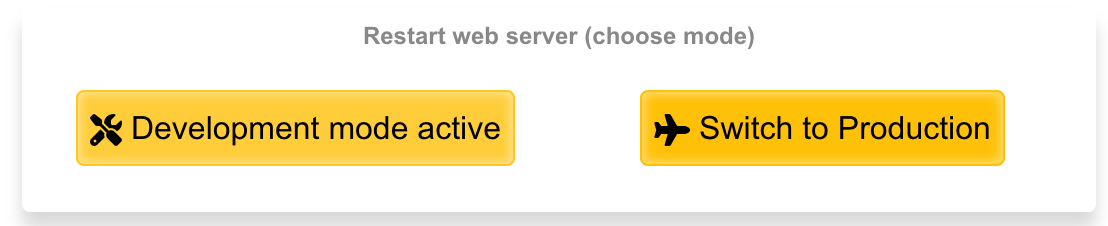
The rXg employs a caching mechanism to maximize performance of the captive portal web application server infrastructure. Use the restart web server dialog to bring the web application infrastructure into development mode in order to disable caching so that changes made to the custom portal files are immediately reflected in the pages being served. If pages are being loaded onto the rXg via SFTP, click the development button when the pages are finished being uploaded to dump the cache by restarting the web server. Restart the web server back into production mode when done making changes.
In order to customize a portal, the administrator must be enabled with SSH access via the Admins view. In addition, a working knowledge of how to use SSH, SFTP and Ruby on Railsare required. Some excellent books that cover these subjects are SSH, The Secure Shell: The Definitive Guide (ISBN 0596008953), Agile Web Development with Rails (ISBN 0977616630) and The Rails Way (ISBN 0321445619).

Custom Portals
An rXg can have multiple custom captive portals residing on it simultaneously. Each captive portal must have a record in the Custom Portals scaffold. Each captive portal may be assigned to serve a different subset of the end-user population. The mapping between portals and end-users is defined by the policies subsystem.
The name field is an arbitrary string used to identify the portal. This string is used for identification purposes only.
The controller name field is the string used to uniquely identify the portal within the Ruby on Rails web application infrastructure. If the controller name is left blank when a new custom portal is created, the rXg administrative console will automatically generate a reasonable default based on the name field.
The controller name becomes the suffix of the direct access URL. For example, if the controller name is abc the direct access URL is https://rxg.local/portal/abc. The controller name also determines the directory and file name structure that is used to store the custom portal on the filesystem of the rXg. It is very important be precise about the controller name when editing and uploading files to customize the portal.
The Google Analytics web property field stores a Google Analytics web property ID. The format of a Google Analytics web property ID is UA-xxxxxx-xx where the x's are numbers. The web property ID is listed next to the name of a configured profile in a Google Analytics account home page.
When the Google Analytics web property field is populated, the captive portal will automatically include a Google Analytics site tracking code. This allows the operator to easily integrate external, third-party verifiable portal traffic tracking for the purposes of revenue verification and advertising/impression count marketing.
It is the responsibility of the operator to create and maintain a Google Analytics account along with an appropriate profile for the desired web property. For most portals, it is recommended that the operator configure the portal post authentication landing page as a goal so that it is easy to see the ratio of potential end-users to end-users who commit to subscribe.
Operator Portals
The 'Operator Portals' scaffold lists all of the currently configured portals on the given system. Multiple portal types can be instantiated at any time, for example, a fleet manager portal, a front office manager (FOM), and others.

When creating a new Operator Portal, several fields needs to be filled in, as follows:
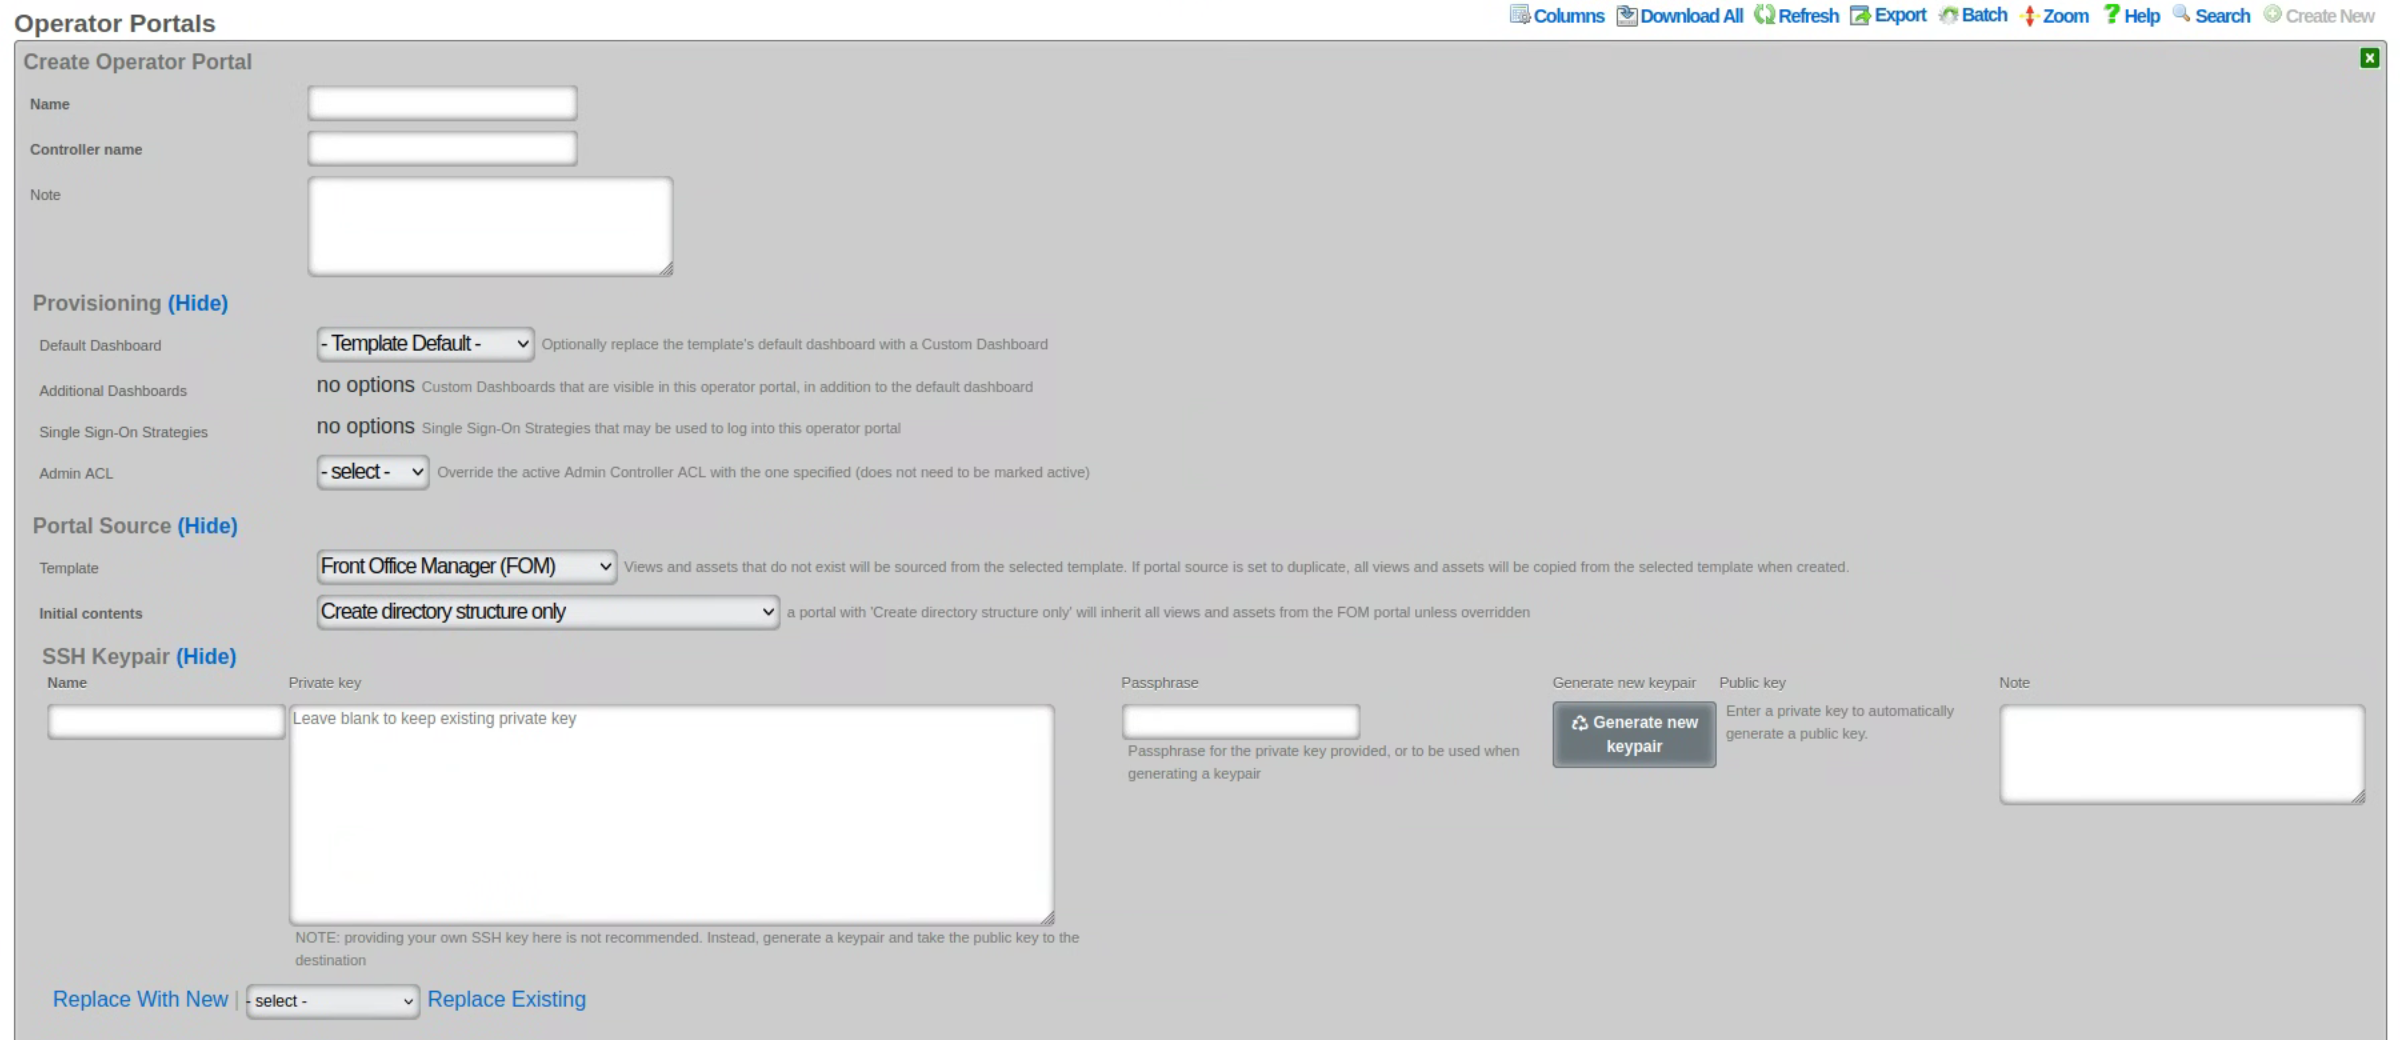
The name field is an arbitrary string descriptor used only for administrative identification. Choose a name that reflects the purpose of the record. This field has no bearing on the configuration or settings determined by this scaffold.
The controller name field sets the name of the controller and how you access the operator portal. For example, if the controller name is set to FOM, then the operator portal would be accessed by going to https://FQDN.OF.SYSTEM/FOM.
The default dashboard field allows the operator to specify which dashboard should be displayed when first logging in. By default, this is set to Template Default, but can be changed to any other custom dashboard that exists on the system.
The additional dashboards field allows the operator to select other custom dashboards that are visible in this operator portal, in addition to the default dashboard.
The single sign-on strategies field is used to select which, if any, single sign-on strategies that may be used to log into this operator portal.
The admin ACL field allows the operator to override the active admin controller ACL with the one specified here; the ACL selected here does not need to be marked as active.
The template field lets the operator choose which template this operator portal will be created from. Views and assets that do not exist will be sourced from the selected template. If portal source is set to duplicate, all views and assets will be copied from the selected template when created. Several options are pre-configured, including the Front Office Manager (FOM), Fleet Manager, Conference, IoT, Location Manager (covered in more detail in the following section), and a Precompiled Web App.
The initial contents field sets how the portal will be created. A portal with ' create directory structure only' selected will inherit all views and assets from the FOM portal unless overridden.
- If ' duplicate files from template or existing portal' is selected, then a new operator portal will be created and all files will be copied to the directory from the selected source, allowing the operator to edit any of the preexisting views.
- If ' Git' is selected then the source portal will be pulled from the Git repository. It is also possible to set a sync frequency when using Git so that any changes made to the repository can automatically be pulled to all systems. Checking ' restart after sync' will restart the webserver if there is change that was pulled and automatically restart the webserver so the changes will take effect.
- If ' Archive file via HTTP GET' is selected then the portal can be pulled from a remote site and sync frequency can be configured as well. It is also possible to use ' rsync' which provides the same sync options.
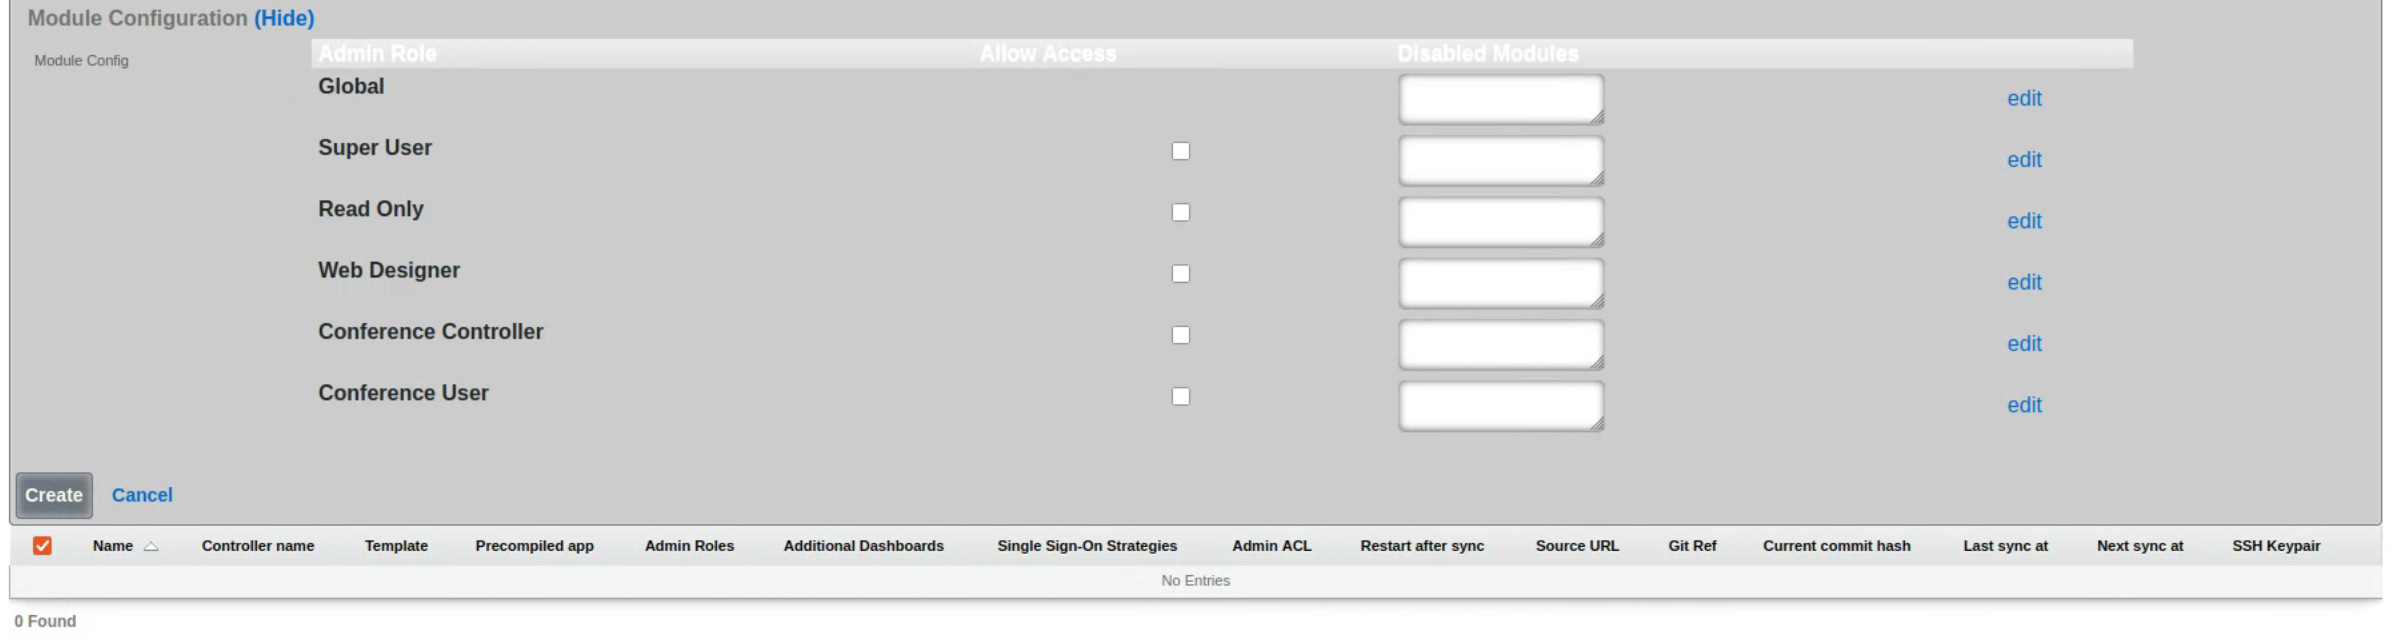
The module configuration section allows the operator to specify not only which admin roles have access to the operator portal but can also be used to disable specific modules contained within the operator portals. To select the specific admin roles able to access (interact with) the given Operator Portal, check the box in the 'Allow Access' column next to the selected Admin Role. The example below shows access granted to the in-build Super User accoutn only, effectively disallowing users in any other groups from vewing this portal.
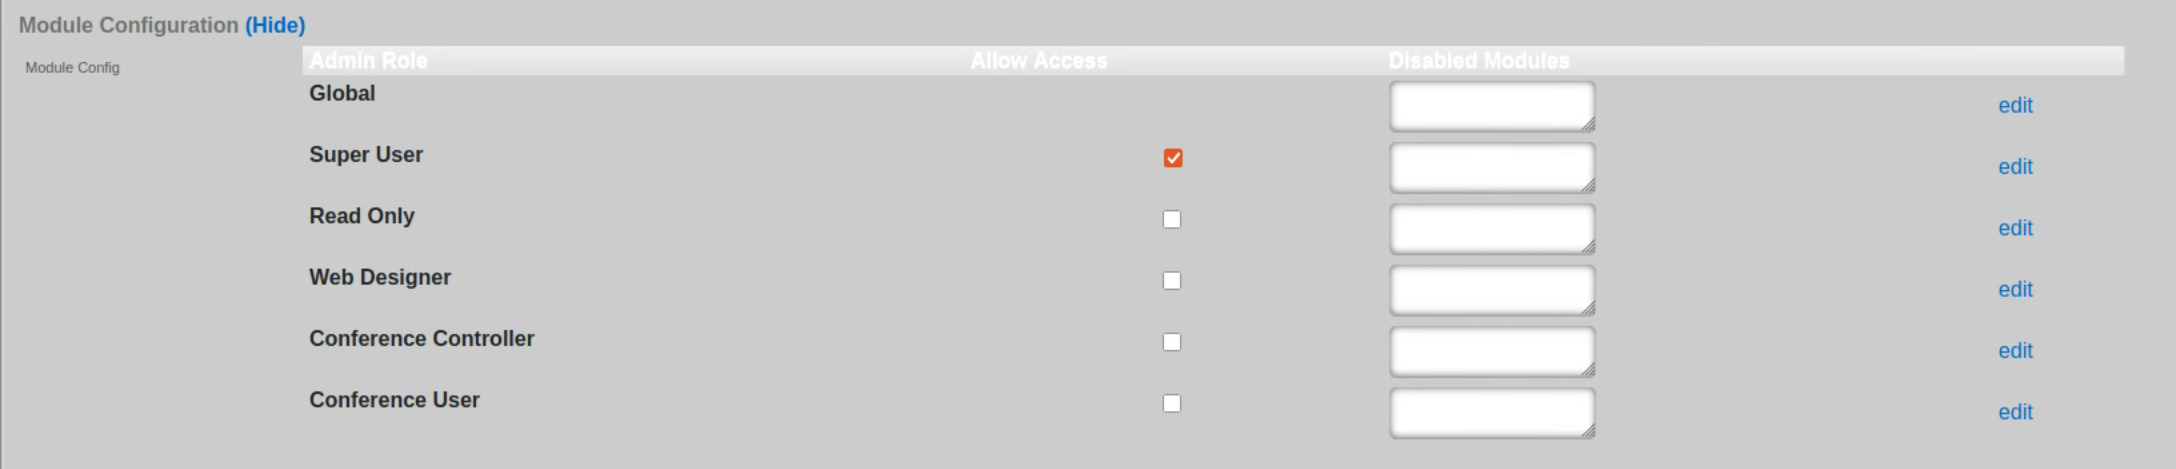
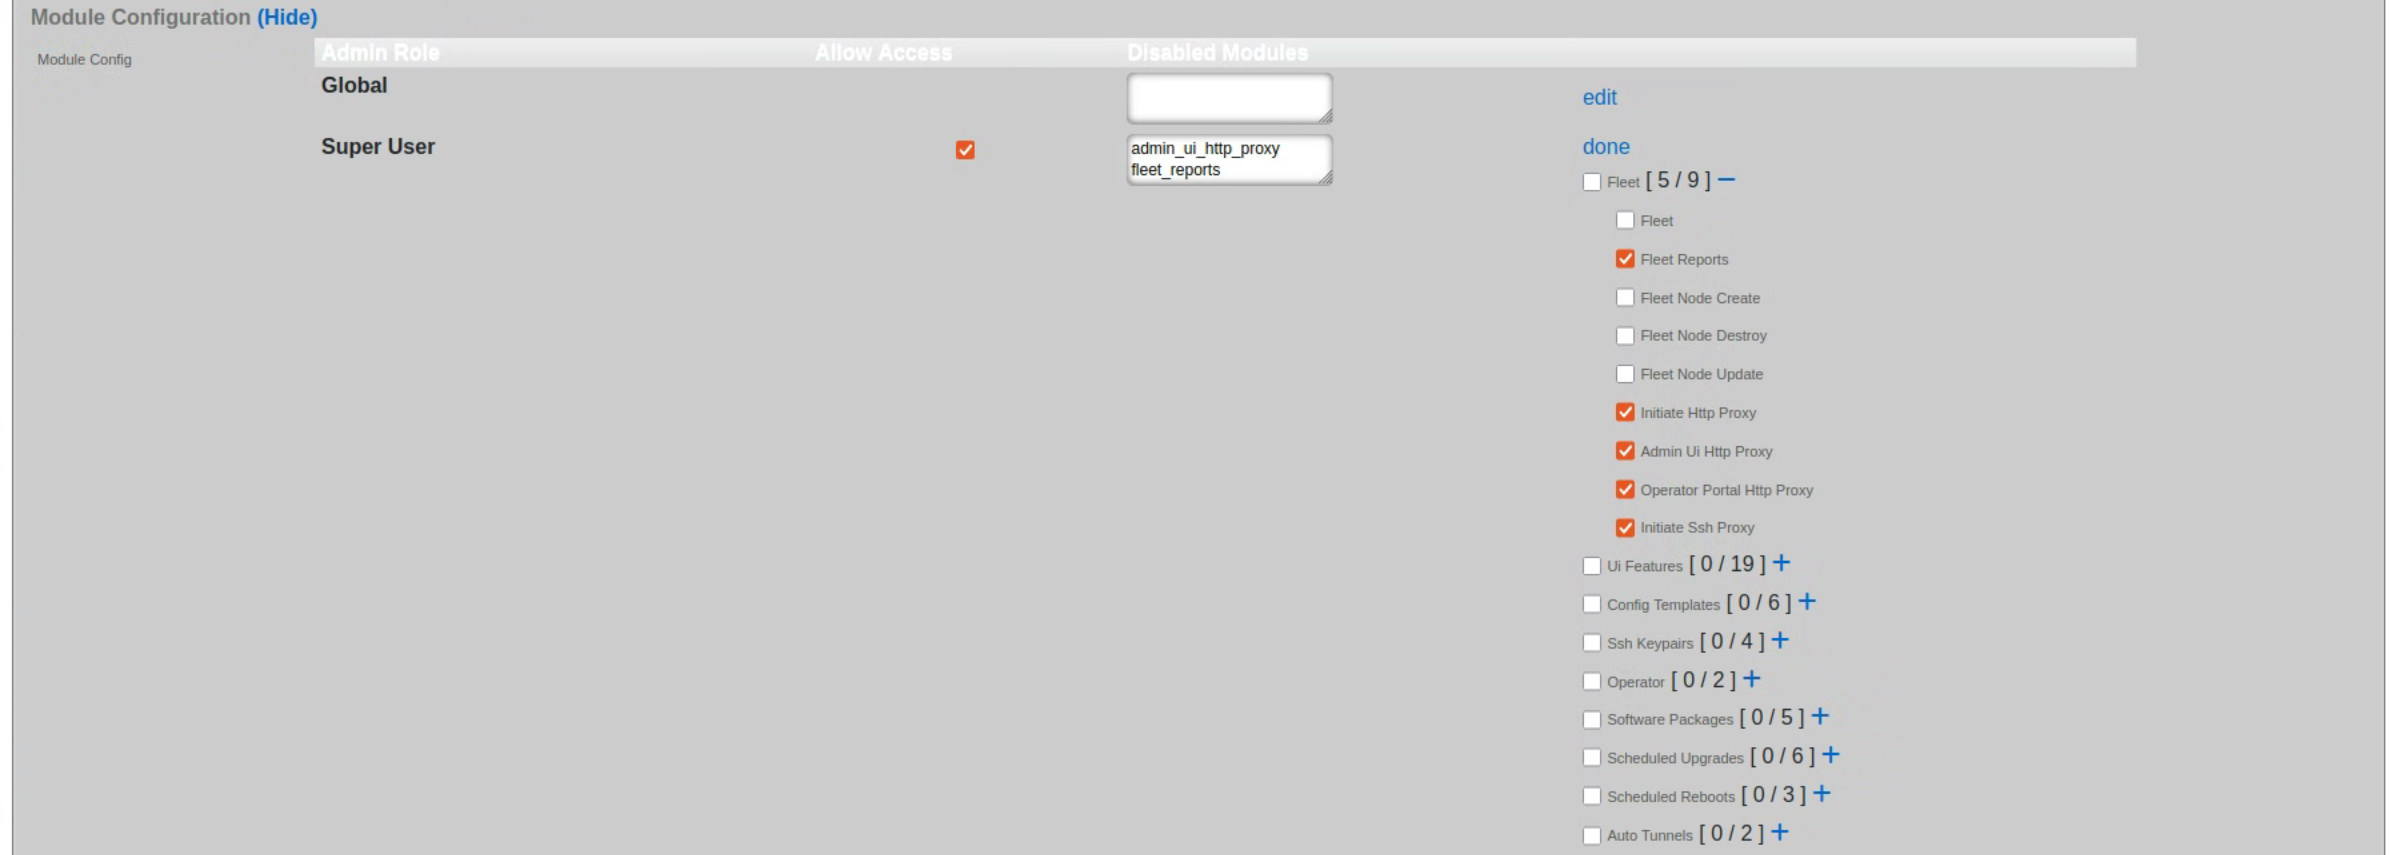
The visibility of specific modules within the given portal can be further controlled using the 'Disabled Modules' section. The example below is for a Fleet Manager type portal, showing settings disabling all proxy settings in the portal. The level of granularity and list of available control features depends on the portal type.
Fleet Manager
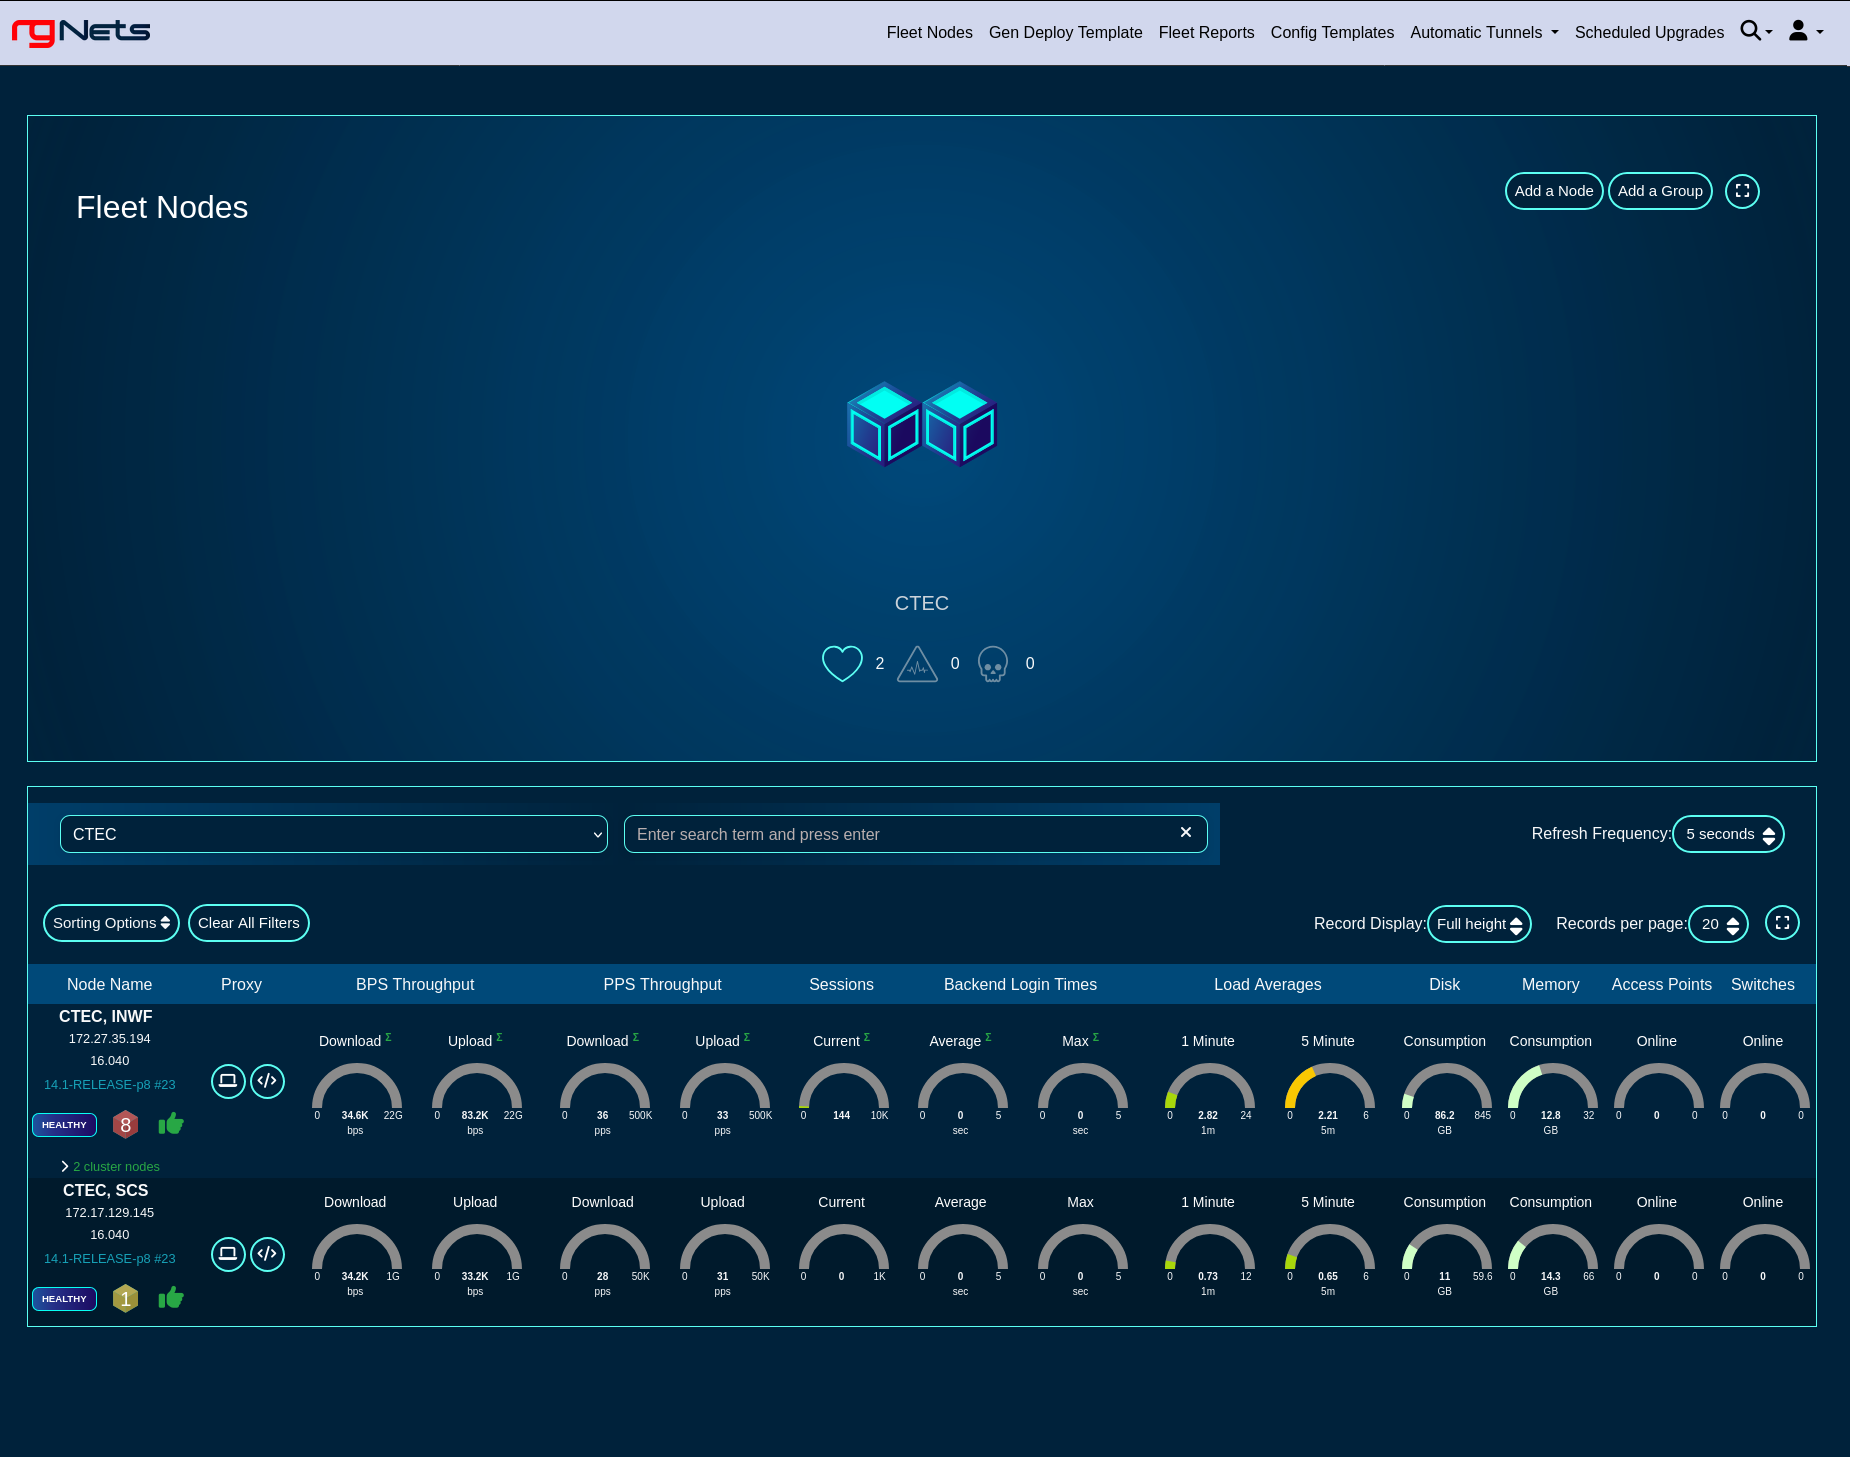
The Fleet Manager portal, as the name suggests, is used to manage a fleet of rXg systems deployed in different geographical locations, organized in arbitrary groups depending on the preferred operational scheme. The Fleet Manager portal is used to view status of different fleet groups and nodes, perform group actions on them (including scheduled software updates), generate reports, etc.
Fleet Nodes
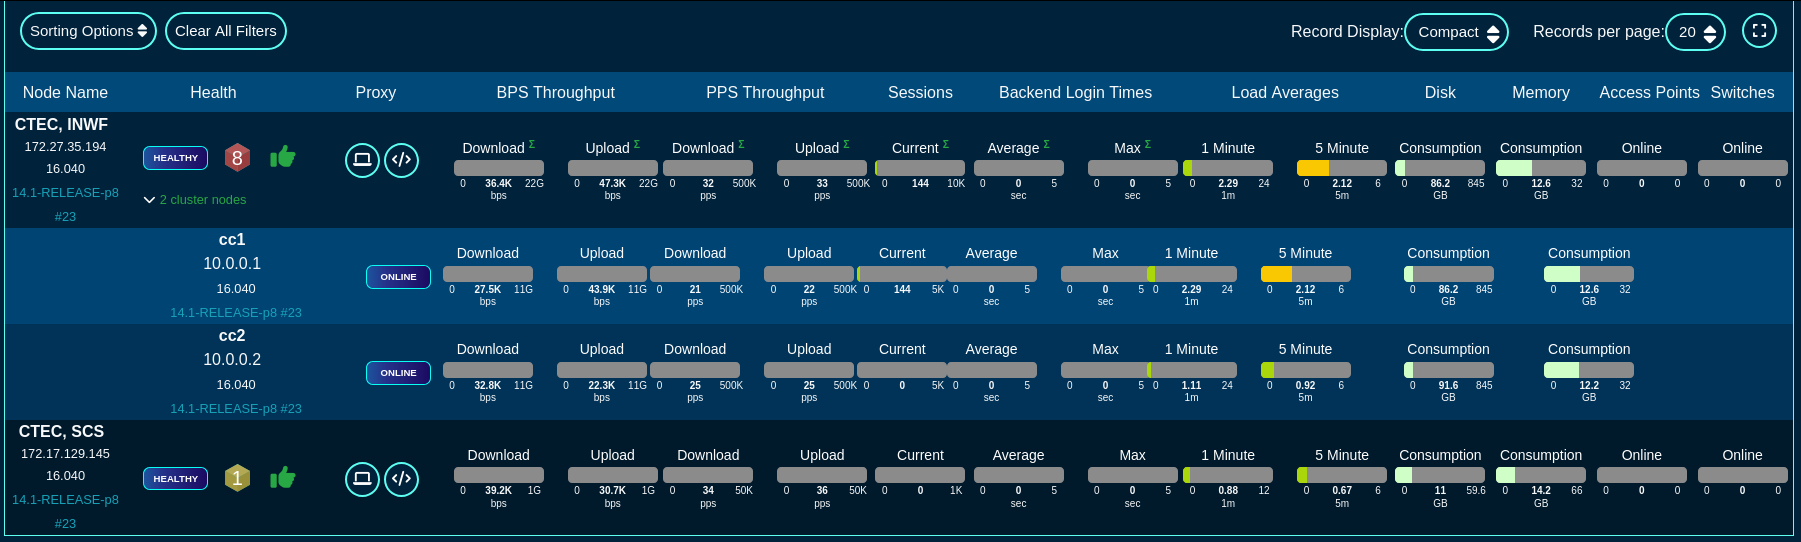
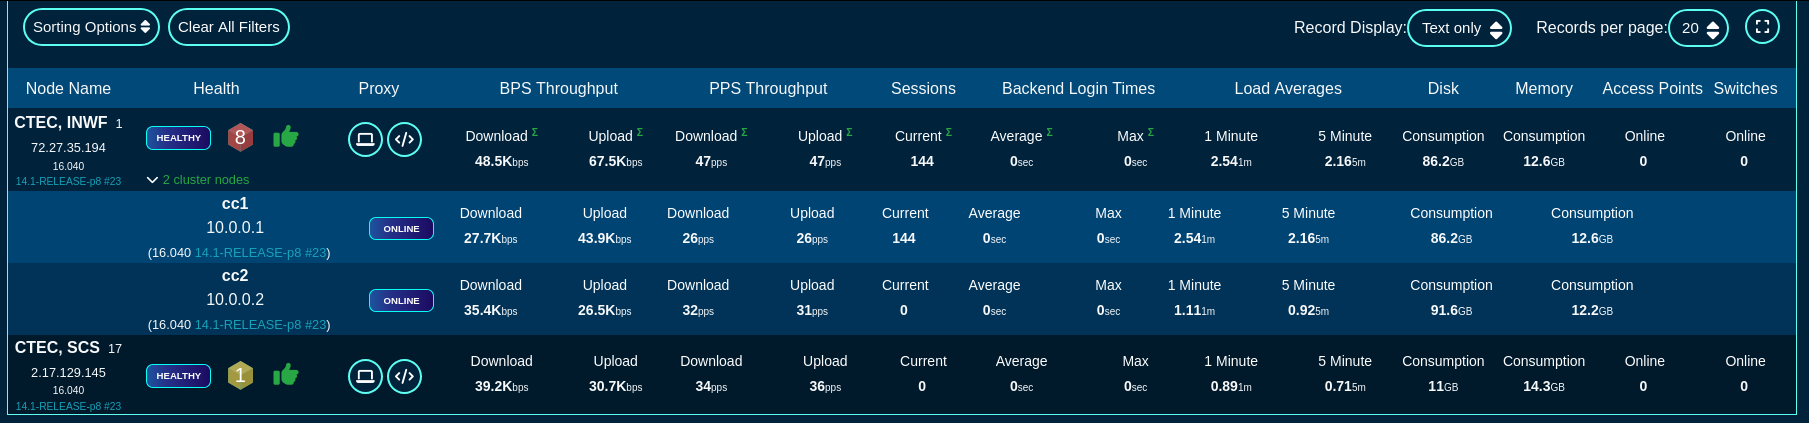
The screen below shows a view of a small fleet with two nodes, one of which comprises a cluster of two nodes.
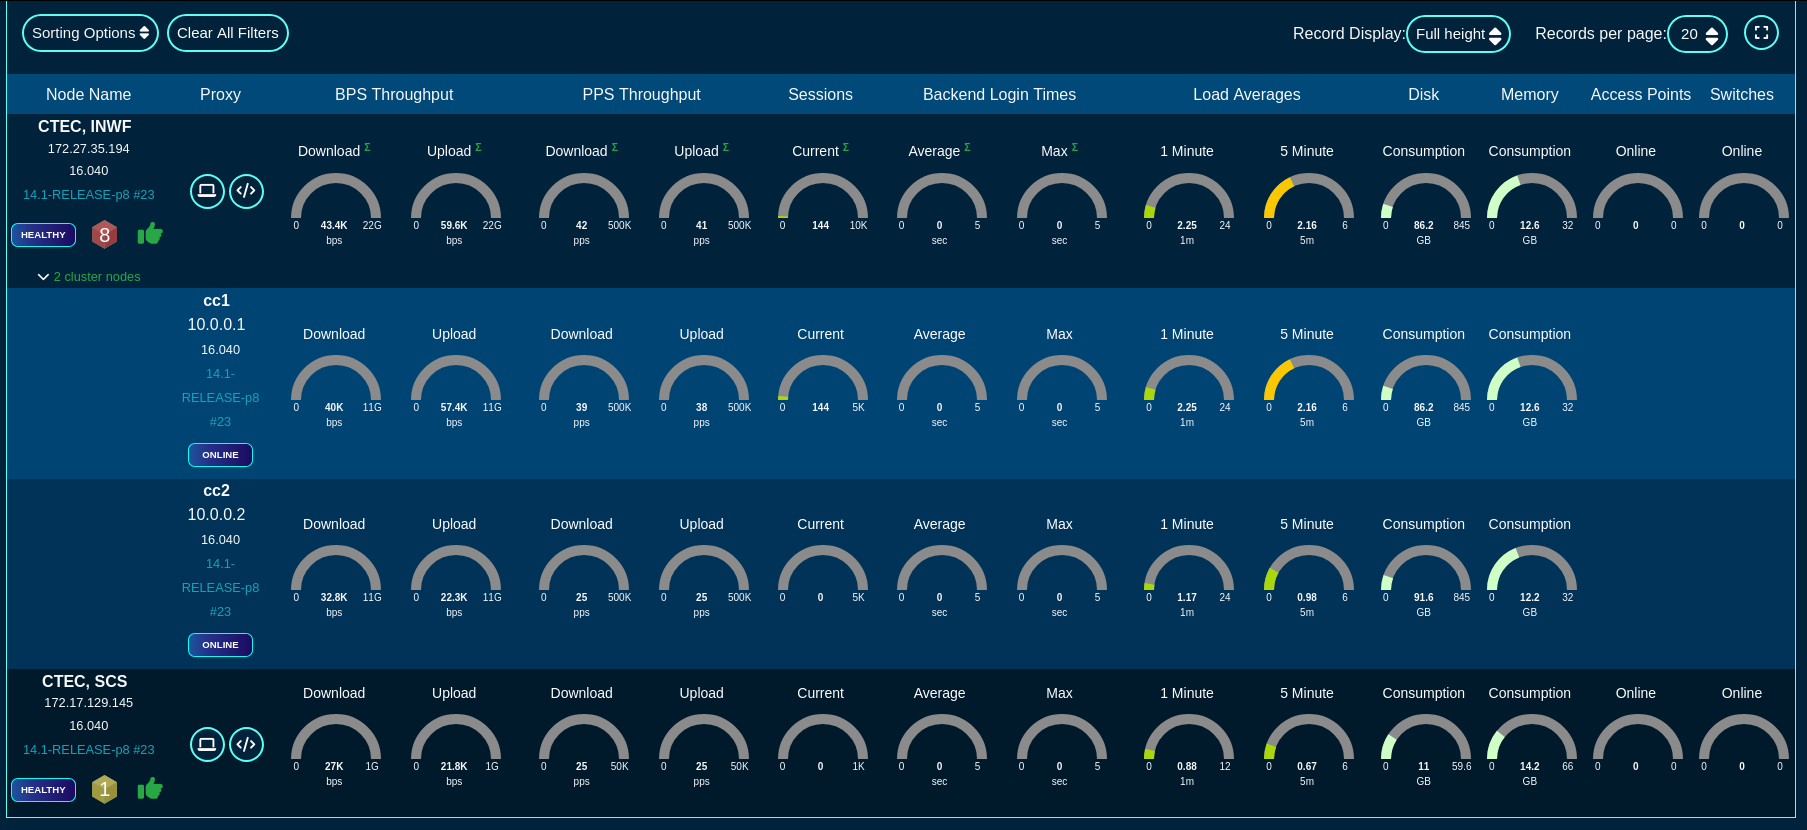
Health metrics for individual nodes can be displayed in a 'Full height', 'Compact', and 'Text' format, by toggling the 'Record Display' option, as shown in the following three screensots.
Full height view of the fleet
Compact view of the fleet
Text view of the fleet
There are also sorting and filtering options, selection of the number of elements displayed per page, as well as the refresh frequency. In the large scale deployments of production Fleet Managers, the refresh time may need to be extended to 30 seconds or even longer, depending on the number of nodes reporting to the fleet manager.
The main screen provides an option to add a group using the 'Add a Group' button to create a new logical grouping of several nodes, as well as 'Add a Node' option to add a node to one of the node groups previously created in the system.
To add a new group, fill in the following fields in the respective dialog
The Name field is an arbitrary string descriptor used only for administrative identification. Choose a name that reflects the purpose of the record. This field has no bearing on the configuration or settings determined by this scaffold.
The Fleet Nodes allows the operator to assign some of the previously existing nodes to the newly created group. This field can be left empty, if the group does not contain any nodes at the time it is created.
The Note field is an arbitrary string note used to describe the given group. This field may be left empty.
The Admins and Admin Roles fields allow to restrict admin access to the given group to the selected admin accounts (when selected in the Admins field) or admin groups (when selected in the Admin Roles field). At least one of them needs to be populated, and by default, the Admin Roles field is populated with the gropup the accoutn creating the given group belongs to.
The Config Templates field may be optionally used to select which of the configuration templates configured in the system are accessible to the given group. This field may be left empty and individual templates can be added to the given group later on.

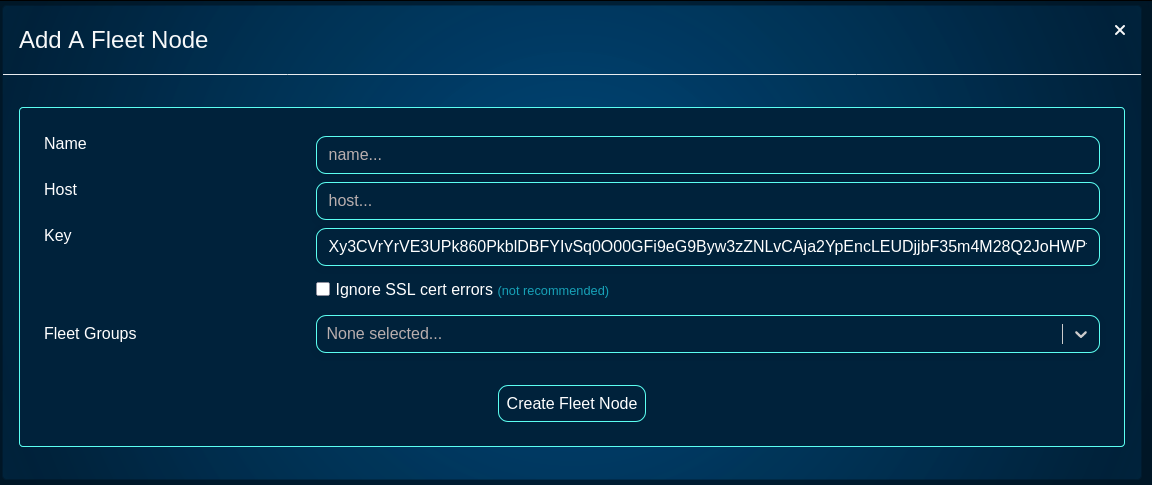
To add a new node, fill in the following fields in the respectibe dialog
The Name field is an arbitrary string descriptor used only for administrative identification. Choose a name that reflects the purpose of the record. This field has no bearing on the configuration or settings determined by this scaffold.
The Host field is filled with the FQDN (must be resolvable via the DNS used by the fleet manager) or the IP address (IPv4 or IPv6) of the fleet node.
The Key field is automatically generated by the dialog itself and will be used to link the new fleet node and connect it to the fleet manager. It may be customized, if needed, but it is recommended to leave it in its default value.
The Fleet Groups field allows to assign the newly created node to one of the existing groups.
The Ignore SSL cert errors field should not be checked in the production conditions to avoid on-boarding potentially insecure fleet nodes.
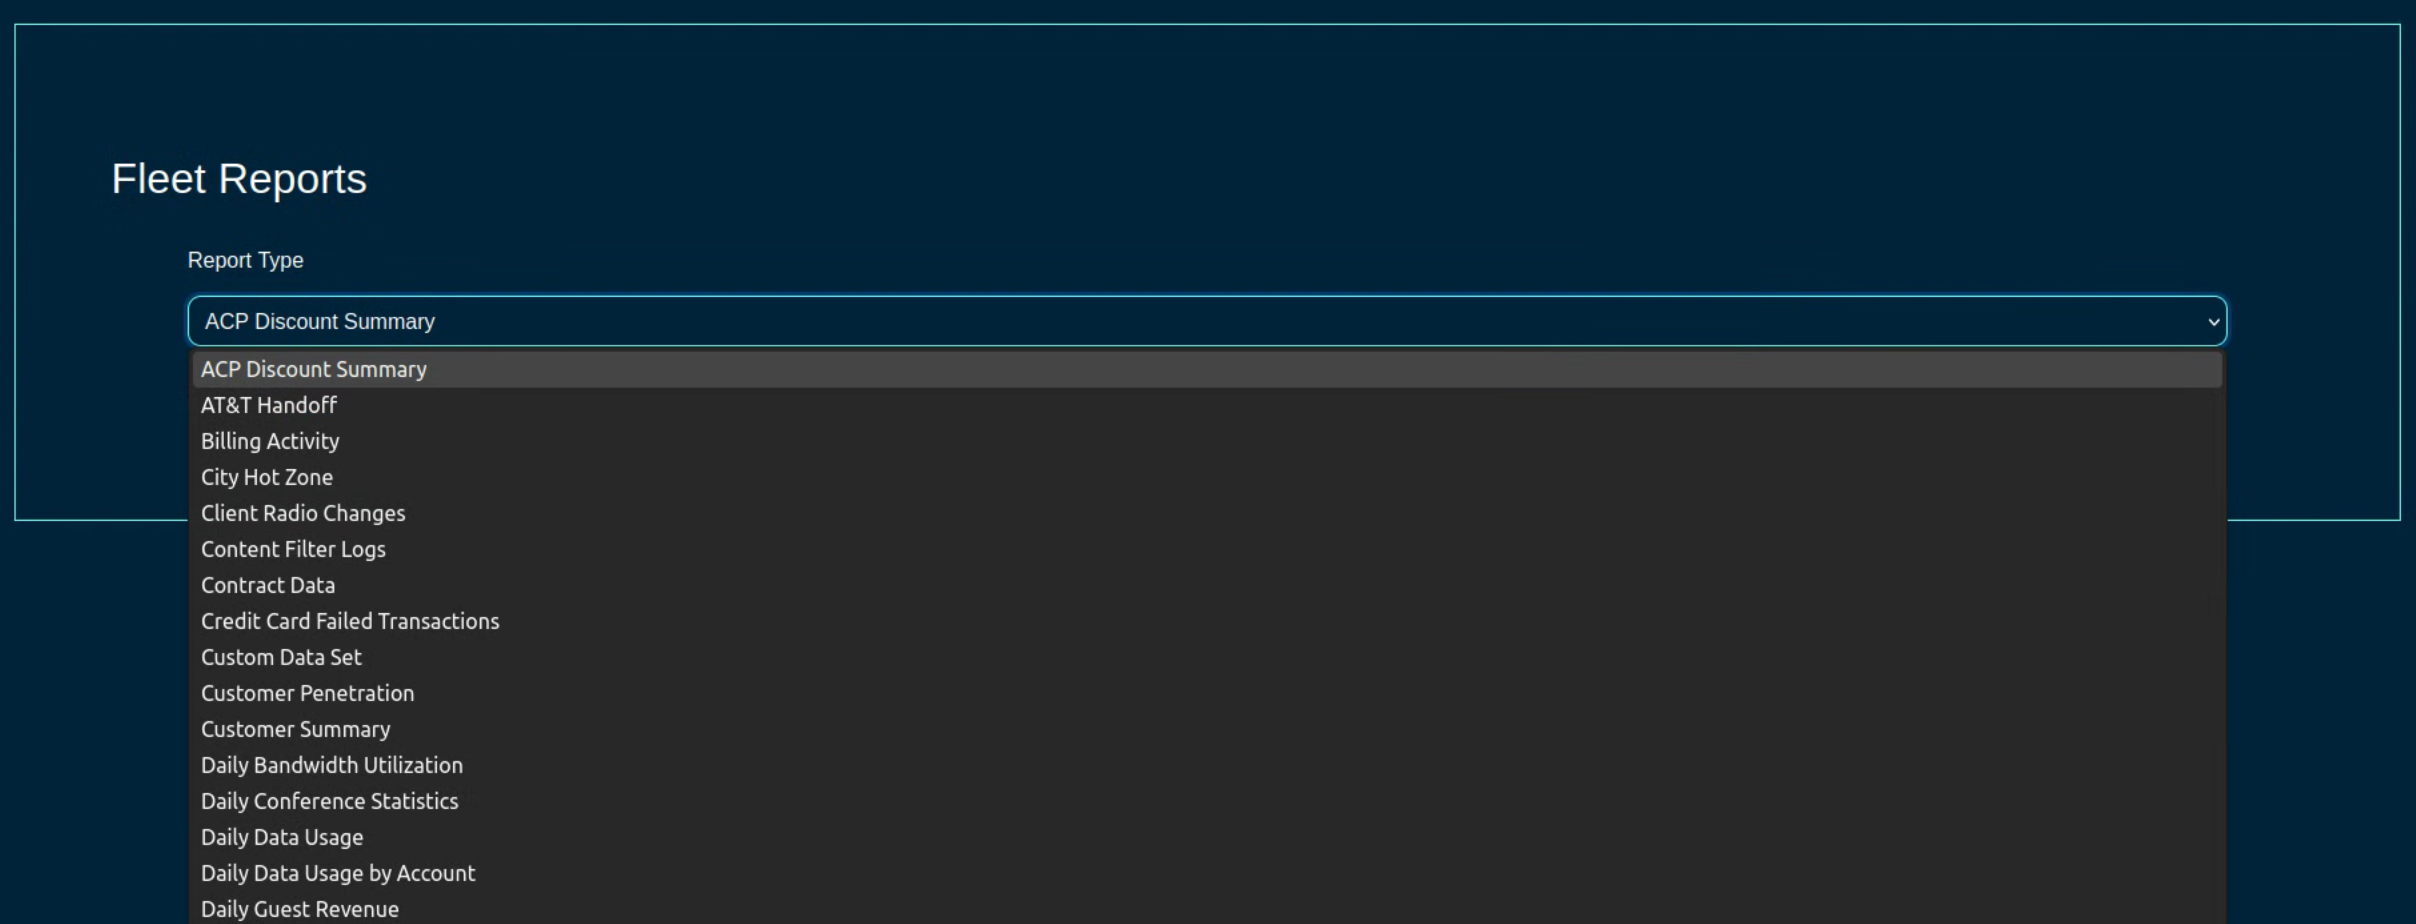
The Fleet Reports screen provides access to a variety of pre-configured reports, providing also an option to create custom ones, as needed. The name of individual report types are pretty self-explanatory and will not be examined in more detail here.
Config Templates
The Conifg Templates screen provides access to the configuration templates, allowing the operator to create a new configuration template, test it, and apply it to selected node(s) or group(s).
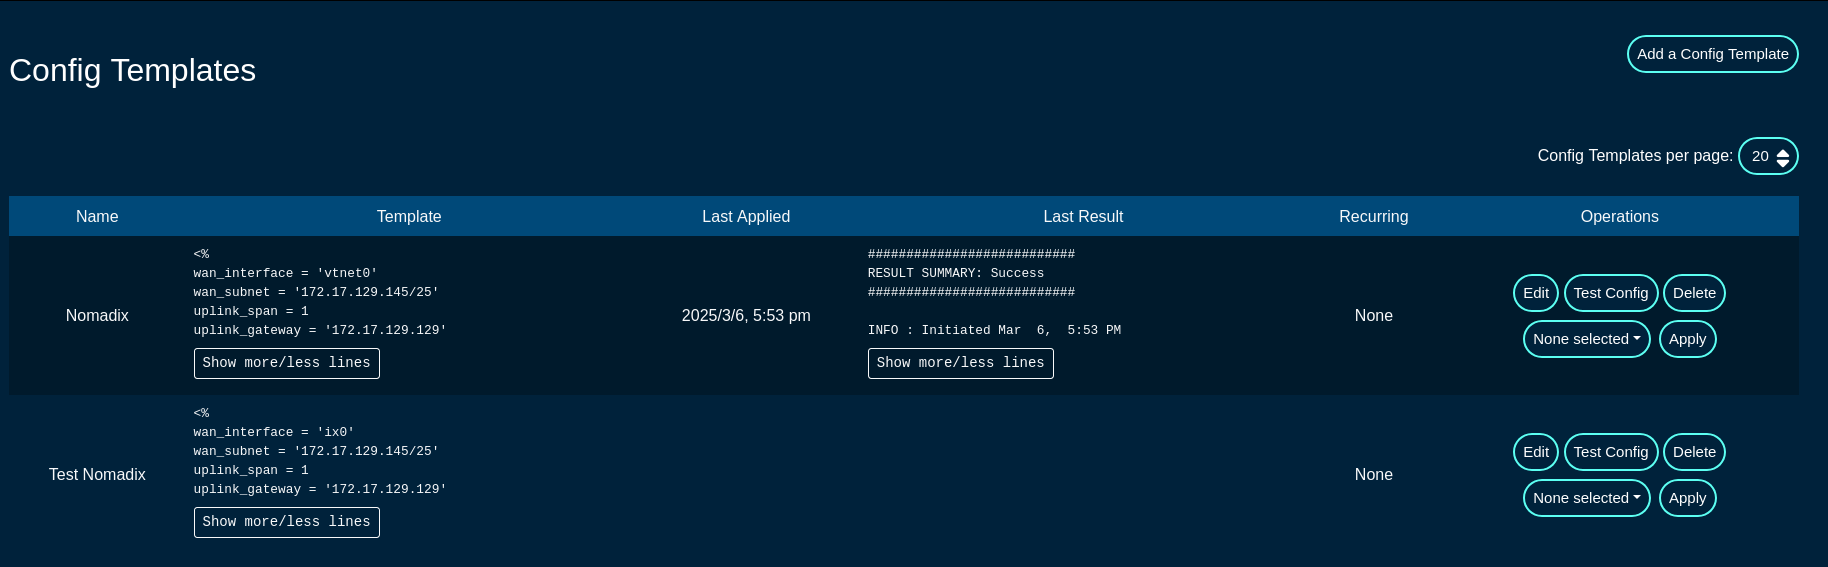
A config template can be edited using the 'Edit' button, deleted using the 'Delete' button, validated using the 'Test Config' button, and applied using the 'Apply' button to nodes selected under the 'None selected' drop down list.
Additionally, new configuration templates can be created using the 'Add a Config Template' button, with the following fields that need to be populated:
The Name field is an arbitrary string descriptor used only for administrative identification. Choose a name that reflects the purpose of the record. This field has no bearing on the configuration or settings determined by this scaffold.
The Note field is an arbitrary string note used to describe the given config template. This field may be left empty.
The File upload allows the operator to upload a YAML-formatted file to overwrite the content of the given config file.
The Remote URL,, Username, Password, and Certificate fields are used for a remote config download process, where the config template is donwloaded from a specific remote location.

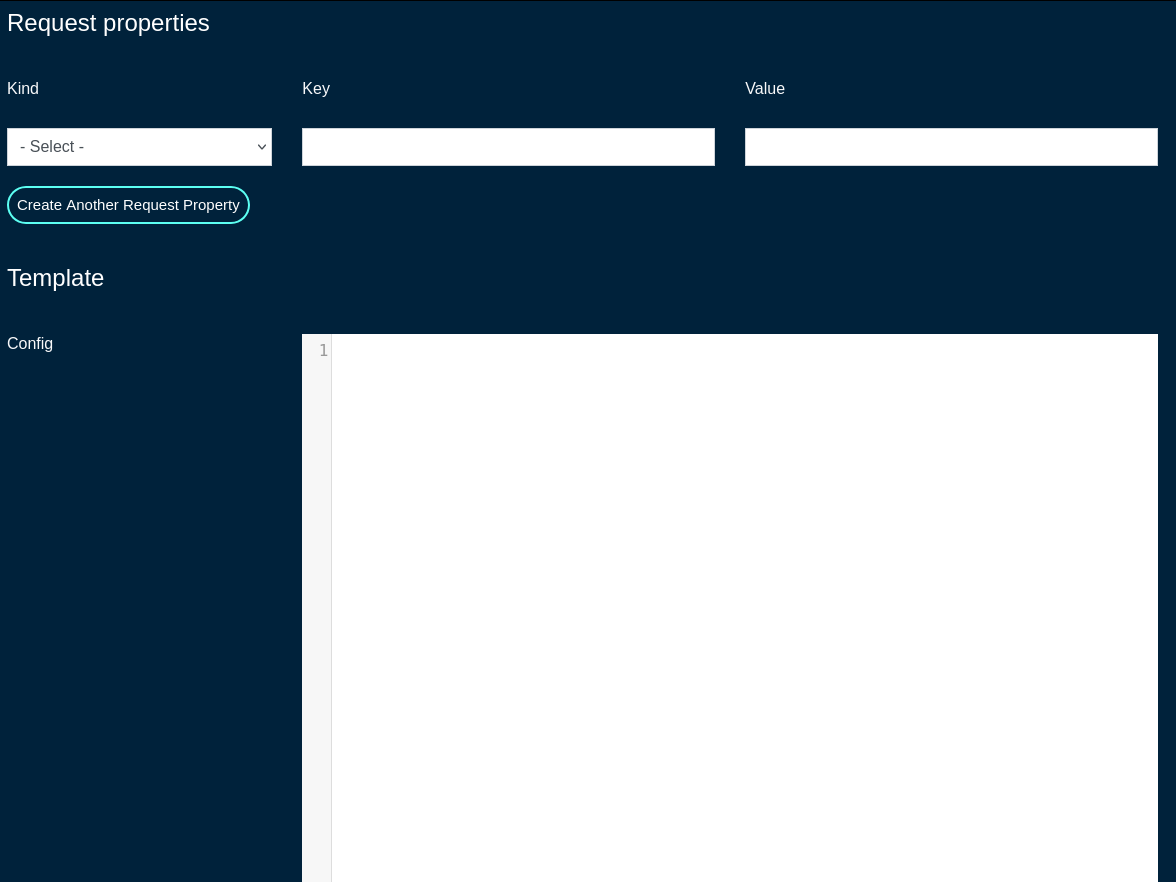
The Request properties allows to custom HTTP Header or Query Parameter fields for the given config template. More than one field / entry is possible, by adding new lines using the 'Create Another Request Property' button
The Config field contains the YAML-formatted body of the config template, which may include also embedded Ruby code.
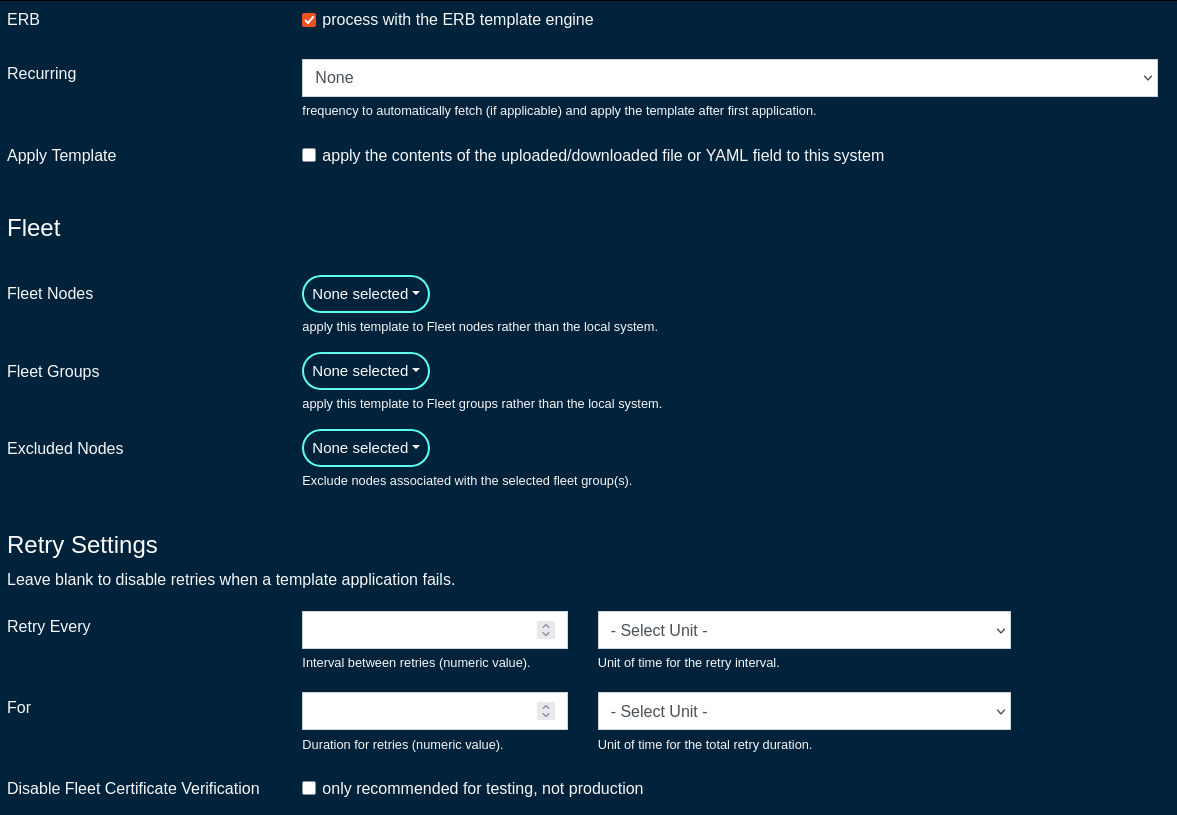
The ERB field should remain checked, which indicates that the given config template is to be processed with the ERB template engine.
The Recurring field allows the operator to set frequency to automatically fetch (if applicable) and apply the config template after first application. Various frequency options are pre-defined, including from hourly to annually, covering the majority of use cases commonly observed in production conditions.
The Fleet Nodes, Fleet Groups, and Excluded Nodes fields provide a flexible way to select which of the node(s) and/or groups to apply the given config template to.
The Retry Every and For fields specify the retry conditions for the given config template, should its application fail. Leave blank to disable retries when a template application fails. The configuration fields allow to specify the retry period in minutes / hours / days / weeks / months and the duration of the retry period (again, in minutes / hours / days / weeks / months).
The Disable Fleet Certificate Verification should not be selected for production conditions and it is only recommended for testing, not production. When checked, the fleet certificates are not being validated, which may lead to a potential of a rouge fleet node have the configuration template applied to.
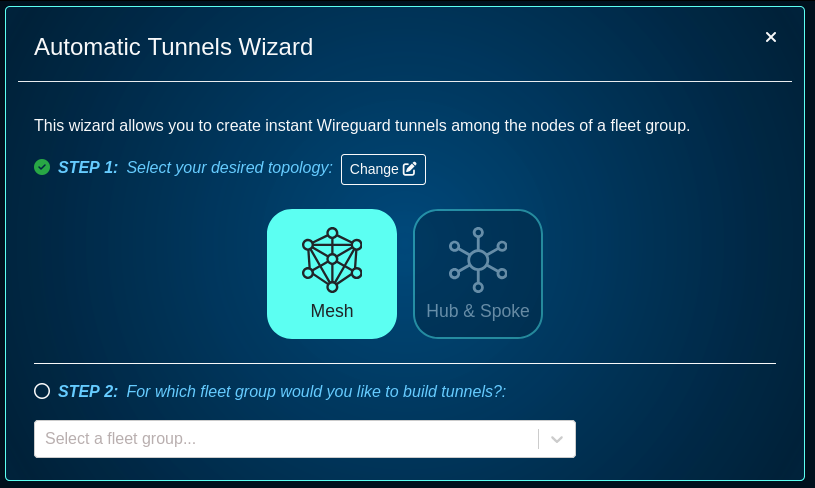
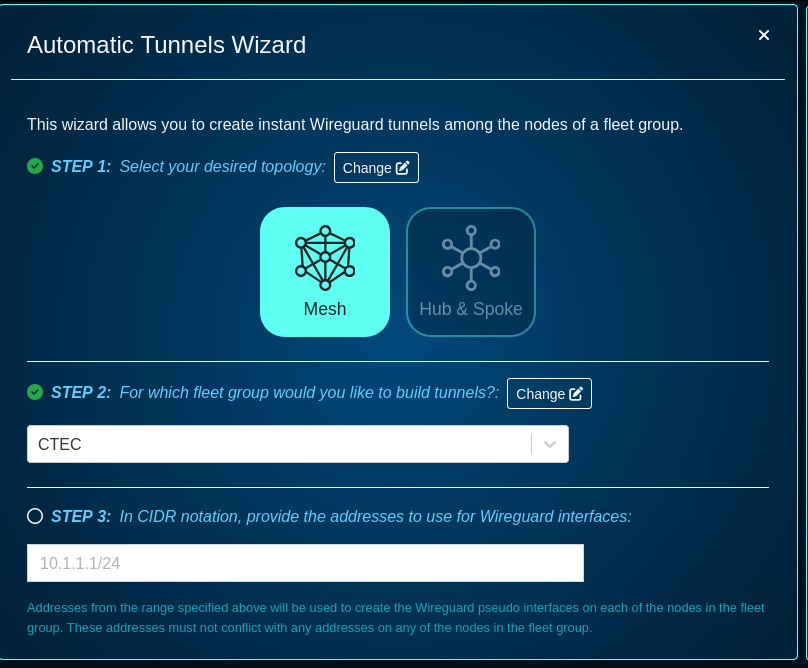
Automatic Tunnels
The Automatic Tunnels screens allows the operator to use a Tunnel Wizard or Tunnel Visualization for the fleet.
The Tunnel Wizard allows the operator to create instant Wireguard tunnels among the nodes of a fleet group, providing L2 connectivity between the selected nodes.
The wizard includes several steps , including
- STEP 1: select the topology (mesh or hub&spoke)
- MESH: Establish a tunnel from every node in the group to every other node in the group.
- HUB & SPOKE: Establish a tunnel from every node in the group to a common hub node.

- STEP 2: select the fleet group the connectivity is applicable to
- STEP 3: provide the addresses to use for Wireguard interfaces (these caddresses can be private RFC1918 IPv4 address space)
- STEP 4: specify a port, keep-alive time, addresses, or IP groups, if needede - this step is optional
- a default Wireguard Port is set to 51820, other port numbers can be used
- a keep alive period can be set to a custom value
- node addresses can be selected - select the addresses for each node that should be accessible via the created tunnels. By default, tunnels will use addresses marked "Wireguard eligible" from the admin UI's addresses scaffold.
- Select the IP Group for each node that should be associated with each of the created tunnels. By default, tunnels will share a new IP group called "WireGuard Default" that will be connected to the default policy.
- there is an option to check to automatically rerun the wizard and apply updates whenever there are changes to fleet nodes within the selected group.

The wizard requires the acknowledgment that running this wizard will make changes to the configuration of all fleet nodes in the selected group, potentially disrupting access to those systems. It is critical that before any Wireguard configuration is committed, backup of all running configurations is taken for all target nodes.
Scheduled Upgrades
The Scheduled Upgrades screen allows to create scheduled upgrades for selected node(s) / group(s).
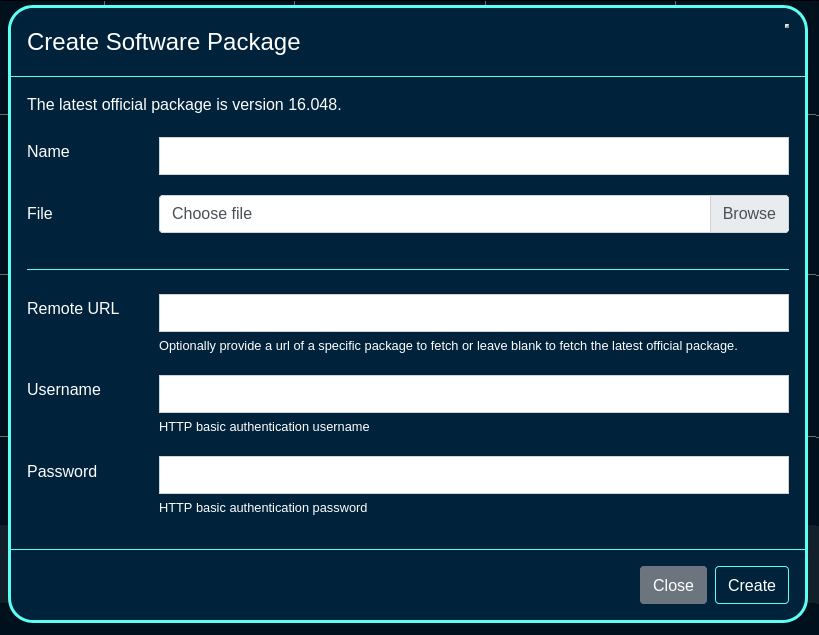
For starters, go to the Software Packages, and click on the 'Create New' button and fill in the following fields:
The Name field is an arbitrary string descriptor used only for administrative identification. Choose a name that reflects the purpose of the record. This field has no bearing on the configuration or settings determined by this scaffold.
The File is where the new firmware file is selected and then uploaded.
The Remote URL,, Username, and Password fields are used for a remote software image download process.
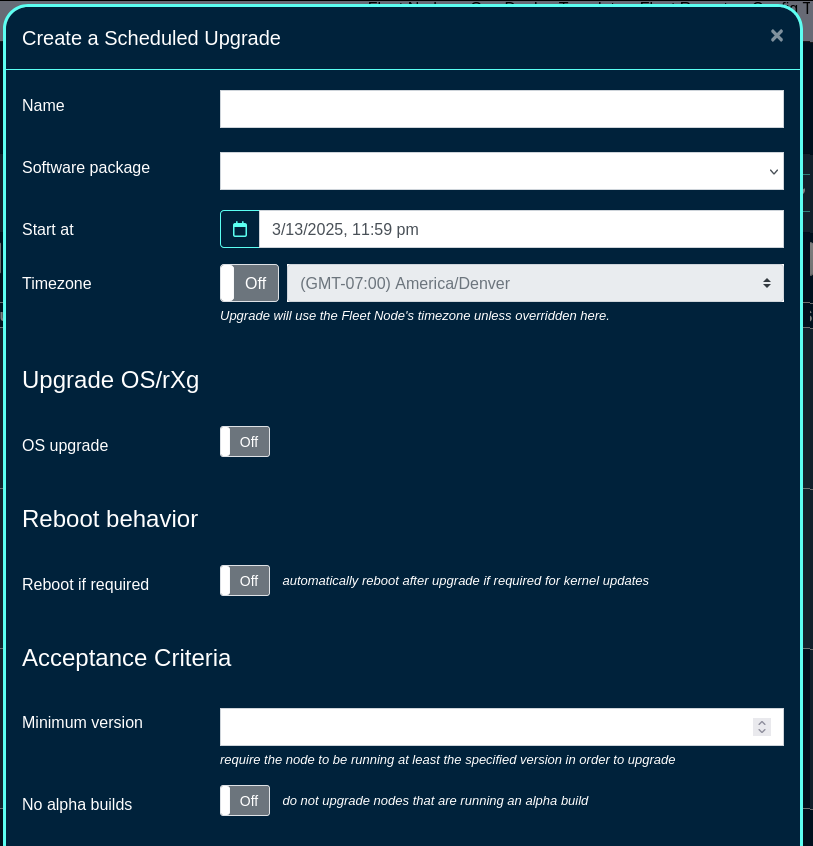
Once the software package(s) required for the fleet are created, a scheduled upgrade can be created, using the 'Create Scheduled Upgrade' button. The following fields are available:
The Name field is an arbitrary string descriptor used only for administrative identification. Choose a name that reflects the purpose of the record. This field has no bearing on the configuration or settings determined by this scaffold.
The Software Package is where one of the pre-defined software packages is selected.
The Start at and the Timezone fields are used to select the time when the upgrade process is scheduled to start.
The OS upgrade toggle allows the OS upgrade to take place.
The Minimum version and No alpha builds allow to set the minimum version of the code required (to make sure that the node is running at least the specified version in order to upgrade), and to control whether the node(s) are allowed to run alpha builds or not.
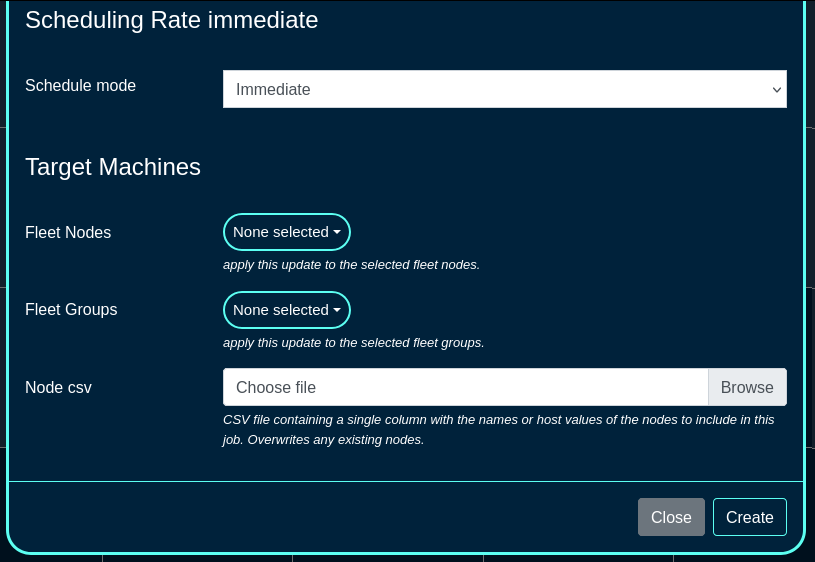
The Schedule mode allows to select when to execute the code upgrade, including the immediate or various types of staggered upgrades. In staggered upgrades, for example upgrades to a specific share of systems per day may be configured, to minimize distuprion to end customers.
The Fleet Nodes, Fleet Groups, and Node csv fields provide a flexible way to select which of the node(s) and/or groups to perform the upgrade on. The CSV file allows also to upload the names or host values for target node(s) to be upgrades.
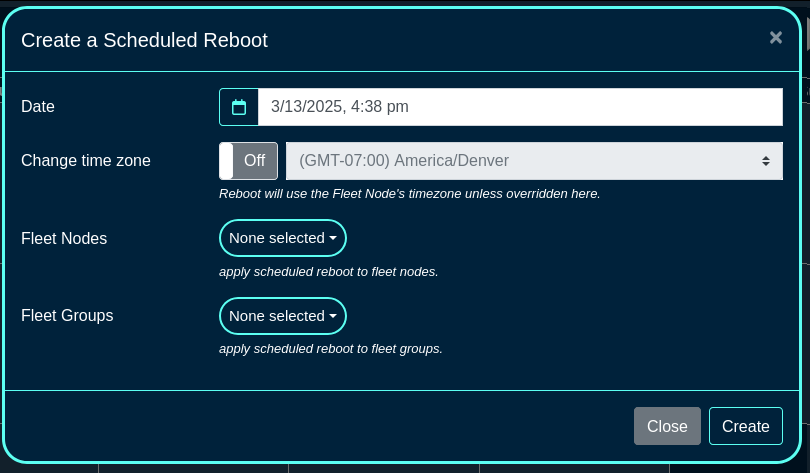
A Scheduled Reboot schedule can be also created using the 'Create Scheduled Reboot' button, including the following fields:
The Date and Timezone fields are used to select the date/time when the reboot process is scheduled to start.
The Fleet Nodes and Fleet Groups fields provide a flexible way to select which of the node(s) and/or groups to perform the reboot on.
Once a scheduled reboot even is created, new information fields are displayed on the left side of the screen (specific nodes ot be rebooted and the scheduled time) as well as the calendar view is updated with the scheduled action.
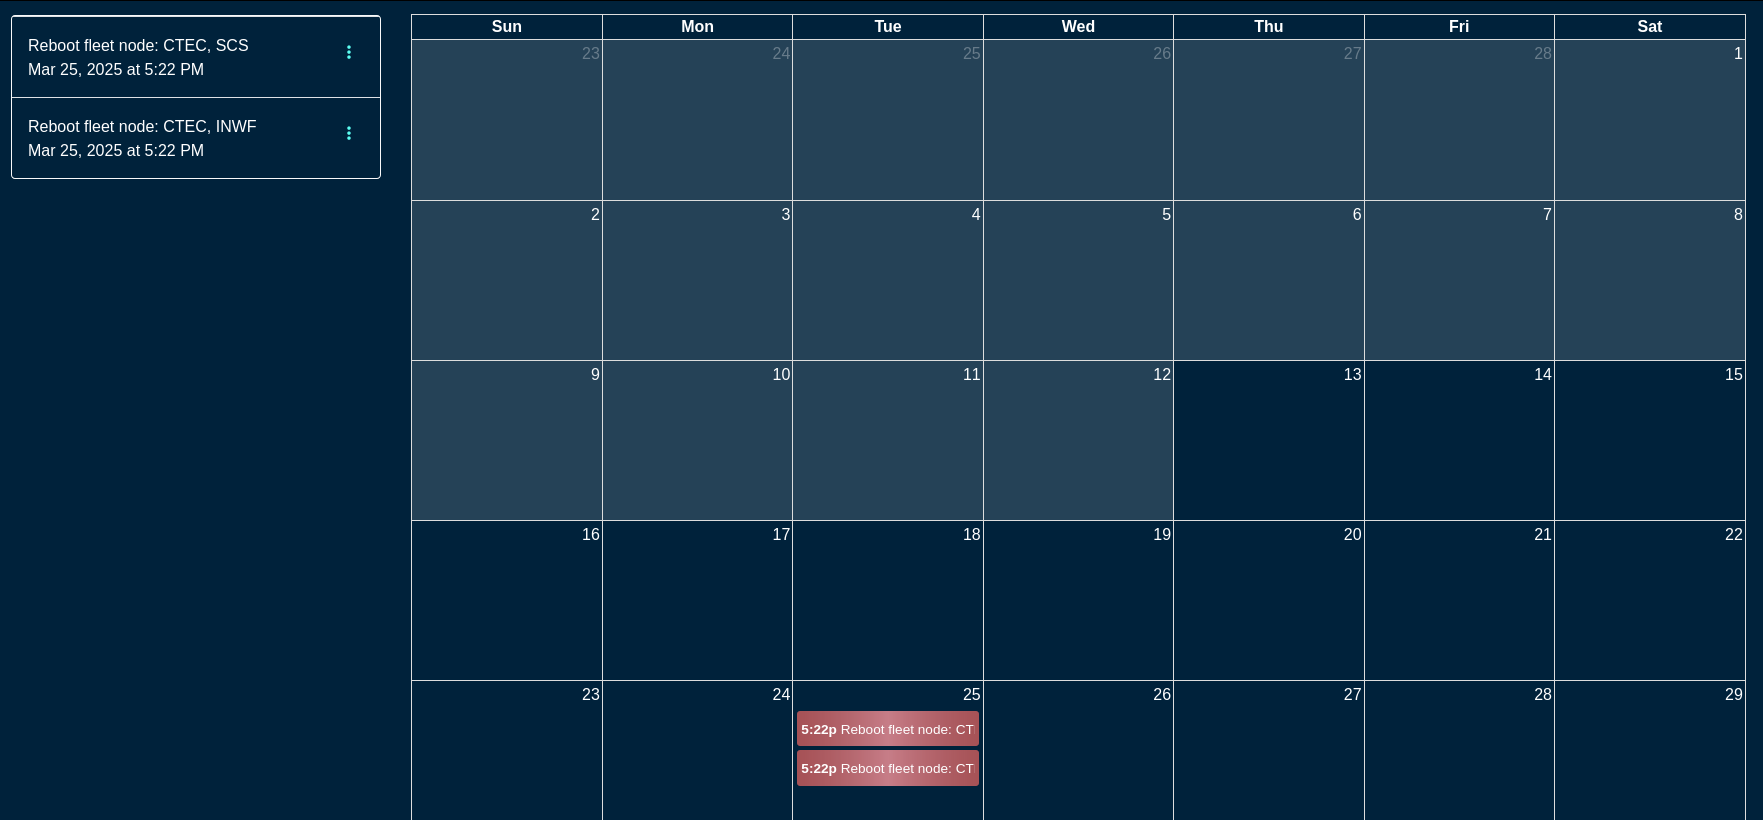
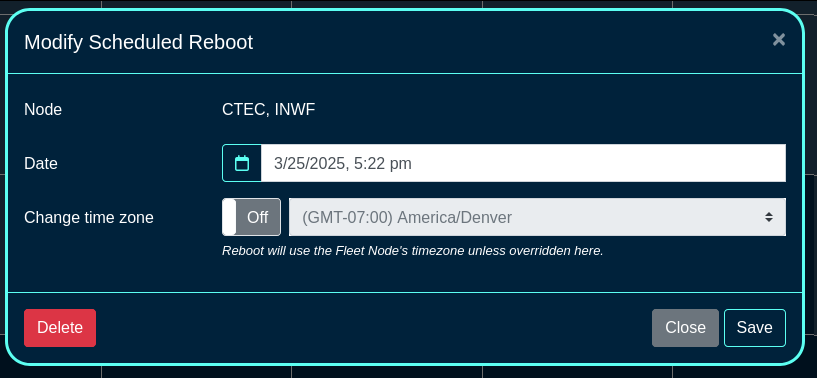
Scheduled events can be deleted / modified by clicking on the target event and changing the desired parameters. For example, to modify a scheduled reboot event, click on the specific calendar entry or select the event on the left, menu option (3 vertical dots), and select Edit. Modify the parameters of the event or delete the action, as needed.
User Menu
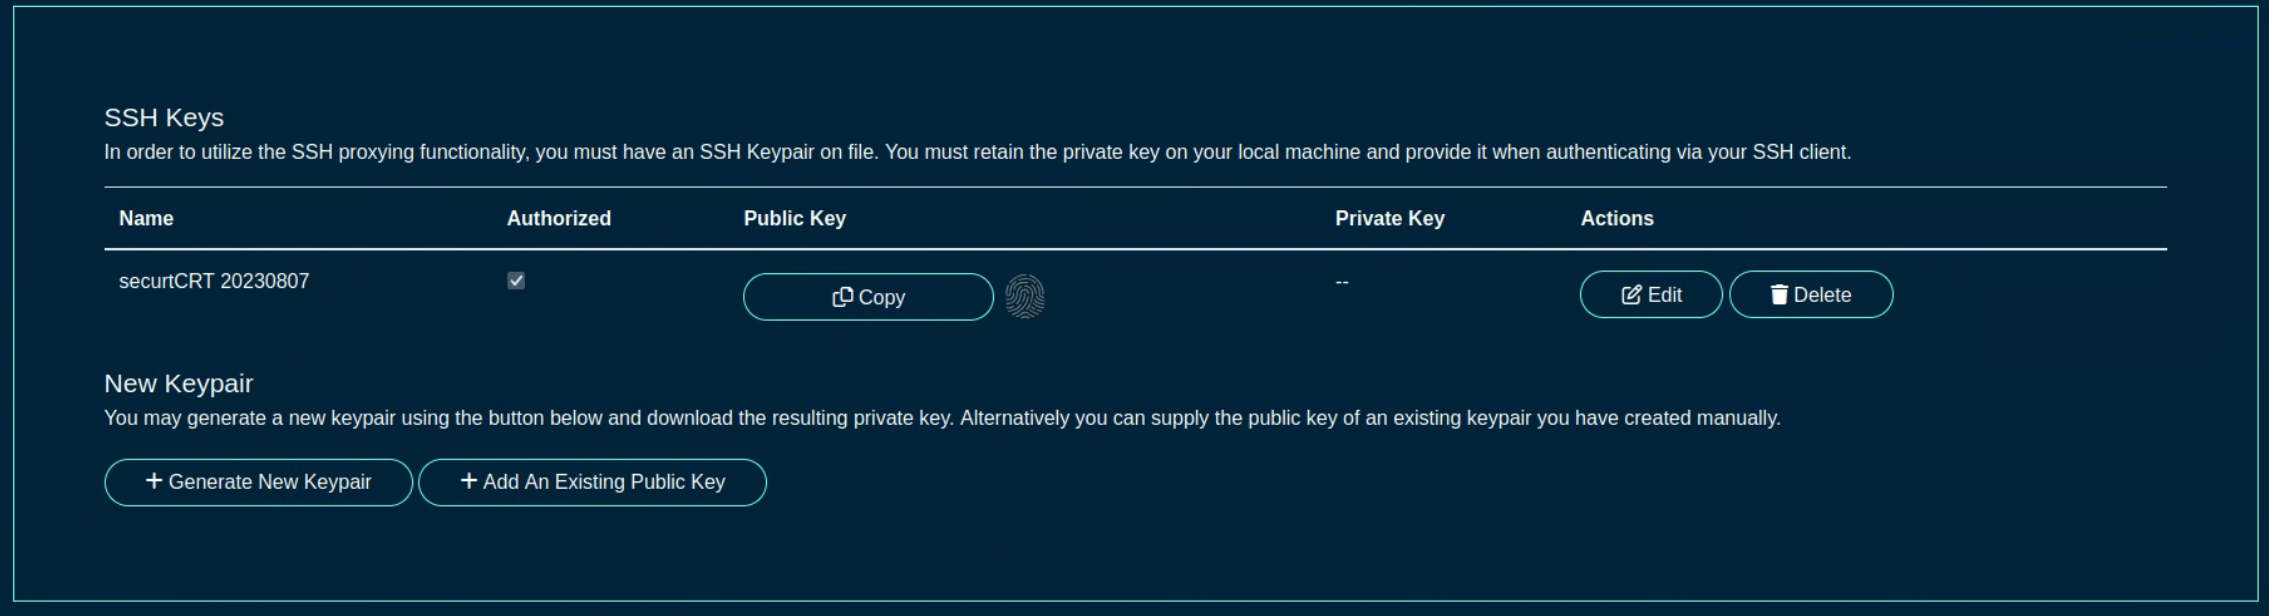
The user menu on the right side of the screen permits the operator to change the password, access SSH key options (see the screen below), or log out from the portal.
The SSH key options include:
- a line entry for each existing SSH key, containing its name, authorization check box (if checked, the SSH key can be used to log into the shell on ths rXg system), a way to copy of the public key, fingerprint value (hash of the key and its size), an optional private key information, as well as an option to Edit or Delete the given key entry.
- there is an option to generate a new key pair (public and private) as well as add an existing SSH keygenerated offline using any of the methods available outside of rXg (Putty, SecurCRT, shell on Linux, Mac, etc.)
Location Manager
The Location Manager is a portal that is aimed at presenting network information in a spatially aware way.
One of its key functionalities is creating and placing POIs (Points of Interest).
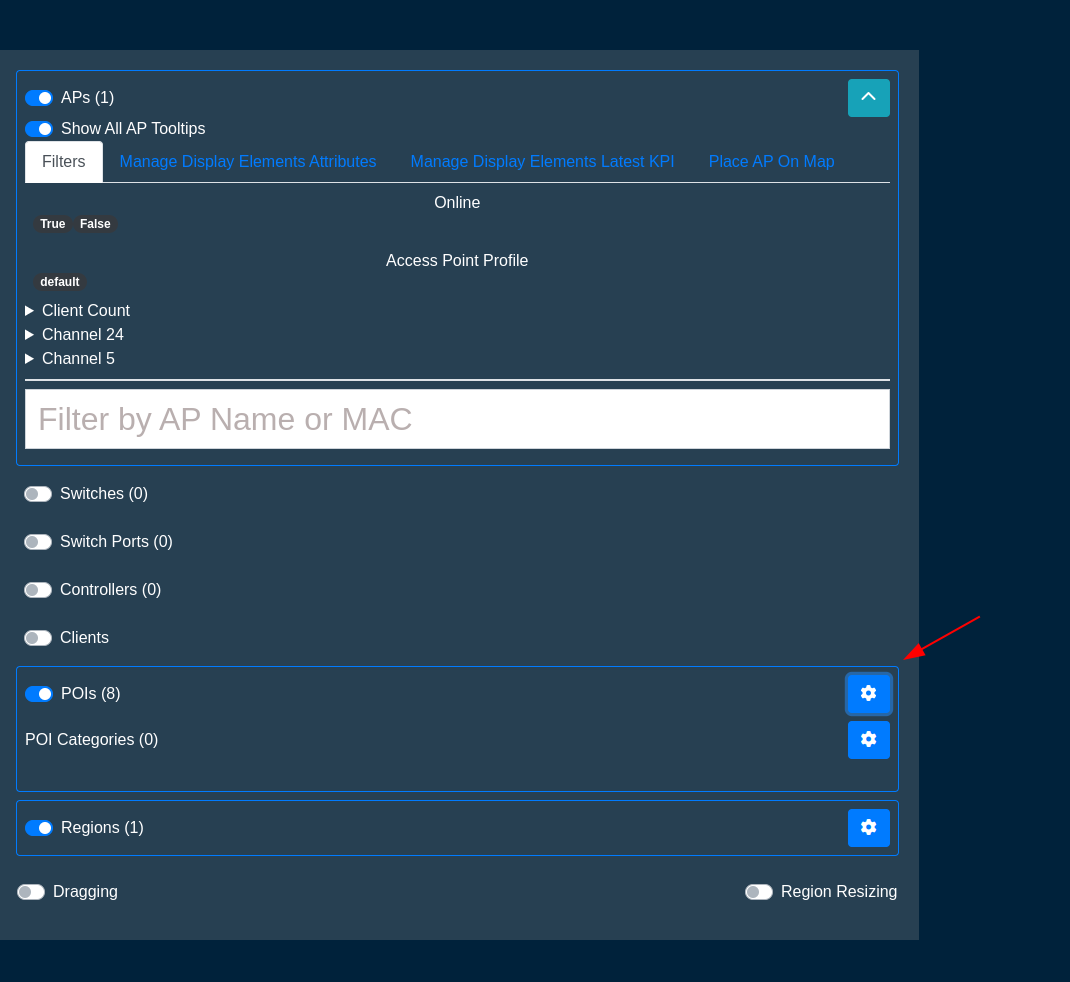
Click Here to Create a new POI.
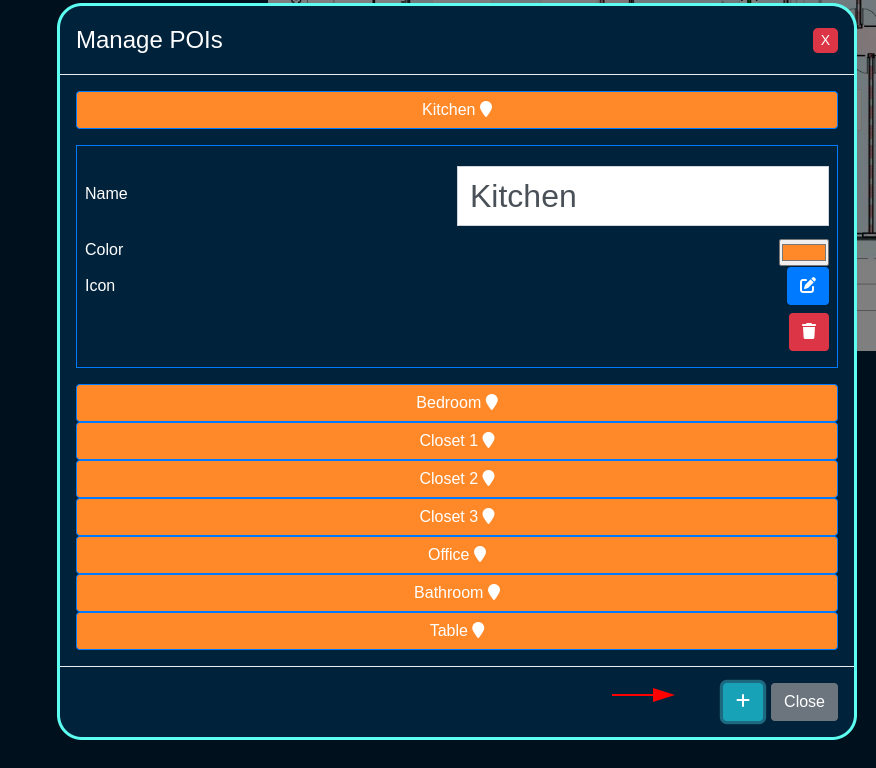
After you name it, click here to save it
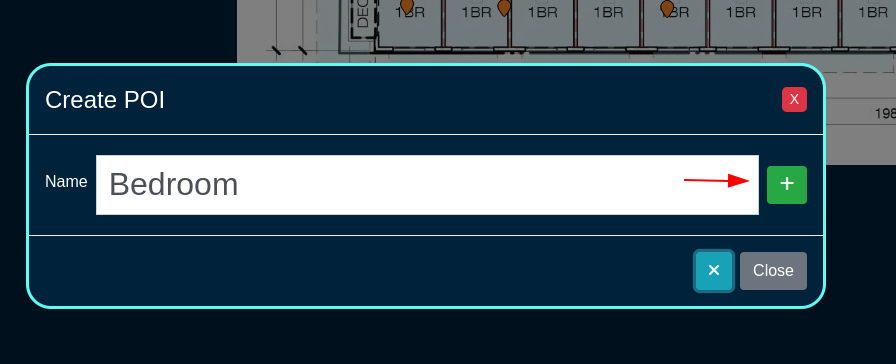
When you first create it, it will be placed in the center of the floorplan. Make sure dragging is turned on, then simply drag it to where it should be.
Omniauth Strategies
The Social Login Strategies scaffold enables creation, modification, and deletion of login strategies for supported Omniauth providers.
The name field identifies this login strategy in the system.
The provider name field determines which Oauth provider this strategy relates to. Select a supported provider from the list.
The app ID field defines the ID of the application that has been created with the provider chosen in the provider name field. For Facebook, this is the App ID , but for Twitter this is the API Key. This value should be obtained from the developer console of the associated provider.
The app secret field defines the app's secret value which authenticates the app. This value should be obtained from the developer console of the associated provider.
The captive portals selections define for which captive portals this strategy is enabled. This strategy will not be available unless it is associated with at least one captive portal.
The usage plans selections determine which usage plans are available for users who log in using this strategy. The plans selected here must also be associated with the end user's effective portal; however, users who have not logged in via this strategy won't be able to see these plans in the usage plan list. If there are no usage plans associated with this strategy, an account will be created for the user, who will then be redirected to the usage plan list view. If there is only one associated usage plan, and it is free, the plan will automatically be applied to the account.
The SAML section contains configuration options which pertain only to SAML login strategies. When utilizing a SAML strategy, the App ID and App Key are not necessary.
A SAML configuration requires at a minimum, an Identity Provider (IdP) SSO URL, and optionally, a IdP Cert Fingerprint to enable validation of the IdP's certificate. Both the SSO URL and Fingerprint may be determined automatically by providing a IdP metadata URL.
The Service Provider (SP) Entity ID is a unique identifier for the service provider, which will be entered into the IdP when adding the SP.
After creating the login strategy , the webserver will restart. Clicking the show link will provide the metadata URL that can be provided out-of-band to the Identity Provider in order to establish a login trust.
Users who log in with an Omniauth strategy only have access to usage plans that are associated with their strategy AND the current captive portal. Users who log in with a non-social account do not have access to the usage plans associated with the portal's Omniauth strategies.
The note field is a place for the administrator to enter a comment. This field is purely informational and has no bearing on the configuration settings.
A WAN target should be associated with the captive portal where the operator intends to use the strategy which allows the user to access the provider's site for the login process. Twitter, Facebook, and Google WAN targets are created automatically and should be selected when utilizing these providers.
For more information, see the Social Login manual entry.

Remote Access to Local Web Servers
The rXg web multiplexor may be configured to recognize operator specified name-based virtual hosts. This feature enables the operator to configure remote access to web servers that are on the LAN side of the rXg in a reasonable, maintainable and understandable manner. Name-based virtual hosts are most often used for remote access to the web management consoles of privately addressed LAN equipment without VPN. VPNs are the preferred mechanism for enabling remote access to LAN equipment. The next best thing is to use name-based virtual hosts through this feature.
The operator must configure DNS records for each and every name-based virtual host that is desired. The DNS records must resolve to the WAN IP of the rXg. Web requests to the DNS record will contain the HTTP headers that enable the rXg web multiplexor to send the request to the appropriate backend server on the LAN.
The rXg must be configured with either a wildcard SSL certificate or individual certificates per destination host. Each HTTP virtual host entry can be configured to use unique SSL Certificates and should match the configured DNS entry for that host. This is required because HTTP headers are read after the SSL handshake is complete.
The hostname for remote access field specifies the DNS record that has
been configured. For example, if the rXg is given the domain name
gw.somewhere.net it would be appropriate to use name-based virtual hosts such
as wc.gw.somewhere.net, ap003.gw.somewhere.net, sw18.gw.somewhere.net,
etc. The chosen domain does not need to be a subdomain of the rXg.
The local server IP field specifies the target IP address(es) of the back-end server(s) for the name-based Virtual Host that is configured by this record. Web traffic sent to the rXg using the hostname configured in this record will be proxied to this IP. Multiple IP addresses can be defined, separated by spaces or newlines. When multiple IPs are defined, requests are load-balanced to the IPs in the list according to the configured Load balancing method.
The available load balanding methods are as follows:
- Round-Robin: This is the default behavior. Traffic is distributed in a round robin fashion.
- Least Connections: The next request is assigned to the server with the least number of active connections.
- Source IP Hash: A hash-function is used to determine what server should be selected for the next request (based on the client's IP address). Subsequent requests from the same client should be send to the same backend server.
- Source IP:Port Hash: A hash function based on the client's IP and Port combination
- Request URI Hash: A hash function based on the full request URI.
- Random: Each request will be passed to a randomly selected server.
- Random + Least Connections: Two servers are chosen at random, and the one with the least number of active connections is used.
The WAN Targets association restricts access to this virtual host to only the hosts included in the WAN Target. All other source IPs will receive a 403 Forbidden response when attempting to access using this FQDN.

Custom Data Set
The name field will be used to call the data set in a portal so choose a name that reflects the purpose of the record.
The policies field allows the operator to restrict which policies have access to the custom data set.
The note field is a place for the administrator to enter a comment. This field is purely informational and has no bearing on the configuration settings.
The key field specifies which custom data keys belong to the custom data set. When creating a custom data set this field is required; however, a custom data keys does not need to belong to a custom data set to be used.

Custom Data Keys
The dataset field is used to tie a custom data key to custom data set. This is optional when creating a custom data key , but can be used to tie a collection of custom data keys into a single custom data set.
The note field is a place for the administrator to enter a comment. This field is purely informational and has no bearing on the configuration settings.
The name field will be used to call the data set in a portal, so choose a name that reflects the purpose of the record.
The value section allows the operator to set what value or values are contained within the custom data key.
The string field is used to store a string value.
The text field is similar to the string field but should be used for large blocks of text.
The Boolean field can be used as a true/false flag. It is false by default.
The decimal field is used to store decimal numbers.
The integer field is used to store whole numbers.
The date field is used to store a specific date.
The time field is used to store the time.
The date-time field is used to store both the date and time.

Attachments
The name field is an arbitrary string descriptor used only for administrative identification. Choose a name that reflects the purpose of the record. This field has no bearing on the configuration or settings determined by this scaffold.
The description field can be used to describe the purpose or a description of the content.
The note field is a place for the administrator to enter a comment. This field is purely informational and has no bearing on the configuration settings.
The custom portals field is used to select which customs portals the content will be available for use. Selecting a custom portal here will make the content available to any Captive or Landing portals based off of the Custom Portal selected.
The captive portals field is used to select which specific Splash portals the content will be available on.
The landing portals field is used to select which specific Splash portals the content will be available on.
The file field is used to select the file to upload and make available to the selected portals.
Simple Webpacker Example
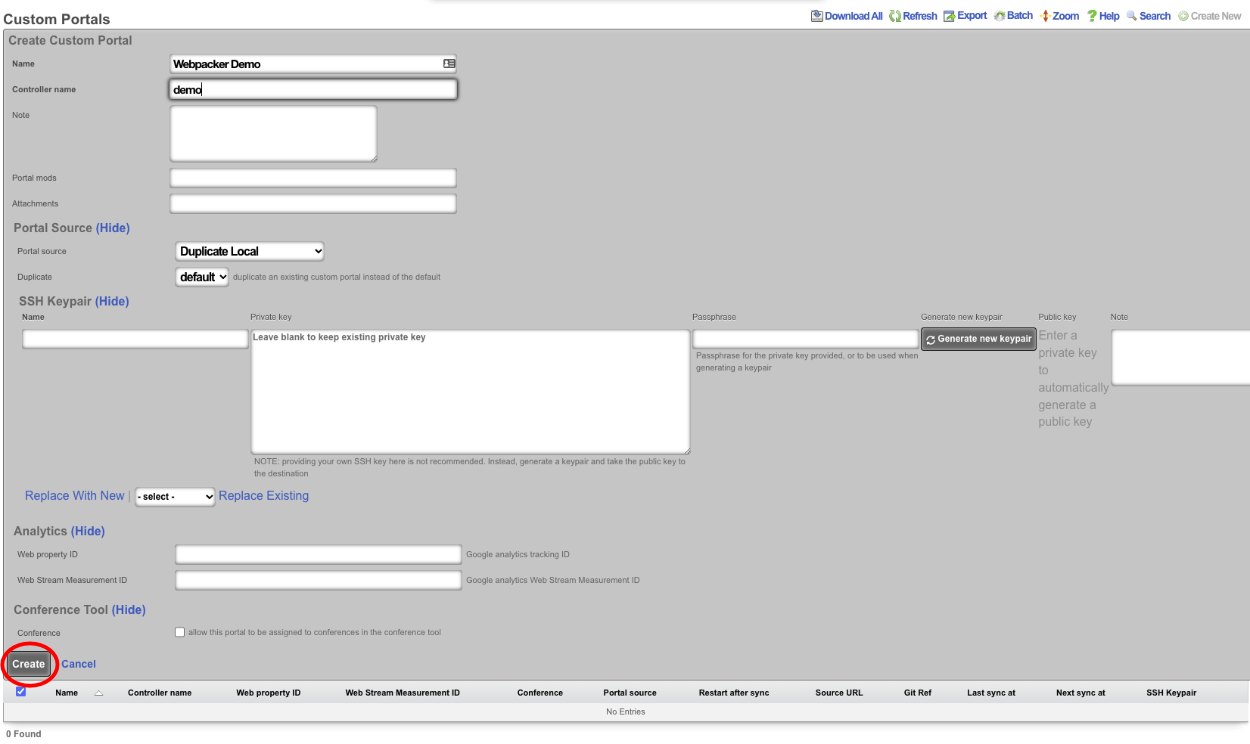
Webpacker allows the operator to import pre-compiled JavaScript into a custom portal. In this example, a new custom portal will be created then add the necessary files. Navigate to System::Portals and create a new custom portal. Note: an existing portal if one already exists.

Give the portal a name, and specify the controller name. For this example, just the default portal will be used so no other information needs to be provided. Click create. Note: webserver will restart when a new portal is created.
Once the portal has been created, access the portal files. This can be done via SSH or SMB ; see the Portal Customization section of the help manual for instructions on setting up access. In this example, SSH to the machine and become root.
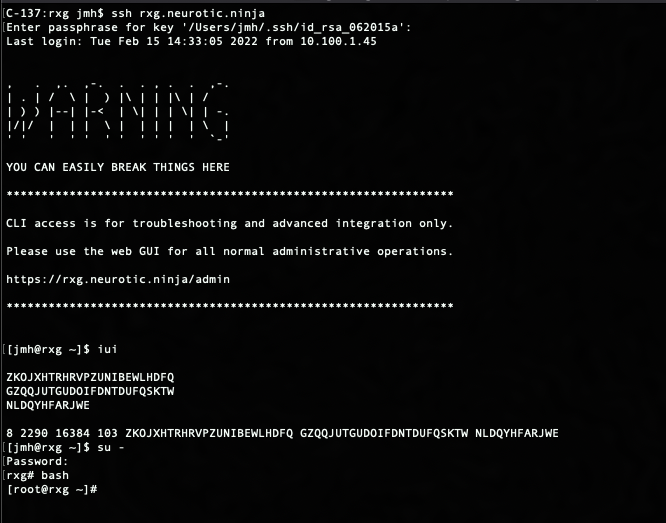
Now navigate to the portal directory cd /space/portals/demo. Note: portal path may be different if using a different portal or used a different controller name.

Next, create a src directory within the root portal directory. This will be where any desired js files imported using webpacker will be placed. To create directory, use the following command: mkdir src

Navigate to the src directory that was created with the following command: cd src
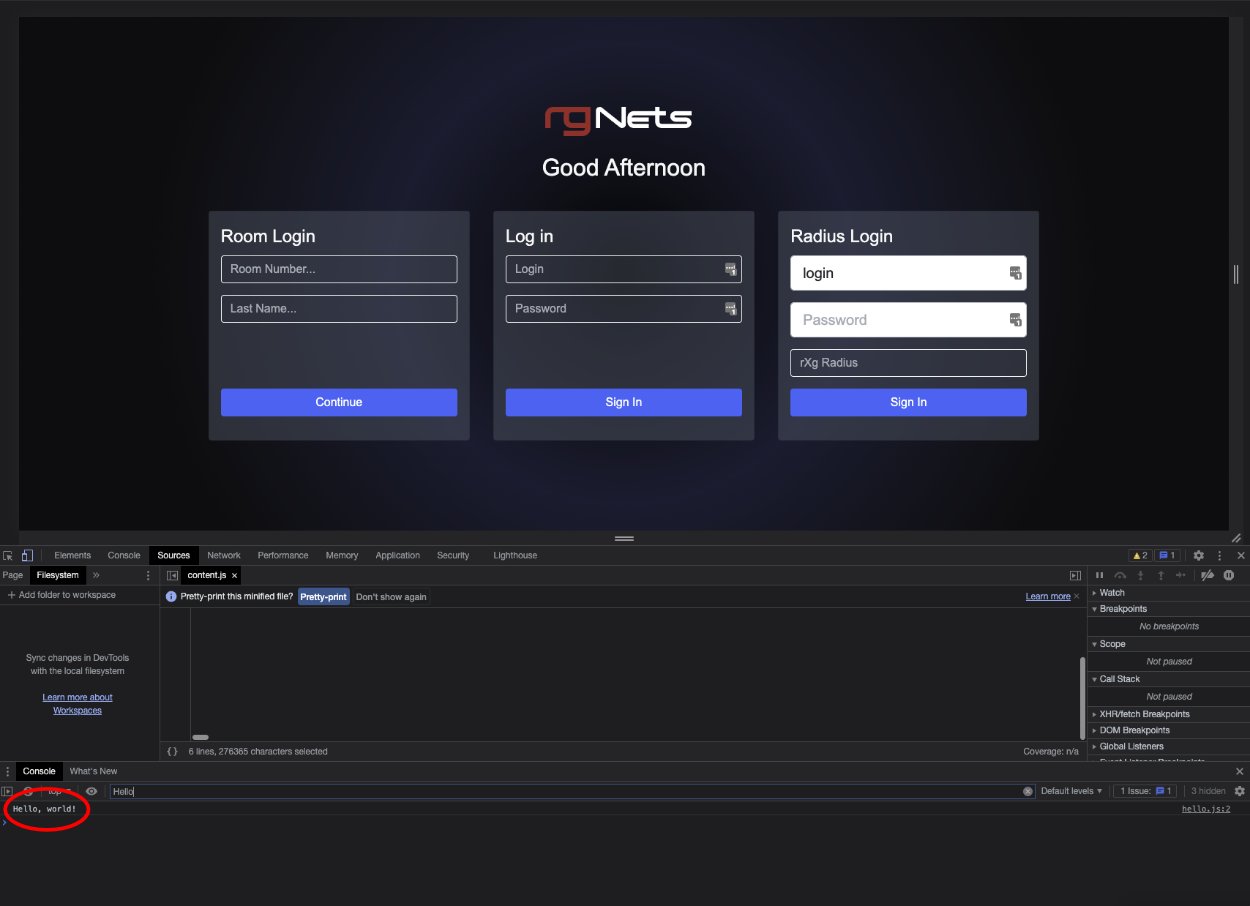
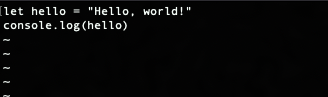
Next, create a hello.js file. This file will contain the following code:
let hello = "Hello, world!" console.log(hello)
Save the file and go back to the root portal directory cd ..
Edit the pack.js file and add the following line:
import "./src/hello.js"
This will import the JavaScript file created in the previous step. Once the line is added, save the file.

Now the portal JavaScript was added can be hit to and see in the developer tools console as the following: