Backup
The Backup view presents the dialogs and scaffolds associated with creating backups, automated push-based remote backups, and restoring backups of the rXg.
Backup is a critical aspect of network continuity. Proper backups enable the RGN operator to quickly and easily recover from a rXg hardware failure. In addition, the rXg backup and restore mechanism enables operators to quickly replicate a rXg configuration across a fleet of rXgs.
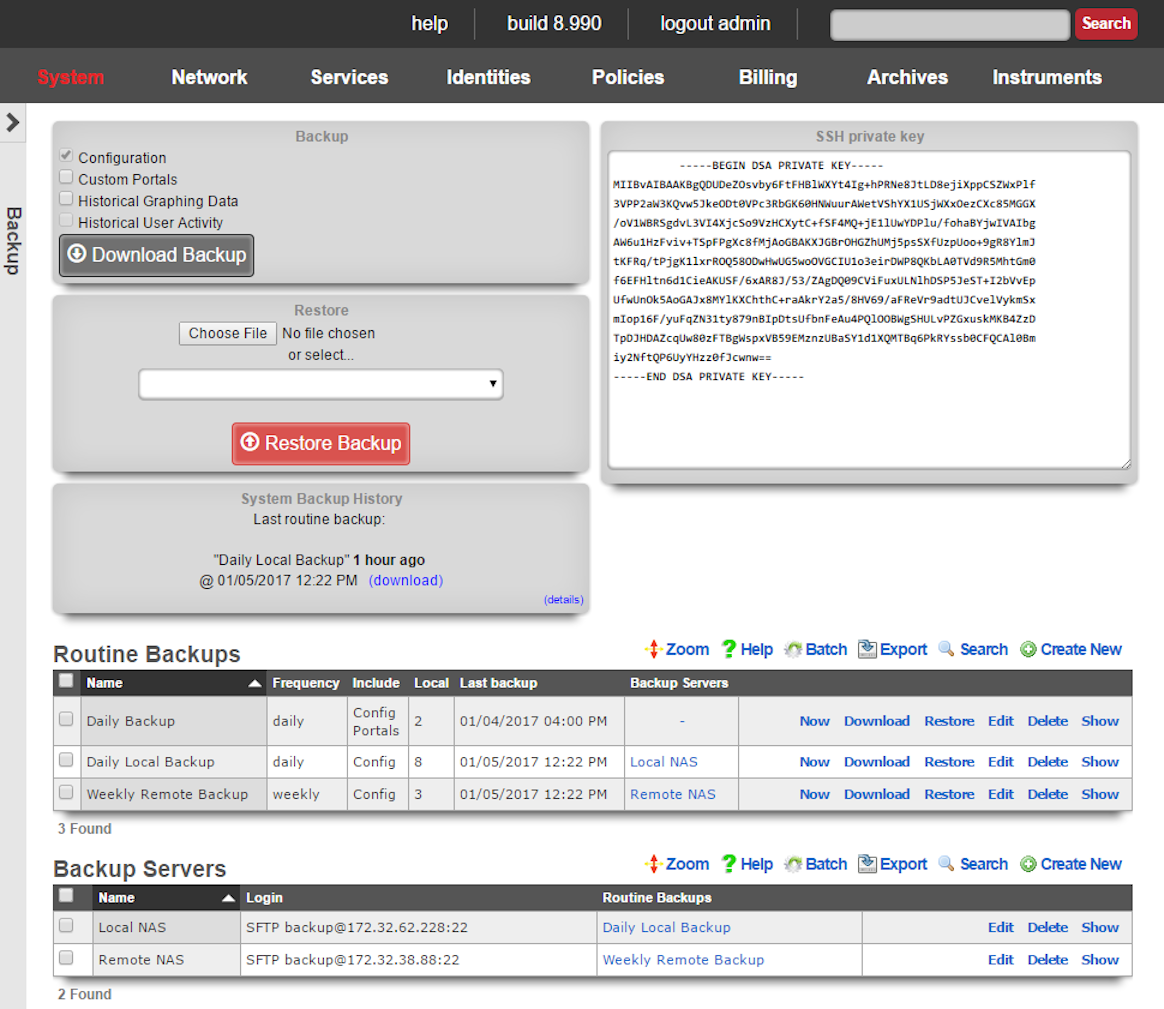
The rXg supports operator initiated on-demand backups as well as rXg initiated periodic scheduled backups. On-demand backups are initiated via a dialog presented on the Backup view. Periodic backups are configured via the Routine Backups and Backup Servers scaffolds.
On-demand and Pull Backup
The operator may initiate a backup at any time via a dialog present on the Backup view. Backups always include the configuration of the rXg. Backups may optionally include custom portals, graph databases, and/or historical data by selecting the appropriate checkbox.

The on-demand backup mechanism may also be used by an operator as part of a pull backup system. The most common use case for this is when an operator wishes to have a server periodically initiate a backup. For example, a UNIX server that has cron and curl might be configured with the following crontab:
30 4 * * * curl -O https://rxg.host/admin/menu/download_backup?api_key=a...123
30 5 * * * rm -f `ls -ot | head -10`
The value for the api_key parameter is obtained from the Admins view. It is highly recommended that the operator creates a specific account for the purpose of enabling pull-based backup on both the rXg and the backup server. There are two additional parameters that may also be present in the URL:portalsWhen set to 1, custom portals are included in the backuprrdsWhen set to 1, graph databases are included in the backupThe two parameters mirror the check box options that are present in the dialog box. The configuration of the rXg is always included in the backup. If the operator wishes to be explicit, the parameterconfig=1 may also be passed.
Scheduled and Push Backup
The rXg supports scheduled backups that are stored on the local persistent storage device, pushed to external servers, and other rXgs. Backup schedules are determined by routine backup records. External servers that will receive push-based backups are configured via backup server records.
Routine Backups
Entries in the Routine Backups scaffold configures the schedule according to which the rXg will perform automated system backups.
The name field is an arbitrary string descriptor used only for administrative identification. Choose a name that reflects the purpose of the record. This field has no bearing on the configuration or settings determined by this scaffold.
The frequency field specifies the execution frequency of the automatic backup defined by this record.
An rXg routine backup will be limited to the configuration of the system by default. Routine backups may optionally include additional data by selecting the appropriate check boxes:
- Configuration - The core system configuration (enabled by default)
- Billing Data - Stored payment methods and billing information
- Custom Portals - All custom portal files
- Graph Databases - Graph database (RRD) files for historical graphs
- Historical Data - Large tables containing detailed end-user data (e.g., connections, web proxy, RADIUS accounting)
- Software Packages - Attached software packages used for Fleet software upgrades
- Device Firmware - Attached device firmware for infrastructure devices
The number of backups to keep on the rXg configures the length of the FIFO storage queue. The rXg creates and stores new backups on the rXg persistent storage mechanism according to the schedule defined by this record. When the number of stored backups reaches the value specified in this field, the rXg deletes the oldest stored backup.
The backup servers field associates this routine backup record with a remote server to which the backup will be pushed. The specification of a backup server is optional. The default behavior when no backup server is specified is to store the backup file on the local persistent storage.
The note field is a place for the administrator to enter a comment. This field is purely informational and has no bearing on the configuration settings.
Backup Servers
Entries in the backup servers scaffold contain the configuration data needed to establish a file transfer to a remote server for the purpose of pushing a backup file created by a routine backup.
The name field is an arbitrary string descriptor used only for administrative identification. Choose a name that reflects the purpose of the record. This field has no bearing on the configuration or settings determined by this scaffold.
The protocol field specifies the application layer protocol that will be used to transport the file.
The host field specifies the DNS name or IP address of the server that will be the destination of the file transfer.
The username , password , and SSH private key fields contain the authentication credentials for the server specified in the host field. When the FTP protocol is selected, only the username and password fields are relevant. When the SFTP protocol is selected, the operator may choose to use either password or public-key based authentication. Public-key authentication is enabled by copying and pasting a key into the SSH private key field and entering the key passphrase into the password field.
The path field specifies the destination on the remote filesystem for the backup file that is being pushed. The location specified by the path field must exist or the routine backup will fail. If the path is left blank, the default path on the server will be used as the destination on for the backup file.
The port field specifies the TCP port that will be used when a connection is made by the rXg to the server specified by the host field. If the port is not specified, port 21 is used for FTP and 22 is used for SFTP.
The note field is a place for the administrator to enter a comment. This field is purely informational and has no bearing on the configuration settings.
Receiving Backups
A secondary warm spare rXg may be configured to receive push backups from a primary active rXg. This mechanism enables operators to rapidly recover from rXg hardware failures. If the primary active rXg hardware fails, the operator simply logs into the secondary warm spare rXg and initiates a restore. The secondary warm spare rXg will then immediately take over the operation of the primary active rXg. This mechanism is most often as a redundancy solution for rXg cluster controllers.
To configure an rXg to receive backups, create a backup server on the primary active rXg. Configure the following settings in the new backup server record:
ProtocolSFTPHostDNS entry of the secondary warm spare rXg.UsernamebackupSSH private keyThe SSH private key from the secondary warm spare (a 4096-bit RSA key or stronger is required).All other fields may be left as their default. The SSH private key for the secondary warm spare rXg may be found on a dialog in the Backup view. 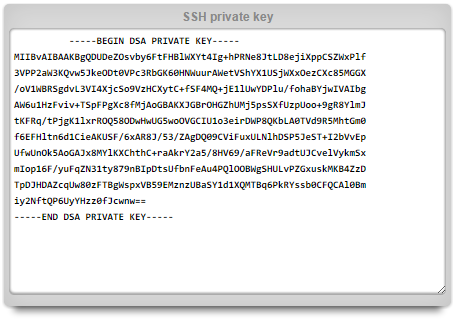
The backup server must be associated with a routine backup record that defines the transmission frequency of backups from the primary active rXg to the secondary warm spare rXg. Backups from the primary active rXg are displayed in the restore dialog of the secondary warm spare rXg.
Fleet Manager Backup Server
A Fleet Manager can act as a central backup server for the nodes it manages. When a fleet node is configured to push its backups to the manager, each routine backup is uploaded to the manager along with the backup's manifest. The manager records the backup against the originating node, verifies the archive's checksum, and applies the node's retention policy. Fleet-node backups are stored separately from the manager's own backups so that the manager's backups do not grow to include the archives of the entire fleet.
A node selects a manager as a backup destination by creating a backup server with the Fleet Manager protocol and choosing the target manager from the drop-down, then attaching that backup server to the routine backups whose archives should be pushed. Because the destination is an ordinary backup server, a node can send different routine backups to different managers (or to a mix of managers and conventional FTP, SFTP, and HTTPS servers). The upload happens at backup-completion time, on the same schedule as every other backup server, and is authenticated with the node's fleet key; no host, port, or credentials are required.
Because a single manager receives backups from the whole fleet, the upload is spread by a short random delay so that members do not all arrive at once, and the manager protects itself: it refuses an upload when accepting it would leave less than its configured free-storage reserve (the Backup Disk Reserve in the manager's own Fleet Node > Fleet Manager Backup Settings, default 30 GB) and softly limits how many uploads it accepts concurrently (the Backup Max Concurrent Uploads setting there, default 6), asking the node to retry later in both cases. While an upload is in progress the manager tracks its arriving bytes, and reclaims the slot only if no data is received for a configurable idle window (the Backup Upload Idle Timeout, default 10 minutes), so a stuck or abandoned upload frees its slot quickly while a healthy slow transfer keeps it. To keep these responses fast under load, the manager verifies each archive's checksum and enforces retention in the background after accepting the upload; an archive that fails its checksum is discarded.
A node sends backups to a manager simply by configuring the Fleet Manager backup server described above and attaching it to a routine backup; no separate permission needs to be enabled on the manager. The manager governs what it accepts and keeps through its disk reserve, its per-backup size limit, and its retention policy rather than a receive gate. A re-upload of a backup the manager already holds is kept as-is, so a duplicate or interrupted retry can never overwrite an accepted archive.
Retention of fleet-node backups is governed by fleet node backup policies. A policy keeps the most recent backups for each node on a grandfather-father-son schedule: a separate keep count for each schedule tier hourly, daily, weekly, and monthly plus a manual bucket for on-demand backups run from a routine backup's Now link. A scheduled backup's tier is the frequency of the routine backup that produced it, while an on-demand Now run is bucketed as manual so it does not evict a scheduled backup. Backups are pruned per node and per tier, so the frequent backups of one tier never crowd out the less frequent backups of another. A blank tier keeps every backup of that tier; zero keeps none.
A policy may further bound what is kept with a maximum age (in days) and a maximum total size (in gigabytes, per node); the oldest backups are pruned first when a bound is exceeded, and the most recent backup is always kept. A separate maximum backup size, entered as a number with a selectable MB or GB unit, is admission control rather than retention a single backup larger than this is refused at upload, and a health notice is raised for the node, instead of being stored and then pruned.
A policy may target any number of fleet nodes and any number of fleet groups, or it may be designated the fleet-wide default. Each node is governed by exactly one policy, chosen most-specific first: a policy targeting the node directly wins; otherwise a policy targeting one of the node's groups (or an ancestor group) applies; failing both, the single default policy applies. The Preview action on a policy shows, for each node it governs, how many backups of each tier would be kept.
Restoring a Fleet Node
A backup that the Fleet Manager holds for a node can be restored back onto that node directly from the Fleet Node Backups scaffold using the Restore to Node action. The Fleet Manager instructs the node to restore the selected backup; the node downloads the archive back from the manager, verifies its checksum, and restores it. The restore uses the same safeguards as a local restore, including the trial restore into a temporary database and the check that the node is not running an older software build than the backup.
Restore
An rXg may be restored with a backup that is uploaded by the operator or that is chosen from one or more that are stored on the local persistent storage. A dialog on the Backup view is presented to accomplish this task.
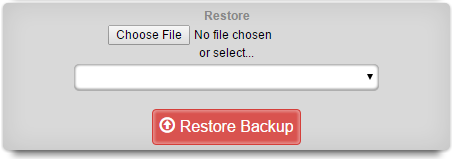
To restore a backup that has been previously created via a pull mechanism, use the file chooser dialog to select a rXg backup file that is accessible via the administrator's workstation. To restore a backup that has been previously created via a local routing backup or remotely pushed to the rXg, select a backup from the drop down.
If no local routine backups or remotely pushed backups are present on the rXg persistent storage, then the option to select a file stored on the rXg will not appear.
When restoring a backup, it is important to note that the rXg will maintain the license that is present on the rXg. Furthermore, when a backup is restored to a rXg that does not have the same Ethernet interfaces, the restore mechanism enables the operator to reconfigure the interfaces before the rXg comes online. This behavior enables operators to use a single rXg to build a configuration template that may be replicated across a fleet of rXgs.
Keep in mind that the flexibility of the backup and restore mechanism must be used in a reasonable manner. In general, the backup and restore mechanism is designed for similar machines. Restoring a secondary warm spare rXg that has fewer capabilities than a failed primary active rXg will likely result in disastrous consequences.
Backup Integrity
Every backup archive that the rXg creates is accompanied by a manifest file, stored alongside the archive with a .manifest.json suffix. The manifest records a SHA-256 checksum of the archive along with the build, host, and contents of the backup.
When a backup is restored, the rXg recomputes the checksum of the archive and compares it against the value recorded in the manifest before extracting any data. A backup that has been truncated or altered in transit fails this comparison and the restore is aborted before the existing configuration is touched. Backups created before this mechanism was introduced do not have a manifest and are restored without an integrity check.
Config Templates
Entries in the Config Templates scaffold provide the ability to configure the rXg with YAML configuration files.
The name field is an arbitrary string descriptor used only for administrative identification. Choose a name that reflects the purpose of the record. This field has no bearing on the configuration or settings determined by this scaffold.
You can either paste in your configuration template into the config field, or you can load one from either a local file with the upload file field or a remote file with the remote URL field. If the remote URL requires basic authentication, then use the username and password fields.
The apply template field applies the config template immediately after saving.
The recurring method field instructs the backend to regularly fetch the file at the remote URL and apply it on a schedule.
The note field is a place for the administrator to enter a comment. This field is purely informational and has no bearing on the configuration settings.
Config Template Deployment History
The Config Template Deployment History scaffold provides a comprehensive audit log of all config template applications. Every time a config template is appliedwhether in test mode or live modethe system creates a detailed record of what was attempted, what changed, and the outcome.
Viewing Deployment History
The deployment history scaffold displays a list of all template applications with the following information:
- Config Template Name - The name of the template that was applied
- Initiated At - When the template application was started
- Status - The outcome of the deployment (Success, Failure, Partial Failure, In Progress, or Pending)
- Deployment Type - Whether this was a local deployment or a fleet deployment
- Initiated By - The administrator who initiated the deployment. For fleet deployments received from a fleet manager, this shows the fleet manager hostname and the initiating admin (e.g., "[FLEET] fleet-manager.example.com (admin)")
- Mode - Whether the template was run in Test mode or Apply mode
- Total Changes - The number of records that were created, updated, or deleted
On fleet managers, additional columns show fleet node deployment statistics.
Viewing Deployment Details
Clicking Show on a deployment record displays comprehensive details including:
- Complete deployment metadata (timestamps, initiator, client IP)
- Change summary showing counts of created, updated, deleted, and failed records
- The raw template content (ERB source) that was applied
- The rendered template content (after ERB processing) for local deployments
- Template checksum for verification
For fleet deployments, the rendered template content is stored per-node rather than on the parent deployment record. This is because each fleet node renders the ERB template against its own database, which may produce different results. View individual node records to see each node's rendered template.
Viewing Individual Changes
Each deployment tracks the individual record changes that occurred. Click the Changes action link to view a detailed list of all changes made during that deployment. For each change, the system records:
- Action - The type of change (Create, Update, Delete, or Failed)
- Affected Model - The type of record that was changed (e.g., Policy, Account, Address)
- Record Label - A human-readable identifier for the affected record
- Before Attributes - The state of the record before the change (for updates and deletes)
- After Attributes - The state of the record after the change (for creates and updates)
- Attribute Changes - For updates, the specific fields that changed and their old/new values
Test Mode Deployments
When a config template is run in test mode, the deployment history still records what would have changed, even though the changes are rolled back. This allows operators to:
- Preview the effects of a template before applying it
- Verify that a template will make the expected changes
- Troubleshoot template issues without affecting production data
Test mode deployments are clearly marked with "Test" in the Mode column.
Fleet Deployments
On a fleet manager, when a config template is applied to fleet nodes, the deployment history tracks:
- The overall deployment status across all targeted nodes
- Individual node deployment status via the Nodes action link
- Success/failure counts for fleet-wide visibility
Click the Nodes action link to view detailed information for each fleet node, including:
- Status - Whether the deployment succeeded, failed, or is still in progress
- Response Time - How long the fleet node took to apply the template
- Changes Count - The number of records modified on that node
- Rendered Template - The template after ERB processing against the fleet node's database
Note on Fleet Node Compatibility: The deployment audit trail feature requires fleet nodes to be running a compatible software version. For fleet nodes running older software that does not support this feature:
- The Changes Count column will display "N/A"
- No individual change records will be available for that node
- The deployment will still succeed; only the audit trail data is unavailable
On fleet nodes that receive templates from a fleet manager, the Initiated By field shows the originating fleet manager and administrator, providing a complete audit trail across the fleet.
Data Retention
Deployment history records are automatically purged after 3 months by default to manage database storage. This includes:
- Config Template Deployment records
- Config Template Deployment Node records (for fleet deployments)
- Config Template Deployment Change records
The retention period can be adjusted in the Database Purgers scaffold under System > Maintenance.
Security and Immutability
Deployment history records are immutable audit logs:
- Records cannot be created, modified, or deleted through the administrative interface
- Critical fields (initiator, template content, timestamps) cannot be changed after creation
- The scaffold is read-only to preserve audit integrity
Example: Audit Trail Flow
Here is a typical audit trail scenario for tracking configuration changes:
Administrator applies template: Admin "jsmith" applies a config template named "Network Settings" that modifies DNS and DHCP settings.
Deployment record created: The system creates a deployment history record showing:
- Initiated by: jsmith
- Template: Network Settings
- Mode: Live
- Status: Success (or Partial Failure if some changes failed)
Individual changes recorded: Each modification is logged as a separate change record:
- Action:
update, Model:Option, Record: "DNS Server 1", showing before/after values - Action:
create, Model:DhcpOption, Record: "Domain Search List" - Action:
update, Model:Option, Record: "DNS Server 2", showing before/after values
- Action:
Viewing the audit trail: Navigate to System > Backup > Config Template Deployment History to see all deployments. Click Changes to view the detailed list of what was modified, including the exact attribute values before and after each change.
This audit trail enables administrators to: - Understand exactly what changed and when - Identify who made specific configuration changes - Roll back changes by referencing the "before" attribute values - Investigate issues by correlating deployment times with system behavior
Configuration Syntax
The top-level YAML object must be a key-value store (also called a hash, map, or dictionary) or an array of key-value stores. There are two types of top-level keys in the YAML configuration template: model/scaffold keys and smart keys.
Model keys (or scaffold keys ) are entries in the YAML template which create/modify entries in the database. These keys are based on the underlying ActiveRecord models, or scaffolds. You may use the PascalCase or snake_case version of the scaffolds (e.g., AdminRole, admin_role, or admin_roles); however, the PascalCase version ensures you don't conflict with a smart key. Fields are always written in snake_case.
For example, to add an administrator:
Admin:
- login: my_admin
  password: 'testPassword1!'
  password_confirmation: 'testPassword1!'
  admin_role: Super User
  ssh_keypairs:
  - name: my_admin authorized public key
    public_key: 'ssh-rsa AAAA...Q=='
    authorized: true
If you wanted to edit an existing record, ensure that the lookup field is defined first. For example, to set the time zone:
DeviceOption:
- name: Default
  time_zone: America/Chicago
Smart keys are snake_case entries in the YAML template which, in addition to creating entries in the database, perform some other operations. An example of this is the license_key. It is not enough to just create the entry; the backend also needs to process the key so the licensing limitations are removed. Otherwise, (for example) if later in the config template, the operator tries to set the Uplink to 1Gbps, the licensing limitations would not allow this until the backend processed the new license key. To set the license_key in a config template:
license_key: |
  abcdQabcduUzuo5IxtjuDabcdx6zVfEgnjl30Q4lDiabcdpCYmNrQa5x
  ...
  xKdOy1PabcdHydNCvs5CU5JLRabcdn0yHZIpv6FvDxFdmku7XiDEGuI=
Advanced Usage
Top-Level Data Structure
If your top-level data structure is a hash, then you cannot replicate keys, or they will overwrite one-another. So, to organize your config template to support duplicate keys, you need to use an array as your top-level data structure:
# configure management network
- Address:
  - name: mgmt
    cidr: 10.0.0.1/24
- Vlan:
  - name: mgmt
    interface: igb3
    tag: 4
    addresses: mgmt

# configure onboarding network
- Address:
  - name: onboarding
    cidr: 172.16.0.1/23
- Vlan:
  - name: onboarding
    interface: igb3
    tag: 5
    addresses: onboarding
Nested Associations
Rather than creating associated records in their own keys, you can also nest the associations, like so:
Address:
- name: mgmt # configure management network
  cidr: 10.0.0.1/24
  create_dhcp_pool: true
  vlan:
    name: mgmt
    interface: igb3
    tag: 4
- name: onboarding # configure onboarding network
  cidr: 172.16.0.1/23
  create_dhcp_pool: true
  vlan:
    name: onboarding
    interface: igb3
    tag: 5
Notice that this pattern is more concise and readable, and naturally groups associated records together, without having to convert your top-level data structure into an array.
Custom Lookups and Mutating Records
Normally, the first key/value pair under a model key will be used to lookup the record. For example, to edit an admin's role, you can do this:
Admin:
- login: someuser
  admin_role: Super User
However, suppose you wanted to edit a user's login. Then you should use the special _lookup field:
Admin:
- _lookup:
    login: sumusr
  login: someuser
Only Update Existing Records
Typically, when a config template is run, the rXg will look up an existing record and modify it, or attempt to create a new record if there is no existing record.
Sometimes you may wish to only update an existing record if it is found and never create a new record. To do this, you may use the special _updatefield:
AccountGroup:
- name: test
  priority: 5
  _update: true
- name: test2
  priority: 7
  _update: true
The template above would look for existing account groups with the name "test" and "test2" and update their priorities as needed. If the groups do not already exist, they will not be created, and the template will fail and be rolled back.
Delete Existing Records
A config template that contains an _delete key can be used to delete an existing record. See the following example:
Admin:
- login: testadmin
  _delete: true
The template above would look for an existing administrator account with the name "testadmin" and delete the administrator if it does exist.
Association Lookups
When defining a nested association, normally you can just provide a string with a "natural key", which usually refers to the name field on the associated record. There are exceptions for models which don't have aname field, such as the Admin model, and for those we try to use the most sensible field (login in the case of theAdmin model). However, you can also provide a full record definition, for which the normal rules apply (first key/value pair will be used for lookup), and you can even provide a nested custom _lookupfield. If the record doesn't exist, it will be created, assuming you provided all the required fields.
Supported Model/Scaffold Keys
We are not going to enumerate the model keys, since they map directly to scaffolds. You can refer to the rXg API documentation, or you can SSH into the rXg and run console to inspect the various models.
ActiveRecord models should generally be referenced using theirPascalCase name, to ensure you are not accidentally using a smart key. However, to accommodate flexibility, you may also use thesnake_case version of the model name in your config template.
Supported Smart Keys
license_key Configure the system with the provided license key. This key only takes a single string as an argument, but you do need to use YAML formatting to send multiple lines. For example:
license_key: |
  abcdQabcduUzuo5IxtjuDabcdx6gnjl30Q4lDiabcdpCYbK4VmNrQa5x
  ...
  xKdOy1PabcdHydNCvs5CU5JLRabcdn0yHZIpv6FvDxFdmku7XiDEGuI=
Use Config Template to Bootstrap New rXg Installation
A new rXg installation (before the first admin is created and the license is applied) can be bootstrapped and pre-configured using a configuration template delivered to the rXg in one of the two following ways:
- on a USB drive during the initial rXg boot, or
- via HTTP(S) download from a server advertised during the DHCP exchange.
The bootstrap process is executed after the installation of the rXg completes but before the first admin account is created and the license is added to the system.
The config template can be of arbitrary complexity and contain all the necessary baseline configuration elements, including local user accounts (administration, read-only, etc.), IP addressing, VLANs, IP groups, policies, etc., as long as the config template syntax is correct. It is also possible to include the license key in the bootstrap config template.
It is recommended that the bootstrap config template be vetted thoroughly before it is applied to any newly installed rXg systems to avoid misconfiguration and the need for additional cleanup.
Bootstrap via USB Drive
The USB bootstrap method allows you to pre-configure an rXg system by placing a configuration template file on a USB drive before the first boot.
USB Bootstrap Flow
                         USB BOOTSTRAP PROCESS


       Power On
         rXg


       rXg Boot
        Starts


       Scan USB            File Detection Criteria:
        Drives        Has .yml extension
              OR contains 'template' in filename


      Config File
        Found?


      YES        NO


 Parse YAML      Boot with
   Config        Default
    Settings
                  (First Admin
                  Setup Screen)

   Valid
   YAML?


 YES        NO


 Process Smart              Log Error
 Keys First                 Boot Default
 (license_key)


 Process Model
 Keys
 (Admin, Device
 Option, etc.)


   All Records
   Created OK?


   YES                  NO (partial)


 Bootstrap         Some records
 Complete          may have failed
                   (check logs)
 System boots
 with applied
 configuration

                     System boots
                     with partial
                     configuration
USB Drive Requirements
| Requirement | Details |
|---|---|
| Filesystem | FAT32, UFS, or ext2/ext3/ext4 |
| File location | Root directory of the USB drive |
| File naming | Must have .yml extension AND/OR contain the word template in the filename |
| Examples | config.yml, bootstrap-template.yml, my-template-config.yml |
Bootstrap Process
- Complete the rXg installation process
- Power down the rXg system
- Insert a USB drive containing your config template file
- Power on the rXg system
During boot, the rXg will: 1. Scan all attached USB drives for files matching the naming criteria 2. If multiple matching files are found, they are processed in alphabetical order 3. Apply each config template following standard config template rules 4. If critical errors occur, the bootstrap is aborted and the system boots with default settings
Minimal Bootstrap Example
A minimal bootstrap configuration typically includes:
# Apply license key (processed first)
license_key: |-
  <your license key here>

# Create administrator account
Admin:
- login: admin
  password: 'YourSecureP@ssword123!'
  password_confirmation: 'YourSecureP@ssword123!'
  admin_role: Super User
  email: [email protected]

# Configure system hostname
DeviceOption:
- name: Default
  active: true
  domain_name: rxg.example.com
  time_zone: America/Chicago
A complete minimal bootstrap example is available here: Minimal Bootstrap Example
Important Notes
- The
license_keyis a smart key that is processed before other configuration items - The
Super Useradmin role exists by default on fresh installations - Password must meet complexity requirements (minimum 8 characters, mixed case, numbers, and special characters)
- The
Defaultdevice option always exists and should be updated rather than created - Use
PascalCasemodel names (e.g.,DeviceOption,SslKeyChain) to avoid conflicts with smart keys
Bootstrap via HTTP(S) Download
The HTTP(S) download bootstrap process allows automatic provisioning of rXg systems using DHCP options to specify the location of a configuration template.
Requirements Summary
| Component | Requirement |
|---|---|
| DHCP Server | Must provide Option 66 (TFTP Server Name) and Option 67 (Bootfile Name) |
| Option 66 | HTTP or HTTPS URL of the server hosting the config template |
| Option 67 | Filename of the config template (e.g., config-template.yml) |
| HTTP(S) Server | Must be accessible from the rXg uplink network |
| Config Template | Valid YAML configuration file |
DHCP Bootstrap Flow
                       DHCP BOOTSTRAP PROCESS


  Power On
    rXg


  rXg Boot
   Starts


                        PHASE 1: Initial DHCP
                        (Standard DORA Process)


   rXg           DHCP Discover         DHCP
   Uplink        DHCP Offer          Server
   Interface     DHCP Request
                 DHCP ACK


        IP Address Acquired (e.g., 192.168.151.182)


                     PHASE 2: Bootstrap Options Request
                     (Periodic DHCP Request for Options 66 & 67)


     Request Options 66, 67
   rXg               DHCP
                                                Server

     Option 66: Server URL
                    Option 67: Filename


  Options
  Received?


 YES        NO


       Continue
       polling DHCP
       periodically


       Eventually boot
       with defaults
       (First Admin
       Setup Screen)


                      PHASE 3: Config Template Fetch


      HTTP(S) GET Request
   rXg              HTTP(S)
                 URL: {Option66}/{Option67}    Server

                   Serves:
      YAML Config Template      config.yml


   Download
  Successful?


 YES        NO


       Log Error
       Retry or boot
       with defaults


                      PHASE 4: Config Template Processing
                      (Same as USB Bootstrap)


 Parse YAML
 Config


 Process Smart
 Keys First
 (license_key)


 Process Model
 Keys
 (Admin, Device
 Option, etc.)


 Bootstrap
 Complete

 System boots
 with applied
 configuration
Dynamic Option 67: The filename in Option 67 can include dynamic parameters that the rXg will substitute with system values:
/config_template_fetch?rxg_iui=%iui%&rxg_ip=%ip%&rxg_mac=%base_mac%
This enables the HTTP(S) server to generate customized configurations based on the requesting rXg's identity.
How It Works
The HTTP(S) download bootstrap process involves specific DHCP server configuration and an HTTP(S) server on which the config template is stored.
The DHCP server provides an IP address to the rXg uplink interface during the boot process, following the standard DHCPv4 DORA process, as shown below, where the rXg acquires the uplink interface address. At this stage, the rXg does not request the DHCP bootstrap options. The example below shows the client rXg (rgxclient) be assigned the address of 192.168.151.182 from the DHCP server of 192.168.151.1. Only standard options are requested and provided.
19:02:00.139469 bc:24:11:02:b7:ae > ff:ff:ff:ff:ff:ff, ethertype IPv4 (0x0800), length 342: (tos 0x10, ttl 128, id 0, offset 0, flags [none], proto UDP (17), length 328)
    0.0.0.0.68 > 255.255.255.255.67: [udp sum ok] BOOTP/DHCP, Request from bc:24:11:02:b7:ae, length 300, xid 0x15500df4, Flags [none] (0x0000)
        Client-Ethernet-Address bc:24:11:02:b7:ae
        Vendor-rfc1048 Extensions
            Magic Cookie 0x63825363
            DHCP-Message (53), length 1: Discover
            Requested-IP (50), length 4: 192.168.151.104
            Client-ID (61), length 7: ether bc:24:11:02:b7:ae
            Hostname (12), length 9: "rxgclient"
            Parameter-Request (55), length 10:
            Subnet-Mask (1), BR (28), Time-Zone (2), Classless-Static-Route (121)
            Default-Gateway (3), Domain-Name (15), Domain-Name-Server (6), Hostname (12)
            Unknown (119), MTU (26)
            END (255), length 0
            PAD (0), length 0, occurs 18
19:02:00.139571 3c:fd:fe:bd:a2:63 > bc:24:11:02:b7:ae, ethertype IPv4 (0x0800), length 342: (tos 0x10, ttl 128, id 0, offset 0, flags [none], proto UDP (17), length 328)
    192.168.151.1.67 > 192.168.151.182.68: [udp sum ok] BOOTP/DHCP, Reply, length 300, xid 0x15500df4, Flags [none] (0x0000)
        Your-IP 192.168.151.182
        Client-Ethernet-Address bc:24:11:02:b7:ae
        Vendor-rfc1048 Extensions
            Magic Cookie 0x63825363
            DHCP-Message (53), length 1: Offer
            Server-ID (54), length 4: 192.168.151.1
            Lease-Time (51), length 4: 3440
            Subnet-Mask (1), length 4: 255.255.255.0
            BR (28), length 4: 192.168.151.255
            Default-Gateway (3), length 4: 192.168.151.1
            Domain-Name-Server (6), length 4: 192.168.151.1
            END (255), length 0
            PAD (0), length 0, occurs 20
19:02:02.269492 bc:24:11:02:b7:ae > ff:ff:ff:ff:ff:ff, ethertype IPv4 (0x0800), length 342: (tos 0x10, ttl 128, id 0, offset 0, flags [none], proto UDP (17), length 328)
    0.0.0.0.68 > 255.255.255.255.67: [udp sum ok] BOOTP/DHCP, Request from bc:24:11:02:b7:ae, length 300, xid 0x15500df4, Flags [none] (0x0000)
        Client-Ethernet-Address bc:24:11:02:b7:ae
        Vendor-rfc1048 Extensions
            Magic Cookie 0x63825363
            DHCP-Message (53), length 1: Request
            Server-ID (54), length 4: 192.168.151.1
            Requested-IP (50), length 4: 192.168.151.182
            Client-ID (61), length 7: ether bc:24:11:02:b7:ae
            Hostname (12), length 9: "rxgclient"
            Parameter-Request (55), length 10:
            Subnet-Mask (1), BR (28), Time-Zone (2), Classless-Static-Route (121)
            Default-Gateway (3), Domain-Name (15), Domain-Name-Server (6), Hostname (12)
            Unknown (119), MTU (26)
            END (255), length 0
            PAD (0), length 0, occurs 12
19:02:02.269596 3c:fd:fe:bd:a2:63 > bc:24:11:02:b7:ae, ethertype IPv4 (0x0800), length 342: (tos 0x10, ttl 128, id 0, offset 0, flags [none], proto UDP (17), length 328)
    192.168.151.1.67 > 192.168.151.182.68: [udp sum ok] BOOTP/DHCP, Reply, length 300, xid 0x15500df4, Flags [none] (0x0000)
        Your-IP 192.168.151.182
        Client-Ethernet-Address bc:24:11:02:b7:ae
        Vendor-rfc1048 Extensions
            Magic Cookie 0x63825363
            DHCP-Message (53), length 1: ACK
            Server-ID (54), length 4: 192.168.151.1
            Lease-Time (51), length 4: 3438
            Subnet-Mask (1), length 4: 255.255.255.0
            BR (28), length 4: 192.168.151.255
            Default-Gateway (3), length 4: 192.168.151.1
            Domain-Name-Server (6), length 4: 192.168.151.1
            END (255), length 0
            PAD (0), length 0, occurs 20
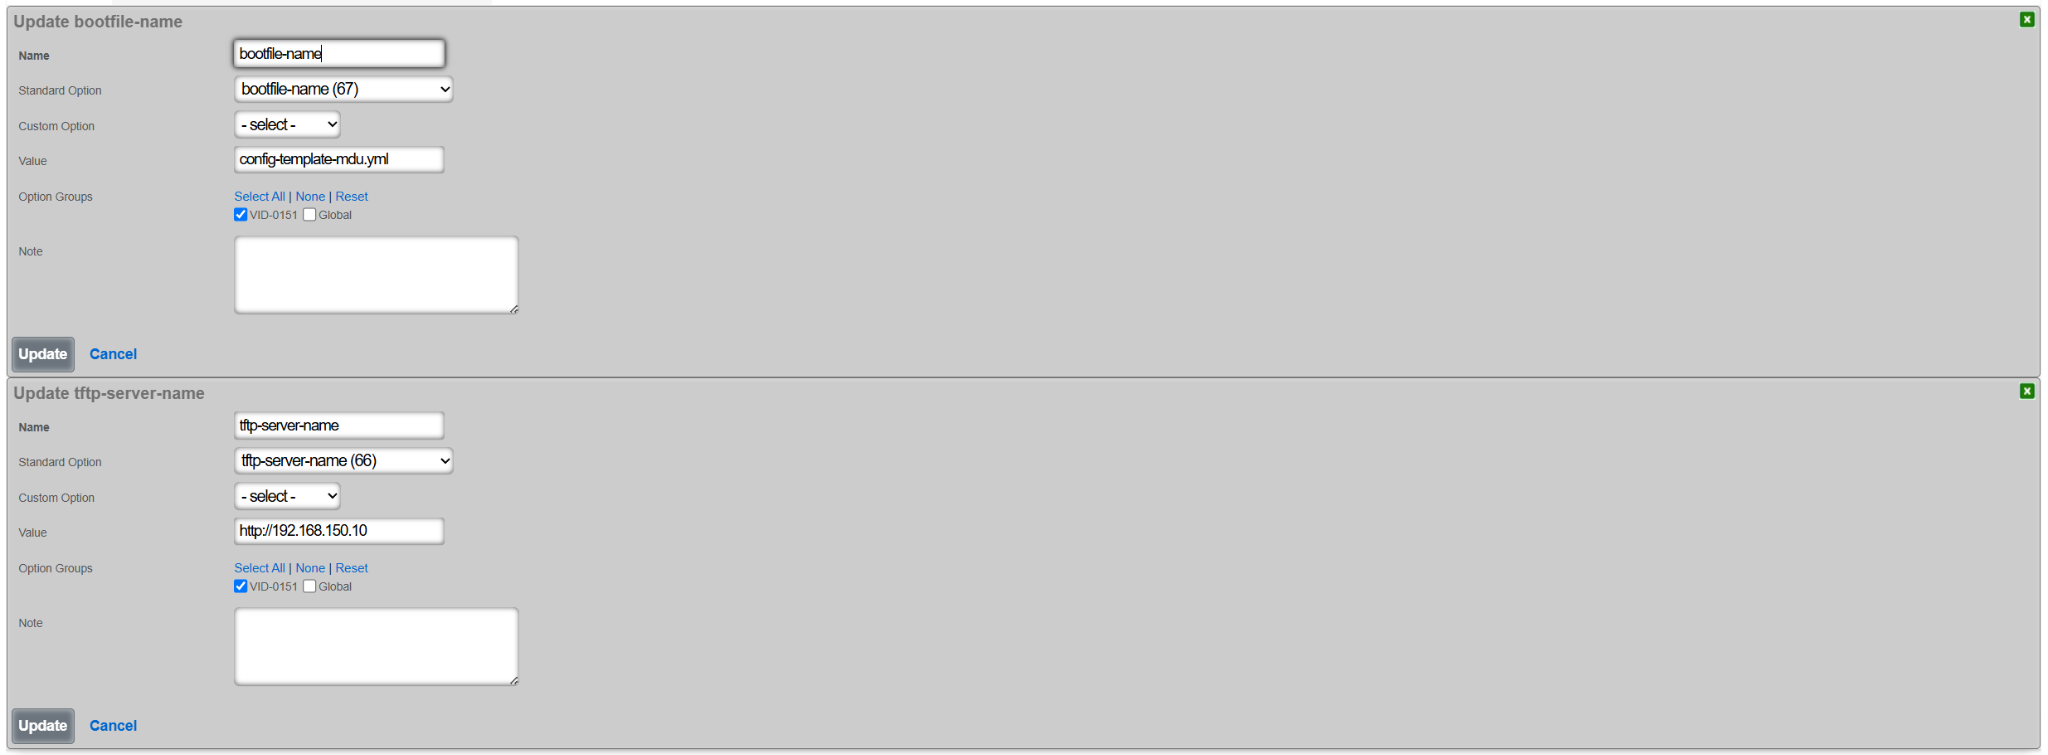
Once the DHCP DORA is completed, the rXg periodically sends a DHCP Request message requesting Option 66 (tftp-server-name) and Option 67 (bootfile-name), as shown below. The DHCP server provides the requested Option 66 (e.g., http://192.168.151.10) and Option 67 (e.g., "config-template-mdu.yml"). The only two supported transport protocols are HTTP and HTTPS.
19:15:52.002351 bc:24:11:02:b7:ae > ff:ff:ff:ff:ff:ff, ethertype IPv4 (0x0800), length 342: (tos 0x10, ttl 128, id 0, offset 0, flags [none], proto UDP (17), length 328)
    0.0.0.0.68 > 255.255.255.255.67: [udp sum ok] BOOTP/DHCP, Request from bc:24:11:02:b7:ae, length 300, xid 0x57663714, Flags [none] (0x0000)
          Client-Ethernet-Address bc:24:11:02:b7:ae
          Vendor-rfc1048 Extensions
            Magic Cookie 0x63825363
            DHCP-Message (53), length 1: Request
            Requested-IP (50), length 4: 192.168.151.182
            Hostname (12), length 9: "rxgclient"
            Parameter-Request (55), length 9:
              Subnet-Mask (1), BR (28), Time-Zone (2), Default-Gateway (3)
              Domain-Name (15), Domain-Name-Server (6), Hostname (12), BF (67)
              TFTP (66)
            Client-ID (61), length 7: ether bc:24:11:02:b7:ae
            END (255), length 0
            PAD (0), length 0, occurs 19
19:15:52.004756 3c:fd:fe:bd:a2:63 > bc:24:11:02:b7:ae, ethertype IPv4 (0x0800), length 370: (tos 0x10, ttl 128, id 0, offset 0, flags [none], proto UDP (17), length 356)
    192.168.151.1.67 > 192.168.151.182.68: [udp sum ok] BOOTP/DHCP, Reply, length 328, xid 0x57663714, Flags [none] (0x0000)
          Your-IP 192.168.151.182
          Client-Ethernet-Address bc:24:11:02:b7:ae
          Vendor-rfc1048 Extensions
            Magic Cookie 0x63825363
            DHCP-Message (53), length 1: ACK
            Server-ID (54), length 4: 192.168.151.1
            Lease-Time (51), length 4: 3600
            Subnet-Mask (1), length 4: 255.255.255.0
            BR (28), length 4: 192.168.151.255
            Default-Gateway (3), length 4: 192.168.151.1
            Domain-Name-Server (6), length 4: 192.168.151.1
            BF (67), length 23: "config-template-mdu.yml"
            TFTP (66), length 21: "http://192.168.151.10"
            END (255), length 0
Once the rXg is provided with the requested Option 66 and Option 67 values, the HTTP(S) GET request is transmitted to the indicated server hosting the indicated config template.
192.168.151.182 - - [19/Apr/2025:03:53:37 +0000] "GET /config-template-mdu.yml? HTTP/1.1" 200 12301 "-" "Ruby"
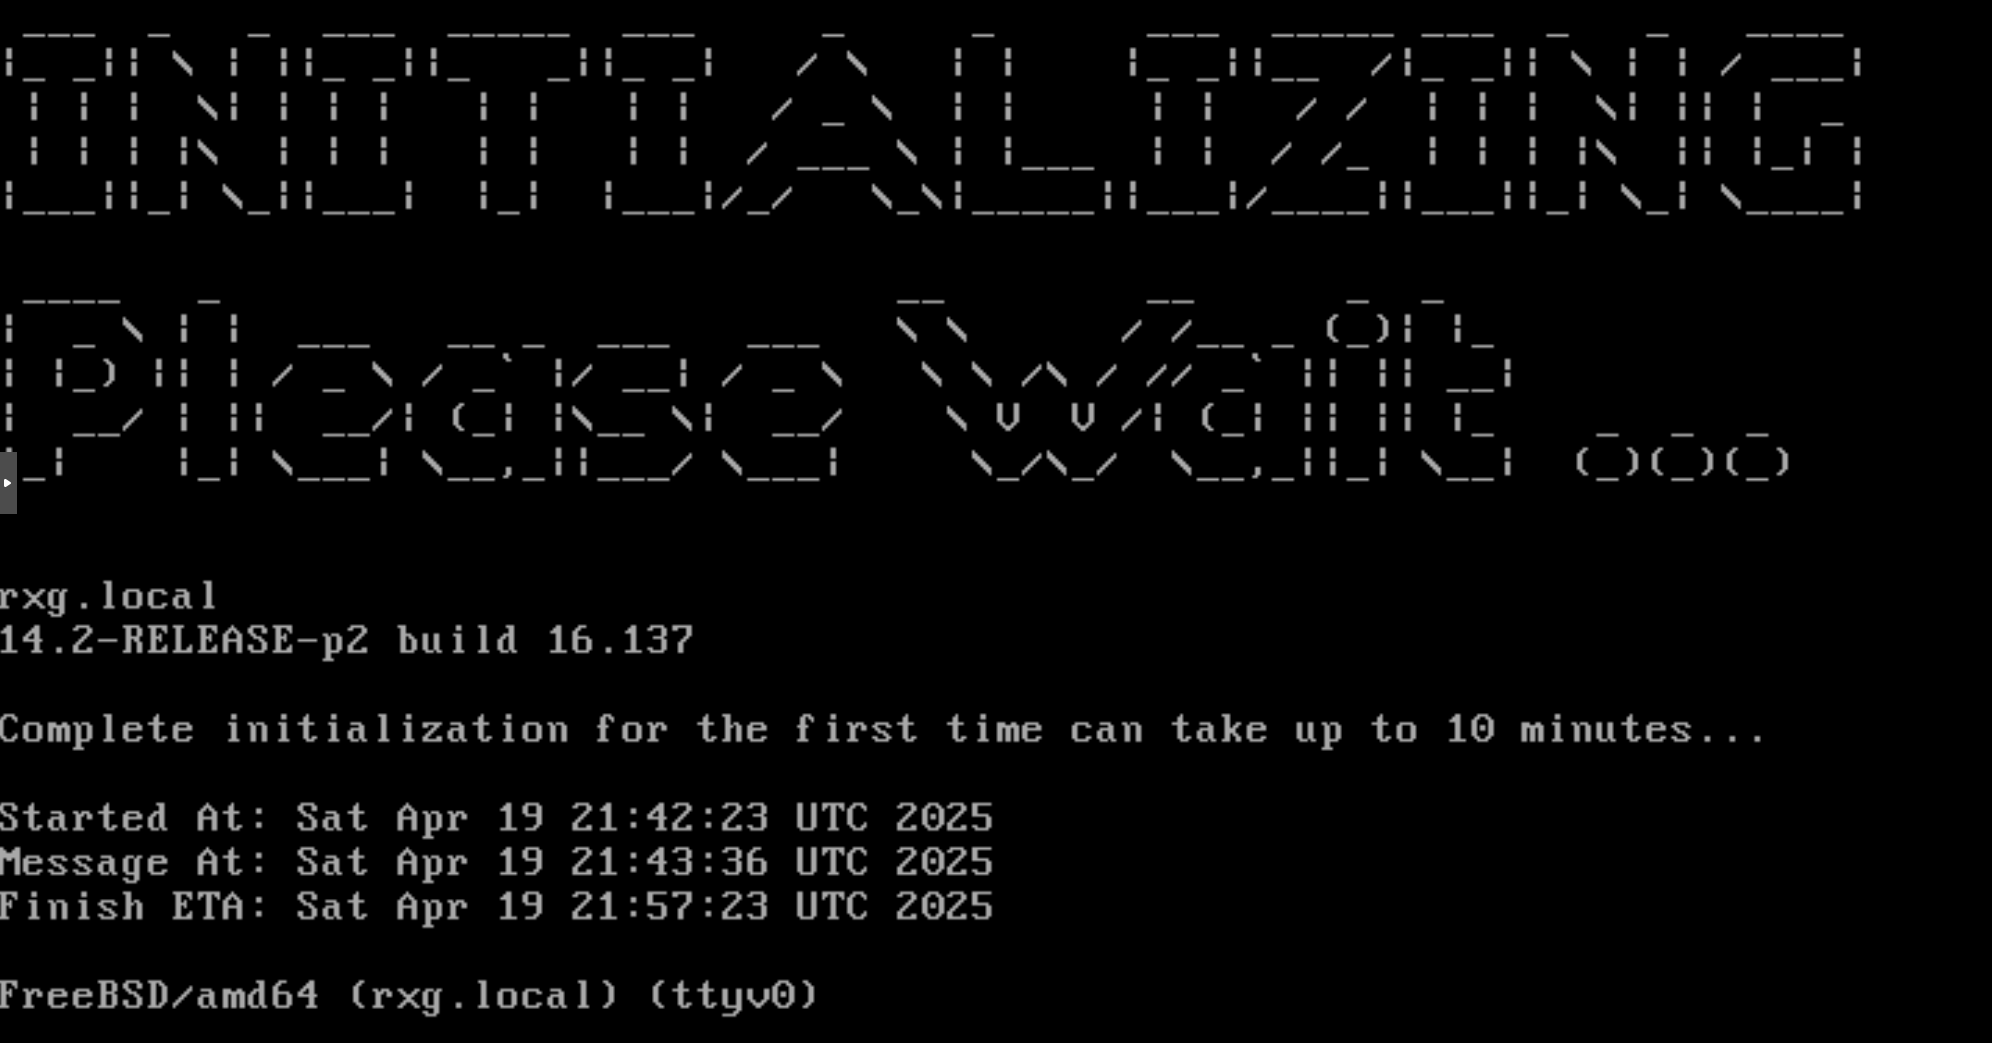
The following message is displayed on the console

DHCP Server Configuration
The DHCP server used to provide Option 66 and Option 67 may use any platform available to the operator. The following examples show the configuration of the necessary DHCP options using a standard rXg DHCP server and two of the predefined options. The Services::DHCP scaffolds are used in this example.
Create new DHCP option entries for Option 66 and Option 67 under the Services::DHCP::DHCP Options scaffold, as shown below and assign them respective names and values. In the example below, Option 66 is assigned the address of the HTTP server hosting the YML file (http://192.168.150.10), while Option 67 is assigned the file name (config-template-mdu.yml).
Next, create a new DHCP option group under the Services::DHCP::DHCP Option Groups scaffold, as shown below. This group will be tied back to the DHCP pool associated with the IP address group / VLAN on which the new rXg is being bootstrapped. Note that several global options were also selected, including:
- Global default-lease-time
- Global max-lease-time
- Global min-lease-time
- send the local gateway address as primary DNS server (recommended)
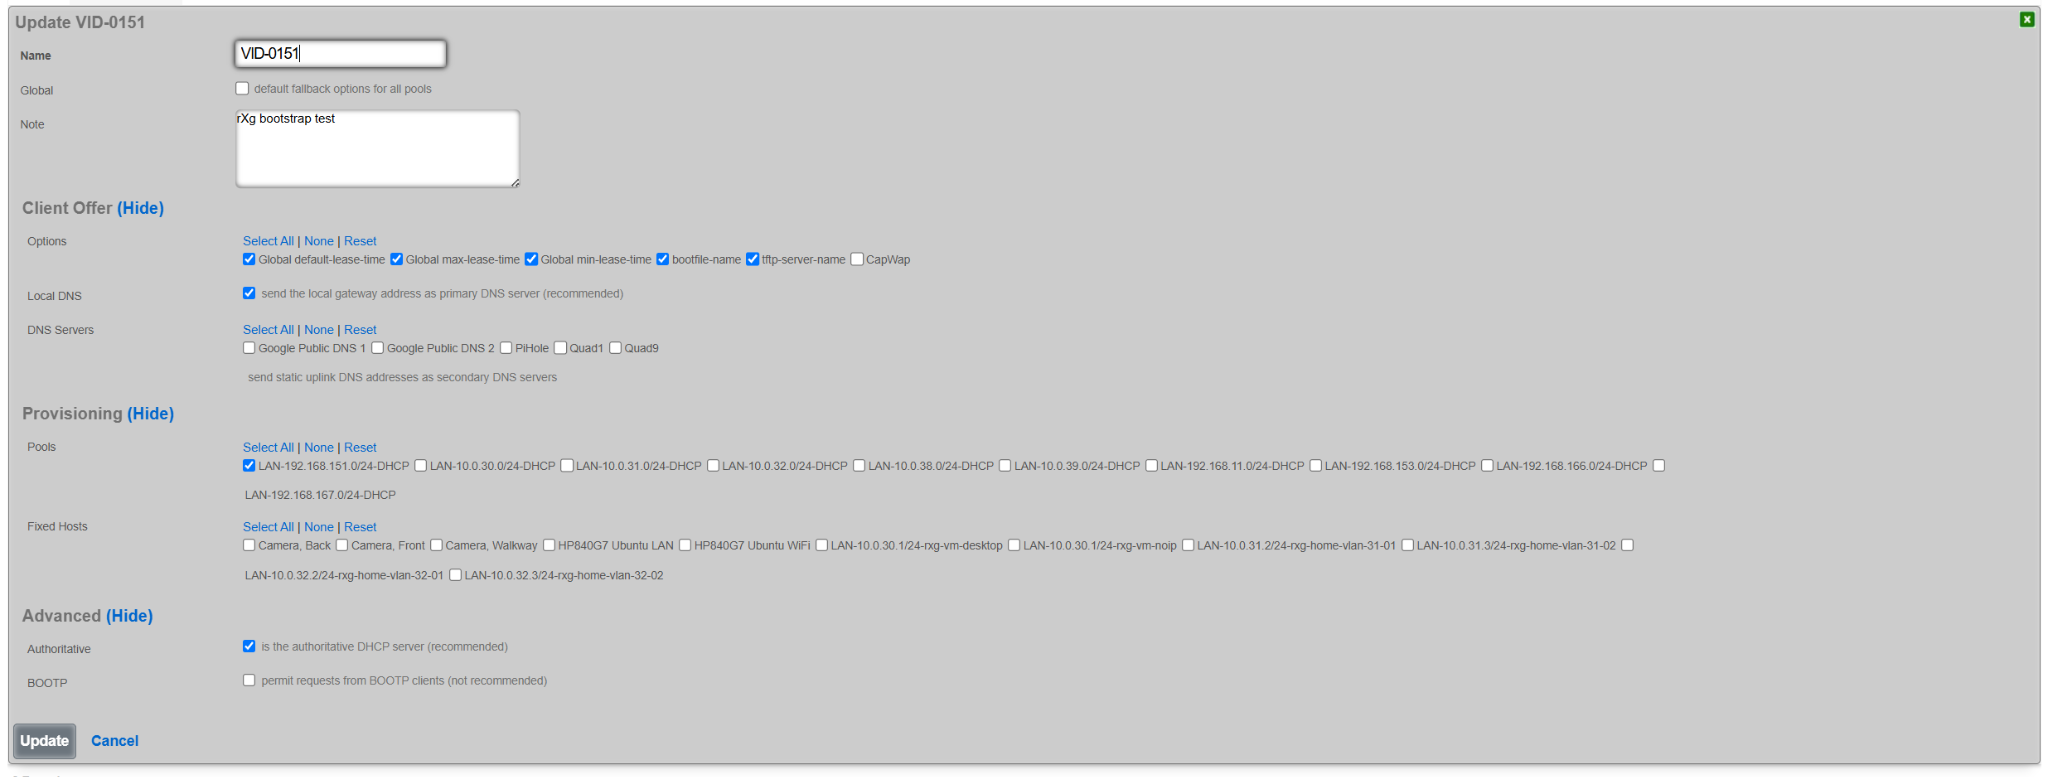
Once created, the DHCP pool for the target VLAN contains an entry associating it with the specific newly created options group (VID-0151 in this case).

Similar configuration can be also reproduced using any existing DHCP server, though details are outside of the scope of this document.
Dynamic Option 67
The value of Option 67 can be also defined using a more comprehensive set of parameters, by sending an HTTP(S) GET request to a specific page on the target HTTP(S) server (/config_template_fetch in the example below) with a number of parameters, comprising tuples of {param_name}=%{value}%, where the param_name depends on the internal implementation of the example config_template_fetch script, and the value is shown in the table below.
| {value} | Internal rXg variable | Meaning |
|---|---|---|
| iui | IUI | rXg sends its local IUI value |
| serial_number | SystemInfo.system_serial_number | rXg sends its serial number |
| version | RXG_BUILD | rXg sends its current build information (version) |
| hostname | DeviceOption.active.domain_name | rXg sends its domain name |
| ip | Uplink.primary_interface_stat_alias | rXg sends the local primary uplink interface IP address |
| base_mac | PhysicalInterface.base_mac | rXg sends the local primary uplink interface MAC address |
| timestamp | Time.now.to_i | rXg sends the current time when the request is being made |
The decision on which of the supported parameters to include in the rXg HTTP(S) GET request is implementation-dependent.
The resulting value of Option 67 requesting the bootstrapped rXg to send to the remote HTTP(S) server would look as follows for IUI and IP address values. This scring can be further extended by adding new parameters and their respective values.
/config_template_fetch?rxg_iui=%iui%&rxg_ip=%ip%
This mechanism allows the remote HTTP(S) server to provide a custom YML config template file in the function of the parameters filled in by the bootstrapped rXg node, including issuing the license (based on the IUI value), generating system certificates (based on hostname value), setting the WAN interface and system options (based on hostname and ip values), etc. The content and the operation of the HTTP(S) server in this respect is implementation-dependent and outside of the scope of responsibility of the rXg system.
Bootstrap Example
For the purposes of the demonstration of the bootstrapping process via DHCP message exchange, a new rXg system was installed and offered a MDU-like config template, enhanced with license information and the initial administration account.
Once the initialization process was completed, the UI displayed (provided that a valid license was installed within the template or already present in the Asset Manager), the Config Templates scaffold shows the config template downloaded during the rXg initialization process. The template is automatically applied to the rXg system, creating the necessary user accounts

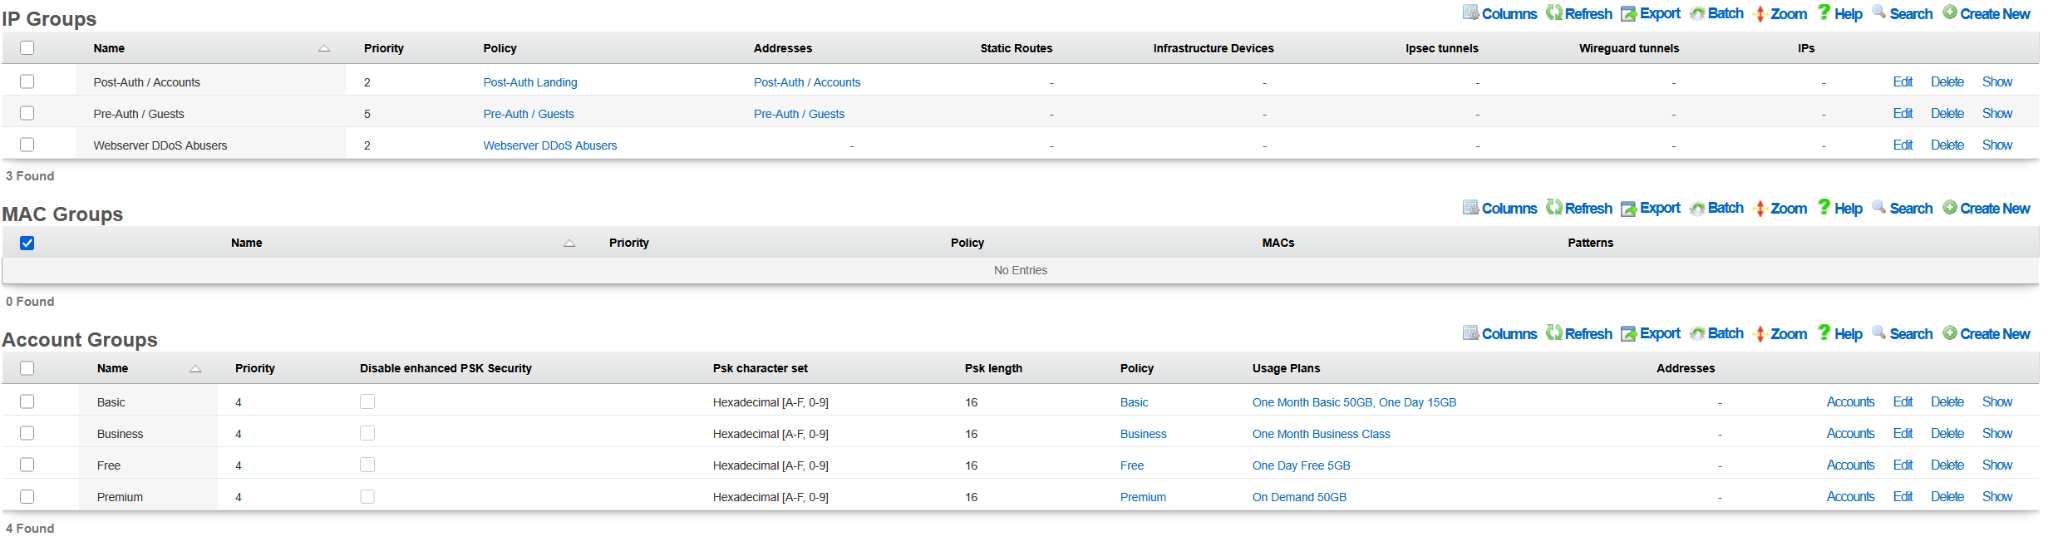
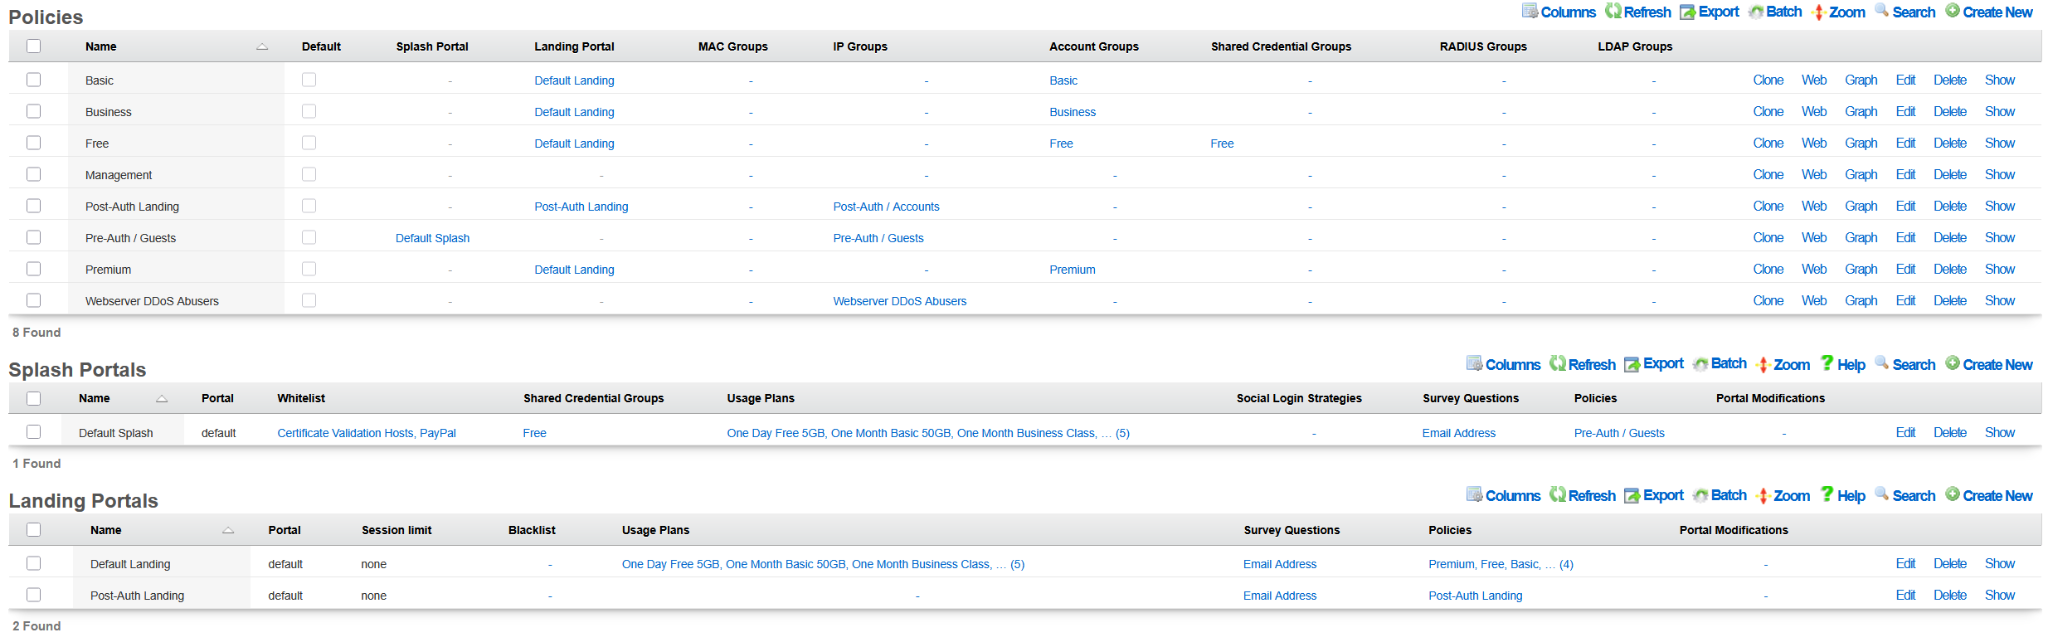
The following example shows the state of the rXg system after the DHCP-driven bootstrap process is completed and the system is fully configured with the MDU-style setup, covering VLANs, IP addresses, policies, accounts, etc., as shown in the following screenshots.


The example of the config template used for this sectio of the manual is available here: YML example
Bootstrap Troubleshooting
This section covers common issues encountered during the bootstrap process and how to diagnose them.
Checking Bootstrap Logs
Bootstrap operations are logged to the system log. To view bootstrap-related log entries:
- SSH into the rXg system (if an admin account exists) or access the console directly
Check the system logs:
shell
grep -i bootstrap /var/log/messages
grep -i "config template" /var/log/messages
For more detailed Rails application logs:
shell
tail -100 /space/rxg/console/log/production.log | grep -i template
Common Issues and Solutions
| Issue | Possible Cause | Solution |
|---|---|---|
| License applied but admin not created | Password doesn't meet complexity requirements | Ensure password has 8+ characters with uppercase, lowercase, numbers, and special characters |
| License applied but admin not created | Incorrect model or field name | Use Admin (not admins) and verify field names match the model |
| USB drive not detected | Unsupported filesystem | Format USB as FAT32, UFS, or ext2/ext3/ext4 |
| Config file not found | Incorrect filename | Ensure file has .yml extension or contains template in the name |
| Config file not found | File not in root directory | Place the YAML file in the root directory of the USB drive |
| SSL certificate not applied | Incorrect model name | Use SslKeyChain (PascalCase), not ssl_key_chains |
| Partial configuration applied | YAML syntax error | Validate YAML syntax before deployment using an online validator |
| DHCP bootstrap not working | Missing DHCP options | Verify Option 66 and Option 67 are configured on DHCP server |
Validating Your Config Template
Before deploying a bootstrap configuration, validate it using these methods:
YAML Syntax Validation: Use an online YAML validator or command-line tool:
shell
python3 -c "import yaml; yaml.safe_load(open('config.yml'))"
Test on Existing rXg: Apply the template in test mode on an existing rXg installation:
- Navigate to System > Backup > Config Templates
- Create a new template and paste your configuration
- Click Test to see what changes would be made without applying them
Check Model Names: Verify that all model names are correct by referencing the rXg API documentation
Password Complexity Requirements
Administrator passwords must meet these requirements: - Minimum 8 characters - Maximum 100 characters - Must include a mix of character types for sufficient complexity - The system calculates a "password strength" score that must meet minimum thresholds
Example of a compliant password: SecureP@ss123!
Default Records Available During Bootstrap
The following records exist by default on a fresh rXg installation and can be referenced in your bootstrap configuration:
| Model | Default Record | Notes |
|---|---|---|
| AdminRole | Super User |
Full administrative access |
| AdminRole | Read Only |
View-only access |
| AdminRole | Web Designer |
Limited access for portal customization |
| AdminRole | Conference Controller |
Conference management access |
| AdminRole | Conference User |
Conference participant access |
| DeviceOption | Default |
Update this record rather than creating a new one |
| Policy | Default |
Default network policy |
Field Name Reference for Common Models
When creating bootstrap configurations, use these field names:
Admin:
yaml
Admin:
- login: username          # Required, 3-32 chars, lowercase + digits
  password: 'password'     # Required for new accounts
  password_confirmation: 'password'  # Must match password
  admin_role: Super User   # References AdminRole by name
  email: [email protected]  # Optional
  first_name: John         # Optional
  last_name: Doe           # Optional
DeviceOption:
yaml
DeviceOption:
- name: Default            # Use "Default" to update existing
  active: true
  domain_name: rxg.example.com
  time_zone: America/Chicago
  smtp_address: localhost  # Optional
  ssh_port: 22             # Optional
SslKeyChain:
yaml
SslKeyChain:
- name: certificate-name
  active: true
  certificate: |           # PEM format
    -----BEGIN CERTIFICATE-----
    ...
    -----END CERTIFICATE-----
  server_key: |            # PEM format
    -----BEGIN PRIVATE KEY-----
    ...
    -----END PRIVATE KEY-----
  intermediate_certificate: |  # Optional, PEM format
    -----BEGIN CERTIFICATE-----
    ...
    -----END CERTIFICATE-----
Integrating with Ansible
Ansible is an automation engine that can automate configuration management, deployment, and many other IT needs. Ansible relies on OpenSSH, making it very lightweight and secure. Furthermore, Ansible does not require any remote agent for configuration management. By utilizing the rXg config template mechanism, Ansible can automate tasks across many installations.
Procedure
- Install Ansible on a host machine. See Installation Guide.
- Create Hosts file "/etc/ansible/hosts"
Populate hosts file (here I create a group called lab, and add my host to it).
  lab:
      hosts:
              lab.rgnets.net:
          production:
            hosts:
              production.rgnets.net:
Ad-Hoc Ping all hosts
  ndk@MBP ansible % ansible all -m ping
          [WARNING]: Platform freebsd on host production.rgnets.com is using the discovered Python interpreter at
          /usr/local/bin/python3.7, but future installation of another Python interpreter could change this. See
          https://docs.ansible.com/ansible/2.9/reference_appendices/interpreter_discovery.html for more information. **production.rgnets.com | SUCCESS =\> {**"ansible_facts": {
                  "discovered_interpreter_python": "/usr/local/bin/python3.7"
              },
              "changed": false,
              "ping": "pong"
          }
          [WARNING]: Platform freebsd on host lab.rgnets.com is using the discovered Python interpreter at
          /usr/local/bin/python3.7, but future installation of another Python interpreter could change this. See
          https://docs.ansible.com/ansible/2.9/reference_appendices/interpreter_discovery.html for more information. **lab.rgnets.com | SUCCESS =\> {**"ansible_facts": {
                  "discovered_interpreter_python": "/usr/local/bin/python3.7"
              },
              "changed": false,
              "ping": "pong"
          }
Ad-Hoc Ping all hosts in 'lab' group
  ndk@MBP ansible % ansible lab -m ping
          [WARNING]: Platform freebsd on host lab.rgnets.com is using the discovered Python interpreter at
          /usr/local/bin/python3.7, but future installation of another Python interpreter could change this. See
          https://docs.ansible.com/ansible/2.9/reference_appendices/interpreter_discovery.html for more information. **lab.rgnets.com | SUCCESS =\> {**"ansible_facts": {
                  "discovered_interpreter_python": "/usr/local/bin/python3.7"
              },
              "changed": false,
              "ping": "pong"
          }
Ad-Hoc copy a file to all hosts in 'lab' group
ansible lab -m copy -a "src=/etc/ansible/test.yaml dest=~/"Create an Ansible "Playbook". In Ansible, a playbook is a list of "plays". Plays are a collection of Ansible modules, or tasks to execute against one or more remote machines. In this example, we will utilize two "plays":
templatewhich is used to copy a file from our Ansible host to the desired rXg, andshellto execute a command on the rXg.Create a rXg config-template YAML. Example:
admins.yamlAdmin: - login: dgray first_name: Dorian last_name: Gray email: [email protected] crypted_password: "$2a$11$NRMhuglh/HgEvB3Um2skUe9Y/GP0jceg6hZRYDrbLufnO0Y2ZN4tO" admin_role: Super UserCreate an Ansible "Playbook" YAML. Example:
adminmgmt.yml--- - hosts: lab tasks: - name: Copy Admins YAML to host(s) template: src: /etc/ansible/admins.yaml dest: ~/admins.yaml - name: Apply the YAML as a config-Template shell: "/space/rxg/rxgd/bin/apply_template ~/admins.yaml" register: apply_template_output - debug: var: apply_template_outputExecute the Ansible Playbook:
  ndk@MBP ansible % ansible-playbook adminmgmt.yml

  PLAY [lab] ***************************************************************************************************************

  TASK [Gathering Facts] ***************************************************************************************************
  [WARNING]: Platform freebsd on host lab.rgnets.com is using the discovered Python interpreter at
  /usr/local/bin/python3.7, but future installation of another Python interpreter could change this. See
  https://docs.ansible.com/ansible/2.9/reference_appendices/interpreter_discovery.html for more information.
  ok: [lab.rgnets.com]

  TASK [Copy Admins YAML to host(s)] ***************************************************************************************
  ok: [lab.rgnets.com]

  TASK [Apply the YAML as a config-Template] *******************************************************************************
  changed: [lab.rgnets.com]

  TASK [debug] *************************************************************************************************************
  ok: [lab.rgnets.com] => {
      "apply_template_output": {
          "changed": true,
          "cmd": "/space/rxg/rxgd/bin/apply_template ~/admins.yaml",
          "delta": "0:00:07.626886",
          "end": "2020-04-01 12:04:32.647933",
          "failed": false,
          "rc": 0,
          "start": "2020-04-01 12:04:25.021047",
          "stderr": "/space/rxg/console/vendor/bundle/ruby/2.6/gems/activesupport-4.2.11.1/lib/active_support/core_ext/....
          "stderr_lines": [
              "/space/rxg/console/vendor/bundle/ruby/2.6/gems/activesupport-4.2.11.1/lib/active_support/core_ext/object....
              "Creating new ConfigTemplate with name Generated by ndk at Apr 1, 12:4 PM"
          ],
          "stdout": "INFO : Initiated Apr 1, 12:04 PM",
          "stdout_lines": [
              "INFO : Initiated Apr 1, 12:04 PM"
          ]
      }
  }

  PLAY RECAP ***************************************************************************************************************
  lab.rgnets.com : ok=4 changed=1 unreachable=0 failed=0 skipped=0 rescued=0 ignored=0


