Setup
There are several prerequisites that must be completed before captive portal customization may begin. First and foremost the web developer must be given access to the rXg filesystem by an administrator. The rXg supports filesystem access via SSH/SFTP as well as SMB/CIFS. SSH/SFTP is the preferred method as it is generally considered to be more secure and is much more reliable when used over the WAN. SMB/CIFS is a less desirable alternative that is suitable for use from developer machines on the LAN as well as over encrypted VPN connections.
SSH / SFTP Access
There are three main steps to granting administrative access to the rXg filesystem over SSH/SFTP. First, The administrator's computer must have an SSH client installed and a key pair must be generated. Next, administrative access to the rXg file system via SSH must be granted by installing the administrator's public key. Finally, the operator must declare that a new customizable portal controller is to be created and specify a name.
SSH and SFTP are the mechanisms used to access the rXg file system and make changes to custom portals. Thus an SSH client must be installed on the computer that will be used by the administrator who will be customizing the portals. OpenSSHis included with MacOS X and most UNIX and Linux distributions. Microsoft does not ship with SSH by default, but there are many third party options for running SSH on Windows.
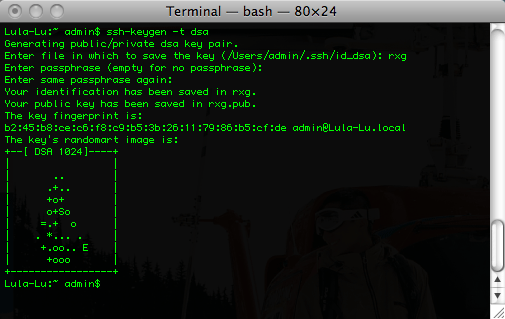
The rXg requires the use of the public key authentication to gain access to the file system. To accomplish this, a key pair must be generated that is 4096-bit RSA or stronger. For example, togenerate an OpenSSH keypair, use the command linessh-keygen -t rsa -b 4096 -f rxg. Most of the Windows SSH utilities come with a GUI to generate keys. Make sure that the private key stored in a safe place on the administrators computer. Keep the public key handy (e.g., pasted into a notepad or textedit window) as it needs to be installed onto the rXg in the next step to enable remote access to the file system.
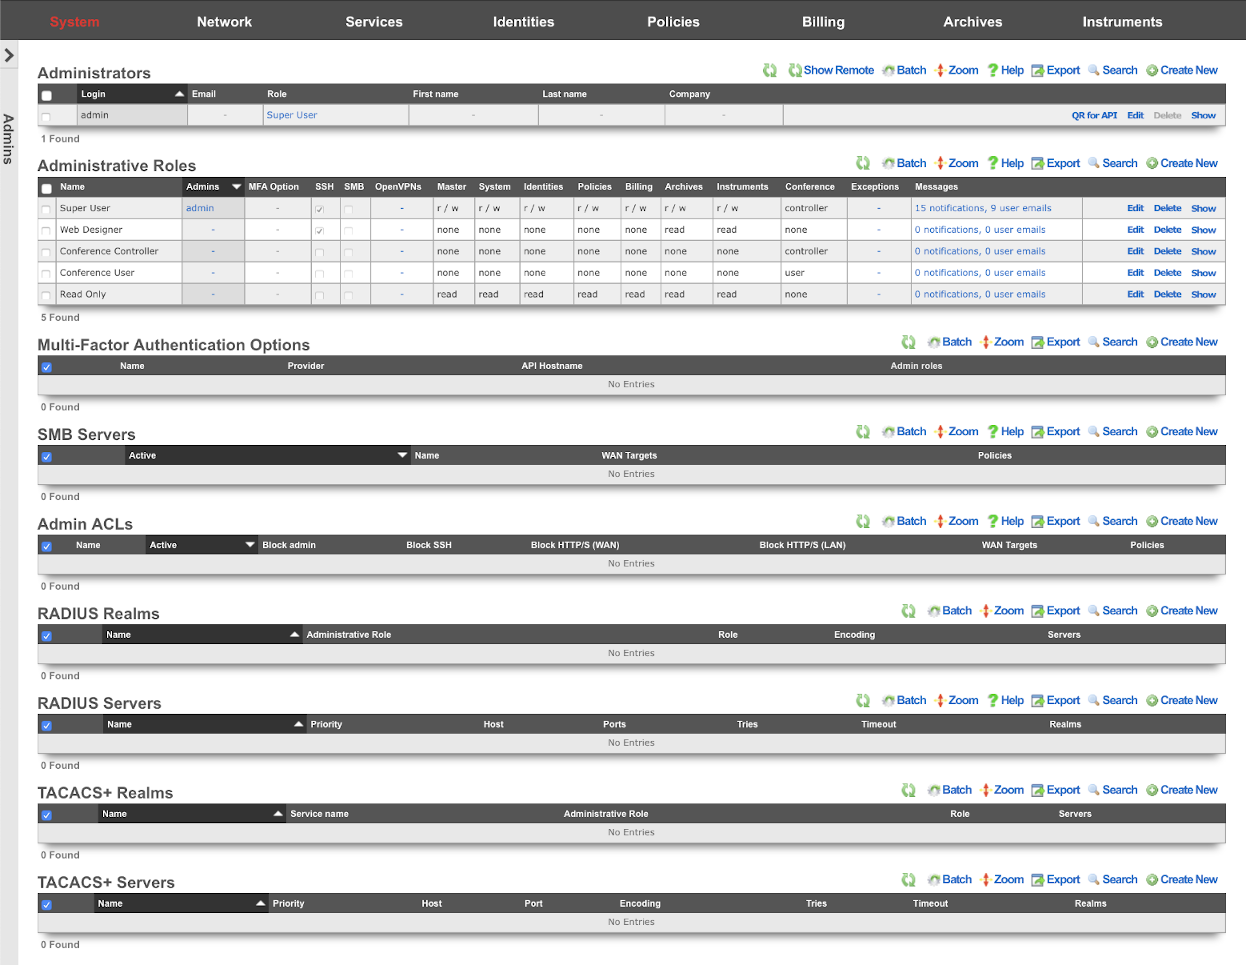
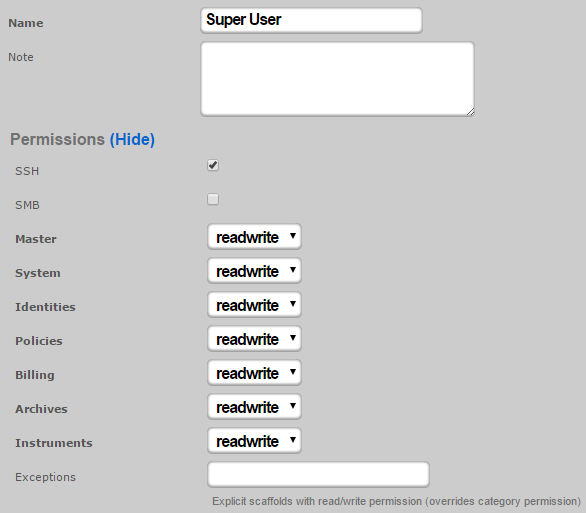
An administrator with SSH access must be established to enable access to the rXg file system. This is accomplished through the Admins view in the System sub-menu. To enable SSH, a change must be made (or the data validated) in at least one record in both scaffolds that are present in this view.
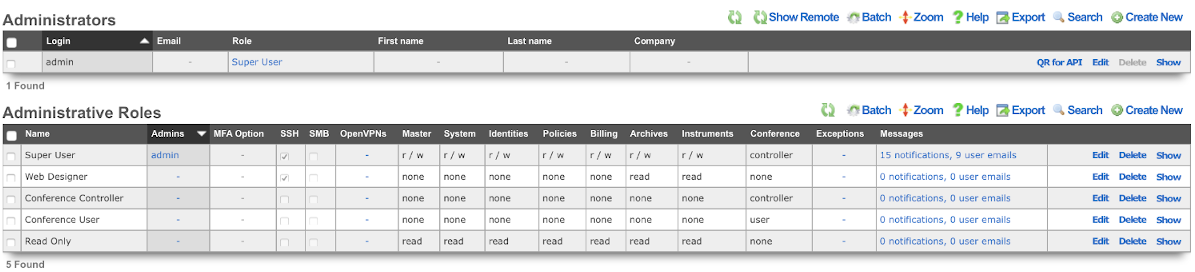
An SSH public key must be added to a record in the administrators scaffold. The operator may choose to edit an existing record or create a new record to grant access to an individual who has never before required administrative access to the rXg. In either case, the public SSH key must be pasted into the text area that is provided. In addition, the role field must be set to an administrative role that has SSH access enabled.
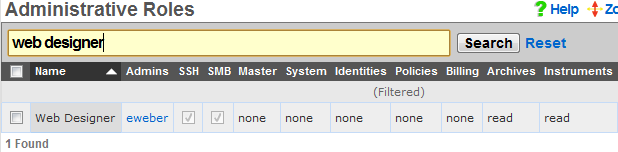
By default, there is a "Web Designer" admin role that will allow members of that role to SSH to the box to edit and save captive portals, as well as view logs and graphs. Of course, custom roles with SSH access may be created if the default ones are not sufficient.

When creating or editing a role that will contain administrators that need to customize captive portals, the check box next to the SSH field should be checked. To disable SSH access for administrators that are assigned a role that has the SSH field is checked, delete the public SSH key from the administrator record.
SMB / CIFS Access
Access to the rXg filesystem via SMB / CIFS is disabled by default. An administrator must create an active record in the SMB Server scaffold found on the Admins view.
SMB / CIFS access must be restricted to the specific IP addresses that will be used by the web developers to access the rXg filesystem. LAN IPs and CIDRs are added to the SMB / CIFS ACL by associating the SMB Server record with a Policy record that is linked to IP and MAC groups. WAN IPs and DNS names are added to the SMB / CIFS ACL by associating the SMB Server record with WAN targets listing devices that should be allowed access.
Only Administrators that are members of Administrative Roles that have SMB access enabled will be able to gain access over SMB / CIFS. By default, no Administrative Roles have SMB / CIFS access enabled. To enable SMB / CIFS access, an administrator must check the SMB checkbox in an administrative role. If no roles have SMB checked, the SMB server will not be started.
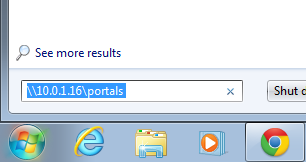
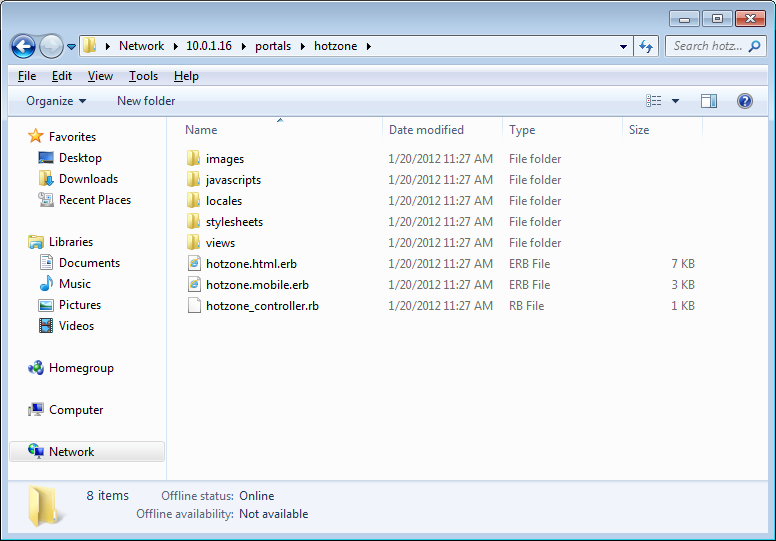
Once the SMB Server is properly configured, the web developer uses the Explorer (Windows), Finder.app (Mac OS X) or SMB client (UNIX) to browser to the IP address or DNS name of the rXg. The captive portals are located in a share called portals.
The username and password credentials that are used for web administrative console access are also used to obtain SMB / CIFS access.

Once authenticated, the web developer may access the captive portals stored on the rXg filesystem as a network share. Most operating systems make SMB / CIFS network shares behave like locally stored files.
SMB / CIFS access is designed to facilitate rapid portal development for operators with web development resources. The SMB / CIFS server should only be used on dedicated development rXgs. It is strongly recommended that SMB / CIFS never be used on production rXgs as the overall security of the SMB / CIFS protocol is inferior to the SSH / SFTP protocol. Once a portal has been developed, the SSH / SFTP protocol should be used to move portals onto production rXgs.
Create New Portal
The default rXg captive portal may not be edited directly. To create a custom portal, a copy of the default portal is made and saved to an operator chosen name. This is accomplished using the Portals view of the System menu.
Portal Source Types
The rXg supports multiple methods for creating custom portals:
- Duplicate Local: Creates a copy of the default portal or another existing portal
- Git: Clone portal from a Git repository with automatic sync capabilities
- Archive file via HTTP GET: Download portal from a remote HTTP/HTTPS URL
- rsync: Synchronize portal from a remote rsync server
Automated Sync Features
For Git, HTTP, and rsync sources, the rXg can automatically sync portal updates: - Sync Frequency: hourly, twice-daily, daily, weekly, bi-weekly, monthly - Automatic restart: Option to restart web server after sync - SSH keypairs: For authenticated Git/rsync access - Client certificates: For HTTPS authentication

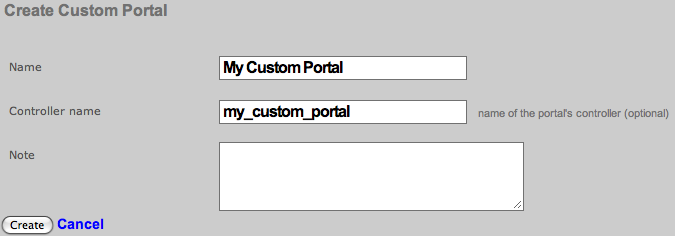
To begin, use the create action in the custom portals scaffold. This will drop down a dialog with two fields that must be completed. The name field is an arbitrary name you choose for this portal and will be used in other areas of the administration console. The controller name field will be the text inserted into the URL when users access this portal. This field should be all lowercase and only one word. If it is left blank, it will be the same as the name field you entered above.
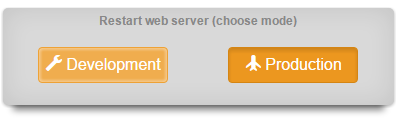
In order for your new captive portal to become usable, you will need to restart the web server. Click on either Production or Development buttons in the Restart Web Server dialog. Production mode is the normal operating mode and is recommended when the rXg is deployed. Development mode will limit access to the administrative console and portals to only one simultaneous user. In addition, server-side page caching is disabled in development mode so changes that are made are reflected immediately.
It is highly recommended that the rXg be left in development mode while captive portals are being developed. This prevents issues from coming about due to the uploaded or edited portals being out of the sync with the version in memory. In addition, it is critically important to click on the Production button even if the web server is running in production mode on when the captive portal is updated on a deployed rXg. Failure to follow this procedure will result in all sorts of bizarre issues ranging from improperly rendered images to browsers intermittently displaying an error 500.
At this point, you should now have a custom captive portal that is a copy of the default portal running on an rXg. You can preview this portal by visiting https://rxg.domain/portal/my_custom_controllerin your browser. rxg.domain is the domain name or IP address of your rXg. my_custom_controller is the one-word lowercase name you defined above.


